1
User Guide
revision 1.0
®
McAfee GroupShield
version 7.0
®
For Microsoft Exchange
™
COPYRIGHT
Copyright © 2007 McAfee, Inc. All Rights Reserved.
No part of this publication may be reproduced, transmitted, transcribed, stored in a retrieval system or translated into any language in any form or by any means
without the written permission of McAfee, Inc. or its suppliers or affiliate companies.
TRADEMARK ATTRIBUTIONS
ACTIVE FIREWALL, ACTIVE SECURITY, ACTIVESECURITY (AND IN KATAKANA), ACTIVESHIELD, CLEAN-UP, DESIGN (STYLIZED E), DESIGN (STYLIZED N),
ENTERCEPT, EPOLICY ORCHESTRATOR, FIRST AID, FOUNDSTONE, GROUPSHIELD, GROUPSHIELD (AND IN KATAKANA), INTRUSHIELD, INTRUSION
PREVENTION THROUGH INNOVATION, MCAFEE, MCAFEE (AND IN KATAKANA), MCAFEE AND DESIGN, MCAFEE.COM, MCAFEE VIRUSSCAN, NET TOOLS,
NET TOOLS (AND IN KATAKANA), NETSCAN, NETSHIELD, NUTS & BOLTS, OIL CHANGE, PRIMESUPPORT, SPAMKILLER, THREATSCAN, TOTAL VIRUS
DEFENSE, VIREX, VIRUS FORUM, VIRUSCAN, VIRUSSCAN, VIRUSSCAN (AND IN KATAKANA), WEBSCAN, WEBSHIELD, WEBSHIELD (AND IN KATAKANA) are
registered trademarks or trademarks of McAfee, Inc. and/or its affiliates in the US and/or other countries. The color red in connection with security is distinctive of
McAfee brand products. All other registered and unregistered trademarks herein are the sole property of their respective owners.
LICENSE INFORMATION
License Agreement
NOTICE TO ALL USERS: CAREFULLY READ THE APPROPRIATE LEGAL AGREEMENT CORRESPONDING TO THE LICENSE YOU PURCHASED, WHICH SETS
FORTH THE GENERAL TERMS AND CONDITIONS FOR THE USE OF THE LICENSED SOFTWARE. IF YOU DO NOT KNOW WHICH TYPE OF LICENSE YOU HAVE
ACQUIRED, PLEASE CONSULT THE SALES AND OTHER RELATED LICENSE GRANT OR PURCHASE ORDER DOCUMENTS THAT ACCOMPANIES YOUR
SOFTWARE PACKAGING OR THAT YOU HAVE RECEIVED SEPARATELY AS PART OF THE PURCHASE (AS A BOOKLET, A FILE ON THE PRODUCT CD or A FILE
AVAILABLE ON THE WEB SITE FROM WHICH YOU DOWNLOADED THE SOFTWARE PACKAGE). IF YOU DO NOT AGREE TO ALL OF THE TERMS SET FORTH
IN THE AGREEMENT, DO NOT INSTALL THE SOFTWARE. IF APPLICABLE, YOU MAY RETURN THE PRODUCT TO MCAFEE OR THE PLACE OF PURCHASE FOR
A FULL REFUND.
Attributions
This product includes or may include:
• Software developed by the OpenSSL Project for use in the OpenSSL Toolkit (http://www.openssl.org/). • Cryptographic software written by Eric A. Young and
software written by Tim J. Hudson. • Some software programs that are licensed (or sublicensed) to the user under the GNU General Public License (GPL) or other
similar Free Software licenses which, among other rights, permit the user to copy, modify and redistribute certain programs or portions thereof, and have access to
the source code. The GPL requires that for any software covered under the GPL which is distributed to someone in an executable binary format, that the source
code also be made available to those users. For any such software covered under the GPL, the source code is made available on this CD. If any Free Software
licenses require that McAfee provide rights to use, copy or modify a software program that are broader than the rights granted in this agreement, then such rights
shall take precedence over the rights and restrictions herein. • Software originally written by Henry Spencer, Copyright 1992, 1993, 1994, 1997 Henry Spencer.
• Software originally written by Robert Nordier, Copyright © 1996-7 Robert Nordier. • Software written by Douglas W. Sauder. • Software developed by the Apache
Software Foundation (http://www.apache.org/). A copy of the license agreement for this software can be found at www.apache.org/licenses/LICENSE-2.0.txt.
• International Components for Unicode ("ICU") Copyright ©1995-2002 International Business Machines Corporation and others. • Software developed by
®
®
CrystalClear Software, Inc., Copyright ©2000 CrystalClear Software, Inc. • FEAD Optimizer technology, Copyright Netopsystems AG, Berlin, Germany. • Outside
®
®
In Viewer Technology ©1992-2001 Stellent Chicago, Inc. and/or Outside In HTML Export, © 2001 Stellent Chicago, Inc. • Software copyrighted by Thai Open
Source Software Center Ltd. and Clark Cooper, © 1998, 1999, 2000. • Software copyrighted by Expat maintainers. • Software copyrighted by The Regents of the
University of California, © 1996, 1989, 1998-2000. • Software copyrighted by Gunnar Ritter. • Software copyrighted by Sun Microsystems, Inc., 4150 Network
Circle, Santa Clara, California 95054, U.S.A., © 2003. • Software copyrighted by Gisle Aas. © 1995-2003. • Software copyrighted by Michael A. Chase, © 1999-2000.
• Software copyrighted by Neil Winton, ©1995-1996. • Software copyrighted by RSA Data Security, Inc., © 1990-1992. • Software copyrighted by Sean M. Burke,
© 1999, 2000. • Software copyrighted by Martijn Koster, © 1995. • Software copyrighted by Brad Appleton, © 1996-1999. • Software copyrighted by Michael G.
Schwern, ©2001. • Software copyrighted by Graham Barr, © 1998. • Software copyrighted by Larry Wall and Clark Cooper, © 1998-2000. • Software copyrighted
by Frodo Looijaard, © 1997. • Software copyrighted by the Python Software Foundation, Copyright © 2001, 2002, 2003. A copy of the license agreement for this
software can be found at www.python.org. • Software copyrighted by Beman Dawes, © 1994-1999, 2002. • Software written by Andrew Lumsdaine, Lie-Quan
Lee, Jeremy G. Siek © 1997-2000 University of Notre Dame. • Software copyrighted by Simone Bordet & Marco Cravero, © 2002. • Software copyrighted by
Stephen Purcell, © 2001. • Software developed by the Indiana University Extreme! Lab (http://www.extreme.indiana.edu/). • Software copyrighted by International
Business Machines Corporation and others, © 1995-2003. • Software developed by the University of California, Berkeley and its contributors. • Software developed
by Ralf S. Engelschall <[email protected]> for use in the mod_ssl project (http:// www.modssl.org/). • Software copyrighted by Kevlin Henney, © 2000-2002.
• Software copyrighted by Peter Dimov and Multi Media Ltd. © 2001, 2002. • Software copyrighted by David Abrahams, © 2001, 2002. See
http://www.boost.org/libs/bind/bind.html for documentation. • Software copyrighted by Steve Cleary, Beman Dawes, Howard Hinnant & John Maddock, © 2000.
• Software copyrighted by Boost.org, © 1999-2002. • Software copyrighted by Nicolai M. Josuttis, © 1999. • Software copyrighted by Jeremy Siek, © 1999-2001.
• Software copyrighted by Daryle Walker, © 2001. • Software copyrighted by Chuck Allison and Jeremy Siek, © 2001, 2002. • Software copyrighted by Samuel
Krempp, © 2001. See http://www.boost.org for updates, documentation, and revision history. • Software copyrighted by Doug Gregor ([email protected]), © 2001,
2002. • Software copyrighted by Cadenza New Zealand Ltd., © 2000. • Software copyrighted by Jens Maurer, ©2000, 2001. • Software copyrighted by Jaakko
Järvi ([email protected]), ©1999, 2000. • Software copyrighted by Ronald Garcia, © 2002. • Software copyrighted by David Abrahams, Jeremy Siek, and Daryle
Walker, ©1999-2001. • Software copyrighted by Stephen Cleary ([email protected]), ©2000. • Software copyrighted by Housemarque Oy
<http://www.housemarque.com>, © 2001. • Software copyrighted by Paul Moore, © 1999. • Software copyrighted by Dr. John Maddock, © 1998-2002.
• Software copyrighted by Greg Colvin and Beman Dawes, © 1998, 1999. • Software copyrighted by Peter Dimov, © 2001, 2002. • Software copyrighted by
Jeremy Siek and John R. Bandela, © 2001. • Software copyrighted by Joerg Walter and Mathias Koch, © 2000-2002. • Software copyrighted by Carnegie Mellon
University © 1989, 1991, 1992. • Software copyrighted by Cambridge Broadband Ltd., © 2001-2003. • Software copyrighted by Sparta, Inc., © 2003-2004.
• Software copyrighted by Cisco, Inc. and Information Network Center of Beijing University of Posts and Telecommunications, © 2004. • Software copyrighted by
Simon Josefsson, © 2003. • Software copyrighted by Thomas Jacob, © 2003-2004. • Software copyrighted by Advanced Software Engineering Limited, © 2004.
• Software copyrighted by Todd C. Miller, © 1998. • Software copyrighted by The Regents of the University of California, © 1990, 1993, with code derived from
software contributed to Berkeley by Chris Torek.
™
Issued September 2007 / GroupShield software version 7.0
DBN-001-EN
Contents
1
Introduction
7
About GroupShield for Exchange . . . . . . . . . . . . . . . . . . . . . . . . . . . . . . . . . . . . . . 7
What is GroupShield? . . . . . . . . . . . . . . . . . . . . . . . . . . . . . . . . . . . . . . . . . . . . 7
How does GroupShield work? . . . . . . . . . . . . . . . . . . . . . . . . . . . . . . . . . . . . . 7
How GroupShield protects Exchange? . . . . . . . . . . . . . . . . . . . . . . . . . . . . . . . 8
How does scanning work? . . . . . . . . . . . . . . . . . . . . . . . . . . . . . . . . . . . . . . . . 9
Other areas to protect . . . . . . . . . . . . . . . . . . . . . . . . . . . . . . . . . . . . . . . . . . . 9
GroupShield Features . . . . . . . . . . . . . . . . . . . . . . . . . . . . . . . . . . . . . . . . . . . . . . 11
What is New? . . . . . . . . . . . . . . . . . . . . . . . . . . . . . . . . . . . . . . . . . . . . . . . . . 12
Features not supported . . . . . . . . . . . . . . . . . . . . . . . . . . . . . . . . . . . . . . . . . 15
Using this Guide . . . . . . . . . . . . . . . . . . . . . . . . . . . . . . . . . . . . . . . . . . . . . . . . . . 16
Audience . . . . . . . . . . . . . . . . . . . . . . . . . . . . . . . . . . . . . . . . . . . . . . . . . . . . 16
Conventions . . . . . . . . . . . . . . . . . . . . . . . . . . . . . . . . . . . . . . . . . . . . . . . . . . 17
Getting product information . . . . . . . . . . . . . . . . . . . . . . . . . . . . . . . . . . . . . . . . . 18
Standard documentation . . . . . . . . . . . . . . . . . . . . . . . . . . . . . . . . . . . . . . . . 18
Contact information . . . . . . . . . . . . . . . . . . . . . . . . . . . . . . . . . . . . . . . . . . . . . . . 19
2
Pre-Installation
21
Pre-Installation scenarios . . . . . . . . . . . . . . . . . . . . . . . . . . . . . . . . . . . . . . . . . . . 21
Types of installation . . . . . . . . . . . . . . . . . . . . . . . . . . . . . . . . . . . . . . . . . . . . 22
System requirements . . . . . . . . . . . . . . . . . . . . . . . . . . . . . . . . . . . . . . . . . . . . . . 23
3
4
Installing the Software
25
Accessing the software . . . . . . . . . . . . . . . . . . . . . . . . . . . . . . . . . . . . . . . . . . . .
What is included with the software? . . . . . . . . . . . . . . . . . . . . . . . . . . . . . . .
®
Installing GroupShield for Microsoft Exchange Server 2003/2007 . . . . . . . . . . .
Installing additional components . . . . . . . . . . . . . . . . . . . . . . . . . . . . . . . . . . . . .
Buffer Overflow Protection . . . . . . . . . . . . . . . . . . . . . . . . . . . . . . . . . . . . . . .
Installing McAfee Anti-Spam for GroupShield . . . . . . . . . . . . . . . . . . . . . . . .
Silent installation . . . . . . . . . . . . . . . . . . . . . . . . . . . . . . . . . . . . . . . . . . . . . . . . . .
Configuring GroupShield in a cluster environment . . . . . . . . . . . . . . . . . . . . . . . .
Upgrading GroupShield from v6.0.2 or higher . . . . . . . . . . . . . . . . . . . . . . . . . . .
25
26
26
30
30
31
32
33
37
Post-Installation Tasks and Maintenance
39
Testing your GroupShield installation . . . . . . . . . . . . . . . . . . . . . . . . . . . . . . . . . . 39
Testing the anti-virus component . . . . . . . . . . . . . . . . . . . . . . . . . . . . . . . . . . 39
Testing the McAfee Anti-Spam component . . . . . . . . . . . . . . . . . . . . . . . . . . 40
3
®
™
McAfee GroupShield 7.0 User Guide
5
6
Contents
Testing GroupShield installation using McAfee Virtual Technician . . . . . . . . .
Quarantining using McAfee Quarantine Manager 4.1 . . . . . . . . . . . . . . . . . . . . .
Upgrading Blacklists and Whitelists . . . . . . . . . . . . . . . . . . . . . . . . . . . . . . . .
Maintaining your GroupShield application . . . . . . . . . . . . . . . . . . . . . . . . . . . . . .
Modifying the GroupShield installation . . . . . . . . . . . . . . . . . . . . . . . . . . . . .
Repairing the GroupShield installation . . . . . . . . . . . . . . . . . . . . . . . . . . . . . .
Restoring original out-of-box configuration . . . . . . . . . . . . . . . . . . . . . . . . . .
Uninstalling GroupShield for Exchange . . . . . . . . . . . . . . . . . . . . . . . . . . . . . . . . .
40
41
42
43
43
44
45
45
Integrating with ePolicy Orchestrator 3.6
47
Introduction . . . . . . . . . . . . . . . . . . . . . . . . . . . . . . . . . . . . . . . . . . . . . . . . . . . . .
Pre-requisites for using ePolicy Orchestrator 3.6 . . . . . . . . . . . . . . . . . . . . . .
Introducing ePolicy Orchestrator console . . . . . . . . . . . . . . . . . . . . . . . . . . .
Before you begin . . . . . . . . . . . . . . . . . . . . . . . . . . . . . . . . . . . . . . . . . . . . . .
Installation . . . . . . . . . . . . . . . . . . . . . . . . . . . . . . . . . . . . . . . . . . . . . . . . . . . . . .
Upgrading from GroupShield for Exchange version 6.0.x NAP settings . . . . .
Configuring GroupShield Policies . . . . . . . . . . . . . . . . . . . . . . . . . . . . . . . . . . . . .
Managing Policies . . . . . . . . . . . . . . . . . . . . . . . . . . . . . . . . . . . . . . . . . . . . .
Scheduling tasks . . . . . . . . . . . . . . . . . . . . . . . . . . . . . . . . . . . . . . . . . . . . . . . . . .
Reports . . . . . . . . . . . . . . . . . . . . . . . . . . . . . . . . . . . . . . . . . . . . . . . . . . . . . . . . .
Configuring reports . . . . . . . . . . . . . . . . . . . . . . . . . . . . . . . . . . . . . . . . . . . .
Uninstallation . . . . . . . . . . . . . . . . . . . . . . . . . . . . . . . . . . . . . . . . . . . . . . . . . . . .
47
47
48
49
49
52
53
54
55
59
60
60
Integrating with ePolicy Orchestrator 4.0
63
Introduction . . . . . . . . . . . . . . . . . . . . . . . . . . . . . . . . . . . . . . . . . . . . . . . . . . . . . 63
Pre-requisites for installing ePolicy Orchestrator 4.0 . . . . . . . . . . . . . . . . . . . 63
Before you begin . . . . . . . . . . . . . . . . . . . . . . . . . . . . . . . . . . . . . . . . . . . . . . 63
ePolicy Orchestrator agent . . . . . . . . . . . . . . . . . . . . . . . . . . . . . . . . . . . . . . . 64
Installation . . . . . . . . . . . . . . . . . . . . . . . . . . . . . . . . . . . . . . . . . . . . . . . . . . . . . . 65
Checking-in the McAfee GroupShield for Microsoft Exchange Server 2003/2007
package to the ePolicy Orchestrator server . . . . . . . . . . . . . . . . . . . . . . . . 65
Installing GroupShield for Exchange on the client computer . . . . . . . . . . . . . 66
Extensions . . . . . . . . . . . . . . . . . . . . . . . . . . . . . . . . . . . . . . . . . . . . . . . . . . . 67
Introducing ePolicy Orchestrator 4.0 Dashboard . . . . . . . . . . . . . . . . . . . . . . . . . 68
Reporting . . . . . . . . . . . . . . . . . . . . . . . . . . . . . . . . . . . . . . . . . . . . . . . . . . . . . . . 69
Systems . . . . . . . . . . . . . . . . . . . . . . . . . . . . . . . . . . . . . . . . . . . . . . . . . . . . . . . . 70
Policies . . . . . . . . . . . . . . . . . . . . . . . . . . . . . . . . . . . . . . . . . . . . . . . . . . . . . . 71
Client tasks . . . . . . . . . . . . . . . . . . . . . . . . . . . . . . . . . . . . . . . . . . . . . . . . . . 72
Uninstallation . . . . . . . . . . . . . . . . . . . . . . . . . . . . . . . . . . . . . . . . . . . . . . . . . . . . .74
7
Integrating with ProtectionPilot 1.5
77
Introduction . . . . . . . . . . . . . . . . . . . . . . . . . . . . . . . . . . . . . . . . . . . . . . . . . . . . .
Pre-requisites for using ProtectionPilot . . . . . . . . . . . . . . . . . . . . . . . . . . . . .
Introducing ProtectionPilot . . . . . . . . . . . . . . . . . . . . . . . . . . . . . . . . . . . . . . .
Before you begin . . . . . . . . . . . . . . . . . . . . . . . . . . . . . . . . . . . . . . . . . . . . . .
Installation . . . . . . . . . . . . . . . . . . . . . . . . . . . . . . . . . . . . . . . . . . . . . . . . . . . . . .
Configuring GroupShield policies . . . . . . . . . . . . . . . . . . . . . . . . . . . . . . . . . . . . .
Setting and enforcing policies . . . . . . . . . . . . . . . . . . . . . . . . . . . . . . . . . . . .
Scheduling tasks . . . . . . . . . . . . . . . . . . . . . . . . . . . . . . . . . . . . . . . . . . . . . . . . . .
77
77
77
79
79
80
81
83
4
®
™
McAfee GroupShield 7.0 User Guide
Contents
Creating a new on-demand scan task . . . . . . . . . . . . . . . . . . . . . . . . . . . . . . 84
Creating a new AutoUpdate task . . . . . . . . . . . . . . . . . . . . . . . . . . . . . . . . . . 84
Uninstallation . . . . . . . . . . . . . . . . . . . . . . . . . . . . . . . . . . . . . . . . . . . . . . . . . . . . 85
8
9
Getting Started with the User Interface
87
Dashboard . . . . . . . . . . . . . . . . . . . . . . . . . . . . . . . . . . . . . . . . . . . . . . . . . . . . . .
Statistics & information . . . . . . . . . . . . . . . . . . . . . . . . . . . . . . . . . . . . . . . . .
On-demand scans . . . . . . . . . . . . . . . . . . . . . . . . . . . . . . . . . . . . . . . . . . . . .
Status report . . . . . . . . . . . . . . . . . . . . . . . . . . . . . . . . . . . . . . . . . . . . . . . . .
Graphical reports . . . . . . . . . . . . . . . . . . . . . . . . . . . . . . . . . . . . . . . . . . . . . .
88
88
90
93
95
Detected Items
97
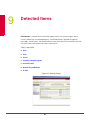
Spam . . . . . . . . . . . . . . . . . . . . . . . . . . . . . . . . . . . . . . . . . . . . . . . . . . . . . . . . . . 98
Phish . . . . . . . . . . . . . . . . . . . . . . . . . . . . . . . . . . . . . . . . . . . . . . . . . . . . . . . . . . . 98
Viruses . . . . . . . . . . . . . . . . . . . . . . . . . . . . . . . . . . . . . . . . . . . . . . . . . . . . . . . . . 99
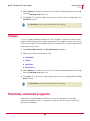
Potentially unwanted programs . . . . . . . . . . . . . . . . . . . . . . . . . . . . . . . . . . . . . . 99
Unwanted content . . . . . . . . . . . . . . . . . . . . . . . . . . . . . . . . . . . . . . . . . . . . . . . 100
Banned file types/messages . . . . . . . . . . . . . . . . . . . . . . . . . . . . . . . . . . . . . . . .101
All items . . . . . . . . . . . . . . . . . . . . . . . . . . . . . . . . . . . . . . . . . . . . . . . . . . . . . . . .101
10
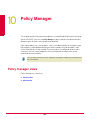
Policy Manager
105
Policy manager views . . . . . . . . . . . . . . . . . . . . . . . . . . . . . . . . . . . . . . . . . . . . . 105
Inheritance view . . . . . . . . . . . . . . . . . . . . . . . . . . . . . . . . . . . . . . . . . . . . . . 106
Advanced view . . . . . . . . . . . . . . . . . . . . . . . . . . . . . . . . . . . . . . . . . . . . . . . 107
Creating a subpolicy . . . . . . . . . . . . . . . . . . . . . . . . . . . . . . . . . . . . . . . . . . . . . . 108
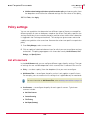
Policy settings . . . . . . . . . . . . . . . . . . . . . . . . . . . . . . . . . . . . . . . . . . . . . . . . . . . 109
List all scanners . . . . . . . . . . . . . . . . . . . . . . . . . . . . . . . . . . . . . . . . . . . . . . 109
View settings . . . . . . . . . . . . . . . . . . . . . . . . . . . . . . . . . . . . . . . . . . . . . . . . .112
Specify users . . . . . . . . . . . . . . . . . . . . . . . . . . . . . . . . . . . . . . . . . . . . . . . . .112
Scanners and filters . . . . . . . . . . . . . . . . . . . . . . . . . . . . . . . . . . . . . . . . . . . . . . .113
Core scanners . . . . . . . . . . . . . . . . . . . . . . . . . . . . . . . . . . . . . . . . . . . . . . . .114
Filters . . . . . . . . . . . . . . . . . . . . . . . . . . . . . . . . . . . . . . . . . . . . . . . . . . . . . . 135
Miscellaneous . . . . . . . . . . . . . . . . . . . . . . . . . . . . . . . . . . . . . . . . . . . . . . . 153
Shared resource . . . . . . . . . . . . . . . . . . . . . . . . . . . . . . . . . . . . . . . . . . . . . . . . . 156
Scanners and alerts . . . . . . . . . . . . . . . . . . . . . . . . . . . . . . . . . . . . . . . . . . . 156
Filter rules . . . . . . . . . . . . . . . . . . . . . . . . . . . . . . . . . . . . . . . . . . . . . . . . . . 160
Time slots . . . . . . . . . . . . . . . . . . . . . . . . . . . . . . . . . . . . . . . . . . . . . . . . . . 162
11
Settings & Diagnostics
On-access settings . . . . . . . . . . . . . . . . . . . . . . . . . . . . . . . . . . . . . . . . . . . . . . .
Notifications . . . . . . . . . . . . . . . . . . . . . . . . . . . . . . . . . . . . . . . . . . . . . . . . . . . .
Anti spam . . . . . . . . . . . . . . . . . . . . . . . . . . . . . . . . . . . . . . . . . . . . . . . . . . . . . .
Detected items . . . . . . . . . . . . . . . . . . . . . . . . . . . . . . . . . . . . . . . . . . . . . . . . . .
McAfee Quarantine Manager . . . . . . . . . . . . . . . . . . . . . . . . . . . . . . . . . . . .
Local database . . . . . . . . . . . . . . . . . . . . . . . . . . . . . . . . . . . . . . . . . . . . . . .
User interface preferences . . . . . . . . . . . . . . . . . . . . . . . . . . . . . . . . . . . . . . . . .
Dashboard settings . . . . . . . . . . . . . . . . . . . . . . . . . . . . . . . . . . . . . . . . . . .
Graph and chart settings . . . . . . . . . . . . . . . . . . . . . . . . . . . . . . . . . . . . . . .
5
163
163
167
168
168
169
169
170
170
170
®
™
McAfee GroupShield 7.0 User Guide
Contents
Diagnostics . . . . . . . . . . . . . . . . . . . . . . . . . . . . . . . . . . . . . . . . . . . . . . . . . . . . . 171
Debug logging . . . . . . . . . . . . . . . . . . . . . . . . . . . . . . . . . . . . . . . . . . . . . . . 171
Error reporting service . . . . . . . . . . . . . . . . . . . . . . . . . . . . . . . . . . . . . . . . . 172
Event logging . . . . . . . . . . . . . . . . . . . . . . . . . . . . . . . . . . . . . . . . . . . . . . . . 172
Product log . . . . . . . . . . . . . . . . . . . . . . . . . . . . . . . . . . . . . . . . . . . . . . . . . . 172
Product log . . . . . . . . . . . . . . . . . . . . . . . . . . . . . . . . . . . . . . . . . . . . . . . . . . . . . 173
DAT settings . . . . . . . . . . . . . . . . . . . . . . . . . . . . . . . . . . . . . . . . . . . . . . . . . . . . .174
Import and export configuration . . . . . . . . . . . . . . . . . . . . . . . . . . . . . . . . . . . . . .174
Index
177
6
1
Introduction
About GroupShield for Exchange
®
™
This section introduces McAfee GroupShield 7.0 and describes how it protects your
®
®
Microsoft Exchange Server 2003 and Microsoft Exchange Server 2007 from
potentially harmful, unwanted, and undesirable content.
Topics covered are:
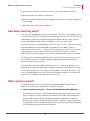
What is GroupShield?
How does GroupShield work?
How GroupShield protects Exchange?
Where GroupShield sits on your network?
Other areas to protect
GroupShield Features
What is New?
Features not supported
What is GroupShield?
®
™
®
McAfee GroupShield 7.0 software protects Microsoft Exchange Server 2003 and
®
Microsoft Exchange Server 2007 from virus, phish, spam, unwanted content,
potentially unwanted programs, and banned file types/messages. It also supports
content filtering within the email messages.
How does GroupShield work?
®
The GroupShield software integrates with Microsoft Exchange Server 2003/2007 to
scan email messages for detections.
7
®
™
McAfee GroupShield 7.0 User Guide
Introduction
About GroupShield for Exchange
Each time, an email message is sent to or received from a source, GroupShield scans
it comparing it with a list of known viruses and suspected virus-like behavior.
GroupShield can also scan for content within the email message using rules and
policies defined within the GroupShield software.
How GroupShield protects Exchange?
®
®
GroupShield uses McAfee Transport Scanner and Microsoft Virus Scanning API
(VSAPI) to scan all email messages.
®
Note
®
For Microsoft Exchange Server 2003 (used as a Bridgehead Server) and Microsoft
Exchange Server 2007 (with Edge Transport or Hub Transport-only role), GroupShield
®
®
uses McAfee Transport Scanner (and not Microsoft Transport Scanner) to protect the
server. However, for Exchange Server 2003 Mailbox Server and Exchange 2007
MailBox Role, GroupShield provides additional scanning option using Microsoft VSAPI.
The anti-spam, anti-virus, and the content management engine scan the messages and
provide the result to GroupShield 7.0 before being written to the file system or being
®
read by the Microsoft Exchange 2003/2007 users.
The anti-virus scanning engine and the anti-spam scanning engine compare the email
message with all the known signatures stored within the currently installed virus
definition (DAT) files and anti-spam rules. The anti-virus engine also checks the message
using the selected heuristic detection methods.
The content management engine searches the email message for banned content as
specified in the content management policies running within the GroupShield
software.
If there are no viruses, banned/unwanted content in the email message, GroupShield
®
passes the information back to Microsoft Exchange 2003/2007.
In case of a detection, GroupShield takes actions that are defined within its
configuration settings.
Note
The default actions may differ, depending on the installed version of Microsoft
Exchange and, where applicable, the chosen scanning method.
®
Email server protection — McAfee GroupShield
®
McAfee GroupShield 7.0 integrates with Microsoft Exchange Server 2003/2007 to
protect against viruses that may be transmitted using your corporate email system.
Due to the close integration between your email server and GroupShield anti-virus
solution, GroupShield can do more than just protecting your email server from viruses.
It can:
8
1
®
™
McAfee GroupShield 7.0 User Guide
Introduction
About GroupShield for Exchange
protect the email server from harmful scripts sent within the email system.
block messages with specific attachments.
block messages based on words that appear either within the subject line/body of
the message.
block messages from specific addresses.
How does scanning work?
®
Central to your GroupShield software is the McAfee Security scanning engine and the
virus definition (DAT) files. The engine is a complex data analyzer. The DAT files contain
a great deal of information including thousands of different drivers, each of which
contains detailed instructions on how to identify a virus or a type of virus.
®
The McAfee Security scanning engine works with the DAT files. It identifies the type
of the item being scanned and decodes the contents of that object, so that it
understands what the item is. It then uses the information in the DAT files to search
and locate known viruses. Many viruses have a distinctive signature. There is a
sequence of characters unique to a virus and the engine searches for that signature.
The engine uses a technique called heuristic analysis to search for unknown viruses.
This involves analysis of the object’s program code and searching for distinctive
features typically found in viruses.
Once the engine has confirmed the identity of a virus, it cleans the object as far as
possible. For example, by removing an infected macro from the attachment in which it
is found or by deleting the virus code in an executable file. In some instances, if the
virus has destroyed data, the file cannot be fixed and the engine must make the file
safe so that it cannot be activated and infect other files.
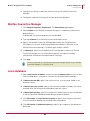
Other areas to protect
®
The following key areas of your network can be protected by McAfee Security
products as a part of your integrated virus defense solution:
Internet gateway protection — Secure Content Management Appliances
The major source of threats to your corporate network comes from Internet traffic,
either through email or by connecting to websites that might contain potentially
harmful code. Secure Content Management Appliances protects the gateway
between your internal networks and the Internet. It prevents infected items from
entering your network through the Internet by scanning all inbound and outbound
traffic between your network and the Internet.
9
1
®
™
McAfee GroupShield 7.0 User Guide
Introduction
About GroupShield for Exchange
Document repository protection — McAfee PortalShield
Using computers within corporate environment has made it easy to create
documents that might contain mission-critical information. Several software
vendors produce portal servers to store, index and control your critical documents
in a way that enables them to be easily located when needed. Because these portal
servers are set up to store your critical information, it is important that this
®
™
information is also protected. McAfee PortalShield integrates with the stores of
these products to provide scanning of such documents each time they are accessed
from, or saved to the store.
Desktop and file server protection — McAfee VirusScan Enterprise
Not all viruses are transmitted via email. Many can be spread by reading from
physical media, such as diskettes or CDs. Others can spread by using network
shares to copy themselves from one computer to another across your network.
From the viewpoint of somebody trying to attack your corporate network, your file
servers are a good target because many other computers connect to the file
servers. Infecting the file server is more likely to have serious consequences than
infecting a single desktop computer.
®
The McAfee VirusScan products protect desktop computers and file servers within
your network. As part of your integrated response to virus threats, VirusScan can be
viewed as your last line of defense, protecting each desktop computer and file
server from viruses that might spread using network shares or physical media.
®
VirusScan is available in versions to protect Microsoft Windows, Unix, Apple
Macintosh computers, as well as all the leading wireless devices that might connect
to your PCs and network.
®
Management solution — McAfee ePolicy Orchestrator
With ePolicy Orchestrator, you can manage and update all your McAfee anti-virus
solutions across your network from a single point, ensuring that the engines and the
virus definition (DAT) files are up-to-date and that the suitable policies are in place
to deal with any attacks to your network.
10
1
®
™
McAfee GroupShield 7.0 User Guide
Introduction
GroupShield Features
GroupShield Features
GroupShield includes these major features on Exchange Server 2003 and 2007:
Anti-virus scanning — GroupShield provides the ability to scan for viruses contained
®
in email messages that are transmitted over Microsoft Exchange SMTP or held
®
within the Microsoft Exchange Server store.
Anti-spam scanning — Spam is increasingly becoming an issue within the
workplace. Spam consumes system resources by taking up bandwidth and storage
within your corporate systems and distracts staff from their key job functions
because they have to deal with the unwanted email within their mailboxes.
®
GroupShield helps you save bandwidth and the storage required by your Microsoft
Exchange servers by assigning spam scores to each email messages while
scanning them and by taking the configured action on those messages.
Anti-phishing — GroupShield is capable of detecting email messages containing
phish that fraudulently tries to obtain personal information. Typically such email
messages request the recipients to click on a link in the email to verify or update
contact details, credit card details or other personal information.
Content filtering — GroupShield provides the ability to scan for content/text in an:
email message subject line
email message body
email attachment
File filtering — GroupShield scans an email attachment depending on the file name,
file type, and the file size of that attachment.
Enterprise rollout, administration, updating and reporting using McAfee ePolicy
®
®
Orchestrator and McAfee ProtectionPilot — GroupShield integrates with McAfee
®
ePolicy Orchestrator and McAfee ProtectionPilot to provide a centralized method
for rolling out, administering and updating the GroupShield software across your
®
Microsoft Exchange system. The ability to centrally manage an organization-wide
implementation of the GroupShield software reduces the time required to
administer and update the system.
®
11
1
®
™
McAfee GroupShield 7.0 User Guide
Introduction
GroupShield Features
What is New?
New Web Based User Interface — GroupShield for Exchange provides a user
friendly web-based interface based on DHTML. To access this, click Start | Programs
| McAfee | GroupShield for Exchange | GroupShield for Exchange (Web).
Policy Management — The Policy Manager menu option lists different policies that
you can set up/manage in GroupShield. You can specify various policies/actions that
determine how different types of threats are treated when detected. For detailed
information on the policy management, refer to the chapter Policy Manager on
page 105.
Anti-Phishing Capability — GroupShield for Exchange is capable of detecting email
messages containing phish that fraudulently tries to obtain personal information.
Capability to detect Packers and Potentially Unwanted Programs — GroupShield for
Exchange is capable of detecting packers that compresses and encrypts the original
code of an executable file.
It also detects Potentially Unwanted Programs that are software programs written
by legitimate companies which may alter the security state or the privacy posture
of a computer on which they are installed.
Enhanced Anti-Spam Capability — GroupShield for Exchange is capable of detecting
spam or unsolicited bulk email messages sent to multiple recipients, who did not
ask to receive it. It assigns a “spam score” to every email message. You can then
choose to block those messages if they are above a certain score.
Enhanced Background Scanning options — For Exchange Server 2007, GroupShield
provides enhanced background scanning options. During this type of scanning, not
all the email messages are scanned when accessed. This reduces the workload of
the scanner. For more information, refer to the sub topic For Exchange Server 2007
on page 165.
Centralized Scanner, Filter Rules and Enhanced Alert Settings — Using Scanners,
you can configure the scanner-related settings that a policy can apply when
scanning items.
In File Filtering Rules, you can set up rules that apply to file name, file type, and file
size. You can use the alert editor to customize the text of an alert message using
the Style, Font, Size, and Token menus.
Time based scanning and actions — GroupShield for Exchange enables scanning
emails at convenient times or at regular intervals. You can schedule regular scan
operations when the server activities are comparatively low and when they do not
interfere with your work.
Content Scanning and True Type File Filtering of Microsoft® Office 2007 file
formats
12
1
®
™
McAfee GroupShield 7.0 User Guide
Introduction
GroupShield Features
Filter for Password Protected ZIP Files — For more information about this filter,
refer to Password-protected files on page 140.
Filter for Protected Content (Password protected Microsoft Office files) — For
more information about this filter, refer to Protected content on page 137.
Support for N+1 cluster — For more information, refer to Single Copy Cluster (SCC,
N+1 cluster configuration) on Exchange Server 2003 and 2007 on page 34.
Enhanced MIME Scanning — MIME (Multipurpose Internet Mail Extensions) is a
communications standard that enables the transfer of non-ASCII formats over
protocols (like SMTP) that supports only 7-bit ASCII characters. GroupShield enables
you to specify how such MIME messages are handled.
Buffer Overflow protection using VirusScan Enterprise version 8.5i — A buffer
overflow is an anomalous condition where a process attempts to store data beyond
the boundaries of a fixed-length buffer. This results in extra data, overwriting the
adjacent memory locations. Enabling Buffer Overflow Protection prevents this
condition. GroupShield has the provision of buffer overflow protection. For more
information, refer to Buffer Overflow Protection on page 30.
®
Buffer over flow protection is available only on 32 -bit platforms (and not on 64-bit
platforms) with Exchange Server 2003.
Note
Enhanced Quarantine Management
Local Quarantine Management — Detected Items can be quarantined. You can
specify the local database to be used as a repository for quarantining email
messages. You can also configure maintenance settings for the local quarantine
database.
Quarantining using McAfee Quarantine Manager version 4.1 or 4.1.1 — You can
specify McAfee Quarantine Manager in a different server as a repository for
quarantining infected email messages. This keeps your Exchange Server safe
from viruses.
Integration with:
McAfee ePolicy Orchestrator version 3.6 and 4.0 — to provide a single point of
control for your McAfee anti-virus products, to manage anti-virus policies and
view reports of anti-virus events and virus activity in an enterprise environment.
For more information, refer to the chapters Integrating with ePolicy Orchestrator
3.6 on page 47 and Integrating with ePolicy Orchestrator 4.0 on page 63.
13
1
®
™
McAfee GroupShield 7.0 User Guide
Introduction
GroupShield Features
McAfee ProtectionPilot version 1.5 and above — to provide security
management that simplifies anti-virus management tasks for network
administrators who manage up to 500 computers. Management consists of
deploying (sending and installing) anti-virus products, configuring product
settings, and keeping those products up-to-date. For more information, refer to
the chapter Integrating with ProtectionPilot 1.5 on page 77.
Anti-virus Engine 5200 — to provide improved and latest detections like Packers
and Potentially Unwanted Programs, improved emulator with agile methodology.
Co-existence with:
McAfee VirusScan Enterprise v 8.0 and above.
McAfee Host Intrusion Prevention Agent.
Auto-update of Virus Definitions (V2API DATs), ExtraDATs, Anti-Virus engine, Spam
engine and Spam rules — McAfee Security regularly provides updated Virus
Definition (DAT) files and virus-scanning engine, spam engine and rules to detect
and clean the latest threats.
Note
GroupShield uses new version of anti-virus DATs and engine (V2API). This provides
improved detections of the latest viruses and threats.
Product Update using SuperDAT v 2.2 executable — GroupShield helps you keep
your server free from viruses, Trojans, spams, phish, PUPs by regularly updating the
product using SuperDAT executable.
In-product Reports — GroupShield generates status reports and graphical reports to
view information about the detected items.
Anti-Virus Stamping mechanism on a Microsoft® Exchange Server 2007 with Edge
®
or Hub server role — McAfee Transport Scanner assigns a stamp to the header of
an email message after scanning. This prevents the message from being
re-scanned by VSAPI.
Direction Based Scanning — GroupShield supports direction-based scanning. It
®
scans inbound, outbound, and internal email messages using McAfee Transport
Scanner.
User and Server level blacklist and whitelist using McAfee Quarantine Manager
version 4.1 — For more information, refer to Upgrading Blacklists and Whitelists on
page 42.
Integration with SuperDAT Manager version 2.2 — SuperDAT Manager 2.2
supports updating of the DAT and Engine for the GroupShield software.
14
1
®
™
McAfee GroupShield 7.0 User Guide
Introduction
GroupShield Features
Integration with McAfee Common Management Agent (CMA) version 3.6 and
above — You can use the CMA component to manage GroupShield and perform
product updates, scheduled tasks, and events reporting as a part of the core
installation.
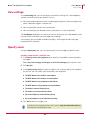
Features not supported
Integration with black and whitelist server application installed along with
GroupShield for Exchange version 6.x.
Integration with Outbreak Manager (OBM).
Integration with Alert Manager (AM).
Integration with ProtectionPilot 1.1.
Integration with ePolicy Orchestrator 3.5.x.
Integration with Exchange Server 2000.
Integration with Common Management Agent 3.5.x.
Integration with McAfee AutoUpdate Architect 1.x.
15
1
®
™
McAfee GroupShield 7.0 User Guide
Introduction
Using this Guide
Using this Guide
™
This guide describes the sequential process of installing McAfee GroupShield 7.0 for
®
Microsoft Exchange 2003 and 2007. It also gives a detailed description of the software
usage. Topics covered are:
Pre-Installation — Pre-installation scenarios and system requirements.
Installing the Software — Accessing and installing GroupShield.
Post-Installation Tasks and Maintenance — Testing the GroupShield installation,
anti-virus component, anti-spam component and testing using the McAfee Virtual
Technician. Quarantining using McAfee Quarantine Manager, modifying, repairing,
restoring and uninstalling the software.
Integrating with ePolicy Orchestrator 3.6 — Testing the GroupShield integration
with ePolicy Orchestrator version 3.6.
Integrating with ePolicy Orchestrator 4.0 — Testing the GroupShield integration
with ePolicy Orchestrator version 4.0.
Integrating with ProtectionPilot 1.5 — Testing the GroupShield integration with
ProtectionPilot.
Getting Started with the User Interface — Using GroupShield for Microsoft
Exchange Server 2003/2007, getting detailed information about the dashboard,
detected items, policy manager and settings & diagnostics.
®
Audience
This information is intended for network administrators who are responsible for their
company’s anti-virus and security program.
16
1
®
™
McAfee GroupShield 7.0 User Guide
Introduction
Using this Guide
Conventions
This guide uses the following conventions:
Bold
Condensed
All words from the interface, including options, menus, buttons, and dialog
box names.
Example:
Type the User name and Password of the appropriate account.
The path of a folder or program; text that represents something the user
types exactly (for example, a command at the system prompt).
Courier
Examples:
The default location for the program is:
C:\Program Files\McAfee\EPO\3.6.0
Run this command on the client computer:
scan --help
Italic
For emphasis or when introducing a new term; for names of product
documentation and topics (headings) within the material.
Example:
Refer to the VirusScan Enterprise Product Guide for more information.
A web address (URL) and/or a live link.
Blue
Example:
Visit the McAfee web site at:
http://www.mcafee.com
<TERM>
Angle brackets enclose a generic term.
Example:
In the console tree, right-click <SERVER>.
Note: Supplemental information; for example, another method of
executing the same command.
Note
Tip: Suggestions for best practices and recommendations from McAfee for
threat prevention, performance and efficiency.
Tip
Caution: Important advice to protect your computer system, enterprise,
software installation or data.
Caution
Warning
Warning: Important advice to protect a user from bodily harm when using
a hardware product.
17
1
®
™
McAfee GroupShield 7.0 User Guide
Introduction
Getting product information
Getting product information
Unless otherwise noted, product documentation comes as Adobe Acrobat .PDF files,
available on the product CD or from the McAfee download site.
Standard documentation
User Guide — System requirements and instructions for installing and starting the
software. Getting started with the product and its features, detailed instructions for
configuring the software, information on deployment, recurring tasks, and operating
procedures.
Help — High-level and detailed information accessed from the software application:
Help menu and/or Help button for page-level help; right-click option for What’s This?
help.
Release Notes — ReadMe. Product information, resolved issues, any known issues,
and last-minute additions or changes to the product or its documentation.
18
1
®
™
McAfee GroupShield 7.0 User Guide
Introduction
Contact information
Contact information
®
Threat Center: McAfee Avert Labs http://www.mcafee.com/us/threat_center/default.asp
Avert Labs Threat Library
http://vil.nai.com
Avert Labs WebImmune & Submit a Sample (Logon credentials required)
https://www.webimmune.net/default.asp
Avert Labs DAT Notification Service
http://vil.nai.com/vil/signup_DAT_notification.aspx
Download Site http://www.mcafee.com/us/downloads/
Product Upgrades (Valid grant number required)
Security Updates (DATs, engine)
HotFix and Patch Releases
For Security Vulnerabilities (Available to the public)
For Products (ServicePortal account and valid grant number required)
Product Evaluation
McAfee Beta Program
Technical Support http://www.mcafee.com/us/support/
KnowledgeBase Search
http://knowledge.mcafee.com/
McAfee Technical Support ServicePortal (Logon credentials required)
https://mysupport.mcafee.com/eservice_enu/start.swe
Customer Service
Web
http://www.mcafee.com/us/support/index.html
http://www.mcafee.com/us/about/contact/index.html
Phone — US, Canada, and Latin America toll-free:
+1-888-VIRUS NO or +1-888-847-8766 Monday – Friday, 8 a.m. – 8 p.m., Central Time
Professional Services
Enterprise: http://www.mcafee.com/us/enterprise/services/index.html
Small and Medium Business:
http://www.mcafee.com/us/smb/services/index.html
19
1
®
™
McAfee GroupShield 7.0 User Guide
Introduction
Contact information
20
1
2
Pre-Installation
This chapter provides information that is important to consider before installing
GroupShield for Exchange 7.0. Topics covered are:
Pre-Installation scenarios
System requirements
Pre-Installation scenarios
®
You MUST log on to Microsoft Windows as a domain administrator. This gives you
relevant rights and permissions to install GroupShield.
Before installing GroupShield:
®
Make sure Microsoft Exchange Server 2003/2007 is installed on the installation
server.
Manually uninstall GroupShield software older than version 6.0.2.
GroupShield for Exchange 7.0 supports automatic upgrading of the software from
version 6.0.2 and above.
Note
Uninstall SpamKilller for Exchange using the Windows Add/Remove Programs feature.
GroupShield for Exchange 7.0 does not support upgrading of SpamKiller software.
Caution
21
®
™
McAfee GroupShield 7.0 User Guide
Pre-Installation
Pre-Installation scenarios
Types of installation
®
GroupShield can be installed on Microsoft Exchange Server 2003/2007 in these ways:
Standard installation
Silent installation
Cluster installation
Standard installation
®
®
You can install McAfee GroupShield software on Microsoft Exchange Server
2003/2007. Refer to Installing GroupShield for Microsoft® Exchange Server 2003/2007
on page 26 for step-by-step instructions.
Silent installation
®
®
You can install McAfee GroupShield software on Microsoft Exchange Server
2003/2007 without user interaction. This is also known as unattended installation.
Refer to Silent installation on page 32 for step-by-step instructions.
Cluster installation
®
®
You can install McAfee GroupShield software on Microsoft Exchange Server
2003/2007 on a cluster environment. Refer to Configuring GroupShield in a cluster
environment on page 33 for step-by-step instructions.
22
2
®
™
McAfee GroupShield 7.0 User Guide
Pre-Installation
System requirements
System requirements
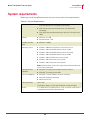
Before you install GroupShield, ensure that your server meets these requirements:
Table 2-1 System Requirements
Processor
Memory
Intel x64 architecture-based processor that supports Intel
Extended Memory 64 Technology (Intel EM64T)
AMD x64 architecture-based processor with AMD 64-bit
technology
Intel x86 architecture-based processor (only on Exchange Server
2003)
Minimum: 512 MB
Recommended: 1 GB
Available Hard disk
space
Minimum: 740MB
Operating system
Windows 2000 Advanced Server with Service Pack 4
Windows 2003 Standard/Enterprise Server (32-bit)
Windows 2003 Standard/Enterprise Server R2 (32-bit)
Windows 2003 Standard/Enterprise Server (64-bit)
Windows 2003 Small Business Server (32-bit)
Windows 2003 Datacenter Server (32-bit)
Windows 2003 Datacenter Server (64-bit)
Note: Refer Windows service pack requirements Release Notes for
Service Pack information.
®
Exchange Servers
Supported
Microsoft Exchange Server 2003 with Service Pack 2
Microsoft Exchange Server 2007
Browsers Supported
Microsoft Internet Explorer version 6 and above
Netscape Navigator version 9.0
Mozilla version 2.0
Screen Resolution
®
®
1024 x 768
For the best display, set the color resolution to 24-bit or higher
General
A CD-ROM drive (if installing from a CD) or an Internet connection (if
installing from the McAfee download site)
23
2
®
™
McAfee GroupShield 7.0 User Guide
Pre-Installation
System requirements
24
2
3
Installing the Software
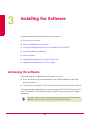
Installing GroupShield software consists of these topics:
Accessing the software
What is included with the software?
Installing GroupShield for Microsoft Exchange Server 2003/2007
Installing additional components
Silent installation
Configuring GroupShield in a cluster environment
Upgrading GroupShield from v6.0.2 or higher
®
Accessing the software
McAfee distributes GroupShield for Exchange in two ways:
As an archived file that you download from the McAfee website or from other
electronic services.
On the Total Virus Defense (TVD), the Active Virus Defense (AVD) or the suite CDs.
Once you have downloaded the archive file or placed the TVD or AVD installation CD in
your CD-ROM drive, the installation steps you follow are the same for each type of
distribution.
®
Note
To install, manage, remove or upgrade GroupShield for Microsoft Exchange Server
2003/2007, you must have a user account with administrative rights.
25
®
™
McAfee GroupShield 7.0 User Guide
Installing the Software
®
Installing GroupShield for Microsoft Exchange Server 2003/2007
What is included with the software?
GroupShield for Exchange has these components in the installer that you can install
separately.
McAfee GroupShield for Exchange 7.0
Buffer Overflow Protection
McAfee Anti-Spam for GroupShield
The McAfee GroupShield for Exchange 7.0 option is selected by default. If you want to install
the additional software components, you must select them in the installer.
®
Caution
™
®
McAfee GroupShield for Microsoft Exchange Server 2003/2007 does not upgrade
®
®
McAfee SpamKiller for Exchange installation. You should uninstall McAfee SpamKiller
for Exchange manually before installing GroupShield for Exchange 7.0.
®
Installing GroupShield for Microsoft Exchange Server
2003/2007
®
1 Using an administrative account, log on to the Microsoft Exchange Server
2003/2007.
2 Create a temporary directory on the network or your local drive.
3 To install, do one of the following depending on how you obtained the software:
Insert the CD into the computers drive and copy the installation files to the
temporary directory you created.
Download the .ZIP archive and extract the files to the temporary directory.
26
3
®
™
McAfee GroupShield 7.0 User Guide
Installing the Software
®
Installing GroupShield for Microsoft Exchange Server 2003/2007
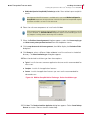
4 Using Windows Explorer, navigate to the folder where you copied the installation
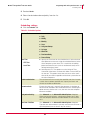
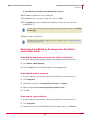
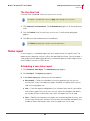
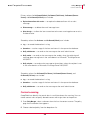
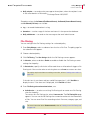
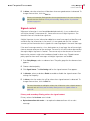
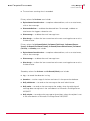
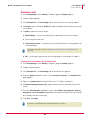
files and double-click SETUP.EXE. The GroupShield for Exchange setup dialog box
appears.
Figure 3-1 McAfee GroupShield for Exchange - Welcome
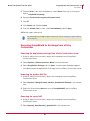
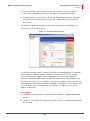
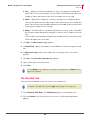
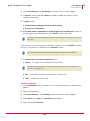
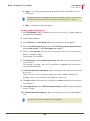
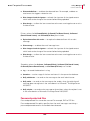
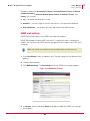
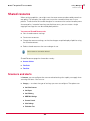
5 Click Next. The Component Selection dialog box displays the software components you
can install.
Figure 3-2 McAfee GroupShield for Exchange - Component selection
McAfee GroupShield for Exchange 7.0 is selected by default.
Buffer Overflow Protection provides buffer overflow protection through host
intrusion prevention using McAfee VirusScan Enterprise version 8.5i.
Buffer overflow protection is not supported on 64-bit platforms.
Note
27
3
®
™
McAfee GroupShield 7.0 User Guide
Installing the Software
®
Installing GroupShield for Microsoft Exchange Server 2003/2007
McAfee Anti-Spam for GroupShield (Evaluation) provides filters to block spam and phish
emails.
Anti-Spam and Anti-Phish feature is available only if you install McAfee Anti-Spam for
GroupShield component during installation. McAfee Anti-Spam for GroupShield requires
Note
activation to enable it to work in licensed mode.
6 Select the software components to install and click Next.
When preparing your computer for installation, if the wizard finds any programs running
on your computer, an Installation Wizard dialog box appears recommending you to exit
any programs running, before continuing with installation.
Note
7 When the End User License Agreement dialog box appears, select the License expiry type
and Select country where purchased and used from the drop-down menus.
8 Click I accept the terms in the license agreement, then OK to display the Destination Folder
dialog box.
9 Click Browse to select a different folder or Next to install the software in the default
directory. The Select Installation type dialog box appears.
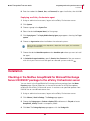
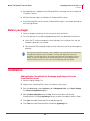
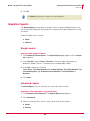
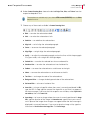
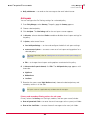
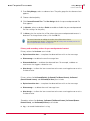
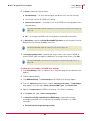
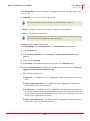
10 Select the desired installation type from these options:
Typical - installs the most common application features and is recommended for
most users.
Complete - installs all the application features.
Custom - installs the application features you want and is recommended for
advanced users.
Figure 3-3 McAfee GroupShield for Exchange - Select Installation type
11 Click Next. The Ready to Install the Application dialog box appears. Select Create Desktop
Shortcut to create a shortcut icon on the desktop.
28
3
®
™
McAfee GroupShield 7.0 User Guide
Installing the Software
®
Installing GroupShield for Microsoft Exchange Server 2003/2007
12 Click Next to display the Updating System dialog box. A progress bar indicates the
features being copied and installed. Once the installation process completes, click
Finish to complete the GroupShield for Exchange installation process.
13 Upon successful completion of the installation, these menus are available from the
Start | Programs | McAfee | GroupShield for Exchange menu:
Note
GroupShield for Exchange (Web)
SiteList Editor
GroupShield for Exchange
GroupShield for Exchange Access Control
The GroupShield for Exchange (Web) option appears in the menu, only if you choose the
Complete installation type.
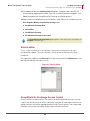
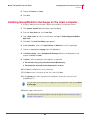
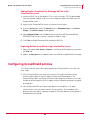
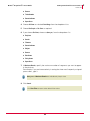
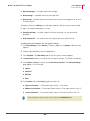
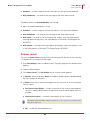
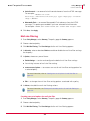
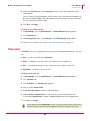
SiteList editor
This is a new functionality in the software, where you can see the list of sites
configured for update. The user interface is similar to that of McAfee VirusScan
Enterprise.
This application modifies the sitelist.xml file of the current machine. EditSiteList.exe is the
tool used for editing the sitelist.xml file.
Figure 3-4 SiteList Editor
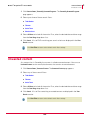
GroupShield for Exchange Access Control
Access control is used to restrict user access to the GroupShield software. You can
simplify the administration of access control by using one or more administrative user
groups and then setting the appropriate permissions to each group. Then simply add
individual users to the user group to grant them those permissions.
29
3
®
™
McAfee GroupShield 7.0 User Guide
Installing the Software
Installing additional components
Permissions can be applied to any object in directory or on the local computer, but
majority of permissions should be applied to groups, rather than individual users. This
eases the task of managing permissions on the software.
Figure 3-5 Access Control
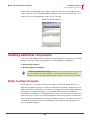
Installing additional components
After the wizard completes the installation of GroupShield for Exchange, the installation
process continues if you had selected any of these additional components:
Buffer Overflow Protection
McAfee Anti-Spam for GroupShield
Note
The McAfee GroupShield for Exchange 7.0 component is selected by default. If you want
to install additional software components, you must select them in the installer.
McAfee Anti-Spam for GroupShield component requires a license key for activation.
Buffer Overflow Protection
Buffer overflow is an attack technique that exploits a software design defect in an
application or process to force it to execute code on the computer. Applications have
fixed-size buffers that hold data. If an attacker sends too much data or code into one of
these buffers, the buffer overflows. The computer then executes the code that
overflowed as a program. As the code execution occurs in the security content of the
application (which is often at a highly-privileged or administrative level), intruders gain
access to execute commands not usually accessible to them. An attacker can use this
vulnerability to execute custom hacking code on the computer and compromise its
security and data integrity.
30
3
®
™
McAfee GroupShield 7.0 User Guide
Installing the Software
Installing additional components
Buffer overflow protection prevents exploited buffer overflows from executing
arbitrary code on your computer. It monitors usermode API calls and recognizes when
they are called as a result of buffer overflow.
GroupShield for Exchange uses the buffer overflow protection of VirusScan Enterprise
to protect these processes:
RPCServ.exe
PrfCtrs.exe
RunScheduled.exe
SAFeService.exe
SDEDIT.exe
StandaloneUI.exe
Enabling buffer overflow protection:
Using Windows Explorer, navigate to the folder where you copied the installation files
and double-click BOPActivation.EXE.
Note
For more information on buffer overflow protection, refer to VirusScan Enterprise v 8.5
User Guide.
Installing McAfee Anti-Spam for GroupShield
Anti-Spam and Anti-Phish feature is available only if you install McAfee Anti-Spam for
GroupShield component during installation. McAfee Anti-Spam for GroupShield
requires activation to enable it to work in licensed mode.
1 If you have selected McAfee Anti-Spam for GroupShield in the Component selection dialog
box, the Add-on Package dialog box appears.
2 Click Next. When the End User License Agreement dialog box appears, choose Select the
location where purchased and used from the drop-down menu.
3 Click Next to install the Anti-Spam feature, then click Finish to complete the
installation.
31
3
®
™
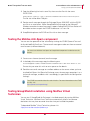
McAfee GroupShield 7.0 User Guide
Installing the Software
Silent installation
Silent installation
The GroupShield for Exchange installation is performed by MSI. You can set the
properties used by the MSI either by editing the SILENT.INI file or by passing the
properties directly to the MSI via the command line.
Silent installation allows you to choose the most convenient time to install GroupShield
®
for Exchange on Microsoft Windows. Another advantage of silent installation is that it
requires little involvement compared to a manual installation.
Before installation, please ensure that the Windows Net Logon Service is running on
the Windows server using domain controllers.
You cannot use silent installation to add or remove components or to do a repair.
Note
Installing GroupShield for Exchange in silent mode
1 Using an administrative account, log on to the computer containing Microsoft
Exchange Server 2003/2007.
®
2 Create a temporary directory on the network or your local drive.
3 To install, do one of the following depending on how you obtained the software:
Insert the CD into the computer’s drive and copy the installation files into the
temporary directory you created.
Download the .ZIP archive and extract the file to the temporary directory.
4 From the command prompt, change the directory to the temporary folder where you
have extracted the installation files.
5 Ensure that the GROUPSHIELD.MSI file is located in the temporary folder.
6 Type MSIEXEC /I <Full Path of the MSI> /QN and press ENTER.
Temporary directory = C:\GSE7
Note
MSIEXEC /I C:\GSE7\GROUPSHIELD.MSI /QN
7 To install directory to a Custom folder and enable installation logs, type:
32
3
®
™
McAfee GroupShield 7.0 User Guide
Installing the Software
Configuring GroupShield in a cluster environment
MSIEXEC /I <MSI path> INSTALLDIR=<Install Directory> and press ENTER.
Install folder = C:\GSE7INSTALL
MSIEXEC /I C:\GSE7\GROUPSHIELD.MSI INSTALLDIR=C:\GSE7INSTALL /QN
Note
MSIEXEC /I <MSI path> INSTALLDIR=<Install Directory> /l* <log
filename and path>
MSIEXEC /I C:\GSE7\GROUPSHIELD.MSI INSTALLDIR=C:\GSE7INSTALL /l*
C:\GSE7\GSELOG.TXT /QN
Upon successful completion of the installation process, these menu appears under
Start | Programs | McAfee | GroupShield for Exchange
Note
GroupShield for Exchange
GroupShield for Exchange Access Control
SiteList Editor
If silent installation is used, only GroupShield software is installed on the server. To have
additional components like Anti-spam for GroupShield, and buffer overflow protection,
you should manually execute the respective setup files.
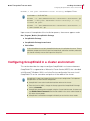
Configuring GroupShield in a cluster environment
This section describes the steps to configure GroupShield in a cluster environment.
®
GroupShield 7.0 is supported on a Microsoft Cluster Service (MSCS) that is bundled
®
with Microsoft Windows 2003 in an Active-Passive configuration.You must install
GroupShield 7.0 on the same drive and path on all the nodes of the cluster.
Note
GroupShield 7.0 does not support Active-Active cluster configuration. To implement
GroupShield in an Active-Active configuration:
GroupShield 7.0 must be installed on both the nodes of the cluster.
From the Services MMC, change the Startup type of the GroupShield Exchange
service to Automatic.
GroupShield should not be managed using the Cluster Administrator. A resource of
type McAfee Cluster Framework should not be added in the cluster administrator to
any of the cluster groups.
GroupShield 7.0 should be managed individually on each of the cluster nodes.
33
3
®
™
McAfee GroupShield 7.0 User Guide
Installing the Software
Configuring GroupShield in a cluster environment
Local Continuous Replication (LCR) on Exchange Server
2007
Local Continuous Replication (LCR) is a single-server solution that uses built-in
asynchronous log shipping technology to create and maintain a copy of a storage group
on a second set of disks that are connected to the same server as the production
storage group.
LCR is not a failover implementation. So GroupShield 7.0 can be installed and used in
a similar way to that of a standalone mailbox server installation.
Clustered Continuous Replication (CCR) on Exchange
Server 2007
®
Cluster Continuous Replication (CCR) is a high availability feature of Microsoft
Exchange Server 2007. It combines the asynchronous log shipping and replay
®
technology built into Microsoft Exchange Server 2007 with the failover and
®
management features provided by the Microsoft Cluster service.
Install GroupShield 7.0 on all the nodes of the cluster following the standard installation
steps.
Note
On an Exchange 2007 CCR Cluster, GroupShield for Exchange 7.0 will not be cluster
aware application. A resource type for GroupShield for Exchange 7.0 will not be
available in the Cluster Administrator and cannot be added to the Exchange Virtual
Server. GroupShield for Exchange 7.0 on all nodes of the cluster must be configured
independently and will work as standalone instances.
Single Copy Cluster (SCC, N+1 cluster configuration) on
Exchange Server 2003 and 2007
A Single Copy Cluster (SCC) is a clustered mailbox server that uses shared storage in
a failover cluster configuration to allow multiple servers to manage a single copy of the
storage groups. This is built on the failover and management features provided by the
®
Microsoft Cluster service. The Exchange Virtual Server uses its own network identity
and not the identity of any node in the cluster. This network identity is referred to as a
clustered mailbox server.
Both Exchange 2007 Mailbox server and Exchange 2003 can be deployed in this type
of cluster.
Install GroupShield 7.0 on all the nodes of the cluster following the steps of standard
installation.
Note
GroupShield for Exchange 7.0 should be added to the Cluster groups where the
Exchange virtual server is present after the installation on the nodes of the cluster.
34
3
®
™
McAfee GroupShield 7.0 User Guide
Installing the Software
Configuring GroupShield in a cluster environment
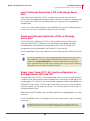
Adding GroupShield for Exchange as a resource to the Cluster group
In Cluster Administrator, select the Exchange cluster group to which the GroupShield for
Exchange resource needs to be added.
1 From the File menu, select New | Resource. The New Resource wizard appears.
Figure 3-6 New Resource
2 Type a suitable Name and Description for the Resource.
3 From the Resource type drop-down list, select McAfee Cluster Framework.
4 From the Group drop-down list, select the Cluster group to which the GroupShield for
Exchange resource needs to be added.
5 Click Next. The Possible Owners screen appears. Ensure that the nodes of the cluster
on which GroupShield for Exchange is installed, are listed in the Possible Owners list.
6 Click Next. The Dependencies screen appears.
Make the current resource of type McAfee Cluster Framework dependent on a resource
of type Physical Disk.
Figure 3-7 Dependencies
35
3
®
™
McAfee GroupShield 7.0 User Guide
Installing the Software
Configuring GroupShield in a cluster environment
7 Click Next. The Parameters screen appears. In the Shared Data Drive section, verify if the
disk (selected from the Dependencies screen) is displayed.
8 Click Finish. A confirmation dialog box appears.
9 Click OK. The cluster resource is successfully created.
10 In Cluster Administrator, right-click on the newly created resource and from the context
menu, select Bring Online to start the GroupShield for Exchange 7.0 resource.
Repeat the above mentioned steps for every Exchange group on which GroupShield
for Exchange is to be added.
Note
For an existing resource of type McAfee Cluster FrameWork, the Physical Disk resource
dependency added at the time of creation should NOT be modified under the
Dependency tab from the <McAfee Cluster Framework resource> Properties dialog box.
If the dependency on the physical disk has to be changed, it is recommended to delete
the existing resource of type McAfee Cluster Framework and then re-create the resource
with the required Physical Disk dependency.
Figure 3-8 Cluster Dependencies
Note
Note
Administration (deployment, configuration and pushing product updates) of
GroupShield for Exchange 7.0 on a (n+1) cluster from ePolicy Orchestrator server is not
supported.
Product update is specific to a GroupShield for Exchange 7.0 instance in an Exchange
Virtual Server. When a product update happens, the node on which the Exchange Virtual
Server with GroupShield for Exchange 7.0 is active gets updated. At the time of a
failover, the updates are copied to the other node automatically by GroupShield for
Exchange 7.0.
36
3
®
™
McAfee GroupShield 7.0 User Guide
Installing the Software
Upgrading GroupShield from v6.0.2 or higher
Cluster Uninstallation
1 Open the Cluster Administrator.
2 Make all the resources of type McAfee Cluster Framework offline.
3 Delete all the resources of type McAfee Cluster Framework.
4 Close the Cluster Administrator.
Make the nodes of the cluster as passive and uninstall GroupShield for Exchange
version 7.0 as mentioned in the topic Uninstalling GroupShield for Exchange on
page 45 of this guide. Repeat this on all nodes of the cluster.
Uninstalling the software from the cluster does not delete the McAfee folder on the
shared drive. You may delete this folder manually after uninstalling the software.
Note
Upgrading GroupShield from v6.0.2 or higher
®
McAfee GroupShield for Exchange version 7.0 supports upgrading your configuration
settings from the previous version of the product. When upgrading to a new version of
GroupShield for Exchange, you do not need to uninstall the existing version. The
installation program successfully updates your installation to the new version.
®
Note
Upgrade from McAfee SpamKiller version 2.1.x is not supported. User should uninstall
®
McAfee SpamKiller from the Add/Remove Programs feature before running
GroupShield for Exchange 7.0 installation.
The product upgrades supported are:
GroupShield for Exchange version 6.0.2
GroupShield for Exchange version 6.0.2 + Patch1
GroupShield for Exchange version 6.0.3
GroupShield for Exchange version 6.0.3 + Patch1
Note
Upgrading to GroupShield for Exchange version 7.0 works only on a licensed version of
the products mentioned above.
1 Run the setup wrapper of GroupShield for Exchange version 7.0 on GroupShield for
Exchange version 6.0.2 / 6.0.2+Patch1 / 6.0.3 / 6.0.3+Patch1 to upgrade to
GroupShield for Exchange version 7.0.
2 Select the Add-Ons which you want to install.
37
3
®
™
McAfee GroupShield 7.0 User Guide
Installing the Software
Upgrading GroupShield from v6.0.2 or higher
3 When the installation is completed successfully, your system is upgraded to
GroupShield for Exchange version 7.0.
Note
After the upgrade, policies, scheduled tasks, rules, and configuration settings are
carried forward to GroupShield 7.0
38
3
4
Post-Installation Tasks and
Maintenance
This chapter includes information that is important to consider when performing post
installation and maintenance tasks:
Testing your GroupShield installation
Quarantining using McAfee Quarantine Manager
Maintaining your GroupShield application
Uninstalling the GroupShield for Exchange software
Testing your GroupShield installation
When you have completed installation of GroupShield for Exchange, we recommend
that you test the installation to ensure that the software is installed properly and can
detect viruses and spam within the email messages.
Testing the anti-virus component
The recommended method to test an anti-virus product is to attach an EICAR anti-virus
®
test file to an email message, and to send the message through the Microsoft
Exchange Server 2003/2007 where you have just installed GroupShield for Exchange.
The EICAR standard anti-virus test file was created jointly by several anti-virus vendors
throughout the world to implement a standard by which customers can verify their
anti-virus installations.
Note
This file is not a virus, Ensure that you delete the file when you have finished testing
your installation to avoid alarming unsuspecting users.
39
®
™
McAfee GroupShield 7.0 User Guide
Post-Installation Tasks and Maintenance
Testing your GroupShield installation
1 Copy the following line into its own file, then save the file with the name
EICAR.COM:
X5O!P%@AP[4\PZX54(P^)7CC)7}$EICAR-STANDARD-ANTIVIRUS-TESTFILE!$H+H*
The file size will be 68 or 70 bytes.
2 Send an email message through the Exchange Server 2003/2007 with the EICAR
®
test file as an attachment. When GroupShield for Exchange on the Microsoft
Windows examines the email message, it reports finding the EICAR test file but will
be unable to clean or repair the EICAR file because it is a test file.
3 GroupShield replaces the EICAR test file with an alert message.
Testing the McAfee Anti-Spam component
You can test the operation of the software by running the GTUBE (General Test mail
for Unsolicited Bulk Email) test. The test email message must be sent from an external
email account (a different domain).
Note
You must have McAfee Anti-Spam for GroupShield component installed to test this
feature.
1 Create a new Internet (external) email message.
2 In the body of the message, copy the following text:
XJS*C4JDBQADN1.NSBN3*2IDNEN*GTUBE-STANDARD-ANTI-UBE-TEST-EMAIL*C.34X
Ensure that you enter this with no extra spaces or line breaks.
3 Send the new email message to a mailbox address on the server where you have
installed Anti-Spam. Anti-Spam for Exchange scans the message, recognizes it as a
junk email message, and deals with it accordingly (as specified in the configuration
settings).
Note
The GTUBE test overrides blacklists and whitelists. For more information on the GTUBE
test file, visit:
http://spamassassin.apache.org/
Testing GroupShield installation using McAfee Virtual
Technician
You can test if GroupShield for Exchange is installed correctly by running McAfee
Virtual Technician. McAfee Virtual Technician automatically checks for common
deviations that may have occurred since the time you installed the product.
®
To download McAfee Virtual Technician, please visit
http://mvt.mcafee.com/mvt/index.asp
40
4
®
™
McAfee GroupShield 7.0 User Guide
Post-Installation Tasks and Maintenance
Quarantining using McAfee Quarantine Manager 4.1
Quarantining using McAfee Quarantine Manager 4.1
®
McAfee Quarantine Manager (MQM) can be used as a repository for quarantining
infected email messages. McAfee products (like GroupShield for Exchange) uses a
pre-assigned port number to send the detection information to MQM.
®
McAfee Quarantine Manager in turn uses the same port number by default, to release
or send configuration information of the detected email messages to the McAfee
®
product. The communication ports mentioned in GroupShield and in the McAfee
Quarantine Manager user interface should be the same.
®
You can use McAfee Quarantine Manager to consolidate the quarantine and anti-spam
management functionality. It gives you a central point from which you can analyze and
act upon emails and files that have been quarantined. Items are quarantined because
they are spam, phish, contain viruses, potentially unwanted software or other
undesirable content. McAfee Quarantine Manager is particularly effective in managing
unsolicited bulk email or spam.
®
Note
This guide does not provide detailed information about installing or using McAfee
Quarantine Manager software. See McAfee Quarantine Manager v 4.1 Product Guide
for more information.
1 Install GroupShield for Exchange on <Server 1>.
2 Install McAfee Quarantine Manager version 4.1 on <Server 2>.
3 Launch GroupShield for Exchange user interface from the <Server 1>.
4 Click Settings & Diagnostics | Detected Items page.
5 Under McAfee Quarantine Manager, select Enabled.
6 Type the IP address of the <Server 2> server, where you have installed McAfee
Quarantine Manager.
7 Use the default values for Port and Callback port or modify them as configured on
McAfee Quarantine Manager Server.
41
4
®
™
McAfee GroupShield 7.0 User Guide
Post-Installation Tasks and Maintenance
Quarantining using McAfee Quarantine Manager 4.1
8 Click Apply, to save the changes.
Note
Once you have completed the above setup, GroupShield starts to quarantine detected
items on McAfee Quarantine Manager Server; however it also logs them in the local
database.
You must install McAfee Quarantine Manager version 4.1 Patch1 and HotFix 285970 on
the McAfee Quarantine Manager Server. Installing this Patch and HotFix will enable you
to release Quarantined items from the server.
You cannot release quarantined items that are detected as viruses.
To disable quarantining on McAfee Quarantine Manager, go to Settings & Diagnostics |
Detected Items page, deselect Enabled, then click Apply. This makes GroupShield to
continue quarantining on the local database.
Upgrading Blacklists and Whitelists
The blacklist and whitelist command line upgrade tool can be used to upgrade the user
blacklists and whitelists existing in GroupShield version 6.0.x to 7.0. The command line
parameters are not case sensitive and you can also use UNC paths when using the
upgrade tool.
1 Using an administrative account, log on to the computer containing GroupShield for
Exchange version 6.0.x user blacklists and whitelists.
2 Create a temporary directory on your local drive.
3 Download the UserBWListUpgrade.ZIP archive and extract the files to the temporary
directory.
4 From the command prompt execute the command shown below:
bwl -m <SrcPath> <DestPath> [-d] [value]
Parameters:
-m: to upgrade the user blacklists and whitelists.
<SrcPath>: to specify the directory path to the existing GroupShield 6.x user
blacklists and whitelists.
<DesPath>: to specify the directory path to where the generated BWLIST.XML file
is to be stored. The output XML file generated can be imported into the McAfee
Quarantine Manager’s database using its Import Export tool.
-d: to enable debugging. The debug log file DEBUG.TXT is generated in the current
directory.
[value]: “1” enables debugging, any other value passed to this parameter disables
debugging and is FALSE. The default value is set as FALSE.
42
4
®
™
McAfee GroupShield 7.0 User Guide
Post-Installation Tasks and Maintenance
Maintaining your GroupShield application
-h: help
you can also substitute the parameters:
Note
- m with /m
-d with /d
-h with /h
Syntax examples:
To upgrade GroupShield 6.x user blacklists and whitelists to version 7.0:
bwl -m “c:\GSE_60_BWL_Path\” “c:\GSE_70_BWL_Path”
To upgrade GroupShield 6.x user blacklists and whitelists to version 7.0 with debug
logs:
bwl -m “c:\GSE_60_BWL_Path\” “c:\GSE_70_BWL_Path” -d 1
To upgrade GroupShield 6.x user blacklists and whitelists to version 7.0 with debug
logs using an UNC path:
bwl -m “c:“\\server-name\shared-resource-pathname\”
“c:\GSE_70_BWL_Path” -d 1
Maintaining your GroupShield application
The GroupShield for Exchange software provides tools to help you maintain your
installation. Refer to these topics for detailed instructions:
Modifying the GroupShield installation
Repairing the GroupShield installation
Restoring original out-of-box configuration
Modifying the GroupShield installation
To modify application features installed for GroupShield for Exchange, you can use the
Windows Add/Remove Programs feature by running the McAfee GroupShield for Exchange
setup program.
Modifying GroupShield
®
1 Using administrative account, log on to the computer where Microsoft Exchange
Server 2003/2007 is installed.
43
4
®
™
McAfee GroupShield 7.0 User Guide
Post-Installation Tasks and Maintenance
Maintaining your GroupShield application
2 Ensure that the server and clients are shut down.
3 From the Start menu, click Settings, then Control Panel. The Control Panel window
appears.
4 Double-click Add/Remove Programs. The Add/Remove Programs dialog box appears.
5 Select McAfee GroupShield for Exchange from the list.
6 Click Change. The Application Maintenance dialog is displayed.
7 Select Modify, then click Next.
8 When the McAfee GroupShield for Exchange features dialog box appears, modify the
required features and click Next.
Once the software is updated, a confirmation message is displayed.
9 Click Finish to close the dialog box.
Repairing the GroupShield installation
To repair GroupShield for Exchange, we recommend using the Windows Add/Remove
Programs feature, although you can also modify GroupShield from the GroupShield for
Exchange setup program.
Note
If GroupShield related files are found to be corrupt or deleted, the repair process will
replace them with proper files. However, no configuration settings are changed or
modified.
Repairing GroupShield
®
1 Using administrative account, log on to the computer where Microsoft Exchange
Server 2003/2007 is installed.
2 Ensure that the server and clients are shut down.
3 From the Start menu, click Settings, then Control Panel. The Control Panel window
appears.
4 Double-click Add/Remove Programs. The Add/Remove Programs dialog box appears.
5 Select McAfee GroupShield for Exchange from the list.
6 Click Change. The Application Maintenance dialog is displayed.
7 Choose Repair, then click Next.
The McAfee GroupShield for Exchange features dialog box appears. Once the software
is updated, a confirmation message is displayed.
44
4
®
™
McAfee GroupShield 7.0 User Guide
Post-Installation Tasks and Maintenance
Uninstalling GroupShield for Exchange
8 Click Finish to close the dialog box.
Restoring original out-of-box configuration
To restore default settings and values from the user interface, click Settings & Diagnostics
| Import and Export Configuration | Restore Default.
Note
Alternatively, you can follow the manual steps given below to restore the default
settings and values:
1 Stop all Exchange Servers and GroupShield for Exchange services on the host.
2 Copy and replace the McAfeeConfig.XML from
<Install_path>\Config\Default\McAfeeConfig.XML
3 Copy and replace cs_rules_en.XML from
<Install_path>\Config\Default\<0409>\cs_rules_en.XML <for English language>
4 Start GroupShield for Exchange services on the host.
5 Start Exchange Servers on the host.
Uninstalling GroupShield for Exchange
To remove GroupShield for Exchange, we recommend using the Windows Add/Remove
Programs feature, although you can also uninstall GroupShield from the GroupShield for
Exchange setup program.
Removing GroupShield for Exchange
®
1 Using administrative account, log on to the computer where Microsoft Exchange
Server 2003/2007 is installed.
2 Ensure that the GroupShield for Exchange services on the server and clients are
shut down.
3 From the Start menu, click Settings, then Control Panel. The Control Panel window
appears.
4 Double-click Add/Remove Programs. The Add/Remove Program Properties dialog box
appears.
5 Select McAfee GroupShield for Exchange from the list.
6 Click Change. The Application Maintenance dialog is displayed.
7 Select Remove, then click Next.
8 The McAfee GroupShield for Exchange Uninstall dialog box appears, click Next.
45
4
®
™
McAfee GroupShield 7.0 User Guide
Post-Installation Tasks and Maintenance
Uninstalling GroupShield for Exchange
9 Once the software is removed, a message is displayed. Click Finish to close the
dialog box.
46
4
5
Integrating with ePolicy
Orchestrator 3.6
Introduction
This chapter describes how to configure GroupShield for Exchange using McAfee
ePolicy Orchestrator management software version 3.6. To use this guide effectively,
you need to be familiar with ePolicy Orchestrator. See the ePolicy Orchestrator v3.6
Product Guide for more information.
The ePolicy Orchestrator software provides a single point of control for your McAfee
anti-virus products, to manage anti-virus policies, view reports of anti-virus events and
virus activity in an enterprise environment. Using ePolicy Orchestrator, you can
configure GroupShield for Exchange on the target computers across your network; you
do not need to configure them individually.
This chapter includes how to:
Check-in the ePolicy Orchestrator agent to the ePolicy Orchestrator repository.
Check-in the package and NAP files of GroupShield for Exchange to the ePolicy
Orchestrator repository.
Configure ePolicy Orchestrator agent features.
Set and enforce anti-virus policies on the target systems.
Note
This guide does not provide detailed information about installing or using ePolicy
Orchestrator software. See ePolicy Orchestrator v3.6 Product Guide.
Pre-requisites for using ePolicy Orchestrator 3.6
Before you can use the ePolicy Orchestrator software to manage GroupShield for
Exchange, install the ePolicy Orchestrator agent on the computer.
47
®
™
McAfee GroupShield 7.0 User Guide
Integrating with ePolicy Orchestrator 3.6
Introduction
Introducing ePolicy Orchestrator console
®
The Microsoft Management Console (MMC) is your interface to the ePolicy
Orchestrator product and its features. Here you register and configure the GroupShield
for Exchange products that are managed through ePolicy Orchestrator. The console
uses standard MMC features.
The console is divided into two panes. When you first log on to the server, the console
appears with the Console Root highlighted in the left pane.
The console tree is the navigation pane of the console. It shows the servers,
workstation, and appliances that you can administer using ePolicy Orchestrator.
The details pane is to the right of the console. Depending on the item selected in
the console tree, the details pane might have an upper details pane and lower
details pane.
The console’s appearance changes to reflect the items you have selected in the
console tree or in the details pane.
Figure 5-1 ePolicy Orchestrator Console
The Agent is a distributed component of ePolicy Orchestrator that must be installed on
each computer on the network. The agent collects and sends information between the
ePolicy Orchestrator server, repositories and manages GroupShield for Exchange
installations across the network. How you configure the agent and its policy settings
determines how it facilitates communication and updating in your environment.
48
5
®
™
McAfee GroupShield 7.0 User Guide
Integrating with ePolicy Orchestrator 3.6
Installation
Assumptions:
Computer 1: ePolicy Orchestrator version 3.6 is installed and configured on a
supported operating system.
®
Computer 2: Microsoft Exchange Server 2003/2007 is installed and configured on
the server.
Exchange Server is added into the ePolicy Orchestrator’s managed server list under
the “Directory” branch.
McAfee Common Agent version installed on the ePolicy Orchestrator server should
be upgraded from version 3.6.0.444 to 3.6.0.453 or above.
From ePolicy Orchestrator server console, ePolicy Orchestrator agent is installed or
pushed on the Exchange Server.
Before you begin
1 Create a temporary directory on the network or your local drive.
2 To install, do one of the following depending on how you obtained the software:
Note
Insert the CD into the computer’s drive and copy the installation files into the
temporary directory you created.
Download the NAP and package .ZIP archive and extract the file to the temporary
directory.
Anti-Spam and Anti-Phish feature is only available if you install McAfee Anti-Spam for
GroupShield component after installation. To install and deploy Anti-Spam and
Anti-Phish, you need to check-in the required package into the repository and then
deploy. If you have deployed the evaluation package, and want to upgrade to the
licensed version, you must check-in the licensed package and then deploy.
Installation
1 Using an administrative account, log on to the ePolicy Orchestrator server. The
ePolicy Orchestrator console appears.
Creating a new site
2 Right-click Directory | New | Site. The Add Sites dialog box appears.
49
5
®
™
McAfee GroupShield 7.0 User Guide
Integrating with ePolicy Orchestrator 3.6
Installation
3 Click Add. The New Site dialog box appears.
You can create a new site to administer specific group of computers.
Note
4 Type the Name for the new site. If the new site is a domain and you want to include
all the computers under the domain, select Domain and Include computers as child nodes.
5 Click OK to add the new site. The Add Site dialog box appears.
6 Deselect Send agent package, then click OK to add the new site <Site name> to the left
pane.
Adding a computer to the site
7 Right-click Directory | <Site name> | New | Computer. The Add Computers dialog box
appears.
8 Click Browse to select the computer from the network, then click OK. The Add
Computers dialog box appears.
9 Select Send agent package, enter the required Credentials for Agent Push Installation, and
click OK to send the agent to the new computer added.
Note
If you deselect Suppress agent installation GUI, the agent installation user interface will
not appear on the client computer during installation.
To enable ePolicy Orchestrator agent icon in the system tray of the client computer:
Tip
a Click ePO Agent link on the right pane.
b Click McAfee Default link for ePolicy Orchestrator agent, the ePolicy Orchestrator
Agent page appears.
c Select Show Agent tray icon.
d Click Apply All.
Sending an Agent Wakeup call
10 From the ePolicy Orchestrator console, right-click the Site or the Exchange Server
on which you intend to install GroupShield for Exchange.
11 Click Agent Wakeup Call. The Agent Wakeup Call dialog box appears.
12 In the Agent Wakeup Call dialog box, change the Agent randomization to 0 (zero) minutes.
13 Select Get full product properties and click OK to complete the installation.
50
5
®
™
McAfee GroupShield 7.0 User Guide
Integrating with ePolicy Orchestrator 3.6
Installation
Adding GroupShield Installation Package files to the ePolicy repository
14 Click Repository. The Repository page appears.
15 Click Check in Package. The Check in package wizard appears.
16 Click Next. The select package type wizard appears.
17 Select Products or updates, then click Next. The Check in package - Browse dialog box
appears.
18 Click Browse and navigate to the temporary folder where you have extracted the
installation package.
19 Select the PkgCatalog.z file, click Open and then click Next. The Check in package wizard
displays Product Name, Version, Package type and Language.
20 Click Finish to check-in the package file.
21 Once the check-in process completes, click Close.
Adding GroupShield software NAP file to the repository
1 Click Repository. The Repository page appears.
2 Click Check-in NAP. The Software Repository Configuration Wizard appears.
3 Select Add new software to be managed and click Next. The Select a software package dialog
box appears.
4 Select the product NAP file from the temporary folder and click Open.
The NAP file is extracted and copied to the ePolicy Orchestrator repository. A
message dialog box appears upon successful completion.
5 Click OK.
Adding GroupShield Reports NAP to the repository
1 Click Repository. The Repository page appears.
2 Click Check in NAP. The Software Repository Configuration Wizard appears.
3 Select Add new reports and click Next. The Select a software package dialog box appears.
4 Select the report NAP file from the temporary folder and click Open.
The report NAP file is extracted and copied to the ePolicy Orchestrator repository.
A message dialog box appears upon successful completion.
5 Click OK.
51
5
®
™
McAfee GroupShield 7.0 User Guide
Integrating with ePolicy Orchestrator 3.6
Installation
Installing GroupShield on the client computer
1 From the ePolicy Orchestrator console, select the Site or the Exchange Server on which
you intend to install GroupShield, then click the Tasks tab. The deployment task page
appears.
2 Double-click the Deployment task. The ePolicy Orchestrator Scheduler dialog box appears.
3 Deselect Inherit under the Tasks tab and select Enable (scheduled task runs at specified
time).
4 Click Settings under the Tasks tab. The Task Settings page appears.
5 Deselect Inherit. From the listed products, select Install from the list item given
against GroupShield for Exchange.
6 Deselect Run this task at every policy enforcement interval.
7 Click OK.
8 Click the Schedule tab. Deselect Inherit.
9 From the Schedule Task list item, select Run Immediately and click Apply.
10 Click OK to complete the deployment task scheduling.
11 Send an agent wakeup call.
For information on sending an agent wakeup call, refer to Sending an Agent Wakeup
call on page 50.
Note
Upgrading from GroupShield for Exchange version 6.0.x NAP
settings
Assumptions:
ePolicy Orchestrator version 3.6 is installed on the server.
NAP files for GroupShield for Exchange version 6.0.2 or version 6.0.3 is
checked-in.
NAP file for GroupShield for Exchange version 7.0 is checked-in.
You have not created any new policies in the GroupShield for Exchange version
7.0 NAP settings.
52
5
®
™
McAfee GroupShield 7.0 User Guide
Integrating with ePolicy Orchestrator 3.6
Configuring GroupShield Policies
Importing the GroupShield for Exchange version 6.x NAP settings
1 Using an administrative account, log on to the computer containing ePolicy
Orchestrator Server.
2 Create a temporary directory on the network or your local drive.
3 To install, do one of the following depending on how you obtained the software:
Insert the CD into the computer’s drive and copy the installation files into the
temporary directory you created.
Download the ePOGSENPUpgrade.ZIP archive and extract the file to the temporary
directory.
4 Using Windows Explorer, navigate to the folder where you copied the installation
files and double-click EPOGSEUPGRADE.EXE.
Note
This tool exports only the configurations saved under the GroupShield for Exchange
version 6.0.2 or version 6.0.3 NAP file to GroupShield for Exchange 7.0 NAP. You can
continue to manage all the versions of GroupShield (6.0.x and 7.0) from the ePolicy
Orchestrator server.
5 Upon the successful upgrade, the installer prompts a message EPOUpgrade from
GSE6.0 to GSE7.0 is completed Successfully…. Please follow the on-screen instructions,
if upgrading fails.
Errors or Exceptions during the upgrade are logged in the file EPODEBUGTRACE.TXT.
Note
Configuring GroupShield Policies
This section explains how you enforce policies from ePolicy Orchestrator. There are
two main steps:
1 Within ePolicy Orchestrator, you select the names of the target computer or the site
on the network and the policies that will apply to those selected computers.
2 You can enforce all the policies to the Exchange Server using the ePolicy
Orchestrator agent. Each computer then observes your new policy, ignoring any
polices that were previously configured at GroupShield for Exchange.
53
5
®
™
McAfee GroupShield 7.0 User Guide
Integrating with ePolicy Orchestrator 3.6
Configuring GroupShield Policies
Managing Policies
The ePolicy Orchestrator console allows you to manage policies across groups of
computers or on a single computer. These policies override configurations set on
individual computers. For information regarding policies and how they are enforced,
see the ePolicy Orchestrator Product Guide.
Before configuring any policies, select the group of computers for which you want to
modify GroupShield policies. You can modify GroupShield policies from the pages and
tabs that are available in the details pane of the ePolicy Orchestrator console. These
pages are identical to those you can access directly from the GroupShield user
interface.
After you have modified the appropriate polices and saved the changes for the
intended computer or group of computers, you are ready to deploy the new settings
via the ePolicy Orchestrator agent.
Modifying policies for GroupShield in ePolicy Orchestrator
1 Using an administrative account, log on to the computer containing ePolicy
Orchestrator Server.
2 In the console tree under ePolicy Orchestrator | <SERVER> | Directory, select the site,
group, single computer or the entire directory to which these policies are to apply.
3 The Policies, Properties, and Tasks tabs appear in the details pane.
4 In the Policies tab, under GroupShield for Exchange, click McAfee Default for a Category to
view the default policy settings. The Policy Settings dialog box appears.
5 Click Duplicate to create and save a copy of the policy settings. The Duplicate Policy
dialog box appears.
6 Choose to Duplicate the curent policy or Create a policy in which all tabs inherit as required.
7 Enter a New policy name.
8 Select or deselect Assign this new policy to the current node (breaks inheritance) as desired,
then click OK.
Creating a New policy for a Category
1 Click Edit for a Category in the GroupShield for Exchange entry in the ePolicy Orchestrator
details pane.
54
5
®
™
McAfee GroupShield 7.0 User Guide
Integrating with ePolicy Orchestrator 3.6
Scheduling tasks
2 Click the Policy Name drop-down list and select New Policy. The Create a new policy dialog
box appears.
Note
You cannot configure the McAfee Default policy settings for a selected Category. To
configure a selected category, you must create a new policy or a duplicate copy of the
policy for the selected Category.
Table 5-1 Policy Options
New Policy name
Type the new policy name for the Category you want
to create.
Duplicate the following policy
Creates a duplicate policy for the selected Category.
Select the policy from the drop-down list.
Create a policy in which all tabs inherit Creates a new policy in which all the policy tab
settings are inherited.
3 Configure the required options from the original policy, then click OK to create the
new policy.
4 Click Apply to save these settings.
Editing an existing policy (Non-default)
1 Click for the selected Category in the GroupShield for Exchange entry in ePolicy
Orchestrator details pane.
2 Configured the required options, then click Apply to save the policy.
Note
To stop a policy enforcement, click Edit for Enforce Policies in the GroupShield for
Exchange entry in ePolicy Orchestrator and select (No) from the Policy Name drop-down.
Scheduling tasks
When GroupShield scans for viruses, spam or phish, it uses information in the DAT and
Rule files to find them. Many new threats are discovered daily and McAfee regularly
creates new DAT files to provide protection from these viruses. To ensure the best
protection, you can use ePolicy Orchestrator to inform where to access the latest
update files and create schedules for replacing earlier DAT and Rule files and running
on-demand scans.
Using ePolicy Orchestrator 3.6, you can create these types of scheduled tasks for the
GroupShield for Exchange software:
AutoUpdate
55
5
®
™
McAfee GroupShield 7.0 User Guide
Integrating with ePolicy Orchestrator 3.6
Scheduling tasks
On-Demand scan
Scheduled tasks for a computer can be set to execute based on the local time or GMT
(Greenwich Mean Time). However, ePolicy Orchestrator cannot monitor the progress
of a scheduled task. So we recommend you to view the log file in the server periodically
to check if the scheduled task was executed successfully.
AutoUpdate task
GroupShield 7.0 software can only provide full protection if you keep it up-to-date with
the latest anti-virus definitions (DATs), anti-spam rules, spam engine, and
virus-scanning engine. We recommend that you update DAT files daily and regularly
check the McAfee AVERT (Anti-Virus Emergency Response Team) website for new
DAT files. If you have multiple servers in the current domain, you can use one server
to download the latest DAT files, then configure the others to copy the files from that
server. Your servers can download files for a number of operating systems, regardless
of the operating systems that are in use.
Creating an AutoUpdate task
1 Using an administrative account, log on to the computer containing ePolicy
Orchestrator Server.
2 In the console tree under ePolicy Orchestrator, right-click Directory or the site, group or
host, then select Schedule Task.
Alternatively, you click the Tasks tab in the upper details pane. Right-click in the pane,
and select Schedule Tasks
The Schedule Task dialog box appears.
3 Type in a New Task Name.
4 In the Task Type drop-down list, select GroupShield for Exchange 7.0 AutoUpdate Task.
5 Click OK. The created task is listed in the Tasks tab.
6 Send an agent wakeup call.
Note
For information on sending an agent wakeup call, refer to Sending an Agent Wakeup
call on page 50.
Configuring an AutoUpdate task
After you have created a new AutoUpdate task, you can configure the task as required.
1 On the Tasks tab in the upper details pane, right-click the task, then select Edit Task.
The ePolicy Orchestrator Scheduler dialog box appears.
56
5
®
™
McAfee GroupShield 7.0 User Guide
Integrating with ePolicy Orchestrator 3.6
Scheduling tasks
2 Click Settings, edit the required options in both the Task and Schedule tabs. The Update
Task page appears with message No additional settings are required for this task.
Note
Note
AutoUpdate is configured to update the product with latest DATs, spam rules, spam and
anti-virus engines from McAfee http/ftp website.
You can also schedule the autoupdate task from the ePolicy Orchestrator Agent Update
option in the Schedule Task dialog box.
On-Demand scan task
GroupShield for Exchange can perform on-demand scanning of your mails, so that all
mails on your computer are checked for viruses, Trojan horses and other malicious
code. You can create any number of on-demand scan schedules. The scan schedules
can be configured to run at set intervals, and can be run at any time by the user. You
can also disable schedules that you do not want to run automatically.
Creating a new task
1 Using an administrative account, log on to the computer containing ePolicy
Orchestrator Server.
2 In the console tree under ePolicy Orchestrator, right-click Directory or the site, group or
host, then select Schedule Task.
Alternatively, you click the Tasks tab in the upper details pane. Right-click in the pane,
and select Schedule Tasks
The Schedule Task dialog box appears.
3 Type a New Task Name.
4 In the Task Type drop-down list, select GroupShield for Exchange 7.0 On-Demand Task.
5 Click OK. The created task is listed in the Tasks tab.
6 Send an agent wakeup call.
Note
For information on sending an agent wakeup call, refer to Sending an Agent Wakeup
call on page 50.
Editing a task
1 Right-click the task and select the Edit Task option. The ePolicy Orchestrator Scheduler
appears.
2 Click Settings. The On-Demand Scan Configuration page appears.
57
5
®
™
McAfee GroupShield 7.0 User Guide
Integrating with ePolicy Orchestrator 3.6
Scheduling tasks
3 Deselect Inherit.
4 Select the desired on-demand policy from the list:
5 Click OK.
Scheduling settings
6 Click the Schedule tab.
Table 5-2 Schedule Options
Schedule Task
Start Time
UTC Time
Local Time
Select one of the available task type from the drop-down list.
Daily
Weekly
Monthly
Once
At System Startup
At Logon
When Idle
Run Immediately
Run on Dialup
Specify the start time for the scheduled task. Select the local
time option to run the task using the scheduled interval at the
client computer system time. This is useful for scheduling
processor-intensive tasks (such as on-demand scans) to run
during non-business hours.
Selecting the UTC Time option uses the Universal Time
Conversion (also known as Greenwich Mean Time or GMT) to
run the task. This option causes the task to run at the same
time for all your clients regardless of the local system time on
the client computers.
Enable randomization
The task does not run at exactly the specified start time. Instead,
it starts after a random specified time. Specify the hours and
minutes to enable randomization.
Run missed task
Ensures that the task is started if the computer is shutdown or
otherwise not available at the scheduled start time. Selecting this
option ensures that the task is run, the next time the computer
becomes available.
Delay missed task by
Click Advanced on the Advanced Schedule Options dialog box.
When running missed tasks, selecting this option sets a delay
after the computer becomes available before the missed tasks
runs.
Start Date / End Date
Click Advanced on the Advanced Schedule Options dialog box.
Type the start and end dates if you only want the task to run for a
specified period (such as for few days or weeks).
58
5
®
™
McAfee GroupShield 7.0 User Guide
Integrating with ePolicy Orchestrator 3.6
Reports
Table 5-2 Schedule Options
Repeat Task
Click Advanced on the Advanced Scheduled Options dialog box.
Use this option to run a task multiple times in the same day. To
do this, select Repeat Task and then set the repeat interval
appropriately.
Typically, you might do this to run a client update task several
times a day, especially if there are a lot of new viruses. You can
also schedule the task to repeat during other intervals, such as
weekly or monthly.
Schedule Task Daily
Specify the interval to execute the schedule task; this could be
an interval of 1 or several days. If you select 1, the schedule task
is executed every other day.
Reports
From the ePolicy Orchestrator console, you can view reports which show how the
GroupShield for Exchange installed on client computers is handling infections. You can
check the configurations that have been set up on the hosts. You can save the
selections you make in the Report Data Filter dialog box for future use.
ePolicy Orchestrator reports allow you to:
Set a directory filter to gather only the information that you want to view. When setting
this filter, you can choose which part of the ePolicy Orchestrator console tree is
included in the report.
Set a data filter by using logical operators, to define precise filters on the data
returned by the report.
Generate graphical reports from the information in the database and filter the
reports as desired. You can print the reports and export them for use in other
software.
Running a report
1 Log on to the ePolicy Orchestrator database server under the Reporting section.
2 Select the desired GroupShield for Exchange 7.0 report under Reporting | ePO Databases |
<database server> | Reports | <Product name> in the console tree. The Set Report Data filter
dialog box appears.
If Yes is selected, the Report Data filter dialog box appears for that category.
Select the report (Agent Versions) you want to generate, then set the data filter
in the Report Data Filter dialog box. Click OK.
59
5
®
™
McAfee GroupShield 7.0 User Guide
Integrating with ePolicy Orchestrator 3.6
Uninstallation
If No is selected, the complete report is shown.
Note
Tabs may vary based on which report is selected. See ePolicy Orchestrator Product
Guide v 3.6 for more details on all the available settings tabs.
Configuring reports
There are several ways in which you can control what data appears on reports. You can
define the version number of virus definition files, scanning engines, and supported
products that need to be installed on the client computers for them to be considered
compliant based on your company’s anti-virus and security program. You can also limit
the results of reports by selected product criteria. (For example, computer name,
operating system, virus name or action taken on infected files.) Once the results of a
report appear, you can then perform a number of tasks on the data. You can view
details on required report data. (For example, to determine which client computers do
not have a compliant version of GroupShield). Some reports even provide links to other
reports called sub-reports that provide data related to the current report. You can also
print reports or export report data into a variety of file formats (including HTML and
®
Microsoft Excel).
Note
See the ePolicy Orchestrator v 3.6 Product Guide for more details on configuring
reports.
Uninstallation
Removing GroupShield for Exchange from Client Computer
Using the ePolicy Orchestrator server, you can uninstall the GroupShield software
installed on a client computer.
Removing the GroupShield software from the client computer
1 From the ePolicy Orchestrator console, select the Site or the Exchange Server on which
you intend to remove GroupShield and click the Tasks tab. The Deployment Task page
appears.
2 Double-click the Deployment task. The ePolicy Orchestrator Scheduler dialog box appears.
3 Deselect Inherit under the Tasks tab and select Enable (scheduled task runs at specified
time).
4 Click Settings under the Tasks tab. The Task Settings page appears.
60
5
®
™
McAfee GroupShield 7.0 User Guide
Integrating with ePolicy Orchestrator 3.6
Uninstallation
5 Deselect Inherit. From the listed products, select Remove from the list item given
against GroupShield for Exchange.
6 Deselect Run this task at every policy enforcement interval.
7 Click OK.
8 Click Schedule tab. Deselect Inherit.
9 From the Schedule Task list item, select Run Immediately and click Apply.
10 Send an agent wakeup call.
Note
For information on sending an agent wakeup call, refer to Sending an Agent Wakeup
call on page 50.
Removing GroupShield for Exchange from ePolicy
Orchestrator
Removing the deployment package from ePolicy Orchestrator server
1 Using an administrative account, log on to the computer containing ePolicy
Orchestrator Server.
2 Select Repository | Software repositories | Master in the console tree.
3 Select GroupShield for Exchange and click Delete. A confirmation dialog box appears.
Click OK to remove GroupShield for Exchange from the ePolicy Orchestrator server.
Removing the product NAP file
1 Using an administrative account, log on to the computer containing ePolicy
Orchestrator Server.
2 Select Repository | Managed Products | Windows | GroupShield for Exchange in the console
tree.
3 Right-click 7.0 and select Remove to uninstall GroupShield NAP from the ePolicy
Orchestrator server.
Removing the report NAP
1 Using an administrative account, log on to the computer containing ePolicy
Orchestrator Server.
2 Select Reporting | Repot Repository | groupshield7.0 in the console tree.
61
5
®
™
McAfee GroupShield 7.0 User Guide
Integrating with ePolicy Orchestrator 3.6
Uninstallation
3 Right-click groupshield7.0 and select Remove to uninstall the report file from the
ePolicy Orchestrator server.
62
5
6
Integrating with ePolicy
Orchestrator 4.0
Introduction
This chapter describes how to configure GroupShield for Exchange using McAfee
ePolicy Orchestrator management software version 4.0. To use this chapter
effectively, you need to be familiar with ePolicy Orchestrator 4.0.
ePolicy Orchestrator 4.0 provides a scalable platform for centralized policy
management and enforcement on your security products and systems on which they
reside. It also provides comprehensive reporting and product deployment capabilities,
all through a single point of control.
Note
This guide does not provide detailed information about installing or using ePolicy
Orchestrator software. See ePolicy Orchestrator v4.0 Product Guide.
Pre-requisites for installing ePolicy Orchestrator 4.0
®
For Microsoft Windows 2000 platform, install these files on your system:
dotnetfx.exe
msxml6-KB925673-enu-x86.exe
WindowsInstaller-KB893803-v2-x86.exe
®
For Microsoft Windows 2003 platform, install these files on your system:
dotnetfx.exe
msxml6-KB925673-enu-x86.exe
Before you begin
1 Create a temporary directory on the network or your local drive.
2 To install, do one of the following depending on how you obtained the software:
63
®
™
McAfee GroupShield 7.0 User Guide
Integrating with ePolicy Orchestrator 4.0
Introduction
Insert the CD into the computer’s drive and copy the installation .ZIP files into the
temporary directory you created.
Download the ZIP files to the temporary directory
ePolicy Orchestrator agent
ePolicy Orchestrator agent is a distributed component of ePolicy Orchestrator that
must be installed on each computer on the network. The agent collects and sends
information between the ePolicy Orchestrator server, repositories and manages
GroupShield for Exchange installations across the network.
Pre-requisites for using ePolicy Orchestrator 4.0
Before you can use the ePolicy Orchestrator software to manage GroupShield for
Exchange, install the ePolicy Orchestrator agent on the computer.
Adding systems and deploying agents to the ePolicy Orchestrator
server
1 Using an administrative account, log on to the ePolicy Orchestrator server.
2 Click New Systems. The New Systems page appears.
3 In How to add systems, choose Deploy agents and add systems to the current group (My
Organization).
Note
To add systems without deploying agents, choose the Add systems to the current group
(My Organization), but do not deploy agents option. To deploy agent at a later time,
perform steps given under the topic Deploying an ePolicy Orchestrator agent on
page 65.
4 In Systems to add, click Browse to locate the system(s) you wish to add. The Browse for
Systems page appears.
5 Select a Domain from the drop-down, which has the system(s) you want to add.
6 Under Systems in Selected Domain, select the desired system(s).
To select all the systems in the chosen domain, click Select all in this page.
Note
7 Click OK to return to the New Systems page.
8 Choose an appropriate Agent version from the drop-down and specify the Installation
options and Installation path as required.
64
6
®
™
McAfee GroupShield 7.0 User Guide
Integrating with ePolicy Orchestrator 4.0
Installation
9 Enter the credentials (Domain, User, and Password) for agent installation, then click OK.
Deploying an ePolicy Orchestrator agent
1 Using an administrative account, log on to the ePolicy Orchestrator server.
2 Click Systems.
3 Choose a group in the System Tree.
4 Select the desired Computer Name(s) of that group.
5 Click Deploy Agents. The Deploy McAfee Security Agent page appears showing the Target
systems.
6 Choose an Agent version to be installed on the selected systems.
Note
Agent versions available in the drop-down, depend on which agent, the installation
packages are checked-in.
7 Choose the desired Installation options and an Installation path where you want to install
the agent.
8 In Credentials for agent installation, specify Domain, User, Password of the user account
with which you want to install the agent on selected systems and click OK.
Installation
Checking-in the McAfee GroupShield for Microsoft Exchange
Server 2003/2007 package to the ePolicy Orchestrator server
You can check-in the GroupShield for Exchange software package from the Master
Repository page. Master Repository is the central location for all McAfee updates
residing on the ePolicy Orchestrator server. It retrieves user-specified updates from
McAfee site or user-defined source sites.
1 Using an administrative account, log on to the ePolicy Orchestrator server.
2 Click Software | Check In Package. The Package page appears.
3 Choose the Package type as Product or Update (.ZIP) and browse in File path to locate
GroupShield7_ePO4.zip saved in a temporary folder.
4 Click Next. The Package Options page appears with the Package info.
65
6
®
™
McAfee GroupShield 7.0 User Guide
Integrating with ePolicy Orchestrator 4.0
Installation
5 Choose the Branch as Current.
6 Click Save.
Installing GroupShield for Exchange on the client computer
1 Using an administrative account, log on to the ePolicy Orchestrator server.
2 Click Systems | System Tree and choose a desired group.
3 From the Client Tasks tab, click Create Task.
4 Type a Name, Notes for the task and choose the Type as Product Deployment (McAfee
Agent 4.0.0).
5 Click Next. The Client Task Builder page appears.
6 Under Description, select the Target Platforms as Windows to install the package.
7 Choose an appropriate Language from the drop-down.
8 In Products to deploy, select GroupShield for Exchange 7.0.0 from the drop-down and
choose the Action as Install.
9 In Options, select or deselect these options as required:
Run this task at every policy enforcement interval (Windows only)
Run update after successful product deployment (4.0 or above)
10 Click Next to schedule this task as desired.
11 Click Next to view a summary of the task, then click Save.
12 In the Systems tab, select a group and a computer where you want to install
GroupShield 7.0.
You can select all the computers in a group to install GroupShield 7.0 by clicking Select
Note
all in the page.
13 Send an agent wake-up call.
Note
For instructions on sending an agent wake-up call, please refer to Sending an Agent
Wakeup Call on page 70.
66
6
®
™
McAfee GroupShield 7.0 User Guide
Integrating with ePolicy Orchestrator 4.0
Installation
Extensions
You can install, remove and manage the GroupShield for Exchange extension files.
Extension files are in ZIP file format and must be installed before that product or
component can be managed by ePolicy Orchestrator 4.0. The two extension files for
GroupShield for Exchange are:
GROUPSHD7000.ZIP
GSE7REPORTS.ZIP
To install the GroupShield for Exchange policy extension files
1 Using an administrative account, log on to the ePolicy Orchestrator server.
2 Click Configuration | Extensions | Install Extension. The Install Extension dialog box appears.
3 Click Browse, select the extension file GROUPSHD7000.ZIP and click OK.
To install the GroupShield for Exchange report extension files
1 Using an administrative account, log on to the ePolicy Orchestrator server.
2 Click Configuration | Extensions | Install Extension. The Install Extension dialog box appears.
3 Click Browse, select the extension file GSE7REPORTS.ZIP and click OK.
67
6
®
™
McAfee GroupShield 7.0 User Guide
Integrating with ePolicy Orchestrator 4.0
Introducing ePolicy Orchestrator 4.0 Dashboard
Introducing ePolicy Orchestrator 4.0 Dashboard
Dashboards are a collection of pre-configured and/or user-selected monitors that
provide current data about your detections.
The ePolicy Orchestrator dashboard consists of a collection of named dashboard
monitors. Depending on the permissions assigned to your user account, you can create
a new dashboard, manage existing dashboards, select active dashboards, and edit
dashboard preferences
Creating a new dashboard
1 Using an administrative account, log on to the ePolicy Orchestrator server.
2 Click Dashboards | Options | New DashBoard. The New DashBoard page appears.
3 Enter a Dashboard Name and choose a desired Dashboard Size from the drop-down.
4 Click New Monitor.
5 Choose the Category as Queries and a desired GroupShield for Exchange related query
from the Monitor drop-down menu.
6 Click OK.
7 Repeat step 4 and 5 for the remaining monitors.
8 Click Save. The Make Active dialog box appears.
9 Click Yes to add this new dashboard to your active set.
Table 6-1 Dashboard Options
Options
Description
Dashboard Name
Specifies the name of the dashboard you select.
Dashboard Size
Specifies the dimensions (by number of dashboard
monitors) of the selected dashboard.
Created by
Specifies the user name who created the selected
dashboard.
Last modified by
Specifies the user name, date and time stamp of the last
modification made to the selected dashboard.
Edit
Takes you to the Edit Dashboard page where you can
make changes to the dashboard’s name and size.
Delete
Deletes the selected dashboard.
Duplicate
Creates and saves a copy of the selected dashboard. This
allows you to create and edit similar dashboards without
having to create one from scratch.
68
6
®
™
McAfee GroupShield 7.0 User Guide
Integrating with ePolicy Orchestrator 4.0
Reporting
Table 6-1 Dashboard Options
Options
Description
Make Public
Adds the selected private dashboard to the Public
Dashboards list, making it available to all users with
permissions, to use public dashboards.
Make Active
Adds the selected dashboard to the Dashboards tab for
easy access.
Reporting
Reports are pre-defined queries which queries the ePolicy Orchestrator database and
generates a graphical output.
ePolicy Orchestrator 4.0 has its own querying and reporting capabilities. McAfee
includes a set of default queries on the left pane. However, you can create a new
query, edit, and manage all the queries.
Running a query
1 Using an administrative account, log on to the ePolicy Orchestrator server.
2 Click Reporting. A list of queries appears on the left pane.
3 Choose a GroupShield for Exchange related query from the list.
4 Click Run. The graphical output is displayed.
Creating a new query
If the pre-defined queries on the left side does not serve your purpose, ePolicy
Orchestrator enables you to create your own queries.
1 Using an administrative account, log on to the ePolicy Orchestrator server.
2 Click Reporting | New Query. The Result Type page appears.
3 On the left pane, choose a desired data type that the query should retrieve and click
Next. The Chart page appears.
4 Choose and accordingly configure a display chart/table and click Next.
5 The Columns page appears allowing you to select columns for the chart/table.
6 Select a columns from the Available Columns pane and click Next.
69
6
®
™
McAfee GroupShield 7.0 User Guide
Integrating with ePolicy Orchestrator 4.0
Systems
7 The Filter page appears. Specify criteria by selecting properties and operators to limit
the data retrieved by the query.
8 Click Run, then Save. The Save Query page appears.
9 Enter a Name and Notes (if required) for the query, then click Save.
Table 6-2 Reporting Options
Options
Description
Delete
Deletes a selected query.
Edit
Launches the Query Builder page loaded with the details of the selected
query, where you can edit any details of the selected query.
Make Public
Moves the selected query from My Queries list to the Public Queries list,
making it available to all users with permissions.
Duplicate
Creates and saves a copy of the selected query.
Export
Exports the selected query to an XML file that can be imported to any
ePolicy Orchestrator server.
Run
Runs the selected query and displays its result.
More Actions |
View Query SQL
Takes you to the View Query SQL page, where you can view and copy the
SQL script of the selected query.
Import Query
Launches a dialog box that allows you to browse to an exported query
file. When you import a query file, the server adds it to My Queries list.
Systems
All the systems in the network are managed in the Systems tab. The System Tree contains
all systems that are managed by the ePolicy Orchestrator. It is the primary interface for
managing policies and tasks on these systems. You can organize or sort these systems
into logical groups in the System Tree.
My Organization is the root of the System Tree. It includes a Lost&Found group that stores
systems whose locations cannot be determined by the server. Depending on the
methods you use to create and maintain the System Tree segments (systems), the
server uses different characteristics to place the systems in the System Tree.
Note
For information on adding a new system, refer to the ePolicy Orchestrator 4.0 Product
Guide.
Sending an Agent Wakeup Call
1 Using an administrative account, log on to the ePolicy Orchestrator server.
2 Click Systems.
70
6
®
™
McAfee GroupShield 7.0 User Guide
Integrating with ePolicy Orchestrator 4.0
Systems
3 Choose a group in the System Tree.
4 Select the desired Computer Name(s) of that group.
5 Click More Actions | Wake Up Agent. The Wake Up Agents page appears.
6 Choose a Wake-up call type and a Randomization period (0-60 minutes) during which the
system(s) respond to the wakeup call sent by the ePolicy Orchestrator server.
7 Select Get full product properties for the agent(s) to send complete properties instead
of sending only those that have changed since the last agent-to-server
communication.
8 Click OK.
Navigate to Server Task Log to see the status of the agent wakeup call.
Note
Policies
You can create, edit, delete or assign a policy to a specific group/system in the System
Tree.
Creating a new policy
1 Using an administrative account, log on to the ePolicy Orchestrator server.
2 Click Systems | System Tree and choose a desired group.
3 From Policies, select the desired Product from the drop-down. A list of policies
managed by the chosen point product appears in the lower pane.
4 Locate a desired policy category, then click Edit Assignment. The Policy assignment for:
My Organization| Lost& Found | (chosen group) page appears.
5 Click Create new policy. The Create a new policy dialog box appears.
6 Choose McAfee Default or My Default as desired.
The McAfee Default policies are read-only and cannot be edited, renamed, or deleted.
Note
7 Enter a New policy name.
8 Click OK, then Save.
71
6
®
™
McAfee GroupShield 7.0 User Guide
Integrating with ePolicy Orchestrator 4.0
Systems
Enforcing Policies
You can enforce a policy to multiple managed systems within a group.
1 Using an administrative account, log on to the ePolicy Orchestrator server.
2 Click Systems | System Tree and choose a desired group.
3 Select the desired system(s).
4 Click Assign Policy. The Assigning Policy for <n> system page appears.
5 Select the desired Product, Category, and Policy from the drop-down, then click Save.
6 Select the systems again.
7 Send an agent wakeup call.
Note
Note
For instructions on sending an agent wake-up call, please refer to Sending an Agent
Wakeup Call on page 70.
You can create and enforce GroupShield policies and view reports only after adding the
GroupShield extension files.
Client tasks
ePolicy Orchestrator allows you to create, schedule and maintain client tasks that run
on the managed systems. You can define client tasks for the entire System Tree, a
specific group, or an individual system.
Using ePolicy Orchestrator 4.0, you can create these types of scheduled tasks for the
GroupShield for Exchange software:
AutoUpdate
OnDemand scan
The client tasks available in the drop-down depend on the extension files installed.
Note
AutoUpdate task
Your software can only provide full protection if you keep it up-to-date with the latest
anti-virus definitions (DATs), anti-spam rules, spam engine and virus-scanning engine.
We recommend that you update DAT files daily and regularly check the McAfee AVERT
(Anti-Virus Emergency Response Team) website for new DAT files.
72
6
®
™
McAfee GroupShield 7.0 User Guide
Integrating with ePolicy Orchestrator 4.0
Systems
Creating a new autoupdate task
1 Using an administrative account, log on to the ePolicy Orchestrator server.
2 Click Systems | System Tree and choose a desired group.
3 From the Client Tasks, select the desired group in the System Tree for which you want
to create the autoupdate task.
4 Click Create Task. The Client Task Builder page appears.
5 Under Description, type a Name and Notes (if required) for the autoupdate task.
6 Choose AutoUpdate Task (GroupShield for Exchange 7.0.0) as the Type of the task and click
Next.
7 Schedule the task as desired and click Next to view the Summary of the autoupdate
task, which includes the Name, Notes, Product, Type of the task, and the Schedule
information.
8 Click Save.
9 Send an agent wake-up call.
Note
Note
For instructions on sending an agent wake-up call, please refer to Sending an Agent
Wakeup Call on page 70.
Click Edit to change the description/schedule of an autoupdate task or Delete to remove
it.
On-Demand scan task
You can create any number of on-demand scan schedules. The scan schedules can be
configured to run at set intervals or can be run at any time by the user.
Creating an on-demand scan task
1 Using an administrative account, log on to the ePolicy Orchestrator server.
2 Click Systems | System Tree | Client Tasks.
3 Select the desired group in the System Tree for which you want to create the
on-demand scan task.
4 Click Create Task. The Client Task Builder page appears.
5 Under Description, type a Name and Notes (if required) for the on-demand scan task.
73
6
®
™
McAfee GroupShield 7.0 User Guide
Integrating with ePolicy Orchestrator 4.0
Uninstallation
6 Choose On Demand Scan (GroupShield for Exchange 7.0.0) as the Type of the task and click
Next.
7 Under Configuration, choose a policy from the drop-down.
8 Click Next and schedule the task as desired.
9 Click Next to view the Summary of the on-demand scan task, which includes the Name,
Notes, Product, Type of the task, and the Schedule information.
10 Click Save.
11 Send an agent wakeup call.
For instructions on sending an agent wake-up call, please refer to Sending an Agent
Wakeup Call on page 70.
Note
Click Edit to change the description/schedule of an on-demand scan task or Delete to
remove it.
Note
Uninstallation
Removing GroupShield for Exchange from the client
computer
1 Using an administrative account, log on to the ePolicy Orchestrator server.
2 Click Systems | System Tree and choose a desired group.
3 From the Client Tasks tab, click Create Task.
4 Type a Name, Notes for the task and choose the Type as Product Deployment (McAfee
Agent 4.0.0).
5 Click Next. The Client Task Builder page appears.
6 Under Description, select the Target Platforms as Windows to uninstall the package.
7 Choose an appropriate Language from the drop-down.
8 In Products to deploy, select GroupShield for Exchange 7.0.0 from the drop-down and
choose the Action as Remove.
9 In Options, select or deselect these options as required:
Run this task at every policy enforcement interval (Windows only)
74
6
®
™
McAfee GroupShield 7.0 User Guide
Integrating with ePolicy Orchestrator 4.0
Uninstallation
Run update after successful product deployment (4.0 or above)
10 Click Next to schedule this task as desired.
11 Click Next to view a summary of the task, then click Save.
12 In the Systems tab, select a group and a computer where you want to install
GroupShield 7.0.
You can select all the computers in a group to install GroupShield 7.0 by clicking Select
Note
all in the page.
13 Send an agent wake-up call.
Note
For instructions on sending an agent wake-up call, please refer to Sending an Agent
Wakeup Call on page 70.
Removing GroupShield for Exchange from the ePolicy
Orchestrator server
Removing the deployment package from ePolicy Orchestrator
1 Using an administrative account, log on to the ePolicy Orchestrator server.
2 Click Software | Master Repository.
3 Click the Delete link of the GroupShield for Exchange package.
Removing the product extension
1 Using an administrative account, log on to the ePolicy Orchestrator server.
2 Click Configuration.
3 Choose the extension file GroupShield for Exchange, click Remove.
4 Select the option Force removal, bypassing any checks or errors.
5 Click OK.
Removing the report extension
1 Using an administrative account, log on to the ePolicy Orchestrator server.
2 Click Configuration.
3 Choose the extension file GroupShield for Exchange Reports, click Remove.
75
6
®
™
McAfee GroupShield 7.0 User Guide
Integrating with ePolicy Orchestrator 4.0
Uninstallation
4 Select the option Force removal, bypassing any checks or errors.
5 Click OK.
76
6
7
Integrating with ProtectionPilot
1.5
Introduction
ProtectionPilot software is a security management system that simplifies anti-virus
management tasks for network administrators who manage up to 500 computers.
Management consists of deploying (sending and installing) anti-virus products,
configuring product settings, and keeping those products up-to-date. Here you register
and configure GroupShield for Exchange to be managed through ProtectionPilot. When
you first log on to the server, the console displays the current level of protection. This
guide describes how to configure GroupShield for Exchange using McAfee
ProtectionPilot software version 1.5. To use this guide effectively, you need to be
familiar with ProtectionPilot.
Note
This guide does not provide detailed information about installing or using ProtectionPilot
software. See ProtectionPilot v1.5 Product Guide.
Pre-requisites for using ProtectionPilot
Before you can use the ProtectionPilot software to manage GroupShield for Exchange:
Check-in the appropriate package and NAP file for GroupShield for Exchange to the
ProtectionPilot repository.
Install the ProtectionPilot agent on your computer.
Introducing ProtectionPilot
®
The Microsoft Management Console (MMC) is your interface to the ProtectionPilot
product and its features. Here you register and configure your GroupShield for
Exchange products that are managed through ProtectionPilot. The console uses the
standard MMC features.
The console is divided into two panes. When you first log on to the server, the console
appears with the Console Root highlighted in the left pane.
77
®
™
McAfee GroupShield 7.0 User Guide
Integrating with ProtectionPilot 1.5
Introduction
The console tree is the navigation pane of the console. It shows the servers,
workstation, and appliances that you can administer using ProtectionPilot.
The details pane is to the right of the console. Depending on the item selected in
the console tree, the details pane might have an upper details pane and lower
details pane.
The console’s appearance changes to reflect the items you have selected in the
console tree or in the details pane.
Figure 7-1 ProtectionPilot console
The McAfee Common Agent is the key to remotely managing products. Installed on
each computer, it deploys products, updates virus definition (DAT) files and the
virus-scanning engine, upgrades existing products with service pack and patch
releases. It also gathers data about installed anti-virus products, the computer, and
infection and system activity. In addition, it ensures that requests from the server are
executed and re-executed or enforced as needed. For example, if a user removes the
anti-virus product you have defined for the computer, the agent will reinstall the
product automatically.
Assumptions:
Computer 1: ProtectionPilot is installed and configured on a supported operating
system.
®
Computer 2: Microsoft Exchange Server 2003 or 2007 is installed and configured
on the server.
78
7
®
™
McAfee GroupShield 7.0 User Guide
Integrating with ProtectionPilot 1.5
Installation
Exchange Server is added into the ProtectionPilot’s managed server list under the
“Directory” branch.
McAfee Common Agent installed on the ProtectionPilot server.
From ProtectionPilot server console, ProtectionPilot agent is installed or pushed on
the Exchange Server.
Before you begin
1 Create a temporary directory on the network or your local drive.
2 To install, do one of the following depending on how you obtained the software:
Note
Insert the CD into the computer’s drive and copy the installation files into the
temporary directory you created.
Download the NAP and pkgCatalog.z archive and extract the file to the temporary
directory.
Anti-Spam and Anti-Phish feature is only available if you install McAfee Anti-Spam for
GroupShield component after installation. To install and deploy Anti-Spam and
Anti-Phish, you need to check-in the required package into the repository and then
deploy. If you have deployed the evaluation package and want to upgrade to the
licensed version, you must check-in the licensed package and then deploy.
Installation
Adding McAfee GroupShield for Exchange pkgCatalog.z file to the
ProtectionPilot server:
1 Locate the pkgCatalog.z file.
2 Log on to the ProtectionPilot server with administrative rights.
3 From the Server page, select Repository tab. In Management Tasks, click Check In Package.
The Check in Package Wizard appears.
4 Select Products and Updates and click Next. Browse and select the McAfee
GroupShield for Exchange pkgCatalog.z file you saved to a temporary folder in Step 1.
5 Click Open to enable ProtectionPilot to load package file.
6 Click Finish to enable ProtectionPilot to load the pkgCatalog.z file.
79
7
®
™
McAfee GroupShield 7.0 User Guide
Integrating with ProtectionPilot 1.5
Configuring GroupShield policies
Adding McAfee GroupShield for Exchange NAP file to the
ProtectionPilot server:
1 Locate the NAP file, on the product CD or in the installation .ZIP file downloaded
from the McAfee website, and save it to a temporary folder accessible from the
ProtectionPilot server.
2 Log on to the ProtectionPilot server with administrative rights.
3 From the Server page, select the Repository tab. In Management Tasks, click Check In
Package. The Check in Package wizard appears.
4 Select Management NAP and click Next. Browse and select McAfee GroupShield
GSEWIN70.nap file you saved to a temporary folder in Step 1.
5 Click Finish to enable ProtectionPilot to load the NAP file.
Deploying McAfee GroupShield using ProtectionPilot server:
1 Select the required Site, Group or Computer in the ProtectionPilot directory and select
the Tasks tab.
2 Modify the Deployment task to deploy and install McAfee GroupShield for Exchange.
Configuring GroupShield policies
This section explains how you enforce policies from ProtectionPilot. There are two
main steps:
1 Within ProtectionPilot, you select the names of the target computers on the
network and the policies that will apply to those selected computers. The
ProtectionPilot Agent installed on all those target computers and you can set up a
number of different policies that will apply to many individual computers or groups
of computers.
2 You set ProtectionPilot to enforce those policies on computers. The agent
communicates with the server to check for new policies. Each computer then
observes your new policy, ignoring any polices that were previously configured at
GroupShield for Exchange.
80
7
®
™
McAfee GroupShield 7.0 User Guide
Integrating with ProtectionPilot 1.5
Configuring GroupShield policies
Setting and enforcing policies
The ProtectionPilot console allows you to enforce policies across groups of computers
or on a single computer. These policies override configurations set on individual
computers. For information regarding policies and how they are enforced, see the
ProtectionPilot Product Guide.
Before configuring any policies, select the group of computers for which you want to
modify GroupShield policies. You can modify GroupShield policies from the pages and
tabs that are available in the details pane of the ProtectionPilot console. These pages
are nearly identical to those you can access directly from the GroupShield user
interface.
After you have modified the appropriate policies and saved the changes for the
intended computer or group of computers, you are ready to deploy the new settings
via the ProtectionPilot agent.
Modifying policies for GroupShield in ProtectionPilot
1 Log on to the ProtectionPilot server.
2 In the console tree under McAfee ProtectionPilot | <SERVER> | Directory, select the site,
group, single computer, or the entire directory to which these policies are to apply.
3 The General, Policies, Scheduled Tasks, and Agent Log tabs appear in the details pane.
4 Click the Policies tab and then the GroupShield for Exchange link. The Policy Settings page
appears with Scanner Settings as the default policy category.
5 Deselect Inherited and modify the policy settings as required.
Note
For more information on modifying the policy settings, refer to the chapter Policy
Manager on page 105.
Setting debug logging
1 Log on to the ProtectionPilot server.
2 In the console tree under McAfee ProtectionPilot | <SERVER> | Directory, select the site,
group, single computer, or the entire directory to which these policies are to apply.
3 The General, Policies, Scheduled Tasks, and Agent Log tabs appear in the details pane.
4 Click the Policies tab and then the GroupShield for Exchange link.
5 Select Diagnostics from the drop-down menu. The Diagnostics page appears.
6 Click Debug Logging tab.
81
7
®
™
McAfee GroupShield 7.0 User Guide
Integrating with ProtectionPilot 1.5
Configuring GroupShield policies
7 Select the debug logging Level. you can select:
High - to collect large number of log entries.
Medium - to collect medium number of log entries.
Low - to collect low number of log entries.
None - to disable debug logging.
8 Select Limit size of debug log files option to specify whether there should be a size limit
for debug log files. You can specify how large (in megabytes or kilobytes) the debug
log files can be.
9 Select Specify location for debug log files option to use the default location for debug
files, or use a different location. If you are specifying a new location, in the first field
select the type of location, and in the second field enter the location details.
Setting error reporting service
1 Click Error Reporting Service tab.
2 Select Enable to enable or disable the error reporting service.
3 Select Catch exceptions to capture information about exceptional events, such as
system crashes.
4 Select Report exceptions to user to specify whether exceptions should be reported to
the administrator.
Setting event logging
1 Click Event Logging tab, you can specify which events should be included in the
Product Log and Event log.
2 Select Write Information events, Write warning events, or Write errors events for inclusion into
the product log.
3 Select Write Information events, Write warning events, or Write errors events for inclusion into
the event log.
Setting product log
1 Click the Product Log tab.
2 Select Specify location of database to specify whether you want to use the default
location for the product log or specify a different location. If deselected, the default
location is used.
82
7
®
™
McAfee GroupShield 7.0 User Guide
Integrating with ProtectionPilot 1.5
Scheduling tasks
3 Specify the Database location or specify a different location for the product log. Use
the first field to tell the software about the type of location you are going to specify
in the second field. For example, if you select Full Path in the first field, enter the full
path name in the second field. If you select a location, specify the file name, or
sub-directory path and file name.
4 Select the filename of database option to specify whether you want to use the default
file name, or specify a different name. If deselected, the default file name is used.
The default file name is productlog.bin or type the Database filename to specify a
different file name for the product log.
5 Select Limit database size to limit the size of the product log database.
6 Type the Maximum database size that the product log database can be. You can specify
the size in either megabytes or kilobytes.
7 Select Limit age of entries, if you want the product log entries to be deleted after a set
period of time.
8 Type the Maximum age of entry to specify how many days an entry should remain in
the database before it is deleted.
9 Select Specify a query timeout to limit the amount of time allowed for answering a
product log query.
10 Type the Query timeout (seconds) to specify the maximum number of seconds allowed
when answering a product log query.
Scheduling tasks
This chapter explains how you enforce policies from ProtectionPilot. GroupShield can
perform on-demand scanning for your Exchange Server.
Settings and actions can be specified in on-demand policies, which can be found under
the Policy Manager. There are three set of policies which can be used for an on-demand
task. These are:
On-Demand (Remove Viruses) - Policies in this set contain anti-virus settings and
filters. These policies provide an easy means to check against viral content in
databases.
On-Demand (Remove Banned Content) - Policies in this set contain content scan
settings. These policies are particularly useful if you want to see the effect of
newly created/assigned content scan rules.
83
7
®
™
McAfee GroupShield 7.0 User Guide
Integrating with ProtectionPilot 1.5
Scheduling tasks
On-Demand (Full Scan) - Policies in this set contain settings for all scanners and
filters. These policies will be the typically used for scanning at regular intervals.
Creating a new on-demand scan task
1 Log on to the ProtectionPilot server.
2 In the console tree under McAfee ProtectionPilot | <SERVER> | Directory, select the site,
group, single computer, or the entire directory to which these policies are to apply.
3 The General, Policies, Scheduled Tasks, and Agent Log tabs appear in the details pane.
4 Click the Scheduled Tasks tab. The Scheduled Tasks for Computer <computer name>
page appears.
5 Click Create Task. The Tasks Types page appears.
6 Click GroupShield for Exchange with the Task type as OnDemand Scan Task.
7 Click Next. The Task Settings page appear.
8 Enter a Name for the task.
9 Under Schedule Settings, deselect Inherit.
10 Select the option Enable (Schedule task that run at specified time) to enable the
on-demand scan task.
11 Select the next option if you want to stop the task after it has run for a certain time.
Specify the hours and minutes to stop the scan.
12 Select an interval from the drop-down to schedule the scan Immediately, Once, Hourly,
Daily, Weekly, or Monthly and specify their appropriate options as you require.
13 Click Apply Settings. The new task you have created appears in the Scheduled Tasks
page showing the task type as OnDemand Scan Task.
Note
Select a desired task and click the Edit button to edit the settings of this task, or click
Delete to delete the task when it is no longer required.
Creating a new AutoUpdate task
1 Log on to the ProtectionPilot server.
2 In the console tree under McAfee ProtectionPilot | <SERVER> | Directory, select the site,
group, single computer, or the entire directory to which these policies are to apply.
3 The General, Policies, Scheduled Tasks, and Agent Log tabs appear in the details pane.
84
7
®
™
McAfee GroupShield 7.0 User Guide
Integrating with ProtectionPilot 1.5
Uninstallation
4 Click the Scheduled Tasks tab. The Scheduled Tasks for Computer <computer name>
page appears.
5 Click Create Task. The Tasks Types page appears.
6 Click GroupShield 7.0 for Exchange with the Task type as AutoUpdate Task.
7 Click Next. The Task Settings page appear.
8 Enter a Name for the task.
9 Under Schedule Settings, deselect Inherit.
10 Select the option Enable (Schedule task that run at specified time) to enable the
on-demand scan task.
11 Select the next option if you want to stop the task after it has run for a certain time.
Specify the hours and minutes to stop the scan.
12 Select an interval from the drop-down to schedule the scan Immediately, Once, Hourly,
Daily, Weekly, or Monthly and specify their appropriate options as you require.
13 Click Apply Settings. The new task you have created appears in the Scheduled Tasks
page showing the task type as AutoUpdate Task.
Note
Select a desired task and click the Edit button to edit the settings of this task, or click
Delete to delete the task when it is no longer required.
Uninstallation
Removing McAfee GroupShield for Exchange from the client computer
using ProtectionPilot server
1 Select the required Site, Group or Computer in the ProtectionPilot directory.
2 From Management Tasks, click Uninstall Products, then Next. The Uninstall Products Wizard
appears, with the option to delete the Product Name and Version from the
ProtectionPilot console. You can also uninstall GroupShield for Exchange from the
client system by selecting GroupShield for Exchange from the List.
3 Click Yes to remove the installation.
Removing the McAfee GroupShield for Exchange pkgCatalog.z
package file from ProtectionPilot repository
1 Log on to the ProtectionPilot server with administrative rights.
85
7
®
™
McAfee GroupShield 7.0 User Guide
Integrating with ProtectionPilot 1.5
Uninstallation
2 Select the GroupShield for Exchange under Repository | View contents of Server
Repository.
3 Select GroupShield for Exchange with the Type as Install from the View contents of
server repository list.
4 Click Delete to uninstall GroupShield for Exchange package file from the server.
Removing the McAfee GroupShield for Exchange NAP file from
ProtectionPilot server
1 Log on to the ProtectionPilot server with administrative rights.
2 Select GroupShield for Exchange under Repository | View contents of server repository.
3 Select GroupShield for Exchange with the Type as NAP from the View contents of server
repository list.
4 Click Delete and then OK to uninstall GroupShield for Exchange NAP file from the
server.
86
7
8
Getting Started with the User
Interface
The user interface provides critical function for GroupShield administrators. It is
important for the administrators to know how well their server is being protected from
viruses and banned content. Dashboard is your interface to the GroupShield for
Exchange.
The left pane of the console has links namely Dashboard, Detected Items, Policy Manager,
and Settings and Diagnostics that you can administer. The right pane shows information
depending on the item you select in the left pane.
To start GroupShield for Exchange user interface:
1 Start McAfee GroupShield for Exchange from the icon on the desktop.
2 You can also start GroupShield for Exchange by clicking on Start | Programs | McAfee |
GroupShield for Exchange. Select either GroupShield for Exchange or GroupShield for
Exchange (Web) as desired.
87
McAfee® GroupShield™ 7.0 User Guide
Getting Started with the User Interface
Dashboard
Dashboard
The dashboard provides an overview of the scanning details, latest detections,
graphical view of these detections, product updates and versions, a list of recently
scanned items, anti-virus news, and security news.
Figure 8-1 Dashboard
Dashboard has four pages:
Statistics & Information
On-Demand Scans
Status Report
Graphical Reports
Statistics & information
The Statistics & Information page is further divided into three sections:
Statistics
Versions & Updates
Reports
88
8
McAfee® GroupShield™ 7.0 User Guide
Getting Started with the User Interface
Dashboard
Statistics
This section shows you the percentage and the number of clean items, detected spam,
phish, viruses, PUPs, banned file types/messages and unwanted content. It also
shows you the average scan time (in milliseconds) and the total number of email
messages scanned.
Click Reset to reset the statistics of detected items. From the Graph drop-down menu,
select one of these:
<Select Detections> — Select the counters in the Detections section by clicking on the
icon of an item. This enables you to view the statistics and graph of the selected
counters.
Spam Summary — View spam statistics and graph.
Phish Summary — View phish statistics and graph.
or Display pie chart icon
as required, to view the
Click the Display bar graph icon
graphical display of detections. You can choose Time Range from the drop-down menu
to view these graphs. The options for the time range are:
Last 24 Hours
Last 7 Days
Last 30 Days
Versions & updates
This section has three tabs:
Update Information: This tab shows the latest instant when the anti-virus engine and
DAT files were successfully updated. It shows how frequently this update was
done. It also shows the version of anti-virus engine, DAT files, and anti-spam engine
(if you have chosen to install the Anti-Spam for GroupShield). You can view the
status of the last update (the Show Status link) and schedule a new updating
frequency (the Edit Schedule link).
McAfee Security regularly provides updated Virus Definition (DAT) files to detect
and clean the latest virus threats. Click Update Now to update the most up-to-date
virus protection available.
Product Information: This tab shows the product name and version, the Service Pack,
HotFix information and the condition of the buffer overflow protection.
Note
A buffer overflow is an anomalous condition where a process attempts to store data
beyond the boundaries of a fixed-length buffer. This results in extra data overwriting the
adjacent memory locations. Enabling Buffer Overflow Protection prevents this condition.
89
8
McAfee® GroupShield™ 7.0 User Guide
Getting Started with the User Interface
Dashboard
Licenses: This tab gives the description of the installed product(s), the type of license,
expiry date (if the license type is Beta), and the number of day(s) remaining for the
license to expire.
Reports
This section has three tabs:
Recently Scanned Items: This tab shows a list of recently scanned items. It also shows the
date and time of scan, sender’s and recipient’s details, the action taken after the scan,
name of the document scanned, name of the detection, type of scan task, reason for
the item being detected, and the policy name chosen.
Anti-Virus News: This tab shows a list of headlines containing the latest anti-virus news
published by a company on a particular date. This is to bring awareness about the latest
virus threats and vulnerabilities. Click on the link of a headline to read the news in a web
page.
Security News: This tab shows a list of headlines published on a particular date containing
the latest information about the IT security. Click on the link of a headline to view
security information in a web page.
On-demand scans
On-demand scan is a method for scanning emails at convenient times or regular
intervals. You can schedule regular scan operations when the server activities are
comparatively low and when they do not interfere with your work.
GroupShield for Exchange enables you to create scheduled on-demand scans. You can
create multiple schedules, each running automatically at predetermined intervals or
times.
You may want to perform an on-demand scan for these reasons:
To check a specific file or files that have been uploaded or published.
To check if the documents within the Exchange Server are virus-free, possibly
following DAT update, in case new viruses can be detected.
If you have detected and cleaned a virus/spam/phish and want to check if your
computer is completely clean.
Scheduling a new on-demand scan
1 Click Dashboard | On-Demand Scans. The On-Demand Scans page appears.
2 Click New Scan. The Schedule an on-demand scan page appears.
90
8
McAfee® GroupShield™ 7.0 User Guide
Getting Started with the User Interface
Dashboard
3 In Choose when to scan, choose any of these options:
Not scheduled — Select the checkbox and specify the number of hours and
minutes after which the scanning has to stop.
Once — From the respective drop-down lists, choose a date, month, year and the
time when a scan has to start. You can select the checkbox and specify the
number of hours and minutes after which the scanning has to stop.
Hours — Specify how frequently, the scan task should take place (in hours), and
at how many minutes past the hour. You can select the checkbox and specify the
number of hours and minutes after which the scanning has to stop.
Days — Specify the time how frequently, in days, the task should take place and
at what time of the day. You can select the checkbox and specify the number of
hours and minutes after which the scanning has to stop.
Weeks — Specify how frequently, in weeks, the task takes place. You can also
specify on which days and at what time of day the task should take place. You
can select the checkbox and specify the number of hours and minutes after
which the scanning has to stop.
Months — On either the first, second, third, fourth or a last day, select a checkbox
by clicking on desired month(s) and specify a time at which a scan has to start.
You can select the checkbox and specify the number of hours and minutes after
which the scanning has to stop.
4 Click Next. In the Choose what to scan page, select the desired folder(s) and click
to move the folder(s) from Available folders to Folders to scan.
Click
to select a folder and all its subfolders.
Note
5 Choose any of these options:
Scan all folders — All folders in Folders to scan will be scanned.
Scan selected folders — Selected folders in Folders to scan will be scanned.
Scan all except selected folders — Folders except the selected ones in Folders to scan
will be scanned.
6 Click Next. In the Configure scan settings page, choose a Policy to use from the
drop-down list. The options are:
On Demand
Find Viruses
91
8
McAfee® GroupShield™ 7.0 User Guide
Getting Started with the User Interface
Dashboard
Remove Viruses
Find Banned Content
Remove Banned Content
Full Scan
7 Select Resumable Scanning to enable Restart from last item.
Note
Using this option, you can specify whether a scan can restart from the point where it
was stopped.
8 Click Next.
9 Enter a name for the task.
10 Click Finish, then Apply.
Modifying an existing on-demand scan
1 Click Dashboard | On-Demand Scans. The On-Demand Scans page lists all the on-demand
scans.
2 Click the Modify link of the scan task you wish to modify.
3 Make the required changes in Choose when to scan. Click Next.
4 Select the desired folders by moving them to Folder to scan. Click Next.
5 Choose a desired policy from the drop-down list and choose if you want to restart
scan from the last item. Click Next.
6 Type a new name for the task.
7 Click Finish, then Apply.
Deleting an on-demand scan
1 Click Dashboard | On-Demand Scans. The On-Demand Scans page appears listing all the
on-demand scans.
2 Click the Delete link of the scan task.
Note
The status of the task that you have deleted changes to Marked for deletion. Click Undo
Delete if you do not want to delete the task.
3 Click Apply.
92
8
McAfee® GroupShield™ 7.0 User Guide
Getting Started with the User Interface
Dashboard
The ‘Run Now’ link
Once you have scheduled a new task, you can run a scan.
This option is available only if you click Apply after creating a new scan task.
Note
1 Click Dashboard | On-Demand Scans. The On-Demand Scans page lists all the on-demand
scans.
2 Click the Run Now link of the task you wish to start. A confirmation dialog box
appears.
3 Click OK to run the on-demand scan immediately.
Click Refresh to update the schedule summary information.
Note
Status report
A status report is a scheduled report sent to an administrator at a specific time. The
report contains detection statistics within that specified time frame. You can choose a
time, recipient email address/distribution list to send the report to, and a subject for the
email. Reports are sent in HTML format.
Scheduling a new status report
1 Click Dashboard | Status Report. The Status Report page appears.
2 Click New Report. The Report page appears.
3 In the when to report page, choose any of these options:
Not scheduled — Select the checkbox to set up a reporting task that you can
activate later. If you are modifying a report schedule, this option allows you to
stop an existing report task.
Once — From the respective drop-down lists, choose a date, month, year and the
time when a report task has to start. You can select the checkbox and specify
the number of hours and minutes after which the report task has to stop.
Hours — Specify how frequently, the report task should take place (in hours), and
at how many minutes past the hour. You can select the checkbox and specify the
number of hours and minutes after which the report task has to stop.
93
8
McAfee® GroupShield™ 7.0 User Guide
Getting Started with the User Interface
Dashboard
Days — Specify the time how frequently, in days, the report task should take
place and at what time of the day. You can select the checkbox and specify the
number of hours and minutes after which the report task has to stop.
Weeks — Specify how frequently, in weeks, the report task should take place.
You can also specify on which days and at what time of day the task should take
place. You can select the checkbox and specify the number of hours and minutes
after which the report task has to stop.
Months — On either the first, second, third, fourth or a last day, select a checkbox
by clicking on a desired month(s) and specify a time at which a report task has to
start.
You can select the checkbox and specify the number of hours and minutes after
which the report task has to stop.
4 Click Next. The Who to report to page appears.
5 In Recipient Email, specify the recipient’s email address to whom the report is to be
sent.
6 In Subject line for report, specify the subject line in the report that is sent to the
recipient.
7 Click Next. The Please enter a task name page appears.
8 Type a meaningful name for the task.
9 Click Finish.
Note
Click the Modify link of a report task to modify its settings or click the Delete link of a
report task to delete it.
The ‘Run Now’ link
Once you have scheduled a new task, you can run a report task.
This option is available only if you click Apply after creating a new report task.
Note
1 Click Dashboard | Status Report. The Status Report page lists all the report tasks.
2 Click the Run Now link of the task you wish to start. A confirmation dialog box
appears.
94
8
McAfee® GroupShield™ 7.0 User Guide
Getting Started with the User Interface
Dashboard
3 Click OK.
Click Refresh to update the schedule summary information.
Note
Graphical reports
The Graphical Reports section gives an explicit view of a graph of detected items. You
can also find each detection by setting filters to specify the type of detections that are
of interest.
Graphical Reports has two tabs:
Simple
Advanced
Simple reports
Viewing simple graphical reports:
1 Click Dashboard | Graphical Reports. The Graphical Reports page appears with the Simple
tab, by default.
2 From Time Span, choose Today or This week to view only today's detections or
detections made in the last 7 calendar days (including today's date).
3 From Filter, choose any of these:
Top 10 Viruses, Top 10 Spam Detections, Top 10 Spam Recipients, Top 10 Phish Detections, Top
10 Unwanted Programs, Top 10 Unwanted Content Detections, Top 10 Infected Files or
Detections.
4 Click Search.
Advanced reports
In Advanced Reports, you can set filters to narrow your search criteria.
Viewing an advanced report using search filters:
1 Click Dashboard | Graphical Reports. The Graphical Reports page appears.
2 Click Advanced tab.
3 Select at least one filter, you can select up to three of these filters:
Subject
Recipient
95
8
McAfee® GroupShield™ 7.0 User Guide
Getting Started with the User Interface
Dashboard
Reason
Ticket Number
Detection Name
Spam Score
4 Choose All Dates or a desired Date Range from the drop-down lists.
5 Choose Bar Graph or Pie Chart as required.
6 If you choose Pie Chart, choose to Query on, from the drop-down list.
Recipient
Sender
Filename
Detection Name
Subject
Reason
Rule Name
Policy Name
Spam Score
7 In Maximum Results, specify the maximum number of segments you want to appear
in the pie chart.
For example, if you are interested only in seeing the three most frequently assigned
spam scores, type 3.
Query on and Maximum Results are available only for pie chart.
Note
8 Click Search.
Click Clear Filter to return to the default filter values.
Note
96
8
9
Detected Items
Detected Items is used to view information about emails that contains spam, phish,
viruses, potentially unwanted programs, unwanted content, banned file types or
messages, and all items. You should select at least one search filter, however you can
use up to three search filters to narrow your search.
Topics covered are:
Spam
Phish
Viruses
Potentially Unwanted Programs
Unwanted Content
Banned File types/Messages
All Items
Figure 9-1 Detected Items
97
McAfee® GroupShield™ 7.0 User Guide
Detected Items
Spam
Spam
Spam is an unwanted email message, specifically unsolicited bulk messages.
1 Click Detected Items | Spam. The Spam page appears.
2 Select up to three of these search filters:
Ticket Number
Sender
Spam Score
Action Taken
3 Select All Dates to include all the entries. Else, select the desired date and time range
from the Date Range drop-down lists.
4 Click Search. A list of spam items matching your search criteria are displayed in the
View Results section.
Click Clear Filter to return to the default search filter settings.
Note
Phish
Phish is a method of fraudulently obtaining personal information (such as passwords,
social security numbers, and credit card details) by sending spoofed email messages
that look as though they have come from trusted sources such as legitimate companies
or banks.
Typically, phishing email messages request that recipients click on a link in the email to
verify or update the contact details or credit card information.
1 Click Detected Items | Phish. The Phish page appears.
2 Select up to three of these search filters:
Ticket Number
Sender
Spam Score
Action Taken
98
9
McAfee® GroupShield™ 7.0 User Guide
Detected Items
Viruses
3 Select All Dates to include all the entries. Else, select the desired date and time range
from the Date Range drop-down lists.
4 Click Search. A list of phish items matching your search criteria are displayed in the
View Results section.
Click Clear Filter to return to the default search filter settings.
Note
Viruses
A virus is a program/code that replicates itself, multiplies, and infects another useful
program, boot sector, partition sector or document that supports macros, by inserting
itself or attaching itself to that medium. Most viruses replicate, many do a large amount
of damage to the system.
1 Click Detected Items | Viruses. The Virus Detections page appears.
2 Select up to three of these search filters:
Ticket Number
Filename
Action Taken
Submit to Avert
3 Select All Dates to include all the entries. Else, select the desired date and time range
from the Date Range drop-down lists.
4 Click Search. A list of viruses matching your search criteria are displayed in the View
Results section.
Click Clear Filter to return to the default search filter settings.
Note
Potentially unwanted programs
Potentially Unwanted Programs (PUPs) are the software programs written by
legitimate companies which, if installed, may alter the security state or the privacy
posture of a computer.
99
9
McAfee® GroupShield™ 7.0 User Guide
Detected Items
Unwanted content
1 Click Detected Items | Potentially Unwanted Programs. The Potentially Unwanted Programs
page appears.
2 Select up to three of these search filters:
Ticket Number
Filename
Action Taken
Submit to Avert
3 Select All Dates to include all the entries. Else, select the desired date and time range
from the Date Range drop-down lists.
4 Click Search. A list of PUPs matching your search criteria are displayed in the View
Results section.
Click Clear Filter to return to the default search filter settings.
Note
Unwanted content
Any content that is filtered by the scanner is called unwanted content. You can use
Unwanted Content to view emails/attachments that contain unwanted content.
1 Click Detected Items | Unwanted Content. The Unwanted Content page appears.
2 Select any of these search filters:
Ticket Number
Filename
Action Taken
3 Select All Dates to include all the entries. Else, select the desired date and time range
from the Date Range drop-down lists.
4 Click Search. A list of files containing unwanted content are displayed in the View
Results section.
Click Clear Filter to return to the default search filter settings.
Note
100
9
McAfee® GroupShield™ 7.0 User Guide
Detected Items
Banned file types/messages
Banned file types/messages
Banned file types are any files which are banned by an administrator.
1 Click Detected Items | Banned File types/Messages.
2 Select any of these search filters:
Ticket Number
Filename
Action Taken
3 Select All Dates to include all the entries. Else, select the desired date and time range
from the Date Range drop-down lists.
4 Click Search. A list of banned file types/messages matching your search criteria are
displayed in the View Results section.
Click Clear Filter to return to the default search filter settings.
Note
All items
You can use All Items to view all emails that contains detected items.
1 Click Detected Items | All Items. The All Items page appears.
2 Select any of these search filters:
Ticket Number
Filename
Action Taken
3 Select All Dates to include all the entries. Else, select the desired date and time range
from the Date Range drop-down lists.
4 Click Search. A list of banned file types/messages matching your search criteria, are
displayed in the View Results section.
Click Clear Filter to return to the default search filter settings.
Note
101
9
McAfee® GroupShield™ 7.0 User Guide
Detected Items
All items
Search filters used:
Action Taken — to search according to the type of action taken when the item was
detected.
Filename — to search by file name.
Sender — to search by the email address of the sender.
Spam Score — to search by the spam score. Spam score is a number that indicates
the amount of potential spam contained within an email message.
Ticket Number — to search by ticket number. A ticket number is a 16-digit
alpha-numeric entry which is auto-generated by GroupShield for every detection.
You can find a ticket number in a notification email. By default, a notification email
does not include the ticket number parameter.
Including a ticket number in a notification email:
1 From Settings & Diagnostics, click Notifications. The Notifications page appears.
2 Click Edit. The GroupShield for Exchange - Notification text dialog box appears.
3 Add Ticket Number: %tik%.
4 Click Save, then Apply.
View results pane
From the View Results section of all the detected items, you can:
Release a quarantined item. Select a record from the View Results pane and click
Release. The original email message is released from the database for delivery to the
intended recipient.
Download a quarantined email message. Select a record from the View Results pane
and click Download.
Export and save records in .CSV format. Select a record from the View Results pane
and click Export to CSV File.
Submit a quarantined item to AVERT. Select a record from the View Results pane and
click Submit to Avert.
102
9
McAfee® GroupShield™ 7.0 User Guide
Detected Items
All items
You can also use:
Columns to display - to select additional column headers to be listed in the View Results
pane. Click this option, select the desired options, and click OK.
You must select at least one column header.
Note
Select All — to select all the detected items in the View Results pane.
Select None — to deselect all the detected items in the View Results pane.
Delete — to delete the selected detected items in the View Results pane.
Delete All — to delete all the detected items in the View Results pane.
103
9
McAfee® GroupShield™ 7.0 User Guide
Detected Items
All items
104
9
10
Policy Manager
This chapter explains how you enforce policies in GroupShield for Microsoft® Exchange
Server 2003/2007. You can use Policy Manager to specify policies that determine how
different types of threats are treated when detected.
Each type of policy has a master policy, which is the default policy for that policy type.
Master policy cannot be deleted, because there should always be one policy from
which other policies can be created. The master policy is configured to cover most
situations. You can create subpolicies for any exceptional situations that are not
covered by the master policy.
Note
You can specify the order in which subpolicies are applied. Subpolicies take priority over
the master policy.
Policy manager views
Policy Manager has two views:
Inheritance View
Advanced View
105
McAfee® GroupShield™ 7.0 User Guide
Policy Manager
Policy manager views
Inheritance view
Inheritance View enables you to view policy settings inherited from another policy.
The policy that inherits the settings is known as the “child policy”, and the policy from
which it inherits those settings is know as the “parent policy”. If the policy name is
indented, that policy inherits some of its settings from its parent policy.
You can use:
The Name of the policy — to edit its settings.
Priority column — to view the order in which policies are applied.
Create sub-policy — to create a subpolicy.
The Delete link — to delete a subpolicy that is no longer required.
Enabled — to enable or disable a subpolicy. If you select this option, the subpolicy is
enabled.
Apply — to apply the settings/changes you make.
106
10
McAfee® GroupShield™ 7.0 User Guide
Policy Manager
Policy manager views
Advanced view
The main purpose of Advanced View is to allow you to change the order in which any
subpolicies are applied (in the Move column).
You can click on:
The Name of the policy — to edit its settings.
Create sub-policy — to create a subpolicy.
You can create a subpolicy for exceptions that are not covered by the master policy.
Note
Enabled — to enable or disable a subpolicy. If you select this option, the subpolicy is
enabled.
The Delete link — to delete a subpolicy that is no longer needed.
The Details link — to view the description of the policy and its parentage.
Apply — to apply the settings/changes you make.
107
10
McAfee® GroupShield™ 7.0 User Guide
Policy Manager
Creating a subpolicy
Creating a subpolicy
1 From Policy Manager, select a menu item for which you want to create a subpolicy.
2 Click Create sub-policy. The Create a sub-policy page appears with three tabs:
Initial configuration
Trigger rules
Scanners and filters
3 In the Initial configuration page, type a sub-policy name that identifies the policy and
what it does.
4 Type a Description for the policy, choose a Parent Policy for the subpolicy from the
drop-down menu, then click Next. The Trigger rules page appears.
5 Specify the conditions when the policy should be triggered. Select Any of the rules
apply, All rules apply or None of the rules apply for a specific user.
6 Click New Rule. From the Specify a policy rule section, choose one of these primary
rules and specify an appropriate secondary rule:
The SMTP address of the sender is e-mail address
The SMTP address of the sender is not e-mail address
The SMTP address of any recipients is e-mail address
The SMTP address of any recipients is not e-mail address
The sender is in Active Directory Group
The sender is not in Active Directory Group
Any of the recipients is in Active Directory Group
Any of the recipients is not in Active Directory Group
7 Click Add to select the trigger rule.
If you do not wish to perform step 9 and 10, you can Copy rules from another policy by
selecting it from the drop-down menu.
Note
8 Click Next. The Scanners and filters page appears.
9 In the Policy scanners and Filters initialization page, choose one of these:
Inherit all settings from the parent policy to inherit all the properties of the Master
policy.
108
10
McAfee® GroupShield™ 7.0 User Guide
Policy Manager
Policy settings
Initialize selected settings with values copied from another policy to choose a policy from
the drop-down and initialize the selected settings with the values of that policy.
10 Click Finish, then Apply.
Policy settings
You can set up policies that determine how different types of threats are treated for
different groups of users or databases stored on the server. Each policy specifies the
settings and actions that are used by the policy and the actions taken when a detection
is triggered in the Exchange environment. The settings are given names and can be
used by many policies at the same time. However the actions are specific to a particular
policy.
1 From Policy Manager, select a menu item.
2 Click on a policy of a desired submenu item for which you want to configure settings
and actions. The policy page appears with three tabs namely List All Scanners, View
Settings, and Specify Users.
List all scanners
In the List All Scanners tab, you can configure different types of policy settings. The type
of settings that are available depend on which scanner/filter is selected. You can use:
Policy — to select a policy (from the drop-down) that you want to configure.
Add Scanner/Filter — to configure the policy so that it only applies at specific times.
For example, you can create anti-virus settings that is applicable only on weekends.
For more information on Add Scanner/Filter, refer to Adding scanner/filter on page 110.
Note
Core Scanners — to configure the policy for each type of scanner. Typical core
scanners include:
Anti-Virus Scanner
Content Scanning
File Filtering
Anti-Spam (Gateway)
109
10
McAfee® GroupShield™ 7.0 User Guide
Policy Manager
Policy settings
Anti-Phishing (Gateway)
For more information on Core Scanners mentioned above, see Scanners and filters on
page 113
Note
Filters — to configure the policy for each type of filter. Typical filters include:
Corrupt Content
Protected Content
Encrypted Content
Signed Content
Password-Protected Files
Scanner Control
MIME Mail Settings
HTML Files
Mail Size Filtering (Gateway)
For more information on Filters mentioned above, see Filters on page 135.
Note
Miscellaneous — to configure the alert messages for this policy. Miscellaneous
settings include:
Alert Settings
Disclaimer Text (Gateway)
For more information on the Miscellaneous settings, see Miscellaneous on page 153.
Note
Adding scanner/filter
1 From Policy Manager, select a submenu item. The policy page for the submenu item
appears.
2 Choose a desired policy from the drop-down list.
3 Click Add Scanner/Filter. The Create time-constrained configuration page appears.
4 Specify the required scanner/filter category from the drop-down list.
5 Under When to use this instance, specify whether you want to use an existing time slot
or create a new one for this time-constrained policy.
110
10
McAfee® GroupShield™ 7.0 User Guide
Policy Manager
Policy settings
6 If you choose Select existing time slot, choose any one of these from the drop-down
menu:
Weekdays
Weekends
Working hours
7 If you choose Create a new time slot, specify a name for the new time slot and select
the desired day(s) and time.
8 Click Save, then Apply.
You can delete a new time slot that you have created.
Note
111
10
McAfee® GroupShield™ 7.0 User Guide
Policy Manager
Policy settings
View settings
In the View Settings tab, you can configure scanner/filter settings for a selected policy
and the scanner/filter that you choose. You can:
View and configure option settings, including specifying which alert message to use
when a detection triggers a content rule.
View and configure content rules and actions.
View and configure the desired action to take place in case of a detection.
The View Settings tab displays a summary of the key settings for the selected policy and
scanners/filters and allows you to change those settings.
For example, you can enable or disable the policy, and change the alert message
associated with that policy.
Specify users
Using the Specify Users tab, you can specify policy rules that apply to specific users.
Creating a new rule for a specific user
1 In the Specify who this policy applies to pane, specify the conditions where the policy
will trigger.
Select Any of the rules apply, All rules apply or None of the rules apply for the specific user.
2 Click New Rule.
3 In the Specify a policy rule pane, select the policy rule, and then specify the condition
for the rule. You can select from these policy rule templates:
The SMTP address of the sender is e-mail address
The SMTP address of the sender is not e-mail address
The SMTP address of any recipients is e-mail address
The SMTP address of any recipients is not e-mail address
The sender is in Active Directory Group
The sender is not in Active Directory Group
Any of the recipients is in Active Directory Group
Any of the recipients is not in Active Directory Group
4 Click Add to select the trigger rule.
Note
If you do not wish to perform step 3 and 4, you can Copy rules from another policy by
selecting it from the drop-down menu.
112
10
McAfee® GroupShield™ 7.0 User Guide
Policy Manager
Scanners and filters
5 Click Apply.
Scanners and filters
Policy Manager has core scanners, filters and miscellaneous settings for different
types of policies (submenu items). The different scanning types in GroupShield for
Exchange are:
On-Access — to create policies for email messages every time they are opened,
copied or saved to determine if they contain a virus or other potentially unwanted
code. On-access scanning is also called real-time scanning.
On-Demand (Default) — to create policies that are activated at set intervals or on
demand, to find a virus or other potentially unwanted code.
On-Demand (Find Viruses) — to create policies that are activated at set intervals or on
demand, to find a virus or other Potentially Unwanted Programs (PUPs) and other
possible threats.
On-Demand (Remove Viruses) — to create policies that are activated at set intervals or
on demand, and which remove viruses, Potentially Unwanted Programs (PUPs) and
other possible threats.
On-Demand (Find Banned Content) — to create policies that are activated at set intervals
or on demand, to find a banned content that you do not want to appear in email
messages.
On-Demand (Remove Banned Content) — to create policies that are activated at set
intervals or on demand, and which remove content that you do not want to appear
in email messages. For example, if an email message contains a particular word or
phrase, you can set up a policy to automatically replace the content of that email
message with an alert message. You can use this type of policy to prevent
unwanted information entering or leaving your organization.
On-Demand (Full Scan) — to create policies that are activated at set intervals or on
demand.
Gateway — to create policies for email messages every time they are opened, copied
or saved to determine if it is a spam, phish, MIME files or HTML files.
113
10
McAfee® GroupShield™ 7.0 User Guide
Policy Manager
Scanners and filters
The core scanners, filters, and miscellaneous settings for each type of policy are
explained in detail below.
Core scanners
Core scanners in GroupShield 7.0 include:
Anti-Virus Scanner
Content Scanning
File Filtering
Anti-Spam
Anti-Phishing
Anti-virus scanner
Anti-Virus Scanner consists of computer programs that attempt to identify, thwart and
eliminate computer viruses and other malicious software.
1 From Policy Manager, select a submenu item. The policy page for the submenu item
appears.
2 Select a desired Policy from the drop-down menu.
3 Click Anti-Virus Scanner. The View Settings tab for the anti-virus scanner appears.
Figure 10-1 Anti-Virus Scanner
4 In Activation, select or deselect Enable to enable or disable the anti-virus scanner
settings for this policy.
114
10
McAfee® GroupShield™ 7.0 User Guide
Policy Manager
Scanners and filters
5 In Options, select any one of these anti-virus option set that you want to view or
configure:
High Protection — to view and configure the settings that are applied when a high
level of protection is required.
Medium Protection — to view and configure the settings that are applied when a
medium level of protection is required.
Low Protection — to view and configure the settings that are applied when a low
level of protection is required.
create new set of options — to create a new set of options for the selected policy.
For step-by-step instructions to create new set of options, refer to Creating new set of
options for Anti-Virus Scanner on page 115.
Note
6 Click the Edit link under Options to edit the selected option set.
7 In Actions to take, view/edit a summary of the actions that will be taken in different
circumstances. To change those actions, click Edit.
For information editing anti-virus scanner actions, refer to Editing anti-virus scanner
actions on page 118
Note
Creating new set of options for Anti-Virus Scanner
1 From Policy Manager, select a submenu item that has anti-virus scanner. The policy
page for the submenu item appears.
2 Choose a desired policy from the drop-down.
3 Click Anti-Virus Scanner. The View Settings tab for the anti-virus scanner appears.
4 In the Options drop-down menu, click create new set of options. The Anti-Virus Scanner
Settings page appears, which has four tabs:
Basic Options
Advanced
Packers
PUPs
5 In Basic Options tab, under Specify which files to scan, select one of these options:
Scan all files — to specify that all the files should be scanned, regardless of their
type.
115
10
McAfee® GroupShield™ 7.0 User Guide
Policy Manager
Scanners and filters
Default file types — to specify that only the default file types should be scanned.
Defined file types — to specify which file types should be scanned.
6 Under Scanner options, select the scanner options you require. You can select:
Scan archive files (ZIP, ARJ, RAR...) — to scan inside archive files, such as ZIP files.
Find unknown file viruses — to use heuristic analysis techniques to search for
unknown viruses.
Find unknown macro viruses — to find unknown viruses in macros.
Scan all files for macros — to scan all files for macros.
Find all macros and treat as infected — to find macros in files and treat them as
infected items.
Remove all macros from document files — to remove all macros from the document
files.
7 In Advanced tab, under Custom malware categories, specify which items should be
treated as malware. There are two ways to select malware types:
Select the malware types from the list of checkboxes below Custom malware
categories.
Select Specific detection names and click Add.
When typing in a name, you can use wildcards for pattern matching.
Note
8 Select or deselect the option Do not perform custom malware check if the object has already
been cleaned to specify, if items that have already been cleaned successfully should
be subject to the custom malware check or not.
9 Under Clean options, specify what happens to files that are reduced to zero bytes
after being cleaned. Select any one of these options:
Keep zero byte file — to keep files that have been cleaned and is of zero bytes.
Remove zero byte file — to remove any file that has zero bytes after being cleaned.
Treat as a failure to clean — to treat zero byte files as if they cannot be cleaned, and
apply the failure to clean action.
10 In Packers, use:
Enable detection — to enable or disable the detection of packers.
116
10
McAfee® GroupShield™ 7.0 User Guide
Policy Manager
Scanners and filters
Exclude specified names — to specify which packers can be ignored.
Include only specified names — to specify which packers you want the software to
detect.
Add — to add packer names to a list.
Delete — to remove packer names from a list.
11 In PUPs, use:
Enable detection — to enable or disable the detection of PUPs. Click on the this
disclaimer link and read the disclaimer before configuring PUP detection.
Select the program types to detect — to specify whether each type of PUP listed below
should be detected or ignored:
Spyware
Adware
Remote administration tools
Dialers
Password crackers
Joke programs
Cookies
Other PUPs not included in the above categories.
Exclude specified names — to list by name the PUPs that you want the software to
ignore. For example, if you have enabled spyware detection, you can create a list of
spyware programs that you want the software to ignore.
Include only specified names — to list by name the PUPs that you want the software to
detect. For example, if you enable spyware detection, and specify that only named
spyware programs should be detected, all other spyware programs are ignored.
Add — to add PUP names to a list. You can use wildcards to match names.
Delete — to delete the PUP names that you have added.
Note
The McAfee website http://vil.nai.com/vil/default.aspx contains a list of PUP names.
Use the Search in Category option to select Potentially Unwanted Programs.
12 Click Save, then Apply.
117
10
McAfee® GroupShield™ 7.0 User Guide
Policy Manager
Scanners and filters
Editing anti-virus scanner actions
1 From Policy Manager, select a submenu item that has anti-virus scanner. The policy
page for the submenu item appears.
2 Choose a desired policy.
3 Click Anti-Virus Scanner. The View Settings tab for the anti-virus scanner appears.
4 Under Actions to take section, click the Edit link. The Anti-Virus Scanner Actions page
appears.
5 In Cleaning tab, under Virus and trojans cleaning, select the option Attempt to clean any
detected virus or trojan to enable the cleaning of any virus or trojan.
6 Under If cleaning succeeds, take the following action, select the desired option(s) if the
cleaning succeeds:
Log — to record the detection in a log.
Quarantine — to take a copy of the item and store it in the quarantine database.
Notify administrator — to send an alert message to the email administrator.
Notify sender — to send an alert message to the sender, when the original email
message does not originate in the same domain as Microsoft® Exchange Server
2003/2007.
Notify recipient — to send an alert message to the recipient, when the recipient is not
in the same domain as Microsoft® Exchange Server 2003/2007.
7 In the remaining tabs (Default Actions, Custom Malware, Packers, and PUPs), choose a
primary action from the drop-down list and select one or more secondary actions.
Note
In the Custom Malware tab, you can also see the custom malware categories that you
have selected while creating a new set of anti-virus scanner options (Advanced tab)
Primary and secondary anti-virus scanner actions
Primary actions for On-Access scan include:
Replace detected item with an alert — to replace the detected item with an alert
message.
Delete embedded item — to delete the detected item. For example, to delete an
attachment that triggers a detection rule.
Delete message — to delete the email message item.
Allow through — to allow the item to continue to the next scanning phase or on to its
final destination.
118
10
McAfee® GroupShield™ 7.0 User Guide
Policy Manager
Scanners and filters
Primary actions for On-Demand (Default), On-Demand (Find Viruses), On-Demand (Remove
Viruses), and On-Demand (Full Scan) scan include:
Replace detected item with an alert — to replace the detected item with an alert
message.
Delete message — to delete the email message item.
Allow through — to allow the item to continue to the next scanning phase or on to its
final destination.
Secondary actions for On-Access and On-Demand (Default) scan include:
Log — to record the detection in a log.
Quarantine — to take a copy of the item and store it in the quarantine database.
Notify administrator — to send an alert message to the email administrator.
Notify sender — to send an alert message to the sender, when the original email
message does not originate in the same domain as Microsoft® Exchange Server
2003/2007.
Notify recipient — to send an alert message to the recipient, when the recipient is not
in the same domain as Microsoft® Exchange Server 2003/2007.
Secondary actions for On-Demand (Find Viruses), On-Demand (Remove Viruses), and
On-Demand (Full Scan) scan include:
Log — to record the detection in a log.
Quarantine — to take a copy of the item and store it in the quarantine database.
Notify administrator — to send an alert message to the email administrator.
Content scanning
GroupShield can identify the textual data in a mail/attachment for scanning. You can
create content rules to specify banned content and assign them to the policies.
1 From Policy Manager, select a submenu item that has the content scanner. The policy
page for the submenu item appears.
2 Choose a desired policy from the drop-down list.
119
10
McAfee® GroupShield™ 7.0 User Guide
Policy Manager
Scanners and filters
3 Click Content Scanning. The View Settings tab for the content scanner appears.
4 In Activation, select or deselect Enable to enable or disable the content scanner
settings for this policy.
5 In Options, select:
Include document and database formats in content scanning
Scan the text of all attachments
6 Under When content is replaced due to a rule being triggered, use the following alert, select an
existing alert from the drop-down or click Create to create a new alert.
For step-by-step instructions about creating a new alert, refer to Creating a new alert on
page 120.
Note
If the alert text is not shown and you would like to preview it, click View/Hide to display
the text. If the alert text is displayed, click View/Hide to hide it.
You cannot customize the default alert messages because they are read-only.
Note
7 In Content Scanner rules and associated actions, click:
Add rule — to create a new content rule for this policy.
For step-by-step instructions on creating a new content rule, refer to Adding a new
content rule on page 122.
Note
Edit — to change the action associated with a content rule.
Delete — to delete a content rule.
Creating a new alert
1 From Policy Manager, select a submenu item. The policy page for the submenu item
appears.
2 Select a desired policy.
3 Click Content Scanning. The View Settings tab for the content scanner appears.
4 Under Options, click Create. The Alert Editor page appears.
5 Type a meaningful Alert name.
120
10
McAfee® GroupShield™ 7.0 User Guide
Policy Manager
Scanners and filters
6 Under Content Scanning Alert, choose the desired Style, Font, Size, and Tokens from the
respective drop-down lists.
These options are available only if you choose HTML content (WYSIWYG) from the Show
drop-down menu.
Note
7 Choose any of these tools available in Content Scanning Alert.
Bold — to make the selected text bold.
Italic — to make the selected text italic.
Underline — to underline the selected text.
Align Left — to left align the selected paragraph.
Center — to center the selected paragraph.
Align Right — to right align the selected paragraph.
Justify — to adjust the selected paragraph so that the lines within the paragraph
fill a given width, with straight left and right edges.
Ordered List — to make the selected text into a numbered list.
Unordered List — to make the selected text into a bulleted list.
Outdent — to move the selected text a set distance to the right.
Indent — to move the selected text a set distance to the left.
Text Color — to change the color of the selected text.
Background Color — change the background color of the selected text.
Horizontal Rule — to insert a horizontal line.
Insert Link — to insert a hyperlink where the cursor is currently positioned. In URL,
type the URL. In Text, type the name of the hyperlink as you want it to appear in
the alert message. If you want the link to open a new window, select Open link in
new window, then click Insert Link.
Insert Image — to insert an image where the cursor is currently positioned. In Image
URL, type the location of the image. In Alternative text, type the text you want to
use in place of the image when images are suppressed or the alert message is
displayed in a text-only browser. If you want to give the image a title, type the
title name in Use this text as the image title. Click Insert Image.
121
10
McAfee® GroupShield™ 7.0 User Guide
Policy Manager
Scanners and filters
Insert Table — to insert a table at the current cursor position. Type the values in
Rows, Columns, Table width, Border thickness, Cell padding, and Cell spacing to
configure the table, then click Insert Table.
8 From the Show drop-down menu, specify how the alert message should be
displayed within the user interface. You can select:
HTML content (WYSIWYG) — to hide the underlying HTML code and display only the
content of the alert message.
HTML content (source) — to display the HTML code as it appears before
compilation.
Plain-text content — to display the content as plain text.
9 Click Save, then Apply.
Click Reset to undo all changes you have made since you last saved the alert message.
Note
Adding a new content rule
1 From Policy Manager, select a submenu item. The policy page for the submenu item
appears.
2 Choose a desired policy.
3 Click Content Scanning. The View Settings tab for the content scanner appears.
4 Under Content Scanner rules and associated actions, click Add rule. The Content Rules page
appears.
5 Under Specify actions for a selection of content rules:
Select a rule group from the Select rules group drop-down menu that will trigger an
action if one or more of its rules are broken.
In Select rules from this group, specify if all rules or only rules with a specific severity
rating should be included. The options are Severity - Low, Severity - Medium, and
Severity - High.
Selecting the Select all option overrides all the three rules.
Note
122
10
McAfee® GroupShield™ 7.0 User Guide
Policy Manager
Scanners and filters
6 Under If detected, take the following action, choose the desired primary and secondary
content scanner actions.
See Primary and secondary content scanner actions on page 123.
Note
7 Click Save, then Apply.
Primary and secondary content scanner actions
Primary actions for On-Access scan include:
Replace item with an alert — to replace the detected item with an alert message.
Delete embedded item — to delete the detected item. For example, to delete an
attachment that triggers a detection rule.
Delete message — to delete the email message item.
Allow through — to allow the item to continue to the next scanning phase or on to its
final destination.
Primary actions for On-Demand (Default), On-Demand (Find Banned Content), On-Demand
(Remove Banned Content), and On-Demand (Full Scan) scan include:
Replace detected item with an alert — to replace the detected item with an alert
message.
Delete message — to delete the email message item.
Allow through — to allow the item to continue to the next scanning phase or on to its
final destination.
Secondary actions for On-Access and On-Demand (Default) scan include:
Log — to record the detection in a log.
Quarantine — to take a copy of the item and store it in the quarantine database.
Notify administrator — to send an alert message to the email administrator.
Notify sender — to send an alert message to the sender, when the original email
message does not originate in the same domain as Microsoft® Exchange Server
2003/2007.
123
10
McAfee® GroupShield™ 7.0 User Guide
Policy Manager
Scanners and filters
Notify recipient — to send an alert message to the recipient, when the recipient is not
in the same domain as Microsoft® Exchange Server 2003/2007.
Secondary actions for On-Demand (Find Banned Content), On-Demand (Remove Banned Content),
and On-Demand (Full Scan) scan include:
Log — to record the detection in a log.
Quarantine — to take a copy of the item and store it in the quarantine database.
Notify administrator — to send an alert message to the email administrator.
File filtering
You can configure the file filtering settings for a selected policy.
1 From Policy Manager, select a submenu item that has a file filter. The policy page for
the submenu item appears.
2 Choose a desired policy.
3 Click File Filtering. The View Settings tab for the file filtering scanner appears.
4 In Activation, select or deselect Enable to enable or disable the file filtering scanner
settings for the policy.
5 In Alert selection, specify which alert will be used when an infected mail triggers a file
filtering rule. You can also select an existing alert or use Create to create a new alert.
For step-by-step instructions on creating a new alert, refer to Creating a new alert on
page 120.
Note
If the alert text is not shown and you would like to preview it, click View/Hide to
display the text. If the alert text is displayed, click View/Hide to hide it.
6 From File filtering rules and associated actions, use:
Note
Available rules — to select an existing file filtering rule or create new file filtering
rules for the policy.
To create a new file filtering rule, select Create new rule. The File Filtering Rule page
appears. You can use the file filtering rules to monitor and restrict the movement
of files. You can even filter files according to their file name, category type, and
size.
For more information about Create a new rule, refer to Creating a new file filtering rule
on page 125.
124
10
McAfee® GroupShield™ 7.0 User Guide
Policy Manager
Scanners and filters
Change — to change the primary and secondary actions associated with a file
filtering rule.
For more information on changing the primary and secondary actions associated with a
file filtering rule, refer to Primary and secondary file filtering actions on page 127
Note
Delete — to delete the file filtering rule.
Creating a new file filtering rule
1 From Policy Manager, select a submenu item that has a file filter. The policy page for
the submenu item appears.
2 Choose a desired policy.
3 Click File Filtering. The View Settings tab for the file filtering scanner appears.
4 From the Available rules drop-down menu under File filtering rules and associated actions,
choose Create new rule. The File Filtering Rule page appears.
5 Enter a unique Rule name. Give the rule, a meaningful name, so that you can easily
identify it and what it does.
For example, FilesOver5MB.
6 In Filename filtering, select Enable file name filtering to enable file filtering according to
the file names.
For example, if you type *.exe, this file filtering rule is applied to any file that has a
.exe file name extension.
7 In Take action when the file name matches, specify the names of the files that are affected
by this rule.
You can use the * and ? wildcard characters to match multiple filenames. For
example, if you want to filter out executable files, type *.exe.
8 Click Add to add the file names to the filtering list or Delete to remove file names from
the filtering list.
9 In File category filtering, select Enable file category filtering to enable file filtering according
to their file type.
10 In Take action when the file category is, specify the type of files that are affected by this
rule.
File types are divided into categories and subcategories.
Note
125
10
McAfee® GroupShield™ 7.0 User Guide
Policy Manager
Scanners and filters
11 In File categories, click on a file type. An asterisk symbol (*) appears next to the file
type to indicate that the selected file type will be filtered.
12 In Subcategories, click on the subcategory you want to filter.
Note
Note
To select more than one subcategory, use Ctrl+Click or Shift+Click.
To select all of the subcategories, click All.
Click Clear selections to undo the last selection. Click on a desired File category you have
chosen (where the asterisk appears) and click Clear Selections to deselect it.
13 Select Extend this rule to unrecognized file categories to apply this rule to any other file
categories and subcategories that are not specifically mentioned in the categories
and subcategories lists.
14 In File size filtering, select Enable file size filtering to filter files according to their file size.
15 In Take action when the file size is, choose Greater than to specify that the action should
only be applied if the file is larger than the size specified.
16 Choose Less Than to specify that the action should only be applied if the file is smaller
than the size specified.
17 Click Save, then Apply.
126
10
McAfee® GroupShield™ 7.0 User Guide
Policy Manager
Scanners and filters
Primary and secondary file filtering actions
Primary actions for On-Access scan include:
Replace detected item with an alert — to replace the detected item with an alert
message.
Delete embedded item — to delete the detected item. For example, to delete an
attachment that triggers a detection rule.
Delete message — to delete the email message item.
Allow through — to allow the item to continue to the next scanning phase or on to its
final destination.
Primary actions for On-Demand (Default), and On-Demand (Full Scan) scan include:
Replace detected item with an alert — to replace the detected item with an alert
message.
Delete message — to delete the email message item.
Allow through — to allow the item to continue to the next scanning phase or on to its
final destination.
Secondary actions for On-Access and On-Demand (Default) scan include:
Log — to record the detection in a log.
Quarantine — to take a copy of the item and store it in the quarantine database.
Notify administrator — to send an alert message to the email administrator.
Notify sender — to send an alert message to the sender, when the original email
message does not originate in the same domain as Microsoft® Exchange Server
2003/2007.
Notify recipient — to send an alert message to the recipient, when the recipient is not
in the same domain as Microsoft® Exchange Server 2003/2007.
Secondary actions for On-Demand (Full Scan) scan include:
Log — to record the detection in a log.
Quarantine — to take a copy of the item and store it in the quarantine database.
127
10
McAfee® GroupShield™ 7.0 User Guide
Policy Manager
Scanners and filters
Notify administrator — to send an alert message to the email administrator.
Anti-spam
You can configure the file filtering settings for a selected policy.
1 From Policy Manager, select Gateway. The policy page for Gateway appears.
2 Choose a desired policy.
3 Click Anti-Spam. The View Settings tab for the anti-spam scanner appears.
4 In Activation, select or deselect Enable to enable or disable the anti-spam settings for
the policy.
5 In Options, select one of these:
Core Anti-Spam Settings — to view and configure the default anti-spam settings.
create new set of options — to create a new set of anti-spam setting options for a
selected policy.
For more information, refer to Creating new set of options for anti-spam settings on
page 129.
Note
Edit — to change the anti-spam setting options associated with a policy.
6 In Actions to take if spam is detected, click Edit. The Anti-Spam Action page appears with
three tabs:
High Score
Medium Score
Low Score
7 Based on the spam score (High, Medium or Low), choose the desired primary and
secondary actions in all the tabs.
Anti-spam scanner is applicable only to inbound email messages.
Note
Primary and secondary filtering actions for anti-spam
Primary actions for Gateway scan (for high, medium, and low spam score) include:
Route to System Junk Folder — to route the email messages to the system junk folder.
Route to User Junk Folder — to route the email messages to the user junk folder.
128
10
McAfee® GroupShield™ 7.0 User Guide
Policy Manager
Scanners and filters
Reject the Message — to reject the email message.
Delete message — to delete the email message item.
Allow through — to allow the item to continue to the next scanning phase or on to its
final destination.
Secondary actions for Gateway scan (for high, medium, and low spam score) include:
Log — to record the detection in a log.
Quarantine message — to take a copy of the item and store it in the quarantine
database.
Notify administrator — to send an alert message to the email administrator.
Creating new set of options for anti-spam settings
1 From Policy Manager, select Gateway. The policy page for the Gateway submenu item
appears.
2 Choose a desired policy from the drop-down.
3 Click Anti-Spam. The View Settings tab for the anti-spam scanner appears.
4 In Instance name, specify a name for the anti-spam settings. This field is mandatory.
5 In the Options drop-down menu, click create new set of options. The Anti-Spam Settings
page appears, with four tabs:
Options
Advanced
Mail Lists
Rules
6 In the Options tab, under Scoring, type the values for:
High score threshold — if the overall spam score is 15 or more.
Medium score threshold — if the overall spam score is 10 or more, but less than 15.
Low score threshold — if the overall spam score is 5 or more, but less than 10.
To use the default values of spam scores, select the Use default option.
Note
129
10
McAfee® GroupShield™ 7.0 User Guide
Policy Manager
Scanners and filters
Caution
These default settings have been carefully optimized to maintain the balance between
a high spam detection rate and a low false positive rate. In the unlikely event that you
need to change these settings, there is a technical notice available from Technical
Support.
7 In Reporting, under the Spam reporting threshold is drop-down menu, select High,
Medium, Low or Custom to specify the point at which an email message should be
marked as spam.
8 In Custom score, enter a specific spam score at which email messages should be
marked as spam. This field is enabled only if you select the Custom option in step 6.
9 Select or deselect the Add prefix to subject of spam messages option as desired.
10 From the Add a spam score indicator drop-down menu, choose one of these:
Never - not to add a spam score indicator to the Internet header of any email
message.
To spam messages only — to add a spam score indicator to the Internet header of
spam email messages only.
To non-spam messages only — to add a spam score indicator to the Internet header
of non-spam email messages only.
To all messages — to add a spam score indicator to the Internet header of all email
messages.
Spam score indicator is a symbol used in the spam report, that is added to the email
message's Internet headers, to indicate the amount of potential spam contained in an
email message.
Note
11 From the Attach a spam report drop-down menu, choose one of these:
Never - not to add a spam report to any of the email messages.
To spam messages only — to add a spam report to spam email messages only.
To non-spam messages only — to add a spam report to non-spam email messages
only.
To all messages — to add a spam report to all email messages.
130
10
McAfee® GroupShield™ 7.0 User Guide
Policy Manager
Scanners and filters
12 Select or deselect Verbose reporting to specify whether verbose reporting is required
or not.
Verbose reporting includes the names and descriptions of the anti-spam rules that
have been triggered.
Verbose reporting is available only if you do not choose Never in step 10.
Note
13 In the Advanced tab, use:
Maximum message size to scan (KB) — to specify the maximum size (in kilobytes) that
an email message can be scanned. You can enter a size up to 999,999,999
kilobytes, although typical spam email messages are quite small. Default value
is 250.
Maximum width of spam headers (Bytes) — to specify the maximum size (in bytes) that
the spam email message header can be. The minimum header width that you
can specify is 40 characters and the maximum is 999 characters. Default value
is 76.
Spammers often add extra information to headers for their own purposes.
Note
Maximum number of reported rules — to specify the maximum number of anti-spam
rules that can be included in a spam report. The minimum number of rules you
can specify is 1 and the maximum is 999. Default value is 180.
Header name — to specify a different name for the email header. You can use this
email header and its header value (below) when tracking email messages and
applying rules to those messages. These fields are optional, and accept up to 40
characters.
Header value — to specify a different header value for the email header.
Add header — to specify that the header should be added to none of the email
messages, all of the email messages, only spam email messages or only to
non-spam email messages.
Select or deselect the Use alternative header names when a mail is not spam option as
required.
131
10
McAfee® GroupShield™ 7.0 User Guide
Policy Manager
Scanners and filters
Select a required Spam profile from the drop-down.
A spam profile is a set of characteristics that identify a category of spam. To enable the
anti-spam software to better detect spam, users can submit examples of spam, which
enables the software to learn to recognize further spam. The anti-spam software builds
a spam profile - a view of what the users regard as spam.
Note
14 In the Mail Lists tab, under Blacklists and Whitelists, enter the email addresses of the
blacklisted and whitelisted senders and recipients.
Email messages sent to or from an email address on a blacklist are treated as spam,
even if they do not contain spam-like characteristics.
Email messages sent to or from email addresses on a whitelist are not treated as
spam, even if they contain spam-like characteristics.
Click Add to add email addresses to a list and the checkbox beside each address to
specify whether it is currently enabled or not. Click Delete to remove an email address
from the list.
Note
You cannot add the same email address more than once.
15 In Rules tab, click the Edit link of a rule to enable or disable it and to change its spam
score. Then click the Save link of that corresponding rule.
Click Reset to return to the default anti-spam settings.
Note
16 Click Save, then Apply.
Anti-phishing
You can configure the anti-phish settings for a selected policy.
1 From Policy Manager, select Gateway. The policy page for Gateway appears.
2 Choose a desired policy.
3 Click Anti-Phishing. The View Settings tab for the anti-phish appears.
4 In Activation, select or deselect Enable to enable or disable the anti-phishing settings
for the policy.
5 In the Options drop-down menu, select one of these:
Core Anti-Phishing Settings — to view and configure the default anti-phishing
settings.
132
10
McAfee® GroupShield™ 7.0 User Guide
Policy Manager
Scanners and filters
create new set of options — to create a new set of options for anti-phising setting of
a selected policy.
For more information, refer to Creating new set of options for anti-phishing settings on
page 133
Note
Edit — to change the anti-phishing setting options associated with a policy.
6 In Actions, click Edit. The Anti-Phishing Actions page appears.
7 Choose the desired primary and secondary actions.
Anti-phish scanner is applicable only to inbound email messages.
Note
Primary and secondary filtering actions for anti-phish
Primary actions for Gateway scan (for high, medium, and low spam score) include:
Reject the Message — to reject the email message.
Delete message — to delete the email message item.
Allow through — to allow the item to continue to the next scanning phase or on to its
final destination.
Secondary actions for Gateway scan (for high, medium, and low spam score) include:
Log — to record the detection in a log.
Quarantine message — to take a copy of the item and store it in the quarantine
database.
Notify administrator — to send an alert message to the email administrator.
Creating new set of options for anti-phishing settings
1 From Policy Manager, select Gateway. The policy page for the Gateway submenu item
appears.
2 Choose a desired policy from the drop-down.
3 Click Anti-Phishing. The View Settings tab for the anti-phishing scanner appears.
4 In the Options drop-down menu, click create new set of options. The Anti-Phishing Settings
page appears.
133
10
McAfee® GroupShield™ 7.0 User Guide
Policy Manager
Scanners and filters
5 In Instance name, specify a name for the anti-phishing settings. This field is
mandatory.
6 In Reporting options, select or deselect these options as required:
Add prefix to subject of phishing messages — to specify that you want to add text to
the start of the subject line of any email message that probably contains phish.
Add a phish indicator header to messages — to specify whether a phish indicator is
added to the Internet header of any email message that probably contains phish.
Attach a phish report — to specify whether a phish report should be generated and
added to an email message.
Verbose reporting — to specify whether the names and a detailed description of
the anti-phish rules that have been triggered should be included in the email
message. This option is available only if the Attach a phish report option is selected.
7 Click Save, then Apply.
134
10
McAfee® GroupShield™ 7.0 User Guide
Policy Manager
Scanners and filters
Filters
Filters in GroupShield 7.0 include:
Corrupt Content
Protected Content
Encrypted Content
Signed Content
Password-Protected Files
Scanner Control
MIME Mail Settings
HTML Files
Mail Size Filtering
Corrupt content
The content in some mails can be corrupt, which means such content cannot be
scanned. Corrupt Content policy specifies how the mails with corrupt content are
handled when detected.
1 From Policy Manager, select a submenu item. The policy page for the submenu item
appears.
2 Choose a desired policy.
3 Click Corrupt Content. The View Settings tab for the corrupt content filter appears.
4 In Activation, select or deselect Enable to enable or disable the corrupt content filter
settings for the policy.
5 In Actions, view the action that will be taken when corrupt content is detected.
To change those actions, click the Edit link.
Note
For information on editing the actions that will be taken when corrupt content is
detected, refer to Primary and secondary filtering actions for corrupt content on
page 136.
135
10
McAfee® GroupShield™ 7.0 User Guide
Policy Manager
Scanners and filters
Primary and secondary filtering actions for corrupt content
Primary actions for On-Access scan include:
Replace detected item with an alert — to replace the detected item with an alert
message.
Delete embedded item — to delete the detected item. For example, to delete an
attachment that triggers a detection rule.
Delete message — to delete the email message item.
Allow through — to allow the item to continue to the next scanning phase or on to its
final destination.
Primary actions for On-Demand (Default), and On-Demand (Full Scan) scan include:
Replace detected item with an alert — to replace the detected item with an alert
message.
Delete message — to delete the email message item.
Allow through — to allow the item to continue to the next scanning phase or on to its
final destination.
Secondary actions for On-Access and On-Demand (Full Scan) scan include:
Log — to record the detection in a log.
Quarantine — to take a copy of the item and store it in the quarantine database.
Notify administrator — to send an alert message to the email administrator.
Secondary actions for On-Demand (Default) scan include:
Log — to record the detection in a log.
Quarantine — to take a copy of the item and store it in the quarantine database.
Notify administrator — to send an alert message to the email administrator.
Notify sender — to send an alert message to the sender, when the original email
message does not originate in the same domain as Microsoft® Exchange Server
2003/2007.
136
10
McAfee® GroupShield™ 7.0 User Guide
Policy Manager
Scanners and filters
Notify recipient — to send an alert message to the recipient, when the recipient is not
in the same domain as Microsoft® Exchange Server 2003/2007.
Protected content
The content of some mails can be protected, which means that content cannot be
scanned. For example, password-protected MS Office files. Protected Content policy
specifies how the mails with protected content are handled when detected.
1 From Policy Manager, select a submenu item. The policy page for the submenu item
appears.
2 Choose a desired policy.
3 Click Protected Content. The View Settings tab for the protected content filter appears.
4 In Activation, select or deselect Enable to enable or disable the protected content filter
settings for the policy.
5 In Actions, view the action that will be taken when protected content is detected. To
change those actions, click the Edit link.
Note
For more information on editing the actions that will be taken when a protected content
is detected, refer to Primary and secondary filtering actions for protected content on
page 137.
Primary and secondary filtering actions for protected content
Primary actions for On-Access scan include:
Replace detected item with an alert — to replace the detected item with an alert
message.
Delete embedded item — to delete the detected item. For example, to delete an
attachment that triggers a detection rule.
Delete message — to delete the email message item.
Allow through — to allow the item to continue to the next scanning phase or on to its
final destination.
Primary actions for On-Demand (Default), On-Demand (Find Banned Content), On-Demand
(Remove Banned Content), and On-Demand (Full Scan) scan include:
Replace detected item with an alert — to replace the detected item with an alert
message.
137
10
McAfee® GroupShield™ 7.0 User Guide
Policy Manager
Scanners and filters
Delete message — to delete the email message item.
Allow through — to allow the item to continue to the next scanning phase or on to its
final destination.
Secondary actions for On-Access, On-Demand (Find Banned Content), On-Demand (Remove
Banned Content) scan include:
Log — to record the detection in a log.
Quarantine — to take a copy of the item and store it in the quarantine database.
Notify administrator — to send an alert message to the email administrator.
Secondary actions for On-Demand (Default) scan include:
Log — to record the detection in a log.
Quarantine — to take a copy of the item and store it in the quarantine database.
Notify administrator — to send an alert message to the email administrator.
Notify sender — to send an alert message to the sender, when the original email
message does not originate in the same domain as Microsoft® Exchange Server
2003/2007.
Notify recipient — to send an alert message to the recipient, when the recipient is not
in the same domain as Microsoft® Exchange Server 2003/2007.
Encrypted content
Some email messages can be encrypted, which means such content cannot be
scanned. For example, any file encrypted with a key. Encrypted Content policy
specifies how the emails with protected content are handled when detected.
1 From Policy Manager, select a submenu item. The policy page for the submenu item
appears.
2 Choose a desired policy.
3 Click Encrypted Content. The View Settings tab for the protected content filter appears.
4 In Activation, select or deselect Enable to enable or disable the encrypted content
filter settings for the policy.
138
10
McAfee® GroupShield™ 7.0 User Guide
Policy Manager
Scanners and filters
5 In Actions, view the action that will be taken when encrypted content is detected. To
change those actions, click the Edit link.
Note
Primary and secondary filtering actions for encrypted content is the same as those of
protected content. Refer to Primary and secondary filtering actions for protected
content on page 137.
Signed content
Whenever information is transferred/uploaded electronically, it can accidentally or
willfully be altered. To overcome this, some software use a digital signature - the
electronic form of a handwritten signature.
A digital signature is extra information added to an email message that identifies and
authenticates the information in that email. It is encrypted and acts like a unique
summary of the information that is signed with a message digest in the email message.
If the email message contains a virus, bad content or is too large, the software might
clean or remove some part of the message. The email is still valid, and can be read, but
the original digital signature is 'broken'. You cannot rely on the contents of the email
because the contents might also have been altered in other ways. Signed content
policy specifies how email messages with digital signatures are handled.
1 From Policy Manager, select a submenu item. The policy page for the submenu item
appears.
2 Choose a desired policy.
3 Click Signed Content. The View Settings tab for the signed content filter appears.
4 In Activation, select or deselect Enable to enable or disable the signed content filter
settings for the policy.
5 In Actions, view the action that will be taken when signed content is detected. To
change those actions, click the Edit link.
Note
For more information on editing the actions that will be taken when a signed content is
detected, refer to Primary and secondary filtering actions for signed content on
page 139
Primary and secondary filtering actions for signed content
Primary actions for On-Access scan include:
Replace detected item with an alert — to replace the detected item with an alert
message.
139
10
McAfee® GroupShield™ 7.0 User Guide
Policy Manager
Scanners and filters
Delete embedded item — to delete the detected item. For example, to delete an
attachment that triggers a detection rule.
Allow changes to break the signature— to break the signature of the signed content
which leads to the change of the content before being uploaded.
Allow through — to allow the item to continue to the next scanning phase or on to its
final destination.
Primary actions for On-Demand(Default), On-Demand (Find Banned Content), On-Demand
(Remove Banned Content), and On-Demand(Full Scan) scan include:
Replace detected item with an alert — to replace the detected item with an alert
message.
Delete message — to delete the email message item.
Allow changes to break the signature— to break the signature of the signed content
which leads to the change of the content before being uploaded.
Allow through — to allow the item to continue to the next scanning phase or on to its
final destination.
Secondary actions for On-Access, On-Demand(Default), On-Demand (Find Banned Content),
On-Demand (Remove Banned Content), and On-Demand(Full Scan) scan include:
Log — to record the detection in a log.
Quarantine — to take a copy of the item and store it in the quarantine database.
Notify administrator — to send an alert message to the email administrator.
Notify sender — to send an alert message to the sender, when the original email
message does not originate in the same domain as Microsoft® Exchange Server
2003/2007.
Notify recipient — to send an alert message to the recipient, when the recipient is not
in the same domain as Microsoft® Exchange Server 2003/2007.
Password-protected files
Password-protected files cannot be scanned. For example, RAR or ZIP files.
Password-protected files policy specifies how the email messages containing a
password-protected content are handled when detected.
140
10
McAfee® GroupShield™ 7.0 User Guide
Policy Manager
Scanners and filters
1 From Policy Manager, select a submenu item. The policy page for the submenu item
appears.
2 Choose a desired policy.
3 Click Password-Protected Files. The View Settings tab for the password-protected file
filter appears.
4 In Activation, select or deselect Enable to enable or disable the password-protected
file filter settings for the policy.
5 In Actions, view the action that will be taken when password-protected content is
detected. To change those actions, click the Edit link.
Note
For more information on editing the actions that will be taken when a
password-protected content is detected, refer to Primary and secondary actions for
password-protected content on page 141.
Primary and secondary actions for password-protected content
Primary actions for On-Access scan include:
Replace item with an alert — to replace the detected item with an alert message.
Delete message — to delete the email message item.
Delete embedded item — to delete the detected item. For example, to delete an
attachment that triggers a detection rule.
Allow through — to allow the item to continue to the next scanning phase or on to its
final destination.
Primary actions for On-Demand(Default), On-Demand (Find Banned Content), On-Demand
(Remove Banned Content), and On-Demand(Full Scan) scan include:
Replace item with an alert — to replace the detected item with an alert message.
Delete message — to delete the email message item.
Allow through — to allow the item to continue to the next scanning phase or on to its
final destination.
Secondary actions for On-Access, On-Demand (Find Banned Content), On-Demand (Remove
Banned Content), and On-Demand(Full Scan) scan include:
Log — to record the detection in a log.
141
10
McAfee® GroupShield™ 7.0 User Guide
Policy Manager
Scanners and filters
Quarantine — to take a copy of the item and store it in the quarantine database.
Notify administrator — to send an alert message to the email administrator.
Secondary actions for On-Demand(Default) scan include:
Log — to record the detection in a log.
Quarantine — to take a copy of the item and store it in the quarantine database.
Notify administrator — to send an alert message to the email administrator.
Notify sender — to send an alert message to the sender, when the original email
message does not originate in the same domain as Microsoft® Exchange Server
2003/2007.
Notify recipient — to send an alert message to the recipient, when the recipient is not
in the same domain as Microsoft® Exchange Server 2003/2007.
Scanner control
You can use Scanner Control settings to limit the nesting level, file size or scan time that
is allowed when scanning email messages.
1 From Policy Manager, select a submenu item. The policy page for the submenu item
appears.
2 Choose a desired policy.
3 Click Scanner Control. The View Settings tab for scanner control appears.
4 In Activation, select or deselect Enable to enable or disable the password-protected
file filter settings for the policy.
5 In Options, select the scanner control option set that you want to view or configure.
You can select:
Core Scanner Control Settings — to view a summary of the scanner control option
set that is used by default when no alternative scanner control option sets are
available.
create new set of options — to create a new option set for this policy.
For step-by-step instructions, refer to Creating new set of options for scanner control
settings on page 143.
Note
Edit — to edit the selected option set.
142
10
McAfee® GroupShield™ 7.0 User Guide
Policy Manager
Scanners and filters
6 In Alert selection, select an existing alert to use when a scanner control option is
triggered, else Create a new alert.
If the alert text is not shown and you would like to preview it, click View/Hide to
display the text. If the alert text is displayed, click View/Hide to hide it.
For more information, refer to Creating a new alert on page 120.
Note
7 In Actions, view/edit the actions that will be taken when the level of nesting, file size
or scan time, is exceeded. To change those actions, click Edit.
Note
Fore more information, refer to Editing primary and secondary scanner control actions
on page 143.
Creating new set of options for scanner control settings
1 From Policy Manager, select a submenu item. The policy page for the submenu item
appears.
2 Choose a desired policy.
3 Click Scanner Control. The View Settings tab for scanner control appears.
4 From the Options drop-down menu, choose create new set of options. The Scanner Control
page appears.
5 Specify an Instance name for the scanner control settings. This field is mandatory.
6 In Maximum nesting level, specify the level to which the scanner should scan, when an
attachment contains compressed files, and other compressed files within. We
recommend that you limit scanning to a depth of 100.
7 In Maximum expanded file size (MB), specify the maximum number of megabytes a file
can be when expanded for scanning. We recommend a maximum size of 100
megabytes.
8 In Maximum scan time (minutes), specify the maximum number of minutes that should
be spent scanning any file. We recommend a maximum of 10 minutes.
9 Click Save, then Apply.
Editing primary and secondary scanner control actions
In Scanner Control Actions, you can specify the actions taken when:
The maximum nesting level is exceeded.
The maximum file size is exceeded.
143
10
McAfee® GroupShield™ 7.0 User Guide
Policy Manager
Scanners and filters
The maximum scanning time is exceeded.
Primary actions for On-Access scan include:
Replace detected item with an alert — to replace a detected item, such as an attachment,
with an alert message.
Delete embedded item — to delete the detected item. For example, to delete an
attachment that triggers a detection rule.
Delete message — to delete the email message item.
Allow through — to allow the item to continue to the next scanning phase or on to its
final destination.
Primary actions for On-Demand (Default), On-Demand (Find Viruses), On-Demand (Remove
Viruses), On-Demand (Find Banned Content), On-Demand (Remove Banned Content), On-Demand
(Full Scan), and Gateway scan include:
Replace detected item with an alert — to replace a detected item, such as an attachment,
with an alert message.
Delete message — to delete the email message item.
Allow through — to allow the item to continue to the next scanning phase or on to its
final destination.
Secondary actions for On-Access and On-Demand (Default) scan include:
Log — to record the detection in a log.
Quarantine — to take a copy of the item and store it in the quarantine database.
Notify administrator — to send an alert message to the email administrator.
Notify sender — to send an alert message to the sender, when the original email
message does not originate in the same domain as Microsoft® Exchange Server
2003/2007.
Notify recipient — to send an alert message to the recipient, when the recipient is not
in the same domain as Microsoft® Exchange Server 2003/2007.
144
10
McAfee® GroupShield™ 7.0 User Guide
Policy Manager
Scanners and filters
Secondary actions for On-Demand (Find Viruses), On-Demand (Remove Viruses), On-Demand
(Find Banned Content), On-Demand (Remove Banned Content), On-Demand (Full Scan), and
Gateway scan include:
Log — to record the detection in a log.
Quarantine — to take a copy of the item and store it in the quarantine database.
Notify administrator — to send an alert message to the email administrator.
MIME mail settings
MIME Mail settings specify how MIME messages are handled.
MIME (Multipurpose Internet Mail Extensions) is a communications standard that
enables the transfer of non-ASCII formats over protocols that supports only 7-bit ASCII
characters.
MIME mail settings are standard and may be modified only by advanced users.
Note
1 From Policy Manager, select a submenu item. The policy page for the submenu item
appears.
2 Choose a desired policy.
3 Click MIME Mail Settings. The View Settings tab for the MIME mail settings appears.
Figure 10-2 MIME Mail Settings
4 In Activation, select or deselect Enable to enable or disable the MIME mail settings
for the policy.
145
10
McAfee® GroupShield™ 7.0 User Guide
Policy Manager
Scanners and filters
5 In Options, choose any one of these:
Core Mail Settings — to view and configure the default mail size filter settings.
An existing instance of MIME mail setting.
create new set of options — to create a new set of MIME mail setting options for a
selected policy.
For more information, refer to Creating new set of options for MIME mail settings on
page 146.
Note
Edit — to change the MIME mail setting options associated with a policy.
6 In Alert selection, choose the Default Blocked MIME Type Alert or an existing alert from the
drop-down, else choose to Create a new alert.
For more information, refer to Creating a new alert on page 120.
Note
7 In Incomplete message actions, view/edit the actions taken when a partial MIME or
external MIME type messages are detected. To change those actions, click Edit.
For more information, see Primary and secondary incomplete message actions on
page 148.
Note
Creating new set of options for MIME mail settings
1 From Policy Manager, select a submenu item. The policy page for the submenu item
appears.
2 Choose a desired policy.
3 Click MIME Mail Settings. The View Settings tab for MIME mail settings appear.
4 From the Options drop-down menu, choose create new set of options. The Mail Settings
page appears with four tabs: Options, Advanced, MIME Types, and Character Sets.
5 Specify an Instance name for MIME mail settings. This field is mandatory.
6 In the Options tab, type a Prefix to message subject.
7 In Preferred re-encoding of attachments in a MIME message, choose one of these
re-encoding methods that is used when re-encoding attachments in MIME
messages:
Re-encode using the original message encoding
146
10
McAfee® GroupShield™ 7.0 User Guide
Policy Manager
Scanners and filters
Re-encode using HTML with numeric unicode references
Re-encode using the following character set (in this case, choose a character set from
the drop-down list).
8 In Preferred re-encoding of modified subject headers, choose one of these re-encoding
methods that is used when re-encoding the subject headers in the MIME
messages:
Re-encode using UTF-8
Re-encode using the original encoding scheme
Re-encode using the following character set (in this case, choose a character set from
the drop-down list).
9 Choose one of these options if the re-encoding of a subject header fails:
Treat as an error - the MIME message is bounced.
Fallback to UTF-8 - the MIME message is encoded into UTF-8.
You can perform step 9 only if you choose Re-encode using the original encoding scheme
or Re-encode using the following character set from Preferred re-encoding of modified
subject headers.
Note
10 In Advanced tab, choose one of these encoding methods to use while encoding the
text part of an email message:
Quoted-printable, which is best suited for messages that mainly contain ASCII
characters, but also contains some byte values outside that range.
Base64, which has a fixed overhead and is best suited for non-text data, and for
messages that do not have a lot of ASCII text.
8-Bit, which is best suited for use with SMTP servers that support the 8BIT MIME
transport SMTP extension.
11 Select or deselect Do not encode if text is 7-bit as required.
12 In Default decode character set, choose a character set that should be used for decoding
when one is not specified by the MIME headers.
13 In Maximum number of MIME parts, specify the maximum number of MIME parts that
can be contained in a MIME message. Default value is 10000 MIME parts.
14 In Header corruption in a MIME message, choose the desired option:
Treat as corrupt content and take appropriate action
147
10
McAfee® GroupShield™ 7.0 User Guide
Policy Manager
Scanners and filters
Do not treat as corrupt content
15 In NULL characters in the headers of a MIME message, choose the desired option:
Treat as corrupt content and take appropriate action
Do not treat as corrupt content
16 In the MIME Types tab, specify which MIME types should be treated as text
attachments and which, as binary attachments.
Note
Click Add to add the MIME types to the list or Delete to delete a MIME type from a list.
Duplicate entries are not allowed.
17 In the Character Sets tab, choose a Character set and corresponding Alternatives.
Deselect Fixed and click Add to specify an alternative character set mapping to the
one specified in the MIME message.
Note
Click Edit to edit character mappings, Delete to delete character mappings and Save to
save any changes you have made to the character mappings.
The Save option is available only when you click Edit.
18 Click Save, then Apply.
Primary and secondary incomplete message actions
Primary actions for On-Access, On-Demand (Default), On-Demand (Find Viruses), On-Demand
(Remove Viruses), On-Demand (Find Banned Content), On-Demand (Remove Banned Content),
On-Demand (Full Scan), and Gateway scan include:
Allow through - the MIME message is allowed to pass on to its final destination.
Delete message - the MIME message is deleted.
Replace message with an alert - the MIME message is replaced with an alert message.
The secondary actions for On-Access scan include:
Log — to record the detection in a log.
Quarantine — to take a copy of the item and store it in the quarantine database.
Notify administrator — to send an alert message to the email administrator.
Notify sender — to send an alert message to the sender, when the original email
message does not originate in the same domain as Microsoft® Exchange Server
2003/2007.
148
10
McAfee® GroupShield™ 7.0 User Guide
Policy Manager
Scanners and filters
Notify recipient — to send an alert message to the recipient, when the recipient is not
in the same domain as Microsoft® Exchange Server 2003/2007.
Secondary actions for On-Demand (Default) has two additional primary actions namely:
Notify internal sender — to send an alert message to the internal sender, when the
original email message originates in the same domain as Microsoft® Exchange
Server 2003/2007.
Notify internal recipient — to send an alert message to the internal recipient, when the
recipient is in the same domain as Microsoft® Exchange Server 2003/2007.
Secondary actions for On-Demand (Find Banned Content), On-Demand (Remove Banned Content),
On-Demand (Full Scan), and Gateway scan include:
Log — to record the detection in a log.
Quarantine — to take a copy of the item and store it in the quarantine database.
Notify administrator — to send an alert message to the email administrator.
HTML files
1 From Policy Manager, select a submenu item. The policy page for the submenu item
appears.
2 Choose a desired policy.
3 Click HTML Files. The View Settings tab for HTML Files appear.
4 In Activation, select or deselect Enable to enable or disable the HTML File settings for
the policy.
5 In Options, choose any one of these:
Default HTML Settings — to view and configure the default HTML File settings.
An existing instance of HTML File settings.
create new set of options — to create a new set of HTML File setting options for a
selected policy.
Note
For more information, refer to Creating a new set of options for HTML file settings on
page 150.
149
10
McAfee® GroupShield™ 7.0 User Guide
Policy Manager
Scanners and filters
Edit — to change the HTML File setting options associated with a policy.
Creating a new set of options for HTML file settings
1 From Policy Manager, select a submenu item. The policy page for the submenu item
appears.
2 Choose a desired policy.
3 Click HTML Files. The View Settings tab for HTML File settings appear.
4 From the Options drop-down menu, choose create new set of options. The HTML Files
page appears.
5 Specify an Instance name for HTML File settings. This field is mandatory.
6 In Scan the following elements, select any of these option(s):
Comments — to scan for comment elements in the HTML message.
For example: <!-- comment text --!>
Metadata — to scan for metadata elements in the HTML message.
For example: < META EQUI="Expires" Content="Tue, 04 June 2007
21:29:02">
Links URLs ("<ahref=...") — to scan for URL elements in the HTML message.
For example: <a HREF="McAfee.htm">
Source URLS ("<img src=...") — to scan for source URL elements in the HTML
message.
For example:
<IMG SRC="..\..\images\icons\mcafee_logo_rotating75.gif">
JavaScript / VBScript — to scan for JavaScript or Visual Basic script in the HTML
message.
For example: <script language="javascript" scr="mfe/mfe.js">
7 In Remove the following executable elements, select any of these option(s):
JavaScript / VBScript — to remove JavaScript or Visual Basic script elements from
the HTML message.
For example: <script language="javascript" scr="mfe/mfe.js">
Java applets — to remove Java applet elements from the HTML message.
For example: <APPLET code="XYZApp.class" codebase="HTML ....."
></APPLET>
150
10
McAfee® GroupShield™ 7.0 User Guide
Policy Manager
Scanners and filters
ActiveX controls — to remove ActiveX control elements from the HTML message.
For example: <OBJECT ID="clock"
data="http://www.mcafee.com/vscan.png" type="image/png"> VirusScan
Image </OBJECT>
Macromedia Flash — to remove Macromedia Flash elements from the HTML
message. This option gets enabled if you have selected ActiveX controls.
For example: <EMBED SCR="somefilename.swf" width="500" height="200">
8 Click Save, then Apply.
Mail size filtering
1 From Policy Manager, select Gateway. The policy page for Gateway appears.
2 Choose a desired policy.
3 Click Mail Size Filtering. The View Settings tab for mail size filtering appears.
4 In Activation, select or deselect Enable to enable or disable the mail size filter settings
for the policy.
5 In Options, choose any one of these:
Default Settings — to view and configure the default mail size filter settings.
An existing instance of mail size filter setting.
create new set of options — to create a new set of mail size filter setting options for
a selected policy.
For more information, refer to Creating new set of options for mail size filter on
page 151.
Note
Edit — to change the mail size filter setting options associated with a policy.
6 In Actions, view/edit the mail size filtering actions.
Note
For more information, see Primary and secondary actions for mail size filtering on
page 152.
Creating new set of options for mail size filter
1 From Policy Manager, select Gateway. The policy page for Gateway appears.
2 Choose a desired policy.
3 Click Mail Size Filtering. The View Settings tab for mail size filtering appears.
151
10
McAfee® GroupShield™ 7.0 User Guide
Policy Manager
Scanners and filters
4 From the Options drop-down menu, click create new set of options. The Mail Size Filtering
page appears.
5 Specify an Instance name for the mail size filter settings. This field is mandatory.
6 In Maximum overall mail size (KB), specify the maximum size (in kilobytes) that an email
message can be. We recommend 100,000 kilobytes (100 megabytes).
7 In Maximum attachment size (KB), specify the maximum size (in kilobytes) that an email
message attachment can be. We recommend 32000 kilobytes.
8 In Maximum number of attachments, specify the maximum number of attachments an
email message can have. We recommend a maximum of 500 attachments.
9 Click Save, then Apply.
Mail size filtering is applicable to both inbound and outbound email messages.
Note
Primary and secondary actions for mail size filtering
Primary actions in the Message Size tab include:
Replace all attachments with a single alert — to create a single alert for all attachments
and replace them instead of generating an alert for each attachment within an email
message.
Allow through — to allow the item to continue to the next scanning phase or on to its
final destination.
Primary actions in the Attachment Size tab include:
Replace the attachment with an alert — to replace the attachment with an alert. In this
case, an alert is generated for each attachment that triggers a detection.
Remove the attachment — to remove the attachment from the email message.
Allow through — to allow the item to continue to the next scanning phase or on to its
final destination.
Primary actions in the Attachment Count tab include:
Replace all attachments with a single alert — to create a single alert for all attachments
and replace them instead of generating an alert for each attachment within an email
message.
Remove all attachments — to remove all of the attachments from the email message.
Allow through — to allow the item to continue to the next scanning phase or on to its
final destination.
152
10
McAfee® GroupShield™ 7.0 User Guide
Policy Manager
Scanners and filters
Secondary actions are the same for all tabs.
Log — to record the detection in a log.
Quarantine — to take a copy of the item and store it in the quarantine database.
Notify administrator — to send an alert message to the email administrator.
Notify sender — to send an alert message to the sender, when the original email
message does not originate in the same domain as Microsoft® Exchange Server
2003/2007.
Notify recipient — to send an alert message to the recipient, when the recipient is not
in the same domain as Microsoft® Exchange Server 2003/2007.
Miscellaneous
Miscellaneous settings include:
Alert Settings
Disclaimer Text
Alert settings
Alert messages are used to notify a person when a particular event occurs. You can
use Alert Settings to set up additional information about these alerts.
1 From Policy Manager, select a submenu item. The policy page for the submenu item
appears.
2 Choose a desired policy.
3 Click Alert Settings. The View Settings tab for alert settings appear.
4 In Activation, select or deselect Enable to enable or disable the alert settings for the
policy.
5 In Options, choose any one of these:
Default Alert Settings — to view and configure the default alert settings.
An existing alert.
create new set of options — to create a new set of alert setting options for a selected
policy.
Note
For more information, refer to Creating new set of options for alert settings on
page 154.
153
10
McAfee® GroupShield™ 7.0 User Guide
Policy Manager
Scanners and filters
Edit — to change the alert setting options associated with a policy.
Creating new set of options for alert settings
1 From Policy Manager, select a submenu item. The policy page for the submenu item
appears.
2 Choose a desired policy.
3 Click Alert Settings. The View Settings tab for alert settings appears.
4 From the Options drop-down menu, click create new set of options. The Alert Settings
page appears.
5 Specify an Instance name for alert setting. This field is mandatory.
6 Choose HTML or Plain text as the Alert format.
7 From the Character encoding drop-down menu, choose a desired character set.
8 In Alert filename, specify the file name for this alert, including the appropriate HTML
(.htm) or plain text (.txt) file extension.
9 Select or deselect Enable alert headers to enable the use of an alert header.
10 In the Alert header text entry box, enter the header for the alert.
11 From Show, choose HTML content (WYSIWYG) or HTML content (source) depending on
whether the HTML text should be shown as compiled code or source code in the
Alert header.
Note
The Show option is only available if you have selected HTML as the alert message
format.
12 Select or deselect Enable alert footers to enable the use of an alert footer.
13 In the Alert footer text entry box, enter the footer for the alert.
14 From Show, choose HTML content (WYSIWYG) or HTML content (source) depending on
whether the HTML text should be shown as compiled code or source code in the
Alert footer.
Note
The Show option is only available if you have selected HTML as the alert message
format.
15 Click Save, then Apply.
154
10
McAfee® GroupShield™ 7.0 User Guide
Policy Manager
Scanners and filters
Disclaimer text
1 From Policy Manager, select Gateway. The policy page for Gateway appears.
2 Choose a desired policy.
3 Click Disclaimer Text. The View Settings tab for the disclaimer text settings appear.
4 In Activation, select or deselect Enable to enable or disable the disclaimer text settings
for the policy.
5 In Options, choose any one of these:
Default Settings — to view and configure the default disclaimer text settings.
An existing disclaimer text.
create new set of options — to create a new set of disclaimer text setting options for
a selected policy.
For more information, refer to Creating new set of options for disclaimer text on
page 155.
Note
Edit — to change the disclaimer text setting options associated with a policy.
Creating new set of options for disclaimer text
1 From Policy Manager, select Gateway. The policy page for Gateway appears.
2 Choose a desired policy.
3 Click Disclaimer Text. The View Settings tab for disclaimer text appears.
4 From the Options drop-down menu, click create new set of options. The Disclaimer Text
page appears.
5 Specify an Instance name for the disclaimer text. This field is mandatory.
6 In Disclaimer message (plain text only), type the disclaimer text message in plain text
format.
7 From the Insert disclaimer drop-down menu, choose Before any message text, After any
message text or As an attachment depending on where/how the disclaimer text should
be inserted in the email message.
8 Click Save, then Apply.
Disclaimers are applicable only to outbound email messages.
Note
155
10
McAfee® GroupShield™ 7.0 User Guide
Policy Manager
Shared resource
Shared resource
When setting up policies, you might want the same resource to be used by more than
one policy. For example, you might want to use the same disclaimer text in two
policies. The disclaimer text can be thought of as a resource that can be shared by more
than one policy. Instead of creating two disclaimer texts, you can create a single
copyright message that can be used by both policies.
You can use Shared Resource to:
View shared resource settings.
Create new resources.
Change the resource settings, so that the changes are picked up by all policies using
the shared resources.
Delete shared resources that are no longer in use.
Some resources cannot be deleted.
Note
Shared Resources page has three tabs namely:
Scanners & Alerts
Filter Rules
Time Slots
Scanners and alerts
In Scanners, you can configure the scanner-related settings that a policy can apply when
scanning the items. You can use:
Category — to select the type of settings you want to configure. The options are:
Anti-Virus Scanner
Anti-Spam
Anti-Phishing
MIME Mail Settings
Scanner Control
Alert Settings
Disclaimer Text
156
10
McAfee® GroupShield™ 7.0 User Guide
Policy Manager
Shared resource
HTML Files
Mail Size Filtering.
Create New — to create a new shared resource for a selected category.
Note
For detailed information, refer to Creating a new shared resource for anti-virus scanner,
Creating a new shared resource for anti-spam, Creating a new shared resource for
scanner control, and Creating a new shared resource for alert settings
Delete — to delete a resource that is no longer used by any of the policies. Some
resources cannot be deleted.
Edit — to change the resource settings.
In Alerts, you can use:
Category — to select the type of alert message you want to configure.
Create New — to create an alert message. The default alert message text is displayed,
and you edit it to create the new alert message.
For more information, refer to Creating a new alert on page 120
Note
Delete — to delete an alert message that is no longer used by any of the policies.
Edit — to change the alert message.
Rename — to rename the alert category.
View — to view an alert message.
Note
You can view only the default alert message for each type of alert. Default alert
messages cannot be edited or deleted.
Creating a new shared resource for anti-virus scanner
1 In Policy Manager, click Shared Resource. The Shared Resources page appears.
2 In Scanners & Alerts tab, choose Anti-Virus Scanner from the Category drop-down menu.
3 In the Scanners pane, click Create New. The Anti-Virus Scanner Settings page appears.
4 Perform step 5 - 12 of Creating new set of options for Anti-Virus Scanner on
page 115.
5 In the Alerts pane, choose a Category.
6 Click Create New and perform steps of Creating a new alert on page 120.
157
10
McAfee® GroupShield™ 7.0 User Guide
Policy Manager
Shared resource
Creating a new shared resource for anti-spam
1 In Policy Manager, click Shared Resource. The Shared Resources page appears.
2 In Scanners & Alerts tab, choose Anti-Spam from the Category drop-down menu.
3 In the Scanners pane, click Create New. The Anti-Spam Settings page appears.
4 Perform step 6 -16 of Creating new set of options for anti-spam settings on
page 129.
5 In the Alerts pane, choose a Category.
6 Click Create New and perform steps of Creating a new alert on page 120.
Creating a new shared resource for anti-phish
1 In Policy Manager, click Shared Resource. The Shared Resources page appears.
2 In Scanners & Alerts tab, choose Anti-Phishing from the Category drop-down menu.
3 In the Scanners pane, click Create New. The Anti-Phishing Settings page appears.
4 Perform step 5 -7 of Creating new set of options for anti-phishing settings on
page 133.
5 In the Alerts pane, choose a Category.
6 Click Create New and perform steps of Creating a new alert on page 120.
Creating a new shared resource for MIME mail settings
1 In Policy Manager, click Shared Resource. The Shared Resources page appears.
2 In Scanners & Alerts tab, choose MIME Mail Settings from the Category drop-down menu.
3 In the Scanners pane, click Create New. The Mail Settings page appears with four tabs:
Options, Advanced, MIME Types, and Character Sets.
4 Perform step 5 - 18 of Creating new set of options for MIME mail settings on
page 146.
5 In the Alerts pane, choose a Category.
6 Click Create New and perform steps of Creating a new alert on page 120.
Creating a new shared resource for scanner control
1 In Policy Manager, click Shared Resource. The Shared Resources page appears.
2 In Scanners & Alerts tab, choose Scanner Control from the Category drop-down menu.
3 In the Scanners pane, click Create New. The Scanner Control page appears.
158
10
McAfee® GroupShield™ 7.0 User Guide
Policy Manager
Shared resource
4 Enter the Instance name.
5 Enter the Maximum nesting level.
6 Enter the Maximum expanded file size (MB).
7 Enter the Maximum scan time (minutes).
8 Click Save.
9 In the Alerts pane, choose a Category.
10 Click Create New and perform steps of Creating a new alert on page 120.
Creating a new shared resource for alert settings
1 In Policy Manager, click on Shared Resource. The Shared Resources page appears.
2 In Scanners & Alerts tab, choose Alert Settings from the Category drop-down menu.
3 In the Scanners pane, click Create New. The Alert Settings page appears.
4 Perform step 5 - 15 of Creating new set of options for alert settings on page 154.
5 In the Alerts pane, choose a Category.
6 Click Create New and perform steps of Creating a new alert on page 120.
Creating a new shared resource for disclaimer text
1 In Policy Manager, click on Shared Resource. The Shared Resources page appears.
2 In Scanners & Alerts tab, choose Disclaimer Text from the Category drop-down menu.
3 In the Scanners pane, click Create New. The Disclaimer Text page appears.
4 Perform step 5 - 8 of Creating new set of options for disclaimer text on page 155.
5 In the Alerts pane, choose a Category.
6 Click Create New and perform steps of Creating a new alert on page 120.
Creating a new shared resource for HTML files
1 In Policy Manager, click on Shared Resource. The Shared Resources page appears.
2 In Scanners & Alerts tab, choose HTML Files from the Category drop-down menu.
3 In the Scanners pane, click Create New. The HTML Files page appears.
4 Perform step 5 - 8 of Creating a new set of options for HTML file settings on
page 150.
159
10
McAfee® GroupShield™ 7.0 User Guide
Policy Manager
Shared resource
5 In the Alerts pane, choose a Category.
6 Click Create New and perform steps of Creating a new alert on page 120.
Creating a new shared resource for mail size filtering
1 In Policy Manager, click on Shared Resource. The Shared Resources page appears.
2 In Scanners & Alerts tab, choose Mail Size Filtering from the Category drop-down menu.
3 In the Scanners pane, click Create New. The Mail Size Filtering page appears.
4 Perform step 5 - 8 of Creating new set of options for mail size filter on page 151.
5 In the Alerts pane, choose a Category.
6 Click Create New and perform steps of Creating a new alert on page 120.
Filter rules
In Content Scanner Rules, you can configure the rules that a policy can apply to the content
of mails, and text in attachments. You can use:
Category — to select the type of rules you want to configure.
New Category — to create a new category of rules.
Rename — to rename a category.
Delete — to delete a category that you no longer require.
Create New — to create a new rule.
For more information, refer to Creating a new content scanner rule on page 161
Note
Edit — to change the rule settings.
Delete — to delete a rule that is no longer used by any of the policies.
Note
There are two Delete links. One link is to delete a category present in the drop-down list
and the other one is to delete a rule that you have created.
You should give each new rule a unique and meaningful name. Avoid using names and
descriptions that might be offensive, because the they can be included in notifications
sent to users when a rule is triggered. Additionally, you do not want notifications to be
blocked because they contain banned content.
160
10
McAfee® GroupShield™ 7.0 User Guide
Policy Manager
Shared resource
In File Filtering Rules, you can set up rules that apply to file name, file type, and file size.
You can use:
Create New — to create a new file filtering rule.
For more information, refer to Creating new file filtering rule on page 162
Note
Delete — to delete a rule that is no longer used by any of the policies.
Edit — to change the rule settings.
When configuring policies, you can select which file filtering rules should be used, and
the order in which they are applied when scanning files.
Note
Creating a new content scanner rule
1 In Policy Manager, click on Shared Resource. The Shared Resources page appears.
2 Click Filter Rules tab.
3 In Content Scanner Rules pane, click Create New. The New Content Scanner Rule page
appears.
4 Enter a unique Rule Name.
5 Under Details, enter a brief description for the rule in the Description field.
6 Under the Word or Phrase tab, specify the words or phrases to look for, in The rule will
trigger when the following word or phrase is found.
7 Select the desired option(s):
Ignore case — If enabled, the rule is triggered for specified word or phrase of any
case.
Starts a longer word or phrase — If enabled, the rule is triggered for specified text
that begins with the word or phrase.
Use Wildcards — If enabled, the rule is triggered for the specified word or phrase
that contain wildcard character(s). (Wildcard characters are often used in place of
one or more characters when you do not know what the real character is or you
do not want to type the entire name).
Ends a longer word or phrase — If enabled, the rule is triggered for specified text that
forms the last part of the word or phrase.
161
10
McAfee® GroupShield™ 7.0 User Guide
Policy Manager
Shared resource
8 Under the File Format tab, select Everything to select all the file categories and its
subcategories.
You can select multiple categories and file types within the selected categories to
be matched. Selecting All in the subcategory selector overrides any other selections
that may already have been made.
9 Click Save, then Apply.
Creating new file filtering rule
1 In Policy Manager, click on Shared Resource. The Shared Resources page appears.
2 Click Filter Rules tab.
3 In File Filtering Rules pane, click Create New. The File Filtering Rule page appears.
4 Follow the instructions of Creating a new file filtering rule on page 125.
Time slots
In Time Slots, you can set up different time slots that can be applied to policies. You can
use:
View — to view the time slot of All the time.
Delete — to delete a time slot that is not used by any of the policies.
Edit — to change the name or times associated with a specific time slot.
Create New — to create a new time slot.
Creating a new time slot
1 In Policy Manager, click on Shared Resource. The Shared Resources page appears.
2 Click Time Slots tab.
3 Click Create New. The Time Slot page appears.
4 Enter a unique Time slot name.
5 Under Select day and time, choose the desired day(s).
6 Choose All day or Selected hours one wants to put into the created time slot.
If you choose Selected hours, choose the Start and End time from the drop-down.
7 Click Save, then Apply.
Note
Master policies use the All the time time slot. If you want a policy to be active during a
different time slot, you must create a subpolicy and specify a different time slot.
162
10
11
Settings & Diagnostics
This chapter describes the settings and diagnostics you could perform on GroupShield
for Exchange.
Topics covered are:
On-Access Settings
Notifications
Anti Spam
Detected Items
User Interface Preferences
Diagnostics
Product Log
DAT Settings
Import and Export Configuration
On-access settings
On-Access Settings is used to configure the General settings, Microsoft Virus Scanning API
(VSAPI) settings, and Transport Scan Settings.
For Exchange Server 2003
By default, the McAfee® Transport Scanner is enabled and scans all the email
messages. If you deselect Transport Scan Settings, Microsoft® Virus Scanning API (VSAPI
v 2.5) scans the email messages.
1 Click Settings & Diagnostics | On-Access Settings. The On-Access Settings page appears.
163
McAfee® GroupShield™ 7.0 User Guide
Settings & Diagnostics
On-access settings
2 In General, choose Allow Through or Remove depending on whether you want to allow
the email message through or delete it, if scanning fails.
3 In Microsoft Virus Scanning API (VSAPI):
Select or deselect Enabled to specify whether VSAPI should be enabled or not.
VSAPI is implemented at a very low-level in the Exchange Information Store. This allows
a virus scanning application to run with high performance, and guarantees that the
message will be scanned before any client can access the message or its attachment.
This allows messages and attachments to be scanned once before delivery, rather than
multiple times (depending on the number of mailboxes to which the message is
delivered). This single-instance scanning also helps prevent messages from being
re-scanned when a message is copied, which results in improved system performance.
Note
Select or deselect Proactive Scanning to specify whether or not to scan email
messages and files when they are written to the store.
Proactive scanning is a type of scanning that is made possible by Microsoft® VSAPI. It
enables objects from the store to be scanned in order of priority.
Note
Items passing in and out of the store receive a priority rating and are placed in a scanning
queue. The scanning queue allows prioritization and re-prioritization of items in the
queue.
For example, if a user tries to open an item that has not been scanned, it is assigned a
high priority, whereas items being saved or posted to public folders are assigned a low
priority. This is known as priority based queuing.
When all the high priority items have been scanned, scanning of lower priority items
begins. The latter scans on a first-in-first-out (FIFO) basis.
Select or deselect Background Scanning to specify whether background scanning
should be enabled or not.
You can use Enable At and Disable At to schedule the background scanning.
Background scanning is a type of on-access scanning made possible within Microsoft®
Exchange 2003/2007 by Microsoft® VSAPI, which does not scan all files on access,
reducing the scanner's workload. It scans the databases on which it has been enabled.
Background scanning is off by default.
Note
Type Scan Timeout (seconds) to specify a time to wait for a scan to wait before it
gets timed out.
Check the Default option to use the default Number of Scan Threads, else deselect
the option and enter a desired value. We recommend you to use the Default
option.
4 In Transport Scan Settings:
164
11
McAfee® GroupShield™ 7.0 User Guide
Settings & Diagnostics
On-access settings
Note
Select Enabled to benefit from direction-based SMTP scanning control. If
deselected, the remaining options also becomes inactive.
Select Scan Inbound Mails to scan messages coming from an external server (for
example, Internet-based email messages). If this option is selected and the next
two options are deselected, then a mail going to a different domain is not
scanned.
Select Scan Outbound Mails to scan any email message that leaves your Exchange
Server or Exchange organization.
Messages are designated as outbound if at least one recipient has an external
address.
Select Scan Internal Mails to scan email messages that are being routed from one
location inside your domain to another location inside your domain.
Messages are designated as Internal if they originate from inside your domain
and ALL the recipients are located inside your domain.
Transport scanning allows you to scan SMTP traffic before it enters the Exchange
information store. SMTP Transport scanning can perform scanning of routed email
messages that are not destined for the local server and can stop delivery of messages.
SMTP Transport scanning can be applied to Microsoft® Exchange 2003 with the VSAPI
2.5.
5 Click Apply.
For Exchange Server 2007
Background scanning capabilities in GSE 7.0 are enhanced using the new features
available in VSAPI v 2.6.
Also, there is a stamping mechanism in case of GroupShield for Exchange Server 2007.
After an email message is scanned, the McAfee® Transport Scanner assigns a stamp
to the header of the email message. This prevents the email message from being
re-scanned by Microsoft® Virus Scanning API (VSAPI).
The remaining features remain the same as that of Exchange Server 2003.
1 Click Settings & Diagnostics | On-Access Settings. The On-Access Settings page appears.
2 Under Background Scan Settings, select or deselect Enable to specify whether
background scanning should be enabled or not.
You can use Enable At and Disable At to schedule the background scanning.
3 Select Only Messages With Attachment to enable background scanning for only email
messages that has attachments.
165
11
McAfee® GroupShield™ 7.0 User Guide
Settings & Diagnostics
On-access settings
4 Select Only Un-Scanned Items to enable background scanning only to those messages
that have not been scanned yet.
5 Select Force Scan All to scan items irrespective of whether the item has a scan stamp
or not.
If an item has a scan stamp, it means that the item is scanned and up to date.
6 Select Update Scan Stamp to perform background scanning up to date.
When you deselect this option, do not update stamp. This feature is useful e.g. if
the vendor wants to access the messages but not necessarily virus scan them.
7 Choose the From Date and To Date fields to schedule the scan stamp update.
You also have an option to select Till Date if required.
8 In Transport Scan Settings:
Select Enable to enable transport scanning. If deselected, the remaining options
also becomes inactive.
Transport Scan Stamp - select to benefit direction-based SMTP scanning control.
Scan Inbound Mails - select to scan messages coming from an external server (for
example, Internet-based email messages). If this option is selected and the next
two options are deselected, then a mail going to a different domain is not
scanned.
Scan Outbound Mails - select to scan any email message that leaves your Exchange
Server or Exchange organization.
Messages are designated as outbound if at least one recipient has an external
address.
Scan Internal Mails - select to scan email messages that are being routed from one
location inside your domain to another location inside your domain.
Messages are designated as Internal if they originate from inside your domain
and ALL the recipients are located inside your domain.
Note
Under Microsoft Virus Scanning API (VSAPI), enter the Lower Age Limit (seconds) to
specify whether to scan all emails or only those that are not older than the date/time
mentioned in the setting.
This is useful in a scenario where the customer suspects an outbreak/infection of emails
that came only in the last 2 days.
This will also help in finishing the background scanning faster and hence result in lesser
load on the server.
9 Click Apply.
166
11
McAfee® GroupShield™ 7.0 User Guide
Settings & Diagnostics
Notifications
Notifications
Notification settings allows the user to configure the content and SMTP address for the
administrator to send email notifications.
1 Click Settings & Diagnostics | Notifications. The Notifications page appears.
2 Type the Administrator E-mail address to notify the administrator email account of that
Exchange Server.
3 Type the Sender E-mail to notify using the sender email address.
4 Type a Subject line for notification to notify using the contents in the subject line, when
a notification is sent.
5 In Notification Text, click Edit to change the notification text that should be included in
the body of the message.
You can use more notification fields and have a custom notification.
Note
6 Select Enable Task results notification to send emails with on-demand scan and update
tasks results. The email is in HTML format and has the same data and format as Task
Result window in the UI. This feature can be enabled/disabled through this option.
By default, this feature is disabled.
7 Click Apply.
Notification fields to use:
%dts% — Date and Time
%sdr% — Sender
%ftr% — Filter
%fln% — Filename
%rul% — RuleName
%act% — Action Taken
%fdr% — Folder
%vrs% — Detection Name
%trs% — State (Train State)
%tik% — Ticket Number
167
11
McAfee® GroupShield™ 7.0 User Guide
Settings & Diagnostics
Anti spam
%idy% — Scanned By
%psn% — Policy Name
%svr% — Server
%avd% — AV DAT
%ave% — AV Engine
%rpt% — Recipient
%rsn% — Reason
%sbj% — Subject
%ssc% — Spam score
%ase% — Anti-Spam Engine
%asr% — Anti-Spam Rules
Anti spam
You can use Anti Spam settings to configure Gateway Spam Filter and User Junk Folder
Routing.
1 Click Settings & Diagnostics | Anti Spam. The Anti Spam Settings page appears.
2 Type an email address to configure the System Junk Folder Address to filter the junk
mails.
3 Select Enable routing to the user junk folders on this server to route junk mails to the user
junk folders on the mail server.
4 Click Apply.
Detected items
You can use Detected Items to:
Specify whether local database or the McAfee Quarantine Manager should be used
for quarantining email messages.
168
11
McAfee® GroupShield™ 7.0 User Guide
Settings & Diagnostics
Detected items
Configure the settings used when communicating with McAfee Quarantine
Manager.
Configure maintenance settings for the local quarantine database.
McAfee Quarantine Manager
1 Click Settings & Diagnostics | Detected Items. The Detected Items page appears.
2 Select Enabled to use McAfee Quarantine Manager as a repository to quarantine
detected items.
If deselected, the remaining options are also disabled.
3 Type the IP address of the McAfee Quarantine Manager server.
4 Specify the McAfee Quarantine Manager Port number that GroupShield for
Exchange will use when sending spam detection and other information to the
McAfee Quarantine Manager. The default port number is 49500.
5 In Callback port, specify the GroupShield for Exchange port number that McAfee
Quarantine Manager will use when releasing email messages or sending
configuration information to GroupShield for Exchange.
6 Click Apply.
Note
For more information on using McAfee Quarantine Manager, please see the McAfee
Quarantine Manager v 4.1 Product Guide.
Local database
1 Select Specify location of database, choose the type of Database location in the first field
(from the drop-down), and specify a location in the second field accordingly.
2 In Maximum item size (MB), specify the maximum size, any item to be stored in the
database can be.
3 In Maximum query size (records), specify the maximum number of records that can be
returned when the local quarantine database receives a query.
4 In Maximum item age (days), specify the maximum number of days an item will be held
in the local quarantine database before being marked for deletion.
5 Click Edit Schedule of Purge of old items frequency to specify how frequently old items
that are marked for deletion are removed from the database.
6 Click Edit Schedule of Optimization frequency to specify how frequently the database is
optimized.
169
11
McAfee® GroupShield™ 7.0 User Guide
Settings & Diagnostics
User interface preferences
7 Click Apply.
User interface preferences
You can use User Interface Preferences to configure user interface refresh, report, metric,
graph and chart settings.
Dashboard settings
1 Click Settings & Diagnostics | User Interface Preferences. The User Interface Preferences page
appears.
2 In the Dashboard Settings tab, select Automatic refresh to specify whether the
information shown on the Dashboard should be refreshed automatically.
3 In Refresh rate (seconds), type the duration in seconds so that the information on the
dashboard is refreshed after the specified time.
4 Select Enable reports to enable or disable reporting.
5 Select Show recently scanned items to specify whether the recently scanned items
should be included in the reports.
6 In Maximum recently scanned items, specify the maximum number of recently scanned
items that should be included in the reports.
7 In Graph scale (units), type the measurement units for the scale of the graph that is
generated.
8 In Number of hours to report for, type the report generation interval (in hours) to
generate a report.
9 Click Apply.
Graph and chart settings
1 In the Graph and Chart Settings tab, select 3D to specify whether you want the
Dashboard graph to be displayed as a three-dimensional (3D) graph.
2 Select Draw transparent to specify whether the bars in a three-dimensional bar graph
should appear solid or transparent. A solid bar will hide part of any bar behind it. A
transparent bar allows you to look through it and see other transparent bars behind
it.
170
11
McAfee® GroupShield™ 7.0 User Guide
Settings & Diagnostics
Diagnostics
3 Select Anti-alias to specify whether you want to use anti-aliasing techniques when
displaying pie charts. If anti-aliasing is used, you will see smoother curves in pie
charts. If anti-aliasing is not used, pie chart curves appear more jagged.
4 Select Explode pie to specify whether the segments should remain within the circle
of the pie chart or be shown with some distance between each segment.
5 In Pie angle (degrees), specify the angle to use when drawing pie charts.
6 Click Apply.
Diagnostics
You can use Diagnostics to specify the level of debug logging required, the maximum
size of debug files, and where they should be saved. You can configure the error
reporting service settings and specify which events should be captured in the product
log and event log by specifying the product log's location, name, size limits, and
time-out settings.
Debug logging
1 Click Settings & Diagnostics | Diagnostics. The Diagnostics page appears.
2 In the Debug Logging tab, from the Level drop-down menu, specify the type of
information that should be captured in the debug log. You can select:
High — to collect large number of log entries.
Medium — to collect medium number of log entries.
Low — to collect low number of log entries.
None — to disable debug logging.
3 Select Limit size of debug log files to specify if you want a size limit for debug log files.
In Maximum size of debug log file, specify how large (in megabytes or kilobytes) the
debug log files can be.
4 Select Specify location for debug files to specify a location for debug files. Choose any
location from the drop-down and specify the location accordingly:
(Full Path)
<Desktop>\
<Install Folder>\
171
11
McAfee® GroupShield™ 7.0 User Guide
Settings & Diagnostics
Diagnostics
<System Drive>\
<Program Files>\
<Windows Folder>\
Avoid using debug logging indiscriminately because it fills up the hard disk space and
affects the overall performance of the Exchange Server. It should be enabled for a
limited duration as advised by an authorized personnel (McAfee support engineer).
Note
Error reporting service
1 In the Error Reporting Service tab, select Enable to enable or disable the error reporting
service.
2 Select Catch exceptions to capture information about exceptional events, such as
system crashes.
3 Select Report exceptions to user to specify whether exceptions should be reported to
the administrator.
Event logging
1 In the Event Logging tab, under Product Log, select Write information events, Write warning
events, and Write error events to include these events into the product log.
2 Under Event Log, select Write information events, Write warning events, and Write error events
to include these events into the event log.
Product log
In the Product Log tab, you can specify the location, size limit and the query time-out
settings for a product log.
1 In Locations section, select Specify location of database to specify whether you want to
use the default location for the product log or specify a different location.
If deselected, the default location is used. If selected, choose any location from the
drop-down and specify the location accordingly:
(Full Path)
<Desktop>\
<Install Folder>\
<System Drive>\
<Program Files>\
172
11
McAfee® GroupShield™ 7.0 User Guide
Settings & Diagnostics
Product log
<Windows Folder>\
2 Select Specify filename of database to specify whether you want to use the default file
name or specify a different name. If deselected, the default file name is used. The
default Database filename is productlog.bin.
3 In Size Limits section:
Select Limit database size to specify that you want to limit the size of the product
log database.
Enter the Maximum database size that the product log database can be. You can
specify the size in either megabytes or kilobytes.
Select Limit age of entries to specify a set period of time after which you want the
product log entries to be deleted.
Enter the Maximum age of entry to specify how many days an entry should remain
in the database before it is deleted.
4 In Advanced section:
Select Specify a query timeout to limit the amount of time allowed for answering a
product log query.
Enter the Query timeout (seconds) to specify the maximum number of seconds
allowed when answering a product log query.
5 Click Apply.
Product log
You can use Product Log to set up search filters that help you find information in the
product log and view the results of the search.
To search for detections:
1 Click Settings & Diagnostics | Product Log. The Product Log page appears.
2 From the Product Log section, select at least one of these filters:
ID — Enter the number which identifies a specific product log entry.
Level — Select Information, Warning or Error from the drop-down in the second field
depending on the type of log you want to see.
173
11
McAfee® GroupShield™ 7.0 User Guide
Settings & Diagnostics
DAT settings
Description — Select the relevant description.
You can select up to three search filters.
Note
3 Choose the All Dates radio button to include all entries, else choose Date Range and
choose the desired date range from the drop-down menu.
4 Click Search. A list of detected items matching your search criteria, are displayed in
the View Results section.
Click Clear Filter to return to the default search filter settings and Export to CSV File to
export the list of detections in .CSV format.
Note
5 Click Apply.
DAT settings
DAT files are the detection definition files, also referred to as signature files, that
identify the code anti-virus and/or anti-spyware software detects to repair viruses,
trojan horses and Potentially Unwanted Programs (PUPs).
1 Click Settings & Diagnostics | DAT Settings. The DAT Settings page appears.
2 Specify Maximum number of old DATs to specify the maximum number of DAT
generations that shall be preserved in the system during regular updates. Default
value is 10.
3 Click Apply.
Import and export configuration
You can use Import and Export Configurations to:
Copy the configuration of the Exchange Server to an area where it can be imported
by the other Exchange Server.
Apply the configuration of a different Exchange system to this system.
Specify the location from which automatic updates are downloaded. Location
information is stored in a site list, and you can specify which site list to use.
174
11
McAfee® GroupShield™ 7.0 User Guide
Settings & Diagnostics
Import and export configuration
There are two tabs, Configuration and Site List.
Configuration
You can copy the configuration of this Exchange Server system and save it to a location
where it can be imported by other Exchange Server systems. To do so:
1 Click Settings & Diagnostics | Import and Export Configuration. The Import and Export
Configurations page appears.
2 Select the Configuration tab.
3 Click Export.
4 Specify the location where the file will be stored.
5 Click Save, then Apply.
Importing a different configuration for this Exchange Server system:
1 Click Settings & Diagnostics | Import and Export Configuration. The Import and Export
Configurations page appears.
2 Select the Configuration tab.
3 Use the Filename field or Browse to locate the configuration file you want to import.
4 Click Import to import that configuration.
Note
Click Restore Default to restore the default settings and values from the
McAfeeConfig.xml file.
Site list
A site list specifies from where automatic updates are downloaded.
By default, GroupShield uses a site list that points to a McAfee site for automatic
updates, but you can use a site list that points to a different location.
If you have already created an alternative site list that you want to import:
1 In the Site List tab, use the Filename field or Browse to locate the Sitelist.xml file you
want to use.
Sitelist.xml is obtained by exporting a repository list from the ePolicy Orchestrator
Note
Server or the McAfee AutoUpdate Architect Server.
2 Click Import. The new site list will overwrite the existing/default site list.
175
11
McAfee® GroupShield™ 7.0 User Guide
Settings & Diagnostics
Import and export configuration
3 Click Apply.
176
11
Index
A
customer service, contacting 19
Add a content rule 120
Add scanner/filter 110
Adding a new content rule 122
Advanced Reports 95
Alert Settings 153
GroupShield 7
D
Dashboard 88
H
dashboard 88
HotFix and Patch releases (for
products and security
vulnerabilities) 19
DAT files
Avert Labs notification service
for updates 19
All Items 101
Anti Spam settings 168
updates, website 19
Anti-phish 132
DAT settings 174
anti-phish 132
Delete an On-Demand Scan 92
Anti-Virus Scanner 114
Detected Items settings 168
Actions 118
G
HTML Files 149
I
Import and Export Configurations
174
Configuration 175
Diagnostics 171
Site list 175
Create new set of options 115
Debug logging 171
Installing additional components 30
Editing actions 118
Error reporting service 172
Installing Anti-Spam for Exchange
Audience 16
Event logging 172
Avert Labs Threat Center 19
Product log 172
31
Installing GroupShield 26
Avert Labs Threat Library 19
Disclaimer Text 155
Introducing ProtectionPilot 77
B
download website 19
K
Banned file types/messages 101
E
KnowledgeBase search 19
beta program website 19
EICAR 39
Buffer Overflow Protection 30, 89
L
Encrypted Content 138
List all scanners 109
C
ePolicy Orchestrator
Local database settings 169
Configuring GroupShield - cluster
environment 33
Installation 49
Pre-requisites 47
M
Configuring GroupShield Policies 53
Uninstallation 60
Mail size filtering 151
Contact information 19
ePolicy Orchestrator console 48
Master policy 109
Content scan actions 123
ePolicy Orchestrator Reports 59
Content scanning 119
Conventions used in the guide 17
evaluating McAfee products,
download website 19
McAfee Quarantine Manager
(MQM) 41
Corrupt content 135
F
MIME Mail settings 145
Create a new alert 120
File filtering 124
Miscellaneous settings 153
Create Sub-Policy 108
Filter Rules 160
Modify an On-Demand Scan 92
Creating a sub-policy 108
McAfee Quarantine Manager
settings 169
Modifying GroupShield 43
177
®
™
McAfee GroupShield 7.0 User Guide
N
New Features of GroupShield 12
new file filtering rule 125
Notification Settings 167
Index
Security Headquarters (See Avert
Labs)
security updates, DAT files and
engine 19
On-demand scans 90
Shared resource 156
Delete 92
Signed Content 139
Modify 92
Silent Installation 32
Schedule 90
Simple Reports 95
Single Copy Cluster 34
P
Spam 98
Password-protected files 140
Specify users 112
Phish 98
Statistics 89
Policy Manager 105
Statistics & Information 88
Status report
Inheritance View 106
Delete 94
Policy types 113
Modify 94
product information, where to find
18
Product Log 173
Schedule 93
submit a sample, Avert Labs
WebImmune 19
product upgrades 19
professional services, McAfee
resources 19
T
Protected Content 137
Testing the GroupShield installation
ProtectionPilot
Installation 79
technical support, contacting 19
39
Threat Center (See Avert Labs)
Pre-requisites 77
threat library 19
Scheduling Tasks 83
Time Slots 162
Setting and Enforcing Policies 81
training, McAfee resources 19
Uninstallation 80
Transport scanning 165
PUP 99
Trigger Rules 108
R
U
Removing GroupShield 45
Unwanted Content 100
Reports 90
upgrade website 19
resources, for product information
Upgrading GroupShield 37
18
User Interface Preferences 170
Run Now 93, 94
Dashboard settings 170
Graph and chart settings 170
S
Scanner Control 142
V
Schedule a new On-Demand Scan
Versions & Updates 89
90
Scheduling Tasks in ePolicy
Orchestrator 55
VSAPI 164
W
On-Access settings 163
ServicePortal, technical support 19
Advanced View 107
Virus Information Library (See Avert
Labs Threat Library)
security vulnerabilities, releases for
19
O
Virus 99
View settings 112
Virtual Technician 40
178
WebImmune, Avert Labs Threat
Center 19
SonicWALL Product Line Manager
(408) 962-6359
700-1705-00
232-001409-00 Rev A
Copyright © 2007 McAfee, Inc. All Rights Reserved.
mcafee.com