1
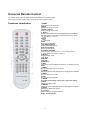
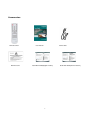
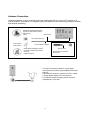
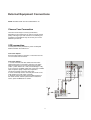
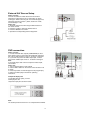
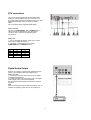
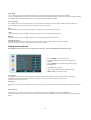
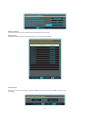
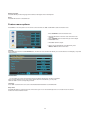
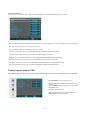
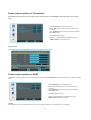
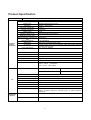
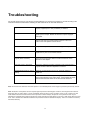
PLASMA TV USER MANUAL Please READ this manual carefully before operating your TV, and retain it for future reference. MODEL :PVQ42VGB 1 WARNING RISK ELECTRIC SHOCK DO NOT OPEN WARNING : To reduce the risk of electric shock do not remove cover or back. No user-serviceable parts inside refer service to qualified service personnel. Operator Safety has been taken into consideration at the design and manufacture phase, but inappropriate operation may cause electric shock or fire. To prevent the product from being damaged, the following rules should be observed for the installation, use and maintenance of the product. Read the following safety instruction before starting the operation. The User Manual uses the following symbols to ensure a safe operation and prevent any damage to operators’ r properties: THIS SYMBOL INDICATES THAT HIGH VOLTAGE IS PRESENT INSIDE. IT IS DANGEROUS TO MAKE ANY KIND OF CONTACT WITH ANY INSIDE PART OF THIS PRODUCT. THIS SYMBOL INDICATES THAT THERE ARE IMPORTANT OPERATING AND MAINTENANCE INSTRUCTIONS IN THE LITERATUR ACCOMPANYING THE APPLIANCE. CANADIAN NOTICE: This Class B digital apparatus compiles with Canadian ICES-003. 2 IMPORTANT SAFETY INSTRUCTIONS Read all of the instructions before using this appliance. When using this appliance, always exercise basic safety precautions, including the following: 1) Read these instructions. 2) Keep these instructions. 3) Heed all warnings. 4) Follow all instructions. 5) Do not use this apparatus near water. 6) Clean only with dry cloth. 7) Do not block any ventilation openings. Install in accordance with the manufacturer`s instructions. 8) Do not install near any heat sources such as radiators, heat registers, stoves, or other apparatus (including amplifiers) that produce heat. 9) Do not defeat the safety purpose of the polarized or grounding-type plug. A polarized plug has two blades with one wider than the other. A grounding type plug has two blades and a third grounding prong. The wide blade or the third prong are provided for your safety. If the provided plug does not fit into your outlet, consult an electrician for replacement of the obsolete outlet. 10) Protect the power cord from being walked on or pinched particularly at plugs, convenience receptacles, and the point where they exit from the apparatus. 11) Only use attachments/accessories specified by the manufacturer. 12) Use only with the cart, stand, tripod, bracket, or table specified by the manufacturer, or sold with the apparatus. When a cart is used, use caution when moving the cart/apparatus combination to avoid injury from tip-over. 13) Unplug this apparatus during lightning storms or when unused for long periods of time. 14) Refer all servicing to qualified service personnel. Servicing is required when the apparatus has been damaged in any way, such as power-supply cord or plug is damaged, liquid has been spilled or objects have fallen into the apparatus, the apparatus has been exposed to rain or moisture, does not operate normally, or has been dropped. 15) WARNING-to reduce the risk of fire or electric shock, do not expose this apparatus to rain or moisture. Apparatus shall not be exposed to dripping or splashing and no objects filled with liquids, such as vases, shall be placed on the apparatus. The apparatus shall not be exposed to dripping or splashing and that no objects filled with liquids, such as vases, shall be placed on the apparatus. The mains plug is used as the disconnect device, remain it readily operable during the apparatus normal use. 3 SAVE THESE INSTRUCTIONS Thank you for purchasing the Haier product. This easy-to-use manual will guide you in getting the best use of your product. Remember to record the model and serial number. They are on label in back of the unit. Model number Serial number Date of purchase Staple your receipt to your manual. You will need it to obtain warranty service. 4 Contents Warning…………………………….. …………………………....……………….……………....……………………………..…………2 Important Safety Instructions ……………………………..……………………...………..…………………………….. ………………3 Save These Instructions…………………………….. …………………………..….. …………………………………………….. ……4 Controls …………………………….. …………………………….. …………….……………………………….. ………………………5 Connection Options…………………………….. ……………………………….……………………………….. ………………………7 Universal Remote Control…………………………….. ………………………………………………………….. …………………….8 Accessories…………………………….. ………………………………………………………….. …………………………………….9 Antenna Connection…………………………….. ………………………………………………………….. ………………………….10 External Equipment Connections…………………………….. ………………………………………………………….. ……………11 Operation………………….. …………………………….. ………………………………………………………….. …………….……17 Menu Operation…………………………….. ………………………………………………………….. ……………………………….18 Maintenance………………………….. ……………………...…………………………………….. ……………………………………30 Cleaning the screen…………………………….. ………………………………………………………….……………………………30 Cleaning the Cabinet……………..…………….. ………………………………………………………….……………………………30 Extended absence………………………….………………………………………………….……………………………………….…30 Product specification………………………….………………………………...……………………….………………………………..31 5 Controls This is a simplified representation of front panel. Here shown may be somewhat different from your TV. Front panel controls 1 INPUT: 2 MENU: 3 CH-/+ : 4 5 Press to show the input source mode. In the MENU/INPUT screen, these buttons serve as ENTER buttons. Menu display. Press to scan through channels. To scan quickly through channels, press and hold down either +/- . In the MENU screen, these buttons serve as Ÿ/ź buttons. VOL -/+ : Press to adjust the volume .In the MENUscreen, these buttons serve as Ż/Ź buttons. POWER: Press to turn on and off the TV. 6 Connection options Back panel controls 1 8 1 2 3 4 5 6 7 8 9 10 9 2 3 10 4 11 5 12 6 13 7 14 15 16 YPbPr 1-Left Audio In YPbPr 2-Left Audio In CVBS & S-Video Left Audio In YPbPr 1-Y in YPbPr 1-Pb In YPbPr 1- Pr In CVBS In YPbPr 1-Right Audio In YPbPr 2-Right Audio In CVBS & S-Video Right Audio In 11 12 13 14 15 16 17 18 19 20 7 17 18 19 20 YPbPr 2-Y in YPbPr 2-Pb In YPbPr 2- Pr In PC- Audio In PC-RGB In HDMI 1 In HDMI 2 In S-Video In Coaxial output terminal TV signal In Universal Remote Control The remote control cannot be operated unless the batteries are properly loaded. When using the remote control, aim it at the remote control sensor on the TV. Fonctions introduction 1 POWER Press toturn on and off the TV 2 MUTE Switches the sound on or off. 3 Numeric buttons Press to change the channel. 4 - Button Press to select additional channels (digital) being broadcast by the same station. For example, to select channel “54-3”, press “54”, then press “-” and “3”. 5 Tv mode recall 6 MTS Mono”,”Stereo”and “Sap”. 7.VOLUME UP/DOWN Press to adjust the volume. 8 CC(closed caption) Select a closed caption. 9CHANNEL UP/DOWN Press to scan through channels. To scan quickly through channels, press and hold down either +/- . 10 Display Display present mode 11,16 Ÿ/ź UP/DOWN 14,13Ż/Ź RIGHT/LEFT 15 EXIT Clears all on-screen displays and returns to TV viewing from any MENU 17 MENU Brings up the main menu to the screen. 18 PMODE Selects the picture mode appropriate for the program's character. 19 INPUT Show the input source mode. 20 FAV Favorite television programs 21 ZOOM The zoom mode settings can be alse in the screen setting 22 EPG Electronic program guide 24 SMODE Selects the sound mode appropriate for the program's character. 25 SLEEP Displays the Sleep Timer option. 26 ,27 FAV+/Favorite television programs up/down 28 NC : No use buttoms. 8 Accessories Remote control Attention Card User manual Power cable Quick Start Guide(English Version) 9 Quick Start Guide(French Version) Antenna Connection Generally speaking, to enjoy a clearer picture,we recommand that you use a CATV system or an outdoor antenna. Over-the-air TV reception quality will depend on your antenna type,antenna location and antenna positioning. Multi-family Dwellings/Apartments (Connect to wall antenna socket) Wall Antenna Socket Bronze Wire RF Coaxial Wire (75 VHF Antenna UHF Antenna Turn clockwise to tighten Single-family Dwellings /Houses (Connect to wall jack for outdoor antenna) Outdoor Antenna Connexions de l'équipement externe Quick set-up Bronze Wire Be careful not to bend the bronze wire gTo improve the picture quality in a poor signal area, please purchase a signal amplifier and install properly. gIf the antenna needs to be split for two TV’s, install a 2-Way Signal Splitter in the connections. gTo install the antenna properly please contact a professional in your area. 10 External Equipment Connections NOTE: All cables shown are not included with the TV. Choose Your Connection There are several ways to connect your television, depending on the components you want to connect and the quality of the signal you want to achieve. The following are examples of some different ways to connect your TV with different input sources. VCR connection To avoid picture noise (interference), leave an adequate distance between the VCR and TV. Connection Option 1 Set VCR output switch to channel 3 or 4 and then tune the TV to the same channel number. Connection Option 2 1. Connect the audio and video cables from the VCR's output jacks to the TV input jacks, as shown in the figure. When connecting the TV to VCR, match the jack colors (Video = yellow, Audio Left = white, and Audio Right = red). If you connect an S-VIDEO output from VCR to the S-VIDEO input, the picture quality is improved; compared to connecting a regular VCR to the Video input. 2. Insert a video tape into the VCR and press PLAY on the VCR. (Refer to the VCR owner`s manual.) 3. Select the input source with using the INPUT button on the remote control, and then press / button to select the source, press the OK button to confirm. 11 External A/V Source Setup How to connect Connect the audio and video cables from the external equipment's output jacks to the TV input jacks, as shown in the figure. When connecting the TV to external equipment, match the jack colors (Video = yellow, Audio Left = white, and Audio Right = red). How to use 1. Select the input source with using the INPUT button on the remote control. 2. Press the / button to select the desired source. 3. Press the OK button to confirm. 4. Operate the corresponding external equipment. DVD connection How to connect 1. Connect the DVD video outputs (COMPONENT) to the Y Pb Pr jacks on the TV and connect the DVD audio outputs to the Y Pb Pr Audio IN jacks on the TV, as shown in the figure. 2. If your DVD only has an S-VIDEO output jack, connect this to the S-VIDEO input on the TV. as shown in the figure. Note If your DVD player does not have component video output, use S-Video. How to use 1. Turn on the DVD player, insert a DVD. 2. Use the INPUT button on the remote control to select Y Pb Pr mode. 3. Press Play button on external equipment for program play. 4. Refer to the DVD player's manual for operating instructions. Component Input ports To get better picture quality, connect a DVD player to the component input ports as shown below. Note The audio input terminal of AV IN 1 is compared with S-VIDEO. 12 DTV connection HDMI This TV can receive Digital Over-the-air/Cable signals without an external digital set-top box. However, if you do receive Digital signals from a digital set-top box or other digital external device, refer to the figure as shown below. This TV supports HDCP (High-bandwidth Digital How to connect Use the TV`s COMPONENT , PC or HDMI/DVI jack for video connections, depending on your set-top box connector. Then, make the corresponding audio connections. How to use 1. Turn on the digital set-top box. (Refer to the owner’s manual for the digital set-top box.) 2. Use INPUT on the remote control to select COMPONENT, PC or HDMI/DVI source. Signal 480i 480p 720p 1080i Component Yes Yes Yes Yes HDMI/DVI Yes Yes Yes Yes Digital Audio Output Send the TV`s audio to external audio equipment (stereo system) via the Digital Audio Output (Optical) port. How to connect 1. Connect one end of an optical cable to the TV Digital Audio(Optical) Output port. 2. Connect the other end of the optical cable to the digital audio (optical) input on the audio equipment. See the external audio equipment instruction manual for operation. Note When connecting with external audio equipments, such as amplifers or speakers, please turn the TV speakers off. 13 HDMI When the source device(DVD player or Set Top Box) supports HDMI How To Connect 1. Connect the source device to HDMI port of this TV with an HDMI cable(not supplied with this product). 2. No separated audio connection is necessary. How To Use If the source device supports Auto HDMI function, the output resolution of the source device will be automatically set to 1280x720p. If the source device does not support Auto HDMI, you need to set the output resolution appropriately. To get the best picture quality, adjust the output resolution of the source device to 1280x720p. Select HDMI input source in input source option of Select Main source menu. When the source device(DVD player or Set Top Box) supports DVI How To Connect 1. Connect the source device to HDMI port of this TV with a HDMI-to-DVI cable(not supplied with this product). 2. A separated audio connection is necessary. 3. If the source device has an analog audio output connector, connect the source device audio output to DVI Audio In port located on the left side of HDMI port. How To Use If the source device supports Auto DVI function, the output resolution of the source device will be automatically setto 1280x720p. If the source device does not support Auto DVI, you need to set the output resolution appropriately. To get the best picture quality, adjust the output resolution of the source device to 1280x720p. Press the INPUT button to select HDMI input source in input source option of Select Main source menu. Installation 14 Cable sample 15 Power source TO USE AC POWER SOURCE Use the AC polarized line cord provided for operation on AC. Insert the AC cord plug into a standard polarized AC outlet. Note Never connect the AC line cord plug to other than the specified voltage. Use the attached power cord only. If the polarized AC cord does not fit into a nonpolarized AC outlet, do not attempt to file or cut the blade. It is the user`s responsibility to have an electrician replace the obsolete outlet. If you cause a static discharge when touching the unit and the unit fails to function, simply unplug the unit from the AC outlet and plug it back in. The unit should return to normal operation. 16 Operation In the manual, the OSD ( on screen display ) may be different from your TV’s, because it is just an example to help you with the TV operation. There are several options you might need to set up in order for your TV to work properly. Read the instruction that follow. Switching On/Off the TV set 1. First, connect power cord correctly. 2. Select the viewing source by using INPUT button on the remote control. 3. When finished using the TV,press the POWER button on the remote control. The TV reverts to standby mode. 4. If you intend to be away on vacation, disconnect the power plug from the wall power outlet. Note If the TV in power on, the screen information according the type of input signal. The information will disappear. If there is no signal, ‘’No Signal’’ will display on the screen. 17 Menu Operation Basic operation Turningthe TURN ON LCD TV 1. Connecting to the AC input cable then press the main power switch to switch ON LCD TV. At this time the TV will enter standby mode and indicator show red. 2. Use POWER button can turn ON LCD TV from standby mode TURN OFF LCD TV button on the remote control to enter standby mode. The indicator is red. 1. Press POWER button or 2. Using main power switch turns off LCD TV completely. z When you are operating the menu, there are some cueing informations on the bottom of the menu,it can clues z z z you to operat the menu favoringly. For example : Press MENU button to return to previous menu and press EXIT button to exit the main menu. Press CH+/CH-/VOL+/VOL- button to move the cursor in the menu. If the time that no signal will be received and you don’t operate it is over 15 minutes,TV set will be standby condition. NOTE: If you use your LCD TV for the first time, you should select the language which will be used for displaying menus and indications. z z z z z 18 Press MENU to display the main menu. Press Ÿ/ź repeatedly and use MENU to select the SET UP menu. Use ENTER to select MENU LANGUAGE. Press Ż button repeatedly to select your desired language. When you are satisfied with your choice, press the MENU or EXIT to exit. 1. Press VOL+/- to adjust the volume. 2. If you want to switch the sound OFF, press the MUTE 3. You can cancel this function by pressing MUTE or VOL+/ VOL-. - Press the MENU button to display the main menu. - Use Ÿ/ź/Ź/Ż buttons to select and adjust the available menus. The OSD (On Screen Display) function enables you to adjust the screen status conveniently since it provides graphical presentation. 19 1. z Using the CH+/CH- on the front panel or on the remote control. Press CH+ to increase channel number. z Press CH - to decrease channel number. 2. Using 0-9 digital buttons and - button You can select the channel number by pressing 0 to 9 and pressing ENTER to confirm you selection. Press the - button to enter a program number for multiple program channel. 3. Example: To select 1-digit channel (e.g. Channel 5): Press the 5 and ENTER button. To select 2-digit channel (e.g. Channel 20): Press the 2 and 0 buttonts,then press ENTER button. To select 3-digit channel (e.g. Channel 103): Press the 1 and 0 and 3 buttods,then press ENTER button. To select a program number for multiple program channel (e.g. Channel 2-1):Press the 2 button, then press - and 1 button. z z z z Note: After select the digit button, the digit will be memorized. You can select the input source by pressing the INPUT on the remote control or on the front panel. Picture menu options In this manual, the OSD ( On Screen Display) may be different from your TV’ s because it is just example to help the TV operation. 20 Press the MENU on the front panel or on the remote control and then use Ż/Ź and Ź /ENTER to select the Picture menu. 1.Press Ź/ENTER to enter the picture menu 2. Press Ÿ/ź button to move the cursor to the item to be selected. 3 .Use Ź/ENTER button to select what you want to adjust in the Picture menu 4. PressŻ/Ź button to adjust. 5. When you are satisfied with your adjustment, press MENU or EXIT to exit the main menu. Picture Mode Select the type of picture which best corresponds to your viewing requirements by selecting Picture Mode in PICTURE menu. Press ENTER button to select the picture mode such as User/Standard/Vivid/Bright. Besides, you may change it directly by pressing the PMODE button on the remote control. Only you select User, the ontrast/Brightness/Sharpness/Color are operable. Contrast Press Ÿ/ź- button and then use Ż/Ź to adjust the contrast of the picture. Brightness Press Ÿ/ź button and then use Ż/Ź to adjust the brightness of the picture. Sharpness Press Ÿ/ź button and then useŻ/Ź to adjust the sharpness level of picture. Color Press Ÿ/ź button and then useŻ/Ź to adjust the color saturation. Tint Press Ÿ/ź button and then use Ż/Ź to adjust the tint of picture. But this function is available in the NTSC which is one of the color system. Aspect Ratio Press ENTER button to select the ratio of picture display such as Normal/ Zoom/ Wide and Cinema. Besides, you may change it directly by pressing the ZOOM button on the remote control. AUDIO menu options Press MENU on the front panel or on the remote control and then use Ÿ/ź and Ź /ENTER to select the AUDIO menu. 1.Press Ź/ENTER to enter the Audio menu 2. Press Ÿ/ź button to move the cursor to the item to be selected. 3 .Use Ź/ENTER button to select what you want to adjust in the Audio menu 4. PressŻ/Ź button to adjust. 5. When you are satisfied with your adjustment, press MENU or EXIT to exit the main menu. 21 Audio Mode You can select the type of sound which best corresponds to your listening requirements by selecting Sound in SOUND menu. Press ENTER button to select one of the audio mode such as User/Voice/Concert/Jazz. Also,you may select the it directlyby pressing the SMODE button on the remote control. Only you select User, the Bass /Treble are operable. Audio Language Press Ż/Ź to select one of the audio language such as English/ French and Spain, but the condition is that the program system has included the language code,or else,this item isn’t available, and you can’t select it. Bass Press Ÿ/ź button and then use Ż/Ź to increase or decrease the level of the lower-pitched sounds. Treble Press Ÿ/ź button and then useŻ/Ź to increase or decrease the level of the higher-pitched sounds. Balance Press Ÿ/ź button and then use Ż/Ź to adjust the audio output between left and right speakers. Digital Audio Output Press ENTER to select the one of mode of the digital audio output such as PCM and RAW.This function is available, when the channel that you are viewing is DTV or the input source is HDMI. Setup menu options Press MENU on the front panel or on the remote control, then use Ÿ/ź and Ź /ENTER to select Setup the menu. 1.Press Ź/ENTER to enter the Setup menu 2. Press Ÿ/ź button to move the cursor to the item to be selected. 3 .Use Ź/ENTER button to select what you want to adjust in the Setup menu 4. PressŻ/Ź button to adjust. 5. When you are satisfied with your adjustment, press MENU or EXIT to exit the main menu. Tuning Band Press ENTER key to select Air, Cable, Cable HRC, Cable IRC or Cable Auto. Besides, you may change it directly by pressing the AIR/CABLE button on the remote control. When you select Air, the range of channel is 2-69.And when you select Cable,the range of channel is 1-135. DTV-Signal In DTV mode, you can refer the strength of the current channel ,and you can tune manually and adjust the angle, orientation of the antenna etc. Auto Ch Search Press Ÿ/ź key to move the cursor to the item to be selected (item selected is highlighted in yellow). Press ENTER key to enter your selection and scan. After the scan is finished, the following menu will display. The channels found are automatically saved as below: 22 Add On Ch Search When the channels are found, useŻ/Ź to add new channels to the channel list. Manual Ch Set Press ENTER button to display a channel list that you can select channel as below: Channel labels Allows you to name the channel that is selected. Use Ż/Ź to move the cursor and use Ÿ/ź to input the name as following: 23 Manual Language Press ENTER key to select language of the OSD such as English/ French and Espanol. Reset Press ENTER to return to the default set. Feature menu options Press MENU on the front panel or on the remote control and then use Ż/Ź and ENTER to select the Feature menu. 1.Press Ź/ENTER to enter the Feature menu 2. Press Ÿ/ź button to move the cursor to the item to be selected. 3 .Use Ź/ENTER button to select what you want to adjust in the Feature menu 4. PressŻ/Ź button to adjust. 5. When you are satisfied with your adjustment, press MENU or EXIT to exit the main menu. Time Set Press Ÿ/ź button and then use Ź/ENTER button, the time set menu as below that allows you to set the time the TV will display. Only Valid at DTV channel. Time Set Mode You can select one of auto and manual to set the time.When selected auto, the item of year/date and time will be disabled and can not to adjust. When select the manualmode, you can press Ż/Ź and Ÿ/ź to set the corresponding functions. Time Zone Press Ż/Ź to select the time zone such as Pacific/Alaska/Hawaii/ Eastern/ Central/Mountain. Sleep Timer Press ENTER button to select the amount of time before your TV turn off automatically.Such as 15 min/30 min/45 min/ 60 min/ 90 min/120 min/180 min/240 min/Off. 24 Advanced Video Menu Press OK to enter the advanced video menu as below: - Noise Reduction--Spatial: pressŻ/Ź to select on or off. - Noise Reduction--Speckle: press Ż/Ź to select on or off. - Noise Reduction--Temporal: pressŻ/Ź to select on or off. - Auto Contrast Enhancement: press Ż/Ź to select on or off. - Color Temperature: pressŻ/Ź to select one of Normal/Cool and Warm. - 3D Y/C: press Ż/Ź to select on or off. Password Set Press ENTER button to enter the Enter Old Password menu, and then input the number of 0-9 as below, and you can change the password when you input the new one twice. Parental Control Press ENTER to enter the sub-menu and then use the 0-9 to enter the correct password. NTSC CC Press ENTER to select CC1/CC2/CC3/CC4/TEXT1/TEXT2/TEXT3/TEXT4 ATSC CC Press ENTER to select CS1/CS2/CS3/CS4/CS5/CS6. 25 Digital Closed Captions This item allows you to set the closed caption, and press ENTER to enter Closed Caption Options menu as below: - Style: pressŻ/Ź to select one of Automatic and Custom, when you select automatic, the others are disable and can not be adjusted. - Size: press Enter to select one of Normal/Large and Small. - Font: press Enter to select one of Default and from Font1 to Font7. - Text Color: press Enter to select one of Red/Green/Blue/Yellow/Magenta/Cyan/Black and White. - Text Opacity: press Enter to select one of the Solid/Flashing/Transparent/Translucent. - Background Color: press Enter to select one of the Black/White/Red/Green/Blue/Yellow/Magenta/Cyan. - Background Opacity: press Enter to select one of the Solid/Flashing/Transparent/Translucent. - Edge Effect press Enter to select one of the None/Raised/Depressed/Uniform/Left Shadow/Right Shadow. - Edge Color press Enter to select one of the Black/White/Red/Green/Blue/Yellow/Magenta/Cyan. Feature menu options VGA Press MENU on the front panel or on the remote control and then use Ÿ/ź and OK to select the Feature menu in VGA mode. 1.Press Ź/ENTER to enter the Feature menu 2. Press Ÿ/ź button to move the cursor to the item to be selected. 3 .Use Ź/ENTER button to select what you want to adjust in the Feature menu 4. PressŻ/Ź button to adjust. 5. When you are satisfied with your adjustment, press MENU or EXIT to exit the main menu. 26 VGA Set Press Ÿ/ź button and then use ENTER to enter the VGA set menu as below: H-Pos Press Ÿ/ź button and then use Ż/Ź adjust the horizontal position of the picture. V-Pos Press Ÿ/ź button and then use Ż/Ź adjust the vertical position of the picture. Phase Press Ÿ/ź button and then use Ż/Ź to adjust the phase of the picture. Clock PressŸ/źbutton and then useŻ/Ź to adjust the clock of the picture. -Phase This function allows you to remove any horizontal noise and clear or sharpen the image of characters -Clock This function is to minimize any vertical bars or stripes visible on the screen background. And the horizontal screen size also will change. -Position This function is to adjust the picture to Left/Right and Up/Down as you prefer. Auto Adjust Press Ÿ/ź button and then use ENTER button to do auto adjust that automatically adjusts the available options for the best viewing configuration. Setting Press Enter to do preset that can return to the factory setting. 27 Feature menu options in Component Press MENU on the front panel or on the remote control and then use Ÿ/ź and Ź/ENTER to select the Feature menu in YpbPr mode. 1.Press Ź/ENTER to enter the Feature menu 2. Press Ÿ/ź button to move the cursor to the item to be selected. 3 .Use Ź/ENTER button to select what you want to adjust in the Feature menu 4. PressŻ/Ź button to adjust. 5. When you are satisfied with your adjustment, press MENU or EXIT to exit the main menu. Component Set Press Ż/Ź button and then use ENTER to enter the Component set menu as below: Feature menu options in HDMI Press MENU on the front panel or on the remote control and then use Ÿ/ź and Ź/ENTER to select the Feature menu in HDMI or S-VIDEO mode. 1.Press Ź/ENTER to enter the Feature menu 2. Press Ÿ/ź button to move the cursor to the item to be selected. 3 .Use Ź/ENTER button to select what you want to adjust in the Feature menu 4. PressŻ/Ź button to adjust. 5. When you are satisfied with your adjustment, press MENU or EXIT to exit the main menu. Time Set Press Ÿ/ź button and then use ENTER, the time set menu as below that allows you to set the time the TV will display. 28 Sleep Timer Press Ż/Ź button to select the amount of time before your TV turn off automatically and press the ENTER that can select the 30 min/60min/90min and OFF. Advance Video Menu Press ENTER to enter the advance video menu. Feature menu options in S-Video and Composite Rear Press MENU on the front panel or on the remote control and then use Ÿ/ź and ENTER to select the Feature menu in S-Video mode. 1.Press Ź/ENTER to enter the Feature menu 2. Press Ÿ/ź button to move the cursor to the item to be selected. 3 .Use Ź/ENTER button to select what you want to adjust in the Feature menu 4. PressŻ/Ź button to adjust. 5. When you are satisfied with your adjustment, press MENU or EXIT to exit the main menu. 29 Maintenance Early malfunctions can be prevented. Careful and regular cleaning can extend the amount of time you will have your new TV. Be sure to turn the power off and unplug the power cord before you begin any cleaning. Cleaning the Screen 1. Here’s a great way to keep the dust off your screen for a while. Wet a soft cloth in a mixture of lukewarm water and a little fabric softener or dish washing detergent. Wring the cloth until it`s almost dry, and then use it to wipe the screen. 2. Make sure the excess water is off the screen, and then let it air-dry before you turn on your TV. Cleaning the Cabinet To remove dirt or dust, wipe the cabinet with a soft, dry, lint-free cloth. Please be sure not to use a wet cloth. Extended Absence If you expect to leave your TV dormant for a long time (such as a vacation), it`s a good idea to unplug the power cord to protect against possible damage from lightning or power surges. 30 Product Specification Items Relevant illustrations Screen size, visible Screen format Display area Resolution Maximum contrast ratio Maximum brightness Display colors 1,500 cd/m² 16.7M 160° (Horizontal) / 160° (Vertical) / 70,000 hours 1155*390*880mm Weight (net) Appro109.17LB include power supply. Accessories Remote-Control, Power cord, Component Cable, User Guide, Quick Set up Guide, Warranty Card 100̚240V AC, 50/60Hz Power mode Normal Power Dissipation Standby Power Dissipation Normal, Standby 280W ˘1W Plug and Play(PnP) Support All-powerful remote control Support Channel and Frequencies VHF-L˖55.25 ̚ 133.25 MHz˗ VHF-H˖139.25 ̚ 415.25 MHz˗ UHF˖421.25 ̚ 859.25 MHz. TV system Stereo Audio Output Intermediate Frequency OSD language CCD/V-CHIP Local control keys Color standard AV Other Inputs and Outputs 10,000:1 Maximum viewing angle Power requirement TV 933.89 wide and 532.22 high 1024(H) × 768(V) pixels Maximum response time Maximum lifetime of background light Dimension (packed) The whole machine parameters 42 PLASMA TV 16:9 VGA YPbPr ATSC system NTSC-M DTV system 8VSB/QAM BTSCǃA2/NICAM 2×10W NTSC-45.75 MHz English// Francais/ Spanish Support INPUT,MENU ,VOL- VOL+ Pro- Pro + POWER ATSC, NTSC YPbPr, VGA, HDMI input VIDEO, S-VIDEO input,Use one-road totally(L/R) VGA/SVGA/XGA/SXGA/UXGA input of 480i/480P/576i/576P/720P50/720P60/1080i50/1080i60 31 audio frequency Troubleshooting For the sake of time and cost, it is strongly recommended that you check out the problem by yourself according to the instructions listed hereunder before contacting the after-sales service for technical assistance. No picture, no sound Verify if the television is properly plugged. Verify if the television is properly supplied power. Verify if electricity is available. Blank screen Verify if correct signals are input. Press INPUT button to change signal input to TV input. Restart the television of power supply is interrupted. No sound Press Mute button and verify if Mute mode is set. Switch to other channel and verify if the same problem happens. Press VOL+ button to see if the problem can be solved. Poor sound Verify if sound system is correct. Refer to Page 22 for adjustments. No picture in some channel Verify if correct channel is selected. Adjust the antenna. Make adjustments by Fine Tune and Manual Scan. No color for some channel program (black and white) Verify if the same problem exists in other channels. Check out of picture and sound systems. Refer to relative instructions in the Manual for color adjusts. Spots with some or all pictures Verify if the antenna is correctly connected. Verify if the antenna is in good condition. Make fine adjustment of channel. Horizontal/vertical bars or picture shaking Check for local interference such as an electrical appliance or power tool. Television out of control Disconnect the television from power supply and, 10 seconds later, connect the television to the power supply. If the problem still exists, contact authorized after-sales service for technical assistance. Note: Do not leave the television with static picture in an extended period as the image may become permanently burned. Note: Production of the plasma screen requires high and precision technologies. However, there might be some dark or bright (red, blue or green) spots, or some anomalistic stripes or spots. This is not defect. If the TV set is used in an area 2,400 meters above the sea level where the air pressure is below 750hpa, the picture on the plasma screen may be affected and a muffled sound might be produced. These phenomena might happen in the area 1,500 meters above the sea level. This is resulted from difference between air pressures inside and outside the display. This is not a defect covered by the limited warranty. 32