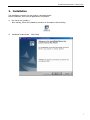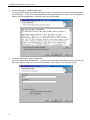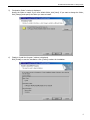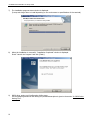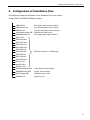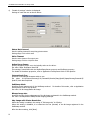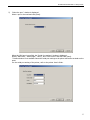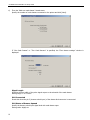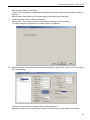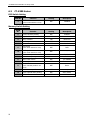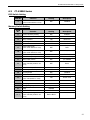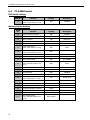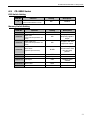
1
CITIZEN OPOS DRIVER 1.8
Setup Guide
’07/12/21 Ver. 1.00
CITIZEN OPOS DRIVER 1.8 Setup Guide
Revision Record
2
Date
Version
07/12/21
V1.00
Description
New issue
CITIZEN OPOS DRIVER 1.8 Setup Guide
Notes
1.
Unauthorized use of all or any part of this document is prohibited.
2.
The information in this document is subject to change without prior notice.
3.
This document has been created with full attention.
contact us.
4.
We shall not be liable for any effect resulting from operation regardless of the above item 3.
5.
If you do not agree with the above terms, you are not permitted to use this driver.
If, however, you find an error or question, please
Trademark
Microsoft, Windows 2000, Windows XP, Visual Basic, and Visual C++ are registered trademarks of Microsoft
Corporation in the United States and/or other countries. (Official name for Windows is Microsoft Windows
Operating System.)
Company names and product names appearing on this document are trademarks and/or registered
trademarks of respective companies.
CITIZEN is a registered trademark of Citizen Holdings Co., Ltd.
3
CITIZEN OPOS DRIVER 1.8 Setup Guide
Contents
1.
OPERATING ENVIRONMENT ................................................................................................5
2.
INSTALLATION.....................................................................................................................7
3.
CONFIGURATION OF INSTALLATION FILES ......................................................................11
4.
OPOS DRIVER SETTING TOOL............................................................................................12
4.1 Adding New Printer and Cash Drawer ............................................................................13
4.2 Adding New Cash Drawer ...............................................................................................20
4.3 Adding Logical Device.....................................................................................................21
4.4 Deleting Device...............................................................................................................22
5.
UNINSTALL ........................................................................................................................26
6.
PRINTER SETTING .............................................................................................................27
6.1 CBM-1000II Series .........................................................................................................27
6.2 CT-S300 Series................................................................................................................28
6.3 CT-S2000 Series..............................................................................................................29
6.4 CT-S4000 Series..............................................................................................................30
6.5 CD-S500 Series ...............................................................................................................31
4
CITIZEN OPOS DRIVER 1.8 Setup Guide
1. Operating Environment
Operating System
This driver supports the following Windows operating systems
・ Windows 2000
・ Windows XP
Object Models
Object models of this product and the corresponding interface are as shown below.
For details of each model, refer to the Printer User’s Guide.
Series of
Model
CBM-1000II
CT-S300
CT-S310
CT-S2000
CT-S4000
CD-S500
Object Model
Interface
Printer Functions
CBM-1000TypeII
Serial, Parallel, USB
Standard
CBM-1000TypeII- L
Serial, Parallel, USB
Blackmark paper and label paper are
supported.
CT-S300
Serial, Parallel, USB
Standard (Paper with blackmark on
front side is supported.)
CT-S300-M1/M2
Serial, Parallel, USB
Paper with blackmark on back side is
supported.
CT-S310
Serial, Parallel, USB
Standard (Paper with blackmark on
front side is supported.)
CT-S310-M1/M2
Serial, Parallel, USB
Paper with blackmark on back side is
supported.
CT-S2000
Serial, Parallel, USB
Standard
CT-S2000-M
Serial, Parallel, USB
Blackmark paper is supported
CT-S2000-L
Serial, Parallel, USB
Label paper is supported.
CT-S4000
Serial, Parallel, USB
Standard (Paper with blackmark on
front side is supported.)
CT-S4000-M
Serial, Parallel, USB
Paper with blackmark on back side is
supported.
CT-S4000-L
Serial, Parallel, USB
Label paper is supported.
CD-S500
Serial, Parallel, USB
Standard type (Without cutting
feature)
CD-S501
Serial, Parallel, USB
With cutting feature
CD-S503
Serial, Parallel, USB
Rewinder equipped (With cutting
feature)
USB Interface Connection
Before using this product with USB interface connection, it is necessary to install Windows driver.
* This product is designed to operate on the USB interface port (Virtual printer port for USB) specified
on Windows driver.
5
CITIZEN OPOS DRIVER 1.8 Setup Guide
Parallel Interface Connection
If the terminal and the printer are connected together through parallel interface, the installation wizard
requesting you to install printer driver each time you start the terminal may start. To prevent this
installation wizard from starting install Windows driver.
Installing Windows Driver
Windows drivers corresponding to individual models are as shown below. For the method of Windows
driver installation, refer to “Windows Driver Guide” supplied with Windows driver.
Object Model
Windows Driver Name
Printer Function
CBM-1000TypeII
CITIZEN CBM1000 Type II
Standard
CBM-1000TypeII- L
CITIZEN CBM1000 Type II Label
Blackmark paper and label paper are
supported.
CT-S300
CITIZEN CT-S300
Standard (Paper with blackmark on
front side is supported.)
CT-S300-M1/M2
CITIZEN CT-S300 Black Mark
Paper with blackmark on back side is
supported.
CT-S310
CITIZEN CT-S300
Standard (Paper with blackmark on
front side is supported.)
CT-S310-M1/M2
CITIZEN CT-S310 Black Mark
Paper with blackmark on back side is
supported.
CT-S2000
CITIZEN CT-S2000
Standard
CT-S2000-M
CITIZEN CT-S2000
Blackmark paper is supported.
CT-S2000-L
CITIZEN CT-S2000
Label paper is supported.
CT-S4000
CITIZEN CT-S4000
Standard (Paper with blackmark on
front side is supported.)
CT-S4000-M
CITIZEN CT-S4000
Paper with blackmark on back side is
supported.
CT-S4000-L
CITIZEN CT-S4000 Label
Label paper is supported.
CD-S500
CITIZEN CD-S500
Standard type (Without cutting
feature)
CD-S501
CITIZEN CD-S501/503
With cutting feature
CD-S503
CITIZEN CD-S500/503
Rewinder equipped (With cutting
feature)
Windows driver includes two types: a driver with status function (language monitor) that allows checking of
printer status and a driver without status function. When using this driver, be sure to install the
Windows driver without status function.
* Use of this driver together with Windows driver having status function is not permitted.
6
CITIZEN OPOS DRIVER 1.8 Setup Guide
2. Installation
The installation procedure for this product is described below.
Before installation, shut down all applications in operation.
1)
Run Setup.exe (installer).
After starting, follow the installation procedure in accordance with the dialog.
2)
Installation wizard starts.
Click [Next].
7
CITIZEN OPOS DRIVER 1.8 Setup Guide
3)
“License Agreement” window is displayed.
If you agree with the product license agreement, select “I accept the terms in the license agreement.”
and click [Next]. If you do not agree with the product license agreement, select “I do not accept the
terms in the license agreement.” and click [Next] to exit the wizard.
4)
“Customer Information” wizard is displayed.
Enter “User Name” and “Organization”. If more than one user uses this computer, select “Anyone who
uses this computer” and if only you use this computer, select “Only for me” and click [Next].
8
CITIZEN OPOS DRIVER 1.8 Setup Guide
5)
“Destination Folder” window is displayed.
Specify the folder to install. If you use a default folder, click [Next]. If you want to change the folder,
click [Change] and specify the folder you want to install.
6)
“Ready to Install the Program” window is displayed.
Click [Install] to start the installation. Click [Cancel] to abort the installation.
9
CITIZEN OPOS DRIVER 1.8 Setup Guide
7)
The installation progress status window is displayed.
(It may take longer time to install depending on the environment or specifications of the terminal.)
8)
When the installation is successful, “Installation Completed” window is displayed.
Check “Launch the Program” and click [Finish].
9)
OPOS driver setting tool Configuration Utility starts.
For the operating method of this setting tool, detailed description is given in the section ”4. OPOS Driver
Setting Tool”.
10
CITIZEN OPOS DRIVER 1.8 Setup Guide
3. Configuration of Installation Files
The following provides the description on the installation files of this product.
“Install Folder”¥CITIZEN¥CITIZENServiceObject
CBMDSO.DLL
(Dot impact printer service object)
CBMPortMon.DLL
(Line thermal printer port monitor)
CBMTSO.DLL
(Line thermal printer service object)
ConfigurationUtility.EXE
(OPOS driver setting tool)
DMCBMPortMon.DLL
(Dot impact printer port monitor)
MFC71.DLL
MFC71CHS.DLL
MFC71CHT.DLL
MFC71DEU.DLL
MFC71ENU.DLL
MFC71ESP.DLL
MFC71FRA.DLL
(Microsoft Visual C++ MFC library)
MFC71ITA.DLL
MFC71JPN.DLL
MFC71KOR.DLL
MFC71U.DLL
MSVCP71.DLL
MSVCR71.DLL
OPOSCashDrawer.OCX
(Cash drawer control object)
OPOSPOSPrinter.OCX
(Printer control object)
POSTTestApp.EXE
(OPOS driver test tool)
README.TXT
(Read me text)
11
CITIZEN OPOS DRIVER 1.8 Setup Guide
4. OPOS Driver Setting Tool
This section provides the description of the method of using Configuration Utility.
installed, a shortcut icon is registered in the Windows Start Menu.
When this driver is
“Start” → “Program” → “CITIZEN” → “CITIZEN Thermal POS Printer” → “Configuration Utility”
Main Screen
Setting view: Indicates the setting of each device (Direct change of setting is
available).
Device view: Tree of physical devices and logical devices is indicated.
12
CITIZEN OPOS DRIVER 1.8 Setup Guide
4.1
Adding New Printer and Cash Drawer
1)
Click “Add Printer” from the Device menu.
2)
“Add Printer” wizard starts.
Select the model to add and click [Next].
(Here specify CBM1000TYPEII.)
Set value: CBM1000TYPEII/CT-S300/CT-S310/CT-S2000/CT-S4000/CD-S500
For the function of each printer, refer to the section in “1 Operating Environment”.
13
CITIZEN OPOS DRIVER 1.8 Setup Guide
3)
“Choose the printer type” window is displayed.
Specify the size of paper width used and the maximum number of columns per line referring to the
following table.
This setting is interlocked with the default value of the ”RecLineChars/RecLineCharsList” property.
For details, refer to Application Development Guide of this product.
CBM-1000TypeII Series
Paper Size
(mm)
58
80
Font A
(12*24dot)
Font B
(9*24dot)
Max. print
columns
30
40
30
36
48
36
42
56
42
48
64
48
Font A
(12*24dot)
Font B
(9*24dot)
Font C
(8*16dot)
Max. print
columns
30
40
45
30
32
42
48
32
42
56
63
42
48
64
72
48
CT-S300/CT-S310 Series
Paper Size
(mm)
58
80
14
CITIZEN OPOS DRIVER 1.8 Setup Guide
CT-S2000 Series
Paper Size
(mm)
58
60
80
83
Font A
(12*24dot)
Font B
(9*24dot)
Font C
(8*16dot)
Max. print
columns
30
40
45
30
30
40
45
Not supported
35
46
52
Not supported
36
48
54
36
36
48
54
36
42
56
64
42
48
64
72
48
53
71
80
53
CT-S4000 Series
Paper Size
(mm)
80
82.5
112
Font A
(12*24dot)
Font B
(9*24dot)
Font C
(8*16dot)
Max. print
columns
42
56
64
42
48
64
72
48
55
73
82
55
60
80
90
60
69
92
104
69
Font A
(9*9dot)
Font B
(7*9dot)
Max. print
columns
25
30
25
27
33
27
30
36
30
32
40
32
33
40
33
35
42
35
CD-S500 Series
Paper Size
(mm)
57.5
69.5
76.2
After setting the above, click [Next].
15
CITIZEN OPOS DRIVER 1.8 Setup Guide
4)
“Details of settings” window is displayed.
Settings of each item are as shown below.
Status Back interval
Sets the polling interval for acquiring printer status.
Setting range: 100 to 900 msec
Write Timeout
Sets the write timeout for output port.
Setting range: 5000 to 100,000 msec
Active Paper Sensor
Specify the paper sensor set to be logically active on the driver.
Set value: Paper End/Paper Near-End
This setting is interlocked with the CapRecEmptySensor property and RecEmpty property.
For details of the above properties, refer to Application Development Guide of this product.
International Char
Specifies a international character table to use.
Set value: U.S.A/France/Germany/U.K./DenmarkI/Sweden/Itary/SpainI/Japan/Norway/DenmarkII/
SpainII/ Latin America/Korea
SetBitmap Mode
Specifies the bit image mode of the SetBitmap method. For details of this mode, refer to Application
Development Guide of this product.
Set value: NV bit image/Raster bit image
Bitmap image size
Specifies the rate of print enlargement of the bit image registered in the SetBitmap method.
Set value: Normal/Double-Width/Double-Height/Quadruple
Map image with Printer Resolution
When this setting is enabled, the setting of “Bit image size” is effective.
When this setting is disabled, it is treated as the size (Normal) of the bit image registered in the
SetBitmap method.
After the above setting, click [Next].
16
CITIZEN OPOS DRIVER 1.8 Setup Guide
5)
“Select the port.” window is displayed.
Select a port to be used and click [Next].
When the COM port is specified, the “Serial Port settings” window is displayed.
Specify “Baud rate”, “Data length”, “Parity”, and “Flow control” and then click [Next].
* Communication is not available unless the serial port settings at the printer and at the terminal are the
same.
For the serial port setting of the printer, refer to the printer User’s Guide.
17
CITIZEN OPOS DRIVER 1.8 Setup Guide
6)
Then the “Add new cash drawer” wizard starts.
Specify the number of cash drawers connected to the printer and click [Next].
If “One Cash Drawer” or “Two Cash Drawers” is specified, the “First drawer settings” window is
displayed.
Signal Length
Specifies the time width of the pulse signal output to the solenoid of the cash drawer.
Setting range: 1 to 10 msec
Pin3 Connected
Check this when the pin 3 (drawer switch input) of the drawer kick connector is connected.
Pin3 Status of Drawer Opened
Specify the drawer switch input signal level with cash drawer open.
Setting value: High/Low
18
CITIZEN OPOS DRIVER 1.8 Setup Guide
After the above setting, click [Next].
* When “Two Cash Drawers” is specified, clicking [Next] causes the “Second drawer settings” window is
displayed.
Set the second cash drawer as in the same manner as the above and click [Next].
7)
“Finish the printer setting” window is displayed.
Click [Finish]. Here, this tool performs registration processing for system registry.
* It takes some time till registration of system registry is completed.
8)
When this wizard is finished, the printer and the cash drawer registered in “Device view” and “Setting
view” are indicated.
* Setting of each item can be changed directly from Setting view.
Each time setting of item is changed, the change is reflected to the system registry immediately.
19
CITIZEN OPOS DRIVER 1.8 Setup Guide
4.2
Adding New Cash Drawer
1)
Click “Add Cash Drawer” from the “Device” menu.
* Be sure to execute Add Cash Drawer after finishing printer registration.
2)
“Add new cash drawer” wizard starts.
Following this step, refer to the description in “6) Then the “Add new cash drawer” wizard starts” of the
section “4.1 Adding New Printer and Cash Drawer” and later, and perform adding drawer procedure in the
same manner.
20
CITIZEN OPOS DRIVER 1.8 Setup Guide
4.3
Adding Logical Device
A logical device name can be assigned to the printer and cash drawer registered.
1)
Click “Add Device Name” in the “Device” menu.
2)
“Add Device” window is displayed.
The printer or cash drawer registered is shown in the list of “Select the device”. Select the object
printer or cash drawer and enter a logical device name in the text box of “Enter the device name”.
After the above setting, click [Add].
3)
If [Cancel] is clicked, the above setting is discarded.
After completion of the above procedure, the added logical device name is indicated on the Device
view.
21
CITIZEN OPOS DRIVER 1.8 Setup Guide
4.4
Deleting Device
This section describes deletion of physical device (printer) and cash drawer registered.
Deleting Printer
1)
Select the printer you want to delete from the “POSPrinter” list of Device view.
2)
Click “Delete Printer” in the “Device” menu.
3)
Message dialog “Warning – Do you want to delete printer device and assorted cash drawers” is
displayed.
Click [Yes (Y)]. If you click [No (N)], deleting the printer is aborted.
* When deleting a printer is carried out, all the registered drawer and logical device are deleted.
22
CITIZEN OPOS DRIVER 1.8 Setup Guide
Deleting Cash Drawer
1)
Select a cash drawer you want to delete from the “CashDrawer” list of the Device view.
2)
Click “Delete Cash Drawer” on the “Device” menu.
* When deleting a drawer is carried out, logical device is also deleted (printer is not deleted).
23
CITIZEN OPOS DRIVER 1.8 Setup Guide
Deleting Logical Device (Printer)
1)
Select a logical device to delete from the “POSPrinter” of the Device view.
2)
Click “Delete Device Name” on the “Device” menu.
24
CITIZEN OPOS DRIVER 1.8 Setup Guide
Deleting Logical Device (Cash Drawer)
1)
Select a logical device you want to delete from the “CashDrawer” list of the Device view.
2)
Click “Delete Device Name” on the “Device” menu.
25
CITIZEN OPOS DRIVER 1.8 Setup Guide
5. Uninstall
Uninstall of this product is explained.
Deleting System Registry
Physical and logical devices are deleted by Configuration Utility.
For the method of deleting device, refer to the section “4.4 Deleting Device”.
* When upgrading this product, retaining the registered device setting is recommended.
Deleting OPOS Driver
1)
From the “Add or Remove Programs” in “Control Panel”, select “CITIZEN Thermal POS Printer” and click
[Delete].
2)
A message dialog “Are you sure you want to remove CITIZEN POS Printer from you computer?” is
displayed.
Click [Yes (Y)]. If you click [No (N)], deleting this program is cancelled.
3)
A dialog indicating the progress of uninstall process is displayed.
4)
When the uninstall procedure is finished normally, “CITIZEN Thermal POS Printer” is removed from the
“Add or Remove Programs” list.
26
CITIZEN OPOS DRIVER 1.8 Setup Guide
6. Printer Setting
Using this product assumes that the DIP switch and memory switch of the printer are set as shown below.
For the details of the method of operating each switch and the content of setting, refer to User’s Guide of
each model.
6.1
CBM-1000II Series
DIP Switch Setting
DSW No.
Function
Setting
Description
1-1
Auto cutter
ON
With auto cutter
1-5
CR mode
OFF
Ignored
1-6
Input buffer
OFF
4KB
2-1
2-2
2-3
ON
Select character code table.
2-4
OFF
OFF
Katakana
OFF
2-5
JIS/Shift-JIS
ON
Shift-JIS
2-6
Condition for BUSY state
ON
Receiving buffer full
OFF
DSR
OFF
Disabled
3-7
3-8
DSR
(when serial interface is used)
INIT
(when serial interface is used)
* This model has no software switch function.
27
CITIZEN OPOS DRIVER 1.8 Setup Guide
6.2
CT-S300 Series
DIP Switch Setting
DSW No.
8
Function
INIT
(when serial interface is used)
Setting
Description
OFF
Disabled
Setting
Description
Memory Switch Setting
MSW
No.
1-1
Power ON notify setting
OFF
Enabled
1-2
Input buffer
OFF
4KB
1-3
Busy condition
ON
Buffer full
1-4
Receiving error character
OFF
Character ?
1-5
CR mode
OFF
Disabled
OFF
DSR
OFF
-
1-7
1-8
28
Function
DSR signal
(when serial interface is used)
INIT signal
(when serial interface is used)
2-2
Auto cutter operation
ON
Enabled
2-4
Full column printing
ON
EPSON
3-1
Auto cutter restore
OFF
L/F enabled
3-2
Cover open restore
OFF
Cover closed
Parallel 31 Pin
3-3
(when USB and parallel IF are
used)
OFF
Reset
3-7
CBM1000-compatible mode
OFF
Non-compatible
3-8
Cover opened while printing
OFF
Auto restore
4-8
Full cut command
OFF
Full cut
CITIZEN OPOS DRIVER 1.8 Setup Guide
6.3
CT-S2000 Series
DIP Switch Setting
DSW No.
8
Function
INIT
(when serial interface is used)
Setting
Description
OFF
Disabled
Setting
Description
Memory Switch Setting
MSW
No.
Function
1-1
Power ON notify setting
OFF
Enabled
1-2
Input buffer
OFF
4KB
1-3
Busy condition
ON
Buffer full
1-4
Receiving error character
OFF
Character ?
1-5
CR mode
OFF
Disabled
OFF
DSR
OFF
-
1-7
1-8
Select DSR signal
(when serial interface is used)
Select INIT signal
(when serial interface is used)
2-2
Auto cutter operation
ON
Enabled
2-4
Full column printing
OFF
Print immediately
3-1
Auto cutter restore
OFF
L/F enabled
Parallel 31Pin
3-3
(when USB and parallel IF are
used)
OFF
Reset
3-7
CBM1000-compatible mode
ON
Compatible
3-8
Cover opened while printing
OFF
Auto restore
4-8
Forced partial
OFF
Disabled
5-2
Vertical basic calculation pitch
OFF
360 dots
ON
Printer class
5-3
USB mode
(when USB interface is used)
7-6
DMA control
Enabled
-
9-1
Code page
Katakana
-
9-2
Foreign language characters
Japan
-
9-3
Kanji
Enabled
-
9-4
JIS/Shift-JIS
Shift-JIS
-
Before BUSY
-
10-3
ACK output timing
(when USB and parallel IF are
used)
29
CITIZEN OPOS DRIVER 1.8 Setup Guide
6.4
CT-S4000 Series
DIP Switch Setting
DSW No.
8
Function
INIT
(when serial interface is used)
Setting
Description
OFF
Disabled
Setting
Description
Memory Switch Setting
MSW
No.
1-1
Power ON notify setting
OFF
Enabled
1-2
Input buffer
OFF
4KB
1-3
Busy condition
ON
Buffer full
1-4
Receiving error character
OFF
Character ?
1-5
CR mode
OFF
Disabled
OFF
DSR
OFF
-
1-7
1-8
Select DSR signal
(when serial interface is used)
Select INIT signal
(when serial interface is used)
2-2
Auto cutter operation
ON
Enabled
2-4
Full column printing
OFF
Print immediately
3-1
Auto cutter restore
OFF
L/F enabled
Parallel 31Pin
3-3
(when USB and parallel IF are
used)
OFF
Reset
3-7
CBM1000-compatible mode
ON
Compatible
3-8
Cover opened while printing
OFF
Auto restore
4-8
Forced partial
OFF
Disabled
5-2
Vertical basic calculation pitch
OFF
360 dots
ON
Printer class
5-3
USB mode
(when USB interface is used)
5-5
Power OFF notify
Disabled
-
7-6
DMA control
Enabled
-
9-1
Code page
Katakana
-
9-2
Foreign language characters
Japan
-
9-3
Kanji
Enabled
-
9-4
JIS/Shift-JIS
Shift-JIS
-
Before BUSY
-
10-3
30
Function
ACK output timing
(when USB and parallel IF are
used)
CITIZEN OPOS DRIVER 1.8 Setup Guide
6.5
CD-S500 Series
DIP Switch Setting
DSW No.
8
Function
INIT
(when serial interface is used)
Setting
Description
OFF
Disabled
Memory Switch Setting
MSW No.
Function
SoftCtrl-1
Command Type
SoftCtrl-5
(when USB and parallel IF are
used)
SoftCtrl-6
SoftCtrl-8
Paper End
Paper Near-End
(when USB and parallel IF are
used)
Print Direct
(Specifies print direction)
Setting
Description
EPSON
-
DIS
At paper end
Only Busy signal is
output.
DIS
At paper near-end
Signal not output
BI-DIR
Print from right or
left end nearer from
the print stop
position.
OFF
-
SoftCtrl-9
Auto LF
SoftCtrl-11
Buffer Size
4Kbyte
-
SoftCtrl-12
Init Signal
ENB
Initialize signal
enabled
Mechanical-2 Auto-Cutter
FREE
-
Mechanical-3 Color Ribbon
ON
Command switching
31
CITIZEN OPOS DRIVER 1.8 Setup Guide
CITIZEN OPOS DRIVER 1.8 Setup Guide
'07/08/02 Ver1.00
CITIZEN SYSTEMS JAPAN CO., LTD.
32