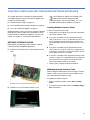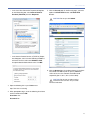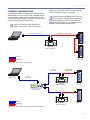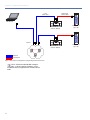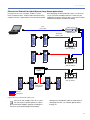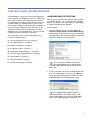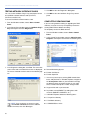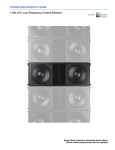
1
USER GUIDE
RMS
RMS™ Remote Monitoring System 5.2
Keep this important user guide.
Check www.meyersound.com for updates.
© 2008
Meyer Sound. All rights reserved.
RMS Remote Monitoring System User Guide
The contents of this manual are furnished for informational purposes only, are subject to change without notice, and should not be construed as a commitment by Meyer Sound Laboratories Inc. Meyer Sound assumes no responsibility or liability for any errors or inaccuracies that may appear in this manual. Except as permitted by applicable copyright law, no part of this publication may be reproduced,
stored in a retrieval system, or transmitted, in any form or by any means, electronic, mechanical, recording or otherwise, without prior written permission from Meyer Sound.
M Series, M1D, M2D, M'elodie, MICA, RMS, UltraSeries, and all alpha-numeric designations for Meyer Sound products and accessories
are trademarks of Meyer Sound. Meyer Sound, the Meyer Sound wave logo, M3D, and MILO are registered trademarks of Meyer Sound
Laboratories Inc. (Reg. U.S. Pat. & Tm. Off.). All third-party trademarks mentioned herein are the property of their respective trademark
holders.
Printed in the U.S.A.
Part Number: 05.033.302.10 A
Enter your serial number (located on the RMS Installer disc sleeve) here:
ii
CONTENTS
Chapter 1: Introduction
How to Use This Manual
RMS Requirements
About the RMS Network Platform
About the RMS Software
Workflow for RMS Configurations
Chapter 2: The RMS Module
About The RMS Module
Resetting the RMS Module
Installing the RMS module (UltraSeries Loudspeakers)
Installing the RMS Module (MP and HP Amplifier Loudspeakers)
Installing the Mute Jumper
Chapter 3: Installing the RMS Software
Backing Up RMS Files
Installing the RMS Software
About the RMS Serial Number
Chapter 4: Installing and Configuring Network Interfaces
5
5
5
6
6
7
9
9
10
10
11
15
17
17
17
18
19
Network Interface Cards
The U10 USB Network Interface Adapter
The i.LON 10 Ethernet Adapter
19
20
21
Chapter 5: Connecting RMS Networks
27
Twisted-Pair vs. Ethernet
Twisted-Pair Cabling
Ethernet Hubs and Switches
Design Tips for RMS networks
Network Specifications
Twisted-Pair Configurations
Ethernet Configurations
Chapter 6: Using the RMS Software
Launching RMS the First Time
The RMS Workspace
Adding Loudspeakers
Loudspeaker Views
Working with Loudspeaker Icons
The Mute, Solo, and Wink Buttons
Muting Options
The Solo/Mute Matrix
Optimized Muting
UX Attenuation Range
27
27
28
29
29
30
33
37
37
39
41
45
48
49
50
51
52
52
iii
CONTENTS
iv
Appendix A: RMS Keyboard Shortcuts
53
Appendix B: Troubleshooting RMS Software Problems
55
Appendix C: External Muting with the i.Lon 100
63
Appendix D: The FTR-120 Free Topology Repeater
65
RMS Configuration Sheet
67
Index
75
CHAPTER 1: INTRODUCTION
This introductory chapter includes the following topics:
RMS Software System Requirements
■
“How to Use This Manual” on page 5
The RMS software system requirements include:
■
“RMS Requirements” on page 5
■
■
“About the RMS Network Platform” on page 6
■
“About the RMS Software” on page 6
■
“Workflow for RMS Configurations” on page 7
Microsoft® Windows 2000 sp4, Windows XP sp2, or
Windows Vista (32-bit systems only)
NOTE: RMS can be run on a Mac running
Windows XP under Boot Camp® (included with
Leopard®) or Parallels™.
HOW TO USE THIS MANUAL
■
Make sure to read this user guide in its entirety before configuring an RMS™ system. In particular, pay close attention
to material related to safety issues.
500 MHz Pentium® III; Pentium IV or faster recommended
■
256 MB of RAM; 512 MB recommended
■
55 MB of hard drive space
As you read this user guide, you will encounter the following
icons for notes, tips, and cautions:
■
CD or DVD drive for software installation
■
800 x 600 display; 1024 x 768 recommended
■
Internet access for RMS upgrade downloads
NOTE: A note identifies an important or useful
piece of information relating to the topic under
discussion.
TIP: A tip offers a helpful tip relevant to the topic
at hand.
CAUTION: A caution gives notice that an
action may have serious consequences and
could cause harm to equipment or personnel, or
could cause delays or other problems.
Information and specifications are subject to change.
Updates and supplementary information are available on the
Meyer Sound website:
http://www.meyersound.com
Meyer Sound Technical Support is available at:
■
Tel: +1 510 486.1166
■
Fax: +1 510 486.8356
■
Email: [email protected]
RMS REQUIREMENTS
Meyer Sound loudspeakers equipped with an RMS module
can be connected to RMS networks and controlled and
monitored with the RMS software. Some Meyer Sound loudspeakers come standard with an RMS module while others
offer it as an option. For more information, visit the Meyer
Sound website.
Supported Network Interfaces
The following network interfaces are supported by RMS:
■
Echelon® PCLTA-20 Network Interface Card —
Requires a 32-bit PCI card slot, half- or full-size.
■
Echelon PCLTA-21 Network Interface Card —
Requires a 32-bit PCI card slot, half- or full-size.
■
Echelon PCC-10 Network Interface Card — Requires
a Type II PC (PCMCIA) card slot.
■
Echelon U10 USB Network Interface Adapter —
Requires a USB 2.0 port.
■
Echelon i.LON 10® Ethernet Adapter — Requires an
Ethernet (RJ-45) port.
NOTE: The Echelon PCC-10 Network Interface
card is not compatible with the following laptop computers: Dell™ Latitude C610, Gateway® Solo
5300, and Toshiba Satellite Pro 4600, 7600, and
8100.
NOTE: RMS cannot be run from a wireless tablet or computer via an i.LON 10 Ethernet
Adapter.
5
CHAPTER 1: INTRODUCTION
Additional Networking Hardware Requirements
Depending on the number of loudspeakers in the RMS network, as well as the length of cabling used, additional networking hardware — such as repeaters, terminators,
switches, or hubs — may be required. In some cases, multiple network interfaces (i.LON 10s) may be recommended.
For more information, see Chapter 5, “Connecting RMS
Networks.”
ABOUT THE RMS NETWORK PLATFORM
RMS uses an established network platform developed by
Echelon Corporation, the world’s leading supplier of networking technology for sensing, monitoring, and control.
The networking platform supports Free Topology, is polarity
insensitive, does not require coaxial or fiber optic cabling,
and is not affected by power losses at loudspeaker nodes.
An RMS network is a real-time data acquisition system,
which means that no data is lost during transmission. A
standard RMS network with twisted-pair connections allows
up to 50 nodes of self-powered loudspeakers (up to 100
with a repeater). Several hundred nodes are allowed with
Ethernet-based configurations.
Once loudspeakers are identified on the RMS network, they
appear in the RMS software as icons and views; they are
also automatically added to the RMS database on the host
computer.
RMS Icons
The RMS software displays all loudspeakers on the network
in a panel with icons, Meter views, and Text views that can
be customized to suit your needs. Loudspeaker data is
updated 2–5 times per second. Individual loudspeakers can
be physically identified with the Wink option in RMS, which
lights the Wink LED on the RMS module for that particular
loudspeaker. Conversely, a loudspeaker can be identified in
the RMS software by pressing the Service Pin on the loudspeaker’s RMS module.
ABOUT THE RMS SOFTWARE
The RMS software provides extensive system status and
performance data for each loudspeaker, including amplifier
voltage, limiting activity, power output, fan and driver status,
as well as mute and solo capability. Loudspeakers are
added to the RMS network and assigned a node name during a one-time commissioning procedure where the loudspeaker is identified by either entering its unique Neuron ID
or by pressing its Service button.
RMS User Panel
Loudspeaker icons and views can be arranged to represent
how the loudspeakers have been deployed in the system.
Multiple panels can be saved and recalled for specific performances and venues.
RMS Add Loudspeaker Dialog Box
6
RMS USER GUIDE
WORKFLOW FOR RMS CONFIGURATIONS
To configure an RMS network, use the following steps:
1. Install the RMS modules in the loudspeakers, if they
have not already been installed (see Chapter 2, “The
RMS Module”).
2. Make a note of each loudspeaker’s Neuron ID. The Neuron ID, which is displayed on each loudspeaker’s RMS
user panel, is required when adding the loudspeaker to
an RMS panel. You can use the datasheet on page 67 of
this user guide for creating a list of loudspeakers in the
setup.
3. To enable mute and solo capability for the loudspeakers,
install the Mute Jumpers (see “Installing the Mute
Jumper” on page 15).
4. Install the RMS software (see Chapter 3, “Installing the
RMS Software”). If you are upgrading your RMS software, first back up any RMS databases and panel files.
5. Write down your RMS software serial number (located on
the RMS Installation disc sleeve) and keep it in a safe
place. A space is provided for the serial number on the
inside cover of this guide.
6. Install your Echelon network interface (PCLTA-20/21,
PCC-10, U10, or i.LON 10) and configure any necessary
control panels. For more information, see Chapter 4,
“Installing and Configuring Network Interfaces.”
7. Connect the RMS network: install cabling and any
repeaters and hubs (if necessary) between the loudspeakers and network adapters. For more information,
see Chapter 5, “Connecting RMS Networks.”
8. Launch RMS and add and commission loudspeakers.
Save the panel file. For more information, see Chapter 6,
“Using the RMS Software.”
7
CHAPTER 1: INTRODUCTION
8
CHAPTER 2: THE RMS MODULE
When equipped with an RMS module, Meyer Sound loudspeakers can be connected to an RMS network and monitored with the RMS software. Some Meyer Sound
loudspeakers, such as the M-Series loudspeakers, come
standard with the RMS module already installed. For other
Meyer Sound loudspeakers, the RMS module is available as
an option that can either be factory installed or installed at a
later date by a qualified service technician.
The following sections document the basic features of the
RMS module, as well as how to install it:
■
“About The RMS Module” on page 9
■
“Resetting the RMS Module” on page 10
■
“Installing the RMS module (UltraSeries Loudspeakers)”
on page 10
■
“Installing the RMS Module (MP and HP Amplifier Loudspeakers)” on page 11
■
“Installing the Mute Jumper” on page 15
NOTE: RMS-equipped loudspeakers include a
Mute Jumper that can be installed to enable
the loudspeaker’s mute and solo capability. Meyer
Sound currently ships RMS-equipped loudspeakers
with the Mute Jumper installed. These mute-enabled
loudspeakers can be identified by the blue “ME”
sticker on the face of the RMS module. Older RMSequipped loudspeakers can easily be mute-enabled
by installing the Mute Jumper. For more information,
see “Installing the Mute Jumper” on page 15.
Service LED (Red)
The red Service LED provides the following feedback:
■
When unlit, the loudspeaker is successfully connected to
the network and commissioned.
■
When blinking once every two seconds, the loudspeaker
is connected to the network but not yet commissioned in
the RMS software.
■
When lit continuously, the loudspeaker’s RMS hardware
has failed and may indicate that the module has been
damaged (contact Meyer Sound Technical Support).
Service Button
Pressing the Service button identifies the loudspeaker on
the RMS network and notifies the RMS software that the
loudspeaker is connected. You can simultaneously press the
Reset and Service buttons to reset the RMS module and
decommission the loudspeaker from the network (see
“Resetting the RMS Module” on page 10).
Wink LED (Green)
The green Wink LED lights when a signal is sent from the
RMS software by clicking the Wink button on the loudspeaker’s icon or on its Text view. This is useful for identifying the physical loudspeaker corresponding to a
loudspeaker icon in the RMS software.
Reset Button
ABOUT THE RMS MODULE
The RMS user panel has three LEDs, two buttons, and two
Network connectors.
Pressing the Reset button causes the RMS module’s firmware to reboot; this will not affect whether the loudspeaker
is commissioned (which is stored in flash memory). You can
simultaneously press the Reset and Service buttons to reset
the RMS module and decommission the loudspeaker from
the network (see “Resetting the RMS Module” on page 10).
Activity LED (Green)
RMS Module
The green Activity LED flashes continuously when the loudspeaker has been successfully commissioned.
NOTE: The LEDs and buttons on the RMS user
panel are used exclusively by RMS and have
no effect on the acoustical or electrical activity of the
loudspeaker.
9
CHAPTER 2: THE RMS MODULE
Network Connectors
To install an RMS module in an UltraSeries loudspeaker:
The two bi-directional Weidmuller locking connectors transfer data to and from the RMS network. Two connectors are
provided to allow for easy connection of multiple (daisychained) loudspeakers on the network.
1. Remove the loudspeaker’s AC power cable and audio
cable and place the loudspeaker on a clean, low-static
flat surface. Orient the loudspeaker with the top facing
up.
RESETTING THE RMS MODULE
2. Remove the four screws securing the cover plate for the
slot below the audio input module. Save the cover plate
in case you need it in the future.
You can use the Reset and Service buttons to reset the RMS
module, which will cause the module to be decommissioned
from the network.
To reset the RMS module:
1. Press and hold the Service button for 10 seconds.
2. While continuing to hold down the Service button, press
and hold the Reset button for 5 seconds.
3. After releasing the Reset button, continue holding down
the Service button for 5 seconds. The RMS module is
reset and the loudspeaker is decommissioned. The RMS
module’s red Service LED blinks.
INSTALLING THE RMS MODULE
(ULTRASERIES LOUDSPEAKERS)
This section documents installing the RMS module in
UltraSeries loudspeakers. The same procedure can also be
used to install or replace an RMS module in several of the
M-Series loudspeakers (see Table 1). This installation procedure requires a standard #2 Phillips screwdriver.
3. Verify that the copper strip on the left side of the open
slot is not damaged and properly positioned. The copper
strip helps ground the RMS module to the chassis. If you
need to replace the copper strip, contact Meyer Sound.
Table 1: UltraSeries RMS Modules
RMS Module
Series
PN
40.076.029.01
M-Series
PN
40.084.008.01
UltraSeries
M-Series
UltraSeries
Loudspeakers
M2D
UPA-1P, UPA-2P, UM-1P,
UM-100P, USM-1P, USM-100,
USW-1P
M1D, MD1-Sub, M’elodie
MJF-212, MJF-212A, UMS-1P,
UPJ-1P, UPJunior, UPM-1P,
UPM-2P, UPQ-1P, UPQ-2P
NOTE: If you want to enable muting capability
for the loudspeaker, make sure to install the
Mute Jumper on the RMS module before installing it.
For more information, see “Installing the Mute
Jumper” on page 15.
10
Copper strip
RMS USER GUIDE
NOTE: If you want to enable muting capability
for the loudspeaker, make sure to install the
Mute Jumper on the RMS module before installing it.
For more information, see “Installing the Mute
Jumper” on page 15.
4. Locate the ribbon cable beneath the audio input module
and attach this cable to the connector on the RMS module. Make sure to fully lock the connector.
NOTE: Before adding an RMS module to loudspeakers with amplifiers manufactured before
1997, the loudspeakers must be retrofitted with TPL
control boards and RMS-ready user panels.
Locking
connector
To install an RMS module in a loudspeaker with an HP or MP
amplifier:
NOTE: Make sure to hold the RMS module by
its edges. Avoid touching any of the components on the RMS module.
5. Slide the RMS module into the open slot (below the
audio input module) and secure it with the four screws.
1. Remove the loudspeaker’s AC power cable and audio
cable and place the loudspeaker on a clean, low-static
firm surface. Orient the loudspeaker with the top facing
up.
2. To remove the amplifier from the loudspeaker cabinet:
■
Remove the eight large screws that secure the amplifier
to the cabinet.
■
Remove the amplifier from the cabinet slowly, taking care
to unplug the green loudspeaker connector on the top
side of the amplifier (there are two connectors for the
four-channel amplifiers).
■
Place the amplifier on a clean, low-static flat firm surface.
6. Reconnect the loudspeaker’s AC power cable and audio
cable and apply power to the loudspeaker. The Activity
LED blinks to indicate the RMS module is operational
and ready to be commissioned on the network.
INSTALLING THE RMS MODULE (MP AND HP
AMPLIFIER LOUDSPEAKERS)
This section documents installing the RMS module in loudspeakers with an MP-2, MP-4, HP-2, and HP-4 amplifiers.
These loudspeakers are all compatible with the same RMS
module (see Table 2).
Table 2: MP/HP Amplifier RMS Module
RMS Module
Series
Loudspeakers
PN
40.033.071.01
M-Series
M2D-Sub, M3D, M3D-Sub, MICA,
MILO 60, MILO 120
Concert
Series
600-HP, 700-HP, 650-P, DF-4, DS-2P,
DS-4P, MSL-4, MSL-6, MTS-4,
PSM-2, PSW-2, PSW-4, PSW-6,
Industrial
Series
SB-1, SB-2, SB-3F
This installation procedure requires the following:
■
Standard #2 Phillips screwdriver
■
3/8” nut driver
■
Fluke 87 multimeter or equivalent ohmmeter
11
CHAPTER 2: THE RMS MODULE
3. To remove the user panel from the amplifier:
■
Remove the eight small screws from the user panel.
■
While carefully removing the user panel, disconnect from
the user panel the signal cable from the input board (with
the gray connector), and disconnect from the AC mains
board the AC input cable (4-wire, green connector) from
the user panel.
4. Remove the blank cover plate from the user panel by
removing the two nuts on the back of the user panel.
5. In the power supply chassis, locate the back right screw
hole (next to the transformer) on the floor of the chassis.
If the paint around the hole has not been sufficiently
removed (to allow for metal-to-metal contact with the
module standoff), remove the paint with a Dremel tool or
sandpaper. Make sure to remove all debris from the
chassis before proceeding.
Rear right
screw hole
CAUTION: Do not grind down the metal
around the screw hole too much. If the metal is
too thin it will reduce the metal-to-metal contact (and
grounding) with the RMS module.
12
RMS USER GUIDE
6. Remove the plastic connector on the power supply
board (next to the fan power connector).
8. Attach the short 9-wire gray ribbon cable from the RMS
module to the connector on the power supply board.
Make sure all pins are engaged and that the connector is
firmly seated.
Plastic
connector
7. Apply one drop of Loctite® to each of the four standoffs
on the RMS module and then place the module in the
bottom of the power supply chassis with the LEDs facing
out and the standoffs aligned with the four screw holes in
the bottom of the chassis.
9. While holding the RMS module in place, place the loudspeaker on its side and secure the RMS module using
the four screws included with the kit.
NOTE: Make sure to hold the RMS module by
its edges. Avoid touching any of the components on the RMS module.
13
CHAPTER 2: THE RMS MODULE
10. Attach the 26-pin connector from the long ribbon cable
to the RMS module connector. Make sure to fully lock
the connector.
12. Reconnect the AC input cable (4-wire, green connector)
from the user panel to the AC mains board. Reconnect
the signal cable from the input board (gray multipin connector) to the user panel. Make sure to fully lock the gray
multipin connector.
11. Using an ohmmeter, measure the resistance for R13 on
the RMS module. R13 is located about an inch to the
right of the center of the module. The resistance should
measure 10 ohms. If the resistance measures 47 ohms,
the module is insufficiently grounded.
13. While carefully aligning the RMS module’s network connectors and LEDs with the user panel, secure the user
panel to the amplifier with the eight small screws.
14. Reconnect the green connector from the loudspeaker
cabinet to the top of the amplifier (there are two connectors for the four-channel amplifiers), then carefully slide
the amplifier back in the cabinet and secure it with the
eight large screws.
15. Affix the Neuron ID label to the bottom center of the user
panel, directly below the RMS module’s LEDs and network connectors.
R13
NOTE: Insufficient grounding may be caused
by too much paint surrounding the back right
screw hole (see Step 5), or it may be caused by overthinning the screw hole (if this is the case, a shorter
screw may fix the problem).
NOTE: The resistance for R13 will not read
10 ohms if the ribbon cable from the RMS
module was not connected to the power supply
board (see Step 8).
14
Neuron ID label
16. Reconnect the loudspeaker’s AC power cable and audio
cable and apply power to the loudspeaker. The Activity
LED blinks to indicate the RMS module is operational
and ready to be commissioned on the network.
RMS USER GUIDE
INSTALLING THE MUTE JUMPER
To use the mute and solo functions of any RMS-equipped
Meyer Sound loudspeaker, the Mute Jumper must be
installed on the RMS module. Meyer Sound currently ships
RMS-equipped loudspeakers with the Mute Jumper
installed. These mute-enabled loudspeakers can be identified by the blue “ME” sticker on the face of the RMS module. Older RMS-equipped loudspeakers can easily be muteenabled by installing the Mute Jumper.
CAUTION: Do not mistakenly install the Mute
Jumper on the white, unlabeled two-pin connector on the RMS module. This connector is for the
VEAM connector option; using it for any other purpose will damage the RMS module.
3. Reinstall the RMS module in the loudspeaker.
To install the Mute Jumper:
1. Remove the loudspeaker’s AC power cable and then
wait at least five minutes before removing the RMS module.
2. On the RMS module, locate the two jumper pins labeled
SHORT TO ENABLE MUTE and install the blue Mute
Jumper on these two pins.
Mute Jumper Not Installed
Mute Jumper Installed
15
CHAPTER 2: THE RMS MODULE
16
CHAPTER 3: INSTALLING THE RMS SOFTWARE
The RMS software includes the RMS program, Echelon
interface drivers, and LSN server software. This chapter
documents installation of the RMS software and includes
the following topics:
■
“Backing Up RMS Files” on page 17
■
“Installing the RMS Software” on page 17
■
“About the RMS Serial Number” on page 18
CAUTION: Do not attempt to install your network interface until after you have installed the
RMS software. The RMS Setup program installs the
required Echelon drivers for the network interfaces.
Make sure to only use the Echelon drivers included
with the RMS software; they have been tested and
verified to work optimally with RMS systems.
RMSNET folders contain network databases associated
with an Echelon network interface card, while numbered
RMSNET folders contain network databases associated
with an i.LON 10 ethernet adapter.
CAUTION: Do not copy or remove the
RMSNET_INT folder.
INSTALLING THE RMS SOFTWARE
NOTE: If you are upgrading your RMS software, it is not necessary to uninstall it before
installing the new RMS software. The RMS Setup
program automatically removes the earlier RMS software components.
To install the RMS software:
BACKING UP RMS FILES
If you are upgrading to a new version of the RMS software
and want to use your existing RMS configuration, you
should back up your RMS files before installing the new
software. After installation, you can then import the RMS
database (see “Importing RMS Network Databases” on
page 38) and load the desired panel files. While the RMS
Setup program automatically backs up existing databases
(adding a date and time stamp to the folder name), it does
not back up RMS panel files. To be safe, you should manually back up your RMS files on a regular basis.
1. Insert the RMS Installation disc in your computer. If the
Setup program does not automatically launch, locate it
in Windows Explorer and double-click it.
2. In the User Information dialog box, enter your User
Name, Company Name, and Serial Number. The serial
number is located on the RMS Installation disc sleeve;
enter it exactly as it appears, including any hyphens.
Click Next.
TIP: Make sure to regularly back your RMS files
(perhaps once a week). If you lose these files
because of a hard drive failure and do not have a
backup, you will have to rebuild and recommission
your entire RMS configuration.
To back up RMS files:
1. In Windows Explorer, navigate to the C:\meyer\rms
folder on your hard drive.
2. Copy the following items to another location on your
hard drive, or onto a backup disc or other storage media.
■
Any panel files with a .pnl extension
■
Any folders named RMSNET, including those with
numerals (RMSNET1, RMSNET2, etc.)
17
CHAPTER 3: INSTALLING THE RMS SOFTWARE
3. In the Setup Type dialog box, select the option for Full
installation and click Next.
4. In the Setup Complete dialog box, deselect Add an RMS
icon to the Windows startup folder. You should only
select this option if you want RMS to launch automatically when Windows starts up. Click Finish.
5. When prompted to restart Windows, select “Yes, I want
to restart my computer now” and click Finish.
ABOUT THE RMS SERIAL NUMBER
Your 16-digit RMS serial number is located on the RMS
Installation disc sleeve. It must be entered (with the
hyphens) when running the RMS Setup program. After
installation, your RMS serial number can be viewed in the
RMS program by choosing About > About RMS. The serial
number can also be viewed by launching the rms.ini file
located in the WINDOWS folder.
It is recommended that you write down your RMS serial
number in a safe place as a backup. A space is provided for
the serial number on the inside cover of this guide.
18
CHAPTER 4: INSTALLING AND CONFIGURING NETWORK INTERFACES
This chapter documents installing and configuring RMScompatible network interfaces and Ethernet adapters and
includes the following topics:
■
“Network Interface Cards” on page 19
■
“The U10 USB Network Interface Adapter” on page 20
■
“The i.LON 10 Ethernet Adapter” on page 21
Before proceeding, make sure you have already installed the
RMS software, which includes the required drivers for the
network interfaces and Ethernet adapters. For more information, see Chapter 3, “Installing the RMS Software.”
NOTE: RMS also supports the LonWorks U10
USB Network Interface Adapter for USBenabled computers. For more information, see “The
U10 USB Network Interface Adapter” on page 20.
Installing Network Interface Cards
To install a network interface card:
1. Power down your computer and install one of the following network interface cards:
■
If you have a LonWorks PCLTA-21 Network Interface
card, install it in any 3.3 V, 5 V, 32-bit, 64-bi, PCI or PCI-X
slot, according to the manufacturer’s instructions. For
more information, refer to the LonWorks PCLTA-21 User
Guide.
■
If you have a LonWorks PCLTA-20 Network Interface
card, install it in a 32-bit PCI card slot, according to the
manufacture’s instructions. For more information, refer to
the LonWorks PCLTA-20 User Guide.
■
If you have a LonWorks PCC-10 Network Interface card,
install it in a Type II PC card (PCMCIA) slot, according to
the manufacture’s instructions. For more information,
refer to the LonWorks PCC-10 User Guide.
NETWORK INTERFACE CARDS
RMS supports the following network interface cards for
interfacing to RMS-equipped loudspeakers:
■
LonWorks PCLTA-20/PCLTA-21 PCI Network Interface
cards
2. Power up your computer and launch Windows.
Validating Network Interface Cards
After installing the RMS software and inserting the network
interface card, you must then launch the LonWorks Plug’n
Play control panel to validate the card.
To validate the network interface:
LonWorks PCLTA-21 PCI Network Interface Card
■
LonWorks PCC-10 PC Network Interface card
1. From the Windows taskbar, choose Start > Control
Panel.
2. In the Control Panel window, open the LonWorks Plug’n
Play control panel.
LonWorks PCC-10 PC Network Interface Card
19
CHAPTER 4: INSTALLING AND CONFIGURING NETWORK INTERFACES
NOTE: If you encounter any error messages,
click Restart and Reset to reset the card and
reload its firmware, then click Test again.
3. Set the NI Application to one of the following options,
depending on your network interface:
■
Click OK to close the Diagnostics dialog box.
6. Click OK to close the LonWorks Plug’n Play control
panel.
TIP: You can use the LonWorks Plug’n Play
control panel at any time to verify whether the
network interface card is properly installed and configured.
THE U10 USB NETWORK INTERFACE
ADAPTER
The LonWorks U10 USB Network Interface Adapter
attaches to your computer’s USB port and includes an
adapter cable for connecting to the RMS network with a
Weidmuller connector.
PCLTA21VNI
Desktop computers with a PCLTA-21
PCL10VNI
Desktop computers with a PCLTA-20
PCC10VNI
Laptop computers with a PCC-10
4. Click Apply to initialize the network interface card.
LonWorks U10 USB Network Interface Adapter
NOTE: If you are using the U10 USB Network
Interface Adapter with a laptop computer and
the laptop already has a LonWorks network interface
card installed, the card must be uninstalled before
attaching the U10 adapter.
5. To test the network interface card, do the following:
■
Click Diagnostics.
■
In the Diagnostics dialog box, click Test. The connection
status of the card is tested and the results are displayed.
The results should be similar to those in the following figure.
Installing the U10 USB Network Interface
Adapter
To install the LonWorks U10 USB Network Interface
Adapter:
1. If you have a LonWorks network interface card installed,
uninstall it:
20
■
From the Windows taskbar, choose Start > Control
Panel.
■
In the Control Panel window, open the System control
panel and click the Hardware tab, then click Device
Manager.
RMS USER GUIDE
■
In the Device Manager window, in the device list, select
the LonWorks network interface card and choose
Action > Uninstall. When prompted to confirm the
device removal, click OK.
3. Open LonWorks Interfaces control panel. Click the
USB tab and verify that the U10 appears as LON1.
■
Power down your computer and remove the LonWorks
network interface card from your computer following the
manufacturer’s instructions, then power up your computer and log into Windows.
4. Click Close to close the LonWorks Interfaces control
panel.
■
From the Windows taskbar, choose Start > Control
Panel.
■
In the Control Panel window, open the LonWorks Plug’n
Play control panel. The control panel opens with Device
Selected set to None. Click Cancel to close the LonWorks Plug’n Play control panel.
CAUTION: This step must be performed.
Opening and closing the LonWorks Plug’n Play
control panel allows the Echelon driver to detect that
the card is no longer installed.
THE I.LON 10 ETHERNET ADAPTER
The i.LON 10 Ethernet Adapter converts twisted-pair networks to Ethernet 10Base-T, allowing you to connect RMS
networks to a computer using a standard Ethernet network.
Multiple i.LON 10 Ethernet Adapters can be connected to a
single computer (via a hub or switch) to make a larger RMS
network with sub-networks, which is especially useful for
operating over long distances with large numbers of loudspeakers.
2. Attach the U10 adapter to your computer’s USB port
according to the manufacturer’s instructions. For information, refer to the LonWorks U10 USB User Guide.
LonWorks i.LON 10 Ethernet Adapter
21
CHAPTER 4: INSTALLING AND CONFIGURING NETWORK INTERFACES
For systems with multiple i.LON 10s, each i.LON 10 must
have its own static IP address to distinguish it as a separate
segment on the RMS network. Each unit will also have its
own RMS database containing a list of the loudspeakers on
that segment.
NOTE: RMS also supports the LonWorks
i.LON 100 Ethernet Adapter, which can be configured for external muting of RMS loudspeakers
when a fire alarm or external relay is triggered. For
more information, see Appendix C, “External Muting
with the i.Lon 100.”
Installing the i.LON 10 Ethernet Adapter
To install the i.LON 10 Ethernet Adapter:
1. Use a Cat 5 crossover cable to connect the i.LON 10 to a
computer Ethernet port, or to an Ethernet hub, switch, or
router, according to the manufacturer’s instructions. For
more information, refer to the LonWorks i.LON 10 User
Guide.
–
2. Configure your computer’s IP address:
■
If you are using Windows XP, do the following:
–
From the Windows taskbar, choose Start > Control
Panel.
–
In the Control Panel window, open the Network Connections control panel and then double-click Local
Area Connections.
–
In the Local Area Connection Status dialog box, click
Properties.
–
In the Local Area Connection Properties dialog box,
on the General tab, select Internet Protocol
(TCP/IP) and click Properties.
■
22
In the Internet Protocol (TCP/IP) Properties dialog
box, select “Use the Following IP Address” and enter
192.168.1.100 in the IP Address field, Accept the
default Subnet Mask value. Click OK.
If you are using Windows Vista, do the following:
–
From the Windows taskbar, choose Start > Control
Panel.
–
In the Control Panel window, open the Network and
Sharing Center control panel and then click Mange
Network Connections.
–
In the Network Connections dialog box, right-click
Local Area Connection and choose Properties.
RMS USER GUIDE
–
In the Local Area Connection Properties dialog box,
on the Networking tab, select Internet Protocol
Version 4 (TCP/IPv4) and click Properties.
5. Click the Security tab. On the Security page, select the
options for Allow HTTP Access and Allow TFTP
Access.
CAUTION: Do not yet click Submit.
–
In the Internet Protocol Version 4 (TCP/IPv4) Properties dialog box, select “Use the Following IP Address”
and enter 192.168.1.100 in the IP Address field.
Accept the default Subnet Mask value. Click OK.
6. Click the General tab. On the General page, in the Hostname field, enter ilon-1 (with no spaces). Additional
i.LON 10s on the same network should be named
sequentially (ilon-2, ilon-3, ilon-4, and so forth).
CAUTION: Do not use any other naming
scheme for the i.LON 10s. They must be
named as indicated.
3. Open the following link in your Web browser:
http://192.168.1.222/config
4. When prompted to log in, enter the following User Name
and Password and click OK.
User Name: ilon
Password: ilon
23
CHAPTER 4: INSTALLING AND CONFIGURING NETWORK INTERFACES
7. Select Specify IP Address and in the IP Address field
enter 192.168.1.101. IP addresses for additional
i.LON 10s on the same network must be assigned
sequentially (192.168.1.102, 192.168.1.103,
192.168.1.104, and so forth).
Configuring the LonWorks Interfaces
Control Panel
To configure the LonWorks Interfaces control panel:
1. From the Windows taskbar, choose Start > Control
Panel.
2. In the Control Panel window, open the LonWorks Plug’n
Play control panel.
3. On the RNI tab, click Add.
4. On the Add Network Interface Wizard – Name page,
enter the Name for the i.LON 10 and click Next. The
name must match the Hostname entered in “Installing
the i.LON 10 Ethernet Adapter” on page 22.
8. Click Submit.
Make sure to document the IP addresses for your computer
and each i.LON 10 on the network, as well as the name for
each i.LON 10. To distinguish the i.LON 10s on the network,
you should physically label each with its name and IP
address.
NOTE: If you encounter problems when configuring the i.LON 10, it may be necessary to
perform a security reset. This is done by holding
down the i.LON 10’s Service Pin while turning on the
unit; continue holding down the Service Pin until the
Wink and Connect LEDs light (this may take around
10 seconds). The i.LON 10 is restored to its default IP
address (192.168.1.122).
24
RMS USER GUIDE
5. On the Add Network Interface Wizard – Type page, set
the Interface Type to Other and click Next.
6. On the Add Network Interface Wizard – IP Address page,
enter the IP Address and click Finish. The address must
match the IP Address entered in “Installing the i.LON 10
Ethernet Adapter” on page 22.
7. Repeat the previous steps to add additional i.LON 10s.
The name and address must follow the scheme used in
“Installing the i.LON 10 Ethernet Adapter” on page 22
(ilon-1, 192.168.1.101; ilon-2, 192.168.1.102; ilon-3,
192.168.1.103; and so forth).
25
CHAPTER 4: INSTALLING AND CONFIGURING NETWORK INTERFACES
26
CHAPTER 5: CONNECTING RMS NETWORKS
This chapter documents connecting RMS networks and
includes the following topics:
■
“Twisted-Pair vs. Ethernet” on page 27
■
“Twisted-Pair Cabling” on page 27
The total length of twisted-pair cabling per network segment should not exceed 1640 ft (500 m). For systems
with network repeaters, the distance to the first loudspeaker should also not exceed 1640 ft (500 m).
■
■
NOTE: For optimum performance, the twisted“Ethernet Hubs and Switches” on page 28./4%4HISPRODUCTHASTHE-UTE%NABLEJUMPERINSTALLEDINTHE2-3
pair cabling between the host computer and
first loudspeaker should not exceed 1,450 ft (450 m).
“Design Tips for RMS networks” on page #OMMUNICATION"OARD4HISALLOWSYOUTO-UTETHISLOUDSPEAKERWHEN
29
■
“Network Specifications” on page 29
■
“Twisted-Pair Configurations” on page 30
■
“Ethernet Configurations” on page 33
■
ITSCONNECTEDTOAN2-3(OST#OMPUTER&ORMOREINFORMATIONPLEASE
The RMS software and hardware components interact conCONSULTTHE2-35SER'UIDEPOSTEDATWWWMEYERSOUNDCOM
tinuously, communicating information about the connected
loudspeakers to the host computer. If the network is overloaded, critical data may reach the host computer very
slowly, or not at all.
TWISTED-PAIR VS. ETHERNET
053(
# CAUTION: Meyer Sound recommends that
#
RMS networks can connect to the host computer via either
Ethernet-based RMS configurations be
twisted-pair cabling or Ethernet. Basic twisted-pair connecdeployed as a closed network, to reduce congestion
tions with a network interface card are suitable for most
from outside network activity.
applications. They are easy to wire and connect and they
require no additional networking hardware, such as routers,
switches, or hubs (although a network repeater is required
TWISTED-PAIR CABLING
for cable runs longer than 1640 ft). Ethernet-based connec4O,OUDSPEAKER
The Weidmuller Network connectors on RMS modules are
tions with one or more i.LON 10s allow for a larger number
3ERVER#05(OST
,OUDSPEAKER)NSTALLATION
connected via twisted-pair cables. The twisted-pair
cabling
of loudspeakers on a single network, a wider area of availcan be connected directly to any of the computer-based
able locations, and improved network speed.
network interfaces (LonWorks PCLTA-21, PCLTA-20,
When deciding which technology to use, consider:
PCC-10, U10 USB, and i.LON 10).
%ARTH#HASSIS
3E
)NPUT
RV
I
CE
T
K
SE
IN
#ASE
2E
+7
7
%3$
!C
TIV
ITY
.ETWORK
,OOP
2 E M O TE - O N I TO R ■
The number of required loudspeakers on the network
■
The amount of cabling needed for the network
■
Whether the system will be fixed or portable
■
The distance between the host computer and the loudspeakers on the network
■
Whether there is any existing Ethernet network access at
the venue
Y
Regardless of whether you use twisted-pair or Ethernet connections, avoid overloading the network by adhering to the
following guidelines:
■
Do not connect more than 50 loudspeakers on a single
network segment. A network segment is equivalent to
one network interface card (without a network repeater),
or a single i.LON 10 Ethernet Adapter.
\2EV"
Twisted-pair connectors for RMS loudspeakers
#OPYRIGHT¹-EYER3OUND,ABORATORIES)NC
!LL2IGHTS2ESERVED
27
4O#05
CHAPTER 5: CONNECTING RMS NETWORKS
For twisted-pair cabling, the following limitations apply:
■
Maximum number of loudspeakers: 50
■
Maximum length of total cabling: 1640 ft (500 m)
To reduce the amount of twisted-pair cabling in an RMS network, groups of neighboring loudspeakers can be daisychained. In addition, the single, twisted-pair cable
connected directly to the computer network interface can be
spliced at a junction box or breakout panel with multiple outputs that can be patched to multiple loudspeaker destinations.
NOTE: A network repeater or an Ethernetbased system with multiple i.LON 10s is
required if you want to connect more than 50 loudspeakers to an RMS host computer. This will increase
the data traffic capacity of the network as well as the
signal strength over longer cable runs.
Custom Twisted-Pair Connectors
When designing twisted-pair cable runs, you can use custom connectors (such as 5-pin XLR connectors) or terminal
blocks to make the installations more user-friendly. This is
common for theater and touring applications.
Network Terminators
An RMS network terminator is a simple resistive, capacitive
device designed to prevent electrical reflections on the network. Terminators can be installed at almost any location in
the network depending on the topology used.
RMS Network Terminator
28
Network Repeaters
A network repeater (such as the FTR-120 Free Topology
Repeater from MicroComm DXI) connects multiple segments of network cabling. It re-times, strengthens, and
regenerates the signal and sends it back to the network. A
network repeater allows you to increase the geographical
coverage of an RMS network and can be used in applications where Ethernet connections are impractical, for example, when touring with twisted-pair RMS configurations.
FTR-120 Network Repeater
NOTE: For information on using the FTR-120
Free Topology Repeater, see Appendix D, “The
FTR-120 Free Topology Repeater.”
ETHERNET HUBS AND SWITCHES
A hub is a device that joins multiple computers or other network devices to form a single network. Switches are similar
to hubs but are more intelligent; they can inspect data as it
is received, determine the source and destination of the
data, and forward it appropriately. Switches conserve network bandwidth and offer better performance than hubs.
A hub or a switch is needed for RMS Ethernet networks that
contain multiple i.LON 10s, or if you are sharing an existing
Ethernet network connection.
RMS USER GUIDE
DESIGN TIPS FOR RMS NETWORKS
NETWORK SPECIFICATIONS
Different designs have their own strengths and weaknesses.
The following tips will help you make the most of your RMS
network design:
Maximum Loudspeaker Nodes
■
Avoid making “dedicated single runs” for each loudspeaker when designing a system. Make only a single
twisted-pair run to loudspeaker locations or arrays when
possible. Once you have reached the loudspeaker array
location, daisy-chain or loop through all the loudspeakers in the array. This will help reduce cable load on the
network.
CAUTION: If you must make dedicated
twisted-pair runs to each loudspeaker (for
example, when using VEAM connectors) do not
exceed the total recommended cable length
(1,640 ft), or plan on using a repeater to minimize
data loss.
■
■
Use a single twisted-pair run from the computer location
to a breakout panel, which should be located as close as
possible to the loudspeakers.
If you are receiving poor data or experiencing other communications problems, use a terminator in the network to
help increase network stability.
■
When planning an Ethernet-based network, plan for the
i.LON 10 location to be as close to the twisted-pair
breakout location as possible.
■
When using a venue’s existing Ethernet-based network,
work with the venue’s IT department to reserve static IP
addresses for the RMS network.
■
When possible, use a closed Ethernet-based network to
reduce congestion from outside network activity
■
Twisted-pair: 50 (up to 100 with network repeater)
■
Ethernet: 50 for each i.LON 10
Cable Type
■
Twisted-pair: 20 AWG (Belden 8205 or equivalent)
twisted pair, stranded, unshielded
■
Ethernet: Category 5 (Cat 5) or higher specification
NOTE: The maximum length for Ethernet
cables is 328 ft (100 m). When connecting an
i.LON 10 to an Ethernet hub or switch, use a straightthrough (patch) cable. When connecting directly to a
computer Ethernet port, use a crossover cable.
Connector Type
■
Twisted pair: Weidmuller 2-conductor locking connector
■
Ethernet: 10BASE-T, type RJ-45
■
USB 2.0: USB plug
■
Portable: XLR and EN3
Maximum Network Length (without Repeaters)
■
Free topology: 500 m (1,640 ft) with 20 AWG, 18 AWG or
16 AWG cable and one 52.3-ohm type terminator
■
Ethernet: 10BASE-T network limitations plus standard
twisted pair limitations
Termination
■
Free topology: One 52.3-ohm type terminator at any
point
■
Bus topology: Two 52.3-ohm type terminators (one on
either end)
Network Platform
■
Differential Manchester encoding; polarity insensitive,
free topology
Transceiver
■
EMI, complies with FCC Part 15, Class A; UL recognized;
VDE, EMI compliant
Data Rate
■
200 ms transfer rate with 20 loudspeakers
29
CHAPTER 5: CONNECTING RMS NETWORKS
TWISTED-PAIR CONFIGURATIONS
Some basic twisted-pair configurations are shown in
Figure 1 and Figure 2. To ensure optimum performance
when designing twisted-pair RMS systems, pay close attention to wiring, cable gauge, and connector requirements
(see “Network Specifications” on page 29).
CAUTION: Consider using a repeater in
twisted-pair configurations if you are nearing
1,640 ft of total cable length, or if you are using VEAM
connectors.
Twisted-pair network cable
Computer with network
interface card
Loudspeakers
(up to 50)
Twisted-pair
Figure 1: Basic Twisted-Pair Configuration
Twisted-pair network cable
Computer with network
interface card
FTR-120 Network
Repeater
Twisted-pair
Figure 2: Twisted-Pair Configuration with Network Repeater
30
Loudspeakers
(up to 50)
Loudspeakers
(up to 50)
RMS USER GUIDE
Twisted-Pair with Termination (Small- to Mid-Sized Venues)
Figure 3 illustrates a twisted-pair configuration with a termination panel, which is often used in small- to mid-sized
venue configurations. Proper planning of cable runs to loud-
speakers and termination points are important for reducing
excess cable in the network and minimizing network latency.
Twisted-pair network cables
Computer with network
interface card
RMS looped to
loudspeakers
Use-supplied termination panel
located near loudspeakers, providing parallel termination
Twisted-pair
Figure 3: Twisted-Pair Configuration with Termination
31
CHAPTER 5: CONNECTING RMS NETWORKS
Twisted-Pair with Custom Connectors (Touring and Portable Applications)
Touring and portable applications may require a more flexible and portable solution for twisted-pair cabling. Figure 4
illustrates a configuration where RMS data is connected to
front-of-house with a “dry pair” on an analog multi-pair
snake system.
For these configurations, a proprietary cable connector,
such as a 5-pin XLR, can be used to avoid any confusion
with standard 3-pin XLR audio cables.
CAUTION: When custom RMS cables are
patched through active or passive audio splitters and transformers, the RMS signal is lost.
RMS looped to
loudspeakers in
arrays
Computer with network
interface card
Custom XLR
RMS cable
Multi box
parallel
2-conductor
wire
Custom cable
Twisted-pair
Figure 4: Twisted-Pair Configuration with Custom Connectors
32
Twisted-pair
network cable
RMS USER GUIDE
ETHERNET CONFIGURATIONS
Compared to twisted-pair configurations, Ethernet-based
RMS networks can have a larger number of loudspeakers on
a single network, a wider area of available locations, and
faster network speeds. Figure 5, Figure 6, and Figure 7 illustrate some basic Ethernet configurations.
NOTE: The maximum length for Ethernet
cables is 328 ft (1oo m). Do not exceed this
length when connecting i.LON 10s to your computer,
as well as to Ethernet switches and hubs.
NOTE: Ethernet-based RMS system must conform to Ethernet network design specifications
(beyond the scope of this guide). A general knowledge of Ethernet networks is very helpful if you plan
to deploy an Ethernet-based RMS system.
Cat 5 crossover cable
Twisted-pair network cable
Computer
with Ethernet
i.LON 10
(static IP address)
Ethernet
Loudspeakers
(up to 50)
Twisted-pair
Figure 5: Basic Closed Ethernet Configuration
Cat 5
patch cable
Computer
with Ethernet
Twisted-pair
network cable
Cat 5
patch cable
i.LON 10
(static IP address)
OFFICE
CONNE CT
1
2
3
Port
Status
Activ ity
4
green = link OK
1
3Com
100BASE-TX
10BASE-T
Port Status
PWR
Al ert
Loudspeakers
(up to 50)
2
3
Act iv it y
4
y ellow = Packet
Switch 140
Network switch
Ethernet
Twisted-pair
i.LON 10
(static IP address)
Loudspeakers
(up to 50)
Figure 6: Basic Closed Ethernet Configuration with Multiple i.LON 10s
33
CHAPTER 5: CONNECTING RMS NETWORKS
Cat 5
patch cable
Twisted-pair
network cable
Computer
with Ethernet
i.LON 10
(static IP address)
Loudspeakers
(up to 50)
Intranet
i.LON 10
(static IP address)
Ethernet
Twisted-pair
Figure 7: Basic Ethernet Configuration Using Existing Intranet Infrastructure
NOTE: For Ethernet-based RMS configurations, a closed, separate network is recommended to reduce congestion from outside network
traffic.
34
Loudspeakers
(up to 50)
RMS USER GUIDE
Ethernet and Twisted-Pair Hybrid System (Large Venue Applications)
For larger venues such as theatres, stadiums, arenas,
hotels, and theme parks, an Ethernet-based network using
multiple i.LON 10s is preferred for increased network speed.
When designing an Ethernet-based system, it is still necessary to convert to twisted pair from the i.LON 10 to your
loudspeaker locations. Doing so allows you to form a hybrid
network of twisted-pair and Ethernet cabling.
Cat 5
patch cable
OFFICE
CONNE CT
1
2
3
Port
Status
Activ ity
4
green = link OK
1
3Com
100BASE-TX
10BASE-T
Port Status
PWR
Al ert
2
3
Act iv it y
4
y ellow = Packet
Switch 140
Network switch
Computer
with Ethernet
Twisted-pair
network cable
i.LON 10
(static IP address)
i.LON 10
(static IP address)
FTR-120 Network
Repeater
i.LON 10
(static IP address)
RMS looped to
loudspeakers
Ethernet
Twisted-pair
Figure 8: Ethernet and Twisted-Pair Hybrid System
NOTE: Even with multiple i.LON 10s, a system
may still require a network repeater. It is possible to overload an RMSNET group by exceeding the
maximum recommended length of twisted-pair
cabling for the loudspeaker node. For information on
cabling requirements, see “Network Specifications”
on page 29.
35
CHAPTER 5: CONNECTING RMS NETWORKS
36
CHAPTER 6: USING THE RMS SOFTWARE
The RMS program is where you create virtual loudspeaker
layouts in panels with loudspeaker views. The software provides extensive system status and performance data for
each loudspeaker, including amplifier voltage, limiting activity, power output, fan and driver status, as well as mute,
solo, and wink capability. Loudspeaker data is updated 2–5
times per second. Loudspeaker icons and views can be
arranged to represent how the loudspeakers have been
deployed in the system. Multiple panels can be saved and
recalled for specific performances and venues.
This chapter documents using the RMS program and
includes the following topics:
■
“Launching RMS the First Time” on page 37
■
“The RMS Workspace” on page 39
■
“Adding Loudspeakers” on page 41
■
“Loudspeaker Views” on page 45
■
“Working with Loudspeaker Icons” on page 48
■
“The Mute, Solo, and Wink Buttons” on page 49
■
“Muting Options” on page 50
■
“Optimized Muting” on page 52
■
“UX Attenuation Range” on page 52
LAUNCHING RMS THE FIRST TIME
After you have installed the RMS software and configured
your network interface, you are ready to launch the RMS
program. The first time you launch RMS you are prompted
to configure an RMS network database.
To launch RMS:
1. From the Windows Start menu, choose Start > All
Programs > Meyer Sound > Remote Monitoring System, or double-click the RMS shortcut from the desktop.
The RMS Network Server and Manager opens displaying
information about your network interlace.
NOTE: If you chose to add an RMS icon to
your Startup folder during the RMS software
installation, RMS automatically launches when Windows starts.
2. If your system does not yet have an RMS network database, you are prompted to create one. Click OK to create the new network database. The database is written
to C:\meyer\rms\ and the RMS program opens.
NOTE: RMS network database folders are
titled “RMSNET” for network interface cards
and U10 USB adapters. For i.LON 10s, the database
folders are numbered (RMSNET1, RMSNET2, etc.).
37
CHAPTER 6: USING THE RMS SOFTWARE
CAUTION: If you are prompted with a message
stating “The object was not found,” your network interface is not connected to a loudspeaker.
Click OK and check your cable connections between
the network interface and loudspeakers.
About the Network Server and Manager
The RMS Network Server and Manager is the communication layer between the RMS program and your loudspeakers. It runs minimized in the background and is accessible
from the Windows taskbar. The RMS Network Server and
Manager has options for removing and importing databases,
as well as options for working with loudspeakers on the network (such as getting info, winking, setting offline, and
removing). The RMS Network Server and Manager automatically closes when the RMS program is closed.
4. When prompted to confirm the removal of the database
from the network, click Yes.
5. When prompted with the RMS Network Remove Service
dialog, click Yes. The database is removed from the network and renamed with a date and time stamp. The
renamed database resides in the C:\meyer\rms folder
on your hard drive.
Importing RMS Network Databases
If you are upgrading to a new version of RMS, or if you have
moved your database files to a new host computer, you can
import the RMS database.
To import an RMS network database:
1. If RMS is currently running, choose Panel > Exit to quit.
2. Locate the RMSNET folder you want to import and copy
it to the C:\meyer\rms folder.
Removing Network Databases
You can use the RMS Network Server and Manager to
remove a database from the RMS network to deactivate it,
or so it can be moved to another computer.
To remove an RMS network database:
1. Launch RMS and open the RMS Network Server and
Manager.
2. Choose Tools > Network Manager.
3. In the RMS Network Manager dialog box, select the
database you want to remove and click Remove.
3. Launch RMS and open the RMS Network Server and
Manager.
4. Choose Tools > Network Manager.
5. In the RMS Network Manager dialog box, click Add.
6. In the Add RMS/LNS Network dialog, select one of the
following options:
■
Default network (RMSNET): Imports a database for one
of the network interface cards.
■
Remote network (RMSNETx): Imports a database for
an i.LON 10.
7. If you are importing an i.LON 10 database, enter the
Assigned Network Number for the i.LON 10. For example, for an i.LON 10 named “ilon-1” with an IP address of
192.168.1.101, enter a value of 1.
8. Click Add Network only (for Import).
9. When prompted to confirm the import, click OK and then
Yes. The loudspeaker nodes are imported with the network database.
38
RMS USER GUIDE
THE RMS WORKSPACE
Compatibility for RMS 5.2 Panels
RMS configurations are saved in panel files (.PNL). Panels
can contain multiple pages, accessed as tabs at the top of
the window, which represent different loudspeaker views.
The first time you run RMS, a blank panel is created with
one untitled page.
Panels saved in RMS 5.2 are not compatible with older versions of RMS. If you are resaving existing panels in RMS 5.2
and need them to be compatible with another system running an older version of the RMS software, make sure to
keep a backup of the older panel files.
Automatically Saving Panels
By default, RMS automatically saves panel files (every 30
seconds) to a backup file while working in the RMS program. This ensures that important changes to panel files are
retained even if you forget to save them. The backup file
(rms_autosave.pnl) is saved to the RMS folder on your hard
drive. You can configure the Autosave option to automatically save at a different time interval, or not at all.
To configure Autosave settings:
1. Choose Panel > Autosave.
2. In the Autosave dialog box, specify the duration for how
often the panel will be automatically saved:
RMS Window with Blank Panel
Working with Panels
Creating New Panels
To create a new panel file:
■
30 seconds
■
1 minute
■
5 minutes
■
10 minutes
■
30 minutes
Saving Panels
■
Never
To save a panel file:
3. Click OK.
1. Choose Panel > New.
2. If you are prompted to save changes to the current panel
file, click Yes to save the changes.
New panels contain a single untitled page.
1. Choose Panel > Save or Panel > Save As.
2. In the Save As dialog box, enter a filename and location
for the panel and click Save.
39
CHAPTER 6: USING THE RMS SOFTWARE
Opening Panels
2. Do one of the following:
To open a panel file:
■
To use a background pattern, set Pattern to Dots, Grid,
Theater, or Stadium and choose a Background and
Foreground color.
■
To import a background image, set Pattern to Image.
Click Browse and select the image you want to import
and click Open.
1. Choose Panel > Open.
2. If you are prompted to save changes to the current panel
file, click Yes to save the changes.
3. In the Open dialog box, select the panel you want to
open and click Open.
TIP: Panel files cannot be launched by doubleclicking them from Windows Explorer.
TIP: RMS remembers the last panel file saved
and automatically opens it when the RMS program is launched.
3. Click OK. The Background dialog box closes and the
new panel background is displayed.
Outdoor Mode
When enabled, Outdoor mode adjusts the colors in the RMS
program so parameters and meters are more visible when
working outside in daylight.
Setting the Panel Background
You can set the panel background to different colors and
patterns, or you can import a custom image to use as the
panel background. Supported image formats for the panel
background include .jpg, .gif, .bmp, .tif, .png, .exif, .wmf,
.emf, and .ico.
NOTE: The panel background is applied to all
pages in the panel.
To set the panel background:
Loudspeaker Views Displayed in Outdoor Mode
To enable Outdoor mode:
■
Select Options > Outdoor Mode or right-click on the
panel background and choose Outdoor mode.
1. Do one of the following:
■
Choose Options > Background > Import Image or
right-click on the panel background and choose Background. The Background dialog box opens.
Working with Pages
Panel files can contain multiple pages, up to 20, that represent different loudspeaker groups or loudspeaker views. For
example, you may want to monitor the main house system
on one page and the stage monitor system on another page.
Pages are available as tabs at the top of the RMS window.
Adding Pages
To add a page to a panel:
1. Choose Panel > Add Page.
40
RMS USER GUIDE
2. In the Enter Page Name dialog box, enter a Name for the
page using up to 10 characters.
Deleting Pages
To delete a page:
1. At the top of the RMS window, click the tab for the page
you want to delete.
2. Choose Panel > Delete Page.
3. When prompted to confirm the deletion, click Yes.
3. Click OK. The new page is added to the panel and
appears as a tab at the top of the RMS window, to the
right of the last page created.
NOTE: Loudspeakers on a deleted page are
not decommissioned.
Navigating Pages
To navigate the pages in a panel:
■
Click a tab at the top of the RMS window to display that
page.
■
Press Tab to cycle through the pages left to right.
■
Press Shift+Tab to cycle through the pages right to left.
■
Use the numeric keypad to select the first 10 pages.
TIP: When RMS encounters loudspeakers with
limiting, excursion, or other concerns, the page
that contains the loudspeakers is automatically
selected.
ADDING LOUDSPEAKERS
Once you have created a panel with pages, the next step is
to add the loudspeakers you want to monitor. Loudspeakers
do not need to be connected to the RMS network before
they are added in the RMS software. This allows you to build
RMS panels without the loudspeakers being present. However, in order for loudspeakers to be monitored in RMS, they
must be connected to the network and commissioned.
Commissioning is the process of identifying the loudspeaker
by its Neuron ID (NID) so it is linked to the network. After
commissioning, it is possible to remove the loudspeaker or
decommission it from the network. Commissioned and
uncommissioned loudspeakers reside in the RMS device
database.
Renaming Pages
To rename a page:
Adding and Commissioning Loudspeakers
1. At the top of the RMS window, click the tab for the page
you want to rename.
When adding a loudspeaker you can choose to commission
it in the Add Loudspeaker dialog box. To commission a
loudspeaker you must either enter its Neuron ID or press its
Service button when prompted.
2. Choose Panel > Rename Page.
3. In the Enter Page Name dialog box, enter a Name for the
page using up to 10 characters.
4. Click OK. The page is renamed.
41
CHAPTER 6: USING THE RMS SOFTWARE
To add and commission a loudspeaker:
1. From the Add menu, select the loudspeaker model you
want to add, or right-click on the panel background and
select the loudspeaker model from the pop-up menu.
The Add Loudspeaker dialog box opens.
2. If you want to override the default Device Name, enter a
unique name using up to eight characters. This name
can contain only alphanumeric characters and hyphens
(no spaces). Device names are used to identify loudspeakers in the RMS database.
TIP: The device name is automatically generated and includes a number that is incremented
each time a new loudspeaker is added. However, it
may be useful to override the name with one that
describes the loudspeaker type and its location
within the system.
5. When prompted with the Add Device to the Network dialog box, click one of the following buttons:
■
Click Press Service Pin to manually commission the
loudspeaker. You must then manually press the Service
button on the loudspeaker’s RMS user panel when
prompted. This will send the loudspeaker’s Neuron ID so
the loudspeaker can be identified on the network. To use
this option the loudspeaker must be powered on and
connected to the network.
■
Click Use Network Properties to automatically commission the loudspeaker. To use this option the loudspeaker
must be powered on, connected to the network, and its
Neuron ID must have been entered correctly in the Add
Loudspeaker dialog box.
■
Click Commission Later to commission the loudspeaker later. Use this option if the loudspeaker is not
yet connected to the network, or if you will perform a
batch commission later.
Commissioned loudspeakers have a green LED in the
lower left of their loudspeaker icon. Loudspeakers that
have not been commissioned instead have a red LED.
3. Enter a Speaker Title using up to 12 characters. This
name does not need to be unique and it can contain
spaces and punctuation characters. Loudspeaker titles
are used to identify loudspeakers in the RMS panel.
4. Enter the following Network Properties:
■
Network: The RMS network for the loudspeaker (such
as RMSNET, or RMSNET1 if connected to an i.LON 10
Ethernet Adapter).
■
Neuron ID: The loudspeaker’s 12-character Neuron ID
(NID), which can be found on the loudspeaker’s user
panel near the orange Network jacks.
■
Firmware: Specify rms3 for loudspeakers manufactured
in the year 2000 and later; these models have an RMS3
label on the RMS user panel. For earlier loudspeaker
models, use Prod6H.
42
Commissioned Loudspeaker
NOTE: By default, loudspeakers are displayed
in Icon View, which provides a graphic representation of the loudspeaker. Additional views include
Small Icon View, Meter View, and Text View. For more
information, see “Loudspeaker Views” on page 45.
TIP: You can use the RMS Configuration Sheet
to keep track of loudspeaker serial numbers,
Neuron IDs, and device names (see the “RMS Configuration Sheet” on page 67).
RMS USER GUIDE
Commissioning Loudspeakers After the Fact
Batch Commissioning Loudspeakers
Individual loudspeakers that have been added to a page and
not yet commissioned can be commissioned after the fact.
Commissioning is also necessary if the loudspeaker was
temporarily removed from the network.
Batch commissioning allows you to automatically commission multiple loudspeakers in a single operation. This is
especially useful when building an RMS panel offline (with
no loudspeakers connected), or when adding several new
loudspeakers to an existing panel. Use the procedure
described in “Adding and Commissioning Loudspeakers”
on page 41 to add loudspeakers to the panel with their
unique Neuron IDs.
TIP: Decommissioned loudspeakers have a red
LED in the lower left of their loudspeaker icon.
To commission a loudspeaker:
To commission loudspeakers in a batch:
1. Select the page containing the loudspeaker you want to
commission.
1. Choose Options > Batch Commission. The Batch
Commission Loudspeakers dialog box opens, displaying
a list of loudspeakers that will be commissioned.
2. If you know the loudspeaker’s Neuron ID and have not
yet specified it for the loudspeaker, do the following:
■
Right-click the loudspeaker and choose Network Properties.
■
In the Network Properties dialog box, enter the loudspeaker’s 12-character Neuron ID (NID), which can be
found on the loudspeaker’s user panel near the orange
Network jacks.
■
Click OK.
3. Right-click the loudspeaker and choose Commission.
4. When prompted with the Add Device to the Network dialog box, do one of the following:
2. Click Start. The Batch Commission Progress dialog box
appears as the loudspeakers are commissioned.
■
If you have not entered the loudspeaker’s Neuron ID,
click Press Service Pin. When prompted, press the Service button on the loudspeaker’s RMS user panel. The
loudspeaker is commissioned. To use this option the
loudspeaker must be powered on and connected to the
network.
■
If you previously entered the loudspeaker’s Neuron ID —
either when adding the loudspeaker, or in the Network
Properties dialog box — click Use Network Properties.
The loudspeaker is commissioned. To use this option the
loudspeaker must be powered on, connected to the network, and its Neuron ID must have been previously
entered correctly.
43
CHAPTER 6: USING THE RMS SOFTWARE
3. Once the batch process has completed, a Batch Commission Summary dialog box opens, displaying a list of
loudspeakers that have been successfully commissioned. Click Close.
2. From the Add menu, select the loudspeaker model you
want to add, or right-click on the panel background and
select the loudspeaker model from the pop-up menu.
The Add Loudspeaker dialog box opens.
3. Select the loudspeaker you want to add:
CAUTION: Commissioning for an individual
loudspeaker will fail if its Neuron ID was
entered incorrectly in the Network Properties dialog
box, or if it is not powered on and connected to the
network.
Adding Loudspeakers from other Panels and
Pages
Once a loudspeaker has been added to a panel it resides in
the RMS device database. Any loudspeaker in the device
database can be easily added to another panel or page
without having to recommission the loudspeaker and reenter its info, thereby speeding up the process of adding
loudspeakers.
NOTE: Loudspeakers that have been added to
the RMS device database are not generic
placeholders. Each unique device corresponds to a
physical loudspeaker that can be identified on the
network.
■
If the loudspeaker resides in the current panel on another
page, select its device name in the Device Names Used
on This Panel column.
■
If the loudspeaker resides in another panel, select its
device name in the Device Names in the Network
Database column.
4. Enter a Speaker Title using up to 12 characters. This
name does not need to be unique and it can contain
spaces and punctuation characters. Loudspeaker titles
are used to identify loudspeakers in the RMS panel.
TIP: If the loudspeaker has already been commissioned, it is not necessary to enter its Neuron ID.
5. Click OK. The loudspeaker is added to the page.
Managing Loudspeakers
Renaming Loudspeakers
To add a loudspeaker from another panel or page:
1. Select the page to which you will add the loudspeaker.
To rename a loudspeaker:
1. Select the page containing the loudspeaker you want to
rename.
2. Right-click the loudspeaker and choose Rename.
3. In the Rename Speaker dialog box, enter the new loudspeaker name using up to 12 characters. The name does
not need to be unique and it can contain spaces and
punctuation characters.
4. Click OK. The loudspeaker is renamed.
44
RMS USER GUIDE
Decommissioning Loudspeakers
LOUDSPEAKER VIEWS
Decommissioned loudspeakers that are online and connected to the RMS network are identified with a red LED in
the lower left of their icons; in Text view, these loudspeakers
are further identified with a “DE-COMM” label. Control of
loudspeakers (muting, soloing, etc.) from the RMS network
is only possible once they’ve been commissioned.
RMS provides the following four loudspeaker views:
■
Small Icon View
■
Icon View
■
Meter View
■
Text View
The available parameters displayed in each view varies
depending on the type of loudspeaker.
Decommissioned Loudspeaker
Displaying Loudspeaker Views
To display a loudspeaker view, do any of the following:
Offline Loudspeakers
■
Right-click any loudspeaker view and select the view you
want to display. To hide a view, deselect it from the
menu.
■
Double-click an Icon View or Small Icon View to display
Meter View. Double-click the Icon View again, or doubleclick the Meter View, to display Text View.
■
Triple-click an Icon View or Small Icon View to display
both Meter View and Text View.
If a loudspeaker icon displays both a red LED in the lower
left and a yellow “i” in the lower right, then the loudspeaker
is commissioned and offline.
Offline Loudspeaker
Deleting Loudspeakers
To delete a loudspeaker:
1. Select the page containing the loudspeaker you want to
delete.
2. Right-click the loudspeaker and choose Delete.
3. When prompted to confirm the deletion, click Yes. The
loudspeaker is removed from all pages in the panel.
4. When prompted with the Remove Loudspeaker from
Network dialog box, click Yes to decommission the
loudspeaker and remove it from the database. If you
intend to use the loudspeaker in a different panel or
page, click No to keep the loudspeaker commissioned.
CAUTION: A loudspeaker must always have at
least one view open. If you attempt to close all
views for a loudspeaker you will be prompted to
delete the loudspeaker.
TIP: You can also remove loudspeakers in the
RMS Network Server and Manager (from the
Network Manager dialog box).
45
CHAPTER 6: USING THE RMS SOFTWARE
Icon View and Small Icon View
Table 3: Icon View Parameters for MILO Loudspeaker
Icon View (the default loudspeaker view) and Small Icon
View are graphic representations of the loudspeaker. In
addition to providing feedback on the loudspeaker’s amplifier channels, these views also have buttons for Mute, Solo,
and Wink, as well as Communication and Information indicators.
Parameter
Function
Communication
Status Indicator
Green
Loudspeaker commissioned and
online
Red
Loudspeaker not commissioned or
offline
Yellow “i”
Indicates one or more of the following:
• Amplifier heat sink >77° C
• No Primary Fan current
• Primary Fan current >97%
• Reserve Fan on
• Driver open circuit
• Driver short circuit
• Loudspeaker offline
Information
Indictor
Amplifier Channel
Status Indicators
Mute
Solo
Communication
Status Indicator
Information
Indicator
Wink
NOTE: In Icon View and Small Icon View, the
Mute and Solo buttons are unavailable
(dimmed) when muting is disabled in the Muting
Options dialog box. For more information, see “Muting Options” on page 50.
Small Icon View for MILO Loudspeaker
Amplifier Channel
Status Indicators
Meter View
Information
Indicator
Communication
Status Indicator
Mute
Solo
Wink
Meter View uses graphic meters to represent power usage,
voltage, fan speed, and temperature. Meter View is the only
loudspeaker view that does not provide controls for Mute,
Solo, and Wink.
Icon View for MILO Loudspeaker
Amplifier
Peak Power (w)
and Voltage (v)
Table 3 provides a list of the parameters for the MILO highpower curvilinear array loudspeaker when in Icon View and
Small Icon View.
Amplifier
Limiting
Table 3: Icon View Parameters for MILO Loudspeaker
Parameter
Function
Amp. Channel
Status Indicators
Green
Mute (M) Button
Solo (S) Button
Wink (W) Button
46
Heatsink
Temp.
(Upper/
Lower)
0 < Voltage (norma)l
Yellow
Voltage present without power
(open driver circuit)
Red
Indicates limiting
Orange
Indicates excursion
Gray
No voltage present
Green
Not muted
Red
Muted
Gray
Not soloed
Yellow
Soloed
Gray
Not winked
Green
Winked
Input
Signal
Level
Input
Polarity
Fan Speed
(Primary/
Reserve)
Meter View for MILO Loudspeaker
TIP: Meter Views can be closed by clicking the
Close (X) button in the upper left corner.
RMS USER GUIDE
Table 4 provides a list of the parameters for the MILO highpower curvilinear array loudspeaker when in Meter View.
Table 4: Meter View Parameters for MILO Loudspeaker
Parameter
Function
Amplifier
Peak Power
For each amplifier channel, the peak power
output in watts
Amplifier
Voltage
For each amplifier channel, the voltage output
(0–100 V). A small momentary bar marks peak
voltage. Segmented bar conditions are:
Green
0 < Voltage < 50 V
Yellow
50 < Voltage < 90 V
Red
90 < Voltage < 100 V
No Bar
Voltage = 0
Entire Bar
Yellow
Open driver circuit
Amplifier
Limiting
For each amplifier channel, the percentage of
limiting
Input Signal
Level
Measures 0–10 V and indicates the following
conditions:
Green
0 < Signal Level < 8 V
Yellow
8 < Signal Level < 9 V
Red
9 < Signal Level < 10 V
Input Polarity
+2
Pin 2 hot
(No Polarity switch for the MILO)
Heatsink
Temperature
Amplifier temperatures: upper and lower
Fan Speeds
Amplifier cooling fans: primary and reserve
Text View
Text View is the most complete monitoring view in RMS,
with a host of important data displayed in text fields.
Amplifier Peak Voltage (Vpk)
and Average Voltage (Vave)
Amplifier Peak Power (Wpk)
and Limiting Percentage
Input
Signal
Level
Heatsink
Temperatures
Fan
Speeds
Input
Polarity
DC
Headroom
Communication
Status Indicator
Service Pin
Indicator
Fault
Indicator
Text View for MILO Loudspeaker
TIP: Text Views can be closed by clicking the
Close button in the lower right corner.
CAUTION: When the Amplifier Limiting meters
turn red or orange, the loudspeaker may distort
due to clipping and exhibit nonlinear driver operation.
Routinely operating a loudspeaker at this level may
compromise the life span of its amplifier and drivers.
Intermittent limiting (when the meters are lit for two
seconds or less) will generally not harm the loudspeaker. Since each loudspeaker behaves differently
when limiting is encountered, consult the loudspeaker’s operating instructions for information on
limiting capabilities.
47
CHAPTER 6: USING THE RMS SOFTWARE
Table 5 provides a list of the parameters for the MILO highpower curvilinear array loudspeaker when in Text View.
Table 5: Text View Parameters for MILO Loudspeaker
Parameter
Function
Amplifier Peak
Voltage (Vpk)
For each amplifier channel, the peak voltage
(0–100 V)
Amplifier Average
Voltage (Vave)
For each amplifier channel, the average voltage (0–100 V)
Amplifier Peak
Power (Wpk)
For each amplifier channel, the peak power
output in watts
Amplifier Limiting
For each amplifier channel, the percentage of
limiting
Amplifier Temperature
The upper and lower heat sink temperatures
Fan Speeds
Amplifier cooling fans: primary and reserve
Input Signal
Level
Measures 0–10 V and indicates the following
conditions:
Green
0 < Signal Level < 8 V
Yellow
8 < Signal Level < 9 V
Red
9 < Signal Level < 10 V
Input Polarity
+2
Pin 2 hot
(No Polarity switch for the MILO)
DC Headroom
Should be over 17 V DC when the AC mains
voltage is sufficient
Communication
Status Indicator
Green
Loudspeaker commissioned and
online
Red
Loudspeaker not commissioned or
offline
Service Pin
Displays “service pin” when the Service button
is pressed on the loudspeaker’s RMS user
panel.
Fault
Indicates loudspeaker faults and abnormal
operating conditions
Mute Button
Green
Not muted
Red
Muted
Gray
Not soloed
Yellow
Soloed
Gray
Not winked
Green
Winked
Solo Button
Wink
Displaying Loudspeaker Names
By default, loudspeakers are displayed in panels with the
names entered when loudspeaker are added. You can
instead choose to display loudspeaker device names.
To set the loudspeaker name:
1. Choose Options > Title.
2. In the Set Title Type dialog box, select one of the following options:
■
Show Device: Displays loudspeakers with their device
names.
■
Show Title: Displays loudspeakers with the name
entered when the loudspeakers are added.
3. Click OK.
WORKING WITH LOUDSPEAKER ICONS
Selecting Loudspeakers
To select a loudspeaker, do one of the following:
■
Click anywhere on the loudspeaker icon (except on the
Mute, Solo, and Wink buttons). The selected loudspeaker becomes outlined in yellow.
■
Draw a rectangle around the entire loudspeaker icon.
The selected loudspeaker becomes outlined in yellow.
Selecting a single loudspeakers
CAUTION: When selecting loudspeakers,
make sure not to click the Mute, Solo, or Wink
buttons. This will instead activate those functions, if
enabled, and not select the loudspeaker.
48
RMS USER GUIDE
Selecting Multiple Loudspeakers
Locating Off-Screen Loudspeakers
To select multiple loudspeakers, do one of the following:
If when opening a panel file some of the loudspeaker icons
are located off-screen, you are prompted to relocate the
loudspeakers to the upper left of the screen. This may be
necessary if the panel was created on a computer with a
higher screen resolution.
■
Shift-click each loudspeaker icon you want to select. The
selected loudspeakers become outlined in yellow.
■
Draw a rectangle around any loudspeaker icons you
want to select. The selected loudspeakers become outlined in yellow.
THE MUTE, SOLO, AND WINK BUTTONS
RMS provides Mute, Solo, and Wink buttons in Icon View,
Small Icon View, and Text View. The Mute and Solo buttons
are useful for troubleshooting during setup and configuration of the system. The Wink button identifies the physical
loudspeaker corresponding to a loudspeaker icon in an
RMS panel.
NOTE: Mute and Solo buttons are only available when they are enabled in the Muting
Options dialog box (see “Muting Options” on
page 50). In addition, muting and soloing is only possible with loudspeakers that have the Mute Jumper
installed (see “Installing the Mute Jumper” on
page 15).
Selecting multiple loudspeakers
CAUTION: When selecting loudspeakers,
make sure not to click the Mute, Solo, or Wink
buttons. This will instead activate those functions, if
enabled, and not select the loudspeaker.
Moving Loudspeakers
Selected loudspeakers can be moved by either dragging
them or by using the Arrow keys on your computer keyboard. Since Meter and Text views are not moved along with
the loudspeakers, you might want to close those views
before moving the loudspeakers.
Muting Loudspeakers with the Mute Button
The Mute button silences the output of a loudspeaker, which
is useful when trying to isolate the output of certain loudspeakers during setup and configuration. Multiple loudspeakers can be muted.
To mute a loudspeaker with the Mute button:
1. In Icon View, Small Icon View, or Text View, click the
loudspeaker’s Mute button. The loudspeaker is muted
and the Mute button LED turns red.
To move the selected loudspeakers, do one of the following:
■
Left-click a loudspeaker icon (or its title bar) and drag it
to a new location in the panel. If multiple loudspeakers
are selected, all selected speakers are moved.
■
Press any of the Arrow keys to move the selected speakers in that direction in 5-pixel increments.
2. Click the Mute button again to unmute the loudspeaker.
The loudspeaker is unmuted and the Mute LED button
turns green.
49
CHAPTER 6: USING THE RMS SOFTWARE
Soloing Loudspeakers with the Solo Button
MUTING OPTIONS
The Solo button silences the output of all other loudspeakers, so you hear only the output from the soloed loudspeaker. Only one loudspeaker can be soloed at a time.
The Muting Options dialog box determines whether loudspeakers can be muted and soloed.
To solo a loudspeaker with the Solo button:
1. In Icon View, Small Icon View, or Text View, click the
loudspeaker’s Solo button. The loudspeaker is soloed
and the Solo button LED turns yellow. All other loudspeakers are muted.
To configure Muting options:
1. Choose Muting > Settings. The Muting Options dialog
box opens.
2. Click the Solo button again to unsolo the loudspeaker.
The loudspeaker is unsoloed and the Solo button LED
turns gray. All other loudspeakers are unmuted.
NOTE: Only one loudspeaker can be soloed at
a time. If you click a Solo button while another
loudspeaker is already soloed, only the new loudspeaker is soloed.
Winking Loudspeakers with the Wink Button
2. Select one of the following options:
■
Allow muting and soloing: Loudspeakers can be muted
and soloed by clicking their Mute and Solo buttons.
■
Allow muting only without soloing: Loudspeakers can
be muted but not soloed. This ensures that a loudspeaker cannot be accidentally soloed during a performance. When this option is selected, Solo buttons are
dimmed.
■
Disable muting and unmute all loudspeakers: Disables muting and soloing for all loudspeakers (and
unmutes any loudspeakers currently muted). When this
option is selected, Mute and Solo buttons are dimmed.
■
Show Mode: Disables muting and soloing for the duration of the RMS session (and unmutes any loudspeakers
currently muted). When this option is selected, Mute and
Solo buttons are dimmed.
The wink function lets you identify the physical loudspeaker
corresponding to a loudspeaker icon in an RMS panel.
To wink a loudspeaker with the Wink button:
1. In Icon View, Small Icon View, or Text View, click the
loudspeaker’s Wink button. The green Wink LED on the
loudspeaker’s RMS user panel lights up and the Wink
button LED on the loudspeaker views in the RMS program also turns green.
2. Click the Wink button again to unwink the loudspeaker.
The green Wink LED on the loudspeaker’s RMS user
panel turns off and the Wink button LED on the loudspeaker views in the RMS program turns gray.
TIP: You can use the Service button on the
loudspeaker’s RMS user panel to identify its
corresponding loudspeaker icon in an RMS panel.
When a loudspeaker’s Service button is pressed, a
yellow “smiley face” icon appears on the loudspeaker
views in the RMS panel.
50
3. To save the Muting options for future RMS sessions,
select Save setting on exit.
4. Click OK.
RMS USER GUIDE
THE SOLO/MUTE MATRIX
The Solo/Mute Matrix manages muting and soloing for large
numbers of loudspeakers. Up to 10 columns of 30 loudspeakers (a total of 300 loudspeakers) can be added to the
matrix.
3. To add loudspeakers to the matrix, right-click a cell and
choose Add. In the Loudspeaker Selector dialog box,
select one or more loudspeakers and click Add.
NOTE: Muting and soloing in the Solo/Mute
Matrix is only available when muting and soloing are enabled in the Muting Options dialog box (see
“Muting Options” on page 50). In addition, muting
and soloing is only possible with loudspeakers that
have the Mute Jumper installed (see “Installing the
Mute Jumper” on page 15).
To use the Solo/Mute Matrix:
1. Choose Muting > Solo/Mute Matrix Controller. The
Matrix Controller opens.
TIP: You can add the same loudspeaker multiple times to the matrix, thereby allowing the
loudspeaker to belong to different columns.
4. To delete a loudspeaker from the matrix, right-click the
loudspeaker cell and choose Remove.
5. If there are empty cells in a column and you want to shift
all loudspeaker cells up in the column, right-click the column head and choose Shift Entries Up.
6. To select loudspeakers that will be muted or soloed:
2. To name a column, right-click a column head and
choose Name Column. In the Name Control Column
dialog box, enter a name for the column and click OK.
■
Click a cell to select a single loudspeaker. The cell for the
selected loudspeaker turns bright green.
■
Shift-click multiple cells to select multiple, consecutive
loudspeakers. The cells for the selected loudspeakers
turn bright green.
■
Ctrl-click multiple cells to select multiple, discontiguous
loudspeakers. The cells for the selected loudspeakers
turn bright green.
■
Click a column head to select all loudspeakers in the column. The cells for the selected loudspeakers turn bright
green.
■
Click and drag in the matrix, either vertically or horizontally, to select multiple, consecutive loudspeakers. The
cells for the selected loudspeakers turn bright green.
51
CHAPTER 6: USING THE RMS SOFTWARE
7. To mute and solo loudspeakers.
■
Click Mute to mute the selected loudspeakers. The cells
for the muted loudspeakers turn red.
■
Click Unmute to unmute the selected loudspeakers. The
cells for the unmuted loudspeakers turn bright green.
■
Click Mute All to mute all loudspeakers.
NOTE: When all loudspeakers are muted, you
are prompted with an RMS Warning.
■
Click Unmute All to unmute all loudspeakers.
■
Click Solo to solo the selected loudspeaker. The cell for
the soloed loudspeaker turns yellow.
OPTIMIZED MUTING
For extremely large systems with many loudspeakers, muting and unmuting all loudspeakers (or large numbers of multiple loudspeakers) may encounter a small delay before the
loudspeakers are muted. This delay can be minimized when
Optimized Muting is enabled in the RMS Network Server
and Manager. Once enabled, the loudspeakers in the RMS
network databases are optimized to allow for more efficient
muting.
To enable Optimized Muting:
■
In the RMS Network Server and Manager, select Tools >
Optimized Muting > Enabled.
NOTE: Optimized Muting is disabled by
default.
UX ATTENUATION RANGE
Choose Options > UX Attenuation Range to open a dialog
box where you can set the amplifier attenuation range for all
UltraSeries loudspeakers. You can set the range to 0–18 dB
or 0–12 dB.
TIP: All Meyer Sound loudspeakers that use a
UX or UPM amplifier are affected by the UX
Attenuation Range setting.
52
APPENDIX A: RMS KEYBOARD SHORTCUTS
The RMS software includes the following keyboard shortcuts.
Command
Shortcut
New Panel
Ctrl+N
Open Panel
Ctrl+O
Save Panel
Ctrl+S
Add Page
Ctrl+A
Delete Page
Ctrl+D
Rename Page
Ctrl+R
Muting Options
Ctrl+M
Background
Ctrl+B
Network Setup
Ctrl+C
Title
Ctrl+T
Mute All
F12
Unmute All
F9
Solo/Mute Matrix Controller
F8
Scroll through Pages (left to right)
Tab
Scroll through Pages (right to left)
Shift+Tab
53
APPENDIX A: RMS KEYBOARD SHORTCUTS
54
APPENDIX B: TROUBLESHOOTING RMS SOFTWARE PROBLEMS
This chapter documents troubleshooting for the RMS software and includes the following topics:
■
“Troubleshooting Network Systems Errors When
Launching RMS” on page 55
■
“Troubleshooting the U10 USB Network Interface
Adapter” on page 58
■
“Testing Network Interface Cards” on page 60
■
“Completely Removing RMS” on page 60
■
“Is the POET 6.0 Object Server Installed?” on page 61
■
“Disabling Startup Items” on page 62
■
“Checking System Resources with Task Manager” on
page 62
Verifying your Computer’s IP Address
To verify your computer’s IP address:
1. From the Windows taskbar, choose Start > Run.
2. In the Run dialog box, enter “command” and click OK.
3. In the Command window, type “ipconfig” and then press
Enter. The computer’s IP address, subnet mask, and
default gateway are returned.
TROUBLESHOOTING NETWORK SYSTEMS
ERRORS WHEN LAUNCHING RMS
If you encounter a network system error when launching the
RMS program, the IP address for your computer and
i.LON 10 may not match, or there may be an IP address
conflict with another device on the network. You can verify
your computer’s IP address with the Windows IP Configuration utility. You can verify the i.LON 10 IP address with the
LonWorks Interfaces control panel.
4. If the computer’s IP address range does not match the
i.LON 10 and you want to change the address for the
computer, do the following:
■
If you are using Windows XP:
–
From the Windows taskbar, choose Start > Control
Panel.
–
In the Control Panel window, open the Network Connections control panel and then double-click Local
Area Connections.
–
In the Local Area Connection Status dialog box, click
Properties.
RMS Startup Errors
Another cause of network system errors is network congestion, which can be tested with the Ping command.
55
APPENDIX B: TROUBLESHOOTING RMS SOFTWARE PROBLEMS
–
–
■
56
In the Local Area Connection Properties dialog box,
on the General tab, select Internet Protocol
(TCP/IP) and click Properties.
In the Internet Protocol (TCP/IP) Properties dialog
box, select “Use the Following IP Address” and enter
the new address in the IP Address field. Make sure
to use an IP address that is not in use by another
computer on the network. Accept the default Subnet
Mask value. Click OK.
If you are using Windows Vista:
–
From the Windows taskbar, choose Start > Control
Panel.
–
In the Control Panel window, open the Network and
Sharing Center control panel and then click Mange
Network Connections.
–
In the Network Connections dialog box, right-click
Local Area Connection and choose Properties.
–
In the Local Area Connection Properties dialog box,
on the Networking tab, select Internet Protocol
Version 4 (TCP/IPv4) and click Properties.
–
In the Internet Protocol Version 4 (TCP/IPv4) Properties dialog box, select “Use the Following IP
Address” and enter the new address in the IP
Address field. Make sure to use an IP address that is
not in use by another computer on the network.
Accept the default Subnet Mask value. Click OK.
RMS USER GUIDE
Verifying the i.LON 10’s IP Address
To verify the i.LON 10’s IP address:
1. From the Windows taskbar, choose Start > Control
Panel.
2. In the Control Panel window, open the LonWorks Interfaces control panel. The i.LON 10’s IP address is displayed on the RNI tab.
4. To verify the connection for the i.LON 10, do the following:
■
In the LonWorks Interfaces control panel, select the
i.LON 10 name and click Test.
■
In the i.LON 10 Diagnostics dialog box, click Start. The
connection to the i.LON 10 is established and a status is
returned along with connection times.
Using the Ping Command
3. If the i.LON 10’s IP address range does not match the
computer and you want to change the address for the
i.LON 10, do the following:
The Ping command can be used to verify the connection
between the RMS host computer and the network hardware.
The Ping command also measures the speed of the
response times.
To use the Ping command:
■
Select the i.LON 10 name and in the Network Interface
section click Properties.
■
In the Network Interface Properties dialog box, click RNI
Device.
■
1. From the Windows taskbar, choose Start > Run.
2. In the Run dialog box, enter the following and click OK.
ping [IP address]
In the Host Device Properties dialog box, enter the new
IP address and click OK. Make sure to use an IP address
that is not in use by another i.LON 10 or another computer on the network.
The Command window opens and the Ping command is
sent. Below are some of the more common results that
may be encountered.
57
APPENDIX B: TROUBLESHOOTING RMS SOFTWARE PROBLEMS
■
The following example illustrates when the Ping command was returned successfully. The time for the Ping is
indicated in milliseconds. Long return times can be
caused by network congestion.
TROUBLESHOOTING THE U10 USB NETWORK
INTERFACE ADAPTER
If a Single U10 Stops Working
If you are using a single U10 USB network interface adapter
and it stops working (this may happen if you unplug and
plug in the device several times), you should unplug the
U10, delete it from the LonWorks Interfaces control panel
and Windows Device Manager, and then plug it back in (see
“Uninstalling the U10” on page 58). You can then use the
LonWorks Interfaces control panel to verify the device is
installed correctly (see “Verifying the Connection to the U10”
on page 59).
■
■
The following example illustrates when the Ping command cannot reach its intended address, usually indicating an incorrect IP address or a bad network connection.
Working with Multiple U10s
The following example illustrates when the Ping command was not returned in the allowed time. Ping timeouts generally indicate a problem with the network, such
that the network hardware is incorrectly configured, not
powered on, or not connected.
Uninstalling the U10
When you have more than one U10 USB network interface
attached to your computer, the LonWorks Interfaces control
panel assigns unique IDs to each interface (LON1, LON2,
etc.). This may cause RMS to lose communication with the
U10 (RMS will only recognize the LON1 device). If you
encounter this situation, unplug all U10 devices and uninstall the devices from the LonWorks Interfaces control panel
and Windows Device Manager (see “Uninstalling the U10”
on page 58). You can then plug in the U10 you want to use
with RMS and verify its connection with the LonWorks Interfaces control panel (see “Verifying the Connection to the
U10” on page 59).
To uninstall the U10 device:
1. Unplug all U10 USB network interfaces from your computer.
2. From the Windows taskbar, choose Start > Control
Panel.
3. In the Control Panel window, open the LonWorks Interfaces control panel and click the USB tab.
58
RMS USER GUIDE
4. Select the LON1 interface and click Remove. Repeat for
any additional interfaces.
Verifying the Connection to the U10
To verify the connection to the U10:
1. From the Windows taskbar, choose Start > Control
Panel.
2. In the Control Panel window, open the LonWorks Interfaces control panel and click the USB tab.
5. In the Control Panel window, open the System control
panel and click the Hardware tab, then click Device
Manager.
6. In the Device Manager window, in the device list, expand
the Universal Serial Bus Controllers list, select “Echelon
USB Network Interface,” and choose Action > Uninstall.
7. When prompted to confirm the device removal, click OK.
3. Select the LON1 interface and click Test.
4. In the U10 Test dialog box, click Test. The connection to
the U10 is verified and a status is returned along with any
errors.
5. Click OK to close the U10 Test dialog box.
8. Plug in the U10 USB network interface you want to use
with RMS. Do not plug in any additional devices.
59
APPENDIX B: TROUBLESHOOTING RMS SOFTWARE PROBLEMS
TESTING NETWORK INTERFACE CARDS
4. Click OK to close the Diagnostics dialog box.
You can use the LonWorks Plug’n Play control panel to test
the LonWorks network interface cards (PCLTA-21,
PCLTA-20, and PCC-10).
5. Click OK to close the LonWorks Plug’n Play control
panel.
To test the LonWorks network interface card:
1. From the Windows taskbar, choose Start > Control
Panel.
2. In the Control Panel window, open the LonWorks Plug’n
Play control panel and click Diagnostics.
COMPLETELY REMOVING RMS
If you are having trouble installing or upgrading the RMS
software, it may be necessary to completely remove the
existing RMS software before reinstalling.
To completely remove the RMS software:
1. From the Windows taskbar, choose Start > Control
Panel.
2. In the Control Panel window, open the Add or Remove
Programs control panel and remove the following items:
3. In the Diagnostics dialog box, click Test. The connection
status of the card is tested and the results are displayed.
The results should be similar to those in the following figure.
■
Remote Monitoring System
■
Echelon LNS Server
■
Echelon OpenLDV
3. If necessary, back up any existing RMS network databases and panel files. In Windows Explorer, navigate to
the C:\meyer\rms folder on your hard drive and copy
the following items to another location on your hard
drive, or onto a backup disc or other storage media:
■
Any panel files with a .pnl extension
■
Any folders named RMSNET, including those with
numerals (RMSNET1, RMSNET2, etc.)
4. In Windows Explorer, delete the following items:
NOTE: If you encounter any error messages,
click Restart and Reset to reset the card and
reload its firmware, then click Test again.
60
■
C:\meyer\rms directory
■
C:\LonWorks directory
■
C:\WINDOWS\rms.ini file
RMS USER GUIDE
5. Remove the LonWorks entries from the Registry:
■
Choose Start > Run.
■
In the Run dialog box, enter “regedit” and click OK. The
Registry Editor opens.
■
Select the “HKEY_CURRENT_USER/Software/Lonworks” folder and choose Edit > Delete.
■
Select the “HKEY_LOCAL_MACHINES/Software/Lonworks” folder and choose Edit > Delete.
■
Choose File > Exit to close the Registry Editor.
IS THE POET 6.0 OBJECT SERVER
INSTALLED?
If you are having problems with the RMS software, verify
that the POET 6.0 Object Server is installed. Once you have
installed RMS and successfully launched the RMS program,
“POET 6.0” should be listed in the Windows Firewall control
panel on the Exceptions tab.
6. Restart Windows.
Windows Firewall Control Panel
61
APPENDIX B: TROUBLESHOOTING RMS SOFTWARE PROBLEMS
DISABLING STARTUP ITEMS
If there are startup items conflicting with RMS you can disable them with the System Configuration Utility.
To disable startup items:
1. From the Windows taskbar, choose Start > Run.
2. In the Run dialog box, enter “msconfig” and click OK.
3. In the System Configuration Utility, on the Startup tab,
deselect the startup items you want to disable and click
OK.
CHECKING SYSTEM RESOURCES WITH TASK
MANAGER
You can use the Windows Task Manager to view how much
CPU and memory resources are being used by the programs and task currently running.
To check system resources with Task Manager:
1. Press Ctrl+Alt+Delete.
2. In the Windows Security dialog box, click Task Manager.
3. In the Windows Task Manager, check the Mem Usage
and VM Size columns to see which applications or tasks
may be draining resources.
4. Restart Windows when prompted.
4. To end a task, select the task and click End Process.
5. Choose File > Exit Task Manager to close the Task
Manager.
62
APPENDIX C: EXTERNAL MUTING WITH THE I.LON 100
This chapter documents using the i.LON 100 for external
muting and includes the following topics:
■
“Fire Alarm External Muting” on page 63
■
“Wiring the i.LON 100 for External Muting” on page 63
■
“Commissioning the i.LON 100” on page 63
FIRE ALARM EXTERNAL MUTING
To ensure safety at venues with high-level sound reinforcement, some venues require automatic muting of audio systems when a fire alarm or other emergency signal is
triggered. The i.LON 100 Ethernet Adapter can be configured for external muting of RMS loudspeakers when a fire
alarm or external relay is triggered.
3. Connect a 4.99 K resistor between positions 15 and 16.
NOTE: This resistor stabilizes connections to
prevent false triggering of the muting command sent to the loudspeakers.
4. Connect a wire between position 16 and the closure side
of the fire alarm dry contact relay (floating).
5. Connect a wire between position 20 (the +12 V connection on the i.LON 100) and the relay trigger side of the fire
alarm dry contact relay (floating).
When the relay is open, the RMS network operates normally
with the loudspeakers outputting audio. When the relay is
closed by a triggering event, a mute command is sent to all
loudspeakers on the RMS network (connected to the
i.LON 100). When the relay is reopened, the loudspeakers
are unmuted.
i.LON 100 Ethernet Adapter
WIRING THE I.LON 100 FOR EXTERNAL
MUTING
To enable muting of loudspeakers from a fire alarm or relay
contact, the i.LON 100 should be wired as follows:
Input 2
Input 1
Net
GND +12V
-
+
-
+
-
+
13
14
15
16
17
18
*
19
20
NOTE: To respond to muting commands from
RMS, loudspeakers must have muting enabled
(the Mute Jumper installed on their RMS module).
Fire Alarm
Dry Contact
Relay (Floating)
COMMISSIONING THE I.LON 100
RMS Net
* 4.99K Resistor
RMS Warning Dialog Boxes
Open = Normal
Closed = Mutes Speakers
To enable external muting for an i.LON 100 in RMS, the
i.LON 100 must be commissioned.
Wiring Diagram for i.LON 100 Fire Alarm Muting
To commission the i.LON 100:
1. Connect the RMS two-wire connections to positions 17
and 18.
1. In the RMS program, choose Muting > Options.
2. Connect a jumper wire (approximately 0 ohms of resistance) between positions 15 and 19 (the Ground connection on the i.LON 100).
2. In the Muting Options dialog box, under External Muting
Control, click Settings.
63
APPENDIX C: EXTERNAL MUTING WITH THE I.LON 100
3. In the External Muting Control dialog box, click
i.LON 100 Setup.
–
Leave the Device Name set to the default name
(iLON-100).
–
Enter the Neuron ID for the i.LON 100 (located on the
bottom of the unit).
–
Enter the RMS Network for the i.LON 100.
–
Click Commission. The i.LON 100 comes online.
4. In the i.LON 100 Setup dialog box, do one of the following:
5. Click Close to close the i.LON 100 Setup dialog box.
6. In the External Muting Control dialog box, make sure the
following options are selected and then click OK.
■
To commission with the Service Pin:
■
Enable External Muting Control
–
Select the Use Service Pin option.
■
Save Setting on Exit
–
Leave the Device Name set to the default name
(iLON-100).
–
Click Commission.
–
Press the Service Pin on the back of the i.LON 100.
The i.LON 100 comes online.
– or –
■
To commission by entering the i.LON 100 Neuron ID:
–
64
Select the Use Network Properties option.
NOTE: To password-protect any changes to
the External Muting settings, select the option
for “Require password to change settings,” specify
the Password, and click OK.
7. Click OK to close the Muting Options dialog box.
APPENDIX D: THE FTR-120 FREE TOPOLOGY REPEATER
This chapter documents the FTR-120 Free Topology
Repeater and includes the following topics:
■
“About the FTR-120” on page 65
■
“Installing and Using the FTR-120” on page 65
■
“FTR-120 Specifications” on page 66
ABOUT THE FTR-120
The FTR-120 is a four-channel network repeater. A message
generated on any network segment to which the FTR-120 is
connected is rebroadcasted on the three other channels.
INSTALLING AND USING THE FTR-120
FTR-120 Physical Installation
The FTR-120 can be mounted on a wall or other surface
using four #6 wood screws (or equivalent). It can be
mounted horizontally with the terminal blocks facing down,
or vertically with the terminal blocks on the right side. The
FTR-120 unit and associated wiring should be mounted and
fastened securely, so that no stress is incurred. Do not install
the FTR-120 in a manner that would allow unanticipated disconnection.
FTR-120 Network Terminations
FTR-120 Free Topology Repeater
There are six status LEDs on the unit:
■
The PWR LED is the power indicator. It is lit if power is
properly supplied to the unit.
■
The other five LEDs give an indication of the amount of
network traffic. The TX1-4 LED flashes whenever a message is transmitted by the repeater. The RX1, RX2, RX3,
RX4 LEDs flash whenever a message is received on a
particular channel.
The FTR-120 is capable of providing standard network termination. As shipped, each channel on the unit has 5-ohm
network termination resistors connected. If no termination or
100-ohm network termination is required, the top must be
removed.
For example, if a message is received on channel 1, the RX1
LED flashes, the message is transmitted on the other channels (2, 3, and 4), and the TX1-4 LED flashes.
FTR-120 Jumper Layout
NOTE: See Chapter 5, “Connecting RMS Networks” for design scenarios using the FTR-120
network repeater.
Network termination can be changed by moving the shorting jumper on CN1, CN2, CN3, or CN4. Table 6 describes
the jumper positions.
Table 6: FTR-120 Jumper Settings
Channel
Number
No
Termination
5-ohm
Termination
100-ohm
Termination
CN1
No Jumper
Jump 1 and 2
Jump 2 and 3
CN2
No Jumper
Jump 1 and 2
Jump 2 and 3
CN3
No Jumper
Jump 1 and 2
Jump 2 and 3
CN4
No Jumper
Jump 1 and 2
Jump 2 and 3
65
APPENDIX D: THE FTR-120 FREE TOPOLOGY REPEATER
When installing an FTR-120 network repeater on an RMS
network, avoid using the twisted wire terminator (provided in
the RMS peripheral kit) on the network output of the loudspeakers connected to the repeater unless the repeater terminator is removed. Double terminating any network output
will decrease performance.
Network 1-4 are the network connections. Network 1 is the
channel 1 network connection. Connect the first network
twisted pair to the terminal block NET1 positions. The wiring
is polarity-independent so it does not matter which wire in
the pair is connected to which position on the terminal
block. Connect the rest of the network twisted pairs to the
other channels. Leave any unused channels unconnected.
FTR-120 Wiring
The FTR-120 is wired using five position terminal blocks.
The wiring pin-out for the FTR-120 module is shown in
Table 7.
Table 7: FTR-120 Wiring Pin-Out
Pin Description
Function
PWR A+
Power A+ positive supply connection
PWR A-
Power A– negative supply connection
N/C
No connection (reserved)
PWR B+
Power B+ positive supply connection
PWR B–
Power B- negative supply connection
NET1
Network channel 1 connection
NET1
Network channel 1 connection
EGND
Earth ground
N/C
No connection (reserved)
NET2
Network channel 2 connection
NET2
Network channel 2 connection
NET3
Network channel 3 connection
NET3
Network channel 3 connection
EGND
Earth ground
N/C
No connection (reserved)
NET4
Network channel 4 connection
NET4
Network channel 4 connection
Power A+ and Power A– are the power supply inputs. Connect the positive lead of the power supply to the terminal
block Power A+ and the negative lead of the power supply
to the terminal block Power A–.
If a redundant supply is required, connect it to Power B+
and Power B–. Connect the positive lead of the redundant
power supply to the terminal block Power B+ and the
negative lead of the power supply to the terminal block
Power B–.
66
NOTE: Terminals labeled EGND should be
connected to an earth ground.
The FTR-120 Universal Power Supply
The universal power supply included with the repeater kit
allows for FTR-120 operation around the world. The supply
accepts any input voltage from 100 to 240 V AC, and produces the required 12 V DC output. The male IEC input
allows for any mains lead adapter to be used with the supply.
FTR-120 SPECIFICATIONS
Table 8: FTR-120 Specifications
Power Supply
+12 V DC to +24 V DC +/–10% @ 100 mA
PWR A+
Power A+ positive supply connection
PWR A–
Power A- negative supply connection
N/C
No connection (reserved)
PWR B+
Power B+ positive supply connection
PWR B–
Power B– negative supply connection
NET1
Network channel 1 connection
NET1
Network channel 1 connection
EGND
Earth ground
N/C
No connection (reserved)
NET2
Network channel 2 connection
NET2
Network channel 2 connection
NET3
Network channel 3 connection
NET3
Network channel 3 connection
EGND
Earth ground
N/C
No connection (reserved)
NET4
Network channel 4 connection
NET4
Network channel 4 connection
RMS CONFIGURATION SHEET
Customer Name
Loudspeaker Model
Venue
Serial Number
Neuron ID #
Loudspeaker Name
Date
Notes
67
68
RMS CONFIGURATION SHEET
Customer Name
Loudspeaker Model
Venue
Serial Number
Neuron ID #
Loudspeaker Name
Date
Notes
69
70
RMS CONFIGURATION SHEET
Customer Name
Loudspeaker Model
Venue
Serial Number
Neuron ID #
Loudspeaker Name
Date
Notes
71
72
RMS CONFIGURATION SHEET
Customer Name
Loudspeaker Model
Venue
Serial Number
Neuron ID #
Loudspeaker Name
Date
Notes
73
74
INDEX
A
Activity LED, RMS modules 9
adding
loudspeakers 41, 44
pages 40
Autosave, panel files 39
B
backing up RMS files 17
batch commissioning loudspeakers 43
C
commissioning i.LON 100 ethernet adapter 63
commissioning loudspeakers 42
after the fact 43
batch 43
configuration sheet, RMS 67
configuring
external muting 63
LonWorks Interfaces control panel 21, 24
RMS networks, workflow 7
creating panel files 39
custom twisted-pair connectors 28
D
decommissioned loudspeakers 45
deleting
loudspeakers 45
pages 41
disabling startup items 62
displaying
loudspeaker device names 48
loudspeaker views 45
E
Ethernet
configurations 33
hubs 28
switches 28
vs. twisted-pair 27
external muting 63
configuring 63
F
fire alarm muting 63
FTR-120 65
installing 65
specifications 66
termination 65
wiring 66
H
hubs, Ethernet 28
I
i.LON 10 ethernet adapter 21
installing 22
LonWorks Interfaces control panel 24
resetting 24
verifying IP address 57
i.LON 100 ethernet adapter
commissioning 63
wiring for external muting 63
Icon View 46
importing RMS network databases 38
installing
FTR-120 65
i.LON 10 ethernet adapter 22
MP/HP RMS modules 11
Mute Jumper 15
network interface cards 19
RMS software 17
U10 network adapter 20
UltraSeries RMS modules 10
IP address
computer 55
i.LON 10 ethernet adapter 57
K
keyboard shortcuts, RMS software 53
L
launching the RMS program 37
LonWorks Interfaces control panel
i.LON 10 ethernet adapter 24
U10 network adapter 21
LonWorks Plug’n Play control panel 19
loudspeaker views 45
displaying 45
Icon View 46
locating off-screen 49
Meter View 46
moving 49
selecting 48
Small Icon View 46
Text View 47
loudspeakers
adding 41
75
INDEX
commissioning 42
decommissioned 45
deleting 45
displaying device names 48
managing 44
Mute Jumper 15
muting 49
offline 45
renaming 44
RMS modules 9
soloing 50
winking 50
M
managing loudspeakers 44
Meter View 46
moving loudspeaker views 49
MP/HP RMS modules 11
Mute Jumper 15
muting loudspeakers
optimized 52
options 50
with Mute button 49
with Solo/Mute Matrix 51
Muting Options dialog box 50
muting, external 63
N
navigating pages 41
Network connectors, RMS modules 10
network interface cards 19
installing 19
LonWorks Plug’n Play control panel 19
PCC-10 network interface 19
PCLTA-20 network interface 19
PCLTA-21 network interface 19
testing 60
uninstalling 20
validating 19
network interfaces, supported 5
network repeaters 28
FTR-120 65
network specifications 29
network system errors 55
network terminators 28
O
offline loudspeakers 45
opening panel files 40
Optimized Muting 52
Outdoor mode 40
P
pages 40
adding 40
76
deleting 41
navigating 41
renaming 41
panel backgrounds 40
panel files 39
automatically saving 39
backing up 17
creating 39
opening 40
saving 39
PCC-10 network interface 19
PCLTA-20 network interface 19
PCLTA-21 network interface 19
POET 6.0 Object Server 61
R
removing
RMS network databases 38
RMS software 60
renaming
loudspeakers 44
pages 41
Reset button, RMS modules 9
resetting
i.LON 10 ethernet adapter 24
RMS modules 10
RMS configuration sheet 67
RMS modules 9
Activity LED 9
for MP/HP loudspeakers 11
for UltraSeries loudspeakers 10
Mute Jumper 15
Network Connectors 10
Reset button 9
resetting 10
Service button 9
Service LED 9
Wink LED 9
RMS network databases
backing up 17
importing 38
removing 38
RMS Network Server and Manager 38
RMS networks 6, 29
configuration workflow 7
Ethernet configurations 33
specifications 29
termination 28
twisted-pair configurations 30
RMS program 37
launching the first time 37
Outdoor mode 40
panel backgrounds 40
workspace 39
RMS software 6
completely removing 60
RMS USER GUIDE
installing 17
keyboard shortcuts 53
RMS Network Server and Manager 38
serial number 18
system requirements 5
troubleshooting 55
S
saving panel files 39
selecting loudspeaker views 48
multiple 49
serial number, RMS 18
Service button, RMS modules 9
Service LED, RMS modules 9
Small Icon View 46
Solo/Mute Matrix 51
soloing loudspeakers
with Solo button 50
with Solo/Mute Matrix 51
specifications for RMS networks 29
startup items, disabling 62
switches, Ethernet 28
system requirements
for RMS software 5
networking hardware 6
supported network interfaces 5
system resources, checking 62
RMS software 60
U10 network adapter 58
V
validating network interface cards 19
verifying
computer IP address 55
i.LON 10 IP address 57
network connections with Ping command 57
U10 network adapter 59
W
Wink LED, RMS modules 9
winking loudspeakers 50
wiring
FTR-120 66
i.LON 100 ethernet adapter 63
T
termination
FTR-120 65
RMS networks 28
testing network interface cards 60
Text View 47
troubleshooting
i.LON 10 ethernet adapter 57
network interface cards 60
network system errors 55
RMS software 55
U10 network adapter 58
twisted-pair cabling 27
configurations 30
custom connectors 28
vs. Ethernet 27
U
U10 network adapter 20
installing 20
LonWorks Interfaces control panel 21
troubleshooting 58
uninstalling 58
verifying 59
UltraSeries RMS modules 10
uninstalling
network interface cards 20
77
INDEX
78
Meyer Sound Laboratories Inc.
2832 San Pablo Avenue
Berkeley, CA 94702
www.meyersound.com
T: +1 510 486.1166
F: +1 510 486.8356
© 2008
Meyer Sound Laboratories Inc.
05.033.302.10 A