1
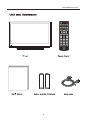
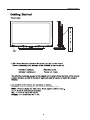
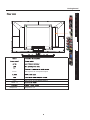
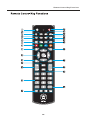
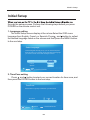
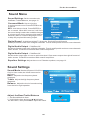
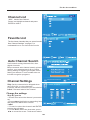
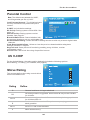
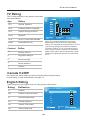
USER’S MANUAL
VR-3725
Contents
1
2-6
Caution
Safety Information
7
8
8
9
10-11
Unit and Accessory
Getting Started
Front View
Rear V iew
Remote Control Key Functions
12
Basic O peration
13-16
Initial Setup
17
Input Source menu
17
Main Menu
18-20
Picture Menu
21-22
Sound Menu
23-24
Channel Menu
25-26
Parenal Control Menu
27-28
Setup menu
28
Others Menu
29
Help
Caution
Caution
The lightening flash with arrowhead symbol ,within an equilateral triangle is
intended to alert the user to the presence of un-insulated”dangerous voltage”
within the products enclosure that may be of sufficient magnitude to constitute a
risk of electric shock to the persons.
The exclamation point within an equilateral triangle isintend to alert the user to
the presence of important operating and maintenance (servicing) instructions in
the literature accompanying the appliance.
Correct disposal of this Product
Waste Electrical & Electronic Equipment (WEEE)
Your product is designed and manufactured with high quality materials and
components which can be recycled and reused.
This symbol means that electrical and electronic equipment,at their end-of-life,
should be disposed of separately from your household waste.
collection /recycling centre.
In the European Union there are separate collection systems for used electrical
and electronic products.Please help us to conserve the environment welivein!
1
Safety Information
2
Safety Information
3
Safety Information
4
Safety Information
5
Safety Information
6
Unit and Accessory
7
Getting started
SOURCE
SOURCE:Press to change TV AV YPbPr VGA HDMI1,2,3,4 .
8
ON/OFF
RF
PC in
Earphone
AC IN
USB
RF
PC IN
Y
PC Audio
IN
AV IN
HDMI x 4
Earphone out
9
R
Pb
L
Pr
R
R
L
L
HDMI 1
HDMI 2
HDMI 3
HDMI 4
Coaxial Earphone
OUT
OUT
GettingStarted
PC signal from computer output
Remote Control Key Functions
10
Remote Control Key Functions
. Mute button (
)
Mutes or unmutes audio.
. YPbPr1 button
Quickly switch input to YPbPr 1
source.
. TV button
Quickly switch input to TV
source.
. YPbPr2 button
Quickly switch input to YPbPr 2
source.
. PC button
Quickly switch input to PC
mode.
. CC button
Turn on Closed Caption or off.
Available at TV/AV.
. P Mode button (
)
Quickly switch the
predetermined picture mode.
Standard/Movie/User/Dynamic.
. Favorite button
Display favourite channel list.
Colour button
The action they perform is
shown on the menu and
changes for each menu.
. Menu button
Press to display the menu.
. Navigation(
)
Navigates through the menus.
Enter button
Activates a selection or accesses
the menu.
. Info button (only for DTV)
Press to display the channel
information.
. Input button
Display all source list.
. Vol+/Vol- button
Adjust speaker volume level.
. Digit (0~9), Dot buttons
11
Input the channel number or
password. When switch to a
digital channel, usually should
be followed by Dot button and
minor channel number. Enter
. DVD Control button
Not available for this model.
. Standby button
Control TV to standby or on.
. Video1 button
Quickly switch input to Video1
source.
. HDMI1 button
Quickly switch input to HDMI1
source.
. Video2 button
Quickly switch input to Video1
source.
. HDMI2 button
Quickly switch input to HDMI2
source.
. Sleep button (
)
Sets a delay after which the TV
switches to standby.
. MTS button
Switch sound channel. Mono/
Stereo/SAP when analog
channel. English and other
languages when digital channel.
. Back button
Returns to a previous screen.
. Info button
Display information about the
TV channel or accessory device.
. CH +/- button
Switches to the next or previous
channel.
. Aspect button
Press to select Aspect Ration.
. Enter button
. Confirm a selection.
Basic Opration
12
Initial Setup
Initial Setup
through the setup process. Perform the following steps before you press
POWER on the remote control unit.
1. Language setting
The Initial Setup screen display at the rst use
. Select the OSD menu
language from English, French, or Spanish. Press and button to sellect
the desired language listed on the screen and then press the MENU button
to the next step.
Select Language
Follow this guide to help you up your TV. Use the Up and
Down arrows on your remote control and select the language
you want to use for menus and messages screens.
English
Enter
French
Enter
Spanish
Enter
:Press to Execute
2. Time Zone setting
Press and button to select your current location for time zone, and
then press the ENTER button to the next step.
Time Zone
Use the left or right key to selection your time zone
Time Zone
Pa
c
Next
: Return
: Move
:Press to Execute
13
Initial Setup
1. Location setting
Press and button to select “Home” or “Showroom” and press
button to the next step.
Power On Mode
Use the up/down key arrows on you remote control to select
power on mode.
Home optimizes the video setting f
Showroom optimizes the video setting for use on a
vironment.
Home
Showroom
: Return
:Press to Execute
: Move
4. Signal select
Press and button to select "Cable Box or Satellite Box”, "Game, BluRay DVD or other player” or “Antenna or coaxial cable input” and then press
ENTER button to the next step.
Lets Get Connected
Cable Box or Satellite Box
Game, Blu-Ray DVD or other player
Antenna or coaxial cable input
Back
: Return
: Move
:Press to Execute
14
Initial Setup
5.Cable or Satellite Box Input selection
Make sure what kind of connection is made with your TV when selecting
for Source select item.
Press and button to select “Next and then press ENTER button to
continue.
Cable or Satellite Box Input
What Connection are you using? For optimal video quality
We Recommend HDMI or Component Input. (Refer to
Quick Connect or User Manual Help)
Source Select
TV
Skip
Next
Back
: Return
: Move
: Change Setting
RF Warning
Note: We don’t recommend RF as your connection because
its poor video signal and quality; Go back to choose another
source ,if you don’t hace a Cable Box that can provide High
Definition quality signals. We recommend you call your Cable
provider for Help!
Proceed
Skip
Back
: Return
: Move
: Press to Execute
6. Other source select
Press and button to select input source and then press ENTER button to the next step.
Page 1/2
SOURCE LIST
TV
AV
YPbPr
HDMI 1
HDMI 2
HDMI 3
HDMI 4
: Select
: Page
: Press to Execute
15
Initial Setup
7.Channel scan select
Press and button to select Antenna [ATSC] or Cable, and then press
ENTER button to the next step.
Scan Channels from Antenna or coaxial cable input
Use the Up or Down arrows on you remote control to select
the channel scan type.
Antenna [ATSC]
Cable
Back
: Return
: Move
: Press to Execute
8. ATSC channel access selection
Some of the ATSC channel require the access code.
Press and button to select “Next” and then press ENTER button to
next step. The 5 digit access code provided by the channel access service.
Antenna [ATSC] Channel Access
Antenna users need a Channel Access Code in order to perform
a channel scan and receive broadcast signals.
Web: www.westinghousedigital.com/support;
select Channel Access and enter Access Info
Text Message: Text Tuner to 95495
Phone: 1-800-701-0680 follow instructions
Select next to obtain the Access code.
Next
Back
: Return
: Move
: Press to Execute
Enter Channel Access Code
Using your remote control to enter the 5digit access code
provided by the channel access service.
: Return
16
0-9
: Enter password
The On-Screen Menu
Input Source
Source Select
TV
Press INPUT to display the input source list.
Press ▼/▲ to select the input source and ENTER to confirm.
AV
YPbPr
PC
HDMI 1
HDMI 2
HDMI 3
HDMI 4
Main Menu
Press MENU to display the main menu or return to the previous menu or close the main menu.
Press ◄/► to highlight the desired menu icon, and press ENTER to select.
If no buttons are pressed, the menu will close automatically after about 10 seconds.
17
The On-Screen Menu
Picture Menu
Picture Settings
Screen Size
Wide
PC Settings
Color Temperature
Normal
Advanced Picture Settings
Move
Press ▼/▲ to highlight one of the following options, then press ENTER or ► to enter next submenu to adjust it. Press EXIT to clear on-screen menu or MENU back to the previous menu.
Picture Settings Adjust the picture quality including brightness, contrast, color, tint,
sharpness. For details, see page 8.
Screen Size Press◄/►to selet the display aspect ratio till the picture is fit onto the screen.
The options are different according to different input source.
PC Wide/Dot by Dot. Dot by Dot means NOT any scaling to original input pixels size.
AV/YPbPr/HDMI/TV Normal/Wide/Cinema/Zoom.Generally each aspect ratio is suitable
for one input format. For example Normal is suitable to watch common TV program. Wide will
do horizontal scaling on the wide panel. Cinema is for the 2.39:1(perhaps marked as 2.40:1 on
the disc) film . Zoom is suitable to view the analog TV which has wide(16:9) content on the 16:9
panel.
PC Settings The item is available only for PC DB15or PC DVI input mode, see page 15.
Color Temperature Press◄/► to select the color temperature that you feel comfortable.
Normal Basically will be accepted by most people.
Cool means a high color temperature that will feel cool.
Warm means a low color temperature that will feel warm.
Advanced Picture Settings The item is some special picture feature ,see page 16.
18
The On-Screen Menu
Picture Settings
:Return
:Move
When Picture Mode is set to User, the following settings can be manually adjusted.
Press PMODE shortcut button on the remote control to select picture mode directly.
Adjusting the values
Picture Mode
Highlight the item and Press ◄/► to select. Movie/Dynamic/Standard/User
Brightness/Contrast/Color/Tint/Sharpness
Highlight the item and press ►, and a process bar
appears, then press ◄/► to adjust the value. Tint is
available when analog TV or NTSC-system AV or Svideo.
Press MENU to back the Picture Settings menu.
19
Brightness
50
The On-Screen Menu
PC Settings
PC Settings Menu is aviliable only in PC DB15
or DVI mode. When DVI signal input, only
Horizontal.
Position and Vertical Position can be adjusted.
Press ▼/▲ to highlight one of the following
options, then press ENTER to select it.
Horizontal Position
0
: Move
Auto Adjust Automatically adjust Clock, Phase, H-Position and V-Position settings.
In order to get a good result, you should open a“filling the screen”picture before executing
Auto Adjust.
Horizontal Position Shift the screen slightly to left or right.
Vertical Position Shift the screen slightly up or down.
Clock Adjust the DB15 picture signal sampling clock rate.
Phase Adjust the Db15 picture signal sampling phase. It maybe affect the definition . Wrong
value maybe result the interference.
Reset
Reset the parameters of current menu to default value.
Advanced Picture Settings
Press ▼/▲ to highlight the item and press
ENTER or ► to display the sub-menu as
following.
Dynamic Contrast
Off/Low/Medium/High
The system will adjust the luminance cur ve
by analyzing the picture content
dynamically.
Film Mode
Off/On
For the 2:2 or 3:2 format signal of cinema ,
enable special pixel process to reduce the
flick of moving area.
Noise Reduction
: Move
Off/Low/Medium/High
You can clear up analog TV signal by reducing the dot noise. This feature is not
available at PC or Media source.
MPEG Noise Reduction
Off/Low/Medium/High
Similar with the Noise Reduction, you can set to reduce the block noise.
20
.
The On-Screen Menu
Sound Menu
Sound Settings Set the sound mode,
and Bass /Treble/Balance, see page 12.
Sound Settings
Surround Mode Set to enjoy the
Surround Mode
virtual surround sound. Press ENTER to set
or cancel.
AVL Auto Volume Level. Press ENTER to
set or cancel. When AVL is set on, it will limit
the sound being heard when sudden changes
in volume occur during commercial breaks or
Generally SAP is a second language sound
or help the people with hearing impair.
AVL
Analog Sound
Digital Sound
Digital Audio Output
PCM
Equalizer Settings
: Move
Digital Sound Available at digital TV channels. English/French/Spanish
Set the preferred sound track of digital channels. French and Spanish exist on some channels.
Digital Audio Output PCM/Raw/Off
Set the preferred sound track of digital channels. French and Spanish exist on some channels.
audio stream. PCM can be matched with most AV amplifiers.
Digital Audio Output PCM/Raw/Off
Set the audio output type of coax or optical terminal. Raw means output the original format of
audio stream. PCM can be matched with most AV amplifiers.
Equalizer Settings Adjust the curve of 7 bands equalizer, see page 13.
Sound Settings
Sound Mode Standard/Dynamic/Soft/User
Only in User mode, the follow items can be
adjusted.
Bass Adjust the low frequency band
response.
Treble Adjust the high frequency band
response.
Balance Adjust the level of sound coming
from the left or right speaker.
SOUND SETTINGS
: Move
Adjust the Bass/Treble/Balance
1 Set Sound Mode to User.
2 Highlight the item and press◄/►to display
the sub-menu, then press◄/►to adjust the value.
21
The On-Screen Menu
Equalizer Settings
Mode Off/Rock/Pop/Jazz/User(only in User
mode, the following can be manually adjusted.)
Mode
Pop
: Move
Adjust Equalizer Settings
Mode Based on your favorites about which frequency band need to be adjusted, make small
adjustment with certain frequency band at a time. Suggest NOT making too large changes.
1 Set Mode to User.
2 Press▼ to select the first(100Hz) item, then press◄/►to select the band to be turned.
3 Press▼/▲to adjust the value.
Channel Menu
Note: The menu is available only at TV source.
Channel List You can view all the channels
and choose one quickly.
For details of setting, see page 15.
Channel Settings
Favorite List All of you favorite channels are
listed in this menu, and you can choose them
quickly. For details of setting, see page 15.
Channel Setting Set the favorite channels,
skipped channels, label of channels,
see page 17.
: Move
Signal Type Set to Air or Cable according to
your antenna source. When set to Air, TV can catch 8VSB broadcasting signal. When set to
Cable, TV can catch analog and clear 64QAM/256QAM broadcasting signal.
Auto Channel Search Highlight and press ENTER to start the auto searching, see page16.
22
The On-Screen Menu
Channel List
D10-1
“ABC”: Label of the Channel .
Press▼/▲to highlight a channel and press
ENTER to view it.
ABC
A51
A52
A53
: Move
Favorite List
Page 1/1
D10-1
The list shows channels that you set as favorite.
See “Channel Settings” on page 17 to
understand how to set channels be favorite.
ABC
A51
A52
: Move
Auto Channel Search
It will search analog channels first, then
digital channels.
Before execute auto channel search, please
confirm your antenna type is Air or Cable.
Wrong setting of Signal Type maybe cause
finding no channel. Found numbers do not
include encryption programs.
: Stop Auto Channel Search
Channel Settings
Skip Set the channel to be skipped when
using CH+/Ch- to view channels.
Favorite Set the channel to your favorite list.
Label Rename label of the channel.
: Skip
CHANNEL SETTINGS
Channel
Skip
Favorite
Change the settings
A51
Skip & Favorite
A52
1.Press▼/▲to select the channel you want to
set.
2.Press◄/►to highlight corresponding item,
and press ENTER to set or cancel.
Label
1 Press▼/▲o select the channel and ENTER
to enter the edit state.
2 Press◄/►to select the character, press
◄/► to move the cursor. Total seven letters.
23
Label
ABC
D10-1
A53
: Cursor/Page
The On-Screen Menu
Parental Control
Note: The default user password is “0000”,
and if forget what you set, try“1470”.
Lock Parental Control The following items
are only available if the password input is
correct.
V-CHIP
Change Password
Keypad Lock
V-CHIP Include below settings:
Source Lock
US V-Chip Rating system used at USA. See
page 19.
Canada V-Chip Rating system used at
Canada. See page 21.
0-9 :Enter Password
Block UnRated Show Control whether lock
the program that have not any valid rating flag.
Downloadable Rating Control the RRT5 setting which are valid only at some digital cable
channels.
Clear Downloadable Data Select to clear the previous downloadable rating data.
Change Password Page22
Keypad Lock Set to prevent it from being used by young children, or other
unexpected usage.
Source Lock Set to lock the using of specified source.
US V-CHIP
For the United States, the rating setting basically include the following options:
Movie Rating,TV Rating. (For Canada, see page19)
Moive Rating
This system defines the rating control which
come from MPAA rules.
: Move
Rating
G
PG
PG-13
R
NC-17
X
Define
General audience. All ages admitted.
Parental guidance suggested. Some material may not be suitable
for children.
Parents strongly cautioned. Some material may be inappropriate
for children under 13.
Restricted. Children under 17 require accompanying parent or
adult guardian.
No one 17 and under admitted.
Adult audience only.
24
The On-Screen Menu
TV Rating
The TV rating compose of two aspects: age-based
and content-based.
Age
Define
TV-Y
General audience
TV-Y7
Parental guidance suggested
TV-G
Parents strongly cautioned
TV-PG
Retricted
TV-14
No one 17 and under admitted
TV-MA
Adult audience only
: Move
Content
Define
FV
Fantasy violence
D
Suggestive dialogue
L
Strong language
S
Sexual situations
V
Violence
Note: The content ratings will increase
depending on the level of the age-based
rating. For example, a program with a TV-PG
V(violence) rating may contain moderate
violence, while a TV-14 V(violence) rating
may contain intense violence. So locking a
higher level option will automatically cause
locking the options that has more sensitive
level.
Canada V-CHIP
For Canada, the rating setting include the following options: English Rating,
French Rating. (For the United States, see page 17)
English Rating
These ratings are for programs which are using English rating system.
Rating
Defined as
C
Children
C8+
Children 8 years and older
G
General programming
PG
Parental guidance
14+
Viewers 14 and older
18+
Adult programming
ENGLISH RATING
C
C8+
G
PG
14+
18+
: Move
25
The On-Screen Menu
French Rating
The ratings are for programs which are using French rating system.
Rating Defined as
FRENCH RATING
G
General
8 ans+
Not recommended for younger children
G
13 ans+ Not recommended for children
under age 13
16 ans+
Not recommended for ages under 16
18 ans+
This program is restricted to adults
8 ans+
13 ans+
16 ans+
18 ans+
: Move
Change Password
At first you should enter the correct old
password then enter new password twice.
If you lost your password, try to enter “1470".
0-9
: Enter Password
Source Lock
Press▼/▲to select the source you want to lock ,
then press ENTER to set it to lock . If anyone
want to use this source, the password is
needed.
YPbPr
HDMI
PC
Media
: Move
26
The On-Screen Menu
Setup Menu
Closed Caption(CC) Include below options:
Caption Display Display or hide the CC .
Analog Caption Type Select from below
closed-caption modes for analog programs.
CC1,2,3,4 Displays corresponding caption
channel of a analog program.(Usually be
set to CC1 for most programs.)
Text1,2,3,4 Displays corresponding text
service channel of a analog program.
Digital Caption Type Applies only to digital
channels with closed caption.
Service1,2,3,4,5,6 These are different
service data channels.
Digital CC Preset Default/Custom
If set to Custom, Digital CC Style is available.
Digital CC Style
: Move
Menu Language Set the menu language. English/French/Spanish.
Clock Set the Time Zone/Auto Clock/Day of time/Daylight Saving, see page 25.
Digital CC Style
This menu is valid only for digital closed caption
of digital channels.
CC Size
Small
CC Font
Style4
CC Opacity
CC Size Small/Standard/Large/Default
Text Color
CC Font Style0~7,Default
CC Background Opacity
Solid
Red
Transparent
CC Opacity Flashing/Default/Solid/Translucent/
CC Background Color
Default
Translucent/Transparent/Default
CLOSED CAPTION
Text Color Blue/Yellow/Red/Black/White/Green/
Magenta/Cyan/Default
:Move
:Return
CC Background Opacity Flashing/Solid/
Translucent/Transparent/Default
CC Background Color Blue/Yellow/Red/Black/White/Green/Magenta/Cyan/Default
27
The On-Screen Menu
Clock
Time Zone Hawaii/Alaska /Pacific Central/
Mountain/Eastern/ Samoa/Newfounland/
Altantic
Auto Clock If set it to ON , the TV will sync
the local clock according to the DTV
broadcasting time automatically. Otherwise
you can set the time manually.
Daylight Saving Time
Setup Time Set Auto Clock to Off, then
you can set the time manually .
:Return
Note: In the case of loss of power, the clock
setting will be lost.
: Move
:Return
Day of Week The TV will calculate current day of week according to the time.
Day of Week The TV will calculate current day of week according to the time.
Daylight Saving Time When Auto Clock set to ON, this item is available to enable
daynight saving option or not.
Others Menu
Blue Back Set the screen background color
blue or not when no valid signal input. When
analog TV input and has no signal, snow noise
will display if this option is cleared.
No Signal Power Off If it is set, TV will
automatically enter standby after 10 minutes
without signal input.
No Operation Power Off If it is set, TV
will automatically enter standby after 3 hours
without any operation.
: Move
All Reset When you highlight the item, the system will note you that”Attention! If [All
Reset] was executed, TV system is reset”, and if you are sure to reset, press ENTER
to reset .
Audio Only When you highlight the item, the system will note you that “Attention!
Hold on power key 3 second to restore video”, and if you are sure not need to view
video, please hold on the power button for 3 seconds.
28
Help
HELP
29
www.westinghousedigital.com
S/N:
Westinghouse Digital, LLC
Orange, CA
SE-UM-3701-0101