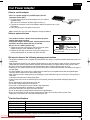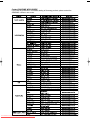
1
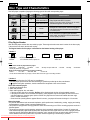
Portable DVD Player
DVD-L760
DVD-L765
ENGDvDPlayer-Manual.com Samsung Manuals
Downloaded From
ENGLISH
Important Safety Instructions
Failed to meet the following precautions
may result in damage to the equipment.
1. Read these instructions.
2. Keep these instructions.
3. Heed all warnings.
4. Follow all instructions.
5. Do not use this apparatus near water.
6. Clean only with dry cloth.
7. Do not block any ventilation openings.
Install in accordance with the manufacturer's
instructions.
8. Do not install near any heat sources such
as radiators. heat registers, stoves, or other
apparatus (including amplifiers) that produce heat.
9. Do not defeat the safety purpose of the
polarized or grounding-type plug. A
polarized plug has two blades with one
wider than the other. A grounding type plug
has two blades and a third grounding prong.
The wide blade or the third prong are
provided for your safety. If the provided plug
does not fit into your outlet. Consult an
electrician for replacement of the obsolete outlet.
10. Protect the power cord from being walked
on or pinched particularly at plugs,
convenience receptacles, and the point
where they exit from the apparatus.
11. Only use attachments/accessories specified
by the manufacturer.
12. Use only with the cart, stand, tripod,
bracket, or table specified by the
manufacturer, or sold with the apparatus.
When a cart is used, use caution when
moving the cart/apparatus combination to
avid injury from tip-over.
Downloaded From DvDPlayer-Manual.com Samsung Manuals
2
13. Unplug this apparatus during lightning
storms or when unused for long periods of time.
14. Refer all servicing to qualified service
personnel. Servicing is requied when the
apparatus has been damaged in any way,
such as power-supply cord or plug is
damaged. Liquid has been spilled or objects
have fallen into the apparatus, the
apparatus has been exposed to rain or
moisture, does not operate normally, or has
been dropped.
15. WARNING - To Reduce the Risk of Fire or
Electric Shock, Do Not Expose This
Appliance To Rain or Moisture.
16. The Shock Hazard Marking and Associated
Graphical Symbol are provided on the
bottom enclosure of unit.
17. Do not expose the product to liquids.
18. CAUTION - Danger of explosion if battery
is incorretly replaced. Replace only with the
same or equivalent type.
ENGLISH
Notices and Safety Instructions
I Safety Instructions
CAUTION
RISK OF ELECTRIC
SHOCK
DO NOT OPEN
CAUTION:
TO REDUCE THE RISK OF ELECTRIC SHOCK, DO NOT
REMOVE COVER(OR BACK). NO USER SERVICEABLE
PARTS INSIDE, REFER SERVICING TO QUALIFIED
SERVICE PERSONNEL.
This symbol is intended to alert the user to the presence of uninsulated
dangerous voltage within the product's enclosure that may be of
sufficient magnitude to constitute a risk of fire or electric shock.
This symbol is intended to alert the user to the presence of important
operating and maintenance instructions in the literature accompanying
this product.
To prevent electric shock, match wide blade of plug to wide slot and fully insert.
Notices and Safety Instructions
I Copy Protection
• Many DVD discs are encoded with copy protection.Because of this, you should only connect your DVD
player directly to your TV, not to a VCR. Connecting to a VCR results in a distorted picture from
copy-protected DVD discs.
• This product incorporates copyright protection technology that is protected by methods claims of certain
U.S. patents and other intellectual property rights owned by Macrovision Corporation and other rights
owners.Use of this copyright protection technology must be authorized by Macrovision Corporation, and is
intended for home and other limited viewing uses only unless otherwise authorized by Macrovision
Corporation. Reverse engineering or disassembly is prohibited.
Safety Information
I Assuring the Finest Performance
This product is designed with the latest technology to provide trouble-free operation.
If the pick-up lens or disk drive gets dirty, the video quality will decrease.
I Moisture Condensation
Condensation may form inside this player under following conditions:
• If warm air comes in contact with any cold parts inside the player
• If the player is located in a room with high humidity
• If the player is exposed to sudden temperature changes from cold to hot.
When condensation forms inside the player, the player may not operate correctly.
If this occurs, leave the player at room temperature until the inside of the player becomes dry
and operational.
I Laser Safety
Caution
This product utilizes a laser. Use of controls or adjustments or
performance of procedures other than those specified herein may result
in hazardous radiation exposure. Do not open covers and do not look
inside the product if interlock mechanism is damaged.
Warning
Be careful not to damage the interlock mechanism.
Downloaded From DvDPlayer-Manual.com Samsung Manuals
3
ENGLISH
Table of Contents
I Setup
Features . . . . . . . . . . . . . . . . . . . . . . . . . . . . . . . . . . . . . . . . . . . . . . . . . . . . . . . . . . . . . . . . . . . . . . . . . . . . . . . . . . 5
Accessories . . . . . . . . . . . . . . . . . . . . . . . . . . . . . . . . . . . . . . . . . . . . . . . . . . . . . . . . . . . . . . . . . . . . . . . . . . . . . . . . 5
Disc Type and Characteristics . . . . . . . . . . . . . . . . . . . . . . . . . . . . . . . . . . . . . . . . . . . . . . . . . . . . . . . . . . . . . . . . . . . 6
Description-Front Panel . . . . . . . . . . . . . . . . . . . . . . . . . . . . . . . . . . . . . . . . . . . . . . . . . . . . . . . . . . . . . . . . . . . . . . . . 7
Tour of the Remote Control . . . . . . . . . . . . . . . . . . . . . . . . . . . . . . . . . . . . . . . . . . . . . . . . . . . . . . . . . . . . . . . . . . . . . 8
Using the Remote Control Unit . . . . . . . . . . . . . . . . . . . . . . . . . . . . . . . . . . . . . . . . . . . . . . . . . . . . . . . . . . . . . . . . . . 9
I Connections
Connecting Headphones to the DVD player. . . . . . . . . . . . . . . . . . . . . . . . . . . . . . . . . . . . . . . . . . . . . . . . . . . . . . . . . 9
Connecting to a TV . . . . . . . . . . . . . . . . . . . . . . . . . . . . . . . . . . . . . . . . . . . . . . . . . . . . . . . . . . . . . . . . . . . . . . . . . . 10
I Adapter directions
Using the AC adapter . . . . . . . . . . . . . . . . . . . . . . . . . . . . . . . . . . . . . . . . . . . . . . . . . . . . . . . . . . . . . . . . . . . . . . . . 10
Using the battery pack . . . . . . . . . . . . . . . . . . . . . . . . . . . . . . . . . . . . . . . . . . . . . . . . . . . . . . . . . . . . . . . . . . . . . . . 11
I Basic Functions
Playing a Disc . . . . . . . . . . . . . . . . . . . . . . . . . . . . . . . . . . . . . . . . . . . . . . . . . . . . . . . . . . . . . . . . . . . . . . . . . . . . . 12
Using the Search & Skip Functions . . . . . . . . . . . . . . . . . . . . . . . . . . . . . . . . . . . . . . . . . . . . . . . . . . . . . . . . . . . . . . 13
Using the Display Function . . . . . . . . . . . . . . . . . . . . . . . . . . . . . . . . . . . . . . . . . . . . . . . . . . . . . . . . . . . . . . . . . . . . 13
Using the Disc and Title Menu. . . . . . . . . . . . . . . . . . . . . . . . . . . . . . . . . . . . . . . . . . . . . . . . . . . . . . . . . . . . . . . . . . 14
Using the Function Menu . . . . . . . . . . . . . . . . . . . . . . . . . . . . . . . . . . . . . . . . . . . . . . . . . . . . . . . . . . . . . . . . . . . . . 14
Repeat Play . . . . . . . . . . . . . . . . . . . . . . . . . . . . . . . . . . . . . . . . . . . . . . . . . . . . . . . . . . . . . . . . . . . . . . . . . . . . . . . 15
I Advanced Functions
Slow Repeat play . . . . . . . . . . . . . . . . . . . . . . . . . . . . . . . . . . . . . . . . . . . . . . . . . . . . . . . . . . . . . . . . . . . . . . . . . . . 15
Adjusting the Aspect Ratio(EZ View) . . . . . . . . . . . . . . . . . . . . . . . . . . . . . . . . . . . . . . . . . . . . . . . . . . . . . . . . . . . . . 16
Selecting the Audio Language. . . . . . . . . . . . . . . . . . . . . . . . . . . . . . . . . . . . . . . . . . . . . . . . . . . . . . . . . . . . . . . . . . 17
Selecting the Subtitle Language . . . . . . . . . . . . . . . . . . . . . . . . . . . . . . . . . . . . . . . . . . . . . . . . . . . . . . . . . . . . . . . . 17
Using the Bookmark Function . . . . . . . . . . . . . . . . . . . . . . . . . . . . . . . . . . . . . . . . . . . . . . . . . . . . . . . . . . . . . . . . . . 18
Changing the Camera Angle . . . . . . . . . . . . . . . . . . . . . . . . . . . . . . . . . . . . . . . . . . . . . . . . . . . . . . . . . . . . . . . . . . . 18
Using the Zoom Function . . . . . . . . . . . . . . . . . . . . . . . . . . . . . . . . . . . . . . . . . . . . . . . . . . . . . . . . . . . . . . . . . . . . . 19
Using the 5.1ch V.S (Virtual Surround) Function . . . . . . . . . . . . . . . . . . . . . . . . . . . . . . . . . . . . . . . . . . . . . . . . . . . . 19
Clips Menu for MP3/WMA/JPEG . . . . . . . . . . . . . . . . . . . . . . . . . . . . . . . . . . . . . . . . . . . . . . . . . . . . . . . . . . . . . . . . 19
Folder Selection . . . . . . . . . . . . . . . . . . . . . . . . . . . . . . . . . . . . . . . . . . . . . . . . . . . . . . . . . . . . . . . . . . . . . . . . . . . . 20
MP3/WMA Playback . . . . . . . . . . . . . . . . . . . . . . . . . . . . . . . . . . . . . . . . . . . . . . . . . . . . . . . . . . . . . . . . . . . . . . . . . 20
Picture CD Playback . . . . . . . . . . . . . . . . . . . . . . . . . . . . . . . . . . . . . . . . . . . . . . . . . . . . . . . . . . . . . . . . . . . . . . . . . 22
I Changing Setup menu
Using the Setup Menu . . . . . . . . . . . . . . . . . . . . . . . . . . . . . . . . . . . . . . . . . . . . . . . . . . . . . . . . . . . . . . . . . . . . . . . 23
Setting Up the Language Features . . . . . . . . . . . . . . . . . . . . . . . . . . . . . . . . . . . . . . . . . . . . . . . . . . . . . . . . . . . . . . 24
Setting Up the Display Options . . . . . . . . . . . . . . . . . . . . . . . . . . . . . . . . . . . . . . . . . . . . . . . . . . . . . . . . . . . . . . . . . 25
Setting Up the Parental Control. . . . . . . . . . . . . . . . . . . . . . . . . . . . . . . . . . . . . . . . . . . . . . . . . . . . . . . . . . . . . . . . . 26
I Reference
Cautionary Notes . . . . . . . . . . . . . . . . . . . . . . . . . . . . . . . . . . . . . . . . . . . . . . . . . . . . . . . . . . . . . . . . . . . . . . . . . . . 27
Troubleshooting . . . . . . . . . . . . . . . . . . . . . . . . . . . . . . . . . . . . . . . . . . . . . . . . . . . . . . . . . . . . . . . . . . . . . . . . . . . . 29
Specifications . . . . . . . . . . . . . . . . . . . . . . . . . . . . . . . . . . . . . . . . . . . . . . . . . . . . . . . . . . . . . . . . . . . . . . . . . . . . . . 30
Car Power Adapter . . . . . . . . . . . . . . . . . . . . . . . . . . . . . . . . . . . . . . . . . . . . . . . . . . . . . . . . . . . . . . . . . . . . . . . . . . 31
Downloaded From DvDPlayer-Manual.com Samsung Manuals
4
ENGLISH
Features
Plays DVD discs and audio CDs
• CD-R/RW discs containing MP3/WMA files can be played.
7 inch LCD display and built-in stereo speakers
• With the built-in 7 inch LCD display and stereo speakers, you can enjoy a DVD movie without requiring a separate TV.
Convenient 2-Way power supply
• You can use your DVD player virtually anywhere by using the
supplied AC adapter indoors and the battery pack outdoors.
Compact size/lightweight design
• Compact and lightweight design makes the player easy to carry.
High-resolution image
• High-resolution LCD screen with 336,000 pixels provides clear pictures.
SVCD
• This unit can play SVCDs.
5.1ch Virtual Surround
• You can enjoy dynamic sound effects similar to that of 5.1 channel surround sound
using conventional stereo speakers or headphones.
Accessories
Remote Control
AK82-00773B
Lithium Battery for
Remote Control
DVD-L760
AK97-01283B
Cigarette Lighter Adapter
Input : 12 V / 24 V - Output : 12 V
AK97-01284A
Instruction Book
AK68-01129A
Rechargeable Battery
AV Adapter Cable
AK82-00774A
DVD-L765
AK97-01283C
AC To DC Adapter 13.5 V / 1.2 A
AK97-01288A
If disc features differ from the explanation in the manual
• Some functions or operations are disc-dependent and may not work in all cases.
Follow the instructions shown on the screen. This manual only covers basic disc operations.
•
may appear during some operations. This mark indicates that the disc in use does not currently support
operations explained in this manual.
Downloaded From DvDPlayer-Manual.com Samsung Manuals
5
ENGLISH
Disc Type and Characteristics
This DVD player is capable of playing the following types of discs with corresponding logos:
Disc Types
(Logos)
DVD
SUPER VIDEO-CD
Recording
Types
Disc
Size
Audio
+
Video
5”
Audio
+
Video
AUDIO-CD
3 1/2”
Max.
Playing Time
Characteristics
Single-sided 240 min. • DVD contains excellent sound and video due to
Double-sided 480 min.
Dolby Digital and MPEG-2 system.
Single-sided 80 min. • Various screen and audio functions can be easily
selected through the on-screen menu.
Double-sided 160 min.
5”
40 min.
5”
74 min.
3 1/2”
20 min.
Audio
• SVCD contains better video resolution, sound, subtitling and
multilingual due to MPEG2 System, VBR and overlay graphics.
It also includes extensions for surround sound multi-channel
(5+1 channels) audio.
• CD is recorded as a Digital Signal with better
audio quality, less distortion and less deterioration
of audio quality over time.
I Play Region Number
Both the DVD player and the discs are coded by region. These regional codes must match in order for the disc to play.
If the codes do not match, the disc will not play.
The Region Number for this player is described on the bottom housing of the player.
* Caution 1
NTSC
• Play Region
Number
• NTSC broadcast system in
U.S.A,Canada, Korea, Japan, etc.
STEREO
DIGITAL
SOUND
• Stereo disc
• Digital
Audio disc
• MP3 disc
NOTE:
Discs which cannot be played with this player:
• DVD-ROM
• DVD-RAM
• CD-ROM
• CDV
• HD layer of super Audio CD • HD DVD
• CDGs play audio only, not graphics.
Ability to play back may depend on recording conditions:
• DVD-R
• CD - RW
• DVD+RW, -RW
• Picture CD
* CD-R, CD-RW and DVD-R may not play in some cases due to disc type or recording condition.
• Blu-Ray
• DVD Audio
* Caution 2
• Some playback functions of a DVD vary by manufacturer.
This DVD player reproduces the disc data according to guidelines provided by the disc manufacturer.
If
appears during disc operations, the disc manufacturer has placed a limit on that function.
Discs that cannot be played
1. Illegally manufactured discs
2. Discs with scratches
3. Discs with fingerprints, dirt, and debris.
• If the disc surface has dirt or scratches, No Disc will be displayed and the disc will not be played correctly.
• If the player encounters dirt or scratches while playing, video playback may be interrupted.(To clean a disc use a
soft cloth without any cleaning agent, liquid or solvent. Only wipe from the center hole towards the outer edge,
never in circular movement.)
• Some block-like (mosaic) patterns appear. When this occurs, your player will restore the image in 2~3 seconds.
About Copyrights
• Any kind of unauthorized and commercial duplication, public performance, broadcasting, renting, copying and making
transmittable the content of discs is strictly prohibited by law.
• This product is equipped with anti-copy protection device and connecting to a VCR for recording purposes results in a
distorted picture.
• This product incorporates copyright protection technology that is protected by method claims of certain U.S. patents and
other intellectual property rights owned by Macrovision Corporation and other rights owners. Use of this copyright protection
technology must be authorized by Macrovision Corporation, and is intended for home and other limited viewing uses only
unless otherwise authorized by Macrovision Corporation. Reverse engineering or disassembly is prohibited.
Downloaded From DvDPlayer-Manual.com Samsung Manuals
6
ENGLISH
Description-Front Panel
I Front View
1. LCD
2. SPEAKER
3. INFO
4. MENU
5. RETURN
6. 5.1ch VIRTUAL SURROUND
7. NAVIGATION (
)
8. ENTER(
)
9. PLAY/PAUSE, REV-SKIP, FWD-SKIP, STOP
10. POWER
11. DVD DISC COVER
12. OPEN SWITCH
I Right View
1. DC IN
2. A/V OUTPUT
3. HEADPHONE B
4. HEADPHONE A
5. VOLUME
6. IR REMOTE SENSOR
7. POWER/CHARGE INDICATED LED (RED/GREEN)
8. OPEN
Downloaded From DvDPlayer-Manual.com Samsung Manuals
7
ENGLISH
Description-Front Panel
I Bottom View
I Battery pack separation method
1. BATTERY PACK
1. Press in the direction of the arrow.
2. RELEASE (Battery pack separation switch)
2. Slide battery pack to the left, then out.
3. OPEN
Tour of the Remote Control
Downloaded From DvDPlayer-Manual.com Samsung Manuals
8
1. POWER Button
• Turns the DVD player on and off
2. Reverse Skip Button
• Returns to the previous chapter or reverse searches.
3. SUBTITLE Button
4. INFO Button
• Displays the current disc mode.
5. MENU Button
• Brings up the DVD player’s setup menu.
6. ENTER/DIRECTION Buttons
(UP/DOWN & LEFT/RIGHT buttons)
7. DISC MENU Button
• Use this button to enter the view disc menu.
8. Number Button
• Use to input the desired chapter number.
9. REPEAT Button
• Allows you to repeat play a title, chapter, track, or disc.
10. ANGLE Button
• Use to access various camera angles on a DVD.
11. EZ VIEW Button
• Use to adjust the aspect ratio on a disc.
12. RETURN Button
• Returns to the previous menu.
13. CLEAR Button
• Use to remove menus or status displays from the screen.
14. AUDIO Button
• Use this button to access various audio functions on a disc.
15. Forward Skip Button
• Go to the next chapter or fast forward.
16. PLAY/PAUSE Button
• Starts or pauses disc play.
17. 5.1ch V.S Button
• Use this button to select the Speaker or Headphone setting for
5.1ch virtual surround sound effect.
18. STOP Button
• Stops disc play
ENGLISH
Using the Remote Control Unit
I Installing the Battery in the Remote
1. Remove the battery compartment in the direction of
the arrow.
(Back of the remote control)
Hole
2. Place the lithium battery in the battery compartment
and put the battery compartment cover back on the
remote.
• Match the polarities (+ and -) on the battery with the
marks in the battery compartment. If the battery is
inserted in the wrong direction, your remote control
may not work correctly.
I Operating Range of Remote Control Unit
Important!
Do not subject the remote control unit to strong vibration or shock.
Keep the remote control unit free from moisture and water.
Caution
• After battery replacement, your remote control unit may not work.
If this occurs, remove the battery and re-insert.
• It may be difficult to operate the remote control unit if the remote control
sensor on the DVD player is exposed to direct sunlight or strong artificial light.
Try operating the remote away from such light sources.
• Remove the battery when not planning to use the remote control unit for
a long period of time.
Remote Control Sensor
Connecting Headphones to the DVD player
You can attach headphones with a stereo mini-jack plug (not supplied)
to the PHONES jack for private listening. There are two jacks available.
I How to use headphones
1. Insert headphones into the A or B PHONES jack.
• This jack is a stereo mini-jack.
Note: When headphones are connected to jack A, you will hear sound through the headphones and over the
speakers. When connected to jack B, sound is heard through the headphones and is muted over the speakers.
Headphone B disables the speakers.
Important!
1. Turn the headphone volume down to the minimum setting before connecting.
2. Adjust the volume level by using the VOLUME control dial.
3. To avoid hearing damage:
- If you are exposed to sound louder than 85db for an extended period, your hearing may be affected. The louder the
sound is, the greater the possibility your hearing will be damaged(an ordinary conversation is in the range of 50 to 60 db
and the noise level on a road is approximately 80 db).
- You are strongly advised to set the volume level to medium (the medium level is usually less than 2/3 of the maximum).
If you feel a ringing in the ear(s), lower the volume or stop using the earphones or headphones.
4. To avoid a risk of traffic accident:
Do not use the earphones while you are driving a bicycle, automobile or motorcycle.
- Otherwise it can cause a serious accident and, furthermore, it is prohibited by the law in some areas.
- Using the earphones while walking, in particular, on a crosswalk can lead to a serious accident. For your safety, make
sure the earphone cable does not get in the way of your arm or other surrounding objects while you are taking exercise
a walk.
Downloaded FromorDvDPlayer-Manual.com
Samsung Manuals
9
ENGLISH
Connecting to a TV
• Always turn off the DVD Player and TV before you connect any cables.
I To view video from the DVD player on a TV
1. Connect the DVD player to a TV with the supplied AV cable.
2. Turn on the TV.
3. Press the TV/VIDEO button on your TV to select the input from the DVD player.
4. Turn on the DVD player, and start playback.
Jack/Plug Color
Video : Yellow
Audio(left) : White
Audio(right) : Red
Caution
• If you wish to view video on your TV only, close the display panel of your DVD player.
Playback will continue, but you still will be able to use the remote to control the DVD player.
Using the AC adapter
To power outlet
Important!
• Always turn off the DVD player before connecting or disconnecting the AC cord.
• Be sure to use the supplied AC adapter. Using a different type of adapter may cause malfunction or damage to the
product.
• When the AC adapter is used for prolonged periods of time, the adapter may heat up.
This is normal and is not a cause for concern.
• When not using the adapter, unplug it from the wall outlet.
• Keep the AC adapter free from moisture, cold, and dust. Otherwise, this can result in a risk of fire or electric shock.
Warning
• Only use the AC adapter supplied with this player.
• Be sure to unwind the AC adapter cable (DC output cable) before using, as electromagnetic
interference may cause problems with other devices.
• Refer to page 31 for details on car adapter connection.
Downloaded From DvDPlayer-Manual.com Samsung Manuals
10
ENGLISH
Using the AC adapter
Important!
• Always turn off the DVD player when inserting or removing the AC adapter.
• Before storing the battery pack, make sure it is completely drained.
• Be sure to recharge the battery at least once every six months to ensure proper battery life.
Caution
• When charging or using the battery pack, it heats up. This is normal and is not a cause for concern.
Battery pack Charge/Playing time
Model
DVD-L760
DVD-L765
Charge Time
Playing Time
Approx. 6.5 hours
Approx. 4.2 hours
Approx. 10 hours
Approx. 7 hours
NOTE:
Connecting the battery pack to the AC Adapter:
• You can charge the battery pack in the DVD player by turning off the player and connecting the AC adapter to the player.
• Charge time may be longer when using the battery pack in a cold environment.
• DVD playing time is a reference indicating the maximum playing time at average speaker volume.
• The playback time may be shortened depending on the disc, surrounding temperature, battery pack
conditions, and speaker volume.
Using the battery pack
Important!
• When inserting the battery pack, make sure that it is inserted correctly.
Otherwise, your DVD player may malfunction.
I Charging the battery pack
Use the AC adapter (included) to charge the battery pack.
• Before charging, make sure that the battery pack is correctly seated.
Power charge Lamp
- Green light(on the front of the unit) will be on when charging.
- When the battery pack is fully charged, the light will turn off.
The playing time is affected by environmental temperature and conditions.
The playing time becomes very short in a cold environment. The continuous playing times
in the operating instructions are measured using a fully charged battery pack at 77°F(25°C).
As the environmental temperature and conditions may differ when you actually use the DVD,
the remaining battery time may not be the same as the approximate continuous playing time given
in these instructions.
NOTE:
• When the operation time is noticeably shorter than normal, it is time to buy a new battery.
• As the battery is completely used, the screen may be intermittently noisy.
Downloaded From DvDPlayer-Manual.com Samsung Manuals
11
ENGLISH
Playing a Disc
I Before Play
After plugging in the player, the first time you press the POWER button, this screen comes up:
Press the UP/DOWN buttons to select the language, and then press the ENTER button.
(This screen will only appear when you plug in the player for the first time.)
If the language for the startup screen is not set, the settings may change whenever you turn
the power on or off. Therefore, make sure that you select the language you want to use.
I Play
1. Move the OPEN switch to open the disc cover.
• The disc cover opens up to around a 60-degree angle.
Do not attempt to open the cover to an angle beyond this range. The cover may become damaged.
2. Place a disc gently into the tray.
• You should hear and feel the disc snap firmly into place
• Place a disc into the tray with the disc’s label facing up.
3. Close the disc cover and then press the part marked “PUSH” until it clicks shut.
4. Stopping Play
• Press the STOP (
) button during play.
5. Pausing Play
Press the PAUSE (
) button on the remote during play.
- Screen stops, no sound.
- To resume, press PLAY (
) button once again.
6. Slow Motion Play (DVD only)
Press and hold the
button to choose the play speed between 1/8, 1/4 and 1/2 of normal during PAUSE mode.
- No sound is heard during slow mode.
- Press PLAY ( ) to resume normal play.
NOTE: Reverse slow motion play will not work.
When you stop disc play, the player remembers where you stopped, so when you press PLAY (
) again, it will pick up
where you left off.
(unless the disc is removed or the player is unplugged, or if you pressed the STOP ( ) button twice.)
Important!
• Make sure that the disc is correctly placed. Otherwise, the disc and/or the DVD player may be damaged.
• If the disc is placed upside down in the disc tray or the region number of the DVD is not supported, No Disc will appear on
the screen.
NOTE:
• If the player is left in the stop mode for more than one minute without any user interaction, a screen saver will be activated.
Press the PLAY (
) button to resume normal play.
• This
icon indicates an invalid button press.
• Do not remove the disc until it has completely stopped.
Downloaded From DvDPlayer-Manual.com Samsung Manuals
12
ENGLISH
Using the Search & Skip Functions
During play, you can search quickly through a chapter or track or use the skip function to jump to the next selection.
I Searching through a Chapter or Track
During play, press the SKIP (
or
) button on the remote.
• Press the SKIP (
or
) button on the remote for more than 2 seconds and press
again or press continuously to search at a faster speed on a DVD, SVCD or CD.
or
) button for less than 2 seconds to use the SEARCH feature.
• Press the SKIP (
(To previous/next chapter or track)
DVD
SVCD
CD
2X, 8X, 32X, 128X
4X, 8X
2X, 4X, 8X
I Skipping Tracks
During play, press the NEXT SKIP (
) or BACK SKIP (
) button less than 2 seconds.
• When playing a DVD, if you press the NEXT SKIP button, it moves to the next chapter.
If you press the BACK SKIP button, it moves to the beginning of the chapter.
One more press makes it move to the beginning of the previous chapter.
• When playing a SVCD or CD, if you press the NEXT SKIP button, it moves to the next track.
If you press the BACK SKIP button, it moves to the beginning of the track.
One more press makes it move to the beginning of the previous track.
• If a track exceeds 15 minutes when playing a SVCD and you press the NEXT SKIP button, it moves forward 5 minutes. If you press the BACK SKIP button, it moves backward 5 minutes.
Using the Display Function
I When Playing a DVD/SVCD/CD
DVD
DVD DVD
1. Press the INFO button during playback.
Title
01
Chapter 02
2. Use the UP/DOWN buttons to select the desired item.
Time
Audio
3. Use the LEFT/RIGHT buttons to make the desired setup, then press ENTER.
Subtitle
0:0 0:1 3
ENG 5.1CH
Off
ENTER
4. To make the screen disappear, press the INFO button again.
Title
To access the desired title when there is more than one in the disc.
SVCD
For example, if there is more than one movie on a DVD, each movie will be identified
VCD SVCD
Chapter
Time
Most of DVD discs are recorded in chapters so that you can quickly find a specific
passage. (similar to tracks on an audio CD).
Allows playback of the film from a desired time.
Input the desired time by pressing the number on Remote directly, and you can use
direction
buttons to set the time after pressing ENTER button.
Note: The numeric buttons can’t work after pressing ENTER button.
Track
Time
ENTER
CD
CD
CD
Track 01
Audio
Subtitle
Refers to the language of the film soundtrack. In the example, the soundtrack is
played in English 5.1CH. A DVD disc can have up to eight different soundtracks.
MP3 and non-secure WMA are also supported.
Time 0:0 0:4 8
ENTER
Refers to the subtitle languages available on the disc. You will be able to choose the
subtitle languages or, if you prefer, turn them off from the screen. A DVD disc can
have up to 32 different subtitles.
Downloaded From DvDPlayer-Manual.com Samsung Manuals
13
ENGLISH
Using the Disc and Title Menu
I Using the Disc Menu
1. Press the MENU button during playback.
2. Select Disc Menu using the UP/DOWN buttons, then press the RIGHT or
ENTER button.
I Using the Title Menu
1. Press the MENU button during playback.
2. Select Title Menu using the UP/DOWN buttons, then press the RIGHT or
ENTER button.
NOTE:
• Depending on the disc, the Title and Disc Menus may be different.
• Title Menu will only be displayed if there are at least two titles in the disc.
Using the Function Menu
I Using the Function Menu
1. Press the MENU button during playback.
2. Use the UP/DOWN buttons to highlight Function, then press the RIGHT or ENTER
button.
3. Function selection screen appears, Info, Zoom, Bookmark, Repeat and EZ View.
- Info (refer to page 13)
- Zoom (refer to page 19)
- Bookmark (refer to page 18)
- Repeat (refer to page 15)
- EZ View (refer to page 16)
4. Use the UP/DOWN button to highlight one of the 5 functions.
Then press the RIGHT or ENTER button to access the function.
NOTE:
• You can use also directly select Info, EZ VIEW, and Repeat using their respective buttons on the remote.
Downloaded From DvDPlayer-Manual.com Samsung Manuals
14
ENGLISH
Repeat Play
Repeat the current track, chapter, title, a chosen section (A-B), or all of the disc.
I When playing a DVD/SVCD/CD
DVD
1. Press the REPEAT button on the remote. Repeat screen appears.
Off
01
T
01 A - B
REPEAT
ENTER
01
D
01 A - B
REPEAT
ENTER
2. Select Chapter, Title or A-B using the LEFT/RIGHT buttons.
• Chapter ( ) : repeats the chapter that is playing.
• Title ( ) : repeats the title that is playing.
• A-B : repeats a segment of the disc that you select.
T
3. Press ENTER.
4. To return to normal play, press REPEAT again, then press the LEFT/RIGHT buttons
to select Off and press ENTER.
SVCD/CD
Off
T
Repeat A-B:
1. Select “A” using the LEFT/RIGHT buttons in the REPEAT On-Screen Display to select the
point where the function starts(A).
2. Press ENTER.
3. Press ENTER again to select the point where the function ends(B).
• A-B REPEAT does not allow you to set point (B) until at least 6 seconds has elapsed after
point (A) has been set.
NOTE:
• DVD repeats play by chapter or title, CD and SVCD repeat play by disc or track.
• Depending on the disc, the Repeat function may not work.
• Repeat A-B function is not available when playing WMA/MP3. (Refer to page 19)
Slow Repeat play
This feature allows you slowly to repeat scenes containing sports, dancing, musical instruments being played etc.
so you can study them more closely.
I When playing a DVD/SVCD
1. During play, press the PAUSE (
2. By pressing the
) button on the remote.
button, you can select slow motion play for 1/8, 1/4 or 1/2 of normal speed.
3. Select “A” using the LEFT/RIGHT buttons in the REPEAT OSD to select the point where the function starts(A).
4. Press ENTER.
5. Press ENTER again to select the point where the function ends(B).
NOTE:
• The disc will play from A to B repeatedly at the speed you chose.
• To terminate the function, press the ‘CLEAR’ button and then press ‘PLAY’.
• A-B REPEAT does not allow you to set point (B) until at least 6 seconds at normal speed has elapsed after point (A)
has been set.
Downloaded From DvDPlayer-Manual.com Samsung Manuals
15
ENGLISH
Adjusting the Aspect Ratio(EZ View)
I To play back using aspect ratio(DVD)
1. During play, press the EZ VIEW button on the remote.
2. The aspect ratio changes when the button is pressed repeatedly.
- The aspect ratio is represented by abbreviations.
I If you are using a 16:9 TV
1. For 16:9 aspect ratio discs
• Wide Screen
Displays the content of the DVD title in 16:9 aspect ratio.
• Screen Fit
The top and bottom of the screen are cut off. When playing a 2.35:1 aspect ratio disc, the black bars at the top and
bottom of the screen will disappear. The picture will look vertically stretched. (Depending on the type of disc, the black
bars may not disappear completely.)
• Zoom Fit
The top, bottom, left and right of the screen are cut off and the central portion of the screen is enlarged.
2. For 4:3 aspect ratio discs
• Normal Wide
Displays the content of the DVD title in 16:9 aspect ratio. The picture will look horizontally stretched.
• Screen Fit
The top and bottom of the screen are cut off and the full screen appears. The picture will look vertically stretched.
• Zoom Fit
The top, bottom, left and right of the screen are cut off and the central portion of the screen is enlarged.
• Vertical Fit
When a 4:3 DVD is viewed on a 16:9 TV, black bars will appear at the left and right of the screen in order to prevent
the picture from looking horizontally stretched.
I If you are using a 4:3 TV
1. For 16:9 aspect ratio discs
• 4:3 Letter Box
Displays the content of the DVD title in 16:9 aspect ratio. The black bars will appear at
the top and bottom of the screen.
• 4:3 Pan Scan
The left and right portions of the screen are cut off and the central portion of the 16:9
screen is displayed.
• Screen Fit
The top and bottom portions of the screen are cut off and the full screen appears.
The picture will look vertically stretched.
• Zoom Fit
The top, bottom, left and right portions of the screen are cut off and the central portion of the screen is enlarged.
EZ VIEW
2. For 4:3 aspect ratio discs
• Normal Screen
Displays the content of the DVD title in 4:3 aspect ratio.
• Screen Fit
The top and bottom portions of the screen are cut off and the full screen appears. The picture looks vertically
stretched.
• Zoom Fit
The top, bottom, left and right portions of the screen are cut off and the central portion of the screen is enlarged.
NOTE:
• This function may behave differently depending on the type of disc.
Downloaded From DvDPlayer-Manual.com Samsung Manuals
16
ENGLISH
Selecting the Audio Language
You can select a desired language quickly and easily with the AUDIO button.
DVD
I Using the AUDIO button (DVD/SVCD/CD)
ENG DOLBY DIGITAL 5.1CH
AUDIO
1. Press the AUDIO button on the remote.
2. The Audio changes when the button is pressed repeatedly.
The audio languages are represented by abbreviations.
3. Press the AUDIO button to select Stereo, Left or Right. (On SVCD/CD)
SVCD/CD
Stereo
AUDIO
NOTE:
• This function depends on what languages are encoded on the disc and may be
available with all DVDs.
• A DVD disc can contain up to 8 audio languages.
• How to have the same audio language come up whenever you play a DVD;
Refer to “Setting Up the Language Features” on page 24 and 25.
Selecting the Subtitle Language
You can select a desired subtitle quickly and easily with the SUBTITLE button.
I Using the SUBTITLE button (DVD)
DVD
1. Press the SUBTITLE button on the remote.
SUBTITLE
2. The subtitle changes when the button is pressed repeatedly.
3. To turn off the display, press the CLEAR or RETURN button.
-The subtitle languages are represented by abbreviations.
NONE
NOTE:
• This function depends on what languages are encoded on the disc and may be available
with all DVDs.
• A DVD disc can contain up to 32 subtitle languages..
• How to have the same subtitle language come up whenever you play a DVD;
Refer to “Setting Up the Language Features” on page 24 and 25.
Downloaded From DvDPlayer-Manual.com Samsung Manuals
17
ENGLISH
Using the Bookmark Function
The Bookmark function lets you select parts of a DVD or SVCD so that you can quickly find the section at a later time.
I Using the Bookmark Function (DVD/SVCD)
1. During play, press the MENU button on the remote.
2. Use the UP/DOWN buttons to highlight Function, then press the RIGHT or ENTER
button.
3. Select Bookmark using the UP/DOWN button and then press ENTER. The Bookmark
icons will be displayed.
4. Highlight “ _ ” and press ENTER to mark the point you want and the mark will change
to a number. Press CLEAR to delete the bookmark.
I Recalling a Marked Scene
1. During play, press the MENU button on the remote.
2. Use the UP/DOWN buttons to highlight Function, then press the RIGHT or ENTER
button.
3. Select Bookmark using the UP/DOWN button and then press ENTER. The Bookmark
icons will be displayed.
4. Use the LEFT/RIGHT buttons to select a marked scene.
5. Press the PLAY (
) button to skip to the marked scene.
6. Press CLEAR to delete this setting
NOTE:
• Up to three scenes may be marked at a time.
• Depending on the disc, the Bookmark function may not work.
Changing the Camera Angle
When a DVD contains multiple angles of a particular scene, you can select the Angle function.
I Using the ANGLE button
Press the ANGLE button to see if an ANGLE (
left hand corner of the screen.
) mark is present at the upper
4/6
ANGLE
1. When an ANGLE mark is shown, press the ANGLE button, then an ANGLE select icon
will appear at the upper hand corner of the screen.
2. Press the ANGLE button to select the desired screen angle.
3. To turn off the display, press the CLEAR button.
NOTE:
• If the disc has only one angle, this feature won ’t work. Currently, very few discs have this feature.
Downloaded From DvDPlayer-Manual.com Samsung Manuals
18
ENGLISH
Using the Zoom Function
I Using the Zoom Function (DVD/SVCD)
1. During play or pause mode, press the MENU button on the remote.
2. Use the UP/DOWN buttons to highlight Function, then press the RIGHT or ENTER button.
3. Select zoom using the UP/DOWN button and then press ENTER. A zoom mark will be
displayed on screen.
4. Use the UP/DOWN or LEFT/RIGHT button to select the part of the screen you want to zoom in on.
5. Press the ENTER button.
- Press ENTER to zoom in 2X/4X/2X/Normal in order. (DVD)
- Press ENTER to zoom in 2X/Normal in order.(SVCD)
Using the 5.1ch V.S (virtual surround) Function
You can reproduce a 2-channel sound source, such as CD and SVCD, in 5.1-channel virtual surround sound.
1. During play, press the 5.1ch V.S button on the remote.
2. The 5.1ch V.S changes as shown below when the button is pressed repeatedly.
Off: Normal Sound.
SPEAKER: 5.1 channel virtual surround sound using speakers.
HEADPHONE: 5.1 channel virtual surround sound using headphones.
NOTE:
- Depending on the disc, the 5.1ch V.S function may not work.
Clips Menu for MP3/WMA/JPEG
Discs with MP3/WMA/JPEG contain individual songs or pictures that can be organized into folders as shown below.
They are similar to how you use your computer to put files into different folders.
1. Open the disc cover.
2. Place the disc in the player.
- Place the disc with the labeled side up.
3. Close the cover.
- The cover is closed and you should get a screen that looks like the one to the right.
: Current 5.1ch virtual surround mode : There are 3 modes.
They can be selected in order by pressing the 5.1ch V.S button.
: Name of currently playing file.
Off
ROOT
Off
ROOT
WMA
: Current Playback Time.
JPEG
MP3
: Current Playback Mode : There are 4 modes.
They can be selected in order by pressing the REPEAT button.
- Off : Normal Playback
- Track : Repeats the current track.
- Folder : Repeats the current folder.
- Random : Files in the disc will be played in random order.
: MP3 file icon.
: Folder icon.
: JPEG file icon.
Parent Folder, Current Folder Folders and Files in
Current Folder
and Peer Folders
: WMA file icon.
: Current Folder icon.
Downloaded From DvDPlayer-Manual.com Samsung Manuals
19
ENGLISH
Folder Selection
The folder can only be selected in the Stop mode.
• To select the Parent Folder
Press the RETURN button to go to Parent folder, or use the UP/DOWN
buttons to select “..” and press ENTER to go to the parent folder.
R oot
WMA
• To select the Peer Folder
Use the LEFT/RIGHT buttons to highlight left window.
Use the UP/DOWN buttons to select the desired folder, then press
ENTER.
J PEG
Parent Folder
M P3
M U SI C
• To select the Sub-Folder
Use the LEFT/RIGHT buttons to highlight right
window. Use the UP/DOWN buttons to select the desired folder,
then press ENTER.
Current Folder
1s t
Sub-Folders
2nd
SON G F ILE 1
Peer Folders
SON G F ILE 2
SON G F ILE 3
MP3/WMA Playback
1. Open the disc cover.
2. Place the disc in the player.
- Place the disc with the labeled side up.
3. Close the cover.
- The cover is closed and you should get a screen that looks like the one below.
I MP3/WMA Play Function
Off
1. Select the desired folder.
2. Use the UP/DOWN or LEFT/RIGHT buttons to select a song file.
3. Press ENTER to begin playback of the song file.
I Repeat/Random playback
Press the REPEAT button to change playback mode.
There are 4 modes: Off, Track, Folder and Random.
- Off : Normal Playback
- Track : Repeats the current song file.
- Folder : Repeats the song files which have the same extension in the current folder.
- Random : Song files which have the same extension will be played in random order.
* To resume normal play,press the CLEAR button.
Downloaded From DvDPlayer-Manual.com Samsung Manuals
20
Off
ENGLISH
MP3/WMA Playback
I CD-R MP3/WMA discs
When you record MP3/WMA files on CD-R, please refer to the following.
• Your MP3 or WMA files should be ISO 9660 or JOLIET format.
ISO 9660 format and Joliet MP3 or WMA files are compatible with Microsoft’s DOS and Windows, and with Apple’s Mac.
This format is the most widely used.
• When naming your MP3 or WMA files, do not exceed 8 characters, and enter “.mp3, .wma” as the file extension.
General name format of: Title.mp3. or Title.wma. When composing your title, make sure that you use 8 characters or
less, have no spaces in the name, and avoid the use of special characters including: (.,/,\,=,+).
• Use a decompression transfer rate of at least 128 Kbps when recording MP3 files.
Sound quality with MP3 files basically depends on the rate of compression/decompression you choose. Getting audio
CD quality sound requires an analog/digital sampling rate, that is conversion to MP3 format, of at least 128 Kbps and
up to 160 Kbps. However, choosing higher rates, like 192 Kbps or more, only rarely give better sound quality.
Conversely, files with decompression rates below 128 Kbps will not be played properly.
• Use a decompression transfer rate of at least 64Kbps when recording WMA files.
Sound quality with WMA files basically depends on the rate of compression/decompression you choose. Getting audio
CD quality sound requires an analog/digital sampling rate, that is conversion to WMA format, of at least 64Kbps and
up to 192Kbps. Conversely, files with decompression rates below 64Kbps or over 192Kbps will not be played properly.
• Do not try recording copyright protected MP3 files.
Certain “secured” files are encrypted and code protected to prevent illegal copying. These files are of the following
types: Windows MediaTM(registered trade mark of Microsoft Inc) and SDMITM (registered trade mark of The SDMI
Foundation).You cannot copy such files.
• Important: The above recommendations cannot be taken as a guarantee that the DVD player will play MP3
recordings, or as an assurance of sound quality.You should note that certain technologies and methods for MP3 file
recording on CD-Rs prevent optimal playback of these files on your DVD player (degraded sound quality and in some
cases, inability of the player to read the files).
• This unit can play a maximum of 3000 files and 300 folders per disc.
Downloaded From DvDPlayer-Manual.com Samsung Manuals
21
ENGLISH
Picture CD Playback
1. Select the desired folder.
2. Use the UP/DOWN buttons to select a Picture file in the clips menu and then press ENTER.
Off
ROOT
Off
ROOT
WMA
• Select the Album icon in the menu and press ENTER to view a Photo CD.
• Use the UP/DOWN or LEFT/RIGHT buttons on the remote control to select the picture you
want to view and then press the ENTER button. (Press the PLAY ( ) button if you want to play
it in the Slide Show mode.)
JPEG
MP3
• Press the UP/DOWN or LEFT/RIGHT buttons on the remote control to display the menu again.
•
: Return to the Album Screen.
• To see the next 6 pictures, press the
button.
• To see the previous 6 pictures, press the
button.
•
: Each time the ENTER button is pressed, the picture rotates 90 degrees clockwise.
•
: Each time the ENTER button is pressed, the picture is enlarged up to 4X.
(Normal ➝ 2X ➝ 4X ➝ 2X ➝ Normal)
Off
Off
ROOT
..
WMA
1
JPEG
2
MP3
3
•
: The unit enters slide show mode.
*Before beginning the Slide Show, the picture interval must be set.
ENTER RETURN
•
: When this icon is selected and ENTER is pressed, the pictures change automatically
with about a 6 second interval.
•
: The pictures change automatically with about a 12 second interval.
•
: The pictures change automatically with about a 18 second interval.
*Depending on the file size, each interval between images may take longer or shorter than the
suggested.
NOTE:
• If no buttons on the remote control are pressed for 10 seconds, the menu will disappear
and the selected item will be played. Press the UP/DOWN or LEFT/RIGHT buttons
on the remote control to display the menu again.
• Press the STOP button to return to the Clips menu.
• When playing a Kodak Picture CD, the unit displays the Photo directly, not the clips menu.
Downloaded From DvDPlayer-Manual.com Samsung Manuals
22
TIMER:
ENTER RETURN
ENGLISH
Picture
CD Playback
Riproduzione
di Picture CD
I CD-R JPEG Discs
• Only files with the “.jpg” and “.JPG” extensions can be played.
• If the disc is not closed, it will take longer to start playing and not all of the recorded files may be played.
• Only CD-R discs with JPEG files in ISO 9660 or Joliet format can be played.
• The name of the JPEG file may not be longer than 8 characters and should contain no blank spaces or special
characters (. / = +).
• Only a consecutively written multisession disc can be played. If there is a blank segment in the multisession disc,
the disc can be played only up to the blank segment.
• A maximum of 3000 images can be stored on a single CD.
• Kodak Picture CDs are recommended.
• When playing a Kodak Picture CD, only the JPEG files in the pictures folder can be played.
• Kodak Picture CD : The JPEG files in the pictures folder can be played automatically.
• Konica Picture CD : If you want to see the Picture, select the JPEG files in the clips menu.
• Fuji Picture CD : If you want to see the Picture, select the JPEG files in the clips menu.
• QSS Picture CD : The unit cannot play QSS Picture CD.
• If the number of files in 1 Disc is over 3000, only 3000 JPEG files can be played.
• If the number of folders in 1 Disc is over 300, only JPEG files in 300 folders can be played.
Using the Setup Menu
The Setup menu lets you customize your DVD player by allowing you to select
various language preferences, set up a parental level, even adjust the player
to the type of television screen you have.
Disc Menu
Title Menu
1. With the unit in Stop mode, press the MENU button.
Select Setup using UP/DOWN buttons, then press the RIGHT or ENTER button.
Function
Setup
Language Setup : Setup of the Language.
Display Setup : Setup of the Display Options.
Use to select which type of screen you want to watch and several display options.
Parental Setup : Setup of the Parental Level.
Allows users to set the level necessary to prevent children from viewing unsuitable movies such as those with
violence, adult subject matter, etc.
2. Use the UP/DOWN buttons on the remote to access the different features.
3. Press the ENTER button to access the sub features.
To make the setup screen disappear after setting up, press the MENU button again.
NOTE:
• How to make the Setup menu disappear or return to menu screen during set up;
Press RETURN or LEFT button.
• Depending on the disc, some Setup Menu selections may not be available.
Downloaded From DvDPlayer-Manual.com Samsung Manuals
23
ENGLISH
Setting Up the Language Features
If you set the player menu, disc menu, audio and subtitle language in advance,
they will come up automatically every time you watch a movie.
Disc Menu
Title Menu
I Using the Player Menu Language
1. With the unit in Stop mode, press the MENU button.
2. Select Setup using UP/DOWN buttons, then press the RIGHT or ENTER button.
3. Select Language Setup using UP/DOWN buttons, then press the RIGHT or
ENTER button.
4. Select Player Menu using UP/DOWN buttons, then press the RIGHT or
ENTER button.
5. Use the UP/DOWN buttons to select the desired language.
6. Press the ENTER button.
- The language is selected and the screen returns to Setup menu.
- To make the Setup menu disappear, press the RETURN or LEFT button.
I Using the Disc Menu Language
This function changes the text language only on the disc menu screens.
1. With the unit in Stop mode, press the MENU button.
2. Select Setup using UP/DOWN buttons, then press the RIGHT or ENTER button.
3. Select Language Setup using UP/DOWN buttons, then press the RIGHT or
ENTER button.
4. Select Disc Menu using UP/DOWN buttons, then press the RIGHT or ENTER button.
5. Use the UP/DOWN buttons to select the desired language.
- Select “Others” if the language you want is not listed.
6. Press the ENTER button.
- The language is selected and the screen returns to Setup menu.
I Using the Audio Language
1. With the unit in Stop mode, press the MENU button.
2. Select Setup using UP/DOWN buttons, then press the RIGHT or ENTER button.
3. Select Language Setup using UP/DOWN buttons, then press the RIGHT or
ENTER button.
4. Select Audio using UP/DOWN buttons, then press the RIGHT or ENTER button.
5. Press the UP/DOWN buttons to select the desired language.
- Select “Original” if you want the default soundtrack language of the disc to be used.
- Select “Others” if the language you want is not listed.
6. Press the ENTER button.
- The language is selected and the screen returns to Setup menu.
Downloaded From DvDPlayer-Manual.com Samsung Manuals
24
Function
Setup
ENGLISH
Setting Up the Language Features
I Using the Subtitle Language
1. With the unit in Stop mode, press the MENU button.
2. Select Setup using UP/DOWN buttons, then press the RIGHT or ENTER button.
3. Select Language Setup using UP/DOWN buttons, then press the RIGHT or
ENTER button.
4. Select Subtitle using UP/DOWN buttons, then press the RIGHT or ENTER button.
5. Use the UP/DOWN buttons to select the desired language.
- Select “Automatic” if you want the subtitle language to be the same as the
language selected as the audio preference.
- Select “Others” if the language you want is not listed. Some discs may not
contain the language you select as your initial language; in that case the disc
will use its original language setting.
6. Press the ENTER button.
- The language is selected and the screen returns to Setup menu.
NOTE:
• If the selected language is not recorded on the disc, the original pre-recorded language
is selected.
• How to make the Setup menu disappear or return to menu screen during set up;
Press RETURN or LEFT button.
Setting Up the Display Options
1. With the unit in Stop mode, press the MENU button.
2. Select Setup using UP/DOWN buttons, then press the RIGHT or ENTER button.
3. Select Display Setup using UP/DOWN buttons, then press the RIGHT or ENTER button.
4. Use the UP/DOWN buttons to select the desired item. Then press the RIGHT or
ENTER button.
TV Aspect
Depending on the type of television you have, you may want to adjust the screen
setting (aspect ratio).
1. 4:3 Letter Box :
Select when you want to see the total 16:9 ratio screen DVD supplies, even though
you have a TV with a 4:3 ratio screen. Black bars will appear at the top and bottom
of the screen.
2. 4:3 Pan Scan :
Select this for conventional size TVs when you want to see the central portion
of the 16:9 screen. (Extreme left and right side of movie picture will be cut off.)
3. 16:9 Wide :
You can view the full 16:9 picture on your widescreen TV.
Still Mode
These options will help prevent picture shake in still mode and display small text clearer.
1. Auto : When selecting Auto, Field/Frame mode will be automatically converted.
2. Field : Select this feature when the screen shakes in the Auto mode.
3. Frame : Select this feature when you want to see small letters more clearly in the
Auto mode.
Screen Messages
Use to turn on-screen messages On or Off.
Black Level
Adjusts the brightness of the screen.(On/Off)
Brightness
You can adjust Brightness.
Contrast
You can adjust Contrast.
Downloaded From DvDPlayer-Manual.com Samsung Manuals
25
ENGLISH
Setting Up the Parental Control
The Parental Control function works in conjunction with DVDs that have been assigned
a rating level which helps you control the types of DVDs that your family watches.
There are up to 8 rating levels on a disc.
1. With the unit in Stop mode, press MENU button. The Setup Menu screen appears.
2. Select Setup using UP/DOWN buttons, then press the RIGHT or ENTER button.
3. Select Parental Setup using UP/DOWN buttons, then press the RIGHT or ENTER button.
4. Use RIGHT or ENTER to select Yes if you want to use a password.
The Enter Password screen appears.
5. Set your password with the numeric key /LEFT/RIGHT buttons and press the
ENTER button. The Re-enter Password screen appears to confirm the password.
Select your password again.
The Parental Control screen appears ( ).
About the Rating Level ;
The Rating Level will work only when Use Password is set to Yes.To unlock the player,
(use RIGHT or ENTER to select No.) Use the UP/DOWN buttons to select Rating Level.
Press ENTER.
- Use UP/DOWN button to select the level(e.g. Level 6) and press ENTER.
Discs that contain Level 7 or higher will not play now.
- To cancel the rating level and unlock the player, use RIGHT or ENTER to select
No in Use Password.
About the Change Password ;
- Use the number buttons to select Change Password.
Press ENTER. The Change Password screen appears.
- Select your new password. Select the new password again.
NOTE:
• How to make the Setup menu disappear or return to menu screen during set up;
Press RETURN or LEFT button.
• If you have forgotten your password, see Forgot Password in the Troubleshooting Guide.
Downloaded From DvDPlayer-Manual.com Samsung Manuals
26
ENGLISH
Cautionary Notes
I Cautions on Using the Player
• Avoid magnetic environments.
Using the player under strong fluorescent lighting, in a car, near a TV or magnetic object may affect
video quality.
• Be sure to remove the disc, turn off the player, and remove the battery pack after use.
• If used near a broadcast station or power transmission tower, the video may become distorted due to
interference.
• Do not drop the player or subject it to strong vibration or shock.
• Do not place the player near a lamp.
Heat from the incandescent light bulbs may cause deformation or malfunction.
• Always observe the rules regulating the use of electrical devices on airplanes.
• Do not expose this product to high temperature and humidity.
This product can be operated within a temperature range of 50°F~86°F (10°C~30°C) and humidity range of 30%~80%.
Do not expose this product to direct sunlight or in a car with its windows closed.
Doing so may result in deformation of casing and circuitry as well as cause fire or bodily injury.
• Do not let water, sand, dust, or other foreign objects in the player. Avoid using or storing the player in a
place where there is smoke, steam, or moisture.
Doing so may cause malfunction or mold on the pick-up lens. Keep the player in a well-ventilated area.
• When using the player in cold environments, the color LCD screen may not be visible immediately after
the power is turned on.
This is not a malfunction. Do not operate the player in temperatures below 50°F(10°C).
• Be especially careful not to scratch the pick-up lens during loading/unloading of the disc, or cleaning.
Doing so may result in malfunction.
I When Moving the Player
• Be sure to remove the disc from the player before packing for moving.
It is recommended that you also remove the disc from the player and turn off the power when not using the player.
Saving Power
• It is recommended that you turn off the power to the DVD player when not in use.
If you are not going to use it for prolonged period of time, unplug the power cord from the wall outlet.
Maintenance of LCD Screen
• To keep the screen clean, turn off the power and then wipe with a soft, dry cloth.
About LCD Screen
• This LCD panel is designed with the latest technology, ensuring 99.99% of active pixels.
* Do not press on the LCD screen
Downloaded From DvDPlayer-Manual.com Samsung Manuals
27
ENGLISH
Cautionary Notes
I Cautions on Using Battery pack
Danger!
Always follow the safety information below when using the battery pack. Otherwise, a short circuit, overheating,
smoke, fire, or damage to the product may result.
1. Never disassemble or modify the battery pack in any way. Do not touch the terminal of the battery pack with a
metal object.
2. Do not let any metal object inside the battery pack.
3. Do not place the battery pack in direct sunlight, dashboard of a vehicle, or high temperature.
4. Do not expose the battery pack to water, fire, or heat.
5. Always use the included AC adapter when charging the battery pack.
6. This battery pack is designed exclusively for your portable DVD player. Do not use it with other devices.
Warning!
1. Do not drop or subject to strong vibration.
2. Keep out of reach of children.
3. If the battery pack is damaged, it may leak fluid that is harmful to your eyes.
If this fluid gets in your eyes, wash eyes immediately with large amounts of running water and get medical
attention immediately.
If the fluid gets on your skin or clothing, wash immediately with water.
Caution!
1. When not using the battery pack, remove it and store in a cool place.
2. Do not use the AC adapter or battery pack for a prolonged period of time during recharging.You might get a low
temperature burn.
3. Keep the battery pack free from smoke, steam, moisture, and dust.
• Do not place the battery pack near a kitchen, heater, or any other place where there is smoke or steam.
Doing so may result in fire or electric shock.
• Avoid direct sunlight, heater, or high temperature place. etc, inside of a car. It can cause explosion or fire.
Doing so may cause a short circuit, overheating, smoke, fire, or damage to the product.
4. Using the battery pack under 50°F(10°C) or over 86°F(30°C) can cause reduced battery life.
After a Recharge, store the Battery pack separately.
• This battery pack is a lithium ion battery. Even when not in use, power will drain slowly. So use a fully charged
battery pack.
• Recharge until the green charge lamp goes off. A partial charging of the battery pack decreases the overall lifetime of
the battery.
Cautions on Charging Battery pack
• Charge within the surrounding temperature range of 50°F~86°F(10°C~30°C). Charging at a low surrounding
temperature slows down the charging time and decreases the battery pack.You cannot fully charge the battery
pack at high temperature.
• If the DVD player is overheated and the battery pack’s internal temperature goes up to a certain level, you will
not be able to charge the battery pack. (The lamp flashes quickly and the light does not come on.) In this case,
remove the battery pack. After the internal temperature reaches a safe level, charging will begin automatically.
• The battery pack becomes warm during recharge or use. This is normal and is not a cause for concern.
A hot battery pack may take longer to charge or may not be charged at all.Wait until the battery pack cools down
before charging.
Battery pack Life and Use (Low Temperature)
• The lifetime of the battery pack is limited.
Power is slowly drained even when not using. Though it varies for differing storage conditions, the battery pack
stored unused for a year has a much shorter lifetime.
If the battery pack does not last long even after a full charge, you might have to replace it with a new one.
• Total operating time of the battery pack becomes much shorter when used at temperatures below 50°F(10°C).
Electrical energy is discharged due to internal chemical action of the battery pack.
A very low temperature may impede this chemical action and shortens the total operating time.
Caution
• Be sure to use only the battery pack exclusively designed for your DVD player.
NOTE:
• When not using the DVD player, always turn off the power to conserve the battery pack.
If the AC adapter is connected to the player, charge the battery pack with the power to the player turned off.
Downloaded From DvDPlayer-Manual.com Samsung Manuals
28
ENGLISH
Cautionary Notes
Cautions on Storing Battery pack
• Even when not in use, power is consumed continuously. To reduce the power consumption, follow the procedure below.
1. Remove the battery pack from the DVD player after every use.
2. When not using the DVD player, turn off the power. If the player is left in the standby mode, power will be
slowly drained from the battery pack and the charging capacity will decrease.
3. Before storing the battery pack, completely drain the power by operating the player and store in a cool, dry place.
If stored in a hot place, the capacity of the battery pack will decrease.
4. The battery pack must be recharged and then used on the DVD player at least once every 6 months.
This helps to prevent the loss of capacity.
AC Adapter
The supplied AC adapter is compatible with 50/60Hz electrical system (110V~240V range).
Use of the AC adapter depends on the specific voltage requirements and electrical outlet design.
• Using the AC adapter near a radio may cause poor reception.
• Do not let any type of flammables, liquid, or metal objects in the adapter.
• The adapter is covered with an outer plastic sheath. Do not peel open the sheath.
• Do not drop, jar, or shake the adapter.
• Do not place in direct sunlight.
• Do not use in high temperatures or cold and humid environments.
Cleaning and Maintenance
• Many plastic parts are used in this DVD player casing. Do not use volatile chemicals such as benzene or thinner.
This might damage the finish.
• Wipe the casing with a soft, dry cloth. For excessive dirt, use a cloth dampened in a diluted neutral detergent.
and wipe again with a soft, dry cloth.
• Wipe off fingerprints or dirt on the LCD screen using a soft, dry cloth.
Troubleshooting
If your DVD player does not seem to be functioning properly, check the items below before you contact a Samsung authorized
service center.
Symptom
Check
Power does not turn on or
suddenly turns off.
• Make sure the AC power cord is securely plugged into an AC outlet.
Battery pack is in place but
the power does not turn on
or suddenly turns off
• Check that the battery pack is charged. If not, recharge it.
Remote control won’t work
• Check that the battery is inserted in the “+” and “-” direction properly.
• Turn the power off and then back on.
• The lithium battery may be dead. Replace it with a new battery.
• Check that the signal transmission is directed at the remote control sensor on the DVD player.
• Remove the obstacle between the remote control unit and remote control sensor.
No picture or sound
• Check that the video and audio cables are securely connected.
• Check that the disc is a DVD (region number 1 or all), DVD-RW, AUDIO CD.
• Do not use a disc that has scratches or dirt.
• Check that the label-side of the disc is facing up.
• The pick-up lens of the DVD player may be dirty. Contact the service center for lens cleaning.
• Check that the TV channel is set to VIDEO or AV if viewing with a TV.
Forgot password
• Press power on from a cold start with no disc in the unit. Press the STOP and PLAY buttons
simultaneously on the unit for three seconds. The Select Menu Language display will appear. Select
the desired language by using UP or DOWN button. Press the MENU button on the remote control to
select the Parental Mode. The Parental Mode is now unlocked as indicated on the display. Press the
DOWN button to select Parental. Press ENTER and the Create Password display will appear. You can
now set your rating level and change your password to a new number.
The DVD player can be influenced by external electrical noise.
If you believe this may be the cause of the problem, turn off the DVD player and then back on.
Downloaded From DvDPlayer-Manual.com Samsung Manuals
29
ENGLISH
Troubleshooting
Symptom
Check
No picture
No sound
• Check that the LCD display is turned on.
Distorted video or sound
• Use a disc without scratches or dents.
While in the input mode, no
picture is output from the external
component to the DVD player
• Check that the video or audio cable is securely connected.
DVD
Battery
Pack
operation
• Check the volume setting. If set to zero, turn up volume level.
• Check that the headphones are plugged into the ”B” jack.
Speakers cannot be used if headphones are plugged into "B".
Video does not appear on an
external component (TV/
Monitor etc.) connected to
the DVD player
Battery pack won’t charge
• Check the TV's input setting.
• Check that the video/audio cable is securely connected.
• Check that the DVD player is turned off. You cannot charge the battery pack with the
player turned on.
• A hot battery pack may take longer to charge. Wait until the battery pack is
sufficiently cooled down.
• Replace with a fully charged battery pack or use the AC adapter.
Power does not turn on
• Replace with a fully charged battery pack or use the AC adapter.
Power charge lamp does
not light (Battery pack
won’t charge)
• If the DVD player is overheated and the battery pack’s internal temperature goes up
to a certain level, you will not be able to charge the battery pack.
If this occurs, remove the battery pack. After the battery pack has sufficiently cooled
down, charging will begin automatically.
• Check that the temperature is within the range of 50°F~86°F(10°C~30°C).
• Check that the DC cord of the AC adapter is plugged in correctly.
Power charge lamp
quickly flashes Green
• Remove the DC cord from the battery pack and then re-plug.
If the battery pack is installed, remove the DC cord from the battery pack before
performing above procedure.
Specifications
General
Disc
Video
Output
Audio
Output
Power Requirements
Power Consumption
Weight
Dimensions
Operating Temperature Range
Operating Humidity Range
DVD
(DIGITAL VERSATILE DISC)
Reading Speed : 11.45 ~ 15.09 ft/sec.
Approx. Play Time (Single Sided, Single Layer Disc) : 135 min.
CD : 5"
(COMPACT DISC)
Reading Speed : 15.75 to 18.37 ft/sec.
Maximum Play Time : 74 min.
CD : 3 1/2"
(COMPACT DISC)
Reading Speed : 15.75 to 18.37 ft/sec.
Maximum Play Time : 20 min.
SVCD : 12"
(SUPER VIDEO COMPACT DISC)
Reading Speed : 15.75 to 18.37 ft/sec.
Maximum Play Time : 40 min.
Composite Video
2
CHANNEL
*Frequency Response
Downloaded From DvDPlayer-Manual.com Samsung Manuals
30
AC 100-240V, 50/60 Hz
15 W
1.2 lbs (without battery pack)
W 7.8 in x D 5.5 in x H 1.1 in
+50°F to +86°F
30 % to 80 %
1 channel : 1.0 Vp-p (75Ω load)
L(1/L), R(2/R)
48 kHz Sampling : 4 Hz to 22 kHz
96 kHz Sampling : 4 Hz to 44 kHz
ENGLISH
Car Power Adapter
I How to use the adapter
• Use it as a power supply for your DVD player (See the
illustration to the right.)
1. Plug the power plug of the power adapter into your vehicle’s
cigarette lighter.
(Be sure to use it with the vehicle’s engine turned on.)
2. Connect the connector of the power adapter cable to the power inlet on your
DVD player.
3. Use it only after your DVD player is turned on.
Note : Please don’t use Car Power Adapter to charge the battery.
I How to replace the fuse
• This product contains a built-in fuse to protect the power
adapter from short-circuiting.
• If the power adapter does not work, check whether the fuse
has blown, and then replace the fuse as needed.
• Be sure to use a 250V/1.5A fuse only.
1. Rotate the front part of the plug to remove it from thr power
adapter as shown in the illustration to the right.
2. Replace the fuse with a new fuse of the proper ratings and
put the parts together in the order they were removed.
1
Rotate the front part of the plug to remove.
2
Replace the fuse and put the parts back in
the reverse order.
I Be sure to observe the following warnings and cautions
• This product is intended for use on negative grounded vehicles only. Using it on a positive grounded vehicle may result in fire
or malfunction.
• When plugging this product into your vehicle’s cigarette lighter, do so with your vehicle’s engine turned on. (Using the power
adapter with your vehicle’s engine turned off may drain the vehicle’s battery of all power and the engine may fail to start.)
• Be sure to remove the power adapter from the cigarette lighter when turning the vehicle’s engine on or off.
• Depending on your vehicle’s make and model, you may not be able to use this product because of the difference in shape of
the cigar lighter.
• Your power adapter may not work due to a loose electrical contact if there are cigarette ashes inside the cigarette lighter.
Clean any ashes or debris from the socket before using.
• When using this product to supply power to your DVD player, picture interference may occur if they are in close proximity of
each other.
In this case, place them about 4 inches (10m) apart.
• If static or noise occurs on the car radio during use of this product, place the power adapter sufficiently away from the
car radio.
• Do not disassemble or modify this product in any way.
• Do not drop or apply strong shock to this product.
• Do not store or use this product in direct sunlight or high temperature.
(This may cause deformation, discoloration, or malfunction.)
• Do not leave this product in a vehicle with closed windows.
• Do not use this product to charge batteries other than the supplied battery.
• Be sure to use a 250V/1.5A fuse only. Never replace the fuse with a wire or the like as this may cause a fire.
Please refer to the reverse side of this guide for replacing the fuse.
I Product Specifications
Input Voltage
Output
Corresponding Vehicle
Operating temperature
Fuse
Weight
DC12V~DC24V
DC12V 1.2A
A negative grounded vehicle with a DC 12V/24V car and a cigarette lighter
0°C ~ 40°C (32°F~104°F)
250V 1.5A
70g (0.15lbs)
* Design and specifications are subject to change for product improvement without notice.
Downloaded From DvDPlayer-Manual.com Samsung Manuals
31
ENGLISH
Warranty
LIMITED WARRANTY TO ORIGINAL PURCHASER
This SAMSUNG brand product, as supplied and distributed by SAMSUNG ELECTRONICS AMERICA, INC. (SAMSUNG) and
delivered new, in the original carton to the original consumer purchaser, is warranted by SAMSUNG against manufacturing defects
in materials and workmanship for the following limited warranty period:
One (1) Year Parts/ 90 days Labor
This limited warranty begins on the original date of purchase, and is valid only on products purchased and used in the United
States, and does not include transportation, installation, removal or reinstallation. Warranty repairs must be performed by
sauthorized service center. To receive warranty service, the original dated bill of sale must be presented upon request as proof of
purchase to SAMSUNG or s authorized service center.
Transportation to and from the service center is the responsibility of the purchaser.
SAMSUNG will repair or replace this product, at our option and at no charge with new or reconditioned parts, if found to be
defective during the limited warranty period specified above. The product must be returned during the warranty period with
transportation charges prepaid to s designated service center. Prior to returning any product for warranty service, the purchaser
must contact SAMSUNG for problem determination and service procedures. SAMSUNG does not warrant uninterrupted or
error-free operation of the product. All replaced parts and products become the property of SAMSUNG and must be returned to
SAMSUNG. Replacement parts and products assume the remaining original warranty, or ninety (90) days, whichever is longer.
This limited warranty covers manufacturing defects in materials and workmanship encountered in normal, noncommercial use of
this product and shall not apply to the following, including, but not limited to: damage which occurs in shipment; applications and
uses for which this product was not intended; failures or problems which are caused by products or equipment not supplied by
SAMSUNG; accidents, misuse, abuse, neglect, misapplication, fire, water, lightning or other acts of nature; incorrect electrical line
voltage, fluctuations or surges; damage caused by improper or faulty installation; improper connection with any peripheral;
product alteration or modification; improper or unauthorized repair; cosmetic damage or exterior finish; product with altered
serial numbers; failure to follow operating instructions, customer adjustments, maintenance and environmental instructions that are
covered and prescribed in the instruction book; use of non-SAMSUNG or unauthorized parts, supplies, accessories or equipment
which damage this product or result in service problems; failures or problems due to incompatibility with other equipment.
Downloaded From DvDPlayer-Manual.com Samsung Manuals
Contact SAMSUNG WORLD WIDE
If you have any questions or comments relating to Samsung products, please contact the
SAMSUNG customer care centre.
Downloaded From DvDPlayer-Manual.com Samsung Manuals
HEADQUARTERS
105 Challenger Road, Ridgefield Park,
N.J.07660-0511
TEL: 1-800-SAMSUNG
SERVICE DIVISION
400 Valley Road, Suite 201
Mount Arlington, NJ 07856
1-800-SAMSUNG (1-800-726-7864)
www.samsungusa.com
Downloaded From DvDPlayer-Manual.com Samsung Manuals
AK68-01129A