1
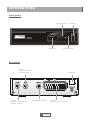
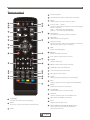
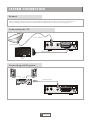
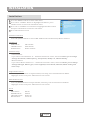
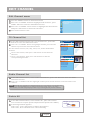
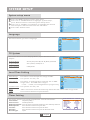
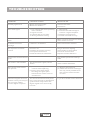
DVB-S
Receptor Satelite Digital
SAT-200
MANUAL DE USUARIO
Lea este manual antes de la instalacion y uso del aparato.
Español
CONTENIDO
INFORMACION DE SEGURIDAD
INTRODUCCION
Panel frontal
Panel trasero
Mando a distancia
1
1
2
CONEXION DEL SISTEMA
General
Conectando la TV
Conectando el aparato HIFI
3
3
3
INSTALACION
Instalacion
4
OPERACIONES
Cambio de canal
Teclas directas
5
5
EDITAR CANAL
Menu Editar canal
Lista canales TV
Lista canales de radio
Borrar todo
6
6
6
6
CONFIGURACION DEL SISTEMA
Menu de configuracion del sistema
Idioma
Sistema de TV
Configuracion hora local
Temporizador
Bloqueo paterno
Configuracion de menus
Favoritos
Otros
7
7
7
7
7
8
8
8
8
HERRAMIENTAS
Menu principal herramientas
Informacion
Ajustes de fabrica
Actualizacion Software
USB
9
9
9
9
9
JUEGOS
Juego
10
REC-GRABACION
Menu principal de Grabacion
Gestor de grabaciones
Ajustes PVR
Informacion HDD
11
11
11
11
GRABACION/ TIMESHIFT
Grabar
Timeshift
12
12
PROBLEMAS COMUNES
13
ESPECIFICACIONES
14
INSTRUCCIONES DE SEGURIDAD
PARA REDUCIR EL RIESGO DE FUEGO O DESCARGA ELÉCTRICA, NO EXPONGA ESTE
APARATO A LA LLUVIA O HUMEDAD.
Por favor lea cuidadosamente estas instrucciones antes de usar la unidad.
Protección del cable de alimentación.
Para evitar cualquier mal funcionamiento de la unidad, y para protegerse contra una descarga
eléctrica, fuego o daño personal, por favor tenga en cuenta lo siguiente:
- Sostenga firmemente el enchufe cuando conecte o desconecte el cable de alimentación.
- Mantenga el cable de alimentación alejado de fuentes de calor.
- No coloque ningún objeto pesado sobre el cable de alimentación.
- No intente reparar ni reconstruir el cable de alimentación en ningún caso.
- No cambie ni realice conexiones con el aparato encendido.
Colocación.
Evite colocar el aparato en lugares de:
Incidencia directa del sol o radiadores, o cerca de zonas con temperaturas elevadas o con
mucha humedad (por encima del 90%), mucho polvo en las partes internas del receptor puede
dañarlo seriamente.
Periodos de no utilización.
Cuando la unidad no se esté usando, apáguela. Si va a estar un largo periodo de tiempo sin
usar el aparato, desconéctelo de la toma de corriente.
No tocar con los dedos u otros objetos el interior de la unidad.
Tocar las partes internas de esta unidad es peligroso y puede causar importantes daños al
aparato. No intente desmontar la unidad.
No ponga objetos externos en su interior.
Mantener lejos del agua y de campos magnéticos.
Mantenga la unidad lejos de jarrones de flores, vasos, fregaderos, etc. Si entra líquido dentro
de la unidad, podría sufrir grandes daños.
No coloque objetos que produzcan campos magnéticos cerca de la unidad.
Apilamiento.
Coloque la unidad en posición horizontal, no ponga objetos pesados sobre ella.
Condensación.
La humedad del ambiente puede condensarse dentro de la unidad en los siguientes casos:
- Inmediatamente después de encender una estufa en una habitación llena de humedad.
- Cuando la unidad es trasladada de golpe de una zona fría a una caliente.
Si la humedad se condensa dentro del aparato, ésta podría no funcionar correctamente. En
este caso, encienda la unidad y espere alrededor de una hora hasta que la humedad se haya
evaporado.
Si hay ruido de interferencia en el TV mientras recibe un canal.
Dependiendo de las condiciones de recepción del televisor, las interferencias pueden aparecer
en su monitor mientras esté viendo algún canal. Esto no se debe a un mal funcionamiento del
aparato o del televisor.
Reciclaje.
Este símbolo sobre el producto o las intrucciones de uso significa que su aparato eléctrico
puede ser reciclado por separado al final de su vida útil. Hay diferentes sistemas de reciclaje
por separado en la UE. Para más información, por favor consulte a las autoridades locales o a
su proveedor donde tirar su producto correctamente.
INTRODUCCION
Panel frontal
Sensor Mando a distancia
Puerto USB
Tecla Standby
Piloto de encendido
Panel trasero
RF IN
Conecte un
cable de antena satelite
Alimentacion AC
Salida Coaxial de Audio Digital
RF OUT
Conecte otro receptor
satelite digital.
11
Español
TV Scart para
conexion al TV
INTRODUCCION
Mando a distancia
STANDBY
1
INFO SUBTITLE
MUTE
4
Previo/ Siguiente
5
PAUSA(Pausa/Funcion timeshift )
6
Menu
(Abrir y cerrar la pantalla de menu)
7
Cursor/CH+, -/VOL+,(Cursor: Teclas de Navegación para navegar entre
opciones del menu)
(CH+/-: Canal Arriba y Abajo)
(VOL+/-: Volume Arriba y Abajo)
8
Tecla OK
(Confirma una selección dentro de un menu)
9
GRABAR
(Graba un Programa TV)
10
Entrada Numerica
(Introducir valores numericos y seleccione un canal
directamente introduciendo su numero)
11
USB
(Entrada de gestor de archivos)
12
MEDIA
(Entrada Menu de grabación)
13
TTX (Teletexto )
15
2
16
3
4
17
5
MENU
EXIT
CH+
18
6
7
OK
VOL-
8
VOL+
RECORD
9
19
CHEPG
20
14
BACK
10
21
11
MEDIA
USB
TTX
TIMER
TV/RADIO AUDIO
22
23
12
FAV
RES
13
24
14
25
MUTE (Encendido y apagado del volumen)
16
SUBTITULO (Subtitulo On/Off)
17
Buscar hacia atrás / adelante
18
EXIT (Salir del menu)
19
STOP
(Parar programación de reproduccion o grabación)
20
EPG
(Abrir menú de guía electrónica de programación)
21
ATRAS
(Volver al canal previo)
26
22
23
1
24
STANDBY
(Cambia el receptor a on y standby)
2
INFO
(Presione para información de canal actual )
3
PLAY
12
TIMER
(Temporizador )
15
TV/RADIO
(Cambia entre TV y Radio)
AUDIO
(Selecciona modo audio y pista de audio)
RES (Cambia a resolución HDMI)
25
FAV
(Abre la lista de Favoritos)
26
Teclas ROJA/VERDE/AMARILLA/AZUL.
(Para teclas de funcciones interactivas /Submenu)
Español
CONEXIONES
General
Hay muchos tipos de equipos de televisión y de otro tipo que se pueden conectar al dispositivo.
En este manual podra ver algunas de las formas más comunes de conectar su equipo.
Conectando la TV
cable RF
Antena
Scart cable
TV
Conectando el aparato HIFI
Hi-Fi
Cable coaxial
13
Español
INSTALACION
Instalacion
1
2
3
4
Presione la tecla "MENU" para entrar en el menu principal.
Presione la tecla "UP"o " DOWN " para resaltar "Instalación", presione
la tecla "RIGHT" para introducir el menu Instalación.
Presione la tecla del cursor "UP" o "DOWN" para resaltar el articulo
deseado, presione la tecla "OK" para entrar el el sub-menu .
Presione la tecla "EXIT" para salir.
Installation
Antenna Connection
Satellite List
Antenna Setup
Single Satellite Search
Multi Satellite Search
TP List
Conexion de la Antena
Presione la tecla LEFT/RIGHT para seleccionar el LNB. LNB incluye Antena Fija/ Motor Antena.
Lista de Satelite
Tecla ROJA:
Tecla VERDE:
Tecla AZUL :
Edita satelite
Añade satelite
Borra satelite
Ajuste de Antena
Antena Fija:
Si selecciona "Antena Fija" en menu "Antena Conexion", este menu le permite cambiar los
ajustes como Satelite, Frecuencia LNB, Transpondedor, DiSEqC 1.0, 22K y Polaridad.
Motor Antena:
Si selecciona "Motor Antena" en el menu "Antena Conexión", este menu le permite cambiar
los tipos de ajustes LNB, Tipo de Motor, Longitud Local/Latitud Local, Borrar todo, Ajustes Motor
Ajustes Limite.
Busqueda de un Satelite:
Presione la tecla UP/DOWN para ajuste de Satelite, Solo FTA, Escanear canal y Modo de escaneo
.
Resaltar "Search" y presione la tecla "OK" para empezar la busqueda.
Busqueda Multi Satelite:
Presione la tecla UP/DOWN ajuste Satelite, Solo FTA, Escanear canal y Modo de escaneo .
Resaltar "Search" y presione la tecla "OK" para empezar la busqueda.
Lista TP
Tecla ROJA:
Tecla VERDE:
Tecla AMARILLA:
Tecla AZUL:
Editar TP
Añadir TP
Borrar TP
Buscar TP
41
E spañol
OPERACIONES
Cambiar de canal
Usted puede cambiar los canales bien:
1
2
3
Presionando las teclas CH+/CH-.
Introduciendo el numero del canal utilisando las teclas NUMERICAS (0-9).
Presionando la tecla "OK" entre en la lista de canales, luego "ARRIBA" "ABAJO" hasta el canal.
Teclas directas
Mientras ve la TV puede hacer lo siguiente:
Presione la tecla ARRIBA/ABAJO para cambiar el canal.
Presione la tecla IZQUIERDA/DERECHA para ajustar el volumen.
Use el teclado numericopara cambiar de canal directamente.
Presione la tecla OK para entrar en la lista de canales.
Presione la tecla BACK le retrocedera al canal previo
Presione la tecla SUB para seleccionar el idioma del subtitulo.
Presione la tecla EPG para entrar en el menu EPG.
Presione la tecla INFO para abrir la barra de informacion, presione INFO de nuevo, le mostrara
los parametros del canal actual.
15
Español
EDITAR CANALES
Menu Editar canales
1
2
3
4
Presione la tecla "MENU" para entrar en el menu principal
Presione las teclas "UP" o "DOWN " para resaltar "Edit Channel",
presione la tecla "RIGHT" para entrar en el menu de canales.
Presione el cursor "UP" o "DOWN" para resaltar el articulo deseado y
presione la tecla "OK" para entrar en el sub-menu .
Presione la tecla "EXIT" para salir.
Edit Channel
TV Channel List
Radio Channel List
Delete All
Lista canales TV
1
2
En el menu Editar Canales, seleccionar "Lista canal TV", y la tecla
"OK" para entrar en el menu de la lista de canales TV.
Presione "ARRIBA" o "ABAJO" para resaltar el canal, presione la tecla
"OK" para previsualizar el canal deseado.
Use este menu para bloquear, saltar, mover, ordenar, borrar, renombrar
canales y elegir favoritos.
.
Presione la tecla "FAV", luego la tecla "OK" para editar la funcción
FAV.
Presione la tecla "color", y presione la tecla "OK" button para editar
la función correspondiente.
TV Channel List
All Satellite
FAV Lock Skip Move Edit
0001 No Name
0002 YooPlay Ga
0003 E4+1
0004 UKTV Histor
0005 SKY THREE
0006 Sky Spts Ne
0007 Sky News
xxxxxxxx
xxxxxx
xxxx
xxx
TV Channel List
Sort
All Satellite
Rename Delete
0001 No Name
0002 YooPlay Ga
0003 E4+1
0004 UKTV Histor
0005 SKY THREE
0006 Sky Spts Ne
0007 Sky News
xxxxxxxx
xxxxxx
xxxx
xxx
Lista canales radio
1
2
En el menu Editar Canal, seleccione "Lista canal Radio", presione "OK" para entrar en el menu
Lista de canales de Radio.
Presione la tecla "ARRIBA" o "ABAJO" para resaltar el canal y presione "OK" para oir el canal TV
deseado.
NOTA: Básicamente, el funcionamiento de "Lista de canales de radio" es igual que la
"Lista de canales TV", pero, en modo "Lista canales de radio"no hay información de vídeo,
por lo que siempre se mostrará el logotipo de Radio en la ventana de vista previa.
Borrar todo
1
2
En el menu Edit Canal, seleccione Borrar todo,presione la tecla "OK".
Le pediran que introduzca una contraseña(que por defecto es "0000").
Una ventana de aviso aparecera.
Selecione "Si", pres ione la tecla "OK" para borrar todos los canales.
Selecione "No", Presione la tecla "OK" para cancelar borrado.
16
Español
Warning! Do you really want to delete
all channels?
Yes
No
CONFIGURACION DEL SISTEMA
Menu de configuracion del sistema
1
2
3
4
System Setup
Presione la tecla "MENU" para entrar en el menu principal.
Presione la tecla "UP" o "DOWN" para resaltar "Ajuste Sistema",
presione la tecla "RIGHT" para entrar en el menu Ajuste de Sistema.
Presione "UP" o "DOWN" del cursor para resaltar el articulo
deseado y presione la tecla "OK" para entrar en el sub-menu.
Presione la tecla "EXIT" para salir.
Language
TV System
Local Time Setting
Timer Setting
Parental Lock
OSD Setting
Favorite
Other
Idioma
Language
Este menu le permite ajustar el idioma.
Language
First Audio
Second Audio
Teletext
English
English
German
English
Sistema de TV
Este menu nos permite establecer el modo Display, modo Aspecto y
Salida Video.
Modo Display:
TV System
Display Mode
Aspect Mode
Video Output
Auto
Auto
CVBS
AUTO/PAL/PAL-M/PAL-N/NTSC/SECAM
Modo Aspecto:
Auto/4:3PS/4:3LB/16:9
Salida Video:
CVBS/RGB
Configuracion hora local
Local Time Setting
Uso horario: GMT Este menu esta utilizado para fijar el uso de GMT.
Las opciones son : Off / On
Ajuste GMT :
GMT Usage
GMT Offset
Summer Time
Date
Time
Este menu es valido solo cuando selecciona "On" en
el menu de uso GTM. La gama ajuste GMT es "-11:30
~ +12:00", incrementandose hora progresivamente.
On
UTC+01:00
Off
xxxx/xx/xx
01:51
Horario de verano: Las opciones son : Off / On
Fecha:
Hora:
menus "Fecha" y "Hora" son validos solo cuando seleccciona "Off" en menu Uso GMT.
Presione la tecla numerica para introducir la hora.
Temporizadores
Este menu nos permite ajustar los ocho temporizadores
Modo:
Apagado/Una vez/Diario
Servicio:
Canal/Grabar
Puede elegir el canal en el que se enciende el aparato
Canal :
Presione la tecla numerica para introducir una fecha.
Fecha :
Presione la tecla para intruducir una hora.
Horario inicio:
Presione la tecla para introducir un tiempo de duración.
Duracion:
Tipo grabación: TS/PS
7
7
Español
.
Current Time/date: 01:36 xx/xx/xxxx
Timer Mode
Daily
Timer Service
Channel
Wakeup Channel
BBC FOUR
Wakeup Date
xx/xx/xxxx
On Time
xx:xx
Duration
xx:xx
Record Type
TS
Save
Cancel
CONFIGURACION SISTEMA
Control parental
Este menu le permite proteger el menu y canal, y cambiar la contraseña.
1 En menu "Config sistema", selec cione "Control parental" pulse "OK",
introduzca la contraseña que (la contraseña por defecto es "0000").
2 Despues de introducir la contraseña correcta con las teclas numericas,
el menu de parental lock aparecera.
Bloquear Menus Para cerrar el menu Editar canal/ Instalación/Herramientas/
REC. Cuando quiera entrar en estos menus, debera introducir la contraseña. Puede ajustar de este menu con on/off.
BloqueoCanal
: On/Off
Nueva contraseña:
Para cambiar la contraseña.
Confirmar contraseña: Para confirmar la nueva contraseña.
Parental Lock
Menu Lock
Channel Lock
New Password
Confirm Password
Off
Off
-------
Configuracion de OSD
Este menu le permite ajustar la duracion y transparencia de los menus
en pantalla (OSD).
Duracion OSD
:1-10
OSD Setting
.
OSD Timeout
OSD Transparency
5
Off
Transparencia OSD: ajustar la transparencia OSD en Off/10%/20%/30%/
40%.
Lista de favoritos
Este menu le permite renombrar el grupo de favoritos.
1 En el menu "Config sistema", seleccione"Favorito", pulse "OK" para
Entrar en el menu de favoritos.
2 Seleccione el grupo deseado, pulse "OK" para abrir teclado
Introducir una letra y numero, uno a uno con el cursor
y pulse la tecla "OK" para confirmar. Despues de terminar la entrada,
resaltar "OK" del teclado falso para confirmar, habra cambiado el
nombre del grupo favorito con exito.
3 Pulse la tecla "EXIT" para salir del menu de renombrar el grupo.
Favorite
1
2
3
4
5
6
7
8
Fav group 1
Fav group 2
Fav group 3
Fav group 4
Fav group 5
Fav group 6
Fav group 7
Fav group 8
Rename
Fav group 1
A B C D E F
G H I J K L
M N O P Q R
S T U V W X
Y Z 0 1 2 3
4 5 6 7 8 9
SP ? <- OK
CAPS DEL OK
Otros ajustes
Alimentacion LNB : On/Off
Si el ajuste esta "On", el receptor dara corriente a la antena del satelite.
Si el ajuste esta "Off", el receptor no suministrara corriente a la antena.
Tipo de Lista :
Other
LNB Power
Channel Play Type
Auto Standby
Libre/encriptado/Todo
Por ejemplo: Si selecciona "Libre", en reproducción pantalla completa, solo
los canales libres seran mostrados con el uso de las teclas UP y DOWN.
Auto Standby:
On/Off
On: Si no hay orden al receptor en el panel frontal o mando a distancia en 3 horas y
ningún evento programado , el receptor entrara en modo standby automaticamente.
Off: El receptor no puede entrar en modo standby automaticamente.
18
Español
On
All
Off
HERRAMIENTAS
Menu principal de herramientas
1
2
3
4
Tools
Presione la tecla "MENU" para entrar en el menu principal.
Presione la tecla "UP" o " DOWN " para resaltar "Herram",pulse la tecla
"RIGHT" para entrar en el menu Herramientas.
Pulse la tecla "UP" o "DOWN" para resaltar el articulo deseado
y pulse la tecla "OK" para entrar en el sub-menu.
Pulse la tecla "EXIT" para salir.
Information
Factory Setting
Upgrade By USB
S/W Upgrade by OTA
USB
Informacion
Information
Este menu puede mostrar algunos parametros en el receptor.
1
En el menu"Herramientas", seleccione "Informacion", pulse "OK"
para abrir la ventana de information.
2
Pulse la tecla "EXIT" para salir.
xxxxxx
xxxxxxxx
xxxxxxxx
xxxxxxxxxx
xxxxxx
xxxx-x-xx
xxxx-x-xx
xxxx-x-xx
xxxx-x-xx
xxxx-x-xx
x.x.x
xxxxx
x.x.x
x.x.x
x.x.x
Configuracion de fabrica
Este menu le permite reajustar el receptor a los ajustes de fabrica,
borra los canales existentes.
1 En el menu "Herramientas", seleccione "Config. fabrica", p ulse "OK".
Introduzca la contraseña (la contraseña por defecto es"0000").
2 Una ventana de confirmación aparecera
Seleccione "Si" para a los ajustes de fabrica y borrar todos los canales.
Seleccione "No" para cancelar la vuelta a ajustes de fabrica.
3 Pulse la tecla "EXIT" para salir .
Factory Setting
This operation will load default and erase all
the channels that user added, continue?
Yes
No
Actualizacion de SW
Upgrade by USB
Es posible actualizar la version software por USB
1
2
3
Upgrade File
No File
Upgrade mode Allcode+bootloader
Start
Entre en el menu "Herram", selec cione "Actualizar por USB" , p ulse
la tecla "OK", el menu de actualización de Software sera mostrado.
Utilice el cursor para seleccionar el fichero deseado, resaltarlo con
"Start" y pulse la tecla "OK" para empezar la actualización.
Pulse la tecla "EXIT" para salir.
0%
Multimedia
Media Player
Esta funcion le permite reproducir archivos desde el puerto USB .
1
2
3
En el menu "Herram" seleccione Multimedia pulse la tecla"OK"
para entrar en el menu Multimedia .
Pulse la tecla cursor "UP" o "DOWN" para seleccionar el fichero
deseado y pulse la tecla "OK" para coger los archivos deseados.
Pulse la tecla "EXIT" para salir.
19
Español
ROOT
uda 1
/..
1.
2.
3.
4.
5.
6.
7.
MPG
OGG
OGG
OGG
OGG
JPG
JPG
840.mpg
I swear.ogg
Why.ogg
Lonely.ogg
Because.ogg
Rose.jpg
Fly.jpg
Play List
Repeat Mode
I swear.ogg
3319KB
00:03:32
00:03:15 00:03:32
Setup 0 Add All Music RES Add Item
Sort 1 Add All Image
JUEGOS
Juegos
Game
Este menu le permite jugar a dos juegos.
1
2
3
4
Pulse la tecla "MENU" para entrar en el menu principal.
Pulse "UP" o "DOWN" para resaltar "Juegos", pulse "RIGHT" para
entrar en el menu de Juegos.
Pulse "UP" o "DOWN" del cursor para resaltar el juego deseado
y pulse la tecla "OK" para introducir el juego.
Pulse la tecla "EXIT" para salir.
10
1
Español
Othello
Sudoku
GRABAR
Grabar
1
2
3
4
REC
Pulse la tecla "MENU" para entrar en el menu principal.
Pulse "UP"o "DOWN" para resaltar "Grabar", pulse la tecla "RIGHT"
para entrar en el menu de grabacion.
Pulse el cursor "UP" o "DOWN" para resaltar el articulo deseado
y pulse la tecla "OK" para entrar en el sub-menu.
Pulse la tecla "EXIT" para salir.
Record Manager
PVR Setting
HDD Information
Gestor de grabacion
Este menu le permite reproducir los archivos grabados
Record Manage
XXX BBC FOUR
1 En el menu "REC", seleccione "Gestor de grabacion",y "OK" para entrar
en el menu Record.
2 Pulse con el cursor "UP" o "DOWN" para seleccionar el fichero
deseado y pulse la tecla "OK" para reproducir la grabacion.
3 Pulse la tecla "EXIT" para salir.
.
16:53-16:56(00:03:22)98M
No.
1
2
3
4
Date
19/03
12/07
12/07
19/03
Rename
Time
01:01-01:02
15:39-15:40
17:41-17:42
16:53-16:56
Channel
BBC FOUR
The HITS
Ideal World
BBC FOUR
Delete
Lock
Configuracion PVR
Este menu nos permite ajustar el PVR.
Pulse la tecla del cursor"UP" o "DOWN" para seleccionar, pulse
la tecla del cursor "LEFT" o "RIGHT" para cambiar los ajustes.
PVR Setting
Timeshift
Jump
TS file size
Timeshift to Record
USB Speed Detect
TimeShift
On/OFF
Salto
30 sec/1 min/5 min/10 min/30 min
Cuando reproduce el programa grabado, presione "PREV"o
"NEXT" para poder saltar al capitulo previo o siguiente.
para verlo.
Tamaño de archivo TS
1G/2G/3G/4G
Graba Timeshift
On/OFF
Si ajusta en "On", grabara la parte de Timeshift cuando presione la tecla "REC".
Detecte velocidad USB
On/OFF
OFF
30sec
1G
ON
ON
Informacion disco
Pulse la tecla "LEFT"/"RIGHT" para resaltar la partición deseada
y se vera resaltada la información de la misma.
Tecla ROJA:
HDD Information
xxx xxxx x xx
Formatea el disco resaltado
xx.xx
xx.xx
xx.xx
xx.xx
xx.xx
xxx
Volume:
Total Size:
Free Size:
Rec Size:
TMS Size:
File System:
Format
11
1
Español
GRABACION/ TIMESHIFT
Al conectar un dispositivo de almacenamiento masivo externo en el puerto USB ya podra grabar
a y hacer Timeshift (grabacion en pausa) en un
. programa de emisión
Pare un programa en directo y continue viendolo mas tarde (Timeshift )
Grabe el programa deseado al modo
.
tradicional
Cuando el espacio disponible en el dispositivo de almacenamiento masivo se agota,la operación
de grabacion se detendrá
.
NOTA:
Por favor use un disco USB 2.0 cuando graba o timeshift.
Para Timeshift y función de grabación, necesita tener un pen
drive o HDD de tamaño más grande a 2GB
.
Grabacion
Grabación Instantánea
Mientras ve un canal pulse"RECORD", una ventana de confirmación aparecera.
Seleccione el tipo de grabacion y luego empezara la grabación
.
en el canal actual.
Si se pulsa la tecla "RECORD" de nuevo, se podra seleccionar la duracion de la grabacion
Pulse la tecla "STOP" para parar de grabar, y una ventana de confirmación aparecera.
Seleccione "Si" para parar de grabar. Seleccione "No" para continuar la grabación.
.
Timeshift
Usted debe activarlo en Menu Principal ->Grabar-> Configuracion PVR->Timeshift
Si ajusta el timeshift "On", esta funcion estara activa cuando el usuario vea la TV.
Pulse la tecla [Info] para ver el OSD timeshift cuando los programas se vean en pantalla completa.
Usted puede pulsar [Left/Right] para para mover el cursor de tiempo a la izquierda o la derecha
.
Pulse [OK] para reproducir desde el punto donde esta el cursor
.
Pulse la tecla "PAUSE" para hacer una pausa en la reproducción
Pulse la tecla "FORWARD" para avanzar rápidamente la reproducción
Pulse la tecla "BACKWARD" para volver atras en la reproducción
Pulse la tecla "STOP" para volver a ver la TV
NOTA:
Por favor, seleccione marcas conocidas de memorias USB 2.0 o discos duros USB para grabar, como
SAMSUNG o SONY.Algunos dispositivos USB tal vez no sean compatibles debido a su baja calidad.
12
1
Español
PROBLEMAS COMUNES
Solución
Problema
Posible causa
La luz standby no enciende
Cable de red desconectado
Fusible de red quemado
Compruebe cable de alimentación
Compruebe el fusible
Ninguna o mala señal
1. La antena satelite no apunta
al satelite.
2. Señal muy debil.
3. Antena muy pequeña .
4. Mal ajuste de antena.
1. Ajuste antena.
2. Aumentar la tensión de LNB o
conectar una amplificador señal.
3. Cambie a una antena mayor
4. Ajuste la antena correctamente .
La busqueda de canales
no funciona
Asegurese que el ajuste de la
antena es correcto en el menu
Mensaje de canal
codificado
Canal codificado
Seleccione un canal alternativo
No responde al mando
a distancia
Receptor apagado
Mando no correctamente dirigido
Panel frontal obstruido
Pilas del mando agotadas
Enchufar y encender el aparato
Orientar al panel frontal
Compruebe alguna obstrucción
Reponer las pilas del mando
.
La contraseña por defecto es
siempre 0000
No hay información de
contraseña
No hay audio
El canal tiene señal, pero no
Audio
Pulse la tecla Audio para confirmar
si el canal tiene Audio
El mando no funciona
(1) Las pilas de su mando
necesitan ser cambiadas
(2) Hay una obstrucción
bloqueando la ruta de la señal
entre el mando y el receptor
(1) Cambiar la pilas
(2) Compruebe si no hay nada en
el recorrido de la ruta de señal
del mando y del receptor
La toma de antena nueva puede
Despues de mover el
dispositivo a otra habitación que venga de un sistema de
distribucion de señal ( antena
ya no puede recibir
colectiva), que reduce el nivel
señal digital
de señal que llega al receptor.
Intente conectarlo directamente a
la antena.
13
1
Español
ESPECIFICACIONES
SINTONIZADOR & CANAL
RF CONECTOR ENTRADA x1
(F-TYPE, IEC169-24, HEMBRA)
RF CONECTOR SALIDA x1
(F-TYPE, IEC169-24, HEMBRA (LOOP THROUGH))
RANGO DE FRECUENCIAS:
950MHz~2150MHz
NIVEL DE ENTRADA:
-25 ~ -78 dBm
CARACTERISTICAS
Decodificador Video
ISO/IEC/4496-2(MPEG 4) cumple, Soporta
Incorpora baseline H.263
Soporta Xvid
Decodificador Audio
MPEG-1 Layer I/II, MPEG2 Layer II audio
Dolby Digital(AC3) & Dolby Digital AC-3 Plus(E-AC-3)
Output Sample rates: 48, 44.1y 32KHz frecuencias
FORMATOS VIDEO
4:3/16:9
SALIDA DE VIDEO
CVBS, RGB
MODULACION
QPSK
CONECTORES
CABLE ALIMENTACION
SINTONIZADOR
SCART
SPDIF
PUERTO DE DATOS
FIJO
ANTENNA INPUTx1, RF OUTPUT x1
TV x1
COAXIAL x1
puerto USB
ALIMENTACION
VOLTAJE DE ENTRADA
AC220~240V, 50/60Hz
CONSUMO
5W
NOTA:
El diseño y la especificacion podran cambiar sin aviso previo
14
1
E spañol
SP@L3 to ASP@L5
DVB-S
Digital Satellite Sep-Top Box
SAT-200
OWNER'S MANUAL
Read this manual before installation and use.
English
SAFETY INFORMATION
TO REDUCE THE RISK OF FIRE AND ELECTRIC SHOCK, DO NOT EXPOSE THIS UNIT TO RAIN OR
MOISTURE.
: To reduce the
CAUTION
risk of fire and electric shock, do
10.
The apparatus shall not be exposedto dripping or splashing and thatno objects
filled with liquids ,such as vasesshall be placed on the apparatus.
Caution: Maintain electrical safety. Powerline operated equipmentor accessories
connected to this unit should bearsafety certification mark on the accessoryitself
and should not be modified soas to defeat the safety features.This will help avoid
any and should not be modifiedso as to defeat the safetyfeatures. This will help
avoid any potential hazard from electrical shockor fire. If in doubt, contact qualified
service personnel.
11.
Accessories- Do not place this videoproduct on an unstable cart, stand,tripod,
bracket, or table. The video productmay fall, causing serious injury to achild or
adult as well as serious damageto the video product. Use thisvideo product only
with a cart, stand, tripod, bracket, ortable recommended by the manufacturer's or
sold with the video product. Any mountingof the product should follow the
manufacturer's instructions and use of amounting accessory recommended by the
manufacturer.
not remove the cover (or back) of
the unit. Refer servicing only to qualified service personnel.
The lightning flash with arrowhead symbol,within an equilateral
triangle, is intended to alert theuser to the presence of uninsulated
"dangerous voltage" within product's enclosure thatmay be of
sufficient magnitude to constitute a risk ofelectric shock.
The exclamation point within an equilateraltriangle is intended to
alert the user to the presenceof important operation and servicing
instructions in the literature accompanying theappliance.
WARNING: TO REDUCE THE RISK OFFIRE OR ELECTRIC SHOCK, DO
NOT EXPOSE THIS APPLIANCE TO RAIN ORMOISTURE.
CAUTION: TO PREVENT ELECTRIC SHOCK, MATCHWIDE BLADE OF
PLUG TO WIDE SLOT AND FULLY INSERT.
The apparatus shall not be exposedto dripping or splashing, and thatno
objects filled with liquids, such asvases, shall be place on theapparatus.
IMPORTANT SAFEGUARDS
11a. A video product and cart combinationshould be moved with care. Quickstops,
excessive force, and uneven surfaces may causethe video product and cart
combination to overturn.
Note to CATV system installer
This reminder is provided to callthe CATV system installer's attention to
Section 820-40 of the NEC whichprovides guidelines for proper grounding
and, in particular, specifies that the cableground shall be connected to the
grounding system of the building, asclose to the point of cableentry as
practical.
In addition to the careful attention devoted to quality standards 12. Outdoor Antenna Grounding- If an outsideantenna or cable system is connectedto
in the manufacture of your videoproduct, safety is a major factor
the video product, be sure theantenna or cable system is groundedso as to provide
in the design of every instrument.However, safety is your
some protection against voltage surges and built-upstatic charges. Section 810 of
the National Electrical Code, ANSI/NFPA No.70-1984(Section 54 of Canadian
responsibility, too. This sheet lists important information that will
Electrical Code, Part1) provides information with respectto proper grounding of
help to assure your enjoyment andproper use of the video
the mast and supporting structure, groundingof the lead-in wire to anantennaproduct and accessory equipment. Please read them carefully
discharge unit, connection to grounding electrodes, andrequirements for the
before operation and using your video product.
grounding electrode.
13.
Installation
1. Read and Follow Instructions- All thesafety and operation instructions
should be read before the videoproduct is operated. Follow all
operating instructions.
14.
2. Retain Instructions- The safety and operating instructionsshould be
retained for future reference.
5. Power Sources- This video product should beoperated only from the
type of power source indicated on themarking label. If you are not sure
of the type of power supply toyour home, consult your video dealer or
local power company. For video products intendedto operate from
battery power, or other sources, refer tothe operating instructions.
Use
Cleaning- Unplug this video product fromthe wall outlet before cleaning.
Do not use liquid cleaners oraerosol cleaners. Use a damp clothfor cleaning.
15.
Objects that may touch dangerous voltagepoints or "short-out" parts could resultin
a fire or electric shock. Neverspill liquid of any kind onthe video product.
16.
Lightning-For added protection for this video productduring a lightning storm, or
when it is left unattended and unusedfor long periods of time, unplugit from the
wall outlet and disconnect the antennaor cable system. This will preventdamage to
the video product due to lightningand power line surges.
3. Heed all Warnings-Comply with all warningson the video product and in
the operating instructions.
4. Polarization- Some video products are equipped witha polarized
alternating -current line plug. This plug willfit into the power outlet, try
reversing the plug. If the plugstill fails to fit, contact yourelectrician to
replace your obsolete outlet. To preventelectric shock, do not use this
polarized plug with an extension cord, receptacle,or other outlet unless
the blades can be fully insertedwithout blade exposure. If you needan
extension cord, use a polarized cord.
Power Lines-An outside antenna system should notbe located in the vicinity of
overhead power lines, other electric lightor power circuits, or where itcan fall into
such power lines or circuits. Wheninstalling an outside antenna system, extreme
care should be taken to keepfrom touching or approaching such powerlines or
circuits, as contact with them might befatal. Installing an outdoor antenna can be
hazardous and should be left to aprofessional antenna installer.
17.
18.
6. Overloading- Do not overload wall outletsor extension cords as this can
result in a risk of fire orelectric shock. Overloaded AC outlets, extension
cords, frayed power cords, damaged or crackedwire insulation, and
broken plugs are dangerous, They mayresult in a shock or firehazard.
Periodically examine the cord, and if itsappearance indicated damage or
deteriorated insulation, have it replaced by yourservice technician.
7. Power-Cord Protection- Power-supply cords should berouted so that
they are not likely to be walkedon or pinched by items placed uponor
against them, paying particular attention tocords at plugs, convenience
19.
receptacles, and the point where theyexit from the video product.
Where the MAIN plug or anappliance coupler is used as thedisconnect
device,the disconnect device shall remain readily operable.
8. Ventilation- Slots and openings in the caseare provided for ventilation
20.
to ensure reliable operation of the videoproduct and to protect it from
overheating. These openings must not the blockedor covered. The
openings should never be blocked byplacing the video product on abed,
sofa, rug, or heat register. Thisvideo product should not be placedin a
built-in installation such as a book caseor rack, unless proper ventilation 21.
is provided or the video product manufacturer'sinstructions have been
followed.
22.
9. Attachments- Do not use attachments unless recommendedby the video
product manufacturer as they may cause hazards.
Service
Servicing-Do not attempt to service this videoproduct yourself, as opening or
removing covers may expose you todangerous voltage or other hazards. Referall
servicing to qualified service personnel.
Conditions Requiring Service-Unplug this video productfrom the wall outlet and
refer servicing to qualified service personnelunder the following conditions:
A.When the power-supply cord or plugis damaged.
B.If liquid has been spilled, orobjects have fallen into the videoproduct.
C.If the video product has been exposedto rain or water.
D.If the video does not operatenormally by following the operating
instructions.
Adjust only those controls that arecovered by operating instructions.
Improper adjustment of other controls mayresult in damage and will often
require extensive work by a qualifiedtechnician to restore the video product
to its normal operation.
E.If the video product has beendropped or cabinet has been damaged.
F.When the video product exhibits adistinct change in performance-this
indicates a need for service.
Replacement Parts-When replacement parts are required,have the service
technician verify that the replacements heuses have the same safety
characteristics as the original parts. Use ofreplacements specified by the video
product manufacturer can prevent fire, electricshock, or other hazards.
Safety Check-Upon completion of any serviceor repairs to this video product,ask
the service technician to perform safetychecks recommended by the manufacturer
to determine that the video productis in safe operating condition.
Wall or Ceiling Mounting- The productshould be mounted to a wallor ceiling only
as recommended by the manufacturer.
Heat-The product should be situated awayfrom heat sources such as radiators,
heat registers, stoves, or other products(including amplifiers) that products heat.
CONTENTS
SAFETY INFORMATION
INTRODUCTION
Front panel
Rear panel
Remote control
1
1
2
SYSTEM CONNECTION
General
Connecting the TV
Connecting a HiFi System
Connecting a video recorder
3
3
3
3
INSTALLATION
Installation
4
OPERATION
Switching channel
Hotkey
5
5
EDIT CHANNEL
Edit Channel menu
TV Channel list
Radio Channel list
Delete All
6
6
6
6
SYSTEM SETUP
System setup menu
Language
TV System
Local Time Setting
Timer Setting
Parental Lock
OSD Setting
Favorite
Other
7
7
7
7
7
8
8
8
8
TOOLS
Tools main menu
Information
Factory Setting
Software Upgrade
USB
9
9
9
9
9
GAMES
Game
10
REC
REC main menu
Record Manager
PVR Setting
HDD Information
11
11
11
11
RECORD/ TIMESHIFT
Record
Timeshift
12
12
TROUBLESHOOTING
13
SPECIFICATIONS
14
INTRODUCTION
Front panel
Remote sensor
USB port
Standby
Power indicate
Rear panel
RF IN
Connect a satellite
antenna cable
RF OUT
Connect other digital
satellite receiver.
AC Mains
Coaxial Digital Audio
1
English
TV Scart
for connection to the TV
INTRODUCTION
Remote control
STANDBY
1
INFO SUBTITLE
MUTE
4
Previous/Next
5
PAUSE(Pause/Active timeshift function)
6
Menu
(Open and close the menu screen)
7
Cursor/CH+, -/VOL+,(Cursor: Navigation buttons used to navigate
menu's items)
(CH+/-: Channel Up and Down)
(VOL+/-: Volume Up and Down)
8
OK button
(Confirm a selection within a menu)
9
RECORD
(Record the TV program)
10
Numeric entry
(Enter numeric values and select the channel
directly by entering it's number)
11
USB
(Enter File Manager)
12
MEDIA
(Enter Recorder menu)
15
2
16
3
4
17
5
MENU
EXIT
CH+
18
6
7
OK
VOL-
8
VOL+
RECORD
9
19
CHEPG
20
13
TTX (Open interactive service)
14
TIMER
(Timer wake-up)
15
MUTE (Turn off/on the volume)
16
SUBTITLE (On/Off Subtitle)
17
Search backward /forward
18
EXIT (Exit from menu)
19
STOP
(Stop program playback or recording)
20
EPG
(Open up Electronic Program Guide Menu)
21
BACK
(Switch to previous channel)
22
TV/RADIO
(Switch between TV and Radio)
23
AUDIO
(Select audio mode and audio track)
24
RES (Switch HDMI resolution)
25
FAV
(Open the Favorite list)
26
RED/GREEN/YELLOW/BLUE Buttons
(For interactive function/Submenu
function buttons)
BACK
10
21
11
MEDIA
USB
TTX
TIMER
TV/RADIO AUDIO
22
23
12
FAV
RES
13
24
14
25
26
1
2
3
STANDBY
(switch the STB on and standby)
INFO
(Press for current channel information )
PLAY
21
English
SYSTEM CONNECTION
General
There are many different types of TV and other equipment that you can connect to the device.
In this manual you will see some of the most common ways to connect your equipment.
Connecting the TV
RF cable
Antenna
Scart cable
TV
Connecting a HiFi system
Hi-Fi
Coaxial cable
31
English
INSTALLATION
Installation
1
2
3
4
Press the "MENU" button to enter main menu.
Press "UP"or " DOWN " button to highlight "Installation", press
"RIGHT" button to enter the Installation menu.
Press "UP" or "DOWN" cursor button to highlight the desired item
and press "OK"button to enter the sub-menu .
Press "EXIT" button to exit.
Installation
Antenna Connection
Satellite List
Antenna Setup
Single Satellite Search
Multi Satellite Search
TP List
Antenna Connection
Press LEFT/RIGHT button to select LNB. LNB include Fixed Antenna/ Motor Antenna.
Satellite List
RED button:
GREEN button:
BLUE button:
Edit satellite
Add satellite
Delete satellite
Antenna Setup
Fixed Antenna:
If you select "Fixed Antenna" in " Antenna Connection" menu, this menu allows you to change
settings like Satellite, LNB Frequency, Transponder, DiSEqC 1.0, 22K and Polarity.
Motor Antenna:
If you select "Motor Antenna" in " Antenna Connection" menu, this menu allows you to change
settings LNB Type, Motor Type, Local Longitude/Local Latitude, Delete all, Motor Setting and
Limit setup.
Single Satellite Search:
Press UP/DOWN button to adjust Satellite, FTA Only, Scan channel and Scan Mode.
Highlight "Search" and press "OK"button to start search.
Multi Satellite Search:
Press UP/DOWN button to adjust Satellite, FTA Only, Scan channel and Scan Mode.
Highlight "Search" and press "OK"button to start search.
TP List
RED button:
GREEN button:
YELLOW button:
BLUE button:
Edit TP
Add TP
Delete TP
Search TP
41
English
OPERATION
Switching Channel
You can change channels by:
1
2
3
Pressing the CH+/CH- buttons.
Entering the channel number using the NUMERIC(0-9) buttons.
Pressing "OK" button to enter channel list, then press "UP" and "DOWN" buttons to select channel.
Hotkey
In TV viewing mode, you can do the following:
Press UP/DOWN button to change channel.
Press LEFT/RIGHT button to adjust volume.
Use number key to change channel directly.
Press OK button to enter channel List.
Press BACK button will switch to previous channel.
Press SUB button to select the subtitle language.
Press EPG button to enter EPG menu.
Press INFO button can open information bar, then press INFO button again, it will show the
parameters of current channel.
51
English
EDIT CHANNEL
Edit Channel menu
1
2
3
4
Edit Channel
Press the "MENU" button to enter main menu.
Press "UP" or "DOWN " button to highlight "Edit Channel", press
"RIGHT" button to enter the Edit Channel menu.
Press "UP" or "DOWN" cursor button to highlight the desired item
and press "OK" button to enter the sub-menu .
Press "EXIT" button to exit.
TV Channel List
Radio Channel List
Delete All
TV Channel list
1
In the Edit Channel menu, select "TV Channel List", press "OK"
button to enter TV channel list menu.
2
Press "UP" or "DOWN" button to highlight channel, press the "OK"
button to preview the desired TV channel.
Use this menu to favor, lock, skip, move, sort, delete andrename
channel.
Press "FAV" button, then press "OK" button to edit the FAV
function.
Press "color" button, then press "OK" button to edit the
corresponding function.
TV Channel List
All Satellite
FAV Lock Skip Move Edit
0001 No Name
0002 YooPlay Ga
0003 E4+1
0004 UKTV Histor
0005 SKY THREE
0006 Sky Spts Ne
0007 Sky News
xxxxxxxx
xxxxxx
xxxx
xxx
TV Channel List
Sort
All Satellite
Rename Delete
0001 No Name
0002 YooPlay Ga
0003 E4+1
0004 UKTV Histor
0005 SKY THREE
0006 Sky Spts Ne
0007 Sky News
xxxxxxxx
xxxxxx
xxxx
xxx
Radio Channel list
1
In the Edit Channel menu, select "Radio Channel List", press "OK" button to enter the Radio
Channel list menu.
2
Press "UP" or "DOWN" button to highlight channel press the "OK" button to listen the desired TV
channel.
NOTE: Basically, the operation of "Radio Channel List" is the same as "TV Channel List",
but there is one point different: In "Radio Channel List" mode, there is no video
information, so it will always display Radio's logo in the right side preview window.
Delete All
1
2
In the Edit Channel menu, select "Delete All", press "OK" button.
You are asked to input a password(the default password is"0000").
A warning window appears.
Select "Yes", press "OK" button to delete all channels.
Select "No", Press "OK" button to cancel deleting.
61
English
Warning! Do you really want to delete
all channels?
Yes
No
SYSTEM SETUP
System setup menu
1
2
3
4
Press the "MENU" button to enter main menu.
Press "UP" or "DOWN" button to highlight "System Setup",
press "RIGHT" button to enter the System Setup menu.
Press "UP" or "DOWN" cursor button to highlight the desired
item and press "OK" button to enter the sub-menu.
Press "EXIT" button to exit.
System Setup
Language
TV System
Local Time Setting
Timer Setting
Parental Lock
OSD Setting
Favorite
Other
Language
Language
This menu allows you to set Language.
Language
First Audio
Second Audio
Teletext
English
English
German
English
TV System
This menu allows us to set Display Mode, Aspect Mode and Video
Output.
Display Mode:
TV System
Display Mode
Aspect Mode
Video Output
Auto
Auto
CVBS
AUTO/PAL/PAL-M/PAL-N/NTSC/SECAM
Aspect Mode:
Auto/4:3PS/4:3LB/16:9
Video Output:
CVBS/RGB
Local Time Setting
Local Time Setting
GMT Usage:
This menu is used for open the usage of GMT.
The options are : Off / On
GMT Offset:
This menu is valid only when selected "On" in GMT
Usage menu . The GMT offset range is
"-11:30 ~ +12:00", increasing half hour progressively.
GMT Usage
GMT Offset
Summer Time
Date
Time
On
UTC+01:00
Off
xxxx/xx/xx
01:51
Summer Time: The options are : Off / On
Date:
Time:
"Date" and "Time" menus are valid only when selected "Off" in GMT Usage menu.
Press numeric button to input the time.
Timer Setting
This menu allows us to set the program timer. You can set 8 timers.
Timer Mode:
Off/Once/Daily
Timer Service:
Channel/Record
Wakeup Channel: You can select a desired channel as the wakeup channel.
Press numeric button to input date.
Wakeup Date:
Press numeric button to input the time.
On Time:
Press numeric button to input the duration time.
Duration:
TS/PS
Record Type:
71
English
Current Time/date: 01:36 xx/xx/xxxx
Timer Mode
Daily
Timer Service
Channel
Wakeup Channel
BBC FOUR
Wakeup Date
xx/xx/xxxx
On Time
xx:xx
Duration
xx:xx
Record Type
TS
Save
Cancel
SYSTEM SETUP
Parental Lock
This menu allows you to protect menu and channel, and change the Password.
1 In "System Setup" menu, select "Parental Lock" and press "OK" button,
you are asked to input a password(the default password is"0000").
2 After inputting the correct password by pressing numeric buttons,
the parental lock menu appears.
Menu Lock: To lock the Edit channel/ Installation/Tools/REC menu.
When you want to enter these menus, you must input
the password. You can set menu lock to on/off.
Channel Lock:
On/Off
New Password: To change the password.
Confirm Password: To confirm the new password.
Parental Lock
Menu Lock
Channel Lock
New Password
Confirm Password
Off
Off
-------
OSD Setting
OSD Setting
This menu allows you to set OSD Timeout and OSD Transparency.
OSD Timeout:
OSD Timeout
OSD Transparency
1-10
5
Off
OSD Transparency: To set the OSD transparency to Off/10%/20%/30%/
40%.
Favorite
This menu allows you to rename the favorite group.
1 In "System Setup" menu, select "Favorite", press "OK" button to enter
Favorite menu.
2 Select desired group, press "OK" button to open the mock keypad.
Input letter and numeric one by one by pressing the cursor button
and press "OK" button to confirm. After finishing input, highlight
"OK" on mock keypad to confirm, you change Favorite group name
successfully.
3 Press "EXIT" button to quit the group rename menu.
Favorite
1
2
3
4
5
6
7
8
Fav group 1
Fav group 2
Fav group 3
Fav group 4
Fav group 5
Fav group 6
Fav group 7
Fav group 8
Rename
Fav group 1
A B C D E F
G H I J K L
M N O P Q R
S T U V W X
Y Z 0 1 2 3
4 5 6 7 8 9
SP ? <- OK
CAPS DEL OK
Other
LNB Power: On/Off
If the setting is "On", the receiver will supply power to satellite antenna.
If the setting is "Off", the receiver won't supply power to satellite antenna.
Channel Play Type:
Free/Scrambled/All
For Example: If you select "Free", in full screen play, only all free channels
will be watched by use UP and DOWN button.
Auto Standby:
On/Off
On: No command to STB on front panel or Remoter in 3 hours and
no timer event, the STB will enter standby mode automatically.
Off: The STB can't enter standby mode automatically.
81
English
Other
LNB Power
Channel Play Type
Auto Standby
On
All
Off
TOOLS
Tools main menu
1
2
3
4
Tools
Press the "MENU" button to enter main menu.
Press "UP" or " DOWN " button to highlight "Tools", press "RIGHT"
button to enter the Tools menu.
Press "UP" or "DOWN" cursor button to highlight the desired item
and press "OK" button to enter the sub-menu.
Press "EXIT" button to exit.
Information
Factory Setting
Upgrade By USB
S/W Upgrade by OTA
USB
Information
Information
This menu can display some parameters information in this STB.
1
In "Tools" menu, select "Information", press "OK" button
to open information window.
2
Press "EXIT" button to exit.
xxxxxx
xxxxxxxx
xxxxxxxx
xxxxxxxxxx
xxxxxx
xxxx-x-xx
xxxx-x-xx
xxxx-x-xx
xxxx-x-xx
xxxx-x-xx
x.x.x
xxxxx
x.x.x
x.x.x
x.x.x
Factory Setting
This menu allows you to re-set the STB back to factory settings,
clear all existed channels.
1 In the "Tools" menu, select "Factory Setting", press "OK" button.
You are asked to input a password(the default password is"0000").
2 A confirmation window is displayed.
Select "Yes" to return back to factory setting and clear all channels.
Select "No" to cancel back to factory setting.
3 Press "EXIT" button to exit .
Factory Setting
This operation will load default and erase all
the channels that user added, continue?
Yes
No
Software Upgrade
Upgrade by USB
We offer the functions for user to upgrade software version by USB.
1
2
3
Upgrade File
No File
Upgrade mode Allcode+bootloader
Start
Enter "Tools" menu, select "S/W Upgrade by USB" , press "OK"
button, Software Upgrade menu is shown.
Press cursor button to select the desired item, then highlight
"Start" and press "OK" button to start upgrade.
Press "EXIT" button to exit.
0%
USB
Media Player
This function allows you to play files from USB port .
ROOT
uda 1
1
2
3
In "Tools" menu, select "USB", press "OK" button to enter
Media Player menu.
Press "UP" or "DOWN" cursor button to select a desired item,
and press "OK" button to play the desired files.
Press "EXIT" button to exit.
91
English
/..
1.
2.
3.
4.
5.
6.
7.
MPG
OGG
OGG
OGG
OGG
JPG
JPG
840.mpg
I swear.ogg
Why.ogg
Lonely.ogg
Because.ogg
Rose.jpg
Fly.jpg
Play List
Repeat Mode
I swear.ogg
3319KB
00:03:32
00:03:15 00:03:32
Setup 0 Add All Music RES Add Item
Sort 1 Add All Image
GAME
Game
Game
This menu allows you to play games.
1
2
3
4
Press the "MENU" button to enter main menu.
Press "UP" or "DOWN" button to highlight "Game", press "RIGHT"
button to enter the Game menu.
Press "UP" or "DOWN" cursor button to highlight the desired item
and press "OK" button to enter the game.
Press "EXIT" button to exit.
10
1
English
Othello
Sudoku
REC
REC
1
2
3
4
REC
Press the "MENU" button to enter main menu.
Press "UP"or "DOWN" button to highlight "REC", press "RIGHT"
button to enter the REC menu.
Press "UP" or "DOWN" cursor button to highlight the desired item
and press "OK"button to enter the sub-menu.
Press "EXIT" button to exit.
Record Manager
PVR Setting
HDD Information
Record Manager
Record Manage
This menu allows you to play the record files
XXX BBC FOUR
1 In "REC" menu, select "Record Manage", press "OK" button to enter
Record Manage menu.
2 Press "UP" or "DOWN" cursor button to select a desired item, and
press "OK" button to play the desired files.
3 Press "EXIT" button to exit.
16:53-16:56(00:03:22)98M
No.
1
2
3
4
Date
19/03
12/07
12/07
19/03
Rename
Time
01:01-01:02
15:39-15:40
17:41-17:42
16:53-16:56
Lock
Channel
BBC FOUR
The HITS
Ideal World
BBC FOUR
Delete
PVR Setting
This menu allows us to set the PVR Setting.
Press "UP" or "DOWN" cursor button to select desired item,
press "LEFT" or "RIGHT" cursor button to change the setting.
PVR Setting
Timeshift
Jump
TS file size
Timeshift to Record
USB Speed Detect
TimeShift
On/OFF
Jump
30 sec/1 min/5 min/10 min/30 min
When you play the record program, press the "PREV"or
"NEXT" button can jump to previous and next chapter
to watch it.
TS file size
1G/2G/3G/4G
Timeshift to Record On/OFF
If you set "On", it will record the timeshift part when you press "REC" button.
USB Speed Detect On/OFF
OFF
30sec
1G
ON
ON
HDD Information
Press "LEFT"/"RIGHT" button highlight partition and you will
see the highlighted partition's information.
RED button:
HDD Information
xxx xxxx x xx
Format the highlighted disk
xx.xx
xx.xx
xx.xx
xx.xx
xx.xx
xxx
Volume:
Total Size:
Free Size:
Rec Size:
TMS Size:
File System:
Format
11
1
English
RECORD/ TIMESHIFT
Plugging an external Mass Storage Device on the USB port gives you access to Time Shift/Record
a broadcast program.
Pause a broadcast program and continue watching it later (Time Shift )
Record a broadcast program.
When the space available on the Mass Storage Device runs out, recording operation of
broadcast will stop.
NOTE:
Please use USB 2.0 disk when recording or timeshift.
For timeshift and recording feature, you need take bigger size USB pen
driver or HDD (>2GB) for recording.
Record
Instant record
In viewing mode, press "RECORD" button, then a confirmation window appears. Select Record type,
then start a record on the current channel.
If "RECORD" button is pressed again, the instant record switches to duration mode.
Press "STOP" button to stop recording, then a confirmation window appears.
Select "Yes" to stop recording. Select "No" to continue recording.
Timeshift
You should set Main Menu->REC->PVR Setting->Timeshift
If set timeshift "On", it will timeshift the program when user watch TV.
Press [Info] key to see timeshift OSD when programs play in full screen
You can press [Left/Right] to move the slide to left or right. Press [OK] key to play the
point where the slide is.
Press "PAUSE" button to pause the playback
Press "FORWARD" button to fast forward the playback
Press "BACKWARD" button to rewind the playback
Press "STOP" button to return to watch TV
NOTE:
Please select famous brand USB 2.0 USB HDD or USB stick for Recording and Timeshift, such as SAMSUNG,
HITACHI and SONY. Some USB devices maybe can't be supported due to its quality.
12
1
English
TROUBLESHOOTING
Problem
Possible cause
What to do
Standby light not lit
Mains lead unplugged
Mains fuse blown
Check mains lead
Check fuse
No or bad signal
1. The satellite dish is not pointing
at the satellite.
2. Signal to weak.
3. Satellite dish is too small.
4. Wrong antenna setting.
1. Adjust dish.
2. Increase the LNB voltage or
connect a signal amplifier.
3. Change to a large dish
4. Set the antenna correctly.
Channel search does not
work
Make sure that the antenna setting
in the menu is correct.
Scrambled channel
message
Channel is scrambled
Select alternative channel
No response to remote
control
Receiver off
Handset not aimed correctly
Front panel obstructed
Hand set batteries exhausted
Plug in and turn on plug
Aim handset at front panel
Check for obstructions
Replace handset batteries
The default password is always
0000
No password information is
given
The audio is not available
The channel has signal, but no
Audio
Press the Audio button to confirm
if the channel has Audio
The remote control does
not operate
(1) The batteries in your remote
control need replacing
(2) There is an obstruction
blocking the signal path
between the remote control
and the box.
(1) Replace the batteries
(2) Check that there is nothing in
the way of the path between
the remote control and the
receiver
After moving the device to
another room you find you
are no longer able to
receive digital reception
The aerial feed former new point
may come through a distribution
system which may reduce the
digital signal now received by
the box.
Try a direct feed from the antenna
13
1
English
SPECIFICATIONS
TUNER & CHANNEL
RF INPUT CONNECTOR x1
(F-TYPE, IEC169-24, FEMALE)
RF OUTPUT CONNECTOR x1
(F-TYPE, IEC169-24, FEMALE (LOOP THROUGH))
FREQUENCY RANGE:
950MHz~2150MHz
SIGNAL LEVEL:
-25 ~ -78 dBm
FEATURES
Video decoder
ISO/IEC/4496-2(MPEG 4) Compliant, Support SP@L3 to ASP@L5
Incorporating baseline H.263
Support Xvid
Audio decoder
MPEG-1 Layer I/II, MPEG2 Layer II audio
Dolby Digital(AC3) & Dolby Digital AC-3 Plus(E-AC-3)
Output Sample rates: 48, 44.1 and 32KHz frequencies
VIDEO FORMATS
4:3/16:9
VIDEO OUTPUT
CVBS, RGB
MODULATION
QPSK
CONNECTION
MAIN POWER CABLE
TUNER
SCART
SPDIF
DATA PORT
FIXED TYPE
ANTENNA INPUTx1, RF OUTPUT x1
TO TV x1
COAXIAL x1
USB slot
POWER SUPPLY
INPUT VOLTAGE
AC220~240V, 50/60Hz
POWER CONSUMPTION
5W
NOTE:
Design and Specifications are subject to change without notice.
14
1
English


![PLAS A O ]-OR](http://vs1.manualzilla.com/store/data/005852706_1-5db0b7ed584537f0e62af161fb124638-150x150.png)