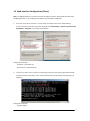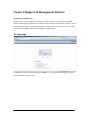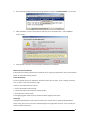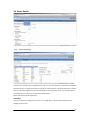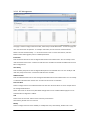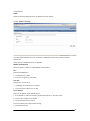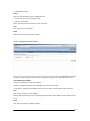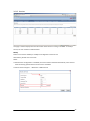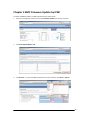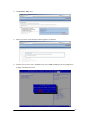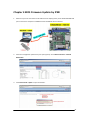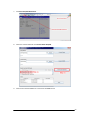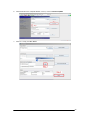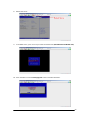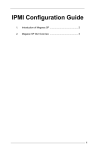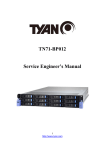
1
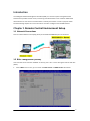
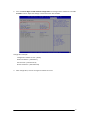
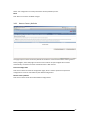
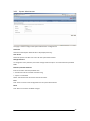
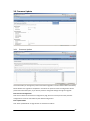
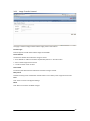
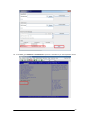
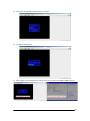
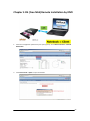
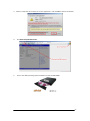
IPMI Configuration User Guide Version 1.0 Published November 2013 Copyright©2013 ASRockRack INC. All rights reserved. Contents Introduction ................................................................................................................... 5 Chapter 1 Remote Control Environment Setup ............................................................ 5 1.1 Network Connections .............................................................................................. 5 1.2 BIOS Configuration (Server) .................................................................................... 5 1.3 Web Interface Configuration (Client) ..................................................................... 7 Chapter 2 Megarac SP Management Platform ............................................................ 9 3.1 Login page ................................................................................................................ 9 3.2 Dashboard.............................................................................................................. 10 3.3 Field Replaceable Unit (FRU)................................................................................. 12 3.4 Server Health ......................................................................................................... 13 3.4.1 Sensor Readings ................................................................................................. 13 3.4.2 Event Log............................................................................................................ 14 3.4.3 System and Audit Log ........................................................................................ 15 3.5 Configuration ......................................................................................................... 16 3.5.1 Active Directory Settings ................................................................................... 16 3.5.2 DNS Server Settings ........................................................................................... 17 3.5.3 System Event Log ............................................................................................... 19 3.5.4 Images Redirection ............................................................................................ 20 3.5.5 LDAP/E-Directory Settings ................................................................................. 21 3.5.6 Mouse Mode Settings ........................................................................................ 22 3.5.7 Network Settings ............................................................................................... 23 3.5.8 Network Bonding Configuration ........................................................................ 25 3.5.9 Network Link Configuration ............................................................................... 26 3.5.10 NTP Settings .................................................................................................. 27 3.5.11 PAM Ordering ................................................................................................ 28 3.5.12 PEF Management .......................................................................................... 29 2 3.5.13 RADIUS Settings ............................................................................................. 30 3.5.14 Configure Remote Session ............................................................................ 31 3.5.15 Services .......................................................................................................... 32 3.5.16 SMTP Settings ................................................................................................ 33 3.5.17 SSL Certificate Configuration ......................................................................... 35 3.5.18 System and Audit Log Settings ...................................................................... 36 3.5.19 User Management ......................................................................................... 37 3.5.20 Virtual Media Devices.................................................................................... 38 3.6 Remote Control ..................................................................................................... 39 3.6.1 Console Redirection ........................................................................................... 39 3.6.2 Power Control and Status .................................................................................. 40 3.6.3 Java SOL ............................................................................................................. 41 3.7 Auto Video Recording ........................................................................................... 42 3.7.1 Triggers Configuration ....................................................................................... 42 3.7.2 Video Recording................................................................................................. 43 3.8 Maintenance .......................................................................................................... 44 3.8.1 Preserve Configuration ...................................................................................... 44 3.8.2 Restore Factory Defaults ................................................................................... 45 3.8.3 System Administrator ........................................................................................ 46 3.9 Firmware Update................................................................................................... 47 3.9.1 Firmware Update ............................................................................................... 47 3.9.2 Image Transfer Protocol .................................................................................... 48 Chapter 3 BMC Firmware Update by IPMI ................................................................. 49 Chapter 4 BIOS Firmware Update by IPMI ................................................................. 51 Chapter 5 OS (Free NAS) Remote Installation by IPMI .............................................. 56 3 Copyright Notice: No part of this documentation may be reproduced, transcribed, transmitted, or translated in any language, in any form or by any means, except duplication of documentation by the purchaser for backup purpose, without written consent of ASRockRack Inc. Products and corporate names appearing in this documentation may or may not be registered trademarks or copyrights of their respective companies, and are used only for identification or explanation and to the owners’ benefit, without intent to infringe. Disclaimer: Specifications and information contained in this documentation are furnished for informational use only and subject to change without notice, and should not be constructed as a commitment by ASRockRack. ASRockRack assumes no responsibility for any errors or omissions that may appear in this documentation. With respect to the contents of this documentation, ASRockRack does not provide warranty of any kind, either expressed or implied, including but not limited to the implied warranties or conditions of merchantability or fitness for a particular purpose. In no event shall ASRockRack, its directors, officers, employees, or agents be liable for any indirect, special, incidental, or consequential damages (including damages for loss of profits, loss of business, loss of data, interruption of business and the like), even if ASRockRack has been advised of the possibility of such damages arising from any defect or error in the documentation or product. This device complies with Part 15 of the FCC Rules. Operation is subject to the following two conditions: (1) this device may not cause harmful interference, and (2) this device must accept any interference received, including interference that may cause undesired operation. CALIFORNIA, USA ONLY The Lithium battery adopted on this motherboard contains Perchlorate, a toxic substance controlled in Perchlorate Best Management Practices (BMP) regulations passed by the California Legislature. When you discard the Lithium battery in California, USA, please follow the related regulations in advance. “Perchlorate Material-special handling may apply, see www.dtsc.ca.gov/hazardouswaste/perchlorate” ASRockRack’s Website: www.ASRockRack.com 4 Introduction The Intelligent Platform Management Interface (IPMI) is a common system management web interface that provides remote access, monitoring and administration over networks. IPMI allows administrators to view server’s hardware status remotely and monitor a server's physical health. See the following chapters for more instructions on how to configure and use IPMI features. Chapter 1 Remote Control Environment Setup 1.1 Network Connections Connect a LAN cable from the laptop (client) to the dedicated IPMI LAN port on the Server. 1.2 BIOS Configuration (Server) Then start the server and enter the BIOS. To do this, press <F2> or <Del> during the Post-On-Self-Test (POST). 1. On the Main menu screen, you can check the UEFI version and BMC version information. 5 2. Go to the Server Mgmt BMC network configuration and configure the IP addresses in the Lan channel 1 section. Adjust the settings as desired and then exit the BIOS. Configuration Example: Configuration Address source = [Static] Station IP address = [192.168.3.1] Subnet mask = [255.255.255.0] Router IP address = [192.168.3.254] 3. After configuration, save the changes and reboot the server. 6 1.3 Web Interface Configuration (Client) Note: The Java application is required to use the management system. Please download and install the Java application on your laptop (client) before using the IPMI management. 1. Go to the “Local Area Connection” on your laptop to configure the client’s TCP/IP settings. In the “Local Area Connection Properties” window, select Networking > Internet Protocol Version 4(TCP/IPv4) > Properties. Then assign the IP address. Configuration Example: IP address = [192.168.3.77] Subnet mask = [255.255.255.0] 2. Then you can check if your connection is working properly by running the Ping (Packet InterNet Grouper) command. Click Start, enter “cmd”(cmd.exe) into the search field, and type [ping <IP address>]. Configuration Example: ping 192.168.3.1 7 3. To enter the management system (Megarac SP), simply enter the Server IP in the address bar of your browser. Configuration Example: 192.168.3.1 Note: It is recommended to delete the Internet Explorer browsing history before and after using management system. 8 Chapter 2 Megarac SP Management Platform Introduction of Megarac SP Megarac SP is a server management solution that allows remote access of computers with BMC (Baseboard Management Controllers) and IPMI (Intelligence Platform Management Interface). System administrators may easily monitor system health or manage computer events of remote computers via the web based Megarac SP GUI using standard Internet browsers. 3.1 Login page The default username and password are both “admin”. It is recommended to change the username and password after your first login. 9 3.2 Dashboard The dashboard displays overall information about the status of the device. Device Information Displays the Firmware Revision and Firmware Build Time (Date and Time). Network Information Shows network settings for the device. Click on the link Edit to view the Network Settings Page. Remote Control Start remote redirection of the host by launching the console from this page. 1. Click Launch. Downloading the jviewer.jnlp file begins. 10 2. If the automatic download blocking message appears as below, click Download File… to continue. 3. After installation, select “I accept the risk and want to run this application.” and click Run to launch the file. 4. Once the file is launched, a Java redirection window will be displayed. Remote Console Preview Box It will show the console preview of the remote server by using a java application. Click on the ‘Refresh’ button to reload the console preview. Sensor Monitoring It lists all available sensors on the device, with information such as status, name, reading, and status icon, as well as a link to that sensor’s page. There are 3 possible states for a Sensor: • - Green dot denotes a Normal state. • - Yellow exclamation mark denotes a Warning state. • - Red x denotes a Critical state. The magnifying glass allows access to the Sensor details page for that sensor. Event Logs A graphical representation of all events incurred by the various sensors and %occupied/available space in logs. If you click on the color-coded rectangle in the Legend for the chart, you can view a list of those specific events only. 11 3.3 Field Replaceable Unit (FRU) This page displays the BMC FRU file information. On selecting a particular FRU Device ID its corresponding FRU information will be displayed. Basic Information It displays the FRU device ID and device name for the selected FRU device ID. Chassis Information It displays the following Chassis information fields. • - Area Format Version • - Chassis Serial Number • - Chassis Type • - Chassis Extra • - Chassis Part Number Board Information It displays the following Board information fields. • - Area Format Version • - Board Serial Number • - Language • - Board Part Number • - Manufacture Date Time • - FRU File ID • - Board Manufacturer • - Board Extra • - Board Product Name Product Information It displays the following Product information fields. • - Area Format Version • - Product Version • - Language • - Product Serial Number • - Manufacturer Name • - Asset Tag • - Product Name • - FRU File ID • - Product Part Number • - Product Extra 12 3.4 Server Health 3.4.1 Sensor Readings A list of sensor readings will be displayed here. Click on a record to show more information about that particular sensor, including thresholds and a graphical representation of all associated events. Double click on a record to toggle (ON / OFF) the live widget for that particular sensor. You can filter the list to view particular sensors only using the drop-down listbox. NOTE: N/A represents Not Applicable. Live Widget Turn On or Off the live widget for this sensor. This widget gives a dynamic representation of the readings for the sensor. 13 View this Event Log Click this button to go the event log page for the viewed sensor. 3.4.2 Event Log This page displays the list of events incurred by different sensors on this device. Double click on a record to see the details of that entry. You can also sort the list of entries by clicking on any of the column headers. You can use the sensor type or sensor name filter options to view those specific events logged in the device. BMC Timezone Check this option to display the event log entries logged with the BMC Timezone value. Client Timezone Check this option to display the event log entries logged with the Client (user’s) Timezone value. UTC Offset Displays the current UTC Offset value based on which event Time Stamps will be updated. Navigational arrows can be used to selectively access different pages of the Event Log. Clear All Event Logs Clear All Event Logs option will delete all existing records for all sensors. 14 3.4.3 System and Audit Log If configured, these logs will display all the system and audit events that occurred on this device. NOTE: Logs have to be configured under ‘Configuration -> System and Audit Log’ in order to display entries. System Log Click the System Log tab to view all system events. Entries can be filtered based on their classification levels. Audit Log Click the Audit Log tab to view all audit events for this device. 15 3.5 Configuration 3.5.1 Active Directory Settings The displayed table shows current configured Role Groups and the available slots. You can modify, add or delete role groups from here. Group domain can be the AD domain or a trusted domain. Group Name should correspond to the name of an actual AD group. To view the page, you must be at least a User. To modify or add a group, you must be an Administrator. NOTE: Free slots are denoted by “~” in all columns for the slot. Advanced Settings Click this option to configure the Active Directory Settings. Options are Enable Active Directory Authentication, User Domain name, Time Out and up to three Domain Controller Server Addresses. 16 Add Role Group Select a free slot and click ‘Add Role Group’ to add a new role group to the device. Alternatively, double click on a free slot to add a role group. Modify Role Group Select a configured slot and click ‘Modify Role Group’ to modify that role group. Alternatively, double click on the configured slot. Delete Role Group Select the desired role group to be deleted and click ‘Delete Role Group’. 3.5.2 DNS Server Settings This page is used to configure the Host name and Domain Name Server configuration of the device. Host configuration Host Settings Choose either Automatic or Manual settings. Host Name It displays the hostname of the device if Auto is selected. If the Host setting is chosen as Manual, then specify the hostname of the device. Register BMC Choose the BMC’s network port to register with the DNS settings. Check the option ‘Register BMC’ to register with the DNS settings. Choose the option ‘Direct Dynamic DNS’ to register with direct dynamic DNS or choose ‘DHCP Client FQDN’ to register through a DHCP server. 17 Domain Name Configuration Domain Settings It lists the options for the domain interface as Manual, v4 or v6 for multi LAN channels. Domain Name It displays the domain name of the device if Auto is selected. If the Domain setting is chosen as Manual, then specify the domain name of the device. Domain Name Server Configuration DNS Server Settings It lists the options for the DNS interface, Manual and available LAN interfaces. IP Priority If the IP Priority is IPv4, it will have 2 IPv4 DNS servers and 1 IPv6 DNS server. If the IP Priority is IPv6, it will have 2 IPv6 DNS servers and 1 IPv4 DNS server. NOTE: This is not applicable for Manual configuration. DNS Server 1, 2 & 3 Specify the DNS (Domain Name System) server address to be configured for the BMC. • - An IPv4 Address is made of 4 numbers separated by dots as in “xxx.xxx.xxx.xxx”. • - Each number ranges from 0 to 255. • - The first number must not be 0. DNS Server Address will support the following: • - IPv4 Address format. • - IPv6 Address format. Save Click ‘Save’ to save any changes made. You will be logged out of current UI session and will need to log back in. Reset Reset the modified changes. 18 3.5.3 System Event Log This page is used to configure the System Event log information. Current Event Log Policy It will display the configured Event Log Policy. Linear Event Log Policy Check this option to enable the Linear System Event Log Policy for the Event Log. Circular Event Log Policy Check this option to enable the Circular System Event Log Policy for the Event Log. Save Click ‘Save’ to save the configured settings. Reset Click ‘Reset’ to reset the modified changes. 19 3.5.4 Images Redirection The displayed table shows configured images on BMC. You can add or replace the images from here to the remote media. Only one image can be configured for each image type. To configure the image, You need to enable Remote Media support using ‘Advanced Settings’. To add or replace an image, you must have Administrator Privileges. NOTE: Free slots are denoted by “~”. Start/Stop Redirection Select a configured slot and click ‘Start Redirection’ to start the remote media redirection. It is a toggle button, if the image is successfully redirected, then click the ‘Stop Redirection’ button to stop the remote media redirection. Add Image Select a free slot and click ‘Add Image’ to configure a new image to the device. Alternatively, double click on a free slot to add an image. Replace Image Select a configured slot and click ‘Replace Image’ to replace the existing image. Alternatively, double click on the configured slot. Delete Image Select the desired image to be deleted and click ‘Delete Image’. NOTE: Redirection needs to be stopped to replace or delete the image. 20 3.5.5 LDAP/E-Directory Settings The displayed table shows the configured Role Groups and available slots. You can modify or add/delete role groups from here. The Group Search Base can be any path from where a Group is located to the Base DN. The Group Name should correspond to the name of an actual LDAP/ E-Directory group. To view the page, the user must at least be a User. To modify or add a group, the user must be an Administrator. NOTE: Free slots are denoted by “~” in all columns for the slot. Advanced Settings Click this option to configure LDAP/E-Directory Advanced Settings. Options are Enable LDAP/E-Directory Authentication, IP Address, Port, Bind DN, Password and Search base. Add Role Group Select a free slot and click ‘Add Role Group’ to add a new role group to the device. Alternatively, double click on a free slot to add a role group. Modify Role Group Select a configured slot and click ‘Modify Role Group’ to modify that role group. Alternatively, double click on the configured slot. Delete Role Group Select the desired role group to be deleted and click ‘Delete Role Group’. 21 3.5.6 Mouse Mode Settings The Redirection Console handles mouse emulation from the local window to the remote screen using either of the two methods. Only ‘Administrator’ has the right to configure these options. • - Relative Mouse mode • - Absolute Mouse mode • - Other Mouse mode Relative Mouse mode The Relative mode sends the calculated relative mouse position displacement to the server. To select this mode select the “Set mode to Relative” option. Absolute Mouse mode The absolute position of the local mouse is sent to the server. To select this mode select the “Set mode to Absolute” option. Other Mouse mode Select Other Mode to have the calculated displacement from the local mouse in the centre postion, sent to the server. Use this mode for SLES 11 Linux OS installation. Save Click ‘Save’ to save any changes made. Reset Click ‘Reset’ to reset the modified changes. 22 3.5.7 Network Settings This page is used to configure the network settings for available LAN channels. LAN Interface Select the LAN interface to be configured. LAN Settings Check this option to enable LAN support for the selected interface. MAC Address This field displays the MAC address of the selected interface (read only). IPv4 Configuration It lists the IPv4 configuration settings. Obtain an IP address automatically Enable ‘Use DHCP’ to dynamically configure the IPv4 address using Dynamic Host Configuration Protocol (DHCP). IPv4 Address, Subnet Mask, Default Gateway If DHCP is disabled, specify a static IPv4 address, Subnet Mask and Default Gateway to be configured for the selected interface. • - An IP Address consists of 4 sets of numbers separated by dots as in “xxx.xxx.xxx.xxx”. • - Each set ranges from 0 to 255. • - The first Number must not be 0. IPv6 Configuration It lists the IPv6 configuration settings. IPv6 Settings Check this option to enable IPv6 support for the selected interface. Obtain an IP address automatically Enable ‘Use DHCP’ to dynamically configure the IPv4 address using Dynamic Host Configuration 23 Protocol (DHCP). IPv6 Address Specify a static IPv6 address to be configured for the selected interface. Subnet Prefix length Specify the subnet prefix length for the IPv6 settings. • - Value ranges from 0 to 128. Default Gateway Specify the v6 default gateway for IPv6 settings. VLAN Configuration It lists the VLAN configuration settings. VLAN Settings Check this option to enable VLAN support for the selected interface. VLAN ID Specify the Identification for VLAN configurations. • - Value ranges from 2 to 4094. NOTE: VLAN ID cannot be changed without resetting the VLAN configuration. VLAN ID 0, 1, 4095 are reserved VLAN ID’s. VLAN Priority Specify the priority for VLAN configurations. • - Value ranges from 1 to 7. NOTE: 7 is the highest priority for VLAN. Save Click ‘Save’ to save any changes made. You will be prompted to log out of the current UI session and log back in at the new IP address. Reset Click ‘Reset’ to reset the modified changes. 24 3.5.8 Network Bonding Configuration This page is used to configure the network bonding configuration for network interfaces. NOTE: A minimum of 2 network interfaces are required to enable Network bonding for the device. Network Bonding Check this option to enable network bonding for network interfaces. NOTE: If VLAN is enabled for slave interfaces, then Bonding cannot be enabled. VLAN can be disabled under Configuration -> Network -> VLAN. Default Interfaces Choose any one of the bonding interfaces for configuring active slave(s). Auto Configuration Enable this option to configure the interfaces in service configuration automatically. NOTE: If Auto configuration is disabled, then interfaces in services can be configured via IPMI command. If Auto configuration is enabled, then all the services will be restarted automatically. Save Click “Save” to save the current changes. NOTE: Disabling bonding will disable the Bonding-VLAN configuration. Reset Click “Reset” to reset the modified changes. 25 3.5.9 Network Link Configuration This page is used to configure the network link configuration for available network interfaces. LAN Interface Select the required network interface from the list to which the Link speed and duplex mode is to be configured. Auto Negotiation This option is enabled to allow the device to perform automatic configuration to achieve the best possible mode of operation (speed and duplex) over a link. Link Speed Link speed will list all the supported capabilities of the network interface. It can be 10/100/1000 Mbps. Duplex Mode Select any one of the following Duplex Modes. • - Half Duplex • - Full Duplex Save Click ‘Save’ to save the settings. Reset Click ‘Reset’ to reset the modified changes. 26 3.5.10 NTP Settings This page displays the device’s current Date & Time Settings. It can be used to configure either Date & Time or NTP (Network Time Protocol) server settings for the device. Date Specify the current Date for the device. Time Specify the current Time for the device. NOTE: As a year 2038 problem exists, the acceptable date range is from 01-01-2005 to 01-18-2038. NTP Server Specify the NTP Server for the device. Check the ‘Automatically synchronize’ option to configure the NTP Server. The NTP Server will support the following: • - IP Address (Both IPv4 and IPv6 format). • - FQDN (Fully qualified domain name) format. UTC Offset UTC Offset list contains the UTC offset values for the NTP server, which can be used to display the exact local time. NOTE: Use the correct UTC offset after adjusting for DST. Automatically synchronize Check this option to automatically synchronize Date and Time with the NTP Server. Refresh Click ‘Refresh’ to reload the current date & time settings. Save Click ‘Save’ to save any changes made. Reset Click ‘Reset’ to reset the modified changes. 27 3.5.11 PAM Ordering This page is used to configure the PAM order for user authentication into the BMC. PAM Module It shows the list of available PAM modules supported in BMC. Move Up Click on the required PAM module, it will be selected. Click on the ‘Move Up’ option to move the selected PAM module one step before the existing PAM module. Move Down Click on the required PAM module, it will be selected. Click on the ‘Move Down’ option to move the selected PAM module one step after the existing PAM module. Save Click ‘Save’ to save any changes made. NOTE: Whenever the configuration is modified, the web server will be restarted automatically. The logged session will be logged out. Reset Click ‘Reset’ to reset the modified changes. 28 3.5.12 PEF Management This page is used to configure the Event Filter, Alert Policy and LAN Destination. To view the page, the user must at least be an Operator. To modify or add a PEF, the user must be an Administrator. NOTE: Free slots are denoted by ‘~’ in all columns for the slot. For more information, refer the Platform Event Filtering (PEF) section in IPMI Specification. Event Filter Click the Event Filter tab to show configured Event filters and available slots. You can modify or add new event filter entries here. A maximum of 40 slots are available and include the default of 15 event filter configurations. Alert Policy Click the Alert policy tab to show configured Alert policies and available slots. You can modify or add new alert policy entries here. A maximum of 60 slots are available. LAN Destination Click the LAN Destination tab to show configured LAN destinations and available slots. You can modify or add new LAN destination entries here. A maximum of 15 slots are available. Send Test Alert Select a configured slot in the LAN Destination tab and click ‘Send Test Alert’ to send a sample alert to the configured destination. NOTE: Test alerts can be sent only with SMTP configurations set to enabled. SMTP suppport can be enabled under Configuration->SMTP. Add Select a free slot and click ‘Add’ to add a new entry to the device. Alternatively, double click on a free slot. Modify Select a configured slot and click ‘Modify’ to modify that entry. Alternatively, double click on the 29 configured slot. Delete Select the desired configured slot to be deleted and click ‘Delete’. 3.5.13 RADIUS Settings To enable/disable RADIUS, check or uncheck the “RADIUS Authentication” Enable checkbox respectively. NOTE: Generic FreeRADIUS alone is supported. RADIUS Authentication Check the option ‘Enable’ to enable RADIUS authentication. Port Specify the RADIUS Port. • - The default Port is 1812. • - Port value ranges from 1 to 65535. Time Out Specify the Time out value. • - The default Time out value is 3 seconds. • - Time out value ranges from 3 to 300. Server Address Enter the ‘IP address’ of the RADIUS server • - An IP Address is made of 4 numbers separated by dots as in “xxx.xxx.xxx.xxx”. • - Each Number ranges from 0 to 255. • - The first Number must not be 0. The server address will support the following: • - IPv4 Address format. 30 • - IPv6 Address format. Secret Enter the ‘Authentication Secret’ for RADIUS server • - Secret must be at least 4 characters long. • - Space is not allowed. NOTE: This field will not allow more than 31 characters. Save Click ‘Save’ to save the settings. Reset Click ‘Reset’ to reset the modified changes. 3.5.14 Configure Remote Session This page is used to configure virtual media configuration settings for the next redirection session. Virtual Media Attach Mode Two types of VM attach modes are available: • Attach - Immediately attaches Virtual Media to the server upon bootup. • Auto Attach - Attaches Virtual Media to the server only when a virtual media session is started. Save Click ‘Save’ to save the current changes. NOTE: It will automatically close the existing remote redirection either KVM or Virtual media sessions, if any. Reset Click ‘Reset’ to reset the modified changes. 31 3.5.15 Services This page is used to display the basic information about services running in the BMC. To modify a service, the user must be an Administrator. Modify Select a slot and click ‘Modify’ to modify the configuration of the service. Alternatively, double click on the slot. NOTE: • Whenever the configuration is modified, the service will be restarted automatically. Users have to close the existing opened session for the service if needed. • Session timeout support : Maximum = 1800 seconds 32 3.5.16 SMTP Settings This page is used to configure the SMTP settings. LAN Channel Number Select the LAN channel to which the SMTP information needs to be configured. Sender Address Enter the ‘Sender Address’ valid on the SMTP Server. Machine Name Enter the ‘Machine Name’ of the SMTP Server. • - Machine Name is a string of maximum 15 alpha-numeric characters. • - Space, special characters are not allowed. Primary SMTP Server It lists the Primary SMTP Server configuration. SMTP Support Check this option to enable SMTP support for the BMC. Server Address Enter the ‘IP address’ of the SMTP Server. It is a mandatory field. • - An IP Address is made of 4 numbers separated by dots as in “xxx.xxx.xxx.xxx”. • - Each Number ranges from 0 to 255. • - The first Number must not be 0. The server address will support the following: • - IPv4 Address format. • - IPv6 Address format. SMTP Server requires Authentication Check the option ‘Enable’ to enable SMTP Authentication. Note: SMTP Server Authentication Types supported are: 33 • - CRAM-MD5 • - LOGIN • - PLAIN If the SMTP server does not support any one of the above authentication types, the user will get an error message stating, “Authentication type is not supported by SMTP Server”. Username Enter the username to access SMTP Accounts. • - The User Name can be 4 to 64 alpha-numeric characters. • - It must start with an alphabet. • - Special characters ‘,’ (comma), ‘:’ (colon), ‘;’ (semicolon), ‘ ‘ (space) and ‘\’ (backslash) are not allowed. Password Enter the password for the SMTP User Account. • - Passwords must be at least 4 characters long. • - Space is not allowed. NOTE: This field will not allow more than 64 characters. Secondary SMTP Server It lists the Secondary SMTP Server configuration. It is an optional field. If the Primary SMTP server is not working, then it tries the Secondary SMTP Server configuration. Save Click ‘Save’ to save the new SMTP server configuration. Reset Click ‘Reset’ to reset the modified changes. 34 3.5.17 SSL Certificate Configuration This page is used to upload a new SSL certificate and privacy key. NOTE: Please check the current BMC time in NTP under the Configuration menu while uploading the SSL certificate. Current Certificate The current certificate, uploaded date/time information will be displayed (read only). New Certificate Browse and navigate the certificate file. • - The certificate file should be of pem type Current Privacy Key The current privacy key, uploaded date/time information will be displayed (read only). New Privacy Key Browse and navigate the privacy key file. • - The privacy key file should be of pem type Upload Click ‘upload’ to upload the SSL certificate and privacy key into the BMC. NOTE: Upon successful upload, HTTPs service will be restarted to use the newly uploaded SSL certificate. 35 3.5.18 System and Audit Log Settings This page is used to configure the System and Audit log settings. System Log Check the option ‘Enable’ to enable system logs. Log Type Select the Log type for system logs, whether it should be preserved in a local file or on a remote server. Local file resides at /var/log/. File Size If Local log is selected, specify the size of the file in bytes. • - Size ranges from 3 to 65535. Rotate Count When logged information exceeds the specified file size, the old log information automatically gets moved to backup files based on the rotate count value. If the rotate count is zero, the old log information gets cleared permanently each time. • - Value ranges from 0 to 255. Server Address Specify the remote server address to log system events. The server address will support the following: • - IP Address (Both IPv4 and IPv6 format). • - FQDN (Fully qualified domain name) format. Audit Log Check the option 'Enable' to enable audit log. Save Click 'Save' to save the configured settings. Reset Click 'Reset' to reset to the previously saved values. 36 3.5.19 User Management The displayed table shows any configured Users and available slots. You can modify or add new users from here. A maximum of 10 slots are available, including the default admin and anonymous. It is advised that the anonymous user’s privilege and password should be modified as a security measure. To view the page, you must have Operator privileges. To modify or add a user, You must have Administrator privileges. NOTE: Free slots are denoted by “~” in all columns for the slot. Add User Select a free slot and click ‘Add User’ to add a new user to the device. Alternatively, double click on a free slot to add a user. Modify User Select a configured slot and click ‘Modify User’ to modify that user. Alternatively, double click on the configured slot. Delete User Select the desired user to be deleted and click ‘Delete User’. 37 3.5.20 Virtual Media Devices Use this page to configure Virtual Media device settings. Floppy devices Select the number of floppy devices that support Virtual Media redirection. CD/DVD devices Select the number of CD/DVD devices that support Virtual Media redirection. Hard disk devices Select the number of hard disk devices that support Virtual Media redirection. SD Media Support Check this option to enable SD Media support in BMC. Save Click ‘Save’ to save the configured settings. Reset Click ‘Reset’ to reset the previously-saved values. 38 3.6 Remote Control 3.6.1 Console Redirection Launch the remote console redirection window from this page. To launch it, you must have Administrator privileges. NOTE: A compatible JRE must be installed in the system prior to the launch of the JNLP file. Java Console Click ‘Java Console’ which will cause the jviewer.jnlp file to be downloaded. Once the file is downloaded and launched, a Java redirection window will be displayed. 39 3.6.2 Power Control and Status This page helps you to view or perform any host power cycle operations. Reset Server Select this option to reboot the system without powering off (warm boot). Power Off Server - Immediate Select this option to immediately power off the server. Power Off Server - Orderly Shutdown Select this option to initiate operating system shutdown prior to the shutdown. Power On Server Select this option to power on the server. Power Cycle Server Select this option to first power off, and then reboot the system (cold boot). Perform Action Click ‘Perform Action’ to perform the selected option. 40 3.6.3 Java SOL Launch the Java SOL, you must have Administrator privileges. NOTE: A compatible JRE must be installed in the system prior to the launch of the JNLP file. 41 3.7 Auto Video Recording 3.7.1 Triggers Configuration Configure which events on the page will trigger the auto-video recording option to start. NOTE: Maximum of 2 video files can be recorded in BMC. Event List You can check/uncheck a box to add/remove that trigger for your system. Save Click ‘Save’ to save any changes made. NOTE: KVM service should be enabled (under ‘Configuration -> Services’) to perform auto-video recording. 42 Reset Click ‘Reset’ to reset the modified changes. 3.7.2 Video Recording This page displays the list of available recorded video files on the BMC. The various fields of Recorded Video are given below: # : The serial number. File Name : The video filename. File Information : Day, date and time of video upload. NOTE: A maximum of 2 video files can be recorded in BMC. Play Video Select a video and click the Play Video button to play the video file in the Java Application. Download Select a video and click the Download button to download and save the video file in the client machine. The video will be downloaded in (.avi) format. Delete Click the Delete button to delete the selected video file. 43 3.8 Maintenance 3.8.1 Preserve Configuration Check which configurations need to be preserved, while Restore Factory Defaults is done. Configuration list You can either check/uncheck a check box to preserve/overwrite the configurations for your system. Check All Click this button to check the whole configuration list. Uncheck All Click this button to uncheck the whole configuration list. Save Click ‘Save’ to save any changes made. 44 NOTE: This configuration is used by the Restore Factory Defaults process. Reset Click ‘Reset’ to reset the modified changes. 3.8.2 Restore Factory Defaults This page helps to restore the factory defaults of the device. Please note that after entering restore factory widgets, other web pages and services will not work. All open widgets will be closed automatically. The device will reset and reboot within a few minutes. Preserve Configuration Click this to redirect to Preserve configuration page, which is used to preserve the particular configurations not to be overwritten by the default configuration. Restore Factory Defaults Click this to restore the firmware with default configurations. 45 3.8.3 System Administrator This page is used to configure the System Administrator configurations. Username Username of the System Administrator is displayed (read only). User Access Check this option to enable user access for the system administrator. Change Password To change the user’s password, check the ‘Change Password’ option. This will enable the password fields. Password, Confirm Password Enter and confirm the new password here. • - Passwords must be at least 8 characters long. • - Space is not allowed. NOTE: This field will not allow more than 64 characters. Save Click ‘Save’ to save the new configuration for the system administrator. Reset Click ‘Reset’ to reset the modified changes. 46 3.9 Firmware Update 3.9.1 Firmware Update This wizard takes you through the process of firmware upgrades. A reset of the box will automatically follow whether the upgrade is completed or cancelled. An option to Preserve configuration will be presented. Enable the option, if you wish to preserve configured settings through the upgrade. Enter Preserve Configuration Click this to redirect to the Preserve configuration page, which is used to preserve the particular configurations not to be overwritten by the default configuration. Enter Update Mode Click ‘Enter Update Mode’ to upgrade the current device firmware. 47 3.9.2 Image Transfer Protocol This page is used to configure the firmware image protocol information. Protocol Type Protocol type to transfer the firmware image into the BMC. Server Address The Server IP address of the firmware image is stored. • - An IP Address is made of 4 numbers separated by dots as in “xxx.xxx.xxx.xxx”. • - Each number ranges from 0 to 255. • - The first number must not be 0. Source Path Full Source path with filename of where the firmware image is stored. Retry Count Number of time(s) to be retried when transfer failure occurs. Retry count ranges from 0 to 255. Save Click ‘Save’ to save the configured settings. Reset Click ‘Reset’ to reset the modified changes. 48 Chapter 3 BMC Firmware Update by IPMI To update the BMC firmware via IPMI, please follow the steps below. 1. Enter the management system and click the Firmware Update from the top menu bar. 2. Click Enter Update Mode > OK. 3. Click Browse… to select the BMC firmware file from the directory. Click Open > Upload. 49 4. Click Proceed > OK to start. 5. When you see the screen below, firmware upgrade is completed. 6. Go back to your server and, in the BIOS screen, press <F10> and Yes to save the configuration changes and reboot the server. 50 Chapter 4 BIOS Firmware Update by IPMI 1. Make sure you have connected a LAN cable from the laptop (client) to the dedicated IPMI LAN port on the Server. Prepare an USB device with the BIOS firmware installed. 2. Enter the management system from your laptop (client). Go to Remote Control > Console Redirection. 3. Click Java Console > Open to open the JViewer . 51 4. 5. 6. Select “I accept the risk and want to run this application.” and click Run to launch the JViewer. In the BIOS screen, go to Advanced > Instant Flash. Insert the USB device with the BIOS firmware installed into your laptop (client). 52 7. Click Hard Disk/USB Redirection. 8. Select the inserted USB and click Connect Hard disk/USB. 9. Confirm the inserted USB device is found and click Close to exit. 53 10. In the BIOS, go to Advanced > Instant Flash and press the <ENTER> key on the keyboard to select. 54 11. Choose the desired BIOS firmware and press <ENTER>. 12. The BIOS updating begins. 13. After upgrade, press <ENTER> key to reboot the server and confirm the BIOS and BMC versions. 55 Chapter 5 OS (Free NAS) Remote Installation by IPMI 1. Enter the management system from your laptop (client). Go to Remote Control > Console Redirection. 2. Click Java Console > Open to open the JViewer. 56 3. Select “I accept the risk and want to run this application.” and click Run to launch the JViewer. 4. Click Hard Disk/USB Redirection. 5. Insert a Free NAS operating system installation CD into the DVD-ROM. 57 6. Select the D from the “CD/DVD Media1” section, and click Connect CD/DVD. 7. When it is ready, click OK > Close. 58 8. Reboot the server. 9. In the BIOS screen, press <F11> key to select the boot device (USB AMI Virtual CDROM0 1.00). 10. Press <ENTER> to select 1 Install/Upgrade to start Free NAS installation. 59 11. The Free NAS installation is completed. 60