1
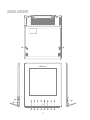
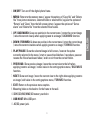
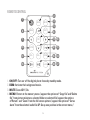
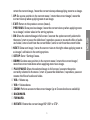
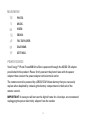
MULTIMEDIA PHOTO FRAME
ENERGY
Manual de usuario / User manual
Manuel de l’utilisateur / Manual do Utilizador
Photo Frame
M8 Ultra Slim
ESPAÑOL
User manual
27
INTRODUCTION
This digital photo frame is a perfect gift to remember the most special moments,
Ultra slim design with 8” LED screen, you can enjoy or share your photos and video
by exceptional picture quality. Moreover, practical backlit touch buttons featuring
all the frame functions. Available functions such as SlideShow with music
background, calendar, alarm, file explorer, auto ON/OFF, USB host and card reader.
We recommend that you fully read this user manual in order to enjoy the product in
a safe way and with the best results.
CARE AND MAINTENANCE
≥≥ Do not expose your Energy™ Photo Frame to collisions, violent shakes, dust, direct
sun light, moisture or extreme temperatures.
≥≥ Do not use abrasive or corrosive cleansers.
≥≥ Keep the device clean and dust free with a soft and dry cloth. We recommend you
to use the provided cleaning cloth.
≥≥ Clean the unit while it is turned off and unplugged from electric power.
≥≥ Do not disassemble the device. Any repairs must be performed by the qualified
Energy Sistem Soyntec´s personnel.
29
ENGLISH
Energy Sistem® thanks you for buying your new digital photo frame Energy™
Photo Frame M8 Ultra Slim. We wish you enjoy using it.
MAIN FEATURES
≥≥ 8” TFT LED backlight screen.
≥≥ Screen format 4:3.
≥≥ 800 x 600 pixels resolution.
≥≥ Practical touch buttons featuring all the frame functions.
≥≥ Compatible with the JPG pictures of the majority of the digital cameras with
maximum resolution 8000 x 8000 pixels.
≥≥ Plays audio with MP3, WMA and WAV files.
≥≥ Plays video with MPEG1, MPEG2, MPEG4 (Divx4.0, Divx5.0, Xvid), AVI and M-JPEG
files, with maximum resolution 720 x 576 pixels.
≥≥ Support eBook reading with TXT files.
≥≥ Compatible with memory cards: XD / MMC / MS / SD / SDHC (up to 32GB).
≥≥ USB Host connector to load pictures from your USB flash drive (up to 32GB).
≥≥ Built-in stereo speakers.
≥≥ Selection of pictures by miniatures on screen and starting Slide Show from the
selected picture.
≥≥ Slide Show with different visual modes (Single window, Four windows and Triple
windows).
≥≥ Several time intervals for the Slide Show (3/5/15/30 sec., 1/5/15/30, 1 hour).
≥≥ Different transition effects for the Slide Show (15 effects including random mode).
≥≥ Color Effects: Color, Monochrome, Sepia.
30
PRODUCT CONTENT
≥≥ Energy™ Photo Frame M8 Ultra Slim
≥≥ Multilingual user manual.
≥≥ Screen cleaning cloth.
≥≥ Remote control.
≥≥ USB adapter A type / C type.
≥≥ AC/DC power adapter (Europlug).
31
ENGLISH
≥≥ Functions of calendar, clock and alarm.
≥≥ Automatic image fit (3 modes: Auto-Fit, Optimal and Full).
≥≥ Brightness, contrast, color and tone adjustments.
≥≥ Allows 90º, 180º and 270º picture rotation.
≥≥ 5 levels of zoom available.
≥≥ Auto ON/OFF function for energy saving.
≥≥ File browser function and data indication of files.
≥≥ Allows deleting files from memory card or USB pendrive.
≥≥ Slim remote control.
≥≥ AC/DC power adapter (Europlug). Input 100-240V; Output 5V/1A.
GENERAL OVERVIEW
9
9
11
10
12
1
2
3
4
5
32
6
7
8
1. ON/OFF: Turn on-off the digital photo frame.
3. UP / BACKWARD: Go up one position in the current menu / rotate the current image
/ move the current view up when applying zoom to an image / BACKWARD function.
4. DOWN / FORWARD: Go down one position in the current menu / rotate the current image
/ move the current view down when applying zoom to an image / FORWARD function.
5. PLAY/PAUSE: Show the selected image in full screen / execute the option
currently selected in the menu / start or pause the slideshow / reproduce, pause or
resume the files of audio and video / enter or exit from the current folder.
6. PREVIOUS: Show previous image / move the current view to the left when
applying zoom to an image / reduce value in the setting options menu / BACKWARD
function.
7. NEXT: Show next image / move the current view to the right when applying zoom to
an image / add value in the setting options menu / FORWARD function.
8. EXIT: Return to the previous menu o option.
9. Mounting holes on the back to fix the frame to the wall.
10. SDHC/SD/MS/MMC/XD memory card slot.
11. USB HOST: Mini USB port.
12. AC/DC power jack.
33
ENGLISH
2. MENU: Return to the memory menu / appear the options of “Copy file” and “Delete
file” from picture miniature, selected folder or selected file / appear the options of
“Rotate” and “Zoom” from the full screen picture / appear the options of “Set as
alarm” and “Delete file” from the selected file of audio.
REMOTE CONTROL
2
1
4
BGM
MENU
EXIT
OK
7
10
SETUP
13
VOL-
16
MUTE
3
5
6
9
8
12
11
ZOOM
15 14
ROTATE
18 17
VOL+
1. ON/OFF: Turn on-off the digital photo frame by standby mode.
2. BGM: Activate the background music.
3. MUTE: Sound Off / On.
4. MENU: Return to the memory menu / appear the options of “Copy file”and“Delete
file” from picture miniature, selected folder or selected file/ appear the options
of“Rotate” and “Zoom” from the full screen picture / appear the option of “Set as
alarm”from the selected audio file.UP: Go up one position in the current menu /
34
35
ENGLISH
rotate the current image / move the current view up when applying zoom to an image.
5. UP: Go up one position in the current menu / rotate the current image / move the
current view up when applying zoom to an image.
6. EXIT: Return to the previous screen (menu).
7. PREVIOUS: Show previous image / move the current view up when applying zoom
to an image / reduce value in the setting options.
8. OK: Show the selected image in full screen / execute the option currently selected in
the menu / start or pause the slideshow / reproduce, pause or resume the files of audio
and video / enter or exit from the current folder / enter or exit from the current folder.
9. NEXT: Show next image / move the current view to the right when applying zoom to
an image / add value in the setting options.
10. SETUP: Enter “Settings”menu.
11. DOWN: Go down one position in the current menu / rotate the current image /
move the current view down when applying zoom to an image.
12. PLAY/PAUSE: Show the selected image in full screen / execute the option
currently selected in the menu / start or pause the slideshow / reproduce, pause or
resume the files of audio and video.
13. VOL-: Volume up.
14. VOL+: Volume down.
15. ZOOM: Perform a zoom to the current image (up to 5 zoom levels are available).
16. BACKWARD.
17. FORWARD.
18. ROTATE: Rotate the current image 90º, 180º or 270º.
MAIN MENU
PHOTO.
MUSIC.
VIDEO.
EBOOK.
FILE EXPLORER.
CALENDAR.
SETTINGS.
POWER SOURCE
Your Energy™ Photo Frame M8 Ultra Slim is powered through the AC/DC 5V adapter
provided with the product. Please firstly connect the photo frame with the power
adapter then connect the power adapter with electrical outlet.
The remote control is powered by a CR2025 3V lithium battery that you can easily
replace when depleted by releasing the battery compartment in the back of the
remote control.
IMPORTANT: In case you will not use the digital frame for a few days, we recommend
unplugging the power electricity adapter from the socket.
36
SWITCHING ON / OFF
To power on your Energy™ Photo Frame M8 Ultra Slim just plug in the provided power
adapter to a 100-240V AC source.
IMAGE DISPLAY
IMAGE DISPLAY BY MINIATURES.
After switching on your Energy™ Photo Frame M8 Ultra Slim and choosing memory
option, the main menu will be displayed by default with the “Photo” option selected.
After pressing the PLAY/PAUSE button, the frame will show a mosaic view with the
miniatures of pictures loaded from the memory device currently connected to the
frame. You can modify this view to see all the pictures stored using the UP, DOWN,
PREVIOUS and NEXT buttons.
A mini menu for selection of “Copy file“ or “Delete file” will appear by pressing the
MENU button, you can use the UP and DOWN buttons to select and use the PLAY/
PAUSE button to confirm the operation. With the option of “Copy file”, you can copy
and save the selected picture into the internal memory of photo frame.
37
ENGLISH
To turn on or turn off your photo frame, simply press the ON/OFF button located on
the front side of the frame, or press the ON/OFF button from remote control.
IMAGE DISPLAY IN FULL SCREEN
From picture miniatures, you can view the currently selected image in full screen by
pressing PLAY/PAUSE button. When in full screen view mode, you can manually move
to the next pictures, using the PREVIOUS and NEXT buttons.
From the full screen image, a mini menu with options of “Rotate” and “Zoom” will
appear by pressing the MENU button, you can use the UP and DOWN buttons to select
and use the PLAY/PAUSE button to confirm the operation.
SLIDESHOW
To start the slideshow from the current picture you just have to press the PLAY/
PAUSE button again. You can also start the slideshow pressing the SLIDESHOW
button from the remote control. To pause or restart the slideshow mode, you can
press the PLAY/PAUSE button again.
Note: Only when slideshow mode is deactivated, it is possible to change the pictures
displayed manually by using the PREVIOUS / NEXT buttons. You can access other
functions too, such as zoom or rotate image.
Important: Do not leave the same image still for more than one day because you risk
damaging the TFT screen. We recommend changing the image at least once or twice a
day, or even better use slideshow mode with a high elapse time.
ZOOM
Press the ZOOM button to enlarge the current picture (the slideshow mode should
be deactivated). You can also press the MENU button, a mini menu will appear, which
you can select and confirm the “Zoom” option with the UP / DOWN buttons and the
38
ROTATE
Pressing the ROTATE button on the remote control or pressing the UP and DOWN
buttons on the frame will rotate the picture 90º, 180º and 270º clockwise (the
slideshow mode should be deactivated). You can also press the MENU button, a mini
menu will appear, which you can select and confirm the “Rotate” option with the UP /
DOWN buttons and the PLAY/PAUSE button. This change will only affect the current
picture and the next pictures shown will have the normal orientation.
VIDEO
You can access to this function from the main menu of your Energy™ Photo Frame
M8 Ultra Slim, by selecting the “VIDEO” option with the UP / DOWN and PLAY/PAUSE
buttons. After that, you will see a list of video files stored in the memory device (e.g.
pendrive or memory cards), with the indication of title, resolution, size and order of
each file. Pressing the UP and DOWN buttons for selecting file or folder and pressing
the PLAY/PAUSE button to play the video.
When playing the reproduction of video, you can visualize the playback indication by
pressing the MENU button. You can increase / decrease the volume by pressing the
VOL+ / VOL- buttons, and you can use the backward and forward functions to skip to
another video.
39
ENGLISH
PLAY/PAUSE button. The digital photo frame allows up to 5 zoom levels to let you see
any detail of the picture. Pressing UP, DOWN, PREVIOUS and NEXT buttons will show
different areas of the current picture in order to select the one we are interested in.
MUSIC
SELECT AND PLAY MUSIC
You can access to this function from the main menu of your Energy™ Photo Frame
M8 Ultra Slim, by selecting the “MUSIC” option with the UP / DOWN and PLAY/PAUSE
buttons. After that, you will see a list of audio files stored in the memory device (e.g.
pendrive or memory cards), with the indication of title, duration, size and order of
each file. Pressing the UP and DOWN buttons for selecting file or folder and pressing
the PLAY/PAUSE button to play the music.
SET ALARM WITH MUSIC
From the list of audio files, a mini menu will be shown by pressing the MENU button,
and then you can select the “Set as Alarm” option by pressing the UP / DOWN buttons
and the PLAY/PAUSE button. With this option, you can set an audio track as the
sound of alarm.
EBOOK
You can access to this function from the main menu of your Energy™ Photo Frame
M8 Ultra Slim, by selecting the “EBOOK” option with the UP / DOWN and PLAY/PAUSE
buttons. After that, you will see a list of files by TXT format stored in the memory
device (e.g. pendrive or memory cards), with the indication of title, size, creation date
and order of each file. Pressing the UP and DOWN buttons for selecting file or folder
and pressing the PLAY/PAUSE button to read the TXT files.
40
You can access to this function from the main menu of your Energy™ Photo Frame M8
Ultra Slim, by selecting the “FILE EXPLORER” option with the UP / DOWN and PLAY/
PAUSE buttons. You can explore the folders and files stored in the memory device
(e.g., pendrive or memory card). Pressing the UP / DOWN buttons for selecting file
or folder and pressing the PLAY/PAUSE button to reproduce the selected multimedia
files or for entering or exit from the folder.
Note: For the folders, only the name and order will be indicated.
DELETE A FILE (OR A FOLDER)
From the file list inside the option of VIDEO / MUSIC / EBOOK / FILE EXPLORER, a mini
menu will be shown by pressing the MENU button, where you can select and confirm
the “Delete file” option with the UP / DOWN buttons and the PLAY/PAUSE buttons.
CALENDAR
You can access this function from the main menu of your Energy™ Photo Frame M8
Ultra Slim, selecting the option “CALENDAR” by pressing the UP / DOWN and PLAY/
PAUSE buttons.
When entering this function, the current month calendar will be shown on the screen
with the current time indication, along with a slideshow using the pictures loaded
from the memory.
41
ENGLISH
FILE EXPLORER
SETTINGS
To modify the system settings just select the “SETTINGS” option from the main menu,
by using the UP / DOWN buttons and the PLAY/PAUSE button.
≥≥ Language: Shows the available languages for the different menus and information, and allows choosing the one we prefer.
≥≥ Photo sequence: : From this option it is possible to select the display order
between “Sequence” and “Random”.
≥≥ Boot mode: From this option it is possible to select the boot mode once turn on the
digital frame, the available options are “Slideshow”, “Music”, “Video”, “Calendar”
and “Choose Card”.
≥≥ Slide mode: From this option is possible to select the mode for slideshow in single
window, 3 windows or 4 windows. Therefore up to 4 independent pictures could be
displayed at the same time.
≥≥ Slide speed: From this option it is possible to choose the time each picture will be
shown in the slideshow mode before changing to the next picture. You can choose
3/5/15/30 seconds, 1/5/15/30 minutes or 1 hour.
≥≥ Photo effect: From this option it is possible to select the preferred effect for the
pictures between “Color”, “Mono” or “Sepia”.
≥≥ Transition effect: This option allows choosing the type of effect desired during
the transition between pictures when the slideshow mode is activated. There are 15
effects available and it is possible to alternate between all of them by choosing the
“Random” option.
42
justments modes:
* Auto Fit: The image is adjusted to display in the screen, respecting the original
proportions.
* Optimal: The image expands vertically and horizontally to fit the (full) screen,
respecting the original proportions and the screen resolution.
* Full: The image expands horizontally to fit the (full) screen.
≥≥ Music Play Mode: Allows choosing between the following 3 modes to play music:
“Repeat one time”, “Circular” and “No repeat”.
≥≥ Video Mode: Allows choosing between the following 3 modes to play video:
“Original”, “Auto-fit” and “Full”:
* Auto Fit: The image is adjusted to display in the screen, respecting the original
proportions and the screen resolution.
* Full: The image expands horizontally to fit the (full) screen.
≥≥ Display: When entering this option, you can modify the contrast, brightness, color
and tone by selecting the option with PLAY/PAUSE button and changing their value
with the PREVIOUS / NEXT buttons.
≥≥ Set time and date: Allows updating the time and date used by the system.
≥≥ Set time format: Allows setting the time format between 12 hours and 24 hours.
≥≥ Set alarm: Allows activate and deactivate alarm, you can set up to 2 different
alarms by 3 modes: One time, Every day and Free.
43
ENGLISH
≥≥ Image mode: Allows choosing between the following 3 automatic image ad-
≥≥ Auto ON / OFF: Allows choosing the time you desired for the automatic turning ON
/ OFF of digital photo frame.
≥≥ Format build-in memory: Allows format the build-in memory of digital photo frame.
≥≥ Reset settings: Allows resetting the digital photo frame to the default values.
USB HOST
Your Energy™ Photo Frame M8 Ultra Slim, as well as showing your favorite pictures
stored in SDHC/SD/MMC/MS/XD memory cards, can also load and display pictures
from USB devices such as pen drives. Just plug in the pen drive to the USB HOST
input located on the back side of the digital photo frame, the system will detect the
compatible image files stored.
TROUBLE SHOOTINGS
Why can’t the digital photo frame display my .JPG files?
Many digital cameras and image edition software add hidden data to the .JPG files.
These data can prevent your digital photo frame from loading the images. Try to
eliminate them by saving the file using a different name.
The memory card I am using is not recognized.
Make sure the memory card is fully inserted in the right direction. Also be reminded
that the photo frame is compatible with SDHC/SD/MMC/MS/XD memory cards only.
I can´t save or copy a file in the built-in memory of photo frame.
In this case, please firstly format the built-in memory of photo frame and then
process with the operation of saving or copying file.
44
WARRANTY
≥≥ Energy Sistem Soyntec SA is liable for any lack of conformity which exists at
This warranty covers any defects in workmanship or materials. This warranty
doesn’t cover any failure of the product due to accidents, misuse or alteration
made by an unauthorized person.
The special 36-months warranty is valid for the European Union. For other
countries, please refer to your specific legislation or your local distributor.
WARRANTY PROCEDURE
1. Visit the Support section at http://support.energysistem.com and select your product to
view the FAQ (Frequently Asked Questions), user manuals, drivers and updates available.
The solution to your problem is very likely to have been already published there.
You can check the availability of the user manual in your language at
http://www.energysistem.com/es-es/support/manuals
2. If you cannot find an appropriate solution in the Support section, you may send us your
enquiry or warranty service request by email: [email protected]
3. Alternatively, you may prefer to contact the distributor from which you purchased the
product, presenting the purchase receipt or invoice.
45
ENGLISH
the time the goods were purchased during a period of 36 months. Batteries are
excluded from the 36-month warranty, having a warranty period of 12 months.
Important: This warranty doesn’t cover any damage or loss to any data stored in the
product memory, therefore Energy Sistem’s Technical Service will not assume any
loss of the above mentioned information so it is recommended to make a backup of
your data and to remove any data or personal info from its internal memory before you
send the product, or to send it only with the original factory default values.
Specifications are subject to change without notice.
Trademarks. All companies, brands and product names are trademarks or registered
trademarks of their respective companies.
© 2012 by Energy Sistem®. All rights reserved.
46
Manufacturer Name: Energy Sistem Soyntec S.A.
09/02/2012
Address: Pol. Ind. Finestrat, C/.Calpe, 1 - 03509, Finestrat, Alicante (Spain)
Tel: 902 388 388
Fax: 902 119 034
NIF: A53107488
We declare under our own exclusive responsibility that the product:
Energy Sistem® Multimedia Photo Frame Energy™ Photo Frame M8 Ultra Slim.
Manufacturing country: China
Is in compliance with the essential norms and standards of the Directive 2004/108/
EC of the European Parliament and of the Council of December 15th 2004.
This symbol on the product or the instructions means that your electrical and
electronic equipment should be disposed at the end of life separately from your
household waste. For more information, please contact the local authority or
dealer where you purchased the product.
47
ENGLISH
DECLARATION OF CONFORMITY
96