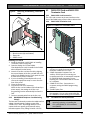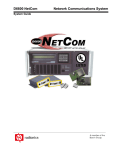
1
Conettix D6600/D6100i
Installation and Operation Guide
EN
Communications
Receiver/Gateway
Conettix D6600/D6100i | Installation and Operation Guide | Trademarks
Trademarks
Microsoft®, Windows®, Windows NT® are either
registered trademarks or trademarks of Microsoft
Corporation in the United States and/or other
countries.
Ademco® is a registered trademark of Alarm Device
Manufacturing Corporation.
2
Bosch Security Systems, Inc. | 9/08| 4998122704-04
Conettix D6600/D6100i | Installation and Operation Guide | Contents
.
Contents
1.0
2.0
3.0
3.1
3.1.1
3.1.2
3.1.3
3.1.4
3.2
3.2.1
3.2.2
3.2.3
4.0
4.1
4.1.1
4.1.2
4.1.3
4.2
4.2.1
4.2.2
4.2.3
5.0
6.0
7.0
7.1
7.2
7.3
7.4
7.5
7.6
7.7
8.0
8.1
8.1.1
8.1.2
9.0
9.1
9.1.1
9.1.2
9.2
Introduction 5
Emergency Procedures ............. 6
Card Functions and Locations........ 6
D6600........................... 6
Front Panel ....................... 6
Line Cards and Modules ............. 7
Rear View ........................ 8
Internal View ...................... 8
D6100i .......................... 9
Front Panel ....................... 9
Line Cards and Modules ............. 9
Back Plate........................ 9
D6600 Specific Cards............... 9
D6640/D6641 Line Cards and D6645 Line
Terminator Card ................... 9
D6640/D6641 LED Descriptions ....... 10
Card Installation................... 10
D6640/D6641Telephone Line Monitoring
Voltage ......................... 11
D6610 CPU Card and D6615 CPU
Terminator Card .................. 11
D6610 CPU Card Connection ......... 11
D6615 CPU Terminator Card ......... 11
Card Removal and Replacement ...... 11
Power Supply Modules (D6600 Only).. 12
Printer Specifications ............. 12
Installation
12
All Installations ................... 12
UL Installations ................... 12
Burglar Alarm Applications ........... 13
Fire Alarm Applications ............. 13
Installation Check List .............. 13
Rack Mount Instructions............. 14
Removing Power to the Receiver ...... 14
Standby Power................... 14
Connecting External Batteries ........ 14
Minimum Standby Battery ........... 15
Minimum Standby UPS Power ........ 15
Input and Output Ports ............ 16
UPS Monitoring through CPU Programmable
Input Ports ...................... 16
Input Default Connection Configuration .. 16
Input Reverse Connection Configuration . 16
Automation Link Monitoring (COM3) through
CPU Programmable Output Ports ...... 17
Bosch Security Systems, Inc. | 9/08| 4998122704-04
10.0 D6600/D6100i Operation ............. 18
10.1
Process Flow .................... 18
10.1.1 Receiver Handshake and Kiss-Off ..... 18
10.1.2 Message Verification ............... 18
10.1.3 Handshake Tone Compatibility ........ 18
10.1.4 Message is Received............... 18
10.1.5 How Call Groups Work ............. 18
10.1.6 Buzzer Operation ................. 19
10.1.7 Reporting Devices: Primary and Secondary
.............................. 19
10.2
Normal Operation Mode............. 19
10.3
Operating in Manual Mode ........... 20
10.4
Keypad Menu Operation ............ 20
10.4.1 Log In .......................... 20
10.4.2 Using the Keypad ................. 20
10.4.3 Event Buffer Display ............... 21
10.4.4 Current System Trouble Display ....... 21
10.4.5 Software Version Display ............ 21
10.4.6 Keypad Functions ................. 21
10.4.7 Skip Current Automation Event ....... 22
10.4.8 Line Test........................ 22
10.4.9 Clear Pending Events .............. 23
10.5
Busy Seconds (Line Busy) Reports..... 23
10.6
Two-Way Audio................... 24
10.6.1 Enhancements and Changes ......... 24
10.6.2 Two-Way Audio Modes of Operation ... 25
11.0
Network Communications .......... 26
12.0 No Data Received Reports ........... 27
12.1
Description ...................... 27
12.2
No Data Received ................. 27
12.3
Data Error ....................... 27
12.4
Wrong Data ..................... 27
13.0
Using the Central Station Automation
System with the Receiver .......... 28
14.0
Central Station Tips............... 29
14.1
Back-up Receiver ................. 29
14.2
Computer Interface ................ 29
14.3
D6200 Programming Software ........ 29
14.4
Telephone Lines .................. 29
14.4.1 Emergency Ringers ................ 29
14.4.2 Rotary Lines ..................... 29
14.5
Proper Ground ................... 30
14.6
Radio Frequency Interference ........ 30
14.7
Test Communicator ................ 30
3
Conettix D6600/D6100i | Installation and Operation Guide | Contents
15.0
16.0
17.0
Troubleshooting Guide ............ 31
Specifications 34
Service Information ............... 36
Figures
Figure 1:
Figure 2:
Figure 3:
Figure 4:
Figure 5:
Figure 6:
Figure 7:
Figure 8:
Figure 9:
Figure 10:
Figure 11:
Figure 12:
Figure 13:
Figure 14:
Figure 15:
Figure 16:
Figure 17:
Figure 18:
Figure 19:
4
D6600 Communications
Receiver/Gateway (Front View) ..... 6
D6600 Communications
Receiver/Gateway (Rear View)...... 8
Receiver Card Placement.......... 8
D6100i Communications Receiver/
Gateway (Front View) ............ 9
D6100i Communications Receiver/
Gateway (Rear View) ............. 9
D6640/D6641 Line Card........... 9
D6645 Line Terminator Card ....... 9
D6640/D6641 LED Descriptions .... 10
Removing and Installing Terminator Card
............................ 11
D6615 CPU Terminator Card ...... 11
Location of D6100i Battery Terminals and
D6600 Battery Connector ......... 13
D6600 Back Panel Showing Input/Output
Ports........................ 16
D6100i Back Panel Showing Input/Output
Ports........................ 16
Input Wiring for Reverse Configuration 16
Conettix Network System Connection
Diagram - C900TTL-E/C900V2 and Any
Control Panel ................. 26
Conettix Network System Connection
Diagram - D9133TTL-E/DX4020 and
Bosch Control Panels............ 27
NO DATA RECEIVED Message .... 27
Receiver System – Direct Connect .. 28
Receiver System – Standard/Network
Automation ................... 29
Tables
Table 1:
Table 2:
Table 3:
Table 4:
Table 5:
Table 6:
Table 7:
Table 8:
Table 9:
Table 10:
Table 11:
Table 12:
Table 13:
D6600/D6100i Supported Communication
Formats ...................... 5
Power LED Indications............ 6
System Trouble LED ............. 7
D6600 Line Cards and Modules ..... 7
Parameters to be set ........... 13
Battery Voltage Display .......... 15
Calculating Standby Current for the
D6600 ...................... 15
Standby Current for the D6100i .... 15
Minimum Standby Battery Chart .... 15
Terminator Card Configuration ..... 17
Communication Links Test Outputs . 21
Hardware Troubleshooting Guide ... 31
D6600/D6100i Specifications ...... 34
Bosch Security Systems, Inc. | 9/08| 4998122704-04
Conettix D6600/D6100i | Installation and Operation Guide | 1.0
Introduction
.
1.0 Introduction
The Conettix D6600/D6100i Communications
Receiver/Gateway offers several unique features:
• Modular construction with plug-in circuit boards
for quick, easy service
• Open structure PC platform for future
development
• Programmable formatting for receiving data from
most major brands of digital communicators
• Easy and inexpensive updating using modular
cards (D6600 only)
• Convenient software downloads
• Superior digital signal processing to reduce noise
and signal loss
• User interface module with LED indicators
• Front panel keypad
• Alphanumeric liquid crystal display (LCD)
The D6600 metal enclosure contains several modular
cards:
• Conettix D6610 Central Processing Unit (CPU)
Card
• Connetix D6615 CPU Terminator Card
• Conettix D6640 or D6641 Telephone Line Card
that supports four telephone line interfaces
• Connetix D6645 Telephone Line Terminator Card
Up to seven additional telephone line cards along with
seven additional line terminator cards can be installed
in the D6600 to expand the receiver’s capacity to 32
receiving lines.
Table 1:
D6600/D6100i Supported
Communication Formats
Acron Super Fast
Ademco® Slow
Ademco Express
Ademco High Speed
Ademco Contact ID
CFSK Bell/V.21*
FBI Superfast
Franklin/Sescoa
ITI*
Radionics BFSK
Radionics Hex
Radionics Modem II
Radionics Modem IIe/IIIa2
RB2000 (D6641 only)*
ROBOFON*
Scantronics Scancom*
Seriee FSK/DTMF*
Sescoa Super Speed
SIA 8/20/300
SIA ADT*
SIA V.21*
Silent Knight Fast
Silent Knight FSK
Standard Pulse Formats
Sur-Gard DTMF
Telim*
Veritech FSK
VONK (D6641 only)*
* Not investigated by UL.
Use a printer to permanently record date, time, group
number or transmission format and line number,
account number, receiver number, and event by area,
zone, and point. The printer tape and the
D6600/D6100i LCD display show other receiver
status messages such as software revision levels of
the CPU Card.
Program the D6600/D6100i using the front panel
keypad or through the COM4 port with the D6200
Programming Software package.
The Conettix D6600 and D6100i support data network
communications including an account database
capacity of up to 3200 accounts with the optional
Conettix D6201 IP Security Key. Refer to Section
11.0 Network Communications on page 26 for more
detailed information.
The D6600/D6100i works with the following Bosch
Security Systems, Inc. control panels (referred to
throughout this manual as “Bosch control panels”):
• D9412GV2
• D9412
• D7412GV2
• D7412
• D7212GV2
• D7212
• D9412G
• D9112
• D7412G
• D7212G
Bosch Security Systems, Inc. | 9/08| 4998122704-04
5
Conettix D6600/D6100i | Installation and Operation Guide | 2.0
2.0 Emergency Procedures
Section 17.0 Service Information on page 36 of this
guide contains a Service Information form. Keep this
form current and accessible to central station
personnel at all times in case of emergency.
If your D6600/D6100i becomes inoperable or
experiences trouble receiving signals:
1. Notify your supervisor.
2. Refer to Section 15.0 Troubleshooting Guide on
page 31.
3. Contact Bosch Security Systems, Inc. at
(800) 289-0096 for assistance if you have a
receiver spares package and need to replace a
circuit card or module.
The AC/DC Power Supply Module and
DC/DC Power Supply Module for the
D6600 are not field serviceable. Contact
Bosch Security Systems, Inc. for
service.
Disconnect power to the receiver before
removing the CPU or CPU terminator
card.
Before Calling
1. Have this guide nearby and opened to Section
15.0 Troubleshooting Guide on page 31.
2. Have your spares package, the D6200
Programming Software, and the D6600/D6100i
Program Entry Guide (P/N: 4998122702) nearby.
3. Know the location of the telephone line jacks for
the receiver.
4. Know the telephone numbers to the receiver’s
telephone line cards.
5. Know the exact nature of the problem you are
experiencing such as reports received, LEDs lit,
or Operator Alert Buzzer sounded.
6. Have the Service Information form nearby
(page 36).
Emergency Procedures
3.0 Card Functions and
Locations
3.1
D6600
3.1.1
Front Panel
Figure 1:
D6600 Communications
Receiver/Gateway (Front View)
2
1
1 – LCD - Shows up to 80 characters of
information (two lines of up to 40 characters
each)
2 – Keypad - The D6600 has a 20-button keypad.
Table 2 and Table 3 on page 7 show and define the
D6600/D6100i POWER and SYSTEM TROUBLE
LEDs.
Table 2: Power LED Indications
Present
AC
On
X
Power LED Status
Batter
y
Green
Solid
Clear
Blinkin
g
X
X
X
Off
X
X
X
X
6
Bosch Security Systems, Inc. | 9/08 | 4998122704-04
Conettix D6600/D6100i | Installation and Operation Guide | 3.0
Card Functions and Locations
.
Table 3: System Trouble LED
System Trouble LED Status
Solid Red
Clear
No System Trouble
Any System Trouble*
*
Refer to Appendix B: D6600/D6100i Internal Messages in
the D6600/D6100i Computer Interface Manual
(P/N: 4998122703). The following items cause system
trouble. Depending on the supervision setting, the items
indicated by ** might cause system trouble.
Battery Missing**
UPS AC Fail
Battery Bad**
UPS Battery Low
AC Fail
System Temperature
High
3.1.2
External Printing Error**
Line Fault**
COM# Error**
Line Card Trouble**
COM3 Trouble**
Line Cards and Modules
Table 4: D6600 Line Cards and Modules
Name
Telephone
line card
Model
D6640
Telephone
line card
D6641
CPU card
D6610
Power
supply
modules
Telephone
line
terminator
card
D6630
and
D6631
D6645
CPU
terminator
card
D6615
Description
Up to eight line cards can be
installed in one D6600 Receiver, for
up to 32 telephone line connections.
Functions like the D6640. Includes
improved Public Switched
Telephone Network (PSTN)
processing, additional memory for
future enhancements, and single
firmware upgrade package.
The D6600 uses one CPU card. The
CPU card takes the incoming
information from the line card and
routes the information to an
automation port, the LCD on the
front of the receiver, and an external
printer.
The power supply modules regulate
the power used by the D6600.
These are not field serviceable.
Located behind the line card, the
tele-phone line terminator card
isolates and protects the line card
against out-side voltage surges that
might come over the telephone line.
Each line card must have a line
terminator card.
Located behind the CPU card, the
CPU terminator card provides the
D6600 with two serial ports (COM3
and COM4), a parallel port (parallel
printer), and a general I/O port (I/O).
The serial ports can be used for
computer automation, PC
connection for programming, or a
network connection with a D6680.
Bosch Security Systems, Inc. | 9/08| 4998122704-04
7
Conettix D6600/D6100i | Installation and Operation Guide | 3.0
3.1.3
Card Functions and Locations
Rear View
The D6600 has input and output pin connector sockets for up to eight line cards, network option (if installed),
and one CPU card. It also has slots for connecting these cards to their corresponding terminator cards.
Figure 2:
D6600 Communications Receiver/Gateway (Rear View)
1
2
3
4
Bosch Security Systems
Fairport, NY
USA
1
2
3
4
B
A
T
T
E
R
Y
Input:
100 - 120/
220 - 240V~
50 - 60 Hz
2.5 Amps
1 – Blank plate and location of optional installed
Conettix D6672 COM1 Expansion Kit
2 – Conettix D6615 CPU Terminator Card
3.1.4
3 – Card slot covers
4 – Conettix D6645 Line Terminator Card
Internal View
Figure 3:
Receiver Card Placement
1
9
2
3
5
4
8
7
1 – Conettix D6645 Telephone Line Terminator
Card
2 – Back plate
3 – Conettix D6615 CPU Terminator Card
4 – D6630 AC/DC Power Supply (not serviceable)
8
6
5–
6–
7–
8–
9–
Conettix D6610 CPU Card
D6631 DC/DC Power Supply (not serviceable)
Card guides
Conettix D6640/D6641 Telephone Line Card
Direction of receiver front
Bosch Security Systems, Inc. | 9/08 | 4998122704-04
Conettix D6600/D6100i | Installation and Operation Guide | 4.0
D6600 Specific Cards
.
3.2
4.0 D6600 Specific Cards
D6100i
The difference between the D6100 and
the D6100i is the D6100i has a built in
Ethernet connection.
3.2.1
4.1
Front Panel
Figure 4:
D6640/D6641 Line Cards and D6645
Line Terminator Card
Figure 6:
D6640/D6641 Line Card
D6100i Communications Receiver/
Gateway (Front View)
1
2
1 – Liquid crystal display (LCD) - Displays up to
80 characters of information (two lines of up to
40 characters each)
2 – 23-button keypad
Table 2 on page 6 and Table 3 on page 7 define the
D6600/D6100i POWER and SYSTEM TROUBLE
LEDs.
3.2.2
Line Cards and Modules
The D6100i does not use the same line cards and
modules as the D6600. These functions are built in.
3.2.3
3
Back Plate
Figure 5:
D6100i Communications Receiver/
Gateway (Rear View)
1
1
1 – 48-pin connection to D6645 Line Termination
Card
2 – 40-pin connection to D6600 Back Plate
3 – LEDs (refer to Figure 8 on page 10)
Figure 7:
D6645 Line Terminator Card
1
2
2
3
8
7
6
1 – Telephone line
connections
2 – Input/output ports
3 – COM4 RS-232 port
4 – COM3 auxiliary
RS-232 port
5
4
3
2
5 – Parallel port
connection
6 – Ethernet port
(D6100i only)
7 - USB port
8 – Power connection
terminal block
Bosch Security Systems, Inc. | 9/08| 4998122704-04
1 – 48-pin connection to D6640/D6641 Line Card
2 – Alignment Guide - Stabilizes the connection
and acts as a guide for connecting the
terminator card to the line card.
3 – Telco Line Jacks - Standard telephone lines
connect to the RJ11C jacks.
9
Conettix D6600/D6100i | Installation and Operation Guide | 4.0
4.1.1
D6640/D6641 LED Descriptions
The LED is active until the system acknowledges the
entire transmission and the telephone line is ready to
receive signals.
Figure 8:
D6640/D6641 LED Descriptions
4.1.2
D6600 Specific Cards
Card Installation
Discharge static electricity from your
body by touching the receiver’s internal
frame (unpainted section) before
handling any circuit card.
Installing Terminator Cards
1
1
2
2
3
3
4
OL/LF
4
1 – Flashes green when an incoming call rings.
2 – Glows green when the receiver is online with
an incoming call.
3 – Glows red when the line card detects a line
fault condition.
4 – LED is off and ready to receive signals or is
disabled in the software.
Refer to Figure 9 on page 11 when performing the
following steps:
1. Remove the two bracket screws that secure the
terminator card (or card slot cover, if this is a new
terminator card installation) to the back of the
D6600 chassis.
2. If you are removing an existing terminator card,
open the display door on the front of the D6600
and pull the line card slightly out, then re-insert.
This will push the existing terminator card out the
back of the D6600 chassis.
3. Remove the existing terminator card.
4. Insert the new terminator card in the same slot by
aligning the top and bottom of the terminator card
with the card guides in the D6600 chassis.
5. Slide the card into the D6600 chassis, wiggling
the card as you push until the card is flush with
the back of the chassis.
6. Secure the bracket screws at the top and bottom
of the terminator card. Ensure that the screws are
tight.
7. Repeat this process for all additional terminator
cards.
8. Connect appropriate telephone line cords to the
telephone line jack on the terminator cards.
9. Continue with Installing Line Cards on page 11.
Even if you are replacing an existing
terminator card, you must proceed to
Installing Line Cards on page 11.
10
Bosch Security Systems, Inc. | 9/08 | 4998122704-04
Conettix D6600/D6100i | Installation and Operation Guide | 4.0
D6600 Specific Cards
.
Figure 9:
Removing and Installing Terminator
Card
4
4.2
D6610 CPU Card and D6615 CPU
Terminator Card
4.2.1
D6610 CPU Card Connection
The CPU card connects to the user interface on the
front of the D6600 using a 50-pin ribbon cable socket.
4.2.2
2
D6615 CPU Terminator Card
Figure 10: D6615 CPU Terminator Card
3
2
1–
2–
3–
4–
1
1
Terminator Card (D6645 shown)
Bracket screws (top and bottom)
Empty slot
D6600 chassis
Installing Line Cards
1. Install the terminator card(s) (refer to Installing
Terminator Cards on page 10).
2. Open the display door on the D6600.
One telephone line card is installed in the D6600
when shipped from the factory.
3. Insert the new line card into the slot by aligning
the top and bottom of the line card with the card
guides in the D6600 chassis. Firmly push the card
to make sure it is fully connected.
4. If you are installing a new telephone line card,
remove the appropriate snap-in covers from the
front of the panel.
5. Close the front panel.
6. Program the line card if necessary.
When the line card is initialized (as indicated by a
printer report), the settings in the line card
programming section automatically load into the
card.
7. Connect communication lines to the line card.
4.1.3 D6640/D6641Telephone Line Monitoring
Voltage
The line card continuously monitors the telephone line
voltage. Normal operating voltage ranges from
1.8 VDC to 2.5 VDC. Any voltage above 2.5 VDC
causes the line to appear good (restoral) and an
indication appears if any voltage is below 1.8 VDC.
Bosch Security Systems, Inc. | 9/08| 4998122704-04
2
3
4
1 – Alignment Guide - Stabilizes the connection
and acts as a guide for connecting the
terminator card to the CPU card.
2 – COM3 Automation Computer Port - An
auxiliary RS-232 port for connecting to a
computer terminal or an automation computer
for SIA/6500 Mode Automation Format
reporting use a null-modem cable to connect
to a computer.
3 – COM4 RS-232 Port - Connection to a
computer running the D6200 programming
software.*
4 – Parallel Printer Port
*
Use a null-modem cable to connect directly to
the computer. You can also connect this port
to a D6680 for communicating over a network.
4.2.3
Card Removal and Replacement
Remove power to the D6600 before
removing, replacing, or installing the
CPU card (D6610) or CPU terminator
card (D6615).
11
Conettix D6600/D6100i | Installation and Operation Guide | 5.0
Removing the CPU Card
1. Remove power to the receiver (refer to Section
7.7 Removing Power to the Receiver on
page 14).
2. Carefully grasp the plastic grip on the CPU card.
Slide it 2 in. to 3 in. (50 mm to 75 mm) out of the
enclosure.
3. Unplug the 50-pin ribbon cable connecting the
user interface card to the CPU card. Be careful
not to bend the board when disconnecting this
cable. Grasp the plastic plug connected to the
CPU board at the end of the cable and gently pull
it away from the circuit board.
4. Pull the CPU card straight out of the card guide.
Replacing the CPU Card
1. Remove power to the receiver (refer to Section
7.7 Removing Power to the Receiver on
page 14).
2. Remove the defective CPU card from the
enclosure.
3. Align the top and bottom of the CPU card with the
card guides. Slide the card into the enclosure,
leaving 2 to 3 in. (50 mm to 75 mm) out to
connect the ribbon cable.
4. Connect the ribbon cable to the CPU card. Orient
the cable so the red stripe is up and slide the card
the remaining distance into the enclosure.
5. Restore power to the receiver.
5.0 Power Supply Modules
(D6600 Only)
The AC/DC (D6630) and DC/DC
(D6631) Power Supply Modules are not
field serviceable.
Contact the Bosch Security Systems,
Inc. National Repair Center at (800)
289-0096 for repair or replacement.
6.0 Printer Specifications
Parallel printer connection: Use the DB25 port on the
back of the D6600/D6100i rear panel to connect to a
standard parallel text printer.
Models: Safecom SC9002 (Star 300) requires
82.6 mm. (3.25 in) wide paper.
Power Supply Modules (D6600 Only)
7.0 Installation
7.1
All Installations
Install the D6600/D6100i Communications
Receiver/Gateway according to the National Electrical
Code (NEC), NFPA 70, the National Fire Alarm Code,
NFPA 72, and the local Authority Having Jurisdiction
(AHJ).
7.2
UL Installations
UL Standard 827 requires that any
central station listed for NFPA 72,
Central Station Protective Signaling, UL
Central Station Burglary or Police
Station Connect Service must have a
redundant receiver on the premises to
use if the primary receiver malfunctions.
The D6640 is not intended for new
installations, but is suitable for existing
or retrofit sites.
A UPS is required for UL Fire Applications
when using the D6600.
For UL installations of the D6100i, the
GlobeTek, Inc. Modem DA-42-18L
transformer shall be used.
The D6100i must be used with an UL
Listed PSDN compatible automation
system.
A "COMM FAIL" message may indicate
a compromise attempt.
To meet requirement UL 1610, Section
63.1: The number of separate signals on
a single channel are limited to 1000.
Exception: There is no limit to the
number of signals if the central-station
equipment is completely duplicated by
standby equipment and a switchover
can be accomplished in not more than
90 seconds without loss of signals
during this period.
Network Communication - The model D6100i receiver
has been evaluated for communication over a Third
Party Data Networks for the following Services when
used with a compatible control unit:
1. Standard Line Security for Central Station Burglar
Alarm Systems per UL 1610 and UL 365.
12
Bosch Security Systems, Inc. | 9/08 | 4998122704-04
Conettix D6600/D6100i | Installation and Operation Guide | 7.0
.
2. Level III Line Security for ULC-S303 and ULCS304.
3. Phone lines have not been evaluated for line
security.
7.3
Burglar Alarm Applications
For commercial fire and burglary,
proprietary and central station
application that are using BIS, the BIS
application shall be installed on the
Listed Bosch model B-010 computer
with Bosch model B-008 monitor and
SC9002 printer connected.
In order to implement the Standard or Encrypted Line
Security over the private or public IP networks, the
firmware version must be 1.8.2.1. The firmware was
evaluated for 128-bit encryption.
Supervision signals between premises alarm
equipment and supervising station alarm receiver
equipment shall be managed by the supervising
station receiving equipment and not an intermediary
network agent, device or service.
UL Standard 827 also states that you must be able to
switch from one receiver to a standby receiver within
30 sec, and repair the faulty receiver and return it to
service within 30 min.
NFPA 72 requires that if more than eight telephone
lines are used, the receiving equipment must be
completely duplicated so switchover can be
accomplished in 30 sec (per NFPA 72-1996
4-5.3.2.2.1.1).
Table 5:
Parameter to be
Set
Location in
Operation &
Inst. Manual
2.2.21 Buzzer
Set to "1" to
sound on all
events. May be
set to "3" when
used with an
automation
system to
sound only
when the
automation link
fails.
Page 19,
section 10.1.6
Set to "1" to
print all events.
May be set to
"3" when used
with an
automation
system.
Page 19, 10.1.7
2.2.34 Battery
Supervision
Set to "1" to
activate.
Page 14, 8.0
3.1.2.1 Phone
Supervision
Set to "1" to
enable.
Page 11, 4.1.3
2.2.33 External
Parallel Printer
Figure 11: Location of D6100i Battery
Terminals and D6600 Battery
Connector
D6100
1
2
D6600
Bosch Security Systems
Fairport, NY
USA
1
Parameters to be set
Programming
Item (location in
Prog. Manual)
Installation
B
A
T
T
E
R
Y
B
A
T
T
E
R
Y
2
3
4
Input:
100 - 120/
220 - 240V~
50 - 60 Hz
2.5 Amps
Receivers are not shown to scale.
Install the D6600/D6100i according to UL Standard
827 for Central Station Burglar Alarm Systems. Use in
a central station that has backup AC power (per UL
827) to supervise certificated accounts.
Terminals for connection of external batteries are on
the rear of the receiver (Figure 11).
7.4
The D6600/D6100i can be used for Central Station
Protective Signaling when it is installed and used in
compliance with NFPA 72 and ANSI/NFPA 70.
Installation limits for digital alarm communicator
receivers (DACR) are under the local AHJ.
7.5
Bosch Security Systems, Inc. | 9/08| 4998122704-04
Fire Alarm Applications
Installation Check List
1. Check each receiver card to see that it is correctly
positioned in the card guides at the top and
bottom of the enclosure. Also confirm that
connections did not loosen during shipment
(D6600 only).
2. Ensure that the earth ground is connected and
grounded through the AC inlet.
3. If you are installing additional line cards, install
the terminator cards now (D6600 only).
13
Conettix D6600/D6100i | Installation and Operation Guide | 8.0
4. After installing additional line terminator cards,
install the line cards (refer to Section 4.1.2 Card
Installation on page 10).
5. You might also want to install the line terminator
card(s) from your spares package(s). If there is a
malfunction, you can quickly switch over to the
replacement card (refer to Section 4.1.2 Card
Installation on page 10).
You can install spare line terminator
cards. Do not install spare line cards.
Do not connect the D6600/D6100i to an
outlet controlled by a switch.
7.7
Do not try to restart the D6600/D6100i
with a fully discharged battery.
Reconnect after you apply power. To
prevent deep battery discharge, use a
D135A Low Battery Cutoff Module.
Refer to the D135A Installation Guide
(P/N:
74-06499-000) for more information.
If programmable Output 1 or 2 is
activated by automation failure, you
cannot clear Output 1 or 2 by pressing
the [ACKNOWLEDGE] key.
The D6100i was tested by UL at
120Vac, 60 Hz.
Ensure that a switch does not control
the outlet.
10. Turn the D6600 power switch on. The D6100i
starts as soon as you plug in the AC Transformer.
11. Set the calendar and clock to the correct date and
time and program the necessary options.
12. Ensure that the communication formats are
correct by having communicators send test
reports to each line connected to the receiver.
7.6
Rack Mount Instructions
Rack mounting hardware is included with the D6600,
and is available as an option with the D6100i
(D6100i RMK). When mounted in a rack, plug the
D6600 AC cord or the D6100i AC transformer into an
outlet inside the rack only if the outlet is wired
according to Article 760 of the NEC. Rack mounting is
required (per NFPA 72, 1-5.2.5.2) to meet the
mechanical protection requirement when using the
type of AC cord provided with the D6600. It is also
required that a UL Listed rack for fire protective
service be provided when used in UL Listed central
stations.
UL requires rack mounting of the D6100i
to meet grounding requirements.
14
Removing Power to the Receiver
1. Remove the battery power connection.
2. Turn off the AC power on the D6600 or unplug
the D6100i AC transformer.
3. Unplug the AC cord from the outlet.
6. Connect four or six conductor telephone cord(s)
to the RJ11C jack(s) of the desired telephone
line(s). Plug the other end of the modular
telephone cord(s) into the telephone jack on the
appropriate line terminator card(s).
7. Connect the appropriate country-specific AC
transformer wiring leads to the AC terminals on
the rear of the D6100.
8. Plug the AC cord (D6600 only) into a correctly
wired 120 VAC, 60 Hz or 220 VAC, 50 Hz outlet
(standard AC outlet).
9. Plug the AC transformer into the correctly wired
wall receptacle that matches the voltage of the
transformer.
Standby Power
8.0 Standby Power
During a loss of AC power, the receiver automatically
switches to standby power. External batteries or an
uninterruptible power supply (UPS) provides standby
power. As long as there is adequate standby power,
the receiver’s operation is not interrupted, even if the
power loss occurs during signal processing. When
power supervision is enabled and a loss of AC power
occurs, the primary reporting devices (such as
printers and computers) show AC FAIL and the
D6600/D6100i power indicator starts blinking. When
AC power restores, the power indicator stops blinking
and reporting devices show AC RESTORE.
8.1
Connecting External Batteries
Do not connect an external battery
charger to the D6600/D6100i or its
battery.
Use the terminal on the rear panel to connect an
external DC power source. During AC power outages,
the external DC source supplies power to the
receiver. Use a 12 VDC lead-acid battery for external
backup power.
Only use approved stationary standby batteries for UL
applications. Battery wiring must run from the receiver
through the UL Listed rack, exit the rack through a
conduit connection, and terminate at a UL Listed
battery enclosure suitable for the size and number of
batteries used for UL applications.
Bosch Security Systems, Inc. | 9/08 | 4998122704-04
Conettix D6600/D6100i | Installation and Operation Guide | 8.0
Standby Power
.
Table 6: Battery Voltage Display
Battery Voltage
Display during
AC power
outage
Above 11.5 V
11.5 V to 10.2 V
Below 10.2 V
Battery OK
Battery Low
Battery Bad
Display if no
battery when
AC power is
restored
Battery
Missing
Table 7: Calculating Standby Current for the D6600
Device
Qty
12 V Battery Standby
Current
D6600 (one D6640/ D6641/D6645
Card)
Additional D6640/ D6641/D6645
Cards
Additional D6650/D6655 Cards
1
800 mA
D6672 COM1 Adapter
800 mA
210 mA x Qty (2 to 7)
300 mA x Qty (1 to 8)
10 mA (if installed)
Total Standby Current:
The standby current required for the D6600 depends
on the number of optional cards installed in the
receiver. Use Table 7 to calculate the D6600 standby
current. The standby current required by the D6100i
is listed in Table 8.
Table 8: Standby Current for the D6100i
12 V Battery Standby
Current
330 mA
UPS AC Standby Current
8.1.1
350 mA
350 mA
35 mA x Qty (2 to
7)
50 mA x Qty (1 to
8)
2 mA (if installed)
Total UPS
Current:
Capacity
4 Ah
800
400
7 Ah
1400
700
8 Ah
1600
800
10 Ah
2000
1000
12 Ah
2400
1200
14 Ah
2800
1400
18 Ah
3600
1800
Includes 20% battery derating storage factor
130
230
265
330
400
465
600
18 Ah batteries are required to meet 24
hour standby requirements.
180 mA
18 Ah batteries are required to meet 24
hour standby requirements.
UPS AC Standby Current
8.1.2
Minimum Standby UPS Power
The minimum UPS power required (in watts) = Total
UPS current x 120 (voltage) x required hours of
standby + 20% (storage).
Minimum Standby Battery
Table 9 shows the maximum standby current for
common rechargeable battery capacities at 4-hour,
8-hour, and 24-hour standby periods. If the standby
current is larger than the value listed, you must use
the next larger capacity battery.
Table 9: Minimum Standby Battery Chart
Rechargeable
Battery
Maximum Standby Current (mA)
4 hr
8 hr
24 hr
Bosch Security Systems, Inc. | 9/08| 4998122704-04
15
Conettix D6600/D6100i | Installation and Operation Guide | 9.0
9.0 Input and Output Ports
Figure 12: D6600 Back Panel Showing
Input/Output Ports
Bosch Security Systems
Fairport, NY
USA
1
2
6
3
1
2
3
4
B
A
T
T
E
R
Y
5
Input and Output Ports
• UPS Battery OK (restore) – contacts closed
• UPS Battery Low input – contacts open
You can apply other output sources to the input wiring
as long as you follow these guidelines:
• The maximum input voltage allowed without
causing damage to the input is 24 VDC.
• For UPS “Battery OK” (restore), the input range
must be between 0 V and 1 V.
• For UPS “Battery Low,” the input range must be
between 3 V and 24 V.
The programmable input voltage range
is undefined for input voltages between
1 V and 3 V. This might cause
unexpected results such as toggling
between “Battery Low” and “Battery
OK.” The input should be connected to
logic level outputs.
4
Input:
100 - 120/
220 - 240V~
50 - 60 Hz
2.5 Amps
1 – Output 1
2 – Output 2
3 – Input 2
4 – Ground 1
5 – Ground 2
6 – Input 1
9.1.2
Figure 13: D6100i Back Panel Showing
Input/Output Ports
1
2
6
1 – Ground 1
2 – Input 1
3 – Output 1
9.1
5
If the input must be the opposite polarity for correct
operation, place an external transistor circuit between
the UPS output signal and the D6600 I/O input
(Figure 14).
3
1
2
4
4 – Output 2
5 – Input 2
6 – Ground 2
Follow these guidelines for correct operation:
• The maximum input voltage allowed without
damaging the input is 24 V.
• UPS Battery OK (restore) input range from the
UPS operates between 5 V and 24 V.
• UPS Battery Low input range operates between
0 V and 0.5 V
Figure 14: Input Wiring for Reverse
Configuration
4
UPS Monitoring through CPU
Programmable Input Ports
Use the CPU programmable input port to connect the
external UPS to the D6600/D6100i for power
monitoring. Connect the monitoring port from the UPS
to matching pins on the D6600/D6100i CPU
Programmable Input/Output port (Figure 12). Wiring
must run from the receiver through the UL Listed
rack, exit the rack through a conduit connection, and
terminate at the external UPS for UL applications. Set
up the D6600/D6100i from Menu 2.2.27 CPU
Programmable Input 1 for Input 1; Menu 2.2.28
CPU Programmable Input 2 for Input 2. Refer to the
D6600/D6100i Program Entry Guide
(P/N: 4998122702) for more information.
9.1.1 Input Default Connection Configuration
• The I/O ports work with dry contact outputs.
• The open circuit input voltage on the input
measures between 9 V and 12 V.
16
Input Reverse Connection Configuration
5
1
2
3
1–
2–
3–
4–
5–
From UPS Battery OK signal 5 to 24 V
22 k to 39 k
Battery Low signal 0 to 0.6V
To I/O input
Any general purpose NPN transistor
Bosch Security Systems, Inc. | 9/08 | 4998122704-04
Conettix D6600/D6100i | Installation and Operation Guide | 9.0
Input and Output Ports
.
Operating the input as an analog input
between 0.5 V and 5 V might cause
abnormal results. This input state is not
defined and might change expected
results
Reverse configuration is not for use in
UL Listed applications.
9.2
Automation Link Monitoring
(COM3) through CPU
Programmable Output Ports
The output connections on the I/O port have an open
collector transistor output that can activate an
external sounder or light if the automation system
fails.
Configure external devices using the
specifications listed in Table 10. Outputs
are not verified by UL.
Table 10: Terminator Card Configuration
Radionics D6615 CPU
Terminator Card
Solid state output provides
a current sink to common
(-)
Maximum load is 20 mA
Vsat @ 1 mA = 0.5 VDC
Vsat @ 10 mA = 3.0 VDC
Maximum voltage =
30 VDC
Bosch D6615 CPU
Terminator Card
Solid State output provides
a current sink to common
(-)
Maximum load is 75 mA
Vsat @ 10 mA = 0.5 VDC
Vsat @ 25 mA = 1.0 VDC
Vsat @ 50 mA = 2.5 VDC
Maximum voltage =
30 VDC
Bosch Security Systems, Inc. | 9/08| 4998122704-04
17
Conettix D6600/D6100i | Installation and Operation Guide | 10.0 D6600/D6100i Operation
10.0 D6600/D6100i Operation
10.1
Process Flow
10.1.1 Receiver Handshake and Kiss-Off
The telephone line dialed by the communicator
connects to a line card in the D6600/D6100i. The line
card detects ringing voltage, answers the incoming
call, and sends a programmed series of handshake
tones. The communicator detects the expected
handshake and transmits its message. The receiver
sends the kiss-off after the receiver receives and
understands the communicator’s message.
Program the receiver for up to eight handshake
attempts, using any combination of the available
handshake tones.
With Handshake Optimization enabled, the D6600
can send the appropriate Handshake Tone
(associated with the Caller ID number in the Caller ID
database) to the control panel or a Dialed Number
Identification Service (DNIS) database can be created
to optimize the handshake outputs and other line card
parameters.
The D6600 can use only one database
(DNIS or Caller ID) at a time.
The D6100i does not have this feature.
10.1.2 Message Verification
The D6600/D6100i checks each message for errors.
If the receiver receives the data correctly, it sends the
kiss-off acknowledgment tone to the communicator.
The communicator hangs up and returns the
subscriber’s telephone line to normal.
If the data is not correct, the receiver withholds the
kiss-off tone and prints an error message (refer to
Section 12.0 No Data Received Reports on page 27),
causing the communicator to retransmit the
information. If the receiver still does not receive the
data correctly after the communicator’s set number of
retransmissions, the communicator hangs up. The
communicator restarts the signal process and
attempts to transmit another message. The
communicator repeats this process until the receiver
receives the kiss-off tone or until the maximum
number of dialing attempts is depleted.
10.1.3 Handshake Tone Compatibility
When the D6600/D6100i answers an incoming line, it
waits for a programmed time before transmitting the
handshake tone(s).
18
Some communicators wait approximately
30 sec for the proper handshake tone.
Others hang up immediately if they hear
an improper handshake tone. Others
have a very short handshake wait time.
To eliminate waiting through a sequence
of handshake tones, program the line
card so the first handshake tone
transmitted is compatible with existing
equipment.
The D6600/D6100i can receive incoming signals
while transmitting handshakes.
10.1.4 Message is Received
The receiver can process messages from all 32
telephone lines simultaneously. The messages print
and appear one by one, as the previous message
clears from the display.
Many control panels can transmit multiple messages
in the same telephone call. Program the receiver to
print all multiple message transmissions as a group,
or print each message on arrival. Refer to Report
Grouping in the D6600/D6100i Program Entry Guide
(P/N: 4998122702) for more information.
As the receiver receives each message and checks
the accuracy, it sends the kiss-off tone so the
communicator can hang up. This allows the receiver
to process new incoming calls on the line. As
reporting devices (such as printers, computers)
become available to receive additional signals, the
D6600/D6100i retrieves the stored messages from
memory and sends the messages to the reporting
devices.
10.1.5 How Call Groups Work
The D6600/D6100i allows each line to report and print
as part of a call group. The receiver assigns
telephone lines, which operate in rotary, to the same
call group. A call group can include any combination
of incoming lines, regardless of the physical location
of the line card in the receiver or the geographical
location of the accounts that report to the various
lines in the group. When the receiver assigns a line to
a call group, the group number (such as G01) can
identify all reports on that line, with the exception of
telephone line or line card trouble reports. If the
receiver does not assign a line to a group, the line
number (such as L01) identifies all reports. Refer to
the D6600/D6100i Program Entry Guide
(P/N: 4998122702) for more details on call groups.
Bosch Security Systems, Inc. | 9/08 | 4998122704-04
Conettix D6600/D6100i | Installation and Operation Guide | 10.0 D6600/D6100i Operation
.
10.1.6 Buzzer Operation
In the Manual Mode, an Operator Alert Buzzer
sounds when a message is received until you press
the [ACKNOWLEDGE] key. The buzzer operation is
programmable and can be disabled when the receiver
is programmed for the Automatic Mode.
10.1.7 Reporting Devices: Primary and
Secondary
A reporting device is any device that can print or
display messages from the D6600/D6100. This
includes the central station automation computer or
an external printer. You can enable the external
printer and designate it as the primary or secondary
device. The automation computer is always a primary
device unless disabled. Primary reporting devices
receive all reports generated by the D6600/D6100i.
Secondary reporting devices only receive input from
the D6600/D6100i when all primary devices fail.
UL 1981 allows the receiver to suppress
printing during normal automation
system operation if the printer starts
printing upon automation system failure.
If the receiver is in the Automatic Mode and all of the
primary reporting devices (such as printers and
computers) fail, the receiver re-routes the messages
to the secondary reporting device(s). If you program
the receiver for no secondary reporting devices or if
all secondary reporting devices fail, the
D6600/D6100i automatically switches to Manual
Mode. When the receiver restores automation to
normal operation, the D6600/D6100i returns to the
Automatic Mode if the user manually acknowledges
the last buffered signal.
Bosch Security Systems, Inc. | 9/08| 4998122704-04
10.2
Normal Operation Mode
In Normal Operation Mode, the D6600/D6100i sends
messages immediately or in blocks to reporting
devices (such as printers and computers) as soon as
the devices are ready to receive the information.
Signals do not remain visible in the display. If all
reporting devices fail, the D6600/D6100i reverts to
Manual Mode until a device returns to service.
Normally, the D6600/D6100i sounds the Operator
Alert Buzzer for new events received when the
automation link fails.
Typical Alarm Receiving Sequence
1. An alarm occurs on Zone 3 at subscriber location
456. The user programs Account 456 to report to
Line 01 and does not assign Line 01 to report to a
call group.
2. The OL LED glows green when the receiver
answers the call and receives data.
3. The primary reporting device(s) (such as external
printer or automation computer) activates.
If the external printer is a primary reporting device
and Line 01 is not assigned to Group Reporting, it
prints:
If Line 01 is assigned to Group 1 Reporting, the
receiver’s external printer prints:
4. Line 01 hangs up
19
Conettix D6600/D6100i | Installation and Operation Guide | 10.0 D6600/D6100i Operation
10.3
Operating in Manual Mode
10.4
Keypad Menu Operation
If all reporting devices (such as printers and
computers) fail, the D6600/D6100i reverts to Manual
Mode until a device returns to service.
10.4.1 Log In
When the D6600/D6100i receives signals while in
Manual Mode:
The Operator Alert Buzzer sounds.
D6600
D6100
1.
1.
ACKNOWLEDGE
2.
D6600
D6100
M/E
MENU
Enter password.
Shuts off the operator alert buzzer
Compare the display to the printout to confirm
you read the data correctly.
2.
D6600 default password: 6600
D6100i default password: 6100
3.
D6600
D6100
D6600
D6100
M/E
MENU
ACKNOWLEDGE
3.
10.4.2 Using the Keypad
D6600
D6100
D6600
D6100
D6600
D6100
D6600
D6100
M/E
ENTER
ACKNOWLEDGE
Sends the message to a connected printer
4.
D6600
D6100
ACKNOWLEDGE
5.
D6600
D6100
D6600
D6100
ACKNOWLEDGE
M/E
ENTER
D6600
D6100
ACKNOWLEDGE
7.
Enters a particular menu.
Continue making changes to options until all
changes are complete.
Sends the message to a connected printer
6.
Scrolls up or down to the
appropriate menu.
D6600
D6600
D6100
CAN
CANCEL
Accepts the change.
Cancels the change and
returns to previous menu.
The new data takes affect upon exiting the
menu.
D6100
ACKNOWLEDGE
Sends the message to a connected printer
8.
Repeat until the reporting device(s) record(s) all
outstanding messages and the display clears.
9.
20
Bosch Security Systems, Inc. | 9/08 | 4998122704-04
Conettix D6600/D6100i | Installation and Operation Guide | 10.0 D6600/D6100i Operation
.
10.4.3 Event Buffer Display
D6600
D6600
D6600
D6100
D6100
Shows event buffer contents
in the order the events are
received.
If multiple lines of text are received,
D6600
D6100
M/E
ENTER
D6600
D6100
D6600
D6100
D6600
D6100
CAN
CANCEL
Continues to browse the
events in the buffer.
D6600
D6100
M/E
ENTER
Refer to Section 15.0 Troubleshooting Guide on
page 31 for more information.
10.4.5 Software Version Display
Shows the current software versions of the CPU and
each line card.
10.4.6 Keypad Functions
Use this option to test the communication links to the
automation firmware and printer.
Exits this menu.
D6100
D6600
SYSTEM
TROUBLE
Views the remaining lines of
each message.
10.4.4 Current System Trouble Display
SYSTEM
TROUBLE
System troubles in the
buffer.
1.
2.
D6100
D6600
F
FUNCTION
Enter password.
D6600 default password: 6600
D6100i default password: 6100
3.
D6600
No more system
troubles remain
D6100
D6600
D6100
M/E
ENTER
4.
D6600
D6100
1
1
5.
D6600
D6100
M/E
ENTER
D6100
D6600
D6100
M/E
ENTER
D6600
D6100
D6600
D6100
D6600
D6100
CAN
CANCEL
Browse the system troubles in
the buffer.
Table 11: Communication Links Test Outputs
Printer
Cancels this menu
As you correct system troubles, the receiver
removes them from this list.
Bosch Security Systems, Inc. | 9/08| 4998122704-04
Automatio
n
DD/DDsTT:TTsL08sACCTs888sss[TEST]
sZNsss8
h1rr8sssssss888s[sss8t
D6500
Mode
<header>[NVX]
SIA
Mode
21
Conettix D6600/D6100i | Installation and Operation Guide | 10.0 D6600/D6100i Operation
10.4.7 Skip Current Automation Event
5.
Use this option to skip the current Automation event.
1.
D6100
D6600
F
D6600
D6100
M/E
ENTER
D6600:
FUNCTION
D6100:
2.
Enter password.
6.
1
D6600 default password: 6600
D6100i default password: 6100
3.
D6600
D6100
M/E
ENTER
4.
D6100
2
2
5.
D6600
D6100
M/E
ENTER
to
D6600
D6600
3
2
1
Selects the line to test.
D6100
D6100
7.
D6600
D6600
or
D6600
D6100
M/E
ENTER
2
The line disconnects, the receiver sends the
handshakes, and the line reconnects.
10.4.8 Line Test
Use this option to test the line operation.
1.
2.
D6100
D6600
F
FUNCTION
Enter password.
D6600 default password: 6600
D6100i default password: 6100
3.
4.
22
D6600
D6100
M/E
ENTER
D6600
D6100
3
3
Bosch Security Systems, Inc. | 9/08 | 4998122704-04
Conettix D6600/D6100i | Installation and Operation Guide | 10.0 D6600/D6100i Operation
.
10.4.9 Clear Pending Events
Use this option to clear all pending events.
1.
2.
D6100
D6600
F
FUNCTION
Enter password.
D6600 default password: 6600
D6100i default password: 6100
3.
D6600
D6100
M/E
ENTER
10.5
Busy Seconds (Line Busy) Reports
The D6600 software monitors and reports when a call
group of receiver lines cannot receive signals. The
receiver cannot process signals if its incoming
telephone lines are in trouble, if other communicators
have the line tied up, or if the line card is inoperative.
The receiver interprets these conditions as busy time.
The amount of busy time accumulated during a 10
min period is the basis for a Busy Seconds Reports.
The 10 min busy period begins when all lines in a call
group become busy, or when a non-programmed
single line for a call group becomes busy. The
D6600/D6100i totals the accumulated busy time and
prints the Busy Seconds Report after the 10 min
period ends. After at least 60 sec (10%) of busy time,
the receiver generates a report. The D6600/D6100i
reports up to 100% busy time.
Program the Busy Seconds Reports option to No if
Busy Seconds Reports are not wanted for all lines.
Setting the Line Sniff option to 2 disables reports for
individual lines.
4.
5.
D6600
D6100
4
4
D6600
D6100
0
0
D6600
D6100
1
1
Enable Seconds Reports for UL Listed
central stations.
Cancels the function and does
not delete all pending events.
Clears all pending events.
UL inspectors might investigate the amount of time
the digital receiver lines cannot receive signals.
Ensure lines are available to process emergency
signals on a timely basis. Excessive Line Busy
Reports can indicate it is necessary to install
additional lines in rotary with your primary receiver
lines.
Assign each line to a call group. For the group to start
accumulating busy time, all lines in the call group
must be online, in trouble, or without an operating line
card.
Although it is not mandatory, not
assigning a line to a call group, or when
there is only one line in the group, 1 min
of busy time during a 10 min period
results in a Busy Seconds Report.
If you do not assign a line to a call group, displays
and printer reports identify the line number instead of
the Group number. A Line Busy Report shows and
prints:
Bosch Security Systems, Inc. | 9/08| 4998122704-04
23
Conettix D6600/D6100i | Installation and Operation Guide | 10.0 D6600/D6100i Operation
10.6
Two-Way Audio
When using the D6600/D6100i for Two-Way Audio
(TWA) verification, use the Flash or Hold option
according to the central station Private Branch
Exchange (PBX) system, taking the D6600/D6100i off
line in a short period. If a PBX is not used, connect a
regular telephone in parallel with the incoming
telephone line. Once the D6600/D6100i is in TwoWay Audio Mode, the operator can pick up the
telephone and undertake the two way audio
operation. Return the telephone to the receiver after
the two-way audio operation finishes.
D6100i two way Audio was not
investigated by UL.
The D6600/D6100i verifies the first digit of the
account code range 0 to F programmed in the
Account Digits option for the following communication
formats:
• Pulse (3 or 4 digit account code)
• DTMF
• BFSK
• Modem II/IIIa2
• SIA
If the received account code is two-way audio
enabled, the line card goes into Two-way Audio
Mode. Programming a non-zero number in the Two
Way Audio Duration option affects all formats, and the
control panels cannot control the two-way audio
duration over the D6600/D6100i.
If the qualifying criteria apply, the D6600/D6100i
sends a signal to the automation firmware indicating
the physical line is in Two-Way Audio Mode. The line
remains off-hook for the time programmed in minutes
in the Two-Way Audio Duration option.
or
When the flash option is set for 1 to 20 (100 ms to
2 sec), the CPU first sends the two-way audio signal
to automation firmware. Then the line is flashed
(quickly disconnected and reconnected) for the
programmed flash duration. It remains off-hook for
another 5 sec then hangs up.
or
When the Hold option is set for 1 to 99 sec, the line
card remains off-hook for the programmed hold after
sending the audio event signal to the automation
firmware, allowing the firmware controlled PBX to pick
up the line. Then it hangs up.
24
10.6.1 Enhancements and Changes
• Setting TWA by the selected Alarm Code allows
one or multiple Alarm Codes to be selected. TWA
works with 10 to 40 baud Pulse formats, DTMF
4/1, 4/2, 4/3 and Contact ID formats
• Setting TWA by the selected zone number allows
the selection of one or multiple zone numbers.
TWA works with 10 to 40 baud formats and
DTMF 4/1, 4/2 and 4/3 formats.
The zone number is the last digit of
events that activates the TWA function.
•
TWA by combined conditions includes the
account number, alarm code, and zone number
• Supports TWA auto-entered by more events and
in various protocols, including Contact ID Event
Code 606, and SIA control blocks.
When the line card is in Two-Way Audio Mode, it only
goes on-hook when the operator presses [CAN] , or
the automation firmware issues a Stop Listening
Command !Knn<CR>, where nn is the physical line
number.
The maximum on-line time during two
audio sessions is disabled.
The line card’s listen-in duration settings
override the control panel’s listen-in
duration settings.
When pressing [CAN] during the two-way audio
session, the receiver prompts the operator to enter
the line number for stopping the two-way audio.
Ensure the D6600 is not in Menu Mode during this
operation.
The OL/LF LED flashes green during the audio
session.
The D6600/D6100i prints the audio status on the
printer with the physical line number and sends the
audio status to the automation firmware with the
physical line number.
The D6600/D6100i decodes the first digit of the
account number to determine when to start two-way
audio operation. If the first digit of the account number
matches the selection, two-way audio activates.
Bosch Security Systems, Inc. | 9/08 | 4998122704-04
Conettix D6600/D6100i | Installation and Operation Guide | 10.0 D6600/D6100i Operation
.
10.6.2 Two-Way Audio Modes of Operation
• Transfer: D6600/D6100i transfers the incoming
line to another line; a flash operation occurs at the
end of the alarm signal. The receiver dials the line
programmed at Transfer Phone Number (refer to
Menu Items 3.1.4.18 Flash [x 100ms] and
3.1.4.19 Transfer Phone Number in the
D6600/D6100i Program Entry Guide
[P/N: 4998122702]).
• Hold: The D6600/D6100i remains off-hook as
programmed so another device can take over the
line before hold time expires. Refer to Menu Item
3.1.4.20 Hold in the D6600/D6100i Program Entry
Guide (P/N: 4998122702) for programming
information.
• Duration: The D6600/D6100i remains off-hook
as programmed or until terminated by a Stop
command. Connect a regular telephone in parallel
with the incoming telephone line. Refer to Menu
Item 3.1.4.1 Duration in the D6600/D6100i
Program Entry Guide (P/N: 4998122702) for
programming information.
The D6600/D6100i can perform only
one of these operations at a time. If
there is more than one, the sequence is
Transfer, Hold, and Duration.
Bosch Security Systems, Inc. | 9/08| 4998122704-04
25
Conettix D6600/D6100i | Installation and Operation Guide | 11.0
11.0 Network Communications
The Conettix D6600 and D6100i Communications
Receiver/Gateway systems support data network
communications. This allows the receiver to connect
to Ethernet networks, and process messages to and
from most networks in user datagram protocol (UDP)
or internet protocol (IP). Use a COM4 or a COM1
connection from the D6600 to connect the D6680 to
the network. The D6100i has a built-in Ethernet
module that can connect directly to the network. Refer
to Conettix D6600/D6100i Network System Guide
(P/N: 4998122712) for configuration setup
Instructions. Central station automation software,
through a local-area network (LAN) or wide-area
network (WAN), receives reports from alarm control
panels from the PSTN, or other data networks. The
automation software also monitors the control panel
status and connection over the network. Update or
upgrade the receiver through the network connection.
Use the D6200 software for remote programming of
the receiver. Refer to the following documents about
network communications and their installation
requirements.
• Conettix D6600/D6100i Network System Guide
(P/N: 4998122712)
• D9133TTL-E Installation Guide
(P/N: 4998122717)
• C900V2 Installation Guide (P/N F01U003472)
• C900TTL-E Installation Guide (P/N: 4998122718)
• DX4020 Installation Guide (P/N: F01U045288)
• D6680 Ethernet Network Adapter Installation
Guide (P/N: 4998138732)
• DeviceInstaller Operation and Installation Guide
(P/N: 4998138688)
26
Network Communications
Figure 15: Conettix Network System
Connection Diagram - C900TTLE/C900V2 and Any Control Panel
2
4
3
5
1
ANEL
P
1 2 3
4 5 6
7 8 9 1 0
O
F
EL CO
T
11
15
6
7
14
8
10
12
11
9
13
1 – Any manufacturer’s control panel
2 – Connection - Control panel telco jack to
C900TTL-E jack
3 – C900TTL-E/C900V2 Dialer Capture Module
4 – Connection - C900TTL-E/C900V2 Ethernet
jack to Ethernet hub
5 – Host PC running D6200 Programming
Administrative Software
6 – Connection - Host PC network interface card
(NIC) to Ethernet hub
7 – Ethernet hub
8 - Connection – Ethernet hub to D6100i
9 - D6100i
10 – Connection – Ethernet hub to D6680
11 – D6680
12 – Connection – D6680 to D6600 COM4 port
13 – D6600
14 – Connection – Second D6680 to D6600 COM 1
port (optional)
15 – Connection – Ethernet hub to second D6680
Bosch Security Systems, Inc. | 9/08 | 4998122704-04
Conettix D6600/D6100i | Installation and Operation Guide | 12.0 No Data Received Reports
.
Figure 16: Conettix Network System
Connection Diagram - D9133TTLE/DX4020 and Bosch Control Panels
2
12.1
4
3
1 2 4 8
12.2
15
6
7
14
10
12
Description
If a message is garbled (incorrect checksum or
inconsistent message rounds) due to a noisy
telephone line or other difficulty, the receiver
withholds the kiss-off tone. This causes the control
panel to retransmit the same message up to four
times.
5
1
11
12.0 No Data Received
Reports
9
11
13
1 – Bosch Control Panels
2 – Connection – Control panel serial device
interface (SDI) bus to D9133TTL-E or DX4020
SDI Terminals
3 – D9133TTL-E or DX4020 Network Interface
Module
4 – Connection – D9133TTL-E or DX4020
Ethernet port to Ethernet hub
5 – Host PC running D6200 Programming
Administrative Software
6 – Connection – Ethernet hub to Host PC NIC
7 – Ethernet hub
8 - Connection – Ethernet hub to D6100i
9 - D6100i
10 – Connection – Ethernet hub to D6680
11 – D6680
12 – Connection – D6680 to D6600 COM4 port
13 – D6600
14 – Connection – Second D6680 to D6600 COM1
port (optional)
15 – Connection – Ethernet hub to second D6680
Bosch Security Systems, Inc. | 9/08| 4998122704-04
No Data Received
The D6600/D6100i generates the message shown in
Figure 17 if one or more of the following occur:
• Telephone line noise causes the data to be
unrecognized.
• A control panel sends the data in a format not
recognized by the D6600/D6100i.
• A control panel transmitted nothing.
Figure 17: NO DATA RECEIVED Message
12.3
Data Error
Data Error is a function of PSTN. It is an error
condition when the D6600/D6100i receives partial
data, appears on the LCD, and sends the error to a
connected printer.
This occurs when telephone line noise causes data to
be unrecognizable.
12.4
Wrong Data
Wrong Data is a function of the CPU where the PSTN
software sends an invalid signal to the CPU. It only
sends output to the LCD and any connected printer.
27
Conettix D6600/D6100i | Installation and Operation Guide | 13.0
System with the Receiver
13.0 Using the Central Station
Automation System with
the Receiver
Figure 18: Receiver System – Direct Connect
1
If using a Bosch Security Systems, Inc. receiver,
connect a central station automation system
computer to the COM3 port (automation computer
port) on the rear of the receiver with a null-modem
cable. Refer to the D6600/D6100i Computer Interface
Manual (P/N: 4998122703) for additional information.
Standard automation reporting usually sends RS-232
serial data from the receiver COM3 port to a COM
port of a separate automation PC (refer to COM3
Automation Configuration in the D6600/D6100i
Program Entry Guide [P/N: 4998122702]). With no
additional programming required at the D6600, you
can use the same serial communication across a
network connection by using D6680s at both ends of
the automation communication path. The D6600 still
sends the standard serial data, but the D6680s
communicate with each other, convert the data back
to the standard RS-232 that the automation computer
can interpret, and transmit that data back over the
network.
Using the Central Station Automation
2
3
5
4
1–
234–
5–
Host PC
Connection – Host PC COM1 port to D6100i
D6100i
D6600 Receiver
Connection - Host PC COM1 Port to D6600
COM3 Port
Some messages might go
unacknowledged (NACK) due to
increased network activities. This forces
the D6600 to resend these messages.
Refer to the Conettix D6600 Network
System Guide (P/N: 4998122712) for
complete details on network
communications and programming.
28
Bosch Security Systems, Inc. | 9/08 | 4998122704-04
Conettix D6600/D6100i | Installation and Operation Guide | 14.0
Central Station Tips
.
14.0 Central Station Tips
Figure 19: Receiver System –
Standard/Network Automation
1
4
3
2
14.1
Spare circuit boards and receivers should be
available at the central station. Keep a spare kit on
hand. UL Listed central stations monitoring burglary
or fire alarms must have a spare receiver available for
activation within 30 sec.
5
6
14.2
4
7
11
Back-up Receiver
Keep spare cards for all receiver
components.
8
9
Keep a spare CPU terminator card in
the central station.
10
1 – Connection - Host PC Network Interface Card
to Hub
2 – Automation PC
3 – Connection - PC COM1 to D6680
4– D6680
5– Connection - D6680 to hub
6 – Hub
7 - Connection – Ethernet hub to D6100i
8 - D6100i
9 – Connection – Ethernet hub to D6680
10 – Connection - D6680 to D6600 COM4
11 – D6600
For automation packages with network
capabilities: The packet format received
from the receiver is the same as for
RS-232 reporting, except an internet
protocol (IP) and user datagram protocol
(UDP) header is stamped on the packet
as the data transmitted by either
standard IP or UDP structure over the
network. Automation software can easily
support the network communication by
calling Socket functions, both provided
in Windows and UNIX. Using the built-in
IP connections (or sockets) available in
Windows and Unix.
Computer Interface
14.3
D6200 Programming Software
Keep D6200 Programming Software in
the central station at all times.
14.4
Telephone Lines
14.4.1 Emergency Ringers
Extension ringers for incoming receiver telephone
lines are available from telephone equipment supply
companies. They ring briefly to indicate an incoming
call. If they continue to ring, your receiver is out-ofservice. The ringer has a volume control, but in a high
traffic central station, you might prefer to use beehive
lights instead of ringers.
14.4.2 Rotary Lines
Use rotary receiver lines (hunt groups)
to prevent delay in alarm signals during
periods of busy central station traffic.
Rotary lines are also important for providing alternate
paths when a line is out of service. To use this feature
have your dispatcher dial the out-of-service line and
leave the calling telephone off the hook. This creates
a busy signal on the line to all incoming
communicators. The communicators automatically
switch to an unused line. The telephone company
provides rotary service when ordered.
UL and Factory Mutual central station
service standards require constant
monitoring of telephone lines.
Bosch Security Systems, Inc. | 9/08| 4998122704-04
29
Conettix D6600/D6100i | Installation and Operation Guide | 14.0
14.5
Central Station Tips
Proper Ground
Connect the receivers to an earth ground, not a
chassis or electrical ground. Measure the resistance
of the receiver ground to another ground. If the meter
reads above 2 Ω, check your receiver ground against
a third ground. If the difference is still greater than 2
Ω, ground your receiver to a different earth ground.
Cold water pipes or a grounding rod usually make a
good earth ground. The grounding wire should be
heavy copper with as short and straight a run as
possible. Avoid sharp bends in the ground wire
because a large power surge might arc across the
bend.
The terminator cards and their connection to the
receiver cabinet provide the ground source for the
receiver’s circuit boards. Firmly tighten all the screws
used to secure the terminator cards to the back of the
receiver cabinet.
If the mounting bracket screws are not
tight, the receiver’s operation can be
erratic. A short circuit or foreign voltage
induced into the system can cause the
receiver to fail.
Put an anti-static mat in front of the receiver to
prevent electrostatic discharge from the operator to
the equipment.
14.6
Radio Frequency Interference
The D6600/D6100i is microprocessor based. All
microprocessors are susceptible to radio frequency
interference (RFI), especially at the 480 MHz and
950 MHz bandwidths used by walkie-talkies. Do not
operate a walkie-talkie near a receiver.
14.7
Test Communicator
Periodically check your receiver and its telephone
lines by using a digital communicator triggered by an
interval timer. If you have more than one data line,
use a communicator for each line or use a multiple
number communicator.
30
Bosch Security Systems, Inc. | 9/08 | 4998122704-04
Conettix D6600/D6100i | Installation and Operation Guide | 15.0
Troubleshooting Guide
.
15.0 Troubleshooting Guide
The D6600 consists of several plug-in assemblies that you can easily replace in the field (components and
controls on individual assemblies are shown starting in Section 3.0 Card Functions and Locations on page 6).
Do not attempt to repair individual assemblies. Return any failed assemblies to Bosch Security
Systems, Inc. for testing and repair. Use this Troubleshooting Guide to identify failed modular
components.
Table 12: Hardware Troubleshooting Guide
Problem
Line Card OL/LF
LED steadily glows
red.
Symptom
Telephone line, telephone
connecting cord, line card, or
telco terminator is defective.
Solution
•
Pull the line card out of the receiver, and re-insert it to ensure
the card is properly connected.
•
Exchange the connecting cord with a telephone line that
operates. If the original OL/LF LED remains a steady red, the
problem is with a plug-in card. Replace the line card with a
spare. If the OL/LF LED for the new card is a steady red,
change the line terminator card.
•
If the OL/LF LED on the original troubled card goes out and
the OL/LF indicator on the previously untroubled card lights
when you swap connecting cords, the trouble is with the
telephone line. Replace the telco line connecting cord.
If the OL/LF LED is still on, the trouble might
be in the telephone line. Report the trouble to
the telephone company.
Take immediate action if a telephone line is out of order and is the first line in a rotary or hunt
group. Ask the telephone company to create a busy signal on the defective line at the telephone
exchange.
If emergency service is not available, call the troubled line and leave the calling handset off the
hook. Do not hang up. Incoming alarm signals see a busy signal and rotor (hunt) to another line in
the hunt group. This procedure does not work for Wide Area Telephone Service (WATS) lines.
Menus cannot be
accessed.
Printer works but
no display.
•
•
•
Incorrect password
Defective keypad panel
Defective CPU card
•
•
Defective or loose cable
between the CPU card
and display panel or user
interface card
Defective user interface
card
Defective CPU
•
•
•
•
•
Bosch Security Systems, Inc. | 9/08| 4998122704-04
D6600 default password: 6600.
D6100i default password: 6100.
Ensure that the ribbon cable connection between the CPU
and the front panel is secure.
Ensure that the ribbon cable connection between the CPU
and the front panel is secure.
Exchange the CPU Card with a known good card.
31
Conettix D6600/D6100i | Installation and Operation Guide | 15.0
Troubleshooting Guide
Table 12: Hardware Troubleshooting Guide (continued)
Problem
Operator alert
buzzer cannot be
silenced.
D6200 cannot
connect to the
D6600/D6100.
Symptom
•
System stalled
•
Defective [Acknowledge]
key
•
Defective user interface
card
D6200 serial connection is
defective, missing, or
incorrect serial cable.
Solution
•
Check watchdog LED on the inside of the door behind the
keypad. LED must flash for a running system. A solid light
indicates a faulty system. Reset power cycle of the D6600 if
stalled.
•
Order replacement part P6603.
•
Return the D6600 for repair.
•
Ensure that the cable between the PC and the
D6600/D6100i is null-modem. Also ensure the cable is not
damaged. Inspect all pins on the D6600/D6100i, PC, and
serial cable.
Ensure that the null-modem cable is connected to the
correct COM port of the PC (as per the D6200 COM setting;
COM1 through COM8).
COM settings do not match. In the D6200, under the
Settings Menu, select COM SETTINGS. Confirm that all
settings match the configuration of the D6600 Host
Programming Parameters (Menu Item 4.5 Parameters).
On the D6600, ensure Menu Item 4.5.9 RS-232 Direct
Access Permission is set to 1.
If upgrading software, ensure that Menu Item 4.5.7 Software
Programming Enable (on the D6600/D6100i) is set to 1.
•
•
•
•
If Software Programming Enable is set to zero
(0), communication between the D6200 and
the D6600 is successful but the upgrades fail.
•
•
•
•
•
•
•
32
If using COM4 through a direct connection, check that Menu
Item 6.1.5 COM4 Network Adapter is set to 0.
If using COM1 through a direct connection, check that Menu
Item 6.2.5 COM1 Network Adapter is set to 0.
Port conflicts with other applications on the host PC.
Reboot the PC and restart the D6200 with no other
applications running.
Defective CPU terminator card.
Defective CPU card.
Defective PC COM port.
Bosch Security Systems, Inc. | 9/08 | 4998122704-04
Conettix D6600/D6100i | Installation and Operation Guide | 15.0
Troubleshooting Guide
.
Table 12: Hardware Troubleshooting Guide (continued)
Problem
D6200 cannot
connect to the
receiver through a
network
connection.
Symptom
D6200 network connection is
defective, missing, or has
incorrect network cable.
D6200 cannot
connect to the
receiver through a
network
connection.
D6200 network connection is
defective, missing, or has
incorrect network cable.
D6200 cannot
connect to the
D6600 through a
network
connection.
D6200 network connection is
defective, missing, or has
incorrect network cable.
Solution
•
Ensure that the Ethernet connection light on the network
interface module for the PC running D6200 Software is on.
This indicates a good network connection.
•
Ensure that the Ethernet connection light on the D6680 for
the PC running D6200 Software is on. This indicates a good
network connection.
•
If using the D6600’s COM4 to connect to the D6680, ensure
that Menu Item 6.1.4 COM4 Network Adapter in the D6600
is set to 1.
•
If using the D6600’s COM1 to connect to the D6680, ensure
that Menu Item 6.2.5 COM1 Network Adapter in the D6600
is set to 1.
•
If using the D6100i’s Ethernet connection, ensure that Menu
item 6.2.5 Network Adapter is set to 1.
•
If communicating within the same LAN, the IP address of the
PC running the D6200 software must be entered into the
receiver Menu Items 6.4.1 IP Address 1, 6.4.2 IP Address 2,
or 6.4.3 IP Address 3.
•
If communicating over a WAN, the external IP address of the
LAN with the PC running the D6200 software must be
entered into the receiver’s Menu Items 6.4.1 IP Address 1,
6.4.2 IP Address 2, or 6.4.3 IP Address 3.
•
Ensure that Menu Item 6.4.5 Network Programming Enable
in the receiver is set to 1.
•
Ensure that the D6200 programming software is set up for
TCP/IP network connection (select Administration Æ
Connection Settings).
— If communicating on the same LAN, ensure that
the IP address of the D6680 or D6100i is
entered correctly.
— If communicating over a WAN, ensure that the
external IP address of the LAN with the D6680
or D6100i is entered.
— Both port numbers match (valid ports are from
2001 to 9998).
•
If encryption is enabled on the D6200,
— it must also be enabled on the D6680 or D6100i.
— the 16-byte key must be the same in the D6680
or D6100i and the D6200 software.
•
If communicating over a WAN, the firewalls of the LANs
must be configured correctly.
For example, the D6680 resides on one LAN while the
D6200 software resides in another LAN. A WAN connects
them both but the firewalls at either LAN need to allow TCP
and UDP packets through.
•
Firewalls must allow your selected ports to pass through.
•
Contact your IT administrator.
Bosch Security Systems, Inc. | 9/08| 4998122704-04
33
Conettix D6600/D6100i | Installation and Operation Guide | 16.0
Specifications
16.0 Specifications
Table 13: D6600/D6100i Specifications
Dimensions
(H x W x D)
D6600
D6100i
Rack mount (4U)
18 cm x 48.3 cm x 49.5 cm
(7.0 in. x 19.0 in. x 19.5 in.)
Standalone
18 cm x 45.0 cm x 49.5 cm
(7.0 in. x 17.75 in. x 19.5 in.)
9.0 cm. x 37.5 cm. x 25.5 cm
(3.5 in. x 19 in. x 10 in.)
9.0 cm. x 30.5 cm. x 25.5 cm
(3.5 in. x 12.0 in. x 10 in.)
Rack mount (2U)
Standalone
Weight
D6600 Power Input
D6100i Power Input
Current Required
D6600
8.7 kg (19 lb)
D6100i
3 kg (7 lb)
AC Nominal Operating Range
AC Maximum Operating Range
AC Nominal Operating Range
D6600 with one line card installed
For each additional line card or
terminal card pair
For network communications card
120 V or 230 V
100 VAC to 120 VAC, 220 VAC to 230 VAC, 50 - 60 Hz
2.5 A maximum
18 VAC, 40 - 50 VA Transformer
Required battery current
Required UPS AC standby current
Required additional battery current
Required additional UPS AC standby current
Required additional battery current
Required additional UPS AC standby current
800 mA
350 mA
210 mA
35 mA
10 mA
10 mA
D6100i
Standby Power
Telephone
FCC Registration
Required battery current
330 mA
Required UPS AC standby current
180 mA
The receiver includes an external battery connection and battery harness. Use 12 V rechargeable sealed leadacid batteries. A 4-hour minimum standby power supply (UPS or battery) is required for UL Certification (refer
to Section 8.1 Connecting External Batteries on page 14 for battery size).
RJ11C modular jacks, with 26 AWG or larger wire diameter.
D6600 ESVUSA-25328-AL-N
D6100i ESVAL04BD6100
The D6600 Receiver is Federal Communications Commission (FCC) registered under Part No. 68 using the
RJ11C Interconnect that can be ordered from your local telephone company.
Notice: This equipment has been tested and found to comply with the limits for a Class A (D6600) or Class B
(D6100i) digital device, pursuant to part 15 of the FCC Rules. These limits are designed to provide reasonable
protection against harmful interference in a residential installation. This equipment generates, uses, and can
radiate radio frequency energy and, if not installed and used in accordance with the instructions, may cause
harmful interference to radio communications. However, there is no guarantee that interference will not occur
in a particular installation. If this equipment does cause harmful interference to radio or television reception,
which can be determined by turning the equipment off and on, the user is encouraged to try to correct the
interference by one or more of the following measures:
•
•
•
Reorient or relocate the receiving antenna.
Increase the separation between the equipment and receiver.
Connect the equipment into an outlet on a circuit different from that to which the receiver is
connected.
• Consult the dealer or an experienced radio/TV technician for help.
Any modifications made to this device that are not approved by Bosch Security Systems, Inc. may void the
authority granted to the user by the FCC to operate this equipment.
Ringer Equivalence
34
0.4 B
Bosch Security Systems, Inc. | 9/08 | 4998122704-04
Conettix D6600/D6100i | Installation and Operation Guide | Contents
.
Industry Canada
D6600 1249A-8925A
D6100i 1249A-6100
This product meets the applicable Industry Canada technical specifications.
The Ringer Equivalence Number is an indication of the maximum number of devices allowed to be connected
to a telephone interface. The termination on an interface may consist of any combination of devices subject
only to the requirement that the sum of the RENs of all the devices does not exceed five (5.0).
Ringer Equivalence
Display
0.2
Screen size: (H x W)
Inputs and Outputs
•
LED
D6600/D6100i
Listings and
Approvals
0.7 in. x 6.0 in. (1.8 cm x 15.2 cm) dot matrix LCD (5 x 7 dots per character).
Shows two separate lines of 40-characters each.
LED display section indicates receiver status and power.
One RS-232 interface port COM3 (middle connector on the CPU terminator card) for connection to an
automation computer.
•
One RS-232 interface port COM4 (upper connector of CPU terminator card) for connection to an external
serial printer, a PC, a modem, or a network.
•
One parallel printer port for connection to a parallel printer
•
Two programmable inputs (wire harness included)
•
Two programmable outputs (wire harness included)
•
Optional: One RS-232 port (COM1) for the Network Communications expansion option (D6600 only).
D6600 Listings and Approvals
D6600 and D6100i Listings and Approvals
•
UL Central Station Fire (UL864)
•
Austel Approved
•
UL Central Station Burglary (UL1610)
•
CE Approved
•
UL Police Station Connect (UL365)
- CTR-21
•
UL Proprietary 1076
- EN60950 Safety
•
Approved for use for Encrypted Line Security
- EN55022 Radiated/Conducted Emissions
when communicating via a Packet Switched
•
FCC
Part 15 Radiated/Conducted Emissions
Data Network (PSDN)
•
FCC
Part 68 Telecom
•
ULC S527 Central Station Fire
•
Industry Canada
•
cUL S304-M88, Central and Monitoring Station
•
•
Burglar Alarm Units, C1076, Proprietary Burglar
Alarm Units and Systems
Approved for use for Level 3 Line Security when
communicating via PSDN
NIST AES Certification (D6680)
Bosch Security Systems, Inc. | 9/08| 4998122704-04
35
Conettix D6600/D6100i | Installation and Operation Guide | 17.0
Service Information
17.0 Service Information
(EMERGENCY DATA SHEET)
In a central station emergency, use this information to contact the necessary people and enable Bosch Security
Systems, Inc. Customer Service Personnel to help you with your emergency. Ask your supervisor to provide
the following information:
Supervisor’s Name:
Emergency Telephone #:
Telephone Co. Repair Service
Telephone #:
Contact:
Power & Light Co. Repair Service
Telephone #:
Contact:
________________________________________________________
________________________________________________________
________________________________________________________
________________________________________________________
________________________________________________________
________________________________________________________
Bosch Security Systems, Inc. Customer Service: (800) 289-0096 (press [2] for Technical
Support).
When calling for emergency central station service, please tell the operator “Receiver Problem.”
Receiver Software
Version #
Line Card Model
Numbers Installed
(D6600 only)
Incoming
Receiver
Telephon
e Line
Numbers:
CPU: _______________
Slot 1:
Slot 2:
Slot 3:
Slot 4:
_______________
_______________
_______________
_______________
Line: _______________
Slot 5:
Slot 6:
Slot 7:
Slot 8:
Line 1:
Line 17:
Line 2:
Line 18:
Line 3:
Line 19:
Line 4:
Line 20:
Line 5:
Line 21:
Line 6:
Line 22:
Line 7:
Line 23:
Line 8:
Line 24:
Line 9:
Line 25:
Line 10:
Line 26:
Line 11:
Line 27:
Line 12:
Line 28:
Line 13:
Line 29:
Line 14:
Line 30:
Line 15:
Line 31:
Line 16:
Line 32:
Are Lines in Rotary?
Yes: __________
Type of WATS Lines? Local:_________
Other:____________
D6200: ________________
_______________
_______________
_______________
_______________
No: __________
Statewide:__________ National:___________
Location of Receiver Spares Package:
_________________________________________________
____
36
Bosch Security Systems, Inc. | 9/08 | 4998122704-04
Conettix D6600/D6100i | Installation and Operation Guide | 17.0
Service Information
.
Location of Receiver Ground Wire Connection:
_________________________________________________
____
Location of AC Power for Receiver:
_________________________________________________
____
Location of Telephone Line Jacks:
_________________________________________________
____
Receiver Connected to Computer System?:
Automation System Manufacturer:
Yes: _____
No: _____
_____________________________________________________
Bosch Security Systems, Inc. | 9/08| 4998122704-04
37
Bosch Security Systems, Inc.
130 Perinton Parkway
Fairport, NY 14450-9199
(800) 289-0096
© 2008 Bosch Security Systems, Inc.
4998122704-04