1
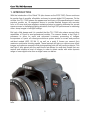
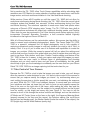
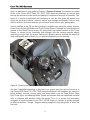
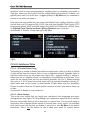
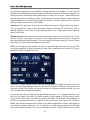
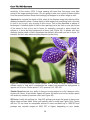
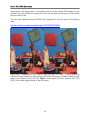
Canon T5i / 700D Experience
PREVIEW of:
Canon T5i / 700D Experience
The Still Photography Guide to Operation and Image
Creation with the Canon Rebel T5i / EOS 700D
by
Douglas J. Klostermann
Full Stop. good writing for better photography
1
Canon T5i / 700D Experience
All rights reserved. This e-book is licensed for your personal enjoyment only and may not be re-sold, fileshared, or given away. No part of this book may be reproduced or transmitted in any form or by any
means, electronically or in print, without expressed permission from the author. Every effort has been
made to make this e-book as accurate as possible, but no warranty of fitness is implied. The information
is provided on an as-is basis. The author shall have no liability or responsibility with respect to any loss or
damages arising from the information provided in this e-book including but not limited to the use of any of
the materials or methods described, the products, retailers, Internet web sites, or links provided. Please
read and follow all instructions and use, safety and handling precautions expressed in the manuals
provided with your equipment and software, and which take precedence over any content in this work.
All contents of this work including cover design, text, and photographs, with the exception of products,
brands, software, contents of menus and screenshots, and logos, are copyright by the author. All
products, brands, software, contents of menus and screenshots, and logos are property of the respective
companies and websites. Terms which are trademarks or service marks in this e-book are used in an
editorial and/ or educational manner, and should not be regarded as affecting the validity of any
trademark or service mark. “Canon” is a trademark of Canon Inc. “Adobe,” “Photoshop,” and “Lightroom”
are trademarks of Adobe Systems Inc. The author and the contents of this book are not affiliated with or
endorsed by Canon Inc.
Special thanks to LensProToGo
www.lensprotogo.com
Douglas Klostermann is a participant in the Amazon Services LLC Associates Program, an
affiliate advertising program designed to provide a means for sites to earn advertising fees by
advertising and linking to amazon.com.
Copyright 2013 Douglas J. Klostermann
Cover design and photograph by the author.
Canon T5i / 700D Experience - PREVIEW
The Still Photography Guide to Operation and Image Creation with the Canon Rebel T5i / EOS 700D
by: Douglas J. Klostermann
Version 1.0
May 2013
Author’s website: www.dojoklo.com
Author’s blog: http://blog.dojoklo.com/
Published by Full Stop Media. good writing for better photography
Cambridge, Massachusetts USA
http://www.dojoklo.com/Full_Stop/
2
Canon T5i / 700D Experience
CONTENTS
1. INTRODUCTION............................................................................................... 5
1.1 Take Control of Your Camera ................................................................................. 6
1.2 Using This Guide ..................................................................................................... 8
1.3 Getting Started ...................................................................................................... 10
2. CAMERA CONTROLS ................................................................................... 13
2.1 T5i / 700D Camera Body ....................................................................................... 13
2.2 Quick Control Screen and Touch Screen.............................................................. 19
3. MENUS and CUSTOM FUNCTIONS ............................................................. 22
3.1 Introduction to Setting Up the T5i / 700D .............................................................. 22
3.2 Shooting Menus..................................................................................................... 23
3.3 Live View Shooting menu...................................................................................... 35
3.4 Playback Menus .................................................................................................... 40
3.5 Set-Up Menus........................................................................................................ 47
3.6 My Menu ................................................................................................................ 57
3.7 Movie Shooting Mode Menus................................................................................ 58
3.8 Custom Functions (C.Fn) Menus .......................................................................... 64
4. PLAYBACK and IMAGE FILE FORMATS .................................................... 70
4.1 Playback ................................................................................................................ 70
4.2 Image File Formats - JPEG vs. RAW.................................................................... 71
4.3 File Sizes and Maximum Burst Rate ..................................................................... 73
5. AUTOFOCUSING ........................................................................................... 75
5.1 Introduction to Autofocus....................................................................................... 75
5.2 Viewfinder Autofocus............................................................................................. 76
5.3 Focus Modes ......................................................................................................... 79
5.4 Live View and Movie Autofocus Methods ............................................................. 86
5.5 Back Button Focusing............................................................................................ 91
6. DRIVE MODES ............................................................................................... 94
7. EXPOSURE Part 1 ......................................................................................... 96
7.1 Aperture, Shutter Speed and ISO ......................................................................... 96
7.2 Aperture Priority Mode (Av) and Shutter Priority Mode (Tv) ............................... 100
7.3 Full Stops............................................................................................................. 106
7.4 Manual Exposure Mode (M) ................................................................................ 108
7.5 Basic Zone Shooting Modes ............................................................................... 111
8. METERING MODES ..................................................................................... 120
8.1 Evaluative Metering ............................................................................................. 120
8.2 Partial Metering ................................................................................................... 121
8.3 Spot Metering ...................................................................................................... 123
8.4 Center-Weighted Average Metering.................................................................... 125
8.5 Manual Metering.................................................................................................. 127
8.6 Metering Modes and Exposure ........................................................................... 128
9. EXPOSURE Part 2 ....................................................................................... 130
9.1 Exposure Lock..................................................................................................... 130
3
Canon T5i / 700D Experience
9.2 Histograms........................................................................................................... 132
9.3 Exposure Compensation ..................................................................................... 135
9.4 Auto Exposure Bracketing................................................................................... 136
10. ADDITIONAL CAMERA FUNCTIONS ....................................................... 140
10.1 Highlight Tone Priority and Auto Lighting Optimizer ......................................... 140
10.2 White Balance ................................................................................................... 142
10.3 Picture Styles and Ambience Selection ............................................................ 147
10.4 Flash .................................................................................................................. 154
10.5 External Flash.................................................................................................... 160
10.6 Wireless Flash ................................................................................................... 164
10.7 Sensor Cleaning ................................................................................................ 170
10.8 Putting it All into Practice................................................................................... 170
11. THE IMAGE TAKING PROCESS ............................................................... 172
11.1 Still Subjects ...................................................................................................... 172
11.2 Moving Subjects ................................................................................................ 174
12. VIDEO - AN INTRODUCTION .................................................................... 177
13. COMPOSITION........................................................................................... 184
14. LENSES ...................................................................................................... 193
14.1 Lens Notations................................................................................................... 193
14.2 Fixed Maximum Aperture vs. Variable Maximum Aperture............................... 196
14.3 Which Lens to Buy Next .................................................................................... 197
15. PHOTOGRAPHY ACCESSORIES ............................................................. 206
15.1 Canon Rebel T5i / EOS 700D Accessories....................................................... 206
15.2 Digital SLR Photography Accessories .............................................................. 208
15.3 Digital Photography Books ................................................................................ 211
16. CONCLUSION ............................................................................................ 213
Future Updates to the Text........................................................................................ 213
About the Author........................................................................................................ 214
4
Canon T5i / 700D Experience
1. INTRODUCTION
With the introduction of the Rebel T5i (also known as the EOS 700D) Canon continues
its popular line of versatile, affordable, and easy to operate digital SLR cameras. On the
surface, the T5i / 700D shares the appearance and many of the specifications of recent
previous models: an 18 megapixel sensor to provide detailed images with accurate
color, a 63-zone dual-layer exposure metering system to properly determine the correct
exposure even in challenging lighting situations, and high ISO performance for obtaining
clean, sharp images in low-light settings.
But look a little deeper and it is revealed that the T5i / 700D also shares several other
capabilities of Canon’s semi-professional models. The camera boasts a fast Digic 5
processor to allow for rapid and advanced in-camera processing of images,
incorporates a 9 point, all cross-type autofocus system similar to current and previous
mid-level models (60D, 5D Mk II), as well as a quick 5 frames per second (fps)
maximum continuous shooting speed. These features will help you capture more sharp
images and optimum moments while photographing both still and moving subjects. Plus
the Digic 5 chip paired with the rapid frame rate allows for multi-shot modes that can
capture and combine a burst of images, in order to obtain results with wider dynamic
range or lower digital noise than a single frame can deliver.
Figure 1 - Detail of the Canon T5i / 700D, shown with the Canon EF 50mm f/1.4 USM
lens.
5
Canon T5i / 700D Experience
Not to mention the T5i / 700D offers Touch Screen capabilities with its articulating high
resolution rear LCD Monitor for easier selection of settings and menu items, multi-touch
image review, and touch autofocus initiation in Live View and Movie shooting.
While previous Canon dSLR models up until the recent T4i / 650D did not allow for
continuous autofocusing during Movie shooting, the T5i / 700D offers the current hybrid
autofocus system that enables fast, accurate, full-time autofocusing during Live View
and Movie shooting. The autofocus operation is made even faster and quieter when
using one of Canon’s STM “stepping motor” lenses. The T5i / 700D also has a built-in
stereo microphone and stereo mic output jack, additional shooting modes, and Creative
Filters that can now be previewed in Live View shooting mode before applying. And it
incorporates Chromatic Aberration Correction, a lens correction feature originally
introduced on the high-end Canon 5D Mark III.
With all of these features and its customization options, this camera has the ability to
meet or exceed most enthusiast photographers’ needs. The Canon Rebel T5i / EOS
700D is a powerful, advanced tool for digital photography and is fully capable of
capturing professional quality images in most any situation you wish to use it. But it is
merely a tool. It is up to you to make use of its features and capabilities to create the
images you envision. While the camera’s manual will tell you about the settings and
controls and how they function, this guide builds upon that to explain when and why you
want to use them. Every button, menu item, Custom Function setting, and feature of the
T5i / 700D is there for a reason: to help you capture and output the images you want.
Some of them are more useful to different types of photographers and shooting
situations and you don’t need to learn and use them all immediately, but this guide
should help to give you the knowledge to confidently use the ones that turn your Canon
Rebel T5i / EOS 700D into an image capturing tool that works best for you.
1.1 Take Control of Your Camera
Because the T5i / 700D is a tool to take the images you want to take, you can’t always
allow the camera to make decisions for you. You have to take control of the camera to
ensure that you capture exactly the images you intend - by autofocusing where you
want, setting the aperture or shutter speed that you want, and obtaining the exposure
you want. While the T5i / 700D is an intelligent camera, it cannot read your mind and
your intentions and does not know that you wish to focus on and properly expose the
face of the man on the right side of the frame, while making the other man and the
background appear out of focus, and the subject to be caught still and not be blurred
from his motion, on this bright and sunny day (see Figure 2). You have to tell the
camera to do all of this through the various controls and settings, such as the autofocus
AF Mode and AF Points (focus on the face on the right), the Exposure Metering Mode
(properly expose for the face and the scene), the Aperture setting (the out-of-focus
second man and background), the Shutter Speed (freeze the motion of the subject), the
ISO (bright day) and the White Balance (sunny day).
6
Canon T5i / 700D Experience
Figure 2 - Parade, Brooklyn, NY - Autofocus, exposure metering mode, aperture,
shutter speed, ISO, and white balance all considered in capturing this image. Shutter
speed 1/320, aperture f/4.5, ISO 100.
One has to think about all this stuff for every photo? Well, yes, that is what digital SLR
photography is all about! At least if you wish to consistently create well made,
interesting, and compelling images. That is why the T5i / 700D has all these controls
and features for you to easily make use of, either with the camera controls or via the
Quick Control Screen. You’re not in the realm of point-and-shoots anymore!
Learning to use and get the most out of a versatile dSLR camera like the T5i / 700D
takes time, practice, patience, mistakes, and experimentation. If you are not yet familiar
with all the controls of a dSLR and the exposure concepts of digital photography, don’t
expect to just pick it all up at once, in one or two readings of a single book. (In fact, you
wouldn’t want to, as the never ending task of learning and mastering photography is a
big part of what it’s all about!) Try not to become frustrated when you don’t quite
understand something or aren’t yet getting the results you desire. Instead learn the
controls, functions, settings, and concepts bit by bit, try them out in real life shooting
situations and experiments, and return to this guide, the Canon manual, and other
photography books to address questions and problems you encounter. Continue to
learn and to photograph often and it should all begin to come together, sometimes
slowly and sometimes in rapid bursts of discovery and understanding.
If you have upgraded from an older Canon dSLR to the T5i / 700D, you should find that
many of the basic controls and features are similar. And its additional features and
7
Canon T5i / 700D Experience
capabilities will more easily help you to capture photographs that you may have been
limited in consistently obtaining before. If you are new to dSLR photography, this book
will help guide you through the camera’s features, controls, and capabilities. Be sure to
take it slowly and patiently and start with the basic features and concepts that I will
explain. With practice and experience you will soon be shooting with confidence and
can begin to take advantage of the camera’s more advanced functions.
1.2 Using This Guide
There are many different ways to use a digital SLR camera and its controls to capture
images, and many diverse situations in which photographers work. I’m going to
concentrate on the techniques that I believe are the most practical, useful, and effective
for the majority of intermediate and dedicated photographers. The settings and controls
I discuss can apply to various types of photography including everyday general
photography, action, travel, and studio photography. Once you have a firm grasp of the
controls, settings, and basic techniques you will have the tools and knowledge to
address different issues and challenging situations, and I encourage you to experiment
and continue to learn.
Since this guide is intended to help you get the most out of your T5i / 700D, it will not go
into detail about all of the automatic features. (For simplicity, I am typically going to refer
to the camera as the “T5i” from this point forward - my apologies to the readers whose
camera badge reads “700D”!) The Canon T5i is a sophisticated tool that deserves to be
used to its full potential, and that involves taking control of the camera and its functions,
which means taking it off Auto+, off Program, off automatically selected auto-focus
points when not required, off Auto ISO. While this may be more challenging at first,
these are the techniques that are necessary to take full advantage of the capabilities of
any dSLR including the T5i, and will lead you to having more control and consistency
over your image making. Hopefully this will inevitably lead to better images!
This guide is intended to be used with the camera in your hands. That is the best way to
directly follow and understand the controls, functions, menus, and settings as they are
being explained. It is also intended to be used in addition to the camera’s manual, not to
completely replace it, so every bit of information in the Canon EOS Rebel T5i / EOS
700D Instruction Manual will not be repeated here. Among the official manual’s often
brief descriptions and sometimes frustratingly incomplete or disjointed explanations
there is some valuable information, as well as the basics for buttons, controls, and how
to change all the settings. And I will refer you to the manual for extremely specialized or
rarely accessed features that are explained well. Note that the T5i manual can also be
obtained as a PDF file from the T5i product page on the Canon website, under
Brochures and Manuals:
http://www.usa.canon.com/cusa/consumer/products/cameras/slr_cameras/eos_rebel_t5
i_18_55mm_is_stm_kit#BrochuresAndManuals
As you can see, there is a lot to make sense of regarding terminology and controls, so I
recommend that you familiarize yourself with the controls and displays of the camera
8
Canon T5i / 700D Experience
body, as described in this guide in Chapter 2 Camera Controls (and shown on pages
20-24 of the Canon EOS Rebel T5i / EOS 700D Instruction Manual), as well as read
through the manual at some point and attempt to understand as much as possible. Yes,
some of it may be complicated and confusing at first, but this guide will explain and
clarify the numerous buttons, controls, menus, and settings and explain how you may
wish to set them and when and why you will want to use them in your photography.
Various settings of the T5i can be controlled in multiple ways using the menus, buttons,
Cross Keys, and the [Q] Button and Quick Control Screen. Settings can be selected and
viewed on the Quick Control screen by using either the camera controls or the Touch
Screen, or viewed in the Viewfinder and changed with the camera controls without
removing your eye from the scene. Explore the different options and find the ways that
work most quickly and intuitively for you and the situations you are shooting.
Figure 3 - Detail of the Canon T5i / 700D.
Any time I capitalize something in this text it is a proper term that can be looked up in
the Canon EOS Rebel T5i / EOS 700D Instruction Manual. I will capitalize the names of
actual buttons, controls, camera parts, and menu items, such as Erase Button, Main
Dial, Cross Keys, and Metering Mode. Words and phrases that are capitalized and bold
refer to chapters and sections within this guide. Turn on or access the bookmarks
navigation or contents panel in your PDF / EPUB viewer or e-reader to quickly navigate
to different sections - though I suggest reading straight through this guide, in order, the
first time.
9
Canon T5i / 700D Experience
3. MENUS and CUSTOM FUNCTIONS
3.1 Introduction to Setting Up the T5i / 700D
The Menus and Custom Functions of Canon dSLR cameras allow you to have greater,
more precise control over how your camera operates. They are part of what makes the
T5i a more powerful tool than a digital compact or basic entry-level dSLR, and they
enable you to customize the camera to work for you, to work how you work. I highly
recommend that you dig into these menus and change the settings to the options that
allow you to use the camera in the manner that works best for you and your way of
photographing.
Some of the Menu items are only used when shooting, reviewing, or processing images,
but many of them should be set up in advance. Below are explanations and
recommendations for the Menus and the Custom Functions of the Canon T5i / 700D.
Please note that this guide will go into further detail about most of these settings and
functions later in the detailed chapters and sections about Autofocusing, Exposure,
White Balance, etc. Although I have attempted to explain many of these items in a
more understandable and unified way than the manual, you still may need to first read
through this chapter to learn about related Menu and Custom Function settings, plus
read the applicable sections of this guide, and then work with the camera a bit before
you will completely understand a specific item and how you may wish to set it. So don’t
become overwhelmed if you don’t yet understand the settings or terminology used to
describe the Menu and Custom Function settings and their options. And if you don’t yet
understand some of the settings or why you might wish to change them, leave those on
the default or recommended settings for now. Remember to return to them later after
you have completed the guide, worked with your camera, begun to better understand its
controls and functions, and started to determine exactly how you want to work.
Important Note: As with most current dSLR cameras, the T5i has a couple menu
settings “quirks” or conflicts that may drive you crazy if you are not aware why they are
occurring. Most notably, some settings will be inaccessible in the menus and you will
not be able to select them if a “conflicting” setting is enabled. Examples include certain
functions like Multi-Shot Noise Reduction, Handheld Night Scene, or HDR Backlight
Control which are not accessible when the camera is set to capture files in the RAW or
RAW+JPEG image format. You must then set the Image Quality to one of the JPEGonly settings. The use of Auto Exposure Bracketing, White Balance Bracketing, MultiShot Noise Reduction, and/ or Long Exposure Noise Reduction will also conflict with
other settings including use of the Creative Filters. These are actually not arbitrary
quirks, but are typically due to logical conflicts or camera limitations. I will mention these
conflicts in the applicable settings.
Place your Mode Dial on Av (Aperture-Priority Auto Shooting Mode) before you go
through these menu settings because they don’t all appear in the menus if your camera
is in Auto+ mode, Program mode, or one of the Basic Zone modes. You may wish to
22
Canon T5i / 700D Experience
first review the Camera Controls in Chapter 2 if you are not yet familiar with the T5i
controls.
3.2 Shooting Menus
Shooting 1 Menu
Figure 13 - Shooting 1 Menu.
Image Quality
You are putting a lot of effort into taking your images and the T5i provides an excellent
18 MP sensor on which to record them. You should make sure the files are of the best
possible quality. I will discuss JPEG vs. RAW file formats in detail in the next chapter,
to better help you decide which format you wish to use to save your images.
recommend: Set either for RAW if you shoot in the RAW format, or the highest quality
and largest JPEG setting (Fine/Large) if you shoot in JPEG format, or both combined
(RAW+Fine/Large JPEG) if you need both types of files (see Figure 14).
Figure 14 - Image Quality menu (left) to set for images to be saved as RAW and/ or
JPEG files. Beep menu (right) to turn camera sounds on or off.
23
Canon T5i / 700D Experience
Beep
The camera will beep when it achieves focus or beep softly when continuing to focus on
a moving subject, as well as when using the Touch Screen and the self timer.
Disable if you find it annoying or unnecessary, or set for Touch to (mute) if you wish to
enable it except for when using the Touch Screen (see Figure 14).
Release Shutter Without Card
This setting prevents you from taking photos if there is no memory card in the camera,
and is typically only used to demo the camera in a store.
Disable. Please! You do not want to take 500 images of your niece's wedding and
discover there was no memory card in the camera. Test to make sure you set it
properly.
Image Review
This is the duration that the image you just took stays visible on the rear LCD Monitor.
User preference. You might wish to leave it Off to save the battery, then hit the
Playback Button quickly (and soon, instinctively) when you want to review an image on
the LCD Monitor. Or you may want to set it for 4 or 8 seconds, or Hold so that the image
stays on the LCD Monitor until you press the Shutter Button half-way or use another
camera control (see Figure 15).
Figure 15 - Image Review menu (left), and Lens Aberration Correction menu (right) for
the camera to automatically correct for lens issues when using Canon lenses, including
Peripheral Illumination and Chromatic Aberration.
Lens Aberration Correction
These menu options can be used to automatically correct images for image quality
issues introduced by Canon lenses (see Figure 15).
Peripheral Illumination will correct for darkened corners of an image that occur with
certain lenses or at certain focal lengths, such as when using a very wide-angle focal
length. If you wish to use this setting, attach the lens before accessing this menu to see
that the correction data is available before setting for Enable. Using this option may
introduce digital noise to the area being corrected. This correction can also be made
with the included Canon Digital Photo Professional (DPP) software, which contains
24
Canon T5i / 700D Experience
C.Fn I: Exposure
C.Fn 1 - Exposure Level Increments
This is to change the increments of shutter speed, aperture, and exposure
compensation: 1/2 stop increments or 1/3 stop (see Figure 68). This setting will also
apply to Auto Exposure Bracketing (AEB) and Flash Exposure Compensation. Set this
depending on your personal preference and what you are used to using for these
increments. Many photographers prefer the greater precision of 1/3 stops, which is
generally the traditional and standard setting, but you may prefer the simplicity and ease
of 1/2 stops. Making use of 1/2 stops might also help with making quick exposure
calculations in your head. Shutter speed and aperture will be covered in the Exposure,
Part 1 chapter, and Exposure Compensation in its own section of the text.
recommend: 0: 1/3-stop
Figure 68 - C.Fn 1 - Exposure Level Increments options (left), and ISO Expansion menu
(right).
C.Fn 2 - ISO Expansion
This allows for ISO speed H (the equivalent of ISO setting 25,600 for still images and
12,800 for movies) to be selected when you or the camera are choosing an ISO setting
(see Figure 68). If you don't often need incredibly high ISO settings, I suggest leaving
this off until you are in a situation that may truly need it, so that you or your camera
does not choose ISO 25,600 in an unwanted situation. Maybe put this in My Menu if
you plan to use it every once in a while. Note that if you have enabled Highlight Tone
Priority (the next item), you will not be able to access the ISO H setting.
recommend: 0: Off
C.Fn II: Image
C.Fn 3 - Highlight Tone Priority
This setting improves the details seen in highlights and helps prevent them from being
overexposed or “blown-out” (see Figure 69). It shifts the dynamic range to the brighter
end (captures more information about bright tones in order to better differentiate subtle
variations), so you may sacrifice some detail in the shadows. It is worth using in certain
65
Canon T5i / 700D Experience
situations, such as when photographing a wedding dress or something very bright or
“high key” where you don't wish to lose the subtle details and variations. However, you
typically don't want it on all the time. I suggest putting it in My Menu so you remember it
is there to use when you need it.
Note that when you enable this, the camera will disable Auto Lighting Optimizer (ALO)
and will limit your ISO range to 200-12,800. Also note that Highlight Tone Priority (HTP)
permanently affects JPEG and RAW image files (while ALO affects only JPEGs). More
on Highlight Tone Priority and Auto Lighting Optimizer later in this text.
recommend: 0: Disable - but perhaps put in My Menu
Figure 69 - Highlight Tone Priority options (left), and AF-Assist Beam Firing menu
(right).
C.Fn III: Autofocus/ Drive
C.Fn 4 - AF-Assist Beam Firing
This setting is to enable or disable the autofocus assist beam, which is a flash or flashes
of light emitted from the internal flash or from a dedicated external Speedlite flash, to
help the camera focus on the subject (see Figure 69). I suggest enabling it, setting 0,
unless you are in a situation where it is unwanted or too distracting in some way. If you
never use the internal flash and only an external Speedlite, set it on 2: Enable external
flash only or 3: IR AF assist beam only which will only use the Speedlite’s infrared AFassist beam and not the series of small flashes of light. Make sure the Speedlite's
Custom Functions have the AF-assist options turned on as well if you wish to make use
of them.
recommend: 0: Enable or user preference
C.Fn 5 - Mirror Lockup
This is the mirror lockup that you might have read about from landscape and macro
photographers (see Figure 70). By enabling it you reduce that extra little bit of vibration
that may cause slight blurring with a long lens or a macro lens. It is only worth using in
conjunction with a remote shutter release or the self timer, and a tripod. You definitely
don't want to use it all the time, so disable it, and put it in your My Menu if you need it
sometimes. This is not the feature to use to raise your mirror for manual sensor
66
Canon T5i / 700D Experience
7. EXPOSURE Part 1
To consistently make successful images you need a basic understanding of what is
sometimes called the “exposure triangle,” which is the function of and relationship
between the shutter speed, aperture, and ISO settings. While you may find this subject
to be confusing, intimidating, and perhaps sometimes counter-intuitive, it lies at the core
of dSLR camera use and image making, so it is essential that photographers
understand it. If you don’t yet fully understand the “exposure triangle” after reading this
section, please read one of the books dedicated to the subject such as Bryan
Peterson’s Understanding Exposure.
Figure 92 - Detail of the Canon T5i including the Mode Dial and ISO Button.
7.1 Aperture, Shutter Speed and ISO
Exposure is controlled by three settings, which determine the amount of light hitting the
sensor (aperture), the time that the sensor is exposed to the light (shutter speed), and
the sensitivity of the sensor (ISO). An optimally exposed image is obtained when all of
these settings are harmoniously set based on the lighting of the scene and the desired
results. Since all three settings work together, they can be changed in a specific
situation (one can be raised and another lowered) and a “properly” exposed image (one
that is not overexposed or underexposed) can still be taken. But the resulting images
may be dramatically different. For example you can take two very different yet properly
exposed photos of a runner moving across your frame. In one shot the runner is frozen
in space and in the other shot the runner is a blurred streak of color. Or you can take
96
Canon T5i / 700D Experience
two properly exposed yet very different looking portraits of a subject. In one shot the
subject and the background behind them are all in focus and in another the subject is in
sharp focus but the background behind them is softly out of focus. These differences
are not dependent on chance or other circumstances, but can always be determined by
the photographer and controlled through the choice of shutter speed and/ or aperture
setting in conjunction with the ISO setting.
Aperture is the opening in the lens that controls the amount of light hitting the sensor.
You can control the size of this opening in Aperture Priority AE mode (Av), and in
Manual Exposure mode (M). A large opening lets in a lot of light and a small opening
lets in a little light.
Shutter Speed is the amount of time that the shutter, which is the curtain in front of the
sensor, is open. If it is open a long time, a lot of light hits the sensor and if it is open a
short time less light hits the sensor. You can control the shutter speed in Shutter Priority
AE mode (Tv), and in Manual Exposure mode (M).
ISO is the sensitivity of the sensor, its ability to grab the light that lands on it. A low ISO
is not very sensitive to light and does not grab much (relatively), and a high ISO is very
sensitive to light and grabs all it can.
Figure 93 - Shutter Speed setting, Aperture setting, and ISO setting all shown on the top
row of the Shooting Settings screen on the rear LCD Monitor. Because the camera is in
Aperture Priority (Av) Mode, the arrows around the Aperture setting indicate you can
turn the Main Dial to adjust this setting.
As you can see, they all relate to the light hitting the sensor. For a proper exposure, one
that isn’t too light or too dark, the right amount of light needs to hit the sensor and it
needs to be at the right sensitivity to accept that light. So all three work together to
control and accept the amount of light that hits the sensor (see Figure 93). In Auto+
Mode, the camera chooses what it thinks is the best combination of these three settings
and creates a proper exposure. So, for example, a small opening (aperture) will need
more time (shutter speed) to let in the necessary amount of light based on the current
97
Canon T5i / 700D Experience
sensitivity of the sensor (ISO). A large opening will need less time since more light
comes in the large opening at once. You are going to take over control of these choices
from the camera because these three settings just happen to do other things as well.
Aperture also controls the depth of field, which is the distance range that objects will be
rendered acceptably sharp. A deep depth of field means that everything from a few feet
in front of you to very, very far away is all in focus. This is often desirable in photos of
landscapes. A shallow depth of field is when perhaps just a few feet or even just inches
of the scene in front of you are in focus, for example a portrait or photo where the
subject is in focus but the background is blurry (see Figure 94). In photos with very
dramatic shallow depth of field, sometimes the subject’s eyes and nose are in focus, for
example, but their ears and everything beyond may be blurry.
Figure 94 - Orchid at Brooklyn Botanic Garden, NY - A “wide” or “large” aperture creates
shallow depth of field which emphasizes the subject and causes the background to
appear out of focus. Shutter speed 1/125, aperture f/4.5, ISO 200.
Shutter Speed controls your ability to freeze a moving subject or to let it become a blur
across your frame. A fast shutter speed will freeze the action and a slow shutter speed
will cause any motion to become a blur (see Figure 95).
ISO doesn’t really do anything fun. High ISO settings just cause the image to have more
digital noise and less detail, which you typically want to avoid (see Figure 94a). Photos
with the T5i can have an acceptable amount of noise and detail up to 1600 ISO and
perhaps very useable images at 3200 ISO or higher, depending on your needs,
98
Canon T5i / 700D Experience
expectations, and image uses. You typically want to use the lowest ISO possible for the
situation, but you will need to change it to allow for the aperture setting or shutter speed
that you wish to use.
You can view additional informal JPEG test images that I took at various ISO settings
here:
http://www.flickr.com/photos/dojoklo/sets/72157633279873599/
Figure 94a - Comparison of ISO 100 vs. 3200 with the T5i / 700D - (JPEG, with Long
Exposure Noise Reduction: On and High ISO Noise Reduction: Standard). Left: Shutter
speed 1 sec, aperture f/5.6, ISO 100. Right: Shutter speed 1/30 sec, aperture f/5.6, ISO
3200. View these images larger at the link above.
99
Canon T5i / 700D Experience
Figure 95 - Pedestrian and Mural, Cambridge, Mass. - A slow shutter speed was used
to express the movement (motion blur) of the pedestrian as she passed in front of the
“Crosswinds” mural by Daniel Galvez. Shutter speed 1/40, aperture f/4, ISO 100,
Exposure Compensation -1/3.
7.2 Aperture Priority Mode (Av) and Shutter Priority Mode (Tv)
Aperture-Priority AE Mode - Av: To control the depth of field (dof) you need to use
Aperture-Priority AE mode (Av). As will be explained in the Composition chapter, depth
of field is one of the most powerful composition tools available to photographers. Many
photographers work the majority of the time with their camera set in Aperture Priority AE
Mode (Av) so that they have full control of the depth of field of their images. To adjust
the Aperture setting when working in Aperture-Priority (Av) Mode, simply turn the Main
Dial. Or else press the [Q] Button or icon to activate the Quick Control Screen and
navigate to the Aperture setting. Again, turn the Main Dial to adjust it (as indicated by
the dial icon at the lower-right of the screen in Figure 96-left), or press the SET Button
or touch the Aperture icon to access the Aperture setting screen (see Figure 96-right).
On this screen you can also press the arrows or else swipe your finger along the
Aperture scale on the Touch Screen to adjust the setting.
100
Canon T5i / 700D Experience
Figure 96 - When working in Aperture-Priority (Av) Mode, simply turn the Main Dial to
adjust the aperture setting. Or you can press the [Q] Button or icon to activate the Quick
Control Screen and select the Aperture icon on the Quick Control Screen (left). Again,
turn the Main Dial to adjust it (as indicated by the dial icon at the lower-right of the
screen), or press SET or touch the icon to access the Aperture setting screen (right). On
this screen you can swipe your finger along the Aperture scale on the Touch Screen to
adjust the setting.
Apertures are identified by numbers such as f/5.6 or f/16. In the Viewfinder of your
camera you will just see the number like 5.6 or 16. On the Shooting Settings Screen or
Quick Control Screen viewed on the rear LCD Monitor you may see F5.6 or F16. These
numbers often confuse people because a seemingly “small” aperture number like f/2.8
is a large aperture opening, and a seemingly “large” aperture number like f/22 is a small
aperture opening. But because they are actually fractions, f/2.8 is a larger opening than
f/22. 1/3 of a pie is larger than 1/22 of a pie, right? So I will say large aperture size to
mean a large opening (maybe f/2.8 or f/4) and small aperture size to mean a small
opening (maybe f/16 or f/22). Unfortunately, the Aperture settings screen as seen in
Figure 96-right uses the Small f/number and Large f/number designations, which don’t
help to clarify this. So I suggest ignoring that wording and focusing on the aperture
numbers only.
A large aperture size (f/2.8, etc.) will create shallow depth of field, which will make the
background blurry, and often creates a more dramatic or interesting photo. A small
aperture size (f/16, etc.) will create deep depth of field, where everything from the
foreground to the distance is in focus, and is often used in landscape photography or
other situations where you wish to render the entire scene in focus (see Figure 97). You
can use Av mode most of the time, in non-action situations, to control the range of what
will be in focus (your depth of field) and the amount of background blur.
101
Canon T5i / 700D Experience
What Readers are Saying About Doug’s previous dSLR Camera Guides
Canon T4i /650D Experience and Canon T3i / 600D Experience:
A Must-Have Accessory - What a great addition to my bag. This is a well written, full
body of work that explains, in plain English, how to get the most out of my new camera.
Doug provides the knowledge and experience to bring you to the next level. I look
forward to learning more every time I open the book.
-Steven
Definitely reduces the slope of the learning curve to an easy gradient - I found that
it was easy to read and understand, full of important hints and suggestions and allowed
me to get to grips with the tools available in the camera in a very short time indeed.
Excellent value!
-O.B.
A Very Useful T4i Guide - This book is written from the perspective of someone who
both knows the T4i and can communicate clearly to the non-professional. The insights
in every section make this book exceptionally useful.
-Ed R.
A must have book for the T4i - This book is a must have to jump-start into using the
T4i. It covers all aspects of the camera's operations in easy to understand terms (with)
photography tips added throughout the book to help you with the how and why on
getting the best photo. This book has given me confidence in taking advantage of all the
features the T4i has to offer in the various shooting modes.
-Cheryl L.
Excellent T3i Learning Jump Start - The book and author do not disappoint. There
are so many helpful and practical tips shared and in terms I can understand as a novice.
-Cathryn C.
Amazing! - Great and easy to understand and very complete. Very highly
recommended. The guy REALLY knows what he's talking about.
-P.M.
Awesome Book - Bought this book right after I got the camera - was the best decision I
made. It shows the key points of setting up and taking images with the Canon T3i. I am
a novice when it comes to dSLR's and I still felt this book helped me a ton. Would highly
recommend it to anyone.
-Sean S.
Purchase Canon T5i / 700D Experience at:
http://www.dojoklo.com/Full_Stop/Canon_T5i_Experience.htm
215