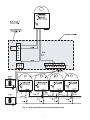
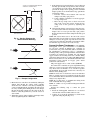
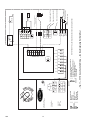
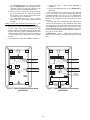
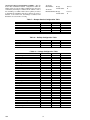
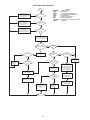
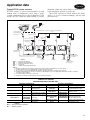
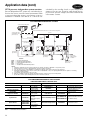
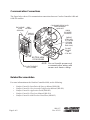
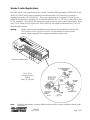
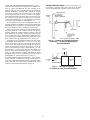
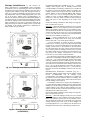
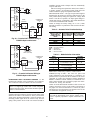
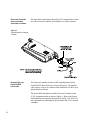
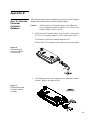
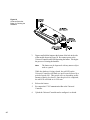
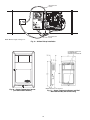
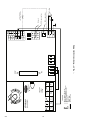
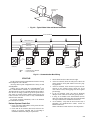
1
Product Specification Single Duct Air Terminal Zone Controller Part Number 33ZCVAVTRM The Single Duct Air Terminal Zone Controller provides dedicated control functions for single duct terminals with modulating heat or up to 2 stages of heat. The zone controller is part of the Carrier ComfortID system. The 33ZCVAVTRM Single Duct Air Terminal Zone Controller provides the following features and benefits: • provides Pressure Independent (VAV) control • uses Proportional Integral Derivative (PID) control • mounts directly onto VAV box damper shaft • terminal fan control • for terminals up to 9000 cfm or 3.4 sq. ft inlet (primary air) • auxiliary heating control of modulating (floating) hot water, single-position hot water, single or two-stage electric, or zone perimeter heat • quick and easy commissioning and balancing process • automatic self calibration of airflow transducer • capable of stand-alone operation, with supply-air temperature sensor • actuator preassembled to housing • capable of demand controlled ventilation support with fieldinstalled IAQ sensor • easy access to airflow sensor pneumatic connections • uses Carrier Comfort Network (CCN) protocol • capable of high-speed 38.4 kilobaud communications network operation • 128 controller maximum system (must be located on same CCN bus segment) • capable of zone humidity control (dehumidification) with fieldinstalled humidity sensor • Carrier Linkage System capability • global set point and occupancy scheduling Copyright 1999 Carrier Corporation Form 33ZC-2PS • capable of local set point adjustment with field-installed temperature sensor (with temperature offset) • both controller housing and actuator are UL94-5V plenum rated Features/Benefits Flexibility for every application The zone controller is a single duct, fan powered, variable air volume (VAV) terminal control with a factoryintegrated controller and actuator. The zone controller maintains precise temperature control in the space by operating the terminal fan and regulating the flow of conditioned air into the space. Buildings with diverse loading conditions can be supported by controlling reheat (single duct only) or supplemental heat. The zone controller can support single position hot water, modulating hot water, 2-stage electric, or perimeter heat. Carrier Linkage System compatibility When linked to a Carrier Linkage System, the zone controller provides numerous features and benefits such as weighted average demand for system operation, intelligent supply-air temperature reset, set point averaging, global set point schedule, and occu- 2 pancy scheduling. Duct static reset for the air source is provided, based on terminal requirements. Additional control features The zone controller provides additional control features such as Occupied/ Unoccupied scheduling initialized via the network. The zone controller offers override invoked from a wall sensor during unoccupied hours from 1 to 1440 minutes in 1-minute increments. Optional Indoor Air Quality (IAQ) or relative humidity monitoring and control are also available. Simple actuator connection The zone controller control assembly contains an integral VAV actuator assembly that is field mounted to the VAV terminal damper shaft, similar to the mounting of a standard actuator. The actuator is rated at 35 lb.-in. (3.95 N-m) torque, a 90-degree stroke, and provides second nominal timing at 60 Hz. The actuator is suitable for mounting onto a 3/8-in. (9.5 mm) square or round VAV box damper shaft, or onto a 1/2-in. (13 mm) round damper shaft. The minimum VAV box damper shaft length is 1 3/4-in. (45 mm). The zone controller is designed for vertical or horizontal mounting. Ease of installation The zone controller is provided with removable connectors for power and communications. The zone controller has non-removable screw type connectors for inputs. The removable connectors are designed so that they can be inserted one way so as to prevent installation errors. The zone controller also provides an RJ-14 modular phone jack for the Network Service tool connection to the module via the Carrier Comfort Network (CCN) communications. An optional Conduit Box Cover (Part Number 33ZCCONBOX) provides for field wiring connection via conduit. The conduit box is designed to accept two 1/2-in. (13 mm) EMT conduits. User Interface The 33ZCVAVTRM is designed to allow a service person or building owner to configure and operate the unit through the CCN user interfaces. A user interface is not required for dayto-day operation. All maintenance, configuration, setup, and diagnostic information is available through the Level II communications port to allow data access by an attached computer running Network Service Tool, ComfortVIEW™, or ComfortWORKS ® software. Specifications Wiring connections Field wiring is 18 to 22 AWG (American Wire Gage). The zone controller is a NEC (National Electronic Code) Class 2 rated device. Inputs • space temperature sensor • primary air damper position • airflow sensor (factory installed) • field-installed remote wall sensor set point adjustment • optional supply temperature sensor (required for heat and supply air monitoring) • optional primary air temperature sensor (required for systems which do not utilize a linkage compatible air source) • optional IAQ sensor • optional relative humidity sensor Outputs • internally factory-wired VAV actuator • heating - modulating (floating) heat - up to 2 stages of heat - single position heat Power supply The power supply is 24 VAC ± 10% at 40 VA (50/60 Hz). Power consumption The power requirement sizing allows for accessory water valves and for the fan contactor. Water valves are limited to 15 VA on both single-position and modulating hot water. The fan contactor is limited to 10 VA (holding) each. Accuracy Terminal airflow (nominal cfm) is rated at 1-in. wg (249 kPa) measured velocity pressure. The zone controller is capable of controlling to as low as 10% or as high as 125% of nominal airflow with an accuracy of ± 3% (nominal) at any point within the range. Hardware (memory) FLASH EPROM Differential pressure range 0 to 2.0 in. wg (0 to 498 kPa) maximum for the onboard flow sensor. Specified sensing temperature range The zone controller space temperature range is –40 to 245 F (–40 to 118 C). The zone controller has an allowable control set point range from 40 to 90 F (4 to 32 C) for heating and 45 to 99 F (7 to 37 C) for cooling. Communications The number of controllers is limited to 128 zones maximum, with a limit of 8 systems (Linkage Coordinator configured for at least 2 zones). Bus length may not exceed 4000 ft (1219 m), with no more than 60 devices on any 1000 ft (305 m) section. Optically isolated RS-485 repeaters are required every 1000 ft (305 m). At 19,200 and 38,400 baud, the number of controllers is limited to 128 maximum, with no limit on the number of Linkage Coordinators. Bus length may not exceed 1000 ft (305 m). Environmental ratings Operating Temperature: 32 to 140 F (0° to 60 C) at 0 to 90% RH (non–condensing) Shipping Temperature: –40 to 185 F (-40 to 85 C) at 0 to 90% RH (non–condensing) Vibration Performance vibration: • 0.014-in. (0.356 mm) Peak-to-Peak displacement measured at 5 to 31 Hz • 0.75 G measured at 31 to 300 Hz Corrosion Office environment. Indoor use only. Approvals • listed under UL 916-PAZX and UL 873 • conforms to requirements per European Consortium standards EN50081-1 (CISPR 22, Class B) and EN50082-1 (IEC 801-2, IEC 801-3, and IEC 801-4) for CE mark labeling • UL94-5V plenum rated (housing and actuator) Accessories Conduit box — The 33ZCCONBOX conduit box provides two conduit connections to the zone controller for installations requiring the use of conduit due to local electrical codes. Supply air temperature sensor — The 33ZCSENSAT supply air temperature sensor is required for heating applications or stand-alone operation. The sensor is optional on cooling only applications and is used for supply air monitoring. The sensor has an operating range of –40 to 245 F (–40 to 118 C). Primary air temperature sensor — The 33ZCSENPAT primary air temperature sensor is required on a linkage coordinator zone controller if the zone controller is not using a CCN linkage compatible air source. The sensor is used to monitor the equipment’s supply-air temperature. The temperature is broadcast to the zone controllers which receive information from the linkage coordinator. The sensor has an operating range of –40 to 245 F (–40 to 118 C). Space temperature sensor with override button — The 33ZCT55SPT space temperature sensor with override button is required for all applications. The space temperature sensor monitors room temperature which is used by the zone controller to determine the amount of conditioned air that is allowed into the space. 3 Space temperature sensor with override button and set point adjustment — The 33ZCT56SPT space temperature sensor with override button and set point adjustment can be used in place of the 33ZCT55SPT space temperature sensor if local set point adjustment is required. A space temperature sensor is required for all applications. The space temperature sensor monitors room temperature which is used by the zone controller to determine the amount of conditioned air that is allowed into the space. The set point adjustment bar allows up to a ± 15 F (8 C) temperature adjustment by the room occupant. Relative humidity sensor — The 33AMSENRHS000 relative humidity sensor (indoor space) is required for zone humidity control (dehumidification). NOTE: The relative humidity sensor and CO2 sensor cannot be used on the same zone controller. Indoor air quality sensor — Two indoor air quality (CO2) sensors are available for optional demand control ventilation. The CGCDXSEN002A00 CO2 Sensor is an indoor, wall mounted sensor with an LED display. The CGCDXSEN003A00 CO2 Sensor is an indoor, wall mounted sensor without display. NOTE: The relative humidity sensor and indoor air quality (CO2) sensor cannot be used on the same zone controller. Dimensions Carrier Corporation • Syracuse, New York 13221 10-99 Manufacturer reserves the right to discontinue, or change at any time, specifications or designs without notice and without incurring obligations. New Book 1 Pg 4 Catalog No. 523-324 Printed in U.S.A. PC 111 Form 33ZC-2PS Book 1 4 Replaces: New Tab 11a 13a Tab CS1 3V™ Control System VVT® Bypass Controller 33ZC Installation, Start-Up and Configuration Instructions Part Number 33ZCBC-01 CONTENTS Page SAFETY CONSIDERATIONS . . . . . . . . . . . . . . . . . . . . . . . . . . . .1 GENERAL . . . . . . . . . . . . . . . . . . . . . . . . . . . . . . . . . . . . . . . . . . . . . 1 INSTALLATION . . . . . . . . . . . . . . . . . . . . . . . . . . . . . . . . . . . . . 1-11 General . . . . . . . . . . . . . . . . . . . . . . . . . . . . . . . . . . . . . . . . . . . . . . . . 1 Bypass Controller Hardware . . . . . . . . . . . . . . . . . . . . . . . . . . . 2 Field-Supplied Hardware. . . . . . . . . . . . . . . . . . . . . . . . . . . . . . . 2 • DUCT TEMPERATURE (DAT) SENSOR Mount Bypass Controller . . . . . . . . . . . . . . . . . . . . . . . . . . . . . . 2 • LOCATION • MOUNTING Connect the Power Transformer . . . . . . . . . . . . . . . . . . . . . . . .2 Bypass Controller Inputs and Outputs . . . . . . . . . . . . . . . . . 5 Install Duct Temperature Sensor. . . . . . . . . . . . . . . . . . . . . . . 5 Install Pressure Tubing . . . . . . . . . . . . . . . . . . . . . . . . . . . . . . . . 5 Install Field-Supplied Actuators . . . . . . . . . . . . . . . . . . . . . . . .6 • FLOATING POINT HIGH-TORQUE ACTUATORS • LINKED ACTUATORS Damper Stops . . . . . . . . . . . . . . . . . . . . . . . . . . . . . . . . . . . . . . .6 Connect the Carrier Network Communication Bus . . . . . 6 • COMMUNICATION BUS WIRE SPECIFICATIONS • CONNECTION TO THE COMMUNICATION BUS START-UP. . . . . . . . . . . . . . . . . . . . . . . . . . . . . . . . . . . . . . . . . . . . . 12 Perform System Checkout . . . . . . . . . . . . . . . . . . . . . . . . . . . . 12 CONFIGURATION . . . . . . . . . . . . . . . . . . . . . . . . . . . . . . . . . . 12-17 Status Display Table . . . . . . . . . . . . . . . . . . . . . . . . . . . . . . . . . . 12 Maintenance Tables. . . . . . . . . . . . . . . . . . . . . . . . . . . . . . . . . . . 13 • BYPASS CONTROLLER MAINTENANCE TABLE • BYPASS CONTROLLER COMMISSIONING MAINTENANCE TABLE • BYPASS CONTROLLER SYSTEM PILOT DEFAULT MAINTENANCE TABLE Configuration Tables . . . . . . . . . . . . . . . . . . . . . . . . . . . . . . . . . 15 • ALARM CONFIGURATION TABLE • BYPASS CONTROLLER CONFIGURATION TABLE • SYSTEM PRESSURE SET POINT CONFIGURATION TABLE • DUCT SENSOR CONFIGURATION TABLE • DEVICE CONFIGURATION TABLE • LANGUAGE CONFIGURATION TABLE OPERATION . . . . . . . . . . . . . . . . . . . . . . . . . . . . . . . . . . . . . 18-20 System Pressure Operation . . . . . . . . . . . . . . . . . . . . . . . .18 Bypass Controller Calibration . . . . . . . . . . . . . . . . . . . . . .18 SAFETY CONSIDERATIONS SAFETY NOTE Air-conditioning equipment will provide safe and reliable service when operated within design specifications. The equipment should be operated and serviced only by authorized personnel who have a thorough knowledge of system operation, safety devices and emergency procedures. Good judgement should be used in applying any manufacturer’s instructions to avoid injury to personnel or damage to equipment and property. Disconnect all power to the unit before performing maintenance or service. Unit may automatically start if power is not disconnected. Electrical shock and personal injury could result. GENERAL The 3V control system VVT bypass controller (33ZCBC-01) is a system static pressure controller that operates to maintain the desired system duct pressure based on the system pressure set point. The VVT bypass controller is used with a system of VVT zone controllers. Zone controllers maintain precise temperature control in the space by regulating the flow of conditioned air into the space and operating an optional terminal fan. As part of the 3V control system, the bypass controller is designed to communicate using a Carrier protocol with a Linkage Coordinator zone controller. One Linkage Coordinator zone controller can coordinate up to 31 additional zone controllers. The purpose of the Linkage Coordinator/zone relationship is to provide an efficient data path for communication between the zone controllers, bypass controller, and associated Carrier network air source. This arrangement makes up the 3V control system. A user interface is not required for everyday operation of the bypass controller. A service person or building owner can configure or operate the bypass controller through a Carrier network user interface such as the System Pilot or Carrier software. INSTALLATION General — The bypass controller is used to control the bypass damper actuator in the 3V control system. The purpose of the bypass damper is to account for fluctuations in the supply air pressure caused by the zone dampers modulating to satisfy individual set points. The bypass system allows a constant volume HVAC (heating, ventilation and air conditioning) unit to supply variable volumes of air to the building. The system bypasses air from the supply side to the return side of the unit. Determining the proper size for the bypass damper is critical for the operation of the VVT (variable volume/variable temperature) system. If the damper selected is too large, it may have to modulate more than necessary to react to system pressure changes. The ability of the system to stay within a pressure range is compromised. When the damper is undersized, the capability of the damper to control the pressure may be compromised due to the inability to bypass enough air volume. An undersized damper also creates higher airflow velocities which add to the noise generated by the system. Manufacturer reserves the right to discontinue, or change at any time, specifications or designs without notice and without incurring obligations. PC 111 Catalog No. 533-30012 Printed in U.S.A. Form 33ZC-14SI Pg 1 10-04 Replaces: New Book 1 4 Tab 11a 13a This book will discuss installation and wiring of the bypass controller and bypass actuator. The bypass damper and duct system should already be correctly sized and installed. The bypass actuator should be sized to match the bypass damper. Carrier provides system software that can be used to design the system and choose the correct dampers and actuators based on the application. 6. Bypass Controller Hardware — The bypass controller consists of the following hardware: • control module • plastic enclosure with integrated actuator • one no. 8 x 3/4-in. self-drilling sheet metal screw Figure 1 shows the bypass controller physical details. 7. Field-Supplied Hardware — Each bypass controller requires the following field-supplied components to complete its installation: • damper • damper actuator (if high-torque actuator is required) • transformer — 24 vac, 40 va (standard applications) • duct temperature sensor (33ZCSENDAT) with grommet (to secure DAT sensor to duct) DUCT TEMPERATURE SENSOR (DAT) — The bypass controller must be connected to a field-supplied duct temperature sensor (part number 33ZCSENDAT) to monitor the temperature of the air delivered by the air source. 8. Mount Bypass Controller LOCATION — The bypass controller should be located on or near the bypass damper in a ceiling area where accessible. When an external high-torque actuator is used, the bypass controller is mounted on the shaft of the damper. Select a location which will be safe from water damage and allow sufficient access for service and wiring. For service access, there should be at least 6 in. of clearance between the front of the bypass controller and adjacent surfaces. Refer to Fig. 1-3. MOUNTING — Perform the following steps to mount the bypass controller: 1. Visually inspect the damper and determine the direction in which the damper shaft moves to open the damper — clockwise (CW) or counterclockwise (CCW). If the damper rotates CCW to open, it does not require any configuration changes. If the damper rotates CW to open, then the damper actuator logic must be reversed. This is done in the software when performing system start-up and damper calibration test. Do not attempt to change damper rotation by changing wiring. This will upset the damper position feedback potentiometer readings. 2. Rotate the damper shaft to the fully closed position. 3. Press the release button on the actuator and rotate the clamp in the same direction that was required to close the damper in Step 2. 4. Press the actuator release button and rotate the actuator back one-position of graduation. Release the button and lock the actuator in this position. 5. Mount the bypass controller to the terminal by sliding the damper shaft through the actuator clamp assembly. See Fig. 2 for details. Remove the controller wiring 9. access cover. Secure the controller by installing the screw provided through the grommet in the antirotation slot. Detach the grommet from the slot so it can slide from side to side. Be sure the floating grommet is in the center of the slot. FAILURE TO CENTER THE GROMMET MAY CAUSE THE ACTUATOR TO STICK OR BIND. Tighten the actuator clamp assembly to the damper shaft. Secure by tightening the two 8-mm nuts. If the damper has less than 90 degrees of travel between the fully open and fully closed positions, then a mechanical stop must be set on the actuator. The mechanical stop prevents the damper from opening past the maximum damper position. To set the mechanical stop, perform the following procedure: a. Press the actuator release button and rotate the damper to the fully open position. b. Using a No. 1 Phillips screwdriver, loosen the appropriate stop clamp screw and move the stop clamp so that it contacts the edge of the cam on the actuator. c. Secure the stop clamp in this position by tightening the screw. Verify that the damper opens and closes. Press the actuator release button and rotate the damper. Verify that the damper does not rotate past the fully open position. Release the button and lock the damper in the fully open position. Replace wiring access cover. Connect the Power Transformer — An individual, field-supplied, 24-vac power transformer is required for each bypass controller. Transformers must be UL (Underwriters’ Laboratories) Class 2 rated. Standard applications require a 24 vac transformer, rated at 40 va minimum. All transformer secondaries are required to be grounded. Use only stranded copper conductors for all wiring to the bypass controller. Wiring connections must be made in accordance with NEC (National Electrical Code) and local codes. Ground one side of the transformer secondary at the transformer location. Connect the grounded side of the transformer to J1-2. Connect the live side of the transformer secondary to J1-1. Connect an 18-gage, green ground wire from terminal J1-3 to the metal chassis of the unit. The power supply is 24 vac ± 10% at 40 va (50/60 Hz). For bypass controllers, the power requirement sizing allows for the bypass actuator. The bypass damper actuator is limited to 20 va. NOTE: Do not run sensor or communication wiring in the same conduit with line-voltage wiring. Perform the following steps to connect the power transformer: 1. Install the field-supplied transformer in an electrical enclosure that conforms to NEC and local codes. 2. Connect 24 vac from the transformer as shown in the applicable wiring diagram (Fig. 4). Be sure to observe polarity when connecting the transformer power. The grounded terminal must be connected to the transformer ground terminal as shown. 2 Fig. 1 — Bypass Controller Details Fig. 2 — Bypass Controller Dimensions 3 DUCT TEMPERATURE SENSOR SUPPLY AIR BYPASS DAMPER BYPASS DAMPER W/ACTUATOR TO BUILDING TRANSFORMER HIGH PRESSURE TUBING LOW PRESSURE OPEN TO SPACE POWER SUPPLY TO COMMUNICATION BUS Fig. 3 — Bypass Controller Installation ORANGE BLUE YELLOW ¤ 16 15 } TO FEEDBACK POTENTIOMETER NOT USED NOT USED NOT USED DAT J4 DAT NOT USED NOT USED NOT USED NOT USED 2 - G + RED WHITE 3 CCN - G + COMM2 1 1 1 ¤ TO COMMUNICATION BUS 3 BLACK } + G 6 1 1 NOT USED 3 J5 TRANS LINE VOLTAGE TRANSFORMER GROUND TO DAMPER ACTUATOR WHITE BLACK EQUIPMENT GROUND RED Fig. 4 — Bypass Controller Wiring 4 } Bypass Controller Inputs and Outputs — The by- Perform the following steps to connect the duct temperature sensor to the bypass controller: 1. Drill or punch a 1/4-in. hole in the supply duct. See Fig. 6. Duct sensor can be installed to hang from top of duct or from the sides. Sensor probe can touch side of duct. 2. Push sensor through hole in the supply duct. Snap the grommet into the hole until it is secure. Pull on the leads of the duct sensor until the sensor is snug against the grommet. 3. Connect the sensor leads to the bypass controller’s terminal board at the terminals labeled DAT (J4-10) and GND (J4-12). See Fig. 4 for wiring. If extending cable length beyond 8 ft, use plenum rated, 20 AWG (American Wire Gage), twisted pair wire. Sensor wiring does not have polarity. Either lead can be wired to either terminal. 4. Neatly bundle and secure excess wire. 5. Using electrical tape, insulate any exposed lead to prevent shorting. 6. Connect shield to earth ground (if shielded wire is used). pass controller inputs and outputs are shown in Tables 1 and 2. Table 1 — Bypass Controller Inputs CHANNEL J4 TERMINATIONS DESCRIPTION DUCT_TMP DMP_POS SP_SENSR 10, 12 Duct Temperature 9 (10 v), 7 (W+), 5 (–) Damper Position 3, 1 System Pressure CONTROL DEVICE 10K Thermistor 0-10 VDC 0-5 VDC Table 2 — Bypass Controller Outputs CHANNEL J5 TERMINATIONS DESCRIPTION DMPR_CCW DMPR_CW 1 (24 VAC), 2 3 (24 VAC), 2 Damper CCW Damper CW CONTROL DEVICE 24 VAC 24 VAC Install Duct Temperature Sensor — The duct temperature sensor is required. The duct temperature sensor must be installed in the supply air duct. The 33ZCSENDAT is the recommended sensor. See Fig. 5 for sensor details. For bypass systems, the duct temperature sensor should be moved to a location which will provide the best sensing of the supply-air temperature during heating and cooling. For bypass systems using a ducted supply, the duct temperature sensor should be located in the main supply duct downstream of the discharge of the air source and before the bypass damper to allow good mixing of the supply airstream. The 33ZCSENDAT duct sensor is a small epoxy sensor that is 11/4-in. long. A grommet is provided for filling the hole around the sensor cable after the sensor is located in the duct. See Fig. 3 and 6 for mounting location. Install Pressure Tubing — The static pressure pick up should be located in the main supply duct before the first branching of ductwork. Run the tubing from the bypass controller to the installation location. For stable airflow measurement, the recommended minimum length of tubing is 2 ft. Connect the tubing to the high side of the pressure sensor marked P1. Make sure the low side of the pressure sensor (P2) is open to the atmosphere. See Fig. 3. DRILL 1/4" HOLE IN TOP OF DUCT AND LET SENSOR HANG DOWN Disconnect electrical power before wiring the bypass controller. Electrical shock, personal injury, or damage to the fan coil controller can result. Do not run sensor or relay wires in the same conduit or raceway with Class 1 AC service wiring. Do not abrade, cut, or nick the outer jacket of the cable. Do not pull or draw cable with a force that may harm the physical or electrical properties. Avoid splices in any control wiring. ALTERNATE INSTALLATION LOCATION INSIDE OF DUCT SUPPLY DUCT Fig. 6 — DAT Installation Location .225/ .245 (5.72/6.22) 0.06 (1.5) 1.00 (25.4) 1.25 (31.8) NOTE: Dimensions are in inches. Dimensions in ( ) are in mm. Fig. 5 — 33ZCSENDAT Duct Sensor 5 75.0 .5 (1905) Install Field-Supplied Actuators — Follow the damper manufacturers recommended installation instructions with the following recommendations. Belimo Multi-Function technology actuators may be ordered direct from Belimo. The following accessory actuators may be used instead of the integrated actuator: • NM24-MFT US P-30002 — 70 in.-lb actuators with floating point control and 0 to 10 vdc feedback. • AM24-MFT US P-30002 — 160 in.-lb actuators with floating point control and 0 to 10 vdc feedback. The following actuators may be used as linked actuators. Up to four actuators may be linked to the main actuator: • LM24-MFT US P-10002 — 35 in.-lb actuators with 0 to 10 vdc control and 0 to 10 vdc feedback. • NM24-MFT US P-10002 — 70 in.-lb actuators with 0 to 10 vdc control and 0 to 10 vdc feedback. • AM24-MFT US P-10002 — 160 in.-lb actuators with 0 to 10 vdc control and 0 to 10 vdc feedback. FLOATING POINT HIGH-TORQUE ACTUATORS — The field-supplied floating point high-torque actuators are multi-function technology actuators intended for applications where higher torque is needed for bypass operation. These actuators would replace the integrated actuator on the bypass controller. The actuators have three wires for power and control and one 0-10VDC feedback wire to send a signal to the bypass controller and any linked actuators. The three control wires are 1(BLK), 2(RED), and 3(WHT). The 1(BLK) and 2 (RED) wires provide power to the actuator. These should be wired to the same power source as the bypass controller making sure wire 2 (RED) connects to J1-1 on the power plug of the Bypass controller and wire 1 (BLK) connects to J5-2 the common of the Bypass Controller power. See Fig. 7 and 8 for wiring. Polarity of the actuator and bypass controller power must be the same for proper operation and to prevent damage to the devices. A 1N4004 or 1N4007 diode must be placed across the CCW and CW terminals of the bypass controller. The end of the diode with the silver band tip (positive end) should be placed in the CCW terminal along with Wire 3(WHT). The other end of the diode should be placed in the CW terminal with the actuator switch in the CW or default position. This will make the damper rotate CCW when the CCW terminal is energized and CW when the CW terminal is energized. For reverse rotation the actuator switch may be changed to the CCW position. LINKED ACTUATORS — Field-supplied linked actuators may be used to link to the bypass controller actuator. Install the actuators per the manufacturer’s directions. Provide power for the linked actuators by wiring 24 vac to the 1(BLK) and 2 (RED) wires. Maintain polarity if more than one actuator is powered by the same power supply. Make sure the direction rotation switches on the linked actuators are set to CW. Wire the wire 3 (WHT) of the linked actuator(s) to the wire 5 (GRN) of the controlling actuator. The linked actuator will then track to the same damper position as the controlling actuator. See Fig. 8-10 for wiring. Linked actuators may be used to control off the integrated actuator of the bypass controller actuator. Install the actuators per the manufacturer’s directions. Provide power for the linked actuators by wiring 24 vac to the 1 (BLK) and 2 (RED) wires. Maintain polarity if more than one actuator is powered by the same power supply. Make sure the direction rotation switches on the linked actuators are set to CW. Connect wire 3 (WHT) of the linked actuator to J4-7(DMPPOS). Damper Stops — For clockwise closed installations the damper stop on the right side of the damper shaft is left at the full clockwise position. The stop on the left side of the shaft must be moved to stop the actuator at the full open position for the damper. For example the Carrier round dampers rotate 45 degrees. Slide the left stop up to the 45 degree mark. Press the actuator release button and rotate the damper CCW all the way to the stop. The damper blade indicator should indicate the damper is full open. Wire 5 (white) should be wired to J4-7(DMPPOS). See Fig. 2. NOTE: The rotation switch should be in the CW position for correct feedback for this application. Reverse the rotation by configuring the bypass controller for clockwise open and do not change the switch from the CW position. Connect the Carrier Network Communication Bus — The bypass controllers connect to the bus in a daisy chain arrangement. The bypass controller may be installed on a primary bus or on a secondary bus from the primary bus. Connecting to a secondary bus is recommended. At any baud (9600, 19200, 38400 baud), the number of controllers is limited to 239 zones maximum. Bus length may not exceed 4000 ft, with no more than 60 total devices on any 1000-ft section. Optically isolated RS-485 repeaters are required every 1000 ft. 6 Fig. 7 — High-Torque Actuator Wiring 7 Fig. 8 — High-Torque Actuator with Linked Dampers Wiring 8 Fig. 9 — Field-Supplied Linked Damper Wiring 9 Fig. 10 — Multiple Field-Supplied Linked Damper Wiring 10 The first device in a network connects directly to the bridge and the others are wired sequentially in a daisy chain fashion. Refer to Fig. 11 for an illustration of communication bus wiring. COMMUNICATION BUS WIRE SPECIFICATIONS — The communication bus wiring is field-supplied and fieldinstalled. It consists of shielded three-conductor cable with drain (ground) wire. The cable selected must be identical to the Carrier Network communication bus wire used for the entire network. See Table 3 for recommended cable. When connecting the communication bus cable, a color code system for the entire network is recommended to simplify installation and checkout. See Table 4 for the recommended color code. Table 4 — Color Code Recommendations SIGNAL TYPE + Ground – Table 3 — Recommended Cables MANUFACTURER Alpha American Belden Columbia CABLE PART NO. 2413 or 5463 A22503 8772 02525 COMMUNICATION BUS WIRE COLOR Red White Black PLUG PIN NUMBER 1 2 3 3. Connect the other end of the communication bus cable to the terminal block labeled CCN in the bypass controller. Following the color code in Table 4, connect the Red (+) wire to Terminal 1. Connect the White (ground) wire to Terminal 2. Connect the Black (–) wire to Terminal 3. 4. Connect additional devices in a daisy chain fashion, following the color coded wiring scheme in Table 4. Refer to Fig. 11. NOTE: The communication bus drain wires (shield) must be tied together at each device. If the communication bus is entirely within one building, the resulting continuous shield must be connected to ground at only one single point. If the communication bus cable exits from one building and enters another building, connect the shields to ground at a lightning suppressor in each building where the cable enters or exits (one point only). NOTE: Conductors and drain wire must be at least 20 AWG (American Wire Gage), stranded, and tinned copper. Individual conductors must be insulated with PVC, PVC/nylon, vinyl, Teflon, or polyethylene. An aluminum/polyester 100% foil shield and an outer jacket of PVC, PVC/nylon, chrome vinyl, or Teflon with a minimum operating temperature range of –20 C to 60 C is required. CONNECTION TO THE COMMUNICATION BUS 1. Strip the ends of the red, white, and black conductors of the communication bus cable. 2. Connect one end of the communication bus cable to the bridge communication port labeled COMM2 (if connecting on a secondary bus). 1000 FT. MAXIMUM DRAIN WIRE (TYP) BLK (TYP) GND WHT (TYP) RED (TYP) 1 2 3 1 2 3 6 5 4 1 2 3 1 2 3 4 COMM 2 BYPASS CONTROLLER ZONE CONTROLLER SYSTEM PILOT Fig. 11 — Communication Bus Wiring 11 ZONE CONTROLLER BRIDGE (RECOMMENDED) START-UP CONFIGURATION Use the Carrier network communication software to start up and configure the bypass coil controller. All set-up and set point configurations are factory-set and field-adjustable. Changes can be made using the System Pilot or Carrier software. During start-up, the System Pilot or Carrier software can also be used to verify communication with the bypass controller. For specific operating instructions, refer to the literature provided with the System Pilot or Carrier software. The following sections describe the computer configuration screens which are used to configure the bypass controller. The screens shown may be displayed differently when using different Carrier software. Status Display Table — The status display table is used to show status of different functions of the bypass controller. The values displayed in this table are read-only values. See Table 5. SYSTEM MODE — The System Mode variable displays the Linkage Coordinator zone controller’s system mode as the bypass controller’s system mode except when the bypass controller is in its commissioning mode or the network communication fails. In bypass commissioning mode, the system mode will display BPCOMMIS to indicate the bypass controller is in its own commissioning mode. If the network communication between the bypass controller and the linkage coordinator fails, the system mode will display LOCAL. System Mode: Display Units ASCII Display Range HEATING, COOLING, FREE COOL, PRESSURE, EVAC, ZONE_BAL, OFF, BPCOMMIS, LOCAL Network Access Read only DAMPER POSITION — This variable displays the damper position percent range of rotation determined by the damper feedback potentiometer. The bypass controller is designed for use on dampers with a range of rotation up to 90 degrees. Damper Position: Display Units % open Display Range 0 to 100 Network Access Read only SYSTEM PRESSURE SETPT — This variable displays the supply air static pressure set point that is to be maintained by the bypass controller. The bypass controller determines the damper position by comparing the system static pressure to this set point. System Pressure Setpoint: Display Units in. wg Display Range 0.10 to 1.80 Network Access Read only SYSTEM PRESSURE — This variable displays the static system pressure through an integrated pressure sensor in increments of 0.1 in. wg. System Pressure: Display Units in. wg Display Range 0.00 to 2.00 Network Access Read only DUCT TEMPERATURE — This variable displays the duct temperature at the bypass damper through a 10K thermistor with a measurement range from –40 to 245 F in 0.1º F increments. Duct Temperature: Display Units F (C) Display Range –40.0 to 245.0 Network Access Read/Write Perform System Checkout — To check out the system, perform the following: 1. Apply 24 vac power to the bypass controller. 2. Using the System Pilot, upload the controller from address 0,141 (default address). The address may be set at this time. The address should be set to 1 higher than the monitor or the linkage coordinator. 3. Access the bypass controller commissioning and maintenance tables. 4. If the terminal damper closes in the clockwise direction, then no adjustment is required. If the terminal damper opens in the clockwise direction, set the CW Rotation point to OPEN. 5. Force the Bypass Commis point to Enable. 6. Force the Damper Calibration point to Enable. The automatic bypass damper calibration process will begin. The bypass controller will verify that the air source fan is off. Communication with the linkage coordinator is required. Make sure the linkage coordinator and the Bypass Controller are addressed correctly. NOTE: If the Bypass Controller is in local mode (stand alone), the user must make sure the duct static pressure is 0 to enable damper calibration. If the fan is turned on, the Damper Calibration process will be aborted. The bypass damper will travel to its minimum and maximum positions. The damper positions will be saved and used by the bypass controller. When the damper calibration process is complete, the bypass controller will automatically return the point to Disable. 7. Force the Zero Pressure Sensor Cal point to Enable. The bypass controller verify that the air source fan is off. If the fan is turned on, the Zero Pressure Sensor Calibration process will be aborted. The bypass controller will automatically calibrate the zero value of the pressure sensor. When the calibration process is complete, the bypass controller will automatically return the point to Disable. 8. Set up all zone controllers and perform system commissioning at the linkage coordinator before adjusting the System Pressure Set Point. 9. Adjust the System Pressure Set Point by forcing the point to the desired value. The bypass controller will write the forced value to the set point table and will begin to control to the new bypass pressure set point. 10. Read the airflow with a measuring device. If the reading varies from the screen value, force the value to the measured value. Once the pressure sensor is forced, the controller will automatically calibrate the pressure sensor (as long as the bypass damper is not >95% open). Repeat as needed. Table 5 — Status Display DESCRIPTION System Mode Damper Position System Pressure Setpt System Pressure Duct Temperature VALUE BPCOMMIS 0 1.50 0.00 73.8 UNITS STATUS Comm failure Comm failure Comm failure Comm failure Comm failure %OPEN in H2O in H2O dF 12 FORCE NAME SYS_MODE DMP_POS SP_SETPT SP_SENSR DUCT_TMP Maintenance Tables — The bypass controller contains the following maintenance tables, Bypass Controller Maintenance Table (BP_MAINT), Bypass Controller Commissioning Maintenance Table (BPCOMMIS), and Bypass Controller System Pilot Default Maintenance (SP_MAINT). BYPASS CONTROLLER MAINTENANCE TABLE — See Table 6 for Bypass Controller Maintenance Table (BP_MAINT). System Mode — This variable displays the master zone controller’s system mode as the bypass controller’s system mode except when the bypass controller is in its commissioning mode or the network communication fails. In bypass commissioning mode, the system mode will display BPCOMMIS to indicate the bypass controller is in its own commissioning mode. If the network communication between the bypass controller and the master zone controller fails, the system mode will display LOCAL. System Mode: Display Units ASCII Display Range HEATING, COOLING, FREE COOL, PRESSURE, EVAC, ZONE_BAL, OFF, BPCOMMIS, LOCAL Forcible No Damper Position — This variable displays the damper position percent range of rotation determined by the damper feedback potentiometer. The bypass controller is designed for use on dampers with a range of rotation up to 90 degrees. Damper Position: Display Units % open Display Range 0 to 100 Forcible No System Pressure Setpt — This variable displays the supply air static pressure set point that is to be maintained by the bypass controller. The bypass controller determines the damper position by comparing the system static pressure to this set point. System Pressure Setpoint: Display Units in. wg Display Range 0.10 to 1.80 Forcible No LAT Exceeds Limit — This variable displays whether the leaving air temperature exceeds the heating or cooling limit configured in the Bypass Controller Service Configuration Table. If Yes is displayed, the System Pressure Set Point is increased by the value in LAT Pressure Delta. This will cause the amount of bypassed air to be reduced, thus protecting the air source from receiving air that is too hot or too cool. If No is displayed, then no LAT protection is in effect. LAT Exceeds Limit: Default Value No Display Range Yes/No Forcible No LAT Pressure Delta — This variable displays the amount of in. wg by which the System Pressure Set Point will be increased if LAT Exceeds Limit displays Yes. LAT Pressure Delta: Display Units in. wg Display Range 0.00 to 1.00 Forcible No System Pressure — This variable displays the static system pressure through an integrated pressure sensor in increments of 0.1 in. wg. System Pressure: Display Units in. wg Display Range 0.00 to 2.00 Forcible No Duct Temperature — This variable displays the duct temperature at the bypass damper through a 10K thermistor with a measurement range from –40 to 245 F in 0.1° F increments. Duct Temperature: Display Units F (C) Display Range –40.0 to 245.0 Forcible Yes Clear Alarms — This variable displays the commanded state of the Clear Alarms function. If this decision is forced to Yes, all alarms in the Alarm History Table will be cleared and this decision will automatically be set back to No. Clear Alarms: Default Value No Display Range Yes/No Forcible Yes Table 6 — Maintenance DESCRIPTION System Mode Damper Position System Pressure Setpt LAT Exceeds Limit LAT Pressure Delta System Pressure Duct Temperature Clear Alarms VALUE BPCOMMIS 58 1.50 No 0.00 0.00 73.8 No UNITS STATUS %OPEN in H2O in H2O in H2O dF 13 FORCE NAME SYS_MODE DMP_POS SP_SETPT LAT_ALRM DELTA_SP SP_SENSR DUCT_TMP CLR_ALRM system fan off. If the communication fails, the damper calibration process will be terminated and this decision will be Disabled. When the fan is off, the zone controller will drive the damper to the full open position. The bypass controller will measure the output voltage of the pressure sensor and verify that the output voltage is within the tolerance of zero pressure voltage of the sensor (1.0 ± 0.1 vdc). If the pressure sensor voltage failed to decrease to within the zero pressure tolerance (1.0 ± 0.1 vdc), a Press Sensr Cal Alarm will be displayed until a successful calibration takes place. When calibration is completed, the force is removed from Zero Pressure Cal decision, and the bypass controller will send a request to the Linkage Coordinator zone controller to return the system fan to normal operation. The damper will remain fully open. NOTE: This value cannot be forced if Auto Press Cal is set to Enable in the Sensor Service Configuration Table. NOTE: Bypass Controller Commissioning will automatically be disabled if no activity is detected in this maintenance table for one hour. Zero Pressure Cal: Default Value Disable Display Range Enable/Disable Forcible Yes Pressure Sensor Cal — This variable displays whether the high-end pressure transducer calibration process has been enabled. The purpose of this process is to correctly calibrate the pressure transducer. When the user forces this decision to Enable after Bypass Commissioning has also been set to Enable, the user may then force the System Pressure to the correct reading as measured with calibrated test equipment. From the forced value, the bypass controller calculates a calibration multiplier that will always be applied to the System Pressure sensor reading. Once the multiplier is calculated, the force is removed and the multiplier is applied to the System Pressure sensor reading. NOTE: Bypass controller commissioning will automatically be disabled if no activity is detected in this maintenance table for one hour. Pressure Sensor Cal: Default Value Disable Display Range Enable/Disable Forcible Yes Damper Position — This variable displays the damper position percent range of rotation determined by the damper feedback potentiometer. The bypass controller is designed for use on dampers with a range of rotation up to 90 degrees. Damper Position: Display Units % open Default Value 0 Display Range 0 to 100 Forcible No BYPASS CONTROLLER COMMISSIONING MAINTENANCE TABLE — See Table 7 for Bypass Controller Commissioning Maintenance Table (BPCOMMIS). Bypass Commis (60 min) — This variable displays whether the bypass commissioning function has been enabled. The bypass commissioning function permits the user to calibrate the bypass damper and the system pressure sensor. All calibration decisions will remain disabled until the user forces Bypass Commissioning to Enable. When the user forces this decision to Enable, System Mode will be updated to BPCOMMIS to indicate that bypass commissioning is in effect. Bypass controller commissioning will automatically be disabled if no activity is detected in the commissioning maintenance table (for example, if none of the calibration decisions are forced or if communication with the zone controller is lost) for one hour. Bypass Commiss: Default Value Disable Display Range Enable/Disable Forcible Yes Damper Calibration — This variable displays whether the damper calibration process has been enabled. When the user forces this decision to Enable after Bypass Commissioning has also been forced to Enable, the bypass damper is calibrated. If the system fan is on, the bypass controller sends a request to the Linkage Coordinator zone controller to turn the system fan off. If the communication fails, the damper calibration process will be terminated and this decision will be Disabled. When the fan is off, the zone controller will drive the damper to the full closed position. After completing the closed position calibration, the zone controller will drive the damper to the full open position. If there was an error during the closed or open position calibration, an alarm will be generated and Damper Cal Alarm will display Alarm until a successful damper calibration takes place. When calibration is completed, the force will be removed from Damper Calibration decision, and the bypass controller will send a request to the Linkage Coordinator zone controller to return the system fan to normal operation. The damper will remain fully open. NOTE: Bypass controller commissioning will automatically be disabled if no activity is detected in this maintenance table for one hour. Damper Calibration: Default Value Disable Display Range Enable/Disable Forcible Yes Zero Pressure Cal — This variable displays whether the pressure transducer zero calibration process has been enabled. When the user forces this decision to Enable after Bypass Commissioning has also been set to Enable, the pressure transducer is calibrated. If the system fan is on, the zone controller will send a request to the Linkage Coordinator zone controller to turn the Table 7 — Commissioning Maintenance DESCRIPTION Bypass Commis (60 min) Damper Calibration Zero Pressure Cal Pressure Sensor Cal Damper Position System Pressure System Pressure Setpt Damper Cal Alarm Press Sensr Cal Alarm VALUE Enable Disable Disable Disable 42 0.00 1.50 Normal Normal UNITS %OPEN in H2O in H2O 14 STATUS FORCE Service NAME COMMISS DMP_CAL ZR_PSCAL PS_CAL DMP_POS SP_SENSR SP_SETPT DAMP_CAL SP_CAL Duct Temperature — This variable displays the duct temperature at the bypass damper through a 10K thermistor with a measurement range from –40 to 245 F in 0.1º F increments. Duct Temperature: Display Units F (C) Default Value –40.0 Display Range –40.0 to 245.0 Forcible Yes Damper Position — This variable displays the damper position percent range of rotation determined by the damper feedback potentiometer. The bypass controller is designed for use on dampers with a range of rotation up to 90 degrees. Damper Position: Display Units % open Default Value 0 Display Range 0 to 100 Forcible No System Pressure — This variable displays the static system pressure through an integrated pressure sensor in increments of 0.1 in. wg. System Pressure: Display Units in. wg Default Value 0.00 Display Range 0.00 to 2.00 Forcible No System Mode — This variable displays the master zone controller’s system mode as the bypass controller’s system mode except when the bypass controller is in its commissioning mode or the network communication fails. In bypass commissioning mode, the system mode will display BPCOMMIS to indicate the bypass controller is in its own commissioning mode. If the network communication between the bypass controller and the Linkage Coordinator zone controller fails, the system mode will display LOCAL. System Mode: Display Units ASCII Display Range HEATING, COOLING, FREE COOL, PRESSURE, EVAC, ZONE_BAL, OFF, BPCOMMIS, LOCAL Forcible No System Pressure — This variable displays the static system pressure through an integrated pressure sensor in increments of 0.1 in. wg. When Bypass Commissioning and Pressure Sensor Cal are Enabled, the user may force this value to the correct reading of the System Pressure as measured with calibrated test equipment. From the forced value, the bypass controller calculates a calibration multiplier that will always be applied to the System Pressure sensor reading. Once the multiplier is calculated, the force is removed and the multiplier is applied to the System Pressure sensor reading. System Pressure: Display Units in. wg Default Value 0.00 Display Range 0.00 to 2.00 Forcible Yes System Pressure Setpt — This variable displays the supply air static pressure set point that is to be maintained by the bypass controller. The bypass controller determines the damper position by comparing the system static pressure to this set point. When the user forces the System Pressure Setpt from this table, the bypass controller automatically updates the System Pressure Setpt configuration value in the Pressure Setpoint Service Configuration Table. System Pressure Setpoint: Display Units in. wg Default Value 0.50 Display Range 0.10 to 1.80 Forcible Yes Damper Cal Alarm — This variable displays Alarm if the damper calibration process failed because there was an error during the closed or open position calibration of the damper. Normal is displayed when a successful damper calibration takes place. Damper Cal Alarm: Default Value Normal Display Range Normal/Alarm Forcible No Press Sensr Cal Alarm — This variable displays Alarm if the pressure transducer zero calibration process failed because the pressure sensor voltage did not decrease to within the zero pressure tolerance (1.0 ± 0.1 vdc). Normal will be displayed when a successful pressure transducer zero calibration takes place. Press Sensr Cal Alarm: Default Value Normal Display Range Normal/Alarm Forcible No BYPASS CONTROLLER SYSTEM PILOT DEFAULT MAINTENANCE TABLE — See Table 8 for Bypass Controller System Pilot Default Maintenance (SP_MAINT). Configuration Tables — The bypass controller contains the following configuration tables: Alarm Configuration (ALMCONF), Bypass Controller Configuration (BP_SERV), Device Configuration (BYPASS), Language Configuration (LNGCONF), Duct Sensor Configuration (SEN_SERV), and Set Point Configuration (SETPOINT). ALARM CONFIGURATION TABLE — The Alarm Configuration Table (ALMCONF) contains decisions used to configure the alarm settings for the zone controller. This includes realarm time and routing of alarms. See Table 9. Table 8 — System Pilot Default Maintenance DESCRIPTION Bypass Controller Duct Temperature Damper Position System Pressure System Mode VALUE 73.8 0 0.00 BPCOMMIS UNITS STATUS FORCE dF %OPEN in H2O DUCT_TMP DMP_POS SP_SENSR SYS_MODE Table 9 — Alarm Configuration DESCRIPTION Alarm Routing Control Re-alarm Time NAME VALUE 11010000 10 15 UNITS min NAME ROUTING RETIME Alarm Routing Control — This decision indicates which Carrier system software or devices will receive and process alarms sent by the zone controller. This decision consists of eight digits each can be set to zero or one. A setting of 1 indicates alarms should be sent to this device. A setting of zero disables alarm processing for that device. Currently the corresponding digits are configured for the following devices: first digit - user interface software; second digit - autodial gateway or Telink; fourth digit - alarm printer interface module/DataLINK/BAClink/Carrier Translator; digits 3, and 5 through 8 - unused. Alarm Routing Control: Range 00000000 to 11111111 Default Value 00000000 Re-Alarm Time — This decision is used to configure the number of minutes the zone controller will wait before an alarm condition which has not been corrected will be re-transmitted on the communications network. Re-alarming of an alarm condition will continue until the condition no longer exists. Alarm Re-Alarm Time: Units Minutes Range 0 to 1440 Default Value 0 (Disabled) BYPASS CONTROLLER CONFIGURATION (BP_SERV) TABLE — The bypass controller configuration table contains decisions used to configure the damper modulation and the LAT (leaving air temperature) protection decisions. The bypass controller can also be configured as a broadcast acknowledger. See Table 10. Damper Control Deadband — This decision is used to configure a deadband for bypass damper position control. This algorithm operates based on the pressure sensor input to achieve the desired set point. In the algorithm, an error signal is defined as the difference between the system pressure set point and the pressure sensor input. The deadband is multiplied by a fixed value of 0.05 to adjust the reaction of the damper algorithm. The size of the deadband will correspond to the gain of the loop. The smaller the deadband, the higher the gain and the faster the loop will react. The larger the deadband, the lower the gain and the slower the loop will react. NOTE: If the Damper Control Deadband value is set too low, excessive actuator movement and wear may occur. Damper Control Deadband: Range 2 to 10 Default Value 5 CW Rotation — This decision is used to configure the rotation of the bypass damper. If the decision is set to close, the bypass controller modulates the damper counterclockwise to the open position. If the decision is set to open, the bypass controller modulates the damper clockwise to the open position. CW Rotation: Range Open/Close Default Value Close bypass damper position is greater than this configured limit and the duct temperature meets required conditions, an alarm will be generated. During the heating mode if the duct temperature is greater than the Heating LAT Limit plus 10° F for more than 2 minutes then a Low Heating Airflow Pressure Alarm will be generated. During the cooling mode if the duct temperature is lower than the Cooling LAT Limit minus 2° F for more than 2 minutes then a Low Cooling Airflow Pressure Alarm will be generated. The damper position configured in this decision is also used when the associated master zone controller has not determined its system mode and the system fan is deenergized. Max Damper Alarm Limit: Range 20 to 99% Default Value 99% LAT Pressure Delta — This decision is used to configure the amount by which the System Pressure Setpt will be increased if the duct temperature goes above the Heat LAT Limit or below the Cool LAT Limit. This will cause the amount of bypassed air to be reduced, protecting the air source from receiving air that is too hot or too cool. LAT Pressure Delta: Display Units in. wg Default Value 0.0 Display Range 0.0 to 1.0 Heat LAT Limit — This decision is used to configure the heating limit used to provide LAT protection to control the system airflow based on the duct temperature. If the duct temperature goes above this limit, the System Pressure Setpt will be increased by the amount configured in LAT Pressure Delta. Heat LAT Limit: Display Units F Default Value 120.0 Display Range 80.0 to 120.0 Cool LAT Limit — This decision is used to configure the cooling limit used to provide LAT protection to control the system airflow based on the duct temperature. If the duct temperature goes below this limit, the System Pressure Setpt will be increased by the amount configured in LAT Pressure Delta. Cool LAT Limit: Display Units F Default Value 50.0 Display Range 35.0 to 70.0 Broadcast Acknowledger — This decision is used if the bypass controller will be used to acknowledge broadcast messages on the Carrier Proprietary Network bus. One broadcast acknowledger is required per bus, including secondary busses created by the use of a bridge. Broadcast Acknowledger: Range No/Yes Default Value No Max Damper Alarm Limit — This decision is used to generate alarms during system heating and cooling modes. When the Table 10 — Bypass Controller Configuration DESCRIPTION Damper Modulation Damp Control Deadband CW Rotation Max Damper Alarm Limit LAT Protection LAT Pressure Delta Heat LAT Limit Cool LAT Limit Broadcast Acknowledger VALUE 5 Close 99 0.0 120.0 50.0 No 16 UNITS %OPEN in H2O dF dF NAME DEADBAND DMP_DIR DMP_LMT DELTA_SP LAT_HLIM LAT_LLIM BCST_ACK Bypass Err Damp Pos — This decision is used to configure the position to which the bypass controller will hold its damper during an error condition associated with the pressure sensor. During the pressure sensor error condition, the bypass controller will hold the damper position and generate a pressure sensor failure alarm. NOTE: If this value is set too low, damage to the system ductwork could occur with a pressure sensor failure. Bypass Err Damp Pos: Range 0 to100% Default Value 100% Press Sensr Cal Alarm — Use this decision to enable an alarm if the pressure sensor input voltage fails to decrease to within the zero tolerance (1.0 ± 0.1 vdc) of the sensor. The alarm is disabled if this decision is set to Disable. Press Sensr Cal Alarm: Default Value Enable Display Range Enable/Disable Duct Temp Cal Offset — This decision is used to calibrate the duct temperature sensor by adjusting the offset value to the desired temperature trim value. For example, if the temperature displayed is two degrees above the value measured with calibrated test equipment, input a value of –2.0. Duct Temp Cal Offset: Display Units F Default Value 0.0 Display Range –9.9 to 9.9 DEVICE CONFIGURATION (BYPASS) TABLE — The Device Configuration table contains reference information about the bypass controller. The user can input a short description and the location of the device. The Software Part Number, Model Number, Serial Number, and Reference Number are also shown. See Table 13. LANGUAGE CONFIGURATION (LNGCONF) TABLE — Use this decision to select the display language that will be seen on all user interfaces for this controller. By default, the bypass controller displays information in English. To change to a second language display, set this decision to No, download this table and then upload the bypass controller to see the factoryloaded second language. If a second language is not available in this module, this decision will be disregarded and information will continue to be displayed in English. See Table 14. English Language: Range No/Yes Default Value Yes SYSTEM PRESSURE SET POINT CONFIGURATION (SETPOINT) TABLE — See Table 11 for System Pressure Set Point Configuration table. Table 11 — System Pressure Set Point Configuration DESCRIPTION System Pressure Setpt VALUE 0.40 UNITS in H2O NAME SP_SET System Pressure Setpt — This variable is used to configure the supply air static pressure set point that is to be maintained by the bypass controller. The bypass controller determines the damper position by comparing the system static pressure to this set point. Do not use this set point to raise the static pressure if all zone damper minimum set points are configured to 0%. Personal injury and damage to ductwork and equipment may occur. System Pressure Setpoint: Display Units in. wg Default Value 0.50 Display Range 0.10 to 1.80 DUCT SENSOR CONFIGURATION (SEN_SERV) TABLE — See Table 12 for Duct Sensor Configuration (SEN_SERV) table. Auto Pres Cal — This decision is used to enable the automatic pressure zero calibration option. This calibration is performed when the system fan transitions to off and remains off for 5 minutes or when this decision is set to Enable and the calibration has not been performed for at least 168 running hours (7 days). If the decision is set to Enable, the bypass controller will send a request to the associated master zone controller to turn the fan off. At the end of the calibration the bypass controller will signal the master zone controller to return the system fan to normal operation. If this decision is set to Disable, the bypass controller will still be able to calibrate the pressure sensor manually from the Bypass Controller Commissioning Maintenance Table. Auto Pressure Cal: Default Value Disable Display Range Enable/Disable Table 12 — Duct Pressure Configuration DESCRIPTION Auto Press Cal Bypass Err Damp Pos Press Sensor Cal Alarm Duct Temp Cal Offset VALUE Disable 100 Enable 0.0 UNITS %OPEN dF NAME AT_PSCAL ERR_DPOS PCAL_ALM TEMP_CAL Table 13 — Device Configuration DESCRIPTION Description: Location: Software Part Number: Model Number: Serial Number: Reference Number: VALUE Bypass Controller BUILDING 1 CESR131340-01 UNITS 0107000001 Version 1.0 NAME DevDesc Location PartNum ModelNum SerialNo RefNum Table 14 — Language Configuration DESCRIPTION English Language VALUE Yes 17 UNITS NAME ENGLISH OPERATION the feedback resistance value meets the Damper Closed Criteria in Table 15, the bypass controller will store the value in non-volatile memory as the resistance at fully closed. The bypass controller will then position the damper fully open. When the feedback resistance value stops changing, the bypass controller reads the value and if the feedback resistance value meets the Damper Open Criteria in Table 15, the bypass controller stores the value as the resistance at fully open. The bypass controller will use the following formula to determine damper position: For damper rotation configured as Open: Damper Position (% open) = ((Feedback Resistance – Resistance at Full Closed)/((Resistance at Full Open) – (Resistance at Full Closed))) * 100. For damper rotation configured as Closed: Damper Position (% open) = 100 – ((Feedback Resistance – Resistance at Full Closed)/((Resistance at Full Open) – (Resistance at Full Closed))) * 100. System Pressure Operation NORMAL OPERATION — The bypass controller will modulate its damper to maintain the proper system static pressure set point. The bypass controller does this by comparing its pressure sensor input reading to the configured system static pressure set point and determining the error (sensor reading — set point). The bypass controller then compares the calculated error to the configured deadband value. If the error is greater than 1/4 of the deadband value (configured deadband times a constant of 0.05), then the bypass controller commands the damper to open or close (depending on the positive or negative value of the error). If the error is less than 1/4 of the deadband value, the bypass controller holds the damper position. If the pressure sensor fails, the bypass controller will move the damper to the configured Pressure Sensor Error Damper Position. See Fig. 12 for an operation flow chart. LEAVING AIR TEMPERATURE (LAT) MODE — The bypass controller will provide LAT protection by controlling the system pressure based on its duct temperature. If the duct temperature goes above the configured heating LAT limit or below the cooling LAT limit, the bypass controller will increase the pressure set point by the configured LAT Pressure Delta value. This will cause the amount of bypassed air going back to the air source to be reduced. If the LAT Pressure Delta decision is configured for zero, the LAT protection function will be disabled. The bypass controller will control to the normal system pressure set point again at the end of the current heating or cooling cycle, or when its duct temperature sensor reads greater than the Cooling LAT limit plus five degrees or less than the Heating LAT limit minus ten degrees. This temperature swing would indicate that the air source cycled the heating or cooling as part of its LAT protection, or because the system conditions are close to satisfying the mode. NOTE: Bypass LAT protection is disabled during Bypass Commissioning mode, or if the duct temperature sensor fails. Table 15 — Damper Position Criteria DAMPER ROTATION CLOCKWISE The resistance value is greater than 75% of the full range of the potentiometer The resistance value is Damper less than 25% of Closed Criteria the full range of the potentiometer Damper Open Criteria COUNTER CLOCKWISE The resistance value is less than 25% of the full range of the potentiometer The resistance value is greater than 75% of the full range of the potentiometer If an invalid resistance value is read, the bypass controller will not store or use the value, and will issue a Damper Calibration Alarm. If the bypass controller loses communication with its associated Linkage Coordinator, the damper calibration process will be terminated. When the damper calibration is completed, the bypass controller will signal the Linkage Coordinator to return the fan to normal operation. PRESSURE TRANSDUCER ZERO CALIBRATION — Pressure transducer calibration will occur under two conditions if it is not operating in stand-alone mode. The first condition is when it is forced by the user in the BPCOMMIS maintenance table to perform this operation. The second condition is when the system goes in to the unoccupied mode for at least 5 minutes or 168 hours (7 days) since the last calibration, whichever comes first. If the bypass controller is not operating in stand-alone mode, it will verify the system fan status with its associated Linkage Coordinator. If the fan is on, the bypass controller will send a high priority request to its Linkage Coordinator to turn the fan off. If the fan is already off, the bypass controller will send the same priority request to ensure that the fan stays off during the calibration procedure. If for some reason the bypass controller loses communication with its Linkage Coordinator for more the 60 minutes or the procedure takes longer the 60 minutes, the Linkage Coordinator will return the fan and system to normal operation and the bypass controller will terminate the calibration procedure and return to normal operation. NOTE: If the bypass is in stand-alone mode (not communicating with a Linkage Controller), the user must ensure the pressure reading is zero before performing calibration. Bypass Controller Calibration — The bypass controller allows calibration of the damper and pressure sensor from the Bypass Commissioning Maintenance screen. Refer to the System Check-Out section for the step-by-step procedure. DAMPER CALIBRATION — If the bypass controller is not operating in stand-alone mode, it will verify the system fan status with its associated Linkage Controller. If the fan is on, the bypass will request its Linkage Controller to turn the fan off. NOTE: If the bypass controller is in stand-alone mode (not communicating with a Linkage Coordinator) the user must ensure the pressure reading is zero before performing calibration. The bypass controller will not be allowed to enter calibration mode if the fan is on. In either case, the bypass will check to ensure the fan is off by reading its pressure sensor and damper position. If the pressure reading is less than 10% of the static pressure set point and the bypass damper position is less than 25% of the resistance of the feedback potentiometer for greater than 60 seconds, then the bypass controller assumes the fan is off. When the fan is off, the bypass controller will drive its damper to the fully closed position. The bypass controller will read the value of the actuator’s feedback potentiometer until the value stops changing. This indicates the damper is fully closed. If 18 the voltage reads within the range of 1.0 vdc ± 0.1 volt, it calculates the offset voltage based on the difference between the output voltage reading and the nominal zero pressure reading of 1.0 vdc. This value is then stored in non-volatile memory. If the voltage reading is outside of the tolerance range, the bypass controller will display “Alarm” in the commissioning screen. The screen will display “Alarm” until a successful calibration of the pressure sensor is performed. When the calibration is completed, the bypass controller will signal the Linkage Coordinator to return the fan to normal operation. In either case, the bypass controller will check to ensure the fan is off by reading its pressure sensor and damper position. If the pressure reading is less than 10% of the static pressure set point and the bypass damper position is less than 25% of the resistance of the feedback potentiometer for greater than 60 seconds, then the bypass controller assumes the fan is off. When the fan is off, the bypass controller will drive its damper to the fully open position. If an invalid feedback resistance value is detected, the bypass controller will terminate the calibration. Once at the fully open damper position, the bypass controller will read the output voltage of the pressure sensor. If 19 BP BP_SETPT DAT DMP_POS LAT LAT_ALARM LAT_HYST LC PS_error SP_SENSR SP_SET — — — — — — — — — — — LEGEND Bypass System Pressure Setpoint Duct Air Temperature Damper Position Leaving Air Temperature Leaving Air Temperature Alarm Leaving Air Temperature Setpoint Hysteresis Linkage Coordinator Static Pressure Sensor error Static Pressure Sensor Static Pressure Setpoint SEN Fig. 12 — Bypass Controller Operation Flow Chart Copyright 2004 Carrier Corporation Manufacturer reserves the right to discontinue, or change at any time, specifications or designs without notice and without incurring obligations. PC 111 Catalog No. 533-30012 Printed in U.S.A. Form 33ZC-14SI Pg 20 10-04 Replaces: New Book 1 4 Tab 11a 13a Product Specification 3V™ Control System Bypass Controller with Integrated Actuator Part Number: 33ZCBC-01 The Bypass Controller is a component of Carrier’s 3V system and is used to regulate the supply duct static pressure for Variable Volume and Temperature Applications. The Bypass Controller is an essential system component that allows constant volume HVAC equipment to provide zone level temperature control. The Bypass Controller provides the following features: • System or stand-alone operation • Integrated pressure sensor • Determines system-operating mode • Air source leaving air temperature lockouts The Bypass Controller operates on the 3V system network and is compatible with all Carrier communicating devices. A user interface is not required for everyday operation of the bypass controller. The Bypass Controller can be configured or operated through the Carrier Network with optional interface tools including the System Pilot or Carrier Software. Features/Benefits BYPASS CONTROLLER Copyright 2004 Carrier Corporation • Primary air temperature and pressure sensors determine system operating mode to ensure proper operation in case of communication failure. • Air Source leaving air temperature protection minimizes the occurrence of heating and/or cooling lockouts based on unacceptable discharge temperatures. • Quick and easy commissioning and balancing process via a dedicated maintenance table • Stand-alone or linked system operation • Carrier linkage system capability • Foreign language support for ASCII based character sets Form 33ZC-13PS Features/Benefits (cont) • • • • • • • • • • Carrier communicating network device High-speed (38.4K baud) communications network Thermistor type duct temperature sensor Pressure sensor UL94-5V plenum rated controller housing Actuator preassembled to housing and rated at 35 in.-lb (3.95 N-m) torque, an adjustable 90-degree stroke, and provides 90-second nominal timing at 60 Hz Actuator assembly has an integrated conduit box and cover Both covers for the control are hinged Actuator suitable for mounting onto a 3/8-in. (9.5 mm) square or round VVT box damper shaft or onto a 1/ -in. (13 mm) round damper shaft. The minimum 2 VVT box damper shaft length is 13/4-in. (45 mm) Actuator will operate with dampers having 90, 60, and 45 degree strokes • Mounts directly onto pressure dependent box damper shaft • Can drive up to 4 linked damper actuators • Designed for vertical or horizontal mounting • Both controller housing and actuator are UL94-5V plenum rated • Control complies with ASHRAE 62.1 Functions • • • • • • • • Auto pressure sensor zero calibration Manual pressure sensor calibration High end pressure transducer calibration Bypass damper calibration Bypass damper modulation Leaving air temperature protection Network tables and alarms Smart Sensor interface Specifications Inputs Wiring requirements • Duct temperature sensor • Damper position feedback potentiometer (factory installed) • System pressure (factory installed) Communication Bus — 3-Conductor, 18-Gage, Stranded, with Shield Power — 2-Conductor, 18-Gage, Stranded, with Shield Outputs Vibration • Integrated factory-wired pressure dependent damper actuator Performance Vibration: 1.5 G measured at 20 to 300 Hz Physical characteristics Corrosion Dimensions . . . . . . . . 2.36 in. H x 9.2 in. W x 4.84 in. D (60 mm x 233.7 mm x 123 mm) Office environment. Indoor use only. Electrical characteristics NEC Class 2 UL 916-PAZX and UL 873 Conforms to requirements per European Consortium standards EN50081-1 (CISPR 22, Class B) and EN50082-1 (IEC 801-2, IEC 801-3, and IEC 801-4) for CE mark labeling. UL94-5V (actuator) Input Volts 40 va at 24 vac + 10% (60 Hz) The power requirement sizing allows for accessory water valves and for the fan contactor. Water valves are limited to 15 va. The fan contactor is limited to 10 va (holding). Environmental requirements Operating Temperature. . . . .32 F to 131 F (0° C to 55 C) Storage Temperature . . . . . . 32 F to 158 F (0° C to 70 C Operating Humidity . . . . . . 10% to 95% non-condensing Storage Humidity . . . . . 10% to 41% at 158 F condensing Communications characteristics Local communications between Carrier communicating network devices at up to 38.4 KB. Computer access available. Remote access through modem at up to 38.4 KB. Computer access available. 2 Agency Approvals Field-installed accessories System Pilot — The 33PILOT-01 System Pilot is a user interface to the Bypass Controller with a full complement of display features that can be used to configure and operate the Bypass Controller. The System Pilot communicates to the Bypass Controller over the main network Bus through Comm1. Field-Installed Actuators — Belimo Multi-Function technology actuators may be ordered direct from Belimo. The following accessory actuators may be used instead of the integrated actuator: • NM24-MFT US P-30002 — 70 in.-lb actuators with floating point control and 0 to 10 vdc feedback. • AM24-MFT US P-30002 — 160 in.-lb actuators with floating point control and 0 to 10 vdc feedback. The following actuators may be used as linked actuators. Up to four actuators may be linked to the master actuator: • LM24-MFT US P-10002 — 35 in.-lb actuators with 0 to 10 vdc control and 0 to 10 vdc feedback. • NM24-MFT US P-10002 — 70 in.-lb actuators with 0 to 10 vdc control and 0 to 10 vdc feedback. • AM24-MFT US P-10002 — 160 in.-lb actuators with 0 to 10 vdc control and 0 to 10 vdc feedback. 3 Dimensions BYPASS CONTROLLER Carrier Corporation • Syracuse, New York 13221 9-04 Manufacturer reserves the right to discontinue, or change at any time, specifications or designs without notice and without incurring obligations. Book 1 4 New Book 1 Pg 4 Catalog No. 523-352 Printed in U.S.A. PC 111 Form 33ZC-13PS Replaces: New Tab 1CS1 Tab 11a 13a 3V™ Control System VVT® Zone Controller Pressure Dependent Control Installation, Start-Up and Configuration Instructions Part Number 33ZCVVTZC-01 CONTENTS Page SAFETY CONSIDERATIONS . . . . . . . . . . . . . . . . . . . . . . 1 GENERAL . . . . . . . . . . . . . . . . . . . . . . . . . . . . . . . . . . . . . . . . 2 INSTALLATION . . . . . . . . . . . . . . . . . . . . . . . . . . . . . . . . 2-26 General . . . . . . . . . . . . . . . . . . . . . . . . . . . . . . . . . . . . . . . . . . 2 Zone Controller Hardware . . . . . . . . . . . . . . . . . . . . . . . . 2 Field-Supplied Hardware . . . . . . . . . . . . . . . . . . . . . . . . . 2 • SPACE TEMPERATURE SENSOR • OPTION BOARD • PRIMARY AIR TEMPERATURE SENSOR • SUPPLY AIR TEMPERATURE (SAT) SENSOR • DUCT AIR TEMPERATURE SENSOR • RELATIVE HUMIDITY SENSOR • INDOOR AIR QUALITY (CO2) SENSOR Mount Zone Controller . . . . . . . . . . . . . . . . . . . . . . . . . . . 4 • LOCATION • MOUNTING Connect the Power Transformer. . . . . . . . . . . . . . . . . . 5 Install Sensors . . . . . . . . . . . . . . . . . . . . . . . . . . . . . . . . . . 15 • SPACE TEMPERATURE SENSOR INSTALLATION • SYSTEM PILOT • PRIMARY AIR TEMPERATURE SENSOR INSTALLATION • DUCT TEMPERATURE SENSOR (33ZCSENDAT) INSTALLATION • SUPPLY AIR TEMPERATURE (33ZCSENSAT) SENSOR INSTALLATION • INDOOR AIR QUALITY SENSOR INSTALLATION • HUMIDITY SENSOR (WALL-MOUNTED) INSTALLATION Remote Occupancy Contact. . . . . . . . . . . . . . . . . . . . . 21 Connect the Outputs . . . . . . . . . . . . . . . . . . . . . . . . . . . . 21 Modulating Baseboard Hydronic Heating . . . . . . . . 23 Connect the Carrier Communicating Network Communication Bus . . . . . . . . . . . . . . . . . . . . . . . . . . 23 • COMMUNICATION BUS WIRE SPECIFICATIONS • CONNECTION TO THE COMMUNICATION BUS START-UP . . . . . . . . . . . . . . . . . . . . . . . . . . . . . . . . . . . . 26-29 Perform System Checkout . . . . . . . . . . . . . . . . . . . . . . 26 Network Addressing . . . . . . . . . . . . . . . . . . . . . . . . . . . . 27 Initial Operation and Test. . . . . . . . . . . . . . . . . . . . . . . . 27 Fan and Heat Configuration and Test. . . . . . . . . . . . 27 System Balancing . . . . . . . . . . . . . . . . . . . . . . . . . . . . . . . 27 Status Table . . . . . . . . . . . . . . . . . . . . . . . . . . . . . . . . . . . . . 28 CONFIGURATION TABLES . . . . . . . . . . . . . . . . . . . 29-39 Alarm Configuration Table . . . . . . . . . . . . . . . . . . . . . . 29 Terminal Service Configuration Table . . . . . . . . . . . 30 Damper Service Configuration Table . . . . . . . . . . . . 33 Holiday Configuration Table. . . . . . . . . . . . . . . . . . . . . 33 Linkage Configuration Table . . . . . . . . . . . . . . . . . . . . 33 Language Configuration Table . . . . . . . . . . . . . . . . . . 35 Master Service Configuration Table . . . . . . . . . . . . . 35 Time Schedule Configuration Table . . . . . . . . . . . . . 36 Option Service Configuration Table . . . . . . . . . . . . . 37 Set Point Configuration Table . . . . . . . . . . . . . . . . . . . 39 MAINTENANCE TABLES . . . . . . . . . . . . . . . . . . . . . 40-51 System Pilot Maintenance Table. . . . . . . . . . . . . . . . . 40 System Pilot Alternate Maintenance Table. . . . . . . 40 Linkage Maintenance Table . . . . . . . . . . . . . . . . . . . . . 41 Master Zone Maintenance Table . . . . . . . . . . . . . . . . . 43 Time Schedule Maintenance Table . . . . . . . . . . . . . . 44 System Commissioning Maintenance Table . . . . . 45 Zone Status Maintenance Table . . . . . . . . . . . . . . . . . 47 Zone Device Maintenance Table . . . . . . . . . . . . . . . . . 47 Zone Maintenance Table . . . . . . . . . . . . . . . . . . . . . . . . 47 Zone Commissioning Maintenance Table . . . . . . . 50 OPERATION. . . . . . . . . . . . . . . . . . . . . . . . . . . . . . . . . . 51-54 System Mode Selection . . . . . . . . . . . . . . . . . . . . . . . . . 51 Linkage . . . . . . . . . . . . . . . . . . . . . . . . . . . . . . . . . . . . . . . . . 52 • AIR SOURCES THAT SUPPORT LINKAGE • NON-LINKAGE CONTROLLED AIR SOURCES System Modes . . . . . . . . . . . . . . . . . . . . . . . . . . . . . . . . . . 53 Air Terminal Modes . . . . . . . . . . . . . . . . . . . . . . . . . . . . . 53 APPENDIX A — SYSTEM OPERATION FLOW CHARTS . . . . . . . . . . . . . . . . . . . . . . . . . . . . 55-58 SAFETY CONSIDERATIONS SAFETY NOTE Air-conditioning equipment will provide safe and reliable service when operated within design specifications. The equipment should be operated and serviced only by authorized personnel who have a thorough knowledge of system operation, safety devices and emergency procedures. Good judgement should be used in applying any manufacturer’s instructions to avoid injury to personnel or damage to equipment and property. Disconnect all power to the unit before performing maintenance or service. Unit may automatically start if power is not disconnected. Electrical shock and personal injury could result. If it is necessary to remove and dispose of mercury contactors in electric heat section, follow all local, state, and federal laws regarding disposal of equipment containing hazardous materials. Manufacturer reserves the right to discontinue, or change at any time, specifications or designs without notice and without incurring obligations. PC 111 Catalog No. 533-30011 Printed in U.S.A. Form 33ZC-13SI Pg 1 1104 10-04 Replaces: New Book 1 4 Tab 11a 13a GENERAL Carrier’s network software can be connected to the system at the SPT sensor if Carrier network communication wiring is run to the SPT sensor. The network software can be used to adjust set points, set operating parameters, and fully configure the zone controller or any device on the system. The zone controller is a single duct, fan powered, Variable Volume and Temperature (VVT®) terminal control with a factory-integrated controller and actuator. The VVT zone controller maintains precise temperature control in the space by operating the terminal fan and regulating the flow of conditioned air into the space. Buildings with diverse loading conditions can be supported by controlling equipment heating and cooling sources or supplemental heat. The VVT zone controller (33ZCVVTZC-01) provides dedicated control functions for single duct terminals with modulating heat, up to 3 stages of ducted heat, or combination baseboard and ducted heat. A relay board (33ZCOPTBRD-01) is required for heat or fan terminals. Carrier’s 3V™ control system provides optimized equipment and component control through airside linkage. Linkage refers to the process through which data is exchanged between the air terminals and the air source that provides the supply air to those terminals. The process “links” the terminals and the air source to form a coordinated system. Linkage allows the air source to operate efficiently and reliably while responding to and satisfying changing conditions in the zones. Linkage also allows the terminals to respond properly to changes in the air source. A VVT zone controller configured as the Linkage Coordinator manages the flow of data between the air source and the VVT system zones. Rooftop units, air handlers, fan coils, and water source heat pumps feature product integrated or factory-installed controls that are directly compatible with the 3V control system. The rooftop units, air handlers, fan coils, and water source heat pumps do not require any special hardware to be compatible with the Carrier linkage system. Consult your local Carrier representative for the complete list of compatible air source controllers. Figure 1 shows an example of a Carrier linkage system. The VVT zone controllers are available factory-mounted to Carrier’s round and rectangular dampers. Round dampers are available in 6, 8, 10, 12, 14, and 16-in. sizes. Rectangular dampers are available in 8x10, 8x14, 8x18, and 8x24-in. sizes. All damper assemblies are equipped with an integrated duct temperature sensor. Zone Controller Hardware — The zone controller consists of the following hardware: • terminal control module • torque-limiting integrated damper actuator • plastic enclosure • one no. 8 x 1/2-in. self-drilling sheet metal screw (to prevent zone controller rotation) Figure 2 shows the zone controller physical details. Field-Supplied Hardware — Each zone controller requires the following field-supplied components to complete its installation: • air terminal unit (unless factory installed — when purchased as factory-installed option an SAT [supply-air temperature] sensor is provided upstream of the damper blade) • round or rectangular mounting bracket (for retrofit applications) • space temperature sensor • transformer — 24 vac, 40 va • two no. 10 x 1/2-in. sheet metal screws (to secure SAT sensor to duct, if required) • two no. 6-32 x 5/8-in. screws (to mount SPT [space temperature] sensor base to electrical box) • contactors (if required for fan or electric heat) • supply air temperature sensor (required for terminal with ducted heat) • option board 33ZCOPTBRD-01 (required for auxiliary heat or fan terminals) • indoor air quality sensor (if required) • relative humidity sensor (if required) • one SPST (single pole, single throw) relay • valve and actuator for hot water heat (if required) • wire • bushings (required when mounting SAT sensor in a duct 6-in. or less in diameter) • primary air temperature sensor (if required) SPACE TEMPERATURE SENSOR — Each zone controller requires a field-supplied Carrier space temperature sensor. There are three sensors available for this application: • 33ZCT55SPT, Space Temperature Sensor with Override Button • 33ZCT56SPT, Space Temperature Sensor with Override Button and Set Point Adjustment • 33PILOT-01, System Pilot Space Temperature Sensor, User Interface, and Configuration Device INSTALLATION General — The VVT zone controller is a microprocessorbased direct digital control (DDC) controller that can be purchased or installed on variable volume and temperature (VVT) air terminals. It can be retrofitted on units manufactured by Carrier or other manufacturers to provide pressure dependent VVT control. Each zone controller has the ability to function as a linkage coordinator for systems with up to 32 zones. As a linkage coordinator, a zone controller will retrieve and provide system information to the rooftop or air-handling equipment and other zone controllers. A zone controller can function as a stand alone device by installing a duct air sensor. The zone controller is connected to a wall-mounted, fieldsupplied, space temperature sensor (SPT) in order to monitor zone temperature changes and satisfy zone demand. On stand-alone applications or applications with ducted or modulating heat, the zone controller must be connected to a field-supplied supply air temperature (SAT) sensor to monitor the temperature of the air delivered by the air terminal. A System Pilot can be used to adjust set points, set operating parameters, and fully configure the zone controller or any device on the system. A System Pilot can also provide local space temperature, set point adjust, time broadcast, and schedule adjustment for a single dedicated or remote device. The System Pilot is a user interface to the Zone Controller with a full complement of zone display features that can be used to configure and operate the Zone Controller. It has an SPT sensor and can transmit its value to the Zone Controller. The System Pilot communicates to the Zone Controller through the Zone Controller’s dedicated Comm2 port or over the main communication bus through Comm1. OPTION BOARD — The option board (33ZCOPTBRD-01) is required for use of auxiliary heat and fan control functions. The Option Board is field installed and provides four triac discrete outputs, three for supplemental heat and one for the fan output. PRIMARY AIR TEMPERATURE SENSOR — A fieldsupplied, primary air temperature (PAT) sensor (part number 33ZCSENPAT) is used on a zone controller which is functioning as a Linkage Coordinator for a non Carrier Network/ Linkage compatible air source. 2 CARRIER COMMUNICATING NETWORK PRIMARY BUS (BUS 0) SYSTEM PILOT ROOFTOP UNIT SYSTEM MONITORING SOFTWARE ROOFTOP UNIT BRIDGE (RECOMMENDED) SECONDARY BUS VVT ZONE CONTROLLER EQUIPPED AIR TERMINAL MAXIMUM OF 32 PER ROOFTOP/LINKAGE MASTER MAXIMUM OF 8 LINKAGE MASTERS PER BUS DATA COLLECTION OPTION Fig. 1 — Typical Carrier Linkage System 3 CLAMP ASSEMBLY MECHANICAL STOP 0 1 WIRING KNOCKOUTS Assembled in USA by Belimo for CARRIER Manual Override 5 35 in-lb (4 Nm) 80...110s y 24VAC/DC 50/60Hz 3VA 2W WI bl or CO bl re w ACTUATOR MANUAL OVERRIDE SWITCH WIRING ACCESS MOTHERBOARD ACCESS Fig. 2 — Zone Controller SUPPLY AIR TEMPERATURE (SAT) SENSOR — The 33ZCSENSAT supply air temperature sensor is required for reheat applications or stand-alone operation. The sensor has an operating range of –40 to 245 F (–40 to 118 C) and includes a 6-in. stainless steel probe and cable. DUCT AIR TEMPERATURE SENSOR — The 33ZCSENDAT Duct Air Temperature Sensor is required for cooling only applications on non-33CS or non-Carrier dampers. The sensor is used for supply air monitoring. The sensor has an operating range of –40 to 245 F (–40 to 118 C) and includes a mounting grommet and 75-in. cable. RELATIVE HUMIDITY SENSOR — The 33AMSENRHS000 relative humidity sensor is required for zone humidity control (dehumidification) when in a linked system with a rooftop unit equipped with a dehumidification device. Otherwise, the RH sensor is used for monitoring only. NOTE: The relative humidity sensor and CO2 sensor cannot be used on the same zone controller. INDOOR AIR QUALITY (CO2) SENSOR — An indoor air quality sensor is required for optional demand control ventilation. The 33ZCSENCO2 CO2 sensor is an indoor, wall mounted sensor with an LED display. The 33ZCT55CO2 and 33ZCT56CO2 CO2 sensors are indoor, wall-mounted sensors without display. NOTE: The relative humidity sensor and CO2 sensor cannot be used on the same zone controller. should be at least 12 in. of clearance between the front of the zone controller and adjacent surfaces. Refer to Fig. 3. MOUNTING — Perform the following steps to mount the zone controller: 1. When retrofitting a zone controller on an existing damper, prior to installing the zone controller, remove all existing hardware. 2. Round or rectangular damper brackets may be attached to the damper to provide a clearance for the damper bearing when the zone controller is installed on older style VVT® dampers. The zone controller is used to determine the location of the bracket. Attach the bracket to the zone controller using a single screw through the anti-rotation tab. 3. Visually inspect the damper and determine the direction in which the damper shaft moves to open the damper — clockwise (CW) or counterclockwise (CCW). Refer to Fig. 4. If the damper rotates CCW to open, it does not require any configuration changes. If the damper rotates CW to open, then the damper actuator logic must be reversed. This is done in the software when performing system start-up and damper calibration test. Do not attempt to change damper rotation by changing wiring. This will upset the damper position feedback potentiometer readings. 4. Rotate the damper shaft to the fully closed position. Note direction of rotation. 5. Press the release button on the actuator and rotate the clamp in the same direction that was required to close the damper in Step 4. 6. Press the release button on the actuator and rotate the actuator back one position graduation. Release the button and lock the actuator in this position. Mount Zone Controller (Retrofit Applications) — The zone controller is factory-mounted on Carrier round and rectangular dampers. When retrofitting a zone controller on an existing damper, perform the following procedures. LOCATION — The zone controller must be mounted on the air terminal’s damper actuator shaft. For service access, there 4 9. If the damper has less than 90 degrees of travel between the fully open and fully closed positions, then a mechanical stop must be set on the actuator. The mechanical stop prevents the damper from opening past the maximum damper position. To set the mechanical stop, perform the following procedure: a. Press the actuator release button and rotate the damper to the fully open position. b. Using a Phillips screwdriver, loosen the appropriate stop clamp screw. c. Move the stop clamp screw so that it contacts the edge of the cam on the actuator. Secure the stop clamp screw in this position by tightening the screw. 10. Verify that the damper opens and closes. Press the actuator release button and rotate the damper. Verify that the damper does not rotate past the fully open position. Release the button and lock the damper in the fully open position. NOTE: The actuator must rotate to the end of the actuator range in the fully closed position. For actuators with less than 90 degrees of travel, the opposite stop must be moved so the actuator travels to mid-range when fully open. Damper calibration will fail if stops on actuator are not set correctly. ALLOW 12” CLEARANCE FOR SERVICE ACCESS TO CONTROL BOX 3” REF. ZONE CONTROLLER END VIEW INLET Fig. 3 — Service Clearance for Zone Controller Mounting Connect the Power Transformer — An individual, field-supplied, 24-vac power transformer is recommended for each zone controller. If multiple zone controllers are powered from one power transformer (100 va maximum for UL [Underwriters’ Laboratories] Class 2 conformance), maintain polarity on the power input terminals. All transformer secondaries are required to be grounded. Use only stranded copper conductors for all wiring to the zone controller. Wiring connections must be made in accordance with NEC (National Electrical Code) and local codes. Ground the transformer at the transformer location. Provide an 18-gage, green, chassis ground wire at the terminal. The power supply is 24 vac ± 10% at 40 va (50/60 Hz). For VVT® zone controllers, the power requirement sizing allows for accessory water valves and for electric heat contactor(s). Water valves are limited to 15 va on both two-position and modulating hot water. The electric heat contactor(s) are limited to 10 va (holding) each. NOTE: If a water valve or electric heat contactor exceeds these limits, or external contactors are required for electric heat, then it is recommended a 60 va transformer be used. The maximum rating for any output is 20 va. NOTE: Do not run sensor or communication wiring in the same conduit with line-voltage wiring. NOTE: A conduit cover is provided and integrated with the zone controller. Perform the following steps to connect the power transformer: 1. Install the field-supplied transformer in an electrical enclosure that conforms to NEC and local codes. 2. Connect 24 vac from the transformer as shown in the applicable wiring diagram (Fig. 5-13). AIR FLOW CW TO OPEN, CCW TO CLOSE AIR FLOW CCW TO OPEN, CW TO CLOSE Fig. 4 — Damper Configuration 7. Mount the zone controller to the terminal by sliding the damper shaft through the actuator clamp assembly. Secure the zone controller to the duct by installing the screw provided through the grommet in the anti-rotation tab or by attaching the mounting bracket to the damper. Be sure the floating grommet is in the center of the slot. Failure to center the grommet may cause the actuator to stick or bind. 8. Tighten the actuator clamp assembly to the damper shaft. Secure by tightening the two 10-mm nuts. 5 CCW COM CW DMPPOS GND IAQ PAT RH SAT SPT — — — — — — — — — — 24VAC/DC 50/60Hz 3VA 2W 3 wht red blk ora 2 blu 1 COM yel WIP 5K Manual Override LEGEND Counterclockwise Common Clockwise Damper Position Ground Indoor Air Quality Primary Air Temperature Sensor Relative Humidity Supply Air Temperature Sensor Space Temperature Sensor Field-Supplied Wiring Factory Wiring 35 in-lb (4 Nm) 80...110s Assembled in USA by Belimo for CARRIER COM BI Y GND O GND AUX DMP CW CCW → Fig. 5 — VVT® Zone Controller Wiring — Single Duct NOTE: The SAT may be relocated to sense and control ducted heat. B +10V 6 DMPPOS 1104 - GND - GND GND J1 + 3 2 1 GND T56 SAT GND SPT +24V + + REMOTE GND PAT GND GND RH/IAQ Line Voltage Chassis Ground Transformer ground 24 VAC Network communication Network communication Dedicated System Pilot SAT SPT CCW COM CW DMPPOS GND HWV IAQ PAT RH SAT SPT — — — — — — — — — — — 24VAC/DC 50/60Hz 3VA 2W 3 wht red blk ora 2 blu 1 COM yel WIP R B BI Y O 24VAC HEAT1 24VAC HEAT2 GND - GND - GND J1 - + 3 2 1 GND T56 SAT GND SPT +24 + + REMOTE HEAT3 24VAC GND 24VAC GND GND RH/IAQ PAT AUX DMP NOTE: The SAT may be relocated to sense and control ducted heat. CCW FAN GND → Fig. 6 — VVT® Zone Controller Wiring — Single Duct Two-Position Hot Water Heat LEGEND Counterclockwise Common Clockwise Damper Position Ground Hot Water Valve Indoor Air Quality Primary Air Temperature Sensor Relative Humidity Supply Air Temperature Sensor Space Temperature Sensor Field-Supplied Wiring Factory Wiring 35 in-lb (4 Nm) 80...110s 5K COM Manual Override GND Assembled in USA by Belimo for CARRIER +10V 7 DMPPOS 24VAC CW AUX 1104 Line Voltag Chassis Ground Transformer ground 24 Network communication Network communication Dedicated System Pilot HWV SAT SPT CCW COM CW DMPPOS GND HWV IAQ PAT RH SAT SPT — — — — — — — — — — — 24VAC/DC 50/60Hz 3VA 2W 3 wht red blk ora 2 blu 1 COM yel WIP CCW BI Y O NOTE: The SAT may be relocated to sense and control ducted heat. R B 24VAC HEAT1 24VAC HEAT2 GND 3 2 J1 - - 1 GND GND + + GND T56 SAT GND SPT +24 + REMOTE HEAT3 24VAC GND 24VAC GND GND RH/IAQ PAT AUX DMP → Fig. 7 — VVT® Zone Controller Wiring — Single Duct Modulating Hot Water Heat LEGEND Counterclockwise Common Clockwise Damper Position Ground Hot Water Valve Indoor Air Quality Primary Air Temperature Sensor Relative Humidity Supply Air Temperature Sensor Space Temperature Sensor Field-Supplied Wiring Factory Wiring 35 in-lb (4 Nm) 80...110s 5K Manual Override COM 8 +10V Assembled in USA by Belimo for CARRIER GND FAN GND 1104 DMPPOS 24VAC CW AUX Line Voltage Chassis Ground Transformer ground 24 VAC Network communication Network communication Dedicated System Pilot HWV O C C O P L M Normally open or normally closed valve may be used SAT SPT 9 CCW COM CW DMPPOS GND IAQ — — — — — — 24VAC/DC 50/60Hz 3VA 2W 35 in-lb (4 Nm) 80...110s Counterclockwise Common Clockwise Damper Position Ground Indoor Air Quality wht red blk — — — — COM CW R Y +10V CCW BI Primary Air Temperature Sensor Relative Humidity Supply Air Temperature Sensor Space Temperature Sensor Field-Supplied Wiring Factory Wiring B H2 HEAT1 24VAC HEAT2 + 2 3 GND 1 - - J1 GND + GND T56 SAT GND SPT +24 GND + REMOTE HEAT3 24VAC GND GND GND RH/IAQ 24VAC H1 PAT AUX DMP SAT SPT Line Voltage Chassis Ground Transformer ground 24 VAC Network communication Network communication Dedicated System Pilot NOTE: The SAT may be relocated to sense and control ducted heat. O GND FAN GND → Fig. 8 — VVT® Zone Controller Wiring — Single Duct, Three Stage Electric Heat LEGEND PAT RH SAT SPT 3 ora 2 blu 1 COM yel WIP 5K Manual Override 24VAC DMPPOS Assembled in USA by Belimo for CARRIER H3 AUX 1104 10 CCW COM CW DMPPOS GND HWV IAQ — — — — — — — 24VAC/DC 50/60Hz 3VA 2W 35 in-lb (4 Nm) 80...110s — — — — COM R CW CCW BI Primary Air Temperature Sensor Relative Humidity Supply Air Temperature Sensor Space Temperature Sensor Field-Supplied Wiring Factory Wiring B +10V Y AUX O GND REMOTE HEAT3 HEAT1 24VAC HEAT2 SAT SPT Line Voltage Chassis Ground Transformer ground 24 VAC Network communication Network communication Dedicated System Pilot HWV Normally open or normally closed valve may be used NOTE: The SAT may be relocated to sense and control ducted heat. 3 2 GND 1 + - - J1 - GND + GND T56 SAT GND SPT +24 GND + GND 24VAC 24VAC PAT GND GND RH/IAQ FAN AUX DMP → Fig. 9 — VVT® Zone Controller Wiring — Single Duct, Combination Base Board, Ducted Heat Counterclockwise Common Clockwise Damper Position Ground Hot Water Valve Indoor Air Quality wht red blk LEGEND PAT RH SAT SPT 3 ora 2 blu 1 COM yel WIP 5K Manual Override H2 GND 1104 DMPPOS Assembled in USA by Belimo for CARRIER H3 24VAC 11 CCW COM CW DMPPOS GND HWV IAQ — — — — — — — 24VAC/DC 50/60Hz 3VA 2W 35 in-lb (4 Nm) 80...110s Counterclockwise Common Clockwise Damper Position Ground Hot Water Valve Indoor Air Quality wht red blk — — — — COM CW R Y +10V CCW BI Primary Air Temperature Sensor Relative Humidity Supply Air Temperature Sensor Space Temperature Sensor Field-Supplied Wiring Factory Wiring B AUX O GND REMOTE HEAT3 HEAT2 HEAT1 24VAC 3 2 GND 1 + - - J1 - GND + GND T56 SAT GND SPT HWV SAT SPT Line Voltage Chassis Ground Transformer ground 24 VAC Network communication Network communication Dedicated System Pilot Fan Motor NOTE: The SAT may be relocated to sense and control ducted heat. AUX DMP +24V GND + GND 24VAC 24VAC PAT GND GND RH/IAQ Fan Relay FAN GND → Fig. 10 — VVT® Zone Controller Wiring — Fan Box Two-Position Hot Water Heat LEGEND PAT RH SAT SPT 3 ora 2 blu 1 COM yel WIP 5K Manual Override DMPPOS Assembled in USA by Belimo for CARRIER 24VAC 1104 12 CCW COM CW DMPPOS GND HWV IAQ — — — — — — — 24VAC/DC 50/60Hz 3VA 2W 35 in-lb (4 Nm) 80...110s Counterclockwise Common Clockwise Damper Position Ground Hot Water Valve Indoor Air Quality wht red blk — — — — COM CW R Y +10V CCW BI Primary Air Temperature Sensor Relative Humidity Supply Air Temperature Sensor Space Temperature Sensor Field-Supplied Wiring Factory Wiring B GND O HEAT1 24VAC HEAT2 J1 1 2 3 GND - - + GND GND + GND T56 SAT GND SPT +24 HWV O C C O P L M SAT SPT Line Voltage Chassis Ground Transformer ground 24 VAC Network communication Network communication Dedicated System Pilot Normally open or normally closed valve may be used Fan Motor NOTE: The SAT may be relocated to sense and control ducted heat. AUX DMP → Fig. 11 — VVT® Zone Controller Wiring — Fan Box, Modulating Hot Water Heat LEGEND PAT RH SAT SPT 3 ora 2 blu 1 COM yel WIP REMOTE HEAT3 + GND 24VAC 24VAC PAT GND GND RH/IAQ Fan Relay FAN GND 1104 5K Manual Override 24VAC DMPPOS Assembled in USA by Belimo for CARRIER AUX 13 CCW COM CW DMPPOS GND HWV IAQ — — — — — — — 24VAC/DC 50/60Hz 3VA 2W 35 in-lb (4 Nm) 80...110s — — — — COM CW R Y +10V CCW BI Primary Air Temperature Sensor Relative Humidity Supply Air Temperature Sensor Space Temperature Sensor Field-Supplied Wiring Factory Wiring B H2 AUX GND O REMOTE HEAT3 HEAT2 HEAT1 24VAC 3 2 J1 GND 1 + - GND T56 SAT GND B + SPT GND SAT SPT Line Voltage Chassis Ground Transformer ground 24 VAC Network communication Network communication Dedicated System Pilot HWV Normally open or normally closed valve may be used Fan Motor NOTE: The SAT may be relocated to sense and control ducted heat. AUX DMP +24 GND B + GND 24VAC 24VAC PAT GND GND RH/IAQ Fan Relay FAN GND → Fig. 12 — VVT® Zone Controller Wiring — Fan Box, Combination Base Board, Ducted Heat Counterclockwise Common Clockwise Damper Position Ground Hot Water Valve Indoor Air Quality wht red blk LEGEND PAT RH SAT SPT 3 ora 2 blu 1 COM yel WIP 5K Manual Override DMPPOS Assembled in USA by Belimo for CARRIER H3 24VAC 1104 14 CCW COM CW DMPPOS GND IAQ — — — — — — 24VAC/DC 50/60Hz 3VA 2W 35 in-lb (4 Nm) 80...110s Counterclockwise Common Clockwise Damper Position Ground Indoor Air Quality wht red blk — — — — COM CW R Y +10V CCW BI Primary Air Temperature Sensor Relative Humidity Supply Air Temperature Sensor Space Temperature Sensor Field-Supplied Wiring Factory Wiring B AUX GND O HEAT1 24VAC HEAT2 + 3 GND SPT Line Voltage Chassis Ground Transformer ground 24 VAC Network communication Network communication Dedicated System Pilot SAT Fan Motor NOTE: The SAT may be relocated to sense and control ducted heat. 2 1 - - - J1 GND + GND T56 SAT GND SPT +24 GND + REMOTE HEAT3 24VAC GND 24VAC GND GND RH/IAQ Fan Relay PAT H1 FAN AUX DMP → Fig. 13 — VVT® Zone Controller Wiring — Fan Box, Three-Stage Electric Heat LEGEND PAT RH SAT SPT 3 ora 2 blu 1 COM yel WIP 5K Manual Override H2 GND 1104 DMPPOS Assembled in USA by Belimo for CARRIER H3 24VAC Install Sensors 3. Connect the sensor cable as follows: a. Connect one wire from the cable (RED) to the SPT terminal on the controller. Connect the other end of the wire to the left terminal on the SEN terminal block of the sensor. b. Connect another wire from the cable (BLACK) to the GND terminal on the controller. Connect the other end of the wire to the remaining open terminal on the SEN terminal block. SPACE TEMPERATURE SENSOR INSTALLATION — A space temperature sensor must be installed for each zone controller. There are two types of SPT sensors available from Carrier: the 33ZCT55SPT space temperature sensor with timed override button and the 33ZCT56SPT space temperature sensor with timed override button and set point adjustment. See Fig. 14. The space temperature sensor is used to measure the building interior temperature and should be located on an interior building wall. The sensor wall plate accommodates the NEMA standard 2 x 4 junction box. The sensor can be mounted directly on the wall surface if acceptable by local codes. Do not mount the sensor in drafty locations such as near air conditioning or heating ducts, over heat sources such as baseboard heaters, radiators, or directly above wall mounted lighting dimmers. Do not mount the sensor near a window which may be opened, near a wall corner, or a door. Sensors mounted in these areas will have inaccurate and erratic sensor readings. The sensor should be mounted approximately 5 ft from the floor, in an area representing the average temperature in the space. Allow at least 4 ft between the sensor and any corner and mount the sensor at least 2 ft from an open doorway. Install the sensor as follows (see Fig. 15): 1. Locate the two Allen type screws at the bottom of the sensor. 2. Turn the two screws clockwise to release the cover from the sensor wall mounting plate. 3. Lift the cover from the bottom and then release it from the top fasteners. 4. Feed the wires from the electrical box through the opening in the center of the sensor mounting plate. 5. Using two no. 6-32 x 1 mounting screws (provided with the sensor), secure the sensor to the electrical box. 6. Use 20 gage wire to connect the sensor to the controller. The wire is suitable for distances of up to 500 ft. Use a three-conductor shielded cable for the sensor and set point adjustment connections. The standard Carrier Network communication cable may be used. If the set point adjustment (slidebar) is not required, then an unshielded, 18 or 20 gage, two-conductor, twisted pair cable may be used. The Carrier Network service jack requires a separate, shielded communication cable. Always use separate cables for communication and sensor wiring. (Refer to Fig. 16 for wire terminations.) 7. Replace the cover by inserting the cover at the top of the mounting plate first, then swing the cover down over the lower portion. Rotate the two Allen head screws counterclockwise until the cover is secured to the mounting plate and locked in position. 8. For more sensor information, see Table 1 for thermistor resistance vs temperature values. NOTE: Clean sensor with damp cloth only. Do not use solvents. Wiring the Space Temperature Sensor (33ZCT55SPT and 33ZCT56SPT) — To wire the sensor, perform the following (see Fig. 16 and 17): 1. Identify which cable is for the sensor wiring. 2. Strip back the jacket from the cables for at least 3-inches. Strip 1/4-in. of insulation from each conductor. Cut the shield and drain wire from the sensor end of the cable. Cool Warm Fig. 14 — Space Temperature Sensor (P/N 33ZCT56SPT Shown) NOTE: Dimensions are in inches. Fig. 15 — Space Temperature Sensor and Wall Mounted Humidity Sensor Mounting 15 c. On 33ZCT56SPT thermostats, connect the remaining wire (WHITE/CLR) to the T56 terminal on the controller. Connect the other end of the wire to the right most terminal on the SET terminal block. d. In the control box, install a No. 6 ring type crimp lug on the shield drain wire. Install this lug under the mounting screw in the upper right corner of the controller (just above terminal T1). e. On 33ZCT56SPT thermostats install a jumper between the two center terminals (right SEN and left SET). Wiring the Network Communication Service Jack — See Fig. 16-18. To wire the service jack, perform the following: 1. Strip back the jacket from the communication cable(s) for at least 3 inches. Strip 1/4-in. of insulation from each conductor. Remove the shield and separate the drain wire from the cable. Twist together all the shield drain wires and fasten them together using an closed end crimp lug or a wire nut. Tape off any exposed bare wire to prevent shorting. 2. Connect the CCN + signal wire(s) (RED) to Terminal 5. 1 2 3 4 5 6 RED(+) WHT(GND) BLK(-) 3. Connect the CCN – signal wire(s) (BLACK) to Terminal 2. 4. Connect the CCN GND signal wire(s) (WHITE/CLR) to Terminal 4. Before wiring the Carrier proprietary network connection, refer to the Connect the Carrier Communicating Network Communication Bus section on page 23, for communication bus wiring and cable selection. The cable selected must be identical to the communication bus wire used for the entire network. The other end of the communication bus cable must be connected to the remainder of the communication bus. If the cable is installed as a T-tap into the bus, the cable length cannot exceed 100 ft. Wire the service jack of the sensor in a daisy chain arrangement with other equipment. Refer to the Connect the Carrier Communicating Network Communication Bus section, page 23, for more details. SYSTEM PILOT — Refer to System Pilot installation instructions for information on installing and using the System Pilot. 1 2 3 4 COM BUS SEN SEN SW1 5 6 RED(+) WHT(GND) BLK(-) COM BUS SET SW1 BLK RED WHT BLK RED SENSOR WIRING SENSOR WIRING JUMPER TERMINALS AS SHOWN Cool Fig. 16 — Space Temperature Sensor Wiring (33ZCT55SPT) Warm Fig. 17 — Space Temperature Sensor Wiring (33ZCT56SPT) 16 Wiring when distance between zone controller and space temperature sensor is 100 feet or less 100 FT. MAXIMUM COMM BUS 3 COND COMM CABLE (TYP) 2 COND TWISTED CABLE OR 3 COND CABLE (TEMP SENSOR WIRING) (TYP) AIR TERMINAL UNIT (TYP) ZONE CONTROLLER Coo War SYSTEM PILOT SPACE TEMPERATURE SENSOR Wiring when distance between zone controller and space temperature sensor is greater than 100 feet DISTANCE GREATER THAN 100 FT. COMM BUS 2 COND TWISTED CABLE OR 3 COND CABLE (TEMP SENSOR WIRING) (TYP) AIR TERMINAL UNIT (TYP) ZONE CONTROLLER Coo War SYSTEM PILOT SPACE TEMPERATURE SENSOR Fig. 18 — Communication Bus Wiring to Zone Controller 17 Table 1 — Thermistor Resistance vs Temperature Values for Space Temperature Sensor, Return-Air Temperature Sensor, and Supply-Air Temperature Sensor TEMP (C) –40 –35 –30 –25 –20 –15 –10 –5 0 5 10 15 20 25 30 35 40 45 50 55 60 65 70 TEMP (F) –40 –31 –22 –13 –4 5 14 23 32 41 50 59 68 77 86 95 104 113 122 131 140 149 158 PRIMARY AIR TEMPERATURE SENSOR INSTALLATION — A primary air temperature (PAT) sensor is used on a zone controller which is functioning as a Linkage Coordinator for a non Carrier Network/Linkage compatible air source. The part number is 33ZCSENPAT. See Fig. 19. When used on a zone controller, try to select a zone controller which will allow installation of the PAT sensor in the main trunk, as close to the air source as possible. See Fig. 20. DUCT TEMPERATURE SENSOR (33ZCSENDAT) INSTALLATION — The 33ZCSENDAT Duct Air Temperature Sensor is required for cooling only applications on nonCarrier dampers. The sensor is used for supply air monitoring. The sensor has an operating range of –40 to 245 F (–40 to 118 C) and includes a mounting grommet and 75-in. cable. The duct temperature sensor must be installed in the supply air duct. See Fig. 21 for sensor details. The duct temperature sensor should be moved to a location which will provide the best sensing of the supply-air temperature during heating and cooling. For systems using a ducted supply, the duct temperature sensor should be located in the supply duct downstream of the discharge of the air source and before the bypass damper to allow good mixing of the supply airstream. The 33ZCSENDAT duct sensor is a small epoxy sensor that is 11/4-in. long. A grommet is provided for filling the hole around the sensor cable after the sensor is located in the duct. See Fig. 22 for mounting location. RESISTANCE (Ohms) 335,651 242,195 176,683 130,243 96,974 72,895 55,298 42,315 32,651 25,395 19,903 15,714 12,494 10,000 8,056 6,530 5,325 4,367 3,601 2,985 2,487 2,082 1,752 2. Push sensor through hole in the supply duct. Snap the grommet into the hole until it is secure. Pull on the leads of the duct sensor until the sensor is snug against the grommet. 3. Connect the sensor leads to the bypass controller’s terminal board at the terminals labeled SAT and GND. See Fig. 5-13 for wiring. If extending cable length beyond 8 ft, use plenum rated, 20 AWG (American Wire Gage), twisted pair wire. Sensor wiring does not have polarity. Either lead can be wired to either terminal. 4. Neatly bundle and secure excess wire. 5. Using electrical tape, insulate any exposed lead to prevent shorting. 6. Connect shield to earth ground (if shielded wire is used). SUPPLY AIR TEMPERATURE (33ZCSENSAT) SENSOR INSTALLATION — The 33ZCSENSAT supply air temperature sensor is required for reheat applications or stand-alone operation. The sensor has an operating range of –40 to 245 F (–40 to 118 C) and includes a 6-in. stainless steel probe and cable. The sensor is factory-supplied but must be relocated for ducted heat. The SAT must be installed in the duct downstream from the air terminal. The SAT sensor is also sometimes called a duct air temperature sensor. Part number 33ZCSENSAT may be used in place of the factory-installed sensor. The SAT sensor probe is 6 inches in length. The tip of the probe must not touch the inside of the duct. Use field-supplied bushings as spacers when mounting the probe in a duct that is 6 in. or less in diameter. If the unit is a cooling only unit, the SAT is not required. If the unit is equipped with electric reheat, ensure that the sensor is installed at least 2 ft downstream of the electric heater. See Fig. 23 for the sensor location in this application. If the unit has an octopus connected directly at the discharge, install the sensor in the octopus. If the unit has an electric heater, the two-foot minimum distance between the sensor and the heater must be maintained. See Fig. 23 for the sensor location in this application. Disconnect electrical power before wiring the bypass controller. Electrical shock, personal injury, or damage to the fan coil controller can result. Do not run sensor or relay wires in the same conduit or raceway with Class 1 AC service wiring. Do not abrade, cut, or nick the outer jacket of the cable. Do not pull or draw cable with a force that may harm the physical or electrical properties. Avoid splices in any control wiring. Perform the following steps to connect the duct temperature sensor to the bypass controller: 1. Drill or punch a 1/4-in. hole in the supply duct. See Fig. 22. Duct sensor can be installed to hang from top of duct or from the sides. Sensor probe can touch side of duct. Disconnect electrical power before wiring the zone controller. Electrical shock, personal injury, or damage to the zone controller can result. 18 Fig. 20 — Primary Air Temperature Sensor Installation (Unit Discharge Location) Fig. 19 — Primary Air Temperature Sensor (Part Number 33ZCSENPAT) .225/ .245 (5.72/6.22) 0.06 (1.5) 1.00 (25.4) 1.25 (31.8) NOTE: Dimensions are in inches (millimeters). Fig. 21 — 33ZCSENSDAT Duct Sensor 19 75.0 .5 (1905) The sensor part number is 33ZCSENCO2. To mount the sensor, refer to the installation instructions shipped with the accessory kit. The CO2 sensors (33ZCSENCO2) factory set for a range of 0 to 2000 ppm and a linear voltage output of 0 to 10 vdc. Figure 25 shows ventilation rates for various CO2 set points when outside air with a typical CO2 level of 350 ppm is used. Refer to the instructions supplied with the CO2 sensor for electrical requirements and terminal locations. The zone controller requires a 24 vac, 25 va transformer to provide power to the sensor. To convert the CO2 sensor into a duct-mounted CO2 sensor, the duct-mounted aspirator (33ZCASPCO2) will need to be purchased. To accurately monitor the quality of the air in the conditioned air space, locate the sensor near the return air grille so it senses the concentration of CO2 leaving the space. The sensor should be mounted in a location to avoid direct breath contact. Do not mount the space sensor in drafty areas such as near supply ducts, open windows, fans, or over heat sources. Allow at least 3 ft between the sensor and any corner. Avoid mounting the sensor where it is influenced by the supply air; the sensor gives inaccurate readings if the supply air is blown directly onto the sensor or if the supply air does not have a chance to mix with the room air before it is drawn into the return air stream. To accurately monitor the quality of the air in the return air duct, locate the sensor at least 6 in. upstream or 15 in. downstream of a 90-degree turn in the duct. The downstream location is preferred. Mount the sensor in the center of the duct. Do not run sensor or relay wires in the same conduit or raceway with Class 1 AC or DC service wiring. Do not abrade, cut, or nick the outer jacket of the cable. Do not pull or draw cable with a force that may harm the physical or electrical properties. Avoid splices in any control wiring. Perform the following steps to connect the SAT sensor to the zone controller: 1. Locate the opening in the control box. Pass the sensor probe through the hole. 2. Drill or punch a 1/4-in. hole in the duct downstream of the unit, at a location that conforms to the requirements shown in Fig. 23. 3. Use two field-supplied, self-drilling screws to secure the sensor probe to the duct. Use field-supplied bushings as spacers when installing the sensor probe in a duct 6 in. or less in diameter. Perform the following steps if state or local code requires the use of conduit, or if your installation requires a cable length of more than 8 ft: 1. Remove the center knockout from a field-supplied 4 x 2-in. junction box and secure the junction box to the duct at the location selected for the sensor probe. 2. Drill a 1/2-in. hole in the duct through the opening in the junction box. 3. Connect a 1/2-in. nominal field-supplied conduit between the zone controller enclosure and the junction box. 4. Pass the sensor probe wires through the conduit and insert the probe in the duct. Use field-supplied bushings as spacers when installing the sensor probe in a duct 6 in. or less in diameter. 5. Secure the probe to the duct with two field-supplied selfdrilling screws. 6. If extending cable length beyond 8 ft, use plenum rated, 20 AWG (American Wire Gage), twisted pair wire. 7. Connect the sensor leads to the zone controller’s wiring harness terminal board at the terminals labeled SAT and GND. 8. Neatly bundle and secure excess wire. INDOOR AIR QUALITY SENSOR INSTALLATION — The indoor air quality (IAQ) sensor accessory monitors carbon dioxide levels. This information is used to modify the position of the outdoor air dampers to admit more outdoor air as required to provide the desired ventilation rate. Two types of sensors are supplied. The wall sensor can be used to monitor the conditioned air space; the duct sensor monitors the return air duct. Both wall and duct sensors use infrared technology to measure the levels of CO2 present in the air. The wall sensor is available with or without an LCD (liquid crystal display) readout to display the CO2 level in ppm. See Fig. 24. IMPORTANT: If the sensor is mounted in the return-air duct, readjust the mixed-air dampers to allow a small amount of air to flow past the return-air damper whenever the mixing box is fully open to the outside air. If the damper is not properly adjusted to provide this minimum airflow, the sensor may not detect the indoor-air quality during the economizer cycle. UNIT WITH ELECTRIC REHEAT 2 FT. MIN. AIR TERMINAL UNIT PRIMARY AIR INLET ZC SAT HEAT UNIT WITH OCTOPUS DRILL 1/4" HOLE IN TOP OF DUCT AND LET SENSOR HANG DOWN 2 FT. MIN. PRIMARY AIR INLET AIR TERMINAL UNIT ZC ALTERNATE INSTALLATION LOCATION INSIDE OF DUCT HEAT OCTOPUS SAT ZC — Zone Controller SUPPLY DUCT Fig. 23 — Supply Air Temperature Probe (Part No. 33ZCSENSAT) Locations Fig. 22 — DAT Installation Location 20 5.625 (14.3) The sensor must be mounted vertically on the wall. The Carrier logo should be oriented correctly when the sensor is properly mounted. DO NOT mount the sensor in drafty areas such as near heating or air-conditioning ducts, open windows, fans, or over heat sources such as baseboard heaters, radiators, or wall-mounted light dimmers. Sensors mounted in those areas will produce inaccurate readings. Avoid corner locations. Allow at least 4 ft between the sensor and any corner. Airflow near corners tends to be reduced, resulting in erratic sensor readings. Sensor should be vertically mounted approximately 5 ft up from the floor, beside the space temperature sensor. For distances up to 500 feet, use a 3-conductor, 18 or 20 AWG cable. A communication cable can be used, although the shield is not required. The shield must be removed from the sensor end of the cable if this cable is used. See Fig. 28 for wiring details. The power for the sensor is provided by the control board. The board provides 24 vdc for the sensor. No additional power source is required. To wire the sensor, perform the following: 1. At the sensor, remove 4-in. of jacket from the cable. Strip 1/ -in. of insulation from each conductor. Route the cable 4 through the wire clearance opening in the center of the sensor. See Fig. 28. 2. Connect the RED wire to the sensor screw terminal marked (+). 3. Install one lead from the resistor (supplied with the sensor) and the WHITE wire, into the sensor screw terminal marked (–). After tightening the screw terminal, test the connection by pulling gently on the resistor lead. 4. Connect the remaining lead from the resistor to the BLACK wire and secure using a closed end type crimp connector or wire nut. 5. Using electrical tape, insulate any exposed resistor lead to prevent shorting. 6. At the control box, remove the jacket from the cable and route the RED conductor over to the left side of the control board. Route the remaining conductors to the right side of the control board. 7. Strip 1/4-in. of insulation from each conductor and equip each with a 1/4-in. female quick connect terminal. 8. Connect the RED wire to terminal +24v on the control board. 9. Connect the BLACK wire to terminal GND on the control board. 10. Connect the WHITE/CLEAR wire to terminal RH/IAQ on the control board. 11. Connect shield to ground (if shielded wire is used). 5 (12.7) 3.25 (8.3) 1.125 (2.9) 0.25 (0.8) NOTE: Dimensions are in inches. Dimensions in ( ) are in millimeters. Fig. 24 — Indoor Air Quality (CO2) Sensor (33ZCSENCO2) Fig. 25 — Ventilation Rated Based on CO2 Set Point Indoor Air Quality Sensor Wiring — To wire the sensors after they are mounted in the conditioned air space and return air duct, see Fig. 26 and the instructions shipped with the sensors. For each sensor, use two 2-conductor 18 AWG twistedpair cables (unshielded) to connect the separate isolated 24 vac power source to the sensor and to connect the sensor to the control board terminals. To connect the sensor to the control board, identify the positive (+) PIN-8 and ground (GND) PIN-7 terminals on the sensor and connect the positive terminal to terminal RH/IAQ and connect the ground terminal to terminal GND. HUMIDITY SENSOR (WALL-MOUNTED) INSTALLATION — The accessory space humidity sensor is installed on an interior wall to measure the relative humidity of the air within the occupied space. See Fig. 27. The use of a standard 2 x 4-in. electrical box to accommodate the wiring is recommended for installation. The sensor can be mounted directly on the wall, if acceptable by local codes. If the sensor is installed directly on a wall surface, install the humidity sensor using 2 screws and 2 hollow wall anchors (field-supplied); do not overtighten screws. See Fig. 15. Remote Occupancy Contact — The remote occupancy input (J4 pin 1) has the capability to be connected to a normally open or normally closed occupancy dry contact. Wire the dry contact as show in Fig. 29 between J4 Pin 1 and 24 VAC J1 Pin 1. The 24 vac necessary to supply the VVT® zone controller remote occupancy contact input is supplied using the zone controller. Connect the Outputs — Wire the zone controller’s Do NOT clean or touch the sensing element with chemical solvents; they can permanently damage the sensor. outputs (fan, staged heat, valves) as shown in the applicable wiring diagrams in Fig. 5-13. 21 22 3 wht red blk ora 2 blu WIP 5K Manual Override 1 COM yel 1 COM B R CW CCW +10V Y DMPPOS BI GND O AUX DMP GND PAT GND GND RH/IAQ 3 GND 1 2 - - GND GND J1 + GND T56 SAT GND SPT +24 + + REMOTE Fig. 26 — Indoor Air Quality Sensor Wiring *Do not connect to the same transformer that supplies power to the zone controller. 24VAC/DC 50/60Hz 3VA 2W 35 in-lb (4 Nm) 80...110s Assembled in USA by Belimo for CARRIER 0 GND GND RH/IAQ 21 24 VAC 87 SEPARATE ISOLATED POWER SUPPLY REQUIRED (24 VAC, 25 VA MINIMUM)* LINE VOLTAGE exceed 4000 ft, with no more than 60 devices on any 1000-ft section. Optically isolated RS-485 repeaters are required every 1000 ft. At 19,200 and 38,400 baud, the number of controllers is limited to 128 maximum, with no limit on the number of Linkage Coordinators. Bus length may not exceed 1000 ft. On larger systems with more than 8 linkage coordinators, use bridges to split the system into sections. The first zone controller in a network connects directly to the bridge and the others are wired sequentially in a daisy chain fashion. Refer to Fig. 31 for an illustration of Communication Bus wiring. The Communication Bus also connects to the zone controller space temperature sensor. Refer to the Install the Sensors section for sensor wiring instructions. COMMUNICATION BUS WIRE SPECIFICATIONS — The Communication Bus wiring is field-supplied and fieldinstalled. It consists of shielded three-conductor cable with drain (ground) wire. The cable selected must be identical to the Communication Bus wire used for the entire network. See Table 2 for recommended cable. Table 2 — Recommended Cables Fig. 27 — Wall Mounted Relative Humidity Sensor MANUFACTURER Alpha American Belden Columbia Modulating Baseboard Hydronic Heating — Install the water valve on the leaving water end of the baseboard heater. See Fig. 30. Observe the fluid flow direction when mounting the valve. Be sure to properly heat sink the valve and direct the flame away from the actuator and valve body when sweating the valve connections. Install the leaving water temperature sensor (33ZCSENCHG) on the hydronic heating coil as shown. The sensor accommodates nominal copper pipe from 1/2 to 1-in. (OD sizes from 5/8 to 1.125 in.). It should be secured to the pipe with the clamp supplied. If piping is larger than 1-in. nominal size, a field-supplied clamp must be used. Use fiberglass pipe insulation to insulate the sensor assembly. Refer to Fig. 7 and 11 to wire the modulating water valve and the sensor to the zone controller. Connect the leaving water temperature sensor to the controller using the wiring connections shown for the SAT sensor. (NOTE: The leaving water temperature sensor replaces the SAT sensor in this application.) Use 18 or 20 AWG wire for all connections. The water valve actuator housing may be used as a junction box if the leaving water temperature sensor cable is not long enough and the sensor cable must be extended to reach the controller. For modulating hydronic heating applications, the default configuration must be changed to properly control the valve. Refer to the service configuration table and set the Heating Loop parameters as follows: Proportional Gain = 20.0 Integral Gain = 0.5 Derivative Gain = 0.0 Start Value = 102.0 Also, set the Ducted Heat decision to YES and set the Maximum Duct Temperature decision equal to the design (maximum) boiler water temperature minus 20 degrees, but not greater than 200 F. CABLE PART NO. 2413 or 5463 A22503 8772 02525 NOTE: Conductors and drain wire must be at least 20 AWG (American Wire Gage), stranded, and tinned copper. Individual conductors must be insulated with PVC, PVC/nylon, vinyl, Teflon, or polyethylene. An aluminum/polyester 100% foil shield and an outer jacket of PVC, PVC/nylon, chrome vinyl, or Teflon with a minimum operating temperature range of –20 C to 60 C is required. CONNECTION TO THE COMMUNICATION BUS 1. Strip the ends of the red, white, and black conductors of the communication bus cable. 2. Connect one end of the communication bus cable to the bridge communication port labeled COMM2 (if connecting on a secondary bus). When connecting the communication bus cable, a color code system for the entire network is recommended to simplify installation and checkout. See Table 3 for the recommended color code. 3. Connect the other end of the communication bus cable to the terminal block labeled J2A in the zone controller of the first air terminal. Following the color code in Table 3, connect the Red (+) wire to Terminal 1. Connect the White (ground) wire to Terminal 2. Connect the Black (–) wire to Terminal 3. 4. Connect additional zone controllers in a daisy chain fashion, following the color coded wiring scheme in Table 3. Refer to Fig. 31. NOTE: The communication bus drain wires (shield) must be tied together at each zone controller. If the communication bus is entirely within one building, the resulting continuous shield must be connected to ground at only one single point. If the communication bus cable exits from one building and enters another building, connect the shields to ground at a lightning suppressor in each building where the cable enters or exits (one point only). → Connect the Carrier Communicating Network Communication Bus — The zone controllers connect to the bus in a daisy chain arrangement. The zone controller may be installed on a primary bus or on a secondary bus from the primary bus. Connecting to a secondary bus is recommended. At 9,600 baud, the number of controllers is limited to 128 zones maximum, with a limit of 8 systems (Linkage Coordinator configured for at least 2 zones). Bus length may not Table 3 — Color Code Recommendations SIGNAL TYPE + Ground – 23 COMMUNICATION BUS WIRE COLOR Red White Black PLUG PIN NUMBER 1 2 3 1104 24 24VAC/DC 50/60Hz 3VA 2W 35 in-lb (4 Nm) 80...110s Assembled in USA by Belimo for CARRIER 3 wht red blk ora 2 blu WIP 5K Manual Override 1 COM yel 11 COM CW R +10V Y DMPPOS BI GND O AUX DMP Fig. 28 — Humidity Sensor Wiring B GND CCW GND GND - GND - GND J1 - + 1 3 2 GND T56 SAT GND SPT +24V + + REMOTE GND PAT GND GND RH/IAQ +24V RH/IAQ 499 + - Line Voltage SHIELD (IF USED) HUMIDITY SENSOR RESISTOR (SUPPLIED W/SENSOR) Chassis Ground Transformer ground 24 SHIELD (IF USED) BLACK WHITE RED 3 CONDUCTOR 20 AWG CABLE 25 24VAC/DC 50/60Hz 3VA 2W 35 in-lb (4 Nm) 80...110s Assembled in USA by Belimo for CARRIER 3 wht red blk ora 2 blu 1 COM yel WIP 5K Manual Override COM CW R +10V Y DMPPOS BI GND O AUX DMP CCW Fig. 29 — Remote Occupancy Wiring B GND 3 GND 1 2 - - GND GND J1 + GND T56 SAT GND SPT +24V + + REMOTE GND PAT GND GND RH/IAQ Line Voltage Chassis Ground Transformer ground 24 VAC FIELD-SUPPLIED DRY CONTACT SWITCH 33ZCSENCHG (SENSOR) FLOW 1/2” TUBE 3/4” TUBE 1” TUBE Fig. 30 — Typical Water Valve and Sensor Installation 1000 FT MAXIMUM DRAIN WIRE (TYP) BLK (TYP) GND WHT (TYP) RED (TYP) 1 2 3 1 2 3 1 2 3 1 2 3 1 2 3 4 COMM 2 ZC (TYP) AIR TERMINAL UNIT (TYP) BRIDGE (RECOMMENDED) ON LARGE SYSTEMS LEGEND ZC — Zone Controller → Fig. 31 — Communication Bus Wiring 3. Check that all air duct connections are tight. 4. At the air terminals, check fan and system controls for proper operation. Verify that actuator screws are properly tightened. 5. At the air terminals, check electrical system and connections of any optional electric reheat coil. If hot water reheat is used, check piping and valves against job drawings. 6. At the air terminals, make sure that all balancing dampers at box outlets are in the fully open position. 7. If using an air source with field-installed controls, make sure controls and sensors have been installed and wired per manufacturer installation instructions. 8. At air source, verify that the motor starter and, if applicable, the Hand/Off/Auto (HOA) switch are installed and wired. START-UP Use the Carrier network communication software to start up and configure the zone controller. All set-up and set point configurations are factory-set and field-adjustable. Changes can be made using the System Pilot or Carrier software. During start-up, the Carrier software can also be used to verify communication with each zone controller. For specific operating instructions, refer to the literature provided with the software. Perform System Checkout 1. Check correctness and tightness of all power and communication connections. 2. Check that all air terminals, ductwork, and zone controllers are properly installed and set according to installation instructions and job requirements. 1104 26 9. Check to be sure the area around the air source is clear of construction dirt and debris. 10. Check that final filters are installed in the air handler(s). Dust and debris can adversely affect system operation. 11. Verify that the zone controller and the air source controls are properly connected to the communication bus. 12. Remember to utilize good duct design and to provide sufficient straight duct at the inlet of the box. A minimum of three times the inlet size is recommended. Maintenance Screen, select the Zone Commissioning Table and force the Commissioning Mode point to Enable. Then select the Damper Cal point and force this point to Enable. The controller automatically tests the actuator by fully closing the damper. It checks the fully closed position to determine if the control was properly mounted. It then opens the damper. The control scales the actual actuator travel range used to a 0 to 100% open value. Finally the control will close the damper, test, and zero the pressure transducer. When completed, the control automatically removes the force from the Damper Cal point. If a failure occurs at any point during the testing, the Damper Calibration Status point at the bottom of the screen will indicate ALARM and the test will be aborted. 6. The actuator stroke has now been calibrated for the proper rotation. Network Addressing — Use the following method Fan and Heat Configuration and Test — Per- when all the zone controllers are installed and powered, and the SPT sensors are wired and functioning properly. This method can be used if no addresses have been set previously. The address of an individual zone controller may be set by using the System Pilot. This is the standard method of setting the address. Each zone controller will default to an address of 0, 140 when its application software is initially loaded. Since multiple controllers will be on the same bus, a unique address must be assigned to each controller before the system can operate properly. The assignment of controller addresses will be performed through the System Pilot, as follows: 1. The System Pilot recognizes that the Zone Controller’s address, stored in the zone controller memory, has not been written yet (this will be true when the unit is first powered up on the job, or after a jumper-initiated reset). 2. Press the override button on the SPT (terminals J4-14 and J4-12 are shorted) for 1 to 10 seconds. 3. The zone controller address changes from 0, 140 to 239, 239 for a period of 15 minutes. 4. Use System Pilot to change the address from 239, 239 to a valid system address within 15 minutes. NOTE: If the address is not changed from 239, 239 to a valid system address within 15 minutes, the controller will revert to address 0, 140 and use of the override button will cause the address function to repeat. The operator MUST actively set the address even if the final desired address is 0, 140. form the following procedure to configure and test the fan and heat: 1. Display the Terminal Service Configuration screen to make sure the proper Terminal Type and Heat Type are configured. See the Configuration section to answer questions about the individual configurations. 2. From the Diagnostics Maintenance Screen select the Zone Commissioning table. 3. Force the Commissioning Mode to Enable. 4. If the terminal is a parallel or series powered fan box, force the Fan Override to Enable. If the damper is open it may have to be repositioned to the proper position depending on the box type. Damper percent change will be displayed. After the damper is positioned correctly, the fan relay should energize and the fan should run for a few seconds. 5. Make sure the fan runs and the Fan Override decision returns to disabled to ensure the fan is wired correctly for proper operation. 6. Force the Heating Override to Enable. If the unit is a single duct unit, this must be done with the primary terminal at reheat set point. The damper will open to the reheat cfm. The heat outputs will be commanded to provide maximum heat. If the unit is a fan-powered terminal, the fan must be on. NOTE: The damper position settings can be found under service configuration in the table AIRFLOW. Initial Operation and Test — Perform the following procedure: 1. Apply 24 vac power to the control. 2. Using the System Pilot, upload the controller from address assigned in Network Addressing section above. 3. From the Terminal Service Configuration screen, properly configure the damper type and inlet size. If a round inlet is used, then enter the size directly in the Inlet Diameter decision. If a square, rectangular, or elliptical damper inlet is supplied, then enter the inlet size in square inches in the Inlet Area decision. 4. If the terminal damper closes in the CW direction, then no adjustment is required. Otherwise, locate the damper direction configuration decision (CW Rotation) and toggle the value to OPEN by using the space bar. This configuration decision is also located on the Terminal Service Configuration screen. 5. After entering the area and rotation direction, verify operation of the damper. From the System Pilot Diagnostic, System Balancing — To balance the system, perform the following procedure: 1. Enable the balancing process by forcing System Commissioning to Enable. 2. Enable the All Zone Dampers to Max point. 3. The zone controller will send all system zone dampers to their configured maximum positions and display the values. Check the system maximum airflows to all zones and set zone dampers while the system is at maximum flow and the bypass damper is closed. Adjust maximum damper position set points if required. The system can also be balanced at design conditions with some dampers closed. 4. If the user forces any zones to a new position, the new position is written to the zone’s maximum damper position configuration value and the damper is repositioned. 5. Enable the All Zone Dampers to Min point. Before starting the air source fan, make sure that dampers at the system’s air terminals are not fully closed. Starting the fan with dampers closed will result in damage to the system ductwork. 27 6. The zone controller will send all system zone dampers to their configured minimum positions and display the values. Check the system bypass pressure and set the pressure set point. Adjust minimum damper set points if required. 7. If the user forces any zones to a new position, the new position is written to the zone’s minimum damper position configuration value and the damper is repositioned. 8. Enable the Position Single Zone point. 9. The zone controller will send all system zone dampers to their configured maximum positions and display the values. 10. If the user forces any zones to a new position, the new position is written to the zone’s maximum damper position configuration value and the damper is repositioned. 11. At this time, the user can force the Bypass Pressure set point. Typically, the maximum unit rated duct static is used. The zone controller will then write the forced Bypass Pressure set point to the set point table in the Bypass Controller by communicating over the network. The bypass controller will then begin to control to the new bypass pressure set point. Status Table — The following sections describe the computer status screen which is used to determine status the zone controller. The screens shown may be displayed differently when using different Carrier software. See Table 4. TERMINAL MODE — The terminal mode is determined by the equipment mode as reported by linkage and space requirements determined by space temperature and set points. The ZONE_BAL and COMMISS modes are the result of the activating the commissioning maintenance table to perform terminal testing and commissioning. Terminal Mode:Display Units ASCII Default Value COOL Display Range HEAT, COOL, VENT, REHEAT, PRESSURE, EVAC, OFF, ZONE_BAL, COMMISS Network Access Read only TERMINAL TYPE — Terminal type is the confirmation of the terminal type configuration in the CONFIG Service Config table. Terminal Type: Display Units ASCII Default value SINGLDUCT Display Range SINGLDUCT, PAR FAN, SER FAN Network Access Read only CONTROLLING SETPOINT — Controlling Set Point will display either the heating master reference or the cooling master reference depending upon what mode the terminal is in. The display will default to the heating master reference and display the last controlling master reference when in neither heating nor cooling. Controlling Setpoint: Display Units F (C) Default Value –40 Display Range –40 to 245 Network Access Read only → SPACE TEMPERATURE — Space temperature from 10 kΩ thermistor (Type II) located in the space. The point name of the displayed Space Temperature is “SPACE_T” in this status display table. This point may be forced for diagnostic purposes. 1104 A non-displayed variable named SPT also exists within the zone controller as a writeable point for normal operations with a System Pilot or other devices that will write a space temperature to the zone controller. The zone controller verifies that the SPT point is being written to before using it to update the SPACE_T point. Values that are received at the SPT point may be averaged with the hardware space temperature input. Space Temperature: Display Units F (C) Default Value –40.0 Display Range –40.0 to 245.0 Network Access Read/Write DAMPER POSITION — Damper position percent range of rotation determined by the transducer calibration procedure. The zone controller is designed be used on dampers with any range of rotation. Damper Position: Display Units % open Default Value 0 Display Range 0 to 100 Network Access Read only → SUPPLY AIR TEMPERATURE — This reading is the temperature of the air provided by the air source. If ducted heat is present, this sensor may be relocated to measure temperature of the air leaving the zone controller downstream of any ducted heat source. Measured by a 10 kΩ thermistor (Type II). This temperature may be used to control the maximum discharge air to the space when local heat is active. The local SAT Installed configuration is used to enable or disable this sensor. Supply Air Temperature: Display Units F (C) Default Value 0.0 Display Range –40.0 to 245.0 Network Access Read/Write LOCAL HEATING CAPACITY — When local heat at the terminal is enabled the percent of heat being delivered is determined by the following formula for modulating (floating point) type heat: % Capacity = [(SAT - SPT)/(Maximum Duct Temp – SPT)] The percent of heat delivered is determined by the following for two-position hot water or staged electric heat: % Output Capacity = (no. of active stages/Total stages) * 100 Local Heating Capacity: Display Units % output capacity Default Value 0 Display range 0 to 100 Network Access Read only TERMINAL FAN — The commanded output for the terminal fan on a fan powered terminal. Terminal Fan: Display Units Discrete ASCII Default Value Off Display Range Off/On Network Access Read/Write RELATIVE HUMIDITY — Space Relative Humidity reading from the optional relative humidity sensor. The humidity reading is used for display and monitoring purposes only. Relative Humidity: Display Units % RH Default Value 0 Display Range 0 to 100 Network Access Read/Write 28 → Table 4 — Status Screen DESCRIPTION Terminal Mode Terminal Type Controlling Setpoint Space Temperature Damper Position Supply Air Temperature Local Heating Capacity Terminal Fan Relative Humidity Demand Ventilation (ppm) Primary Air Temperature Heat Remote Start VALUE HEAT SER FAN 69.0 66.0 0 67.1 100 On 0.0 0 66.0 Enable Off UNITS CONFIGURATION OCCUPANCY Off (default) Normally Closed (default) Occupied (default) On Normally Closed Unoccupied Off Normally Open Unoccupied On Normally Open Occupied FORCE dF dF %OPEN dF % % dF Remote Start: DEMAND VENTILATION — This variable displays the amount of CO2 in the air as read from the demand ventilation sensor if DCV (demand control ventilation) is specified. NOTE: The zone controller either reads relative humidity or demand ventilation depending on what is specified in the Control Options configuration. If this point is not specified, it is available for use as a software point. Demand Ventilation: Display Units ppm Default Value 0 Display Range 0 to 5000 Network Access Read/Write → PRIMARY AIR TEMPERATURE — Primary air temperature from sensor (10 kΩ, Type II), located in main trunk of ductwork for supply air provided by the air source equipment. Used for linkage coordination of linked systems, not local operation. Primary Air Temperature: Display Units F (C) Default Value 0.0 Display Range –40.0 to 245.0 Network Access Read/Write HEAT (ENABLE/DISABLE) — Provides enable/disable function for local heat at the terminal. When enabled the Local heat capacity function will run to operate the terminal heat. Heat Display: Display Units Discrete ASCII Default Value Disable Display Range Disable/Enable Network Access Read/Write REMOTE START — This variable displays the value of the remote timeclock input point that can be used for occupancy override. The input point is configured as normally open or normally closed in the Terminal Service Configuration Table. The occupancy mode of the zone controller will depend on the configuration of the timeclock input and the value of the input as follows: REMOTE TIMECLOCK INPUT STATUS Display Units Default Value Display Range Network Access NAME MODE TYPE CNTSP SPACE_T DMPPOS SAT HCAP FAN RH DCV PATEMP HEAT REMTCIN Discrete ASCII Off On/Off Read/Write CONFIGURATION TABLES The following sections describe the computer configuration screens which are used to configure the zone controller. The screens shown may be displayed differently when using different Carrier software. See Table 5. Alarm Configuration Table — The Alarm Configuration Table (ALARMLIM) contains decisions used to configure the alarm settings for the zone controller. This includes re-alarm time, routing of alarms, limits for space temperature and demand control ventilation. RE-ALARM TIME — This decision is used to configure the number of minutes the zone controller will wait before an alarm condition which has not been corrected will be re-transmitted on the communications network. Re-alarming of an alarm condition will continue until the condition no longer exists. Alarm Re-Alarm Time: Units Minutes Range 0 to 1440 Default Value 0 (Disabled) ALARM ROUTING CONTROL — This decision indicates which Carrier Proprietary Network system software or devices will receive and process alarms sent by the zone controller. This decision consists of eight digits each can be set to zero or one. A setting of 1 indicates alarms should be sent to this device. A setting of zero disables alarm processing for that device. Currently the corresponding digits are configured for the following devices: first digit — user interface software; second digit — autodial gateway or Telink; fourth digit — alarm printer interface module; digits 3, and 5 through 8 — unused. Alarm Routing Control: Range 00000000 to 11111111 Default Value 00000000 SPACE TEMPERATURE OCCUPIED HYSTERESIS — This configuration defines the range above the occupied high set point and below the occupied low set point that the space temperature must exceed for an alarm condition to exist during occupied hours. Space Temperature Occupied Hysteresis: Units delta F (delta C) Range 0.0 to 99.9 Default Value 5.0 The user can override the zone controller’s unoccupied mode by forcing Remote Start to On. The default state (Normally Closed and Off) is such that it may be used by controllers that do not have remote timeclock wiring. 29 1104 Table 5 — Alarm Configuration Table DESCRIPTION Alarm Configuration Re-alarm Time Alarm Routing SPT Occupied Hysteresis Unoccupied SPT Low Limit High Limit Demand Ctrl Ventilation Low Limit High Limit UNOCCUPIED SPACE TEMPERATURE LOW LIMIT — This configuration defines the lowest temperature that the unoccupied space can be before an alarm is generated. Unoccupied Space Temperature Low Limit: Units F (C) Range 0 to 255 F Default Value 40 UNOCCUPIED SPACE TEMPERATURE HIGH LIMIT — This configuration defines the highest temperature that the unoccupied space can be before an alarm is generated. Unoccupied Space Temperature High Limit: Units F (C) Range 0 to 255 F Default Value 99 DEMAND CONTROL VENTILATION LOW LIMIT — This configuration defines the lowest CO2 level reading that the occupied space can have before an alarm is generated. Demand Control Ventilation Low Limit: Units ppm Range 0 to 5000 Default Value 250 DEMAND CONTROL VENTILATION HIGH LIMIT — This configuration defines the highest CO2 level reading that the occupied space can have before an alarm is generated. Demand Control Ventilation High Limit: Units ppm Range 0 to 5000 Default Value 1200 Terminal Service Configuration Table — The Terminal Service Configuration Table (CONFIG) contains decisions used to configure the main settings for the zone controller. This includes Terminal Type, Primary Inlet Size, and gains for the damper and heating PID loops. Decisions regarding auxiliary heat are made in this table and up to 10 temperature readings can be configured for room temperature sensor averaging. SPT and SAT sensor trimming are done here as well. See Table 6. TERMINAL TYPE — This configuration is used to indicate the terminal type that the zone controller is installed on. A 1 is for Single Duct terminals, a 2 is for Parallel Fan terminals, and a 3 is for Series Fan terminals. Terminal Type: Range 1 to 3 Default Value 1 → PRIMARY INLET SIZE — The Primary Inlet Size configuration is used to input the inlet diameter of the terminal if used with a round inlet. The Inlet Area configuration is used for oval or rectangular inlets. The zone controller will use the larger value for demand weighting if both values are configured. If both inlet size and inlet area are zero, then the damper will not be included in the average demand calculations. NOTE: Carrier sizes 12, 14, and 16 are oval. 1104 VALUE UNITS 0 00000000 5.0 ^F RETIME ROUTING SPTHYS 40.0 99.0 dF dF LOWLIM HIGHLIM 250.0 1200.0 min NAME LOWLIM HIGHLIM Primary Inlet Size (Inlet Diameter): Units Inches Range 0.0 to 24.0 Default Value 6.0 → INLET AREA — The Inlet Area configuration is used if the terminal has an oval or rectangular inlet. The Primary Inlet Size configuration is used for round inlets. The zone controller will use the larger value for demand weighting if both values are configured. If both inlet size and inlet area are zero, then the damper will not be included in the average demand calculations. Inlet Area: Units Square Inches Range 0.0 to 500.0 Default Value 0.0 DAMPER LOOP PARAMETERS — The loop gains and start value define how the terminal will respond to deviations in measured temperature in order control to the damper position. The Proportional Gain is calculated each time the airflow is compared to the active airflow set point. As the error from set point goes to zero, the proportional term will also go to zero. The Integral Gain is a running summation of all integral terms since the loop started. This has the effect of trimming off any offset from the set point which might occur, if only the proportional term existed. Normally a proportional loop with no integral term would require frequent adjustments of the starting value to eliminate the offset as static pressure and other conditions change. The derivative gain tends to nullify or accelerate the changes in the proportional gain depending on the size of the error from the set point. This allows the damper to respond faster and more efficiently to accurately maintain the space temperature set points. The Start Value is the initial value that is then modified by the error terms of the PID calculation. Damper Loop Parameters Proportional Gain:Range 00.0 to 99.9 Default Value 10.0 Integral Gain: Range 00.0 to 99.0 Default Value 2.5 Derivative Gain: Range 00.0 Default Value 4.0 Start Value: Units % Range 0 to 100 Default Value 40 CLOCKWISE ROTATION — This configuration is used to define what effect a clockwise rotation of the actuator will have on the damper. If the actuator rotates clockwise to closed position, the configuration should be set to Close. If the actuator rotates clockwise to open, the configuration should be set to open. This configuration is used to change the rotation of the actuator so that the damper transducer calibration will work properly. The actuator does not have to be re-installed nor any switches changed to reverse the action. Clockwise Rotation: Range Close/Open Default Value Close 30 → Table 6 — Terminal Service Configuration Table DESCRIPTION COOLING Terminal Type 1 = Single Duct 2 = Parallel Fan 3 = Series Fan Primary Inlet Size Inlet Diameter (Inches) Inlet Area (Sq. In.) Damper PID Proportional Gain Integral Gain Derivative Gain Starting Value CW Rotation HEATING Heat Type 0 = None 2 = Two Position 3 = Staged Electric 4 = Modulating/CV 5 = Combination Heating PID Proportional Integral Gain Derivative Gain Starting Value Ducted Heat Maximum Temperature # Electric Heat Stages Heat On Delay Fan Off Delay 2-Pos Heat Logic System Call for Heat? Supp. Heat Lockout Temp. System Pilot Averaging 0 = System Pilot only 1 = with one T55 2 = with four T55s 3 = with nine T55s SPT Sensor Trim SAT Sensor Trim Local SAT Installed Remote Contact Config VALUE UNITS 1 TERMTYPE 6.0 0.0 10.0 2.5 4.0 40.0 Close RNDSZ SQA % KP KI KD STARTVAL DMPDIR 0 HEATTYPE 10.0 0.5 0.0 80.0 Yes 110 3 2 2 Normal Yes 140.0 0 KP KI KD STARTVAL DUCTHEAT MAXTEMP STAGES HONDEL FNOFFD HEATYPE HEATCALL SHL_TEMP SENS_AVG 0.0 0.0 Yes Close 31 NAME dF dF min min dF ^F ^F SPTTRIM SATTRIM LOC_SAT RMTCFG 1104 heat is deactivated (in a parallel terminal) until the parallel fan is deactivated. This allows the fan to circulate air and remove the residual heat from the heat source. Fan Off Delay: Units minutes Range 1 to 15 Default Value 2 TWO-POSITION HEAT LOGIC — This configuration is used for controlling a normally closed or normally open valve for hot water. Use normal logic if the valve is normally closed. Use inverted logic if the valve is normally open. Two Position Heat Logic: Range Normal/Invert Default Value Normal SYSTEM CALL FOR HEAT? — This decision is used whenever auxiliary heat is available and can handle the heat load for the zone without calling the system for heat. This prevents the entire building from going to heat for one cold room. Configure this decision to No when this zone should not be allowed to call the air source for heat. System Call For Heat: Range No/Yes Default Value Yes SUPPLEMENTAL HEAT LOCKOUT TEMP — This configuration is the temperature setting that is compared to the outside air temperature to make a determination if supplemental heat at the zone will be allowed to operate. Supplemental Heat Lockout Temp: Units F Range –40.0 to 140 F Default 140 SYSTEM PILOT AVERAGING — This configuration determines how multiple sensors are averaged with the System Pilot. A 0 equals System Pilot only. A 1 equals with one T55 sensor. A 2 equals with four T55 sensors. A 3 equals with nine T55 sensors. System Pilot Averaging: Range 0-3 Default Value 0 SPACE TEMPERATURE TRIM — This configuration is used to trim a space sensor which might need calibration. For example, if the temperature displayed is two degrees above the value measured with calibrated test equipment, input a value of –2.0. System Pilot Trim: Units delta F (delta C) Range –9.9 to 9.9 Default Value 0.0 SUPPLY AIR TEMPERATURE TRIM — This configuration is used to trim a supply air sensor which might need calibration. For example, if the temperature displayed is two degrees above the value measured with calibrated test equipment, input a value of –2.0. Supply Air Temperature Trim: Units delta F (delta C) Range –9.9 to 9.9 Default Value 0.0 LOCAL SAT INSTALLED — This configuration tells the zone controller if a local SAT sensor is installed. When configured as “Yes”, the zone controller will use this information to determine if the local SAT sensor has failed or is out of range and has sensed an alarm. When configured to “No”, the SAT point will read 0.0° F and the SAT alarm condition will be cleared. Local SAT Installed: Range No/Yes Default Yes HEAT TYPE — This configuration is used to define the type of heat installed on the terminal. A 0 or 1 is equal to None. A 2 is equal to Two Position. A 3 is equal to Staged Electric. A 4 is equal to Modulating/CV. A 5 is equal to combination. Heat Type: Range 0 to 5 Default Value 0 HEATING LOOP PARAMETERS — The heating loop gains and start value define how the terminal will respond to deviations in measured space temperature in order to control to the heat set point. The Proportional Gain is calculated each time the space temperature is compared to the heat set point. As the error from set point goes to zero, the Proportional Gain will also go to zero. The Integral Gain is a running summation of all integral terms since the loop started. This has the affect of trimming off any offset from set point which might occur if only the Proportional Gain existed. Normally a proportional loop with no Integral Gain would require frequent adjustments of the starting value to eliminate the offset as loading conditions on the room change. The Derivative Gain is not needed. This term tends to nullify large changes in the Proportional Gain for dampened response. The Start Value is the initial value that is then modified by the Error terms of the PID calculation. Heating Loop Parameters Proportional Gain: Range 00.0 to 99.9 Default Value 8.0 Integral Gain: Range Default Value 00.0 to 99.0 3.0 Derivative Gain: Range 00.0 Default Value 0.0 Start Value: Units F (C) Range 40 to 125 Default Value 80 DUCTED HEAT — The Ducted Heat configuration is used to configure the terminal for ducted heat. If a local heat source is in the duct and requires airflow to provide heat, set the Ducted Heat configuration for yes. Ducted Heat: Range No/Yes Default Value Yes MAXIMUM TEMPERATURE — This configuration is used to configure the maximum supply-air temperature desirable for heating the space. This will cause the heat to be modulated or cycled using this value as the maximum temperature of the air to be supplied. Maximum Temperature: Units F (C) Range 40 to 200 Default Value 110 NUMBER OF ELECTRIC STAGES — This configuration is used to define the number of stages of electric heat controlled by the zone controller. Number of Electric Stages: Range 1 to 3 Default Value 1 HEAT ON DELAY — The Heat On Delay configuration is used to define a delay from the time a parallel terminal fan is started until the heat is activated. Heat On Delay: Units minutes Range 1 to 60 Default Value 2 FAN OFF DELAY — The Fan Off Delay configuration is used to define a delay time. The delay time is from when the 32 Holiday Configuration Table — The Holiday Con- REMOTE CONTACT CONFIG — The remote timeclock contact input can be configured as a normally open or normally closed contact. When the timeclock input is ‘On’ the zone will follow it’s local occupancy schedule. When the timeclock input is ‘Off’ the zone will be forced into unoccupied state. Remote Contact Config: Range Close/Open Default Value Close figuration Table (HOLDYxxS) contains decisions used to configure the start date and duration of holidays. See Table 8. START MONTH — The start month is the month in which the holiday starts. Months are represented by numbers with 1 representing January, 2 February, up to 12. Start Month: Range 1 to 12 Default Value 1 START DAY — The start day is the day on which the holiday will start. Start Day: Range 1 to 31 Default Value 1 DURATION — Length of time, in days, that the holiday will last. Duration: Range 0 to 365 Default Value 0 Damper Service Configuration Table — The Damper Service Configuration Table (DAMPER) contains decisions used to configure the damper minimum, maximum and ventilation positions. See Table 7. COOL MINIMUM POSITION — This configuration is the minimum damper position the terminal will control to when the equipment mode is Cooling (or Fan Only), or free cooling and the space requirements for cooling are at a minimum. Cool Minimum Position: Units % Range 0 to 100 Default Value 0 COOL MAXIMUM POSITION — This configuration is the maximum damper position the terminal will control to when the equipment mode is cooling (or fan only), or free cooling and the space requirements for cooling are at a maximum. Cool Maximum Position: Units % Range 0 to 100 Default Value 100 REHEAT MINIMUM POSITION — This configuration is for single duct units with ducted reheat. Configure the desired damper position at which the reheat will provide optimum performance. This value is compared to the Minimum Cool value and the greater of the two values is used to determine the damper position. Reheat Minimum Position: Units % Range 0 to 100 Default Value 0 HEAT MINIMUM POSITION — This configuration is the Minimum damper position the terminal will control to when the equipment mode is Warm-Up or Heat. If the terminal is not configured for VAV central heating this is the only position the terminal will control to for these equipment modes. Heat Minimum Position: Units % Range 0 to 100 Default Value 0 HEAT MAXIMUM POSITION — This configuration is used to configure the maximum damper position at which the zone controller will operate if VAV central heat is configured to yes. If the equipment mode is Heat or Warm-Up and the demand in the space is for heat the zone controller will calculate the proper damper position needed to achieve space temperature set point, operating between the Heat Min and Heat Max. Heat Maximum Position: Units % Range 0 to 100 Default Value 100 VENTILATION POSITION — This configuration is used to specify the ventilation damper position the terminal will control to when the air source operating mode is VENT. Ventilation Position: Units % Range 0 to 100 Default Value 30 Linkage Configuration Table — The Linkage Configuration Table (LINKAGE) contains decisions used to configure the linkage coordinator zone controller's linkage settings. This is where the linkage coordinator zone controller, the air source and the bypass controller options are configured. It also includes Carrier Network Function Configuration used for collecting data from multiple controllers and finding the high, low or average value and transferring the data to another controller. This table is also used to setup Temperature Sensor Grouping, which is the sharing of one space temperature sensor among multiple zone controllers. See Table 9. LINKAGE MASTER ZONE — This decision defines if the zone controller will function as a Linkage Coordinator (Linkage Master) for itself and other zones. If the zone controller is to use a supply air sensor for stand-alone operation, this configuration must be configured to No and the number of Zones to 1. If the zone controller will use its primary air sensor to determine the air handler mode for a number of zone controllers, configure this configuration to Yes, input the number of zones, and leave the air source decisions at the default values of zero. If this zone controller will communicate linkage information with an air source, configure this configuration to Yes. The number of zones must be configured and the address of the air source entered. Linkage Master Zone: Range Yes/No Default Value No NUMBER OF ZONES — This decision defines the number of zone controllers (including itself) for the Linkage Coordinator to scan and include as part of the average temperature, set points, and occupancy information to the air source. The address of the zone controller functioning as a Linkage Coordinator must be larger than the number of zones configured. The zone controller will scan addresses less than its own, including information for as many zones as are configured. Other zone controller configured as linkage coordinators will also be included, so it is possible to have zones scanned by more than one linkage coordinator. Therefore care must be taken in addressing to prevent overlapping systems, unless overlapping systems is necessary. In large buildings the use of bridges and multiple busses is recommended to improve communication and provide system differentiation. Number of Zones: Range 1 to 32 Default Value 1 33 AIR SOURCE BUS AND ELEMENT NUMBER — The Air Source Bus and Element Number configurations define the address of the air source providing conditioned air to the zones controlled by the linkage coordinator. If the address is left at zero, the linkage coordinator will look for a primary air sensor to determine the equipment mode. If no primary air sensor is installed, or the sensor fails, the Linkage Coordinator will default the air source mode to Cooling. Air Source Bus Number: Range Default Value 0 to 239 0 Air Source Element Number: Range Default Value 0 to 239 0 Table 7 — Damper Service Configuration Table DESCRIPTION Cool Minimum Pos Cool Maximum Pos Reheat Minimum Pos Heat Minimum Pos Heat Maximum Pos Ventilation Pos VALUE UNITS 0 100 0 0 100 30 % % % % % % NAME CMINPOS CMAXPOS REMINPOS HMINPOS HMAXPOS VENTPOS Table 8 — Holiday Configuration Table DESCRIPTION VALUE Start Month Start Day Duration UNITS 1 1 0 NAME MONTH DAY DURATION → Table 9 — Linkage Configuration Table DESCRIPTION Zone Linkage Linkage Master Zone Number of Zones Air Source Bus # Air Source Element # System Bypass Exists AST Mode Verification AST Sensor Location 0 = Airsource 1 = Local PAT 2 = Bypass CCN-LINKAGE DATA CCN Variable Name CCN Func Config 0 = None 1 = Average 2 = Low 3 = High Data Transfer Rate CCN Output Point Destination Bus # Destination Element # TEMP SENSOR GROUPING Sensor Mode 1 = Local Sensor 2 = Broadcast 3 = Listen Listen Sensor Config 1 = SPT 2 = SPT & Offset Broadcasting Element # 1104 VALUE UNITS No 1 0 0 Yes No 0 MZENA NSYSTZ ASBUSN ASELEMN SYS_BP AST_CHCK AST_LOC CCNVAR CCNFUNC 0 10 34 NAME min 0 0 DATARATE CCNOUTP DESTBUSN DESTELEN 1 BRD_RECV 1 SENSCFG 1 BRDDEVID Destination Element Number: Units none Range 0-239 (0 = disabled) Default Value 0 TEMP SENSOR GROUPING — Each zone controller has the capability to broadcast the associated space temperature sensor’s data or listen to another controller’s sensor data over the network. All controllers sharing the same sensor must be installed on the same communication bus. There are three configuration decisions that must be configured in order to share sensors. The Temp Sensor Mode is used to specify if a controller will use its own local sensor, broadcast its local sensor, or listen to another controller’s sensor broadcast. The Listen Sensor Config is used to specify if the controller is sharing the space temperature information only or the space temperature and temperature offset slidebar information. The Broadcast Element Number decision is used to specify which controller number a zone will listen for when configured to receive another controller’s broadcast. Temp Sensor Mode: Units none Range 1 = Local Sensor, 2 = Broadcast, 3 = Listen Default Value 1 Listen Sensor Config: Units none Range 1 = SPT, 2 = SPT and offset Default Value 1 Broadcast Element Number: Units None Range 1-239 Default Value 1 SYSTEM BYPASS EXISTS — This decision is used to tell the linkage coordinator that an optional bypass controller does or does not exist in this system. If this decision is set to Yes, the linkage coordinator will attempt to communicate with a bypass controller whose address must be one higher than the linkage coordinator. If this decision is set to No, the linkage coordinator will not attempt to communicate with a bypass controller. System Bypass Exists: Range Yes/No Default Value Yes → AST MODE VERIFICATION — This decision is used to tell the linkage coordinator whether or not to qualify the mode sent to it by comparing the air source supply air temperature value to space temperature to ensure the air source is discharging an appropriate supply air temperature for the current heat/cool mode. If heating is required but the supply air temperature is too cool for heating, the zone controller will act as if the air source mode is cool rather than heat. AST Mode Verification: Range Yes/No Default Value No → AST SENSOR LOCATION — This decision is used to specify where the air source supply air temperature sensor is located. It may be located at the air source, at the bypass controller, or there may be an optional primary air temperature sensor (PAT) installed in the primary air duct. AST Sensor Location: Units none Range 0 = air source, 1 = local PAT, 2 = bypass Default Value 0 CCN LINKAGE DATA — A zone controller configured as a linkage coordinator has the ability to poll its linked zones and collect the high, low or average value of any variable within its linked zones. Once the high, low or average is determined, the linkage coordinator can then transfer that value to a configured bus number, element number and point name. Typically this feature is used to determine a system’s highest indoor air quality reading. In order to utilize this feature the CCN Variable Name being collected from the linked zones must be supplied. The data transfer rate must be specified and whether the high, low, or average value is being determined. After the value has been determined, a valid point name and communication bus address to transfer the value to must be entered. CCN Variable Name: Units ASCII (8 Characters) Range A-Z, 0-9 Default Value (blank) CCN Function Config: Units none Range 0 = none, 1 = average, 2 = low, 3 = high Default Value 3 Data Transfer Rate: Units minutes Range 1-15 Default Value 10 CCN Output Point: Units ASCII (8 Characters) Range A-Z, 0-9 Default Value (blank) Destination Bus Number: Units none Range 0-239 Default Value 0 Language Configuration Table — The Language Configuration table (LNGCONF) is used to select the display language that will be seen on all user interfaces for this controller. By default, the zone controller displays information in English. To change to a second language display, set this decision to No, download this table and then upload the zone controller to see the factory-loaded second language. If a second language is not available in this module, this decision will be disregarded and information will continue to be displayed in English. English Language: Range No/Yes Default Value Yes Master (Linkage Coordinator) Service Configuration Table — The Master (Linkage Coordinator) Service Configuration Table (MASTER) contains decisions used by the linkage coordinator zone controller to determine the system demand mode (heat/cool/vent). See Table 10. COOL START AVERAGE DEMAND — This decision is used to configure the minimum average cooling demand that must be met before the system will start in cooling mode if no mode is currently active. NOTE: If there is also an average heating demand, and it is also greater than its configured minimum average heating demand (Heat Start Avg. Demand), then the mode with the greater demand will be selected. If both heating and cooling average demand are exactly the same then the mode with the greatest individual zone demand will determine the starting system mode. Cool Start Average Demand: Units delta F (C) Range 0.5 to 5.0 Default Value 0.7 35 1104 Table 10 — Master Service Configuration Table DESCRIPTION Cool Start Avg. Demand Cool Mode Hysteresis Heat Start Avg. Demand Heat Mode Hysteresis System Mode Reselect Cool Time Guard Timer Heat Time Guard Timer Cont. Fan When Occ? Heat Mode Lockout Setp Cool Mode Lockout Setp VALUE 0.7 0.7 0.7 0.7 30 0 0 Yes 140.0 –40.0 UNITS ^F ^F ^F ^F min min min dF dF NAME CSA_DMD C_HYST HSA_DMD H_HYST RESELECT C_MOD_TG H_MOD_TG FAN_MODE HLO_SPT CLO_SPT HEAT TIME GUARD TIMER — This decision is used to configure the minimum time that the heating mode must be active before a mode change can take effect. The Heat Time Guard Timer becomes active whenever the heating mode goes into effect. Heat Time Guard Timer: Units minutes Range 0 to 255 Default Value 0 CONT. FAN WHEN OCC — This decision is used to configure the air source fan to go On whenever the zone is in an occupied mode. If this decision is set to No, the fan will cycle on and off during occupied modes in order to maintain set point. Cont. Fan When Occ: Range No/Yes Default Value Yes HEAT MODE LOCKOUT SET POINT — This decision is used to lock out the heating mode by comparing this value to outdoor air temperature. If the outdoor air temperature reading is valid and greater than this value then the heating mode will be locked out. If outdoor air temperature drops 3 degrees below the Heat Mode Lockout Set Point, the lockout is cancelled. This 3-degree hysteresis is fixed. Heat Mode Lockout Set Point: Units F (C) Range –40.0 to 140.0 (140 = disable) Default Value 140 COOL MODE LOCKOUT SET POINT — This decision is used to lock out the cooling mode by comparing this value to outdoor air temperature. If the outdoor air temperature reading is valid and less than this value then the cooling mode will be locked out. If outdoor air temperature raises 3 degrees above the Cool Mode Lockout Set Point, the lockout is cancelled. This 3-degree hysteresis is fixed. Cool Mode Lockout Set Point: Units F (C) Range –40.0 to 140.0 (–40 = disable) Default Value –40 COOL MODE HYSTERESIS — This decision is used to configure the hysteresis that will be used to determine when the cooling mode will end. The cooling mode ends when the average cooling demand drops below the minimum average demand minus the hysteresis: (average cooling demand < Cool Start Avg. Demand — Cool Mode Hysteresis) Cool Mode Hysteresis: Units delta F (C) Range 0.5 to 5.0 Default Value 0.7 HEAT START AVERAGE DEMAND — This decision is used to configure the minimum average heating demand that must be met before the system will start in heating mode if no mode is currently active. NOTE: If there is also an average cooling demand, and it is also greater than its configured minimum average cooling demand (Cool Start Avg. Demand), then the mode with the greater demand will be selected. If both heating and cooling average demand are exactly the same then the mode with the greatest individual zone demand will determine the starting system mode. Heat Start Average Demand: Units delta F (C) Range 0.5 to 5.0 Default Value 0.7 HEAT MODE HYSTERESIS — This decision is used to configure the hysteresis that will be used to determine when the heating mode will end. The heating mode ends when the average heating demand gets below the minimum average demand minus the hysteresis: (average heating demand < Heat Start Avg. Demand - Heat Mode Hysteresis) Heat Mode Hysteresis: Units delta F (C) Range 0.5 to 5.0 Default Value 0.7 SYSTEM MODE RESELECT — This decision is used to configure the minimum time that must elapse before a mode change can take effect. System Mode Reselect: Units minutes Range 0 to 255 Default Value 30 COOL TIME GUARD TIMER — This decision is used to configure the minimum time that the cooling mode must be active before a mode change can take effect. The Cool Time Guard Timer becomes active whenever the cooling mode goes into effect. Cool Time Guard Timer: Units minutes Range 0 to 255 Default Value 0 Time Schedule Configuration Table — The Time Schedule Configuration Table (OCCDEFCS) contains decisions used to configure the zone controller’s occupancy schedule. For flexibility of scheduling, the occupancy configuration is broken into eight separate periods. See Table 11. MANUAL OVERRIDE HOURS — The Manual Override Hours decision is used to command a timed override by entering the number of hours the override will be in effect. If the occupancy schedule is occupied when this number is downloaded, the current occupancy period will be extended by the number of hours downloaded. 36 If the current occupancy period is unoccupied when the occupancy override is initiated, the mode will change to occupied for the duration of the number of hours downloaded. If the occupancy override will end after the start of the next occupancy period, the mode will transition from occupancy override to occupied without becoming unoccupied, and the occupancy override timer will be reset. An active occupancy override or a pending occupancy override may be canceled by downloading a zero to this configuration. Once a number other than zero has been downloaded to this configuration any subsequent downloads of any value other than zero will be ignored by the zone controller. Manual Override Hours: Units hours Range 0 to 4 Default Value 0 OCCUPANCY SCHEDULING — For flexibility of scheduling, the occupancy programming is broken into eight separate periods. For each period the scheduling, the active days of the week, occupied start time, and occupied stop time needs to be configured. DAY OF WEEK — This configuration consists of eight fields corresponding to the seven days of the week and a holiday field in the following order: Monday, Tuesday, Wednesday, Thursday, Friday, Saturday, Sunday, Holiday. A separate configuration screen is used. If a 1 is configured in the corresponding place for a certain day of the week, the related “Occupied from” and “Occupied to” times for that period will take effect on that day of the week. If a 1 is placed in the holiday field the related times will take effect on a day configured as a holiday. A zero means the schedule period will not apply to that day. Period (1-8): Day of Week: Range 0 or 1 Default Values 11111111 for period 1, 00000000 for periods 2-8. OCCUPIED FROM — This field is used to configure the hour and minute, in military time, when the mode for the zone controller becomes occupied. Period (1-8): Occupied from: Units Hours: Minutes Range 00:00 to 24:00 Default Value 00:00 OCCUPIED TO — This field is used to configure the hour and minute, in military time, when the occupied mode for the zone controller becomes unoccupied. Period (1-8): Occupied from: Units Hours: Minutes Range 00:00 to 24:00 Default Value 24:00 GLOBAL SCHEDULE MASTER — The Global Schedule Master configuration allows the Occupancy Schedule to be used as a Global Schedule Master (Occupancy Schedules 65-99). Global Schedule Master: Range No/Yes Default Value No → OVERRIDE — The Override parameter is used to configure the number of hours and minutes the override will be in effect. The user initiates override by pressing the override button on the space temperature sensor. This will cause the schedule to enter into the Occupied mode. If global scheduling is used, all zones using the global schedule will enter Occupied mode. Pushing the override button during Occupied mode will have no effect. If the occupancy override is due to end after the start of the next occupancy period, the mode will transition from occupancy override to occupied without becoming unoccupied, and the occupancy override timer will be reset. NOTE: If using the tenant billing function, the override hours set point must be configured between 1 and 3 hours. Override: Units Hours: Minutes Range 00:00 to 24:00 Default Value 00:00 SET POINT GROUP NUMBER — The Set Point Group Number is used to define the current zone controller as a part of a group of zone controllers which share the same set points. All zone controllers with the same Set Point Group Number will have the same set points. The set points are broadcast to the group by the zone controller defined by the Global Set Point Master configuration. A value of 0 is a local schedule. Values 1 to 16 are used for global scheduling. Set Point Group Number: Range 0 to 16 Default Value 0 GLOBAL SET POINT MASTER — This configuration defines if the current zone controller will broadcast its set point values to the other zone controllers which are made part of the same group by configuring the Set Point Group Number. Global Set Point Master: Range No/Yes Default Value No MAXIMUM OFFSET ADJUSTMENT — This configuration determines the maximum amount that the set point will be biased (up or down), by adjusting the slide bar on the space temperature sensor (if installed). Maximum Offset Adjustment: Units delta F (delta C) Range 0 to 15 Default Value 2 BROADCAST ACKNOWLEDGER — This configuration defines if the zone controller will be used to acknowledge broadcast messages on the communication bus. One broadcast acknowledger is required per bus, including secondary busses created by the use of a bridge. Broadcast Acknowledger: Range No/Yes Default Value No LOADSHED FUNCTION GROUP NUMBER — This decision is used to assign the number that the loadshed function will use when transmitting alerts and commands to differentiate this loadshed group from any other loadshed group in the network. The loadshed algorithm is disabled if the value 0 is entered in this decision. Loadshed Function Group Number: Range 0 to 16 Default Value 0 Option Service Configuration Table — The Option Service Configuration Table (OPTIONS) contains decisions used to configure the service options of the zone controller. This includes such things as whether the zone controller is a global schedule master, a global set point master, a broadcast acknowledger, and whether it will be using demand control ventilation. This is also where loadshed parameters are configured. See Table 12. OCCUPANCY SCHEDULE NUMBER — The Occupancy Schedule Number defines what Occupancy schedule the zone controller will use. Occupancy Schedule 64 is a local schedule. Occupancy Schedules 65 to 99 are global schedules. Occupancy Schedule Number: Range 64 to 99 Default Value 64 37 1104 Table 11 — Time Schedule Configuration Table DESCRIPTION Manual Override Hours Period 1 DOW (MTWTFSSH) Occupied from Occupied to Period 2 DOW (MTWTFSSH) Occupied from Occupied to Period 3 DOW (MTWTFSSH) Occupied from Occupied to Period 4 DOW (MTWTFSSH) Occupied from Occupied to Period 5 DOW (MTWTFSSH) Occupied from Occupied to Period 6 DOW (MTWTFSSH) Occupied from Occupied to Period 7 DOW (MTWTFSSH) Occupied from Occupied to Period 8 DOW (MTWTFSSH) Occupied from Occupied to VALUE 0 11111111 00:00 24:00 00000000 00:00 24:00 00000000 00:00 24:00 00000000 00:00 24:00 00000000 00:00 24:00 00000000 00:00 24:00 00000000 00:00 24:00 00000000 00:00 24:00 UNITS hours NAME OVRD DOW1 OCC1 UNOCC1 DOW2 OCC2 UNOCC2 DOW3 OCC3 UNOCC3 DOW4 OCC4 UNOCC4 DOW5 OCC5 UNOCC5 DOW6 OCC6 UNOCC6 DOW7 OCC7 UNOCC7 DOW8 OCC8 UNOCC8 → Table 12 — Option Service Configuration Table DESCRIPTION Occupancy Schedule # Global Schedule Master Override (Hours: Minutes) VALUE Setpoint Group # Global Setpoint Master Maximum Offset Adjust Broadcast Acknowledger Loadshed Function Group Number Loadshed Offset Adjust Maximum Loadshed Time Control Options 0 = None 1 = RH (Monitor Only) 2 = DCV Demand Ctrl Ventilation Proportional Gain Integral Gain Maximum Output Value DCV Low Voltage DCV High Voltage DCV Low Ref (ppm) DCV High Ref (ppm) 1104 UNITS 64 No 00:00 0 No 2.0 No 0 2.0 60 0 0.10 0.03 100.0 0.0 10.0 0 2000 38 ^F NAME SCH_NUM GS_MAST OVR SET_NUM SET_MAS SET_LIMT BROACK ^F min LDSGRPN LOADLIMT MAXSHED CTLOPT % Volts Volts KP KI MAXOUT DCVINLO DCVINHI DCVLO DCVHI DCV LOW REF (PPM) — This decision is used to define the value in parts per million that correlate to the low voltage reading from the demand control ventilation sensor. DCV Low Ref (ppm): Units ppm Range 0 to 5000 Default Value 0 DCV HIGH REF (PPM) — This decision is used to define the value in parts per million that correlate to the high voltage reading from the demand control ventilation sensor. DCV High Ref (ppm): Units ppm Range 0 to 5000 Default Value 2000 LOADSHED OFFSET ADJUST — This decision is used to configure an amount by which the Occupied Heating and Occupied Cooling set points will be relaxed in response to a redline broadcast. The zone controller responds to a loadshed event similar to a redline event, if the loadshed command is preceded by a redline event. Specifically, if the unit is already in redline when the loadshed command is received, the zone controller will drop one stage of heat if heating, provided there is more than one stage available. If the unit is in cooling, the zone controller uses the Loadshed Offset Adjust to raise the cooling set point, if raising the sepoint by this amount will cause the space to be satisfied. Also, if the system experiences a loadshed event while not in redline, it will treat the event as a redline event and raise or lower the cooling and heating set points by the amount configured in this decision. Loadshed Offset Adjustment: Units delta F (delta C) Range 0 to 15 Default Value 2 MAXIMUM LOADSHED TIME — This decision is used to specify the maximum amount of time that a redline or loadshed event may affect this zone. A timer starts at the beginning of the event and automatically terminates the event after this configurable time limit. Override: Units Minutes Range 0 to 240 Default Value 60 CONTROL OPTIONS — The Control Options configuration determines whether the zone controller will use a humidity sensor or an indoor air quality sensor. A configuration of 0 means no sensors are used. A configuration of 1 means a Humidity Sensor is used. A configuration of 2 means an IAQ Sensor is used. Control Options: Range 0 to 2 Default Value 0 DEMAND CONTROL VENTILATION — These configuration values define the calculation parameters for determining the airflow needed for demand control ventilation (DCV). The Maximum Output Value is measured in percentage of nominal terminal cfm. Proportional Gain: Range 0.0 to 9.99 Default Value 0.10 Integral Gain: Range 0.00 to 9.99 Default Value 0.03 Set Point Configuration Table — The Set Point Configuration Table (SETPOINT) contains decisions used to configure the zone controller's occupied and unoccupied heat and cool set points. It is also used to configure the demand control ventilation set point in parts per million (ppm). See Table 13. OCCUPIED HEAT — The Occupied Heat set point is used to configure the heating set point for the zone controller during Occupied mode. Occupied Heat: Units F (C) Range 40.0 to 90.0 Default Value 70.0 OCCUPIED COOL — The Occupied Cool set point is used to configure the cooling set point for the zone controller during Occupied mode. Occupied Cool: Units F (C) Range 45.0 to 99.9 Default Value 74.0 UNOCCUPIED HEAT — The Unoccupied Heat set point is used to configure the heating set point for the zone controller during Unoccupied mode. Unoccupied Heat: Units F (C) Range 40.0 to 90.0 Default Value 55.0 UNOCCUPIED COOL — The Unoccupied Cool set point is used to configure the cooling set point for the zone controller during Unoccupied mode. Unoccupied Cool: Units F (C) Range 45.0 to 99.9 Default Value 90.0 DEMAND VENT (PPM) — This decision is used to configure the ventilation set point for the zone controller if optional Demand Control Ventilation support is used. Demand Vent: Units ppm Range 0 to 5000 Default Value 850 Maximum Output Value: Range 0.0 to 100.0% (max cool damper position) Default Value 100.0 DCV LOW VOLTAGE — This decision is used to define the lowest voltage that should be read from the demand control ventilation sensor. DCV Low Voltage: Units volts Range 0 to 10 Default Value 0 DCV HIGH VOLTAGE — This decision is used to define the highest voltage that should be read from the demand control ventilation sensor. DCV High Voltage: Units volts Range 0 to 10 Default Value 10 Table 13 — Set Point Configuration Table DESCRIPTION Setpoints Occupied Heat Occupied Cool Unoccupied Heat Unoccupied Cool Demand Vent (ppm) 39 VALUE 70.0 74.0 55.0 90.0 850 UNITS dF dF dF dF NAME OHSP OCSP UHSP UCSP DCVSP MAINTENANCE TABLES maximum airflow capacities of the zone controllers scanned by the linkage coordinator. Occupied Heat Set Point: Display Units F (C) Display Range 40.0 to 99.9 Network Access Read/Write OCCUPIED COOL SET POINT — This variable displays the weighted average of the occupied cool set point, calculated by the linkage coordinator, from the information received from polling its associated zones. The set points are weighted by the maximum airflow capacities of the zone controllers scanned by the linkage coordinator. Occupied Cool Set Point: Display Units F (C) Display Range 45.0 to 99.9 Network Access Read/Write UNOCCUPIED HEAT SET POINT — This variable displays the weighted average of the unoccupied heat set point, calculated by the linkage coordinator, from the information received from polling its associated zones. The set points are weighted by the maximum airflow capacities of the zone controllers scanned by the linkage coordinator. Unoccupied Heat Set Point: Display Units F (C) Display Range 40.0 to 99.9 Network Access None UNOCCUPIED COOL SET POINT — This variable displays the weighted average of the unoccupied cool set point, calculated by the linkage coordinator, from the information received from polling its associated zones. The set points are weighted by the maximum airflow capacities of the zone controllers scanned by the linkage coordinator. Occupied Cool Set Point: Display Units F (C) Display Range 45.0 to 99.9 Network Access None System Pilot Alternate Maintenance Table — The System Pilot Alternate Maintenance Table (ALT_DISP) displays the current heating/cooling/ventilation mode as well as the damper position. See Table 15. NOTE: This screen can only be viewed using the System Pilot. To view this screen, press the right button on the System Pilot for 5 seconds while at the default zone controller display. This screen cannot be viewed using Carrier network software. DAMPER POSITION — This variable displays the damper position of the zone controller in the system. Damper Position: Display Units % (open) Display Range 0.0 to 100.0 Network Access Read/Write COOLING IN EFFECT — This variable shows if cooling mode is currently in effect in the system. Cooling In Effect: Display Range No/Yes Network Access Read/Write HEATING IN EFFECT — This variable shows if heating mode is currently in effect in the system. Heating In Effect: Display Range No/Yes Network Access Read/Write DCV IN EFFECT — This variable shows if DCV is currently in effect in the system. DCV In Effect: Display Range No/Yes Network Access Read/Write The following sections describe the computer maintenance screens which are used to perform maintenance on the zone controller. The screens shown may be displayed differently when using different Carrier software. System Pilot Maintenance Table — The System Pilot Maintenance Table (SP_MAINT) displays the mode of the zone controller, the controlling set point, the zone’s current space temperature and occupancy status and whether this zone controller is a master. It also displays this zone’s occupied and unoccupied heat and cool set points which the user may alter from this table. This table provides ease of operation using the System Pilot. See Table 14. This screen can be accessed through the maintenance option on the System Pilot or through Carrier network software. TERMINAL MODE — This variable will display the current operating mode of the terminal, if linkage is available, or the mode determined by the linkage coordinator using the primary air sensor, if available. If the primary air sensor has failed or was not installed, the linkage coordinator will assume the default mode of cooling. Operating Mode: Display Range OFF COOL, HEAT, COMMISS, ZONE_BAL, PRESSURE, EVAC, VENT, REHEAT Network Access Read only CONTROLLING SETPOINT — Controlling Setpoint will display either the heating master reference or the cooling master reference depending upon what mode the terminal is in. The display will default to the heating master reference and display the last controlling master reference when in neither heating nor cooling. Controlling Setpoint: Display Units F (C) Display Range: –40 to 245 Network Access: Read only LINKAGE MASTER — This variable displays whether this zone controller functions as the linkage coordinator for itself and other zones. Linkage Master: Display Range No/Yes Network Access Read Only → SPACE TEMPERATURE — Space temperature from 10 kΩ thermistor (Type II) located in the space. The point name of the displayed Space Temperature is “SPACE_T” in this status display table. This point may be forced for diagnostic purposes. A non-displayed variable named SPT also exists within the zone controller as a writeable point for normal operations with a System Pilot or other devices that will write a space temperature to the zone controller. The zone controller verifies that the SPT point is being written to before using it to update the SPACE_T point. Values that are received at the SPT point may be averaged with the hardware space temperature input. Space Temperature: Display Units F (C) Display Range –40.0 to 245.0 Network Access Read/Write OCCUPIED — This variable displays whether the zone controller is operating in the occupied mode. Occupied: Display Range No/Yes Network Access Read Only OCCUPIED HEAT SET POINT — This variable displays the weighted average of the occupied heat set point, calculated by the linkage coordinator, from the information received from polling its associated zones. The set points are weighted by the 1104 40 → Table 14 — System Pilot Maintenance Table DESCRIPTION Terminal Mode Controlling Setpoint Linkage Master (coordinator) Space Temperature Occupied Occupied Heat Setpoint Occupied Cool Setpoint Unoccupied Heat Setpoint Unoccupied Cool Setpoint VALUE HEAT 69.0 Yes 66.0 No 70.0 74.0 55.0 90.0 UNITS STATUS FORCE NAME MODE CNTSP LINKMAST SPACE_T ZONEOCC OHSP OCSP UHSP UCSP FORCE NAME DMPPOS COOLFLAG HEATFLAG DCVFLAG dF dF dF dF dF dF Table 15 — System Pilot Alternate Maintenance Table DESCRIPTION Damper Position Cooling in Effect Heating in Effect DCV in Effect VALUE 0 No Yes No UNITS %OPEN Linkage Maintenance Table — The Linkage Maintenance Table (LINKMNT) displays linkage data for the Linkage Coordinator zone controller. This data includes air source operating mode, air source supply temperature, and all set points and current and occupied temperatures of the reference zone. It also displays composite occupancy data for the linked zones including next occupied day and time, next unoccupied day and time and previous unoccupied day and time. See Table 16. AIR SOURCE BUS NUMBER — This variable will display the bus number of the air source that the zone controller will be communicating Linkage to, if this zone is the Linkage Coordinator. Air Source Bus Number: Range 0 to 239 Network Access None AIR SOURCE ELEMENT NUMBER — This variable will display the Element Address of the Air Source that the zone controller will be communicating Linkage to, if this zone is the Linkage Coordinator. Air Source Element Number: Display Range 1 to 239 Network Access None MASTER ZONE ELEMENT NUMBER — This variable will display the element address of the zone which is the Linkage Coordinator. Master Zone Element Number: Display Range 1 to 239 Network Access Read only OPERATING MODE — This variable will display the current operating mode of the air source, if Linkage is available, or the mode determined by the Linkage Coordinator using the primary air sensor, if available. If the primary air sensor has failed or was not installed, the Linkage Coordinator will assume the default mode of cooling. Operating Mode: Display Range COOLING, HEATING, FREECOOL, PRESSURE, EVAC, OFF Network Access Read only AIR SOURCE SUPPLY TEMPERATURE — This variable displays the supply temperature reading of the air source. Air Source Supply Temperature: Units F (C) Display Range –40 to 245 Network Access None START BIAS TIME — This variable displays the Start Bias Time, in minutes, calculated by the air source. The Start Bias Time is calculated to bring the temperature up or down to the STATUS set point under the optimum start routine. This value will be sent to all associated zones for optimum start of zone controllers. This function is supported by all Carrier equipment which perform linkage. Start Bias Time: Display Units minutes Display Range 0 to 255 Network Access None OCCUPIED HEAT SET POINT — This variable displays the weighted average of the occupied heat set point, calculated by the linkage coordinator, from the information received from polling its associated zones. The set points are weighted by the maximum airflow capacities of the zone controllers scanned by the linkage coordinator. Occupied Heat Set Point: Display Units F (C) Display Range 40.0 to 99.9 Network Access None OCCUPIED COOL SET POINT — This variable displays the weighted average of the occupied cool set point, calculated by the linkage coordinator, from the information received from polling its associated zones. The set points are weighted by the maximum airflow capacities of the zone controllers scanned by the linkage coordinator. Occupied Cool Set Point: Display Units F (C) Display Range 45.0 to 99.9 Network Access None UNOCCUPIED HEAT SET POINT — This variable displays the weighted average of the unoccupied heat set point, calculated by the linkage coordinator, from the information received from polling its associated zones. The set points are weighted by the maximum airflow capacities of the zone controllers scanned by the linkage coordinator. Unoccupied Heat Set Point: Display Units F (C) Display Range 40.0 to 99.9 Network Access None UNOCCUPIED COOL SET POINT — This variable displays the weighted average of the unoccupied cool set point, calculated by the linkage coordinator, from the information received from polling its associated zones. The set points are weighted by the maximum airflow capacities of the zone controllers scanned by the linkage coordinator. Occupied Cool Set Point: Display Units F (C) Display Range 45.0 to 99.9 Network Access None 41 1104 Table 16 — Linkage Maintenance Table DESCRIPTION Zone Linkage Air Source Bus # Air Source Element # Master Zone Element # Operating Mode Air Source Supply Temp Start Bias Time Occ Heat Setpt Occ Cool Setpt Unoc Heat Setpt Unoc Cool Setpt Ref Zone Temp Occ Ref Zone Temp Composite CCN Value Occupancy Status (1 = occ) Next Occupied Day Next Occupied Time Next Unoccupied Day Next Unoccupied Time Prev Unoccupied Day Prev Unoccupied Time VALUE 0 8 118 COOLING 55.0 0 68.0 74.0 64.0 78.0 71.0 71.0 0.0 0 Fri 10:15 UNITS dF min dF dF dF dF dF dF 00:00 Fri 04:01 STATUS FORCE NAME ASBUSNUM ASDEVADR MZDEVADR ASOPMODE ASTEMP STRTBIAS OHS OCS UHS UCS ZT OZT CCCNVAL OCCSTAT NXTOCCD NXTOCCT NXTUNOD NXTUNOT PRVUNOD PRVUNOT NEXT OCCUPIED TIME — This variable displays the time of day when the next associated zone is scheduled to change from unoccupied to occupied mode. This point is read in conjunction with the next occupied day to allow the user to know the next time and day when a zone will become occupied. Next Occupied Time: Display Range 00:00 to 24:00 Network Access None NEXT UNOCCUPIED DAY — This variable displays the day when the next associated zone is scheduled to change from occupied to unoccupied mode. This point is read in conjunction with the next unoccupied time to allow the user to know the next time and day when a zone will become unoccupied. Next Unoccupied Day: Display Range MON, TUE, WED, THU, FRI, SAT, SUN Network Access None NEXT UNOCCUPIED TIME — This variable displays the time of day when the next associated zone is scheduled to change from occupied to unoccupied mode. This point is read in conjunction with the next unoccupied day to allow the user to know the next time and day when a zone will become unoccupied. Next Unoccupied Time: Display Range 00:00 to 24:00 Network Access None PREVIOUS UNOCCUPIED DAY — This variable displays the day when the last associated zone changed from occupied to unoccupied mode. This point is read in conjunction with the previous unoccupied time to allow the user to know the last time and day when a zone became unoccupied. Previous Unoccupied Day: Display Range MON, TUE, WED, THU, FRI, SAT, SUN Network Access None PREVIOUS UNOCCUPIED TIME — This variable displays the time of day when the last associated zone changed from occupied to unoccupied mode. This point is read in conjunction with the previous unoccupied day to allow the user to know the last time and day when a zone became unoccupied. Previous Unoccupied Time: Display Range 00:00 to 24:00 Network Access None REF ZONE TEMPERATURE — This variable displays the weighted average of the space temperatures, collected by the linkage coordinator, from polling its associated zones. The temperatures are weighted by the maximum airflow capacities of the zone controllers scanned by the linkage coordinator. Ref Zone Temperature: Display Units F (C) Display Range –40.0 to 245.0 Network Access Read Only OCCUPIED REF ZONE TEMPERATURE — This variable displays the weighted average of the space temperatures of occupied zones, collected by the linkage coordinator, from polling its associated zones. The temperatures are weighted by the maximum airflow capacities of the zone controllers scanned by the linkage coordinator. Occupied Ref Zone Temperature:Display Units F (C) Display Range –40.0 to 245.0 Network Access Read Only COMPOSITE CCN VALUE — This variable displays the high, low or average of the CCN variable collected from each zone as configured in the Linkage Master (Coordinator) Configuration Screen. The value is sent to the network address and variable specified within that configuration table. Composite CCN Value: Display Range 0 to 65535 Network Access Read Only OCCUPANCY STATUS — This variable displays a “1” when at least one of the associated zone controllers (that are being scanned) is in the occupied mode. Occupancy Status:Display Range 0 or 1 (1 = occupied) Network Access Read only NEXT OCCUPIED DAY — This variable displays the day when the next associated zone is scheduled to change from unoccupied to occupied mode. This point is read in conjunction with the next occupied time to allow the user to know the next time and day when a zone will become occupied. Next Occupied Day: Display Range MON, TUE, WED, THU, FRI, SAT, SUN Network Access None 42 Master Zone Maintenance Table — The Master Zone Heating and Cooling set points. When in unoccupied mode, the demand will be directly related to configured Unoccupied Heating and Cooling set points. The reference zone is re-determined on every scan of the zone controllers which is at a one minute frequency. Reference Zone Demand: Display Range delta 0.00 to 99.9 F Network Access Read only REFERENCE ZONE # — This variable displays the number of the zone whose heating or cooling needs are the greatest at any time and that requires the same mode as the system. For example, if the Desired System Mode is cooling, the Reference Zone # is that mode that has the greatest cooling need. The zones are numbered such that the master zone is zone number 1 and the zone that is one address below the master zone is zone number 2 and so on to zone number 32. If the master zone is at address 0, 118 then zone no. 2 is the zone controller at address 0, 117 and zone no. 3 is the zone controller at address 0, 116 and so on. Reference Zone Number: Display Range 1 to 32 Network Access Read only COOL MODE LOCK OUT — This variable displays whether the system has been locked out of cooling mode. If this decision is forced to Yes, the system may not go into cooling mode regardless of how many zones are calling for cooling. Cool Mode Lock Out: Display Range Yes/No Network Access Read/Write AVERAGE COOL DEMAND — This variable displays the average cooling demand of all occupied linked zones, taking into consideration the size of each zone as configured in the Terminal Service Configuration Table. This is so that the size of a zone will be considered when comparing its demand to other zones. If all zones are unoccupied then all zones will be included in the calculation. Average Cool Demand: Display Range delta 0.00 to 99.9 F Network Access Read Only Maintenance Table (MZNMAINT) displays variables used by the Linkage Coordinator zone controller when determining the system mode (heat/cool/vent). It also indicates whether a bypass controller and an air source are being used and which zone is the reference zone. The user may override cooling or heating time guards from this table. See Table 17. DESIRED SYSTEM MODE — This variable will display the desired operating mode of the air source. Desired Operating Mode: Display Range COOLING, HEATING, FREECOOL, PRESSURE, EVAC, OFF Network Access Read only SYSTEM MODE — This variable will display the current system mode of the air source, if Linkage is available, or the mode determined by the Linkage Coordinator using the primary air sensor, if available. If the primary air sensor has failed or was not installed, the Linkage Coordinator will assume the default mode of cooling. System Mode: Display Range COOLING, HEATING, FREECOOL, PRESSURE, EVAC, OFF Network Access Read only AIR SOURCE DETECTED — This variable displays whether the Linkage Coordinator zone controller has detected a communicating air source at the address configured in the Linkage Configuration Table. Air Source Detected: Display Range Yes/No Network Access Read only BYPASS CONTROLLER — This variable displays whether the Linkage Coordinator zone controller has detected a communicating bypass controller as configured in the Linkage Configuration Table. Bypass Controller: Display Range Yes/No Network Access Read only REFERENCE ZONE DEMAND — This variable displays the demand of the reference zone. When occupied, the demand will be a function of T56 bias and configured Occupied Table 17 — Master Zone Maintenance Table DESCRIPTION Desired System Mode System Mode Air Source Detected? Bypass Controller? Reference Zone Demand Reference Zone # Cool Mode Lock Out? Average Cool Demand Max Cool Demand Max Cool Demand Zone Cooling Time Guard Time Guard Override Heat Mode Lock Out? Average Heat Demand Max Heat Demand Max Heat Demand Zone Heating Time Guard Mode Reselect Time Outdoor Air Temperature VALUE COOLING COOLING Yes No 0.0 0 No 0.0 0.0 0 0.0 No No 0.0 0.0 1 0.0 0.0 0.0 UNITS ^F ^F ^F min ^F ^F min min dF 43 STATUS FORCE NAME NEXTMODE LINKMODE AIRSOURC BYPASS REF_DMD REF_ZONE C_LOCK AVGC_DMD MAXC_DMD MAXCZONE C_TGUARD TG_OVRD H_LOCK AVGH_DMD MAXH_DMD MAXHZONE H_TGUARD RESELECT OAT Max Heat Demand Zone: MAX COOL DEMAND — This variable displays the maximum cooling demand of all occupied linked zones, taking into consideration the size of each zone as configured in the Terminal Service Configuration Table. This is so that the size of the zone will be considered when comparing its demand to other zones. Max Cool Demand: Display Range delta 0.00 to 99.9 F Network Access Read Only MAX COOL DEMAND ZONE — This variable displays the number of the zone that has the weighted maximum cooling demand of all occupied linked zones. If all zones are unoccupied then all zones will be included in the calculation. Max Cool Demand Zone: Display Range 0 to 31 Network Access Read Only COOLING TIME GUARD — This variable displays the remaining time that the cooling mode must be active before a mode change can take effect. The cooling time guard timer becomes active whenever the COOL mode goes into effect. This timer value is configured in the Master Service Configuration Table. Cooling Time Guard: Display Range 0 to 255 minutes Network Access Read Only TIME GUARD OVERRIDE — This variable displays whether there is a time guard override in effect. The override acts as a one time override of any time guard in effect, heating or cooling. NOTE: The time guard override applies to the mode sent to the air source. This is independent of the mode reselect function. Forcing this point to Yes will allow the user to initiate a Time Guard Override. Time Guard Override: Display Range Yes/No Network Access Read/Write HEAT MODE LOCK OUT — This variable displays whether the system has been locked out of heating mode. If this decision is forced to Yes, the system may not go into heating mode regardless of how many zones are calling for heating. Heat Mode Lock Out: Display Range Yes/No Network Access Read/Write AVERAGE HEAT DEMAND — This variable displays the average heating demand of all occupied linked zones, taking into consideration the size of each zone as configured in the Terminal Service Configuration Table. This is so that the size of a zone will be considered when comparing its demand to other zones. If all zones are unoccupied then all zones will be included in the calculation. Average Heat Demand: Display Range delta 0.00 to 99.9 F Network Access Read Only MAX HEAT DEMAND — This variable displays the maximum heating demand of all occupied linked zones, taking into consideration the size of each zone as configured in the Terminal Service Configuration Table. This is so that the size of the zone will be considered when comparing its demand to other zones. Max Heat Demand: Display Range delta 0.00 to 99.9 F Network Access Read Only MAX HEAT DEMAND ZONE — This variable displays the number of the zone that has the weighted maximum heating demand of all occupied linked zones. If all zones are unoccupied then all zones will be included in the calculation. Display Range 0 to 31 Network Access Read Only HEATING TIME GUARD — This variable displays the remaining time that the heating mode must be active before a mode change can take effect. The heating time guard timer becomes active whenever the HEAT mode goes into effect. This timer value is configured in the Master Service Configuration Table. Heating Time Guard: Display Range 0 to 255 minutes Network Access Read Only MODE RESELECT TIME — This variable displays the remaining time that must elapse before the mode change can take effect. The user can override the timer by forcing this value. This timer value is configured in the Master Service Configuration Table. Mode Reselect Time: Display Range 0 to 255 minutes Network Access Read/Write OUTDOOR AIR TEMPERATURE — This variable displays the outdoor air temperature. Outdoor Air Temperature: Display Range –40 to 245 F Network Access Read Only Time Schedule Maintenance Table — The Time Schedule Maintenance Table (OCCDEFME) displays occupancy set points, the occupied mode and whether and override is in progress. See Table 18. MODE — This variable displays the current occupied mode for the zone controller. If the zone controller is following its own local schedule, this is the result of the local schedule status. NOTE: This information only applies to the locally configured occupancy schedule or if the zone controller is configured to be the Global Schedule Master. The information does not apply to a zone if it is following a global schedule. Mode: Display Range 0 or 1 (1 = occupied) Network Access None CURRENT OCCUPIED PERIOD — If the zone controller is configured to determine occupancy locally, this variable will display the current period determining occupancy. Current Occupied Period: Display Range 1 to 8 Network Access None OVERRIDE IN PROGRESS — If an occupancy override is in progress, this variable will display a yes. Override In Progress: Display Range Yes/No Network Access None OVERRIDE DURATION — This variable displays the number of minutes remaining for an occupancy override which is in effect. If the number of override hours was downloaded, the value will be converted to minutes. Override Duration: Display Units minutes Display Range 0 to 240 Network Access None OCCUPIED START TIME — This variable displays the time that the current occupied mode began. Occupied Start Time: Display Range 00:00 to 23:59 Network Access None 44 Table 18 — Time Schedule Maintenance Table DESCRIPTION Mode Current Occupied Period Override in Progress Override Duration Occupied Start Time Unoccupied Start Time Next Occupied Day Next Occupied Time Next Unoccupied Day Next Unoccupied Time Last Unoccupied Day Last Unoccupied Time VALUE 1 2 No 0 08:00 18:00 Thu 00:00 Wed 18:00 00:00 UNITS min NAME MODE PERIOD OVERLAST OVERDURA OCCSTART UNSTART NXTOCCD NXTOCCT NXTUNOD NXTUNOT PRVUNOD PRVUNOT unoccupied day to allow the user to know the next time and day when the zone will become unoccupied. NOTE: If the current mode is unoccupied, this point makes reference to the next unoccupied period and, in most cases, may not be the same as the current unoccupied start time. Next Unoccupied Time: Display Range 00:00 to 24:00 Network Access None LAST UNOCCUPIED DAY — This variable displays the last day when the zone changed from occupied to unoccupied mode. This point is read in conjunction with the last unoccupied time to allow the user to know the last time and day when the zone became unoccupied. Last Unoccupied Day: Display Range MON, TUE, WED, THU, FRI, SAT, SUN Network Access None LAST UNOCCUPIED TIME — This variable displays the last time of day when the zone changed from occupied to unoccupied mode. This point is read in conjunction with the last unoccupied day to allow the user to know the last time and day when a zone became unoccupied. Last Unoccupied Time: Display Range 00:00 to 24:00 Network Access None UNOCCUPIED START TIME — This variable displays the time that the current occupied mode will end (the beginning of the next unoccupied mode). Unoccupied Start Time: Display Range 00:00 to 24:00 Network Access None NEXT OCCUPIED DAY — This variable displays the day when the next occupied period is scheduled to begin. This point is read in conjunction with the next occupied time to allow the user to know the next time and day when the next occupied period will occur. NOTE: If the current mode is occupied, this point makes reference to the next occupied period and, in most cases, may not be the same as the current occupied start time. Next Occupied Day: Display Range MON, TUE, WED, THU, FRI, SAT, SUN Network Access None NEXT OCCUPIED TIME — This variable displays the time of day when the next occupied period will occur. This point is read in conjunction with the next occupied day to allow the user to know the next time and day when the zone will become occupied. NOTE: If the current mode is occupied, this point makes reference to the next occupied period and, in most cases, may not be the same as the current occupied start time. Next Occupied Time: Display Range 00:00 to 24:00 Network Access None NEXT UNOCCUPIED DAY — This variable displays the day when the next unoccupied period is scheduled to begin. This point is read in conjunction with the next unoccupied time to allow the user to know the next time and day when the zone will become unoccupied. NOTE: If the current mode is unoccupied, this point makes reference to the next unoccupied period and, in most cases, may not be the same as the current unoccupied start time. Next Unoccupied Day: Display Range MON, TUE, WED, THU, FRI, SAT, SUN Network Access None NEXT UNOCCUPIED TIME — This variable displays the time of day when the next unoccupied period is scheduled to begin. This point is read in conjunction with the next System Commissioning Maintenance Table — The System Commissioning Maintenance Table (SYSTCOMM) displays and permits the setting of all dampers in the linked system from the Linkage Coordinator zone controller. The bypass controller damper position, system pressure and pressure set point are also displayed and the pressure set point may be altered directly from this table. See Table 19. COMMISSIONING MODE — This variable is used to put the master zone controller into the commissioning mode. Force this point to enable. The Linkage Coordinator zone controller will be ready to accept a command to perform the tests and functions on this screen. The Linkage Coordinator zone controller will go into ZONE_BAL mode. NOTE: If this zone controller is not the Linkage Coordinator, enabling this variable will have no effect. Commissioning Mode: Display Range Disable/Enable Default Value Disable Network Access Read /Write 45 Table 19 — System Commissioning Maintenance Table DESCRIPTION Commissioning Mode Auto-Disable Timer All Zone Dampers to Max All Zone Dampers to Min Position Single Zone Zone 1 Damper Position Zone 2 Damper Position Zone 3 Damper Position Zone 4 Damper Position Zone 5 Damper Position Zone 6 Damper Position Zone 7 Damper Position Zone 8 Damper Position Zone 9 Damper Position Zone 10 Damper Position Zone 11 Damper Position Zone 12 Damper Position Zone 13 Damper Position Zone 14 Damper Position Zone 15 Damper Position Zone 16 Damper Position Zone 17 Damper Position Zone 18 Damper Position Zone 19 Damper Position Zone 20 Damper Position Zone 21 Damper Position Zone 22 Damper Position Zone 23 Damper Position Zone 24 Damper Position Zone 25 Damper Position Zone 26 Damper Position Zone 27 Damper Position Zone 28 Damper Position Zone 29 Damper Position Zone 30 Damper Position Zone 31 Damper Position Zone 32 Damper Position Bypass Damper Position Bypass Pressure Sensor Bypass Pressure Setpoint VALUE Disable 0.0 Disable Disable Disable 0 0 0 0 0 0 0 0 0 0 0 0 0 0 0 0 0 0 0 0 0 0 0 0 0 0 0 0 0 0 0 0 0 0.00 0.00 UNITS Enable/Disable Min Enable/Disable Enable/Disable Enable/Disable %OPEN %OPEN %OPEN %OPEN %OPEN %OPEN %OPEN %OPEN %OPEN %OPEN %OPEN %OPEN %OPEN %OPEN %OPEN %OPEN %OPEN %OPEN %OPEN %OPEN %OPEN %OPEN %OPEN %OPEN %OPEN %OPEN %OPEN %OPEN %OPEN %OPEN %OPEN %OPEN %OPEN in H2O in H2O STATUS FORCE NAME SCMOD SCTIME ZD_MAX ZD_MIN ZD_SING ZD_POS01 ZD_POS02 ZD_POS03 ZD_POS04 ZD_POS05 ZD_POS06 ZD_POS07 ZD_POS08 ZD_POS09 ZD_POS10 ZD_POS11 ZD_POS12 ZD_POS13 ZD_POS14 ZD_POS15 ZD_POS16 ZD_POS17 ZD_POS18 ZD_POS19 ZD_POS20 ZD_POS21 ZD_POS22 ZD_POS23 ZD_POS24 ZD_POS25 ZD_POS26 ZD_POS27 ZD_POS28 ZD_POS29 ZD_POS30 ZD_POS31 ZD_POS32 BDP BPSENS BPSETP NOTE: If this zone controller is not the Linkage Coordinator, enabling this variable will have no effect. All Zone Dampers to Max: Display Range Enable/Disable Network Access Read/Write ALL ZONE DAMPERS TO MIN — This variable displays whether the Linkage Coordinator zone controller has been directed to set all of its linked zone controllers to their configured Cool Minimum Positions (Damper Service Configuration Table). If this decision is forced to Enable, the Linkage Coordinator zone controller will set all system zone dampers to their configured Cool Minimum Positions and display the values in Zone (1-32) Damper Position variables. At this time if any of the Zone (1-32) Damper Position variables are forced, the new position will be written to the zone’s Cool Minimum Position and Heat Minimum Position configuration values and the zone will be repositioned to this new minimum position. NOTE: If this zone controller is not the Linkage Coordinator, enabling this variable will have no effect. All Zone Dampers to Min: Display Range Enable/Disable Network Access Read/Write AUTO DISABLE TIMER — This variable displays the number of minutes remaining before the system commissioning mode will be automatically disabled. System commissioning mode is automatically disabled after one hour of no activity in this table. The Auto Disable Timer is reset each time a value is changed in this table. Auto Disable Timer: Display Range 0 to 60 min Network Access None ALL ZONE DAMPERS TO MAX — This variable displays whether the Linkage Coordinator zone controller has been directed to set all of its linked zone controllers to their configured Cool Maximum Positions (Damper Service Configuration Table). If this decision is forced to Enable, the Linkage Coordinator zone controller will set all system zone dampers to their configured Cool Maximum Positions and display the values in Zone (1-32) Damper Position variables. At this time if any of the Zone (1-32) Damper Position variables are forced, the new position will be written to the zone’s Cool Maximum Position and Heat Maximum Position configuration values and the zone will be repositioned to this new maximum position. 46 POSITION SINGLE ZONE — This variable displays whether the individual zone positioning process has been enabled. If this decision is forced to Enable, the Linkage Coordinator zone controller will set all system zone dampers to their configured Cool Maximum Positions and display the values in Zone (1-32) Damper Position variables. At this time, if any of the Zone (1-32) Damper Position variables are forced, the zone will be repositioned to this new maximum position. The forced position will be shown on the Zone (1-32) Damper Position variable with a Supervisor force. This Supervisor force will disappear and the damper’s current position will display when the new damper position has been broadcasted to the zone controller's Damper Reference point. The Damper Reference point will display a Control force which will remain until System Commissioning is disabled and the Damper Position will go to the new desired position. NOTE: If this zone controller is not the Linkage Coordinator, enabling this variable will have no effect. Position Single Zone: Display Range Enable/Disable Network Access Read/Write ZONE (1-32) DAMPER POSITION — This variable displays the current damper position of all system zones during system commissioning. These values can be used to verify and change configured maximum damper positions when All Zone Dampers to Max is Enabled and verify and change configured minimum damper positions when All Zone Dampers to Min is Enabled. The user can also reposition individual zone’s dampers when Position Single Zone is Enabled. Force this value to the desired minimum or maximum damper position. Zone (1-32) Damper Position: Display Range 0 to 100% Network Access Read/Write BYPASS DAMPER POSITION — This variable displays the bypass damper position. Bypass Damper Position: Display Range 0 to 100% Network Access No BYPASS PRESSURE SENSOR — This variable displays the current value of the bypass static system pressure. Bypass Pressure Sensor: Display Range 0.00 to 2.00 in. wg Network Access No BYPASS PRESSURE SET POINT — This variable displays the current Bypass Pressure set point. At any time in the system commissioning process, the user can force the Bypass Pressure set point. Typically the maximum unit rated duct velocity pressure would be entered in this decision prior to enabling All Zone Dampers to Maximum. When this value is forced, the new set point is written to the Pressure Set Point Table in the bypass controller over the communication network. The bypass controller then controls to the new bypass pressure set point. Bypass Pressure Set Point: Display Range 0.00 to 2.00 in. wg Network Access Read/Write BYPASS COMM STATUS — This variable displays the communication status of the bypass damper controller. NOTE: If the zone controller is not a Linkage Coordinator, the status will be NONE. Bypass Com Status: Display Range Com OK, None, Failed ZONE (1-32) COMM STATUS — This variable displays the communication status of each zone controller. NOTE: If the zone controller is not a Linkage Coordinator, the status will be NONE. Zone (1-32) Comm Status: Display Range Com OK, None, Failed Zone Device Maintenance Table — The Zone Device Maintenance Table (ZDEVMAIN) displays the type of device found at each address in the 3V control system beginning with the device found at the address that is one element higher than the Linkage Coordinator zone controller, decrementing by 1 until the configured number of zones have been checked. This table is only active in the Linkage Coordinator zone controller. See Table 21. BYPASS DEVICE TYPE — This variable displays the type of device found at the location where there is typically a bypass controller. This location is one address higher than the Linkage Coordinator zone controller. Valid displays for this variable are: • None = No device present/com. fail/ pending • Master = Linkage Coordinator found (typically found at ZD_DEV01 only) • Bypass = bypass controller • PDZone = pressure dependent zone • PIZone = pressure independent zone • Other = other Carrier Network device found NOTE: If this zone controller is not a Linkage Coordinator, the value of this display will be None. ZONE (1-32) DEVICE TYPE — This variable displays the type of device found when the master scans zones 1 through n where n is the number of zones (1-32) configured in the Number of Zones decision in the Linkage Configuration Table. The zones are scanned in descending order, beginning with the Linkage Coordinator itself at zone n. Valid displays for this variable are: • None = No device present/com. fail/pending • Master = Linkage Coordinator found (typically found at ZD_DEV01 only) • Bypass = bypass controller • PDZone = pressure dependent zone • PIZone = pressure independent zone • Other = other Carrier Network device found NOTE: If this zone controller is not a Linkage Coordinator, the value of this display will be None. Zone Maintenance Table — The Zone Maintenance Table (ZNMAINT) displays the status of the air source (heating, cooling, ventilation) and the reference values that the zone is using for control. This table also displays whether this zone is the Linkage Coordinator, whether there is an override in effect, and whether there are any loadshed conditions currently in effect. See Table 22. OCCUPIED — This variable displays the current occupied mode for the zone controller. If the zone controller is following its own local schedule, this is the result of the local schedule status. If the zone controller is configured to follow a global schedule, this displays the mode last received from a global schedule broadcast. Occupied: Display Range No/Yes Network Access Read Only LINKAGE ZONE — This variable displays if air source linkage is in effect. Linkage Zone: Display Range No/Yes Network Access Read Only Zone Status Maintenance Table — The Zone Status Maintenance Table (ZCOMAINT) displays the communication status of the air source, the optional bypass controller, and each of the zone controllers in the 3V™ control system. This table is only active in the Linkage Coordinator zone controller. See Table 20. AIR SOURCE STATUS — This variable displays the communication status of the air source. NOTE: If the zone controller is not a Linkage Coordinator, the status will be NONE. Air Source Status: Display Range Com OK, None, Failed 47 Table 20 — Zone Status Maintenance Table DESCRIPTION Air Source Status Bypass Comm Status Zone 1 Comm Status Zone 2 Zone 3 Zone 4 Zone 5 Zone 6 Zone 7 Zone 8 Zone 9 Zone 10 Zone 11 Zone 12 Zone 13 Zone 14 Zone 15 Zone 16 Zone 17 Zone 18 Zone 19 Zone 20 Zone 21 Zone 22 Zone 23 Zone 24 Zone 25 Zone 26 Zone 27 Zone 28 Zone 29 Zone 30 Zone 31 Zone 32 VALUE Failed Failed Com OK None None None None None None None None None None None None None None None None None None None None None None None None None None None None None None None UNITS 48 STATUS FORCE NAME AIRSRCE ZD_CS00 ZD_CS01 ZC_CS02 ZC_CS03 ZC_CS04 ZC_CS05 ZC_CS06 ZC_CS07 ZC_CS08 ZC_CS09 ZC_CS10 ZC_CS11 ZC_CS12 ZC_CS13 ZC_CS14 ZC_CS15 ZC_CS16 ZC_CS17 ZC_CS18 ZC_CS19 ZC_CS20 ZC_CS21 ZC_CS22 ZC_CS23 ZC_CS24 ZC_CS25 ZC_CS26 ZC_CS27 ZC_CS28 ZC_CS29 ZC_CS30 ZC_CS31 ZC_CS32 Table 21 — Zone Device Maintenance Table DESCRIPTION Bypass Device Type Zone 1 Device Type Zone 2 Zone 3 Zone 4 Zone 5 Zone 6 Zone 7 Zone 8 Zone 9 Zone 10 Zone 11 Zone 12 Zone 13 Zone 14 Zone 15 Zone 16 Zone 17 Zone 18 Zone 19 Zone 20 Zone 21 Zone 22 Zone 23 Zone 24 Zone 25 Zone 26 Zone 27 Zone 28 Zone 29 Zone 30 Zone 31 Zone 32 VALUE Bypass Master PD Zone PD Zone None None None None None None None None None None None None None None None None None None None None None None None None None None None None None UNITS STATUS FORCE NAME ZD_DEV00 ZD_DEV01 ZD_DEV02 ZD_DEV03 ZD_DEV04 ZD_DEV05 ZD_DEV06 ZD_DEV07 ZD_DEV08 ZD_DEV09 ZD_DEV10 ZD_DEV11 ZD_DEV12 ZD_DEV13 ZD_DEV14 ZD_DEV15 ZD_DEV16 ZD_DEV17 ZD_DEV18 ZD_DEV19 ZD_DEV20 ZD_DEV21 ZD_DEV22 ZD_DEV23 ZD_DEV24 ZD_DEV25 ZD_DEV26 ZD_DEV27 ZD_DEV28 ZD_DEV29 ZD_DEV30 ZD_DEV31 ZD_DEV32 FORCE NAME ZONE_OCC LINKSLAV LINKMAST TIMOV T56OFF CCMR PDSMR SH_LOCK HCMR HSMR TC_DPOS DCVD COOLFLAG HEATFLAG DCVFLAG CLR_ALRM Table 22 — Zone Maintenance Table DESCRIPTION Occupied Linkage Zone Linkage Master Timed Override in Effect Setpoint Offset (T-56) Cool Master Reference Damper Reference Supp. Heat Lockout Heat Master Reference Heat Submaster Reference Temp Control Position DCV Damper % Cooling in Effect Heating in Effect DCV in Effect Clear Alarms Loadshed Function Redline Loadshed Loadshed Timer VALUE UNITS Yes No Yes No 0.0 74.0 0 No 70.0 110 0 0 No Yes No No No No 0 ^F dF % dF dF % % min 49 STATUS REDLINE LOADSHED LOADTIME Temperature Control Position: Display Units % Display Range 0 to 100 Network Access Read Only DCV DAMPER % — This variable displays the damper set point determined by the demand control ventilation loop calculation. The zone controller compares the demand of the temperature and demand control ventilation loops. The greatest of the two will become the Damper Reference. DCV Damper %: Display Units % Display Range 0 to 100 Network Access Read Only COOLING IN EFFECT — This variable displays if the air source is in the Cooling mode and if the terminal is using the cooling damper set points. Cooling In Effect: Display Range No/Yes Network Access Read Only HEATING IN EFFECT — This variable displays if the air source is in the Heat mode and if the terminal is using the heating damper set points. Heating In Effect: Display Range No/Yes Network Access Read Only DCV IN EFFECT — This variable indicates if the DCV control is active. DCV In Effect: Display Range No/Yes Network Access Read Only CLEAR ALARMS — This variable displays the commanded state of the Clear Alarms function. If this decision is forced to Yes, all alarms in the Alarm History Table will be cleared and this decision will automatically be set back to No. Clear Alarms: Display Range No/Yes Network Access Read/Write LOADSHED FUNCTION REDLINE — This variable displays whether the zone controller is currently participating in a redline event and as a result has relaxed its current set points by the amount configured in the Options Configuration Table. Redline: Display Range No/Yes Network Access Read Only LOADSHED — This variable displays whether the zone controller is currently participating in a loadshed event. If the loadshed event was preceded by a redline event and was in redline when the loadshed command was received, then the zone controller will drop one stage of heat if in heating mode and provided there is more than one stage available. If in cooling mode, the zone controller will raise the cooling set point by the amount configured in the Options Configuration Table, if this will cause the space to be satisfied. Loadshed: Display Range No/Yes Network Access Read Only LOADSHED TIMER — This variable displays the timer that is started during a redline or loadshed event to automatically timeout the event after a user programmable time limit. The time limit is configurable in the Option Service Configuration Table. NOTE: The redline/loadshed response will be automatically cancelled upon termination of the current occupied period. Loadshed Timer: Display Range 0 to 240 min Network Access Read Only LINKAGE MASTER — This variable displays if this zone controller is functioning as a Linkage Coordinator. Linkage Master: Display Range No/Yes Network Access Read Only TIMED OVERRIDE IN EFFECT — This variable indicates if a timed override is in effect. Timed Override in Effect: Display Range No/Yes Network Access Read Only SET POINT OFFSET (T-56) — This variable displays the degrees of offset when using a 33ZCT56SPT space temperature sensor with set point adjustment. The slidebar on the sensor will adjust the desired temperature in that zone, up or down, when it is moved. The Set Point Offset (T-56) variable can disable set point offset (set to 0). Set Point Offset (T-56): Display Units delta F (delta C) Display Range –15.0 to 15.0 Network Access Read/Write COOL MASTER REFERENCE — This variable displays the cooling master reference from the set point schedule. This should be the occupied cool set point when the zone is in occupied mode or the unoccupied cool set point when the zone is in unoccupied mode. This variable will display any space temperature sensor slidebar offset that is being applied. Cool Master Reference: Display Units F (C) Display Range 45.0 to 99.9 Network Access Read/Write DAMPER REFERENCE — This variable displays the current damper reference position. Damper Reference: Display Units % (open) Display Range 0 to 100 Network Access Read/Write SUPPLEMENTAL HEAT LOCKOUT — This variable displays if Supplemental Heat is locked out by the outside air temperature or if forced. If this variable is set to Yes, then Supplemental Heat is locked out. Supplemental Heat Lockout: Display Range No/Yes Default No Network Access Read/Write HEAT MASTER REFERENCE — This point displays the occupied heat set point if occupied, or the unoccupied heat set point if unoccupied. This variable will display any space temperature sensor slidebar offset that is being applied. Heat Master Reference: Display Units F (C) Display Range 40.0 to 90.0 Network Access Read/Write HEAT SUBMASTER REFERENCE — If heat is enabled, this variable displays the desired supply air temperature calculated to heat the space. This is a result of the heating PID loop calculation. Heat Submaster Reference: Display Units F (C) Display Range 0 to 240 Network Access Read/Write TEMPERATURE CONTROL POSITION — This variable displays the airflow set point determined from the temperature loop calculation. The zone controller compares the temperature demand and DCV loops. The greatest of the two will become the primary damper airflow reference. Zone Commissioning Maintenance Table — The Zone Commissioning Maintenance Table (ZONECOMM) displays and permits the setting of damper position for the purpose of damper actuator transducer calibration. It also allows the user to test the fan on series and parallel fan powered terminals and to test the heat outputs. It displays the supply air temperature for the heat test and will display an alarm if the calibration fails. See Table 23. 50 Table 23 — Zone Commissioning Maintenance Table DESCRIPTION Commissioning Mode Damper Cal Fan Override Heating Override Damper Position Supply Air Temperature Damper Cal Status VALUE Disable Disable Disable Disable 10 67.1 Normal UNITS STATUS FORCE %OPEN dF NAME CMODE CALIBRAT FANOVER HEATOVER DMPPOS SAT CAL_ALRM Supply-Air Temperature: COMMISSIONING MODE — This variable is used to put the zone controller into the commissioning mode. Force this point to enable. The zone controller will be ready to accept a command to perform the tests and functions on this screen. NOTE: Commissioning mode will automatically be disabled after one hour. Commissioning Mode: Display Range Disable/Enable Default Value Disable Network Access Read /Write DAMPER ACTUATOR CALIBRATION — The Damper Actuator calibration is the first calibration which should be performed on a newly installed actuator. The zone controller will command the actuator to close and read the feedback potentiometer to determine the zero position of the damper. It will then command the damper to fully open. The zone controller will read the potentiometer to determine the maximum open position. Damper positions from closed to maximum open will be scaled to read 0 to 100% for the damper position. The zone controller will then close the damper and open it once more to zero calibrate the airflow sensor. The entire calibration procedure can take up to 3 minutes. If the damper fails the test or the airflow calibration is unable to be completed, the Auto-Calibration point will indicate an Alarm. Damper Actuator Calibration: Display Range Disable/Enable Default Value Disable Network Access Read /Write FAN OVERRIDE — This variable can be used to test the fan on series and parallel fan powered terminals. Enabling this point will cause the terminal fan to run until this point is disabled or the commissioning mode is ended. Fan Override: Display Range Disable/Enable Default Value Disable Network Access Read /Write HEATING OVERRIDE — This variable can be used to test the heat outputs. Enabling this variable will cause the heat to be modulated or staged to full heat until this point is disabled or the force released. Ducted reheat operation will be controlled so as not to exceed the configured maximum duct temperature. The supply-air temperature is included on this screen to verify that the heat is operating. Heating Override: Display Range Disable/Enable Default Value Disable Network Access Read /Write DAMPER POSITION — This variable displays the current damper position. During CFM Balancing, this variable is used to display the position of the damper. This value can be used to see if the damper is fully open and the system air is sufficient. Damper Position: Display Units % (open) Display Range 0 to 100 Default Value 100 Network Access Read Only SUPPLY-AIR TEMPERATURE — This variable displays the supply-air temperature for ease of verifying the heat operation during the heat test. Display Units F (C) Display Range –40.0 to 245.0 Default Value 0.0 Network Access Read /Write DAMPER CALIBRATION STATUS — This variable will display “Normal” if the actuator and airflow transducer calibrations are successful. If damper or transducer calibration was not successful, this point will display “Alarm” and the zone controller will broadcast the appropriate alarm (if configured to transmit alarms). Damper Calibration Status: Display Range Normal/Alarm Default Value Normal Network Access Read Only OPERATION System Mode Selection — The Linkage Coordinator will determine whether the system as a whole requires heating or cooling and whether the air source will operate in occupied or unoccupied mode. This will be determined by obtaining the heating or cooling needs of each zone and adjusting for the duct size of the zones and calculating an average cool demand (ACD) and average heat demand (AHD) as well as its occupancy mode. The Linkage Coordinator will be the highest addressed zone controller of all zones that are served by the same air source equipment and it will obtain this information when it scans all its associated zones on approximately 1-minute intervals. When using the Occupied Heating Set Point (OHS) or Occupied Cooling Set Point (OCS) the actual configured values will be used including T56 biased offset (if present) as the zone operating set points. The T56 bias is not applied to Unoccupied Heating and Cooling Set Points. Temperature demand will be used to indicate individual zone demand and for accumulating the total weighted average demand for heating and for cooling. If the space temperature (SPT) is greater than the OCS then the zone demand is cooling and the space temperature will be used in the ACD. If the SPT is less than the OHS than the zone demand will be heating and the space temperature will be used in the AHD. If the SPT is between the OHS and OCS, the zone will be considered to have no demand and will not be included in determining the system mode. Only those zones with a valid SPT of greater than –40 F, less than 245 F, and a configured damper size greater than 0 will be included in the calculations. If any zone is occupied then the Linkage Coordinator will calculate the ACD and AHD using only the occupied zones. If no zones are occupied will then the Linkage Coordinator will calculate the ACD and AHD including all zones in the calculation. The zone controller then display the ACD, the Max Cool Demand and Max Cool Demand Zone, the AHD, the Max Heat Demand Max Cool Demand Zone, the Reference Zone Demand and Zone Identification for each demand in the Master Zone maintenance table. 51 air source to be controlled by the demands of the zones and allows the zones to properly respond to the changes in the air source operating modes. Linkage operation in air sources that have Carrier communicating network controls such as 48/50HG, 48/50A, and 48/50Z Product Integrated Controls (PIC) series rooftop units, PremierLink™ control or Universal Controller is supported. Existing air sources that do not have Carrier communicating network controls may be retrofitted with PremierLink or a Universal Controller depending on the equipment type. The designated Linkage Coordinator of each system will be the Linkage Coordinator between the air source and its associated zones. AIR SOURCES THAT SUPPORT LINKAGE — Air sources with PICs or PremierLink controls do not require any configuration settings to establish linkage with the Linkage Coordinator. This is done automatically when the air source bus and element address are configured in the Linkage Coordinator’s LINKAGE configuration table. The linkage information that is supplied to the air source by the Linkage Coordinator is as follows: • Reference zone temperature • Reference zone occupied biased heating and cooling setpoints • Average unoccupied heating and cooling set points of all zones serviced by the air source • Composite occupancy mode The air source will control the equipment based on this information and in return will provide the Linkage Coordinator with the following data: • Operating mode — Cooling, Heating, Free Cool, Pressure, Evacuation or Off • Supply-air temperature This synchronization of data optimizes the efficiency of the air source and the zones to operate at peak system performance at all times. This information can be seen in linkage maintenance tables of the Linkage Coordinator and the air source and is updated at approximately 1-minute intervals. The reference zone temperature that is sent by the Linkage Coordinator will vary depending on the current demand. At times this will be a calculated value instead of an actual value to allow the air source to turn off heating or cooling after the current mode is satisfied or as it makes a transition to a mode. Table 24 defines when these values will be sent and how they are determined. If no mode is currently active, the Linkage Coordinator will determine the mode by first comparing the AHD and the ACD. If only one demand is greater than the start demand (Heat Start Avg. Demand or Cool Start Avg. Demand in the Master [Linkage Coordinator] Service Configuration table), the system will start in that mode. If both average demands are greater than the configured minimum average demand required to begin a mode, then the mode with the greatest demand will be selected. If both heating and cooling average demand are exactly the same then the mode with the greatest individual zone demand will determine the system mode. Once the mode is selected, the information is communicated to its air source via the Linkage Coordinator so that the air source may respond to the requested mode. The Linkage Coordinator also has the capability of locking out the mode based on the outside air temperature (OAT). If the OAT has exceeded the lockout set point for that mode, then the Linkage Coordinator will not request that mode from the air source. There is a fixed 3° F hysteresis on the heating and cooling set points before a mode is re-enabled. Once a mode has begun, the system mode reselect timer is started to monitor the elapsed time of the operating mode. A mode will end when the average demand for that mode drops below the average demand hysteresis for the mode (Heat Mode Hysteresis or Cool Mode Hysteresis in the Master [Linkage Coordinator] Service Configuration table). If a system mode is currently active and the average demand for the opposite mode becomes greater than the current mode average demand, and the opposite mode demand is also greater than the mode Start Avg. Demand for that mode, then the system mode may change but only after the system mode reselect time of the current mode exceeds the configured System Mode Reselect timer value. If these are all true, the system will begin the change to the opposite system mode. This is accomplished by sending information to the air source that ends the current mode. The Linkage Coordinator then waits for the supply-air temperature (SAT) to fall within the ventilation temperature range of 65 to 75 F. Once that occurs, the opposite mode is started. If the mode is dropped due to the reselection criteria above, the algorithm will not permit the original mode to be re-established unless there is sufficient average demand to start the new mode. This is true even if the old mode has once again become the more dominant requirement. Linkage — Linkage is the process used to communicate between the air source (HVAC equipment) and the zone terminals to form a coordinated HVAC system. Linkage allows the Table 24 — Occupied Reference Zone Value SYSTEM OCCUPIED REFERENCE DESIRED MODE ZONE TEMPERATURE (OZT) COOLING OZT = RZSPT OZT = RZHSP HEATING NONE OZT = RZSPT OZT = RZCSP OZT = (RZCSP – RZHSP) + RZCSP OZT = 0 C_FLUSH, H_FLUSH ACD AHD RZSPT RZCSP RZHSP — — — — — OZT = (RZCSP – RZHSP) + RZCSP SYSTEM MODE CONDITION ACD >= Avg Cool Start Demand and system is in Cooling Heating mode has just satisfied (AHD < (Avg Heat Start Demand – Heat Mode Hysteresis)). Fan will continue to run if configured for continuous fan operation AHD >= Avg Heat Start Demand and system is in Heating Cooling mode has just satisfied (ACD < (Avg Cool Start Demand – Cool Mode Hysteresis)). Fan will continue to run if configured for continuous fan operation RZSPT is less then RZCSP and greater than RZHSP. No demand for heat or cool. 1) System in unoccupied modes. 2) System is occupied, there is no demand for heat or cool and fan operation is configured for intermittent. 3) System is occupied and bypass pressure sensor calibration is in progress. System Mode Reselect is in effect and has timed out. The previous mode has ended and system is transitioning to the opposite mode. LEGEND Average Cool Demand Average Heat Demand Reference Zone Space Temperature (actual) Reference Zone Cool Set Point Reference Zone Heat Set Point 52 NON-LINKAGE CONTROLLED AIR SOURCES — In systems with Non–Linkage central air sources or central air sources that do not support Linkage, the zone coordination function of Linkage can still be provided by the Linkage function contained within a Linkage Coordinator. In these cases, the zone configured as the Linkage Coordinator will determine the operational mode of the air source through its bypass controller pressure sensor. Once the air source is determined to be operational, the Linkage Coordinator will attempt to determine the air source mode (heating or cooling) by measuring the supply air temperature from the air source by either a primary air temperature sensor or a bypass duct temperature sensor. A field-supplied primary air temperature sensor is required. The modes that can be determined are Cooling, Heating, Free Cooling, or Off. If a sensor is not installed, or the sensor fails, then the Linkage Coordinator will default to the cooling mode. The mode and air source status is then transmitted down to the zones by the Linkage Coordinator. NOTE: If Linkage communication should fail between a linked air source and its Linkage Coordinator for more then 5 minutes, the Linkage Coordinator will generate a Linkage Failure alarm and will revert back a Non-Linkage air source control. Once Linkage communication has been re-established it will automatically begin controlling the air source. HEAT MODE — The linked air source is in heat mode due to a request for from Linkage Coordinator. For a non-Linkage controlled air source, when the fan is determined to be on, the Linkage Coordinator controller reads the primary air temperature value. If the duct temperature is 5° F greater than the reference zone temperature and the reference zone is greater than 65 F, or if the reference zone is less than 65 F and the duct temperature is 10° F greater than the reference zone temperature, then the mode is determined to be heating. COOL MODE — The linked air source is in cool mode due to a request for from Linkage Coordinator. For a non-linkage controlled air source, when the fan is determined to be on, the Linkage Coordinator controller reads the primary air temperature value. If the temperature is less than the reference zone temperature, as calculated by the Linkage Coordinator controller, minus 2° F, the mode is determined to be cooling. FREECOOL MODE — The following conditions must be present in the linked air source for free cooling mode: • the average zone temperature value is greater than the average unoccupied zone cooling temperature set point • the current time is between 3:00 AM and 7:00 AM • the air source is providing cooling to the system If the above conditions are true, then the mode is determined to be Free Cooling. This mode is then communicated to all zone controllers associated (linked) with the Linkage Coordinator controller. For a non-Linkage controlled air source, this will be same as COOL mode if the criteria for COOL mode is met as described above. PRESSURIZATION MODE — If the linked air source has its optional Pressurization input closed, it will transmit this mode to the Linkage Coordinator. If this mode is active then all zones will open the dampers to the cooling maximum damper position, series fan boxes will have their fans forced on and parallel fan boxes will have their fan forced off. This mode is not available for if there is a non-Linkage controlled air source. EVACUATION MODE — If the linked air source has its optional Fire Shutdown or Evacuation input closed, it will transmit this mode to the Linkage Coordinator. If this mode is active then all zone dampers will be fully closed and series and parallel fan boxes will have their fans forced off. This mode is not available for if there is a non-Linkage controlled air source. System Modes — The following modes are determined by the Linkage Coordinator through the Linkage data exchange when there is a linked, controlled air source or by using its bypass controller and primary air sensor if the there is a non-linkage controlled air source. Some modes will not be available if the there is a non-Linkage controlled air source. All the listed modes are available if there is a linked Carrier communicating network controlled air source depending on the available input options of the of the air source. Each mode description identifies if and how that mode is determined if there is a non-linkage controlled air source. OFF MODE — The linked air source will determine this mode based on its fan status input under normal operating conditions. For a non-Linkage controlled air source, the Linkage Coordinator will determine if the air source is operational (the fan is on) by determining if the bypass pressure can be measured. If no pressure can be measured then the Linkage Coordinator controller concludes that the air source is off and all zone dampers will go to 70% open. If pressure is measured, then the Linkage Coordinator concludes that the air source in on. If no bypass controller is present then the system will be considered to be always on. Air Terminal Modes — Once the system mode is established the terminals will control their dampers to maintain the zone temperature in the space. Table 25 list a brief description of their operation. For a detail description of the terminal modes and their operation, refer to the 3V™ Control System Application manual. Table 25 — Air Terminal Modes AIR TERMINAL AS DISPLAYED IN AIR TERMINAL ACTION OPERATING MODE POINTS STATUS TABLE OFF OFF No active control of temperature or Cfm in the zone. VENT Temperature requirement of the zone is satisfied. Minimum cooling or ventilation position VENT (which ever is greater) is maintained. COOL COOL Zone Controller is attempting to cool the zone by using supply air. COOL or VENT Zone Controller is attempting to increase zone ventilation by overriding temperature control DCV damper position requirements. System must be in cooling or ventilation mode. HEAT Zone Controller is attempting to heat the zone by using supply air or local heating if HEAT configured for series or parallel fan terminal. REHEAT Zone Controller is attempting the heat the zone by locally re-heating the supply air REHEAT (single duct terminal only). PRESSURE Zone Controller is participating in the pressurization by forcing damper to max cooling PRESSURE* position and turning on fan if configured for series fan terminal. EVAC Zone Controller is participating in the evacuation by forcing damper to closed and turning off EVACUATION* fan if configured for series or parallel fan terminal. COMMISSIONING COMMISS Zone damper is in the process of calibrating its damper. ZONE BALANCING ZONE_BAL Zone damper position is being overridden by its Linkage Coordinator's system balancing mode. *Systems with linkage controlled air source only. 53 other specific conditions, it can be disabled by forcing the Heat point in the Status Display table to Disable. Contact your local Carrier Controls representative if you need assistance with this application. ZONE DAMPER VENTILATION — After the zone has satisfied and the system mode is Cooling or Free Cooling and the SAT is between 65 and 75 F, the damper will go to its Ventilation Position or the Cool Minimum Position, whichever is greater. If the SAT is less then 65 or greater then 75 or the system mode changes to Heating, the damper go to the current system mode Minimum Position. The Ventilation Damper Position is defined in the Damper service configuration table. DEMAND CONTROL VENTILATION (DCV) — If the zone controller has a CO2 Demand Ventilation sensor it will be able to override the temperature controlled damper position if it is occupied, the system mode is Cooling or Free Cool, and the zone is does not have a demand for heat. When the IAQ sensor exceeds the configured Demand Vent set point it will use a PID algorithm to calculate a higher damper position to allow more airflow to the zone in order to dilute the CO2 levels. The Demand Ventilation algorithm has a higher priority then the temperature control algorithm under these conditions so the damper will be controlled to the greater of the two values. The DCV mode, when active, overrides the Cool Minimum and Ventilation Positions. As the CO2 levels decrease in the zone the damper will soon be returned to normal temperature control. If the zone is configured for modulating ducted reheat and the zone temperature decreases to less than half way between the heat and cool set point then the reheat will be enabled to prevent the zone from going into the heat mode. If the zone is configured for any other type of reheat it will NOT be energized. If the temperature continues to decrease below the heat set point, the DCV mode will be disabled and the zone will resume normal temperature control. The zone ZNMAINT maintenance status table will display the calculated damper position and if the temperature or DCV is in control of the damper as well as other information such as occupancy status, heat and cool set points, reheat sub-master reference and whether local heating or cooling is in effect. LOADSHED — The zone controller can respond to a redline or loadshed broadcast from an optional Loadshed module installed on the Carrier communicating network. The purpose of this function is to monitor and conserve electrical power usage. If a redline command is broadcast the zone controller expand its heat and cool set points by the amount that is configured in Loadshed Offset Adjust decision in the OPTIONS service configuration table. The default is 2° F so this amount would be subtracted from the heat set point and added to the cool set point if is left unchanged. A configurable redline/loadshed delay timer (Maximum Loadshed Time decision in the OPTIONS service configuration) will also started to prevent the set points from being expanded indefinitely. If a Loadshed command is broadcast then the set points will be expanded and the zone controller will drop 1 stage of reheat providing that the reheat option is enabled and there is more than one stage of heat. The set points will be returned to normal and additional staged heat will be allowed when the redline/ loadshed command is canceled by the Loadshed Module, the zone controller’s internal redline/loadshed delay timer times out or the zone becomes unoccupied. Contact your local Carrier Controls representative for more information on this application. The zone controller can be configured for one of three types of air terminal control - single duct, series fan or parallel fan. If configured for parallel fan, the fan will be energized whenever the there is a demand for heat the system mode is not Heating and when there is a demand for heat when the zone is unoccupied and the system mode is not Heating. If configured for series fan, the fan will be energized whenever the zone is occupied and when the there is a demand for heat when it is unoccupied. To prevent all series fan zones from starting at one time, the zone controller will run a start delay algorithm based on the zone controllers address to stagger the fan start time. Before starting the fan is started the zone damper will go to the fully closed position to prevent the fan from starting backwards. The following formula is used to delay the fan start in second: Delay time in seconds = (((Whole Remainder of Element#/ 20)*60)+20) ZONE DAMPER TEMPERATURE CONTROL — The damper will modulate to adjust the airflow to the space to maintain its current set point. The damper is controlled by a PID loop to provide precise control of the damper position. The damper will be modulated opened if the system mode and local mode are the same. As the zone temperature gets closer to the set point, the damper will modulate to the Minimum Damper Position. The amount the damper will be open at any given time depends on how far away the temperature is from the set point, how fast it takes to satisfy the mode, and the Minimum and Maximum Positions for current mode. Once the zone is satisfied the damper will go to its Minimum Damper Position for that mode. Cool/Heat Minimum and Maximum Positions are defined in the Damper service configuration table. If the local zone temperature is different from the system mode then the damper will be at Minimum Position for the system mode. ZONE DAMPER REHEAT — If the zone controller has optional reheat installed, it will use this heat to maintain the heating set point. There are 4 types of heat options available as listed below: • Modulating hot water or steam (requires a supply air temperature [SAT] sensor for ducted heat or a leaving water temperature sensor for baseboard heat) • Two-position hot water or steam (SAT required) • 1 to 3 stages of electric heat (SAT required) • Combination of staged baseboard and ducted heat (SAT required) If the zone controller is configured for single duct terminal, the system mode is cooling, and the zone local mode is heating the damper will go to the configured Reheat Minimum Position or the Cool Minimum Damper Position (as configured in the Damper service configuration table) whichever is greater, and reheat will be energized. If the zone controller is configured for series or parallel fan terminal the zone controller will close the damper to the Cool Minimum Position before energizing the reheat. For parallel zone terminals the fan will be energized as the first stage of heat. The zone controller uses a PID algorithm to calculate a supply air or leaving water temperature, which the reheat will be controlled to, in order to satisfy the heat demand. If the system mode is Heating, the zone controller will try to heat the zone with the central heat but may energize reheat to satisfy the demand if it is required. If the terminal type is configured for parallel fan the fan will remain off. If no reheat is desired in the zone while central heat is on or under any 54 APPENDIX A — SYSTEM OPERATION FLOW CHARTS → 3V™ System Mode Selection LEGEND Enter — Avg Cool Demand — Avg Heat Demand — OAT Cooling Lockout Setpoint CSA_DMD — Cool Start Avg. Demand C_HYST — Cool Demand Hysteresis HLO_SPT — OAT Heating Lockout Setpoint HSA_DMD — Heat Start Avg. Demand H_HYST — Heat Start Hysteresis OAT — Outside Air Temperature OZT — Occupied Zone Temperature RZCSP — Reference Zone Cool Setpoint RZHSP — Reference Zone Heat Setpoint RZSPT — Reference Zone Space Temp Is ACD < (CSA_DMD —C_HYST) ACD AHD CLO_SPT Scan zone controllers in system for cool and heat demand Send Linkage data OZT = RZSPT NO YES System demand = Cooling Is RZSPT < RZCSP? Calculate ACD & AHD NO Send Linkage data OZT = RZCSP YES System demand = Cooling Is current mode Cooling? YES Send Linkage data OZT = (RZCSP —RZHSP) + RZCSP NO System demand = None NO Is current mode Heating? NO Is ACD < (HSA_DMD —H_HYST) YES Send Linkage data OZT =RZSPT YES System demand = Heating Is ACD=AHD and ACD >=CSA _DMD and AHD>=HSA_DMD? YES Is RZSPT > RZHSP? NO Send Linkage data OZT = RZHSP YES System demand = Heating NO Is largest heat zone demand > largest cool zone demand? Send Linkage data OZT = (RZCSP —RZHSP) + RZCSP NO System demand = None YES Is ACD >= CSA_DMD? NO Is AHD >= HSA_DMD? YES Is OAT <= CLO_SPT? YES YES YES NO NO Is OAT < CLO_SPT? Is OAT >= HLO_SPT? Is OAT >= HLO_SPT? NO NO System demand = Cooling System demand = Heating YES YES Start system mode reselect timer System demand = Cooling System demand = Heating Send Linkage data OZT = RZSPT Start system mode reselect timer Send Linkage data OZT = RZSPT Exit 55 1104 3V™ Zone Damper Operation Enter DMPPOS = 70% Fan off if configured for Fan Box Terminal Type YES DMPPOS EVAC HSMR PID PRES SAT SPT TC_DPOS VENT Is system mode = OFF? NO DMPPOS = 0% Fan off if configured for Series or Parallel Fan Terminal Type YES — — — — — — — — — LEGEND Damper Position Evacuation Heat Submaster Reference Proportional/Integral/Derivative Pressurization Supply Air Temperature Space Temperature Temperature Control Damper Output Ventilation Is system mode = EVAC? NO DMPPOS = Cool Max Damper Position Fan on if configured for Series Fan Terminal Type YES Is system mode = PRES? NO Turn on fan if configured for Series Fan Terminal Type Is system mode = FREECOOL or COOL? YES Is SPT valid? NO YES NO NO Is SPT valid? System mode = HEAT Is local mode = HEAT? NO YES DMPPOS= Heat Min Damper Position NO YES Is local mode = HEAT? YES Zone configured for reheat? YES DMPPOS= Cool Min Damper Position Is local mode = COOL? NO YES Local mode = VENT DMPPOS= Cool Min Damper Position or Reheat Damper Position (if configure for Single Duct Terminal Type) which ever is greater Run Temperature Control PID Logic YES Is SAT between 65 and 75 ? Turn on fan if configured for Parallel Fan Terminal Type NO DMPPOS = TC_DPOS Run PID loop to stage or modulate reheat to control SAT= HSMR DMPPOS= Cool Min Damper Position or Vent Poisition which ever is greater Exit 56 DMPPOS = Cool Min Damper Position NO 3V™ Zone Controller DCV Damper Control Logic Enter NO DCV DCVSP DCVD MAXOUT — — — — LEGEND Demand Control Ventilation Sensor Demand Control Ventilation Setpoint Demand Control Ventilation Damper Output DCVD Configured Maximum Output Zone Occupied? YES YES Biased Occuped? NO YES Zone in Heat mode? NO DCVD = 0 Error = DCVSP - DCV Integral Term = (Error x Integral Gain) + Previous Integral Term Proportional Term = Error x Proportional Gain DCVD = Proportional Term + Integral Term + Starting Value DCVD > MAXOUT? YES NO Previous Integral Term = Integral Term Exit 57 DCVD = MAXOUT 3V™ Zone Controller Temperature Control Damper Logic CCMR DCV DCVD DMD DMPPOS HCMR SPT [System Mode] TC_DPOS — — — — — — — — — LEGEND Cooling Setpoint Demand Control Ventilation DCV Damper Output Zone Demand Damper Position Heat Setpoint Space Temperature Current System Mode Temperature Control Damper Output TC_DPOS=0 Enter YES Lo cal DMD = heat? NO NO Error = HCMR - SPT L ocal DMD = cool? YES Error = CCMR - SPT Integral Term = (Error x Integral Gain) + Previous Integral Term Proportional Term = Error x Proportional Gain NO Derivative Term = (Error - Previous Error) x Derivative Gain Is DCV active? YES TC _D POS =Proportional Term + Integral Term + Derivative Term + Starting Value NO Is DCV active? Is DCVD > [COOL ] Min Ouput? YES Is DCVD > [COOL ] Min Ouput? NO YES YES YES [COOL ]Min Output = DCVD TC_DPOS <[System Mode] Min Output or TC_DPOS >[System Mode] Max Output [COOL] Min Output = DCVD NO TC_D POS = [System Mode] Min Position Previous Error = Error Previous Integral Term = Integral Term Limit such that: Minimum Output < TC_DPOS < Maximum Output YES Current DMPPOS = + 6 .2 5%? TC_D POS _ NO Current DMPPOS < TC_D POS - 6 .25%? YES NO Open Damper Hold Damper NO Current DMPPOS > TC_D POS + 6.25 %? YES Close Damper Exit 58 NO Copyright 2004 Carrier Corporation Manufacturer reserves the right to discontinue, or change at any time, specifications or designs without notice and without incurring obligations. PC 111 Catalog No. 533-30011 Printed in U.S.A. Form 33ZC-13SI Pg 60 1104 10-04 Replaces: New Book 1 4 Tab 11a 13a Product Data VVT® (Variable Volume and Temperature) Zoning System 3V™ Control System The VVT zoning system provides the following features and benefits: • New, easy-to-use System Pilot interface • Flexible architecture • Simplified installation and commissioning Features/Benefits The VVT zoning system provides an effective balance between flexible zone comfort, diverse system application requirements, and efficient high-performance unit operation. User interface The VVT zoning system is designed to allow a service person or building owner to configure and operate the VVT bypass controller and zone controllers, linkage compatible air source and all other networked devices through the system pilot user interface. The System Pilot’s backlit, alphanumerical Liquid Crystal Display (LCD) and rotary knob design allow the user to navigate through the menus, select desired options and modify data with ease. All VVT zoning system maintenance, configuration, setup and diagnostic information is available through the Level II communications port to allow data access by the System Pilot or an attached computer running Network Service Tool or ComfortVIEWTM software. Flexibility for every application The VVT zoning system maintains precise temperature control in the space by regulating the flow of conditioned Copyright 2004 Carrier Corporation Form 33ZC-1PD air into the space using Carrier’s VVT® Zone and Bypass Controllers. Buildings with diverse loading conditions can be supported by controlling reheat applications, including two-position hot water, modulating hot water, up to 3-stage electric heat or combination baseboard and ducted heat. Carrier’s VVT zoning system offers zone level flexibility with its expanded range of compatible zone sensors. Now select the zone level of control required for every application. Carrier’s sensor offering includes simple space temperature sensors up to full network compatible devices. Carrier Linkage System compatibility When linked to a Carrier Linkage System, the VVT zoning system components provide numerous features and benefits such as weighted average demand for system operation, intelligent supply-air temperature reset, set point averaging, global set point schedule, and occupancy scheduling. Duct static reset for the air source is provided, based on terminal requirements. Additional control features The VVT zoning system components provide additional control features such as Occupied/Unoccupied scheduling initialized via the network. The VVT zone controller offers override invoked from a wall sensor during unoccupied hours from 1 to 1440 minutes in 1-minute increments. Optional Indoor Air Quality (IAQ) control or relative humidity monitoring are also available. Simple actuator connection The VVT zone controller control assembly contains an integral actuator assembly that is field mounted to the VVT terminal damper shaft, similar to the mounting of a standard actuator. The actuator is rated at 35 lb-in. (3.95 N-m) torque, a 45, 60, or Table of contents Features/Benefits . . . . . . . . . . . . . . . . . . . . . . . . . . . . . . . . . . . . . . . . . . 1,2 VVT System Key Components . . . . . . . . . . . . . . . . . . . . . . . . . . . . . . . . 3,4 Dimensions . . . . . . . . . . . . . . . . . . . . . . . . . . . . . . . . . . . . . . . . . . . . . . 5-7 Performance Data . . . . . . . . . . . . . . . . . . . . . . . . . . . . . . . . . . . . . . . . 8-10 Application Data . . . . . . . . . . . . . . . . . . . . . . . . . . . . . . . . . . . . . . . . 11-15 Guide Specifications — 3V Control System . . . . . . . . . . . . . . . . . . . . . 16-23 2 90-degree stroke, and provides second nominal timing at 60 Hz. The actuator is suitable for mounting onto a 3/8-in. (9.5 mm) square or round VVT box damper shaft, or onto a 1/2-in. (13 mm) round damper shaft. The minimum VVT box damper shaft length is 13/4-in. (45 mm). The VVT zone controller is designed for vertical or horizontal mounting. Ease of installation The VVT zoning system components are provided with removable connectors for power and communications. Non-removable screw type connectors are used for inputs. The removable connectors are designed so that they can be inserted one way so as to prevent installation errors. The VVT zone controller also provides an RJ-14 modular phone jack for the Network Service tool connection to the module via the Carrier communicating network. VVT® system key components Terminal control Bypass controller (33ZCBC-01) — The VVT bypass controller is a component of Carrier’s 3V™ control system and is used to regulate the supply duct static pressure for Variable Volume and Temperature Applications. The bypass Controller is an essential system component that allows constant volume HVAC equipment to provide zone level temperature control. VVT zone controller (33ZCVVTZC-01) — The VVT Zone Controller is a component of Carrier’s 3V control system and is used to provide zone level temperature and air quality control for Variable Volume and Temperature Applications. The VVT zone controller is a pressure dependent device that maintains space temperature by modulating the amount of supply airflow through its primary damper. An integrated 35 in.-lb actuator is standard on all VVT zone controllers. VVT zone controllers are available factory mounted to Carrier’s round and rectangular dampers. Round dampers are available in 6, 8, 10, 12, 14, and 16-in. sizes. Rectangular dampers are available in 8x10, 8x14, 8x18, and 8x24-in. sizes. All damper assemblies are equipped with an integrated duct temperature sensor. Zone controllers are available for field retrofit applications. VAV zone controller (33ZCVAVTRM, 33ZCFANTRM) — Carrier’s 3V control system provides seamless integration of pressure independent zones for use with VVT systems. Simply use Carrier’s family of VAV zone controllers (ComfortID™) to regulate the flow of conditioned air into the space. The VAV zone controllers provide dedicated control functions for single duct terminals with modulating heat (up to 2-stages of heat), series fan or parallel fan powered terminals, or as a primary controller for dual duct or zone pressurization applications. Refer to Carrier’s ComfortID literature for additional information. Linkage compatible unit controls and auxiliary controls Carrier’s 3V control system provides optimized equipment control through airside linkage. Linkage allows the air source to adjust its supply air temperature set points and occupancy schedules to run in the most efficient manner. The 3V control system linkage compatible controllers include ComfortLink™, PremierLink™ and the Universal Controller. ComfortLink™ controls — The factory-integrated controls are available on Carrier’s 2 to 25 ton Centurion rooftop product line. The ComfortLink controller is a component of Carrier’s 3V system and provides: optimum performance of the rooftop’s refrigeration circuits, an easy to read English scrolling marquee display and user interface, and unparalleled diagnostic information with factory-mounted sensors. PremierLink™ control (33CSPREMLK) — The PremierLink communicating controller is available as a factory-installed option on 3 to 25 ton rooftop units and as a field-installed accessory. The PremierLink controller is plug and play compatible with all Carrier communicating controls including ComfortLink. The control is DCV (Demand Controlled Ventilation) compatible and internet ready. 3 Universal controller (33UNIVCTRL-01) — The Universal Controller provides auxiliary building control to interface with lighting, fans, pumps and other HVAC equipment in a stand-alone or Carrier-networked environment using closed-loop, direct digital controls. The Universal Controller’s pre-engineered algorithms provide simple building integration for small-to-medium commercial applications with 16 field point capability (8 inputs and 8 outputs). Interface devices System Pilot — The System Pilot is a component of Carrier’s 3V control system and serves as the user-interface and configuration tool for all Carrier Communicating devices. The System Pilot can be used to install and commission a 3V zoning system, linkage compatible air source, universal controller and all other devices operating on the Carrier communicating network. ComfortVIEW™ software — ComfortVIEW software can be installed on a PC and is used to configure and monitor the 3V system. Remote monitoring capability device — The remote monitoring device installs on the Carrier network and provides a connection for a phone line or ethernet connection, allowing the user to view and change information using a standard web browser. The user will also have access to the point displays, set point schedules, and operating schedules. Field-installed accessories Option board (33ZCOPTBRD-01) — Carrier’s optional relay board may be used with VVT zone controllers to provide control functions for heat or fan air terminals. Heating capabilities include modulating heat, up to 3 stages of ducted heat or combination baseboard and ducted heat control. Mounting kit — Mounting kits are used to field install the VVT zone controllers onto Carrier 33CS dampers. Mounting kits come in packages of 10. The 33ZCMBRC-01 kit is used when mounting on rectangular dampers. The 33ZCMBRD-01 kit is used when mounting on round dampers. Sensors Outdoor-air sensor (HH79NZ039) — The outdoor-air sensor reads temperatures between 0° and 150 F and is used to report the outdoor-air temperature to the communication bus. The information can be used to lock out heating or cooling modes when the temperature is not within user-configured limits. The outdoor-air sensor is needed when an economizer is used. Supply air temperature sensor — The 33ZCSENSAT supply air temperature sensor is required for heating applications or stand-alone operation. The sensor has an operating range of –40 to 245 F (–40 to 118 C) and includes a 6-in. stainless steel probe and cable. Duct temperature sensor (33ZCSENDAT) — The duct temperature sensor is required for use with a bypass controller and must be installed in the supply air duct. The 33ZCSENDAT is the recommended sensor for cooling operation. VVT® system key components (cont) For bypass systems, the duct temperature sensor should be moved to a location which will provide the best sensing of the supply-air temperature during heating and cooling. For bypass systems using a ducted supply, the duct temperature sensor should be located in the main supply duct downstream of the discharge of the air source and before the bypass damper to allow good mixing of the supply airstream. Primary air temperature sensor — The primary air temperature (PAT) sensor (part number 33ZCSENPAT) is used on a zone controller which is functioning as a Linkage Coordinator for a non-communicating or Linkage compatible air source. Space temperature sensor — A space temperature (SPT) sensor must be installed for each zone controller. There are 3 types of SPT sensors available from Carrier: the 33ZCT55SPT space temperature sensor with timed override button, the 33ZCT56SPT space temperature sensor with timed override button and set point adjustment, and the 33ZCT59SPT space temperature sensor with timed push button override button, set point adjustment and digital readout display. 4 The space temperature sensor is used to measure the building interior temperature and should be located on an interior building wall. Air quality sensor (CO2) — An indoor air quality sensor is required for optional Demand Controlled Ventilation. The 33ZCSENCO2 CO2 sensor is an indoor, wall-mounted sensor with an LED display. The 33ZCT55CO2 and 33ZCT56CO2 CO2 sensors are indoor, wall-mounted sensors without display. NOTE: The relative humidity sensor and CO2 sensor cannot be used on the same zone controller. Humidity sensors — The relative humidity sensor is required for zone humidity control (dehumidification) for pressure independent zones only. The indoor wallmounted relative humidity sensor (33ZCSENSRH-01) or duct mounted relative humidity sensor (33ZCSENDRH-01) can be used. NOTE: The relative humidity sensor and CO2 sensor cannot be used on the same zone controller. Dimensions BYPASS CONTROLLER VVT ZONE CONTROLLER (PRESSURE DEPENDENT) 5 Dimensions (cont) SYSTEM PILOT 6-in. 3 1/2-in. PREMIERLINK™ COMMUNICATING CONTROLLER 6 RECTANGULAR DAMPERS WITH VVT ZONE CONTROLLER A DIMENSIONS (Inches) B D E PART NUMBER 33ZCD1008ZC-01 33ZCD1408ZC-01 33ZCD1808ZC-01 33ZCD2408ZC-01 A B 101/4 101/4 131/ 101/4 101/4 4 171/4 211/4 271/4 C D E 8 8 8 8 10 14 18 24 131/2 131/2 131/2 131/2 C ROUND DAMPERS WITH VVT ZONE CONTROLLER DIMENSIONS (Inches) B C A PART NUMBER 33ZCDR06ZC-01 33ZCDR08ZC-01 33ZCDR10ZC-01 33ZCDR12ZC-01 33ZCDR14ZC-01 33ZCDR16ZC-01 A B C 6 8 10 12 14 16 18 18 18 24 24 24 9.0 11.0 13.0 15.0 17.0 19.0 7 Performance data APPLICATION NC* LEVELS (RADIATED SOUND) — ROUND ZONE DAMPERS DAMPER CFM 160 200 33ZCDR06ZC-01 240 360 280 350 33ZCDR08ZC-01 420 630 440 514 33ZCDR10ZC-01 584 659 990 630 700 770 33ZCDR12ZC-01 860 950 1425 STATIC PRESSURE (in. wg) 0.02 0.52 1.00 0.04 0.50 1.00 0.06 0.50 1.00 0.10 0.50 1.00 0.03 0.50 1.00 0.04 0.50 1.00 0.06 0.50 1.00 0.10 0.50 1.00 0.01 0.50 1.00 0.02 0.50 1.00 0.03 0.50 1.00 0.04 0.50 1.00 0.09 0.50 1.00 0.01 0.50 1.00 0.03 0.50 1.00 0.02 0.50 1.00 0.04 0.50 1.00 0.05 0.50 1.00 0.11 0.50 1.00 NC LEVEL *Noise Criteria. NOTE: The NC values are based on ARI (Air Conditioning and Refrigeration Institute) Standard 885-90 application assumptions. 8 <20 <20 25 <20 22 24 <20 24 28 28 32 35 <20 <20 22 <20 22 22 28 25 27 28 28 30 22 25 27 22 28 29 25 27 32 30 32 34 35 35 37 22 35 38 22 37 38 22 38 39 27 39 40 32 40 40 40 44 45 APPLICATION NC* LEVELS (RADIATED SOUND) — ROUND ZONE DAMPERS (cont) DAMPER CFM 852 976 1074 33ZCDR14ZC-01 1175 1275 1910 1125 1175 1275 1376 33ZCDR16ZC-01 1475 1574 1676 2512 STATIC PRESSURE (in. wg) 0.02 0.50 1.00 0.01 0.50 1.00 0.01 0.50 1.00 0.01 0.50 1.00 0.06 0.50 1.00 0.13 0.50 1.00 0.02 0.50 1.00 0.04 0.50 1.00 0.05 0.50 1.00 0.05 0.50 1.00 0.06 0.50 1.00 0.07 0.50 1.00 0.03 0.50 1.00 0.18 0.50 1.00 NC LEVEL 22 30 35 25 32 36 30 32 27 31 35 38 30 36 39 41 45 47 27 39 41 30 39 41 31 40 42 35 41 44 35 42 45 36 44 46 38 45 46 50 51 54 *Noise Criteria. NOTE: The NC values are based on ARI (Air Conditioning and Refrigeration Institute) Standard 885-90 application assumptions. 9 Performance data (cont) APPLICATION NC* LEVELS (RADIATED SOUND) — RECTANGULAR ZONE DAMPERS DAMPER CFM 410 509 33ZCD1008ZC-01 610 914 561 625 33ZCD1408ZC-01 725 825 1237 725 775 874 33ZCD1808ZC-01 974 1075 1611 925 974 1075 33ZCD2408ZC-01 1175 1275 1375 2062 STATIC PRESSURE (in. wg) 0.01 0.50 1.00 0.03 0.50 1.00 0.07 0.50 1.00 0.16 0.50 1.00 0.02 0.50 1.00 0.02 0.50 1.00 0.03 0.50 1.00 0.05 0.50 1.00 0.11 0.50 1.00 0.01 0.50 1.00 0.01 0.50 1.00 0.02 0.50 1.00 0.02 0.50 1.00 0.03 0.50 1.00 0.06 0.50 1.00 0.01 0.50 1.00 0.01 0.50 1.00 0.01 0.50 1.00 0.02 0.50 1.00 0.02 0.50 1.00 0.03 0.50 1.00 0.06 0.50 1.00 NC LEVEL *Noise Criteria. NOTE: The NC values are based on ARI (Air Conditioning and Refrigeration Institute) Standard 885-90 application assumptions. 10 <20 30 45 <20 30 40 23 31 40 35 37 45 <20 36 47 22 37 45 25 38 45 32 40 46 40 45 54 22 38 48 22 38 48 28 40 48 30 42 48 33 44 50 40 50 60 26 38 48 27 38 50 32 40 50 35 41 50 37 43 50 38 44 50 47 50 55 Application data Typical VVT® system overview dependant system that adjusts damper position based on space temperature variation from set point. Typical VVT applications include medical and dental offices, 1 to 3 story commercial buildings, and strip mall and retail stores. The VVT system is a control system designed to provide multiple zones of temperature control using a single, constant volume heating and cooling packaged unit. Traditionally, the VVT system has been primarily a pressure VVT PRESSURE DEPENDENT SYSTEM Supply Air Sensor Carrier Communicating RTU (Use PremierLink Retrofit Control for non Carrier communicating RTU) Communication Bus 20/3/Shielded cable (See Notes 1,2) 120 vac 24vac (See Note 2) 40va 24vac 40va Bypass VVT Linkage Coordinator (See Note 3) Comm Bus — — — — — 24vac 40va (See Note 5) 20/2/Shielded cable (See Note 2) CCN DCV PAT RTU VVT 24vac 40va Primary Air Sensor Duct Sensor (Locate upstream of damper) System Pilot (See Note 6) 24vac 40va (Optional for Linkage Coordinator) VVT Zone 20/3/Shielded Cable (See Note 2) T55/56/59 LEGEND Carrier Comfort Network Demand Controlled Ventilation Primary Air Temperature Sensor Rooftop Unit Variable Volume/Variable Temperature VVT Zone Comm Bus 32 zones max including Linkage Coordinator T55/56/59 T55/56/59 CO2/T55/56 (Optional for DCV) See Note 2,4) NOTES: 1. 239 devices maximum per bus. Repeater required every 1000 ft or 60 devices. Maximum of 3 repeaters per bus. 2. Communication bus and sensor wiring MUST be separate from AC power wiring. 3. Up to 32 total zones per system. Maximum of 8 Linkage Coordinators with a total of 128 devices per single bus. 4. Combination CO2/T55/T56 sensor may be used in place of T55/T56/T59 on any zone requiring DCV. RTU must be capable of controlling economizer for DCV conditions. 5. Locate PAT in supply air duct from air source unit. 6. System Pilot can share power with Bypass Controller or VVT Zone Controller. TYPICAL VVT SYSTEM PRESSURE DEPENDENT CONTROL ONLY REQUIRED COMPONENTS Part Number Usage 1 per pressure VVT Zone Controller 33ZCVVTZC-01 dependent zone Devices Bypass Controller Devices PremierLink™ Controller Supply Air Temp Sensor 33ZCBC-01 1 per system System Pilot 33PILOT-01 1 per system on com bus. Optional for space sensors Space Sensor 33ZCT55SPT 33ZCT56SPT 33ZCT59SPT 1 per zone Relative Humidity Sensor Primary Air Temp Sensor 33ZCSENPAT 1 per Linkage Coordinator Outside Air Temp Sensor CO2 Sensors OPTIONAL COMPONENTS Part Number Usage 1 required per if non33CSPREMLK communicatingsystem air source. 1 required for bypass 33ZCSENSAT Option for zones 33ZCT55CO2 as required per zone for DCV 33ZCT56CO2 33ZCSENSRH-01 Optional to Monitor RH 33ZCSENDRH-01 only (if no DCV sensor). HH79NZ039 Required with field-installed PremierLink control LEGEND DCV — Demand Controlled Ventilation RH — Relative Humidity 11 Application data (cont) VVT® pressure independent system overview calculated by the controller, based on space temperature variation from set point. Therefore, even though the supply duct static pressure changes, the airflow volume at the zone remains constant. Pressure Independent VVT systems are used when the airflow into the zone is critical and must be maintained. With a pressure independent strategy, zone damper position is modulated to maintain zone airflow at a cfm flow rate VVT PRESSURE INDEPENDENT SYSTEM Carrier Communicating RTU Supply Air Sensor (Use PremierLink Retrofit Control for non Carrier communicating RTU) 120 vac Communication Bus 20/3/Shielded cable (See Notes 1,2) (See Note 2) 24vac 40va 24vac 40va Bypass VVT Linkage Coordinator (See Note 3,6) Comm Bus — — — — — 24vac 40va (See Note 5) 20/2/Shielded cable (See Note 2) CCN DCV PAT RTU VVT 24vac 40va Primary Air Sensor Duct Sensor (Locate upstream of damper) System Pilot (See Note 7) 24vac 40va ComfortID Zone ComfortID Zone 20/3/Shielded Cable (See Note 2) LEGEND Carrier Comfort Network Demand Controlled Ventilation Primary Air Temperature Sensor Rooftop Unit Variable Volume/Variable Temperature Comm Bus T55/56/59 32 zones max including Linkage Coordinator T55/56/59 CO2/T55/56 (Optional for DCV) See Note 2,4) NOTES: 1. 239 devices maximum per bus. Repeater required every 1000 ft or 60 devices. Maximum of 3 repeaters per bus. 2. Communication bus and sensor wiring MUST be separate from AC power wiring. 3. Up to 32 total zones per system. Maximum of 8 Linkage Coordinators with a total of 128 devices per single bus. 4. Combination CO2/T55/T56 sensor may be used in place of T55/T56/T59 on any zone requiring DCV. RTU must be capable of controlling economizer for DCV conditions. 5. Locate PAT in supply air duct from air source unit. 6. VVT zone controller is required for Linkage Coordinator functions if all zones are pressure independent. 7. System Pilot can share power with Bypass Controller or VVT Zone Controller. VVT PRESSURE INDEPENDENT ONLY SYSTEM PRESSURE INDEPENDENT CONTROL ONLY Devices REQUIRED COMPONENTS Part Number VVT Zone Controller VAV Zone Controller (ComfortID) Usage 1 for Linkage 33ZCVVTZC-01 Function Only per pressure 33ZCVAVTRM 1 independent zone OPTIONAL COMPONENTS Part Number Usage 1 required per system if non33CSPREMLK communicating air source. 1 required for bypass Supply Air Temp Sensor 33ZCSENSAT Option for zones 33ZCT55CO2 as required per zone for CO2 Sensors 33ZCT56CO2 DCV Devices PremierLink™ Controller Bypass Controller 33ZCBC-01 1 per system System Pilot 33PILOT-01 1 per system on com bus. Optional for space sensors Relative Humidity Sensor Space Sensor 33ZCT55SPT 33ZCT56SPT 33ZCT59SPT 1 per zone Outside Air Temp Sensor Primary Air Temp Sensor 33ZCSENPAT 1 per Linkage Coordinator LEGEND DCV — Demand Controlled Ventilation 12 33ZCSENSRH-01 Optional to Monitor RH only 33ZCSENDRH-01 (if no DCV sensor). HH79NZ039 Required with field-installed PremierLink control VVT® pressure dependent and independent system overview control system both forms of control are available. Simply use Carrier’s VAV Zone Controller, to provide pressure independent control for critical airflow zones. In many applications VVT Systems require both pressure dependent and independent zone control. With 3V™ VVT PRESSURE DEPENDENT AND INDEPENDENT SYSTEM Carrier Communicating RTU Supply Air Sensor (Use PremierLink Retrofit Control for non Carrier communicating RTU) 120 vac Communication Bus 20/3/Shielded cable (See Notes 1,2) (See Note 2) 24vac 40va 24vac 40va VVT Linkage Coordinator (See Note 3) Bypass VVT Zone Comm Bus (Optional for Linkage Coordinator) LEGEND — — — — — 24vac 40va (See Note 5) 20/2/Shielded cable (See Note 2) CCN DCV PAT RTU VVT 24vac 40va Primary Air Sensor Duct Sensor (Locate upstream of damper) System Pilot (See Note 6) 24vac 40va 20/3/Shielded cable (See Note 2) T55/56/59 ComfortID Zone Comm Bus T55/56/59 32 zones max including Linkage Coordinator T55/56/59 CO2/T55/56 (Optional for DCV) See Note 2,4) Carrier Comfort Network Demand Controlled Ventilation Primary Air Temperature Sensor Rooftop Unit Variable Volume/Variable Temperature NOTES: 1. 239 devices maximum per bus. Repeater required every 1000 ft or 60 devices. Maximum of 3 repeaters per bus. 2. Communication bus and sensor wiring MUST be separate from AC power wiring. 3. Up to 32 total zones per system. Maximum of 8 Linkage Coordinators with a total of 128 devices per single bus. 4. Combination CO2/T55/T56 sensor may be used in place of T55/T56/T59 on any zone requiring DCV. RTU must be capable of controlling economizer for DCV conditions. 5. Locate PAT in supply air duct from air source unit. 6. System Pilot can share power with Bypass Controller or VVT Zone Controller. VVT PRESSURE DEPENDENT AND INDEPENDENT SYSTEM Devices REQUIRED COMPONENTS Part Number VVT Zone Controller Usage 1 per pressure 33ZCVVTZC-01 dependent zone 1 per pressure independent zone OPTIONAL COMPONENTS Part Number Usage 1 required per system if PremierLink™ 33CSPREMLK non-communicating air Controller source. 1 required for bypass Supply Air Temp Sensor 33ZCSENSAT Option for zones 33ZCT55CO2 as required per zone for CO2 Sensors 33ZCT56CO2 DCV Devices VAV Zone Controller (ComfortID) 33ZCVAVTRM Bypass Controller 33ZCBC-01 1 per system System Pilot 33PILOT-01 1 per system on com bus. Optional for space sensors Relative Humidity Sensor Space Sensor 33ZCT55SPT 33ZCT56SPT 33ZCT59SPT 1 per zone Outside Air Temp Sensor Primary Air Temp Sensor 33ZCSENPAT 1 per Linkage Coordinator 33ZCSENSRH-01 Optional to Monitor RH only 33ZCSENDRH-01 (if no DCV sensor). HH79NZ039 Required with field-installed PremierLink control LEGEND DCV — Demand Controlled Ventilation 13 Application data (cont) Fan powered and reheat VVT® system overview Adding supplemental heat and fan-powered terminals has never been simpler than with 3V™ control system. Simply add a stackable option board to any VVT zone controller and your system is ready. New reheat flexibility offers floating-point control for hot water valves and combination 2-position baseboard with ducted staged heat. VVT PRESSURE DEPENDENT/PRESSURE INDEPENDENT WITH FAN POWERED ZONES AND/OR REHEAT SYSTEM Carrier Communicating RTU Supply Air Sensor (Use PremierLink Retrofit Control for non Carrier communicating RTU) Communication Bus 20/3/Shielded cable (See Notes 1,2) 120 vac 24vac (See Note 2) 40va Duct Sensor (Locate upstream of damper) 20/2/Shielded cable (See Note 2) 24vac 40va Primary Air Sensor Supply Air Sensor (See Note 6) 24vac 40va 24vac 40va Supply Air Sensor 24vac 40va (See Note 5) H Pipe Sensor 12 C Opt Brd Opt Brd System Pilot (See Note 8) VVT Linkage Coordinator w/ Modulating HW (See Note 3,7) Bypass Comm Bus CCN DCV PAT RTU VVT — — — — — LEGEND Carrier Comfort Network Demand Controlled Ventilation Primary Air Temperature Sensor Rooftop Unit Variable Volume/Variable Temperature (Optional for Linkage Coordinator) T55/56/59 VVT Zone w/2 Position HW Baseboard Heat (See Note 7) 20/3/Shielded Cable (See Note 2) Opt Brd ComfortID Zone w/Series FP and 2 Stage Electric Heat (See Note 7) Comm Bus T55/56/59 32 zones max including Linkage Coordinator T55/56/59 CO2/T55/56 (Optional for DCV) See Note 2,4) NOTES: 1. 239 devices maximum per bus. Repeater required every 1000 ft or 60 devices. Maximum of 3 repeaters per bus. 2. Communication bus and sensor wiring MUST be separate from AC power wiring. 3. Up to 32 total zones per system. Maximum of 8 Linkage Coordinators with a total of 128 devices per single bus. 4. Combination CO2/T55/T56 sensor may be used in place of T55/T56/T59 on any zone requiring DCV. RTU must be capable of controlling economizer for DCV conditions. 5. Locate PAT in supply air duct from air source unit. 6. Locate downstream of ducted reheat. 7. Option Board required for all VVT zones with heat and/or fan powered mixing box. 8. System Pilot can share power with Bypass Controller or VVT Zone Controller. FAN POWERED AND REHEAT VVT SYSTEMS PRESSURE DEPENDENT AND INDEPENDENT CONTROL CAPABILITY REQUIRED COMPONENTS Part Number Usage 1 per pressure VVT Zone Controller 33ZCVVTZC-01 dependent zone 1 per pressure VAV Zone Controller 33ZCFANTRM independent zone (ComfortID) with fan or reheat Devices Bypass Controller 33ZCBC-01 1 per system System Pilot 33PILOT-01 1 per system on com bus. Optional for space sensors Space Sensor 33ZCT55SPT 33ZCT56SPT 33ZCT59SPT 1 per zone 1 per Linkage Coordinator 1 required per Fan/Reheat Option Board 33ZCOPTBRD-01 VVT Zone with Reheat Primary Air Temp Sensor 33ZCSENPAT LEGEND DCV — Demand Controlled Ventilation PD — Pressure Dependent RH — Relative Humidity 14 Devices PremierLink™ Controller Supply Air Temp Sensor OPTIONAL COMPONENTS Part Number Usage 1 required per system if non33CSPREMLK communicating air source. 33ZCSENSAT 1 required for bypass Option for zones 33ZCT55CO2 as required per zone for DCV 33ZCT56CO2 Relative Humidity 33ZCSENSRH-01 Optional to Monitor RH only Sensor 33ZCSENDRH-01 (if no DCV sensor). CO2 Sensors Strap-on Pipe Temp Sensor 33ZCSENCHG Outside Air Temp Sensor HH79NZ039 Optional if baseboard heat ONLY. (Not required with zone ducted heat) Required with field-installed PremierLink control Compatibility of Carrier systems The following chart shows the compatibility of Carrier’s 3V™ Control System and GEN-III VVT® products. VVT Gen II conversion (manufactured prior to July 1995) — There is no compatibility between VVT Gen II systems and 3V control systems. A complete change of system components is required with the exception of physical dampers which may remain in place. The existing 5-wire control wiring from the thermostat to the damper may be used for the System Pilot communication wire or for a T55, T56, or T59 space sensor. The wiring must be 18 to 20 AWG (American Wire Gage) stranded, shielded cable and conform to 3V control system and Carrier communicating network wiring guidelines. Any wiring that does not conform to these guidelines must be replaced. 3V AND GEN-III VVT PRODUCT COMPATIBILITY CHART GEN III PRODUCT DESCRIPTION COMPATIBLE FOR USE WITH 3V CONTROL SYSTEM TEMP SYSTEMS Working Gen-III TEMP systems may reside on same bus with a 3V control system. If an existing Gen-III TEMP system needs component replacement, refer to the components below. 33CSTM(T)-01 TEMP Monitor No. Replace with PremierLink™ control 33CSUCE-06 TEMP System Relay Pack No. Replace with PremierLink control VVT GEN-III SYSTEM COMPONENTS Working Gen-III VVT systems may reside on same bus with a 3V control system. If an existing Gen-III system needs component replacement, refer to the components below. 33CSVM(T)-32 VVT Monitor Thermostats Yes for a 3V Zone(s)* 33CSBC-00 Bypass Controllers Yes. † 33CSZC-01 Pressure Dependent Zone Controller No. Use 33ZCVVTZC-01.** 33CSZC-PI Pressure Independent Zone Controller No. Use 33ZCVAVTRM-01.†† DAMPERS 33CSDCDR Round or Rectangular Yes – sheet metal only 33CASDCARPL, M08 Damper Actuators No 33CSDCA060,090 High Torque Damper Actuators No RELAY PACKS 33CSZRP-06 Universal Damper Relay Pack No 33CSUCE-06 Monitor-only Relay Pack No SENSORS 920238 (HS) Humidity Sensor No, 3V system uses 2 to 10 vdc humidity sensor. 920247 (RAS) Refrigerated Air (DX) Sensor No. 3V system uses standard 10K sensors. 920076 (RDS) Remote Duct Sensor No. 3V system uses standard 10K sensors. 920077 (RDS) Remote Room Sensor No. 3V system uses standard 10K sensors. 920089 (OAS) Outside Air Sensor No. 3V system uses standard 10K sensors. Pressure Sensor No, 3V static pressure sensor is integrated into Bypass 33CSPS-01 Controller. For PI zones, velocity pressure sensor is integrated into the VAV (ComfortID™) controller. Pressure Sensor No, 3V static pressure sensor is integrated into Bypass 33CSPS-02 Controller. For PI zones, velocity pressure sensor is integrated into the VAV (ComfortID) controller. Yes 33ZCSENCO2 CO2 Sensor EXISTING WIRING Non-Shielded device, bus or sensor wiring No Shielded device, bus or sensor wiring Yes 24 VAC power wiring Yes LEGEND DX — Direct Expansion PI — Pressure Independent VVT — Variable Volume/Variable Temperature *A Gen-III VVT Monitor will scan new 3V zones. No special configuration is required. Address 3V zone within the Gen-III Monitor’s scanning range. If the Gen-III VVT monitor needs replacement and components are not available, 3V zone controller(s) may be substituted for all zones with compatible sensors. Existing damper may be re-used, but with new 3V actuator(s). †An Integrated Gen-III Bypass Controller and damper may remain in 3V system, but must be re-addressed out of the 3V system’s scanning range, and must be configured for Standalone operation. If the Gen-III Bypass Controller needs replacement and components are not available, 3V bypass controller may be substituted with compatible sensors. Existing damper may be re-used, but with new 3V actuator. **A Gen-III Pressure Dependent Zone Controller is not compatible in 3V system. However, a 3V zone controller is compatible in a Gen-III system. If the Gen-III Zone Controller needs replacement and components are not available, 3V zone controller may be substituted with compatible sensors. Existing damper may be re-used, but with new 3V actuator. ††A Gen-III Pressure Independent Zone Controller is not compatible with 3V systems. If the Gen-III PI Zone Controller needs replacement and components are not available, ComfortID controller may be substituted when configured for Standalone only out of Gen-III Monitors scanning range, and with compatible sensors. Existing damper may be re-used, but with new ComfortID actuator. 15 Guide specifications — 3V™ control system Variable Volume/Variable Temperature (VVT®) Multiple Zone HVAC Control System Model Number: 33ZCVVTZC-01 Zone Controller 33ZCBC-01 Bypass Controller 33PILOT-01 System Pilot Part 1 — General 1.01 SYSTEM DESCRIPTION The 3V™ control system shall consist of programmable, multiple communicating Zone Controllers; and a Bypass Controller. The system shall also include a complete array of input and output devices. The system shall provide full control of HVAC heating and cooling equipment in a multiple zone application. The 3V system shall be capable of operating as a stand-alone system or networked with multiple systems connected on a communications bus to communicating air source controllers. 1.02 DELIVERY, STORAGE AND HANDLING The products shall be stored and handled per manufacturer’s recommendations. Part 2 — Products 2.01 EQUIPMENT A. General: The control system shall be available as a complete package with the required input sensors and devices readily available. The system shall be capable of providing complete control of HVAC functions; variable air zone control, bypass air control in both pressure dependent and pressure independent applications. Airside controls shall be capable of operating 3V system dampers as well as VAV (variable air volume) terminal boxes and Fan Powered terminal boxes with and without supplemental heat sources at the zone. All temperature sensors shall be capable of being read and displayed in 0.1° F increments. Controllers shall support either a local dedicated or remote System Pilot capable of displaying sensor and input information applicable to the controller in degrees Fahrenheit or Celsius. The System Pilot shall be capable of displaying the following information as a minimum: System Pilot Linkage Coordinator Zone Controller Display: 1. Space Temperature 2. Primary Air Temperature 3. Damper Position Desired 4. Damper Position Actual 5. Cfm (Pressure Independent Controllers Only) 6. Average Temperature from multiple remote Room Sensor(s) 7. Zone Indoor Relative Humidity 8. Zone Indoor CO2 concentration 9. Zone Supply Air Temperature 10. Outside Air Temperature 11. Air Source Mode 16 System Pilot Zone Controller Display: 1. Space Temperature 2. Damper Position Desired 3. Damper Position Actual 4. Cfm (Pressure Independent Controllers Only) 5. Average Temperature from multiple remote Room Sensor(s) 6. Zone Indoor Relative Humidity 7. Zone Indoor CO2 concentration 8. Zone Supply Air Temperature 9. Outside Air Temperature 10. Air Source Mode System Pilot Bypass Controller Display: 1. System Pressure in hundredths of an inch 2. System Pressure Set Point 3. Damper Position Desired 4. Damper Position Actual 5. Air Source Supply Air Temperature 6. Air Source Mode 7. All applicable sensors shall be accessed for calibration at the controller display. B. Rooftop Controller Interface: The VVT zone controller shall be capable of zone demand data coordination with a communicating rooftop. Set point and temperature information from the zones shall be shared with the rooftop controller so that the rooftop controllers error reduction calculations can determine the proper number of heating or cooling stages to operate in order to balance the system load. C. Memory and Timeclock: The system shall not require the use of batteries for any data storage. The VVT zone controller and Bypass Controller shall have a Non-Volatile Memory providing indefinite storage of configuration data. The VVT zone controller shall have a 365-day software clock with built in daylight savings time and leap year adjustment. In the event of power failure, the timeclock may be automatically updated with current time and date from a network Time Sync device. The network time sync device shall update all software and Hardware clocks on the communications network twice a day. The System Pilot shall be capable of sharing time information with other 3V system controls or any other General Purpose Electronic Controller existing on the communications bus with timeclock capabilities. The VVT zone controller shall also have the capability of changing occupancy mode by reading a set of discrete, dry contacts controlled by an external timeclock. D. Set Points: 1. The VVT zone controller shall utilize and store the following set points: a. Occupied Heating Set Point b. Occupied Cooling Set Point c. Unoccupied Heating Set Point d. Unoccupied Cooling Set Point e. Ventilation CO2 Set Point 2. The Linkage Coordinator shall utilize and store these additional set points: a. Space Temperature Occupied Hysteresis b. Unoccupied Space Temperature Low Limit c. Unoccupied Space temperature High Limit d. Heating OAT Lockout Set Point e. Cooling OAT Lockout Set Point 3. VAV Zone Controllers with the pressure independent control feature shall utilize and store these additional set points: a. Heat Minimum Airflow Set Point b. Heat Maximum Airflow Set Point c. Cool Minimum Airflow Set Point d. Cool Maximum Airflow Set Point e. Reheat Airflow Set Point 4. Bypass Controllers shall utilize and store these set points: a. System Pressure Set Point b. Heat Leaving Air Temperature Limit c. Cool Leaving Air Temperature Limit d. Leaving Air Temperature Pressure Delta 5. All set points shall be capable of being modified at the controller display or through a communication network with a System Pilot or PC and EMS (Energy Management System) software. E. Scheduling: The system shall be capable of operating in an occupied or unoccupied mode with up to 8 period changes per day including holidays. All 3V™ zone controllers shall have the capability to follow independent local schedules or receive the schedule from other Application specific controllers as well as all General Purpose Electronic Controllers (GPECs) existing on the communications bus with scheduling capabilities. All schedules shall be adjustable in oneminute increments. The VVT® zone controller shall be capable of utilizing up to 16 holiday schedules with up to 99 days per schedule for overriding the occupancy schedule. The VVT zone controller shall have built-in override capabilities for unoccupied schedule override from 0 to 24 hours in 1-minute increments. Schedule overrides and schedules shall be flexible enough to allow individual zones to become occupied without the rest of the system becoming occupied or allow some or all zones of an associated piece of equipment, or from several pieces of equipment to become occupied together. When scheduled to become occupied together, all zones from that group should participate in a single occupancy override from any single request. When scheduled to operate independently F. G. H. I. only the zone where the Occupancy override was requested should become occupied. Security Level: The System Pilot(s) shall have four levels of security for access of control tasks and decisions with level one providing full access and level four providing read access only from the controller. Levels two and three provide limited access. HVAC Equipment Protection: The air sources controller shall be capable of monitoring the leaving air temperature to control stages in both the heating and cooling modes. It shall have the capability to shut down stages based on a rise or fall in leaving air temperature above or below adjustable or calculated values. Calculated supply air temperature requirements shall be based on error reduction calculations from reference zone data to determine the optimum supply air temperature to satisfy space requirements. The system and shall provide protection from short cycling of heating and cooling by utilizing time guards and minimum run time configurations. Sensor Calibration: All applicable sensors shall be accessed for calibration at the controller or through a communicating network with a System Pilot device or PC and EMS software. Energy Conservation: The system shall incorporate the following features for the provision of energy conservation: 1. Load balancing from error reduction calculations that optimize staging. 2. The locking out of mechanical heating or cooling modes based on configurable outside air temperature limits. 3. The system shall intelligently start all equipment in a stagger start manner after a transition from unoccupied to occupied modes as well as power failure to reduce high peak power consumption on start-up. 4. 3V controllers shall have the capability of being overridden by a Peak Demand Limiting Option Module existing on the communications bus with demand limiting functions to reduce overall energy consumption and control on and off peak time kW usage. 5. Temperature compensated start. The zone controller shall be capable of supporting temperature compensated start with the air source. Prior to occupancy the zone controllers and Air Source shall work together to provide zone-byzone temperature compensated conditioning. The air source will track the time required for recovery report the optimal start bias time to the zones prior to each occupied period so that the zone can start conditioning the space prior to occupancy. 17 Guide specifications — 3V™ control system (cont) J. Stand-Alone Capability: The controllers shall be capable of providing all control functions of the HVAC system without the use of a computer. All configuration selections shall be capable of being performed at a System Pilot display via push button access. The controllers shall include the inherent capability to access the system control selections as well as to monitor system performance by means of a communicating network with a PC and EMS software program. K. DDC Control Networking: The 3V™ system controllers shall be capable of sharing the same communication network as General Purpose Electronic Modules and option modules. The System Pilot shall be capable of broadcasting time and date. The air source controller shall be capable of broadcasting outside air temperature, outside air enthalpy status, or outside air CO2 concentration on the communications bus to other Application Specific Controllers, and General Purpose Electronic Controllers existing on the network. The VVT® zone controllers shall also be able to receive this information and more from the same type of controllers on the network communications bus. The VVT zone controllers shall also be capable of receiving commands from General Purpose Electronic Controllers (GPEC) existing on the communications bus. This information shall be used in a variety of ways to control the HVAC system as well as other building functions and applications. L. VVT Zone Controller as a Linkage Coordinator: 1. The VVT zone controller shall be capable of controlling space demand in a variable volume application by monitoring space temperature and determining the heating or cooling demand. The space temperatures shall be controlled to maintain individual heating and cooling setpoints. The VVT zone controller shall have the capability of scanning up to 32 linked zones including itself and determining system heating and cooling requirements. Individual zones may be configured so that they do not participate in system mode determination for heating and cooling or just for the heating if zone supplemental heat is installed. The zone controller shall include adjustable system mode lockouts for Cooling, Heating and a configuration for intermittent fan when occupied. These settings shall be accessible from a System Pilot or from a PC with EMS software. The system fan shall be capable of operating in a continuous or automatic mode during occupied hours and in an automatic mode during unoccupied hours. The zone controller shall be capable of operating the system in manual or automatic changeover mode. 18 2. The zone controller shall include a heating/ cooling mode temperature changeover cycle to eliminate zone thermal shock during periods of system mode change. 3. The zone controller shall have a system commissioning mode whereby the installer may easily command all dampers to the maximum or all dampers to the minimum positions or position individual dampers. While this mode is active, maximum and minimum damper settings may be set. The system static pressure reading may be viewed from the same screen while performing the operations above and the Bypass pressure set point adjusted as required. The screen data for this mode may be displayed from the System Pilot or from a PC with EMS software. 4. The Zone Controller shall be capable of providing a communication check of all associated controls and display device type as well as error conditions. M. VVT Zone Controller: 1. The VVT zone controller shall be capable of independent zone control. 2. The zone controller shall operate all 3V VVT zone dampers as well as VAV and fan powered terminal boxes equipped with VVT zone controllers. 3. The zone controller shall be capable of controlling supplemental heat or auxiliary heat sources, including fan control, when required at the zone level. Conversion to supplemental heat shall not require replacement of the control system. 4. The zone controller shall operate in a pressure dependent mode. Damper inlet area shall be adjustable in increments of one square inch. The zone controller shall be capable of reading zone airflow in cfm and controlling zone airflow based upon this information when operating in pressure independent mode. 5. The zone controller shall have the capability to support adjustable minimum and maximum damper positions. N. 3V Bypass Controller: 1. The 3V bypass controller shall be capable of reading supply static pressure and controlling the bypass damper to maintain the supply static set point. This operation shall be provided when operating within a 3V system application or in a stand-alone mode. 2. The bypass controller shall include a prepositioning mode for opening the damper prior to fan operation. The bypass controller shall provide configurable minimum and maximum damper position settings. 3. The bypass controller shall have the capability of displaying system static pressure, duct temperature, pressure set point and damper position. 4. The bypass controller shall provide the capability of increasing the maintained supply static pressure when the system supply-air temperature exceeds adjustable high and low duct temperature set point limits. O. Demand Controlled Ventilation (DCV): The 3V™ zone controller shall be capable of reading an analog signal from a CO2 sensor or other sensor measuring volatile contaminants, or relative humidity and provide DCV at the zone by calculating a DCV damper position and participate in system DCV operation with the air source. 1. System DCV (System Level): The zone controller when operating as a Linkage Supervisor shall have the ability to collect the DCV value from any or all of the zone controllers it is configured to scan. These values may be averaged or the high or low sensor value may be transmitted to an air source controller’s analog DCV sensor input. The air sources configured DCV routine may perform the appropriate actions to reduce CO2 concentration at the reporting zones. If not being used for DCV this system composite value collection may be used to collect zone relative humidity readings or another type of analog sensor values to be reported to the air source. 2. Local DCV (Zone Level): All VVT® Comfort System Zone Controllers shall be capable of reading an analog signal from a CO2 sensor or other sensors measuring volatile contaminants at the zone level, for independent DCV mode operation. The zone controller shall calculate a DCV damper position for the zone based on an error reduction calculation. When the DCV damper position value is greater than temperature control damper position the DCV damper position shall be used to position the damper. 3. System heating and cooling and zone supplemental heat shall be allowed to operate. 4. Pre-Occupancy Purge: The 3V system shall be capable of providing a pre-occupied purge to flush the building of contaminants up to one hour before the occupancy period. 5. The CO2 sensor shall be available in wall-mount as well as duct-mount with or without an LED display of parts per million of measured contaminant. The set point shall be adjustable. P. Zone Dampers: Each Zone Damper shall include: 1. A motorized damper assembly constructed of 24 gage galvanized iron with blade of 20 gage. 2. Blade operation providing full modulation from open to closed position. 3. The ability to operate in a controlling/link arrangement, where the controlling damper is operated by the zone controller. The controlling damper shall have the capability to have up to 4 linked dampers tracking its position. The linked dampers shall modulate to the same position as the controlling damper. 4. Round dampers shall have elliptical blades with a seal around the entire damper blade edge. Rectangular dampers shall have fully sealed edges. 5. A duct temperature sensor shall be an integral part of the damper assembly. Q. Diagnostics: The Zone and Bypass controllers shall provide selftest, on board diagnostics and alarm conditions, and shall be capable of performing diagnostics on its critical components as well as all hard-wired sensors and inputs. The controllers shall display any alarm messages on the System Pilot until the alarm condition has been corrected. The controllers shall store at a minimum the last five alarm conditions. The controllers may be configured to report alarms on a network or to not report alarms. All alarms shall be capable of being read from the controller through the use of a communicating network with a PC and EMS software. R. Monitoring: The 3V system controllers shall be capable of providing the following information for monitoring of system parameters: 1. Space temperatures 2. Filter status 3. CO2 status 4. Space temperature averaging 5. Space temperature sharing 6. Occupancy mode 7. Supply air temperatures 8. Leaving air temperature conditions 9. Air source supply temperature 10. Heat/Cool mode conditions 11. Error reduction optimized staging 12. Indoor relative humidity 13. Fan run time 14. Compressor run time 15. Compressor starts 16. Outside air temperature 17. Fan status 19 Guide specifications — 3V™ control system (cont) 2.02 SOFTWARE A. Access Capability: Access capability to the system, whether local or remote, shall be accomplished using a communications bus, modem or AutoDial Gateway/TeLINK (as applicable) and PC with EMS software. B. Information Retrieval: The software shall be capable of, but not limited to, listing all current system sensor readings, listing and modifying configuration parameters such as set point, occupancy schedules, alarm options, temperature limits and functional configuration data. System temperature and input information shall be available for local or remote site trending. Part 3 — ADS Requirements 3.01 AIR DISTRIBUTION SYSTEM (ADS) A. Multiple zone controllers being serviced by the same air handler shall be networked together. B. Each zone controller shall include an occupancy schedule or may share a global occupancy control for an entire designated group. C. Each zone controller shall be capable of supporting holiday periods. D. Each zone controller shall include the capability to monitor one space temperature sensor and CO2 sensor or Relative Humidity sensor. E. The zone controller shall monitor primary damper position, space temperature, air handler status and mode, supply-air temperature (as applicable) and shall position its terminal damper based on its PID (Proportional, Integral, Derivative) temperature control algorithm to maintain the desired zone temperature set point. F. Each zone controller shall include the inherent ability to override the temperature control loop and modulate the terminal’s damper with a PID loop, based on a ventilation sensor with its associated set point schedule, in conjunction with the normal temperature control loop. G. The zone controller shall be capable of maintaining an air quality set point through a Demand Controlled Ventilation algorithm in conjunction with the Air Handler to fulfill the requirements of ASHRAE standard, 62-1989 “Ventilation For Acceptable Indoor Air Quality” (including addendum 62a-1990). The algorithm shall also be capable of modulating the heat to keep the space temperature between the heating and cooling set points. The IAQ algorithm shall be temporarily suspended if the space temperature falls below the heating set point or the system mode is Heat or Morning Warmup. The system shall also include the capability for a maximum primary damper position limit to protect the zone from over cooling for those units that do not include local heating. H. Depending upon the type of terminal, the zone controller shall sequence the terminal’s fan, hot water valve or auxiliary heat as required. 20 I. Depending on the equipment mode of operation, separate heat/cool, minimum/maximum, damper position set points shall be used to help protect the equipment from insufficient airflow during heating (minimum heating damper position) or overload (maximum heating and maximum cooling damper position). J. Auxiliary heating for IAQ applications shall be of the modulating hydronic type. Two-position actuator or staged heat shall not be acceptable for IAQ applications. K. All parallel fan powered terminals with local auxiliary heat shall include a heat on delay timer (unless in the commissioning mode) to ensure that the use of plenum air is insufficient before any heat stage is enabled. All ducted heat shall be controlled so as not to exceed a user defined maximum duct temperature. All fan powered terminals with local auxiliary heat shall also include a fan off delay value, to ensure that the heat has been sufficiently dispersed before disabling the fan. All timers shall be provided in software. L. Each space temperature sensor shall include an override button as an integral part of the sensor. Whenever the button is pushed during the unoccupied mode, the zone shall be indexed to control to its occupied set points, the air source shall start, and the zone shall stay in its Occupied mode for the duration of the override period. The timed override duration shall be operator configurable from one minute to 24 hours in one-minute increments. 3.02 SYSTEM TERMINAL MODES A. Each air terminal mode shall be based on the current air handler mode, terminal type, space temperature, and the current temperature set points. B. All zone controller’s servicing Series fan terminals shall include a Series Fan Terminal Precheck (SFTP) algorithm before starting its fan and control sequence. The SFTP algorithm shall ensure proper fan rotation whenever the fan is commanded on, by closing its damper, waiting for a short time delay, and then enabling its fan. Actual damper position shall be required for this algorithm. After the fan starts the zone controller shall modulate its damper. Each zone controller servicing Series terminals shall include a unique time delay to prevent all dampers from closing at once, and to prevent all the fans from starting at the same time. C. The terminal operation depends upon the air source operation and zone requirements as follows: 1. Off: a. All terminal dampers will maintain a 70% open position. Both Parallel and Series fans shall be disabled. b. If the zone requirement is heating, all single duct terminals shall maintain their damper position at 70%. Any zone controller servicing a parallel or series box shall fully close their dampers while the fan is operating. If local heat is available, the series and parallel fans shall start and local heat shall be enabled to maintain its unoccupied heating set point. The damper shall be modulated open to 70% after heating is no longer required. 2. Cooling and Night Time Free Cooling (NTFC): a. If the zone requirement is none, then the zone controllers shall modulate their dampers to maintain their minimum cooling damper position or damper ventilation position if the supply air temp is between 65 and 75 F. Any zone controllers servicing Series terminals shall also modulate their dampers to maintain their minimum cooling damper position or damper ventilation position if the supply air temp is between 65 and 75 F after completing their SFTP cycle. During the NTFC mode the zone controller shall control between its heating and cooling set points. During the other modes the zone controller shall modulate its damper to its occupied cooling set point. b. If the zone requirement is cooling, then the zone controllers shall modulate their air dampers between their minimum and maximum cooling damper position to maintain their cooling set point. Parallel fans shall be disabled. Series fans shall start and control after completing their SFTP cycle. c. If the zone requirement is heating, then the zone controllers shall modulate their dampers to maintain their minimum cooling damper position. Any zone controllers servicing Series fans shall complete their SFTP cycle before modulating their dampers. Any zone controllers servicing single duct units with reheat capability shall maintain the greater of either the minimum cooling damper position or the minimum reheat damper position. Zone controllers servicing parallel units shall enable their fans. Zone controllers servicing Series terminals shall complete their SFTP cycle before modulating their dampers. After the fan starts, the damper shall be modulated to maintain its minimum cooling damper position. 3. Heat: a. If the zone requirement is none, then the zone controller shall maintain its minimum heating damper position. Parallel fans shall be disabled and their air damper shall be modulated to maintain their minimum heating damper position. Series units shall complete their SFTP cycle checks and then modulate its damper to maintain its minimum heating damper position. b. If the zone requirement is cooling, then the zone controller shall modulate its damper to maintain its minimum heating damper posi- tion. Parallel fans shall be disabled. Zone controllers servicing Series units shall complete their SFTP cycle and then shall modulate their primary damper to maintain their minimum heating damper position. 4. Pressurization: a. If the zone requirement is none or cooling, then the zone controller shall maintain its maximum cooling damper position. Parallel fans shall be disabled. The damper for series fans, after successfully completing its SFTP cycle, shall modulate to maintain the maximum cooling damper position. b. If the zone requirement is heating, and the zone controller has been enabled to provide local heating, then the zone controller shall modulate its damper to its maximum cooling damper position and enable its auxiliary heat. If local heat is not available, the damper shall be modulated to maintain its maximum cooling damper position. c. For series fan operations, the SFTP cycle shall be completed before modulating the primary air damper to its maximum cooling damper position. 5. Evacuation: During the Evacuation mode all terminal fans shall be disabled and all dampers shall close. Part 4 — Abnormal Conditions 4.01 The proposed system shall include the ability to detect abnormal conditions, and to react to them automatically. A return to normal conditions shall also generate a return to normal notification and the system shall revert back to its original control scheme before the abnormal condition existed. The following abnormal terminal conditions shall automatically generate an alarm and the system shall take the following actions: A. If a space temperature sensor is determined by the zone controller to be invalid, the zone controller shall generate an alarm, default to its Ventilation mode and maintain its configured ventilation damper position. B. If a relative humidity sensor (monitor only function) is determined by the zone controller to be invalid, the zone controller shall generate an alarm. C. If an indoor air quality sensor is determined by the zone controller to be invalid, the zone controller shall generate an alarm, and disable its IAQ algorithm. D. If a zone controller loses communication with its associated coordinator, it shall generate an alarm. If the zone controller does not have a supply-air sensor installed, then the zone controller shall assume it is in a Cooling mode and modulate its primary air damper between its minimum and maximum damper position. If the zone includes a reheat coil, it 21 Guide specifications — 3V™ control system (cont) shall not allow reheat to function unless the zone has a valid supply air sensor. E. If a linkage master loses communications with the equipment controller and it has a primary air temperature sensor installed, the linkage master zone controller shall determine the equipment operating mode based on the temperature of the primary air, and the system pressure measured at the bypass controller. If no bypass controller exists, the air source will be determined to be always on. F. If a linkage master loses communication with an associated zone controller, the linkage master shall alarm and remove that zone temperature from its weighted averages. The zone controller shall continue to operate in a stand-alone mode. Part 5 — System 5.01 The system shall include the ability to configure and display up to 32 zones for each air source. A zone shall be defined as a space temperature sensor wired to a zone controller. A. Configuration: Each zone shall have the ability to configure and display the following: 1. Minimum/Maximum damper position limits used by the terminal control when the air source is in the Cooling mode. 2. Minimum/Maximum damper position limits used by the terminal control when the air source is in the Heating mode. 3. Reheat damper position limit (single duct units only) used when local heat is required and the air source is in Cooling mode. 4. Ventilation damper position when air source is in cooling or free cooling mode. 5. Terminal Inlet size (diameter or square inches). 6. Heating type. 7. Central Heating caller. 8. Heat on delay. 9. Fan off delay (parallel terminal fans only). 10. Maximum duct temperature. 11. Alarm set points. 12. Occupancy Override value. 13. Heating and cooling Occupied/Unoccupied temperature set points. 14. Ventilation set point (CO2) and maximum damper position limit. 15. Heat enable/disable. B. Zone Display: Zones shall have the capability to display the following as a minimum: 1. Terminal operating mode and terminal type. 2. Zone space temperature. 3. Actual damper blade position (0 to 100% open). 22 4. Primary air temperature (if applicable). 5. Terminal fan status (if applicable). 6. Leaving temperature (heating only). 7. Zone CO2 (if applicable). 8. Zone Relative Humidity (if applicable). C. Maintenance Display: Maintenance screens shall be provided to ease and expedite the task of troubleshooting. The screens shall have the capability to display the following as a minimum: 1. The current calculated damper reference. 2. Occupancy and override status. 3. Current user set point offset value. 4. Current heating and cooling set points. 5. Heat Status (if applicable). 6. Ducted heating reference temperature. 7. Current Air Source operating mode and supply temperature. 8. Average zone temperature, average occupied zone temperature, and the next occupied/ unoccupied day and time for all terminals serviced by each respective air handler (linkage master only). 9. Occupancy maintenance screens shall display such information as timed override status and duration and current occupied and unoccupied time (Local schedule only). 10. Position of the open primary air damper of all terminals serviced by their respective air handler (coordinator only). Part 6 — Linkage 6.01 Each zone controller shall have the capability to directly communicate to a factory supplied air source microprocessor to provide a totally linked and coordinated Air Distribution System. A. The linkage shall include the following air source modes for use by the Coordinator as a minimum: Off, Cooling, Heating, Night Time Free Cooling, Pressurization, and Evacuation. B. The linkage shall also provide system data to the air source controller for use in its algorithms. C. The coordinator shall periodically poll its assigned zones to acquire their updated values. D. Space temperature and space temperature set points acquired by the coordinator for use by the air handler controller shall include a weighted factor, proportional to the size of the zone. E. Only those zones with valid temperature readings shall be included. F. The system data shall include average zone temperature, average occupied zone temperature, average occupied and unoccupied heat/cool set points, occupancy status, and the next occupied zones terminal time and day. G. Maximum CO2 or space relative humidity shall be supplied to the air source through other networking means. H. The system shall provide the capability of using the above data in the air source algorithms for adaptive optimal start, Night Time Free Cooling, dehumidification and Demand Controlled Ventilation adjustments to the mixed air damper routine. I. The air handler controller shall, through the Air Distribution System, bias its occupancy time schedules to provide optimization routines and occupant override. J. For those systems that do not include inherent linkage software, the Coordinator shall determine the operational mode of the equipment through its associated bypass controller pressure sensor and a temperature sensor mounted in the supply ductwork. If there is no bypass controller then the system will assumed to be always on. K. The vendor shall make it clear in the bid/proposal if linkage software is not going to be part of their offering. 23 Carrier Corporation • Syracuse, New York 13221 9-04 Manufacturer reserves the right to discontinue, or change at any time, specifications or designs without notice and without incurring obligations. Book 1 4 New Book 1 Pg 24 Catalog No. 523-349 Printed in U.S.A. PC 111 Form 33ZC-1PD Replaces: New Tab 1CS1 Tab 11a 13a Product Specification VVT® Zone Controller 3V™ Control System 33ZC 1 2 1 J6 6 GND GND PAT 1 G + 1 8 3 CCW COM CW +10V DMPPOS GND AUX DMP GND J5 1 Copyright 2004 Carrier Corporation - 3 Bus#: Element#: Unit#: SPT GND SAT T56 GND REMOTE J2A CCN Part Number: 33ZCVVTZC-01 S/N: +24V GND 1 1 IAQ/RH J4 J7 FAN 24VAC HEAT3 24VAC HEAT2 24VAC HEAT1 24VAC J3 J1 24VAC SRVC 3 J2BCOMM2 1 - G + 2 G + ® 12 11 Part Number: 33ZCVVTZC-01 The VVT Zone Controller is a component of Carrier’s 3V Control System and is used to provide zone level temperature and air quality control for Variable Volume and Temperature Applications. The VVT zone controller can be operated and configured through the Carrier communicating network with the System Pilot user interface. The VVT Zone Controller provides the following features and benefits: • provides pressure dependent (VVT) control • uses Proportional Integral Derivative (PID) control • mounts directly onto VVT terminal damper shaft • optional terminal fan control NOTE: Terminal fan control requires the VVT Zone Controller Option Board P/N 33ZCOPTBRD-01 • optional auxiliary heating control of: two-position hot water; one, two, or three-stage electric; modulating hot water valve; or combination radiant/ ducted heat stages NOTE: Auxiliary heating requires the VVT Zone Controller Option Board P/N 33ZCOPTBRD-01 • VVT control for terminals up to 2.7 sq. ft inlet • quick and easy commissioning and balancing process via a dedicated maintenance table for system wide air balancing • capable of stand-alone operation with supply-air temperature sensor • actuator preassembled to housing with conduit box and hinged covers • capable of zone level Demand Controlled Ventilation support with field-installed CO2 sensor • communicates to all Carrier 3V networked devices • capable of high-speed 38.4 kilobaud communications network operation Form 33ZC-12PS • 128 controller maximum system (must be located on same network bus segment) • up to 32 zone controllers per system • capable of zone humidity monitoring with field-installed humidity sensor • Carrier Linkage System capability • global set point and occupancy scheduling • sensor averaging • foreign language support for ASCII based character set • dedicated port for System Pilot connection • can drive up to 4 linked damper actuators • capable of local set point adjustment using fieldinstalled temperature sensor (with temperature offset) • both controller housing and actuator are UL94-5V plenum rated • control complies with ASHRAE 62.1 Features/Benefits Flexibility for every application User interface The VVT® zone controller is a single duct, variable volume and temperature terminal control with a factory-integrated controller and actuator. The VVT zone controller maintains precise temperature control in the space by regulating the flow of conditioned air into the space. Buildings with diverse loading conditions can be supported by controlling reheat (single duct only) or supplemental heat. The VVT zone controller can support two-position hot water, modulating hot water, 3-stage electric heat, or combination baseboard and ducted heat. The VVT zone controller is designed to allow a service person or building owner to configure and operate the unit through the System Pilot user interface. A user interface is not required for day-to-day operation. All maintenance, configuration, setup, and diagnostic information is available through the Level II communications port to allow data access by an attached computer running Network Service Tool or ComfortVIEW™ software. → Carrier linkage system compatibility When linked to a Carrier Linkage System, the VVT zone controller provides numerous features and benefits such as weighted average demand for system operation, reference zone temperature and set points, set point averaging, global set point schedule, and occupancy scheduling. Additional control features The VVT zone controller provides additional control features such as Occupied/Unoccupied scheduling initialized via the network. The zone controller offers override invoked from a wall sensor during unoccupied hours from 1 to 1440 minutes in 1-minute increments. Optional CO2 control or relative humidity monitoring are also available. Simple actuator connection The VVT zone controller control assembly contains an integral VVT actuator assembly that is field mounted to the terminal damper shaft, similar to the mounting of a standard actuator. The actuator is rated at 35 lb.-in. (3.95 N-m) torque, a 90-degree stroke, and provides 90-second nominal timing at 60 Hz. The actuator is suitable for mounting onto a 3/8-in. (9.5 mm) square or round VVT box damper shaft, or onto a 1/2-in. (13 mm) round damper shaft. The minimum VVT box damper shaft length is 13/4-in. (45 mm). The VVT zone controller is designed for vertical or horizontal mounting. → Ease of installation The VVT zone controller is provided with removable connectors for power, communications, and damper. The VVT zone controller has non-removable screw type connectors for inputs. The VVT zone controller also provides an RJ-14 modular phone jack for the Carrier network software connection to the module via Carrier network communications. 2 105 Functions • Pressure dependent space temperature control for single duct, series fan powered and parallel fan powered air terminals • Auxiliary heat functions including two-position hot water valve, 3 stages of electric heat, modulating hot water valve and combination radiant/ducted heat stages • T55/T56 wall mounted space temperature sensor interface • T56 space temperature set point reset (slide potentiometer) • Timed override (T55/T56 pushbutton) with one-minute granularity • Space temperature and set point reset sharing • Display of relative humidity based on local or remote sensor • Local occupancy control • Remote occupancy override • Airside linkage • Linkage function for multiple terminals with and without an air source • Adaptive optimal start (AOS) • Sensor grouping function • Commissioning functions • System-wide air balancing • Damper calibration • Sensor trim • Carrier network tables and alarms • Demand Controlled Ventilation (DCV) • Analog CO2 monitoring and control • Loadshed/redline response • System Pilot interface Specifications Wiring connections Communications Field wiring is 18 to 22 AWG (American Wire Gage). The VVT zone controller is a NEC (National Electronic Code) Class 2 rated device. The number of controllers is limited to 128 devices maximum, with a limit of 8 systems (Linkage Coordinator configured for at least 2 zones). Bus length may not exceed 4000 ft (1219 m), with no more than 60 devices on any 1000 ft (305 m) section. Optically isolated RS-485 repeaters are required every 1000 ft (305 m). At 19,200 and 38,400 baud, the number of controllers is limited to 128 maximum, with no limit on the number of Linkage Coordinators. Bus length may not exceed 1000 ft (305 m). Inputs • Space temperature sensor • T55/T56 wall-mounted space temperature sensor interface • T56 space temperature set point reset (slide potentiometer) • Optional supply air temperature sensor (required for reheat and stand-alone operation) • Optional primary air temperature sensor (one required per system that does not utilize a linkage compatible air source) • Optional CO2 sensor • Optional relative humidity sensor (for monitoring only) • Optional remote occupancy contact input Outputs • Integrated factory-wired pressure dependent damper actuator • Heating (requires VVT Zone Controller Option Board 33ZCOPTBRD-01) — Two-position hot water — One to three stages of heat — Modulating hot water valve — Combination radiant/ducted heat stages • Terminal fan (requires VVT Zone Controller Option Board 33ZCOPTBRD-01) • Damper position output (0 to 10v) for linked dampers Power supply The power supply is 24 vac ± 10% at 40 va (50/60 Hz). Environmental ratings Operating Temperature. . . . .32 F to 131 F (0° C to 55 C) Storage Temperature . . . . . .32 F to 158 F (0° C to 70 C) Operating Humidity . . . . . . 10% to 95%, non-condensing Storage Humidity . . . . .10% to 41% at 158 F, condensing Power consumption The power requirement sizing allows for accessory water valves and for the fan contactor. Water valves are limited to 15 va. The fan contactor is limited to 10 va (holding). Vibration Performance Vibration: 1.5 G measured at 20 to 300 Hz Corrosion Office environment. Indoor use only. Approvals • NEC Class 2 • UL 916-PAZX and UL 873 • Conforms to requirements per European Consortium standards EN50081-1 (CISPR 22, Class B) and EN50082-1 (IEC 801-2, IEC 801-3, and IEC 801-4) for CE mark labeling • UL94-5V (actuator) Accessories Supply air temperature sensor — The 33ZCSENSAT supply air temperature sensor is required for heating applications or stand-alone operation. The sensor has an operating range of –40 to 245 F (–40 to 118 C) and includes a 6-in. stainless steel probe and cable. Duct air temperature sensor — The 33ZCSENDAT Duct Air Temperature Sensor is required for cooling only applications on non-33ZC dampers. The sensor is used for supply air monitoring. The sensor has an operating range of –40 to 245 F (–40 to 118 C) and includes a mounting grommet and 75-in. cable. Primary air temperature sensor — The 33ZCSENPAT Primary Air Temperature sensor is required on a linkage coordinator Zone Controller if the Zone Controller is not using a Carrier network, linkage compatible air source. The sensor is used to monitor the equipment’s supply-air temperature. The temperature is broadcast to the system Zone Controllers which receive information from the master. The sensor has an operating range of –40 to 245 F (–40 to 118 C) and includes a 6-in. stainless steel probe with conduit box. Space temperature sensor with override button — The 33ZCT55SPT Space Temperature Sensor with Override Button is required for all applications. The space temperature sensor monitors room temperature, which is used by the Zone Controller to determine the amount of conditioned air that is allowed into the space. Space temperature sensor with override button and set point adjustment — The 33ZCT56SPT Space Temperature Sensor with Override Button and Set Point Adjustment can be used in place of the 33ZCT55SPT space temperature sensor if local set point adjustment is required. A space temperature sensor is required for all applications. The space temperature sensor monitors room temperature, which is used by the Zone Controller to determine the amount of conditioned air that is allowed into the space. The set point adjustment bar is configurable 3 Accessories (cont) 33ZCT55CO2 CO2 sensor is a combination CO2 sensor and temperature sensor with pushbutton timed override. The 33ZCT56CO2 has these features and includes a set point offset slidebar. NOTE: The Relative Humidity sensor and Indoor Air Quality (CO2) sensor cannot be used on the same zone controller. VVT® zone controller option board (33ZCOPTBRD-01) — The 3V-VVT Zone Controller Option Board is required for use of auxiliary heat and fan control functions. The Option Board is field installed and provides four triac discrete outputs, three for supplemental heat and one for the fan output. for up to a ± 15 F (8 C) temperature adjustment by the room occupant. Space temperature sensor with override button, set point adjustment, and liquid crystal display (LCD) — The 33ZCT59SPT space temperature sensor with override button, set point adjustment, and LCD can be used in place of the 33ZCT56SPT space temperature sensor if an LCD is required. A space temperature sensor is required for all applications. Relative humidity sensor — The 33ZCSENSRH-01 Relative Humidity sensor (indoor space) is required for zone humidity monitoring. Indoor air quality sensor — Two CO2 sensors are available for optional Demand Controlled Ventilation (DCV). They are indoor, wall-mounted sensors. The Dimensions → ZONE CONTROLLER Carrier Corporation • Syracuse, New York 13221 105 9-04 Manufacturer reserves the right to discontinue, or change at any time, specifications or designs without notice and without incurring obligations. Book 1 4 New Book 1 Pg 4 Catalog No. 523-351 Printed in U.S.A. PC 111 Form 33ZC-12PS Replaces: New Tab 1CS1 Tab 11a 13a Comfort Controller 6400 and 6400-I/O Installation Instructions Panel Mounting ENCLOSURE FIELD SUPPLIED NOTE: At least 2.88 inches (73.0 mm) between drill holes (top and bottom) to accomodate side by side arrangement of 2 or more modules. (REF.) FOR PLACEMENT OF SECOND DRILL 2 HOLE #29 (≈0.125" dia) (≈3.2 mm) 2" ) 2.1mm 3.8 (5 (REF.) FOR PLACEMENT 1 OF FIRST DRILL HOLE #29 (≈0.125" dia) (≈3.2 mm) 8" ) 2.8mm 3.0 (7 8" ) 6.3 mm .9 61 (1 2 8" ) 2.8mm 3.0 (7 3" m) m 2 . 6 1 (7 NOTE: Minimum distance from base of enclosure to place first drill hole. 808-997 Rev. 03/03 #8-32 X 3/4" SELF TAPPING SCREW (2 PLACES) Page 1 of 6 6400 and 6400-I/O Power Connector Location Warning: If using a 24 Vac power supply to power the Comfort Controller, do not use it to also power other non-Comfort Controller modules or field devices (for example, actuators). Pin Number Power Connector 3 2 1 24 Vac or 33 Vdc (+) 24 Vac or 33 Vdc (-) Chassis ground POWER CONNECTOR (PLUG-IN TYPE ON 6400 MODULE) Failure to correctly wire power connector can permanently damage 6400 module. Page 2 of 6 3 WARNING: 2 Connect Pin 1 on each Comfort Controller module's power connector to chassis (earth) ground. 1 CAUTION: 24 (+) VAC OR 33VDC 808-997 Rev. 03/03 (–) CHASSIS GND 6400 and 6400-I/O Communication Connector Location PLUG-IN TYPE CONNECTOR ON 6400 MODULE WHT, CLEAR OR GRN 3 2 1 (–) NOTE: Do not bundle power and communication wiring with sensor and device wiring. (+) G RED BLK SHIELD CCN COMMUNICATION 808-997 Rev. 03/03 Page 3 of 6 Communication Connections The figure below shows I/O communication connections between Comfort Controller 6400 and 6400-I/O modules. 12 6400 ENCLOSURE MODULE (FIELD SUPPLIED) 31 2 COMMUNICATION DAISY CHAIN BETWEEN MODULES 3 3 3 SHIELD BY-PASSES MODULES 6400/IO MODULE 2 2 3 12 1 2 13 SHIELDS ATTACHED TO CHASSIS GROUND (ON ONE END ONLY) 13 3 1 1 23 13 2 TO NEXT ELEMENT ON CCN BUS 31 13 2 12 3 BOTTOM VIEW OF MODULES TO NEXT ELEMENT ON CCN BUS NOTE: Do not bundle power and communication wiring with sensor and device wiring. Related Documentation For more information on the Comfort Controller 6400, see the following: • • • • • Comfort Controller Installation & Start-up Manual (808-890) Comfort Controller Overview and Configuration Manual (808-891) Comfort Controller Application Guide (808-892) Comfort Controller Flowchart Manual (808-910) Comfort Controller 6400 Product Data Sheet (808-895) Page 4 of 6 808-997 Rev. 03/03 Smoke Control Applications In UUKL smoke control applications, the Comfort Controller 6400 (part number CEPL130201) and 6400-I/O (CEPL130203) must be mounted in an enclosure that is UL listed for fire-protective signaling use, such as CEAS321422-01. The power supply must be a regulated, UL-listed power supply for fire-protective signaling use. It should be rated for 250 VA, 120 Vac, 60 Hz primary, and 24 Vac secondary. The figure below illustrates module wiring for smoke control applications. Refer to the UUKL Smoke Control Application Guide (808-220) for complete information on CCN Communication Bus wiring. Warning: Smoke control system installations must conform to the methods described in the UUKL Smoke Control Application Guide. Do not attempt to install a smoke control system using only the component installation instructions. Comfort Controller 6400 I/O & CCN Communication RS-485 5Vdc @ 1/4 amp Note: For these applications, you must fabricate and install the varistor assemblies shown in the illustration. 808-997 Rev. 03/03 Page 5 of 6 CCN Bus Supervisor Comfort Controller hardware with specially programmed firmware (Upgrade Kit, part number CEPL130432) is used as a CCN bus supervisor in smoke control applications. It should be wired as shown in the figure below. Page 6 of 6 808-997 Rev. 03/03 PRODUCT DATA Comfort Controller 6400 The Comfort Controller 6400 is a microcontroller-based module that provides general purpose HVAC control and monitoring capability in a standalone or network environment using closed-loop, direct digital control. The 6400 gives the Carrier Comfort Network (CCN) the capability to control and communicate with non-Carrier equipment and Carrier HVAC equipment not equipped with Product Integrated Controls (PIC) controls. You can connect 16 field points (8 inputs and 8 outputs) to the 6400. To connect additional field points, add optional input/output modules (8 inputs and 8 outputs per I/O module) to the 6400. By using multiple I/O modules, you can connect up to 48 additional points, giving you the capability to control and/or monitor a total of up to 64 field points. The appropriate number of I/O modules are selected for each control situation and simply installed along with the 6400 in your fieldselected NEMA-1 enclosure. This modular concept contributes to overall versatility and ease of installation. The Comfort Controller 6400 includes a diverse library of performance-proven control routines, written in plain English, using simple "fill-in-the blanks" format for fast, easy programming. Additionally, for custom applications, Carrier's BEST++ software provides custom programming capabilities to work independently, or in conjunction with the pre-engineered control routines. 8 INPUTS Numbers Specifications 1 to 8 Discrete, analog, or temperature Discrete Dry contact Pulsed dry contact Analog 4-20 mA 0-10 Vdc Temperature 5K & 10K ohm thermistors 1K ohm nickel RTD FEATURES • Stand-alone control and monitoring of up to 16 field points, using proven algorithms. • Support of the UT203 FID family of I/O modules for retrofit and upgrade applications. • Compatibility with the following interface devices: Local Interface Device (LID), ComfortWORKS, Building Supervisor III, System Access Module (SAM), and Network Service Tool III. • Three LEDs, conveniently located on the front of the module, indicate processor status (red), CCN Communication Bus status (yellow), and I/O module communication status (green). • Entire database at your disposal. Based on your application's requirements, you determine how many and which algorithms, inputs/outputs, schedules, alarms, and system functions to include in the database. Therefore, the database will only consist of the items that are necessary for the application — valuable memory space is not wasted. Specifications subject to change without notice 8 OUTPUTS Numbers Specifications 1 to 8 Discrete or analog © 1996, Carrier Corporation Discrete 24 Vdc@80 mA Analog 4-20 mA 0-10 Vdc Printed in U.S.A. 808-895 Rev. 11/96 PRODUCT DATA • Ability to display the amount of available database space. • Ability to add items to database as necessary. • Local connection for LID and CCN. • Total facilities management when linked to a CCN. • Ability to disable all inputs, all outputs, or disable both inputs and outputs by simply flipping a switch. • Two-day backup of clock and data such as Data Collection and Runtime. • Simplified field wiring using “plug type” terminals (two-pin connection). • No need for batteries. • Optional Comfort Controller 6400-HOA (Hand-OffAuto) consisting of eight switches that provide you with the capability to manually override each discrete output point. • Uses any standard, field-supplied 24 Vac, 60VA transformer. FUNCTIONS Cooling and Heating Control Space Temperature Comfort Zone Humidification and Dehumidification Mixed Air Damper Optimization VAV Fan Control VAV Supply and Return Fan Tracking Indoor Air Quality Generic PID Control Time Scheduing with/without Override Analog Temperature Control Discrete Interlock Staged Thermostat Proportional Thermostat Primary/Secondary Pump Control Staged Discrete Control Permissive Interlock Night Time Free Cooling Morning Warm-up Adaptive Optimal Start/Stop Control Point Reset On-Board Consumable Point Calculates a usage value (kwh, gal/hr, lbs/hr,etc.) in applications where simple data collection is required. On-Board Trending Collects up to 48 data samples per point (with an adjustable iteration rate) on a revolving basis, or stops the trending after 48 samples are collected. Use as a means of troubleshooting. Specifications subject to change without notice Linkage to Airside (TSM) and Waterside (WSM) Systems Optimizes efficiency by fully integrating all HVAC operations. (DAV) Custom Programming (BEST++) Enhances or supplements the industry-proven, preengineered algorithms with BEST++ by creating new algorithms to meet any unique control requirements. CCN FEATURES When included in a network with other CCN controllers, Option Modules, and user interfaces, the following additional capabilities are possible: • Alarm processing, messages, and annunciation. • Runtime, history, and consumable data collection and report generation. • Demand limiting/loadshedding. • Broadcast of data such as outside air temperature, outside air humidity, and time of day. • Data transfer between system elements. • Timed overrides for use with Tenant Billing. • Airside and waterside linkage. © 1996, Carrier Corporation Printed in U.S.A. 808-895 Rev. 11/96 PRODUCT DATA Comfort Controller 6400-I/O The Comfort Controller 6400-I/O is used with the Comfort Controller 6400 to expand the field point capacity from 16 points (8 inputs and 8 outputs) up to a total of 64 points. Each 6400-I/O can be configured to use all 16 points (8 inputs and 8 outputs) or only 8 outputs or only 8 inputs. This provides the ultimate flexibility in useage of field points to meet the specific needs of each application. Determine the number of 6400-I/O required for your particular application. Then simply install the modules along with the 6400 in your field-selected NEMA-1 enclosure. To determine the number of 6400-I/O required by the particular application, first decide how many field points are required. Then order and install the 6400-I/O(s) along with the 6400 in your field-selected enclosure. This modularity contributes to overall versatility. FEATURES • Monitors up to 16 field points. • Two LEDs, conveniently located at the top of the module, indicate processor status (red) and module communication status (green). • Local connection for LID. • Ability to disable all inputs or all outputs by simply flipping a switch. • Simplified field wiring using “plug type” terminals (two-pin connection). • Optional Comfort Controller 6400-HOA (Hand-OffAuto) consisting of eight switches that provide you with the capability to manually override each discrete output point. 8 INPUTS Numbers Specifications 1 to 8 Discrete, analog, or temperature Discrete Dry contact Pulsed dry contact Analog 4-20 mA 0-10 Vdc Temperature 5K & 10K ohm thermistors 1K ohm nickel RTD 8 OUTPUTS Numbers Specifications 1 to 8 Discrete or analog Discrete 24 Vdc@80 mA Analog 4-20 mA 0-10 Vdc Specifications subject to change without notice © 1996, Carrier Corporation Printed in U.S.A. 808-895 Rev. 11/96 PRODUCT DATA SPECIFICATIONS — Comfort Controller 6400 and Comfort Controller 6400-I/O Power Requirements ............... 60VA@24 Vac + 15% 1.5A@33 Vac + 15% Dimensions .................. 13 in H x 2.75 in W x 5.5 in D (33 cm x 7 cm x 14 cm) Operating Temperature ........................ 32°F to 140°F (0°C to 60°C) Storage Temperature .......................... -40°F to 185°F (-40°C to 85°C) Operating Humidity .......... 0 to 90%, non-condensing Discrete Out Specifications Output Signal............. 24Vdc@80 mA current limited Analog Out Specifications 4-20 mA Milliamp Type Load Resistance .................................. 0-600 ohms Resolution ................................................ 0.085 mA Accuracy .......................................................... ±2% 10K Thermistor Type Nominal reading @ 10,000 ohms .................... 77°F (25°C) Resolution ....................................................... 0.1oF Accuracy ......................................................... + 1oF Nickel RTD Type Nominal reading @ 1,000 ohms ...................... 70°F (21°C) Resolution ....................................................... 0.1oF Accuracy .......................................................... ±2oF The 6400 and 6400-I/O are UL 916 PAZX, UL 864 UDTZ, VDE, ULc, and CE Mark listed. ENCLOSURE AND POWER SUPPLY The 6400 and 6400-I/O are designed so that they can be easily installed in a field-supplied NEMA-1 enclosure. The 6400 and 6400-I/O use any standard, Class II, SELV-compatible, field-supplied 24 Vac, 60 VA transformer. 0-10 Vdc Voltage Type Load Resistance .............................. >50,000 ohms Resolution ..................................................... 50 mV Accuracy .......................................................... ±2% Discrete In Specifications Dry Contacts ....................................... Switch Closure Pulsing Dry Contacts Repetition Rate ....................................... 5 Hz max. Minimum Pulse Width ............................. 100 msec Analog In Specifications 4-20 mA Milliamp Type Wire type ....................................................... 2-wire Resolution ................................................ 0.025 mA Accuracy ......................................................... ±1% 0-10 Vdc Voltage Type Resolution .................................................0.0125 V Accuracy .......................................................... ±1% 5K Thermistor Type Nominal reading @ 5,000 ohms ...................... 77°F (25°C) Resolution ....................................................... 0.1oF Accuracy ......................................................... + 1oF Specifications subject to change without notice © 1996, Carrier Corporation Printed in U.S.A. 808-895 Rev. 11/96 PREMIERLINK™ Retrofit Rooftop Controller Version 2.x Installation, Start-Up and Configuration Instructions Part Number 33CSPREMLK CONTENTS Page SAFETY CONSIDERATIONS . . . . . . . . . . . . . . . . . . . . . . 1 GENERAL . . . . . . . . . . . . . . . . . . . . . . . . . . . . . . . . . . . . . . . . 2 INSTALLATION . . . . . . . . . . . . . . . . . . . . . . . . . . . . . . . . 2-25 Inspection. . . . . . . . . . . . . . . . . . . . . . . . . . . . . . . . . . . . . . . . 2 PremierLink Controller Hardware. . . . . . . . . . . . . . . . . 2 Field-Supplied Hardware . . . . . . . . . . . . . . . . . . . . . . . . . 2 • SPACE TEMPERATURE (SPT) SENSOR • SUPPLY AIR TEMPERATURE (SAT) SENSOR • INDOOR AIR QUALITY CO2 SENSOR • OUTDOOR AIR QUALITY CO2 SENSOR • RELATIVE HUMIDITY SENSOR • OUTDOOR AIR TEMPERATURE SENSOR • OUTDOOR AIR ENTHALPY SWITCH/RECEIVER • FILTER SWITCH Mount PremierLink Control. . . . . . . . . . . . . . . . . . . . . . . 3 • LOCATION • MOUNTING PremierLink Controller Inputs and Outputs . . . . . . 3 Control Wiring. . . . . . . . . . . . . . . . . . . . . . . . . . . . . . . . . . . . 3 Install Sensors . . . . . . . . . . . . . . . . . . . . . . . . . . . . . . . . . . . 6 • SPACE TEMPERATURE (SPT) SENSOR INSTALLATION • SUPPLY AIR TEMPERATURE (SAT) SENSOR INSTALLATION • INDOOR AIR QUALITY CO2 SENSOR INSTALLATION • OUTDOOR AIR QUALITY CO2 SENSOR INSTALLATION • HUMIDITY SENSOR (WALL-MOUNTED) INSTALLATION • OUTDOOR AIR TEMPERATURE SENSOR • FACTORY-INSTALLED CONTROLLER Connect Discrete Inputs . . . . . . . . . . . . . . . . . . . . . . . . 14 Connect to CCN Communication Bus . . . . . . . . . . . 16 • COMMUNICATIONS BUS WIRE SPECIFICATIONS Enthalpy/Switch Receiver . . . . . . . . . . . . . . . . . . . . . . . 18 • OUTDOOR ENTHALPY CONTROL • DIFFERENTIAL ENTHALPY CONTROL Enthalpy Sensors and Control . . . . . . . . . . . . . . . . . . 20 • OUTDOOR AIR ENTHALPY SENSOR/ ENTHALPY CONTROLLER • RETURN AIR ENTHALPY SENSOR Economizer . . . . . . . . . . . . . . . . . . . . . . . . . . . . . . . . . . . . . 21 • Q769B ADAPTER • Q769C ADAPTER Economizer with 4 to 20 mA Actuator . . . . . . . . . . . 23 • DRIVE DIRECTION • SWITCH SELECTION • WIRING START-UP . . . . . . . . . . . . . . . . . . . . . . . . . . . . . . . . . . . . 25-31 Page Perform System Check-Out . . . . . . . . . . . . . . . . . . . . . 25 Initial Operation and Test . . . . . . . . . . . . . . . . . . . . . . . 25 Sequence of Operation. . . . . . . . . . . . . . . . . . . . . . . . . . 25 • THERMOSTAT MODE • CCN SENSOR MODE CONFIGURATION . . . . . . . . . . . . . . . . . . . . . . . . . . . . 31-49 Points Display Screen. . . . . . . . . . . . . . . . . . . . . . . . . . . 31 Thermostat Control Input Screen. . . . . . . . . . . . . . . . 34 Alarm Service Configuration Screen . . . . . . . . . . . . 34 Controller Identification Screen . . . . . . . . . . . . . . . . . 35 Holiday Configuration Screen . . . . . . . . . . . . . . . . . . . 35 Occupancy Configuration Screen . . . . . . . . . . . . . . . 35 Set Point Screen . . . . . . . . . . . . . . . . . . . . . . . . . . . . . . . . 36 Service Configuration Selection Screen. . . . . . . . . 37 PremierLink Configuration Screen . . . . . . . . . . . . . . 41 Occupancy Maintenance Screen . . . . . . . . . . . . . . . . 44 Primary Maintenance Screen. . . . . . . . . . . . . . . . . . . . 45 System Pilot Maintenance Table. . . . . . . . . . . . . . . . . 48 System Pilot Alternate Maintenance Table. . . . . . . 48 SAFETY CONSIDERATIONS SAFETY NOTE Air-conditioning equipment will provide safe and reliable service when operated within design specifications. The equipment should be operated and serviced only by authorized personnel who have a thorough knowledge of system operation, safety devices and emergency procedures. Good judgement should be used in applying any manufacturer’s instructions to avoid injury to personnel or damage to equipment and property. Disconnect all power to the unit before performing maintenance or service. Unit may automatically start if power is not disconnected. Electrical shock and personal injury could result. An individual field-supplied 24-vac power transformer is recommended for each PremierLink controller. If the unit transformer is used but does not have enough power, damage to equipment may result. The field-supplied transformer must be less than 100 VA to meet UL (Underwriters Laboratories) Class 2. Manufacturer reserves the right to discontinue, or change at any time, specifications or designs without notice and without incurring obligations. Catalog No. 04-53330002-01 Printed in U.S.A. Form 33CS-58SI Pg 1 4-07 Replaces: 33CS-57SI Book 1 4 Tab 11a 13a • 33ZCT58SPT, T58 communicating room sensor with override button, set point adjustment, and manual fan control • 33ZCT59SPT, space temperature sensor with LCD (liquid crystal display) screen, override button, and set point adjustment If controlling an economizer in the thermostat mode, a duct sensor must be mounted in the return air duct and wired to SPT input. SUPPLY AIR TEMPERATURE (SAT) SENSOR — The PremierLink controller must be connected to a field-supplied supply air temperature (SAT) sensor (part number 33ZCSENSAT) to monitor the temperature of the air delivered. The SAT consists of a thermistor encased within a stainless steel probe. The probe is 6 in. nominal length. The SAT sensor has 114 in. of unshielded, plenum-rated cable (2 conductors, 22 AWG [American Wire Gage]). The sensor range is –40 to 185 F with a nominal resistance of 10,000 ohms at 77 F. The sensor measures temperature with an accuracy of ±0.36 F. Ideally, the SAT sensor should be located inside the unit under the heat exchanger. The SAT sensor can also be installed in the supply air duct downstream from unit heat source to control. INDOOR AIR QUALITY CO2 SENSOR — An indoor air quality sensor is required for CO2 level monitoring. Three different CO2 sensors are available for this application: • 33ZCSENCO2 sensor is an indoor, wall-mounted sensor with an LCD (liquid-crystal display) screen • 33ZCT55CO2 sensor is an indoor, wall-mounted sensor without display. The CO2 sensor also includes a space temperature sensor with override button • 33ZCT56CO2 sensor is an indoor, wall-mounted sensor without display. The CO2 sensor also includes a space temperature sensor with override button and temperature offset OUTDOOR AIR QUALITY CO2 SENSOR — The outdoor air CO2 sensor (33ZCSENCO2) is designed to monitor carbon dioxide (CO2) levels found in diesel exhaust and control ventilation systems. It comes with an outdoor enclosure. This sensor provides an outdoor baseline for differential DCV (Demand Control Ventilation) control. NOTE: The relative humidity sensor and the outdoor air CO2 sensor cannot both be used on the controller at the same time. RELATIVE HUMIDITY SENSOR — The 33ZCSENSRH01 relative space humidity sensor is required for dehumidification control on a rooftop unit equipped with a dehumidification device. Otherwise, the relative humidity sensor is used for monitoring only. NOTE: The relative humidity sensor and the outdoor air CO2 sensor cannot both be used on the controller at the same time. OUTDOOR AIR TEMPERATURE SENSOR — The outdoor air temperature sensor (33ZCSENOAT) monitors the temperature of the outside air. If the sensor is to be installed in the outdoor air duct instead of an outdoor location, sensor 33ZCSENPAT should be used. OUTDOOR AIR ENTHALPY SWITCH/RECEIVER (33CSENTHSW) — This device measures both temperature and humidity and converts the data into a relay output dependent on the sensor mode. Mode 1 is designed to energize the relay at a fixed set point of 28 Btu/lb or 75 F. Mode 2 is used in conjunction with the Return Air Enthalpy Sensor (33CSENTSEN) to measure both indoor and outdoor enthalpy and to determine which is greater. The enthalpy switch output can be normally open or normally closed. FILTER SWITCH — A field-supplied third-party differential air flow switch with normally open contacts is requried for detection of dirty filters. The switch must be rated for a minimum of 5 va at 24 vac. GENERAL The PremierLink™ controller, version 2.0, is a field retrofit rooftop control compatible with the Carrier Comfort Network® (CCN) system. This control is designed to allow users the access and ability to change factory-defined settings, thus expanding the function of the standard unit control board. The complete PremierLink package (part number 33CSPREMLK) consists of a rooftop control circuit board with plastic cover and label, wire harnesses, spade connectors, wire nuts and 4 mounting screws. IMPORTANT: PremierLink part number 33CSPREMLK should only be used in applications where the integrity of the Underwriters Laboratories rating will be maintained. Access is available via an RJ-11 connection or a 3-wire connection to the communication bus. User interfaces available for use with the CCN system are PCs equipped with Carrier user interface software such as Service Tool, ComfortVIEW™, or ComfortWORKS® software. When used as part of the CCN system, other devices such as the CCN data transfer, System Pilot™, Touch Pilot™, or Comfort Controller can read data from or write data to the PremierLink retrofit controller. INSTALLATION Inspection — Inspect package contents for visual defects that may have occurred during shipping. If there is any damage, contact your local representative before proceeding. PremierLink Controller Hardware — The PremierLink package consists of the following hardware: • control module (with plastic cover and label) • 7 wire harnesses • 10 spade connectors • wire nuts • 4 no. 6x1-in. self-drilling Phillips pan head mounting screws Field-Supplied Hardware — The PremierLink controller is configurable with the following field-supplied sensors: • space temperature sensor (33ZCT55SPT, 33ZCT56SPT, 33ZCT58SPT, or 33ZCT59SPT) in sensor mode or thermostat mode for economizer control • supply air temperature sensor (33ZCSENSAT) required for all applications • indoor air quality sensor (33ZCSENCO2, 33ZCT55CO2, 33ZCT56CO2) required only for demand control ventilation. A dedicated 24-vac transformer is required. • outdoor air quality sensor (33ZCTSENCO2) required only for demand control ventilation • outdoor air temperature sensor (33ZCSENOAT) • outdoor air enthalpy switch (33CSENTHSW) • filter switch (third party differential airflow) • return air enthalpy sensor (33CSENTSEN) • indoor relative humidity sensor (33ZCSENSRH-01), required only for dehumidification For specific details about sensors, refer to the literature supplied with the sensor. SPACE TEMPERATURE (SPT) SENSOR — A field-supplied Carrier space temperature sensor is required to maintain space temperature in sensor mode. There are four sensors available for this application: • 33ZCT55SPT, space temperature sensor with override button • 33ZCT56SPT, space temperature sensor with override button and set point adjustment 2 NOTE: If PremierLink controller will be installed in same location where Apollo controller was previously installed, simply use 2 of the existing Apollo mounting holes to line up with the board. 5. Provide 24 v power to the circuit board from the unit transformer or an isolated power transformer. Use the appropriate conductors for voltage per base unit nameplate. See Fig. 2. Board will require 10 va at 24 vac. 6. Replace plastic cover to protect circuit board. 7. Restore power to unit. Mount PremierLink™ Control LOCATION — The PremierLink controller should be located inside one of the available service access panels of the unit. Be sure the location selected prevents moisture and rain from coming into contact with the circuit board. Select a location which will be safe from water damage and allow sufficient access for service and wiring. For service access, there should be at least 6 in. of clearance between the front of the PremierLink controller and adjacent surfaces. Be sure to leave 1/2-in. clearance in front of RJ-14 connector for attaching RJ-14 cable from a CCN interface device. A fieldsupplied right angle 6-pin RJ-14 connector can be attached if necessary. NOTE: If the PremierLink controller must be installed in a location where there is not easy access to CCN connectors, a remote connection kit (part number 33CSREMCCN) can be ordered. MOUNTING — Refer to Mounting Sheet included with controller for additional detailed mounting instructions. 1. Ensure all power to unit is removed. 2. Locate a space in the unit control panel or a space inside the equipment that is free from dirt and dust. 3. Remove plastic cover by gently squeezing the middle of longer sides of the cover and pull away from the board. This will release the locking tabs inside. 4. Mount the PremierLink controller to the desired location by holding the controller firmly in place. Be sure all standoffs are in contact with mounting surface and board DOES NOT flex! Attach controller to unit using 4 screws provided ensuring a secure grip to unit surface. See Fig.1. a33-9129 PremierLink Controller Inputs and Outputs — The PremierLink controller inputs and outputs are shown in Table 1. Disconnect electrical power before wiring the PremierLink controller. Electrical shock, personal injury, or damage to the PremierLink controller can result. Control Wiring — The PremierLink controller can be connected to either a Carrier-approved thermostat or CCN compatible temperature sensor. 1. Turn off power to the control box. 2. Strip the ends of the red, white, and black conductors of the communication bus cable. NOTE: When connecting the communication bus cable, a color code system for the entire network is recommended to simplify installation and checkout. See Table 2 for the recommended color code. Fig. 1 — PremierLink Control Module 3 PWR HS3/EXH/RVS RED R ORN Y1 RED PNK Y2 RED W1 RELAYS HS1 WHT G CMP2 BLU C RED X YEL 48HJ,TJ004-014 50HJ,TJ004-014 50HJQ,TJQ004-012 ROOFTOP UNIT FAN PWR J1 J8 RED GRN BRN GRN RMTOCC RED YEL CMPSAFE BLU RED FSD WHT RED PNK RED ORN RED SFS DISCRETE CMP1 DDC CONTROL W2 J4 CUT FOR DUAL TRANSFORMER EQUIPMENT HS2 CUT TO ISOLATE CONTROLLER POWER a33-9130 FILTER ENTH 48/50HJ,TJ004-014 AND 50HJQ,TJQ004-012 UNITS PWR HS3/EXH/RVS RED TB2 W1 RED PNK R RED C RELAYS HS1 WHT Y1 Y2 CMP2 BLU G RED X YEL 48HJ015-025 50HJ015-025 48TJ016-028 50TJ016-028 ROOFTOP UNIT PWR J1 J8 RED FAN GRN BRN GRN RMTOCC RED YEL CMPSAFE BLU RED WHT RED PNK RED ORN RED FSD SFS FILTER ENTH 48/50HJ015-025 AND 48/50TJ016-028 UNITS NOTE: Inputs on J4 are 24 VAC; red leads are voltage source. Fig. 2 — Typical PremierLink™ Control Wiring to 48/50HJ,TJ, 50HJQ,TJQ Rooftop Units 4 DISCRETE CMP1 DDC CONTROL J4 CUT FOR DUAL TRANSFORMER EQUIPMENT HS2 CUT TO ISOLATE CONTROLLER POWER a33-9131 W2 ORN RED HS3/EXH/RVS RC ORN a33-9132 RH RED HS2 RED PNK W1 W2 RELAYS HS1 WHT Y2 CMP2 BLU G J8 RED YEL X 11 FAN GRN PWR J1 50HJQ014,016 BRN GRN RMTOCC RED YEL CMPSAFE BLU RED WHT RED PNK RED ORN RED FSD SFS DISCRETE C CMP1 DDC CONTROL Y1 RED CUT TO ISOLATE CONTROLLER POWER TB2 J4 CUT FOR DUAL CAP OR REMOVE TRANSFORMER THIS END OF JUMPER EQUIPMENT PWR FILTER ENTH 50HJQ014,016 UNITS NOTE: Inputs are 24 VAC; red leads are voltage source. Fig. 2 — Typical PremierLink™ Control Wiring to 48/50HJ,TJ, 50HJQ,TJQ Rooftop Units (cont) Table 1 — PremierLink Controller Inputs and Outputs INPUTS SPACE TEMPERATURE (SPT) SET POINT ADJUSTMENT (STO) SUPPLY AIR TEMPERATURE (SAT) OUTDOOR AIR TEMPERATURE (OAT) IAQ SENSOR (IAQI) OUTDOOR AQ/INDOOR HUMIDITY SENSOR (OAQ/IRH) REMOTE TIME CLOCK/DOOR SWITCH (RMTOCC) COMPRESSOR LOCKOUT (CMPSAFE) FIRE SHUTDOWN (FSD) SUPPLY FAN STATUS (SFS) FILTER STATUS (FLTS) ENTHALPY STATUS (ENTH) OUTPUTS ECONOMIZER (ECONPOS) FAN (SF) COOL STAGE 1 (CMP1) COOL STAGE 2 (CMP2) HEAT STAGE 1 (HS1) HEAT STAGE 2 (HS2 HEAT 3/EXHAUST/REV VALVE/DEH/OCC RELAY (HS3/EXH/RVS) POWER AI (10K Thermistor) AI (10K Thermistor) AI (10 K Thermistor) AI (10K Thermistor) (4-20 mA) (4-20 mA) DI (24 VAC) DI (24 VAC) DI (24 VAC) DI (24 VAC) DI (24 VAC) DI (24 VAC) POWER 4-20 mA DO Relay (24 VAC, 1A) DO Relay (24 VAC, 1A) DO Relay (24 VAC, 1A) DO Relay (24 VAC, 1A) DO Relay (24 VAC, 1A) DO Relay (24 VAC, 1A) TERMINAL(S) J6-7, J6-6 J6-5, J6-6 J6-3, J6-4 J6-1, J6-2 J5-5, J5-6 J5-2, J5-3 J4-11, J4-12 J4-9, J4-10 J4-7, J4-8 J4-5, J4-6 J4-3, J4-4 J4-1, J4-2 TERMINALS J9-1, J9-2 J8-18 J8-15 J8-12 J8-9 J8-6 J8-3 LEGEND AI — Analog Input DI — Digital Input DO — Digital Output codes in Table 2 to ensure the Red (+) wire connects to Terminal 1. Connect the White (ground) wire to Terminal 2. Connect the Black (–) wire to Terminal 3. 4. Secure all connections in Step 3 with wire nuts. 5. Insert the plug into the existing 4-pin mating connector on the base module in the main control box (Terminal J-2). 6. Restore power. Table 2 — Color Code Recommendations SIGNAL TYPE + Ground – CCN BUS WIRE COLOR Red White Black CCN PLUG PIN NUMBER 1 2 3 3. Use 4-pin Molex harness with red, white and black wires to connect the communication wires. Verify the color 5 Install Sensors — The PremierLink™ controller can be used with either the T58 communicating sensor or any combination of CO2 and space temperature sensors. Refer to the instructions supplied with each sensor for electrical requirements. NOTE: All sensors are field-installed accessories. SPACE TEMPERATURE (SPT) SENSOR INSTALLATION — There are four types of SPT sensors available from Carrier: The 33ZCT55SPT space temperature sensor with timed override button, the 33ZCT56SPT space temperature sensor with timed override button and set point adjustment, the 33ZCT58SPT T58 communicating room sensor with timed override button, set point adjustment, and manual fan control, and the 33ZCT59SPT space temperature sensor with LCD screen, override button, and set point adjustment. The space temperature sensors are used to measure the building interior temperature. The T58 communicating room sensors measure and maintain room temperature by communicating with the controller. Sensors should be located on an interior building wall. The sensor wall plate accommodates the NEMA (National Electrical Manufacturers Association) standard 2 x 4 junction box. The sensor can be mounted directly on the wall surface if acceptable by local codes. Do not mount the sensor in drafty locations such as near air conditioning or heating ducts, over heat sources such as baseboard heaters, radiators, or directly above wall-mounted lighting dimmers. Do not mount the sensor near a window which may be opened, near a wall corner, or a door. Sensors mounted in these areas will have inaccurate and erratic sensor readings. The sensor should be mounted approximately 5 ft from the floor, in an area representing the average temperature in the space. Allow at least 4 ft between the sensor and any corner and mount the sensor at least 2 ft from an open doorway. The SPT sensor wires are to be connected to terminals in the unit main control board. Install the sensor as follows: 1. Locate the 2 Allen type screws at the bottom of the sensor. 2. Turn the two screws clockwise to release the cover from the sensor wall mounting plate. 3. Lift the cover from the bottom and then release it from the top fasteners. 4. Feed the wires from the electrical box through the opening in the center of the sensor mounting plate. 5. Using two no. 6-32 x 1 mounting screws (provided with the sensor), secure the sensor to the electrical box. NOTE: Sensor may also be mounted directly on the wall using 2 plastic anchors and 2 sheet metal screws (field-supplied). 6. Use 20 gage wire to connect the sensor to the controller. The wire is suitable for distances of up to 500 ft. Use a three-conductor shielded cable for the sensor and set point adjustment connections. The standard CCN communication cable may be used. If the set point adjustment (slidebar) is not required, then an unshielded, 18 or 20 gage, two-conductor, twisted pair cable may be used. The CCN network service jack requires a separate, shielded CCN communication cable. Always use separate cables for CCN communication and sensor wiring. (Refer to Fig. 3-6 for wire terminations.) 7. Replace the cover by inserting the cover at the top of the mounting plate first, then swing the cover down over the lower portion. Rotate the 2 Allen head screws counterclockwise until the cover is secured to the mounting plate and locked in position. 1 2 3 4 5 6 RED(+) WHT(GND) BLK(-) CCN COM SEN SW1 BRN (GND) BLU (SPT) SENSOR WIRING Fig. 3 — Space Temperature Sensor Typical Wiring (33ZCT55SPT) NOTE: See Table 3 for thermistor resistance vs temperature values. Table 3 — Thermistor Resistance vs Temperature Values for Space Temperature Sensor, Supply Air Temperature Sensor, and Outdoor Air Temperature Sensor TEMP (C) –40 –35 –30 –25 –20 –15 –10 –5 0 5 10 15 20 25 30 35 40 45 50 55 60 65 70 TEMP (F) –40 –31 –22 –13 –4 5 14 23 32 41 50 59 68 77 86 95 104 113 122 131 140 149 158 RESISTANCE (Ohms) 335,651 242,195 176,683 130,243 96,974 72,895 55,298 42,315 32,651 25,395 19,903 15,714 12,494 10,000 8,056 6,530 5,325 4,367 3,601 2,985 2,487 2,082 1,752 Wiring the Space Temperature Sensor — To wire the sensor, perform the following (see Fig. 3-6): 1. Identify which cable is for the sensor wiring. 2. Strip back the jacket from the cables for at least 3 inches. Strip 1/4-in. of insulation from each conductor. Cut the shield and drain wire from the sensor end of the cable. 6 BRN (COM) BLK (STO) BLU (SPT) OR 1 2 3 4 SEN SW1 5 6 RED(+) WHT(GND) BLK(-) OPB COM- PWR+ CCN COM SENSOR WIRING 24 VAC Fig. 6 — Space Temperature Sensor Typical Wiring (33ZCT59SPT) 3. Connect the sensor cable as follows: a. Connect one wire from the cable to (BLU) wire on J6-7 analog connector on the controller. Connect the other end of the wire to the left terminal on the SEN terminal block of the sensor. See Fig. 7. b. Connect another wire from the cable to (BRN) J6-6 analog connector on the controller. Connect the other end of the wire to the remaining open terminal on the SEN terminal block. On the 33ZCT59SPT sensor, connect this cable to the 24-v COM terminal. A separate 24-vac transformer is required for this sensor. See Fig. 6. c. On 33ZCT56SPT and 33ZCT59SPT sensors, connect the remaining wire to the (BLK) STO on J6-5 connector on the controller. Connect the other end of the wire to the SET terminal on the sensor. d. In the control box, install a no. 10 ring type crimp lug on the shield drain wire. Install this lug under the mounting screw of the PremierLink controller. e. On 33ZCT56SPT sensors, install a jumper between the two center terminals (right SEN and left SET). See Fig. 4. f. Refer to Fig. 5 for 33ZCT58SPT sensor wiring. Once the T58 sensor is powered up, all of the graphic icons on the LCD display will be energized for a few seconds. The graphical icons will then turn off and the T58 sensor will energize the threedigit numeric display. The value “58” will be displayed for two seconds. After 2 seconds, the LCD will display the default space temperature value. NOTE: See Fig. 8 for space temperature sensor averaging. Warm Fig. 4 — Space Temperature Sensor Typical Wiring (33ZCT56SPT) FIELD WIRING T58 SENSOR VAC J1-3 (24 VAC) 24 VAC COM J1-2 SDT (COM) CCN- BLACK (-) GND WHITE (GND) CCN+ RED (+) CCN BUS BLACK (-) WHITE (GND) POWER WIRING NOTE: Must use a separate isolated transformer. JUMPER TERMINALS AS SHOWN a33-9133 SEN SET BLK (T56) BRN (GND) BLU (SPT) Cool SET SENSOR WIRING CCN BUS RED (+) Fig. 5 — Space Temperature Communicating Sensor Typical Wiring (33ZCT58SPT) 7 8 Fig. 7 — PremierLink™ Controller and Sensor Wiring — 33ZCT55SPT, 33ZCT56SPT, 33ZCT58SPT Space Temperature Sensors; 33ZCSENSAT Supply Air Temperature Sensor; Indoor Relative Humidity Sensor (33ZCSENSRH-01) 33ZCSENCO2 (Outdoor), and 33ZCT55CO2, 33ZCT56CO2 (Indoor) Air Quality Sensors a33-9134 J6 6 7 RED RED BLK BLK RED RED RED BLK BLK BLK SENSOR 1 SENSOR 2 SENSOR 3 SENSOR 4 SPACE TEMPERATURE AVERAGING — 4 SENSOR APPLICATION J6 RED RED BLK BLK BLK BLK SENSOR 1 SENSOR 3 SENSOR 2 RED BLK 7 RED RED 6 RED RED BLK BLK SENSOR 4 SENSOR 6 SENSOR 5 LEGEND Factory Wiring RED RED BLK BLK Field Wiring SENSOR 8 SENSOR 7 SENSOR 9 SPACE TEMPERATURE AVERAGING — 9 SENSOR APPLICATION Fig. 8 — Space Temperature Averaging Perform the following steps to connect the SAT sensor to the PremierLink™ controller: 1. Locate the opening in the control box. Pass the sensor probe through the hole. 2. Drill or punch a 1/2-in. hole in the unit. 3. Use two field-supplied, self-drilling screws to secure the sensor probe to the unit. 4. Connect the sensor leads to the PremierLink controller’s wiring harness J6-3,4 board at the terminals labeled SAT (ORN) and GND (BRN). See Fig. 7. Perform the following steps if state or local code requires the use of conduit, or if the installation requires a cable length of more than 8 ft: 1. Secure the probe to the unit with two field-supplied self-drilling screws. 2. If extending cable length beyond 8 ft, use plenum rated, 20 AWG, twisted pair wire. 3. Connect the sensor leads to the PremierLink controller’s wiring harness terminal board at the terminals labeled SAT (ORN) and GND (BRN). 4. Neatly bundle and secure excess wire. SUPPLY AIR TEMPERATURE (SAT) SENSOR INSTALLATION — The 33ZCSENSAT supply air temperature sensor is required for controller operation. The sensor consists of a thermistor encased within a stainless steel probe. The SAT sensor probe is 6-in. nominal length with 114 in. of unshielded, 2-conductor 18 AWG twisted-pair cables. The sensor temperature range is –40 to 245 F with a nominal resistance of 10,000 ohms at 77 F. The sensor measures accuracy of ±0.36 F. The SAT sensor is supplied with a gasket and 2 selfdrilling mounting screws. NOTE: The sensor must be mounted in the discharge of the unit, downstream of the cooling coil and heat exchanger. Be sure the probe tip does not come in contact with any of the unit surfaces. See Fig. 9 and 10 for mounting location. Do not run sensor or relay wires in the same conduit or raceway with Class 1 AC service wiring. Do not abrade, cut, or nick the outer jacket of the cable. Do not pull or draw cable with a force that may harm the physical or electrical properties. Avoid splices in any control wiring. 9 SUPPLY AIR TEMPERATURE SENSOR Sensors use infrared technology to measure the levels of CO2 present in the air. The wall sensor is available with or without an LCD readout to display the CO2 level in ppm. The CO2 sensors are all factory set for a range of 0 to 2000 ppm and a linear mA output of 4 to 20. Refer to the instructions supplied with the CO2 sensor for electrical requirements and terminal locations. To accurately monitor the quality of the air in the conditioned air space, locate the sensor near a return-air grille (if present) so it senses the concentration of CO2 leaving the space. The sensor should be mounted in a location to avoid direct breath contact. Do not mount the IAQ sensor in drafty areas such as near supply ducts, open windows, fans, or over heat sources. Allow at least 3 ft between the sensor and any corner. Avoid mounting the sensor where it is influenced by the supply air; the sensor gives inaccurate readings if the supply air is blown directly onto the sensor or if the supply air does not have a chance to mix with the room air before it is drawn into the return airstream. Wiring the Indoor Air Quality Sensor — To wire the sensors after they are mounted in the conditioned air space or outdoor location, see Fig. 7 and the instructions shipped with the sensors. For each sensor, use two 2-conductor 18 AWG (American Wire Gage) twisted-pair cables (unshielded) to connect the separate isolated 24 vac power source to the sensor and to connect the sensor to the control board terminals. To connect the sensor to the control, identify the positive (4 to 20 mA) and ground (SIG COM) terminals on the sensor. Connect the 4-20 mA terminal to terminal IAQ (RED) and connect the SIG COM terminal to terminal GND (BRN). Combination Temperature and CO2 Sensor — If using a combination temperature and CO2 sensor (33ZCT55CO2 or 33ZCT56CO2), refer to the installation instructions provided with the sensor. See Fig. 11 for wiring. OUTDOOR AIR QUALITY CO2 SENSOR INSTALLATION (OAQ) — The outdoor air CO2 sensor is designed to monitor carbon dioxide (CO2) levels in the air and interface with the ventilation damper in an HVAC system. The OAQ sensor is packaged with an outdoor cover. See Fig. 12 and 13. The outdoor air CO2 sensor must be placed in an area that is representative of the entire conditioned space. A mounting height of 6 ft is recommended. For installation where it is not necessary to reach the control, it may be mounted higher on the wall or on the ceiling, provided the location represents a good sampling of air. Wiring the Outdoor Air CO2 Sensor — Power requirements are 18 to 36 VAC RMS 50/60 Hz; 18 to 42 vdc polarity protected/dependent; and 70 mA average, 100 mA peak at 24 vdc. All system wiring must be in compliance with all applicable local and national codes. A dedicated power supply is required for this sensor. A two-wire cable is required to wire the dedicated power supply for the sensor. The two wires should be connected to the power supply and terminals 1 and 2. To connect the sensor to the control, identify the positive (4 to 20 mA) and ground (SIG COM) terminals on the sensor. Connect the 4 to 20 mA terminal OAQ (BLU) terminal J5-2. Connect the SIG COM terminal to terminal GND (BRN) terminal J5-3. See Fig. 11. ROOF CURB SUPPLY AIR RETURN AIR Fig. 9 — Typical Mounting Location for Supply Air Temperature (SAT) Sensor On Small Rooftop Units DIRECT DRIVE MOTOR DIMPLED HEAT EXCHANGER SAT LOCATION IMPORTANT: Be certain SAT does not come in contact with heat exchanger tubes. Fig. 10 — Typical Mounting Location for Supply Air Temperature (SAT) Sensor in Heat Exchanger INDOOR AIR QUALITY CO2 SENSOR INSTALLATION (IAQ) — The indoor air quality sensor accessory monitors carbon dioxide (CO2) levels. This information is used to monitor IAQ levels. Three types of sensors are provided. The wall sensor can be used to monitor the conditioned air space. 10 11 2 J4 3 1 2 J5 3 SEE NOTE 1 + 1 - 2 J3 SEE NOTE 2 24 VAC DEDICATED 24 VAC TRANSFORMER Fig. 11 — PremierLink™ Controller Wiring — Combination Temperature and CO2 Sensor — 33ZCT55CO2, 33ZCT56CO2 NOTES: 1. Optional 24 VDC power source may ONLY be used if PremierLink control is using a dedicated transformer. 2. Do not use 24 VAC power source if using 24 VDC from PremierLink controller. 1 J5 2 3 1 If the sensor is installed directly on a wall surface, install the humidity sensor using 2 screws and 2 hollow wall anchors (field-supplied). Do not over tighten screws. See Fig. 14. The sensor must be mounted vertically on the wall. The Carrier logo should be oriented correctly when the sensor is properly mounted. Avoid corner locations. Allow at least 4 ft between the sensor and any corner. Airflow near corners tends to be reduced, resulting in erratic sensor readings. The sensor should be vertically mounted approximately 5 ft up from the floor, beside the space temperature sensor. For wiring distances up to 500 feet, use a 3-conductor, 18 or 20 AWG cable. A CCN communication cable can be used, although the shield is not required. The shield must be removed from the sensor end of the cable if this cable is used. See Fig. 15 for wiring details. The power for the sensor is provided by the PremierLink control on terminal J5-4 (+33 to +35vdc). To wire the sensor perform the following: 1. At the sensor, remove 4-in. of jacket from the cable. Strip 1/ -in. of insulation from each conductor. Route the cable 4 through the wire clearance opening in the center of the sensor. See Fig. 14. 2. Connect a field-supplied BLACK wire to the sensor screw terminal marked Vin. 3. Connect a field-supplied RED wire into the sensor screw terminal marked Io. 4. At the PremierLink controller, route the cable away from high voltage wiring and disconnect the power to prevent accidental shorting or grounding of wires when connecting the sensor. Remove the J5 Molex female plug and locate the BROWN wire on pin 3. Using a small, flat blade screwdriver gently press down in the slot on the side of the plug while pulling on the BROWN wire to remove it from slot. Re-insert the BROWN wire in the pin 4 slot making sure it is securely seated. There should now be an empty slot between the BLUE and BROWN wires. See Fig. 15. 5. Connect the field-supplied RED wire from the sensor to the BLUE wire on J5-4. 6. Connect the field-supplied BLACK wire from the sensor to the BROWN wire on J5-2. + 0-10VDC - SIG COM (J5-3) + 4-20mA (J5-2) ALARM NC COM RELAY NO CONTACTS } H G 24 VAC OR + - 24 VDC 2 1 8765432 1 Fig. 12 — Outdoor Air Quality (CO2) Sensor (33ZCSENCO2) — Typical Wiring Diagram COVER REMOVED SIDE VIEW Fig. 13 — Outdoor Air Quality Sensor Cover HUMIDITY SENSOR (WALL-MOUNTED) INSTALLATION — The accessory space humidity sensor is installed on an interior wall to measure the relative humidity of the air within the occupied space. The use of a standard 2 x 4-in. electrical box to accommodate the wiring is recommended for installation. The sensor can be mounted directly on the wall, if acceptable by local codes. MOUNTING HOLES WIRING OPENING Vo 3 4 5 Gnd SW2 2 Do NOT clean or touch the sensing element with chemical solvents as they can permanently damage the sensor. DO NOT mount the sensor in drafty areas such as near heating or air-conditioning ducts, open windows, fans, or over heat sources such as baseboard heaters, radiators, or wall-mounted light dimmers. Sensors mounted in those areas will produce inaccurate readings. Vin 1 Io 6 ON a33-9141 Fig. 14 — Humidity Sensor Installation 12 13 NOTE: Remove BROWN wire from J5-3 and insert into J5-4. Fig. 15 — Humidity Sensor Wiring OUTDOOR AIR TEMPERATURE SENSOR (Fig. 16-19) — The OAT sensor must be located properly. For outdoor locations use sensor 33ZCSENOAT. For duct mounting in the fresh air intake, use sensor 33ZCSENPAT. The sensor must be installed immediately upstream from outdoor-air damper where it will accurately sense the temperature of the outdoor air entering the mixing box. See Fig. 16 and 17. For applications without economizer, the sensor may be located in the outdoor air duct near the outdoor-air intake (Fig. 17) or on the exterior of the building (Fig. 16). The thermistor has a range of –40 to 245 F and a resistance of 10,000 ohms at 77 F. Do not mount the sensor in direct sunlight. Inaccurate readings may result. Do not mount the sensor near the exhaust from air-handling units or compressors, near leakage drafts of indoor air, or near shrubbery or trees, or under direct water runoff. If the sensor is installed outdoors, perform the following instructions. Install the 1/2-in. conduit connector into the rear opening. Tighten the conduit connector securely to prevent water leakage into the assembly. Mount the assembly onto the 1/ -in. conduit and secure by tightening the conduit nut. After 2 the sensor wiring is completed, secure the gasket and cover in place using the screws provided with the cover. See Fig. 18. If the sensor is to be mounted in the outdoor air duct, use the 33ZCSENPAT sensor which has a 2 x 4-in. by 11/2-in. deep electrical box. Remove the cover and enter the knockout from the rear of the box. Install the sensor through the opening so that the sensor leads are inside the electrical box. Secure the sensor to the electrical box using a field-supplied 1/2-in. conduit nut. Drill a 1/2-in. hole in the outdoor-air duct about a foot upstream of the outdoor-air damper. Apply a 1/4-in. bead of silicone type sealer around the opening and install the sensor through the hole. Secure the electrical box to the duct using 2 field-supplied, no. 10 sheet metal screws. See Fig. 19. FACTORY-INSTALLED CONTROLLER — The PremierLink™ controller is available as a factory-installed option on some units. Additional terminal boards are provided for wiring. Sensors and input devices are wired to terminal boards instead of directly to the Premierlink controller. See Fig. 20. Connect Discrete Inputs — If used, wire the dry con- tact switches, compressor safety switch, and supply fan status switch to the PremierLink controller. See Fig. 21 for wiring. Fig. 16 — Outdoor Air Temperature Sensor Installation — Located on Building Wall (P/N 33ZCSENOAT) RETURN AIR OAT OUTDOOR AIR ROOF TOP UNIT Fig. 17 — OAT Sensor Location in Outside Air Duct (P/N 33ZCSENPAT) 14 2.8125 IN. (71.4 mm) 0.5000 IN. (12.7 mm) NPT THREADED CONDUIT OPENINGS TYP. GROUND SCREW 4.5625 IN. (115.9 mm) 2.0000 IN. (50.8 mm) SINGLE-GANG ALUMINUM BELL BOX FOAM COVER GASKET ALUMINUM COVER 4.9200 IN. (125.0 mm) Fig. 18 — Outdoor Air Temperature Sensor (P/N 33ZCSENOAT) 33ZCSENPAT SENSOR DUCT MOUNTED LEGEND OA — Outdoor Air OAT — Outdoor Air Temperature Fig. 19 — Outdoor Air Temperature Sensor Installation (P/N 33ZCSENPAT) 15 Fig. 20 — PremierLink™ Factory-Installed Controller Wiring Connect to CCN Communication Bus — The PremierLink™ controller connects to the bus in a daisy chain arrangement. Negative pins on each component must be connected to respective negative pins, and likewise, positive pins on each component must be connected to respective positive pins. The controller signal pins must be wired to the signal ground pins. Wiring connections for CCN must be made at the 3-pin plug. At any baud (9600, 19200, 38400 baud), the number of controllers is limited to 239 devices maximum. Bus length may not exceed 4000 ft, with no more than 60 total devices on any 1000-ft section. Optically isolated RS-485 repeaters are required every 1000 ft. NOTE: Carrier device default is 9600 band. COMMUNICATION BUS WIRE SPECIFICATIONS — The CCN Communication Bus wiring is field-supplied and field-installed. It consists of shielded 3-conductor cable with drain (ground) wire. The cable selected must be identical to the CCN Communication Bus wire used for the entire network. See Table 4 for recommended cable. Table 4 — Recommended Cables MANUFACTURER Alpha American Belden Columbia CABLE PART NO. 2413 or 5463 A22503 8772 02525 NOTE: Conductors and drain wire must be at least 20 AWG, stranded, and tinned copper. Individual conductors must be insulated with PVC, PVC/nylon, vinyl, Teflon, or polyethylene. An aluminum/polyester 100% foil shield and an outer jacket of PVC, PVC/nylon, chrome vinyl, or Teflon with a minimum operating temperature range of –20 C to 60 C is required. Do not run communication wire in the same conduit as or next to any AC voltage wiring. The communication bus shields must be tied together at each system element. If the communication bus is entirely within one building, the resulting continuous shield must be connected to ground at only one single point. If the communication bus cable exits from one building and enters another building, the shields must be connected to the grounds at a lightning suppressor in each building (one point only). 16 17 Fig. 21 — PremierLink™ Field-Installed Controller Discrete Input Wiring NOTE: Remove red wire from J4-9 to prevent 24 VAC shorting out other components or ground. a33-9137 OUTDOOR ENTHALPY CONTROL (Fig. 24) — Outdoor enthalpy control requires only an enthalpy switch/receiver (33CSENTHSW). The enthalpy switch/receiver is mounted in the outdoor air inlet and calculates outdoor air enthalpy. The enthalpy switch/receiver energizes the relay output when the outdoor enthalpy is above 28 BTU/lb OR dry bulb temperature is above 75 F and is deenergized when the outdoor enthalpy is below 27 BTU/lb AND dry bulb temperature is below 74.5 F. The relay output is wired to the unit economizer which will open or close depending on the output of the switch. NOTE: The enthalpy calculation is done using an average altitude of 1000 ft above sea level. Mounting — Mount the enthalpy switch/receiver in a location where the outdoor air can be sampled (such as the outdoor air intake). The enthalpy switch/receiver is not a NEMA 4 enclosure and should be mounted in a location that is not exposed to outdoor elements such as rain or snow. Use two field-supplied no. 8 x 3/4-in. TEK screws. Insert the screws through the holes in the sides of the enthalpy switch/receiver. Wiring — Carrier recommends the use of 18 to 22 AWG twisted pair or shielded cable for all wiring. All connections must be made with 1/4-in. female spade connectors. A 24-vac transformer is required to power the enthalpy switch/receiver; as shown in Fig. 24, the PremierLink™ board provides 24 vac. Connect the GND and 24-vac terminals on the enthalpy switch/receiver to the terminals on the transformer. On some applications, the power from the economizer harness can be used to power the enthalpy switch/receiver. To power the enthalpy switch/receiver from the economizer harness, connect power of the enthalpy switch/receiver to the red and brown wires (1 and 4) on the economizer harness. For connection to rooftop units with PremierLink™ control, connect the LOW Enthalpy terminal on the enthalpy switch/receiver to J4 — pin 2 of the PremierLink control on the HVAC (Heating, Ventilation, and Air Conditioning) unit. The switch can be powered through the PremierLink control board if desired. Wire the 24-vac terminal on the enthalpy switch/receiver to J4 — pin 1 on the PremierLink control. Wire the GND terminal on the enthalpy switch/receiver to J1 — pin 2 on the PremierLink control. The HI Enthalpy terminal is not used. See Fig. 24. DIFFERENTIAL ENTHALPY CONTROL (Fig. 25) — Differential enthalpy control requires both an enthalpy switch/ receiver (33CSENTHSW) and an enthalpy sensor (33CSENTSEN). The enthalpy switch/receiver is mounted in the outdoor air inlet and calculates outdoor air enthalpy. The enthalpy sensor is mounted in the return airstream and calculates the enthalpy of the indoor air. The enthalpy switch/receiver energizes the HI Enthalpy relay output when the outdoor enthalpy is greater than the indoor enthalpy. The LOW Enthalpy terminal is energized when the outdoor enthalpy is lower than the indoor enthalpy. The relay output is wired to the unit economizer which will open or close depending on the output of the switch. NOTE: The enthalpy calculation is done using an average altitude of 1000 ft above sea level. Mounting — Mount the enthalpy switch/receiver in a location where the outdoor air can be sampled (such as the outdoor air intake). The enthalpy switch/receiver is not a NEMA 4 enclosure and should be mounted in a location that is not exposed to outdoor elements such as rain, snow, or direct sunlight. Use two field-supplied no. 8 x 3/4-in. TEK screws. Insert the screws through the holes in the sides of the enthalpy switch/receiver. Enthalpy Switch/Receiver — The accessory en- thalpy switch/receiver (33CSENTHSW) senses temperature and humidity of the air surrounding the device and calculates the enthalpy when used without an enthalpy sensor. The relay is energized when enthalpy is high and deenergized when enthalpy is low (based on ASHRAE [American Society of Heating, Refrigeration, and Air Conditioning Engineers] 90.1 criteria). If an accessory enthalpy sensor (33CSENTSEN) is attached to the return air sensor input, then differential enthalpy is calculated. The relay is energized when the enthalpy detected by the return air enthalpy sensor is less than the enthalpy at the enthalpy switch/receiver. The relay is deenergized when the enthalpy detected by the return air enthalpy sensor is greater than the enthalpy at the enthalpy switch/receiver (differential enthalpy control). See Fig. 22 and 23. Fig. 22 — Enthalpy Switch/Receiver Dimensions Fig. 23 — Enthalpy Sensor Dimensions (33CSENTSEN) 18 a33-9138 *Used with Differential Enthalpy Control only. Fig. 24 — Typical Wiring Schematic — Carrier Rooftop Unit with PremierLink™ Controls 120 VAC LINE VOLTAGE 24 VAC SECONDARY 24 VAC OUTPUT FROM N/C CONTACT WHEN THE OUTDOOR ENTHALPY IS LESS THAN THE ORN INDOOR ENTHALPY (ENABLE ECONOMIZER) 24 VAC OUTPUT FROM N/O CONTACT WHEN THE INDOOR ENTHALPY IS GREATER THAN THE OUTDOOR ENTHALPY (ENABLE ENERGYSRECYCLER) 24-36 4-20 VDC mA IN OUT 4-20 24-36 mA VDC IN OUT HI LOW GND 24 ENTHALPY VAC LEGEND N/C — Normally Closed N/O — Normally Open 33CSENTHSW 33CSENTSEN JUMPER SETTINGS FOR 33CSENTHSW 0% 50% OFF 100% M1 M2 19 M3 0% 50% OFF 100% M1 M2 M3 Fig. 25 — Differential Enthalpy Control Wiring JUMPER SETTINGS FOR 33CSENTSEN Mount the enthalpy sensor in a location where the indoor air can be sampled (such as the return air duct). The enthalpy sensor is not a NEMA 4 enclosure and should be mounted in a location that is not exposed to outdoor elements such as rain or snow. Use two field-supplied no. 8 x 3/4-in. TEK screws. Insert the screws through the holes in the sides of the enthalpy sensor. Wiring — Carrier recommends the use of 18 to 22 AWG twisted pair or shielded cable for all wiring. All connections must be made with 1/4-in. female spade connectors. The PremierLink™ board provides 24-vac to power the enthalpy switch/receiver. Connect the GND and 24-vac terminals on the enthalpy switch/receiver to the terminals on the transformer. On some applications, the power from the economizer harness can be used to power the enthalpy switch/receiver. To power the enthalpy switch/receiver from the economizer harness, connect power of the enthalpy switch/receiver to the red and brown wires (1 and 4) on the economizer harness. Connect the LOW Enthalpy terminal on the enthalpy switch/receiver to J4 — pin 2 of the PremierLink control on the HVAC unit. The switch can be powered through the PremierLink control board if desired. Wire the 24 vac terminal on the enthalpy switch/receiver to J4 — pin 1 on the PremierLink control. Wire the GND terminal on the enthalpy switch/ receiver to J1 — pin 2 on the PremierLink control. The HI Enthalpy terminal is not used. See Fig. 24. Connect the 4-20 mA In terminal on the enthalpy switch/ receiver to the 4-20 mA Out terminal on the return air enthalpy sensor. Connect the 24-36 VDC Out terminal on the enthalpy switch/receiver to the 24-36 VDC In terminal on the return air enthalpy sensor. See Fig. 25. Enthalpy Switch/Receiver Jumper Settings — There are two jumpers. One jumper determines the mode of the enthalpy switch/receiver. The other jumper is not used. To access the jumpers, remove the 4 screws holding the cover on the enthalpy switch/receiver and then remove the cover. The factory settings for the jumpers are M1 and OFF. The mode jumper should be set to M2 for differential enthalpy control. The factory test jumper should remain on OFF or the enthalpy switch/receiver will not calculate enthalpy. Enthalpy Sensor Jumper Settings — There are two jumpers. One jumper determines the mode of the enthalpy sensor. The other jumper is not used. To access the jumpers, remove the 4 screws holding the cover on the enthalpy sensor and then remove the cover. The factory settings for the jumpers are M3 and OFF. The mode jumper should be set to M3 for 4 to 20 mA output. The factory test jumper should remain on OFF or the enthalpy sensor will not calculate enthalpy. BRACKET HH57AC078 RETURN AIR ENTHALPY SENSOR (USED WITH ENTHALPY CONTROL FOR DIFFERENTIAL ENTHALPY OPERATION) HH57AC077 ENTHALPY CONTROL AND OUTDOOR AIR ENTHALPY SENSOR C7400 A1004 + MOUNTING PLATE Fig. 26 — Enthalpy Control, Sensor, and Mounting Plate OUTSIDE AIR ENTHALPY SWITCH RETURN AIR ENTHALPY SENSOR DIFFERENTIAL ENTHALPY CONTROLLER Fig. 27 — Location of Differential Enthalpy Controller and Return Air Enthalpy Sensor on 50TJ Rooftop Unit OUTDOOR AIR ENTHALPY SENSOR/ENTHALPY CONTROLLER (HH57AC077) — To wire the outdoor air enthalpy sensor, perform the following (see Fig. 28 and 29): NOTE: The outdoor air sensor can be removed from the back of the enthalpy controller and mounted remotely. 1. Use a 4-conductor, 18 or 20 AWG cable to connect the enthalpy control to the PremierLink controller and power transformer. 2. Connnect the following 4 wires from the wire harness located in rooftop unit to the enthalpy controller: a. Connect the BRN wire to the 24 vac terminal (TR1) on enthalpy control and to pin 1 on 12-pin harness. b. Connect the RED wire to the 24 vac GND terminal (TR) on enthalpy sensor and to pin 4 on 12-pin harness. c. Connect the ORN/GRAY wire to J4-2 on PremierLink controller and to terminal (3) on enthalpy sensor. d. Connect the RED/GRAY wire to J4-1 on PremierLink controller and to terminal (2) on enthalpy sensor. Enthalpy Sensors and Control — The enthalpy control (HH57AC077) is supplied as a field-installed accessory to be used with the economizer damper control option. The outdoor air enthalpy sensor is part of the enthalpy control. The separate field-installed accessory return air enthalpy sensor (HH58AC078) is required for differential enthalpy control. See Fig. 26. NOTE: The enthalpy control must be set to the “D” setting for differential enthalpy control to work properly. The enthalpy control receives the indoor and return enthalpy from the outdoor and return air enthalpy sensors and provides a dry contact switch input to the PremierLink controller. Locate the controller in place of an existing economizer controller or near the actuator. The mounting plate may not be needed if existing bracket is used. See Fig. 27. A closed contact indicates that outside air is preferred to the return air. An open contact indicates that the economizer should remain at minimum position. 20 This condition is followed by a constant 36 VDC output from the PremierLink economizer output (J-9). NOTE: If installing in a Carrier rooftop, use the two gray wires provided from the control section to the economizer to connect PremierLink™ controller to terminals 2 and 3 on enthalpy sensor. If NOT using Carrier equipment, wires may need to be field supplied and installed. RETURN AIR ENTHALPY SENSOR — Mount the returnair enthalpy sensor (HH57AC078) in the return-air duct. The return air sesnor is wired to the enthalpy controller (HH57AC077). See Fig. 26. The outdoor enthalpy changeover set point is set at the controller. To wire the return air enthalpy sensor, perform the following (see Fig. 28): 1. Use a 2-conductor, 18 or 20 AWG, twisted pair cable to connect the return air enthalpy sensor to the enthalpy controller. 2. At the enthalpy control remove the factory-installed resistor from the (SR) and (+) terminals. 3. Connect the field-supplied RED wire to (+) spade connector on the return air enthalpy sensor and the (SR+) terminal on the enthalpy controller. Connect the BLK wire to (S) spade connector on the return air enthalpy sensor and the (SR) terminal on the enthalpy controller. See Fig. 28. ENTHALPY CONTROLLER A B TR C D SO TR1 SR + 2 + RED BRN BLK RED The Q769B adapter is supplied with female quick-connect terminal that fits over the male quick-connect P1 and P on the actuator. To connect the Q769B adapter to the actuator, follow these steps and refer to Fig. 30: 1. Remove power from unit. 2. Mount the adapter on the actuator by gently pushing the adapter onto the P1 and P terminals on actuator. NOTE: Be sure the plus (+) terminal on the adapter connects to P1 on the actuator and the minus (–) terminal on the adapter connects to P terminal on the actuator. See Fig. 30. 3. Using field-supplied wire, connect the plus (+) terminal on the adapter to the plus (+) terminal on the loop isolator. Connect the minus (–) terminal on the adapter to the minus (–) terminal on the loop isolator. 4. Connect 24 vac to actuator terminals TR and TR1. 5. Connect the plus (+) terminal from the loop isolator to J9-1 terminal on the PremierLink controller. Connect the minus (–) terminal from the loop isolator to J9-2 terminal on the PremierLink controller. 6. Restore power to unit. Q769C ADAPTER — The Q769C adapter incorporates a female quick-connect terminal that attaches to P1 and P male quick-connects on the actuator. S (OUTDOOR AIR + ENTHALPY SENSOR) S (RETURN AIR + ENTHALPY SENSOR) 3 1 To avoid permanent damage to the PremierLink 4 to 20 mA connection, a signal loop isolator must be installed when using the Q769B adapter. GRAY LED GRAY WIRE HARNESS IN UNIT NOTES: 1. Remove factory-installed jumper across SR and + before connecting wires from return air sensor. 2. Switches shown in high outdoor air enthalpy state. Terminals 2 and 3 close on low outdoor air enthalpy relative to indoor air enthalpy. 3. Remove sensor mounted on back of control and locate in outside airstream. IMPORTANT: It is recommended that the Q769C adapter be used with a field-supplied 500-ohm resistor across the terminals. Using the Q769C and actuator requires a separate, fieldsupplied transformer because the actuator with a Q769C is a positive ground device. The PremierLink control is a negative ground device. The positive P1 terminal on the Q769C goes to ground. See Fig. 31. Fig. 28 — Outside and Return Air Enthalpy Sensor Wiring Economizer — The PremierLink controller will interface To connect the Q769C adapter to the actuator, follow the steps below and refer to Fig. 31: 1. Remove power from unit. 2. Mount the adapter onto the actuator by gently pushing the adapter onto terminals P1 and P of actuator. 3. NOTE: Be sure the plus (+) terminal on the adapter connects to P1 on the actuator and the minus (–) terminal on the adapter connects to P terminal on the actuator. See Fig. 31. 4. Connect 24 vac to actuator terminals TR and TR1. 5. Connect 500-ohm resistor (field supplied) to the plus (+) and minus (–) terminals on adapter. 6. Connect the plus (+) terminal from the adapter to J9-1 terminal on the PremierLink controller. Connect the minus (–) terminal from the adapter to J9-2 terminal on the PremierLink controller. 7. Restore power to unit. with an economizer in some applications. Most common economizers will contain a Honeywell actuator (Honeywell part number M7415). An adapter (Honeywell part number Q769B or Q769C) must be used to enable the 4 to 20 mA signal from the PremierLink controller to control the position of the economizer. Refer to Honeywell Q769B and Q769C accessory installation instructions for wiring details. Disconnect power supply before making wiring connections to prevent electrical shock and equipment damage. Q769B ADAPTER — Because the Honeywell adapter is designed for a negative 4 to 20 mA input instead of a positive signal, the Q769B adapter requires a separate transformer and a current loop isolator to perform properly. Connecting the adapter directly to the PremierLink controller could cause the 4 to 20 mA output on the controller to be permanently damaged. 21 22 Fig. 29 — PremierLink Controller Wiring — Enthalpy Control (HH57AC077) NOTE: If PremierLink™ controller is grounded and actuator is grounded on common side, then common wire from PremierLink controller J9-2 is not needed. a33-9139 installed in the DA mode so damper will close automatically on power shut down. If Reverse Acting (RA) operation is desired, move Switch 3 to the RA position. An increasing control signal drives the actuator toward the spring return position in RA mode. SWITCH SELECTION — The type of input control signal is determined by the position of Switch 5. With Switch 5 in the VDC position (factory setting), the signal is DC voltage. With Switch 5 min the mA position, the input signal changes to current input. See Fig. 32 and Table 6. The switch should be set to mA for use with PremierLink controller. NOTE: To change the factory setting, use a 1/8-in. (3-mm) flat-blade screwdriver to position the mode switch to the alternate setting. . 24 VAC TR 24 VAC TR1 TRANSFORMER T SENSOR T1 PREMIERLINK CONTROL J9 Q769B ADAPTER MIN. POS P1 P + - + 2 - 1 LOOP ISOLATOR M7415 ACTUATOR + - - + Table 5 — Actuator Drive Direction Settings POSITION OF SWITCH 3 AND THE DRIVE DIRECTION DRIVE DIRECTION DIRECTION OF WITH A MINIMUM WITH A MAXIMUM SPRING RETURN INPUT SIGNAL INPUT SIGNAL DRIVE DA/CCW CCW CW RA/CCW CW CCW DA/CW CW CCW RA/CW CCW CW Fig. 30 — PremierLink™ Control Wiring to Q769B Adapter and Actuator 24 VAC TR CCW CW DA RA 24 VAC TR1 TRANSFORMER (SEPARATE, FIELD-SUPPLIED) T T1 PREMIERLINK CONTROL J9 Q769C ADAPTER P1 P LEGEND Counterclockwise Clockwise Direct Action Reverse Action Table 6 — Mode Selection Information SENSOR MIN. POS — — — — + - - + 500 OHM RESISTOR 2 MODE SWITCHES 5 4 1 3 2 1 M7415 ACTUATOR SWITCH FUNCTIONS VDC or mA 0 to 10 VDC (0 to 20 mA or 2 to 10 VDC (4 to 20 mA) Direct Acting (DA) or Reverse Acting (RA) FIXED or AUTO — or 6 to 9 VDC FACTORY SETTINGS VDC 0 to 10 DA FIXED — NOTE: The 6 to 9 VDC setting of Switch 1 overrides switch 4. WIRING (See Fig. 33-34B) — The wires for power and signal transmission from PremierLink to economizer are provided in the 12-pin harness that is standard on all Carrier equipment. To connect the economizer actuator (installed on Bellimo or Johnson Controls actuators) to PremierLink controller, connect the pink wire on actuator to purple wire on PremierLink J9-1. See Fig. 34A and 34B. NOTE: To retrofit PremierLink controller to older 4 to 20 mA actuator, connect the red wire on the actuator wire harness to the purple wire on the PremierLink J9-1. Connect the yellow and white wires from the actuator wire harness to the 24-volt AC transformer on equipment. See Fig. 33. Fig. 31 — PremierLink Control Wiring to Q769C Adapter and Actuator Economizer with 4 to 20 mA Actuator — The PremierLink controller can be connected to an economizer. The economizer features a Johnson 4 to 20 mA actuator. IMPORTANT: The actuator that comes with the economizer is a stepper-type actuator and is NOT compatible with PremierLink control. This actuator should be replaced with a 4 to 20 mA actuator. DRIVE DIRECTION — The actuator drive direction is dependent upon the position of Switch 3 and the spring return direction. See Table 5. The actuator is factory set for Direct Acting (DA) operation with Switch 3 in the DA position. An increasing control signal drives the actuator away from the spring return position in DA mode. The actuator should be IMPORTANT: Make sure the common side is grounded for both the PremierLink power and the actuator power. This is especially important if separate transformers are used. 23 MOVE TO LEFT FOR 4-20mA CONTROL WITH PREMIERLINK CONTROLLER 5 4 3 2 1 VDC 0-10 DA FIXED — mA 2-10 RA AUTO 6-9 Fig. 32 — Position of Actuator Mode Switches (Factory Default) WIRE HARNESS FROM ACTUATOR Gray White/Red Red Yellow White Output 20 VDC at 25 mA Feedback 0 (2)-10 or 6-9 VDC Input 0 (2)-10 or 6-9 VDC, 0 (4)-20 mA 24 VAC/VDC COM (5) (4) (3) (2) (1) J9-1 TO 24V TRANSFORMER Fig. 33 — PremierLink™ Controller Wiring to Economizer Actuator With Wire Harness (M9206-GGC-2) ECONOMIZER 12-PIN HARNESS ACTUATOR 50TJ400812 M9206-GGC-2 24 VAC TRANSFORMER GROUND 4-20mA TO J9-1 ON PREMIERLINK CONTROLLER Fig. 34A — PremierLink Control Wiring to Johnson Actuator Economizer Harness 24 BLACK 4 TRANSFORMER GROUND 3 5 BLUE 500 OHM RESISTOR 2 8 VIOLET 6 NOTE 1 PINK RUN 7 WIRES FOR OAT SENSOR RED NOTE 3 1 24 VAC 10 YELLOW 50HJ540573 ACTUATOR ASSEMBLY 11 9 DIRECT DRIVE ACTUATOR 4-20mA SIGNAL WHITE 12 4-20 mA TO J9 ON PremierLink BOARD ECONOMISER2 PLUG NOTES: 1. Switch on actuator must be in run position for economizer to operate. 2. PremierLink™ control requires that the standard 50HJ540569 outside-air sensor be replaced by either the CROASENR001A00 dry bulb sensor or HH57A077 enthalpy sensor. 3. 50HJ540573 actuator consists of the 50HJ540567 actuator and a harness with 500-ohm resistor. Fig. 34B — PremierLink™ Control Wiring to Belimo-Style Actuator EconoMi$er2 Harness 6. Verify that the PremierLink controls are properly connected to the CCN bus. START-UP Initial Operation and Test — Perform the following procedure: 1. Apply 24 vac power to the control. 2. Connect the service tool to the phone jack service port of the controller. 3. Using the Service Tool, upload the controller from address 0, 31 at 9600 baud rate. The address may be set at this time. Make sure that Service Tool is connected to only one unit when changing the address. MEMORY RESET — DIP switch 4 causes an E-squared memory reset to factory defaults after the switch has been moved from position 0 to position 1 and the power has been restored. To enable the feature again, the switch must be put back to the 0 position and power must be restored; this prevents subsequent resets to factory defaults if the switch is left at position 1. To cause a reset of the non-volatile memory (to factory defaults), turn the controller power off if it is on, move the switch from position 1 to position 0, and then apply power to the controller for a minimum of 5 seconds. At this point, no action occurs, but the controller is now ready for the memory to reset. Remove power to the controller again and move the switch from position 0 to position 1. This time, when power is applied, the memory will reset to factory defaults. The controller address will return to bus 0 element 31, indicating that memory reset occurred. The unit must be electrically grounded in accordance with local codes and NEC ANSI/NFPA 70 (American National Standards Institute/National Fire Protection Association). Use the Carrier network communication software to start up and configure the PremierLink controller. Changes can be made using the ComfortWORKS® software, ComfortVIEW™ software, Network Service Tool, System Pilot™ device, or Touch Pilot™ device. The System Pilot and Touch Pilot are portable interface devices that allow the user to change system set-up and set points from a zone sensor or terminal control module. During start-up, the Carrier software can also be used to verify communication with PremierLink controller. NOTE: All set-up and set point configurations are factoryset and field-adjustable. For specific operating instructions, refer to the literature provided with user interface software. Perform System Check-Out 1. Check correctness and tightness of all power and communication connections. 2. At the unit, check fan and system controls for proper operation. 3. At the unit, check electrical system and connections of any optional electric reheat coil. 4. Check to be sure the area around the unit is clear of construction dirt and debris. 5. Check that final filters are installed in the unit. Dust and debris can adversely affect system operation. Sequence of Operation THERMOSTAT MODE — If the PremierLink™ controller is configured for Thermostat mode (TSTAT), it will control only to the thermostat inputs on J4. These inputs can be overridden through CCN communication via the CV_TSTAT points display table. When in this mode, the fire safety shutdown (FSD) 25 SASP after the stage two has been on for 90 seconds. This provides protection for the compressor against flooded starts and allow refrigerant flow to stabilize before modulating the economizer again. By using return air across the evaporator coil just after the compressor has started allows for increased refrigerant flow rates providing better oil return of any oil washed out during compressor start-up. Routine No. 3: If the OAT > 68 F and the enthalpy is low and the OAT <SPT then the economizer will open to 100% and compressors 1 and 2 will be cycled based on Y1 and Y2 inputs respectively. If any of these conditions are not met the economizer will go to minimum position. If there is no call for heating or cooling, the economizer, if available, will maintain the SASP at 70 F. Heating — For gas or electric heat, HS1 and HS2 outputs will follow W1 and W2 inputs respectively. The fan will also be turned on if it is configured for electric heat. If the PremierLink controller is configured for heat pump operation with the Auxiliary Out relay for Reversing Valve (AUXOUT = 3 in the CONFIG configuration table), the indoor fan will be turned on, compressors 1 and 2 turned on and the reversing valve relay (HS3) will be energized on a call from the W1 input. On a call from the W2 input, heat outputs HS1 and HS2 will be energized. If only W2 input is detected, then it will be determined as call for emergency heat and HS1 and HS2 will be energized. The reversing valve relay will stay energized until there is a call for cooling at which time it will be deenergized. Heating may also be energized when an IAQ sensor installed and has overridden the minimum economizer damper position. If the OAT < 55 F and an IAQ sensor is installed and the IAQ minimum position > minimum damper position causing the SAT to decrease below the SPT – 10° F, then the heat stages will be cycled to temper the SAT to maintain a temperature between the SPT and the SPT + 10° F. Auxiliary Relay configured for Exhaust Fan — If the Auxiliary Relay is configured for exhaust fan (AUXOUT = 1) in the CONFIG configuration table and Continuous Power Exhaust (MODPE) is enable in the SERVICE configuration table then the output (HS3) will be energized whenever the G input is on. If the MODPE is disabled then output will be energized based on the Power Exhaust Setpoint (PES) in the SETPOINT table. Indoor Air Quality — If the optional indoor air quality (IAQI) sensor is installed, the PremierLink™ controller will maintain indoor air quality within the space at the user-configured differential set point (IAQD) in the CONFIG configuration table. The set point is the difference between the IAQI and an optional outdoor air quality sensor (OAQ). If the OAQ is not present then a fixed value of 400 ppm is used. The actual space IAQ setpoint (IAQS) is calculated as follows: IAQS = IAQD + OAQ (OAQ = 400 ppm if not present) As air quality within the space changes, the minimum position of the economizer damper will be changed also thus allowing more or less outdoor air into the space depending on the relationship of the IAQI to the IAQS. The IAQ algorithm runs every 30 seconds and calculates IAQ minimum position value using a PID loop on the IAQI deviation from the IAQS. The IAQ minimum position is then compared against the user configured minimum position (MDP) and the greatest value becomes the final minimum damper position (IQMP). If the calculated IAQ Minimum Position is greater than the IAQ maximum damper position (IAQMAXP) decision in the SERVICE configuration table, then it will be clamped to IAQMAXP value. If IAQ is configured for low priority, the positioning of the economizer damper can be overridden by comfort requirements. If the SAT < SASP – 8°F and both stages of heat are on for more then 4 minutes or the SAT > SASP + 5° F and both stages of cooling on for more then 4 minutes then the IAQ input cannot be used, so any fire/life safety shutdown must be physically wired to disable the 24 vac control circuit to the unit. Indoor Fan — The indoor fan output will be energized whenever there is 24 vac present on the G input. The indoor fan will be turned on without any delay and the economizer damper will open to its minimum position if the unit has a damper connected to the controller. This will also occur if the PremierLink™ controller has been configured for electric heat or heat pump operation. Cooling — For cooling operation, there must be 24 vac present on G. When G is active, the PremierLink controller will then determine if outdoor conditions are suitable for economizer cooling when an economizer damper is available. A valid OAT, SPT (CCN space temperature) and SAT (supply air temperature) sensor MUST be installed for proper economizer operation. It recommended that an outdoor or differential enthalpy sensor also be installed. If one is not present, then a jumper is needed on the ENTH input on J4, which will indicate that the enthalpy will always be low. Economizer operation will be based only on outdoor air dry bulb temperature. The conditions are suitable when: enthalpy is low, OAT is less than OATL High Lockout for TSTAT, and OAT is less than OATMAX, the high set point for free cooling. The default for OATL is 65 F. The default for OATMAX is 75 F. When all of the above conditions are satisfied and all the required sensors are installed, the PremierLink controller will use the economizer for cooling. One of three different control routines will be used depending on the temperature of the outside air. The routines use a PID loop to control the SAT to a supply air set point (SASP) based on the error from set point (SASPSAT). The SASP is determined by the routine. If an economizer is not available or the conditions are not met for the following economizer routines below, the compressors 1 and 2 will be cycled based on Y1 and Y2 inputs respectively. Any time the compressors are running, the PremierLink controller will lock out the compressors if the SAT becomes too low. These user configurable settings are found in the SERVICE configuration table: Compressor 1 Lockout at SAT < SATLO1 (50 to 65 F) (default is 55 F) Compressor 2 Lockout at SAT < SATLO2 (45 to 55 F) (default is 50 F) After a compressor is locked out, it may be started again after a normal time-guard period and the supply-air temperature has increased at least 8° F above the lockout set point. Routine No. 1: If the OAT ≤ DXLOCK (OAT DX lockout temperature) and DX Cooling Lockout is enabled when Y1 input is energized, the economizer will be modulated to maintain SAT at the Supply Air Setpoint (SASP) = SATLO1 + 3° F (Supply Air Low Temp lockout for compressor 1). When Y2 is energized, the economizer will be modulated to control to a lower SASP = SATLO2 + 3° F (Supply Air Low Temp lockout for compressor no. 2). Mechanical cooling is locked out and will not be energized. Routine No. 2: If DXLOCK (or DX Cooling Lockout is disabled) < OAT ≤ 68 F when Y1 input is energized, the economizer will be modulated to maintain SAT at SASP = SATLO1 + 3° F. If the SAT > SASP + 5° F and the economizer position > 85% then the economizer will close the to minimum position for three minutes or until the SAT > 68 F. The economizer integrator will then be reset and begin modulating to maintain the SASP after stage one has been energized for 90 seconds. When Y2 is energized, the economizer will be modulated to control to a lower supply air setpoint SASP= SATLO2 + 3° F. If the SAT > SASP + 5° F it will close the economizer to minimum position for 3 minutes, reset the integrator for the economizer, then start modulating the economizer to maintain the 26 The PremierLink controller has an optional Supply Fan Status input to provide proof of airflow. If this is enabled, the point will look for a contact closure whenever the Supply Fan Relay is on. If the input is not enabled, then it will always be the same state as the Supply Fan Relay. The cooling, economizer and heating routines will use this input point for fan status. Cooling — The compressors are controlled by the Cooling Control Loop that is used to calculate the desired SAT needed to satisfy the space. It will compare the SPT to the Occupied Cool Setpoint (OCSP) + the T56 slider offset (STO) when occupied and the Unoccupied Cool Setpoint (UCSP + Unoccupied Cooling Deadband) if unoccupied to calculate a Cooling Submaster Reference (CCSR) that is then used by the staging algorithm (Cooling submaster loop) to calculate the required number of cooling stages. The economizer, if available, will be used as the first stage of cooling in addition to the compressors. This loop runs every minute. The following conditions must be met in order for this algorithm to run: • indoor fan has been ON for at least 30 seconds • heat mode is not active and the time guard between modes equals zero. • mode is occupied or the Temperature Compensated Start or Cool mode is active • SPT reading is available and > (OCSP + STO) • If mode is unoccupied and the SPT > (UCSP + Unoccupied Cooling Deadband). The indoor fan will be turned on by the staging algorithm. • OAT > DXLOCK or OAT DX Lockout is disabled If all of the above conditions are met, the CCSR will be calculated, otherwise it is set to its maximum value and DX stages is set to 0. If only the last condition is not true and an economizer is available, it will be used to cool the space. The submaster loop uses the CCSR compared to the actual SAT to determine the required number of capacity stages to satisfy the load. There is a programmable minimum internal time delay of 3 to 5 minutes on and 2 to 5 minutes off for the compressors to prevent short cycling. There is also a 3-minute time delay before bringing on the second stage compressor. If the PremierLink controller is configured for Heat Pump and AUXOUT is configured for Reversing Valve Cool, the H3_EX_RV ouput will energize 2 seconds after the first compressor is energized and stay energized until there is a demand for heat. If AUXOUT is configured for Reversing Valve Heat, then the H3_EX_RV contact will be deenergized when there is a demand for cooling. An internal 5 to 10-minute user-programmable time guard between modes prevents rapid cycling between modes when used in a single zone application. The Time Guard is lowered to 3 minutes when Linkage is active to allow the 3V™ linkage coordinator to have better control of the PremierLink controller when used as the air source for the 3V control system. Table 7 indicates the number of stages available. The staging algorithm looks at the number of stages available based the number of cool stages configured in the SERVICE configuration table. The algorithm will skip the economizer if it is not available and turn on a compressor. Any time the compressors are running, the PremierLink controller will lockout the compressors if the SAT becomes too low. These user configurable settings are found in the SERVICE configuration table: Compressor 1 Lockout at SAT < SATLO1 (50 to 65 F) (default is 55 F) Compressor 2 Lockout at SAT < SATLO2 (45 to 55 F) (default is 50 F) After a compressor is locked out, it may be started again after a normal time-guard period and the supply air temperature has increased at least 8° F above the lockout set point. minimum damper position will become 0 and the IQMP = MDP. IAQ mode will resume when the SAT > SASP – 8° F in heating or the SAT < SASP + 5° F in cooling. If the PremierLink™ controller is configured for 1 stage of heat and cool or is only using a single stage thermostat input, this function will not work as it requires the both Y1 and Y2 or W1 and W2 inputs to be active. In this application, it is recommended that the user configure IAQ priority for high. If IAQ is configured for high priority and the OAT < 55 F and the SAT < (SPT –10° F), the algorithm will enable the heat stages to maintain the SAT between the SPT and the SPT + 10° F. CCN SENSOR MODE — When the PremierLink controller is configured for CCN control, it will control the compressor, economizer and heating outputs based its own space temperature input and set points or those received from Linkage. An optional CO2 IAQ sensor mounted in the space or received through communications can also influence the economizer and heating outputs. The PremierLink controller does not have a hardware clock so it must have another device on the CCN communication bus broadcasting time. The controller will maintain its own time once it has received time as long as it has power and will send a request for time once a minute until it receives time when it has lost power and power is restored. The controller will control to unoccupied set points until it has received a valid time. The controller must have valid time in order to perform any broadcast function, follow an occupancy schedule, perform IAQ pre-occupancy purge and many other functions as well. The following sections describe the operation for the functions of the PremierLink controller. Indoor Fan — The indoor fan will be turned on whenever any one of the following conditions are met: • If the PremierLink controller is in the occupied mode and ASHRAE 90.1 Supply Fan is configured for Yes in the CONFIG table. This will be determined by its own internal occupancy schedule if it is programmed to follow its local schedule or broadcast its local schedule as a global schedule, or following a global schedule broadcast by another device. • If PremierLink controller is in the occupied mode and ASHRAE 90.1 Supply Fan is configured for No and there is a heat or cool demand (fan auto mode) • If the PremierLink controller is in the occupied mode and ASHRAE 90.1 Supply Fan is configured for Yes when Linkage is active and the Linkage Coordinator device is sending an occupied mode flag • When Temperature Compensated Start is active • When Free Cool is active • When Pre-Occupancy Purge is active • Whenever there is a demand for cooling or heating in the unoccupied mode • Whenever the Remote Contact input is configured for Remote Contact (RC_DC=1 in SERVICE table) and it is closed or the point is forced Closed via communications in the STATUS01 points display table (remote contact closed = occupied, remote contact open = unoccupied) • Whenever the H3_EX_RV point is configured for Dehumidification (AUXOUT=5 in CONFIG table) and it is in the unoccupied mode and the indoor RH exceeds the unoccupied humidity set point • Whenever the Supply Fan Relay point is forced On in the STATUS01 points display table The fan will also continue to run as long as compressors are on when transitioning from occupied to unoccupied with the exception of Fire Shutdown mode. If the Fire Shutdown input point is closed or forced in the STATUS01 points display table, the fan will be shutdown immediately regardless of the occupancy state or demand. 27 consideration to avoid large changes in damper position when the OAT is cold: ECONPOS = SubGain x (ECONSR–SAT) + CTRVAL where SubGain = (OAT – TEMPBAND) / (ESG + 1) If the OAT < DXLOCK (DX Cool Lockout set point) then the damper will be modulated to maintain the SAT at the ECONSR value. If the OAT is between DXLOCK and 68 F (DXLOCK < OAT < 68 F) and additional cooling is required, the economizer will close the to minimum position for three minutes, the economizer integrator will then be reset to 0 and begin modulating to maintain the SASP after the stage has been energized for about 90 seconds. This will allow the economizer to calculate a new ECONSR that takes into account the cooling effect that has just been turned on and not return to the value require before the cooling was added. This will prevent the economizer from causing premature off cycles of compressors while maintaining the low SAT temperature set point for the number of stages active. In addition to preventing compressor short cycling, by using return air across the evaporator coil just after the compressor has started allows for increased refrigerant flow rates providing for better oil return of any oil washed out during compressor start-up. If the OAT > 68 F and OAT < SPT and the number of DX stages requested is > 0 by the staging algorithm, then ECONSR is set to its minimum value 48 F and the damper will go to 100% open. If the Auxiliary Relay is configured for exhaust fan (AUXOUT = 1) in the CONFIG configuration table and Continuous Power Exhaust (MODPE) is Enable in the SERVICE configuration table, then the AUXO output (HS3) will be energized whenever the PremierLink controller is in the occupied mode. If the MODPE is disabled then AUXO output will be energized based on the Power Exhaust Setpoint (PES) in the SETPOINT table. Heating — The heat stages are controlled by the Heating Control Loop, which is used to calculate the desired SAT needed to satisfy the space. It will compare the SPT to the Occupied Heat Setpoint (OHSP) + the T56 slider offset (STO) when occupied and the Unoccupied Heat Setpoint (UHSP – Unoccupied Heating Deadband) if unoccupied to calculate a Staged Heat Submaster Reference (SHSR). The heat staging algorithm compares the SHSR to the actual SAT to calculate the required number of heating stages to satisfy the load. This loop runs every 40 seconds. The following conditions must be met in order for this algorithm to run: • Indoor fan has been ON for at least 30 seconds. • Cool mode is not active and the time guard between modes equals zero. • Mode is occupied or the Temperature Compensated Start or Heat mode is active. • SPT reading is available and < (OHSP + STO). • If it is unoccupied and the SPT < (UHSP – Unoccupied Heating Deadband). The indoor fan will be turn on by the staging algorithm. When all of the above conditions are met, the SHSR is calculated and up to 3 stages of heat will turned on and off to satisfy to maintain the SAT = SHSR. If any of the above conditions are not met, the SHSR is set to its minimum value of 35 F. The Staged Heat Submaster Reference (SHSR) is calculated as follows: SHSR = Heating PID function on (error) where error = (OHSP + STO) - Space Temperature Table 7 - Available Cooling Stages 1 Number of Stages 0 (Economizer*) Compressor 1 Off Off Compressor 2 Off Off * If conditions are suitable for economizer operation. 2 3 On Off On On Dehumidification – The PremierLink controller will provide occupied and unoccupied dehumidification control when AUXOUT = 5 in the CONFIG table and is installed on HVAC units that are equipped with additional controls and accessories to accomplish this function. This function also requires a space relative humidity sensor be installed on the OAQ/IRH input. When in the occupied mode and the indoor relative humidity is greater then the Occupied High Humidity set point, then the H3_EX_RV output point will be energized. When in the unoccupied mode and indoor relative humidity is greater then the Unoccupied High Humidity set point, then the H3_EX_RV output point and supply fan output will be energized. There is a fixed 5% hysteresis that the indoor relative humidity must drop below the active set point to end the dehumidification mode and deenergize the H3_EX_RV output. If the Premierlink controller is in the unoccupied mode, then the fan relay will deenergize if there is no other mode requiring to the fan to be on. This function will not energize mechanical cooling as a result of the indoor relative humidity exceeding either set point. A high humidity alarm will be generated if the indoor relative humidity exceeds the high humidity set point by the amount configured in the Control Humidity Hysteresis in the ALARMS table for 20 minutes. The alarm will return to normal when the indoor relative humidity drops 3% below the active humidity set point. Economizer — The economizer dampers are used to provide free cooling and indoor air quality if optional CO2 sensor is installed and when the outside conditions are suitable. Temperature control is accomplished by controlling the SAT to a certain level determined by the Economizer PID Loop by calculating a submaster reference (ECONSR) value. This algorithm will calculate the submaster reference temperature (ECONSR) based on OAT and enthalpy conditions and cooling requirements. The ECONSR value is then passed to the Economizer Submaster Loop, which will modulate dampers to maintain SAT at ECONSR level. The following conditions are required to determine if economizer cooling is possible: • Indoor fan has been on for at least 30 seconds • Enthalpy is low • SAT reading is available • OAT reading is available • SPT reading is available • OAT ≤ SPT • OAT < OATMAX (OATMAX default is 75 F) • Economizer position is NOT forced If any of the above conditions are not met, the ECONSR will be set to its MAX limit of 120 F and the damper will go to its configured minimum position. The minimum damper position can be overridden by the IAQ routine described later in this section. The calculation for ECONSR is as follows: ECONSR = PID function on (set point – SPT), where: set point = ((OCSP+STO) + (OHSP+STO))/2 when NTLO (Unoccupied Free Cool OAT Lockout) < OAT < 68 F setpoint = (OCSP+STO) – 1 when OAT ≤ NTLO setpoint = (OHSP+STO) + 1 when OAT ≥ 68 F The actual damper position (ECONPOS) is the result of the following calculation. Values represented in the right side of the equation can be found in the SERVICE configuration table descriptions in this manual. Note that that the OAT is taken into The Maximum SHSR is determined by the SATHI configuration. If the supply-air temperature exceeds the SATHI configuration value, then the heat stages will turn off. Heat staging 28 calculated IAQ minimum position is greater than the IAQ maximum damper position (IAQMAXP) decision in the SERVICE configuration table, then it will be clamped to IAQMAXP value. If IAQ is configured for low priority, the positioning of the economizer damper can be overridden by comfort requirements. If the SPT > OCSP + 2.5 or the SPT < OHSP – 2.5 then IAQ minimum position becomes 0 and the IQMP = MDP. The IAQ mode will resume when the SPT ≤ OCSP + 1.0 and SPT ≥ OHSP – 1.0. If IAQ is configured for high priority and the OAT < 55 F and the SAT < (SPT – 10° F), the algorithm will enable the heat stages to maintain the SAT between the SPT and the SPT + 10° F. IAQ Pre-Occupancy Purge — This function is designed to purge the space of airborne contaminants that may have accumulated 2 hours prior to the beginning of the next occupied period. The maximum damper position that will be used is temperature compensated for cold whether conditions and can be pre-empted by Temperature Compensated Start function. For pre-occupancy to occur, the following conditions must be met: • IAQ Pre-Occupancy Purge option is enabled in the CONFIG configuration table • Unit is in the unoccupied state • Current Time is valid • Next Occupied Time is valid • Time is within 2 hours of next Occupied period • Time is within Purge Duration (user-defined 5 to 60 minutes in the CONFIG configuration table) • OAT Reading is available If all of the above conditions are met, the economizer damper IQMP is temporarily overridden by the pre-occupancy damper position (PURGEMP). The PURGEMP will be set to one of the following conditions based on atmospheric conditions and the space temperature: • If the OAT ≥ NTLO (Unoccupied OAT Lockout Temperature) and OAT < 65 F and OAT is less than or equal to OCSP and Enthalpy = Low then PURGEMP = 100%. • If the OAT < NTLO then PURGEMP = LTMP (Low Temperature Minimum Position – defaults to 10%) • If the OAT > 65 F or (OAT ≥ NTLO and OAT > OCSP) or Enthalpy = High then PURGEMP = HTMP (High Temperature Minimum Position defaults to 35%). The LTMP and HTMP are user adjustable values from 0 to 100% in the SETPOINT table. Whenever PURGEMP results in a number greater than 0%, the IAQ pre-occupancy purge mode will be enabled turning on the Indoor Fan Relay and setting the economizer IQMP to the PURGEMP value. When IAQ pre-occupancy mode is not active PURGEMP = 0%. Unoccupied Free Cooling — Unoccupied free cool function will start the indoor fan during unoccupied times in order to cool the space with outside air. This function is performed to delay the need for mechanical cooling when the system enters the occupied period. Depending on how Unoccupied Free Cooling is configured, unoccupied mode can occur at any time in the unoccupied time period or 2 to 6 hours prior to the next occupied time. Once the space has been sufficiently cooled during this cycle, the fan will be stopped. In order to perform unoccupied free cooling all of the following conditions must be met: • NTEN option is enabled in the CONFIG configuration table • Unit is in unoccupied state • Current time of day is valid • Temperature Compensated Start mode is not active • COOL mode is not active • HEAT mode is not active • SPT reading is available • OAT reading is available • Enthalpy is low will resume after a delay to allow the supply-air temperature to drop below the SATHI value. The maximum number of stages available is dependent on the type of heat and the number of stages programmed in the CONFIG and SERVICE configuration tables. Staging will occur as follows for gas electric units, Carrier heat pumps with a defrost board, or cooling units with electric heat: For Heating PID STAGES = 2 HEAT STAGES = 1 (50% capacity) - energize HS1. HEAT STAGES = 2 (100% capacity) - energize HS2. For Heating PID STAGES = 3 and AUXOUT = HS3 HEAT STAGES = 1 (33% capacity if) - energize HS1 HEAT STAGES = 2 (66% capacity) - energize HS2 HEAT STAGES = 3 (100% capacity) - energize HS3 Staging will occur as follows For heat pump units with AUXOUT configured as reversing valve: For Heating PID STAGES = 2 and AUXOUT = Reversing Valve Heat (the H3_EX_RV output will stay energized until there is a cool demand) HEAT STAGES = 1 (50% capacity) shall energize CMP1, CMP2, RVS. HEAT STAGES = 2 (100% capacity) shall energize HS1 and HS2. Heating PID STAGES = 3 and AUXOUT = Reversing Valve Heat (the H3_EX_RV output will stay energized until there is a cool demand) HEAT STAGES = 1 (33% capacity if) shall energize CMP1, CMP2, RVS HEAT STAGES = 2 (66% capacity) shall energize HS1 HEAT STAGES = 3 (100% capacity) shall energize HS2 If AUXOUT is configured for Reversing Valve Cool, then the H3_EX_RV contact will be deenergized when there is a demand for heating. The heat stages will be cycled to temper the SAT so that it will be between the SPT and the SPT + 10° F (SPT < SAT < (SPT + 10° F)) if: • the number of heat stages calculated is zero • the OAT < 55 F • an IAQ sensor is installed • the IAQ Minimum Damper Position > minimum damper position • and the SAT < SPT –10° F. There is also a SAT tempering routine that will act as SAT low limit safety to prevent the SAT from becoming too cold should the economizer fail to close. One stage of heating will be energized if it is not in the Cooling or Free Cooling mode and the OAT is below 55 F and the SAT is below 40 F. It will deenergize when the SAT > (SPT + 10° F). Indoor Air Quality — If the optional indoor air quality (IAQI) sensor is installed, the PremierLink™ controller will maintain indoor air quality within the space at the user configured differential set point (IAQD) in the CONFIG configuration table. The set point is the difference between the IAQI and an optional outdoor air quality sensor (OAQ). If the OAQ is not present then a fixed value of 400 ppm is used. The actual space IAQ setpoint (IAQS) is calculated as follows: IAQS = IAQD + OAQ (OAQ = 400 ppm if not present) As air quality within the space changes, the minimum position of the economizer damper will be changed also thus allowing more or less outdoor air into the space depending on the relationship of the IAQI to the IAQS. The IAQ algorithm runs every 30 seconds and calculates IAQ minimum position value using a PID loop on the IAQI deviation from the IAQS. The IAQ minimum position is then compared against the user configured minimum position (MDP) and the greatest value becomes the final minimum damper position (IQMP). If the 29 Once Linkage is active, the PremierLink controller’s own SPT, temperature set points, and occupancy are ignored and the controller will use the information provided by the remote linkage device. The following information will be received from the remote linked device and can be viewed in the maintenance display table: • Supervisory Element • Supervisory Bus • Supervisory Block • Average Occupied Heat Setpoint • Average Occupied Cool Setpoint • Average Unoccupied Heat Setpoint • Average Unoccupied Cool Setpoint • Average Zone Temp • Average Occupied Zone Temp • Occupancy Status In return, the PremierLink controller will provide its SAT and operating mode to the linked device. It will convert its operating modes to Linkage modes. See Table 8. • OAT > NTLO (with 1 degree F hysteresis) and < Max Free Cool set point If any of the above conditions are not met, Unoccupied Free Cool mode will be stopped, otherwise, the mode will be controlled as follows: The NTFC set point (NTSP) is determined as NTSP = (OCSP + OHSP) / 2 The Unoccupied Free Cool mode will be started when: SPT > (NTSP + 2° F) and SPT > (OAT + 8° F) The Unoccupied Free Cool mode will be stopped when: SPT < NTSP or SPT < (OAT + 3° F) Temperature Compensated Start — This function will run when the controller is in unoccupied state and will calculate early start bias time (SBT) based on space temperature deviation from occupied set points in minutes per degree. The following conditions will be met for the function to run: • Unit is in unoccupied state • Next occupied time is valid • Current time of day is valid • Valid space temperature reading is available (from sensor or linkage thermostat) • Cool Start Bias (KCOOL) and Heat Bias Start (KHEAT) > 0 in the CONFIG configuration table The SBT is calculated by one of the following formulas depending on temperature demand: If SPT > OCSP then SBT = (SPT – OCSP) * KCOOL If SPT < OHSP then SPT = (OHSP – SPT) * KHEAT. The calculated start bias time can range from 0 to 255 minutes. When SBT is greater than 0 the function will subtract the SBT from the next occupied time to calculate a new start time. When a new start time is reached, the Temperature Compensated Start mode is started. This mode energizes the fan and the unit will operate as though it is in occupied state. Once set, Temperature Compensated Start mode will stay on until the unit returns to occupied state. If either Unoccupied Free Cool or IAQ Pre-Occupancy mode is active when Temperature Compensated Start begins, their mode will end. Door Switch – The Door Switch function is designed to disable mechanical heating and cooling outputs when the REMOCC contact input is closed (in the ON state) after a programmed time delay. The fan will continue to operate based on the current mode and the ASHRAE 90.1 Supply Fan setting. The delay is programmable from 2 to 20 minutes by setting the Remote Cont/Door Switch decision in the SERVICE table to a value equal to the number of minutes desired. When the contact is open (in the OFF state), the PremierLink controller will resume normal temperature control. This application is designed for use in schools or other public places where a door switch can be installed to monitor the opening of a door for an extended period of time. The controller will disable mechanical cooling and heating when the door is open for a programmed amount of time. This function can also be used to monitor a high condensate level switch when installed on a water source heat pump to disable mechanic cooling in case of a plugged evaporator condensate pan drain. Linkage — The Linkage function in the PremierLink™ controller is available for applications using a Linkage thermostat or the 3V™ control system. If using the Linkage thermostat, both the PremierLink controller and the stat must be on the same CCN bus. When used as the air source for a 3V control system, the PremierLink controller is not required to be on the same CCN bus but it is recommended. Linkage will be active when it is initiated from the Linkage thermostat or the 3V Linkage Coordinator through CCN communications and requires no configuration. Only one device can be linked to the PremierLink controller. Table 8 — Linkage Modes ROOFTOP MODE VALUE Demand Limit N/A Heat 3 Cool or Free Cooling 4 IAQ Control N/A Temp. Compensated 2 Start Heat Temp. Compensated 4 Start Cool IAQ Purge 6 Occupied (Indoor Fan ON) 4 Unoccupied Free Cool 5 Fire Shutdown 7 Factory/Field Test 1 Off 1 LINKAGE MODE N/A Heating Cooling N/A Warm-up Cooling Pressurization Cooling Unoccupied Free Cooling Evac Off Off The PremierLink controller will generate a Linkage Communication Failure alarm if a failure occurs for 5 consecutive minutes once a Linkage has previously been established. It will then revert back to its own SPT, set points and occupancy schedule for control. For this reason, Carrier strongly recommends that an SPT be installed in the space on open plenum systems or in the return air duct of ducted return air systems to provide continued backup operation. When Linkage communication is restored, the controller will generate a return to normal. For more information on how the PremierLink controller is used in conjunction with the Carrier 3V control system, contact your CCN controls representative. IMPORTANT: The PremierLink controller should not be used as a linked air source in a ComfortID™ VAV system. The ComfortID VAV system will NOT function correctly when applied with a PremierLink controller as the air source, resulting in poor comfort control and possible equipment malfunction. NOTE: The PremierLink controller can be used as an air source in a 3V Pressure Independent (PI) System (a 3V Linkage Coordinator with ComfortID PI Zone Controllers), but it should not be used as an air source with ComfortID controllers unless a 3V zone controller is used as the Linkage Coordinator. Contact your Carrier CCN controls representative for assistance. Demand Limit — If the demand limit option is enabled, the control will receive and accept Redline Alert and Loadshed commands from the CCN load shed controller. When a redline alert is received, the control will set the maximum stage of 30 capacity equal to the stage of capacity that the unit is operating at when the redline alert was initiated. When load shed command is received the control will reduce capacity as shown in Tables 9 and 10. Outdoor Air Temperature: Table 9 — Load Shed Command — Gas and Electric Heat Units CURRENT CAPACITY NEW CAPACITY CMP1 DX Cooling OFF CMP1+CMP2 CMP1 HS1 Heat OFF HS1+HS2 (+HS3) HS1 NEW CAPACITY Cooling: CMP1 DX Cooling OFF CMP1+CMP2 CMP1 ROOFTOP MODE — This point displays the current mode of the PremierLink controller based on active space temperature, set points, and occupancy. Rooftop Mode: Display Units ASCII Default Value Off Display Range OFF, COOL, HEAT, FAN ONLY, UNOCCOOL, UNOCHEAT, WARMUP, FREECOOL, PRESS EVAC Network Access Read Only Heating: CMP1+CMP2+RV Heat OFF CMP1+CMP2+RV+HS1+HS2 CMP1+CMP2+RV degrees F (degrees C) 0.0 –40.0 to 245.0 Read/Write CONTROL SET POINT — This point displays the current controlling set point when a heat or cool mode is active. If there is not an active heat or cool set point, the set point of the last mode is displayed. Upon reset or start-up, the proper cooling set point is displayed, depending on occupancy. In the thermostat mode, this point is not used for equipment control. Control Set Point: Display Units degrees F (degrees C) Default Value Unoccupied Cool Setpoint Display Range 35 to 110 Network Access Read Only Table 10 — Load Shed Command — Heat Pump Units CURRENT CAPACITY Display Units Default Value Display Range Network Access The controller will have a maximum demand limit timer of 1 hour that prevents the unit from staying in load shed or redline alert longer than 1 hour in the event the controller loses communication with the network load shed module. Should the maximum demand limit timer expire prior to receiving the unshed device command from CCN, the control will stop demand limit mode and return to normal operation. COOLING PERCENT TOTAL CAPACITY — The Cooling Percent Total Capacity point is used to display the current Cooling Capacity. When cooling is enabled, the percent of cooling being delivered is determined by the following formula for the number of compressor stages confirmed: % Output Capacity = (no. of active stages/Total stages) * 100. Cooling Percent Total Capacity: Display Units % output capacity Default Value 0 Display Range 0 to 100 Network Access Read Only CONFIGURATION The following sections describe the computer configuration screens which are used to configure the PremierLink™ controller. The screens shown may be displayed differently when using different Carrier software. Points Display Screen — The Points Display screen is used to monitor and change the PremierLink controller set points. See Table 11. SPACE TEMPERATURE — This point displays the space temperature from the 10K thermistor (Type II) located in the space. Space Temperature: Display Units degrees F (degrees C) Default Value –40.0 Display Range –40.0 to 245.0 Network Access Read/Write HEATING PERCENT TOTAL CAPACITY — The Heating Percent Total Capacity point is used to display the current Heating Capacity. When heat is enabled, the percent of heat being delivered is determined by the following formula for gas or electric heat: % Output Capacity = (no. of active stages/Total stages) * 100 Heating Percent Total Capacity: Display Units % output capacity Default Value 0 Display Range 0 to 100 Network Access Read Only SUPPLY AIR TEMPERATURE — The Supply Air Temperature point displays the temperature of the air leaving the unit, downstream of any cool or heat sources. Temperature is measured by a 10K thermistor (Type II). This sensor is required for proper function of the heating, cooling, and the economizer. Supply Air Temperature: Display Units degrees F (degrees C) Default Value 0.0 Display Range –40.0 to 245.0 Network Access Read/Write ECONOMIZER ACTIVE — The Economizer Active point displays the status of the economizer for free cooling. When the outdoor conditions match the desired indoor conditions, the economizer will be enabled for outdoor air assisted cooling. Economizer Active: Display Units Discrete ASCII Default Value No Display Range No/Yes Network Access Read Only OUTDOOR AIR TEMPERATURE — Temperature of the air entering the rooftop is measured by a 10K thermistor (Type II). This sensor is required for proper function of the cooling mode and the economizer. 31 Table 11 — Points Display DESCRIPTION Space Temperature Supply Air Temperature Outdoor Air Temperature Control Setpoint Rooftop Mode Cooling % Total Capacity Heating % Total Capacity Economizer Active Supply Fan Relay Supply Fan Status Economizer Position Current Min Damper Pos Filter Status Remote Occupied Mode Heat Stage 1 Heat Stage 2 Ht 3/Exhaust/Rev Valv/DH Enthalpy Indoor Air Quality Indoor Air Quality Setpt Outdoor Air Quality Indoor RH Fire Shutdown SPT Offset Compressor 1 Compressor 2 Compressor Safety Rooftop Mode LON Setpoint Alarm Status VALUE 72.2 67.1 48.8 70.0 COOL 0 0 Yes On On 26.2 20 Clean Off Off Off Off Low 367.9 1050.0 0.0 0 Normal 0.0 Off Off Off 2 72 Normal UNITS dF dF dF dF STATUS % % % % Sensor failure % ^F dF FORCE NAME SPT SAT OAT CLSP MODE CCAP HCAP ECOS SF SFS ECONPOS IQMP FLTS RMTOCC HS1 HS2 H3_EX_RV ENTH IAQI IAQS OAQ IRH FSD STO CMP1 CMP2 CMPSAFE RTU_MODE LON_SP ALARM NOTE: Bold values indicate points that can be forced through communications. exceeded, this point will display the current calculated minimum position deemed necessary to maintain the air quality in the space. Current Minimum Damper Position: Display Units % Open Default Value 0 Display Range 0 to 100 Network Access Read Only SUPPLY FAN RELAY — This point displays the commanded state of the Supply Fan Relay. Supply Fan Relay: Display Units Discrete ASCII Default Value Off Display Range Off/On Network Access Read/Write SUPPLY FAN STATUS — This point displays the Supply Fan status if controller is configured to receive input from the Supply Fan. Otherwise this point will display the output state of the Supply Fan Relay. This mode can only be used when the controller is in sensor control mode. Supply Fan Status: Display Units Discrete ASCII Default Value Off Display Range Off/On Network Access Read Only FILTER STATUS — The filter status point will be shown as “CLEAN” until the run time of the fan exceeds the configured Filter Timer Hours or the filter switch is closed. When the userconfigured Filter Timer Hours has been exceeded, the Filter Status will display “DIRTY” and a CCN alarm will be generated. Forcing the point to “CLEAN” will clear the alarm condition and will reset the timer. (Setting the configured filter timer value to zero will provide the same function.) The value of the timer is stored in EEPROM to protect it in the event of a power failure. This is done periodically every 24 hours. The filter timer function only operates if the configured filter timer value (FLTTMR) is a non-zero number. If a filter switch is used, then “CLEAN” will be shown when the switch is open. Filter Status: Display Units Discrete ASCII Default Value Clean Display Range Clean/Dirty Network Access Read/Write ECONOMIZER DAMPER POSITION — This point displays the current commanded damper position of the economizer 4 to 20 mA on the J-9 connector. The 4 to 20 mA signal is scaled linearly over the range of 0 to 100% of the Supply Fan Relay. Economizer Position: Display Units % Open Default Value 0 Display Range 0 to 100 Network Access Read/Write CURRENT MINIMUM DAMPER POSITION — This point displays the current minimum damper position if an Indoor Air Quality routine is not active. If an Indoor Air Quality sensor is installed and the differential air quality set point has been REMOTE OCCUPIED MODE — This point displays the status of the remote timeclock input or a remote door switch contact. This input is only available when the controller is being used in sensor control mode. When configured for Remote Contact, if the point is ON and the controller is not controlled by a 3V™ Linkage, the controller will function in an occupied 32 Indoor Air Quality (ppm): mode. When the point is OFF, the controller will revert to its own occupancy schedule. When configured for a remote door switch, if the point is ON, then the heating and cooling outputs will be turned off after a configured time delay. When the point is OFF, the controller will resume control of the heating and cooling outputs based normal temperature control. Remote Occupied Mode: Display Units Discrete ASCII Default Value Off Display Range Off/On Network Access Read/Write Display Units None shown (parts per million implied) Default Value 0 Display Range 0 to 5000 Network Access Read/Write INDOOR AIR QUALITY SET POINT — This point displays the current Indoor Air Quality set point. The set point is determined by the configured Indoor Air Quality differential and the current outdoor air quality value. If an outdoor air quality value is not received, the controller will assume a default outdoor level of 400 ppm and calculate the set point using that value. Indoor Air Quality Set Point: Display Units None shown (parts per million implied) Default Value 0 Display Range 0 to 5000 Network Access Read Only HEAT STAGE 1 — The Heat Stage 1 point provides the state of the Heating 1 output. Heating Stage 1: Display Units Discrete ASCII Default Value Off Display Range Off/On Network Access Read Only HEAT STAGE 2 — The Heat Stage 2 point provides the state of the Heating 2 output. Heating Stage 2: Display Units Discrete ASCII Default Value Off Display Range Off/On Network Access Read Only OUTDOOR AIR QUALITY — This point displays the reading from an outdoor air quality sensor. This point supports global broadcast of outdoor air quality on a network. Outdoor Air Quality Set Point: Display Units None shown (parts per million implied) Default Value 0 Display Range 0 to 5000 Network Access Read/Write HEAT STAGE 3, EXHAUST FAN, REVERSING VALVE, OR DEHUMIDIFICATION — This point displays the commanded state of auxiliary output. This output can be configured to control a third stage of heat, an exhaust fan, a reversing valve on some heat pump units, dehumidification, or an occupied output. The output energizes for Heat mode when configured as Reversing Valve Heat and will energize in Cool mode when configured for Reversing Valve Cool. In the exhaust fan mode with continuous exhaust configured, this point may control a bank of lights or another indicator that should remain ON whenever the controller is in the occupied mode. If configured for Dehumidification, the output will energize when the indoor relative humidity exceeds the occupied or unoccupied humidity set point. If configured for Occupancy Schedule, the output will follow schedule OCCPC63 only. Ht 3, Exhaust, Rev Valv, DH: Display Units Discrete ASCII Default Value Off Display Range Off/On Network Access Read Only ENTHALPY — This point displays the current status of an outdoor air or differential enthalpy input. This point may be broadcast to other controllers or received from a controller which supports global broadcast of the ENTH variable. Enthalpy: Display Units Discrete ASCII Default Value High Display Range High/Low Network Access Read/Write INDOOR RELATIVE HUMIDITY — This point displays the value from the optional space relative humidity sensor. It is used in the dehumidification function if it is installed. Indoor RH: Display Unit % Humidity Default Value 0% Display Range 0 to 100% Network Access Read/Write FIRE SHUTDOWN — While in sensor control mode, this point can be used to receive a signal from a smoke detector or fire panel to shut down the Supply Fan, all heating and cooling stages, and to close the economizer. Fire Shutdown: Display Units Discrete ASCII Default Value Normal Display Range Normal/Alarm Network Access Read/Write SPT OFFSET — This point displays the value of the Space Temperature offset calculated from the input of a T56 sensor slide bar. SPT Offset: Display Units delta degrees F (C) Default Value 0.0 Display Range –15 to 15 Network Access Read/Write COMPRESSOR 1 — This point displays the commanded state of the compressor 1 output. Compressor 1: Display Units Discrete ASCII Default Value Off Display Range Off/On Network Access Read Only COMPRESSOR 2 — This point displays the commanded state of the compressor 2 output. Compressor 2: Display Units Discrete ASCII Range Off/On Default Value Off Network Access Read Only INDOOR AIR QUALITY (IAQ) — The Air Quality point displays the indoor air quality reading from a CO2 sensor installed in the space. The CO2 sensor maintains differential indoor air quality for demand control ventilation per ASHRAE Standard 62-1999. The controller can be configured to generate an alarm when the control is in occupied mode and the CO2 level exceeds the high or low limit set. 33 Alarm Routing Control: COMPRESSOR SAFETY — When the controller is in sensor mode, this point can be used to monitor the status of the compressor trouble output supplied with some equipment. When the input is detected, the controller will issue a compressor trouble alert on the communications network. Staging will operate as normal. Compressor Safety: Display Units Discrete ASCII Display Range Off/On Default Value Off Network Access Read Only ROOFTOP MODE — This point displays the numeric value of the Rooftop Mode ASCII point and is used with the LON Translator for interfacing into third party LON systems. Rooftop Mode: Display Units Numeric Default Value 1 Display Range 1-10 (1=OFF, 2=COOL, 3=HEAT, 4=FAN ONLY, 5=UNOCCOOL, 6=UNOCHEAT, 7=WARMUP, 8=FREECOOL, 9=PRESS, 10=EVAC) Network Access Read Only LON SETPOINT — This point displays the midpoint between the configured Occupied Low Setpoint and the Occupied High Setpoint. It is used to display the LON Setpoint when the PremierLink™ controller is used with a LON translator for interfacing into third party LON Systems. Range Default Value 00000000 to 1111111 00000000 ALARM RE-ALARM TIME — This decision is used to configure the number of minutes that will elapse between re-alarms. A re-alarm occurs when the condition that caused the initial alarm continues to persist for the number of minutes specified. Re-alarming continues to occur at the specified interval until the alarm condition no longer exists. Re-Alarm Time: Display Units minutes Display Range 0 to 1440 Default Value 0 (Disabled) CONTROL TEMPERATURE HYSTERESIS — This configuration defines the range above the high set point and below the low set point the space temperature must exceed for an alarm condition to exist during occupied hours. For example, if the current setpoint is 75 F and the hysteresis value is 5° F, an alarm will be generated if space temperature exceeds the low limit of 70 F or the high limit of 80 F. Control Temperature Hysteresis: Display Units delta degrees F (delta degrees C) Range 1.0 to 100.0 Default Value 5.0 CONTROL HUMIDITY HYSTERESIS — This configuration defines the range above the dehumidification set point that the humidity must exceed to generate an alarm condition. This value is added to the both the occupied and unoccupied dehumidification set points. Control Humid Hysteresis: Range –5 to 10 % Default Value 5% IMPORTANT: Forcing this point will cause the configured Occupied Low and Occupied High set points to change by equal amounts. SUPPLY AIR TEMPERATURE — LOW LIMIT — The Supply Air Temperature Low Limit alarm is used to monitor the value of the supply-air temperature within a specified range. If the supply-air temperature becomes too low, an alarm condition will exist. Supply Air Temperature Low Limit: Display Units degrees F (degrees C) Display Range –40.0 to 245.0 Default Value 45.0 LON Setpoint: Display Unit degrees F (degrees C) Default Value 72.0 F Default Range -40.0 to 245.0 F Network Access Read/Write ALARM STATUS — This point displays the alarm status of the PremierLink controller if there is an active alarm. It is primarily used to display the alarm status when used with the LON translator for interfacing into third party LON systems. ALARM STATUS: Units Discrete ASCII Default Value Normal Default Range Normal/Alarm Network Access Read Only SUPPLY AIR TEMPERATURE — HIGH LIMIT — The Supply Air Temperature High Limit alarm is used to monitor the value of the supply-air temperature within a specified range. If the supply-air temperature becomes too high, an alarm condition will exist. Supply Air Temperature High Limit: Display Units degrees F (degrees C) Display Range –40.0 to 245.0 Default Value 150.0 Thermostat Control Input Screen — The Thermostat Control Input Display is used to display the input status of equipment requests from the thermostat (TSTAT). See Table 12. Alarm Service Configuration Screen — The Alarm Service Configuration (ALARMS) is used to configure the alarms used on the PremierLink™ controller. See Table 13. INDOOR AIR QUALITY ALERT LIMIT — The IndoorAir Quality Alert Limit alarm defines the allowable CO2 levels during occupied periods. If the CO2 levels become too low or too high during occupied periods, an alarm condition will exist. Indoor Air Quality Low Limit: Display Units PPM (implied) Display Range 0.0 to 5000.0 Default Value 0.0 Indoor Air Quality High Limit Display Units PPM (implied) Display Range 0.0 to 5000.0 Default Value 1200.0 ALARM ROUTING CONTROL — The Alarm Routing Control indicates which CCN system software or devices will receive and process alarms sent by the PremierLink controller. This decision consists of 8 digits which can be set to zero or one. A setting of one indicates alarms should be sent to this device. A setting of zero disables alarm processing for that device. Currently the corresponding digits are configured for the following devices: first digit is for user interface software (ComfortWORKS®, ComfortVIEW™, BACnet/Modbus Translator, etc.); second digit is for Autodial Gateway or Telink; fourth digit is for Alarm Printer Interface Module, DataLINK™ module; digits 3 and 5 through 8 are unused. 34 Table 12 — Thermostat Control Input Display DESCRIPTION Y1 - Call for Cool 1 Y2 - Call for Cool 2 W1 - Call for Heat 1 W2 - Call for Heat 2 G - Call for Fan VALUE On On Off Off On UNITS VALUE 00000000 0 5.0 5 45.0 150.0 UNITS NAME min ^F % ALRMCNT REALARM SPTHYS RHHYS dF dF LOWLIM HIGHLIM 0.0 1200.0 Normal DURATION — The Duration field indicates how long the holiday will last (in days). Duration: Range 0 to 365 Default Value 0 As an example, if a Holiday is configured for Month 2, Day 5, Duration 2, then the Holiday will start February 5 and end February 7. LOWLIM HIGHLIM FIAC Table 15 — Holiday Configuration DESCRIPTION Start Month Start Day Duration Table 14 — Controller Identification CESR131269-08 Version 2.000 VALUE 1 1 0 UNITS NAME MONTH DAY DURATION Occupancy Configuration Screen — The Occupancy Configuration Screen is used to configure the occupancy schedule for the PremierLink controller. Occupancy schedule OCCPC64 is used by the controller for heating and cooling. Occupancy schedule OCCPC63 is only used by the H3_EX_RV output when it is configured for type 6 Occupied Schedule. See Table 16. MANUAL OVERRIDE HOURS — The Manual Override Hours point is used to command a timed override by entering the number of hours the override will be in effect. If the occupancy schedule is occupied when this number is downloaded, the current occupancy period will be extended by the number of hours downloaded. If the current occupancy period is unoccupied when the occupancy override is initiated, the mode will change to occupied for the duration of the number of hours downloaded. If the occupancy override is due to end after the start of the next occupancy period, the mode will transition from occupancy override to occupied without becoming unoccupied and the occupancy override timer will be reset. An active occupancy override or a pending occupancy override may be canceled by downloading a zero to this configuration. Once a number other than zero has been downloaded to this configuration, any subsequent downloads of any value other than zero will be ignored by the controller. Manual Override Hours: Units hours Range 0 to 4 Default Value 0 Controller Identification Screen — The controller identification screen contains reference information used to identify the PremierLink™ controller. See Table 14. DESCRIPTION — The Description point displays the type of device. LOCATION — The Location point shows the location of the device. SOFTWARE PART NUMBER — The Software Part Number indicates the part number of the software being used. MODEL NUMBER — The Model Number indicates the model number of the device being used. SERIAL NUMBER — The Serial Number indicates the serial number of the device being used. REFERENCE NUMBER — The Reference Number indicates the version of the software being used. VALUE UNITS Rooftop Control NAME Y1 Y2 W1 W2 G START DAY — The Start Day field is used to determine which day the holiday will start. Start Day: Range 1 to 31 Default Value 1 FIRE INPUT ALARM CONDITION — This configuration defines the condition of the Fire Shutdown input point that will generate an alarm and turn off the fan. If set to Normal (for normally open contact), the alarm condition will occur when the contact is closed. If set to Invert (for normally closed contact), the alarm condition will occur when the contact opens. Fire Inp Alm Conditn: Range Invert/Normal Default Value Normal DESCRIPTION Description: Location: Software Part Number: Model Number: Serial Number: Reference Number: FORCE START MONTH — The Start Month field is used to configure the month that the holiday will start. The numbers 1 through 12 are used to indicate which month is specified. Start Month: Range 1 to 12 Default Value 1 (January) Table 13 — Alarm Service Configuration DESCRIPTION Alarm Control Alarm Routing Control Realarm Time Control Temp Hysteresis Control Humid Hysteresis Supply Air Temperature Low Limit High Limit IAQ High Alert Limit Low Limit High Limit Fire Inp Alm Conditn STATUS NAME DevDesc Location PartNum ModelNum SerialNo RefNum Holiday Configuration Screen — The Holiday Configuration screen is used by the PremierLink controller to store configuration fields for up to 12 holidays. See Table 15. OCCUPANCY SCHEDULE — For flexibility of scheduling, the occupancy programming is broken into 8 separate periods. 35 For each period the schedule contains the following fields: Day of Week, Occupied From, and Occupied To. Set Point Screen — The Set Point screen is used to configure the occupied and unoccupied set points. See Table 17. OCCUPIED LOW — The Occupied Low set point describes the low temperature limit of the space during Occupied mode. Occupied Low: Units degrees F (degrees C) Range 40.0 to 90.0 Default Value 70.0 DAY OF WEEK — The Day of Week configuration consists of 8 fields corresponding to the 7 days of the week and a holiday field in the following order: Monday, Tuesday, Wednesday, Thursday, Friday, Saturday, Sunday, Holiday. It is displayed as: M T W Th Fr Sa Su Hol 0 0 0 0 0 0 0 0 If a 1 is configured in the corresponding place for a certain day of the week, the related “Occupied from” and “Occupied to” times for that period will take effect on that day of the week. If a 1 is placed in the holiday field, the related times will take effect on a day configured as a holiday. A zero means the schedule period will not apply to that day. Day of week: Range 0 or 1 Default Values 11111111 for period 1, 00000000 for the rest of the periods OCCUPIED HIGH — The Occupied High set point describes the high temperature limit of the space during Occupied mode. Occupied High: Units degrees F (degrees C) Range 45.0 to 99.9 Default Value 74.0 UNOCCUPIED LOW — The Unoccupied Low set point describes the low temperature limit of the space during Unoccupied mode. The cooling mode will be turned on when the space temperature achieves this value plus the unoccupied cooling deadband. The cooling mode will be turned off when the space temperature goes below this value. Unoccupied Low: Units degrees F (degrees C) Range 40.0 to 90.0 Default Value 75.0 OCCUPIED FROM — This field is used to configure the hour and minute, in military time, that the mode for the PremierLink™ controller will switch to occupied. Occupied From: Units Hours:Minutes Range 00:00 to 24:00 (Minutes 00 to 59) Default Value 00:00 UNOCCUPIED HIGH — The Unoccupied High set point describes the high temperature limit of the space during Unoccupied mode. The heating mode will be turned on when the space temperature achieves this value minus the unoccupied heating deadband. The heating mode will be turned off when the space temperature goes above this value. Unoccupied High: Units degrees F (degrees C) Range 45.0 to 99.9 Default Value 90.0 HIGH OAT LOCKOUT FOR TSTAT — This is the high outdoor air lockout temperature for thermostat mode. In thermostat mode, the OAT must be below this value and below OAT max for free cooling from the economizer. Hi OAT Lckout for TSTAT: Units degrees F (degrees C) Range 55.0 to 75.0 Default Value 65.0 UNOCCUPIED OAT LOCKOUT TEMPERATURE — The Unoccupied OAT Lockout Temperature describes the lowest outdoor-air temperature allowed for Unoccupied Free Cooling operation. This function is also used by IAQ PreOccupancy Purge control to determine the minimum damper position for IAQ purge. Unoccupied OAT Lockout: Units degrees F (degrees C) Range 40.0 to 70.0 Default Value 50.0 OCCUPIED TO — This field is used to configure the hour and minute, in military time, that the mode for the PremierLink controller switches from occupied to unoccupied. Occupied To: Units Hours:Minutes Range 00:00 to 24:00 (Minutes 00 to 59) Default Value 24:00 Table 16 — Occupancy Configuration DESCRIPTION Manual Override Hours Period 1: Day of Week Period 1: Occupied from Period 1: Occupied to Period 2: Day of Week Period 2: Occupied from Period 2: Occupied to Period 3: Day of Week Period 3: Occupied from Period 3: Occupied to Period 4: Day of Week Period 4: Occupied from Period 4: Occupied to Period 5: Day of Week Period 5: Occupied from Period 5: Occupied to Period 6: Day of Week Period 6: Occupied from Period 6: Occupied to Period 7: Day of Week Period 7: Occupied from Period 7: Occupied to Period 8: Day of Week Period 8: Occupied from Period 8: Occupied to VALUE 0 11111111 00:00 24:00 00000000 00:00 24:00 00000000 00:00 24:00 00000000 00:00 24:00 00000000 00:00 24:00 00000000 00:00 24:00 00000000 00:00 24:00 00000000 00:00 24:00 UNITS hours NAME OVRD DOW1 OCC1 UNOCC1 DOW2 OCC2 UNOCC2 DOW3 OCC3 UNOCC3 DOW4 OCC4 UNOCC4 DOW5 OCC5 UNOCC5 DOW6 OCC6 UNOCC6 DOW7 OCC7 UNOCC7 DOW8 OCC8 UNOCC8 UNOCCUPIED HEATING DEADBAND — The Unoccupied Heating Deadband describes the value that is subtracted from the unoccupied heating set point that the space temperature must achieve before unoccupied heating mode will be turned on. Unoccupied Heating Deadband: Units delta degrees F (delta degrees C) Range 0.0 to 10.0 Default Value 1.0 UNOCCUPIED COOLING DEADBAND — The Unoccupied Cooling Deadband describes the value that is added to the unoccupied cooling set point that the space temperature must achieve before unoccupied cooling mode will be turned on. 36 Unoccupied Cooling Deadband: Units Range Default Value Table 17 — Set Point Configuration delta degrees F (delta degrees C) 0.0 to 10.0 1.0 DESCRIPTION Setpoints Occupied Low Setpoint Occupied High Setpoint Unoccupied Low Setpoint Unoccupied High Setpoint Hi OAT Lckout for TSTAT Unocc. OAT Lockout TEMP Unocc. Heating Deadband Unocc. Cooling Deadband Low Temp. Min. Position Hi Temp. Min. Position Power Exhaust Setpoint Occ Rel Hum Setpoint Unocc Rel Hum Setpoint LOW TEMPERATURE MINIMUM POSITION — The Low Temperature Minimum Position describes the low temperature limit for low outdoor-air temperature conditions. This value is only used with the pre-occupancy purge. The IAQ Pre-Occupancy Purge Algorithm will use this value whenever Outdoor Air Temperature is below Unoccupied OAT Lockout Temperature. Low Temperature Minimum Position: Units % damper open Range 0 to 100% Default Value 10.0% HIGH TEMPERATURE MINIMUM POSITION — The High Temperature Minimum Position specifies the value for Purge Minimum Damper Position for High Outdoor Air temperature conditions. This value is only used with the pre-occupancy purge. IAQ Pre-Occupancy Purge Algorithm will use this value whenever Outdoor Air Temperature is above or at Unoccupied OAT Lockout Temperature, and also OAT is above Occupied Cool Set Point or Enthalpy is High. Whenever OAT is greater than or equal to NTLO and OAT is less than or equal to OCSP and Enthalpy is Low, the Purge algorithm will set Purge Minimum Damper Position to 100%. High Temperature Minimum Position: Units % damper opoen Range 0 to 100% Default Value 35.0% VALUE 70.0 74.0 69.0 75.0 65.0 50.0 1.0 1.0 10 35 50 50 99 UNITS NAME dF dF dF dF dF dF ^F ^F % % % % % OHSP OCSP UHSP UCSP OATL NTLO UHDB UCDB LTMP HTMP PES ORHS URHS Service Configuration Selection Screen — The Service Configuration Selection screen is used to configure the service set points of the PremierLink™ controller. See Table 18. COOLING PID — The PremierLink controller reads the space temperature sensor and compares the temperature to the current high set point. If it exceeds the set point, and cooling is configured and available, the controller then calculates the required supply air temperature to satisfy the given conditions. The Cooling PID includes the following set points: Proportional Gain, Integral Gain, Derivative Gain, and Starting Value. Proportional Gain: Range 0.0 to 40.0 Default Value 6.0 Integral Gain: Range 0.0 to 10.0 Default Value 3.0 Derivative Gain: Range 0.0 to 20.0 Default Value 5.0 Starting Value: Units degrees F (degress C) Range 40.0 to 90.0 Default Value 70.0 POWER EXHAUST SET POINT — The Power Exhaust Set Point describes the minimum damper position that the Economizer Damper must be before the power exhaust fan will be energized. Power Exhaust Set Point: Units % damper open Range 0 to 100% Default Value 50.0% OCCUPIED RELATIVE HUMIDITY SET POINT — The Occupied Relative Humidity set point describes the high space relative humidity limit that will be maintained during the Occupied mode. Occupied High: Units % Humidity Range 40 to 99 % Default 50 % UNOCCUPIED RELATIVE HUMIDITY SET POINT — The Unoccupied Relative Humidity set point describes the high space relative humidity limit that will be maintained during the Unoccupied mode. Unoccupied High: Units % Humidity Range 40 to 99 % Default 99 % SAT CMP1 LOCKOUT TEMP — The SAT CMP1 Lockout Temperature displays the low supply temperature set point for compressor no. 1 supply air during cooling. If compressor no. 1 is on during Cooling mode, the economizer will assist the cooling and work to maintain a discharge air temperature slightly above lockout temperature set point. If the economizer is at minimum and the supply-air temperature goes below Lockout Temperature set point, the compressor will cycle to maintain the supply air set point. The minimum on and off times will still be in effect. SAT CMP1 Lockout Temp: Units degrees F (degrees C) Range 50.0 to 65.0 Default Value 55.0 37 the output is then adjusted to satisfy conditions by using a Proportional/Integral/Derivative (PID) loop. The Heating PID includes the following set points: Proportional Gain, Integral Gain, Derivative Gain, and Starting Value. Proportional Gain: Range –100.0 to 100.0 Default Value 6.0 Integral Gain: Range –5.0 to 5.0 Default Value 3.0 Derivative Gain: Range –20.0 to 20.0 Default Value 5.0 Starting Value: Units degrees F (degrees C) Range 40.0 to 120.0 Default Value 75.0 NOTE: If configured for heat pump operation, the proportional, integral, and derivative gains need to be changed to the following values: proportional gain - 10.0, integral gain - 1.0 to 2.0, derivative gain - 3.0. SAT HIGH SET POINT — This is the maximum duct temperature value that will be calculated by heating algorithm during the heat mode. SAT High Setpoint: Display Unit degrees F (degrees C) Range 100.0 to 140.0 F Default Value 140.0 F SAT CMP2 LOCKOUT TEMP — The SAT CMP2 Lockout Temperature displays the low supply temperature set point for compressor no. 2 supply air during cooling. If compressor no. 2 is on during Cooling mode, the economizer will assist the cooling and work to maintain a discharge-air temperature slightly above lockout temperature set point. If the economizer is at minimum and the supply-air temperature goes below Lockout Temperature set point, the compressor will cycle to maintain the supply air set point. The minimum on and off times and stage-up and down timers will still be in effect. SAT CMP2 Lockout Temp: Units degrees F (degrees C) Range 45.0 to 55.0 Default Value 50.0 STAGED COOLING — The staging function is used for DX cooling (1 or 2 stages). The staging function uses the cooling submaster reference from the PID and compares the value to the supply-air temperature to calculate the required number of output stages to energize. Time Guard delays are provided to allow for up to 2 stages of compression. Also, a DX Lockout will prevent operation of the DX cooling if the outdoor air temperature is below this value. The cooling algorithm controls the valve or stages of DX cooling to prevent the space temperature from exceeding the current cooling set point (which includes any calculated offset value from a T56 sensor slide bar or T59 sensor during occupied periods). Also, the cooling is controlled so that the supply air temperature does not fall below 50 F when cooling is active. Number of Stages: Range 1 to 3 Default Value 2 The Time Guards must be set to Enable for output to a compressor, and set to Disable for output to a valve or compressor unloader. When enabled, the staging PID loop will have a minimum delay of 3 minutes before adding the stage and dropping the stage after it is started. This delay will run concurrently with the Compressor Minimum On (C_MIN_ON) and Off (C_MIN_OF) delays found in this table. The actual compressor on/off delays will be the greater of the two functions. When disabled, there will be no delay in adding or droping the stage other then the Compressor Minimum On and Off Delays. NOTE: Stage 1 Time Guard cannot be disabled. Stage 1 Time Guard: Range Disable/Enable Default Value Enable Stage 2 Time Guard: Range Disable/Enable Default Value Enable Stage 3 (not used) Time Guard: Range Disable/Enable Default Value Disable HEATING PID — The PremierLink™ controller determines if a heating demand exists in the space. The controller reads the space temperature sensor and compares the temperature to the current low set point (including any calculated offset value from a T56 or T59 sensor) during occupied periods. If it is below the set point, and heating is configured and available, it then calculates the required supply-air temperature to satisfy the given conditions. The calculated value (heating submaster reference) is compared to the actual supply-air temperature and STAGED HEATING — The Staged Heating function is used for two-position valves or for electric heat (1 or 2 stages). The staging function uses the heating submaster reference value from the PID and compares it to the supply-air temperature to calculate the required number of output stages to energize. The time guard, when enabled, will increase the heat output minimum off time from 3 minutes to 5 minutes. Number of Stages: Range 1 to 3 Default Value 2 Stage 1 Time Guard: Range Disable/Enable Default Value Enable Stage 2 Time Guard: Range Disable/Enable Default Value Enable Stage 3 Time Guard: Range Disable/Enable Default Value Enable IAQ PID — The proportional gain affects the response of PID calculations for staged control. The gain is also used for two position control to establish the hysteresis between on and off. A larger gain speeds response time or reduces the hysteresis, while a smaller gain requires a larger error to generate the same response to changes in Indoor Air Quality. Enter the desired proportional gain for the Indoor Air Quality control algorithm. The integral gain affects the PID calculation; an increase will make the IAQ submaster reference change greater as the error in indoor air quality increases. The integral gain should be selected to eliminate proportional droop without overshoot. Enter the desired integral gain for the Indoor Air Quality control algorithm. The Derivative Gain is typically not required for Indoor Air Quality operation and should be left at the default value. The Starting Value is used to establish the starting value for the IAQ PID calculation. 38 The IAQ PID includes the following set points: Proportional Gain, Integral Gain, Derivative Gain, and Starting Value. Proportional Gain:Range –100.0 to 40.0 Default Value 1.0 Integral Gain: Range –5.0 to 5.0 Default Value 0.5 Derivative Gain: Range –20.0 to 20.0 Default Value 0.0 Starting Value: Units Percent Range 0.0 to 100.0 Default Value 0.0 ECONOMIZER PID — The proportional gain determines the response of the PID temperature control loop; a larger gain increases the amount of damper movement while a smaller gain requires a larger error to achieve the same results. The integral gain affects the response of a PID calculation; an increase in gain will compensate more quickly for proportional control droop. Too large of an integral gain will cause excessive damper positioning and instability. Enter the desired integral gain for the damper control algorithm. The economizer derivative gain has been tested for ideal operation in sensor mode and should be left at the default value. NOTE: In thermostat mode, the modulation may appear to regularly change. However, it will precisely control leaving-air temperature. The economizer Starting Value is used to establish the starting value for the damper PID calculation. The Economizer PID includes the following set points: Proportional Gain, Integral Gain, Derivative Gain, and Starting Value. Proportional Gain: Range –100.0 to 100.0 Default Value –4.0 Integral Gain: Range –5.0 to 5.0 Default Value –2.0 Derivative Gain: Range –20.0 to 20.0 Default Value –3.0 Starting Value: Units degrees F (degrees C) Range 48.0 to 120.0 Default Value 70.0 Table 18 — Service Configuration Selection DESCRIPTION Cooling PID Proportional Gain Integral Gain Derivative Gain Starting Value SAT CMP1 Low Setpoint SAT CMP2 Low Setpoint Staged Cooling Total Number of Stages Stage 1 Time Guard Stage 2 Time Guard Stage 3 Time Guard Heating PID Proportional Gain Integral Gain Derivative Gain Starting Value SAT High Setpoint Staged Heating Total Number of Stages Stage 1 Time Guard Stage 2 Time Guard Stage 3 Time Guard IAQ PID Proportional Gain Integral Gain Derivative Gain Starting Value Economizer PID Proportional Gain Integral Gain Derivative Gain Starting Value Submaster Gain Limit Submaster Center Value Damper Movement Band OAT Temp Band Minimum Damper Position Low Temp MDP Override DX Cooling Lockout DX Cooling Lockout Temp Time Guard Override Continuous Power Exhaust Supply Fan Status Enable Remote Cont/Door Switch ASHRAE 90.1 Supply Fan Min Setpoint Deadband Max OAT for Free Cool Max Offset Adjustment Comp Time Gard for Fire Comp Min Off Time Comp Min On Time Mode Change Time Space Temp Trim Supply Air Temp Trim SUBMASTER GAIN LIMIT — The Submaster Gain Limit is used to define the submaster gain limit that is multiplied by the Submaster Error and added to the Submaster Center Value to produce the output value that will be sent to the device. The sign of the submaster gain limit determines the direction in which the output will be driven in response to a given error. The gain is expressed in percent change in output per degree of error. Submaster Gain Limit Reference: Range –20.0 to 20.0 Default Value –5.5 SUBMASTER CENTER VALUE — The Submaster Center Value is used to define the submaster loop center value which defines the starting point of the loop. This value typically represents the midpoint of the range of the device being controlled. Submaster Center Value Reference: Units % damper open Range 0 to 100% Default Value 60% DAMPER MOVEMENT BAND — The Damper Movement Band is used to define what the minimum desired range of change in economizer damper position that is required before the controller will attempt to open/close the economizer. Damper Movement Reference: Units % damper open Range 0 to 5% Default Value 0% 39 VALUE 6.0 3.0 5.0 70.0 55 50 UNITS NAME dF dF dF KP KI KD STARTVAL SATLO1 SATLO2 2 Enable Enable Disable 6.0 3.0 5.0 75.0 140 STAGES TG1 TG2 TG3 dF dF 2 Enable Enable Enable 0.1 0.5 0.0 0.0 -4.0 -2.0 -3.0 70.0 -5.5 60 0 25 20 100 On 45.0 Off Disable Disable 0 Yes 1.5 75 2.0 Yes 5 3 10 0.0 0.0 KP KI KD STARTVAL SATHI STAGES TG1 TG2 TG3 % dF % % dF % % dF ^F dF ^F min min min ^F ^F KP KI KD STARTVAL KP KI KD STARTVAL ESG CTRVAL ECONBAND TEMPBAND MDP LOWMDP DXCTLO DXLOCK TGO MODPE SFSENABL RC_DS CONTFAN MIN_DBND OATMAX LIMT COMP_TG C_MIN_OF C_MIN_ON M_SELECT RATTRIM SATTRIM TIME GUARD OVERRIDE — The Time Guard Override function will reset the Time Guard. Whenever this option is changed from OFF to ON, the control will evaluate the amount of time left in Compressor Time Guards. If the time in a Time Guard is more than 30 seconds, it will be replaced with 30 seconds. NOTE: Changing this decision from OFF to ON will only result in one-time Time Guards override. To perform the override again, the override must be changed from OFF to ON again. Time Guard Override: Range On/Off Default Value Off OAT TEMP BAND — The OAT Temp Band is used to slow the response of the economizer damper based on the value of OAT. In other words, the colder OAT gets the slower the rate of change in the economizer. OAT Temp Reference: Range 0 to 40 delta degrees F (delta degrees C) Default Value 25.0 MINIMUM DAMPER POSITION — The minimum damper position (MDP) specifies user configured occupied minimum economizer damper position. The control selects the greatest value between MDP and IAQ calculated Minimum Position. The resulting value is the Current Minimum Damper Position (IQMP) for Occupied mode. Economizer Damper is limited to IQMP in Occupied mode, or whenever Supply Fan is ON in units with Thermostat control. Minimum Damper Position: Units % damper open Range 0 to 100% Default Value 20.0% CONTINUOUS POWER EXHAUST — The Continuous Power Exhaust function defines the operation of the power exhaust fan. If disabled, the power exhaust fan will operate during economizer purge cycles when the economizer damper position is above the configured minimum value. If enabled, the power exhaust fan will follow the supply fan's operation. Continuous Power Exhaust: Range Disable/Enable Default Value Disable LOW TEMP MINIMUM DAMPER POSITION OVERRIDE — The Low Temperature Minimum Damper Position (MDP) specifies the value for purge minimum damper position for low outdoor air temperature conditions. The IAQ Pre-Occupancy Purge Algorithm shall use this value for the minimum damper position whenever Outdoor Air Temperature is below Unoccupied OAT Lockout Temperature. The Low Temperature MDP must be lower than the configured Minimum Damper Position. A value of 100 will disable this function. Low Temperature MDP Override: Units % damper open Range 0 to 100% Default Value 100% (disabled) SUPPLY FAN STATUS ENABLE — The Supply Fan Status Enable function is enabled when an actual sensor input is used to determine that the supply fan is on. If the status is OFF when the fan should be running, Heat, Cool and Economizer will be disabled. If this decision is disabled, the Supply Fan Status will follow the state of the Supply Fan Relay in order to allow the algorithms to run that depend on the Supply Fan Status to be ON before executing. Supply Fan Status Enable: Range Disable/Enable Default Value Disable REMOTE CONTACT/DOOR SWITCH — This function configures the Remote Occupied Mode input point (REMOCC) to be used as an remote contact or as a door switch. If set for 0 (Remote Contact) and the PremierLink™ controller is not under Linkage Control, then the PremierLink controller will control to the occupied set points if the input is closed. If set for 2-20 (Door Switch), the PremierLink will disable heat and cool outputs after the input has been closed for the configured time delay. The time delay is configurable from 2 to 20 minutes. Remote Cont/Door Switch: Allowable Entries 0 - Remote Contact, 1 - Disabled, 2-20 – Door Switch Default Value 0 ASHRAE 90.1 SUPPLY FAN — This configuration determines the state of the fan operation during the occupied mode. If set to YES, the fan will run continuously in the occupied mode in compliance with ASHRAE 90.1. If set to NO, then the fan will run only when there is a heat or cool demand. ASHRAE 90.1 Supply Fan Range No/Yes Default Value Yes NOTE: This MUST be set to Yes if the PremierLink controller is used as the air source in a 3V™ zoning system. MINIMUM SETPOINT DEADBAND — This value determines the minimum deadband between the Occupied Low and Occupied High set points. DX COOLING LOCKOUT — The DX (direct expansion) Cooling Lockout function enables or disables the Low Ambient DX Cooling Lockout option. When DX Cooling Lockout is enabled, Cooling control will compare OAT against the DX Cooling Lockout Temperature. Whenever OAT ≤ the DX Cooling Lockout Temperature and current DX stages are 0, the control will set Cooling Submaster Reference (CCSR) to 150 F. That will prevent the unit from staging up. DX Cooling Lockout: Range On/Off Default Value On The DXCTLO should be turned OFF (to ignore the DXLOCK setpoint) in applications where there is no OAT sensor (local or broadcast) or the OAT sensor has failed. If DXCTLO is set to “OFF,” compressor cooling will be allowed. If the OAT sensor is not installed or shorted (OAT point reads below –40 F or above 245 F and “Sensor Failure”), the cooling stages are NOT locked out regardless of the setting of DXCTLO. To ensure that cooling will occur when there is no OAT sensor installed, be sure to short the OAT sensor leads together. DX COOLING LOCKOUT TEMPERATURE — The DX Cooling Lockout Temperature specifies Low Ambient DX Cooling Lockout Temperature that is compared against OAT to determine if the unit can stage up or not. DX Cooling Lockout Temp: Units degrees F (degrees C) Range 40.0 to 60.0 Default Value 45.0 40 Min Setpoint Deadband: SUPPLY AIR TEMPERATURE TRIM — The Supply Air Temperature Trim configuration is used to calibrate the temperature display for a sensor that does not appear to be reading correctly. Supply Air Temperature Trim: Units delta degrees F (delta degrees C) Range –9.9 to 9.9 Default Value 0.0 Display Unit delta degrees F (delta degrees C) Range 1.5 to 10.0 F Default Value 1.5 F MAXIMUM OUSTIDE AIR TEMPERATURE FOR FREE COOL — This value determines the maximum outside air temperature that the Unoccupied Free Cool function will be allowed to use. If Free Cool is active and the OAT exceeds this value, the mode will be disabled. If the OAT is greater then this value prior to the start of Free Cool, then the mode it will not be allowed to start. This applies to both sensor and thermostat modes. Max OAT for Free Cool: Display Unit degrees F (degrees C) Range 50.0 to 75.0 F Default Value 75.0 F PremierLink Configuration Screen — The PremierLink Configuration screen allows the user to configure all functions. See Table 19. OPERATING MODE — The Operating Mode function determines the operating mode of the PremierLink controller. There are two operating modes from which to choose: TSTAT and CCN Sensor. The TSTAT mode allows PremierLink controller to operate as a stand-alone thermostat control by monitoring Y1 (cooling stage 1), Y2 (cooling stage 2), W1 (heating stage 1), W2 (heating stage 2), and G (indoor fan) inputs. The CCN mode allows the controller to integrate into a Carrier Comfort Network® system. Operating Mode: Range 0 for TSTAT 1 for CCN Default Value 1 (CCN Sensor)* *Default value for Versions 1.1 and 1.2 is 0 (TSTAT). MAXIMUM OFFSET ADJUSTMENT — Maximum Offset Adjustment value determines the degree in which the occupied heating and cooling set points can be adjusted by the setpoint adjustment slide bar on the space temperature sensor. Max Offset Adjustment: Units delta degrees F (delta degrees C) Range 0.0 to 15.0 Default Value 2.0 COMPRESSOR TIME GUARD FOR FIRE SHUTDOWN — When the Fire Shutdown point is active, the supply fan is immediately shut down. The compressors may not turn off immediately due to minimum on time delays. When this function is set to YES, the compressors will be turned off immediately along with the fan. Comp Time Gard for Fire: Range No/Yes Default Value Yes COMPRESSOR MINIMUM OFF TIME — This is the minimum time that compressors will be off once they are deenergized before they can be restarted. Comp Min Off Time: Display Unit Minutes Range 2 to 5 Default Value 5 COMPRESSOR MINIMUM ON TIME — This is the minimum time the compressors will run once they have been energized in the cool mode before they can be shut off. Comp Min On Time: Display Unit Minutes Range 3 to 5 Default Value 3 MODE CHANGEOVER TIME — This is the minimum amount of time the Premierlink™ controller must wait before changing modes. This value is ignored and automatically set to 3 minutes when Linkage Control is Yes in the MAINT display. Mode Change Time: Display Unit Minutes Range 5 to 10 Default Value 10 HEAT TYPE — The Heat Type mode determines the type of heat equipment the controller uses. There are two choices: gas or electric. Heat Type: Range 0 for Gas 1 for Electric Heat Default Value 0 (Gas) UNIT TYPE — The Unit Type mode determines the type of heating/cooling equipment the controller is attached to. There are two choices: AC or Heat Pump. The AC mode is primarily used for units using the compressors for cooling only. The Heat Pump mode is primarily used for units using a heat pump (for example, compressors for heating and cooling). Unit Type: Range 0 for AC 1 for Heat Pump Default Value 0 (AC) AUXILIARY OUTPUT — The Auxiliary Output function is used to define the specific use of the Auxiliary Output on the controller board. The output will be energized or deenergized by the appropriate algorithm that uses that specific output. Auxiliary Output is displayed as one of the following: 0 = None 1 = Exhaust Fan 2 = Heat Stage 3 = Reversing Valve Heat 4 = Reversing Valve Cool Rev Valve Heat Cool SPACE TEMPERATURE TRIM — The Space Temperature Trim configuration is used to calibrate the temperature display for a sensor that does not appear to be reading correctly. Space Temperature Trim: Units delta degrees F (delta degrees C) Range –9.9 to 9.9 Default Value 0.0 Heat Mode ON OFF Cool Mode OFF ON 5 = Dehumidification 6 = Separate Schedule (will follow occupancy schedule OCCPC63 only) Auxiliary Output: Range 0 to 6 Default Value 0 41 UNOCCUPIED FREE COOL — The Unoccupied Free Cool function is used during unoccupied periods to pre-cool the space using outside air when outside conditions are suitable in the unoccupied mode. The mode can be configured for any time during the unoccupied mode or 2 to 6 hours prior to the occupied mode. Unoccupied Free Cool: Range 0 = Disabled 1 = Always enabled 2-6 = Hours prior to Occupied Mode Default Value 0 Table 19 — PremierLink™ Control Configuration DESCRIPTION VALUE UNITS 0=TSTAT, 1=CCN Sensor 0 0=Gas, 1=Electric Heat 0 0=AC Unit, 1=Heat Pump 0 Auxiliary Output 0 0=None 1=Exhaust Fan 2=Heat Stage 3=Reversing Valve Heat 4=Reversing Valve Cool 5=Dehumidification 6=Separate Schedule Unnoc Free Cool 0 0=Disable 1=Always enabled 2-6 Hours prior to OCC Demand Limiting Disable Loadshed Group Number 1 CCN Broadcast OAT, ENTH,OAQ 0 Global Schedule Broadcast No Broadcast Acknowledge No Schedule Number 64 Timed Override Hours 0 hours Global Override Enable Yes Linkage Thermostat Cool Strt Bias(min/deg) 10 min Heat Strt Bias(min/deg) 10 min Filter Timer hrs* 100 15 IAQ Priority Level Low IAQ Pre-Occupancy Purge Disable IAQ Purge Duration 5 min IAQ Delta Setpoint 650 IAQ Maximum Damper Pos. 50 % Indoor AQ Low Ref. 0.0 Indoor AQ High Ref. 2000.0 Outdoor AQ Low Ref. 0.0 Outdoor AQ High Ref. 2000.0 Outdoor AQ Lockout Point 0 DEMAND LIMITING — The Demand Limiting function is used to limit operating capacity of the unit to prevent system overloads. Both Heating and Cooling capacity is limited. When Demand Limit option is enabled, the control will respond to the Loadshed Controller commands, such as Redline Alert, Shed, Unshed, and Redline Cancel. Demand Limiting: Range Disable/Enable Default Value Disable LOADSHED GROUP NUMBER — The Loadshed Group Number function defines the Loadshed table number (LDSHDxxS, where xx is the configured loadshed group number) that the controller will respond to when a broadcast for Redline/ Loadshed has been detected on the CCN bus. Unoccupied Free Cool: Range 1 to 16 Default Value 1 CCN, BROADCAST OAT, ENTHALPY, OAQ — These functions configure the controller to CCN broadcast any or all of the point values for Outside Air Temperature (OAT), Enthalpy (ENTH), and Outdoor Air Quality (OAQ). Example: To broadcast OAQ and ENTH but not OAT, the corresponding bitmap is 110; the binary equivalent of the decimal number 6. The configuration decision would then be set to a 6. CCN Broadcast, OAT, Enthalpy, OAQ Allowable Entries: 0 — None 5 — OAT and OAQ 1 — OAT Only 6 — ENTH and OAQ 2 — ENTH Only 7 — OAT, ENTH and OAQ 3 — OAT and ENTH 4 — OAQ Only Default Value 0 (disabled, no broadcasts performed) NAME TSTATCFG HEATTYPE AC AUXOUT NTEN DLEN LSGP OATBC GSBC BCACK SCHEDNUM TIMOVRID GLOB_OV KCOOL KHEAT FIL_TIMR IAQP IAQPURGE IQPD IAQD IAQMAXP IIAQREFL IIAQREFH OIAQREFL OIAQREFH OIAQLOCK SCHEDULE NUMBER — The Schedule Number determines which Global Occupancy Schedule that the controller will follow. A value of 64 disables global occupancy from CCN and will decide Occupancy from its local schedule. A value between 65 and 99 will allow the controller to follow the global occupancy schedule of the number broadcast over CCN. Occupancy Schedule Number Range 64 to 99 Default Value 64 GLOBAL SCHEDULE BROADCAST — The Global Schedule Broadcast setting configures the controller to broadcast or receive a global schedule. If set to Yes, the controller will act as a global schedule master and its schedule will be broadcast to the CCN. If set to No, the controller will not broadcast a global schedule and it will receive the configured schedule number. Global Schedule Master: Range No/Yes Default Value No TIMED OVERRIDE HOURS — The Timed Override Hours function is used to configure a timed override duration by entering the number of hours the override will be in effect. Pressing the override button on a space temperature sensor will cause an override. Timed Override Hours: Range 0 to 4 Default Value 0 GLOBAL OVERRIDE ENABLE — Global Override Enable must be set to NO on all controllers configured for global schedule, including the global schedule broadcaster, for individual overide to be enabled. If any controller using a global schedule is set to YES, that controller will send the schedule override message to the global schedule broadcaster and the global schedule will be overriden. This will cause all controllers on that global schedule go into occupancy override. BROADCAST ACKNOWLEDGER — The Broadcast Acknowledger setting configures the controller to recognize broadcast messages that appear on its CCN bus. NOTE: For proper CCN bus operation, there should be only one device per CCN bus that is configured as the Broadcast Acknowledger. Acknowledger: Range No/Yes Default Value No 42 Global Override Enable: Range Default Value INDOOR AIR QUALITY DELTA SET POINT — The Indoor Air Quality Delta Set Point specifies the highest Indoor Air Quality level (measured in ppm) allowed within the space whenever unit is in Occupied mode (or Supply Fan On for units with Thermostat control) and Indoor Air Quality sensor is installed. Indoor Air Quality Delta Set Point: Display Units PPM (parts per million) Display Range 1 to 5000 Default Value 650 No/Yes Yes LINKAGE THERMOSTAT — The Linkage Thermostat start time biases allow the installer to configure the time per degree the space should take to recover in the Heat and Cool modes for optimum start with a Linkage Thermostat, 3V™ control system, or an attached SPT sensor. These numbers will be used to calculate the Start Bias time. The value entered is determined by the mass of the zone. Typically, a value of 10 (the default), will be adequate for most applications. For higher mass areas, such as a store lobby, the value may be increased to 20 or 25. Cool Start Bias: Units minutes/degree Range 0 to 60 Default Value 10 Heat Start Bias Units Range Default Value INDOOR AIR QUALITY MAXIMUM DAMPER POSITION — This point displays upper limit of the Indoor Air Quality minimum damper position calculated by the IAQ control. For example, if IAQ is calculating 100% Minimum Damper Position, but this decision is set to 50%, then the IAQ Minimum Damper Position will be clamped to 50%. NOTE: When IAQ priority is set to HIGH, this value must reflect the maximum outdoor air percentage that the equipment can heat or cool at worst conditions. Indoor Air Quality Maximum Damper Position: Display Units % damper open Display Range 0 to 100% Default Value 50% INDOOR AIR QUALITY SENSOR — The indoor air quality sensor defines the value in parts per million (ppm) which correlate to the low and high voltage readings from the sensor. Low Reference specifies the low point of the Indoor IAQ Sensor range in ppm. Low Reference: Units PPM (parts per million) Range 0 to 5000 Default Value 0 High Reference specifies the high point of the Indoor IAQ Sensor range in ppm. High Reference: Units PPM (parts per million) Range 0 to 5000 Default Value 2000 OUTDOOR AIR QUALITY SENSOR — The outdoor air quality sensor defines the value in parts per million (ppm) which correlate to the low and high voltage readings from the sensor. Low Reference specifies the low point of the Outdoor IAQ Sensor Range in ppm. minutes/degree 0 to 60 10 FILTER TIMER HOURS — The Filter Timer Hours configuration determines when the filter status will display a “Dirty” alarm. When the Filter Timer Hours is configured to a value other than zero and fan run time exceeds the value configured, the filter status will display “Dirty” and a CCN alarm will be generated. Resetting the configured Filter Timer Hours value to zero will disable the alarm condition. The value of the timer is stored in EEPROM to protect it in the event of a power failure. The value is stored every 24 hours. If configured for 0, an optional normally open filter status switch can be read when connected the Filter Status input. Filter status will display "Clean" when open and "Dirty" when closed. Filter Timer Hours: Range 0 to 99 Default Value 15 (where 15*100=1500) INDOOR AIR QUALITY PRIORITY LEVEL — The Indoor Air Quality Priority Level, when set to Low, ensures that comfort is not being compromised by bringing in too much outdoor air to maintain IAQ set point. When an override condition takes place, IAQ control is disabled, and Economizer Minimum Position is set to the user configured value MDP. When set to High, IAQ control is always active regardless of indoor comfort conditions. The controller will temper cold air (OAT <55 F) to prevent cold blow. Indoor Air Quality Priority Level: Range High/Low Default Value Low Low Reference: Units PPM (parts per million) Range 0 to 5000 Default Value 0 High Reference specifies the high point of the Outdoor IAQ Sensor Range in ppm. High Reference: Units PPM (parts per million) Range 0 to 5000 Default Value 2000 INDOOR AIR QUALITY PREOCCUPANCY PURGE — The Indoor Air Quality Preoccupancy Purge brings in fresh outdoor air before the Occupied mode begins. The IAQ PreOccupancy Purge is used to lower carbon dioxide levels below the IAQ set point before Occupied mode starts. The purge is started 2 hours before the occupied time and lasts for the specified duration. Indoor Air Quality Preoccupancy Purge: Range Disable/Enable Default Value Disable INDOOR AIR QUALITY PURGE DURATION — The Indoor Air Quality Purge Duration specifies the duration of IAQ Pre-Occupancy purge. The purge is started 2 hours before the occupied time and lasts for the specified duration. Indoor Air Quality Purge Duration: Display Units minutes Display Range 0 to 60 Default Value 5 OUTDOOR AIR QUALITY LOCKOUT POINT — When set to non-zero value, the IAQ algorithm will compare Outdoor IAQ reading against this decision and disable IAQ control whenever the value of OAQ exceeds this configured value. Outdoor Air Quality Lockout Point: Range 0 to 5000 Default Value 0 43 mode. If the current mode is unoccupied, the value displayed by this point will remain at default. Unoccupied Start Time: Display Range 00:00 to 24:00 Default Value 00:00 Network Access None Occupancy Maintenance Screen — The Occupan- cy Maintenance screen (OCCPC63S-64S) is used to check the occupied schedule. Information concerning the current occupied period is displayed. See Table 20. The information shown in the occupancy maintenance screen only applies to the local schedule in the controller. If the controller is a global schedule broadcaster, then this information applies to any device following this schedule. This information can only be viewed on the occupancy maintenance screen of the broadcasting controller. NOTE: Occupancy schedule OCCPC63 maintenance table only applies to the H3_EX_RV output when configured for type 6 Occupancy Schedule. MODE — The Mode point displays the current occupied mode for the controller. If the controller is following its own local schedule or broadcasting a global schedule, this is the result of the schedule status. Mode: Display Range 0 to 1 Default Value 0 Network Access None NEXT OCCUPIED DAY — The Next Occupied Day point displays the day of week when the next occupied period will begin. This point is used with the Next Occupied Time so the user will know when the next occupied period will occur. Next Occupied Day: Display Range MON, TUE, WED, THU, FRI, SAT, SUN Default Value No display (Blank) Network Access None NEXT OCCUPIED TIME — The Next Occupied Time point displays the time day when the next occupied period will begin. This point is used with the Next Occupied Day so the user will know when the next occupied period will occur. Next Occupied Time: Display Range 00:00 to 24:00 Default Value 00:00 Network Access None NEXT UNOCCUPIED DAY — The Next Unoccupied Day point displays the day of week when the next unoccupied period will begin. This point is used with the Next Unoccupied Time so the user will know when the next unoccupied period will occur. Next Unoccupied Day: Display Range MON, TUE, WED, THU, FRI, SAT, SUN Default Value No display (Blank) Network Access None NEXT UNOCCUPIED TIME — The Next Unoccupied Time point displays the time day when the next unoccupied period will begin. This point is used with the Next Unoccupied Day so the user will know when the next unoccupied period will occur. Next Unoccupied Time: Display Range 00:00 to 24:00 Default Value 00:00 Network Access None CURRENT OCCUPIED PERIOD — If the controller is configured to determine occupancy locally, the Current Occupied Period point is used to display the current period determining occupancy. Current Occupied Period: Display Range 1 to 8 Default Value 0 Network Access None OVERRIDE IN PROGRESS — The Override in Progress point is used to display if an occupancy override is in progress. The point will display “Yes” if an override is in progress, or “No” if there is no override. Override In Progress: Display Range Yes/No Default Value No Network Access None OVERRIDE DURATION — The Override Duration point displays the number of minutes remaining for an occupancy override which is in effect. If the override duration value downloaded is in hours, the value will be converted to minutes. If the occupancy schedule is occupied when override is initiated, the current occupancy period will be extended by the number of hours/minutes requested. If the current occupancy period is unoccupied when the occupancy override is initiated, the mode will change to occupied for the duration of the number of hours/minutes downloaded. If the occupancy override is due to end after the start of the next occupancy period, the mode will transition from occupancy override to occupied without becoming unoccupied, and the occupancy override timer will be reset. Override Duration: Display Units minutes Display Range 0 to 240 Default Value 0 Network Access None OCCUPIED START TIME — The Occupied Start Time point shows the time that the current occupied mode began. If the current mode is unoccupied, the value displayed by this point will remain at default. Occupied Start Time: Display Range 00:00 to 24:00 Default Value 00:00 Network Access None LAST UNOCCUPIED DAY — The Last Unoccupied Day point displays the day of week when the controller last changed from occupied to the Unoccupied mode. This point is used in conjunction with the Last Unoccupied Time to know the last time and day when the controller became unoccupied. Last Unoccupied Day: Display Range MON, TUE, WED, THU, FRI, SAT, SUN Default Value No display (Blank) Network Access None LAST UNOCCUPIED TIME — The Last Unoccupied Time point displays the time of day when the controller last changed from occupied to the Unoccupied mode. This point is read in conjunction with the Last Unoccupied Day to know the last time and day when the controller became unoccupied. Last Unoccupied Time Display Range 00:00 to 24:00 Default Value 00:00 Network Access None UNOCCUPIED START TIME — The Unoccupied Start Time point shows the time that the current occupied mode will end. This will also be the beginning of the next unoccupied 44 NOTE: When a control mode ends, “NO” mode must be completed before opposite mode can begin. Heat: Display Range No/Yes Default Value No Network Access None Table 20 — Occupancy Maintenance Screen (OCCPC63S-64S) DESCRIPTION Mode Current Occupied Period Override in Progress Override Duration Occupied Start Time Unoccupied Start Time Next Occupied Day Next Occupied Time Next Unoccupied Day Next Unoccupied Time Last Unoccupied Day Last Unoccupied Time VALUE 0 0 No 0 00:00 00:00 UNITS min 00:00 00:00 00:00 NAME MODE PERIOD OVERLAST OVERDURA OCCSTART UNSTART NXTOCCD NXTOCCT NXTUNOD NXTUNOT PRVUNOD PRVUNOT COOL — The Cool point shows if there is a demand for cooling in the space. The space temperature must be above the Occupied High or Unoccupied High set point. NOTE: When a control mode ends, “NO” mode must be completed before opposite mode can begin. Cool: Display Range No/Yes Default Value No Network Access None IAQ CONTROL — The IAQ control indicates whether or not IAQ control is active in the controller. IAQ control of the minimum damper position is active whenever the configured parameters for the IAQ PID calculate a minimum position greater than the configured economizer minimum position. IAQ Control: Display Range: No/Yes Default Value: No Network Access: Read Only The primary Maintenance Screen (MAINT) is used to service the PremierLink™ controller. See Table 21. THERMOSTAT CONTROL — Indicates the result of the configuration decision to control in the thermostat or sensor mode. Thermostat Control: Display Range: No/Yes Default Value: Yes Network Access: Read Only Primary Maintenance Screen — DEMAND LIMIT — Demand limit indicates that a command has been received to limit capacity or reduce capacity of the heating or cooling. Demand Limit: Display Range: No/Yes Default value: No Network Access: Read Only TEMP COMPENSATED START — The temperature compensated start function indicates that the controller has started the equipment prior to occupancy in order to be at the occupied set points at the start of occupancy. Temp Compensated Start: Display Range: No/Yes Default Value: No Network Access: Read Only OCCUPIED — The Occupied point indicates whether or not the controller is operating in the Occupied mode. Occupied: Display Range No/Yes Default Value No Network Access Read/Write OVERRIDE TIME REMAINING — If the controller is a global schedule follower and Global Override Enable is set to No, then this point becomes the override timer. Override Time Remaining: Display Units Minutes Display Range 0 to 240 Default Value 0 IAQ PRE-OCCUPANCY PURGE — The IAQ preoccupancy purge indicates that the pre-occupancy purge mode is currently active. IAQ Pre-occupancy Purge: Display Range: No/Yes Default Value: No Network Access: Read Only TIMED OVERRIDE IN EFFECT — The Timed Override In Effect point shows if a timed override is currently in effect. NOTE: For controllers using a global schedule, Global Override Enable must be set to NO on all controllers configured for global schedule, including the global schedule broadcaster, for individual override to be enabled. Timed Override in Effect: Display Range No/Yes Default Value No Network Access Read Only UNOCCUPIED FREE COOLING — The unoccupied free cooling point indicates that unoccupied free cooling is in effect. Unoccupied Free Cooling: Display Range: No/Yes Default Value: No Network Access: Read Only START BIAS TIME — The Start Bias Time, in minutes, is calculated during the unoccupied period by the controller as needed to bring the temperature up or down to the set point under the optimum start routine. The start time bias for heat and cool are configurable. This value will be reported to the Linkage Thermostat if it is used. It cannot be used with Global Scheduling. Start Bias Time: Display Units minutes Display Range 0 to 180 Default Value 0 Network Access Read only FIRE SHUTDOWN — The fire shutdown point indicates in a sensor mode that the Fire shutdown input has been sensed. This will cause the supply fan and heating and cooling to be turned off also. Fire Shutdown: Display Range: No/Yes Default Value: No Network Access: Read/Write LINKAGE CONTROL — Linkage control indicates if the controller is receiving linkage communication. Linkage Control: Display Range: No/Yes Default Value: No Network Access: Read/Write HEAT — The Heat point shows if there is a demand for heat in the space. The space temperature must be below the Occupied Low or Unoccupied Low set point. FIELD/STARTUP TEST — This point is used to enable field test of the controller. When forced to Yes, the controller will 45 SUPPLY FAN RUN TIME — This point displays the number of run hours of the supply fan. NOTE: The clock must be set for run times to accumulate. This is not the same timer used for the filter status. A separate timer is used to keep track of the run hours since the last filter change. Supply Fan Run Time: Display Units: Hours Default Value: 0 Network Access: Read Only RESET STATISTICS — When this point is forced to Yes, the Compressor Starts, Compressor 1 Runtime, Compressor 2 Runtime, and Supply Fan Runtime values will be reset to 0. The point will automatically be reset to No after being forced. Reset Statistics: Display Range No/Yes Default Value No Network Access Read/Write AUXILLARY OUTPUT SCHEDULE — This point displays the state of the H3_EX_RV point when set to type 6 (Occupied Schedule) in the CONFIG table. The state of the point is determined by the occupancy state of schedule OCCPC63. If the value is Yes, then the mode is occupied and H3_EX_RV will be ON. If the value is No then the mode is unoccupied and the H3_EX_RV will be OFF. AUXOUT Schedule: Display Range No/Yes Default Value No Network Access Read/Write NOTE: Read/write access of this point is allowed so that the hardware point may be indirectly controlled via communications from a program in another controller. perform a test of all outputs and reset to “NO” at end of test. The test may be aborted at any time by forcing value to NO. Field/Startup Test: Display Range: No/Yes Default Value: No Network Access: Read/Write HEAT SUBMASTER REFERENCE — When in sensor mode, the Heat Submaster Reference point displays the supply air temperature calculated by the heating PID loop. This value is compared to the actual supply-air temperature to determine the number of required stages. When in the thermostat mode, the value displayed is zero. Heat Submaster Reference: Display Units: degrees F (degrees C) Display Range: 35.0 to 140.0 Default Value: 35.0 Network Access: Read Only COOL SUBMASTER REFERENCE — The Cool Submaster Reference point displays the supply air temperature calculated by the cooling PID loop when in sensor mode. This value is compared to the actual supply-air temperature to determine the number of required stages. When in the thermostat mode, the value displayed is zero. Cool Submaster Reference: Display Units: degrees F (degrees C) Display Range: 45.0 to 150.0 Default Value: 150.0 Network Access: Read Only ECONOMIZER SUBMASTER REFERENCE — This point displays the supply-air temperature determined by the Economizer PID calculation. Economizer Submaster Reference: Display Units: degrees F (degrees C) Display Range: 48 to 120 Default Value: 120 Network Access: Read Only LINKAGE THERMOSTAT — The following Linkage Thermostat points display the standard values received from a Linkage Thermostat (if one is being used to provide space temperature, set point and occupancy information) or a linked 3V™ Linkage Coordinator. Linkage Status: Display Range: 0 to 3 Default Value: 2 Network Access: None The Supervisory Element displays the address of the device sending the linkage supervisory table to the PremierLink™ controller. Supervisory Element: Default Value: 0 Network Access: Read Only The Supervisory Bus displays the bus number of the device sending the linkage supervisory table to the PremierLink controller. Supervisory Bus: Default Value: 0 Network Access: Read Only The Supervisory Block displays the block or table number of the linkage table occurrence in the supervisory device. Some linkage supervisory devices may contain more than one linkage table for different air sources. Supervisory Block: Default Value: 0 Network Access: Read Only The Average Occupied Heat Set Point displays the Occupied Heat set point from the 3V™ Linkage Coordinator. Average Occupied Heat Set Point: Display Units: degrees F (degrees C) Display Range: 0.0 to 99.9 Default Value: 0.0 Network Access: None ECONOMIZER SUBMASTER GAIN — The Economizer Submaster Gain point displays the current Submaster gain multiplier in use to calculate the economizer damper position. At temperatures below 45 F this number will decrease to slow the rate of movement of the economizer damper. Economizer Submaster Gain: Display Range: –20 to 20 Default Value: –5.5 Network Access: Read Only COMPRESSOR STARTS — This point displays the total number of compressor starts. Compressor Starts: Default Value: 0 Network Access: Read Only COMPRESSOR 1 RUN TIME — This point displays the number of run hours of compressor no. 1. NOTE: The clock must be set for run times to accumulate. Compressor 1 Run Time: Display Units: Hours Default Value: 0 Network Access: Read Only COMPRESSOR 2 RUN TIME — This point displays the number of run hours of compressor 2. NOTE: The clock must be set for run times to accumulate. Compressor 2 Run Time: Display Units: Hours Default Value: 0 Network Access: Read Only 46 same as the Average Occupied Zone Temperature if the 3V system is in the occupied mode. Average Zone Temperature: Display Units: degrees F (degrees C) Display Range: 0.0 to 99.9 Default Value: 0.0 Network Access: None The Average Occupied Zone Temperature displays the space temperature from the 3V Linkage Coordinator during occupied periods. This value will be 0 if the system is in unoccupied mode. Average Occupied Zone Temperature:Display Units: degrees F (degrees C) Display Range: 0.0 to 99.9 Default Value: 0.0 Network Access: None The Occupancy Status point displays a 1 if occupancy is reported by the 3V Linkage Coordinator. The Occupancy Status point displays a 0 if occupancy is not reported by the 3V Linkage Coordinator. Occupancy Status: Display Range: 0, 1 Default Value: 0 Network Access: None The Average Occupied Cool Set Point displays the Occupied Cool set point from the 3V™ Linkage Coordinator. Average Occupied Cool Set Point: Display Units: degrees F (degrees C) Display Range: 0.0 to 99.9 Default Value: 0.0 Network Access: None The Average Unoccupied Heat Set Point displays the Unoccupied heat set point from the 3V Linkage Coordinator. Average Unoccupied Heat Set Point: Display Units: degrees F (degrees C) Display Range: 0.0 to 99.9 Default Value: 0.0 Network Access: None The Average Unoccupied Cool Set Point displays the Unoccupied cool set point from the 3V Linkage Coordinator. Average Unoccupied Cool Set Point: Display Units: degrees F (degrees C) Display Range: 0.0 to 99.9 Default Value: 0.0 Network Access: None The Average Zone Temperature displays the space temperature from the 3V Linkage Coordinator. This value will be the Table 21 — Primary Maintenance Screen (MAINT) DESCRIPTION Thermostat Control Occupied Override Time Remaining Timed Override in Effect Start Bias Time Heat Cool IAQ Control Demand Limit Temp Compensated Start IAQ Pre-Occupancy Purge Unoccupied Free Cool Fire Shutdown Linkage Control Field/Startup Test Heat Submaster Ref Cool Submaster Ref Economizer Submaster Ref Economizer Submastr Gain Compressor Starts Compressor 1 Runtime Compressor 2 Runtime Supply Fan Runtime Reset Statistics AUXOUT Schedule Linkage Thermostat Linkage Status Supervisory Element Supervisory Bus Supervisory Block Average Occ Heat Setpt Average Occ Cool Setpt Average Unoc Heat Setpt Average Unoc Cool Setpt Average Zone Temp Average Occ Zone Temp Occupancy Status(1=occ) VALUE No Yes 0 No 0 No No No No No No No No No No 40.0 150.0 120.0 0.00 0.00 0.00 0.00 17.00 No Yes 2 0 0 0 0.0 0.0 0.0 0.0 0.0 0.0 1 UNITS min min dF dF dF HOURS HOURS HOURS STATUS FORCE NAME TSTAT OCCUP OVRTIMER TIMOV STRTBIAS HEAT COOL IAQCL DEMLT TCSTR IQPRG NTFCL FIRES DAVCL FIELD SHSR CCSR ECONSR ECONGN CMPST CM1RT CM2RT FANRT STAT_RES AUXSCHED LINKSTAT SUPE-ADR SUPE-BUS BLOCKNUM OCLOSTPT OCHISTPT UNLOSTPT UNHISTPT AZT AOZT OCCSTAT dF dF dF dF dF dF NOTE: Bold values indicate points that can be forced through communications. 47 Occupied Heat Set Point: System Pilot Maintenance Table — The System Pilot Maintenance Table (SP_MAINT) displays the mode of the controller, the controlling set point, the current space temperature, and occupancy status of the PremierLink™ controller. It also displays PremierLink controller’s occupied and unoccupied heat and cool set points which the user may change from this table. See Table 22. This screen can be accessed through the maintenance option on the System Pilot™ device or through Carrier network software. Display Units degrees F (degrees C) Display Range 40.0 to 90.0 Network Access Read/Write OCCUPIED COOL SET POINT — This variable displays the occupied cool set point and will be displayed in the attached System Pilot device’s default display if the PremierLink controller is in the occupied mode. Occupied Cool Set Point: Display Units degrees F (degrees C) Display Range 45.0 to 99.9 Network Access Read/Write UNOCCUPIED HEAT SET POINT — This variable displays the unoccupied heat set point and will be displayed in the attached System Pilot device’s default display if the PremierLink controller is in the unoccupied mode. Unoccupied Heat Set Point: Display Units degrees F (degrees C) Display Range 40.0 to 90.0 Network Access Read/Write UNOCCUPIED COOL SET POINT — This variable displays the unoccupied cool set point and will be displayed in the attached System Pilot device’s default display if the PremierLink controller is in the unoccupied mode. Occupied Cool Set Point: Display Units degrees F (degrees C) Display Range 45.0 to 99.9 Network Access Read/Write Table 22 — System Pilot Maintenance Table (SP_MAINT) DESCRIPTION VALUE Rooftop Mode COOL UNITS NAME MODE Control Setpoint 70 Linkage Master No Space Temperature 73 Occupied Yes Occupied Heat Setpoint 70 dF OHSP Occupied Cool Setpoint 74 dF OCSP Unoccupied Heat Setpoint 69 dF UHSP Unoccupied Cool Setpoint 75 dF UCSP dF CLSP LINKMAST dF SPT ZONEOCC ROOFTOP MODE — This variable will display the current operating mode of the controller. The variable will be displayed in the attached System Pilot device’s default display. Rooftop Mode: Display Range OFF, COOL, HEAT, FAN ONLY, UNOCCOOL, UNOCHEAT, WARMUP, FREECOOL, PRESS, EVAC Network Access Read only CONTROL SET POINT — This variable will display the current controlling set point of the controller. This variable is not displayed in the System Pilot default display. Control Setpoint: Display Units degrees F (degrees C) Display Range: 40.0 to 99.9 Network Access Read only LINKAGE MASTER — This is not used. Linkage Master: Display Range No/Yes Network Access Read Only SPACE TEMPERATURE — This variable is the current space temperature of the PremierLink controller. The variable will be displayed in the attached System Pilot device’s default display. Space Temperature: Display Units degrees F (degrees C) Display Range –40.0 to 245.0 Network Access Read/Write OCCUPIED — This variable displays whether the controller is operating in the occupied mode. The variable will be displayed in the attached System Pilot device’s default display. Occupied: Display Range No/Yes Network Access Read Only OCCUPIED HEAT SET POINT — This variable displays the occupied heat set and will be displayed in the attached System Pilot device’s default display if the PremierLink controller is in the occupied mode. System Pilot Alternate Maintenance Table — The System Pilot Alternate Maintenance Table (ALT_DISP) displays the current supply air temperature, heating and cooling capacity and other information listed in the table. See Table 23. Table 23 — System Pilot Alternate Maintenance Display Table(ALT_DISP) DESCRIPTION Supply Air Temperature Cooling % Total Capacity VALUE UNITS 66.5 dF SAT 0 % CCAP HCAP Heating % Total Capacity 0 % Outdoor Air Temperature 74.8 dF Enthalpy Low NAME OAT ENTH Economizer Position 20 Indoor Air Quality 0 IAQI Clean FLTS Filter Status Indoor RH 0 % % ECONOS IRH NOTE: This screen can be viewed using the System Pilot when attached to the PremierLink controller. To view this screen, press the right button on the System Pilot device for 5 seconds while at the default display. This screen can also be viewed using Carrier network software. SUPPLY AIR TEMPERATURE — The Supply Air Temperature point displays the temperature of the air leaving the unit located downstream of any cool or heat sources. This sensor is required for proper function of the heating, cooling, and economizer systems. Supply Air Temperature: Display Units F (C) Display Range –40.0 to 245.0 Network Access Read/Write 48 ECONOMIZER DAMPER POSITION — This point displays the current commanded damper position of the economizer. Economizer Position: Display Units % damper open Display Range 0 to 100% Network Access Read/Write INDOOR AIR QUALITY (IAQ) — The Air Quality point displays the indoor air quality reading from a CO2 sensor installed in the space. The CO2 sensor maintains differential indoor air quality for demand control ventilation per ASHRAE Standard 62-1999. Indoor Air Quality (ppm): Display Units None shown (parts per million implied) Display Range 0 to 5000 Network Access Read/Write FILTER STATUS — The filter status point will be shown as CLEAN until the run time of the fan exceeds the configured Filter Timer Hours or the filter switch is closed. When the userconfigured Filter Timer Hours has been exceeded, the Filter Status will display DIRTY and a CCN alarm will be generated. Forcing the point to CLEAN will clear the alarm condition and will reset the timer. If a filter switch is used, then CLEAN will be shown when the switch is open. Filter Status: Display Units Discrete ASCII Display Range Clean/Dirty Network Access Read/Write INDOOR RELATIVE HUMIDITY — This point displays the Space Relative Humidity value from the optional space relative humidity sensor. It is used in the dehumidification function (if installed). Indoor RH: Display Unit % Humidity Display Range 0 to100% Network Access Read/Write COOLING PERCENT TOTAL CAPACITY — The Cooling Percent Total Capacity point is used to display the current cooling capacity. When cooling is enabled, the percent of cooling being delivered is determined by the following formula for the number of compressor stages confirmed: % Output Capacity = (no. of active stages/total stages) * 100 Cooling % Total Capacity: Display Units % output capacity Display Range 0 to 100% Network Access Read Only HEATING PERCENT TOTAL CAPACITY — The Heating Percent Total Capacity point is used to display the current Heating Capacity. When heat is enabled, the percent of heat being delivered is determined by the following formula for gas or electric heat: % Output Capacity = (no. of active stages/total stages) * 100 Heating % Total Capacity: Display Units % output capacity Display Range 0 to 100% Network Access Read Only OUTDOOR AIR TEMPERATURE — This point displays the temperature of the air entering the rooftop unit. This sensor is required for proper function of the cooling mode and the economizer. Outdoor Air Temperature: Display Units degrees F (degrees C) Display Range –40.0 to 245.0 Network Access Read/Write ENTHALPY — This point displays the current status of an outdoor air or differential enthalpy input. This point may be broadcast to other controllers or received from a controller which supports global broadcast of the ENTH variable. Enthalpy: Display Units Discrete ASCII Display Range High/Low Network Access Read/Write 49 Copyright 2007 Carrier Corporation Manufacturer reserves the right to discontinue, or change at any time, specifications or designs without notice and without incurring obligations. Catalog No. 04-53330002-01 Printed in U.S.A. Form 33CS-58SI Pg 52 4-07 Replaces: 33CS-57SI Book 1 4 Tab 11a 13a Product Specification PremierLink™ Retrofit Rooftop Controller 33CSPREMLK The PremierLink Retrofit Rooftop Controller is an intelligent control that continuously monitors and regulates rooftop operation with reliability and precision that minimizes downtime to ensure maximum occupant comfort. The PremierLink Controller is compatible with the Carrier Comfort Network (CCN). Carrier’s diagnostic standard tier display tools such as Navigator or Scrolling Marque can be used with the PremierLink controller. User interfaces include the CCN Service Tool, ComfortVIEW™ and ComfortWORKS® software. When used as part of the CCN, other devices such as the CCN data transfer, Linkage Thermostat, or Comfort Controller can read data from or write data to the retrofit controller. The 33CSPREMLK retrofit controller provides the following features and benefits: • provides software clock and local occupancy schedule for local occupancy control (requires time broadcaster and hardware clock from another device in the system) • uses remote timeclock input to provide occupancy control through external contacts • provides optional Linkage Thermostat interface capability • features supply air temperature limiting and integrated safeties for DX (direct expansion), gas, electric and heat pump units • provides field tests that enables the user to check output points and verify their functionality • controls two stages of DX cooling to maintain space temperature set point • controls up to 3 stages of gas heat or combination of mechanical and electric heat to maintain space temperature set point Copyright 2001 Carrier Corporation Form 33CS-19PS • ability to control exhaust fan based on economizer or occupancy on 2 stage heat units • ability to control reversing valve on heat pump units • provides temperature compensated start of heating or cooling to achieve set point by the start of the scheduled occupied time • provides alarms for analog temperature input(s) out of range • provides alarm for space temperature deviation from desired set point • adjustable filter maintenance timer • allows manual and system overrides of selected input/output channels • supports CCN remote timed override, set point adjustment and manual fan speed override • provides Broadcast Acknowledger capability for CCN (configuration) • conforms to the general requirements for CCN devices • supports Navigator and Scrolling Marquee Display and alarms • modulates control of economizer to assist mechanical cooling without adversely affecting compressor performance • provides ventilation monitoring with optional CO2 ventilation sensor • compatible with T55 space sensor and T56 space sensor with set point adjustment, timed override and service port jack • compatibility with T58 communicating sensor provides set point adjustment, timed override, force fan, and read equipment mode • support a local or global occupancy schedule or remote start input status to determine occupancy Features/Benefits Available for wide range of rooftop applications The PremierLink™ controller is available as a field retrofit application and can control one or several rooftop units with (multiple controllers) from 3 to 25 tons. In addition, it has an integrated economizer controller that eliminates the need for a separate circuit board. The PremierLink controller can be installed on the following Carrier rooftop units: 48/50HJ (3 to 121/2 tons), 48TF/50TFF (3 to 121/2 tons), and 48/50TJ (121/2 to 25 tons). Other 2 When connected to a Carrier Linkage Thermostat, the PremierLink controller can use occupancy schedules, zone temperature, and set points from the thermostat. The PremierLink controller provides the thermostat with the unit’s operating mode and supply air temperature for local display at the thermostat. When used with the Linkage Thermostat, the PremierLink controller provides local space temperature sensing, (remote space temperature sensing and averaging with up to 3 optional remote room sensors), occupied and unoccupied heat and cool set points, occupancy scheduling with up to 8 time periods, 12 holiday periods, network time broadcast, occupied set point range limiting, temperature compensated start, and global occupancy. A single Linkage Thermostat will have the ability to interface with up to 8 rooftop controls serving a single zone with the ability to unlink if communications to the linkage thermostat are lost. initialized via the network. The PremierLink controller offers override invoked from a wall sensor during unoccupied hours from 1 to 4 hours in 1-hour increments. The PremierLink controller offers ventilation monitoring with an optional CO2 ventilation sensor. The CO2 ventilation sensor measures the amount of ventilation needed by the space and a proportional integral derivative loop (PID) calculation makes adjustments to the economizer minimum position during occupied operation. The indoor CO2 will be compared to an outdoor CO2 reference before making adjustments to the economizer minimum position. Using a space sensor with set point adjustment, timed override and service port jack, the PremierLink controller will provide intelligent compressor staging and economizer operation. Modulating control of the economizer will assist mechanical cooling without adversely affecting compressor performance. Economizer assisted cooling is determined from a comparison of space temperature, outside air temperature and an enthalpy switch input. The switch input can also be used for differential enthalpy input, meeting ASHRAE Standard 90.1. The T58 Communicating Space temperature sensor with service port jack provides set point adjustment, timed override, force fan and read equipment mode and measures and maintains room temperature by communicating with the PremierLink controller. Fast and reliable system monitoring with Navigator Simple mounting and ease of installation Carrier’s unique, hand-held diagnostic tool, Navigator, can be used with the PremierLink controller. Instant access to detailed information is provided to technicians. Access is available via an RJ-11 connection or a 3-wire connection to the communication bus. Navigator offers flexibility for fast service. Technicians can monitor rooftop operation from the rooftop’s main control panel. Additional hardware or controller configuration is required for Navigator applications. The PremierLink controller has an integrated plastic cover with secured with two plastic tabs that can be removed for ease of installation. For ease of installation, PremierLink controller is provided with removable Molex connectors which include pigtails for easy installation to unit or sensors using spade connectors or wire nuts. The removable connectors are designed so that they can be inserted one way so as to prevent installation errors. The PremierLink controller also provides an RJ-11 modular phone jack for the Network Service Tool connection to the module via the Carrier Comfort Network (CCN) communications. Carrier equipment and non-Carrier equipment can also be controlled by PremierLink controller. Contact Carrier Factory Sales representative for more information. Flexibility for every application The PremierLink controller is an advanced microprocessor-based control. PremierLink is precision controlled to send heating and cooling only when needed, reducing energy use and operating costs. Carrier Linkage Thermostat compatibility Additional control features The PremierLink controller provides additional control features such as Occupied/Unoccupied scheduling Specifications User interface The 33CSPREMLK is designed to allow a service person or building owner to configure and operate the unit through the CCN user interface. A user interface is not required for day-to-day operation. All maintenance, configuration, setup, and diagnostic information is available through the Level II communications port to allow data access by an attached computer running Network Service Tool, ComfortVIEW™, or ComfortWORKS® software. Data access also can be obtained from Navigator or Scrolling Marque Display. (4 to 32 C) for heating and 45 to 99 F (7 to 37 C) for cooling. Communications The number of PremierLink controllers is limited only by the maximum number of controllers allowed on a CCN system. Bus length may not exceed 4000 ft (1219 m), with no more than 60 devices on any 1000 ft (305 m) section. Optically isolated RS-485 repeaters are required every 1000 ft (305 m). Status and control data is transmitted at a baud rate of between 9600 and 38.4K. Wiring connections Activity indicators Field wiring is 18 to 22 AWG (American Wire Gage). The PremierLink controller is a NEC (National Electrical Code) Class 2 rated device. Two activity indicators present on the PremierLink controller indicate activity. A green LED will indicate activity on the communication port and a red LED will indicate status of processor operation. Inputs • • • • • • • • • • space temperature sensor set point adjustment outdoor air temperature sensor indoor air quality sensor outdoor air quality sensor compressor lockout fire shutdown supply fan status remote time clock enthalpy status Outputs • • • • • • • economizer fan cool stage 1 cool stage 2 heat stage 1 heat stage 2 heat stage 3/exhaust/reversing valve Dimensions Height: 53/4-in. (146 mm) Width: 81/2-in. (216 mm) Depth: 3-in. (76 mm) Minimum service dimensions Height: 7-in. (178 mm) Width: 9-in. (229 mm) Depth: 4-in. (102 mm) Environmental ratings Operating Temperature: –40 to 158 F (–40 to 70 C) at 10 to 95% RH (non-condensing) Storage Temperature: –40 to 185 F (–40 to 85 C) at 10 to 95% RH (non-condensing) Vibration Performance vibration: all planes/directions, 1.5G @ 20 to 300 Hz Power supply Shock 2-wire, 24 VAC ± 15% at 40 va, 60 Hz Operation: all planes/directions, 5G peak, 11 ms Storage: all planes/directions, 100G peak, 11 ms Power consumption Normal operating supply range is 18 to 32 VAC with minimum consumption of 10 VA Corrosion Hardware (memory) Approvals Internal flash memory of 64K Specified sensing temperature range The PremierLink controller space temperature range is –40 to 245 F (–40 to 118 C). The PremierLink controller has an allowable control set point range from 40 to 90 F Office environment. Indoor use only. Listed under UL 873, UL94-V0/5VB (plastic), and UL, Canada. Standard compliance CE Mark, ASHRAE 90 and ASHRAE 62-99 compliant. NOTE: Compliance standards subject to change without notice. Accessories Supply air temperature sensor — The 33ZCSENSAT supply air temperature sensor is required for all applications to monitor the temperature of the air delivered. A second supply air temperature sensor set to thermostat mode (or a space temperature sensor) must be installed in the return air for proper economizer and IAQ control. Space temperature sensor with override button — The space temperature sensor monitors room temperature which is used by the PremierLink controller to determine the temperature of conditioned air that is allowed into the space. 3 Accessories (cont) CO2 sensor — Three different CO2 sensors are available for monitoring space indoor-air quality. The 33ZCSENCO2 sensor is an indoor, wall mounted sensor with an LED (light-emitting diode) display. The sensor has an analog output (0 to 10 vdc or 4 to 20 mA) over a range of 0 to 2000 ppm. An SPDT contact is provided to close at 1000 ppm with a hysteresis of 50 ppm. The 33ZCT55CO2 sensor is an indoor, wall mounted sensor without display. The CO2 sensor also includes a space temperature sensor with override button. The 33ZCT56CO2 sensor is an indoor, wall mounted sensor without display. The CO2 sensor also includes a space temperature sensor with override button and temperature offset. Linkage thermostat — The Linkage Thermostat (33CSKITLST-01) is used to control multiple units from a single thermostat. The Linkage Thermostat can control up to 8 units. It is used in place of any space temperature sensor. The 33ZCT55SPT (T55) space temperature sensor with override button is required for all applications. The space temperature sensor monitors room temperature which is used by the PremierLink controller to determine the temperature of conditioned air that is allowed into the space. Space temperature sensor with override button and set point adjustment — The 33ZCT56SPT (T56) space temperature sensor with override button and set point adjustment can be used in place of the 33ZCT55SPT (T55) space temperature sensor if local set point adjustment is required. The space temperature sensor monitors room temperature which is used by the PremierLink controller to determine the temperature of conditioned air that is allowed into the space. T58 communicating sensor with override button, set point adjustment, and manual fan control — The 33ZCT58SPT (T58) communicating room sensor with override button, set point adjustment, and manual fan control can be used in place of the 33ZCT55SPT space temperature sensor. The T58 communicating room sensor measures and maintains room temperature by communicating with the controller. Dimensions Carrier Corporation • Syracuse, New York 13221 3-01 Manufacturer reserves the right to discontinue, or change at any time, specifications or designs without notice and without incurring obligations. Book 1 4 New Book 1 Pg 4 Catalog No. 523-330 Printed in U.S.A. PC 111 Form 33CS-19PS Replaces: New Tab CS1 Tab 11a 13a Product Specification VVT® Zone Controller 3V™ Control System 33ZC 1 2 1 J6 6 GND GND PAT 1 G + 1 8 3 CCW COM CW +10V DMPPOS GND AUX DMP GND J5 1 Copyright 2004 Carrier Corporation - 3 Bus#: Element#: Unit#: SPT GND SAT T56 GND REMOTE J2A CCN Part Number: 33ZCVVTZC-01 S/N: +24V GND 1 1 IAQ/RH J4 J7 FAN 24VAC HEAT3 24VAC HEAT2 24VAC HEAT1 24VAC J3 J1 24VAC SRVC 3 J2BCOMM2 1 - G + 2 G + ® 12 11 Part Number: 33ZCVVTZC-01 The VVT Zone Controller is a component of Carrier’s 3V Control System and is used to provide zone level temperature and air quality control for Variable Volume and Temperature Applications. The VVT zone controller can be operated and configured through the Carrier communicating network with the System Pilot user interface. The VVT Zone Controller provides the following features and benefits: • provides pressure dependent (VVT) control • uses Proportional Integral Derivative (PID) control • mounts directly onto VVT terminal damper shaft • optional terminal fan control NOTE: Terminal fan control requires the VVT Zone Controller Option Board P/N 33ZCOPTBRD-01 • optional auxiliary heating control of: two-position hot water; one, two, or three-stage electric; modulating hot water valve; or combination radiant/ ducted heat stages NOTE: Auxiliary heating requires the VVT Zone Controller Option Board P/N 33ZCOPTBRD-01 • VVT control for terminals up to 2.7 sq. ft inlet • quick and easy commissioning and balancing process via a dedicated maintenance table for system wide air balancing • capable of stand-alone operation with supply-air temperature sensor • actuator preassembled to housing with conduit box and hinged covers • capable of zone level Demand Controlled Ventilation support with field-installed CO2 sensor • communicates to all Carrier 3V networked devices • capable of high-speed 38.4 kilobaud communications network operation Form 33ZC-12PS • 128 controller maximum system (must be located on same network bus segment) • up to 32 zone controllers per system • capable of zone humidity monitoring with field-installed humidity sensor • Carrier Linkage System capability • global set point and occupancy scheduling • sensor averaging • foreign language support for ASCII based character set • dedicated port for System Pilot connection • can drive up to 4 linked damper actuators • capable of local set point adjustment using fieldinstalled temperature sensor (with temperature offset) • both controller housing and actuator are UL94-5V plenum rated • control complies with ASHRAE 62.1 Features/Benefits Flexibility for every application User interface The VVT® zone controller is a single duct, variable volume and temperature terminal control with a factory-integrated controller and actuator. The VVT zone controller maintains precise temperature control in the space by regulating the flow of conditioned air into the space. Buildings with diverse loading conditions can be supported by controlling reheat (single duct only) or supplemental heat. The VVT zone controller can support two-position hot water, modulating hot water, 3-stage electric heat, or combination baseboard and ducted heat. The VVT zone controller is designed to allow a service person or building owner to configure and operate the unit through the System Pilot user interface. A user interface is not required for day-to-day operation. All maintenance, configuration, setup, and diagnostic information is available through the Level II communications port to allow data access by an attached computer running Network Service Tool or ComfortVIEW™ software. → Carrier linkage system compatibility When linked to a Carrier Linkage System, the VVT zone controller provides numerous features and benefits such as weighted average demand for system operation, reference zone temperature and set points, set point averaging, global set point schedule, and occupancy scheduling. Additional control features The VVT zone controller provides additional control features such as Occupied/Unoccupied scheduling initialized via the network. The zone controller offers override invoked from a wall sensor during unoccupied hours from 1 to 1440 minutes in 1-minute increments. Optional CO2 control or relative humidity monitoring are also available. Simple actuator connection The VVT zone controller control assembly contains an integral VVT actuator assembly that is field mounted to the terminal damper shaft, similar to the mounting of a standard actuator. The actuator is rated at 35 lb.-in. (3.95 N-m) torque, a 90-degree stroke, and provides 90-second nominal timing at 60 Hz. The actuator is suitable for mounting onto a 3/8-in. (9.5 mm) square or round VVT box damper shaft, or onto a 1/2-in. (13 mm) round damper shaft. The minimum VVT box damper shaft length is 13/4-in. (45 mm). The VVT zone controller is designed for vertical or horizontal mounting. → Ease of installation The VVT zone controller is provided with removable connectors for power, communications, and damper. The VVT zone controller has non-removable screw type connectors for inputs. The VVT zone controller also provides an RJ-14 modular phone jack for the Carrier network software connection to the module via Carrier network communications. 2 105 Functions • Pressure dependent space temperature control for single duct, series fan powered and parallel fan powered air terminals • Auxiliary heat functions including two-position hot water valve, 3 stages of electric heat, modulating hot water valve and combination radiant/ducted heat stages • T55/T56 wall mounted space temperature sensor interface • T56 space temperature set point reset (slide potentiometer) • Timed override (T55/T56 pushbutton) with one-minute granularity • Space temperature and set point reset sharing • Display of relative humidity based on local or remote sensor • Local occupancy control • Remote occupancy override • Airside linkage • Linkage function for multiple terminals with and without an air source • Adaptive optimal start (AOS) • Sensor grouping function • Commissioning functions • System-wide air balancing • Damper calibration • Sensor trim • Carrier network tables and alarms • Demand Controlled Ventilation (DCV) • Analog CO2 monitoring and control • Loadshed/redline response • System Pilot interface Specifications Wiring connections Communications Field wiring is 18 to 22 AWG (American Wire Gage). The VVT zone controller is a NEC (National Electronic Code) Class 2 rated device. The number of controllers is limited to 128 devices maximum, with a limit of 8 systems (Linkage Coordinator configured for at least 2 zones). Bus length may not exceed 4000 ft (1219 m), with no more than 60 devices on any 1000 ft (305 m) section. Optically isolated RS-485 repeaters are required every 1000 ft (305 m). At 19,200 and 38,400 baud, the number of controllers is limited to 128 maximum, with no limit on the number of Linkage Coordinators. Bus length may not exceed 1000 ft (305 m). Inputs • Space temperature sensor • T55/T56 wall-mounted space temperature sensor interface • T56 space temperature set point reset (slide potentiometer) • Optional supply air temperature sensor (required for reheat and stand-alone operation) • Optional primary air temperature sensor (one required per system that does not utilize a linkage compatible air source) • Optional CO2 sensor • Optional relative humidity sensor (for monitoring only) • Optional remote occupancy contact input Outputs • Integrated factory-wired pressure dependent damper actuator • Heating (requires VVT Zone Controller Option Board 33ZCOPTBRD-01) — Two-position hot water — One to three stages of heat — Modulating hot water valve — Combination radiant/ducted heat stages • Terminal fan (requires VVT Zone Controller Option Board 33ZCOPTBRD-01) • Damper position output (0 to 10v) for linked dampers Power supply The power supply is 24 vac ± 10% at 40 va (50/60 Hz). Environmental ratings Operating Temperature. . . . .32 F to 131 F (0° C to 55 C) Storage Temperature . . . . . .32 F to 158 F (0° C to 70 C) Operating Humidity . . . . . . 10% to 95%, non-condensing Storage Humidity . . . . .10% to 41% at 158 F, condensing Power consumption The power requirement sizing allows for accessory water valves and for the fan contactor. Water valves are limited to 15 va. The fan contactor is limited to 10 va (holding). Vibration Performance Vibration: 1.5 G measured at 20 to 300 Hz Corrosion Office environment. Indoor use only. Approvals • NEC Class 2 • UL 916-PAZX and UL 873 • Conforms to requirements per European Consortium standards EN50081-1 (CISPR 22, Class B) and EN50082-1 (IEC 801-2, IEC 801-3, and IEC 801-4) for CE mark labeling • UL94-5V (actuator) Accessories Supply air temperature sensor — The 33ZCSENSAT supply air temperature sensor is required for heating applications or stand-alone operation. The sensor has an operating range of –40 to 245 F (–40 to 118 C) and includes a 6-in. stainless steel probe and cable. Duct air temperature sensor — The 33ZCSENDAT Duct Air Temperature Sensor is required for cooling only applications on non-33ZC dampers. The sensor is used for supply air monitoring. The sensor has an operating range of –40 to 245 F (–40 to 118 C) and includes a mounting grommet and 75-in. cable. Primary air temperature sensor — The 33ZCSENPAT Primary Air Temperature sensor is required on a linkage coordinator Zone Controller if the Zone Controller is not using a Carrier network, linkage compatible air source. The sensor is used to monitor the equipment’s supply-air temperature. The temperature is broadcast to the system Zone Controllers which receive information from the master. The sensor has an operating range of –40 to 245 F (–40 to 118 C) and includes a 6-in. stainless steel probe with conduit box. Space temperature sensor with override button — The 33ZCT55SPT Space Temperature Sensor with Override Button is required for all applications. The space temperature sensor monitors room temperature, which is used by the Zone Controller to determine the amount of conditioned air that is allowed into the space. Space temperature sensor with override button and set point adjustment — The 33ZCT56SPT Space Temperature Sensor with Override Button and Set Point Adjustment can be used in place of the 33ZCT55SPT space temperature sensor if local set point adjustment is required. A space temperature sensor is required for all applications. The space temperature sensor monitors room temperature, which is used by the Zone Controller to determine the amount of conditioned air that is allowed into the space. The set point adjustment bar is configurable 3 Accessories (cont) 33ZCT55CO2 CO2 sensor is a combination CO2 sensor and temperature sensor with pushbutton timed override. The 33ZCT56CO2 has these features and includes a set point offset slidebar. NOTE: The Relative Humidity sensor and Indoor Air Quality (CO2) sensor cannot be used on the same zone controller. VVT® zone controller option board (33ZCOPTBRD-01) — The 3V-VVT Zone Controller Option Board is required for use of auxiliary heat and fan control functions. The Option Board is field installed and provides four triac discrete outputs, three for supplemental heat and one for the fan output. for up to a ± 15 F (8 C) temperature adjustment by the room occupant. Space temperature sensor with override button, set point adjustment, and liquid crystal display (LCD) — The 33ZCT59SPT space temperature sensor with override button, set point adjustment, and LCD can be used in place of the 33ZCT56SPT space temperature sensor if an LCD is required. A space temperature sensor is required for all applications. Relative humidity sensor — The 33ZCSENSRH-01 Relative Humidity sensor (indoor space) is required for zone humidity monitoring. Indoor air quality sensor — Two CO2 sensors are available for optional Demand Controlled Ventilation (DCV). They are indoor, wall-mounted sensors. The Dimensions → ZONE CONTROLLER Carrier Corporation • Syracuse, New York 13221 105 9-04 Manufacturer reserves the right to discontinue, or change at any time, specifications or designs without notice and without incurring obligations. Book 1 4 New Book 1 Pg 4 Catalog No. 523-351 Printed in U.S.A. PC 111 Form 33ZC-12PS Replaces: New Tab 1CS1 Tab 11a 13a Product Specification PremierLink™ Retrofit Rooftop Controller 33CSPREMLK The PremierLink Retrofit Rooftop Controller is an intelligent control that continuously monitors and regulates rooftop operation with reliability and precision that minimizes downtime to ensure maximum occupant comfort. The PremierLink Controller is compatible with the Carrier Comfort Network (CCN). Carrier’s diagnostic standard tier display tools such as Navigator or Scrolling Marque can be used with the PremierLink controller. User interfaces include the CCN Service Tool, ComfortVIEW™ and ComfortWORKS® software. When used as part of the CCN, other devices such as the CCN data transfer, Linkage Thermostat, or Comfort Controller can read data from or write data to the retrofit controller. The 33CSPREMLK retrofit controller provides the following features and benefits: • provides software clock and local occupancy schedule for local occupancy control (requires time broadcaster and hardware clock from another device in the system) • uses remote timeclock input to provide occupancy control through external contacts • provides optional Linkage Thermostat interface capability • features supply air temperature limiting and integrated safeties for DX (direct expansion), gas, electric and heat pump units • provides field tests that enables the user to check output points and verify their functionality • controls two stages of DX cooling to maintain space temperature set point • controls up to 3 stages of gas heat or combination of mechanical and electric heat to maintain space temperature set point Copyright 2001 Carrier Corporation Form 33CS-19PS • ability to control exhaust fan based on economizer or occupancy on 2 stage heat units • ability to control reversing valve on heat pump units • provides temperature compensated start of heating or cooling to achieve set point by the start of the scheduled occupied time • provides alarms for analog temperature input(s) out of range • provides alarm for space temperature deviation from desired set point • adjustable filter maintenance timer • allows manual and system overrides of selected input/output channels • supports CCN remote timed override, set point adjustment and manual fan speed override • provides Broadcast Acknowledger capability for CCN (configuration) • conforms to the general requirements for CCN devices • supports Navigator and Scrolling Marquee Display and alarms • modulates control of economizer to assist mechanical cooling without adversely affecting compressor performance • provides ventilation monitoring with optional CO2 ventilation sensor • compatible with T55 space sensor and T56 space sensor with set point adjustment, timed override and service port jack • compatibility with T58 communicating sensor provides set point adjustment, timed override, force fan, and read equipment mode • support a local or global occupancy schedule or remote start input status to determine occupancy Features/Benefits Available for wide range of rooftop applications The PremierLink™ controller is available as a field retrofit application and can control one or several rooftop units with (multiple controllers) from 3 to 25 tons. In addition, it has an integrated economizer controller that eliminates the need for a separate circuit board. The PremierLink controller can be installed on the following Carrier rooftop units: 48/50HJ (3 to 121/2 tons), 48TF/50TFF (3 to 121/2 tons), and 48/50TJ (121/2 to 25 tons). Other 2 When connected to a Carrier Linkage Thermostat, the PremierLink controller can use occupancy schedules, zone temperature, and set points from the thermostat. The PremierLink controller provides the thermostat with the unit’s operating mode and supply air temperature for local display at the thermostat. When used with the Linkage Thermostat, the PremierLink controller provides local space temperature sensing, (remote space temperature sensing and averaging with up to 3 optional remote room sensors), occupied and unoccupied heat and cool set points, occupancy scheduling with up to 8 time periods, 12 holiday periods, network time broadcast, occupied set point range limiting, temperature compensated start, and global occupancy. A single Linkage Thermostat will have the ability to interface with up to 8 rooftop controls serving a single zone with the ability to unlink if communications to the linkage thermostat are lost. initialized via the network. The PremierLink controller offers override invoked from a wall sensor during unoccupied hours from 1 to 4 hours in 1-hour increments. The PremierLink controller offers ventilation monitoring with an optional CO2 ventilation sensor. The CO2 ventilation sensor measures the amount of ventilation needed by the space and a proportional integral derivative loop (PID) calculation makes adjustments to the economizer minimum position during occupied operation. The indoor CO2 will be compared to an outdoor CO2 reference before making adjustments to the economizer minimum position. Using a space sensor with set point adjustment, timed override and service port jack, the PremierLink controller will provide intelligent compressor staging and economizer operation. Modulating control of the economizer will assist mechanical cooling without adversely affecting compressor performance. Economizer assisted cooling is determined from a comparison of space temperature, outside air temperature and an enthalpy switch input. The switch input can also be used for differential enthalpy input, meeting ASHRAE Standard 90.1. The T58 Communicating Space temperature sensor with service port jack provides set point adjustment, timed override, force fan and read equipment mode and measures and maintains room temperature by communicating with the PremierLink controller. Fast and reliable system monitoring with Navigator Simple mounting and ease of installation Carrier’s unique, hand-held diagnostic tool, Navigator, can be used with the PremierLink controller. Instant access to detailed information is provided to technicians. Access is available via an RJ-11 connection or a 3-wire connection to the communication bus. Navigator offers flexibility for fast service. Technicians can monitor rooftop operation from the rooftop’s main control panel. Additional hardware or controller configuration is required for Navigator applications. The PremierLink controller has an integrated plastic cover with secured with two plastic tabs that can be removed for ease of installation. For ease of installation, PremierLink controller is provided with removable Molex connectors which include pigtails for easy installation to unit or sensors using spade connectors or wire nuts. The removable connectors are designed so that they can be inserted one way so as to prevent installation errors. The PremierLink controller also provides an RJ-11 modular phone jack for the Network Service Tool connection to the module via the Carrier Comfort Network (CCN) communications. Carrier equipment and non-Carrier equipment can also be controlled by PremierLink controller. Contact Carrier Factory Sales representative for more information. Flexibility for every application The PremierLink controller is an advanced microprocessor-based control. PremierLink is precision controlled to send heating and cooling only when needed, reducing energy use and operating costs. Carrier Linkage Thermostat compatibility Additional control features The PremierLink controller provides additional control features such as Occupied/Unoccupied scheduling Specifications User interface The 33CSPREMLK is designed to allow a service person or building owner to configure and operate the unit through the CCN user interface. A user interface is not required for day-to-day operation. All maintenance, configuration, setup, and diagnostic information is available through the Level II communications port to allow data access by an attached computer running Network Service Tool, ComfortVIEW™, or ComfortWORKS® software. Data access also can be obtained from Navigator or Scrolling Marque Display. (4 to 32 C) for heating and 45 to 99 F (7 to 37 C) for cooling. Communications The number of PremierLink controllers is limited only by the maximum number of controllers allowed on a CCN system. Bus length may not exceed 4000 ft (1219 m), with no more than 60 devices on any 1000 ft (305 m) section. Optically isolated RS-485 repeaters are required every 1000 ft (305 m). Status and control data is transmitted at a baud rate of between 9600 and 38.4K. Wiring connections Activity indicators Field wiring is 18 to 22 AWG (American Wire Gage). The PremierLink controller is a NEC (National Electrical Code) Class 2 rated device. Two activity indicators present on the PremierLink controller indicate activity. A green LED will indicate activity on the communication port and a red LED will indicate status of processor operation. Inputs • • • • • • • • • • space temperature sensor set point adjustment outdoor air temperature sensor indoor air quality sensor outdoor air quality sensor compressor lockout fire shutdown supply fan status remote time clock enthalpy status Outputs • • • • • • • economizer fan cool stage 1 cool stage 2 heat stage 1 heat stage 2 heat stage 3/exhaust/reversing valve Dimensions Height: 53/4-in. (146 mm) Width: 81/2-in. (216 mm) Depth: 3-in. (76 mm) Minimum service dimensions Height: 7-in. (178 mm) Width: 9-in. (229 mm) Depth: 4-in. (102 mm) Environmental ratings Operating Temperature: –40 to 158 F (–40 to 70 C) at 10 to 95% RH (non-condensing) Storage Temperature: –40 to 185 F (–40 to 85 C) at 10 to 95% RH (non-condensing) Vibration Performance vibration: all planes/directions, 1.5G @ 20 to 300 Hz Power supply Shock 2-wire, 24 VAC ± 15% at 40 va, 60 Hz Operation: all planes/directions, 5G peak, 11 ms Storage: all planes/directions, 100G peak, 11 ms Power consumption Normal operating supply range is 18 to 32 VAC with minimum consumption of 10 VA Corrosion Hardware (memory) Approvals Internal flash memory of 64K Specified sensing temperature range The PremierLink controller space temperature range is –40 to 245 F (–40 to 118 C). The PremierLink controller has an allowable control set point range from 40 to 90 F Office environment. Indoor use only. Listed under UL 873, UL94-V0/5VB (plastic), and UL, Canada. Standard compliance CE Mark, ASHRAE 90 and ASHRAE 62-99 compliant. NOTE: Compliance standards subject to change without notice. Accessories Supply air temperature sensor — The 33ZCSENSAT supply air temperature sensor is required for all applications to monitor the temperature of the air delivered. A second supply air temperature sensor set to thermostat mode (or a space temperature sensor) must be installed in the return air for proper economizer and IAQ control. Space temperature sensor with override button — The space temperature sensor monitors room temperature which is used by the PremierLink controller to determine the temperature of conditioned air that is allowed into the space. 3 Accessories (cont) CO2 sensor — Three different CO2 sensors are available for monitoring space indoor-air quality. The 33ZCSENCO2 sensor is an indoor, wall mounted sensor with an LED (light-emitting diode) display. The sensor has an analog output (0 to 10 vdc or 4 to 20 mA) over a range of 0 to 2000 ppm. An SPDT contact is provided to close at 1000 ppm with a hysteresis of 50 ppm. The 33ZCT55CO2 sensor is an indoor, wall mounted sensor without display. The CO2 sensor also includes a space temperature sensor with override button. The 33ZCT56CO2 sensor is an indoor, wall mounted sensor without display. The CO2 sensor also includes a space temperature sensor with override button and temperature offset. Linkage thermostat — The Linkage Thermostat (33CSKITLST-01) is used to control multiple units from a single thermostat. The Linkage Thermostat can control up to 8 units. It is used in place of any space temperature sensor. The 33ZCT55SPT (T55) space temperature sensor with override button is required for all applications. The space temperature sensor monitors room temperature which is used by the PremierLink controller to determine the temperature of conditioned air that is allowed into the space. Space temperature sensor with override button and set point adjustment — The 33ZCT56SPT (T56) space temperature sensor with override button and set point adjustment can be used in place of the 33ZCT55SPT (T55) space temperature sensor if local set point adjustment is required. The space temperature sensor monitors room temperature which is used by the PremierLink controller to determine the temperature of conditioned air that is allowed into the space. T58 communicating sensor with override button, set point adjustment, and manual fan control — The 33ZCT58SPT (T58) communicating room sensor with override button, set point adjustment, and manual fan control can be used in place of the 33ZCT55SPT space temperature sensor. The T58 communicating room sensor measures and maintains room temperature by communicating with the controller. Dimensions Carrier Corporation • Syracuse, New York 13221 3-01 Manufacturer reserves the right to discontinue, or change at any time, specifications or designs without notice and without incurring obligations. Book 1 4 New Book 1 Pg 4 Catalog No. 523-330 Printed in U.S.A. PC 111 Form 33CS-19PS Replaces: New Tab CS1 Tab 11a 13a Universal Controller Installation and Start-up Manual Introduction .................................................................. 1 About this Manual .................................................. 1 Overview ................................................................. 2 8 Inputs .......................................................... 2 8 Outputs ........................................................ 3 Features .......................................................... 3 Specifications ................................................. 4 Installation and Wiring .............................................. 7 Required Tools and References .............................. 7 Module Installation ................................................. 7 Panel Mounting .............................................. 8 Wall Mounting ............................................... 9 DIN Rail Mounting ...................................... 10 System Pilot Installation ......................................... 11 Power Supply Installation ....................................... 11 Power Wiring .......................................................... 11 Universal Controller Power Connector Location ........................................................ 12 Wiring in a Typical Enclosure ..................... 12 Communication Wiring ......................................... 13 Grounding of Bus Shields ............................ 14 Universal Controller Communication Connector Location ...................................... 16 System Pilot and ComfortVIEW Connection ................................................... 16 Sensor and Device Wiring ..................................... 17 Wiring Guidelines ........................................ 17 General Input Sensor Wiring ........................ 18 Externally Powered 4-20 mA Sensor Wiring .......................................................... 19 Wiring T-56 Space Temperature Sensor ........................................................... 20 Wiring ACI 10K-AN and 10K-CP Sensors ........................................... 20 Configuration Guidelines ............................. 21 Checkout .................................................................... 23 Field Wiring ............................................................ 23 Power Supply ......................................................... 24 Diagnostic LEDs .....................................................24 Module Operation ..................................................25 External Devices ............................................ 25 Configuration .........................................................30 Input and Output Device Connection ....................30 Input Devices ................................................30 Output Devices .............................................31 Discrete Outputs ...........................................31 Tuning Control Loops ............................................31 Definition of Terms ........................................32 Equations ......................................................33 System Checkout ...........................................34 Determination of Throttling Range ................36 Dual Loop PID Tuning ..................................36 Single Loop PID Tuning ................................40 Appendix A Wire List ....................................................... 43 Universal Controller I/O Wire List .............. 44 Appendix B How to Clear the Universal Controller Database ....................................................... 45 Appendix C Quick Reference Guide ................................ 47 Index .......................................................................... 51 Figures Figure 1 Universal Controller Module .......... 5 Figure 2 Panel Mount Installation Showing Mounting Hole Locations ............... 8 Figure 3 Wall Mount Installation Showing Mounting Hole Locations ............... 9 Figure 4 DIN Rail Mounted in an Enclosure Showing Rail Spacing ................... 10 Figure 5 Power Connector Location ........... 12 Figure 6 Power Wiring in a Typical Enclosure ..................................... 13 This document is the property of Carrier Corporation and is delivered on the express condition that it is not to be disclosed, reproduced in whole or in part, or used for manufacture by anyone other than Carrier Corporation without its written consent, and that no right is granted to disclose or so use any information contained in said document. Carrier reserves the right to change or modify the information or product described without prior notice and without incurring any liability. © 2004, Carrier Corporation 808-347 08/04 Figure 7 Figure 8 Figure 9 Figure 10 Figure 11 Figure 12 Figure 13 Figure 14 Figure 15 Figure 16 Figure 17 Figure 18 CCN Communication Wiring .......15 Communication Connector Location ...................................... 16 Connecting the System Pilot and ComfortVIEW ............................ 17 General Input Sensor Wiring ...... 19 Externally Powered 4-20 mA Sensor Wiring ............................. 19 Discrete Input Sensor Wiring ..... 21 General Output Device Wiring... 22 Bundling and Dressing Sensor and Device Wiring ............................ 22 Diagnostic LEDs ......................... 24 Disconnecting the Universal Controller From the CCN ........... 45 Disconnecting Power From the Universal Controller ................... 45 Universal Controller Button for Clearing the Database ................. 46 Tables Table 1 Power Connector Pin Assignments ............................... 12 Table 2 Universal Controller Status ........ 24 Table 3 Temperature to Resistance Conversion ................................. 26 Table 4 Additional Temperature to Resistance Conversions .............. 29 Table C-1 Quick Reference Guide .............. 47 ii Introduction Introduction Introduction About this Manual This manual is intended for use by Carrier Corporation technical representatives. It provides installation, start-up, and checkout procedures for the Universal Controller. The manual is divided into three main sections. Section One, Introduction, describes the Universal Controller and its functions in the Carrier Comfort Network (CCN). Section Two, Installation and Wiring, contains step-by-step instructions for mounting and wiring the Universal Controller. It also contains sample installations of sensors and other devices. Section Three, Checkout, describes how to verify field wiring, that the power supply is operating and that the unit is communicating on the CCN. It also contains instructions for calibrating input devices and tuning analog output control loops. Appendix A contains a wire list for the Universal Controller. Appendix B provides instructions for clearing the Universal Controller database. Appendix C provides a summary of product specifications and CCN product compatibility data for the Universal Controller in a quick reference guide format. This manual is written for world-wide use. Engineering measurements are in customary U.S. and metric units. Installation and start-up of all devices must be performed by Carrier qualified service technicians. 1 Overview The Universal Controller provides auxiliary building control to interface with lighting, fans, pumps and other HVAC equipment in a standalone or Carrier-networked environment using closed-loop, direct digital controls. The Universal Controller’s pre-engineered algorithms provide simple building integration for small-to-medium commercial applications with 16 field point capability (8 inputs and 8 outputs). The Universal Controller gives the Carrier Comfort Network (CCN) the capability to control and communicate with Carrier and nonCarrier HVAC equipment that do not have Product Integrated Controls (PICs). You configure the Universal Controller to utilize a database of the algorithms, points, schedules, alarms, and system functions that are necessary to control and monitor the equipment at your site. You enter the configuration data using the following CCN operator interface devices: • • • • System Pilot CCNWeb ComfortVIEW Network Service Tool You can connect 16 field points (8 inputs and 8 outputs) to the Universal Controller. 8 Inputs 2 Numbers Specifications 1 to 8 Discrete, analog, or temperature Discrete Dry Contact Pulsed dry contact Analog 4-20 mA (2 wire ) 0-10 Vdc Temperature 5K & 10K ohm thermistors 8 Outputs Features Numbers Specifications 1 to 8 Discrete or analog Discrete 24 Vdc@80 mA Analog 4-20 mA 0-10 Vdc The Universal Controller supports the following features: • Stand-alone control and monitoring of up to 16 field points, using proven algorithms • Outdoor duty rated • Control of non-Carrier equipment and Carrier HVAC equipment not equipped with Product Integrated Controls, using the Carrier Network • Compatibility with all standard CCN user interface devices including the following: System Pilot, CCNWeb, ComfortVIEW, and Network Service Tool • Two LEDs, conveniently located on the front of the module, indicate processor status (red), and CCN Communication Bus status (yellow) • Local connection for CCN • Total facilities management when linked to a CCN • Three-day backup of clock and data such as Runtime and Consumable • Simplified field wiring using “removable type” connectors • Use of any standard, field-supplied 24 Vac, 60VA transformer 3 Specifications Power Requirements .......................................... 60VA@24 Vac+15% Dimensions ........................................ 14 in H x 2.25 in W x 6.25 in D (36 cm x 5 cm x 16 cm) Operating Temperature ....................... -40°F to 158°F, Outdoor Rated (-40°C to 70°C) Storage Temperature .................................................... -40°F to 185°F (-40°C to 85°C) Operating Humidity ................................10% to 95%, non-condensing Discrete Out Specifications Output Signal ............................ 24Vdc@80 mA + 3V current limited Analog Out Specifications 4-20 mA Milliamp Type Load Resistance ...............................................500-600 ohms Resolution ............................................................... 0.04 mA Accuracy ........................................................................ +2% 0-10 Vdc Voltage Type (varies with point type) Load Resistance ....................................................>500 ohms Resolution .................................................................. 20 mV Accuracy ........................................................................ +2% Discrete In Specifications Dry Contacts.............................................................. Switch Closure Pulsing Dry Contacts Repetition Rate ...................................................... 5 Hz max. Minimum Pulse Width............................................ 100 msec Analog In Specifications 4-20 mA Milliamp Type Wire Type ................................................................... 2-wire Resolution ............................................................. 0.025 mA Accuracy ..................................................................... +1.5% 0-10 Vdc Voltage Type Resolution .............................................................. 0.0125 V Accuracy ........................................................................ +1% 4 5K Thermistor Type Nominal reading @5,000 ohms ......................... 77°F (25°C) Resolution .....................................................................0.2°F Accuracy ....................................................................... +1°F 10K Thermistor Type Nominal reading @ 10,000 ohms ....................... 77°F (25°C) Resolution .....................................................................0.2°F Accuracy ....................................................................... +1°F The Universal Controller is UL 873 and CE Mark Industrial listed. Figure 1 below shows the Universal Controller Module. Figure 1 Universal Controller Module 5 6 Installation and Wiring Introduction Installation and Wiring Required Tools and References Module Installation Drill with a #29 bit Small needle-nose pliers Volt ohmmeter (VOM) Wire cutter/stripper 1/8" blade screwdriver 1/4" and 5/16" nut drivers with 6" extension Completed wire lists and configuration sheets for each Universal Controller Universal Controller Overview and Configuration Manual (808-346) Installation instructions for all enclosures, power sources, and devices The Universal Controller can be mounted in the following locations: Panel mounted in a NEMA Type 1 enclosure Wall mounted DIN rail mounted in an enclosure The Universal Controller's dimension's are 14 in H x 2.25 in W x 6.25 in D (36 cm H x 5 cm W x 16 cm D). It is recommended that the module be installed in a NEMA Type 1 enclosure for security purposes and to prevent damage. The location of the enclosure or module is shown on the building layout drawings that have been approved by the customer. Ambient temperature in the enclosure should be -40°F to 158°F (-40°C to 70°C), and humidity should be 10% to 95%, non-condensing. Caution: Do not install this module close to heaters, generators, power switching devices, or other equipment that generates electrical noise. Before mounting the module, install the enclosure in the designated area using the instructions provided by its manufacturer. 7 Panel Mounting Figure 2 Panel Mount Installation Showing Mounting Hole Locations 8 The module can be panel mounted in any field-supplied standard NEMA Type 1 enclosure with a backplate. 1. Drill two holes for the module using a #29 bit. Refer to Figure 2 for mounting hole locations. 2. Partially attach two, 3/4 in, #8-32, self-tapping screws to the mounting surface. 3. Slide the screws into the holes. 4. If necessary, tighten the screws to secure the module. Wall Mounting The module should be flush mounted in a location where the enclosure depth is shallow, such as inside a control panel, or on the side of a unit, such as an air handler. 1. Using a #29 bit, drill three mounting holes as shown in Figure 3. 2. Attach the module using three, 1-1/2 in, #8-32, self-tapping screws. Note: Orient the module so that you have access to the connectors and switches. Figure 3 Wall Mount Installation Showing Mounting Hole Locations 9 DIN Rail Mounting Figure 4 DIN Rail Mounted in an Enclosure Showing Rail Spacing 10 The module can be mounted on a field-supplied DIN rail in an enclosure. 1. Install the DIN rail as shown in Figure 4. 2. Place the module on the DIN rail. 3. Partially attach a #8-32 screw in the keyhole slot on the top of the module. 4. Tighten the screw to secure the module. System Pilot Installation The System Pilot is a wall mounted device. Refer to the System Pilot Installation and Operation Instructions (Catalog # 533-30013) for instructions on mounting the System Pilot on the wall. Power Supply Installation The Universal Controller uses any standard, Class II, SELVcompatible, field-supplied 24 Vac power source. The power requirement is as follows: 60 VA @ 24 Vac + 15% All installation wiring must conform to the following requirements: • All applicable local codes, ordinances, and regulations must be observed. • All module power wiring must be as short as possible. • Primary power wiring must be run in separate conduit or Electrical Metallic Tubing (EMT) from the CCN Communication Bus, sensor field wiring, and device field wiring. The power supply must be minimum 60VA, Class II rated, with a fused secondary. A 3.3A slow blow fuse is recommended. Install it according to the manufacturer’s installation instructions. Warning: Power Wiring Do not plug in or turn on the power supply at this time. Module power wiring can be completed only after the module is installed in the enclosure. This section describes how to wire power connections to the Universal Controller. The CCN Installation and Start-up Manual (808-211) provides U.S. and international wire specifications for various applications and lists recommended wire vendors. Warning: When using a 24 Vac power supply to power the Universal Controller, do not use it to also power non-controller type devices such as sensors and actuators. If sharing power between other CCN controllers, you must maintain phasing between devices (see Power Requirements in Appendix C). 11 Universal Controller Power Connector Location The figure below shows the location of the power connector on the Universal Controller and a detailed view of the connector. Figure 5 Power Connector Location Table 1 Power Connector Pin Assignments Wiring in a Typical Enclosure Pin Number Power Connector 1 2 3 24 Vac 24 Vac Chassis ground On the Universal Controller, two pins are reserved for power and one is reserved for chassis ground. Figure 6 shows power wiring within a typical enclosure for the power supply and the module. 12 Figure 6 Power Wiring in a Typical Enclosure Communication Wiring CCN communication wiring can be completed only after all Universal Controllers are installed in their enclosures. This section describes how to wire CCN communication to the Universal Controller and ComfortVIEW. The CCN Installation and Start-up Manual (808-211) provides U.S. and international wire specifications for various applications and lists recommended wire vendors. The CCN Communication Bus conveys commands and data between the Universal Controller and any other element on the CCN. Physically, the CCN Communication Bus consists of three-conductor, shielded cable. System elements must be connected directly to the bus in a daisy chain fashion without the use of T-taps or spurs. 13 When connecting the CCN Communication Bus to a system element, each of the three conductors must be used for the same signal type throughout the entire CCN. That is: signal (+) terminals must always be wired to signal (+) signal ground terminals must always be wired to signal ground signal (-) terminals must always be wired to signal (-) To achieve this consistancy, the following color code system is recommended: Signal Type Conductor Insulation Color/Pin # + Ground - Red White Black (1) (2) (3) If a cable with a different color scheme is selected for the CCN Communication Bus, a similar color code system should be adopted to simplify installation and checkout. Grounding of Bus Shields At each system element, the shields of its communication bus cables must be tied together. If the CCN Communication Bus is entirely within one building, the resulting continuous shield must be connected to ground at only one single point (refer to Figure 7). If the CCN Communication Bus exits from one building and enters another, its shields must also be connected to ground at a lightning suppressor in each building. The specific shield connections are illustrated on the following pages in the wiring description for each system element type. 14 Figure 7 CCN Communication Wiring All buses, both primary and secondary, are composed of bus segments. A bus segment may be up to 1000 feet in length. A Repeater functions to join two bus segments. Up to three Repeaters can be used to form a bus, consisting of four 1000-foot segments. 15 Universal Controller Communication Connector Location The figure below shows the location of the CCN communication connector on the Universal Controller, and a detailed view of the connector. Figure 8 Communication Connector Location System Pilot and ComfortVIEW Connection The Universal Controller provides an RJ14 modular phone jack for ComfortVIEW cable connection, as shown in Figure 9. The interface cable requires a four or six conductor cable with an RJ14 or RJ11 style plug mounted at each end. The System Pilot communicates with the Universal Controller via the CCN Communication Bus as shown in Figure 9. Refer to the System Pilot Installation and Operation Instructions (Catalog # 533-30013) for more information on connecting the System Pilot to the CCN Communication Bus. 16 Figure 9 Connecting the System Pilot and ComfortVIEW RJ14 MODULAR PHONE JACK (J5) PIN LAYOUT + 24 Vac CCN (+) CCN (G) NC CCN (-) - 24 Vac 123456 Sensor and Device Wiring The following section lists general procedures and guidelines for wiring sensors and output devices. The CCN Installation and Start-up Manual (808-211) provides U.S. and international wire specifications for various applications and lists recommended wire vendors. Appendix B of the Universal Controller Overview and Configuration Manual (808-346) lists the engineering units, ranges, resolutions, and accuracy for the standard input and output devices that the Universal Controller supports. Wiring Guidelines Sensor and output device wiring is usually done in two stages. First, bring the wiring to the enclosure. Then terminate the wire to the module connectors. 1. Mark each wire with the cable number specified on the module wire list. Refer to Appendix A for a sample wire list. 2. Pull the sensor and device wiring into the enclosure. Route all sensor and device wiring through either the top or bottom of the enclosure. 17 Note: Pulsed-type discrete input sensors require twisted shielded pair (tsp) wiring. Terminate the shield from the sensor to a forked type crimp connector, allowing enough wire so that this shield can be fastened under the module mounting screw. If the Universal Controller is not already installed, leave about 2 feet of wire in the enclosure before terminating the wire to the module connectors. 3. Refer to Field Wiring in the Checkout section prior to terminating the wires. 4. Terminate the wires to the module I/O connectors, as shown in Figures 10 through 13 on the following pages. Wire to the terminals designated on the wire list. Make final termination by stripping the end of each wire, inserting it into the connector, and tightening the adjacent screw. Refer to Figures 10 through 13 for more detailed information. Note: 5. Bundle and dress all cables according to module and connector. Refer to Figure 14. Caution: Note: 6. General Input Sensor Wiring 18 If the Universal Controller is already installed, you can remove the connectors to facilitate wiring. Bundle input and output cables separately. Leave the connectors unplugged from the module until you complete wiring checkout and controller configuration. Any input sensor or device located in another building structure must be equipped with a Carrier-approved lightning suppressor. It should be grounded to the Universal Controller enclosure using 14 to 16 gauge wire no longer than 6 inches. Discrete Input Temperature Type 0-10 V 4-20 mA Figure 10 General Input Sensor Wiring Note: Externally Powered 4-20 mA Sensor Wiring Pin 17 is typically used for Channels 1-4, Pin 18 is typically used for Channels 5-8. Pins 17 and 18 each provide 24 Vdc current limited to 90 mA. Figure 11 Externally Powered 4-20 mA Sensor Wiring 19 Note: Wiring T-56 Space Temperature Sensor Pins 17 and 18 of Connector J3 are 24 Vdc sources for internally powered (2-wire) milliamp sensors. Each pin can provide power for up to four sensors maximum. Powering other devices could damage the Universal Controller. The T-56 can be wired to any two channels. TH 1 2 CH. A COM 1 SW Note: Wiring ACI 10K-AN and 10K-CP Sensors 20 2 CH. B You should configure channel B as a setpoint offset hardware input type point. When wiring the Automation Components Inc. 10K-CP (Carrier part number 33ZCT56SPT) sensor with slidebar, follow the guidelines below: The sensor requires one temperature input hardware point and one setpoint offset point on the Universal Controller, one for the thermistor and one for the slidebar. Wire both inputs to the same controller, and run a 3-wire cable to the sensor. The ACI sensor has four terminals. The second SEN terminal (on left), and the first (SET) terminal (on right) should be jumpered (common wire). Since there is a common for both signals and both inputs wired to the same module, do not jumper the signal commons on the controller (pin 2 of both channels). Configuration Guidelines The temperature input for an ACI/10K-CP must be configured as a type 3 (10K Type II (CP/MCI)) temperature sensor. The slidebar input must always be configured as a setpoint offset type analog input. When using this sensor, you must configure the setpoint reference (Offset Low Value/Offset High Value) decisions in the setpoint offset configuration table. The actual biased setpoints are visible in the setpoint offset maintenance table, based on the current slidebar position. The slidebar units are displayed as 0 to 100%, where 50% is the center position (no setpoint bias), 0% is the full low (minus), and 100% is the full high (plus) setpoint bias position. Figure 12 Discrete Input Sensor Wiring 21 Figure 13 General Output Device Wiring Figure 14 Bundling and Dressing Sensor and Device Wiring 22 Checkout Introduction Checkout This section describes basic checkout procedures that you should follow before and after you complete the installation. Note: Field Wiring Because these procedures are interdependent, you should perform them in the order in which they are presented. The first step in checking out an installation is to verify the field wiring by checking for stray voltage, shorts and grounds, or resistance. 1. Turn module power off. 2. Verify that I/O connectors are removed from the module. 3. Using the wire list as a guide, locate the wiring pair associated with the point to be verified. 4. For the same point, go to the sensor or controlling relay and remove the wiring pair from the device terminals. Short the two wires together. 5. Return to the module and use a VOM to measure the resistance across the wiring pair described in Step 3 above. The reading should be less than 5 ohms. 6. Go to the sensor or controlling relay and remove the short described in Step 4 above. Do not re-connect the wires to the sensor at this time. 7. Return to the module and again use a VOM to measure the resistance across the wiring pair. The reading should measure an open, or infinite ohms. 8. If either of the resistances measured in Steps 5 and 7 above was incorrect, a problem exists in the wiring. Replace the wiring pair, or repair wiring if practical. 9. If both measurements were correct, continue with the next procedure. 10. Check between each wire and ground for AC voltage, DC voltage and continuity. Correct as needed. 23 Power Supply Diagnostic LEDs The next step in checking out an installation is to verify that the power supply is operating. 1. Apply 120 Vac or other line voltage to the primary side of the power supply. 2. Ensure that 24 Vac + 15% is present on the power connector before you plug it into the module. The Universal Controller features the diagnostic LEDs shown in the figure below. Figure 15 Diagnostic LEDs The following table shows the status of the Universal Controller as indicated by the blink rate of the red LED. Table 2 Universal Controller Status Blink Rate 0.5 Hz (blink) 1.0 Hz (blink, 80% duty cycle) On (not blinking) for less than 30 seconds .25 Hz (blink) Steady on or erratic blink 24 Status Normal Start-up Mode Initializing Database Error Failure Module Operation External Devices Follow the steps below to verify module operation. 1. Before applying power to the module, be sure that the I/O connectors are disconnected from the module. 2. Power the module. The red LED should flash at the "Start-up Mode" 1.0 Hz rate (On for 4/5 second, Off for 1/5 second), for 3 seconds. Then the red LED will stay On (not blinking) for less then 30 seconds. Finally, the red LED will flash at the “Normal” 0.5 Hz rate. (On for 1 second, Off for 1 second). 3. Using the Address Change Utility or System Pilot, verify that the CCN address setting is correct. 1. After you have determined that the wiring between the module and the sensor or controlling relay is correct, you should then determine if the device itself is functional. 2. If the device is a temperature sensor, verify that it is properly mounted at the correct location as shown in the installation drawings. Be sure that space sensors are not located near coffee pots, copying machines, or other sources of heat or cold. 3. If the device is a thermistor, or a DO relay coil, use a VOM to measure resistance across the device terminals. Compare this measurement to Table 3. If the measurement is correct, reconnect all wiring between the device and the module. If the measurement is incorrect, replace the failed device and reconnect all wiring between it and the module. 4. If the device is a 2-wire, 4-20 mA type, there is no simple verification procedure. In this case, assume that it is functional until all device and module wiring, configuration decisions, and setpoint schedules are verified as correct. The 4-20 mA device should be replaced only after all other parameters have been checked thoroughly. 25 5. If the device is a motor current transducer CT-1, the verification procedure is as follows: Warning: a. Before servicing this device or any device inside a motor control panel, be sure to disconnect the high voltage supply. Verify motor current transducer CT-1 is installed and properly wired in the correct part of the starter circuit as shown in the installation drawings. b. Verify wiring from the module to CT-1 by following the External Devices procedure above, then re-connect the wiring pair at the device terminals. c. Re-connect the high voltage supply to the motor control panel. d. Return to the module. Do not connect the field wiring connector to the module. e. 6. Table 3 Temperature to Resistance Conversion Manually run the machine up to full load. Use a VOM to measure the voltage across the device wiring pair. The reading should be 1 to 5 Vdc. If the voltage is incorrect, replace motor current transducer CT-1. After external wiring and devices have been determined to be functional, re-connect the field wiring connector to the module. Temperature °F °C -40 -35 -30 -25 -20 -15 -40 -37.2 -34.4 -32 -29 -26.1 Resistance (ohms) 5K Thermistor 168.3K 140.1K 117.1K 98.19K 82.60K 69.72K 10K Type III (AN/YSI) Thermistor 239.9K 203.9K 173.7K 148.5K 127.2K 109.3K (continued) 26 Table 3 Temperature to Resistance Conversion (Continued) Temperature °F °C -10 -5 0 5 10 15 20 25 30 35 40 45 50 52 54 55 56 58 60 62 64 65 66 68 70 72 74 75 76 77 78 80 85 90 95 -23.3 -21.0 -18.0 -15.0 -12.2 -9.4 -7.0 -3.8 -1.1 1.6 4.4 7.2 10.0 11.1 12.2 13.0 13.3 14.4 15.6 16.7 17.8 18.3 18.9 20.0 21.1 22.2 23.3 24.0 24.4 25.0 25.6 26.7 29.4 32.2 35.0 Resistance (ohms) 5K Thermistor 59.03K 50.13K 42.70K 36.47K 31.24K 26.84K 23.12K 19.96K 17.28K 15.00K 13.05K 11.38K 9.95K 8.72K 7.65K 6.73K 5.94K 5.25K 4.64K 4.12K 3.66K 3.26K 10K Type III (AN/YSI) Thermistor 94.17K 81.31K 70.38K 61.07K 53.11K 46.29K 40.44K 35.41K 31.06K 27.31K 24.06K 21.24K 18.79K 17.90K 17.05K 16.65K 16.26K 15.50K 14.78K 14.10K 13.46K 13.15K 12.85K 12.27K 11.72K 11.19K 10.70K 10.46K 10.23K 10.00K 9.78K 9.35K 8.37K 7.51K 6.75K (continued) 27 Table 3 Temperature to Resistance Conversion (Continued) Temperature °F °C 100 105 110 115 120 125 130 135 140 145 150 155 160 165 170 175 180 185 190 195 200 205 210 215 220 225 230 235 240 245 250 28 37.8 41.0 43.0 46.1 49.0 52.0 54.0 57.2 60.0 63.0 65.5 68.3 71.1 73.8 76.6 79.4 82.2 85.0 88.0 91.0 93.0 96.1 99.0 102.0 104.0 107.2 110.0 113.0 116.0 118.3 121.1 Resistance (ohms) 5K Thermistor 2913.0 2604.0 2331.0 2091.0 1878.0 1690.0 1523.0 1375.0 1243.0 1126.0 1021.0 927.0 843.0 767.8 700.2 639.4 584.7 535.3 490.7 450.4 413.9 380.8 350.8 323.5 298.6 276.0 255.3 236.4 219.2 203.4 189.0 10K Type III (AN/YSI) Thermistor 6078.0 5479.0 4947.0 4475.0 4050.0 3672.0 3334.0 3032.0 2760.0 2516.0 2297.0 2100.0 1921.0 1760.0 1615.0 1483.0 1363.0 1255.0 1156.0 1067.0 985.0 910.5 842.5 780.3 723.5 671.4 623.6 579.8 539.6 502.6 468.5 Table 4 Additional Temperature to Resistance Conversions Temperature °F °C -40 -31 -22 -20 -15 -13 -10 -5 -4 0 5 10 14 15 20 23 25 30 32 35 40 41 45 50 55 59 68 77 86 95 104 113 122 131 140 149 158 167 176 185 -40.0 -35.0 -30.0 -29.0 -26.1 -25.0 -23.3 -21.0 -20.0 -18.0 -15.0 -12.2 -10.0 -9.4 -7.0 -5.0 -3.8 -1.1 0.0 1.6 4.4 5.0 9.2 10.0 13.0 15.0 20.0 25.0 30.0 35.0 40.0 45.0 50.0 55.0 60.0 65.0 70.0 75.0 80.0 85.0 Resistance (ohms) 10K Type II (CP/MCI) Thermistor 336000.0 242700.0 177000.0 130402.0 97060.0 72940.0 55319.0 42324.0 32654.0 25396.0 19903.0 15714.0 12493.0 10000.0 8056.0 6530.0 5327.0 4370.0 3606.0 2986.0 2488.0 2083.0 1752.0 1480.0 1255.0 1070.0 (continued) 29 Table 4 Additional Temperature to Resistance Conversions (Continued) Configuration Temperature °F °C 194 203 212 221 230 239 246 90.0 95.0 100.0 105.0 110.0 115.0 118.8 Resistance (ohms) 10K Type II (CP/MCI) Thermistor 915.0 787.0 680.0 592.0 517.0 401.0 450.0 At this point, you should refer to the Universal Controller Overview and Configuration Manual (808-346) for instructions on how to configure the newly installed Universal Controller. After the Universal Controller is configured, use the System Pilot or ComfortVIEW to verify that each sensor or transducer works correctly. Input and Output Device Connection Input Devices The final step in the Universal Controller checkout is to connect the field devices to the module and check their operation. This requires physical inspection of the devices. 1. Plug the field wiring connector into the module. 2. Display each input channel. 3. Check each input’s accuracy by comparing the data displayed on the System Pilot with the actual temperature, status, pressure, etc., at the input device. Note: 4. 30 For AI points, verify the physical location of the sensor. For example, is the discharge sensor downstream from the coil? Is the space sensor in the correct space? Is the pressure sensor in a nonturbulent area? If any input does not checkout properly, verify its hardware and software configuration. Inputs that have slightly inaccurate readings can be trimmed. Output Devices Caution: 1. Force each output to a safe position. Caution: Discrete Outputs Tuning Control Loops You must correct inaccurate inputs before connecting output devices. This is very important because the module will take control of the output devices as soon as you plug the field connectors into the module. The safe position ensures an orderly checkout procedure without disrupting normal building operation. 2. Plug the field connectors into the module. 1. Display each discrete output. 2. Force the device on (or off) and verify its operation. 3. Force the device off (or on) and verify its operation. 4. Remove the force as each discrete output passes checkout. Observe proper algorithm control of each point before proceeding. The following section offers a suggested procedure for control loop tuning if an application consists of a heating, cooling, or other device controlled by an analog, 4-20 mA actuator. While necessarily generic in nature, these steps can be used by any Carrier controller containing PID based analog output control loops. The sensitivity of most HVAC processes varies with changes in air temperature, water temperature, air volume, and other environmental conditions. Therefore, HVAC control loops periodically need recalibration or tuning to maintain a steady, stable response through seasonal changes. The most common indications that a loop requires tuning are: • The output oscillates, in some cases from the maximum to the minimum output value, and the loop is unable to maintain setpoint. 31 The controlling sensor is away from the setpoint by more than an acceptable amount, but the output to the controlling device (valve, damper, etc.) does not respond over a reasonable time period. In some cases, the control loop tuning precision that can be attained depends on the application. For example, when controlling a mixed air damper, the proportion of outside to return air for a given commanded position varies because of mechanical looseness in the damper/actuator assembly. A mixed air damper control algorithm is considered to be well tuned if the mixed air temperature is maintained within one degree F of setpoint. Dual loop algorithms controlling space conditions can be adjusted such that the setpoint can be maintained within several tenths of a degree F. For most HVAC situations, a somewhat sluggish response to changes in setpoint or in the value of the controlling sensor is desired. Tuning to provide rapid, knee-jerk response, while desirable in some situations, will invariably lead to tuning problems when environmental conditions change. The need for re-tuning the loop will be minimized with a slow but steady system response. You will tune a control loop using the PID Master Loop and Submaster Loop configuration decisions. Refer to the Universal Controller Overview and Configuration Manual (808-346) for information on the software aspects of control loop tuning. Definition of Terms Error The difference between the reference (Master or Submaster, ie., the setpoint) and the controlling sensor. (See the Equations section that follows.) Master Proportional Equation A component of the Master Proportional, Integral and Derivative (PID) Equation (see Equations) which calculates the Submaster Reference (SubRef). Varies the SubRef based on the magnitude of the Error and the time away from setpoint. Master Proportional Gain Used to adjust sensitivity of the Master Proportional Equation. 32 Master Integral Equation A component of the Master PID Equation which calculates the Submaster Reference. Varies the SubRef based on the magnitude of the error and the amount of time it has existed. Master Integral Gain Used to adjust sensitivity of the Master Integral Equation. Master Derivative Equation A component of the Master PID Equation which calculates the Submaster Reference. Varies the SubRef based on the rate of change of the Error in the Master PID Equation. Master Derivative Gain Used to adjust sensitivity of the Master Derivative Equation. Submaster Equation Calculates the loop output which is proportional to the magnitude of the Error in the Submaster Equation (see Equations). Submaster Proportional Gain Used to adjust sensitivity of the Submaster Equation. Note: Equations For all single loop equations, use the master definitions above. All Universal Controller analog algorithms are based on PID equations. In a dual loop algorithm, the master loop calculates the submaster reference and the submaster loop calculates the output signal. In a single loop algorithm, the output signal is calculated directly by a PID equation similar to the master loop equation. These calculations are run at intervals as defined in the respective algorithm's Block Iteration Rate configuration decision. Refer to the Universal Controller Overview and Configuration Manual (808346) for information on the algorithm's configuration decisions. These are the error calculations for the equations that follow: Error1 = Setpoint - Value of Controlling Sensor Error2 = Submaster Reference - Value of Submaster Sensor 33 These are the proportional (P Term), integral (I Term) and derivative (D Term) terms for the equations that follow: P Term = (Error1 * Proportional Gain) I Term = (Error1 * Integral Gain) + Previous I Term D Term = (Current Error1 - Previous Error1) * Derivative Gain All single loop algorithms use the following equation: Output Signal = P Term + I Term + D Term + Starting Value Note: Output Signal will not exceed the minimum and maximum output values configured for the algorithm. All dual loop algorithms use the following master and submaster equations. Master PID Equation: Submaster Reference = P Term + I Term + D Term + Starting Value Note: Submaster Reference will not exceed the minimum and maximum SubRef values configured for the algorithm. Submaster Equation: Output Signal = (Error2 * Submaster Proportional Gain) + Center Value Note: System Checkout Before you begin tuning the loop, check out the system and verify the following: 1. 34 Output Signal will not exceed the minimum and maximum output values configured for the algorithm. There are no mechanical or electrical problems with the controls or the controlled equipment. Devices such as valves, dampers, and sensors must be operating properly. 2. Whether the valves and dampers are normally open or normally closed so that the correct display types and gains can be selected. For normally closed devices, the actual control signal (mA or Volts) would be scaled such that the low end (4 mA or 2 Vdc) will display 0%, while the high end (20 mA or 10 Vdc) will display 100%. A normally open device will invert that relationship such that 0% would equate to 20 mA or 10 Vdc while 100% would equate to 4 mA or 2 Vdc. The polarity and value of the gain is important, because they determine the direction and magnitude of the output for a given amount of error. The master and submaster loops are mathematical formulas whose response is tailored via these gains. If set up properly, any increase in the algorithms output from 0 to 100% will result in an increase in output from the controlled device. As long as the output channels are set up with display types that match the controlled device, then the following will be true: For all dual loops, the master proportional, integral, and derivative gain will always be positive. Dual loop heating algorithms will use positive submaster proportional gain. Dual loop cooling algorithms will use negative submaster proportional gain. Single loop heating algorithms will use positive proportional, integral, and derivative gain. Single loop cooling algorithms will use negative proportional, integral, and derivative gain. Note: 3. All derivative gains have a default value of zero. The system must be operating under actual load conditions. If conditions are atypical, any adjustments will be invalid when normal operating conditions return. 35 Determination of Throttling Range Caution: You must determine the throttling range of the controlled device prior to attempting to tune the control loop. The throttling range of a device can be defined as the range of output over which the device produces a measurable effect. You must differentiate between the throttling range and the mechanical or electrical spring range since the range over which the device (value, damper, etc.) produces a measurable effect (heat, cool, pressure, etc.) is almost surely to be less than the full spring range. Once the true throttling range is determined, the center value (for dual loops) or starting value (for single loops) can be determined. The Center Value (CV) or Starting Value (SV) can be defined as the center of the throttling range. This may be the mathematical center of the spring range or it may not. For systems which have a very non-linear response, such as a steam valve which opens with a great rush of heat, the CV or SV will be closer to the closed end of the spring range rather than the middle. To make this determination, the actuator should be stroked over its entire range while monitoring the leaving conditions of the device. This procedure provides the means of determining not only the device's center, but also the point where it begins working, and finally the point where it reaches its maximum capability. You should plot the leaving conditions as a function of output, beginning at a fully closed output and continuing until the leaving conditions no longer change. To insure accuracy over a variety of conditions, this should be done when load conditions are typical for the operation of this device. If you are tuning a dual loop algorithm, enter the center value in the Submaster Loop Center Value configuration decision. If you are tuning a single loop algorithm, enter the starting value in the PID Master Loop Starting Value configuration decision. Dual Loop PID Tuning 36 All control loops in a Universal Controller allow user adjustment of loop timing. The default for all dual loops is 120 seconds for the master loop and 2 seconds for the submaster loop. It is suggested that the defaults be maintained unless there is a compelling reason to change them. The following steps apply only to dual loop algorithms: 1. Set the Center Value. Verify the correct submaster center value as outlined in Determination of Throttling Range. 2. Tune the Submaster Loop. Force the submaster reference to a value several degrees above or below the current value of the submaster sensor. This will cause the controlled device to operate in the middle portion of its throttling range. Since the accuracy of the center value has already been proven, any problems with the submaster loop can normally be attributed to improper settings of the submaster gain. Observe the loop response and determine if any of the following conditions are present: Loop Oscillation. An excessive amount of submaster gain is indicated if the submaster sensor and output signal repeatedly oscillate and do not stabilize. To correct for this condition, reduce the submaster proportional gain in 50% increments until the oscillation subsides, and then bring it back up by half of the amount reduced, again verifying that the loop remains free of oscillation. Should this increase return the loop to oscillation, again reduce the gain by one half of the increased amount. The intent is to produce a steady output signal within +/- 5% of the target submaster reference. Droop Droop is indicated if the output is stable (not oscillating) but the submaster sensor is more than +/- 5% of reference away from the target submaster reference. Assuming proper adjustment of the submaster gain, this condition normally indicates that the center value was incorrect. Increase or decrease it until the submaster sensor is within +/- 5% or the submaster reference. Again, the goal is to produce a steady output signal within +/- 5% of the target submaster reference. 37 3. Set the Master Integral Gain to 0. 4. Adjust the Master Proportional Gain. At this point, the submaster loop is stable and its gain has been adjusted for proper response. Adjust the setpoint to a value +/- 5% away from current conditions at the controlling sensor (normally the space sensor) and remove the submaster force to allow the master loop to calculate a new submaster reference (based on the amount of error between the master sensor and the setpoint). This will allow the equipment to operate with a legitimate load. Observe the loop response and determine if the following condition is present: 5. 38 Inverse Loop Polarity If the output responds in reverse of what is expected, reverse the polarity of the submaster gain (+/-). An example of this condition is when the reference requires heat, but the valve goes closed or moves towards closed. After the required corrections are made, re-evaluate for the other possible conditions. Loop Oscillation. If the submaster reference swings wildly from its maximum to its minimum allowable value, the most likely cause is an excessive amount of master proportional gain. Reduce the master proportional gain in increments of 50% until stability results, then increase its value by half of the reduced amount. Since the master loop in this example runs every two minutes, you are advised to allow a minimum of eight minutes (four loop iterations) between successive gain adjustments. The intent is to produce a steady output signal without reaching the minimum and maximum submaster values. At this point the loop should stabilize at an output that will likely not achieve setpoint. This is normal, and we will compensate for this by adjustment of the integral gain. Set the Integral Gain. Once the proportional gain is established, input a value of integral gain that is between 10% and 50% of the proportional gain. This will cause the output to increase or decrease incrementally at each loop iteration until setpoint is achieved. If the output causes a setpoint overshoot, reduce the integral gain by 50% of the initial value and re-evaluate the loops response. The goal is to cause the loop to gradually approach and achieve setpoint with minimal overshoot. Since the master loop in this example runs every two minutes, you are advised to allow a minimum of eight minutes (four loop iterations) between successive gain adjustments. After making any necessary adjustments to the master loop, the output should be stable (not oscillating) and the controlling sensor should be at or approaching setpoint. A change in setpoint or in the value of the controlling sensor should cause the output to move steadily in the appropriate direction, and allow the loop to reach setpoint in a reasonable period of time. 6. Adjust the Derivative Term. Determine if the application requires a derivative term. Normally, this would only be required when, after careful adjustment of the submasters proportional gain and the masters proportional and integral gains, excessive overshoot/ undershoot is observed. The purpose of the derivative term is to reduce or eliminate overshoot in systems which have a very rapid rate of change at the controlling sensor. Most HVAC applications that use a master/submaster approach do not respond that quickly, therefore the derivative is normally not necessary or used. As such, the default value for the derivative gain is zero. The actual mathematical function of the derivative term is two-fold; it will subtract from the value of the proportional and integral calculation (thus reducing overall output) when the controlling sensor is approaching setpoint, and conversely, it will add to the proportional and integral calculation (thus increasing the overall output) in cases where the controlling sensor is drifting away from setpoint. In cases where there is no change in the value of the controlling sensor, (that is to say the change in loop error is zero), the derivative will have no effect (the calculated derivative term is zero). 39 If after careful adjustment of the proportional and integral gains, your application does require a derivative term (indicated by excessive overshoot), set it to a value approximately 25% of the proportional gain, and re-test and re-adjust (by +/- 50% intervals) until overshoot is reduced to a satisfactory level. Single Loop PID Tuning As was the case with dual loop tuning, the entire system (controls, mechanical equipment, etc.) must be thoroughly evaluated before proceeding. The throttling range must also be determined using the procedure described in Determination of Throttling Range above. When those steps are completed, the actual tuning procedure may commence. The AOAdaptive Single Loop PID is the only single loop algorithm in the Universal Controller. The optimum loop timing (set via the Block Iteration decision) will vary based on the nature of the application. The default value of 10 seconds may not be appropriate for all applications. The user is advised to adjust this value to reflect the actual time constant of the controlled process (the time it takes to stabilize after a step change of output to the controlled device). The following steps apply to single loops only. During the following procedure, if the output responds in reverse of what is expected, reverse the polarity of the proportional, integral, and derivative gains (+/-). In all cases, the polarity of the proportional, integral, and derivative gains must be the same. An example of the output responding in reverse of what is expected is when the reference requires heat, but the valve goes closed or moves towards closed. 40 1. Set the Starting Value. Verify the correct starting value as outlined previously in the Determination of Throttling Range section of this chapter. 2. Force the Output. Force the output to its minimum position. 3. Set the Master Integral Gain to 0. 4. Set the Proportional Gain. Release the output force and adjust the setpoint to a value that will cause the output to increase. This will cause the controlled device to begin operating under automatic control. Since we have already proven the accuracy of the starting value, any problems with the loop can be attributed to improper settings of gain. Observe the loop response over several minutes time, and identify whether the following conditions apply: 5. Loop Oscillation. An excessive amount of proportional gain is indicated when the controlling sensor and output oscillate. To correct for this condition, reduce the proportional gain in 50% increments until the oscillation subsides, and then bring it back up by half of the amount reduced, again verifying that the loop remains free of oscillation. Should this increase return the loop to oscillation, reduce the gain by one half of the increased amount. The intent is to produce a steady output signal within +/- 5% of the target setpoint. Droop Droop is indicated if the output is stable (not oscillating) but the controlling sensor is more than +/- 5% of reference away from the target setpoint. Assuming proper adjustment of the proportional gain, this condition normally indicates that the starting value was incorrect. Increase or decrease it until the controlling sensor is within +/- 5% of the setpoint. The goal is to produce a steady output signal within +/- 5% of the target setpoint. Set the Integral Gain. Once the proportional gain is established, input a value of integral gain that is between 10% and 50% of the proportional gain. This will cause the output to increase or decrease incrementally at each loop iteration until setpoint is achieved. If the setpoint is exceeded indicating overshoot, reduce the integral gain by 50% of the initial value and re-evaluate the loops response. The goal is to cause the loop to gradually approach and achieve setpoint with minimal overshoot. 41 After making these adjustments, the output should be stable (not oscillating) and the controlling sensor should be at or approaching setpoint. 6. Adjust the Derivative Term. Determine if the application requires a derivative term. Normally, this would only be required when, after careful adjustment of the submasters proportional gain and the masters proportional and integral gains, excessive overshoot/ undershoot is observed. The purpose of the derivative term is to reduce or eliminate overshoot in systems which have a very rapid rate of change at the controlling sensor. Most HVAC applications that use a master/submaster approach do not respond that quickly, therefore the derivative is normally not necessary or used. As such, the default value for the derivative gain is zero. The actual mathematical function of the derivative term is two-fold; it will subtract from the value of the proportional and integral calculation (thus reducing overall output) when the controlling sensor is approaching setpoint, and conversely, it will add to the proportional and integral calculation (thus increasing the overall output) in cases where the controlling sensor is drifting away from setpoint. In cases where there is no change in the value of the controlling sensor, (that is to say the change in loop error is zero), the derivative will have no effect (the calculated derivative term is zero). If after careful adjustment of the proportional and integral gains, your application does require a derivative term (indicated by excessive overshoot), set it to a value approximately 25% of the proportional gain, and re-test and re-adjust (by +/50% intervals) until overshoot is reduced to a satisfactory level. 42 Appendixes Introduction Appendix A Wire List This appendix contains a wire list for the Universal Controller. 43 REVISION____________ Universal Controller I/O Wire List DATE______/____/_____ JOB: NAME __________________________________ NUMBER ______________ LOCATION: BUILDING_________________________ FLOOR________________ AREA_______________ ADDRESS: POINT/ CABLE# J3 Pin # (+) (-) a INPUT TYPE 17 1 2 wire mA 1 2 Volt, DI, Temp, or 4 wire mA 17 3 2 wire mA 3 4 Volt, DI, Temp, or 4 wire mA 17 5 2 wire mA 5 6 Volt, DI, Temp, or 4 wire mA 17 7 2 wire mA 7 8 Volt, DI, Temp, or 4 wire mA 18 9 9 10 11 2 wire mA 12 Volt, DI, Temp, or 4 wire mA 18 13 2 wire mA 13 14 Volt, DI, Temp, or 4 wire mA 18 15 2 wire mA 16 Volt, DI, Temp, or 4 wire mA J4 Pin # (-) 1 2 3 4 5 6 7 8 9 10 11 12 13 14 15 16 SENSOR CODE WIRING DWG# SYSTEM NAME POINT NAME SENSOR CODE WIRING DWG# SYSTEM NAME 2 wire mA 11 (+) POINT NAME Volt, DI, Temp, or 4 wire mA 18 15 POINT/ CABLE# BUS #_____________ ELEMENT#__________________ CONTROLLER#_______________ a OUTPUT TYPE DO mA Volt DO mA Volt DO mA Volt DO mA Volt DO mA Volt DO mA Volt DO mA Volt DO mA Volt 06/04 44 Appendix B How To Clear the Universal Controller Database Follow the procedure below to completely erase the Universal Controller database and return the unit to its factory default settings. Caution: 1. All data, such as 24-character names, algorithm selections, configuration decision entries, etc., as well as the module's address will be erased. If the Universal Controller that is to be cleared is connected to the CCN, you must disconnect it. Refer to the figure below. To disconnect a Universal Controller from the CCN: Remove the CCN communication connector from the module. Figure 16 Disconnecting the Universal Controller From the CCN 2. Disconnect power by removing the power connector from the module. Refer to the figure below. Figure 17 Disconnecting Power From the Universal Controller 45 Figure 18 Universal Controller Button for Clearing the Database 3. Depress and hold the button at the bottom of the hole in the side of the module shown in Figure 18. Re-connect power to the Universal Controller while still depressing the button. This begins the process of clearing the database. Note: The button can be depressed with any narrow object such as a pencil. While the database is being cleared, the red LED on the Universal Controller will blink at a one-Hz rate followed by a period of steady ON. This period will vary depending on the amount of data to be cleared. Once the process is completed, the red LED will blink at a 0.5-Hz rate. 46 4. Release the button. 5. Re-connect the CCN Communication Bus to the Universal Controller. 6. Upload the Universal Controller and re-configure it as desired. Appendix C Quick Reference Guide The following table is intended to be a summary of product specifications and CCN product compatibility data for the Universal Controller. Table C-1 Quick Reference Guide Item Value Baud Rate Data Default Baud Rate Range of Baud Rates 9600 9600-38400 Address Data Default Address Valid Range of Addresses Address Setting Method NST ESU/Address Search Utility DIP Switch Yes Yes No Controller Reset Procedure By Reset Jumper? By Pushbutton? Software Reset by Config Decision? Address/Baud Rate Retention? No Yes No No/No Power Requirements AC Power (VA and Volts, +/- %) Power Sharing See Note at end of table Bus Communications 38.4K Bridge Compatible 8088 Bridge Compatible 8052 Bridge Compatible Ethernet Bridge # of Devices per Bus/Bus Segment (>= 19,400) # of Devices per Bus/Bus Segment (< 19,400) Comments 0,1 1-239 Reverts to address 0,1 @ 9600 60 VA@24 Vac +/- 15% Yes Phasing MUST be maintained Yes Yes Yes Yes 239 239 (continued) 47 Table C-1 Quick Reference Guide (Continued) Item Value Comments User Interface Compatibility Building Supervisor IV Network Service Tool IV ComfortVIEW ComfortWORKS HSIO II (color buttons, white or black casing) LID1B LID2B Chiller Visual Controller (CVC) Remote Enhanced Display (Display-only CVC) Navigator Scrolling Marquee Carrier One System Pilot Option Module Compatibility APIM Data Collection I Data Collection III Data Collection IV Maintenance Management Timed Force Tenant Billing Loadshed Facility Time Schedule Cleaver Brooks Interface Leibert Interface Simplex Interface Terminal System Manager II Terminal System Manager II Plus Chillervisor System Manager I Chillervisor System Manager II Chillervisor System Manager III No Yes Yes Yes No No No No No No No Yes Yes Yes No Yes Yes No Yes Yes Yes Yes N/A N/A N/A N/A N/A N/A N/A N/A (continued) 48 Table C-1 Quick Reference Guide (Continued) Item Value Flotronic System Manager N/A Hydronic System Manager Hydro Hi-Q System Manager Water System Manager N/A N/A N/A Interoperability Interfaces DataPORT DataPORT II (DataLINK) BACLink CCNWeb Server Carrier Translator Yes Yes No Yes Yes Product Specific Controllers 19XL 23XL 39L/39N 30GTN (M-1 PIC) 30 GX/HX 50 BJ/BK 48, 50 NP, 50 NB 48, 50 DK/NK 64 RT 17, 19 EX VAV Zone Controller Yes Yes Yes Yes Yes Yes Yes Yes Yes Yes Yes V2-VVT Fan Coil Controller Yes Yes V05 Fan Coil Zone Controller CS5000 (Platform A) Flotronic II Phase 3 (30 GN) Conquest 30 Series Global Chiller 19/23 Series PIC II Chiller Yes Yes Yes Yes Yes Yes Comments Linkage, Global Schedule override broadcast Linkage Global Schedule override broadcast (continued) 49 Table C-1 Quick Reference Guide (Continued) Item 32MP Gateway ProDialog ProDialog II PTAC System Manager Air Source Interface (ASI) VVT Gateway PremierLINK Yes Yes Yes No No No Yes General Purpose Controllers Comfort Controller FID Phase IV Comfort Thermostat Linkage Thermostat Yes N/A Yes Yes Note: 50 Value Comments Global Schedule override broadcast Linkage compatibility It is strongly recommended that you use isolated, non-shared transformers to power this module. If power is to be shared with another device, you must maintain phasing of the power source between elements in question. Failure to maintain consistent phasing can result in irreparable damage to the modules. Index Introduction Index A ACI sensors 10K-CP 20 Address 47 B Baud rate 47 Bundling and wiring 18 Bus communications 15, 47 Button for clearing the database 46 C CCN operator interfaces 2 CCN communication connector 16 CCN communication wiring 13, 16 grounding of bus shields 14 repeater 15 Center value tuning control loops determination of throttling range 36 dual loop PID tuning 37 equations 34 Checkout procedures 23 diagnostic LEDs 24 discrete outputs 31 external devices 25 input devices 30 module 24 module operation 25 output devices 31 power supply 24 temperature to resistance conversion 26 Clearing Universal Controller database 45 ComfortVIEW connection 16 Communication wiring CCN 13, 16 Compatibility bridges 47 CCN product 47, 48 general purpose controllers 50 interoperability interfaces 49 option modules 48 product specific controllers 49 user interfaces 48 Configuration 30 Configuration data entering 2 Controller reset procedure 45, 47 D D term tuning control loops equations 34 Database clearing 45 Derivative gain tuning control loops dual loop PID tuning 39 single loop PID tuning 42 Derivative term tuning control loops equations 34 Determination of throttling range tuning control loops 36 Device wiring 17 general input sensor wiring 18 wiring guidelines 17 bundling and dressing 18 lightning suppressor 18 Devices connecting 30 temperature to resistance conversion 26 Dimensions of module 7 DIN rail mounting module on 10 Disconnecting power from Universal Controller 45 Universal Controller from the CCN 45 Droop tuning control loops dual loop PID tuning 37 single loop PID tuning 41 Dual loop algorithms tuning control loops equations 34 Dual loop cooling algorithms tuning control loops system checkout 35 Dual loop heating algorithms tuning control loops system checkout 35 Dual loop PID tuning tuning control loops 37 Dual loops tuning control loops system checkout 35 E Enclosure mounting, specifications 7 type of 7 Erasing Universal Controller database 45 Error tuning control loops definition of terms 32 Error calculations tuning control loops equations 33 External devices checkout procedures 25 F Factory default settings 45 Features 3 Field points 2 Fuse recommendations 11 G Grounding of bus shields 14 I I term tuning control loops equations 34 Input points 2 Input/output devices connecting 30 Installation 7 Integral gain tuning control loops dual loop PID tuning 38 single loop PID tuning 41 Integral term tuning control loops equations 34 Inverse loop polarity tuning control loops dual loop PID tuning 38 J J5 phone jack pin layout 17 L LEDs significance 24 Lightning suppressor 18 Loop oscillation tuning control loops dual loop PID tuning 37, 38 single loop PID tuning 41 Loop timing tuning control loops dual loop PID tuning 36 single loop PID tuning 40 Loop tuning 31 definition of terms 32 error 32 master derivative equation 33 master derivative gain 33 master integral equation 33 master integral gain 33 master proportional equation 32 master proportional gain 32 submaster equation 33 submaster proportional gain 33 dual loop PID tuning 37 51 center value 37 derivative gain 39 droop 37 integral gain 38 inverse loop polarity 38 loop oscillation 37, 38 loop timing 36 master integral gain 38 master proportional gain 38 submaster loop tuning 37 equations 33 center value 34 derivative term 34 dual loop algorithms 34 error calculations 33 integral term 34 master PID equation 34 output signal 34 proportional term 34 single loop algorithms 34 starting value 34 submaster equation 34 submaster reference 34 single loop PID tuning 40 derivative gain 42 droop 41 integral gain 41 loop oscillation 41 loop timing 40 master integral gain 40 proportional gain 40 starting value 40 system checkout 34 dual loop cooling algorithms 35 dual loop heating algorithms 35 dual loops 35 single loop cooling algorithms 35 single loop heating algorithms 35 throttling range determination 36 center value 36 spring range 36 starting value 36 M Master derivative equation tuning control loops definition of terms 33 Master derivative gain tuning control loops definition of terms 33 Master integral equation tuning control loops definition of terms 33 Master integral gain tuning control loops definition of terms 33 dual loop PID tuning 38 single loop PID tuning 40 52 Master PID equation tuning control loops equations 34 Master proportional equation tuning control loops definition of terms 32 Master proportional gain tuning control loops definition of terms 32 dual loop PID tuning 38 Module operation checkout procedures 25 Mounting module enclosure 7 flush, in control panel 9 flush, on air handler 9 locations for 7 on DIN rail, in enclosure 10 on panel, in enclosure 8 wall, in control panel 9 wall, on air handler 9 O Output points 3 Output signal tuning control loops equations 34 P P term tuning control loops equations 34 Phone jack (J5) pin layout 17 PID definition of terms 32 error 32 master derivative equation 33 master derivative gain 33 master integral equation 33 master integral gain 33 master proportional equation 32 master proportional gain 32 submaster equation 33 submaster proportional gain 33 dual loop PID tuning 37 center value 37 derivative gain 39 droop 37 integral gain 38 inverse loop polarity 38 loop oscillation 37, 38 loop timing 36 master integral gain 38 master proportional gain 38 submaster loop tuning 37 equations 33 center value 34 derivative term 34 dual loop algorithms 34 error calculations 33 integral term 34 master PID equation 34 output signal 34 proportional term 34 single loop algorithms 34 starting value 34 submaster equation 34 submaster reference 34 single loop PID tuning 40 derivative gain 42 droop 41 integral gain 41 loop oscillation 41 loop timing 40 master integral gain 40 proportional gain 40 starting value 40 system checkout dual loop cooling algorithms 35 dual loop heating algorithms 35 dual loops 35 single loop cooling algorithms 35 single loop heating algorithms 35 throttling range determination 36 center value 36 spring range 36 starting value 36 tuning control loops 31 Pin assignments power connector 12 RJ14 phone jack 16 Power connector pin assignments 12 Power connector location 11, 12 Power requirement 11, 47 Power sharing 11, 50 Power supply checkout procedures 24 installation 11 Power wiring 11, 12 typical enclosure 12 Proportional gain tuning control loops single loop PID tuning 40 Proportional term tuning control loops equations 34 R Repeater 15 Reset button 46 RJ14 phone jack pin layout 17 S Sensor and device installation ACI 10K-CP 20, 21 Sensor wiring 17 general input sensor wiring 18 wiring guidelines 17 bundling and dressing 18 lightning suppressor 18 Single loop algorithms tuning control loops equations 34 Single loop cooling algorithms tuning control loops system checkout 35 Single loop heating algorithms tuning control loops system checkout 35 Single loop PID tuning tuning control loops 40 System Pilot communication with Universal Controller 16 installation 11 Specifications 4, 47 Spring range tuning control loops determination of throttling range 36 Starting value tuning control loops determination of throttling range 36 equations 34 single loop PID tuning 40 Submaster equation tuning control loops definition of terms 33 Submaster loop tuning tuning control loops dual loop PID tuning 37 Submaster proportional gain tuning control loops definition of terms 33 Submaster reference tuning control loops equations 34 T T-56 Space Temperature Sensor with Adjustment 20 Temperature to resistance conversion 26 10K Type II (CP/MCI) thermistor 29, 30 10K Type III (AN/YSI) thermistor 26, 27, 28 5K thermistor 26, 27, 28 Throttling range determination tuning control loops 36 Tools required for installation 7 Tuning control loops 31 definition of terms 32 error 32 master derivative equation 33 master derivative gain 33 master integral equation 33 master integral gain 33 master proportional equation 32 master proportional gain 32 submaster equation 33 submaster proportional gain 33 dual loop PID tuning 37 center value 37 derivative gain 39 droop 37 integral gain 38 inverse loop polarity 38 loop oscillation 37, 38 loop timing 36 master integral gain 38 master proportional gain 38 submaster loop tuning 37 equations 33 center value 34 derivative term 34 dual loop algorithms 34 error calculations 33 integral term 34 master PID equation 34 output signal 34 proportional term 34 single loop algorithms 34 starting value 34 submaster equation 34 submaster reference 34 single loop PID tuning 40 derivative gain 42 droop 41 integral gain 41 loop oscillation 41 loop timing 40 master integral gain 40 proportional gain 40 starting value 40 system checkout 34 dual loop cooling algorithms 35 dual loop heating algorithms 35 dual loops 35 single loop cooling algorithms 35 single loop heating algorithms 35 throttling range determination 36 center value 36 spring range 36 starting value 36 U Universal Controller communication with System Pilot 16 W Wire list 17, 43 Wiring bundling 18 CCN communication 13 checkout procedures 23 device 17 guidelines 17 lightning suppressor 18 power 11 RJ14 phone jack 16 sensor and device 17 53 54 Reader's Comments Your comments regarding this manual will help us improve future editions. Please comment on the usefulness and readability of this manual, suggest additions and deletions, and list specific errors and omissions. Document Name: Publication Date: Usefulness and Readability: Suggested Additions and Deletions: Errors and Omissions (Please give page numbers): Date: Name: Title or Position: Organization: Address: Fold so that the mailing address is visible, staple closed, and mail. Carrier Corporation Carrier World Headquarters Building One Carrier Place Farmington, CT 06034-4015 Attn: CCN Documentation Introduction 808 - 347 08/04 Product Specification Universal Controller Part Number: 33UNIVCTRL-01 The Universal Controller (part number 33UNIVCTRL-01) provides auxiliary building control to interface with lighting, fans, pumps and other HVAC equipment in a stand-alone or Carriernetworked environment using closedloop, direct digital controls. The Universal Controller's pre-engineered algorithms provide simple building integration for small-to-medium commercial applications with 16 field point capability (8 inputs and 8 outputs). → Features/Benefits • Integrates auxiliary building system control. • Controls non-Carrier equipment and Carrier HVAC equipment not equipped with Product Integrated Controls, using the Carrier communicating network. • Compatible with all standard Carrier network user interfaces. • Stand-alone control and monitoring of up to 16 field points, using proven algorithms. • Two LEDs, conveniently located on the front of the module, indicate processor status (red) and communication bus status (yellow). • Local connection for Carrier network. • Three-day backup of clock and data such as Runtime and Consumable. • Batteries are not required. Functions • Constant Volume (CV) Cooling and Heating Control • Dehumidification • CV Mixed Air Damper Optimization • Fan Control • Pump Control • Lighting Control • Indoor Air Quality Copyright 2004 Carrier Corporation 105 Form 33ZC-14PS Features/Benefits (cont) • Generic PID Control • Time Scheduling with/without Override • Analog Temperature Control • Discrete Interlock • Discrete Staging Control • Permissive Interlock • Nighttime Free Cooling • Set Point Reset • Optimal Start/Stop • Linkage to airside systems 8 inputs • Each input (1 to 8) can be used as a discrete, analog, or temperature input • Discrete inputs can be dry contact or pulsed dry contact • Analog inputs can be 4 to 20 mA or 0 to 10 vdc • Temperature inputs can be 5K or 10K ohm thermistors 8 outputs • Each output (1 to 8) can be discrete or analog • Discrete outputs are 24 vdc at 80 mA • Analog outputs are 4 to 20 mA or 0 to 10 vdc (varies with point type) Carrier network features When included in a network with other network controllers, Option Modules, and user interfaces, the following additional capabilities are possible: • Alarm processing, messages, and annunciation • Runtime, history, and consumable data collection and report generation • Demand limiting • Broadcast of data such as outside-air temperature, outside air humidity, and time of day • Timed overrides for use with Tenant Billing • Airside linkage → Enclosure and power supply The Universal Controller is designed so that it can be easily installed in a field-supplied enclosure (not outdoor rated). The Universal Controller uses any standard, Class II, SELVcompatible, field-supplied 24 vac, 60 va transformer. Specifications → Power Requirements. . . . . . . . . . . 60 va at 24 vac ± 15% (1.5a at 33 vdc ± 15%) Dimensions . . . . . . . . . . . . 14-in. H x 6.5-in. W x 2-in. D (35.5 cm x 16.5 cm x 5.1 cm) Operating Temperature. . . –40 F to 158 F, Outdoor Rated (–40 C to 70 C) Storage Temperature . . . .–40 F to 185 F (–40 C to 85 C) Operating Humidity . . . . . . . 10 to 95%, non-condensing → Discrete output specifications Output Signal. . . . . . . . . . . . . . . . . . . . 24 vdc at 80 mA Analog output specifications 4 to 20 mA Type Load Resistance . . . . . . . . . . . . . . . . . 500 to 600 ohms Resolution . . . . . . . . . . . . . . . . . . . . . . . . . . . .0.04 mA Accuracy . . . . . . . . . . . . . . . . . . . . . . . . . . . . . . .±2% 0 to 10 vdc Type (varies with point type) Load Resistance . . . . . . . . . . . . . . . . . . . . . . . .50 ohms Resolution . . . . . . . . . . . . . . . . . . . . . . . . . . . . . 20 mV Accuracy . . . . . . . . . . . . . . . . . . . . . . . . . . . . . . . .±2% Discrete input specifications Dry Contacts . . . . . . . . . . . . . . . . . . . . . Switch Closure Pulsing Dry Contacts Repetition Rate . . . . . . . . . . . . . . . . . . . . . . .5 Hz max. Minimum Pulse Width . . . . . . . . . . . . . . . . . . . 100 msec 2 105 Analog input specifications 4 to 20 mA Type Wire type. . . . . . . . . . . . . . . . . . . . . . . . . . . . . . .2-wire Resolution . . . . . . . . . . . . . . . . . . . . . . . . . . .0.025 mA Accuracy . . . . . . . . . . . . . . . . . . . . . . . . . . . . . ± 1.5% 0 to 10 vdc Type Resolution . . . . . . . . . . . . . . . . . . . . . . . . . . . 0.0125 V Accuracy . . . . . . . . . . . . . . . . . . . . . . . . . . . . . . . ± 1% 5K Thermistor Type Nominal reading at 5,000 ohms. . . . . . . . . . . 77 F (25 C) Resolution . . . . . . . . . . . . . . . . . . . . . . . . . . . . . . 0.2 F Accuracy . . . . . . . . . . . . . . . . . . . . . . . . . . . . . . . + 1 F 10K Thermistor Type Nominal reading at 10,000 ohms. . . . . . . . . . 77 F (25 C) Resolution . . . . . . . . . . . . . . . . . . . . . . . . . . . . . . 0.2 F Accuracy . . . . . . . . . . . . . . . . . . . . . . . . . . . . . . . + 1 F Approvals The Universal Controller is UL 873 and CE Mark Industrial listed. Dimensions → UNIVERSAL CONTROLLER 3.5" (89 mm) 2.5" (64 mm) 1.5" (38 mm) .75" (19 mm) 6.5" (165 mm) 13.5" (343 mm) 1.5" (38 mm) 3.25" (83 mm) 11" (279 mm) 13.5" (343 mm) 14" (355 mm) 3.5" (89 mm) 1.5" (38 mm) 2" (51 mm) 3 Carrier Corporation • Syracuse, New York 13221 105 9-04 Manufacturer reserves the right to discontinue, or change at any time, specifications or designs without notice and without incurring obligations. Book 1 4 New Book 1 Pg 4 Catalog No. 523-353 Printed in U.S.A. PC 111 Form 33ZC-14PS Replaces: New Tab 1CS1 Tab 11a 13a Single Duct Air Terminal Zone Controller VAV Fan Terminal Zone Controller Secondary Terminal Zone Controller Installation, Start-Up and Configuration Instructions Part Numbers 33ZCFANTRM, 33ZCVAVTRM, 33ZCSECTRM CONTENTS Page SAFETY CONSIDERATIONS . . . . . . . . . . . . . . . . . . . . . . 1 GENERAL . . . . . . . . . . . . . . . . . . . . . . . . . . . . . . . . . . . . . . . . 2 INSTALLATION . . . . . . . . . . . . . . . . . . . . . . . . . . . . . . . . 2-29 General . . . . . . . . . . . . . . . . . . . . . . . . . . . . . . . . . . . . . . . . . . 2 Zone Controller Hardware . . . . . . . . . . . . . . . . . . . . . . . . 2 Field-Supplied Hardware . . . . . . . . . . . . . . . . . . . . . . . . . 2 • SPACE TEMPERATURE SENSOR • PRIMARY AIR TEMPERATURE SENSOR • SUPPLY AIR TEMPERATURE (SAT) SENSOR • RELATIVE HUMIDITY SENSOR • INDOOR AIR QUALITY (CO2) SENSOR Mount Zone Controller . . . . . . . . . . . . . . . . . . . . . . . . . . . 4 • LOCATION • MOUNTING Connect the Power Transformer . . . . . . . . . . . . . . . . . . 7 Connect Airflow Pickups . . . . . . . . . . . . . . . . . . . . . . . . . 7 Install Sensors . . . . . . . . . . . . . . . . . . . . . . . . . . . . . . . . . . 19 • SPACE TEMPERATURE SENSOR INSTALLATION • PRIMARY AIR TEMPERATURE SENSOR INSTALLATION • SUPPLY AIR TEMPERATURE (SAT) SENSOR INSTALLATION • INDOOR AIR QUALITY SENSOR INSTALLATION • HUMIDITY SENSOR (WALL-MOUNTED) INSTALLATION Remote Occupancy Contact. . . . . . . . . . . . . . . . . . . . . 26 Connect the Outputs . . . . . . . . . . . . . . . . . . . . . . . . . . . . 26 Modulating Baseboard Hydronic Heating . . . . . . . . 26 Connect the CCN Communication Bus . . . . . . . . . . 26 • COMMUNICATION BUS WIRE SPECIFICATIONS • CONNECTION TO THE COMMUNICATION BUS START-UP . . . . . . . . . . . . . . . . . . . . . . . . . . . . . . . . . . . . 29-31 Perform System Check-Out . . . . . . . . . . . . . . . . . . . . . 29 Network Addressing. . . . . . . . . . . . . . . . . . . . . . . . . . . . . 30 Initial Operation and Test. . . . . . . . . . . . . . . . . . . . . . . . 30 Airflow Check . . . . . . . . . . . . . . . . . . . . . . . . . . . . . . . . . . . 30 Fan and Heat Configuration and Test. . . . . . . . . . . . 30 CONFIGURATION . . . . . . . . . . . . . . . . . . . . . . . . . . . . 31-50 Points Display Screen . . . . . . . . . . . . . . . . . . . . . . . . . . . 31 Modify Controller Configuration. . . . . . . . . . . . . . . . . 32 • ALARM LIMIT CONFIGURATION SCREEN • CONTROLLER IDENTIFICATION SCREEN • HOLIDAY CONFIGURATION SCREENS • LINKAGE COORDINATOR CONFIGURATION SCREEN • OCCUPANCY CONFIGURATION SCREEN • SET POINT SCREEN Service Configuration Selection Screen. . . . . . . . . 37 • AIRFLOW SERVICE CONFIGURATION SCREEN • TERMINAL SERVICE CONFIGURATION SCREEN • OPTIONS SERVICE CONFIGURATION SCREEN • SECONDARY DAMPER SERVICE CONFIGURATION SCREEN Maintenance Table Menu Screen . . . . . . . . . . . . . . . . 43 • LINKAGE MAINTENANCE TABLE • OCCUPANCY MAINTENANCE TABLE • ZONE AIR BALANCE/COMMISSIONING TABLE • ZONE MAINTENANCE TABLE SAFETY CONSIDERATIONS SAFETY NOTE Air-handling equipment will provide safe and reliable service when operated within design specifications. The equipment should be operated and serviced only by authorized personnel who have a thorough knowledge of system operation, safety devices and emergency procedures. Good judgement should be used in applying any manufacturer’s instructions to avoid injury to personnel or damage to equipment and property. Disconnect all power to the unit before performing maintenance or service. Unit may automatically start if power is not disconnected. Electrical shock and personal injury could result. If it is necessary to remove and dispose of mercury contactors in electric heat section, follow all local, state, and federal laws regarding disposal of equipment containing hazardous materials. Manufacturer reserves the right to discontinue, or change at any time, specifications or designs without notice and without incurring obligations. PC 111 Catalog No. 533-355 Printed in U.S.A. Form 33ZC-1SI Pg 1 11-99 Replaces: New Book 1 4 Tab 11a 13a GENERAL the SPT sensor. The Network Service Tool can be used to adjust set points, set operating parameters, and fully configure the zone controller or any device on the system. The zone controller is a single duct, fan powered, Variable Air Volume (VAV) terminal control with a factory-integrated controller and actuator. The zone controller maintains precise temperature control in the space by operating the terminal fan and regulating the flow of conditioned air into the space. Buildings with diverse loading conditions can be supported by controlling reheat or supplemental heat. The VAV Fan Terminal Zone Controller (33ZCFANTRM) provides dedicated control functions for series fan or parallel fan powered terminals, single duct terminals with 3 stages of heat, or as a primary controller for dual duct or zone pressure control applications. The Single Duct Air Terminal Zone Controller (33ZCVAVTRM) provides dedicated control functions for single duct terminals with modulating heat or up to 2 stages of heat. When the VAV Fan Terminal Zone Controller is used in conjunction with a secondary terminal and the 33ZCSECTRM secondary terminal zone controller, either dual duct or zone pressurization applications can be supported. Carrier’s Linkage system is an integrated combination of Carrier Comfort Network (CCN) controllers for use with Single Duct air terminals and VAV Fan Powered terminals. The Single Duct air terminal and VAV Fan terminal zone controllers are part of the Carrier ComfortID system. Devices manufactured by Carrier which have Product Integrated Controls on the same communication bus as the zone controller, air handlers (such as the 39L,T), or large rooftop units do not require an external controller to function as part of a Carrier linkage system. These air handlers or large rooftop units feature factory-installed Product Integrated Control (PIC) controllers that are directly compatible with the system. Consult your local Carrier representative for the complete list of compatible air handlers. The Comfort System AirManager (CSAM) or the CC6400 supports linkage for non-Carrier devices or air handlers. Figure 1 shows an example of a Carrier linkage system. Zone Controller Hardware — The zone controller consists of the following hardware: • terminal control module • torque-limiting damper actuator • airflow transducer (velocity sensor) • plastic enclosure • one no. 8 x 1/2-in. sheet metal screw (to prevent zone controller rotation) NOTE: A filter is not provided for the airflow transducer. For installations on systems with a high degree of impurities, an air filter can be purchased and installed on the transducer high pressure pickup. Figure 2 shows the zone controller physical details. Figures 3-5 show the 3 different types of zone controllers. Field-Supplied Hardware — Each zone controller requires the following field-supplied components to complete its installation: • air terminal unit • space temperature sensor • transformer — 24 vac, 40 va • two no. 10 x 1/2-in. sheet metal screws (to secure SAT sensor to duct, if required) • two no. 6-32 x 5/8-in. screws (to mount SPT sensor base to electrical box) • contactors (if required for fan or electric heat) • supply air temperature sensor (required for terminal with ducted heat) • indoor air quality sensor (if required) • relative humidity sensor (if required) • one SPST (for each stage of electric heat, not required for Carrier fan terminals) • valve and actuator for hot water heat (if required) • delta pressure airflow pickup NOTE: When selecting an airflow pickup, it is the designer's responsibility to select a sensor that provides the desired output at the design airflow. • wire • polyethylene tubing (for pressure pickup) • bushings (required when mounting SAT sensor in a duct 6-in. or less in diameter) • primary air temperature sensor (if required) SPACE TEMPERATURE SENSOR — Each zone controller requires a field-supplied Carrier space temperature sensor. There are two sensors available for this application: • 33ZCT55SPT, Space Temperature Sensor with Override Button • 33ZCT56SPT, Space Temperature Sensor with Override Button and Set Point Adjustment PRIMARY AIR TEMPERATURE SENSOR — A fieldsupplied, primary air temperature (PAT) sensor (part number 33ZCSENPAT) is used on a zone controller which is functioning as a Linkage Coordinator for a non CCN/Linkage compatible air source. SUPPLY AIR TEMPERATURE (SAT) SENSOR — On stand-alone applications or applications with ducted heat, the zone controller must be connected to a field-supplied supply air temperature (SAT) sensor (part number 33ZCSENSAT) to monitor the temperature of the air delivered by the air terminal. The zone controller will maintain the air temperature below the maximum air temperature in ducted heating applications. INSTALLATION General — The zone controller is a microprocessor-based direct digital control (DDC) controller for variable air volume (VAV) air terminals. It can be retrofitted on units manufactured by Carrier or other manufacturers to provide pressureindependent VAV control. Each zone controller has the ability to function as a linkage coordinator for systems with up to 128 zones. As a linkage coordinator, a zone controller will retrieve and provide system information to the air handling equipment and other zone controllers. A zone controller can function as a stand alone device by installing a primary supply air sensor. The zone controller monitors differential pressure from an airflow pickup (or a pair of pickups) mounted on the terminal box. It compares the resulting signal to an airflow set point in order to provide pressure-independent control of the air passing through the terminal. The zone controller is connected to a wall-mounted, fieldsupplied, space temperature sensor (SPT) in order to monitor zone temperature changes and satisfy zone demand. On stand-alone applications or applications with heat, the zone controller must be connected to a field-supplied supply air temperature (SAT) sensor to monitor the temperature of the air delivered by the air terminal. Carrier’s Network Service Tool can be connected to the system at the SPT sensor if CCN communication wiring is run to 2 CCN SYSTEM MONITORING SOFTWARE CCN PRIMARY BUS (BUS 0) FULLY COMPATIBLE AIR HANDLER CC6400 OR CSAM EQUIPPED NON-CCN AIR HANDLER BRIDGE (RECOMMENDED) SECONDARY BUS COMFORTID EQUIPPED AIR TERMINAL (1 OF UP TO 128) ADDRESSED SEQUENTIALLY DATA COLLECTION OPTION LEGEND CCN — Carrier Comfort Network CSAM — Comfort System AirManager Fig. 1 — Typical Carrier Linkage System 3 RH/IAQ US GND FAN AC FAN SECFLOW J7 24VAC N/A HEAT3 DMPPOS GND 3 TEST ® LISTED 94D5 TENP IND & REG. EQUIP. 1 1 2 1 REMOTE + - G CW COM COW Class 2 Supply 24VAC/DC 50/60 Hz 3VA 2W yel blk red G - J1 24VAC 1 + NOTE: Actuator clamp accepts dampers shafts with the following characteristics: Round — 1/4-in. to 5/8-in. (6 to 16 mm) Square — 1/4-in. to 7/16-in. (6 to 11 mm) Damper shaft must be a minimum of 1.5-in. (38 mm) long. Fig. 2 — Zone Controller Physical Details (33ZCFANTRM Shown) 3. Press the release button on the actuator and rotate the clamp in the same direction that was required to close the damper in Step 2. 4. Press the release button on the actuator and rotate the actuator back one position graduation. Release the button and lock the actuator in this position. 5. Mount the zone controller to the terminal by sliding the damper shaft through the actuator clamp assembly. Secure the zone controller to the duct by installing the screw provided through the grommet in the antirotation tab. Be sure the floating grommet is in the center of the slot. Failure to center the grommet may cause the actuator to stick or bind. 6. Tighten the actuator clamp assembly to the damper shaft. Secure by tightening the two 10-mm nuts. 7. If the damper has less than 90 degrees of travel between the fully open and fully closed positions, then a mechanical stop must be set on the actuator. The mechanical stop prevents the damper from opening past the maximum damper position. To set the mechanical stop, perform the following procedure: a. Press the actuator release button and rotate the damper to the fully open position. b. Using a Phillips screwdriver, loosen the appropriate stop clamp screw. c. Move the stop clamp screw so that it contacts the edge of the cam on the actuator. Secure the stop clamp screw in this position by tightening the screw. 8. Verify that the damper opens and closes. Press the actuator release button and rotate the damper. Verify that the damper does not rotate past the fully open position. Release the button and lock the damper in the fully open position. R E L A T I V E H U M I D I T Y S E N S O R — The 33AMSENRHS000 relative humidity sensor is required for zone humidity control (dehumidification). NOTE: The relative humidity sensor and CO2 sensor cannot be used on the same zone controller. INDOOR AIR QUALITY (CO2) SENSOR — An indoor air quality sensor is required for optional demand control ventilation. The CGCDXSEN002A00 CO2 Sensor is an indoor, wall mounted sensor with an LED display. The CGCDXSEN003A00 CO2 Sensor is an indoor, wall mounted sensor without display. NOTE: The relative humidity sensor and CO2 sensor cannot be used on the same zone controller. Mount Zone Controller LOCATION — The zone controller must be mounted on the air terminal’s damper actuator shaft. For service access, there should be at least 12 in. of clearance between the front of the zone controller and adjacent surfaces. Refer to Fig. 6. MOUNTING — Perform the following steps to mount the zone controller: 1. Visually inspect the damper and determine the direction in which the damper shaft moves to open the damper — clockwise (CW) or counterclockwise (CCW). Refer to Fig. 7. If the damper rotates CCW to open, it does not require any configuration changes. If the damper rotates CW to open, then the damper actuator logic must be reversed. This is done in the software when performing system start-up and damper calibration test. Do not attempt to change damper rotation by changing wiring. This will upset the damper position feedback potentiometer readings. 2. Rotate the damper shaft to the fully closed position. Note direction of rotation. 801 ANTIROTATION TAB wht HIGH PRESSURE TUBING ROUTING → 3 6 1 2 3 ora blu 1 CCW COM CW HEAT1 24VAC HEAT2 COM ACTUATOR RELEASE BUTTON + J6 HIGH 5K WIP GROMMET GND PAT 3 NEMA 2 T56 J3 3art Number: 33ZCFANTRM S/N: Bus#: Element#: Unit#: SAT 3 LR 92800 J2A CCN 1 35 in-lb (4 Nm) 80...110s 3 ® GND ZONE Controller J8 SEC DMP HF23BJ042 Made in Switzerland by Belimo Automation GND SRVC 1 0 +10V SPT - G 1 2 J6 MECHANICAL STOP +24V J2B LEN 1 C 16 15 LOW PRESSURE TUBING ROUTING J4 ACTUATOR CLAMP ASSEMBLY LOW DAMPER SHAFT 4 16 SPT GND 1 2 J6 FAN AC FAN SECFLOW J7 24VAC N/A HEAT3 SAT +10V T56 DMPPOS GND GND PAT TEST ® 1 2 1 1 Unit#: Class 2 Supply 24VAC/DC 50/60 Hz 3VA 2W → J4 SECFLOW +10V DMPPOS 1 0 GND TEST ® ZONE Controller SPT GND SAT T56 GND PAT REMOTE 2 1 1 ® GND +24V 1 HF23BJ042 J3 Class 2 Supply 24VAC/DC 50/60 Hz 3VA 2W blu ora blk red → J1 1 6 24VAC 1 2 3 WIP yel 1 3 COM CCW COM CW HEAT1 24VAC HEAT2 J6 HIGH 5K - G Bus#: Element#: Unit#: + 3 NEMA 2 + - G Part Number: 33ZCVAVTRM S/N: 3 LR 92800 J2A CCN 35 in-lb (4 Nm) 80...110s LISTED 94D5 TENP IND & REG. EQUIP. G - J1 RH/IAQ US C 16 LOW Fig. 3 — VAV Fan Terminal Zone Controller GND Made in Switzerland by Belimo Automation 24VAC 1 wht J2B LEN red SRVC blk + + G - ora 15 blu 6 1 2 3 WIP yel 1 3 COM CCW COM CW HEAT1 24VAC HEAT2 J6 HIGH 5K + SRVC J3 LISTED 94D5 TENP IND & REG. EQUIP. + 3 S/N: Bus#: Element#: NEMA 2 CW COM COW J2B LEN 3 Part Number: 33ZCFANTRM - G LR 92800 J2A CCN 1 35 in-lb (4 Nm) 80...110s J8 SEC DMP ZONE Controller ® Made in Switzerland by Belimo Automation REMOTE GND 3 HF23BJ042 - G 1 GND 3 1 0 +24V RH/IAQ US C J4 LOW 15 — wht Fig. 4 — Single Duct Air Terminal Zone Controller 5 801 6 US J1 LOW ® C D OUT FLOW TPUT +10V OV CW 1 0 GND COM 1 ® CCW ZONE Controller HF23BJ042 MMON CW Made in Switzerland by Belimo Automation 35 in-lb (4 Nm) 80...110s LR 92800 Part Number: 33ZCSECTRM S/N: NEMA 2 UL Unit#: 24VAC/DC 50/60Hz 3VA 2W 5K J2 COM WIP yel blu ora 1 2 3 blk red wht 1 CCW COM CW N/A N/A N/A Class 2 Supply HIGH LISTED 94D5 TEMP. IND. & REG. EQUIP. 6 Fig. 5 — Secondary Terminal Zone Controller ALLOW 12” CLEARANCE FOR SERVICE ACCESS TO CONTROL BOX 3” REF. ZONE CONTROLLER END VIEW INLET Fig. 6 — Service Clearance for Zone Controller Mounting 6 J1 NOTE: Do not run sensor or communication wiring in the same conduit with line-voltage wiring. NOTE: An accessory conduit box (part no. 33ZCCONBOX) is available for conduit wiring connections to the zone controller. Perform the following steps to connect the power transformer: 1. Install the field-supplied transformer in an electrical enclosure that conforms to NEC and local codes. 2. Connect 24 vac from the transformer as shown in the applicable wiring diagram (Fig. 8A-J). AIR FLOW CW TO OPEN, CCW TO CLOSE Connect Airflow Pickups — The zone controller determines velocity pressure by obtaining the difference between high and low duct pressure from two airflow pickups. The pickups are connected to barb fittings on the zone controller with 1/4-in. polyethylene tubing. All piping for this purpose must conform to local codes. Figure 9 indicates the positions of the two barb fittings. Perform the following steps to install and connect the airflow pickups: 1. Select a location on the air handler’s supply air duct where the airflow pickups will be installed. The location should be one where there are at least three duct diameters of straight duct upstream of the pickups. If this requirement is not met, stable airflow measurements may not be possible. 2. Mount the field-supplied airflow pickup(s) in the duct, following the manufacturer's directions. Two individual pickups may be used, one for high pressure airflow and one for low pressure airflow. A dual pickup, which combines the two functions, may also be used. When using individual pickups, make sure that the one for high pressure airflow faces upstream, in the direction the air is coming from, and the one for low pressure airflow faces downstream, in the direction the air is going to. 3. Use field-supplied 1/4-in. tubing (rated for the application) to connect the high pressure airflow pickup to barb fitting P1 on the pressure transducer. At the zone controller, the P1 fitting is on the side with the filter installed. Be careful to avoid sharp bends in the tubing, because malfunctions may occur if the tubing is bent too sharply. Use at least 2 ft of tubing for reading stability. 4. Use field-supplied 1/4-in. tubing (rated for the application) to connect the low pressure airflow pickup to barb fitting P2 on the pressure transducer. Be careful to avoid sharp bends in the tubing, because malfunctions may occur if the tubing is bent too sharply. Use at least 2 feet of tubing for stability. AIR FLOW CCW TO OPEN, CW TO CLOSE Fig. 7 — Damper Configuration Connect the Power Transformer — An individual, field-supplied, 24 vac power transformer is recommended for each zone controller. If multiple zone controllers are powered from one power transformer (100 va maximum for UL [Underwriters’ Laboratories] Class 2 conformance), maintain polarity on the power input terminals. All transformer secondaries are required to be grounded. Use only stranded copper conductors for all wiring to the zone controller. Wiring connections must be made in accordance with NEC (National Electrical Code) and local codes. Ground the transformer at the transformer location. Provide an 18-gage, green, chassis ground wire at the terminal. The power supply is 24 vac ± 10% at 40 va (50/60 Hz). For 33ZCVAVTRM zone controllers, the power requirement sizing allows for accessory water valves and for electric heat contactor(s). Water valves are limited to 15 va on both two-position and modulating hot water. The electric heat contactor(s) are limited to 10 va (holding) each. For 33ZCFANTRM zone controllers, the power requirement sizing allows for accessory water valves and for the fan contactor. Water valves are limited to 8 va on both two-position and modulating hot water. The fan contactor is limited to 11 va (holding). NOTE: If a water valve or electric heat contactor exceeds these limits, or external contactors are required for electric heat, then it is recommended a 60 va transformer be used. The maximum rating for any output is 20 va. 7 801 8 CCN SAT SPT TRAN Yel — — — — Ora Blk com Red 24VAC/DC 50/60Hz 3VA 2W → Wht W Hi B R HEAT1 24VAC HEAT2 R W B (GND) (-) REMOTE PAT GND T56 SAT (+) GND N/A GND Or DMPPOS Bl +10V Y GND SPT +24V Fig. 8A — Zone Controller Wiring — Single Duct Air Terminal, Cooling Only 35 in-lb(4Nm) 80...110s 1 LEGEND Carrier Comfort Network Supply-Air Temperature Sensor Space Temperature Sensor Transformer Field Wiring Factory Wiring Blu Made in Switzerland By Belimo Automation HF23BJ042 0 Low SECFLOW GND RH/IAQ Line Voltage TRAN 24 VAC CCN comunications CCN comunications Not used SAT SPT 9 801 — — — — — LEGEND Carrier Comfort Network Hot Water Valve Supply-Air Temperature Sensor Space Temperature Sensor Transformer Field Wiring Factory Wiring Yel Blu Made in Switzerland By Belimo Automation → Ora HF23BJ042 0 Red Wht HWV W Hi Low B R HEAT1 24VAC HEAT2 R W B (GND) (-) REMOTE PAT GND T56 SAT GND SPT +24V (+) GND N/A GND Or DMPPOS Bl +10V Y SECFLOW GND RH/IAQ Fig. 8B — Zone Controller Wiring — Single Duct Air Terminal, Two-Position Hot Water Heat Blk com 24VAC/DC 50/60Hz 3VA 2W 35 in-lb(4Nm) 80...110s 1 *Normally open or normally closed valve may be used. CCN HWV SAT SPT TRAN Line Voltage TRAN 24 VAC CCN comunications CCN comunications Not used SAT SPT 801 10 — — — — — LEGEND Carrier Comfort Network Hot Water Valve Supply-Air Temperature Sensor Space Temperature Sensor Transformer Field Wiring Factory Wiring Yel Blu Ora Made in Switzerland By Belimo Automation HF23BJ042 0 → Red Wht HWV COM CL W Hi Low B R HEAT1 24VAC HEAT2 R W B (GND) (-) REMOTE PAT GND T56 SAT GND SPT +24V (+) GND N/A GND Or DMPPOS Bl +10V Y SECFLOW GND RH/IAQ Fig. 8C — Zone Controller Wiring — Single Duct Air Terminal, Modulating Hot Water Heat Blk com 24VAC/DC 50/60Hz 3VA 2W 35 in-lb(4Nm) 80...110s 1 *Required for some spring return modulating valves. CCN HWV SAT SPT TRAN OP Line Voltage TRAN 24 VAC CCN comunications CCN comunications Not used SAT SPT 11 801 CCN H HWV SAT SPT TRAN — — — — — — Yel Blu Ora Blk com Red 24VAC/DC 50/60Hz 3VA 2W 35 in-lb(4Nm) 80...110s 1 Wht H2 W Hi Low H1 B R HEAT1 24VAC HEAT2 R W B (GND) (–) REMOTE PAT GND T56 SAT GND SPT +24V (+) GND N/A GND Or DMPPOS Bl +10V Y SECFLOW GND RH/IAQ → Fig. 8D — Zone Controller Wiring — Single Duct Air Terminal, Staged Electric Heat (2 Stages) Made in Switzerland By Belimo Automation HF23BJ042 0 LEGEND Carrier Comfort Network Heater Relay Hot Water Valve Supply-Air Temperature Sensor Space Temperature Sensor Transformer Field Wiring Factory Wiring TRAN Line Voltage TERMINAL GROUND TRANSFORMER GROUND 24 VAC CCN comunications CCN comunications Not Used SAT SPT 801 12 Yel Blu Made in Switzerland By Belimo Automation → Ora HF23BJ042 0 H3 Red Wht W Hi Low H1 B R HEAT1 24VAC HEAT2 LEGEND Carrier Comfort Network Heater Relay Supply-Air Temperature Sensor Space Temperature Sensor Transformer Field Wiring Factory Wiring Second Damper CCW COM CW Heat3 Not Used 24 VAC FAN FAN AC B W R GND N/A GND Or DMPPOS Bl +10V Y SECFLOW GND RH/IAQ B W R REMOTE PAT GND T56 SAT GND SPT +24V Line Voltage TRAN 24 VAC CCN comunications CCN comunications Not used SAT SPT NOTE: The VAV fan terminal zone controller is used on single duct air terminals with 3 stages of electric heat. — — — — — Fig. 8E — Zone Controller Wiring — Single Duct Air Terminals, Staged Electric Heat (3-Stage) Blk com 24VAC/DC 50/60Hz 3VA 2W 35 in-lb(4Nm) 80...110s 1 H2 CCN H SAT SPT TRAN 13 801 Yel Blu Made in Switzerland By Belimo Automation Ora HF23BJ042 0 HEAT1 24VAC HEAT2 (–) (GND) (+) GND B W R REMOTE PAT GND T56 Fig. 8F — Zone Controller Wiring — Fan Powered Terminals, Cooling Only R CCW COM CW Heat3 Not Used N/A GND Or DMPPOS Bl SAT GND SPT +24V → Wht B Second Damper FAN 24 VAC FAN AC +10V Y SECFLOW GND RH/IAQ Fan Motor M Red W Hi Low Fan Contactor Blk com 24VAC/DC 50/60Hz 3VA 2W 35 in-lb(4Nm) 80...110s 1 LEGEND CCN — Carrier Comfort Network SPT — Space Temperature Sensor TRAN — Transformer Field Wiring Factory Wiring TRAN Line Voltage TERMINAL GROUND TRANSFORMER GROUND 24 VAC CCN comunications CCN comunications Not Used SPT Line Voltage 801 14 — — — — — 0 Yel Blu Made in Switzerland By Belimo Automation R HEAT1 24VAC HEAT2 CCW COM (-) (GND) (+) GND N/A DMPPOS Bl GND Or B W R REMOTE PAT GND T56 SAT TRAN Line Voltage CCN comunications TRANSFORMER GROUND TERMINAL GROUND Line Voltage SPT CCN comunications Not Used 24 VAC Fig. 8G — Zone Controller Wiring — Fan Powered Terminals, Two-Position Hot Water Heat Wht B Second Damper CW Heat3 Not Used 24 VAC FAN FAN AC SAT GND SPT +24V → Red W Hi Low +10V Y SECFLOW GND RH/IAQ Fan Motor M Blk HWV Fan Contactor Ora com 24VAC/DC 50/60Hz 3VA 2W 35 in-lb(4Nm) 80...110s 1 LEGEND Carrier Comfort Network Hot Water Valve Supply-Air Temperature Sensor Space Temperature Sensor Transformer Field Wiring Factory Wiring HF23BJ042 CCN HWV SAT SPT TRAN — — — — — — LEGEND Carrier Comfort Network Hot Water Valve Primary Air Temperature Sensor Supply-Air Temperature Sensor Space Temperature Sensor Transformer Field Wiring Factory Wiring COM CL HWV OP 15 Yel Blu Made in Switzerland By Belimo Automation HF23BJ042 0 HEAT1 24VAC HEAT2 B W R REMOTE PAT GND T56 PAT* SAT TRAN Line Voltage CCN comunications TRANSFORMER GROUND TERMINAL GROUND Line Voltage SPT CCN comunications Not Used 24 VAC Fig. 8H — Zone Controller Wiring — Fan Powered Terminals, Modulating Hot Water Heat Wht R (-) (GND) (+) GND N/A GND Or Bl DMPPOS SAT GND SPT +24V → Red B CCW COM CW Heat3 Not Used 24 VAC FAN FAN AC +10V Y SECFLOW GND RH/IAQ Fan Motor M Blk W Hi Second Damper Fan Contactor Ora com 24VAC/DC 50/60Hz 2W 3VA 35 in-lb(4Nm) 80...110s 1 Low *Required only on Linkage master if on a non-compatible air source. CCN HWV PAT SAT SPT TRAN 24V* 801 801 16 Blu Ora Blk com Red 24VAC/DC 50/60Hz 3VA 2W 35 in-lb(4Nm) 80...110s 1 Wht H2 → W Hi Low H1 B R HEAT1 24VAC HEAT2 Second Damper CCW COM CW Heat3 Not Used 24 VAC FAN FAN AC (-) (GND) (+) GND N/A GND Or DMPPOS Bl +10V Y SECFLOW GND RH/IAQ B W R REMOTE PAT GND T56 SAT GND SPT +24V CCN H PAT SAT SPT TRAN Line Voltage LEGEND — Carrier Comfort Network — Heater Relay — Primary Air Temperature Sensor — Supply-Air Temperature Sensor — Space Temperature Sensor — Transformer Field Wiring Factory Wiring TRAN Line Voltage CCN comunications TRANSFORMER GROUND TERMINAL GROUND PAT* SAT SPT CCN comunications Not Used 24 VAC Fan Motor M Fig. 8I — Zone Controller Wiring — Fan Powered Terminals, Staged Electric Heat *Required only on Linkage master if on a non-compatible air source. Yel Made in Switzerland By Belimo Automation HF23BJ042 0 H3 Fan Contactor 17 801 Blu Ora Blk com → Red 24VAC/DC 50/60Hz 3VA 2W 35 in-lb(4Nm) 80...110s 1 LEGEND CCN — Carrier Comfort Network SPT — Space Temperature Sensor TRAN — Transformer Field Wiring Factory Wiring Yel Made in Switzerland By Belimo Automation HF23BJ042 0 B R HEAT1 24VAC HEAT2 CCW COM CW Second Damper Heat3 Not Used 24 VAC FAN FAN AC Fig. 8J — Zone Controller Wiring — Dual Duct Applications Wht W Hi Low PRIMARY DAMPER — 33ZCFANTRM PAT GND T56 SAT GND SPT +24V SPT 24 VAC TRAN LINE VOLTAGE CCN comunications CCN comunications Not Used SHIELDED (CCN-TYPE) CABLE B W R REMOTE SHIELD (-) (GND) (+) GND N/A +10V Y DMPPOS Bl GND Or SECFLOW GND RH/IAQ 18 Yel Blu Made in Switzerland By Belimo Automation HF23BJ042 0 Blk Red Wht W Hi B R Y Bl Or CCW GND CW +10V SECFLOW GND LEGEND CCN — Carrier Comfort Network SPT — Space Temperature Sensor TRAN — Transformer Field Wiring Factory Wiring Fig. 8J — Zone Controller Wiring — Dual Duct Applications (cont) Ora com 24VAC/DC 50/60Hz 3VA 2W 35 in-lb(4Nm) 80...110s 1 Low SECONDARY DAMPER — 33ZCSECTRM → Install Sensors SPACE TEMPERATURE SENSOR INSTALLATION — A space temperature sensor must be installed for each zone controller. There are three types of SPT sensors available from Carrier: the 33ZCT55SPT space temperature sensor with timed override button, the 33ZCT56SPT space temperature sensor with timed override button and set point adjustment and the 33ZCT58SPT with liquid crystal display. See Fig. 10. The space temperature sensor is used to measure the building interior temperature and should be located on an interior building wall. The sensor wall plate accommodates the NEMA standard 2 x 4 junction box. The sensor can be mounted directly on the wall surface if accpectable by local codes. Do not mount the sensor in drafty locations such as near air conditioining or heating ducts, over heat sources such as baseboard heaters, radiators, or directly above wall mounted lighting dimmers. Do not mount the sensor near a window which may be opened, near a wall corner, or a door. Sensors mounted in these areas will have inaccurate and erratic sensor readings. The sensor should be mounted approximately 5 ft from the floor, in an area representing the average temperature in the space. Allow at least 4 ft between the sensor and any corner and mount the sensor at least 2 ft from an open doorway. Install the sensor as follows (see Fig. 11): 1. Locate the two Allen type screws at the bottom of the sensor. 2. Turn the two screws clockwise to release the cover from the sensor wall mounting plate. 3. Lift the cover from the bottom and then release it from the top fasteners. 4. Feed the wires from the electrical box through the opening in the center of the sensor mounting plate. 5. Using two no. 6-32 x 1 mounting screws (provided with the sensor), secure the sensor to the electrical box. 6. Use 20 gage wire to connect the sensor to the controller. The wire is suitable for distances of up to 500 ft. Use a three-conductor shielded cable for the sensor and set point adjustment connections. The standard CCN communication cable may be used. If the set point adjustment (slidebar) is not required, then an unshielded, 18 or 20 gage, two-conductor, twisted pair cable may be used. The CCN network service jack requires a separate, shielded CCN communication cable. Always use separate cables for CCN communication and sensor wiring. (Refer to Fig. 12 for wire terminations.) 7. Replace the cover by inserting the cover at the top of the mounting plate first, then swing the cover down over the lower portion. Rotate the two Allen head screws counterclockwise until the cover is secured to the mounting plate and locked in position. 8. For more sensor information, see Table 1 for thermistor resistance vs temperature values. NOTE: Clean sensor with damp cloth only. Do not use solvents. Wiring the Space Temperature Sensor (33ZCT55SPT and 33ZCT56SPT) — To wire the sensor, perform the following (see Fig. 12 and 13): 1. Identify which cable is for the sensor wiring. 2. Strip back the jacket from the cables for at least 3-inches. Strip 1/4-in. of insulation from each conductor. Cut the shield and drain wire from the sensor end of the cable. 3. Connect the sensor cable as follows: a. Connect one wire from the cable (RED) to the SPT terminal on the controller. Connect the other end of the wire to the left terminal on the SEN terminal block of the sensor. b. Connect another wire from the cable (BLACK) to the GND terminal on the controller. Connect the other end of the wire to the remaining open terminal on the SEN terminal block. c. On 33ZCT56SPT thermostats, connect the remaining wire (WHITE/CLR) to the T56 terminal on the controller. Connect the other end of the wire to the right most terminal on the SET terminal block. d. In the control box, install a No. 6 ring type crimp lug on the shield drain wire. Install this lug under the mounting screw in the upper right corner of the controller (just above terminal T1). e. On 33ZCT56SPT thermostats install a jumper between the two center terminals (right SEN and left SET). → Wiring the Space Temperature Sensor (33ZCT58SPT) — The T58 space temperature sensor is wired differently than other conventional sensors. The T58 sends all its sensor information through the CCN bus to the zone controller that is is associated with. The SPT sensor wiring connections are not used. The T58 sensor does not need to be directly wired to the zone controller. The T58 sensor may be powered by a separate 24-VAC power supply or may be connected to the J1 24 VAC power terminals on the zone controller. Be sure that the polarity of the power supply connections are consistent. For multiple devices wired to the same power supply, all positive (+) and negative (–) terminals should be wired in the same polarity. Wire the T58 sensor to the CCN. Connect the CCN + terminal to the RED signal wire (CCN+). Connect the CCN – terminal to the BLACK signal wire (CCN–). Connect the GND terminal to the WHITE/CLEAR signal wire (Ground). Refer to the T58 sensor Installation Instructions for more information on installing and wiring the sensor. IMPORTANT: The T58 sensor must be configured with the bus address and device type of the zone controller before it will broadcast temperature to the zone controller. Refer to the T58 sensor Installation Instructions for more information on configuring the sensor. Wiring the CCN Network Communication Service Jack — See Fig. 12, 13, and 14. To wire the service jack, perform the following: 1. Strip back the jacket from the CCN communication cable(s) for at least 3 inches. Strip 1/4-in. of insulation from each conductor. Remove the shield and separate the drain wire from the cable. Twist together all the shield drain wires and fasten them together using an closed end crimp lug or a wire nut. Tape off any exposed bare wire to prevent shorting. 2. Connect the CCN + signal wire(s) (RED) to Terminal 5. 3. Connect the CCN – signal wire(s) (BLACK) to Terminal 2. 4. Connect the CCN GND signal wire(s) (WHITE/CLR) to Terminal 4. 19 801 LOW PRESSURE TUBING 0 H 1 HF23BJ042 L Made in Switzerland by Belimo Automation 35 in-lb (4 Nm) 80...110s LR 92800 NEMA 2 LISTED 94D5 TEMP. IND. & REG. EQUIP. UL Class 2 Supply 24VAC/DC 50/60Hz 3VA 2W 5K COM WIP yel blu ora 1 2 3 blk red wht HIGH PRESSURE TUBING NOTE: Minimum length of tubing is 2 ft. Fig. 9 — Airflow Pickup Installation Cool Warm NOTE: Dimensions are in inches. Fig. 10 — Space Temperature Sensor (P/N 33ZCT56SPT Shown) Fig. 11 — Space Temperature Sensor and Wall Mounted Humidity Sensor Mounting 20 1 2 3 4 5 6 RED(+) WHT(GND) BLK(-) 1 2 3 4 CCN COM SEN SEN SW1 SW1 BLK (GND) RED (SPT) 5 6 RED(+) WHT(GND) BLK(-) SET WHT (T56) BLK (GND) RED (SPT) SENSOR WIRING CCN COM SENSOR WIRING JUMPER TERMINALS AS SHOWN Cool Fig. 12 — Space Temperature Sensor Wiring (33ZCT55SPT) Warm Fig. 13 — Space Temperature Sensor Wiring (33ZCT56SPT) Table 1 — Thermistor Resistance vs Temperature Values for Space Temperature Sensor, Return-Air Temperature Sensor, and Supply-Air Temperature Sensor TEMP (C) –40 –35 –30 –25 –20 –15 –10 –5 0 5 10 15 20 25 30 35 40 45 50 55 60 65 70 TEMP (F) –40 –31 –22 –13 –4 5 14 23 32 41 50 59 68 77 86 95 104 113 122 131 140 149 158 21 RESISTANCE (Ohms) 335,651 242,195 176,683 130,243 96,974 72,895 55,298 42,315 32,651 25,395 19,903 15,714 12,494 10,000 8,056 6,530 5,325 4,367 3,601 2,985 2,487 2,082 1,752 Wiring when distance between zone controller and space temperature sensor is 100 feet or less 100 FT. MAXIMUM CCN COMM BUS 3 COND COMM CABLE (TYP) 2 COND TWISTED CABLE OR 3 COND CABLE (TEMP SENSOR WIRING) (TYP) AIR TERMINAL UNIT (TYP) ZONE CONTROLLER (TYP) Cool Warm Cool Warm Cool Warm SPACE TEMPERATURE SENSOR Wiring when distance between zone controller and space temperature sensor is greater than 100 feet DISTANCE GREATER THAN 100 FT. CCN COMM BUS 2 COND TWISTED CABLE OR 3 COND CABLE (TEMP SENSOR WIRING) (TYP) AIR TERMINAL UNIT (TYP) ZONE CONTROLLER (TYP) Cool Warm SPACE TEMPERATURE SENSOR Fig. 14 — Communication Bus Wiring to Zone Controller Before wiring the CCN connection, refer to the Connect to the CCN Communication Bus section on page 26, for communication bus wiring and cable selection. The cable selected must be identical to the CCN communication bus wire used for the entire network. The other end of the communication bus cable must be connected to the remainder of the CCN communication bus. If the cable is installed as a T-tap into the bus, the cable length cannot exceed 100 ft. Wire the CCN service jack of the sensor in a daisy chain arrangement with other equipment. Refer to the Connect to the CCN Communication Bus section, page 26, for more details. 22 PRIMARY AIR TEMPERATURE SENSOR INSTALLATION — A primary air temperature (PAT) sensor is used on a zone controller which is functioning as a Linkage Coordinator for a non CCN/Linkage compatible air source. The part number is 33ZCSENPAT. See Fig. 15. When used on a zone controller, try to select a zone controller which will allow installation of the PAT sensor in the main trunk, as close to the air source as possible. See Fig. 16. SUPPLY AIR TEMPERATURE (SAT) SENSOR INSTALLATION — On terminals with heat, the SAT sensor is required. The SAT must be installed in the duct downstream from the air terminal. The SAT sensor is also sometimes called a duct temperature (DT) sensor. The part number is 33ZCSENSAT. The SAT sensor probe is 6 inches in length. The tip of the probe must not touch the inside of the duct. Use field-supplied bushings as spacers when mounting the probe in a duct that is 6 in. or less in diameter. If the unit is a cooling only unit, the SAT is not required. Fig. 15 — Primary Air Temperature Sensor (Part Number 33ZCSENPAT) Fig. 16 — Primary Air Temperature Sensor Installation (Unit Discharge Location) If the unit is equipped with electric reheat, ensure that the sensor is installed at least 2 ft downstream of the electric heater. See Fig. 17 for the sensor location in this application. If the unit has an octopus connected directly at the discharge, install the sensor in the octopus. If the unit has an electric heater, the two foot minimum distance between the sensor and the heater must be maintained. See Fig. 17 for the sensor location in this application. Disconnect electrical power before wiring the zone controller. Electrical shock, personal injury, or damage to the zone controller can result. Do not run sensor or relay wires in the same conduit or raceway with Class 1 AC or DC service wiring. Do not abrade, cut, or nick the outer jacket of the cable. Do not pull or draw cable with a force that may harm the physical or electrical properties. Avoid splices in any control wiring. Perform the following steps to connect the SAT sensor to the zone controller: 1. Locate the opening in the control box. Pass the sensor probe through the hole. 2. Drill or punch a 1/4-in. hole in the duct downstream of the unit, at a location that conforms to the requirements shown in Fig. 17. 3. Use two field-supplied, self-drilling screws to secure the sensor probe to the duct. Use field-supplied bushings as spacers when installing the sensor probe in a duct 6 in. or less in diameter. Perform the following steps if state or local code requires the use of conduit, or if your installation requires a cable length of more than 8 ft: 1. Remove the center knockout from a field-supplied 4 x 2-in. junction box and secure the junction box to the duct at the location selected for the sensor probe. 2. Drill a 1/2-in. hole in the duct through the opening in the junction box. 3. Connect a 1/2-in. nominal field-supplied conduit between the zone controller enclosure and the junction box. 4. Pass the sensor probe wires through the conduit and insert the probe in the duct. Use field-supplied bushings as spacers when installing the sensor probe in a duct 6 in. or less in diameter. 5. Secure the probe to the duct with two field-supplied self-drilling screws. 6. If you are extending cable length beyond 8 ft, use plenum rated, 20 AWG, twisted pair wire. 7. Connect the sensor leads to the zone controller’s wiring harness terminal board at the terminals labeled SAT and GND. 8. Neatly bundle and secure excess wire. → INDOOR AIR QUALITY SENSOR INSTALLATION — The indoor air quality (IAQ) sensor accessory monitors carbon dioxide levels. This information is used to modify the position of the outdoor air dampers to admit more outdoor air as required to provide the desired ventilation rate. Two types of sensors are supplied. The wall sensor can be used to monitor the conditioned air space; the duct sensor monitors the return air duct. Both wall and duct sensors use infrared technology to measure the levels of CO2 present in the air. The wall sensor is available with or without an LCD readout to display the CO2 level in ppm. See Fig. 18. The sensor part number is 33ZCSENCO2. To mount the sensor, refer to the installation instructions shipped with the accessory kit. 23 800 UNIT WITH ELECTRIC REHEAT 2 FT. MIN. AIR TERMINAL UNIT PRIMARY AIR INLET ZC SAT HEAT UNIT WITH ELECTRIC OCTOPUS 2 FT. MIN. AIR TERMINAL UNIT PRIMARY AIR INLET ZC OCTOPUS HEAT SAT ZC — Zone Controller Fig. 17 — Supply Air Temperature Probe (Part No. 33ZCSENSAT) Locations The CO2 sensors (33ZCSENCO2) factory set for a range of 0 to 2000 ppm and a linear voltage output of 0 to 10 vdc. Figure 19 shows ventilation rates for various CO2 set points when outside air with a typical CO2 level of 350 ppm is used. Refer to the instructions supplied with the CO2 sensor for electrical requirements and terminal locations. The zone controller requires 24 vac 25 va transformer to provide power to the sensor. 5.625 (14.3) To convert the CO2 sensor into a duct-mounted CO2 sensor, the duct-mounted aspirator (33ZCASPCO2) will need to be purchased. To accurately monitor the quality of the air in the conditioned air space, locate the sensor near the return air grille so it senses the concentration of CO2 leaving the space. The sensor should be mounted in a location to avoid direct breath contact. Do not mount the space sensor in drafty areas such as near supply ducts, open windows, fans, or over heat sources. Allow at least 3 ft between the sensor and any corner. Avoid mounting the sensor where it is influenced by the supply air; the sensor gives inaccurate readings if the supply air is blown directly onto the sensor or if the supply air does not have a chance to mix with the room air before it is drawn into the return air stream. To accurately monitor the quality of the air in the return air duct, locate the sensor at least 6 in. upstream or 15 in. downstream of a 90 degree turn in the duct. The downstream location is preferred. Mount the sensor in the center of the duct. 5 (12.7) 3.25 (8.3) 1.125 (2.9) IMPORTANT: If the sensor is mounted in the return air duct, readjust the mixed-air dampers to allow a small amount of air to flow past the return air damper whenever the mixing box is fully open to the outside air. If the damper is not properly adjusted to provide this minimum airflow, the sensor may not detect the indoor-air quality during the economizer cycle. 0.25 (0.8) → Fig. 18 — Indoor Air Quality (CO2) Sensor (33ZCSENCO2) 800 24 Fig. 19 — Ventilation Rated Based on CO2 Set Point Indoor Air Quality Sensor Wiring — To wire the sensors after they are mounted in the conditioned air space and return air duct, see Fig. 20 and the instructions shipped with the sensors. For each sensor, use two 2-conductor 18 AWG twistedpair cables (unshielded) to connect the separate isolated 24 vac power source to the sensor and to connect the sensor to the control board terminals. To connect the sensor to the control board, identify the positive (+) PIN-8 and ground (GND) PIN-7 terminals on the sensor and connect the positive terminal to terminal RH/IAQ and connect the ground terminal to terminal GND. HUMIDITY SENSOR (WALL-MOUNTED) INSTALLATION — The accessory space humidity sensor is installed on an interior wall to measure the relative humidity of the air within the occupied space. See Fig. 21. The use of a standard 2- x 4-in. electrical box to accommodate the wiring is recommended for installation. The sensor can be mounted directly on the wall, if acceptable by local codes. If the sensor is installed directly on a wall surface, install the humidity sensor using 2 screws and 2 hollow wall anchors (field-supplied); do not overtighten screws. See Fig. 11. Do NOT clean or touch the sensing element with chemical solvents; they can permanently damage the sensor. The sensor must be mounted vertically on the wall. The Carrier logo should be oriented correctly when the sensor is properly mounted. DO NOT mount the sensor in drafty areas such as near heating or air-conditioning ducts, open windows, fans, or over heat sources such as baseboard heaters, radiators, or wall-mounted light dimmers. Sensors mounted in those areas will produce inaccurate readings. Avoid corner locations. Allow at least 4 ft between the sensor and any corner. Airflow near corners tends to be reduced, resulting in erratic sensor readings. Sensor should be vertically mounted approximately 5 ft up from the floor, beside the space temperature sensor. For distances up to 500 feet, use a 3-conductor, 18 or 20 AWG cable. A CCN communication cable can be used, although the shield is not required. The shield must be removed from the sensor end of the cable if this cable is used. See Fig. 22 for wiring details. → The power for the sensor is provided by the control board. The board provides 24 vdc for the sensor. No additional power source is required. To wire the sensor, perform the following: 1. At the sensor, remove 4-in. of jacket from the cable. Strip 1/4-in. of insulation from each conductor. Route the cable through the wire clearance opening in the center of the sensor. See Fig. 22. 2. Connect the RED wire to the sensor screw terminal marked (+). 3. Install one lead from the resistor (supplied with the sensor) and the WHITE wire, into the sensor screw terminal marked (–). After tightening the screw terminal, test the connection by pulling gently on the resistor lead. 4. Connect the remaining lead from the resistor to the BLACK wire and secure using a closed end type crimp connector or wire nut. 5. Using electrical tape, insulate any exposed resistor lead to prevent shorting. 6. At the control box, remove the jacket from the cable and route the RED conductor over to the left side of the control board. Route the remaining conductors to the right side of the control board. RH/IAQ GND 0 21 1 87 HF23BJ042 Made in Switzerland by Belimo Automation 35 in-lb (4 Nm) 80...110s LR 92800 24 VAC NEMA 2 LISTED 94D5 TEMP. IND. & REG. EQUIP. UL SEPARATE POWER SUPPLY REQUIRED Class 2 Supply 24VAC/DC 50/60Hz 3VA 2W 5K LINE VOLTAGE COM WIP yel blu ora 1 2 3 blk red wht *Do not connect to the same transformer that supplies power to the zone controller. Fig. 20 — Indoor Air Quality Sensor Wiring 25 801 Refer to the service configuration table and set the Heating Loop parameters as follows: Proportional Gain = 20.0 Integral Gain = 0.5 Derivative Gain = 0.0 Start Value = 102.0 Also, set the Ducted Heat decision to YES and set the Maximum Duct Temperature decision equal to the design (maximum) boiler water temperature minus 20 degrees, but not greater than 200 degrees F. Connect the CCN Communication Bus — The zone controllers connect to the bus in a daisy chain arrangement. The zone controller may be installed on a primary CCN bus or on a secondary bus from the primary CCN bus. Connecting to a secondary bus is recommended. At 9,600 baud, the number of controllers is limited to 128 zones maximum, with a limit of 8 systems (Linkage Coordinator configured for at least 2 zones). Bus length may not exceed 4000-ft, with no more than 60 devices on any 1000-ft section. Optically isolated RS-485 repeaters are required every 1000 ft. At 19,200 and 38,400 baud, the number of controllers is limited to 128 maximum, with no limit on the number of Linkage Coordinators. Bus length may not exceed 1000 ft. The first zone controller in a network connects directly to the bridge and the others are wired sequentially in a daisy chain fashion. Refer to Fig. 25 for an illustration of CCN Communication Bus wiring. The CCN Communication Bus also connects to the zone controller space temperature sensor. Refer to the Install the Sensors section for sensor wiring instructions. COMMUNICATION BUS WIRE SPECIFICATIONS — The Carrier Comfort Network (CCN) Communication Bus wiring is field-supplied and field-installed. It consists of shielded three-conductor cable with drain (ground) wire. The cable selected must be identical to the CCN Communication Bus wire used for the entire network. See Table 2 for recommended cable. Fig. 21 — Wall Mounted Relative Humidity Sensor (P/N 33AMSENRHS000) 7. Strip 1/4-in. of insulation from each conductor and equip each with a 1/4-in. female quick connect terminal. 8. Connect the RED wire to terminal +24v on the control board. 9. Connect the BLACK wire to terminal GND on the control board. 10. Connect the WHITE/CLEAR wire to terminal RH/IAQ on the control board. 11. Connect shield to ground (if shielded wire is used). → Remote Occupancy Contact — The remote occupancy input (J4 pin 2) has the capability to be connected to a normally open or normally closed occupancy dry contact. Wire the dry contact as show in Fig. 23 between J4 Pin 2 and 24 VAC J1 Pin 1. The 24 VAC necessary to supply the ComfortID™ Controller remote occupancy contact input shall be supplied using the existing ComfortID Controller. Table 2 — Recommended Cables MANUFACTURER CABLE PART NO. 2413 or 5463 Alpha A22503 American 8772 Belden 02525 Columbia NOTE: Conductors and drain wire must be at least 20 AWG (American Wire Gage), stranded, and tinned copper. Individual conductors must be insulated with PVC, PVC/nylon, vinyl, teflon, or polyethylene. An aluminum/polyester 100% foil shield and an outer jacket of PVC, PVC/nylon, chrome vinyl, or Teflon with a minimum operating temperature range of –20° C to 60° C is required. Connect the Outputs — Wire the zone controller’s outputs (fan, staged heat, valves) as shown in the applicable wiring diagrams in Fig. 8A-J. Modulating Baseboard Hydronic Heating — Install the water valve on the leaving water end of the baseboad heater. See Fig. 24. Observe the fluid flow direction when mounting the valve. Be sure to properly heat sink the valve and direct the flame away from the actuator and valve body when sweating the valve connections. Install the leaving water temperature sensor (33ZCSENCHG) on the hydronic heating coil as shown. The sensor accommodates nominal copper pipe from 1/2 to 1-in. (OD sizes from 5/8 to 1.125 in.). It should be secured to the pipe with the clamp supplied. If piping is larger than 1-in. nominal size, a field-supplied clamp must be used. Use fiberglass pipe insulation to insulate the sensor assembly. Refer to Fig. 8C and 8H to wire the modulating water valve and the sensor to the zone controller. Connect the leaving water temperature sensor to the controller using the wiring connections shown for the SAT sensor. (NOTE: The leaving water temperature sensor replaces the SAT sensor in this application.) Use 18 or 20 AWG wire for all connections. The water valve actuator housing may be used as a junction box if the leaving water temperature sensor cable is not long enough and the sensor cable must be extended to reach the controller. For modulating hydronic heating applications, the default configuration must be changed to properly control the valve. 801 CONNECTION TO THE COMMUNICATION BUS 1. Strip the ends of the red, white, and black conductors of the communication bus cable. 2. Connect one end of the communication bus cable to the bridge communication port labeled COMM2 (if connecting on a secondary bus). When connecting the communication bus cable, a color code system for the entire network is recommended to simplify installation and checkout. See Table 3 for the recommended color code. Table 3 — Color Code Recommendations SIGNAL TYPE + Ground – 26 CCN BUS WIRE COLOR Red White Black PLUG PIN NUMBER 1 2 3 NOTE: The communication bus drain wires (shield) must be tied together at each zone controller. If the communication bus is entirely within one building, the resulting continuous shield must be connected to ground at only one single point. If the communication bus cable exits from one building and enters another building, connect the shields to ground at a lightning suppressor in each building where the cable enters or exits (one point only). 3. Connect the other end of the communication bus cable to the terminal block labeled CCN in the zone controller of the first air terminal. Following the color code in Table 3, connect the Red (+) wire to Terminal 1. Connect the White (ground) wire to Terminal 2. Connect the Black (–) wire to Terminal 3. 4. Connect additional zone controllers in a daisy chain fashion, following the color coded wiring scheme in Table 3. Refer to Fig. 25. 3 CONDUCTOR 20 AWG CABLE RED + - WHITE BLACK 499 RESISTOR (SUPPLIED W/SENSOR) SHIELD (IF USED) HUMIDITY SENSOR RH/IAQ GND +24V 0 1 HF23BJ042 Made in Switzerland by Belimo Automation 35 in-lb (4 Nm) 80...110s LR 92800 NEMA 2 LISTED 94D5 TEMP. IND. & REG. EQUIP. UL Class 2 Supply 24VAC/DC 50/60Hz 3VA 2W 5K COM WIP yel blu ora 1 2 3 blk red wht Fig. 22 — Humidity Sensor Wiring 27 801 28 CCN SAT SPT TRAN Yel — — — — Ora Blk com Red 24VAC/DC 50/60Hz 3VA 2W 35 in-lb(4Nm) 80...110s 1 LEGEND Carrier Comfort Network Supply-Air Temperature Sensor Space Temperature Sensor Transformer Field Wiring Factory Wiring Blu Made in Switzerland By Belimo Automation HF23BJ042 0 Wht → W Hi Low R HEAT1 24VAC HEAT2 Fig. 23 — Remote Occupancy Wiring B R W B (GND) (-) PAT GND T56 SAT GND SPT +24V (+) GND N/A GND Or DMPPOS Bl +10V Y SECFLOW GND RH/IAQ Line Voltage TRAN 24 VAC CCN comunications CCN comunications Not used FIELD-SUPPLIED DRY CONTACT SWITCH 33ZCSENCHG (SENSOR) FLOW 1/2” TUBE 3/4” TUBE 1” TUBE → Fig. 24 — Typical Water Valve and Sensor Installation 1000 FT. MAXIMUM DRAIN WIRE (TYP) BLK (TYP) GND WHT (TYP) RED (TYP) 1 2 3 1 2 3 1 2 3 1 2 3 1 2 3 4 CCN CCN CCN CCN COMM 2 ZC (TYP) AIR TERMINAL UNIT (TYP) BRIDGE (RECOMMENDED) CCN ZC LEGEND — Carrier Comfort Network — Zone Controller Fig. 25 — Communication Bus Wiring START-UP 3. Check that all air duct connections are tight. 4. At the air terminals, check fan and system controls for proper operation. Verify that actuator screws are properly tightened. 5. At the air terminals, check electrical system and connections of any optional electric reheat coil. If hot water reheat is used, check piping and valves against job drawings. 6. At the air terminals, make sure that all balancing dampers at box outlets are in the fully open position. 7. If using an air handler with field-installed controls, make sure controls and sensors have been installed and wired per manufacturer installation instructions. 8. At air handlers, verify that the motor starter and, if applicable, the Hand/Off/Auto (HOA) switch are installed and wired. NOTE: The HOA switch must be in the Off position. Use the Carrier network communication software to start up and configure the zone controller. All set-up and set point configurations are factory-set and field-adjustable. Changes can be made using the ComfortWORKS® software, ComfortVIEW™ software, or Network Service Tool. The Network Service Tool is a portable interface device that allows the user to change system set-up and set points from a zone sensor or terminal control module. During start-up, the Carrier software can also be used to verify communication with each zone controller. For specific operating instructions, refer to the literature provided with the software. Perform System Check-Out 1. Check correctness and tightness of all power and communication connections. 2. Check that all air terminals, ductwork, and zone controllers are properly installed and set according to installation instructions and job requirements. 29 800 elliptical damper inlet is supplied, then enter the inlet size in square inches in the Inlet Area decision. 5. If the terminal damper closes in the CW direction, then no adjustment is required. Otherwise, locate the damper direction configuration decision (CW Rotation) and toggle the value to OPEN by using the space bar. This configuration decision is also located on the Terminal Service Configuration screen. 6. After entering the area and rotation direction, verify operation of the damper. From the service tool Diagnostic, Maintenance Screen, select the Zone Air Balance/Commissioning Table and force the Commissioning Mode point to Enable. Then select the Damper/Transducer Cal point and force this point to Enable. The controller automatically tests the actuator by fully closing the damper. It checks the fully closed position to determine if the control was properly mounted. It then opens the damper. The control scales the actual actuator travel range used to a 0 to 100% open value. Finally the control will close the damper, test, and zero the pressure transducer. When completed, the control automatically removes the force from the Damper/Transducer Cal point. If a failure occurs at any point during the testing, the Auto-Calibration point at the bottom of the screen will indicate ALARM and the test will be aborted. 7. The actuator stroke has now been calibrated for the proper rotation. 9. Check to be sure the area around the air handler(s) is clear of construction dirt and debris. 10. Check that final filters are installed in the air handler(s). Dust and debris can adversely affect system operation. 11. Verify that the zone controller and the air handler controls are properly connected to the CCN bus. Before starting the air source fan, make sure that dampers at the system’s air terminals are not fully closed. Starting the fan with dampers closed will result in damage to the system ductwork. 12. Remember to utilize good duct design and to provide sufficient straight duct at the inlet of the box. A minimum of three times the inlet size is recommended. Network Addressing — Use the following method when all the zone controllers are installed and powered, and the SPT sensors are wired and functioning properly. This method can be used if no addresses have been set previously. The address of an individual zone controller may be set by using the address search function on the Service Tool software when it is directly connected to the service port of the zone controller and the CCN bus is disconnected. This is the standard method of setting the address. Addresses may also be set using the Service Tool Address Search Function if the zone controller is isolated from the CCN bus. Each zone controller will default to an address of 0, 140 when its application software is initially loaded. Since multiple controllers will be on the same bus, a unique address must be assigned to each controller before the system can operate properly. The assignment of controller addresses will be performed through software by using the Address Search function of the Network Service Tool, as follows: 1. The software recognizes that the Zone Controller's address, stored in the zone controller memory, has not been written yet (this will be true when the unit is first powered up on the job, or after a jumper-initiated reset). 2. Press the override button on the SPT (terminals J4-14 and J4-12 are shorted) for 1 to 10 seconds. 3. The zone controller address changes from 0, 140 to 239, 239 for a period of 15 minutes. → 4. Use Network Service Tool to change the address from 239, 239 to a valid system address within 15 minutes. NOTE: If the address is not changed from 239, 239 to a valid system address within 15 minutes, the controller will revert to address 0, 140 and use of the override button will cause the address function to repeat. The operator MUST actively set the address even if the final desired address is 0, 140. Airflow Check — After the damper transducer calibration has been performed, the terminal is ready for an airflow check. To perform airflow check, make sure Terminal Type, Primary Inlet Size, and Probe Multiplier settings on the Terminal Service Configuration screen are configured. If all of the terminals were installed with the dampers open, it is acceptable to start the fan at this time. If it becomes difficult for the air source to provide the necessary static pressure for airflow testing, it may be necessary to calibrate the damper transducer for a majority of terminals and check temperatures and set points to be sure most will be controlling to less than maximum CFM when the air source is started. When the system fan is running and the static pressure is fairly stable access the Zone Air Balance/Commissioning table and force the Commissioning Mode Point to Enable. The system is now ready to enable maximum CFM and check if the airflow controls correctly with the maximum CFM set point. Read the Zone Air Balance/Commissioning table section on page 47 which describes the Zone Air Balance/Commissioning table and what adjustments can be made from this screen. If the maximum airflow function is working properly, the user can stop here and leave the rest of the airflow calibration for the air balance contractor. If working with the air balance contractor, proceed with the minimum airflow calibration at this time. If this terminal is fan powered or the terminal was installed with heat, and the heat configuration was already performed, continue with the fan and heat test while the Zone Air Balance/Commissioning table is still being displayed. Initial Operation and Test — Perform the following procedure: 1. Apply 24 vac power to the control. 2. Connect the service tool to the phone jack service port of the controller. 3. Using the service tool, upload the controller from address assigned in Network Addressing section above. 4. From the Terminal Service Configuration screen, properly configure the damper type and inlet size. If a round inlet is used, then enter the size directly in the Inlet Diameter decision. If a square, rectangular, or 501 Fan and Heat Configuration and Test — Perform the following procedure to configure and test the fan and heat: 1. Display the Terminal Service Configuration screen to make sure the proper Terminal Type and Heat Type are configured. See the Configuration section to answer questions about the individual configurations. 2. From the Diagnostics Maintenance Screen select the Zone Air Balance/Commissioning table. 3. Force the Commissioning Mode to Enable. 30 4. If the terminal is a parallel or series powered fan box, force the Fan Override to Enable. If the damper is open it may have to be repositioned to the proper position depending on the box type. Damper percent change will be displayed. After the damper is positioned correctly, the fan relay should energize and the fan should run for a few seconds. 5. Make sure the fan runs and the Fan Override decision returns to disabled to ensure the fan is wired correctly for proper operation. 6. Force the Heating Override to Enable. If the unit is a single duct unit, this must be done with the primary terminal at reheat set point. The damper will modulate to maintain the terminal reheat CFM. The heat outputs will be commanded to provide maximum heat. If the unit is a fan powered terminal, the fan must be on. NOTE: The CFM settings can be found under service configuration in the table AIRFLOW. CONFIGURATION The following sections describe the computer configuration screens which are used to configure the zone controller. The screens shown may be displayed differently when using different Carrier software. Points Display Screen — The Points Display screen allows the user to view the status of the air terminal controller points. See Table 4. TERMINAL MODE — The terminal mode is determined by the equipment mode as reported by linkage and space requirements determined by space temperature and set points. The ZEROCAL and COMMISS modes are the result of the activating the commissioning maintenance table to perform terminal testing and commissioning. Terminal Mode: Display Units ASCII Default Value COOL Display Range HEAT, COOL, VENT, FAN AND VENT, DEHUMID, WARMUP, REHEAT, PRESSURE, EVAC, OFF, ZEROCAL, COMMISS Network Access Read only TERMINAL TYPE — Terminal type is the confirmation of the terminal type configuration in the SERVCONF Service Config table. Terminal Type: Display Units ASCII Default value SINGLDUCT Display Range SINGLDUCT, PAR FAN, SER FAN, DUALDUCT Network Access Read only → CONTROLLING SETPOINT — Controlling Setpoint will display either the heating master reference or the cooling master reference depending upon what mode the terminal is in. The display will default to the heating master reference and display the last controlling master reference when in neither heating nor cooling. Controlling Setpoint Display Units F (C) Default Value: –40 Display Range: –40 to 245 Network Access: Read only SPACE TEMPERATURE — Space temperature from 10 kΩ thermistor (Type III) located in the space. Space Temperature: Display Units F (C) Default Value -40.0 Display Range -40.0 to 245.0 Network Access Read/Write PRIMARY AIRFLOW — Volume of primary air calculated for pressure reading from the velocity pressure pickup probe located in the input collar of the air terminal. Primary Airflow: Display Units cfm Default Value 0 Display Range 0 to 9999 Network Access Read/Write PRIMARY DAMPER POSITION — Damper position percent range of rotation determined by the transducer calibration procedure. The zone controller is designed be used on dampers with any range of rotation. Primary Damper Position: Display Units % open Default Value 0 Display Range 0 to 100 Network Access Read only → Table 4 — Points Display Screen DESCRIPTION Terminal Mode Terminal Type Controlling Setpoint Space Temperature Primary Airflow Primary Damper Position Supply Air Temperature Local Heating Capacity Terminal Fan Relative Humidity Air Quality (ppm) Secondary Airflow Primary Air Temperature Heat DEFAULT COOL SINGLDUCT -40.0 F -40.0 F 0 cfm 100 % 0.0 F 0% Off 0 % RH 0 ppm 0 cfm 0.0 F Dsable 31 POINT NAME MODE TYPE CNTSP SPT PRIFLO DMPPOS SAT HCAP FAN RH AQ SECFLO PATEMP HEAT 801 Air Quality (ppm):Display units None shown (parts per million implied) Default Value 0 Display range 0 to 5000 Network Access Read/Write SECONDARY AIRFLOW — Airflow reading from the secondary pressure transducer, supplied with the secondary actuator, intended for dual duct and pressure control applications. Secondary Airflow: Display Units cfm Default Value 0 Display Range 0 to 9999 Network Access Read/Write PRIMARY AIR TEMPERATURE — Primary air temperature from sensor (10 kΩ, Type III), located in main trunk of ductwork for supply air provided by the air-handling equipment. Used for linkage coordination. Primary Air Temperature: Display Units F (C) Default Value 0.0 Display Range -40.0 to 245.0 Network Access Read/Write HEAT ENABLE/DISABLE — Provides enable/disable function for local heat at the terminal. When enabled the Local heat capacity function will run to operate the terminal heat. Heat Display: Display Units Discrete ASCII Default Value Dsable Display Range Dsabe/Enable Network Access Read/Write SUPPLY AIR TEMPERATURE — Temperature of the air leaving the zone controller downstream of any ducted heat source. Measured by a 10 kΩ thermistor (Type III). This temperature is used to control the maximum discharge air to the space when local heat is active. The sensor is not required or recommended for cooling only terminals. If supply air temperature display is required by specification, on a cooling only box, a heat type other than zero must be configured. This will have no adverse affect on the operation of a cooling only terminal. Supply Air Temperature: Display Units F (C) Default Value 0.0 Display Range -40.0 to 245.0 Network Access Read/Write LOCAL HEATING CAPACITY — When local heat at the terminal is enabled the percent of heat being delivered is determined by the following formula for modulating (floating point) type heat: % Capacity = [(SAT - SPT)/(Maximum Duct Temp – SPT )] The percent of heat delivered is determined by the following for two-position hot water or staged electric heat: % Output Capacity = (# of active stages/Total stages) * 100 Local Heating Capacity: Display Units % output capacity Default Value 0 Display range 0 to 100 Network Access Read only TERMINAL FAN — The commanded output for the terminal fan on a fan powered terminal. Terminal Fan: Display Units Discrete ASCII Default Value Off Display Range Off/On Network Access Read/Write RELATIVE HUMIDITY — Space Relative Humidity reading from the optional relative humidity sensor. Used by Humidity control function if configured. Relative Humidity: Display Units % RH Default Value 0 Display Range 0 to 100 Network Access Read/Write AIR QUALITY — Indoor air quality reading from a CO2 sensor installed in the space. Used by Air Quality control function if configured. Modify Controller Configuration — In Service Tool software, select the desired zone controller and access the Modify Controller Configuration Menu screen. This configuration screen is also displayed under CONFIGURE when using ComfortWORKS® and ComfortVIEW™ software. The Modify Controller Configuration Menu screen is used to access the Alarm Limit Configuration screen, Controller Identification screen, Holiday Configuration screen, Linkage Coordinator Configuration screen, Occupancy Configuration screen, and Set Point screen. ALARM LIMIT CONFIGURATION SCREEN — The Alarm Limit Configuration screen is used to configure the alarm settings for the zone controller. See Table 5. → Table 5 — Alarm Limit Configuration Screen DESCRIPTION Alarm Routing Control Re-Alarm Time SPT Occupied Hysteresis Unoccupied SPT Low Limit High Limit Occupied RH Low Limit High Limit Unoccupied RH Low Limit High Limit Air Quality Low Limit High limit High Velocity Pressure 801 DEFAULT 00000000 0 5.0 F POINT NAME ROUTING RETIME SPTHYS 40 F 99 F LOWLIM HIGHLIM 10 % 99 % LOWLIM HIGHLIM 0% 100 % LOWLIM HIGHLIM 250 ppm 1200 ppm 1.2 in. wg LOWLIM HIGHLIM HIGHVP 32 Alarm Routing Control — This decision indicates which CCN system software or devices will receive and process alarms sent by the zone controller. This decision consists of eight digits each can be set to zero or one. A setting of 1 indicates alarms should be sent to this device. A setting of zero disables alarm processing for that device. Currently the corresponding digits are configured for the following devices: first digit - user interface software; second digit - autodial gateway or Telink; fourth digit - alarm printer interface module; digits 3, and 5 through 8 - unused. Alarm Routing Control: Range 00000000 to 11111111 Default Value 00000000 Re-Alarm Time — This decision is used to configure the number of minutes the zone controller will wait before an alarm condition which has not been corrected will be re-transmitted on the communications network. Re-alarming of an alarm condition will continue until the condition no longer exists. Alarm Re-Alarm Time: Units Minutes Range 0 to 1440 Default Value 0 (Disabled) Space Temperature Occupied Hysteresis — This configuration defines the range above the occupied high set point and below the occupied low set point that the space temperature must exceed for an alarm condition to exist during occupied hours. Space Temperature Occupied Hysteresis: Units delta F (delta C) Range 0.0 to 99.9 Default Value 5.0 Unoccupied Space Temperature Low Limit — This configuration defines the lowest temperature that the unoccupied space can be before an alarm is generated. Unoccupied Space Temperature Low Limit: Units F (C) Range 0 to 255 F Default Value 40 Unoccupied Space Temperature High Limit — This configuration defines the highest temperature that the unoccupied space can be before an alarm is generated. Unoccupied Space Temperature High Limit: Units F (C) Range 0 to 255 F Default Value 99 Occupied Humidity Low Limit — This configuration defines the lowest humidity that the occupied space can be before an alarm is generated. Occupied Humidity Low Limit: Units % humidity Range 0 to 100% Default Value 10 Occupied Humidity High Limit — This configuration defines the highest humidity that the occupied space can be before an alarm is generated. Occupied Humidity High Limit: Units % humidity Range 0 to 100% Default Value 99 → Unoccupied Humidity Low Limit — This configuration defines the lowest humidity that the unoccupied space can be before an alarm is generated. Unoccupied Humidity Low Limit: Units % humidity Range 0 to 100% Default Value 0 → Unoccupied Humidity High Limit — This configuration defines the highest humidity that the unoccupied space can be before an alarm is genenerated. Unoccupied Humidity High Limit: Units % humidity Range 0 to 100% Default Value 100 Indoor Air Quality Low Limit — This configuration defines the lowest CO2 level that the occupied space can have before an alarm is generated. Indoor Air Quality Low Limit: Units PPM (implied) Range 0 to 5000 Default Value 250 Indoor Air Quality High Limit — This configuration defines the highest CO2 level that the occupied space can have before an alarm is generated. Indoor Air Quality High Limit: Units PPM Range 0 to 5000 PPM Default Value 1200 High Velocity Pressure — This configuration defines the maximum velocity pressure the zone controller should see at the pickup mounted in the inlet of the terminal. This is also used by the zone controller to calculate the maximum CFM the terminal will be able to control to using the terminal inlet size configured in the service configuration table. High Velocity Pressure: Units in. wg Range 0.0 to 2.0 in. wg Default Value 1.2 CONTROLLER IDENTIFICATION SCREEN — The controller identification screen displays the device information for the zone controller. HOLIDAY CONFIGURATION SCREENS — The zone controller has configuration screens for up to 12 different holiday schedules. Highlight the holiday name on the screen and press enter to configure the holiday schedule. A separate screen is used to ENTER the Holiday schedule. Start Month — The start month is the month in which the holiday starts. Months are represented by numbers with 1 representing January, 2 February, up to 12. Start Month: Range 1 to 12 Default Value 1 Start Day — The start day is the day on which the holiday will start. Start Day: Range 1 to 31 Default Value 1 Duration — Length of time, in days, that the holiday will last. Duration: Range 0 to 365 Default Value 0 33 801 Air Source Bus and Element Number — The Air Source Bus and Element Number configurations define the address of the air source providing conditioned air to the zones controlled by the linkage coordinator. If the address is left at zero, the Linkage coordinator will look for a primary air sensor to determine the equipment mode. If no primary air sensor is installed, or the sensor fails, the Linkage Coordinator will default the air source mode to Cooling. Air Source Bus Number: Range 0 to 240 Default Value 0 LINKAGE COORDINATOR CONFIGURATION SCREEN — The Linkage Coordinator Configuration screen allows the user to set the linkage coordinator configuration settings. See Table 6. Linkage Master Zone — This decision defines if the zone controller will function as a Linkage Coordinator (Linkage Master) for itself and other zones. If the zone controller is to use a supply air sensor for standalone operation, this configuration must be configured to No and the number of Zones to 1. If the zone controller will use its primary air sensor to determine the air handler mode for a number of zone controllers, configure this configuration to Yes, input the number of zones, and leave the air source decisions at the default values of zero. If this zone controller will communicate linkage information with an air source, configure this configuration to Yes. The number of zones must be configured and the address of the air source entered. Linkage Master Zone: Range Yes/No Default Value No Number of Zones — This decision defines the number of zone controllers (including itself) for the Linkage Coordinator to scan and include as part of the average temperature, set points, and occupancy information to the air source. The address of the zone controller functioning as a Linkage Coordinator must be larger than the number of zones configured. The zone controller will scan addresses less than its own, including information for as many zones as are configured. Other zone controller configured as linkage coordinators will also be included, so it is possible to have zones scanned by more than one linkage coordinator. Therefore care must be taken in addressing to prevent overlapping systems, unless overlapping systems is necessary. In large buildings the use of bridges and multiple busses is recommended to improve communication and provide system differentiation. Number of Zones: Range 1 to 128 Default Value 1 Air Source Element Number: 0 to 240 Default Value 0 Static Pressure Reset — Air systems designed with diversity (airflow required with all zones at maximum cfm exceeds design capacity of air handler) are capable of providing enough CFM to all zones on days when conditions meet the demand at design static. At other times, the air system does not require the design static to meet the load requirements. Static pressure reset allows the static pressure set point on the air source to be reset whenever the system load is reduced from the design maximum. The zone controller will then monitor damper positions. When the system dampers are modulating at lower damper positions due to the higher static, the static pressure will then be reset to a lower value allowing the dampers to open more. This allows the system to automatically make adjustments to the static pressure and optimize performance of the fan which will reduce energy consumption. The linkage coordinator monitors the position of all dampers in its system. When any zone’s maximum damper position reaches the Reset Maximum Damper Position, the linkage coordinator will reduce the value of the reset variable. The Maximum Damper Position and Static Pressure Reset values can be viewed on the Linkage maintenance screen. NOTE: The static pressure set point configured in the air source should be the desired maximum (zero reset) static pressure. → Table 6 — Linkage Coordinator Configuration Screen DESCRIPTION Zone Linkage Linkage Master Zone Number of Zones Air Source Bus Number Air Source Element Number Static Pressure Reset Reset Minimum Damper Position Reset Maximum Damper Position Maximum Reset SP Reset Variable Name CCN Linkage Data CCN Variable Name CCN Function Configuration Data Transfer Rate CCN Output Point Destination Bus Number Destination Element Number Temperature Sensor Grouping Temperature Sensor Mode Temperature Sensor Configuration Broadcast Device ID 801 DEFAULT POINT NAME No 1 0 0 MZENA NSYSTZ ASBUSN ASELEMN 50 % 80 % 0.0 in. wg (blank) MINDP MAXDP SPMAX SPRVAR (blank) 3 10 minutes (blank) 0 0 CCNVAR CCNFUNC DATARATE CCNOUTP DESTBUSN DESTELEN 1 1 1 BRD_RECV SENSCFG BRDDEVID 34 Reset Minimum Damper Position: Units % Range 0 to 99 Default Value 50 Reset Maximum Damper Position: Units % Range 0 to 99 Default Value 80 Maximum Reset: Units in. wg Range 0.0 to 5.0 Default Value 0.0 Static Pressure Reset Variable Name: Units ASCII (8 characters) Range A-Z,0-9 Default Value * *To use Static Pressure Reset with a Comfort System AirManager, configure the variable name to SPRESET. Currently, to make use of the static reset information, a custom program must be written in a Comfort Controller to read the reset value and change the set point of the static pressure control in the air source. Use this configuration to create a variable name (Static Pressure Reset Value). See the application manual for information about creating this custom program. The Comfort System AirManager™ control has an internal SPRESET variable which functions to accept the static pressure reset value from the linkage coordinator (refer to the Air Manager manual for configuration setup). → CCN Linkage Data — A zone controller configured as a Linkage master has the ability to poll its slaves and collect the high, low or average value of any variable within its slaves. Once the high, low or average is determined, the master can then transfer that value to a configured bus number, element number and point name. Typically this feature is used to determine a system’s highest indoor air quality reading. In order to utilize this feature the CCN Variable Name being collected from the slaves must be supplied. The data transfer rate must be specified and whether the high, low, or average value is being determined. After the value has been determined, a valid point name and CCN address to transfer the value to must be entered. CCN Variable Name: Units ASCII (8 Characters) Range A-Z, 0-9 Default Value (blank) CCN Function Config: Units none Range 0 = none, 1 = average, 2 = low, 3 = high Default Value 3 Data Transfer Rate: Units minutes Range 1-15 Default Value 10 CCN Output Point: Units ASCII (8 Characters) Range A-Z, 0-9 Default Value (blank) Destination Bus Number: Units none Range 0-239 Default Value 0 Destination Element Number: Units none Range 0-239 (0 = disabled) Default Value 0 → Temp Sensor Grouping — Each ComfortID™ controller has the capability to broadcast the associated space temperature sensor’s data or listen to another controller’s sensor data over the network. All controllers sharing the same sensor must be installed on the same CCN bus. There are three configuration decisions that must be configured in order to share sensors. The Temp Sensor Mode is used to specify if a controller will use its own local sensor, broadcast its local sensor, or listed to another controller’s sensor broadcast. The Temp Sensor Config is used to specify if the controller is sharging the space temperature information only or the space temperature and temperature offset slidebar information. The Broadcast Device ID decision is used to specify which controller number a zone will listen for when configured to receive another controller’s broadcast. Temp Sensor Mode: Units none Range 1 = Local Sensor, 2 = Broadcast, 3 = Listen Default Value 1 Temp Sensor Config: Units none Range 1 = SPT, 2 = SPT and offset Default Value 1 Broadcast Device ID: Units None Range 1-239 Default Value 1 OCCUPANCY CONFIGURATION SCREEN — The Occupancy Configuration screen is used to set the occupied schedule. See Table 7. Manual Override Hours — The Manual Override Hours decision is used to command a timed override by entering the number of hours the override will be in effect. If the occupancy schedule is occupied when this number is downloaded, the current occupancy period will be extended by the number of hours downloaded. If the current occupancy period is unoccupied when the occupancy override is initiated, the mode will change to occupied for the duration of the number of hours downloaded. If the occupancy override will end after the start of the next occupancy period, the mode will transition from occupancy override to occupied without becoming unoccupied, and the occupancy override timer will be reset. An active occupancy override or a pending occupancy override may be canceled by downloading a zero to this configuration. Once a number other than zero has been downloaded to this configuration any subsequent downloads of any value other than zero will be ignored by the zone controller. Manual Override Hours: Units hours Range 0 to 4 Default Value 0 Occupancy Scheduling — For flexibility of scheduling, the occupancy programming is broken into eight separate periods. For each period the scheduling, the active days of the week, occupied start time, and occupied stop time needs to be configured. Day of Week — This configuration consists of eight fields corresponding to the seven days of the week and a holiday field in the following order: Monday, Tuesday, Wednesday, Thursday, Friday, Saturday, Sunday, Holiday. A separate configuration screen is used. 35 801 Table 7 — Occupancy Schedule Information Screen DESCRIPTION Manual Override Hours Period 1: Day of Week Period 1: Occupied From Period 1: Occupied To Period 2: Day of Week Period 2: Occupied From Period 2: Occupied To Period 3: Day of Week Period 3: Occupied From Period 3: Occupied To Period 4: Day of Week Period 4: Occupied From Period 4: Occupied To Period 5: Day of Week Period 5: Occupied From Period 5: Occupied To Period 6: Day of Week Period 6: Occupied From Period 6: Occupied To Period 7: Day of Week Period 7: Occupied From Period 7: Occupied To Period 8: Day of Week Period 8: Occupied From Period 8: Occupied To If a 1 is configured in the corresponding place for a certain day of the week, the related “Occupied from” and “Occupied to” times for that period will take effect on that day of the week. If a 1 is placed in the holiday field the related times will take effect on a day configured as a holiday. A zero means the schedule period will not apply to that day. Period (1-8): Day of Week: Range 0 or 1 Default Values 11111111 for period 1, 00000000 for periods 2-8. Occupied From — This field is used to configure the hour and minute, in military time, when the mode for the zone controller becomes occupied. Period (1-8): Occupied from: Units Hours: Minutes Range 00:00 to 24:00 Default Value 00:00 Occupied To — This field is used to configure the hour and minute, in military time, when the occupied mode for the zone controller becomes unoccupied. Period (1-8): Occupied from: Units Hours: Minutes Range 00:00 to 24:00 Default Value 24:00 SET POINT SCREEN — The Set Point screen is used to modify the zone controller set points. See Table 8. Occupied Heat — The Occupied Heat set point is used to configure the heating set point for the zone controller during Occupied mode. Occupied Heat: Units F (C) Range 40.0 to 90.0 Default Value 70.0 1001 DEFAULT 0 11111111 00:00 24:00 00000000 00:00 24:00 00000000 00:00 24:00 00000000 00:00 24:00 00000000 00:00 24:00 00000000 00:00 24:00 00000000 00:00 24:00 00000000 00:00 24:00 POINT NAME OVRD DOW1 OCC1 UNOCC1 DOW2 OCC2 UNOCC2 DOW3 OCC3 UNOCC3 DOW4 OCC4 UNOCC4 DOW5 OCC5 UNOCC5 DOW6 OCC6 UNOCC6 DOW7 OCC7 UNOCC7 DOW8 OCC8 UNOCC8 Occupied Cool — The Occupied Cool set point is used to configure the cooling set point for the zone controller during Occupied mode. Occupied Cool: Units F (C) Range 45.0 to 99.9 Default Value 74.0 Unoccupied Heat — The Unoccupied Heat set point is used to configure the heating set point for the zone controller during Unoccupied mode. Unoccupied Heat: Units F (C) Range 40.0 to 90.0 Default Value 55.0 Unoccupied Cool — The Unoccupied Cool set point is used to configure the cooling set point for the zone controller during Unoccupied mode. Unoccupied Cool: Units F (C) Range 45.0 to 99.9 Default Value 90.0 → Occupied High Humidity — The Occupied High Humidity set point is used to configure the humidity set point for the zone controller if optional zone humidity control (dehumidification) is used. Occupied High Humidity: Units % Humidity Range 0.0 to 100.0 Default Value 60.0 → Unoccupied High Humidity — The unoccupied high humidity set point is used to configure the unoccupied humidity set point for the zone controller if optional zone humidity control (dehumidification) is used. Unoccupied High Humidity: Units % humidity Range 0 to 100 Default Value 100 36 Cool Minimum (PI) — This configuration is the minimum airflow the terminal will control to when the equipment is in Cooling mode (or Fan Only mode) or free cooling. The space requirements for cooling must be at a minimum, or the terminal is a fan powered terminal and the space requirements are for heat. Cool Minimum: Units CFM Range 0 to 9999 (Limited by the High Velocity pressure limit alarm) Default Value 0 Cool Maximum (PI) — This configuration is the maximum airflow the terminal will control to when the equipment is in Cooling mode (or Fan Only mode) or free cooling and the space requirements for cooling are at a maximum. Cool Maximum: Units CFM Range 0 to 9999 (Limited by the High Velocity pressure limit alarm) Default Value 4000 Terminal Reheat (PI) — This configuration is for single duct units with ducted reheat. The desired airflow is configured at which the reheat will provide optimum performance. This value is compared to the Minimum Cool value and the greater of the two values is used to determine the airflow set point. Terminal Reheat: Units CFM Range 0 to 9999 (Limited by the High Velocity pressure limit alarm) Default Value 0 Air Quality — The Air Quality set point is used to configure the IAQ set point for the zone controller if optional controlled ventilation support is used. Air Quality Units none shown (ppm (ppm): implied) Range 0 to 5000 Default Value 850 Delta Airflow — The Delta Airflow set point is used to configure the Delta Airflow set point for the zone controller if the zone pressure control option is used. If a negative pressure is desired, configure the value as a positive delta. Delta Airflow: Units cfm Range -9999 to 9999 Default Value 0 Service Configuration Selection Screen — The Service Configuration Selection screen is a menu of Service screens which can be accessed by the user. The following screens are available: Airflow Service Configuration, Terminal Service Configuration, Option Service Configuration, and Secondary Damper Service Configuration. AIRFLOW SERVICE CONFIGURATION SCREEN — The Airflow Service Configuration Table is used to configure the pressure independent and backup pressure dependent set points. See Table 9. Pressure Independent — Pressure Independent (PI) set points should be configured for pressure independent operation applications. → Table 8 — Set Point Screen DESCRIPTION Set Points Occupied Heat Occupied Cool Unoccupied Heat Unoccupied Cool Occupied HIgh Humidity Unoccupied High Humidity Air Quality (ppm) Delta Airflow DEFAULT POINT NAME 70.0 F 74.0 F 55.0 F 90.0 F 60.0 % 100 % 850 ppm 0 cfm OHSP OCSP UHSP UCSP ORHH URHH AQSP DCFM Table 9 — Airflow Service Configuration Screen DESCRIPTION Pressure Independent Cool Minimum Cool Maximum Terminal Reheat Heat Minimum Heat Maximum Parallel Fan On Dual Duct CV Airflow Pressure Dependent Cool Minimum Position Cool Maximum Position Reheat Minimum Position Heat Minimum Positon Heat Maximum Position Deadband Percent DEFAULT POINT NAME 0 cfm 4000 cfm 0 cfm 0 cfm 4000 cfm 0 cfm 4000 cfm COOLMIN COOLMAX REHEAT HEATMIN HEATMAX FNONCFM DDCVFLOW 0% 100 % 0% 0% 100 % 12.5 % CMINPOS CMAXPOS REMINPOS HMINPOS HMAXPOS DB_PCT 37 1001 Reheat Minimum Position (PD) — This configuration is for single duct units with ducted reheat. Configure the desired damper position at which the reheat will provide optimum performance. This value is compared to the Minimum Cool value and the greater of the two values is used to determine the damper position. Reheat Minimum Position: Units % Range 0 to 100 Default Value 0 Heat Minimum Position (PD) — This configuration is the Minimum damper position the terminal will control to when the equipment mode is Warm-Up or Heat. If the terminal is not configured for VAV central heating this is the only position the terminal will control to for these equipment modes. Heat Minimum Position: Units % Range 0 to 100 Default Value 0 Heat Maximum Position (PD) — This configuration is used to configure the maximum damper position at which the zone controller will operate if VAV central heat is configured to yes. If the equipment mode is Heat or Warm-Up and the demand in the space is for heat the zone controller will calculate the proper damper position needed to achieve space temperature set point, operating between the Heat Min and Heat Max. Heat Maximum Position: Units % Range 0 to 100 Default Value 100 Deadband Percent — This configuration is used to configure the Deadband Percent that the airflow will operate with. Deadband Percent: Units % Range 0.0 to 100.0 Default Value 12.5 TERMINAL SERVICE CONFIGURATION SCREEN — The Terminal Service Configuration screen lists the main configuration settings for the air terminal controller. See Table 10. Terminal Type — This configuration is used to indicate the terminal type that the zone controller is installed on. A 1 is for Single Duct terminals, a 2 is for Parallel Fan terminals, a 3 is for Series Fan terminals, and a 4 is for Dual Duct applications. Terminal Type: Range 1 to 4 Default Value 1 Primary Inlet Size — The Primary Inlet Size configuration is used to input the inlet diameter of the terminal if used with a round inlet. The Inlet Area configuration is used for oval or rectangular inlets. The zone controller will use the larger value for CFM calculations if both values are configured. NOTE: Carrier sizes 12, 14, and 16 are oval. Primary Inlet Size (Inlet Diameter): Units Inches Range 3.0 to 24.0 Default Value 6.0 Inlet Area — The Inlet Area configuration is used if the terminal has an oval or rectangular inlet. The Primary Inlet Size configuration is used for round inlets. The zone controller will use the larger value for CFM calculations if both values are configured. Inlet Area: Units Square Inches Range 0.0 to 500.0 Default Value 0.0 Heat Minimum (PI) — This configuration is the minimum airflow the terminal will control to when the equipment mode is Warm-Up or Heat. If the terminal is not configured for VAV central heating this is the only airflow the terminal will control to for these equipment modes. Heat Minimum: Units CFM Range 0 to 9999 (Limited by the High Velocity pressure limit alarm) Default Value 0 Heat Maximum (PI) — This configuration is used to configure the maximum airflow at which the zone controller will operate if VAV central heat is configured to yes. If the equipment mode is heat or warm-up, and the demand in the space is for heat, the zone controller will calculate the proper airflow needed to achieve space temperature set point (operating between the Heat Min and Heat Max). Heat Maximum: Units CFM Range 0 to 9999 (Limited by the High Velocity pressure limit alarm) Default Value 4000 Parallel Fan On (PI) — This configuration is used to define the primary airflow setting below which a parallel fan terminal should energize its fan. The setting should be used to allow a low volume of primary airflow to be better diffused into the space. Parallel Fan On: Units CFM Range 0 to 9999 (Limited by the High Velocity pressure limit alarm) Default Value 0 Dual Duct CV Airflow (PI) — This configuration defines the Dual Duct, constant volume, total airflow set point. Dual Duct Airflow: Units CFM Range 0 to 9999 (Limited by the High Velocity pressure limit alarm) Default Value 4000 Pressure Dependent — Pressure Dependent (PD) set points should be configured for backup pressure dependent operation, if an operating problem with the pressure transducer occurs. IMPORTANT: Pressure dependent settings are included for use only in the event of a pressure transducer failure. The inclusion of these configuration settings does not indicate that Carrier is endorsing this product for pressure dependent operation. In the case of a pressure sensor failure, the zone controller will broadcast a pressure sensor failure message on the CCN bus. These configurations may be used by a service technician to put the terminal in pressure dependent mode until the zone controller can be replaced. Cool Minimum Position (PD) — This configuration is the minimum damper position the terminal will control to when the equipment mode is Cooling (or Fan Only), or free cooling and the space requirements for cooling are at a minimum. Cool Minimum Position: Units % Range 0 to 100 Default Value 0 Cool Maximum Position (PD) — This configuration is the maximum damper position the terminal will control to when the equipment mode is cooling (or fan only), or free cooling and the space requirements for cooling are at a maximum. Cool Maximum Position: Units % Range 0 to 100 Default Value 100 38 → Table 10 — Terminal Service Configuration Screen DESCRIPTION COOLING Terminal Type Primary Inlet Size Inlet Diameter Inlet Area Probe Multiplier Calibration Gain Offset Damper Proportional Gain Integral Gain Derivative Gain Starting Value CW Rotation Pressure Independent HEATING Heat Type VAV Central Heating Heating Proportional Gain Integral Gain Derivative Gain Starting Value Ducted Heat Maximum Temperature Number of Electric Heat Stages Heat On Delay Fan Off Delay 2-Position Heat Logic SPT Trim SAT Trim Remote Contact Configuration DEFAULT POINT NAME 1 TERMTYPE 6.0 in. 0.0 in. 2.443 1.000 0 cfm RNDSZ SQA PMF CAL_GAIN OFFSET 30.0 5.0 0.0 20 % Close Yes KP KI KD STARTVAL DMPDIR PRESIND 0 Yes HEATTYPE CENHEAT 8.0 3.0 0.0 80 F Yes 110 F 1 2 2 Normal 0.0 F 0.0 F Close KP KI KD STARTVAL DUCTHEAT MAXTEMP STAGES HONDEL FNOFFD HEATYPE SPTTRIM SATTRIM RMTCFG The calibration gain is used for the fine tuning adjustments which might need to be made to the airflow calculation. This number is calculated automatically by the zone controller after input to the air balance maintenance screen, or it can be input manually at this screen. For ease of use it is recommended to use the Air Balance Maintenance screen to determine this number. The Air Balancing Maintenance screen will cause the value to be updated during the balancing procedure. If the Calibration Gain must be configured manually, it is determined as a percentage up or down that the CFM indicated will be offset. A number of .95 will cause the maximum airflow calculated to be reduced to 95% of the value. A Calibration Gain of 1.00 will cause no change. A number of 1.05 would cause readings to become 5% higher. The Calibration Gain is adjusted on the Air Balance Maintenance screen when performing the Maximum Airflow calibration and will have the greatest effect on the airflow at maximum CFM. Any error in reading at minimum airflow is adjusted by calculating the Offset configuration value. After performing the air balance using the Air Balance Maintenance screen it is a good idea to upload and save the Calibration Gain and Offset values. Calibration Gain: Range 0.000 to 9.999 Default Value 1.000 Offset — The Offset configuration is included for precision applications where the minimum airflow is critical and not zero. This configuration indicates the amount of CFM the transducer is off by, at minimum airflow, during the minimum airflow test on the air balance screen. This configuration should not be used to zero the airflow transducer since an auto zero test is included on the air balance screen and is also automatically performed each time the equipment fan is disabled (or every 72 hours for systems which run the fan continuously). Probe Multiplier — This configuration is used to input a factor for the velocity pressure probe characteristics installed in the inlet. All averaging probes will have some aerodynamic characteristics which will amplify the pressure difference read at the inlet of the terminal. The default value of 2.443 is the correct value to use if the probe is a Carrier probe in a 35 of 45 Series terminal. The formula for calculating velocity using an Ideal probe is: Velocity = 4005* SQRT (Velocity Pressure) Most manufactures will provide a probe constant for the probe supplied. For example, Velocity = 2213*SQRT(Velocity Pressure). To calculate the number to input in this decision (Probe Multiplier) use the formula. (4005/2213)2 = 3.3. So you would use 3.3 in place of 2.443 for a probe with a probe constant of 2213. An easy way to determine the probe constant for a probe without documentation is to measure the velocity pressure with a Magnahelic gage. Open the damper and adjust the static pressure until you have one inch of velocity pressure on the Magnahelic gage. Measure the total CFM of air being produced. The CFM just measured divided by the inlet area in feet should equal the probe constant for the formula. Velocity = (CFM just measured/ inlet area) * SQRT (1.0). Now use the constant that was empirically derived to determine the probe multiplier (4005/(CFM at 1.0 in. wg/inlet area))2 = Probe Multiplier. Probe Multiplier: Range 0.250 to 9.999 Default Value 2.443 Calibration Gain — Air terminal testing by industry standards is done with straight duct, upstream of the terminal. Since some applications do not get installed in this manner, the actual airflow from the terminal at balancing may not equal the reading from the zone controller. 39 801 VAV Central Heating — The VAV Central Heating configuration is used if the air source has the ability to provide heat and the terminal is required to modulate, using the heat minimum and heat maximum airflows, when the air source is in the heat mode. If this variable is set to No, the terminal will use its available local heat to heat the zone at all times. VAV Central Heating: Range No/Yes Default Value Yes Heating Loop Parameters — The heating loop gains and start value define how the terminal will respond to deviations in measured space temperature in order to control to the heat set point. The Proportional Gain is calculated each time the space temperature is compared to the heat set point. As the error from set point goes to zero, the Proportional Gain will also go to zero. The Integral Gain is a running summation of all integral terms since the loop started. This has the affect of trimming off any offset from set point which might occur if only the Proportional Gain existed. Normally a proportional loop with no Integral Gain would require frequent adjustments of the starting value to eliminate the offset as loading conditions on the room change. The Derivative Gain is not needed. This term tends to nullify large changes in the Proportional Gain for dampened response. Heating Loop Parameters Proportional Gain: Range 00.0 to 99.9 Default Value 8.0 After performing the air balance testing using the Air Balance Maintenance screen it is a good idea to upload and save the Calibration gain and Offset values. The cfm will be offset by the value entered in the Minimum Cfm variable and will zero at the value entered in the Maximum Cfm variable. There will be a linear relationship between the two set points. Offset: Units cfm Range -250 to 250 Default Value 0 Damper Loop Parameters — The loop gains and start value define how the terminal will respond to deviations in measured CFM in order to control to the airflow set point. The Proportional Gain is calculated each time the airflow is compared to the active airflow set point. As the error from set point goes to zero, the proportional term will also go to zero. The Integral Gain is a running summation of all integral terms since the loop started. This has the effect of trimming off any offset from the set point which might occur, if only the proportional term existed. Normally a proportional loop with no integral term would require frequent adjustments of the starting value to eliminate the offset as static pressure and other conditions change. The Derivative Gain is not needed. The Derivative Gain would tend to nullify large changes in the Proportional Gain for dampened response. These large changes in the Proportional Gain do not tend to happen for this type of control. Damper Loop Parameters Proportional Gain:Range 00.0 to 99.9 Default Value 30.0 Integral Gain: Range Default Value Derivative Gain: Range Default Value 00.0 to 99.0 5.0 Integral Gain: 00.0 0.0 Range Default Value Derivative Gain: Range Default Value Units % Range 0 to 100 Default Value 20 Clockwise Rotation — This configuration is used to define what effect a clockwise rotation of the actuator will have on the damper. If the actuator rotates clockwise to closed position, the configuration should be set to Close. If the actuator rotates clockwise to open, the configuration should be set to open. This configuration is used to change the rotation of the actuator so that the damper transducer calibration will work properly. The actuator does not have to be re-installed nor any switches changed to reverse the action. Clockwise Rotation: Range Close/Open Default Value Close Pressure Independent — This configuration defines if the terminal will function in the pressure independent or pressure dependent mode. NOTE: Pressure dependent mode should only be used in an emergency, if the pressure sensor is not functioning. Pressure Independent: Range No/Yes Default Value Yes → Heat Type — This configuration is used to define the type of heat installed on the terminal. A 0 is equal to None. A 1 is equal to Modulating/VAV. A 2 is equal to Two Position. A 3 is equal to staged Electric. A 4 is equal to Modulating/CV. Heat Type: Range 0 to 4 Default Value 0 00.0 to 99.0 3.0 00.0 0.0 Start Value: 801 Start Value: Units F (C) Range 40 to 125 Default Value 80 Ducted Heat — The Ducted Heat configuration is used to configure the terminal for ducted heat. If a local heat source is in the duct and requires airflow to provide heat, set the Ducted Heat configuration for yes. Ducted Heat Range No/Yes Default Value Yes Maximum Duct Temperature — This configuration is used to configure the maximum supply-air temperature desirable for heating the space. This will cause the heat to be modulated or cycled using this value as the maximum temperature of the air to be supplied. Maximum Duct Temperature: Units F (C) Range 40 to 200 Default Value 110 Number of Electric Stages — This configuration is used to define the number of stages of electric heat controlled by the zone controller. Number of Electric Stages: Range 1 to 3 Default Value 1 Heat On Delay — The Heat On Delay configuration is used to define a delay from the time a parallel terminal fan is started until the heat is activated. Heat On Delay: Units minutes Range 1 to 60 Default Value 2 40 OPTIONS SERVICE CONFIGURATION SCREEN — The Options Service Configuration screen is used to configure the service options of the air terminal controller. See Table 11. Occupancy Schedule Number — The Occupancy Schedule Number defines what Occupancy schedule the zone controller will use. Occupancy Schedule 64 is a local schedule. Occupancy Schedules 65 to 99 are global schedules. Occupancy Schedule Number: Range 64 to 99 Default Value 64 Global Schedule Master — The Global Schedule Master configuration allows the Occupancy Schedule to be used as a Global Schedule Master (Occupancy Schedules 65-99). Global Schedule Master: Range No/Yes Default Value No Override — The Override parameter is used to configure the number of hours and minutes the override will be in effect. The user initiates override by pressing the override button on the space temperature sensor. This will cause the schedule to enter into the Occupied mode. If global scheduling is used, all zones using the global schedule will enter Occupied mode. Pushing the override button during Occupied mode will have no effect. If the occupancy override is due to end after the start of the next occupancy period, the mode will transition from occupancy override to occupied without becoming unoccupied, and the occupancy override timer will be reset. NOTE: If using the tenant billing function, the override hours set point must be configured between 1 and 3 hours. Override: Units Hours: Minutes Range 00:00 to 24:00 Default Value 00:00 Broadcast Acknowledger — This configuration defines if the zone controller will be used to acknowledge broadcast messages on the CCN bus. One broadcast acknowledger is required per bus, including secondary busses created by the use of a bridge. Broadcast Acknowledger: Range No/Yes Default Value No Fan Off Delay — The Fan Off Delay configuration is used to define a delay time. The delay time is from when the heat is deactivated (in a parallel terminal) until the parallel fan is deactivated. This allows the fan to circulate air and remove the residual heat from the heat source. Fan Off Delay: Units minutes Range 1 to 15 Default Value 2 Two-Position Heat Logic — This configuration is used for controlling a normally closed or normally open valve for hot water. Use normal logic if the valve is normally closed. Use inverted logic if the valve is normally open. Two Position Heat Logic: Range Normal/Invert Default Value Normal Space Temperature Trim — This configuration is used to trim a space sensor which might need calibration. For example, if the temperature displayed is two degrees above the value measured with calibrated test equipment, input a value of –2.0. Space Temperature Trim: Units delta F (delta C) Range –9.9 to 9.9 Default Value 0.0 Supply Air Temperature Trim — This configuration is used to trim a supply air sensor which might need calibration. For example, if the temperature displayed is two degrees above the value measured with calibrated test equipment, input a value of –2.0. Supply Air Temperature Trim: Units delta F (delta C) Range –9.9 to 9.9 Default Value 0.0 → Remote Contact Config — The remote timeclock contact input can be configured as a normally open or normally closed contact. When the timeclock input is ‘On’ the zone will follow it’s local occupancy schedule. When the timeclock input is ‘Off’ the zone will be forced into unoccupied state. Remote Contact Config: Range Close/Open Default Value Close Table 11 — Options Service Configuration Screen DESCRIPTION Occupancy Schedule Number Global Schedule Master Override Broadcast Acknowledge Set Point Group Number Global Set Point Master Maximum Offset Adjust Control Options Humidity Proportional Gain Integral Gain Maximum Output Value Air Quality Proportional Gain Integral Gain Maximum Output Value AQ Low Voltage AQ High Voltage AQ Low Reference AQ High Reference DEFAULT 64 No 00:00 No 0 No 2F 0 POINT NAME SCH GSM OVR BCACK SETT GSTM LIMT CTLOPT 1.5 0.30 100.0 cfm KP KI MAXOUT 0.10 0.03 100.0 cfm 0.0 10.0 0 ppm 2000 ppm KP KI MAXOUT AQINLO AQINHI AQLO AQHI 41 801 Set Point Group Number — The Set Point Group Number is used to define the current zone controller as a part of a group of zone controllers which share the same set points. All zone controllers with the same Set Point Group Number will have the same set points. The set points are broadcast to the group by the zone controller defined by the Global Set Point Master configuration. A value of 0 is a local schedule. Values 1 to 16 are used for global scheduling. Set Point Group Number: Range 0 to 16 Default Value 0 Global Set Point Master — This configuration defines if the current zone controller will broadcast its set point values to the other zone controllers which are made part of the same group by configuring the Set Point Group Number. Global Set Point Master: Range No/Yes Default Value No Maximum Offset Adjustment — This configuration determines the maximum amount that the set point will be biased (up or down), by adjusting the slide bar on the space temperature sensor (if installed). Maximum Offset Adjustment: Units delta F (delta C) Range 0 to 15 Default Value 2 Control Options — The Control Options configuration determines whether the zone controller will use a humidity sensor or an indoor air quality sensor. A configuration of 0 means no sensors are used. A configuration of 1 means a Humidity Sensor is used. A configuration of 2 means an IAQ Sensor is used. Control Options: Range 0 to 2 Default Value 0 Humidity Control — These configuration values define the calculation parameters for determining the airflow needed to correct a high humidity problem in the space. The Maximum Output Value is measured in percentage of nominal terminal cfm. Proportional Gain: Range 0.0 to 9.9 Default Value 1.5 Integral Gain: Range Default Value Proportional Gain:Range Default Value 0.00 to 9.99 0.10 Integral Gain: 0.00 to 9.99 0.03 Range Default Value Maximum Output Value: Range 0.0 to 100.0% (max cool cfm) Default Value 100.0 → IAQ Sensor Low Voltage — This configuration defines the lowest voltage which should be read from the air quality sensor. IAQ Sensor Low Voltage: Range 00.0 to 10.0 Default Value 0.0 IAQ Sensor High Voltage — This configuration defines the highest voltage which should be read from the air quality sensor. IAQ Sensor High Voltage: Range 00.0 to 10.0 Default Value 10.0 IAQ Low Reference — This configuration defines the value in parts per million which correlate to the low voltage reading from the air quality sensor. IAQ Low Reference: Units ppm (parts per million) Range 0 to 5000 Default Value 0 IAQ High Reference — This configuration defines the value in parts per million which correlate to the high voltage reading from the air quality sensor. IAQ High Reference: Units ppm (parts per million) Range 0 to 5000 Default Value 2000 SECONDARY DAMPER SERVICE CONFIGURATION SCREEN — The Secondary Damper Service Configuration screen is used to configure the secondary damper settings. See Table 12. Zone Pressure Control — The Zone Pressure Control configuration determines whether the primary and secondary controllers will be configured for zone pressure control. Zone Pressure Control: Range Dsable/Enable Default Value Dsable Dual Duct Type — The Dual Duct Type setting configures the secondary controller for the correct dual duct type. A value of 0 configures the type to None. A value of 1 configures the type to Second Inlet (Hot Deck). A value of 2 configures the duct to Total Probe (terminal outlet). Dual Duct Type: Range 0 to 2 Default Value 0 0.00 to 9.99 0.30 Maximum Output Value: Range 0.0 to 100.0% (max cool cfm) Default Value 100.0 Indoor Air Quality Control — These configuration values define the calculation parameters for determining the airflow needed to correct a high incidence of air pollution contaminants in the space, such as CO2. The Maximum Output Value is measured in percentage of nominal terminal cfm. Table 12 — Secondary Damper Service Configuration Screen DESCRIPTION Zone Pressure Control Dual Duct Type Secondary Duct Size Inlet Diameter Inlet Area Probe Multiplier Calibration Gain Offset CW Rotation 800 DEFAULT Dsable 0 POINT NAME ZPCNTL DDTYPE 6.0 in. 0.0 sq. in. 2.443 1.000 0 cfm Close SRNDSZ SSQA SPMF CAL_GAIN SOFFSET DMPDIR 42 Secondary Duct Size — The Secondary Duct Size setting is used to input the inlet diameter of the terminal, if used with a round inlet. The Inlet Area configuration is used for oval or rectangular inlets. The zone controller will use the larger value for CFM calculations if both values are configured. Secondary Duct Size (Inlet Diameter): Units Inches Range 3.0 to 24.0 Default Value 6.0 Inlet Area — The Inlet Area configuration is used if the terminal has an oval or rectangular inlet. The Primary Inlet Size configuration is used for round inlets. The zone controller will use the larger value for CFM calculations if both values are configured. Inlet Area: Units Square Inches Range 0.0 to 500.0 Default Value 0.0 Probe Multiplier — This configuration is used to input a factor for the velocity pressure probe characteristics installed in the inlet. All averaging probes will have some aerodynamic characteristics which will amplify the pressure difference read at the inlet of the terminal. The default of 2.443 is the correct value to use if the probe is a Carrier probe in a 35 or 45 Series terminal. The formula for calculating velocity using an Ideal probe is: Velocity = 4005* SQRT (Velocity Pressure) Most manufactures will provide a probe constant for the probe supplied. For example, Velocity = 2213*SQRT(Velocity Pressure). To calculate the number to input in this decision (Probe Multiplier) use the formula. (4005/2213)2 = 3.3. So you would use 3.3 in place of 2.443 for a probe with a probe constant of 2213. An easy way to determine the probe constant for a probe without documentation is to measure the velocity pressure with a Magnahelic gage. Open the damper and adjust the static pressure until you have one inch of velocity pressure on the Magnahelic gage. Measure the total CFM of air being produced. The CFM just measured divided by the inlet area in feet should equal the probe constant for the formula. Velocity = (CFM just measured/inlet area) * SQRT (1.0). Now use the constant that was empirically derived to determine the probe multiplier (4005/(CFM at 1.0 Inch/Inlet area))2 = Probe Multiplier. Probe Multiplier: Range 0.250 to 9.999 Default Value 2.443 Calibration Gain — Air terminal testing by industry standards is done with straight duct, upstream of the terminal. Since most applications do not get installed in this manner, the actual airflow from the terminal at balancing may not equal the reading from the zone controller. The calibration gain is used for the fine tuning adjustments which might need to be made to the airflow calculation. If the Calibration Gain must be configured manually. It is determined as a percentage up or down that the CFM indicated will be offset. A number of .95 will cause the maximum airflow calculated to be reduced to 95% of the value. A Calibration Gain of 1.00 will cause no change. A number of 1.05 would cause readings to become 5% higher. Any error in reading at minimum airflow is adjusted by calculating the Offset configuration value. Calibration Gain: Range 0.000 to 9.999 Default Value 1.000 Offset — The Offset configuration is included for precision applications where the minimum airflow is critical and not zero. The cfm will be offset by the value entered in the Minimum Cfm variable and will zero at the value entered in the Maximum Cfm variable. There will be a linear relationship between the two set points. Offset: Units cfm Range –250 to 250 Default Value 0 Clockwise Rotation — This configuration is used to define what effect a clockwise rotation of the actuator will have on the damper. If the actuator rotates clockwise to closed position, the configuration should be set to Close. If the actuator rotates clockwise to open, the configuration should be set to open. This configuration is used to change the rotation of the actuator so that the damper transducer calibration will work properly. The actuator does not have to be reinstalled nor any switches changed to reverse the action. Clockwise Rotation: Range Close/Open Default Value Close Maintenance Table Menu Screen — The Maintenance Table Menu screen allows the user to select one of 4 available maintenance tables: the Linkage Maintenance Table, the Occupancy Maintenance Table, the Zone Air Balance Table, and the Zone Maintenance Table. LINKAGE MAINTENANCE TABLE — The Linkage Maintenance table is used to view the zone linkage variables. See Table 13. → Air Source Bus Number — This variable will display the bus number of the air source that the zone controller will be communicating Linkage to, if this zone is the Linkage Master. Air Source Bus Number: Range 0 to 239 Default Value 0 Network Access None → Air Source Element Number — This variable will display the Element Address of the Air Source that the zone controller will be communicating Linkage to, if this zone is the Linkage Master. Air Source Element Number: Display Range 1 to 239 Default Value 0 Network Access None Master Zone Element Number — This variable will display the element address of the zone which is the Linkage Master. Master Zone Element Number: Display Range 1 to 239 Default Value 0 Network Access Read only Operating Mode — This variable will display the current operating mode of the air source, if Linkage is available, or the mode determined by the Linkage Master using the primary air sensor, if available. If the primary air sensor has failed or was not installed, the Linkage master will assume the default mode of cooling. Operating Mode: Display Range COOLING, HEATING, WARM-UP, FREECOOL, PRESSURE, EVAC, OFF Default Value OFF Network Access Read only → Air Source Supply Temperature — This variable displays the supply temperature reading of the air source. Air Source Supply Temperature: Units F (C) Display Range -40 to 245 Default Value 0 Network Access None 43 501 → Table 13 — Linkage Maintenance Screen DESCRIPTION Air Source Bus Number Air Source Element Number Master Zone Element Number Operating Mode Air Source Supply Temperature Start Bias Time Average Occupied Heat Set Point Average Occupied Cool Set Point Average Unoccupied Heat Set Point Average Unoccupied Cool Set Point Average Zone Temperature Average Occupied Zone Temperature Composite CCN Value Occupancy Status Next Occupied Day Next Occupied Time Next Unoccupied Day Next Unoccupied Time Previous Unoccupied Day Previous Unoccupied Time Maximum Damper Position Static Pressure Reset Pressure Decrease Value Pressure Increase Value DEFAULT 0 0 0 OFF 0F 0 minutes 0.0 F 0.0 F 0.0 F 0.0 F 0.0 F 0.0 F 0 0 (blank) 00:00 (blank) 00:00 (blank) 00:00 0.0 % 0.0 in. wg 0.000 in. wg 0.000 in. wg Average Unoccupied Heat Set Point: Display Units F (C) Display Range 0.0 to 99.9 Default Value 0.0 Network Access None Average Unoccupied Cool Set Point — This variable displays the weighted average of the unoccupied cool set point, calculated by the linkage coordinator, from the information received from polling its associated zones. The set points are weighted by the maximum airflow capacities of the zone controllers scanned by the linkage coordinator. Average Occupied Cool Set Point: Display Units F (C) Display Range 0.0 to 99.9 Default Value 0.0 Network Access None Average Zone Temperature — This variable displays the weighted average of the space temperatures, collected by the linkage coordinator, from polling its associated zones. The temperatures are weighted by the maximum airflow capacities of the zone controllers scanned by the linkage coordinator. Average Zone Temperature: Display Units F (C) Display Range 0.0 to 99.9 Default Value 0.0 Network Access Read Only Average Occupied Zone Temperature — This variable displays the weighted average of the space temperatures of occupied zones, collected by the linkage coordinator, from polling its associated zones. The temperatures are weighted by the maximum airflow capacities of the zone controllers scanned by the linkage coordinator. Average Occupied Zone Temperature:Display Units F (C) Display Range 0.0 to 99.9 Default Value 0.0 Network Access Read Only Start Bias Time — This variable displays the Start Bias Time, in minutes, calculated by the air source. The Start Bias Time is calculated to bring the temperature up or down to the set point under the optimum start routine. This value will be sent to all associated zones for optimum start of zone controllers. This function is supported by all Carrier equipment which perform linkage. Start Bias Time: Display Units minutes Display range 0 to 185 Default Value 0 Network Access None Average Occupied Heat Set Point — This variable displays the weighted average of the occupied heat set point, calculated by the linkage coordinator, from the information received from polling its associated zones. The set points are weighted by the maximum airflow capacities of the zone controllers scanned by the linkage coordinator. Average Occupied Heat Set Point: Display Units F (C) Display Range 0.0 to 99.9 Default Value 0.0 Network Access None Average Occupied Cool Set Point — This variable displays the weighted average of the occupied cool set point, calculated by the linkage coordinator, from the information received from polling its associated zones. The set points are weighted by the maximum airflow capacities of the zone controllers scanned by the linkage coordinator. Average Occupied Cool Set Point: Display Units F (C) Display Range 0.0 to 99.9 Default Value 0.0 Network Access None Average Unoccupied Heat Set Point —This variable displays the weighted average of the unoccupied heat set point, calculated by the linkage coordinator, from the information received from polling its associated zones. The set points are weighted by the maximum airflow capacities of the zone controllers scanned by the linkage coordinator. 801 POINT NAME ASBUSNUM ASDEVADR MZDEVADR ASOPMODE ASTEMP STRTBIAS AOHS AOCS AUHS AUCS AZT AOZT CCCNVAL OCCSTAT NXTOCCD NXTOCCT NXTUNOD NXTUNOT PREVUNOD PRVUNOT MAXDMPOS PRESVAL PRESDECR PRESINCR 44 → Composite CCN Value — This variable displays the high, low or average of the CCN variable collected from each zone as configured in the Linkage Coordinator Configuration Screen. The value is sent to the CCN address and variable specified within that configuration table. Composite CCN Value: Display Range 0-65535 Default Value 0 Network Access Read Only Occupancy Status — This variable displays a “1” when at least one of the associated zone controllers (that are being scanned) is in the occupied mode. Occupancy Status:Display Range 0 or 1 (1 = occupied) Default Value 0 Network Access Read only Next Occupied Day — This variable displays the day when the next associated zone is scheduled to change from unoccupied to occupied mode. This point is read in conjunction with the next occupied time to allow the user to know the next time and day when a zone will become occupied. Next Occupied Day: Display Range MON, TUE, WED, THU, FRI, SAT, SUN Default Value No display (Blank) Network Access None Next Occupied Time — This variable displays the time of day when the next associated zone is scheduled to change from unoccupied to occupied mode. This point is read in conjunction with the next occupied day to allow the user to know the next time and day when a zone will become occupied. Next Occupied Time: Display Range 00:00 to 24:00 Default Value 0:00 Network Access None Next Unoccupied Day — This variable displays the day when the next associated zone is scheduled to change from occupied to unoccupied mode. This point is read in conjunction with the next unoccupied time to allow the user to know the next time and day when a zone will become unoccupied. Next Unoccupied Day: Display Range MON, TUE, WED, THU, FRI, SAT, SUN Default Value No display (Blank) Network Access None Next Unoccupied Time — This variable displays the time of day when the next associated zone is scheduled to change from occupied to unoccupied mode. This point is read in conjunction with the next unoccupied day to allow the user to know the next time and day when a zone will become unoccupied. Next Unoccupied Time: Display Range 00:00 to 24:00 Default Value 0:00 Network Access None Previous Unoccupied Day — This variable displays the day when the last associated zone changed from occupied to unoccupied mode. This point is read in conjunction with the previous unoccupied time to allow the user to know the last time and day when a zone became unoccupied. Previous Unoccupied Day: Display Range MON, TUE, WED, THU, FRI, SAT, SUN Default Value No display (Blank) Network Access None Previous Unoccupied Time — This variable displays the time of day when the last associated zone changed from occupied to unoccupied mode. This point is read in conjunction with the previous unoccupied day to allow the user to know the last time and day when a zone became unoccupied. Previous Unoccupied Time: Display Range 00:00 to 24:00 Default Value 0:00 Network Access None Maximum Damper Position — This variable displays the damper position of the zone controller in the system with the damper in the most open position. This is used by the linkage coordinator to calculate the static pressure reset. Maximum Damper Position: Display Units % (open) Display Range 0.0 to 100.0 Default Value 0.0 Network Access Read/Write Static Pressure Reset — This variable displays the current static pressure reset calculated, using the maximum damper position and the configuration information from the linkage configuration table. Static Pressure Reset: Display Units in. wg Display Range 0.0 to 5.0 Default Value 0.0 Network Access Read/Write Pressure Decrease Value — If the maximum damper position in the system goes below the minimum configuration setting, the linkage coordinator will calculate an amount that the static pressure should be decreased. This is used to open the system dampers more so that they will modulate between their minimum and maximum settings. This number is rounded to the nearest tenth of an inch and will be added to the static pressure reset value unless the static pressure reset value has reached maximum reset. Pressure Decrease Value: Display Units in. wg Display Range 0.000 to 5.000 Default Value 0.000 Network Access Read/Write Pressure Increase Value — If the maximum damper position in the system goes above the maximum configuration setting, the linkage coordinator will calculate an amount that the static pressure should be increased. This is used to close the system dampers more so that they will modulate between their minimum and maximum settings. This number is rounded to the nearest tenth of an inch and will be subtracted to the static pressure reset value unless the static pressure reset value has reached zero. Pressure Increase Value: Display Units in. wg Display Range 0.000 to 5.000 Default Value 0.000 Network Access Read/Write OCCUPANCY MAINTENANCE TABLE — The Occupancy Maintenance table is used to view the occupancy set points. See Table 14. Mode — This variable displays the current occupied mode for the zone controller. If the zone controller is following its own local schedule, this is the result of the local schedule status. If the zone controller is configured to follow a global schedule, this point displays the mode last received from a global schedule broadcast. Mode: Display Range 0 or 1 (1 = occupied) Default Value 0 Network Access None 45 801 Table 14 — Occupancy Maintenance Screen DESCRIPTION Mode Current Occupied Period Override in Progress Override Duration Occupied Start Time Unoccupied Start Time Next Occupied Day Next Occupied Time Next Unoccupied Day Next Unoccupied Time Last Unoccupied Day Last Unoccupied Time Current Occupied Period — If the zone controller is configured to determine occupancy locally, this variable will display the current period determining occupancy. Current Occupied Period: Display Range 1 to 8 Default Value 0 Network Access None Override in Progress — If an occupancy override is in progress, this variable will display a yes. Override In Progress: Display Range Yes/No Default Value No Network Access None Override Duration — This variable displays the number of minutes remaining for an occupancy override which is in effect. If the number of override hours was downloaded, the value will be converted to minutes. Override Duration: Display Units minutes Display Range 0 to 1440 Default Value 0 Network Access None Occupied Start Time — This variable displays the time that the current occupied mode began. If the current mode is unoccupied or the zone controller is following a global schedule, the value displayed by this point will be 0:00. Occupied Start Time: Display Range 00:00 to 23:59 Default Value 0:00 Network Access None Unoccupied Start Time — This variable displays the time that the current occupied mode will end (the beginning of the next unoccupied mode). If the current mode is unoccupied or the zone controller is following a global schedule, the value displayed by this point will be 0:00. Unoccupied Start Time: Display Range 00:00 to 24:00 Default Value 0:00 Network Access None Next Occupied Day — This variable displays the day when the next occupied period is scheduled to begin. This point is read in conjunction with the next occupied time to allow the user to know the next time and day when the next occupied period will occur. If the zone controller is following a global schedule this point will remain at default. 501 DEFAULT 0 0 No 0 00:00 00:00 (blank) 00:00 (blank) 00:00 (blank) 00:00 POINT NAME MODE PERIOD OVERLAST OVERDURA OCCSTART UNSTART NXTOCCD NXTOCCT NXTUNOD NXTUNOT PRVUNOD PRVUNOT NOTE: If the current mode is occupied, this point makes reference to the next occupied period and, in most cases, may not be the same as the current occupied start time. Next Occupied Day: Display Range MON, TUE, WED, THU, FRI, SAT, SUN Default Value No display (Blank) Network Access None → Next Occupied Time — This variable displays the time of day when the next occupied period will occur. This point is read in conjunction with the next occupied day to allow the user to know the next time and day when the zone will become occupied. If the zone controller is following a global schedule this point will remain at default. NOTE: If the current mode is occupied, this point makes reference to the next occupied period and, in most cases, may not be the same as the current occupied start time. Next Occupied Time: Display Range 00:00 to 24:00 Default Value 0:00 Network Access None → Next Unoccupied Day — This variable displays the day when the next unoccupied period is scheduled to begin. This point is read in conjunction with the next unoccupied time to allow the user to know the next time and day when the zone will become unoccupied. If the zone controller is following a global schedule this point will remain at default. NOTE: If the current mode is unoccupied, this point makes reference to the next unoccupied period and, in most cases, may not be the same as the current unoccupied start time. Next Unoccupied Day: Display Range MON, TUE, WED, THU, FRI, SAT, SUN Default Value No display (Blank) Network Access None → Next Unoccupied Time — This variable displays the time of day when the next unoccupied period is scheduled to begin. This point is read in conjunction with the next unoccupied day to allow the user to know the next time and day when the zone will become unoccupied. If the zone controller is following a global schedule this point will remain at default. NOTE: If the current mode is unoccupied, this point makes reference to the next unoccupied period and, in most cases, may not be the same as the current unoccupied start time. Next Unoccupied Time: Display Range 00:00 to 24:00 Default Value 0:00 Network Access None 46 → Last Unoccupied Day — This variable displays the last day when the zone changed from occupied to unoccupied mode. This point is read in conjunction with the last unoccupied time to allow the user to know the last time and day when the zone became unoccupied. If the zone controller is following a global schedule this point will remain at default. Last Unoccupied Day: Display Range MON, TUE, WED, THU, FRI, SAT, SUN Default Value No display (Blank) Network Access None → Last Unoccupied Time — This variable displays the last time of day when the zone changed from occupied to unoccupied mode. This point is read in conjunction with the last unoccupied day to allow the user to know the last time and day when a zone became unoccupied. If the zone controller is following a global schedule this point will remain at default. Last Unoccupied Time: Display Range 00:00 to 24:00 Default Value 0:00 Network Access None ZONE AIR BALANCE/COMMISSIONING TABLE — The Zone Air Balance/Commissioning Table is used to display the air balance variables. See Table 15. Commissioning Mode — This variable is used to put the zone controller into the commissioning mode. Force this point to enable. The zone controller will be ready to accept a command to perform the tests and functions on this screen. NOTE: Commissioning mode will automatically be disabled after one hour. Commissioning Mode: Display Range Dsable/Enable Default Value Dsable Network Access Read /Write calibration procedure can take up to 3 minutes. If the damper fails the test or the airflow calibration is unable to be completed, the Auto-Calibration point will indicate an Alarm. Damper Actuator Transducer Calibration: Display Range Dsable/Enable Default Value Dsable Network Access Read /Write Maximum Cooling Airflow Calibration — By enabling the Maximum Cooling Airflow Calibration, the Maximum Cooling Airflow from the set point schedule will be made the Airflow CFM Set Point. The zone controller will modulate the damper to control to this set point. The actual airflow, damper position, and velocity pressure readings will be displayed. If the set point is not correct, it may be changed from this screen by forcing the airflow set point to the desired value. The value will be written to the set point schedule in the Maximum Cool CFM set point, and the zone controller will begin to control to the new value. The airflow can be measured using test and balance equipment and compared to the actual reading on the screen. If the value measured requires adjustment to the value on the screen, force the value on the screen to the value measured. The zone controller will take the value and calculate a new calibration gain which will be shown at the bottom of the screen. The new value will be automatically loaded into the Service Configuration table. Maximum Cooling Airflow Calibration: Display Range Dsable/Enable Default Value Dsable Network Access Read /Write Minimum Cooling Airflow Calibration — Enabling the Minimum Cooling Airflow Calibration will cause the airflow CFM set point to change to the Minimum Cooling set point. The actual airflow, damper position, and velocity pressure readings will be displayed. If the set point is not correct, it may be changed from this screen by forcing the Airflow set point to the desired value. The value will be written to the set point schedule in the Minimum Cool CFM set point, and the zone controller will begin to control to the new value. The airflow can be measured using test and balance equipment and compared to the actual reading on the screen. If the value measured requires adjustment to the value on the screen, force the value on the screen to the value measured. The zone controller will take the value and calculate a new offset. Damper Actuator/Transducer Calibration — The Damper Actuator Transducer calibration is the first calibration which should be performed on a newly installed actuator. The zone controller will command the actuator to close and read the feedback potentiometer to determine the zero position of the damper. It will then command the damper to fully open. The zone controller will read the potentiometer to determine the maximum open position. Damper positions from closed to maximum open will be scaled to read 0 to 100% for the damper position. The zone controller will then close the damper and open it once more to zero calibrate the airflow sensor. The entire → Table 15 — Zone Air Balance/Commissioning Table DESCRIPTION Commissioning Mode Damper/Transducer Calibration Maximum Cooling Minimum Cooling Heating Override Fan Override CFM Set Point Actual Airflow Primary Damper Position Measured Velocity Pressure Supply Air Temperature Auto-Calibration Calibration Gain DEFAULT Dsable Dsable Dsable Dsable Dsable Dsable 0 cfm 0 cfm 100 % 0.000 in. wg 0.0 F Normal 1.000 47 POINT NAME CMODE CALIBRAT MAXCOOL MINCOOL HEATOVER FANOVER COMCFM AIRFLOW DMPPOS MVP SAT CAL CAL_GAIN 501 Primary Damper Position: Display Units % (open) Display Range 0 to 100 Default Value 100 Network Access Read Only Measured Velocity Pressure — This variable displays the measured velocity pressure, which is used to check accuracy during test and balancing of the terminal. If the pressure appears to be much different than that measured with a Magnahelic gage, the transducer can be forced to recalibrate its zero by enabling the Damper/Transducer Calibration. Measured Velocity Pressure: Display Units in. wg Display Range 0.000 to 2.000 (Limited by velocity pressure transducer high alarm limit) Default Value 0.000 Network Access Read Only Supply-Air Temperature — This variable displays the supplyair temperature for ease of verifying the heat operation during the heat test. Supply-Air Temperature: Display Units F (C) Display Range -40.0 to 245.0 Default Value 0.0 Network Access Read /Write Auto-Calibration — This variable will display “Normal” if the actuator and airflow transducer calibrations are successful. If damper or transducer calibration was not successful, this point will display “Alarm” and the zone controller will broadcast the appropriate alarm (if configured to transmit alarms). Auto-Calibration: Display Range Normal/Alarm Default Value Normal Network Access Read Only Calibration Gain — Air terminal testing by industry standards is done with straight duct, upstream of the terminal. Since most applications are not installed in this manner, the actual airflow from the terminal, at balancing, may not equal the reading from the zone controller. The Calibration Gain is used for making fine tuning adjustments to the airflow calculation. This number is calculated automatically by the zone controller after input to the air balance maintenance screen. The Calibration Gain can also be entered manually in the service configuration CONFIG screen. A number of .95 entered into the Calibration Gain variable will cause the maximum airflow to be reduced to 95% of the calculated value. A number of 1.05 would cause readings to become 5% higher. The Calibration Gain is adjusted on the Air Balance maintenance screen when performing the Maximum Airflow Calibration and will have the greatest affect on the airflow at maximum CFM. After performing the air balance procedure using the air balance maintenance screen, it is recommended to upload and save the Airflow Configuration, Calibration Gain, and Offset settings. Calibration Gain: Display Range 0.000 to 9.999 Default Value 1.000 Network Access Read Only The Offset configuration is included for precision applications where the minimum airflow is critical and not zero. The Offset configuration should not be used to zero the airflow transducer since an auto zero test is included in the normal function of the zone controller and is automatically performed each time the equipment fan is disabled (or every 72 hours for systems which run the fan continuously). After performing air balance testing using the Air Balance Maintenance screen, it is a good idea to upload and save the Airflow set points, Calibration Gain, and Offset values. Minimum Cooling Airflow Calibration: Display Range Dsable/Enable Default Value Dsable Network Access Read /Write Fan Override — This variable can be used to test the fan on series and parallel fan powered terminals. Enabling this point will cause the terminal fan to run until this point is disabled or the commissioning mode is ended. Fan Override: Display Range Dsable/Enable Default Value Dsable Network Access Read /Write Heating Override — This variable can be used to test the heat outputs. Enabling this variable will cause the heat to be modulated or staged to full heat until this point is disabled or the force released. Ducted reheat operation will be controlled so as not to exceed the configured maximum duct temperature. The supply-air temperature is included on this screen to verify that the heat is operating. Heating Override: Display Range Dsable/Enable Default Value Dsable Network Access Read /Write Airflow CFM Set Point — This variable displays the current airflow set point that the zone controller is controlling to. During the calibration tests this value can be forced, which will change the set point configuration for the value being tested. Airflow CFM Set Point: Display Units CFM Display Range 0 to 9999 (Limited by velocity pressure transducer high alarm limit) Default Value 0 Network Access Read /Write Actual Airflow Display — This variable shows the actual airflow being measured, based on the inlet size configured. During the Maximum and Minimum Cooling Airflow calibration tests this value can be forced, which will correct the multiplier or offset used to calculate the airflow. Actual Airflow: Display Units CFM Display Range 0 to 9999 (Limited by velocity pressure transducer high alarm limit) Default Value 0 Network Access Read /Write Primary Damper Position — This variable displays the current damper position. During CFM Balancing, this variable is used to display the position of the damper. This value can be used to see if the damper is fully open and the system air is sufficient. 48 unoccupied mode. This variable will display any space temperature sensor slidebar offset that is being applied. Cool Master Reference: Display Units F (C) Display Range 45.0 to 99.9 Default Value 90.0 Network Access Read/Write Primary Damper Airflow Reference — This variable displays the current controlling airflow set point. Primary Damper Airflow Display Units CFM Reference: Display Range 0 to 9999 (Limited by velocity pressure transducer high alarm limit) Default Value 0 Network Access Read /Write Primary Damper Position — This variable displays the current damper position. Primary Damper Position: Display Units % (open) Display Range 0 to 100 Default Value 100 Network Access Read/Write Secondary Damper Airflow Reference — This variable displays the current controlling airflow set point for the secondary damper. Secondary Damper Airflow Display Units CFM Reference: Display Range 0 to 9999 (Limited by velocity pressure transducer high alarm limit) Default Value 0 Network Access Read /Write Heat Enable — This variable displays the demand for heat in the space. The space temperature must be below the appropriate heat set point. Heat Enable: Display Range Dsable/Enable Default Value Dsable Network Access Read Only ZONE MAINTENANCE TABLE — The Zone Maintenance table is used to display zone set points and variables. See Table 16. Occupied — This variable indicates if the zone controller is operating in the occupied mode. Occupied: Display Range No/Yes Default Value No Network Access Read Only → Linkage Slave — This variable displays if air source linkage is in effect. Linkage Slave: Display Range No/Yes Default Value No Network Access Read Only Linkage Master — This variable displays if this zone controller is functioning as a linkage master. Linkage Master: Display Range No/Yes Default Value No Network Access Read Only Timed Override in Effect — This variable indicates if a timed override is in effect. Timed Override in Effect: Display Range No/Yes Default Value No Network Access Read Only Set Point Offset (T-56) — This variable displays the degrees of offset when using a 33ZCT56SPT space temperature sensor with set point adjustment. The slidebar on the sensor will adjust the desired temperature in that zone, up or down, when it is moved. The Set Point Offset (T-56) variable can disable set point offset (set to 0). Set Point Offset (T-56): Display Units delta F (delta C) Display Range 0.0 to 15.0 Default Value 0.0 Network Access Read Only Cool Master Reference — This variable displays the cooling master reference from the set point schedule. This should be the occupied cool set point when the zone is in occupied mode or the unoccupied cool set point when the zone is in → Table 16 — Zone Maintenance Table DESCRIPTION Occupied Linkage Slave Linkage Master Timed Override in Effect Set Point Offset (T-56) Cool Master Reference PI Primary Damper Reference PD Primary Damper Reference Secondary Damper Reference Heat Enable Heat Master Reference Heat Submaster Reference Temperature Control Airflow Relative Humidity Airflow Air Quality Airflow Cooling in Effect Heating in Effect RH in Effect AQ in Effect Unoccupied Dehumidification Cooling Energy Heating Energy DEFAULT No No No No 0.0 F 90.0 F 0 cfm 100 % 0 cfm Dsable 55.0 F 0F 100 % 0% 0% Yes No No No No 0 Btu 0 Btu 49 POINT NAME ZONEOCC DAVCTL LINKMAST TIMOV T56OFF CCMR PISMR PDSMR SDSMR HEATENA HCMR HSMR TCA RHA AQA COOLFLAG HEATFLAG RHFLAG AQFLAG UNOCCDH COOLBTUS HEATBTUS 801 Heat Master Reference — This point displays the occupied heat set point if occupied, or the unoccupied heat set point if unoccupied. This variable will display any space temperature sensor slidebar offset that is being applied. Heat Master Reference: Display Units F (C) Display Range 40.0 to 90.0 Default Value 55.0 Network Access Read/Write Heat Submaster Reference — If heat is enabled, this variable displays the desired supply air temperature calculated to heat the space. This is a result of the heating PID loop calculation. Heat Submaster Reference: Display Units F (C) Display Range 0 to 240 Default Value 0 Network Access Read/Write Temperature Control Airflow — This variable displays the airflow set point determined from the temperature loop calculation. The zone controller compares the Temperature, Relative Humidity, and Air Quality loop. The greatest of the three will become the primary damper airflow reference. Temperature Control Airflow: Display Units % Display Range 0 to 100 Default Value 100 Network Access Read Only Relative Humidity Control Airflow — This variable displays the airflow set point determined from the relative humidity loop calculation. The zone controller compares the Temperature, Relative Humidity, and Air Quality loop. The greatest of the three will become the primary damper airflow reference. Relative Humidity Control Airflow: Display Units % Display Range 0 to 100 Default Value 0 Network Access Read Only Air Quality Control Airflow — This variable displays the airflow set point determined from the air quality loop calculation. The zone controller compares the Temperature, Relative Humidity, and Air Quality loop. The greatest of the three will become the primary damper airflow reference. Air Quality Control Airflow: Display Units % Display Range 0 to 100 Default Value 0 Network Access Read Only 801 Cooling in Effect — This variable displays if the air source is in the Cooling mode and if the terminal is using the cooling airflow set points. Cooling In Effect: Display Range No/Yes Default Value Yes Network Access Read Only Heating in Effect — This variable displays if the air source is in the Heat mode and if the terminal is using the heating airflow set points. Heating In Effect: Display Range No/Yes Default Value No Network Access Read Only Relative Humidity Control in Effect — This variable indicates if the relative humidity control is active. Relative Humidity Control In Effect: Display Range No/Yes Default Value No Network Access Read Only Air Quality Control in Effect — This variable indicates if the air quality control is active. Air Quality Control In Effect: Display Range No/Yes Default Value No Network Access Read Only → Unoccupied Dehumidification — This variable indicates if unoccupied dehumidification control is in effect. Unoccupied Dehumidification: Display Range Yes/No Default Value No Network Access Read Only Cooling Energy — This variable displays the amount of primary air source cooling BTUs being provided to the space by the terminal. A CCN compatible air source or PAT sensor on a linkage master is required. Cooling Energy: Display Units Btu Display Range 0 to 999999 Default Value 0 Network Access Read Only Heating Energy — This point displays the amount of primary air source heating BTUs being provided to the space by the terminal. This value will not include zone level heating. A CCN compatible air source or PAT sensor on a linkage master is required. Heating Energy: Display Units Btu Display Range 0 to 999999 Default Value 0 Network Access Read Only 50 Copyright 1999 Carrier Corporation Manufacturer reserves the right to discontinue, or change at any time, specifications or designs without notice and without incurring obligations. PC 111 Catalog No. 533-355 Printed in U.S.A. Form 33ZC-1SI Pg 52 1001 11-99 Replaces: New Book 1 4 Tab 11a 13a