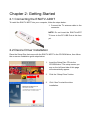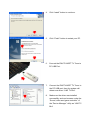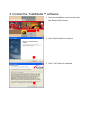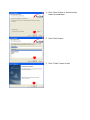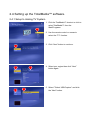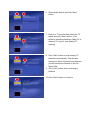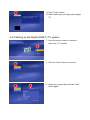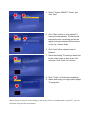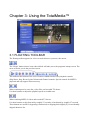
1
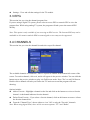
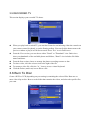
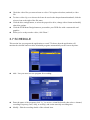
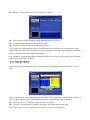
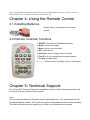
ENUTV-ADDT
USB Hybrid DVB-T / Analog TV Tuner Adapter
(USB 2.0 / 1.1 PnP TV Capture Box)
Users Guide
ENUTV-ADDT Users Guide
Notice
No part of this manual, including the products and software described in it, may be reproduced,
transmitted, transcribed, stored in a retrieval system, or translated into any language in any form or
by any means, except documentation kept by the purchaser for backup purposes, without the
express written permission of us.
WE PROVIDE THIS MANUAL “AS IS” AND WITHOUT WARRANTY OF ANY KIND,
EITHER EXPRESS OR IMPLIED, INCLUDING BUT NOT LIMITED TO THE IMPLIED
WARRANTIES OR CONDITIONS OF MERCHANTABILITY OR FITESS FOR A
PARTICULAR PURPOSE. IN NO EVENT SHALL US, ITS DIRECTORS, OFFICERS,
EMPLOYEES OR AGENTS BE LIABLE FOR ANY INDIRECT, SPECIAL, INCIDENTAL, OR
CONSEQUENTIAL DAMAGES (INCLUDING DAMAGES FOR LOSS OF PROFITS, LOSS
OF BUSINESS, LOSS OF USE OR DATA, INTERRUPTION OF BUSINESS AND THE LIKE),
EVEN IF WE HAVE BEEN ADVISED OF THE POSSIBILITY OF SUCH DAMAGES ARISING
FROM ANY DEFECT OR ERROR IN THIS USER MANUAL OR PRODUCT.
Product warranty or service will not be extended if: (1) the product is repaired, modified or altered,
unless such repair, modification of alteration is authorized in writing by us; or (2) the serial
number of the product is defaced or missing.
Products and corporate names appearing in this manual may or may not be registered trademarks
or copyrights of their respective companies, and are used only for identification or explanation and
to the owners’ benefit, without intent infringe.
z Windows, MS-DOS, and DirectX are registered trademarks of Microsoft Corporation.
z Adobe and Acrobat are registered trademarks of Adobe Systems Incorporated.
The product name and revision number are both printed on the product itself. Manual revisions are
released for each product design represented by the digit before and after the period of the manual
revision number. Manual updates are represented by the third digit in the manual revision number.
SPECIFICATIONS AND INFORMATION CONTAINED IN THIS MANUAL ARE
FURNISHED FOR INFORMATIONAL USE ONLY, AND ARE SUBJECT TO CHANGE AT
ANY TIME WITHOUT NOTICE, AND SHOULD NOT BE CONSTRUED AS A
COMMITMENT BY US. WE ASSUME NO RESPONSIBILITY OR LIABILITY FOR ANY
ERRORS OR INACCURACIES THAT MAY APPEAR IN THIS MANUAL, INCLUDING THE
PRODUCTS AND SOFTWARE DESCRIBED IN IT.
Copyright© 2008 Encore Electronics Inc. All Rights Reserved.
2
ENUTV-ADDT Users Guide
Contents:
Chapter 1: Introduction ...................................................................................................................... 4
1.1 Package Contents ................................................................................................................. 4
1.2 System Requirements........................................................................................................... 4
Chapter 2: Getting Started ................................................................................................................. 5
2.1 Connecting the ENUTV-ADDT........................................................................................... 5
2.2 Device Driver Installation.................................................................................................... 5
2.3 Install the TotalMedia™ software........................................................................................ 7
2.4 Setting the TotalMedia™ software. ..................................................................................... 9
2.4.1 Setting up Analog TV system ................................................................................... 9
2.4.2 Setting up Digital (DVB-T) TV system.................................................................. 11
Chapter 3: Launching the TotalMedia Software .............................................................................. 13
3.1 FLOATING TOOLBAR .................................................................................................... 13
3.2 TV MODULE .................................................................................................................... 14
3.3 EPG .................................................................................................................................... 15
3.4 CHANNELS ...................................................................................................................... 15
3.5 RECORDED TV................................................................................................................ 16
3.6 Burn To Disc ...................................................................................................................... 16
3.7 SCHEDULE....................................................................................................................... 17
3.8 TELETEXT........................................................................................................................ 18
Chapter 4: Using the Remote Control.............................................................................................. 19
4.1 Installing the batteries ........................................................................................................ 19
4.2 Remote control functions................................................................................................... 19
Chapter 5: Technical Support Information: ..................................................................................... 19
3
Chapter 1: Introduction
1.1 Package Contents
z
z
z
z
z
z
z
ENUTV-ADDT
Setup Disc
Quick Installation Guide
USB cable
Portable Antenna
PAL to NTSC connector
Remote control (batteries included)
1.2 System Requirements
z
z
z
z
z
z
z
z
z
IBM PC or compatible
Intel Pentium 4 2.0GB MHz / or equivalent AMD Athlon™ CPU or better processor
One available USB 2.0 port.
Minimum of 256 MB of RAM or more
Minimum of 100 MB hard disk space available
1024x768 graphics card, DirectX R 9.0c or above compatible graphics card or better
Microsoft® Windows XP/XP 64bit , Windows Vista™ 32bit/64bit
CD-ROM drive (for application software and driver installation)
Hard Disk: 5400 RPM or above (7200 RPM preferred)
Chapter 2: Getting Started
2.1 Connecting the ENUTV-ADDT
To install the ENUTV-ADDT into your computer, follow the steps below:
1. Connect the TV antenna cable to the
connector.
NOTE: Do not insert the ENUTV-ADDT
TV tuner to the PC USB Port at this time
yet.
2.2 Device Driver Installation
Place the Setup Disc that came with the ENUTV-ADDT in the CD-ROM drive, then follow
the on-screen installation guide steps below.
1.
Insert the Setup Disc CD into the
CD-ROM drive. The setup screen you
see on the left hand side of this page
will automatically appear.
2.
Click the “Setup Driver” button.
3.
Click “Next” to start the driver
installation.
4.
Click “Install” button to continue.
5.
Click “Finish” button to restart your PC.
6.
Connect the ENUTV-ADDT TV Tuner to
PC USB Port.
7.
Connect the ENUTV-ADDT TV Tuner to
the PC USB port, then the system will
detect new driver “UAD TV Box”.
8.
Make sure the driver was installed
successfully and can be seen under the
“Sound, video and game controller” of
the “Device Manager” utility as “UAD TV
Box”
2.3 Install the TotalMedia™ software.
1. From the installation menu screen click
the “Setup Utility” button.
2. Click “Next” button to continue.
3. Click “Yes” button to continue.
4. Click “Next” button or choose setup
folder for installation.
5. Click “Next” button.
6. Click “Finish” button to exit.
2.4 Setting up the TotalMedia™ software.
2.4.1 Setup to Analog TV System
1. Click the TotalMedia™ shortcut or click to
select TotalMedia™ from the
Start/Programs.
2. Use the remote control or mouse to
select the “TV” function.
3. Click “Next” button to continue.
4. Select your region then click “Next”
button again.
5. Select “Trident USB Capture” and click
the “Next” button.
6. Select audio device and click “Next”
button.
7. Find your TV service then select the TV
signal and click “Next” button. (Your
selection should be between Cable TV or
Antenna TV only for your Analog TV
viewing)
8. Click “Start” button to scan analog TV
channels automatically. This will take
some time. When Channels are detected
you will see those channels in the Ch /
Name field.
9. Click “Next” button when scanning is
finished.
10. Click “Next” button to continue.
11. Click “Finish” button.
12. Watch and enjoy your high quality digital
TV.
2.4.2 Setting up the Digital (DVB-T) TV system
1. Use the remote control or mouse to
select the “TV” function.
2. Click the “Next” button to continue.
3. Select your region then click the “Next”
button again.
4. Select “Trident USB DTV Tuner” and
click “Next”
5. Click “Start” button to scan digital TV
channels automatically. The bar would
indicate the time remaining and all the
digital channels detected will be shown
on the Cg. / Name fields.
6. Click “Next” when channel scan is
finished
7. Since the Analog TV setting is done first,
let the radio button to stay at the “No”
selection. Click “Next” to continue.
8. Click “Finish” to finishe the installation
9. Watch and enjoy your high quality digital
TV programs.
Notes: Set up two tuners. After setting up one tuner, if there is another tuner in your PC, you can
repeat the steps for the second tuner.
Chapter 3: Using the TotalMedia™
3.1 FLOATING TOOLBAR
The floating toolbar appears for a few seconds whenever you move the mouse:
The "Home" button (house icon) when clicked will take you to the program's startup screen. The
arrow will take you to the previous screen.
The toolbar at the bottom of the screen features standard audio/video playback controls
(Play/Pause, Stop, Record,) plus Volume and Channel controls. Special controls for MPEG2
playback and only appear when necessary.
When watching movies on a disc, video files, and recorded TV shows:
Use these buttons to adjust the playback speed at variable rates.
When watching MPEG-2 videos and recorded TV shows:
Use these buttons to skip forward by roughly 27 seconds, or backwards by roughly 27 seconds.
These buttons are useful for bypassing commercials or skipping back slightly if you accidentally
skipped ahead too far.
3.2 TV MODULE
This section lets you view and edit the settings for TV recording.
You may pause and rewind TV (while you’re watching) using both the remote control and the
toolbar.
Options include:
z Full Screen - Displays the video over the entire program display area-typically the entire
screen. You can click the Full Screen button to switch into full screen mode. Press "Esc" or
double-click the mouse to go back to a normal window.
Note: You should check the "Time Shift" option in TV Settings to display the time bar.
z EPG - Display the electronic programming guide.
z Channels - View the program channel list. Click a channel to learn more about it.
z Recorded TV - Burn the recorded TV shows to a disc.
z Schedule - Program the application to record TV shows.
z
z
Capture Frame - Take a screen capture of the current video screen. The captured image will be
saved in the "My Documents | My Pictures" folder by default.
Teletext - Watch teletext (if available).
z
Settings - View and edit the settings for the TV module.
3.3 EPG
This section lets you view the channel program lists.
If you are using a digital TV system, please select to access EPG or network EPG to view the
program lists. While using analog TV system, the program will take you to the network EPG
directly.
Note: This option is only available if you are using an EPG service. The Internet EPG may not be
available in all countries and the EPG on some digital services may not be supported.
3.4 CHANNELS
This section lets you view the channel list and select a specific channel.
The available channels are listed here. There is a preview window in the bottom left corner of the
screen. To watch a channel, click on it, and it will appear in the preview window. You can click the
button next to the preview window to play it in Full Screen mode. Press "Esc" to exit Full Screen.
Double click a channel will take you back to the TV main screen and the program will start
showing.
Options include:
z Add to Favorite - Highlight a channel on the list and click on the button to set it as a favorite
channel. A checkmark indicates favorite channel.
z Delete From Favorite - If you select a favorite channel, click on this button to remove it from
the favorite channels list.
z From the "Channel Type", choose either to view "All" or only the "Favorite" channels.
Note: When using digital tuner, there will be two more options: "TV" and "Radio".
3.5 RECORDED TV
This section displays your recorded TV shows.
z
z
z
z
z
z
When you play back recorded TV, you can fast forward or rewind using either the controls on
your remote control, keyboard, or on the floating toolbar. You can click the button next to the
preview window to play it in Full Screen mode. Press "Esc" to exit Full Screen.
From the View section, you can choose either "Detail" or "Thumbnail" view. Both views
show you thumbnails of the available photos and folders; "Detail" view includes file/folder
names and dates.
From the Sort section, choose to arrange the photos according to name or date.
To trim a video, click the scissors icon to the right of the file.
To rename a video file, click the "A_" icon to access a virtual keyboard.
Click the Delete (trash can) icon to delete a file.
3.6 Burn To Disc
Create a DVD or VCD (depending on your settings) containing the selected files. Burn one or
more video clips to disc. Browse to the folder that contains the videos, and select the specific files
you want.
z
z
z
z
z
Check the video files you want to burn to a disc. Click again to deselect (uncheck) a video
file.
To trim a video clip, or to choose the frame be used as the chapter button thumbnail, click the
scissors icon to the right of the file name.
Click the disc settings button, to select the proper disc drive, change video format and modify
other disc options.
Click the DVD Menu Design button to personalize your DVD disc with a custom title and
graphics.
When you’re ready to make a disc, click "Burn."
3.7 SCHEDULE
This section lets you program the application to record TV shows, then the application will
monitor the schedule and record the scheduled programs automatically on the correct day/time.
z
Add - Lets you enter in a new program for recording:
z
Enter the name of the program (click "A_" to access a virtual keyboard), then select a channel,
recording Frequency (once, daily, or weekly), and set the start/stop recording time.
Modify - Edit the recording details of the selected item.
z
z
History - Display a history of your recorded TV shows.
z The selected recorded program can be shown in the preview area.
z Click the Delete (trash can) icon to delete a file.
z Click the "Clear All" button to discard all the files.
The "Frequency" option enables you to filter shows by how often they are recorded (once, daily,
and weekly).If conflicting recording sessions are scheduled, you will be presented with a summary
of the conflicts and asked to update the schedule.
tvtv schedules - Download program schedules from the tvtv website. (The option is only available
when you are using the tvtv EPG.)
3.8 TELETEXT
This section lets you watch the teletext. The available teletext channels are listed in the preview
area.
Move your mouse to select different teletext channels. The selected titles will be shown on the red,
green, yellow and blue area. Click the button with the corresponding color to watch it.
z Click the "Live TV" button to go back to the TV screen.
z Click the "Teletext Home" button to go back to the teletext main index page.
Note: This function is not available in all countries. (Typically only Europe.)
Note: For detailed information and operations of the TotalMedia™ software, please check the
TotalMedia™ User’s Manual included in installation CD.
Chapter 4: Using the Remote Control
4.1 Installing Batteries
Please draw out the plastic from remote
control.
4.2 Remote controller functions
1. ON/OFF: Open/Close TotalMedia program.
2. Back: Cancel the setting
3. Mute: click to mute the audio
4. OK: Enter the set
5. Vol+/Vol-: click to enlarge/reduce volume.
6. Ch+/Ch-: click to switch previous/next channel.
7. 0-9 key: Number keys.
8. ↑←↓→: Move Cursor U p/ Right / Down / Left button.
Chapter 5: Technical Support:
For toll free 24/7 Technical Support or Installation Hotline contact information please visit
our web site at http://www.encore-usa.com
Note:
Toll free calls are within the 50 states of the United States only. Our international toll call
(fee based) phone number, 24/7 technical support and installation hotline is also available.
Toll rates and other fees are based by your local Long Distance phone carriers.
2007/06/28
Version 0.91