1
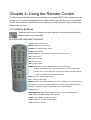
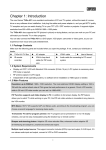
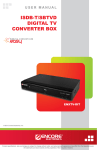
ENXTV-X2
External TV Tuner PRO
(Remote controller included)
ENXTV Series
User’s Guide
ENXTV-X2 User’s Guide
User’s Notice
No part of this manual, including the products and software described in it, may be reproduced,
transmitted, transcribed, stored in a retrieval system, or translated into any language in any form or
by any means, except documentation kept by the purchaser for backup purposes, without the
express written permission of Encore Electronics Inc.
ENCORE ELECTRONICS INC. PROVIDES THIS MANUAL “AS IS” WITHOUT WARRANTY
OF ANY KIND, EITHER EXPRESS OR IMPLIED, INCLUDING BUT NOT LIMITED TO THE
IMPLIED WARRANTIES OR CONDITIONS OF MERCHANTABILITY OR FITESS FOR A
PARTICULAR PURPOSE. IN NO EVENT SHALL ENCORE ELECTRONICS INC., ITS
DIRECTORS, OFFICERS, EMPLOYEES OR AGENTS BE LIABLE FOR ANY INDIRECT,
SPECIAL, INCIDENTAL, OR CONSEQUENTIAL DAMAGES (INCLUDING DAMAGES FOR
LOSS OF PROFITS, LOSS OF BUSINESS, LOSS OF USE OR DATA, INTERRUPTION OF
BSINESS AND THE LINK), EVEN IF ENCORE ELECTRONCIS HAS BEEN ADVISED OF
THE POSSIBILITY OF SUCH DAMAGES ARISING FROM ANY DEFECT OR ERROR IN
THIS MANUAL OR PRODUCT.
Product warranty or service will not be extended if: (1) the product is repaired, modified or
altered, unless such repair, modification of alteration is authorized in writing by ENCORE
ELECTRONICS INC.; or (2) the serial number of the product is defaced or missing.
Products and corporate names appearing in this manual may or may not be registered
trademarks or copyrights of their respective companies, and are used only for identification or
explanation and to the owners’ benefit, without intent infringe.
Windows, MS-DOS, and DirectX are registered trademarks of Microsoft Corporation.
Adobe and Acrobat are registered trademarks of Adobe Systems Incorporated.
The product name and revision number are both printed on the product itself. Manual revisions are
released for each product design represented by the digit before and after the period of the manual
revision number. Manual updates are represented by the third digit in the manual revision number.
SPECIFICATIONS AND INFORMATION CONTAINED IN THIS MANUAL ARE
FURNISHED FOR INFORMATION USE ONLY, AND ARE SUBJECT TO CHANGE AT ANY
TIME WITHOUT NOTICE, AND SHOULD NOT BE CONSTRUED AS A COMMITMENT BY
ENCORE ELECTRONICS INC. ENCORE ELECTRONICS INC. ASSUMES NO
RESPONSIBILITY OR LIABILITY FOR ANY ERRORS OR INACCURACIES THAT MAY
APPEAR IN THIS MANUAL, INCLUDING THE PRODUCTS AND SOFTWARE DESCRIBED
IN IT. Encore Electronics Inc. Copyright ©2008. All Rights Reserved.
2
ENXTV-X2 User’s Guide
Contents:
Chapter 1: Introduction 4
1.1 Package Contents ................................................................................................................. 4
1.2 System Requirements........................................................................................................... 4
1.3 Main Features....................................................................................................................... 5
Chapter 2: Getting Started 6
2.1 Rear panel connectors .......................................................................................................... 6
2.2 Right Side panel connectors................................................................................................. 6
2.3 Wire connection ................................................................................................................... 7
2.4 External Video / Audio input connection............................................................................. 7
Chapter 3: Use the ENXTV-X2 8
3.1 PC side VGA resolution setting ........................................................................................... 8
Chapter 4: Using the Remote Control 10
4.1 Installing Batteries ............................................................................................................. 10
4.2 Remote controller functions............................................................................................... 10
4.3 How to use MENU..............................................................................................................11
4.4 OSD display MENU Setting.............................................................................................. 12
Chapter 5: Supporting Center:
16
3
Chapter 1: Introduction
The ENXTV-X2 is an excellent solution in combining a computer and a TV system without
the need for screw driver or software driver. Enhance your computer to a home theater
quality system adding a high quality TV receiver, just plug-in cables and power adapter.
The ENXTV-X2 provides high quality, high resolution of up to 1680x1050. Watch your
favorite TV program while using your computer at the same time or watch your favorite TV
program even your computer is turned-off12.
12
If the speaker cable is hooked up directly to the computer’s the PC sound card the audio will not work. The audio speaker cable
should be connected to the ENXTV-X2Audio-Out port when watching TV while the computer is turned off.
1.1 Package Contents
Please confirm the following parts are included when open the package. If not, please
contact your distributor or dealer.
ENXTV-X2 External TV Tuner
IR Remote Control
2 pc. AAA Batteries (for remote controller)
Switching AC adapter
VGA-In loop back cable (for PIP mode)
3.5 mm stereo Audio cable
User’s Manual
1.2 System Requirements
Display unit CRT / LCD with Standard VGA connector (D-Sub 15 pin). A computer is
necessary when in PIP mode.
RF antenna signal or CATV signal.
Independent of OS (operating system), no software driver installation or HDD space is
needed.
1.3 Main Features
Resolution up to WSXGA:
1680x1050 Resolution. The most optimized VIDEO display
setting is 1024×768 with the vertical refresh rate at 75Hz gives the best performance In a generic
15 inch LCD monitor, while in 20 inch LCD Wide monitor users can set up to 1680x1050
PIP Function supports sub-Video display in PC: In addition to a full screen display, the PIP
feature allow the user to watch TV programs while using the computer, the PIP sub video
Window can be move around to the any places of the monitor screen.
16 Channels TV wall for program preview: The TV program can be previewed with 4 ,9 or 16
display Windows, and can be easily manipulated by a function key or remote control key
More sharper and stunning pictures: Adaptive 3D noise reduction filter. Enhanced motion
adaptive 3D de-interlacing and adaptive Luma/Chroma enhanced engine.
Multiple input/output source: Supported connectors include (RCA) input and output、S-VHS
input、3.5 mm stereo audio input and output、convert for VCR、DVD connection.
Chapter 2: Getting Started
2.1 Rear panel connectors
ENXTV-X2 cable connection is easy. The most typical cable connections are shown in the picture
diagram below. Make sure the power cable is not connected when hooking these cables in.
CONNECTOR
TYPE
DESCRIPTION
DC In
5mm, INT+, EXT-
AC adapter, power in (5V, 2 A)
VGA Out
15 pin D-Sub
ENXTV-X2 main video output. Connects to CRT/LCD
connector
Monitor
8pin Mini DIN
VGA-In loop back cable。The other end of this cable
connector
connects to the PC’s VGA D-sub 15 pin connector.
3.5mm stereo
Audio out connects to the speaker.
VGA In
Audio Out
connector
Audio In
Video Out
3.5mm stereo
Audio In Connect to PC sound system (Audio-out of sound
connector
card).
RCA Jack
ENXTV-X2 Video output. Can be used to connect to Video
input of display unit。
RF
TV antenna
TV or CATV signal-in connector
connector
2.2 Right Side Panel Port Connectors
CONNECTOR
TYPE
DESCRIPTION
S-Video In
7-pin Min Din
S-VHS type external video input source. Can be used for
connector
DVD, VCR or Camcorder
RCA Jack
External composite video input source, can be connected to
Video In
DVD, VCR or Camcorder.。
Audio In (L/R)
RCA Audio jack
RCA audio jack used for external audio input source.
2.3 Cable Connections
There is no sequential requirement which cable should be connected first except AC
adapter, it is strongly recommended connecting the AC adapter as the last step when
finish all the connection.
*For Macintosh users: The connector or cable requirements may be different, the
ENXTV-X2 package does not contain such accessories. Owners may need to get it form
the Macintosh store.
2.4 External Audio/Video input connection
When connecting the ENXTV-X2 with the external A/V source such as DVD, VCR or Camcorder
and to enjoy the high quality visual / sound entertainment, please turn off the power and make the
correct connection as the diagram indicated below.
Chapter 3: Using the ENXTV-X2
This chapter shows how to use the ENXTV-X2.
3.1 PC side VGA resolution setting
ENXTV-X2 can be used independent of PC system for a full screen display. In addition to
the full screen display, when it is connected in conjunction with the Computer system, the
PIP sub video Window can also be displayed at the top of PC monitor screen to let the
user watch TV while using the computer at the same time, or just enjoy a full screen TV
viewing..
When the ENXTV-X2 is use as a standalone TV box (computer CPU is turned off), it is
completely independent with the computer’s VGA or monitor screen settings. Resolution
and other adjustments depend on the monitor or the ENXTV-X2 settings.
While in PIP mode (computer is turned on and in PIP mode), in order to have the optimized
resolution and performance, we recommend setting the computer VGA in XGA mode
(1024x768) and monitor’s refresh rate at 75Hz. Below, illustrates the computer VGA
settings.
1. In windows system, the VGA resolution
setting page can be invoked by a right
click on the mouse when it is pointed at an
empty monitor screen area.
2. When the “Display properties” page is
shown, select the recommended value
1024x768.
3. Click on the “Advanced” button, to select
the monitor refresh rate, the
recommended vale is 75Hz
4. Click on OK to close the property page.
5. Windows system will change the display
mode to your setting and ask whether to
use this display mode or not, please click
on OK to confirm the setting.
6. In Windows ME/95/98, the changes
requires al reboot for the new setting to
take effect.
Chapter 4: Using the Remote Control
The included Infra Red Remote control allows you to operate ENXTV-X2 remotely, such as
turning your TV on/off, changing channels, adjust volume, etc. Aim the front of the Remote
Control at the Remote Control Receiver and press the control buttons as you would on the
infrared rays receiver.
4.1 Installing Batteries
Open the back cover of remote controller and put in two pieces AAA batteries
(alkaline battery recommended).
4.2 Remote controller functions
Power: power on/off control.
MUTE: Volume mute or resume.
Numbers: Program number select
TV/AV: Source select.
PC/TV: Switch to select PIPPC mode or full screen TV mode.
CH+: Channel Up.
CH-: Channel Down.
VOL+: Volume Up.
VOL-: Volume Down.
MENU: When in Full Screen Mode, this key is use for settings.
When in PIP Mode, this is use to move the PIP screen in conjunction
with the CH+/- keys to move PIP screen high and low, and with the VOL
+/- keys to move the PIP screen right and left
EXIT: Exit form current Menu setting.
PIP:
Enter into PIP mode.
MODE: When in PIP Mode: MODE key is use to change the PIP screen display
size. When in Full Screen Mode: MODE key is use to change the ENXTV-X2
resolution settings. Example: 800x600x85 Hz to 1024x768 60Hz,
1280X1024Hz.
MULTI-DISPLAY: Multi-picture display. Displays up to 16 video Windows.
SKIP: Skip
/ No skip current TV channel.
SLEEP: Set to Sleep timer and Off Sleep.
SYS: double click to return default setting
OSD: On Screen Display
4.3 How to use the Menu
In this section the ENXTV-X2 Main Menu and its operations will be discussed here. Press
the MENU button from the remote control to get to this screen (TV mode must be in Full
Screen Mode)
Use the CH+/CH- keys to move the cursor to the desired item (Left and Right), once the
desired selection is highlighted click MENU key to select it. Use the VOL+/VOL- keys
move the highlights down to every sub menus and use MENU key to select.
The EXIT key on remote controller returns to previous menu setting page or when in the
main menu screen this key will exit from the main menu screen. If there is no activity within
5 seconds the OSD Menu display will automatically exit out.
4.4 OSD Display MENU Settings
PIC
PICTURE
SOUND
ADVANCED SETTING
PICTURE
BRIGHT: Sets for screen brightness
CONTRAST: Sets for screen contrast
SATURATION: Sets for saturation
HUE: Sets for Color Hue
SHARPNESS: Sets for sharpness
SOUND
VOLUME: To adjust Audio Out volume
MUTE: Audio Out volume mute
BALANCE: To adjust Audio Left or right track Out volume
ADVANCED SETTING
NOISE REDUCTION: 3 degrees adjust image noise reduction
BLACK LEVEL: 2 degrees adjust image black level
CHANNEL SURF: 4,9,16 video division of TV wall mode
PIP MODE SET: 4,9,16 video division of PIP mode
PS-GAME: 2 status about support PS2 game. If “ON”,
you can get well quality image when playing PS2 game.
TUNE
CURRENT CH: Display current TV channel
EXCHANGE CH: Change the current channels sequence list
EXCHANGE SAVE: Save the adjusted channels sequence list
SKIP: Skip/no skip current TV channel
FINE TUNING: Adjust current TV signal quality
AUTO SCAN: Auto process of scanning TV signal
MANUAL SCAN: manual process of scanning TV signal
SYS
TVSYSTEM: PAL system standard setting
BLUESCREEN: Background color is blue when no signal input
VIDEOSOURCE: TV\AV\SV input video source selection
DISPLAY SCALE: Switch to wide image resolution.
RESOLUTION: Output image resolution selection
DISPLAY TYPE: Support CRT OR LCD output
RESET: Comeback factory default setting
OSD
LANGUAGE: OSD menu language selection: Chinese and English
H POSITION: Adjust OSD Horizontal position
V POSITION: Adjust OSD vertical position
BACK COLOR: Change the OSD back color
TRANSPARENCY: Adjust OSD background transparency
OSD TIMEOUT: OSD caption reserved time
Chapter 5: Technical Support
Visit our web site at http://www.encore-usa.com for our tech support contact information
and policy information.
Version: 1.0
2008/01/16