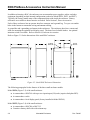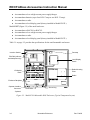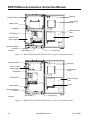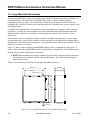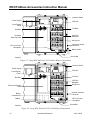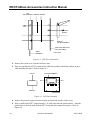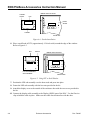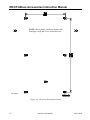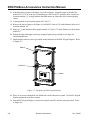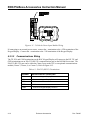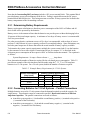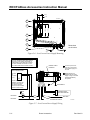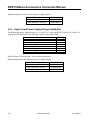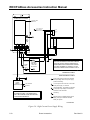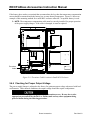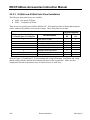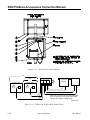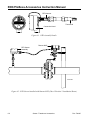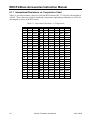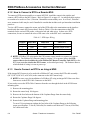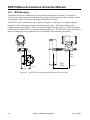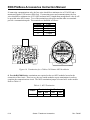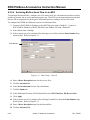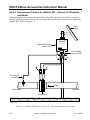
1
Form Number A4637 Part Number D301061X012 March 2010 ROC/FloBoss Accessories (For FloBoss 100-Series, ROC300-Series, FloBoss 407, FloBoss 500-Series, and ROC800-Series) Instruction Manual Flow Computer Division Website: www.emersonprocess.com/remote ROC/FloBoss Accessories Instruction Manual Revision Tracking Sheet March 2010 This manual is periodically altered to incorporate new or updated information. The date revision level of each page is indicated at the bottom of the page opposite the page number. A major change in the content of the manual also changes the date of the manual, which appears on the front cover. Listed below is the date revision level of each page. Page Title page (i), ii, 5-5, 5-6, and 5-16 All Pages All Pages All Pages All Pages Revision Mar/10 Feb/05 10/03 2/02 2/97 NOTICE Remote Automation Solutions (“RAS”), division of Emerson Process Management shall not be liable for technical or editorial errors in this manual or omissions from this manual. RAS MAKES NO WARRANTIES, EXPRESSED OR IMPLIED, INCLUDING THE IMPLIED WARRANTIES OF MERCHANTABILITY AND FITNESS FOR A PARTICULAR PURPOSE WITH RESPECT TO THIS MANUAL AND, IN NO EVENT SHALL RAS BE LIABLE FOR ANY INCIDENTAL, PUNITIVE, SPECIAL OR CONSEQUENTIAL DAMAGES INCLUDING, BUT NOT LIMITED TO, LOSS OF PRODUCTION, LOSS OF PROFITS, LOSS OF REVENUE OR USE AND COSTS INCURRED INCLUDING WITHOUT LIMITATION FOR CAPITAL, FUEL AND POWER, AND CLAIMS OF THIRD PARTIES. Bristol, Inc., Bristol Canada, BBI SA de CV and Emerson Process Management Ltd, Remote Automation Solutions division (UK), are wholly owned subsidiaries of Emerson Electric Co. doing business as Remote Automation Solutions (“RAS”), a division of Emerson Process Management. FloBoss, ROCLINK, Bristol, Bristol Babcock, ControlWave, TeleFlow and Helicoid are trademarks of RAS. AMS, PlantWeb and the PlantWeb logo are marks of Emerson Electric Co. The Emerson logo is a trademark and service mark of the Emerson Electric Co. All other trademarks are property of their respective owners. The contents of this publication are presented for informational purposes only. While every effort has been made to ensure informational accuracy, they are not to be construed as warranties or guarantees, express or implied, regarding the products or services described herein or their use or applicability. RAS reserves the right to modify or improve the designs or specifications of such products at any time without notice. All sales are governed by RAS’ terms and conditions which are available upon request. RAS does not assume responsibility for the selection, use or maintenance of any product. Responsibility for proper selection, use and maintenance of any RAS product remains solely with the purchaser and end-user. © 1997-2010 Remote Automation Solutions, division of Emerson Process Management. All rights reserved ii Rev. Mar/10 ROC/FloBoss Accessories Instruction Manual TABLE OF CONTENTS Section 1 – Introduction ............................................................................................... 1-1 1.1 SCOPE OF MANUAL ..................................................................................................................... 1-1 1.2 ORGANIZATION OF MANUAL ....................................................................................................... 1-1 Section 2 – Freestanding Enclosure............................................................................. 2-1 Section 3 – Mountable Enclosures............................................................................... 3-1 3.1 SMALL MOUNTABLE ENCLOSURES.............................................................................................. 3-1 3.2 LARGE MOUNTABLE ENCLOSURES .............................................................................................. 3-6 Section 4 – Enclosure Accessories ............................................................................... 4-1 4.1 LOCAL DISPLAY PANEL (ROC300-SERIES)................................................................................. 4-1 4.2 ROC KEYPAD DISPLAY (ROC800-SERIES)................................................................................. 4-6 4.3 INTRUSION SWITCHES ............................................................................................................... 4-16 4.4 GFI DUPLEX RECEPTACLE ........................................................................................................ 4-22 Section 5 – Power Accessories...................................................................................... 5-1 5.1 OVERVIEW .................................................................................................................................. 5-1 5.2 BATTERY ENCLOSURES ............................................................................................................... 5-1 5.3 BATTERIES .................................................................................................................................. 5-5 5.4 POWER SUPPLY/CHARGER........................................................................................................... 5-8 5.5 SOLAR ARRAYS ......................................................................................................................... 5-18 Section 6 – Sensor / Transducer Accessories.............................................................. 6-1 6.1 RTD SENSOR............................................................................................................................... 6-1 6.2 MULTI-VARIABLE SENSOR (MVS).............................................................................................. 6-5 6.3 DUAL-VARIABLE SENSOR (DVS).............................................................................................. 6-22 Section 7 – Communications Accessories ................................................................... 7-1 7.1 LOCAL OPERATOR INTERFACE CABLE......................................................................................... 7-1 7.2 LOCAL OPERATOR INTERFACE SWITCH ....................................................................................... 7-1 iii Table of Contents Rev. Feb/05 ROC/FloBoss Accessories Instruction Manual 7.3 MAST KIT ....................................................................................................................................7-6 Index ................................................................................................................................I-1 iv Table of Contents Rev. Feb/05 ROC/FloBoss Accessories Instruction Manual SECTION 1 – INTRODUCTION 1.1 Scope of Manual This manual describes the installation of accessory items for the FloBoss™ 100-Series Flow Managers, ROC300-Series Remote Operations Controllers, the FloBoss 407 Flow Managers, FloBoss 500-Series Flow Managers, and ROC800-Series Remote Operations Controllers. These accessories enhance or complement the functionality of the unit. Accessories, such as solar panels and enclosures, help make it possible to have a fully functional ROC or FloBoss installation in a remote location. This manual covers only the accessories designed or assembled at the factory. Both the mechanical and electrical aspects of installation are described, as applicable. For information on options that install in a ROC or FloBoss unit, such as input/output (I/O) modules and communications cards, refer to the appropriate ROC or FloBoss instruction manual. 1.2 Organization of Manual This manual provides information about the following accessory items: ♦ Section 2 – Freestanding Enclosure. Applies to ROC800-Series and ROC300-Series. ♦ Section 3 – Mountable Enclosures. Applies to ROC300-Series. ♦ Small. ♦ Large. ♦ Section 4 – Enclosure Accessories. ♦ Local Display Panel. Applies to enclosures for the ROC300-Series. ♦ Keypad Display. Applies to enclosures for the ROC800-Series. ♦ Intrusion Switch. Applies to Freestanding and Mountable enclosures and FloBoss 500Series. ♦ Duplex Receptacle. Applies to Freestanding and Mountable enclosures. ♦ Section 5 – Power Accessories. ♦ Battery Enclosures. Applies to Freestanding and Mountable enclosures. ♦ Batteries. Applies to all products, except the FloBoss 100-Series. ♦ Power Supply/Charger. Applies to all products. ♦ Solar Arrays (Panels) Applies to all products, except the ROC800-Series. ♦ Section 6 – Sensor/Transducer Accessories. ♦ RTD Sensors. Applies to all products. ♦ Dual-Variable Sensors. Applies to FloBoss 103, and 503. ♦ Multi-Variable Sensors. Applies to ROC800-Series, ROC300-Series, FloBoss 407, and FloBoss 503 (with remote MVS interface). ♦ Section 7 – Communications Accessories. ♦ Local Operator Interface Cable. Applies to all products. 1-1 Introduction Rev. Feb/05 ROC/FloBoss Accessories Instruction Manual ♦ Local Operator Interface Switch. Applies to all products. ♦ Mast Kit. Applies to ROC300-Series. 1-2 Introduction Rev. Feb/05 ROC/FloBoss Accessories Instruction Manual SECTION 2 – FREESTANDING ENCLOSURE The freestanding enclosure bolts to a concrete pad or floor and provides environmental protection for electronic equipment, such as a ROC300-series or ROC800-Series Remote Operations Controller. The enclosure is ideally suited to installations where exposure to wind, rain, and icing is a concern. The freestanding design allows the unit to be placed on-site without the need for erecting a pipestand or protective shed, thus minimizing installation costs. Refer to Figure 2-1. Solar Panel (Optional) Local Display Panel (Optional) Electronics Compartment Battery Box Base DOC0287A Figure 2-1. Freestanding Enclosure The freestanding ROC enclosure (ordered as model EN23) consists of a main electronics compartment and a battery box with an integral mounting base. The electronics compartment and battery box have hinged doors. The electronics compartment of the enclosure can accommodate a ROC306, a ROC312, or a ROC364 with up to 64 input/output (I/O) points. This compartment can also house a power supply, a radio, and a local display panel. Figure 2-2 displays the typical components that are installed by the factory inside the enclosure. In addition, the enclosure can accommodate up to three solar panels, batteries, an antenna mast, and other components. Many of these items are available as accessories. Refer to Sections 4, 5, and 7 for information on accessories used with the freestanding enclosure. 2-1 Freestanding Enclosure Rev. Feb/05 ROC/FloBoss Accessories Instruction Manual NOTE: If utilizing a direct mount solar panel, use care to find a suitable location to take advantage of solar exposure. Refer to Section 5, Power Accessories. The enclosure features an external operator interface connector (for the interface cable accessory), a ground lug, hinged doors with locking latches, cutouts and studs for the optional local display panel, and pre-punched holes for field and solar panel wiring. The latch handle on the door of the electronics compartment can be padlocked, and the battery box door is secured with a latch that opens only with a turnbuckle key. The enclosures are constructed of heavy-gauge steel with a baked-on corrosionresistant finish. An intrusion switch (see Section 4, Enclosure Accessories) is available for the electronics compartment to provide a contact closure whenever the door is opened. This contact closure can be monitored through the ROC, using a Discrete Input, to provide a security alarm. Figure 2-3 gives the freestanding enclosure mounting dimensions. Specifications for the freestanding enclosure display in Table 2-1, on page 2-4. 2-2 Freestanding Enclosure Rev. Feb/05 ROC/FloBoss Accessories Instruction Manual ROC364 Local Display Panel Intrusion Switch Radio Power Supply DOC0288T Figure 2-2. Typical Component Layout (ROC364 Shown) 2-3 Freestanding Enclosure Rev. Feb/05 ROC/FloBoss Accessories Instruction Manual 25.50 (648) 5.62 (124) WIRING PORT 8.44 (214) 16.88 18.00 19.12 (429) (457) (485) .75 (19) DIA 4 PLACES DOC0128B 5.00 (127) 27.50 INCH (mm) (700) Figure 2-3. Base Bolt Pattern and Dimensions Table 2-1. Freestanding ROC Enclosure Specifications Freestanding ROC Enclosure Specifications CONSTRUCTION 14-gauge welded steel wrapper and doors, with zincplated steel hinges. Battery box has turnbuckle-style latch. Main door utilizes a 3-point latching system; handle can be padlocked. DIMENSIONS Overall: 1.67 m H by 485 mm W by 700 mm D (66 in. H by 19.1 in. W by 27.5 in. D). Main box: 1.32 m H by 480 mm W by 244 mm D (52 in. H by 19 in. W by 9.6 in. D). Battery box: 488 mm H by 472 mm W by 300 mm D (19.2 in. H by 18.6 in. W by 11.8 in. D). FINISH Baked-on polyester urethane in black and regal gray. 2-4 MOUNTING Refer to the Base Bolt Dimensions above. WEIGHT 91 kg (200 lb). APPROVAL RATING Type 3R rating. INTRUSION SWITCH (OPTIONAL) Type: SPST, normally-closed, spring-loaded plunger switch, with two push-on terminals. Maximum Contact Rating (Resistive Load): 100 mA at 100 Vdc. Approvals: Approved by CSA for hazardous locations Class I, Division 2, Groups A, B, C, and D. Freestanding Enclosure Rev. Feb/05 ROC/FloBoss Accessories Instruction Manual SECTION 3 – MOUNTABLE ENCLOSURES This section contains the following information: Section Page Number 3.1 Small Mountable Enclosures 3-1 3.2 Large Mountable Enclosures 3-6 3.1 Small Mountable Enclosures The small mountable ROC enclosure displayed in Figure 3-1 houses a ROC300-series Remote Operations Controller and related equipment, providing the equipment with protection from outdoor environmental conditions. The enclosure mounts on a wall or, with an optional kit, to a pipestand (see Section 3.1.1, Pipestand Mounting Assembly, on page 3-5). Figure 3-1. Small Mountable ROC Enclosure NOTE: When mounting an enclosure outdoors, do not orient the enclosure with the hinges at the bottom because moisture and dirt collect at the bottom. This could cause the hinges to prematurely corrode. 3-1 Mountable Enclosures Rev. Feb/05 ROC/FloBoss Accessories Instruction Manual In addition to housing a ROC, the enclosures can accommodate power supplies, radios, and other equipment, depending on their internal configuration (ordered as Model EN34, EN35, and EN37). Typically, the factory installs most of the components that reside inside the enclosure. Battery enclosures are available to house batteries as needed. Refer Section 5, Power Accessories. Each of these enclosures has an operator interface connector and a ground lug. Two pre-cut conduit holes in the bottom accommodate wiring and antenna cabling. A ground bar and a grounding stud mount in the enclosures. The enclosure doors have cutouts and studs for mounting the optional local display panel. The doors have lockable latches. An optional intrusion switch is available. Refer to Section 4, Enclosure Accessories. Refer to Figure 3-2 for the dimensions of the small ROC enclosure. Figure 3-2. Small ROC Enclosure Dimensions The following paragraphs list the features of the three small enclosure models. Model EN34 (Figure 3-3) of the small enclosure: ♦ Accommodates a ROC364 with up to two input/output (I/O) racks (requires backplate BP2). ♦ Accommodates a radio. ♦ Accommodates a local display panel (factory-installed in Model EN34L). Model EN35 (Figure 3-4) of the small enclosure: ♦ Accommodates a ROC306 or ROC312. ♦ Contains a battery shelf with acid-resistant tray. 3-2 Mountable Enclosures Rev. Feb/05 ROC/FloBoss Accessories Instruction Manual ♦ Accommodates a low or high-current power supply/charger. ♦ Accommodates batteries (up to four B120 7-amp or one B121 33-amp). ♦ Accommodates a radio. ♦ Accommodates a local display panel (factory-installed in Model EN35L). Model EN37 (Figure 3-5) of the small enclosure: ♦ Accommodates a ROC306 or ROC312. ♦ Accommodates a low or high-current power supply/charger. ♦ Accommodates a radio. ♦ Accommodates a local display panel (factory-installed in Model EN37L). Table 3-1 on page 3-5 provides the specifications for the small mountable enclosures. Intrusion Switch* Doorstop ROC364 (with tworack backplate only)* Local Display Panel* Radio Mounting Plate I/O Module Rack* Radio* Enclosure Backplate Operator Interface Connector Ground Bar Ground Lug *Optional Figure 3-3. Model EN34 Mountable ROC Enclosure (Typical Component Layout) 3-3 Mountable Enclosures Rev. Feb/05 ROC/FloBoss Accessories Instruction Manual Doorstop Intrusion Switch* Local Display Panel* Battery Shelf Backplate Radio Mounting Plate ROC306/312* Radio* Small or Large Power Supply* Operator Interface Connector *Optional Ground Bar Ground Lug Figure 3-4. Model EN35 Mountable ROC Enclosure (Typical Component Layout) Intrusion Switch* Doorstop Small or Large Power Supply* Local Display Panel* Backplate ROC306/312* Radio Mounting Plate Radio* Battery Shelf Operator Interface Connector *Optional Ground Bar Ground Lug Figure 3-5. Model EN37 Mountable ROC Enclosure (Typical Component Layout) 3-4 Mountable Enclosures Rev. Feb/05 ROC/FloBoss Accessories Instruction Manual Table 3-1. Mountable Enclosure (Small) Specifications ROC Enclosure Specifications MOUNTABLE ROC ENCLOSURES Construction: 14-gauge welded steel box and door with stainless steel hinges and latches. Model EN35 with battery shelf has acid-resistant plastic tray. Rating: CSA Type 4 (NEMA 4 equivalent). Finish: Baked-on polyester urethane in RAL 7035 gray. Dimensions: Refer to the ROC Enclosure Dimensions. Battery shelf in EN35 model is 135 mm by 310 mm (5.3 in by 12.2 in.), with 226 mm (8.9 in.) of access height. Wall Mounting: See ROC Enclosure Dimensions. Pipestand Mounting: Mounts using optional kit. Weight (empty): 17.3 kg (38 lb). INTRUSION SWITCH (OPTIONAL) Type: SPST, normally-closed, spring-loaded plunger switch, with push-on terminals for NC and Common. Maximum Contact Rating (Resistive Load): 100 mA @ 100 V dc. Weight: 30 g (1 oz) nominal. Approvals: Approved by CSA for hazardous locations Class I, Division 2, Groups A, B, C, and D. 3.1.1 Pipestand Mounting Assembly This optional assembly allows the small enclosures to mount on a 2-inch pipestand. The pipestand mounting assembly consists of the following: Description 5⁄ 3-5 16 U-bolt, 3.75 × 2.50 × 1.50, SST Quantity 2 Keps Nut, 5⁄16 -18UNC - 2B, SST 4 Washer, Plain, .34 × .69 × .065, SST Bracket, Pipe mounting enclosure, 1¼-2½ 4 2 Mountable Enclosures Rev. Feb/05 ROC/FloBoss Accessories Instruction Manual 3.2 Large Mountable Enclosures The large mountable ROC enclosures typically house a ROC364 Remote Operations Controller and related equipment. The enclosures are available either with or without a ventilated battery compartment. Refer to Figure 3-6 for dimensions. Both can accommodate a ROC364 that has a backplane (BP2 or BP4) for either two or four input/output (I/O) module racks, a power supply, and a local display panel. In addition to housing the ROC, the enclosures can accommodate power supplies, radios, and other equipment. Typically, the factory installs most of the components that install inside the enclosure. Separate battery enclosures are available to house batteries as required. Refer Section 5, Power Accessories. Each enclosure features an operator interface connector, welded-on mounting ears, a screw-clamp secured hinged door, provision for a padlock, cutouts and studs for the optional local display panel, a ground bar, circuit breakers, and wiring ducts. An optional intrusion switch is also available. Refer to Section 4, Enclosure Accessories. Figure 3-7 shows a large enclosure (model EN32) without a battery compartment, and Figure 3-8 shows a large enclosure (model EN31) with the optional battery compartment. Note that those items marked with an asterisk in the figures are optional. NOTE: When mounting an enclosure outdoors, do not orient the enclosure with the hinges at the bottom because moisture and dirt collect at the bottom. This could cause the hinges to prematurely corrode. Table 3-2 provides the specifications for the large mountable enclosures. 30.00 (762) 13.35 (339) 24.00 (610) 12.00 (305) 2X .44 (11) DIA 36.00 (914) 37.25 (946) INCH (mm) 2X .44 (11) Figure 3-6. Large ROC Enclosure EN31 and EN32 Dimensions 3-6 Mountable Enclosures Rev. Feb/05 ROC/FloBoss Accessories Instruction Manual *Intrusion Switch *Power Supply *ROC364 *Local Display Panel Breakers *I/O Rack Enclosure Mounting Panel *ROC364 Backplate Wiring Duct Operator Interface Connector *GFI Line Power Receptacle Battery Cable Ground Bar *Optional Figure 3-7. Large ROC Enclosure EN32 without Battery Compartment *Intrusion Switch *Power Supply *ROC364 *Local Display Panel *I/O Rack Breakers *ROC364 Backplate Wiring Duct Enclosure Mounting Panel Operator Interface Connector Battery Compartment *Battery *GFI Line Power Receptacle Ground Bar *Optional Figure 3-8. Large ROC Enclosure EN31 with Battery Compartment 3-7 Mountable Enclosures Rev. Feb/05 ROC/FloBoss Accessories Instruction Manual Table 3-2. Mountable Enclosure (Large) Specifications ROC Enclosure Specifications CONSTRUCTION 14-gauge welded steel box and hinged door with gasket. Door secured with stainless steel screwclamp fasteners. Enclosure available with or without internal battery compartment. Finish: Baked-on white polyester urethane. Installed Circuit Breakers: One 15 A breaker for AC power and one 10 A breaker for DC power. DIMENSIONS Nominally 914 mm H by 762 mm W by 305 mm D (36 in. H by 30 in. W by 12 in. D). MOUNTING Wall mounted, using welded-on mounting ears. WEIGHT (EMPTY) Without Battery Compartment: 58 kg (128 lb.). With Battery Compartment: 62 kg (136 lb.). APPROVAL RATING Designed to meet Type 4 (NEMA 4 equivalent). 3-8 INTERNAL BATTERY COMPARTMENT (OPTIONAL) Enclosure is available with ventilated 14-gauge steel compartment (Type 13 rated) and lid with gasket. Inside Dimensions (useable): 251 mm H by 219 mm W by 333 mm L (9.875 in. H by 8.625 in. W by 13.125 in. L). Capacity: Holds batteries (not included) with capacity for up to 60 Amp-Hour @ 12 V or 30 Amp-Hour @ 24 V. INTRUSION SWITCH (OPTIONAL) Type: SPST, normally-closed, hermetically-sealed, spring-loaded plunger switch, with two push-on terminals. Maximum Contact Rating (Resistive Load): 100 mA at 100 Vdc. Approval Rating: Approved by CSA for hazardous locations Class I, Division 2, Groups A, B, C, and D. GFI DUPLEX RECEPTACLE (OPTIONAL) Duplex Receptacle is wired to the 120-V ac circuit breaker. The receptacle is rated for 15 Amps @ 125 V ac. Mountable Enclosures Rev. Feb/05 ROC/FloBoss Accessories Instruction Manual SECTION 4 – ENCLOSURE ACCESSORIES This section contains the following information. Section Page Number 4.1 Local Display Panel (ROC300-Series) 4-1 4.2 ROC Keypad Display (ROC800-Series) 4-6 4.3 Intrusion Switches 4-17 4.4 GFI Duplex Receptacle 4-23 4.1 Local Display Panel (ROC300-Series) The Local Display Panel (LDP) is an ASCII terminal with a 4-line by 20-character liquid crystal display (LCD) and a 4-button keypad. Refer to Figure 4-1. The LDP mounts in the door of a ROC300-series enclosure and is a display-only device. The LDP communicates to the ROC300-series unit through, and receives its power from, the Display (DSPL) connector on the ROC. The LDP allows you to view the point configuration and related point data values on-site without requiring a personal computer. The LDP uses both menu and point displays to convey ROC information. The Menu option shows list displays or point displays. The point displays provide current, relevant information specific to a point, such as an AGA flow or an Analog Input. Refer to Table 4-1 for Local Display Panel specifications. For operating instructions, refer to the Local Display Panel appendix in the respective ROC instruction manual. >I/O AGA SYS PID DB TNK UP DWN ENTER FST MSG LCD MENU Figure 4-1. Local Display Panel 4.1.1 Installing the Local Display Panel A kit is available for field installation of the Local Display Panel in a ROC enclosure that contains cutouts for the display panel in the door. If you have an older ROC enclosure without the cutouts, you can order a new door with cutouts from your sales representative. You can also purchase a kit, with a cutout template, for mounting the Local Display Panel (LDP) in other enclosures. 4-1 Enclosure Accessories Rev. Feb/05 ROC/FloBoss Accessories Instruction Manual The following Local Display Panel kits are available: ♦ FSACC-1/LCDWH – white. ♦ FSACC-1/LCDAH – RAL 7035 (light) gray. ♦ FSACC-1/LCDRH – Regal (dark) gray. Each LDP kit includes the items in the following list. Description LCD Sub-Assembly Window Gasket Display Cover Assembly 6-32 × .25 Screws 6-32 Hex Nuts Flat Wire Clips RTV Sealant Cable Assembly Quantity 1 1 1 1 2 4 2 1 1 While referring to Figure 4-2, use the following steps to install the Local Display Panel (LDP). Note that the panel is also referred to as the LCD (liquid crystal display). 1. Inspect the kit and verify that all parts are included with the kit. 4-2 Enclosure Accessories Rev. Feb/05 ROC/FloBoss Accessories Instruction Manual LCD SUB-ASSEMBLY WINDOW GASKET HEX NUT SCREW DISPLAY COVER ASSEMBLY PRE-PUNCHED DOOR (NOT INCLUDED) CABLE ASSEMBLY A6004P.WMF Figure 4-2. LDP Parts Orientation 2. Remove the cutout cover from the enclosure door. 3. Place two small drops of RTV sealant on the LDP sub-assembly to hold the window in place while installing the panel. Refer to Figure 4-3. LCD SUB-ASSEMBLY TAB UP RTV RTV WINDOW A6004A.WMF Figure 4-3. LCD Sub-Assembly 4. Remove the protective paper from the window and place the window in the cavity. 5. Place a small bead of RTV (approximately 1/16 inch wide) onto the gasket surface. Align the gasket holes to the door studs with the RTV facing the door and press into place. Refer to Figure 4-4. 4-3 Enclosure Accessories Rev. Feb/05 ROC/FloBoss Accessories Instruction Manual GASKET HOLES INSIDE VIEW OF DOOR RTV DOOR STUDS GASKET A6004B.WMF Figure 4-4. Gasket Installation 6. Place a small bead of RTV (approximately 1/16 inch wide) around the edge of the window. Refer to Figure 4-5. RTV HOLES INSIDE VIEW OF DOOR LCD SUB-ASSEMBLY WITH WINDOW A6004C.WMF Figure 4-5. Using RTV to Seal Window 7. Position the LDP sub-assembly over the door studs and press into place. 8. Fasten the LDP sub-assembly with the hex nuts provided in the kit. 9. Attach the display cover to the outside of the enclosure door with the two screws provided in the kit. 10. Connect the display cable assembly to the Display (DSPL) port of the ROC. Use the flat wire clips to hold the cable in place. Make sure the cable does not interfere with the door. 4-4 Enclosure Accessories Rev. Feb/05 ROC/FloBoss Accessories Instruction Manual Table 4-1. LDP Specifications ROC300-Series Local Display Panel Specifications DISPLAY 4-line by 20-character LCD. Display size 25 by 75 mm (1 by 3-inch). Temperature-compensated for constant contrast. PUSHBUTTONS Four contact-type with weather-proof membrane cover. PORTS Connects to DISPLAY or DSPL port on ROC with cable supplied as 0.61 meters (2 ft.) and 2.286 meters (7.5 ft.) lengths. POWER REQUIREMENTS 4.75 to 5.25 V dc, 2.5 mA nominal, and -4.50 to 5.25 V dc, 2.0 mA nominal, both supplied by ROC. ENVIRONMENTAL Operating Temperature: -20 to 70°C (-4 to 160°F). Storage Temperature: -50 to 85°C (-58 to 185°F). Operating Humidity: To 95% relative humidity, non-condensing. EMI Emissions: Meets FCC Class A requirements when installed in a metallic ROC enclosure. WEIGHT 0.77 kg (1.7 lb.) nominal. APPROVALS Approved by CSA for hazardous locations Class I, Division 2, Groups A, B, C, and D. DIMENSIONS 133 mm H by 127 mm W by 20 mm D (5.25 in. H by 5 in. W by 0.8 in. D). 4-5 Enclosure Accessories Rev. Feb/05 ROC/FloBoss Accessories Instruction Manual 4.2 ROC Keypad Display (ROC800-Series) The ROC Keypad Display provides users access to the process and operational information contained in a ROC800-Series Remote Operations Controller. It allows the user to view and change parameters in the ROC unit. The two displays consist of eight-line by twenty-one character LCDs. When powered-up, the ROC Keypad Display shows ROC values in real-time. Backlighting of the LCD displays is userconfigurable. The keypad has twenty-five multi-function keys. The user can browse through lists and screens, type text, and enter numeric values. Changes made with the ROC Keypad Display take effect immediately in the ROC. Refer to Section 4.2.4 for a list of the actions of each keypad button. The ROC Keypad Display is intended for panel or enclosure mounting. The ROC unit communicates to the ROC Keypad Display through any EIA-232 (RS-232) port on the ROC800-Series unit. The ROC Keypad Display requires 10 to 30 volts dc and can be powered by the ROC’s power module or an external power source. The following tools are required for installation, removal, or wiring of a ROC Keypad Display. ♦ Phillips screwdriver, size 2. ♦ Flat blade screwdriver, size 2.5 mm (1/10-inch). ♦ Electric screwdriver, tip size 2 (can be portable battery-driven style). ♦ Drill with 0.219 inch drill bit. ♦ 1¼ inch Knockout Punch. ♦ Wrench for 8/32-inch hex nuts. The ROC Keypad Display requires no configuration at the keypad. The configuration resides in the ROC800-Series unit configuration file and is created using ROCLINK 800 software. Refer to the ROCLINK 800 Configuration Software User Manual (Form A6121) for details. 4.2.1 How to Mount the ROC Keypad Display The mounting of a ROC Keypad Display to a ROC800-Series enclosure (Models EN23 or EN37 or other Type 4 enclosure) requires the use of the gasket on the back of the ROC Keypad Display. If the ROC Keypad Display is to be mounted on a panel, the gasket may be removed. Refer to steps 1 to 10 for enclosure mounting instructions. Be sure to prepare the enclosure, using steps 1 to 6 below, before performing the mounting procedures. Refer to steps 1 to 10 if mounting on a panel that has not been pre-cut. Refer to steps 7 to 10 if mounting on a pre-cut panel. 1. Copy Figure 4-6 to a sheet of paper that you can dispose of when finished. Reduce or enlargen the drawing until Figure 4-6 is to scale. 4-6 Enclosure Accessories Rev. Feb/05 ROC/FloBoss Accessories Instruction Manual NOTE: Due to printer variations, measure this drawing to verify that it is to scale before use. mm [inch] Figure 4-6. Enclosure Mounting Locations 4-7 Enclosure Accessories Rev. Feb/05 ROC/FloBoss Accessories Instruction Manual 2. Attach the sheet of paper with Figure 4-6 to the enclosure. Orient the paper so that the line marked 95.5 (3.76) is at the top. If installing on a EN23 or EN37 enclosure door, use the two locations marked “A” to align with the threaded inserts on either side of the existing display cutout. 3. Center punch at seven locations marked “B” and “C”. 4. Remove the sheet of paper with Figure 4-6 and drill 5.6 mm (0.219 inch) diameter holes at six locations marked “B”. 5. Punch a 1 ¼-inch knockout hole (approximately 44.5 mm [1.75 inch] diameter) at the location marked “C”. 6. Deburr all edges and apply a touch-up coating of paint (not provided) to raw edges for corrosion protection. 7. Install washers and set screws (provided) on the backplate of the ROC Keypad Display. Refer to Figure 4-7. Washer Set Screw Gasket Figure 4-7. Backplate of ROC Keypad Display 8. Place six set screws through the six drilled holes in the enclosure or panel. Press ROC Keypad Display against the enclosure or panel. 9. Attach ROC Keypad Display to enclosure or panel with 8/32-inch hex nuts (provided). Refer to Figure 4-8. 4-8 Enclosure Accessories Rev. Feb/05 ROC/FloBoss Accessories Instruction Manual Enclosure wall Hex Nut View D Figure 4-8. Side View of Installed ROC Keypad Display 4.2.2 How to Install the Visor The visor generally is shipped from the factory separately. To install the visor, perform the following steps. 1. Place the visor onto the upper portion of the ROC Keypad Display. Make sure the visor fits into the retaining tabs. Refer to Figure 4-9. 2. Insert a small screw (provided) into the hole on the visor and hole in one side of the ROC Keypad Display. Refer to Figure 4-9. 4-9 Enclosure Accessories Rev. Feb/05 ROC/FloBoss Accessories Instruction Manual Figure 4-9. Visor Mounting 3. For first time installation, use an electric screwdriver with a Phillips size 2 bit to drive the screw into place. For installation after the initial installation, use a size 2 Phillips screwdriver. Make sure the screw is engaged in the threads before screwing it in. You may need to reverse the direction of the screw to engage fully. Be careful: If you install the screw without full engagement, you will strip the threads. 4. Insert a small screw (provided) in the holes on the other side of the ROC Keypad display and perform step 3 again. To remove the visor, simply unscrew each side of the visor. Take care to keep the screws; the holes in the sides of the ROC Keypad Display are intended for this type of fastener. 4.2.3 How to Wire the ROC Keypad Display The termination block accessible through the cutout on the back of the ROC Keypad Display connects wiring for the power and EIA-232 (RS-232) communications. The terminals will accept wires 16 AWG or smaller. Bare at least 5 mm (0.2-inch). Tighten the terminals to 0.22 N-m (1.95 in-lb). 4-10 Enclosure Accessories Rev. Feb/05 ROC/FloBoss Accessories Instruction Manual Table 4-2. Keypad Display Terminations TERMINAL +VIN 4.2.3.1 DESCRIPTION Input Power + -VIN Input Power – RX RS-232 Receive TX RS-232 Transmit COM RS-232 Common Power Wiring The +VIN and -VIN power terminations on the ROC Keypad Display will connect to either an external power supply delivering 12 volts dc or the Power Input Module (either the 12 volts dc or 24 volts dc model) of the ROC800-Series unit. If connecting to the 12 volts dc Power Input Module of the ROC800-Series unit, use the AUXSW+ and AUXSW- terminals which will deliver 12 volts dc to the ROC Keypad Display. The AUXSW+ termination connects to the +VIN termination of the Keypad Display; the AUXSW- termination connects to the -VIN (Input Power -) termination of the Keypad Display. You may also use the AUX+ and AUX- terminations, but the AUXSW terminations will allow the unit to switch off the ROC Keypad Display in power-loss situations. Refer to Figure 4-10. Figure 4-10. 12 Volts dc Power Input Module Wiring If connecting to the 24 volts dc Power Input Module of the ROC800-Series unit, be sure to use the AUX+ and AUX- terminals which will deliver 12 volts dc to the ROC Keypad Display. The AUX+ termination connects to the +VIN termination of the Keypad Display; the AUX- termination connects to the -VIN (Input Power -) termination of the Keypad Display. Refer to Figure 4-11. 4-11 Enclosure Accessories Rev. Feb/05 ROC/FloBoss Accessories Instruction Manual Figure 4-11. 24 Volts dc Power Input Module Wiring If connecting to an external power source, connect the + termination to the +VIN termination of the Keypad Display. Connect the – termination to the -VIN termination of the Keypad Display. 4.2.3.2 Communications Wiring The TX, RX, and COM terminations on the ROC Keypad Display will connect to the RX, TX, and GND terminations on an EIA-232 (RS-232) communications port on the ROC800-Series unit. The EIA-232 (RS-232) port can be either the Comm 2 port on the CPU or an optional communications module (Comm 3, Comm, 4, or Comm 5). Refer to Figure 4-12. Table 4-3. EIA-232 (RS-232) Terminations TERMINAL RX 4-12 KEYPAD DISPLAY CONNECTION Connect to Keypad Display TX. TX Connect to Keypad Display RX. RTS N/C DTR N/C GND Connect to Keypad Display Common. Enclosure Accessories Rev. Feb/05 ROC/FloBoss Accessories Instruction Manual Figure 4-12. Communications Wiring (CPU Comm 2 Port Shown) 4.2.4 Keypad and LEDs The keypad allows three alpha-numeric values per pad. The table below lists which LEDs indicate the various keypad functions. Table 4-4. Keypad Display LEDs FUNCTION LED Solid Red SHIFT/ALT ACTION Pressed 1 time FUNCTION ACTION Enter the red characters on the pads in upper case. Solid Blue Pressed 2 times Enter the blue characters on the pads in upper case. Blinking Red Pressed 3 times Enter the red characters in lower case. Blinking Blue Pressed 4 times Enter the blue characters in lower case. No Light Not Pressed or Shift held down for 1 second or longer Enter the black numbers and symbols. The following table lists the actions of the non-alpha-numeric keypad buttons. 4-13 Enclosure Accessories Rev. Feb/05 ROC/FloBoss Accessories Instruction Manual Table 4-5. Keypad Display Buttons KEYPAD BUTTON PREV ACTION Return to Previous list of sub-menu options. This pad is only available if a < sign appears in the lower left corner of the screen. F1 Selects the left sub-menu option. If it points to Log#-, it will decrease the logical number of the point being displayed. If it points to another screen, it will open the screen. F2 Selects the middle sub-menu option. If it points to Log#+, it will increase the logical number of the point being displayed. If it points to another screen, it will open the screen. F3 Selects the right sub-menu option, if one is there. Typically points to another screen that it will open. NEXT Go to Next list of sub-menu choices. This pad is only available if a > sign appears on the bottom line of the screen. BKSP Moves cursor back one space in Edit mode and deletes the last character. ← (Left Arrow) Returns display from sub-menu to higher menu. → (Right Arrow) Takes display to highlighted sub-menu. ENTER has the same action. ↓ (Down Arrow) Highlights item below the currently highlighted item. ↑ (Up Arrow) Highlights item above the currently highlighted item. SHIFT/ALT Enters Function mode. See table above for Function actions. ENTER Takes display to highlighted sub-menu or saves values of pressed keypad buttons. To return to the Main menu or any other higher level menu from any sub-menu, press the ← button. 4-14 Enclosure Accessories Rev. Feb/05 ROC/FloBoss Accessories Instruction Manual Table 4-6. Keypad Display Specifications Keypad Display Specifications DISPLAYS Two displays, each is 8-line by 21-character LCD. Display size 128 x 64 pixels. Backlit, configurable. DIMENSIONS 235 mm H x 134 mm W x 42 mm D (9.25 in. H x 5.25 in. W x 1.64 in. D). KEYPAD 25 touchpad keys. MOUNTING Suitable for Panel or Enclosure mounting. LEDS Two LEDs: Shift/Alt Function (Red, Blue, and Off) and one reserved for future use. ENVIRONMENTAL Operating Temperature: -20 to 70°C (-4 to 158°F). COMMUNICATIONS Connects to EIA-232 (RS-232), maximum cable length of 15 m (50 ft). POWER Input Power: 1.2 W maximum, supplied by ROC or other power source. Input Voltage: 10 to 30 V dc. WEIGHT 0.84 kg (1.85 lb), without optional visor. 0.95 kg (2.1 lb), with optional visor. HOUSING PC/Acrylic alloy, UV stabilized. 4-15 Storage Temperature: -30 to 85°C (-22 to 185°F). Operating Humidity: 0 to 95% relative humidity, non-condensing. Radiated/Conducted Transmissions: Meets the same specifications as the ROC800-Series unit in which it is installed. Radiated Emissions: Meets the same specifications as the ROC800-Series unit in which it is installed. APPROVALS Approved as Model W40124 by CSA for hazardous locations Class I, Division 2, Groups A, B, C, and D. CSA Type 4 rating when installed on enclosure per included instructions sheet Form A6164. Enclosure Accessories Rev. Feb/05 ROC/FloBoss Accessories Instruction Manual 4.3 Intrusion Switches The intrusion switch is a momentary contact switch used to detect whether the door to the enclosure is open or closed. The switch, which has a normally-closed contact, mounts in a freestanding or mountable ROC enclosure or FloBoss 500-Series enclosure. When the normally-closed contacts are wired to a Discrete Input in the ROC or FloBoss, an “On” Status is detected when the door is closed and an “Off” Status when it is open. The Status of the switch can be configured to generate an alarm when the door to the enclosure is open. Two types of intrusion switches are available: ♦ ROC 306 / 312 / 364 / 809 enclosures – ITS2 switch. ♦ FloBoss 503 / 504 enclosures – ITS3 switch. The Intrusion Switch kit includes the following items. Note that the ITS2 switch uses an L or Zshaped bracket, while the ITS3 switch uses a special Z-shaped bracket. Refer to Table 4-7 on page 4-22 for specifications on the intrusion switch. Description Switch Assembly Push-On Terminals Three feet of 22 AWG, 2-conductor cable Mounting Bracket, Z-shaped Mounting Bracket, L-shaped Machine Screw, Pan Head, 6-32 × .38 Sealing Washers Hex Nut, No. 6 Quantity Key No.* 1 2 1 1 1 2 2 2 1 – – 2 3 4 5 6 *Refer to Figure 4-13, Figure 4-14, and Figure 4-16 concerning Key No. locations. 4.3.1 Installing the Intrusion Switch Use the following steps to install the intrusion switch. Refer to Figure 4-13 through Figure 4-18. 1. Inspect the Intrusion Switch kit and verify that all parts are there. 2. Fasten the switch to the mounting bracket as shown. 3. Remove the two screws from the top, side corner of the door frame on the enclosure. 4. If no mounting holes are present, use the bracket as a template to mark the hole spacing and drill two 5⁄32-inch diameter holes to mount the bracket. 5. Mount the switch and adapter bracket assembly to the door frame with the pan-head screws that came in the kit. 6. Wire the switch to a Discrete Input (DI) on the ROC or FloBoss to monitor access activity and to provide logging and alarm capability. On a ROC, this could be a DI Source module or a built-in Discrete Input; on a FloBoss 503 or FloBoss 504, this could be a DI on the input/output (I/O) Card. Figure 4-17 shows a wiring example for a ROC using a DI Source Module. 4-16 Enclosure Accessories Rev. Feb/05 ROC/FloBoss Accessories Instruction Manual SWITCH ASSEMBLY MACHINE SCREW SEALING WASHER MOUNTING BRACKET Dimensions are in inches. Figure 4-13. Intrusion Switch Mounting for EN34, EN35, and EN37 4-17 Enclosure Accessories Rev. Feb/05 ROC/FloBoss Accessories Instruction Manual Dimensions are in inches. HEX NUT SWITCH ASSEMBLY MOUNTING BRACKET MACHINE SCREW Figure 4-14. Intrusion Switch Mounting for EN23 Enclosures 4-18 Enclosure Accessories Rev. Feb/05 ROC/FloBoss Accessories Instruction Manual TYPICAL INSTALLATION EN31, EN32 ENCLOSURES C .70 .25 .75 INSTALL USING VIEW C 5/32 DIA HOLES SCALE NONE Dimensions are in inches. A6054E.WMF Figure 4-15. Intrusion Switch Mounting for EN31 and EN32 Enclosures 4-19 Enclosure Accessories Rev. Feb/05 ROC/FloBoss Accessories Instruction Manual Figure 4-16. Intrusion Switch Mounting for FloBoss 500-Series Enclosures COM - N/C + DI SRC C A B A B C SWITCH NC A6054Ia.WMF NOTE: The Discrete Input Source Module is not included with the kit. Figure 4-17. Intrusion Switch Wiring (ROC300-Series DI Module shown) 4-20 Enclosure Accessories Rev. Feb/05 ROC/FloBoss Accessories Instruction Manual TYPICAL INSTALLATION BATTERY ENCLOSURES E E .70 .50 INSTALL USING 5/32 DIA HOLES .8 8 A6054b.wmf Dimensions are in inches. VIEW E-E (SHOWN WITH DOOR TIGHTLY LATCHED) Figure 4-18. Intrusion Switch Installation in Battery Enclosure Table 4-7. Intrusion Switch Specifications Intrusion Switch Specifications TYPE SPST, normally-closed, hermetically-sealed, spring-loaded plunger switch, with two push-on terminals. MAXIMUM CONTACT RATING (RESISTIVE LOAD) 100 mA @ 100 V dc. 4-21 WEIGHT 30 g (1 oz) nominal. APPROVALS Approved by CSA for hazardous locations Class I, Division 2, Groups A, B, C, and D. Enclosure Accessories Rev. Feb/05 ROC/FloBoss Accessories Instruction Manual 4.4 GFI Duplex Receptacle The Duplex Receptacle (ordered as model RCP1) is a Ground Fault Interrupter (GFI) dual outlet housed in a galvanized steel box, which mounts directly to the backplate in a large mountable enclosure. When mounted in the enclosure, the Duplex Receptacle is wired to the 120 volts ac circuit breaker. The receptacle is rated for 15 Amps at 125 volts ac. Figure 4-19. GFI Duplex Receptacle 4-22 Enclosure Accessories Rev. Feb/05 ROC/FloBoss Accessories Instruction Manual SECTION 5 – POWER ACCESSORIES 5.1 Overview The power for a ROC or FloBoss installation typically comes either from a line source or from a solar array. In a line-powered installation, a power supply is used, with optional battery backup. The battery backup consists of batteries with sufficient reserve to power the ROC or FloBoss and associated equipment for the duration of a typical power outage. A battery enclosure may be used to house the batteries and the power supply if the ROC or FloBoss enclosure is not so equipped. In a solar-powered installation, a solar array provides the primary power, with batteries providing power at night and during periods of cloudy weather. For general power and grounding information, please refer to the installation guidelines section in the respective ROC or FloBoss instruction manual. When installing units in a hazardous area, make sure all installation components selected are labeled for use in such areas. Installation and maintenance must be performed only when the area is known to be non-hazardous. Installation in a hazardous area could result in personal injury or property damage. To avoid circuit damage when working with the unit, use appropriate electrostatic discharge precautions, such as wearing a grounded wrist strap. This section contains the following information: Section 5.2 Battery Enclosures 5.3 Batteries 5.4 Power Supply/Charger 5.5 Solar Arrays Page Number 5-1 5-5 5-8 5-19 5.2 Battery Enclosures The battery enclosures are a welded steel box with a hinged lid, a vapor vent, and flanges to fasten the box to the floor or other horizontal surface. A partitioned battery box (model ENB2) is available. The partitioned version allows a power supply to mount in the same box and yet be isolated from the batteries. Figure 5-1 shows the partitioned battery enclosure. Table 5-1 provides specifications for the battery enclosures, including mounting dimensions. The enclosures mount on a floor or a pipestand (mounting kit included). When the non-partitioned enclosure (model ENB3) is pipestand-mounted, it will not hold the 150Amp/12-Volt and 75-Amp/24-Volt battery configurations (see Section 5.3). The partitioned battery enclosure (model ENB3) does not hold these battery configurations in either mounting method. 5-1 Power Accessories Rev. Mar/10 ROC/FloBoss Accessories Instruction Manual Cable Battery Power Battery Figure 5-1. Battery Enclosure with Power Supply Compartment (Inside View) 5.2.1 Battery Enclosure Mounting Battery enclosures may be mounted on a floor (such as a concrete pad) or on a 2-inch pipestand (freestanding pole) using the supplied mounting kit. Refer to Figure 5-2 and Figure 5-3. The kit includes two U-bolts to secure the flanges of the battery enclosure to a user-supplied pole. The pipestand mounting kit consists of the following: Description 5-2 Quantity - 18, 3.75 × 2.50 × .50 2 Washer, Plain, .34 × .69 × .065 Nut, Keps, Ext T LW, Hex 5⁄16 - 18 4 4 Bracket, U-Bolt 2 U-Bolt, 5⁄ 16 Power Accessories Rev. Mar/10 ROC/FloBoss Accessories Instruction Manual DOC0326A Figure 5-2. Installation with Floor Mounted Battery Enclosure (FloBoss 407 Shown) 5-3 Power Accessories Rev. Mar/10 ROC/FloBoss Accessories Instruction Manual DOC0327A Figure 5-3. Installation with Pipestand Mounted Battery Enclosure (FloBoss 407 Shown) 5-4 Power Accessories Rev. Mar/10 ROC/FloBoss Accessories Instruction Manual Table 5-1. Battery Enclosure Specifications Battery Enclosure Specifications CONSTRUCTION 14-gauge welded steel box and lid (hinged along length), with screw-clamp lid fasteners, vapor vent, and floor or pole-mount flanges. Available in a partitioned model (ENB2), which has a compartment and mounting plate for a power supply. Finish: Baked-on white polyester urethane. DIMENSIONS External: 410 mm L by 355 mm W by 255 mm D (16 in. L by 14 in. W by 10 in. D). Internal (useable): 387 mm L by 333 mm W by 238 mm D (15.25 in. L by 13.125 in. W by 9.375 in. D). Power supply compartment in partitioned box is 175 mm by 350 mm (7 in. by 14 in.). MOUNTING Two flanges on ends of box each have two 8 mm (0.3 in.) holes for flange mounting, with centers 425 mm by 305 mm (16.75 in. by 12 in.). Holes and U-bolt kit for pipestand mounting also provided. CAPACITY Non-partitioned box (ENB3) holds batteries supplying up to 120 Amp-Hour @ 12 V or 60 AmpHour @ 24 V. WEIGHT (EMPTY) Without Partition: 10.9 kg (24 lb.). With Partition: 12.3 kg (27 lb.). APPROVAL RATING Designed to meet NEMA Type 13. 5.3 Batteries The Batteries described in this section supplement both line-powered and solar-powered installations in all the ROC and FloBoss products, except the FloBoss 100-Series. When used in line-powered installations, the batteries serve as a backup in case of line power failure. When used in solar installations, batteries provide power for the ROC or FloBoss when the solar panels are not generating sufficient output. The standard battery configurations available from your sales representative use a 12 volt, sealed, lead-acid battery. Batteries purchased from your sales representative are for use only in the United States. The 12 volt configurations can provide 35, 75, or 150 Amp-hour capacities; 24 volt configurations can provide 35 or 75 Amp-hour capacities. The various size batteries connect in series or parallel as required to achieve the voltage and current capacity. The amount of battery capacity required for a particular installation depends upon the power requirements of the equipment and days of reserve (autonomy) desired. If other batteries are used, rechargeable, sealed, gel-cell, lead-acid batteries are recommended. The recommended 7 Amp-Hour battery types, such as are used (up to four batteries) for FloBoss 500series units, are: 5-5 ♦ Powersonic PS-1270 7.0 Amp-Hour ♦ Panasonic LCR12V7.2P 7.2 Amp-Hour ♦ Yuasa NP7-12 7.0 Amp-Hour Power Accessories Rev. Mar/10 ROC/FloBoss Accessories Instruction Manual Note that the freestanding ROC enclosure includes a DC power terminal block. This terminal block provides battery power to miscellaneous field devices. Fusing is required between the DC power terminal block and field devices. This fusing must not exceed the 10-Amp system fuse located in the battery compartment of the freestanding enclosure. 5.3.1 Determining Battery Requirements Battery requirement calculations are based on power consumption of the ROC or FloBoss and all devices that will be powered by the batteries. Battery reserve is the amount of time that the batteries can provide power without discharging below 20 percent of their total output capacity. A minimum of two days of battery reserve is recommended for a line-powered unit. For solar-powered units, a minimum reserve of five days is recommended, with ten days of reserve preferred. Add 24 hours of reserve capacity to allow for overnight discharge. Space limitations, cost, and solar panel output are all factors that affect the actual amount of battery capacity available. To determine the system capacity requirement, multiply the system current load (Isf) on the batteries by the amount of reserve time required. Instructions on how to compute “Isf” is described in the section on power consumption in the respective ROC or FloBoss instruction manual. The equation is as follows: System Requirement = Isf amps × Reserve hours = _____ Amp-hours Next, determine the number of batteries required for the calculated power consumption. Table 5-2 provides an example of the selection that would be made using the 7, 35, 75, or 150 Amp-hour batteries in a 12 volt system. For a 24 volt system, double the number of batteries required. Table 5-2. Example Battery Requirements for 12-Volt Systems Power Consumption (Amp-hours) 0-30 31-75 76-150 151-300 Battery Capacity (Amp-hours) 7.0 35 75 150 1 to 4 1 – – 1 2 – – 1 2 5.3.2 Connecting Batteries for 12-Volt Systems – Parallel Connections Multiple batteries are used in 12 volt systems when the demand required exceeds the capacity of a single battery. These batteries must be connected in parallel. Do not mix batteries of different Amp-hour capacities. The parallel connections are made as follows: ♦ Attach the system positive (+) lead and the second battery positive (+) terminal to the positive (+) terminal of the first battery. ♦ Attach the system negative (–) lead and the second battery negative (–) terminal to the negative (–) terminal of the first battery. 5-6 Power Accessories Rev. Mar/10 ROC/FloBoss Accessories Instruction Manual Whether or not multiple batteries are used, make sure that the system positive lead contains a fuse rated at no more than 10 Amps (such as the in-line fuse typically provided in the power leads supplied with the ROC enclosure). When installing units in a hazardous area, make sure installation components selected are labeled for use in such areas. Installation and maintenance must be performed only when the area is known to be non-hazardous. Installation in a hazardous area could result in personal injury or property damage. 5.3.3 Connecting Batteries for 24-Volt Systems – Series Connections In 24 volt systems, it is necessary to connect two 12 volt batteries in series. Do not mix batteries of different Amp-hour capacities. The series connections are made as follows: ♦ Attach the first battery’s positive (+) terminal to system positive (+) lead. ♦ Attach the first battery’s negative (–) terminal to the second battery’s positive (+) terminal. ♦ Attach the second battery’s negative (–) terminal to system negative (–) lead. Additional batteries should be added in pairs that are first connected in series, and then connected in parallel to the system leads. Make sure that the system positive lead contains a fuse rated at no more than 10 Amps, such as the in-line fuse typically provided in the power leads supplied with a ROC enclosure. 5-7 Power Accessories Rev. Mar/10 ROC/FloBoss Accessories Instruction Manual 5.4 Power Supply/Charger A power supply/charger is used as the primary source of power for all the ROC or FloBoss products in line-powered installations. It may be used as a power supply only or as a combination power supply and battery charger. The power supply converts alternating current (ac) line power to direct current (dc) power for operating a ROC or FloBoss and its associated accessories. Refer to Figure 5-4 and Figure 5-5. The unit provides a fully-regulated, temperature-compensated output that is protected from overcurrent conditions. POWER AC L1 L2 DC GR + T - 1 DI 2 + - DOC0110H Figure 5-4. High Current Power Supply Specifications for the power supply/charger are listed in Table 5-3, Table 5-4, and Table 5-5. NOTE: Refer to Section 5.4.4, Connecting the Power Supply/Charger to Wiring and Section 5.4.5, Installing the Thermistor Cable. 5-8 Power Accessories Rev. Mar/10 ROC/FloBoss Accessories Instruction Manual Figure 5-5. Low Current Power Supply Two high current and one low current power supply/charger models are available. For the high current model, two versions provide different output voltages: one with a 12 volt output, and one with a 24 volt output. The low current model is available only with a 12 volt output. The line power input for either model can be 115 or 230 volts ac. All power supply models are designed for hazardous areas; therefore, they do not include on/off switches. Specifications for the power supply/charger are listed in Table 5-3, Table 5-4, and Table 5-5. NOTE: Refer to Section 5.4.4, Connecting the Power Supply/Charger to Wiring and Section 5.4.5, Installing the Thermistor Cable. 5.4.1 Installing the Power Supply/Charger The power supply/charger is not weatherized and must be protected from the elements. The power supply/charger mounts in a ROC enclosure, or inside a protective enclosure. See Table 5-4 and Table 5-5 for mounting dimensions. 5-9 Power Accessories Rev. Mar/10 ROC/FloBoss Accessories Instruction Manual The power supply must NOT be installed in the same compartment as the batteries, for safety reasons. If you install the power supply in the same enclosure as the ROC, ensure that the heat loading will not be too high. Failure to provide adequate cooling can result in elevated temperatures that can cause premature failure of electronic components. When installing units in a hazardous area, make sure installation components selected are labeled for use in such areas. Installation and maintenance must be performed only when the area is known to be non-hazardous. Installation in a hazardous area could result in personal injury or property damage. 5.4.2 Low Current Power Supply/Charger Installation The low current power supply/charger (model PSI22H) is a 12 volts dc, 1.0 Amp unit. The items that comprise the unit include: Reference Location in Figure 5-6 Item Description Quantity 1 2 3 4 5 6 Screw, Machine, 8-32 × 3/8 Power Supply, 12 Vdc, 1.0A Cable Assembly, DC output Cable Assembly, Thermistor Locknut, Sealing, ½ KO Connector, Cord Grip, ½ KO 2 1 1 1 2 2 Refer to Figure 5-6 for installation information; this example shows a small ROC enclosure. Refer to Figure 5-7 and Section 5.4.4 for wiring information. 5-10 Power Accessories Rev. Mar/10 ROC/FloBoss Accessories Instruction Manual (2.68) (1.50) DOC0324A 1 (6.16) (5.81) 2 3 4 5 Dimensions are in inches. 6 Figure 5-6. Low Current Power Supply Mounting NOTICE: ENSURE COMPONENTS SELECTED FOR THE HAZARDOUS AREA ARE LABELED FOR USE IN SUCH AREAS. MOUNTING OF COMPONENTS IN SUITABLE ENCLOSURES AT FINAL ASSEMBLY IS SUBJECT TO CSA OR OTHER INSPECTION AUTHORITY APPVL. PRODUCT INFO LABELING 1 115 VAC input: Insure "hot" line is connected to the power supply "L1" terminal. 2 Required fusing not supplied with the power supply. Fusing is included with standard battery box options. L2 GR L1 + - T2 + - DC PWR IN AUX PWR OUT 1 T1 ROC CONNECTIONS + + GND ROC364 DC POWER TERMINAL SHOWN. SEE INSTRUCTION MANUAL OF PRODUCT BEING INSTALLED FOR PROPER WIRING CONNECTIONS. 2 1 AC POWER IN FUSE NC 10 AMP SLO BLO BATTERY + RED BLK BATTERY - BLK RED C B A DISCRETE INPUT ISOLATED MODULE BATTERY DC POWER OUT THERMISTER CABLE DOC0325A Figure 5-7. Low Current Power Supply Wiring 5-11 Power Accessories Rev. Mar/10 ROC/FloBoss Accessories Instruction Manual Replacement parts for the low current power supply include: Description Fuse, 1 Amp, AGC, 250 Volt Cable Assembly, Thermistor Part Number W18081X0072 W20169X0022 5.4.3 High Current Power Supply/Charger Installation The high current power supply/charger is a 12 volts dc, 5.1 Amp (model PS121H) or a 24 volts dc, 3.6 Amp (model PS241H) unit. The items that comprise either unit include: Item Description Quantity Connector, Cord Grip, ½ KO Locknut, Sealing, ½ KO Screw, Machine, 10-32 × ½ Power Supply (PS122H shown in Figure 5-8) Cable Assembly, DC Out Cable Assembly, Thermistor 2 2 2 1 1 1 Refer to Figure 5-8 and Section 5.4.4 for wiring information. Replacement parts for the high current power supply include: Description Fuse, 1½ Amp, AGC, 250 volt Fuse, 3 Amp, AGC, 250 volt Cable Assembly, Thermistor 5-12 Power Accessories Part Number W18081X0082 W18081X0092 W20169X0022 Rev. Mar/10 ROC/FloBoss Accessories Instruction Manual POWER SUPPLY/CHARGER MCU PRODUCT INFO LABELING 3 11 TO 16 VDC or 22 TO 30 VDC INPUT VOLTAGE + + GND DC PWR IN AUX PWR OUT 1 1 AC L1 L2 DC GR + - T 1 DISCRETE INPUT ISOLATED MODULE I/O RACK DI 2 + GND BLK RED RED NC BLK 2 A B C 4 - BLK FUSE 10 AMP SLO BLO 5 NOTICE: INSURE COMPONENTS SELECTED FOR THE HAZARDOUS AREA ARE LABELED FOR USE IN SUCH AREAS. MOUNTING OF COMPONENTS IN SUITABLE ENCLOSURES AT FINAL ASSEMBLY IS SUBJECT TO CSA OR OTHER INSPECTION AUTHORITY APPVL. BATTERY GELL CELL 12/24 VDC 30 TO 90 Ah RED + HAZARDOUS AREA NON-HAZARDOUS AREA 15 AMP CIRCUIT PROTECTION 2 115 / 230 VAC 47-63 Hz 1 Insure proper fusing is used for the selected AC input voltage. Refer to the power supply product info labeling. 2 115 VAC input: Insure "hot" line is connected to the power supply "L1" terminal. 3 WARNING: TO PREVENT IGNITION OF A HAZARDOUS AREA - BATTERIES MUST ONLY BE CHANGED IN AN AREA KNOWN TO BE NON-HAZARDOUS. Jumper selectable - Insure MCU is configured for the proper input voltage. See instruction manual for more information. 4 Grounding. 5 Required fusing not supplied with the power supply. Fusing is included with standard battery box options. A4624M.WMF Figure 5-8. High Current Power Supply Wiring 5-13 Power Accessories Rev. Mar/10 ROC/FloBoss Accessories Instruction Manual 5.4.4 Connecting the Power Supply/Charger to Wiring 1. Select the input line voltage: ♦ High Current Power Supply – use the slide switch on the side of the power supply. ♦ Low Current Power Supply – use the internal slide switch accessible from the back of the power supply (factory set at 115 volts). 2. Make sure the correct fuse is installed for the input voltage selected. Provide a 15 Amp circuit protector on the line side input. 3. Hook the line power neutral to the L2 terminal, the hot line to L1, and a green or bare conductor to earth ground. 4. Connect the wiring. The ROC enclosures typically provide red and black leads for DC power. The red lead for positive (+) hooks to the positive (+) DC terminal on the power supply and the black lead hooks to the negative (–) DC terminal. These leads are connected to the power input terminals on the ROC and to the respective positive (+) and negative (–) terminals on the battery backup if present. If you are using battery backup, make sure that the end with an in-line fuse is connected to the positive terminal of the battery. Refer to Figure 5-7 and Figure 5-8. 5. Connect the thermistor cable. A temperature compensation (thermistor) cable (connected to the “T” terminals) is used by the power supply/charger to sense the temperature of the battery. See Section 5.4.5, Installing the Thermistor Cable, on page 5-15 for details. 6. Connect the Discrete Input (DI). The power supply provides an unprotected DC voltage signal (at the “DI” terminals) to indicate when the DC output voltage is no longer present. This condition could be caused by an overload, AC power input failure, or a failure within the power supply itself. This voltage signal can be connected to a Discrete Input, such as a DI Isolated module on the ROC or FloBoss (see Figure 5-7 or Figure 5-8), to allow detection of a power failure. As described in the user manual for ROCLINK 800 Configuration Software or ROCLINK for Windows Configuration Software, Report-By-Exception (RBX) alarming could be used to notify the host computer of the problem. 5.4.5 Installing the Thermistor Cable A temperature compensation cable (connected to the “T” terminals of the power supply/charger) is used by the power supply/charger to sense the temperature of the battery. The temperature is sensed by a thermistor in the termination lug at the battery end of the cable. Although the cable does not provide an electrical connection between the battery and the power supply/charger, the sensor should be physically connected to the negative (–) battery terminal to properly sense the temperature, as indicated in Figure 5-7 and Figure 5-8. 5-14 Power Accessories Rev. Mar/10 ROC/FloBoss Accessories Instruction Manual If the battery does not have a terminal that accommodates the lug, then the temperature compensation sensor should be mounted inside the battery box to sense battery temperature. Figure 5-9 shows an example of this mounting method for a small ROC enclosure when the 7 Amp-hour battery is used. NOTE: The temperature compensation cable must be correctly installed, for proper operation of the power supply/charger. If the cable is damaged, it must be replaced. Thermistor Cable DOC0293B Figure 5-9. Thermistor Cable Location in Small ROC Enclosure 5.4.6 Checking for Proper Output Voltage The power supply/charger is adjusted at the factory for optimum output voltage when used with leadacid batteries. Under normal conditions, the output voltage should not require readjustment. Be sure to follow any applicable procedures for hazardous areas. Be sure also to take appropriate precautions for the ROC or FloBoss unit and any other equipment being powered down during the following procedure. 5-15 Power Accessories Rev. Mar/10 ROC/FloBoss Accessories Instruction Manual To verify that the output voltage is set correctly, follow these steps: 1. Disconnect the load by removing the wire that typically goes to the battery (and any other wires connected to this terminal) from the negative DC output terminal. 2. Disconnect the thermistor cable from the “T” terminals of the power supply. 3. Connect a 1.5KΩ resistor across the “T” terminals. 4. Measure the voltage at the DC output terminals. It should measure: ♦ 14 volts for a 12-volt power supply. ♦ 26 volts for a 24-volt power supply. If you measure an output voltage that is more than 1 volt above or below the stated values, the power supply/charger should be returned to your local sales representative or the factory for adjustment or repair. When you are finished checking the output voltage, remove the resistor and reconnect the thermistor cable. Then, reconnect the load to the negative output terminal. Table 5-3. Power Supply/Charger Common Specifications Power Supply/Charger Common Specifications AC INPUT 105 to 132 V ac, or 207 to 264 V ac, 47 to 63 Hz. Input ranges are switch-selectable. TEMPERATURE COMPENSATION Temperature sensed by thermistor to regulate charging voltage. REGULATION Output voltage varies no more than ±0.05% for a 10% change in line voltage or for a 50% change in load current. EMI/RFI SUSCEPTIBILITY Meets the requirements of FCC Docket 20780 for Class B equipment and VDE 0871 for Class B. ENVIRONMENTAL Operating: -40 to 65ºC (-40 to 149ºF), fully rated. Storage: -40 to 85ºC (-40 to 185ºF). 5-16 STABILITY ±0.3% for 24 hours after warm-up. APPROVALS Approved by CSA for hazardous locations Class I, Division 2, Groups A, B, C, and D. Power Accessories Rev. Mar/10 ROC/FloBoss Accessories Instruction Manual Table 5-4. High-Current Power Supply Specifications High-Current Power Supply Specifications AC INPUT FUSING 3 A for 115 V ac range; 1.5 A for 230 V ac range. DC OUTPUT 12 Vdc Model: 14 V dc no-load. Supplies 5.1 A maximum @ 25ºC (77ºF). 24 Vdc Model: 26 V dc no-load. Supplies 3.6 A maximum @ 25ºC (77ºF). Derate DC output power 10% for 50 Hz operations. WEIGHT 4.8 kg (10.4 lb.). OUTPUT RIPPLE 12 Vdc Model: 5.0 mV peak-to-peak, maximum. 24 Vdc Model: 3.0 mV peak-to-peak plus 0.02% of output voltage, maximum. EFFICIENCY 12 Vdc Model: 55% typical. 24 Vdc Model: 60% typical. DIMENSIONS 94 mm H by 127 mm W by 280 mm L (3.7 in. H by 5 in. W by 11 in. L), including mounting flanges. Mounting holes are 260 mm (10.25 in.) center-tocenter. Table 5-5. Low-Current Power Supply Specification Low-Current Power Supply Specifications AC INPUT FUSING 1 A for either 115 or 230 V ac range. EFFICIENCY 55% typical. DC OUTPUT 14 Vdc no-load. Supplies 1.0 A maximum @ 25ºC (77ºF). Derate DC output power 10% for 50 Hz operations. DIMENSIONS 119 mm H by 67 mm W by 157 mm L (4.7 in. H by 2.6 in. W by 6.2 in. L) overall, including mounting flanges. Mounting holes are 148 mm (5.81 in.) center-to-center. OUTPUT RIPPLE 5.0 mV peak-to-peak, maximum. 5-17 WEIGHT 0.9 kg (2.0 lb.), including case. Power Accessories Rev. Mar/10 ROC/FloBoss Accessories Instruction Manual 5.5 Solar Arrays Solar arrays are used to generate electrical power for the ROC or FloBoss from solar radiation. The size and number of solar panels required for a particular installation depends on several factors, including the power consumption of all devices connected to the solar array and the geographic location of the installation. Solar panels can be mounted using the freestanding pole mounting kit detailed in Section 5.2.1, Battery Enclosure Mounting. For 30-Watt and 60-Watt solar panel arrays, mounting hardware is supplied that allows attaching the panels and their regulator to the ROC freestanding enclosure. With an additional kit, these panels can instead be mounted on a pipestand. One regulator (supplied) handles two 60-Watt panels. The panels are connected in parallel for increased current capacity. For 21-Watt and 42-Watt solar panel arrays, mounting hardware is supplied that allows attaching the panels to a pipestand. Hardware is not available for mounting these panels on a freestanding enclosure. For the FloBoss 100-Series units, a 2 Watt or 5 Watt solar panel can be ordered and installed to provide charging power for the backup batteries. An external solar panel typically mounts to the same 2-inch pipe that supports the FloBoss unit. Other wattage solar arrays are available from other suppliers. NOTE: Solar panels for FloBoss 500-series units, such as a FloBoss 503, are user-supplied. Please refer to the FloBoss 503 & 504 Instruction Manual (Form A6050) for further information on user-supplied solar panel installations. 5.5.1 System Solar Panel Sizing To determine solar panel output requirements, first determine the solar insolation for your geographic area. The map in Figure 5-10 shows solar insolation (in hours) for the United States during winter months. Call your local sales representative for a map detailing your specific geographic area. Insolation (from map) = _____ hours Next, calculate the amount of current required from the solar array per day using the following equation. Isf is the system current requirement. Refer to the power consumption section in the respective ROC or FloBoss instruction manual concerning Isf. Iarray = [Isf (Amps) × 24 (hrs)]/Insolation (hrs) = _____ Amps Finally, the number of solar panels can be determined using the following equation: Number of Panels = Iarray Amps/(Ipanel Amps/panel) = _____ panels For example, if Iarray equals 6.5 Amps, and Ipanel equals 3.5 Amps for a 60-Watt panel, then the number of panels required equals 1.86, which would be rounded up to 2. Table 5-6 gives Ipanel values for selected solar panel sizes. NOTE: The value entered in the “Panel” column varies depending on the type of solar panel installed. Refer to the documentation supplied by the vendor for the type of solar panel being used. 5-18 Power Accessories Rev. Mar/10 ROC/FloBoss Accessories Instruction Manual Table 5-6. Solar Panel Sizing Panel I panel 10-Watt 21-Watt 30-Watt 42-Watt 60-Watt 0.7 Amps 1.3 Amps 1.7 Amps 2.6 Amps 3.5 Amps Figure 5-10. Solar Insolation in Hours for the United States NOTE: Refer to http://www.solar4power.com/solar-power-global-maps.html for global solar insolation maps. 5-19 Power Accessories Rev. Mar/10 ROC/FloBoss Accessories Instruction Manual 5.5.2 Solar Panel Installation After determining the power requirements of the installation, use a panel mounting kit to mount the appropriate number of solar panels. The kit for pipestand mounting consists of an adapter plate to which the brackets of the freestanding mounting kit are attached with four bolts. 5.5.2.1 30-Watt Solar Panel Installation The 30-Watt solar panel kit (ordered as FSACC-1-SLR0) includes the items in the following list. Refer to Figure 5-11 for installation details. Refer to Figure 5-12 for wiring information. The 30Watt solar panel kit is intended for use only with the EN23 freestanding enclosure. Reference Location in Figure 5-11 and Figure 5-12/ Key No. 5-20 Item Description Quantity 21 Cap Screw, 3⁄8-16 × .50 4 23 24 25 27 Solar Mounting Bracket Solar Mounting Bracket with index Panel Pivot Cap screw, 5⁄16 -18 × .75 1 1 2 8 28 Lockwasher, 5⁄16 4 29 Nut, 5⁄16 -18 4 31 37 218 219 Cable, 2 Conductor Cord Grip Fastener, ½ KO Solar Panel Solar regulator Power Accessories 3.65 m (12) ft 1 1 1 Rev. Mar/10 ROC/FloBoss Accessories Instruction Manual RO RE M C OT EO PE RA TIO NS C ON TR O LL E R A4629Ma.WMF Figure 5-11. 30-Watt Solar Panel Installation 5-21 Power Accessories Rev. Mar/10 ROC/FloBoss Accessories Instruction Manual 219 SOLAR REGULATOR MCU TERMINALS + + GND 218 RED BLK SOLAR + BAT + NEG - DC PWR IN AUX PWR OUT 1 PANEL 1 REQUIRED FUSING NOT SUPPLIEDWITH 1 FUSE BATTERY + - 10 AMP SLO BLO + RED - BLK THE SOLAR PANEL KIT. FUSING IS INCLUDED WITH STANDARD BATTERY BOX OPTIONS. RED BLK 31 CABLE 37 CGF * INSERT REGULATOR IN SOLAR PANEL JUNCTION BOX BEFORE CONNECTING TERMINALS USE PUSH NUTS TO HOLD IN PLACE A4629W.WMF Figure 5-12. 30 Watt Solar Panel Wiring The following replacement parts are available for the 30-Watt solar panel: Description Solar Panel, 30 Watt Solar Regulator * Panel Mounting Kit, Part Number W30156X0012 W10689X0012 W30110X0012 * Panel mounting kits include all necessary mounting hardware but exclude solar panels and solar regulators. 5.5.2.2 60, 120, and 180 Watt Solar Panel Installation The following solar panel arrays are available for the EN23 freestanding enclosure: ♦ FSACC-1-SLR1 – One 60-Watt panel. ♦ FSACC-1-SLR2 – Two 60-Watt panels. ♦ FSACC-1-SLR3 – Three 60-Watt panels. 5-22 Power Accessories Rev. Mar/10 ROC/FloBoss Accessories Instruction Manual The multiple panel kits use 60-Watt panels connected in parallel to increase the wattage. The 60, 120, and 180 Watt solar panel kits include the following items: Quantity Required Reference Location in Figure 5-13 and Figure 5-14/ Key No.* Item Description 1 Panel Kit 2 Panel Kit 3 Panel Kit 21 Cap Screw, 3⁄8 -16 × .50 4 4 4 22 23 24 25 26 27 Solar Panel Solar MTG Bracket Solar MTG Bracket with index Panel Pivot Solar regulator Cap screw, 5⁄16 -18 × .75 1 1 1 2 1 8 2 1 1 2 1 12 3 1 1 2 2 16 *28 Lockwasher, 5⁄16 4 8 12 *29 Nut, 5⁄16 -18 4 8 12 30 31 Extension, Panel Mounting Cable, 2 Conductor – 3.65 m (12 ft) 2 4.57 m (15 ft) 2 9.14 m (30 ft) * Parts may be substituted with a washer-nut assembly (P/N W10133X0012) in some kits. Refer to Figure 5-13 and Figure 5-14 for mounting and wiring information. 21 30 23 26 25 29 24 FI S HE 28 R 27 RO RE C MO TE O PE RA TIO NS CO NT RO LL ER 22 A4195Ma.WMF Figure 5-13. Solar Panel Mounting (120-Watt Shown) 5-23 Power Accessories Rev. Mar/10 ROC/FloBoss Accessories Instruction Manual 1 REQUIRED FUSING NOT SUPPLIED MCU TERMINALS RED BLK 2 3 4 5 6 7 8 9 10 11 RED RED RED RED + TERMINAL BLOCK - REGULATOR PANEL #1 PANEL #2 22 22 26 SOLAR REGULATOR 22 + P2 + P2 + P1 + P1 + P1 - P2 - P2 - P2 - P1 - P1 - P1 + P2 BLK BLK BLK BLK - BLK + RED - BLK + COM + COM + RED 31 12 FT - BLK + RED PANEL #3 B+ A+ C- + + GND SOLAR B+ A+ C- DC PWR IN AUX PWR OUT 1 WITH THE SOLAR PANEL KIT. FUSING IS INCLUDED WITH STANDARD BATTERY BOX OPTIONS. 26 + RED - BLK 1 FUSE BATTERY + - 10 AMP SLO BLO 31 3 FT 31 15 FT RED BLK A4159W.WMF Figure 5-14. 60, 120, and 180-Watt Solar Panel Wiring The following replacement parts are available for the solar arrays based on the 60-Watt panel: Description Solar Panel, 60-Watt Solar Regulator * Panel Mounting Kits 1 Panel Mounting 2 Panel Mounting 3 Panel Mounting Part Number W30108X0012 W10349X0012 – W30110X0012 W30112X0012 W30112X0022 * Panel mounting kits include all necessary mounting hardware but exclude solar panels and solar regulators. 5-24 Power Accessories Rev. Mar/10 ROC/FloBoss Accessories Instruction Manual 5.5.2.3 20 Watt and 40 Watt Solar Panel Installation The following solar panel arrays are available: ♦ SLR4 – One panel (20 Watt). ♦ SLR5 – Two panels (40 Watt). These arrays are typically used with the FloBoss 407. Each panel provides 20 Watts and the panels can be connected in parallel to increase the wattage. These solar panel kits include: Required Quantity 1 Panel 2 Panel Kit Kit Reference Location in Figure 5-15 and Figure 5-16/ Key No. Item Description 1 2 2 3 4 Solar Panel, 20 Watt Panel Mounting Kit – Single Panel Panel Mounting Kit – Double Panel Solar Regulator, 6.5 Amp Machine Screw, 10-32 × 7⁄16 1 1 – 1 2 2 – 1 1 2 5 6 7 Regulator Mounting Bracket Cord Connector, ½ Knockout Sealing Locknut 1 1 1 1 1 1 Refer to Figure 5-15 and Figure 5-16 for mounting and wiring information. Installation and wiring should comply with the National and Canadian electrical codes as applicable. Make sure that components selected for hazardous areas are labeled for use in such areas. 5-25 Power Accessories Rev. Mar/10 ROC/FloBoss Accessories Instruction Manual Figure 5-15. 20 Watt Solar Panel Mounting SLR5 PV + SOLAR PANEL 1 SOLAR REGULATOR SLR4 BATT LOAD + - + - 3 ROC/FLOBOSS DC POWER TERMINAL BATTERY - SOLAR PANEL - 1 1 + + 1 RED BLK RED BLK NOTE: FOLLOW THE INSTRUCTIONS INCLUDED WITH SOLAR REGULATOR AND PANEL WHEN COMPLETING WIRING CONNECTIONS. A6067W.WMF Figure 5-16. 20 Watt and 40 Watt Solar Panel Wiring 5-26 Power Accessories Rev. Mar/10 ROC/FloBoss Accessories Instruction Manual 5.5.2.4 Solar Panel Expansion Kits Solar panel expansion kits are available for adding to the capacity of a solar installation for a freestanding enclosure that uses 60-Watt panels. The following kits are available for expanding from: ♦ One 60-Watt panel to two 60-Watt panels. ♦ One 60-Watt panel to three 60-Watt panels. ♦ Two 60-Watt panels to three 60-Watt panels. Refer to Section 5.5.2.2 on page 5-23 for parts listing and installation information. 5-27 Power Accessories Rev. Mar/10 ROC/FloBoss Accessories Instruction Manual 5-28 Power Accessories Rev. Mar/10 ROC/FloBoss Accessories Instruction Manual SECTION 6 – SENSOR / TRANSDUCER ACCESSORIES This section contains the following information: Section Page Number 6.1 RTD Sensor 6-1 6.2 Multi-Variable Sensor (MVS) 6-5 6.3 Dual-Variable Sensor (DVS) 6-22 6.1 RTD Sensor Resistance Temperature Detectors (RTD) are transducers typically used to sense the temperature of a gas or fluid in a pipe. A RTD sensor can provide a signal to a RTD input module in a ROC, a MultiVariable Sensor, a RTD input of a FloBoss 103 optional termination board, or a built-in RTD input of a FloBoss 503. The following RTD assemblies include an RTD element in a protective thermowell and a connection head with screw terminals. ♦ RTD Element, -100 to 400°C (-148 to 752°F), with 2.5-inch thermowell, 4-wire (Model TW25). ♦ RTD Element, -100 to 400°C (-148 to 752°F), with 4.5-inch thermowell, 4-wire (Model TW45). These assemblies use a 100-ohm platinum RTD element. The spring-loaded element has an alpha of 0.00385 and can be used to measure temperatures in the range of -100 to 400°C (-148 to 752°F) or more, as indicated in Table 6-1. The element is encased in a 316 Stainless Steel thermowell, with a choice of either a 2.5 or 4.5 inch immersion length. The tapered-style thermowell mounts in a ¾-14 NPT hole. An explosion-proof connection head, union, and nipple are included in the assembly. The connection head meets requirements for Class I, Division 1, Groups C and D hazardous locations. Refer to Figure 6-1 for assembly details. For additional information on how to assemble and install the RTD sensor, refer to the manufacturer’s literature that ships with the sensor. The RTD requires a user-supplied shielded nipple where the wiring connects to the housing. Refer to Figure 6-2 for a typical RTD sensor installation in a gas line. 6-1 Sensor / Transducer Accessories Rev. Feb/05 ROC/FloBoss Accessories Instruction Manual RTD element Thermowell Connection Head Figure 6-1. RTD Assembly Details Remote MVS RTD Sensor Assembly remtrtd.ds4 Figure 6-2. RTD Sensor Installed with Remote MVS (Class I Division 2 Installation Shown) 6-2 Sensor / Transducer Accessories Rev. Feb/05 ROC/FloBoss Accessories Instruction Manual 6.1.1 International Resistance vs. Temperature Chart Table 6-1 provides resistance values for a 100-ohm RTD element (IEC 751 Class B) with an alpha of 0.00385. These values are useful for simulating a temperature input during calibration, as well as for checking the accuracy of the RTD sensor. Table 6-1. International Resistance vs. Temperature 6-3 °C °F Ohms °C °F Ohms °C °F Ohms -200 -190 -180 -170 -160 -150 -140 -130 -120 -110 -100 -90 -80 -70 -60 -50 -40 -30 -20 -10 0 10 -328 -310 -292 -274 -256 -238 -220 -202 -184 -166 -148 -130 -112 -94 -76 -58 -40 -22 -4 14 32 50 18.49 22.80 27.80 31.32 35.53 39.71 43.87 48.00 52.11 56.19 60.25 64.30 68.33 72.33 76.33 80.31 84.27 88.22 92.16 96.09 100.00 103.90 20 30 40 50 60 70 80 90 100 110 120 130 140 150 160 170 180 190 200 210 220 230 68 86 104 122 140 158 176 194 212 230 248 266 284 302 320 338 356 374 392 410 428 446 107.79 111.67 115.54 119.40 123.24 127.07 130.89 134.70 138.50 142.29 146.06 149.82 153.58 157.31 161.04 164.76 168.46 172.16 175.84 179.51 183.17 186.32 240 250 260 270 280 290 300 310 320 330 340 350 360 370 380 390 400 410 420 430 440 450 464 482 500 518 536 554 572 590 608 626 644 662 680 698 716 734 752 770 788 806 824 842 190.45 194.07 197.69 201.29 204.88 208.45 212.02 215.57 219.12 222.65 226.17 229.67 233.17 236.65 240.13 243.59 247.04 250.48 253.90 257.32 260.72 264.11 Sensor / Transducer Accessories Rev. Feb/05 ROC/FloBoss Accessories Instruction Manual 6.1.2 How to Connect a RTD to a Remote MVS To connect a RTD sensor assembly to a remote MVS205, install the sensor in the pipeline and connect a RTD cable to the MVS sensor. Refer to Figure 6-2 on page 6-2. An armored cable requires no conduit to be used in a Class I, Division 2 hazardous non-incendiary area. In a Class I, Division 1 area, unarmored cable may be used if installed in conduit that includes seals per hazardous installation practices. To wire a RTD sensor, connect the sensor end of the RTD cable to the terminations on the interface board inside the remote MVS sensor head. Refer to Table 6-2 for the connections at the RTD terminals for the various RTD probes, with typical red and white wires. In three wire RTD connections, be sure to connect the wires of the same color to the REF and + terminations. Table 6-2. RTD Input Wiring Terminal 4-Wire RTD 3-Wire RTD 2-Wire RTD REF Red Red Jumper to + + Red Red Red with Jumper to REF – White White White RET White NOTE: A FloBoss 503 unit requires the CR1 remote sensor interface to connect to a remote MVS205. The FloBoss 503 firmware (must be version 2.30 or greater) allows the RTD sensor either to be wired directly to the FloBoss 503 Master Controller Unit (MCU) at the RTD input or to be wired to the MVS sensor, as described previously. The firmware detects which method of wiring is in use at power-up. 6.1.3 How to Connect an RTD to an Integral MVS If the integral MVS sensor is to be used with a FloBoss 407 unit, connect the RTD cable assembly (RC12, RC24, RCA12, or RCA24) to the connector on the MVS sensor body. NOTE: In some cases, the installation of a FloBoss 407 using an integral MVS does not allow front access to the RTD Cable Connector on the MVS. If you need to access the RTD Cable Connector from the rear through the hole in the MVS Sensor mounting plate: 1. Remove the mounting plate. 2. Rotate the sensor body 180 degrees. 3. Remove the four bolts on the bottom of the Coplanar flange from the sensor body. 4. Rotate the Coplanar flange 180 degrees. 5. Reattach the Coplanar flange and mounting plate. To meet CSA requirements, tighten the four bolts of the Coplanar flange to the following torque specifications: 33.8 n-m (300 in-lbs) for stainless steel bolts and 73.4 n-m (650 in-lbs) for carbon steel bolts. 6-4 Sensor / Transducer Accessories Rev. Feb/05 ROC/FloBoss Accessories Instruction Manual 6.2 Multi-Variable Sensor (MVS) The MVS205 Multi-Variable Sensor provides static pressure, differential pressure, and process temperature inputs. The inputs from the MVS sensor are used in performing orifice flow calculations. The MVS205 operates as a remote unit that communicates via a serial format. Functionally, the MVS is a sensor device that measures three flow-related variables simultaneously. These variables are continuously available to the FloBoss or ROC unit that polls the MVS. Two versions of the MVS sensor are available: MVS205P with reference accuracy of 0.075% and MVS205E with reference accuracy of 0.10%. The MVS consists of a transducer and an interface circuit. The transducer, contained in the sensor body, uses capacitance-cell technology to sense differential pressure and piezoresistive technology to sense the static (absolute or gauge) pressure. The transducer electronics convert the pressure variables directly into a digital format, allowing accurate correction and compensation. The raw temperature is converted by the interface board into digital format. A microprocessor linearizes and corrects the raw pressure signals (from the sensor) using characterization data stored in non-volatile memory. NOTE: For information on how flow is archived and reported, refer to Section 6.3.4, DVS Downstream Flow, on page 6-24. The interface circuit allows the MVS to connect to and communicate with a ROC or FloBoss using a serial 4-wire EIA-485 (RS-485) connection. In a Remote MVS, this interface circuit board is enclosed in an explosion-proof electronics head. An external three or four-wire RTD is used to sense the process temperature. The RTD sensor is connected directly to the interface circuit board of the MVS sensor. A separate RTD cable assembly is required for the connection. FloBoss 407 units can use a remote or integral MVS205 sensor. ROC800-Series units can use a remote MVS205 sensor. ROC300-series controllers can use a remote MVS205 sensor, but they must also be equipped with a Remote MVS Interface (CMA8H). FloBoss 500-series units can use a remote MVS205 sensor, but they must also be equipped with a CR1 to connect with a Remote MVS. For information on the number of MVS Sensors that can be supported by a ROC or FloBoss, refer to the MVS input or module specifications in the appropriate ROC or FloBoss hardware instruction manual. Attached to the bottom of the sensor body is a Coplanar™ flange. This flange, which provides drain/vent valves, allows the MVS to be mounted on a pipestand, on a wall or panel, or on an integral orifice assembly or manifold valve. It is important to disconnect power from the ROC/FloBoss before installing the Remote MVS to avoid damage to the Remote MVS. 6-5 Sensor / Transducer Accessories Rev. Feb/05 ROC/FloBoss Accessories Instruction Manual 6.2.1 MVS Mounting The Remote MVS uses a transmitter-style head to house the interface electronics. The interface circuit board is factory-mounted inside the head, which provides protection for the electronics, a place for termination of the field wiring, and ratings for hazardous locations. The MVS205 can be mounted to a pipe or panel (see Figure 6-3 and Figure 6-4) with the optional bracket kit, which includes an L-shaped bracket and a pipe clamp. The bracket attaches to the Coplanar flange on the MVS205. The process pressure inputs are piped to the ¼-18 NPT connections on the bottom of the MVS205 or to an intervening manifold valve. The MVS205 can also be mounted directly to flange taps using a manifold valve or an integral orifice assembly (not shown). P S LO E W IVE ATM O ARNI NG S P - E - H X IN RE P K E E AL I V E - - H U I I T T G T W H E N R CI C INCH (mm) INCH (mm) 3.54 (90) MVS205a.dsf 6.25 (159) MVS205ac.dsf Figure 6-3. MVS205 Pipe Mounting (Horizontal and Vertical Pipe) 6-6 Sensor / Transducer Accessories Rev. Feb/05 ROC/FloBoss Accessories Instruction Manual 6.15 (156) 2.81 (71) 4.73 (120) INCH (mm) MVS205aa.dsf Figure 6-4. MVS205 Panel Mounting 6.2.1.1 Remote MVS Interface Mounting The MVS Interface for the ROC300-series controllers (CMA8H) consists of a Dual Comm card and a Dual Port Interface (DPI) module. The Dual Comm Card installs inside the ROC unit in the same way as a ROC Communication card. The Dual Port Interface module mounts outside the ROC on a flat surface or on a DIN rail. Refer to the Remote MVS Interface User Manual (Form A6090). The MVS Interface for the FloBoss 503 flow manager consists of a CR1 card and the bracket assembly to hold the card and seal the integral sensor opening. To install the L-shaped bracket: 1. Place the long side of the bracket on the bottom of the enclosure with the mounting plate for the CR1 card at the front of the enclosure. 2. From below the enclosure, center the round plate and gasket over the integral sensor opening. The screw on the back of the bracket will be coming through the center of the opening. 3. Tighten the nut over the screw. To install the CR1 card, press it squarely onto the four compression standoffs on the mounting plate of the bracket. 6.2.2 MVS Field Wiring In ROC/FloBoss installations with one or more Remote MVS units, the signal wiring between the ROC/FloBoss and the Remote MVS is connected as follows. Use Sealtite, or a similar product, to seal the conduit path from the Remote MVS to the ROC/FloBoss. An armored cable requires no conduit to be used in a Class I, Division 2 hazardous non-incendiary area. In a Class I, Division 1 area, unarmored cable may be used if installed in conduit and have seals per hazardous installation practices. All installation wiring must follow code to meet the respective Class and Division ratings. To connect a multi-drop MVS setup, connect each MVS to the ROC/FloBoss unit one at a time. Make sure that each MVS is functioning correctly before installing the next MVS. 6-7 Sensor / Transducer Accessories Rev. Feb/05 ROC/FloBoss Accessories Instruction Manual Before connecting a Remote MVS to the ROC/FloBoss unit, remove all power from the MVS by unplugging the power to the ROC/FloBoss. If you do not remove ALL power from the MVS, electronic components will be damaged. When installing devices in a hazardous area, make sure each device is labeled for use in such areas. Procedures involving switching power on or off, or procedures for installing or removing any wiring or components, must be performed only when the area is known to be nonhazardous. Installation in a hazardous area could result in personal injury or property damage. To avoid circuit damage when working with the unit, use appropriate electrostatic discharge precautions, such as wearing a grounded wrist strap. During this procedure, all power will be removed from the ROC/FloBoss and devices powered by the ROC/FloBoss. Ensure that all connected input devices, output devices, and processes will remain in a safe state when power is removed from the ROC/FloBoss and also when power is restored. An unsafe state could result in property damage. NOTE: For Measurement Canada units, maintenance and resealing of the FloBoss must be performed by authorized personnel only. NOTE: There is a possibility of losing the ROC/FloBoss configuration and historical data held in RAM while performing the following procedure. As a precaution, save the current configuration and historical data to permanent memory. Refer to the ROCLINK for Windows Configuration Software User Manual (Form A6091) or the ROCLINK 800 Configuration Software User Manual (Form A6121). 1. Power down the ROC or FloBoss unit. Do not reverse polarity of the power wires (+ and –) while wiring the Remote MVS units, or circuits in the Remote MVS and elsewhere may be damaged. Double-check for proper connections before applying power. 2. Connect the wiring from the MVS Sensor to the ROC or FloBoss unit. a. For the ROC300-series unit, connect the prefabricated cable from the DPI module to the communications connection of the ROC300-series assembly. The MVS Interface Card (CMA8H) is required as the Communications Card. Then run four wires from the DPI module port 2 connection to the MVS sensor. Refer to the Remote MVS Interface User Manual (Form A6090). b. For the FloBoss 407 unit, run four wires from the FloBoss 407 MVS terminal block on the termination board to the Remote MVS sensor. If connecting communications only, the four wires should be a minimum size of 22 AWG and a maximum length of 1220 meters (4000 feet). If connecting power and communications, the four wires should be a minimum size of 22 AWG and must have a length short enough that 8 volts dc will be provided at the MVS sensor. Two of the terminals provide power and the other two terminals provide a communication path. The terminals are identified as follows: 6-8 Sensor / Transducer Accessories Rev. Feb/05 ROC/FloBoss Accessories Instruction Manual Terminal A B + – Usage + Signal – Signal + Power – Power A REF RTD RTD RET PWR PWR B RTD + - RTD + - A B + - DOC0471A Figure 6-5. Signal Hook-Up for a FloBoss 407 Remote MVS Installation The MVS sensor is labeled as follows with terminal 1 on the left and terminal 8 located on the right: Terminal A B RTD REF RTD + RTD – RTD RET + – Usage + Signal – Signal RTD REF RTD + RTD – RTD RET + Power – Power c. For the FloBoss 500-series unit, run four wires from the terminal block on the MVS Interface Card (CR1) to the MVS sensor. The MVS Interface Card cable plugs directly into the Main Electronics Board at the P/DP connector. 6-9 Sensor / Transducer Accessories Rev. Feb/05 ROC/FloBoss Accessories Instruction Manual If connecting communications only, the four wires should be a minimum size of 22 AWG and a maximum length of 1220 meters (4000 feet). If connecting power and communications, the four wires should be a minimum size of 22 AWG and must have a length short enough that 8 volts dc will be provided at the MVS sensor. Two of the terminals provide power and the other two terminals provide a communication path. The terminals are identified as follows: Terminal – + B A Usage – Power + Power – Signal + Signal + B A A B REF RTD RTD RET PWR PWR RTD + - RTD + - DOC0416T DOC0470A Figure 6-6. Terminations for a FloBoss 503 Remote MVS Installation d. For the ROC800-Series, terminations are required on the two MVS modules located at the extremities of the circuit. That is to say, the two outside modules require terminations in order to complete the communications circuit. The MVS termination jumper is located at J4 on the module. Refer to Table 6-3. Table 6-3. MVS Termination Jumper J4 6-10 Terminated TER Out Not Terminated TER Out x Sensor / Transducer Accessories x Rev. Feb/05 ROC/FloBoss Accessories Instruction Manual Out In TER J4 809MVSJ4.dsf Figure 6-7. MVS Jumper J4 (Shown Not Terminated) Four wires run from the MVS module terminal block and connect to the sensor. If connecting communications only, the four wires should be a minimum size of 22 AWG and a maximum length of 1220 meters (4000 feet). If connecting power and communications, the four wires should be a minimum size of 22 AWG and must have a length short enough that 8 volts dc will be provided at the MVS sensor. NOTE: Insulated, shielded, twisted-pair wiring is required when using MVS signal lines. Two of the terminal blocks provide power and the other two terminals provide a communication path. The terminals are identified in Table 6-4. Table 6-4. MVS Signal Routing – Comm3, Comm4, and Comm5 Label A B None + – MVS LED RX / TX + RX / TX No Connect Lit green when receiving N/A Lit green when transmitting N/A Sensor Power Common N/A Terminal 1 2 3 4 5 Pay close attention and do not reverse the power wires. These connections should always be made with power removed from the ROC800-Series. Double-check for proper orientation before applying power. If the connections are reversed and power is applied, the MVS and the ROC800-Series processor board will be damaged. NOTE: All modules are isolated on the field side. Be aware that you can induce ground loops by tying commons together. 6-11 Sensor / Transducer Accessories Rev. Feb/05 ROC/FloBoss Accessories Instruction Manual 3. The terminals in the MVS205 head are labeled the same as the terminals on the MVS terminal block in the ROC/FloBoss. Connect the ROC/FloBoss and Remote MVS terminals one for one: A to A, B to B, “+” to “+”, and “–” to “–”. 4. Connect the Remote MVS to a suitable earth ground per applicable codes and standards. Two means of grounding are available on the unit: internal and external. To use the internal ground to meet U.S. and Canadian requirements, connect to the ground terminal inside. To meet IEC and CENELEC requirements, use the external ground lug to connect to earth ground. 5. The address of each MVS must be set prior to final wiring of multiple MVS devices. For proper operation of multiple MVS devices, each MVS device must have a unique address. The FloBoss 407 allows up to four MVS devices to be connected on its communications bus in a multi-drop connection scheme. The ROC306 and ROC312 allows up to three devices. The ROC364 allows up to five devices. Refer to Section 6.2.3 for information on setting these addresses. 6. Once a unique address is set for each MVS in the multi-drop configuration, connect like terminals to like. This means all the “A” terminals on the devices are electrically connected to the ROC or FloBoss “A” terminal and so on. The wiring can be done entirely from the ROC or FloBoss with an individual cable to each Remote MVS, or by wiring in parallel (daisychain) through each Remote MVS. Pay close attention. Do not reverse the power wires. These connections should always be made with power removed from the ROC/FloBoss unit. Double-check for proper orientation before applying power. If the connections are reversed and power is applied, the MVS and the ROC/FloBoss processor board may be damaged. 6.2.2.1 MVS Lightning Protection To safeguard against lightning strikes, install surge suppression devices. The following commercially available lightning protection modules have been found to meet requirements: Model Number LPC 10643 - 485 LPC 10643 - 1 Purpose Protects the communication pair (A and B terminals). Protects the power and ground pair (“+” and “–” terminals). These units are available from: Lightning Protection Corporation PO Box 6086 Santa Barbara, CA 93160 Telephone: 1-800-317-4043 http://www.lightningprotectioncor.com/ 6-12 Sensor / Transducer Accessories Rev. Feb/05 ROC/FloBoss Accessories Instruction Manual 6.2.3 MVS Configuration Use ROCLINK for Windows or ROCLINK 800 Configuration software to configure the MVS sensor. For ROC300-Series, ROC800-Series, and FloBoss 407 installations, the first step in configuring an MVS is to set the interface address. This is essential if there is more than one MVS connected to a ROC/FloBoss unit (multi-drop configuration). The MVS interface address is set using the ROCLINK for Windows or ROCLINK 800 Configuration software. All MVS units are sent from the factory with a default interface address of “1.” This allows for first-time communications to be accomplished. Set a unique Address and Tag identification for each MVS in your multi-drop installation by: 1. Connect the ROC/FloBoss unit to a computer running ROCLINK for Windows or ROCLINK 800 software. 2. Select Configure > MVS Sensor (ROCLINK for Windows) or Configure > I/O > MVS Sensor (ROCLINK 800). 3. Navigate to the MVS screen associated with the MVS being addressed. 4. Enter the unique number in the Address field. Do not use addresses 0 or 240. 5. Save your changes. Once a unique address is set for each MVS, connect the MVS units. For the ROC800-Series, once a unique address is set for each MVS, connect the MVS units in a multi-drop arrangement. The only requirement for wiring multi-drop devices is that all like terminals be tied together. This means all the “A” terminals on the devices are electrically connected to the ROC800-Series “A” terminal and so on. The wiring can be done by wiring in parallel (daisychaining) through each remote MVS. 6.2.4 MVS Calibration A 5-point (minimum input, maximum input, and up to three intermediate points) calibration of the MVS can be performed. To perform initial calibration or recalibration (such as after an orifice plate is changed) for the MVS, you can use either ROCLINK for Windows Configuration Software, ROCLINK 800 software, or the FloBoss 407 keypad (if calibrating a FloBoss 407). To calibrate using ROCLINK Configuration Software, refer to the Verifying Calibration, Calibration, and Performing Zero Shift procedures in the ROCLINK for Windows Configuration Software User Manual (Form A6091) or the ROCLINK 800 Configuration Software User Manual (Form A6121). NOTE: Because any calibration changes are recorded in flash memory, the power supplied to the ROC/FloBoss unit must be within the specified range (usually at least 12.5 volts). If it is not, the changes are not saved and the previous settings may be lost. 6-13 Sensor / Transducer Accessories Rev. Feb/05 ROC/FloBoss Accessories Instruction Manual 6.2.4.1 Keypad Calibration of a FloBoss 407 The following procedure is performed using the FloBoss 407 keypad. Set up the pressure calibrator and make the necessary connections to the MVS. To start the procedure, activate the display and enter the user Password. In any of the scrolling list displays you encounter, you can press the HOLD DISPLAY key to stop the scrolling. Use the UP and DOWN arrow keys to move through the list. At any time during calibration, you can press ALT, and then CANCEL to quit. NOTE: To properly perform the calibration procedure, you must know if the FloBoss 407 and MVS are configured to sense absolute pressure or gauge pressure. Press ALT, then CALIBRATE on the keypad. The following sequence begins: Select Meter Run TAG 1 TAG Exit Select Meter Input DP Reading Press Reading Temp Reading Exit Calibration Step 1 Calibration Step 4 Press the ENTER key to select a meter run. Selecting EXIT returns the date and time display and exits the calibration program. Push ENTER to go to Freeze Values Menu The selected input displays as shown in Calibration Step 5. Calibration Step 2 Press the ENTER key to advance to the next display and key in the desired freeze values. TAG OF METER DP Reading Press Reading Temp Reading Freeze the Meter Exit DATA DP Reading Calibrate Exit Zero Shift Effect Verify Calibration Step 5 Calibration Step 3 The program scrolls through a list. After entering desired Freeze values, press the ENTER key when FREEZE THE METER displays. The program next displays SELECT METER INPUT. Selecting EXIT returns to Calibration Step 1. 6-14 The program scrolls through the following meter input list: DP READING, PRESS READING, TEMP READING, and EXIT. Press the ENTER key to select an input for calibration. Step 5 is the hub of the calibration program. The scrolling option list includes CALIBRATE, EXIT, ZERO SHIFT EFFECT, and VERIFY. Select the CALIBRATE option to calibrate the selected input. An EXIT on this step returns to the previous step (Step 4) to select another input. When DP READING is selected, the ZERO SHIFT EFFECT is available from Calibration Step 5. Sensor / Transducer Accessories Rev. Feb/05 ROC/FloBoss Accessories Instruction Manual DP Reading Zero Shift Effect Verify Calibrate Exit Calib. Minimum Scale App. Value DATA Cur. Value DATA Save Exit Calibration Step 5 Minimum Scale Calibration Display Press the EDIT key on the ZERO SHIFT EFFECT line. Apply working pressure, let stabilize, then SAVE. Selecting EXIT discards the data and returns the program to Calibration Step 5. The SAVE option saves the Zero Shift data, logs the event, and returns the program to Calibration Step 5. Set the minimum input on the calibrator. Key the calibration setting into the APP. VALUE field. Select SAVE or EXIT by pressing the ENTER key. SAVE advances the program to CALIB. MAXIMUM SCALE and EXIT returns to Calibration Step 5. Calib. Maximum Scale App. Value DATA Cur. Value DATA Save Exit Adjust Zero Shift Zero Shift DATA Save Exit Adjust Zero Shift Display After selecting the VERIFY option at Calibration Step 5, the program advances to the VERIFY CALIBRATION display. DP Reading Verify Calibrate Exit Zero Shift Effect Calibration Step 5 The program scrolls through the list of Applied Value, Current Value, and Accuracy (computed as a difference). Apply a test signal and press the ENTER key on the APP. VALUE line to enter the corresponding test value. Verify as many test values as desired. Select LOG VERIF. to log the last verified value to the Event Log. EXIT returns the program to Calibration Step 5 Verify Calibration App. Value DATA Cur. Value DATA Accuracy DATA Log Verif. Exit The SAVE entry in CALIB. MINIMUM SCALE advances the program to this display. Set the maximum input on the calibrator. Key the calibration setting into the APP. VALUE field. Select SAVE or EXIT by pressing the ENTER key. The SAVE option returns the CALIB. MORE POINTS? screen and EXIT returns to Calibration Step 4. The SAVE entry on the CALIB. MAXIMUM SCALE display advances the program to this display. A NO selection returns to SELECT METER INPUT (Step 4). A YES selection takes the program to the CALIB. MID. POINT #1, 2 , 3 display. Calib. Mid. Point #1, 2, 3 App. Value DATA Cur. Value DATA Save Exit Midpoint Calibration Display Verify Calibration Display 6-15 Maximum Scale Calibration Display Set the lowest mid-point input on the calibrator. Key the calibration setting into the APP. VALUE field. Select SAVE when done. This returns the CALIB. MORE POINTS? display. Sensor / Transducer Accessories Rev. Feb/05 ROC/FloBoss Accessories Instruction Manual Repeat the procedure for mid-points 2 and 3 as needed. Saving mid-point 3 or selecting EXIT returns to SELECT METER INPUT (Step 4). Upon selecting EXIT from SELECT METER INPUT, the prompt “Save Calib. Data?” appears. Calib. More Points? No Yes Save Calib. Data? No Yes A YES at this display saves the calibration data, logs the data to the event log, and advances to the SELECT METER RUN (Calibration Step 1) display. A NO restores old calibration data and proceeds to the SELECT METER RUN display. Select Meter Run TAG 1 TAG ........... Exit Selecting EXIT from SELECT METER RUN display returns the date and time display and exits the calibration program. 6.2.5 MVS Downstream and Bi-Directional Flow The following details downstream pressure and bi-directional flow connection, configuration, and calibration guidelines for various FloBoss and ROC products. In all FloBoss and ROC products, the value of the static pressure input (as displayed on the Meter > Setup screen, Input tab) is the value that is archived in history. While the Multi-Variable Sensor (MVS) is intended to measure and report upstream static pressure, options are described in the following sections for setting up these devices to report a downstream pressure as the value of the static pressure input. This is required by users who need to archive the downstream pressure value to meet the needs of their gas accounting system or for bi-directional flow. The value of the upstream, absolute pressure will always be used in the calculation of flow, as required by the AGA 3 standard. The ROCLINK software selections for absolute/gauge and upstream/downstream tell the unit what, if any, conversions must be done to the input value to calculate the upstream, absolute pressure for the flow equation. The upstream/downstream selection indicates the input value returned from the sensor is already a downstream pressure and causes the value to be converted to upstream for the flow equation. 6-16 Sensor / Transducer Accessories Rev. Feb/05 ROC/FloBoss Accessories Instruction Manual 6.2.5.1 MVS Downstream Pressure – Independent of ROC or FloBoss Firmware The Multi-Variable Sensor (MVS) can be configured for downstream pressure when using a FloBoss 407, or ROC300-series with a FlashPAC and a remote MVS interface version 1.04 or greater. The MVS sensor is an upstream device and the static pressure line normally connects to the high pressure side (H), and the upstream values are calculated. To use the MVS with a FloBoss 407, or ROC300-series with a FlashPAC as a downstream device, connect the upstream pressure connections to the high (H) pressure side and the downstream pressure connections to the low (L) pressure side. Refer to Figure 6-8. Mount the Resistance Temperature Detector (RTD) probe downstream of the orifice to ensure that it does not create turbulence prior to the orifice plate measurement element. Follow the distance guidelines in AGA Report No. 3. Part 2 Section 2.6.4. Solar Panel FloBoss 407 Multi-Variable Sensor (MVS) L L H H Flow Upstream Downstream Orifice Plate DOWNMVS.dsf Figure 6-8. MVS Interface (Version 1.04 or greater) for Downstream Process Connections 6-17 Sensor / Transducer Accessories Rev. Feb/05 ROC/FloBoss Accessories Instruction Manual 6.2.5.2 Archiving Downstream Pressure in an MVS To configure ROCLINK software to archive downstream pressure: 1. Connect to ROCLINK for Windows software for the ROC300-series with FlashPAC. Connect to ROCLINK 800 software for the FloBoss 407 with a FlashPAC. 2. Select Meter menu > Setup. 3. Click the Advanced tab. 4. Select Downstream under the Pressure Tap option. 5. Click OK. 6. Select Configure menu > MVS Sensor (ROCLINK for Windows) or Configure > I/O > MVS Sensor (ROCLINK 800). 7. Select the Downstream Pressure Tap Location radio button. Refer to Figure 6-9. Figure 6-9. Multi-Variable Sensor – Downstream 8. Click OK. 9. Select Meter menu > Calibrate. 10. Select the desired Meter ID. 11. Calibrate the differential pressure (Diff Pressure) as a positive value on the high (H) side in the same manner as you would for an upstream application. Refer to Section 6.2.4, MVS Calibration, on page 6-13 for detailed calibration instructions. Downstream pressure is calculated by the sensor interface (Stat Pressure minus Diff Pressure) for display. Data archived to history indicates the downstream pressure. 6-18 Sensor / Transducer Accessories Rev. Feb/05 ROC/FloBoss Accessories Instruction Manual Upstream pressure is used in the flow calculations as required by the AGA 3 (1992) standard. 6.2.5.3 Bi-directional Flow using ROC300-Series or FloBoss 407 The Electronic Flow Measurement (EFM) can be configured for bi-directional flow when using a FloBoss 407 or ROC300-series with a FlashPAC and a remote Multi-Variable Sensor (MVS) interface version 1.04 or greater. To use the FloBoss 407 or ROC300-series with a FlashPAC as a bi-directional flow device, connect the upstream process connections to the high (H) pressure side and the downstream process connections to the low (L) pressure side. Refer to Figure 6-10. You must configure two meter runs in the ROC/FloBoss to archive bi-directional flow. NOTE: Mount the Resistance Temperature Detector (RTD) probe downstream from the low (L) pressure side. However, be aware that this may create RTD thermowell interference when flowing in the reverse direction. Solar Panel FloBoss 407 Multi-Variable Sensor (MVS) L L H H Flow Flow Flow Upstream Downstream Orifice Plate DWNMVS2.dsf Figure 6-10. MVS Interface (Version 1.04 or greater) for Bi-Directional Process Connections 6-19 Sensor / Transducer Accessories Rev. Feb/05 ROC/FloBoss Accessories Instruction Manual 6.2.5.4 Archiving Bi-Directional Flow in an MVS To perform bi-directional flow, configure one AGA meter run to use a downstream pressure tap and a second AGA meter run to use an upstream pressure tap. The MVS uses an upstream pressure tap and Reverse DP to compensate for the negative differential pressure reading in reverse flow mode. To configure ROCLINK for Windows to archive bi-directional flow: 1. Connect to ROCLINK for Windows to the ROC300-series with a FlashPAC. Connect to ROCLINK for Windows or ROCLINK 800 to the FloBoss 407 with a FlashPAC. 2. Select Meter menu > Set Up. 3. Select a meter run (to be configured for archiving reverse flow) from the Point Number drop- down list box. Refer to Figure 6-11. Point Number Figure 6-11. Meter Setup – General 4. Enter a Meter Description name for the reverse flow. 5. Click the Advanced tab. 6. Select the Downstream Pressure Tap radio button. 7. Click the Inputs tab. 8. In the Differential Pressure I/O Definition field, select MVS Interface, DP Reverse Flow. 9. Click Apply. 10. Select a meter run (to be configured for archiving forward flow) from the Point Number drop- down list box. Refer to Figure 6-11. 11. Enter a Meter Description name for the forward flow. 12. Click the Advanced tab. 6-20 Sensor / Transducer Accessories Rev. Feb/05 ROC/FloBoss Accessories Instruction Manual 13. Select the Upstream Pressure Tap radio button. 14. Click the Inputs tab. 15. In the Differential Pressure I/O Definition field, select MVS Interface, DP Diff Reading. 16. Click Apply. 17. Select Configure menu > MVS Sensor. 18. Select the desired MVS from the MVS Sensor drop-down list box. 19. Select the Upstream Pressure Tap Location radio button. 20. Click OK. 21. Select Meter menu > Calibrate. 22. Select the desired Meter ID. 23. Calibrate the differential pressure (Diff Pressure) as a negative value on the low (L) side of the sensor, and calibrate as a positive value on the high (H) side. Refer to the appropriate hardware manual for detailed calibration instructions. 6.2.6 MVS Troubleshooting It is very important that the power is disconnected, before the MVS is removed or replaced. When replacing an MVS, remove all power from the MVS by pulling out the MVS connector (plug P8) on the FloBoss 407 or the terminal block connector on the MVS Interface Card on the ROC300-series or FloBoss 503 unit. If you do not remove all power from the MVS, electronic components may be damaged. If there is more than one MVS connected to the ROC/FloBoss unit, make sure that each has a unique address, as explained in Section 6.2.3. Use ROCLINK for Windows or ROCLINK 800 Configuration Software to establish MVS addresses. If you believe an MVS is damaged or faulty, contact your local sales representative for repair or replacement. If you are having difficulty communicating with an MVS unit, reset the MVS to factory default settings as explained below. Only one MVS should be connected in the following procedure. To restore factory default settings in an MVS: 1. Connect the ROC/FloBoss unit to a PC running ROCLINK software. 2. Select Utilities > MVS Calibration Values. 3. Click Set Back to Factory Defaults. 4. Click the Yes. If your MVS displays letters (such as NAN0) for any of its input readings, a floating-point error is likely in the sensor. Attempt to reset the MVS back to factory default settings. 6-21 Sensor / Transducer Accessories Rev. Feb/05 ROC/FloBoss Accessories Instruction Manual 6.2.7 MVS Sensor Specifications For a list of MVS205 Sensor specifications, refer to Specification Sheet 2.5:MVS205. 6.3 Dual-Variable Sensor (DVS) The Dual-Variable Sensor (DVS), which uses Rosemount sensor technology, measures differential pressure and absolute or gauge (static) pressure by converting the applied pressure to electrical signals and making the readings available to the Main Electronics Board. The sensor housing screws into an adapter, which in turn mounts with four bolts to the bottom of the FloBoss enclosure. The DVS cable plugs directly into the Main Electronics Board at the P/DP connector. The readings from the Dual-Variable Sensor are stored in Analog Inputs on the FloBoss 503 or FloBoss 103. The differential pressure value uses the Analog Input (AI) Point Number A1, and the static pressure value uses the AI Point Number A2. If the alarm for either point is enabled, and the sensor fails to communicate during either initialization or operation, an alarm is entered in the Alarm Log. The DVS uses an interrupt to inform the Main Electronics Board that it is ready for an update. This must occur at least once per second. The FloBoss 503 or FloBoss 103 then converts this value and stores it in the proper Analog Input for access by other functions within the unit. If an update does not occur in the one second interval, the sensor is re-initialized. A point fail alarm is set if the sensor does not respond to the initialization. NOTE: For information on how flow is archived and reported, refer to Section 6.3.4, DVS Downstream Flow, on page 6-24. 6.3.1 DVS Sensor Wiring The FloBoss 503 and the Dual-Variable Sensor ship from the factory with the wiring connected between them. This wiring consists solely of a ribbon cable from the DVS, which plugs into the P/DP connector on the Main Electronics Board at P11. This ribbon cable fits into the P11 connector in only one direction. Always turn off power to the FloBoss 503 before you connect or disconnect wiring. Wiring of powered equipment could result in personal injury or property damage. The FloBoss 103 and the Dual-Variable Sensor are attached by an adapter. The adapter, in turn, mounts with four bolts to the bottom of the FloBoss enclosure. The DVS Sensor should only be installed and removed at the factory. The DVS cable plugs directly into the backplane board. The DVS cable should only be installed and removed at the factory. 6-22 Sensor / Transducer Accessories Rev. Feb/05 ROC/FloBoss Accessories Instruction Manual 6.3.2 DVS Configuration For the FloBoss 503, use ROCLINK for Windows configuration software to configure the DVS. For more information, refer to the ROCLINK for Windows User Manual (Form A6091). For the FloBoss 103, use ROCLINK 800 configuration software to configure the DVS. For more information, refer to the ROCLINK 800 User Manual (Form A6121). ♦ The differential pressure is configured at Analog Input Point Number A1. ♦ The static pressure (gauge or absolute) is configured at Analog Input Point Number A2. ♦ The Resistance Temperature Detector (RTD) is configured at Analog Input Point Number A3. The defaults contained within the DVS are the initial pressures read. The initial range of the differential pressure is 0 to 250 inches of water depending upon the sensor installed. Refer to Error! Reference source not found. on page 6-30 concerning ranges. You can change the ranges through the calibration routines. The turndown on the range should not be greater than the values in Error! Reference source not found. on page 6-30. The Sensor also supports the conversion of values to metric units. In metric mode, both the differential pressure and the static pressure are in kPa. For the procedure to convert to metric, refer to the appropriate ROCLINK user manual. The FloBoss automatically adjusts the units, ranges, alarm limits, and calibration factors of the differential pressure, static pressure, RTD, and enclosure/battery temperature, to the Metric mode. To return to US units, enable the US field and save this change to the FloBoss. The FloBoss adjusts the values to US units. 6.3.3 DVS Calibration A 5-point (minimum input, maximum input, and up to three intermediate points) calibration of the DVS can be performed. To perform initial calibration or recalibration (such as after an orifice plate is changed) for the DVS, you can use either ROCLINK for Windows Configuration Software or ROCLINK 800 software. To calibrate using ROCLINK Configuration Software, refer to the Verifying Calibration, Calibration, and Performing Zero Shift procedures in the ROCLINK for Windows Configuration Software User Manual (Form A6091) or the ROCLINK 800 Configuration Software User Manual (Form A6121). NOTE: Because any calibration changes are recorded in flash memory, the power supplied to the ROC/FloBoss unit must be within the specified range (usually at least 12.5 volts). If it is not, the changes are not saved and the previous settings may be lost. 6.3.3.1 Verifying DVS Calibration If the run has been calibrated before, ROCLINK for Windows Configuration Software can verify the calibration to see if the DVS requires re-calibration. To verify, read the Notes below and then follow the Verifying Calibration procedure in the Calibration section of the ROCLINK for Windows Configuration Software User Manual (Form A6091). NOTE: The Freeze Value function occurs automatically when using Quick Setup. 6-23 Sensor / Transducer Accessories Rev. Feb/05 ROC/FloBoss Accessories Instruction Manual NOTE: Open the by-pass valve on the valve manifold before isolating the sensor from the process, to protect the differential cell of the Dual-Variable Sensor. This will keep one side of the differential sensor from being subjected to high pressure while the other side has no pressure applied. This should be done whether you are calibrating differential or static pressure. When the verification for a selected point is complete, you have the choice to verify or calibrate another input or to complete the verification or calibration. When complete, connect the DualVariable Sensor back to the process. NOTE: Do NOT close the by-pass valve on the valve manifold until after process pressure has been reapplied, to protect the differential cell of the Dual-Variable Sensor. This will keep one side of the differential sensor from being subjected to high pressure while the other side has no pressure applied. 6.3.4 DVS Downstream Flow The following details downstream pressure flow connection and configuration guidelines for various FloBoss products. In all FloBoss products, the value of the static pressure input (as displayed on the Meter > Setup screen, Input tab) is the value that is archived in history. While the Dual-Variable Sensor (DVS) is intended to measure and report upstream static pressure, options are described in the following sections for setting up these devices to report a downstream pressure as the value of the static pressure input. This is required to archive the downstream pressure value to meet the needs of specific gas accounting systems. The value of the upstream, absolute pressure will always be used in the calculation of flow, as required by the AGA 3 standard. The selections, made in ROCLINK software, for absolute/gauge and upstream/downstream tell the FloBoss what, if any, conversions must be done to the input value to calculate the upstream, absolute pressure for the flow equation. The firmware assumes the DVS is installed with the static pressure tap upstream. For firmware 2.30 or greater, the upstream/ downstream selection causes the firmware to convert the raw input to a downstream value for display and archiving and then convert the value back to upstream for the flow equation. For firmware 2.30 or earlier, the upstream/downstream selection indicates the input is already a downstream pressure and causes the value to be converted to upstream for the flow equation. 6.3.4.1 Downstream Pressure for FloBoss 503 – Version 2.30 Firmware and Later Typically, the FloBoss 503 is an upstream device and the upstream static pressure line connects to the high pressure side (H) and upstream values are stored in the historical archive. To utilize the FloBoss 503 as a downstream device, the upstream pressure line is still connected to the high (H) pressure side and the downstream pressure line to the low (L) pressure side. Piping taps from the meter run connect to the Dual-Variable Sensor (DVS) of the FloBoss. Both the high and low pressures pipe to female ¼-18 NPT connections on the bottom of the DVS. Refer to Figure 6-12. 6-24 Sensor / Transducer Accessories Rev. Feb/05 ROC/FloBoss Accessories Instruction Manual Mount the Resistance Temperature Detector (RTD) probe downstream of the orifice to ensure that it does not create turbulence prior to the orifice plate measurement element. Follow the distance guidelines in AGA Report No. 3. Part 2 Section 2.6.4. Solar Panel FloBoss 500-Series Version 2.30 or Greater L L Thermowell and RTD Low Pressure Tap Dual-Variable Sensor (DVS) H H High Pressure Tap Flow Downstream Upstream Orifice Plate Down.dsf Figure 6-12. FloBoss 500-Series Version 2.30 or Greater – Downstream Process Connections 6-25 Sensor / Transducer Accessories Rev. Feb/05 ROC/FloBoss Accessories Instruction Manual 6.3.4.2 Archiving Downstream Pressure for FloBoss 503 – Version 2.30 Firmware To configure ROCLINK for Windows to archive downstream pressure: 1. Connect ROCLINK for Windows to the FloBoss. 2. Select Meter menu > Set Up. 3. Click the Advanced tab. 4. Select the Downstream Pressure Tap radio button. 5. Click OK. 6. Select Meter menu > Calibrate. 7. Select the desired Meter ID. 8. Calibrate the differential pressure (Diff Pressure) in the same manner as you would for an upstream application. Refer to the ROCLINK for Windows Software User Manual (Form A6091) for detailed calibration instructions. Downstream pressure is calculated (Stat Pressure minus Diff Pressure) for display. Data archived to history indicates the downstream pressure. Upstream pressure is used in flow calculations as required by the AGA 3 (1992) standard. 6-26 Sensor / Transducer Accessories Rev. Feb/05 ROC/FloBoss Accessories Instruction Manual 6.3.4.3 Downstream Pressure for FloBoss 503 – Version 2.23 Firmware and Earlier Downstream pressure is supported for the FloBoss if the Dual-Variable Sensor (DVS) was piped to have the upstream pressure on the low (L) port on the DVS and the downstream pressure piped to the high (H) port. Refer to Figure 6-13. Solar Panel FloBoss 500-Series Version 2.23 L L Dual-Variable Sensor (DVS) H H Thermowell and RTD Flow Downstream Upstream Orifice Plate Down223.dsf Figure 6-13. FloBoss 500-Series Version 2.23 – Downstream Process Connections 6-27 Sensor / Transducer Accessories Rev. Feb/05 ROC/FloBoss Accessories Instruction Manual 6.3.4.4 Archiving Downstream Pressure for FloBoss 503 – Version 2.23 Firmware To configure ROCLINK for Windows to archive downstream pressure: 1. Connect ROCLINK for Windows to the FloBoss. 2. Select Meter menu > Setup. 3. Click the Advanced tab. 4. Select the Downstream Pressure Tap radio button. 5. Click OK. 6. Select Meter menu > Calibrate. 7. Select the desired Meter ID. 8. Calibrate the differential pressure (Diff Pressure) as a positive value on the low (L) side of the sensor. The Live Reading appears as a negative value. 9. Calibrate the static pressure (Stat Pressure) the same as for upstream. Refer to Section Error! Reference source not found. for detailed calibration instructions. Data archived to history indicates the downstream pressure. Upstream pressure is used in the flow calculations as required by the AGA 3 (1992) standard. 6.3.5 Troubleshooting the DVS No field repair or replacement parts are associated with the DVS. Return the FloBoss 503 to your local sales representative for repair or replacement. NOTE: The DVS sensor should only be installed and removed at the factory. If your sensor is not responding: 1. Ensure that the DVS is plugged into the P/DP connector on the Main Electronics Board at P11. This ribbon cable fits into the P11 connector in only one direction. 2. Ensure that the connector and cable do not appear to be defective. 3. Ensure that the DVS is not in manual mode by setting the Scanning field in Analog Input Point Number A1 to Enabled. Refer to Figure 6-14. 6-28 Sensor / Transducer Accessories Rev. Feb/05 ROC/FloBoss Accessories Instruction Manual Figure 6-14. Analog Input – Scanning Enabled 4. Reset the DVS to factory defaults, using the following procedure. To reset the FloBoss 503 DVS configuration back to the original factory defaults: 1. Launch ROCLINK software. 2. Select Configure > I/O > AI Points. 3. Select Analog Inputs 1 (Point Number A1). 4. Select the Advanced tab. 5. Enter 32767 in the Adjusted A/D 100% field. Refer to Figure 6-15. Figure 6-15. Analog Input – Advanced 6. Click Apply. 6-29 Sensor / Transducer Accessories Rev. Feb/05 ROC/FloBoss Accessories Instruction Manual 6.3.6 DVS Sensor Specifications Dual-Variable Sensor Specifications (FloBoss 503) DIFFERENTIAL PRESSURE INPUT Range Options: 0 - 62.2 kPa (0 - 250 in. H2O). 0 - 248.8 kPa (0 - 1000 in. H2O). Reference Accuracy: ±0.075% of span with a 10:1 turndown (includes linearity, hysteresis, and repeatability effects). PROCESS CONNECTIONS 1/4-18 NPT on 2-1/8 in. centers, located on bottom of Coplanar flange. STATIC PRESSURE INPUT Range Options: Either Absolute or Gauge: 0 - 5516 kPa (0 - 800 psia/psig). 0 - 25,000 kPa (0 - 3626 psia/psig). Reference Accuracy: ±0.075% of span with a 6:1 turndown (includes linearity, hysteresis, and repeatability effects). For spans with less than 6:1 turndown, contact factory. Stability: ±0.1% of upper range limit for 12 months. ENVIRONMENTAL AND OTHER SPECS Meets the Environmental specifications of the FloBoss 500 unit, including Temperature and Voltage Surge specifications. CONSTRUCTION 316 SST*. Wetted O-rings are glass-filled TFE. Coupler is stainless steel (CF8M). Note: *Consult factory for special ranges and materials that may be available. Dual-Variable Sensor Specifications (FloBoss 103) DIFFERENTIAL PRESSURE INPUT Range*: 0 - 62.2 kPa (0 - 250 in. H2O), DVS205E or P. 0 – 248 kPa (0 – 1000 in. H2O), DVS205E or P. STATIC PRESSURE INPUT Range*: Either Absolute or Gauge: 0 - 5516 kPa (0 - 800 psia/psig ), DVS205E or P. 0 - 25,000 kPa (0 - 3626 psia/psig), DVS205E or P. REFERENCE ACCURACY DVS205P: ±0.075% of URL with 6:1 turndown (includes linearity, hysteresis, and repeatability effects). DVS 205E: ±0.10% of URL. STABILITY ±0.1% OF UPPER RANGE LIMIT FOR 12 MONTHS.PROCESS CONNECTIONS 1/4-18 NPT on 2-1/8 in. centers, located on bottom of Coplanar flange. CONSTRUCTION 316 SST (standard)* or optional Hastelloy C. Wetted O-rings are glass-filled TFE. ENVIRONMENTAL AND OTHER SPECS Meets specifications of the FloBoss 100-Series unit in which it is installed. *Consult factory for special ranges and materials that may be available. 6-30 Sensor / Transducer Accessories Rev. Feb/05 ROC/FloBoss Accessories Instruction Manual SECTION 7 – COMMUNICATIONS ACCESSORIES Communications accessories support direct (serial line), radio, or telephone communications between a ROC or FloBoss unit and other devices. For information about communication card options, refer to the respective ROC or FloBoss instruction manual. This section contains information on the Local Operator Interface Cable, Local Operator Interface Switch, and the Mast Kit. 7.1 Local Operator Interface Cable The Local Operator Interface (LOI) cable available from your sales representative connects a personal computer, such as a notebook PC, directly to a ROC or FloBoss. The Local Operator Interface (LOI) cable is a prefabricated 25-foot coiled cable that connects to the 3-pin, cannon-style connector found on most ROC or FloBoss enclosures. An adapter extension (included) allows the cable to plug into the female, 9-pin, D-shell connector found on ROC300-series units. The other end of the LOI cable is a female, 9-pin, D-shell connector for connecting to a serial communications port on the PC. 7.2 Local Operator Interface Switch This section details the Local Operator Interface (LOI) switch that allows the LOI port to act as a communications port for the ROC or FloBoss unit. The LOI switch operates in two modes: ♦ LOI – Local Operator Interface. ♦ RCP – Remote Communications Port. The LOI switch remains in RCP mode until an active connection is made locally. The switch to LOI mode occurs when an operating computer is plugged into the LOI connector at the FloBoss 500-series unit. 7.2.1 RCP Mode In RCP mode, the RCP is a limited EIA-232 (RS-232) serial port with the signals TXD (transmit data), RXD (receive data), RTS (ready to send) and COM (signal common) available. RCP mode is always active, unless a local connection is detected. 7.2.2 LOI Mode When a local connection is detected, the switch to LOI mode occurs. Once in LOI mode, any data being sent in the RCP port is interrupted and is lost. If the RTS signal is active in RCP mode, it becomes inactive in LOI mode. You can then execute any necessary configuration or data retrieval that you require. Once you disconnect from the FloBoss LOI connector, the switch from LOI mode to RCP mode occurs. The signals available in LOI mode are TXD, RXD, and COM. 7-1 Communications Accessories Rev. Feb/05 ROC/FloBoss Accessories Instruction Manual 7.2.3 How to Install the LOI Switch Use the following steps to install the LOI switch. Refer to Figure 7-1 through Figure 7-4. 1. Verify all specifications for the LOI switch are met. Refer to Table 7-1 on page 7-5 for specifications on the LOI switch. 2. Ensure all power is removed from the unit. 3. Clean the mounting location using isopropyl alcohol. 4. Measure and mark the LOI switch position inside of the enclosure as shown in Figure 7-1 and Figure 7-2. 5. Remove the backing from the adhesive pad on the back of the LOI switch. 6. Position the LOI switch over the marked area and press firmly into place. NOTE: The switch cannot be repositioned. 7. Connect all wiring as in Figure 7-4. 8. Reconnect power to the unit. 7-2 Communications Accessories Rev. Feb/05 ROC/FloBoss Accessories Instruction Manual LOI Switch LOI2.dsf LOI Connector Figure 7-1. Location for LOI Switch 7-3 Communications Accessories Rev. Feb/05 ROC/FloBoss Accessories Instruction Manual .38 .62 Section A-A Scale: None Units: Inches LOI4.dsf Figure 7-2. LOI Switch Mounting (Detail of Section A-A from Figure 7-1) LOI1.dsf Figure 7-3. Location for LOI Switch Close-up 7-4 Communications Accessories Rev. Feb/05 ROC/FloBoss Accessories Instruction Manual Main Electronics Board LOI Switch LOI Connector To Remote Communications Device loi3.dsf Figure 7-4. LOI Switch Wiring Table 7-1. LOI Switch LOI Switch Specifications LOI SWITCH Input Voltage: +10 to +15 Vdc, 26 mA typical, 30 mA maximum, not to exceed +15 Vdc. Correct polarity required. 7-5 Remote Communication Signals: Must conform to RS-232. Storage Temperature: -40 to 80°C (-40 to 176°F). Operating Temperature: -40 to 75°C (-40 to 167°F). Communications Accessories Rev. Feb/05 ROC/FloBoss Accessories Instruction Manual 7.3 Mast Kit The mast kit consists of the mounting hardware required to mount a mast to the freestanding enclosure described in Section 2. By adding U-bolts and clamps, the kit can easily be adapted for attaching the mast to a pipestand. The mast should be Schedule 40, 1¼ inch, steel pipe in the length appropriate for your application. Use the following procedure to install the mast on a freestanding ROC enclosure. 1. Mount an antenna to the mast approximately 6 inches from the end of the mast. 2. Carefully thread the antenna cable through the mast, radio connector first. Make sure that the antenna connector is nearest the antenna. 3. Connect the cable to the antenna. The cable can be routed out of the top of the mast, down the side of the mast, and back up to the antenna connector. Secure the cable to the mast at the antenna attachment point. 4. Seal the antenna-to-cable connection with moisture barrier tape. 5. Install the mast support bracket (L-shaped bracket) on the side of the freestanding enclosure using the ½-inch cap screws. Due to the weight of the mast assembly, it is recommended that two people lift the mast in place. 6. Lift the mast into position and place the end of the mast on the support bracket. Install the four mast brackets (two at each location) using four 3½ inch cap screws and lockwashers. Do not tighten the cap screws. 7. Aim the antenna in the desired direction by grasping the mast and rotating it. Tighten the four mast bracket cap screws. 8. Remove the plastic plug just below the operator interface connector located on the side of the freestanding enclosure. 10. Thread the cable into the opening. 11. Slide a cable clamp into the opening, and thread the gasketed locknut onto the cable clamp with its gasket facing the opening. 12. Tighten the gasketed locknut. 13. Route the cable to the radio. Provide enough cable to lay across the bottom of the electronics enclosure. 14. Tighten the outside nut on the cable clamp until it seals the opening and fits securely around the cable. The nut is tight when the cable cannot be pulled through the strain-relief cable clamp. 15. Coil any excess cable and, using cable ties, secure the coil. The coil can be secured to the lower mast bracket. 7-6 Communications Accessories Rev. Feb/05 ROC/FloBoss Accessories Instruction Manual INDEX EN37........................................................................... 3-3 Enclosures .................................................................. 3-1 Accessories ............................................................ 4-1 Battery ................................................................... 5-1 Freestanding........................................................... 2-1 Hinges.................................................................... 3-6 Large Mountable.................................................... 3-6 Large Mountable Specifications ............................ 3-8 Small Mountable.................................................... 3-2 Small Mountable Specifications ............................ 3-5 A Analog Inputs ........................................................... 6-22 Antenna Mast ............................................................. 7-6 B Batteries...................................................................... 5-5 Connecting for 24 volt Systems............................. 5-7 Connecting Multiple .............................................. 5-6 Requirements ......................................................... 5-6 Battery Enclosures...................................................... 5-1 Bi-Directional Flow.................................................. 6-19 F Figure 2-1. Freestanding Enclosure........................... 2-1 Figure 2-2. Typical Component Layout .................... 2-3 Figure 2-3. Base Bolt Pattern and Dimensions.......... 2-4 Figure 3-1. Small Mountable ROC Enclosure........... 3-1 Figure 3-2. Small ROC Enclosure Dimensions ......... 3-2 Figure 3-3. Model EN34 Mountable ROC Enclosure (Typical Component Layout).................................... 3-3 Figure 3-4. Model EN35 Mountable ROC Enclosure 3-4 Figure 3-5. Model EN37 Mountable ROC Enclosure (Typical Component Layout).................................... 3-4 Figure 3-6. Large ROC Enclosure EN31 and EN32 Dimensions ............................................................... 3-6 Figure 3-7. Large ROC Enclosure EN32 without Battery Compartment................................................ 3-7 Figure 3-8. Large ROC Enclosure EN31 with Battery Compartment ............................................................ 3-7 Figure 4-1. Local Display Panel ................................ 4-1 Figure 4-10. 12 Volts dc Power Input Module Wiring 411 Figure 4-11. 24 Volts dc Power Input Module Wiring 412 Figure 4-12. Communications Wiring (CPU Comm 2 Port Shown) ............................................................ 4-13 Figure 4-13. Intrusion Switch Mounting for EN34, EN35, and EN37..................................................... 4-17 Figure 4-14. Intrusion Switch Mounting for EN23 Enclosures............................................................... 4-18 Figure 4-15. Intrusion Switch Mounting for EN31 and EN32 Enclosures .................................................... 4-19 Figure 4-16. Intrusion Switch Mounting for FloBoss 500-Series Enclosures............................................. 4-20 Figure 4-17. Intrusion Switch Wiring...................... 4-20 Figure 4-18. Intrusion Switch Installation in Battery Enclosure ................................................................ 4-21 Figure 4-19. GFI Duplex Receptacle....................... 4-22 Figure 4-2. LDP Parts Orientation............................. 4-3 Figure 4-3. LCD Sub-Assembly................................ 4-3 Figure 4-4. Gasket Installation .................................. 4-4 Figure 4-5. Using RTV to Seal Window ................... 4-4 Figure 4-6. Enclosure Mounting Locations ............... 4-7 C Cables Local Operator Interface........................................ 7-1 RTD ....................................................................... 6-4 Calibration DVS ..................................................................... 6-23 MVS .................................................................... 6-13 Charger Power Supply......................................................... 5-8 Communications Accessories..................................... 7-1 Communications Port Remote................................................................... 7-1 Configuration Dual-Variable Sensor........................................... 6-23 Multi-Variable Sensor ......................................... 6-13 Connecting Batteries for 24-Volt Systems ................. 5-7 D Differential Pressure................................................. 6-23 Dual-Variable Sensor Archiving Downstream Pressure ......................... 6-26 Calibration ........................................................... 6-23 Configuration....................................................... 6-23 Downstream Pressure .......................................... 6-24 DVS ..................................................................... 6-22 Specifications....................................................... 6-30 Troubleshooting................................................... 6-28 Verify Calibration................................................ 6-23 Wiring.................................................................. 6-22 Duplex Receptacle.................................................... 4-22 DVS Sensor Specifications....................................... 6-30 E EN31........................................................................... 3-6 EN32........................................................................... 3-6 EN34........................................................................... 3-2 EN35........................................................................... 3-2 I-1 Index Rev. Feb/05 ROC/FloBoss Accessories Instruction Manual Figure 4-7. Backplate of ROC Keypad Display ........ 4-8 Figure 4-8. Side View of Installed ROC Keypad Display ...................................................................... 4-9 Figure 4-9. Visor Mounting ..................................... 4-10 Figure 5-1. Battery Enclosure with Power Supply Compartment (Inside View)...................................... 5-2 Figure 5-10. Solar Insolation in Hours for the United States....................................................................... 5-19 Figure 5-11. 30-Watt Solar Panel Installation ......... 5-21 Figure 5-12. 30 Watt Solar Panel Wiring ................ 5-22 Figure 5-13. Solar Panel Mounting (120-Watt Shown)523 Figure 5-14. 60, 120, and 180-Watt Solar Panel Wiring ................................................................................ 5-24 Figure 5-15. 21-Watt Solar Panel Mounting............ 5-26 Figure 5-16. 21-Watt and 42-Watt Solar Panel Wiring 526 Figure 5-2. Installation with Floor Mounted Battery Enclosure .................................................................. 5-3 Figure 5-3. Installation with Pipestand Mounted Battery Enclosure .................................................................. 5-4 Figure 5-4. High-Current Power Supply.................... 5-8 Figure 5-5. Low-Current Power Supply .................... 5-9 Figure 5-6. Low Current Power Supply Mounting .. 5-11 Figure 5-7. Low Current Power Supply Wiring ...... 5-11 Figure 5-8. High Current Power Supply Wiring...... 5-13 Figure 5-9. Thermistor Cable Location in Small ROC Enclosure ................................................................ 5-15 Figure 6-1. RTD Assembly Details ........................... 6-2 Figure 6-10. MVS Interface (Version 1.04 or greater) for Bi-Directional Process Connections.................. 6-19 Figure 6-11. Meter Setup – General ........................ 6-20 Figure 6-12. FloBoss 500-Series Version 2.30 or Greater – Downstream Process Connections .......... 6-25 Figure 6-13. FloBoss 500-Series Version 2.23 – Downstream Process Connections .......................... 6-27 Figure 6-14. Analog Input – Scanning Enabled....... 6-29 Figure 6-15. Analog Input – Advanced ................... 6-29 Figure 6-2. RTD Sensor Installed with Remote MVS6-2 Figure 6-3. MVS205 Pipe Mounting (Horizontal and Vertical Pipe) ............................................................ 6-6 Figure 6-4. MVS205 Panel Mounting ....................... 6-7 Figure 6-5. Signal Hook-Up for a FloBoss 407 Remote MVS Installation....................................................... 6-9 Figure 6-6. Terminations for a FloBoss 503 Remote MVS Installation..................................................... 6-10 Figure 6-7. MVS Jumper J4..................................... 6-11 Figure 6-8. MVS Interface (Version 1.04 or greater) for Downstream Process Connections .......................... 6-17 Figure 6-9. Multi-Variable Sensor – Downstream... 6-18 Figure 7-1. Location for LOI Switch ......................... 7-3 Figure 7-2. LOI Switch Mounting ............................. 7-4 Figure 7-3. Location for LOI Switch Close-up.......... 7-4 Figure 7-4. LOI Switch Wiring.................................. 7-5 Freestanding Enclosure............................................... 2-1 I-2 G GFI............................................................................ 4-22 H High Current Power Supply / Charger Installation ... 5-12 Hinges......................................................................... 3-6 I Installation MVS....................................................................... 6-6 Installing Local Display Panel ............................................... 4-1 International Resistance vs. Temperature ................... 6-3 Intrusion Switch........................................................ 4-16 ITS2 .......................................................................... 4-16 ITS3 .......................................................................... 4-16 L Large Mountable Enclosures ...................................... 3-6 LED Multi-Variable Sensor.......................................... 6-11 Lightning Protection MVS..................................................................... 6-12 List of products ........................................................... 1-1 Local Display Panel.................................................... 4-1 Installing ................................................................ 4-1 Local Operator Interface Cable ...................................................................... 7-1 LOI......................................................................... 7-1 Switch .................................................................... 7-1 Low Current Power Supply / Charger Installation.... 5-10 M Mast Kit ...................................................................... 7-6 Mountable Enclosures .........................................3-1, 3-6 Multi-Variable Sensor LEDs .................................................................... 6-11 Wiring .................................................................. 6-11 Multi-Variable Sensors Archiving Bi-Directional Flow ............................ 6-20 Archiving Downstream Pressure.......................... 6-18 Bi-Directional Flow .................................... 6-16, 6-19 Calibration ........................................................... 6-13 Calibration via FloBoss 407 Keypad ................... 6-14 Downstream Pressure.................................. 6-16, 6-17 Field Wiring ........................................................... 6-7 Lightning Protection ............................................ 6-12 Mounting................................................................ 6-6 MVS....................................................................... 6-5 Remote Mounting .................................................. 6-7 Specifications....................................................... 6-22 Troubleshooting ................................................... 6-21 Index Rev. Feb/05 ROC/FloBoss Accessories Instruction Manual Power..................................................................... 5-8 P P/DP ................................................................ 6-22, 6-28 Pipestand Mounting Assembly................................... 3-5 Power Accessories...................................................... 5-1 Power Supply / Charger.............................................. 5-8 Checking Power Supply ...................................... 5-15 Connecting Wiring............................................... 5-14 High Current Installation ..................................... 5-12 Installing ................................................................ 5-9 Low Current Installation...................................... 5-10 Power Supply Thermistor Cable............................... 5-14 Process Connections................................................. 6-17 T Table 2-1. Freestanding ROC Enclosure Specifications .................................................................................. 2-4 Table 3-1. Mountable Enclosure (Small) Specifications .................................................................................. 3-5 Table 3-2. Mountable Enclosure (Large) Specifications .................................................................................. 3-8 Table 4-1. LDP Specifications................................... 4-5 Table 4-2. Keypad Display Terminations................ 4-11 Table 4-3. EIA-232 (RS-232) Terminations............ 4-12 Table 4-4. Keypad Display LEDs............................ 4-13 Table 4-5. Keypad Display Buttons ........................ 4-14 Table 4-6. Keypad Display Specifications .............. 4-15 Table 4-7. Intrusion Switch Specifications.............. 4-21 Table 5-1. Battery Enclosure Specifications ............. 5-5 Table 5-2. Example Battery Requirements for 12-Volt Systems..................................................................... 5-6 Table 5-3. Power Supply/Charger Common Specifications.......................................................... 5-16 Table 5-4. High-Current Power Supply Specifications 517 Table 5-5. Low-Current Power Supply Specification.. 517 Table 5-6. Solar Panel Sizing .................................. 5-19 Table 6-1. International Resistance vs. Temperature. 6-3 Table 6-2. RTD Input Wiring .................................... 6-4 Table 6-3. MVS Termination .................................. 6-10 Table 6-4. MVS Signal Routing – Comm3, Comm4, and Comm5............................................................. 6-11 Table 7-1. LOI Switch............................................... 7-5 Temperature International Resistance......................................... 6-3 Thermistor Cable Power Supply....................................................... 5-14 Troubleshooting Dual-Variable Sensor........................................... 6-28 Multi-Variable Sensor ......................................... 6-21 R Receptacle Duplex ................................................................. 4-22 Remote Communications Port RCP........................................................................ 7-1 Remote MVS Interface Mounting .............................. 6-7 Resistance vs. Temperature ........................................ 6-3 RTD ...........................................................................6-23 RTD Cables ................................................................ 6-4 RTD Sensor ................................................................ 6-1 S Security Intrusion Switch................................................... 4-16 Sensor Wiring DVS......................................................... 6-28 Sensor/Transducer Accessories .................................. 6-1 Small Enclosure Models............................................. 3-2 Small Mountable Enclosures ...................................... 3-1 Solar Arrays Refer to Solar Panels ........................................... 5-18 Solar Panels Expansion Kits..................................................... 5-27 Installation ........................................................... 5-20 Installation 21 & 42 Watt .................................... 5-25 Installation 30 Watt.............................................. 5-20 Installation 60 Watt.............................................. 5-22 Sizing................................................................... 5-18 Static Pressure .......................................................... 6-23 Supply / Charger W Wiring Dual-Variable Sensor........................................... 6-22 Multi-Variable Sensor ......................................... 6-11 If you have comments or questions regarding this manual, please direct them to your local sales representative or contact: Emerson Process Management Flow Computer Division Marshalltown, Iowa 50158 U.S.A. Houston, TX 77065 U.S.A. Pickering, North Yorkshire UK Y018 7JA Website: www.EmersonProcess.com/flow I-3 Index Rev. Feb/05