1
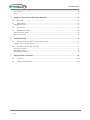
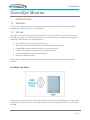
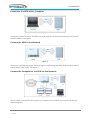
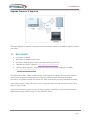
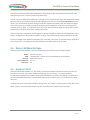
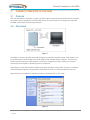
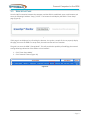
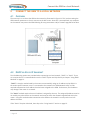
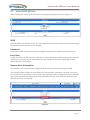
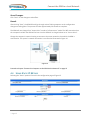
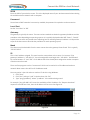
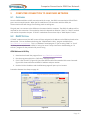
GreenEye Monitor GEM Communication Setup Manual For GEM model: GEM-W (Wifi Only Option) Document Code: COM-W Ver 1.7 2013-10-23 ©Copyright Brultech Research Inc. 2013 Introduction CONTENTS 1 Introduction ................................................................................................................... 3 1.1 Overview ....................................................................................................................................... 3 1.2 Outline........................................................................................................................................... 3 Set GEM to AP Mode .............................................................................................................................................3 Connect to the GEM with a Computer ..................................................................................................................4 Connect the GEM to the Network .........................................................................................................................4 Connect the Computer to the GEM via the Network.............................................................................................4 Upgrade Firmware if Required ..............................................................................................................................5 1.3 2 3 4 Requirement ................................................................................................................................. 5 Set GEM to Access Point Mode ....................................................................................... 6 2.1 Access Point Mode ........................................................................................................................ 6 2.2 Test for AP Mode .......................................................................................................................... 6 2.3 Set to AP Mode ............................................................................................................................. 6 2.4 Default AP Mode Settings ............................................................................................................. 7 2.5 Important Note ............................................................................................................................. 7 Connect Computer to the GEM ....................................................................................... 8 3.1 Purpose ......................................................................................................................................... 8 3.2 Procedure ...................................................................................................................................... 8 3.3 Web Setup Page ............................................................................................................................ 9 Connect the GEM to a Local Network ............................................................................ 10 4.1 Overview ..................................................................................................................................... 10 4.2 DHCP or Static IP Address? ......................................................................................................... 10 4.3 Using DHCP Method.................................................................................................................... 11 SSID .....................................................................................................................................................................11 Password .............................................................................................................................................................11 Local Port ............................................................................................................................................................11 Remote Host Information ...................................................................................................................................11 Save Changes ......................................................................................................................................................12 Result ..................................................................................................................................................................12 4.4 Using Static IP Method ................................................................................................................ 12 SSID .....................................................................................................................................................................13 Password .............................................................................................................................................................13 Local Port ............................................................................................................................................................13 Gateway ..............................................................................................................................................................13 Mask ...................................................................................................................................................................13 IP .........................................................................................................................................................................13 Remote Host Information ...................................................................................................................................14 Page 1 Introduction Save Changes ......................................................................................................................................................14 Result ..................................................................................................................................................................14 5 Computer Connection to GEM Over Network ................................................................ 15 5.1 Overview ..................................................................................................................................... 15 5.2 DHCP Option ............................................................................................................................... 15 GEM Network Utility ...........................................................................................................................................15 5.3 Static Option ............................................................................................................................... 16 5.4 Remote Host Setup ..................................................................................................................... 16 Host with Domain Name .....................................................................................................................................16 Host with IP Address ...........................................................................................................................................16 6 Troubleshooting ........................................................................................................... 17 6.1 Cannot connect to GEM in “Access Point” Mode ....................................................................... 17 Verify PC Network Adaptor Setting .....................................................................................................................17 6.2 The Web Interface Will Not Load................................................................................................ 17 Old Firmware Version .........................................................................................................................................17 Wifi Buffer Overflow ...........................................................................................................................................17 Web Interface Limitation ....................................................................................................................................17 7 Web Interface Limitations ............................................................................................. 18 7.1 Important .................................................................................................................................... 18 7.2 Web Interface Behavior .............................................................................................................. 18 Page 2 Introduction GreenEye Monitor 1 INTRODUCTION 1.1 OVERVIEW This manual provides instructions for establishing communication with a GreenEye Monitor (GEM) equipped with “Wifi Only” option (model GEM-W). 1.2 OUTLINE This section is a brief overview of the steps required to connect the GEM to a network and connect to the GEM setup page. The purpose of this section is to understand the process before executing each as explained in later chapters. The required tasks are: Set the GEM to Access Point (AP) mode (Figure 1) Make a Wifi connect directly between a computer and the GEM (Figure 2) Change GEM network settings to connect to a network (Figure 3) Connect the computer to the GEM via the network (Figure 4) Upgrade the GEM firmware if required (Figure 5) Access the “GEM Setup Page” Each of these are illustrated and described briefly below. Each procedure is detailed in subsequent chapters. Set GEM to AP Mode Figure 1 The first task is to set the GEM to “Access Point” (AP) mode. This make the GEM appear as a typical WiFi router does. This provides a known SSID (Wifi network name) and IP address allowing a PC to connect to the GEM. Page 3 Introduction Connect to the GEM with a Computer Figure 2 A computer connects directly to the GEM in AP mode using the same method used when a PC connects to a WiFi Network. See Figure 2. Connect the GEM to the Network Figure 3 The PC opens the GEM setup page. The setup page is used to change the GEM’s Wifi settings to connect to the network’s WiFi router. See Figure 3. Connect the Computer to the GEM via the Network Figure 4 Once the GEM is connected to the network, any computer on the network can communicate with the GEM. See Figure 4. Page 4 Introduction Upgrade Firmware if Required Figure 5 If firmware upgrade is required, a computer can load the new firmware to the GEM through the network connection. 1.3 REQUIREMENT A computer with Wifi Wifi Router or Network Access Point The router’s SSID (wireless network name) and security password “GEM Network Utility” software ( http://brultech.com/software ) “GEM Firmware Upgrader” software and firmware file (if firmware upgrade is needed ) ( http://brultech.com/software ) The GEM needs to have “COM” firmware version 1.70 or greater installed as it incorporates a built-in web interface to setup the GEM parameters. This also includes a means of setting up the Wifi parameters. Any GEM purchased after January 15, 2013 would qualify as having compatible firmware. If the COM firmware is older than version 1.70, an upgrade will be required. Firmware version 2.40 or better is recommended. If you do not know the firmware version currently installed on the GEM, it can be acquired using the GEM Network Utility software using the “Get GEM Info” button. Page 5 Set GEM to Access Point Mode 2 SET GEM TO ACCESS POINT MODE Figure 6 2.1 ACCESS POINT MODE If the GEM is being setup for the first time, it needs to be set to “Access Point” (AP) mode. This will set it with factory default settings. This allows a PC to connect directly to the GEM. Once connected the GEM can be setup to connect to a network WiFi router. 2.2 TEST FOR AP MODE The GEM may already be in “AP” mode, since this is the default setting when shipped. This can be tested by searching for Wifi connections. If a network called “GreenEyexxx” (where xxx is the GEM’s partial serial number) is present then connect to it and skip to the chapter “Connect Computer to the GEM” on page 8. 2.3 SET TO AP MODE The default Wifi settings are obtained by using a key sequence involving the use of the recessed push button switch located at the bottom of the GEM enclosure. See Figure 6 for switch location. Follow the two steps below: 1. Press and maintain the PB switch until the GEM’s “System” LED glows yellow* then release it immediately. 2. Notice the following GEM LED sequence: o Red LED flashes on-off three times o Green LED flashes on-off three times o Yellow* LED flashes on-off three times o LED returns to normal operating state If for some reason this didn’t happen repeat the above procedure. *Note: “Yellow” is the combined color resulting from the “System” dual color LED glowing red and green at the same time. The cover’s light pipe combines both colors to provide a yellow glow. With the GEM’s cover removed the light is not combined through the light pipe, therefore the two discrete colors (red and green) will be seen on the system LED. Page 6 Set GEM to Access Point Mode The purpose of the procedure described above is to get familiar with the sequence of LED flashes. No changes will occur as a result of performing those steps. In order to set the GEM’s WiFi module to its default values, repeat the two steps described above except this time, during the sequence where the red LED flashes three times, briefly press and release the PB switch. This must be done anytime during the red flash sequence but before the next sequence begins. If for some reason you missed pressing the PB during the red sequence, allow the entire sequence to complete then try again. It is important not to press the PB switch during sequences other that the red sequence since doing so will execute a different function. After this process is completed, the LED sequence will then change to a different flashing pattern as the GEM re-configures the Wifi module to default settings. This process will last approximately 18 seconds. Once the changes to AP mode has completed, the “Com LED” (see Figure 7) will flash amber rapidly and green slowly. This is an indication that the GEM has successfully been set to AP mode. 2.4 DEFAULT AP MODE SETTINGS When the GEM’s Wifi module is set to its default settings it will have the following settings: Mode: SSID: Security: Local IP Address: Local Port: 2.5 Access Point (AP) “GreenEyexxx” (where xxx is the GEM partial serial number) Open (no security) 1.2.3.4 80 IMPORTANT NOTE When the GEM’s Wifi module is in “AP” mode, it sometimes exhibits connections issues such that if a connection is closed, it may have trouble reconnecting. For this reason, it is recommended to immediately complete the procedures in the next two chapters to redirect the GEM to a network after the initial AP mode connection. Once the GEM connects to a network there is no need to worry about this issue. If connection issues are experienced while connected in “AP” mode, try cycling power to the GEM. If this doesn’t work, use the PC to disconnect from the “GreenEye” WiFi network then reconnect. Page 7 Connect Computer to the GEM 3 CONNECT COMPUTER TO THE GEM 3.1 PURPOSE Now that the GEM is in AP mode, our goal is to make a Wifi connection with the GEM so that its network parameters may be modified to have the GEM connect to a local network. The changes are done with the GEM’s web setup interface using a browser. 3.2 PROCEDURE Figure 7 The GEM is in Access Point (AP) mode and will appear as a wireless network named “GreenEyexxx” (xxx is the GEM’s partial serial number) when searching for Wifi networks with a computer. If you are not familiar with connecting to a Wifi network, consult your computer’s manual or perform an internet search using the computer’s operating system as a keyword. After doing a scan for Wifi networks and discovering the GreenEye, simply select “Connect” to establish a Wifi connection (Figure 8). No password is required since there is no security enabled at this time. Figure 8 shows an example of a connection made to “GreenEye118” in “AP” mode. Figure 8 Page 8 Connect Computer to the GEM 3.3 WEB SETUP PAGE Once the Wifi connection between the computer and the GEM is established, open a web browser and enter the following IP address “http://1.2.3.4”. The browser should display the GEM’s “Enter Setup” page (Figure 9). Figure 9 If this page is not displayed, try refreshing the browser. It may take a couple of tries to properly display this page, but once the GEM is in setup mode, the web interface will run smoother. The goal is to enter the GEM’s “Setup Mode”. This will provide the capability of modifying the network settings allowing redirection of the GEM to a local network. 1. Click “Enter Setup Mode” 2. Click “Network” Menu (Figure 10) Figure 10 Page 9 Connect the GEM to a Local Network 4 CONNECT THE GEM TO A LOCAL NETWORK 4.1 OVERVIEW The next step is to re-direct the GEM to the network as illustrated in Figure 11. This involves setting the GEM network parameter so that it connects to the Wifi router. Once this is accomplished, any computer on the network may access the GEM allowing all setup parameters and/or firmware upgrade to be done. Figure 11 4.2 DHCP OR STATIC IP ADDRESS? Two IP addressing options are provided when connecting to a local network, “DHCP” or “Static”. If you are a novice then it is recommended to use the “DHCP” option and skip directly to chapter “Using DHCP Method” on page 11. “DHCP” is simply a method used by the router to automatically assign an IP address to the GEM. It is the easiest option however once it is connected to the network the “GEM Network Utility” will be required to determine the IP address that has been assigned to the GEM. Furthermore, the IP address may change if the router is re-started. The “Static” method requires that an IP address is assigned by the user. The assigned IP address must be un-used by any other device on the network and must be within the allowed range defined within the router. Using this method makes connection to the GEM on the network is an easy task since its IP address is known. If the “Static” IP option is desired, then skip to the “Using Static IP” section on page 12. Page 10 Connect the GEM to a Local Network 4.3 USING DHCP METHOD When selecting the “DHCP” option the network setup page will appear as shown in Figure 12. Figure 12 SSID Enter the SSID of your wireless router. This is the displayed name of your wireless network when viewing the available wireless network with a computer. Password Since almost all Wifi networks have security enabled, the password is required to make connection. Local Port Set the “Local Port” to “80”. Port 80 is used since it is the standard port used by web browser. If desired, a different port number may be used however the port number will have to be appended to the IP address entered in the browser. Remote Host Information The “Remote Host” is the information regarding the server which will host data from the GEM. The red outlined box in Figure 13 shows where the “Remote Host” information is entered. At this time the “Remote Host” information is not required. These parameters will be configured once the GEM data host is determined and the proper packet format has been selected. These fields are explained in the GEM Setup manual “SET-General”. Figure 13 Page 11 Connect the GEM to a Local Network Save Changes Click “Save” for the changes to take effect. Result After clicking “Save”, the GEM LEDs will go through various flashing sequence as the configuration changes are taking place. The process will take approximately 20 seconds to complete. The GEM will now change from “Access Point” mode to “Infrastructure” mode. The Wifi connection that the computer had with the GEM will be lost since the GEM will no longer behave as an “Access Point”. Change the computer’s network setting to connect to the same network as that which the GEM is connected to. The system’s network connection is now like that illustrated in Figure 14. Figure 14 Proceed to chapter “Connect the Computer to the GEM via the Network” on page 15 4.4 USING STATIC IP METHOD Selecting the “Static” option will result in the configuration page of Figure 15. Figure 15 Page 12 Connect the GEM to a Local Network SSID Enter the SSID of your wireless router. This is the displayed name of your wireless network when viewing the available wireless network with a computer. Password Since almost all Wifi networks have security enabled, the password is required to make connection. Local Port Set the “Local Port” to “80” Gateway The gateway is typically the router. There are various methods to obtain the gateway IP address and the procedure varies depending on operating systems. It is typically displayed under Wifi “Status”, “Details”. A quick internet search will provide sites explaining how to read the gateway IP address. It is beyond the scope of this document to describe the procedure for each operating system. Mask The subnet mask is obtainable from the same source where the gateway IP was found. This is typically “255.255.255.0” IP This is the IP address assigned. This must have the same subnet as the router. For instance, if the gateway IP address is: “192.168.2.1”, then the assigned IP must begin with: “192.168.2.” and followed by a value between “2 “and “254”. An IP address which has already been assigned to another computer or device cannot be used. There are free programs such as “netscan.exe” which can be used to list all IP addressed used on a network. Most routers also will list all IP addresses used. One easy option is the trial and error method. To do this using Windows: 1. Click “Start” 2. Click “Run” and type “cmd” in the box then click “OK” 3. Type “ping *ip address+” where” ip address” is the address being tested For example “ping 192.168.2.44” to test the availability of this IP address. If a “Request timed out” response is echoed four times, then the IP address is free to use. See Figure 16. Figure 16 Page 13 Connect the GEM to a Local Network Remote Host Information The “Remote Host” is the information regarding the server which will host data from the GEM. The red outlined box in Figure 17 shows where the “Remote Host” information is entered. At this time the “Remote Host” information is not required. These parameters will be configured once the GEM data host is determined and the proper packet format has been selected. These fields are explained in the GEM Setup manual “SET-General”. Figure 17 Save Changes Click “Save” for the changes to take effect. Result After clicking “Save”, the GEM LEDs will go through various flashing sequence as the configuration changes are taking place. The process will take approximately 20 seconds to complete. The GEM will now change from “Access Point” mode to “Infrastructure” mode. The Wifi connection that the computer had with the GEM will be lost since the GEM will no longer behave as an “Access Point”. Change the computer’s network setting to connect to the same network as the GEM. The system’s network connection is now similar to that illustrated in Figure 18. Figure 18 Proceed to chapter “Computer Connection to GEM Over Network” on page 15 Page 14 Computer Connection to GEM Over Network 5 COMPUTER CONNECTION TO GEM OVER NETWORK 5.1 OVERVIEW Once the GEM establishes a WiFi connection with the router, the GEM’s communication LED will flash green at one second intervals. When the PC establishes a TCP connection with the GEM, the communication LED will change from flashing mode to solid green. The goal now is to connect to the GEM over the network with a computer. The GEM’s IP address will be required for the connection. The method to obtain this depends on whether “Static” or “DHCP” method was used in the previous chapter. If “DHCP” method was chosen then skip to “DHCP Option” below. 5.2 DHCP OPTION If “DHCP” mode was used, the WiFi router will have assigned an IP address to the GEM and needs to be determined. This can be determined using the “GEM Network Utility” program available from http://brultech.com/software . This is a “Windows” based program. If you are using “MAC” or “Linux” OS, then you can search out the GEM’s IP using the router’s setup interface or downloading an “IP scanner” program for the particular OS you are using. GEM Network Utility 1. Download and install the program from http://brultech.com/software 2. Run the program and click the “Wifi Only” tab (Figure 19-1) 3. Click “Listen for WiFi” (Figure 19-2) and the GEM should be discovered within several seconds. Figure 19-3 shows a discovered GEM’s IP address and port number 4. Double click the IP address and the GEM setup page will open up in a browser Proceed to Remote Host Setup on page 16. Figure 19 Page 15 Computer Connection to GEM Over Network 5.3 STATIC OPTION If the “Static” option was used, open a browser and enter the manually assigned IP address. For example, based on the example of Figure 15, the IP address http://192.168.2.88 would be entered in the browser’s address box. If a port number other than “80” is used, it will need to be specified in the browser’s address box. For example if the port was set to port 8085 in the example, then the IP address would be: http://192.168.2.88:8085 5.4 REMOTE HOST SETUP At this point, the GEM Setup page is opened in a browser. The remote host is the website, server or PC which will collect the GEM data. This chapter describes how to set the GEM to send data directly to the host over the network or internet. This procedure can be done at a later time when the hardware is completely installed and the GEM parameters are all configured. There may be separate documentation for this task which relates to the desired host such as “Smart Energy Groups” (SEG). The The host information such as “IP address” or “Domain Name” and “Port” may be configured when the GEM is in Setup Mode and the “Network” menu is selected. Host with Domain Name If a domain name is used, then enter it in the “URL” field and make sure to enter “0.0.0.0” in the “Server IP” field. Host with IP Address If using an IP address as would be the case if the data host is on the local network, enter the host IP address in the “Server IP” field and make sure the URL field is blank (empty). The “Remote Host” port is typically port “80” especially when sending data over the internet. Page 16 Troubleshooting 6 TROUBLESHOOTING 6.1 CANNOT CONNECT TO GEM IN “ACCESS POINT” MODE Verify PC Network Adaptor Setting Verify that the computer’s network adaptor has been set to “Obtain IP Address Automatically”. This is done using the following steps: 1. 2. 3. 4. 5. Click Control Panel Under the Network and Internet section, click View network status and tasks On the Network and Sharing Center window, click Change adapter settings Right-click Local Area Connection, then click Properties On the Local Area Connection Properties window, click Internet Protocol Version 4 (TCP/IPv4) then click Properties 6. Select Obtain an IP address automatically and Obtain DNS server address automatically 7. Click OK to save the changes 6.2 THE WEB INTERFACE WILL NOT LOAD Old Firmware Version If the “COM” firmware version is older than version 1.70, the web interface page will not load. If the firmware version is not known, the “GreenEye Setup” java program will need to be used to determine the firmware version. Download from http://brultech.com/software Wifi Buffer Overflow If the GEM is sending large packets and COM1 Flow control is disabled, the Wifi module’s buffer may create issues. Try cycling power to the GEM and turning off “Real-Time” packets using the “GreenEye Setup” java program. Download from http://brultech.com/software Web Interface Limitation Read the chapter Web Interface Limitations on page 18 to better understand the web interface operation. Page 17 Web Interface Limitations 7 WEB INTERFACE LIMITATIONS 7.1 IMPORTANT The performance of the GEM’s web interface has limitations however it does get the job done. It is typically used for initial setup and may never again be required once the GEM has been configured. The setup page works best with the “Com1” baud rate set to 115,200 baud. Use the GEM Network Utility or the Setup page to change the baud rate to 115,200. Given the web interface limitations, the user may need to click the browser’s address bar a couple of times initially to enter the web section. The web interface is a bit slow at loading pages therefore wait until a page is fully loaded before clicking another menu. If a page fails to load properly, simply wait a couple of seconds and refresh the browser. Try to avoid clicking any page buttons several times. Sometimes there will be a couple of seconds delay before the page loads. 7.2 WEB INTERFACE BEHAVIOR If “Setup Mode” is entered, the GEM ceases to send packets or send “keep-alive” characters until the user properly exits the setup mode at which time the GEM will proceed with its normal operation. If by chance the “Exit Setup Mode” button is not clicked to exit properly, the GEM will eventually exit setup mode after approximately 15 minutes. Additionally, if in setup mode and the browser remains idle for 15 minutes, the GEM will also exit setup mode. Page 18