1
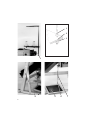
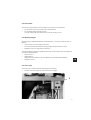
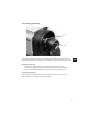
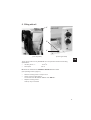
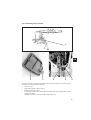
767
Spezialnähmaschine
Betriebsanleitung
D
Instruction manual
GB
Manuel d'instructions
Postfach 17 03 51, D-33703 Bielefeld • Potsdamer Straße 190, D-33719 Bielefeld
Telefon +49 (0) 5 21 / 9 25- 00 • Telefax +49 (0) 5 21 / 9 25 24 35 • www.duerkopp-adler.com
Ausg. / Edition: Änderungsindex
10/2008
Rev. index: 03.0
Printed in the Czech Republic
Teile-Nr./Part.-No.:
0791 767742
F
Alle Rechte vorbehalten.
Eigentum der Dürkopp Adler AG und urheberrechtlich geschützt. Jede, auch
auszugsweise Wiederverwendung dieser Inhalte ist verboten.
All rights reserved.
Property of the Dürkopp Adler AG and copyrighted. Reproduction or
publication of the content in any manner, without express permission of the
publisher, is prohibited.
Tous droits réservés.
Propriété de la société Dürkopp Adler AG et protégé par la loi sur le droit
d’auteur. Une copie ou reproductionpar quelque procédé que ce soit du
contenu sans accord écrite de l’auteur est interdite.
Copyright
ã 2008 - Dürkopp Adler AG
Foreword
This instruction manual is intended to help the user to become familiar
with the machine and take advantage of its application possibilities in
accordance with the recommendations.
The instruction manual contains important information on how to
operate the machine securely, properly and economically. Observation
of the instructions eliminates danger, reduces costs for repair and
down-times, and increases the reliability and life of the machine.
The instruction manual is intended to complement existing national
accident prevention and environment protection regulations.
The instruction manual must always be available at the machine/sewing
unit.
The instruction manual must be read and applied by any person that is
authorized to work on the machine/sewing unit. This means:
–
–
–
Operation, including equipping, troubleshooting during the work
cycle, removing of fabric waste,
Service (maintenance, inspection, repair) and/or
Transport.
The user also has to assure that only authorized personnel work on the
machine.
The user is obliged to check the machine at least once per shift for
apparent damages and to immediatly report any changes (including the
performance in service), which impair the safety.
The user company must ensure that the machine is only operated in
perfect working order.
Never remove or disable any safety devices.
If safety devices need to be removed for equipping, repairing or
maintaining, the safety devices must be remounted directly after
completion of the maintenance and repair work.
Unauthorized modification of the machine rules out liability of the
manufacturer for damage resulting from this.
Observe all safety and danger recommendations on the machine/unit!
The yellow-and-black striped surfaces designate permanend danger
areas, eg danger of squashing, cutting, shearing or collision.
Besides the recommendations in this instruction manual also observe
the general safety and accident prevention regulations!
General safety instructions
The non-observance of the following safety instructions can cause
bodily injuries or damages to the machine.
1. The machine must only be commissioned in full knowledge of the
instruction book and operated by persons with appropriate training.
2. Before putting into service also read the safety rules and
instructions of the motor supplier.
3. The machine must be used only for the purpose intended. Use of
the machine without the safety devices is not permitted. Observe all
the relevant safety regulations.
4. When gauge parts are exchanged (e.g. needle, presser foot, needle
plate, feed dog and bobbin) when threading, when the workplace is
left, and during service work, the machine must be disconnected
from the mains by switching off the master switch or disconnecting
the mains plug.
5. Daily servicing work must be carried out only by appropriately
trained persons.
6. Repairs, conversion and special maintenance work must only be
carried out by technicians or persons with appropriate training.
7. For service or repair work on pneumatic systems, disconnect the
machine from the compressed air supply system (max. 7-10 bar).
Before disconnecting, reduce the pressure of the maintenance unit.
Exceptions to this are only adjustments and functions checks made
by appropriately trained technicians.
8. Work on the electrical equipment must be carried out only by
electricians or appropriately trained persons.
9. Work on parts and systems under electric current is not permitted,
except as specified in regulations DIN VDE 0105.
10. Conversion or changes to the machine must be authorized by us
and made only in adherence to all safety regulations.
11. For repairs, only replacement parts approved by us must be used.
12. Commissioning of the sewing head is prohibited until such time as
the entire sewing unit is found to comply with EC directives.
13. The line cord should be equipped with a country-specific mains
plug. This work must be carried out by appropriately trained
technicians (see paragraph 8).
It is absolutely necessary to respect the safety
instructions marked by these signs.
Danger of bodily injuries !
Please note also the general safety instructions.
Contents
page:
Part 2: Cl. 767 Installation instructions
1.
Items delivered . . . . . . . . . . . . . . . . . . . . . . . . . . . . . . . . .
3
2.
2.1
2.2
2.3
2.4
2.5
2.6
Setting up
Erecting the upper part .
Transport . . . . . . . . .
V-belt tension . . . . . .
Reel stand . . . . . . . .
Working height. . . . . .
Knee lever . . . . . . . .
.
.
.
.
.
.
5
5
5
7
7
7
3.
3.1
3.2
3.3
Electrical connection
Rated voltage . . . . . . . . . . . . . . . . . . . . . . . . . . . . . . . . . .
Checking direction of motor rotation . . . . . . . . . . . . . . . . . . . . .
Checking positioning . . . . . . . . . . . . . . . . . . . . . . . . . . . . . .
8
8
9
4.
Pneumatic connection . . . . . . . . . . . . . . . . . . . . . . . . . . . .
10
5.
5.1
5.2
Filling with oil
Regulation of hook lubrication . . . . . . . . . . . . . . . . . . . . . . . .
Lubricating wicks and felt . . . . . . . . . . . . . . . . . . . . . . . . . . .
12
13
6.
Sewing test . . . . . . . . . . . . . . . . . . . . . . . . . . . . . . . . . . .
14
.
.
.
.
.
.
.
.
.
.
.
.
.
.
.
.
.
.
.
.
.
.
.
.
.
.
.
.
.
.
.
.
.
.
.
.
.
.
.
.
.
.
.
.
.
.
.
.
.
.
.
.
.
.
.
.
.
.
.
.
.
.
.
.
.
.
.
.
.
.
.
.
.
.
.
.
.
.
.
.
.
.
.
.
.
.
.
.
.
.
.
.
.
.
.
.
.
.
.
.
.
.
.
.
.
.
.
.
.
.
.
.
.
.
.
.
.
.
.
.
.
.
.
.
.
.
.
.
.
.
.
.
.
.
.
.
.
.
.
.
.
.
.
.
.
.
.
.
.
.
.
.
.
.
.
.
.
.
.
.
.
.
GB
1. Items supplied
Which items are supplied depends on your order. Please check that all the required
components are present before beginning setting-up work.
–
Basic machine with one or two needles, with or without thread clipper and with or
without edge cutter.
–
–
–
–
frame, drive, reel stand, maintenance unit
knee lever, lamp
optional equipment
pack of minor components
GB
3
1
2
3
4
5
6
7
4
8
9
2. Setting up
IMPORTANT !
The special sewing machine may only be set up by trained
specialist personnel.
Packing must be removed prior to setting-up.
–
–
Remove safety bands and wood from upper part, table and frame.
Remove safety bands and block from motor.
2.1 Erecting the upper part
If the special sewing machine was not delivered fully assembled:
–
Screw hinges 2 and 3 to base plate.
Attach upper-part support 1.
–
–
–
–
Fit upper part.
–
Place oil-recirculation felt 7 in the depression of the oil bath.
The hose 8 must not make contact with moving parts.
Fit and tension V-belt (see section 2.3).
Fit belt guard and oil bath.
GB
Align surge container 9.
The surge container must be turned so that it is vertical when the upper part of the
machine is vertical.
2.2 Transport
For internal transport the sewing machine must be lifted and moved by a suitable
vehicle (e.g. a fork-lift).
2.3 V-belt tension
After the machine has been moved the pre-set V-belt tension must be checked.
The tension in the V-belt 6 must be such that it can be depressed by about 10 mm by
applying finger pressure in the middle.
–
–
–
Loosen nuts 4 and 5.
Swivel drive until V-belt tension is correct.
Retighten nuts 4 and 5.
5
1
2
3
1
4
6
5
6
7
2.4 Reel stand
The structure and position of the reel stand 1 can be seen in the illustration.
–
–
Fit reel stand 1 and secure it with nuts 2 and washers 3.
Fit reel-stand holder and take-up arms.
The reel-stand holder and take-up arms must be vertically in line.
2.5 Working height
Working height is adjustable between 750 and 900 mm. It is pre-set at 790 mm prior to
delivery.
–
–
–
Loosen screw 4 on both sides of the frame.
Place the machine at the desired working height and ensure that it is level.
Retighten screw 4 on both sides of the frame.
The shift linkage 6 between the pedal and the motor-control cabinet must be adjusted in
line with the working height.
–
–
Loosen screw 7.
–
Retighten screw 7.
Adjust pedal 5.
Operatives must be able to move the pedal freely forwards and backwards.
GB
2.6 Knee lever
The knee lever is used to raise the sewing feet mechanically.
–
Fit knee lever with hinges into hollow shaft 8 and engage.
8
7
3. Electrical connection
IMPORTANT !
All work on the electrical equipment of this special sewing
machine may only be carried out by qualified electricians or
other appropriately trained persons.
The mains plug must be removed.
3.1 Rated voltage
IMPORTANT !
The mains voltage must coincide with the rated voltage
specified on the model-identification plate.
3.2 Checking the direction of rotation of the motor
IMPORTANT !
Before the special sewing machine is started it is essential
to check the direction of rotation of the motor.
Switching it on can cause damage if the direction of rotation
is incorrect.
The arrow indicates the correct direction of rotation.
–
With 3-phase drives the direction of rotation is determined by the rotatory field.
If the direction of rotation is incorrect, check whether the power supply generates a
clockwise-rotating field. If it is, 2 phases in the connecting plug must be reversed.
–
With DC drives the direction of rotation is set at the operating panel.
If the direction of rotation is incorrect it must be reversed at the operating panel.
8
3.3 Checking positioning
1
2
The sewing machine should be positioned with the thread lever at top dead centre.
The position transmitter 2 is fixed to the shaft with the position-transmitter ring 1. With
fully-assembled sewing machines the pre-set position is indicated by a coloured mark.
GB
Checking positioning
–
Switch on the sewing machine. Pull pedal fully back and hold it there.
The thread is clipped and the sewing machine positioned in the 2nd position.
–
Check with the handwheel whether the thread lever is at top dead centre.
Correcting positioning
If positioning is incorrect the reference point must be reset with the control unit.
This adjustment is described in the service manual.
9
4. Pneumatic connection
1
2
The pneumatic system of the special sewing machine and its optional equipment must
be connected to a supply of moisture-free compressed air.
Air pressure must be between 8 and 10 bar.
Connecting the compressed-air maintenance unit
–
Connect hose 2 (order no. 0797 003031) to the compressed-air supply with an
R ¼" hose connector.
Adjusting the operating pressure
Operating pressure is 6 bar. It can be read from the pressure gauge.
–
10
To increase pressure: lift twist grip 1 and turn clockwise.
To decrease pressure: lift twist grip 1 and turn anti-clockwise.
5. Filling with oil
1
2
1
(until July 2003)
(from August 2003)
GB
Top up the oil reservoir only with DA-10 oil or an equivalent oil with the following
specification:
–
–
Viscosity at 40° C :
Flash point:
2
10 mm /s
150 °C
DA-10 can be obtained from DÜRKOPP ADLER AG sales outlets
(see operating manual, page 27).
–
–
Remove oil-filling screw 1 and pour in oil.
–
Replace oil-filling screw 1.
Clean up any oil overflow.
Check oil level at sight glass 2.
The oil level must be between “FULL” and “EMPTY”.
11
5.1 Regulation of hook lubrication
IMPORTANT !
The oil quantity is pre-set at a relatively high level in order
to ensure adequate lubrication during running-in.
This setting should be checked and corrected after
running-in (approx. 50 hours).
See also or service manual.
Caution Risk of Injury !
Turn the main switch off.
Set the hook lubrication only with the sewing machine
turned off.
Conduct function tests with the machine running only with
the greatest possible caution.
The hook is to have positive lubrication with the least possible amount of oil.
3
1
2
3
–
–
Let the sewing machine run approx. 2 minutes.
–
–
Remove cover plate 2.
–
Turn screw 3 in until the tube movement just starts and then an 1/8 turn farther.
The hook lubrication is preset.
–
–
Attach cover plate 2 again.
Let the sewing machine run in intervals.
Hold a piece of paper next to the hook and check if sufficient oil is spun off onto the
paper.
Loosen screw 3 until the tube 1 not longer moves.
This is the case when the tube is in the center of the drilled hole.
Setting the hook lubrication with screw 3.
Turn screw 3 in = Reduce the oil quantity
Turn screw 3 out = Increase the oil quantity
ATTENTION !
The setting range between the minimum and maximum oil
quantity is only ¼ turn.
When screw 3 is turned in too far, then there is a danger
that the tube 1 will be pressed together and the oil flow
interrupted.
12
5.2 Lubricating wicks and felt
1
GB
2
3
4
5
6
The wicks and felt 1 must be soaked with a little oil when setting up the machine and
following any extended period of disuse.
–
–
–
Unscrew cap 2.
Soak wicks and felt 1 with a little oil.
Replace and tighten cap 2.
The felt tab 3 of the cap must be clamped between the recirculating felt 4 and the
nipple of the wick 6.
The film 5 must be in contact with the inside of the cap.
13
6. Sewing test
1
A sewing test must be carried out following setting-up.
Look out! Danger of injury!
The upper and lower threads must be threaded with the
sewing machine switched off.
–
–
–
Thread upper and lower threads.
–
–
First carry out the test slowly, then at a higher speed.
14
Select material 1 to be sewn.
Switch on sewing machine and set the required functions at the control unit.
The sewing test should be carried out with the “ornamental-seam lock-stitch / sew
at restricted speed” function switched on.
Check that the seams conform to requirements.
If not, carry out the adjustments and measures specified in the operating manual.
If necessary carry out the adjustments and measures specified in the service
manual.