1
EMC® Host Connectivity with Emulex
Fibre Channel Host Bus Adapters (HBAs)
and Fibre Channel over Ethernet
Converged Network Adapters (CNAs)
for the Linux Environments
P/N 300-002-583
REV A20
EMC Corporation
Corporate Headquarters:
Hopkinton, MA 01748-9103
1-508-435-1000
www.EMC.com
Copyright © 2011, 2012 EMC Corporation. All rights reserved.
Published: April, 2012
EMC believes the information in this publication is accurate as of its publication date. The information is
subject to change without notice.
THE INFORMATION IN THIS PUBLICATION IS PROVIDED "AS IS." EMC CORPORATION MAKES NO
REPRESENTATIONS OR WARRANTIES OF ANY KIND WITH RESPECT TO THE INFORMATION IN THIS
PUBLICATION, AND SPECIFICALLY DISCLAIMS IMPLIED WARRANTIES OF MERCHANTABILITY OR
FITNESS FOR A PARTICULAR PURPOSE.
Use, copying, and distribution of any EMC software described in this publication requires an applicable
software license.
For the most up-to-date regulatory document for your product line, go to the Technical Documentation and
Advisories section on EMC Powerlink.
For the most up-to-date listing of EMC product names, see EMC Corporation Trademarks on EMC.com.
All other trademarks used herein are the property of their respective owners.
2
EMC Host Connectivity with Emulex FC HBAs and FCoE CNAs for the Linux Environment
Contents
Preface.............................................................................................................................. 9
Chapter 1
Introduction
Purpose of this document................................................................ 14
Host connectivity .............................................................................. 14
Fibre Channel ..............................................................................14
Fibre Channel over Ethernet .....................................................14
Boot device support.......................................................................... 15
Zoning ................................................................................................ 16
Useful Linux utilities and functions............................................... 17
EMC storage array-specific settings............................................... 18
Chapter 2
Installation Steps
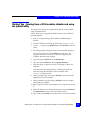
Prerequisites for first-time installation .......................................... 20
Summary of installation steps......................................................... 22
Installing the adapter ....................................................................... 24
Prerequisites ................................................................................24
Installation procedure ................................................................24
Matching the adapter with the correct PCI slot .....................26
Chapter 3
Installing and Configuring the BIOS Settings
Verifying and updating the Emulex firmware and boot BIOS... 32
Verifying the correct BIOS version...........................................32
Updating the boot BIOS.............................................................33
Method One — Updating the adapter boot BIOS with
hbacmd ............................................................................................... 34
EMC Host Connectivity with Emulex FC HBAs and FCoE CNAs for the LiInux Environment
3
Contents
Method Two – Booting from a DOS bootable diskette and
using the lp6dutil utility .................................................................. 37
Method Three – Using lputil at the command line (for the
Emulex 7.x driver) ............................................................................ 38
Updating the HBA firmware with lputil ................................ 38
Updating the HBA boot BIOS with lputil............................... 40
Chapter 4
Installing and Configuring the Linux Host with the
Emulex Driver
Installation instructions for the Emulex v8.x-series driver......... 44
Downloading the Emulex v8.x-series adapter driver for
the v2.6.x kernel .......................................................................... 45
Installing the Emulex CNA v8.x-series driver on RHEL
5.2 and SLES 10 SP2 hosts ......................................................... 46
Installing the Emulex v8.x-series driver on SLES 9 SP1
hosts.............................................................................................. 47
Installing the Emulex v8.x-series driver on RHEL 4 hosts ... 49
Included Emulex driver on RHEL 4, RHEL 5, OEL 4,
OEL 5, Asianux 2.0, Asianux 3.0, SLES 9, SLES 10, and
SLES 11 ......................................................................................... 52
Uninstalling the Emulex v8.x-series driver................................... 56
Exercising the Emulex v8.x-series device driver.......................... 57
Loading and unloading the Emulex v8.x-series driver......... 57
Target information exported to the /proc filesystem ........... 58
Dynamically modifying the driver and device
information exported to the /sys filesystem .......................... 58
Installation instructions for the Emulex v7.x-Series driver ........ 63
Enabling the Emulex v7.x-Series driver in RHEL 3.0 U4
and U5 .......................................................................................... 63
Enabling the Emulex v7.x-Series driver in Asianux
1.0 U1............................................................................................ 64
Installing the IOCTL Application Helper Module on
RHEL 3.0 U4 ................................................................................ 65
Included Emulex driver in RHEL3.0 U6, RHEL3.0 U7,
RHEL3.0 U8, and RHEL 3.9 ...................................................... 67
Installing the Emulex v7.x-Series driver ................................. 68
Installing the Emulex applications kit ..................................... 77
Uninstallation of the Emulex v7.x-Series driver .......................... 79
Uninstallation methods for the Emulex v7.x-Series
driver ............................................................................................ 79
Installing the Emulex HBAnywhere applications kit.................. 84
Editing the configuration files ........................................................ 87
4
EMC Host Connectivity with Emulex FC HBAs and FCoE CNAs for the LiInux Environment
Contents
Description of the Emulex lpfc driver parameters.................87
Descriptions of the Emulex parameters...................................88
Editing the Emulex driver parameters on hosts with
SLES 9, SLES 10, and SLES 11 ...................................................90
Editing the Emulex driver parameters on hosts with
RHEL 4 and RHEL 5 ...................................................................91
Editing the Emulex driver parameters on hosts with
Asianux 2.0 and Asianux 3.0 .....................................................92
Editing the Emulex driver parameters on hosts with
OEL 4 and OEL 5.........................................................................93
Using the Emulex lun_scan script .................................................. 94
Chapter 5
Updating the Adapter and CEE/Menlo Firmware
Updating the adapter firmware with hbacmd.............................. 98
Updating Emulex CEE /Menlo firmware for
LP21000-E/LP21002-E FCoE adapters ......................................... 102
Updating Emulex BIOS/firmware for the
OCe10102-FM-E/OCe10102-FX CNA adapters ......................... 104
Chapter 6
Connecting to the Storage
Zoning and connection planning in a fabric environment ....... 110
Planning procedure ..................................................................110
Establishing connectivity to the storage array......................110
Enabling persistent binding........................................................... 111
Obtaining initiator and target information ...........................111
Editing /usr/src/lpfc/lpfc.conf .............................................112
Editing /etc/modules.conf......................................................114
Configuring Emulex OCe10102-FM-E/OCe10102-FX iSCSI
CNA for iSCSI connectivity ........................................................... 117
Chapter 7
Configuring a Boot Device on an EMC Storage Array
Cautions and restrictions booting from an EMC storage
array .................................................................................................. 122
Symmetrix-specific cautions and restrictions .......................122
VNX series- and CLARiiON-specific cautions and
restrictions..................................................................................123
Limitations ....................................................................................... 124
Common limitations.................................................................124
Symmetrix-specific limitations ...............................................126
VNX series- and CLARiiON-specific limitations .................126
EMC Host Connectivity with Emulex FC HBAs and FCoE CNAs for the LiInux Environment
5
Contents
Configuring a Symmetrix boot device......................................... 128
Preparing the Symmetrix system ........................................... 128
Preparing the host .................................................................... 128
Configuring the Emulex boot BIOS for SAN boot............... 129
Configuring a VNX series or CLARiiON boot device............... 132
Preparing the VNX series or CLARiiON system ................. 132
Preparing the host .................................................................... 132
Configuring the Emulex boot BIOS for SAN boot............... 133
Installing an operating system on a Symmetrix, VNX series,
or CLARiiON................................................................................... 136
Installing supported RHEL 2.1 and 3.0 releases onto the
EMC storage device with the Emulex v7.x-Series driver ... 136
Installing RHEL 2.1 and 3.0 onto the EMC storage
device with the Emulex v7.x-Series driver diskette ............ 137
Installing RHEL 3.0 U4 and U5 onto the EMC storage
device with the Emulex v7.x-Series driver ........................... 138
Installing RHEL 3.0 U6 through RHEL 3.9 onto the EMC
storage device with the Emulex v7.x-Series driver ............. 138
Installing SLES 8 SP4 for the i386 architecture onto the
EMC storage device with the Emulex v7.x-Series driver
diskette ....................................................................................... 139
Installing supported RHEL 4, RHEL 5, OEL 4, OEL 5,
Asianux 2.0, Asianux 3.0, SLES 9, SLES 10, and SLES 11
operating systems onto the boot device with the Emulex
v8.x-series driver............................................................................. 141
Installing RHEL 5.2 and SLES 10 SP2 operating systems
onto a boot device using FCoE Adapters.................................... 142
RHEL 5.2 OS SAN-boot installation with Emulex FCoE
adapters...................................................................................... 142
SLES 10 SP2 OS SAN-boot installation with Emulex
FCoE adapters ........................................................................... 143
Upgrading the Linux kernel.......................................................... 145
Chapter 8
Additional Notes
Ethernet connectivity over the CNA............................................ 148
Using the Emulex lun-scan script................................................. 149
Device reconfiguration procedures.............................................. 151
Rebooting the host.................................................................... 151
Unloading and reloading the modular Emulex driver ....... 151
Device reconfiguration: Device numbering................................ 154
HPQ server-specific note ............................................................... 155
LUN 000 requirement for the Linux v2.6.x kernel ..................... 156
6
EMC Host Connectivity with Emulex FC HBAs and FCoE CNAs for the LiInux Environment
Contents
Linux device-naming convention ................................................. 157
Block device file names ............................................................157
Red Hat distributions ...............................................................158
SuSE distributions.....................................................................158
PowerPath examples ................................................................159
Character device file names.....................................................159
Device reconfiguration procedures .............................................. 161
Rebooting the host ....................................................................161
Unloading and reloading the modular Emulex driver .......161
Echoing the /proc filesystem ..................................................163
Rescanning the SCSI bus ................................................................ 164
Incorporating EMC Fibre Channel ............................................... 165
Appendix A
Special Instructions
CLARiiON “Ghost” LUN reported with the Emulex
v7.1.14 and v7.3.2 drivers (PQB filter).......................................... 168
Enabling the lpfc_inq_pqb_filter parameter ........................ 169
(CLARiiON only): Required /etc/modules.conf edit for
RHEL 2.1, RHEL 3.0, and SLES 8.0 default modular kernels ... 171
(CLARiiON only): Linux Navisphere Agent/CLI limitation
with fdisk on CLARiiON ............................................................... 174
Disabling the Navisphere Agent service .............................. 175
Issuing a Navisphere Agent stop command........................ 175
Removing the Naviagent/CLI RPM ..................................... 175
(CLARiiON only): Linux Navisphere Naviagent/CLI
limitation with VERITAS Volume Manager v3.2 on
CLARiiON........................................................................................ 177
(CLARiiON only): Linux Navisphere Agent requirement
for RHEL 2.1 Intel Itanium systems ............................................. 178
(CLARiiON Only): Linux Navisphere Agent requirement
for RHEL 3.0 Intel Itanium systems ............................................. 179
Index .............................................................................................................................. 181
EMC Host Connectivity with Emulex FC HBAs and FCoE CNAs for the LiInux Environment
7
Contents
8
EMC Host Connectivity with Emulex FC HBAs and FCoE CNAs for the LiInux Environment
Preface
As part of an effort to improve and enhance the performance and capabilities
of its product line, EMC from time to time releases revisions of its hardware
and software. Therefore, some functions described in this document may not
be supported by all revisions of the software or hardware currently in use.
For the most up-to-date information on product features, refer to your
product release notes.
If a product does not function properly or does not function as described in
this document, contact your EMC representative.
This guide describes the features and setup procedures for Linux
hosts with Emulex Host Bus Adapters (HBAs) and Converged
Network Adapters (CNAs) to EMC Symmetrix, EMC VNX series,
and EMC CLARiiON storage systems.
Audience
This guide is intended for use by storage administrators, system
programmers, or operators who are involved in acquiring, managing,
or operating Symmetrix, VNX series, and CLARiiON, and host
devices.
Readers of this guide are expected to be familiar with the following
topics:
EMC Support Matrix
◆
Symmetrix, VNX series, and CLARiiON system operation
◆
Linux operating environment
◆
Emulex adapters and drivers
Always consult the EMC Support Matrix, available through E-Lab
Interoperability Navigator at: http://elabnavigator.EMC.com, under
the PDFs and Guides tab, for the most up-to-date information.
EMC Host Connectivity with Emulex FC HBAs and FCoE CNAs for the Linux Environment
9
Preface
Related
documentation
Conventions used in
this guide
The following documents are available on Powerlink:
◆
EMC Host Connectivity Guide for Linux
◆
EMC Host Connectivity with QLogic Fibre Channel and iSCSI Host
Bus Adapters (HBAs) and Converged Network Adapters (CNAs) for the
Linux Environment
◆
EMC Linux iSCSI Attach Release Notes
◆
The EMC Networked Storage Topology Guide has been divided into
several TechBooks and reference manuals and are available
through the E-Lab Interoperability Navigator, Topology
Resource Center tab, at http://elabnavigator.EMC.com.
◆
For Emulex-specific documentation, refer to the Emulex website
EMC uses the following conventions for notes and cautions.
Note: A note presents information that is important, but not hazard-related.
!
CAUTION
A caution contains information essential to avoid data loss or
damage to the system or equipment. The caution may apply to
hardware or software.
Typographical Conventions
EMC uses the following type style conventions in this guide:
Normal
Used in running (nonprocedural) text for:
• Names of interface elements (such as names of windows,
dialog boxes, buttons, fields, and menus)
• Names of resources, attributes, pools, Boolean expressions,
buttons, DQL statements, keywords, clauses, environment
variables, filenames, functions, utilities
• URLs, pathnames, filenames, directory names, computer
names, links, groups, service keys, file systems, notifications
Bold
Used in running (nonprocedural) text for:
• Names of commands, daemons, options, programs,
processes, services, applications, utilities, kernels,
notifications, system call, man pages
Used in procedures for:
• Names of interface elements (such as names of windows,
dialog boxes, buttons, fields, and menus)
• What user specifically selects, clicks, presses, or types
10
EMC Host Connectivity with Emulex FC HBAs and FCoE CNAs for the Linux Environment
Preface
Where to get help
Italic
Used in all text (including procedures) for:
• Full titles of publications referenced in text
• Emphasis (for example a new term)
• Variables
Courier
Used for:
• System output, such as an error message or script
• URLs, complete paths, filenames, prompts, and syntax when
shown outside of running text
Courier bold
Used for:
• Specific user input (such as commands)
Courier italic
Used in procedures for:
• Variables on command line
• User input variables
<>
Angle brackets enclose parameter or variable values supplied by
the user
[]
Square brackets enclose optional values
|
Vertical bar indicates alternate selections - the bar means “or”
{}
Braces indicate content that you must specify (that is, x or y or z)
...
Ellipses indicate nonessential information omitted from the
example
EMC support, product, and licensing information can be obtained as
follows.
Product information — For documentation, release notes, software
updates, or for information about EMC products, licensing, and
service, go to the EMC Powerlink website (registration required) at:
http://Powerlink.EMC.com
Technical support — For technical support, go to EMC Customer
Service on Powerlink. To open a service request through Powerlink,
you must have a valid support agreement. Please contact your EMC
sales representative for details about obtaining a valid support
agreement or to answer any questions about your account.
Your comments
Your suggestions will help us continue to improve the accuracy,
organization, and overall quality of the user publications. Please send
your opinion of this document to:
[email protected]
EMC Host Connectivity with Emulex FC HBAs and FCoE CNAs for the Linux Environment
11
Preface
12
EMC Host Connectivity with Emulex FC HBAs and FCoE CNAs for the Linux Environment
1
Invisible Body Tag
Introduction
This document describes the procedures for installing an
EMC-approved Emulex adapter into a Linux host environment and
configuring the host for connection to an EMC storage array over
Fibre Channel (FC) or Fibre Channel over Ethernet (FCoE).
Review the EMC Support Matrix for the latest information on
approved adapters and drivers.
◆
◆
◆
◆
◆
◆
Purpose of this document .................................................................
Host connectivity ...............................................................................
Boot device support ...........................................................................
Zoning..................................................................................................
Useful Linux utilities and functions................................................
EMC storage array-specific settings ................................................
Introduction
14
14
15
16
17
18
13
Introduction
Purpose of this document
This document is meant to assist in the installation and setup of
Emulex Fibre Channel Host Bus Adapters (HBAs) and Fibre Channel
Over Ethernet (FCoE) Converged Network Adapters (CNAs) and
with the v7.x-series driver on the Linux v2.4.x hosts and the
v8.x-series driver on Linux v2.6.x hosts. The focus of this document is
to:
◆
Enable the integrated Emulex drivers in the Linux distributions
◆
Set up Linux hosts using the Emulex v7.x-series driver, which can
be downloaded from the EMC®-approved section of the Emulex
website
◆
Configure Linux hosts using the Emulex v8.x-series driver,
downloadable from the EMC-approved section of the Emulex
website at http://www.emulex.com.
Host connectivity
Review the EMC Support Matrix or contact your EMC representative
for the latest information on qualified adapters, drivers, and Linux
distributions.
Note: EMC does not support mixing different types of Fibre Channel adapter
(including different types from the same vendor) in a server.
Fibre Channel
The Fibre Channel adapter driver functions as a device driver layer
below the standard Linux SCSI adapter driver. The Fibre Channel
interface therefore is transparent to the Linux disk administration
system.
Fibre Channel over Ethernet
EMC supports the Emulex Fibre Channel over Ethernet (FCoE)
Converged Network Adapter (CNA). FCoE adapters provide a
method to converge both Fibre Channel and Ethernet traffic over a
single physical link to a switch infrastructure which manages both
storage (SAN) and network (IP) connectivity within a single unit.
14
EMC Host Connectivity with Emulex FC HBAs and FCoE CNAs for the Linux Environment
Introduction
The benefits of FCoE technology become apparent in large data
centers:
◆
Where dense, rack-mounted and blade server chassis exist.
◆
Where physical cable topology simplification is a priority.
◆
In virtualization environments, where several physical storage
and network links are commonly required.
The installation of the Emulex FCoE CNA provides the host with an
Intel-based 10 gigabit Ethernet interface (using the existing in-box
drivers), and an Emulex Fibre Channel adapter interface, which
requires the installation of the supported driver revision.
Following installation of the proper driver for the FCoE CNA, the
Fibre Channel interface will function identically to that of a standard
Emulex Fibre Channel HBA. The FCoE CNA simply encapsulates
Fibre Channel traffic within Ethernet frames. As such, FC-based
content within this document also applies directly to the Emulex
FCoE CNAs.
In-depth information about FCoE and its supported features and
topologies can be found in the EMC Fibre Channel over Ethernet (FCoE)
TechBook available at the Topology Resource tab in the E-Lab
Interoperability Navigator at http://elabnavigator.EMC.com.
Boot device support
Linux hosts using Emulex adapters have been qualified for booting
from EMC storage array devices interfaced through Fibre Channel as
specified in the EMC Support Matrix.
The EMC Symmetrix®, EMC VNX™ series, and EMC CLARiiON®
system that is to contain the Master Boot Record (MBR) for the host
must have a lower logical unit number (LUN) than any other device
visible to the host. This device must be mapped as /dev/sda by the
Linux operating system for the boot to succeed from the device.
Refer to Chapter 7, ”Configuring a Boot Device on an EMC Storage
Array,” for further information on booting from the SAN.troduction
Boot device support
15
Introduction
Zoning
When using Linux hosts in a fabric environment, the zoning must be
set up as single-initiator and single-target zoning. A single
initiator/target zone has one adapter port and one EMC storage array
port. Storage arrays ports can be shared among adapters; however,
each adapter port must be in its own zone.
Note: Multi-initiator zones are not supported in a Linux fabric environment.
16
EMC Host Connectivity with Emulex FC HBAs and FCoE CNAs for the Linux Environment
Introduction
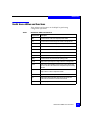
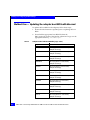
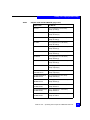
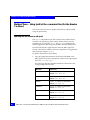
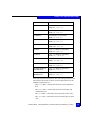
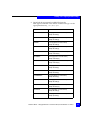
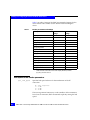
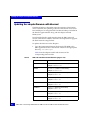
Useful Linux utilities and functions
These utilities and functions can be helpful in performing
configuration operations.
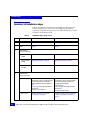
Table 1
Useful Linux utilities and functions
Utility/Function
Description
fdisk
Command used to create and manipulate partition tables.
grep
Command used to search through a file or files to find specific text.
fsck
Command used to check and repair a Linux filesystem.
mkfs
Command used to create a Linux filesystem on a device partition.
mount
Command used to attach the filesystem on a device to the file tree.
umount
Command used to detach a filesystem.
shutdown
Command used to shut down the system gracefully.
reboot
Command used to stop and restart the operating system.
insmod
Utility used to dynamically load a single module into a running kernel.
rmmod
Utility used to unload loadable modules from the running kernel if they
are not in use and if other modules are not dependent upon those being
removed.
modprobe
Utility used to load or remove a set of modules that can be either a
single module or a stack of dependent modules.
lsmod
Utility used to list the currently loaded modules.
lspci
Utility used to display information about all of the PCI buses in the
system and all of the devices connected to those buses.
scsiinfo
Utility to query information from a scsi device.
Useful Linux utilities and functions
17
Introduction
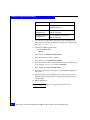
EMC storage array-specific settings
Refer to the EMC Host Connectivity Guide for Linux, available at
http://Powerlink.EMC.com, for EMC storage array-specific settings.
18
EMC Host Connectivity with Emulex FC HBAs and FCoE CNAs for the Linux Environment
2
Invisible Body Tag
Installation Steps
This chapter outlines the prerequisites for first-time installation,
offers a summary of the installation steps with links to the
appropriate sections, and provides information on installing the
adapter.
Review the EMC Support Matrix for the latest information on
approved adapters and drivers.
◆
◆
◆
Prerequisites for first-time installation ........................................... 20
Summary of installation steps.......................................................... 22
Installing the adapter......................................................................... 24
Installation Steps
19
Installation Steps
Prerequisites for first-time installation
In order to complete a first-time installation of the Emulex adapter in
your server, you will need the following:
Operating system
!
◆
“Operating system” on page 20
◆
“HBAnyware and hbacmd utilities” on page 20
◆
“BIOS and firmware” on page 20
◆
“Linux driver” on page 21
Before the Emulex adapter is installed, the Linux operating system
must be installed and properly configured. Install the Linux kernel
from the distribution installation CD by following the procedure
provided in the distribution installation guide. Partition the boot
drive, and select the packages and services necessary for the host.
IMPORTANT
Include the kernel source/development package and the gcc
compiler tools during the installation. If these tools are not
installed, then the out-of-kernel driver installation may fail and the
driver will not be installed.
HBAnyware and
hbacmd utilities
Emulex's HBAnyware program is a GUI-based utility. The hbacmd is
a text-based utility. Both applications may be installed on any Linux
system and used to manage, configure, and update the
EMC-approved Emulex HBAs. The examples contained within this
document use the hbacmd utility.
The EMC-qualified versions of HBAnyware and the hbacmd, along
with complete documentation that includes the instructions for the
installation of these utilities, are available for download from the
EMC-approved section of the Emulex website at
http://www.emulex.com/emc/support/index.jsp.
Follow the links to your adapter for the appropriate version.
BIOS and firmware
The version of BIOS and firmware (adapter firmware for your HBA
or CNA, and CEE/Menlo firmware for your CNA) per the EMC
Support Matrix for your supported configuration.
These are available for download from the EMC-approved section of
the Emulex website at
http://www.emulex.com/emc/support/index.jsp.
20
EMC Host Connectivity with Emulex FC HBAs and FCoE CNAs for the Linux Environment
Installation Steps
Follow the links to your adapter for the appropriate version.
Linux driver
The Linux driver for your HBA or CNA per theEMC Support Matrix
for your supported configuration.
EMC supports both in-kernel and out-of-kernel drivers.
Note: The installation of the in-kernel driver occurs when you install your
Linux distribution of choice.
Refer to the latest EMC Support Matrix for your specific Linux
distribution, kernel version, and driver to determine whether or not
you need to proceed with the following out-of-kernel instructions.
If your installation requires an out-of-kernel driver, download it from
the EMC-approved section of the Emulex website at
http://www.emulex.com/emc/support/index.jsp.
Follow the links to your adapter for the appropriate version.
Prerequisites for first-time installation
21
Installation Steps
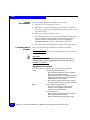
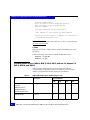
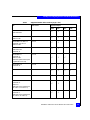
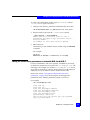
Summary of installation steps
Table 2 describes the procedures for installing an EMC-approved
Emulex adapters into a Linux host and configuring the host for
connection to an EMC Storage Array over Fibre Channel (FC) or Fibre
Channel over Ethernet (FCoE).
Table 2
Step
Instructions
For Fibre Channel, refer to
For Fibre Channel over Ethernet, refer to
1
Install the HBA .
“Installing the adapter” on page 24
“Installing the adapter” on page 24
2
Verify the BIOS
version
“Verifying the correct BIOS version” on
page 32
“Verifying the correct BIOS version” on
page 32
3
Install the BIOS.
There are three states:
• If no version is
installed
“Updating the boot BIOS” on page 33
“Updating the boot BIOS” on page 33
• If wrong version is
installed
“Updating the boot BIOS” on page 33
“Updating the boot BIOS” on page 33
• If correct version
is installed
Proceed to step 4.
Proceed to step 4.
• In kernel
For drivers listed in the EMC Support Matrix as
in-kernel drivers, there is no need to install a
driver since the process of installing the
operating system has already included the
driver.
Table 5 on page 52 lists supported Emulex
driver versions .
If in kernel, proceed to Step 5.
For drivers listed in the EMC Support Matrix as
in-kernel drivers, there is no need to install a
driver since the process of installing the
operating system has already
included the driver.
Table 5 on page 52 lists supported Emulex
driver versions .
If in kernel, proceed to Step 5.
• Out of kernel
“Installation instructions for the Emulex
v8.x-series driver” on page 44
“Installing the Emulex CNA v8.x-series driver
on RHEL 5.2 and SLES 10 SP2 hosts” on
page 46.
4
22
Installation steps (page 1 of 2)
Install the driver.
There are two states:
EMC Host Connectivity with Emulex FC HBAs and FCoE CNAs for the Linux Environment
Installation Steps
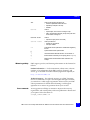
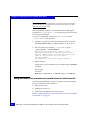
Table 2
Installation steps (page 2 of 2)
Step
Instructions
For Fibre Channel, refer to
For Fibre Channel over Ethernet, refer to
5
Install the
HBanywhere
applications kit.
“Installing the Emulex HBAnywhere
applications kit” on page 84
“Installing the Emulex HBAnywhere
applications kit” on page 84
6
Install the firmware.
There are two states:
“Updating the adapter firmware with hbacmd”
on page 98
“Updating the adapter firmware with hbacmd”
on page 98, and
“Updating Emulex CEE /Menlo firmware for
LP21000-E/LP21002-E FCoE adapters” on
page 102
• Wrong firmware
Once corrected, proceed to Step 7.
Once corrected, proceed to Step 7.
• Correct firmware
Proceed to Step 7.
Proceed to Step 7.
7
Connect to the
storage.
“Zoning and connection planning in a fabric
environment” on page 110
“Zoning and connection planning in a fabric
environment” on page 110
8
Reconfigure the
device.
“Device reconfiguration procedures” on
page 151
“Device reconfiguration procedures” on
page 151
Summary of installation steps
23
Installation Steps
Installing the adapter
This section contains the following information needed for installing
the adapter:
◆
“Prerequisites” on page 24
◆
“Installation procedure” on page 24
◆
“Matching the adapter with the correct PCI slot” on page 26
Prerequisites
Before the Emulex HBA is installed, the host must be configured with
Linux. Install the Linux kernel (including sources) from the
distribution installation CD, following the procedure provided in the
distribution installation guide. Partition the boot drive and select the
packages and services necessary for the host.
Installation procedure
Follow this procedure to install an adapter in your server.
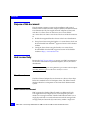
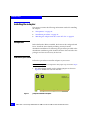
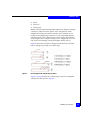
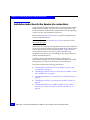
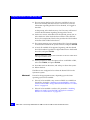
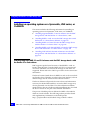
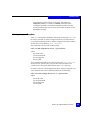
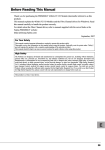
Note: Newer adapters do not require this first jumper step. Proceed to Step 2.
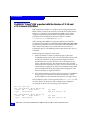
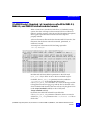
1. For older adapter models, set the adapter jumpers as shown in
Figure 1to enable it for use with the host.
JX1
JX2
1 2 3 1 2 3
Figure 1
24
LP9002-E
LP9802/DC-E
Jumpers on Emulex adapters
EMC Host Connectivity with Emulex FC HBAs and FCoE CNAs for the Linux Environment
Installation Steps
2. With host system power removed, install the adapter card and
cables as instructed in the server documentation. The card installs
into a single slot.
3. (Optical cable only.) Remove the protective covers on each
fiber-optic cable.
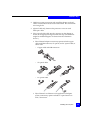
4. Plug one end of the cable into the connector on the adapter as
shown in the appropriate figure under this step. (The hardware
might be rotated 90 degrees clockwise from the orientation
shown.)
• Fibre Channel adapter connectivity options include copper
cable with DB9 connector, SC optical, and LC optical cable, as
shown next.
– Copper cable with DB9 connector:
– SC optical cable:
1
2
3
– LC optical cable:
1
2
3
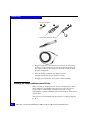
• Fibre Channel over Ethernet converged network adapter
(CNA) connectivity options include LC optical and Cisco
SFP+, shown next.
Installing the adapter
25
Installation Steps
– LC optical cable:
1
2
3
– Cisco SFP+ (Twinax cable)
5. Plug the other end of the cable into a connector on the storage
system or a hub/switch port. For FCoE switch connections, do
not connect cables to the switch port until the switch has been
properly configured.
6. Label each cable to identify the adapter and the
storage/switch/hub port to which it connects.
7. Reapply power and allow the system to boot normally.
Matching the adapter with the correct PCI slot
When choosing an adapter for your server, it is important to know
which adapter is compatible with your server's PCI/PCI-X/PCI
Express slots. Certain adapter models have specific voltage
requirements or physical limitations that allow them to work only in
specific slots.
Servers have several different bus slot types for accepting adapters:
◆
26
PCI
EMC Host Connectivity with Emulex FC HBAs and FCoE CNAs for the Linux Environment
Installation Steps
◆
PCI-X
◆
PCI-X 2.0
◆
PCI-Express
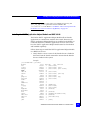
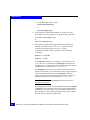
PCI slots can be 32-bit and 64-bit (denoted by their 124-pin or 188-pin
connectors.) These slots have plastic "keys" that prevent certain
adapters from fitting into them. These keys work with the cutout
notches in the adapter edge connector so only compatible adapters
will fit into them. This is done because of the voltage characteristics
of the adapter. (For example, inserting a 3.3 V adapter into a 5 V slot
will cause severe damage to both the adapter and the server.)
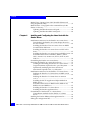
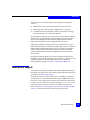
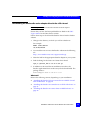
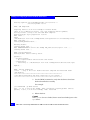
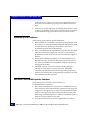
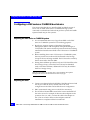
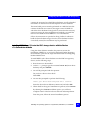
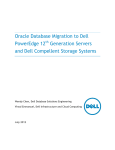
Figure 2 shows how PCI slots will appear with their keys and what
type of voltage is provided for each slot type.
Figure 2
PCI slot types and voltage key locations
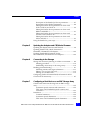
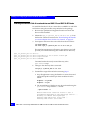
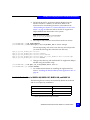
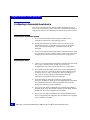
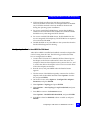
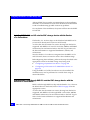
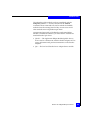
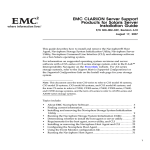
Figure 3 on page 28 shows the adapter edge connectors compatible
with the PCI slots shown in Figure 2.
Installing the adapter
27
Installation Steps
Figure 3
Adapter edge connectors
Note adapter 5, which shows a universal adapter edge connector.
Universal adapters are compatible with both 3.3 V and 5 V PCI slots.
PCI-X (or PCI Extended) slots increase the speed with which data
travels over the bus. PCI-X slots appear identical to a 64-bit PCI slot
keyed for 3.3 V. (Refer to number 3 in Figure 2 on page 27 and
Figure 3.) PCI-X slots are backwards compatible with 3.3 V PCI
adapters and universal adapters. Inserting standard PCI adapters
into PCI-X slots will lower the bus speed as they cannot take
advantage of the improved performance.
PCI-X 2.0 is the next generation of PCI-X buses. PCI-X 2.0 increases
the bus speed again, providing more performance for adapters.
PCI-X 2.0 slots also appear identical to a 64-bit PCI slot keyed for 3.3
V. (Refer to number 3 in Figure 2 on page 27 and Figure 3.) PCI-X 2.0
is also fully backward compatible with 3.3 V PCI and PCI-X.
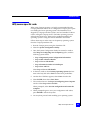
PCI Express (sometimes noted as PCIe) is a new bus type that uses
the existing PCI model, but implements it in a faster, serial protocol.
Because of the serial way it transmits data, the PCI Express bus slot
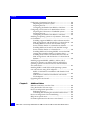
can be different sizes depending on the throughput it supports. PCI
Express slot speeds are expressed in "lanes" and are normally shown
as x1, x4, x8, and x16. Each type of slot is a different length (as shown
in Figure 4 on page 29) and adapter edge connectors will also be of
varying lengths depending on how many lanes they require for
throughput. Because of how PCI Express slots are keyed, an x1
adapter can be inserted in all four slot types, as the adapter will
28
EMC Host Connectivity with Emulex FC HBAs and FCoE CNAs for the Linux Environment
Installation Steps
negotiate with the slot to determine the highest mutually supported
number of lanes. However, an adapter requiring x16 lanes will not fit
into a smaller slot.
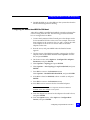
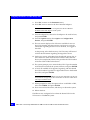
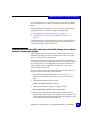
Figure 4
PCI Express slots
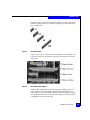
Figure 5 shows x1, x4, and x16 lane slots aligned on a mainboard. You
can see how the slots are keyed so that low-lane adapters can fit into
larger slots.
Figure 5
PCI Express slots aligned
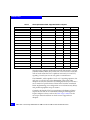
Emulex offers adapters for each bus/slot type available. Table 3 on
page 30 shows each of the EMC-supported Emulex adapters, and
their respective slot requirements. Be sure to consult both your server
user guide and Emulex to ensure that the adapter you want to use is
compatible with your server's bus.
Installing the adapter
29
Installation Steps
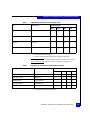
Slot requirements of EMC-supported Emulex adapters
Table 3
Adapter model
Protocol
PCI spec
BUS length
Power
Slot key
LP9002L
FC
PCI 2.2
64-bit
3.3V
Universal
LP9002DC
FC
PCI 2.2
64-bit
3.3V
Universal
LP982
FC
PCI-X 1.0a & PCI 2.2
64-bit
3.3V
Universal
LP9802
FC
PCI-X 1.0a & PCI 2.2
64-bit
3.3V
Universal
LP9802DC
FC
PCI-X 1.0a & PCI 2.2
64-bit
3.3V, 5V
3.3V
LP1050/LP1050DC
FC
PCI-X 1.0a & PCI 2.3
64-bit
3.3V, 5V
Universal
LP10000/LP10000DC
FC
PCI-X 1.0a & PCI 2.3
64-bit
3.3V, 5V
Universal
LP1050Ex/LP10000ExDC
FC
PCI Express
x4 lane
3.3v
n/a
LP1150/LP11000/LP11002
FC
PCI-X 2.0 & PCI 3.0
64-bit
3.3v
3.3v
LPe1150/LPe11000/LPe11002
FC
PCI Express
x4 lane
3.3v
n/a
LPe1250
FC
PCI Express
x4 lane
3.3v
n/a
LPe12000
FC
PCI Express
x4 lane
3.3v
n/a
LPe12002
FC
PCI Express
x4 lane
3.3v
n/a
LP21000
FCoE
PCI Express
x8 lane
3.3v
n/a
LP21002
FCoE
PCI Express
x8 lane
3.3v
n/a
Note that a few adapters are keyed universally, but require 5 V power
(LP7000, LP8000, LP850.) They will fit into a 3.3 V PCI/PCI-X slot, but
will not work unless the slot is capable of universal (3.3 V and 5 V)
signaling. Consult your server user guide or manufacturer.
The LP9802DC, while capable of 3.3 V or 5 V signaling operation, fits
only into a 3.3 V PCI/PCI-X slot. Remember, some of the older
adapters are tall (also referred to as full-height) and may not fit into a
server with a low-profile chassis. These factors must be considered
before implementing your configuration to avoid unnecessary delays
and possible equipment swaps or returns.
Currently, the Emulex FCoE converged network adapters (CNAs)
require servers that can accommodate full-height, full-length PCI
Express adapters. Always refer to the EMC Support Matrix for the
most up-to-date information on which servers support these
adapters.
30
EMC Host Connectivity with Emulex FC HBAs and FCoE CNAs for the Linux Environment
3
Invisible Body Tag
Installing and
Configuring the BIOS
Settings
This chapter provides information on installing and configuring the
BIOS settings.
◆
◆
◆
◆
Verifying and updating the Emulex firmware and boot BIOS .......... 32
Method One — Updating the adapter boot BIOS with hbacmd....... 34
Method Two – Booting from a DOS bootable diskette and
using the lp6dutil utility ................................................................... 37
Method Three – Using lputil at the command line (for the
Emulex 7.x driver).............................................................................. 38
Installing and Configuring the BIOS Settings
31
Installing and Configuring the BIOS Settings
Verifying and updating the Emulex firmware and boot BIOS
Each Emulex Fibre Channel controller has a flash upgradable
firmware and boot BIOS. In most instances, it is necessary to keep
only the firmware up-to-date, because the BIOS is used only when
using connected storage as a boot device. The latest supported
firmware can be found on the Emulex website:
http://www.emulex.com/ts/docoem/framemc.htm
From this site, select the appropriate file for your adapter. The files
are typically in a .zip file that contains different combinations of
firmware and BIOS images. Extract the downloaded file to a diskette,
and refer to readme.txt to determine which filename image to use.
If you are planning to boot from an EMC Storage Array, you need to
use the file that includes the boot BIOS. Select the boot BIOS under
the BootBIOS/FCode link listed for your adapter.
!
IMPORTANT
If you are upgrading the firmware and BIOS, you must upgrade the
firmware first, because it might contain an older BIOS version,
which you can update separately later.
For instructions on updating the firmware, refer to “Updating the
Adapter and CEE/Menlo Firmware” on page 97.
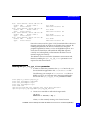
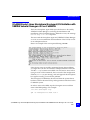
Verifying the correct BIOS version
You can determine the BIOS version at boot time from the Emulex
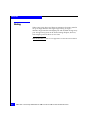
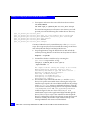
banner or from the Emulex BIOS Utility options menu.
◆
Figure 6
32
From the banner: Boot the host and watch for the banner, as
shown in the LP11002 example in Figure 6.
LP1102 Emulex banner
EMC Host Connectivity with Emulex FC HBAs and FCoE CNAs for the Linux Environment
Installing and Configuring the BIOS Settings
• If the banner does not display the required version, update the
BIOS as described in “Updating the boot BIOS” on page 33.
• If the banner displays the required version, continue to the
“Installation instructions for the Emulex v8.x-series driver” on
page 44.
Updating the boot BIOS
Either of the following three methods can be used to update the boot
BIOS:
◆
“Method One — Updating the adapter boot BIOS with hbacmd”
on page 34
◆
“Method Two – Booting from a DOS bootable diskette and using
the lp6dutil utility” on page 37
For the Emulex v7.x-Series driver, the lputil utility may be used, as
described in:
◆
“Method Three – Using lputil at the command line (for the
Emulex 7.x driver)” on page 38
Verifying and updating the Emulex firmware and boot BIOS
33
Installing and Configuring the BIOS Settings
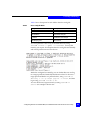
Method One — Updating the adapter boot BIOS with hbacmd
To update the boot BIOS on the adapters, follow these steps:
1. Ensure that the firmware is updated prior to updating the boot
BIOS.
2. Download the appropriate boot BIOS file from the
EMC-approved section of the Emulex website and copy it to the
appropriate directory, /usr/sbin/lpfc.:
Table 4
34
Adapter model and Boot BIOS file (page 1 of 2)
Adapter model
Boot BIOS file
LP982-E
lbXXX.prg (where XXX is the version)
Example: lb170a3.prg
LP9002-E
cbXXX.prg (where XXX is the version)
Example: cb170a3.prg
LP9802-E
hbXXX.prg (where XXX is the version)
Example: hb170a3.prg
LP9802DC-E
hbXXX.prg (where XXX is the version)
Example: hb170a3.prg
LP1050-E
mbXXX.prg (where XXX is the version)
Example: mb170a3.prg
LP1050DC-E
mbXXX.prg (where XXX is the version)
Example: mb170a3.prg
LP1050EX-E
mbXXX.prg (where XXX is the version)
Example: mb170a3.prg
LP10000-E
tbXXX.prg (where XXX is the version)
Example: tb170a3.prg
LP10000DC-E
tbXXX.prg (where XXX is the version)
Example: tb170a3.prg
LP10000EXDC-E
tbXXX.prg (where XXX is the version)
Example: tb170a3.prg
LP101-E
ebXXX.prg (whereXXX. is the version)
Example: eb170a3.prg
EMC Host Connectivity with Emulex FC HBAs and FCoE CNAs for the Linux Environment
Installing and Configuring the BIOS Settings
Table 4
Adapter model and Boot BIOS file (page 2 of 2)
Adapter model
Boot BIOS file
LPe111-E
ybXX.X..all (whereXXX. is the version)
Example: yb170a3.prg
LPe1150-E
wbXXX.prg (where XXX is the version)
Example: wb170a3.prg
LPe11002-E
zbXXX.prg (where XXX is the version)
Example: zb170a3.prg
LP11002-E
bbXXX..prg (where XXX. is the version)
Example: bb170a3.prg
LP11250-E
obXXX..prg (where XXX. is the version)
Example: ob202a1.prg
LPe12000-E
ubXXX..prg (where XXX. is the version)
Example: ub202a1.prg
LPe12002-E
ubXXX..prg (where XXX. is the version)
Example: ub202a1.prg
LP21000-E
auXXX..prg (where XXX. is the version)
Example: au501a5.prg
LP21002-E
mpXXX..prg (where XXX. is the version)
Example: mp501a5.prg
LP1005-DC Mezzanine for
HPQ Blade Servers
mpXXX.prg (where XXX. is the version)
Example: mp501a5.prg
LP100-DC Mezzanine for
IBM Blade Servers
mcXXX.prg (where XXX is the version)
Example: mc501a3.prg
LP1005-BC Mezzanine for
IBM Blade Servers
buXXX..prg (where XXX. is the version)
Example: bu502a1.prg
LPe1105-M Mezzanine for
Dell Blade Servers
zbXXX..all (where XXX is the version)
Example: zb202a1.all
LPe1105-M4 Mezzanine for zbXXX .all (where XXX is the version)
Dell Blade Servers
Example: zb202a1.all
LPe1205-M Mezzanine for
Dell Blade Servers
udXXX .all (where XXX is the version)
Example: ud110a5.all
Method One — Updating the adapter boot BIOS with hbacmd
35
Installing and Configuring the BIOS Settings
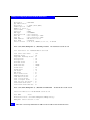
3. Execute the command /usr/sbin/hbanyware/hbacmd ListHBA,
and record the "Port WWN" information for all adapters within
the host.
4. Execute the command /usr/sbin/hbanyware/hbacmd Download
<WWPN> <firmwarefile>, where WWPN is the first Port WWN
recorded from Step 2, and firmwarefile is the firmware file name
determined in Step 1. The utility will report "Download
Complete." when the firmware download has completed
successfully.
5. If the installed adapter is a dual-ported model, then the boot BIOS
does not need to be downloaded to each adapter port;
downloading it to either port results in both ports being updated
with the latest BIOS. Otherwise, for multiple single-port adapter
models, repeat Step 4 for each adapter port WWN reported in
Step 3, to ensure that all adapter instances within the host have
been updated.
6. Reboot the system.
36
EMC Host Connectivity with Emulex FC HBAs and FCoE CNAs for the Linux Environment
Installing and Configuring the BIOS Settings
Method Two – Booting from a DOS bootable diskette and using
the lp6dutil utility
This section discusses how to update the firmware and boot BIOS,
using the Ip6util utility.
Follow these steps to upgrade the flash firmware from a MS-DOS
bootable diskette:
1. Boot the computer using a DOS/WIN95/WIN98 bootable
diskette.
2. Insert the diskette containing the flash utility (LP6DUTIL.EXE).
3. At the A:\> prompt, type lp6dutil and press ENTER to start the
utility.
4. The utility performs diagnostic tests on the installed adapter(s).
You may be required to press ENTER after each test so the
program can move on to the next. After the diagnostics are
complete, the main menu appears.
5. Type 5 and press ENTER to select Maintenance.
6. Type 1 and press ENTER to select Upgrade Firmware.
7. Enter the range of adapters to flash; for example: 1–4 (for four
adapters).I
Enter the Firmware Image filename, including the path. The
firmware image file should be on the same disk as the
LP6DUTIL.EXE program file.
8. When prompted, type 1 and press ENTER to proceed with the
upgrade for the first controller.
9. When prompted, type 1 and press ENTER to reset the adapter
after loading is complete.
10. Repeat steps 8 and 9 for each adapter in the range entered in step
6.
11. When all adapters have been loaded, type 0 and press ENTER at
the Maintenance menu to return to the main menu.
12. Type 7 and press ENTER at the main menu to exit the flash utility.
Method Two – Booting from a DOS bootable diskette and using the lp6dutil utility
37
Installing and Configuring the BIOS Settings
Method Three – Using lputil at the command line (for the Emulex
7.x driver)
This section discusses how to update the firmware and boot BIOS,
using the lputil utility.
Updating the HBA firmware with lputil
The lputil is dependent upon the existence of the Emulex driver.
Therefore, the operating system and the Emulex driver must be
installed prior to using the lputil. The lputil is included in the
Emulex Application Kit along with the HBA API and HBAnyware.
Download the Emulex Application Kit from the EMC-approved
section of the Emulex website. Follow the steps below to upgrade the
flash firmware using the lputil.
To update the firmware on the HBAs:
1. Copy the appropriate firmware file from the CD-ROM or the
EMC-approved section of the Emulex website to the appropriate
directory, /usr/sbin/lpfc.
The following table lists the HBA models and the name of the
corresponding firmware files.
38
HBA model
Firmware file
LP982-E
lfbXXX.all (where XXX is the version)
Example: lfb1.91a5.all
LP9002-E
cdcXXX.all (where XXX is the version)
Example: cdc3.92a2.all
LP9802-E
hdXXX.all (where XXX is the version)
Example: hd1.91a5.all
LP9802DC-E
hfXXX.all (where XXX is the version)
Example: hf1.91a5.all
LP1050-E
mfXXX.all (where XXX is the version)
Example: mf1.91a5.all
LP1050DC-E
mfXXX.all (where XXX is the version)
Example: mf1.91a5.all
EMC Host Connectivity with Emulex FC HBAs and FCoE CNAs for the Linux Environment
Installing and Configuring the BIOS Settings
HBA model
Firmware file
LP1050EX-E
mfXXX.all (where XXX is the version)
Example: mf1.91a5.all
LP10000-E
tdXXX.all (where XXX is the version)
Example: td1.91a5.all
LP10000DC-E
tdXXX.all (where XXX is the version)
Example: td1.91a5.all
LP10000EXDC-E
tdXXX.all (where XXX is the version)
Example: td1.91a5.all
LP101-E
embXXX.all (where XXX is the version)
Example: emb1.91a5.all
LPe1150-E
wfXXX.all (where XXX is the version)
Example: wf2.50a6.all
LPe11002-E
zfXXX.all (where XXX is the version)
Example: zf2..10a10.all
LP1150-E
jfXXX.all (where XXX is the version)
Example: jf2.50a6.all
LP11002-E
bfXXX.all (where XXX is the version)
Example: bf2.50a6.all
LP1005DC Mezzanine for
HPQ Blade Servers
mfXXX.all (where XXX is the version)
Example: mf1.91a2.all
LP1005DC Mezzanine for
IBM BladeServers
mfXXX.all (where XXX is the version)
Example: mf1.90a5.all
Each firmware file contains four files. The naming schema of the
files follows the format as shown in the example below for the
LP9002 v3.92a2 firmware.
cdc3.92a2.dwc = contains the firmware with combination
boot
cdc3.92a2.awc = contains the firmware with loader and
combination boot
cd3.92a2.dwc = contains the firmware with no boot code
cd3.92a2.awc = contains the firmware with loader, no boot
code
Method Three – Using lputil at the command line (for the Emulex 7.x driver)
39
Installing and Configuring the BIOS Settings
2. Start the firmware update utility:
cd /usr/sbin/lpfc
./lputil
3. Select Option 3 – Firmware Maintenance.
4. Select the number of the adapter to update.
5. Select Option 1 – Load Firmware Update.
6. Enter the full name of the image file (as shown in the table above;
for example, td190a4.all) and press ENTER.
7. Select Option 0 – Return to Main Menu.
8. Repeat steps 3 through 7 for each additional adapter in the
system.
9. If you plan to update the BIOS on the system that will allow the
system to boot from the EMC storage array, then update the Boot
BIOS as described in “Verifying and updating the Emulex firmware
and boot BIOS” on page 32.
10. If you do not plan to update the Boot BIOS, then reboot the
system.
Note: If you are using the HBA to boot from the SAN, update the Boot BIOS
immediately after updating the firmware as the firmware overwrites part of
the Boot BIOS.
Updating the HBA boot BIOS with lputil
Follow these steps to upgrade the boot BIOS using the lputil:
To update the boot BIOS on the HBAs:
1. Ensure that the firmware has been updated prior to updating the
boot BIOS.
40
EMC Host Connectivity with Emulex FC HBAs and FCoE CNAs for the Linux Environment
Installing and Configuring the BIOS Settings
2. Download the appropriate boot BIOS file from the
EMC-approved section of the Emulex website and copy it to the
appropriate directory, /usr/sbin/lpfc:
HBA model
Boot BIOS file
LP982-E
lbXXX.prg (where XXX is the version)
Example: lb170a3.prg
LP9002-E
cbXXX.prg (where XXX is the version)
Example: cb170a3.prg
LP9802-E
hbXXX.prg (where XXX is the version)
Example: hb170a3.prg
LP9802DC-E
hbXXX.prg (where XXX is the version)
Example: hb170a3.prg
LP1050-E
mbXXX.prg (where XXX is the version)
Example: mb170a3.prg
LP1050DC-E
mbXXX.prg (where XXX is the version)
Example: mb170a3.prg
LP1050EX-E
mbXXX.prg (where XXX is the version)
Example: mb170a3.prg
LP10000-E
tbXXX.prg (where XXX is the version)
Example: tb170a3.prg
LP10000DC-E
tbXXX.prg (where XXX is the version)
Example: tb170a3.prg
LP10000EXDC-E
tbXXX.prg (where XXX is the version)
Example: tb170a3.prg
LP101-E
ebXXX.prg (where XXX is the version)
Example: eb170a3.prg
LPe1150-E
wbXXX.prg (where XXX is the version)
Example: wb170a3.prg
LPe11002-E
zbXXX.prg (where XXX is the version)
Example: zb170a3.prg
LP1150-E
jbXXX.prg (where XXX is the version)
Example: jb170a3.prg
Method Three – Using lputil at the command line (for the Emulex 7.x driver)
41
Installing and Configuring the BIOS Settings
HBA model
Boot BIOS file
LP11002-E
bbXXX.prg (where XXX is the version)
Example: bb170a3.prg
LP1005DC Mezzanine for
HPQ Blade Servers
mpXXX.prg (where XXX is the version)
Example: mp501a5.prg
LP1005DC Mezzanine for
IBM BladeServers
mcXXX.prg (where XXX is the version)
Example: mc501a3.prg
3. Copy the file for Open Boot support from the CD-ROM or the
EMC-approved section of the Emulex website to the appropriate
directory, /usr/sbin/lpfc.
4. Start the boot BIOS update utility:
cd /usr/sbin/lpfc
./lputil
5. Select Option 3 – Firmware Maintenance.
6. Select the adapter number to update.
7. Select Option 1 – Load Firmware Update.
8. Enter the full name of the image file (as shown in the table in item
1; for example, cd190a4.awc) and press ENTER.
9. Select Option 0 – Return to Main Menu.
10. If desired, repeat steps 4 through 8 for each additional adapter in
the system.
11. Using the lputil, choose the HBA that is to be used for booting
from the fabric. Select Option 3 to enable the boot BIOS on the
intended HBA.
12. Reboot the system.
Note: Booting from the SAN is not supported with EFI boot code.
42
EMC Host Connectivity with Emulex FC HBAs and FCoE CNAs for the Linux Environment
4
Invisible Body Tag
Installing and
Configuring the Linux
Host with the Emulex
Driver
This chapter describes the procedures for installing an
EMC-approved Emulex host bus adapter (HBA) into a Linux host.
Refer to the EMC Support Matrix for the most up-to-date information
on approved adapters and drivers.
◆
◆
◆
◆
◆
◆
◆
◆
Installation instructions for the Emulex v8.x-series driver..........
Uninstalling the Emulex v8.x-series driver....................................
Exercising the Emulex v8.x-series device driver ...........................
Installation instructions for the Emulex v7.x-Series driver .........
Uninstallation of the Emulex v7.x-Series driver............................
Installing the Emulex HBAnywhere applications kit ...................
Editing the configuration files..........................................................
Using the Emulex lun_scan script ...................................................
Installing and Configuring the Linux Host with the Emulex Driver
44
56
57
63
79
84
87
94
43
Installing and Configuring the Linux Host with the Emulex Driver
Installation instructions for the Emulex v8.x-series driver
Using the Emulex adapter with the Linux operating system requires
adapter driver software. The driver functions at a layer below the
Linux SCSI driver to present Fibre Channel devices to the operating
system as if they were standard SCSI devices.
Refer to the latest EMC Support Matrix for specific qualified kernel
versions and distributions.
Note: The support stated in the EMC Support Matrix supersedes versions
listed in this document.
The Emulex v8.x-series lpfc and lpfcdfc drivers may be installed onto
a Linux host using the installer script packaged along with the driver
sources. However, for drivers listed in the EMC Support Matrix as
in-kernel drivers, there is no need to perform the following
installation since the process of installing the operating system has
already included the driver.
Currently, the v2.6.x kernel does not allow scanning past a
non-existent LUN 000. As a result, LUN 000 must exist on the EMC
Storage Array in order for the SCSI layer to scan all devices.
This section includes the following information:
44
◆
“Downloading the Emulex v8.x-series adapter driver for the
v2.6.x kernel” on page 45
◆
“Installing the Emulex CNA v8.x-series driver on RHEL 5.2 and
SLES 10 SP2 hosts” on page 46
◆
“Installing the Emulex v8.x-series driver on SLES 9 SP1 hosts” on
page 47
◆
“Installing the Emulex v8.x-series driver on RHEL 4 hosts” on
page 49
◆
“Included Emulex driver on RHEL 4, RHEL 5, OEL 4, OEL 5,
Asianux 2.0, Asianux 3.0, SLES 9, SLES 10, and SLES 11” on
page 52
EMC Host Connectivity with Emulex FC HBAs and FCoE CNAs for the Linux Environment
Installing and Configuring the Linux Host with the Emulex Driver
Downloading the Emulex v8.x-series adapter driver for the v2.6.x kernel
Note: This procedure is for both Fibre Channel and FCoE adapters.
Ensure that you have the latest qualified driver. Refer to the EMC
Support Matrix for the latest driver revision.
Follow these steps to download the Emulex driver from the Emulex
website:
1. Change to the directory to which you will save the driver.
For example:
mkdir /home/emulex
cd /home/emulex
2. Use a web browser to access the Emulex website at the following
url:
http://www.emulex.com/emc/support/index.jsp
3. Select the link for the appropriate Emulex adapter in your system.
4. Find the listing for the Linux v8.x-Series driver listed:
lpfc_2.6_driver_kit-8.2.0.29-1.tar.gz
5. In addition to the actual driver installation tar archive, the
Emulex Application Kit tar archive may also be downloaded. The
package name is:
ElxLinuxApps-4.0a31-8.2.0.29-1-1.tar
What next?
Refer to the following sections, depending on your installation:
◆
“Installing the Emulex CNA v8.x-series driver on RHEL 5.2 and
SLES 10 SP2 hosts” on page 46
◆
“Installing the Emulex v8.x-series driver on SLES 9 SP1 hosts” on
page 47
◆
“Installing the Emulex v8.x-series driver on RHEL 4 hosts” on
page 49
Installation instructions for the Emulex v8.x-series driver
45
Installing and Configuring the Linux Host with the Emulex Driver
Installing the Emulex CNA v8.x-series driver on RHEL 5.2 and SLES 10 SP2 hosts
To install the Emulex FCoE v8.x-series driver on RHEL 5.2 and SLES
10 SP2 hosts using the installer script included in the package.
1. Boot into the qualified and supported kernel onto which the
driver will be installed.
2. Obtain the lpfc_2.6_driver_kit-8.2.0.29-1.tar.gz from
the Emulex website as instructed in “Downloading the Emulex
v8.x-series adapter driver for the v2.6.x kernel” on page 45.
3. Uncompress and extract the source files from the tar archive:
cd /home/emulex
tar xzvf lpfc_2.6_driver_kit-8.2.0.29-1.tar.gz
The initial uncompression will create a new directory and will
provide you with the following files within the new directory:
lpfc_2.6_driver_kit-8.2.0.29-1/
lpfc_2.6_driver_kit-8.2.0.29-1/lpfcdriver_2.6-8.2.0.29-1.noarch.rpm
lpfc_2.6_driver_kit-8.2.0.29-1/lpfc-install
lpfc_2.6_driver_kit-8.2.0.29-1/README
Contained within the newly created directory is the
lpfc-install script.
4. Change to the directory that is extracted:
cd lpfc_2.6_driver_kit-8.2.0.29-1
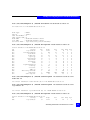
5. Uninstall the original driver before executing Step 6.
a. Stop all applications using the Emulex 8.x-series driver and
unload the lpfcdfc and the lpfc driver modules from the
kernel.
modprobe -r lpfcdfc
modprobe -r lpfc
b. The uninstallation of the driver may be performed using the
lpfc-install script with the -u switch:
./lpfc-install -u
Emulex LPFC Driver Installer Version 1.30.1.2
Determining distribution type and kernel version ...
Checking for Emulex driver packages ...
Removing LPFC DFC Driver source RPM ...
Removing LPFC Driver source RPM ...
46
EMC Host Connectivity with Emulex FC HBAs and FCoE CNAs for the Linux Environment
Installing and Configuring the Linux Host with the Emulex Driver
Removing Emulex DFC driver startup script ...
Restoring old Emulex drivers...
Configuring /etc/modprobe.conf ...
Original saved as /etc/modprobe.elx
Original ramdisk image
/boot/initrd-2.6.9-5.0.3.ELsmp.img saved as
/boot/initrd-2.6.9-5.0.3.ELsmp.img.elx
Creating ramdisk ...
The ramdisk for this kernel has been updated.
Uninstallation complete
c. Reboot the host.
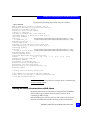
6. After the reboot, execute the lpfc-install script with no options
to install the driver kit:
cd /home/emulex/lpfc_2.6_driver_kit-8.2.0.29-1
./lpfc-install
Upon completion of the lpfc-install script, the Emulex lpfc
driver for the FCoE adapter is loaded and FC disks that are
connected to the systemare accessible.
Note: The system must be rebooted so that the lpfc driver is loaded through
the newly created ramdisk.
Installing the Emulex v8.x-series driver on SLES 9 SP1 hosts
The Emulex v2.10f driver (included by default in the SLES 9 SP1
distribution) is not supported by EMC. EMC requires the use of the
v8.0.16.6_x2 driver when connecting to EMC storage.
Before installing the v8.0.16.6_x2 driver, the existing v2.x series driver
must be uninstalled. The Emulex v8.0.16.6_x2 driver may then be
compiled as a module and configured to load automatically at boot
time. When the installer script is used, it creates a new RAM disk
which includes the new driver.
This section describes the above-mentioned process using the
installer script included in the package.
1. Boot into the qualified and supported kernel onto which the
driver will be installed.
2. Obtain the lpfc_2.6_driver_kit-8.0.16.6_x2-1.tar.gz from
the Emulex website as instructed in “Downloading the Emulex
v8.x-series adapter driver for the v2.6.x kernel” on page 45.
Installation instructions for the Emulex v8.x-series driver
47
Installing and Configuring the Linux Host with the Emulex Driver
3. Uncompress and extract the source files from the tar archive:
cd /home/emulex
tar xzvf lpfc_2.6_driver_kit-8.0.16.6_x2-1.tar.gz
The initial uncompression will create a new directory and will
provide you with the following files within the new directory:
lpfc_2.6_driver_kit-8.0.16.6_x2-1/
lpfc_2.6_driver_kit-8.0.16.6_x2-1/lpfc_2.6_ioctl_module-2.0.2-1.noarch.rpm
lpfc_2.6_driver_kit-8.0.16.6_x2-1/lpfcdriver_2.6-8.0.16.6_x2-1.noarch.rpm
lpfc_2.6_driver_kit-8.0.16.6_x2-1/lpfc-install
lpfc_2.6_driver_kit-8.0.16.6_x2-1/README
lpfc_2.6_driver_kit-8.0.16.6_x2-1/elxlpfc
Contained within the newly created directory is the lpfc-install
script. This script may be used to uninstall the existing v2.10f driver
and will install both the lpfc and the lpfcdfc drivers.
4. Stop all applications using the Emulex driver and unload the
currently running Emulex v2.10f driver in the system as follows:
modprobe –r lpfcdd
5. Uninstall the Emulex v2.10f driver by executing the
lpfc-install script with the –u flag:
cd lpfc_2.6_driver_kit-8.0.16.6_x2-1/
./lpfc-install –u
6.
The output from the running the script is as follows:
Emulex LPFC Driver Installer Version 1.30.1.2
Determining distribution type and kernel version ...
Checking for Emulex driver packages ...
Restoring old Emulex drivers...
Configuring /etc/modprobe.conf ...
Configuring /etc/sysconfig/kernel ...
Uninstallation complete.
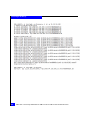
The installer script will install both the lpfc and the lpfcdfc
drivers. No options are needed when executing this script. The
installer script unpacks the source RPMs included in the package
in the /usr/src/lpfc directory and builds the driver using the
sources for the currently running kernel. The script then modifies
/etc/modprobe.conf and /etc/sysconfig/kernel to
include changes for the v8.x driver. The elxlpfc is an
initialization script for the Application Helper Module (lpfcdfc
driver). The elxlpfc script is also installed so that the lpfcdfc
driver is configured to start and stop during system boot up and
shutdown. Finally, the installer script creates a backup of the
existing RAM disk and creates a new RAM disk.
48
EMC Host Connectivity with Emulex FC HBAs and FCoE CNAs for the Linux Environment
Installing and Configuring the Linux Host with the Emulex Driver
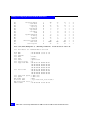
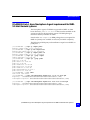
The output from running the installer script is as follows:
./lpfc-install
Emulex LPFC Driver Installer Version 1.30.1.2
Determining distribution type and kernel version ...
Checking for old Emulex driver ...
Looking for kernel source package ...
Looking for compilers ...
Searching for LPFC Driver source RPM from
/home/emulex/lpfc_2.6_driver_kit-8.0.16.6_x2-1/. ...
Installing package ...
Preparing...
########################################### [100%]
1:lpfcdriver_2.6
########################################### [100%]
Building lpfc driver ...........
Loading LPFC Driver ....................
Searching for LPFC DFC Driver source RPM from
/home/emulex/lpfc_2.6_driver_kit-8.0.16.6_x2-1/. ...
Installing package ...
Preparing...
########################################### [100%]
1:lpfc_2.6_ioctl_module ########################################### [100%]
Building lpfcdfc driver ...........
Loading LPFC DFC Driver ..
Installing Emulex DFC driver startup script ...
elxlpfc
0:off 1:off 2:on
3:on
4:on
5:on
6:off
Package installation complete
Configuring ramdisk...
Configuring /etc/modprobe.conf ...
Original saved as /etc/modprobe.elx
Configuring /etc/sysconfig/kernel ...
Original saved as /etc/sysconfig/kernel.elx
Creating ramdisk ......
1 message generated during installation:
o The ramdisk for this kernel has been updated.
Please reboot this system to complete the installation
of the Emulex LPFC driver kit.
Note: The system must be rebooted so that the lpfc driver is loaded through
the newly created ramdisk.
Installing the Emulex v8.x-series driver on RHEL 4 hosts
By default, the Emulex v8.0.16 driver is integrated into the RHEL 4
kernel. EMC requires the use of the v8.0.16.6_x2 driver when
connecting to EMC storage.
Before installing the v8.0.16.6_x2 driver, the existing v8.0.16 driver
must be uninstalled. The Emulex v8.0.16.6_x2 driver will then be
Installation instructions for the Emulex v8.x-series driver
49
Installing and Configuring the Linux Host with the Emulex Driver
compiled as a module and configured to load automatically on boot
up. Also, a new RAM disk will be created for the system that includes
the new driver in it.
This section describes the previously mentioned process using the
installer script included in the package.
1. Boot into the qualified and supported kernel onto which the
driver will be installed.
2. Obtain the lpfc_2.6_driver_kit-8.0.16.6_x2-1.tar.gz from
the Emulex website as instructed under the “Downloading the
Emulex v8.x-series adapter driver for the v2.6.x kernel” on
page 45 section.
3. Uncompress and extract the source files from the tar archive:
cd /home/emulex
tar xzvf lpfc_2.6_driver_kit-8.0.16.6_x2-1.tar.gz
The initial uncompression will create a new directory and will
provide you with the following files within the new directory:
lpfc_2.6_driver_kit-8.0.16.6_x2-1/
lpfc_2.6_driver_kit-8.0.16.6_x2-1/lpfc_2.6_ioctl_module-2.0.2-1.noarch.rpm
lpfc_2.6_driver_kit-8.0.16.6_x2-1/lpfcdriver_2.6-8.0.16.6_x2-1.noarch.rpm
lpfc_2.6_driver_kit-8.0.16.6_x2-1/lpfc-install
lpfc_2.6_driver_kit-8.0.16.6_x2-1/README
lpfc_2.6_driver_kit-8.0.16.6_x2-1/elxlpfc
Contained within the newly created directory is the
lpfc-install script. This script may be used to uninstall the
existing v8.0.16 driver and will install both the lpfc and the
lpfcdfc drivers
4. Stop all applications using the Emulex driver and then unload the
currently running Emulex v8.0.16 driver in the system as follows:
modprobe –r lpfc
5. Uninstall the Emulex v8.0.16 driver by executing the
lpfc-install script with the –u flag as follows:
cd lpfc_2.6_driver_kit-8.0.16.6_x2-1/
./lpfc-install –u
The output from the running the script is as follows:
Emulex LPFC Driver Installer Version 1.30.1.2
Determining distribution type and kernel version ...
Checking for Emulex driver packages ...
50
EMC Host Connectivity with Emulex FC HBAs and FCoE CNAs for the Linux Environment
Installing and Configuring the Linux Host with the Emulex Driver
Restoring old Emulex drivers...
Configuring /etc/modprobe.conf ...
Uninstallation complete.
6. The installer script will install both the lpfc and the lpfcdfc
drivers. No options are needed when executing this script. The
installer script unpacks the source RPMs included in the package
in the /usr/src/lpfc directory and builds the driver using the
sources for the currently running kernel. The script then modifies
/etc/modprobe.conf to include scsi_host_adapter lines. The
elxlpfc is an initialization script for the lpfcdfc driver. The
elxlpfc script is also installed so that the lpfcdfc driver is
configured to start and stop during system boot up and
shutdown. Finally, the installer script creates a backup of the
existing RAM disk and creates a new RAM disk.
The output from running the installer script is as follows:
./lpfc-install
Emulex LPFC Driver Installer Version 1.30.1.2
Determining distribution type and kernel version ...
Checking for old Emulex driver ...
Looking for kernel development package ...
Looking for compilers ...
Searching for LPFC Driver source RPM from
/home/emulex/lpfc_2.6_driver_kit-8.0.16.6_x2-1/. ...
Installing package ...
Preparing...
########################################### [100%]
1:lpfcdriver_2.6
########################################### [100%]
Building lpfc driver .....
Loading LPFC Driver ........
Searching for LPFC DFC Driver source RPM from
/home/emulex/lpfc_2.6_driver_kit-8.0.16.6_x2-1/. ...
Installing package ...
Preparing...
########################################### [100%]
1:lpfc_2.6_ioctl_module
########################################### [100%]
Building lpfcdfc driver .....
Loading LPFC DFC Driver ..
Installing Emulex DFC driver startup script ...
Package installation complete
Configuring ramdisk...
Configuring /etc/modprobe.conf ...
Original saved as /etc/modprobe.elx
Installation instructions for the Emulex v8.x-series driver
51
Installing and Configuring the Linux Host with the Emulex Driver
Original ramdisk image
/boot/initrd-2.6.9-5.0.3.ELsmp.img saved as
/boot/initrd-2.6.9-5.0.3.ELsmp.img.elx
Creating ramdisk ...
1 message generated during installation:
o The ramdisk for this kernel has been updated.
Please reboot this system to complete the installation
of the Emulex LPFC driver kit.
Note: The system must be rebooted so that the lpfc driver is loaded through
the newly created ramdisk.
Caveat
If the lpfcdfc driver is loaded, then it must be unloaded prior to the
lpfc driver.
Use the following commands to unload the Emulex drivers:
modprobe –r lpfcdfc
modprobe –r lpfc
Included Emulex driver on RHEL 4, RHEL 5, OEL 4, OEL 5, Asianux 2.0, Asianux 3.0,
SLES 9, SLES 10, and SLES 11
Table 5 lists the Emulex driver versions supported with the
corresponding OS updates. These driver versions are included by
default in the kernel and do not require any installation.
Table 5
OS
Supported Emulex driver versions (page 1 of 4)
Driver version
Supported adapters
1/2 Gb
52
Red Hat RHEL 4 U1
Asianux 2.0
Miracle Linux SE 4.0
RedFlag DC Server 5.0
Haansoft Linux 2006 Server
8.0.16.6_x2
SuSe SLES 9 SP2
8.0.16.6_p3
4 Gb
8 Gb
√
√
√
EMC Host Connectivity with Emulex FC HBAs and FCoE CNAs for the Linux Environment
CNA
Installing and Configuring the Linux Host with the Emulex Driver
Table 5
OS
Supported Emulex driver versions (page 2 of 4)
Driver version
Supported adapters
1/2 Gb
4 Gb
8 Gb
CNA
Red Hat RHEL 4 U2
SuSe SLES 9 SP3
8.0.16.17
√
√
Red Hat RHEL 4 U3
Asianux 2.0 SP1
8.0.16.18
√
√
Red Hat RHEL 4 U4, RHEL 4.5,
Oracle OEL 4 U4, OEL 4.5
Asianux 2.0 SP2
8.0.16.27
√
√
Red Hat RHEL 4.6
SuSE SLES 9 SP4
Oracle OEL 4.6
8.0.16.34
√
√
Red Hat RHEL 4.7
Oracle OEL 4.7
Asianux 2.0 SP3
SLES 9 SP4 (errata kernels equal to
or greater than 2.6.5-7.316)
8.0.16.40
√
√
√
Red Hat RHEL 4.8
Oracle OEL 4.8
8.0.16.46
√
√
√
√a
Red Hat RHEL 4.9
8.0.16.47
√
√
√
√a
SuSe SLES 10 GA
8.1.6
√
√
Red Hat RHEL 5.0
Oracle OEL 5.0
Asianux 3.0
SuSE SLES 10 SP1 (errata kernels
2.6.16.46-0.12, 2.6.16.46-0.14)
8.1.10.3
√
√
Red Hat RHEL 5.1
Oracle OEL 5.1
SuSE SLES 10 SP1 (errata kernels
2.6.16.53-0.8, 2.6.16.53-0.16)
8.1.10.9
√
√
Installation instructions for the Emulex v8.x-series driver
53
Installing and Configuring the Linux Host with the Emulex Driver
Table 5
OS
54
Supported Emulex driver versions (page 3 of 4)
Driver version
Supported adapters
1/2 Gb
4 Gb
8 Gb
√
√
√
√
√
CNA
SuSE SLES 10 SP1 (errata kernels
equal to or greater than
2.6.16.54-0.2.3)
8.1.10.12-update
Red Hat RHEL 5.2
SuSE SLES 10 SP2
Oracle OEL 5.2
Asianux 3.0 SP1
8.2.0.22
RedHat RHEL 5.4
SuSE SLES 10 SP3
8.2.0.48.2p
√
√
√
√a
RHEL 5.3
OEL 5.3
8.2.0.33.3p
√
√
√
√a
RHEL 5.4
OEL 5.4
8.2.0.48.2p
8.2.0.48.3p (errata kernels
2.6.18-164.11.1.0.1.el5 and higher)
√
√
√
√a
RHEL 5.5
OEL 5.5
8.2.0.63.3p
√
√
√
√b
RHEL 5.6
8.2.0.87.1p
√
√
√
√b
RHEL 5.7
8.2.0.96.2p
√
√
√
√b
RHEL 5.8
8.2.0.108.4p
√
√
√
√b
RHEL 6.0
8.3.5.17
√
√
√
√b
SLES 10 SP4
8.2.0.92.1p
√
√
√
√
SuSE SLES 11 GA
8.2.8.14
√
√
√
√a
EMC Host Connectivity with Emulex FC HBAs and FCoE CNAs for the Linux Environment
Installing and Configuring the Linux Host with the Emulex Driver
Table 5
OS
Supported Emulex driver versions (page 4 of 4)
Driver version
Supported adapters
1/2 Gb
4 Gb
8 Gb
CNA
SuSE SLES 11 SP1
8.3.5.8.1p
√
√
√
√b
SuSE SLES 11 SP2
8.3.5.48.2p
√
√
√
√b
RHEL 6.1
8.3.5.30.1p
√
√
√
√
RHEL 6.2
8.3.5.45.4p
√
√
√
√
a. For models LP21000/LP21002 CNAs only.
b. For models LP21000/LP21002 and models OCe10102-FM-E/OCe10102-FX CNAs.
Note: Support of 8 Gb FC adapters begins with drivers 8.0.16.40 and 8.2.0.22.
Please consult the EMC Support Matrix for supported configurations.
Table 6
OS
Supported FC and FCoE out-of-kernel driver versions
Driver version
Supported adapters
1/2 Gb
4 Gb
8 Gb
CNA
√
√
Red Hat RHEL 4.0
8.0.16.6_x2-2
SUSE SLES 9 SP1
8.0.16.6_x2-2
Red Hat RHEL 5.4
FCoE driver 8.2.0.71
SUSE SLES 10 SP3
FCoE driver 8.2.0.71
SUSE SLES 11
FCoE driver 8.2.8.40
√a
√a
√a
a. For models OCe10102-FM-E/OCe10102-FX-E only.
Installation instructions for the Emulex v8.x-series driver
55
Installing and Configuring the Linux Host with the Emulex Driver
Uninstalling the Emulex v8.x-series driver
This section guides you through the process of uninstalling the
Emulex v8.x-series driver. The installer script contained within the tar
archive may be used to remove the Emulex driver from both SLES 9
SP1 and RHEL 4 hosts. The installer script will restore the old Emulex
driver.
1. Stop all applications using the Emulex 8.x-series driver and
unload the lpfcdfc and the lpfc driver modules from the kernel.
modprobe -r lpfcdfc
modprobe -r lpfc
2. The uninstallation of the driver may be performed using the
lpfc-install script with the -u switch:
./lpfc-install -u
Emulex LPFC Driver Installer Version 1.30.1.2
Determining distribution type and kernel version ...
Checking for Emulex driver packages ...
Removing LPFC DFC Driver source RPM ...
Removing LPFC Driver source RPM ...
Removing Emulex DFC driver startup script ...
Restoring old Emulex drivers...
Configuring /etc/modprobe.conf ...
Original saved as /etc/modprobe.elx
Original ramdisk image
/boot/initrd-2.6.9-5.0.3.ELsmp.img saved as
/boot/initrd-2.6.9-5.0.3.ELsmp.img.elx
Creating ramdisk ...
The ramdisk for this kernel has been updated.
Uninstallation complete
3. Reboot the host.
56
EMC Host Connectivity with Emulex FC HBAs and FCoE CNAs for the Linux Environment
Installing and Configuring the Linux Host with the Emulex Driver
Exercising the Emulex v8.x-series device driver
This section describes the following functionality available with the
Emulex v8.x-Series driver:
◆
“Loading and unloading the Emulex v8.x-series driver”, next
◆
“Target information exported to the /proc filesystem” on page 58
◆
“Dynamically modifying the driver and device information
exported to the /sys filesystem” on page 58
Loading and unloading the Emulex v8.x-series driver
The preceding sections described the process of installing the Emulex
driver, the supported Application Helper Module (lpfcdfc driver),
and the Emulex Application Kit. The Emulex Application Kit and the
Application Helper Module (lpfcdfc driver) utilize the base Emulex
driver functionality. Hence, prior to unloading the Emulex driver, it is
necessary to stop the application kit and to unload the Application
Helper Module (lpfcdfc driver). Also, stop other applications that
maybe using the Emulex driver to access the devices and unmount
any mounted devices.
◆
Run the following commands to stop the Emulex application
daemons:
cd /usr/sbin/hbanyware
./stop-hbanyware
◆
Run the following command to remove the Emulex Application
Helper Module (lpfcdfc driver):
/etc/init.d/elxlpfc stop
◆
Finally, unload the Emulex driver:
modprobe -r lpfc
To reload the Emulex driver, the Application Helper Module (lpfcdfc
driver), and the Application Kit use the following steps.
◆
Load the Emulex driver:
modprobe lpfc lpfc_log_verbose=0x10
◆
Reload the Emulex Application Helper Module (lpfcdfc driver):
/etc/init.d/elxlpfc start
Exercising the Emulex v8.x-series device driver
57
Installing and Configuring the Linux Host with the Emulex Driver
◆
Start the Emulex Application daemons:
cd /usr/sbin/hbanyware
./start_elxdiscovery
./start_myserver
Note: While loading the Emulex driver using modprobe, it is possible to
specify driver parameters. However, any parameters set in the
/etc/modprobe.conf or /etc/modprobe.conf.local files will
override the values specified on the command line.
Target information exported to the /proc filesystem
The Emulex driver populates the
/proc/lpfc/<host_adapter_number> file with the WWPN and the
WWNN of all targets for each adapter in the system. The
<host_adapter_number> increments every time the driver is
unloaded and reloaded.
For example:
cat /proc/scsi/lpfc/1
lpfc1t00 DID 491b00 WWPN 50:06:01:60:10:60:12:70 WWNN 50:06:01:60:90:60:12:70
lpfc1t01 DID 481b00 WWPN 50:06:01:68:10:60:12:70 WWNN 50:06:01:60:90:60:12:70
Dynamically modifying the driver and device information exported to the
/sys filesystem
The Emulex driver exports the driver versions, parameters, and
device information in /sys/class/scsi_host/ directory. A new
directory is dynamically created for each Emulex
scsi_host_adapter in the system. Similar to the incrementing of the
<host_adapter_number> in the /proc filesystem, the directory
number will be incremented every time the driver is unloaded and
reloaded.
The following is a listing of the directory contents:
cd /sys/class/scsi_host/host1
ls
.
events
..
fabric_name
board_online fwrev
cmd_per_lun
hdw
ctlreg
host_busy
device
info
58
lpfc_lun_queue_depth
lpfc_max_luns
lpfc_nodev_tmo
lpfc_scan_down
lpfc_topology
lpfc_use_adisc
outfcpio
port_name
port_type
portfcid
portnum
proc_name
EMC Host Connectivity with Emulex FC HBAs and FCoE CNAs for the Linux Environment
Installing and Configuring the Linux Host with the Emulex Driver
disc_adisc
disc_map
disc_npr
disc_plogi
disc_prli
disc_reglgn
disc_unmap
disc_unused
issue_lip
lpfc_ack0
lpfc_drvr_version
lpfc_fcp_bind_method
lpfc_fcp_class
lpfc_fdmi_on
lpfc_link_speed
lpfc_log_verbose
management_version
mbox
modeldesc
modelname
node_name
nport_evt_cnt
num_discovered_ports
option_rom_version
programtype
scan
serialnum
sg_tablesize
speed
state
unchecked_isa_dma
unique_id
This directory contains information regarding the driver and the
various driver parameters available for manipulation. EMC
recommends that the hbacmd utility be used to query and modify
these values. The hbacmd utility is installed with the Emulex
application kit and is available in the /usr/sbin/hbanyware
directory. The hbacmd utility requires that both the Emulex driver and
the Application Helper Module (lpfcdfc driver) be loaded.
The following is an example session of using the hbacmd utility.
For more information on how to use hbacmd, execute the command
without any options.
host:/usr/sbin/hbanyware # ./hbacmd listhbas
Manageable HBA List
Port WWN
:
Node WWN
:
Fabric Name:
Flags
:
Host Name :
Mfg
:
10:00:00:00:c9:3d:e3:3a
20:00:00:00:c9:3d:e3:3a
10:00:08:00:88:20:10:e9
8000fa0d
host
Emulex Corporation
Port WWN
:
Node WWN
:
Fabric Name:
Flags
:
Host Name :
Mfg
:
10:00:00:00:c9:3d:e3:3b
20:00:00:00:c9:3d:e3:3b
10:00:08:00:88:60:d0:6b
8000fa0d
host
Emulex Corporation
host:/usr/sbin/hbanyware # ./hbacmd HBAAttrib
10:00:00:00:c9:3d:e3:3a
HBA Attributes for 10:00:00:00:c9:3d:e3:3a
Host Name
Manufacturer
Serial Number
Model
Model Desc
Node WWN
Node Symname
:
:
:
:
:
:
:
host
Emulex Corporation
MM42301231
LP10000
Emulex LightPulse LP10000 2 Gigabit PCI Fibre Channel Adapter
20 00 00 00 c9 3d e3 3a
Emulex LP10000 FV1.90A4 DV8.0.16.6_x2V8.0.16.6_x2
Exercising the Emulex v8.x-series device driver
59
Installing and Configuring the Linux Host with the Emulex Driver
HW Version
:
Opt ROM Version:
FW Version
:
Vender Spec ID :
Number of Ports:
Driver Name
:
Device ID
:
HBA Type
:
Operational FW :
SLI1 FW
:
SLI2 FW
:
IEEE Address
:
Boot BIOS
:
Driver Version :
1001206d
1.90A4 (T2D1.90A4)
10DF
1
lpfc
FA00
LP10000DC
SLI-2 Overlay
SLI-1 Overlay 1.90a4
SLI-2 Overlay 1.90a4
00 00 c9 3d e3 3a
Disabled
8.0.16.6; HBAAPI(I) v2.1.a, 11-04-04
host:/usr/sbin/hbanyware # ./hbacmd portstat
10:00:00:00:c9:3d:e3:3b
Port Statistics for 10:00:00:00:c9:3d:e3:3b
Secs Since Last Reset
:
Exchange Count
:
Responder Exchange Count:
TX Seq Count
:
RX Seq Count
:
TX Frame Count
:
RX Frame Count
:
TX Word Count
:
RX Word Count
:
TX KB Count
:
RX KB Count
:
LIP Count
:
NOS Count
:
Error Frame Count
:
Dumped Frame Count
:
Link Failure Count
:
Loss of Sync Count
:
Loss of Signal Count
:
Prim Seq Prot Err Count :
Invalid TX Word Count
:
Invalid RX Frame CRC Cnt:
121
24
0
52
52
52
52
10496
10496
41
41
-1
0
0
-1
0
7
0
0
8
0
host:/usr/sbin/hbanyware # ./hbacmd serverAttrib
10:00:00:00:c9:3d:e3:3b
Server Attributes for 10:00:00:00:c9:3d:e3:3b
Host Name
: host
FW Resource Path: /usr/sbin/hbanyware/RMRepository/
DR Resource Path: /usr/sbin/hbanyware/RMRepository/
HBAnyware Server Version: 2.1a8
60
EMC Host Connectivity with Emulex FC HBAs and FCoE CNAs for the Linux Environment
Installing and Configuring the Linux Host with the Emulex Driver
host:/usr/sbin/hbanyware # ./hbacmd allnodeinfo 10:00:00:00:c9:3d:e3:3a
All Node Info for 10:00:00:00:c9:3d:e3:3a
Node Type
:
FCP ID
:
SCSI Bus Number:
SCSI Target Num:
Node WWN
:
Port WWN
:
OS Device Name :
READY
744E13
0
0
50:06:04:8A:CB:37:C6:63
50:06:04:8A:CB:37:C6:63
/sys/class/scsi_host/host0/00,0
host:/usr/sbin/hbanyware # ./hbacmd driverparams 10:00:00:00:c9:3d:e3:3a
Driver Params for 10:00:00:00:c9:3d:e3:3a
DX
string
Low
00:
log-verbose
0
01:
lun-queue-depth
1
02:
scan-down
0
03:
nodev-tmo
0
04:
topology
0
05:
link-speed
0
06:
fcp-class
2
07:
use-adisc
0
08:
ack0
0
09:
fcp-bind-method
1
0a:
cr-delay
0
0b:
cr-count
1
0c:
fdmi-on
0
0d:
discovery-threads
1
0e:
max-luns
1
0f:
scsi-req-tmo
0
High
ffff
80
1
ff
6
2
3
1
1
4
3f
ff
2
40
8000
ff
host:/usr/sbin/hbanyware # ./hbacmd setdriverparam
nodev-tmo 20
Def
0
1e
1
1e
0
0
3
0
0
2
0
1
0
1
100
1e
Cur
0
1e
1
1e
2
2
3
0
0
2
0
1
0
20
100
1e
Exp
1
1
1
1
1
1
1
1
1
1
1
1
1
1
1
1
Dyn
1
4
4
1
4
4
4
1
4
4
4
4
4
4
4
1
10:00:00:00:c9:3d:e3:3a N
Set Driver Parameter nodev-tmo=20 (N) for 10:00:00:00:c9:3d:e3:3a
host:/usr/sbin/hbanyware # ./hbacmd setdriverparam
log-verbose 20
10:00:00:00:c9:3d:e3:3a N
Set Driver Parameter log-verbose=20 (N) for 10:00:00:00:c9:3d:e3:3a
host:/usr/sbin/hbanyware # ./hbacmd driverparams 10:00:00:00:c9:3d:e3:3a
Driver Params for 10:00:00:00:c9:3d:e3:3a
DX
string
Low
00:
log-verbose
0
High
ffff
Def
0
Cur
14
Exp
1
Dyn
1
Exercising the Emulex v8.x-series device driver
61
Installing and Configuring the Linux Host with the Emulex Driver
01:
02:
03:
04:
05:
06:
07:
08:
09:
0a:
0b:
0c:
0d:
0e:
0f:
lun-queue-depth
scan-down
nodev-tmo
topology
link-speed
fcp-class
use-adisc
ack0
fcp-bind-method
cr-delay
cr-count
fdmi-on
discovery-threads
max-luns
scsi-req-tmo
1
0
0
0
0
2
0
0
1
0
1
0
1
1
0
80
1
ff
6
2
3
1
1
4
3f
ff
2
40
8000
ff
host:/usr/sbin/hbanyware # ./hbacmd portAttrib
1e
1
1e
0
0
3
0
0
2
0
1
0
1
100
1e
1e
1
14
2
2
3
0
0
2
0
1
0
20
100
1e
10:00:00:00:c9:3d:e3:3b
Port Attributes for 10:00:00:00:c9:3d:e3:3b
Node
Port
Port
Port
Port
Port
Port
Port
WWN
WWN
Symname
FCID
Type
State
Service Type
Supported FC4
Port Active FC4
:
:
:
:
:
:
:
:
:
Port Supported Speed:
Port Speed
:
Max Frame Size
:
OS Device Name
:
Num Discovered Ports:
Fabric Name
:
62
1
1
1
1
1
1
1
1
1
1
1
1
1
1
1
20 00 00 00 c9 3d e3 3b
10 00 00 00 c9 3d e3 3b
611413
Fabric
Operational
12
00 00 01 20 00 00 00 01
00 00 00 00 00 00 00 00
00 00 00 00 00 00 00 00
00 00 00 00 00 00 00 00
00 00 01 00 00 00 00 01
00 00 00 00 00 00 00 00
00 00 00 00 00 00 00 00
00 00 00 00 00 00 00 00
2 GBit/sec.
2 GBit/sec.
2048
/sys/class/scsi_host/host0/1
2
10 00 08 00 88 60 d0 6b
EMC Host Connectivity with Emulex FC HBAs and FCoE CNAs for the Linux Environment
4
4
1
4
4
4
1
4
4
4
4
4
4
4
1
Installing and Configuring the Linux Host with the Emulex Driver
Installation instructions for the Emulex v7.x-Series driver
Using the Emulex adapter with the Linux operating system requires
HBA driver software. The driver functions at a layer below the Linux
SCSI driver to present fibre Channel devices to the operating system
as if they were standard SCSI devices.
Refer to the latest EMC Support Matrix for specific qualified kernel
versions and distributions.
Please note that the support stated in the EMC Support Matrix
supersedes versions listed in this document.
Enabling the Emulex v7.x-Series driver in RHEL 3.0 U4 and U5
EMC supports the Emulex v7.1.14 driver included in RHEL 3.0 U4
and U5 distributions. In the RHEL 3.0 kernel v2.4.21-27.EL and later,
the Emulex v7.1.14 driver is the default driver integrated into the
kernel.
To enable the lpfcdfc driver in RHEL 3.0 U4, please refer to
“Installing the IOCTL Application Helper Module on RHEL 3.0 U4”
on page 65. By default, RHEL 3.0 U5 includes the lpfcdfc IOCTL
Application Helper Module so no steps need to be taken in order to
enable it.
The following procedure provides instructions for enabling the
integrated v7.1.14 driver.
1. Ensure that the /etc/modules.conf file references an entry for
each installed Emulex HBA.
For each installed Emulex HBA, add an entry:
alias scsi_hostadapterN lpfc
where N is the sequential value of each Emulex HBA installed in
the system, beginning with the number after the last host adapter
number entry in the file. (The first host adapter entry begins with
zero.)
Example:
alias
alias
alias
alias
alias
parport_lowlevel partport_pc
scsi_hostadapter mptbase
scsi_hostadapter1 mptscsi
scsi_hostadapter2 lpfc
scsi_hostadapter3 lpfc
Installation instructions for the Emulex v7.x-Series driver
63
Installing and Configuring the Linux Host with the Emulex Driver
alias eth0 tg3
options scsi_mod max_scsi_luns=255 scsi_allow_ghost_devices=1
2. If any modifications are made to the /etc/modules.conf file to
include references to the Emulex HBAs, create a new ramdisk to
reflect the changes made:
cd /boot
mkinitrd –v initrd-$1.img $1
where $1 is the currently running v2.4.x kernel version.
Example:
cd /boot
cp initrd-2.4.21-27.ELsmp.img
initrd-2.4.21-27.ELsmp.img.orig
mkinitrd –v initrd-2.4.21-27.ELsmp.img 2.4.21-27.ELsmp
3. Reboot the host.
Note: When using RHEL 3.0 U4 and U5, it is required that parameter value
modifications be made via an edit to /etc/modules.conf, not
lpfc.conf.
Note: When attaching to a VNX series or CLARiiON storage system, the
lpfc_inq_pqb_filter parameter must be enabled in the
/etc/modules.conf file. Refer to “CLARiiON “Ghost” LUN reported with
the Emulex v7.1.14 and v7.3.2 drivers (PQB filter)” on page 168.
Enabling the Emulex v7.x-Series driver in Asianux 1.0 U1
EMC supports the Emulex v7.1.14 driver integrated into the Asianux
1.0 U1 distribution. As with RHEL 3.0 U4, the Asianux 1.0 U1 kernel
v2.4.21-20.19AX includes the Emulex v7.1.14 lpfc driver and the
lpfcdfc IOCTL application helper driver by default in the kernel.
Follow the procedure used to enable the integrated v7.1.14 driver for
RHEL 3.0 U4 for Asianux 1.0 U1 hosts. Refer to “Enabling the Emulex
v7.x-Series driver in RHEL 3.0 U4 and U5” on page 63.
As with RHEL 3.0 U5, Asianux 1.0 U1 includes the lpfcdfc IOCTL
Application Helper Module by default so no steps need to be taken in
order to enable it.
64
EMC Host Connectivity with Emulex FC HBAs and FCoE CNAs for the Linux Environment
Installing and Configuring the Linux Host with the Emulex Driver
Note: When attaching to a VNX series or CLARiiON storage array, the
lpfc_inq_pqb_filter parameter must be enabled in the
/etc/modules.conf file. Refer to “CLARiiON “Ghost” LUN reported with
the Emulex v7.1.14 and v7.3.2 drivers (PQB filter)” on page 168.
Installing the IOCTL Application Helper Module on RHEL 3.0 U4
The Emulex IOCTL Application Helper Module allows Emulex
applications to communicate with the driver itself. However, the
IOCTL Application Helper Module is not included in the RHEL 3.0
U4 kernel. Therefore, if Emulex applications are to be used on the
host, the IOCTL Application Helper Module must be downloaded
and installed separately.
Follow these steps to install the IOCTL Application Helper Module
on a RHEL 3.0 U4 host.
1. Verify that the correct version of the Emulex driver is loaded in
the kernel. Run the lsmod command to ensure that the Emulex
driver is loaded on the system.
Example:
[root@l82bi250 /]# lsmod
Module
Size
nfs
97392
lockd
58256
sunrpc
87804
lpfc
215568
ide-cd
33728
cdrom
32064
lp
8964
parport
38560
autofs4
16664
audit
90328
tg3
64520
amd8111e
16144
mii
4120
floppy
56464
sg
36460
keybdev
2912
mousedev
5528
hid
21892
input
6048
usb-ohci
21384
usbcore
80352
ext3
88968
jbd
54452
Used by
Not tainted
1 (autoclean)
1 (autoclean) [nfs]
1 (autoclean) [nfs lockd]
0
0 (autoclean)
0 (autoclean) [ide-cd]
0 (autoclean)
0 (autoclean) [lp]
4 (autoclean)
3
1
1
0 [amd8111e]
0 (autoclean)
0 (autoclean)
0 (unused)
1
0 (unused)
0 [keybdev mousedev hid]
0 (unused)
1 [hid usb-ohci]
3
3 [ext3]
Installation instructions for the Emulex v7.x-Series driver
65
Installing and Configuring the Linux Host with the Emulex Driver
mptscsih
mptbase
diskdumplib
sd_mod
scsi_mod
40944
41888
3808
13744
110312
4
3
0
8
4
[mptscsih]
[mptscsih mptbase]
[lpfc sg mptscsih sd_mod]
2. Review the files in /proc/scsi/lpfc/ to verify the Emulex
driver version.
Example:
[root@l82bi250 /]# cat /proc/scsi/lpfc/*
Emulex LightPulse FC SCSI 7.1.14
Emulex LightPulse LP10000 2 Gigabit PCI Fibre Channel Adapter on PCI bus 09 device
08 irq 25
SerialNum: MM40706045
Firmware Version: 1.90A4 (T2D1.90A4)
Hdw: 1001206d
VendorId: 0xfa0010df
Portname: 10:00:00:00:c9:3d:30:a7
Nodename: 20:00:00:00:c9:3d:30:a7
Link Up - Ready:
PortID 0x960c00
Fabric
Current speed 2G
lpfc0t00 DID 491200 WWPN 50:06:04:8a:cc:c8:31:7e WWNN 50:06:04:8a:cc:c8:31:7e
lpfc0t01 DID 481300 WWPN 50:06:04:8a:cc:c8:31:4f WWNN 50:06:04:8a:cc:c8:31:4f
Emulex LightPulse FC SCSI 7.1.14
Emulex LightPulse LP10000 2 Gigabit PCI Fibre Channel Adapter on PCI bus 09 device
10 irq 26
SerialNum: MM40706098
Firmware Version: 1.90A4 (T2D1.90A4)
Hdw: 1001206d
VendorId: 0xfa0010df
Portname: 10:00:00:00:c9:3d:30:6b
Nodename: 20:00:00:00:c9:3d:30:6b
Link Up - Ready:
PortID 0x970c00
Fabric
Current speed 2G
lpfc1t00 DID 961b00 WWPN 50:06:04:8a:cc:c8:31:4e WWNN 50:06:04:8a:cc:c8:31:4e
lpfc1t01 DID 491400 WWPN 50:06:04:8a:cc:c8:31:7f WWNN 50:06:04:8a:cc:c8:31:7f
3. Change to the directory to which you will save the IOCTL
Application Helper Module kit.
Example:
[root@l82bi250 /]# mkdir /home/emulex
[root@l82bi250 /]# cd /home/emulex/
66
EMC Host Connectivity with Emulex FC HBAs and FCoE CNAs for the Linux Environment
Installing and Configuring the Linux Host with the Emulex Driver
4. Download the IOCTL Application Helper Module from the
Emulex website to a directory on the server. Refer to the
instructions for downloading the driver as described in the
“Downloading the Emulex v7.x-Series HBA driver for the v2.4.x
kernel” on page 68. Select the link for the IOCTL Application
Helper Module and download it to the system.
Note: The name of the package to be downloaded is
lpfc_2.4_ioctl_module_kit-1.0.13-1
5. Uncompress and extract the source files from the tar archive:
[root@l82bi250 /]# cd /home/emulex/
[root@l82bi250 /]# tar zxvf lpfc_2.4_ioctl_module_kit-1.0.13-1.tar.gz
The uncompressing will create a new directory and will provide
you with the following files within the new directory:
lpfc_2.4_ioctl_module_kit-1.0.13-1/
lpfc_2.4_ioctl_module_kit-1.0.13-1/elxlpfc
lpfc_2.4_ioctl_module_kit-1.0.13-1/ioctl-install
lpfc_2.4_ioctl_module_kit-1.0.13-1/lpfc_2.4_ioctl_module-1.0.13-1.noarch.rpm
lpfc_2.4_ioctl_module_kit-1.0.13-1/README
6. Change to the directory and install the IOCTL Application Helper
Module using the installer script:
[root@l82bi250 /]# cd lpfc_2.4_ioctl_module_kit-1.0.13-1/
[root@l82bi250 /]# ./ioctl-install
7. For additional information on installing the Applications Kit,
refer to “Installing the Emulex HBAnywhere applications kit” on
page 84.
Included Emulex driver in RHEL3.0 U6, RHEL3.0 U7, RHEL3.0 U8, and RHEL 3.9
The following driver versions are included by default in the kernel
and do not require any installation:
OS
Driver version
RHEL3.0 U6
7.3.2a
RHEL3.0 U7
7.3.3a
RHEL3.0 U8 and RHEL3.9
7.3.6a
a. Minimum required driver versions to support 4 GB HBAs.
Installation instructions for the Emulex v7.x-Series driver
67
Installing and Configuring the Linux Host with the Emulex Driver
Installing the Emulex v7.x-Series driver
Installation methods for the Emulex v7.x-Series driver
The Emulex v7.x-series lpfc and lpfcdfc drivers can be installed
onto a Linux host using one of the two methods listed below.
◆
Method one – Run the installer script provided in the driver tar
archive to compile and install the modular lpfc and lpfcdfc
drivers on RHEL 2.1, RHEL 3.0, and SLES 8 systems.
◆
Method two – Use the DKMS RPM to compile and install the
modular lpfc and lpfcdfc drivers on RHEL 2.1 and RHEL 3.0
sytems. By using the DKMS RPM, the necessary files will be
edited and the drivers will be compiled and installed
automatically.
Downloading the Emulex v7.x-Series HBA driver for the v2.4.x kernel
Ensure that you have the latest qualified driver. Refer to the EMC
Support Matrix for the latest driver revision.
Follow these steps to download the Emulex driver from the Emulex
website:
1. Change to the directory to which you will save the driver.
For example:
mkdir /home/emulex
cd /home/emulex
2. Use a web browser to access the Emulex website at the following
url:
http://www.emulex.com
3. Select the link option Drivers, Software, and Manuals.
4. On the next page, select the EMC link from the Select vendor
pull-down menu in the HBAs installed in OEM equipment
section.
5. On the next page, select the link for the appropriate Emulex HBA
in your system.
6. Find the listing for the Linux v7.x-series driver. There are two
distinct tar archives for all of the Linux distributions supported:
lpfc_2.4_dkms_kit-7.1.14-2.tar.gz
lpfc_2.4_driver_kit-7.1.14-4.tar.gz
68
EMC Host Connectivity with Emulex FC HBAs and FCoE CNAs for the Linux Environment
Installing and Configuring the Linux Host with the Emulex Driver
7. Select the appropriate link to download the desired tar archive for
your distribution.
8. In addition to the actual driver installation tar archive, the IOCTL
Application Helper Module and Emulex Applications Kit tar
archives may also be downloaded. The file names for the kits are
as follows:
lpfc_2.4_ioctl_module_kit-1.0.13-1.tar.gz
elxlinuxapps-2.1a24-7.3.2-1-2.tar
What next?
Select a method to install the driver on a Linux host:
◆
Proceed to “Installing the Emulex v7.x-Series driver, Method one”,
next, if you have selected the standard tar archive driver kit
(lpfc_2.4_driver_kit-7.1.14-4.tar.gz).
◆
Proceed to “Installing the Emulex v7.x Series driver, Method two” on
page 72, if you have selected the DKMS RPM tar archive
(lpfc_2.4_dkms_kit-7.1.14-2.tar.gz).
Installing the Emulex v7.x-Series driver, Method one
This section guides you through the process of installing and utilizing
the Emulex tar archive. The installer script contained within the tar
archive will create the Emulex v7.x-series driver for RHEL 2.1, and
RHEL 3.0, and SLES 8 distributions.
Note: Refer to the EMC Support Matrix for the specific kernel revisions
qualified and supported.
1. Boot into the qualified and supported kernel onto which the
driver will be installed.
2. Create a directory to which you will save the tar archive
mkdir /home/emulex
3. Obtain the lpfc_2.4_driver_kit-7.1.14-4.tgz from the
Emulex website as instructed under “Downloading the Emulex
v7.x-Series HBA driver for the v2.4.x kernel” on page 68.
4. Install the Emulex driver’s tar archive onto your system with the
following steps:
a. Uncompress and extract the source files from the tar archive:
cd /home/emulex
tar zxvf lpfc_2.4_driver_kit-7.1.14-4.tgz
Installation instructions for the Emulex v7.x-Series driver
69
Installing and Configuring the Linux Host with the Emulex Driver
The initial uncompression will create a new directory and will
provide you with the following files within the new directory:
lpfc_2.4_driver_kit-7.1.14-4/
lpfc_2.4_driver_kit-7.1.14-4/elxlpfc
lpfc_2.4_driver_kit-7.1.14-4/lpfcdfcdriver-1.0.13-1.noarch.rpm
lpfc_2.4_driver_kit-7.1.14-4/lpfc-install
lpfc_2.4_driver_kit-7.1.14-4/README
Contained within the newly created directory is the
lpfc-install script. This script will install both the lpfc and the
lpfcdfc drivers. These driver RPMs are installed in the
/usr/src/lpfc directory. No options are needed when
executing this script.
After the RPMs are installed into the /usr/src/lpfc directory,
the RPMs then are executed so that the drivers will be built and
installed into the currently running kernel. The script then
modifies /etc/modules.conf. The lpfc driver host adapter line
will be appended to the /etc/modules.conf file for each
instance of an Emulex HBA.
The options line containing the addition of the
scsi_allow_ghost_devices and max_scsi_luns parameters
will also be appended to the file. This will allow the host to
correctly identify the disconnected LUN 0 that is reported when
attached to a VNX series or CLARiiON storage system, as well as
allow the SCSI stack to scan up to 255 devices. The
Unisphere™/Navisphere® Host Agent requires that the
disconnected LUN 0 be reported.
After modifying the /etc/modules.conf file, the last action
performed by the installer is to create a new ramdisk.
The elxlpfc is an initialization script for the lpfcdfc driver. The
elxlpfc script is also installed so that the lpfcdfc driver is
configured to start and stop during system boot up and
shutdown.
5. Install the Emulex driver.
cd /home/emulex/lpfc_2.4_driver_kit-7.1.14-4
./lpfc_install
The output from running the installer script is as follows:
Emulex LPFC Driver Installer Version 1.4.1.10
Determining distribution type and kernel version ...
Checking for old Emulex driver ...
70
EMC Host Connectivity with Emulex FC HBAs and FCoE CNAs for the Linux Environment
Installing and Configuring the Linux Host with the Emulex Driver
Looking for kernel source ...
Looking for compilers ...
Searching for LPFC Driver source RPM from
/home/emulex/lpfc_2.4_driver_kit-7.1.14-4/. ...
Installing package ...
Preparing...
########################################### [100%]
1:lpfcdriver
########################################### [100%]
***************
* Source Files are now available under /usr/src/lpfc
* RPM installer will now attempt to :
* Step 1: Install lpfc.conf file in /etc [ ln -s /usr/src/lpfc/lpfc.conf
/usr/src/lpfc/lpfc.conf ]
* Step 2: Build driver from sources and install under /lib/modules [ make -C
/usr/src/lpfc build install]
***************
* Action : Step 1: Installing lpfc.conf file ...
* Done
: Step 1: New lpfc.conf file has been installed in /etc
****************
* Action : Step 2: Building driver .........
* Done
: Step 2: The driver has been compiled and installed under /lib/modules
*************************************************************
* The Emulex LPFC Driver has been installed on your system. *
*************************************************************
Loading LPFC Driver ..........
Searching for LPFC DFC Driver source RPM from
/home/emulex/lpfc_2.4_driver_kit-7.1.14-4/. ...
Installing package ...
Preparing...
########################################### [100%]
1:lpfcdfcdriver
########################################### [100%]
***************
* Source Files are now available under /usr/src/lpfc/ioctls
* RPM installer will now attempt to :
* Step 1: Build driver from sources and install under /lib/modules [ make -C
/usr/src/lpfc/ioctls build install]
***************
* Action : Step 1: Building driver ...
* Done
: Step 1: The driver has been compiled and installed under /lib/modules
************************************************************
* The Emulex DFC Driver has been installed on your system. *
************************************************************
Loading LPFC DFC Driver ..
Installing Emulex DFC driver startup script ...
Package installation complete
Configuring ramdisk...
Configuring /etc/modules.conf ...
Original saved as /etc/modules.elx
Original ramdisk image /boot/initrd-2.4.21-15.0.3.ELsmp.img saved as
/boot/initrd-2.4.21-15.0.3.ELsmp.img.elx
Creating ramdisk ..
1 message generated during installation:
Installation instructions for the Emulex v7.x-Series driver
71
Installing and Configuring the Linux Host with the Emulex Driver
o The ramdisk for this kernel has been updated.
Please reboot this system to complete the installation
of the Emulex LPFC driver kit.
An example of a newly modified /etc/modules.conf is shown
below.
The last three lines of the file have been newly added by the
installer script.
[root@l82bi250 /]# more /etc/modules.conf
alias eth0 tg3
alias eth1 tg3
alias eth2 tg3
alias scsi_hostadapter mptbase
alias scsi_hostadapter1 mptscsih
alias usb-controller usb-ohci
alias scsi_hostadapter2 lpfc
alias scsi_hostadapter3 lpfc
options scsi_mod max_scsi_luns=256 scsi_allow_ghost_devices=1
The scsi_allow_ghost_devices parameter is enabled by
default in SLES 8 SP3. Therefore the installer script will not add
the parameter to the /etc/modules.conf file for SLES 8 SP3
installations.
6. Reboot the host so that the lpfc driver can be loaded through the
newly created ramdisk.
Installing the Emulex v7.x Series driver, Method two
This section guides you through the process of installing and utilizing
the Emulex DKMS RPM for the Emulex v7.1.14 driver for RHEL 2.1
and 3.0 distributions.
Note: Please note that the DKMS RPM method does not function properly
with SLES 8 distributions and may not be used.
The DKMS RPM will build and install the lpfc and lpfcdfc drivers
and modify your /etc/modules.conf file.
The host adapter line will be appended to the /etc/modules.conf
file for the lpfc driver.
The options line containing the addition of the
scsi_allow_ghost_devices and max_scsi_luns parameters will
also be appended to the file. This will allow the host to correctly
identify the disconnected LUN 0 that is reported when attached to a
72
EMC Host Connectivity with Emulex FC HBAs and FCoE CNAs for the Linux Environment
Installing and Configuring the Linux Host with the Emulex Driver
VNX series or CLARiiON storage system as well as allow the SCSI
stack to scan up to 255 devices. The Unisphere/Navisphere Host
Agent requires that the disconnected LUN 0 be reported.
The DKMS RPM will install the Emulex driver as a module.
Note: After the driver installation, the system should be rebooted so that the
lpfc driver may be loaded through the newly created ramdisk.
1. Boot into the qualified and supported kernel into which the
driver will be installed. Ensure that the kernel sources and the gcc
compiler tools are installed.
2. Create a directory to which you will save the tar archive:
mkdir /home/emulex
3. Obtain the lpfc_2.4_dkms_kit-7.1.14-2.tar.gz from the
Emulex website as instructed under “Downloading the Emulex
v7.x-Series HBA driver for the v2.4.x kernel” on page 68.
Install the Emulex driver’s tar archive onto your system with the
following steps:
1. Uncompress and extract the source files from the tar archive:
cd /home/emulex
tar zxvf lpfc_2.4_dkms_kit-7.1.14-2.tar.gz
The initial uncompression will create a new directory and will
provide you with the following files within the new directory:
lpfc_2.4_driver_kit-7.1.14-4/
lpfc_2.4_driver_kit-7.1.14-4/dkms-2.0.4-1.noarch.rpm
lpfc_2.4_driver_kit-7.1.14-4/lpfc_2.4_dkms_kit-7.1.14-2.tar.gz
lpfc_2.4_driver_kit-7.1.14-4/lpfc_2.4_driver_kit-7.1.14-4
lpfc_2.4_driver_kit-7.1.14-4/lpfc_2.4_driver_kit-7.1.14-4.tar.gz
lpfc_2.4_driver_kit-7.1.14-4/lpfcdfcdkms-1.0.13-2.noarch.rpm
lpfc_2.4_driver_kit-7.1.14-4/lpfcdkms-7.1.14-2.noarch.rpm
lpfc_2.4_driver_kit-7.1.14-4/README
2. If you do not already have DKMS installed on your system, then
install the DKMS RPM contained within the newly created
directory. If DKMS is already installed on the system, then skip to
the next step to perform the Emulex driver installation.
rpm -ivh dkms-2.0.4-1.noarch.rpm
Installation instructions for the Emulex v7.x-Series driver
73
Installing and Configuring the Linux Host with the Emulex Driver
The output from the installation of DKMS is as follows:
warning: dkms-2.0.4-1.noarch.rpm: V3 DSA signature: NOKEY, key ID 23b66a9d
Preparing...
########################################### [100%]
1:dkms
########################################### [100%]
3. Install the Emulex lpfc driver DKMS RPM:
rpm -ivh lpfcdkms-7.1.14-2.noarch.rpm
The output from the installation is as follows:
Preparing...
########################################### [100%]
1:lpfcdkms
########################################### [100%]
***************
* Source Files are now available under /usr/src/lpfc-7.1.14
* RPM installer will now attempt to :
* Step 1: Install lpfc.conf file in /etc [ ln -s /usr/src/lpfc-7.1.14/lpfc.conf
/usr/src/lpfc/lpfc.conf ]
* Step 2: Build driver from sources and install under /lib/modules [ make -C
/usr/src/lpfc-7.1.14 build install]
***************
* Action : Step 1: Installing lpfc.conf file ...
* Done
: Step 1: New lpfc.conf file has been installed in /etc
****************
* Action : Step 2: Building driver .
Creating symlink /var/lib/dkms/lpfc/7.1.14/source ->
/usr/src/lpfc-7.1.14
DKMS: add Completed.
Preparing kernel 2.4.21-15.0.4.ELsmp for module build:
(This is not compiling a kernel, only just preparing kernel symbols)
Running Red Hat style preparation routine
make clean....
using
/lib/modules/2.4.21-15.0.4.ELsmp/build/configs/kernel-2.4.21-i686-smp.config
make oldconfig.....
running dkms_mkkerneldoth....
Building module:
cleaning build area....
make KERNELRELEASE=2.4.21-15.0.4.ELsmp
KERNELVERSION=2.4.21-15.0.4.ELsmp............
cleaning build area....
DKMS: build Completed.
Running module version sanity check.
lpfc.o:
- Original module
- Found /lib/modules/2.4.21-15.0.4.ELsmp/kernel/drivers/addon/lpfc/lpfc.o
- Storing in /var/lib/dkms/lpfc/original_module/2.4.21-15.0.4.ELsmp/i686/
- Archiving for uninstallation purposes
74
EMC Host Connectivity with Emulex FC HBAs and FCoE CNAs for the Linux Environment
Installing and Configuring the Linux Host with the Emulex Driver
- Installation
- Installing to /lib/modules/2.4.21-15.0.4.ELsmp/kernel/drivers/scsi/lpfc/
/etc/modules.conf: added alias reference for 'lpfc'
/etc/modules.conf: added 'options scsi_mod scsi_allow_ghost_devices=1
max_scsi_luns=255'
depmod....
Saving old initrd as /boot/initrd-2.4.21-15.0.4.ELsmp_old.img
Making new initrd as /boot/initrd-2.4.21-15.0.4.ELsmp.img
(If next boot fails, revert to the _old initrd image)
mkinitrd....
DKMS: install Completed.
* Done
: Step 2: The driver has been compiled and installed under /lib/modules
*************************************************************
* The Emulex LPFC Driver has been installed on your system. *
*************************************************************
An example of a newly modified /etc/modules.conf is shown
below.
The last three lines of the file have been newly added by the
installer script.
[root@l82bi250 /]# more /etc/modules.conf
alias eth0 tg3
alias eth1 tg3
alias eth2 tg3
alias scsi_hostadapter mptbase
alias scsi_hostadapter1 mptscsih
alias usb-controller usb-ohci
alias scsi_hostadapter2 lpfc
alias scsi_hostadapter3 lpfc
options scsi_mod max_scsi_luns=256 scsi_allow_ghost_devices=1
4. Install the Emulex DFC driver DKMS RPM:
rpm -ivh lpfcdfcdkms-1.0.13-2.noarch.rpm
The output is as follows:
[root@l82bi250 dkms]# rpm -ivh lpfcdfcdkms-1.0.13-2.noarch.rpm
Preparing...
########################################### [100%]
1:lpfcdfcdkms
########################################### [100%]
***************
* Source Files are now available under /usr/src/lpfcdfc-1.0.13
* RPM installer will now attempt to :
* Step 1: Build ioctl module from sources and install under /lib/modules [ make
-C /usr/src/lpfcdfc-1.0.13 build install]
***************
* Action : Step 1: Building ioctl module .
Installation instructions for the Emulex v7.x-Series driver
75
Installing and Configuring the Linux Host with the Emulex Driver
Creating symlink /var/lib/dkms/lpfcdfc/1.0.13/source ->
/usr/src/lpfcdfc-1.0.13
DKMS: add Completed.
Preparing kernel 2.4.21-27.0.1.ELsmp for module build:
(This is not compiling a kernel, only just preparing kernel symbols)
Storing current .config to be restored when complete
Running Red Hat style preparation routine
make clean....
using
/lib/modules/2.4.21-27.0.1.ELsmp/build/configs/kernel-2.4.21-i686-smp.config
make oldconfig.....
running dkms_mkkerneldoth....
Building module:
cleaning build area....
make KERNELRELEASE=2.4.21-27.0.1.ELsmp INC_TOP=/usr/src/lpfc-7.1.14......
cleaning build area....
DKMS: build Completed.
Running module version sanity check.
lpfcdfc.o:
- Original module
- No original module exists within this kernel
- Installation
- Installing to /lib/modules/2.4.21-27.0.1.ELsmp/kernel/drivers/scsi/lpfc/
depmod....
DKMS: install Completed.
* Done
: Step 1: The ioctl module has been compiled and installed under
/lib/modules
************************************************************
* The Emulex DFC module has been installed on your system. *
************************************************************
5. Use the DKMS command to verify that the drivers have been
built and installed successfully.
For example:
[root@l82bi250 /]# dkms status
lpfc, 7.1.14, 2.4.21-27.0.1.ELsmp, i686: installed (original_module exists)
lpfcdfc, 1.0.13, 2.4.21-27.0.1.ELsmp, i686: installed
6. Reboot the host.
Caveat
If the lpfcdfc driver is loaded, then it must be unloaded prior to the
lpfc driver.
76
EMC Host Connectivity with Emulex FC HBAs and FCoE CNAs for the Linux Environment
Installing and Configuring the Linux Host with the Emulex Driver
Use the following to unload the lpfc driver:
modprobe –r lpfcdfc
modprobe –r lpfc
Installing the Emulex applications kit
The lpfc driver must be installed first because HBAnyware is
dependent upon the existence of the lpfc driver.
1. Create a directory to which the application kit will be saved.
mkdir /home/emulex_apps
2. Download the Applications Kit from the Emulex website and
save it to the newly created directory. The name of the
Application Kit is elxlinuxapps-2.0a20-7.1.14-1.tar.
3. Change to the newly created directory and uncompress and
extract the source files from the tar archive:
cd /home/emulex_apps
tar xvf elxlinuxapps-2.0a20-7.1.14-1.tar
The initial uncompression will create a new directory and will
provide you with the following files within the new directory:
[root@l82bi250 /home/emulex_apps]# tar xvf elxlinuxapps-2.0a20-7.1.14-1.tar
enterprise_kitfiles/
install
uninstall
README.txt
README_SSC.txt
Contained within the existing directory is the install script.
Note: When the installation script is run, it will automatically install
HBAnyware, the lputil utility, the HBAAPI libraries, and the
lpfcdfc libraries and utility.
4. Within the newly created enterprise_kitfiles/ directory are
the applications to be installed.
[root@l82bi250 emulex_apps]# ls -la enterprise_kitfiles/
hbaapi_2.0.f.tgz
lputil_16a10.tgz
EmlxApps300a15.tgz
lpfcutil_2.4_lib_kit-1.0.13-1.tgz
scripts/
Installation instructions for the Emulex v7.x-Series driver
77
Installing and Configuring the Linux Host with the Emulex Driver
5. To install the application kit, change to the directory and run the
installation script.
cd /home/emulex_apps/enterprise_kitfiles
./install
The output from running the installer script is as follows:
[root@l82bi250 emulex_apps]# ./install
Untarring EmlxApps tgz file...
Untarring lpfcutil tgz file...
Untarring hbaapi libs tgz file...
Untarring lputil tgz file...
Stopping HBAnyware Remote Management Server
Stopping HBAnyware Discovery Server
Starting HBAnyware Remote Management Server
Untarring HBAnyware local jre...
HBAnyware installation complete.
Cleaning up...
6. HBAnyware is a GUI-based application so the console may not be
used. To start up the HBAnyware application, run the following
commands:
cd /usr/sbin/hbanyware
./hbanyware
78
EMC Host Connectivity with Emulex FC HBAs and FCoE CNAs for the Linux Environment
Installing and Configuring the Linux Host with the Emulex Driver
Uninstallation of the Emulex v7.x-Series driver
This section describes how to successfully uninstall the Emulex
v7.x-series driver from your Linux host.
Uninstallation methods for the Emulex v7.x-Series driver
The Emulex v7.x-series lpfc and lpfcdfc drivers can be uninstalled
from a Linux host one of two methods:
◆
Method one – Using the installer script with the –-uninstall
switch, remove the modular lpfc and lpfcdfc drivers.
Note: See “Uninstalling the Emulex v7.x-Series driver, Method one,”
next.
◆
Method two – Use the DKMS RPM to uninstall the modular lpfc
and lpfcdfc drivers on RHEL 2.1 and 3.0 systems.
Note: See “Uninstalling the Emulex v7.x-Series driver, Method two” on
page 81.
Uninstalling the Emulex v7.x-Series driver, Method one
This section guides you through the process of uninstalling and
utilizing the Emulex tar archive. The installer script contained within
the tar archive may be used to remove the Emulex driver as a
module.
If you have used the tar archive method to install the Emulex driver,
then the uninstallation of the driver may be performed using the
lpfc-install script with the –uninstall switch.
1. Remove the Emulex tar archive driver:
cd /home/emulex/lpfc_2.4_driver_kit-7.1.14-4
./lpfc-install –-uninstall
The output is as follows:
Emulex LPFC Driver Installer Version 1.4.1.10
Determining distribution type and kernel version ...
Checking for Emulex driver packages ...
Removing LPFC DFC Driver source RPM ...
The Emulex DFC Driver has been removed from your system.
Uninstallation of the Emulex v7.x-Series driver
79
Installing and Configuring the Linux Host with the Emulex Driver
Removing LPFC Driver source RPM ...
lpfc: Device or resource busy
/usr/src/lpfc/lpfc.conf saved as /usr/src/lpfc/lpfc.conf.backup
The Emulex LPFC Driver has been removed from your system.
Removing Emulex DFC driver startup script ...
Restoring old Emulex drivers...
2. Reboot the host.
Note: When using SLES 8 SP3, the uninstallation procedure does not fully
remove all of the files. Therefore, the lpfc --uninstall command for the tar
archive must be run twice.
Upgrading from the
Emulex v2.x-Series
driver to the
v7.x-Series driver
To upgrade from the v2.x-series Emulex driver to the v7.x-series
driver, the uninstallation procedure discussed above may be used to
remove the previous installation of the v2.x-series driver.
1. Prior to upgrading the driver, all I/O being generated must be
stopped and all applications currently using the Emulex HBAs
and driver must be exited.
2. To remove the existing v2.x-series driver instance, run the
command:
./lpfc-install --uninstall
• This process will create a back up copy of the following files:
–
–
–
/etc/modules.conf
/etc/lpfc.conf
/boot/initrd-$1.img
• If RPMs were used to install the v2.x-series driver, the
uninstallation will attempt to remove those RPMs from the
system.
• A new ramdisk will be created with all references to Emulex
drivers removed.
3. Reboot the host.
When the Emulex v2.x-series driver has been removed, refer to the
“Installing the Emulex v7.x-Series driver” on page 68 for instructions
to install the v7.x-series driver.
80
EMC Host Connectivity with Emulex FC HBAs and FCoE CNAs for the Linux Environment
Installing and Configuring the Linux Host with the Emulex Driver
Uninstalling the Emulex v7.x-Series driver, Method two
If you have used the DKMS RPMs, then the RPMs should be removed from
the system in order to uninstall the drivers.
Note: Please note that the DKMS RPM method does not function properly
with SLES 8 distributions and may not be used.
The driver names may be verified by querying the RPMs.
For example:
[root@l82bi250 /]# rpm -qa | grep lpfc
lpfcdkms-7.1.14-2
lpfcdfcdkms-1.0.13-2
1. In order to successfully remove the lpfc and lpfcdfc drivers, the
lpfcdfc driver RPM must be uninstalled first. If the attempt is
made to uninstall the lpfc driver first, you will receive output
similar to the following:
[root@l82bi250 /]# rpm -ev lpfcdkms-7.1.14-2
error: Failed dependencies:
lpfcdkms >= 7 is needed by (installed) lpfcdfcdkms-1.0.13-2
2. To successfully remove the lpfc driver, first remove the lpfcdfc
driver with the following command.
rpm -ev lpfcdfcdkms-1.0.13-2
The output of the command is as follows:
Uninstall of emulex lpfcdfc module (version 1.0.13) beginning:
-------- Uninstall Beginning -------Module: lpfcdfc
Version: 1.0.13
Kernel: 2.4.21-27.0.1.ELsmp (i686)
------------------------------------Status: Before uninstall, this module version was ACTIVE on this kernel.
lpfcdfc.o:
- Uninstallation
- Deleting from: /lib/modules/2.4.21-27.0.1.ELsmp/kernel/drivers/scsi/lpfc/
- Original module
- No original module was found for this module on this kernel.
- Use the dkms install command to reinstall any previous module version.
DKMS: uninstall Completed.
Uninstallation of the Emulex v7.x-Series driver
81
Installing and Configuring the Linux Host with the Emulex Driver
-----------------------------Deleting module version: 1.0.13
completely from the DKMS tree.
-----------------------------Done.
The Emulex DFC module has been removed from your system.
3. With the successful uninstallation of the lpfcdfc driver RPM, the
lpfc driver RPM may be removed from the system.
To uninstall the lpfc driver, use the following command:
rpm -ev lpfcdkms-7.1.14-2
The output of the command is as follows:
Uninstall of emulex lpfc module (version 7.1.14) beginning:
-------- Uninstall Beginning -------Module: lpfc
Version: 7.1.14
Kernel: 2.4.21-27.0.1.ELsmp (i686)
------------------------------------Status: Before uninstall, this module version was ACTIVE on this kernel.
lpfc.o:
- Uninstallation
- Deleting from: /lib/modules/2.4.21-27.0.1.ELsmp/kernel/drivers/scsi/lpfc/
- Original module
- Archived original module found in the DKMS tree
- Moving it to: /lib/modules/2.4.21-27.0.1.ELsmp/kernel/drivers/scsi/lpfc/
Saving old initrd as /boot/initrd-2.4.21-27.0.1.ELsmp_old.img
Making new initrd as /boot/initrd-2.4.21-27.0.1.ELsmp.img
(If next boot fails, revert to the _old initrd image)
mkinitrd....
Removing original_module from DKMS tree for kernel 2.4.21-27.0.1.ELsmp (i686)
DKMS: uninstall Completed.
-----------------------------Deleting module version: 7.1.14
completely from the DKMS tree.
-----------------------------Done.
/etc/lpfc.conf saved as /etc/lpfc.conf.backup
...Restoring - lib/modules/2.4.21-15.0.3.ELsmp/kernel/drivers/net/lpfndd.o
...Restoring - lib/modules/2.4.21-15.0.3.ELsmp/kernel/drivers/scsi/lpfcdd.o
...Restoring lib/modules/2.4.21-15.0.3.ELsmp/kernel/drivers/scsi/lpfc/lpfc_7114.o
82
EMC Host Connectivity with Emulex FC HBAs and FCoE CNAs for the Linux Environment
Installing and Configuring the Linux Host with the Emulex Driver
...Restoring lib/modules/2.4.21-27.0.1.ELsmp/kernel/drivers/addon/lpfc_703/lpfc_703.o
The Emulex LPFC Driver has been removed from your system.
Uninstallation of the Emulex v7.x-Series driver
83
Installing and Configuring the Linux Host with the Emulex Driver
Installing the Emulex HBAnywhere applications kit
!
IMPORTANT
The lpfc driver must be installed first, because HBAnyware is
dependent upon the existence of the lpfc driver.
Note: There is a one-to-one relationship between versions of the lpfc driver
and the versions of the applications kit. For example, for the 8.0.16.6_x2 lpfc
driver the application kit is ElxLinuxApps-2.1a8-8.0.16.4-1.tar. You will find
the appropriate application kit located on the same page as the driver on the
EMC-approved web page at the Emulex website.
Note: As of RHEL5, OEL 5, and Asianux 3.0, the Emulex 8.1.10.x
driver/application combination requires the netlink library for event
handling. RHEL5, OEL 5, and Asianux 3.0, by default, installs only the 64 bit
netlink library on 64 bit architectures (IA64 and PPC64). HBAnyware
provides both 32 and 64 bit libraries and on install will report a dependency
error for the 32 bit library because the 32 bit netlink library is not present. The
following message appears:
32-bit DFC library failed to install. Verify operating
system is configured with 32-bit development/library s/w
support. HBAnyware utilities not affected by this failure
as they are 64-bit applications.
32 bit applications, like SMI-S and others that rely on the HBA API
component of HBAnyware, will need to install the 32 bit netlink library
(available on the RHEL5, OEL 5, and Asianux 3.0 CDs) following the Emulex
ReadMe notes.
To install the Emulex HBAnywhere applications kit:
1. Create a directory to which the application kit will be saved.
mkdir /home/emulex_apps
2. Download the Applications Kit Applications Kit, and the
associated HBAnyware User Manual, from the Emulex website
and save it to the newly created directory. Refer to the HBAnyware
User Manual for any operating system requirements needed to
complete this installation.
84
EMC Host Connectivity with Emulex FC HBAs and FCoE CNAs for the Linux Environment
Installing and Configuring the Linux Host with the Emulex Driver
Note: To install HBAnyware, you will need the rpm-build-xxxx package
(e.g., rpm-build-4.2.1-4.2) and the gcc-xxx package (e.g., gcc-3.2.3-20).
Note: There is a one-to-one relationship between versions of the lpfc
driver and the versions of the applications kit. For example, for the
8.0.16.6_x2 lpfc driver the application kit is
ElxLinuxApps-2.1a8-8.0.16.4-1.tar. You will find the appropriate
application kit located on the same page as the driver on the
EMC-approved web page at the Emulex website.
3. Change to the newly created directory and uncompress and
extract the source files from the tar archive:
cd /home/emulex_apps
tar xvf ElxLinuxApps-2.1a8-8.0.16.4-1.tar
The initial uncompression will create a new directory and will
provide you with the following files within the new directory:
enterprise_kitfiles/
enterprise_kitfiles/hbaapi_2.1.a.tgz
enterprise_kitfiles/lputil_20a3.tgz
enterprise_kitfiles/EmlxApps300a28.tgz
enterprise_kitfiles/lpfcutil_2.6_lib_kit-80.161-2.tgz
install
uninstall
README.txt
README_SSC.txt
Contained within the existing directory is the install script.
Note: When the installation script is run, it will automatically install
HBAnyware, the lputil utility, and the HBA API libraries.
4. To install the Application Kit, change to the newly created
directory and run the installation script.
./install
The output from running the installer script is as follows:
Untarring EmlxApps tgz file...
Untarring lpfcutil tgz file...
Untarring hbaapi libs tgz file...
Untarring lputil tgz file...
Stopping HBAnyware Remote Management Server
Stopping HBAnyware Discovery Server
Starting HBAnyware Remote Management Server
Installing the Emulex HBAnywhere applications kit
85
Installing and Configuring the Linux Host with the Emulex Driver
Untarring HBAnyware local jre...
HBAnyware installation complete.
Cleaning up...
5. The installation utility will prompt for the "mode of operation" for
HBAnyware to manage adapters. Select the desired mode of
operation:
• Option 1 (Local Mode) allows management of only the
adapters within the host running HBAnyware.
• Option 2 (Managed Mode) allows local adapters to be
managed both by the local machine, as well as by remote
machines running HBAnyware.
• Option 3 (Remote Mode) is identical to Option 2, with the
added feature that the local machine running HBAnyware can
manage remote machines running HBAnyware (assuming
they are running in "Managed Mode").
6. The installation utility will prompt to allow the user to change
management mode (as described in Step 5). Select the desired
answer.
7. hbacmd is a command-line program that can be used to modify
and query Emulex adapter parameters. A sample session using
hbacmd is described in the “Exercising the Emulex v8.x-series
device driver” on page 57 of this document.
8. HBAnyware is a GUI-based application that is used to manage
Emulex adapters on the host. To start up the HBAnyware
application, run the following commands:
cd /usr/sbin/hbanyware
./hbanyware
86
EMC Host Connectivity with Emulex FC HBAs and FCoE CNAs for the Linux Environment
Installing and Configuring the Linux Host with the Emulex Driver
Editing the configuration files
This section contains information on editing the configuration files.
◆
“Description of the Emulex lpfc driver parameters”, next
◆
“Descriptions of the Emulex parameters” on page 88
◆
“Editing the Emulex driver parameters on hosts with SLES 9,
SLES 10, and SLES 11” on page 90
◆
“Editing the Emulex driver parameters on hosts with RHEL 4 and
RHEL 5” on page 91
◆
“Editing the Emulex driver parameters on hosts with Asianux 2.0
and Asianux 3.0” on page 92
◆
“Editing the Emulex driver parameters on hosts with OEL 4 and
OEL 5” on page 93
Description of the Emulex lpfc driver parameters
The Emulex driver exports certain parameters which may be used to
modify the behavior of the driver. To obtain a listing of the
parameters that have been exported, issue the modinfo command.
/sbin/modinfo lpfc | grep parm
parm:
lpfc_max_luns:Maximum number of LUNs per target driver will support (int)
parm:
lpfc_scsi_hotplug:Enables support of SCSI hotplug (int)
parm:
lpfc_discovery_threads:Maximum number of ELS commands during discovery (int)
parm:
lpfc_fdmi_on:Enable FDMI support (int)
parm:
lpfc_cr_count:A count of I/O completions after which aninterrupt response
is generated (int)
parm:
lpfc_cr_delay:A count of milliseconds after which aninterrupt response is
generated (int)
parm:
lpfc_fcp_bind_method:Select the bind method to be used (int)
parm:
lpfc_ack0:Enable ACK0 support (int)
parm:
lpfc_use_adisc:Use ADISC on rediscovery to authenticate FCP devices (int)
parm:
lpfc_fcp_class:Select Fibre Channel class of service for FCP sequences (int)
parm:
lpfc_link_speed:Select link speed (int)
parm:
lpfc_topology:Select Fibre Channel topology (int)
parm:
lpfc_nodev_tmo:Seconds driver will hold I/O waiting for a device to come
back (int)
parm:
lpfc_scan_down:Start scanning for devices from highest ALPA to lowest (int)
parm:
lpfc_lun_queue_depth:Max number of FCP commands we can queue to a specific
LUN (int)
parm:
lpfc_log_verbose:Verbose logging bit-mask (int)
Editing the configuration files
87
Installing and Configuring the Linux Host with the Emulex Driver
Table 7 provides a listing of the EMC-recommended settings for the
driver. These values will be used as default when installing the
driver.
Table 7
Emulex parameters and settings
Emulex parameters
Emulex default
settings
EMC recommended
settings
lpfc_max_luns
256
256
lpfc_discovery_threads
32
32
lpfc_fdmi_on
0
0
lpfc_cr_delay
0
0
lpfc_cr_count
1
1
lpfc_fcp_bind_method
2
2
lpfc_ack0
0
0
lpfc_use_adisc
0
0
lpfc_fcp_class
3
3
lpfc_link_speed
0
0
lpfc_topology
0x00
0x00
lpfc_nodev_tmo
30
30 *
lpfc_scan_down
1
1
lpfc_lun_queue_depth
30
30
lpfc_log_verbose
0x0
0x0
*
If PEMC owerPath,® Veritas DMP, or Linux native multipath (DM-MPIO) is installed,
lpfc_nodev_tmo must be set to 10.
Descriptions of the Emulex parameters
lpfc_link_speed
Specifies link speed selection for the initialization of the FC
connection.
0
1
2
4
=
=
=
=
auto negotiate
1 GB
2 GB
4 GB
The auto-negotiation feature may not be suitable in all environments.
In such an environment, EMC recommends explicitly setting the link
speed.
88
EMC Host Connectivity with Emulex FC HBAs and FCoE CNAs for the Linux Environment
Installing and Configuring the Linux Host with the Emulex Driver
Note: For FCoE adapters, the FC link is virtualized within a 10 gigabit
ethernet link. As such, modification of this setting will not affect the FC link
speed.
lpfc_topology
Specifies the link topology.
0x0 = attempt loop mode then point-to-point
0x02 = attempt point-to-point mode only
0x04 = attempt loop mode only
0x06 = attempt point-to-point mode then loop
In certain environments, attempting to log into a fabric in loop-mode
may cause undesirable behavior. In such environments, EMC
recommends explicitly setting the link topology. Explicitly setting the
lpfc_topology parameter may reduce the time to complete the login
to a target. Hence, if the host is connecting only to a FC-AL
environment, this parameter should be set to 0x04. Similarly, if the
host is connecting only to a FC-SW environment, this parameter
should be set to 0x02.
lpfc_nodev_tmo
Specifies the amount of time [0-255] that all I/O errors will be held on
devices that disappear. EMC recommends that this value be set to 30.
In certain high-stress, non-production environments, a higher
timeout value has helped recover over-exercised LUNS. In such
environments, this value has been set to 60 seconds.
lpfc_log_verbose
Specifies the bit mask to record specific types of verbose messages.
0x0 = No verbose logging
0x1 = ELS events
0x2 = Link Discover events
0x4 = Mailbox events
0x8 = Initialization events
0x10 = Link events
0x20 = IP traffic history
0x40 = FCP Traffic History
0x80 = Node Table events
0x400 = Miscellaneous events
0x800 = SLI events
0x1000 = FCP Check Condition Flag
0x2000 = LIBDFC events
0xffff = Log All Messages
The logging level may be increased by setting the desired flags.
Editing the configuration files
89
Installing and Configuring the Linux Host with the Emulex Driver
What next?
Certain customization features are available in the form of driver
parameter options. These options are read every time the driver is
loaded and included in the newly created RAM disk that includes the
Emulex v8.x driver.
◆
For editing the driver parameters on hosts with SLES 9 SP1 and
newer service packs, and SLES 10 and newer service packs,
proceed to “Editing the Emulex driver parameters on hosts with
SLES 9, SLES 10, and SLES 11” on page 90.
◆
For editing the driver on hosts with RHEL 4 and newer updates,
and RHEL 5, proceed to “Editing the Emulex driver parameters
on hosts with RHEL 4 and RHEL 5” on page 91.
Editing the Emulex driver parameters on hosts with SLES 9, SLES 10, and SLES 11
On hosts with SLES 9 SP1 and newer service packs, SLES 10 and
newer service packs, or SLES 11 and newer service packs, the values
for the driver parameters are set in the file
/etc/modprobe.conf.local..
Refer to “Description of the Emulex lpfc driver parameters” on
page 87 for the description of the supported parameters and to
identify parameters suited to your host.
The following is an example of a modified
/etc/modprobe.conf.local file for a host that is connecting to a
fabric in Point-to-Point at a 2 GB link speed and the log level set as
verbose in order to capture all link events.
cat /etc/modprobe.conf.local
#
# please add local extensions to this file
#
## LPFC Module options ##
options lpfc lpfc_link_speed=2 lpfc_topology=0x02
lpfc_log_verbose=0x10
EMC recommends creating a new RAM disk after modifying the
parameters in /etc/modprobe.conf.local and rebooting the host in
order to use the new RAM disk.
90
EMC Host Connectivity with Emulex FC HBAs and FCoE CNAs for the Linux Environment
Installing and Configuring the Linux Host with the Emulex Driver
To create a new RAM disk, use the script lpfc-install with the
--createramdisk option as follows:
1. Change to the directory where the installation files are located.
cd /home/emulex/lpfc_2.6_driver_kit-8.0.16.6_x2-1/
2. Run the install script with the --createramdisk option:
./lpfc-install --createramdisk
Emulex LPFC Driver Installer Version 1.30.1.2
Determining distribution type and kernel version ...
Creating ramdisk .....
The ramdisk for this kernel has been updated.
3. Reboot the host.
Alternatively, a new ramdisk may be created using the mkinitrd
command.
For example:
cd /boot
mkinitrd -k vmlinuz -i initrd-2.6.5-7.139smp
Editing the Emulex driver parameters on hosts with RHEL 4 and RHEL 5
On hosts with RHEL 4 and newer updates, and RHEL 5, the values
for the driver parameters are set in the file /etc/modprobe.conf. The
following is an example of a modified /etc/modprobe.conf file for
a host that is connecting to a fabric in Point-to-Point at a 2 GB link speed
and the log level set as verbose in order to capture all link events.
Refer to the section “Description of the Emulex lpfc driver
parameters” on page 87 for the description of the supported
parameters and to identify parameters suited to your host.
For example:
cat /etc/modprobe.conf
alias eth0 tg3
alias eth1 tg3
alias scsi_hostadapter mptbase
alias scsi_hostadapter1 mptscsih
alias scsi_hostadapter3 lpfc
alias scsi_hostadapter4 lpfc
## LPFC Module options ##
options lpfc lpfc_link_speed=2 lpfc_topology=0x02
lpfc_log_verbose=0x10
Editing the configuration files
91
Installing and Configuring the Linux Host with the Emulex Driver
Note: All options must be contained on a single line. The above example
contains all options on a single line; however, because of line wrap, they
appear to be on separate lines.
EMC recommends creating a new RAM disk after modifying the
parameters in /etc/modprobe.conf and rebooting the host in order
to use the new RAM disk.
To create a new RAM disk, use the script lpfc-install with the
--createramdisk option as follows:
1. Change to the directory where the installation files are located.
cd /home/emulex/lpfc_2.6_driver_kit-8.0.16.6_x2-1/
2. Run the install script with the --createramdisk option:
./lpfc-install --createramdisk
Emulex LPFC Driver Installer Version 1.30.1.2
Determining distribution type and kernel version ...
Original ramdisk image /boot/initrd-2.6.9-5.EL.img
saved as /boot/initrd-2.6.9-5.EL.img.elx
Creating ramdisk ...
The ramdisk for this kernel has been updated.
3. Reboot the host.
Alternatively, a new ramdisk may be created using the mkinitrd
command.
For example:
cd /boot
mkinitrd –v initrd-2.6.9-5smp.EL.img 2.6.9-5smp.EL
Editing the Emulex driver parameters on hosts with Asianux 2.0 and Asianux 3.0
The following distributions are part of Asianux consortium and are
based on Asianux 2.0 and Asianux 3.0:
◆
Miracle Linux v4.0
◆
RedFlag DC Server 5.0
◆
Haansoft Linux 2006 Server Asianux Inside
Refer to “Editing the Emulex driver parameters on hosts with RHEL
4 and RHEL 5” on page 91.
92
EMC Host Connectivity with Emulex FC HBAs and FCoE CNAs for the Linux Environment
Installing and Configuring the Linux Host with the Emulex Driver
Editing the Emulex driver parameters on hosts with OEL 4 and OEL 5
Refer to “Editing the Emulex driver parameters on hosts with RHEL
4 and RHEL 5” on page 91.
Editing the configuration files
93
Installing and Configuring the Linux Host with the Emulex Driver
Using the Emulex lun_scan script
Contained within the Emulex driver applications kit is a script, called
lun_scan, which automates the SCSI scan requests for Emulex
adapters. This script is located in the following applications kit
directory:
enterprise_kitfiles/scripts/lun_scan
When the applications kit is installed, the lun_scan script is installed
into the /usr/sbin/lpfc directory with the dfc and lputil utilities.
This script may be integrated into the system run-level transitions to
ensure that all devices are fully detected.
The lun_scan script may be used to scan all of the Emulex HBAs or a
specific Emulex HBA.
If the lun_scan script is run without specifying parameters, the
output is as follows:
[root@l82bi250 /]# lun_scan
Usage: lun_scan [ <#> [<#>] | all ]
where
<#> : is a scsi host number of a specific lpfc HBA that is to
be scanned. More than 1 host number can be specified.
all : indicates that all lpfc HBAs are to be scanned.
Example:
lun_scan all
lun_scan 2
lun_scan 2 4
: Scans all lpfc HBAs
: Scans the lpfc HBA with scsi host number 2
: Scans the lpfc HBAs with scsi host number 2 and 4
Warning: Scanning an adapter while performing a tape backup should
be avoided.
Examples of the usage of the script are shown below.
1. To obtain the SCSI host number of the Emulex HBAs within the
system, refer to the /proc filesystem:
[root@l82bi250 /]# ls /proc/scsi/lpfc/
2 3
In this particular system, the Emulex HBAs are listed as SCSI host numbers 2 and 3.
To scan on a single Emulex HBA, run the command plus the desired host number. For
example:
[root@l82bi250 /]# lun_scan 2
Scanning lpfc2, scsi host number : 2
94
EMC Host Connectivity with Emulex FC HBAs and FCoE CNAs for the Linux Environment
Installing and Configuring the Linux Host with the Emulex Driver
2. If the system contained multiple Emulex HBAs, the command
could be run with specific SCSI host numbers.
For example, this system has four Emulex HBAs:
[root@l82bi183 /]# ls /proc/scsi/lpfc/
2 3 4 5
To rescan the SCSI bus for LUNs on some of the HBAs, the SCSI
host numbers for those HBAs may be specified:
[root@l82bi250 /]# lun_scan 2 5
Scanning lpfc2, scsi host number : 2
Scanning lpfc5, scsi host number : 5
3. To rescan the LUNs on all of the Emulex HBAs within the system,
execute the following:
[root@l82bi183 /]# lun_scan all
Scanning lpfc2, scsi host number
Scanning lpfc3, scsi host number
Scanning lpfc4, scsi host number
Scanning lpfc5, scsi host number
:
:
:
:
2
3
4
5
Using the Emulex lun_scan script
95
Installing and Configuring the Linux Host with the Emulex Driver
96
EMC Host Connectivity with Emulex FC HBAs and FCoE CNAs for the Linux Environment
5
Invisible Body Tag
Updating the Adapter
and CEE/Menlo
Firmware
This chapter provides information on updating the adapter and
CEE/Menlo firmware for Fibre Channel over Ethernet adapters.
◆
◆
Updating the adapter firmware with hbacmd..................................... 98
Updating Emulex CEE /Menlo firmware for LP21000-E/
LP21002-E FCoE adapters ..................................................................... 102
Updating the Adapter and CEE/Menlo Firmware
97
Updating the Adapter and CEE/Menlo Firmware
Updating the adapter firmware with hbacmd
The hbacmd utility is dependent upon the existence of the Emulex
driver. Therefore, the operating system and the Emulex driver must
be installed prior to using hbacmd. The hbacmd utility is included in
the Emulex Application Kit along with the adapter API and
HBAnyware.
Download the Emulex Application Kit from the EMC-approved
section of the Emulex website, and follow the steps below to upgrade
the flash firmware using hbacmd.
To update the firmware on the adapters:
1. Copy the appropriate firmware file from the CD-ROM or the
EMC-approved section of the Emulex website to the appropriate
directory, /usr/sbin/lpfc.
Table 8 lists the adapter models and the name of the
corresponding firmware files.
Table 8
98
HBA and CNA Fibre Channel firmware (page 1 of 3)
Adapter model
Firmware file
LP982-E
lfbXXX.all (where XXX is the version)
Example: lfb191a1.all
LP9002-E
cdcXXX.all (where XXX is the version)
Example: cdc392a2.all
LP9802-E
hdXXX.all (where XXX is the version)
Example: hd191a1.all
LP9802DC-E
hfXXX.all (where XXX is the version)
Example: hf191a1.all
LP1050-E
mfXXX.all (where XXX is the version)
Example: mf191a1.all
LP1050DC-E
mfXXX.all (where XXX is the version)
Example: mf191a1.all
LP1050EX-E
mfXXX.all (where XXX is the version)
Example: mf191a1.all
LP10000-E
tdXXX.all (where XXX is the version)
Example: td191a1.all
EMC Host Connectivity with Emulex FC HBAs and FCoE CNAs for the Linux Environment
Updating the Adapter and CEE/Menlo Firmware
Table 8
HBA and CNA Fibre Channel firmware (page 2 of 3)
Adapter model
Firmware file
LP10000DC-E
tdXXX.all (where XXX is the version)
Example: td191a1.all
LP10000EXDC-E
tdXXX.all (where XXX is the version)
Example: td191a1.all
LP101-E
embXXX.all (where XXX is the version)
Example: emb191a1.all
LPe111-E
ymXXX.all (where XXXis the version)
Example: ym250a8.all
LPe1150-E
wfXXX.all (where XXX is the version)
Example: wf250a4.all
LPe11002-E
zfXXX.all (where XXX is the version)
Example: zf210a7.all
LP11002-E
bfXXX.all (where XXX is the version)
Example: bf250a4.all
LP11250-E
ofXXX.all (where XXX is the version)
Example: of110a5.all
LPe12000-E
udXXX.all (where XXX is the version)
Example: ud110a5.all
LPe12002-E
udXXX.all (where XXX is the version)
Example: ud110a5.all
LP21000-E
adXXX.all (where XXX is the version)
Example: ad100a5.all
LP21002-E
afXXX.all (where XXX is the version)
Example: af100a5.all
OCe10102-FM-E
OCe10102-FX-E
XXXXXXXX.UFI(where XXXXXXXX is the version)
Example: S2200017.UFI
LP1005-DC Mezzanine for
HPQ Blade Servers
mfXXX.all (where XXX is the version)
Example: mf191a2.all
LP1005-DC Mezzanine for
IBM Blade Servers
mfXXX.all (where XXX is the version)
Example: mf190a5.all
Updating the adapter firmware with hbacmd
99
Updating the Adapter and CEE/Menlo Firmware
Table 8
HBA and CNA Fibre Channel firmware (page 3 of 3)
Adapter model
Firmware file
LP1005-BC Mezzanine for
IBM Blade Servers
bfXXX.all (where XXX is the version)
Example: bf210a10.all
LPe1105-M Mezzanine for
Dell Blade Servers
zfXXX.all (where XXX is the version)
Example: zf280a4.all
LPe1105-M4 Mezzanine for zfXXX.all (where XXX is the version)
Dell Blade Servers
Example: zf280a4.all
LPe1205-M Mezzanine for
Dell Blade Servers
udXXX.all (where XXX is the version)
Example: ud110a5.all
Each firmware file contains four files. The naming schema of the
files follows the format as shown in the example below for the
LP9002 v3.92a2 firmware.
cdc392a2.dwc = contains the firmware with combination boot
cdc392a2.awc = contains the firmware with loader and
combination boot
cd392a2.dwc = contains the firmware with no boot code
cd392a2.awc = contains the firmware with loader, no boot
code
2. Execute the command /usr/sbin/hbanyware/hbacmd ListHBA,
and record the Port WWN information for all adapters within the
host.
3. Execute the command /usr/sbin/hbanyware/hbacmd Download
<WWPN> <firmwarefile>, where WWPN is the first Port WWN
recorded from Step 2, and firmwarefile is the firmware file name
determined in Step 1. The utility will report "Download
Complete" when the firmware download has completed
successfully.
4. Repeat Step 3 for each adapter port WWN reported in Step 2, to
ensure that all adapter instances within the host have been
updated.
5. If you do not plan to update the Boot BIOS, then reboot the
system.
100
EMC Host Connectivity with Emulex FC HBAs and FCoE CNAs for the Linux Environment
Updating the Adapter and CEE/Menlo Firmware
Note: If you are using the adapter to boot from the SAN, update the Boot
BIOS immediately after updating the firmware as the firmware overwrites
part of the Boot BIOS.
Updating the adapter firmware with hbacmd
101
Updating the Adapter and CEE/Menlo Firmware
Updating Emulex CEE /Menlo firmware for LP21000-E/LP21002-E
FCoE adapters
Each Emulex Fibre Channel controller has a flash upgradable
firmware and boot BIOS. In most instances, it is necessary to keep
only the firmware up-to-date, because the BIOS is applied only when
using connected storage as a boot device. The latest supported
firmware can be found on the Emulex website:
http://www.emulex.com/ts/docoem/framemc.htm
From this site, select the appropriate file for your adapter. The files
are typically in a .zip file that contains different combinations of
firmware and BIOS images. Extract the downloaded file to a diskette,
and refer to readme.txt to determine which filename image to use.
!
IMPORTANT
If you are upgrading the firmware and BIOS, you must upgrade the
firmware first, because it might contain an older BIOS version,
which you can update separately later.
FCoE adapters include an additional chip component which requires
the latest supported firmware. This chip is commonly referred to as a
CEE (converged enhanced ethernet) or "Menlo" chip, the purpose of
which is to handle the convergence of storage (FC) and network (IP)
traffic over a single ethernet interface.
Note: To update the boot BIOS, refer to Chapter 3, ”Installing and
Configuring the BIOS Settings.”
To update the CEE/Menlo firmware on the CNAs, follow these steps:
1. Copy the appropriate CEE/Menlo firmware file from the
CD-ROM or the EMC-approved section of the Emulex website to
the appropriate directory, /usr/sbin/hbanyware.
2. Execute the command /usr/sbin/hbanyware/hbacmd ListHBA,
and record the "Port WWN" information for all adapters within
the host.
3. Execute the command /usr/sbin/hbanyware/hbacmd
CEEdownload <WWPN> <CEEfirmwarefile>, where WWPN is
the first Port WWN recorded from Step 2, and CEEfirmwarefile is
102
EMC Host Connectivity with Emulex FC HBAs and FCoE CNAs for the Linux Environment
Updating the Adapter and CEE/Menlo Firmware
the firmware file name determined in Step 1. The utility will
report "Download Complete" when the firmware download has
completed successfully.
4. If the installed adapter is a dual-ported model, then the
CEE/Menlo firmware does not need to be downloaded to each
adapter port; downloading it to either port results in both ports
being updated. Otherwise, for multiple single-port adapter
models, repeat Step 3 for each adapter port WWN reported in
Step 2, to ensure that all adapter instances within the host have
been updated.
Updating Emulex CEE /Menlo firmware for LP21000-E/LP21002-E FCoE adapters
103
Updating the Adapter and CEE/Menlo Firmware
Updating Emulex BIOS/firmware for the
OCe10102-FM-E/OCe10102-FX CNA adapters
OneCommand Manager is the GUI software that is designed for
administration of Emulex storage networking products, including
both HBAs and CNAs. It can be used for retrieving card information,
tuning of card parameters, and updating of firmware and BIOS. It is
the upgraded version of previous HBAnyware GUI software offered
by Emulex.
Before updating the OCe10102-FM-E/OCe10102-FX CNA firmware,
download the latest firmware and Boot Code (BIOS) from the
EMC-supported section of Emulex website at
http://www.emulex.com/downloads/emc.html.
Prior to the release of OCe10102-FM-E/OCe10102-FX CNA, Emulex
offered software packages for firmware and BIOS separately. The
user needed to download both and update separately. After the
release of the OCe10102-FM-E/OCe10102-FX CNA, a single unified
software package, which is capable of updating both firmware and
BIOS simultaneously, is available from Emulex.
The firmware updating process for the
OCe10102-FM-E/OCe10102-FX CNA iSCSI CNA is different from
updating the HBA or FCoE CNA, as follows:
104
EMC Host Connectivity with Emulex FC HBAs and FCoE CNAs for the Linux Environment
Updating the Adapter and CEE/Menlo Firmware
◆
Figure 7
For HBA or FCoE CNA, the button to invoke a firmware update
process is under the Maintenance tab on the right pane of each
port interface, as shown in Figure 7 on page 105.
Firmware update interface for Emulex FCoE CNA
◆
However, the button for the OCe10102-FM-E/OCe10102-FX CNA
iSCSI CNA is under the Firmware tab of the card entity, as shown
in Figure 8 on page 106.
Updating Emulex BIOS/firmware for the OCe10102-FM-E/OCe10102-FX CNA adapters
105
Updating the Adapter and CEE/Menlo Firmware
Figure 8
Firmware update interface for Emulex OCe10102-FM-E/OCe10102-FX
iSCSI CNA
Since firmware and BIOS are offered in separate packages for HBAs
and CNAs released before the OCe10102-FM-E/OCe10102-FX CNA,
users need to update twice by clicking the Update Firmware…
button and select appropriate packages for firmware and BIOS
(firmware packages have .all as extension, while BIOS packages'
extension is .PRG). However, for the OCe10102-FM-E/OCe10102-FX
CNA cards, the user only needs to update once, using the unified
package (with .all as extension).
106
EMC Host Connectivity with Emulex FC HBAs and FCoE CNAs for the Linux Environment
Updating the Adapter and CEE/Menlo Firmware
To update the OCe10102-FM-E/OCe10102-FX CNA firmware and
BIOS, complete the following steps.
1. Invoke the OneCommand Manager GUI client by issuing
/usr/sbin/hbanyware/ocmanager in the Linux command
prompt.
2. Click on the card entity with model name (such as "OneConnect
OCe10100"; refer to Figure 8 on page 106);
3. Select the Firmware tab on the right pane of the interface and
click Update Firmware… to invoke the firmware download
window.
4. Click Browse… to open file browser and navigate to the directory
with the firmware package stored.
5. Select the appropriate package and click Start Download to start
the download process.
6. After the download process is completed, switch to the Adapter
Information tab, and verify both the firmware and BIOS versions
are updated. Figure 9 shows an example of the Adapter
Information tab prior to the firmware upate.
Figure 9
Adapter information prior to firmware update
Updating Emulex BIOS/firmware for the OCe10102-FM-E/OCe10102-FX CNA adapters
107
Updating the Adapter and CEE/Menlo Firmware
The updating process is completed once the latest versions are
verified, as shown in Figure 10.
Figure 10
108
Adapter information after firmware update
EMC Host Connectivity with Emulex FC HBAs and FCoE CNAs for the Linux Environment
6
Invisible Body Tag
Connecting to the
Storage
This chapter provides information on connecting to the storage.
◆
◆
◆
Zoning and connection planning in a fabric environment ........ 110
Enabling persistent binding ............................................................ 111
Configuring Emulex OCe10102-FM-E/OCe10102-FX iSCSI
CNA for iSCSI connectivity............................................................ 117
Connecting to the Storage
109
Connecting to the Storage
Zoning and connection planning in a fabric environment
In a fabric environment, the user should plan for the switch topology,
target-to-hosts mapping, and the zone.
Planning procedure
The recommended procedure is as follows:
1. Draw the connectivity among the hosts, switch, and storage array
to verify the correct fabric configuration.
2. Configure the zone capability in the switch. If connecting to EMC
Connectrix, refer to the Connectrix Enterprise Storage Network
System Planning Guide for information on the zone configuration.
Establishing connectivity to the storage array
Once the adapter has been properly configured, connectivity will
need to be established between the adapter and the storage array. In
the case, where the adapter will be directly connected to the storage
array, the cable can just be attached. However, when attaching to an
FC or FCoE switch, several additional configuration steps are needed.
These include zoning the port on the adapter to the correct port on
the storage array, as well as configuring LUN Masking on the array.
For additional information on how to perform these additional
installation steps, refer to the Fibre Channel over Ethernet (FCoE)
TechBook, located at http://elabnavigator.EMC.com, Topology
Resource Center tab.
Note: You will need to reload the driver or reboot the server so the new
targets and LUNs may be scanned and acquired by the Linux SCSI
subsystem.
What next:
Follow the instructions in “Device reconfiguration procedures” on
page 151.
110
EMC Host Connectivity with Emulex FC HBAs and FCoE CNAs for the Linux Environment
Connecting to the Storage
Enabling persistent binding
In a fabric environment, EMC recommends, but does not require,
enabling persistent binding in the driver. When using persistent
binding, EMC strongly recommends the use of binding via WWPN.
Without a persistent binding mechanism, the host will be unable
maintain persistent logical routing of the communication from a
storage device object across the fabric to an EMC storage array
volume. If the physical configuration of the switch is changed (for
example, cables are swapped or the host is rebooted), the logical
route becomes inconsistent, which could cause data corruption.
Please note that the persistent binding mechanism in the Emulex
driver is target-based only, not LUN-based.
Obtaining initiator and target information
The initiator and target information necessary for persistent binding
is logged in /proc/scsi/lpfc/N (where N indicates the file for each
adapter in the system) when the driver is loaded. The initiator and
target information is used to assign the persistent binding
information in /usr/src/lpfc/lpfc.conf or /etc/modules.conf.
You can obtain the initiator and target information by grep'ing the
/proc/scsi/lpfc/N file for each adapter in the system.
For example:
cd /proc/scsi/lpfc
grep WWPN *
This example produces output similar to the following:
2:lpfc0t05
2:lpfc0t06
3:lpfc2t02
3:lpfc2t04
DID
DID
DID
DID
6c0b13
6c1713
6c0b13
6c1713
What next?
WWPN
WWPN
WWPN
WWPN
50:06:01:61:10:60:12:70
50:06:01:69:10:60:12:70
50:06:01:61:10:60:12:70
50:06:01:69:10:60:12:70
WWNN
WWNN
WWNN
WWNN
50:06:01:60:90:60:12:70
50:06:01:60:90:60:12:70
50:06:01:60:90:60:12:70
50:06:01:60:90:60:12:70
To enable persistent binding for the modular driver, you must edit either
/usr/src/lpfc/lpfc.conf or /etc/modules.conf.
To edit one of these files, proceed to the appropriate section:
◆
“Editing /usr/src/lpfc/lpfc.conf” on page 112
◆
“Editing /etc/modules.conf” on page 114
Enabling persistent binding
111
Connecting to the Storage
Editing /usr/src/lpfc/lpfc.conf
The Emulex v7.1.14 driver uses the lpfc_fcp_bind_method
parameter. When using the lpfc_fcp_bind_method parameter, the
following values will force a particular type of binding:
◆
A value of 1 forces WWNN binding.
◆
A value of 2 forces WWPN binding.
◆
A value of 3 forces DID binding.
◆
A value of 4 forces the driver to derive the binding from ALPA.
EMC recommends enabling persistent binding via WWPN; therefore,
the default value of 2 should be used.
To edit /usr/src/lpfc/lpfc.conf and compile the persistent
binding parameters into the driver, follow these steps:
1. Please note the following requirements when enabling persistent
binding:
• Only one persistent binding method can be used.
• The lpfc_automap parameter must be set to 0.
• The lpfc_scan_down parameter must be set to 0.
2. As stated previously, the lpfc_scan_down parameter must be set
to 0 when using persistent binding. Search for the
lpfc_scan_down parameter in /usr/src/lpfc/lpfc.conf and
change the value from:
int lpfc_scan_down = 1;
to
int lpfc_scan_down = 0;
3. Next, the lpfc_automap parameter must be set to 0 when using
persistent binding. Search for the lpfc_automap parameter in
/usr/src/lpfc/lpfc.conf and change the value from:
int lpfc_automap = 1;
to
int lpfc_automap = 0;
2-2Installing and Configuring the HBA and Driver
112
EMC Host Connectivity with Emulex FC HBAs and FCoE CNAs for the Linux Environment
Connecting to the Storage
4. Add the WWPN and SCSI ID information to the
lpfc_fcp_bind_WWPN parameter. The SCSI ID consists of the lpfc
interface to bind with and the target number for that lpfc
interface.
For example, lpfc0t1 would reference target 1 on interface
lpfc0.
Example:
char
*lpfc_fcp_bind_WWPN[MAX_FC_BINDINGS]={"50060482cadfe242:lpfc0t1","50
060482cadfe243:lpfc0t2", 0};
Note: The entry must be all on one line; the length of the line forces it to
wrap to multiples lines in this document.
5. Save your changes to the /usr/src/lpfc/lpfc.conf file.
6. Recompile the driver:
make build
7. Install the driver in the currently running kernel:
make install
The make install parameter copies the driver to the appropriate
/lib/modules/ $1/kernel/drivers/scsi directory (where $1
is the kernel version).
8. Create a new ramdisk to reflect the changes made. This may be
done by using the lpfc-install script or by manually creating a
new ramdisk.
• When using the lpfc-install script, you will need to use the
-configramdisk option.
For example:
/home/emulex/lpfc_2.4_driver_kit-7.1.14-4/lpfc-instal
l -configramdisk
The output from this command will be similar to the following:
Emulex LPFC Driver Installer Version 1.4.1.10
Determining distribution type and kernel version ...
Configuring ramdisk...
Configuring /etc/modules.conf ...
Original saved as /etc/modules.elx
Enabling persistent binding
113
Connecting to the Storage
Original ramdisk image /boot/initrd-2.4.21-27.0.1.ELsmp.img saved as
/boot/initrd-2.4.21-27.0.1.ELsmp.img.elx
Creating ramdisk ..
The ramdisk for this kernel has been updated.
• Depending upon your distribution, use one of the following
instruction sets when manually creating a new ramdisk.
– For Red Hat distributions, use:
cd /boot
mkinitrd -v initrd-$1.img $1
where $1 is the currently running v2.4.x kernel version.
Example:
cd /boot
cp initrd-2.4.21-15.0.4.ELsmp.img initrd-2.4.21-15.0.4.ELsmp.img.orig
mkinitrd –v initrd-2.4.21-15.0.4.ELsmp.img 2.4.21-15.0.4.ELsmp
– For SuSE distributions use:
cd /boot
mkinitrd –k vmlinuz-$1 –i initrd-$1
Example:
cd /boot
cp initrd-2.4.21-266 initrd-2.4.21-266.orig
mkinitrd –k vmlinuz-2.4.21-266 –i initrd-2.4.21-266
9. Reboot the host.
What next?
Proceed to “Additional Notes” on page 147.
Editing /etc/modules.conf
Instead of editing /usr/src/lpfc/lpfc.conf to compile the
persistent binding parameters into the driver, you may use the
options parameter in /etc/modules.conf to specify those settings:
1. Obtain the initiator and target information for each adapter in the
system as instructed under “Obtaining initiator and target
information” on page 111.
2. Change to the appropriate directory and append the persistent
binding information to the bottom of the modules.conf file:
cd /etc
vi modules.conf
d Configuring the HBA and Driver
114
EMC Host Connectivity with Emulex FC HBAs and FCoE CNAs for the Linux Environment
Connecting to the Storage
3. Set the lpfc_scan_down parameter as follows:
The default setting is:
lpfc_scan_down=1
Change it to zero:
lpfc_scan_down=0
4. Set the lpfc_automap parameter as follows:
The default setting is:
lpfc_automap=1
Change it to zero:
lpfc_automap=0
5. Set the lpfc_fcp_bind_WWPN parameter to the required number
of persistent binding entries.
Example:
lpfc_fcp_bind_WWPN=50060160006000ed:lpfc0t1,500601680
06000ed:lpfc0t2,50060160006000ed:lpfc1t1,500601680060
00ed:lpfc1t2
Note: The entry must be all on one line; the length of the line forces it to
wrap to multiples lines in this document.
6. Save the changes to /etc/modules.conf.
The following is an example of /etc/modules.conf for a v2.4.x
system using the Emulex driver with persistent binding enabled:
alias parport_lowlevel parport_pc
alias scsi_hostadapter sym53c8xx
alias scsi_hostadapter1 lpfc
alias scsi_hostadapter2 lpfc
alias eth0 tlan
options scsi_mod max_scsi_luns=255 scsi_allow_ghost_devices=1
options lpfc lpfc_topology=0x02 lpfc_automap=0 lpfc_scan_down=0
lpfc_fcp_bind_WWPN=50060160006000ed:lpfc0t1,50060168006000ed:lpfc0t2,50060160060
00ed:lpfc1t1,50060168006000ed:lpfc1t2
Note: The last three lines of the example are actually all one line; however,
the length of the line forces it to wrap to multiples lines in the display.
Enabling persistent binding
115
Connecting to the Storage
7. Create a new ramdisk to reflect the changes made. This may be
done by using the lpfc-install script or by manually creating a
new ramdisk.
• When using the lpfc-install script, use the
-configramdisk option.
For example:
cd /home/emulex/lpfc_2.4_driver_kit-7.1.14-4/
./lpfc-install -configramdisk
The output will be similar to the following:
Emulex LPFC Driver Installer Version 1.4.1.10
Determining distribution type and kernel version ...
Configuring ramdisk...
Configuring /etc/modules.conf ...
Original saved as /etc/modules.elx
Original ramdisk image /boot/initrd-2.4.21-27.0.1.ELsmp.img saved as
/boot/initrd-2.4.21-27.0.1.ELsmp.img.elx
Creating ramdisk ..
The ramdisk for this kernel has been updated.
• Depending upon your distribution, use one of the following
instruction sets when manually creating a new ramdisk.
– For Red Hat distributions, use:
cd /boot
mkinitrd -v initrd-$1.img $1
where $1 is the currently running v2.4.x kernel version.
For example:
cd /boot
cp initrd-2.4.21-15.0.4.ELsmp.img initrd-2.4.21-15.0.4.ELsmp.img.orig
mkinitrd –v initrd-2.4.21-15.0.4.ELsmp.img 2.4.21-15.0.4.ELsmp
– For SuSE distributions use:
cd /boot
mkinitrd -k vmlinuz-$1 -i initrd-$1
For example:
cd /boot
cp initrd-2.4.21-266 initrd-2.4.21-266.orig
mkinitrd -k vmlinuz-2.4.21-266 -i initrd-2.4.21-266
8. Reboot the host.
What next?
116
Proceed to “Additional Notes” on page 147.
EMC Host Connectivity with Emulex FC HBAs and FCoE CNAs for the Linux Environment
Connecting to the Storage
Configuring Emulex OCe10102-FM-E/OCe10102-FX iSCSI CNA
for iSCSI connectivity
If OCM is not available for a particular OS, iSCSI connectivity can still
be configured for the OCe10102-FM-E/OCe10102-FX iSCSI CNA by
using the iscsiadm utility. Iscsiadm creates an interface (iface) for
each OCe10102-FM-E/OCe10102-FX iSCSI CNA port and uses such
structure to bind sessions and support iSCSI offload.
First, ensure the be2iscsi driver is already available as an in-kernel
driver. It can be checked using 'modinfo be2iscsi'. If an in-kernel
be2iscsi driver is not available, an out-of-box driver needs to be
installed. This out-of-box driver is provided by Emulex.
Next, the initiator name and network settings must be configured. An
example of an initiator name and network setting is shown in
Figure 11.
Figure 11
Network Settings window
Configuring Emulex OCe10102-FM-E/OCe10102-FX iSCSI CNA for iSCSI connectivity
117
Connecting to the Storage
An IP must be configured on the OCe10102-FM-E/OCe10102-FX port
to ensure the host can ping each target port without any issues. If you
cannot ping the portal, then you will not be able to bind a session to
the portal.
The open-iscsi package needs to be installed and started to use the
iscsiadm utility.
When iscsiadm is run for the first time, it creates a default iface config
file under the /etc/iscsi/ifaces directory for each of your
OCe10102-FM-E/OCe10102-FX CNA portals. You can check the
ifaces created by issuing iscsiadm -m host.
For each port, you can view the detailed configurations in the iface
config file. An example of the default iface config file content is
shown next.
118
EMC Host Connectivity with Emulex FC HBAs and FCoE CNAs for the Linux Environment
Connecting to the Storage
Table 9 lists a description for each field in the iface config file.
Table 9
iface config file fields
Setting
Description
Ifacename
Iface configuration name
Iface.hwaddress
MAC address of the port
Ip_address
IP address to use for this port
Iface.transport_name
Name of driver
You can update the value of any of the fields above by using
iscsiadm -m iface -o update -I <ifacename> to set up the
interface you require. It will update the iface config file automatically
and will be persistent across host reboots.
With iface configured successfully, you can further discover and log
in to target portals and manually bind them to ifaces. To discover a
target portal and bind it to a particular iface, using iscsiadm -m
discovery -t -st -p <target ip:port> -I <iface> , and then
log in using iscsiadm -m node -L all.
You can check active login sessions by issuing iscsiadm -m
session. An example is shown next.
Configuring Emulex OCe10102-FM-E/OCe10102-FX iSCSI CNA for iSCSI connectivity
119
Connecting to the Storage
120
EMC Host Connectivity with Emulex FC HBAs and FCoE CNAs for the Linux Environment
7
Invisible Body Tag
Configuring a Boot
Device on an EMC
Storage Array
With the introduction of the Emulex v7.x-series driver, EMC supports
booting RHEL 2.1 and 3.0 hosts from an EMC storage array through
an EMC-qualified Emulex Fibre Channel HBA.
With the introduction of the Emulex v8.x-series driver in the kernel,
EMC supports hosts booting from EMC storage arrays through an
EMC-qualified Emulex Fibre Channel adapter with RHEL 4 and
newer updates, RHEL 5 and newer updates, OEL 4 U4 and newer
updates, OEL 5 and newer updates, Asianux 2.0 and newer service
packs, Asianux 3.0, SLES 9 SP1 and newer service packs, SLES 10 and
newer service packs, and SLES 11.
◆
◆
◆
◆
◆
◆
◆
◆
Cautions and restrictions booting from an EMC storage
array ................................................................................................... 110
Limitations ........................................................................................ 124
Configuring a Symmetrix boot device .......................................... 128
Configuring a VNX series or CLARiiON boot device................ 132
Installing an operating system on a Symmetrix or
CLARiiON......................................................................................... 136
Installing supported RHEL 4, RHEL 5, OEL 4, OEL 5,
Asianux 2.0, Asianux 3.0, SLES 9, SLES 10, and SLES 11
operating systems onto the boot device with the Emulex
v8.x-series driver .............................................................................. 141
Installing RHEL 5.2 and SLES 10 SP2 operating systems onto
a boot device using FCoE Adapters .............................................. 142
Upgrading the Linux kernel ........................................................... 145
Configuring a Boot Device on an EMC Storage Array
121
Configuring a Boot Device on an EMC Storage Array
Cautions and restrictions booting from an EMC storage array
Note the following cautions and restructions when booting from an
EMC storage array:
!
CAUTION
If the Linux host booting from the SAN loses connectivity long
enough, the disks will disappear from the system. To prevent
further data from being lost in a situation like this, EMC
recommends that the error behavior be changed from continue to
remount read-only. To make this change, consult the man page for
tune2fs. A hard reboot is required to bring the system back to a
usable state.
!
CAUTION
You should configure the host with enough memory to eliminate
the need for a swap partition. EMC cannot recommend an amount
of memory as this varies greatly depending upon the environment.
EMC recommends shutting down the host server during any
maintenance procedures that could make the boot disk unavailable to
the host.
Any of these events have the potential to crash a system booting from
an EMC storage array:
Symmetrix-specific cautions and restrictions
The following are Symmetrix-specific restrictions:
122
◆
Lost connection to Symmetrix system (pulled or damaged cable
connection).
◆
Symmetrix service and upgrade procedures, such as online
Symmetrix microcode upgrades and/or configuration changes.
◆
Symmetrix director failures, including failed lasers.
◆
Symmetrix system power failure.
◆
Storage area network service and upgrade procedures, such as
firmware upgrades or hardware replacements.
EMC Host Connectivity with Emulex FC HBAs and FCoE CNAs for the Linux Environment
Configuring a Boot Device on an EMC Storage Array
VNX series- and CLARiiON-specific cautions and restrictions
The following are VNX series and CLARiiON-specific restrictions:
◆
Lost connection to VNX series and CLARiiON array (pulled or
damaged cable connection).
◆
VNX series service and upgrade procedures.
◆
CLARiiON service and upgrade procedures, such as online
CLARiiON FLARE® upgrades and/or configuration changes.
◆
VNX series and CLARiiON SP failures, including failed lasers.
◆
VNX series and CLARiiON system power failure.
◆
Storage area network failures, such as failures in Fibre Channel
switches, switch components, or switch power.
◆
Storage area network service and upgrade procedures, such as
firmware upgrades or hardware replacements.
◆
Trespass of a VNX series and CLARiiON LUN from one SP to the
other.
Cautions and restrictions booting from an EMC storage array
123
Configuring a Boot Device on an EMC Storage Array
Limitations
This section contains the following limitation information:
◆
“Common limitations” on page 124
◆
“Symmetrix-specific limitations” on page 126
◆
“VNX series- and CLARiiON-specific limitations” on page 126
Common limitations
Boot configurations must not deviate from the following limitations
established by EMC:
◆
LUN 000 must exist on the EMC storage array in order for the
SCSI layer to scan all devices on RHEL 4 (all releases), SLES 9 SP1,
and Asianux 2.0. In these distributions, the v2.6.x kernel does not
allow scanning past a nonexistent LUN 000.
Note: This issue has been resolved with SLES 9 SP2 and RHEL 4 U3.
Note: It is recommended that SPC-2 and the SC3 bit be set on the
Symmetrix FA ports attached to the host.
124
◆
The EMC Storage device must have enough disk space to hold the
Linux operating system.
◆
A maximum of 32 volumes may be configured on the EMC
storage array port that will be used to boot Linux.
◆
EMC recommends that you install, rather than upgrade, the
kernel-source and kernel UP, SMP, and enterprise RPMs.
◆
Linux hosts booting from an EMC storage array are limited to the
use of one HBA.
◆
Hosts booting from an EMC storage array must use the Emulex
driver as a module, not statically linked into the kernel.
◆
Only 32-bit SLES 8 hosts are supported booting from an EMC
storage array. 64-bit architectures are not supported.
EMC Host Connectivity with Emulex FC HBAs and FCoE CNAs for the Linux Environment
Configuring a Boot Device on an EMC Storage Array
◆
The Symmetrix, VNX series, or CLARiiON device that is to
contain the Master Boot Record (MBR) for the host must have a
lower logical unit number (LUN) than any other device visible to
the host. This device must be mapped as /dev/sda by the Linux
operating system for the boot to succeed from the device.
Note that this includes the following cases:
• Volume Logix database device when using Volume Logix in a
Symmetrix environment — The installer will fail to write the
MBR to this device, as it is write-protected.
– To force the installer to avoid an attempt to write to this
device, EMC recommends masking the LUN. The
administrative host must first initialize the Volume Logix
database. The LUN may then be masked by modifying the
active configuration file to enable the ‘fba flag2’ to restrict
access to the Volume Logix database.
– An alternative to masking the VCM DB, is to map the
Volume Logix database device so that it is the highest LUN
presented to the host However, please be aware that the
LUN number should not be higher than 254 (FE) if it is to
be used by Solutions Enabler or EMC ControlCenter®
running on a Microsoft host.
Note: The EMC-recommended method is to use LUN masking.
• VNX series or CLARiiON ghost LUN — If no LUN 0 exists in
the storage group, a phantom device (LUNZ) will be
presented by the array in its place. Additionally, a valid LUN 0
presented via an inactive path acts as a not-ready device.
Always ensure that a valid LUN 0 is present in the storage
group and that it is owned by the SP connected to the boot
HBA. If the boot LUN trespasses, a system crash may result.
◆
When attaching the Linux host to an EMC storage array, use the
adapter in the lowest-numbered PCI slot in the server. To keep the
configuration and installation simple, it is recommended that
only that single HBA be cabled to the array. Ensure that the boot
BIOS or firmware has been applied to your HBA.
◆
The installer installs the boot block onto only the first disk it sees.
This includes SCSI and IDE drives in your system. If only EMC
storage array devices are attached to the system, the boot BIOS
should be set to the first LUN the HBA sees. If there are other
Limitations
125
Configuring a Boot Device on an EMC Storage Array
local disks in the system, you may be forced (depending on how
Linux discovers the drives) to put your boot block onto a local
disk.
◆
Some servers present the option of disabling the local drive. If the
local drive is disabled, then verify that the boot block is installed
on the first EMC storage array device seen by the Linux host.
Symmetrix-specific limitations
The following are Symmetrix-specific limitations:
◆
When attached to a Symmetrix, the physical-to-logical split must
be such that you meet the minimum required disk space required
to install the Linux operating system. Refer to your Linux
distribution guide for these requirements.
◆
Prior to the installation on a Symmetrix LUN, the Linux host HBA
must have successfully logged into the array. Using Solutions
Enabler from another host, at least one LUN must be assigned to
the host.
◆
During the installation procedure, it is recommended, but not
required, that only one LUN be allocated to the host for ease of
use. Once the installation has completed, additional LUNs may
be assigned to the host.
◆
For RHEL 4.5, boot from a LUN with the VCM gatekeeper
existing on a Symmetrix, you may receive an "unhandled
exception with ZeroDivisionError" message when partitioning
the boot LUN. Remove the VCM gatekeeper from the FA port and
the installation will be successful.
VNX series- and CLARiiON-specific limitations
The folloiwng are VNX series- and VNX series- or
CLARiiON-specific limitations:
126
◆
Prior to the installation on a VNX series or CLARiiON LUN, the
Linux host must have been manually registered on the array and
assigned to a Storage Group. At least one LUN must be bound to
the host’s Storage Group and owned by the SP connected to the
HBA being used for the fabric boot. The lowest-numbered path to
the boot LUN must be the active path.
◆
It is required that the boot LUN be assigned Host LUN ID 0.
EMC Host Connectivity with Emulex FC HBAs and FCoE CNAs for the Linux Environment
Configuring a Boot Device on an EMC Storage Array
◆
During the installation procedure, it is recommended that only
one LUN be assigned to the Storage Group for ease of use. Once
the installation has completed, additional LUNs may be added to
the Storage Group.
◆
Booting from the SAN requires the use a Unisphere/Navisphere
Management station with the Unisphere/Navisphere Manager or
NaviCLI. The station must be separate from the boot server, but
networked to the VNX series or CLARiiON system.
Limitations
127
Configuring a Boot Device on an EMC Storage Array
Configuring a Symmetrix boot device
This section describes how to install an EMC-qualified version of
Linux onto a Symmetrix system connected to an Intel-based x86 and
x86_64 class systems and AMD Opteron-based x86_64 class systems.
Preparing the Symmetrix system
◆
It is recommended that Volume Logix be enabled on the
Symmetrix system for LUN-masking purposes.
◆
During the installation procedure, only one LUN should be
allocated to the host, so that the boot LUN may be identified
easily. After the OS installation, additional LUNs may be
allocated.
◆
Create a zone that includes the WWPN of the HBA to be used and
one Symmetrix FA port. Add the newly created zone to the zone
configuration in the fabric and enable the zone configuration.
◆
Create a zone that includes the WWPN of the HBA to be used and
one FA port. Add the newly created zone to the zone
configuration in the fabric and enable the zone configuration.
◆
The PCI Fibre Channel HBA must be the lowest-numbered PCI
slot in the server. For example, if there are three adapters in the
system in slots 2, 4, and 5, connect the cable to the adapter in
slot 2. Do not connect cables to other adapters until the
installation is complete and the host rebooted.
◆
SCSI hard disks are allowed in SAN boot configurations.
However, the BIOS for the disk's SCSI adapters must be disabled.
Any SCSI disks attached to the host should be disconnected
during the operating system installation.
◆
For servers with SCSI CD-ROM drives, ensure that the BIOS is
enabled on the SCSI channel that includes the CD-ROM. Disable
the BIOS on any other integrated SCSI channels.
◆
For servers with IDE CD-ROM drivers, disable the BIOS on the
server's integrated SCSI adapter(s). The SCSI BIOS is not required
to boot from the CD-ROM.
Preparing the host
128
EMC Host Connectivity with Emulex FC HBAs and FCoE CNAs for the Linux Environment
Configuring a Boot Device on an EMC Storage Array
◆
Disable the BIOS on any other HBAs in the system other than the
Emulex HBA designated for booting.
Configuring the Emulex boot BIOS for SAN boot
After the boot BIOS is installed and enabled, it must be configured for
use for booting from the SAN. The following procedure describes
how to configure the boot BIOS:
1. Connect the Symmetrix Fibre Channel port to the adapter in the
lowest-numbered PCI slot in the server. For example, if there are
three adapters in the system in slots 2, 4, and 5, connect the cable
to the adapter in slot 2. Do not connect cables to the other
adapters at this time.
2. Boot the server, and press ALT-E when the Emulex banner
appears.
3. The first screen of the BIOS setup utility contains a list of all the
adapters with the boot BIOS installed. Select Option 1 from the
list, and press ENTER.
4. On the next screen, select Option 2 - Configure This Adapter's
Parameters, and press ENTER.
5. Select Option 4 - Topology and press ENTER.
6. Select Option 1 - Auto Topology: Loop First (default) and press
ENTER.
7. Press ESC to return to the Parameters menu.
Select Option 1 - Enable/Disable Boot BIOS, and press ENTER.
8. If the BIOS is listed as Disabled, select 1 to enable it, and press
ENTER.
9. Press ESC to return to the Parameters menu.
10. Press ESC twice to return to the list of installed adapters.
Note: It is recommended, but not required, that the boot BIOS be
disabled on the other adapters in the system.
11. From the adapter list, select 1 for the adapter to be used for boot,
and press ENTER.
12. From the Options menu, select Option 1 - Configure Boot
Devices, and press ENTER.
Configuring a Symmetrix boot device
129
Configuring a Boot Device on an EMC Storage Array
13. The next screen displays a list of devices available for use as a
boot LUN. Initially, the values are set to 0. However, once the
information regarding the boot LUN is obtained, it is logged in
this field.
At the prompt, select the boot entry of 1. This entry will be used
to fill in the information regarding the target boot device.
14. On the next screen, select 00 to clear the selected priority slot, or
select the device from which the host will boot. Select the boot
device (for example, 01). This list also provides the LUN number
of the first LUN visible on that device.
15. The system prompts you to enter the boot LUN. Type the number
of the device from which the system will boot, and press ENTER.
16. A list of all available LUNs appears, beginning with the desired
boot LUN number. Type the two-digit number next to the desired
boot LUN, and press ENTER.
Note: On Symmetrix systems, the LUN number of the first visible device
to that port should be used.
17. When prompted to select the option to boot via WWPN or DID,
select 1 for WWPN, and press ENTER.
18. Press X to exit from the menu, and select y to reboot the system.
19. Reboot the host.
The HBA is now configured to boot from the desired LUN on the
Symmetrix system.
What next?
130
Proceed to the appropriate section, depending upon the Linux
operating system to be installed:
◆
If the OS to be installed is any version of RHEL 2.1 or RHEL 3.0
U2 and U3, proceed to “Installing supported RHEL 2.1 and 3.0
releases onto the EMC storage device with the Emulex v7.x-Series
driver” on page 136.
◆
If the OS to be installed is 3.0 U4 or U5, proceed to “Installing
RHEL 3.0 U4 and U5 onto the EMC storage device with the
Emulex v7.x-Series driver” on page 138.
EMC Host Connectivity with Emulex FC HBAs and FCoE CNAs for the Linux Environment
Configuring a Boot Device on an EMC Storage Array
◆
If the OS to be installed is RHEL 3.0 U6, U7, U8, or RHEL 3.9,
proceed to “Installing RHEL 3.0 U6 through RHEL 3.9 onto the
EMC storage device with the Emulex v7.x-Series driver” on
page 138.
◆
If the OS to be installed is SLES 8 SP4 (32-bit only), proceed to
“Installing SLES 8 SP4 for the i386 architecture onto the EMC
storage device with the Emulex v7.x-Series driver diskette” on
page 139.
Configuring a Symmetrix boot device
131
Configuring a Boot Device on an EMC Storage Array
Configuring a VNX series or CLARiiON boot device
This section describes how to install an EMC-qualified version of
Linux onto an EMC VNX series or CLARiiON storage system
connected to an Intel-based x86 and x86_64 class systems and AMD
Opteron-based x86_64 class systems.
Preparing the VNX series or CLARiiON system
◆
It is recommended that Access Logix be enabled on the VNX
series or CLARiiON system for LUN masking purposes.
◆
Boot device support requires a Unisphere/Navisphere
Management station with Unisphere/Navisphere Manager or
CLI installed. The station must be separate from the server being
installed and must be networked to the VNX series or CLARiiON
system.
◆
Before installing Linux onto a VNX series or CLARiiON system,
the array must have one bound LUN allocated to the Storage
Group for the server being installed. The LUN must be owned by
the SP connected to the boot HBA.
◆
During the installation procedure, only one LUN should be in the
boot Storage Group, so that the boot LUN may be identified
easily. After the installation, additional LUNs may be added to
the host's Storage Group.
Note: If LUNs need to be created, refer to the Unisphere/Navisphere
Management software documentation for the array type.
Preparing the host
132
◆
Create a zone that includes the WWPN of the HBA to be used and
one SP port. Add the newly created zone to the zone
configuration in the fabric and enable the zone configuration.
◆
EMC recommends using port 0 on the SP for consistency.
◆
The PCI Fibre Channel HBA must be the lowest-numbered PCI
slot in the server. For example, if there are three adapters in the
system in slots 2, 4, and 5, connect the cable to the adapter in
slot 2. Do not connect cables to other adapters until the
installation is complete and the host rebooted.
EMC Host Connectivity with Emulex FC HBAs and FCoE CNAs for the Linux Environment
Configuring a Boot Device on an EMC Storage Array
◆
SCSI hard disks are allowed in SAN boot configurations.
However, the BIOS for the disk's SCSI adapters must be disabled.
Any SCSI disks attached to the host should be disconnected
during the operating system installation.
◆
For servers with SCSI CD-ROM drives, ensure that the BIOS is
enabled on the SCSI channel that includes the CD-ROM. Disable
the BIOS on any other integrated SCSI channels.
◆
For servers with IDE CD-ROM drivers, disable the BIOS on the
server's integrated SCSI adapter(s). The SCSI BIOS is not required
to boot from the CD-ROM.
◆
Disable the BIOS on any other HBAs in the system other than the
Emulex HBA designated for booting.
Configuring the Emulex boot BIOS for SAN boot
After the boot BIOS is installed and enabled, it must be configured for
use for booting from the SAN. The following procedure describes
how to configure the boot BIOS:
1. Connect the VNX series or CLARiiON SP Fibre Channel port to
the adapter in the lowest-numbered PCI slot in the server. For
example, if there are three adapters in the system in slots 2, 4, and
5, connect the cable to the adapter in slot 2. Do not connect cables
to the other adapters at this time.
2. Boot the server, and press ALT-E when the Emulex banner
appears.
3. The first screen of the BIOS setup utility contains a list of all the
adapters with the boot BIOS installed. Select Option 1 from the
list, and press ENTER.
4. On the next screen, select Option 2 - Configure This Adapter's
Parameters, and press ENTER.
5. Select Option 4 - Topology and press ENTER.
6. Select Option 1 - Auto Topology: Loop First (default) and press
ENTER.
7. Press ESC to return to the Parameters menu.
Select Option 1 - Enable/Disable Boot BIOS, and press ENTER.
8. If the BIOS is listed as Disabled, select 1 to enable it, and press
ENTER.
Configuring a VNX series or CLARiiON boot device
133
Configuring a Boot Device on an EMC Storage Array
9. Press ESC to return to the Parameters menu.
10. Press ESC twice to return to the list of installed adapters.
Note: It is recommended, but not required, that the boot BIOS be
disabled on the other adapters in the system.
11. From the adapter list, select 1 for the adapter to be used for boot,
and press ENTER.
12. From the Options menu, select Option 1 - Configure Boot
Devices, and press ENTER.
13. The next screen displays a list of devices available for use as a
boot LUN. Initially, the values are set to 0. However, once the
information regarding the boot LUN is obtained, it is logged in
this field.
At the prompt, select the boot entry of 1. This entry will be used
to fill in the information regarding the target boot device.
14. On the next screen, select 00 to clear the selected priority slot, or
select the device from which the host will boot. Select the boot
device (for example, 01). This list also provides the LUN number
of the first LUN visible on that device.
15. The system prompts you to enter the boot LUN. Type the number
of the device from which the system will boot, and press ENTER.
16. A list of all available LUNs appears, beginning with the desired
boot LUN number. Type the two-digit number next to the desired
boot LUN, and press ENTER.
Note: On VNX series or CLARiiON systems, the desired boot LUN is 00.
On Symmetrix storage arrays, the LUN number of the first visible device
to that port should be used.
17. When prompted to select the option to boot via WWPN or DID,
select 1 for WWPN, and press ENTER.
18. Press X to exit from the menu, and select y to reboot the system.
19. Reboot the host.
The HBA is now configured to boot from the desired LUN on the
VNX series or CLARiiON system.
134
EMC Host Connectivity with Emulex FC HBAs and FCoE CNAs for the Linux Environment
Configuring a Boot Device on an EMC Storage Array
What next?
Select the appropriate section depending upon the Linux operating
system to be installed:
◆
If the OS to be installed is any version of RHEL 2.1 or RHEL 3.0
U2 and U3, proceed to “Installing supported RHEL 2.1 and 3.0
releases onto the EMC storage device with the Emulex v7.x-Series
driver” on page 136.
◆
If the OS to be installed is 3.0 U4 or U5, proceed to “Installing
RHEL 3.0 U4 and U5 onto the EMC storage device with the
Emulex v7.x-Series driver” on page 138.
◆
If the OS to be installed is RHEL 3.0 U6, proceed to “Installing
RHEL 3.0 U6 through RHEL 3.9 onto the EMC storage device
with the Emulex v7.x-Series driver” on page 138.
◆
If the OS to be installed is SLES 8 SP4 (32-bit only), proceed to
“Installing SLES 8 SP4 for the i386 architecture onto the EMC
storage device with the Emulex v7.x-Series driver diskette” on
page 139.
Configuring a VNX series or CLARiiON boot device
135
Configuring a Boot Device on an EMC Storage Array
Installing an operating system on a Symmetrix, VNX series, or
CLARiiON
This section includes the following information for installing an
operating system on a Symmetrix, VNX series, or CLARiiON:
◆
“Installing supported RHEL 2.1 and 3.0 releases onto the EMC
storage device with the Emulex v7.x-Series driver,” next
◆
“Installing RHEL 2.1 and 3.0 onto the EMC storage device with
the Emulex v7.x-Series driver diskette” on page 137
◆
“Installing RHEL 3.0 U4 and U5 onto the EMC storage device
with the Emulex v7.x-Series driver” on page 138
◆
“Installing RHEL 3.0 U6 through RHEL 3.9 onto the EMC storage
device with the Emulex v7.x-Series driver” on page 138
◆
“Installing SLES 8 SP4 for the i386 architecture onto the EMC
storage device with the Emulex v7.x-Series driver diskette” on
page 139
Installing supported RHEL 2.1 and 3.0 releases onto the EMC storage device with
the Emulex v7.x-Series driver
EMC supports specific kernel revisions of both RHEL 2.1 and 3.0
booting from the SAN. Currently, RHEL AS/ES 2.1 v2.4.9-e.49 and
v2.4.9-e.57 and RHEL 3.0 v2.4.21-15.EL through v2.4.21-20.EL are
supported. Please refer to the EMC Support Matrix for the most recent
information.
The kernel versions listed above for RHEL 2.1 and 3.0 do not include
any Emulex driver. Therefore, in order to boot from the SAN, a driver
diskette image must be created for these kernel revisions.
The driver diskette will provide the correct driver and information
necessary for the Red Hat Installer to access the EMC storage array
devices presented over the fabric. The driver diskette installation
method allows devices to be discovered at installation time, for which
the device drivers are not part of the standard distribution.
The process of building a driver diskette for RHEL is described in
detail on several websites. The following website provides details
and supplementary information on the build process:
http://people.redhat.com/dledford. Doug Ledford’s website
136
EMC Host Connectivity with Emulex FC HBAs and FCoE CNAs for the Linux Environment
Configuring a Boot Device on an EMC Storage Array
contains the necessary kit to build driver diskettes, as well as detailed
information on the function and development of driver diskettes.
The entire build process must be performed on a Red Hat host that
contains the kernel source tree for the target version of RHEL for
which the driver diskette is being built. To ensure that the necessary
source tree exists, the most straightforward method is to install the
kernel source RPMs from the RHEL 2.1 or 3.0 distributions.
Follow the instructions as specified on Doug Ledford’s website to
build the driver diskette image. Once the driver diskette has been
successfully created, the installation may be performed.
Installing RHEL 2.1 and 3.0 onto the EMC storage device with the Emulex
v7.x-Series driver diskette
Using the driver diskette created in the previous section, the
installation of RHEL 2.1 or 3.0 may be performed. Before beginning
the installation, performs the steps described under the Configuring
the Boot BIOS section.
To install RHEL with a driver diskette onto the EMC storage array
device, use the following steps:
1. Boot the server to be installed.
2. At the boot: prompt, type the command linux dd (Linux driver
diskette), and press ENTER.
3. You will be prompted with the question:
Do you have a device driver disk?
Select YES.
4. You are then prompted to perform the following:
Insert your driver disk and press OK to continue.
Insert the device driver diskette as instructed, and select OK.
5. When asked for the type of installation to perform, select Custom.
By selecting the Custom installation option, you will have
complete control of the boot device selection and manipulation.
From this point, follow the normal installation process.
Installing an operating system on a Symmetrix, VNX series, or CLARiiON
137
Configuring a Boot Device on an EMC Storage Array
Although EMC does not make recommendations on the installation
selections, it is worthwhile to create a boot diskette for the installation
to aid in troubleshooting possible connectivity problems.
On completion of the installation, the system will boot into the RHEL
OS selected.
Installing RHEL 3.0 U4 and U5 onto the EMC storage device with the Emulex
v7.x-Series driver
The Emulex v7.1.14 driver ships as the default in both RHEL 3.0 U4
(v2.4.21-27.EL kernel) and U5 (v2.4.21-32.EL kernel).
As of the date this document was written, booting from the SAN is
supported with RHEL 3.0 U4 and U5 for 32-bit, AMD64, and EM64T
architectures, but not Itanium. Refer to the EMC Support Matrix for
the latest information on supported distributions, kernels, and
architectures.
Since the Emulex v7.1.14 driver is integrated into the RHEL 3.0 U4
and U5 kernels, there is no need to create a driver diskette image.
Before beginning the installation, performs the steps described in the
appropriate section for the EMC storage array being used:
◆
“Configuring a Symmetrix boot device” on page 128
◆
“Configuring a VNX series or CLARiiON boot device” on
page 132
Using the RHEL 3.0 U4 CDs, boot the server to be installed. The
installation may now be performed as it would when using an
internal disk drive.
Installing RHEL 3.0 U6 through RHEL 3.9 onto the EMC storage device with the
Emulex v7.x-Series driver
RHEL 3.0 U6 through RHEL 3.9 ship with the Emulex v7.3.x driver as
the default driver in the kernel, refer to Table 5 on page 52 for the
appropriate version.
As of the date this document was written, booting from the SAN is
supported with RHEL 3.0 U6 through RHEL 3.9 for 32-bit, AMD64,
and EM64T architectures, but not Itanium. Refer to the EMC Support
Matrix for the latest information on supported distributions and
architectures.
138
EMC Host Connectivity with Emulex FC HBAs and FCoE CNAs for the Linux Environment
Configuring a Boot Device on an EMC Storage Array
Since the Emulex v7.3.x driver is integrated into the kernel of RHEL
3.0 U6 through RHEL 3.9, there is no need to create a driver diskette
image.
Before beginning the installation, perform the steps described in the
appropriate section for the EMC storage array being used:
◆
“Configuring a Symmetrix boot device” on page 128
◆
“Configuring a VNX series or CLARiiON boot device” on
page 132
Using the CDs for your Red Hat Enterprise Linux 3.0 install, boot the
server to be installed. The installation may now be performed as it
would when using an internal disk drive.
Installing SLES 8 SP4 for the i386 architecture onto the EMC storage device with the
Emulex v7.x-Series driver diskette
EMC supports specific kernel revisions of SLES 8 SP4 for the i386
architecture booting from the SAN. Please refer to the EMC Support
Matrix for the most recent information.
The Emulex v1.23a driver included in the SLES 8 SP4 distribution is
not supported and must be replaced with the v7.x series driver. Since
the v7.x series driver is not integrated into the SLES 8 SP4 kernel, a
driver diskette image is required for the Emulex 7.x-series driver
when booting from the SAN.
The driver diskette image for SLES 8 SP4 may be downloaded from
the Linux Tools section on the Emulex website.
1. Download the driver diskette image, and save it to a local
directory on a host other than the host that is to boot from the
SAN.
2. Uncompress the driver diskette image:
gunzip dd-emulex-20050517.img.gz
3. Write the driver diskette image to a floppy diskette:
dd if=dd-emulex-20050517.img of=/dev/fd0
4. Boot the host system from the SLES 8 SP4 CD with the driver
diskette floppy in the floppy drive, and begin the installation. The
SLES 8 SP4 installation automatically searches the floppy and will
load the lpfc driver during the installation.
Installing an operating system on a Symmetrix, VNX series, or CLARiiON
139
Configuring a Boot Device on an EMC Storage Array
Do not remove the SLES 8 SP4 CD from the CD-ROM driver until
the installation program prompts for the SLES 8 CD 1.
Note: A separate /boot partition should be created during the
installation.
When the SLES 8 SP4 kernel is upgraded to a newer kernel
version, the Emulex driver will revert to the default 1.23a driver
that is integrated into the kernel. As a result, the Emulex
v7.x-series driver must be reinstalled.
Using YaST2, perform the Online Update to update the system
kernel to the desired revision.
Rename, or if desired, delete, the existing v1.23a driver modules.
To rename the driver modules, run the following commands:
cd /lib/modules/2.4.21-292-smp/kernel/drivers/scsi/lpfc
mv lpfcdd.o lpfcdd_123a.o
mv lpfndd.o lpfndd_123a.o
After the v1.23a drivers are renamed, the installer script provided
in the Emulex v7.x-series driver tar archive should be used to
compile the v 7.x-series driver. Refer to “Installing the Emulex
v7.x-Series driver” on page 68 for further instructions.
140
EMC Host Connectivity with Emulex FC HBAs and FCoE CNAs for the Linux Environment
Configuring a Boot Device on an EMC Storage Array
Installing supported RHEL 4, RHEL 5, OEL 4, OEL 5, Asianux 2.0,
Asianux 3.0, SLES 9, SLES 10, and SLES 11 operating systems onto
the boot device with the Emulex v8.x-series driver
RHEL 4 or newer updates, RHEL 5, and newer updates, OEL 4 U4
and newer updates, OEL 5 and newer updates, Asianux 2.0 and
newer service packs, Asianux 3.0, SLES 9 SP1or newer service packs,
SLES 10 or newer service packs, , and SLES 11 or newer service packs,
include Emulex device drivers as part of their distribution. EMC
recommends that these drivers be used during the initial OS
installation. After completing the installation, it may be required that
the driver be upgraded to the latest supported Emulex driver and
corresponding Application Helper Module (lpfcdfc driver) as posted
in the EMC Support Matrix.
Note: EMC recommends, but does not require, installing the Emulex
Application Kit.
Installing supported RHEL 4, RHEL 5, OEL 4, OEL 5, Asianux 2.0, Asianux 3.0, SLES 9, SLES 10, and SLES 11 op-
141
Configuring a Boot Device on an EMC Storage Array
Installing RHEL 5.2 and SLES 10 SP2 operating systems onto a
boot device using FCoE Adapters
EMC supports booting from an array device in FCoE environments
with RHEL 5.2 and SLES 10 SP2 operating systems.
Because RHEL 5.2 and SLES 10 SP2 distributions do not have
in-kernel support for the Emulex FCoE adapters, Emulex provides a
special “DD” driver package to allow loading of the FCoE adapter
driver at install time, which allows for installing to an array device.
These driver packages are available from the EMC-supported section
of the Emulex website.
The DD driver package is available as a floppy disk image and a CD
image, which can be copied to the respective media, based on the
removable storage options in the host platform.
RHEL 5.2 OS SAN-boot installation with Emulex FCoE adapters
To install RHEL 5.2 SAN-boot with Emulex FCoE adapters:
1. Obtain the appropriate “DD” driver kit for the Emlux FCoE
adapter from the EMC-supported section of the Emulex website,
and copy it to the appropriate media (floppy disk or CD).
2. Insert RHEL 5.2 product CD #1 in the CD drive and boot the
system.
The system boots from the CD and stops at the boot prompt.
3. At the boot prompt, type:
linux dd
and then press ENTER.
The Driver Disk message box displays the prompt:
Do you have a driver disk
Select YES, then press ENTER.
4. From the Driver Disk Source window, select the driver source:
• If the driver file is on a disk, select fd0, then press ENTER.
• If the driver file is on a CD, select hdx (where x=CD drive
letter), then press ENTER.
The Insert Driver Disk window displays.
142
EMC Host Connectivity with Emulex FC HBAs and FCoE CNAs for the Linux Environment
Configuring a Boot Device on an EMC Storage Array
5. Insert the disk (described in Step 1) into either the floppy disk
drive or the CD drive, depending on the option selected in Step 4.
6. Click OK, then press ENTER.
The SCSI driver is loaded automatically.
7. The Disk Driver window displays, prompting for more drivers to
install. Click NO, then press ENTER.
8. Insert the current Linux Red Hat product CD #1 in the CD drive
(remove the iso-dd-kit CD first if necessary), then press ENTER.
9. Follow the on-screen instructions to complete the installation.
SLES 10 SP2 OS SAN-boot installation with Emulex FCoE adapters
To install SLES 10 SP2 SAN-boot with Emulex FCoE adapters:
1. Obtain the appropriate “DD” driver kit for the Emulex FCoE
adapter from the EMC-supported section of the Emulex website,
and copy it to the appropriate media (floppy disk or CD).
2. Insert the SLES 10 CD #1 in CD drive and boot the system.
3. On the main installation screen, press F5.
4. The system prompts you to select Yes, No, or File.
Select Yes.
5. Select the installation option, then press ENTER
In response to the following prompt:
Please choose the driver update medium.
b. Make sure the dd-kit is inserted in proper drive (i.e., CD-ROM
or Floppy).
c. Select appropriate drive, then press ENTER. This loads the
driver update to the system.
6. If the driver update was successful, the following message
displays:
Driver Update OK.
Press ENTER.
7. If the system prompts you to update another driver, click BACK,
then press ENTER.
Installing RHEL 5.2 and SLES 10 SP2 operating systems onto a boot device using FCoE Adapters
143
Configuring a Boot Device on an EMC Storage Array
The following message displays:
Make sure that CD number 1 is in your drive.
8. Put SLES 10 CD 1 in the drive and press OK.
9. Follow the on-screen instructions to complete the installation.
144
EMC Host Connectivity with Emulex FC HBAs and FCoE CNAs for the Linux Environment
Configuring a Boot Device on an EMC Storage Array
Upgrading the Linux kernel
After successfully completing the installation and rebooting your
host, you may want to upgrade the kernel to newer errata to take
advantage of fixes and features incorporated into the kernel errata.
EMC recommends installing the kernel packages, rather than
upgrading, so that either kernel version may be used for boot. Also, if
you have created a boot diskette, an updated diskette should be
created after the upgrade.
After upgrading the kernel, however, it is required that the supported
Emulex driver be installed and included as part of the RAM disk.
Upgrading the Linux kernel
145
Configuring a Boot Device on an EMC Storage Array
146
EMC Host Connectivity with Emulex FC HBAs and FCoE CNAs for the Linux Environment
8
Invisible Body Tag
Additional Notes
This chapter provides additional notes to consider.
◆
◆
◆
◆
◆
◆
◆
◆
◆
◆
Ethernet connectivity over the CNA .............................................
Using the Emulex lun-scan script ..................................................
Device reconfiguration procedures ...............................................
Device reconfiguration: Device numbering .................................
HPQ server-specific note ................................................................
LUN 000 requirement for the Linux v2.6.x kernel ......................
Linux device-naming convention ..................................................
Device reconfiguration procedures ...............................................
Rescanning the SCSI bus.................................................................
Incorporating EMC Fibre Channel ................................................
Additional Notes
148
149
151
154
155
156
157
161
164
165
147
Additional Notes
Ethernet connectivity over the CNA
The Emulex FCoE CNA delivers lossless 10 Gb/s Enhanced Ethernet
support with dynamic allocation of networking and storage
bandwidth that may be used for either system ethernet or iSCSI
traffic, as well as FCoE. The Linux driver that supports the ethernet
and iSCSI traffic for this device is ixgbe. The driver will automatically
be installed and loaded by your supported Linux distribution.
To configure the network capabilities of your Emulex CNA, refer to
your Linux distributor's network administrator's guide for more
details. If you are configuring your CNA for iSCSI traffic, refer to the
EMC Linux iSCSI Attach Release Notes found on
http://powerlink.emc.com for the iSCSI configuration after
configuring the network first.
148
EMC Host Connectivity with Emulex FC HBAs and FCoE CNAs for the Linux Environment
Additional Notes
Using the Emulex lun-scan script
Contained on the EMC approved web page of the Emulex website is
a script called lun_scan.sh, which allow you to dynamically
(without a reboot or driver unload/reload) discover new targets and
LUNs (on new or existing targets) that have come online. This script
is located at the following URL:
http://www.emulex.com/ts/downloads/linuxfc/linux_tools.html
This script may be integrated into the system run-level transitions to
ensure that all devices are fully detected.
Note: It is highly recommended that a rescan of the SCSI bus should not be
conducted while you are running IO. The dynamic discovery and insertion of
LUNs while IO is running on applications may cause unforeseen errors to
occur on the IO in flight. The benefit of the dynamic scanning of the SCSI bus
is to reduce the need to reboot the server.
The lun_scan.sh script may be used to scan all of the Emulex
adapters or a specific Emulex adapter. If the lun_scan.sh script is
run without specifying parameters, the output is as follows:
[root@l82bi250 /]# lun_scan.sh
Usage: lun_scan [ <#> [<#>] | all ]
where
# is a SCSI host number of a specific lpfc HBA that is to be scanned.
More than 1 host number can be specified.
all indicates that all lpfc HBAs are to be scanned.
Example:
lun_scan all : Scans all lpfc HBAs
lun_scan 2 : Scans the lpfc HBA with scsi host number 2
lun_scan 2 4 : Scans the lpfc HBAs with scsi host number 2 and 4
Warning: Scanning an adapter while performing a tape backup should
be avoided.
Examples of the usage of the script are:
◆
To obtain the SCSI host number of the Emulex adapters within
the system, refer to the /proc filesystem:
[root@l82bi250 /]# ls /proc/scsi/lpfc/
2 3
In this particular system, the Emulex adapters are listed as SCSI
host numbers 2 and 3.
Using the Emulex lun-scan script
149
Additional Notes
To scan on a single Emulex adapter, run the command plus the
desired host number. For example:
[root@l82bi250 /]# lun_scan.sh 2
Scanning lpfc2, scsi host number : 2
◆
If the system contained multiple Emulex adapters, the command
could be run with specific SCSI host numbers.
For example, this system has four Emulex adapters:
[root@l82bi183 /]# ls /proc/scsi/lpfc/
2 3 4 5
To rescan the SCSI bus for LUNs on some of the adapters, the
SCSI host numbers for those adapters may be specified:
[root@l82bi250 /]# lun_scan.sh 2 5
Scanning lpfc2, scsi host number : 2
Scanning lpfc5, scsi host number : 5
stalling and Configuring the Emulex HBA and v7.x-Series Driver
◆
To rescan the LUNs on all of the Emulex adapters within the
system, execute the following:
[root@l82bi183 /]# lun_scan.sh all
Scanning lpfc2, scsi host number :
Scanning lpfc3, scsi host number :
Scanning lpfc4, scsi host number :
Scanning lpfc5, scsi host number :
150
2
3
4
5
EMC Host Connectivity with Emulex FC HBAs and FCoE CNAs for the Linux Environment
Additional Notes
Device reconfiguration procedures
The Linux v2.6.x kernel lacks a command built into the kernel that
allows for a dynamic SCSI bus reconfiguration such as drvconfig or
ioscan.
The SCSI bus may be rescanned with a system reboot, or with a
removal and reinsertion of the modular driver. In either case, all I/O
must be stopped and all other mounted filesystems must be
unmounted before rebooting or removing the modular driver.
Note: In the Linux v2.6.x kernel, the adapter numbers will increment in the
/proc filesystem with each reinsertion of the Emulex driver.
Rebooting the host
Rebooting the host allows for the reliable detection of newly added
devices. The host may be rebooted after all I/O has been stopped.
Unloading and reloading the modular Emulex driver
Depending upon the hardware configuration, it is possible to unload
and reload the modular Emulex driver. This driver removal from and
reinsertion into the kernel causes a scan of the SCSI bus and causes
the driver to detect any newly added device(s).
If the driver is to be removed from and then reinserted into the
kernel, perform the following before removing the driver:
1. Stop all I/O.
2. Unmount all filesystems attached to the Emulex driver.
3. If the Unisphere Host Agent or Navisphere Agent/CLI is
installed and enabled on the host, stop the Unisphere Host Agent
or Navisphere Agent service by typing one of the following
commands:
• For the Unisphere Host Agent:
/etc/init.d/hostagent stop
or
service hostagent stop
Device reconfiguration procedures
151
Additional Notes
• For the Navisphere Host Agent:
/etc/init.d/naviagent stop
or
service naviagent stop
4. If PowerPath is installed and enabled on the host, stop the
PowerPath service by typing one of the following commands:
/etc/init.d/PowerPath stop
or
service PowerPath stop
5. If the Emulex Applications Helper Module is installed and
enabled on the host, remove the lpfcdfc module from the
currently running kernel prior to the lpfc driver.
To unload the Emulex drivers, type both of the following
commands:
modprobe -r lpfcdfc
modprobe -r lpfc
The modprobe command is a wrapper or an extension to the
insmod and rmmod commands. The modprobe command uses
and maintains a set of files that describe all the modules that are
available for the current kernel in /lib/modules.
The modprobe command may be used to load and unload an
entire set of modules. (A set of modules can be a single module or
a stack of dependent modules.) The modprobe command
automatically loads all of the dependent modules needed in a
module stack based on the information in modules.dep.
Note: EMC recommends using modprobe to load and unload the
Emulex modular drivers.
The loading of the module is accomplished with either modprobe
or insmod. These commands are used to install loadable kernel
modules into a running kernel. The commands will attempt to
link a module into the running kernel by resolving the symbols
from the kernel's exported symbol table.
152
EMC Host Connectivity with Emulex FC HBAs and FCoE CNAs for the Linux Environment
Additional Notes
The unloading of the module can be accomplished with the
modprobe (with the -r switch) command or the rmmod
command. These commands are used to unload the loadable
modules from the running kernel if they are not in use and if
other modules are not dependent upon them.
As mentioned previously, if the Emulex Application Helper
Module is installed and loaded, you must remove it before the
standard Emulex lpfc driver.
• lpfcdfc — The Application Helper Module (lpfcdfc driver)
that is used to communicate with the Emulex adapters and to
query information and perform maintenance on the Emulex
adapters.
• lpfc — The low-level Emulex Linux adapter driver module.
Device reconfiguration procedures
153
Additional Notes
Device reconfiguration: Device numbering
In the Linux v2.6.x kernel, SCSI addresses are not used in the device
file names as they are in other types of UNIX (Sun, SGI, HP-UX, and
BSD, for example). Block device filenames take the form /dev/sdln,
where l is the letter denoting the physical drive and n is the number
denoting the partition on that physical drive. Disk device file names
and major and minor numbers are assigned dynamically at boot time
or device loading time in the order of discovery.
Depending upon the hardware configuration, if a device is added
and the system rebooted, the device numbering might change,
possibly rendering the host's mount table inaccurate. For the most
consistent results and to reduce the possibility of mount table
inaccuracies, new devices should be appended (if possible) to the list
of already attached devices. For example, if the host contains multiple
adapters, it is best to append the new device to the last adapter and to
the end of the device list attached to that adapter. This would
eliminate the need to alter the preexisting entries in the mount table,
since the new device could be appended to that as well.
If a new device were added to the first out of two adapters and the
system rebooted, the device file names will shift by one number and
the mount table entries will also shift by one device file name. If there
is only one adapter, the new device can more easily be appended to
the list of the regularly attached devices and the mount table altered
accordingly.
154
EMC Host Connectivity with Emulex FC HBAs and FCoE CNAs for the Linux Environment
Additional Notes
HPQ server-specific note
When using Compaq systems, it is highly recommended that the
Compaq SmartStart CD be run to configure the Compaq server prior
to installing the Linux operating system. The SmartStart CD is
shipped by Compaq with their systems, and is a bootable CD that is
used to configure Compaq servers. If another operating system is
selected other than Linux, there may be problems installing the
operating system or using the drivers installed in the kernel.
Follow these steps to select Linux as the primary operating system
from the Compaq SmartStart CD:
1. Boot the Compaq server using the SmartStart CD.
2. Select the System Configuration Utility.
3. Once the System Configuration Utility has started, a window
titled Steps in Configuring Your Computer appears, with the
following options listed:
• Step 1: Important System Configuration Information
• Step 2: Add or Remove Boards
• Step 3: View or Edit Details
• Step 4: Examine Switches or Print Report
• Step 5: Save and Exit
Select Step 3: View or Edit Details.
4. In the new window, select Primary Operating System (the first
item in the list); then select Unix from the list of possibilities.
5. Another list of UNIXes appears; select Linux from this list.
6. Select ENTER; then select <F10> Done.
7. The console returns to the Steps in Configuring Your Computer
window. Select Step 5: Save and Exit.
When prompted, select Save the configuration and restart the
computer.
8. When prompted again to save your configuration and reboot,
press ENTER to reboot the system.
9. You may then proceed with installing your operating system.
HPQ server-specific note
155
Additional Notes
LUN 000 requirement for the Linux v2.6.x kernel
LUN 000 must exist on the EMC storage array in order for the SCSI
layer to scan all devices on RHEL 4 (all releases), SLES 9 SP1, and
Asianux 2.0. In these distributions, the v2.6.x kernel does not allow
scanning past a nonexistent LUN 000.
Note: This issue has been resolved with SLES 9 SP2 and RHEL 4 U3.
Note: It is recommended that SPC-2 and the SC3 bit be set on the Symmetrix
FA ports attached to the host.
156
EMC Host Connectivity with Emulex FC HBAs and FCoE CNAs for the Linux Environment
Additional Notes
Linux device-naming convention
The four high-level device drivers in Linux are:
sd
sg
sr
st
- Direct access (disks)
- SCSI generic interface
- Data CD-ROMs
- Tapes
The sg driver is a character-based device while the other three
drivers are block-based devices. The sg driver is used primarily for
scanners, CD writers, and printers. The sg device files are
dynamically mapped to SCSI IDs/LUNs on the SCSI bus starting
with the first SCSI controller.
Block device file names
A native device file name for block devices takes the following form:
/dev/sdLN
where:
◆
L is a letter denoting the physical drive.and Configuring the HBA
and Driver.
◆
N is a number denoting the partition on that physical drive.
Note: Usually, the partition number is not included when referring to the
entire drive.
Following this format, the filenames are as follows:
/dev/sd[a-d][a-z][1-15]
The Linux kernel reserves 16 major numbers for SCSI devices. Each
major number can have zero to 255 minor numbers. These minor
numbers include the partitions for a SCSI device. Linux supports one
to 15 partitions per disk device. Partitions 1 through 4 are the primary
partitions, while partitions 5 and greater are the logical or extended
partitions. These limitations are specific to the Intel platform. By
default, slices are not used in Linux.
Therefore, the product of 16 major numbers and 16 minor numbers
yields 256 SCSI devices. As a result, the kernel is able to scan logical
devices ranging from 0 through 255. Red Hat Linux distributions and
Linux device-naming convention
157
Additional Notes
SuSE SLES 7 support a maximum of 128 SCSI devices as opposed to
the SuSE SLES 8 distribution, which supports all 256 SCSI devices.
The 256 total of SCSI devices includes any non-EMC storage array
devices, such as local disks.
Red Hat distributions
Red Hat Linux distributions can scan LUN numbers from 0 through
255; however, only the first 128 SCSI devices discovered by the
system will be mapped to an sd device. Any gaps in devices
presented to the system will not result in gaps in the sd device
names.
Note: The first device may be a non-zero LUN.
Examples:
◆
If you have allocated devices 0 through 255 to the Linux host, it
will be able to scan up to 255; however, only the first 128 devices
(0 through 127) will be usable and accessible by the host.
◆
If you have LUNs 128 through 255 assigned to a Linux host, you
will be able to scan through and use all of them.
◆
If you have LUNs 256 or above exported to a Linux host, the
Linux hosts will neither see nor be able to access those devices
with an address over 256.
In total, a Red Hat host could support disk devices from /dev/sda
through /dev/sddx.
SuSE distributions
For SuSE distributions prior to SLES 8, the limitations are the same as
for Red Hat distributions. SuSE SLES 8 is different in that it supports
up to 256 devices by default as it reserves 16 major numbers for SCSI
devices.
Each major number is allocated 0 to 255 minor numbers that are used
to denote the partitions for a SCSI device. Therefore, a product of 16
major numbers and 16 minor numbers yields up to 256 SCSI devices.
As a result, the kernel is able to scan logical devices ranging from 0
through 255. These disk devices would be reported as /dev/sda
through /dev/sdiu.
158
EMC Host Connectivity with Emulex FC HBAs and FCoE CNAs for the Linux Environment
Additional Notes
Therefore, if you have allocated LUNs from 0 through 255 to the SLES
8 Linux host, the host can scan and use all 256 logical units. However,
just as with Red Hat distributions, if you present logical units over
256 to a Linux host, the host will neither see nor be able to access
those devices with an address of over 256.
PowerPath examples
When EMC PowerPath® is installed, keep in mind that there is a limitation of 128 SCSI devices total per system, not per adapter.
◆
Example without PowerPath — If you have two HBAs or a dual
channel HBA and you want both ports/HBAs to see and access
devices; you must split the 128 devices between the two HBAs.
For example, 64 devices would be allocated to each HBA. If you
allocate 128 devices to the first HBA, the second HBA will not be
able to access any devices. The limitation of 128 SCSI devices is in
the Linux SCSI subsystem and is per system, not per adapter.
◆
Example with PowerPath — Keep in mind that if you present 128
LUNs to a Linux host to one HBA, then only that one HBA will be
able to see and access devices.
In the case of PowerPath, if you have eight HBAs in a server and
plan to have two paths per HBA, you will be left with only eight
devices per HBA:
128 LUNs/ (8 HBAs * 2 paths) = 8 devices
Character device file names
The corresponding character device file names take the following
form:
/dev/sgN
where N begins with zero and increments by one.
The use of the alphabetic sg device file names
/dev/sg[a-d][a-z]
are now deprecated and are used as links to the sg numeric device
filenames.
Current versions of the Solutions Enabler and the included inquiry
utility require the existence of the deprecated alphabetic SCSI generic
Linux device-naming convention
159
Additional Notes
device file names. Not all Linux distributions provide corresponding
sg device file names for the sd device file names. Additionally, since
the alphabetic sg device file names are deprecated, some
distributions, such as SuSE SLES 8 do not provide them at all. For
example, on Red Hat releases there are generally 128 sd device file
names, 16 sg numeric file names, and 16 sg alphabetic file names. On
SuSE SLES 8, there are 256 sd device file names, 64 sg numeric file
names, and no sg alphabetic device file names.
In order for inquiry and other Solutions Enabler commands to
complete successfully, the sg alphabetic file names must exist and be
linked to the sg numeric. You can use mknod to create any sg numeric
file names needed and use ln to create the link from the sg numeric to
the SG alphabetic.
Note: The Linux kernel assigns minor SCSI device numbers dynamically by
assigning them only to devices that are actually connected to the host in the
order of their SCSI IDs. This means that connecting an external SCSI device
can change the minor numbers of all the internal SCSI devices with a higher
SCSI ID.
160
EMC Host Connectivity with Emulex FC HBAs and FCoE CNAs for the Linux Environment
Additional Notes
Device reconfiguration procedures
Linux currently lacks an actual kernel command that allows for a
dynamic SCSI channel reconfiguration like drvconfig or ioscan.
The three methods of reconfiguring devices on a Linux host are:
◆
Rebooting the host
◆
Unloading and reloading the modular Emulex driver
◆
Echoing the /proc filesystem
Rebooting the host
Rebooting the host allows reliable detection of newly added devices.
The host may be rebooted after all I/O has stopped, whether the
driver is modular or statically linked.
Unloading and reloading the modular Emulex driver
Depending upon the hardware configuration and on whether the
Emulex driver has been loaded into the kernel as a module, the
Emulex driver may be unloaded and then reloaded. If the Emulex
driver has been loaded as a module, this unloading and reloading
will cause a scan of the SCSI bus. The driver should detect the newly
added device(s).
If, however, the modular driver is to be removed from and then
reinserted into the kernel, the following must be done before
removing the driver:
1. Stop all I/O.
2. Unmount all filesystems attached to the Emulex driver.
3. If the Unisphere Host Agent or Navisphere Agent/CLI is
installed and enabled on the host, stop the Unisphere Host Agent
or Navisphere Agent service by typing one of the following
commands:
• For the Unisphere Host Agent:
/etc/init.d/hostagent stop
or
service hostagent stop
Device reconfiguration procedures
161
Additional Notes
• For the Navisphere Host Agent:
/etc/init.d/naviagent stop
or
service naviagent stop
4. If PowerPath is installed and enabled on the host, stop the
PowerPath service with one of the following commands:
/etc/init.d/PowerPath stop
or
service PowerPath stop
5. If the Emulex Application Kit has been installed, stop the
Discovery Server and Remote Management Server processes with
the following commands:
/etc/init.d/ElxDiscSrv stop
/etc/init.d/ElxRMSrv stop
6. Unload the lpfcdfc driver before unloading the lpfc driver.
Use the modprobe command to remove the drivers:
modprobe -r lpfcdfc
modprobe -r lpfc
The modprobe command is a wrapper or an extension to insmod
and rmmod. The command uses and maintains a set of files that
describe all the modules that are available for the current kernel
in /lib/modules. The modprobe command can be used to load
and unload an entire set of modules. (A set of modules can be a
single module or a stack of dependent modules.) When
modprobe is used, it automatically loads all of the modules
needed in a module stack based on the information in
modules.dep. EMC recommends using modprobe to load and
unload the Emulex modular drivers.
The loading of the module is accomplished with either modprobe
or insmod. These commands are used to install loadable kernel
modules into a running kernel. The commands will attempt to
link a module into the running kernel by resolving the symbols
from the kernel’s exported symbol table.
162
EMC Host Connectivity with Emulex FC HBAs and FCoE CNAs for the Linux Environment
Additional Notes
The unloading of the module can be done with either the
modprobe (with the -r switch) or rmmod command. These
commands are used to unload the loadable modules from the
running kernel if they are not in use and if other modules are not
dependent on them.
Echoing the /proc filesystem
If the /proc filesystem is enabled in the kernel, echoing the /proc can
be used to add and/or remove single SCSI devices. To add a device,
you must first identify the host, channel, target ID and LUN numbers
for the device to be added to /proc/scsi/scsi.
The command to be run follows this format:
echo "scsi add-single-device 0 1 2 3" > /proc/scsi/scsi
where:
0 is the host ID.
1 is the channel ID.
2 is the target ID.
3 is the LUN.
This command will add the new device to the file /proc/scsi/scsi.
If one does not already exist, a device file name may need to be
created via for this newly added device in the /dev directory.
To remove a device, use the appropriate host, channel, target ID, and
LUN numbers and issue a command similar to the following:
echo "scsi remove-single-device 0 1 2 3" > /proc/scsi/scsi
where:
0 is the host ID.
1 is the channel ID.
2 is the target ID.
3 is the LUN.
Device reconfiguration procedures
163
Additional Notes
Rescanning the SCSI bus
The SCSI bus may be rescanned with a system reboot, or with a
removal and reinsertion of the modular driver. In either case, all I/O
must be stopped and all other mounted file systems must be
unmounted before rebooting or removing the modular driver.
If the SCSI bus is not rescanned or the Unisphere/Navisphere Agent
service not stopped, attempts to make a new filesystem with mkfs on
the newly created partition will fail.
164
EMC Host Connectivity with Emulex FC HBAs and FCoE CNAs for the Linux Environment
Additional Notes
Incorporating EMC Fibre Channel
After the EMC storage array has devices assigned with device
addresses and the directors have been switched on line, the host
can see all the target EMC devices assigned to that host interface.
Devices are presented to the host in the same manner as devices
accessed through a standard SCSI interface.
Incorporating EMC Fibre Channel
165
Additional Notes
166
EMC Host Connectivity with Emulex FC HBAs and FCoE CNAs for the Linux Environment
A
Invisible Body Tag
Special Instructions
This appendix contains special instructions for the following:
◆
◆
◆
◆
◆
◆
CLARiiON “Ghost” LUN reported with the Emulex
v7.1.14 and v7.3.2 drivers (PQB filter) .......................................... 168
(CLARiiON only): Required /etc/modules.conf edit for
RHEL 2.1, RHEL 3.0, and SLES 8.0 default modular kernels .... 171
(CLARiiON only): Linux Navisphere Agent/CLI limitation
with fdisk on CLARiiON ................................................................ 174
(CLARiiON only): Linux Navisphere Naviagent/CLI
limitation with VERITAS Volume Manager v3.2 on
CLARiiON ......................................................................................... 177
(CLARiiON only): Linux Navisphere Agent requirement for
RHEL 2.1 Intel Itanium systems .................................................... 178
(CLARiiON Only): Linux Navisphere Agent requirement for
RHEL 3.0 Intel Itanium systems .................................................... 179
Special Instructions
167
Special Instructions
CLARiiON “Ghost” LUN reported with the Emulex v7.1.14 and
v7.3.2 drivers (PQB filter)
EMC supports the Emulex v7.1.14 driver that is integrated into the
RHEL 3.0 U4 (v2.4.21-27.EL) and U5 (v2.4.21-32.EL) kernels and the
Emulex v7.3.2 driver that is integrated into RHEL: 3.0 U6. When
using these quarterly updates and the integrated Emulex driver,
parameter value modifications must be made via an edit to
/etc/modules.conf, rather than lpfc.conf.
When running these RHEL 3.0 quarterly updates in CLARiiON
environments, it is highly recommended that the lpfc_inq_pqb_filter
parameter be enabled. In certain environments, there have been cases
where the SCSI mid-layer exits a SCSI disk scan incorrectly or
prematurely due to a mishandling of the response from the INQUIRY
command.
The following are symptoms of this issue:
1. When an initiator is zoned to multiple targets on the same
CLARiiON storage system, the scan of the SCSI bus will succeed
and the list of devices on the first initiator-target pair will be
enumerated. However, the SCSI bus scan is not issued on any
targets, other than the first. The premature exit of the SCSI bus
scan results in the reporting of a “ghost” LUN for each instance of
a failed initiator-target pair, as well as an incomplete enumeration
of the available disks using the failed initiator-target pairs, and
the unavailability of target-side failover.
2. If a SCSI host initiator is zoned to only one target on a CLARiiON
storage system, the initiator incorrectly enumerates a "ghost"
LUN in addition to the actual devices in the host Storage Group.
The CLARiiON “ghost” LUN is reported in the /proc/scsi/scsi file
as a DGC Direct-Access device, but no Model type is displayed.
An example of this incorrect reporting is shown below:
168
more /proc/scsi/scsi
Host: scsi2 Channel: 00 Id: 00 Lun: 00
Vendor: DGC
Model: RAID 5
Type:
Direct-Access
Rev: 0207
ANSI SCSI revision: 04
Host: scsi2 Channel: 00 Id: 00 Lun: 01
Vendor: DGC
Model: RAID 5
Type:
Direct-Access
Rev: 0207
ANSI SCSI revision: 04
EMC Host Connectivity with Emulex FC HBAs and FCoE CNAs for the Linux Environment
Special Instructions
Host: scsi2 Channel: 00 Id: 00
Vendor: DGC
Model: RAID
Type:
Direct-Access
Host: scsi2 Channel: 00 Id: 00
Vendor: DGC
Model: RAID
Type:
Direct-Access
Host: scsi2 Channel: 00 Id: 00
Vendor: DGC
Model: RAID
Type:
Direct-Access
Host: scsi2 Channel: 00 Id: 01
Vendor: DGC
Model:
Type:
Direct-Access
Lun: 02
5
Lun: 03
5
Lun: 04
5
Rev: 0207
ANSI SCSI revision: 04
Rev: 0207
ANSI SCSI revision: 04
Rev: 0207
ANSI SCSI revision: 04
Lun: 00
Rev: 0207
ANSI SCSI revision: 04
Due to the existence of the “ghost” LUN, PowerPath failover does not
function properly and can result in an all paths down scenario. By
enabling the parameter, the driver is instructed to change the
peripheral qualifier bit from 1 to 3 for an INQUIRY response. As a
result, the SCSI mid-layer will handle the INQUIRY response
correctly and, subsequently, will enumerate the disks for each
initiator-target pair correctly.
This behavior has not occurred in Symmetrix environments and,
therefore, enabling the lpfc_inq_pqb_filter parameter is not
required in said environments.
Enabling the lpfc_inq_pqb_filter parameter
1. In order to enable this parameter, the options line for the lpfc
driver should be appended to the /etc/modules.conf file.
The following is an example of /etc/modules.conf file for a
RHEL 3.0 U4, U5, or U6 system using the integrated Emulex
driver with the lpfc_inq_pqb_filter parameter enabled:
alias parport_lowlevel parport_pc
alias scsi_hostadapter sym53c8xx
alias scsi_hostadapter1 lpfc
alias scsi_hostadapter2 lpfc
alias eth0 tlan
options scsi_mod max_scsi_luns=255 scsi_allow_ghost_devices=1
options lpfc lpfc_topology=0x02 lpfc_inq_pqb_filter=1
2. Create a new ramdisk to reflect the changes made.
cd /boot
mkinitrd –v initrd-$1.img $1
where $1 is the currently running v2.4.x kernel version.
CLARiiON “Ghost” LUN reported with the Emulex v7.1.14 and v7.3.2 drivers (PQB filter)
169
Special Instructions
For example:
cd /boot
cp initrd-2.4.21-27.0.4.ELsmp.img initrd-2.4.21-27.0.4.ELsmp.img.orig
mkinitrd –v initrd-2.4.21-27.0.4.ELsmp.img 2.4.21-27.0.4.ELsmp
3. Reboot the host.
After the host reboots, the Emulex driver should report all
devices accurately.
170
EMC Host Connectivity with Emulex FC HBAs and FCoE CNAs for the Linux Environment
Special Instructions
(CLARiiON only): Required /etc/modules.conf edit for RHEL 2.1,
RHEL 3.0, and SLES 8.0 default modular kernels
When a Linux host is attached to both SPs in a CLARiiON storage
system, the driver will report a disconnected LUN 0 on SPB and a
failure to read the capacity of the device. The Unisphere/Navisphere
Host Agent requires that disconnected LUN 0 be reported
properly.-39Installing an
A device file name is allocated to the disconnected LUN 0 in the /dev
filesystem, but the device cannot be mounted, partitioned, or
otherwise accessed.
An example of a disconnected LUN 0 being reported in
/var/log/messages:
Red Hat and SuSE have added a parameter to the SCSI stack
(scsi_scan.c file) to allow access to devices marked as offline.
For RHEL, the max_scsi_luns parameter must be enabled in
/etc/modules.conf. In the default Red Hat kernels,
CONFIG_SCSI_MULTI_LUN is disabled. As a result, if the target 0 LUN
0 disappears from the storage group and the host is rebooted or the
driver unloaded and reloaded, the host will see only the ghost LUNs
(with ArrayCommPath disabled) or the LUNZ (with
ArrayCommPath enabled).
By default, the SuSE SLES 8 kernel has enabled the
CONFIG_SCSI_MULTI_LUN parameter. Therefore, there is no need to
add the max_scsi_luns parameter to the /etc/modules.conf file on
SLES 8 SP3.
(CLARiiON only): Required /etc/modules.conf edit for RHEL 2.1, RHEL 3.0, and SLES 8.0 default modular
kernels
171
Special Instructions
A kernel compilation is not required when appending the
scsi_allow_ghost_devices parameter to /etc/modules.conf.
Follow these steps to enable the new parameter in
/etc/modules.conf:
1. Change to the appropriate directory and edit the file:
vi /etc/modules.conf
2. Append the following line to the file:
• For Red Hat distributions use:
options scsi_mod max_scsi_luns=255 scsi_allow_ghost_devices=1
Example:
alias parport_lowlevel parport_pc
alias scsi_hostadapter sym53c8xx
alias scsi_hostadapter1 lpfc
alias eth0 tlan
alias scsi_hostadapter2 lpfc
options scsi_mod max_scsi_luns=255 scsi_allow_ghost_devices=1
• For SuSE distributions use:
options scsi_mod scsi_allow_ghost_devices=1
Example:
alias parport_lowlevel parport_pc
alias scsi_hostadapter sym53c8xx
alias scsi_hostadapter1 lpfc
alias scsi_hostadapter2 lpfc
alias eth0 tlan
options scsi_mod max_scsi_luns=255 scsi_allow_ghost_devices=1
options lpfc lpfc_topology=0x02 lpfc_automap=0 lpfc_scan_down=0
lpfc_fcp_bind_WWPN=50060160006000ed:lpfc0t1,50060168006000ed:lpfc0t2,50060160060
00ed:lpfc1t1,50060168006000ed:lpfc1t2
3. Create a new ramdisk to reflect the changes made:
• For Red Hat distributions, use:
cd /boot
cp initrd-$1.img initrd-$1.img.orig
mkinitrd -v initrd-$1.img $1
where $1 is the currently running v2.4.x kernel version.
Example:
cd /boot
cp initrd-2.4.21-15.0.4.ELsmp.img initrd-2.4.21-15.0.4.ELsmp.img.orig
mkinitrd –v initrd-2.4.21-15.0.4.ELsmp.img 2.4.21-15.0.4.ELsmp
172
EMC Host Connectivity with Emulex FC HBAs and FCoE CNAs for the Linux Environment
Special Instructions
• For SuSE distributions use:
cd /boot
cp initrd-$1 initrd-$1.orig
mkinitrd -k vmlinuz-$1 -i initrd-$1
Example:
cd /boot
cp initrd-2.4.21-266 initrd-2.4.21-266.orig
mkinitrd –k vmlinuz-2.4.21-266 –i initrd-2.4.21-266
4. Reboot the host.
(CLARiiON only): Required /etc/modules.conf edit for RHEL 2.1, RHEL 3.0, and SLES 8.0 default modular
kernels
173
Special Instructions
(CLARiiON only): Linux Navisphere Agent/CLI limitation with fdisk
on CLARiiON
There is a known issue with the Linux Naviagent/CLI in which the
Naviagent does not close the sd devices before becoming a daemon
and, as a result, the devices remain open. This may cause issues when
attempting to access devices.
For example, if the Naviagent service is left running and someone
runs fdisk to create new partitions on CLARiiON storage devices,
any attempt to make a new filesystem with mkfs on the newly created
partition(s) will fail.
An example of a warning issued when fdisk is run is:
WARNING: Re-reading the partition table failed with
error 16. Device or resource busy. The kernel still
uses the old table. The new table will be used at next
reboot.
If, after receiving the above warning, the user attempts to run mkfs
on a newly created filesystem, mkfs will also fail with an error similar
to the following:
mke2fs.ext2: No such device or address while trying to
determine filesystem size
This problem may be resolved in on of the ways described in detail in
the following list:
◆
Disable the Naviagent/CLI service.
◆
Issue a Naviagent stop command:
• On RHEL, issue the command:
service naviagent stop
• On SLES , issue the command:
/etc/init.d/naviagent stop
174
◆
Remove the Naviagent/CLI RPM.
◆
Rescan the SCSI bus.
EMC Host Connectivity with Emulex FC HBAs and FCoE CNAs for the Linux Environment
Special Instructions
Disabling the Navisphere Agent service
After the Naviagent registers the host with the CLARiiON system,
the service may be disabled so that it does not start upon reboot. This
may be performed manually or by using the curses-based setup tool.
To peform this manually:
If the Unisphere Host Agent or Navisphere Agent/CLI is installed
and enabled on the host, stop the Unisphere Host Agent or
Navisphere Agent service by typing one of the following commands:
• For the Unisphere Host Agent:
/etc/init.d/hostagent stop
or
service hostagent stop
• For the Navisphere Host Agent:
/etc/init.d/naviagent stop
or
service naviagent stop
Issuing a Navisphere Agent stop command
On RHEL, the Naviagent service may be stopped with one of the two
following commands and then the fdisk/mkfs commands may be
rerun:
service naviagent stop
/etc/rc.d/init.d/naviagent stop
On SLES, the Naviagent service may be stopped with the following
command and then the fdisk/mkfs commands may be rerun:
/etc/init.d/naviagent stop
Removing the Naviagent/CLI RPM
The Naviagent/CLI RPM may be removed from the system after it
has been used for the initial set-up and registration of the host on the
CLARiiON system.
(CLARiiON only): Linux Navisphere Agent/CLI limitation with fdisk on CLARiiON
175
Special Instructions
In order to remove the RPM, stop the Naviagent service and then
remove the RPM package.
Example:
/etc/init.d/naviagent stop
rpm -ev naviagentcli-6.20.0.2.59-1
176
EMC Host Connectivity with Emulex FC HBAs and FCoE CNAs for the Linux Environment
Special Instructions
(CLARiiON only): Linux Navisphere Naviagent/CLI limitation with
VERITAS Volume Manager v3.2 on CLARiiON
The Linux Navisphere Agent holds open the devices to be used by
VERITAS Volume Manager v3.2 during the initialization and
installation of the CLARiiON devices. When this occurs, the message
Devices busy or in use is reported.
The issue with the Navisphere Agent and VERITAS Volume Manager
v3.2 can occur on initialization and installation of the VxVM, as well
as on subsequent reboots.lling and Configuring the HBA and Driver
Here is an example of the error reported during vxinstall:
If the devices were successfully partitioned during the installation,
you might also run into an issue after subsequent reboots where the
VxVM's rootdg becomes unavailable. You will receive errors when
trying to issue VxVM commands; this is a result of the configuration
daemon (vxconfigd) not running, and can happen if the Navisphere
host agent is running. To resolve the problem:
The Naviagent/CLI RPM may be removed from the system after it
has been used for the initial set-up and registration of the host on the
CLARiiON system.
In order to remove the RPM, stop the Naviagent service and then
remove the RPM package. For example:
/etc/init.d/naviagent stop
rpm -ev naviagentcli-6.20.0.2.59-1
(CLARiiON only): Linux Navisphere Naviagent/CLI limitation with VERITAS Volume Manager v3.2 on CLARiiON
177
Special Instructions
(CLARiiON only): Linux Navisphere Agent requirement for RHEL
2.1 Intel Itanium systems
The Navisphere Agent/CLI RPM for Linux is a 32-bit executable.
Therefore, for RHEL 2.1 Itanium-based systems, the x86-compat-libs
RPM package must be installed in order for the Linux Navisphere
Agent/CLI RPM to install properly.
178
EMC Host Connectivity with Emulex FC HBAs and FCoE CNAs for the Linux Environment
Special Instructions
(CLARiiON Only): Linux Navisphere Agent requirement for RHEL
3.0 Intel Itanium systems
The Navisphere Agent/CLI RPM is supported on RHEL 3.0 IA64
hosts. However, glibc-2.3.2-95.27 or later must be installed on the
system in order for the Navisphere Agent/CLI RPM pkacage to
install successfully on RHEL 3.0 IA64.
Note that the x86-compat-libs RPM package that was required for
RHEL 2.1 [IA64] is not available or necessary for RHEL 3.0 [IA64].
The following is RPM query and installation output from a RHEL 3.0
[IA64] host:
[root@l82bi021 /]# rpm -q compat-glibc
package compat-glibc is not installed
[root@l82bi021 /]# rpm -q x86-compat-libs
package x86-compat-libs is not installed
[root@l82bi021 /]# rpm -q compat-glibc.7x
package compat-glibc.7x is not installed
[root@l82bi021 /]# rpm -qa | grep compat
compat-libstdc++-7.3-2.96.128
[root@l82bi021 /]# rpm -qa | grep glibc
glibc-2.3.2-95.30
glibc-devel-2.3.2-95.30
glibc-2.3.2-95.30
glibc-headers-2.3.2-95.30
glibc-profile-2.3.2-95.30
glibc-common-2.3.2-95.30
glibc-kernheaders-2.4-8.34.1
glibc-utils-2.3.2-95.30
[root@l82bi021 /]# ls /emul
ia32-linux ia32-Linux
[root@l82bi021 /]# rpm -ivh Navisphere Agentcli-6.7.0.4.7-1.i386.rpm
Preparing... ########################################### [100%]
1:Navisphere Agentcli ########################################### [100%]
[root@l82bi021 /]# rpm -ivh Navisphere Agentcli-6.16.0.4.63-1.i386.rpm
Preparing... ########################################### [100%]
1:Navisphere Agentcli ########################################### [100%]
(CLARiiON Only): Linux Navisphere Agent requirement for RHEL 3.0 Intel Itanium systems
179
Special Instructions
180
EMC Host Connectivity with Emulex FC HBAs and FCoE CNAs for the Linux Environment
Index
A
Asianux 1.0 64
Asianux 2.0 hosts, editing Emulex driver
parameters on 92
B
binding, persistent 111
BIOS, boot 32, 102
boot
BIOS 32, 102
device support 15
boot BIOS
update 32
boot device, Symmetrix, configuring 128
boot device, VNX/CLARiiON, configuring 132
C
cable, HBA, connecting 25
CEE/Menlo firmware 102
CNA 14
CNA, Ethernet connectivity 148
converged network adapter 14
D
device drivers 157
E
edit /usr/src/lpfc/lpfc.conf 112
Emulex
Fibre Channel controller 32, 102
v7.1.14 driver 63
website 32, 102
Emulex Application Kit 84, 98
tar archive 45
Emulex v2.10f driver 47
Emulex v8.0.16.6_x2 driver 47
Emulex website 32, 102
Ethernet connectivity 148
F
FCoE 14
FCoE adapters 102
Fibre Channel controller, Emulex 32, 102
Fibre Channel over Ethernet 14
firmware files 98
firmware, upgradable 32, 102
firmware/BIOS (flash), updating 32, 102
flash firmware/BIOS, updating 32, 102
functions, Linux 17
H
HBA API 98
HBA, installing 24
hbacmd 34, 86
HBAnyware 98
HBAnywhere
applications kit 84
host connectivity 14
hosts, booting 15
L
Linux
functions 17
EMC Host Connectivity with Emulex FC HBAs and FCoE CNAs for the Linux Environment
181
Index
utilities 17
LP6DUTIL 37
lp6dutil 37
lpfc_2.6_driver_kit-8.0.16.6_x2-1.tar.gz 50
lpfc-install script 46, 48, 56, 113
M
Master Boot Record (MBR) 15
Menlo (CEE) firmware 102
message url http
//www.emulex.com/emc/support/index.js
p 20, 21, 45
modules.conf 114
P
persistent binding 111
S
single-initiator/target zone 16
U
uninstall, drivers 56
upgradable firmware 32, 102
utilities, Linux 17
V
v2.10f driver, Emulex 47
v8.0.16.6_x2 driver, Emulex 47
W
website, Emulex 32, 102
Z
zoning 16
182
EMC Host Connectivity with Emulex FC HBAs and FCoE CNAs for the Linux Environment