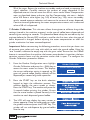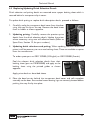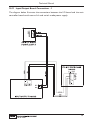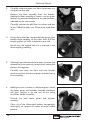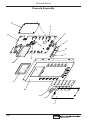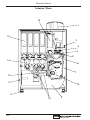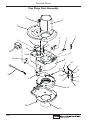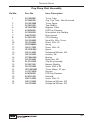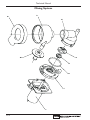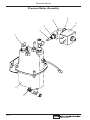
1
Technical Manual
Including Spare Parts Information
Part No. PR10960000
Issue: New
04/06
Technical Manual
Contents
Page No.
Introduction ...................................................................................................2
Important Information.................................................................................2
Section 1 - Machine Specifications............................................................3
Section 2 - Installation Procedure ............................................................7
Section 3 - Programming Mode ..............................................................13
Section 4 - Engineers Program................................................................16
Section 5 - Service Keypad Functions ...................................................56
Section 6 - The Vend Cycle.....................................................................60
Section 7 - Technical Information ..........................................................64
Section 8 - Espresso (B2C) System .......................................................69
Section 9 - Dispense Tube Lengths .......................................................72
Section 10 - Electrical/Electronic Diagrams .........................................73
Section 11 - Diagnostics and Simple Maintenance .............................84
Section 12 - Spare Parts ...........................................................................95
The following symbol is used throughout this Technical Manual:
Safety First! Take care, risk of personal injury.
Crane Merchandising Systems accepts no responsibility for damage caused to the equipment through
misinterpretation or misuse of the information contained in this manual.
© Copyright 2006 Crane Merchandising Systems
1
Technical Manual
Introduction
This machine has been designed to our own rigid safety and performance standards.
It has been designed to comply with sanitation and health guidlines recommended by
the Automatic Merchandising Health-Industry Council (AMHIC) and it conforms with
all other NAMA safety recommendations.
This machine has been manufactured in accordance with the safety standards of both
Underwriter’s Laboratories and the Canadian Standards Association. To maintain this
degree of safety and to continue to schieve the level of performance built into this
machine, it is important that installationand maintenance be performed so as not to
alter the original construction or wiring and that replacement parts are as specified in
Section 13, Spare Parts. Your investment in this equipment will be protected by using
this Technical Manual in your operation, service and maintenance work. By following
prescribed procedures, machine performance and safety will be preserved.
Crane Merchandising Systems Parts and Support Phone Numbers:
Parts: 1-800-621-7278
Service: 1-800-628-8363
Important Information
When installing or servicing this machine, always have this manual available for quick
and easy reference and always follow these basic precautions:
1.
The machine should be situated on a strong horizontal surface capable of
supporting 160lbs (70kg) minimum and at a convenient height.
2.
Allow the machine to cool before moving.
3.
Do not operate the machine if any part is damaged, e.g. power cord, until a
qualified Service Technician has checked it.
4.
Warning! Always disconnect the machine from the electricity supply before
removing any protective covers/panels when servicing. Replace all covers/panels
before reconnecting the electricity supply.
5.
Important! The machine is fitted with a pressurized water system. Under no
circumstances should this be dismantled other than by a fully trained
service engineer.
6.
Never use a water jet to clean this machine.
7.
This machine is for indoor use only and because it is a beverage machine, should
be sited in a clean, hygienic area.
2
Technical Manual
Section 1 - Machine Specifications
1.1 Specifications
Espresso (B2C)
Height
33.85 in. (860 mm)*
Depth
23.23 in. (590 mm)
Width
21.26 in. (540 mm)
Weight
154 lbs. (70 kg)
Cup Capacity
230
Number of Canisters
Electrical Requirements
(i) Voltage
(ii) Current
(iii) Frequency
Water Services
Pressure
6
115 V ac
12 Amp, single phase
60Hz
10 psi (69 KPa) - 80 psi (522 KPa)
* Height includes visible bean container.
All weights and dimensions are approximate and are for guidance only.
1.2 Canister Capacities
Canister Capacities (Approximate)
Espresso Coffee Beans
4.0 lbs. - 240 cups
Freshbrew Coffee
1.2 lbs. - 130 cups
Chocolate
5.0 lbs. - 130 cups
French Vanilla
5.0 lbs. - 130 cups
Topping
3.0 lbs. - 180 cups
Sugar
6.0 lbs. - 1075 cups
1.3 Water Filter
Genesis machines fitted with the CoEx® espresso brewer must be connected to the
water supply via a scale inhibiting water filter.
3
Technical Manual
1.4 External Features
11
1
10
2
3
4
9
5
8
6
7
Key:
1.
Coin Entry
7.
Foot
2.
Coin Reject Button
8.
Door Lock
3.
LCD Display
9.
Graphic Panel
4.
Drink Selection Keypad
10. Door
5.
Selection Decals
11. Fresh Beans Container
6.
Coin Return
4
Technical Manual
1.5 Internal Features
1
3
2
14
4
13
5
12
11
6
10
9
8
7
Key:
1.
Soluble Ingredient Canister
8.
Waste Tray Grill
2.
Freshbrew Coffee Canister
9.
Moving Dispense Head
3.
Fresh Beans Container
10. Door Switch
4.
Main Wire Harness
11. Mixing System
5.
CoEx® Brewer
12. Cup Drop Unit
6.
Brewer Waste Bucket
13. Canister Outlet
7.
Waste Tray
14. Cup Turret
5
Technical Manual
1.6 Drinks Choice - Espresso (B2C)
Ingredients:
6 Canisters
1. Milk
2. Sugar
3. French Vanilla
4. Chocolate
5. Freshbrew Coffee
6. Fresh Coffee Beans
All speciality drinks made with
freshly ground coffee beans
and cappuccino topping.
Drink Selections
6
Espresso
6 Canisters
Gourmet Coffee
●
Fresh Coffee
●
Hot Chocolate
●
Cappuccino
●
Caffe Mocha
●
Caffe Latte
●
Espresso
●
Double Espresso
●
Americano
●
Chocomilk
●
French Vanilla
●
Hot Water
●
Technical Manual
Section 2 - Installation Procedure
2.1 Location Preparation
After the machine is unpacked and placed near its permanent location, you need to
make sure that you have the correct electrical and water service.
The machine needs electrical power as shown in the following table.
NOTE: Each machine should have its own electrical circuit.
Power Requirements
Country
Volts
Frequency (Hz)
Current (Amps)
Canada
115
60
15
United States
115
60
15
This machine is supplied with a service cord for the country of use and is terminated
in a grounding type plug. The wall receptical used for this machine must be properly
polarized, grounded and of the correct voltage. Operating the machine from a source
of low voltage will VOID YOUR WARRANTY. Each machine should have its own
electrical circuit and that circuit should be protected with a circuit breaker or fuse
conforming to local regulations.
Voltage Check - Place the levels of a voltmeter across the LINE (LIVE) and
NEUTRAL terminals of the wall receptical. The voltmeter should indicate 110-130 volts
ac for 120 volt, 60 Hz locations.
Polarity Check - Place leads of a voltmeter across the LINE (LIVE) and GROUND
terminals ff the wall receptical. The voltmeter should indicate 110-130 volts ac for 120
volt, 60 Hz locations.
Noise Potential Check - Place leads of a voltmeter across the NEUTRAL and
GROUND terminals ff the wall receptical. The voltmeter should indicate 0 volts ac. A
measurement greater than 1.5 - 2.0 volts ac could result in problems for the machines
electronic circuitry caused by electrical noise.
Any deviation from these requirements could result in unreliable performance from
the machine.
7
Technical Manual
2.2 Locating the Machine
1.
The machine is suitable for indoor use only, sited in an area with a recommended
ambient temperature not below 50°F (10º C) and not exceeding 86°F (30º C).
The machine should be located near the appropriate water and electrical services
as detailed in the specification table.
2.
Prior to moving the machine to its location, ensure that there is sufficient access
space available via passageways, stairs, lifts, etc and that the table/counter where
the machine is to be located is strong enough to support its weight. (Refer to
Specifications Table).
3.
To ensure adequate ventilation, 4 - 6 inches (100 - 150 mm) clearance must be
allowed between the back of the cabinet and the wall.
4.
Open the cabinet door using the key provided. Remove all transit packing and the
installation kit from the machine. Check for visual signs of damage which may have
occurred during transit. If the machine is damaged or any parts are missing, you
must contact the supplier immediately.
5.
Referring to the diagram opposite, fit the four feet (1)
to the machine. Ensure that the spacer (2) is fitted
between the washers (3) as shown. Using a 12 mm
wrench, adjust the feet until the machine is levelled in
both front to back and side to side planes. Ensure that
the door opens and closes easily.
2
3
1
2.3 Connecting the Water Supply
The best type of water for coffee brewing is normal hard (tap) water. If your location
has chemically softened water you should do one of the following things:
● Have a non-softened supply line run to the machine
● Contact your local water filter supplier for information and suggestions
Well water can also be used in the Genesis. However, you should have it checked for levels
of carbonates and alkalies. Contact your water filter supplier if these values are relatively high.
What is the Water Pressure at Your Location?
It should be no less than:
And no more than:
10 psi (69.0 KPa) at 1/2 gallon/minute
80 psi (522.0 KPa) at 1/2 gallon/minute
If you are unsure about the pressure and flow rate, check with your water company.
8
Technical Manual
2.4 What to do With the Water Supply Line:
● Locate the supply line at the rear of the machine
● Equip the line with a shut-off valve
1.
Flush the water supply line before connecting it to the machine. A minimum of 5
gallons is usually required before connecting the machine to the supply line. DO
NOT flush the machines water system. If you do, you might introduce water line
contaminants into the machine.
2.
The machine should be situated within 3 feet (1 meter) of a drinking water supply.
Connect the hose supplied with the machine to the water supply ensuring that the
seal supplied is fitted correctly.
3.
Connect the hose to the inlet valve located on the rear of the machine. Ensure that
the seal is correctly fitted. Ensure that all water supply fittings are tight.
4.
Water Filter: Genesis B2C machines are fitted with a CoEx® brewer and must
be connected to the water supply via a water filter. This filter must be of food
grade quality and able to remove temporary hardness (scale), heavy metals (lead,
copper, iron, cadmium), chlorine and any organic pollutant's/discolouration.
Note: If the machine is connected to the water supply and used without a water
filter as specified above, the warranty will be void.
5.
Turn on the water supply and check for leaks. Prime the water filter following the
instructions supplied by the filter manufacturer.
2.5 Connecting the Electricity Supply
Safety First! The power cord furnished with the machine has a 3-prong
grounded type attachment plug. It must be plugged into a 3 prong grounded
type receptacle grounded in accordance with National and Local electrical
codes and ordinances.
Important: If the power cord becomes damaged in any way it must be replaced with
one of the same type available from the manufacturer of this machine.
9
Technical Manual
2.6 Set-Up Procedure
1.
Ensure that the electrical and water services to the machine are connected
correctly and turned on. Ensure that the waste tray is fitted correctly to the
machine. Open the front door of the machine and swing the cup turret assembly
out of the machine.
2.
Soluble Ingredient Canisters: Rotate soluble ingredient canister outlets to
upright position and remove the canisters - DO NOT place ingredient canisters
on the floor. Remove the canister lids.
Fill the canisters with the correct ingredients, re-fit the lids and re-fit canisters
into machine ensuring that they are returned to their correct positions. Rotate
the canister outlets to their correct operating positions.
Fresh Beans Container: Release the clips securing the
bean container cover as shown in the photograph.
Carefully lift the cover from the container. DO NOT
place the cover on the floor.
Fill the container with fresh coffee beans. The container
has a capacity of approximately 4.0 lbs (1.8 kgs). Refit the
cover ensuring that the clips are located correctly.
Note: To maintain optimum drink quality, Crane Merchandising Systems
recommend that the bean container is replenished on a daily basis.
3.
Remove the turret cap and fill the tubes with the correct
size cups for the type of cup catcher fitted to the machine.
Load the cup turret only with cups that have been
designed for use in a hot beverage vending machine.
Allow the cups to drop into the tubes directly from the
packaging. DO NOT TOUCH THE CUPS WITH YOUR
HANDS.
Important: Do not fill the tube directly above the cup dispense position. Allow
the cup turret motor to rotate a full tube to the cup dispense position. Rotating
the cup turret by hand will damage the mechanism.
Note: If paper cups are being loaded, each pack of cups must first be inspected
for damage to the cup rims. Damaged cups must not be used.
4.
10
Swing the cup turret assembly back to its operating
position. Ensure that the unit is held securely by the
magnetic catch. Insert the safety key (a) supplied with the
machine into the door switch as shown. The machine is
now on. The water inlet valve will open and the cup turret
a
Technical Manual
mechanism will index the first available full cup stack to the dispense position and
drop the cup stack into the cup drop mechanism. Fill the remaining empty cup
stack with cups and replace the turret cap.
5.
While the machine is powering up, the LCD will
display the message as shown opposite.
As the machine initializes a small amount of
water is pumped through the system and is
discharged into the waste tray. When the
machine enters standby mode remove the tray and empty the contents. Refit the
waste tray to the machine.
Before using the machine for the first time it is necessary to purge the water
system to ensure any water left in the system during transport is dispensed. Press
button 9 on the Service Keypad fitted inside the door (see page 56). The machine
will pump approximately 14 oz (400ml) of water through the system which will
be heated to operating temperature. Ensure that a suitable container is placed
under the dispense head. Remove the container and empty the contents before
proceeding.
Important: Should the machine fail to fill correctly or leak, turn off the water
and the power to the machine before investigating the fault.
6.
Check the LCD display on the front of the machine to ensure that the water has
heated to the correct temperature and that the machine is in standby mode. A
machine set to free vend mode will alternate the messages:
Note: Messages displayed in standby mode will change depending upon the
monetary device fitted and set up during programming.
7.
Ensure that the cup drop mechanism operates correctly. Press the Cup Test
switch (7), located in the Service Keypad on the rear of the door and ensure that
a cup is ejected cleanly from the cup drop unit.
8.
Ensure that the dispense head mechanism operates correctly. Press the Park
Head switch (8), located in the Service Keypad on the rear of the door and
ensure that the dispense head moves to its fully extended position. Press the
switch again to return the dispense head to its correct (homed) position.
11
Technical Manual
9.
Pull the bean canister shut-off (a) to its fully extended
position as shown in the photograph.
a
Ensure that the brewer waste container is fitted correctly
beneath the CoEx® brewer unit.
10. If fitted, check that the coin mechanism and cash box
operate correctly. Fill the coin tubes with correct coinage.
Ensure coin return mechanism functions correctly.
11. Operate the machine through its complete range of selections to ensure that each
vend is correctly dispensed. Follow the instructions detailed on page 57 for making
a vend using the Test Vend switch (6) located on the Service Keypad.
12. Remove the safety key and close the cabinet door. Ensure that the machine is left
in a clean and safe condition.
12
Technical Manual
Section 3 - Programming Mode
3.1 Drink Selection Keypad
Programming mode utilises the drink selection keypad, as defined in the illustration
below, and allows the engineer to view and alter stored data within the machines
memory. During programming the keys are used as follows:
Keys 0-9
Used for entering numerical data
▲
For indexing up in a program, or
incrementing data
▼
For indexing down in a program, or
incrementing data
↵
(Edit) Used to select and enter the
highlighted menu and to save data to
machines memory
X
(Exit) To return to the previous menu
screen
START
Press to ‘set all’ or ‘clear all’ data or
begin a test sequence.
MILK
START
SUGAR
3.2 Menu Display
The Genesis features an interactive menu display. The multi line LCD display helps
to make navigating the programming menu structure easy and intuitive. It is used to
display programming information and will change according to the type of data being
updated.
1.
The top line of the screen is the Menu title.
2.
Selected items are highlighted in white. Press the
▲ (up) or ▼ (down) keys on the drink selection
keypad to highlight an item.
3.
Press the ↵ (Edit) key to select the item. In this example, pressing the the ↵ (Edit)
key will display the Mug Discount screen.
4.
The bottom line of the screen will often show important information. In certain
configuration menus it will display the current value for the selected item. In the
example shown the screen is showing that the current Mug Discount is set at
13
Technical Manual
$0.05. This is a useful way to quickly check stored settings and also confirm that
a value has been altered correctly.
5.
To return to the Main Menu from any screen, simply press the X (Exit) key until
you reach the Main Menu.
3.3 Accessing the Programming Mode
1.
Open the door of the machine and insert the door switch key to restore power
to the machine. The machine is now on.
2.
Press the Program Entry key (1) on the
service keypad, located inside the door (see page
56 for details). The LCD will display the screen
as shown opposite. Enter the 4 digit engineers
entry pin code using the drink selection keypad.
Note: The factory default code is entered by pressing the sequence 1-1-1-1. You
may be issued with your own personalized code.
3.
Press the ↵ (Edit) key. Providing the engineer
has entered the code correctly, the LCD will
display the screen as shown opposite. Press the
↵ (Edit) key to access the engineers program or
X (Exit) key to return the machine to standby
mode
4.
The LCD on the front of the machine will display
the top level programming menu screen - Main
Menu. The first available menu Data Recall is
highlighted indicating that it can be selected.
To move to a different menu press the ▲ (up)
or ▼ (down) keys on the drink selection keypad
until the required menu is highlighted.
5.
14
With the required menu highlighted, press the ↵
(Edit) key to select it. Using the Price menu as
an example, the LCD will display the sub menus
as shown opposite.
Main Menu
Data Recall
Diagnostics
Test
Price
Product Configuration
Press EDIT to Select
Free Vend
Coins In/Out
System Settings
Security Codes
Timed Events
Technical Manual
6.
Using the ▲ (up) or ▼ (down) keys, the ↵ (Edit) key and the X (Exit) key it is
possible to easily navigate through all of the menus contained within the Engineers
Program.
7.
To update parameters, key in the actual digits of the number required using the
selection keys 0-9. Once the correct parameter has been entered, press the ↵
(Edit) key to overwrite the previous value and save the new parameter in the
machines memory. Pressing the X (Exit) key will move back to the previous
screen.
Certain programming functions require that the engineer chooses either one or
multiple parameters within a sub program. These can take the form of either check
boxes or radio buttons.
8.
Check Boxes: The example opposite shows
the Days of Week screen accessed via the
Sanitation Events Menu which allows the
engineer to choose multiple days of the week
on which a specific function will take place.
9.
Using the ▲ (up) or ▼ (down) keys, scroll through until the required day is
highlighted as shown. Pressing the ↵ (Edit) key will select the day, indicated by
an X appearing in its adjacent box.
Continue until all required days have been selected. Pressing the X (Exit) key will
move back to the previous screen and save the new settings to the machines
memory.
Note: Pressing the Start key on the drink selection keypad will check all boxes
if empty or clear all boxes if checked.
10.
Radio Buttons: The example opposite shows
the State screen accessed via the Timed
Events Menu which requires the engineer to
select one of the options shown. Use the ▲
(up) or ▼ (down) keys to set the required
option followed by the ↵ (Edit) key to store/save it (indicated by the filled radio
button).
All engineer programming for the machine follows the procedures as described
above. Specific program actions are described fully in the following section.
15
Technical Manual
Section 4 - Engineers Program
Main Menu
To access the Engineers Program, enter the
programming mode as described in section 3. Once
in the Engineers Program the LCD on the front of the
machine will display the top level programming menu
screen - Main Menu.
Note: Coins In/Out will only be displayed on
machines fitted with an MDB coin mech.
Data Recall
Diagnostics
Test
Price
Product Configuration
Press EDIT to Select
Free Vend
Coins In/Out
System Settings
Security Codes
Timed Events
Using the ▲ (up) or ▼ (down) keys, ↵ (Edit) key and X (Exit) key on the drink
selection keypad the engineer can navigate quickly and easily through the engineers
program menus as described in Section 3.
4.1 Data Recall Menu
Entry into this menu allows the engineer to view
Data Recall
Non-Resettable and Resettable Sales Data, view data Non Resettable Sales Data
Sales Data
relating to Timed Events and Identification Numbers Resettable
Events
of installed components and (if feature enabled) view Identification Numbers
SureVend™ assisted vend information. The Re- SureVend
Press EDIT to Select
settable Sales Data and SureVend™ data menus
contain an extra sub-menu which allows the engineer to delete the current data from
the machines memory.
1. Non Resettable Sales Data: This menu allows the engineer to view and record
monetary and sales values. This data cannot be reset and will remain intact for the
service life of the controller board.
1.
2.
16
From the Data Recall screen highlight Non
Resettable Sales Data and press the ↵ (Edit) key.
The LCD will display the screen as shown
opposite. From this menu the engineer can view
data for the Overall Totals (highlighted), By
Product, along with data relating to Cash,
Cashless and Token Vends.
Non Resettable Sales Data
Overall Totals
By Product
Cash
Cashless
Token
Press EDIT to Select
To view the Overall Totals screen, press the ↵ (Edit) key on the drink selection
keypad. This menu displays both the total $ amount and total vend counts for the
following data:
Sales-$ Displays the total machine sales in $
Sales-# Displays the total number of machine vends. This value
includes normal, discount and surcharge vend totals.
Technical Manual
Discount-$
Discount-#
Test Vend-$
Test Vend-#
Surcharge-$
Surcharge-#
Free Vend-$
Free Vend-#
Displays
Displays
Displays
Displays
Displays
Displays
Displays
Displays
the
the
the
the
the
the
the
the
total
total
total
total
total
total
total
total
monetary value of all discounts in $
number of discounted vends
monetary value of all test vends in $
number of test vends
monetary value of all surcharges in $
number of surcharge vends
monetary value of all free vends in $
number of free vends
Note: Surcharge data fields are not supported by Genesis machines.
3.
Scroll through the list displayed using the ▲ (up)
or ▼ (down) keys on the front panel and record
the audit data.
When complete, press the X (Exit) key on the
drink selection keypad to return to the Non
Resettable Sales Data menu screen.
Overall Totals
Sales-$
Sales-#
Discounts-$
Discounts-#
Test Vend-$
Test Vend-#
Surcharge-$
Surcharge-#
Free Vend-$
Free Vend-#
0.00
0
0.00
0
0.00
0
0.00
0
0.00
0
4.
The engineer can also view and record audit data by individual product. Press the
▼ (down) key on the drink selection keypad to highlight By Product on the Non
Resettable Sales Data menu screen.
5.
Press the ↵ (Edit) key on the keypad to enter the By Product menu screen. This
menu contains all of the drink selections available from the machine. Use the ▲
(up) or ▼ (down) keys on the drink selection keypad to scroll through the menu
until the required selection is highlighted.
6.
Press the ↵ (Edit) key on the keypad to enter
the highlighted selection e.g. chocolate. The
LCD will display the screen as shown opposite.
This menu displays both the total $ amount and
total vend count as previously described.
Note: Individual By Product screens also display
the price set for the selection as shown.
Hot Chocolate
Price-$
Sales-$
Sales-#
Discounts-$
Discounts-#
Surcharge-$
Surcharge-#
Free Vend-$
Free Vend-#
0.00
0.00
0
0.00
0
0.00
0
0.00
0
The engineer can then scroll through the list displayed using the ▲ (up) or ▼
(down) keys on the drink selection keypad and record the audit data.
7.
When complete, press the X (Exit) key on the drink selection keypad to return
17
Technical Manual
the machine to the previous screen. The engineer can then view data for more
selections using the procedure described above and also access further menus via
the Non Resettable Sales Data menu relating to Cash, Cashless and Token audit
data.
8.
To return the machine to standby mode, press the X (Exit) key repeatedly until
the LCD displays the standby screen.
2. Resettable Sales Data: This menu contains similar data to that available from the
Non Resettable Sales Data menu. However, once viewed and recorded, data from this
menu can be cleared from the machines memory.
1.
From the Data Recall screen, highlight Resettable
Sales Data and press the ↵ (Edit) key. The LCD
will display the screen as shown opposite and
allow the engineer to view data for all
parameters as described for Non-Resettable
Sales Data. Additionally the menu allows the
engineer to delete all resettable data via the
Clear Data menu.
Resettable Sales Data
Overall Totals
By Product
Cash
Cashless
Token
Press EDIT to Select
Clear Data
Overall Totals
2.
To view the Overall Totals screen, press the ↵
(Edit) key on the drink selection keypad. This
menu displays both the total $ amount and total
vend count (since the last time it was cleared)
for the data fields shown.
Note: Please see page 16 & 17 for detailed
descriptions of these data fields.
Sales-$
Sales-#
Discounts-$
Discounts-#
Test Vend-$
Test Vend-#
Surcharge-$
Surcharge-#
Free Vend-$
Free Vend-#
0.00
0
0.00
0
0.00
0
0.00
0
0.00
0
3.
Scroll through the list displayed using the ▲ (up) and ▼ (down) keys on the front
panel and record the audit data. When complete, press the X (Exit) key on the
drink selection keypad to return to the Resettable Sales Data menu screen.
4.
The engineer can also view and record resettable monetary and vend data for
individual product by entering the By Product menu, and also view and record
data relating to Cash, Cashless and Token vends using their relevant sub-menus.
18
Technical Manual
Once the engineer has viewed and recorded required information from these submenu’s, the data can be deleted via the Clear Data sub menu.
5.
From the Resettable Sales Data screen, highlight
the Clear Data sub menu using the ▼ (down) key
and press the ↵ (Edit) key. The LCD on the front
of the machine will display the screen as shown
opposite, warning the engineer that all data will
be deleted.
Clear Data
Are you sure you want
to set all resettable
data to zero?
CANCEL - EXIT
OK - EDIT
Either press the ↵ (Edit) key to clear the data or press the X (Exit) key to exit
the menu without clearing the data.
3. Events
1.
2.
3.
From the Data Recall menu scroll down and
highlight Events then press the ↵ (Edit) key. The
LCD will display the screen as shown opposite.
From this menu screen the engineer can access
then view and record information relating to the
four events as shown.
To view the Power Losses screen, press the ↵
(Edit) key. The screen displays a list of the 10
most recent occasions when power to the
machine has been disconnected in date, time of
day and period format. Press the X (Exit) key to
return to the Events menu.
Events
Power Losses
Last Data Clear
Last Vend
Last Clock Set
Power Losses
05-08-05
04-08-05
12:25
12:10
10Min
12Min
Press the ▼ (down) key to highlight Last Data Clear, Last Vend and Last Clock
Set. Information for these events is displayed along the bottom of the screen.
4. Identification Numbers
1.
From the Data Recall menu scroll down and
Identification Numbers
highlight Identification Numbers then press the ↵ Main PCB
(Edit) key. The LCD will display the screen as Coin Mechanism
Bill Validator
shown opposite. From this menu the engineer Card Reader
can access and then view serial number, part
number and version type information relating to
the main PCB and any MDB coin/card mechanism fitted to the machine.
Note: Coin Mechanism, Bill Validator and Card Reader will only be displayed if
an MDB device is fitted to the machine.
19
Technical Manual
5. SureVend: This menu becomes available when SureVend is enabled via the Product
Configuration menu (see page 30).
1.
2.
From the Data Recall menu scroll down and
highlight SureVend then press the ↵ (Edit) key.
The LCD will display the screen as shown
opposite. From this menu screen the engineer
can view and record the number of cup drop
failures that SureVend has logged and also the
number of SureVend assisted vends.
SureVend
Cup Drop Failures 1-#
SV Assisted-#
Clear Data
0
0
Once the engineer has viewed and recorded the data it can be cleared via the
Clear Data menu as described previously.
6. Mug Vends
1.
This menu displays the number of vends that the
machine has made without dropping a cup. Once
the engineer has viewed and recorded the data
it can be cleared via the Clear Data menu as
described previously.
7. Print Data
1.
This menu displays the data that can be
extracted from the machine when a printer is
connected and the corresponding keypad
number which needs to be pressed to send the
data to the printer. For more information
regarding this function, please see page 44.
Print Data
Press
1
2
3
4
Data Type
All Data
Overall Totals
By Product
Cash
4.2 Diagnostic Menu
1.
Should a fault occur within the machine, the LCD will display a fault message and
in some cases the machine may become inoperable. The Diagnostic menu displays
error messages relating to faults that may occur, enabling the engineer to easily
locate and repair the problem, bringing the machine quickly back into service.
2.
Tables detailing the error messages displayed on the LCD, diagnostic messages
displayed via this menu and fault descriptions are included on pages 84 - 86 of this
manual.
20
Technical Manual
4.3 Test Menu
This menu allows the engineer to test individual
components and switch inputs to ensure correct
operation. On entry into the Test menu the LCD will
display the screen as shown.
Test
Cup Mechanism
Hot Vend
Test Dispense Head
Switches & Sensors
Test Vend Without Cups
Press EDIT to Select
Test Vend
Grinder Test
Display
Keypad Entry
1. Cup Mechanism: This sub menu allows the engineer to test the operation of the
cup drop unit and replicates the function assigned to switch 7 on the service keypad
(see page 56).
1.
Press the ↵ (Edit) key twice to display the test
screen followed by the START button on the
drink selection keypad. The cup drop unit will
dispense a cup indicated by the screen opposite.
Test Cup Mechanism 1
Status
Dispensing
Press STOP To Abort
2.
Pressing the X (Exit) key twice will return to the main test menu screen.
2. Hot Vend: Upon entry into this menu the LCD
will display the screen as shown. From this menu
screen the engineer can test for the correct operation
of the auger and whipper motors.
Hot Vend
Auger
Whipper
1. Auger: This sub menu allows the engineer to test for correct operation of each
individual ingredient motor fitted to the machine. Press the ↵ (Edit) key to display the
test screen which indicates the number of motors fitted to the machine.
Note: Testing the ingredient motor causes the ingredient canister auger to turn.
Remove canisters before carrying out this test sequence. DO NOT place ingredient
canisters on the floor. Refit correctly after carrying out the test.
1.
To test an ingredient motor, e.g. number 1, press
the corresponding button on the drink selection
keypad. The selection will be highlighted as
shown and the motor will operate for 3 seconds.
Repeat this operation to test additional
ingredient motors.
Auger
Auger Number
1 2 3 4 5
Press Any Number
Note: Pressing the START button will run all motors in sequence.
2.
Press the X (Exit) key to return to the main test menu screen.
21
Technical Manual
2. Whipper: This sub menu allows the engineer to test for correct operation of each
individual whipper assembly fitted to the machine. Press the ↵ (Edit) key to display the
test screen which indicates the number of whippers fitted to the machine.
1.
To test a whipper, press the corresponding
button on the drink selection keypad. The
selection will be highlighted as shown and the
whipper will run for 3 seconds. Repeat this
operation to test additional whipper units.
Whipper
Whipper Number
1 2 3
Press Any Number
Note: Pressing the START button will run all whippers in sequence.
2.
Press the X (Exit) key to return to the main test menu screen.
3. Test Dispense Head: This sub menu allows the engineer to test the operation of
the dispense head mechanism.
1.
Press the ↵ (Edit) key to display the test screen
followed by the START button on the drink
selection keypad. The dispense head mechanism
will move to its first dispense position indicated
by the screen opposite.
Test Dispense Head
Dispense Head Position
Moving
Press STOP to Abort
2.
When the head reaches its first dispense position, it will stop and the LCD screen
will show the message Dispense Head Position - Extended. Press the START
key a second time to move the head to its second dispense position. Press the
START key again to move the head to its fully extended dispense position.
3.
To return the dispense head to its “home”
position and complete the test, press the START
key. The dispense head mechanism will return to
its rest position as indicated by the screen
opposite.
4.
Dispense Head Position
Initializing
Press START to Begin
When the head reaches its “home” position, it will stop and the LCD screen will
show the message Dispense Head Position - Idle indicating that the test has
been completed successfully. Press the X (Exit) key to return to the main test
menu screen.
4. Switches & Sensors: This sub menu displays the
switches/sensors that can be tested. For most of the
items displayed the status line at the bottom of the
screen indicates the current state of the highlighted
sensor/switch. In the example opposite, the status line
indicates that the Waste Tray Sensor is detecting
22
Test Dispense Head
Switches & Sensors
Waste Pail Sensor
Cup Turret Switch
Cup Turret Sensor
Mug Sensor - Current
Mug Sensor - Average
Empty
Technical Manual
that the waste tray is empty. Press the ▲ (up) or ▼ (down) keys to highlight the other
switch/sensor inputs and view their status.
Mug Sensor - Current: This menu gives the engineer an indication as to the
efficiency of the SureVend™ sensor. The range for correct operation is a numerical
value between 51 - 255.
1.
2.
Highlight Mug Sensor - Current from the
Switches & Sensors menu and press the ↵ (Edit)
key. The LCD will display the screen as shown
opposite. The numerical value shown indicates
the current mug sensor value.
Mug Sensor - Current
Current Sensor Value
200
The Mug Sensor value can be any number between 0 and 255 and represents the
current value read from the sensor. The engineer can test the mug sensor by
blocking the SureVend™ sensors located in the drink dispense area. The value
displayed in the status line will drop as the sensors are blocked.
Mug Sensor - Average: This menu gives the engineer an indication as to overall
efficiency of the SureVend™ sensor.
1.
Highlight Mug Sensor - Average from the
Switches & Sensors menu and press the ↵ (Edit)
key. The LCD will display the screen as shown.
The value displayed represents the average
sensor calibration value.
Mug Sensor - Average
Average Sensor Value
195
5. Test Vend Without Cups: This menu allows the engineer to test vend a selection
without dropping a cup.
Note: Ensure that a suitable container is placed under the dispense position to receive
the vend.
1.
2.
Highlight Test Vend Without Cups in the main
Test menu and press the ↵ (Edit) key. The LCD
will display the screen as shown opposite. Make
a selection using the drink selection keypad and
press the START button. The machine will
dispense the selection without dropping a cup.
Test Vend Without Cups
Make a Selection
Credit .00
Time 03:20
Press the X (Exit) key to return to the main test menu screen.
23
Technical Manual
6. Test Vend: This menu allows the engineer to make a test vend in order to verify
that the dispensed vend is acceptable.
1.
Highlight Test Vend in the main Test menu and
press the ↵ (Edit) key. The LCD will display the
screen as shown opposite.
Time 03:22
2.
Make a selection using the drink selection keypad and press the START button.
The machine will drop a cup before dispensing the selection. If the SureVend
system is turned on the sensors must be activated within 3 seconds of the cup
being dispensed (see page 30).
3.
Press the X (Exit) key to return to the main test menu screen.
7. Grinder Test: This sub menu allows the engineer to test for correct operation of
the bean grinder.
Note: Remove the CoEx® brewer from the machine and place a suitable container
under the grinder outlet to catch any coffee grounds before starting the test sequence.
1.
2.
Highlight Grinder Test in the main Test menu
and press the ↵ (Edit) key. The LCD will display
the screen as shown opposite. Press button 1 on
the drink selection keypad. The grinder will run
for approximately 4 seconds.
Grinder Test
Grinder Number
1
Press Any Number
Press the X (Exit) key to return to the main test menu screen.
8. Display: Entry into this menu allows the engineer to test the LCD display screen.
1.
Highlight Display in the Test menu and press the ↵ (Edit) key. Press the START
key repeatedly to cycle through the different test patterns. The test patterns will
reveal any flaw in the display.
2.
Press the X (Exit) key to return to the main test menu screen.
9. Keypad Entry: This menu enables the engineer to test each key on both the drink
selection keypad and internal service keypad to ensure correct operation.
1.
Highlight Keypad Entry in the Test menu and
press the ↵ (Edit) key. The LCD will display the
screen with Main Keypad highlighted as shown.
Keypad Entry
Main Keypad
Service Keypad
Press EDIT to Select
24
Technical Manual
2.
3.
To test the Main Keypad, press the ↵ (Edit) key
to access the test screen. Press any key on the
drink selection keypad and verify that it is
displayed correctly. Example; pressing the
START key on the drink selection keypad will
display the screen as shown opposite.
Main Keypad
Start
Press Key And Verify
Press the X (Exit) key to return to the Keypad Entry menu screen. Use the ▼
(down) key to highlight Service Keypad and press the ↵ (Edit) key to access its
test screen. Follow the procedure described above to test the service keypad.
Note: Pressing either the ↵ (Edit) key or X (Exit) key (or 1 and 2 on the service
keypad) will return to the Keypad Entry menu screen.
4.4 Price Menu
Entry into this menu allows the engineer to enter individual prices for each drink
selection available, one price for all drink selections and set a discount to be applied
for customers who use their own cup/mug. The menu also contains a sub menu which
allows the engineer to view the highest and lowest price set in the machines memory.
Note: Values entered via this menu are only applicable to machines fitted with a
coin/card system.
1. Individual Prices: This sub menu allows the
engineer to set an individual price for each drink
selection available from the machine.
1.
With Individual Prices highlighted as shown
opposite, press the ↵ (Edit) key to access the
menu.
2.
Upon entry into this sub menu, all drink
selections available from the machine are listed
along with the current drink price for the
highlighted selection. The example shown
illustrates an Gourmet Coffee from beans
selection with a price set currently at $1.35.
3.
To change the price of the highlighted selection,
press the ↵ (Edit) key. The LCD will change and
display the screen as shown. To update the price,
e.g. increase to $1.45, press the sequence 0-0-14-5 using the appropriate number keys on the
drink selection keypad.
Individual Prices
Gourmet Coffee
Fresh Coffee
French Vanilla
Hot Chocolate
Choco Milk
=$ 1.35
Gourmet Coffee
001.45
0-9 to Edit Value
Edit when Finished
25
Technical Manual
4.
Press the ↵ (Edit) key to return to the Individual Prices screen and verify that the
new price displays in the status line along the bottom of the display. Use the ▲
(up) or ▼ (down) keys to highlight further selections.
2. Entire Machine: This sub menu allows the engineer to set a single price for all
selections available from the machine.
1.
2.
When highlighted from within the Price menu,
the LCD will display the screen, with the current
value (e.g. $1.50), as shown.
Press the ↵ (Edit) key to access the Entire
Machine sub menu. To update the value, e.g. set
a price of $1.60, press the sequence 0-0-1-6-0
using the appropriate number keys on the drink
selection keypad. Press the ↵ (Edit) key to return
to the Price menu screen and verify that the new
price displays in the status line along the bottom
of the display.
Price
Individual Prices
Entire Machine
Mug Discount
View High/Low Price
=$ 1.50
Entire Machine
001.60
0-9 to Edit Value
Edit when Finished
Tip: If most selections are to be sold at the same price, use this menu to quickly set
the entire machine to this price, then access the Individual Prices menu to adjust prices
for individual selections. Entering a single price for the entire machine will over-ride
any individual prices previously programmed.
3. Mug Discount: This sub menu allows the engineer to program a discount value
against all drink selections for customers who use their own cup/mug.
When a customer places their own cup into the dispense area and selects a drink, the
SureVend™ sensors will detect the cup and disable the cup drop mechanism. The price
set for Mug Discount is then subtracted from the price of the drink selected and the
appropriate change/credit returned to the customer.
Note: It is important to ensure that any value entered for a mug discount is supported
by the coin mechanism fitted to the machine, e.g. if a mug discount is set at $0.05 but
the lowest coin available from the coin mechanism is $0.10, the machine will not return
the discount to the customer.
1.
26
Highlight the Mug Discount sub menu from
within the Price menu. The LCD will display the
screen, with a current value in the status line (e.g.
$0.05), as shown. Press the ↵ (Edit) key to access
the Mug Discount sub menu.
Price
Individual Prices
Entire Machine
Mug Discount
View High/Low Price
=$ 0.05
Technical Manual
2.
To enter a discount value, e.g. $0.10, press the sequence 0-0-0-1-0 using the
appropriate number keys on the drink selection keypad.
3.
The LCD will change and display the screen as
shown. Press the ↵ (Edit) key to return to the
Price menu screen and verify that the new price
displays in the status line along the bottom of the
display.
Mug Discount
000.10
0-9 to Edit Value
Edit when Finished
4. View High/Low Price: This sub menu allows the engineer to view the highest and
lowest values in force, programmed via the Individual Prices sub menu.
Note: If a single price is currently in force, this value will be displayed in both fields.
4.5 Product Configuration Menu
Entry into this menu allows the engineer to configure
the selection timers for the drink selections, disable
drink selections, turn SureVend™ On or Off, set the
cup size, adjust water compensation settings and
grinder calibration values and set brewer waste
counter values.
Product Configuration
Configuration Version
Selection Timers
Disable Selections
SureVend
Cup Size Selection
On
Water Compensation
Grinder Calibration
Brewer Waste Management
1. Configuration Version: This displays the manufacturer configuration code for the
machine and is for information purposes only.
2. Selection Timers: Genesis B2C machines are supplied pre-programmed with
carefully tested default recipes for each drink selection. These recipes are for 8oz
drinks and will be suitable for most applications. Each selection can, however, be
adjusted to accommodate different ingredient types or operator/customer preference.
These recipes can be quickly and easily changed from within the Selection Timers
menu.
Important: All selection timer values are displayed in seconds, except for drink
selections made with fresh beans where water values are displayed in millilitres (ml)
and fresh coffee values in grams (g).
1.
Highlight Selection Timers then press the ↵
(Edit) key to access the menu. The menu
contains all of the drink selections available from
the machine. Scroll down using the ▼ key to
highlight a selection and press the ↵ (Edit) key to
enter the sub-menu.
Selection Timers
Cappuccino
Caffe Latte
Café Mocha
Americano
Gourmet Coffee
Press EDIT to Select
27
Technical Manual
2.
The following examples describe how to adjust the Gourmet Coffee recipe
made from fresh beans.
3.
With Gourmet Coffee highlighted in the
Selection Timers menu, press the ↵ (Edit) key to
access the Gourmet Coffee Timers menu. This
menu, shown opposite, contains the three
ingredients which may be required in a gourmet
coffee from ground beans selection.
4.
Gourmet Coffee
Fresh Coffee Beans
Milk
Sugar
Press EDIT to Select
With Fresh Coffee Beans highlighted press the ↵ (Edit) key to access the menu.
The status line at the bottom of the screen shows the current value of the
highlighted timer. In the example shown, the Hot Water value is configured to
deliver 120ml of water during the vend.
The default Fresh Coffee
Hot Water
=
Ingredient 1
=
Ingredient 2
=
Ingredient 3
=
Product Delay
=
Post Dispense Delay =
Beans timers are:
120 ml
7.5 g
8.0 g
6.5 g
0.00 s
0.00 s
Fresh Coffee Beans
Hot Water
Ingredient - 1
Ingredient - 2
Ingredient - 3
Product Delay
= 120 ml
Post Dispense Delay
Note: Ingredient 1, 2 and 3 shown relate to the default normal, strong and mild
timings.
5.
To strengthen the flavor of the gourmet coffee,
lengthen the time of the product throw. Press
the ▼ (down) key to highlight Ingredient -1.
The status line at the bottom of the screen will
display the current value.
Ingredient - 1
08.0
0-9 to Edit Value
Edit when Finished
6.
Press the ↵ (Edit) key to access the screen as shown. Enter a value for a stronger
normal selection, e.g. 8.0 g. Press the sequence 0-8-0 using the drink selection
keypad.
7.
Press the ↵ (Edit) key to return to the Fresh Coffee Beans menu and verify that
the new value is displayed at the bottom of the screen.
8.
Adjust the other timers within the Gourmet Coffee menu as desired. The recipe
also contains menus for Milk and Sugar timers. If necessary adjust the timings for
these ingredients. Once all timings have been entered and verified, vend the
selection to ensure that the new recipe is satisfactory and that the cup does not
28
Technical Manual
under or over-fill.
9.
Each drink selection available from the machine will be made up with different
selection timers, for example the Café Mocha recipe will contain timers for
Chocolate, Fresh Coffee Beans and Milk and will also contain whipper timers
which control how the selection is mixed and presented in the cup.
10. Product, Whipper and Post Dispense Delays
Product Delay - This determines the time interval between the water valve start
and the start of the product ingredient motor.
Whipper Delay - This determines the time interval between the water valve
start and the start of the product whipper motor.
Note: The sugar whipper delay will always take precedent over the milk whipper
delay. If both are selected the total whipper run time will be the sum of the sugar
whipper and milk whipper run times.
Product Delay - This determines when the dispense head is retracted after a
vend.
Note: When a soluble ingredient screen is accessed (e.g. Hot Chocolate) with the
ingredient highlighted, pressing the START key will run the ingredient motor for the
programmed time, allowing the engineer to collect and weigh the ingredient to
determine gram throw if required.
Disable Selections
3. Disable Selections: This sub menu allows the
engineer to disable individual or all drink selections if
necessary. With Disable Selections highlighted, press
the ↵ (Edit) key to access the menu.
X
Espresso
Double Espresso
Cappuccino
Caffe Latte
Café Mocha
*/? = Set or Clear All
1.
Upon entry into the menu the LCD will display the screen as shown. Using the
▲ (up) or ▼ (down) keys, scroll through the menu until the required drink
selection is highlighted. Pressing the ↵ (Edit) key will select the drink, indicated
by an X appearing in its adjacent box.
2.
If necessary continue until all required drink selections have been checked.
Pressing the X (Exit) key will move back to the Product Configuration screen and
save the new parameters to the machines memory.
Note: Pressing the START key on the drink selection keypad will check all boxes
if empty, disabling all drink selections or clear all boxes if previously checked.
3.
On returning to standby mode the selection button light will be extinguished next
29
Technical Manual
to any drink selections that have been disabled, indicating to the customer that
the drink choice is un-available.
4. SureVend: Entry into this menu allows the engineer to turn the SureVend™
product delivery sensor on or off.
SureVend™ Overview:
1.
SureVend™ ensures that a cup is always available in the cup station before any
money is collected or product delivered. The sensing system is a beam of infrared light across the cup station that is broken by a cup as it falls into position from
the cup drop unit, or by a customer placing his own mug in the dispense area.
2.
The SureVend™ software monitors the cup
Vend Failed
station sensor during the time that the cup ring
Press for Change
is operated and for three seconds afterwards. If
or Remove Card
a cup is not detected the software will then
attempt to drop a cup a second and if necessary,
Credit 0.40
12.31
a third time. After three failed vend attempts the
cup ring is placed temporarily out of service. The machine will beep once and the
LCD will display the Vend Failed message (if set to Pay Vend mode).
3.
Customers can now get their money back by pressing the coin return button or
removing their card. The LCD will change and display the message Please Insert
Mug. The machine remains in service but will not vend a cup from the cup drop
unit.
4.
To clear the message and return to standby mode, enter the Diagnostic menu and
press the START key twice to clear each SureVend™ error displayed.
Alternatively, press button 14 on the service keypad. Check and if necessary, clear
the cup drop unit and ensure correct operation before leaving the machine.
To configure SureVend™, proceed as follows:
SureVend
1.
From the Product Configuration menu highlight
SureVend and press the ↵ (Edit) key. By default
SureVend™ is factory set to On as indicated by
the status line at the bottom of the screen.
SureVend
On
2.
30
To disable SureVend™, press the ↵ (Edit) key to
enter the SureVend On/Off screen. Use the ▲
(up) key to select Off (indicated by the filled
radio button).
Technical Manual
3.
Press the ↵ (Edit) key to confirm the selection and return to the SureVend screen.
Verify that the status line at the bottom of the screen displays Off when SureVend
is highlighted.
4.
Pressing the X (Exit) key will move back to the Product Configuration screen and
save the new parameter to the machines memory.
5. Cup Size Selection: This sub menu allows the engineer to quickly and easily
change the cup size dispensed by the machine, either 8oz or 9oz when required.
1.
From the Product Configuration menu highlight Cup Size Selection.The screen will
display the current cup size (eg 9oz) as indicated by the status line at the bottom
of the screen.
2.
To change the cup size, press the ↵ (Edit) key to
enter the Cup Size Selection screen. Use the ▲
(up) key to select 8oz (indicated by the filled
radio button).
3.
Press the ↵ (Edit) key. The screen will change
and prompt the engineer to confirm the
selection. Press the ↵ (Edit) key to continue.
Cup Size Selection
8oz
9oz
Confirm Selection
Are you sure you want
to change cup size
timer values?
CANCEL - EXIT
OK - EDIT
Confirm Selection
4.
The LCD will display the screen as shown. In the
background the software is updating all preloaded parameters relating to serving a 8oz
drink.
5.
Once the software has completed updating the timer values the screen will change
and display the message Update Complete. Press the X (Exit) key twice to
return to the Product Configuration screen.
Please wait Updating cup size
timer values
6. Water Compensation: This sub menu allows the engineer to finely “tune” the
bean to cup water system to compensate for varying operating conditions - type of
beans, grind particle size, water flow etc.
IMPORTANT: The Grinder Calibration MUST be carried out before adjusting the
Water Compensation - see page 33.
Each drink type has water level compensation enabling tuning of the freshbrew and
31
Technical Manual
espresso drink types available from the machine. To adjust the water compensation
values, proceed as follows:
1.
From the Product Configuration menu highlight Water Compensation and press
the ↵ (Edit) key to access the menu screen as
Water Compensation
shown. Using the ▲ (up) or ▼ (down) keys, Soluble Compensation
Compensation
scroll through the menu until the required drink FB
Esp Compensation
type is highlighted e.g. Esp Compensation for
espresso and espresso based selections. Press
= 100
the ↵ (Edit) key to access the menu.
2.
The LCD will display the screen as shown
opposite where 160 is the default value for
espresso selections, set when the machine leaves
the factory. The following examples describe
how to adjust this setting if required.
Esp Compensation
160
0-9 to Edit Value
EDIT when Finished
Note: Before proceeding with the following tests, ensure that you have an
accurate measuring cylinder to hand.
3.
Soluble Compensation: Enter the Selection Timers menu and access the Hot
Water sub menu. Check and note the water timer setting (default 180ml). Return
the machine to standby mode and vend a hot water selection. Carefully measure
the amount of water dispensed. If the dispensed amount is less or more than
180ml, return to the Water Compensation menu as described above and enter
the Soluble Compensation sub menu - default value 100. Enter a value higher (e.g.
105) or lower (e.g. 095), return to standby, vend a hot water selection and
measure the amount of water dispensed. Continue increasing/decreasing the
water compensation amount until a measured value of 180ml is dispensed.
4.
Freshbrew Compensation: Enter the Selection Timers menu and access the
Gourmet Coffee sub menu. Check and note the water timer setting - default
120ml plus 40ml for sugar and 40ml for milk. Return the machine to standby mode
and vend a black gourmet coffee (no sugar) selection. Carefully measure the
amount of water dispensed. If the dispensed amount is less or more than 120ml,
return to the Water Compensation menu as described above and enter the
Freshbrew Compensation sub menu - default value 115. Enter a value higher (e.g.
120) or lower (e.g. 110), return to standby, vend a second black freshbrew coffee
selection and measure the amount of water dispensed. Continue
increasing/decreasing the water compensation amount until a measured value of
120ml is dispensed.
4.
Espresso Compensation: Enter the Selection Timers menu and access the
Espresso sub menu. Check and note the water timer setting - default 40 ml plus
32
Technical Manual
20 ml for sugar. Return the machine to standby mode and vend an espresso (no
sugar) selection. Carefully measure the amount of water dispensed. If the
dispensed amount is less or more than 60 ml, return to the Water Compensation
menu as described above and enter the Esp Compensation sub menu - default
value 160. Enter a value higher (e.g. 165) or lower (e.g. 155), return to standby,
vend a second espresso selection and measure the amount of water dispensed.
Continue increasing/decreasing the water compensation amount until a measured
value of 60 ml is dispensed.
7. Grinder Calibration: This sub menu allows the engineer to calibrate the grinder
settings (stored in the machines memory) to the type of coffee beans dispensed and
converts gram settings to seconds. This procedure must always be carried out by the
engineer before the Genesis B2C machine is used for the first time, when the type of
beans dispensed is changed, before adjusting the water compensation or after the
grinder mechanism has been removed/repaired.
Important: Before commencing the following procedure, ensure that you have a set
of accurate gram scales and a cup with which to catch the ground coffee. Using the
‘tare’ function, calibrate the empty cup with the gram scales. Ensure that the CoEx®
brewer is removed from the machine, the brewer waste bucket is in position, the bean
container contains beans and the container outlet slide is open. To configure the
Grinder Calibration, proceed as follows:
1.
From the Product Configuration menu highlight
Grinder Calibration and press the ↵ (Edit) key to
access the menu screen as shown. This displays
the current calibration setting in seconds, eg 2.0
grams of ground coffee (factory default) will be
dispensed per second of grinder operation.
2.
Press the START key on the drink selection
keypad to begin the calibration process. The
machine displays the menu screen as shown.
Press the START key. The machine will pause for
3 seconds before priming the grinder. Ensure
that the waste bucket is placed correctly in the
machine to catch dispensed ground coffee.
3.
The LCD will now display the menu screen as
shown opposite. Place the calibrated cup under
the grinder outlet and press the START key. The
grinder will run and dispense dry ground coffee
into the cup.
Grinder Calibration
Current Value (Seconds)
002.0
Press START To Begin
33
Technical Manual
4.
The LCD will now display the menu screen as
shown opposite. Weigh the cup and its contents
and enter the weight into the machine. If the
weight of ground coffee was 6.5 grams, enter 00-6-5 using the drink selection keypad. Empty the
contents of the cup and press the START key to
continue calibrating the grinder.
5.
Repeat steps 3 and 4 twice more. Upon
completion the LCD will change and display the
new calibrated value as a value of grams per second
as the example shown. Press the ↵ (Edit) key to
save the new value or X (Exit) key to cancel.
001.8
9. Brewer Waste Management: This sub menu allows the engineer to set a value
for the maximum amount of brewer waste that can be ejected from the CoEx® brewer
into the waste container. This value is used to determine the number of vends that
can be completed before fresh coffee/espresso based drinks become disabled and the
waste container needs to be removed from the machine and emptied. The menu also
allows the engineer to turn waste management on or off and view the number of fresh
coffee/espresso drinks vended since the waste container was last emptied and the
waste counter reset.
1.
2.
From the Product Configuration menu highlight
Brewer Waste Management and press the ↵
(Edit) key to access the menu screen as shown.
To set a a maximum waste counter value press
the ▼ (down) key and highlight Brewer Waste
Capacity.
With Brewer Waste Capacity highlighted, press
the ↵ (Edit) key to access the sub-menu screen.
To change the value enter a new number using
the drink selection keypad. Press the ↵ (Edit) key
to store the new value.
Brewer Waste Management
Brewer Waste Management
Brewer Waste Capacity
Current Waste Counter
On
Brewer Waste Capacity
200
0-9 to Edit Value
EDIT when Finished
Note: The program is set to allow a maximum value of 200 to be entered as
shown.
3.
34
From the Brewer Waste Management menu press the ▼ (down) key and highlight
Current Waste Counter. The number displayed shows the number of
freshbrew/espresso vends that have been dispensed since the waste counter was
last reset.
Technical Manual
Important: Once the brewer waste container has been emptied, cleaned and
re-fitted to the machine, the waste counter must be reset by pressing button 12
on the service keypad mounted inside the door. The machine will bleep twice to
confirm that the counter has been reset.
4.
To turn waste management Off, highlight Brewer
Waste Management from the Brewer Waste
Management screen. Press the ↵ (Edit) key to
display the screen as shown. Press the ▲ (up) key
to select Off (indicated by the filled radio
button).
Brewer Waste Management
Off
On
Note: If the brewer waste management is turned off the waste counter becomes
disabled.
4.6 Free Vend Menu
This menu allows the engineer to turn free vend on or off when the machine is fitted
with a coin/card mechanism.
1.
From the Main Menu screen use the ▼ (down) key to scroll through the menu
until Free Vend is highlighted. By default, Free Vend is set to Off as indicated by
the status line at the bottom of the screen.
2.
To set Free Vend to On, press the ↵ (Edit) key to
access the screen as shown. Press the ▼ (down) key
to select On (indicated by the filled radio button).
Press the ↵ (Edit) key to confirm the selection and
return to the Main Menu screen.
3.
Free Vend
Off
On
Verify that the status line at the bottom of the Main Menu screen displays On
when Free Vend is highlighted.
Note: When the machine is set to Free Vend, the standby screen will display the
message No Money Required. If set to Free Vend it is also necessary to turn off
any monetary devices (as described on pages38 - 43).
4.7 Coins In/Out
Note: Coins In/Out will only be displayed on machines fitted with an MDB coin mech.
The Coins In/Out menu emulates the coin mechanism from the front end screen and
allows the engineer to view information relating to the coin mechanism and eject coins
from the machine without opening the door.
35
Technical Manual
Coins In/Out
Coin Count
0.05
34
0.10
18
0.25
9
8
1.00
1.
From the Main Menu screen use the ▼ (down) key to
scroll through the menu until Coins In/Out is
highlighted. Press the ↵ (Edit) key to access the menu
screen which will look similar to the example shown.
2.
From this screen the engineer can view the coin sets in the coin mechanism, the
number of coins in each coin stack and the total value of the coins. To eject coins
from the mechanism the engineer simply presses the relevant button on the
keypad eg pressing button 4 will eject a $0.25 coin. The count will reduce to 8
and the value to $2.00.
4.8 System Settings Menu
This menu allows the engineer to input text
information relevant to the machine and its location,
set the current time and date, change the language
displayed, configure the monetary system, set and
view DTS information, backup and restore machine
software, view the machine and I/O board software
versions installed in the machine, set temperature and
idle screen display options and input custom
messages.
Press
1
2
3
4
Value
1.70
1.80
2.25
8.00
System Settings
Machine Information
Clock
Language
Monetary
DTS
Press EDIT to Select
Serial Flash
Backup/Restore
Screen Contrast
Software Version
I/O Board Software
Temperature Units
Idle Screen Options
Custom Messages
Note: Serial Flash sub menu is only visible when a Serial Flash card is inserted into
plug J9A on the control board - see page 45.
1. Machine Information: This sub-menu allows the engineer to create a unique
identification for the machine and enter its location. A combination of text and
numerical data can be entered and stored via the machines keypad.
1.
2.
36
From the Systems Settings menu highlight
Machine Information and press the ↵ (Edit) key.
The LCD will display the screen as shown
opposite. To update/create a Machine ID press
the ↵ (Edit) key.
Machine Information
Machine ID
Machine Location
Press EDIT to Select
Enter a machine ID using the 0-9 drink selection keys. Press the relevant key until
the required letter/number is highlighted. To correct an input error press the 0
key once. To add a space between characters, press the 0 key twice.
Technical Manual
The
1=
2=
3=
4=
5=
keys are configured as follows:
,.?';:"1
6= mno 6
abc 2
7= pqrs 7
def 3
8= tuv 8
ghi 4
9= wxyz 9
jkl 5
0= -\$@%#&0
Note: To change from lower to upper case, press the START key.
3.
When complete, press the X (Exit) key to return to the Machine Information
menu screen. Press the ▼ (down) then ↵ (Edit) keys to highlight then enter the
Machine Location screen. Enter a unique machine location using the 0-9 drink
selection keys as described above. When complete press the X (Exit) key.
2. Clock: The machine displays the current time in either 12 or 24 hour format.
Upon entry to the System Settings menu, the Clock sub menu is highlighted. Press the
↵ (Edit) key to access the Clock sub menu screen. This menu allows the engineer to
set the date, time and daylight saving via 3 separate sub menus.
Note: The current date, time and daylight saving (when highlighted) held in the
machines memory are displayed in the status line at the bottom of the screen.
1.
Date: Press the ↵ (Edit) key to enter the Date menu. The date is displayed in
day, month, year format. To set the date, e.g. 27th January 2006, press the
sequence 2-7-0-1-0-6 using the appropriate number keys on the drink selection
keypad.
Note: The text ‘Press 0-9 to Edit Value’
displayed in the status line at the bottom of the
screen will alternate with the text ‘Press */? To
Change Mode’. Pressing the START key on the
drink selection keypad allows the date to be
displayed in month, day, year format.
Date
dd - mm - yy
00
00
00
Press 0-9 to Edit Value
Pressing the ↵ (Edit) key will move back to the Clock menu screen and save the
date to the machines memory. Confirm that the status line at the bottom of the
screen displays the correct date when Date is highlighted.
2.
Time: From the Clock menu screen press the ▼ (down) key to highlight the Time
menu followed by the ↵ (Edit) key. The LCD will
Time
display the screen as shown opposite.
hh / mm / mode: 12 / 24
By default the time is displayed in 12 hour
format. To enter a time of 10:30 PM press the
sequence 1-0-3-0 on the drink selection keypad.
00 : 00
AM
Press 0-9 to Edit Value
37
Technical Manual
As the engineer presses the final zero, the AM
value will appear within a dotted box and the
text at the bottom of the LCD will now read
‘Press Arrows To Select’. Press the ▲ (up) or
▼ (down) key until PM appears in the box.
Time
hh / mm / mode: 12 / 24
10 : 30
PM
Press Arrows To Select
Pressing the ↵ (Edit) key will move back to the Clock menu screen and save the
new time to the machines memory. Confirm that the status line at the bottom of
the screen displays the correct time when Time is highlighted.
Note: When set to 12 hour format, the program will only allow the engineer to
set the numbers 0 or 1 in the first field. Once the number 24 has been entered
via the ▲ (up) or ▼ (down) keys to indicate 24 hour format, the engineer can
reset the first two values to reflect 10:30 PM in 24 hour format e.g. 22:30.
3.
Daylight Saving: From the Clock menu screen
press the ▼ (down) key to highlight the Daylight
Saving menu followed by the ↵ (Edit) key. The
LCD will display the screen as shown opposite.
Daylight Savings Time
North American
US 2007
European
Australian
Off
By default daylight savings time is set to Off. To
choose one of the available options, press the ▲ (up) or ▼ (down) key until
selected (indicated by the filled radio button) followed by the ↵ (Edit) key. Ensure
that the required setting is displayed in the status line at the bottom of the screen.
Press the X (Exit) key to return to the main menu.
3. Language Setup: From this menu the engineer can specify the language that the
machine will use to display messages, programming information etc. The default
language for the machine is set to English U.S. To change the language setting:
1.
2.
From the System Settings menu, use the ▼
(down) key to highlight the Language Setup menu
and press the ↵ (Edit) key. The LCD will display
the screen as shown opposite. Using the ▲ (up)
or ▼ (down) keys, select the desired language
option (indicated by the filled radio button).
Language Setup
English U.S.
English U.K.
German
French
Spanish
Dutch
Press the ↵ (Edit) key to save the language option and return to the System
Settings menu. Verify that the chosen language is displayed in the status line at the
bottom of the display when Language Setup is highlighted.
4. Monetary: From this menu the engineer can select the type of coin/card mechanism
or note reader fitted to the machine, select the coin set and configure values for low
change, multiple vends, credit for failed vends etc.
38
Technical Manual
The Monetary menu can display up to 11 sub menus, depending on machine
configuration, as listed below:
•
•
•
•
•
•
•
•
•
•
•
Coin Mechanism
Bill Validator
Card Reader
Bill Stack Option
Multiple Vend Mode (Only if MDB mech. selected)
Change Without Purchase (Only if MDB mech. selected)
Low Change Message (Only if MDB mech. selected)
Accept On Low Change (Only if MDB mech. selected)
Credit for Failed Vend (Only if MDB mech. selected)
Card Re-Value (Only if MDB card reader / key system is selected)
Display Coin Set
1. Select The Coin Mechanism
1.
2.
From the Monetary menu highlight Coin
Mechanism and press the ↵ (Edit) key. The Coin
Mechanism screen allows the engineer to select
one of the options shown. Using the ▲ (up) or
▼ (down) keys, select the desired coin
mechanism option (indicated by the filled radio
button).
Coin Mechanism
No Coin Mechanism
MDB Coin Mechanism
Exec Coin Mechanism
Press the ↵ (Edit) key to save the selection and return to the Monetary menu.
Verify that the chosen coin mechanism option is displayed in the status line at the
bottom of the display.
Note: An Executive Card/Key system (when fitted) is enabled when Exec Coin
Mechanism is selected.
2. Select The Bill Validator (MDB Systems Only)
An MDB bill validator is supported and can be mounted in the optional base cabinet
option.
3. Select The Card/Key Reader (MDB Systems Only)
Note: An Executive protocol card/key system emulates an Executive coin mechanism
and is selected via the Coin Mechanism menu.
39
Technical Manual
1.
2.
From the Monetary menu press the ▼ (down)
key to scroll down and highlight Card Reader and
press the ↵ (Edit) key. Using the ▲ (up) or ▼
(down) keys, select the desired card reader
option (indicated by the filled radio button).
Card Reader
No Card
MDB Card
Digi Card
Press the ↵ (Edit) key to save the selection and return to the Monetary menu.
Verify that the chosen option is displayed in the status line at the bottom of the
display.
4. Configure Bill Stack Option (MDB Systems Only)
An MDB bill validator is supported and can be mounted in the optional base cabinet
option.
5. Configure Multiple Vend Mode
Note: This option is only applicable when an MDB coin mechanism is fitted and
configured from within the Coin Mechanism menu.
The Multiple Vend Mode option specifies how the machine will dispense change to the
customer once a purchase is made. The engineer can set one of two options:
(i)
Single Vend: Change will be returned to the customer automatically as soon
as a valid selection is made.
(ii) Multi Vend: With this option selected the customer can make multiple vends
as long as there is sufficient credit entered. In order to get change, the customer
must press the coin return.
1.
2.
From the Monetary menu press the ▼ (down)
key to highlight Multiple Vend Mode and press
the ↵ (Edit) key. Using the ▲ (up) or ▼ (down)
keys, select the desired multiple vend option
(indicated by the filled radio button).
Multiple Vend Mode
Single Vend
Multi Vend
Press the ↵ (Edit) key to save the selection and return to the Monetary menu.
Verify that the chosen option is displayed in the status line at the bottom of the
display.
6. Configure Change Without Purchase Value
Note: This option is only applicable when an MDB coin mechanism is fitted and
configured from within the Coin Mechanism menu.
The Change Without Purchase value specifies how and when the machine returns
40
Technical Manual
change to a customer. If the customer deposits credit into the machine which is less
than or equal to the value set in the Change Without Purchase menu, change will be
returned without a purchase. However, if the credit is larger, the customer must make
a purchase before change will be given.
Examples:
Value set to 01.00: Non-escrowed coins less than or equal to $1.00 will be changed
without purchase. All escrowed coins are returned.
Value set to 00.00: Forced Vend. This value forces the customer to make a selection.
No change will be returned without a purchase.
Note: Each coin denomination for which the coin mechanism has a tube is called an
Escrowed coin because it can be returned.
To configure this value:
1.
2.
From the Monetary menu press the ▼ (down)
key to highlight Change Without Purchase and
press the ↵ (Edit) key. Enter the required value,
e.g. press 0-1-0-0 using the drink selection
keypad to set a change without purchase value
of $1.00. To specify Force Vend, set a value of
00.00.
Change Without Purchase
01.00
0.00 = Forced Vend
Press the ↵ (Edit) key to save the new value and return to the Monetary menu.
Verify that the entered value is displayed in the status line at the bottom of the
display when Change Without Purchase is highlighted.
7. Configure Low Change Message Value
Note: This option is only applicable when an MDB coin mechanism is fitted and
configured from within the Coin Mechanism menu.
When the total value of the coins in the coin mechanism falls below the value set in
the Low Change Message menu, the standby message displayed on the LCD will read
‘Use Exact Change’. To configure this value:
1.
2.
From the Monetary menu press the ▼ (down)
key and highlight Low Change Message and press
the ↵ (Edit) key. Enter the required value, e.g.
press 0-1-0-0 using the drink selection keypad to
set a low change message value of $1.00.
Low Change Message
01.00
0-9 to Edit Value
EDIT when Finished
Press the ↵ (Edit) key to save the new value and return to the Monetary menu.
41
Technical Manual
Verify that the entered value is displayed in the status line at the bottom of the
display when Low Change Message is highlighted.
Note: The machine will still accept money with this value set, but may short
change the customer if there is insufficient coinage in the coin mechanism. Set the
Low Change Message and the Accept on Low Change values to the same figure
to eliminate any chance that the customer will be short changed.
8. Configure the Accept on Low Change Value
Note: This option is only applicable when an MDB coin mechanism is fitted and
configured from within the Coin Mechanism menu.
When the total value of the coins in the coin mechanism falls below the value set in
the Accept on Low Change menu, the machine will stop accepting coins and notes for
which it cannot return change. For example, if the engineer sets a value of $0.50, the
machine will not accept $0.50 coins if there is less than $0.50 value of coins in the coin
mechanism. To configure this value:
1.
2.
From the Monetary menu press the ▼ (down)
key to scroll down and highlight Accept on Low
Change and press the ↵ (Edit) key. Enter the
required value, e.g. press 0-0-5-0 using the drink
selection keypad to set a value of $0.50.
Accept on Low Change
00.50
0-9 to Edit Value
EDIT when Finished
Press the ↵ (Edit) key to save the new value and return to the Monetary menu.
Verify that the entered value is displayed in the status line at the bottom of the
display when Accept on Low Change is highlighted.
9. Configure Credit For Failed Vend Option
Note: This menu is only available when an MDB coin mechanism is fitted and
configured from within the Coin Mechanism menu.
This option specifies how the machine will react when a vend fails. The engineer can
set one of two options:
(i)
Hold Credit: With this option selected the customers credit is retained,
allowing them to either make an alternative selection or press the coin return.
(ii) Return Change: With this option selected the customers change is immediately
returned after a failed vend.
42
Technical Manual
1.
2.
From the Monetary menu press the ▼ (down)
key and highlight Credit For Failed Vend and
press the ↵ (Edit) key. Using the ▲ (up) or ▼
(down) keys, select the desired option (indicated
by the filled radio button).
Credit For Failed Vend
Hold Credit
Return Change
Press the ↵ (Edit) key to save the selection and return to the Monetary menu.
Verify that the chosen option is displayed in the status line at the bottom of the
display when Credit For Failed Vend is highlighted.
10. Configure Card Revalue
Not applicable for Genesis machines.
11. Configure Display Coin Set
The Display Coin Set menu enables the engineer to configure the coin set to suit the
coin/card mechanism or bill validator fitted to the machine. This ensures that the
message displayed in standby mode, correctly indicates to the customer which coins
(or card/key) may be entered.
The available coin sets are:
1.
5.
9.
1c to 20c
5c to $1
50c to $1
2. 1c to 50c
6. 5c to $2
10. Card
3. 1c to $1
7. 5c to $1
11. Key
4. 5c to 50c
8. 5c to $2
12. Money
To configure the coin set:
1.
2.
From the Monetary menu press the ▼ (down)
key to highlight Coin Set and press the ↵ (Edit)
key. Using the ▲ (up) or ▼ (down) keys, select
the desired coin set, card or key (indicated by
filled radio button).
Press the ↵ (Edit) key to save the new coin set
and return to the Monetary menu. Verify that the
chosen set is displayed in the status line at the
bottom of the display when Coin Set is
highlighted.
Display Coin Set
1c to 20c
1c to 50c
1c to $1
5c to 50c
5c to $1
5c to $2
5c to $1
5c to $2
50c to $1
Card
Key
Money
5. DTS: Entry into this menu allows the engineer to configure the machine in order
to send audit data relating to sales and events stored in the machines memory to a
43
Technical Manual
data carrier or other device.
Data Transfer Standard (EVA-DTS) - Overview: The standard makes it possible
to transfer information from vending machines/payment systems to PC-based
accounting/management systems and/or the opposite way. It is important that all
suppliers of vending machines and payment systems agree to a common standard for
the Electronic Data Transfer, because only this way the engineer can be sure that all
his equipment can be read out and programmed by means of the same handheld
terminal.
1.
DTS Standby Mode: Scroll down and highlight
DTS from the System Settings menu. Press the ↵
(Edit) key to access the menu. The LCD will
display the screen as shown. The first sub-menu
DTS Standby Mode is highlighted with its current
state (DDCMP) shown in the bottom line.
DTS
DTS Standby Mode
DTS Audit List
CA304 Data Type
Data Reset Mode
Event Reset Mode
DDCMP
Printer Baud Rate
The machine is factory set to enable data transfer via the optical DDCMP link. To
change this to the DEX setting, press the ↵ (Edit) key to access the menu and the
▲ (up) key to select DEX (indicated by the filled radio button. Press the ↵ (Edit)
key to save the selection.
Note: Even if the default is set to DDCMP, once the controller detects a DEX
activity, it will automatically switch to the other mode. However, setting the
default to the correct protocol will speed up response time.
The engineer can now download data from the machine by plugging a DEX
enabled device into the DEX port (J36) on the I/O board, located on the rear of
the door.
2.
DTS Audit List: From this sub-menu the
engineer can select which data is transferred
from the machine to a DEX/DDCMP data
carrier. Scroll down and highlight DTS Audit
Data. Press the ↵ (Edit) key to access the menu.
The LCD will display the screen as shown.
DTS Audit List
X
X
X
X
X
ID
ID
ID
ID
ID
1
2
3
4
5
*/?=Set or Clear All
All data and events fields within a vending machine are assigned a unique code
determined by the Standard. From this sub-menu the engineer can choose to
allow all fields to be available for download by pressing the START/? key or
scrolling through the list and adding an X to the required fields.
3.
44
CA304 Data Type: This sub-menu determines whether the the data will be
displayed as currency or numerical, for example, assuming that the value of dollar
bills in the machine is $3.00, when set to currency CA304 will read 300 in the
Technical Manual
DEX/DDCMP report. When set to numeric it will read 3.
4.
Data Reset Mode: This field can be set to either AUTO or SAVE from within
the sub-menu. When set to AUTO, all resettable data will be reset after a
successful read.
5.
Event Reset Mode: This field can be set to either AUTO or SAVE from within
the sub-menu. When set to AUTO, all event data will be reset after a successful
read.
6.
Printer Baud Rate: This allows the engineer to set the correct baud rate for a
serial printer if one is to be used. It is important for this to be set correctly to
ensure successful data transfer.
6. Serial Flash: This menu only becomes available when a serial flash card is inserted
into plug J9A on the control board. It allows the engineer to upgrade the machine
software or backup data. The following operations are supported:
● View data information
● Delete data
● Load data into the machine
● Save data back from the machine
The view, delete and load options will only become available when data is held on the
card. Also, when backup data is added, a description can be entered to aid retrieval.
The following types of data are supported:
● Firmware - The operating system and default factory machine set-up data
● Default Data - The default factory machine set-up data - eg canister and button
layout, default run times etc.
● Configuration Data - Any machine set-up data that can be changed by the user
● Configuration and Sales Data - All sales data plus the set-up data that can be
changed by the operator
● Language Data - Not currently used
The serial flash card can hold the following amounts of data - 1 copy of the firmware,
OR 4 copies of default data, and 16 copies of configuration data, and 16 copies of
configuration and sales data. The following example describes how the engineer can
download Configuration Data to the serial flash card.
IMPORTANT: Before inserting the serial flash card, ensure machine is disconnected
from the power supply.
1.
Open the door of the machine. Release the catch and open the monetary door.
Remove the control board cover and insert the serial flash card into plug J9A.
45
Technical Manual
Close the door and restore power to the machine.
2.
3.
Enter the engineers program as previously
described. Access the Systems Settings menu and
using the ▼ (down) key highlight Serial Flash.
Press the ↵ (Edit) key to enter the sub program.
If an empty card is being used the LCD will
display the screen as shown.
Serial Flash
Firmware
Default Data
Configuration Data
Configuration and Sales Data
Language Data
0
0
0
0
0
Using the ▼ (down) key highlight Configuration Data then press the ↵ (Edit) key
to enter the sub program. As the card is empty
Configuration Data
of data the LCD will display the screen as shown. Save Data
Note: When a card with data loaded is used the
menu will also include Image Info, Load Data and
Delete Data along with the Save Data menu
Press EDIT to Select
4.
To save data to the card press the ↵ (Edit) key.
Save Data
The Save Data screen will be displayed with 16 Edit Data
empty data fields available. Press the ↵ (Edit) key Save Data
once more to enter the menu screen as shown.
From this menu the engineer can either enter the
Press EDIT to Select
Edit Data Screen and enter a description before
saving the data (see page 36 for details) or scroll down and simply save the data.
5.
Press the ↵ (Edit) key to save the data to the
Save Data
card. The LCD will display the screen as shown
Are you sure you want
before exiting to standby mode. Disconnect the
to save this data
machine from the power supply and open the
to the disk?
door. Unplug the serial flash card and replace the
CANCEL - EXIT OK - EDIT
control board cover. Close the monetary door
and the door of the machine before restoring power to the machine.
7. Backup/Restore: This menu allows the engineer to manually backup information
stored in the machines memory to the controller board.
Note: It is also possible for the engineer to program Backup as a timed event, thus
ensuring even greater security for the information stored in memory. This ensures that
the machine can easily be restored to its last operational state should the information
be lost through corruption or power failure. For full details see page 54.
46
Technical Manual
1.
2.
3.
4.
Scroll down and highlight Backup/Restore from
the System Settings menu. Press the ↵ (Edit) key
to access the menu. If this is the first time that a
backup has been selected the LCD will display
the screen as shown.
Press the ↵ (Edit) key to access the menu. The
LCD will display the screen as shown. To backup
the memory press the ↵ (Edit) key. After a few
seconds the machine will beep once and the
Initializing screen will be displayed before the
machine returns to standby mode, ready to vend.
When accessing the Backup/Restore sub-menu
after backups of the memory have been made,
the information changes and the engineer is
presented with the screen as shown. The first
sub-menu, Last Backup is highlighted with the
date and time this occurred displayed at the
bottom of the screen.
Backup/Restore
Backup Data
Press EDIT to Select
Backup Data
Are you sure you want
to backup all
NVM data?
CANCEL - EXIT
OK - EDIT
Backup/Restore
Last Backup
Backup Data
Restore Data
23-09-05 11:17
To restore the machines memory to the last
Restore Data
available backup, scroll down using the ▼ (down)
Are you sure you want
key, highlight Restore Data and press the ↵ (Edit)
to restore the data
key to access the menu. The LCD will display the
from the backup?
screen as shown. Press the ↵ (Edit) key to
CANCEL - EXIT OK - EDIT
restore the backed up data. After a few seconds
the machine will beep once and the Initializing screen will be displayed before the
machine returns to standby mode, ready to vend.
8. Screen Contrast: Genesis machines are factory set with a default screen contrast
setting of 12 which should be suitable for most installations. For installations with
special considerations, e.g. very low or high ambient light levels, the engineer can adjust
the screen contrast via this menu to improve screen legibility.
1.
2.
From the System Settings menu, scroll down
using the ▼ (down) key to highlight the Screen
Contrast menu and press the ↵ (Edit) key. The
LCD will display the screen as shown opposite.
Enter a new value between 05 - 20 using the
drink selection keypad.
Screen Contrast
12
0-9 to Edit Value
EDIT when Finished
Press the ↵ (Edit) key to save the new value and return to the System Settings
menu. Verify that the number is displayed in the status line at the bottom of the
47
Technical Manual
display when Screen Contrast is highlighted.
9. Software Version: The Software version menu displays the version number of the
software installed and is for information only. The menu also displays the current time
and date.
10. I/O Board Software: This menu displays the version number of the I/O board
software installed and is for information only.
11. Temperature Units: This menu is not applicable to Genesis B2C machines.
12. Idle Screen Options: This menu allows the engineer to configure the LCD so
that it displays either time with the standby message when idle. To configure the idle
screen options, proceed as follows:
1.
From the System Settings menu press the ▼ (down) key to highlight Idle Screen
Options and press the ↵ (Edit) key to access the menu.
2.
Press the ▼ (down) key to highlight the required option, eg Time (indicated by
the filled radio button) or None. The LCD will
Idle Screen Options
display the screen as shown opposite. Press the
None
Time
↵ (Edit) key to return to the System Settings
screen. With Idle Screen Options highlighted,
verify that the status line confirms the option is
set to Time.
3.
Press the X (Exit) key until the machine exits the
engineers program into standby mode. The LCD
will display the standby message with the time
displayed as shown.
Please Make
a Selection
Time: 10:45
4.8 Security Codes Menu
This menu allows the engineer to change both the operator and engineer program
entry codes for the machine. These factory default codes are 1-1-1-1 (engineers) and
2-2-2-2 (operators). If either code is changed ensure that the new code is recorded
and kept in a secure place. To change either engineer or operator program entry
codes, proceed as follows:
1.
From the Main Menu screen press the ▼ (down)
key until Security Codes is highlighted then press
the ↵ (Edit) key to access the menu screen. The
LCD will display the screen as shown.
Security Codes
Enter Pin
Engineer Program
Operator Program
Engineer Program
48
Technical Manual
2.
To change the engineer entry code, press the ▼
(down) key to highlight Engineer Program then
press the ↵ (Edit) key. The LCD will display the
Edit Pin screen as shown. Enter a new pin
number using the drink selection keypad and
press the ↵ (Edit) key.
Engineer Program
0158
0-9 to Edit Value
EDIT when Finished
Note: This security number is not displayed. Be sure to record the new pin code
and keep it in a safe place.
3.
Highlight Operators Program and follow the above procedure to change the
operator code. Ensure that all operators who use the machine are issued with
the new code.
4.9 Timed Events Menu
1. Time of Day Events: From this menu the engineer can set up inhibited vend
periods, free vend periods and discounted vend periods.
The following example describes how the engineer can program the machine to free
vend specific drink selections between 10.30 am and 2:30 pm on week days.
1.
From the Main Menu press the ▼ (down) key
until Timed Events is highlighted then press the
↵ (Edit) key twice to access the Time of Day
menu screen. The LCD will display the screen as
shown.
Time Of Day Events
1
2
3
4
5
6
Inhibit
Inhibit
Inhibit
Inhibit
Free Vend
Free Vend
Off
Off
Off
Off
Off
Off
Note: Although event 1 is shown as Inhibit, it is possible for the engineer to set
event 1 as the first Free Vend (or Discounted Vend) period.
2.
Press the ↵ (Edit) key to access the menu. The
LCD will display the screen as shown. By default
the current State is set to Off as indicated by the
status line at the bottom of the screen.
1
State
Event Type
Start Time
Stop Time
Days Of Week
Off
3.
Press the ↵ (Edit) key to access the State sub
menu. Using the ▼ (down) key, set the state to
On (indicated by the filled radio button). Press
the ↵ (Edit) key to return to the Event 1 screen.
Verify that the status line confirms the State is set
to On.
State
Off
On
49
Technical Manual
4.
5.
Press the ▼ (down) key to highlight Event Type
and press the ↵ (Edit) key to access the menu.
Using the ▼ (down) key, set the Event Type to
Free Vend (indicated by the filled radio button).
Press the ↵ (Edit) key to return to the Event 1
screen. Verify that the status line confirms the
Event Type is set to Free Vend.
Press the ▼ (down) key to highlight Start Time
and press the ↵ (Edit) key. From this menu the
engineer sets the time at which the free vend
period will start. Press the sequence 1-0-3-0,
using the drink selection keypad, to set the time.
If necessary use the ▲ (up) or ▼ (down) key until
AM appears in the dotted box.
Event Type
Inhibit
Free Vend
Discount
Start Time
hh / mm / mode: 12 / 24
10 : 30
AM
Press Arrows To Select
6.
Press the ↵ (Edit) key to return to the Event 1 screen. Verify that the correct
start time is displayed in the status line at the bottom of the screen.
7.
Press the ▼ (down) key to highlight Stop Time
and press the ↵ (Edit) key. From this menu the
engineer sets the time at which the free vend
period will end. Press the sequence 0-2-3-0, using
the drink selection keypad, to set the time. If
necessary use the ▲ (up) or ▼ (down) key until
PM appears in the dotted box.
Stop Time
hh / mm / mode: 12 / 24
02 : 30
PM
Press Arrows To Select
8.
Press the ↵ (Edit) key to return to the Event 1 screen. Verify that the correct
stop time is displayed in the status line at the bottom of the screen.
9.
Press the ▼ (down) key to highlight Days Of Week and press the ↵ (Edit) key.
The engineer can now set the days on which the
Days of Week
free vend period will take place. Upon entry to X Tuesday
the sub menu, the first day, Monday will be X Wednesday
X Thursday
highlighted with an empty box. Pressing the ↵ X Friday
Saturday
(Edit) key will select the day, indicated by an X
Start = Set or Clear All
appearing in its adjacent box.
Using the ▼ (down) key and the ↵ (Edit) key, highlight and select additional days
of the week that the free vend period will take place. When complete press the
X (Exit) key to return to the Event 1 screen.
50
Technical Manual
10. Press the ▼ (down) key to highlight Selections
Selections
and press the ↵ (Edit) key. The engineer can now X Espresso
set the drink selections that will be available X Double Espresso
X Hot Chocolate
during the free vend period. Upon entry to the
Cappuccino
Caffe Mocha
sub menu, the Espresso selection will be
Start = Set or Clear All
highlighted with an empty box. Pressing the ↵
(Edit) key will select the day, indicated by an X appearing in its adjacent box.
Using the ▼ (down) key and the ↵ (Edit) key, highlight and select additional drink
selections that will be available during the free vend period.
Tip - Items 9 & 10: To set the required days/selections quickly, press the START
key to check all boxes, then using the ▼ (down) key, scroll and highlight the
days/selections not required and press the ↵ (Edit) key to remove the X from the
corresponding box.
11. Press the X (Exit) key three times to return to the Timed Events Menu.
Using the previous sequence the engineer can quickly and easily set up additional free
vend periods and inhibit vend and/or discount vend periods if required.
12. When setting up a discount price period it is necessary for the engineer to enter
a value for the discount. Follow the procedure as described previously to enter
a discount vend period and set the state, start time, stop time and days of the
week that the event will occur.
13. The engineer can now enter a Discount menu in
order to enter a discount value as a percentage
(%). The LCD will display a screen similar to the
one shown opposite. With Discount highlighted,
press the ▼ (Edit) key to access the Discount
screen.
14. To enter the discount value, e.g. 50%, press the
sequence 5-0 using the appropriate number keys
on the drink selection keypad. Press the ↵ (Edit)
key to return to the 11 (Discount) screen and
verify that the status line displays the discount
percentage value entered.
11
Event Type
Start Time
Stop Time
Days Of Week
Discount
0%
Discount
50
0-9 to Edit Value
Edit when Finished
Note: When machine is fitted with a coin mechanism, please ensure that discount
value entered can be supported by the coin tubes.
15. Press the X (Exit) key three times to return to the Main Menu screen.
51
Technical Manual
2. Sanitation Events Menu: This sub menu allows the engineer to select periods
when the machine will automatically rinse through the water system via the 6 timed
and 6 post vend rinse periods available. The default setting for all rinse periods is Off.
1.
From the Main Menu press the ▼ (down) key until Timed Events is highlighted
then press the ↵ (Edit) key.
Sanitation Events Menu
2.
Once in the Timed Events menu press the ▼
(down) key to highlight Sanitation Events Menu
then press the ↵ (Edit) key. The LCD will display
the screen as shown.
1
2
3
4
5
6
Timed
Timed
Timed
Timed
Timed
Timed
Off
Off
Off
Off
Off
Off
The following example describes how the engineer can program a timed event to rinse
the water system at 07.00 am, everyday.
1.
2.
3.
4.
5.
52
To set up the first timed rinse, press the ↵ (Edit)
key to access the 1 Timed sub menu. The LCD
will change and display the screen as shown. By
default the current State is set to Off as indicated
by the status line at the bottom of the screen.
Press the ↵ (Edit) key to access the State sub menu.
Using the ▼ (down) key, set the state to On
(indicated by the filled radio button). Press the ↵
(Edit) key to return to the 1 (Timed) screen. Verify
that the status line confirms the State is set to On.
Press the ▼ (down) key to highlight Event Type.
By default the event is set to Timed as indicated
by the text displayed in the status line at the
bottom of the screen. Therefore it is not
necessary for the engineer to enter this sub menu.
Press the ▼ (down) key to highlight Start Time
and press the ↵ (Edit) key. From this menu the
engineer sets the time at which the the sanitation
event will start. Using the drink selection keypad,
press the sequence 0-7-0-0 to set the time. If
necessary use the ▲ (up) or ▼ (down) key until
AM appears in the dotted box.
1
State
Event Type
Start Time
Days Of Week
Off
State
Off
On
1
State
Event Type
Start Time
Days Of Week
Timed
Start Time
hh / mm / mode: 12 / 24
07 : 00
AM
Press Arrows To Select
Press the ↵ (Edit) key to return to the 1 (Timed) screen. Verify that the correct
start time is displayed in the status line at the bottom of the screen.
Technical Manual
6.
Press the ▼ (down) key to highlight Days Of Week and press the ↵ (Edit) key.
From this menu the engineer can set the days on
Days of Week
which the sanitation event will take place. To X Monday
Tuesday
select everyday (Monday - Sunday), press the X
X Wednesday
START key on the drink selection keypad. The X Thursday
program automatically places an X in every box X Friday
Start = Set or Clear All
indicating that each day is selected.
Note: To select individual days, scroll through the menu using the ▲ (up) or ▼
(down) keys until the required day is highlighted. Press the ↵ (Edit) key to select
the day, indicated by an X appearing in its adjacent box.
7.
Press the X (Exit) key three times to return to the Timed Events Menu. Using
the sequence described above the engineer can quickly and easily set up additional
sanitation event periods for the machine.
It is also possible for the engineer to program up to six post vend sanitation events.
The following example describes how the engineer can program a post vend event to
rinse the water system 12 minutes after each vend.
1.
From the Main Menu press the ▼ (down) key until Timed Events is highlighted
Sanitation Events Menu
then press the ↵ (Edit) key. Once in the Timed
Timed
Off
Events menu press the ▼ (down) key to highlight 2
3
Timed
Off
Sanitation Events Menu then press the ↵ (Edit) 4
Timed
Off
Timed
Off
key. Press the ▼ (down) key until the first Post 5
Timed
Off
Vend event is highlighted. The LCD will display 67
Post Vend
Off
the screen as shown.
2.
With Post Vend highlighted, press the ↵ (Edit)
key to access the 7 Post Vend sub menu. The
LCD will change and display the screen as shown.
By default the current State is set to Off as
indicated by the status line at the bottom of the
screen.
3.
Press the ↵ (Edit) key to access the State sub
menu. Using the ▼ (down) key, set the state to
On (indicated by the filled radio button). Press
the ↵ (Edit) key to return to the 7 (Post Vend)
screen. Verify that the status line confirms the
State is set to On.
7
State
Event Type
Delay
Off
State
Off
On
53
Technical Manual
4.
5.
Press the ▼ (down) key to highlight Event Type.
By default the event is set to Timed as indicated
by the text displayed in the status line at the
bottom of the screen. Therefore it is not
necessary for the engineer to enter this sub
menu.
7
State
Event Type
Delay
Post Vend
Press the ▼ (down) key to highlight Delay. The status line indicates the factory
default delay which is set to 0.1hrs (6 minutes).
Delay
To change the value so that the machine will self
clean 12 minutes after a drink is vended press the
00.2
↵ (Edit) key to access the Delay sub menu. The
0-9 to Edit Value
LCD will display the screen as shown. Using the
Edit when Finished
drink selection keypad, press the sequence 0-02 to set the new delay.
Press the ↵ (Edit) key and verify that the status line confirms that Delay (when
highlighted) is set to 0.2hrs.
6.
Press the X (Exit) key three times to return to the Timed Events Menu. Using
the sequence described above the engineer can quickly and easily set up additional
post vend sanitation event periods for the machine if required.
Note: A sanitation event, either timed or post vend, dispenses water into the
drip tray. If the tray reaches its full limit the machine will be ‘Out Of Service’.
3. Backup Events Menu: This sub menu allows the engineer to program the
machine to perform an automatic backup of all user configurable settings and sales data
stored in its memory. The default setting for Backup Events is Off.
1.
From the Main Menu press the ▼ (down) key until Timed Events is highlighted
then press the ↵ (Edit) key.
2.
Once in the Timed Events menu press the ▼
(down) key twice to highlight Backup Events
Menu then press the ↵ (Edit) key. The LCD will
display the screen as shown.
3.
Press the ↵ (Edit) key to access the 1 Backup
Data sub menu. The LCD will change and display
the screen as shown. By default the current State
is set to Off as indicated by the status line at the
bottom of the screen.
Backup Events
54
Backup Data
Off
1
State
Start Time
Days Of Week
Off
Technical Manual
4.
5.
Press the ↵ (Edit) key to access the State sub
menu. Using the ▼ (down) key, set the state to
On (indicated by the filled radio button). Press
the ↵ (Edit) key and verify that the status line
confirms the State is set to On.
Press the ▼ (down) key to highlight Start Time
and press the ↵ (Edit) key. Using the drink
selection keypad, set the time at which the the
Backup event will start. If necessary use the ▲
(up) or ▼ (down) key until AM appears in the
dotted box.
State
Off
On
Start Time
hh / mm / mode: 12 / 24
03 : 30
AM
Press Arrows To Select
6.
Press the ↵ (Edit) key and verify that the correct start time is displayed in the
status line at the bottom of the screen.
7.
Days of Week
Press the ▼ (down) key to highlight Days Of
Monday
X
Week and press the ↵ (Edit) key. From this
X Tuesday
menu the engineer can set the days on which the X Wednesday
Backup event will take place. To select everyday X Thursday
Friday
(Monday - Sunday), press the START key on the X
Start = Set or Clear All
drink selection keypad. The program
automatically places an X in every box indicating that each day is selected.
Note: To select individual days, scroll through the menu using the ▲ (up) or ▼
(down) keys until the required day is highlighted. Press the ↵ (Edit) key to select
the day, indicated by an X appearing in its adjacent box.
55
Technical Manual
Section 5 - Service Keypad Functions
Genesis machines are fitted with a service keypad (a)
mounted on the rear of the door (photo). This keypad
contains the Engineers Program entry key and also
allows the engineer/operator to carry out specific functions
during routine cleaning and maintenance.
Note: During certain operations e.g. View Counters it is
necessary for the engineer to utilize the selection keypad
and LCD mounted on the front of the door to access data.
a
Please refer to Section 3 - Programming Mode for details of selection keypad layouts
and functions.
When the safety key is inserted into the door switch and the machine is switched on,
the service keypad allows the engineer to carry out the following functions:
5.1 Switch 1 - Program Entry
This switch allows the engineer to access the Engineers Program (Section 4, page 16).
5.2 Switch 3 - Rinse/Flush
1.
The rinse sequence operates automatically and rinses the mixing bowls.
2.
Each hot water valve and the corresponding whipper is switched on in sequence
for a pre-set rinse time. Once the rinse cycle is complete the machine returns to
standby mode, ready to vend.
3.
To rinse the machine:
a.
Open the front door of the machine and insert the safety key.
Caution: Ensure that a suitable container is placed under the dispense
position. Keep hands away from the dispense area while the rinsing cycle is
in operation.
b.
Press and release the Rinse/Flush switch (3). The rinse sequence begins.
c.
Empty the waste water container when complete.
5.3 Switch 5 - View Counters
The View Counters switch (5) allows the engineer to access the Data Recall Menu.
Entry into this menu allows the engineer to view Non-Resettable and Resettable Sales
Data, view data relating to Timed Events and Identification Numbers of installed
components and (if feature enabled) view SureVend™ assisted vend information. The
56
Technical Manual
Resettable Sales Data and SureVend™ Data menus contain an extra sub-menu which
allows the engineer to delete the current data from the machines memory. Full details
relating to this menu and its contents can be found on pages 16 - 18.
5.4 Switch 6 - Test Vend
The Test Vend switch (6) allows the engineer to vend a drink from the machine to
ensure correct operation after cleaning or maintenance.
1.
When the switch is pressed and released the
LCD will display the screen as shown opposite.
Press a drink selection button followed by the
START button to begin the vend sequence.
2.
Ensure that the selection is correct, has not under/overfilled the cup and most
importantly, tastes good!
3.
Press the X (Exit) key on the drink selection keypad to exit from the Test menu
and return to stand-by mode.
5.5 Switch 7 - Cup Test
This switch allows the engineer to test the operation of the cup drop unit after refilling
the cup stacks. When the switch is pressed the cup drop solenoid is operated and a
cup is ejected from the cup drop unit. This function ensures that the mechanism is
working correctly.
5.6 Switch 8 - Park Head
When this switch is pressed, the dispense head moves to its fully extended position and
stops. Press the switch again to return the dispense head to its correct (homed) position.
Note: It is necessary for the operator to wait for a few seconds between each key
press to allow the machine to respond accordingly.
5.7 Switch 9 - Boiler Fill
When this switch is pressed, the machine pumps a measured amount of water through
the system - approximately 13.5 fl. oz. (400ml), heating it as it does so. This ensures that
heated water is immediately available when a drink is selected. This switch should also be
used to purge any water left in the system after the machine has been moved or shut down
for any length of time.
5.8 Switch 10 - Machine Cool Down
This switch allows the engineer to purge water through the pressure boiler when
system maintenance is required. When the switch is pressed, a fixed amount - 13.5 fl.
57
Technical Manual
oz. (370 ml) is dispensed from the system. Ensure a container is placed under the
dispense head to collect the water. When complete the LCD will display the message
‘Machine Cooled’ and all switch inputs are disabled. Once the power to the machine
is disconnected the engineer can then work safely on the water system.
5.9 Switch 11 - CoEx® Tablet Clean
This switch when pressed initiates the CoEx® brewer tablet cleaning routine. Crane
Merchandising Systems recommends that this brewer cleaning routine should be
carried out on a weekly basis. Proceed as follows:1.
Open the front door of the machine and insert the safety key to restore power
to the machine.
Caution: Ensure that a suitable container is placed under the dispense position.
Keep hands away from the dispense area while the cleaning cycle is in operation.
2.
Press and release button 11 on the service keypad. The LCD
will display the message ‘Please Place Cleaning Tablet in
Brewer’.
Take one cleaning tablet (supplied in packs of 30 - CMS part
no. ZC10598000) and place it into the brewer piston
chamber as shown.
3.
Press the START key on the drink selection keypad to begin the CoEx® tablet
cleaning routine.
4.
The cleaning cycle lasts approximately 7 minutes and dispenses 850 ml of water
through the dispense head. The LCD will display the message ‘Cleaning in
Progress’ throughout the cleaning cycle.
Safety First! Keep hands clear of the brewer mechanism during the cleaning
routine.
5.
When the cleaning cycle is complete the LCD will display the message ‘Cleaning
Cycle Complete’. Press the X (Exit) key on the drink selection keypad to return
the machine to standby mode. Empty the water from the container. Remove the
safety key and close the front door.
5.10 Switch 12 - Reset Waste Counter
IMPORTANT: Every time that the waste container is emptied the waste counter
must be reset. Press button 12 on the service keypad. Two audible bleeps confirm that
the counter has been reset to zero.
58
Technical Manual
5.11 Switch 14 - Clear SureVend Error
This switch when pressed allows the engineer to simply and quickly clear SureVend
errors caused by cup failures.
59
Technical Manual
Section 6 - The Vend Cycle
6.1 Standby Mode
In standby mode the machine is idle, awaiting input from the drink selection keypad.
The LCD will display to the customer one of a number of messages indicating the credit
mechanism of the machine, the coin set and the time. The messages displayed are
determined by the type of coin system which has been programmed via the System
Settings menu (Section 4, page 38).
The credit mechanism is indicated by one of the following prompts:
1. ‘No Money Required’ - indicates that a free vend mode is in force.
2. ‘Please Insert Card’ - indicates that a card system is attached.
3. ‘Please Insert Coins’ - indicates that a coin mechanism is connected.
4. ‘Please Insert Key’ - indicates that the machine is fitted with a key system.
In addition, the prompts ‘Exact Change Please’ or ‘No Change Given’ inform the
customer whether change is available. If the mechanism is set to acceptor, the ‘No
Change Given’ message will always be displayed. If the mechanism is set to changegiver, the prompt will depend upon how full the change tubes are. For more
information please refer to the manual supplied with the change-giver.
The coin set accepted by the coin mechanism is also displayed. This is pre-set in the
controller and outlined in the section covering the programming of the coin set in the
engineer’s program.
6.2 Selecting A Drink
Drink selections are made by pressing the appropriate selection button on the keypad
and then utilising the keypad selection buttons and the LCD display to alter the drink
strength and add milk/sugar to suit the customers personal preference. When in
standby mode, all drink selection buttons will be lit indicating that the drink is available
to be selected. At this time the Milk, Sugar and Start buttons are not lit.
The following example describes how to vend a Gourmet Coffee selection from a
machine set to ‘Free Vend’.
1.
60
Press selection button 6, Gourmet Coffee on
the keypad. All of the other selections buttons
will be extinguished, the Milk, Sugar and Start
buttons will light up and the machine exits from
standby mode. The LCD will display the screen
as shown opposite.
Gourmet Coffee
Technical Manual
Note: The default strength setting for this drink selection is Normal as shown.
2.
To obtain a Strong or Mild beverage it is necessary to press the current drink
selection button. Pressing once will toggle to the Strong selection. Pressing the
button again will toggle to the Mild selection.
Gourmet Coffee
Gourmet Coffee
Pressing the current drink selection button again will revert to the Normal screen.
3.
If milk and/or sugar is required, it is necessary to
press the corresponding button on the keypad
for each selection. When the Milk button is
pressed the LCD changes and displays the
default screen as shown opposite.
4.
If Extra Milk is required the customer presses the milk button a second time. A
third press will display the No Milk selection.
Gourmet Coffee
Gourmet Coffee
Gourmet Coffee
Pressing the milk button again will revert to the Milk selection.
Gourmet Coffee
5.
If the customer requires sugar it is necessary to
press the sugar button. The LCD changes and
displays the default screen shown opposite.
6.
If Extra Sugar is required the customer presses the sugar button a second time.
A third press will display the No Sugar selection.
Gourmet Coffee
Gourmet Coffee
Pressing the sugar button again will revert to the Sugar selection.
61
Technical Manual
7.
Once the required drink has been selected, press the Start button on the keypad.
All lit buttons will be extinguished apart from the drink selection button which
flashes indicating that the drink is being vended.
Unless the customer has placed their own cup
into the dispense area, a cup will automatically
be ejected from the cup drop unit into the
dispense area and the drink selection will be
delivered into the cup. While this operation is in
progress the LCD will display the screen shown
opposite.
8.
After the beverage has been dispensed the LCD will display the message Thank
You and the machine will beep once. The message on the display will change to
read Please remove cup. The drink can then be carefully removed from the
dispense area and the machine will return to standby mode.
9.
Certain drink selections do not allow the
strength option to be selected or milk added.
For example, if the customer presses the
Cappuccino selection button, all of the other
selection buttons will be extinguished, the Sugar
and START buttons will light up and the LCD
will display the screen opposite. The customer can either press the START button
to vend the drink or first press the sugar button in order to add sugar to their
taste as described above.
10. Other drink choices do not allow the strength
Hot Chocolate
option or milk/sugar to be selected. For
example, if the customer presses the
Chocolate selection button, all of the other
selection buttons will be extinguished, the
START buttons will light up and the LCD will
display the screen opposite. The customer simply presses the START button and
the machine will vend the drink as described above.
62
Technical Manual
6.3 Replacing/Updating Drink Selection Decals
Drink selection and pricing decals are mounted onto a paper backing sheet which is
secured behind a transparent clip-in cover.
To update drink pricing or replace drink description decals, proceed as follows:
1. Carefully unclip the transparent decal cover from the door
using the snap fit clip at the top. Remove the decal sheet
from its holder as shown opposite.
2. Updating pricing: Carefully remove the previous price
decals from the drink selection decals. Update the prices
where necessary using new self adhesive decals (Refer to
Spare Parts, Section 12, for part numbers).
3. Updating drink selections and pricing: When updating selection decals and
prices it will be necessary to use a new backing sheet. These are available as spares
from the manufacturer.
To order quote part no GR11157000 (US English) or GR11199000 (French).
Peel the relevant drink selection decals from their
backing sheet (part no. PR10233000) and apply to the
backing sheet using the printed guides as shown
opposite.
Apply price decals as described above.
4. Place the decal carrier behind the transparent decal cover and refit complete
assembly to the door. Ensure decal cover locating lugs are correctly located before
pushing the snap fit clip into place.
63
Technical Manual
Section 7 - Technical Information
7.1 Water Services
The water supply provides water for the pressure system fitted to Genesis B2C
machines. Water enters at the rear of the machine through a solenoid operated inlet
valve operating at 24v DC, which opens or closes the water supply as required.
The water system fitted to Genesis machines is described in detail in Section 8 of this
manual (8.2 - System Overview).
7.2 Ingredient Dispense
1.
The ingredients required for making up either an instant or freshbrew drink are
contained in ingredient canisters and are dispensed by means of an auger located
in the base of each canister. Each auger is driven by a 24v DC motor.
2.
The amount of product dispensed by each canister is controlled by the vending
machine controller and may be adjusted via the Selection Timers menu in the
engineers program - see page 27 for further details.
3.
The required ingredients for each vend are delivered to a mixing bowl, where they
are blended with hot water by a high speed whipper prior to discharge at the
dispense head.
4.
To ensure a free flow of ingredient powder and granules, it is essential that they
are kept completely dry. This is achieved by extracting steam from the mixing
system using an exhaust fan. The electrical supply for the exhaust fan is 115v AC.
Note: The fan runs continuously whilst the cabinet door switch is in the on position.
5.
Coffee beans are stored in a bean container which is fitted with a sealable lid to
keep the beans fresh and are dispensed into the CoEx® Brewer via a grinder
located under the bean container outlet.
6.
The amount of beans dispensed from the container is controlled by the vending
machine controller and may be adjusted via timing constraints set in the Engineers
Program - see page 28 for details.
7.3 Mixing System
1.
64
The mixing system utilises a 24v DC 13,000 RPM motor assembly and mixes
ingredient with hot water to make a drink.
Technical Manual
2.
The mixing units are front mounted and secured by a single fixing screw. For
servicing, the complete unit can be quickly and easily removed from the front of
the machine.
Note: An illustration showing the parts breakdown for the Mixing System is
included in Section 12 - page 115.
7.4 Moving Dispense Head
1.
Genesis machines are fitted with a moving dispense head mechanism. This allows
for a quicker and more direct cup drop and also helps to prevent cross
contamination of drinks. The head features three separate dispense positions
depending upon the drink being dispensed.
2.
The mechanism is operated by a 24v DC 50 RPM motor. The motor is connected
to a pinion which engages with a rack on the dispense arm. This mechanism is
used to move the dispense head backwards and forwards.
3.
A micro switch, fitted to the rear of the dispense head chassis detects the home
position (head withdrawn/not dispensing). An optical sensor is also fitted and this
works in conjunction with a decoder bracket attached to the rack to determine
the position of the dispense head.
4.
A molded dispense head mounted at the front of the unit connects the pipes from
the various mixing systems, brewers and hot water, to separate dispense nozzles.
Note: An illustration showing the parts breakdown for the Moving Dispense
Head is included in Section 12 - page 113. Dispense tube lengths are shown on
page 72.
7.5 Cup Dispense Unit
1.
Cups (either paper or plastic) are stored in tubes which are located above the
cup dispense unit. The unit incorporates a 24v DC, 1.7 r.p.m. motor for Indexing
the correct turret over the cup drop unit as required.
2.
When a selection is made the Main Controller checks that the cups are not sold
out, a 115v AC solenoid is energised and a cup is dispensed.
3.
The cups are separated and ‘dropped’ by a cup ring. The cup ring comprises six
separator cams operated by a solenoid, which is controlled by the vending
machine controller.
65
Technical Manual
4.
The cup level is monitored by an electronic system. An infrared LED (cup sensor
transmitter) is positioned in the cup assembly above the cup ring, with an infrared
detector (cup sensor receiver) mounted directly opposite.
5.
The light emitted by the LED is detected when NO CUPS are present. With a
stack of cups present, the beam is broken. As the cups drop below the LED,
transmitted light is detected. If this is the case, the controller will index the cup
tubes until a stack is located. A turret location micro-switch ensures that the cup
tubes stop centrally over the cup ring.
Note: The turret motor will run until the next stack is deposited into the cup
ring, which breaks the LED beam, and the cup stack micro switch returns to its
normally open state. The motor will run until it either finds the next stack or all
the turret tubes have been checked.
6.
The cup stack index motor is protected by a time-out feature. The motor will
rotate for a maximum period of 60 seconds. If at the end of this period no cups
have been detected the machine will display the Out of Cups message.
Note: An illustration showing the parts breakdown for the Cup Drop Unit is
included in Section 12 - page 107.
7.6 Waste Level Probes
1.
The waste level probes, fitted to the underside of the machine, detect the water
level in the waste tray.
2.
The system consists of two springs set at different levels. When the water level
is high enough that both of the springs are immersed in the water a message is
displayed on the machine saying the waste tray is full and the machine is disabled.
Note: The springs are set at two different levels in order to lessen the chance
that movement of water in the drip tray could accidentally disable the machine.
7.7 CoEx® Brewer
The unique CoEx® combined coffee and espresso brewer provides both freshly
brewed coffee along with fresh coffee from beans through the same unit. The unit is
driven by a 24v DC, 13 RPM motor, controlled by a micro switch. The switch sends
logic signals to the controller during vend and initialize operations, indicating its
position. Please refer to Section 8 for full details of the CoEx® brewer and its
operation.
66
Technical Manual
7.8 Power Supply Unit
1.
The power supply unit (PSU) provides power to the machine. It is mounted on
the PSU chassis on the left hand side of the machine and can be accessed by
removing the lower front panel.
2.
The PSU converts 115v AC to 24v DC to run the valves, whipper motors,
ingredient motors, brewers, etc. fitted to the machine. The solid state relay,
mounted on the PSU chassis, uses a 24v DC switching circuit to provide 115v AC
for the heater element.
3.
The Input/Output (I/O) board, mounted on the PSU chassis, utilizes signals from
the main controller in order to operate valves, whipper motors, the dispense head
motor, ingredient motors, brewer motors, etc.
4.
The PSU houses three fuses. These are as follows.
● Heater, 12 amp T (ceramic)
● 115v Auxiliary, 4 amp (glass)
● 115v PSU, 4 amp (glass)
Note: An illustration showing the parts breakdown for the PSU is included in
Section 12 - page 117.
7.9 16 Amp Filter
A 16 Amp filter, mounted on the rear panel, prevents voltage spikes reaching the
power supply, I/O board, controller boards and other sensitive components within the
machine. It also prevents voltages generated within the machine from being emitted
into the 115v supply.
7.10 Coin Mechanism Transformer
The coin mechanism transformer converts 115v AC to 24v AC for Executive protocol
type coin mechanisms. The 24v AC supply is protected by an in-line 4 amp, glass fuse,
which is located in the door assembly above the coin mechanism.
7.11 Coin and Card/Key Systems
The Genesis may be equipped with coin or card/key validation systems using either
protocol ‘A’ or alternatively an MDB system. The coin or card/key system informs the
vending machine controller of the amount of credit which has been deposited into the
vending machine.
67
Technical Manual
7.12 Coin Mechanism
1.
The Coin Mechanism communicates with the vending machine controller through
a serial communication interface. It will validate a coin and if accepted, send a signal
to the vending machine controller indicating the total amount of money which has
been tendered since the last vend.
2.
Once sufficient credit has been accumulated a vend will be permitted. Where
possible the coin mechanism will return the appropriate amount of change to the
customer.
7.13 Coin Blocker
For Genesis machines fitted with a coin mechanism, a logic ‘low’ level from the vending
machine controller will disable any coin acceptance.
7.14 Card/Key System
1.
The card system fitted to the machine communicates with the vending machine
controller using the same principle as the coin mechanism.
2.
The card system informs the vending machine controller of the amount of credit
on the customer's card. If there is sufficient credit for the selected drink, the
vending machine controller permits a vend and informs the card system of the
amount of credit to be taken from the card. The new balance will then be rewritten onto the customer's card.
Note: For full information and programming instructions for all of these systems,
please refer to the user manual supplied with the validation system.
68
Technical Manual
Section 8 - Espresso (B2C) System
Genesis B2C machines are capable of producing high quality espresso based drinks
through the unique CoEx® brewer unit either independently (Espresso, Americano),
or in conjunction with the soluble product (Cappuccino, Caffe Mocha etc). The
machine can also vend high quality freshbrew coffee from pre-ground product.
8.1 Example Vend
When an Espresso drink is selected the following sequence occurs:1.
The customer selects an espresso drink. Fresh beans are delivered into the
grinder and the grinder is operated for a pre-determined time. Ground coffee is
deposited into the CoEx® brewer.
2.
The brewer moves to the vend position. The brewer motor starts running clockwise,
causing the filter assembly to cover the piston chamber and the piston to move
upwards, forming the ground coffee into a compressed cake as it does so.
3.
When the heater reaches the correct temperature the inlet valve is opened and
the 3 bar pressure relief valve closed. At the same time the pumps will start
pumping water through the system and into the brewer.
4.
While water is passing through the system a water flow meter will send pulses
back to the main controller and the espresso selection will be delivered into the
cup.
5.
Once the required amount of water has been pumped through the system, the
inlet valve closes and the pumps stop pumping water through the system. The
brewer compresses the used coffee pellet, the pressure relief valve is opened and
the espresso valve switched on.
6.
The brewer motor reverses and drives the piston back up to the top of the
chamber. The wiper mechanism ejects the used coffee cake into the dry waste
container and the brewer piston moves back to the stand-by position.
8.2 System Overview
Note: A diagram illustrating the water system fitted to Genesis B2C machines is
included at the end of this section.
Important: The machine must be operated in conjunction with a water filter of food
grade quality, capable of removing temporary hardness (scale), heavy metals (lead,
69
Technical Manual
copper, iron, cadmium), chlorine and any organic pollutants/discolouration.
1. Water Inlet Valve
A 24V dc single solenoid water inlet valve. When a drink is selected the inlet valve is
opened. At the same time the pumps are operated, pumping water through the
system.
2. Reducing Valve
An inline reducing valve that maintains water pressure within the system at 0.5 bar.
3. Vibration Pumps
When a drink is selected the pumps switch on at the appropriate moment until the
required amount of water has been pumped through the system.
4. Flow Meter
As water flows through the system, the flow meter sends pulses back to the control
board.
5. Pressure Boiler
The pressure boiler has a capacity of 11.8 fl. oz. (350 ml) and is fitted with a 1250 W
heating element. Cold water is diffused as it enters the boiler through the lower
coupling. Heated water exits the boiler through the top coupling. A resettable
temperature cut-out is mounted externally near the top of the boiler and acts as a safety
feature. A thermistor is mounted on the front of the boiler to measure water
temperature.
6. Espresso Valve
Supplies heated water to the CoEx® brewer when an espresso or freshbrew drink has
been selected.
7. Pressure Valve
This valve is normally open exposing the system to the 43 psi (3 bar) mechanical relief
valve. It is closed during vends to allow higher pressures to be achieved within the
system.
8. Relief Valve - 43 psi (3 Bar) - Mechanical
The 43 psi (3 bar) pressure valve is a mechanical safety valve. The valve allows for heat
expansion while the machine is in stand-by mode.
9. Safety Valve - 174 psi (12 Bar) - Mechanical
This valve provides overall system safety. The valve will open should the pressure
within the system exceed 174 psi (12 bar).
70
Technical Manual
10. Grinder Mechanism (Not Shown On Water Flow Diagram)
The grind mechanism consists of a 115V ac conical grinder with a manual adjustment.
When an espresso based drink is selected the grinder will run for the required time,
grinding beans and feeding the brewer at the same time. The grinder is fitted with a
manual adjusting mechanism which allows the engineer to vary the size of the ground
coffee in order to satisfy customers’ taste preferences.
11. CoEx® Brewer (Not Shown On Water Flow Diagram)
The brewer unit is capable of receiving between 5 and 9 grams of ground coffee. Once
the coffee has been ground and dispensed into the brewer unit, the 24V dc brewer
motor drives the brewer to the vend position using the current sensing as control.
Once the coffee has been compressed into a round cake, water is pumped through
the brewer.
When the required amount of water has passed through the brewer, the now wet
coffee ‘cake’ is squeezed, removing most of the water from the ‘cake’, preventing the
brewer becoming unnecessarily dirty. After the ‘cake’ has been squeezed the brewer
will deposit the cake into the dry waste container and return to the stand-by position.
8.3 Genesis B2C Water Flow Diagram
13
13
13
13
KEY:
12
VALVE 1
VALVE 2
VALVE 3
VALVE 4
PRESSURE VALVE
10
TOPPING
MILK/SUGAR
CHOCOLATE
HOT WATER
N/O
11
9
1.
2.
3.
4.
5.
6.
7.
8.
9.
10.
11.
12.
13.
INLET VALVE
REDUCING VALVE
FLOW METER
PUMPS
PRESSURE BOILER
ELEMENT
THERMISTER
THERMAL CUT-OUT
ESPRESSO VALVE - 3 WAY
PRESSURE VALVE - 2 WAY
RELIEF VALVE - 3 BAR
SAFETY VALVE - 12 BAR
3 WAY VALVE
NOTE:
System shown in idle state
BREWER
2
4
3
7
PUMP 2
8
WATER
SUPPLY
6
4
1
PUMP 1
DRIPTRAY
5
71
Technical Manual
Section 9 - Dispense Tube Lengths
H
4
3
1
2
Tube No
1
2
3
4
Diameter
0.236
0.236
0.236
0.315
in
in
in
in
(6
(6
(6
(8
mm)
mm)
mm)
mm)
I.D.
I.D.
I.D.
I.D.
x
x
x
x
0.394
0.394
0.394
0.512
Length
in
in
in
in
(10
(10
(10
(13
mm)
mm)
mm)
mm)
O.D.
O.D.
O.D.
O.D.
H = Hot Water Dispense Tube
French Vanilla
Hot Chocolate
72
6.693 in (170 mm)
6.299 in (160 mm)
6.693 in (170 mm)
14.173 in (360 mm)
Technical Manual
Section 10 - Electrical/Electronic Diagrams
The diagrams shown on the following pages illustrate the layout of, and the connections
between, the electrical and electronic components within Genesis B2C machines.
10.1 Console Board/Service Keypad
1
RIBBON
CABLE
J3
2
J2
J5
J4
4
5
6
LCD
J6
WHITE/GREY
BLACK/WHITE
JUG KEY
SWITCH
7
8
RIBBON
CABLE
SERVICE KEYPAD
FREE VEND
SWITCH
3
PURPLE/GREEN
BLACK/WHITE
NOT USED
J1
MAIN CONTROLLER
BOARD LINK
RIBBON CABLE
1
6
2
7
3
8
CONSOLE BOARD
DRINKS SELECTION
AND PROGRAMMING
BUTTONS
9
4
5
PIEZO
SOUND DEVICE
X
0
START
73
Technical Manual
10.2 Control Board
The Control Board is the main controller for all of the machines functions. The board
is located inside the door behind the monetary cover. To gain access to the board:
1.
Switch off the power to the machine and open the front door. Unscrew and
remove the two knurled thumbscrews securing the monetary cover.
2.
Open the monetary cover. Loosen the four screws securing the control board
cover and remove.
J9A
J36
J35
DEX
RS232
MAIN CONTROLLER BOARD
8
7
6
J4
THERM OUT
THERM COM
3
IR IN-TX
2
IR OUT-TX
1
5V+
} THERMISTOR
} SURE VEND SENSOR
J5
LED 2 POWER
LED 1 COMMUNICATIONS
SERIAL COMMS
8
GND
7
RST
6
RXD
TXD
1
2
3
4
1
2
J3
3
4
5
6
0V
POWER
24V+
GND
TX
24V+
RX
MONETARY DEVICE
2
J39
RED
BLUE
SCREEN
CLK
3
1
74
J8
5V+
5
4
BATTERY
GND
J7
3
2
J6
CONSOLE
IrDA
J9B
4
1
J10
CONSOLE
9
5
4
3
2
1
MAIN
CONTROLLER
BOARD LINK
RIBBON CABLE
SUREVEND
SENSOR
BLACK
WHITE
PLUG
RED
RED
BLUE
BLACK
THERMISTOR
PRESSURE
TANK
RED
BLUE
BLACK
WHITE
BLACK
1
2
3
4
5
6
7
8
9
J4
J9A
5V+
} SURE VEND SENSOR
} THERMISTOR
MAIN
CONTROLLER
BOARD
LED 2 POWER
J5
J6
CONSOLE
IrDA
J10
CONSOLE
LED 1 COMMUNICATIONS
IR OUT-TX
IR IN-TX
THERM COM
THERM OUT
J9B
MAIN
CONTROLLER
BOARD LINK
RIBBON CABLE
Technical Manual
10.3 Control Board Connections - 1
The diagram below illustrates the connections between the control board and the
console board, SureVend™ sensor, pressure tank and thermistor.
75
BLACK
Technical Manual
10.4 Control Board Connections - 2
The diagram below illustrates the connections between the control board and the
input/output board, coin mechanism communications and the switch mode power
supply.
76
Technical Manual
10.5 Input/Output Board
The Input/Output Board is mounted onto the power supply chassis. This is located on
the PSU chassis on the left hand side of the machine and can be accessed by removing
the lower front panel.
1
1
J15
2
D34
J16
BREWER
MOTOR
2
3
D37
D36
D35
CUP SPLITTER
SOLENOID
1
J17
D38
2
GRINDER
MOTOR
3
1
J18
D39
1
SSR GND
SSR 24V
PUMP 1
1
D40
2
PUMP 2
3
1
J20
36
2
3
J19
2
J14
SOLID
STATE
RELAY
D33
D32
D31
D30
D29
D28
D27
D41
2
3
1
I/O Board
LED Reference
DISPENSE
HEAD MOTOR
34
33
32
24V
31
30
29
TURRET MOTOR
INLET VALVE
HOT WATER VALVE
28
27
26
D18
D17
D16
D15
D14
D13
D12
D11
25
24
23
24V
24V
22
21
20
PRESSURE VALVE
J10
19
18
ESPRESSO VALVE
17
15
14
13
12
24V
MOTORS
VALVES
WHIPPERS
GND
RST
RXD
TXD
CLK
5V+
OUTPUT
GND
5V+
OUTPUT
GND
24V
9
1
2
J2
3
SERIAL
COMMS
4
5
1
2
3
CDU CUP
SENSOR
4
J4
5
6
DISPENSE HEAD
OPTO SENSOR
7
8
J5
11
10
2
3
D10
D9
D8
D7
D6
D5
D4
D3
16
FLOW METER
9
LED’s
8
7
1
6
GND
5
24V
3
PROBE
GND
PROBE
GND
4
GND
2
J7
1
GND
2
J3
3
4
5
J1
24V
6
CAROUSEL
POSITION SWITCH
DISPENSE HEAD
HOME SWITCH
BREWER HOME
POSITION SWITCH
1
2
3
4
1
3
2
WASTE PROBE
SWITCH MODE
POWER SUPPLY
D3 = VALVE 1 (MILK/SUGAR)
D4 = MOTOR 1 (MILK)
D5 = MOTOR 2 (SUGAR)
D6 = WHIPPER 1 (MILK/SUGAR)
D7 = VALVE 3 (TOPPING)
D8 = MOTOR 3 (TOPPING)
D9 = WHIPPER 2 (TOPPING)
D10 = VALVE 4 (CHOCOLATE)
D11 = MOTOR 4 (CHOCOLATE)
D12 = WHIPPER 3 (CHOCOLATE)
D13 =
D14 = MOTOR 5 (F/B COFFEE)
D15 = ESPRESSO VALVE
D16 =
D17 = PRESSURE VALVE
D18 =
D19 =
D20 =
D21 =
D22 = VALVE 2 (HOT WATER)
D23 = INLET VALVE
D24 = TURRET MOTOR
D25 =
D26 =
D27 = DISP HEAD MOTOR FORWARD
D28 = DISP HEAD MOTOR BACK
D29 = DISP HEAD MOTOR ON
D30 =
D31 =
D32 =
D33 = HEATER
D34 = CDU SOLENOID
D35 = BREWER ON
D36 = BREWER (LEFT)
D37 = BREWER (RIGHT)
D38 = GRINDER
D39 = PUMP 1
D40 = PUMP 2
D41 =
D42 =
D42
INPUT/OUTPUT BOARD
D26
D25
D24
D23
D22
D21
D20
D19
J21
35
77
Technical Manual
10.6 Output Circuit
J16
ORANGE/PINK
BREWER
MOTOR
WHITE
J14
SOLID STATE
RELAY
RED/ORANGE
SSR GND
PURPLE/BLACK
SSR 24V
J10
DISPENSE HEAD
MOTOR
VALVE 2
(HOT WATER)
PRESSURE
VALVE
ESPRESSO
VALVE
78
RED/ORANGE
ORANGE/BLACK
Technical Manual
10.11 Input/Output Board Connections - 1
The diagram below illustrates the connections between the I/O board and the main
controller board serial comms link and switch mode power supply.
79
Technical Manual
10.12 Input/Output Board Connections - 2
The diagram below illustrates the connections between the I/O board and the CDU
cup sensor, dispense head opto sensor, turret position switch and dispense head home
switch.
FLOW
METER
DISPENSE HEAD
OPTO SENSOR
YELLOW/GREY
CDU CUP
SENSOR
BLUE/GREEN
INPUT/OUTPUT BOARD
WASTE
PROBE
80
Technical Manual
10.13 Power Circuit - 115V System
MAINS PLUG
BLUE
N
E
BROWN
BLUE
N
MAINS
FILTER
N
GREEN/YELLOW
E
L
E
BROWN
L
L
PRESSURE BOILER
1.25KW HEATER
BLUE
OFF/ON
M
P
P
RED/BLUE
BLUE/PURPLE
BLUE/WHITE
PURPLE/ORANGE
BLUE/BROWN
BLUE
BROWN(4)
J18
3
2
1
1
3
2
1
J17
3
2
1
J15
3
CDU SPLITTER
SOLENOID
1
SSR
2
BROWN(3)
2
PUMP 2
FUSE HEATER (12A)
EXTRACT
FAN
PUMP 1
GRINDER
MOTOR
BLUE
THERMAL CUT OUT
(MANUAL RESET)
BROWN
DOOR SWITCH
BROWN(4)
J19
TEMP CUT OUT
4
I/O BOARD
3
PURPLE/BLACK
SYSTEM FUSE (4A)
BROWN
RED/BLUE
BLUE
UK OPTION
TRANSFORMER
GREY/BLUE
GREY/ORANGE
WHITE/BLACK
15
13
14
9
12
8
7
FUSE COIN MECH (4A)
11
5
6
10
115V N
RED/PINK
WHITE/RED
RED/BLACK
5
TB1
3
4
6
3
1
2
TB2
1
2
+24V
+24V
+24V
0V
0V
0V
3
115V L
1
2
SWITCH MODE
POWER SUPPLY
PINK/WHITE
4
FUSE PSU (4A)
RED/ORANGE
(SELF
RESETTING)
POWER
MOLEX CONNECTION
TO COIN MECHANISM CONNECTORS
81
Technical Manual
10.14 Heater Circuit
1.25kW HEATER
PRESSURE BOILER
SOLID
STATE
RELAY
MAIN CONTROLLER
BOARD
N
The water temperature in the pressure tank is controlled by a thermistor probe. The
thermistor has a variable resistance; when cold it has a high resistance and when hot
it has a low resistance.
1.
The thermistor probe sits directly in the water and continuously senses the water
temperature. The resistance of the thermistor is interpreted by the controller
as a temperature reading.
Note: The resistance of the thermistor when at ambient (room) temperature
should measure about 3000 ohms, when hot (205°F/96°C) it should measure
approximately 220 ohms.
2.
If the water needs to be heated, a signal from the controller is sent down the
Comms. link to the I/O board (heater on signal). The I/O board then switches a
24 volt negative output to the solid state relay. The solid state relay then switches
a 115V supply to the heater element. The element then starts to heat up the
water.
Note: Heating element fitted in the pressure tank is rated at 1250W.
82
Technical Manual
3.
This process continues until the water has reached the temperature which has
been set in the temperature configuration program.
4.
Whenever a drink is selected the water is heated in the pressure tank throughout
the vend.
83
Technical Manual
Section 11 - Diagnostics and Simple Maintenance
11.1 Diagnostics
The following pages list the error messages that may be displayed, diagnostics messages
accessed via the engineers program and fault descriptions.
Crane Merchandising Systems Parts and Support Phone Numbers:
Parts: 1-800-621-7278
Service: 1-800-628-8363
Error
Message
Diagnostics
Screen Text
Fault
Description
Sorry Out of Service
Head Not Homed
Head not homed
Dispense head has not returned to
home position in expected time
Sorry Out of Service
Head Not Extended
Head not extended
Dispense head has not fully
extended in the expected time
Sorry Out of Service
Waste Tray Full
Waste tray full
Waste tray full
Init failed restart
Machine failed on initialization
No I/O comm
Comms error detected between
mpu and I/O board
-
CoEx® brewer not situated
correctly in the machine
All selections
disabled
All drink selections have been disabled
Sorry Out of Service
Rinsing
Rinsing
Automatic or manual rinse
cycle in progress
-
Rinsing
A rinsing cycle was interrupted
and not completed
Cup turret/no cups/
no cups
Unable to find cup stack.
Cup turret has timed-out on initialization
Sorry Out of Service
No Cups
No cups and mug
sensor failure
Machine is out of cups and
mug sensor is faulty
Out Of Cups
Please Insert Mug
No cups/no cups
No cups are available but the mug
sensor is working
Out Of Cups
Please Insert Mug
No cup delivered ring 1
SV on
Non fatal error detected with
SureVend cup mechanism
Please Remove Cup
Mug sensor error/
please remove cup
An error has occurred with the SureVend
sensor during a vend
Sorry Out of Service
Mug Sensor Error
SureVend error and
must SureVend
No cups remaining and fault
with mug sensor
Temporarily
Out of Service
Sorry Out of Service
No I/O Comm
Initializing
Temporarily
Out Of Service
Out Of Cups
Please Insert Mug
84
Technical Manual
Error
Message
Diagnostics
Screen Text
Fault
Description
Please Remove Cup
Mug sensor error
Cup not removed from dispense
area after vend completed
or faulty mug sensor
Sorry Out of Service
Please Insert Mug
No cup delivered ring 1
SureVend on/SureVend
error and must SureVend
Problem with CDU (cup jam)
No more cups being dispensed
Sorry Out of Service
Low Water
Low water
Low water level in heater tank
Sorry Out of Service
Water Tank Heating
Water tank
heating
Water in the heater tank is below the
minimum vend temperature
Sorry Out of Service
Fill Timeout
Fill timeout/ low water
Machine has been filling for 2 minutes and
not reached optimum level
Sorry Out of Service
Invalid Temp
Invalid temp
1. Comms error between I/O & MPU
2. Machine has exceeded optimum
boiler temp
3. Temperature probe fault
Sorry Out of Service
Brewer Jam
Brewer jam
Brewer has not moved from its home
position and may be jammed
Sorry Out of Service
Brewer Not Homed
Brewer not homed
Brewer has not returned to its home
position and may be jammed
Sorry Out of Service
No Monetary Device
Coin mech
comm
Communication error detected between
monetary device and machine
Sorry Out of Service
No Monetary Device
No monetary
device-fatal/No
monetary device
Machine is configured for an incorrect
monetary device, or the device
is not responding
Temporarily
Out Of Service
Coin mech ROM
MDB coin mech ROM checksum
test failed (fatal error)
Temporarily
Out Of Service
Coin mech accept
unplugged
MDB coin mech is
unplugged or faulty
Temporarily
Out Of Service
Coin mech accept
jam
Coin jam detected in coin acceptor
Temporarily
Out Of Service
Coin mech
payout jam
Coin jam detected in coin tube
Temporarily
Out Of Service
Coin mech
tube sensor
Coin tube sensor fault detected
Temporarily
Out Of Service
Coin mech all
tubes err
No useable coin tubes. Machine
unable to pay out
Temporarily
Out Of Service
Coin mech
tube err
Problem with coin tube. Tube indicates
full, but coin count is zero
Temporarily
Out Of Service
Card reader comm
Fatal error. Cannot communicate
with the card reader
85
Technical Manual
Error
Message
Diagnostics
Screen Text
Fault
Description
Temporarily
Out Of Service
Single card reader
error
Transient error with card reader, but card
reader in service. Unable to communicate
with the card reader
Temporarily
Out Of Service
Card reader reports
a comm error
Repeatable error with card reader, but
card reader in service. Unable to
communicate with card reader
Temporarily
Out Of Service
Card reader error
Problem with card reader.
Manufacturing error detected
Temporarily
Out Of Service
Card reader failed
OOS err
Card reader is out of service
Temporarily
Out Of Service
Card reader reports
comm error & is OOS
Comm error with card reader.
Out of service
Temporarily
Out Of Service
Card jammed in
card reader
Card jam
Temporarily
Out Of Service
Card reader failure
Problem with card reader.
Manufacturing error detected
Temporarily
Out Of Service
Card reader
requests servicing
Card reader needs servicing
-
Low water during a CoEx®
brewer clean
No Water
Available
No Water Available
An Error Has
occurred
Sorry Out Of Service
No Water Available
11.2 Adjusting The Cup Drop Mechanism
When changing the type or size of cup vended from the machine, it may also be
necessary to adjust the cup drop mechanism to accommodate the new cups. Proceed
as follows:
1.
Open the door and swing the cup turret assembly out of the machine. Carefully
lift and remove the four transparent cup sleeves from the cup drop unit. Discard
any cups that may be left over.
2.
Place a minimum of 4 new cups into the cup ring. Observe the clearance as shown
in the illustration below.
86
Technical Manual
Note: Clearance indicated in Correct Adjustment diagram should be no more
than half the diameter of the cup lip (maximum) but just enough to allow for
smooth cup ejection.
3.
If necessary adjust the cup ring to obtain the
clearance as shown. Loosen the adjustment arm
screw (a) and move the adjustment arm (b) until
the correct clearance is achieved. Hold
adjustment arm in place and retighten the
adjustment screw.
Note: Move the arm clockwise if adjusting for
larger diameter cups and anti-clockwise for
smaller cups.
4.
Switch on the power to the machine using the door switch safety key. Using the
service keypad located in the rear of the door, press the cup test switch (7) and
check that a cup is ejected correctly. Repeat this test several times to confirm
that the mechanism is functioning correctly.
5.
Refit the transparent cup sleeves to the cup drop mechanism ensuring that the
flat on the turret motor lines up with the flat in the turret molding. Fill the cup
sleeves with cups. DO NOT touch cups with your hands. Allow the cups to drop
into the cup sleeves directly from the packaging.
6.
Rotate the cup turret assembly back into its operating position, ensuring that the
unit ‘locks’ into place. Remove the safety key and close the door.
11.2 B2C System Drain Down
Should it become necessary for the engineer to work on the B2C water system or the
machine requires draining prior to shipping, it is very important that the following
sequence is followed to ensure safe working as well as correct system fill and heating
when the machine is powered up.
1.
Open the door and insert the door switch safety key. Ensure the waste tray is
fitted correctly and empty. Using the service
keypad located in the rear of the door, press the
Machine cooling
‘Machine Cool Down’ switch (10). The LCD will
display the message shown opposite while
approximately 13.5 fl. oz. (400ml) of cold water
is flushed through the system and out to the
waste tray.
87
Technical Manual
IMPORTANT: Pressing switch 10 also informs the machine software that the
B2C system has been drained ensuring that the B2C system will automatically fill
before heating on power up. This is very important and must not be overlooked.
2.
Once the B2C system has been cooled the LCD will display the message ‘Machine
cooled’ and water will stop pumping through the system. Remove the waste tray
and empty the contents before re-fitting to the machine.
3.
Remove the safety key from the door switch to turn off the power to the machine.
4.
Close the fresh beans outlet slide and remove the fresh beans container. Rotate
ingredient canister outlets to upright position and remove the canisters. DO NOT
place them on the floor.
5.
Loosen the 4 screws securing the top cover and
remove. Remove the brewer waste bucket from the
machine. Loosen the 4 screws securing the lower
cover.
6.
Remove the lower cover from the machine to expose
the boiler blanking plug (1). Hold the collar and
remove the plug. Attach a length of silicone tube to
the outlet to act as a drain. Place the trailing end into
an empty bucket.
7.
Remove the air intake blanking plug (2) located in the
top LH corner of the machine. All water will be
ejected from the system via the boiler drain into the
bucket allowing the engineer to safely work on system
components.
1
2
To refill the system, proceed as follows:
1.
Remove the drain tube from the boiler drain and replace the blanking plug. Refit
the air intake blanking plug. Refit both the top and lower covers to the machine.
Ensure all fixing screws are re-tightened.
2.
Refit the fresh coffee beans container into the machine and open the outlet slide.
Refit ingredient canisters into the machine, rotating outlets to their correct
operating position. Refit the brewer waste bucket into the machine.
88
Technical Manual
3.
Insert the door switch safety key. The machine will initialise, priming the system
with 13.5 fl. oz. (400ml) of water before returning to standby. Hold a suitable
container under the dispense head during machine power up. Once in standby
mode remove the safety key and close the door.
11.3CoEx® Brewer/Bean Grinder Maintenance
Genesis machines are fitted with the unique CoEx® brewer unit which produces both
fresh coffee and espresso based drinks from ground beans and freshbrew pre-ground
coffee from the same unit. Routine cleaning and maintenance instructions for this unit
can be found in the Genesis Operators Manual - Part No. PR10959000.
1. CoEx® Brewer/Grinder Blades - 50,000 Vend Service
Crane Merchandising Systems recommends that the brewer unit and bean grinder is
serviced by an authorized engineer after every 50,000 vends.
A CoEx® service kit (part no. PH10820000, shown
opposite) is available from the manufacturer and
contains all of the components required to ensure
the machine continues to give trouble-free service.
The service kit contains the following components
(with part nos.):
1.
Lower piston and cylinder assembly - Pt. No.
ME10592000
2.
Filter head assembly - Pt. No. ME10284000
3.
Grinder blades - Pt. No. ME07308000
4.
‘O’ ring - water inlet (not shown) - Pt. No.
ME10595000
1
2
3
To carry out the 50,000 vend service, proceed as follows:
1.
Disconnect the machine from the electrical power.
Open the front door of the machine.
2.
Remove the coffee dispense pipe from the brewer
outlet. Holding the unit as shown in the photograph,
lift the green lever (a) and carefully pull the brewer
unit out of the machine.
a
89
Technical Manual
3.
Carefully unclip the wiper arm from the brewer unit
and place to one side.
Remove the filter assembly from the brewer.
Holding the filter assembly as shown, turn the green
locking ring counter-clockwise to its open position,
indicated by the two arrows.
Carefully remove the old filter unit down and out
of the CoEx® brewer unit. Discard the used filter
unit.
4.
Using a 3mm allen key, remove the bolt securing the
brewer drive coupling to the input shaft. Pull the
coupling off of the shaft and place to one side.
Ensure that the captive lock nut is retained in the
drive coupling moulding.
5.
Working from the front of the brewer, unscrew and
remove the three retaining screws which secure the
brewer unit together.
Carefully ease both the front and rear brewer
panels away from the central piston chamber/swing
arms assembly.
6.
Holding the unit as shown in the photograph, rotate
the lower piston and cylinder assembly clockwise
and then remove it up and out of the swing
arms/filter holder assembly.
Discard the used lower piston and cylinder
assembly.
Clean all of the dismantled brewer components
thoroughly to remove all traces of waste coffee
product.
90
Technical Manual
7.
Take the new lower piston and cylinder assembly
from the service kit.
Before assembling the unit to the swing arms/filter
holder assembly, ensure that the lower piston (a) is
at the top of its stroke as shown in the photograph.
8.
Ensure that the piston drive cam (b) is positioned
as shown.
If necessary, push the piston drive cam counterclockwise until it reaches its stop position.
9.
Holding the lower piston and cylinder assembly as
shown, guide the assembly into the swing arms/filter
holder assembly.
10. Check and ensure that the lower piston guide block
(c) locates with the piston drive cam (d) as shown
in the photograph.
c
d
91
Technical Manual
11. Ensure that the plastic washer (a) is fitted correctly
over the input shaft (long side) as shown.
Re-assemble the front and rear brewer panels to
the central piston chamber/swing arms assembly
using the three retaining screws/locknuts.
Check and ensure that the brewer release lever
mechanism operates correctly.
12. Re-fit the brewer drive coupling to the input shaft
ensuring that the raised ‘pip’ (b) lines up with its
locating dimple (c) on the input shaft.
Ensure that the captive lock nut is retained in the
plastic drive coupling moulding. Using a 3mm allen
key, refit the bolt to secure the brewer drive
coupling to the input shaft.
13. Take the new filter head assembly from the service
kit.
Holding the new filter assembly as shown, turn the
green locking ring counter-clockwise to its open
position, indicated by the two arrows.
Place the filter unit up into the filter holder and turn
the green locking ring clockwise to lock it into
place.
14. Re-assemble the wiper arm (d) to the filter holder
assembly
Ensure that the wiper arm is located under the
coffee outlet pipes as shown (e).
92
Technical Manual
15. Moving to the machine, remove the ‘O’ ring (a)
from the water inlet pipe and discard. Fit the ‘O’
ring included in the service kit onto the inlet pipe.
Ensure that the new ‘O’ ring is seated correctly.
Refit the CoEx® brewer unit into the machine. Slide
the unit into place until it ‘clicks’ into position. Refit
the coffee dispense pipe to the brewer outlet.
16. Replacing The Grinder Blades.
Push in the bean canister shut-off to close the fresh
beans outlet. Carefully remove the fresh beans
canister from the machine and place it to one side.
Pull up and remove the grinder adjusting wheel
assembly (b) from the rear of the grinder body.
Unscrew the grinder body (c) anti-clockwise and
remove it from the blade housing.
Note: Grinder mechanism removed from the
machine for clarity
17. Unscrew and remove the nut, star washer and
agitator (d) from the drive shaft.
Note: Nut is fitted with a left hand thread.
Remove the grinder blade block (e) and discard.
Replace with the new grinder blade block included
with the service kit.
Refit the agitator, star washer and nut. Ensure that
the nut is tightened securely.
18. Take the new grinder body complete with inner grinder ring from the service kit.
Screw the grinder body clockwise into the blade housing until it stops.
Re-set the grinder blades. An approximate starting position is achieved by turning
the grinder body back one full turn anti-clockwise.
Re-assemble the grinder adjuster wheel assembly to the grinder unit.
19. Refit the fresh beans container to the machine. Pull the bean canister shut-off to
its fully extended position.
93
Technical Manual
20. Turn on the electricity supply to the machine.
Important! Before returning the machine to service, the engineer must carry out
the Grinder Calibration routine described on pages 33 - 34 to ensure correct
operation of the grinder with the type of beans used in the machine.
Use the grinder adjuster wheel to fine tune the blade settings in order to obtain
the desired grind quality.
94
Technical Manual
Section 12 - Spare Parts
The following section details the spare parts that are available for the Genesis. Use of
these components when servicing or repairing the machine will significantly increase
the working life of the machine.
Crane Merchandising Systems Parts and Support
Phone Numbers:
Parts: 1-800-621-7278
Service: 1-800-628-8363
95
Technical Manual
Exterior View
15
1
13
2
3
12
4
11
5
14
9
6
7
10
96
8
Technical Manual
Exterior View
Ref No.
Part No.
1
2
PL10005250
(a) PL10003250
(b) PL10004250
PR10224000
(a) MT10437000
(b) MT10438000
3
4
5
6
7
8
9
10
11
12
13
14
15
(a) MT10168250
(b) MT10178250
MT10169250
PL10007250
PL10014000
PL10008000
PL10010000
(a) GR10242000
(b) GR11158000
PL10001319
PR11138000
Item Description
Coin Reject Button
Coin Insert Molding
Blank Molding - Free Vend
Genesis Name Plate
Side Panel - L.H.
Side Panel - R.H.
Console Assembly - See Page 101
Coin Return Plate
Blank Plate - Free Vend
Coin Return Flap
Coin Return Molding
Waste Tray Grill
Waste Tray
Graphic Panel Cover - Transparent
Graphic Panel - B2C
Graphic Panel - B2C, French/Canada
Door Molding
Hot Beverage Label
Bean Container - See Page 125
97
Technical Manual
Door Interior
18
17
1
16
2
15
14
3
4
13
12
5
6
2
11
10
9
98
8
7
Technical Manual
Door Interior
Ref No.
Part No.
1
2
3
4
5
6
7
8
EL10025001
FA01416000
ME02857000
ME00933000
MT05222000
MT07119000
LO10264001
(a) PH04863000
(b) PH04864000
SI01142960
MT10177000
MT10172000
(a) ME01859000
(b) MT06635000
(c) ME03333000
PL10006000
MT10175000
9
10
11
12
13
14
15
16
17
18
WO07022000
(a) MT10389000
(b) MT10181000
(a) PR11137000
(b) PR10313000
Item Description
Service Keypad
Knurled Thumb Nut - M5
Door lock
Key - No. 2101
Door Lock Cam
Door Switch Actuator
SureVend Cup Sensor Harness
Cup Catcher Molding - Squat Cup
Cup Catcher Molding - Tall Cup
Silicon Tube
Cup Chute Mounting Bracket
Cashbox
Cashbox Lock
Cashbox Lock Cam
Cashbox Key - No. 300245B
Coin Return Bowl Molding
Control Board Cover
Control Board - See Page 101
Door Hinge
Inner Door Assembly - Coin Mech.
Inner Door Assembly - Free vend/Cashless
Internal Decal Set - US English
Internal Decal set - French
99
Technical Manual
1
2
3
4
5
6
7
9
10
8
11
14
12
13
15
Console Assembly
100
Technical Manual
Console Assembly
Ref No.
Part No.
1
2
PL10011000
(a) PR10233000
(b) PR10928000
(a) GR11157000
(b) GR11199000
PL10002250
PL10040001
EL10024000
LO10225000
FA10222000
PL10031000
PL10032000
PL10033000
PL10012000
(a) FA10223000
(b) FA01506000
EL10039000
EL10256000
3
4
5
6
7
8
9
10
11
12
13
14
15
Item Description
Selection Cover Molding - Transparent
Selection Decals - English
Price Decal Sheet - US
Selection Backer - US English B2C
Selection Backer - French B2C
Console Molding
LCD Cover
LCD Display
Link Loom Console (To MPU PCB)
PCB Stand Off
Milk Selection Button
Start Button
Sugar Selection Button
Selection Button
PCB Mount - Brass
Nut - M4
Console PCB
Genesis MPU PCB
101
Technical Manual
Interior View
16
1
15
2
3
4
5
14
6
7
13
12
8
11
10
102
9
Technical Manual
Interior View
Ref No.
1
2
3
4
5
6
7
8
9
10
11
12
13
14
15
16
Part No.
MT10143000
MO10955000
(i) FA02029000
(ii) FA01502000
(iii) ME10988000
(iv) FA03197000
(v) FA01506000
FA07111000
PL10540000
MT10131000
PL10550000
SI04345960
(i) ME05281001
(ii) FA07112000
(iii) FA10255000
PL06334000
SI01171960
Item Description
Fresh Beans Container - See Page 125
Bean Container Retainer
Grinder & Motor Assembly
Posi Pan Head Screw - M4 x 20
Posi Pan Head Screw - M4 x 6
M/F Bobbin Mount, M4
Shake Proof Washer - External
Full Nut, M4
Knurled Thumbscrew M4 x 10
Coffee Chute Molding
Waste Chute
CoEx® Brewer Assembly - See Page 119
Coffee Waste Bucket
Silicone Tube - Hot Water/Coffee
Foot
Spacer
Washer - M10
Service Key
Silicone Tube
Whipper System Assembly - See Page 115
Ingredient Canister Assembly - See Page 109
Freshbrew Coffee Canister - See Page 111
103
Technical Manual
Interior View - Covers Removed
13
8
14
15
16
2
17
12
1
11
2
10
3
2
4
6
5
6
9
2
8
7
104
Technical Manual
Interior View - Covers Removed
Ref No.
1
2
3
4
5
6
7
8
9
10
11
12
13
14
15
16
17
18
19
Part No.
Item Description
ME10208000
HO10245000
ME10952000
PL10246000
PL10282000
SI10538000
VA10044000
ME10211000
MO10152000
VA10043000
ME10209000
VA10041000
ME10207000
ME10216000
VA10042000
ME10217000
ME10218000
ME10212000
ME11186000
Coupling, Extended Male Elbow
FEP Tube, 0.24” (6mm) OD
Pump
Tee Piece, Nylon
Coffee Outlet, Grinder
Silicone Tube, 0.16” (4mm) ID
Pressure Relief Valve - 43.5 PSI (3 Bar)
Coupling, Female
Ingredient Motor, 24v DC - 130 rpm
Pressure Relief Valve - 174 PSI (12 Bar)
Coupling, Male - Stand Pipe
Valve, 3 Way
Coupling, Male - Branch ‘T’
Coupling - ‘T’ Piece
Valve, 2 Way
Coupling, Elbow
Male Coupling
Coupling, Male Stud Run Tee
Coupling, Blanking Plug
105
Technical Manual
Cup Drop Unit Assembly
2
1
3
7
5
6
4
10
27
25
24
26
23
8
10
9
11
12
22
16
13
21
17
14
15
18
20
19
106
Technical Manual
Cup Drop Unit Assembly
Ref No.
1
2
3
4
5
6
7
8
9
10
11
12
13
14
15
16
17
18
19
20
21
22
23
24
25
26
27
Part No.
Item Description
PH10020001
PL10985000
PH10019000
PL10015000
ME10067000
EL10038000
PL10018000
EL04920000
PL10016000
FA10204000
FA10205000
ME05208000
FA03217000
ME10201000
FA01554000
FA01506000
MT10066000
FA10203000
PA10262000
PL10017000
FA10202000
MO10885000
LO10114000
EL10038000
EL10951000
FA02155000
FA02142000
FA10206000
Turret Tube
Cap, Cup Tube - Not Illustrated
Turret Spigot
Top Molding
Magnetic Catch
PCB Cup Detector
Microswitch Arm Molding
Micro Switch
CDU Molding
Spirol Pin, M4 x 14 mm
Screw, M3 x 10
Spring
Screw, M4 x 10
Spacer
Shakeproof Washer, M4
Locknut, M4
Bracket
Nyloc Nut, M3
Cup Ring Assembly
Bottom Molding
Screw, M3.5 x 20
Turret Motor, 2.2 rpm
Harness
PCB Cup Detector
Solenoid
Screw, M5 x 12
Shakeproof Washer, M5
Shakeproof Washer, M3
107
Technical Manual
Ingredient Canister Assembly
1
11
5
4
3
10
2
9
4
8
7
6
108
Technical Manual
Ingredient Canister Assembly
Ref No.
1
2
3
4
5
6
7
8
9
10
11
Part No.
Item Description
PL10153000
PL10154000
Canister Assembly - c/w Agitator
Canister Assembly - No Agitator
PL07138000
PL10390000
PL10358000
PL10356000
PL02711000
PL01442000
PL01441000
PL01128000
PL10357000
(a) ME02706000
(b) SI02705000
ME10388000
Canister Lid
Canister Base
Flange - Rear
End Cap
Canister Drive
Canister Chute, RH - Long
Canister Chute, LH - Long
Canister Chute - Central
Flange - Front
Auger c/w ‘O’ Ring
‘O’ Ring
Agitator Assembly
109
Technical Manual
Freshbrew Canister Assembly
1
9
5
4
3
8
7
4
6
110
2
Technical Manual
Freshbrew Canister Assembly
Ref No.
1
2
3
4
5
6
7
8
9
Part No.
Item Description
PL10549000
Canister Assembly - Freshbrew Coffee
PL07138000
PL10390000
PL10358000
PL10356000
PL02711000
PL01441000
PL10357000
(a) ME10386000
(b) SI02705000
ME10388000
Canister Lid
Canister Base
Flange - Rear
End Cap
Canister Drive
Canister Chute
Flange - Front
Auger, Steel c/w ‘O’ Ring
‘O’ Ring
Agitator Assembly
111
Technical Manual
Dispense Head Assembly
1
2
3
4
6
5
7
8
10
9
112
Technical Manual
Dispense Head Assembly
Ref No.
1
2
3
4
5
6
7
8
9
10
Part No.
Item Description
EL04920000
EL10036000
MT10099000
MO10794000
MT10101000
PL10035000
FA01416000
PL05496000
PH05501000
MT10100000
ME04063000
Micro Switch
Dispense Head Opto Sensor
Cover Plate
Motor, 24v DC, 50rpm c/w Drive Pinion
Decoder Bracket
Rack Moulding
Knurled Thumb Nut, M5
Dispense Head Moulding
Nozzle Set c/w Hot Water Nozzle*
Dispense Head Arm
Dispense Head Slide
* Not Illustrated
113
Technical Manual
1
2
3
4
8
5
6
9
7
Mixing System
114
Technical Manual
Mixing System
Ref No.
1
2
3
4
5
6
7
8
9
Part No.
Item Description
MO10991000
PL10188000
SI10343000
SI10344000
PL01970000
PL10992000
PL01967000
PL10183000
PL10187000
Whipper Motor c/w Fixing Plate
Whipper Base
Whipper Base ‘O’ Ring
Whipper Base Seal
Impeller
Whipper Body
Mixing Bowl
Bowl Adaptor
Steam Trap
115
Technical Manual
Power Supply Assembly
2
1
5
3
7
6
4
7
116
7
Technical Manual
Power Supply Assembly
Ref No.
Part No.
1
(i) EL10146000
2
3
4
5
6
7
Item Description
Genesis I/O PCB
MT10788000
MA10546000
EL01152001
EL10021000
EL01994000
EL01995000
EL01227000
PSU Cover (Not Illustrated)
Power Supply Chassis
Solid State Relay
Switch Mode Power Supply
Fuse Holder Assembly
Fuse - 12A, 250v
Fuse - 4A, Anti-surge
LO10112001
Power Supply Harness (Not Illustrated)
117
Technical Manual
9
8
2
4
1
6
3
5
7
CoEx® Brewer/Motor Assembly
118
Technical Manual
CoEx® Brewer/Motor Assembly
Ref No.
1
2
3
4
5
6
7
8
9
Part No.
Item Description
ME10190000
ME10762000
EL10587000
ME10763000
ME10595000
ME10597000
MT10978000
MO10191000
ME10284000
PL10283000
Brewer Assembly*
Mounting Bracket
Microswitch
Water Inlet Connection
‘O’ Ring - Water Inlet Connection
Drive Wheel
Motor Mounting Bracket
CoEx Brewer Motor
Filter Head Assembly
Coffee Outlet Spout
* Includes 2, 3, 4, 5 and 8
119
Technical Manual
Water Inlet/Pressure Valve Assembly
4
3
2
1
120
5
Technical Manual
Water Inlet/Pressure Valve Assembly
Ref No.
1
2
3
4
5
Part No.
Item Description
VA10147000
VA10048000
Inlet Valve, 24v DC
Valve, Pressure Reducing
Tank Assembly - See Page 123
Silicone Tubing, 0.16in (4mm) i.d.
Flow Meter
Rear Cover Panel
*
SI10538000
ME10834000
MT11067000
*
Not Illustrated
121
Technical Manual
Pressure Boiler Assembly
4
6
5
6
3
2
1
7
122
Technical Manual
Pressure Boiler Assembly
Ref No.
Part No.
Item Description
1
BA10000009
2
3
4
5
6
7
EL10226000
ME1022000
VA10535000
VA10536000
ME10218000
ME11186000
Pressure Tank c/w 1.25kW Element and
Blanking Plug, ME11186000
High Temperature Cut Out
Coupling, Double Male Stem
Valve Body, 3 Way
Valve Coil, 3 Way
Coupling, Male
Blanking Plug
123
Technical Manual
Fresh Beans Container
1
2
3
4
124
Technical Manual
Fresh Beans Container
Ref No.
1
2
3
4
Part No.
PL10027000
SI10548000
PL10026000
PL10028000
Item Description
Bean Container Lid
Bean Container Lid Seal
Fresh Beans Container
Bean Container Shut Off
125
Technical Manual
Terms and Conditions of Sale
LIMITED WARRANTY: Subject to the limitation specified herein, all parts included
on original equipment manufactured by CRANE MERCHANDISING SYSTEMS and sold
to purchaser are warranted for one year from the date of shipment of the equipment
in question. This warranty applies only to the original purchaser of the Merchandiser
and is null and void if the merchandiser is sold during the period of the warranty.
Defective parts will be repaired or replaced free of charge when the defective part is
returned, with transportation charges prepaid by the purchaser, to a destination
designated by CRANE MERCHANDISING SYSTEMS.
This warranty does not include any cost of service rendered or repairs made by
customer or its agents on Merchandiser, or parts, unless authorization to incur such
expense has been given in writing by CRANE MERCHANDISING SYSTEMS prior to
incurring such expense. This warranty does not cover labor and service charges
performed by CRANE MERCHANDISING SYSTEMS service technicians.
This warranty does not apply to A) electrical components, wiring, or circuits or
mechanical parts or assemblies damaged as a result of operating the Merchandiser at
other than the design voltage and frequency specified on the Electrical Rating Tag, or
B) in event of vandalism, fire or negligence, or C) incandescent lamps, neon lamps,
fluorescent lamps, ballasts, starters or other expendable items, or D) when seal is
broken on electronic boards, or E) when other manufactured components are installed
in CRANE MERCHANDISING SYSTEMS Merchandisers.
Replacement parts sold by CRANE MERCHANDISING SYSTEMS as After Market shall
be covered for three months from the date shown on the parts invoice. Purchaser
must obtain prior RETURN AUTHORIZATION for return of all parts, following
guidelines given by CRANE MERCHANDISING SYSTEMS.
New, unused parts purchased as After Market can be returned within 30 days from
date of parts invoice, with prior authorization from CRANE MERCHANDISING
SYSTEMS.
THIS WARRANTY IS IN LIEU OF ALL OTHER WARRANTIES EXPRESS OR
IMPLIED, INCLUDING WITHOUT LIMITATION, WARRANTIES OF MERCHANTABILITY OF FITNESS FOR A PARTICULAR PURPOSE. CRANE MERCHANDISING SYSTEMS SHALL NOT BE RESPONSIBLE FOR CONSEQUETIAL OR
PUNITIVE DAMAGES. CRANE MERCHANDISING SYSTEMS neither assumes nor
authorizes any person to assume for it any obligation or liability in connection with the
sale of said equipment or any part thereof.
126
12955 Enterprise Way, Bridgeton,
Missouri 63044-1200
(314) 298-3500
Website: www.cranems.com