1
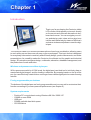
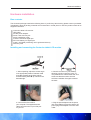
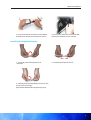
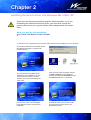
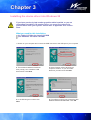
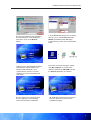
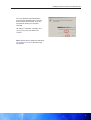
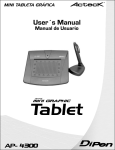
User’s guide
Pioneering pen computing
Tablet LCD Monitor
Centurion
TM
series
www.wintime.com.tw
PN: 49-60003-010
FCC compliance statement
This equipment has been tested and found to comply with the limits for a Class B digital
device, pursuant to Part 15 of FCC Rules. These limits are designed to provide reasonable
protection against harmful interference when the equipment is operated in a residential installation.
This equipment generates, uses, and can radiate radio frequency energy and if not installed
and used in accordance with the instruction manual may cause harmful interference to radio
communications. However, there is no guarantee that interference will not occur in a particular installation.
If this equipment causes harmful interference to radio or television reception, which can be
determined by turning the equipment off and on, the user is encouraged to try to correct the
interference by one or more of the following measures:
Reorient the receiving antenna.
Increase the separation between the equipment and receiver.
Connect the equipment into an outlet on a circuit different from that to which the receiver is
connected.
Changes or modifications not expressly approved by the party responsible for compliance
can void the user's authority to operate the equipment. This product is equipped with a
shielded cable. Extension cables, if used, must be shielded in order to comply with the
emission limits. Operation of this device is subject to the following conditions: (1) This device may not cause harmful interference, and (2) this device must accept any interference
received, including interference that may cause undesired operation.
CE compliance statement
This product complies with all the requirements of the EMC Directive 89/336./EEC. This
product has been tested and found to comply with:
z lEN55022 (CISPR 22) - Electromagnetic interference.
z lEN50082-1 (IEC801-2, IEC801-3, IEC801-4) - Electromagnetic immunity
z lEN60950 (IEC60950) - Product safety
Disclaimer and limitation of liability
Wintime Electronics Corp. assumes no responsibility for any damage or loss resulting from
the use of this manual. Wintime Electronics will not be liable for technical or typographical
errors in this document, nor for incidental or consequential damages resulting from the use
of this material. Wintime Electronics Corporation also reserves the right to change product
specifications without prior notice. No part of this document may be copied, reproduced, or
transmitted by any means, for any purpose without prior written permission from Wintime
Electronics Corporation.
Trademarks
Microsoft, Windows, Windows CE and any other trademarks related to Microsoft products
are trademarks of Microsoft. All other trademarks used in this manual belong to their respective owners.
© 2003 Wintime Electronics Corporation. All rights reserved.
Contents
Contents
Pioneering pen computing
Chapter 1
Introduction .......................................................................... 2
Hardware installation ........................................................... 3
Chapter 2
Installing the device driver into Windows Me / 2000 / XP... 5
Chapter 3
Installing the device driver into Windows 98 ...................... 7
Chapter 4
Customizing the digital pen ................................................ 10
Appendix A
Removal of previous graphics tablet drivers ..................... 12
Appendix B
On screen display (OSD) settings ..................................... 13
Appendix C
Taking care of your tablet LCD monitor .............................. 14
Appendix D
Product specifications ........................................................ 15
1
Chapter
Chapter 11
Pioneering pen computing
Introduction
Thank you for purchasing the Centurion tablet
LCD monitor, which allows you to work directly
on the screen and offers an alternative to keyboard and mouse. You can navigate your cursor, and design, paint, draw, write or sign in an
intuitive and natural way by means of Wintime’s
exclusive wireless and pressure sensitive digital pen.
The Centurion tablet LCD monitor provides optimum hand-eye coordination, allowing users
to work with a pen on the screen as easy as on normal paper. This input device is designed
for everybody who wants to creatively and efficiently design, produce documents, and make
presentations. Its versatility makes the Centurion the ultimate tool for graphic and industrial
design, 3D-animation and game design, multimedia, education, database management, and
the production of audio and video.
Wireless and pressure sensitive stylus pen
With a pressure sensitivity of 1024 levels, the digital pen is an ideal tool to intuitively draw or
manipulate digital images, and for shading in sketches. By pressing harder on the tip of the
pen you can effectively create thicker or stronger lines or dose digital paint to create stunning
artwork.
Freely programmable pen buttons
The buttons of the digital pen are freely programmable and you may add or customize their
function according to your own personal preferences (see chapter 4).
System requirements
-
Pentium PC or equivalent running Windows 98 / Me / 2000 / XP
128MB or more RAM
USB port
200MB available hard disk space
CD-ROM drive
2
Hardware installation
Hardware installation
Box contents
The Centurion package contains the following items. If you find any items lacking, please contact your dealer
immediately. Store all packing materials and accessories in a safe place in case the product needs to be
shipped in the future.
Centurion tablet LCD monitor
USB cable
AC/DC power adapter
Power cord with DC jack
Quick installation guide
Pressure sensitive digital pen
AAA size battery for digital pen
Install - CD-ROM (containing user’s guide and drivers)
Warranty card
Installing and connecting the Centurion tablet LCD monitor
1. After unpacking, adjust the screen angle
to an appropriate position. Release metal
lever A by pressing and holding it down
and then sliding stand B up or down to the
desired angle.
2. Place the monitor on your desktop,
allowing a minimum space of 10cm (4inch) between the case and the wall. This
will ensure that the monitor receives
sufficient ventilation through the slots at
the back.
3. Connect the VGA cable to
your computer. The supplied monitor
cable connects to the 15-pin VGA port
on your PC.
4. Plug the power adapter into the power
jack of the tablet LCD monitor and the AC
power plug of the adapter in a mains walloutlet.
3
Hardware installation
5. Connect the power cord to the power adapter
and the power plug to the mains power outlet.
6. Connect the USB connector of the USB
cable to the USB port of your monitor.
Installing the digital pen battery
1. Turn both parts of the digital pen as
indicated.
2. Pull both parts apart as shown.
3. Carefully push the AAA battery into place, with
the plus pole to the right.
Tip: Alkaline batteries last significantly longer.
4
Chapter
Chapter 22
Pioneering pen computing
Installing the device driver into Windows Me / 2000 / XP
If you have previously had another graphics tablet installed, or you are
reinstalling the tablet LCD monitor driver, you must first remove the
present driver from your system. Please refer to Appendix A for instructions.
What you need for this installation:
the Tablet LCD Monitor install CD-ROM
1. Switch on your computer and connect the USB connector to the USB port of your computer
2. The New Hardware Found wizard will find
the tablet and install the “USB Human
Interface Device”
3. Insert the Driver and Manual CDROM into the CD-ROM drive. If your
system has the “Autorun” function
enabled, your screen will display the
main menu.
4. In the main menu choose English.
In the following screen choose Driver
Installation.
If the main menu did not appear, doubleclick My computer on the Windows
desktop, and then the CD-ROM icon and
the Autorun.exe file in succession.
5. Read the instructions on the screen
and click green arrow to launch the
installation program.
5
Installing the device driver into Windows Me / 2000 / XP
6. In the Wintime Tablet Setup screen
click the Finish button.This will then
install the device driver.
In some setups of Windows 2000 and
Windows XP a Microsoft Digital Signature
warning may appear on your screen. Click
Yes to continue the installation.
7. Setup is complete, click OK, and you
may now use your tablet LCD monitor.
Note: Please refer to Wintime’s website at
www.wintime.com.tw for tutorials to get
you started.
6
Chapter
Chapter 33
Pioneering pen computing
Installing the device driver into Windows 98
If you have previously had another graphics tablet installed, or you are
reinstalling the tablet LCD monitor driver, you must first remove the
present driver from your system. Please refer to Appendix A for instructions.
What you need for this installation:
the Tablet LCD Monitor install CD-ROM
your Windows 98 install CD-ROM
1. Switch on your computer and connect the USB connector to the USB port of your computer
2. The Add New Hardware wizard will
then prompt you to install the USB
device driver. Click Next.
4. In the following two screens click
Next.
3. Select “Display a list of all drivers in
a specific location, so you can select
the driver you want” and click Next.
5. This will then prompt you to insert the disk
labeled “Windows 98 CD-ROM”. Click OK.
7
Installing the device driver into Windows 98
6. Insert your Windows 98 CD-ROM in
the CD-ROM drive. In the dialog box
that opens, click on the Browse
button.
7. In the Drives field select your CD-ROM
drive (e.g. e:) In the Folders field select
Win98. Click OK and then OK again.
In the following screen click on the Finish
button.
8. Remove your Windows 98 CD-ROM
and replace it with the Tablet LCD
Monitor install CD-ROM. If your
system has the “Autorun” function
enabled, your screen will display the
main menu.
9. In the main menu choose English
as your language. In the following
screen choose Driver Installation.
If the main menu did not appear, doubleclick My computer on the Windows
desktop, and then the CD-ROM icon and
the Autorun.exe file in succession.
10. Read the instructions on the screen
and click green arrow to launch the
installation program.
8
Installing the device driver into Windows 98
11. In the Wintime USB Tablet Setup
screen click the Finish button.This will
then install the device driver. If you are
prompted to restart your computer
click Yes.
12. Setup is complete, click OK, and
you may now use your tablet LCD
monitor.
Note: Please refer to Wintime’s website at
www.wintime.com.tw for tutorials to get
you started.
9
Chapter
Chapter 44
Pioneering pen computing
Customizing the digital pen
There are three buttons on the digital pen:
Stylus tip -This button works like the left-click of a mouse.
Lower button -This button works A the right-click.
Upper button -This button works like the double-click.
Upper button
Lower button
Stylus tip
After you have installed your tablet LCD monitor, you can easily customize the pen buttons
according to your personal preferences in Windows control panel
Wintime Tablet
Tap Start > Settings > Control Panel, and tap two times on the Wintime Tablet icon to
open the parameter window.
There are four tabs in this window: Info, Buttons, Response and Pressure.
.
Info
This tab shows the basic information
of the tablet LCD monitor
Buttons
The buttons of the pen tablet are freely
programmable.If you press the Use
Default button, the action of these buttons
will be set back to the default settings (see
the diagram at the top of this page).
10
Customizing the stylus pen
.
.
Response
Here you can adjust the double-click speed
as well as the size of the double-click
area. For a best result please drag the Area
slider to the middle.You can test the result
of the new settings in the Test Area.
Pressure
The pressure sensitivity of the tablet LCD
monitor can be adjusted in this tab. It is
recommended to move the Click Threshold slider to the most left position (Soft)
for optimum pressure sensitivity. You can
test the result of the new settings in the
Test Area.
11
Appendix A
Pioneering pen computing
Removal of previous graphics tablet drivers
Windows 98 / Me
1. Click Start > Settings > Control Panel > Add/
Remove Programs
2a. Select the tablet driver. Click
Add/Remove > OK > OK > OK. Restart
your computer.
Windows 2000
Windows XP
2b. Select the tablet driver. Click Change/
Remove > Finish. Restart your computer
2c. Select the tablet driver. Click Change/
Remove > Finish. Restart your computer
12
Appendix
Appendix B
B
Pioneering pen computing
On screen display (OSD) settings
zBRIGHTNESS:
Press > to increase or < to decrease brightness.
zCONTRAST:
Press > to increase or < to decrease contrast.
zDISPLAY ADJUST:
Press > or < to select the geometry submenu.
V-POSITION: Press > or < to move the image up or down on the screen.
H-POSITION: Push > or < to move the image to the left or right on the screen.
PITCH: Press > or < to adjust the video pitch for maximum focus and visibility.
PHASE: Press > or < to adjust the video phase for maximum focus and visibility.
SHARPNESS: Press > or < to adjust video or text quality.
AUTO TUNING: Press A to automatically set the best settings for the current input signal.
zCOLOR TEMPERATURE:
Press > or <” to select the color temperature submenu.
9300K: Sets the CIE coordinate 9300 color temperature
6500K: Sets the CIE coordinate 6500 color temperature
USER PRESET: Use this function to set a customized color temperature.
zLANGUAGE:
Press > or < to select your language.
ENGLISH
SPANISH / ESPANOL
GERMAN / DEUTSCH
ITALIAN / ITALIANO
FRENCH / FRANÇAIS
zOSD ADJUST:
Press >or < to select the OSD adjustment submenu.
OSD H-POS: Press > or < to move the OSD window to left or right on the screen.
OSD V-POS: Press > or < to move the OSD window up or down on the screen.
OSD TIMER: Press > or < to adjust the OSD display time on the screen.
OSD TRANSPARENCY: Press > or < to adjust the OSD transparency on the screen.
zRESET:
Reset the monitor to its default display parameters.
zEXIT:
Close the OSD
13
Appendix C
C
Appendix
Pioneering pen computing
Taking care of your tablet LCD monitor
1. Always disconnect the power cord from the Centurion tablet LCD monitor before
making any installation. Make sure both the system and external devices are
turned off, and that the monitor is properly grounded.
2. Turn off the system power before cleaning. Clean the system using a cloth with
some mild detergent only. Do not spray any liquid cleaner directly onto the
screen, but spray the cleaner on a cloth first before wiping the screen.
3. Avoid using other objects than the digital pen to operate the system. Scratches
on the screen may cause malfunction or internal failure to the unit.
4. Do not open or attempt to disassemble the unit, but leave reparations to a qualified technician.
5. The Centurion tablet LCD monitor is fortified with an extra thick case, which
makes it sturdy, but not invulnerable. Don’t put too much weight on the screen.
Troubleshooting
The digital pen doesn’t function.
- Please check the status of the battery
of your digital pen.
- Always connect the Centurion tablet
LCD monitor to the same USB-port as
the one you used during the installation
of the device driver. Not doing so may
cause the digital pen to malfunction. If
you need to connect to a different USBport you must reinstall the driver (see
chapter 2 of this manual).
14
Appendix D
Pioneering pen computing
Product Specifications
General
Screen adjustment
Focus, brightness, contrast, horizontal / vertical position,
horizontal size
Power requirement
DC 12 Volt / 36W
Power consumption
Under 36W
Power adapter
100-240V, 50 ~ 60 Hz (High power, model: HPA-501242U3 A8)
Power cord
USA
No. of ports
USB, DC input jack
Connectivity
Attached cable (RGB)
Platform support
Window 98 / Me / 2000 / XP
Weight
6.3kg
Dimensions (WxDxH)
390 x 350 x 60mm
Stylus pen:
Weight
25g
Dimensions (LxD)
155 x 13.5mm
Regulatory compliance:
Safety
TÜV (EN60950), UL, CB
EMI
FCC 15 class B, CE, BSMI
LCD Monitor
LCD driver
Active matrix color TFT
Resolution
1024 x 768 pixels (XGA)
Color depth
16.7M (simulation)
Screen size
15-inch
Pitch
0.297mm
Interface
D-Sub 15Pin VGA connector
Response time
TYP 40ms,MAX 90ms
Viewing angle
Horizontal: 120 degrees; Vertical: 110 degrees
Brightness
250 cd/cm²
Contrast
350
Tablet
Reading method
Electromagnetic
Resolution
1000LPI
Reading speed
100RPS
Pressure sensitivity
1024 levels
Tablet active area
304.1 x 228.1mm
Proximity
6mm
Connectivity
USB
15