1
Digidesign Frequently Asked Questions
Created on March 25, 2004
Use our search engine at answerbase.digidesign.com for the most current answers to your technical questions. Click
on the index hyperlinks in this document to find answers to your technical questions. Many thanks to the Digidesign
Technical Support staff around the world for making this document possible.
FAQ Index
1622 I/O
192 I/O
888/24 I/O
96 I/O
ASIO Driver
Authorization
AVoption and AVoption XL
Control|24
Customer Service
DAE
Digi 001 Mac
Digi 001 Win
Digi 002 Mac
Digi 002 Win
Digi Cables
DigiTranslator
Expansion Chassis
HTDM
iLok
Mbox
Motor Mix
OMS
PostConform
PRE
Pro Tools 5.1
Pro Tools 6.0
Pro Tools FREE Mac
Pro Tools FREE Win
Pro Tools LE Time Code Q & A
Pro Tools NT
Pro Tools TDM Mac
Pro Tools|HD
ProControl
SCSI Basics
SCSI64 Kit
Sync I/O
Tech Tips
USD
Windows 98 SE and ME Setup
1622 I/O
Can you use the 1622 with a Y-cable?
How do I adjust the input gains on my 1622?
The 1622 is not showing up properly. It looks like the 1622 is being called 888/24 #4.
The 1622 is not showing up at all.
Is there any way to save the level gain stages for the 1622 on each song?
Can a 1622 be used in standalone mode as a 16 to 2 line mixer?
I get no input on channels 1-2 of my 1622.
I want to use the 1622 in standalone mode, but when I boot my computer switches out of standalone mode.
I have a USD and a device that can convert the ADAT proprietary sync to SMPTE how should I set it up?
[4350]
Can you use the 1622 with a Y-cable?
No, it uses all 16 available inputs and outputs on a mix card. Because of this it requires a special 16 channel
peripheral cable.
1622 I/O Index | All FAQ Index
[4351]
How do I adjust the input gains on my 1622?
The analog inputs are 1/4 inch TRS and can be INDIVIDUALLY calibrated from +4 to -10 in the Hardware Setup>
Other options. These connectors accept balanced & unbalanced connections. The analog outputs are 1/4 inch TRS
and are factory calibrated at +14 headroom. (They mirror outputs 1 and 2 in Pro Tools)
1622 I/O Index | All FAQ Index
[4352]
The 1622 is not showing up properly. It looks like the 1622 is being called 888/24 #4.
Click the I/O labels factory reset button. Note that you cannot hook up a 1622 to a DSP farm.
1622 I/O Index | All FAQ Index
[4353]
The 1622 is not showing up at all.
- Make sure the cables to the 1622 are firmly seated.
- Make sure you have DigiSystem Init and DAE version 5.0 or later.
1622 I/O Index | All FAQ Index
[4354]
Is there any way to save the level gain stages for the 1622 on each song?
Level gain stages are saved in the Pro Tools session. Some third party applications that use direct I/O do not save
this information with their "session documents".
The "Store" button in the "Other options" dialog box will store your trim settings when used in stand alone mode.
1622 I/O Index | All FAQ Index
[4355]
Can a 1622 be used in standalone mode as a 16 to 2 line mixer?
Yes.
Note: In stand alone mode, all odd input channels are summed to channel 15 and all even input channels are
summed to channel 16. This is so all inputs route to one 2 channel ADC (U89). This is normal behavior in stand
alone mode.
1622 I/O Index | All FAQ Index
[4356]
I get no input on channels 1-2 of my 1622.
Inputs 1-2 are software switchable between analog and digital. Analog and digital cannot be used concurrently.
1622 I/O Index | All FAQ Index
[4357]
I want to use the 1622 in standalone mode, but when I boot my computer switches out of standalone
mode.
If the 1622 is attached to a computer it can only be used in standalone when the computer is OFF
1622 I/O Index | All FAQ Index
[4362]
I have a USD and a device that can convert the ADAT proprietary sync to SMPTE how should I set it up?
Plug the USD slave clock out to the first audio interface slave clock in. (888/24 etc. if you have one or to the ADAT
Bridge I/O) Hook up the ADAT bridge I/O word clock out to the ADAT sync device's 48k in and set the sync device
to ext sync. Connect the sync device's SMPTE out to the USD LTC in and make sure the sync device is configured to
send SMPTE. Set Pro Tools to internal sync and put it on-line. You do not have to configure the sync device in OMS
for this setup as Pro Tools will receive the positional reference directly from the USD. Configure the USD as normal.
1622 I/O Index | All FAQ Index
192 I/O
Is the 192 Digital Audio Interface expandable like the 192 Audio Interface (with optional Digital I/O, D/A or A/D converter
cards)?
Can I use the Digidesign 192 interface to perform analog transfers directly from industry standard multi-track recorders?
Have you tested for frequency response anomalies on a transfer like this?
How do you set the 192 I/O's enclosure optical port to ADAT optical. There is no selection for this in the hardware setup.
How many legacy peripheral can I connect to the legacy port on the 192 I/O
The user guide talks about calibrating the 192 I/O but there are no specific instructions. Where can I get them.
How can I stream audio digitally from my old 44.1/48k effects processors into higher sample rate sessions
In the past Digi interfaces always mirrored the output of the analog out at the digital out. The 192 does not do this is there
a way to emulate the old behavior.
If I want to make my own cables for the 192 I/O which pin is hot?
What is the proper clock connection between an HD Audio Interface (96 I/O, 192 i/O) and a Legacy Interface (888|24,
882|20, etc...)?
[27846]
Is the 192 Digital Audio Interface expandable like the 192 Audio Interface (with optional Digital I/O, D/
A or A/D converter cards)?
No. The 192 Digital I/O uses a different power supply that is incompatible with the 192 analog cards.
192 I/O Index | All FAQ Index
[7871]
Can I use the Digidesign 192 interface to perform analog transfers directly from industry standard multitrack recorders? Have you tested for frequency response anomalies on a transfer like this?
Yes you can, and yes we have.
Visit this location for the full details:
http://www.digidesign.com/support/faq/192/
192 I/O Index | All FAQ Index
[7448]
How do you set the 192 I/O's enclosure optical port to ADAT optical. There is no selection for this in the
hardware setup.
The enclosure optical port defaults to ADAT optical and will function in ADAT mode unless S/PDIF Optical is selected
in the hardware setup.
192 I/O Index | All FAQ Index
[7450]
How many legacy peripheral can I connect to the legacy port on the 192 I/O
Two 8 channel interfaces or One 16 channel interface.
192 I/O Index | All FAQ Index
[7451]
The user guide talks about calibrating the 192 I/O but there are no specific instructions. Where can I
get them.
The calibration guide is available at our web site. http://www.digidesign.com/support/
docs/192_IO_Calibration_Mode.pdf
192 I/O Index | All FAQ Index
[7453]
How can I stream audio digitally from my old 44.1/48k effects processors into higher sample rate
sessions
The 192 I/O comes with one 192 Digital card installed with the option to install a second card. The inputs and
outputs on both cards can be configured for realtime sample rate conversion on a per input basis. This allows you to
use older effects units digitally or to stream audio into higher sample rate session from sources like ADAT or DA-88.
192 I/O Index | All FAQ Index
[7454]
In the past Digi interfaces always mirrored the output of the analog out at the digital out. The 192 does
not do this is there a way to emulate the old behavior.
Yes, the 192 I/O lets you assign multiple outputs by Control Clicking on the Output selection on the main tab of the
hardware setup. You can choose the enclosure analog outputs and combine them with any of the enclosure digital
outputs.
192 I/O Index | All FAQ Index
[7452]
If I want to make my own cables for the 192 I/O which pin is hot?
Pin 2 is hot.
192 I/O Index | All FAQ Index
[7431]
What is the proper clock connection between an HD Audio Interface (96 I/O, 192 i/O) and a Legacy
Interface (888|24, 882|20, etc...)?
Connect the Ext. Clock output port on the HD Audio Interface to the Slave Clock In on the Legacy peripheral. The
Legacy peripheral will switch to Slave mode once the proper clock is received from the HD Audio Interface. Always
use the Ext. Clock Out port of the same I/O to which the Legacy peripheral is attached.
If using multiple MIX-series audio interfaces chained off of a single HD Audio Interface, connect the Slave Clock Out
of the first interface to the Slave Clock In of the second interface.
192 I/O Index | All FAQ Index
888/24 I/O
How do I know if I have 24 bit DACs (Digital-Analog Converters)?
How do I upgrade my DACs to 24 bit?
How can I use the 888/24 in Stand Alone mode & how can I tell if it is in Stand Alone mode?
The default sample rate in Stand Alone mode is 44.1 kHz, how can I change that?
Why are the inputs on my 888/24 distorting when connected to my Mix Farm card, but operate correctly when connected
to another audio card?
Why am I getting clicks and pops when recording a digital input?
How do I change the operating level of the 888/24 from +4 to -10?
Why would I want to change the operating level of my 888|24? What’s the difference?
When or why should I calibrate my 888/24’s inputs and outputs?
I set the Infinite Peak Hold preference in Pro Tools, but the meters on my 888/24 haven’t changed, why?
How do I enable/disable DAC muting when using Stand Alone mode?
I have a USD and a device that can convert the ADAT proprietary sync to SMPTE how should I set it up?
Specifications for 888|24 Audio Interface.
[6238]
How do I know if I have 24 bit DACs (Digital-Analog Converters)?
The affected serial number cutoff is DH17130. Any unit carrying a serial number higher than this or displaying " Rev
J" or higher on the external FCC label already has 24 bit DACs installed.
888/24 I/O Index | All FAQ Index
[6239]
How do I upgrade my DACs to 24 bit?
Customers who own 888|24's with 20-bit DACs may upgrade their units for a fee. The upgrade price covers all parts
and service, as well as return shipping to the customer. Customers who purchased 888|24's after June 1st, 1998
are eligible for free upgrades. Contact Digidesign for upgrade pricing.
Upgrades require the return of the 888|24 to the Digidesign Service Center.
An advance replacement program is also in place. For an additional fee an upgraded unit with 24-bit DACs will be
sent to the customer in exchange for their original unit(s).
Contact Digidesign Technical Support for the upgrade.
888/24 I/O Index | All FAQ Index
[6242]
How can I use the 888/24 in Stand Alone mode & how can I tell if it is in Stand Alone mode?
To use your 888/24 as a ‘stand alone'24 bit Analog-Digital or Digital-Analog converter:
- Quit Pro Tools if it is launched.
- For Analog-Digital conversion, be sure to disconnect or turn off any external digital devices (DAT machines, effects
processors, etc.) that may be providing word clock information to the 888/24’s AES/EBU or S/PDIF channel 1 & 2
inputs.
- An AES/EBU (or S/PDIF -- see below) word clock signal is necessary for Digital-Analog conversion in Stand Alone
mode. Be sure to have a digital device providing word clock connected to the AES/EBU inputs 1 & 2 of the 888/24
interface.
In Stand Alone mode, the 888/24’s default word clock input port is AES/EBU, unless changed to S/PDIF via the
corresponding internal jumper setting. Please refer to the 888/24 I/O Installation Guide for specific instructions and
guidance.
To verify that the 888/24 is in Stand Alone mode:
- Check to see that the "analog" LED display for meters 1 & 2 is flashing. The LED flashes between a half-lit state to
full display.
-Turn off your CPU.
888/24 I/O Index | All FAQ Index
[6243]
The default sample rate in Stand Alone mode is 44.1 kHz, how can I change that?
The factory default sample rate of the 888/24 is 44.1kHz. You can change this default sample rate to 48 kHz by
moving an internal jumper on the circuit board. This requires careful removal of the 888/24’s top cover and
physically moving the jumper corresponding to the desired sample rate.
Please refer to the 888/24 I/O Installation Guide for specific instructions and guidance.
888/24 I/O Index | All FAQ Index
[6245]
Why are the inputs on my 888/24 distorting when connected to my Mix Farm card, but operate correctly
when connected to another audio card?
This is due to a change made in Revision N of the 888/24 that affected all interfaces through Revision Q.
Revision R fixes the problem. Contact Digidesign Tech Support for repair information.
888/24 I/O Index | All FAQ Index
[6247]
Why am I getting clicks and pops when recording a digital input?
When 2 digital devices are connected via AES/EBU or S/PDIF and recording in either direction, a common clock is
required (For example: 1 device’s clock must be slaved to the other’s)
If you are recording into Pro Tools via the AES/EBU or S/PDIF inputs (such as a DAT or any other digital device),
the Sync Mode in the Hardware Setup window should be set to DIGITAL.
Setup > Hardware > Sync Mode > Digital OR Windows > Show Session Setup > Sync Mode > Digital
When you are finished recording the digital signal, you should set your Sync Mode to Internal for Pro Tools playback.
There are exceptions to these guidelines, especially when working with expanded systems, external synchronizers,
and optical devices. Please refer to the appropriate installation guide when using expanded systems or additional
devices.
888/24 I/O Index | All FAQ Index
[6240]
How do I change the operating level of the 888/24 from +4 to -10?
The 888/24 I/O is factory set to +4 dBu operating levels for input and output. You can individually switch any of the
analog inputs or outputs to either a +4 dBu or -10 dBu operating level by moving internal jumpers on its circuit
board.
This requires careful removal of the 888/24’s top cover physically moving the jumpers corresponding to each input
and output.
Please refer to the 888/24 I/O Installation Guide for specific instructions and guidance.
888/24 I/O Index | All FAQ Index
[6241]
Why would I want to change the operating level of my 888|24? What’s the difference?
It is important to determine which line level is appropriate for you studio equipment. Setting the +4 or -10 dBu
operating levels help determine the input and outputs loads a particular piece of equipment can handle or deliver.
+4 dBu is generally considered "professional" and -10 dBu "consumer". Some processors, etc. can be toggled
manually between +4 and -10 dBu via an external switch or internal jumper (such as the 888/24). However, many
are permanently set. Check the owner’s manual for you mixer, amplifiers, or effects processors to determine the
correct operating level for you studio’s equipment.
888/24 I/O Index | All FAQ Index
[6248]
When or why should I calibrate my 888/24’s inputs and outputs?
The 888/24 is factory calibrated so that it’s operating level is +4 dBu with 18 dB of headroom nominal at full code,
unity gain, making calibration unnecessary for most professional applications. However, you may want to calibrate
the inputs and outputs of the 888/24 to the operating level of your mixing console, so that the output meters of the
888/24 match the levels of your console. Additionally, you may want to re-calibrate you interface if you feel that
the inputs or outputs of your 888/24 are not recording or playing back at equal levels.
Please refer to the 888/24 I/O Installation Guide for specific instructions and guidance.
888/24 I/O Index | All FAQ Index
[6246]
I set the Infinite Peak Hold preference in Pro Tools, but the meters on my 888/24 haven’t changed,
why?
In the Display Preferences, the Peak Hold options only affect the meters within Pro Tools (on screen).
The Peak Hold and Level Sensitivity settings for the 888/24 meters are available in the Other Options dialog box
from within the Hardware Setup window:
Setups > Hardware > Other Options
888/24 I/O Index | All FAQ Index
[6244]
How do I enable/disable DAC muting when using Stand Alone mode?
In certain cases, you may wish to mute the 888/24’s Digital-Analog Converters when in Analog-Digital Stand Alone
mode. This is useful if, for example, you need to eliminate potential external analog feedback through a console.
This procedure requires careful removal of the 888/24’s top cover and physically moving the jumper corresponding
to Stand Alone DAC muting.
Please refer to the 888/24 I/O Installation Guide for specific instructions and guidance.
888/24 I/O Index | All FAQ Index
[4362]
I have a USD and a device that can convert the ADAT proprietary sync to SMPTE how should I set it up?
Plug the USD slave clock out to the first audio interface slave clock in. (888/24 etc. if you have one or to the ADAT
Bridge I/O) Hook up the ADAT bridge I/O word clock out to the ADAT sync device's 48k in and set the sync device
to ext sync. Connect the sync device's SMPTE out to the USD LTC in and make sure the sync device is configured to
send SMPTE. Set Pro Tools to internal sync and put it on-line. You do not have to configure the sync device in OMS
for this setup as Pro Tools will receive the positional reference directly from the USD. Configure the USD as normal.
888/24 I/O Index | All FAQ Index
[2217]
Specifications for 888|24 Audio Interface.
The 888|24 I/O is an audio interface used with Pro Tools (requires PT 4.1 or later). It connects to any of the
following cards: PT Project PCI, Disk I/O PCI, d24 Audio Card, Mix Core, Mix Farm. The 888|24 I/O may also be
connected to the legacy port of a 192 I/O on a Pro Tools HD system.
General
Analog Inputs/Outputs: Actively balanced XLR connectors; internally switchable between +4dBu and -10dBV
operating levels
Analog Level Trimming: via recessed trim pot, accessible from front panel
Digital I/O's AES/EBU: 8 channels; balanced XLR connectors
Digital I/O's S/PDIF: 2 channels; coaxial RCA connectors
Sample Rate: 44.1kHz or 48kHz +/-10ppm
Clock Reference: Super Clock 256x sample clock; In/Out; BNC connectors; additional clock references supported via
Digidesign's Universal Slave Driver, SMPTE Slave Driver, Video Slave Driver and other optional synchronizers
Nominal Operating Level: +4dBu; factory calibrated at -18dB headroom
A/D Specifications (typical)
SNR (signal-to-noise ratio): •-113dB (balanced, A-weighted), •-110dB (unweighted)
THD: 0.003% -0.01dB @ 1kHz 20Hz-20kHz (band-limited)
Maximum Input: +26dB
Frequency Response: 20Hz-20kHz +/-1db
Clock jitter: <40pS RMS 22Hz-22kHz BW
D/A Specifications (typical)
SNR (signal-to-noise ratio): •-110dB (balanced, A-weighted), •-107dB (unweighted)
THD: 0.003% -0.01dB @ 1kHz 20Hz- 20kHz (band-limited)
Maximum Output: +26 dB/channel (bridging loads)
Frequency Response: 20Hz-20kHz +/-1dB
Output Impedance: 50ohms typical (45 min, 55 max)
Input Impedance: 24 kohms typical
Physical Specifications
Power requirements: 90-260 VAC, 47-63 Hz; 30 VA; auto-switching
Weight: 7 lbs, 9 oz (4.1 kg)
Dimensions: 2u external rackmount device; 19" x 3.5" x 9.75" (48.26 cm x 8.89 cm x 24.77 cm) black anodized
finish
D/A Converters changed from 20-bit to 24-bit starting with s/n DH17130 (Rev J).
888/24 I/O Index | All FAQ Index
96 I/O
What are the primary differences between the 96i I/O and 96 I/O Audio Interfaces?
Is the 96 Audio Interface expandable like the 192 Audio Interface (with optional Digital I/O, D/A or A/D converter cards)?
Is it possible to use two different digital formats simultaneously with the 96 Audio Interface?
What is the Accessory Port on the 96 Audio Interface used for?
Do the meters on the 96 I/O and 96i I/O Audio Interfaces represent Input or Output?
Are the 96 I/O and 96i I/O Audio Interfaces capable of "on the fly" real-time sample rate conversion during digital audio
transfers (like the 192 I/O Audio Interface)?
What interfaces are supported on the Legacy Expansion port of the 96 I/O and 96i I/O?
Is it possible to record at 192 kHz with one 192 I/O Audio Interface and one 96 I/O or 96i I/O Audio Interface? Can the 96
I/Os clock to the higher sample rate of the 192?
What is the proper clock connection between an HD Audio Interface (96 I/O, 192 i/O) and a Legacy Interface (888|24,
882|20, etc...)?
[27496]
What are the primary differences between the 96i I/O and 96 I/O Audio Interfaces?
The 96i I/O offers a 16 input, two output analog configuration with software controllable gain on inputs 1-4. The 96
I/O offers an 8 input, 8 output analog configuration with no software controllable gain feature. Inputs 5-16 on the
96i are selectable between -8 dBV and +4 dBu. All inputs on the 96 are selectable between -10 dBV and +4 dBu.
Outputs on both units are also selectable between -10 dBV and +4 dBu. The 96i I/O has a S/PDIF digital I/O option
where as the 96 I/O offers a choice of AES/EBU, S/PDIF, and Optical digital formats.
96 I/O Index | All FAQ Index
[7434]
Is the 96 Audio Interface expandable like the 192 Audio Interface (with optional Digital I/O, D/A or A/
D converter cards)?
No. The 96 Audio Interface is not expandable. It is not possible to install 192 expansion cards into a 96 I/O.
96 I/O Index | All FAQ Index
[7435]
Is it possible to use two different digital formats simultaneously with the 96 Audio Interface?
Yes. It is possible to utilize the ADAT Optical connections simultaneously with either AES/EBU or S/PDIF.
96 I/O Index | All FAQ Index
[7436]
What is the Accessory Port on the 96 Audio Interface used for?
This port is not currently implemented (3/1/02).
96 I/O Index | All FAQ Index
[7427]
Do the meters on the 96 I/O and 96i I/O Audio Interfaces represent Input or Output?
The 96 and 96i I/Os have 16 meters which can either represent the Input levels OR the output levels of the
channels. To change from Output metering to Input metering (or vice versa) go to the Setups Menu, choose
Hardware Setup, and in the tab labeled Main look for the Meters button.
96 I/O Index | All FAQ Index
[7428]
Are the 96 I/O and 96i I/O Audio Interfaces capable of "on the fly" real-time sample rate conversion
during digital audio transfers (like the 192 I/O Audio Interface)?
No. The digital I/O's on the 96 and 96i I/O interface enclosures cannot do real-time sample rate conversion.
Likewise, the digital I/O's on the 192 Audio Interface enclosure do not do sample rate conversion. Only the digital I/
O's on the 192's Digital I/O card have this feature.
96 I/O Index | All FAQ Index
[7429]
What interfaces are supported on the Legacy Expansion port of the 96 I/O and 96i I/O?
You can connect two 8-channel interfaces (such as the 888|24 or 882|20) or a single 16-channel interface (1622 I/
O, 24-bit ADAT Bridge I/O, or the original ADAT Bridge I/O) for expanded input and output options, using their
original cables.
96 I/O Index | All FAQ Index
[7430]
Is it possible to record at 192 kHz with one 192 I/O Audio Interface and one 96 I/O or 96i I/O Audio
Interface? Can the 96 I/Os clock to the higher sample rate of the 192?
No. When the session sample rate is set above 96 kHz only the 192's inputs and outputs will be available.
96 I/O Index | All FAQ Index
[7431]
What is the proper clock connection between an HD Audio Interface (96 I/O, 192 i/O) and a Legacy
Interface (888|24, 882|20, etc...)?
Connect the Ext. Clock output port on the HD Audio Interface to the Slave Clock In on the Legacy peripheral. The
Legacy peripheral will switch to Slave mode once the proper clock is received from the HD Audio Interface. Always
use the Ext. Clock Out port of the same I/O to which the Legacy peripheral is attached.
If using multiple MIX-series audio interfaces chained off of a single HD Audio Interface, connect the Slave Clock Out
of the first interface to the Slave Clock In of the second interface.
96 I/O Index | All FAQ Index
ASIO Driver
What were the primary known limitations of the previous ASIO Drivers. Have these limitations been fixed?
Is there a Mac OS X version of the Digidesign ASIO Driver?
With the ASIO Driver, will it be possible to use non-Digidesign hardware (such as MOTU or RME cards) with Pro Tools
software?
Can you use Digidesign hardware along with the ASIO Driver without installing Pro Tools?
How do I remove the ASIO Driver?
How do I install the ASIO Driver?
Will there be new versions of the Digidesign ASIO Driver?
Can you use Pro Tools and an ASIO program (or more than one ASIO program) at the same time?
How do I change ASIO Driver settings?
Which programs currently support the Digidesign ASIO Driver?
Does the ASIO Driver support Native Instruments Programs with Windows XP?
Can I unplug the Mbox while Using the ASIO Driver 6.1.1 in Windows XP?
How do I fix an ASIO System Overload error in Logic Audio on Windows XP?
What versions of Pro Tools will work with the Digidesign ASIO Driver 6.1.1?
How many channels are supported by ASIO DirectIO and/or Core Audio?
Where do I find the ASIO Digidesign Direct I/O Driver for Mac OS 9x?
[27438]
What were the primary known limitations of the previous ASIO Drivers. Have these limitations been
fixed?
These two main issues have been fixed:
The ASIO Driver 5.3.2b2 could not be installed on a system with the Digidesign WaveDriver already installed. The
WaveDriver was removed when you install the ASIO Driver. This was fixed with version 6.1 of the ASIO driver
included with all Pro Tools 6.1 systems. The ASIO Driver 6.1.1 and Digidesign WaveDriver 6.1.1 can both be
installed at the same time.
The beta ASIO Driver 5.3.2b2 and release version ASIO Driver 6.1 could not be used with the MIDI ports on the
Digi 001 and Digi 002. This is fixed with version 6.1.1. The MIDI ports on the Digi 002, Digi 002 Rack, and Digi 001
can be used with the ASIO Driver 6.1.1.
ASIO Driver Index | All FAQ Index
[27439]
Is there a Mac OS X version of the Digidesign ASIO Driver?
No. The Digidesign Core Audio Driver is used on Mac OS X. Also, in a joint collaboration with Propellerhead
Software, Digidesign has added Rewire 2 support with all Pro Tools 6.1 and higher systems for Mac OS X and
Windows XP.
ASIO Driver Index | All FAQ Index
[27440]
With the ASIO Driver, will it be possible to use non-Digidesign hardware (such as MOTU or RME cards)
with Pro Tools software?
No. The ASIO Driver can only be used in configurations with Digidesign hardware and software programs that
support the ASIO standard.
ASIO Driver Index | All FAQ Index
[27442]
Can you use Digidesign hardware along with the ASIO Driver without installing Pro Tools?
Yes, ASIO Driver 6.1.1 can also be used as a stand alone driver (without Pro Tools), with any of the supported
Digidesign hardware systems. For compatibility check the Digidesign ASIO Driver page at www.digidesign.com/
download/asio
ASIO Driver Index | All FAQ Index
[27445]
How do I remove the ASIO Driver?
1. Choose Start > Control Panel.
2. Double-click the Add or Remove Programs icon.
3. From the Currently installed programs list, select Digidesign ASIO Driver.
4. Click the Change/Remove button.
5. Click OK to remove the ASIO Driver.
ASIO Driver Index | All FAQ Index
[27444]
How do I install the ASIO Driver?
Note: ASIO Driver 6.1.1 is not supported on systems with Pro Tools LE 6.1 or lower installed. If Pro Tools LE 6.1 is
installed on your system , use the Add/Remove Programs Control Panel to remove it before install ASIO Driver
6.1.1. If you plan to use Pro Tools on the system with the ASIO Driver, Pro Tools LE 6.1.1 must be installed before
the ASIO Driver in order for both to function correctly. If the ASIO Driver was installed before Pro Tools, removed
both programs from the Add/Remove Control Panel, reinstall Pro Tools, then reinstall the ASIO Driver.
To install the ASIO Driver:
1. Verify your hardware is connected.
2. Turn on your system.
3. After downloading and expanding the ZIP encoded folder, locate and double-click "Digidesign ASIO Driver 6.1.1
setup.exe."
4. If a "Locked File Detected" message displays during installation, click Reboot when prompted. If you get the
"Locked File Detected" message, do not select Ignore or Retry. Selecting Ignore or Retry results in an unsuccessful
installation.
5. When installation is complete, click Finish to restart your computer.
ASIO Driver Index | All FAQ Index
[27443]
Will there be new versions of the Digidesign ASIO Driver?
Yes. Check for new versions of the ASIO driver on the Digidesign ASIO Driver page at www.digidesign.com/
download/asio
ASIO Driver Index | All FAQ Index
[27441]
Can you use Pro Tools and an ASIO program (or more than one ASIO program) at the same time?
The ASIO Driver does not support simultaneous use of multiple stand-alone client programs. However, you can use
multiple ASIO applications as plug-ins when using a program such as Cubase.
ASIO Driver Index | All FAQ Index
[27446]
How do I change ASIO Driver settings?
Instructions for changing ASIO Driver settings are included in the ASIO Driver Usage Guide. This can be
downloaded at www.digidesign.com/download/asio
ASIO Driver Index | All FAQ Index
[27435]
Which programs currently support the Digidesign ASIO Driver?
The following programs have been tested and are supported with the latest Digidesign ASIO Driver 6.1.1:
Ableton LIVE Digidesign Edition
Applied Acoustics Systems Lounge Lizard v1.0 and v2.0
Applied Acoustics Systems Tassman v3.02
Arturia Moog Modular V v1.1
Emagic Logic Audio 5.01
Image Line Fruity Loops 3
Native Instruments Absynth v2.01*
Native Instruments B4 v1.1.1*
Native Instruments Battery v1.1*
Native Instruments FM7 v1.1*
Native Instruments Kontakt v1.2.1
Native Instruments Pro-52 v2.5*
Native Instruments Pro-53 v1.0*
Native Instruments Reaktor v3.0
Propellerhead Reason 2.0
Propellerhead Reason Adapted
Sonic Foundry Acid Pro 4.0
Sonic Foundry Vegas 4.0
Steinberg Cubase SX 1.06
Steinberg Nuendo 1.5.2 and 2.01
Steinberg Wavelab 4.0
*Plug-in or AudioMedia III stand-alone only.
ASIO Driver Index | All FAQ Index
[27294]
Does the ASIO Driver support Native Instruments Programs with Windows XP?
The ASIO Driver cannot support the audio input functionality of Native Instruments programs, except when used
with AudioMedia
III (as a stand-alone driver), or when used as a plug-in within another program (such as Nuendo) with other
Digidesign
hardware. This is because Native Instruments Program inputs only work with hardware that reports a 32-bit data
path.
(All Digidesign hardware except AudioMedia III reports a 24-bit data path.) Audio output is not effected.
From the Digidesign ASIO Driver 6.1.1 ReadMe
ASIO Driver Index | All FAQ Index
[27295]
Can I unplug the Mbox while Using the ASIO Driver 6.1.1 in Windows XP?
Unplugging Mbox while the ASIO Driver is active is not supported. Doing so will cause unexpected errors to occur.
From the Digidesign ASIO Driver 6.1.1 ReadMe
ASIO Driver Index | All FAQ Index
[27296]
How do I fix an ASIO System Overload error in Logic Audio on Windows XP?
Should you receive an ASIO System Overload dialog when using the ASIO Driver with Emagic Logic Audio, try
turning off the
transition effect in your Windows Display Properties.
To turn off transition effect:
1. Right-click your desktop and choose Properties.
2. Choose the Appearance tab and click the Effects button.
3. Uncheck “Use the following transition effect for menus and tooltips.”
4. Click OK twice.
From the Digidesign ASIO Driver 6.1.1 ReadMe
ASIO Driver Index | All FAQ Index
[27189]
What versions of Pro Tools will work with the Digidesign ASIO Driver 6.1.1?
The 6.1.1 ASIO Driver is intended for use with 6.1.1 only or with no version of Pro Tools installed at all. Unlike the
WaveDriver installer the ASIO 6.1.1 installer will actually prevent customers from installing if they have 6.1 or
earlier installed, since it is not compatible with earlier versions of Pro Tools or ASIO system software.
ASIO Driver Index | All FAQ Index
[26703]
How many channels are supported by ASIO DirectIO and/or Core Audio?
Standalone DirectIO only supports 8 channels on HD cards. The ASIO & CoreAudio drivers are both clients of
standalone DirectIO, so they both have this same 8-channel limitation with HD. MIX supports 16, 001 supports 18,
and Mbox supports 2.
ASIO Driver Index | All FAQ Index
[3198]
Where do I find the ASIO Digidesign Direct I/O Driver for Mac OS 9x?
The Direct I/O drivers are only available from the third-party sequencer manufacturers such as Steinberg and
MOTU. Digidesign does not have an ASIO available for Mac OS. There is a link available to Steinberg's latest drivers
under the Utilities & Links to Third Party Software section of the Downloads page on www.digidesign.com. Click on
ASIO Digidesign Direct I/O Driver.
ASIO Driver Index | All FAQ Index
Authorization
What is the Digidesign Plug-In Validator?
HDpack v5.0 License Cards
When I try to register an iLok I get a message saying "waiting for server...still processing...almost done" but it does not
complete the process and my iLok does not get registered.
What plugins are included in the various HDpack license card versions?
Can I use any iLok to authorize my HDpack plug-ins?
"Error while verifying your authorization. Result Code: 12101"
After updating to Pro Tools 5.3.1 for HD (Macintosh version), several plug-ins won't see the iLok authorization key:
Focusrite d2, Maxim, and the D-Fi Bundle (LoFi, RectiFi, SciFi, and VariFi).
After updating to Pro Tools 5.3.1 for HD (Macintosh version), DPP-1 won't see the text serial number authorization that
was previously entered.
Instructions for authorizing HDpack or iLok plug-ins running in Demo mode
When attempting to authorize my copy of D-Verb with the diskette (Pro Tools LE for Windows), an "Invalid Disk" error is
posted.
When attempting to authorize my purchase of MP3 Option (Pro Tools LE 5.1.1), I am prompted to insert an authorization
diskette instead of my authorization code.
What is the copy protection scheme for plug-ins on Pro Tools|HD systems?
What is a License Card?
Is there a way to combine authorizations onto a single iLok to free up a USB port?
What is required for iLok support on Macintosh and Windows?
I just got a new computer and it is not equipped with a Floppy Drive. How do I authorize my Digidesign software?
My disk does not mount on the desktop even though I have the proper SuperDisk Extensions as well as the PACE USB
Floppy Enabler system extensions.
My computer freezes whenever I launch MasterList CD 2.2.
Where is the authorization code for Pro Tools located?
My computer hangs when I launch Pro Tools LE 5.0.1 for the first time after installing it. I can still move my mouse and
the words "Pro Tools LE" are displayed on the menu bar, but I am never prompted to enter my authorization code.
I ordered my computer with the optional internal SCSI drive but your manuals say that an ATA drive is required. Is this
true?
"this demo copy of ... has expired." How do I make it so I don't see this error anymore?
I keep getting the message, "This copy of AVOption requires authorization. Please insert the key disk...". What is
AVOption?
[27845]
What is the Digidesign Plug-In Validator?
This is a utility that allows you to check the version of your non-Digidesign plug-ins to determine whether or not
they need to be updated for use with the currently installed version of Pro Tools.
To use the Digidesign Plug-In Validator:
Launch the "Digidesign Plug-In Validator" application located in your Pro Tools Utilities folder. If any of your nonDigidesign plug-ins have not been updated, they will be listed in the display window. Please visit the Web site for
the manufacturer of any affected plug-ins and download the update (if available), or ask the manufacturer when
one will be available.
This utility was originally introduced with Pro Tools 6.2.2 due to a PACE copy protection bug. Some users experience
instability and/or crashes when launching Pro Tools, opening a session, or dismissing a trial-period dialog if any
Pace-wrapped third party plug-ins are installed. The fix for this bug is in the latest PACE drivers included and
installed automatically within the Pro Tools software installer. Updates to all plug-ins are also necessary to prevent
instability and/or crashes. All plug-ins supplied with the Pro Tools 6.2.3 installer have been fixed. Even if you do not
have updates for all your plug-ins, instability would only occur immediately after adding or removing a plug-in from
your Pro Tools Plug-Ins folder. After the first crash and subsequent reboot, you should not see any further
problems, unless you then add or remove plug-ins from the Plug-Ins folder.
Authorization Index | All FAQ Index
[27613]
HDpack v5.0 License Cards
HDpack 1 and HDpack 2 v5.0 are on 1 License Card.
HDpack 3 v5.0 is 2 License Cards:
Pro Tools|HDpack 3 - License Card 1 - Version 5.0
Amp Farm
Bruno/Reso
d2.d3
D-Fi
Impact
Maxim
Reverb One
Virus Indigo
Pro Tools|HDpack 3 - License Card 2 - Version 5.0
SoundReplacer
Speed
The Sony Oxford EQ plug-in included with HDpack 3 v5.0 does not use an iLok license card.
Customers receive a registration code printed on a separate card included with the HDpack 3 package. Then they go
to the Sony website to register, and Sony deposits an authorization on iLok.com
Authorization Index | All FAQ Index
[26866]
When I try to register an iLok I get a message saying "waiting for server...still processing...almost
done" but it does not complete the process and my iLok does not get registered.
This can happen if you are trying to register or update an iLok from an authenticating proxy server. This type of
server is currently not supported for use with iLok.com. Some alternatives for registering are to temporarily turn off
the authentication proxy requirement, use a dial up to connect to the internet (proxy free), or register from another
location (home, the café, library, a friends house, etc.)
PACE is still looking into this situation so any new information will be updated online.
Authorization Index | All FAQ Index
[26817]
What plugins are included in the various HDpack license card versions?
Macintosh:
HD 1 license card v1.0 = Focusrite d2, DPP-1, Bomb Factory Classic Compressors
HD 2 license card v1.0 = Focusrite d2, DPP-1, Maxim, Bruno/Reso, D-Fi, Bomb Factory Classic Compressors
HD 3 license card v1.0 = Focusrite d2, DPP-1, Maxim, Bruno/Reso, D-Fi, Bomb Factory Classic Compressors, Reverb
One, Virus (by Access Music), PitchDoctor (by WaveMechanics)
HD 1 license card v2.0 = Focusrite d2/d3, Pitch Dr. (Wave Mechanics)
HD 2 License card v2.0 = Focusrite d2/d3, Pitch Dr. (Wave Mechanics), D-fi (text), Maxim (text), Bruno/Reso,
Master X (TC Works)
HD 3 License card v2.0 = Focusrite d2/d3, Pitch Dr. (Wave Mechanics), D-fi (text), Maxim (text), Bruno/Reso,
Master X (TC Works), Amp Farm, Reverb One
HD 1 license card v3.0 = Focusrite d2/d3, Pitch Dr. (Wave Mechanics)
HD 2 license card v3.0 = Focusrite d2/d3, Pitch Dr. (Wave Mechanics), D-fi, Maxim, Bruno/Reso, Amp Farm
HD 3 license card v3.0 = Focusrite d2/d3, Pitch Dr. (Wave Mechanics), D-fi, Maxim, Bruno/Reso, Amp Farm, Reverb
One
HD 1 license card v4.0 = Focusrite d2/d3
HD 2 license card v4.0 = Focusrite d2/d3, D-fi, Maxim, Bruno/Reso, Amp Farm
HD 3 license card v4.0 = Focusrite d2/d3, D-fi, Maxim, Bruno/Reso, Amp Farm, Reverb One
Windows:
HD 1 license card v.1.0 = d2/d3 (license card) , DPP-1 (text), D-fx (text). *NOTE: {The HD-1 bundle for Windows
does not have a separate license card; it ships only with a d2/d3 license card and authorization codes for DPP-1 and
D-Fx.}
HD 2 license card v.1.0 = d2/d3 (license card) , DPP-1 (text), D-fx (text), Maxim, Big Bottom & Aural Exciter
HD 3 license card v.1.0 = d2/d3 (license card) , DPP-1 (text), D-fx (text), Maxim, Big Bottom & Aural Exciter, D-fi,
Drawmer, Sound Replacer, SurroundScope
Authorization Index | All FAQ Index
[26767]
Can I use any iLok to authorize my HDpack plug-ins?
The HDpack license cards are designed to be used only with the HD iLok that's included with an HD system (PID#
ends in -600 or last four digits of the second line ends in 9966).
Attempting to authorize these cards to any other iLok is not supported and may result in authorizations being lost.
Things to check if you're having problems authorizing any of the HDpack plug-ins:
- Verify that it is an HD iLok (PID# ends in -600 or last four
digits of the second line ends in 9966).
- Verify the version of the HDpack license card to determine
which authorizations are on the card
- Verify that you are using the correct HDpack Installer CD
- Verify that current PACE InterLok drivers are in use
- Verify that the license card is inserted correctly within the iLok
when authorizing a plug-in
HDpack1, 2, or 3 license cards, version 1.0 through 4.0
For more information on HDpack plug-ins see the iLok Information Page and Pro Tools|HDpack Updates on the
Digidesign website
Authorization Index | All FAQ Index
[25935]
"Error while verifying your authorization. Result Code: 12101"
This error can occur if PACE Interlok Drivers 4.1.3 are installed and the product is not yet authorized. Interlok 4.1.3
supports iLok but has discontinued support for floppy disk authorization. Any product that can be authorized with
floppy disk is susceptible to this error.
The Interlok extensions include:
Interlok Engine v.4.1.3
USB iLok Driver v.4.1.3
This was first discovered on Pro Tools 5.3.1 on HD when trying to authorize MachineControl and DigiTranslator 2.0
(which can be authorized by either iLok or floppy disk). The workaround is to upgrade to Interlok Drivers 4.1.4 or
higher, or downgrade to Interlok Drivers 4.1.1 or lower (the Pro Tools 5.3.1 Installation CD includes Interlok Drivers
version 4.0.7).
Authorization Index | All FAQ Index
[8169]
After updating to Pro Tools 5.3.1 for HD (Macintosh version), several plug-ins won't see the iLok
authorization key: Focusrite d2, Maxim, and the D-Fi Bundle (LoFi, RectiFi, SciFi, and VariFi).
The original iLok authorized versions of these plug-ins should still be located in: Macintosh HD > Obsoleted
Digidesign Software folder > DAE Folder > Plugins folder.
Move these copies of the plug-ins back into the main plug-ins folder: Macintosh HD > System Folder > DAE Folder
> Plug-Ins folder
Alternately, you can choose to reinstall these plug-ins from the HD|Pack Installer, but you must first remove the
newer versions from the Plug-Ins folder, otherwise you will end up with duplicate versions of these plug-ins (and
Pro Tools will still load the floppy authorized versions only).
Note that the initial posting of the Pro Tools 5.3.1 TDM updater for Mac installed DINR plug-ins that needed to be
replaced using the process described above. The 6/19/2002 posting of the installer instals the iLok authorized
version of DINR and does not cause the issue described above.
Authorization Index | All FAQ Index
[8170]
After updating to Pro Tools 5.3.1 for HD (Macintosh version), DPP-1 won't see the text serial number
authorization that was previously entered.
The original serial number authorized version of this plug-in should still be located in: Macintosh HD > Obsoleted
Digidesign Software folder > DAE Folder > Plugins folder.
Move this copy of the plug-in back into the main plug-ins folder: Macintosh HD > System Folder > DAE Folder >
Plug-Ins folder.
Alternately, you can choose to reinstall this plug-in from the HDpack CD Installer, but you must first remove the
newer version from the Plug-Ins folder, otherwise you will end up with duplicate versions of this plug-in (and Pro
Tools will still load the floppy authorized versions only).
Authorization Index | All FAQ Index
[8053]
Instructions for authorizing HDpack or iLok plug-ins running in Demo mode
If you are trying to authorize one or more HDpack or other iLok plug-ins that are already running in Demo mode:
- Launch Pro Tools before you insert the iLok
- Insert the iLok into any available USB port when prompted.
- Follow the onscreen instructions until you are prompted to insert the License Card into the iLok.
Some plug-ins will not show days remaining on the demo period and will not allow you to authorize them with the
method outlined above. Another way to force the demo plug-ins to ask for authorization is to advance the date on
your computer to a time that is past the demo period. You can then authorize the plug-ins to your iLok and switch
your system back to the correct date. **Be aware that this may expire all demos running on your system and these
cannot be re-run.**
Included in the HDpack Download Read Me on the Q1/Q2 2002 HDpack Installer CD
Authorization Index | All FAQ Index
[7296]
When attempting to authorize my copy of D-Verb with the diskette (Pro Tools LE for Windows), an
"Invalid Disk" error is posted.
If you have Pro Tools 5.1 or 5.1.1 you should download D-Verb 1.8.1 from the Support > Downloads section: http://
www.digidesign.com/download
If you got this error running a version of Pro Tools previous to Pro Tools 5.1, contact technical support for
assistance.
Authorization Index | All FAQ Index
[7297]
When attempting to authorize my purchase of MP3 Option (Pro Tools LE 5.1.1), I am prompted to insert
an authorization diskette instead of my authorization code.
This problem seems to develop and be solved a bit differently depending on how Pro Tools LE v.5.1.1 has been
installed to your machine.
First scenerio:
You install Pro Tools LE v5.1.1 from a full install CDROM. Simply remove the PACE file from the MP3 codecs folder
and restart.
Second scenerio:
The machine has Pro Tools LE 5.1 on it and then the Pro Tools LE 5.1.1 LE updater download has been run on it. If
you then download the MP3 option 1.1.1.0 for Win and you're getting prompted for a floppy auth., the fix is to
Uninstall Pro Tools LE 5.1.1 and then reinstall Win Pro Tools LE 5.1 from the installer CD. Then download the MP3
option for 5.1. After you get the MP3 option authorized you then need to download and run the Pro Tools LE 5.1.1
updater for Windows.
Authorization Index | All FAQ Index
[7299]
What is the copy protection scheme for plug-ins on Pro Tools|HD systems?
The new iLok USB dongle is now used and one is included with all Pro Tools|HD systems (PID# ends in -600 or last
four digits of the second line ends in 9966). They contain preauthorized demo authorizations for certain plug-ins
that are included in the HDpack bundles.
All non-DigiRack Digidesign plug-ins require iLok authorizations for Pro Tools|HD systems running Pro Tools 6.0 and
higher software on OS X. Pro Tools 5.3/5.3.1 on OS 9 can use iLok or floppy authorizations for most Digidesign plugins with the exception of Reverb One, Bruno/Reso, DINR, and Virus, which require iLok authorization.
Authorization Index | All FAQ Index
[7298]
What is a License Card?
A License Card is used to authorize an iLok for any number of plug-ins. It looks like a credit card with a small
breakaway section that is broken out of the card and can be slid into the slot at the end of the iLok USB key. This
will install an authorization for the appropriate plug-in(s).
Authorization Index | All FAQ Index
[7300]
Is there a way to combine authorizations onto a single iLok to free up a USB port?
There is currently no way to merge authorizations that may reside on multiple iLoks. However, once registered at
www.ilok.com you can view what each iLok is authorized for. A powered USB hub may be used to run multiple iLoks
if you do not have available USB ports on your system.
Authorization Index | All FAQ Index
[6659]
What is required for iLok support on Macintosh and Windows?
Mac OS and Windows require certain InterLok drivers to be installed to use iLok
For Mac OS X 10.2.3 and higher:
Pro Tools 6x software automatically installs the InterLok Engine drivers on Mac OS X systems.
For Mac OS 9x:
Starting with Pro Tools 5.3 for HD systems, InterLok Extensions were authomatically installed. To use iLok with Pro
Tools 5.1x software, download current versions from the PACE website. These extensions are:
- InterLok Engine
- USB iLok Driver
For Windows:
Download the current InterLok Driver Installer from the PACE website.
Latest versions for Mac OS and Windows can be found online at: http://www.paceap.com/dldrvr.html
If you currently have an older version of these extensions in your system, certain plug-in installations may require
the latest available version and will attempt to automatically update the drivers from the PACE website.
Authorization Index | All FAQ Index
[4365]
I just got a new computer and it is not equipped with a Floppy Drive. How do I authorize my Digidesign
software?
Imation SuperDisk or Newer Tech Udrive or SmartDisk USB Floppy Drive (model FDUSB-M, Color Kit Edition,
formerly VST) with proper system extensions are required for floppy disk authorization. For specifics, please see the
following page in our online compatibility documents:
http://www.digidesign.com/compato/floppy.html
Authorization Index | All FAQ Index
[4366]
My disk does not mount on the desktop even though I have the proper SuperDisk Extensions as well as
the PACE USB Floppy Enabler system extensions.
Disable Virtual Memory in the Memory Control Panel and restart the computer.
Authorization Index | All FAQ Index
[4368]
My computer freezes whenever I launch MasterList CD 2.2.
The MLCD 2.2 installer installs version 1.3 of the USB Floppy Enabler which is incompatible with the application.
Replacing the extension with USB Floppy Enabler version 2.0 fixes this incompatibility
Authorization Index | All FAQ Index
[4371]
Where is the authorization code for Pro Tools located?
The current authorization codes are located on the inside cover of the Getting Started Guides for TDM and LE
systems.
Authorization Index | All FAQ Index
[4372]
My computer hangs when I launch Pro Tools LE 5.0.1 for the first time after installing it. I can still move
my mouse and the words "Pro Tools LE" are displayed on the menu bar, but I am never prompted to
enter my authorization code.
This is a known issue with the PACE copy protection, and the initial workaround was to let the machine sit (up to an
hour or more) until the authorization dialog came up. (You can locate the authorization code on the inside cover of
the System Installation Guide.)
PACE created an app (Hang Buster) that can be run on a system before launching Pro Tools LE to fix this problem.
Authorization Index | All FAQ Index
[4373]
I ordered my computer with the optional internal SCSI drive but your manuals say that an ATA drive is
required. Is this true?
Since the PACE copy protection used with Pro Tools 4.3.1 and earlier will not authorize over a SCSI bus on Power
Macintosh B&W G3 and G4 computers, an ATA drive is required. Although it is still strongly recommended that you
use an internal ATA for your system volume due to compatibility issues with SCSI controller cards shipped by Apple
and our software, PACE fixes this incompatibility starting with Pro Tools 5.0 and will authorize a SCSI drive on these
computers.
Authorization Index | All FAQ Index
[4375]
"this demo copy of ... has expired." How do I make it so I don't see this error anymore?
If you have purchased the key to the plug-in, insert the key disk when Pro Tools prompts you. Otherwise, remove
either the specific plug-in files (System Folder>DAE Folder>Plug-ins folder) that Pro Tools says are expired or that
have the word "demo" in the filename. Trash the DAE prefs (entire folder) from the System Folder>Preferences
folder, empty the Trash and relaunch Pr Tools. For DINR, you need to remove 3 files: Broadband Noise Reduction,
Broadband Noise Reduction A/S and Hum Removal.
Authorization Index | All FAQ Index
[4376]
I keep getting the message, "This copy of AVOption requires authorization. Please insert the key
disk...". What is AVOption?
If you don't have the optional AVOption card set (ABVB/Janus card set or Meridien hardware) but ran the AVOption
installer, trash the Video Engine folder from the System Folder>DAE Folder, empty the Trash and relaunch Pro
Tools.
Authorization Index | All FAQ Index
AVoption and AVoption XL
Can I pass digitized video back and forth between my AVoption and AVoption|XL systems?
What are the SCSI requirements for digitizing video with AVoption|XL?
Can I have multiple video clips in a Pro Tools AV session? What if I am digitizing a one hour video clip and the record is
aborted after 45 minutes, can I then digitize the remaining 15 minutes and add it to the end?
Can I run AVoption on my AudioVision audio hardware?
Is a USD or SYNC I/O required for use with AVoption and AVoption|XL or can a Microlynx be used?
If I upgraded from AudioVision to AVoption can I continue to run AudioVision on my new 24-bit audio hardware?
Is S-Video supported with AVoption and AVoption|XL?
Can I use the single channel ATTO card from my AudioVision system with AVoption?
When is the additional cooling fan required with AVoption and AVoption|XL?
Can I do basic video editing within AVoption or AVoption|XL?
[6190]
Can I pass digitized video back and forth between my AVoption and AVoption|XL systems?
AVoption uses AVID's ABVB hardware while AVoption|XL uses AVID's Meridien hardware. The two use different
formats, thus digitized video can not be interchanged.
AVoption and AVoption XL Index | All FAQ Index
[6191]
What are the SCSI requirements for digitizing video with AVoption|XL?
AVoption|XL requires the ATTO EPCI-DC or UL3D card for audio and video recording. The ATTO Express PCI Dual
Channel Ultra-2 LVD SCSI HBA card (EPCI-UL2D) or an additional UL3D is required for 2:1 or 1:1 video recording
and playback. Compression ratios of 3:1 or higher can be done with only the EPCI-DC or UL3D card. Check www.
digidesign.com for additional SCSI controller compatibility as this information is subject to change.
AVoption and AVoption XL Index | All FAQ Index
[4011]
Can I have multiple video clips in a Pro Tools AV session? What if I am digitizing a one hour video clip
and the record is aborted after 45 minutes, can I then digitize the remaining 15 minutes and add it to
the end?
Pro Tools AVoption 5.0 and 5.0.1 and AVoption|XL 5.0.1 are only capable of handling one clip per session. However,
a sequence containing multiple clips can be imported from an AVID system or other source using Digitranslator. If a
video digitize is aborted midway through then the clip must be re-digitized from the beginning. AVoption and
AVoption XL 5.1 and higher can have multiple video clips on the timeline simultaneously.
Pro Tools AV 5.01
AVoption and AVoption XL Index | All FAQ Index
[4012]
Can I run AVoption on my AudioVision audio hardware?
This configuration has not been tested by Digidesign. Preliminary reports show that digitizing video to a drive
connected to the Disk I/O may drop out of record after roughly 1 minute.
There may also be problems recognizing video drives on this system as Audiovision uses a single channel ATTO
SCSI card and Pro Tools AVoption uses a dual channel ATTO card.
AVoption and AVoption XL Index | All FAQ Index
[4526]
Is a USD or SYNC I/O required for use with AVoption and AVoption|XL or can a Microlynx be used?
Digidesign's USD or SYNC I/O is required for AVoption and AVoption|XL as they are the only sync devices that can
provide Pro Tools with the necessary top of frame boundary data it needs to establish near sample-accurate video
lock.
AVoption and AVoption XL Index | All FAQ Index
[5279]
If I upgraded from AudioVision to AVoption can I continue to run AudioVision on my new 24-bit audio
hardware?
No, AudioVision will not run on AVoption systems with Pro Tools|24 and Pro Tools|24 Mix hardware, it requires a
Disk I/O and DSP Farm. Also, AudioVision uses a single channel ATTO SCSI accelerator while AV Option uses a dual
channel ATTO card. However, customers who upgraded from AudioVision were not required to return their
AudioVision hardware or software. This allows the flexibility to reconfigure an AudioVision system in the future as
necessary.
AVoption and AVoption XL Index | All FAQ Index
[5280]
Is S-Video supported with AVoption and AVoption|XL?
S-Video is only possible with AVoption|XL hardware. It is not supported with AVoption.
AVoption and AVoption XL Index | All FAQ Index
[5281]
Can I use the single channel ATTO card from my AudioVision system with AVoption?
No, the ATTO Express PCI dual channel (EPCI-DC) and the ATTO UL2D are currently the only qualified SCSI
controllers for AVoption.
The ATTO single channel card is not qualified.
AVoption and AVoption XL Index | All FAQ Index
[5282]
When is the additional cooling fan required with AVoption and AVoption|XL?
The cooling fan (part # MC201) is required when placing the ABVB and Janus cards or the Meriden card in certain
Magma expansion chassis.
Earlier Magma 13 slot chassis (both 68 and 80 pin models) do require a fan kit with AVoption.
Fan kits are no longer required for Magma 13 slot chassis Rev G and higher. Rev G chassis can be identified by a
newer faceplate and a serial number that ends in "00G".
AVoption and AVoption XL Index | All FAQ Index
[5284]
Can I do basic video editing within AVoption or AVoption|XL?
AVoption 5.0 and 5.0.1 and AVoption|XL 5.0.1 are not capable of video editing.
Versions 5.1 and higher will allow very basic video cutting.
Pro Tools AV option and AV option XL 5.01
AVoption and AVoption XL Index | All FAQ Index
Control|24
What are some of the features of the Control|24?
Does Control|24 provide the A/D-D/A conversion for me, replacing my audio interfaces?
How do I connect Control|24 to my Pro Tools system?
What kind of power requirements are there?
How can I communicate with people in the studio?
Can I use Control|24 for mixing in surround?
What are the differences between Control|24 and ProControl?
I understand that Pro Tools 5.1.1 for Windows 2000 supports the Control|24. How do I install the Control|24 software
from the Pro Tools CD?
What are the dimensions of the Control|24?
What kinds of systems does Control|24 work with?
Can I have more than one Control|24 connected to my Pro Tools system?
Can I listen to other input sources besides Pro Tools?
Are custom cable systems available for the Control|24?
The External Talkback and Listenback Mic inputs on the Control|24 do not output phantom power.
[6269]
What are some of the features of the Control|24?
Control|24 Features
- 24 touch-sensitive motorized faders
- 16 Focusrite Class A Mic Preamps
- Hands-on access to Pro Tools recording, routing, mixing, and editing parameters
- Comprehensive Control Room Section capable of up to 5.1 surround monitoring
- Illuminated switches for Mute, Solo, Record Arm, Channel Selects, and Automation Mode on every channel
- Dedicated EQ and Dynamics switches on every channel
- 26 scribble strips provided for system feedback
- Connects to Pro Tools TDM systems via high-speed Ethernet
- High-resolution LED display for transport location at a glance
- Integrated submixer with 8 stereo inputs
- Touch-Sensitive automation of plug-in parameters using faders via Plug-In Flip Mode
Extensive Control
Control|24 is an ergonomic control surface that will enhance the speed of working with TDM-equipped Pro Tools
systems. This unit features a host of dedicated switches and faders, offering hands-on access to nearly every
recording, routing, mixing, and editing function in Pro Tools. Control|24 transforms even the most complex
sequence of functions into a series of simple movements, allowing users to spend a lot less time using the
computer’s keyboard and mouse.
World-Class Focusrite Analog Design
High resolution digital audio workstations such as Pro Tools offer very accurate and detailed audio quality, making it
all the more important to use high-end mic/line preamps to ensure that the most precise signal is being fed into the
audio interface.
With 16 Class A mic/line preamps from Focusrite, Control|24 provides a highly sophisticated front-end to Digidesign
audio interfaces. It even features 2 DI (direct inject) inputs on the first two channels for directly plugging in
instrument-level devices such as an electric guitar or bass.
Control|24 Index | All FAQ Index
[6270]
Does Control|24 provide the A/D-D/A conversion for me, replacing my audio interfaces?
No, you still have a choice of which audio interface you would like to use with your Control|24. It provides a high
quality signal path for your audio and is designed to be the perfect front end to high resolution Pro Tools audio
interfaces like the HD 192 I/O or the Mix 888|24 I/O.
Control|24 Index | All FAQ Index
[6271]
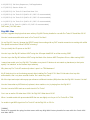
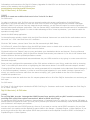
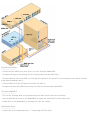
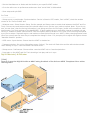
How do I connect Control|24 to my Pro Tools system?
Control|24 connects to the inputs of your audio interfaces via 25 pin D-Sub connectors on the back of the unit.
These will fan out to either XLR or 1/4" balanced connections depending on which interface you use. There are a
total of 7 D-Sub connections on the back of the unit. See the Control|24 25 Pin Female D-sub Pinouts at http://
www.digidesign.com/support/docs/Control_24_Pinouts.html
Also available in the Control|24 section of the Technical Document Library :
http://www.digidesign.com/support/docs
For a custom built solution from Digidesign, see the following:
http://answerbase.digidesign.com/detail.cfm?DID=6272
Control|24 Index | All FAQ Index
[6273]
What kind of power requirements are there?
Rev. A--G Control|24 's will work happily with 100 to 220 volt power. Fuses for these models ship with the unit and
the user has to simply choose the correct fuse and insert the fuse holder with the arrow pointing to the desired
operating voltage. Newer RevH Control|24 models have a different power supply design that does not require the
user to install a fuse and will auto-detect the correct fuse setting after connecting to a power outlet.
Control|24 Index | All FAQ Index
[6275]
How can I communicate with people in the studio?
Control|24 has complete Talkback and Listenback capabilities. There is a built in mic and input for external Talkback
and Listenback mics. (these are not phantom powered inputs, contrary to a misprint in the original Control|24
manual)
Control|24 Index | All FAQ Index
[6277]
Can I use Control|24 for mixing in surround?
Yes! Control|24 provides access to all of the Pro Tools surround output panners including positions, divergence and
LFE control. The Control Room monitor section also supports multichannel mixes up to 5.1 in width at the press of a
button!
Control|24 Index | All FAQ Index
[6279]
What are the differences between Control|24 and ProControl?
ProControl and Control|24 are both extremely powerful control surface options for Pro Tools, but there are distinct
differences between them. Here are a few guidelines to distinguish the two:
Expandability
ProControl is a larger format, more professional control surface that can be operated by more than one user, if
necessary. ProControl can be expanded up to 48 faders plus Edit Pack, so it can handle larger mixes more
comfortably and with less banking. Control|24 is not expandable. It is a self-contained unit, fixed at a 24-fader
configuration.
Dedicated Editing and Mixing Features
ProControl has a dedicated DSP Edit/Assign section and 8 character LED scribble strips that are able to display more
information than the 4-character LCD scribble strips on Control|24. There is no dedicated DSP Edit/Assign section
on Control|24, so its scribble strips have to toggle between two display functions: channel strip information and
plug-in parameter information.
Surround Mixing Controls
The Edit Pack option for ProControl features two touch-sensitive motorized joystick panners, providing full access to
all the surround panning controls in Pro Tools 5.1 software. Control|24 does not provide surround panning
capability.
Metering Options
Edit Pack includes 8 high-resolution output meters for viewing up to 7.1 surround mixes, while Control|24 is limited
to 6 regular-resolution output meters. Control|24 also lacks the dedicated, comprehensive MachineControl section
featured in Edit Pack.
Full Control of Pro Tools
The Edit Pack option for ProControl, with its QWERTY keyboard and trackball, completely replaces the standard
keyboard and mouse for computer input. Control|24 users will still need a computer keyboard and mouse or
trackball to access Pro Tools commands.
Professional Look and Feel
The components (faders, encoders and switches) used on ProControl are higher in quality than those used on
Control|24. Operationally, they will perform in an almost identical manner, meaning the data passed on to Pro Tools
is about the same. However, these components on ProControl are substantially more expensive, giving users a
more professional look and feel.
Control|24 Index | All FAQ Index
[6281]
I understand that Pro Tools 5.1.1 for Windows 2000 supports the Control|24. How do I install the
Control|24 software from the Pro Tools CD?
Installation for Windows systems:
1. On the desktop, right-click the My Network Places icon, and then choose Properties.
2. Right-click on the relevant Local Area Connection, and then choose Properties.
3. Click on Install, select Protocol and click the Add button.
4. Click on Have Disk.
5. Point to the DigiNet.inf file in the \Controllers\ProControl directory on your Pro Tools Installer CD-ROM. (The file
OEMSETUP.INF becomes obsolete.)
6. Follow instructions on-screen to complete the installation.
The Installer puts the DigiNet.inf files in the Digidesign\DAE\Controllers\Procontrol directory.
Control|24 Index | All FAQ Index
[6280]
What are the dimensions of the Control|24?
If you want to know how the Control|24 will fit into your studio, or you want to build custom furniture, you can find
the dimensions at http://www.digidesign.com/support/docs/control24dimensions.html
Control|24 Index | All FAQ Index
[6278]
What kinds of systems does Control|24 work with?
Control|24 requires a Digidesign-approved Mac OS-based Pro Tools TDM or LE system. For the latest compatibility
information, including updated computer requirements, see the Digidesign Compatibility Documents at http://www.
digidesign.com/compato/
Control|24 Index | All FAQ Index
[6276]
Can I have more than one Control|24 connected to my Pro Tools system?
No. Control|24 can't be expanded past 24 channels, but banking, nudging, show/hide and memory locations make
it possible to navigate sessions with many more than 24 tracks.
Control|24 Index | All FAQ Index
[6274]
Can I listen to other input sources besides Pro Tools?
Yes, Control|24 has 3 stereo External Sources available in addition to its 3 stereo Pro Tools Sources. You could also
use the 8 channel stereo submixer to monitor more sources, if required.
Control|24 Index | All FAQ Index
[6272]
Are custom cable systems available for the Control|24?
A: Yes! The optional Control|24™ Cable Kit is a complete custom cable kit that allows you to easily connect your
Control|24 to Pro Tools interfaces or external audio gear. This cable kit includes 7 custom color-coded, customlabeled 25-foot, eight channel cable snakes that feature a lifetime warranty. The following cable snakes are included
with the Control|24 Cable Kit:
- 2 D-Sub to XLR Female
- 3 D-Sub to XLR Male
- 2 D-Sub to TRS
Control|24 Index | All FAQ Index
[5813]
The External Talkback and Listenback Mic inputs on the Control|24 do not output phantom power.
The manual incorrectly states that the Talkback and Listenback Mics inputs output phantom power.
Control|24 Index | All FAQ Index
Customer Service
How do I contact the Digistore for a refund, return, exchange or general information about my purchase?
Why should I register my Digidesign products?
How do I register my Digidesign products?
What if I want to buy someone else's gear? Can I register it?
How do I upgrade to Pro Tools 5.1 or Pro Tools LE 5.1?
[26646]
How do I contact the Digistore for a refund, return, exchange or general information about my
purchase?
DigiStore Order Line:
You may call 800-333-2137 option 4 business hours 8:30 AM to 5:00 PM Monday though Friday.
Customer Service Index | All FAQ Index
[6249]
Why should I register my Digidesign products?
Because registering your Digidesign hardware entitles you to tech support for a year after purchase; registering
your software entitles you to tech support for 90 days after purchase and entitles you to receive any free updates
that are released between major software upgrade revisions.
Customer Service Index | All FAQ Index
[6250]
How do I register my Digidesign products?
Fill out the registration card from your "Product Registration & Customer Services Information booklet", make a
copy of it for your own records (very important!), and mail or FAX it in to us. The card is pre-addressed; our FAX
number in the US is 650-856-4275.
Customer Service Index | All FAQ Index
[6251]
What if I want to buy someone else's gear? Can I register it?
Yes. You need to use the Transfer of Ownership Form, which you can download from the Customer Service
Registration section of Support on this website.
Please note that Pro Tools software, except for PowerMix, is not transferrable by itself, since the Pro Tools software
license is tied to the hardware it was originally furnished with. See the form for complete details. There is no cost
for this service.
Customer Service Index | All FAQ Index
[6252]
How do I upgrade to Pro Tools 5.1 or Pro Tools LE 5.1?
You can order the upgrade online at the new DigiStore. You will be sent the upgrade package, with the option to
download the 5.1 installer immediately upon purchase. International customers can purchase the 5.1 upgrade either
through the DigiStore or the Digidesign office or distributor where they are registered.
Customer Service Index | All FAQ Index
DAE
DAE and Pro Tools 5.x Compatibility
DAE and Pro Tools 4.x Compatibility
DAE and Pro Tools 3.x Compatibility
DAE and Session / Pro Tools 3.x & 2.x Compatibility
[6253]
DAE and Pro Tools 5.x Compatibility
DAE 5.0.1 DAE 5.0.1 is the version that ships with Pro Tools 5.0.1 and 5.0.1 LE and fixes the following problems.
Digisystem INIT Error
- Having too many drivers (Hard Disk, USB Extensions, etc.) no longer causes the Digisystem INIT to report that 2
Digisystem INITs are loading.
Mac TDM systems
- Launching Pro Tools no longer results in the error "A Digisystem INIT is required" when the USB Floppy Enabler
(v1.2) is installed and enabled. Note: USB Floppy Enabler 2.1.1 was current as of August 2000.
5.0P 5.0P allows Post Conform and Pro Tools to run at the same time (fixed in 5.0.1).
- Available on the Post Conform 2.0 installer disk. NOT automatically installed.
- Active in Background must be disabled in Pro Tools.
5.0 cs4 Version 5.0cs4 is an interim release that can be used with Pro Tools 5.0 TDM and Pro Tools 5.0 LE Systems.
Preliminary testing has shown that this DAE/DSI combination fixes the following problems (addressed in versions
5.0cs1-cs3):
Digi 001 systems
- Cannot generate MIDI Time Code (MTC) from the Digi 001 MIDI Output.
- Analog Inputs 2, 4, 6 and 8 are delayed by 1 sample. Analog Outputs 1, 3, 5 and 7 are delayed by 1 sample.
- S/PDIF Input 2 (R) is delayed by 1 sample and S/PDIF Output 1 (L) is delayed by 1 sample.
TDM systems with DSP Farm 1 cards
- Certain Plug-Ins, e.g. D-Verb, are problematic (audio dropouts or no wet signal) when loaded on the first chip of a
DSP Farm 1 card.(these have serial numbers below FF09226)
5.0 cs3 Fixed the plug-in issue on DSP Farm I's & the analog phase (sample delays on i/o) issue with the Digi 001.
5.0 cs2 Not releasedÉ fixes rolled into 5.0 cs3
5.0 cs1 Fixed the ability to output MTC directly from the Digi 001 interface.
5.0 DAE 5.0 is the version that ships with Pro Tools 5.0 and 5.0 LE.
Third-party applications that access DAE may need this version in order to work on an Apple G4 &/or OS 9.x.
DAE Index | All FAQ Index
[6254]
DAE and Pro Tools 4.x Compatibility
3.4.2 cs1 DAE 3.4.2cs1 is a beta release that allows Pro Tools 4.3.x to work with OS9.
3.4.2 f9 Interim release for users of Pro Tools TDM and Waveshell 2.7 and 2.8 with improved memory management
and stability. This DAE should be used with Pro Tools 4.3x and Waveshell 2.8.1. Pro Tools 5 users should use DAE/
DSI 5.0 w/ Waveshell 2.81.
3.4.2 For anybody who uses Pro Tools 4.3.1 or 4.3.2, and anybody using Digidesign hardware with 3rd party apps
on the Blue/White G3 and Yikes model (PCI Graphics) G4.
3.4.1 For Project II and all hardware systems running Pro Tools 4.3, it fixes a problem with the sync mode pop-up
when using Direct I/O and the ADAT Bridge I/O. This version also enables PostConform to use Pro Tools|24 and Pro
Tools MIX hardware.
3.3 DAE 3.3 is the version that ships with Pro Tools 4.2.
** DAE 3.3 is the Highest version to support Nubus machines **
3.2.3+ Compatibility update for 882|20 and Tascam DATs
3.2.3 For all hardware systems running Pro Tools 4.1.1
3.2.1+ Only for d24 owners using a Bit-3 expansion chassis
3.2.1 Only for PT 4.1 running on d24, increases PT|24 track count to 32.
3.2 DAE 3.2 is the version that ships with Pro Tools 4.1.This is for PT 4.0.1 users on 68k machines, it fixes the
destructive record bug.
3.1.1 DAE 3.1.1 is the version that ships with Pro Tools 4.0.
DAE Index | All FAQ Index
[6255]
DAE and Pro Tools 3.x Compatibility
3.03 3rd party sequencer/DAE apps
3.01 Pro Tools 3.22 - PCI only
3.0 Pro Tools 3.21 -- PCI Only
- Digital Performer 1.7 only, available from http://www.motu.com
2.95 DAE 2.95 is the version that ships with Pro Tools 3.2.
DAE Index | All FAQ Index
[6256]
DAE and Session / Pro Tools 3.x & 2.x Compatibility
- DAE & DSI DO NOT match 1.44 (DSI 2.94) Session 2.0 on PCI Macs
1.43 (DSI 2.93) Session 2.0 -- Additional CPU support
1.42 (DSI 2.92) Recommended for Pro Tools 3.1 & Session 2.0 (Nubus)
1.4 (DSI 2.9) Version originally shipped with Pro Tools 3.1
1.32 (DSI 2.8 or 2.81) Recommended for Pro Tools 3.0 or Session 8 1.1
1.3 (DSI 2.8) 3rd Party Sequencer / DAE applications
1.12 (DSI 2.6) 3rd Party Sequencer / DAE applications
1.1 (DSI 2.6) Session 8 MAC 1.1
1.09 (DSI 2.5) Pro Tools 2.5 and 2.51
1.08 (DSI 2.5) 3rd Party Sequencer / DAE applications
1.07 (DSI 2.5) Session 8 Mac 1.0
1.05 (DSI 2.5) Pro Tools 2.03 and Post View 2.11
1.03 (DSI 2.4) Pro Tools 2.03 (DAE 1.05 / DSI 2.5 recommended)
1.02 (DSI 2.4) Pro Tools 2.02 (DAE 1.05 / DSI 2.5 recommended)
1.01 (DSI 2.3) Pro Tools 2.01 (DAE 1.05 / DSI 2.5 recommended)
1.0 (DSI 2.3) Pro Tools 2.0 (DAE 1.05 / DSI 2.5 recommended)
DAE Index | All FAQ Index
Digi 001 Mac
How do I upgrade the plug-ins that came with my Digi 001 Factory bundle for use with Pro Tools LE 6 and Mac OS X?
How do I create an audible click track in Pro Tools LE for Mac?
On my Digi 001, how do I change the SPDIF format from working with my DAT coaxial connection to working with a Mini
Disc optical connection? What is SPDIF mirroring?
Can you clarify the I/O specs on the 001?
How do I sync the Digi 001 with an ADAT using the JLCooper dataSYNC on a Mac running OS9?
How do I sync the Digi 001 with an ADAT using the Mark of the Unicorn MIDI Timepiece AV on a Mac running OS9?
I cannot hear audio out of my Digi 001. The labels on my track I/O buttons do not match my hardware (or the inputs
specify "no interface" on the channel input selector).
Why does my Pro Tools LE session clip when I open it on TDM hardware?
My D-Verb plug-in is not functioning properly after installing Pro Tools LE 5.1 Mac. D-Verb asks for a key disk
authorization, and I only have a serial number. Do I need a key disk?
All of the input and output choice pop-ups reference a different interface (888) other than the Digi 001. How do I fix this?
How do I hear what my MIDI device (keyboard, drum machine, etc.) is playing from the Digi 001?
How do I record a MIDI track as an audio track in Pro Tools?
Can I use an earlier OS other than OS 8.6 for Digi 001? What about OS 9?
When I overdub audio with prerecorded MIDI the two are slightly out of sync in Pro Tools LE or TDM.
I'm unable to get MIDI signal into Pro Tools LE via the Digi 001 on OS 9.x.
[26881]
How do I upgrade the plug-ins that came with my Digi 001 Factory bundle for use with Pro Tools LE 6
and Mac OS X?
Information and instructions for Digi 001 Factory Upgrades for Mac OS X can be found in the Support/Downloads
section of the website, with the following link:
www.digidesign.com/download/001/factory/osx
Digi 001 Mac Index | All FAQ Index
[7277]
How do I create an audible click track in Pro Tools LE for Mac?
For OS9 users:
In order to produce a click, ProTools can use a sound module with proper configuration of the OMS Setup
application. You have the ability to route the click from ProTools LE to trigger any device provided it has been
defined in OMS. If you do not have any external sound modules, you still have the option to use the QuickTime
Musical Instruments software synthesizer. This is a General MIDI, multitimbral sound module which is included with
the Macintosh Operating System. In order to take advantage of this "virtual synthesizer," you need to enable its
operation through OMS.
Launch the OMS setup application.
In the studio setup window, double click the QuickTime Musical Instrument icon and click the radio button next to
the word "on". Click "Use Rock Drum Kit" checkbox .
Click the "OK" button, choose "save" from the file menu and quit OMS Setup.
In ProTools LE, select Click Options from the MIDI pull-down menu or double click on either the countoff or
metronome button in the transport MIDI controls window.
Click and hold on the "Output" pop-up menu and select your destination device and channel. If using a General
MIDI compatible synthesizer (such as QuickTime Musical Instruments) use channel 10, for this is the channel that
contains all drum and non-pitched percussion sounds.
Select a note for the accented and unaccented beats via your MIDI controller or by typing in a note name with the
Macintosh keyboard.
Once you have configured the parameters of the Click options window to your liking, enable the click by choosing
"click" in the MIDI pull-down menu or highlighting the metronome button in the MIDI controls transport window.
If using QuickTime Musical Instruments, the sound generated will be outputted via the Macintosh Sound Manager (i.
e. the internal speaker). However, in order to route this signal elsewhere in your studio (such as a channel on a
mixer) you need to connect a cable from the stereo miniplug (1/8") jack located on the rear of the Computer
marked with speaker icon.
If you want to route the audio thru the 001 outputs please refer to #8 of the FAQ for instructions on monitoring an
Aux input.
For OSX users:
Pro Tools LE v.6.0 and higher includes the RTAS Click Plug-In. Create an audio track. Instanciate the Click Plug-In
on an insert. Hit Play.
Digi 001 Mac Index | All FAQ Index
[7278]
On my Digi 001, how do I change the SPDIF format from working with my DAT coaxial connection to
working with a Mini Disc optical connection? What is SPDIF mirroring?
To change the SPDIF format of a session, choose Setups > Playback Engine. In order for us to change I/O labels, a
session cannot be opened so when you click yes to proceed your session is automatically saved and closed and after
you click done it will reopen your session.
You can only use one set of SPDIF ports at a time so if you want to use the coxial SPDIF connection for your Dat
machine then you need to set the Optical Format to Adat in the Setups > Playback Engine > Other Options. If you
are trying to use a Mini Disc with optical SPDIF that you need to set the Optical Format to SPDIF in the Setups >
Playback Engine > Other Options.
IF SPDIF mirroring is on, it means that whatever is output to the main outputs 1/2 will also be 'mirrored' on the
SPDIF output ports. For some applications you may want to turn off SPDIF mirroring and set the output of a track
to the SPDIF outputs.
Digi 001 Mac Index | All FAQ Index
[7281]
Can you clarify the I/O specs on the 001?
Inputs 1-8 are all balanced TRS jacks.
Inputs 1-2 on the front have the front mounted gain knobs and -26dB pads. These jacks can support +18 dBu input
signal with the pad in and the gain knob set fully counter-clockwise. The specs we publish in the manual and on our
datasheet/website were confirmed using inputs 1-2. The Neutrik connector can support balanced/unbalanced TRS
inputs and balanced/unbalanced XLR connectors. (I'm not sure why you'd ever want unbalanced XLR connectors,
but that's the way it is wired).
Inputs 3-8 on the back are also balanced and have software controlled gain. The inputs are optimized for +4 dBu or
-10 dBV line levels (all other gain settings offer specs close to our published specs, but we can only guarantee our
published specs at the +4 and -10 settings). If you go into the Other Options dialog, you will have 8 choices for
input gain attenuation or sensitivity. The box defaults for the -8 dBV line level. The reason we didn't default the box
for -10 dBV was due to some newer synths that run slightly hotter than -10 dBV (hence -8 dBV instrument level). If
you sent a full code signal into input 3-8 with the input gain set for -10 dBV you might clip the input(s). On the flip
side, if you have a low-level output from your synth, you may not be getting enough signal into the 001. In that
case, you should increase the input gain to -10 dBV first and see if that works. If not, go back into the Other
Options dialog and increase the gain below -10 dBV (there are two more settings below -10 dBV. If you are using
+4dBu line levels, then you should open the Other Options dialog and lower the input gain all the way (this is
marked with the +4 dBu line-level label). Use an Aux track in Pro Tools to check your levels. With the fader at
nominal (option-click the fader) the input should be metering in the yellow area for a good clean signal. Inputs 3-8
can support a maximum input level of +18 dBu (in the +4 dBu line-level gain setting). The inputs support both
balanced and unbalanced connections.
On the outputs, only the monitoring outputs and the main outs 1-2 are balanced. This is strictly due to power
consumption. Since we are drawing power from the computer, running all outputs with balanced line-levels at full
code would require more than 2X the power we are currently drawing from the computer using unbalanced
connections. The computer does not supply enough power through its PCI ports to power 8 balanced outputs at full
code as well as phantom power, and a headphone amp (which can output up to +17 dBV @ 600 Ohm loads,
+14dBV @ 150 Ohm loads).
Digi 001 Mac Index | All FAQ Index
[7240]
How do I sync the Digi 001 with an ADAT using the JLCooper dataSYNC on a Mac running OS9?
Physical Connections
--------------------- Connect out the ADAT sync (sony 9-pin) in to the JLCooper dataSYNC2.
- Complete the loop by connecting out the JLCooper back into the ADAT sync.
- Connect optically out of the ADAT in to the Digi 001 optical in (on the card in the computer) note: optical out has
a red light emanating from it.
- Connect MIDI out of the JLCooper to the Digi 001 MIDI in.
- Complete the loop with MIDI out the Digi 001 back into the JLCooper dataSYNC2.
JLCooper dataSYNC2
--------------------- Turn on the JLCooper after you've powered up the ADAT (ADAT clock set to internal)
- Set the desired frame rate on the dataSYNC2 to match the ADAT and Pro Tools frame rate.
- Enable MTC on the dataSYNC2 by pressing the "MTC On" button.
OMS Studio Setup
--------------------- Double click on the keyboard with a "?" (branching off of the 001)
- Set the Manufacturer to Alesis and the Model to your specific ADAT model.
- Go to the edit menu to preferences and ensure that "serial DMA" is UNchecked.
- Save setup and quit OMS.
Pro Tools
--------------------- Setups menu to peripherals: Synchronization: Device is Generic MTC reader, Port is ADAT, check the enable
control of Pro Tools via MMC box.
- Windows menu: Show Session Setup. Set the sample and frame rates to match that between the ADAT and Pro
Tools. Current time and session start time should match hours. Set the sync mode to optical. Note: If you do not
see "current time" then the timing information is not being sent from the JLCooper (check midi connections, OMS
studio setup, Pro Tools settings or the dataSYNC2). If when switching sync mode from internal to optical you get
the error "unable to detect a clock source" then the optical cable is at fault or Pro Tools is not receiving the optical
sync (Go to setups: Playback engine: and make sure that Optical format is on ADAT). When changing session start
times you must press the enter key to complete the change in hour. If it prompts you to adjust the regions choose
"Maintain Relative" position.
- MIDI menu: Input devices: Ensure that the ADAT is checked on.
- Transport window: Put online (Operations menu: Online). The clock will flash blue and the edit window should
read "waiting for sync" near the bottom left hand corner.
- Setups menu: Preferences: Choose either record at ADAT lock or Insertion/selection.
- Press play on the ADAT and Pro Tools should go into play and be in sync.
Digi 001 Mac Index | All FAQ Index
[7241]
How do I sync the Digi 001 with an ADAT using the Mark of the Unicorn MIDI Timepiece AV on a Mac
running OS9?
Instructions
--------------------- Connect the MTP AV's ADAT sync OUT port to the primary ADAT's 9-pin sync IN port.
- Connect an optical cable out the ADAT into the 001 card (back of the computer). Note: optical out has a red light
emanating from it.
- Ensure the essential serial/USB connection from the MTP AV is going to the Computer.
On the MTP AV
--------------------MTP AV clock must be set to internal.
- Word clock out must be set to 1x.
- The MTP AV's MMC ID must match Pro Tools.
- FreeMIDI/OMS Studio Setup
- Install OMS first.
- Install FreeMIDI, Clockworks, & the MTP Express Console (www.motu.com). Launch FreeMIDI and tell it to "use
OMS" (or go to the preferences and select "OMS").
- Launch OMS and make sure it recognizes the MTP AV as an interface.
- Branching off the MTP AV create a device and set the correct manufacturer and model.
- Choose port 9 for the connection from the MTP AV to the ADAT.
- Go in the edit menu to preferences and ensure that "serial dma" is UNchecked.
- Save, make current, and quit OMS.
Pro Tools
--------------------Setups menu to peripherals:
- Synchronization: Device is Generic MTC reader, Port is MTPAV,mdm
- Machine Control: Enable and send to the MTP AV, mdm ID# 127
- Windows menu: Show Session Setup. Set the sample and frame rates to match the ADAT's. Current time and
session start time should match hours. Set the sync to optical. Note: If you do not see "current time" then the
timing information is not being sent from the MTP AV (check MIDI connections, FreeMIDI/OMS setup, Pro Tools
setting or the MTP AV). When changing session start times you must press the enter key to complete the change in
hour. If it prompts you to adjust the regions choose "Maintain Relative" position.
- MIDI menu: Input devices. Ensure that the ADAT and/or the MTP AV is checked.
- Transport window: Put online (Operations menu: Online). The clock will flash blue.
- Setups menu: Preferences. Choose either record at ADAT lock or Insertion/selection.
- Drop the cursor (with the waveform tool) at a location in Pro Tools and press play on the transport window. Pro
Tools should go into play mode and begin playback of the ADAT.
- Set (in the transport window) transport=MMC. The transport will now drive the ADAT.
Digi 001 Mac Index | All FAQ Index
[6377]
I cannot hear audio out of my Digi 001. The labels on my track I/O buttons do not match my hardware
(or the inputs specify "no interface" on the channel input selector).
Verify that your monitors' audio signal runs through an amplifier or you have powered monitors connected to the
Monitor Outputs of the Digi 001 interface. Verify that the Monitor Mode button on the front of the Digi 001 is NOT
depressed (for more information on monitor mode, refer to page 40 of your "Getting Started with Digi 001" Manual).
If the I/O labels on your track I/O buttons do not match your Digi 001 interface or specify "no interface", you need
to set your I/O setups dialog to the factory default. Go to Setups > I/O Setup and choose the Input tab. Click on
the Default button to reset your inputs to their factory designation. Continue through the Outputs, Insert and Bus
tabs and click the Default button on each page.
Digi 001 Mac Index | All FAQ Index
[5831]
Why does my Pro Tools LE session clip when I open it on TDM hardware?
Pro Tools LE uses the power of your CPU's processor to perform mixing and processing. A side benefit of this
technology is its ability to use 32-bit floating point math to scale the level of signals to avoid clipping (which
translates to great headroom). Signals in Pro Tools LE can indeed clip, but signal management can be easier... you
mostly have to watch output levels for mixed signal busses and bring them down so that they don't clip.
Pro Tools TDM systems use HW DSP acceleration that utilize 24-bit fixed point math. (Comparing 24-bit fixed point
and 32-bit floating point audio systems is a bit like comparing PowerPC and Intel Pentium processors... properly
implemented and designed, you can get a great result out of either one... but comparing the techniques used
directly can be difficult!) TDM systems provide 48 bits of precision at the mix bus, which allows a very large degree
of headroom as well. However, Plug-In processing in the TDM world is restricted to a 24-bit data path, so as with
most any signal processing in the audio world, some attention to level setting is necessary to avoid clipping.
For example , if you introduce a signal into a DigiRack EQ that is close to "full code" (the hottest digital level before
clipping) and you add a large boost on an EQ, you will likely clip the EQ Plug-In. Just as with any rack mounted
device, etc., you can avoid this simply by using the input attenuator control provided. The EQ Plug-In for Pro Tools
LE behaves the same way, but because all of the processing is occurring in the host computer, the levels can be
scaled for you to avoid most clipping without adjustment (other than mix outputs which require it).
Note: Some Plug-Ins use a technique called "double precision arithmetic" to provide 48 bit precision when
processing, which results in increased headroom. This is great, but keep in mind that these Plug-In do require
roughly twice as much DSP power to do their work.
Because of these differences, if you plan on exchanging sessions between Pro Tools LE and TDM systems, it can be
prudent to attenuate the input level of a Plug-In like DigiRack EQ if you have applied a large amount of boost to a
predominant frequency (like a big booming kick drum). This will avoid the possibility of clipping in the TDM version
of the Plug-In, and you'll still get to take advantage of a "24-bit clean signal" when levels are set correctly.
Digi 001 Mac Index | All FAQ Index
[5235]
My D-Verb plug-in is not functioning properly after installing Pro Tools LE 5.1 Mac. D-Verb asks for a key
disk authorization, and I only have a serial number. Do I need a key disk?
WARNING: FREE D-Verb does not work with Pro Tools FREE.
Installing Pro Tools LE 5.1 or the D-Verb Plug-In Demo over previous installs of Pro Tools LE will remove your FREE
D-Verb Plug-In. To keep your FREE D-Verb Plug-in from being overwritten by the Pro Tools LE 5.1 and D-Verb
Demo Installers, remove both the D-Verb and D-Verb AS Plug-Ins from your Plug-Ins folder.Place the plug-ins in a
temporary location other than the Pro Tools Plug-Ins folder and outside of your System Folder, such as on your
Desktop. The Plug-Ins folder is located in the following directory:System Folder:DAE Folder:Plug-Ins
After removing the D-Verb & D-Verb AS Plug-Ins from the Plug-Ins folder,run the Pro Tools 5.1 LE Installer. Once
the Pro Tools 5.1 installation is complete, both the D-Verb and D-Verb AS Plug-Ins can be returned to the Plug-Ins
folder. An updated FREE D-Verb Installer for Pro Tools LE users is posted on the Digidesign website in Support/
Downloads at http://www.digidesign.com/download
Note: If you have already run either the Pro Tools LE 5.1 or D-Verb Demo Installer and fear you have overwritten
your FREE D-Verb Plug-Ins,you can still reinstall the FREE D-Verb Plug-In Promotion from the Pro Tools LE 5.0.1
Software CD.
If you continue to have problems with your D-Verb authorization, download D-Verb v1.8.1 from http://www.
digidesign.com/download/dverb. This version of D-Verb (v1.8.1) does not require authorization.
Digi 001 Mac Index | All FAQ Index
[3583]
All of the input and output choice pop-ups reference a different interface (888) other than the Digi 001.
How do I fix this?
Select I/O labels under the Setups menu. Select Inputs from the Display section of the I/O Labels window. Hit
Factory Reset. Repeat this procedure for the outputs and all other I/O labels available.
Digi 001 Mac Index | All FAQ Index
[3584]
How do I hear what my MIDI device (keyboard, drum machine, etc.) is playing from the Digi 001?
1) Create an auxiliary input channel (mono or stereo) for monitoring the device.
2) Connect the analog outputs of the device into available inputs on the 001.
3) Set the input of the auxiliary input channel to the input(s) you have your MIDI device plugged in to.
4) Make sure to bring up the level of the auxiliary since they default to a negative infinity value.
Digi 001 Mac Index | All FAQ Index
[3585]
How do I record a MIDI track as an audio track in Pro Tools?
1) Create an audio track(s). If a stereo recording is desired, create a stereo track or make two audio channels and
pan each hard (100) left and right.
2) Connect the outputs of your MIDI device (keyboard, drum machine, etc.) into available inputs of your Digidesign
Hardware.
3) Set the input of the audio track(s) to the Digidesign Hardware input(s) you have connected to the outputs of
your MIDI device.
4) If you are not actually recording yet but want to monitor the signal through an audio track(s), make sure that
Pro Tools LE is set to Input Monitor only under the Operations menu.
5) Record enable your audio channel(s) and hit play/record.
Digi 001 Mac Index | All FAQ Index
[3586]
Can I use an earlier OS other than OS 8.6 for Digi 001? What about OS 9?
The first Digi 001 systems shipped with Pro Tools LE 5.0 and were supported under os 8.6 or OS 9.0. Earlier
operating systems are not supported.
Digi 001 Mac Index | All FAQ Index
[3588]
When I overdub audio with prerecorded MIDI the two are slightly out of sync in Pro Tools LE or TDM.
You need to set the Negative MIDI Playback Offset in the Preferences menu. Choose Setups>Preferences>MIDI.
This capability is provided to compensate for the audio monitoring latency. If you are monitoring the output from
your midi devices thru a mixer, there is no latencey. If however, you are monitoring the devices thru the Digi 001
the midi tracks will play slightly later that the audio tracks. The larger the setting for the Hardware Buffer size, the
larger the latency.
By configuring a Midi offset, you can get your Midi tracks to play back slightly earlier by a specified number of
samples, thereby compensating for the latency in monitoring qudio within Pro Tools LE.
Digi 001 Mac Index | All FAQ Index
[3594]
I'm unable to get MIDI signal into Pro Tools LE via the Digi 001 on OS 9.x.
* Make sure that the Digi 001 OMS driver is in the OMS folder, located in the System folder, and that the 001 is
recognized by the OMS Studio Setup.
* Make sure the "Use Apple SerialDMA when available" is unchecked in the OMS preferences which are located
under the Edit menu of OMS. If you uncheck it, you must restart the CPU for the change to take affect.
* Make sure that you have defined an input device in the OMS Studio Setup for your MIDI.
* Make sure that your MIDI device is checked in the Input Devices menu located under the MIDI menu in Pro Tools
LE.
* Make sure that you have the appropriate filters selected in the Input Filters menu located under the MIDI menu in
Pro Tools LE.
* Make sure that "Run MIDI in background" is checked in the OMS MIDI setup window located under the Setups
menu in Pro Tools LE.
* Make sure that you have the correct MIDI channel selected and that the MIDI track is in record enabled.
* If you are not actually recording yet but want to monitor the signal through an auxiliary, make sure that Pro Tools
LE is set to Input Monitor only under the Operations menu.
* Try restarting the Mac again after confirming the previous steps to make sure that the serial ports get reset.
Digi 001 Mac Index | All FAQ Index
Digi 001 Win
In Pro Tools LE 5.3.1 for Windows XP the Input Gain controls are working backwards.
How can I update the three Bomb Factory Plug-Ins included with the Digi 001 Factory bundle so that I can use them on
Pro Tools LE 5.3.1 for Windows XP?
How do I generate a MIDI click track / Setup MIDI for a controller keyboard?
How do I sync the Digi 001 with an ADAT using the Mark of the Unicorn MIDI Timepiece AV on Windows?
When I try to launch Pro Tools LE for Windows the message "This demonstration version of ______ has expired"
appears.
Are Pro Tools LE for Windows sessions transferable to Pro Tools LE for Macintosh?
How can I avoid -9093 errors on my Pro Tools LE system?
What PC is recommended for use with my Windows Digi 001 system?
When trying to launch Pro Tools LE on Windows 98 or Windows ME, the message "DAE error -9113" appears onscreen.
When playing back a session, "You're running out of CPU power. Take out some plug-ins to free up CPU power (-9128)"
appears onscreen. How can I get more RTAS plug-ins in my session?
Why is there a small amount of delay while monitoring audio when I am recording?
How do I hear what my MIDI Device (keyboard, drum machine, etc.) is playing in the Pro Tools LE mixer?
Do I need a SCSI drive for optimal performance with a DIGI 001 on Windows 98ME?
How do I authorize D-verb for Windows 98 or ME? D-verb does not seem to accept the challenge response code to
authorize D-verb or it requests a diskette to authorize?
When I try to launch Pro Tools LE for Windows the message "Missing cfd.dll" or "Cannot find cfd.dll" appears on the
screen.
How do I optimize my PC for use with a Windows Digi 001, Tool Box, or Pro Tools Free system?
[25497]
In Pro Tools LE 5.3.1 for Windows XP the Input Gain controls are working backwards.
If you add Input Gain to an analog input on the Digi 001, Pro Tools actually decreases the Input Gain for that track.
The inverse is also true: If you decrease the Input Gain for an analog input on the Digi 001, the Input Gain in
increased.
In Pro Tools > Setups > Hardware Setup.
This is a bug and will be fixed in a future version of Pro Tools.
The workaround is to adjust the Input Gains in a backwards manner.
Digi 001 Win Index | All FAQ Index
[8266]
How can I update the three Bomb Factory Plug-Ins included with the Digi 001 Factory bundle so that I
can use them on Pro Tools LE 5.3.1 for Windows XP?
The Bomb Factory Plug-ins included with the Digi 001 Factory bundle need to be updated to version 3.0.2 in order
to use them with Pro Tools LE 5.3.1 for Windows XP.
From the Pro Tools LE 5.3.1 for Windows XP Updates page in the Support/Downloads section of the Digidesign
website:
http://www.digidesign.com/download/winup
To update your Digi 001 Factory Bundle software from Bomb Factory for Windows XP compatibility, you will need to
download the free update for the 3 Bomb Factory plug-ins included with the Digi 001 Factory:
Classic Compressors: 1176
Classic Compressors: LA-2A
moogerfooger™ Lowpass Filter
To Download the free update:
1
2
3
4
5
-
Go to www.bombfactory.com
Click on "downloads"
Click on "demos/updates"
Fill out the form to create an account, and Bomb Factory will email you instructions to access downloads.
Once there, download the following: 001 Factory Free Windows XP Update
These updates require the preauthorized iLok included with your Digi 001 Factory purchase.
Digi 001 Win Index | All FAQ Index
[7870]
How do I generate a MIDI click track / Setup MIDI for a controller keyboard?
Pro Tools LE can generate a click track by triggering a MIDI controller keyboard or sound module. To enable the
click track:
- Connect the MIDI OUT of your controller keyboard to the MIDI IN of the Digi 001 and the MIDI OUT of the Digi
001 to the MIDI IN of the controller keyboard.
- Choose the MIDI pull-down Menu in Pro Tools LE and verify that MIDI Thru is checked.
- Choose Click Options from the MIDI menu and select set the click to play during both playback and recording.
- Select a note for the accented and unaccented beats via your MIDI controller or by typing in a note name with the
computer keyboard.
- Set the Output to Digi 001and an appropriate channel number.
- If you are using a General MIDI compatible controller or module use channel 10, as this is the channel that
contains all drum and non-pitched percussion sounds.
- Once you have configured the parameters of the Click Options window to your liking, enable the click by choosing
"click" in the MIDI pull-down menu or highlighting the metronome button in the MIDI controls transport window.
If you want to route the audio from the controller keyboard through the Digi 001 monitor outputs:
- Connect the analog outputs of your MIDI device to any available inputs of the Digi 001 (I.E. inputs 7 and 8).
- Create a stereo auxiliary track in the Pro Tools mixer and assign the input to reflect the Digi 001 inputs you've
connected to the keyboard (I.E. inputs 7 and 8).
- Bring up the auxiliary fader.
- If configured properly, your keyboard should output a click sound when play is pressed on the transport.
To record and playback a MIDI track:
- Create a MIDI track.
- In the Mix window, set the device selector (Top button on the MIDI channel strip) to Digi 001 channel 1. Record
enable the track and hit a few notes on your keyboard controller.
- You should see a Level on the MIDI track meter.
- If you are not getting a level, check your MIDI cabling / keyboard settings.
- If you want to route the audio from the keyboard through the Digi 001monitor outputs you will need to connect
the analog outputs of your keyboard to any available inputs of the Digi 001 (i.e. inputs 7 and 8).
- Create a stereo auxiliary track in the Pro Tools mixer and assign the input to reflect the Digi 001 inputs you've
connected to the keyboard (i.e. inputs 7 and 8).
- Bring up the volume on the auxiliary fader. If this is configured properly, you should hear your keyboard in the
headphones or powered monitors connected to your Digi 001.
- Press Record and Play on the Transport.
- Play a few notes on the keyboard and verify that MIDI information is being drawn on the MIDI track in the Edit
window.
- Press Stop, Rewind and Play on the Transport. Your keyboard will playback the notes you recorded.
Digi 001 Win Index | All FAQ Index
[7242]
How do I sync the Digi 001 with an ADAT using the Mark of the Unicorn MIDI Timepiece AV on Windows?
Connections
--------------------- Connect the MTP AV's ADAT sync OUT port to the primary ADAT's 9-pin sync IN port.
- Connect an optical cable out of the ADAT into the 001 card (back of the computer).
note: optical out has a red light eminating from it.
- Make sure the parallel port connection from the MTP AV is going to the Computer.
On the MTP AV
---------------------- MTP AV clock must be set to internal.
- Word clock out must be set to 1x.
- The MTP AV's MMC ID must match Pro Tools (or use 127).
MTP AV Configuration
--------------------- In Control Panels >Multimedia >MIDI tab, ensure the MTP AV shows up. If not, visit Mark of the Unicorn at www.
motu.com and download the latest drivers for the MTP AV. You may need to check your BIOS and change the
parallel port's mode. (Normal, Bi-directional)
Pro Tools
--------------------1. In setups > Peripherals
Synchronization: Device is Generic MTC reader, Port is any
Machine Control: Enable and send to the MTP AV: Out All (ID 127)
2. In Windows > Show Session Setup, set the sample and frame rates to match the ADAT's. Current time and
session start time should match hours. Set the sync to optical. note: If you do not see "current time" then the
timing information is not being sent from the MTP AV (check MIDI connections, windows multi-media, Pro Tools
setting or the MTP AV). When changing session start times you must press the enter key to complete the change in
hour. If it prompts you to adjust the regions choose "Maintain Relative" position.
3. Transport window: transport = MMC
4. Setups menu: Preferences. Choose either record at ADAT lock or Inserton/selection.
5. Drop the cursor (with the waveform tool) at a location in Pro Tools and press play on the transport window. Pro
Tools should go into play mode and begin playback of the ADAT.
Digi 001 Win Index | All FAQ Index
[6367]
When I try to launch Pro Tools LE for Windows the message "This demonstration version of ______ has
expired" appears.
After installing and activating a Plug-In Demo, it will be available for a period of 15 days. Once the trial period has
elapsed, you will need to remove the expired Plug-In(s) to avoid the Plug-In expiration notices that will occur while
launching Pro Tools. To Remove an expired Plug-In, choose Start > Settings > Control Panel > Add/Remove
Programs. Highlight the expired Plug-In on the list of programs and choose the "Add/Remove" button to delete the
Plug-In.
Digidesign provides demonstration versions of D-Fi, D-FX, DINR, Focusrite d2, Focusrite d3, Maxim, and
SoundReplacer Plug-Ins that can be used with Pro-Tools LE 5.1.1 for Windows. To Install the Demo Plug-Ins:
- Insert the Pro-Tools LE 5.1.1 CD and go to the Digidesign Plug-In Demos folder on the root level of the CD.
- Choose the "Setup" Installer for the Plug-In you'd like to try.
Digi 001 Win Index | All FAQ Index
[6172]
Are Pro Tools LE for Windows sessions transferable to Pro Tools LE for Macintosh?
With the release of Pro Tools LE 5.1, sessions are transferable between Mac and Windows systems. For more
information, see page 107 of the Pro Tools 5.1 Reference Guide available from the "Help" menu in Pro Tools LE..
How to create a cross platform session:
* Since Pro Tools 5.1 is the first to support cross platform functionality, both systems must be using Pro Tools 5.1
(or later) to make this possible.
* Open the desired session(s) on the original system.
* Choose File>Save Session Copy In...
* Choose either AIFF or WAV for the Audio File Type
* Enable the "Enforce Mac/PC Compatibility"option
In Pro Tools 5.0.1 on the Windows platform, you can bring your Windows 98 SE Pro Tools LE sessions to a Windows
NT TDM system, and bring Windows NT TDM sessions back to Windows 98 SE Pro Tools LE. The same integration
Between LE/TDM is also possible on the Macintosh Platform. True cross platform support for Macintosh and Windows
98 SE Pro Tools LE requires Pro Tools LE 5.1 or higher.
Digi 001 Win Index | All FAQ Index
[4833]
How can I avoid -9093 errors on my Pro Tools LE system?
On some Windows systems, the network device/driver can cause -9093 errors while using Pro Tools LE with small
(128 or 256) H/W buffer sizes. One workaround is obviously to raise the H/W buffer size to 512 or 1024, but this
results in larger (and undesirable) input-to-output latencies in Pro Tools. There are a few workarounds that allow H/
W buffers of 128 to work on most systems. (Both involve temporarily disabling your network device.)
Option 1: Manually Disable the Network Device in your (default) Hardware Profile.
Go to the Windows Control Panel and open the "System" applet. On the "Device Manager" tab, expand the "Network
adapters" item, and then double click on the icon for your network device. A properties dialog will open. On the
"General" tab you'll see a checkbox for "Disable in this hardware profile." Check this box and close all the dialogs.
You shouldn't need to reboot -- your network device has now been disabled and Pro Tools LE should perform better
with small H/W buffer sizes. To re-enable your Network Device, go back to the Device Manager and uncheck the
"Disable in this hardware profile" checkbox.
Option 2: Create a New Hardware Profile with your Network Device Disabled.
An alternative to manually enabling/disabling the Network Device in the Device Manager (option 1 above) is to
create a new Hardware Profile and disable the Network Device in that profile. This option is a bit cleaner/simpler,
but does require you to reboot Windows when switching between Profiles. To create a new profile, go to the
Windows Control Panel and open the "System" applet. On the "Hardware Profiles" tab select the "Original
Configuration" profile (or whatever profile you typically use) and click the "Copy..." button. Name the new Profile
"Pro Tools LE" or something similar and press OK. Click OK to close the System Control Applet, and then reboot
Windows. Each time you reboot, you'll be given the option to select which Hardware Profile you'd like to use. Select
the "Pro Tools LE" profile you just created, and when Windows is fully booted follow the steps in Option 1 (above) to
disable the Network Device in your current profile. From now on, whenever you boot Windows using the "Pro Tools
LE" hardware profile the Network Device will automatically be disabled. If you boot Windows using the "Original
Configuration" Profile, your Network Device will be enabled.
Note: Some other devices (in addition to Network Devices) can cause similar problems/conflicts with Pro Tools LE. If
these devices are not necessary while running Pro Tools (e.g., other sound devices, modem devices, FireWire/1394
Controller devices, etc.) you can disable them as well as your network card in the "Pro Tools LE" Hardware Profile.
If -9093, -9094, or -9128 errors are happening frequently, the methods above can be used to identify which device
is causing the problem. By systematically disabling one device at a time (and then running Pro Tools LE to check
performance), you can see if the presence of a certain device causes Pro Tools LE to throw errors during playback/
record.
Systems using hard drives that do not have DMA enabled (see step 7) are prone to -9093,-9094, and -9129 DAE
errors. The procedure below will update the driver provider for the Intel Hard Disk Controller from Intel to
Microsoft . It should only be attempted if you are having persistent -9093,-9094 or -9129 errors that have not been
remedied by Option 1 and 2 above. If your motherboard has an Intel Chipset (See the Dig i001 for Windows
compatibility section at www.digidesign.com for more information) the following steps will usually make the DMA
parameter available for your IDE Drive:
* Shut down your computer and reboot into "Safe" mode by holding down the "F8" or "Ctrl" key at the Windows
splash screen (Some PC's may use a different key to enter "Safe" mode, consult with your PC manufacturer if you
cannot enter "Safe" mode).
* At the Desktop, choose Start Menu > Control Panel > Add Remove Programs. Select the Intel ATA Storage Driver
and remove.
* Insert the Windows 98 SE or ME CD Rom in the CD tray and restart your computer.
* The Hardware Wizard will automatically update the driver. Restart.
* Right-Click on My Computer > Choose Properties > Device Manager > Disk Drives > Generic IDE Drive (usually
Type 47) > Settings. Enable the DMA Parameter.
* Enable DMA for other hard drives. Restart.
* Launch Pro-Tools LE and verify that -9093,-9094, -9129 error messages no longer occur.
Digi 001 Win Index | All FAQ Index
[4192]
What PC is recommended for use with my Windows Digi 001 system?
Before putting together your Windows Digi 001 system, it is critical that you review the Windows Digi 001
compatibility documents that are posted in the Compatibility section of the Digidesign Website. A Digi 001 system
installed in an incompatible or untested PC may experience operational difficulties that cannot be remedied. Due to
the large variety of PC's on the market, we've created a special section of the Digidesign Users Conference entitled
"Windows User Configurations." This forum is dedicated to providing helpful information about PC configurations
that are performing well in the studio's of Pro-Tools LE users.
Disclaimer: Digidesign cannot verify that the information in this forum will provide full functionality or performance.
Please refer to the Compatibility Documents for Digidesign's official system requirements.
Digi 001 Win Index | All FAQ Index
[4193]
When trying to launch Pro Tools LE on Windows 98 or Windows ME, the message "DAE error -9113"
appears onscreen.
This error occurs if the WIN 98 Wave Driver is not installed, is disabled, or is installed incorrectly. Resources must
be assigned to the hardware before Pro Tools is installed. Therefore, it is imperative that you follow the installation
procedure documented in Chapter 3 (specifically, pages 18 and 19) of the Digi 001 or Toolbox XP Quick Start
Guides.
These guides are available for download at http://www.digidesign.com and are shipped with their respective
products.
Digi 001 Win Index | All FAQ Index
[4194]
When playing back a session, "You're running out of CPU power. Take out some plug-ins to free up CPU
power (-9128)" appears onscreen. How can I get more RTAS plug-ins in my session?
The amount of plug-ins that can be instantiated in a given session is largely determined by the CPU processor
speed. Plug-in count will vary from PC to PC, but in general, the faster the processor, the more RTAS plug-ins, realtime automation, and track edits you will be able to apply to your session.
Because the Digi 001 is a host-based processing system, the software is reliant upon the CPU for all necessary
calculations and does not receive any additional DSP support from the hardware. When you have finally exceeded
the limits of your CPU, an error message stating "You're running out of CPU power. Take out some plug-ins to free
up CPU power (-9128)" will appear onscreen. From this point, it will be necessary to de-instantiate one or more of
the plug-ins to achieve playback. To squeeze the highest RTAS plug-in count out of your system, you must manage
your CPU resources wisely. Here are a few recommendations for optimizing your CPU usage:
1) From the Pro Tools menu choose Setups > Hardware. Set the CPU Usage to 75 or 85%. This setting determines
the percentage of CPU processing the software will be able to use from your system's total
CPU resources.
2) When you have completed tracking in your Pro-Tools LE session and are ready to mix, choose Setups >
Hardware and set the Hardware Buffer size to 1024. This may allow instantiating of one or more additional RTAS
plug-ins as compared to the lower Hardware Buffer settings. You can experiment with this setting to see how it
affects plug-in performance.
3) The RTAS D-Verb plug-in is the most CPU intensive of the RTAS DigiRack plug-ins. Most high end systems will
max out at 4-5 RTAS D-Verb instantiations therefore it is not practical to instantiate a separate D-Verb on every
track. A more appropriate alternative would be to create a Stereo Auxillary track with the RTAS D-Verb instantiated,
and then bus any audio tracks that require effecting to this track. You can apply this method to other RTAS plug-ins
as well. The goal is to share one RTAS instantiating between tracks that require similar effecting.
4) Keep in mind that the amount of automation and the number of edits in your session will directly affect the
amount of RTAS plug-ins available. Conservation in one area will free up more CPU resources for another. Having
unnecessary applications running in the background can also lower the amount of available RTAS plug-ins.
5) Remember that Audiosuite plug-ins do not require any CPU resources. Most RTAS plug-ins have an Audiosuite
counterpart which makes Audiosuite processing practical when CPU resources are running low. Since most plug-in
settings are savable as well as interchangeable between RTAS and Audiosuite architectures, a track instantiated
with an RTAS plug-in setting will sound similar to the same waveform processed with it's Audiosuite counterpart.
6) On a Mac in OS 9, if you are not planning to use QuickTime Musical Instruments for playback of General Midi
sounds or for a Click Track, you can turn of the QuickTime Synth in OMS (In OMS setup document, double-click on
the QuickTime logo and disable the QuickTime Synth) which may allow additional instantiating of one or more RTAS
Plug-Ins. You must reboot the CPU for this to take effect.
7) On Hyper Threading Windows XP machines with Pentium 4 processors, disable Hyper Threading in the BIOS.
Digi 001 Win Index | All FAQ Index
[4196]
Why is there a small amount of delay while monitoring audio when I am recording?
Because Pro Tools LE uses the host processor in your computer for audio processing, playback, and recording there
is a small amount of audio delay, or latency, when monitoring audio through the system. The degree of latency is
controlled by the Hardware Buffer Size setting.
From the Pro Tools LE 5.1.1 Menu bar choose Setups > Hardware > H/W Buffer Size and designate the number of
samples (Users of Pro Tools LE 5.3.1 and higher will find this setting under the Playback Engine). The recommended
setting for recording audio is 128-256 samples. For playback, the recommended setting is 512-1024 samples.
Pro Tools LE 5.1 users will also find a feature called Low Latency Monitoring. This feature allows you to record with
extremely low latency and is very desirable for time-critcal overdubs.
To activate Low Latency Monitoring, select Operations > Low Latency Monitoring from the Pro-Tools Menu. Tracks
use Low Latency Monitoring when they are record-enabled, assigned to an actual audio input (not a bus), and
assigned to outputs 1 or 2. When Low Latency Monitoring is enabled, any plug-ins and sends assigned to recordenabled tracks (routed to Outputs 1-2) are automatically bypassed, and must remain bypassed. Also, these tracks
will not register on meters for Master Faders.
Digi 001 Win Index | All FAQ Index
[4197]
How do I hear what my MIDI Device (keyboard, drum machine, etc.) is playing in the Pro Tools LE
mixer?
In order to hear MIDI playback of a MIDI device in Pro-Tools LE, you must route the analog outputs of your device
into available inputs of the Digi-001 and set up a Stereo Auxiliary track for monitoring.
In order to hear MIDI playback of a MIDI device in Pro-Tools LE, you must route the analog outputs of your device
into available inputs of the Digi-001 and set up a Stereo Auxillary track for monitoring.
* Connect the 1/4 inch L and R outputs of the MIDI device to any available inputs on the DIGI 001(I.E. 7/8 inputs.)
* In your Pro-Tools session, select the File menu and choose New Track. In the New Track dialog box, click on Audio
Track and choose Aux Input Stereo from the pop-up menu. The dialog should now read "create 1 new Aux Input
Stereo." Click on the create button.
* In the Mix Window, set the inputs of the Auxillary track (Aux) to the Digi 001 inputs you have connected to your
MIDI device. (I.E. Analog 7/ Analog 8)
* Bring up the fader on the Auxillary track to the desired level.
Digi 001 Win Index | All FAQ Index
[4195]
Do I need a SCSI drive for optimal performance with a DIGI 001 on Windows 98ME?
You will achieve similar results with qualified SCSI and ATA/IDE drives. The only noticeable performance difference
might be a slight delay upon playback or recording in large sessions when using an ATA/IDE drive.
SCSI is not a requirement for use with the Digi 001, however, if you are working in multiple studios an external
SCSI drive allows easy portability to other Pro Tools Windows 98 SE systems.
If you are thinking about purchasing a SCSI controller for playback and recording with the Digi 001, be advised that
the ADAPTEC AVA -2906 SCSI controller card is the only supported model for Digi 001 Windows 98 SE Systems. We
can not guarantee the performance of other SCSI controller cards. Review the Windows 98 SE Digi 001
compatibility available on our website document for more information: http://www.digidesign.com/compato/
Digi 001 Win Index | All FAQ Index
[3970]
How do I authorize D-verb for Windows 98 or ME? D-verb does not seem to accept the challenge
response code to authorize D-verb or it requests a diskette to authorize?
Any users of Pro Tools systems that are having problems authorizing their D-Verb TDM, RTAS, or AudioSuite D-Verb
plug-ins should download D-Verb 1.8.1
This version is compatible with Pro Tools v5.1.x/5.2 TDM & Pro Tools LE v5.1.x/5.2.1
It is available at http://www.digidesign.com/download/dverb
D-Verb 1.8.1 is not compatible with Pro Tools FREE.
With Pro Tools LE version 5.0.1 you will need a floppy to authorize the plug in, D-Verb. This floppy authorization key
diskette should be included with your version of Pro Tools.
If you did not receive this floppy, register the product and a back up floppy will be distributed to you. If you did not
receive an authorization disk call technical support to confirm that you are registered.
Digi 001 Win Index | All FAQ Index
[4388]
When I try to launch Pro Tools LE for Windows the message "Missing cfd.dll" or "Cannot find cfd.dll"
appears on the screen.
These errors can occur if you install Pro Tools before installing the Wave Driver, or have an incorrect driver
installation. Resources must be assigned to the hardware before Pro Tools is installed. Therefore, it is imperative
that you follow the installation procedure documented in Chapter 3 (specifically, pages 19-21) of the Getting
Started with Digi 001 Guide.
This guide is available for download at http://www.digidesign.com/support/documents.html
Digi 001 Win Index | All FAQ Index
[4393]
How do I optimize my PC for use with a Windows Digi 001, Tool Box, or Pro Tools Free system?
Start with the fastest Pentium III or AMD Thunderbird Processor you can afford (single processor) and at least 192
MB of RAM.
IMPORTANT: See Dig i001 for Windows compatibility section of the Digidesign Website for complete compatibility
requirements: http://www.digidesign.com/compato/
We have seen better performance on computers that have less components attached and non-custom versions of
the BIOS or Windows. For maximum performance, a dedicated qualified ATA/IDE or SCSI disk drive with FAT32 file
system is required.
All Pro Tools LE sessions should be stored on a dedicated drive and all Digidesign system files should be stored on
the system boot drive. Although it is possible to record sessions to your PC's boot drive, this is not recommended
and full 24-track performance is not guaranteed.
After Installing your Digi 001 hardware and software in your PC, please make the following adjustments to your
Windows settings to ensure optimal performance:
Disable Auto-Insert Notification for CD-Rom and removable media drives:
* From the desktop, right-click My Computer and choose Properties.
* In the System Control Panel, click the Device Manager tab.
* Locate and double-click the device for your CD-ROM. In the CD Rom Properties dialog, click the Settings tab.
* Deselect the option for Auto Insert Notification and click OK.
* Repeat for any removable media devices, such as JAZ and ZIP drives.
* Close the System Control Panel.
Enable DMA for any IDE Drives:
* From the desktop, right-click on My Computer and choose Properties.
* In the System Control Panel, click on the Device Manager tab.
* Locate and double-click the device for your IDE hard drive. In the Disk Drive Properties dialog, click the Settings
tab.
* Enable (check) the DMA option and click O.K.
* Repeat for any additional IDE drives.
* Close the System Control Panel. Restart computer.
Other Software and Hardware Affecting System Performance.
Pro-Tools LE can also be affected by other software and hardware drivers installed on your computer. For best
possible performance, it is recommended that you:
* Avoid running other Windows programs at the same time as Pro Tools LE.
* Turn off any software utilities that run in the background, such as calendars and virus protection.
* Disable Windows System sounds. In the Sound Control Panel set the Sound Scheme to No Sounds.
* If your video display card supports it, enable Bus Mastering in the manufacturer's Control Panel.
* Disable any networking cards.
* Turn off any power management features of your system.
Digi 001 Win Index | All FAQ Index
Digi 002 Mac
I have the Digi 002pack plug-ins that came with my Digi 002 and Pro Tools LE 5.3.2 for OS 9. How do I upgrade these
for Pro Tools 6 and Mac OS X?
I am experiencing audio artifacts and unexpected performance problems with my Digi 002.
Should I hook up my FireWire drives to the second FireWire port on the Digi 002?
Why is S/PDIF mirroring no longer available in Pro Tools LE 5.3.2 & 6x for the Digi 002 and Digi 002 Rack?
Some plug-ins do not appear in the plug-in menus of Pro Tools LE 5.3.2.
My I/O labels keep changing when working with sessions of different sample rates.
Sampletank and bundled 002 plugs-ins are not playing back. I can see level on the MIDI track but no level on the aux
track.
Performance is poor on my PowerBook. I get lots of -6085, -6086 errors.
Noise pops are emitted from the Digi 002 Monitor Outputs while making a FireWire connection with computer.
What are the steps for the most stable Digi 002 system boot-up?
I am unable to use the smallest buffer sizes without encountering 9092, 9093, or 6086 errors on my laptop when using
Pro Tools LE 5.3.2 and a Digi 002.
[26880]
I have the Digi 002pack plug-ins that came with my Digi 002 and Pro Tools LE 5.3.2 for OS 9. How do I
upgrade these for Pro Tools 6 and Mac OS X?
Information and instructions for Digi 002 002pack Upgrades for Mac OS X can be found in the Support/Downloads/
Digi 002 section of the website, with the following link:
www.digidesign.com/download/002/osx
Digi 002 Mac Index | All FAQ Index
[25906]
I am experiencing audio artifacts and unexpected performance problems with my Digi 002.
Try removing any extraneous USB devices or hubs from the system to see if this alleviates the problem.
Digi 002 Mac Index | All FAQ Index
[25897]
Should I hook up my FireWire drives to the second FireWire port on the Digi 002?
No. The second FireWire port on the Digi 002 is NOT intended for external hard drives or other storage devices, as
this may result in unexpected behavior. It is recommended that Digi 002 be connected as the last device in the
FireWire chain, or be connected to a dedicated FireWire port.
So why is there a second FireWire port on the Digi 002 and Digi 002 Rack?
From the Getting Started with 002 Guide:
Connecting Other FireWire Devices to Digi 002
The second FireWire port on the Digi 002 unit is available for daisy-chaining FireWire devices such as digital
cameras or digital video recorders. Even when it is powered off, Digi 002 supplies power from the computer through
its FireWire ports, letting you recharge batteries in other FireWire devices.
Digi 002 Mac Index | All FAQ Index
[25884]
Why is S/PDIF mirroring no longer available in Pro Tools LE 5.3.2 & 6x for the Digi 002 and Digi 002
Rack?
S/PDIF mirroring was not included in Pro Tools LE 5.3.2. and 6.x. for the Digi 002 and Digi 002 Rack.
S/PDIF mirroring routes the audio signal to the Main, Monitor and headphone outputs as well as the S/PDIF outputs.
This routing is not automatic with the Digi 002 as it was with the Digi 001.
It is possible to mirror tracks on the SPDIF output by holding down the control key (mac) or the start key (win) and
selecting S/PDIF L & R stereo. You will notice a "+" in the track's output selector now that you have assigned
multiple routings. The output will now say Analog 1 & 2 stereo with a "+" sign: + Analog 1 & 2.
To change the outputs of all the audio and auxiliary tracks simultaneously, hold down the control and option key
(mac) or the Start and Alt keys (win).
You can control the output level of these tracks by creating an additional Stereo Master fader for the SPDIF output.
(File menu > New Track. Create a Stereo Master Fader. Set the output to S/PDIF L & R stereo).
This new Stereo Master fader will control the output going to the S/PDIF output on the Digi 002.
Digi 002 Mac Index | All FAQ Index
[25885]
Some plug-ins do not appear in the plug-in menus of Pro Tools LE 5.3.2.
On Macintosh, Pro Tools LE 5.3.2 requires that RTAS plug-ins be compatible with Pro Tools 5.3 or later.
Digi 002 Mac Index | All FAQ Index
[25877]
My I/O labels keep changing when working with sessions of different sample rates.
I/O setup is easiest to manage if all routings are defaulted upon each coarse sample rate resolution change.
Digi 002 Mac Index | All FAQ Index
[25821]
Sampletank and bundled 002 plugs-ins are not playing back. I can see level on the MIDI track but no
level on the aux track.
SampleTank uses RAM to playback samples. 320 MB of RAM is recommended to use Pro Tools LE 5.3.2 with
SampleTank.
discovered by Digi Sales rep with Sony Vaio
Digi 002 Mac Index | All FAQ Index
[25678]
Performance is poor on my PowerBook. I get lots of -6085, -6086 errors.
If "Allow Processor Cycling" is enabled in the Energy Saver control panel, The Pro Tools transport is subject to very
poor performance and will throw -60xx errors. Always disable "Allow Processor Cycling" for normal performance.
Applies to Powerbooks only.
Digi 002 Mac Index | All FAQ Index
[25715]
Noise pops are emitted from the Digi 002 Monitor Outputs while making a FireWire connection with
computer.
It is recommended to always use the hardware MUTE button when connecting/disconnecting a FireWire drive to the
computer.
From the Read Me for Pro Tools LE v.5.3.2
Digi 002 Mac Index | All FAQ Index
[25769]
What are the steps for the most stable Digi 002 system boot-up?
1) Start with CPU and all FireWire devices powered-off.
2) Connect FireWire drive(s) to CPU.
3) Connect 002 to FireWire drive(s) or to second FireWire port on CPU.
4) Boot CPU.
5) Once CPU is up, boot FireWire drives.
6) Once drives mount, boot 002.
Note: The main point here is that most stable FireWire performance occurs if the CPU is booted before FireWire
peripherals are powered-on.
Note #2: We suggest connecting FireWire components while everything is powered-off to help guard against the
possibility of a bad (dangerous) connection once everything's powered-on.
Digi 002 Mac Index | All FAQ Index
[25672]
I am unable to use the smallest buffer sizes without encountering 9092, 9093, or 6086 errors on my
laptop when using Pro Tools LE 5.3.2 and a Digi 002.
Some laptop computers do not perform well when using the smallest Hardware Buffer setting. If you are
experiencing frequent errors, try increasing the Hardware Buffer size.
taken from the Pro Tools LE 5.3.2 Read Me
behavior encountered with Sony VAIO and PowerBook G4|800
Digi 002 Mac Index | All FAQ Index
Digi 002 Win
I am experiencing audio artifacts and unexpected performance problems with my Digi 002.
Should I hook up my FireWire drives to the second FireWire port on the Digi 002?
Why is S/PDIF mirroring no longer available in Pro Tools LE 5.3.2 & 6x for the Digi 002 and Digi 002 Rack?
My I/O labels keep changing when working with sessions of different sample rates.
On Windows XP there is no way to adjust the Digi 002 WaveDriver settings outside of Pro Tools LE. These settings
include H/W buffer size, Ch 1-2 Format, and Advanced Settings.
Sampletank and bundled 002 plugs-ins are not playing back. I can see level on the MIDI track but no level on the aux
track.
Noise pops are emitted from the Digi 002 Monitor Outputs while making a FireWire connection with computer.
What are the steps for the most stable Digi 002 system boot-up?
I am unable to use the smallest buffer sizes without encountering 9092, 9093, or 6086 errors on my laptop when using
Pro Tools LE 5.3.2 and a Digi 002.
Digi 002 MIDI ports are not recognized by Pro Tools.
[25906]
I am experiencing audio artifacts and unexpected performance problems with my Digi 002.
Try removing any extraneous USB devices or hubs from the system to see if this alleviates the problem.
Digi 002 Win Index | All FAQ Index
[25897]
Should I hook up my FireWire drives to the second FireWire port on the Digi 002?
No. The second FireWire port on the Digi 002 is NOT intended for external hard drives or other storage devices, as
this may result in unexpected behavior. It is recommended that Digi 002 be connected as the last device in the
FireWire chain, or be connected to a dedicated FireWire port.
So why is there a second FireWire port on the Digi 002 and Digi 002 Rack?
From the Getting Started with 002 Guide:
Connecting Other FireWire Devices to Digi 002
The second FireWire port on the Digi 002 unit is available for daisy-chaining FireWire devices such as digital
cameras or digital video recorders. Even when it is powered off, Digi 002 supplies power from the computer through
its FireWire ports, letting you recharge batteries in other FireWire devices.
Digi 002 Win Index | All FAQ Index
[25884]
Why is S/PDIF mirroring no longer available in Pro Tools LE 5.3.2 & 6x for the Digi 002 and Digi 002
Rack?
S/PDIF mirroring was not included in Pro Tools LE 5.3.2. and 6.x. for the Digi 002 and Digi 002 Rack.
S/PDIF mirroring routes the audio signal to the Main, Monitor and headphone outputs as well as the S/PDIF outputs.
This routing is not automatic with the Digi 002 as it was with the Digi 001.
It is possible to mirror tracks on the SPDIF output by holding down the control key (mac) or the start key (win) and
selecting S/PDIF L & R stereo. You will notice a "+" in the track's output selector now that you have assigned
multiple routings. The output will now say Analog 1 & 2 stereo with a "+" sign: + Analog 1 & 2.
To change the outputs of all the audio and auxiliary tracks simultaneously, hold down the control and option key
(mac) or the Start and Alt keys (win).
You can control the output level of these tracks by creating an additional Stereo Master fader for the SPDIF output.
(File menu > New Track. Create a Stereo Master Fader. Set the output to S/PDIF L & R stereo).
This new Stereo Master fader will control the output going to the S/PDIF output on the Digi 002.
Digi 002 Win Index | All FAQ Index
[25877]
My I/O labels keep changing when working with sessions of different sample rates.
I/O setup is easiest to manage if all routings are defaulted upon each coarse sample rate resolution change.
Digi 002 Win Index | All FAQ Index
[25871]
On Windows XP there is no way to adjust the Digi 002 WaveDriver settings outside of Pro Tools LE.
These settings include H/W buffer size, Ch 1-2 Format, and Advanced Settings.
The Digi 002 WaveDriver Setup.exe file installs as a program and the Digidesign WaveDriver does not list in Device
Manager the way it does in previous manual WaveDriver installations.
You will see Digidesign Digi 002 listed in the Sounds and Audio Devices control panel under the Audio tab.
Digi 002 Win Index | All FAQ Index
[25821]
Sampletank and bundled 002 plugs-ins are not playing back. I can see level on the MIDI track but no
level on the aux track.
SampleTank uses RAM to playback samples. 320 MB of RAM is recommended to use Pro Tools LE 5.3.2 with
SampleTank.
discovered by Digi Sales rep with Sony Vaio
Digi 002 Win Index | All FAQ Index
[25715]
Noise pops are emitted from the Digi 002 Monitor Outputs while making a FireWire connection with
computer.
It is recommended to always use the hardware MUTE button when connecting/disconnecting a FireWire drive to the
computer.
From the Read Me for Pro Tools LE v.5.3.2
Digi 002 Win Index | All FAQ Index
[25769]
What are the steps for the most stable Digi 002 system boot-up?
1) Start with CPU and all FireWire devices powered-off.
2) Connect FireWire drive(s) to CPU.
3) Connect 002 to FireWire drive(s) or to second FireWire port on CPU.
4) Boot CPU.
5) Once CPU is up, boot FireWire drives.
6) Once drives mount, boot 002.
Note: The main point here is that most stable FireWire performance occurs if the CPU is booted before FireWire
peripherals are powered-on.
Note #2: We suggest connecting FireWire components while everything is powered-off to help guard against the
possibility of a bad (dangerous) connection once everything's powered-on.
Digi 002 Win Index | All FAQ Index
[25672]
I am unable to use the smallest buffer sizes without encountering 9092, 9093, or 6086 errors on my
laptop when using Pro Tools LE 5.3.2 and a Digi 002.
Some laptop computers do not perform well when using the smallest Hardware Buffer setting. If you are
experiencing frequent errors, try increasing the Hardware Buffer size.
taken from the Pro Tools LE 5.3.2 Read Me
behavior encountered with Sony VAIO and PowerBook G4|800
Digi 002 Win Index | All FAQ Index
[25614]
Digi 002 MIDI ports are not recognized by Pro Tools.
If the Digi 002 is not powered on before launching Pro Tools, the MIDI ports will not be recognized. The workaround
is to make sure Digi 002 is powered up before launching Pro Tools.
Taken from the Pro Tools LE 5.3.2 Read Me (pg. 2)
Digi 002 Win Index | All FAQ Index
Digi Cables
What do the DigiSnake Kits cost?
Didn't Digidesign already offer these?
Are there any differences between the cables that come as DigiSnake vs. DigiSnake Kits?
What are DigiSnake Kits?
Additional DigiSnake compatibility information
How much do DigiSnakes cost?
What features do DigiSnakes offer?
What are those cable bales on the ends of the DigiSnake for?
What products use DigiSnake cables?
Why is Digidesign offering DigiSnakes?
What are DigiSnakes?
Additional DigiLink compatibility information
How much do DigiLink cables cost?
What products need DigiLink cables?
What size DigiLink cables does Digidesign offer?
Doesn't Digidesign include these DigiLink cables with HD cores / I/O's?
What are DigiLink cables?
What DigiSnakes does Digidesign offer?
[7256]
What do the DigiSnake Kits cost?
Check the All Products Index under Cables in the Products section of the website, or contact your Digidesign Dealer.
Products: http://www.digidesign.com/products/
Dealers: http://www.digidesign.com/aboutus/dealers/
Digi Cables Index | All FAQ Index
[7257]
Didn't Digidesign already offer these?
Yes, they were formerly known as the ProControl Cable Kit and Control|24 Cable Kit. We changed the name to
DigiSnake Kits with the introduction of the individual DigiSnakes. Model numbers and pricing have not changed. We
also added an all TRS version of the Control|24 DigiSnake Kit.
Digi Cables Index | All FAQ Index
[7258]
Are there any differences between the cables that come as DigiSnake vs. DigiSnake Kits?
The only differences are:
Specific labeling for the specific control surface they are designed for
No cable bales
All 3 (ProControl) or 7 (Control|24) snakes in one box.
Digi Cables Index | All FAQ Index
[7259]
What are DigiSnake Kits?
DigiSnake Kits are multiple DigiSnakes that are custom labeled and designed specifically for Digidesign Control
Surfaces, all in one box. These kits make for a quick and easy "all cables in one box" solution for ProControl or
Control|24.
There are three DigiSnake Kits available.
ProControl DigiSnake Kit -- Product MC100-C
Includes the following three 8-channel snakes:
- DB25 to 8 XLR Female (includes 2)
- DB25 to 8 XLR Male
Control|24 XLR/TRS DigiSnake Kit -- Product MC124-C
Includes the following seven 8-channel snakes:
- DB25 to 8 XLR Female (includes 2)
- DB25 to 8 XLR Male (includes 3)
- DB25 to 8 TRS (includes 2)
Control|24 TRS DigiSnake Kit -- Product MC124-TRS
Includes the following seven 8-channel snakes:
- DB25 to 8 TRS snakes (includes 7)
Digi Cables Index | All FAQ Index
[7260]
Additional DigiSnake compatibility information
- All DigiSnakes are 110 ohm digital grade cable (except TDIF-TDIF data cable)
- TDIF-TDIF DigiSnake is for TDIF use only. Use only on TDIF digital connectors.
- The +4/-10 Padded DigiSnake is an output-only snake for use only on the 192 I/O +4 dBU output port. You can
use any other snake for the 192 I/O -10dBv input connector.
- The ProControl snake has one DB25 connector with a reversed pin-out to match the ProControl. If you use this
cable with other gear, the channels will be reversed (ie channel 1 will appear on channel 8, channel 2 will appear on
channel 7, etc.).
- Please use the cable bales for connector stress relief.
Digi Cables Index | All FAQ Index
[7261]
How much do DigiSnakes cost?
Check the All Products Index under Cables in the Products section of the website, or contact your Digidesign Dealer
Products: http://www.digidesign.com/products/
Dealers: http://www.digidesign.com/aboutus/dealers/
Digi Cables Index | All FAQ Index
[7262]
What features do DigiSnakes offer?
- Uniquely designed for use with Digidesign products
- Custom colored and labeled
- Include stress relieving cable bales
- Lifetime warranty
- 110 Ohm "Digital Grade" cable suitable for analog or digital use
- Available from your local Digidesign dealer, making for an easy, quick cable solution to get your Pro Tools|HD
system up and running immediately.
Digi Cables Index | All FAQ Index
[7263]
What are those cable bales on the ends of the DigiSnake for?
These are used to relieve stress on the D-Sub connectors of the 192 I/O. PLEASE USE THEM! Tack the cable bale to
some nearby solid rack structure to release any stress on the 192 I/O's connectors.
Digi Cables Index | All FAQ Index
[7267]
What products use DigiSnake cables?
- 192 I/O (A/D card, D/A card, and Digital I/O card)
- 192 Digital I/O (has 2 digital I/O cards, but no Analog I/O)
- 192 A/D option card (expansion for 192 I/O)
- 192 D/A option card (expansion for 192 I/O)
- 192 Digital option card (expansion for 192 I/O)
- Control|24
- ProControl
- PRE
Note: the 96 I/O uses TRS connectors, not DB25
Digi Cables Index | All FAQ Index
[7268]
Why is Digidesign offering DigiSnakes?
The 192 I/O audio interface has a connection design where all audio connections on the I/O cards are via DB25
connectors*. This is due to lack of real estate. There physically is not enough room on the back of the 192 I/O for
its entire throughput capacity to be available on individual connectors.
Important: The 192 I/O audio interface has a connection design where all analog, AES/EBU and TDIF connections
on the I/O cards are via standard DB25 connectors*. Because of this, it is important to realize that unless you will
be using a custom wiring installation, EVERY 192 I/O sold, new or through an exchange, will need the purchase of
one or more DigiSnakes or other standard DB25-based cables in order to use these I/O.
* ADAT I/O is via TOS-Link, and SPDIF Digital is via RCA
Digi Cables Index | All FAQ Index
[7269]
What are DigiSnakes?
DigiSnakes are 8 channel DB25-based cable snakes, offered in a variety of break-out connections, each specifically
designed for 192 I/O systems.
All individual DigiSnakes incorporate:
- Custom color coding
- Custom labeling
- Cable bales
- Lifetime warranty
- 110-ohm "digital grade" cable, suitable for digital or analog use.
Digi Cables Index | All FAQ Index
[7270]
Additional DigiLink compatibility information
The 100' DigiLink cable is only qualified for audio with sample rates up to 96 kHz
To ensure signal integrity with 192 kHz sample rates, you must use 1.5' DigiLink cables between I/Os
Digi Cables Index | All FAQ Index
[7271]
How much do DigiLink cables cost?
Check the All Products Index under Cables in the Products section of the website, or contact your Digidesign Dealer
Products: http://www.digidesign.com/products/
Dealers: http://www.digidesign.com/aboutus/dealers/
Digi Cables Index | All FAQ Index
[7272]
What products need DigiLink cables?
DigiLink cables are required for two different uses:
- For connection of HD I/O's to HD Core and HD Process cards.
- For connection of a HD I/O to another HD I/O via the Expansion Port.
Additional notes, not related to the DigiLink cables: The Legacy Port on the back of the of the HD I/O uses the
"legacy" interface cable that came with your legacy interface. The Legacy Port supports any of the following
configurations, at 48 kHz or lower sample rate only:
- 888|24 I/O - connect 1 to a single 192 I/O or 96 I/O, connect 2 using a "Y" cable
- 882|20 I/O - connect 1 to a single 192 I/O or 96 I/O, connect 2 using a "Y" cable
- 1622 I/O - connect 1 to a single 192 I/O or 96 I/O, all 16 channels using the 1622's single cable
- 24-bit ADAT Bridge - connect 8 channels to a single 192 I/O or 96 I/O, all 16 channels using a "Y" cable
Digi Cables Index | All FAQ Index
[7273]
What size DigiLink cables does Digidesign offer?
Digidesign offers DigiLink cables in five different sizes, as follows:
DigiLink 1.5'
Same cable that is included with every 192 I/O and 96 I/O. Available separately as MH087. 1.5 foot length.
DigiLink 12'
Same cable that is included in every Pro Tools|HD core system. Available separately as MH088. 12 foot length.
DigiLink 25'
Twenty-five foot length allows you to further separate your I/O from your CPU / HD Core. Available as MH093.
DigiLink 50'
Fifty foot length allows you to further separate your I/O from your CPU / HD Core. Available as MH089.
DigiLink 100'
One hundred foot length allows you to greatly separate your I/O from your CPU/HD Core. Available as MH090. Note
that this cable length does not support sample rates above 96 kHz
Digi Cables Index | All FAQ Index
[7274]
Doesn't Digidesign include these DigiLink cables with HD cores / I/O's?
Yes. Digidesign includes one 12 foot DigiLink cable with each HD Core sold (for connection of the I/O to the HD
Core), and one 1.5 foot cable with each HD I/O (for connection of one HD I/O to the Expansion Port of another HD I/
O). As described below, DigiLink cables in other lengths will also be available for custom installs or machine room /
CPU noise control use.
Digi Cables Index | All FAQ Index
[7275]
What are DigiLink cables?
DigiLink cables are the interface cables that connect an HD I/O peripheral to an HD Core or Process card, or an HD I/
O to another HD I/O.
Digi Cables Index | All FAQ Index
[7266]
What DigiSnakes does Digidesign offer?
DB25-XLR M+F AES/EBU Snake
-DB25 to 4 XLR Male and 4 XLR Female.
- Below 192 KHz, AES/EBU carries 2 channels per line, so this snake transmits 8 out and 8 in via the 8 XLR
connectors.
- At 192kHz sample rate, the 192 I/O is using dual wire transmission. This means the AES snake transmits 4 out
and 4 in at 192 kHz. In this case, the connector labeled "output 1&2" is output 1, "output 3&4" is output 2, and so
forth.
- The 4 XLRF wire jackets are yellow; the 4 XLRM jackets are black, all with appropriate labeling..
- Product MH080; Length: 12 feet.
DB25-XLRM Snake
- DB25 to 8 XLR Male; Output snake.
- Analog or digital.
- Red jackets on both ends with appropriate labeling.
- Product MH081; Length: 12 feet.
DB25-XLRF Snake
- DB25 to 8 XLR Female; Input snake.
- Analog or digital.
- Blue jackets on both ends with appropriate labeling.
- Product MH082; Length: 12 feet.
DB25-TRS Snake
- DB25 to 8 balanced TRS connectors for audio input or output
- Analog or digital.
- Orange jackets on both ends with appropriate labeling.
- Product MH083; Length: 12 feet.
DB25-DB25 Snake
- DB25 to DB25, standard wiring.
- White (12 foot) or green (25 foot) jackets on both ends.
- Typically used for communication between any two standard - - - DB25-equipped devices; For example, PRE out
to 192 I/O analog in.
- Cannot be used for AES/EBU or TDIF digital dubbing. For TDIF dubbing, use the TDIF DigiSnake (below). For AES/
EBU digital dubbing, use two AES/EBU DigiSnakes, connected end to end (XLR to XLR).
- Product MH084; Length: 12 feet. Product MH085; Length: 25 feet.
DB25-DB25R ProControl Snake
- DB25 to pin-reversed DB25.
- This DigiSnake was developed specifically to compensate for the reversed pin outs on the ProControl. Typically
used to connect the 192 I/O output to the audio input of the ProControl.
- Purple jackets on both ends with appropriate labeling.
- Product MH086; Length: 25 feet.
DB25-TS +4 dBu/-10 dBV Padded DigiSnake
- Balanced +4 dBu DB25 to unbalanced -10 dBV TS snake.
- This snake contains the appropriate padding circuit to reduce the 192 I/O's +4 dBu output signal down to -10 dBV.
- For +4 dBu output only. Use any other input snake for return/input.
- Grey jackets on both ends with appropriate labeling.
- Product MH087; Length: 12 feet.
DB25-DB25 TDIF Only DigiSnake
- TDIF Digital (dubbing) cable. Designed for digital TDIF transfers only.
- Can only be used for TDIF to TDIF- i.e., Tascam MDM to 192 I/O TDIF connector.
- Cannot be used for AES/EBU digital dubbing. For AES/EBU digital dubbing, use two AES/EBU DigiSnakes,
connected end to end (XLR to XLR).
- Brown jackets on both ends with appropriate labeling..
- Product MH095; Length: 12 feet.
Digi Cables Index | All FAQ Index
DigiTranslator
I installed the DV Toolkit demo from my Pro Tools LE 6.1 CD. Now that the demo period has expired, how do I remove it?
I installed the demo version of DigiTranslator 2.0 and the demo period has expired. How can I remove DigiTranslator
from my system?
What Pro Tools systems are compatible with DigiTranslator 2.0?
Why doesn’t Digitranslator 1.0 and 1.0.1 recognize sessions created by Pro Tools 5.1 and higher? How can I convert a
5.1 or higher Pro Tools session to OMF?
What does it mean when Digitranslator 1.0 reports an "allocation failure."
When exporting an OMF using Digitranslator, what is the "quantize edits to frame boundaries" function and when should
it be checked?
Does Digitranslator support 24-bit audio files?
What audio file types does Digitranslator read and write?
Can Digitranslator translate keyframe automation into Pro Tools automation?
In between the releases of Digitranslator 1.0 and 2.0 there were several "cs" releases. What are these cs releases and
what issues did they resolve?
What does it mean when I get the error "File edit rate does not match project edit rate" error when trying to import an
OMF created in DigiTranslator?
When exporting an OMF from an Avid system there are options for OMF 1.0 and OMF 2.0. Which does Digitranslator
support?
When exporting an OMF from an Avid system or converting to OMF with Digitranslator, what is the difference between
creating external OMFI media vs. creating embedded OMFI media?
Is there or will there be a standalone version of Digitranslator 2.0 that does not operate within Pro Tools?
What does OMF stand for?
What are the main differences between Digitranslator 1.0 and Digitranslator 2.0?
[27159]
I installed the DV Toolkit demo from my Pro Tools LE 6.1 CD. Now that the demo period has expired,
how do I remove it?
Included on the Pro Tools LE 6.1 installer CD-ROM is a 30-day demo version of DV Toolkit.
Before Installing the DV Toolkit Demo Please Note:
Contrary to information included in the DV Toolkit PDF electronic guide, the DV Toolkit demo will replace Pro Tools
LE 6.1. At the end of 30 days, DV Toolkit demo users will need to either:
1. Purchase and authorize DV Toolkit from a Digidesign Dealer or the DigiStore (an iLok USB authorization key is
required).
2. Uninstall the demo and reinstall Pro Tools LE 6.1. Please keep your Pro Tools LE 6.1 CD-ROM installer handy for
this purpose.
When reinstalling Pro Tools LE 6.1 on Windows XP, users will be confronted with a multiple-choice dialogue. From
the available selections, please choose, "Repair."
Step-by-Step Installation and Removal Information:
Installing DV Toolkit
To install DV Toolkit
1.
2.
3.
4.
5.
Install your Pro Tools LE hardware and software.
When hardware and software installation is complete, restart your computer.
Insert the Pro Tools Installer CD-ROM in your CD-ROM drive.
Locate and open the DV Toolkit Installer folder, and double-click the Install DV Toolkit icon.
Click Next to begin installation.
The installer process automatically replaces your current Pro Tools LE with a version of Pro Tools LE that provides
the Time Code features unique to DV Toolkit, DigiTranslator, and DINR LE.
Removing DV Toolkit forPro Tools LE
If you need to remove DV Toolkit for Pro Tools LE from your computer, refer to the steps for your operating system:
Removing DV Toolkit for Pro Tools LE also removes the Pro Tools LE application.
To reinstall Pro Tools LE on Windows, reinstall Pro Tools from the Pro Tools Installer CD-ROM, and choose Repair in
the installer dialog.
To reinstall Pro Tools LE on Macintosh, reinstall Pro Tools from the Pro Tools Installer CD-ROM.
To remove Synchro Arts VocALign Project, refer to its documentation.
Windows XP
To remove DV Toolkit:
1. Choose Start > Control Panel.
2. Launch Add or Remove Programs.
3. From the Currently installed programs list, select Digidesign DV Toolkit.
4. Click the Change/Remove button.
5. Click OK to remove Digidesign DV Toolkit.
Mac OS X
To remove DV Toolkit:
1. Make sure you are logged in as an Administrator for the account where Pro Tools LE DV is installed. For details on
Administrator privileges in Mac OS X, refer to your Mac OS X documentation.
2. Locate and open the DV Toolkit Installer folder, and double-click the Install DV Toolkit icon.
3. Enter your Administrator password and click OK to authenticate the installation.
4. In the Installer window, choose Uninstall from the pop-up menu, and click Uninstall.
5. Click Quit to close the Installer window.
DigiTranslator Index | All FAQ Index
[27089]
I installed the demo version of DigiTranslator 2.0 and the demo period has expired. How can I remove
DigiTranslator from my system?
From the DigiTranslator Guide installed with the demo:
chapter 1
Installation and Authorization
Uninstalling DigiTranslator
To uninstall the DigiTranslator option:
On Windows, go to Add/Remove Programs, select Digidesign Pro Tools and click the Add/Remove button. Then
select Modify. Scroll through the list and uncheck DigiTranslator and proceed with uninstalling it.
On Macintosh, it is recommended that you delete the OMF.dll file from your Pro Tools folder by dragging it to the
trash.
If running Pro Tools 5.1.3 on Macintosh, delete the OMF.dll and DigiOMM.dll files from the Pro Tools folder.
DigiTranslator Index | All FAQ Index
[27090]
What Pro Tools systems are compatible with DigiTranslator 2.0?
Current Supported Systems
The following Pro Tools systems are compatible
with DigiTranslator 2.0:
Pro Tools TDM 6.1 for Windows XP and Mac OS X
Pro Tools LE 6.1 for Windows XP and Mac OS X
Pro Tools TDM 5.3.3 for Windows XP
Pro Tools TDM 5.3.1 for Windows XP
Pro Tools LE 5.3.1 for Windows XP
Pro Tools|HD 5.3.1 for Mac OS 9
Pro Tools|24 MIX 5.1.3 for Mac OS 9
DigiTranslator Index | All FAQ Index
[6195]
Why doesn’t Digitranslator 1.0 and 1.0.1 recognize sessions created by Pro Tools 5.1 and higher? How
can I convert a 5.1 or higher Pro Tools session to OMF?
Digitranslator 1.0 and 1.0.1 were created before the release of Pro Tools 5.1 and do not recognize the newer file
type. Use the Save Session Copy In function in Pro Tools 5.1 or higher to save a copy of the session in 5.0 format.
Digitranslator 2.0 is integrated directly into Pro Tools 5.1.3 or higher software and does allow direct OMF import/
export of 5.1 (and higher) sessions.
DigiTranslator Index | All FAQ Index
[6196]
What does it mean when Digitranslator 1.0 reports an "allocation failure."
Digitranslator requires more memory to perform the operation. Get info on Digitranslator and increase the amount
of preferred memory assigned. In some cases, Digitranslator may require as much as 100MB of RAM allocated to
convert larger files. Never change the minimum memory settings.
DigiTranslator Index | All FAQ Index
[6197]
When exporting an OMF using Digitranslator, what is the "quantize edits to frame boundaries" function
and when should it be checked?
This is available because Pro Tools is sample accurate and AVID applications such as Media Composer and
Symphony are frame accurate. It should always be checked when the destination of the OMF is an AVID or other
frame accurate system. When checked, Digitranslator will add silent "frame accurate edits" to the head and/or tail
of a region so that its head and tail fall on exact frame boundaries once imported into the destination application.
DigiTranslator Index | All FAQ Index
[6198]
Does Digitranslator support 24-bit audio files?
Digitranslator 1.0 does not support 24-bit audio files. It will however convert a 16-bit OMF to a 24-bit Pro Tools
session or vice versa by writing new audio files.
Digitranslator 2.0, an optional that can be integrated directly into Pro Tools 5.1.3 and higher software does support
import/export of 24-bit files.
DigiTranslator Index | All FAQ Index
[6199]
What audio file types does Digitranslator read and write?
Digitranslator 1.0 reads and writes AIFF and SDII files. Digitranslator 2.0 supports AIFF, SDII, and WAV files.
DigiTranslator Index | All FAQ Index
[6200]
Can Digitranslator translate keyframe automation into Pro Tools automation?
Digitranslator 1.0 will only translate clip-based gain. Digitranslator 2.0 will translate keyframe gain from Avid
versions 10.0 and higher. Clip-based gain is also supported with Digitranslator 2.0.
DigiTranslator Index | All FAQ Index
[6201]
In between the releases of Digitranslator 1.0 and 2.0 there were several "cs" releases. What are these
cs releases and what issues did they resolve?
1.0cs1 fixes:
- Timestamps on some regions (specifically regions that are right-hand contributors to crossfades) are incorrectly
time stamped by DigiTranslator 1.0 in the translation process.
- In sessions created by DigiTranslator 1.0 a small percentage of edits may be missing under some common
circumstances. In these sessions, the regions are present in the region list but, due to an error, are missing in the
timeline.
- DigiTranslator 1.0 may not translate a sequence, returning a "not enough room on volume an additional X MB is
required..." message when there is adequate space available on the specified volume. DigiTranslator was incorrectly
calculating the usable space on some volumes.
1.0cs2 fixes:
- Sometimes after opening a Pro Tools session created by DigiTranslator, deleting (or trimming) one fade on a track
will delete all the fades on that track.
- Multi-group video clips from Media Composer versions 8.0 and later are converted as video black.
- Sometimes an "Assertion in FF_EmbeddedAudioFile.cpp" occurs when translating OMF files with embedded audio
originating from Symphony.
- Sometimes a one sample rounding error results in edits that that are not "healable" but which should be.
1.0cs3 fixes
- uncompressed (1:1) video and "multi-file" clips. i.e., uncompressed video > 2 GB.
DigiTranslator Index | All FAQ Index
[6202]
What does it mean when I get the error "File edit rate does not match project edit rate" error when
trying to import an OMF created in DigiTranslator?
When converting from Pro Tools to OMF for import into an Avid system, always check the "quantize edits to frame
boundaries" box. Because Pro Tools systems perform edits on a sample accurate basis, and Avid systems edit on
frame boundaries, this option writes additional "pad" files so that regions are placed on frame boundaries when
imported into an Avid system.
DigiTranslator Index | All FAQ Index
[6203]
When exporting an OMF from an Avid system there are options for OMF 1.0 and OMF 2.0. Which does
Digitranslator support?
Digitranslator only supports OMF 2.0
DigiTranslator Index | All FAQ Index
[6204]
When exporting an OMF from an Avid system or converting to OMF with Digitranslator, what is the
difference between creating external OMFI media vs. creating embedded OMFI media?
Embedded media creates one single OMFI file that contains both the metadata (roadmap of how to assemble the
audio on the timeline) and the media files. Embedded files can be very large in size depending on the project.
External media is similar in structure to a Pro Tools session and its audio files. Its comprised of one small OMFI file
containing metadata only, and a separate folder containing all of the media files.
DigiTranslator Index | All FAQ Index
[6205]
Is there or will there be a standalone version of Digitranslator 2.0 that does not operate within Pro
Tools?
There are currently no plans to create a stand-alone version of DigiTranslator that includes the functionality of
version 2.0. Users without Pro Tools 5.1.3 or higher software should continue using Digitranslator 1.0cs3.
DigiTranslator Index | All FAQ Index
[6207]
What does OMF stand for?
Open Media Framework
DigiTranslator Index | All FAQ Index
[6208]
What are the main differences between Digitranslator 1.0 and Digitranslator 2.0?
The largest difference is that all the functionality of DigiTranslator 1.0 is now built directly into the Pro Tools
application, so there is no need to launch a separate application for OMF import or export. In addition,
DigiTranslator 2.0:
- Can export OMF versions of Pro Tools 5.1.x session files (Previously only 5.0.1 files and lower) Imports and
exports 24-bit OMF files (previously only 16-bit file supported)
- Exports Broadcast WAV (BWF) files as well as AIFF and Sound Designer II (Previously only AIFF or SDII). Both
versions of DigiTranslator can convert standard WAV files to either AIFF or SDII.
- Can translate Avid keyframe automation into Pro Tools breakpoint automation playlists (previously only clip-based
gain could be translated)
- Can play back an OMF sequence with embedded media without first having to extract the media files (saves time)
- Creates sample-accurate sequences for export to systems that perform only frame-accurate editing.
- Can check files and sequences directly into Unity MediaManager
DigiTranslator Index | All FAQ Index
Expansion Chassis
What are PCI Slots?
How many PCI slots do I need for a Digidesign Pro Tools system?
What is an expansion chassis? Do I need one?
What components make up an expansion chassis?
Are all Digidesign cards able to be installed in an expansion chassis?
Can I use any expansion chassis that is currently available?
Can expansion chassis be used both in Macintosh and PCs?
Is there an order to PCI slots, or are all slots the same?
How can I find out the numbering of the slots in my computer and expansion chassis?
What slots do I install Digidesign and third-party cards into? What is the slot order?
Can I install non-Digidesign cards inside the expansion chassis?
What is the maximum number of Digidesign cards that I can use? Can I install as many cards as I can fit into an
expansion chassis?
[4275]
What are PCI Slots?
When you buy a computer, it comes from the manufacturer with the capacity to perform certain tasks out of the
box (i.e, word-processing, playing games, etc.). However, certain specialized functions, such as professional quality
audio and video manipulation, usually require that you add both software and hardware to the computer.
Hardware is usually "added" to the computer by means of expansion slots, which are connectors mounted on the
motherboard that allow for the installation of cards that the computer can use for the specialized functions. The
standard expansion slot format used in computers today is called PCI (which stands for Peripheral Computer
Interface); Thus, a PCI slot is simply a computer expansion slot that complies to the PCI standard.
Expansion Chassis Index | All FAQ Index
[4276]
How many PCI slots do I need for a Digidesign Pro Tools system?
That depends on the system you are putting together, but generally speaking you will need at least two available
PCI slots for a basic system (Either a Digi 001, and Audiomedia III, or Mix Core, plus an approved SCSI card).
However, you can put together a Pro Tools TDM system using up to 10 cards.
To find out exactly how many cards your particular setup will use, contact your authorized Digidesign dealer, or a
Digidesign product specialist at 1(800)333-2137 or via email: [email protected]
Expansion Chassis Index | All FAQ Index
[4277]
What is an expansion chassis? Do I need one?
Computers have a limited number of PCI slots; usually three or six. An expansion chassis is an external box that
has a number of additional PCI slots (up to thirteen). When the expansion chassis is properly connected to the
computer, the PCI slots of the chassis become an "expansion" of the computer, thereby allowing you to use more
PCI cards than was originally possible.
If the total number of PCI cards you need to install on your computer is greater than the number of available PCI
slots on the computer, then you need an expansion chassis.
Expansion Chassis Index | All FAQ Index
[4278]
What components make up an expansion chassis?
Expansion chassis usually have four components:
(1) Host card: PCI card that installs into the computer.
(2) Cable: cable which connects the host card to the expansion chassis.
(3) Backplane Controller card: the card that gets installed in the expansion chassis itself.
Note that the name "backplane" is not used by every expansion chassis manufacturer to refer to this card.
Sometimes "backplane" denotes the motherboard in the expansion chassis.
(4) Chassis: the actual metal box that houses the circuit board and the PCI slots.
It is also important to note that some expansion chassis exist that do not have a separate card inside to connect to
the expansion chassis cable. In these cases, the circuit board in the chassis has a connector built onto it for the
cable, and the expansion chassis therefore only has three components (host card, cable and chassis).
Expansion Chassis Index | All FAQ Index
[4279]
Are all Digidesign cards able to be installed in an expansion chassis?
No. The only cards tested by Digidesign to be installed in an expassion chassis are TDM based cards, and Sample
Cell II TDM and non-TDM cards.
The Audiomedia III card, and the Digi 001 system were not tested by Digidesign inside an expansion chassis. Note
that some companies other than Digidesign have tested these cards inside an expansion chassis. In case of
troubleshooting, the Digidesign Tech Support department reserves the right to ask that the system be installed in a
supported configuration.
For the most up-to-date compatibility list, check the Digidesign Compatibility Documents
Expansion Chassis Index | All FAQ Index
[4280]
Can I use any expansion chassis that is currently available?
No. The capacity for digidesign software to communicate with digidesign cards inside an expassion chassis has to be
specifically written into the software. Additionally, very specific configurations are tested by Digidesign to insure full
system functionality. Specific computers and configurations can only work with specific expansion chassis models.
For these reasons, only expansion chassis that have been approved by Digidesign for your specific computer can be
used. For the most up-to-date compatibility list, check the Digidesign Compatibility Documents
Expansion Chassis Index | All FAQ Index
[4281]
Can expansion chassis be used both in Macintosh and PCs?
Yes. expansion chassis have been approved to be used with Pro Tools and Sample Cell systems on both Macintosh
and PC computers.
Expansion Chassis Index | All FAQ Index
[4282]
Is there an order to PCI slots, or are all slots the same?
PCI slots are not all the same. The PCI protocol (or "PCI Spec", as it is usually called) orders the slots from lowest
to highest, using alpha-numeric denomination. The term "alpha-numeric" simply means that the slots may be labled
using a letter, a number, or both (for instance, Slots A, B, C …; Slots 0, 1 ,2 …; or Slots A1, A2, A3 …). Digidesign
uses mainly numbers to refer to slot order.
Expansion Chassis Index | All FAQ Index
[4283]
How can I find out the numbering of the slots in my computer and expansion chassis?
Sometimes the slot numbers are silk-screened onto the circuit board itself, but usually the best way to know slot
numbering is looking at the documentation that came with the computer and with the expansion chassis.
There are also some software that can probe the hardware and display slot numbering, and sometimes even what
type of card is installed into the PCI slot. An example of these would be the Apple System Profiler, and Digidesign’s
Digitest. Note, however, that not all types of PCI cards will be properly recognized by all applications. If you need to
find this information with certainty, you should visually inspect the computer and expansion chassis.
Expansion Chassis Index | All FAQ Index
[4284]
What slots do I install Digidesign and third-party cards into? What is the slot order?
Every configuration will have a specific slot order. Your Pro Tools system should come with a booklet entitled, Pro
Tools Expanded System Guide. In this document you will find the specific slot order for your system.
Slots in the computer: there is no general rule for the slot order of the host card in the computer (sometimes it
goes in the lowest slot, sometimes in the middle, and sometimes at the highest numbered slot). Additionally, other
cards may have to be installed in the computer, such as a supported SCSI card, or a video capture card.
Slots in the expansion chasis: for Digidesign cards in the expansion chassis, the general order to follow (from
lowerst to highest slot number) is, Mix Core, Mix Farms, d24s, Mix I/Os, DSP Farm II’s*, DSP Farm I’s*, and
Sample Cell II’s (TDM or non-TDM).
Here are a two examples, using common configurations: A Pro Tools Mix Plus system, with added Mix cards, DSP
Farms and Sample Cell cards:
13 Slot expansion Chassis
Slot 6: Mix Core
Slot 7: Mix Farm
Slot 8: Mix Farm
Slot 9: Mix I/O
Slot 10: DSP Farm II
Slot 11: DSP Farm II
Slot 12: DSP Farm I
Slot 13: Sample Cell II TDM
Slot 14: Sample Cell II TDM
Slot 15: Sample Cell II TDM
Slot 16: Empty
Slot 17: Empty
Slot 18: Empty
A Pro Tools 24 system (using a d24 card as the core), with Mix Farms (no Mix Core), and Sample Cell cards:
7 Slot expansion Chassis
Slot 6: Mix Farm
Slot 7: Mix Farm
Slot 8: d24
Slot 9: DSP Farm II
Slot 10: DSP Farm II
Slot 11: DSP Farm I
Slot 12: Sample Cell II TDM
* DSP Farm I is the original PCI DSP Farm (serial number starts with the letters "FF"); and DSP Farm II is similar to
the original DSP Farm PCI, except that it went through a manufacturing revision (serial numbers start with "FG").
Both cards are functionally identical and perform exactly the same. The only difference is that some DSP Farm I’s
may need an upgrade of one of the chips in order to work in newer computer models or expansion chassis. If you
have a DSP Farm I and are unsure of wether you need the upgrade, consult the Digidesign Technical Support
department.
Expansion Chassis Index | All FAQ Index
[4285]
Can I install non-Digidesign cards inside the expansion chassis?
For the most part, no. In most configurations only digidesign cards are to be installed into the expansion chassis.
The only possible exception to this is the following: in a 13 slot expansion chassis, the very last slot of the chassis
may be used to install a non-bus master PCI card*. This would be possibly a video card for a second monitor (NOT
a video capture card). However, please be aware that this is not guaranteed to work. The more powerful the card is
(such as a 3D graphics card), the less chances that it will work, as it will take up too much bandwidth from the PCI
bus in the expansion chassis. If you have problems in your Pro Tools system with a non-digidesign card installed
onto the last slot, the first thing you should do is to remove this card.
* "Bus-master" is a type of PCI card that controls more aspects of the PCI slot than regular PCI cards. Usually, SCSI
cards, Video Capture cards, and Network cards are bus-masters. To find out for sure if a PCI card is a bus-master,
consult the card’s documentation or call the manufacturer.
Expansion Chassis Index | All FAQ Index
[4286]
What is the maximum number of Digidesign cards that I can use? Can I install as many cards as I can fit
into an expansion chassis?
The maximum number of Digidesign cards you can have in a system is 10. The limitation on each individual type of
card that make up the 10 cards is as follows:
Mix Core: 1
Mix Farm: 6 if a Mix Core is present; 7 if a Mix Core is not present
d24: 2
DSP Farm: 9
Sample Cell: 10 (in which case, no other cards would be installed
Expansion Chassis Index | All FAQ Index
HTDM
What is HTDM?
What kind of computer do I need to successfully work with HTDM Plug-Ins?
How many HTDM Plug-Ins can be used in a session?
How much memory will I need?
Will I experience latency when using HTDM Plug-Ins?
In Pro Tools v5.1 and higher I can use RTAS Plug-Ins on a TDM system. Isn't HTDM the same?
What is the difference between DirectConnect and HTDM?
Can I use DirectConnect and HTDM at the same time?
How about RTAS and HTDM Plug-Ins? Can I mix both Plug-In types in a session?
Are HTDM Plug-Ins available for Pro Tools|24 and Pro Tools III systems?
Are HTDM Plug-Ins available for all CPU platforms?
I am a Pro Tools LE user. Will HTDM Plug-Ins work for me?
[7243]
What is HTDM?
HTDM stands for "Host TDM" and refers to Plug-Ins that do all audio processing on the host CPU instead of the DSP
chips found on your TDM hardware. They use a single, shared DSP on the TDM system to allow the audio from
these host Plug-In processes to stream in or out of the system. The faster your computer, the more Plug-Ins you
will be able to run.
HTDM Plug-Ins allow the power and flexibility of host-based processing for synths and sampling to directly integrate
into Pro Tools. You can work with these Plug-Ins as you would use standard TDM Plug-Ins, including major benefits
like using Pro Tools automation (in addition to MIDI) to automate parameters, or using control surfaces for handson control of Plug-In parameters.
HTDM Index | All FAQ Index
[7244]
What kind of computer do I need to successfully work with HTDM Plug-Ins?
We highly recommend Macintosh G4 computers to get a good amount of host processing power while keeping
screen refresh rates and overall system performance at an acceptable level.
HTDM Index | All FAQ Index
[7245]
How many HTDM Plug-Ins can be used in a session?
Depending on the host CPU speed and the number of audio streams per Plug-In, you can instantiate up to 32 mono
or 16 stereo HTDM Plug-Ins. The number of Plug-Ins you can run is also practically limited by available memory, as
many HTDM Plug-Ins require large amounts of additional RAM.
As an example, on a G4/450 (not the fastest machine out there now!), you can easily run three or four of these
Plug-Ins without the host CPU's UI getting bogged down, or error messages.
HTDM Index | All FAQ Index
[7246]
How much memory will I need?
A good rule of thumb will be to add roughly 20 Megabytes per Plug-In to the memory allocation of DAE. Please note
that some HTDM Plug-Ins also require more memory in Pro Tools, so it might be a good idea to allocate significantly
more memory to Pro Tools also. Running several Plug-Ins simultaneously might require as much as 200 Megabytes
for DAE and Pro Tools or even more!
HTDM Index | All FAQ Index
[7247]
Will I experience latency when using HTDM Plug-Ins?
Yes. Unlike TDM Plug-Ins that run on DSP chips with infinitesimally small amounts of delay, a host-based Plug-In
will always add a certain amount of latency. HTDM Plug-Ins will be prone to latencies that depend on the version of
Digidesign StreamManager you're using and can vary between 512 and 128 samples.
HTDM Index | All FAQ Index
[7249]
In Pro Tools v5.1 and higher I can use RTAS Plug-Ins on a TDM system. Isn't HTDM the same?
Yes you can use RTAS and HTDM on a TDM system. No they are not the same. There are certain limitations to using
RTAS Plug-Ins on a PT 5.1 TDM system. In particular:
- RTAS Plug-Ins can only be instantiated on disk tracks, not on aux tracks or on master faders.
- Even on disk tracks, all RTAS Plug-Ins must be inserted before TDM Plug-Ins.
- RTAS Plug-Ins do not support sidechain inputs on 5.1 TDM systems.
- RTAS Plug-Ins must have symmetric I/O (i.e. 1 in, 2 out is not allowed)
HTDM Plug-Ins do not have any of those limitations.
HTDM Index | All FAQ Index
[7250]
What is the difference between DirectConnect and HTDM?
DirectConnect and HTDM are very similar, in that behind the scenes they are using the same basic StreamManager
technology. The audio is "streamed" in or out of the TDM mix environment by a single DSP, which can handle up to
32 mono or 16 stereo "streams" of audio. The difference is that HTDM Plug-Ins exist directly within the Pro Tools
mix environment, and can make use of Pro Tools automation rather than using MIDI only.
DirectConnect supports stand-alone applications that can stream in or out of TDM, but they are not directly
integrated as HTDM Plug-Ins are. Instead you must move between Pro Tools and other DirectConnect "client
applications" when working.
HTDM Plug-Ins also let you use Pro Tools TDM-compatible control surfaces like ProControl, Control|24 and
inexpensive MIDI controllers to control these Plug-Ins, a major plus!
HTDM Index | All FAQ Index
[7251]
Can I use DirectConnect and HTDM at the same time?
HTDM Plug-Ins and DirectConnect can be used simultaneously in your session because DirectConnect in fact is a
special HTDM Plug-In that allows other host-based applications to stream their audio into Pro Tools.
HTDM Index | All FAQ Index
[7252]
How about RTAS and HTDM Plug-Ins? Can I mix both Plug-In types in a session?
At this time we highly recommend not using HTDM and RTAS Plug-Ins simultaneously in order to avoid audio
artifacts or other problems. We will continue to optimize this new functionality in future Pro Tools releases.
HTDM Index | All FAQ Index
[7253]
Are HTDM Plug-Ins available for Pro Tools|24 and Pro Tools III systems?
No, HTDM Plug-Ins require Pro Tools MIX hardware to work. Similar to DirectConnect, HTDM Plug-Ins needs at least
one free SRAM DSP on a Pro Tools MIX card to work.
HTDM Index | All FAQ Index
[7254]
Are HTDM Plug-Ins available for all CPU platforms?
Currently, HTDM Plug-Ins are available for Macintosh only. We are in the process of developing HTDM for Windows
but we can't be more specific about its availability yet.
HTDM Index | All FAQ Index
[7255]
I am a Pro Tools LE user. Will HTDM Plug-Ins work for me?
No, Pro Tools LE can take advantage of RTAS Plug-Ins only. Since HTDM Plug-Ins are modified RTAS Plug-Ins it is
very likely that a certain HTDM product is also available for the RTAS platform. Please contact the manufacturer of
your favorite Plug-In for more information about HTDM and RTAS support.
HTDM Index | All FAQ Index
iLok
What is the Digidesign Plug-In Validator?
HDpack v5.0 License Cards
How can I tell if I have the correct iLok for my HD system?
When I try to register an iLok I get a message saying "waiting for server...still processing...almost done" but it does not
complete the process and my iLok does not get registered.
What plugins are included in the various HDpack license card versions?
Can I use any iLok to authorize my HDpack plug-ins?
"Error while verifying your authorization. Result Code: 12101"
After updating to Pro Tools 5.3.1 for HD (Macintosh version), several plug-ins won't see the iLok authorization key:
Focusrite d2, Maxim, and the D-Fi Bundle (LoFi, RectiFi, SciFi, and VariFi).
Instructions for authorizing HDpack or iLok plug-ins running in Demo mode
Can I assign a password to my iLok(s)?
I followed the 001 Factory Install Notes for installing the PACE System Files and Factory Plug-Ins. When Pro Tools
launches I can only run the demo versions of the plug-ins. If I click Next to authorize the plug-in, a "Hardware Key
Required" dialog comes up saying that no hardware key can be found.
Which USB port should I plug the iLok into?
What is a License Card?
What is the copy protection scheme for plug-ins on Pro Tools|HD systems?
Is there a way to combine authorizations onto a single iLok to free up a USB port?
When I install the iLok Extensions, using the InterLok Extensions Installer, I get this message "An error occurred while
trying to download the file."
When authorizing the Bomb Factory plug-ins in the Digi 001 Factory Bundle: There is no "GSM" chip or "License Card"
for the USB iLock SmartKey that comes with the Digi 001 Factory Bundle.
What is required for iLok support on Macintosh and Windows?
[27845]
What is the Digidesign Plug-In Validator?
This is a utility that allows you to check the version of your non-Digidesign plug-ins to determine whether or not
they need to be updated for use with the currently installed version of Pro Tools.
To use the Digidesign Plug-In Validator:
Launch the "Digidesign Plug-In Validator" application located in your Pro Tools Utilities folder. If any of your nonDigidesign plug-ins have not been updated, they will be listed in the display window. Please visit the Web site for
the manufacturer of any affected plug-ins and download the update (if available), or ask the manufacturer when
one will be available.
This utility was originally introduced with Pro Tools 6.2.2 due to a PACE copy protection bug. Some users experience
instability and/or crashes when launching Pro Tools, opening a session, or dismissing a trial-period dialog if any
Pace-wrapped third party plug-ins are installed. The fix for this bug is in the latest PACE drivers included and
installed automatically within the Pro Tools software installer. Updates to all plug-ins are also necessary to prevent
instability and/or crashes. All plug-ins supplied with the Pro Tools 6.2.3 installer have been fixed. Even if you do not
have updates for all your plug-ins, instability would only occur immediately after adding or removing a plug-in from
your Pro Tools Plug-Ins folder. After the first crash and subsequent reboot, you should not see any further
problems, unless you then add or remove plug-ins from the Plug-Ins folder.
iLok Index | All FAQ Index
[27613]
HDpack v5.0 License Cards
HDpack 1 and HDpack 2 v5.0 are on 1 License Card.
HDpack 3 v5.0 is 2 License Cards:
Pro Tools|HDpack 3 - License Card 1 - Version 5.0
Amp Farm
Bruno/Reso
d2.d3
D-Fi
Impact
Maxim
Reverb One
Virus Indigo
Pro Tools|HDpack 3 - License Card 2 - Version 5.0
SoundReplacer
Speed
The Sony Oxford EQ plug-in included with HDpack 3 v5.0 does not use an iLok license card.
Customers receive a registration code printed on a separate card included with the HDpack 3 package. Then they go
to the Sony website to register, and Sony deposits an authorization on iLok.com
iLok Index | All FAQ Index
[27500]
How can I tell if I have the correct iLok for my HD system?
The iLok that ships with Pro Tools|HD systems contains demo authorizations for the HDpack plug-ins and can be
identified by the PID number on the backside of the iLok (PID 0-0966-600). Newer HD systems may ship with iLoks
that do not contain PID numbers. These can be identified by the last four digits of the second line on the backside
label. If they read 9966 it is a HD iLok.
iLok Index | All FAQ Index
[26866]
When I try to register an iLok I get a message saying "waiting for server...still processing...almost
done" but it does not complete the process and my iLok does not get registered.
This can happen if you are trying to register or update an iLok from an authenticating proxy server. This type of
server is currently not supported for use with iLok.com. Some alternatives for registering are to temporarily turn off
the authentication proxy requirement, use a dial up to connect to the internet (proxy free), or register from another
location (home, the café, library, a friends house, etc.)
PACE is still looking into this situation so any new information will be updated online.
iLok Index | All FAQ Index
[26817]
What plugins are included in the various HDpack license card versions?
Macintosh:
HD 1 license card v1.0 = Focusrite d2, DPP-1, Bomb Factory Classic Compressors
HD 2 license card v1.0 = Focusrite d2, DPP-1, Maxim, Bruno/Reso, D-Fi, Bomb Factory Classic Compressors
HD 3 license card v1.0 = Focusrite d2, DPP-1, Maxim, Bruno/Reso, D-Fi, Bomb Factory Classic Compressors, Reverb
One, Virus (by Access Music), PitchDoctor (by WaveMechanics)
HD 1 license card v2.0 = Focusrite d2/d3, Pitch Dr. (Wave Mechanics)
HD 2 License card v2.0 = Focusrite d2/d3, Pitch Dr. (Wave Mechanics), D-fi (text), Maxim (text), Bruno/Reso,
Master X (TC Works)
HD 3 License card v2.0 = Focusrite d2/d3, Pitch Dr. (Wave Mechanics), D-fi (text), Maxim (text), Bruno/Reso,
Master X (TC Works), Amp Farm, Reverb One
HD 1 license card v3.0 = Focusrite d2/d3, Pitch Dr. (Wave Mechanics)
HD 2 license card v3.0 = Focusrite d2/d3, Pitch Dr. (Wave Mechanics), D-fi, Maxim, Bruno/Reso, Amp Farm
HD 3 license card v3.0 = Focusrite d2/d3, Pitch Dr. (Wave Mechanics), D-fi, Maxim, Bruno/Reso, Amp Farm, Reverb
One
HD 1 license card v4.0 = Focusrite d2/d3
HD 2 license card v4.0 = Focusrite d2/d3, D-fi, Maxim, Bruno/Reso, Amp Farm
HD 3 license card v4.0 = Focusrite d2/d3, D-fi, Maxim, Bruno/Reso, Amp Farm, Reverb One
Windows:
HD 1 license card v.1.0 = d2/d3 (license card) , DPP-1 (text), D-fx (text). *NOTE: {The HD-1 bundle for Windows
does not have a separate license card; it ships only with a d2/d3 license card and authorization codes for DPP-1 and
D-Fx.}
HD 2 license card v.1.0 = d2/d3 (license card) , DPP-1 (text), D-fx (text), Maxim, Big Bottom & Aural Exciter
HD 3 license card v.1.0 = d2/d3 (license card) , DPP-1 (text), D-fx (text), Maxim, Big Bottom & Aural Exciter, D-fi,
Drawmer, Sound Replacer, SurroundScope
iLok Index | All FAQ Index
[26767]
Can I use any iLok to authorize my HDpack plug-ins?
The HDpack license cards are designed to be used only with the HD iLok that's included with an HD system (PID#
ends in -600 or last four digits of the second line ends in 9966).
Attempting to authorize these cards to any other iLok is not supported and may result in authorizations being lost.
Things to check if you're having problems authorizing any of the HDpack plug-ins:
- Verify that it is an HD iLok (PID# ends in -600 or last four
digits of the second line ends in 9966).
- Verify the version of the HDpack license card to determine
which authorizations are on the card
- Verify that you are using the correct HDpack Installer CD
- Verify that current PACE InterLok drivers are in use
- Verify that the license card is inserted correctly within the iLok
when authorizing a plug-in
HDpack1, 2, or 3 license cards, version 1.0 through 4.0
For more information on HDpack plug-ins see the iLok Information Page and Pro Tools|HDpack Updates on the
Digidesign website
iLok Index | All FAQ Index
[25935]
"Error while verifying your authorization. Result Code: 12101"
This error can occur if PACE Interlok Drivers 4.1.3 are installed and the product is not yet authorized. Interlok 4.1.3
supports iLok but has discontinued support for floppy disk authorization. Any product that can be authorized with
floppy disk is susceptible to this error.
The Interlok extensions include:
Interlok Engine v.4.1.3
USB iLok Driver v.4.1.3
This was first discovered on Pro Tools 5.3.1 on HD when trying to authorize MachineControl and DigiTranslator 2.0
(which can be authorized by either iLok or floppy disk). The workaround is to upgrade to Interlok Drivers 4.1.4 or
higher, or downgrade to Interlok Drivers 4.1.1 or lower (the Pro Tools 5.3.1 Installation CD includes Interlok Drivers
version 4.0.7).
iLok Index | All FAQ Index
[8169]
After updating to Pro Tools 5.3.1 for HD (Macintosh version), several plug-ins won't see the iLok
authorization key: Focusrite d2, Maxim, and the D-Fi Bundle (LoFi, RectiFi, SciFi, and VariFi).
The original iLok authorized versions of these plug-ins should still be located in: Macintosh HD > Obsoleted
Digidesign Software folder > DAE Folder > Plugins folder.
Move these copies of the plug-ins back into the main plug-ins folder: Macintosh HD > System Folder > DAE Folder
> Plug-Ins folder
Alternately, you can choose to reinstall these plug-ins from the HD|Pack Installer, but you must first remove the
newer versions from the Plug-Ins folder, otherwise you will end up with duplicate versions of these plug-ins (and
Pro Tools will still load the floppy authorized versions only).
Note that the initial posting of the Pro Tools 5.3.1 TDM updater for Mac installed DINR plug-ins that needed to be
replaced using the process described above. The 6/19/2002 posting of the installer instals the iLok authorized
version of DINR and does not cause the issue described above.
iLok Index | All FAQ Index
[8053]
Instructions for authorizing HDpack or iLok plug-ins running in Demo mode
If you are trying to authorize one or more HDpack or other iLok plug-ins that are already running in Demo mode:
- Launch Pro Tools before you insert the iLok
- Insert the iLok into any available USB port when prompted.
- Follow the onscreen instructions until you are prompted to insert the License Card into the iLok.
Some plug-ins will not show days remaining on the demo period and will not allow you to authorize them with the
method outlined above. Another way to force the demo plug-ins to ask for authorization is to advance the date on
your computer to a time that is past the demo period. You can then authorize the plug-ins to your iLok and switch
your system back to the correct date. **Be aware that this may expire all demos running on your system and these
cannot be re-run.**
Included in the HDpack Download Read Me on the Q1/Q2 2002 HDpack Installer CD
iLok Index | All FAQ Index
[7880]
Can I assign a password to my iLok(s)?
Digidesign does not support assigning passwords to an iLok Key.
You will not be able to register your iLok at iLok.com if it has been password protected.
If you attempt to use this feature, you should document your password. Make sure not to lose it as there is no way
to reset it without returning the iLok to PACE. If you lose your password, you will need to arrange for this with PACE
using the RMA (Return Merchandise Authorization) Form located on the iLok.com Support pages — in order to get
an RMA number. PACE charges $10.00 plus shipping to remove the password from your iLok and return it.
**iLok FAQ**
iLok Index | All FAQ Index
[7746]
I followed the 001 Factory Install Notes for installing the PACE System Files and Factory Plug-Ins.
When Pro Tools launches I can only run the demo versions of the plug-ins. If I click Next to authorize
the plug-in, a "Hardware Key Required" dialog comes up saying that no hardware key can be found.
The 001 Factory Install Notes require you to insert the iLok USB SmartKey before running the PACE System Files
Setup and the Factory Plug-In installers. This can present a problem since Windows 98SE/Me will detect the iLok
but will not have drivers loaded for it. The iLok may show up in the System Properties/Device Manager under the
heading Other Devices, illustrated with a yellow question mark. Even after installing the PACE System Files Setup
and Factory Plug-Ins, Windows will not recognize the iLok and the plug-ins will not load as authorized versions when
Pro Tools is launched.
For Windows to recognize the iLok correctly, go to:
1) Control Panel > System Properties > Device Manager > Other Devices
2) Highlight the iLok and select Add/Remove
3)Close the System Properties and restart the computer
By removing the generic iLok listing from the Device Manager, the system will re-detect the iLok when you restart
the computer. Windows will load the PACE drivers and the iLok will now show up in the Device Manager under
Dongles > USB iLok Driver. Your plug-ins will load correctly when Pro Tools is launched.
iLok Index | All FAQ Index
[7730]
Which USB port should I plug the iLok into?
The iLok key should work in any available USB port on your system. However, some users have reported problems
with their computer failing to recognize the iLok when installed in a keyboard port. If you experience this problem,
insert the iLok in one of the available USB ports on the CPU.
iLok Index | All FAQ Index
[7298]
What is a License Card?
A License Card is used to authorize an iLok for any number of plug-ins. It looks like a credit card with a small
breakaway section that is broken out of the card and can be slid into the slot at the end of the iLok USB key. This
will install an authorization for the appropriate plug-in(s).
iLok Index | All FAQ Index
[7299]
What is the copy protection scheme for plug-ins on Pro Tools|HD systems?
The new iLok USB dongle is now used and one is included with all Pro Tools|HD systems (PID# ends in -600 or last
four digits of the second line ends in 9966). They contain preauthorized demo authorizations for certain plug-ins
that are included in the HDpack bundles.
All non-DigiRack Digidesign plug-ins require iLok authorizations for Pro Tools|HD systems running Pro Tools 6.0 and
higher software on OS X. Pro Tools 5.3/5.3.1 on OS 9 can use iLok or floppy authorizations for most Digidesign plugins with the exception of Reverb One, Bruno/Reso, DINR, and Virus, which require iLok authorization.
iLok Index | All FAQ Index
[7300]
Is there a way to combine authorizations onto a single iLok to free up a USB port?
There is currently no way to merge authorizations that may reside on multiple iLoks. However, once registered at
www.ilok.com you can view what each iLok is authorized for. A powered USB hub may be used to run multiple iLoks
if you do not have available USB ports on your system.
iLok Index | All FAQ Index
[7327]
When I install the iLok Extensions, using the InterLok Extensions Installer, I get this message "An error
occurred while trying to download the file."
Previous versions of the InterLok Extensions Installer required that your computer remain online during the
installation process. If you are seeing this error while installing, you should download the latest version of the
InterLok Extensions Installer which does not require the system to be online during the installation process.
If the computer using the iLok is not online:
1) Download the InterLok Extensions Installer to a computer that is online
2) Copy the installer to CD-R or other removable media
3) Transfer this file to the computer with that using the iLok with Pro Tools LE.
4) Run the installer. This will install the required drivers to the System Folder/Extensions Folder
The current driver/extensions for Mac OS X and OS 9x are:
InterLok Engine
USB iLok Driver
5) Restart the computer
The Pace website: http://paceap.com/dldrvr.html
What to download: InterLok Extensions Installer (Mac), InterLok Drivers Installer (Windows)
iLok Index | All FAQ Index
[7185]
When authorizing the Bomb Factory plug-ins in the Digi 001 Factory Bundle: There is no "GSM" chip or
"License Card" for the USB iLock SmartKey that comes with the Digi 001 Factory Bundle.
The .pdf "How to Authorize" file in the Bomb Factory folder on the Digi 001 Factory Bundle CD is incorrect. There is
a discrepancy with the iLock instructions that Bomb Factory provides vs. Digidesign's iLock instructions.
You do not need a "License Card" or "GSM" cutout to insert in the iLock for the Digi 001 Factory Bundle, as the
iLock comes preauthorized.
From 001 Factory Install Notes .pdf file on CD:
"iLok USB SmartKey - The iLok USB SmartKey included in the 001 Factory is preauthorized for the plug-ins
mentioned above. Before installing any of the plug-ins, plug the iLok USB Smart Key into any available USB port on
your Macintosh. The iLok USB Smart Key will need to remain connected to the computer while using the plug-ins.
You may remove the iLok USB Smart Key, but will need to reconnect it to use the plug-ins".
To view the whole .pdf file: Digi 001 Factory Bundle CD > Bomb Factory Folder > Documentation > How to
Authorize.
iLok Index | All FAQ Index
[6659]
What is required for iLok support on Macintosh and Windows?
Mac OS and Windows require certain InterLok drivers to be installed to use iLok
For Mac OS X 10.2.3 and higher:
Pro Tools 6x software automatically installs the InterLok Engine drivers on Mac OS X systems.
For Mac OS 9x:
Starting with Pro Tools 5.3 for HD systems, InterLok Extensions were authomatically installed. To use iLok with Pro
Tools 5.1x software, download current versions from the PACE website. These extensions are:
- InterLok Engine
- USB iLok Driver
For Windows:
Download the current InterLok Driver Installer from the PACE website.
Latest versions for Mac OS and Windows can be found online at: http://www.paceap.com/dldrvr.html
If you currently have an older version of these extensions in your system, certain plug-in installations may require
the latest available version and will attempt to automatically update the drivers from the PACE website.
iLok Index | All FAQ Index
Mbox
Mbox and latency issues with Pro Tools LE for recording and playback on a Mac.
CPU usage is holding off USB audio -9136 when running Pro Tools LE 5.2 on Mbox.
Getting pops and clicks written in the audio when recording with Mbox.
What happens when my computer goes to sleep while using the Mbox?
Not receiving the S/PDIF clock signal when using Mbox.
Will Mbox work on my USB hub? My PCMCIA adapter? My PCI card?
Can I use Mbox in a truly mobile way, like out in the desert where there is no place to plug in my laptop’s power supply?
Can I play my Mac sounds through Mbox?
What happens if the USB cable gets unplugged while I am recording?
Why can’t I use the analog and digital inputs independent of one another? I could do this with my Audiomedia III card.
Why can’t I turn off S/PDIF mirroring?
Where did the Tascam DA30 S/PDIF option go? For that matter, what happened to "Other Options"in the Hardware
Setup window?
What happened to Low Latency Monitoring?
Can I use other audio applications with Mbox using Direct IO? My third party audio application is not working properly
with Mbox (Logic Audio, Digital Performer, etc.)
Can I use Mbox on my existing Pro Tools TDM or LE system?
Why won't my 1/4" microphone plug work when I plug it into Mbox?
Can I use the Mbox inserts for outboard gear while I am mixing?
Why are there only two insert ports? Where am I supposed to plug in my effect returns?
When I press the Mono button nothing happens.
Can I still use virtual synths and samplers with Pro Tools via DirectConnect when using Mbox?
[7868]
Mbox and latency issues with Pro Tools LE for recording and playback on a Mac.
Here are a few tips regarding latency issues with Mbox on a Mac:
Tip #1:
When recording into Pro Tools LE Mac:
1) Mute recorded enabled audio track in Pro Tools. When recording on Mbox, you are actually monitoring the audio
signal going to Mbox. If the record enabled audio track is not muted, you will also be monitoring the signal going
out of Pro Tools back to Mbox. This will be heard as a doubling effect because you are hearing both the input and
the latent output at the same time.
2) Adjust the "Mix" knob on Mbox to prevent any echo or latency sound.
3) Press the "Mono" button on Mbox. This will prevent the input signal from sounding hard panned left or right when
adjusting the Mix knob on Mbox. The "Mono" knob does not affect the mix playing out of Pro Tools, just the
incoming signal.
Tip #2:
1) When you record into Pro Tools LE Mac there is a latency of 164 samples. All tracks recorded into Pro Tools have
164 samples of latency, but you will not notice this with the first track unless you have a MIDI click, or a recorded
click to play along with. Thus, when you record the second track/pass, you will hear latency when the two tracks
are played together. Tip #3 explains how to deal with this issue.
2) Tip #1 just helps to prevent hearing the latency while recording into Pro Tools; however, there will be latency
when recording into Pro Tools/Mbox.
Tip #3:
1) After recording your second track/pass into Pro Tools LE Mac, adjust the newly recorded audio track to
compensate for the 164 samples of latency.
2) Select the second pass of audio with the Grabber Tool. Edit Menu > Shift. Click "Earlier" and type in 164 in the
"Samples" field. Click "OK". Now, Pro Tools will locate the audio 164 samples earlier.
3) "Shift" each track or recorded pass back by 164 samples immediately after recording. If you are stacking up
tracks, you definitely want them all to be in sync as each new one is recorded.
4) If you recorded your audio at the very start of the session, you will have to trim in the audio before the
waveform starts to allow space for the audio to be shifted 164 samples ahead.
Now, you may ask, are all other passes 164 samples apart from each other too?
Not exactly, each recording pass will be 164 samples behind everything already recorded. If you record one track at
a time, and mute recorded tracks as you go along so you're only listening to the most recent track, then yes, your
final track (say, 24) will be 23 x164 samples behind the first track, at least in terms of what you're hearing.
Technically, the last track is still only 164 samples behind the first track but listening to these delays building up will
cause your playing in time to the tracks to start falling behind noticeably.
So if you add one track at a time and listen to all previous tracks on each recording you'll be hearing:
Track 1: On time
Track 2: 164 samples behind Track 1
Track 3: 164 samples behind Tracks 1 and 2, so play in time to Track 1 you're off by 164 samples, but if you play in
time to Track 2 you're 328 samples off.
Track 4: 164 samples behind Tracks 1, 2, and 3, but the delays build up differently depending on what track you
play off of.
Mbox Index | All FAQ Index
[7771]
CPU usage is holding off USB audio -9136 when running Pro Tools LE 5.2 on Mbox.
- Lower the CPU usage to 65% or lower in Pro Tools LE (Setups menu/Hardware window).
- Update Mac OS to 9.2.2 (this error is more common with 9.1).
- Remove RTAS Plug-Ins, since they take more Host time.
- For Apple laptop computers when using the battery:
Adjust the battery usuage of an Apple laptop computer: Apple Menu > Control Panels > Energy Saver. Under
"Advanced Settings" there are three checkboxes that effect system performance. Uncheck three items in "Other
Options": "Allow processor cycling", "Reduce processor speed", and "Increase application idle time". All of these
settings have a dramatic effect upon performance of Pro Tools LE on a laptop.
Mbox Index | All FAQ Index
[7727]
Getting pops and clicks written in the audio when recording with Mbox.
Mbox users reported getting pops and clicks when recording Pro Tools LE sessions over a half hour.
Digidesign has developed a new USB driver that solves this. To obtain the new Digidesign USB driver go to: www.
digidesign.com > support > downloads > Mbox > download the Digidesign USB driver v. 1.0.1
This driver should replace the Digidesign USB driver in the Extensions folder on the Mac Hard Drive.
Mac Hard Drive > System folder > Extensions folder.
Mbox Index | All FAQ Index
[7432]
What happens when my computer goes to sleep while using the Mbox?
Peak Indicators on the Mbox may light when the computer goes to sleep. Additionally, be sure to turn off Mbox's
48V Phantom Power when the computer is in sleep mode.
Mbox Index | All FAQ Index
[7433]
Not receiving the S/PDIF clock signal when using Mbox.
Make sure the digital device was connected to the S/PDIF connection before switching to S/PDIF sync mode.
(Setups Menu > Sync Mode > S/PDIF).
Or, plug in the S/PDIFconnection to Mbox before powering up Mbox.
Mbox Index | All FAQ Index
[6838]
Will Mbox work on my USB hub? My PCMCIA adapter? My PCI card?
Mbox is designed to work on a single, dedicated USB port build into your computer. We do not support its use on
any hubs, adapters, expansion cards, or the USB port on the side of your USB keyboard.
Mbox Index | All FAQ Index
[6839]
Can I use Mbox in a truly mobile way, like out in the desert where there is no place to plug in my
laptop’s power supply?
Yes, but you should bring extra batteries for your laptop. Mbox draws a significant amount of current over the USB
bus, and will drain your laptop’s battery relatively quickly.
Mbox Index | All FAQ Index
[6840]
Can I play my Mac sounds through Mbox?
In OS 9 you would have to install the Digidesign Control Panel that is an installation option on the Pro Tools LE
Installer CD. The Digidesign control panel allows you to choose Digidesign as the output device in the Sound control
panel and this will then play the Mac sounds out of the Mbox.
In OS X you can use the Core Audio Drivers to play other applications such as iTunes or Quicktime to play thru the
Digidesign Hardware but it does not support playing back the Mac System Sounds. You can download the Core
Audio Drivers from our web site for Pro Tools LE 6.0.1 and higher.
Mbox Index | All FAQ Index
[6841]
What happens if the USB cable gets unplugged while I am recording?
Pro Tools will stop recording and show an alert letting you that this has happened. If you reconnect the USB cable
you can resume recording (once you clear the error message by clicking OK.)
Mbox Index | All FAQ Index
[6842]
Why can’t I use the analog and digital inputs independent of one another? I could do this with my
Audiomedia III card. Why can’t I turn off S/PDIF mirroring?
The USB spec only allows for a certain amount of Data to pass in either direction at any given time, and there is
simply not enough bandwidth to handle the load presented by 4 discrete audio streams. Audiomedia III uses the
PCI bus for throughput, which is not limited in this way.
Mbox Index | All FAQ Index
[6843]
Where did the Tascam DA30 S/PDIF option go? For that matter, what happened to "Other Options"in
the Hardware Setup window?
The Tascam toggle has been removed from the software since the S/PDIF output from Mbox will be recognized by
your DA30 as it is.
In prior versions of Pro Tools you were required to enable the "Tascam DA-30" toggle when using one of these DAT
decks. Mbox does not require this switch, since the S/PDIF output from the Mbox will be recognized by your DA30
as it is.
Also, none of the "Other Options" window apply to Mbox; thus, it has been removed.
The Mbox transmits as a DAT category device.
Mbox Index | All FAQ Index
[6844]
What happened to Low Latency Monitoring?
This role of this feature has been replaced by the "mix"pot on the front of your Mbox. By simply muting recordreadied tracks in Pro Tools, you can dial in just the right blend of input vs. playback using this pot. The mono button
offers additional monitoring control.
Mbox Index | All FAQ Index
[6845]
Can I use other audio applications with Mbox using Direct IO? My third party audio application is not
working properly with Mbox (Logic Audio, Digital Performer, etc.)
Mbox uses a new set of DIO and DSI. 3rd party companies may need to make modifications to their applications for
these versions of DIO/DSI to work correctly with their app.
Mbox Index | All FAQ Index
[6846]
Can I use Mbox on my existing Pro Tools TDM or LE system?
While it is possible to use Mbox on a system that includes existing Digidesign hardware, it is not recommended.
Mbox requires a specialized version of Pro Tools to run, with its own specialized components, and thus complications
may arise when combining it with other Digi gear.
Mbox Index | All FAQ Index
[6847]
Why won't my 1/4" microphone plug work when I plug it into Mbox?
When the Mbox inputs are set to "mic", they only accept signal from the XLR contacts of its input ports.
Microphones with 1/4"TS or TRS connectors will not work. Try the "inst"or "line"settings instead.
Mbox Index | All FAQ Index
[6848]
Can I use the Mbox inserts for outboard gear while I am mixing?
No. The Mbox inserts are places between the input amps and the A/D converters, and may only be used for signals
as they are being recorded. The option to use hardware inserts on Pro Tools tracks has been disabled due to the
bandwidth limitations of USB.
Mbox Index | All FAQ Index
[6849]
Why are there only two insert ports? Where am I supposed to plug in my effect returns?
Each input port accepts a single 1/4"TRS connector. The tip conductor carries the outbound signal to your external
device, while the ring conductor carries the return from the external device back to Mbox. The sleeve acts as
ground for both. Please consult you manual.
Mbox Index | All FAQ Index
[6850]
When I press the Mono button nothing happens.
The mono button only affects signals being received by the analog inputs of Mbox, and its effect may only be heard
on the "input"side of the mix pot. It does not have any influence on playback from Pro Tools.
Mbox Index | All FAQ Index
[6852]
Can I still use virtual synths and samplers with Pro Tools via DirectConnect when using Mbox?
Yes.
Mbox Index | All FAQ Index
Motor Mix
I cannot get more than one Solo button selected on the Motor Mix when holding the Shift key.
Cannot control any Orange Vocoder parameters with my MIDI controller.
No communication between Motor Mix (or HUI) and OMS when using a MIDIman MIDIsport USB interface.
There does not seem to be communication between my Motor Mix and Pro Tools. Motor Mix LCD reads "Motor Mix (tm)
is ready for a session", though a Pro Tools session has already been launched.
My Motor Mix is not communicating with Pro Tools; Motor Mix responds to movement of the Pro Tools faders, but Pro
Tools faders will not respond to movements of Motor Mix faders. A communication error message keeps appearing in
Pro Tools.
How do I set up OMS to use Motor Mix if I AM NOT using a Mark of the Unicorn (MOTU) USB MIDI interface?
When I try to locate to a memory location using Motor Mix in Transport Mode, Pro Tools does not respond. Other
communication functions seem normal.
How is "Fader Punch Mode" on the Motor Mix different than standard Pro Tools mode? It seems that I can perform the
same automation functions in either.
How can I get the latest Motor Mix firmware?
How do I set up OMS to use Motor Mix if I AM using a Mark of the Unicorn (MOTU) USB MIDI interface?
How do I check the firmware version currently installed on my Motor Mix?
Where is the Record button on my Motor Mix?
Why does Pro Tools keep crashing? I'm seeing an assortment of errors and / or the computer keeps freezing up. I'm
using a Mark of the Unicorn USB MIDI interface with one or more Motor Mix units.
Cannot instantiate a plug-in beyond the eighth fader when using multiple motor mix units.
What button do I press on Motor Mix to engage record?
[27732]
I cannot get more than one Solo button selected on the Motor Mix when holding the Shift key.
With the Latch Solo Buttons preference disabled in the Pro Tools you cannot get more than one Solo button to
activate on the Motor Mix when holding the Shift key on either the Motor Mix or Apple keyboard. The workaround is
to hold either Shift key and use the mouse to select Solo in Pro Tools. This is seen with Pro Tools 5.x on OS 9 and
Pro Tools 6.x on OS X.
Motor Mix Index | All FAQ Index
[5459]
Cannot control any Orange Vocoder parameters with my MIDI controller.
This is a known limitation in version 1.0 of Orange Vocoder RTAS. This is addressed in version 2.0 which is available
as a download from our web site.
Note: The authorization for Orange Vocoder 2.0 requires ilok authorization to run. Please contact Customer Service
if you need to upgrade from a floppy authorized version to ilok.
Motor Mix Index | All FAQ Index
[4207]
No communication between Motor Mix (or HUI) and OMS when using a MIDIman MIDIsport USB
interface.
Make sure OMS was installed first, then the MIDIsport drivers. Sometimes communication will not occur even if this
has been done properly, and it may then be necessary to trash all OMS and MIDIsport components, and reinstall in
the proper order.
It is widely held that the best alternative is to use an older, Mac serial format MIDI interface on a Gport or Stealth
Port, which does not require USB drivers.
Motor Mix Index | All FAQ Index
[3961]
There does not seem to be communication between my Motor Mix and Pro Tools. Motor Mix LCD reads
"Motor Mix (tm) is ready for a session", though a Pro Tools session has already been launched.
Motor Mix is probably operating in Standard Mode. Simultaneously press the ESCAPE and PLAY keys to toggle back
to Pro Tools Mode.
From Motor Mix FAQ.
Motor Mix Index | All FAQ Index
[3962]
My Motor Mix is not communicating with Pro Tools; Motor Mix responds to movement of the Pro Tools
faders, but Pro Tools faders will not respond to movements of Motor Mix faders. A communication error
message keeps appearing in Pro Tools.
Make sure Motor Mix is selected as an input device in Pro Tools: MIDI menu > Input Devices. This may also be
caused by a faulty MIDI cable or port. Make sure both the in and out MIDI ports are being employed, both on the
Motor Mix end and the MIDI interface end. Try using different MIDI cables and switching to different ports on your
MIDI interface. Ultimately it may be necessary to create a new OMS Studio Setup to regain normal communication.
From the Motor Mix FAQ.
Motor Mix Index | All FAQ Index
[3963]
How do I set up OMS to use Motor Mix if I AM NOT using a Mark of the Unicorn (MOTU) USB MIDI
interface?
1. OMS should be installed first, and the computer restarted.
2. Install any driver software that was packaged with your MIDI interface, the restart your computer again.
3. Launch OMS Setup, or choose OMS Studio Setup from the Setups menu in Pro Tools. Click OK when the first
window appears.
4. In the next window, select the port(s) that your MIDI interface(s) are attached to. If you are using a USB
equipped computer without a Modem or Printer port and/or if you are using the Digi 001 MIDI ports, leave these
boxes unchecked.
5. The next window should list your MIDI interface(s). Click OK.
6. The next window shows MIDI devices that are connected to your MIDI interface(s). Make sure there is an X in
the box next to the keyboard/question mark symbol which represents the port that you Motor Mix is attached to.
6. Name your Studio Setup.
7. Double-click the keyboard/question mark icon in the Session Setup window which is shown connected to the port
that your Motor Mix is attached to. The Manufacturer should be set to CM Automation, and the Model should be
designated as Motor Mix. You will see other options change when this assignment is made.
8. In Pro Tools, make sure Motor Mix is selected as an input device under the MIDI menu > Input Devices.
Motor Mix Index | All FAQ Index
[3975]
When I try to locate to a memory location using Motor Mix in Transport Mode, Pro Tools does not
respond. Other communication functions seem normal.
Make sure Pro Tools is using its "classic" keypad configuration in Preferences > Operation. If it is already set to
"classic", try quitting Pro Tools, trashing the Pro Tools preferences (Mac HD > System Folder > Preferences), and
restarting the computer. You may need to make adjustments to some preferences and peripheral settings after
doing this.
Motor Mix Index | All FAQ Index
[3977]
How is "Fader Punch Mode" on the Motor Mix different than standard Pro Tools mode? It seems that I
can perform the same automation functions in either.
There is no difference. Earlier in the development of Motor Mix it was necessary to enter Fader Punch Mode in order
to punch in automation, but this is no longer the case.
Motor Mix Index | All FAQ Index
[3979]
How can I get the latest Motor Mix firmware?
Contact CM Automation through the support site of their website:
www.cmlabs.net
[email protected]
http://www.cmautomation.com
Motor Mix Index | All FAQ Index
[4187]
How do I set up OMS to use Motor Mix if I AM using a Mark of the Unicorn (MOTU) USB MIDI interface?
1. OMS should be installed first, and the computer restarted.
2. Install FreeMIDI (version 1.4 or greater) and restart the computer once again.
3. Launch FreeMIDI setup, and when asked to choose between FreeMIDI and OMS choose OMS. This will assure
that FreeMIDI is operating in OMS compatibility mode.
3. Launch OMS Setup, or choose OMS Studio Setup from the Setups menu in Pro Tools. Click OK when the first
window appears.
4. In the next window, leave the modem and printer boxes unchecked and click OK.
5. The next window should list your MIDI interface(s). Click OK.
6. The next window shows MIDI devices that are connected to your MIDI interface(s). Make sure there is an X in
the box next to the keyboard/question mark symbol which represents the port that you Motor Mix is attached to.
6. Name your Studio Setup.
7. Double-click the keyboard/question mark icon in the Session Setup window which is shown connected to the port
that your Motor Mix is attached to. The Manufacturer should be set to CM Automation, and the Model should be
designated as Motor Mix. You will see other options change when this assignment is made.
8. In Pro Tools, make sure Motor Mix is selected as an input device under the MIDI menu > Input Devices.
Motor Mix Index | All FAQ Index
[3978]
How do I check the firmware version currently installed on my Motor Mix?
The firmware version is displayed for a few seconds after the Motor Mix power switch has been turned on.
Motor Mix Index | All FAQ Index
[3976]
Where is the Record button on my Motor Mix?
There is not a dedicated record button on the Motor Mix. To initiate recording from the Motor Mix, arm the tracks
you wish to record on, then enter "Transport Mode" by simultaneously pressing the SHIFT and transport (PLAY)
buttons on Motor Mix. The SELECT buttons below the LCD screen become Transport Control buttons, and the
"RECORD" button is among them.
Motor Mix Index | All FAQ Index
[3964]
Why does Pro Tools keep crashing? I'm seeing an assortment of errors and / or the computer keeps
freezing up. I'm using a Mark of the Unicorn USB MIDI interface with one or more Motor Mix units.
Make sure you have followed the proper setup procedure for using OMS and Motor Mix with a MOTU USB MIDI
interface (see the Motor Mix FAQ).
The use of the HUI or Motor Mix and OMS (required for Pro Tools) in conjunction with a Mark of the Unicorn USB
MIDI interface has in some cases proven to be unstable, and resistant to trouble shooting. If your are experiencing
these sorts of problems, try using another brand of USB MIDI interface, or switch to using the interface's old Mac
Serial port if it is equipped with one. Problems are more often seen when using multiple HUIs or Motor Mix units, so
also try using only one controller if possible.
Motor Mix Index | All FAQ Index
[4177]
Cannot instantiate a plug-in beyond the eighth fader when using multiple motor mix units.
Here is the procedure:
1) Press the "Plug-In" button on Motor Mix #1
2) Select the desired channel on Motor Mix #2, 3, or 4.
3) Press the "Plug-In" button on the Motor Mix unit which currently displays the channel you wish to instantiate on.
You should then see that channel number in the LCD display of Motor Mix #1.
4) Use Motor Mix #1 to choose and instantiate the desired plug-in.
Motor Mix Index | All FAQ Index
[3816]
What button do I press on Motor Mix to engage record?
1. Press Rec-Ready
2. Select your track
3. Hold Burn Button
4. Hit Play
Motor Mix Index | All FAQ Index
OMS
I am seeing timecode coming in through the timecode reader in OMS but I am not seeing it in Pro Tools. Why?
How can I get another sequencer like Digital Performer to sync up with Pro Tools so I can do Midi in another application
besides ?
What is the latest version of OMS?
Why can't I see more of my synth patches in my sequencer?
How do I use OMS Names?
Are OMS and FreeMidi compatible?
How do "virtual nodes" work and what are they?
What extensions do I need for my Midi interface?
[4287]
I am seeing timecode coming in through the timecode reader in OMS but I am not seeing it in Pro Tools.
Why?
This can be due to several things. Check to see that in Setup>Peripherals that the type of device is selected and on
the correct port. Check Current time in Session Setup to verify incoming timecode to. If these settings are correct
but you still do not see incoming timecode, try trashing OMS prefs, DAE prefs and Digisetup along with preferences
from the Preferences folder (inside the system folder), restart the computer and relaunch . If this does not work, a
complete reinstallation of both OMS and may be necessary. In a few instances it has been required to reinstall the
Mac OS as well in order to resolve the problem.
OMS Index | All FAQ Index
[4288]
How can I get another sequencer like Digital Performer to sync up with Pro Tools so I can do Midi in
another application besides ?
At least one IAC bus needs to be created for Midi Time Code to travel between the applications. This is done by
double-clicking on the IAC device icon in OMS Studio Setup, and naming one of the busses to MTC. In , under
Setup>Peripherals, select Generic MTC Reader and for port choose the newly-created MTC. Put Pro Tools online by
clicking the clock icon in the transport window or use command-J (Mac) or control-J (Windows). In the secondary
Midi sequencer application, tell the sequencer to output MTC to the IAC bus named MTC. Hitting play (or recordplay) in the secondary application will at this point trigger Pro Tools into play mode which will then allow the two
applications to sync together.
To enable playback control of a background application from within Pro Tools, Midi Machine Control (MMC) via the
IAC bus must be used. Creating a separate IAC bus in OMS Studio Setup called MMC makes it possible to select that
bus as a port when enabling MMC in Setup>Peripherals. Going online in Pro Tools with transport=Pro Tools makes it
possible to control playback and stop of a background sequencing application. If the above MTC settings have been
made, this can now be used to start the background app which in turn sends MTC back to Pro Tools to begin slaving
in sync with the background application.
OMS Index | All FAQ Index
[4289]
What is the latest version of OMS?
2.3.8 was the last version of OMS released by Opcode.
OMS Index | All FAQ Index
[4290]
Why can't I see more of my synth patches in my sequencer?
OMS has preset program data files that it refers to when publishing patch name information to sequencing
applications. OMS does not look to the synth to see what program names are in memory, but instead uses the
preset files it has when you choose the particular synth name when setting up device info in OMS Studio Setup. To
add more names to the lists OMS uses, a third-party librarian application is required or one must use the OMS
Names application (included on the Pro Tools installer CD-ROM) to manually add program names.
OMS Index | All FAQ Index
[4291]
How do I use OMS Names?
OMS Names is a program that comes in the OMS installer (included on the Pro Tools CD-ROM) that is designed to
allow additional program names to be added to the current set provided by OMS. It may also be used to create
additional sets from scratch for synthesizers that are not found on the OMS Studio Setup Device and Manufacturer
lists.
The instructions for using OMS Names are found in a .pdf document for Adobe Acrobat called OMS_NameMgr.pdf in
Opcode>OMS Applications>OMS Tech Pubs.
OMS Index | All FAQ Index
[4292]
Are OMS and FreeMidi compatible?
Yes they are. In order for OMS to detect most MOTU midi interfaces, FreeMidi must be installed after OMS, and
FreeMidi setup run first before running OMS Setup. FreeMidi needs to be told to use OMS when available.
OMS Index | All FAQ Index
[4293]
How do "virtual nodes" work and what are they?
Virtual nodes is a capability of OMS to update it's published list of synthesizers to applications that use OMS
dynamically, responding to the instantiation or de-instantiation of software synths and IAC buses as they may occur
in real-time. What this means is that if you instantiate a software synth that uses virtual nodes, OMS sees it and
automatically creates a listing for it in the application that can address it. Subsequent instantiations yield further
listings, and so on.
So far the only real-world call for virtual nodes is within Virus TDM, a software synthesizer that uses Digidesign Mix
card DSP chips for its RAM rather than other software synthesizers which use regular computer RAM. If you insert
Virus on a Pro Tools track, it immediately becomes available as an output device on any Midi track within Pro Tools.
The use of virtual nodes allows one to differentiate between separate instantiations of the same synth (i.e. Virus 1a,
1b and so on) and instantiations of different synths (i.e. Virus 1, 2, 3 and so on). As soon as the synth is removed
and thus deactivated, it is also removed as an available output device within OMS and is no longer published to Pro
Tools.
OMS Index | All FAQ Index
[4294]
What extensions do I need for my Midi interface?
For all USB-type MOTU interfaces, you will need the three FreeMidi extensions as well as the MOTU USB driver
extension.
For the USB Unitor 8 interface you will need the USB Unitor Family Driver version 1.0 or later.
For the USB MidiSport interface you will need the USB MidiSport Shim extension.
For any Opcode USB interfaces you will need the USB OMS extension.
For connecting regular serial port interfaces to a Blue G3 or G4 computer, you will need a Stealthport or Gport
installed into the computer's internal modem slot. No separate extensions are required for this type of connection.
These interfaces include most Opcode Studio series of interfaces (3, 4, 5, 64xtc, 128x and so on) and the Unitor 8
and MidiMan interfaces.
OMS needs to be installed on the computer prior to installation of the Midisport drivers. This allows the the Midisport
driver installer to write the required files into the OMS folder.
OMS Index | All FAQ Index
PostConform
When I launch PostConform v2.0 I get the following message: "DAE could not be successfully acquired, for some
reason. Perhaps another application is currently using DAE, or no valid drive is available."
Why is the MicroLynx option not available in the setups>machine control dialog box for PostConform v2.0?
When authorizing PostConform 2.0, the application throws the following error "The authorization count on your master
disk has been corrupted. -104".
I can't get PostConform to control the deck via machine control.
What are the synchronization equipment requirements for PostConform v2.0?
How do I recreate sources without starting a new session and importing the EDL all over again?
How does the sorting method I choose affect the order in which PostConform loads sources from the source tape?
-Why is PostConform locating the machine control deck in a random fashion while loading sources? -Why is
PostConform trying to load source items randomly or out of order from the reel/tape? -Why is PostConform prompting me
to insert the next reel/tape even though it has not finished loading all sources off of the current reel/tape? -Why is
PostConform prompting me to insert a tape it has loaded previously?
Why is PostConform 2.0 naming the sources in my source bin with strange names that make no sense such as the
following: 15A-01abYBx2kR4fr6h0.
[4295]
When I launch PostConform v2.0 I get the following message: "DAE could not be successfully acquired,
for some reason. Perhaps another application is currently using DAE, or no valid drive is available."
Pro Tools is most likely running concurrently with PostConform and is taking over the DAE application for its own
use. PostConform 2.0 is not qualified to run concurrently with Pro Tools 4.32 or below. DAE 5.0P allows Pro Tools
and PostConform to run simultaneously. The PostConform 2.0 installer doesn't replace 5.0 with 5.0P.
If you are using PostConform with Pro Tools 5.0, quit both Pro Tools and PostConform and replace the DAE
application (v5.0) on your system hard drive with the DAE application (v5.0P) from the PostConform 2.0 Installer
CD located in the DAE Folder. Launch Pro Tools and disable the Active In Background option under the Operations
menu. Launch PostConform and continue working. If you are using PostConform and Pro Tools 5.0.1 disable the
Active in Background option under the Operations menu in Pro Tools and continue working.
PostConform Index | All FAQ Index
[4296]
Why is the MicroLynx option not available in the setups>machine control dialog box for PostConform
v2.0?
Direct MicroLynx machine control support is not available in PostConform v2.0. The only machine control standards
that PostConform 2.0 supports are Sony 9-Pin (P-2), V-LAN, and VPR-3.
PostConform Index | All FAQ Index
[4298]
When authorizing PostConform 2.0, the application throws the following error "The authorization count
on your master disk has been corrupted. -104".
The only authorization key diskette that works with PostConform v2.0 is the "Authorizer for PostConform v2.0 for
Macintosh" diskette. If you have not received this diskette please call digidesign customer service during normal
business hours.
PostConform Index | All FAQ Index
[4299]
I can't get PostConform to control the deck via machine control.
Make sure your deck is in remote mode and that it is receiving its correct machine control standard signal from
PostConform. Reseat both ends of the serial 9-pin cable leading from the computer to the deck in use.
Note: For machine control of external decks, PostConform requires either a Mac serial port, a qualified modem-toserial port adapter or USB-to-serial adapter. For modem-to-serial conversion on Blue & White G3 and G4 Macintosh
computers, Digidesign currently supports the Griffin gPort, gPort II and the GeeThree Stealth Port and Stealth Port
for G4 - AGP video. For USB-to-serial conversion Digidesign qualifies the Keyspan USB Serial Adapter with driver
v1.7.2 or higher available at:
http://www.keyspan.com/products/usb/adapter/downloads
PostConform Index | All FAQ Index
[4300]
What are the synchronization equipment requirements for PostConform v2.0?
PostConform v2.0 requires either a Digidesign Universal Slave Driver or an LTC-to-MTC converter for
synchronization.
USD: Universal Slave Driver connects directly to Pro Tools|24 MIX and MIXplus systems, but requires a qualified
modem-to-serial converter for use with Pro Tools III systems in Blue & White G3 / G4 configurations. NOTE:
PostConform v2.0 is currently not supported with Pro Tools III systems. A fix for this is currently under
development.
LTC-to-MTC Converters: Digidesign recommends using a serial MIDI Interface. Serial MIDI interfaces require either
a Mac serial port or a qualified modem-to-serial port adapter. Alternatively USB MIDI Interfaces have been tested
and are similarly compatible.
PostConform Index | All FAQ Index
[4301]
How do I recreate sources without starting a new session and importing the EDL all over again?
Select the events you want to redo. This selects the source for each event (or one source for many events). In the
Source Audio menu choose Clear Selected. This deletes all the selected sources but leaves the EDL events in place.
Now select the events you want to create sources for and choose Create Sources in EDL menu. If you want to
create sources again for the entire EDL, choose Select All Events in the EDL menu and choose Clear Selected in the
Source Audio menu. Now select all the events in the EDL and choose Create Sources in the EDL menu.
PostConform Index | All FAQ Index
[4302]
How does the sorting method I choose affect the order in which PostConform loads sources from the
source tape?
Sort by Record In (A Mode) will load the audio in chronological order of the show regardless of reel number or time
code. This means that PostConform will not pay any attention to whether other sources from the same tape can be
loaded at that time. This is the least efficient manner by which to conform your audio.
Sort by Name/Record In (B mode) will force PostConform to pay attention to all sources that can be loaded from the
same tape. It then loads all source audio from that tape in chronological order of the show but not in the order of
sources on the tape. This means that PostConform will at least load all sources that reside on one tape but it will
force your tape deck to shuttle back and forth as it attempts to find the right section.
Sort by Name/Source In (C Mode) is the most efficient method of conforming using PostConform. This method
forces PostConform to pay attention to both the reel number as well as source audio time code. In this mode
PostConform pays no attention to the chronology of the show itself and is instead only concerned with loading
source audio in the fastest manner from the start of the tape towards the end.
PostConform Index | All FAQ Index
[4303]
-Why is PostConform locating the machine control deck in a random fashion while loading sources? Why is PostConform trying to load source items randomly or out of order from the reel/tape? -Why is
PostConform prompting me to insert the next reel/tape even though it has not finished loading all
sources off of the current reel/tape? -Why is PostConform prompting me to insert a tape it has loaded
previously?
This is probably caused by enabling the Use Comments as Region Names preference. Disable the preference by
turning it off and create sources again.
1. Go to the Options menu and choose Preferences, hit the Conforming menu button and make sure the "Use
Comments as Region Names" option is clicked OFF. Hit OK.
2. Go to the EDL menu and choose "Select All Events".
3. Go to the Source Audio menu and choose Clear Selected. It will throw a dialog box that says "Are you sure you
want to clear the selected sources? This command cannot be undone." Click yes.
4. Go to the EDL menu and choose Create Sources.
What happens?
When the Use comments as region names preference is enabled, PostConform will also use those comments to
name the audio sources in the source bin. PostConform loads audio from the tape/reel according to the order of the
sources in the source bin. It does this from top to bottom but it sorts the sources in alphanumeric order with
numbers having priority in the hierarchy and then letters. If you load audio with this preference on, PostConform
may not load the audio in the most efficient manner. You can have several sources on one tape in succession
according to the EDL but with this preference on, PostConform will not necessarily sort them according to their
appearance on the tape. Sources starting with numbers will be loaded first even though there may be other sources
on the tape/reel named with letters that physically come before them. As PostConform locates the deck via machine
control it appears to the user to be randomly shuttling the deck looking for the correct time code. It will also take
substantially longer to load audio sources in this manner.
If the preference is turned off, PostConform will name the sources by stating the reel/tape number first followed by
the source number from that reel/tape followed by an OMF type description, for example 15A-01abYBx2kR4fr6h0.
When PostConform loads sources named in this way, it loads them most efficiently. However, if the user exports the
PostConform session with this preference turned off, the regions in their Pro Tools session will be named as
mentioned above as well. It's best to load the audio in with the preference turned off and then turn the preference
on before exporting the session to Pro Tools. A user will see no change in the PostConform session upon doing this
but the change will be reflected in the Pro Tools session.
PostConform Index | All FAQ Index
[4304]
Why is PostConform 2.0 naming the sources in my source bin with strange names that make no sense
such as the following: 15A-01abYBx2kR4fr6h0.
This usually happens when you have the Use comments as region names option turned off. To fix it, turn the
preference back on.
Caution: Turning this preference on during the loading process can increase loading times substantially. This is due
to PostConform's source naming convention and alphanumeric sorting hierarchy. It's best to load sources with this
preference turned off. (see related FAQ above) If you need to rename the sources in the source bin after loading
audio, you will have to change the preference by following steps 1-7 above. This unlinks all sources from their
loaded files, which will have to be relinked one by one.
Note: You can change this preference without noticing any difference in the naming convention. This preference will
not take affect until you create sources for the session again. This is true even if you change the preference and
then close and reopen the PostConform session.
1. Open the PostConform session in question.
2. It should open with all events listed in the EDL window and the sources for those events listed in the Source bin
with funky names like 15A-01abYBx2kR4fr6h0.
3. Go to the Options menu and choose Preferences, hit the Conforming menu button and make sure the "Use
Comments as Region Names" option is clicked on. Hit OK.
4. Go to the EDL menu and choose "Select All Events". At this point, everything in the session is selected in both
the EDL window and the source bin.
5. Go to the Source Audio menu and choose Clear Selected. It will throw a dialog box that says "Are you sure you
want to clear the selected sources? This command cannot be undone." Click yes.
6. All of the sources should have disappeared from the source bin and the EDL window will show all of the events
from the EDL in italicized font indicating that there are no sources created for those events.
7. Go to the EDL menu and choose Create Sources.
This preference directly effects how PostConform names the sources in the source bin. With the preference on,
PostConform will use the comments field as names for the sources in the source bin. With the preference off,
PostConform will instead use its funky naming convention for the sources in the source bin.
PostConform Index | All FAQ Index
PRE
What is the power consumption of PRE?
What is included with my PRE?
What are the system requirements for PRE?
What are the specifications for the Digidesign PRE?
Where can I find a Pinout diagram for the DB-25 connector on the PRE?
What are the main features of PRE?
Why do I hear clicks when changing the gain on my PRE?
[26835]
What is the power consumption of PRE?
60 watts @110V (North America)
120 watts @ 240V (Europe)
PRE Index | All FAQ Index
[26828]
What is included with my PRE?
- PRE
- AC Power cable
- PRE guide
PRE Index | All FAQ Index
[26829]
What are the system requirements for PRE?
When used as a stand-alone microphone preamplifier,
PRE is ready to use.
For remote control within Pro Tools, PRE requires:
• Pro Tools TDM hardware and software:
• Pro Tools HD-series system, running
Pro Tools TDM 6.0 or later on Macintosh
OS X
• Pro Tools HD-series system, running
Pro Tools TDM 5.3.3 or later on Windows
• Pro Tools|HD-series, Pro Tools|24 MIX-series,
or Pro Tools|24 system, running
Pro Tools TDM 5.3.1 or later on Macintosh
OS 9.x
• Digidesign-qualified Macintosh or Windows
computer
• 17" or larger color monitor; 1024x768 resolution
• Digidesign-qualified MIDI interface
Mic Preamps in Pro Tools can optionally be remotecontrolled by Digidesign control surfaces
(such as Control|24 and ProControl).
PRE Index | All FAQ Index
[26830]
What are the specifications for the Digidesign PRE?
PRE Specifications:
Gain Range 0 dB to +69 dB, in approximately
3 dB steps. With Pad enabled, –18 to +51 dB.
Input Impedance (Input Z): 1.5k ohm (low impedance);
15k ohm (mid impedance);
1.5M ohm (high impedance)
Frequency Response: ±0.1 dB; 20 Hz to 20 kHz,
@ +48 dB gain
Total Harmonic Distortion + Noise <0.0005%
@ 1 kHz, 0 dB gain @ 20 dB signal; <0.001%
(20 Hz to 20 kHz), 0 dB gain @ 0 dB signal
Equivalent Input Noise –128 dB @ 66 dB gain
(20 Hz to 20 kHz unweighted) 150 ohm
Phase Response <2.5 degrees (20 Hz to 20 kHz)
Dynamic Range 124 dB @ 0 dB gain
(20 Hz to 20 kHz unweighted)
Maximum Input Level +47 dBu Pad In, @ 1 kHz,
<0.1% THD
Maximum Output Level +29 dBu balanced,
@ 1 kHz, <0.1% THD
Common Mode Rejection Ratio <–75 dB
@ 1 kHz, 140 mVcm, +6 dB gain
Crosstalk <<90 dB, 20 Hz to 20 kHz
Phantom Power 48V ±1V
High-Pass Filter –3 dB @ 85 Hz 18 dB/octave
PRE Index | All FAQ Index
[26831]
Where can I find a Pinout diagram for the DB-25 connector on the PRE?
Page 41 of the PRE guide (Appendix B).
This document can be found online at:
http://www.digidesign.com/support/docs/PRE_Guide.pdf
PRE Index | All FAQ Index
[26825]
What are the main features of PRE?
- Eight high performance, discrete matched transistor hybrid microphone preamplification circuits.
- Remote Control with qualified Pro Tools TDM system and Digidesign control surfaces (such as Control 24 or Pro
Control).
- Maximum fidelity of PRE outputs signals, by keeping preamplification of low level signals close to the source.
- Analog outputs utilize industry standard CD-25 connectors for easy connection to Pro Tools audio interfaces or any
other recording or mixing medium.
•Each channel features:
• Support for microphone (XLR), line level
inputs (1/4½) and direct instrument (1/4½)
• Selectable impedance settings for Mic input
• Input gain variable from 0 dB to +69 dB, in
approximately 3 dB steps, with an optional
–18 dB pad
• +48V power for condenser microphones
• Balanced Insert points (Send and Return),
for easy integration of outboard gear (such
as compressors or EQs)
• Phase invert
•85 Hz High-Pass Filter
• Up to nine PREs are supported through software
for up to 72 channels of remote-controlled
Mic Preamp channels.
• All features are available in Stand-alone mode,
making PRE ideal for any recording application.
PRE Index | All FAQ Index
[8273]
Why do I hear clicks when changing the gain on my PRE?
The clicks are a normal and necessary result of the high-quality gain control method used in PRE. The highest
priority item for us with PRE was the sonic quality and we worked hard to obtain the performance with the initial
design and keep it there through the remote control process.
PRE is a precision, transformer-less design, and uses a high-precision differential transistor pair (actually, a bunch
on 'em in parallel to reduce noise) as a front end in place of the traditional input transformer.
The gain control method used in PRE utilizes relays to place fixed resistors in the feedback path. To vary the gain of
the circuit, you cross-couple some feedback from one side of the input to the other. There are very slight DC offsets
present across these resistors.
When you change gains, some of the DC offset from one side of the circuit is injected into the other side and we get
what is called a "step change". Basically, this comes out as a small transient or 'click'. There are plenty of nonremotely controlled mic preamps that utilize a variation of this type of design and they use a potentiometer for gain
control, in which case the step change never occurs. On some of these preamps, you can quickly rotate the gain
control and hear a "whoosh" or a scratching sound (depending on the type of pot used,) which is really the same
artifact in disguise.
As a manufacturer, the real problem comes in when you want to remotely vary the gain of one of these circuits. You
can easily use a VCA (voltage controlled amplifier) or an MDAC (multiplying digital-to-analog converter,) which
delivers the convenience and reduced artifacts of a pot but unfortunately impairs the fidelity and performance
substantially. Remember, the audio performance of PRE in terms of noise and distortion is very, very good and due
to the high-gain design and critical nature of the circuits, it's very easy to impair this excellent performance with a
less-than-excellent gain control method.
When it comes right down to it, there are only two methods of remotely controlling a transformer-less mic preamp
that I'm aware of.
The first might be using an actual servo motor to drive an actual pot. If you can get around the noise of the motor
circuit leaking into the sensitive audio electronics, it's a workable solution. Unfortunately, servo motors cost serious
money, as do motor drivers, as does the additional power supply required to run them, which would raise the price
substantially, not to mention the fact that we would have to fit eight of them in the case and then deal with the
extra heat, etc.
Then, you have reliability concerns since you now have an electro-mechanical assembly in a critical path. Topping
that off, you now have to deal with the error of the pot, which means that unless you calibrate each pot to each mic
preamp, you can't have reliable gain amounts, which in turn makes it hard to work in stereo. So the cost, size,
complexity and heat all go up while the reliability and accuracy are reduced.
The other option is to use relays to switch fixed precision resistors in the circuit. The benefits are many;
performance and sound quality are maintained, cost is kept reasonable, reliability is high and gain matching
between channels is great. The downsides are simple but livable given the other options; you have fixed gain steps
and there are small clicks when changing gain. I believe it is a small price to pay for the increased sonic
performance and benefit of being able to locate the preamp at the source.
From a post by Stan Cotey, Product Manager.
PRE Index | All FAQ Index
Pro Tools 5.1
I cannot hear audio out of my Digi 001. The labels on my track I/O buttons do not match my hardware (or the inputs
specify "no interface" on the channel input selector).
I get a "Bounce Handler cannot keep up..." error when bouncing a Pro Tools LE session to disk. What can I do to avoid
this?
9093 or 9094 error during recording or playback.
"Cannot initialize shared heap error" when running Pro Tools LE on Windows ME.
Does Pro Tools TDM 5.1 require a floppy drive?
Why does my Pro Tools LE session clip when I open it on TDM hardware?
My D-Verb plug-in is not functioning properly after installing Pro Tools LE 5.1 Mac. D-Verb asks for a key disk
authorization, and I only have a serial number. Do I need a key disk?
I get the following error: "The MP3 option cannot be enabled because a program error occurred (-2802) while looking up
symbol "CodecInit" in "MP3.dll", when I Bounce To Disk using the MP3 Export Option,
DAE error -1 when trying to instantiate a Focusrite d3 plug-in in Pro Tools TDM v. 5.1. Also may get the message that
"Certain plug-ins have been deactivated due to lack of system resources"
Which VST floppy drives are supported for PACE USB floppy authorization?
How do I hear what my MIDI device (keyboard, drum machine, etc.) is playing from the Digi 001?
I'm unable to get MIDI signal into Pro Tools LE via the Digi 001 on OS 9.x.
[6377]
I cannot hear audio out of my Digi 001. The labels on my track I/O buttons do not match my hardware
(or the inputs specify "no interface" on the channel input selector).
Verify that your monitors' audio signal runs through an amplifier or you have powered monitors connected to the
Monitor Outputs of the Digi 001 interface. Verify that the Monitor Mode button on the front of the Digi 001 is NOT
depressed (for more information on monitor mode, refer to page 40 of your "Getting Started with Digi 001" Manual).
If the I/O labels on your track I/O buttons do not match your Digi 001 interface or specify "no interface", you need
to set your I/O setups dialog to the factory default. Go to Setups > I/O Setup and choose the Input tab. Click on
the Default button to reset your inputs to their factory designation. Continue through the Outputs, Insert and Bus
tabs and click the Default button on each page.
Pro Tools 5.1 Index | All FAQ Index
[6379]
I get a "Bounce Handler cannot keep up..." error when bouncing a Pro Tools LE session to disk. What
can I do to avoid this?
A couple possible solutions exist for this:
Reduce the Disk Cache in the Apple Memory Control Panel to 512k and restart the computer.
Close all unnecessary windows such as Plug-Ins and the Big Counter before proceeding with a Bounce To Disk.
Allocate more preferred memory to the Pro Tools LE and DAE applications. Click on the icon once to highlight it and
choose File>Get Info in the Finder (shortcut: Command+I). Increase the DAE Preferred size to 70000k (70MB) and
Pro Tools LE to 60000k (60MB). Never change the Minimum memory size. If you have, reset DAE Minimum size to
30000k and Pro Tools Minimum to 35320k.
Pro Tools 5.1 Index | All FAQ Index
[6381]
9093 or 9094 error during recording or playback.
DMA mode must be enabled for all IDE drives in your system.
To do this in Windows 98 SE:
- Select the Windows "Start" button -> "Settings" -> "Control Panel"
- In the Control Panel folder double-click the "System" control panel.
- Select the "Device Manager" tab 4.
- Under the "Disk drives" branch, right-click the IDE drive(s) you are using.
- Click on "Properties"
- On the "Settings" Tab of the disk's properties dialog, make sure the "DMA" option is enabled.
- Click "OK"
- Close the "System" control panel and the Control Panel folder by clicking on the "Close" button
- Windows will prompt you to restart your computer.
- Repeat for all drives present in your computer
- Once you have restarted follow steps 1-5 above once again to make sure "DMA" is in fact still set to enabled. If
your computer is unable to keep this setting please contact your PC manufacturer.
- If your computer does not have this option and you plan to setup a Digi 001 system (not Audiomedia III), you
should check your BIOS settings for options to enable bus masters.
Print this page or write these instructions, as you will need to restart your computer in order to access your system
BIOS.
To access your computer's BIOS you must restart your computer. During the initial startup your computer will tell
you which key to press in order to enter the setup program (typically DEL or F2 for Award). Press the corresponding
key during startup. You should see an "Entering Setup" message. If present, make this change to your computer's
BIOS:
Allow PCI Bus Masters = Enabled
In addition to checking the BIOS if DMA is not available, you can also check in device manager under "Hard disk
controllers" and make sure that you have the IDE controller and NOT the ATA controller. If you have the ATA
controller you will need to Update the hard disk controller driver to the "standard dual IDE controller".
Pro Tools 5.1 Index | All FAQ Index
[6383]
"Cannot initialize shared heap error" when running Pro Tools LE on Windows ME.
Windows ME requires that you install Pro Tools LE 5.1. Earlier versions of Pro Tools LE will cause this error when run
with Windows ME.
Pro Tools 5.1 Index | All FAQ Index
[6382]
Does Pro Tools TDM 5.1 require a floppy drive?
Plug-Ins from third party developers and non-core Digidesign plug-ins often require a floppy drive for floppy disk
authorization. The Pro Tools 5.1 application and the DigiRack plug-ins do not require floppy drive authorization.
Pro Tools 5.1 Index | All FAQ Index
[5831]
Why does my Pro Tools LE session clip when I open it on TDM hardware?
Pro Tools LE uses the power of your CPU's processor to perform mixing and processing. A side benefit of this
technology is its ability to use 32-bit floating point math to scale the level of signals to avoid clipping (which
translates to great headroom). Signals in Pro Tools LE can indeed clip, but signal management can be easier... you
mostly have to watch output levels for mixed signal busses and bring them down so that they don't clip.
Pro Tools TDM systems use HW DSP acceleration that utilize 24-bit fixed point math. (Comparing 24-bit fixed point
and 32-bit floating point audio systems is a bit like comparing PowerPC and Intel Pentium processors... properly
implemented and designed, you can get a great result out of either one... but comparing the techniques used
directly can be difficult!) TDM systems provide 48 bits of precision at the mix bus, which allows a very large degree
of headroom as well. However, Plug-In processing in the TDM world is restricted to a 24-bit data path, so as with
most any signal processing in the audio world, some attention to level setting is necessary to avoid clipping.
For example , if you introduce a signal into a DigiRack EQ that is close to "full code" (the hottest digital level before
clipping) and you add a large boost on an EQ, you will likely clip the EQ Plug-In. Just as with any rack mounted
device, etc., you can avoid this simply by using the input attenuator control provided. The EQ Plug-In for Pro Tools
LE behaves the same way, but because all of the processing is occurring in the host computer, the levels can be
scaled for you to avoid most clipping without adjustment (other than mix outputs which require it).
Note: Some Plug-Ins use a technique called "double precision arithmetic" to provide 48 bit precision when
processing, which results in increased headroom. This is great, but keep in mind that these Plug-In do require
roughly twice as much DSP power to do their work.
Because of these differences, if you plan on exchanging sessions between Pro Tools LE and TDM systems, it can be
prudent to attenuate the input level of a Plug-In like DigiRack EQ if you have applied a large amount of boost to a
predominant frequency (like a big booming kick drum). This will avoid the possibility of clipping in the TDM version
of the Plug-In, and you'll still get to take advantage of a "24-bit clean signal" when levels are set correctly.
Pro Tools 5.1 Index | All FAQ Index
[5235]
My D-Verb plug-in is not functioning properly after installing Pro Tools LE 5.1 Mac. D-Verb asks for a key
disk authorization, and I only have a serial number. Do I need a key disk?
WARNING: FREE D-Verb does not work with Pro Tools FREE.
Installing Pro Tools LE 5.1 or the D-Verb Plug-In Demo over previous installs of Pro Tools LE will remove your FREE
D-Verb Plug-In. To keep your FREE D-Verb Plug-in from being overwritten by the Pro Tools LE 5.1 and D-Verb
Demo Installers, remove both the D-Verb and D-Verb AS Plug-Ins from your Plug-Ins folder.Place the plug-ins in a
temporary location other than the Pro Tools Plug-Ins folder and outside of your System Folder, such as on your
Desktop. The Plug-Ins folder is located in the following directory:System Folder:DAE Folder:Plug-Ins
After removing the D-Verb & D-Verb AS Plug-Ins from the Plug-Ins folder,run the Pro Tools 5.1 LE Installer. Once
the Pro Tools 5.1 installation is complete, both the D-Verb and D-Verb AS Plug-Ins can be returned to the Plug-Ins
folder. An updated FREE D-Verb Installer for Pro Tools LE users is posted on the Digidesign website in Support/
Downloads at http://www.digidesign.com/download
Note: If you have already run either the Pro Tools LE 5.1 or D-Verb Demo Installer and fear you have overwritten
your FREE D-Verb Plug-Ins,you can still reinstall the FREE D-Verb Plug-In Promotion from the Pro Tools LE 5.0.1
Software CD.
If you continue to have problems with your D-Verb authorization, download D-Verb v1.8.1 from http://www.
digidesign.com/download/dverb. This version of D-Verb (v1.8.1) does not require authorization.
Pro Tools 5.1 Index | All FAQ Index
[5123]
I get the following error: "The MP3 option cannot be enabled because a program error occurred (-2802)
while looking up symbol "CodecInit" in "MP3.dll", when I Bounce To Disk using the MP3 Export Option,
This error is caused by a version incompatibility with Pro Tools 5.1 and version 1.0 of the MP3.dll file. Install the
MP3.dll v1.1 located in Pro Tools 5.1 CD-ROM > DAE > Codecs > MP3. The MP3.dll v1.1 is also available from http://
www.digidesign.com/download/mp3.html
To update to MP3.dll v1.1:
1. Quit Pro Tools
2. Go to System Folder > DAE Folder > Codecs > MP3
3. Remove MP3.dll v1.0
4. Put MP3.dll v1.1 in the Codecs folder
The MP3.dll v1.0 and 1.1 use the same authorization. No additional authorization will be required if MP3.dll v1.0
was authorized.
Pro Tools 5.1 Index | All FAQ Index
[5083]
DAE error -1 when trying to instantiate a Focusrite d3 plug-in in Pro Tools TDM v. 5.1. Also may get the
message that "Certain plug-ins have been deactivated due to lack of system resources"
This can occur if the Focusrite d3 plug-in v.1.3.1 is used with Pro Tools 5.1. Installing version Focusrite d3 v 1.4 will
correct the problem.
This version mismatch will occur if you install Pro Tools 5.1, then install the Q1 2001 mix pack. If you run the PT
5.1 installer again with just the Plug-Ins Update checked, then the correct version will be installed.
Pro Tools 5.1 Index | All FAQ Index
[5071]
Which VST floppy drives are supported for PACE USB floppy authorization?
Model FDUSB-M is supported for PACE floppy authorization with Digidesign products using the following extensions:
USB Floppy Enabler 2.1.1 - http://www.digidesign.com/download/utility
USB Floppy Support 2.1.5 or 2.1.6 - http://www.digidesign.com/download/utility
These extensions are available at http://www.digidesign.com/download/utility
FDTUSB and FDUSB models are not supported.
Pro Tools 5.1 Index | All FAQ Index
[3584]
How do I hear what my MIDI device (keyboard, drum machine, etc.) is playing from the Digi 001?
1) Create an auxiliary input channel (mono or stereo) for monitoring the device.
2) Connect the analog outputs of the device into available inputs on the 001.
3) Set the input of the auxiliary input channel to the input(s) you have your MIDI device plugged in to.
4) Make sure to bring up the level of the auxiliary since they default to a negative infinity value.
Pro Tools 5.1 Index | All FAQ Index
[3594]
I'm unable to get MIDI signal into Pro Tools LE via the Digi 001 on OS 9.x.
* Make sure that the Digi 001 OMS driver is in the OMS folder, located in the System folder, and that the 001 is
recognized by the OMS Studio Setup.
* Make sure the "Use Apple SerialDMA when available" is unchecked in the OMS preferences which are located
under the Edit menu of OMS. If you uncheck it, you must restart the CPU for the change to take affect.
* Make sure that you have defined an input device in the OMS Studio Setup for your MIDI.
* Make sure that your MIDI device is checked in the Input Devices menu located under the MIDI menu in Pro Tools
LE.
* Make sure that you have the appropriate filters selected in the Input Filters menu located under the MIDI menu in
Pro Tools LE.
* Make sure that "Run MIDI in background" is checked in the OMS MIDI setup window located under the Setups
menu in Pro Tools LE.
* Make sure that you have the correct MIDI channel selected and that the MIDI track is in record enabled.
* If you are not actually recording yet but want to monitor the signal through an auxiliary, make sure that Pro Tools
LE is set to Input Monitor only under the Operations menu.
* Try restarting the Mac again after confirming the previous steps to make sure that the serial ports get reset.
Pro Tools 5.1 Index | All FAQ Index
Pro Tools 6.0
I have the Digi 002pack plug-ins that came with my Digi 002 and Pro Tools LE 5.3.2 for OS 9. How do I upgrade these
for Pro Tools 6 and Mac OS X?
How do I upgrade the plug-ins that came with my Digi 001 Factory bundle for use with Pro Tools LE 6 and Mac OS X?
-9014 Error with Mbox
"Unable to Create DAE Deck" on Pro Tools 6.0 with Mac OS 10.2.4 or 10.2.5. DigiTest doesn't see the installed
hardware.
There is no OS X version of the Mbox Firmware updater.
After accidentally unplugging one of my Firewire drives while Pro Tools 6.0 was launched, I seemed to have lost the
basic functions of my workspace. After rebooting my machine and relaunching Pro Tools, if I try to Reveal the contents of
an AUDIO CD, I get an error and a CRASH.
When chasing time code or machine control, Pro Tools 6.0 does not record MIDI.
Icon status for locked files no longer auto update in browsers when changing to unlocked and vice versa.
Intermittant, but reproducible SCSI bus hangs occurring during playback with the ATTO UL3D.
Processing a region with an audiosuite plug-in while a track is recording causes an assertion error to be displayed in the
task manager.
Crash when reconnecting to a FW drive volume that was not properly unmounted.
Intermittently unable to record MIDI in Pro Tools 6.0.
"Relative Grid" in Grid mode doesn't fit in the button in Pro Tools 6.0
While in Grid (Bar:Beat) mode, attempting to cut Tempo events from the timeline results in an assertion.
Selecting "Copy From Source Media" when drag/dropping a session with video to a new, blank session, results in an
empty video track in the destination session, and a video files folder created with a corrupt video file.
Pro Tools crashes when choosing "delete selected" within the Workspace when attempting to delete several session
folders (which were cancelled by "save session copy in" tasks).
Pro Tools crashes when you quit Pro Tools 6.0 while previewing an audio file in the workspace.
Some areas in MP3 Bounce window are cut off in Pro Tools 6.0.
Crash when forcing Recalculate Overview while overview is being calculated in the background.
Assertion can occur when saving an Extracted Groove in the Clipboard as a Groove Template in Pro Tools 6.0
Assertion error can occur when saving changes to Groove Quantize templates in Pro Tools 6.0
Unable to relink a video file that resides on a non-local disk (shared server). Files that end in ".dv" cannot be relinked.
Pro Tools 6.0 fails to gracefully recover from the following error dialog: "File or folder not found (-43) while deleting "Fade
xxxxxxxxx.wav". Reappears after every fade file there is an issue with and the user is not allowed to close session.
Other OS X programs are capable of putting Pro Tools 6.0 MIDI into a temporary bad state. Bad state in this case means
that a steady stream of MIDI events becomes "stuttery".
On the mix stage with HD3 and code coming from Fairlight MFX, ProTools 6.0 will chase the code most of the time but
after a while lockup can take up to 8 seconds or sometimes not at all.
Pro Tools 6.0 Databasing improperly identifies 8-bit Quicktime files as 16 bit. This happens in Import Audio dialog, and in
all Browsers.
"Compact" button in Compacting window is cut off in Pro Tools 6.0.
In Pro Tools 6.0 you can no longer trim MIDI notes to nearest grid value by simply clicking on the MIDI note with the trim
tool--now you must ALWAYS drag with the trim tool to trim to grid.
In Pro Tools 6.0 dragging files over network with the file browser to a local drive (ie current session) causes a crash
when the copy is complete.
In Pro Tools 6.0 when you try to save as a Pro Tools 4.3 session some parts of the dialogue which comes up is cut off.
The Import Into existing Tracks command can be undone with the Z shortcut command during playback or recording. A
crash occurs when undoing the Import Into Existing Tracks command during a record pass.
Pro Tools 6.0 is sending incorrect bank change commands when only CC#0 is specified in the XML patch name file.
Kernel panic uplugging/replugging MIDI IO, relaunching Pro Tools 6.0, and engaging playback.
Crash during edit density test while fades are being created.
Surround mixer fails to show a clip when a positive DC offset occurs in 44.1k Pro Tools 6.0 sessions.
Serato Pitch N' Time appears "greyed out" in the TCE Tool selection menu of Pro Tools 6.0.
Audio files which are placed in the trash are automatically linked to/referenced from Pro Tools 6.0 without any user alert.
In Pro Tools 6.0 destructive recording on a file while overviews are being calculated for it causes a crash.
HTDM plug-ins (StreamManager) crashes in Pro Tools 6.0.
LE search - modification date field is not available
RTAS Click plugin gets out of sync with Pro Tools 6.0 transport upon change of buffer size to 128.
When opening a Stationary Pad session from the workspace in Pro Tools 6.0, it is treated like an ordinary session and
can be edited. Opening from the Finder is fine.
Attempting to preview audio in the regions bin when no output paths are assigned causes a crash.
Pro Tools 6.0 is missing the horizontal scroll bar in the Regions bin. Thus, it is impossible to horizontally scroll/reveal/
hide file names in the audio regions bin.
"Save as..." in "Save slider settings" in Groove quantize is cut off in Pro Tools 6.0.
The translation of "from" and "to" in "Change velocity" and "Change duration" window need to be changed in Pro Tools
6.0.
"Select Track to Import" in "Import audio from other movie" window is truncated in Pro Tools 6.0.
Crash after dragging a file from a browser into the Edit window during record.
Groove Template Slider Settings are not Saved with the Groove Template.
Crash when trying to delete a folder in the workspace in Pro Tools 6.0.
The fill gaps functions in Pro Tools 6.0 causes this error "ProTools has a dialog on the screen" and then access the
desktop is not possible.
The audio files folder in the Project browser does not dynamically update when importing tracks, copying media and
sample rate converting.
ProControl performance - Grouped fader performance goes to hell after stopping transport while moving faders.
Is an iLok dongle required to run Pro Tools 6.0?
What version of OS X is required with Pro Tools 6.0?
Will Pro Tools 6.0 work without hardware connected? Why do I keep getting an error while launching "Unable to Create
DAE Deck"?
Does Pro Tools 6.0 require that Users have Administrator access?
When installing Pro Tools 6 the installer becomes stuck at the Pro Tools "splash screen" window.
Where are the Pro Tools preference files located in Mac OS X?
MIDI I/O not recognized by the MIDI I/O installer/OS X firmware updater on the Pro Tools 6.0 installer.
After installing or upgrading OS X onto a drive that also contains OS 9.x, all of my Pace authorized plug-ins are no longer
authorized.
Where are the Patch Name and MIDI definition files in Pro Tools 6.0?
What drive formatting is supported in Pro Tools on OS X?
[26880]
I have the Digi 002pack plug-ins that came with my Digi 002 and Pro Tools LE 5.3.2 for OS 9. How do I
upgrade these for Pro Tools 6 and Mac OS X?
Information and instructions for Digi 002 002pack Upgrades for Mac OS X can be found in the Support/Downloads/
Digi 002 section of the website, with the following link:
www.digidesign.com/download/002/osx
Pro Tools 6.0 Index | All FAQ Index
[26881]
How do I upgrade the plug-ins that came with my Digi 001 Factory bundle for use with Pro Tools LE 6
and Mac OS X?
Information and instructions for Digi 001 Factory Upgrades for Mac OS X can be found in the Support/Downloads
section of the website, with the following link:
www.digidesign.com/download/001/factory/osx
Pro Tools 6.0 Index | All FAQ Index
[26553]
-9014 Error with Mbox
When launching Pro Tools 6.0 on Mbox, -9014 errors may have occurred. This problem has been fixed in Pro Tools
6.0.1.
From the Pro Tools LE 6.0.1 Read Me.
Pro Tools 6.0 Index | All FAQ Index
[26522]
"Unable to Create DAE Deck" on Pro Tools 6.0 with Mac OS 10.2.4 or 10.2.5. DigiTest doesn't see the
installed hardware.
Verify that Date & Time are set accurately, Uninstall Pro Tools from the 6.0 CD's Installer, then Reinstall.
Mac OS 10.2.4 has a bug which will randomly reset the Date & Time to 1969 or 1970. If Pro Tools is installed while
the Date is set inaccurately the software drivers will not initialize the hardware properly, resulting in the "Unable to
Create DAE Deck" error.
Pro Tools 6.0 Index | All FAQ Index
[26435]
There is no OS X version of the Mbox Firmware updater.
This was an issue in Pro Tools 6.0. This is fixed in Pro Tools 6.0.1
Pro Tools 6.0 Index | All FAQ Index
[26436]
After accidentally unplugging one of my Firewire drives while Pro Tools 6.0 was launched, I seemed to
have lost the basic functions of my workspace. After rebooting my machine and relaunching Pro Tools,
if I try to Reveal the contents of an AUDIO CD, I get an error and a CRASH.
This was an issue in Pro Tools 6.0. This is fixed in Pro Tools 6.0.1
Pro Tools 6.0 Index | All FAQ Index
[26438]
When chasing time code or machine control, Pro Tools 6.0 does not record MIDI.
This was an issue in Pro Tools 6.0. This is fixed in Pro Tools 6.0.1
Pro Tools 6.0 Index | All FAQ Index
[26437]
Icon status for locked files no longer auto update in browsers when changing to unlocked and vice
versa.
This was an issue in Pro Tools 6.0. This is fixed in Pro Tools 6.0.1
Pro Tools 6.0 Index | All FAQ Index
[26440]
Intermittant, but reproducible SCSI bus hangs occurring during playback with the ATTO UL3D.
This was an issue in Pro Tools 6.0. This is fixed in Pro Tools 6.0.1
Pro Tools 6.0 Index | All FAQ Index
[26442]
Processing a region with an audiosuite plug-in while a track is recording causes an assertion error to be
displayed in the task manager.
This was an issue in Pro Tools 6.0. This is fixed in Pro Tools 6.0.1
Pro Tools 6.0 Index | All FAQ Index
[26444]
Crash when reconnecting to a FW drive volume that was not properly unmounted.
This was an issue in Pro Tools 6.0. This is fixed in Pro Tools 6.0.1
Pro Tools 6.0 Index | All FAQ Index
[26446]
Intermittently unable to record MIDI in Pro Tools 6.0.
This was an issue in Pro Tools 6.0. This is fixed in Pro Tools 6.0.1
Pro Tools 6.0 Index | All FAQ Index
[26448]
"Relative Grid" in Grid mode doesn't fit in the button in Pro Tools 6.0
This was an issue in Pro Tools 6.0. This is fixed in Pro Tools 6.0.1
Pro Tools 6.0 Index | All FAQ Index
[26457]
While in Grid (Bar:Beat) mode, attempting to cut Tempo events from the timeline results in an assertion.
This was an issue in Pro Tools 6.0. This is fixed in Pro Tools 6.0.1
Pro Tools 6.0 Index | All FAQ Index
[26456]
Selecting "Copy From Source Media" when drag/dropping a session with video to a new, blank session,
results in an empty video track in the destination session, and a video files folder created with a corrupt
video file.
This was an issue in Pro Tools 6.0. This is fixed in Pro Tools 6.0.1
Pro Tools 6.0 Index | All FAQ Index
[26455]
Pro Tools crashes when choosing "delete selected" within the Workspace when attempting to delete
several session folders (which were cancelled by "save session copy in" tasks).
This was an issue in Pro Tools 6.0. This is fixed in Pro Tools 6.0.1
Pro Tools 6.0 Index | All FAQ Index
[26454]
Pro Tools crashes when you quit Pro Tools 6.0 while previewing an audio file in the workspace.
This was an issue in Pro Tools 6.0. This is fixed in Pro Tools 6.0.1
Pro Tools 6.0 Index | All FAQ Index
[26453]
Some areas in MP3 Bounce window are cut off in Pro Tools 6.0.
This was an issue in Pro Tools 6.0. This is fixed in Pro Tools 6.0.1
Pro Tools 6.0 Index | All FAQ Index
[26452]
Crash when forcing Recalculate Overview while overview is being calculated in the background.
This was an issue in Pro Tools 6.0. This is fixed in Pro Tools 6.0.1
The typical scenario this occured in was when processing a stereo file, the left channel got the overview first. Since
task manager didn't appear in the foreground, one would recalculate overview not knowing that the calculation was
already underway.
Pro Tools 6.0 Index | All FAQ Index
[26451]
Assertion can occur when saving an Extracted Groove in the Clipboard as a Groove Template in Pro
Tools 6.0
This was an issue in Pro Tools 6.0. This is fixed in Pro Tools 6.0.1
Pro Tools 6.0 Index | All FAQ Index
[26450]
Assertion error can occur when saving changes to Groove Quantize templates in Pro Tools 6.0
This was an issue in Pro Tools 6.0. This is fixed in Pro Tools 6.0.1
Pro Tools 6.0 Index | All FAQ Index
[26449]
Unable to relink a video file that resides on a non-local disk (shared server). Files that end in ".dv"
cannot be relinked.
This was an issue in Pro Tools 6.0. This is fixed in Pro Tools 6.0.1
Pro Tools 6.0 Index | All FAQ Index
[26467]
Pro Tools 6.0 fails to gracefully recover from the following error dialog: "File or folder not found (-43)
while deleting "Fade xxxxxxxxx.wav". Reappears after every fade file there is an issue with and the
user is not allowed to close session.
This was an issue in Pro Tools 6.0. This is fixed in Pro Tools 6.0.1
Pro Tools 6.0 Index | All FAQ Index
[26466]
Other OS X programs are capable of putting Pro Tools 6.0 MIDI into a temporary bad state. Bad state in
this case means that a steady stream of MIDI events becomes "stuttery".
This was an issue in Pro Tools 6.0. This is fixed in Pro Tools 6.0.1
Pro Tools 6.0 Index | All FAQ Index
[26464]
On the mix stage with HD3 and code coming from Fairlight MFX, ProTools 6.0 will chase the code most
of the time but after a while lockup can take up to 8 seconds or sometimes not at all.
This was an issue in Pro Tools 6.0. This is fixed in Pro Tools 6.0.1
Pro Tools 6.0 Index | All FAQ Index
[26463]
Pro Tools 6.0 Databasing improperly identifies 8-bit Quicktime files as 16 bit. This happens in Import
Audio dialog, and in all Browsers.
This was an issue in Pro Tools 6.0. This is fixed in Pro Tools 6.0.1
Pro Tools 6.0 Index | All FAQ Index
[26462]
"Compact" button in Compacting window is cut off in Pro Tools 6.0.
This was an issue in Pro Tools 6.0. This is fixed in Pro Tools 6.0.1
Pro Tools 6.0 Index | All FAQ Index
[26461]
In Pro Tools 6.0 you can no longer trim MIDI notes to nearest grid value by simply clicking on the MIDI
note with the trim tool--now you must ALWAYS drag with the trim tool to trim to grid.
This was an issue in Pro Tools 6.0. This is fixed in Pro Tools 6.0.1
Pro Tools 6.0 Index | All FAQ Index
[26460]
In Pro Tools 6.0 dragging files over network with the file browser to a local drive (ie current session)
causes a crash when the copy is complete.
This was an issue in Pro Tools 6.0. This is fixed in Pro Tools 6.0.1
Pro Tools 6.0 Index | All FAQ Index
[26459]
In Pro Tools 6.0 when you try to save as a Pro Tools 4.3 session some parts of the dialogue which
comes up is cut off.
This was an issue in Pro Tools 6.0. This is fixed in Pro Tools 6.0.1
Pro Tools 6.0 Index | All FAQ Index
[26458]
The Import Into existing Tracks command can be undone with the Z shortcut command during playback
or recording. A crash occurs when undoing the Import Into Existing Tracks command during a record
pass.
This was an issue in Pro Tools 6.0. This is fixed in Pro Tools 6.0.1
Pro Tools 6.0 Index | All FAQ Index
[26506]
Pro Tools 6.0 is sending incorrect bank change commands when only CC#0 is specified in the XML patch
name file.
This was an issue in Pro Tools 6.0. This is fixed in Pro Tools 6.0.1
Pro Tools 6.0 Index | All FAQ Index
[26503]
Kernel panic uplugging/replugging MIDI IO, relaunching Pro Tools 6.0, and engaging playback.
This was an issue in Pro Tools 6.0. This is fixed in Pro Tools 6.0.1
Pro Tools 6.0 Index | All FAQ Index
[26494]
Crash during edit density test while fades are being created.
This was an issue in Pro Tools 6.0. This is fixed in Pro Tools 6.0.1
Pro Tools 6.0 Index | All FAQ Index
[26493]
Surround mixer fails to show a clip when a positive DC offset occurs in 44.1k Pro Tools 6.0 sessions.
This was an issue in Pro Tools 6.0. This is fixed in Pro Tools 6.0.1
Pro Tools 6.0 Index | All FAQ Index
[26490]
Serato Pitch N' Time appears "greyed out" in the TCE Tool selection menu of Pro Tools 6.0.
This was an issue in Pro Tools 6.0. This is fixed in Pro Tools 6.0.1
Pro Tools 6.0 Index | All FAQ Index
[26485]
Audio files which are placed in the trash are automatically linked to/referenced from Pro Tools 6.0
without any user alert.
This was an issue in Pro Tools 6.0. This is fixed in Pro Tools 6.0.1
Pro Tools 6.0 Index | All FAQ Index
[26483]
In Pro Tools 6.0 destructive recording on a file while overviews are being calculated for it causes a
crash.
This was an issue in Pro Tools 6.0. This is fixed in Pro Tools 6.0.1
Pro Tools 6.0 Index | All FAQ Index
[26482]
HTDM plug-ins (StreamManager) crashes in Pro Tools 6.0.
This was an issue in Pro Tools 6.0. This is fixed in Pro Tools 6.0.1
Pro Tools 6.0 Index | All FAQ Index
[26481]
LE search - modification date field is not available
This was an issue in Pro Tools 6.0. This is fixed in Pro Tools 6.0.1
Pro Tools 6.0 Index | All FAQ Index
[26480]
RTAS Click plugin gets out of sync with Pro Tools 6.0 transport upon change of buffer size to 128.
This was an issue in Pro Tools 6.0. This is fixed in Pro Tools 6.0.1
Pro Tools 6.0 Index | All FAQ Index
[26476]
When opening a Stationary Pad session from the workspace in Pro Tools 6.0, it is treated like an
ordinary session and can be edited. Opening from the Finder is fine.
This was an issue in Pro Tools 6.0. This is fixed in Pro Tools 6.0.1
Pro Tools 6.0 Index | All FAQ Index
[26475]
Attempting to preview audio in the regions bin when no output paths are assigned causes a crash.
This was an issue in Pro Tools 6.0. This is fixed in Pro Tools 6.0.1
Pro Tools 6.0 Index | All FAQ Index
[26474]
Pro Tools 6.0 is missing the horizontal scroll bar in the Regions bin. Thus, it is impossible to horizontally
scroll/reveal/hide file names in the audio regions bin.
This was an issue in Pro Tools 6.0. This is fixed in Pro Tools 6.0.1
Pro Tools 6.0 Index | All FAQ Index
[26473]
"Save as..." in "Save slider settings" in Groove quantize is cut off in Pro Tools 6.0.
This was an issue in Pro Tools 6.0. This is fixed in Pro Tools 6.0.1
Pro Tools 6.0 Index | All FAQ Index
[26472]
The translation of "from" and "to" in "Change velocity" and "Change duration" window need to be
changed in Pro Tools 6.0.
This was an issue in Pro Tools 6.0. This is fixed in Pro Tools 6.0.1
Pro Tools 6.0 Index | All FAQ Index
[26471]
"Select Track to Import" in "Import audio from other movie" window is truncated in Pro Tools 6.0.
This was an issue in Pro Tools 6.0. This is fixed in Pro Tools 6.0.1
Pro Tools 6.0 Index | All FAQ Index
[26468]
Crash after dragging a file from a browser into the Edit window during record.
This was an issue in Pro Tools 6.0. This is fixed in Pro Tools 6.0.1
Pro Tools 6.0 Index | All FAQ Index
[26447]
Groove Template Slider Settings are not Saved with the Groove Template.
This was an issue in Pro Tools 6.0. This is fixed in Pro Tools 6.0.1
Pro Tools 6.0 Index | All FAQ Index
[26445]
Crash when trying to delete a folder in the workspace in Pro Tools 6.0.
This was an issue in Pro Tools 6.0. This is fixed in Pro Tools 6.0.1
Pro Tools 6.0 Index | All FAQ Index
[26443]
The fill gaps functions in Pro Tools 6.0 causes this error "ProTools has a dialog on the screen" and then
access the desktop is not possible.
This was an issue in Pro Tools 6.0. This is fixed in Pro Tools 6.0.1
Pro Tools 6.0 Index | All FAQ Index
[26441]
The audio files folder in the Project browser does not dynamically update when importing tracks,
copying media and sample rate converting.
This was an issue in Pro Tools 6.0. This is fixed in Pro Tools 6.0.1
Pro Tools 6.0 Index | All FAQ Index
[26439]
ProControl performance - Grouped fader performance goes to hell after stopping transport while
moving faders.
This was an issue in Pro Tools 6.0. This is fixed in Pro Tools 6.0.1
Pro Tools 6.0 Index | All FAQ Index
[26375]
Is an iLok dongle required to run Pro Tools 6.0?
The Pro Tools 6.0 is authorized by a serial number text code and does not require an iLok.
Copy protected plug-ins do require an iLok to work with Pro Tools 6.0.
Pro Tools 6.0 Index | All FAQ Index
[26376]
What version of OS X is required with Pro Tools 6.0?
Pro Tools 6.0 requires OS X version 10.2.3 or higher. Users on versions 10.0 or 10.1 will need to purchase the 10.2
Upgrade (code named "Jaguar"), making sure to then update to version 10.2.3 or higher via the Apple website. If
you are looking for a specific version to upgrade to (such as 10.2.3) you can go to http://info.apple.com/ and do a
Search in the Download category for "10.2.3"
Please refer to www.digidesign.com for all of the latest OS X compatibility information.
Pro Tools 6.0 Index | All FAQ Index
[26377]
Will Pro Tools 6.0 work without hardware connected? Why do I keep getting an error while launching
"Unable to Create DAE Deck"?
All versions of Pro Tools 6.0 require that supported Digidesign hardware be connected.
If the hardware is connected and the error persists, try running the Pro Tools Installer again, this time choosing
"Uninstall" instead of "Custom Install". After Uninstall is complete, reinstall again, taking care to only select the Pro
Tools package for your specific hardware.
If the error persists, either it is not being seen by the computer, or it is being used by another program. Try quitting
all other running applications before launching Pro Tools.
Pro Tools 6.0 Index | All FAQ Index
[26361]
Does Pro Tools 6.0 require that Users have Administrator access?
Yes. Pro Tools is capable of creating and deleting huge files on a system, and if a user with no Administrator
privileges isn't normally allowed to delete these files then Pro Tools shouldn't let him/her delete them either. If Pro
Tools gave Administrator powers to non-administrators there could be a lot of potential problems.
Historically this has always been the case with Pro Tools, whether on Mac OS 9 and previous (where there was only
one user who had the equivalent of Administrator access), or on Windows NT, 2000, or XP.
Pro Tools 6.0 Index | All FAQ Index
[26349]
When installing Pro Tools 6 the installer becomes stuck at the Pro Tools "splash screen" window.
In OS X the display resolution defaults to 800 x 600
You must set the display properties to a resolution of 1024 x 768 in order to see the Continue button, and all
aspects of the Edit and Mix windows
To adjust your resolution go to:
Apple Menu > System Preferences > Displays > set to 1024 x 768
Pro Tools 6.0 Index | All FAQ Index
[26327]
Where are the Pro Tools preference files located in Mac OS X?
Each User has their own set of Preferences located in their Home folder. If the User's Account Name is "Bob" then
the files would be located in the following directory: /Users/bob/Library/Preferences/
The files in question are:
com.digidesign.protools.plist
DAE Prefs
DigiSetup.OSX
Pro Tools v6.0 Preferences
com.digidesign.protools.plist - saves information on various window settings (such as New Session, Save Session,
Import Audio, etc...)
DAE Prefs - saves information on which plug-ins are installed
DigiSetup.OSX - saves information on what hardware is installed
Pro Tools v6.0 Preferences - saves basic Pro Tools settings
Pro Tools 6.0 Index | All FAQ Index
[26317]
MIDI I/O not recognized by the MIDI I/O installer/OS X firmware updater on the Pro Tools 6.0 installer.
Download and install the new MIDI I/O Software installer located at: http://www.digidesign.com/download/midiio/
This is a combined 2.0.1 installer for Mac OS X and 1.5 for Mac OS 9. This installer can be used on OS 9 and OS X.
When run on a particular operating system it will automatically install the corresponding system components.
Pro Tools 6.0 Index | All FAQ Index
[26004]
After installing or upgrading OS X onto a drive that also contains OS 9.x, all of my Pace authorized plugins are no longer authorized.
This is a known issue that Digidesign and Pace have seen on some, but not all machines. Installing OS X (or
upgrading to a later version of OS X) on the same computer that you run OS 9.x with Pro Tools can cause serious
file corruption and permanent damage to Pro Tools-related authorizations.
Digidesign recommends that you remove all of your Pace floppy authorizations from the hard drive before installing
any flavor of OS X onto that same drive. Once the OS X installation has been completed, reboot back into OS 9.x
and reinstall the Pace floppy authorizations.
If you have already installed OS X and are experiencing problems with your floppy based authorizations, please
contact Digidesign technical support via phone for possible workarounds.
Pro Tools 6.0 Index | All FAQ Index
[25902]
Where are the Patch Name and MIDI definition files in Pro Tools 6.0?
- Patch name files will be installed into /Library/Audio/MIDI Patch Names/Digidesign/
- The device definition file (populating make and model popups in AMS) resides in /Library/Audio/MIDI Devices/
Digidesign
- The device definition file is called "Legacy Devices.middev" and is needed to populate AMS' manufacturer (make)
and model popup menus.
Pro Tools 6.0 Index | All FAQ Index
[25889]
What drive formatting is supported in Pro Tools on OS X?
There are 3 types of hard disk drive formats used in Mac OS X: HFS (aka Mac OS Standard), HFS+ (aka Mac OS
Extended) and UFS (Unix File System). When formatting drives for use with Pro Tools USE ONLY HFS+. This
includes the boot drive (where the Operating System resides). Drives formatted HFS or UFS will most likely be
incompatible with Pro Tools on OS X.
Pro Tools 6.0 Index | All FAQ Index
Pro Tools FREE Mac
What plug-ins can I use with Pro Tools FREE?
"this demo copy of ... has expired." How do I make it so I don't see this error anymore?
How do I record a MIDI track as an audio track?
Why is there a small amount of delay while monitoring audio when I am recording?
When I overdub audio with prerecorded MIDI the two are slightly out of sync in Pro Tools FREE
When I launch Pro Tools Free I get the error "A DigiSystem INIT is required".
How do I create an audible click track in Pro Tools Free for Mac?
I can't find a way to set the sample rate in Pro Tools FREE on my Macintosh to 48kHz. Why not?
When I launch Pro Tools I get DAE Error -2804.
After I installed Pro Tools Free, Pro Tools TDM or Pro Tools LE does not launch.
"Error while loading libraries. The library named OTUtilityLib could not be found. Please install this library or call technical
support. Result code -2804" when launching Pro Tools.
[5358]
What plug-ins can I use with Pro Tools FREE?
Pro Tools FREE supports the AudioSuite and RTAS Plug-In formats. Check the Plug-In Finder in the Products section
of the website to find a complete list, or to search for specific kinds of plug-ins.
Pro Tools FREE 5.0.1 plug-in compatibility is currently as follows:
- All Digidesign RTAS and AudioSuite Plug-Ins (with the exception of SoundReplacer, which is currently not
compatible with Pro Tools FREE for Windows)
- RTAS and AudioSuite Plug-Ins from Digidesign's Development Partners, with the exception of the RTAS and/or
AudioSuite Plug-Ins from the following:
AnTares Systems
Bomb Factory
For the latest plug-in compatibility information for Pro Tools FREE, refer to the Pro Tools FREE compatibility
documents, located on Digidesign's website.
NOTE: Before purchasing any RTAS or AudioSuite Plug-In for use with Pro Tools FREE 5.0.1, be sure to check
compatibility with the manufacturer.
Pro Tools FREE Mac Index | All FAQ Index
[4375]
"this demo copy of ... has expired." How do I make it so I don't see this error anymore?
If you have purchased the key to the plug-in, insert the key disk when Pro Tools prompts you. Otherwise, remove
either the specific plug-in files (System Folder>DAE Folder>Plug-ins folder) that Pro Tools says are expired or that
have the word "demo" in the filename. Trash the DAE prefs (entire folder) from the System Folder>Preferences
folder, empty the Trash and relaunch Pr Tools. For DINR, you need to remove 3 files: Broadband Noise Reduction,
Broadband Noise Reduction A/S and Hum Removal.
Pro Tools FREE Mac Index | All FAQ Index
[4377]
How do I record a MIDI track as an audio track?
-Create an audio track (File Menu > New Track). If stereo, make two audio tracks and pan each hard left and right.
-Connect the outputs of your MIDI device (keyboard, drum machine, etc.) into the available audio inputs of your
computer.
-Set the input of the audio track to the input(s) you have connected into from your MIDI device to your computer's
audio inputs.
-If you are not actually recording yet and you want to monitor the signal through an audio track, make sure that
Pro Tools Free is set to Input Monitor only under the Operations menu. Record enable the audio tracks you wish to
hear signal on. If you plan on monitoring the audio signal from your MIDI device without recording it you can route
it to an Au track. This will allow you to hear the signal without xillaryrecord enabling tracks.
Pro Tools FREE Mac Index | All FAQ Index
[4378]
Why is there a small amount of delay while monitoring audio when I am recording?
Because Pro Tools Free uses the host processor in your computer for audio processing, playback, and recording
there is a small amount of audio delay, or latency, when monitoring audio through the system. This causes a delay
between the source audio and the audio going through the computer as it is input, processed, and output.
To avoid hearing the delay in audio when you are recording you can monitor the audio that you are recording
through a mixer (such as a Mackie 1202) before it enters Pro Tools Free. Here's how:
-Route the audio that you are recording into your mixer. Next, route that signal back out of the mixer (preferably
via an Auxiliary Send or Direct Out to avoid a feedback loop) into the audio inputs on your computer.
-Route the main mix of Pro Tools Free from your computer audio outputs to your mixer.
-Create the audio tracks in Pro Tools Free that you are going to record on.
-Record enable the tracks you are going to record on. You should see levels on these tracks and hear the latency
(delay) that you are trying to avoid.
-Mute the tracks that you are going to record on. This will allow you to monitor the recorded audio through your
mixer but not through your computer and avoid any monitoring latency.
Pro Tools FREE Mac Index | All FAQ Index
[4381]
When I overdub audio with prerecorded MIDI the two are slightly out of sync in Pro Tools FREE
You need to set the Negative MIDI Playback Offset in the Preferences menu. Choose Setups>Preferences>MIDI.
This capability is provided to compensate for the audio monitoring latency. If you are monitoring the output from
your MIDI devices through a mixer, there is no latency. If however, you are monitoring the devices through your
computer's outputs the MIDI tracks will play slightly later than the audio tracks. The larger the setting for the
Hardware Buffer size, the larger the latency (This can be adjusted on win98 systems in setups > hardware under
hardware buffer size. It cannot be adjusted on MAC PTFree systems).
By configuring a MIDI offset, you can get your MIDI tracks to play back slightly earlier by a specified number of
samples, thereby compensating for the latency in monitoring audio through Pro Tools Free.
Pro Tools FREE Mac Index | All FAQ Index
[4384]
When I launch Pro Tools Free I get the error "A DigiSystem INIT is required".
Make sure that you have a Digisystem Init installed and enabled in the Apple Menu > Control Panel > Extensions
Manager .
You may have the wrong version of the Digisystem Init installed or enabled in Extensions Manager. If you need to
re-install them, they are on the Pro Tools CD, scroll down in the CD window and open the System Folder Items
folder and drag the Digisystem Init on to your hard drive into the Extensions Folder.
Pro Tools FREE Mac Index | All FAQ Index
[4386]
How do I create an audible click track in Pro Tools Free for Mac?
In order to produce a click, Pro Tools Free can use a sound module with proper configuration of the OMS Setup
application. You have the ability to route the click from Pro Tools Free to trigger any device provided it has been
defined in OMS. If you do not have any external sound modules, you still have the option to use the QuickTime
Musical Instruments software synthesizer. This is a General MIDI, multitimbral sound module which is included with
the Macintosh Operating System. In order to take advantage of this "virtual synthesizer," you need to enable its
operation through OMS.
- Launch the OMS setup application.
- In the studio setup window, double click the QuickTime Musical Instrument icon and click the radio button next to
the word "on". Click "Use Rock Drum Kit" checkbox .
- Click the "OK" button, choose "save" from the file menu and quit OMS Setup.
- In Pro Tools Free, select Click Options from the MIDI pull-down menu or double click on either the count-off or
metronome button in the transport MIDI controls window.
- Click and hold on the "Output" pop-up menu and select your destination device and channel. If using a General
MIDI compatible synthesizer (such as QuickTime Musical Instruments) use channel 10, for this is the channel that
contains all drum and non-pitched percussion sounds.
- Select a note for the accented and unaccented beats via your MIDI controller or by typing in a note name with the
Macintosh keyboard.
- Once you have configured the parameters of the Click options window to your liking, enable the click by choosing
"click" in the MIDI pull-down menu or highlighting the metronome button in the MIDI controls transport window.
Pro Tools FREE Mac Index | All FAQ Index
[4385]
I can't find a way to set the sample rate in Pro Tools FREE on my Macintosh to 48kHz. Why not?
Sound Manager on the Macintosh no longer supports a sample rate of 48kHz. If you use the built-in sound of your
Macintosh, the sample rate you can use is 44.1kHz.
Pro Tools FREE Mac Index | All FAQ Index
[4382]
When I launch Pro Tools I get DAE Error -2804.
Go to Apple Menu > Control Panels > Sound and set input and output to built-in.
Pro Tools FREE Mac Index | All FAQ Index
[4379]
After I installed Pro Tools Free, Pro Tools TDM or Pro Tools LE does not launch.
Pro Tools Free will not run in conjunction with another version of Pro Tools. If you have installed Pro Tools Free over
another version of Pro Tools, you will need to reinstall Pro Tools TDM or LE if you wish to use that version of Pro
Tools.
Note that on the MAC all non Pro Tools Free components will be moved to the Obsoleted Digidesign Software folder.
If you are a Windows user have Pro Tools FREE installed on your computer, please do the following BEFORE
installing the Digi001 or AMIII card in your computer:
1)
2)
3)
4)
Uninstall Pro Tools FREE (use the "Add/Remove Programs" applet in the Windows Control Panel)
Reboot your computer at least once
Turn your machine off and install the Digi001 or AMIII card
Proceed with the driver installation when you boot Windows, then Run the Pro Tools LE installer
If you don't remove Pro Tools FREE (and reboot) before installing the Digi001/AMIII card, you will need to reinstall
the drivers. If you don't reinstall the drivers you will see 'DAE is low on memory' when you try to launch Pro Tools
LE. To reinstall the AMIII/Digi001 drivers, go to Control Panel/System/Device Manager and bring up Properties for
the AMIII/Digi001 device. Click the 'Update Driver' button on the Driver Tab and choose to browse for the driver
files (in the WaveDriver98 folder on the Pro Tools LE Installer).
Pro Tools FREE Mac Index | All FAQ Index
[3030]
"Error while loading libraries. The library named OTUtilityLib could not be found. Please install this
library or call technical support. Result code -2804" when launching Pro Tools.
OTUtilityLib is missing in the extension folder. User needs to create an OS base set + Pro Tools extensions
(DigiSystem INIT, DSP Manager) and OMS (if using MIDI interface or SSD).
Pro Tools FREE Mac Index | All FAQ Index
Pro Tools FREE Win
When I try to launch Pro Tools LE for Windows the message "This demonstration version of ______ has expired"
appears.
How can I avoid -9093 errors with my Pro Tools FREE software?
What computer is recommended for use with my Windows Pro Tools Free system?
When I try to launch Pro Tools LE for Windows the message "Missing cfd.dll" or "Cannot find cfd.dll" appears on the
screen.
When I try to launch Pro Tools Free for Windows 98 SE the message "DAE error -1113" appears on my screen.
On my PC, Pro Tools FREE seems slow to react and I'm noticing a delay in the audio output. What is going on?
I'm hearing some distortion on audio playback through Pro Tools FREE on a PC. What's going on?
What Software and Hardware can affect my Pro Tools Free PC system performance?
How do I optimize my PC for use with a Windows Digi 001, Tool Box, or Pro Tools Free system?
Do I need a SCSI drive for optimal performance with Pro Tools Free for PC?
Are Pro Tools Free for Windows 98 SE sessions transferable to Pro Tools Free for Macintosh?
Specific recommendations for working with different PC soundcards and chip sets and Pro Tools Free 5.01.
[6367]
When I try to launch Pro Tools LE for Windows the message "This demonstration version of ______ has
expired" appears.
After installing and activating a Plug-In Demo, it will be available for a period of 15 days. Once the trial period has
elapsed, you will need to remove the expired Plug-In(s) to avoid the Plug-In expiration notices that will occur while
launching Pro Tools. To Remove an expired Plug-In, choose Start > Settings > Control Panel > Add/Remove
Programs. Highlight the expired Plug-In on the list of programs and choose the "Add/Remove" button to delete the
Plug-In.
Digidesign provides demonstration versions of D-Fi, D-FX, DINR, Focusrite d2, Focusrite d3, Maxim, and
SoundReplacer Plug-Ins that can be used with Pro-Tools LE 5.1.1 for Windows. To Install the Demo Plug-Ins:
- Insert the Pro-Tools LE 5.1.1 CD and go to the Digidesign Plug-In Demos folder on the root level of the CD.
- Choose the "Setup" Installer for the Plug-In you'd like to try.
Pro Tools FREE Win Index | All FAQ Index
[4834]
How can I avoid -9093 errors with my Pro Tools FREE software?
On some Windows systems, the network device/driver can cause -9093 errors while using Pro Tools FREE with small
H/W buffer sizes. One workaround is obviously to raise the H/W buffer size, but this results in larger (and
undesirable) input-to-output latencies in Pro Tools.
There are two other easy workarounds that allow smaller H/W buffers to work on most systems (both involve
temporarily disabling the network device)...
Option 1: Manually Disable the Network Device in your (default) Hardware Profile
Go to the Windows Control Panel and open the "System" applet. On the "Device Manager" tab, expand the "Network
adapters" item, and then double click on the icon for your network device. A properties dialog will open. On the
"General" tab you'll see a checkbox for "Disable in this hardware profile." Check this box and close all the dialogs.
You shouldn't need to reboot -- your network device has now been disabled and Pro Tools FREE should perform
better with small H/W buffer sizes. To re-enable your Network Device, go back to the Device Manager and
unchecked the "Disable in this hardware profile" checkbox.
Option 2: Create a New Hardware Profile with your Network Device Disabled
An alternative to manually enabling/disabling the Network Device in the Device Manager (option 1 above) is to
create a new Hardware Profile and disable the Network Device in that profile. This option is a bit cleaner/simpler,
but does require you to reboot Windows when switching between Profiles. To create a new profile, go to the
Windows Control Panel and open the "System" applet. On the "Hardware Profiles" tab select the "Original
Configuration" profile (or whatever profile you typically use) and click the "Copy..." button. Name the new Profile
"Pro Tools FREE" or something similar and press OK. Click OK to close the System Control Applet, and then reboot
Windows. Each time you reboot, you'll be given the option to select which Hardware Profile you'd like to use. Select
the "Pro Tools FREE" profile you just created, and when Windows is fully booted follow the steps in Option 1 (above)
to disable the Network Device in your current profile. From now on, whenever you boot Windows using the "Pro
Tools FREE" hardware profile the Network Device will automatically be disabled. If you boot Windows using the
"Original Configuration" Profile, your Network Device will be enabled.
Note:
Some other devices (in addition to Network Devices) can cause similar problems/conflicts with Pro Tools FREE. If
these devices are not necessary while running Pro Tools (e.g., other sound devices, modem devices, FireWire/1394
Controller devices, etc.) you can disable them as well as your network card in the "Pro Tools FREE" Hardware Profile.
If -9093, -9094, or -9128 errors are happening frequently, the methods above can be used to identify which device
is causing the problem. By systematically disabling one device at a time (and then running Pro Tools FREE to check
performance), you can see if the presence of a certain device causes Pro Tools FREE to throw errors during
playback/record.
Pro Tools FREE Win Index | All FAQ Index
[4387]
What computer is recommended for use with my Windows Pro Tools Free system?
Pro Tools Free may not run on all PC configurations. For information on compatible hardware please check the
compatibility documents for Pro Tools Free http://www.digidesign.com/ptfree
Supplemental information on PC configurations may be found on Digidesign's Users Conference.
Pro Tools FREE Win Index | All FAQ Index
[4388]
When I try to launch Pro Tools LE for Windows the message "Missing cfd.dll" or "Cannot find cfd.dll"
appears on the screen.
These errors can occur if you install Pro Tools before installing the Wave Driver, or have an incorrect driver
installation. Resources must be assigned to the hardware before Pro Tools is installed. Therefore, it is imperative
that you follow the installation procedure documented in Chapter 3 (specifically, pages 19-21) of the Getting
Started with Digi 001 Guide.
This guide is available for download at http://www.digidesign.com/support/documents.html
Pro Tools FREE Win Index | All FAQ Index
[4389]
When I try to launch Pro Tools Free for Windows 98 SE the message "DAE error -1113" appears on my
screen.
This error occurs if the WIN 98 Wave Driver is not installed, is disabled, or is installed incorrectly. Resources must
be assigned to the hardware before Pro Tools is installed. Therefore, it is imperative that you follow the installation
procedure as it is documented.
Pro Tools FREE Win Index | All FAQ Index
[4390]
On my PC, Pro Tools FREE seems slow to react and I'm noticing a delay in the audio output. What is
going on?
The Pro Tools hardware buffers are intentionally set very large on Windows to overcome some problems with very
inexpensive soundcards. This results in delay or latency in the playback of audio tracks, the display of onscreen
audio level meters, and a slower response time. Some users with better performing soundcards can try lowering
their hardware buffer size to reduce these delays. Before you do this, verify the kind of soundcard or soundchip
your PC is using and check for any information on that make of card or chip in the Pro Tools FREE Read Me or our
online documentation.
If your card is a SoundBlaster or Diamond Monster MX 400, reducing the buffer size is not recommended, but with
other cards you can experiment. Please check the Pro Tools Reference Guide PDF or our online Pro Tools FREE
support information for details on changing the size of the hardware buffer in Pro Tools FREE or LE.
Pro Tools FREE Win Index | All FAQ Index
[4391]
I'm hearing some distortion on audio playback through Pro Tools FREE on a PC. What's going on?
Pro Tools has always been designed to work with high quality audio cards. Pro Tools FREE attempts to bridge a gap
and work on as many inexpensive soundcards and chip sets as possible. Many of these audio cards and chip sets
have difficult design limitations and use components which are often extremely inexpensive. Please check specific
information included in the Pro Tools FREE Read Me and also below, on working with different PC soundcards or chip
sets.
The workaround:
In most cases, the audio distortion you are hearing is only on the monitoring output. The distortion is not being
included in your tracks as you record them, but is being added to the playback output. You can continue to record,
edit and mix, multitrack versions of your project until you have the makings of a stereo first draft or final product of
your mix. When you are ready to make a stereo "master," use the "Bounce to Disk" command to reduce your tracks
to a stereo pair. When you play these tracks back in Media Player or another application, or burn them onto an
audio CD, you should hear a much clearer stereo version of your work.
If you'd like to avoid this distortion on output problem completely, please check out any of Digidesign's combined
hardware and software products.
Pro Tools FREE Win Index | All FAQ Index
[4392]
What Software and Hardware can affect my Pro Tools Free PC system performance?
Pro Tools Free can also be affected by other software and hardware drivers installed on your computer. For best
possible performance, it is recommended that you:
1) Avoid running other Windows programs at the same time as Pro Tools Free.
2) Turn off any software utilities that run in the background, such as calendars and virus protection.
3) Disable Windows System sounds. In the Sound Control Panel set the Sound Scheme to No Sounds.
4) If your video display card supports it, enable Bus Mastering in the manufacturer's Control Panel.
5) Disable any networking cards.
6) Turn off any power management features of your system.
Pro Tools FREE Win Index | All FAQ Index
[4393]
How do I optimize my PC for use with a Windows Digi 001, Tool Box, or Pro Tools Free system?
Start with the fastest Pentium III or AMD Thunderbird Processor you can afford (single processor) and at least 192
MB of RAM.
IMPORTANT: See Dig i001 for Windows compatibility section of the Digidesign Website for complete compatibility
requirements: http://www.digidesign.com/compato/
We have seen better performance on computers that have less components attached and non-custom versions of
the BIOS or Windows. For maximum performance, a dedicated qualified ATA/IDE or SCSI disk drive with FAT32 file
system is required.
All Pro Tools LE sessions should be stored on a dedicated drive and all Digidesign system files should be stored on
the system boot drive. Although it is possible to record sessions to your PC's boot drive, this is not recommended
and full 24-track performance is not guaranteed.
After Installing your Digi 001 hardware and software in your PC, please make the following adjustments to your
Windows settings to ensure optimal performance:
Disable Auto-Insert Notification for CD-Rom and removable media drives:
* From the desktop, right-click My Computer and choose Properties.
* In the System Control Panel, click the Device Manager tab.
* Locate and double-click the device for your CD-ROM. In the CD Rom Properties dialog, click the Settings tab.
* Deselect the option for Auto Insert Notification and click OK.
* Repeat for any removable media devices, such as JAZ and ZIP drives.
* Close the System Control Panel.
Enable DMA for any IDE Drives:
* From the desktop, right-click on My Computer and choose Properties.
* In the System Control Panel, click on the Device Manager tab.
* Locate and double-click the device for your IDE hard drive. In the Disk Drive Properties dialog, click the Settings
tab.
* Enable (check) the DMA option and click O.K.
* Repeat for any additional IDE drives.
* Close the System Control Panel. Restart computer.
Other Software and Hardware Affecting System Performance.
Pro-Tools LE can also be affected by other software and hardware drivers installed on your computer. For best
possible performance, it is recommended that you:
* Avoid running other Windows programs at the same time as Pro Tools LE.
* Turn off any software utilities that run in the background, such as calendars and virus protection.
* Disable Windows System sounds. In the Sound Control Panel set the Sound Scheme to No Sounds.
* If your video display card supports it, enable Bus Mastering in the manufacturer's Control Panel.
* Disable any networking cards.
* Turn off any power management features of your system.
Pro Tools FREE Win Index | All FAQ Index
[4394]
Do I need a SCSI drive for optimal performance with Pro Tools Free for PC?
You will achieve similar results with qualified SCSI and ATA/IDE drives. The only noticeable performance difference
might be a slight delay upon playback or recording in large sessions when using an ATA/IDE drive. SCSI is not a
requirement with the Pro Tools Free. However, if you are working in multiple studios an external SCSI drive allows
easy portability to other Pro-Tools Windows 98 SE systems. If you are thinking about purchasing a SCSI controller
for playback and recording with Pro Tools Free, be advised that the ADAPTEC AVA -2906 SCSI controller card is the
only supported model for Pro Tools Free Windows 98 SE Systems. We can not qualify the performance of other
SCSI controller cards at this time. Review the Pro Tools Free compatibility document available at Digidesign.com for
more information.
Pro Tools FREE Win Index | All FAQ Index
[4395]
Are Pro Tools Free for Windows 98 SE sessions transferable to Pro Tools Free for Macintosh?
On the Windows platform, you can bring your Windows 98 SE Pro Tools Free or Pro-Tools LE sessions to a Windows
NT TDM system, and bring Windows NT TDM sessions back to Windows 98 SE Pro Tools Free or Pro-Tools LE. The
same integration Between Pro Tools Free/LE/TDM is also possible on the Macintosh Platform. True cross platform
support for Macintosh and Windows 98 SE Pro-Tools LE is currently unsupported. We hope to include this feature in
a future release.
Pro Tools FREE Win Index | All FAQ Index
[4396]
Specific recommendations for working with different PC soundcards and chip sets and Pro Tools Free
5.01.
Sound Blaster Problems
Should also be used only at a 48kHz sample rate. Recent Sound Blaster cards drift about 490 samples for 60
seconds of playback at 44.1. Buffer Size should be set at 8k (the highest setting) for best results.
Diamond Monster MX400
The Diamond Monster MX400 exhibits a sample clock drift phenomenon similar to that of the Sound Blaster Live except much worse. The Monster drifts ~5987 samples - nearly 136 milliseconds for every 60 seconds of playback.
Should also be used only at a sample rate of 48kHz. Only the highest hardware buffer size will work.
Event Electronics Gina
Testing with this card has shown that large hardware buffer sizes are not necessary for successful operation. We
have had success with hardware buffer sizes as low as 256. This greatly reduces monitoring latency as well as
control sluggishness that is associated with higher hardware buffer size settings.
Montego and Aureal soundcards do not work well with Pro Tools FREE 5.0.1.
Ego-Systems Waveterminal U2A USB audio interface has not performed well with Pro Tools FREE 5.0.1.
Pro Tools FREE Win Index | All FAQ Index
Pro Tools LE Time Code Q & A
How Do I Work With Time Code In Pro Tools LE?
Does Pro Tools LE Work Accurately with QuickTime Movies?
What is "Resolving" to Time Code? Is it Important to Me as a Pro Tools LE user?
How Do I Work With QuickTime Video if I Don't Have a Time Code Ruler? How Do I Set Up My QuickTime Movie in the
Session?
Does Pro Tools LE Support Time Code?
[7283]
How Do I Work With Time Code In Pro Tools LE?
If you're new to Pro Tools LE (software for Digi 001 and ToolBox), you may have questions about how to perform
common tasks such as locking to video decks, working with built-in QuickTime Movies, and spotting elements to
time code. Let's take a look at some frequently asked questions, and some sample workflows...
Pro Tools LE Time Code Q & A Index | All FAQ Index
[7284]
Does Pro Tools LE Work Accurately with QuickTime Movies?
Yes. Your QuickTime Movie triggers accurately to the incoming MIDI Time Code. Your Movie remains "frame locked"
wherever you click on the screen (provided you followed the rules when capturing it!). Of course, as with any
system that uses QuickTime, the performance of your system will vary depending on whether or not your using a
dedicated capture card with a codec, a SCSI accelerator, and how much you're asking your computer to do. Faster
computers with dedicated video subsystems and drives can yield great performance.
As with any host-based audio system, you'll be trading off the ability of the CPU to manage tracks, mixing and
effects against what it's being asked to do with video. More expensive digital audio systems (such as Pro Tools TDM
systems) use dedicated HW for most audio tasks, so they can deliver better performance with a given CPU
configuration. Because system performance can vary tremendously, Digidesign has not "officially qualified" common
video cards (like the Miro DC30 or Aurora Fuse) for the Macintosh for use with Pro Tools LE. These cards do work...
just make sure that with your workflow, there's enough CPU horsepower for what you want to do. For more on
QuickTime video and Pro Tools LE, read below...
Pro Tools LE Time Code Q & A Index | All FAQ Index
[7287]
What is "Resolving" to Time Code? Is it Important to Me as a Pro Tools LE user?
Post Production Pros commonly run their systems locked to a reference signal such as "black burst" or "house sync"
so that all machines in the studio (audio or video) are referenced to the same "master clock." When a system is
locked in this way, and you trigger to start at a specific location, your system remains locked all devices are running
at the same speed. The term "resolved" refers to this kind of lock. In a "resolved" digital audio system, the speed of
the "slave" audio system is constantly and subtly adjusted to match the "master." Pro Tools LE *can* be resolved to
an external clock via the S/PDIF port on the Digi 001 or AMIII, but external sync boxes that can do this (available
from third-parties) are pretty expensive (as much or close to your overall system cost!). Without a resolved system,
you cannot maintain lock over longer periods of time to analog tape transports (like cassettes, or even multi-track
machines). The choice about how far to go with resolving your system lies with your needs and budget.
Entering Your Offset
----------------------------Pro Tools LE's Session Setup Window has a SMPTE offset entry area ("Session Start"), which allows you to set the
SMPTE start time for your session. (There is also an area that lets you set the frame rate for your incoming time
code.) If you get a tape to work with that contains a new SMPTE start time (a change from when you started your
project), you can enter a new start time. When you do this, you will be prompted to choose if you wish to maintain
the absolute positions of your on-screen regions relative to the time code on your tape (most common), or whether
you wish to keep the position of your regions relative to the start of the session. For example, your session might
start at 01:00:00:00 and you have a region at 2:10.000 (coincides with 01:02:10:00 on your tape). You then
decide to move the Session Start earlier so that you can spot something to a location before 1 hr. Setting the
Session Start to 00:00:00:00 will prompt you to Maintain Time Code (your region will now be at 62:10.000 and will
still line up with your tape) or Maintain Relative Position (your region will still be 2 minutes and 10 seconds from the
start of the session, an hour earlier than the location on your tape).
Incoming Time Code Display
----------------------------The Session Setup Window also features an incoming time code display (labelled "Current Time"). This allows you to
see your incoming SMPTE. If the display is rolling, you know you've got time code and you can view where you are
against incoming time code at all times.
Pro Tools LE Time Code Q & A Index | All FAQ Index
[7288]
How Do I Work With QuickTime Video if I Don't Have a Time Code Ruler? How Do I Set Up My QuickTime
Movie in the Session?
You can import your QT Movie into Pro Tools LE, and move it to start on a specific Bar|Beat, Minutes/Seconds or
Sample location. Pro Tools LE does not support QuickTime video capture. Instead, you must use a third-party
application (such as Adobe Premiere). The Pro Tools Reference Guide contains several tips about this, but briefly,
you'll want to "conform" your Movie to match the SMPTE frame rate for your session, and make sure you don't have
any "dropped frames." Choose a resolution that won't overly tax your system. If the picture looks great, and you
can't run many tracks, do any mixing, or add effects, you won't be happy...
Once you're set, you can import the QuickTime Movie. Make sure that when you export it from your video
application that you trim the Movie start to a logical (and known) start time. This is common if you have a "window
burn" that shows a time code location on the picture, or a "2 pop" or Academy leader on your video, which allows
you to set up sync easily between sound and picture. Then you can have the Movie start right at a certain Bar|Beat
location, or at an even minute or second boundary by using Grid or Spot.
Am I Missing Anything?
Having a SMPTE Time Code ruler is a nice convenience, but in practice, it doesn't afford greater (or any) accuracy in
placing your QT movie against your audio or MIDI data. In the case of locating your QT Movie in your session, the
only thing that a SMPTE ruler gives you is the ability to exactly match the location of a conformed QT movie's
window against an identical SMPTE reference location in a PT session. On a practical basis, this is not necessary. Cut
your QT Movie on a "normal" frame boundary (like the academy leader count down at the start, or a "two pop" [2
beeps that occur 2 seconds before picture start ]). Or, anywhere you want. Then place the Movie at the point in real
time minutes/seconds or musical time (bars|beats) that you want the picture to start at. That might be at the very
beginning of your session, or a little ways in. Make sure that you place your Movie using Grid or Spot (either
minutes/seconds or bars/beats) so that the Movie's start time is exactly referenced to your working "time scale."
Practically, many people get QT movies delivered to them that do not contain a window burn with time code.
Provided that the movie is captured at high enough quality, you can get 30/60 field performance (conformed) with
a capture card like Miro or Aurora Fuse. In post work, people generally start at even time marks, so you don't have
to worry about having a Movie start at a subframe location.
The Movie as "Master"
Alternatively, you can place your Movie at the head of the session, and set up a Bar|Beat "point of origin" so that
Bar 1, Beat 1 lines up to the start of picture by using Edit>Identify Beat. This allows you to use the Movie as
"Master," and everything before your start time is a negative "count down" bar. If your Movie is conformed, and you
have it start at an even second boundary, you can easily move along the timeline of your Movie when you're in
Minutes/Seconds Grid mode.
What About "Laying Back" My Audio to QuickTime Video?
Once you're done with your session, you can "lay back" to a QuickTime Movie by using the "Bounce to Movie"
feature from the Movie menu. Or, you can work the your favorite video application to do more editing work in the
video domain. Just bounce down your audio as a "flattened file," then import it into your video app. Make sure that
there is audio from the "beginning of time" (or where ever you want to place it). You can use a "reference 2 pop" at
the audio start to line up with the picture within your video editing application.
Pro Tools LE Time Code Q & A Index | All FAQ Index
[3597]
Does Pro Tools LE Support Time Code?
Yes, you can work with SMPTE time code in Pro Tools LE. If you're new to the world of Digidesign's new Pro Tools
LE/001 or AM III ToolBox systems, you may have heard some rumors that you can't work with SMPTE time code
with Pro Tools LE. This isn't true, you can! If you're starting out, and are not sure if you need to work with SMPTE
time code, let's consider what you might need to do:
1) You might want to lock up your Pro Tools LE system to a tape machine or video deck.
2) You might want to work with a video source (like a video deck or QuickTime Movie) and "spot" your effects or
other audio elements to a specific location in the picture.
If you don't need to do either of these things, then locking to external time code isn't something you need to be
concerned about.
While it's true that there is no SMPTE time code *ruler* or Spot dialog for time code (you'll find these in Pro Tools
TDM systems, which are focused towards post professionals), Pro Tools LE works just fine for most any basic tasks
when locking to external time code with audio or video decks, or working to picture with QuickTime Movies or even
spotting events to video decks.
Pro Tools LE Time Code Q & A Index | All FAQ Index
Pro Tools NT
What versions of Pro Tools are supported under Windows NT?
Are there any "off the shelf" PCs that I can buy that are tested or approved.
Is the ATTO/Digi SCSI 64 kit approved for the PC.
Is NTFS a supported file system?
Why do I keep getting a DAE -87 error when playing back audio.
Can I use third party apps Like Acid or Sound Forge with my Digi hardware?
How do I move sessions between Mac and PC?
How can I get Mac sessions to load from CD-ROM?
How do I obtain a Mac formatted drive if I don't own a Mac?
Will my keys survive if I format my hard drive?
[26694]
What versions of Pro Tools are supported under Windows NT?
Windows NT is supported for Pro Tools Versions 4.2.6 - 5.0.1 only. Compatibility information for Pro Tools 4.2.6 5.0.1 running on Windows NT can be found in the compatibility archive at www.digidesign.com/support/compato
Pro Tools NT Index | All FAQ Index
[6355]
Are there any "off the shelf" PCs that I can buy that are tested or approved.
We have published a list of compatible components and recommend that you use this list as a guideline when
ordering your pre-built PC or selecting components for a custom built unit.
This information can be found at:
http://www.digidesign.com/compato/
Pro Tools NT Index | All FAQ Index
[6356]
Is the ATTO/Digi SCSI 64 kit approved for the PC.
Yes, with Pro Tools 5.1.1 for Windows 2000. But not with Pro Tools 5.0 for NT, where you need to use one of the
following, Adaptec 2940UW PCI card with Bios 1.3x or higher, Adaptec 3940UW PCI card with Bios 1.3x or higher,
or the Integrated Adaptec AIC-78xx chipsets with Bios 1.3x or higher. The 1.3 Bios update is included on the Pro
Tools CD-ROM.
Pro Tools NT Index | All FAQ Index
[6357]
Is NTFS a supported file system?
Yes, you can use NTFS for your system and audio drives. There are some issues with copy protection and selecting
NTFS for your system volume. After adding or updating software using Pace copy protection you may need to
confirm your authorizations for Pro Tools and any plug-ins that are Pace copy protected. It is for these reasons that
FAT 32 is the recommended file system.
Pro Tools NT Index | All FAQ Index
[6358]
Why do I keep getting a DAE -87 error when playing back audio.
Check your disk allocation under the setups menu and confirm that you have selected a valid SCSI audio drive. You
may be attempting to use your systems ATA drive to record and playback 24bit audio.
Pro Tools NT Index | All FAQ Index
[6359]
Can I use third party apps Like Acid or Sound Forge with my Digi hardware?
Yes. The Digidesign d24/MIX Wave Driver is a 2-channel, multimedia wave driver for Digidesign's Pro Tools d24 and
Pro Tools 24 MIX cards. This wave driver allows third-party audio applications to utilize Digidesign hardware for 2channel recording and/or playback. The driver is also required for auditioning audio files in the SampleCell Editor
when Pro Tools hardware is used in conjunction with SampleCell.
Pro Tools NT Index | All FAQ Index
[6360]
How do I move sessions between Mac and PC?
To enforce MAC/PC compatibility WAV is now available on
both MAC and Windows versions of Pro Tools.
Mac users need to burn a CD in Joliet format or used a
shared network drive to go from Mac to PC.
Macs can read the PC formatted Disks and CD's.
Previously the solution was to use Mac Opener by DataViz. Mac Opener will allow you to mount HFS (Mac) volumes
and read Pro Tools session documents and audio files. You can work directly on the Mac volume or convert and save
the session to FAT or NTFS volumes.
Pro Tools NT Index | All FAQ Index
[6361]
How can I get Mac sessions to load from CD-ROM?
Pro Tools will not allow you to open Mac sessions from CD-ROM. You must copy the session on to an HFS (Mac)
volume that is mounted on the system.
Pro Tools NT Index | All FAQ Index
[6362]
How do I obtain a Mac formatted drive if I don't own a Mac?
Mac opener will allow you to format hard drives attached to the system as Mac volumes, this will allow you to
temporarily or permanently dedicate a local volume for file transfer.
Pro Tools NT Index | All FAQ Index
[6363]
Will my keys survive if I format my hard drive?
Yes. Your keys will survive a high level format. You can destroy them by doing a low level format using the format
utility found in your computers BIOS. You should also avoid using anti virus software as it my damage
authorizations or key disks.
Pro Tools NT Index | All FAQ Index
Pro Tools TDM Mac
What are some basic/optimum settings for Pro Tools on OS 9.x? ( TDM Mac )
Which files are installed with Pro Tools 5.x on OS 9.x and where should they be located?
Can Pro Tools convert and import MP3 files?
Can I run Pro Tools 5.x or 6.x without hardware (like PowerMix in Pro Tools 4.x)?
What should I use to back up my Pro Tools sessions?
What exactly does Compact Selected do?
How can I move files from one session to another and retain Time Code stamps?
How do I set up a click track in Pro Tools 5.x?
Pro Tools 5.x is not receiving MIDI, what should I check?
What is the difference between the variations of Dither in Pro Tools?
[6177]
What are some basic/optimum settings for Pro Tools on OS 9.x? ( TDM Mac )
- Appearance Control Panel > Fonts, change all fonts to Chicago & Disable "Smooth all fonts on screen."
- Under Sound, set Soundtrack to "none."
- In the Energy Saver Control Panel Set sleep time to "Never."
- In the Memory Control Panel Select "Custom" twice under Disk Cache and set it to 512k. You will see a warning
regarding system performance. Do Not Panic! This warning does not affect Pro Tools' performance. 512k is the
optimum setting.
- Set Virtual Memory and Ram Disk to "Off."
In the Monitors Control Panel:
- If using a 9500 or 9600 (or lower) Mac, set colors to 256.
- If using a G3 or G4, setting the color to "thousands" should be adequate.
- AV users should set the monitor attached to the ABVB card to "millions."
In the Extensions Manager:
- Under "Selected Set," select the OS Base Set (Listed by OS version...ex. OS 8.6 Base Set)
- Select "Duplicate Set" and name the set "Pro Tools."
- Add/enable:
OMS Preferred Device (control panel)
Digidesign DSP Manager (ext)
Digisystem INIT (ext)
Open Music system (ext)
Digidesign Stream Manager (ext).... if applicable/needed
Digidesign Output Drivers (ext)... if applicable/needed
Digidesign Direct I/O (ext)... if applicable/needed - v5.01 and higher
Digidesign Sound (control panel)... if applicable/needed - v5.01/OS9 and higher
Pro Tools/DAE
- Memory Allocation (Basic settings, based on 128-196 mb of RAM):
- In Digidesign folder>Pro Tools, 'get info' (Cmd-I)* on the Pro Tools application. Set the Preferred Memory to 3050 mb (30000k-50000k) Minimum Memory should be left at the default (Enter a '0' if in doubt)
- In System Folder>DAE Folder, 'get info' (Cmd-I)* on the DAE application. Set the Preferred Memory to 40-60 mb
(40000-60000k) Minimum Memory should be left at the default (Enter a '0' if in doubt). NEVER 'lock' these "Get
Info" windows
- These settings are merely a starting point.
DAE Playback Buffer setting (DAE > File menu > Set Playback Buffer).
- Mix System - 2
- D24 System - 2
- Pro Tools III System - 0
- PowerMix Engine - 8
Pro Tools TDM Mac Index | All FAQ Index
[6178]
Which files are installed with Pro Tools 5.x on OS 9.x and where should they be located?
-Digidesign Folder -----> on root level of boot hard drive (usually called Macintosh HD)
-Document Readers Folder
-(Other Digidesign Applications, if installed)
-Pro Tools Folder
-Pro Tools Utilities folder
-DigiTest
-Track Transfer Utility Folder
-Calibration Mode Templates Folder (TDM
only)
-OMF Tool Folder (TDM only) ... if installed
-Pro Tools (Application)
-Release Notes & Documentation Folder
-DAE Folder ------> in System Folder (which lies on the root level of the boot hard drive)
-Codecs Folder
-Controllers Folder
-DAE (application)
-Plug-In Settings Folder
-Plug-Ins Folder
-16 or 24 bit Optimized Mixer
(required)
-Other plug-ins
-Plug-Ins (Unused) Folder
The following are installed into the Extensions and Control Panel folders in the System folder:
OMS Preferred Device (control panel)
Digidesign Sound (control panel)........ if applicable v5.01/OS9 and higher
Digidesign DSP Manager (ext)
Digisystem INIT (ext)
Open Music system (ext)
Digidesign Stream Manager (ext)......... if
applicable/needed
Digidesign Output Drivers (ext)........ if
applicable/needed
Digidesign Direct I/O (ext)........ if applicable/needed v5.01/OS9 and higher
Pro Tools TDM Mac Index | All FAQ Index
[6179]
Can Pro Tools convert and import MP3 files?
Pro Tools v5.0 and v5.01 could only export MP3 files via the MP3 Export option.
Pro Tools v5.1 and v5.1.1 can export or convert and import MP3 files via the MP3 Option.
Pro Tools v6.x can export or convert and import MP3 files via the MP3 Option.
Pro Tools TDM Mac Index | All FAQ Index
[6180]
Can I run Pro Tools 5.x or 6.x without hardware (like PowerMix in Pro Tools 4.x)?
No, Pro Tools 5.x and 6.x are unable to launch or operate without the appropriate hardware with the exception of
Pro Tools Free (v5.01)
Pro Tools TDM Mac Index | All FAQ Index
[6181]
What should I use to back up my Pro Tools sessions?
-Digidesign does not qualify any one style of file back up.*
CD-R, DVD-RAM, and Tape Backup are just a few of the
options.
-CD-R's are probably the most common method, however will
only store approximately 650-700mgs. Some are
re-recordable.
-DVD-RAM's can hold up to 5.2 gigs and are re-recordable.
-Tape Backup systems (various types) are capable of storing
40+ gigs and are re-recordable.
-You should never back up your audio in "Compression" mode. Use a "Native" mode.
-Any system that can backup/restore SDII or other compatible
files will work.
-Check with manufacturers regarding their systems for
capacity and other specifications.
*Back up & restoration software & hardware will vary in their features, specifications, and results depending upon
their speed, capacity, and error checking/correction capabilities.
Pro Tools TDM Mac Index | All FAQ Index
[6183]
What exactly does Compact Selected do?
- Compacting audio files and regions can be an effective way to maximize your storage capabilities, however, it is a
DESTRUCTIVE process and CANNOT BE UNDONE.
- When Compacting, you will permanently alter the original "parent"* audio files, that are referenced by the regions
residing within the session. The portions of audio files referenced by the audio regions removed from your session,
will be deleted, thus consolidating (compacting) the "parent" audio files to only contain the audio actually used in
the session.
- The Padding setting allows you set an amount of extra audio at the beginning and end of each region's boundaries.
- This is a process normally done near or at the end of the session.
- Look up "Compact Selected" in the Pro Tools reference manual glossary for details.
* "Parent" audio files are the audio files used in your Pro Tools session. They are listed in the session's Audio
Regions List in Bold on the right side of the Edit Window. If the Audio Regions List is not showing, click on the two
arrows pointing to the left on the bottom right-hand corner of the Edit Window.
- Regions are pieces of audio "captured" from an audio file and are displayed in normal text, not in Bold. Regions
are subfiles of the parent file.
- The Pro Tools Reference Manual provides additional basic Pro Tools concepts.
Pro Tools TDM Mac Index | All FAQ Index
[6184]
How can I move files from one session to another and retain Time Code stamps?
- Highlight the regions/files you wish to move to another session in the Audio Regions List or on its track in the Edit
Window.
- Select "Time Stamp Selected" from the Audio Menu (above the Audio Regions List) and set a User Time Stamp to
the desired position in time.
You may enter a new SMPTE time in three different ways:
1) Enter the numbers manually (with the help fo the arrow keys).
2) Click the Current Time Code button (or press the Equal key), if you want to compute the imcoming time code
address.
3) Click the Current Selection button, if you want to enter the start time of the current on-screen selection.
4) Click OK.
This command can be used in "batch mode" to set new time stamps for several regions at a time. To do this, simply
select several regions and choose the Time Stamp Selected command. One after another, a dialog will open for
each region, allowing you to quickly enter new values. Once entered, the user time stamps can be displayed in all
regions currectly placed in tracks.
- With the regions/files still selected, choose "Export Region Definitions" from the same Audio menu.
- Import files into the new session and use Spot mode to select the User Timestamp.
- The Original Time Stamp will now be retained.
- If you have a large number of regions in each track, then you may consider using 'Consolidate Selection' from the
Edit menu.
Pro Tools TDM Mac Index | All FAQ Index
[6185]
How do I set up a click track in Pro Tools 5.x?
Pro Tools 5.x can generate a MIDI note click track that follows the tempo set in either the Tempo Ruler or the
Conductor track.
- This is not an audible signal. You must route this track to a MIDI device, or a QuickTime instrument. OMS must be
configured for your MIDI device(s) or QuickTime for the click track to be setup.
- In the MIDI menu, select Click Options and select the destination device under Output Device, which will only be
listed after doing an OMS setup.
- Enable the Click track by selecting Click from the MIDI menu or Transport window.
- Make sure the audio outputs of your MIDI device are routed into a mixer or an auxillary track in Pro Tools (via the
Digidesign interface).This must be done in order to hear the audio coming from your MIDI device.
In Pro Tools 6.0x there is a MIDI click plug-in, which is an audible click track that doesn't require a MIDI device to
be heard. Create a mono aux. input track and instantiate the click plug-in in the Mix window.
Pro Tools TDM Mac Index | All FAQ Index
[6186]
Pro Tools 5.x is not receiving MIDI, what should I check?
-First, consult your TDM Software Installation guide to verify you have installed and set up OMS correctly.
- Verify that the latest OMS drivers for your MIDI interface are installed in the OMS folder.
-The MIDI track should be record enabled.
-In the MIDI menu, select Input Devices, and enabled the MIDI device you wish to record.
Pro Tools TDM Mac Index | All FAQ Index
[6182]
What is the difference between the variations of Dither in Pro Tools?
-The Dither/PowR dither plug in only affects the mono or stereo output of a track or bounced file(s). The insert on a
master fader is Post fader.
-The Dither Setting in the Preference menu (Setups menu > Preferences > Processing Tab) only affects Audio Suite
plug ins. As of right now, there have been no other A/S dither programs created to add to pop up menu that
contains the "Digidesign Dither" default setting. When the "Use AudioSuite Dither" is not selected, then a standard
dither is used (no noise shaping).
-The Dither on Fades uses a standard Pro Tools dither algorithm.
Pro Tools TDM Mac Index | All FAQ Index
Pro Tools|HD
Can I use the Pro Tools 6.2 TDM Software CD to install plug-ins for other Pro Tools 6.x systems?
Can I use the Digidesign 192 interface to perform analog transfers directly from industry standard multi-track recorders?
Have you tested for frequency response anomalies on a transfer like this?
How many Time Slots does the new TDM II bus on Pro Tools|HD have? Are there any differences in the way those Time
Slots are used versus the the way Time Slots are used on a Pro Tools| 24 MIX system?
What is the maximum number of 192 I/Os or 96 I/Os I can have attached to my HD system?
I have an external effects processor that is equipped with digital input and output, but it only supports 44.1kHz or 48kHz
sample rates; can I connect it digitally to my 192 I/O for use with an 88.2k, 96k, 176.4k, or 192k session?
What are the maximum voice counts for Pro Tools|HD hardware? (See the Pro Tools Reference Guide for a description
of the difference between Voices and Tracks.)
With the release of Pro Tools 5.3 for the HD system, have there been any changes made to the Pro Tools Mixer?
Are DigiLink Cables included with an HD1, HD2, or HD 3 system? Are DigiLink Cables included with a 192 I/O or 96 I/O?
Can I use SampleCell II / SampleCell II Plus cards with Pro Tools|HD?
How much disk (hard drive) space is used up by recording at the various sample rates available on a Pro Tools|HD
system?
When attaching legacy peripherals to the Legacy Port on my 192 I/O or 96 I/O, can I use a Y-Cable?
[27436]
Can I use the Pro Tools 6.2 TDM Software CD to install plug-ins for other Pro Tools 6.x systems?
The plug-in installers on the Pro Tools 6.2 TDM Software CD are compatible with Pro Tools HD and HD Accel
systems only. The 6.2 Digidesign TDM/RTAS/AudioSuite Plug-Ins CD and the 6.2 Digidesign Development Partner
Plug-Ins CD are compatible with all Pro Tools systems and software versions of 6.x.
Pro Tools|HD Index | All FAQ Index
[7871]
Can I use the Digidesign 192 interface to perform analog transfers directly from industry standard multitrack recorders? Have you tested for frequency response anomalies on a transfer like this?
Yes you can, and yes we have.
Visit this location for the full details:
http://www.digidesign.com/support/faq/192/
Pro Tools|HD Index | All FAQ Index
[7437]
How many Time Slots does the new TDM II bus on Pro Tools|HD have? Are there any differences in the
way those Time Slots are used versus the the way Time Slots are used on a Pro Tools| 24 MIX system?
TDM II is really quite a different bus, so it is hard to make apples to apples comparisons. While in the absolute
worst case TDM II "only" has twice the slots (at 48k), for most real world sessions it really is much more than this.
First, TDM II is a bidirectional bus that has 512 slots (256 slots at 96k) running "down" the bus and another totally
separate set of 512 slots running "up". In a sense this is really like having 1024 slots, as long as the amount of
communication "up" is fairly even with the "down". Also, slots can be "reused". Meaning that if you need a
connection between DSP 1 to DSP 3 and another connection between DSP 5 and DSP 6, TDM II will just use a single
slot. It is not uncommon for slot "reuse" to result in 2x to 4x improvement in slot usage, although it will definitely
depend on the session.
Putting these two factors together the bottom line is that with most sessions slot usage will be greatly improved on
TDM II.
Info regarding time slots / timeslots
Pro Tools|HD Index | All FAQ Index
[7438]
What is the maximum number of 192 I/Os or 96 I/Os I can have attached to my HD system?
You can have a maximum of eight 192 I/Os, or six 96 I/Os attached to an HD system. If you are combining 192 I/
Os and 96 I/Os on the same system, the total maximum is eight, and the 192 I/Os should come first. Keep in mind,
there is a maximum of two I/Os per HD Card, so you would need at least one HD Core plus three HD Process Cards
in order to attach eight I/Os.
Pro Tools|HD Index | All FAQ Index
[7439]
I have an external effects processor that is equipped with digital input and output, but it only supports
44.1kHz or 48kHz sample rates; can I connect it digitally to my 192 I/O for use with an 88.2k, 96k,
176.4k, or 192k session?
This is not possible for the following reason: the Digital Card on the 192 I/O can sample rate convert on input (AES,
TDIF, or ADAT on the digital card), but cannot sample rate convert on output (AES, TDIF, or ADAT).
As a workaround, you can go analog out to the effects processor, and return digitally from the effects processor (or
just use analog in and out to the effects processor).
Pro Tools|HD Index | All FAQ Index
[7440]
What are the maximum voice counts for Pro Tools|HD hardware? (See the Pro Tools Reference Guide
for a description of the difference between Voices and Tracks.)
With a HD Core card:
96 tracks at 44.1/48k
48 tracks at 88.2/96k
12 tracks at 176.4/192k
With 1 HD Core and 1 or more HD Process cards:
128 tracks at 44.1/48k
64 tracks at 88.2/96k
24 tracks at 176.4/192k with HD cards inside the CPU
16 tracks at 176.4/192k with HD cards inside the CPU
Pro Tools|HD Index | All FAQ Index
[7441]
With the release of Pro Tools 5.3 for the HD system, have there been any changes made to the Pro Tools
Mixer?
1. The dither code was rewritten. Now every dither source is uncorrelated. What this mainly means to users is when
multiple dither sources (e.g. from busses) are mixed together, the dither noise floor won't be as high. Summing two
correlated dither sources results in a 6dB increase in noise floor, where as summing two uncorrelated dither sources
results in a 3dB increase.
2. The master fader code was rewritten in the stereo mixer to be more inline with the surround mixer, and to have
slightly better truncation error performance.
3. The mixer summing bus headroom was increased from 30dB to 48dB.
Pro Tools|HD Index | All FAQ Index
[7442]
Are DigiLink Cables included with an HD1, HD2, or HD 3 system? Are DigiLink Cables included with a
192 I/O or 96 I/O?
Each HD core system (HD1, HD2, or HD3 ) comes with one 12' DigiLink cable, for the purpose of connecting a 192 I/
O or 96 I/O to the HD Core Card. Each 192 I/O or 96 I/O comes with a 1.5' DigiLink cable, intended for chaining a
second 192 I/O or 96 I/O to its Expansion Port. Given this, if you have three, five, or seven HD I/Os, you most
likely will want to purchase an additional one, two, or three 12' (or longer) DigiLink cables respectively, to connect
to HD Process Cards.
Pro Tools|HD Index | All FAQ Index
[7444]
Can I use SampleCell II / SampleCell II Plus cards with Pro Tools|HD?
Direct TDM connection with SampleCell II / SampleCell II Plus is not possible on Pro Tools|HD systems. You can still
install SampleCell II / SampleCell II Plus cards in Pro Tools|HD systems, but you will need to use the analog outs of
the SampleCell cards. If you intend to use SampleCell cards with your Pro Tools|HD system, you will also need to
install the DigiSystem INIT that was included on your Pro Tools|HD installer CD.
Pro Tools|HD Index | All FAQ Index
[7445]
How much disk (hard drive) space is used up by recording at the various sample rates available on a
Pro Tools|HD system?
Approximate storage consumption (Megabytes per minute per track):
Sample Rate: 44.1k 48k 96k 192k
16-bit 5 MB 5.5 MB 11 MB 22 MB
24-bit 7.5 MB 8 MB 16 MB 32 MB
Pro Tools|HD Index | All FAQ Index
[7446]
When attaching legacy peripherals to the Legacy Port on my 192 I/O or 96 I/O, can I use a Y-Cable?
Yes.
Pro Tools|HD Index | All FAQ Index
ProControl
Are the pinouts in the ProControl manual for the analog board (DB-25 D-subs) outputs correct?
Can a fader be replaced in the field by the "end user" or must the unit be returned to Digidesign for the fader to be
replaced?
What can be done when a fader appears to have gone bad (Fader is dead in all modes including "Vegas")? Is the fader
really dead?
Can the headphone jack be used as a separate out assigned by a separate mix out, independent of the main mix?
Can more than one Pro Tools system use one ProControl over a network?
Pro Tools is unable to communicate or is not responding to ProControl after the Ethernet controllers scan? What's
wrong?
Does AppleTalk need to be on for ProControl communication?
Can MIDI Controller parameters be controlled from a ProControl?
Can the armrest be replaced in the field if it is chipping or peeling?
Where is the firmware located for the ProControl? Do I need to rev the unit's firmware?
There is a 6db drop on the Main L/R outputs while in surround monitor mode. When switching the ProControl to stereo
monitor mode, the level goes back up to +4 (unity). The level on the Surround L/R and center/lfe channels stay at unity in
both surround and stereo monitor modes. All of the pots are up on full. Is this the correct behavior?
Why do I get feedback when using talkback in surround mode?
When using the talkback and local talkback simultaneously, the signals cancel each other out (in versions prior to Pro
Tools ver. 5.0.1).
Why are some third party plug-in parameters unavailable or missing in the edit/DSP menu on the ProControl?
What other added features/fixes are there for the ProControl with the Pro Tools 5.01 release?
[4306]
Are the pinouts in the ProControl manual for the analog board (DB-25 D-subs) outputs correct?
For details on the correct pinouts please refer to these 2 updated ProControl Acrobat (PDF) Documents, based on
your ProControl serial number:
Addendum to ProControl User's Guide pre June 2000 (Pre Serial Number NX01801) located at:
http://www.digidesign.com/support/docs/ProCtrlAudOut_PreSN_NX1801.pdf
Addendum to ProControl User's Guide post June 2000 (Post Serial Number NX01801) located at:
http://www.digidesign.com/support/docs/ProCtrlAudOut_PostSN_NX1801.pdf
Note that the PDF states serial number NX1801 when it should read NX01801.
ProControl Index | All FAQ Index
[4307]
Can a fader be replaced in the field by the "end user" or must the unit be returned to Digidesign for the
fader to be replaced?
Yes, the fader can be replaced in the field by ordering:
DigiFader with ProControl Spares manual
Part 910004950,00
Warranty on a NEW Digi fader is one year from Date of Purchase.
Warranty on a Refurbished Digi fader is 90 Days.
ProControl Index | All FAQ Index
[4308]
What can be done when a fader appears to have gone bad (Fader is dead in all modes including
"Vegas")? Is the fader really dead?
Maybe no, Maybe yes, What can happen is the fader will "fall" out of the parameter "window" which is the
acceptable range the fader can fall and still work. If it slips up or down beyond the parameter window the fader
goes dead. If after a factory reset and running Vegas mode, the fader still does not respond. Go to Utilities> Test>
Fader > Recal to recalibrate it. If this does not bring the fader back on-line contact Digidesign Technical Support for
a fader replacement.
ProControl Index | All FAQ Index
[4309]
Can the headphone jack be used as a separate out assigned by a separate mix out, independent of the
main mix?
No. You cannot monitor a discrete mix through the headphone jack while monitoring another mix through your
main outs. To set up a discrete mix for talent or other purposes use outputs 5-6 to a headphone amp.
ProControl Index | All FAQ Index
[4310]
Can more than one Pro Tools system use one ProControl over a network?
The ProControl can be safely used by only one system at a time. However, multiple systems can "access" a
ProControl on a local area network simultaneously.
ProControl Index | All FAQ Index
[4311]
Pro Tools is unable to communicate or is not responding to ProControl after the Ethernet controllers
scan? What's wrong?
Make sure you made a selection in the pull down menu after the scan to identify the ProControl Main unit and fader
pack. Another cause could be AppleTalk not being set to Ethernet in the AppleTalk control panel.
ProControl Index | All FAQ Index
[4312]
Does AppleTalk need to be on for ProControl communication?
The AppleTalk Protocol does not need to be turned on (in the Chooser). However, the AppleTalk control panel needs
to be set to Ethernet.
ProControl Index | All FAQ Index
[4313]
Can MIDI Controller parameters be controlled from a ProControl?
This is not currently supported.
ProControl Index | All FAQ Index
[4314]
Can the armrest be replaced in the field if it is chipping or peeling?
Yes, contact Technical Support to order the appropriate part(s):
PC main model (arm rest) # MH078 Part# 99007014-00 $115
PC fader pack (arm rest) # MH079 Part# 99007016-00 $95
ProControl Index | All FAQ Index
[4315]
Where is the firmware located for the ProControl? Do I need to rev the unit's firmware?
The factory default firmware can be reloaded through the Utility menu on the ProControl. When Pro Tools is
launched it checks the current version of ProControl firmware. If the current ProControl firmware is older than the
version that Pro Tools has access to it will update the ProControl's firmware.
ProControl Index | All FAQ Index
[4316]
There is a 6db drop on the Main L/R outputs while in surround monitor mode. When switching the
ProControl to stereo monitor mode, the level goes back up to +4 (unity). The level on the Surround L/R
and center/lfe channels stay at unity in both surround and stereo monitor modes. All of the pots are up
on full. Is this the correct behavior?
The -6dB L/R level difference in surround mode is deliberate, and is documented in the manual. It is necessary in
order for the center and surround levels to exceed the L/R levels. If this level difference was not present, the L/R
levels could never be adjusted to be less than the surround channels. The surround trims should be adjusted to
match the L/R channels, then the main level control should be adjusted for the make-up gain.
ProControl Index | All FAQ Index
[4317]
Why do I get feedback when using talkback in surround mode?
Prior to Pro Tools 5.0.1 the talkback/slate was routed to channels 5 and 6 when in surround mode which caused a
feedback loop. As of Pro Tools 5.0.1 this has been corrected and talkback/slate is no longer routed through 5 & 6 in
the control room.
ProControl Index | All FAQ Index
[4318]
When using the talkback and local talkback simultaneously, the signals cancel each other out (in
versions prior to Pro Tools ver. 5.0.1).
As of Pro Tools v 5.0.1 talkback and local talkback do not cancel each other out.
ProControl Index | All FAQ Index
[4319]
Why are some third party plug-in parameters unavailable or missing in the edit/DSP menu on the
ProControl?
It is up to the third party plug-in manufacturers to Develop plug-ins with full ProControl support. At this time not all
Plug-ins have this implementation.
ProControl Index | All FAQ Index
[4320]
What other added features/fixes are there for the ProControl with the Pro Tools 5.01 release?
1) Increased size of fader pack window to reduce incidents of faders going offline.
2) Faders no longer snap back when released during fader resistance adjustment.
3)Increased fader position interpolation to previous value for smoother fader moves.
ProControl Index | All FAQ Index
SCSI Basics
So if the maximum throughput is only 8.8 MB/sec (for TDM MIX), do you really need a 100 MB/sec (ATA/100) disk drive?
What about SCSI - do you really need an LVD Ultra/160 disk controller and drive?
What drives should I use with Pro Tools and my ATTO dual channel SCSI Host Bus Adapter (HBA)?
Will LVD drives work with my ATTO SCSI HBA?
Can I format my drives as a RAID to increase performance?
How do I configure a striped set of drives for AV OptionXL
What is a SCSI ID?
Can I put a wide to narrow adapter on my wide drive and install it in my old narrow enclosure?
How can I mix different SCSI types on the same SCSI HBA?
Can I still use FWB 3.02 to initialize my drives in OS 9.
[4856]
So if the maximum throughput is only 8.8 MB/sec (for TDM MIX), do you really need a 100 MB/sec
(ATA/100) disk drive? What about SCSI - do you really need an LVD Ultra/160 disk controller and drive?
The answer - no.
It turns out that super duper disk I/O throughput is not really a major factor (after a point) for Pro Tools. In fact,
you may actually experience more problems and unwanted side effects from ATA/100 or Ultra/160 SCSI disk
subsystems. What are these side effects? Some ATA/100 or high-speed SCSI controllers have drivers that hog too
much CPU bandwidth or PCI bandwidth (holding off interrupts for too long, or dominating the PCI bus). When this
happens, you may experience -9092, -9093, -9128, or -6042 errors when using Pro Tools.
This is why we recommend that users of SCSI systems "throttle back" their SCSI controller (like via the SCSI BIOS
with Adaptec controllers) to 20 MB/sec instead of 40, 80, or 160 MB/sec (the most common defaults). Higher values
may cause the SCSI PCI card to generate too much PCI traffic, and you don't really need that much disk I/O
bandwidth anyway (as explained above). We recommend 20 MB/sec for SCSI systems to give a bit of "headroom"
when there is disk fragmentation and/or a lot of dense edits within the Pro Tools session.
ATA/100 systems can work, but we've seen evidence of poorly written drivers that don't work as well as ATA/66 or
ATA/33 systems. For instance, it's known that the currently shipping drivers from VIA for the VIA 686B South
Bridge (on many new motherboards) have performance problems under Windows 2000. Fortunately, the problems
don't exist under Windows 98SE or Windows NT, so Pro Tools users are currently immune to this specific problem.
However, we have seen reports of bad performance with ATA/100 drivers even under Windows 98 (different but
related performance issues). Over time these driver issues will probably be resolved, but it just goes to show that
"faster" is not always better.
From Kenn LeGault's Digidesign User Conference post on 1.22.2001:
http://duc.digidesign.com/showflat.php?&Number=333578
SCSI Basics Index | All FAQ Index
[4843]
What drives should I use with Pro Tools and my ATTO dual channel SCSI Host Bus Adapter (HBA)?
The ATTO EPCI-DC SCSI HBA is an ultra wide SCSI card. Therefore, all wide drives will work with the ATTO EPCI-DC
HBA. Narrow SCSI drives will also work, if used, they should be the last devices of a wide SCSI bus. Note: A
terminating adapter should be used between the last wide device and the first narrow device. The adapter must
terminate the unused signal lines of the wide bus.
Low Voltage Differential drives are wide drives that are compatible with single ended Ultra HBAs like the EPCI-DC.
However, you will have to keep total cable length on each bus to less than three meters, since the EPCI-DC is a
single ended HBA.
SCSI Basics Index | All FAQ Index
[4844]
Will LVD drives work with my ATTO SCSI HBA?
Yes, Low Voltage Differential drives are wide drives that are compatible with single ended Ultra HBAs, like the EPCIDC. However, you will have to keep total cable length on each bus to less than three meters, since the EPCI-DC is a
single ended HBA.
SCSI Basics Index | All FAQ Index
[4845]
Can I format my drives as a RAID to increase performance?
No. Software RAIDs (Redundant Arrays of Inexpensive Disks) are not well suited for digital audio, but can be used
for video only drives. A striped set of drives can be used for playing back high-resolution video as with AV Option XL.
SCSI Basics Index | All FAQ Index
[4846]
How do I configure a striped set of drives for AV OptionXL
When using a compression ratio of 2:1 or 1:1 a second SCSI HBA (ATTO UL2D or UL3D) is required. 2:1
compression requires two drives connected across both channels of the Video HBA; 1:1 requires four drives across
both channels. The drives can be striped using either ATTO ExpressRAID (version 2.3.2 or higher) or Avid Drive
Utility 2.1 or higher. Simply select the drives and format them as a striped set.
Note: 3:1 compression with AV OptionXL does not require a second SCSI HBA or striped drives.
SCSI Basics Index | All FAQ Index
[4849]
What is a SCSI ID?
A SCSI ID is a unique identification/addressing for each device on the SCSI bus. Two devices on the same SCSI bus
cannot share a SCSI ID number.
Note: ID 7 is almost always reserved for the initiator - either the SCSI HBA, or SCSI chipset on the computer’s
motherboard. Do not use this ID for any other devices on the chain.
SCSI Basics Index | All FAQ Index
[4847]
Can I put a wide to narrow adapter on my wide drive and install it in my old narrow enclosure?
Not if the drive will be connected to an ATTO EPCI-DC or other wide SCSI HBA. SCSI spec does not support WideNarrow-Wide configurations.
SCSI Basics Index | All FAQ Index
[4848]
How can I mix different SCSI types on the same SCSI HBA?
Since Ultra3, Ultra2 and Ultra SCSI are all downward compatible, simply attach the devices to the adapter and use
the type of terminator that matches your slowest device. When mixing wide and narrow devices always put the
narrow devices after the wide devices on a wide SCSI bus. Note: Never use a wide device after a narrow device on
a wide SCSI bus.
SCSI Basics Index | All FAQ Index
[4850]
Can I still use FWB 3.02 to initialize my drives in OS 9.
No, FWB 3.02 is not recommended on OS 9 or higher. ATTO ExpressPro-Tools 2.3.2 should be used instead. If you
need to use drives that are formatted with FWB, the inhibit driver loading option should be used in ExpressProTools. Follow the procedure listed at http://www.digidesign.com/compato/os9/stg/fwb.html
Note: This option is only available when using an ATTO SCSI HBA.
SCSI Basics Index | All FAQ Index
SCSI64 Kit
What is the recommended Sync Rate for drives connected to the ATTO card?
When formatting drives with the ExpressPro-Tools control panel should I use the digital audio option?
What should the drives be formatted as, HFS (Mac OS standard) or HFS + (Mac OS extended)?
How should I configure wide and narrow devices on the ATTO SCSI bus?
Do I need to use an active terminator on the end of my SCSI chain?
What is the Inhibit driver loading option in ExpressPro-Tools, and when should I use it?
How long should my SCSI cables be?
When formatting drives with ATTO ExpressPro -Tools, should I do a High-Level Initialization or Low-Level format?
I'm getting a two DSI error when booting the system, what can I do to get around this?
[3990]
What is the recommended Sync Rate for drives connected to the ATTO card?
Digidesign recommends setting the sync rate to 20 (10) for all drives to reduce the load on the PCI bus. This is the
default setting for the SCSI 64 kit, other default settings include: Termination set to Automatic, PCI burst rate set
to 32, Synchronous Transfers Enabled, Wide Transfers Enabled, Allow Disconnect Enabled, LUN's Enabled.
SCSI64 Kit Index | All FAQ Index
[3991]
When formatting drives with the ExpressPro-Tools control panel should I use the digital audio option?
Yes, Digidesign recommends using this option on recording drives for use with Pro Tools. Non audio drives do not
need to use this option.
SCSI64 Kit Index | All FAQ Index
[3992]
What should the drives be formatted as, HFS (Mac OS standard) or HFS + (Mac OS extended)?
Either HFS or HFS + is supported in Pro Tools 5.0 and up. However, for compatibility with older versions of Pro
Tools (prior to 5.0), drives should be formatted as HFS (Mac OS standard).
Due to the greater number of allocation blocks with HFS+, you will experience longer "prime times" when recording.
In other words, you will experience a delay between the time you initiate recording and the time recording actually
gets underway. Other than that, there is no perceivable difference in performance between HFS+ and HFS.
There is a preference in Pro Tools 5.x that allows the user to specify the length of record time. By limiting the
allocated hard drive space the "prime time" can also be shortened.
To limit the space for recording:
1. Choose Setups > Preferences and click Operation.
2. Under the Open Ended Record Allocation option, select Limit To and enter a number of minutes to be allocated.
The number of minutes specified is allocated for each record-enabled track. You may find it necessary to
experiment with this number to achieve the desired performance and recording.
SCSI64 Kit Index | All FAQ Index
[3993]
How should I configure wide and narrow devices on the ATTO SCSI bus?
It is recommended to place narrow devices after wide devices on a wide SCSI bus. Or if your configuration permits,
you can place the narrow devices on one SCSI bus and wide devices on the other.
SCSI64 Kit Index | All FAQ Index
[3994]
Do I need to use an active terminator on the end of my SCSI chain?
Yes, Digidesign recommends using an active terminator. Most active terminators have a light on them to show that
they are working properly. As with everything else on the SCSI chain, use high quality devices to avoid problems.
SCSI64 Kit Index | All FAQ Index
[3995]
What is the Inhibit driver loading option in ExpressPro-Tools, and when should I use it?
Inhibit driver loading stops the drivers installed on your hard disks from loading at startup. This option requires the
ExpressPro-Tools extension to be loaded in the system folder, this also requires ExpressPro-Tools version 2.3.2 or
later. This option can be helpful when using drives that are formatted with different utilities or if disk driver
problems occur.
SCSI64 Kit Index | All FAQ Index
[3998]
How long should my SCSI cables be?
On a single ended Ultra SCSI controller like the ATTO Express EPCI-DC, total cable length should be kept to less
than 1.5 meters. But as with any SCSI system, cables should be as short as possible.
SCSI64 Kit Index | All FAQ Index
[3999]
When formatting drives with ATTO ExpressPro -Tools, should I do a High-Level Initialization or LowLevel format?
It is not recommended to Low-Level format your drives, under most circumstances all that is necessary is a HighLevel Initialization. Note: Low-Level formatting can do more harm than good.
SCSI64 Kit Index | All FAQ Index
[4000]
I'm getting a two DSI error when booting the system, what can I do to get around this?
You can use the Inhibit drive loading option in the ATTO ExpressPro -Tools control panel. This will eliminate the
problem by reducing the number of drivers loading at boot.
SCSI64 Kit Index | All FAQ Index
Sync I/O
Sometimes a "dot" (or period) appears in the timecode display of USD or SYNC I/O, why does this happen?
The Sync I/O Word Clock output signal is low. As soon as you connect the sync I/O Word Clock Output to the External
Clock Input of the 192 I/O, the signal drops from 5v to 2.3v .
Does the SYNC I/O support Loop Clock?
How do I take the SYNC I/O out of remote mode?
How do I switch the SYNC I/O between NTSC and PAL?
SYNC Setup application doesn't have a choice for Digiserial port. How can I update the SYNC I/O's firmware or change
other settings without this application?
How to restore original factory settings for the SYNC I/O.
Calibration information for the Sync I/O and how to recalibrate.
Into which of the two DigiSerial Ports on my HD Core card do I plug my Sync I/O?
[25819]
Sometimes a "dot" (or period) appears in the timecode display of USD or SYNC I/O, why does this
happen?
A "dot" between the minutes and frames display (00 00. 00 00) indicates that the positional reference is in auto
LTC/VITC mode.
A "dot" between the frames and subframes display (00 00 00. 00) indicates odd/even field distinction. A lit decimal
point to the right of frames indicates an even-numbered field; no decimal point indicates odd numbered.
Sync I/O Index | All FAQ Index
[7353]
The Sync I/O Word Clock output signal is low. As soon as you connect the sync I/O Word Clock Output
to the External Clock Input of the 192 I/O, the signal drops from 5v to 2.3v .
This is exactly how the output is designed to work. The Word Clock output has a 75 ohm source impedance and the
192 Word Clock input has a 75 ohm termination. The result is that the signal level is dropped in half. This is
standard procedure for a high frequency signal such as video or AES/EBU. If a person needs to drive multiple
destinations with such a signal then they need a distribution amp.
SYNC I/O was meant to use its Loop Sync output to clock the I/O boxes which would leave the Word Clock output
available to drive another load. The current release of Pro Tools doesn't support this function. There is also a Word
Clock output on each I/O box for driving additional loads.
Sync I/O Index | All FAQ Index
[7364]
Does the SYNC I/O support Loop Clock?
When first shipped with Pro Tools 5.3, Sync I/O does not support Loop Clock. To use SYNC I/O as the clock master
with a 92 I/O or 192 I/O interface, connect the external clock 1x/256x out of the SYNC I/O to the corresponding in
of the first audio interface. Sync mode for that interface (and all others in the chain) should then read "EXT" when
Pro Tools is launched.
SYNC I/O will support Loop Clock in a subsequent release of Pro Tools and SYNC I/O firmware.
Sync I/O Index | All FAQ Index
[7365]
How do I take the SYNC I/O out of remote mode?
From SYNC I/O's front panel, hold down clock reference, positional reference, and frame rate.
Sync I/O Index | All FAQ Index
[7366]
How do I switch the SYNC I/O between NTSC and PAL?
Make sure that SYNC I/O is not in remote mode (the green remote light should be off). To take SYNC I/O out of
remote mode hold down clock reference, positional reference, and frame rate. Hit the Set button on the unit's front
panel, then use the up button to toggle through the menu until you see "Video Sy." Hit Set again and use Up or
Down to select between NTSC or PAL. Hit Set to exit.
Sync I/O Index | All FAQ Index
[7367]
SYNC Setup application doesn't have a choice for Digiserial port. How can I update the SYNC I/O's
firmware or change other settings without this application?
The SYNC Setup application will only communicate with the SYNC I/O when connected to a modem or printer port
(or compatible emulator such as Griffin Gport or Gee Three Stealth port). Most SYNC I/O features including window
burn and updating firmware can be accessed through the Pro Tools software in Peripherals > Synchronization if the
unit is connected to the Digiserial port. All other features can be accessed from the unit's front panel.
Sync I/O Index | All FAQ Index
[7363]
How to restore original factory settings for the SYNC I/O.
SYNC I/O can be reset to its default factory settings. To reset all parameters to default settings:
1 Switch off power to SYNC I/O and wait at least 10 seconds.
2 Hold down the Up and Down front panel switches and turn on power to SYNC I/O -- do not release the Up and
Down switches until the display reads FAC-CFG. Resetting factory settings does not reset the SYNC I/O oscillator.
Sync I/O Index | All FAQ Index
[7362]
Calibration information for the Sync I/O and how to recalibrate.
The onboard clock crystal of Sync I/O is factory calibrated to a number between -9999 to +9999. To check a SYNC
I/O's factory calibration, see the sticker on the bottom of the unit.
With normal usage, SYNC I/O should never require recalibrating. Each unit is factory calibrated to within +/- 5 ppm
(parts per million).
You may want to recalibrate SYNC I/O in the following situations:
- If greater than 5 ppm accuracy is required
- If the unit needs to be matched to a unique (nonstandard) frequency
- To precisely compensate for component aging
- To restore the original factory setting
Note: Oscillator recalibration does not occur during firmware updating or when resetting SYNC I/O to factory
defaults.
To recalibrate: Warm Up SYNC I/O Before Recalibrating. Before you begin the calibration procedure, power on SYNC
I/O and allow it to warm up for at least five minutes. The temperature of the room (or chassis) isn’t critical during
the calibration procedure. However, if you need better than 3 ppm accuracy, it is recommended that you allow
SYNC I/O to warm up for at least 30 minutes and that the chassis be at normal operating temperature.
The original Oscillator Calibration value is printed on the factory sticker, on the SYNC I/O bottom panel. To restore
the SYNC I/O oscillator calibration to its factory setting:
1 Press Set, then press Up until Video System (VIdEo SY) is displayed in the LED readout.
2 With the LED Time Code Display showing VIdEo SY, press and hold the Up switch. While you continue to hold that
switch, press the Clock Reference switch momentarily, and then release both switches. The LED Time Code Display
will read: O5C CAL,
3 Press Set again. The LED Time Code Display shows the current parameter value, which shows a sample rate
frequency deviation from -0999 to 0999.
4 Take note of the Oscillator Calibration value printed on the factory sticker, on the SYNC I/O bottom panel.
5 Use the Down and Up switches to scroll through the parameter values.
6 When you reach a value that matches the sticker’s value, stop scrolling and press Set. The LED Time Code Display
will return to showing time code numbers. Your SYNC I/O is now properly calibrated. The next time you press Set,
the LED Time Code Display will again show O5C CAL. If you then press the Down switch, you’ll disengage the
Oscillator Calibration parameter name. To change the setting once again, you’ll need to repeat steps 1 through 6.
Sync I/O Index | All FAQ Index
[7361]
Into which of the two DigiSerial Ports on my HD Core card do I plug my Sync I/O?
From page 8 of the Sync I/O Guide:
SYNC I/O includes a 4 meter (approximately 12 foot) standard Macintosh serial cable. Connect one end of the Host
Serial cable to the SYNC I/O Host Serial port. Connect the other end to the DigiSerial port closest to the Digi-Link
connector. Do not use any other DigiSerial ports on your HD Core, or any other HD-series card, for SYNC I/O.
Sync I/O Index | All FAQ Index
Tech Tips
How do I create or edit XML documents for patch names in Pro Tools 6.x under Mac OS 10.2.x?
Tip: Tired of Pro Tools 6 (and higher) automatically re-syncing sound FX folders that never change?
Why does my Pro Tools LE session clip when I open it on TDM hardware?
[26863]
How do I create or edit XML documents for patch names in Pro Tools 6.x under Mac OS 10.2.x?
Detailed information on Creating Mac OS X Patch Names & MIDI Device Definitions is available at:
http://www.digidesign.com/support/tips/xnames.html
and as an Acrobat PDF download from the bottom of that same page:
http://www.digidesign.com/support/docs/xnames.pdf
Tech Tips Index | All FAQ Index
[26622]
Tip: Tired of Pro Tools 6 (and higher) automatically re-syncing sound FX folders that never change?
Use the Mac finder to lock the folder. Pro Tools will not re-sync a folder that has been locked. This will speed up
your browser when searching through those locked folders.
Tech Tips Index | All FAQ Index
[5831]
Why does my Pro Tools LE session clip when I open it on TDM hardware?
Pro Tools LE uses the power of your CPU's processor to perform mixing and processing. A side benefit of this
technology is its ability to use 32-bit floating point math to scale the level of signals to avoid clipping (which
translates to great headroom). Signals in Pro Tools LE can indeed clip, but signal management can be easier... you
mostly have to watch output levels for mixed signal busses and bring them down so that they don't clip.
Pro Tools TDM systems use HW DSP acceleration that utilize 24-bit fixed point math. (Comparing 24-bit fixed point
and 32-bit floating point audio systems is a bit like comparing PowerPC and Intel Pentium processors... properly
implemented and designed, you can get a great result out of either one... but comparing the techniques used
directly can be difficult!) TDM systems provide 48 bits of precision at the mix bus, which allows a very large degree
of headroom as well. However, Plug-In processing in the TDM world is restricted to a 24-bit data path, so as with
most any signal processing in the audio world, some attention to level setting is necessary to avoid clipping.
For example , if you introduce a signal into a DigiRack EQ that is close to "full code" (the hottest digital level before
clipping) and you add a large boost on an EQ, you will likely clip the EQ Plug-In. Just as with any rack mounted
device, etc., you can avoid this simply by using the input attenuator control provided. The EQ Plug-In for Pro Tools
LE behaves the same way, but because all of the processing is occurring in the host computer, the levels can be
scaled for you to avoid most clipping without adjustment (other than mix outputs which require it).
Note: Some Plug-Ins use a technique called "double precision arithmetic" to provide 48 bit precision when
processing, which results in increased headroom. This is great, but keep in mind that these Plug-In do require
roughly twice as much DSP power to do their work.
Because of these differences, if you plan on exchanging sessions between Pro Tools LE and TDM systems, it can be
prudent to attenuate the input level of a Plug-In like DigiRack EQ if you have applied a large amount of boost to a
predominant frequency (like a big booming kick drum). This will avoid the possibility of clipping in the TDM version
of the Plug-In, and you'll still get to take advantage of a "24-bit clean signal" when levels are set correctly.
Tech Tips Index | All FAQ Index
USD
Why isn't Pro Tools resolving to a tape striped with LTC/VITC that I received from a European studio?
Why do I still need the USD setup in Pro Tools v5.01?
How do I update the USD firmware?
Where do I connect USD?
How do I scrub frame by frame?
What's the most common cable config for the USD in resolve mode?
How do I determine the USD's firmware?
What should I verify if Pro Tools does not lock or randomly drops sync?
When did Pro Tools start supporting the Digiserial port for the USD?
Can I update the USD firmware from within Pro Tools?
Why is the Speed Cal Light Blinking?
Can I use the 9-pin port on the back of the USD?
[4428]
Why isn't Pro Tools resolving to a tape striped with LTC/VITC that I received from a European studio?
Most likely the tape was striped at 25 frames per second (fps). In order to play this tape back at the correct rate
you will need a PAL sync box that generates 25 fps of black burst. You can currently change between PAL and NTSC
via the USD Setup v5.01 using the video format parameter or from the Front Panel of the USD. To change between
NTSC and PAL from the front panel:
Press SET,
Press UP or DOWN to get to Video Sys Window,
then press SET to get to NTSC/PAL setting.
Press UP or DOWN to choose NTSC or PAL.
USD Index | All FAQ Index
[4429]
Why do I still need the USD setup in Pro Tools v5.01?
In order to switch the Vid Ref Jack between PAL and NTSC settings (optional: also selectable from front panel: see
above) and for Pro Tools III systems which don't have a digiserial port.
USD Index | All FAQ Index
[4430]
How do I update the USD firmware?
From the USD setup or within the peripherals dialogue of Pro Tools v4.31 and later. With a d24 or Mix Card you can
update the USD if it's connected to the Digiserial port. With a Pro Tools III system (Disk I/O and DSP Farm) use the
USD Setup.
USD Index | All FAQ Index
[4431]
Where do I connect USD?
For best sync, the USD should be connected to the Digiserial port (available on d24 and Mix Cards) and Machine
Control (9-pin) should be connected to the modem or printer port. When the USD is on the Mac Serial port there is
potentially some latency in resetting the USD so the lock will not be as accurate (+/- 5-10 samples vs. +/- 1
sample).
USD Index | All FAQ Index
[4432]
How do I scrub frame by frame?
Set the "time scale" to Time Code and select "1 frame" in the Nudge/Grid pop-up menu. Jog the deck via the plus
(+) or Minus (-) key on the numeric keypad.
USD Index | All FAQ Index
[4433]
What's the most common cable config for the USD in resolve mode?
Black Burst (BB) or House Sync à USD Vid Ref Jack
BB to Video Deck Sync IN
USD Super Clock OUT to 888/24 Slave clock IN (888/24 says "Slave" on front panel)
USD to Digiserial
Deck to USD LTC IN. Use the 75 ohm Terminator on the other Video Ref Jack.
USD Index | All FAQ Index
[4434]
How do I determine the USD's firmware?
Power cycle the USD and look at the numbers that first appear on the USD. E.g., 312 means firmware version 3.12.
USD Index | All FAQ Index
[4435]
What should I verify if Pro Tools does not lock or randomly drops sync?
Try a tape you know has good TC (VERY important)
Verify that the 75 ohm terminator is attached to one of the parallel Vid Ref Jacks
Verify all connections (as outlined above)
Verify configuration in the session setup window (frame rate and sample rate, positional reference and clock
reference).
Verify configuration in the peripherals window (synchronization = USD; port = Digiserial)
If all else fails, trash the DAE prefs folder, Digisetup and Pro Tools preferences in MAC Hard Drive > System Folder
> Preferences folder.
USD Index | All FAQ Index
[4436]
When did Pro Tools start supporting the Digiserial port for the USD?
Pro Tools v4.3 first supported the Digiserial port.
USD Index | All FAQ Index
[4437]
Can I update the USD firmware from within Pro Tools?
Yes. In Pro Tools 4.31 or later. Go to the peripherals dialog and select "update firmware". Then navigate to the USD
folder and select firmware update file.
USD Index | All FAQ Index
[4438]
Why is the Speed Cal Light Blinking?
Verify the clock reference in the session setup e.g., if you're feeding the USD Black Burst, clock reference should =
Vid Ref. If it is set to the wrong reference e.g., LTC, the USD cannot resolve.
Here are some important Session Setup settings to verify when trouble-shooting sync:
Clock Reference
Positional Reference
Sync Mode
Frame Rate
Sample Rate
USD Index | All FAQ Index
[4439]
Can I use the 9-pin port on the back of the USD?
No. Currently, the 9-pin port is not supported.
USD Index | All FAQ Index
Windows 98 SE and ME Setup
Can I run my soundblaster card in the same hardware profile with my Digi 001 or Audiomedia III system on Win98 SE or
WinME?
How to Check your system for any resource (IRQ) conflicts on Win98 SE and WinME.
How do I Enable DMA for all IDE/ATA drives in on Win98 SE and WinME?
Disable all Startup Items from the system to prevent conflicts when using Pro Tools LE software on Win98 SE and
WinME
In general is there anything I should know about driver errors?
How to set the Multimedia control panel settings for use with Pro Tools LE for Win98 SE and WinME.
How to change the "Role" of the computer.
How to lower the Color bit depth in Display settings for use with Pro Tools LE for Win98 SE and WinME.
How to setup power schemes and screensavers for use with Pro Tools LE for Win98 SE and WinME.
How do Reduce Video Hardware Acceleration to improve system performance on Win98 SE and WinME?
How do I improve disk performance with Pro Tools LE for Win98 SE and WinME?
[8199]
Can I run my soundblaster card in the same hardware profile with my Digi 001 or Audiomedia III
system on Win98 SE or WinME?
It is known that many Sound blaster cards will share the parallel port IRQ without any indication in Windows.
Although Soundblaster card's usually present little problems running in the same computer as Digidesign hardware,
this IRQ arrangement may cause crashing problems on some systems. To disable:
- Right-click MY COMPUTER, select PROPERTIES.
- Select the DEVICE MANAGER tab, and look for Creative Misc. Devices. If found, double-click anything that says
Legacy Emulation, and checkmark the Disable. Hit OK. If not found, check in your Sound, Video and Game
controllers for anything that says Legacy Emulation or Legacy Audio and disable.
Windows 98 SE and ME Setup Index | All FAQ Index
[8187]
How to Check your system for any resource (IRQ) conflicts on Win98 SE and WinME.
How to check your resource (IRQ) assignments:
-Right-Click MY COMPUTER, select PROPERTIES.
-Select the DEVICE MANAGER tab and double-click COMPUTER. This will show you a complete list of all the IRQ's in
use.
-If you see more than 2 devices on the same number, you may experience a conflict.
-Any device can, without problem, share with IRQ holder for PCI steering, or ACPI IRQ holder for PCI IRQ steering.
Some other devices that will not usually cause problems are System Management Bus or SMBus, and SCI IRQ used
by ACPI Bus.
When it comes to any Digidesign Hardware (Digi 001 or Audimedia III), make sure that they are assigned a unique
IRQ. The only item that may (and should) be sharing with our hardware is a "Holder for PCI Steering"
-Devices to watch out for (especially when they are sharing with other hardware in your system) include:
Other sound cards (e.g. SoundBlaster), SCSI controllers, USB controllers, Network cards, Video cards, and many
others.
If you have a conflict, here's how to resolve it:
The best way to force Windows to allocate a different resource to your hardware is by installing the card in question
to another PCI slot. This may mean trying 2,3, or even 4 different slots. You may need to swap positions with
another card to allow the audio card to use that PCI slot.
All unused PCI cards should be PHYSICALLY REMOVED, not just disabled in Windows, as this does not always truly
free up the resource. Remember to power down your system before changing hardware; you should NEVER install
or remove hardware while the computer is powered ON, except for USB and FireWire devices.
Some BIOS manufacturers may allow you to assign a specific IRQ to a PCI slot (from within the BIOS under PCI
configuration - see below), but you should try to avoid IRQ 9 because it is cascaded to IRQ 2. It will allow you to
assign PCI slot 2, for example, to IRQ 5.
Some more tricks for freeing up IRQs are to disable one or more COM (serial) ports, Printer (aka: LPT or Parallel)
ports, USB ports and/or onboard audio (Sometimes called AC97 or Legacy Audio) from within the BIOS (see below).
You must check with your motherboard/computer manufacturer to find the correct way to do this. Disabling devices
within the BIOS will remove them from the system, and possibly allow a device or two to jump to a free IRQ,
reducing the amount of troubleshooting you must do.
To get into your computer's BIOS, you'll need to reboot (or turn on) the machine. Immediately when you see the
boot-up logo or memory/hard drive check, press the appropriate key (which varies from computer to computer check your computer's documentation if you're unsure) until it enters the SETUP. This will be before Windows boots,
and typically it only waits for 1-2 seconds for you to press the key. The most likely keys are DEL, F1, and F2, but
could also be any of the F-keys (you can usually press multiple keys at the same time if you're unsure.) Within the
BIOS, you should select Integrated Peripherals. If you don't see this option, try Advanced, and within this menu,
look for I/O Configuration, Peripheral Configuration, or something of the like- it varies from system to system. This
is where you'll see the options to enable/disable hardware. This is also where you'll change the parallel port mode if
you are using a parallel port midi interface. Then follow onscreen instructions on how to exit and save changes.
Another option within the BIOS, which may be under almost any menu depending on the computer, is PLUG AND
PLAY BIOS or INSTALLED OS. This will have two choices, Windows and non-Windows (the wording may be
different). This setting determines whether the BIOS or Windows will control resources. You may want to try
switching the option to the other choice. If it doesn't work as well, it can always be changed back.
If you're using a USB device (either audio or midi interface), you'll want to have the USB on its own IRQ. Most new
computers actually have two USB devices: One pair on the back and one which is either connected to the front or
not connected at all. Resolving IRQ sharing with USB is more difficult because there is no way to control which IRQ
it uses, so usually you must move devices off of the USB IRQ by moving or removing the PCI card in conflict. Also,
if you can avoid it, don't use any other USB device on that pair of USB ports. This will decrease the bandwidth for
your audio/midi device and possibly create conflicts. Especially avoid hubs and high-bandwidth items like modems,
Ethernet controllers, hard drives or CD-ROM drives, printers, and scanners.
If you're using a FireWire audio device, you'll want to have the FireWire IEEE 1394 controller on its own IRQ just
like it is your sound card. All FireWire ports on a card share the same resources, so it shouldn't make a difference
where they are plugged in unless there is a physical problem with the card.
Windows 98 SE and ME Setup Index | All FAQ Index
[8188]
How do I Enable DMA for all IDE/ATA drives in on Win98 SE and WinME?
How to enable DMA:
1) Select the Windows "Start" button -> "Settings" -> "Control Panel"
2) In the Control Panel folder double-click the "System" control panel.
3) Select the "Device Manager" tab 4.
4) Under the "Disk drives" branch, select the IDE drive(s) you are using.
5) Click on "Properties"
6) On the "Settings" Tab of the disk's properties dialog, make sure the "DMA" option is enabled.
7) Click "OK"
8) Close the "System" control panel and the Control Panel folder by clicking on the "Close" button
9) Windows will prompt you to restart your computer.
10) Repeat for all drives present in your computer
Once you have restarted follow steps 1-5 above once again to make sure "DMA" is in fact still set to enabled. If
your computer is unable to keep this setting please contact your PC manufacturer.
If you do not see an option to enable DMA:
- Not having an option to enable DMA on your drives can be problematic for PT LE and cause -9129/-9093/-9094
errors. Installing the generic IDE driver included with Win98/ME usually resolves these errors:
How to install the Generic IDE Controller from the Win98/ME CD-ROM:
- Insert the Win98/ME CD-ROM
- Open the Control Panels>System>Device Manger tab
- Expand the Hard disk controllers list
- Highlight the IDE Controller device, click “Properties”
- Click the Driver tab and then the “Update Driver” button
-I n the Update Device Driver Wizard, enable “Search for a better driver...” and click “Next”
- Enable the CD-ROM and click “Next”
- Enable “Install one of the other drivers” and click “View List”
**You know you have been successful when you open the Control Panels>System>Device Manager>Disk Drives list
and your drive label reads “Generic IDE Disk”
Windows 98 SE and ME Setup Index | All FAQ Index
[8189]
Disable all Startup Items from the system to prevent conflicts when using Pro Tools LE software on
Win98 SE and WinME
How to disable Startup Items:
- Go to your START MENU, RUN, type MSCONFIG and hit OK.
- GENERAL tab is already selected, checkmark SELECTIVE STARTUP.
- Uncheck PROCESS AUTOEXEC.BAT and CONFIG.SYS.
- Select STARTUP tab, and deselect everything except for:
--->SYSTEM TRAY
--->SCANREGISTRY
--->LOAD POWER PROFILE
Windows 98 SE and ME Setup Index | All FAQ Index
[8191]
In general is there anything I should know about driver errors?
Check your sound hardware/software manufacturers' websites for updates.
Many times an updated driver is the simple solution for an error. If possible, you should keep your old driver just in
case. In addition, be aware of beta (not fully tested) drivers and updates.
Windows 98 SE and ME Setup Index | All FAQ Index
[8192]
How to set the Multimedia control panel settings for use with Pro Tools LE for Win98 SE and WinME.
WinME:
Go to START MENU->SETTINGS-> CONTROL PANEL-> SOUNDS & MULTIMEDIA.
At the bottom under Scheme, select No Sounds and answer NO to "Save current scheme?" This will turn off all
Windows system sounds.
Select DEVICES tab, and expand the AUDIO DEVICES item.
Double-click the Audio for Digidesign Multimedia Devices, and checkmark the box "DO NOT MAP THROUGH THIS
DEVICE" and hit OK.
This will disallow Windows from using your Digi 001 or Audiomedia III card. If you have a Sound blaster-compatible
card still installed, Windows will now use it for Windows sounds.
Win98:
Go to START MENU->SETTINGS->CONTROL PANEL->MULTIMEDIA
Select DEVICES tab, and expand the AUDIO DEVICES item.
Double-click the Audio for Digidesign Multimedia Devices,, and checkmark the box "DO NOT MAP THROUGH THIS
DEVICE" and hit OK.
This will disallow Windows from using your Digi 001 or Audiomedia III card. while you're in a recording program. If
you have a Sound blaster-compatible card still installed, Windows will now use it for Windows sounds.
Go back to the CONTROL PANEL->SOUNDS.
At the bottom under Scheme, select No Sounds and answer NO to "Save current scheme?" This will turn off all
Windows system sounds.
Windows 98 SE and ME Setup Index | All FAQ Index
[25420]
How to change the "Role" of the computer.
How to change the "Role" of the computer:
- Right-click MY COMPUTER, select PROPERTIES.
- Click the PERFORMANCE tab, click the FILE SYSTEM button.
-Change the role of your computer from DESKTOP COMPUTER to a NETWORK SERVER. (This will change the file
caching scheme to be a little more efficient)
Windows 98 SE and ME Setup Index | All FAQ Index
[8193]
How to lower the Color bit depth in Display settings for use with Pro Tools LE for Win98 SE and WinME.
Right-click anywhere on your Desktop, select PROPERTIES.
Click the SETTINGS tab, and change the COLORS setting to 16 BIT. Screen resolution or Screen area needs to be at
least 1024x768.
Windows 98 SE and ME Setup Index | All FAQ Index
[8194]
How to setup power schemes and screensavers for use with Pro Tools LE for Win98 SE and WinME.
Right-click anywhere on your Desktop, select PROPERTIES.
Click the SCREEN SAVER tab. Set the Screen Saver to None.
Click the SETTINGS button in the Energy Saver area. Set the Turn off Monitor, and Turn off Hard Disks, and System
Standby to NEVER. Then Click Apply.
Windows 98 SE and ME Setup Index | All FAQ Index
[8195]
How do Reduce Video Hardware Acceleration to improve system performance on Win98 SE and WinME?
How to do this:
- Right-click MY COMPUTER, select PROPERTIES. Click the PERFORMANCE tab, click the Graphics button.
- Hardware acceleration has 4 options. More than likely yours will be set at Full. This is usually fine, but sometimes
some systems will run better if this setting is either on NONE or the first notch (Basic). Try one or both of these
settings, and if it doesn't help, you can always set it back up to Full.
Windows 98 SE and ME Setup Index | All FAQ Index
[8196]
How do I improve disk performance with Pro Tools LE for Win98 SE and WinME?
Limiting your VCACHE may help.
Go to START MENU > RUN > type NOTEPAD C:\WINDOWS\SYSTEM.INI and press Enter.
Scroll down about half way through the document to [Vcache]. It will probably not have anything directly under it.
Add these two lines:
MaxFileCache=8192
MinFileCache=8192
These settings may not be optimal for all systems. Use with caution.
Windows 98 SE and ME Setup Index | All FAQ Index