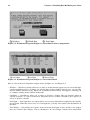
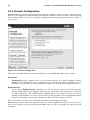
1
Red Hat Enterprise Linux 4
Installation Guide for the IBM®
S/390® and IBM® eServer™
zSeries® Architectures
Red Hat Enterprise Linux 4: Installation Guide for the IBM® S/390® and IBM® eServer™ zSeries® Architectures
Copyright © 2005 Red Hat, Inc.
Red Hat, Inc.
1801 Varsity Drive
Raleigh NC 27606-2072 USA
Phone: +1 919 754 3700
Phone: 888 733 4281
Fax: +1 919 754 3701
PO Box 13588
Research Triangle Park NC 27709 USA
rhel-ig-s390(EN)-4-Print-RHI (2004-09-24T13:10)
Copyright © 2005 by Red Hat, Inc. This material may be distributed only subject to the terms and conditions set forth in the
Open Publication License, V1.0 or later (the latest version is presently available at http://www.opencontent.org/openpub/).
Distribution of substantively modified versions of this document is prohibited without the explicit permission of the copyright
holder.
Distribution of the work or derivative of the work in any standard (paper) book form for commercial purposes is prohibited
unless prior permission is obtained from the copyright holder.
Red Hat and the Red Hat "Shadow Man" logo are registered trademarks of Red Hat, Inc. in the United States and other
countries.
All other trademarks referenced herein are the property of their respective owners.
The GPG fingerprint of the [email protected] key is:
CA 20 86 86 2B D6 9D FC 65 F6 EC C4 21 91 80 CD DB 42 A6 0E
Table of Contents
Introduction.......................................................................................................................................... i
1. Document Conventions .......................................................................................................... i
2. How to Use This Manual ..................................................................................................... iii
2.1. We Need Feedback! .............................................................................................. iv
3. Accessibility Solutions ........................................................................................................ iv
1. Steps to Get You Started................................................................................................................. 1
1.1. Additional S/390 Hardware Preparation for Installation Notes ......................................... 1
1.2. Basic Overview of the Boot Method.................................................................................. 2
1.3. Preparing for a Network Installation.................................................................................. 2
1.3.1. Using ISO Images for NFS Installs .................................................................... 3
1.4. Preparing for a Hard Drive Installation.............................................................................. 3
1.5. Installing under z/VM ........................................................................................................ 4
1.6. Installing in an LPAR using the Red Hat Enterprise Linux LPAR CD ............................. 8
1.7. Installing in an LPAR without the Red Hat Enterprise Linux for S/390 CD-ROMs ......... 9
1.8. Installing in an LPAR (Common Steps) ............................................................................ 9
1.9. Do You Have Enough Disk Space?.................................................................................. 10
2. Installing Red Hat Enterprise Linux........................................................................................... 11
2.1. The Graphical Installation Program User Interface ......................................................... 11
2.2. The Text Mode Installation Program User Interface ....................................................... 11
2.2.1. Using the Keyboard to Navigate ....................................................................... 13
2.3. Running the Installation Program .................................................................................... 13
2.3.1. Installation using X11 Forwarding ................................................................... 14
2.3.2. Installation using VNC ..................................................................................... 14
2.4. Installing from a Hard Drive (DASD).............................................................................. 14
2.5. Installing via NFS ............................................................................................................ 15
2.6. Installing via FTP............................................................................................................. 15
2.7. Installing via HTTP.......................................................................................................... 16
2.8. Welcome to Red Hat Enterprise Linux ............................................................................ 17
2.9. FCP Devices..................................................................................................................... 17
2.10. Language Selection ........................................................................................................ 17
2.11. Disk Partitioning Setup .................................................................................................. 18
2.12. Automatic Partitioning ................................................................................................... 19
2.13. Partitioning Your System ............................................................................................... 21
2.13.1. Graphical Display of DASD Device(s) ........................................................... 21
2.13.2. Disk Druid’s Buttons ..................................................................................... 21
2.13.3. Partition Fields ................................................................................................ 22
2.13.4. Recommended Partitioning Scheme ............................................................... 22
2.13.5. Editing Partitions ............................................................................................ 23
2.14. Network Configuration .................................................................................................. 23
2.15. Firewall Configuration ................................................................................................... 25
2.16. Language Support Selection .......................................................................................... 28
2.17. Time Zone Configuration ............................................................................................... 29
2.18. Set Root Password ......................................................................................................... 30
2.19. Package Group Selection ............................................................................................... 32
2.20. Preparing to Install ......................................................................................................... 33
2.21. Installing Packages......................................................................................................... 34
2.22. Installation Complete ..................................................................................................... 34
2.23. Activate Your Subscription ............................................................................................ 34
2.23.1. Provide a Red Hat Login................................................................................. 35
2.23.2. Provide Your Subscription Number ................................................................ 35
2.23.3. Connect Your System...................................................................................... 35
A. Removing Red Hat Enterprise Linux......................................................................................... 37
B. Sample Parameter Files ............................................................................................................... 39
C. Upgrading Your Current System................................................................................................ 43
C.1. Determining Whether to Upgrade or Re-Install .............................................................. 43
C.2. Upgrading Your System .................................................................................................. 44
C.3. Upgrading Packages ........................................................................................................ 44
C.4. Upgrade Complete........................................................................................................... 44
D. Troubleshooting Your Installation of Red Hat Enterprise Linux............................................ 45
D.1. You are Unable to Boot Red Hat Enterprise Linux......................................................... 45
D.1.1. Is Your System Displaying Signal 11 Errors?.................................................. 45
D.2. Trouble During the Installation ....................................................................................... 45
D.2.1. No devices found to install Red Hat Enterprise Linux Error Message
45
D.2.2. Trouble with Partition Tables ........................................................................... 45
D.2.3. Other Partitioning Problems............................................................................. 45
D.2.4. Are You Seeing Python Errors? ....................................................................... 46
D.3. Problems After Installation ............................................................................................. 47
D.3.1. Remote Graphical Desktops and XDMCP....................................................... 47
D.3.2. Problems When You Try to Log In .................................................................. 47
D.3.3. Your Printer Does Not Work ............................................................................ 48
D.3.4. Apache-based httpd service/Sendmail Hangs During Startup ...................... 48
E. Additional Boot Options .............................................................................................................. 49
F. Additional Information for S/390 and zSeries Users................................................................. 51
F.1. The sysfs File System.................................................................................................... 51
F.2. Using the zFCP Driver ..................................................................................................... 52
F.3. Using mdadm to Configure RAID-Based and Multipath Storage .................................... 55
F.3.1. Creating a RAID Device With mdadm .............................................................. 55
F.3.2. Creating a Multipath Device With mdadm ........................................................ 56
F.4. Configuring IPL from a SCSI Device .............................................................................. 57
F.4.1. IPL the SCSI Disk............................................................................................. 57
F.5. Adding DASD.................................................................................................................. 58
F.6. Adding a Network Device................................................................................................ 62
F.6.1. Adding a qeth Device ...................................................................................... 62
F.6.2. Quick Reference for Adding Network Devices ................................................ 66
F.7. Kernel-Related Information ............................................................................................. 71
Index................................................................................................................................................... 73
Colophon............................................................................................................................................ 77
Introduction
Welcome to the Red Hat Enterprise Linux Installation Guide. This guide contains useful information
to assist you during the installation of Red Hat Enterprise Linux 4. From fundamental concepts such as
installation preparation to the step-by-step installation procedure, this book will be a valuable resource
as you install Red Hat Enterprise Linux.
1. Document Conventions
When you read this manual, certain words are represented in different fonts, typefaces, sizes, and
weights. This highlighting is systematic; different words are represented in the same style to indicate
their inclusion in a specific category. The types of words that are represented this way include the
following:
command
Linux commands (and other operating system commands, when used) are represented this way.
This style should indicate to you that you can type the word or phrase on the command line
and press [Enter] to invoke a command. Sometimes a command contains words that would be
displayed in a different style on their own (such as file names). In these cases, they are considered
to be part of the command, so the entire phrase is displayed as a command. For example:
Use the cat testfile command to view the contents of a file, named testfile, in the current
working directory.
file name
File names, directory names, paths, and RPM package names are represented this way. This style
should indicate that a particular file or directory exists by that name on your system. Examples:
The .bashrc file in your home directory contains bash shell definitions and aliases for your own
use.
The /etc/fstab file contains information about different system devices and file systems.
Install the webalizer RPM if you want to use a Web server log file analysis program.
application
This style indicates that the program is an end-user application (as opposed to system software).
For example:
Use Mozilla to browse the Web.
[key]
A key on the keyboard is shown in this style. For example:
To use [Tab] completion, type in a character and then press the [Tab] key. Your terminal displays
the list of files in the directory that start with that letter.
[key]-[combination]
A combination of keystrokes is represented in this way. For example:
The [Ctrl]-[Alt]-[Backspace] key combination exits your graphical session and return you to the
graphical login screen or the console.
ii
Introduction
text found on a GUI interface
A title, word, or phrase found on a GUI interface screen or window is shown in this style. Text
shown in this style is being used to identify a particular GUI screen or an element on a GUI
screen (such as text associated with a checkbox or field). Example:
Select the Require Password checkbox if you would like your screensaver to require a password
before stopping.
top level of a menu on a GUI screen or window
A word in this style indicates that the word is the top level of a pulldown menu. If you click on
the word on the GUI screen, the rest of the menu should appear. For example:
Under File on a GNOME terminal, the New Tab option allows you to open multiple shell
prompts in the same window.
If you need to type in a sequence of commands from a GUI menu, they are shown like the
following example:
Go to Main Menu Button (on the Panel) => Programming => Emacs to start the Emacs text
editor.
button on a GUI screen or window
This style indicates that the text can be found on a clickable button on a GUI screen. For example:
Click on the Back button to return to the webpage you last viewed.
computer output
Text in this style indicates text displayed to a shell prompt such as error messages and responses
to commands. For example:
The ls command displays the contents of a directory. For example:
Desktop
Mail
about.html
backupfiles
logs
mail
paulwesterberg.png
reports
The output returned in response to the command (in this case, the contents of the directory) is
shown in this style.
prompt
A prompt, which is a computer’s way of signifying that it is ready for you to input something, is
shown in this style. Examples:
$
#
[stephen@maturin stephen]$
leopard login:
user input
Text that the user has to type, either on the command line, or into a text box on a GUI screen, is
displayed in this style. In the following example, text is displayed in this style:
To boot your system into the text based installation program, you must type in the text command at the boot: prompt.
replaceable
Text used for examples, which is meant to be replaced with data provided by the user, is displayed
in this style. In the following example, <version-number> is displayed in this style:
Introduction
iii
The directory for the kernel source is /usr/src/<version-number>/, where
<version-number> is the version of the kernel installed on this system.
Additionally, we use several different strategies to draw your attention to certain pieces of information.
In order of how critical the information is to your system, these items are marked as a note, tip,
important, caution, or warning. For example:
Note
Remember that Linux is case sensitive. In other words, a rose is not a ROSE is not a rOsE.
Tip
The directory /usr/share/doc/ contains additional documentation for packages installed on your
system.
Important
If you modify the DHCP configuration file, the changes do not take effect until you restart the DHCP
daemon.
Caution
Do not perform routine tasks as root — use a regular user account unless you need to use the root
account for system administration tasks.
Warning
Be careful to remove only the necessary Red Hat Enterprise Linux partitions. Removing other partitions could result in data loss or a corrupted system environment.
2. How to Use This Manual
This manual focuses on a VM and LPAR-based installation and is ideal for users (both new and old)
who want a quick and simple installation solution. It helps you prepare your system and walk you
through the installation of Red Hat Enterprise Linux.
Red Hat Enterprise Linux includes multiple installation CD-ROMs. Note that only the first CD-ROM
(CD #1) is bootable. The additional installation CD-ROMs are required, even for a minimal installation. Red Hat also provides supplementary CD-ROMs containing source RPMs and documentation
for all the packages, as well as a Linux Applications CD (LACD).
iv
Introduction
If you are an experienced user and you do not need a review of the basics, you can skip ahead to
Chapter 2 Installing Red Hat Enterprise Linux to begin the installation process.
2.1. We Need Feedback!
If you discover a typo in the Red Hat Enterprise Linux Installation Guide or have thought of a way to
make this manual better, we would love to hear from you. Submit a bug report against the component
rhel-ig-s390 in Bugzilla at:
http://bugzilla.redhat.com/bugzilla/
When submitting a bug report, be sure to mention the manual’s identifier:
rhel-ig-s390(EN)-4-Print-RHI (2004-09-24T13:10)
If you have a suggestion for improving the documentation, try to be as specific as possible when describing it. If you have found an error, please include the section number and some of the surrounding
text so we can find it easily.
If you have a support question (for example, if you need help configuring X, or if you are not sure
how to partition your hard drive[s]), use the online support system by registering your subscriptions
at:
http://www.redhat.com/apps/activate/
3. Accessibility Solutions
While the graphic user interface (GUI) is convenient for sighted users, it is often inhibiting to those
with visual impairments because of the difficulty speech synthesizers have interpreting graphics. Red
Hat Enterprise Linux is an ideal operating system for users with visual limitations because the GUI is
not required by the kernel. Most modern tools including email, news, Web browsers, calendars, calculators, and much more can run on Linux without a graphical environment. The working environment
can also be customized to meet the hardware or software needs of the user.
Red Hat, Inc. is the distribution of choice for people with special needs because of the outstanding
support that is offered with the purchase of any boxed set. Many Linux distributions provide limited
or nonexistent support to customers. Red Hat’s installation support is deliverable via email or via
the telephone and special circumstances will be considered and addressed for users with physical
limitations. Customers should inform the support technician if they require specialized support.
For more information, refer to:
•
http://www.tldp.org/HOWTO/Accessibility-HOWTO/
•
http://www.tldp.org/HOWTO/Keyboard-and-Console-HOWTO.html
•
The README-Accessibility file provides more information and instructions for
using some of the tools available for users with special needs. This file can be found in
/usr/share/doc/redhat-release-X/, where X is the release number of your installed
subscription.
Chapter 1.
Steps to Get You Started
The installation process assumes a basic familiarity with the IBM S/390 and IBM eServer zSeries
platforms. For additional information on these platforms, refer to the IBM Redbooks available online
at:
http://www.redbooks.ibm.com/
This manual assumes you are familiar with the related Redbooks and can set up logical partitions
(LPARs) and virtual machines (VMs) on an S/390 or IBM eServer zSeries system.
Note
For the most current IBM resources, visit http://www.ibm.com/eserver/zseries/.
Before you install Red Hat Enterprise Linux, you must to perform the following steps:
1. Allocate sufficient DASD1 or SCSI 2 partitions to provide suitable disk space (for example, 2 GB
is sufficient for server installations, while 5 GB is minimally required to install all packages).
2. Acquire a minimum of 256 MB RAM (512 MB is strongly recommended) to designate for the
Linux virtual machine.
3. Determine if you need swap space and if so how much. While it is possible (and recommended)
to assign enough memory to z/VM and let z/VM do the necessary swapping, there may be cases
where the amount of required RAM is not predictable. Such instances should be examined on a
case-by-case basis.
4. Decide what environment under which to run the Red Hat Enterprise Linux operating system
(on an LPAR or as a guest operating system on one or more virtual machines).
5. Finally, it is important to review sections 3.3 through 3.8, and Chapters 5 and 6 of the IBM Linux
for S/390 Redbook, as it explains the different configurations and install scenarios available on
the S/390 platform as well as how to setup an initial LPAR or Linux virtual machine (z/VM).
1.1. Additional S/390 Hardware Preparation for Installation
Notes
The network configuration must be determined beforehand. Red Hat Enterprise Linux for S/390 supports multiple network devices including CTC (channel-to-channel), IUCV (inter-user communication
vehicle), LCS (LAN channel station), and QDIO-enabled (Queued Direct I/O) devices.
For the purposes of this installation, it is recommended that at least 4 GB of disk space (such as two 2
GB DASD, direct access storage device, partitions or equivalent zSeries SCSI LUNs) be allocated for
the installation process. All DASD disk allocations should be completed prior to the install process.
1.
Direct Access Storage Devices (or DASDs) are hard disks that allow a maximum of three (3) partitions per
DASD. For example, dasda has dasda[123].
2. Using the zFCP driver over fiber and a dedicated switch, SCSI LUNs can be presented.
2
Chapter 1. Steps to Get You Started
After the installation, more DASD or SCSI (for zSeries only) disk partitions may be added or deleted
as necessary.
1.2. Basic Overview of the Boot Method
To prepare for installation, you must have the Linux kernel (kernel.img), the ram disk
(initrd.img), a CMS configuration file (generic.conf) and a parameter file. Sample parameter
and CMS configuration files are provided (generic.prm and generic.conf). You should edit the
CMS configuration file and add information about your DASD. You may also want to add some
information about your network configuration. Once this is started on the S/390, the networking is
configured. You can then use telnet or ssh on another computer to log into your Red Hat Enterprise
Linux installation image. Now you can start an installation script to install Red Hat Enterprise Linux.
Note
The CMS configuration file is a new file for Red Hat Enterprise Linux 4. Users of prior
releases should note this addition. This new file is explained in more detail throughout
Chapter 1 Steps to Get You Started .
1.3. Preparing for a Network Installation
The Red Hat Enterprise Linux installation media must be available for either a network installation
(via NFS, FTP, or HTTP) or installation via local storage. Use the following steps if you are performing an NFS, FTP, or HTTP installation.
The NFS, FTP, or HTTP server to be used for installation over the network must be a separate machine
which can provide the complete RedHat/ directory. Both the RedHat/base/ and RedHat/RPMS/
directories must be available and populated with all files from all installation CD-ROMs.
Note
The directory specified in the following refers to /location/of/disk/space/. This means it is the
directory up to, but not including, the RedHat/ distribution directory. For example, if you have Red
Hat Enterprise Linux 4 installation files located in /export/rhel/ on the installation staging server,
/location/of/disk/space/ would be /export/rhel/.
To copy the RedHat/ directory from the installation CD-ROMs to a Linux machine which acts as an
installation staging server, perform the following steps:
•
For each binary CD-ROM, execute the following commands:
•
mount /mnt/cdrom
•
cp -var /mnt/cdrom/RedHat /location/of/disk/space
where /location/of/disk/space/ is a directory you create such as /export/rhel/
•
umount /mnt/cdrom/
Chapter 1. Steps to Get You Started
•
3
Note that the Release Notes are not included in the RedHat directory. Unless they are specifically
copied over, the Release Notes will not be available during your installation of Red Hat Enterprise
Linux. The Release Notes are formatted in HTML files located at the root of the disc. Copy the files
to your installation directory. For example:
cp /mnt/cdrom/RELEASE-NOTES*.html /location/of/disk/space/
The Release Notes are also available online from http://www.redhat.com/docs/.
•
Next, make /location/of/disk/space/ available for network installation via NFS, FTP, or
HTTP and verify access from a client system.
•
For NFS, export the directory by adding an entry to /etc/exports to export to a specific system:
/location/of/disk/space client.ip.address(ro,no_root_squash)
To export to all machines (not appropriate for all NFS systems), add:
/location/of/disk/space *(ro,no_root_squash)
Start the NFS daemon (on a Red Hat Enterprise Linux machine, use /sbin/service nfs
start). If NFS is already running, reload the configuration file (on a Red Hat Enterprise Linux
system, use /sbin/service nfs reload).
Be sure to test the NFS share following the directions in the Red Hat Enterprise Linux System
Administration Guide.
If the RedHat/ directory does not appear in the NFS shared directory, the wrong path may have
been mounted and/or exported.
•
FTP and HTTP installations also support a second type of tree structure. To make it easier to access
the contents of the installation CD-ROMs, mount each CD-ROM or ISO image with the following
mount point on the FTP or HTTP server (where X is the number of the CD-ROM or ISO image):
/location/of/disk/space/discX/
For example:
mount -o loop CD1.iso /location/of/disk/space/disc1/
1.3.1. Using ISO Images for NFS Installs
NFS installations can use ISO (or CD-ROM) images rather than copying an entire installation tree.
After placing the required ISO images (the binary Red Hat Enterprise Linux CD-ROMs) in a directory,
choose to install via NFS. You will then point the installation program at that directory to perform the
installation.
Verifying that the ISO images are intact before you attempt an installation will help to avoid problems
that are often encountered during an NFS installation. To verify the ISO images are intact prior to
performing an installation, use an md5sum program (many md5sum programs are available for various
operating systems). An md5sum program should be available on the same server as the ISO images.
Additionally, if a file called updates.img exists in the directory from which you install, then it will
be used for installation program updates. Refer to the file install-methods.txt in the anaconda
RPM package for detailed information on the various ways to install Red Hat Enterprise Linux, as
well as how to apply the installation program updates.
Note
You can only have the ISO images for one release and one variant of Red Hat Enterprise Linux in the
directory.
4
Chapter 1. Steps to Get You Started
1.4. Preparing for a Hard Drive Installation
Note
DASD installations only work from ext2 or ext3 file systems. If you have a file system other than ext2
or ext3 you will not be able to perform a DASD installation.
To prepare your system for a hard drive installation, you must set the system up in one of the following
ways:
•
Using a set of CD-ROMs — Create CD-ROM ISO image files from each installation CD-ROM.
For each CD-ROM, execute the following command on a Linux system:
dd if=/dev/cdrom of=/tmp/file-name.iso
This command may raise an error message when the data at the end of the CD-ROM is reached
which can be ignored. The ISO images created can now be used for installation, once copied to the
correct DASD.
•
Using ISO images — transfer these images to the system to be installed (or to the correct DASD).
Verifying that ISO images are intact before you attempt an installation, helps to avoid problems.
To verify the ISO images are intact prior to performing an installation, use an md5sum program
(many md5sum programs are available for various operating systems). An md5sum program should
be available on the same Linux machine as the ISO images.
Make the correct DASDs accessible to the new VM or LPAR, and then proceed with installation.
Additionally, if a file called RedHat/base/updates.img exists in the directory from which you
install, it is used for installation program updates. Refer to the file install-methods.txt in the
anaconda RPM package for detailed information on the various ways to install Red Hat Enterprise
Linux, as well as how to apply the installation program updates.
1.5. Installing under z/VM
Log onto z/VM as the Linux guest account. You can use x3270 or c3270 (from the x3270-text package
in Red Hat Enterprise Linux) to log in to z/VM from other Linux systems. Alternatively, use the OS/2
3270 terminal emulator on the S/390 management console. If you are working from a Windows based
machine, Jolly Giant (http://www.jollygiant.com/) offers an SSL-enabled 3270 emulator.
If you are not in CMS mode, enter it now.
i cms
If necessary, add the device containing z/VM’s TCP/IP tools to your CMS disk list. For example:
vmlink tcpmaint 592 592
If using any of the qdio/qeth based network connection types (such as OSA express or hipersockets),
set the VM guest qioassist parameter off:
set qioassist off
FTP to the machine containing the Red Hat Enterprise Linux boot images ( kernel.img and
initrd.img), log in, and execute the following commands (use the (repl option if you are
overwriting existing kernel.img and initrd.img image files):
Chapter 1. Steps to Get You Started
5
• cd /location/of/boot/images/
• locsite fix 80
• bin
• get kernel.img (repl
• get initrd.img (repl
• ascii
• get redhat.parm (repl
• quit
You may now create the parameter file (for example, redhat.parm). Refer to
Appendix B Sample Parameter Files for sample parm files. Below is an explanation of the parm file
contents.
There is a limit of 32 total parameters in the parameter file. In order to accommodate limitations
with parameter files, a new configuration file on a CMS DASD should be used to configure the initial
network setup and the DASD specification.
A .parm file is still required for the real kernel parameters, such as root=/dev/ram0 ro
ip=off ramdisk_size=40000, and single parameters which are not assigned to variables,
such as vnc. Two new parameters which point the installation program at the new configuration file
need to be added to the .parm file:
CMSDASD=191 CMSCONFFILE=redhat.conf
CMSDASD is the device ID of the CMS formatted DASD which contains the configuration file.
CMSDASD is usually the ’$HOME’ DASD 191 of the mainframe user. The name of the configuration
file must be set with CMSCONFFILE and needs to be all lowercase.
The syntax of the CMSCONFFILE is bash style with variable="value" pairs, one on each line.
Example redhat.parm file:
root=/dev/ram0 ro ip=off ramdisk_size=40000
CMSDASD=191 CMSCONFFILE=redhat.conf
vnc
Example redhat.exec file:
/* */
’cl rdr’
’purge rdr all’
’spool punch * rdr’
’PUNCH KERNEL IMG A (NOH’
’PUNCH REDHAT PARM A (NOH’
’PUNCH INITRD IMG A (NOH’
’ch rdr all keep nohold’
’i 00c’
Example redhat.conf file:
HOSTNAME="foobar.zSeries.example.com"
DASD="200-203"
NETTYPE="qeth"
IPADDR="192.168.17.115"
SUBCHANNELS="0.0.0600,0.0.0601,0.0.0602"
PORTNAME="FOOBAR"
NETWORK="192.168.17.0"
NETMASK="255.255.255.0"
6
Chapter 1. Steps to Get You Started
BROADCAST="192.168.17.255"
SEARCHDNS="example.com:zSeries.example.com"
GATEWAY="192.168.17.254"
DNS="192.168.17.1"
MTU="4096"
The following parameters are required and must be included in the parameter file:
• DASD=<dasd-list>
Where <dasd-list> represents the list of DASD devices to be used by Red Hat Enterprise Linux.
Although autoprobing for DASDs is done if this parameter is omitted, it is highly recommended
to include the DASD= parameter, as the device numbers (and therefore the device names) can vary
when a new DASD is added to the Red Hat Enterprise Linux guest. This can result in an unusable
system.
• root=<file-system>
where <file-system> represents the device on which the root file system can be found. For
installation purposes, it should be set to /dev/ram0, which is the ramdisk containing the Red Hat
Enterprise Linux installation program.
The following parameters are required to set up networking:
• SUBCHANNELS=
Provides required device bus IDs for the various network interfaces.
qeth: SUBCHANNELS="<read_device_bus_id>,<write_device_bus_id>,
<data_device_bus_id>"
lcs: SUBCHANNELS="<read_device_bus_id>,<write_device_bus_id>"
ctc: SUBCHANNELS="<read_device_bus_id>,<write_device_bus_id>"
For example (a sample qeth SUBCHANNEL statement):
SUBCHANNELS=0.0.0600,0.0.0601,0.0.0602
To force a specific CTC protocol, additionals parameters can be added. For example:
CTCPROT=<n>
Where <n> is one of the following:
· 0 for compatibility mode (used with non-Linux peers other than S/390 and zSeries operating
systems)
· 1 for extended mode
· 2 for CTC-based tty (only supported on Linux-to-Linux connections)
· 3 for compatibility mode with S/390 and zSeries operating systems
• PEERID=<userid>
Where <userid> represents the ID of the guest machines you want to connect to. Note that the
ID must be written in capital letters. For example, a PEERID connection to a z/VM TCP/IP service
machine should be written as:
PEERID=TCPIP
Note that the PEERID parameter replaces the IUCV parameter used with the Linux kernel version
2.4.
The following parameters are optional:
• HOSTNAME=<string>
Where <string> is the hostname of the newly-installed Linux guest.
Chapter 1. Steps to Get You Started
7
• NETTYPE=<type>
Where <type> must be one of the following: ctc, iucv, lcs, or qeth.
• IPADDR=<IP>
Where <IP> is the IP address of the new Linux guest.
• NETWORK=<network>
Where <network> is the address of your network.
• NETMASK=<netmask>
Where <netmask> is the netmask.
• BROADCAST=<broadcast>
Where <broadcast> is the broadcast address.
• GATEWAY=<gw>
Where <gw> is either the gateway-IP for your eth device or the IP address of the ctc/escon/iucv
point-to-point partner.
• MTU=<mtu>
Where <mtu> is the Maximum Transmission Unit (MTU) for this connection.
• DNS=<server1>:<server2>:...:<serverN>
Where <server1>:<server2>:...:<serverN> is a list of DNS servers, separated by
colons. For example:
DNS=10.0.0.1:10.0.0.2
• SEARCHDNS=<domain1>:<domain2>:...:<domainN>
Where <domain1>:<domain2>:...:<domainN> is a list of the search domains, separated by
colons. For example:
SEARCHDNS=example.com:example.org
• PORTNAME=<osa_portname> | <lcs_portnumber>
This variable supports OSA devices operating in qdio mode or non-qdio mode.
When using qdio mode: <qeth_portname> is the portname specified on the OSA device when
operating in qeth mode. PORTNAME is only required for z/VM 4.3 or older without APARs
VM63308 and PQ73878.
When using non-qdio mode: <lcs_portnumber> is used to pass the relative port number as
integer in the range of 0 through 15.
• FCP_<n>="<device_number> <SCSI_ID> <WWPN> <SCSI_LUN> <FCP_LUN>"
The variables can be used on systems with FCP devices to preconfigure the FCP setup and can be
subsequently edited in anaconda during the installation. An example value may look similar to:
FCP_1="0.0.5000 0x01 0x5105074308c212e9 0x0 4010"
•
<n> is an integer value (e.g. FCP_1, FCP_2, ...).
•
<device_number> is used to specify the address of the FCP device ( 0.0.5000 for device
5000, for example).
•
<SCSI_ID> is specified in hex-value, typically sequential values (e.g. 0x01, 0x02 ... ) are
used over multiple FCP_ variables.
•
<WWPN> is the world wide port name used for routing (often in conjunction with multipathing)
and is as a 16-digit hex value (e.g. 0x5105074308c212e9).
8
Chapter 1. Steps to Get You Started
•
•
<SCSI_LUN> refers to the local SCSI logical unit value and is specified as a hex-value, typically sequential values (e.g. 0x00, 0x01, ...) are used over multiple FCP_ variables.
<FCP_LUN> refers to the storage logical unit identifier and is specified as a hex-value (such as
0x4010).
Note
Each of the values used in the FCP parameters (FCP_1, FCP_2, ...) are site-specific and are
normally supplied by the FCP storage administrator.
The following parameter for kickstart installations is optional:
• RUNKS=<value>
Where <value> is defined as 1 if you want to run the installation program in noninteractive mode
in the 3270 terminal, or 0 otherwise.
Note
Make sure that your kickstart file contains all required parameters before you use this option.
If any of the network parameters required to make the network operate correctly are omitted from the
parm file, a prompt appears during the installation boot process.
If you logged off, reconnect and log in using z/VM guest ID you configured for installation. If you
are not in CMS mode, enter it now.
i cms
Create an executable script containing the commands necessary to IPL the kernel image and start the
installation. The following sample script is a typical initial start-up script:
/* */
’CL RDR’
’PURGE RDR ALL’
’SPOOL PUNCH * RDR’
’PUNCH KERNEL IMG A (NOH’
’PUNCH REDHAT PARM A (NOH’
’PUNCH INITRD IMG A (NOH’
’CH RDR ALL KEEP NOHOLD’
’IPL 00C CLEAR’
The initial installation start-up script prompts you for information about your networking and DASDs
unless you have specified all necessary information in the parm file.
Once all questions have been answered, you are ready to begin the core installation program, loader.
To continue with the installation, refer to Chapter 2 Installing Red Hat Enterprise Linux for further
instructions.
Chapter 1. Steps to Get You Started
9
1.6. Installing in an LPAR using the Red Hat Enterprise Linux
LPAR CD
The following steps must be taken when installing Red Hat Enterprise Linux onto an LPAR.
•
Log in on the Hardware Master Console (HMC) or the Support Element Workplace (SEW) as a user
with sufficient privileges to install a new OS to an LPAR. The SYSPROG user is recommended.
•
Select Images, then select the LPAR to which you wish to install. Use the arrows in the frame on
the right side to navigate to the CPC Recovery menu.
•
Double-click on Load from CD-ROM or Server.
•
In the dialog box that follows, select Local CD-ROM then click Continue.
•
In the dialog that follows, keep the default selection of generic.ins then click Continue.
•
Skip to Section 1.8 Installing in an LPAR (Common Steps) to continue.
1.7. Installing in an LPAR without the Red Hat Enterprise Linux
for S/390 CD-ROMs
•
Log in on the Support Element Workplace as a user with sufficient privileges to install a new OS to
an LPAR.
•
Select Images, then select the LPAR you wish to install to.
•
Use the arrows in the frame on the right side to navigate to the CPC Recovery menu.
•
Double-click on Load from CD-ROM or Server.
•
In the dialog box that follows, select FTP Source, and enter the following information:
Host Computer:
Hostname or IP address of the FTP server you wish to install from (for example,
ftp.redhat.com)
User ID:
Your user name on the FTP server (or anonymous)
Password:
Your password (use your email address if you are logging in as anonymous)
Account:
Leave this field empty
File location (can be left blank):
Directory on the FTP server holding Red Hat Enterprise Linux for S/390 (for example,
/pub/redhat/linux/rawhide/s390)
•
Click Continue.
•
In the dialog that follows, keep the default selection of redhat.ins and click Continue.
•
Refer to Section 1.8 Installing in an LPAR (Common Steps) to continue.
10
Chapter 1. Steps to Get You Started
1.8. Installing in an LPAR (Common Steps)
Once the Red Hat Enterprise Linux installation program has started (if the red field behind the LPAR
icon is disappearing, the installation program has begun), select the LPAR and double-click on Operating System Messages.
The initial installation start-up script asks you questions about your networking and DASD configurations. Red Hat Enterprise Linux 4 has changed the limit for parameter file definitions and now accepts
thirty-two (32) parameters. Any information not specified in the parameter file must be specified by
answering the installation program questions.
Once all questions have been answered, you are ready to begin the core installation program, loader.
To continue with the installation, refer to Chapter 2 Installing Red Hat Enterprise Linux for further
instructions.
Note
If you install over a network with FTP or HTTP you must perform a text mode installation.
1.9. Do You Have Enough Disk Space?
Nearly every modern-day operating system (OS) uses disk partitions, and Red Hat Enterprise Linux is
no exception. When you install Red Hat Enterprise Linux, you may have to work with disk partitions.
The disk space used by Red Hat Enterprise Linux must be separate from the disk space used by other
OSes you may have installed on your system.
For
more
information
about
disks
and
Section 2.13.4 Recommended Partitioning Scheme.
partition
configuration,
refer
to
Chapter 2.
Installing Red Hat Enterprise Linux
This chapter explains how to perform a Red Hat Enterprise Linux installation using the graphical,
mouse-based installation program. The following topics are discussed:
•
Becoming familiar with the installation program’s user interface
•
Starting the installation program
•
Selecting an installation method
•
Configuration steps during the installation (language, keyboard, mouse, partitioning, etc.)
•
Finishing the installation
2.1. The Graphical Installation Program User Interface
If you have used a graphical user interface (GUI) before, you are already familiar with this process;
use your mouse to navigate the screens, click buttons, or enter text fields.
You can also navigate through the installation using the keyboard. The [Tab] key allows you to move
around the screen, the Up and Down arrow keys to scroll through lists, [+] and [-] keys expand and
collapse lists, while [Space] and [Enter] selects or removes from selection a highlighted item. You
can also use the [Alt]-[X] key command combination as a way of clicking on buttons or making other
screen selections, where [X] is replaced with any underlined letter appearing within that screen.
2.2. The Text Mode Installation Program User Interface
The Red Hat Enterprise Linux text mode installation program uses a screen-based interface that includes most of the on-screen widgets commonly found on graphical user interfaces. Figure 2-1, and
Figure 2-2, illustrate the screens that appear during the installation process.
Note
While text mode installations are not explicitly documented, those using the text mode installation
program can easily follow the GUI installation instructions.
12
Chapter 2. Installing Red Hat Enterprise Linux
Figure 2-1. Installation Program Widgets as seen in Boot Loader Configuration
Figure 2-2. Installation Program Widgets as seen in Disk Druid
Here is a list of the most important widgets shown in Figure 2-1 and Figure 2-2:
•
Window — Windows (usually referred to as dialogs in this manual) appear on your screen throughout the installation process. At times, one window may overlay another; in these cases, you can only
interact with the window on top. When you are finished in that window, it disappears, allowing you
to continue working in the window underneath.
•
Checkbox — Checkboxes allow you to select or deselect a feature. The box displays either an
asterisk (selected) or a space (unselected). When the cursor is within a checkbox, press [Space] to
select or deselect a feature.
•
Text Input — Text input lines are regions where you can enter information required by the installation program. When the cursor rests on a text input line, you may enter and/or edit information on
that line.
•
Text Widget — Text widgets are regions of the screen for the display of text. At times, text widgets
may also contain other widgets, such as checkboxes. If a text widget contains more information
Chapter 2. Installing Red Hat Enterprise Linux
13
than can be displayed in the space reserved for it, a scroll bar appears; if you position the cursor
within the text widget, you can then use the [Up] and [Down] arrow keys to scroll through all
the information available. Your current position is shown on the scroll bar by a # character, which
moves up and down the scroll bar as you scroll.
•
Scroll Bar — Scroll bars appear on the side or bottom of a window to control which part of a list or
document is currently in the window’s frame. The scroll bar makes it easy to move to any part of a
file.
•
Button Widget — Button widgets are the primary method of interacting with the installation program. You progress through the windows of the installation program by navigating these buttons,
using the [Tab] and [Enter] keys. Buttons can be selected when they are highlighted.
•
Cursor — Although not a widget, the cursor is used to select (and interact with) a particular widget.
As the cursor is moved from widget to widget, it may cause the widget to change color, or the cursor
itself may only appear positioned in or next to the widget. In Figure 2-1, the cursor is positioned on
the OK button. Figure 2-2, shows the cursor on the Edit button.
2.2.1. Using the Keyboard to Navigate
Navigation through the installation dialogs is performed through a simple set of keystrokes. To move
the cursor, use the [Left], [Right], [Up], and [Down] arrow keys. Use [Tab], and [Alt]-[Tab] to cycle
forward or backward through each widget on the screen. Along the bottom, most screens display a
summary of available cursor positioning keys.
To "press" a button, position the cursor over the button (using [Tab], for example) and press [Space]
or [Enter]. To select an item from a list of items, move the cursor to the item you wish to select and
press [Enter]. To select an item with a checkbox, move the cursor to the checkbox and press [Space]
to select an item. To deselect, press [Space] a second time.
Pressing [F12] accepts the current values and proceeds to the next dialog; it is equivalent to pressing
the OK button.
Caution
Unless a dialog box is waiting for your input, do not press any keys during the installation process
(doing so may result in unpredictable behavior).
2.3. Running the Installation Program
After following the steps outlined in Chapter 1 Steps to Get You Started for booting an LPAR or VM
system, telnet or ssh to the configured Linux install system on the S/390. Logging on via ssh is
the preferred method.
Although the text mode installation program is run by default for most installations, you can optionally
run the graphical installation program available for both VM and LPAR installations via the NFS
installation method.
Note
If you have a slow network connection or prefer a text-based installation, do not set the DISPLAY=
variable in the parm file. The text-based installation is similar to the graphical installation; however,
14
Chapter 2. Installing Red Hat Enterprise Linux
the graphical installation offers more package selection details and other options not available in
text-based installs. It is strongly recommended to use the graphical installation whenever possible.
To run the graphical installation, use a workstation that has an X Window System server or VNC
client installed. Use an SSH client that allows X11 forwarding or a Telnet client. SSH is strongly
recommended for its security features as well as its ability to forward X and VNC sessions. Enable
X11 forwarding in your SSH client prior to connecting to the Linux image (the Linux guest running
on z/VM).
2.3.1. Installation using X11 Forwarding
For example, to connect to the Linux image and display the graphical installation program using
OpenSSH with X11 forwarding on a Linux workstation, type the following at the workstation shell
prompt:
ssh -X linuxvm.example.com
The -X option enables X11 forwarding.
The graphical installation program cannot be started if your DNS or hostnames are not set correctly,
or the Linux image is not allowed to open applications on your display. You can prevent this by setting
a correct DISPLAY= variable. Add the parameter DISPLAY=workstationname:0.0 in the parameter file, replacing workstationname with the hostname of the client workstation connecting to
the Linux Image. Allow the Linux image to connect to the workstation using the command xhost
+linuxvm on the local workstation.
If the graphical installation via NFS does not automatically begin for you, verify the DISPLAY= variable settings in the parm file. If performing a VM installation, rerun the installation to load the new
parm file on the reader. Additionally, make sure when performing an X11 forwarded display that the
X server is started on the workstation machine. Finally, make sure the NFS installation method is
chosen, as this is the only method that supports graphical installations.
2.3.2. Installation using VNC
If you are using VNC, a message on the workstation SSH terminal prompts you to start the VNC client
viewer and details the VNC display specifications. Enter the specifications from the SSH terminal into
the VNC client viewer and connect to the Linux image to begin the installation.
Once you have logged into the Linux image the loader will start the installation program.
When the loader starts, several screens appear for selecting the installation method.
2.4. Installing from a Hard Drive (DASD)
The Select Partition screen applies only if you are installing from a disk partition (that is, if you
selected Hard Drive in the Installation Method dialog). This dialog allows you to name the disk
partition and directory from which you are installing Red Hat Enterprise Linux.
Enter the device name of the partition containing the Red Hat Enterprise Linux ISO images. There is
also a field labeled Directory holding images.
If the ISO images are in the root (top-level) directory of a partition, enter a /. If the ISO images
are located in a subdirectory of a mounted partition, enter the name of the directory holding the
ISO images within that partition. For example, if the partition on which the ISO images is normally
mounted as /home/, and the images are in /home/new/, you would enter /new/.
Chapter 2. Installing Red Hat Enterprise Linux
15
After you have identified the disk partition, the Welcome dialog appears.
2.5. Installing via NFS
The NFS dialog applies only if you are installing from an NFS server (if you selected NFS Image in
the Installation Method dialog).
Enter the domain name or IP address of your NFS server. For example, if you are installing from a
host named eastcoast in the domain example.com, enter eastcoast.example.com in the NFS
Server field.
Next, enter the name of the exported directory. If you followed the setup described
in
Section 1.3 Preparing for a Network Installation,
you
would
enter
the
directory
/location/of/disk/space/ which contains the RedHat/ directory.
If the NFS server is exporting a mirror of the Red Hat Enterprise Linux installation tree, enter
the directory which contains the RedHat/ directory. (If you do not know this directory
path, ask your system administrator.) For example, if the NFS site contains the directory
/mirrors/redhat/arch/RedHat/, enter /mirrors/redhat/arch/ (where arch is replaced
with the architecture type of your system, such as i386, ia64, ppc, or s390). If everything was
specified properly, a message appears indicating that the installation program for Red Hat Enterprise
Linux is running.
Figure 2-3. NFS Setup Dialog
If the NFS server is exporting the ISO images of the Red Hat Enterprise Linux CD-ROMs, enter the
directory which contains the ISO images.
Next, the Welcome dialog appears.
2.6. Installing via FTP
The FTP dialog applies only if you are installing from an FTP server (if you selected FTP in the
Installation Method dialog). This dialog allows you to identify the FTP server from which you are
installing Red Hat Enterprise Linux.
16
Chapter 2. Installing Red Hat Enterprise Linux
Figure 2-4. FTP Setup Dialog
Enter the name or IP address of the FTP site you are installing from, and the name of the directory
containing the RedHat/ installation files for your architecture. For example, if the FTP site contains
the directory /mirrors/redhat/arch/RedHat/, enter /mirrors/redhat/arch/ (where arch
is replaced with the architecture type of your system, such as i386, ia64, ppc, or s390). If everything
was specified properly, a message box appears indicating that base/hdlist is being retrieved.
Next, the Welcome dialog appears.
Tip
You can save disk space by using the ISO images you have already copied to the server. To accomplish this, install Red Hat Enterprise Linux using ISO images without copying them into a single tree
by loopback mounting them. For each ISO image:
mkdir discX
mount -o loop example-1.iso discX
2.7. Installing via HTTP
The HTTP dialog applies only if you are installing from an HTTP server (if you selected HTTP in the
Installation Method dialog). This dialog prompts you for information about the HTTP server from
which you are installing Red Hat Enterprise Linux.
Enter the name or IP address of the HTTP site you are installing from, and the name of the directory
containing the RedHat/ installation files for your architecture. For example, if the HTTP site contains
the directory /mirrors/redhat/arch/RedHat/, enter /mirrors/redhat/arch/ (where arch
is replaced with the architecture type of your system, such as i386, ia64, ppc, or s390). If everything
was specified properly, a message box appears indicating that base/hdlist is being retrieved.
Chapter 2. Installing Red Hat Enterprise Linux
17
Figure 2-5. HTTP Setup Dialog
Next, the Welcome dialog appears.
Tip
You can save disk space by using the ISO images you have already copied to the server. To accomplish this, install Red Hat Enterprise Linux using ISO images without copying them into a single tree
by loopback mounting them. For each ISO image:
mkdir discX
mount -o loop example-1.iso discX
2.8. Welcome to Red Hat Enterprise Linux
The Welcome screen does not prompt you for any input. Read over the help text in the left panel for
additional instructions and information on where to register your Red Hat Enterprise Linux product.
Notice the Hide Help button at the bottom left corner of the screen. The help screen is open by default.
To minimize the help text, click on Hide Help.
Click on the Next button to continue.
2.9. FCP Devices
FCP (Fibre Channel protocol) devices enable zSeries systems to use SCSI devices rather than DASD
devices.
Typically, an operating system is loaded, and the automatic probing and defining of hardware is done
by the OS. However, zSeries systems require that any FCP (Fibre Channel protocol) device be entered
manually in order for the installation program to recognize the hardware. The values entered here are
unique to each site in which they are setup.
Each value entered should be verified as correct, as any mistakes made may cause the system not to
operate properly.
For more information on these values, refer to the hardware documentation that came with your system
and check with the system administrator who has setup the network for this system.
18
Chapter 2. Installing Red Hat Enterprise Linux
2.10. Language Selection
Using your mouse, select a language to use for the installation (refer to Figure 2-6).
Selecting the appropriate language also helps target your time zone configuration later in the installation. The installation program tries to define the appropriate time zone based on what you specify on
this screen.
Figure 2-6. Language Selection
Once you select the appropriate language, click Next to continue.
2.11. Disk Partitioning Setup
Partitioning allows you to divide your hard drive into isolated sections, where each section behaves as
its own hard drive. Partitioning is particularly useful if you run multiple operating systems.
On this screen, you can choose to perform automatic partitioning, or manual partitioning using Disk
Druid.
Automatic partitioning allows you to perform an installation without having to partition your drive(s)
yourself. If you do not feel comfortable with partitioning your system, it is recommended that you do
not choose to partition manually and instead let the installation program partition for you.
To partition manually, choose the Disk Druid partitioning tool.
Chapter 2. Installing Red Hat Enterprise Linux
19
Warning
The Red Hat Update Agent downloads updated packages to /var/spool/up2date/ by default.
If you partition the system manually, and create a separate /var/ partition, be sure to create the
partition large enough (3.0 GB more more) to download package updates.
Figure 2-7. Disk Partitioning Setup
If you chose to manually partition using Disk Druid, refer to Section 2.13 Partitioning Your System.
Warning
If you receive an error after the Disk Partitioning Setup phase of the installation saying something
similar to
The partition table on device hda was unreadable. To create new partitions it must be initialized, causing the loss of ALL DATA on this drive.
you may not have a partition table on that drive or the partition table on the drive may not be recognizable by the partitioning software used in the installation program.
No matter what type of installation you are performing, backups of the existing data on your systems
should always be made.
20
Chapter 2. Installing Red Hat Enterprise Linux
2.12. Automatic Partitioning
Automatic partitioning allows you to have some control concerning what data is removed (if any)
from your system. Your options are:
•
Remove all Linux partitions on this system — select this option to remove only Linux partitions
(partitions created from a previous Linux installation). This does not remove other partitions you
may have on your hard drive(s).
•
Remove all partitions on this system — select this option to remove all partitions on your hard
drive(s) (this includes partitions created by other operating systems).
Caution
If you select this option, all data on the selected hard drive(s) is removed by the installation program. Do not select this option if you have information that you want to keep on the hard drive(s)
where you are installing Red Hat Enterprise Linux.
•
Keep all partitions and use existing free space — select this option to retain your current data
and partitions, assuming you have enough free space available on your hard drive(s).
Figure 2-8. Automatic Partitioning
Using your mouse, choose the hard drive(s) on which you want Red Hat Enterprise Linux to be
installed. If you have two or more hard drives, you can choose which hard drive(s) should contain this
installation. Unselected hard drives, and any data on them, are not touched.
Caution
It is always a good idea to back up any data that you have on your systems. For example, if you are
upgrading or creating a dual-boot system, you should back up any data you wish to keep on your
hard drive(s). Mistakes do happen and can result in the loss of all your data.
To review and make any necessary changes to the partitions created by automatic partitioning, select
the Review option. After selecting Review and clicking Next to move forward, the partitions created
Chapter 2. Installing Red Hat Enterprise Linux
21
for you in Disk Druid appear. You can make modifications to these partitions if they do not meet your
needs.
Click Next once you have made your selections to proceed.
2.13. Partitioning Your System
If you chose to partition manually, you must tell the installation program where to install Red Hat
Enterprise Linux. This is done by defining mount points for one or more disk partitions in which Red
Hat Enterprise Linux is installed.
Figure 2-9. Partitioning with Disk Druid
The partitioning tool used by the installation program is Disk Druid. With the exception of certain
esoteric situations, Disk Druid can handle the partitioning requirements for a typical installation.
2.13.1. Graphical Display of DASD Device(s)
Disk Druid offers a graphical representation of your DASD device(s).
Using your mouse, click once to highlight a particular field in the graphical display. Double-click to
edit an existing partition and assign a mount point.
Above the display, you can review the Drive name (such as /dev/dasda), the Geom (which shows the
hard disk’s geometry and consists of three numbers representing the number of cylinders, heads, and
sectors as reported by the hard disk), and the Model of the hard drive as detected by the installation
program.
22
Chapter 2. Installing Red Hat Enterprise Linux
2.13.2. Disk Druid’s Buttons
These buttons control Disk Druid’s actions. They are used to change the attributes of a partition (for
example the file system type and mount point) and also to create RAID devices. Buttons on this screen
are also used to accept the changes you have made, or to exit Disk Druid. For further explanation,
take a look at each button in order:
•
Edit: Used to modify attributes of the partition currently selected in the Partitions section. Selecting Edit opens a dialog box. Some or all of the fields can be edited, depending on whether the
partition information has already been written to disk.
•
Make RAID: Make RAID can be used if you want to provide redundancy to any or all disk
partitions. It should only be used if you have experience using RAID. To read more about RAID,
refer to the RAID (Redundant Array of Independent Disks) chapter in the Red Hat Enterprise Linux
System Administration Guide.
•
To make a RAID device, you must first create (or reuse existing) software RAID partitions. Once
you have created two or more software RAID partitions, select Make RAID to join the software
RAID partitions into a RAID device.
2.13.3. Partition Fields
Above the partition hierarchy are labels which present information about the partitions you are creating. The labels are defined as follows:
•
Device: This field displays the partition’s device name.
•
Mount Point/RAID/Volume: A mount point is the location within the directory hierarchy at which
a volume exists; the volume is "mounted" at this location. This field indicates where the partition is
mounted. If a partition exists, but is not set, then you need to define its mount point. Double-click
on the partition or click the Edit button.
•
Type: This field shows the partition’s file system type (for example, ext2 or ext3).
•
Format: This field shows if the partition being created will be formatted.
•
Size (MB): This field shows the partition’s size (in MB).
•
Start: This field shows the cylinder on your hard drive where the partition begins.
•
End: This field shows the cylinder on your hard drive where the partition ends.
Hide RAID device/LVM Volume Group members: Select this option if you do not want to view
any RAID device or LVM Volume Group members that have been created.
2.13.4. Recommended Partitioning Scheme
Unless you have a reason for doing otherwise, we recommend that you create the following partitions:
•
A swap partition (at least 256 MB) — swap partitions are used to support virtual memory. In other
words, data is written to a swap partition when there is not enough RAM to store the data your
system is processing.
If you are unsure about what size swap partition to create, make it twice the amount of RAM on
your machine (but no larger than 2 GB). It must be of type swap.
Creation of the proper amount of swap space varies depending on a number of factors including the
following (in descending order of importance):
•
The applications running on the machine.
Chapter 2. Installing Red Hat Enterprise Linux
•
The amount of physical RAM is installed on the machine.
•
The version of the OS.
23
Swap should equal 2x physical RAM for up to 2 GB of physical RAM, and then 1x physical RAM
for any amount above 2 GB, but never less than 32 MB.
Using this formula, a system with 2 GB of physical RAM would have 4 GB of swap, while one
with 3 GB of physical RAM would have 5 GB of swap. Creating a large swap space partition can
be especially helpful if you plan to upgrade your RAM at a later time.
Tip
If your partitioning scheme requires a swap partition that is larger than 2 GB, you should create
an additional swap partition. For example, if you need 4 GB of swap, you should create two 2 GB
swap partitions. If you have 4 GB of RAM, you should create three 2 GB swap partitions. Red Hat
Enterprise Linux supports up to 32 swap files.
For systems with really large amounts of RAM (more than 32 GB) you can likely get away with a
smaller swap partition (around 1x, or less, of physical RAM).
•
A /boot/ partition (100 MB) — the partition mounted on /boot/ contains the operating system
kernel (which allows your system to boot Red Hat Enterprise Linux), along with files used during
the bootstrap process. Due to the limitations of most PC BIOSes, creating a small partition to hold
these files is a good idea. For most users, a 100 MB boot partition is sufficient.
•
A root partition (500 MB - 5.0 GB) — this is where "/" (the root directory) is located. In this
setup, all files (except those stored in /boot) are on the root partition.
A 500 MB partition allows you to install a minimal installation, while a 5.0 GB root partition lets
you perform a full installation, choosing all package groups.
2.13.5. Editing Partitions
To edit a partition, select the Edit button or double-click on the existing partition.
Note
If the partition already exists on your hard disk, you can only change the partition’s mount point. To
make any other changes, you must delete the partition and recreate it.
2.14. Network Configuration
If you do not have a network device, this screen does not appear during your installation and you
should advance to Section 2.15 Firewall Configuration.
24
Chapter 2. Installing Red Hat Enterprise Linux
Figure 2-10. Network Configuration
The installation program automatically detects any network devices you have and display them in the
Network Devices list.
Once you have selected a network device, click Edit. From the Edit Interface pop-up screen, you can
choose to configure the IP address and Netmask of the device via DHCP (or manually if DHCP is not
selected) and you can choose to activate the device at boot time. If you select Activate on boot, your
network interface is started when you boot. If you do not have DHCP client access or you are unsure
what to provide here, please contact your network administrator.
Note
DHCP is not available for automatic configuration of CTC/Escon devices. Point-to-Point addresses
are used to configure connections for these devices.
Chapter 2. Installing Red Hat Enterprise Linux
25
Figure 2-11. Editing a Network Device
Note
Do not use the numbers as seen in this sample configuration. These values will not work for your own
network configuration. If you are not sure what values to enter, contact your network administrator for
assistance.
If you have a hostname (fully qualified domain name) for the network device, you can choose to have
DHCP (Dynamic Host Configuration Protocol) automatically detect it or you can manually enter the
hostname in the field provided.
Finally, if you entered the IP and Netmask information manually, you may also enter the Gateway
address and the Primary, Secondary, and Tertiary DNS addresses.
Tip
Even if your computer is not part of a network, you can enter a hostname for your system. If you do
not take this opportunity to enter a name, your system will be known as localhost.
Tip
To change your network configuration after you have completed the installation, use the Network
Administration Tool.
Type the system-config-network command in a shell prompt to launch the Network Administration Tool. If you are not root, it prompts you for the root password to continue.
26
Chapter 2. Installing Red Hat Enterprise Linux
2.15. Firewall Configuration
Red Hat Enterprise Linux offers firewall protection for enhanced system security. A firewall exists
between your computer and the network, and determines which resources on your computer remote
users on the network can access. A properly configured firewall can greatly increase the security of
your system.
Figure 2-12. Firewall Configuration
Next, you can decide whether to enable a firewall for your Red Hat Enterprise Linux system.
No firewall
No firewall provides complete access to your system and does no security checking. Security
checking is the disabling of access to certain services. This should only be selected if you are
running on a trusted network (not the Internet) or plan to do more firewall configuration later.
Enable firewall
If you choose Enable firewall, connections are not accepted by your system (other than the
default settings) that are not explicitly defined by you. By default, only connections in response
to outbound requests, such as DNS replies or DHCP requests, are allowed. If access to services
running on this machine is needed, you can choose to allow specific services through the firewall.
If you are connecting your system to the Internet, this is the safest option to choose.
Next, select which services, if any, should be allowed to pass through the firewall.
Enabling these options allow the specified services to pass through the firewall. Note, these services
may not be installed on the system by default. Make sure you choose to enable any options that you
may need.
Chapter 2. Installing Red Hat Enterprise Linux
27
Remote Login (SSH)
Secure Shell (SSH) is a suite of tools for logging in to and executing commands on a remote
machine. If you plan to use SSH tools to access your machine through a firewall, enable this option. You need to have the openssh-server package installed in order to access your machine
remotely, using SSH tools.
Web Server (HTTP, HTTPS)
The HTTP and HTTPS protocols are used by Apache (and by other Web servers) to serve webpages. If you plan on making your Web server publicly available, enable this option. This option
is not required for viewing pages locally or for developing webpages. You must install the httpd
package if you want to serve webpages.
File Transfer (FTP)
The FTP protocol is used to transfer files between machines on a network. If you plan on making
your FTP server publicly available, enable this option. You must install the vsftpd package in
order to publicly serve files.
Mail Server (SMTP)
If you want to allow incoming mail delivery through your firewall, so that remote hosts can
connect directly to your machine to deliver mail, enable this option. You do not need to enable
this if you collect your mail from your Internet Service Provider’s server using POP3 or IMAP,
or if you use a tool such as fetchmail. Note that an improperly configured SMTP server can
allow remote machines to use your server to send spam.
Note
By default, the Sendmail mail transport agent (MTA) does not accept network connections from
any host other than the local computer. To configure Sendmail as a server for other clients, you
must edit /etc/mail/sendmail.mc and change the DAEMON_OPTIONS line to also listen on
network devices (or comment out this option entirely using the dnl comment delimiter). You
must then regenerate /etc/mail/sendmail.cf by running the following command (as root):
make -C /etc/mail
You must have the sendmail-cf package installed for this to work.
Additionally, you can now setup SELinux (Security Enhanced Linux) during your installation of Red
Hat Enterprise Linux.
SELinux allows you to provide granular permissions for all subjects (users, programs, and processes)
and objects (files and devices). You can safely grant an application only the permissions it needs to do
its function.
The SELinux implementation in Red Hat Enterprise Linux is designed to improve the security of
various server daemons while minimizing the impact on the day-to-day operations of your system.
Three states are available for you to choose from during the installation process:
•
Disable — Select Disable if you do not want SELinux security controls enabled on this system.
The Disabled setting turns enforcing off and does not set up the machine for the use of a security
policy.
•
Warn — Select Warn to be notified of any denials. The Warn state assigns labels to data and
programs, and logs them, but does not enforce any policies. The Warn state is a good starting place
for users who eventually want a fully active SELinux policy, but who first want to see what effects
the policy would have on their general system operation. Note that users selecting the Warn state
may notice some false positive and negative notifications.
28
•
Chapter 2. Installing Red Hat Enterprise Linux
Active — Select Active if you want SELinux to act in a fully active state. The Active state enforces
all policies, such as denying access to unauthorized users for certain files and programs, for additional system protection. Choose this state only if you are sure that your system can still properly
function with SELinux fully enabled.
For additional information about SELinux, refer to the following URLs:
•
http://www.redhat.com/docs/
•
http://www.nsa.gov/selinux/
Tip
To change your security configuration after you have completed the installation, use the Security
Level Configuration Tool.
Type the system-config-securitylevel command in a shell prompt to launch the Security Level
Configuration Tool. If you are not root, it prompts you for the root password to continue.
2.16. Language Support Selection
You can install and support multiple languages for use on your system.
You must select a language to use as the default language. The default language is the language used
on the system once the installation is complete. Typically, the default language is the language you
selected to use during the installation.
If you choose to install other languages during this installation, you can change your default language
after the installation. If you are only going to use one language on your system, selecting only that
language saves significant disk space.
Caution
If you select only one language, you can only use that specified language after the installation is
complete.
Chapter 2. Installing Red Hat Enterprise Linux
29
Figure 2-13. Language Support Selection
To use more than one language on your system, choose specific languages to be installed or select all
languages to have all available languages installed on your Red Hat Enterprise Linux system.
Use the Reset button to cancel your selections. Resetting reverts to the default; only the language you
selected for use during the installation is installed.
Tip
To change the language configuration after you have completed the installation, use the Language
Configuration Tool.
Type the system-config-language command in a shell prompt to launch the Language Configuration Tool. If you are not root, it prompts you for the root password to continue.
2.17. Time Zone Configuration
Set your time zone by selecting the city closest to your computer’s physical location.
There are two ways for you to select your time zone:
•
Using your mouse, click on the interactive map to select a specific city (represented by a yellow
dot). A red X appears indicating your selection.
•
You can also scroll through the list at the bottom of the screen to select your time zone. Using your
mouse, click on a location to highlight your selection.
30
Chapter 2. Installing Red Hat Enterprise Linux
Figure 2-14. Configuring the Time Zone
Select System Clock uses UTC if you know that your system is set to UTC.
Tip
To change your time zone configuration after you have completed the installation, use the Time and
Date Properties Tool.
Type the system-config-date command in a shell prompt to launch the Time and Date Properties
Tool. If you are not root, it prompts you for the root password to continue.
To run the Time and Date Properties Tool as a text-based application, use the command
timeconfig.
2.18. Set Root Password
Setting up a root account and password is one of the most important steps during your installation.
Your root account is similar to the administrator account used on Windows NT machines. The root
account is used to install packages, upgrade RPMs, and perform most system maintenance. Logging
in as root gives you complete control over your system.
Note
The root user (also known as the superuser) has complete access to the entire system; for this reason, logging in as the root user is best done only to perform system maintenance or administration.
Chapter 2. Installing Red Hat Enterprise Linux
31
Figure 2-15. Root Password
Use the root account only for system administration. Create a non-root account for your general use
and su - to root when you need to fix something quickly. These basic rules minimize the chances of
a typo or an incorrect command doing damage to your system.
Tip
To become root, type su - at the shell prompt in a terminal window and then press [Enter]. Then,
enter the root password and press [Enter].
The installation program prompts you to set a root password1 for your system. You cannot proceed to
the next stage of the installation process without entering a root password.
The root password must be at least six characters long; the password you type is not echoed to the
screen. You must enter the password twice; if the two passwords do not match, the installation program
asks you to enter them again.
You should make the root password something you can remember, but not something that is easy for
someone else to guess. Your name, your phone number, qwerty, password, root, 123456, and anteater
are all examples of bad passwords. Good passwords mix numerals with upper and lower case letters
and do not contain dictionary words: Aard387vark or 420BMttNT, for example. Remember that the
password is case-sensitive. If you write down your password, keep it in a secure place. However, it is
recommended that you do not write down this or any password you create.
1.
A root password is the administrative password for your Red Hat Enterprise Linux system. You should only
log in as root when needed for system maintenance. The root account does not operate within the restrictions
placed on normal user accounts, so changes made as root can have implications for your entire system.
32
Chapter 2. Installing Red Hat Enterprise Linux
Note
Do not use one of the example passwords offered in this manual. Using one of these passwords
could be considered a security risk.
Tip
To change your root password after you have completed the installation, use the Root Password
Tool.
Type the system-config-rootpassword command in a shell prompt to launch the Root Password
Tool. If you are not root, it prompts you for the root password to continue.
2.19. Package Group Selection
Now that you have made most of the choices for your installation, you are ready to confirm the default
package selection or customize packages for your system.
The Package Installation Defaults screen appears and details the default package set for your Red
Hat Enterprise Linux installation. This screen varies depending on the version of Red Hat Enterprise
Linux you are installing.
If you choose to accept the current package list, skip ahead to Section 2.20 Preparing to Install.
To customize your package set further, select Customize the set of packages to be installed option
on the screen. Clicking Next takes you to the Package Group Selection screen.
You can select package groups, which group components together according to function (for example,
X Window System and Editors), individual packages, or a combination of the two.
Note
Users of zSeries systems who want support for developing or running 31-bit applications are encouraged to select the Compatibility Arch Support and Compatibility Arch Development Support
packages to install architecure specific support for their systems.
To select a component, click on the checkbox beside it (refer to Figure 2-16).
Chapter 2. Installing Red Hat Enterprise Linux
33
Figure 2-16. Package Group Selection
Select each component you wish to install. Selecting Everything (at the end of the component list)
installs all packages included with Red Hat Enterprise Linux.
Once a package group has been selected, click on Details to view which packages are installed by
default, and to add or remove optional packages from that group.
Figure 2-17. Package Group Details
34
Chapter 2. Installing Red Hat Enterprise Linux
2.20. Preparing to Install
A screen preparing you for the installation of Red Hat Enterprise Linux now appears.
For your reference, a complete log of your installation can be found in /root/install.log once
you reboot your system.
Warning
If, for some reason, you would rather not continue with the installation process, this is your last
opportunity to safely cancel the process and reboot your machine. Once you press the Next button,
partitions are written and packages are installed. If you wish to abort the installation, you should
reboot now before any existing information on any hard drive is rewritten.
To cancel this installation process, you must stop the VM. To do this, and restart CMS, type #cp i
cms in the 3270 console window.
2.21. Installing Packages
At this point there is nothing left for you to do until all the packages have been installed. How quickly
this happens depends on the number of packages you have selected and your computer’s speed.
2.22. Installation Complete
Congratulations! Your Red Hat Enterprise Linux installation is now complete!
The installation program prompts you to prepare your system for reboot.
Once the installation is complete, you must IPL (boot) from the DASD(s) where Red Hat Enterprise
Linux has been installed. For example, on the 3270 console you may issue the command #cp i 200.
Note
Assuming you are to disconnect from the 3270 console, use #cp disc instead of #cp logout or #cp
log. This allows Red Hat Enterprise Linux for S/390 to continue running when not connected to the
3270 console.
Following IPLing the installed Red Hat Enterprise Linux OS, you may log on to the system via
telnet or ssh. It is important to note that the only place you can log in as root is from the 3270 or
from other devices as listed in /etc/securetty. To log in as root from remote systems, use ssh.
The first time you start your Red Hat Enterprise Linux system in run level 5 (the graphical run level),
the Setup Agent is presented, which guides you through the Red Hat Enterprise Linux configuration.
Using this tool, you can set your system time and date, install software, register your machine with
Red Hat Network, and more. The Setup Agent lets you configure your environment at the beginning,
so that you can get started using your Red Hat Enterprise Linux system quickly.
For more information on using the Setup Agent, refer to the chapter titled Getting Started in the Red
Hat Enterprise Linux Step By Step Guide.
For information on registering your Red Hat Enterprise Linux subscription, refer to
Section 2.23 Activate Your Subscription.
Chapter 2. Installing Red Hat Enterprise Linux
35
2.23. Activate Your Subscription
Before you can access service and software maintenance information, and the support documentation included in your subscription, you must activate your subscription by registering with Red Hat.
Registration includes these simple steps:
•
Provide a Red Hat login
•
Provide a subscription number
•
Connect your system
The first time you boot your installation of Red Hat Enterprise Linux, you are prompted to register
with Red Hat using the Setup Agent. If you follow the prompts during the Setup Agent, you can
complete the registration steps and activate your subscription.
If you can not complete registration during the Setup Agent (which requires network access), you
can alternatively complete the Red Hat registration process online at http://www.redhat.com/register/.
2.23.1. Provide a Red Hat Login
If you do not have an existing Red Hat login, you can create one when prompted during the Setup
Agent or online at:
https://www.redhat.com/apps/activate/newlogin.html
A Red Hat login enables your access to:
•
Software updates, errata and maintenance via Red Hat Network
•
Red Hat technical support resources, documentation, and Knowledgebase
If you have forgotten your Red Hat login, you can search for your Red Hat login online at:
https://rhn.redhat.com/help/forgot_password.pxt
2.23.2. Provide Your Subscription Number
Your subscription number is located in the package that came with your order. If your package did not
include a subscription number, your subscription was activated for you and you can skip this step.
You can provide your subscription number when prompted during the Setup Agent or by visiting
http://www.redhat.com/register/.
2.23.3. Connect Your System
The Red Hat Network Registration Client helps you connect your system so that you can begin to get
updates and perform systems management. There are three ways to connect:
1. During the Setup Agent — Check the Send hardware information and Send system package
list options when prompted.
2. After the Setup Agent has been completed — From the Main Menu, go to System Tools, then
select Red Hat Network.
3. After the Setup Agent has been completed — Enter the following command from the command
line as the root user:
36
Chapter 2. Installing Red Hat Enterprise Linux
• /usr/bin/up2date --register
Appendix A.
Removing Red Hat Enterprise Linux
To remove Red Hat Enterprise Linux from the S/390 you can either remove the DASD allocation from
the VM or you can start the installation program and re-format all of the DASD partitions. Instead of
selecting OK you will select Cancel to exit the installation program.
38
Appendix A. Removing Red Hat Enterprise Linux
Appendix B.
Sample Parameter Files
The IBM S/390(R) and IBM eServer zSeries(R) architectures use a special parameter file to set up
networking before the installation program (anaconda) can be started. This section describes the
contents of the parameter file.
The parameter file has a limit of 32 total parameters. To accommodate limitations of the parameter files, a new configuration file on a CMS DASD should be used to configure the initial network
setup and the DASD specification. The .parm file should contain the real kernel parameters, such
as root=/dev/ram0 ro ip=off ramdisk_size=40000, and single parameters which are
not assigned to variables, such as vnc. Two new parameters which point the installation program at
the new configuration file need to be added to the .parm file. They are CMSDASD and CMSCONF.
CMSDASD=<cmsdasd_address>
Where <cmsdasd_address> represents the list of the device ID of the CMS DASD device
which contains the configuration file. This is usually the CMS user’s ’A’ disk. This option is
applicable only for users who have a CMS formatted disk (z/VM) available.
For example: CMSDASD=191
CMSCONFFILE=<configuration_file>
Where <configuration_file> represents the name of the configuration file. This value
must be specified in lower case. It is specified in a Linux style file name format. The CMS file
REDHAT CONF is specified as redhat.conf. This option is applicable only for users who have
a CMS formatted disk (z/VM) available.
For example: CMSCONFFILE=redhat.conf
DASD=<dasd-list>
Where <dasd-list> represents the list of DASD devices to be used by Red Hat Enterprise
Linux.
Although automatic probing for DASDs is done if this parameter is omitted, it is highly recommended to include the DASD= parameter, as the device numbers (and therefore the device names)
can vary when a new DASD is added to the Red Hat Enterprise Linux guest. This can result in
an unusable system.
For example: DASD=0.0.0100,0.0201-0.0.0204
The following parameters are required to set up networking:
SUBCHANNELS=
Provides required device bus IDs for the various network interfaces.
qeth: SUBCHANNELS="<read_device_bus_id>,<write_device_bus_id>,
<data_device_bus_id>"
lcs: SUBCHANNELS="<read_device_bus_id>,<write_device_bus_id>"
ctc: SUBCHANNELS="<read_device_bus_id>,<write_device_bus_id>"
Due to the length of the qeth command line, it has been broken
into two lines.
For example (a sample qeth SUBCHANNEL statement):
SUBCHANNELS=0.0.0600,0.0.0601,0.0.0602
40
Appendix B. Sample Parameter Files
To force a specific CTC protocol, additional parameters can be added. For example:
CTCPROT=<n>
where <n> is one of the following:
•
0 for compatibility mode (used with non-Linux peers other than S/390 and zSeries operating
systems)
•
1 for extended mode
•
2 for CTC-based tty (only supported on Linux-to-Linux connections)
•
3 for compatibility mode with S/390 and zSeries operating systems
PEERID=<userid>
Where <userid> represents the ID of the guest machines you want to connect to. Note that
the ID must be written in capital letters. For example, an IUCV connection to a z/VM TCP/IP
service machine would be written as:
PEERID=TCPIP
The following parameters are optional:
HOSTNAME=<string>
Where <string> is the hostname of the newly-installed Linux guest.
NETTYPE=<type>
Where <type> must be one of the following: ctc, iucv, qeth or lcs.
IPADDR=<IP>
Where <IP> is the IP address of the new Linux guest.
NETWORK=<network>
Where <network> is the address of your network.
NETMASK=<netmask>
Where <netmask> is the netmask.
BROADCAST=<broadcast>
Where <broadcast> is the broadcast address.
GATEWAY=<gw>
Where <gw> is either the gateway-IP for your eth device or the IP address of the ctc/escon/iucv
point-to-point partner.
MTU=<mtu>
Where <mtu> is the Maximum Transmission Unit (MTU) for this connection.
DNS=<server1>:<server2>:...:<serverN>
Where <server1>:<server2>:...:<serverN> is a list of DNS servers, separated by
colons. For example:
DNS=10.0.0.1:10.0.0.2
Appendix B. Sample Parameter Files
41
SEARCHDNS=<domain1>:<domain2>:...:<domainN>
Where <domain1>:<domain2>:...:<domainN> is a list of the search domains, separated
by colons. For example:
SEARCHDNS=example.com:example.org
PORTNAME=<osa_portname> | <lcs_portnumber>
This variable supports OSA devices operating in qdio mode or in non-qdio mode.
When using qdio mode: <qeth_portname> is the portname specified on the OSA device
when operating in qeth mode. PORTNAME is only required for z/VM 4.3 or older without
APARs VM63308 and PQ73878.
When using non-qdio mode: <lcs_portnumber> is used to pass the relative port number as
integer in the range of 0 through 15.
FCP_* (FCP_1, FCP_2, ...)
These variables can be used on systems with FCP devices to preconfigure the FCP setup (these
can be changed during the installation).
Use the following samples as a guide to formatting proper parameter files.
Sample file with minimally required parameters:
root=/dev/ram0 DASD=200
Note
The Red Hat Enterprise Linux installation program prompts the user for any required parameters not
specified in the parameter file.
Sample file configuring a CTC networking device:
Example of redhat.parm file:
root=/dev/ram0 ro ip=off ramdisk_size=40000
CMSDASD=191 CMSCONFFILE=redhat.conf
vnc
Example of redhat.conf file (pointed to by CMSCONFFILE in redhat.parm)
DASD=200
HOSTNAME=client.z900.example.com
NETTYPE=ctc
IPADDR=192.168.0.10
SUBCHANNELS=0.0.0150,0.0.0151
NETWORK=192.168.0.0
NETMASK=255.255.255.0
SEARCHDNS=example.com:dns.example.com:z900.example.com
BROADCAST=192.168.0.255
GATEWAY=192.168.0.1
DNS=192.168.0.254
MTU=1492
CTCPROT=0
42
Appendix B. Sample Parameter Files
Appendix C.
Upgrading Your Current System
This appendix explains the various methods available for upgrading your Red Hat Enterprise Linux
system.
C.1. Determining Whether to Upgrade or Re-Install
Although upgrades are supported from Red Hat Enterprise Linux 3, you are more likely to have a
consistent experience by backing up your data and then installing this release of Red Hat Enterprise
Linux 4 over your previous Red Hat Enterprise Linux installation.
This recommended reinstallation method helps to ensure the best system stability possible.
For more information about re-installing your Red Hat Enterprise Linux system, refer to the Technical
Whitepapers available online at http://www.redhat.com/docs/wp/.
If you currently use Red Hat Enterprise Linux 3, you can perform a traditional, installation programbased upgrade.
However, before you chose to upgrade your system, there are a few things you should keep in mind:
•
Individual package configuration files may or may not work after performing an upgrade due to
changes in various configuration file formats or layouts.
•
If you have one of Red Hat’s layered products (such as the Cluster Suite) installed, it may need to
be manually upgraded after the Red Hat Enterprise Linux upgrade has been completed.
•
Third party or ISV applications may not work correctly following the upgrade.
Upgrading your system installs the modular 2.6.x kernel as well as updated versions of the packages
which are currently installed on your system.
The upgrade process preserves existing configuration files by renaming them with an .rpmsave extension (for example, sendmail.cf.rpmsave). The upgrade process also creates a log of its actions
in /root/upgrade.log.
Caution
As software evolves, configuration file formats can change. It is very important to carefully compare
your original configuration files to the new files before integrating your changes.
Note
It is always a good idea to back up any data that you have on your systems. For example, if you are
upgrading or creating a dual-boot system, you should back up any data you wish to keep on your
hard drive(s). Mistakes do happen and can result in the loss of all of your data.
Some upgraded packages may require the installation of other packages for proper operation. If you
choose to customize your packages to upgrade, you may be required to resolve dependency prob-
44
Appendix C. Upgrading Your Current System
lems. Otherwise, the upgrade procedure takes care of these dependencies, but it may need to install
additional packages which are not on your system.
Depending on how you have partitioned your system, the upgrade program may prompt you to add an
additional swap file. If the upgrade program does not detect a swap file that equals twice your RAM,
it asks you if you would like to add a new swap file. If your system does not have a lot of RAM (less
than 128 MB), it is recommended that you add this swap file.
C.2. Upgrading Your System
The Upgrade Examine screen appears if you have instructed the installation program to perform an
upgrade.
Note
If the contents of your /etc/redhat-release file have been changed from the default, your Red Hat
Enterprise Linux installation may not be found when attempting an upgrade to Red Hat Enterprise
Linux 4.
You can relax some of the checks against this file by booting with the following boot command:
linux upgradeany
Use the linux upgradeany command if your Red Hat Enterprise Linux installation was not given as
an option to upgrade.
To perform an upgrade, select Perform an upgrade of an existing installation. Click Next when you
are ready to begin your upgrade.
To re-install your system, select Perform a new Red Hat Enterprise Linux installation and refer to
http://www.redhat.com/docs/wp/ as well as Chapter 2 Installing Red Hat Enterprise Linux for further
instructions.
To perform a new installation of Red Hat Enterprise Linux on your system, select Perform a new
Red Hat Enterprise Linux installation and refer to Chapter 2 Installing Red Hat Enterprise Linux
for further instructions.
C.3. Upgrading Packages
At this point, there is nothing left for you to do until all the packages have been upgraded or installed.
C.4. Upgrade Complete
Congratulations! Your Red Hat Enterprise Linux 4 upgrade is now complete!
The installation program prompts you to prepare your system for reboot.
For information on registering your Red Hat Enterprise Linux subscription, refer to
Section 2.23 Activate Your Subscription.
Appendix D.
Troubleshooting Your Installation of Red Hat
Enterprise Linux
This appendix discusses some common installation problems and their solutions.
D.1. You are Unable to Boot Red Hat Enterprise Linux
D.1.1. Is Your System Displaying Signal 11 Errors?
A signal 11 error, commonly know as a segmentation fault, means that the program accessed a memory
location that was not assigned.
If you receive a fatal signal 11 error during your installation, it is probably due to a hardware error in
memory on your system’s bus. A hardware error in memory can be caused by problems in executables
or with the system’s hardware. Like other operating systems, Red Hat Enterprise Linux places its own
demands on your system’s hardware. Some of this hardware may not be able to meet those demands,
even if they work properly under another OS.
Ensure that you have the latest installation updates and images from Red Hat. Review the online errata
to see if newer versions are available. If the latest images still fail, it may be due to a problem with
your hardware.
D.2. Trouble During the Installation
D.2.1. No devices found to install Red Hat Enterprise Linux
Error Message
If you receive an error message stating No devices found to install Red Hat Enterprise
Linux, then there may be an issue with your DASD devices. If you encounter this error, add the
DASD=<disks> parameter to your parm file (where disks is the DASD range reserved for installation), and start the install again.
Additionally, make sure that you format the DASDs using the dasdfmt command within a Linux root
shell, instead of formatting the DASDs using CMS.
D.2.2. Trouble with Partition Tables
If you receive an error after the Disk Partitioning Setup (Section 2.11 Disk Partitioning Setup) phase
of the installation saying something similar to
The partition table on device hda was unreadable. To create new partitions it must be initialized,
causing the loss of ALL DATA on this drive.
you may not have a partition table on that drive or the partition table on the drive may not be recognizable by the partitioning software used in the installation program.
No matter what type of installation you are performing, backups of the existing data on your systems
should always be made.
46
Appendix D. Troubleshooting Your Installation of Red Hat Enterprise Linux
D.2.3. Other Partitioning Problems
If you are using Disk Druid to edit partitions, but cannot move to the next screen, you probably have
not created all the partitions necessary for Disk Druid’s dependencies to be satisfied.
You must have the following partitions as a bare minimum:
•
A / (root) partition
•
A <swap> partition of type swap
Tip
When defining a partition’s type as swap, you do not have to assign it a mount point. Disk Druid
automatically assigns the mount point for you.
D.2.4. Are You Seeing Python Errors?
During some upgrades or installations of Red Hat Enterprise Linux, the installation program (also
known as anaconda) may fail with a Python or traceback error. This error may occur after the selection
of individual packages or while trying to save the upgrade log in the /tmp/directory. The error may
look similar to:
Traceback (innermost last):
File "/var/tmp/anaconda-7.1//usr/lib/anaconda/iw/progress_gui.py",
line 20, in run
rc = self.todo.doInstall ()
File "/var/tmp/anaconda-7.1//usr/lib/anaconda/todo.py", line 1468, in
doInstall
self.fstab.savePartitions ()
File "fstab.py", line 221, in savePartitions
sys.exit(0)
SystemExit: 0
Local variables in innermost frame:
self: <fstab.GuiFstab instance at 8446fe0>
sys: <module ’sys’ (built-in)>
ToDo object:
(itodo
ToDo
p1
(dp2
S’method’
p3
(iimage
CdromInstallMethod
p4
(dp5
S’progressWindow’
p6
<failed>
This error occurs in some systems where links to /tmp/ are symbolic to other locations or have been
changed since creation. These symbolic or changed links are invalid during the installation process,
so the installation program cannot write information and fails.
Appendix D. Troubleshooting Your Installation of Red Hat Enterprise Linux
47
If you experience such an error, first try to download any available errata for anaconda. Errata can be
found at:
http://www.redhat.com/support/errata/
The anaconda website may also be a useful reference and can be found online at:
http://rhlinux.redhat.com/anaconda/
You can also search for bug reports related to this problem. To search Red Hat’s bug tracking system,
go to:
http://bugzilla.redhat.com/bugzilla/
Finally, if you are still facing problems related to this error, register your product and contact our
support team. To register your product, go to:
http://www.redhat.com/apps/activate/
D.3. Problems After Installation
D.3.1. Remote Graphical Desktops and XDMCP
If you have installed the X Window System and would like to log in to your Red Hat Enterprise Linux
system using a graphical login manager, enable the X Display Manager Control Protocol (XDMCP).
This protocol allows users to remotely log in to a desktop environment from any X Window System compatible client (such as a network-connected workstation or X terminal). To enable remote
login using XDMCP, edit the following line in the /etc/X11/gdm/gdm-config file on the Red Hat
Enterprise Linux system with a text editor such as vi or nano:
[xdmcp]
Enable=false
Edit the line to read Enable=true, save the file, and exit the text editor. Switch to runlevel 5 to start
the X server:
/sbin/init 5
From the client machine, start remote X session using X. For example:
X :1 -query s390vm.example.com
The command connects to the remote X server via XDMCP (replace s390vm.example.com with
the hostname of the remote X server) and displays the remote graphical login screen on display :1 of
the client system (usually accessible by using the [Ctrl]-[Alt]-[F8] key combination).
You may also access remote desktop sessions using a nested X server, which opens the remote
desktop as a window in your current X session. Xnest allows users to open a remote desktop nested
within their local X session. For example, run Xnest using the following command, replacing
s390vm.example.com with the hostname of the remote X server:
Xnest :1 -query s390vm.example.com
48
Appendix D. Troubleshooting Your Installation of Red Hat Enterprise Linux
D.3.2. Problems When You Try to Log In
If you did not create a user account in the Setup Agent, log in as root and use the password you
assigned to root.
If you cannot remember your root password, boot your system as linux single.
Once you have booted into single user mode and have access to the # prompt, you must type passwd
root, which allows you to enter a new password for root. At this point you can type shutdown -r
now to reboot the system with the new root password.
If you cannot remember your user account password, you must become root. To become root, type su
- and enter your root password when prompted. Then, type passwd <username>. This allows you
to enter a new password for the specified user account.
If the graphical login screen does not appear, check your hardware for compatibility issues. The Hardware Compatibility List can be found at:
http://hardware.redhat.com/hcl/
D.3.3. Your Printer Does Not Work
If you are not sure how to set up your printer or are having trouble getting it to work properly, try
using the Printer Configuration Tool.
Type the system-config-printer command at a shell prompt to launch the Printer Configuration Tool. If you are not root, it prompts you for the root password to continue.
D.3.4. Apache-based httpd service/Sendmail Hangs During Startup
If you are having trouble with the Apache-based httpd service or Sendmail hanging at startup, make
sure the following line is in the /etc/hosts file:
127.0.0.1
localhost.localdomain
localhost
Appendix E.
Additional Boot Options
This appendix discusses additional boot and kernel boot options available for the Red Hat Enterprise
Linux installation program.
Add these boot options to the
Section 1.5 Installing under z/VM.
parameter
file.
For
more
information,
refer
to
Boot Time Command Arguments
askmethod
This command asks you to select the installation method you would like to use when booting
from the Red Hat Enterprise Linux CD-ROM.
dd=url
This argument causes the installation program to prompt you to use a driver image from a specified HTTP, FTP, or NFS network address.
display=IP:0
This command allows remote display forwarding. In this command, IP should be replaced with
the IP address of the system on which you want the display to appear.
On the system you want the display to appear on, you must execute the command xhost
+remotehostname, where remotehostname is the name of the host from which you are
running the original display. Using the command xhost +remotehostname limits access
to the remote display terminal and does not allow access from anyone or any system not
specifically authorized for remote access.
mediacheck
This command gives you the option of testing the integrity of the install source (if an ISO-based
method). This command works with the CD, DVD, hard drive ISO, and NFS ISO installation
methods. Verifying that the ISO images are intact before you attempt an installation helps to
avoid problems that are often encountered during an installation.
noprobe
This command disables hardware detection and instead prompts the user for hardware information.
rescue
This command runs rescue mode. Refer to the Red Hat Enterprise Linux System Administration
Guide for more information about rescue mode.
text
This command disables the graphical installation program and forces the installation program to
run in text mode.
vnc
This command allows you to install from a VNC server.
50
Appendix E. Additional Boot Options
vncpassword=
This command sets the password used to connect to the VNC server.
Appendix F.
Additional Information for S/390 and zSeries
Users
F.1. The sysfs File System
The Linux 2.6 kernel introduces the sysfs file system. The sysfs file system is described as a union
of the proc, devfs, and devpty file systems. The sysfs file system enumerates the devices and
busses attached to the system into a file system hierarchy that can be accessed from user space. It
is designed to handle the device and driver specific options that have previously resided in /proc/,
and encompass the dynamic device addition previously offered by devfs. At this early point in the
implementation of sysfs, there are many drivers and utilities that still refer to the older proc entries.
However, it is understood that sysfs is the way of the future.
The sysfs file system is mounted at /sys/ and contains directories that organize the devices attached
to the system in several different ways. The /sysfs/ subdirectories include:
1. The /devices/ directory
This directory contains the /css0/ directory. Its subdirectories represent all the subchannels
detected by the Linux kernel. Subchannel directories are named in the form 0.0.nnnn where
nnnn is the subchannel number in hex between 0 and ffff. Subchannel directories in turn contain
status files and another subdirectory which represents the actual device. The device directory is
named 0.0.xxxx where xxxx is the unit address for the device. The /devices/ directory
also contains status information as well as configuration options for the device.
2. The /bus/ directory
This contains a /ccw/ subdirectory and a /ccwgroup/ subdirectory. CCW devices are accessed
using channel command words. Devices in the /ccw/ directory only use one subchannel on the
mainframe channel subsystem. CCW group devices are also accessed with channel command
words, but they use more than one subchannel per device. For example, a 3390-3 DASD device
uses one subchannel, while a QDIO network connection for an OSA adapter uses three subchannels. The /ccw/ and the /ccwgroup/ directories both contain directories called devices
and drivers:
The /devices/ directory contains a symbolic link to the device directories in the
/sys/devices/css0/ directory.
The /drivers/ directory contains directories for each device driver currently loaded on the
system. The zFCP driver has a directory here. The /driver/ directory contains settings for the
device driver, as well as symbolic links to the devices it is using (in the /sys/devices/css0/
directory).
3. The /class/ directory
This contains directories that group together similar devices such as ttys, SCSI tape drives,
network devices, and other miscellaneous devices.
4. The /block/ directory
This directory contains directories for each of the block devices on the system. These are mostly
disk type devices such as real DASD, loopback devices, and software raid block devices. The
noticeable difference between older Linux systems and ones that use sysfs is the need to refer
to devices by their sysfs name. On a 2.4 kernel image, the zFCP driver was passed as its device
addresses. On the 2.6 Kernel image system the driver is passed as 0.0.1600.
52
Appendix F. Additional Information for S/390 and zSeries Users
F.2. Using the zFCP Driver
During the initial installation, you are prompted to enter SCSI/FCP information. If this information is
entered, it creates the /etc/zfcp.conf file which contains your SCSI configuration. It also adds the
line alias scsi_hostadapter zFCP to /etc/modprobe.conf. This loads the required zFCP
modules.
# cat /etc/zfcp.conf
0.0.010a 0x01 0x5005076300c18154 0x00 0x5719000000000000
# cat /etc/modprobe.conf
alias eth0 qeth
options dasd_mod dasd=201,4b2e
alias scsi_hostadapter zfcp
If no SCSI devices were defined during the initial installation, the following example demonstrates
how to add one manually:
# cd /lib/modules/2.6.7-1.451.2.3/kernel/drivers/s390/scsi
# modprobe zfcp
# lsmod
Module
zfcp
autofs4
qeth
qdio
ccwgroup
ipt_REJECT
ipt_state
ip_conntrack
iptable_filter
ip_tables
sd_mod
scsi_mod
dm_mod
ext3
jbd
dasd_fba_mod
dasd_eckd_mod
dasd_mod
Size
221460
39944
166288
60240
25344
23552
18944
57904
19712
37888
39688
182904
86408
179056
92720
25344
77056
85328
Used by
0 [permanent]
0
0
3 zfcp,qeth
1 qeth
1
5
1 ipt_state
1
3 ipt_REJECT,ipt_state,iptable_filter
0
2 zfcp,sd_mod
0
2
1 ext3
0
4
6 dasd_fba_mod,dasd_eckd_mod
# cd /sys/bus/ccw/drivers/zfcp/0.0.010a
# echo 1 > online
# cat online
1
# echo 0x5005076300c18154 > /sys/bus/ccw/drivers/zfcp/0.0.010a/port_add
# ls
0x5005076300c18154
availability
card_version
cmb_enable
cutype
detach_state
devtype
failed
fc_link_speed
fc_service_class
fc_topology
hardware_version
host2
in_recovery
lic_version
nameserver
online
port_add
port_remove
scsi_host_no
serial_number
s_id
status
wwnn
wwpn
# cd /sys/bus/ccw/drivers/zfcp/0.0.010a/0x5005076300c18154
# echo 0x5719000000000000 > unit_add
# ls
0x5719000000000000
d_id
in_recovery
status
unit_remove
Appendix F. Additional Information for S/390 and zSeries Users
detach_state
failed
scsi_id
unit_add
53
wwnn
# cat /sys/bus/ccw/drivers/zfcp/0.0.010a/scsi_host_no
0x0
# cat /sys/bus/ccw/drivers/zfcp/0.0.010a/0x5005076300c18154/scsi_id
0x1
# cat \
/sys/bus/ccw/drivers/zfcp/0.0.010a/0x5005076300c18154/0x5719000000000000/scsi_lun
0x0
# cat /sys/bus/scsi/devices/0\:0\:1\:0/hba_id
0.0.010a
# cat /sys/bus/scsi/devices/0\:0\:1\:0/wwpn
0x5005076300c18154
# cat /sys/bus/scsi/devices/0\:0\:1\:0/fcp_lun
0x5719000000000000
# cat /sys/bus/scsi/devices/0\:0\:1\:0/block/dev
8:0
# cat /sys/bus/scsi/devices/0\:0\:1\:0/block/sda1/dev
8:1
# cat /proc/scsi/scsi
Attached devices:
Host: scsi2 Channel: 00 Id: 01 Lun: 00
Vendor: IBM
Model: 2105F20
Type:
Direct-Access
Rev: .123
ANSI SCSI revision: 03
# fdisk /dev/sda1
# mke2fs -j /dev/sda1
# mount /dev/sda1 /mnt
# df
Filesystem
/dev/dasda1
none
/dev/dasdb1
/dev/sda1
1K-blocks
2344224
511652
2365444
3844088
Used Available Use% Mounted on
1427948
797196 65% /
0
511652
0% /dev/shm
32828
2212456
2% /opt
32828
3615988
1% /mnt
# cd /boot
# mv initrd-2.6.7-1.451.2.3.img initrd-2.6.7-1.451.2.3.img.orig
# mkinitrd -v --with=scsi_mod --with=zfcp --with=sd_mod
initrd-2.6.7-1.451.2.3.img 2.6.7-1.451.2.3
Looking for deps of module ide-disk
Looking for deps of module dasd_mod
Looking for deps of module dasd_eckd_mod
dasd_mod
Looking for deps of module dasd_mod
Looking for deps of module dasd_fba_mod dasd_mod
Looking for deps of module dasd_mod
Looking for deps of module ext3 jbd
Looking for deps of module jbd
Looking for deps of module scsi_mod
Looking for deps of module zfcp qdio scsi_mod
Looking for deps of module qdio
Looking for deps of module scsi_mod
Looking for deps of module sd_mod
scsi_mod
Looking for deps of module scsi_mod
Using modules: ./kernel/drivers/s390/block/dasd_mod.ko
./kernel/drivers/s390/block/dasd_eckd_mod.ko
./kernel/drivers/s390/block/dasd_fba_mod.ko ./kernel/fs/jbd/jbd.ko
./kernel/fs/ext3/ext3.ko ./kernel/drivers/scsi/scsi_mod.ko
54
Appendix F. Additional Information for S/390 and zSeries Users
./kernel/drivers/s390/cio/qdio.ko ./kernel/drivers/s390/scsi/zfcp.ko
./kernel/drivers/scsi/sd_mod.ko
Using loopback device /dev/loop0
/sbin/nash -> /tmp/initrd.cT1534/bin/nash
/sbin/insmod.static -> /tmp/initrd.cT1534/bin/insmod
‘/lib/modules/2.6.7-1.451.2.3/./kernel/drivers/s390/block/dasd_mod.ko’->
‘/tmp/initrd.cT1534/lib/dasd_mod.ko’
‘/lib/modules/2.6.7-1.451.2.3/./kernel/drivers/s390/block/dasd_eckd_mod.ko’ ->
‘/tmp/initrd.cT1534/lib/dasd_eckd_mod.ko’
‘/lib/modules/2.6.7-1.451.2.3/./kernel/drivers/s390/block/dasd_fba_mod.ko’ ->
‘/tmp/initrd.cT1534/lib/dasd_fba_mod.ko’
‘/lib/modules/2.6.7-1.451.2.3/./kernel/fs/jbd/jbd.ko’ ->
‘/tmp/initrd.cT1534/lib/jbd.ko’
‘/lib/modules/2.6.7-1.451.2.3/./kernel/fs/ext3/ext3.ko’ ->
‘/tmp/initrd.cT1534/lib/ext3.ko’
‘/lib/modules/2.6.7-1.451.2.3/./kernel/drivers/scsi/scsi_mod.ko’ ->
‘/tmp/initrd.cT1534/lib/scsi_mod.ko’
‘/lib/modules/2.6.7-1.451.2.3/./kernel/drivers/s390/cio/qdio.ko’ ->
‘/tmp/initrd.cT1534/lib/qdio.ko’
‘/lib/modules/2.6.7-1.451.2.3/./kernel/drivers/s390/scsi/zfcp.ko’ ->
‘/tmp/initrd.cT1534/lib/zfcp.ko’
‘/lib/modules/2.6.7-1.451.2.3/./kernel/drivers/scsi/sd_mod.ko’ ->
‘/tmp/initrd.cT1534/lib/sd_mod.ko’
Loading module dasd_mod with options dasd=201,4b2e
Loading module dasd_eckd_mod
Loading module dasd_fba_mod
Loading module jbd
Loading module ext3
Loading module scsi_mod
Loading module qdio
Loading module zfcp
Loading module sd_mod
# zipl -V
Using config file ’/etc/zipl.conf’
Target device information
Device..........................: 5e:00
Partition.......................: 5e:01
Device name.....................: dasda
DASD device number..............: 0201
Type............................: disk partition
Disk layout.....................: ECKD/compatible disk layout
Geometry - heads................: 15
Geometry - sectors..............: 12
Geometry - cylinders............: 3308
Geometry - start................: 24
File system block size..........: 4096
Physical block size.............: 4096
Device size in physical blocks..: 595416
Building bootmap ’/boot//bootmap’
Building menu ’rh-automatic-menu’
Adding #1: IPL section ’linux’ (default)
kernel image......: /boot/vmlinuz-2.6.7-1.451.2.3 at 0x10000
kernel parmline...: ’root=LABEL=/’ at 0x1000
initial ramdisk...: /boot/initrd-2.6.7-1.451.2.3.img at 0x800000
Preparing boot device: dasda (0201).
Preparing boot menu
Interactive prompt......: disabled
Menu timeout............: disabled
Default configuration...: ’linux’
Syncing disks...
Done.
Appendix F. Additional Information for S/390 and zSeries Users
55
F.3. Using mdadm to Configure RAID-Based and Multipath
Storage
Similar to other tools comprising the raidtools package set, the mdadm command can be used to
perform all the necessary functions related to administering multiple-device sets. This section explains
how mdadm can be used to:
•
Create a RAID device
•
Create a multipath device
F.3.1. Creating a RAID Device With mdadm
To create a RAID device, edit the /etc/mdadm.conf file to define appropriate DEVICE and ARRAY
values:
DEVICE /dev/sd[abcd]1
ARRAY /dev/md0 devices=/dev/sda1,/dev/sdb1,/dev/sdc1,/dev/sdd1
In this example, the DEVICE line is using traditional file name globbing (refer to the glob(7) man
page for more information) to define the following SCSI devices:
• /dev/sda1
• /dev/sdb1
• /dev/sdc1
• /dev/sdd1
The ARRAY line defines a RAID device (/dev/md0) that is comprised of the SCSI devices defined
by the DEVICE line.
Prior to the creation or usage of any RAID devices, the /proc/mdstat file shows no active RAID
devices:
Personalities :
read_ahead not set
Event: 0
unused devices: <none>
Next, use the above configuration and the mdadm command to create a RAID 0 array:
mdadm -C /dev/md0 --level=raid0 --raid-devices=4 /dev/sda1 /dev/sdb1 /dev/sdc1 \
/dev/sdd1
Continue creating array? yes
mdadm: array /dev/md0 started.
Once created, the RAID device can be queried at any time to provide status information. The following
example shows the output from the command mdadm --detail /dev/md0:
/dev/md0:
Version : 00.90.00
Creation Time : Mon Mar 1 13:49:10 2004
Raid Level : raid0
Array Size : 15621632 (14.90 GiB 15.100 GB)
Raid Devices : 4
Total Devices : 4
Preferred Minor : 0
Persistence : Superblock is persistent
56
Appendix F. Additional Information for S/390 and zSeries Users
Update Time : Mon Mar 1 13:49:10 2004
State : dirty, no-errors
Active Devices : 4
Working Devices : 4
Failed Devices : 0
Spare Devices : 0
Chunk Size : 64K
Number
Major
Minor
RaidDevice State
0
8
1
0
active sync
1
8
17
1
active sync
2
8
33
2
active sync
3
8
49
3
active sync
UUID : 25c0f2a1:e882dfc0:c0fe135e:6940d932
Events : 0.1
/dev/sda1
/dev/sdb1
/dev/sdc1
/dev/sdd1
F.3.2. Creating a Multipath Device With mdadm
In addition to creating RAID arrays, mdadm can also be used to take advantage of hardware supporting
more than one I/O path to individual SCSI LUNs (disk drives). The goal of multipath storage is
continued data availability in the event of hardware failure or individual path saturation. Because this
configuration contains multiple paths (each acting as an independent virtual controller) accessing a
common SCSI LUN (disk drive), the Linux kernel detects each shared drive once "through" each
path. In other words, the SCSI LUN (disk drive) known as /dev/sda may also be accessible as
/dev/sdb, /dev/sdc, and so on, depending on the specific configuration.
To provide a single device that can remain accessible if an I/O path fails or becomes saturated, mdadm
includes an additional parameter to its --level option. This parameter — multipath — directs
the md layer in the Linux kernel to re-route I/O requests from one pathway to another in the event of
an I/O path failure.
To create a multipath device, edit the /etc/mdadm.conf file to define values for the DEVICE and
ARRAY lines that reflect your hardware configuration.
Note
Unlike the previous RAID example (where each device specified in /etc/mdadm.conf must represent
different physical disk drives), each device in this file refers to the same shared disk drive.
The command used for the creation of a multipath device is similar to that used to create a RAID
device; the difference is the replacement of a RAID level parameter with the multipath parameter:
mdadm -C /dev/md0 --level=multipath --raid-devices=4 /dev/sda1 /dev/sdb1
/dev/sdc1 /dev/sdd1
Continue creating array? yes
mdadm: array /dev/md0 started.
Due to the length of the mdadm command line, it has been broken into two lines.
In this example, the hardware consists of one SCSI LUN presented as four separate SCSI devices, each
accessing the same storage by a different pathway. Once the multipath device /dev/md0 is created,
all I/O operations referencing /dev/md0 are directed to /dev/sda1, /dev/sdb1, /dev/sdc1, or
/dev/sdd1 (depending on which path is currently active and operational).
Appendix F. Additional Information for S/390 and zSeries Users
57
The configuration of /dev/md0 can be examined more closely using the command mdadm --detail
/dev/md0 to verify that it is, in fact, a multipath device:
/dev/md0:
Version : 00.90.00
Creation Time : Tue Mar 2 10:56:37 2004
Raid Level : multipath
Array Size : 3905408 (3.72 GiB 3.100 GB)
Raid Devices : 1
Total Devices : 4
Preferred Minor : 0
Persistence : Superblock is persistent
Update Time : Tue Mar 2 10:56:37 2004
State : dirty, no-errors
Active Devices : 1
Working Devices : 4
Failed Devices : 0
Spare Devices : 3
Number
0
1
2
3
Major
Minor
RaidDevice State
8
49
0
active sync
/dev/sdd1
8
17
1
spare
/dev/sdb1
8
33
2
spare
/dev/sdc1
8
1
3
spare
/dev/sda1
UUID : 4b564608:fa01c716:550bd8ff:735d92dc
Events : 0.1
Another feature of mdadm is the ability to force a device (be it a member of a RAID array or a
path in a multipath configuration) to be removed from an operating configuration. In the following
example, /dev/sda1 is flagged as being faulty, is then removed, and finally is added back into the
configuration. For a multipath configuration, these actions would not affect any I/O activity taking
place at the time:
# mdadm
mdadm:
# mdadm
mdadm:
# mdadm
mdadm:
#
/dev/md0 -f /dev/sda1
set /dev/sda1 faulty in /dev/md0
/dev/md0 -r /dev/sda1
hot removed /dev/sda1
/dev/md0 -a /dev/sda1
hot added /dev/sda1
F.4. Configuring IPL from a SCSI Device
Anaconda (the installation program) supports the direct installation of Red Hat Enterprise Linux to
SCSI devices. This section includes information on how to IPL from a SCSI device within z/VM.
F.4.1. IPL the SCSI Disk
To IPL the SCSI disk, we provide the WWPN and LUN to the machine loader using the SET LOADDEV
command.
set loaddev portname 50050763 00c18154 lun 57190000 00000000
Ready; T=0.01/0.01 15:47:53
q loaddev
PORTNAME 50050763 00C18154
BR_LBA
00000000 00000000
LUN
57190000 00000000
BOOTPROG 0
58
Appendix F. Additional Information for S/390 and zSeries Users
Ready; T=0.01/0.01 15:47:56
IPL the SCSI disk using the FCP device defined to the guest.
q fcp
00: FCP 010A ON FCP
010ACHPID C1 SUBCHANNEL = 0000
00:
010A QDIO-ELIGIBLE
QIOASSIST-ELIGIBLE
Ready; T=0.01/0.01 15:51:29
i 010a
00: I 010A
00: HCPLDI2816I Acquiring the machine loader from the processor
controller.
00: HCPLDI2817I Load completed from the processor controller.
00: HCPLDI2817I Now starting machine loader version 0001.
01: HCPGSP2630I The virtual machine is placed in CP mode due to a SIGP
stop and
store status from CPU 00.
00: MLOEVL012I: Machine loader up and running (version 0.13).
00: MLOPDM003I: Machine loader finished, moving data to final storage
location.
Linux version 2.6.7-1.451.2.3 ([email protected]) (gcc
version 3.4
.1 20040702 (Red Hat Linux 3.4.1-2)) #1 SMP Wed Jul 14 17:52:22 EDT 2004
We are running under VM (64 bit mode)
Note
The example may vary slightly from your Red Hat Enterprise Linux 4 installed system due to the code
available during the documentation process for this manual.
F.5. Adding DASD
The following is an example of how to add a DASD volume:
Note
Make sure the device is attached or linked to the Linux system if running under VM.
CP LINK RHEL4X 4B2E 4B2E MR
DASD 4B2E LINKED R/W
Use the cd command to change to the /sys/ directory that represents that volume:
# cd /sys/bus/ccw/drivers/dasd-eckd/0.0.4b2e/
# ls -l
total 0
-r--r--r-- 1 root root 4096 Aug 25 17:04 availability
-rw-r--r-- 1 root root 4096 Aug 25 17:04 cmb_enable
-r--r--r-- 1 root root 4096 Aug 25 17:04 cutype
Appendix F. Additional Information for S/390 and zSeries Users
-rw-r--r--r--r--r--r--r--r--rw-r--r--rw-r--r--rw-r--r--
1
1
1
1
1
1
root
root
root
root
root
root
root
root
root
root
root
root
4096
4096
4096
4096
4096
4096
Aug
Aug
Aug
Aug
Aug
Aug
25
25
25
25
25
25
17:04
17:04
17:04
17:04
17:04
17:04
59
detach_state
devtype
discipline
online
readonly
use_diag
Next, check to see if it is already online:
# cat online
0
If it is not online, run the following command to bring it online:
# echo 1 > online
# cat online
1
Verify which block devnode it is being accessed as:
# ls -l
total 0
-r--r--r-lrwxrwxrwx
-rw-r--r--r--r--r--rw-r--r--r--r--r--r--r--r--rw-r--r--rw-r--r--rw-r--r--
1
1
1
1
1
1
1
1
1
1
root
root
root
root
root
root
root
root
root
root
root
root
root
root
root
root
root
root
root
root
4096
0
4096
4096
4096
4096
4096
0
4096
4096
Aug
Aug
Aug
Aug
Aug
Aug
Aug
Aug
Aug
Aug
25
25
25
25
25
25
25
25
25
25
17:04
17:07
17:04
17:04
17:04
17:04
17:04
17:04
17:04
17:04
availability
block -> ../../../../block/dasdb
cmb_enable
cutype
detach_state
devtype
discipline
online
readonly
use_diag
As shown in this example, device 4B2E is being accessed as /dev/dasdb.
Use the cd command to change back to the /root directory and format the device:
# cd
# dasdfmt -b 4096 -d cdl -f /dev/dasdb -l LX4B2E -p -y
cyl
97 of
3338 |#----------------------------------------------|
2%
When the progress bar reaches the end and the format is complete, use fdasd to partition the device:
# fdasd -a /dev/dasdb
auto-creating one partition for the whole disk...
writing volume label...
writing VTOC...
checking !
wrote NATIVE!
rereading partition table...
Next, make a file system on the new partition:
# mke2fs -j /dev/dasdb1
mke2fs 1.35 (28-Feb-2004)
Filesystem label=
OS type: Linux
Block size=4096 (log=2)
Fragment size=4096 (log=2)
300960 inodes, 600816 blocks
60
Appendix F. Additional Information for S/390 and zSeries Users
30040 blocks (5.00%) reserved for the super user
First data block=0
19 block groups
32768 blocks per group, 32768 fragments per group
15840 inodes per group
Superblock backups stored on blocks:
32768, 98304, 163840, 229376, 294912
Writing inode tables: done
Creating journal (8192 blocks): done
Writing superblocks and filesystem accounting information: done
This filesystem will be automatically checked every 39 mounts or
180 days, whichever comes first. Use tune2fs -c or -i to override.
Mount the new file system:
# mount /dev/dasdb1 /opt
# mount
/dev/dasda1 on / type ext3 (rw)
none on /proc type proc (rw)
none on /sys type sysfs (rw)
none on /dev/pts type devpts (rw,gid=5,mode=620)
none on /dev/shm type tmpfs (rw)
/dev/dasdb1 on /opt type ext3 (rw)
Add an entry to /etc/fstab so that the file system is mounted at IPL time:
# vi /etc/fstab
# cat /etc/fstab
LABEL=/
1 1
none
0 0
none
0 0
none
0 0
none
0 0
/dev/dasdb1
1 2
/
ext3
defaults
/dev/pts
devpts
gid=5,mode=620
/dev/shm
tmpfs
defaults
/proc
proc
defaults
/sys
sysfs
defaults
/opt
ext3
defaults
Add the device to the option line for the dasd_mod in /etc/modprobe.conf Make sure to add the
new device at the end of the list, otherwise it changes the device number : devnode mapping
and file systems are not on the devices they used to be on.
# vi /etc/modprobe.conf
# cat /etc/modprobe.conf
alias eth0 qeth
options dasd_mod dasd=201,4B2E
Rerun mkinitrd to pick up the changes to modprobe.conf so that the device can be online and
mountable after the next IPL:
Note that the example below has been modified slightly for readability and for printing purposes.
Each line that ends with "(elf64-s390)" should be treated as one line with no spaces, such as
/tmp/initrd.AR1182/lib/dasd_mod.ko(elf64-s390).
# cd /boot
# mv initrd-2.6.7-1.451.2.3.img initrd-2.6.7-1.451.2.3.img.old
Appendix F. Additional Information for S/390 and zSeries Users
61
# mkinitrd -v initrd-2.6.7-1.451.2.3.img 2.6.7-1.451.2.3
Looking for deps of module ide-disk
Looking for deps of module dasd_mod
Looking for deps of module dasd_eckd_mod
dasd_mod
Looking for deps of module dasd_mod
Looking for deps of module dasd_fba_mod dasd_mod
Looking for deps of module dasd_mod
Looking for deps of module ext3 jbd
Looking for deps of module jbd
Using modules: ./kernel/drivers/s390/block/dasd_mod.ko
./kernel/drivers/s390/block/dasd_eckd_mod.ko
./kernel/drivers/s390/block/dasd_fba_mod.ko ./kernel/fs/jbd/jbd.ko
./kernel/fs/ext3/ext3.ko
Using loopback device /dev/loop0
/sbin/nash -> /tmp/initrd.AR1182/bin/nash
/sbin/insmod.static -> /tmp/initrd.AR1182/bin/insmod
copy from
/lib/modules/2.6.7-1.451.2.3/./kernel/drivers/s390/block/dasd_mod.ko
(elf64-s390) to
/tmp/initrd.AR1182/lib/dasd_mod.ko(elf64-s390)
copy from
/lib/modules/2.6.7-1.451.2.3/./kernel/drivers/s390/block/dasd_eckd_mod.ko
(elf64-s390) to
/tmp/initrd.AR1182/lib/dasd_eckd_mod.ko
(elf64-s390)
copy from
/lib/modules/2.6.7-1.451.2.3/./kernel/drivers/s390/block/dasd_fba_mod.ko
(elf64-s390) to
/tmp/initrd.AR1182/lib/dasd_fba_mod.ko
(elf64-s390)
copy from
/lib/modules/2.6.7-1.451.2.3/./kernel/fs/jbd/jbd.ko(elf64-s390) to
/tmp/initrd.AR1182/lib/jbd.ko(elf64-s390)
copy from
/lib/modules/2.6.7-1.451.2.3/./kernel/fs/ext3/ext3.ko(elf64-s390) to
/tmp/initrd.AR1182/lib/ext3.ko(elf64-s390)
Loading module dasd_mod with options dasd=201,4B2E
Loading module dasd_eckd_mod
Loading module dasd_fba_mod
Loading module jbd
Loading module ext3
Run zipl to save the changes to initrd for the next IPL:
# zipl -V
Using config file ’/etc/zipl.conf’
Target device information
Device..........................:
Partition.......................:
Device name.....................:
DASD device number..............:
Type............................:
Disk layout.....................:
Geometry - heads................:
Geometry - sectors..............:
Geometry - cylinders............:
Geometry - start................:
File system block size..........:
Physical block size.............:
Device size in physical blocks..:
Building bootmap ’/boot//bootmap’
Building menu ’rh-automatic-menu’
5e:00
5e:01
dasda
0201
disk partition
ECKD/compatible disk layout
15
12
3308
24
4096
4096
595416
62
Appendix F. Additional Information for S/390 and zSeries Users
Adding #1: IPL section ’linux’ (default)
kernel image......: /boot/vmlinuz-2.6.7-1.451.2.3 at 0x10000
kernel parmline...: ’root=LABEL=/’ at 0x1000
initial ramdisk...: /boot/initrd-2.6.7-1.451.2.3.img at 0x800000
Preparing boot device: dasda (0201).
Preparing boot menu
Interactive prompt......: disabled
Menu timeout............: disabled
Default configuration...: ’linux’
Syncing disks...
Done.
F.6. Adding a Network Device
The process of adding a network device has changed greatly for Red Hat Enterprise Linux. This is
due in part to the migration of the 2.4 kernel to the 2.6 kernel:
•
The proc file system is no longer used to control or obtain status on network devices.
•
The new sys file system now provides facilities for controlling devices.
• /sys/class/net/<interface_name>/device now
provides status on active devices.
<interface_name> is a name such as eth0 or ctc2 that is given to a network interface by the
device driver when the device is configured.
• /etc/chandev.conf no
longer exists.
The sys file system now contains the information that was placed in /etc/chandev.conf.
• /etc/modules.conf no
longer exists.
Network interface alias specifications are now placed in /etc/modprobe.conf.
Section F.6.1 Adding a qeth Device describes in detail how to add a qeth device to an existing instance of Red Hat Enterprise Linux. Section F.6.2 Quick Reference for Adding Network Devices is a
quick reference for installing other zSeries network interfaces.
F.6.1. Adding a qeth Device
First, determine whether the qeth device driver modules are loaded.
# lsmod | grep qeth
qeth
qdio
ipv6
ccwgroup
135240
45360
303984
15104
0
2 qeth
13 qeth
1 qeth
If the output of the lsmod command shows that the modules are not loaded, you must run the
modprobe command to load them:
# modprobe qeth
Next, create a qeth group device.
# echo <read_device_bus_id >,<write_device_bus_id >,<data_device_bus_id >
> /sys/bus/ccwgroup/drivers/qeth/group
Due to the length of this command, it has been broken into two lines.
Appendix F. Additional Information for S/390 and zSeries Users
63
In the following example, read_device_bus_id is 0.0.0600, write_device_bus_id is
0.0.0601, and data_device_bus_id is 0.0.0602. The device is a z/VM virtual NIC and the IP
address to be assigned to this interface is 192.168.70.69.
# echo 0.0.0600,0.0.0601,0.0.0602 > /sys/bus/ccwgroup/drivers/qeth/group
Next, verify that the qeth group device was created properly:
# ls /sys/bus/ccwgroup/drivers/qeth
0.0.0600 0.0.09a0 group notifier_register
You may optionally add a portname. First, you must check to see if a portname is required:
# cat /sys/bus/ccwgroup/drivers/qeth/0.0.0600/portname
no portname required
The response indicates that you do not need to provide a portname.
To add a port name, check that the devices are offline, and then run the following command:
Note
The device(s) must be offline when you add a portname.
# echo <portname> > /sys/bus/ccwgroup/drivers/qeth/0.0.0600/portname
Next, bring the device back online:
# echo 1 /sys/bus/ccwgroup/drivers/qeth/0.0.0600/online
Then verify the state of the device:
# cat /sys/bus/ccwgroup/drivers/qeth/0.0.0600/online
1
A return value of "1" indicates that the device is online, while a return value ’0’ indicates that the
device is offline.
Check to see what interface name was assigned to the device:
# cat /sys/bus/ccwgroup/drivers/qeth/0.0.0600/if_name
eth1
To change the value of if_name, run the following command:
# echo <new_if_name> > /sys/bus/ccwgroup/drivers/qeth/0.0.0600/if_name
You may optionally set additional parameters and features, depending on the way you are setting up
your system and the features you require.
•
add_hhlen
•
broadcast_mode
•
buffer_count
•
canonical_macaddr
64
Appendix F. Additional Information for S/390 and zSeries Users
•
card_type
•
checksumming
•
chpid
•
detach_state
•
fake_broadcast
•
fake_ll
•
ipa_takeover
•
portno
•
priority_queueing
•
recover
•
route4
•
rxip
•
state
•
ungroup
•
vipa
For
information
on
how
these
features
work,
refer
to
http://oss.software.ibm.com/developerworks/opensource/linux390/docu/lx26apr04dd01.pdf (Linux
for zSeries and S/390 Device Drivers, Features, and Commands).
Now you need to create the configuration file for your new interface. The network interface configuration files are placed in /etc/sysconfig/network-scripts/.
The network configuration files use the naming convention ifcfg-<device>, where device is the
value found in the if_name file in the qeth group device that was created earlier. In this example it is
eth1.
If there is an existing configuration file for another device of the same type already defined, the simplest solution is to copy it to the new name.
# cd /etc/sysconfig/network-scripts
# cp ifcfg-eth0 ifcfg-eth1
If you do not have a similar device defined you must create one. Use this example of ifcfg-eth0 as
a template.
/etc/sysconfig/network-scripts/ifcfg-eth0
# IBM QETH
DEVICE=eth0
BOOTPROTO=static
HWADDR=00:06:29:FB:5F:F1
IPADDR=9.12.20.136
NETMASK=255.255.255.0
ONBOOT=yes
NETTYPE=qeth
SUBCHANNELS=0.0.09a0,0.0.09a1,0.0.09a2
TYPE=Ethernet
Edit the new ifcfg-eth1 file.
Remove the HWADDR line for now.
Modify the DEVICE statement to reflect the contents of the if_name file from your ccwgroup.
Modify the IPADDR statement to reflect the IP address of your new interface.
Appendix F. Additional Information for S/390 and zSeries Users
65
Modify the NETMASK statement as needed.
If you want your new interface to be activated at boot time, then make sure ONBOOT is set to yes.
Make sure the SUBCHANNELS statement matches the hardware addresses for your qeth device.
/etc/sysconfig/network-scripts/ifcfg-eth1
# IBM QETH
DEVICE=eth1
BOOTPROTO=static
IPADDR=192.168.70.87
NETMASK=255.255.255.0
ONBOOT=yes
NETTYPE=qeth
SUBCHANNELS=0.0.0600,0.0.0601,0.0.0602
TYPE=Ethernet
A qeth device requires an alias definition in /etc/modprobe.conf. Edit this file and add an alias
for your interface.
/etc/modprobe.conf
alias eth0 qeth
alias eth1 qeth
options dasd_mod dasd=0.0.0100,0.0.4b19
Now you can start the new interface:
# ifup eth1
Check the status of the interface:
# ifconfig eth1
eth1
Link encap:Ethernet HWaddr 02:00:00:00:00:01
inet addr:192.168.70.87 Bcast:192.168.70.255 Mask:255.255.255.0
inet6 addr: fe80::ff:fe00:1/64 Scope:Link
UP BROADCAST RUNNING NOARP MULTICAST MTU:1492 Metric:1
RX packets:23 errors:0 dropped:0 overruns:0 frame:0
TX packets:3 errors:0 dropped:0 overruns:0 carrier:0
collisions:0 txqueuelen:1000
RX bytes:644 (644.0 b) TX bytes:264 (264.0 b)
Note that the HWaddr field in the first line of the ifconfig command output. The value after that
must be added to the ifcfg-eth1 file. Add a line like the following to that file:
HWADDR=02:00:00:00:00:01
Now ifcfg-eth1 looks similar to the following:
# IBM QETH
DEVICE=eth1
HWADDR=02:00:00:00:00:01
BOOTPROTO=static
IPADDR=192.168.70.69
NETMASK=255.255.255.0
ONBOOT=yes
NETTYPE=qeth
SUBCHANNELS=0.0.0600,0.0.0601,0.0.0602
TYPE=Ethernet
Check the routing for the new interface:
66
Appendix F. Additional Information for S/390 and zSeries Users
# route
Kernel IP routing table
Destination
Gateway
192.168.70.0
*
9.12.20.0
*
169.254.0.0
*
default
pdlrouter-if5.p
Genmask
255.255.255.0
255.255.255.0
255.255.0.0
0.0.0.0
Flags
U
U
U
UG
Metric
0
0
0
0
Ref
0
0
0
0
Use
0
0
0
0
Iface
eth1
eth0
eth1
eth0
Verify your changes by using the ping command to ping the gateway:
# ping -c 1 192.168.70.8
PING 192.168.70.8 (192.168.70.8) 56(84) bytes of data.
64 bytes from 192.168.70.8: icmp_seq=0 ttl=63 time=8.07 ms
If the default route information has changed, you must also update /etc/sysconfig/network accordingly.
F.6.2. Quick Reference for Adding Network Devices
There are several basic tasks for adding a network interface on zSeries systems.
•
Load the device driver.
•
Create the group device or, for IUCV, create the IUCV device.
•
Configure the device.
•
Set the device online (not applicable to IUCV).
•
Define the alias (if needed).
•
Create a configuration script.
•
Activate the device.
The following sections provide basic information for each task of each zSeries network device driver.
F.6.2.1. Working With the LCS Device Driver
The LAN channel station (LCS) device driver supports OSA-2 Ethernet/Token Ring, OSA-Express
Fast Ethernet in non-QDIO mode, and OSA-Express High Speed Token Ring in non-QDIO mode. For
z990, the LCS driver also supports Gigabit Ethernet in non-QDIO mode (including 1000Base-T).
Based on the type of interface being added, the LCS driver assigns one of two base interface names:
eth<n> for OSA-Express Fast Ethernet and Gigabit Ethernet tr<n> for Token Ring, where <n>
is an integer that uniquely identifies the device. <n> is 0 for the first device of that type, 1 for the
second, and so on.
•
Load the device driver:
# modprobe lcs
•
Create the group device:
# echo <read_device_bus_id>,<write_device_bus_id>
> /sys/bus/ccwgroup/drivers/lcs/group
Due to the length of this command, it has been broken into two lines.
•
Configure the device.
OSA cards can provide up to 16 ports for a single CHPID. By default, the LCS group device uses
port 0. To use a different port, issue a command similar to the following:
# echo <portno> > /sys/bus/ccwgroup/drivers/lcs/<device_bus_id>/portno
Appendix F. Additional Information for S/390 and zSeries Users
67
For more information about configuration of the LCS driver, refer to the following:
http://oss.software.ibm.com/developerworks/opensource/linux390/docu/lx26apr04dd01.pdf
(Linux for zSeries and S/390 Device Drivers, Features, and Commands)
•
Set the device online:
# echo 1 /sys/bus/ccwgroup/drivers/lcs/<read_device_bus_id>/online
•
Define the alias.
Based on the type interface being added, add a line to /etc/modprobe.conf that is similar to one
of the following:
eth<n> alias lcs
tr<n> alias lcs
•
Create a configuration script.
Create a file in /etc/sysconfig/network-scripts/ with a name like one of the following:
ifcfg-eth<n>
ifcfg-tr<n>
The file should look similar to the following:
/etc/sysconfig/network-scripts/ifcfg-eth0
# IBM LCS
DEVICE=eth0
BOOTPROTO=static
HWADDR=00:06:29:FB:5F:F1
IPADDR=9.12.20.136
NETMASK=255.255.255.0
ONBOOT=yes
NETTYPE=lcs
SUBCHANNELS=0.0.09a0,0.0.09a1
PORTNAME=0
TYPE=Ethernet
Based on the type interface being added, the DEVICE parameter should be one of the following:
DEVICE=eth<n>
DEVICE=tr<n>
•
Activate the device.
Based on the type interface being added, issue an ifup command:
# ifup eth<n>
# ifup tr<n>
F.6.2.2. Working With the QETH Device Driver
The QETH network device driver supports zSeries HiperSockets, OSA-Express Fast Ethernet, Gigabit
Ethernet (including 1000Base-T), High Speed Token Ring, and ATM features (running Ethernet LAN
emulation) in QDIO mode.
Based on the type of interface being added, the QETH driver assigns one of three base interface names:
•
hsi<n> for HiperSocket devices
•
eth<n> for OSA-Express Fast Ethernet and Gigabit Ethernet
•
tr<n> for Token Ring
The value <n> is an integer that uniquely identifies the device. <n> is 0 for the first device of that
type, 1 for the second, and so on.
•
Load the device driver:
68
Appendix F. Additional Information for S/390 and zSeries Users
# modprobe qeth
•
Create the group device:
# echo <read_device_bus_id>,<write_device_bus_id>,<data_device_bus_id>
> /sys/bus/ccwgroup/drivers/qeth/group
Due to the length of this command, it has been broken into two lines.
•
Configure the device.
For more information about configuration of the QETH driver, refer to the following:
http://oss.software.ibm.com/developerworks/opensource/linux390/docu/lx26apr04dd01.pdf
(Linux for zSeries and S/390 Device Drivers, Features, and Commands)
•
Set the device online:
# echo 1 /sys/bus/ccwgroup/drivers/qeth/<read_device_bus_id>/nline
•
Define the alias.
Based on the type interface being added, add a line to /etc/modprobe.conf that is like one of
the following:
hsi<n> alias qeth
eth<n> alias qeth
tr<n> alias qeth
•
Create a configuration script.
Create a file in /etc/sysconfig/network-scripts/ with a name like one of the following:
ifcfg-hsi<n>
ifcfg-eth<n>
ifcfg-tr<n>
The file should look like this:
/etc/sysconfig/network-scripts/ifcfg-eth0
# IBM QETH
DEVICE=eth0
BOOTPROTO=static
HWADDR=00:06:29:FB:5F:F1
IPADDR=9.12.20.136
NETMASK=255.255.255.0
ONBOOT=yes
NETTYPE=qeth
SUBCHANNELS=0.0.09a0,0.0.09a1,0.0.09a2
TYPE=Ethernet
Based on the type interface being added, the DEVICE parameter should be like one of the following:
DEVICE=hsi<n>
DEVICE=eth<n>
DEVICE=tr<n>
•
Activate the device.
Based on the type interface being added, issue an ifup command:
# ifup hsi<n>
# ifup eth<n>
# ifup tr<n>
Appendix F. Additional Information for S/390 and zSeries Users
69
F.6.2.3. Working With the CTC Device Driver
A Channel-to-Channel (CTC) connection is the typical high speed connection between mainframes.
The CTC device driver can be used to establish a point-to-point TCP/IP or tty connection between two
Linux for zSeries and S/390 instances or between a Linux for zSeries and S/390 instance and another
mainframe operating system instance such as z/OS, OS/390, z/VM, or z/VSE.
The CTC driver assigns a base interface name like the following:
ctc<n>
The value <n> is an integer that uniquely identifies the device. <n> is 0 for the first device of that
type, 1 for the second, and so on.
•
Load the device driver:
# modprobe ctc
•
Create the group device:
# echo <read_device_bus_id>,<write_device_bus_id>
> /sys/bus/ccwgroup/drivers/ctc/group
Due to the length of this command, it has been broken into two lines.
•
Configure the device.
Set the protocol:
# echo <protocol> /sys/bus/ccwgroup/drivers/ctc/<device_bus_id>/protocol
Where <protocol> is 0, 1, 2, or 3.
0 — This protocol provides compatibility with peers other than OS/390, or z/OS, for example, a
VM TCP service machine. This is the default.
1 — This protocol provides enhanced package checking for Linux peers.
2 — This protocol provides a CTC-based tty connection with a Linux peer.
3 — This protocol provides compatibility with OS/390 or z/OS peers.
For more information about configuration of the CTC driver, refer to the following:
http://oss.software.ibm.com/developerworks/opensource/linux390/docu/lx26apr04dd01.pdf
(Linux for zSeries and S/390 Device Drivers, Features, and Commands)
•
Set the device online:
# cho 1 /sys/bus/ccwgroup/drivers/lcs/<read_device_bus_id>/online
•
Define the alias.
Based on the type interface being added, add a line to /etc/modprobe.conf that is like the
following:
ctc<n> alias ctc
•
Create a configuration script.
Create a file in /etc/sysconfig/network-scripts/ with a name like the following:
ifcfg-ctc<n>
The file should look like the following:
/etc/sysconfig/network-scripts/ifcfg-ctc0
# IBM CTC
DEVICE=ctc0
BOOTPROTO=static
IPADDR=192.168.70.136
GATEWAY=172.16.70.136
NETMASK=255.255.255.255
ONBOOT=yes
70
Appendix F. Additional Information for S/390 and zSeries Users
SUBCHANNELS=0.0.1b00,0.0.1b01
NETTYPE=ctc
CTCPROT=0
TYPE=CTC
•
Activate the device.
Based on the type interface being added, issue an ifup command:
# ifup ctc<n>
F.6.2.4. Working With the IUCV Device Driver
The Inter-User Communication Vehicle (IUCV) is a VM communication facility that enables a program running in one VM guest to communicate with another VM guest, with a control program, or
even with itself. The Linux for zSeries and S/390 IUCV device driver is a network device driver that
uses IUCV to connect Linux guests running on different VM user IDs, or to connect a Linux guest to
another VM guest such as a TCP/IP service machine.
The IUCV driver assigns a base interface name like the following:
iucv<n>
The value <n> is an integer that uniquely identifies the device. <n> is 0 for the first device of that
type, 1 for the second, and so on.
•
Load the device driver:
# modprobe netiucv
•
Create the IUCV device:
# echo <peer_id> > /sys/bus/iucv/drivers/netiucv/connection
The value of <peer_id> is the guest ID of the VM guest you want to connect to. The IUCV
device driver interprets the ID as uppercase. This is usually TCPIP.
This creates a sysfs structure like the following:
cat /sys/bus/iucv/drivers/netiucv/netiucv<n>
The value <n> is an integer that uniquely identifies the device. <n> is 0 for the first device of
that type, 1 for the second, and so on.
•
Configure the device.
Set the maximum buffer size if needed:
# echo <value> > /sys/bus/iucv/drivers/netiucv/netiucv <n>/buffer
The <value> is the number of bytes you want to set. If you specify a value outside the valid
range, the command is ignored.
The permissible range of values for the maximum buffer size depends on the MTU settings. It must
be in the range <minimum MTU + header size> to <maximum MTU + header size>. The header
space is typically 4 bytes. The default for the maximum buffer size is 32768 bytes (32 KB).
For more information on configuration of the IUCV driver, refer to the following:
http://oss.software.ibm.com/developerworks/opensource/linux390/docu/lx26apr04dd01.pdf
(Linux for zSeries and S/390 Device Drivers, Features, and Commands)
•
Define the alias.
Based on the type interface being added, add a line to /etc/modprobe.conf that is like the
following:
iucv<n> alias netiucv
Appendix F. Additional Information for S/390 and zSeries Users
•
71
Create a configuration script.
Create a file in /etc/sysconfig/network-scripts/ with a name like the following:
ifcfg-iucv<n>
The file should look like this:
/etc/sysconfig/network-scripts/ifcfg-iucv0
# IBM IUCV
DEVICE=iucv0
BOOTPROTO=static
IPADDR=192.168.70.136
GATEWAY=172.16.70.136
NETMASK=255.255.255.255
ONBOOT=yes
NETTYPE=iucv
PEERID=TCPIP
TYPE=IUCV
•
Activate the device.
Based on the type interface being added, issue an ifup command like the following:
# ifup iucv<n>
F.7. Kernel-Related Information
Red Hat Enterprise Linux includes a modification to the way the Linux kernel timer interrupt is handled. Normally, a hardware timer is set to generate periodic interrupts at a fixed rate (100 times a
second for most architectures). These periodic timer interrupts are used by the kernel to schedule
various internal housekeeping tasks, such as process scheduling, accounting, and maintaining system
uptime.
While a timer-based approach works well for a system environment where only one copy of the kernel
is running, it can cause additional overhead when many copies of the kernel are running on a single
system (for example, as z/VM(R) guests). In these cases, having thousands of copies of the kernel
each generating interrupts many times a second can result in excessive system overhead.
Therefore, Red Hat Enterprise Linux now includes the ability to turn off periodic timer interrupts.
This is done through the /proc/ file system. To disable periodic timer interrupts, issue the following
command:
echo "0" > /proc/sys/kernel/hz_timer
To enable periodic timer interrupts, issue the following command:
echo "1" > /proc/sys/kernel/hz_timer
By default, periodic timer interrupts are enabled.
Periodic timer interrupt states can also be set at boot-time; to do so, add the following line to
/etc/sysctl.conf to disable periodic timer interrupts:
kernel.hz_timer = 0
72
Appendix F. Additional Information for S/390 and zSeries Users
Note
Disabling periodic timer interrupts can violate basic assumptions in system accounting tools. If you
notice a malfunction related to system accounting, verify that the malfunction disappears if periodic
timer interrupts are enabled, then submit a bug at http://bugzilla.redhat.com/bugzilla/ (for malfunctioning bundled tools), or inform the tool vendor (for malfunctioning third-party tools).
Index
F
/boot/, 23
/boot/ partition
recommended partitioning, 22
/root/install.log
install log file location, 34
/var/ partition
recommended partitioning, 22
FCP devices, 17
feedback
contact information for this manual, iv
firewall configuration, 26
customize incoming services, 26
customize trusted services, 26
security levels
enable firewall, 26
no firewall, 26
FTP
installation, 2, 15
A
G
accessibility, iv
activating your subscription, 35
automatic partitioning, 18, 20
graphical installation program
running from NFS, 13
VNC, 14
x11 forwarding, 14
Symbols
B
boot method
overview, 2
boot options
additional, 49
kernel, 49
C
clock, 29
configuration
clock, 29
network, 23
time, 29
time zone, 29
conventions
document, i
D
DASD
adding, 58
DASD installation, 14
Disk Druid
buttons, 22
editing partitions, 23
partitions, 21
disk partitioning, 18
disk space, 10
H
hard drive installation, 14
preparing for, 4
hardware
preparation, 1
hostname configuration, 25
how to use this manual, iii
HTTP
installation, 2, 16
I
install log file
/root/install.log, 34
installation
DASD, 14
disk space, 10
FTP, 2, 15
GUI
CD-ROM, 11
hard drive, 4, 14
HTTP, 2, 16
keyboard navigation, 13
network, 2
NFS, 2, 15
server information, 15
partitioning, 21
program
graphical user interface, 11
text mode user interface, 11
installation program
starting, 13
74
installing
without the LPAR CD
using a recent SEW, 9
without the Red Hat Enterprise Linux for S/390
CD-ROMs, 9
installing packages, 32
introduction, i
IPL configuration from a SCSI device, 57
NFS
installation, 2, 15
O
online help
hiding, 17
K
kernel
boot options, 49
Kernel Related Information, 71
keyboard
navigating the installation program using, 13
P
packages
groups, 32
selecting, 32
L
language
selecting, 18
support for multiple languages, 28
LPAR
installing
common steps, 10
using the LPAR CD, 9
without the Red Hat Enterprise Linux for S/390
CD-ROMs, 9
installing, 32
selecting, 32
parameter files
ctc sample, 41
minimal configuration, 41
optional parameters, 40
required parameters, 39
required parameters for networking, 39
samples, 39
M
partitioning, 21
automatic, 18, 20
mdadm
RAID-based and multipath storage configuration,
55
editing, 23
recommended, 22
password
setting root, 30
N
network
configuration, 23
installations
FTP, 15
HTTP, 16
NFS, 15
network device (S/390)
adding, 62
network devices
adding, quick reference, 66
CTC device driver, 69
ICUV device driver, 70
LCS device driver, 66
QETH device driver, 67
network installation
preparing for, 2
R
RAID-based and multipath storage configuration, 55
re-installation, 43
recursion
(see recursion)
registering your subscription, 35
root / partition, 23
recommended partitioning, 22
root password, 30
75
S
V
SCSI-over-fiber driver (zFCP), 52
security levels
firewall configuration, 26
SELinux, 27
selecting
packages, 32
SELinux
security levels, 27
steps
disk space, 10
steps to get you started, 1
subscription registration, 35
swap, 22
swap file
upgrade, 44
swap parition
recommended partitioning, 22
sysfs file system, 51
VM
(see z/VM)
VNC, 14
T
time zone
configuration, 29
troubleshooting, 45
after the installation
Apache-based httpd service hangs during
startup, 48
after the installation, 47
graphical login, 47
logging in, 48
printers, 48
Sendmail hangs during startup, 48
booting, 45
signal 11 error, 45
during the installation
No devices found to install Red Hat Enterprise
Linux error message, 45
during the installation, 45
completing partitions, 46
partition tables, 45
Python errors, 46
U
uninstalling, 37
upgrade, 43
adding a swap file, 44
user interface, graphical
installation program, 11
user interface, text mode
installation program, 11
X
x11 forwarding, 14
XDMCP, 47
Z
z/VM
installing, 4
zFCP driver, 52
Colophon
The manuals are written in DocBook SGML v4.1 format. The HTML and PDF formats are produced
using custom DSSSL stylesheets and custom jade wrapper scripts. The DocBook SGML files are
written in Emacs with the help of PSGML mode.
Garrett LeSage created the admonition graphics (note, tip, important, caution, and warning). They
may be freely redistributed with the Red Hat documentation.
The Red Hat Product Documentation Team consists of the following people:
Sandra A. Moore — Primary Writer/Maintainer of the Red Hat Enterprise Linux Installation Guide
for x86, Itanium™, AMD64, and Intel® Extended Memory 64 Technology (Intel® EM64T); Primary
Writer/Maintainer of the Red Hat Enterprise Linux Installation Guide for the IBM® POWER Architecture; Primary Writer/Maintainer of the Red Hat Enterprise Linux Installation Guide for the IBM®
S/390® and IBM® eServer™ zSeries® Architectures
John Ha — Primary Writer/Maintainer of the Red Hat Cluster Suite Configuring and Managing a
Cluster; Co-writer/Co-maintainer of the Red Hat Enterprise Linux Security Guide; Maintainer of
custom DocBook stylesheets and scripts
Edward C. Bailey — Primary Writer/Maintainer of the Red Hat Enterprise Linux Introduction to System Administration; Primary Writer/Maintainer of the Release Notes; Contributing Writer to the Red
Hat Enterprise Linux Installation Guide for x86, Itanium™, AMD64, and Intel® Extended Memory
64 Technology (Intel® EM64T)
Karsten Wade — Primary Writer/Maintainer of the Red Hat SELinux Application Development Guide;
Primary Writer/Maintainer of the Red Hat SELinux Policy Guide
Andrius Benokraitis — Primary Writer/Maintainer of the Red Hat Enterprise Linux Reference Guide;
Co-writer/Co-maintainer of the Red Hat Enterprise Linux Security Guide; Contributing Writer to the
Red Hat Enterprise Linux System Administration Guide
Paul Kennedy — Primary Writer/Maintainer of the Red Hat GFS Administrator’s Guide; Contributing
Writer to the Red Hat Cluster Suite Configuring and Managing a Cluster
Mark Johnson — Primary Writer/Maintainer of the Red Hat Enterprise Linux Desktop Configuration
and Administration Guide
Melissa Goldin — Primary Writer/Maintainer of the Red Hat Enterprise Linux Step By Step Guide
The Red Hat Localization Team consists of the following people:
Amanpreet Singh Alam — Punjabi translations
Jean-Paul Aubry — French translations
David Barzilay — Brazilian Portuguese translations
Runa Bhattacharjee — Bengali translations
Chester Cheng — Traditional Chinese translations
Verena Fuehrer — German translations
Kiyoto Hashida — Japanese translations
N. Jayaradha — Tamil translations
Michelle Jiyeen Kim — Korean translations
Yelitza Louze — Spanish translations
Noriko Mizumoto — Japanese translations
Ankitkumar Rameshchandra Patel — Gujarati translations
Rajesh Ranjan — Hindi translations
78
Nadine Richter — German translations
Audrey Simons — French translations
Francesco Valente — Italian translations
Sarah Wang — Simplified Chinese translations
Ben Hung-Pin Wu — Traditional Chinese translations