1
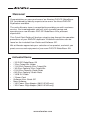
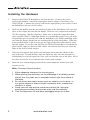
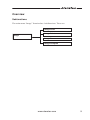
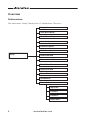
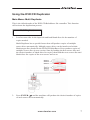
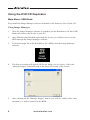
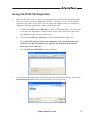
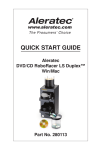
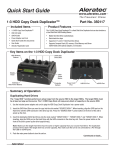
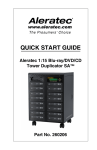
QUICK START GUIDE
Aleratec
DVD/CD RoboRacer SA™
Part No. 280112, 280112EUR
Welcome!
Congratulations on your purchase of an Aleratec DVD/CD RoboRacer
SA, considered by industry experts to be one of the finest DVD/CD
Duplicators available.
The entire Aleratec team is committed to providing you with courteous
service. Our knowledgeable staff will strive to make owning and
operating your new Aleratec DVD/CD RoboRacer SA a pleasant
experience.
This Quick Start Guide will lead you step-by step through the operation
procedures of your DVD/CD duplicator. Detailed instructions can be
found on the included User Guide and Software CD.
We at Aleratec appreciate your selection of our product, and wish you
great success and enjoyment of your new DVD/CD RoboRacer SA.
Included Items
••
••
••
••
••
••
••
••
••
••
••
••
1 DVD/CD RoboRacer SA
1 Disc Output Bin Holder
1 100-Disc Capacity Disc Output Bin
1 50-Disc Capacity Disc Output Bin
4 100-Disc Capacity Guide Rods
4 50-Disc Capacity Guide Rods
1 USB 2.0 Cable
1 Power Cord
Software/User Guide CD
Nero Software
1 UK Power Plug Adapter (280112EUR only)
1 EU Power Plug Adapter (280112EUR only)
www.aleratec.com
Product Features
The DVD/CD RoboRacer SA is a versatile robotic desktop DVD/CD
copying solution.
•• Fully Automatic Disc Publisher
–– Fully automatic disc handling
–– 100 disc capacity
–– Unattended operation
–– Batch mode processing copies multiple source discs
Key Items on the
DVD/CD RoboRacer SA
1
5
2
3
6
7
4
8
1.
2.
3.
4.
5.
6.
7.
8.
Clear Plastic Disc Guide Rods
LCD Display Panel
Control Panel
Disc Tray Control Arm
Disc Input Bin
Protective Cover
Disc Bin Holder
Disc Output Bin
B
C
A
A. Power Plug
B. High Performance Cooling Fan
C. USB
www.aleratec.com
1
Installing the Hardware
1.
Remove the DVD/CD RoboRacer SA from the box. Connect the power
cord to the machine. Attach the appropriate power adapter if necessary (for
280112EUR). Connect the power cord into an appropriate power source. Place
the RoboRacer SA on a level surface.
2.
Slide the bin holder into the slot on the left side of the RoboRacer SA case and
place a disc output bin into the bin holder. There are two output bins included
(50 disc capacity, 100 disc capacity). Make sure to keep the output bins that
come with the 280112. Although similar to a normal disc media cover, the Disc
Output Bins are for specific use with the RoboRacer SA. When installing, make
sure that the flanges on the bin are touching the lip of the bin holder. If the bin
is not pushed down as far as it can go, the edge of the bin could interfere with
the disc output. To use the 100 disc bin, the DVD/CD RoboRacer SA should be
placed at the edge of a desk or table. Make sure that the bin does not touch the
edge of the desk or table surface.
3.
Take the clear plastic disc guide rods and place them into the 4 holes in the
top of the unit. To load the discs into the input bin, take one disc and place it
horizontally level in the input bin. Now you can load the rest of the discs. All of
the discs need to be level with the sides of the stack straight.
4.
Same the box and packaging material for return shipment should your unit
require service.
Note: Choose a Good Location
1. Allow adequate clearance for moving parts.
2. When placing the duplicator on the side/edge of a tabletop ensure
that all four foot pads are in complete contact with the surface of
the table.
3. Do not place near heat sources such as radiators or air ducts, or
in a place subject to direct sunlight, excessive dust, mechanical
vibration or shock.
4. Good care will help assure maximum product life. Improper
operating environment and misuse may void the warranty.
5. Turn the duplicator off and leave unplugged when not in use.
2
www.aleratec.com
Introduction
DVD/CD RoboRacer SA Display Panel
1
2
3
4
Multi Duplicate
ESC
6
Enter
5
1 Display shows all functions and messages
2 Power Indicator
3 LEFT Scroll Button
4 RIGHT Scroll Button
5 ENTER Button
The left and right scroll buttons are used to navigate through the operating
menu, while the enter and escape buttons are used to select or cancel menu
settings. 6 ESCAPE Button
www.aleratec.com
3
Overview
Main Menu
This section provides a listing of the functions on the DVD/CD RoboRacer SA.
Detailed descriptions of each function are given in the next section. The functions
are numbered for easy reference; these numbers are also used in the next section.
There are 5 main menu items that will display in the DVD/CD RoboRacer SA
Display Panel. These are:
Multi Duplicate
Compare
Image
USB Mode
Setup
4
www.aleratec.com
Overview
Subfunctions
The main menu “Image” function has 4 subfunctions. These are:
Image Load
Image
Image Delete
Image Burn
Image Compare
www.aleratec.com
5
Overview
Subfunctions
The main menu “Setup” function has 13 subfunctions. These are:
Copy Mode
Over Burn Mode
Read Error Skip
Auto Verify
CD Burn Speed
DVD Burn Speed
Setup
Default Reload
Format Hard Disk
Test Mode Set
System Sound
Erase Disc
Software ID
Reset Robot
Input Bin
Pointer 1
Pointer 2
Demo Run
6
www.aleratec.com
Using the DVD/CD Duplicator
Main Menu: Multi Duplicate
This is the default mode of the DVD/CD RoboRacer SA controller. This function
will activate the duplication process.
Multi Duplicate
1.
Load a source disc in the input bin and load blank discs for the number of
copies needed.
Multi Duplicate has a special feature that will produce copies of multiple
source discs automatically. Multiple source discs can be interleaved within
blank target discs loaded in the DVD/CD RoboRacer SA to produce copies of
multiple source discs in one session. Start by loading the first source disc and
the desired number of blank discs for copies, then load the next source disc and
blank discs for copies of the next source and so on.
2.
Press ENTER ( ) and the machine will produce the desired number of copies
of each source disc automatically.
www.aleratec.com
7
Using the DVD/CD Duplicator
Main Menu: USB Mode
First install the Image Manager software included on the Software/User Guide CD.
Using Image Manager
1.
Once the Image Manager software is installed, put the RoboRacer SA into USB
Mode and connect the device to your PC.
2.
After Windows has finished registering the device you will have access to the
HDD through the Image Manager software.
3.
To load an image file to the RoboRacer SA’s HDD, start the Image Manager
software.
4.
The first screen that will appear will be the image you see below. Select the
“Manage Images” button located at the lower left corner of the screen.
5.
After clicking on the “Manage Images” button, you will see a table where each
partition is or will be located on the HDD.
8
www.aleratec.com
Using the DVD/CD Duplicator
6.
Click on the table row to choose which partition you will load the image onto. The row selected will be highlighted in blue. The letter you see in the Index
column is the same as the letter used to locate the image when you return the
duplicator back to stand alone mode (USB Mode off).
a.
Click the Load From .CPM file to load a .CPM image file. This file type
is used by the duplicator in stand alone mode when you load a disc onto
the HDD using the Image Load feature.
b.
Click the Load From .ISO file to load a standard ISO image file.
To create ISO images from your computer, you can install the Nero
software (see disc included). See page 29 for detailed instructions
about the Nero software.
c.
7.
The Load From .DVM file is also available.
If you want to load an image such as an already existing ISO image, choose the
Load From ISO file and locate the file that you wish to load.
www.aleratec.com
9
Using the DVD/CD Duplicator
Main Menu: USB Mode
Using Image Manager - continued
8.
Once you click Open you will see the Information screen appear. Click the OK
button to begin loading the disc image.
9.
The Manage Images screen will appear and display the status of the image load. The screen will then disappear when the transfer is completed.
10. You will now see the image file you just loaded onto the duplicator’s HDD in
the partition that you chose.
10
www.aleratec.com
Using the DVD/CD Duplicator
11. If you would like to edit the image information so that you can easily find the
image, select the “Edit Title” button at the top of the Manage Images screen to
add a description to the selected image file.
12. If you would like to export the image files on the duplicator’s HDD onto the PC,
select the image that you would like to export. Then click the Export to (ISO,
CPM, DVM) file button. This option is useful if you do not have an original
ISO file and had loaded a disc image in the RoboRacer SA using the Image
Load feature, which as described earlier will create a .CPM image file.
13. When you are finished using the Image Manager click the Close button in the
upper right corner of the Manage Images screen and then click the Exit button
in the main menu for the Image Manager.
14. Take the RoboRacer SA out of USB Mode by pressing the ESCAPE
( ) button and then press ENTER ( ).
15. Burn the image located in the partition just loaded by following the “Image
Burn” procedure outlined on page 11 of this User Guide.
www.aleratec.com
11
Technical Support Addresses and
Phone Numbers
►► By e-mail: [email protected]
►► By Telephone: 1-818-678-0484 – Skype: support.aleratec.com
Technical Support Group can be reached 8:00 AM to 5:00 PM, Pacific
Time, Monday through Friday, excluding U.S. holidays.
Please try to call from a phone near your computer system.
►► Access is available 24 hours a day, 365 days a year, via:
The World Wide Web at: www.aleratec.com
FAX at: 1-818-678-0483
12
www.aleratec.com
Notes:
www.aleratec.com
Document Number: 9299063_ENG_Rev. L
Specifications subject to change without notice. Copyright © 2012
Aleratec, Inc.
9851 Owensmouth Avenue
Chatsworth, CA 91311 U.S.A.
www.aleratec.com