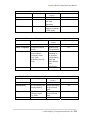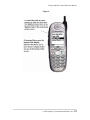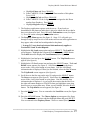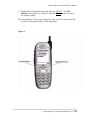
1
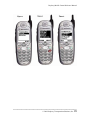
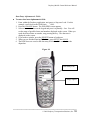
Prophesy Mobile Comm Reference Manual Prophesy Transportation Solutions, Inc. 204C West Newberry Road Bloomfield, CT 06002 Tel: (800) 776-6706 Fax: (860) 243-2619 http://www.mile.com [email protected] [email protected] Copyright © 2004, Prophesy Transportation Solutions, Inc. All rights reserved. Prophesy Mobile Comm Reference Manual Rev 0722 Prophesy Transportation Solutions, Inc. licenses the User to operate Software published by Prophesy and licensed by User, and agrees to support such use, pursuant to these terms and conditions. 1. Definitions 1.1 “Software” means any computer program or database, or any enhancement, modification, upgrade or addition thereto, and any documentation for use therewith, supplied by Prophesy to User. 1.2 “User” means the registered User of Software. 1.3 “Agreement” means this agreement as amended. 1.4 “Support” means Prophesy’s standard customer support, pursuant to Prophesy's support policies and procedures, as modified by Prophesy periodically and without notice. 2. Limitations 2.1 Software may be installed on and accessed by only one computer with one central processing unit (CPU) per license as defined in this Agreement, unless the appropriate multi-user license has been purchased by the User. 2.2 Software may be used only by the User for internal business purposes. Unless specifically authorized by Prophesy in writing, Software may not be used by subsidiaries or affiliates of the User, and may not be used by a third party or by User for any third party. User is not authorized to sub-license Software in whole or part. User agrees not to resell or otherwise transfer to a third party any data extracted from the database portion of the Software. 2.3 Software is the valuable exclusive property of Prophesy and is protected by applicable U.S. copyright law and international treaty provisions. Software may not be copied, decompiled, reverse assembled or disassembled without the express written authorization of Prophesy. User agrees not to use a software program other than those provided by Prophesy to extract data from the database portion of the Software unless otherwise authorized by Prophesy in writing. 2.3 User acknowledges and agrees that this Agreement does not secure ownership of Software by User, and that User will safeguard and protect the same from unauthorized access, disclosure, copying and use by at least the same procedure and vigilance with which it protects its own valuable intangible property. User will immediately notify Prophesy of any unauthorized access, disclosure, copying or use of Software in violation of this Agreement. User will provide reasonable cooperation and assistance, at the sole cost of Prophesy, in any proceedings initiated by Prophesy for copyright infringement. 3. Fees 3.1 License fees are specified at time of sale and are payable according to the terms of this Agreement. Annual Support fees are specified at the time User subscribes to or renews Support. 3.2 Fees do not include taxes, which are the sole responsibility of User, except taxes based upon the net income of Prophesy. 3.3 Interest on overdue payments will be charged at the rate of one and one-half percent (1.5%) per month. 4. Disclaimers 4.1 Software is licensed ‘as is’ without any warranty express or implied. PROPHESY DISCLAIMS THE WARRANTIES OF MERCHANTABILITY AND FITNESS FOR A PARTICULAR PURPOSE and does not warrant that the Software is problem or error free. If, during the first ninety (90) days from purchase by User, a defect in a diskette should occur, User may return the diskette to Prophesy, and Prophesy will replace the diskette without charge, save for applicable shipping charges. If the damage to the diskette has resulted from abuse or misuse of the product, Prophesy will bear no responsibility to replace the diskette. 4.2 Prophesy will use reasonable efforts to correct any deficiency in the Software at no cost to User but Prophesy WILL NOT BE RESPONSIBLE FOR ANY DAMAGES INCURRED BY USER OR ANY THIRD PARTY, DIRECT, INDIRECT, CONSEQUENTIAL OR PUNITIVE, IN TORT OR IN CONTRACT, EVEN IF IT HAS BEEN ADVISED OF THE POSSIBILITY OF SUCH DAMAGES. 4.3 The sole liability of Prophesy and the exclusive remedy of User for any cause arising hereunder shall be rescission of this Agreement and refund of the annual Support fees paid by User to Prophesy during the preceding twelve (12) months. 5. Terms and Limitations 5.1 Any use of Software by User shall constitute acceptance of this Agreement by User. 5.2 This Agreement shall commence on the date of acceptance by User and shall continue for a term of one (1) year thereafter unless terminated earlier for breach in accordance with the provisions of Section 5.4 below. 5.3 Subject to earlier termination for breach, this Agreement shall be automatically renewed for terms of one (1) year unless either party shall notify the other that it does not wish to renew the Agreement. 5.4 Either party may terminate this Agreement for material breach or default by the other by notice describing such breach, such termination to be effective thirty (30) days after receipt unless the defaulting party shall have cured the breach or default within such thirty (30) day period. Upon termination of this Agreement, User shall destroy all copies of Software in whole or in part and shall provide Prophesy a certificate of compliance with this provision signed by the chief executive officer of User. 6. Infringement 6.1 Should Software become subject to any claim of infringement, or in the opinion of Prophesy become likely to become the subject of any such claim, Prophesy at its option and expense may (I) procure for User the right to continue to use the Software, (ii) replace or modify the Software to make it non-infringing, or (iii) return to User the net license fee paid for such Software and terminate the license of such Software to User. 6.2 THIS SECTION 6 STATES THE ENTIRE LIABILITY OF Prophesy WITH RESPECT TO INFRINGEMENT OR ALLEGED INFRINGEMENT BY SOFTWARE OR ITS USE OR OPERATION. 7. General 7.1 Notification pursuant to this Agreement shall be in writing addressed to either party, delivered by private express courier or United States Postal Service, in either case with written receipt for delivery, and shall be effective upon such delivery. 7.2 This Agreement expresses the entire agreement of the parties, superseding all prior agreements, negotiations and discussions. It may be amended or modified only in writing, and is subject to the same terms currently in effect. It may not be assigned by either party without the prior written consent of the other party, which approval shall not be unreasonably withheld. It shall be governed by and interpreted in accordance with the laws and courts of the State of Connecticut. This Agreement is revised as of 6/00. Windows™ is a trademark of Microsoft Corporation. The names of other products or services may be trademarks or registered trademarks of their respective companies. Copyright © 2004 Prophesy Transportation Solutions, Inc. All Rights reserved. CHAPTER 1 ................................................................................................... 1 INTRODUCTION ................................................................................................................ 1 How Mobile Comm Works for You ............................................................................. 1 What Makes it Tick?.................................................................................................... 2 CHAPTER 2 ................................................................................................... 5 USING THIS GUIDE ........................................................................................................... 5 Purpose ....................................................................................................................... 5 Audience...................................................................................................................... 5 Organization ............................................................................................................... 5 Product Support .......................................................................................................... 5 CHAPTER 3 ................................................................................................... 7 SETTING UP PROPHESY MOBILE COMM............................................................................ 7 Purchasing a Phone and Plan .................................................................................... 7 Mobile Comm Installation .......................................................................................... 7 First Time Startup ....................................................................................................... 9 Updating Prophesy Mobile Comm............................................................................ 10 Deinstalling Prophesy Mobile Comm....................................................................... 11 Auto-Launching the Prophesy Application............................................................... 11 Setting a GPS PIN Code ........................................................................................... 12 CHAPTER 4 ................................................................................................. 13 LOOKING AROUND ......................................................................................................... 13 Prophesy Tracker...................................................................................................... 13 Prophesy TrackerPLUS and TrackerDispatch ......................................................... 14 Scrolling Indicator .................................................................................................... 20 CHAPTER 5 ................................................................................................. 25 USING PROPHESY MOBILE COMM .................................................................................. 25 Connection Configuration ........................................................................................ 25 Starting the Prophesy Application ............................................................................ 26 Receiving Information on the Phone......................................................................... 31 Entering Information on the Phone .......................................................................... 34 Sending Information from the Phone........................................................................ 36 Initiating and Receiving Phone Calls on the Phone ................................................. 38 Prophesy Mobile Comm Reference Manual CHAPTER 1 Introduction Welcome and thank you for choosing Prophesy Mobile Comm! Your new mobile communications tracking system will help you manage your fleet more efficiently, reduce operating costs, and maximize profits. Prophesy Mobile Comm is currently available in three product levels. We invite you to select the level that will best meet the needs of your unique trucking operation: Prophesy Tracker – Track a mobile asset or mobile workforce Prophesy TrackerPLUS – Itinerary based tracking combines actual location interaction with schedule Prophesy TrackerDispatch – Our top-level solution connecting mobile communications with full enterprise dispatch and compliance trucking software All products offer next-generation mobile communications technology driven by cutting edge transportation software. To learn more about our products please contact us at 1-800-776-6706. This chapter introduces you to the Mobile Comm application by describing: How Mobile Comm Works For You What Makes It Tick How Mobile Comm Works for You Track your fleet in real time: Track your vehicles in real time Integrate all information about vehicles existing schedule with actual location information captured from the phone (TrackerPLUS and TrackerDispatch only) Automatically update and adjust ETAs (TrackerPLUS and TrackerDispatch only) View your vehicles’ location with state-of-the-art mapping technology ______________________________________________________ © 2004 Prophesy Transportation Solutions, Inc 1 . Prophesy Mobile Comm Reference Manual Configure polling frequency, buffer size and other data transmission settings Send Load and other Critical Information to your Drivers: Send detailed Load information and instructions including Customer, City, State, Driving Directions, Scheduled Arrival and Departure times, Reference Numbers, Goods Quantities, Seal Number and more (TrackerPLUS and TrackerDispatch only) Identify Pickups and Drops for both Goods and Trailers (TrackerPLUS and TrackerDispatch only) Send important text messages Automatically Receive, Update, and Adjust Trip and other Critical Information from your Drivers (TrackerPLUS and TrackerDispatch only): Actual Arrival and Departure Times BOL & POD Actual Goods Quantities (Pieces, Pallets, Weight, and more) Integration and "Ease of Use": Integrates with Prophesy Dispatch and Prophesy TrackerPLUS What Makes it Tick? A highly robust and reliable client-server architecture tuned for maximum performance. Software Cutting edge transportation software from Prophesy Easy-to-use, intuitive interface design Next-generation mobile communication OS ______________________________________________________ © 2004 Prophesy Transportation Solutions, Inc 2 . Prophesy Mobile Comm Reference Manual Hardware Rugged, easy to use, high quality cellular phones and data terminals built to last Modern, scalable, multi-processor server network RAID fail-safe protection These powerful features combine to create the most comprehensive and affordable Dispatch-to-Mobile Comm solutions available on the market today. ______________________________________________________ © 2004 Prophesy Transportation Solutions, Inc 3 . Prophesy Mobile Comm Reference Manual ______________________________________________________ © 2004 Prophesy Transportation Solutions, Inc 4 . Prophesy Mobile Comm Reference Manual CHAPTER 2 Using This Guide Purpose The purpose of this guide is to help you get the most out of your Prophesy Mobile Comm system by familiarizing you with its many features and options. Audience This guide accompanies software that is designed for individuals who work with fleet tracking and dispatching in small, medium, or large business environments. It assumes that you have a basic familiarity with a personal computer, cellular phone, and Microsoft Windows®. Organization The information in this guide is divided into 5 chapters: Chapter 1: Introduction describes Mobile Comm, how it works, and how it can benefit your business. Chapter 2: Using this Guide outlines the guide and explains the conventions used within. Chapter 3: Setting Up Prophesy Mobile Comm describes how to obtain the mobile communication device, install the software, and start it for the first time. Chapter 4: Looking Around takes you on a guided tour through Mobile Comm’s display screens on the phone. Chapter 5: Using Prophesy Mobile Comm describes configuring and starting the application for the first time, receiving and entering information on the phone, sending information from the phone, and initiating and receiving phone calls while running the application. Product Support If you have questions using Prophesy Mobile Comm, check this guide, or use the available online help. If you need further assistance, contact technical support at 1800-776-6707. When you call, please have Mobile Comm running on your PC and phone and have this guide on hand. Be ready to provide the following information so our technical support team will be able to give you the most accurate help: ______________________________________________________ © 2004 Prophesy Transportation Solutions, Inc 5 . Prophesy Mobile Comm Reference Manual The serial number from your Mobile Comm installation disc sleeve or case A description of your problem The model number of the phone you are using The version of Windows you are using on your PC ______________________________________________________ © 2004 Prophesy Transportation Solutions, Inc 6 . Prophesy Mobile Comm Reference Manual CHAPTER 3 Setting up Prophesy Mobile Comm This chapter describes how to obtain a mobile communication device, install your software on the device, and start it for the first time. Prophesy currently supports 3 cellular phones for its Mobile Comm solution – the Nextel® i58sr, i88 and i355 phones by Motorola®. Purchasing a Phone and Plan 1. If you have not already done so, purchase the Nextel® i58sr, i88 or i355 phones by Motorola® at any Nextel® distributor or local outlet in your area. Or, order directly from www.Nextel.com. The i58sr is a rugged version of the i88s – otherwise identical in features and functionality 2. Call Nextel® at 800-639-6111 and add a data plan to your service. Your phone will need this data plan to transmit data from the phone back to the dispatcher. Nextel® currently offers an Unlimited Data Access plan at $10.00 per month per phone. Mobile Comm Installation Depending on which Prophesy Mobile Comm product you purchase, installation may require you to install software on both your PC and phone. This section describes the steps for installing Mobile Comm on your phone. For a description of the steps for installing Mobile Comm on your PC, refer to the documentation that came with your Prophesy software. Installing Mobile Comm on Your Phone There are several steps you must follow closely in order to install Prophesy Mobile Comm on your phone. *Note: The Prophesy application requires 113 Kilobytes of available Program Space and 15 Kilobytes of available Data Space on the phone. ______________________________________________________ © 2004 Prophesy Transportation Solutions, Inc 7 . Prophesy Mobile Comm Reference Manual X To install Mobile Comm on your Phone: 1. Complete the Handset Registration form (attached at the end of this user manual) and return it to your Prophesy sales representative (if convenient, copy the form and email it). You will need your Nextel® account BAN (Billing Account Number), 10-digit phone number for each handset, and the firmware version for each handset (refer to the form for details). If you need assistance contact your Prophesy sales representative. 2. After you complete and return the registration form to your Prophesy sales representative, Prophesy will create the necessary accounts for your company and return the registration form to you with all necessary information including your logon, user names and passwords, user manuals, and other documentation you’ll need to complete the registration process. 3. After your sales representative returns the registration form to you and confirms that your Mobile Comm accounts have been activated, you can download the Prophesy Mobile Comm application to your handsets. Downloading the Prophesy Mobile Comm Application to the Phone *Note: The Prophesy application requires 113 Kilobytes of available Program Space and 15 Kilobytes of available Data Space on the phone. X To download the Prophesy Mobile Comm application to your phone: 1. On the handset, from the Nextel® main menu, press the MENU button located between the left and right soft keys. 2. Scroll to and SELECT “Java Apps”. 3. Scroll to and SELECT “Download Apps”. 4. If this is the first time you are using Download Apps, it must run a self-install before you can download the Prophesy Mobile Comm application. Follow the instructions to install Download Apps and when finished installing, highlight Download Apps and press the RUN button. 5. The Download Apps program will establish a connection with the download site. If this is the first time you are downloading the Prophesy Mobile Comm application to this phone, scroll to and SELECT “New Purchases”. If 2nd or later time, scroll to and SELECT “Re-Downloads”. 6. Scroll to and SELECT the Prophesy application (“Prophesy”). 7. After the phone gathers initial information about the application (a few seconds), press GET IT. The phone will download the application (with a good signal this usually takes no longer than 30 seconds and usually is much quicker). 8. After application is downloaded to phone, press EXIT. 9. You are now returned to the “Java Apps” menu. Scroll down to and highlight the new Prophesy application. Press INSTALL. The application will install on the phone (usually takes about 20 seconds). ______________________________________________________ © 2004 Prophesy Transportation Solutions, Inc 8 . Prophesy Mobile Comm Reference Manual 10. When the application has finished installing, press DONE. The application is now installed on the phone. First Time Startup First time Startup on Your Phone There are several steps you must follow to run Prophesy Mobile Comm for the first time. *Note: The Prophesy application requires 113 Kilobytes of available Program Space and 15 Kilobytes of available Data Space on the phone. X To start the Mobile Comm application on your phone for the first time: 1. Confirm that you have a good Cell Phone and IP signal by looking at the signal bar located at the top left portion of the screen. 2. Navigate to the Prophesy application (From the Nextel® main menu, press the MENU button located between the left and right soft keys) 3. Scroll down to and SELECT “Java Apps”. 4. Scroll down to the Prophesy application and press RUN. Press CHANGE and enter your 10-digit Nextel® phone number. Press SAVE. 5. Scroll down to “Auth Code” and press CHANGE. Enter the Auth Code assigned to this phone by Prophesy. Press SAVE. 6. Scroll to and SELECT “Register”. 7. You will notice on the Phone’s Screen the Registration Process occurring, and once it’s complete, your phone is ready to use. 8. When the phone prompts you if you would like to grant permission to obtain GPS, select YES, and when subsequently prompted, select ALWAYS. This will allow the Prophesy application to collect GPS data without having to request permission each time. Press RESUME to resume the Prophesy application. If you have entered your “Phone” and “Auth Code” correctly, the application will register with the server and log on. If you are out of range of cellular service when you attempt to register the phone at startup, the application will start in an “offline” mode and allow you to access previously stored information from the phone. Until the phone is in range of cellular service, the phone will retry every 5 minutes to establish a connection with the server until successful. ______________________________________________________ © 2004 Prophesy Transportation Solutions, Inc 9 . Prophesy Mobile Comm Reference Manual * Note that while you are working offline, the phone continues to gather GPS information and then stores and forwards the information to the Dispatcher as soon as the phone is in range of cellular service. * Make sure your phone stays charged at all times and place the handset in a safe area where it is likely to obtain a strong cellular signal – on the dashboard of the vehicle, for example, or in a handset cradle mounted in the interior of the vehicle. Updating Prophesy Mobile Comm There may be times when you will need to update the Prophesy Mobile Comm application to a newer version. Updating Prophesy Mobile Comm If you are unsure if you should update the Prophesy Mobile Comm application on your handset, contact your Prophesy sales representative first. *Note: The Prophesy application requires 113 Kilobytes of available Program Space and 15 Kilobytes of available Data Space on the phone. X To update the Prophesy Mobile Comm application from your phone: 1. From the Nextel® main menu, press the MENU button located between the left and right soft keys. 2. Scroll down to and SELECT “Java Apps”. 3. Scroll down to and SELECT “Download Apps”. 4. The Download Apps program will establish a connection with the download site. If this is the first time you are downloading the new version of the Prophesy Mobile Comm application to this phone, scroll to and SELECT “New Purchases”. If 2nd or later time, scroll to and SELECT “Re-Downloads”. 5. Scroll to and SELECT the Prophesy application (“Prophesy”). 6. After the phone gathers initial information about the application (a few seconds), press GET IT. The phone will download the application (with a good signal this usually takes no longer than 30 seconds and usually is much quicker). 7. After application is downloaded to phone, press EXIT. 8. You are now returned to the “Java Apps” menu. Scroll down to and highlight the new Prophesy application. Press the MENU button located between the left and right soft keys. 9. Scroll to and SELECT “Update”. 10. Select OK when prompted about “…power loss destroying additional applications”. 11. The new version will update the previous version (usually takes about 20 seconds). ______________________________________________________ © 2004 Prophesy Transportation Solutions, Inc 10 . Prophesy Mobile Comm Reference Manual 12. When the application has finished installing, press DONE. The new version is now installed on the phone. Deinstalling Prophesy Mobile Comm There may be times when you will need to deinstall the Prophesy Mobile Comm application from your handset in order to upgrade the application to a newer version. Deinstalling Prophesy Mobile Comm If you are unsure if you should deinstall the Prophesy Mobile Comm application from your handset, contact your Prophesy sales representative first. * Note: deinstalling Prophesy Mobile Comm from the phone removes all stored Load and GPS data from the phone’s persistent storage. Before you deinstall the application, make sure that the driver no longer needs the Load information on his phone and that Prophesy Dispatch and/or the Prophesy Tracker Web application has received all updates from the phone. X To deinstall the Prophesy Mobile Comm application from your phone: 1. From the Nextel® main menu, press the MENU button located between the left and right soft keys. 2. Scroll down to and SELECT “Java Apps”. 3. Scroll down to the Application you want to deinstall (usually named “Prophesy”). 4. Press the MENU button located between the left and right soft keys. 5. Scroll to and select “Deinstall”. 6. Select “Yes” when prompted “…if you are sure you want to deinstall the application”. 7. Select “Ok” when prompted about “…power loss destroying additional applications”. 8. When the Prophesy Mobile Comm application has been deinstalled from the phone, press DONE. Auto-Launching the Prophesy Application The phone can be set up to auto-launch the Prophesy Mobile Comm application each time it powers on. X To set up the phone to auto-launch the Prophesy Mobile Comm application: 1. From the Nextel main screen, press the MENU key. 2. Scroll down and SELECT on Settings. 3. Scroll down and SELECT on Personalize. ______________________________________________________ © 2004 Prophesy Transportation Solutions, Inc 11 . Prophesy Mobile Comm Reference Manual 4. Scroll down and SELECT on Power Up App. 5. Press CHANGE. 6. If using a 3-digit handset model (i355), SELECT Prophesy for the power up app. If using a 2-digit handset model (i58, i88), SELECT Java Apps for the power up app. 7. Back your way out to the Nextel main menu. 8. That's it! The next time you power the phone on the Prophesy Mobile Comm application will auto-launch. Setting a GPS PIN Code The phone has a GPS Privacy setting that can either allow or disallow the Prophesy Mobile Comm application from obtaining a GPS fix. After setting the GPS Privacy setting you have the option of creating a GPS PIN code that will prevent other users from changing the setting. X To set up a GPS PIN on the phone: 1. From the Nextel main screen, press the MENU key and scroll to and SELECT on Settings, and then scroll to and SELECT Security, and then scroll to and SELECT GPS PIN. 2. Make sure that it is checked off as 'On'. If it prompts you for a PIN before you can check it off as 'On', try entering 0000 (that's 4 zeros). That is the default Nextel PIN. 3. Then, from the Security screen, scroll to and SELECT on New Passwords. Scroll to and SELECT on GPS PIN. Enter in the Old GPS PIN - try 0000 if this is the first time you are changing the PIN. Then you will be prompted to enter a new GPS PIN. Enter the new 4-6 digit GPS PIN. Then you will be prompted to verify the new PIN. 4. When completed, back your way out to the Nextel main screen. Now press the MENU key, and scroll to and SELECT GPS. SELECT on Privacy. You will be prompted to enter your new GPS PIN before you can change the GPS Privacy settings. Change the GPS Privacy settings to 'Unrestricted' - if it is not set to "Unrestricted" already. After you set it to "Unrestricted", a check mark will appear before "Unrestricted". 5. Back your way out to the main Nextel screen, you are finished. ______________________________________________________ © 2004 Prophesy Transportation Solutions, Inc 12 . Prophesy Mobile Comm Reference Manual CHAPTER 4 Looking Around This chapter will familiarize you with the basic menu options on the Prophesy Mobile Comm application running on the Nextel® handsets. It assumes that you have read the owner’s manual for your cellular phone and are familiar with basic phone operation, menu navigation, and data input. Prophesy Tracker Major Push Buttons The Prophesy Tracker application makes regular use of the 2 soft buttons located on either side of the device’s MENU button (see figure 1). As you navigate through the Prophesy application you will notice that the labels located above the soft buttons change depending on which screen is displayed and which menu item is highlighted. The buttons are: EXIT Exits the Prophesy application. SELECT Selects the menu item highlighted on the display. OK Confirms the message or action displayed on the screen. BACK Displays the previous screen. Menu Items The Prophesy Mobile Comm application makes use of a Main menu and an Options menu. Prophesy Menu My Loads Selecting My Loads brings you to the Load List screen that displays all of the loads that have been sent to the phone (TrackerPLUS and TrackerDispatch only). ______________________________________________________ © 2004 Prophesy Transportation Solutions, Inc 13 . Prophesy Mobile Comm Reference Manual GPS Monitor Selecting GPS Monitor brings you to the GPS Monitor screen where you can observe the status of the phone as it obtains a GPS signal. Options Menu Menu Selecting Menu brings you to the Prophesy Menu. Connect Selecting Connect sends all GPS data back to the server where it can be viewed. Exit Exits the Prophesy application. Show State Displays the internal state of the application – for Prophesy use. Prophesy TrackerPLUS and TrackerDispatch Major Push Buttons The Prophesy TrackerPLUS and Prophesy TrackerDispatch applications make regular use of the 2 soft buttons located on either side of the device’s MENU button (see figure 1). As you navigate through the Prophesy application you will notice that the labels located above the soft buttons change depending on which screen is displayed and which menu item is highlighted. The buttons are: EXIT Exits the Prophesy application. SELECT Selects the menu item highlighted on the display. OK Confirms the message or action displayed on the screen. BACK Displays the previous screen. OPTIONS Displays the Options menu. CHANGE Displays a screen that will provide the user with the ability to enter information. MORE Displays a screen with the full contents of the highlighted menu item. ______________________________________________________ © 2004 Prophesy Transportation Solutions, Inc 14 . Prophesy Mobile Comm Reference Manual Menu Items The Prophesy Mobile Comm application makes use of a Main menu and an Options menu. Prophesy Menu My Loads Selecting My Loads brings you to the Load List screen that displays all of the loads that have been sent to the phone. GPS Monitor Selecting GPS Monitor brings you to the GPS Monitor screen where you can observe the status of the phone as it obtains a GPS signal. Options Menu Menu Selecting Menu brings you to the Prophesy Menu. Delete Load Selecting Delete Load prompts and then deletes the load from the phone. Connect Selecting Connect sends all stored data (GPS and prompted entries) back to the Dispatch or client software on the PC. Exit Exits the Prophesy application. Show State Displays the internal state of the application – for Prophesy use. Screens Following is a detailed description of the screens and menu items displayed on the Prophesy application on your device. ______________________________________________________ © 2004 Prophesy Transportation Solutions, Inc 15 . Prophesy Mobile Comm Reference Manual Prophesy Menu: Main menu for the application Menu Item Name: Displays: My Loads GPS Monitor When Selected Displays: Editable Field ? A list of all loads sent from dispatcher. The status of phone as it obtains a GPS signal. No No Load List screen: Displays the list of all loads sent from dispatcher Menu Item Name: Load - Unopened Load - Opened Displays: Unopened/Unread Loads Load Order Number Load Number Company Name City, State Scheduled ArrivalTime When Selected Displays: Editable Field ? Opened Load w/Load details Details pertaining to the selected load including Stops and other detailed load information. No No Trip Details screen: Displays Load Details and list of all Stops on the Load. Menu Item Name: Displays: When Selected Displays: Editable Field ? Load Details The load number the details pertain to. No Stop n Stop Number Company Name City, State Details pertaining to the selected load. Details pertaining to the selected Stop. No ______________________________________________________ © 2004 Prophesy Transportation Solutions, Inc 16 . Prophesy Mobile Comm Reference Manual Load Details screen: Displays Load Details for a given Load. Menu Item Name: Instructions Description Code Code Description Seal Number Actual Seal Number Equip Code Displays: Load Instructions. A Description of the Load. The Load Code. The Load Code Description The Seal Number for the Load. The Actual Seal Number for the Load. The Equipment Code for the Load. When Selected Displays: Editable Field ? No No No No No Editable field Yes No ______________________________________________________ © 2004 Prophesy Transportation Solutions, Inc 17 . Prophesy Mobile Comm Reference Manual Menu Item Name: Pickup/Drop Name Addr CS SAr Act. Arrival SDep Act. Departure POD POD Notes Shipper Ref BOL Dir Ph Fax Office Hours Contact Persons Status Desc QTY Actual Qty Wgt Act Weight Plts Act Plts Pcs Act Pcs Uqty Actual UQty Stop Details screen: Displays Stop Details for a given Trip. Displays: When Selected Displays: Displays whether this stop is a pickup, drop, or both. Company name. Address of company. City and State of destination The scheduled arrival time for the stop. The actual arrival time for the stop. The scheduled departure time from the stop. The actual departure from the stop. Proof of Delivery Proof of delivery notes. Shipper reference number Bill of Lading Driving directions to the stop The phone number at the stop The fax number at the stop The stop’s office hours Names of contact people at the stop. The status of the stop The description of goods on the stop The quantity of goods described in the Desc field. The actual quantity of goods. The weight of the goods The actual weight of the goods The number of pallets The actual number of pallets The number of pieces The actual number of pieces The user quantity The actual user quantity Editable Field ? No No No No No Editable field Yes No Editable field Yes Editable field Editable field Yes Yes No Yes No No No No No Editable field No No No Editable field Editable field Editable field Editable field Editable field Yes No Yes No Yes No Yes No Yes *Note that while all these fields can be made available most will not be used by the average trucking company. ______________________________________________________ © 2004 Prophesy Transportation Solutions, Inc 18 . Prophesy Mobile Comm Reference Manual Menu Item Name: Menu Delete Load Connect Exit Show State Options screen: Displays common menu options Displays: Editable Field ? When Selected Displays: Main Prophesy Menu No Confirms and then No will delete a load from the phone. Forces device to No connect and send stored data to server and dispatcher. Confirms and then No exits the Prophesy application. Internal state of the No application – for Prophesy use. ______________________________________________________ © 2004 Prophesy Transportation Solutions, Inc 19 . Prophesy Mobile Comm Reference Manual Scrolling Indicator Prophesy Mobile Comm applications make use of 2 soft buttons and horizontal, vertical, and arrowed lines to indicate scrolling position on the screen display. See figures 1, 2, 3 and 4 for details. Figure 1. ______________________________________________________ © 2004 Prophesy Transportation Solutions, Inc 20 . Prophesy Mobile Comm Reference Manual Figure 2. ______________________________________________________ © 2004 Prophesy Transportation Solutions, Inc 21 . Prophesy Mobile Comm Reference Manual Figure 3. ______________________________________________________ © 2004 Prophesy Transportation Solutions, Inc 22 . Prophesy Mobile Comm Reference Manual Figure 4. ______________________________________________________ © 2004 Prophesy Transportation Solutions, Inc 23 . Prophesy Mobile Comm Reference Manual ______________________________________________________ © 2004 Prophesy Transportation Solutions, Inc 24 . Prophesy Mobile Comm Reference Manual CHAPTER 5 Using Prophesy Mobile Comm This chapter describes the Prophesy Mobile Comm application running on the Motorola® i58sr, i88 and i355 phones. The i58sr is a rugged version of the i88s otherwise identical in features and functionality. Connection Configuration The Prophesy Mobile Comm application interacts with the server and dispatcher based on configurable parameters set by your Mobile Comm administrator. Each time the Prophesy application is started it loads these configuration settings. There are 5 configuration settings controlled from your dispatch software or web application (See Below): GPS Obtain Frequency (minutes): The frequency at which the phone will poll for a new GPS position. The minimum number of minutes between positions is 1 minute. GPS Obtain Frequency if Stop Detected (minutes): If a stop is detected, the phone will switch to using this parameter for the GPS obtain frequency interval. When the phone detects that the vehicle is moving again, it will revert to using the GPS Obtain Frequency parameter for polling frequency. Frequency of Attempts to Resend Stored Data (minutes): If the phone attempts to send a transmission to the server and cellular network coverage is unavailable, it will attempt to resend the transmission at an interval equal to this parameter. Minimum Number of Positions to Send Via One Package: The phone stores the chronology of GPS data it gathers in a buffer and then sends the data in a ______________________________________________________ © 2004 Prophesy Transportation Solutions, Inc 25 . Prophesy Mobile Comm Reference Manual transmission to the dispatcher. This parameter insures that the device will only send the GPS data to the dispatcher after it has collected a number of positions/fixes equal to the value you enter in the field. Minimum Point-to-Point Distance (miles): This parameter determines if a GPS position is considered a Stop, or part of a current Stop. For example, if the distance between 2 GPS positions is less than (x) miles, the second GPS position is considered to be Stopped – or part of a Stop. If the distance between 2 GPS positions is greater than (x) miles, the second GPS position is considered to be moving – or the First moving GPS after the Stop. Maximum Time with No Connect (minutes): This parameter overrides the others and guarantees (provided there is cellular network coverage) that the phone will send all GPS and user-entered data to the dispatcher every (n) minutes. This parameter is helpful in situations where the GPS buffer size is large, and/or the vehicle is stopped and the phone would not send transmissions back to the dispatcher for extended periods of time. Setting Interval Parameters The Prophesy Mobile Comm application will check for new and/or updated information from the dispatcher at regular intervals. The interval period is set by your Mobile Comm administrator and can be easily changed. X To change the interval parameter: From the dispatch software running on your PC or web application, change the parameter(s) so the frequency of GPS polling and intervals between the phone and the dispatcher are suitable to your business operations. Starting the Prophesy Application Starting the Prophesy Mobile Comm Application on the Phone This section outlines the steps required to start Prophesy Mobile Comm on your phone. X To start the Prophesy Mobile Comm application on your phone: 1. Power on your phone. Press the MENU button, then scroll to and select JAVA APPS. Press SELECT. 2. Scroll to and select Prophesy. Press RUN. The Prophesy Mobile Comm application starts. If this is the first time you are stating the Prophesy application, you will need to enter a registration number and authorization code. To enter the registration number and authorization code: ______________________________________________________ © 2004 Prophesy Transportation Solutions, Inc 26 . Prophesy Mobile Comm Reference Manual a. Highlight Phone and Press CHANGE b. Enter CAREFULLY the 10-digit Cell Phone number of this phone. Press SAVE c. Highlight AuthCode and Press CHANGE d. Enter CAREFULLY the 4-digit Auth Code assigned to this Phone number from Prophesy. Press SAVE e. Highlight Register and press SELECT 3. The Prophesy application registers with the server. If any loads are downloaded to the phone an audio alert is played to inform the driver that he has received one new load. Press OK on the Information screen (See figure 1). Press OK on the subsequent Information screen. 4. The Prophesy Menu appears (See figure 2). Steps 5-12 will guide you through a step-by-step overview of the menus and screens in the application as they appear when a load has been dispatched to the phone * In steps 5-12, note that load-oriented information only applies to TrackerPLUS and TrackerDispatch. 5. Highlight the My Loads menu option and press SELECT. The Load List screen appears. Highlight the Unopened Load and press the OPEN button. The Load List screen displays the Load Summary (See figure 3). 6. Highlight the Load and press the SELECT button. The Trip Details screen appears (See figure 4). 7. Highlight the LD Details menu item and press the SELECT button. The Load Details screen appears (See figure 5). Scroll down by pushing the down arrow on the 4-way select button on your phone. Note the Load Detail information that is displayed. When you are finished, select the BACK button. The Trip Details screen reappears (See figure 4). 8. Scroll down to the first stop on the trip (S1) and press the SELECT button. The Stop screen appears (See figure 6). Scroll down by pushing the down arrow on the 4-way select button on your phone. Note the detailed Stop information that is displayed. As you scroll down notice that the label over the right soft button changes to CHANGE when you highlight a menu item that accesses or accepts data entry. When you are finished, select the BACK button. The Trip details screen reappears (See figure 4). 9. Press the BACK button. You are returned to the Load List screen (See figure 3). 10. Press the OPTIONS button. The Choose Option screen appears (See figure 7). Glance at the menu options and then highlight Menu and press SELECT. You are returned to the Prophesy Menu – where we started (See figure 2). ______________________________________________________ © 2004 Prophesy Transportation Solutions, Inc 27 . Prophesy Mobile Comm Reference Manual 11. Highlight the GPS Monitor menu item and press SELECT. The GPS Monitor screen appears (see figure 8). Press the MENU button to return to the Prophesy Menu. 12. Congratulations! You’ve just completed a quick overview of the menus and screens in the Prophesy Mobile Comm application. Figure 1. ______________________________________________________ © 2004 Prophesy Transportation Solutions, Inc 28 . Prophesy Mobile Comm Reference Manual ______________________________________________________ © 2004 Prophesy Transportation Solutions, Inc 29 . Prophesy Mobile Comm Reference Manual ______________________________________________________ © 2004 Prophesy Transportation Solutions, Inc 30 . Prophesy Mobile Comm Reference Manual Figure 8. Receiving Information on the Phone (TrackerPLUS and TrackerDispatch only) Receiving data sent from the dispatcher to the phone can be is as easy as powering on your phone and starting the Prophesy Mobile Comm application. Note that while the Prophesy application is transferring data to/from the Prophesy server, other services are blocked until the transfer is complete. ______________________________________________________ © 2004 Prophesy Transportation Solutions, Inc 31 . Prophesy Mobile Comm Reference Manual Receiving Information on the Phone when it Powers-on When the phone is turned on and the Prophesy application is first started, the phone will establish a connection with the data server and receive any information waiting to be downloaded from the dispatcher. If cellular network coverage is unavailable, the Prophesy application will start and allow the user to work in an “offline” mode. The phone will continue to attempt to connect with the data server at regular intervals until successful, at which time will receive information waiting to be downloaded. * Note that while you are working offline, the phone continues to gather GPS information and then stores and forwards the information to the dispatcher as soon as the phone is in range of cellular service. X To receive information sent from the dispatcher to your phone when you poweron: 1. Power on your phone. Press the MENU button, then scroll to and select Java Apps. Press SELECT. 2. Scroll to Prophesy. Press RUN. The Prophesy Mobile Comm application starts. If this is the first time you are stating the Prophesy application, you will need to enter a registration number and authorization code (See chapter 3, subsection First Time Startup for more). 3. The Prophesy application registers with the server and checks for new information sent from the dispatcher. If there is new and/or updated information to be sent to your phone, the Prophesy application downloads it and displays a summary of the download. When prompted, press OK to accept the downloaded data. (Note: If there is no new information to be downloaded, you are forwarded to the Information screen. Press OK.) 4. The Prophesy Menu appears (See figure 9). ** Note: for a detailed breakdown of screens, menu items, and information displayed on your phone, see chapter 4 Looking Around. ______________________________________________________ © 2004 Prophesy Transportation Solutions, Inc 32 . Prophesy Mobile Comm Reference Manual Figure 9. Receiving Information on the Phone at Regular Intervals The Prophesy Mobile Comm application will check for new and/or updated information from the dispatcher at regular intervals. The interval period is configured by your Mobile Comm administrator and can be easily changed (See above Connection Configuration). X To receive information sent from the dispatcher to your phone at regular intervals: 1. If you have not already done so, power-on your phone (See Receiving Information on the Device when it Powers-On above). For best results and to improve cellular transmission Prophesy recommends that your ______________________________________________________ © 2004 Prophesy Transportation Solutions, Inc 33 . Prophesy Mobile Comm Reference Manual phone stays charged at all times and the handset is placed in a safe area where it is likely to obtain a strong cellular signal – on the dashboard of the vehicle, for example, or in a handset cradle mounted in the interior of the vehicle. 2. Your phone will automatically receive new and/or updated information from the dispatcher after each elapsed interval. ** Note: for a detailed breakdown of screens, menu items, and information displayed on your phone, see chapter 4 Looking Around. Entering Information on the Phone (TrackerPLUS and TrackerDispatch only) There are several fields in the Mobile Comm application that accept data entry. This information is stored on the device and then sent back to the dispatcher. For example, a driver can enter the actual date and time he arrives and departs at a stop. He may want to enter BOL or POD information, or enter actual quantities of goods. Fields that accept data entry can be identified by a data entry line appended to the menu item (See figure 10). When you scroll to and highlight a data entry field, the right soft button displays as CHANGE (See figure 10). Data is entered in different formats depending on the field you are editing. For example, Actual Arrival Time accepts data differently then BOL. Data Entry: Date Fields Date fields provide an easy-to-use data entry interface for entering dates. X To enter the date in a data entry field: 1. From within the Prophesy application, navigate to a Stop on a Load. Scroll down to the Act. Arrival____ field. 2. Press the CHANGE button. The Act. Arrival screen appears. 3. The entry field defaults to the current date and time. If this is the correct date and time of your arrival you are finished. Otherwise, use the keypad (optionally in conjunction with the 4-way select button) to set a new time and date. 4. Press NEXT, then SAVE. 5. The Actual Arrival time is saved to the data entry field and will be sent back to the dispatcher. ______________________________________________________ © 2004 Prophesy Transportation Solutions, Inc 34 . Prophesy Mobile Comm Reference Manual Data Entry: Alphanumeric Fields X To enter data in an alphanumeric field: 1. From within the Prophesy application, navigate to a Stop on a Load. For this example, scroll down to the POD Notes____ field . 2. Press the CHANGE button. The POD Notes screen appears. 3. Select a letter or number on the keypad and press it repeatedly – fast. You will see the range of possible letters and numbers displayed on the screen. When you reach the desired letter or number, stop pressing the key. The character is displayed on the screen. 4. If you make a mistake, press the DELETE button to backspace. 5. When you are finished entering POD Notes, press NEXT, then SAVE. 6. The POD Notes are saved to the data entry field and will be sent back to the dispatcher. Figure 10. Data Entry Line Change Option ______________________________________________________ © 2004 Prophesy Transportation Solutions, Inc 35 . Prophesy Mobile Comm Reference Manual Sending Information from the Phone As you will see in the steps outlined below, it is very easy to send information from the phone to the dispatcher. Note that while the Prophesy application is transferring data to/from the Prophesy server, other services are blocked until the transfer is complete. Your phone sends 2 types of data to the dispatcher: GPS positions and User-Entered information. Sending GPS Positions from the Phone to the Dispatcher GPS data is automatically collected and stored on your phone according to configurable parameters set by your Mobile Comm administrator. Your phone sends GPS data to the dispatcher in two ways: Automatically or Driver-Initiated. X To send GPS positions from the phone to the dispatcher automatically: 1. Your phone automatically sends GPS data to the dispatcher based on a time interval. This interval is calculated based on parameters set by your Mobile Comm administrator (See above Changing Interval Parameters for more). X To send GPS positions from the phone to the dispatcher, Driver-Initiated: 1. You can force the transmission of stored GPS data from your phone to the dispatcher by navigating to the Options menu, highlighting the Connect menu item, and pressing SELECT (See figure 11). After you press SELECT, refrain from pushing any additional buttons on the phone until the operation has completed. You will know when the operation has completed because you will be returned to the previously displayed screen. ______________________________________________________ © 2004 Prophesy Transportation Solutions, Inc 36 . Prophesy Mobile Comm Reference Manual Figure 11. Sending User-Entered Data from the Phone to the Dispatcher (TrackerPLUS and TrackerDispatch only) There are several fields in the Mobile Comm application that can accept input from the driver. The information entered in these fields is stored on the phone and sent to the dispatcher based on a time interval. Your phone sends User-Entered data to the dispatcher in two ways: Automatically or Driver-Initiated. X To send User-Entered data from the phone to the dispatcher automatically: 1. Your phone automatically sends User-Entered data to the dispatcher based on a time interval. This interval is calculated based on parameters set by your Mobile Comm administrator. ______________________________________________________ © 2004 Prophesy Transportation Solutions, Inc 37 . Prophesy Mobile Comm Reference Manual X To send User-Entered data from the phone to the dispatcher, Driver-Initiated: 1. You can force the transmission of stored User-Entered data from your phone to the dispatcher by navigating to the Options menu, highlighting the Connect menu item, and pressing SELECT (See figure 11). After you press SELECT, refrain from pushing any additional buttons on the phone until the operation has completed. You will know when the operation has completed because you will be returned to the previously displayed screen. Initiating and Receiving Phone Calls on the Phone Pausing the Mobile Comm Application to Make a Phone Call If you need to make a phone call and you are currently running the Prophesy Mobile Comm application, you will need to suspend the application first. Note that while the Prophesy application is transferring data to/from the Prophesy server, other services are blocked until the transfer is complete. * Note that while you are making a call, the phone continues to gather GPS information and then stores and forwards the information to the Dispatcher with its next server session. X To pause the Prophesy Mobile Comm application to make a phone call: 1. Locate the red “end-call” button located to the left of the 4-way select button and press it twice (See figure 12). The phone returns to the Nextel® home screen. Make the phone call(s). 2. When you are finished making phone calls and want to return to the Prophesy Mobile Comm application, press the MENU button (see figure 12), then highlight Java Apps, press SELECT and then RESUME. You are returned to the Prophesy Mobile Comm application. ______________________________________________________ © 2004 Prophesy Transportation Solutions, Inc 38 . Prophesy Mobile Comm Reference Manual Figure 12. Receiving an Incoming Call on Your Phone while the Mobile Comm Application is Running You can receive incoming calls on your phone while the Prophesy Mobile Comm application is running. The application will go into a suspended mode. Note that while the Prophesy application is transferring data to/from the Prophesy server, other services are blocked until the transfer is complete. * Note that while the application is suspended, the phone continues to gather GPS information and then stores and forwards the information to the Dispatcher with its next server session. ______________________________________________________ © 2004 Prophesy Transportation Solutions, Inc 39 . Prophesy Mobile Comm Reference Manual X To receive an incoming call on your phone while the Mobile Comm application is running: 1. When the phone rings, press YES to accept the incoming call. When your call has ended, press the MENU button (see figure 12), then highlight Java Apps, press SELECT, and then RESUME. You are returned to the Mobile Comm application. ______________________________________________________ © 2004 Prophesy Transportation Solutions, Inc 40 . Prophesy Mobile Comm Reference Manual ______________________________________________________ © 2004 Prophesy Transportation Solutions, Inc 41 . Prophesy Mobile Comm Reference Manual Prophesy Mobile Comm Customer Handset Registration Date: Company Name: Primary Contact Person: Phone: Nextel Account BAN (Billing Account Number): In the table below please enter: 1. The model number of the phone. 2. The 10-digit phone number. 3. The firmware (operating system) version for each phone. To view firmware version on the phone: a) In a quick sequence, press #, *, Menu, and Right Arrow on your phone’s keypad to pull up the Trace Mode menu. b) Scroll to and SELECT Unit Info. c) Scroll to and SELECT Software. Record the Software Version. This number usually begins with R and takes the form R88.02.00 or something similar. Model Number 10 Digit Phone Number Firmware Version