1
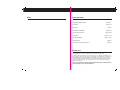
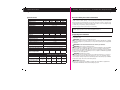
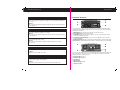
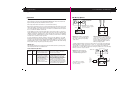
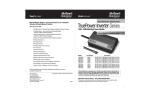
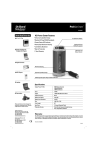
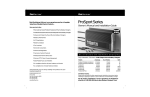
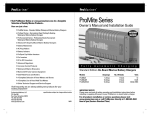
On Board
ProMa r i ne r
Solutions
®
A ProMariner Company
On Board
ProMa r i ne r
Solutions
®
A ProMariner Company
Heavy Duty Marine / Industrial Grade
Visit ProMariner Online at www.promariner.com, for a Complete
Selection of Quality Marine Products...
TruePower Inverter Series
Here are just a few:
600 - 1200 Watt Mid Power Models
ProMite Series - Standard Edition Waterproof Marine Battery Chargers
ProSport Series - Recreational Sport Fishing & Boating
Waterproof Marine Battery Chargers
Owner Manual & Installation Guide
ProTournament Series - Professional Grade Tournament
Waterproof Marine Battery Chargers
Advanced 4 Step Dry Mount Marine Battery Chargers
Battery Maintainers
AC Plug Holders
Battery Isolators
ProSport Cup Holder Inverters
Pro Inverters
DC to AC Inverters
Advanced Regulators
Corrosion Control Products
Waterproof Marine Binoculars
Marine CCTV Color Camera Equipment
Gold Plated Fuses and Holders
A Complete Selection of Panel Meters and Shunts
Model
A Complete Line of Hand Held Test Meters
600 Watt
800 Watt
1000 Watt
1200 Watt
Online Technical Support and Service Support
Visit frequently, we are always adding new products for your
boating enjoyment!
Factory Service
TEL: 1-800-824-0524
www.promariner.com
www.onboardsolutions.biz
8:30 - 5:00 Eastern Time
200 International Drive, Suite 195
Portsmouth, NH 03801
specifications subject to change without notice
02/05
Part Number
05060
05080
05100
05120
Description
12 VDC Input / 600 Watt 110 VAC Output Inverter
12 VDC Input / 800 Watt 110 VAC Output Inverter
12 VDC Input / 1000 Watt 110 VAC Output Inverter
12 VDC Input / 12000 Watt 110 VAC Output Inverter
Your Satisfaction is Important to us. Do Not return this Product to the Retailer or
Dealer for any service or warranty requirements. Please call our Customer Care
Department line at 1-800-824-0524 from 8 am to 5 pm (Eastern Time) for warranty,
service or installation assistance you may need. Thank you.
IMPORTANT SAFETY NOTICE - SAVE THESE INSTRUCTIONS
Please save and read all safety, operating and installation instructions before
installing or applying DC power to your TruePower Inverter.
Notes
Table Of Contents
Safety and Precautions...
pages 1-2
Installation Preparations...
pages 2-3
Overview...
pages 3-4
Features...
page 5
Installation Guidelines...
Testing Your Inverter...
pages 5-9
pages 9-10
Operation...
pages 11-12
Trouble Shooting...
pages 13-16
Specification...
page 17
Customer Service & Warranty...
page 18
Introduction
Thank you from all of us at On Board Solutions, A ProMariner Company.
Congratulations on your recent purchase of a TruePower Inverter!
Leading the Marine industry in Power Conversion for over 30 years, ProMariner’s On
Board Solutions division has designed a complete line of Power Inverters ranging from
200 to 3,000 watts specifically for Marine / Industrial use. TruePower Inverters will
convert your OnBoard 12Vdc Battery power to 110Vac Household Power to run TV’s,
Laptops, Gaming Systems, power tools, hairdryers, coffee makers, blender’s, large
appliances and more.
Please save and read this manual carefully and fully understand the safety instructions
before installing your new TruePower Inverter.
Safety & Precautions
Customer Service & Warranty
1
18
General Safety Instructions
Customer Service & Warranty
Before installing and using your new inverter, read all appropriate sections of this
guide and any cautionary markings on the inverter, batteries and on your appliances.
We are committed to customer satisfaction and value your business. If at any time
during the warranty period you experience a problem with your new TruePower Inverter
simply call us at 1-800-824-0524 during standard business hours (8:30 AM – 5 PM
Eastern Time) for technical support.
1. CAUTION: Do not operate the inverter if the carton or unit has significant damage
from being dropped or crushed, received a direct hit of force or is otherwise damaged.
2. CAUTION: Do not dismantle the inverter. Call the factory directly when service or
repair is required. Incorrect assembly may result in risk of electrical shock or fire.
3. CAUTION: To reduce the risk of electrical shock, disconnect both AC and DC power
from the inverter prior to any maintenance or cleaning.
4. CAUTION: Protect the inverter from rain, snow water and spray.
5. CAUTION: Internal inverter components remain charged after power is disconnected.
6. CAUTION: As a precaution - Keep Children away from the inverter and its components!
The same potentially hazardous or lethal AC power that is found in a normal household
110AC power outlet can be found in the TruePower inverter.
7. CAUTION: Under no circumstance should the user connect live AC (household) power
to the inverter’s AC receptacles. The inverter will become damaged even if it is switched
off. This unit can only take 12V DC battery power and invert it to 110V AC household
power. This unit is not a battery charger!
8. CAUTION: For an ABYC E-11 compliant installation, this Inverter must be installed
with an inline fuse in the positive (+) cable on the DC side of the inverter (between the
battery and the inverter) at a distance of seven inches from the battery connection
(Please see Specifications Table in this Manual for correct sizing).
Personal Safety Precautions
1. Someone should be within the range of your voice or close enough to come to
your aid when installing power inverters or working near lead acid batteries.
2. Wear complete eye protection and protective clothing. Avoid touching eyes while
working on or with batteries. Have plenty of soap and water nearby in case of battery
acid comes in contact with skin, clothing or eyes.
3. If battery acid comes in contact with skin or clothing, wash immediately with soap
and water. If acid enters the eye (s) flood eye (s) with running water for at least 10
minutes and get medical attention immediately.
4. Never smoke or allow a spark or a flame in the vicinity of a battery or engine.
TRUEPOWER
TWO YEAR LIMITED FACTORY WARRANTY
Each product is guaranteed against defects in material and workmanship to the original consumer in normal
use for two full years from the date of purchase. On Board Solutions and Professional Mariner, LLC at its
discretion will repair or replace free of charge any defects in material or workmanship. The following
conditions apply:
• Warranty is calculated from date of manufacture if not registered within two weeks of sale.
• Warranty void if damage occurs due to negligent repairs.
• Customer is responsible for returning the product to On Board Solutions and Professional
Mariner, LLC. inbound shipping costs must be prepaid.
• This warranty does not cover blemishes due to normal wear and tear or damages caused
by accidents, abuse alterations or misuse.
Purchase or other acceptance of the product shall be on the condition and agreement that On Board Solutions and
Professional Mariner SHALL NOT BE LIABLE FOR INCIDENTAL OR CONSEQUENTIAL DAMAGES OF ANY KIND.
(Some states do not allow the exclusion or limitation of consequential damages, so the above limitations may not
apply to you.) This warranty is made in lieu of all other obligations or liabilities on the part of Onboard Solutions and
Professional Mariner. Additionally, On Board Solutions and Professional Mariner neither assumes nor authorizes
any person for any obligation or liability in connection with the sale of this product.
To make a claim under warranty, call Factory Service at 1-800-824-0524. Follow the company’s return policy, which
will be provided by the company. On Board Solutions and Professional Mariner will make its best effort to repair
or replace the product, if found to be defective within the terms of the warranty, within 30 days after return of the
product to the company. On Board Solutions and Professional Mariner will ship the repaired or replaced product
back to the purchaser.
The GFCI is covered by a 90 day warranty limitation, as the life of a GFCI in a harsh, humid, outdoor marine
environment cannot be guaranteed. The GFCI is a standard off the shelf serviceable / replaceable component
in the TruePower Inverter Series. Please contact Customer Service for additional assistance.
This warranty provides to you specific legal rights and you may also have other rights, which vary from state to
state. This warranty is in lieu of all other, expressed or implied.
OBS & Professional Mariner, LLC.
Factory Service Center
200 International Drive, Suite 195
Portsmouth, NH 03801
Service Phone: 1-800-824-0524
Phone: (603) 433-4440
Fax: (603) 433-4442
Visit us on the web at: www.promariner.com
www.onboardsolutions.biz
Specifications
Safety & Precautions / Installation Preparation
17
2
Personal Safety Precautions Continued
Specifications
TruePower
600W
Power (W)
Continuous Power
Surge Power
Output Waveform
AC Output Voltage
AC Output Amps (up to)(continous)
600W
600W
1200W
DC Input Voltage
DC Input Amps (up to)
Efficiency
No load Current
Cooling Fan
Short Protection
Soft- Start
High Voltage Protection
800W
1000W
1200W
1200W
1200W
2400W
5.5
800W
1000W
800W
1000W
1600W
2000W
Modified Sine Wave
115V +/- 10%
7.3
9.1
60A
10V to 15V
80A
100A
10.9
120A
<0.8A
<1.0A
<1.0A
Yes
Yes
Yes
Yes
7. Never charge or invert power from a frozen battery.
*WARNING: Restrictions on Use- The TruePower inverter shall not be used in connection
with life support systems or other medical equipment devices.
WARNING: This devise is not Ignition Protected
Avoid serious injury or death from or explosion. Do not install in compartments containing
gasoline fueled engines or gasoline tank, or in areas where ignition protected equipment
is required.
11.9VDC
11.5VDC
10.5VDC +/- .5VDC
10VDC +/- .5VDC
WARNING: Do not mount the inverter above or below your batteries.
ANL Ignition Protected Fuses for TruePower Models
Single Position ANL
High Amperage
Fuse Holder
Preparing for Installation
Read this entire installation section if you plan a hardwire installation from
beginning to end.
Reverse Polarity Protection (By Fuse)
Yes
Operating environment temperature
-15 to 50° Celsius or 5 to122° Fahrenheit
Internal Fuse
20A * 4pcs 35A * 3pcs 35A * 4pcs 35A * 4pcs
Recommended User Supplied
80A
105A
140A
140A
ABYC E-11 Compliant Fuse
Amperage
6. Remove all personal metal items such as rings, bracelets, necklaces, watches and
jewelry when working near a battery. A battery can produce a short circuit high enough
to weld a ring or any metal, causing serious burns.
>85%
<0.65A
Low Battery Alarm (Bat’ Saver)
Low Battery Shutdown (Bat’ Saver)
Low battery Alarm
Low Battery Shutdown
ProMariner Part No. for
Recommended User Supplied
ABYC E-11 Compliant Fuse
5. Be extra cautious to reduce the risk of dropping a metal tool onto a battery. It may
spark or short-circuit the battery or other electrical parts that may cause an explosion.
600 Watt
800 Watt
1000 Watt
1200 Watt
88120
88100
88100
88160
88160
100-425 amps
100 amp
100 amp
160 amp
160 amp
WARNING: Electrical shock and fire hazards
On Board Solutions, a ProMariner Company recommends all wiring be done by qualified
personnel. Disconnect all AC and DC power sources to prevent accidental shock.
Disable and secure all AC and DC disconnect devices and automatic generator starting
devices. It is the installer’s responsibility to ensure compliance with all the applicable
installation codes and regulations.
WARNING: Installation Precaution
The TruePower inverter should be mounted on a flat horizontal surface or a vertical
surface with the front panel and label facing the user. In no case should the front or
rear endcaps be facing in an upward or downward position. This allows proper ventilation
and product safety of the unit as intended by design.
WARNING: Fire Hazard
Do not cover or obstruct the ventilation openings. Do not install this equipment in a
compartment with limited airflow; Overheating may result.
Installation Preparation / Overview
Tr o u b l e s h o o t i n g
3
Preparing for Installation Continued
16
Power tool operates at incorrect speed
WARNING: Risk of Fire or Explosion
This equipment contains components that could produce arcs or sparks. To reduce the
risk of fire or explosion, do not install this equipment in compartments containing
batteries, flammable materials or fumes, or in a location containing gasoline-powered
machinery, or joints, fittings, or other connections between components of the fuel
system.
Possible Cause:
- Caused by the purely inductive load
Solution:
- Operate a small lamp or a similar non-inductive load at the same time as the tool.
WARNING: Keep Children away from the inverter and its components!
The same potentially hazardous or lethal AC power that is found in a normal household
110AC power outlet can be found in the TruePower inverter.
Note about Modified Sine Wave Inverters
A modified sine wave inverter has a waveform more like a square wave, but with
an extra step or so. A modified sine wave inverter will work fine with most equipment,
although the efficiency or power will be reduced with some.
WARNING: Low Voltage - Electrical burn and spark hazard.
Disconnect battery power before servicing.
WARNING: Restrictions on Use
The TruePower inverter shall not be used in connection with life support systems or
other medical equipment or devices.
Installation Recommendations & Requirements include the following:
American Boat and Yacht Council (ABYC)
The Canadian Electrical Code (CEC)
Canadian Standards Association (CSA)
The U.S. National Electrical Code (NEC)
RV Industry Association (RVIA)
Guide to Operation
General Advisory
Install your TruePower Inverter to the guidelines recommended in this manual. The
TruePower Inverter is designed to meet UL 458, CE and ABYC standards.
General Operation
The TruePower Inverters series are modified sine wave inverters which convert
12 volt direct-current (DC) power from your batteries to 120 volts alternating current
(AC) power. The inverter allows you to have AC power when and where you need
it. The TruePower Inverter comes equipped with numerous protection features to
provide you safe and worry-free operation. Please see the following sections of
the manual for Inverter Features, Installation instructions, Testing instructions,
Operation and Troubleshooting.
Motors, such as refrigerator motor, pumps, fans etc will use more power from the
inverter due to the fact that a modified sine wave has a lower efficiency than that
of pure sine wave. Most motors will use about 20% more power.
Some fluorescent lights may not operate quite as bright, or may buzz.
Electronic timers and/or digital clocks will often not operate correctly. Many
appliances get their timing from the line power, and because the timing of a modified
sine wave signal may be slightly different than that of a pure sine wave, clocks and
timers may run faster or not work at all.
Note: Some stereo systems and radios may emit a buzzing sound from their speakers
when operated from the inverter. This buzzing occurs because the radio or electronic
device does not filter the modified sine wave produced by the inverter adequately.
Television interference may occur with some TV signals, even though this inverter
is designed to minimize such interference. If a disturbance occurs in a weak TV
signal, you may try the following to correct the problem:
- Place the TruePower inverter far away as possible from the television, the antenna
cables and the antenna as well. Use an extension cable from the inverter to the TV
if necessary.
- Make sure the TV antenna provides a snow free signal when operated on a source
other than the inverter. Additionally, we recommend the use of a high quality,
shielded antenna cable.
- Coil the TV power cord as well as the input power cables running from the battery
to the inverter.
- Attach an AC interference filter or similar filter product between the inverter and
televisions power cord. This type of filter is available at most electronic supply
stores.
- Try a different Television set as different models and manufacturers vary in their
vulnerability to interference.
Overview
Tr o u b l e s h o o t i n g
4
15
Fan does not turn on.
Possible Cause:
- The power rating of the appliance may be too low or the ambient temperature
is too cool.
Solution:
- No action. The fan will run at full speed when the inverter is powering a higher
rated appliance.
TruePower Overview
6
2
Remote Port
5
Power Fault
AMPS
GFCI 110 VAC Output
4
3
VOLTS
100%
75
50
25
0
15
14
13
12
10
On
Off
1
On Board
Solutions
Bat-Sav'r
A ProMariner Company
Fan runs all the time.
Possible Cause:
- The power rating of the appliance is too high.
Solution:
- No action. The fan will run at full speed when the inverter is powering a higher
rated appliance.
Possible Cause:
- The ambient temperature is high.
Solution:
- No action. The fan will run at a higher ambient temperature to keep the
inverter cool.
The above picture outlines the front of the TruePower Inverter with bullets pointing
out digital bar graph display, on/off and bat’ saver, led locations etc. Please Reference
Table below for features:
1. ON/Off Switch turns the inverter to ON, OFF or to Bat’ Saver mode
2. Power light illuminates when inverter is on.
3. Fault Light illuminates Red for fault conditions such as over temperature, output
overload, or battery low voltage.
4. Two GFCI Protected AC Outputs to power connected appliances, Reset and Test
monthly capabilities.
5. Ventilation Openings provide air circulation for peak performance. (front and rear panel)
6. Remote Port for optional simple remote with on / off switch and power and fault led
7
8
9
POS
NEG
Low Battery alarm sounds continuously
Possible Cause:
- Bad wiring or connection
Solution:
- Tighten and clean all DC connections
Power tool will not start
Possible Cause:
- Large start-up (surge) current demand.
Solution:
- If power tool will not start, then proper sized inverter should be used.
DC Input
10
AC Output
10V-15VDC
Up to 60Amps Continuous
110V - 120VAC 60Hz
5 Amps Continuous
TruePower600
P/N: 05060
12
600 Watts Continuous
1200 Watts Peak
11
The above picture outlines the back of the TruePower Inverter with bullets pointing out
DC connections, fuse holder locations etc. The Table below references the above
numbered features of the back panel
7. DC Input Cable (Positive +)
8. DC Input Cable (Negative -)
9. Fan Housings
10. Ground Stud
11. Mounting flanges (Side)
12. Tech Spec Label
Tr o u b l e s h o o t i n g
Features
14
5
Inverter Features
The TruePower inverter comes standard with a Ground Fault Circuit Interrupter
(GFCI) protected Dual AC outlet which can protect the user against hazardous
electrical shock that could be caused by dampness, water spray, or worn cables.
Bat’ Saver- mode allows the user to protect from draining down the entire power of
the engine start battery, and shuts the inverter off when the battery reaches a threshold
of 11.7 volts allowing you to still start your boat or vehicle.
Soft Start, Noise Filtered Technology- progressively increases the output voltage to
start heavy loads, with minimal or no interference.
Optional Standard Function Remote- can be purchased as an accessory and may be
plugged into the remote prot for the 600w thru 1200w models.
TruePower performance features include:
- Internal Conformal Coating for Anti-Corrosion
- Soft Start and Noise Filtered Technology
- Bat’ Saver Mode – 200 to 1200 watt Models
- True Rated Continuous Power
- Hi-Surge Ratings for Demanding Loads
- Heavy Duty Marine/Industrial Construction
- Constructed to UL 458
- Meets the Requirements of ABYC E-11 Marine
- Highly Visible Power & Fault LED Indicators
TruePower Inverters are protected by a variety of features including:
- GFCI AC Outlet Safety Protected
- Input Polarity Protection
- Low Battery Alarm
- Low Battery Shutdown
- Overload Protection
- Output Short Circuit Protection
- Thermal Protection
- Over Voltage (15 VDC) Protection
Note: These inverters may not be suitable for use with some fluorescent lighting,
halogen lights or other inductive loads. If you wish to run such an item, plug it in
to one of the inverter outlets and plug in a small non-inductive load bearing item
such as a low wattage light bulb into the other outlet.
No AC output voltage. Red Fault LED light is illuminated.
Possible Cause:
- Inverter may be overloaded.
Solution:
- Disconnect all appliances connected to the inverter and reset the inverter by
turning the ON/Off switch to Off then back to ON.
Possible Cause:
- Battery voltage may be too high.
Solution:
-The inverter will restart if the battery voltage drops below 15.5 volts DC.
Possible Cause:
- Battery voltage may be too low.
Solution:
- Battery voltage becoming low, recharge battery and resume inverting power.
Possible Cause:
- Over temperature.
Solution:
- Allow the inverter to cool down. The inverter will start automatically.
Possible Cause:
- Unit may be defective
Solution:
- Call Factory Service 800 number.
No AC output voltage. NO Lights are illuminated.
Possible Cause:
- Battery voltage is too low.
Solution:
- Recharge the batteries. Restart the inverter with recharged batteries.
Possible Cause:
- Poor DC wiring.
Solution:
- Turn the inverter to Off. Disconnect the DC wiring. Use proper wiring and ensure
all connections are secure.
Installation Guidelines
Tr o u b l e s h o o t i n g
6
13
Troubleshooting
Mounting your Inverter
This section is designed to accommodate you in identifying and troubleshooting
common problems that may result with an inverter. Review this section before
contacting customer service. If you can not resolve the problem, record the data
of the instance based on information provided here with in this manual.
IMPORTANT: ALWAYS PLACE THE INVERTER IN AN ENVIRONMENT WHICH IS:
(A) WELL VENTILATED
(B) NOT EXPOSED TO DIRECT SUNLIGHT OR HEAT SOURCE
(C) OUT OF REACH FROM CHILDREN
(D) AWAY FROM WATER / MOISTURE, OIL OR GREASE
(E) AWAY FROM ANY FLAMMABLE SUBSTANCE
(F) DO NOT INSTALL DIRECTLY ABOVE OR BELOW BATTERIES
This troubleshooting section will aid you in identifying the source of common problems
you may encounter. If you are unable to resolve the problem from the troubleshooting
reference table, contact customer service.
Fuses:
No AC output voltage. No indicator lights are illuminated.
Possible Cause:
- The switch is in Off position.
Solution:
-Turn the ON/Off switch to the ON position.
Possible Cause:
- No input power to the inverter.
Solution:
-Check the DC wiring to the inverter for loose connections or frayed wiring.
Possible Cause:
- DC fuse is blown.
Solution:
-Check user installed ABYC compliant fuse.
-Have a qualified service technician check and replace internal fuse.
No AC output voltage. Inverter light is illuminated.
Possible Cause:
- Circuit breaker has tripped.
Solution:
- Disconnect all appliances to reduce the overload, check the AC wiring, and
reset the breaker by turning the ON/Off switch to Off and then back to ON.
Possible Cause:
- GFCI has tripped.
Solution:
- Clear the ground fault, and reset the GFCI by pressing the reset on the GFCI button.
As stated in this manual, for an ABYC E-11 compliant installation, this Inverter must be
installed with an inline fuse in the positive (+) cable on the DC side of the inverter
(between the battery and the inverter) at a distance of seven inches from the battery
connection (Please see Specifications Table in this Manual for correct sizing).
If this external fuse blows, or if the breaker trips on the larger models, there is a short
or overload in the DC wiring. Find and fix the problem before replacing the fuses or
resetting the breaker. After replacing the fuse, reconnect the inverter.
In addition to the DC inline fuse, the TruePower inverter is protected by internal fuses.
The external Fuse provided by the user is to protect installation wiring.
To mount the TruePower Inverter:
1. Turn the On/Off switch on the front panel of the inverter to Off position.
2. Select an appropriate mounting location and orientation.
3. Hold the inverter against the mounting surface, mark the position of the mounting
screws, and then remove the inverter.
4. Drill pilot holes for the four mounting fasteners ( Use caution prior to drilling or cutting
to ensure proper clearance from existing wiring and hardware).
5. Fasten the inverter to the mounting surface with four hardware fasteners.
Note: For the best load starting performance, the DC cables should be short and
large as possible. A solid, low resistance connection to the DC power source is
important for proper operation of the TruePower Inverter. Using a smaller cable may
cause the inverter to shut down under a heavy load.
Note: A ground stud can be found on the rear panel of the TruePower inverter as illustrated
in “TruePower Overview” earlier in this manual. The ground stud must be connected to
Operation
Installation Guidelines
7
12
Mounting your Inverter Continued
Operation
a grounding point, which will vary depending on where the TruePower inverter is installed.
We recommend an #8 gauge AWG or larger copper wire. In a vehicle, please secure a
ground wire from this stud to the chassis of your vehicle, keeping the distance of the
ground as short as possible. In a boat, connect to the boat’s grounding system. In a fixed
location connect the inverter’s ground stud to earth by connecting to a ground rod (a
metal rod pounded into the earth) or other proper service entrance ground.
Resetting the Inverter:
Battery Operating Time
Operating time of your inverter is determined by the size and type of battery you
use, but more specifically it is determined by how much power you will draw.
Follow the below steps to calculate roughly the battery ampere-hour capacity you
may require.
1. Establish how many watts each piece of equipment you will use consumes. This
usually can be found on the label of your power products. If only current draw is given,
you can estimate the watt consumption by multiplying current draw by 115.
2. Estimate the time in hours you will be running each power product between charging
your battery source
3. Calculate the total watt hours of energy consumption (power x operating time) using
the average power consumption and the total estimated running hours. (Power x
Operating hours = Watt Hours)
4. Now Divide the Watt Hours by 10 to determine how many 12volt ampere-hours will
be used. You need to have a battery or a bank of batteries with same ampere-hours
you demand.
If the user has TruePower running off the start battery of your vehicle, we recommend
the user to start the vehicles engine very 30 minutes to recharge the battery. This will
help prevent any automatic shutdown of the inverter due to low battery voltage and
help ensure enough battery capacity to start the vehicle’s engine. The inverter’s low
battery alarm will sound when the battery drops to 10.5 volts and shut down at 10v. If
you are using the TruePower Bat’ Saver mode, the Low battery alarm will sound at 11.9
volts and shut down at 11.7v.
The TruePower inverter can be used with or without the vehicle’s engine running. The
inverter may not be able to operate while the engine is starting as battery voltage drops
substantially during engine cranking. The best battery setup we can recommend for
providing sufficient inverter capacity while protecting the engine start battery from being
overdrawn is to have a separate battery for starting the vehicle and to have a deep
discharge type battery or several batteries in parallel for powering the inverter if you plan
on running electrical products for extended periods of time on a frequent basis.
To reset the TruePower Inverter, turn the ON/Off switch to Off and then back to ON.
Resetting the Ground Fault Circuit Interrupter (GFCI):
Function- The GFCI receptacle protects the receptacle output against a ground fault.
Correcting a Ground - When a ground fault condition is detected, the Reset button on
the GFCI receptacle Fault will trip and the power to an appliance is interrupted. To
resume normal operation, determine and correct the ground fault, then press the Reset
button.
Monthly Testing- Once a month, with the TruePower turned ON, press the Test button
on the GFCI receptacle. The Rest button should pop out. Press it to reset the GFCI and
to continue with normal operation. If the Rest button does not trip, the GFCI may have
failed. Contact Customer Service to have a qualified technician inspect the unit.
Resetting as the Result of an Overload:
The TruePower has a high surge capacity of double the stated model power rating for
5 seconds. If the appliance(s) connected to the unit try to draw excess power for more
than 5 seconds, the TruePower will shut down and the Red Fault light will illuminate.
After removing the overload condition, the TruePower will cycle through a 15 second
self check and automatically reset to operating levels.
Operating Several Appliances at the Same Time:
If you are going to operate several appliances at the same time, turn them on
independently, after you have powered up the inverter. This action ensures that the
TruePower does not have to deliver the starting current for all of the appliances at
once. The TruePower can accommodate several appliances at once as long as they
do not exceed more than a combined total of the stated wattage of the inverter.
Recharging Your Batteries:
We recommend you recharge your batteries before they are fully discharged. This will
provide a much longer life cycle than recharging them when they are almost completely
discharged. It is recommended to use a Remote Battery Status indicator to monitor
the battery levels and determine optimum recharge times and cycles.
Installation Guidelines
Operation
8
11
DC Wiring Options
Operation
positive
TruePower
In the ON position, the Inverter /Fault LED light will illuminate Green. The TruePower
begins inverting and provides modified sine wave power.
POS
negative
The ON/Off switch turns the TruePower Inverter to ON or to Off.
NEG
In the Off position the inverter draws no current from the battery.
As a rule of thumb, most often the start up or surge load of the appliance or tool will
determine if your TruePower inverter has the capability of running it. If the appliance
or tool does not start the first try, attempt switching the appliance on every 2 seconds
until the appliance turns on. If the appliance does not start after the 5th or 6th attempt,
it may require a larger surge than your inverter provides.
LED Indicators:
The two indicator lights on the front panel of the inverter illustrate the operating status
of the TruePower Inverter. See table 4 below.
Status of Indicator Lights Table
Light
Color
Status
Result
Power
Green
When the TruePower unit is on,
the Inverter light illuminates.
Can run your appliances through the
Inverter from the battery.
Fault
Red
The Fault light illuminates
whenever there is a battery
over-voltage fault condition
(in excess of 15volts +/- 1volt),
a low battery protection
indicator (below 10volts +/.5volts), an output overload
condition or an overtemperature fault condition.
Can not run appliances as the AC output
is disabled in the inverter mode. Clear
the fault condition. Reset the unit by
turning the ON/Off switch to Off and then
back to ON. The inverter may need to
cool off for a period. Reduce load,
duration of use if you have been using
for a longer period of time. If it continues
to be a problem, you may need to properly
size your inverter to your application.
Boat/
Vehicle
Battery
Figure 1) This wiring setup displays
an inverter connected directly to
the engine battery for light-duty
applications.
Figure 2) Displays 2 x 12volt batteries
connected in a parallel system that
doubles the capacity and maintains
the 12v voltage requirement of your
inverter. This battery bank requires a
battery charging system.
To obtain sufficient battery capacity, you may need to use more than one battery.Two
identical batteries can be connected + to + and – to – in a parallel system, doubling
capacity. We recommend that you do not connect batteries from different
manufacturers, or with different amp-hour ratings in parallel as decreased battery
life may result. See figure 3 below.
Figure 3) This wiring diagram
displays a battery configuration
for Medium-Duty applications.
TruePower
POS
NEG
*fuse
*For an ABYC E-11 compliant
installation, customer supplied
fuse, 7" from battery
deep
cycle
auxiliary battery
isolator
boat/vehicle battery
to ground
Some appliances and tools operate using larger electric motors, tubes or capacitors
require an initial surge of power to start up. This extra surge of power required is often
called the “peak load”, “starting load” or “surge capacity”. Once such a tool or appliance
is started, it requires significantly less power to continue operation. This is commonly
referred to the “continuous load” of power.
*For an ABYC E-11 compliant
installation, customer supplied
fuse, 7" from battery
*fuse
from alternator
or charger
Bat’ Saver mode allows the user to protect from draining down the entire power of the
engine start battery, and shuts the inverter off when the battery reaches a threshold
of 11.7 volts allowing you to start your boat or vehicle. To use the Bat’ Saver mode, turn
the on / off switch to the Bat’ Saver mode.
I n s t a l l a t i o n G u i d e l i n e s / Te s t i n g Yo u r I n v e r t e r
Te s t i n g Yo u r I n v e r t e r
9
10
Connecting the DC Cables
Performing Checks Prior to Operation Continued
DC connections must be securely fastened and all connections must be tight to
avoid risk of fire. Connect the DC cables from the inverter to the battery as noted in
the following steps:
Verify the Negative (-) battery cable is connected to the negative (-) battery terminal.
1. Switch the On/Off switch to the Off position.
Verify the battery voltage is within the proper range for this unit (roughly 10-15.5 volts DC).
Verify the DC fuse is in tact.
2. Route the DC cables from the inverter toward the battery.
Testing Installation
3. For an ABYC E-11 compliant installation, connect a customer supplied DC fuse or
circuit breaker in the positive side of the circuit within 7 inches of the battery. This
protects your battery and wiring in case of an accidental shorting (Please see
Specifications Table in this Manual for correct sizing).
When you are ready to test your installation and operate the TruePower Inverter, close
the DC fuse or the DC circuit breaker to supply DC power to the TruePower inverter.
4. Open the DC fuse or turn off the circuit breaker.
The ON/OFF switch turns the TruePower inverter to ON or to OFF:
5. Install one connector on the POSITIVE (+) cable to the POSITIVE DC terminal on the inverter.
- In the On position, the Inverter Power LED light illuminates Green. The TruePower begins
inverting and provides AC power.
- In the Off position, the TruePower Inverter draws no current from the battery. None of
the front panel LED lights are illuminated.
- The Fault Light Illuminates Red when a fault conditions such as over temperature, output
overload, or battery low voltage occurs.
6. Install the other connector to the POSITIVE (+) terminal DC fuse or DC circuit breaker. Use
a wrench to tighten the connection. Test that the cable is secure and the connection is tight.
7. Attach a short DC cable from the unconnected end of the DC fuse or DC circuit
breaker. Tighten appropriately.
8. Observing polarity carefully, connect the end of the fused cable to the POSITIVE (+)
terminal of the battery. Tighten this connection to the battery manufacturer’s recommended
torque. You may replace the fuse now or turn the DC circuit breaker on.
Display Functions of the LED Light Pattern:
To test the TruePower Inverter:
9. Connect one connector on the NEGATIVE (-) cable to the NEGATIVE (-) battery
terminal. Tighten the connection and assure the cable is secure.
1. Turn the On/Off switch to the ON position.
The Inverter/Fault LED light illuminates Green.
2. Plug an appliance of equal watts or less into the AC outlet.
3. Turn the appliance ON to verify that it operates.
10. Check that the polarity of the DC connection is correct: positive (+) on the inverter is
connected to the positive (+) on the battery and negative (-) is connected to the negative (-).
If the Inverter/Fault light illuminates Red, see the TruePower Inverter “Troubleshooting”
section.
IMPORTANT: The next step is the last cable connection you will need to make in mounting
the TruePower inverter. A spark is normal when this connection is made!
11. Connect the other connector of the NEGATIVE (-) cable onto the NEGATIVE (-) terminal
on the TruePower Inverter.
12. Use a wrench to tighten the nut. Test that all cable connections are tight.
Performing Checks Prior to Operation
Before starting up your inverter, ensure these conditions are met:
Verify the On/Off switch is in the Off position
Verify the Positive (+) battery cable is connected to the positive (+) battery terminal.
Testing of the GFCI
1. Turn the On/Off switch to the ON position.
2. Plug a test lamp into the GFCI outlet.
3. Press the “test” button located on the GFCI outlet.
4. The “reset” button should pop out and the power to the test lamp should turn off. If the
lamp does not shut off and remains on, or if the reset button does not pop out, the GFCI
receptacle is defective. Please call factory service at 1-800-824-0524 for replacement or
service.
5. To resume regular operation, push the “reset” button to return to regular operation.