1
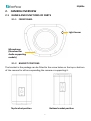
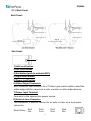
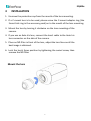
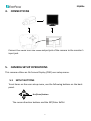
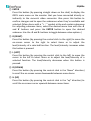
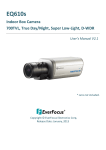
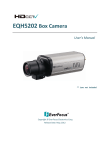
EQ610x Indoor Box Camera 600TVL, High Resolution, D-WDR User’s Manual * Lens not included. Copyright © EverFocus Electronics Corp, Release Date: March, 2013 CAUTIONS 1. Do not install the camera near electric or magnetic fields. 2. Never disassemble the camera beyond the recommendations in this manual nor introduce materials other than those recommended herein. 3. Try to avoid facing the camera toward the sun. 4. Keep the power cable away from water and other liquids and never touch the power cord with wet hands. 5. Never install the camera in areas exposed to oil, gas or solvents. 6. Do not operate the camera beyond the specified temperature or humidity. Use the camera at temperatures within -10°C~50°C (14°F~122°F) and humidity between 20%~ 80%; this device is not rated as submersible. 7. Determine the polarity of the power adapter pigtail before connecting the camera to the power source. The input power source is 12 VDC / 90-260 VAC~. i EQ610x 1. INTRODUCTION The EverFocus EQ610x box camera features an incredible 600TVL resolution in full color with a low-light sensitivity of 0.15 lux. Delivered by a high-sensitivity sensor, the camera also features the added benefits of advanced DSP technology to enhance image quality. This camera also utilizes technologies like DNR (to reduce recording file sizes and thus conserve DVR HDD space), Digital Wide Dynamic Range, Day/Night mode switching, Privacy Masking, Motion Detection, and much more! 1.1 FEATURES • 600TVL high-resolution CCD sensor. • High sensitivity, low smear, high anti-blooming and high S/N ratio for high-performance video. • Easy-to-use OSD Setup Menu. • Built-in DNR, D-WDR and easy Day/Night functions. • Built-in Back Light Compensation (BLC), Auto Electronic Shutter (AES), Auto Gain Control (AGC) and Auto White Balance (AWB). • Built-in Motion Detection and Privacy Mask for advanced surveillance functions. 1.2 • • • • • • PACKAGE CONTENTS 1 x Camera Unit 1 x User’s Manual 1 x Accessory Pack with Screws 1 x Mounting Bracket 1 x C-mount Adaptor 1 x Power Pigtail Cable (only for 12 VDC model) 1 EQ610x 1.3 SPECIFICATIONS Pickup Device Video Format 1/3" High Sensitivity Color CCD NTSC, PAL NTSC: 811 x 507 Picture Elements (H x V) PAL: 795 x 595 Horizontal Resolution 600TVL Sensitivity 0.15Lux / F1.2 S/N Ratio Over 48dB (AGC off) Video Output 1.0Vp-p Composite, 75Ω ; BNC Gamma Correction 0.45 Lens Type C/CS Mount (Lens sold separately) Back Light HLC / BLC / OFF C i Auto Electronic Shutter 1/60(50) ~ 1/100,000 sec. Auto Gain Control AUTO (3 Steps) Auto White Balance ATW1 / ATW2 / AWC / Manual Sync. Mode Internal OSD Control (English / Simplified Chinese /Spanish / OSD Menu Russian) DNR On / Off switch D-WDR On / Off Switch Mirror On / Off switch Motion Detection 4 Detection Zone Blocks Privacy Mask 8 Zones Power Source Two types: 90-260 VAC~ or 12 VDC Power Consumption 12 VDC: 1W max. 90-260 VAC~: 3.1W max. Operating Temperature Dimensions (W x D x H) Weight Certifications -10˚C~50˚C / 14˚F~122˚F 68 x 56 x 120 mm / 2.6 x 2.2 x 4.7 in 265 g / 0.58 lbs CE / FCC 2 EQ610x 2. CAMERA OVERVIEW 2.1 NAMES AND FUNCTIONS OF PARTS 2.1.1 FRONT PANEL Light Sensor Microphone (Reserved for Audio-supporting models) 2.1.2 BRACKET POSITIONS The bracket in the package can be fitted to the screw holes on the top or bottom of the camera for either suspending the camera or supporting it. Top bracket position Bottom bracket position 3 EQ610x 2.1.3 Back Panel Back Panel: Side Panel: 8 1) Left-scroll button 2) Up-scroll button 3) Set button (push to activate OSD) 4) Right-scroll button 5) Down-scroll button 6) Video Output Connector BNC connector that connects to a 75 Ohm type coaxial cable to feed the video output of the camera to a color monitor or other video devices. 7) Power Input Terminal Connects to the appropriate power source. 8) Auto Iris Lens Connector This connector is used to connect to an auto iris lens via a 4 pin male connector Pin1 Pin2 Pin3 Pin4 Direct Drive CntCnt+ Drv+ Drv4 EQ610x 3 INSTALLATION 1. Unscrew the protection cap from the mouth of the lens mounting. 2. If a C-mount lens is to be used, please screw the C-mount adaptor ring (the 5mm-thick ring in the accessory pack) on to the mouth of the lens mounting. 3. Mount the lens by turning it clockwise on the lens mounting of the camera. 4. If you use an Auto Iris lens, connect the lens’s cable to the Auto Iris lens connector on the side of the camera. 5. Place an ND filter in front of the lens, adjust the lens focus until the best image is obtained. 6. Lock the lens’s focus position by tightening the swivel screw, then remove the ND filter. Mount the lens 5 EQ610x 4. CONNECTIONS EXT. SENSOR Connect the cable from the video output jack of the camera to the monitor’s input jack. 5. CAMERA SETUP OPERATIONS This camera utilizes an On Screen Display (OSD) user setup menu. 5.1 SETUP BUTTONS To set items on the user setup menu, use the following buttons on the back panel. Set (Enter) button The cursor direction buttons and the SET/Enter button 6 EQ610x ① ENTER Press this button (by pressing straight down on the stick) to display the OSD’s main menu on the monitor that you have connected directly or indirectly to the camera’s video connector. Also press this button to confirm changes and to open the submenus when they’re available and selected. (Menu items with a “<┘” symbol at the end contain submenus. For adjusting submenu items, select the desired menu item with the and buttons and press the ENTER button to open the desired submenu. Use the and buttons to toggle between value options.) ② R (RIGHT) Press this button (by pressing the control stick to the right) to move the on-screen cursor to the right to select items or to adjust the level/intensity of a selected function. The level/intensity increases when this button is pressed. ③ L (LEFT) Press this button (by pressing the control stick to the left) to move the cursor to the left to select items or to adjust the level/intensity of a selected function. The level/intensity decreases when this button is pressed. ④ D (DOWN) Press this button (by pressing the control stick in the “down” direction) to scroll the on-screen cursor downwards between menu items. ⑤ U (UP) Press this button (by pressing the control stick in the “up” direction) to scroll the on-screen cursor upwards between menu items. 7 EQ610x 5.2 OSD Operation ** SETUP ** LENS EXPOSURE WHITE BAL. IMAGE ADJ. BACKLIGHT DAY & NIGHT SPECIAL LANGUAGE RESET EXIT DC <┘ ATW1 <┘ OFF<┘ AUTO<┘ <┘ ENGLISH <┘ Note: The OSD display shown in the image above is for reference only. The actual version will look different, but will have the same wording and format. 1. Open the OSD menu Press the ENTER button to open the OSD’s main menu on your screen. 2. Scroll with the cursor buttons to select menu items Use the and buttons to move the cursor up and down to scroll to the desired menu items. 3. Toggle between the right-hand options (modes) of each menu item Use the and buttons to change the modes of menu items and to access the submenus of those modes (to adjust the parameters or values of submenu items – where applicable). Menu items with a “<┘” symbol at the end contain submenus. (If the right-hand menu title is “SET”, it means that there are no modes to choose from, only a settings submenu for the left-hand main menu item.) 4. Open submenus Right-hand items (or “modes”) with a “<┘” symbol at the end contain submenus. For adjusting submenu items, select the desired menu item with the and buttons, then select the desired submenu title (or “mode”) to the right of the menu item with the and buttons, then press ENTER to open the submenu. 5. Return to the previous page Scroll to RETURN and press the ENTER button to return to the previous page. 6. Exit the OSD menu Scroll to EXIT and press the ENTER button to exit the OSD menu. 8 EQ610x 6. CONFIGURATION WITH THE OSD 6.1 LENS The camera’s LENS setting is set to DC and cannot be changed. This menu item is for reference only. 6.2 EXPOSURE ** SETUP ** LENS EXPOSURE WHITE BAL. IMAGE ADJ. BACKLIGHT DAY & NIGHT SPECIAL LANGUAGE RESET EXIT ** EXPOSURE ** DC <┘ ATW1 <┘ OFF<┘ AUTO<┘ <┘ ENGLISH <┘ SHUTTER BRIGHTNESS AGC 1 / 50 |||||||||||||||| 050 ----- DWDR OFF RET <┘ RETURN Main Menu Submenu Once you have opened the OSD’s main menu on your screen, use the UP and DOWN buttons to scroll to the “EXPOSURE” menu item. Press the ENTER button to open this menu’s configuration submenu. SHUTTER FLK: Flickerless – Select this setting to let the camera automatically adjust shutter speed to eliminate flickering. AUTO: This lets the camera automatically determine and select the optimal shutter speed. 1/250 ~ 1/100000: These are faster shutter speeds and can cause flickering if the light environment is not suitable for the selected shutter speed. BRIGHTNESS Select the brightness of the image. AGC The Auto Gain Control field is not adjustable and for reference only. 9 EQ610x DWDR You can turn the DWDR function On and press the Enter button to open the configuration submenu to set the DWDR level. In the RETURN field, scroll to END and press Enter to exit from the configuration menus, or scroll to RET and press Enter to return to the EXPOSURE submenu. RETURN Select RET and press Enter to return to the main menu. Select END and press Enter to exit from the configuration menus. 6.3 WHITE BALANCE In this menu field you can scroll between the options ATW1, ATW2, AWC->SET, and MANUAL. The MANUAL field can be set to one of the following values: COLOR TEMP MANUAL: In this mode, you can select the values of the BLUE and RED levels. INDOOR: This is a preset setting for indoor environments. OUTDOOR: This is a preset setting for outdoor environments. 6.4 IMAGE ADJUSTMENT In this menu field you can press Enter to open this category’s submenu. The submenu has the following setting options: LENS SHAD. Use this setting to turn the lens-shading feature on or off. This function reduces any darkness in the corners of the screen which might be caused by some lenses. 2DNR Use this setting to turn the 2DNR (Noise Reduction) feature off or on. MIRROR Use this setting to flip the camera image around a vertical axis. 10 EQ610x FONT COLOR Use the sliding bar to select the color of the OSD’s font, as well as the color of the ID and Title display’s font. CONTRAST Use the sliding bar to select the contrast level. SHARPNESS Use the sliding bar to select the sharpness of the image. DISPLAY USER: If you select this setting, you can press Enter to set your own Gamma, Ped Level, and Color Gain values for the camera. CRT: If you select this setting, you can press Enter to select the Ped Level and Color Gain values. LCD: If you select this setting, you can press Enter to select the relevant Gamma, Ped Level, and Color Gain values. NEG. IMAGE You can use this field to switch the camera image to a negative image. RETURN Select RET and press Enter to return to the main menu. Select END and press Enter to exit from the configuration menus. 6.5 BACKLIGHT Scroll down to the BACKLIGHT menu item and scroll sideways to select either OFF, BLC (Backlight Compensation), or HLC (High Light Compensation). ** SETUP ** LENS EXPOSURE WHITE BAL. IMAGE ADJ. BACKLIGHT DAY & NIGHT SPECIAL LANGUAGE RESET EXIT DC <┘ ATW1 <┘ BLC<┘ AUTO<┘ <┘ ENGLISH <┘ 11 EQ610x BLC (Back Light Compensation) Even when there is a bright backlight behind an object, clear images of the object and its background can still be captured by selecting BLC mode. AREA SEL.: Select which of the two given areas you want to configure. AREA STATE: For Area 2, this can be used to activate the area and make the area indicator visible. GAIN: Set the gain of the selected area here. HEIGHT: Increase or decrease the height of the selected area. WIDTH: Increase or decrease the width of the selected area. LEFT/RIGHT: Move the area left or right. TOP/BOTTOM: Move the area up or down. HLC (Highlight-Suppression BLC) HLC (Highlight-Suppression BLC) is used to reduce the brightness of light sources in a specific area. It is activated only in a low illumination environment to minimize the effects of glare from bright lights such as spotlights, street lights or headlights in the field of view. Whereas BLC can increase the exposure of a dark area surrounded by a brighter area, HLC can decrease the exposure of bright areas surrounded by darker areas. This enables the camera to better display information that would otherwise have been “whited out”, like a license plate between two bright headlights on a dark road. Select the level of HLC and whether the setting will be applied during NIGHT ONLY, or ALL DAY. 6.6 DAY & NIGHT Scroll down to the DAY&NIGHT menu item and scroll sideways to select either COLOR, B&W, AUTO, or EXT. The configurable options are: AUTO D->N LEVEL: Select the light level at which the camera will switch from Day mode to Night mode. D->N DELAY: Set the number of seconds that the camera will wait when the D/N change level is reached. In other words, this will be the length of time that the selected light level will have to be sustained before the camera will react. 12 EQ610x N->D LEVEL: Select the light level at which the camera will switch from Night mode to Day mode. N->D DELAY: Set the number of seconds that the camera will wait when the N/D change level is reached. In other words, this will be the length of time that the selected light level will have to be sustained before the camera will react. B&W BURST: Switch burst mode on or off here. 6.7 SPECIAL Scroll down to the SPECIAL menu item and press Enter to enter the submenu. Here you can configure the CAM TITLE, MOTION, PRIVACY, PARK. LINE, COMM ADJ., DPC, and VERSION settings. CAM TITLE Select ON to display the camera’s title on the screen. Press Enter to enter the create or change the title. Use your direction buttons to navigate between the digits. Use your Enter button to select and confirm items. Use CLR to clear the whole title. Use the two Left and Right arrows to move the in-title cursor and change separate digits by selecting new digits. Select POS to move the position of the camera title to where you want it to be displayed on the screen (the title will start flashing in its current position when you click POS, use your direction buttons to move it to the desired position). Select END to return to the SPECIAL submenu. MOTION Here you can select ON to switch Motion Detection on. Now you can press Enter to open the Motion submenu and configure area blocks where motion will be detected. AREA SEL.: Select the number of one of the four preconfigured area blocks that you want to select. The corresponding block will start to flash when you select its number. AREA STATE: Switch the selected area block on or off. Off means that motion will not be detected in that area. HEIGHT: Adjust the height of the selected area block. WIDTH: Adjust the height of the selected area block. 13 EQ610x LEFT/RIGHT: Move the block horizontally. TOP/BOTTOM: Move the block vertically. DEGREE: Set the sensitivity of the motion detection function for the selected area. A low value means high sensitivity. VIEW: Switch the block display On or Off. If switched On, the blocks inside the activated motion detection area squares will appear as transparent mosaic patterns when they detect motion. PRIVACY Here you can select ON to switch Privacy Masking on. Now you can press Enter to open the PRIVACY submenu and configure area blocks where the camera feed will be hidden from view and from recording. AREA SEL.: Select the number of one of the four preconfigured area blocks that you want to select. The corresponding block will start to flash when you select its number. AREA STATE: Switch the selected area block on or off. Off means that motion will not be detected in that area. HEIGHT: Adjust the height of the selected area block. WIDTH: Adjust the height of the selected area block. LEFT/RIGHT: Move the block horizontally. TOP/BOTTOM: Move the block vertically. COLOR: Use the sliding bar to change the color of the selected block, if required. DPC (Defective Pixel Compensation) Enter this submenu if you want the camera to adjust itself to compensate for any defective pixels it may have. Follow the on-screen instructions to execute this action. VERSION This line shows the firmware version of the camera. This is for reference only. 14 EQ610x 6.8 LANGUAGE Scroll sideways to choose among English, Mandarin Chinese, Spanish and Russian as the language of the OSD wording. ** SETUP ** LENS EXPOSURE WHITE BAL. IMAGE ADJ. BACKLIGHT DAY & NIGHT SPECIAL LANGUAGE RESET EXIT 6.9 DC <┘ ATW1 <┘ OFF<┘ AUTO<┘ <┘ ENGLISH <┘ RESET Scroll to this menu item and press Enter to open the RESET submenu. If you stay on the FACTORY line and press Enter, the camera’s settings will return to the factory default and all other settings will be lost. 15 EverFocus Electronics Corp. EverFocus Taiwan: 12F, No.79, Sec. 1, Shin-Tai Wu Road, Hsi-Chih, Taipei, Taiwan TEL: +886 2 2698 2334 FAX: +886 2 2698 2380 www.everfocus.com.tw [email protected] EverFocus Europe - Germany: Albert-Einstein-Strasse 1, D-46446 Emmerich, Germany TEL: +49 2822 93940 FAX: +49 2822 939495 www.everfocus.de [email protected] EverFocus China - Beijing: Room 609, Technology Trade Building, Shangdi Information Industry Base, Haidian District, Beijing 100085, China TEL: +86 10 6297 3336~39 FAX: +86 10 6297 1423 www.everfocus.com.cn [email protected] EverFocus China - Shenzhen: 4F, No. 2, D4 Building, Wan Yelong Industrial Park, Tangtou Road, Shiyan, Baoan, Shenzhen, Guangdong 518101, China TEL: +86 755 2765 1313 FAX: +86 755 2765 0337 www.everfocus.com.cn [email protected] EverFocus USA - California: 1801 Highland Avenue, Unit A, Duarte, CA 91010, USA TEL: +1 626 844 8888 FAX: +1 626 844 8838 www.everfocus.com [email protected] EverFocus USA - New York: 415 Oser Avenue, Unit S, Hauppauge, NY 11788, USA TEL: +1 631 436 5070 FAX: +1 631 436 5027 www.everfocus.com [email protected] EverFocus Japan: 5F, Kinshicho City Building, 2-13-4 Koto-Bashi,Sumida-Ku, Tokyo, 130-0022, Japan TEL: +81 3 5625 8188 FAX: +81 3 5625 8189 www.everfocus.co.jp [email protected] EverFocus Europe - UK: Unit 12, Spitfire Business Park, Hawker Road, Croydon Surrey, CR0 4WD, UK TEL: +44 20 8649 9757 / +44 845 430 9999 FAX: +44 20 8649 9907 www.everfocusuk.co.uk [email protected] EverFocus India: Suite 803, Housefin Bhavan, C-21, Bandra Kurla Complex, Bandra (East), Mumbai 400051, India TEL: +91 22 6128 8700 FAX: +91 22 6128 8705 www.everfocus.in [email protected] Your EverFocus product is designed and manufactured with high quality materials and components which can be recycled and reused. This symbol means that electrical and electronic equipment, at their end-of-life, should be disposed of separately from your household waste. Please, dispose of this equipment at your local community waste collection/recycling centre. In the European Union there are separate collection systems for used electrical and electronic product. Please, help us to conserve the environment we live in! Ihr EverFocus Produkt wurde entwickelt und hergestellt mit qualitativ hochwertigen Materialien und Komponenten, die recycelt und wieder verwendet werden können. Dieses Symbol bedeutet, dass elektrische und elektronische Geräte am Ende ihrer Nutzungsdauer vom Hausmüll getrennt entsorgt werden sollen. Bitte entsorgen Sie dieses Gerät bei Ihrer örtlichen kommunalen Sammelstelle oder im Recycling Centre. Helfen Sie uns bitte, die Umwelt zu erhalten, in der wir leben! Ver. A