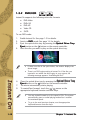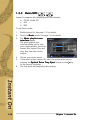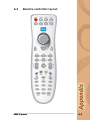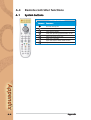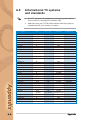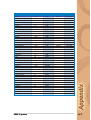
1
®
S-presso
Multimedia System
User Guide
Software Information
E1747
First Edition V1
December 2 0 0 4
Copyright © 2004 ASUSTeK COMPUTER INC. All Rights Reserved.
No part of this manual, including the products and software described in it, may be
reproduced, transmitted, transcribed, stored in a retrieval system, or translated into any
language in any form or by any means, except documentation kept by the purchaser for
backup purposes, without the express written permission of ASUSTeK COMPUTER INC.
(“ASUS”).
Product warranty or service will not be extended if: (1) the product is repaired, modified or
altered, unless such repair, modification of alteration is authorized in writing by ASUS; or (2)
the serial number of the product is defaced or missing.
ASUS PROVIDES THIS MANUAL “AS IS” WITHOUT WARRANTY OF ANY KIND, EITHER EXPRESS
OR IMPLIED, INCLUDING BUT NOT LIMITED TO THE IMPLIED WARRANTIES OR CONDITIONS OF
MERCHANTABILITY OR FITNESS FOR A PARTICULAR PURPOSE. IN NO EVENT SHALL ASUS, ITS
DIRECTORS, OFFICERS, EMPLOYEES OR AGENTS BE LIABLE FOR ANY INDIRECT, SPECIAL,
INCIDENTAL, OR CONSEQUENTIAL DAMAGES (INCLUDING DAMAGES FOR LOSS OF PROFITS,
LOSS OF BUSINESS, LOSS OF USE OR DATA, INTERRUPTION OF BUSINESS AND THE LIKE),
EVEN IF ASUS HAS BEEN ADVISED OF THE POSSIBILITY OF SUCH DAMAGES ARISING FROM
ANY DEFECT OR ERROR IN THIS MANUAL OR PRODUCT.
SPECIFICATIONS AND INFORMATION CONTAINED IN THIS MANUAL ARE FURNISHED FOR
INFORMATIONAL USE ONLY, AND ARE SUBJECT TO CHANGE AT ANY TIME WITHOUT NOTICE,
AND SHOULD NOT BE CONSTRUED AS A COMMITMENT BY ASUS. ASUS ASSUMES NO
RESPONSIBILITY OR LIABILITY FOR ANY ERRORS OR INACCURACIES THAT MAY APPEAR IN
THIS MANUAL, INCLUDING THE PRODUCTS AND SOFTWARE DESCRIBED IN IT.
Products and corporate names appearing in this manual may or may not be registered
trademarks or copyrights of their respective companies, and are used only for identification
or explanation and to the owners’ benefit, without intent to infringe.
ii
Table of contents
Notices ................................................................................................. v
Safety information .............................................................................. vi
Electrical safety ....................................................................... vi
Operation safety ..................................................................... vi
About this guide ................................................................................ vii
Chapter 1:
1.1
1.2
1.3
Installing Instant On .............................................................. 1-2
1.1.1
Requirements for installing to an empty hard
disk drive (HDD) ..................................................... 1-2
1.1.2
Requirements for installing to an occupied HDD .... 1-2
1.1.3
Installation procedure ............................................. 1-3
Using Instant On ................................................................... 1-5
1.2.1
General Setup Menu ................................................ 1-6
1.2.2
Information ............................................................. 1-7
1.2.3
Picture properties ................................................... 1-7
Entertainment modes ........................................................... 1-9
1.3.1
TV (default mode) .................................................. 1-9
1.3.2
DVD/VCD .............................................................. 1-12
1.3.3
Music/MP3 ............................................................ 1-14
1.4.4
Radio (FM) ............................................................ 1-15
Chapter 2:
2.1
Instant On
Home Theater
Installing the TV/FM card drivers ......................................... 2-2
2.1.1
Using the installation CD ........................................ 2-2
2.1.2
Using the Windows® Found New Hardware
Wizard .................................................................... 2-3
2.2
Uninstalling the TV/FM card drivers ..................................... 2-5
2.3
Installing ASUS Home Theater .............................................. 2-6
2.4
Using the ASUS Front Panel Display (AFPD) utility .............. 2-8
2.5
Launching ASUS Home Theater ............................................ 2-9
2.6
Using ASUS Home Theater ................................................. 2-11
iii
Table of contents
2.7
Entertainment modes ......................................................... 2-13
2.7.1
TV ......................................................................... 2-13
2.7.2
DVD/VCD .............................................................. 2-18
2.7.3
Pictures ................................................................. 2-21
2.7.4
Videos ................................................................... 2-23
2.7.5
Music .................................................................... 2-25
2.7.6
Radio ..................................................................... 2-27
2.7.7
Setup .................................................................... 2-30
Appendix
A.1
Specifications ....................................................................... A-2
A.2
Using the remote controller ................................................. A-2
A.3
Remote controller layout ...................................................... A-3
A.4
Remote controller functions ................................................. A-4
A.5
iv
A.1
System buttons ...................................................... A-4
A.2
Key table ................................................................ A-5
International TV systems and standards .............................. A-6
Notices
Federal Communications Commission Statement
This device complies with Part 15 of the FCC Rules. Operation is subject
to the following two conditions:
• This device may not cause harmful interference, and
• This device must accept any interference received including
interference that may cause undesired operation.
This equipment has been tested and found to comply with the limits for a
Class B digital device, pursuant to Part 15 of the FCC Rules. These limits
are designed to provide reasonable protection against harmful
interference in a residential installation. This equipment generates, uses
and can radiate radio frequency energy and, if not installed and used in
accordance with manufacturer’s instructions, may cause harmful
interference to radio communications. However, there is no guarantee
that interference will not occur in a particular installation. If this
equipment does cause harmful interference to radio or television
reception, which can be determined by turning the equipment off and on,
the user is encouraged to try to correct the interference by one or more
of the following measures:
• Reorient or relocate the receiving antenna.
• Increase the separation between the equipment and receiver.
• Connect the equipment to an outlet on a circuit different from that
to which the receiver is connected.
• Consult the dealer or an experienced radio/TV technician for help.
The use of shielded cables for connection of the monitor to the
graphics card is required to assure compliance with FCC
regulations. Changes or modifications to this unit not expressly
approved by the party responsible for compliance could void the
user’s authority to operate this equipment.
Canadia
n Department of Communications Statemen
Canadian
Statementt
This digital apparatus does not exceed the Class B limits for radio noise
emissions from digital apparatus set out in the Radio Interference
Regulations of the Canadian Department of Communications.
This class B digital apparatus complies with Canadian
ICES-003.
v
Safety information
Electrical safety
• To prevent electrical shock hazard, disconnect the power cable from
the electrical outlet before relocating the system.
• When adding or removing devices to or from the system, ensure that
the power cables for the devices are unplugged before the signal
cables are connected.
• If the power supply is broken, do not try to fix it by yourself. Contact
a qualified service technician or your retailer.
Operation safety
• Before installing devices into the system, carefully read all the
documentation that came with the package.
• Before using the product, make sure all cables are correctly
connected and the power cables are not damaged. If you detect any
damage, contact your dealer immediately.
• To avoid short circuits, keep paper clips, screws, and staples away
from connectors, slots, sockets and circuitry.
• Avoid dust, humidity, and temperature extremes. Do not place the
product in any area where it may become wet. Place the product on a
stable surface.
• If you encounter technical problems with the product, contact a
qualified service technician or your retailer.
Lithium-Ion Battery Warning
CAUTION
N: Danger of explosion if battery is incorrectly replaced.
Replace only with the same or equivalent type recommended by the
manufacturer. Dispose of used batteries according to the
manufacturerís instructions.
VORSICHT
T: Explosionsgetahr bei unsachgemäßen Austausch der
Batterie. Ersatz nur durch denselben oder einem vom Hersteller
empfohlenem ähnljchen Typ. Entsorgung gebrauchter Batterien nach
Angaben des Herstellers.
LASER PRODUCT WARNING
CLASS 1 LASER PRODUCT
vi
About this guide
Safeguards
Audience
This guide provides general information and installation instructions
about the ASUS S-presso. This guide is intended for experienced users
and integrators with hardware knowledge of personal computers.
How this guide is organized
1.
Chapter 1: Instant On
This chapter tells you how to install and use I n s t a n t O n
n.
2.
Chapter 2: Home Theater
This chapter tells you how to install and use H o m e T h e a t e r .
3.
Appendix
The Appendix includes information on the remote controller, the
ASUS S-presso key table, and international TV systems and
standards.
vii
Conventions used in this guide
W A R N I N G : Information to prevent injury to yourself when
trying to complete a task.
C A U T I O N : Information to prevent damage to the
components when trying to complete a task.
I M P O R T A N T : Instructions that you MUST follow to complete
a task.
N O T E : Tips and additional information to aid in completing a
task.
Where to find more information
Refer to the following sources for additional information and for product
and software updates.
1.
ASUS websites
2.
The ASUS websites worldwide provide updated information on
ASUS hardware and software products. Refer to the ASUS contact
information.
Optional documentation
Your product package may include optional documentation, such
as warranty flyers, that may have been added by your dealer.
These documents are not part of the standard package.
viii
Chapter 1
This chapter tells you how to install
and use I n s t a n t O n
n.
ASUS S-presso
1.1
Installing Instant On
IMPORTANT!
•
Install Instant On before installing an operating
system in your hard disk.
•
Instant On does not support add-on or VGA
cards.
Because motherboard settings and hardware options vary, use the
setup procedures presented in this chapter for general reference
only. Refer to your OS documentation for more information.
The S-presso system allows you to enjoy the features of consumer
electronics on a PC platform. Without entering the Windows® operating
system, you can watch TV, view DVD/VCD movies, and listen to FM
radio/audio CD/MP3 files.
1.1.1
Requirements for installing to an empty hard
disk drive ((HDD
HDD
HDD))
1.
Instant On installation CD
2.
Empty and unpartitioned hard disk
Before installing Instant ON:
1.1.2
1-2
•
set the hard disk drive as P r i m a r y I D E M a s t e r in the BIOS
setup.
•
set the HDD jumper to M a s t e r .
Requirements for installing to an occupied
HDD
1.
Instant On installation CD
2.
200 MB free and unpartitioned hard disk space
•
Clear the hard disk partition if Windows® and/or DOS already
occupies 100% of the hard disk.
•
In the BIOS setup, set the hard disk drive as P r i m a r y I D E
M a s t e r before installing Instant On.
Chapter 1: Instant On
1.1.3
1.
Installation procedure
Boot your PC using the Instant On installation CD.
In the BIOS Boot Menu, set your optical drive as the 1 s t B o o t
D e v i c e priority.
The Instant On installation CD will automatically create a 200 MB
partition and install Instant On in it.
2.
The Instant On installation
screen appears.
Choose your preferred
language.
3.
The installation process
begins. A bar appears,
indicating the progress of the
installation.
4.
Shut down your computer when
installation is complete.
ASUS S-presso
1-3
If you will install Windows® XP, Instant On will occupy the first
partition of your hard disk so Windows® XP will be assigned to
Drive D . To prevent the operating system from malfunctioning if
it is not in the default drive, change the drive assignment
following the procedure below.
To change the drive assignment in Windows® X P :
1.
2.
1-4
Go to C o n t r o l P a n e l -> P e r f o r m a n c e a n d M a i n t e n a n c e ->
A d m i n i s t r a t i v e T o o l s -> C o m p u t e r M a n a g e m e n t .
Use the D i s k M a n a g e m e n t utility to change Windows® XP
C .” Instant On is marked as an unknown partition in
partition as “C
®
Windows XP. Find Instant On and assign a drive letter to it.
Chapter 1: Instant On
1.2
Using Instant On
Instant On is an application that allows you to watch TV, view DVD/
VCD movies, and listen to the radio as well as CD/MP3 music without
entering the Windows® operating system. Use the touch sensors on
the front panel, the remote controller, or keyboard keys to navigate
through the Instant On functions.
•
You need to install Instant On from the Instant On installation
CD to use this feature. See page 1-2.
•
For detailed information on the remote controller
and keyboard controls, refer to the Appendix.
To use Instant On:
1.
Connect the S-presso power
plug and cable.
2.
To power on, touch the Instant
On P o w e r sensor ( ) for at
least five seconds, or press the
P o w e r ( ) button on the
remote controller.
Optical drive tray
eject button
Play/Pause
Stop
Instant On power
Volume down
Volume up
Rewind
ASUS S-presso
Mode
Forward
1-5
3.
To switch modes, press the appropriate button on the remote
controller, or touch the M o d e sensor in succession until the LED
panel displays the mode you want. Touch the P L A Y / P A U S E ( )
sensor to confirm your choice.
•
Instant On goes to TV mode by default.
•
See page 1-8 for details on the different entertainment
modes.
•
If you do not touch the P L A Y / P A U S E ( ) sensor to
confirm the mode, the system automatically reverts to the
previous mode.
4.
To decrease volume, touch ( - )). To increase volume, touch ( + )).
5.
To exit Instant On and turn off the system, press the Instant On
P o w e r sensor ( ) for at least five seconds.
6.
To exit Instant On and enter the Windows®operating system, press
P C ( ) on the remote controller.
Refer to Chapter 1 of the H a r d w a r e I n f o r m a t i o n guide for
detailed descriptions of the S-presso LED panel.
1.2.1
General Setup Menu
To enter the General Setup Menu:
1.
Press <Ctrl> + <D> on your keyboard, or M o r e i n f o ( ) then
O K ( ) on the remote
controller.
2.
Use the arrow keys on your
keyboard or remote controller
to navigate through and set
the following items in the
general setup menu:
L a n g u a g e S e l e c t . Allows
you to set the language for
the setup menu.
D a t e & T i m e . Allows you to set the date and time.
1-6
Chapter 1: Instant On
S l e e p T i m e r . Allows you to set the period of time within which
Instant On automatically turns off.
You can configure this item only if your hardware supports TV out
function..
U p d a t e . Provides updates about Instant On. If no update is available,
the following message appears: “There is no update available.
InterVideo InstantON will return to the previous mode.”
V e r s i o n I n f o r m a t i o n . Provides informaton on the Instant On
version.
R e s e t t o D e f a u l t . Allows you to reset the system to the default
settings.
) on the
3.
When done, press <Enter> on your keyboard, or O K (
remote controller.
4.
To hide the menu screen, press <Ctrl> + <D> on your keyboard, or
M o r e i n f o ( ) on the remote controller.
1.2.2
Information
This item allows you to keep the onscreen display (OSD) on your
monitor. To enable information display:
1.
2.
3.
Press <Ctrl> + <D> on your keyboard, or M o r e i n f o ( ) then
O K ( ) on the remote controller to open the setup menu.
Use the arrow keys on your keyboard or remote controller to go
to the I n f o r m a t i o n bar.
Press <Enter> on your keyboard, or O K ( ) on the remote
controller.
1.2.3
Picture properties
To set the picture properties for TV, DVD/+-VR/VCD/SVCD:
1.
2.
3.
Press <Ctrl> + <D> on your keyboard, or M o r e i n f o ( ) then
O K ( ) on the remote controller.
Use the arrow keys on your keyboard or remote controller to go
to the P i c t u r e P r o p e r t i e s bar.
Press <Enter> on your keyboard, or O K ( ) on the remote
controller.
ASUS S-presso
1-7
4.
A setup screen appears,
allowing you to set properties
for the following items:
•
Hue
•
Contrast
•
Brightness
• Saturation
5. Use the arrow keys on your
keyboard and remote controller
to set desired levels.
Choose R e s e t t o D e f a u l t to reset all items to zero level.
6.
When done, press <Enter> on your keyboard, or O K (
remote controller.
) on the
7.
To hide the menu screen, press <Ctrl> + <D> on your keyboard, or
M o r e i n f o ( ) on the remote controller.
1-8
Chapter 1: Instant On
1.3
Entertainment modes
Instant On does not support Photo mode. To use this mode, refer
to C h a p t e r 2 : H o m e T h e a t e rr.
1.3.1
TV (default mode)
•
Make sure that you have installed the TV/FM tuner card driver
from the support CD that came with the system.
•
For detailed information on the remote controller
and keyboard keys, refer to the Appendix.
TV setup menu
G e n e r a l S e t u p , I n f o r m a t i o n , P i c t u r e P r o p e r t i e s . See pages
1-6 to 1-8 for details.
A / V I n p u t . Allows you to select
the following:
•
TV source - choose
Antenna to maximize
channels based on the TV
area. Choose Cable to scan
available cable TV channels.
•
TV system - set the TV
according to the type of video input stream. Refer to the
Appendix for detailed information on the TV system in your
country or region.
ASUS S-presso
1-9
•
Video input - choose from TV, Composite, or S-Video.
•
Audio input - choose from Aux In, Line In, or With Video
Save Favorite Channel.
Allows you to save up to 12
of your favorite channels for
easy access.
To save your favorite
channel:
1. Go to a TV channel.
2. Press <Ctrl> + <D> on
your keyboard, or M o r e
i n f o ( ) then O K ( ) on the remote controller to open the
setup menu.
3. Press the down arrow key on your keyboard or remote
controller to go to the S a v e F a v o r i t e C h a n n e l bar.
4. Press the right arrow key on your keyboard or remote
controller to open the sub-menu ( ).
5. Use the arrow keys to assign a number for this channel.
Press <Enter> on your keyboard or O K ( ) on the remote
controller .
6. Press the left arrow key on your keyboard or remote
controller to close the sub-menu.
7. To hide the menu screen, press <Ctrl> + <D> on your
keyboard, or M o r e i n f o ( ) on the remote controller.
C h a n n e l S c a n . When using the TV mode for the first time, make sure
you scan the available channels in your area.
Do not interrupt or cancel the scanning process. You need to scan
the channels when you first use the TV mode.
1-10
Chapter 1: Instant On
C h a n n e l M o d e . Allows you to set the channel mode to either
Favorite Channel or Live Channel.
P r e v i o u s C h a n n e l . Allows you to view the last channel before you
shut down your system.
T V A r e a . Allows you to set your TV area.
M T S ( A u d i o ) . Allows you to set your audio to Stereo, Mono, or
Secondary Audio Program.
If the TV channel does not support SAP, set this item to M o n o
o.
F i n e T u n i n g . Allows you to fine tune the TV display.
To use the Fine Tuning function:
1. Press <Ctrl> + <D> on your keyboard, or M o r e i n f o ( )
then O K ( ) on the remote controller to open the setup
menu.
2. Use the down arrow key on your keyboard or remote
controller to go to the F i n e T u n i n g bar.
3. A message pops up, giving
you instructions on how to
use this feature.
4. Press <Enter> on your
keyboard, or O K ( ) on
the remote controller.
5. Use the left/right arrow
keys on your keyboard or
remote controller to fine-tune the channel.
ASUS S-presso
1-11
1.3.2
DVD/VCD
Instant On supports the following video disc formats:
•
DVD-Video
•
DVD+VR
•
DVD-VR
•
Video CD
•
SVCD
To use DVD mode:
1.
Enable Instant On. See page 1-5 for details.
2.
3.
Switch to D V D mode. See page 1-6 for details.
Eject the optical drive tray by pressing the O p t i c a l D r i v e T r a y
E j e c t button or the
button on the remote controller.
4.
Place the disc you want to play on the optical drive tray.
6.
7.
8.
1-12
•
If there is no disc in the optical drive, the monitor displays the
above image.
•
There is no DVD region setting in Instant On. If the disc you
inserted is not within the drive region in your system, the
following message appears: “Invalid Region Disc.”
Close the optical drive tray by pressing the O p t i c a l D r i v e T r a y
E j e c t button or the
button on the remote controller.
The movie automatically starts playing.
/
sensor or the
To rewind/fast forward, touch the
appropriate keyboard/remote controller keys.
•
You may rewind/forward up to the speed of 30x. The system
automatically goes to normal playing mode after it reaches
the maximum speed.
•
To go to the next/previous chapter, use the appropriate
keyboard/remote controller keys.
Chapter 1: Instant On
DVD setup menu
The items in the setup menu are content-dependent. The screen
shown here is for reference only, and may vary depending on the
disc you load.
General Setup, Information,
P i c t u r e P r o p e r t i e s . See
pages 1-6 to 1-8 for details.
A u d i o I n p u t . Allows you to select
choose from the following
audio outputs:
• 2 Channel
• 4 Channel
• 5.1 Channel
• S/PDIF
A u d i o , S u b - T i t l e , A n g l e . These items are not configurable in this
version of Instant On.
D i s p l a y S e t t i n g . Sets the display setting.
ASUS S-presso
1-13
1.3.3
Music/MP3
Instant On supports the following music disc formats:
•
CD-DA (Audio CD)
•
AC3
•
MP3
To use Music mode:
1.
2.
1-14
Enable Instant On. See page 1-5 for details.
Switch to M u s i c mode. See page 1-6 for details.
3.
The M u s i c p l a y l i s t u s e r
i n t e r f a c e opens.
The music playlist user
interface allows you to view
your current playlist, as well as
browse files, import files, and
clear files from the current
playlist.
4.
Choose your music source.
5.
If you want to play a music CD, eject the optical drive tray by
key
pressing the O p t i c a l D r i v e T r a y E j e c t button or the
on the remote controller.
6.
The first track automatically starts playing.
Chapter 1: Instant On
1.4.4
Radio (FM)
Make sure that you have installed the radio antenna on the rear
panel as well as the TV/FM tuner card driver from the support CD
that came with the system.
To use Radio (FM) mode:
1.
Enable Instant On. See page 1-5 for details.
2.
Switch to F M mode. See page 1-6 for details.
3.
Scan the available FM stations in your area.
4.
Preset/save your favorite FM stations.
See page 1-16 for information on how to scan and preset FM
stations.
Radio (FM) setup menu
G e n e r a l S e t u p , I n f o r m a t i o n . See pages 1-6 to 1-8 for details.
S a v e C h a n n e l . Allows you to save up to 10 of your favorite stations for
easy access.
S e t S e n s i t i v i t y . Allows you to set the frequency sensitivity.
ASUS S-presso
1-15
To scan and preset an FM station:
1. Press
/
on the remote
controller to scan available FM
stations in your area.
To scan bacward/forward
by increments of 0.1 MHz,
press
/
on the
remote controller.
2.
Press <Ctrl> + <D> onyour keyboard, or M o r e i n f o ( ) on the
remote controller to open the setup menu.
3.
Press the down arrow key on your keyboard or remote
controller to go to the S a v e C h a n n e l bar.
4.
Press the right arrow key on your keyboard or remote
controller to open the sub-menu ( ).
5.
Use the arrow keys to assign a number for this channel.
Press <Enter> on your keyboard or O K ( ) on the remote
controller .
6.
Press the left arrow key on your keyboard or remote
controller to close the sub-menu.
7.
To hide the menu screen, press <Ctrl> + <D> on your
keyboard, or M o r e i n f o ( ) on the remote controller.
1-16
Chapter 1: Instant On
Chapter 2
This chapter tells you how to install and use
the H o m e T h e a t e r feature.
ASUS S-presso
2.1
Installing the TV/FM card drivers
2.1.1
Using the installation CD
You need to install the TV/FM card drivers to your computer so you
can use the Home Theater feature of the S-presso system. To install
the card drivers:
1.
Turn on your computer.
2.
Windows® auto-detects
the ASUS TV/FM card and
displays the F o u n d N e w
Hardware Wizard
window. Click C a n c e ll.
3.
Place the installation CD in
your optical drive.The
ASUS TV/FM Card
installation wizard appears
and begins installing the
drivers in your computer
Click C a n c e l if you want
to stop the installation.
If A u t o r u n is not enabled in your computer, browse the contents of
the installation CD to located the S e t u p . e x e file. Double-click
S e t u p . e x e to run the CD.
5. Click Finish after the
installation wizard completes
the card drivers installation.
2-2
Chapter 2: Starting up
2.1.2
Using the Windows® Found New Hardware
Wizard
The Windows® Found New Hardware Wizard allows automatic
installation of the TV/FM card drivers. Windows® auto-detects the
TV/FM card hardware and installs the required drivers automatically
using the installation CD.
To install the card drivers using the Windows Found New Hardware
Wizard:
1.
Turn on your computer.
2.
Place the installation CD in
the optical drive.
3.
Windows® auto-detects
the ASUS TV/FM card and
displays the F o u n d N e w
Hardware Wizard
window. Select I n s t a l l
the hardware
automatically
( R e c o m m e n d e d )), then
click N e x tt.
Windows® searches for the
card driver, then installs it
to your computer.
4.
ASUS S-presso
2-3
2-4
5.
Click F i n i s h after the
Found New Hardware
Wizard completes
installation.
6.
Windows® detects the
other hardwares and
searches for their
respective drivers. Follow
steps 3 to 5 to install
these hardwares.
Chapter 2: Starting up
2.2
Uninstalling the TV/FM card drivers
Follow these instructions to uninstall the TV/FM card drivers from your
computer.
1.
Turn on your computer.
2.
Place the installation CD to the optical drive.
3.
Browse the contents of the installation CD to located the
S e t u p . e x e file. Double-click S e t u p . e x e to run the CD.
A confirmation window
appears. Click O K
K.
3.
4.
The InstallShield Wizard
uninstalls the card drivers
from your system. Click
Finish
h.
ASUS S-presso
2-5
2.3
Installing ASUS Home Theater
The ASUS Home Theater maximizes the multimedia features of the
TV/FM card on your S-presso system. The following sections provide
information on installing and using the ASUS Home Theater.
To install ASUS Home Theater:
2-6
1.
Place the ASUS Home Theater CD in the optical drive.
2.
The initial installation
window appears. Click
N e x tt.
3.
Read the License
Agreement, then click Y e ss.
4.
When prompted, select the
program folder where you
want to save the ASUS
Home Theater program
icons. The default is
Intervideo Home
Theater.
Click N e x tt.
Chapter 2: Starting up
5.
The Home Theater
application is copied into
your system.
6.
The S e t u p S t a t u s window
appears, indicating the
progress of the installation.
7.
The F i l e T y p e s
A s s o c i a t i o n window
appears. Select the media
files for which you want
Home Theater to be the
default player.
7.
The S e t u p C o m p l e t e
window appears, indicating
that Home Theater has
been installed.
Click Y e s to restart your
computer now or N o to
restart later.
Click F i n i s h
h.
ASUS S-presso
2-7
2.4
Using the ASUS Front Panel Display
(AFPD) utility
The ASUS Front Panel Display (AFPD) utility allows you to display and
monitor the CPU/system temperature, CPU/chassis fan performance,
and voltage of the S-presso system on the LED panel.
To launch the ASUS Front Panel Display:
2-8
1.
On the Windows taskbar,
double-click the AFPD icon.
2.
The ASUS FPD Setup
screen appears.
3.
Check the information that
you want to display on the
LED panel.
4.
The information then
appears on the LED panel.
Chapter 2: Starting up
2.5
Launching ASUS Home Theater
To launch the ASUS Home Theater:
1.
Press the power button to enter the operating system.
Play/Pause
Optical drive tray
eject button
Stop
Volume down
Mode
Volume up
POWER BUTTON
2.
Forward
Rewind
Click S t a r t > A l l P r o g r a m s > I n t e r v i d e o H o m e T h e a t e r >
I n t e r v i d e o H o m e T h e a t e rr. Or, press the H o m e button on the
remote controller.
•
For detailed information on the remote controller
and keyboard controls, refer to the Appendix.
•
If you are in Instant On mode, press
on the remote
®
controller to enter the Windows operating system, then
press
ASUS S-presso
to enter Home Theater.
2-9
3.
4.
5.
The S e t u p window
appears when you launch
the ASUS Home Theater
for the first time.
Click S t a r t to begin
configuring the settings.
The G e n e r a l S e t t i n g s
window appears. Make your
desired settings by clicking
N o button, or the
the Y e ss/N
< />
> button for more
options.
Click N e x t configure the
TV Settings, Picture
S e t t i n g s , and D V D
S e t t i n g ss.
Click C l o s e if you want to
configure these items later.
See section “2.7.7 Setup” for detailed information on setting up
Home Theater.
2-10
Chapter 2: Starting up
2.6
Using ASUS Home Theater
The ASUS Home Theater features a user-friendly interface that
integrates all the multimedia functions of the TV/FM card. This
application lets you watch TV, play a DVD/VCD movie, browse pictures,
watch video clips, listen to audio files, or tune in to an FM radio station
in a single interface. This flexibility allows you to switch from one
entertainment mode to another without having to launch several
multimedia applications.
Home Theater Main Window
Window
control
buttons
Window
control
buttons
Entertainment
mode
buttons
Setup
button
User
account
name
E n t e r t a i n m e n t m o d e b u t t o n s - Click on a bar to launch an
entertainment mode.
S e t u p - Click this bar to display the setup window.
Computer account name
e- Displays the user currently using
the application.
W i n d o w c o n t r o l b u t t o n s - Controls the Home Theater window.
to return to the Home Theater main window.
Click
Click
to return to the previous window.
Click
to return to open the Help window.
Click
to minimize the window.
Click
to return the window to its previous size or to maximize
the window.
Click
to exit Home Theater.
For detailed information on the remote controller
and keyboard keys, refer to the Appendix.
ASUS S-presso
2-11
The control panel
Each Home Theater window is equipped with a control panel to control the
entertainment modes. The control panel buttons and functions are illustrated
below.
Record
Mute
Stop
Volume up
Rewind/Replay
Volume down
Forward
Next
Pause
Previous
Play
Some control panel buttons change from one entertainment
system to another.
2-12
Chapter 2: Starting up
2.7
Entertainment modes
You need to install the ASUS TV/FM card to use all the
entertainment modes of Home Theater. If no TV/FM card is
installed, you cannot use the TV and Radio modes.
2.7.1
TV
Home Theater lets you watch
TV on your computer.
On initial use, the ASUS Home Theater instructs you to autoscan
available TV channels. Click the S e t t i n g s button, then click
A u t o s c a n to view the available channels. See “Settings” on
page 2-17 for details.
Time Shifting feature
Home Theater comes with the T i m e s h i f t i n g feature that allows you
to take a break from the program you are watching, then replay the
program from where you left off, or jump back to live view.
To use Time Shifting:
1.
2.
3.
Click the P a u s e button on the Control Panel or press the S p a c e
B a r on your keyboard.
To replay the program from where you paused, click the P a u s e or
P l a y button, or press the S p a c e B a r on your keyboard.
To return to live TV, click the S t o p button on the Control Panel
When you use the T i m e S h i f t i n g feature, your system records
the live TV from where you clicked P a u s e and saves it
temporarily in your hard disc. The slide bar on the Control Panel
indicates how much video stream has been recorded.
ASUS S-presso
2-13
Sub-menus
The TV window has seven sub-menus. Change the TV channel by
clicking the C h a n n e l buttons on the control panel or the
button on
the remote controller. Double-click the screen for full-screen viewing.
Guide
Click the G u i d e bar to open the
TitanTV website. TitanTV is an
Electronic Program Guide (EPG)
that allows users to record and
watch TV right from the guide.
Visit the Titan TV website for
details.
Channel
buttons
Closed Caption/TeleText
The C l o s e d C a p t i o n option is available only in the United States.
This feature provides subtitles, if available. T e l e T e x t is available only
in Europe. This is a service that provides additional information such as
weather or program schedule, if available.
Schedule
The S c h e d u l e option allows you to set a schedule to record a TV
program.
Home Theater automatically saves a recorded program in the
Windows® M y V i d e o s folder. Home Theater records TV
programs in InterVideo Media File format.
To create a recording schedule:
1.
2.
2-14
Click the S c h e d u l e bar on
the T V menu. The
S c h e d u l e window opens.
Click the A d d bar.
Chapter 2: Starting up
3.
Key-in the program name.
4.
Select the Channel
Frequency, Start Date,
Start Hour, Start Minute,
Duration, and Record
>
Quality using the < />
buttons
Click F i n i s h when done.
5.
The TV recording feature requires a higher capacity HDD if
you save a recorded program in high quality.
Channel Surfing
To surf for available channels in
your location:
1.
2.
3.
Click the C h a n n e l
S u r f i n g bar.
Multiple channel previews
appear on screen .
Double-click a channel to
display.
ASUS S-presso
2-15
Recorded TV
The R e c o r d e d T V option lets
you view, play, and organize
recorded TV programs.
Organize your recorded
programs by clicking the S o r t
By Name
D a t e bars.
e/D
Double-click a thumbnail to
preview a recorded program. A
window displays a snapshot of
each recorded program. Doubleclick the snapshot to start
playing in full-screen view.
Preview window
Home Theater automatically saves a recorded program in the
Windows® M y V i d e o s folder. Home Theater records TV
programs in InterVideo Media File format.
Take a Snapshot
Home Theater allows you to take a still photo from live TV or a
recorded program.
Click the T a k e a S n a p s h o t bar to take a still photo.
View a Snapshot
Click the V i e w S n a p s h o t s bar to view the photo.
Home Theater automatically saves snapshots in the Windows® M y
P i c t u r e s folder in bitmap (*.bmp) format.
2-16
Chapter 2: Starting up
Settings
To change the TV settings:
1.
Click the S e t t i n g s bar.
2.
Select the TV source
(Cable/Antenna), input
source (TV/ S-Video/
Composite), record quality
(Good/Better/Best), and
TV Audio (Stereo/Mono/
>
SAP). Click the < />
buttons to view available
options.
3.
Click
to return to the TV main window.
Remote controller function buttons
TV Mode
Button
Function
Enter TV mode
Volume up/down
Channel up/down
Time Shifting
Live TV
Mute
Record TV
Shuffle between channels
0~9
ASUS S-presso
Select the channel number
2-17
2.7.2
DVD/VCD
Watch a movie with the ASUS
Home Theater DVD/VCD player.
Place a DVD/VCD in the optical
drive, then click the P l a y
button on the control panel.
Double-click the screen for
full-screen viewing.
The bars in the DVD/VCD menu are enabled only when a
DVD/VCD is inserted to the optical drive.
Sub-menus
Menu
Click the M e n u bar to return to
the DVD main menu.
Audio
Displays your DVD audio
language setting.
Subtitle Language
Displays your subtitle language
setting.
Take a Snapshot
Home Theater allows you to
take a still photo from the
DVD/VCD movie you are
playing.
Click the T a k e a S n a p s h o t bar
to take a still photo. Click the
V i e w S n a p s h o t to view the
photo.
2-18
Chapter 2: Starting up
•
Home Theater automatically saves snapshots in the Windows®
M y P i c t u r e s folder in bitmap (*.bmp) format.
•
This Home Theater version does not support Karaoke
function.
Settings
Click S e t t i n g s to adjust the
DVD/VCD player properties.
A u d i o L a n g u a g e . Select the
DVD audio language. You may
select an audio language if the
DVD supports multilanguage
audio.
S u b t i t l e L a n g u a g e . Allows
you to select an available DVD
subtitle language.
A u t o R e s u m e . Allows you to resume watching a movie from the
beginning or from where you stopped.
S o u r c e . Displays the video input source.
A u d i o o u t p u t . Allows you to set your audio output to analog or
digital (S/PDIF).
S p e a k e r c o n f i g u r a t i o n . Home Theater automatically detects and
displays your speaker configuration.
To change the DVD/VCD settings:
1.
Click the S e t t i n g s bar.
2.
> buttons to view
Make your desired settings by clicking the < />
available options.
3.
Click
to return to the TV main window.
ASUS S-presso
2-19
Remote controller function buttons
DVD/VCD Mode
Button
Function
Enter DVD/VCD mode
Replay the previous chapter
Stop playing
Skip the current chapter; proceed to
the next chapter
Rewind
Pause
Forward
Volume up/down
Play
Mute
Repeat/ Play the video again
0~9
2-20
Select the chapter number
Chapter 2: Starting up
2.7.3
Pictures
The P i c t u r e s window lets you
view and print pictures saved in
the Windows® M y P i c t u r e s
folder. Double-click the
thumbnails to view the photos
in full-screen view.
Sub-menus
Slideshow
To create a slideshow:
1.
Click the S e t t i n g s bar.
2.
Adjust the slideshow
properties.
3.
to return to the
Click
Pictures window. To start
the slideshow, click the
P l a y button on the control
panel.
Sort By Name
Allows you to sort your pictures
by name.
Sort By Date
Allows you to sort your pictures
by date.
Rotate Left
Allows you to rotate your
pictures counter-clockwise.
Rotate Right
Allows you to rotate your pictures
clockwise.
Other Media
Allows you to view and organize
photos stored in removable media
such as CDs, floppy disks, or flash
disks.
ASUS S-presso
Rotate left
Rotate right
Play slideshow
Previous
Next
2-21
Remote controller function buttons
Photo Mode
Button
Function
Enter Photo mode
Start slideshow
Pause slideshow
Stop slideshow
Previous photo
Next photo
Volume up/down
Mute
2-22
Chapter 2: Starting up
2.7.4
Videos
View, play and organize your
video clips using the Videos
window. The Videos window
displays the title and length of
video clips saved in the
Windows® M y V i d e o s folder.
The V i d e o C l i p s window only lists video clips saved in the
Windows® M y V i d e o s folder.
Sub-menus
Sort By Name
Allows you to sort your video
clips by name.
Sort By Date
Allows you to sort your video
clips by date.
Other Media
Allows you to view and organize
video clips stored in removable
media such as CDs, floppy disks, or flash disks.
Take a Snapshot
Home Theater allows you to take a still photo from live TV or a
recorded program.
Click the T a k e a S n a p s h o t bar to take a still photo.
View Snapshots
Click the V i e w S n a p s h o t s bar to view the photo.
Home Theater automatically saves snapshots in the Windows® M y
P i c t u r e s folder in bitmap (*.bmp) format.
ASUS S-presso
2-23
Remote controller function buttons
Video Mode
Button
Function
Enter Video mode
Replay the previous video clip
Stop playing
Proceed to the next video clip
Rewind
Pause
Forward
Volume up/down
Play
Mute
Repeat/ Play the video again
2-24
Chapter 2: Starting up
2.7.5
Music
Home Theater lets you play
audio CD/DVD tracks, MP3 files,
and radio recordings using the
M u s i c window.
Select M y M u s i c to view and
play audio files or radio
recordings saved to your hard disk drive. Click M y M u s i c to display
audio CD/DVD tracks. Control the audio playback using the control
panel buttons.The M u s i c window lists the title, album, artist, and
genre of available audio files.
Click the R e w i n d / R e p l a y or F o r w a r d button on the control panel to
change the media browser ambience.
Home Theater only
lists the MP3 files
saved in the
Windows® M y M u s i c
folder.
Sub-menus
Repeat
Allows you to play your selected music again and again.
Shuffle
Allows you to listen to your selected music in random order.
Go to Playlist
Allows you to organize your music in the Playlist page.
Add to Playlist
Allows you to add your selected music to the Playlist.
ASUS S-presso
2-25
Remote controller function buttons
Music (MP3/CD) Mode
Button
Function
Enter Music mode
Replay the previous track
Stop playing
Skip the current track; play the next
Rewind
Pause
Forward
Volume up
Volume down
Play
Mute
Repeat/ Play from the first track
0~9
2-26
Select the track number
Chapter 2: Starting up
2.7.6
Radio
Home Theater lets you tune in
and listen to an FM radio station.
Click R a d i o on the Home
Theater main window. The Radio
window appears.
Organize the FM stations by
name or frequency using the
Sort By Name/Frequency
buttons. Edit your station list with
the A d d / R e m o v e S t a t i o n
bars.
On initial use, the ASUS
Home Theater
autoscans available FM
radio stations.
Radio recording
Home Theater allows you to
make a radio recording using
the control panel R e c o r d
button. Click the R e c o r d
button to start recording. Click
the S t o p button to stop.
Home Theater automatically
saves your radio recording in
the Windows® M y M u s i c
folder. Use the Home Theater
M u s i c window to view and/or listen
to your recordings.
ASUS S-presso
Record button
2-27
Sub-menus
My Favorite
Click this bar to display your
saved favorite FM radio
stations.
Add to Favorite
Allows you to save your favorite
radio stations from the My
Station window. Simply click the
check box beside the station
name you want to save, then click
Add to Favorite
e.
Record radio
Sort by Name
Allows you to sort radio stations
by name.
Sort by Frequency
Allows you to sort radio stations
by frequency.
Tune down
Tune up
Play radio
Scan up
Scan down
Volume up
Volume down
Mute
Add Station
Allows you to add a station to your
station list.
Recorded Radio
Allows you to record radio shows, news, songs, or any piece from the
radio.
Remove Station
Allows you to remove a station from your station list. Click the check
box beside the station name you want to remove, then click the
R e m o v e S t a t i o n bar
Settings
Allows you to choose your radio band. Choose FM or AM, then click the
R e s c a n F r e q u e n c i e s to find available radio stations.
The Home Theater version in your S-presso system only plays FM
radio.
2-28
Chapter 2: Starting up
Remote controller function buttons
Radio (FM) Mode
Button
Function
Enter Radio mode
Scan frequency down
Scan frequency up
Fine tuning (-)
Fine tuning (+)
Volume up/down
Next/previous preset station
Mute
ASUS S-presso
2-29
2.7.7
Setup
The S e t u p button allows you to configure Home Theater and the
multimedia windows.
General Settings
This window lets you
configure general Home
Theater settings.
Hide Date and Time
Time.
Allows you to display or
hide the date and time.
Music Visualization.
Allows you to view music
visualization while playing
music files.
Run with Windows Start
Start. Allows you to automatically launch
Home Theater at the start of Windows®.
Enable Animation. Allows you to enable or disable animation.
Control Panel Auto Hide. Allows you to specify within how many
seconds the control panel will hide itself.
Display Options. Allows you to choose Single Display or Multiple
Displays.
TV settings
Use this window to adjust
the Home Theater TV
properties.
TV Source
Source. Allows you to
select Cable or Antenna
as the TV signal source.
Quality. Allows
Record Quality
you to set your recording
quality to Good, Better,
or Best.
o. Allows you to set your TV audio to Stereo or Mono.
TV Audio
Click N e x t to display the Picture settings window or C l o s e to
return to the main Home Theater window.
2-30
Chapter 2: Starting up
Picture settings
Allows you to customize
your picture viewing and to
setup a slideshow.
Click N e x t to display the
DVD settings window or
C l o s e to return to the main
window.
DVD/VCD settings
Adjust the DVD/VCD player
settings on this window. See
page 2-19 for DVD/VCD
settings.
Click F i n i s h to return to the
main window.
You may also modify the Home Theater configuration in
Windows®. In the Windows® desktop, click S t a r t > A l l
Programs > Intervideo Home Theater > Intervideo
Home Theater Config
g. A C o n f i g u r a t i o n window
appears. Change the Home Theater configuration as desired.
ASUS S-presso
2-31
2-32
Chapter 2: Starting up
Appendix
The Appendix includes information
on the remote controller, the ASUS
S-presso key table, and
international TV systems and
standards.
ASUS S-presso
A.1
Specifications
The ASUS remote controller allows you to operate the TV/FM card from a
distance. Use the remote controller to navigate through Instant On and the
ASUS Home Theater windows.
Operating range
5 meters (max)
Power Source
3V (2 x “AAA” batteries)*
Receiver
USB infrared receiver (supplied)
*not included
A.2
Using the remote controller
To use the remote controller:
A-2
1.
Install the remote
controller batteries.
2.
Insert the receiver USB
plug to an available USB
port in your computer.
3.
Install the receiver at an
unobscured location for
optimum operation.
4.
Turn on your computer,
then open the ASUS Home
Theater.
5.
Navigate through the
Home Theater windows
using the remote
controller.
3
2
4
5
Appendix
A.3
Remote controller layout
ASUS S-presso
A-3
A.4
Remote controller functions
A.1
System buttons
SYSTEM BUTTONS
Button
Function
Activate Instant On
Launch Home Theater
Close Home Theater
Enter the operating system/Power on PC
Eject the optical drive tray
Enter Live TV mode
Open the Home Theater Guide screen
Open the DVD Menu screen
A-4
Appendix
A.2
Key table
Button
Key Name
Function
Keyboard
control
Right
Right
VK_Right
Up
Up
VK_Up
Down
Down
VK_Down
Left
Left
VK_Left
Back
Go back
Backspace
OK
OK/Select
VK_Return
More info
More information
Ctrl+D
Replay
Previous chapter/search previous station
Ctrl+B
Stop
Skip
Stop
Next chapter/search next station
Ctrl+Shift+S
Ctrl+F
Rew
Rewind/back by 0.1 MHz
Ctrl+Shift+B
Pause
Pause
Ctrl+P
Fwd
VOL+
Fast forward/forward by 1.0 MHz
Volume up
Ctrl+Shift+F
F10
VOL-
Volume down
F9
Play
Play
Ctrl+Shift+P
Ch+
Channel up/next preset station
Page up
Ch-
Channel down/previous preset station
Page down
My Video
Launch video mode
Ctrl+E
My Music
Launch music mode
Ctrl+M
My TV
Launch TV mode
Ctrl+Shift+T
My Picture
Launch photo mode
Ctrl+I
Mute
Mute
F8
Radio
rec
Launch radio (FM) mode
Record
Ctrl+A
Ctrl+R
1
1
1
VK_1
2
2
2
VK_2
3
3
3
VK_3
4
4
4
VK_4
5
5
5
VK_5
6
6
6
VK_6
7
7
7
VK_7
8
8
8
VK_8
9
9
9
VK_9
0
0
0
VK_0
Repeat
Repeat
Ctrl+Alt+Shift+B
Shuffle
Shuffle
Ctrl+Alt+Shift+F
ASUS S-presso
A-5
A.5
•
Since TV systems and standards may change anytime without
notice, this list is provided for reference only.
•
Make sure that your TV/FM card conforms with the system or
standard used in your country or location.
COUNTRY
TV
COLOR
Albania
Argentina
Australia
Austria
Azores Is. (Portugal)
Bahamas
Bahrain
Barbados
Belgium
Bermuda
Brazil
B/G
N
B/G
B/G
B
M
B
N
B/G
M
M
PAL
Bulgaria
Canada
CC
Canary Is.
China
Colombia
Cyprus
Czech Republic
Denmark
Egypt
Faroe Islands (DK)
Finland
France
Gambia
Germany
Germany (prev East)
Gibraltar
Greece
Hong Kong
Hungary
D
M
Iceland
India
Indonesia
Iran
Ireland
A-6
International TV systems
and standards
B
D
N
B
D/K
B
B
B
B/G
E/L
I
B/G
B/G
B
B/H
I
B/G
& D/K
B
B
B
H
I
PAL
PAL
PAL
STEREO
PAL-N
FM-FM
FM-FM
PAL
NTSC
PAL
NTSC
Nicam
NTSC
PAL-M
SECAM
NTSC
SUBTITLE
Teletext
Teletext
Teletext
MTS
MTS
PAL
PAL
NTSC
PAL
SECAM/PAL
PAL
PAL
SECAM
PAL
PAL
SECAM/PAL
Nicam
SECAM
PAL
Nicam
FM-FM
TeleText
TeleText
Antiope
TeleText
PAL
SECAM
PAL
PAL
Nicam
Nicam
(was SECAM)
(Budapest only)
PAL
PAL
PAL
PAL
SECAM
Nicam
TeleText
Appendix
COUNTRY
TV
Israel
Italy
Jamaica
Japan
Jordan
Kenya
Korea
Luxembourg
Madeira
Madagascar
Malaysia
Malta
Mauritius
Mexico
Monaco
Morocco
Netherlands
New Zealand
North Korea
Norway
Pakistan
Paraguay
Peru
Philipines
Poland
Portugal
Romania
Russia
Saudi Arabia
Seychelles
Singapore
South Africa
South Korea
Spain
Sri Lanka
Sweden
Switzerland
Tahiti
Taiwan
Thailand
Trinidad
Tunisia
Turkey
B/G
B/G
M
M
B
B
M
B/G
B
B
B
B/G
B
M
L/G
B
B/G
B/G
D/K?
B/G
B
N
M
M
D/K
B/G
G
D/K
B
I
B
I
N
B/G
B/G
B/G
B/G
KI
M
B
M
B
BPAL
ASUS S-presso
COLOR
STEREO
SUBTITLE
PAL
PAL
SECAM
NTSC
PAL
PAL
NTSC
PAL
PAL
SECAM
PAL
PAL
SECAM
NTSC
SECAM/PAL
SECAM
PAL
PAL
SECAM
PAL
PAL
PAL
NTSC
NTSC
PAL
PAL
PAL
SECAM
SECAM
PAL
PAL
PAL
NTSC
PAL
PAL
PAL
PAL
SECAM
NTSC
PAL
NTSC
SECAM
Nicam
FM/FM
TeleText
TeleText
Matrix
TeleText
MTS
CC
FM-FM
Nicam
TeleText
TeleText
Nicam
Nicam
Teletext
Teletext
Nicam
Nicam
FM-FM
Teletext
TeleText
TeleText
A-7
A-8
Appendix