1
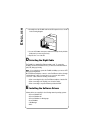
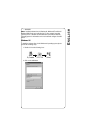
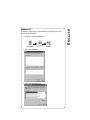
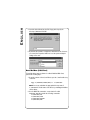
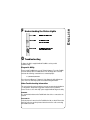
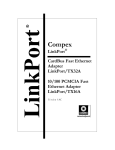
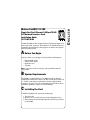
Matrox FastNIC 10/100
Single Port Fast Ethernet 100BaseTX NIC
PCI Network Interface Card
Installation Guide
10574-MT-0102
The Matrox FastNIC 10/100 is a high-performance Fast Ethernet adapter card,
ideal for typical and “power user” PC workstations. The FastNIC installs into a
standard bus-mastering PCI slot. Driver support is provided for most popular
network operating systems.
A Before You Begin
Verify the contents of your package. It should contain the following items:
•
•
•
•
Matrox FastNIC 10/100
Software driver diskette
Registration card
This guide
NOTE: If any of these items are missing, contact your Matrox Networks
representative.
B System Requirements
The FastNIC is a standard PCI device. The BIOS of the PC into which the
FastNIC will be installed must conform to the PCI Local Bus Specification v2.0/
2.1. The PCI slot into which you will insert the card must support PCI bus
mastering. If necessary, refer to the documentation that came with the PC for
information regarding its compliance to the PCI standard.
C Installing the Card
To install the FastNIC in a PC, perform the following steps:
1. Turn off your PC.
2. Open the case of your PC and locate an empty PCI expansion slot.
3. Unbolt and remove the blank panel adjacent to the PCI slot you will use
for the FastNIC.
4. Carefully insert the FastNIC card into the PCI expansion slot as shown
in the following diagram:
5. Secure the FastNIC card in place with the bolt that previously held the
blank panel you removed previously.
6. Replace the cover of the PC.
D Selecting the Right Cable
The FastNIC is a standard Fast Ethernet adapter card. To connect the
FastNIC to another Fast Ethernet device, you must use unshielded twistedpair (UTP) Category 5 wiring.
NOTE: If you only plan to operate the FastNIC at 10Mbps, you can use UTP
Category 3 wiring instead.
Most Fast Ethernet adapters connect to other Fast Ethernet devices through
“straight-through” cables. You may have to use a special cable called a
“cross-over” cable, under the following circumstances:
• When connecting directly to the Fast Ethernet adapter of another PC.
• When connecting to the “Uplink” port of a hub or switch.
• When connecting to any other Ethernet port labeled “MDI.”
E Installing the Software Drivers
Software drivers are supplied for the following network operating systems:
•
•
•
•
•
•
Microsoft Windows NT
Microsoft Windows 95
Microsoft Windows for Workgroups
Novell NetWare
LAN Manager
OS/2
• SCO UNIX
NOTE: Installation instructions for Windows 95, Windows NT, and Novell
NetWare (DOS client) are provided below. For other network operating
systems, please consult the documentation that came with the network
operating system for information on how to install and configure client PC
drivers.
Windows 95
To install the software driver for the Windows 95 operating system, please
perform the following steps:
1. Double-click on the following icons:
2. Click on the Add button:
3. Click on the Have Disk button:
4. Insert the driver diskette into the PC’s floppy drive. Specify the
directory a:\win95 and click OK:
5. By default, the Fast NIC is configured for AutoDetect mode. However,
you can use the Properties window to force the speed and duplex
settings of the card:
Windows NT
To install the software driver for the Windows NT operating system, please
perform the following steps:
1. Double-click on the following icons:
2. Click on the Add button:
3. Click on the Have Disk button:
4. Insert the driver diskette into the PC’s floppy drive. Specify the
directory a:\winnt and click OK:
5. By default, the Fast NIC is configured for AutoDetect mode. However,
you can use the Properties window to force the speed and duplex
settings of the card:
Novell NetWare (DOS Client)
To install the driver support software for a Novell NetWare DOS client,
perform the following steps:
1. Copy the contents of the a:\novell directory to the c:\nwclient directory
on the PC:
copy a:\netware\client\dos\*.* c:\nwclient
NOTE:If necessary, substitute the appropriate directory name if
c:\nwclient is not the name of the directory containing the NetWare
client software.
2. Use the DOS Edit command to create a batch file called
startnet.bat that contains the following commands:
c:\nwclient\lsl
c:\nwclient\l100
c:\nwclient\ipxodi
c:\nwclient\vlm
F Understanding the Status Lights
ACT
LNK
100
!
" #!$
10/100Mb
G Troubleshooting
A diagnostic utility is supplied with the FastNIC to assist you with
troubleshooting.
Diagnostic Utility
Please test the FastNIC before you call Technical Support. To test the FastNIC,
insert the diskette labeled “FastNIC drivers” into the floppy drive of the PC,
and enter the following command from a command prompt:
a:\ezshoot\shooter
Select the option Diagnose | Diagnosis. If the diagnostic utility indicates an
error, refer to its online help system for troubleshooting information.
Other Troubleshooting Information
This section describes typical problems you may encounter during installation
or configuration, and provides suggested solutions for those problems.
Please refer also to the online help system supplied with the diagnostic utility.
PROBLEM:
No communication between the FastNIC and other devices connected to the
network.
SOLUTION #1:
Verify the physical connection of the FastNIC to the hub or switch. Ensure that
physical connectors are firmly inserted at both ends of the cable connecting
the FastNIC to the LAN.
SOLUTION #2:
The device may require a cross-over or straight-through wire in order to
connect to the other device. Refer to the instructions contained in section D
to determine which kind of wire to use in order to connect a specific type of
device.
H Obtaining Technical Support
Please complete and mail the registration card.
If you are unable to solve a particular problem with installation or
configuration, you can contact Matrox Networks for technical support.
World Wide Web
Updated troubleshooting information is made available through our website
on an ongoing basis:
www.matrox.com/networks
E-mail
We will respond to your e-mailed questions within one business day:
[email protected]
Telephone
Technical support is available by telephone Monday through Friday, from
9:00AM to 5:00PM Eastern Time:
(514) 969-6090
I
Specifications
Standard
IEEE802.3/802.3u 10BaseT/100BaseTX
Bus Interface
32 bit bus master
Hardware Interrupts PCI INTA
Base I/O Addresses Assigned by BIOS
Cable Connections RJ-45 (10BaseT) UTP Category 3 and higher.
RJ-45 (100BaseTX) UTP Category 5.
Software Support
•
•
•
•
•
•
•
Microsoft Windows NT
Microsoft Windows 95
Microsoft Windows for Workgroups
Novell NetWare
LAN Manager
OS/2
SCO UNIX
Operating
Temperature
0°C - 55°C (32°F - 131°F)
Storage
Temperature
-20°C - 70°C (-4°F - 158°F)
Operating Humidity 10% - 90%
Storage Humidity
5% - 95%
EMC Compliance
FCC Class B, CE Mark
Dimensions
125mm x 94mm
Power
Consumption
2W maximum
1.25W Typical
J Regulatory Compliance
FCC Compliance Statement
Warning
Changes or modifications to this unit not expressly approved by the party
responsible for the compliance could void the user’s authority to operate this
equipment.
Note
This equipment has been tested and found to comply with the limits for a Class
B digital device, pursuant to Part 15 of the FCC Rules. These limits are designed
to provide reasonable protection against harmful interference in a residential
installation. This equipment generates, uses and can radiate radio frequency
energy and, if not installed and used in accordance with the instructions, may
cause harmful interference to radio communications. However, there is no
guarantee that interference will not occur in a particular installation. If this
equipment does cause harmful interference to radio or television reception,
which can be determined by turning the equipment off and on, the user is
encouraged to try to correct the interference by one or more of the following
measures:
•Reorient or relocate the receiving antenna.
•Increase the separation between the equipment and receiver.
•Connect the equipment into an outlet on a circuit different from that to which
the receiver is connected.
•Consult the dealer or an experienced radio/TV technician for help.
Industry Canada Compliance Statement
This digital apparatus does not exceed the Class B limits for radio noise
emission from digital apparatus set out in the Radio Interference Regulations of
Industry Canada.
Le présent appareil numérique n’émet pas de bruits radioélectriques dépassant
les limites applicables aux appareils numériques de Classe B prescrites dans le
Règlement sur le brouillage radioélectrique édicté par Industrie Canada.