1
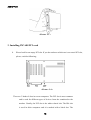
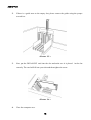
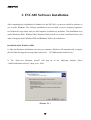
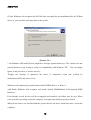
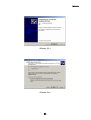
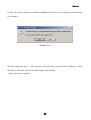
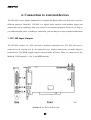
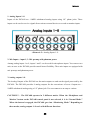
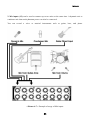
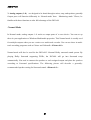
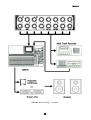
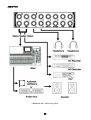
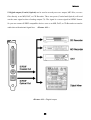
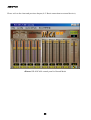
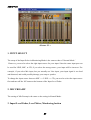
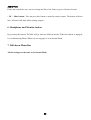
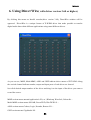
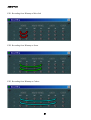
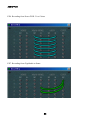
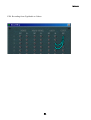
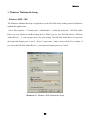
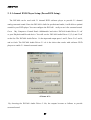
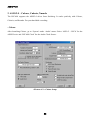
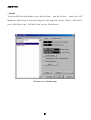
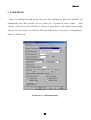
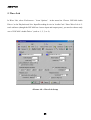
AUDIOTRAK
WARRANTY
EGO SYStems Inc. warrants the return policy to its original purchaser as follows; All EGO SYS
products, under normal use, will be free from faulty as long as the purchaser owns this product.
The terms of warranty is 15 months to EGO SYS distributors considering a 3-month temporary
stock period ahead of being sold to the end user. Therefore, the actual terms of warranty is 12
months to the end user.
EGO SYS will, at its sole option, repair or replace a product, which is found to be defective. This
warranty shall be null and void if, in the sole opinion of EGO SYS, a product failure is the result
of misuse, abuse, modification, or misapplication.
Except as expressly provided above, EGO SYS products are provided 'as is' without any kind of
warranty. No claim is made for merchantability or fitness for any purpose.
In no event will EGO SYS be liable for any direct, indirect, consequential, or incidental damages
arising out of use of the product.
The purchaser must contact EGO SYS or its regional representative to receive prior approval
before returning a faulty unit. All such returns must be shipped to EGO SYS' headquarters in
Seoul, Korea as being packaged in the original or equivalent protective packaging material (Rack,
PCI card, Power Cables, connection cables), with freight prepaid and adequate insurance.
If the returned product is deemed to be defective, the repaired or replacement product will be
back to you at no extra charge via the carrier chosen by EGO SYS.
TRADE MARKS
AUDIOTRAK, AUDIOTRAK Inca88 and Miditrak2120 are trademarks of EGO SYStems Inc.
IBM is a registered trademark of International Business Machines Corporation. Windows is a
trademark of Microsoft Corporation. Other product and brand names are trademarks or registered
trademarks of their respective companies.
1
INCA88
For technical support, contact Audiotrak:
www.audiotrak.net
[email protected]
Second Edition. September, 2002
* All features and specifications subject to change without notice.
2
AUDIOTRAK
INDEX
1. Introduction to AUDIOTRAK INCA88 .......................................... 5
- FEATURES - ............................................................................................................7
2. Hardware Installation ..................................................................... 10
1. SYSTEM REQUIREMENTS ...............................................................................10
2. PREPARATION FOR HARDWARE INSTALLATION ........................................................ 11
3. INSTALLING INCA88 PCI CARD.............................................................................13
3. INCA88 Software Installation ........................................................ 17
4. Connection to external devices ....................................................... 23
1. INCA88 INPUT/OUTPUTS ......................................................................................23
< INCA88 External Connection Box >.................................................................25
2. BASIC CONNECTION TO AN EXTERNAL DEVICE .......................................................28
5. INCA88 Control Panel .................................................................... 37
[[ NORMAL MODE ]] ..................................................................................................38
1. INPUT SELECT....................................................................................................40
2. MIC PREAMP ......................................................................................................41
3. INPUT LEVEL FADER, LEVE METER ........................................................................41
4. WAVE OUT LEVEL FADER, LEVEL METER ..............................................................42
5. MASTER OUT FADER ..............................................................................................44
6. HEADPHONE AND MONITOR BUTTON .....................................................................44
7. PULL-DOWN MENU BAR ........................................................................................44
[[ MONITORING MODE ]] ...........................................................................................46
1. INPUT SELECT....................................................................................................47
2. MIC PREAMP ......................................................................................................47
3. INPUT LEVEL FADER, LEVEL METER, MONITORING BUTTON .................................47
3
INCA88
4. WAVE OUT LEVEL FADER, LEVEL METER, MONITORING BUTTON ............................. 48
5. MASTER OUT FADER ..............................................................................................48
6. HEADPHONE AND MONITOR BUTTON .....................................................................49
7. PULL-DOWN MENU BAR ........................................................................................49
6. Using Direct Wire( with driver version 3.60 or higher)................ 50
7. Setting in Application ...................................................................... 55
1. WINDOWS MULTIMEDIA SETUP ..............................................................................56
2. 5.1 CHANNEL DVD PLAYER SETUP (POWERDVD SETUP)......................................57
2. ASIO 2.0 – CUBASE, CUBASIS, NUENDO................................................................59
3. CAKEWALK ........................................................................................................62
4. SOUND FORGE .......................................................................................................64
5. WAVE LAB .............................................................................................................65
4
AUDIOTRAK
1. Introduction to AUDIOTRAK INCA88
Thank you for choosing the AUDIOTRAK INCA88. The INCA 88 is a Multimedia digital audio
device different from other sound cards. You will be amazed at the various and powerful
functions and features of INCA88 when you use it. The INCA88 will satisfy beginners who have
just become involved in digital audio to
professional musicians who produce music at a
professional level with its many features and useful functions. Especially, high quality surround
sound will lead you to a true AV experience.
INCA88 adopts the ‘E-WDM’ driver model to provide superior data processing
and
compatibilities. Until now, Windows based drivers such as MME, DirectX, and the WDM driver
did not have adequate performance for serious music production. Furthermore, Steinberg’s ASIO
and Nemesys’ GSIF drivers do not support full compatibility. These drivers have caused chaos
for users and the performance varies from driver to driver. Also, the advent of Windows 2000
adds another hardware and software compatibility issue for the users. AUDIOTRAK employs the
E-WDM driver to provide a new solution for users in to take advantage of newer Windows
versions and concentrate on their work, not their system. The INCA88 will lead you to the new
world of E-WDM.
The E-WDM supports MME, ASIO, GSIF, and DirectX taking all the merits of these drivers.
One of its advantages is OS support that ranges from Windows 98 and Windows ME to Windows
2000 and XP thus allowing the user to choose the OS of his or her preference.
The INCA88 delivers high-quality sound from Windows multimedia tools with various
additional features replacing the soundcard in your computer. The INCA88 is capable of playing
games using DirectX, playing back MPEG, MP3,
wav files, and playing DVD and Video CDs.
As the Internet becomes more and more popular, multimedia on the Internet is also useful, such
5
INCA88
as Flash media and internet phones. The INCA88 supports all of these features and, most
importantly, 5.1 channel Dolby Surround that will turn your computer system into a DVD AV
system better than expensive AV equipment for Hi-Fi users.
The INCA88 can be used not only for multimedia but also for the beginner of hard-disk
recording to professionals in this field. The E-WDM will work at its best in multi-track, harddisk recording. The INCA88 is compatible with multi-track recording software such as Cakewalk,
Cubase, Cubasis, and Nuendo; mastering software such as Sound Forge and Wave Lab; software
sampler like GigaSampler and GigaStudio, and most Virtual Synthesizers and Virtual
Instruments.
As the evolution of the computer system continues, digital audio is becoming more and more
common. With the INCA88, you can complete your Desk Top Music Production System easily.
The INCA88 will be the center of your DTMP system providing high quality sound that can be
compared to that of a professional studio and a guide to the world of digital audio music and
multimedia.
6
AUDIOTRAK
- FEATURES -
20-Bit D/A Converter & 18-Bit A/D Converter
The INCA88 employs high quality 20-Bit A/D converters and 18Bit D/A converters to provide a
very low S/N ratio in A/D D/A converting and top-quality sound in recording and playback.
8 In / 8 Out Analog audio Input/Output
The INCA88 provides 8 In / 8 Out analog 1/4” phone jack ports with -10dBV reference level that
allows connection to most equipment of your choice.
5.1ch. Dolby Surround
The INCA88 can be used for 5.1 channel Dolby Surround sound. You will need a DVD-ROM
and DVD player software to build a high-quality surround system using a Dolby Surround DVD
player in your computer. Also, you can produce surround audio with software capable of
producing surround sound.
Simultaneous 8 ch. recording and 8 ch. Playback – Full-Duplex
The INCA88 supports full duplex, 8-channel recording and playback that is suitable for multitrack recording. In multi-track recording, you can record multiple tracks in your software while
monitoring the tracks that were previously recorded.
7
INCA88
S/PDIF Optical, Coaxial digital output
The INCA88 has S/PDIF digital input and output ports in optical and coaxial connections that
will minimize the loss of signal when transferring digital data to or from other digital equipment
including MD and DAT.
CD-ROM analog input
The INCA88 has an analog input port to connect the CD-ROM driver to an analog output that
allows you to listen or record an audio CD with your CD-ROM drive.
Various Sample Rate Support
The INCA88 supports various sampler rates from 32kHz, to 44.1kHz to 48kHz. Specifically, the
INCA88 detects your sample rate automatically to select the appropriate sample rate. You will
just need to set up the sample rate in your software to have the INCA88 set it accordingly.
Internal Mixer for analog monitoring
The INCA88 inputs (Analog, Mic, CD-ROM) are connected to analog outputs in order to
monitor inputs by the internal mixer. Also, it is capable of monitoring the input source with a
wave file being played at the same time.
8
AUDIOTRAK
32Bit PCI Bus Mastering
Usually, a PCI card and a PC system exchange data via a 32-bit PCI bus. The INCA88 adopts
PCI Bus Mastering that makes a low-CPU load possible to enable faster data processing and
optimized CPU performance. PCI bus mastering allows more plugins to be used in the audio
software.
2 MIC Preamp
The INCA88 can be connected to 2 mics directly in order to record onto your hard disk drive.
The Mic inputs have built-in mic preamps that amplify the mic input signal to the proper level
where you can monitor or record. This allows the user to have more flexibility in the digital
recording environment. Also, the mic inputs provide 12V Phantom Power that supply 12 V
electrical power to condenser mics. The users can connect a mic directly into INCA88 Mic input
without an external power supply.
Dual headphone Output
The INCA88 provides 2 headphone outputs with a headphone preamp through which the users
can monitor what they are working on.
9
INCA88
2. Hardware Installation
The INCA88 requires a 3-step installation: ‘PCI card installation’, ‘Connection to an external
device,’ and finally ‘Driver installtion.’ The ‘PCI card installation’ step involves placing the
INCA88 PCI card into the PCI slot and connecting it to the included breakout box. In the
‘Connection to an external device’ step, you will understand how to connect the INCA88 to other
devices such as a mic, amp, mixer, and a recording device such as an MD or DAT player. ‘Driver
installation’ is having the operating system in your computer recognize the INCA88 and building
the communication channel.
1. SYSTEM REQUIREMENTS
To take advantage of the INCA88 and its full capacity, the computer specifications are very
important. Even though the INCA88 is built to have low-CPU dependability, the computer needs
to meet some requirements in order to get maximum performance. The INCA88 is not just a
simple soundcard, but a multimedia digital audio device with various functions. Therefore, the
performance of the INCA88 is affected by the computer specs that are required to process the
vast amount of digital data. A faster CPU, faster hard disk, and larger amounts of RAM are
recommended.
Minimum System Requirement
1.
Intel Pentium II CPU or equivalent AMD CPU
2.
64MB of RAM
3.
One available PCI slot
4.
Microsoft Windows 98/ME/2000/XP operating system
10
AUDIOTRAK
Recommended System Requirement
1.
Intel Pentium III CPU or equivalent AMD CPU
2.
More than 256MB of RAM
3.
One avaiable PCI slot
4.
Microsoft Windows 98/ME/2000/XP operating system
2. Preparation for hardware installation
The INCA88 PCI card and other components in the computer can be easily damaged by
electrical shock. You need to use an anti-static device that can discharge the static electricity of
your body to avoid potential static damage to the cards.
1.
The AUDIOTRAK INCA88 PCI card is placed into the anti-static plastic pouch as it
is packaged. Do not open the pouch before you install the card.
2.
Turn off the computer power and remove the power cable from your computer power
supply.
<Picture 2-1 >
11
INCA88
3.
Remove the computer cover. Make sure that you have an available PCI slot in your
motherboard to install the ICNA88. Please, refer to your computer user’s manual to
remove the cover.
<Picture 2-2 >
4.
To avoid possible static shock to the computer parts, discharge it by touching the
computer case or something grounded. We recommend you to use an anti-static
device such as an anti-static wrist band.
5.
When you need to hold the INCA88 PCI card, please, hold it on the guide. Do not
grab the card by the board.
12
AUDIOTRAK
<Picture 2-3 >
3. Installing INCA88 PCI card
1.
Please look for an empty PCI slot. If you do not know which one is an actual PCI slot,
please, read the following ;
<Picture 2-4 >
There are 3 kinds of slots in recent computers. The PCI slot is most common
and is used for different types of devices from the soundcard to the
modem. Usually, the PCI slot is the white-colored slot. The ISA slot
is used in older computers and it is marked with a black slot. The
13
INCA88
AGP slot is only for the videocard and is the most recent type of slot. It is marked
with a brown slot and is located close to the CPU. It will be not too
hard to find the PCI slot for the INCA88.
14
AUDIOTRAK
2.
If there is a guide next to the empty slot, please remove the guide using the proper
screwdriver.
<Picture 2-5 >
3.
Next, put the INCA88 PCI card into the slot and make sure it is placed in the slot
correctly. The card will fit into your slot and then tighten the screw.
<Picture 2-6 >
4.
Close the computer case.
15
INCA88
5.
After finishing the installation of the PCI card, connect it to the breakout box using
the provided cable.
<Picture 2-7 >
16
AUDIOTRAK
3. INCA88 Software Installation
After completing the installation of hardware for the INCA88, you need to install its software to
use it under Windows. The software installation is not too hard, even for computer beginners.
Just follow the steps below and you will complete it without any problems. The installation steps
under Windows 98SE, Windows ME, Windows 2000 and XP are a little bit different from each
other. Setting up under Windows ME and Windows 2000 is described here.
Installtion under Windows 2000
1. After the hardware installation, turn on your computer. Windows will automatically recognize
the INCA88 showing the message that it detected a ‘PCI Multimedia Audio Device’.
2. The “Add new hardware wizard” will pop up as the following window. Select
“Add/Troubleshoot a device” then, press ‘Next.’
<Picture 3-1 >
17
INCA88
3. Select “Search for a suitable driver for my device[recommended].”
<Picture 3-2 >
4. Specify the location of the driver. Insert the provided CD into the CD-Rom drive and select
‘CD-Rom drive.’ ( If it’s failed, You can also copy the Inca88 driver to your hard disk.)
<Picture 3-3 >
18
AUDIOTRAK
5. Now Windows will recognize the INCA88 after searching for the installation files in CD-Rom
drive( or your har disk) and copy them to the system.
<Picture 3-4 >
* On Windows 2000 and XP, there might be a message appeared that says “The software has not
passed Windows Logo testing to verify its compatibility with Windows XP.”
You can simply
ignore it and just select ‘Continue Anyway’.
Though, the message is appeared, the driver is completely tested and verified by
manufacturer(ESI) and safe to use it.
Windows will continuously install from Inca88 E-WDM Wave-1 to Wave-6.
And finally Windows will recognize and install ‘Inca88 Midi(Miditrak 2120-Optional MIDI
Interface)’.
Even though, several devices will be recognized and installed, just follow step by step. When
your system keeps asking restart the computer, just ignore that and keep going to install.
When all the drivers are installed and the system doesn’t ask driver install any more, restart the
computer.
19
INCA88
<Picture 3-5 >
<Picture 3-6>
20
AUDIOTRAK
<Picture 3-7>
<Picture 3-8>
21
INCA88
6. Then, all required software is installed and Windows will ask you to restart the system. Restart
the computer.
<Picture 3-9>
10. After rebooting, go to ‘My computer->Control panel->System->Device Manager.’ Check
the devices ‘INCA88’ and ‘INCA media bridge’ under Sound,
Video, and Game controllers.
22
AUDIOTRAK
4. Connection to external devices
The INCA88 is not a simple soundcard but a multimedia digital audio card that can be used for
different purposes. Basically,
INCA88 is a digital audio interface with multiple inputs and
outputs that can be confusing when you connect it to external equipment. However, as long as
you understand the basics of making a connection, you can adapt it to more complex connections.
1. INCA88 Input/Outputs
The INCA88 consists of a PCI card and a breakout connection box. The PCI card can be
connected to an external box by its connection port. Analog connections are made using its
breakout box. The SPDIF digital output is located on the PCI card. There is a connector for the
Miditrak 2120(Optional), a 2-in, 2-out MIDI interface.
All
<Picture 4-1 > INCA 88 PCI Card
23
INCA88
1. Connector for the breakout box
Using this connector, the INCA88 PCI card can be connected to its breakout external box. Use
the provided 44-pin cable to connect and fasten the screws. It is recommended to connect it
while the computer power is off. Also, turn down or turn off the external devices connected as it
could damage the equipment..
2. Coaxial SPDIF output
The INCA88 has a stereo digital coaxial output that can be connected to other digital equipment
by an RCA cable. You can use it with an external device with digital inputs such as a DAT
machine.
- The Coaxial digital output sends out the same signal as Analog Output 7 and 8. Set the audio
output as output 7 and 8 to send out the desired audio to digital output.
- Even though the same RCA cable is used, the digital output is different from analog. The digital
output uses 1 RCA port to send out a stereo signal whereas analog needs to use a couple of ports
to send out the stereo signal.
3. Optical SPDIF output
The INCA88 has a stereo digital output in optical format. You can connect it to an external
device that is using the optical input as a digital input. It can be used to connect to an MD or CD
recorder.
- The Optical digital output sends out the same signal as Analog Output 7 and 8. Set the audio
output as Output 7 and 8 to send out the desired audio to the digital output.
Caution !!!– The above-mentioned Coaxial and Optical outputs send out the same signal
that comes out from Analog Output 7 and 8. You cannot set them to send out other sources.
24
AUDIOTRAK
4. D-OUT – 2 pin digital connector
You can connect to an internal device using a 2 pin cable. This connector can be used to send out
the SPDIF digital signal to another internal device such as another soundcard. The signal that
comes out of this connector is the same as the Coaxial and Optical signal.
Caution !!! – The Optical digital outputs cannot be used for ‘INPUT MONITORING.’
Please, use analog outputs for this purpose.
5. CD In – CD Rom audio input
Most CD-Roms installed in your computer have 4 pin analog outputs that can be connected to
the INCA88 ‘CD In’ for your listening pleasure. An audio CD can be played in your CD-Rom
that sends out an analog signal to the INCA88 through this connection. Use the proper cable to
connect to a CD-Rom and enjoy CD audio from the INCA88.
6. Miditrak 2120 Connector
The INCA88 can be expanded to an audio and MIDI interface by attaching the optional Miditrak
2120 from AUDIOTRAK. The INCA88 will have 2-in 2-out 32 channel MIDI functions by
adding the Miditrak 2120. The Miditrak 2120 does not require any power supply or any drivers
to be installed.
< INCA88 External Connection Box >
The INCA88 external connection box is for the main analog inputs and outputs. Most of the
connections to external devices need to be done via this breakout box. You can connect
amplifiers, microphones, headsets, mixers, and synthesizers.
25
INCA88
1. Analog Inputs 1~8
Inputs of the INCA88 are –10dBV unbalanced analog inputs using 1/4” phone jacks. These
inputs can be used to receive signals from various external devices to record or monitor inputs.
<Picture 4-2 > Analog Inputs 1~8
2. Mic Inputs – input 1,3 : Mic preamp with phantom power
Among analog inputs 1 to 8, inputs 1 and 3 can be used for microphone inputs. You can use two
mics at once as the INCA88 provides much better flexibility. These mic inputs are equipped with
mic preamps and phantom power.
3. Analog outputs 1~8
The Analog Outputs of the INCA88 are the main outputs to send out the signal processed by the
INCA88. The INCA88 provides 8 analog outputs for the convenience of users. Outputs are –
10dBV unbalanced analog using a 1/4” phone jack. You can connect to an amp or a mixer.
CAUTION!!! – The INCA88 operates in 2 different modes. When the ‘Headphone and
Monitor’ button on the INCA88 control panel is not selected, it is in “Normal Mode.”
When the button is engaged, the INCA88 goes into “Monitoring Mode.” Depending on
these modes, analog outputs 1~8 work with different functions.
26
AUDIOTRAK
- Normal Mode – Analog outputs work as 1~8 wave output ports as assigned in various
applications. Also, with Input monitoring, inputs 1~8 will be monitored by outputs 1~8.
<Picture 4-3 >
<Picture 4-3 > Analog outputs 1~8
This ‘Normal’ mode will be used for ‘Dolby Surround 5.1channel.’ Outputs will be turned into a
surround setting automatically as you play Dolby Surround supporting DVD. <Picture 4-4 >
<Picture 4-4 > Dolby Surround 5.1channel
27
INCA88
-Monitoring Mode – Analog outputs 1,2 become a stereo master output for audio from the
INCA88. The Outputs 3 and 4 each become a stereo headphone output that send out the same
audio as outputs 1,2. In this mode, the INCA88 will have a stereo master output with dual stereo
headphone outputs. The outputs 5~8 will be used for surround out in this mode.
<Picture 4-5 > Stereo Monitoring Mode
2. Basic connection to an external device
The INCA88 is a piece of multimedia digital audio equipment that allows various uses. This
means there are many different ways to connect other devices to the INCA88. Even more, it has
16 channels of audio inputs and outputs that make connections a bit confusing. However, once
you understand the basics, you have flexibility in making several types of connections.
1. Analog inputs (1~8) take signals into the INCA88 and the computer. A regular CD-player,
MD, and any other analog source can be connected to listen or record. Also, a sound module,
sampler, and synthesizer can be connected to record their outputs.
Inputs 1~8 can be used as pairs of stereo like 1-2, 3-4, 5-6, and 7-8 or as individual mono inputs
like 1, 2, 3, 4… . Also, they can be mixes of mono inputs and stereo inputs. These combinations
28
AUDIOTRAK
can be used for the intents and purposes of the user. A total of 8 inputs will provide superior
flexibility to users in their audio work environment. <Picture 4-6 >
<Picture 4-6 > Example of usage of Analog inputs 1~8
29
INCA88
2. Mic inputs (1,3) can be used to connect up to two mics at the same time. A dynamic mic or
condenser mic that needs phantom power can also be connected.
You can record a voice or musical instruments such as guitar, bass, and piano.
<Picture 4-7 > Example of usage of Mic inputs
30
AUDIOTRAK
3. Analog outputs (1~8) are designed to be heard through a mixer, amp, and speakers generally.
Output ports will function differently in ‘Normal mode’ than ‘Monitoring mode.’ Please, be
familiar with these functions to take full advantage of the INCA88.
-Normal Mode
In Normal mode, analog outputs 1~8 works as output ports of a wave device. You can set up
these in your application or Windows Multimedia properties. This Normal mode is usually used
for multiple outputs when you use a mixer or a multi-track recorder. You can use these in multitrack recording programs such as Cubase and Cakewalk. <Picture 4-8 >
Normal mode will also be used for the INCA88 5.1channel Dolby surround sound system. By
playing Dolby Surround supporting DVDs, the INCA88 will go into Surround setup
automatically. You need to connect the speakers to each assigned output and place the speakers
according to Surround specifications. The following picture will describe a generallyrecommended speaker setting for Surround sound. <Picture 4-9 >
31
INCA88
<Picture 4-8 > Analog 1~8 outputs
32
AUDIOTRAK
<Picture 4-9 > Dolby Surround 5.1 channel setting
33
INCA88
- Monitoring Mode
Monitoring Mode is set completely different from that of Normal Mode. Outputs 1-2 become the
INCA88 Stereo Master Output. The INCA88 output sources will come out of this stereo master
output. Both Outputs 3 and 4 become a stereo headphone output to use 2 pairs of headphones.
The same signal will come out of the master output and the two headphones sets. <Picture 4-10
>
34
AUDIOTRAK
<Picture 4-10 > Monitoring Mode
35
INCA88
5. Digital output (Coaxial, Optical) can be used to record your wave output, MP3 files, or wave
files directly to an MD, DAT, or CD Recorder. These two ports (Coaxial and Optical) will send
out the same signal as that of analog outputs 7,8. The signal is a stereo signal in S/PDIF format.
So you can connect S/PDIF compatible devices suce as an MD, DAT, or CD Recorder to transfer
audio data with minimal signal loss.
<Picture 4-11 >
<Picture 4-11 > Digital outpus
36
AUDIOTRAK
5. INCA88 Control Panel
If you complete the INCA88 hardware installation and software setup, you need to learn about
the INCA88 Control Panel. This control panel is where you control your setup for the INCA88.
The INCA88 Control Panel is built for easy control. However, it could look complex since there
are many inputs and outputs. All input and output controls are the same. So, if you learn about
one control, you can use the others easily.
After successfully installing INCA88 hardware and software, you can see the icon INCA88
icon in the system tray. This is the INCA88 control panel icon and the control panel will be
launched as you click on this icon.
The INCA88 Control Panel operates in 2 different modes. They are explained in the previous
chapter.
You can go into the different mode by pressing the ‘Headphone and Monitor’ button on the
control panel.
1.
Normal Mode - ‘Headphone and Monitor’ : OFF.
2.
Monitoring Mode - ‘Headphone and Monitor’ : On.
CAUTION !!! Input Monitoring – Input monitoring is one of the INCA88’s functions to send
out an input signal directly to the output ports for monitoring purposes. For example, you can
monitor mic inputs through INCA88 analog output.
37
INCA88
[[ Normal Mode ]]
It is in ‘Normal Mode’ when the ‘Headphone and Monitor’ button is not engaged in the top-right
corner of the INCA88 Control Panel. You cannot do Input Monitoring under Normal Mode. The
biggest difference between Normal Mode and Monitoring Mode is that you cannot check out the
source of the input. If you select the INCA88 in your application as your output device, the
signals coming into the INCA88 will be recorded onto your hard disk. If you wish to monitor
inputs and record at the same time, please choose ‘Monitoring Mode.’ You cannot use headphone
outs in Normal Mode.
‘Normal Mode’ can be used for 5.1 channel Dolby Surround Sound system. For surround sound,
there is no additional setup required. As you play a DVD movie with a software DVD player, the
INCA88 outputs turn into surround speaker outputs.
OUTPUT
SPEAKER
1
2
Front Left
Front Right
3
4
-
-
5
6
Rear Left
Rear Right
7
8
Center
Sub Woofer
<Picture 5-1> 5.1 channel surround speaker setting
38
AUDIOTRAK
Please refer to the chart and previous chapter (4-2. Basic connection to external devices).
<Picture 5-2 >INCA88 control panel in Normal Mode
39
INCA88
1. INPUT SELECT
The Input select area is where you select your input source. Basically, the INCA88 uses a 10dBV unbalanced mono line input. Among the 8 inputs, inputs 1,2,3,4 can be used as line
inputs, mic inputs, and CD inputs. In more detail: you can use inputs 1,2 as line inputs or mic
inputs by your selection. Inputs 3,4 can be used as line inputs, mic inputs, or CD inputs by your
selection. Your selection will be a source when you record the inputs. For example, if you select
‘INCA88 Audio Driver 1’ in your application, your can record inputs selected for input 1,2
between the Line input and Mic input.
CAUTION !!! Ex. – If you want to record an audio CD in Cakewalk,
1. Select CD for inputs 3,4 in “Input Select” on the INCA88 Control Panel.
2. Select ‘INCA88 Audio Driver 2’ for your recording source in Cakewalk.
1. LINE – line input select
If ‘Line’ is selected for inputs 1,2 and 3,4 in “Input Select” on the INCA88 Control Panel, the
INCA88 will take the –10dBV line input as its source. The rest of the inputs, inputs 5,6,7,8 will
always take the –10dBV line input as its source.
2. MIC – Mic input select
The INCA88 can record audio from microphones. A mic can be connnected to input 1 and 3 only,
unless you use a separate mic preamp. When the mic buttton is pressed, the mic connected to
input 1 becomes input 1,2 and the mic connected to input 3 becomes input 3,4.
3. CD – CD input select
As you press this button, The INCA88 will take the input from the CD-ROM connection on the
PCI card. You can play and record CD music from your CD-ROM drive. You can only select this
on inputs 3,4.
40
AUDIOTRAK
2. MIC PREAMP
Select the proper settings for your mic. You can select the input level and phantom power. This
will work when you select ‘MIC’ in Input Select.
1. +20dB
When this button is engaged, the mic preamp will amplify the level of the input from the mic by
+20dB. The mic input level is less than the line input level, and this mic preamp needs to be on
when you use mics.
2. PHANTOM
When you use a condenser mic that requires external power, the INCA88 will supply 12V power
to the mic. This is called Phantom Power and this will allow you to plug a mic directly into the
INCA88 input without going through
an external mixer or an additional mic preamp. You can
turn the mics on and off that are connected to the inputs 1 and 3 individually. Again, the
INCA88 provides 12V phantom power to the mic.
3. Input Level Fader, Leve Meter
The Input Level Fader will control the input volume level of inputs 1~8 of the INCA88. All 8
input level faders work in the same way.
1. Level Fader
The Level Fader controls the input level. You can control levels 1~8 individually or as pairs like
1-2,3-4,5-6, and 7-8 in stereo. Move the mouse pointer over specific port fader to adjust the level
individually. To adjust a stereo level, move the mouse over the middle of the stereo ports. The
selected port fader(s) will turn into a brighter color to indicate the selected port(s).
41
INCA88
You can move the fader in three different ways. Basically, the volume level can be adjusted by
±1.5dB.
- Drag the fader as you press the left mouse button.
- Select the fader with the mouse cursor and adjust with the mouse wheel. You can select the
steps from the pull-down menu, ‘Config’ ->’Mouse Wheel’.
- Select the fader with the mouse cursor and use the up and down arrows of your keyboard.
2. Level Meter
The Level Meter will display incoming signal levels. This will be active when there is a signal
coming from an input port. All 8 channels have their own meter so you can compare the inputs
and adjust them. You can use the level meters even though you do not monitor the inputs.
3. Input Level Indicator
The Level Indicator shows the current level set for the input. By comparing these, you can set up
the input level with external devices and other inputs. You can adjust it by moving the input level
fader.
4. Wave Out Level Fader, Level Meter
The Wave Out Level Fader is the output volume control fader that controls outputs 1~8 of the
INCA88. All 8 level faders act the same so you need to learn only one. You can adjust the
volumes of wave files, multimedia files, and the sound of games that the INCA88 PCI card
controls. The term ‘Wave’ means the sound that is generated by the computer. The input
monitoring level can not be controlled here.
1. Level Fader
The Level Fader will change the level of the “Wave Out” volume. You can control outputs 1~8
individually or control the stereo pairs like outputs 1-2,3-4,5-6, and 7-8. You need to move the
42
AUDIOTRAK
mouse pointer over the specific port fader to adjust it individually or move the mouse pointer
over the middle of the two ports to adjust it as a stereo channel. If the port fader(s) is selected, it
will turn into a brighter color.
You can move the fader in three different ways. Basically, the volume level can be adjusted by
±1.5dB.
- Drag the fader as you press the left mouse button.
- Select the fader with the mouse curser and adjust with the mouse wheel. You can select the
steps from the pull-down menu, ‘Config’ ->’Mouse Wheel’.
- Select the fader with the mouse cursor and use the up and down arrows of your keyboard.
2. Level Meter
The Level meter displays the signal level of the wave signal. You can see the level of each output
to compare them and adjust the level on the basis of these
meters. If you wish to send out a wave file to an external device, refer to the level meters to
adjust the signal to the proper level.
3. Output Level Indicator
The Output Level Indicator shows the current level setting for each of the outputs. You can
compare the output levels based on this indicator in order to adjust the output level to a desired
level. Move the output level fader in order to set it to a proper level.
CAUTION !!! – The Wave Out Level Fader can be misunderstood to control the outputs of
INCA88 that comes from output ports 1~8. The INCA88 Wave Out Level Fader is able to
control the level of the waves that are generated by the computer. It can NOT control all
output levels.
43
INCA88
5. Master Out Fader
The Master Out Fader controls the entire output level of the INCA88. However, in Normal Mode,
this fader is set to 0 dB. Therefore, you need to set the Input and Output levels in each port.
6. Headphone and Monitor button
The Headphone and Monitor button decides the modes of the INCA88. When the button is
engaged, it is in ‘Normal Mode’ and, when the button is not engaged, it is in ‘Monitoring Mode.’
7. Pull-down Menu Bar
The INCA88 Control Panel includes a pull-down menu bar that contains the configuration for the
Control Panel. This Menu Bar consists of a File menu and a Config menu.
1. File - Exit
File – Exit will terminate the INCA88 Control Panel but it will not shut down the Control Panel.
You can launch the Control Panel by clicking on the INCA88 icon in the system tray.
2. Config – Mouse Wheel
The Config-Mouse Wheel will control the mouse wheel adjustment. When you use the mouse
wheel to adjust the volume level, the adjustment step is set to ±1.5dB. You can configure the
adjustment steps to your preference.
- Step 1 : When you move the mouse wheel one step, the fader will move by ±1.5dB.
- Step 2 : When you move the mouse wheel one step, the fader will move by ±3.0dB
- Step 4 : When you move the mouse wheel one step, the fader will move by ±6.0dB.
- Step 8 : When you move the mouse wheel one step, the fader will move by ±12.0dB.
44
AUDIOTRAK
3. Config – Sample Rate
The Sample Rate option gives you three sample rates available for the INCA88. The INCA88
supports 32 kHz, 44.1 kHz, and 48 kHz. The sample rate must be selected here, then the same
sample rate has to be set in your application.
4. Config – Buffer Size
This will decide the latency of the INCA88. The INCA88 provides 4 different sample buffer size;
64 sample, 128 sample, 256 sample, and 512 sample. In general, 64-sample buffer size results in
3 milisecond of latency.
5. Config – Factory Default
This returns all INCA88 configurations to their default setting.
6. Always On Top
This will set the INCA88 Control Panel to always display over other windows. If this is not
selected, the active windows will be set over the INCA88 Control Panel.
45
INCA88
[[ Monitoring Mode ]]
The INCA88 will operate in Monitoring Mode when the ‘Headphone and Monitor’ button is
engaged. This mode allow the user to directly monitor the inputs of the INCA88 through the
outputs. The INCA88 Monitoring Mode supports direct monitoring that routes the inputs directly
into the outputs. Monitoring through the software could affect the quality of sound and create a
time gap in the monitoring process latency. By using hardware direct monitoring, monitoring
sound is as close as the inputs. You can record inputs regardless of the monitoring. Also, you can
use headphones for monitoring.
CAUTION !!!!! - In ‘Monitoring Mode’, the INCA88 outputs 1~8 perform
different functions.
- 1-2 output become the master monitoring outputs.
- Outputs 3 and 4 each become the stereo headphone output to provide dual
headphone outs. The outputs of the headphones are the same as that of the master
output 1,2.
- Outputs 5,6,7,8 work as normal ( wave out 5,6,7,8 ).
46
AUDIOTRAK
<Picture 5-3 >
1. INPUT SELECT
The setup of the Input Select in Monitoring Mode is the same as that of ‘Normal Mode.’
However, you need to select the right input source for your input. Since the same input port can
be used for LINE, MIC, or CD, if you select the wrong source, your input will be incorrect. For
example, if you select Mic input, but you actually use Line input, your input signal is too loud
and distorted, and could possibly damage your amp or speaker.
To change the input source between MIC <-> LINE <-> CD, you need to select the input source
first and turn off the ‘M’ button at the bottom of the Input Level Fader.
2. MIC PREAMP
The setting of Mic Preamp is the same as the setting in Normal Mode.
3. Input Level Fader, Level Meter, Monitoring button
47
INCA88
‘Mix’ – Monitoring button – The Input Level Fader can be used to adjust the input level for
inputs 1~8. You can adjust it the same way as in Normal Mode. However, there is a ‘Mix’ button
underneath of each level indicator in Monitoring Mode. When the button is engaged, you can
monitor the input for that input port. The inputs with the ‘Mix’ button on can be monitored
through the master outputs 1,2 and/or the headphone outputs 3 and 4.
All the inputs with ‘Mix’
button on are sent to the master outputs.
4. Wave Out Level Fader, Level Meter, Monitoring button
‘Mix’ – Monitoring button -
The Wave Out Level Fader controls the wave volume of
INCA88 outputs 1~8. You can adjust the level the same way you do in Normal Mode. The ‘Mix’
button underneath the fader needs to be engaged to monitor the wave out on that port. The
signals to the output port will be sent to the stereo Master output 1,2 when the button is engaged.
You can monitor selected Wave outs through the master output 1,2 and the headphone outputs 3
and 4.
CAUTION !!! – The Wave Out Level Fader can be misunderstood to control the outputs of
INCA88 that comes from output ports 1~8. Especially in Monitoring Mode, it could be
confusing. The Wave Out Fader 1,2 controls the level of the device, Wave 1,2 ; but the
Master Level Fader controls the actual output that comes from Output ports 1,2.
Again, The Wave out Fader 1,2 controls the volume level of the wave device 1,2 - not the
Master Out 1,2. Master out 1,2 can be adjusted by the Master Out Fader.
5. Master Out Fader
The Master Out Fader controls the INCA88 master output level. In ‘Monitoring Mode’, you can
adjust the levels using this fader (in Normal Mode, it is set to 0dB ). In Monitoring Mode,
outputs 1,2 are used for a stereo master output and outputs 3 and 4 for the headphones. Use the
Master Out Fader to adjust the level of this output. Adjust the input level by using Input Level
48
AUDIOTRAK
Fader and control the wave out level using the Wave Out Fader to get a well-mixed sound.
- ‘M’ – Mute button : You can press this button to mute the master output. The button will turn
into ‘M’ and it will mute all the analog outputs.
6. Headphone and Monitor button
By pressing this button, INCA88 will go into two different modes. When the button is engaged,
it is in Monitoring Mode. When it is not engaged, it is in Normal Mode.
7. Pull-down Menu Bar
All the settings are the same as in Normal Mode.
49
INCA88
6. Using Direct Wire( with driver version 3.60 or higher)
By clicking this menu on Inca88 console(driver version 3.60), DirectWire window will be
appeared. DirectWire is a unique feature of E-WDM driver that make possible to transfer
digital audio data within different applications using same/different drivers.
As you can see, MME, Multi-MME, ASIO and GSIF indicate driver names of WT192M. Along
the vertical channel indicate number, output and input ports of each driver are showed.
Just click desired output number of the driver and drag it to the input of the driver you want to
record the source.
MME section means normal application's I/O, ex.) WinAmp, WaveLab, Cakewalk ...
Multi-MME section means SONAR, PowerDVD, Win DVD I/O ...
ASIO section means Cubase, Logic, Nuendo, Reason I/O ...
GSIF section means GigaStudio I/O.
50
AUDIOTRAK
EX1. Recording from Winamp to WaveLab
EX2. Recording from Winamp to Sonar
EX3. Recording from Winamp to Cubase
51
INCA88
EX4. Recording from Sonar to Cubase or Vice versa
EX5. Recording from Power DVD 5.1 to Sonar
52
AUDIOTRAK
EX6. Recording from Power DVD 5.1 to Cubase
EX7. Recording from GigaStudio to Sonar
53
INCA88
EX8. Recording from GigaStudio to Cubase
54
AUDIOTRAK
7. Setting in Application
INCA88 is a multimedia digital audio device designed to be used for audio work in a Windows
environment. It has a wide range of usage from game sound to DVD surround sound. It is very
easy to set up the INCA88 in the multimedia setup of the Windows Control Panel. Also the
INCA88 can be used with digital audio software to perform hard-disk recording. This chapter
includes the set up guide for some common recording software. Especially, the INCA88 uses the
E-WDM driver that supports the audio dedicated drivers such as MME and ASIO.
This chapter only contains the basic setup for some of the software. For more detailed info,
please refer to the manual of the software.
55
INCA88
1. Windows Multimedia Setup
- Windows 98SE / ME
The Windows Multimedia setup is required to use the INCA88 as the sound system for Windows
multimedia applications.
Go to ‘My computer -> Control panel -> Multimedia’-> Audio tab. Select the INCA88 Audio
Driver as your Playback and Recording device. When you see four INCA88 drivers, INCA88
Audio Driver 1 ~ 4, select proper device for your setting. The INCA88 Audio Driver 1 represents
the Input and Output ports 1 and 2 , Driver 2 represents 3 and 4, and so forth. For example, if
you select the INCA88 Audio Driver 3, your input and output ports are 5 and 6.
<Picture 6-1 > Windows 98SE Multimedia Setup
56
AUDIOTRAK
2. 5.1 channel DVD Player Setup (PowerDVD Setup)
The INCA88 can be used with 5.1 channel DVD software player to provide 5.1 channel
analog surround sound. Since the INCA88 is built for professional audio, it will deliver optimal
sound for your DVD player. You can configure the INCA88 easily to use it for surround sound.
Go to
‘My Computer->Control Panel->Multimedia’ and select ‘INCA88 Audio Driver 5.1 ch’
as your Playback and Record device. You will see the ‘INCA88 Audio Driver-1,2,3,4, and 5.1ch’
on the list. The INCA88 Audio Driver 1 is the input and output ports 1 and 2, Drver 2 is 3 and 4,
and so forth. The INCA88 Audio Driver 5.1 ch is the driver that works with software DVD
players to enable 5.1 channel surround sound.
<Picture 6-2>
By choosing the INCA88 Audio Driver 5.1ch, the outputs become as follows to provide
surround sound.
57
INCA88
OUTPUT
SPEAKER
1
2
Front Left
Front Right
3
4
-
-
5
6
Rear Left
Rear Right
7
8
Center
Sub Woofer
In PowerDVD, select Configuration on the PowerDVD interface. Press the Audio tab, select
“Use WaveOut” and “Dolby Surround.”
<Picture 6-4>
58
AUDIOTRAK
2. ASIO 2.0 – Cubase, Cubasis, Nuendo
The INCA88 supports the ASIO2.0 driver from Steinberg. It works perfectly with Cubase,
Cubasis, and Nuendo. For your hard-disk recording:
- Cubase
After launching Cubase, go to ‘System’ under ‘Audio’ menu. Select ‘ASIO 2 – INCA’ for the
ASIO Device and ‘INCA88 Clock’ for the Audio Clock Source.
<Picture 6-2 > Cubase Setup
59
INCA88
- Cubasis
Settings in Cubasis are the same as Cubase. Select ‘System...’ from ‘Audio’ menu and ‘ASIO 2 –
INCA88’ from ‘ASIO Device.’ Select ‘INCA88 Clock’ as your ‘Audio Clock Source.’
<Picture 6-3 > Cuasis Setup
CAUTION !!! Cubasis included in this package has a limitation on the number of output
ports and other functions. You can upgrade to CubaseVST to use more functions.
60
AUDIOTRAK
- Nuendo
To use the INCA88 with Nuendo, select ‘Device Setup...’ from the ‘Devices’ menu, then ‘VST
Multitrack’ under Devices. Select the Setup tab on the right side. Choose ‘ASIO 2 – INCA88’ as
your ‘ASIO Driver’ and
‘INCA88 Clock’ as your ‘Clock Source.’
<Picture 6-4 > Nuendo setup
61
INCA88
3. CAKEWALK
When you launch Cakewalk for the first time after installing the INCA88, Cakewalk will
automatically start ‘Wave Profiler’ to set a buffer size. In Cakewalk, select ‘Audio...’ from
‘Options.’ Check to see if the ‘INCA88’ is selected as ‘Input Drivers’ and ‘Output Drivers’ under
‘Drivers’ tab. Also check to see that the ‘INCA88 Audio Driver’ is selected as ‘Timing Master’
under the ‘General’ tab.
<Picture 6-5 > Cakewalk Setup 1
62
AUDIOTRAK
<Picture 6-6 > Cakewalk Setup 2
63
INCA88
4. Sound Forge
In Sound Forge, select ‘Options’ from the menu bar.
Select ‘Preferences...’ then ‘Wave’ tab.
Choose ‘INCA88 Audio Driver’ as your Playback and Record device.
Since Sound Forge is 2-
track software (though the INCA88 has 4 stereo input and output ports), you need to choose only
one of ‘INCA88’s Audio Driver’ (such as 1, 2, 3, or 4).
<Picture 6-7 > Sound Forge Setup
64
AUDIOTRAK
5. Wave Lab
In Wave Lab, select ‘Preferences...’ from ‘Options’ in the menu bar. Choose ‘INCA88 Audio
Driver’ as the Playback and Live Input/Recording device in ‘Audio Card.’ Since Wave Lab is 2track software (though the INCA88 has 4 stereo input and output ports), you need to choose only
one of ‘INCA88’s Audio Driver’ (such as 1, 2, 3, or 4).
<Picture 6-8 > Wave Lab Setup
65
INCA88
66


![[English] 1 MB](http://vs1.manualzilla.com/store/data/005724727_1-d0907da86b06d0402fef0dce028404c5-150x150.png)