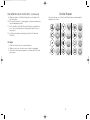
1
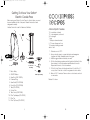
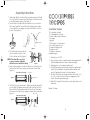
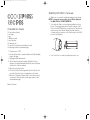
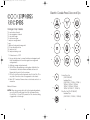
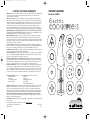
CKM25_COOKIE_IB_4/7/02
5/7/02
15:45
Page 1
LIMITED ONE YEAR WARRANTY
Warranty: This product is warranted by Salton, Inc. to be free from defects in materials or workmanship for
a period of (1) year from the original purchase date. This product warranty covers only the original
consumer purchaser of the product.
Warranty Coverage: This warranty is void if the product has been damaged by accident in shipment,
unreasonable use, misuse, neglect, improper service, commercial use, repairs by unauthorized personnel,
normal wear and tear, improper assembly, installation or maintenance abuse or other causes not arising out
of defects in materials or workmanship. This warranty is effective only if the product is purchased and
operated in the USA, and does not extend to any units which have been used in violation of written
instructions furnished with the product or to units which have been altered or modified or to damage to
products or parts thereof which have had the serial number removed, altered, defaced or rendered illegible.
Implied Warranties: ANY IMPLIED WARRANTIES WHICH THE PURCHASER MAY HAVE ARE LIMITED IN
DURATION TO ONE (1) YEAR FROM THE DATE OF PURCHASE. Some states do not allow limitations on how
long an implied warranty lasts, so the above limitation may not apply to you.
Warranty Performance: During the above one-year warranty period, a product with a defect will be
either repaired or replaced with a reconditioned comparable model (at our option) when the product is
returned to the Repair Center, or the purchase price refunded. The repaired or replacement product will be
in warranty for the balance of the one-year warranty period and an additional one-month period. No charge
will be made for such repair or replacement.
Service and Repair: Should the appliance malfunction, you should first call toll-free 1 (800) 233-9054
between the hours of 9:00 am and 5:00 pm Central Standard Time and ask for CONSUMER SERVICE stating
that you are a consumer with a problem. Please refer to model number CKM25 when you call.
In-Warranty Service (USA): For an appliance covered under the warranty period, no charge is made for
service or postage. Call for return authorization 1 (800) 233-9054.
Out-of Warranty Service: A flat rate charge by model is made for out-of-warranty service. Include $8.00
(U.S.) for return shipping and handling. We will notify you by mail of the amount of the charge for service
and require you to pay in advance for the repair or replacement.
For Products Purchased in the USA, but Used in Canada: You may return the product insured,
packaged with sufficient protection, and postage and insurance prepaid to the USA address listed below.
Please note that all customs duty / brokerage fees, if any, must be paid by you and we will require you to
pay the cost of customs duty / brokerage fees to us in advance of our performing any service.
Risk During Shipment: We cannot assume responsibility for loss or damage during incoming shipment.
For your protection, carefully package the product for shipment and insure it with the carrier. Be sure to
enclose the following items with your appliance: any accessories related to your problem, your full return
address and daytime phone number, a note describing the problem you experienced, a copy of your sales
receipt or other proof of purchase to determine warranty status. C.O.D. shipments cannot be accepted.
To return the appliance, ship to:
ATTN: Repair Center
Salton, Inc.
708 South Missouri Street
Macon, MO 63552
To contact us, please write to, call, or email:
Salton, Inc.
P.O. Box 7366
Columbia, MO 65205-7366
1-800-233-9054
E-mail: [email protected]
Limitation of Remedies: No representative or person is authorized to assume for Salton, Inc. any other
liability in connection with the sale of our products. There shall be no claims for defects or failure of
performance or product failure under any theory of tort, contract or commercial law including, but not
limited to negligence, gross negligence, strict liability, breach of warranty and breach of contract. Repair,
replacement or refund shall be the sole remedy of the purchaser under this warranty, and in no event
shall Salton be liable for any incidental or consequential damages, losses or expenses.
Some states do not allow the exclusion or limitation of incidental or consequential damages, so the above
limitation or exclusion may not apply to you.
Legal Rights: This warranty gives you specific legal rights, and you may also have other rights which vary
from state to state.
For more information on Salton products: visit our website: www.eSalton.com
©2002 Salton, Inc. All rights reserved.
P/N 61092
Made in China
6/02
OWNER’S MANUAL
Model No. CKM25
CKM25_COOKIE_IB_4/7/02
5/7/02
15:45
Page 3
IMPORTANT SAFEGUARDS
WARNING: A risk of fire and electric shock exists in all
electrical appliances and may cause personal injury or
death. Please follow all safety instructions.
When using electrical appliances, basic safety precautions should
always be followed including the following:
1. Read all instructions before using appliance.
2. To protect against risk of electrical shock, do not immerse or
rinse Motor Body, cord or plug in water or any other liquid.
3. This appliance is not for use by children.
4. Close supervision is necessary when any appliance is used
near children.
5. Unplug from outlet when not in use, before putting on or taking
off parts and before cleaning. To disconnect, grasp plug and
pull from electrical outlet. Never pull cord.
6. Avoid contacting moving parts.
7. Do not operate any appliance with a frayed or damaged cord,
or plug or after the appliance malfunctions or has been
dropped or damaged in any manner. Contact Consumer
Service for return authorization, examination, repair or electrical
or mechanical adjustment.
8. Do not let cord hang over edge of table or counter, or touch
hot surfaces including the stove.
9. Do not use outdoors or while standing in a damp area.
10. Keep hands, hair, clothing, as well as utensils away from
moving parts and Discs while processing to prevent the risk
of severe injury to persons, or damage to the Cookie Press.
Handle Discs and Tips carefully when removing, inserting
or cleaning.
11. Be certain Tube and Tube Cover are securely locked in place
before operating appliance. Do not attempt to remove Tube or
Tube Cover while operating.
12. Do not place on or near a hot gas or electric burner, or in a
heated oven.
13. The use of accessory attachments not recommended or sold
by the manufacturer may cause fire, electric shock or injury.
14. Do not use appliance for other than intended use.
Brown Sugar Cookies
1/2 cup butter, softened
1 cup brown sugar
2 eggs
1 teaspoon vanilla extract
1/2 teaspoon maple extract
3 cups all-purpose flour
1/2 teaspoon baking soda
1/4 teaspoon salt
1. Preheat oven to 350˚F.
2. Use an electric mixer to cream the butter until fluffy. Gradually
beat in the brown sugar.
3. Add eggs, vanilla extract, maple extract and mix well.
4. Sift the flour, baking soda and salt together. Add half of the
flour mixture to the butter mixture and beat until smooth.
Repeat with the rest of the flour mixture.
5. Fill the Cookie Press with dough and select Cookie Disc 9 or
any other. Form the cookies on ungreased cookie sheets.
Decorate with colored sugar crystals.
6. Bake 8-10 minutes. Remove from cookie sheets and cool on
wire racks.
Makes 7-8 dozen
SAVE THESE INSTRUCTIONS
FOR HOUSEHOLD USE ONLY
1
22
CKM25_COOKIE_IB_4/7/02
5/7/02
15:45
Page 5
Introduction
Congratulations on your purchase of the Salton® CKM25 Electric
Cookie Press. With the press of a button, this Cookie Press allows
you to make a delicious and appealing variety of cookies. Push
button operation means each and every cookie will be fashioned to
perfection — no guess work involved. Make bakery style cookies in
your own home . . . quickly change from a Cookie Disc to a Filler Tip
and you're ready to add the final flourishes to pastries, cakes and
candies. The Electric Cookie Press comes complete with a wide
selection of interchangeable Cookie Discs and Filler Tips. Get
creative and make today a special occasion to remember!
Gingersnap Cookies
1/2 cup butter, softened
1/4 cup margarine, softened
3/4 cup brown sugar
3/4 cup molasses
1 egg
4 cups all-purpose flour
1/4 teaspoon salt
1-1/2 teaspoons baking soda
2-1/2 teaspoons allspice
Before Using for the First Time
1. Preheat oven to 375˚F.
2. Use an electric mixer to cream the butter and margarine until
fluffy. Gradually beat in the brown sugar.
3. Add molasses and egg and mix well.
4. Sift the flour, baking soda, salt and allspice together. Add half
of the flour mixture to the butter mixture and beat until
smooth. Repeat with the rest of the flour mixture.
5. Fill the Cookie Press with dough and select Cookie Disc 6 or
any other. Form the cookies on ungreased cookie sheets.
6. Bake 10-12 minutes. Remove from cookie sheets and cool on
wire racks.
1. Carefully unpack the Cookie Press and all accessories.
2. After unpacking, wash Cookie Discs, Filler Tips, Filler Tip
Adapter, Tube Cover, Filler Tip Cover, Tube, Cam Disc, Press
Disc and Cam Shaft with warm, soapy water. Rinse and dry
thoroughly.
3. Make sure the unit is unplugged and then wipe all surfaces
with a slightly moistened, soft cloth and dry thoroughly. Never
immerse the Motor Body, plug or cord in water or any other
liquid. Do not use steel wool, scouring pads or abrasive
cleansers as they will damage the finish.
4. Thoroughly dry all parts so that no water enters the
Motor Body.
Polarized Plug
This appliance has a polarized plug (one blade is wider than the
other). As a safety feature to reduce the risk of electrical shock, this
plug is intended to fit in a polarized outlet only one way. If the plug
does not fit fully into the outlet, reverse the plug. If it still does not
fit, contact a qualified electrician. Do not attempt to defeat this
safety feature.
Makes 8-9 dozen
21
2
CKM25_COOKIE_IB_4/7/02
5/7/02
15:45
Page 7
Getting To Know Your Salton®
Electric Cookie Press
Before using your Electric Cookie Press for the first time, you must
become familiar with all of the parts. Read all instructions and
safeguards carefully.
PRODUCT MAY VARY SLIGHTLY FROM ILLUSTRATIONS
Almond Spritz Cookies
2.
1/2 cup butter, softened
1/2 cup margarine, softened
3/4 cup sugar
1 egg
1 teaspoon almond extract
2-1/4 cups all-purpose flour
1/2 teaspoon baking powder
dash of salt
5.
7.
4.
8.
1.
10.
6.
9.
3.
1.
2.
3.
4.
5.
6.
7.
8.
9.
10.
11.
12.
Cookie Disc
Assembly
Motor Body
ON/OFF Button
Cam Disc (P/N 70701A)
Polarized Plug
Cam Shaft (P/N 70702A)
Press Disc (P/N 70703A)
Tube (P/N 70704)
Cookie Disc
Tube Cover (P/N 70706)
Filler Tip Adapter (P/N 70705)
Filler Tip
Filler Tip Cover (P/N 70707)
3
11.
12.
Filler Tip Assembly
1. Preheat oven to 375˚F.
2. Use an electric mixer to cream the butter and margarine
together until fluffy. Gradually beat in the sugar.
3. Add the egg and almond extract; mix well.
4. Sift the flour, baking powder and salt together. Add half of the
flour mixture to the butter mixture and blend until smooth.
Repeat with the rest of the flour mixture.
5. Fill the Cookie Press with dough and select Cookie Disc 3, 7,
or any other. Form the cookies on ungreased cookie sheets.
6. Bake for 10-12 minutes. Remove from cookie sheets and cool
on wire racks.
Makes 4-5 dozen
20
CKM25_COOKIE_IB_4/7/02
5/7/02
15:45
Page 9
Electric Cookie Press Discs and Tips
1.
5.
9.
2.
6.
10.
3.
7.
11.
4.
8.
12.
Orange Crisp Cookies
1/2 cup butter, softened
1/2 cup margarine, softened
1/2 cup white sugar
1/2 cup brown sugar
1 teaspoon orange extract
1 egg
1 teaspoon finely grated orange rind
21/2 cups all-purpose flour
1/4 teaspoon salt
1/4 teaspoon baking soda
1. Preheat oven to 375˚F.
2. Use an electric mixer to cream the butter and margarine until
fluffy. Gradually beat in the white sugar, brown sugar and
orange extract.
3. Add egg, orange rind and mix well.
4. Sift the flour, salt and baking soda together. Add half of the
flour mixture to the butter mixture and beat until smooth.
Repeat with the rest of the flour mixture.
5. Fill the Cookie Press with dough and select Cookie Disc 10 or
any other. Form the cookies on ungreased cookie sheets.
6. Bake 10-12 minutes. Remove from cookie sheets and cool on
wire racks.
Makes 8-9 dozen
1.
5.
NOTE: When using a recipe that calls for finely grated ingredients,
use a Cookie Disc with large holes. We recommend using
Cookie Discs 3, 4, and 10 to prevent the Disc from becoming
clogged with cookie dough.
Cookie Discs Set
(P/N 70708-SET)
Individual Discs:
(P/N 70708-1, 70708-2, 70708-3,
70708-4, 70708-5, 70708-6,
70708-7, 70708-8, 70708-9,
70708-10, 70708-11, 70708-12)
Filler Tips Set (P/N 70709-SET)
Individual Tips:
(P/N 70709-1, 70709-5, 70709-9)
9.
19
4
CKM25_COOKIE_IB_4/7/02
5/7/02
15:45
Page 11
Assembly Instructions
1. Attach Cam Shaft to the Press Disc by inserting stem of the Shaft
into the Press Disc’s center hole. Press firmly. You will hear a click
as the Shaft snaps in place. (See Figure 1.)
2. Line the Tabs on the Motor Body up with the slots on the Cam
Disc. Insert Cam Disc into the Motor Body. Using the two Grips
on the Cam Disc, turn slightly clockwise until the Disc clicks into
position. (See Figure 2.)
Slots
Grips
Cam Disc
Tabs
Figure 1
3. Fit the Shaft all the way inside the
unit, the outside contours of the
2 Discs will line up. (See Figure 3.)
LOC
K
Figure 2
NOTE: Turn Cam Disc one click
counter-clockwise if Shaft is
Figure 3
difficult to insert into Motor Body.
4. Select a Disc and place it inside the Tube Cover. Then place the
Tube into the Tube Cover, turning clockwise until locked. (See
Figure 4.)
Tube with Disc Assembly
Cookie Disc
Tube Cover
Figure 4
5. If a Filler Tip is to be used, refer to Figure 5 and fit the desired Tip
over the Filler Tip Adapter and secure it with the Filler Tip Cover.
Place the Filler Tip Assembly inside the Tube Cover. Then place
the Tube into the Tube Cover, turning clockwise until locked. (See
Figure 5.)
Tube Cover
Snowflake Cookies
1/2 cup butter, softened
1/2 cup margarine, softened
3 ounces cream cheese, softened
1 cup sugar
1 egg yolk
1-1/2 teaspoon coconut extract
2-1/2 cups all-purpose flour
1/2 teaspoon baking soda
1/2 teaspoon salt
1/4 teaspoon cinnamon
powdered sugar
1. Preheat oven to 375˚F.
2. Use an electric mixer to cream the butter and margarine until
fluffy. Gradually beat in the cream cheese and sugar.
3. Add egg yolk, coconut extract and mix well.
4. Sift the flour, baking soda, salt and cinnamon together. Add
half of the flour mixture to the butter mixture and beat until
smooth. Repeat with the rest of the flour mixture.
5. Fill the Cookie Press with dough and select Cookie Disc 2, 6,
8, or 10, or other. Form the cookies on ungreased cookie
sheets. Dust with powdered sugar.
6. Bake 10-12 minutes. Remove from cookie sheets and cool on
wire racks.
Makes 7-8 dozen
Tube with Tip Assembly
Figure 5
Tip Adapter
5
Filler
Tip
Filler
Tip Cover
18
CKM25_COOKIE_IB_4/7/02
5/7/02
15:45
Page 13
Assembly Instructions (Continued)
Chocolate Kiss Cookies
1/2 cup butter, softened
1 cup sugar
1 egg
2 tablespoons milk
2 cups cake flour
1/4 teaspoon salt
1/2 cup milk chocolate chips, melted and cooled
colored sugar crystals or powdered sugar
1. Preheat oven to 375˚F.
2. Use an electric mixer to cream the butter until fluffy. Gradually
beat in the sugar.
3. Add egg and milk and mix well.
4. Sift the cake flour and salt together. Add half of the flour
mixture to the butter mixture and blend until smooth. Repeat
with the rest of the flour mixture.
5. Mix in the cooled chocolate.
6. Fill the Cookie Press with dough and select Cookie Disc 9 or
any other. Form the cookies on ungreased cookie sheets.
7. Bake for 8-10 minutes. Remove from cookie sheets and cool
on wire racks. Decorate with colored sugar crystals or dust
with powdered sugar.
6. With a spoon or spatula, load freshly prepared cookie dough.
NOTE: To ensure proper operation, do not fill the Tube past
the MAX Fill Line. DO NOT OVERFILL!
7. Look inside the Tube to see the ridges extending from top to
bottom. These ridges align with the outside contours of the 2
Discs. In the UNLOCK position, the arrow on the Tube lines up
with the arrow on the Handle. Grasp Tube firmly and turn
clockwise until the top arrow on the Tube lines up in the LOCK
position. (See Figure 6.)
8. Your Cookie Press is now fully assembled and ready for use.
Makes 5-6 dozen
17
6
CKM25_COOKIE_IB_4/7/02
5/7/02
15:45
Page 15
Instructions for Making Cookies
The proper consistency of cookie dough is very important. If the
dough is too stiff, it won't release from the Cookie Press. If the
dough is too soft or sticky, chill in the refrigerator for 15 minutes.
For best results, use the recipes in this booklet until you get a feel
for the proper consistency of the dough. We do not recommend
using store-bought refrigerated cookie doughs.
1. Plug the fully assembled and filled Cookie Press into a standard
120V AC outlet.
2. Stand the Cookie Press upright and press against the surface
of the cookie sheet. Refer to Figure 7. The Cookie Press has
been specially designed for thumb operation. Thumb operation
provides better balance for placing the cookie shapes on the
cookie sheets. (See Figure 8.)
3. When the Tube is filled with cookie dough and the ON/OFF
Button is pressed, the Press Disc pushes downward, forcing
the dough through the Disc or Tip to form an attractive cookie
or decoration.
4. Holding the Cookie Press in position against the cookie sheet,
press and hold the ON/OFF Button until the air pockets have
been removed and the dough starts to emerge from the
openings in the Cookie Disc.
5. Press a cookie for 2 seconds and note the result.
NOTE: The time to press each cookie will be based on the
desired thickness and shape of your cookie and the dough
you are using.
6. Release the ON/OFF Button and quickly step to the next
position on the cookie sheet. Refer to Figure 8.
NOTE: It may be necessary to experiment with varying times and
pressures until the desired cookie thickness is achieved.
Lemon Drop Cookies
1/2 cup butter, softened
1/2 cup margarine, softened
1/2 cup white sugar
1/2 cup brown sugar
1 egg
1 tablespoon lemon juice
1 teaspoon finely grated lemon rind
2-1/2 cups all-purpose flour
1/4 teaspoon baking soda
1 teaspoon salt
powdered sugar
1. Preheat oven to 375˚F.
2. Use an electric mixer to cream the butter and margarine
together until fluffy. Gradually beat in the white and
brown sugar.
3. Add egg, lemon juice and lemon rind, mix well.
4. Sift the flour, baking soda and salt together. Add half of the
flour mixture to the butter mixture and beat until smooth.
Repeat with the rest of the flour mixture.
5. Fill the Cookie Press with dough and select Cookie Disc 4 or
any other. Form the cookies on ungreased cookie sheets.
6. Bake for 10-12 minutes. Remove from cookie sheets and cool
on wire racks. Dust with powdered sugar.
Makes 6-7 dozen
NOTE: When using a recipe that calls for finely grated ingredients,
use a Cookie Disc with large holes. We recommend using
Cookie Discs 3, 4, and 10 to prevent the Disc from becoming
clogged with cookie dough.
Figure 7
Figure 8
7
16
CKM25_COOKIE_IB_4/7/02
5/7/02
15:45
Page 17
Refilling The Cookie Press
Holiday Butter Cookies
1/2 cup butter, softened
1/2 cup margarine, softened
3/4 cup sugar
1 egg
food coloring
2-1/4 cups all-purpose flour
1/4 teaspoon baking powder
1/8 teaspoon salt
1 teaspoon almond extract
colored sugar crystals
1. Preheat oven to 375˚F.
2. Use an electric mixer to cream the butter and margarine
together until fluffy. Gradually beat in the sugar.
3. Add the egg and a few drops of food coloring (red for
Valentines Day, green for Christmas Trees) and mix well.
4. Sift the flour, baking powder and salt together. Add half of the
flour mixture to the butter mixture and blend until smooth.
Repeat with the rest of the flour mixture.
5. Fill the Cookie Press with dough and select any Cookie Disc.
Select Cookie Disc 5 for Valentines Day, or Disc 1 for
Christmas Trees, or any other. Form the cookies on ungreased
cookie sheets. Decorate with colored sugar crystals.
6. Bake for 10-12 minutes. Remove from cookie sheets and cool
on wire racks.
Makes 6-7 dozen
1. Unplug the Cookie Press.
2. Hold the Tube pointing down with one hand and turn the Tube
Cover counter-clockwise. This will unlock the Tube Cover and
the Cookie Disc or Tip. Remove the Disc or Tip Assembly and
set all parts aside.
3. Hold the Handle of the Motor Body with one hand. With the
other hand turn the Tube counter-clockwise until the arrow
from the Motor Body lines up with the arrow on the Tube, the
unlock position.
4. Remove the Tube from the Motor Body. Pull the Cam Shaft
with Press Disc out of the Motor Body. Rinse and dry
thoroughly.
CAUTION: Avoid any contact of any liquid with the inside of
Motor Body.
5. Because of dough build-up, sometimes it may be necessary to
clean the Cam Disc before refilling the Cooking Press. If so,
first remove the Cam Disc from the Motor Body. Using the two
Grips on the Cam Disc, firmly turn the Disc counter-clockwise
until the Disc lifts out easily.
6. Clean the Cam Disc with soapy water, rinse and dry thoroughly.
NOTE: Clean and thoroughly dry all parts. Avoid any contact
with any liquid and the inside of the Motor Body.
7. Assemble the Cam Disc, Cam Shaft, and Press Disc onto
Cookie Press Motor Body, following the Assembly Instructions.
8. Reattach the Cookie Disc or Tip Assembly and securely lock
into place with the Tube Cover.
9. Fill the Tube with freshly prepared cookie dough up to the MAX
Fill Line.
NOTE: To ensure proper operation, do not fill the Tube past
the MAX Fill Line. DO NOT OVERFILL!
10. Attach the Tube to the Motor Body. Align the arrow on the
Tube with the arrow on the Handle. Grasp the Tube firmly and
turn clockwise until the top arrow on the Tube lines up in the
LOCK position. (See Figure 6.)
11. Your Cookie Press is now fully assembled and ready for use.
15
8
CKM25_COOKIE_IB_4/7/02
5/7/02
15:45
Page 19
Hints
• We do not recommend using store-bought refrigerated
cookie doughs.
• Avoid greased or non-stick cookie sheets, as they will not hold
the shape of the cookie as well.
• When a recipe calls for butter and margarine, both must be
used. Do not substitute one with the other.
• Dough should be pliable enough to easily emerge from the
Disc and stick on the cookie sheet.
• If dough is too soft or sticky, refrigerate for 15 minutes, or beat
in a small amount of flour. If the dough is too stiff, mix in the
yolk of one egg.
• Once dough has been loaded, use it immediately.
• Cookie dough that has been refrigerated overnight will be too
stiff and will not work properly.
• Some doughs and Discs work better when you move faster,
and some when you move slower. After some practice, with
rhythm and timing, the shapes will improve.
Create Your Own Cookie Recipes!
Use your imagination to create fabulous,
professional-looking decorated and flavored
cookies. Its simple! Use the Basic Butter Cookie
Recipe below and where you see this symbol
( ❃ ) choose your own colors, flavors and
toppings. The possibilities are endless.
Basic Butter Cookie
• Use Discs with cookie dough for the preparation of cookies.
• Use Tips with soft dough for decorating canapes, candies,
cookies, desserts, fill pastries, etc.
• If dough is not moist enough to hold the decorations, lightly
brush a little water, milk, honey or a little egg white where
decorations are to be placed.
• The amount of cookies per batch will vary with each recipe, the
Cookie Disc used, and the thickness of the cookies.
• When using a recipe that calls for finely grated ingredients, use
a Cookie Disc with large holes. We recommend using Cookie
Discs 3, 4, 5, and 10 to prevent the Disc from becoming
clogged with cookie dough.
❃
❃
❃
1/2 cup butter, softened
1/2 cup margarine, softened
3/4 cup sugar
1 egg
food coloring (your choice)
2-1/4 cups all-purpose flour
1/4 teaspoon baking powder
1/8 teaspoon salt
1 teaspoon extract (your choice)
cookie topping (your choice)
Suggestions for Colors, Flavor Extracts & Toppings
Yellow
Almond, Pineapple, Banana Sugar Crystals
Red
Strawberry, Cherry
Red Hots
Blue
Coconut, Vanilla, Berry
Coconut
Orange
Orange, Vanilla, Almond
Chopped Nuts
Green
Peppermint, Mint, Lime
Dried Fruits
Mixing Colors: Red + Blue = Purple, Yellow + Blue = Green,
Red + Yellow = Orange
9
14
CKM25_COOKIE_IB_4/7/02
5/7/02
15:45
Page 21
Cookie Shapes
User Maintenance Instructions (Continued)
9. Wipe the exterior of the Motor Body with a soft, damp cloth.
Dry thoroughly.
10. Do not use steel wool, scouring pads, or abrasive cleansers as
they will damage the finish.
11. As Cookie Discs and Filler Tips get older, they may darken in
color. This is normal and in no way interferes with the use of
the product.
12. A stiff brush will aid in cleaning the inside of the Tube and
Filler Tips.
Choose from any one of the Cookie Discs below to make beautiful
bakery style cookies.
1
5
9
2
6
10
3
7
11
4
8
12
Storage
1. Clean the Cookie Press as instructed above.
2. When the unit is not in use, be sure to leave it unplugged.
3. Store the Cookie Press and parts in its original box in a clean,
dry location.
13
10
CKM25_COOKIE_IB_4/7/02
5/7/02
15:45
Page 23
Filler Tip Shapes
Choose from any one of the Filler Tips below to decorate and add
textures, colors, or flavors to cookies, cakes and candies.
Basic Round Tip (Tip #1)
Use this Tip to fill cream puffs or jelly doughnuts.
Crown Tip (Tip #5)
The bottom edge is flat and the top is ridged. Use this Tip to
decorate fruits, vegetables or crackers, prepare beautiful canapes
with delicious cream cheese spreads.
Modified Star Tip (Tip #9)
Use to create exaggerated swirls and ridges. For a gourmet
dessert, fill your favorite snifter with swirls of luscious
chocolate mousse.
1.
5.
9.
• Have fun and experiment with different motions while
decorating cookies. A back and forth motion creates a “ribbon”
effect. Create soft swirls by using a circular motion.
11
User Maintenance Instructions
This Salton® CKM25 Electric Cookie Press requires little
maintenance. It contains no user-serviceable parts. Any servicing
requiring disassembly other than cleaning must be performed by a
qualified appliance repair technician.
CAUTION: Do not immerse Motor Body, cord, or plug in
water or any other liquid.
Cleaning
To keep your Cookie Press operating properly, we recommend
cleaning after each recipe.
1. Unplug the Cookie Press.
2. Hold the Tube pointing down with one hand and turn the Tube
Cover counter-clockwise. This will unlock the Tube Cover and
the Cookie Disc or Tip. Remove the Disc or Tip Assembly and
set all parts aside.
3. Hold the Handle of the Motor Body with one hand. With the
other hand turn the Tube counter-clockwise until the arrow
from the Motor Body lines up with the arrow on the Tube, the
unlock position.
4. Remove the Tube from the Motor Body. Pull the Cam Shaft
with Press Disc out of the Motor Body. Rinse and dry
thoroughly.
CAUTION: Avoid any contact of any liquid with the inside of
Motor Body.
5. Remove the Cam Disc from the Motor Body. Using the two
Grips on the Cam Disc, firmly turn the Disc counter-clockwise
until the Disc lifts out easily.
6. Clean the Cam Disc with soapy water, rinse and dry thoroughly.
7. Wash the Filler Tip Adapter, Tube Cover, Filler Tip Cover, Tube,
Cam Disc, Press Disc, Cam Shaft, Cookie Discs and Filler Tips
immediately after each use in warm soapy water. Rinse and dry
thoroughly. Do not wash in dishwasher.
8. Cookie Discs and Filler Tips are made of Stainless Steel and
should be cleaned with a soft cloth or sponge. Dry immediately
after cleaning to avoid spotting. Do not put Discs or Tips into
dishwasher, as they will discolor.
12
CKM25_COOKIE_IB_4/7/02
5/7/02
15:45
Page 21
Cookie Shapes
User Maintenance Instructions (Continued)
9. Wipe the exterior of the Motor Body with a soft, damp cloth.
Dry thoroughly.
10. Do not use steel wool, scouring pads, or abrasive cleansers as
they will damage the finish.
11. As Cookie Discs and Filler Tips get older, they may darken in
color. This is normal and in no way interferes with the use of
the product.
12. A stiff brush will aid in cleaning the inside of the Tube and
Filler Tips.
Choose from any one of the Cookie Discs below to make beautiful
bakery style cookies.
1
5
9
2
6
10
3
7
11
4
8
12
Storage
1. Clean the Cookie Press as instructed above.
2. When the unit is not in use, be sure to leave it unplugged.
3. Store the Cookie Press and parts in its original box in a clean,
dry location.
13
10
CKM25_COOKIE_IB_4/7/02
5/7/02
15:45
Page 19
Hints
• We do not recommend using store-bought refrigerated
cookie doughs.
• Avoid greased or non-stick cookie sheets, as they will not hold
the shape of the cookie as well.
• When a recipe calls for butter and margarine, both must be
used. Do not substitute one with the other.
• Dough should be pliable enough to easily emerge from the
Disc and stick on the cookie sheet.
• If dough is too soft or sticky, refrigerate for 15 minutes, or beat
in a small amount of flour. If the dough is too stiff, mix in the
yolk of one egg.
• Once dough has been loaded, use it immediately.
• Cookie dough that has been refrigerated overnight will be too
stiff and will not work properly.
• Some doughs and Discs work better when you move faster,
and some when you move slower. After some practice, with
rhythm and timing, the shapes will improve.
Create Your Own Cookie Recipes!
Use your imagination to create fabulous,
professional-looking decorated and flavored
cookies. Its simple! Use the Basic Butter Cookie
Recipe below and where you see this symbol
( ❃ ) choose your own colors, flavors and
toppings. The possibilities are endless.
Basic Butter Cookie
• Use Discs with cookie dough for the preparation of cookies.
• Use Tips with soft dough for decorating canapes, candies,
cookies, desserts, fill pastries, etc.
• If dough is not moist enough to hold the decorations, lightly
brush a little water, milk, honey or a little egg white where
decorations are to be placed.
• The amount of cookies per batch will vary with each recipe, the
Cookie Disc used, and the thickness of the cookies.
• When using a recipe that calls for finely grated ingredients, use
a Cookie Disc with large holes. We recommend using Cookie
Discs 3, 4, 5, and 10 to prevent the Disc from becoming
clogged with cookie dough.
❃
❃
❃
1/2 cup butter, softened
1/2 cup margarine, softened
3/4 cup sugar
1 egg
food coloring (your choice)
2-1/4 cups all-purpose flour
1/4 teaspoon baking powder
1/8 teaspoon salt
1 teaspoon extract (your choice)
cookie topping (your choice)
Suggestions for Colors, Flavor Extracts & Toppings
Yellow
Almond, Pineapple, Banana Sugar Crystals
Red
Strawberry, Cherry
Red Hots
Blue
Coconut, Vanilla, Berry
Coconut
Orange
Orange, Vanilla, Almond
Chopped Nuts
Green
Peppermint, Mint, Lime
Dried Fruits
Mixing Colors: Red + Blue = Purple, Yellow + Blue = Green,
Red + Yellow = Orange
9
14
CKM25_COOKIE_IB_4/7/02
5/7/02
15:45
Page 17
Refilling The Cookie Press
Holiday Butter Cookies
1/2 cup butter, softened
1/2 cup margarine, softened
3/4 cup sugar
1 egg
food coloring
2-1/4 cups all-purpose flour
1/4 teaspoon baking powder
1/8 teaspoon salt
1 teaspoon almond extract
colored sugar crystals
1. Preheat oven to 375˚F.
2. Use an electric mixer to cream the butter and margarine
together until fluffy. Gradually beat in the sugar.
3. Add the egg and a few drops of food coloring (red for
Valentines Day, green for Christmas Trees) and mix well.
4. Sift the flour, baking powder and salt together. Add half of the
flour mixture to the butter mixture and blend until smooth.
Repeat with the rest of the flour mixture.
5. Fill the Cookie Press with dough and select any Cookie Disc.
Select Cookie Disc 5 for Valentines Day, or Disc 1 for
Christmas Trees, or any other. Form the cookies on ungreased
cookie sheets. Decorate with colored sugar crystals.
6. Bake for 10-12 minutes. Remove from cookie sheets and cool
on wire racks.
Makes 6-7 dozen
1. Unplug the Cookie Press.
2. Hold the Tube pointing down with one hand and turn the Tube
Cover counter-clockwise. This will unlock the Tube Cover and
the Cookie Disc or Tip. Remove the Disc or Tip Assembly and
set all parts aside.
3. Hold the Handle of the Motor Body with one hand. With the
other hand turn the Tube counter-clockwise until the arrow
from the Motor Body lines up with the arrow on the Tube, the
unlock position.
4. Remove the Tube from the Motor Body. Pull the Cam Shaft
with Press Disc out of the Motor Body. Rinse and dry
thoroughly.
CAUTION: Avoid any contact of any liquid with the inside of
Motor Body.
5. Because of dough build-up, sometimes it may be necessary to
clean the Cam Disc before refilling the Cooking Press. If so,
first remove the Cam Disc from the Motor Body. Using the two
Grips on the Cam Disc, firmly turn the Disc counter-clockwise
until the Disc lifts out easily.
6. Clean the Cam Disc with soapy water, rinse and dry thoroughly.
NOTE: Clean and thoroughly dry all parts. Avoid any contact
with any liquid and the inside of the Motor Body.
7. Assemble the Cam Disc, Cam Shaft, and Press Disc onto
Cookie Press Motor Body, following the Assembly Instructions.
8. Reattach the Cookie Disc or Tip Assembly and securely lock
into place with the Tube Cover.
9. Fill the Tube with freshly prepared cookie dough up to the MAX
Fill Line.
NOTE: To ensure proper operation, do not fill the Tube past
the MAX Fill Line. DO NOT OVERFILL!
10. Attach the Tube to the Motor Body. Align the arrow on the
Tube with the arrow on the Handle. Grasp the Tube firmly and
turn clockwise until the top arrow on the Tube lines up in the
LOCK position. (See Figure 6.)
11. Your Cookie Press is now fully assembled and ready for use.
15
8
CKM25_COOKIE_IB_4/7/02
5/7/02
15:45
Page 15
Instructions for Making Cookies
The proper consistency of cookie dough is very important. If the
dough is too stiff, it won't release from the Cookie Press. If the
dough is too soft or sticky, chill in the refrigerator for 15 minutes.
For best results, use the recipes in this booklet until you get a feel
for the proper consistency of the dough. We do not recommend
using store-bought refrigerated cookie doughs.
1. Plug the fully assembled and filled Cookie Press into a standard
120V AC outlet.
2. Stand the Cookie Press upright and press against the surface
of the cookie sheet. Refer to Figure 7. The Cookie Press has
been specially designed for thumb operation. Thumb operation
provides better balance for placing the cookie shapes on the
cookie sheets. (See Figure 8.)
3. When the Tube is filled with cookie dough and the ON/OFF
Button is pressed, the Press Disc pushes downward, forcing
the dough through the Disc or Tip to form an attractive cookie
or decoration.
4. Holding the Cookie Press in position against the cookie sheet,
press and hold the ON/OFF Button until the air pockets have
been removed and the dough starts to emerge from the
openings in the Cookie Disc.
5. Press a cookie for 2 seconds and note the result.
NOTE: The time to press each cookie will be based on the
desired thickness and shape of your cookie and the dough
you are using.
6. Release the ON/OFF Button and quickly step to the next
position on the cookie sheet. Refer to Figure 8.
NOTE: It may be necessary to experiment with varying times and
pressures until the desired cookie thickness is achieved.
Lemon Drop Cookies
1/2 cup butter, softened
1/2 cup margarine, softened
1/2 cup white sugar
1/2 cup brown sugar
1 egg
1 tablespoon lemon juice
1 teaspoon finely grated lemon rind
2-1/2 cups all-purpose flour
1/4 teaspoon baking soda
1 teaspoon salt
powdered sugar
1. Preheat oven to 375˚F.
2. Use an electric mixer to cream the butter and margarine
together until fluffy. Gradually beat in the white and
brown sugar.
3. Add egg, lemon juice and lemon rind, mix well.
4. Sift the flour, baking soda and salt together. Add half of the
flour mixture to the butter mixture and beat until smooth.
Repeat with the rest of the flour mixture.
5. Fill the Cookie Press with dough and select Cookie Disc 4 or
any other. Form the cookies on ungreased cookie sheets.
6. Bake for 10-12 minutes. Remove from cookie sheets and cool
on wire racks. Dust with powdered sugar.
Makes 6-7 dozen
NOTE: When using a recipe that calls for finely grated ingredients,
use a Cookie Disc with large holes. We recommend using
Cookie Discs 3, 4, and 10 to prevent the Disc from becoming
clogged with cookie dough.
Figure 7
Figure 8
7
16
CKM25_COOKIE_IB_4/7/02
5/7/02
15:45
Page 13
Assembly Instructions (Continued)
Chocolate Kiss Cookies
1/2 cup butter, softened
1 cup sugar
1 egg
2 tablespoons milk
2 cups cake flour
1/4 teaspoon salt
1/2 cup milk chocolate chips, melted and cooled
colored sugar crystals or powdered sugar
1. Preheat oven to 375˚F.
2. Use an electric mixer to cream the butter until fluffy. Gradually
beat in the sugar.
3. Add egg and milk and mix well.
4. Sift the cake flour and salt together. Add half of the flour
mixture to the butter mixture and blend until smooth. Repeat
with the rest of the flour mixture.
5. Mix in the cooled chocolate.
6. Fill the Cookie Press with dough and select Cookie Disc 9 or
any other. Form the cookies on ungreased cookie sheets.
7. Bake for 8-10 minutes. Remove from cookie sheets and cool
on wire racks. Decorate with colored sugar crystals or dust
with powdered sugar.
6. With a spoon or spatula, load freshly prepared cookie dough.
NOTE: To ensure proper operation, do not fill the Tube past
the MAX Fill Line. DO NOT OVERFILL!
7. Look inside the Tube to see the ridges extending from top to
bottom. These ridges align with the outside contours of the 2
Discs. In the UNLOCK position, the arrow on the Tube lines up
with the arrow on the Handle. Grasp Tube firmly and turn
clockwise until the top arrow on the Tube lines up in the LOCK
position. (See Figure 6.)
8. Your Cookie Press is now fully assembled and ready for use.
Makes 5-6 dozen
17
6
CKM25_COOKIE_IB_4/7/02
5/7/02
15:45
Page 11
Assembly Instructions
1. Attach Cam Shaft to the Press Disc by inserting stem of the Shaft
into the Press Disc’s center hole. Press firmly. You will hear a click
as the Shaft snaps in place. (See Figure 1.)
2. Line the Tabs on the Motor Body up with the slots on the Cam
Disc. Insert Cam Disc into the Motor Body. Using the two Grips
on the Cam Disc, turn slightly clockwise until the Disc clicks into
position. (See Figure 2.)
Slots
Grips
Cam Disc
Tabs
Figure 1
3. Fit the Shaft all the way inside the
unit, the outside contours of the
2 Discs will line up. (See Figure 3.)
LOC
K
Figure 2
NOTE: Turn Cam Disc one click
counter-clockwise if Shaft is
Figure 3
difficult to insert into Motor Body.
4. Select a Disc and place it inside the Tube Cover. Then place the
Tube into the Tube Cover, turning clockwise until locked. (See
Figure 4.)
Tube with Disc Assembly
Cookie Disc
Tube Cover
Figure 4
5. If a Filler Tip is to be used, refer to Figure 5 and fit the desired Tip
over the Filler Tip Adapter and secure it with the Filler Tip Cover.
Place the Filler Tip Assembly inside the Tube Cover. Then place
the Tube into the Tube Cover, turning clockwise until locked. (See
Figure 5.)
Tube Cover
Snowflake Cookies
1/2 cup butter, softened
1/2 cup margarine, softened
3 ounces cream cheese, softened
1 cup sugar
1 egg yolk
1-1/2 teaspoon coconut extract
2-1/2 cups all-purpose flour
1/2 teaspoon baking soda
1/2 teaspoon salt
1/4 teaspoon cinnamon
powdered sugar
1. Preheat oven to 375˚F.
2. Use an electric mixer to cream the butter and margarine until
fluffy. Gradually beat in the cream cheese and sugar.
3. Add egg yolk, coconut extract and mix well.
4. Sift the flour, baking soda, salt and cinnamon together. Add
half of the flour mixture to the butter mixture and beat until
smooth. Repeat with the rest of the flour mixture.
5. Fill the Cookie Press with dough and select Cookie Disc 2, 6,
8, or 10, or other. Form the cookies on ungreased cookie
sheets. Dust with powdered sugar.
6. Bake 10-12 minutes. Remove from cookie sheets and cool on
wire racks.
Makes 7-8 dozen
Tube with Tip Assembly
Figure 5
Tip Adapter
5
Filler
Tip
Filler
Tip Cover
18
CKM25_COOKIE_IB_4/7/02
5/7/02
15:45
Page 9
Electric Cookie Press Discs and Tips
1.
5.
9.
2.
6.
10.
3.
7.
11.
4.
8.
12.
Orange Crisp Cookies
1/2 cup butter, softened
1/2 cup margarine, softened
1/2 cup white sugar
1/2 cup brown sugar
1 teaspoon orange extract
1 egg
1 teaspoon finely grated orange rind
21/2 cups all-purpose flour
1/4 teaspoon salt
1/4 teaspoon baking soda
1. Preheat oven to 375˚F.
2. Use an electric mixer to cream the butter and margarine until
fluffy. Gradually beat in the white sugar, brown sugar and
orange extract.
3. Add egg, orange rind and mix well.
4. Sift the flour, salt and baking soda together. Add half of the
flour mixture to the butter mixture and beat until smooth.
Repeat with the rest of the flour mixture.
5. Fill the Cookie Press with dough and select Cookie Disc 10 or
any other. Form the cookies on ungreased cookie sheets.
6. Bake 10-12 minutes. Remove from cookie sheets and cool on
wire racks.
Makes 8-9 dozen
1.
5.
NOTE: When using a recipe that calls for finely grated ingredients,
use a Cookie Disc with large holes. We recommend using
Cookie Discs 3, 4, and 10 to prevent the Disc from becoming
clogged with cookie dough.
Cookie Discs Set
(P/N 70708-SET)
Individual Discs:
(P/N 70708-1, 70708-2, 70708-3,
70708-4, 70708-5, 70708-6,
70708-7, 70708-8, 70708-9,
70708-10, 70708-11, 70708-12)
Filler Tips Set (P/N 70709-SET)
Individual Tips:
(P/N 70709-1, 70709-5, 70709-9)
9.
19
4
CKM25_COOKIE_IB_4/7/02
5/7/02
15:45
Page 7
Getting To Know Your Salton®
Electric Cookie Press
Before using your Electric Cookie Press for the first time, you must
become familiar with all of the parts. Read all instructions and
safeguards carefully.
PRODUCT MAY VARY SLIGHTLY FROM ILLUSTRATIONS
Almond Spritz Cookies
2.
1/2 cup butter, softened
1/2 cup margarine, softened
3/4 cup sugar
1 egg
1 teaspoon almond extract
2-1/4 cups all-purpose flour
1/2 teaspoon baking powder
dash of salt
5.
7.
4.
8.
1.
10.
6.
9.
3.
1.
2.
3.
4.
5.
6.
7.
8.
9.
10.
11.
12.
Cookie Disc
Assembly
Motor Body
ON/OFF Button
Cam Disc (P/N 70701A)
Polarized Plug
Cam Shaft (P/N 70702A)
Press Disc (P/N 70703A)
Tube (P/N 70704)
Cookie Disc
Tube Cover (P/N 70706)
Filler Tip Adapter (P/N 70705)
Filler Tip
Filler Tip Cover (P/N 70707)
3
11.
12.
Filler Tip Assembly
1. Preheat oven to 375˚F.
2. Use an electric mixer to cream the butter and margarine
together until fluffy. Gradually beat in the sugar.
3. Add the egg and almond extract; mix well.
4. Sift the flour, baking powder and salt together. Add half of the
flour mixture to the butter mixture and blend until smooth.
Repeat with the rest of the flour mixture.
5. Fill the Cookie Press with dough and select Cookie Disc 3, 7,
or any other. Form the cookies on ungreased cookie sheets.
6. Bake for 10-12 minutes. Remove from cookie sheets and cool
on wire racks.
Makes 4-5 dozen
20
CKM25_COOKIE_IB_4/7/02
5/7/02
15:45
Page 5
Introduction
Congratulations on your purchase of the Salton® CKM25 Electric
Cookie Press. With the press of a button, this Cookie Press allows
you to make a delicious and appealing variety of cookies. Push
button operation means each and every cookie will be fashioned to
perfection — no guess work involved. Make bakery style cookies in
your own home . . . quickly change from a Cookie Disc to a Filler Tip
and you're ready to add the final flourishes to pastries, cakes and
candies. The Electric Cookie Press comes complete with a wide
selection of interchangeable Cookie Discs and Filler Tips. Get
creative and make today a special occasion to remember!
Gingersnap Cookies
1/2 cup butter, softened
1/4 cup margarine, softened
3/4 cup brown sugar
3/4 cup molasses
1 egg
4 cups all-purpose flour
1/4 teaspoon salt
1-1/2 teaspoons baking soda
2-1/2 teaspoons allspice
Before Using for the First Time
1. Preheat oven to 375˚F.
2. Use an electric mixer to cream the butter and margarine until
fluffy. Gradually beat in the brown sugar.
3. Add molasses and egg and mix well.
4. Sift the flour, baking soda, salt and allspice together. Add half
of the flour mixture to the butter mixture and beat until
smooth. Repeat with the rest of the flour mixture.
5. Fill the Cookie Press with dough and select Cookie Disc 6 or
any other. Form the cookies on ungreased cookie sheets.
6. Bake 10-12 minutes. Remove from cookie sheets and cool on
wire racks.
1. Carefully unpack the Cookie Press and all accessories.
2. After unpacking, wash Cookie Discs, Filler Tips, Filler Tip
Adapter, Tube Cover, Filler Tip Cover, Tube, Cam Disc, Press
Disc and Cam Shaft with warm, soapy water. Rinse and dry
thoroughly.
3. Make sure the unit is unplugged and then wipe all surfaces
with a slightly moistened, soft cloth and dry thoroughly. Never
immerse the Motor Body, plug or cord in water or any other
liquid. Do not use steel wool, scouring pads or abrasive
cleansers as they will damage the finish.
4. Thoroughly dry all parts so that no water enters the
Motor Body.
Polarized Plug
This appliance has a polarized plug (one blade is wider than the
other). As a safety feature to reduce the risk of electrical shock, this
plug is intended to fit in a polarized outlet only one way. If the plug
does not fit fully into the outlet, reverse the plug. If it still does not
fit, contact a qualified electrician. Do not attempt to defeat this
safety feature.
Makes 8-9 dozen
21
2
CKM25_COOKIE_IB_4/7/02
5/7/02
15:45
Page 3
IMPORTANT SAFEGUARDS
WARNING: A risk of fire and electric shock exists in all
electrical appliances and may cause personal injury or
death. Please follow all safety instructions.
When using electrical appliances, basic safety precautions should
always be followed including the following:
1. Read all instructions before using appliance.
2. To protect against risk of electrical shock, do not immerse or
rinse Motor Body, cord or plug in water or any other liquid.
3. This appliance is not for use by children.
4. Close supervision is necessary when any appliance is used
near children.
5. Unplug from outlet when not in use, before putting on or taking
off parts and before cleaning. To disconnect, grasp plug and
pull from electrical outlet. Never pull cord.
6. Avoid contacting moving parts.
7. Do not operate any appliance with a frayed or damaged cord,
or plug or after the appliance malfunctions or has been
dropped or damaged in any manner. Contact Consumer
Service for return authorization, examination, repair or electrical
or mechanical adjustment.
8. Do not let cord hang over edge of table or counter, or touch
hot surfaces including the stove.
9. Do not use outdoors or while standing in a damp area.
10. Keep hands, hair, clothing, as well as utensils away from
moving parts and Discs while processing to prevent the risk
of severe injury to persons, or damage to the Cookie Press.
Handle Discs and Tips carefully when removing, inserting
or cleaning.
11. Be certain Tube and Tube Cover are securely locked in place
before operating appliance. Do not attempt to remove Tube or
Tube Cover while operating.
12. Do not place on or near a hot gas or electric burner, or in a
heated oven.
13. The use of accessory attachments not recommended or sold
by the manufacturer may cause fire, electric shock or injury.
14. Do not use appliance for other than intended use.
Brown Sugar Cookies
1/2 cup butter, softened
1 cup brown sugar
2 eggs
1 teaspoon vanilla extract
1/2 teaspoon maple extract
3 cups all-purpose flour
1/2 teaspoon baking soda
1/4 teaspoon salt
1. Preheat oven to 350˚F.
2. Use an electric mixer to cream the butter until fluffy. Gradually
beat in the brown sugar.
3. Add eggs, vanilla extract, maple extract and mix well.
4. Sift the flour, baking soda and salt together. Add half of the
flour mixture to the butter mixture and beat until smooth.
Repeat with the rest of the flour mixture.
5. Fill the Cookie Press with dough and select Cookie Disc 9 or
any other. Form the cookies on ungreased cookie sheets.
Decorate with colored sugar crystals.
6. Bake 8-10 minutes. Remove from cookie sheets and cool on
wire racks.
Makes 7-8 dozen
SAVE THESE INSTRUCTIONS
FOR HOUSEHOLD USE ONLY
1
22
CKM25_COOKIE_IB_4/7/02
5/7/02
15:45
Page 1
LIMITED ONE YEAR WARRANTY
Warranty: This product is warranted by Salton, Inc. to be free from defects in materials or workmanship for
a period of (1) year from the original purchase date. This product warranty covers only the original
consumer purchaser of the product.
Warranty Coverage: This warranty is void if the product has been damaged by accident in shipment,
unreasonable use, misuse, neglect, improper service, commercial use, repairs by unauthorized personnel,
normal wear and tear, improper assembly, installation or maintenance abuse or other causes not arising out
of defects in materials or workmanship. This warranty is effective only if the product is purchased and
operated in the USA, and does not extend to any units which have been used in violation of written
instructions furnished with the product or to units which have been altered or modified or to damage to
products or parts thereof which have had the serial number removed, altered, defaced or rendered illegible.
Implied Warranties: ANY IMPLIED WARRANTIES WHICH THE PURCHASER MAY HAVE ARE LIMITED IN
DURATION TO ONE (1) YEAR FROM THE DATE OF PURCHASE. Some states do not allow limitations on how
long an implied warranty lasts, so the above limitation may not apply to you.
Warranty Performance: During the above one-year warranty period, a product with a defect will be
either repaired or replaced with a reconditioned comparable model (at our option) when the product is
returned to the Repair Center, or the purchase price refunded. The repaired or replacement product will be
in warranty for the balance of the one-year warranty period and an additional one-month period. No charge
will be made for such repair or replacement.
Service and Repair: Should the appliance malfunction, you should first call toll-free 1 (800) 233-9054
between the hours of 9:00 am and 5:00 pm Central Standard Time and ask for CONSUMER SERVICE stating
that you are a consumer with a problem. Please refer to model number CKM25 when you call.
In-Warranty Service (USA): For an appliance covered under the warranty period, no charge is made for
service or postage. Call for return authorization 1 (800) 233-9054.
Out-of Warranty Service: A flat rate charge by model is made for out-of-warranty service. Include $8.00
(U.S.) for return shipping and handling. We will notify you by mail of the amount of the charge for service
and require you to pay in advance for the repair or replacement.
For Products Purchased in the USA, but Used in Canada: You may return the product insured,
packaged with sufficient protection, and postage and insurance prepaid to the USA address listed below.
Please note that all customs duty / brokerage fees, if any, must be paid by you and we will require you to
pay the cost of customs duty / brokerage fees to us in advance of our performing any service.
Risk During Shipment: We cannot assume responsibility for loss or damage during incoming shipment.
For your protection, carefully package the product for shipment and insure it with the carrier. Be sure to
enclose the following items with your appliance: any accessories related to your problem, your full return
address and daytime phone number, a note describing the problem you experienced, a copy of your sales
receipt or other proof of purchase to determine warranty status. C.O.D. shipments cannot be accepted.
To return the appliance, ship to:
ATTN: Repair Center
Salton, Inc.
708 South Missouri Street
Macon, MO 63552
To contact us, please write to, call, or email:
Salton, Inc.
P.O. Box 7366
Columbia, MO 65205-7366
1-800-233-9054
E-mail: [email protected]
Limitation of Remedies: No representative or person is authorized to assume for Salton, Inc. any other
liability in connection with the sale of our products. There shall be no claims for defects or failure of
performance or product failure under any theory of tort, contract or commercial law including, but not
limited to negligence, gross negligence, strict liability, breach of warranty and breach of contract. Repair,
replacement or refund shall be the sole remedy of the purchaser under this warranty, and in no event
shall Salton be liable for any incidental or consequential damages, losses or expenses.
Some states do not allow the exclusion or limitation of incidental or consequential damages, so the above
limitation or exclusion may not apply to you.
Legal Rights: This warranty gives you specific legal rights, and you may also have other rights which vary
from state to state.
For more information on Salton products: visit our website: www.eSalton.com
©2002 Salton, Inc. All rights reserved.
P/N 61092
Made in China
6/02
OWNER’S MANUAL
Model No. CKM25