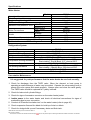
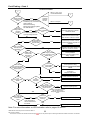
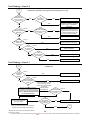
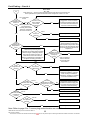
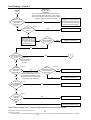
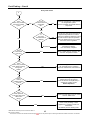
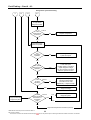
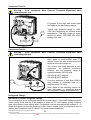
1
Rheem Australia Pty Ltd
ABN 21 098 823 511
SERVICE INSTRUCTIONS
310 Series Heat Pump
TM025
R
Reevviissiioonn:: B
B
PPuubblliisshheedd:: 0088//0077
551310
This document is stored and maintained electronically by
Service. All printed copies not bearing this statement in RED are deemed “uncontrolled”.
Contents
Safety Warning ....................................................................................................................2
Introduction ..........................................................................................................................2
Specifications.......................................................................................................................3
Preventative Maintenance ...................................................................................................3
Operation .............................................................................................................................4
Electronic Controller ............................................................................................................5
Operating Sequence Flow Charts:.......................................................................................6
Refrigeration Terms and their Meaning................................................................................8
Components and their Function...........................................................................................8
Common Faults ...................................................................................................................9
Wiring Diagram ..................................................................................................................11
Refrigeration Sealed System Diagram...............................................................................12
LED Indication ...................................................................................................................12
Fault Finding ......................................................................................................................14
Refrigerant Charge ............................................................................................................45
Electrical Insulation Testing ...............................................................................................46
Component Replacement Procedures – Water Heater......................................................47
Component Replacement Procedures – Refrigeration Plant .............................................52
Component Replacement Procedures – Sealed Refrigeration System .............................57
Exploded View - Refrigeration Plant ..................................................................................62
Replacement Parts List – Refrigeration Plant.................................................................63
Exploded View - Water Heater...........................................................................................64
Replacement Parts List – Water Heater .........................................................................65
Rheem Electric Water Heater Warranty - (Australia Only) .................................................66
Document Revision History................................................................................................67
TM025 Rheem Heat Pump Service Instructions REV: B
Date of Issue: 02/08/07
This document is stored and maintained electronically by
1
Service. All printed copies not bearing this statement in RED are deemed “uncontrolled”.
Safety Warning
The purpose of this Service Manual is to provide sufficient information to allow a person
with the skills as required by the controlling Regulatory Authorities to carry out effective
repairs to a Rheem 310 series Heat Pump Water Heater in the minimum of time.
Safety precautions or areas where extra care should be observed when conducting tests
outlined in this manual are indicated by print in bold italics and/or a warning symbol. Take
care to observe the recommended procedure.
Certain diagnostic procedures outlined in these service instructions require
“live” testing to be conducted. Wear Personal Protective Equipment (PPE)
when conducting these tests to prevent the risk of electric shock. (Refer to
the Rheem Safety Procedure on electrical testing)
R134A is a controlled substance under the fair trading act. Personnel
qualified and licensed to work with refrigerants may only carry out service
and repair to the sealed refrigeration system. During repair the refrigerant
must be recovered, not vented to atmosphere.
Environmental
At the end of the service life of a Rheem heat pump the refrigerant must be
recovered by personnel qualified and licensed to work with refrigerants
prior to the unit being disposed of. Refrigerants must not be vented to
atmosphere.
Introduction
The information provided in these instructions is based on the water heater being installed
in accordance with the Installation Instructions provided with each water heater.
Should you require further technical advice on a Rheem 310 Series Heat Pump Water
Heater, contact your nearest Rheem Service Department where all genuine replacement
parts are also available.
Heater Model Identification
All identification numbers are designed to convey detailed information about the water
heater to which it is attached. The model number consists of 8 digits.
5
X
X
310
0
X
5 – Renewable Energy Model
5 – Air Sourced
9 – Solar Sourced
0 – No Heating Units
1 – Booster Element
Storage Capacity in Litres
No Reference – System Requirement
0 – Element Not fitted
5 – 2400 watts
7 – 3600 watts
Note: Model number, serial number and date of manufacture should be quoted in all
correspondence.
TM025 Rheem Heat Pump Service Instructions REV: B
Date of Issue: 02/08/07
This document is stored and maintained electronically by
2
Service. All printed copies not bearing this statement in RED are deemed “uncontrolled”.
Specifications
Water Heater
Model
Capacity - Litres
Boost Capacity - Litres
Booster element rating - kW
T&PR valve Rating - kPa
With ECV
Without ECV
Inlet / Outlet
Water Connections
T&PR
Quantity
Anode
Length
Control board thermostat setting (fixed)
Limp mode mechanical thermostat setting
Mechanical thermostat ECO setting
Maximum inlet pressure - kPa
551310
310
220
2.4 or 3.6
1000
680
800
RP¾/20
RP½/15
1
1153
60ºC
70ºC
88ºC
Refrigeration System
Parameter
Sound rating
Superheat setting (Factory)
Refrigerant charge R134A
Compressor internal OTC
Compressor winding resistance
Compressor Capacitor
Fan winding resistance
Fan Capacitor
Circulator winding resistance
551310
51 dBA @1.5m
+6ºC at 10ºC Evaporator temp.
1050 grams
Open 150ºC. Close 90ºC (automatic reset)
Run winding - Red & Blue: 2.2 ohms at 20ºC
Start winding - Red & Black: 3.27 ohms at 20ºC
35µF 240 VAC 50HZ
Run winding – Black & Brown: 184 ohms at 20ºC
Start winding – Black & Blue: 238 ohms at 20ºC
2µF 240 VAC 50HZ
75.3 ohms @ 20ºC
Preventative Maintenance
It is suggested for peak performance that the water heater be serviced annually.
1. Check for discharge from the T&PR valve. When the element or heat pump is
operating a small discharge of water may be evident. Operate the valve-easing lever to
ensure the valve opens and resets properly. Always open and close the valve gently.
The T&PR valve should be replaced at 5 yearly intervals.
2. Check for leaks at all cylinder fittings.
3. Check for signs of excessive corrosion on the water heater jacket.
4. Isolate power to the water heater and check all electrical connections for signs of
overheating due to poor connection.
5. Conduct an 'Electrical insulation test' on the water heater (refer to page 46).
6. Check evaporator fins and fan blade for build up of dust or debris.
7. Check for sludge build up and if necessary drain and flush tank.
TM025 Rheem Heat Pump Service Instructions REV: B
Date of Issue: 02/08/07
This document is stored and maintained electronically by
3
Service. All printed copies not bearing this statement in RED are deemed “uncontrolled”.
Operation
Operation – Water System:
The heat pump utilises a form of heating called ‘top down’ heating.
The circulator (1) draws cooler water from the bottom of the cylinder
via the long dropper tube (2). The water passes through the heat
exchanger (condenser) (3) where it is heated by the refrigerant and is
then returned to the top of the cylinder via a short dropper tube (4).
1
3
4
Operation – Heat Pump Mode:
During normal operation in ‘heat pump’ mode the electronic controller
(control board) holds a control relay in the energised state and power
for the compressor is passed to an electronic switch (called a triac) via
the normally open relay contact.
The operation of the compressor causes a pressure difference within
the sealed refrigeration system. This pressure difference causes the
refrigerant to move around the sealed system. The refrigerant enters
the evaporator (5) as a liquid, as the refrigerant absorbs heat from the
atmosphere it changes state, at low pressure, from a sub cooled liquid
to a super heated vapour or gas (evaporates). The vapour then enters
the compressor (6) and obtains more heat, known as heat of
compression, and passes into the heat exchanger as a super heated
vapour at high pressure.
As the refrigerant passes through the heat exchanger it gives off
heat which is absorbed by the water flowing through a separate
chamber inside the heat exchanger. As the refrigerant gives off
heat it cools and changes state back into a liquid (condenses). The
refrigerant then enters the evaporator again and the cycle is
repeated.
2
5
6
3
Operation – Boost Mode:
The controller will enter ‘boost’ mode when atmospheric conditions are unsuitable for heat
pump operation or a possible failure of the refrigeration or water circuits has been
detected. The following error conditions will initiate boost mode:
1. The temperature sensed by the ambient air sensor is below 0°C.
2. The water leaving the heat exchanger is greater than 80°C.
3. The compressor discharge temperature is greater than 110°C.
4. The evaporator temperature is less than -3°C.
5. The failure of sensors S3, S4 or S5.
6. The compressor is not running based on either of the following conditions:
a. After 2 minutes in controller sequence 3 the compressor discharge temperature has
not risen 15°C above ambient.
b. In controller sequence 4 the water temperature rise across the heat exchanger
(condenser) is less than 8°C.
In boost mode the electronic controller continues to control the temperature of the water in
the cylinder and the circulator however the control relay is de-energised switching the
power supply from the compressor triac to the element.
TM025 Rheem Heat Pump Service Instructions REV: B
Date of Issue: 02/08/07
This document is stored and maintained electronically by
4
Service. All printed copies not bearing this statement in RED are deemed “uncontrolled”.
Boost mode allows 220 litres of 60ºC hot water to be provided by electric boosting. During
this mode the circulator will cycle on and off periodically allowing for the 220 litre boost
capacity rather than just the amount of water above the element as is the case with a
conventional electric boost system.
Once a heating cycle is completed the error is cleared and normal operation is resumed on
the next call for heat.
Note: If sensor S4 fails the system will operate on boost mode however the temperature
will in this case be controlled by the mechanical thermostat and 220 litres of 70ºC water
will be available.
Operation – Limp Mode:
Limp mode will only occur due to the failure of both sensors S1 and S4.
In limp mode the electronic controller no longer controls the operation of the heat pump
and both ‘heat pump’ mode and ‘boost’ mode are rendered inoperable. The control relay is
de-energised switching the power supply from the compressor triac to the element.
Limp mode allows 111 litres of hot water to be provided by electric boosting and the water
temperature is controlled by the mechanical thermostat which is set to 70°C; in this
condition only the water in the zone above the element is heated as the circulator does not
operate.
It should be noted that if sensor S1 fails and sensor S4 is operational the system operates
in boost mode however the circulator cannot operate. In this case the end result is an
operation similar to limp mode in which 111 litres of water is heated by the booster and the
temperature controlled to 70ºC by the Robertshaw thermostat.
Electronic Controller
The main features of the electronic controller
(control board) are shown on the diagram opposite.
The inputs to the software are shown in blue and
the outputs that control the heat pump are shown in
red.
The connection marked “relay element” energises
or de-energises a relay that switches from heat
pump heating to electric element heating when the
system operates in “boost” or “limp” mode.
The “Compressor TRIAC” switches the power to the
compressor on and off.
The “Communication port” can be used in
conjunction with a computer to read the inputs and
outputs from the software. This information may be
logged using specially designed logging software
(Contact Rheem Service for more information
regarding this software).
The “Software loading port” is only used for loading
software on to the control board.
The green and red LED’s indicate the condition of
the heat pump (refer to the section titled “LED
Indication” on page 12).
TM025 Rheem Heat Pump Service Instructions REV: B
Date of Issue: 02/08/07
This document is stored and maintained electronically by
5
Service. All printed copies not bearing this statement in RED are deemed “uncontrolled”.
Operating Sequence Flow Charts:
Page 1 of 2:
Power to controller
Error condition reset
Y
Tank
sensors S3-S5
ok?
NO
YES
A
Sequence 0
Heat
pump sensors
T0-T4 ok?
Thermostat
contacts
closed?
YES
NO
H
NO
Z
YES
Controller de-energised
no operation
Relay energised
Cylinder sensors
S4< 44.5°C
or S3 < 50°C
Green LED solid
System in stand by mode
NO
Call for heat
YES
B
Circulator
fault
T0
>80°C?
YES
Ambient conditions too cold
for heat pump operation
NO
T4
<0°C?
NO
YES
YES
Seq 1
T2
<-3°C?
T3
>60°C?
NO
Compressor
recently on delay start
YES
H
Set paramaters
NO
Seq 2
Green LED flashing
At maximum flow rate
Circulator on
H
Compressor on
30 seconds later
Evaporator fan on
Circulator to minimum flow rate
Sequence 3
After 2 minutes
T3 >
T4 +15°C?
Refrigerant
circuit not
operational
NO
Compressor discharge
temperature 15°C above ambient
NO
YES
T0
= or > than
57°C?
Heat exchanger
outlet sensor
YES
Circulator to variable speed
T0 - T1
Open or
short circuit
Open or
short circuit
Sensor
T0 - T4
S3 - S5
Use value of T4 and T1 to set circulator flow
rate to achieve 62°C at heat exchanger outlet
YES
<8°C
Temperature rise across heat
exchanger smaller than 8°C
NO
Sequence 4
T3 >
T4 +15°C?
NO
Compressor discharge
temperature 15°C above ambient
Condenser inlet
temp higher than
pick up temp
Water
discharge temp
too hot
High ambient
temp or running
too long
Ambient air
temp too
low
Evaporator
frozen
T1 > S4 +7°C
T0 > 80°C
T3 > 110°C
T4 < 0°C
T2 < -3°C
YES
Check every
11 minutes
NO
T0
= 60°C?
Adjust pump
flow rate
NO
YES
Fault
detected?
NO
YES
HPV 4.0
or higher
NO
S4 > 53°C
or S5 > 50°C?
YES
Circulator off
Compressor off
Evaporator off
Refrigeration
Heating cycle
ends
TM025 Rheem Heat Pump Service Instructions REV: B
Date of Issue: 02/08/07
This document is stored and maintained electronically by
Software
version
S0 & S1
< 62°C?
YES
Relay deenergised &
element on
S4< 44.5°C
or S3 < 50°C
NO
S0 & S1
> 62°C?
YES
YES
B
HPV 3.1, HPV
3.2 or no HPV
identification
NO
Relay
energised &
element off
6
Service. All printed copies not bearing this statement in RED are deemed “uncontrolled”.
Page 2 of 2:
H
Red LED Flashing
Relay de-energised
Element On
T2
> 2°C?
YES
Ambient temperature high enough
to resume heat pump operation
NO
T4
> 2°C?
A
YES
NO
S4
Sensor
ok?
Controller can no longer detect
lower cylinder temperature.
Water temperature will be
controlled by mechanical
thermostat to 70°C
NO
S1
Sensor
ok?
NO
Boost Mode
220L heated to
approx. 70°C
YES
Sequence 0
S1
Sensor
ok?
NO
Element On
YES
Controller can no longer detect
upper cylinder temperature.
S1
>62°C?
The circulator will not operate
preventing water below the
element level from heating
YES
NO
Circulator On
Temperature at sensor S4 will
not achieve 53°C
NO
NO
Limp Mode
111L heated to
approx. 70°C
S1
<61°C?
Element On
YES
Temp at
thermostat =
70°C?
YES
Circulator Off
NO
Temp at
thermostat =
70°C?
YES
Element Off
YES
Boost Mode
220L heated to
approx. 60°C
S1
>62°C?
Power to controller off
S4
>53°C?
YES
Y
Element Off
YES
NO
NO
NO
Circulator On
YES
Heating Cycle
complete
S1
<61°C?
Circulator Off
YES
S4
>53°C?
Z
NO
TM025 Rheem Heat Pump Service Instructions REV: B
Date of Issue: 02/08/07
This document is stored and maintained electronically by
7
Service. All printed copies not bearing this statement in RED are deemed “uncontrolled”.
Refrigeration Terms and their Meaning
Sub Cooled Liquid – A substance below its saturation temperature at a given pressure.
Super Heated Vapour – A substance above its boiling point at a given pressure.
Saturated Vapour – A substance at its boiling point at a given pressure.
Latent Heat – Hidden (invisible) heat removed or added to a substance that results in a
change of state (i.e. liquid to a vapour) without an increase or decrease in temperature.
Heat of Compression – The additional heat added to a substance by the act of
compressing it.
Low Side – Components and pipe work of a refrigeration system operating at low
pressure, generally considered to be the evaporator, suction line and accumulator.
High Side – Components and pipe work of a refrigeration system operating at high
pressure, generally considered to be the condenser, discharge line, liquid receiver/filter
drier and compressor case where a rotary compressor is utilized.
Boil Off – The action of a substance as it absorbs heat and changes state (evaporates)
from a liquid to a vapour (gas).
Give Up Heat – The action of a substance as it releases heat and changes state
(condenses) from a vapour (gas) to a liquid.
Components and their Function
Temperature and Pressure Relief Valve - A valve designed to provide automatic relief by
discharging water in case of excessive temperature, pressure or both.
Never fit a T&PR Valve with a pressure rating greater than that indicated on
the product-rating label.
Pressure Limiting Valve (P.L.V.) - A valve that controls its outlet pressure to a
predetermined limit.
Outlet Delivery Tube (Dip Tube) - A plastic tube installed in the hot water outlet of the
water heater cylinder to conduct water from the highest point to the outlet connection. It
also acts as a fitting liner.
Diffuser - A plastic device installed in the cold water inlet of the water heater cylinder to
assist with stratification. It also acts as a fitting liner.
Fitting Liner - A plastic tube installed in the cold-water inlet of the water heater to provide
protection against corrosion through the life of the water heater.
Anode (Sacrificial) - A metal alloy electrode installed in the water heater cylinder that by
galvanic action protects the cylinder from corrosion.
Thermostat - A device responsive to temperature that controls the supply of electrical
energy to the compressor, which results in the stored water being maintained at the
required temperature.
Evaporator Thermistor - A device responsive to temperature that controls the active
supply between the compressor circuit and the booster element circuit.
TM025 Rheem Heat Pump Service Instructions REV: B
Date of Issue: 02/08/07
This document is stored and maintained electronically by
8
Service. All printed copies not bearing this statement in RED are deemed “uncontrolled”.
Compressor - An electro-mechanical device that adds heats to the refrigerant by
compressing it, known as “heat of compression” the resulting increase in refrigerant
temperature increases its pressure and causes the refrigerant to circulate through the
system.
Evaporator - A finned copper coil mounted on top of the water heater. The refrigerant
enters as a liquid, as it passes through the coil it absorbs heat from the surrounding
atmosphere and “boils off” (evaporates) to a gas.
Condenser - An insulated housing containing stainless steel chambers where heat
transfer occurs. The condenser (or heat exchanger) contains three chambers, one for
refrigerant, one for water and a third separating chamber containing air. The refrigerant
enters as a gas, as it passes through the condenser it transfers (“gives up”) the heat
absorbed via the evaporator to the water flowing through the condenser in a separate
chamber, during this process the refrigerant cools and changes state (condenses) back to
a liquid.
Receiver Filter Drier - This device, fitted between the condenser and thermal expansion
(TX) valve, receives and stores liquid refrigerant from the condenser for delivery to the
evaporator. The receiver also incorporates a filter and drier to trap impurities and remove
moisture from the sealed refrigeration system
Accumulator - This device, fitted in the suction line prior to the compressor, is designed to
accumulate and prevent liquid refrigerant from entering and damaging the compressor.
Any liquid refrigerant is evaporated or “boiled off” and converted to a vapour by the
accumulator.
Thermal Expansion (TX) Valve - A valve, installed between the condenser and
evaporator that controls (meters) the amount of refrigerant delivered to the evaporator.
The TX valve has an external temperature sensor fitted to the suction line and increases or
decreases the refrigerant flow to the evaporator depending on the detected suction line
temperature.
Thermal Cut Out (Overload) - A manual reset temperature sensitive device that
automatically cuts off the supply of electrical energy to the control board and/or boost
element.
Heating Unit (Element) - A tubular device containing an electric resistance element that
converts electrical energy to heat. Standard element ratings are 2.4 and 3.6kW.
Common Faults
When a complaint is lodged about the performance of a hot water system there are a
number of causes that should be checked and eliminated. In an attempt to pinpoint the
most likely cause it is important to discuss with the customer their reasons for the
complaint, the duration of the problem, any change in circumstances or usage and recent
weather conditions. This information in conjunction with the following listed common
complaints will assist you in locating the most likely cause. All procedures assume there is
water flowing through the water heater.
Discoloured water - This may be the result of discoloured water entering from the cold
water mains. Check if the cold water is also discoloured.
Excessive hot water usage - The complaints of insufficient hot water and no hot water
can on many occasions be attributed to hot water usage exceeding the capacity of the
water heater to provide hot water.
TM025 Rheem Heat Pump Service Instructions REV: B
Date of Issue: 02/08/07
This document is stored and maintained electronically by
9
Service. All printed copies not bearing this statement in RED are deemed “uncontrolled”.
When first attending a call of this nature it is essential to establish the probable hot water
usage by querying the usage habits of the household and compare this with the potential
delivery of the model water heater installed. It can then be established if the usage is
within or outside the capacity of the model. The areas to look at for excessive usage are:
1. Automatic washing machines.
2. Showers exceeding 12 litres/minute for mixed water and 5 minutes in duration.
3. Two or more showers operating at the same time.
4. Change of occupancy or number of persons increased.
5. High water pressure area. (Excessive pressure relief valve discharge)
6. Plumbing leaks.
7. Crossed connection.
Water hammer - A water heater will not cause water hammer, however valves associated
with the water heater may be the source of the problem i.e. cold-water stopcock, nonreturn valve or relief valve.
Most water hammer problems are associated with plumbing, hot and cold or appliances
i.e. solenoid valves, ballcocks, loose pipes, sharp angles in pipe work, faulty or worn valve
parts, loose tap washers or neighbouring equipment.
High water pressure areas will have more complaints of this nature and the use of a
pressure-limiting valve (PLV) to reduce the household cold-water pressure will usually
solve most problems.
Hot water plumbing leaks - If hot water has not been used for a period of time, feeling
the temperature of the hot water line may give an indication of water flow if the pipe is
warm. The method of checking for plumbing leaks is:
1. Turn off the stopcock on the cold water supply to the water heater.
2. Open a hot tap to ensure the flow of water stops. This will confirm the stopcock is
operating correctly.
3. Turn off the hot tap.
4. Turn on the stopcock to make up the water pressure in the cylinder, and then turn the
stopcock off again.
5. Wait approximately 5 minutes then do either of the following:
a. With your ear close to the stopcock turn it on slightly and listen for any water
passing. If there are no leaks, water should not pass.
b. Open a hot tap while listening for any pressure release. If there is a pressure
release there will be no leaks in the plumbing system.
Mixing or crossed connections - If an automatic dishwasher, washing machine, flick
mixer tap, tempering valve or thermostatic mixing valve is installed there is always the
possibility that the cold water could mix with the hot water through a faulty or incorrectly
installed valve. This is referred to as a cross connection. The complaints of insufficient hot
water, water too cold or excessive discharge from the pressure relief valve may be
attributed to a cross connection. The method of checking for a cross connection is:
1. Turn off the stopcock on the cold water supply to the water heater.
2. Open a hot tap. If water flow is persistent and cold a cross connection exists.
TM025 Rheem Heat Pump Service Instructions REV: B
Date of Issue: 02/08/07
This document is stored and maintained electronically by
10
Service. All printed copies not bearing this statement in RED are deemed “uncontrolled”.
Wiring Diagram
TM025 Rheem Heat Pump Service Instructions REV: B
Date of Issue: 02/08/07
This document is stored and maintained electronically by
11
Service. All printed copies not bearing this statement in RED are deemed “uncontrolled”.
Refrigeration Sealed System Diagram
LED Indication
All 310 series Heat Pumps have LED indication. There are two variations of LED indication
depending upon the version of the controllers software; however all versions utilise a red
and green LED to display the operational status and/or fault condition of the appliance.
Note: The software version is printed on a label on the control board.
Controller Software Version HPV 3.1, HPV 3.2 or no HPV identification
310 Series Heat Pumps with controller version HPV3.1, HPV 3.2 or no HPV identification
have a green and red LED located internally on the control board in the heat pump
(refrigeration) module and utilise the following LED indication:
LED Indication
LED Status
Condition
Details
Standby mode (end of heating cycle,
Green Solid
S4 > 53ºC or S5 > 50ºC
cylinder water at required temperature).
Green Flashing S4 < 44.5ºC or S3 < 50ºC Call for heat initiated.
Various (refer to operating
Component fault or ambient conditions
Red Flashing
sequence flow chart on
too cold for heat pump operation.
page 6 for more details).
Fault or system in limp mode with call for
Fault or system operating
No indication
heat satisfied (water in cylinder @ 70ºC
in limp mode.
determined by mechanical thermostat).
Note: Refer to diagram on page 5 for control board LED location.
TM025 Rheem Heat Pump Service Instructions REV: B
Date of Issue: 02/08/07
This document is stored and maintained electronically by
12
Service. All printed copies not bearing this statement in RED are deemed “uncontrolled”.
Controller Software Version HPV 4.0 or higher
310 series Heat Pumps with controller version HPV 4.0 or higher have a red and green
LED located externally on the front of the heat pump module or internally on the control
board in the heat pump (refrigeration) module depending upon date of manufacture.
LED Flashing Frequency: Different combinations of flashing red and/or green LED’s are
utilised to indicate the operational status or fault condition of the Heat Pump. Each flash in
a series will last 0.5 seconds and is separated by 0.5 seconds between flashes. Each
series of flashes is separated by 2 sec.
Example: LED provides 2 flashes: 1) LED on for 0.5 sec.
2) LED off for 0.5 sec.
3) LED on for 0.5 sec.
4) LED off for 2 sec.
5) Return to Step 1).
Operational LED Indication: If no fault is present the green LED will flash as shown
below to indicate the operational sequence number the Heat Pump is currently operating
in (refer to operating sequence flow chart on page 6 for more details).
Sequence
0
2
3
4
Operational LED Indication
Green LED
Solid
2 flashes
3 flashes
4 flashes
Red LED
0
0
0
0
Fault Indication: If a fault is present the green and/or red LED’s will indicate the fault
condition according to the table below.
Fault Indication
Fault
Error
Green LED
Red LED
Faulty power supply or system in limp mode
N/A
0
0
with call for heat satisfied (1)
SerrNo 4
1 Flash
0
T3 (comp dis) > 60°C in sequence 0 (2)
SerrNo 1
0
Solid
T4 (ambient air) < 0°C (3)
Any Sensor Strip Sensor Fault
Any Sflag
0
1 Flash
SerrNo 2
0
2 Flashes
Water circ fault T0 (water outlet) > 80°C
SerrNo 8
0
3 Flashes
T2 (evaporator) < -3°C
SerrNo 32
0
4 Flashes
Comp/refrig fault T3 > T4 + 15°C (in seq3)
SerrNo
32
0
5
Flashes
Comp/refrig fault T0 - T1 < 8°C (in seq4)
SerrNo 64
0
6 Flashes
Water circ fault T1 > S4 + 7°C
SerrNo 128
0
7 Flashes
TRIAC/refrig fault T3 > 110°C
Thermistor T0 Fault
Tflag 1
1 Flash*
1 Flash*
Thermistor T1 Fault
Tflag 2
2 Flashes*
2 Flashes*
Thermistor T2 Fault
Tflag 4
3 Flashes*
3 Flashes*
Thermistor T3 Fault
Tflag 8
4 Flashes*
4 Flashes*
Thermistor T4 Fault
Tflag 16
5 Flashes*
5 Flashes*
Notes:
* The green and red LED’s flash simultaneously in these cases.
(1) System may be in limp mode with call for heat satisfied (water in cylinder @ 70ºC
determined by mechanical thermostat).
(2) This condition creates a delay start for the compressor. This is not considered a fault.
(3) Ambient temperature too cold for heat pump operation. This is not considered a fault.
TM025 Rheem Heat Pump Service Instructions REV: B
Date of Issue: 02/08/07
This document is stored and maintained electronically by
13
Service. All printed copies not bearing this statement in RED are deemed “uncontrolled”.
Fault Finding
Fault
No Hot Water
Insufficient hot water
Software version
HPV 3.1, HPV 3.2
or no HPV
identification
System in boost or limp mode
Software version
HPV 4.0 or higher
Leaking water heater
Noisy water heater
Blowing fuse/circuit breaker
TM025 Rheem Heat Pump Service Instructions REV: B
Date of Issue: 02/08/07
This document is stored and maintained electronically by
Chart
Number
1
1.1
1.2
7
2
3
3.1
3.2
3.3
3.4
3.5
3.6
3.7
8.1
8.3
4
4.1
4.2
4.3
4.4
4.5
4.6
4.7
4.8
4.9 – 4.13
4.14
8
8.2
5
6
7
Page
16
17
21
43
23
24
25
25
26
27
29
30
30
44
44
32
33
33
34
35
36
37
38
39
40
40
44
44
41
42
43
14
Service. All printed copies not bearing this statement in RED are deemed “uncontrolled”.
General Fault Finding Chart
Fault Diagnosis
No
hot water?
YES
1
YES
2
NO
Insufficient
hot water?
NO
System
in boost or limp
mode?
NO
HPV 3.1, HPV 3.2 or
no HPV identification
3
What is the
controller
software
version?
YES
Boost or limp mode will be
indicated by any of the following
LED conditions:
Red solid or flashing.
Red & green flashing together.
No LEDs (Limp mode with
Robertshaw thermostat open)
HPV 4.0 or higher
Leaking
water heater?
4
YES
5
YES
6
Blowing fuse/circuit breaker
7
NO
Noisy
water heater?
NO
Note: For more information on LED indication refer to pages 12 and 13.
TM025 Rheem Heat Pump Service Instructions REV: B
Date of Issue: 02/08/07
This document is stored and maintained electronically by
15
Service. All printed copies not bearing this statement in RED are deemed “uncontrolled”.
Fault Finding Chart 1
No Hot Water
1
Warning: Terminals may be ‘live’.
Wear Personal Protective
Equipment to prevent risk of
electric shock.
Is 240
volts present at
the terminal
block?
YES
1.1
Test 1
NO
Is
the heater
connected to an
off peak
tariff?
YES
Off peak connection is unsuitable for Heat
Pump models. Connect to continuous tariff or
‘off peak 2’ if available
YES
Restore power and advise customer
NO
Fault in household electrical wiring
NO
Is the
isolating switch
or time clock
turned off?
NO
Is the
fuse blown at the
switchboard?
YES
Reset circuit breaker
or rewire fuse
Did
the fuse or
circuit breaker blow
again?
YES
1. Heat pump connected to mixed circuit,
possible excessive current draw or another
appliance with a fault
2. Faulty circuit breaker or fatigued fuse wire
3. Unit may be short cycling due to faulty
thermostat
NO
TM025 Rheem Heat Pump Service Instructions REV: B
Date of Issue: 02/08/07
This document is stored and maintained electronically by
7
16
Service. All printed copies not bearing this statement in RED are deemed “uncontrolled”.
Fault Finding Chart 1.1
No Hot Water
1.1
Test 2
Are the
thermostat contacts
closed?
NO
Replace thermostat.
Is there
Test 3
240V at the
control board &
relay?
YES
Wiring incorrect.
Check control board wiring loom
plug (lower thermostat to control
board wiring loom).
NO
YES
HPV 4.0 or higher
Note: To reset heat
Reset heat pump &
pump switch power off,
wait five minutes
wait for 30 seconds
before progressing
then switch back on.
from this point.
Red solid or Red and
Green LED’s indicating
simultaneously
Note: Ensure you
wait the full five
minutes before
progressing from
this point.
No indication
What is the
status of the
control boards Red flashing
LED’s five
minutes after
Green solid
resetting?
Is the
refrigeration
system
heating?
YES
HPV 3.1, HPV 3.2 or
no HPV identification
Replace control board.
1.2
Is the
sensor strip
working?
Test 4
NO
Replace sensor strip.
NO
Replace sensor T3.
Green flashing
YES
Is the
compressor
running?
YES
What is the
controller
software
version?
1.2
Is
sensor T3
working?
NO
Test 5
YES
To check if the refrigeration system is
heating feel the braided flexible hose
from the heat exchanger water outlet.
Replace control board (system
should have been operating in
boost mode after five minutes
from resetting) then check
system operation as a second
fault may be present.
NO
Is the
evaporator fan
operating?
YES
Replace control board.
3.6
NO
Is
the air flow
obstructed?
YES
Remove obstruction or clean
evaporator.
System working ok. The element circuit should be
checked as a temporary condition may have caused the
appliance to enter boost mode. If in boost mode and the
element circuit is not operational the cylinder water will
be cold and the system cannot reset itself automatically.
NO
Note: For more information on LED indication refer to pages 12 and13.
TM025 Rheem Heat Pump Service Instructions REV: B
Date of Issue: 02/08/07
This document is stored and maintained electronically by
17
Service. All printed copies not bearing this statement in RED are deemed “uncontrolled”.
Component Tests 1, 2, 3 & 6
Tests 1
Test 2
240
Warning – ‘Live’ equipment wear
Personal Protective Equipment
when conducting this test.
Warning - Ensure power is
isolated before conducting this
test.
Using a multimeter on the AC voltage
scale, measure between the terminals of
the terminal block located behind the
element access cover. The following
measurements should be obtained:
Using a multimeter on the ohms scale,
measure between the terminals of the
mechanical thermostat. The following
results should be obtained:
1L & 2T – 0 ohms.
3L & 4L – 0 ohms.
Active & Neutral – 240 volts.
Active & Earth – 240 volts.
Neutral & Earth – 0 volts.
Test 3
Test 6
240
240
Warning – ‘Live’ equipment wear
Personal Protective Equipment
when conducting this test.
Warning – ‘Live’ equipment wear
Personal Protective Equipment
when conducting this test.
Using a multimeter on the AC voltage Using a multimeter on the AC voltage
scale, measure between the top 2 terminals scale, measure between the A return and
of the heat pump module terminal block.
Neutral terminals of the terminal block
located behind the element access cover.
Normal voltage is 240 volts.
Normal voltage is 240 volts.
Note: Refer to page 19 for component test 4 and page 20 for component test 5.
TM025 Rheem Heat Pump Service Instructions REV: B
Date of Issue: 02/08/07
This document is stored and maintained electronically by
18
Service. All printed copies not bearing this statement in RED are deemed “uncontrolled”.
Component Test 4
Warning – ‘Live’ equipment wear Personal Protective Equipment when
conducting this test.
Sensor Strip Testing: Unplug the sensor strip plug from the control board and using a
multimeter on the kilo-ohms scale, measure between the pins of the sensor strip plug*.
There are six individual tests to be performed as there are six individual sensors contained
along the length of the sensor strip (sensors S0 – S5). As the resistance of each sensor
will change according to its temperature, the resistance measurements for each sensor will
need to be checked against the Temperature/Resistance Table shown below. For this
reason it is best to empty the tank of hot water and then measure the cold water
temperature at the T&PR so a known temperature datum can then be applied to all
sensors which should then in turn all have similar resistance value when tested.
Sensor Test Points
8.49
S0 – Between Pins 1 and 9
S1 – Between Pins 2 and 9
S2 – Between Pins 4 and 9
S3 – Between Pins 6 and 9
S4 – Between Pins 3 and 8
S5 – Between Pins 3 and 10
Sensor strip plug
pin configuration
Testing the
sensor strip
*Note: The sensor strip plug socket test points are quite small, Fine Probe Adapters (part
number WH0020082) can be utilised as probe extensions. Alternatively small pins may be
used however ensure good contact is made when testing.
Sensor Strip Temperature / Resistance Table
T (°C)
-10
-9
-8
-7
-6
-5
-4
-3
-2
-1
0
1
2
3
4
5
6
7
8
9
R (kΩ)
37.45
35.73
34.11
32.56
31.10
29.71
28.39
27.13
25.94
24.81
23.73
22.71
21.73
20.81
19.92
19.09
18.29
17.52
16.80
16.11
T (°C)
10
11
12
13
14
15
16
17
18
19
20
21
22
23
24
25
26
27
28
29
R (kΩ)
15.45
14.82
14.22
13.65
13.10
12.58
12.09
11.61
11.16
10.72
10.31
9.913
9.535
9.173
8.826
8.495
8.177
7.873
7.583
7.304
TM025 Rheem Heat Pump Service Instructions REV: B
Date of Issue: 02/08/07
This document is stored and maintained electronically by
T (°C)
30
31
32
33
34
35
36
37
38
39
40
41
42
43
44
45
46
47
48
49
R (kΩ)
7.037
6.782
6.537
6.302
6.076
5.86
5.653
5.454
5.264
5.081
4.905
4.736
4.574
4.418
4.269
4.125
3.987
3.854
3.726
3.603
T (°C)
50
51
52
53
54
55
56
57
58
59
60
61
62
63
64
65
66
67
68
69
R (kΩ)
3.485
3.371
3.262
3.157
3.055
2.957
2.863
2.773
2.686
2.602
2.521
2.442
2.367
2.295
2.225
2.157
2.092
2.029
1.968
1.91
T (°C)
70
71
72
73
74
75
76
77
78
79
80
81
82
83
84
85
86
87
88
89
R (kΩ)
1.853
1.799
1.743
1.695
1.646
1.589
1.552
1.508
1.465
1.424
1.384
1.345
1.307
1.271
1.236
1.202
1.169
1.137
1.107
1.077
19
Service. All printed copies not bearing this statement in RED are deemed “uncontrolled”.
Component test 5
T Sensor Testing: 310 Series Heat Pumps have five independent thermistors which are
utilised to monitor temperatures at various locations around the system. These thermistors
connect to and are monitored by the control board and are known as ‘T sensors’.
All five T sensors are identical and each can be tested as follows:
Warning - Ensure power is isolated before conducting this test.
Unplug the relevant T sensor from the
control board and remove the T sensor
from its location so its temperature will be
the same as the ambient air temperature
(As sensor T4 detects the ambient air
temperature it may remain in position for
this test). Using a multimeter on the kiloohms scale, measure between the two pins
of the T sensor plug*. As the resistance of
each sensor will change according to its
temperature, the resistance measurements
for each sensor will need to be checked
against the Temperature/Resistance Table
shown below and the value then compared
to the ambient air temperature.
*Note: The sensor strip plug socket test points are quite small, Fine Probe Adapters (part
number WH0020082) can be utilised as probe extensions. Alternatively small pins may be
used however ensure good contact is made when testing.
Sensor
T0
T1
T2
T3
T4
Monitors
Water temperature leaving the condenser
Water temperature entering the condenser
Evaporator temperature
Compressor discharge temperature
Ambient air temperature
Part Number
056006
T Sensor Temperature / Resistance Table
The table below sets out the resistance of the T sensors for a given water or air
temperature.
Temperature
Degrees C
0
10
20
30
40
50
60
70
80
TM025 Rheem Heat Pump Service Instructions REV: B
Date of Issue: 02/08/07
This document is stored and maintained electronically by
Resistance (All T Sensors)
Kilo-ohms
23.73
15.45
10.31
7.037
4.905
3.485
2.521
1.853
1.384
20
Service. All printed copies not bearing this statement in RED are deemed “uncontrolled”.
Fault Finding - Chart 1.2
No Hot Water
1.2
Note: all faults in this chart are in the ‘boost’ or ‘limp mode’ (element)
circuit. After determining the fault in the element circuit the appliance
operation should then be checked to determine why the system
entered boost or limp mode as a second fault may be present.
Is there
240V at the
element?
Test 6
Is there
240V at the N/C
relay contact?
NO
YES
Repair faulty wiring between heat
pump module electrical
connection plug and element.
Appliance operation should then
be checked to determine why the
system entered boost or limp
mode as a second fault may be
present.
YES
Replace control board.
Appliance operation should then
be checked to determine why the
system entered boost or limp
mode as a second fault may be
present.
Test 7
NO
Test 9
Is there
6VDC at the relay
coil?
YES
Replace relay.
Appliance operation should then
be checked to determine why the
system entered boost or limp
mode as a second fault may be
present.
NO
Test 8
Is the
element resistance
correct?
Replace element.
Appliance operation should then
be checked to determine why the
system entered boost or limp
mode as a second fault may be
present.
NO
Repair faulty wiring.
Appliance operation should then
be checked to determine why the
system entered boost or limp
mode as a second fault may be
present.
YES
TM025 Rheem Heat Pump Service Instructions REV: B
Date of Issue: 02/08/07
This document is stored and maintained electronically by
21
Service. All printed copies not bearing this statement in RED are deemed “uncontrolled”.
Component Tests 7, 8 & 9
Tests 7
Test 8
240
Warning – ‘Live’ equipment wear
Personal Protective Equipment
when conducting this test.
Warning - Ensure power is
isolated before conducting this
test.
Using a multimeter on the AC voltage
scale, measure between the white wire on
the heat pump module electrical
connection plug and the top terminal of the
heat pump module terminal block
(Neutral).
Disconnect the element wires from the
thermostat and terminal block, and using a
multimeter on the ohms scale, measure
between the two element wires. The
following results should be obtained:
Normal voltage is 240 volts.
2.4kW element: 22 – 26 ohms.
3.6kW element: 15 – 17 ohms.
Test 9
Warning – ‘Live’ equipment wear Personal Protective Equipment when
conducting this test.
Using a multimeter on the DC voltage scale, measure between the two wires on the
control board relay plug.
Normal voltage is 6 Volts DC.
TM025 Rheem Heat Pump Service Instructions REV: B
Date of Issue: 02/08/07
This document is stored and maintained electronically by
22
Service. All printed copies not bearing this statement in RED are deemed “uncontrolled”.
Fault Finding - Chart 2
Insufficient Hot Water
2
HPV 3.1, HPV 3.2 or
no HPV identification
Is the
What is the
heater operating
controller
YES
in boost or limp
software
Boost or limp mode may be
mode?
version?
indicated by any of the following
LED conditions:
NO
Red solid or flashing.
Red & green flashing together.
No LED indication.
Has the
Is the
usage pattern
YES
heater of sufficient
changed
size?
recently?
i.e. additional appliances
or people using hot water
Is the heater
connected to an
off peak tariff?
NO
Recommend a hot water usage
pattern that will suit the water
heater and the customers needs.
Off peak connection is unsuitable
for Heat Pump models. Connect
to continuous tariff or off peak 2 if
available.
Depending on the ambient
temperature the water heater may
take 3 to 5 hours to recover.
YES
Is the
T&PR valve
continuously
discharging
water?
Is the
water supply pressure
more than 80% of the
T&PR rating?
YES
Is the
correct T&PR
valve fitted?
Are there
any plumbing leaks,
crossed connections or
dripping taps?
NO
YES
NO
YES
YES
Fit pressure limiting valve if not
already installed.
Existing pressure limiting valve
faulty - replace.
YES
Check for crossed water
connection.
Replace T&PR valve.
Clean or replace filters
Is the
tempering valve outlet
NO
Replace tempering valve
water temperature
approx 48°C?
Note: This assumes that
the hot water to the
tempering valve is above
52°C.
NO
YES
NO
The heater outlet
water temperature
can be measured at
the T&PR.
Replace T&PR valve with one of
correct pressure rating.
Do not use reconditioned T&PR
valves.
Repair any leaks.
Isolate crossed connections.
Are
the filters
blocked?
NO
Is the
heater outlet water
temperature
> 58°C
YES
NO
NO
Is a
tempering valve
fitted?
4
Recommend a water heater of
sufficient capacity to meet the
customers needs.
NO
YES
Has the
supply of hot water
recently been
depleted?
NO
HPV 4.0 or higher
YES
NO
3
Is the
sensor strip
working?
Test 4
NO
Replace sensor strip
YES
YES
System working
Note: For more information on LED indication refer to pages 12 and 13.
TM025 Rheem Heat Pump Service Instructions REV: B
Date of Issue: 02/08/07
This document is stored and maintained electronically by
23
Service. All printed copies not bearing this statement in RED are deemed “uncontrolled”.
Fault Finding - Chart 3
System in boost or limp mode - Software version HPV 3.1, HPV 3.2 or no HPV
identification
3
Red solid or Red and Green LED’s
indicating simultaneously
Replace control board.
Green flashing
What is the
status of the
control boards
LED’s?
System working. Check operation.
Green solid
No LED Indication
3.1
Red flashing
Are the
relay, circulator,
fan, sensor strip & T
sensors all firmly plugged
into the correct
sockets?
YES
NO
Test 4
Is the
sensor strip
working?
NO
Are all
T sensors
working?
YES
Ensure water in heat
pump is below 60ºC &
reset heat pump. To
reset heat pump switch
off, wait for 30 seconds
then switch back on.
Replace sensor strip.
Test 5
NO
Replace faulty T sensor(s).
Red solid or flashing / Red and Green
indicating simultaneously / Green solid
YES
LED
Status
after 5
seconds
Replace control board.
Red - flashing
3.2
Green - flashing
Is
circulator
operating?
3.8
YES
Note: The compressor
starts 30 seconds after
Does
Does
the circulator.
compressor
compressor try
NO
successfully start
to start after
after delay?
delay?
YES
Let heat pump
run for ten
minutes or until
red LED flashes.
Red LED will flash if
system enters boost
mode.
YES
3.3
NO
Circulator operation can be
checked by feeling circulator
brass body for vibration.
3.4
NO
Has
compressor
recently been
operating?
YES
Does
red LED
flash?
Ensure plugs are firmly plugged
into correct sockets on control
board and that plug pins on
control board are clean and free
from conformal coating.
NO
8.3
Compressor internal OTC
may have opened.
Switch off power to heat
pump, wait for ten
minutes then switch
power back on.
3.5
YES
System working. Ambient air
temperature may have been too high or
low for normal operation. Heat pump
may have been too hot after operating
for an extended period due to large
volumes and/or frequent water usage.
NO
Note: Refer to page 5 for T sensor plug socket location on control board.
TM025 Rheem Heat Pump Service Instructions REV: B
Date of Issue: 02/08/07
This document is stored and maintained electronically by
24
Service. All printed copies not bearing this statement in RED are deemed “uncontrolled”.
Fault Finding – Chart 3.1
System in boost or limp mode - Software version HPV 3.1, HPV 3.2 or no HPV
identification
3.1
Test 2
Are the
thermostat contacts
closed?
Repair faulty wiring.
Replace control board.
YES
NO
Is the
sensor strip
working?
Test 4
NO
System has operated in limp mode
due to a faulty sensor strip (S1 & S4
faults) and has completed a heating
cycle. Water was heated by the
electric element and controlled by
the Robertshaw thermostat to 70ºC.
Replace sensor strip.
YES
Are the
sensor strip plug
pins clean?
Ensure sensor strip plug pins and
control board socket are clean
and free from conformal coating.
NO
YES
Replace control board.
Fault Finding – Chart 3.2
3.2
Switch off heat pump &
allow sensor T0 to cool
below 80ºC. When
sufficiently cool switch
heat pump back on.
Is red
LED flashing after
5 seconds?
System in boost or limp mode - Software version HPV 3.1, HPV 3.2 or no HPV
identification
T0 is monitoring
water out of the
heat exchanger
Has
sensor T0 cooled
to below
80ºC?
YES
NO
Is
Green LED
flashing?
NO
YES
Is circulator
operating?
YES
Replace control board
NO
3.3
Circulator operation can be
checked by feeling circulator
brass body for vibration.
YES
NO
TM025 Rheem Heat Pump Service Instructions REV: B
Date of Issue: 02/08/07
This document is stored and maintained electronically by
3.8
Replace control board
25
Service. All printed copies not bearing this statement in RED are deemed “uncontrolled”.
Fault Finding – Chart 3.3
3.3
Is 240V
present at the
circulator?
System in boost or limp mode - Software version HPV 3.1, HPV 3.2 or no HPV
identification
Test 10
NO
Is the
circulator plug firmly
plugged into correct
socket?
YES
Test 11
Is the
circulator motor
resistance
correct?
NO
Ensure circulator is firmly plugged
into correct socket on control
board and that plug pins on
control board are clean and free
from conformal coating.
YES
Replace control board
Check circulator impellor for
restriction or siezure.
YES
NO
Replace circulator
Component Tests 10 & 11
Test 10
Test 11
Warning – ‘Live’ equipment wear
Personal Protective Equipment
when conducting this test.
Warning - Ensure power is
isolated before conducting this
test.
Using a multimeter on the AC voltage Unplug the circulator connection plug from
scale, measure between the circulator the control board and using a multimeter on
plug terminals at the control board.
the ohms scale, measure between the two
circulator connection plug terminals.
Normal voltage is 240 volts.
A reading of approximately 75.3 ohms
Note: As the control board controls the should be obtained.
speed of the circulator by pulsing the
electrical supply to the circulator an
analogue
multimeter
may
indicate
between 180 – 240V.
TM025 Rheem Heat Pump Service Instructions REV: B
Date of Issue: 02/08/07
This document is stored and maintained electronically by
26
Service. All printed copies not bearing this statement in RED are deemed “uncontrolled”.
Fault Finding – Chart 3.4
3.4
System in boost or limp mode - Software version HPV 3.1, HPV 3.2 or no HPV
identification
Test 9
Is there
6VDC at the relay
coil?
Is the
relay plug plugged
into the control
board?
NO
YES
NO
Ensure plug pins are clean of
conformal coating and are making
contact. If plug & pins are ok
replace the control board.
YES
Test 13
Test 12
Is 240V
Is 240V
present at the
present at the control
NO
compressor
board compressor
terminals? Note: Tests 12 & 13 must be terminals?
performed after waiting for the 30
second delay after starting of the
circulator and cannot be performed
YES
whilst the red LED is flashing.
Test 14
Are
the compressor
winding resistances
correct?
NO
Plug in relay plug at control board.
YES
Faulty compressor wiring.
NO
Compressor internal ECO
may have tripped open
circuiting the compressor
windings. Wait ten
minutes for ECO to cool
and auto reset.
Replace control board
Note: Compressor internal
ECO is auto trip & auto
reset & is not a replaceable
component.
ECO Opens @ 150ºC
ECO Closes @ 90ºC
Test 14
Are
the compressor
winding resistances
correct?
YES
Reset heat pump and run
system until compressor
ECO trips again.
YES
NO
Note: To reset heat
pump switch power off,
wait for 30 seconds
then switch back on.
Replace compressor
Is the
compressor
temperature 150ºC
or hotter?
NO
YES
Is the
compressor
capacitor
working?
8.3
Test 15
NO
Replace compressor capacitor
YES
TM025 Rheem Heat Pump Service Instructions REV: B
Date of Issue: 02/08/07
This document is stored and maintained electronically by
Faulty compressor and/or
compressor capacitor wiring.
27
Service. All printed copies not bearing this statement in RED are deemed “uncontrolled”.
Component Tests 12 – 15
Tests 12
Test 13
Warning – ‘Live’ equipment wear
Personal Protective Equipment
when conducting this test.
Warning – ‘Live’ equipment wear
Personal Protective Equipment
when conducting this test.
Remove the compressor electrical access
cover and using a multimeter on the AC
voltage scale, measure between the red
and blue wires.
Normal voltage is 240 volts.
Using a multimeter on the AC voltage
scale, measure between the control board
compressor output terminal and the top
terminal of the heat pump module terminal
block (Neutral).
Normal voltage is 240 volts.
Test 14
Test 15
Warning - Ensure power is
isolated before conducting this
test.
Warning - Ensure power is
isolated before conducting this
test.
Remove the compressor electrical access
cover and mark and disconnect terminal
wiring. Using a multimeter on the ohms
scale, measure between the compressor
terminals. The following run and start
winding results should be obtained.
Disconnect the wiring to the compressor
capacitor and using a multimeter on the
capacitance (µF) scale measure between
the two capacitor terminals.
Normal capacitance is 35 micro Farads
(35µF).
(Run) Red & Blue terminals – 2.2 ohms
(Start) Red & Black terminals – 3.2 ohms
TM025 Rheem Heat Pump Service Instructions REV: B
Date of Issue: 02/08/07
This document is stored and maintained electronically by
28
Service. All printed copies not bearing this statement in RED are deemed “uncontrolled”.
Fault Finding – Chart 3.5
System in boost or limp mode - Software version HPV 3.1, HPV 3.2 or no HPV
identification
3.5
Is the
temperature at
sensor T4
< 2ºC?
System functioning correctly and
should operate in boost mode
until temperature at T4 rises
above 2ºC at which time the heat
pump will reset and start back at
sequence 0.
T4 is ambient
air sensor
YES
NO
T2 is evaporator
sensor
Is the
temperature at
YES
sensor T2
< 2ºC?
T2 temperature can
be measured by
inserting thermometer
probe into evaporator
NO
fins next to sensor T2.
Is the
ambient air
temperature <
5ºC?
System working ok. Ambient air
temperature too hot for normal
heat pump operation.
YES
Is the
circulator water
flow direction
correct?
YES
3.6
System functioning correctly and
should operate in boost mode
until evaporator temperature rises
above 2ºC at which time the heat
pump will reset and start back at
sequence 0.
YES
Is
the ambient air
temperature above
50ºC?
NO
NO
Reinstall circulator so flow is
directed towards heat exchanger.
NO
Is there
an air lock in the
water system
Bleed air from water outlet at
flexible hose union.
YES
Warning! Ensure water escaping
from flexible hose is caught in a
container and does not escape or
sensor strip damage may occur.
NO
Is the
circulator impellor
functioning?
NO
Repair or replace circulator
impellor.
YES
Clear blockage in water system at
circulator, heat exchanger,
dropper tubes or flexible hoses.
YES
Is the
water system
blocked?
NO
Has the
cold water dropper
tube fallen off?
NO
YES
Replace cold water dropper tube.
Tests 19 & 20
Are the
refrigeration
system pressures
correct?
NO
YES
TM025 Rheem Heat Pump Service Instructions REV: B
Date of Issue: 02/08/07
This document is stored and maintained electronically by
8.1
3.7
29
Service. All printed copies not bearing this statement in RED are deemed “uncontrolled”.
Fault Finding – Chart 3.6
System in boost or limp mode - Software version HPV 3.1, HPV 3.2 or no HPV
identification. Also HPV 4.0 or higher from fault finding chart 1.1 only
3.6
Did the
evaporator fan
come on with the
compressor?
Is
the air flow
obstructed?
YES
YES
Remove obstruction.
Clean dirty evaporator.
Appliance installed in enclosed
room contrary to installation
instructions.
NO
NO
Test 16
Is 240V
present at the fan
NO
terminals?
Is the
evaporator fan firmly
plugged into correct
socket?
YES
Ensure evaporator fan is firmly
plugged into correct socket on
control board and that plug pins
on control board are clean and
free from conformal coating.
NO
YES
Test 17
Are the
fan motor winding
resistances
correct?
Replace control board.
NO
Replace evaporator fan motor.
Test 18
YES
Is the
fan capacitor
working?
YES
NO
Is the
fan wiring faulty
or incorrect?
Replace capacitor.
YES
Repair or replace faulty wiring.
NO
Replace faulty control board.
Fault Finding – Chart 3.7
System in boost or limp mode - Software version HPV 3.1, HPV 3.2 or no HPV
identification
3.7
Is the
compressor
capacitor
working?
Test 15
YES
Replace faulty control board.
Test 14
Are
the compressor
NO
YES
Replace compressor capacitor
winding resistances
correct?
Note: Compressor internal
ECO is auto trip & auto
reset & is not a replaceable
NO
component.
Opens @ 150ºC
Replace compressor capacitor.
Test 14
Are
Closes @ 90ºC
Compressor internal ECO may have
the compressor
tripped open circuiting the compressor
winding resistances
NO
windings. Wait ten minutes for ECO
correct?
to cool and auto reset.
YES
Reset heat pump and run
system until compressor
ECO trips again.
Is the
compressor
temperature 150ºC
or hotter?
Note: To reset heat pump switch power off,
wait for 30 seconds then switch back on.
TM025 Rheem Heat Pump Service Instructions REV: B
Date of Issue: 02/08/07
This document is stored and maintained electronically by
NO
YES
Replace compressor
8.3
30
Service. All printed copies not bearing this statement in RED are deemed “uncontrolled”.
Component Tests 16, 17 & 18
Tests 16
Test 17
240
Warning – ‘Live’ equipment wear
Personal Protective Equipment
when conducting this test.
Warning - Ensure power is
isolated before conducting this
test.
Using a multimeter on the AC voltage scale,
measure between the third and fourth
terminals down from the top on the heat
pump module terminal block.
Normal voltage is 240 volts.
Mark and disconnect fan wiring at the heat
pump module terminal block and using a
multimeter on ohms scale, measure
between the disconnected fan wires. The
following run and start winding results
should be obtained.
(Run) Black & Brown wires – 184 ohms
(Start) Black & Blue wires – 238 ohms
Test 18
Warning - Ensure power is isolated before conducting this test.
Mark and disconnect the fan capacitor wiring at the heap pump module terminal block
and using a multimeter on the capacitance (µF) scale measure between the two
capacitor wires.
Normal capacitance is 2 micro Farads (2µF).
Note: Refer to page 45 for component tests 19 & 20.
TM025 Rheem Heat Pump Service Instructions REV: B
Date of Issue: 02/08/07
This document is stored and maintained electronically by
31
Service. All printed copies not bearing this statement in RED are deemed “uncontrolled”.
Fault Finding – Chart 4
System in boost or limp mode - Software version 4.0 or higher
4
Boost or limp mode will be indicated by any
of the following LED conditions:
Red solid
4.1
Red 1 flash
4.2
Red 2 flash
4.3
Red 3 flash
4.4
Red 4 flash
4.5
Red 5 flash
4.6
Red 6 flash
4.7
Red 7 flash
4.8
Red & Green 1 flash
4.9
Red & Green 2 flash
4.10
Red & Green 3 flash
4.11
Red & Green 4 flash
4.12
Red & Green 5 flash
4.13
No LED indication
4.14
Red solid or flashing.
Red & Green flashing simultaneously.
No LED indication.
For other LED indication refer to notes
below.
What is the
status of the
control boards
LEDs?
Notes:
Flashing frequency: Different combinations of flashing
LED’s (one Red & one Green) will indicate the status of the
heat pump. Each flash in a series will last for 0.5 seconds
and is separated by 0.5 seconds between flashes. Each
series of flashes is separated by 2 seconds.
Other LED indication: If no fault is present the Green LED
will flash to indicate the following:
Green solid - Heat pump operating in sequence 0 (standby)
Green 1 flash - Compressor delay start (T3 > 60ºC in seq 0)
Green 2 flash - Heat pump operating in sequence 2
Green 3 flash - Heat pump operating in sequence 3
Green 4 flash - Heat pump operating in sequence 4
For more information on LED indication refer to pages 12 and13.
TM025 Rheem Heat Pump Service Instructions REV: B
Date of Issue: 02/08/07
This document is stored and maintained electronically by
32
Service. All printed copies not bearing this statement in RED are deemed “uncontrolled”.
Fault Finding – Chart 4.1
Red solid
T4 < 0ºC
4.1
Note: When T4 < -0ºC the system will enter boost mode. When in boost mode due
to this operation the system will reset and start at sequence 0 when T4 > 2ºC
Is the
temperature at
sensor T4
< 2ºC?
System functioning correctly and
should operate in boost mode
until temperature at T4 rises
above 2ºC at which time the heat
pump will reset and start back at
sequence 0.
T4 is ambient
air sensor
YES
NO
Is
sensor T4
firmly plugged
into correct
socket?
Ensure sensor T4 is firmly
plugged into correct socket on
control board and that plug pins
on control board are clean and
free from conformal coating.
NO
YES
Is
sensor T4
working?
Test 5
NO
Replace sensor T4
YES
Replace control board
Note: Refer to page 5 for T sensor plug socket location on control board.
Fault Finding – Chart 4.2
Red 1 flash
sensor strip fault
4.2
Is the
sensor strip
firmly plugged
into the correct
socket?
NO
Ensure sensor strip is firmly
plugged into correct socket on
control board and that plug pins
on control board are clean and
free from conformal coating.
NO
Replace sensor strip
YES
Replace control board
YES
Is the
sensor strip
working?
Test 4
TM025 Rheem Heat Pump Service Instructions REV: B
Date of Issue: 02/08/07
This document is stored and maintained electronically by
33
Service. All printed copies not bearing this statement in RED are deemed “uncontrolled”.
Fault Finding – Chart 4.3
Red 2 flash
T0 >80ºC
4.3
T0 is monitoring
water out of the
heat exchanger
Is
sensor T0
firmly plugged
into correct
socket?
Ensure sensor T0 is firmly
plugged into correct socket on
control board and that plug pins
on control board are clean and
free from conformal coating.
NO
YES
Is
sensor T0
working?
Test 5
NO
Replace sensor T0
YES
Switch off heat pump &
allow sensor T0 to cool
below 80ºC. When
sufficiently cool switch
heat pump back on.
Does red
LED immediately
go to 2 flash?
YES
Has
sensor T0 cooled
to below
80ºC?
NO
YES
NO
Is circulator
operating?
Circulator operation can be
checked by feeling circulator
brass body for vibration.
Blockage of water system at
circulator, heat exchanger,
dropper tubes or flexible hoses.
Loose, damaged or jammed
circulator impellor.
YES
Is there
an air lock in the
water system?
NO
Bleed air from water outlet at
flexible hose union.
YES
Warning! Ensure water escaping
from flexible hose is caught in a
container and does not escape or
sensor strip damage may occur.
NO
Test 10
Is 240V
present at the
circulator?
Replace control board
NO
Is the
circulator plug firmly
plugged into correct
socket?
YES
Is the
Test 11
circulator motor
resistance
correct?
NO
Ensure circulator is firmly plugged
into correct socket on control
board and that plug pins on
control board are clean and free
from conformal coating.
YES
Replace control board
YES
Check for loose, damaged or
jammed circulator impellor.
NO
Replace circulator
Note: Refer to page 5 for T sensor plug socket location on control board.
TM025 Rheem Heat Pump Service Instructions REV: B
Date of Issue: 02/08/07
This document is stored and maintained electronically by
34
Service. All printed copies not bearing this statement in RED are deemed “uncontrolled”.
Fault Finding – Chart 4.4
Red 3 flash
T2 < -3ºC
Note: When T2 < -3ºC the system will enter boost mode. When in boost mode due
to this operation the system will reset and start at sequence 0 when T2 > 2ºC
4.4
T2 is evaporator
sensor
Is
sensor T2
firmly plugged
NO
into correct
T2 temperature can
socket?
be measured by
inserting thermometer
YES
probe into evaporator
fins next to sensor T2.
Test 5
Is
sensor T2
working?
Is the
temperature at
sensor T2
< 2ºC?
YES
Ensure sensor T2 is firmly
plugged into correct socket on
control board and that plug pins
on control board are clean and
free from conformal coating.
NO
NO
Replace sensor T2
YES
Is the
ambient air
temperature <
5ºC?
NO
Replace control board
System functioning correctly and
should operate in boost mode
until evaporator temperature rises
above 2ºC at which time the heat
pump will reset and start back at
sequence 0.
YES
Raise temperature of sensor T2 to
above 2ºC by removing from
evaporator and holding probe between
thumb & fingers. Heat pump should
auto reset to sequence 0 when T2
raises above 2ºC. Ensure sensor
probe is reinserted into evaporator on
completion of testing procedure.
Did the
system reset &
operate in normal
heat pump
mode?
YES
Is the
evaporator fan
running?
YES
Is
the air flow
obstructed?
YES
NO
Note: Compresor
will not start until
30 seconds after
the circulator
Remove obstruction.
Clean dirty evaporator.
Appliance installed in enclosed
room contrary to installation
instructions. Appliance is suitable
for outdoor installation only.
NO
NO
Test 16
Is 240V
present at the fan
NO
terminals?
Is the
evaporator fan firmly
plugged into correct
socket?
NO
Ensure evaporator fan is firmly
plugged into correct socket on
control board and that plug pins
on control board are clean and
free from conformal coating.
YES
YES
Test 17
Are the
fan motor winding
resistances
correct?
YES
Is the
fan capacitor
working?
NO
Replace control board
Replace evaporator fan motor
Test 18
NO
YES
Replace capacitor
Repair faulty wiring
Note: Refer to page 5 for T sensor plug socket location on control board.
TM025 Rheem Heat Pump Service Instructions REV: B
Date of Issue: 02/08/07
This document is stored and maintained electronically by
35
Service. All printed copies not bearing this statement in RED are deemed “uncontrolled”.
Fault Finding – Chart 4.5
Red 4 flash
T3 is not > T4 +
15ºC in sequence 3
4.5
Note: T3 is compressor discharge sensor. T4 is ambient air sensor. This check is performed in sequence 3 to
ensure that the sealed refrigerant system is operating (heating).
Are
sensors T3 & T4
firmly plugged into
the correct
sockets?
Ensure sensors T3 & T4 are firmly
plugged into correct sockets on
control board and that plug pins
on control board are clean and
free from conformal coating.
NO
Test 5
YES
Are
sensors T3 & T4
working?
NO
Replace faulty sensor(s)
YES
Ensure water in heat
pump is below 60ºC &
reset heat pum p. To
reset heat pump switch
off, wait for 30 seconds
then switch back on.
Does red
LED immediately
go to 4 flash?
YES
Replace control board
NO
Note: The compressor starts 30
Does
seconds after the circulator.
compressor start
or try to start after
delay?
NO
Test 9
Is there
6VDC at the relay
NO
coil?
8
YES
Is the
relay plug plugged
in to the control
board?
YES
NO
YES
Is 240V
Is 240V
Test 12
Test 13
present at the
present at the control
NO
YES
compressor
board compressor
Note: Tests 12 & 13 must be
terminals?
terminals?
performed after waiting for the 30
second delay after starting of the
circulator and cannot be performed
YES
NO
whilst the red LED is flashing.
Test 14
Are
the compressor
winding resistances
correct?
Plug in relay plug at control board.
Ensure plug pins are clean of
conformal coating and are making
contact. If plug & pins are ok
replace the control board.
Faulty compressor wiring.
Replace control board
NO
Replace compressor
NO
Replace compressor capacitor
YES
Faulty compressor and/or
compressor capacitor wiring.
YES
Is the
compressor
capacitor
working?
Test 15
Note: Refer to page 5 for T sensor plug socket location on control board.
TM025 Rheem Heat Pump Service Instructions REV: B
Date of Issue: 02/08/07
This document is stored and maintained electronically by
36
Service. All printed copies not bearing this statement in RED are deemed “uncontrolled”.
Fault Finding – Chart 4.6
Red 5 flash
T0 - T1 < 8ºC in
sequence 4
4.6
Note: T0 is heat exchanger water outlet sensor. T1
is heat exchanger water inlet sensor. This check is
performed in sequence 4 to ensure that the sealed
refrigerant system is operating (heating).
Are
sensors T0 & T1
firmly plugged into
the correct
sockets?
YES
NO
Are
sensors T0 & T1
working?
Ensure sensors T0 & T1 are
plugged into correct sockets on
control board and that plug pins
on control board are clean and
free from conformal coating.
Test 5
NO
Replace faulty sensor(s)
YES
Ensure water in heat
pump is below 60ºC &
reset heat pump. To
reset heat pump switch
off, wait for 30 seconds
then switch back on.
Does red
LED immediately
go to 5 flash?
YES
Replace control board
NO
Does
compressor start
or try to start after
Note: The
delay?
compressor starts 30
seconds after the
circulator.
NO
Is 240V
present at the
compressor
terminals?
YES
Test 12
NO
Note: Tests 12 & 13 must be
performed after waiting for the 30
second delay after starting of the
circulator and cannot be performed
whilst the red LED is flashing.
Test 14
Are
the compressor
winding resistances
correct?
8
YES
Is 240V
present at the control
board compressor
terminals?
Test 13
NO
YES
Faulty compressor wiring.
Replace control board
NO
Replace compressor
NO
Replace compressor capacitor
YES
Is the
compressor
capacitor
working?
Test 15
YES
Faulty compressor and/or
compressor capacitor wiring.
Note: Refer to page 5 for T sensor plug socket location on control board.
TM025 Rheem Heat Pump Service Instructions REV: B
Date of Issue: 02/08/07
This document is stored and maintained electronically by
37
Service. All printed copies not bearing this statement in RED are deemed “uncontrolled”.
Fault Finding – Chart 4.7
Red 6 flash
T1 > S4 + 7ºC in
sequence 3 or 4
4.7
Note: T1 is heat exchanger water inlet sensor. S4 is thermistor sensor strip sensor.
This check is performed in sequence 3 or 4 to ensure that the circulator is operating.
Is the
circulator water
flow direction
correct?
NO
Reinstall circulator so as flow is
directed towards heat exchanger.
YES
Is the
sensor strip & sensor
T1 firmly plugged into
the correct
sockets?
NO
Ensure sensor strip & sensor T1
are both firmly plugged into the
correct sockets on control board
and that plug pins on control
board are clean and free from
conformal coating.
YES
Is
sensor T1
working?
Test 5
NO
Replace sensor T1
NO
Replace sensor strip
YES
Bleed air from water system at
water outlet flexible hose union.
YES
Is
sensor strip
working?
Test 4
YES
Is there
an air lock
in the water
system?
Warning! Ensure water escaping
from flexible hose is caught in a
container and does not escape or
sensor strip damage may occur.
NO
Has the
cold water dropper
tube fallen off?
YES
NO
Replace cold water dropper tube.
Replace control board.
Note: Refer to page 5 for T sensor plug socket location on control board.
TM025 Rheem Heat Pump Service Instructions REV: B
Date of Issue: 02/08/07
This document is stored and maintained electronically by
38
Service. All printed copies not bearing this statement in RED are deemed “uncontrolled”.
Fault Finding – Chart 4.8
Red 7 flash
T3 > 110ºC in
sequence 3 or 4
4.8
Note: T3 is compressor
discharge sensor.
Is
sensor T3
firmly plugged
into correct
socket?
Ensure sensor T3 is firmly
plugged into the correct socket on
control board and that plug pins
on control board are clean and
free from conformal coating.
NO
YES
Test 5
Is
sensor T3
working?
NO
Replace sensor T3
YES
System working ok. Ambient air
temperature too hot for normal
heat pump operation.
YES
Is
the ambient air
temperature above
50ºC?
NO
Fit pressure gauge to
high side of
refrigerant system
Has
sensor T3 cooled
to below
60ºC?
NO
Switch off heat pump &
allow sensor T3 to cool
below 60ºC. When
sufficiently cool switch
heat pump back on.
YES
Is the
head pressure
excessive?
Test 19
8.2
YES
Appliance may have been
operating for an extended period
due to large volume and/or
frequent water usage.
NO
Note: Refer to page 5 for T sensor plug socket location on control board.
TM025 Rheem Heat Pump Service Instructions REV: B
Date of Issue: 02/08/07
This document is stored and maintained electronically by
39
Service. All printed copies not bearing this statement in RED are deemed “uncontrolled”.
Fault Finding – Charts 4.9 to 4.13
T sensor fault
4.9
4.10
4.11
4.12
4.13
T0 fault.
T0 is monitoring
water out of the
heat exchanger.
T1 fault.
T1 is monitoring
water into the
heat exchanger.
T2 fault.
T2 is monitoring
the evaporator
temperature.
T3 fault.
T3 is monitoring
the compressor
discharge temp.
T4 fault.
T4 is monitoring
the ambient air
temperature.
Is
T sensor
firmly plugged
into correct
socket?
NO
Ensure T sensor is firmly plugged
into correct socket on control
board and that plug pins on
control board are clean and free
from conformal coating.
NO
Replace T sensor.
YES
Is
T sensor
working?
Test 5
YES
Replace control board.
Note: Refer to page 5 for T sensor plug socket location on control board.
Fault Finding – Chart 4.14
System in boost or limp mode - Software version 4.0 or higher
4.14
Test 2
Are the
thermostat contacts
closed?
NO
Repair faulty wiring.
Replace control board.
YES
Is there
240V at the
control board &
relay?
Test 3
NO
Wiring incorrect.
Check control board wiring loom
plug (lower thermostat to control
board wiring loom).
YES
Test 4
Is the
sensor strip
working?
YES
NO
System has operated in limp mode
due to a faulty sensor strip (S1 & S4
faults) and has completed a heating
cycle. Water was heated by the
electric element and controlled by
the Robertshaw thermostat to 70ºC.
Are the
sensor strip plug
pins clean?
NO
YES
TM025 Rheem Heat Pump Service Instructions REV: B
Date of Issue: 02/08/07
This document is stored and maintained electronically by
Replace sensor strip.
Ensure sensor strip plug pins and
control board socket are clean
and free from conformal coating.
Replace control board.
40
Service. All printed copies not bearing this statement in RED are deemed “uncontrolled”.
Fault Finding – Chart 5
Leaking water heater
5
Is
the water leak
intermittent?
Leak is probably condensate
draining from the evaporator
condensate tray.
Normal Operation.
YES
NO
Is
the T&PR
valve continuously
discharging
water?
Is the
correct T&PR valve
fitted?
YES
NO
Replace T&PR valve with one of
the correct pressure rating.
Do NOT use reconditioned
T&PR valves.
YES
Existing pressure limiting valve
faulty.
Fit pressure limiting valve if not
already fitted.
Replace T&PR valve if required.
YES
Is the
water supply
pressure above
800kPa?
NO
Check for crossed water
connection.
Replace T&PR valve.
NO
Is
the leak from the
heat pump water
system?
Tighten or remake flexible hose
connection(s).
Repair or replace leaking heat
exchanger.
Replace leaking circulator.
Remake or replace dropper tube
connections.
YES
NO
Is the
leak from the
electrical access
cover?
Is the
leak from
the element barrel
fitting?
YES
NO
NO
YES
Are
the anode/s
leaking?
Check for loose element bolts.
Remove element and replace
gasket.
Inner Cylinder leaking
Check for hot spots on the jacket
Replace water heater.
NO
Remove anode and repair leak
using Teflon thread tape.
YES
TM025 Rheem Heat Pump Service Instructions REV: B
Date of Issue: 02/08/07
This document is stored and maintained electronically by
41
Service. All printed copies not bearing this statement in RED are deemed “uncontrolled”.
Fault Finding – Chart 6
Noisy water heater
6
Is the
noise only evident
during the heating
cycle?
Is the
noise from the
evaporator
fan?
YES
NO
Check for loose fittings or pipe work in
the refrigeration system.
Check for possible mechanical failure in
compressor
AIR
Normal noise level during operation is
approximately 52dB at 1.5 metres.
If this level is affecting neighbors a timer
should be fitted to prevent operation
during the affected hours or to comply
with local council regulations
YES
Is
the noise
mechanical or air
related?
NO
Mechanical
Is the
noise water
hammer?
Fan loose on motor shaft, remove
assembly and tighten.
Fan motor faulty - Replace.
Refer to water hammer causes in the
‘Common Complaints’ section.
YES
NO
Is the
noise only evident
when water is flowing
through the
heater?
Check all other appliances or valves that
can generate noise i.e. washing
machines, dishwashers, ball valves etc.
NO
YES
Is the
noise a
metallic popping
sound?
Cylinder contracting due to pressure
release when hot tap opened.
This can also be accompanied by a
creaking or cracking sound.
Normal Operation.
YES
NO
Is the
water pressure
more than 80% of the
T&PR valve
rating?
Check for a faulty stop cock, non-return
valve or T&PR valve.
NO
Check for restrictions in pipe work, faulty
valves, loose plumbing or other
appliances i.e. washing machine or
dishwasher.
Fit 600kPa pressure limiting valve.
YES
TM025 Rheem Heat Pump Service Instructions REV: B
Date of Issue: 02/08/07
This document is stored and maintained electronically by
42
Service. All printed copies not bearing this statement in RED are deemed “uncontrolled”.
Fault Finding – Chart 7
Blowing fuse/circuit breaker
7
Note: The control board has an internal resistor that will provide a Megaohm reading of
0.66 Megaohms when an insulation test is conducted on the control board or the
appliance with control board connected.
Disconnect the wiring to the
compressor and megger
between each compressor
terminal and earth.
Is the
reading below 1
Megaohm?
YES
Replace compressor.
Is the
reading below 1
Megaohm?
YES
Replace fan motor.
Is the
reading below 1
Megaohm?
YES
Replace element.
Is the
reading below 1
Megaohm?
YES
Replace thermostat.
Is the
reading below 1
Megaohm?
YES
Replace circulator.
Is the
reading below 0.66
Megaohms?
YES
Replace control board.
NO
Disconnect the wiring to the
fan motor at the terminal
block and megger between
each fan wire and earth.
NO
Disconnect the wiring to the
element at the thermostat
and megger between each
element wire and earth.
NO
Disconnect the remaining
wiring from the thermostat
and megger between each
thermostat terminal and
earth.
NO
Disconnect the wiring plug to
the circulator at the control
board and megger between
each circulator wire and
earth.
NO
Disconnect the power supply
wiring to the control board at
the terminal block and
megger between each control
board wire and earth.
NO
TM025 Rheem Heat Pump Service Instructions REV: B
Date of Issue: 02/08/07
This document is stored and maintained electronically by
Check for pinched or
damaged wiring touching
the heater jacket.
43
Service. All printed copies not bearing this statement in RED are deemed “uncontrolled”.
Fault Finding – Chart 8 - 8.3
Refrigeration system fault finding
8
8.1
8.2
8.3
Fit pressure gauge
to high side of
refrigerant system.
Test 19
Is the
head pressure
excessive?
NO
Replace compressor.
NO
Locate blockage in refrigerant
system and repair.
YES
Possible restriction in system,
Locate and repair.
Possible system overcharge,
adjust refrigerant charge.
TX valve metering incorrectly,
adjust or replace TX valve.
NO
Adjust TX valve (refer to
component replacement
procedure 23 “TX valve
adjustment”) or replace if faulty.
YES
Allow time for the
system to equalise.
Did
the system
equalise?
YES
Is the system
taking too long to
equalise?
NO
Is the
TX valve
operating?
Test 21
System overcharged, adjust
refrigerant charge.
YES
Fit pressure gauges
to high and low side
of refrigerant system.
Test 20
Is the
Suction pressure
YES
low/vacuum or
excessively
high?
Low
Locate and repair leak in
refrigerant system.
High
NO
High side head pressure excessive (Test 18)
TM025 Rheem Heat Pump Service Instructions REV: B
Date of Issue: 02/08/07
This document is stored and maintained electronically by
44
Service. All printed copies not bearing this statement in RED are deemed “uncontrolled”.
Component Test 19
Warning – “Live” equipment. Wear Personal Protective Equipment when
conducting this test.
Fit gauges to the high side access pipe
and observe the discharge pressure.
1800 kPa
Typical high pressure range is
2100 kPa depending on cylinder
temperature. The high pressure
should be within 1700-1800 kPa
heating from cold.
1400water
range
when
Component Test 20
Warning – “Live” equipment. Wear Personal Protective Equipment when
conducting this test.
Check for persistent air bubbles through
sight glass of receiver/filter drier. Fit
gauges to the low side access pipe and
observe the suction pressure.
The suction (low side) pressure is very
dependent on ambient conditions
however the low pressure range is
typically between 200-600 kPa.
200 kPa @ 10°C ambient.
600 kPa @ 45°C ambient.
A suction pressure of less than 200kPa
may indicate a refrigerant leak or a
malfunctioning TX valve.
400 kPa
Note: Refer to the following section for
more information on refrigerant charge
and refrigerant charge fault indications.
Refrigerant Charge
Indication of correct refrigerant charge
The receiver/filter dryer sight glass should show clear liquid, a few small bubbles might be
visible during initial start up of the system or when the TX valve opens quickly, however
clear liquid should return shortly after. Compressor current draw should be between 5 – 6
Amps and system pressures should be within normal ranges (refer to component test 19
(above) and component test 20 (above) for typical system pressures).
TM025 Rheem Heat Pump Service Instructions REV: B
Date of Issue: 02/08/07
This document is stored and maintained electronically by
45
Service. All printed copies not bearing this statement in RED are deemed “uncontrolled”.
Indication of undercharged system
Bubbles persist for a significant amount of time or repeat often. Compressor current draw
is low (<5 Amps) together with low system pressures. If sight glass indicates clear gas,
not liquid, and current draw is very low combined with low discharge line temperature then
the system is totally empty. Note: Unusual current draw or low suction pressure can be a
sign of other problems such as a blockage or malfunctioning TX valve.
Indication of overcharged system
Continuous liquid through sight glass, evaporator tends to flood, head pressure high,
compressor current draw high (>6 Amps) and compressor noisy. Note: Unusual current
draw or high head pressure can be a sign of other problems such as a blockage or
malfunctioning TX valve.
Component Test 21
Warning – “Live” equipment. Wear Personal Protective Equipment when
conducting this test.
Fit gauges to low side access pipe.
Remove the insulation from the TX valve
sensor on the suction line.
Hold the sensor by hand to increase the
heat detected by the sensor. The TX
valve should open with the following
results:
1. Flow of refrigerant through sight glass
of receiver/filter dryer should increase.
2. Evaporator pressure should increase.
3. Suction line should become cooler.
Remove hand and replace insulation, the
TX valve should close, resulting in the
reversal of the above results.
Electrical Insulation Testing
There are three basic test procedures that should be carried out when the operation and
function of a heat pump water heater’s electrical system is in doubt.
Wear Personal Protective Equipment when conducting step 1 of this
procedure to reduce the risk of electric shock. Refer to Rheem safety
procedure on electrical testing.
Insulation resistance of the water heater Neutral Circuit. (Reading not to be below
0.66 Mega ohm).
1. Isolate power to the water heater at the isolation switch. Confirm with multimeter across terminal block Active and Neutral, then Active and Earth, then
Neutral and Earth that voltage is not present.
2. Once satisfied, disconnect the Active and Neutral wires from the water heater terminal
block.
3. Connect megger leads to the Neutral of the water heater wiring and Earth.
4. Operate megger. A reading above 0.66 Mega ohm should be obtained.
5. If a reading below 0.66 Mega ohm is indicated, all component parts will need to be
individually tested to locate the fault. Refer to Fault Finding Chart 7 on page 43.
TM025 Rheem Heat Pump Service Instructions REV: B
Date of Issue: 02/08/07
This document is stored and maintained electronically by
46
Service. All printed copies not bearing this statement in RED are deemed “uncontrolled”.
Insulation resistance of the water heater Active Circuit (reading not to be below 0.66
mega-ohm).
6. Connect megger leads to the Active of the water heater wiring and Earth.
7. Operate megger. A reading above 0.66 Mega ohm should be obtained.
8. If a reading below 0.66 Mega ohm is indicated, all component parts will need to be
individually tested to locate the fault. Refer to Fault Finding Chart 7 on page 43.
To check “Continuity” of the Heat Pump electrical circuit.
9. Set megger to resistance scale or multimeter to x1 resistance scale.
10. Measure between the Active and Neutral terminals on the power supply terminal block
located behind the electrical/element access cover. The resistance should be
approximately 24 ohms. If a reading outside this resistance is measured all electrical
component parts will need to be individually tested to locate the fault. Refer to
Specifications table on page 3 for indicative resistance values of components.
11. Reconnect active cable to ‘A’ terminal and neutral cable to ‘N’ terminal at heater
terminal block.
12. Replace fuse. Note: If continuing with any diagnostic procedures do not replace
the fuse.
Component Replacement Procedures – Water Heater
Draining the Water Heater (Procedure 1)
Elevated temperatures may be present during the draining process.
Wear Personal Protective Equipment to prevent scalds or burns.
Wear Personal Protective Equipment when conducting step 3 of this
procedure to reduce the risk of electric shock. Refer to Rheem Safety
Procedure on electrical testing.
1. Isolate the power and water supplies to the water heater.
2. Relieve pressure from the water heater through the T & PR valve or a hot tap.
3. Remove the lower electrical/element access cover and confirm with a multimeter between the Active and Neutral, then Active and Earth, then Neutral and
Earth terminals of the terminal block that voltage is not present.
4. Disconnect the cold water supply pipe
5. Fit a drain hose to the cold-water connection and run the other end to a drain or safe
location.
6. Open the temperature and pressure relief valve to allow air into the system.
TM025 Rheem Heat Pump Service Instructions REV: B
Date of Issue: 02/08/07
This document is stored and maintained electronically by
47
Service. All printed copies not bearing this statement in RED are deemed “uncontrolled”.
Temperature and Pressure Relief Valve (Procedure 2)
Never fit a T&PR valve with a rating higher than that indicated on the water
heater rating plate. Do not use reconditioned T&PR valves.
1.
2.
3.
4.
Isolate the power and water supplies to the water heater.
Relieve pressure from the water heater through the T & PR valve or a hot tap.
Remove the drain line from the T&PR valve.
Unscrew the T&PR valve and remove.
A quantity of hot water will discharge from the tank during this process. Wear
Personal Protective Equipment to prevent scalds or burns.
5. Confirm the replacement T&PR valve is the correct rating and refit using thread tape.
6. Refit the drain line.
7. Close the hot tap and restore water supply.
8. Check T&PR valve thread for leaks.
9. Operate the T&PR valve lever to reset relief drain.
10. Purge air from the system through hot taps.
11. Restore the power supply to the water heater.
Dip Tube (Procedure 3)
1. Isolate the power and water supplies to the water heater.
2. Relieve pressure from the water heater through the T & PR valve or a hot tap.
3. Disconnect the hot water line from the outlet of the water heater.
A quantity of hot water will discharge from the outlet during this process.
Wear Personal Protective Equipment to prevent scalds or burns.
4. Using a flat blade screwdriver gently split the outer rim at the top and bottom of the dip
tube face and prise the dip tube out of the cylinder fitting.
5. Fit the replacement dip tube into the cylinder fitting ensuring the flat lines up with the
fitting (dip tube facing up) and gently drive the dip tube into the fitting a short distance.
6. Reconnect the plumbing; this will push the dip tube into the correct location.
7. Restore the water supply and purge air from the system through hot taps.
8. Restore the power supply.
Mechanical Thermostat (Procedure 4)
Wear Personal Protective Equipment when conducting step 2 of this
procedure to reduce the risk of electric shock. Refer to Rheem Safety
Procedure on electrical testing.
1. Isolate the power to the water heater and remove access cover.
2. Confirm with a multi-meter between Active and Neutral, then Active and Earth,
then Neutral and Earth terminals of the terminal block that voltage is not present.
3. Disconnect the wiring to the thermostat.
4. Slide the thermostat out from under the retaining clamp.
5. Remove any scale from the cylinder surface.
6. Fit the replacement thermostat under the clamp.
7. Reconnect the wiring as per the circuit wiring diagram on page 11.
8. Conduct an electrical insulation test. Refer to page 46.
9. Refit the access cover and restore the power supply.
TM025 Rheem Heat Pump Service Instructions REV: B
Date of Issue: 02/08/07
This document is stored and maintained electronically by
48
Service. All printed copies not bearing this statement in RED are deemed “uncontrolled”.
Anode (Procedure 5)
Elevated temperatures may be present during anode removal process. Wear
Personal Protective Equipment to prevent scalds or burns.
1. Isolate the power and water supplies to the water heater.
2. Relieve pressure from the water heater and drain approximately 10 litres of water
from the cylinder through the T & PR valve.
3. Remove the air inlet louver (Refer to Procedure 10).
4. Remove the refrigeration section jacket top.
5. Remove the anode cap(s). Access is provided through the refrigeration plant chassis.
6. Using a 27mm tube or socket spanner remove the anode(s).
7. Apply thread seal tape to replacement anode, refit and tighten. Note: It may be
necessary to cut the anode to length prior to fitting. Refer to page 3 for the correct
anode length.
8. Restore water supply and check for leaks.
9. Refit the anode cap(s), jacket, air inlet louver and jacket top and restore power.
Heating Unit (Procedure 6)
Wear Personal Protective Equipment when conducting step 1 of this
procedure to reduce the risk of electric shock. Refer to Rheem Safety
Procedure on electrical testing.
1. Drain the water heater. Refer to procedure 1.
2. Remove the access cover and disconnect the wiring from the terminal block.
Disconnect the wiring to the heating unit from the thermostat. Unclip the terminal block
from the jacket and remove thermostat and terminal block.
3. Remove the two screws retaining the thermostat clamp.
4. Loosen the two lower screws slightly. When water is below the heating unit level, refit
the cold water supply pipe.
5. Remove the two lower screws and withdraw the heating unit carefully making sure the
loop does not catch and open up inside the cylinder.
6. Clean around the cylinder fitting, fit gasket to replacement heating unit and insert into
water heater. Note: Ensure the element is installed in the same orientation.
7. Replace screws and thermostat clamp, and then tighten.
8. Close T&PR valve, and open all hot taps. Restore the cold water supply and purge air
through hot taps, close each hot tap as water runs freely.
9. Check heating unit for leaks.
10. Refit thermostat and terminal block and reconnect the wiring as per the circuit wiring
diagram on page 11.
11. Refit the access cover.
12. Restore power supply to the water heater.
TM025 Rheem Heat Pump Service Instructions REV: B
Date of Issue: 02/08/07
This document is stored and maintained electronically by
49
Service. All printed copies not bearing this statement in RED are deemed “uncontrolled”.
Dropper Tube(s) (Procedure 7)
Wear Personal Protective Equipment when conducting step 2 of this
procedure to reduce the risk of electric shock. Refer to Rheem Safety
Procedure on electrical testing.
In order to replace the dropper tube(s) the heat pump (refrigeration) module
must be removed and refitted. Due to the weight of the unit (approx 45kgs)
this is a two man job.
A quantity of hot water may discharge from the flexible hose(s) during this
procedure. Wear Personal Protective Equipment to prevent scalds or burns
and ensure all escaping water is caught in a container to prevent the sensor
strip from becoming water damaged.
1. Isolate the power and water supplies to the water heater.
2. Confirm with a multi-meter between Active and Neutral, then Active and Earth,
then Neutral and Earth terminals of the terminal block that voltage is not
present.
3. Relieve pressure from the water heater and drain approximately 10 litres of water
from the cylinder through the T & PR valve.
4. Remove the refrigeration module (refer to procedure 9 steps 4 - 9).
5. Remove the sensor strip wiring grommet from the jacket top.
6. Loosen the main power wiring cable clamp screw.
7. Carefully remove the jacket top. Note: During the foaming process the foam adheres to
the jacket top which can make it difficult to remove.
8. Clear foam from around the dropper tube(s) ¾” to ½”brass fitting(s).
9. Using an extra deep 35mm socket unscrew the dropper tube(s) brass fitting(s) in an
anticlockwise direction. Note: the 35mm socket must have a minimum internal nut
clearance depth of 40mm.
10. Withdraw brass adapter(s) and dropper tube(s) from cylinder. Note: dropper tube is a
push fit into the tapered section of the brass adapter, simply pull dropper tube to
remove.
11. Complete reassembly in reverse order of above using thread tape on dropper tube(s)
brass adapter(s) threaded section.
TM025 Rheem Heat Pump Service Instructions REV: B
Date of Issue: 02/08/07
This document is stored and maintained electronically by
50
Service. All printed copies not bearing this statement in RED are deemed “uncontrolled”.
Sensor Strip (Procedure 8)
Wear Personal Protective Equipment when conducting step 2 of this
procedure to reduce the risk of electric shock. Refer to Rheem Safety
Procedure on electrical testing.
In order to replace the sensor strip the heat pump (refrigeration) module must
be removed and refitted. Due to the weight of the unit (approx 45kgs) this is a
two man job.
1. Isolate the power and water supplies to the water heater.
2. Confirm with a multi-meter between Active and Neutral, then Active and Earth,
then Neutral and Earth terminals of the terminal block that voltage is not
present.
3. Remove the refrigeration module (refer to procedure 9).
4. Remove the sensor strip wiring grommet from the jacket top.
5. Loosen the main power wiring cable clamp screw.
6. Carefully remove the jacket top. Note: During the foaming process the foam adheres to
the jacket top which can make it difficult to remove.
7. Carefully remove the foam insulation from around the sensor strip wiring until the
sensor strip pocket can be seen (approx 150 – 200mm down), adjacent to the cylinder
top. Note: Save the foam insulation for repacking in step 14 of this procedure.
8. Carefully grip the sensor strip and slide the sensor strip out, ensure that the sensor
strip pocket has also not been gripped. Note: The fitment between the sensor strip
and the pocket is quite firm, do not pull on the wires only as they will break away
from the strip.
9. Carefully insert the replacement sensor strip into the pocket. Note: When reinserting
the replacement sensor strip ensure the plastic backing is facing AWAY from the
cylinder. The strip will need to be supported by hand to prevent it bending as it is
inserted into the pocket and it must be fully inserted to operate correctly. Lubricants
of any kind must NOT be used.
10. Re-pack the foam removed in step 11 into the hole.
11. Complete reassembly in reverse order of above.
12. Restore water and electricity supplies and check heat pump operation.
TM025 Rheem Heat Pump Service Instructions REV: B
Date of Issue: 02/08/07
This document is stored and maintained electronically by
51
Service. All printed copies not bearing this statement in RED are deemed “uncontrolled”.
Component Replacement Procedures – Refrigeration Plant
Refrigeration Module (Procedure 9)
Wear Personal Protective Equipment when conducting step 2 of this
procedure to reduce the risk of electric shock. Refer to Rheem Safety
Procedure on electrical testing.
Due to the weight of the refrigeration unit (approx 45kgs) this is a two man
job.
A quantity of hot water may discharge from the flexible hose(s) during this
procedure. Wear Personal Protective Equipment to prevent scalds or burns
and ensure all escaping water is caught in a container to prevent the sensor
strip from becoming water damaged.
1. Isolate the power and water supplies to the water heater.
2. Confirm with a multi-meter between Active and Neutral, then Active and Earth,
then Neutral and Earth terminals of the terminal block that voltage is not
present.
3. Relieve pressure from the water heater and drain approximately 10 litres of water
from the cylinder through the T & PR valve.
4. Remove the front and rear air louvres.
5. Undo the controller cover retaining screw, remove the controller cover and disconnect
the sensor strip and power supply wiring loom plugs from the electronic controller.
6. If fitted, disconnect the condensate drain.
7. Disconnect the hot and cold flexible hoses connecting the heat pump module to the
cylinder at the cylinder fittings (refer to owners guide for location). Note: Ensure all
escaping water is caught in a container to prevent the sensor strip from
becoming water damaged.
8. Remove the 3 x 6mm bolts retaining the heat pump module to the cylinder (refer to
owners guide for location).
9. Slide lifting bars (part number 080151) through the slots provided in the chassis (refer
to owners guide for location) and lift the heat pump module clear of the cylinder.
10. Complete reassembly in reverse order of above.
Air Inlet Louver (Procedure 10)
1. Isolate the power to the water heater.
2. Remove the refrigeration section jacket top.
3. Remove the 2 screws from the left and right hand sides of the air inlet louver.
4. Remove the 3 screws from the Colorbond trim directly below the air inlet louver.
5. Lift the louver clear of the jacket.
6. Complete reassembly in reverse order of above.
TM025 Rheem Heat Pump Service Instructions REV: B
Date of Issue: 02/08/07
This document is stored and maintained electronically by
52
Service. All printed copies not bearing this statement in RED are deemed “uncontrolled”.
Refrigeration Section Jacket (Procedure 11)
The fan motor may commence operation without warning. Failure to isolate
the power may result in serious injury if the fan commences operation during
the removal process.
1. Remove the air inlet louver (refer to Procedure 10).
2. Remove the air outlet cover.
3. Remove the handle.
4. Remove the screws retaining the jacket to the water heater and lift the jacket clear.
Note: The refrigeration section jacket is quite flexible, care should be taken to ensure it
does not kink during removal or replacement.
5. Complete reassembly in reverse order of above.
Evaporator Fan Motor (Procedure 12)
Wear Personal Protective Equipment when conducting step 2 of this
procedure to reduce the risk of electric shock. Refer to Rheem Safety
Procedure on electrical testing.
The fan motor may commence operation without warning. Failure to isolate
the power may result in serious injury if the fan commences operation during
the removal process.
1. Isolate the power to the water heater.
2. Remove the access cover and confirm with a multi-meter between Active and
Neutral, then Active and Earth, then Neutral and Earth terminals of the terminal
block that voltage is not present.
3. Remove the refrigeration section jacket (refer to Procedure 11).
4. Undo the controller cover retaining screw, remove the controller cover and disconnect
the wiring to the fan motor from the terminal block. Cut wiring loom cable ties and
remove fan wiring.
5. Remove the 2 screws retaining the fan shroud to the evaporator.
6. Slide the shroud up to disengage the locating tabs and lift clear.
7. Undo the nut retaining the fan blade to the motor shaft and remove the blade.
8. Undo the 3 nuts retaining the motor to the shroud and remove the motor.
9. Complete reassembly in reverse order of above.
TM025 Rheem Heat Pump Service Instructions REV: B
Date of Issue: 02/08/07
This document is stored and maintained electronically by
53
Service. All printed copies not bearing this statement in RED are deemed “uncontrolled”.
Control Board (Procedure 13)
Wear Personal Protective Equipment when conducting step 2 of this
procedure to reduce the risk of electric shock. Refer to Rheem Safety
Procedure on electrical testing.
1. Isolate the power to the water heater.
2. Remove the access cover and confirm with a multi-meter between Active and
Neutral, then Active and Earth, then Neutral and Earth terminals of the terminal
block that voltage is not present.
3. Remove the air inlet louver (refer to Procedure 10).
4. Undo the controller cover retaining screw, remove the controller cover and unplug
power supply wiring loom, T sensors, circulator, fan and sensor strip plugs from control
board.
5. Mark and disconnect compressor wiring from control board.
6. Remove two screws retaining control board bracket to refrigeration base and remove
control board.
7. Complete reassembly in reverse order of above.
Relay (Procedure 14)
Wear Personal Protective Equipment when conducting step 2 of this
procedure to reduce the risk of electric shock. Refer to Rheem Safety
Procedure on electrical testing.
1. Isolate the power to the water heater.
2. Remove the access cover and confirm with a multi-meter between Active and
Neutral, then Active and Earth, then Neutral and Earth terminals of the terminal
block that voltage is not present.
3. Remove the air inlet louver (refer to Procedure 10).
4. Undo the controller cover retaining screw, remove the controller cover and disconnect
wiring to compressor capacitor.
5. Remove cable tie retaining compressor capacitor and remove compressor capacitor.
6. Mark and disconnect wiring to relay, remove two relay retaining screws and remove
relay.
7. Complete reassembly in reverse order of above.
Compressor Capacitor (Procedure 15)
Wear Personal Protective Equipment when conducting step 2 of this
procedure to reduce the risk of electric shock. Refer to Rheem Safety
Procedure on electrical testing.
1. Isolate the power to the water heater.
2. Remove the access cover and confirm with a multi-meter between Active and
Neutral, then Active and Earth, then Neutral and Earth terminals of the terminal
block that voltage is not present.
3. Remove the air inlet louver (refer to Procedure 10).
4. Undo the controller cover retaining screw, remove the controller cover and disconnect
wiring to compressor capacitor.
5. Remove cable tie retaining compressor capacitor and remove compressor capacitor.
6. Complete reassembly in reverse order of above.
TM025 Rheem Heat Pump Service Instructions REV: B
Date of Issue: 02/08/07
This document is stored and maintained electronically by
54
Service. All printed copies not bearing this statement in RED are deemed “uncontrolled”.
Fan Capacitor (Procedure 16)
Wear Personal Protective Equipment when conducting step 2 of this
procedure to reduce the risk of electric shock. Refer to Rheem Safety
Procedure on electrical testing.
1. Isolate the power to the water heater.
2. Remove the access cover and confirm with a multi-meter between Active and
Neutral, then Active and Earth, then Neutral and Earth terminals of the terminal
block that voltage is not present.
3. Remove the air inlet louver (refer to Procedure 10).
4. Undo the controller cover retaining screw, remove the controller cover and disconnect
wiring to compressor capacitor
5. Remove cable tie retaining compressor capacitor and remove compressor capacitor.
6. Disconnect wiring to fan capacitor, remove two fan capacitor retaining screws and
remove fan capacitor.
7. Complete reassembly in reverse order of above.
Circulator (Procedure 17)
Wear Personal Protective Equipment when conducting step 2 of this
procedure to reduce the risk of electric shock. Refer to Rheem Safety
Procedure on electrical testing.
A quantity of hot water may discharge from the circulator flexible hoses
during this procedure. Wear Personal Protective Equipment to prevent scalds
or burns and ensure all escaping water is caught in a container to prevent the
sensor strip from becoming water damaged.
1. Isolate the power and water supplies to the water heater.
2. Remove the access cover and confirm with a multi-meter between Active and
Neutral, then Active and Earth, then Neutral and Earth terminals of the terminal
block that voltage is not present.
3. Relieve pressure from the water heater and drain approximately 10 litres of water
from the cylinder through the T & PR valve.
4. Remove the air inlet louver (refer to Procedure 10).
5. Remove circulator electrical cover, disconnect wiring and remove wiring from circulator
compression gland.
6. Unscrew circulator flexible hose unions. Note: Ensure all escaping water is caught
in a container to prevent the sensor strip from becoming water damaged.
7. Unscrew circulator inlet adapter and remove circulator from supporting bracket.
8. Complete reassembly in reverse order of above.
TM025 Rheem Heat Pump Service Instructions REV: B
Date of Issue: 02/08/07
This document is stored and maintained electronically by
55
Service. All printed copies not bearing this statement in RED are deemed “uncontrolled”.
T sensor(s) (Procedure 18)
Wear Personal Protective Equipment when conducting step 2 of this
procedure to reduce the risk of electric shock. Refer to Rheem Safety
Procedure on electrical testing.
1. Isolate the power supply to the water heater.
2. Remove the access cover and confirm with a multi-meter between Active and
Neutral, then Active and Earth, then Neutral and Earth terminals of the terminal
block that voltage is not present.
3. Remove the air inlet louver (refer to Procedure 10).
4. Undo the controller cover retaining screw and remove the controller cover.
5. Unplug the T sensor plug from the control board.
6. Remove insulation surrounding T sensor (if applicable).
7. Remove sensor retaining clip and withdraw sensor. Note: Ambient air sensor is held in
place by a locking nut and evaporator sensor is held in place by a cable tie. Ambient air
sensor retainer can be manoeuvred out of cable tie. Do not cut cable tie as it is difficult
to replace.
8. Cut wiring loom cable ties and remove T sensor and wiring.
9. Complete reassembly in reverse order of above.
TM025 Rheem Heat Pump Service Instructions REV: B
Date of Issue: 02/08/07
This document is stored and maintained electronically by
56
Service. All printed copies not bearing this statement in RED are deemed “uncontrolled”.
Component Replacement Procedures – Sealed Refrigeration System
Personnel qualified and licensed to work with refrigerants may only carry out
the following repair procedures to the sealed refrigeration system.
The following procedures assume that all work conducted conforms to the
refrigeration code of good practice. During repair the refrigerant must be
recovered, not vented to atmosphere.
Evaporator (Procedure 19)
Wear Personal Protective Equipment when conducting step 2 of this
procedure to reduce the risk of electric shock. Refer to Rheem Safety
Procedure on electrical testing.
1. Isolate the power to the water heater.
2. Remove the access cover and confirm with a multi-meter between Active and
Neutral, then Active and Earth, then Neutral and Earth terminals of the terminal
block that voltage is not present.
3. Remove the evaporator shroud and fan assembly (refer to Procedure 12 Steps 3 - 6).
4. Remove the evaporator T sensor clip from the cable tie and remove the T sensor from
the evaporator finning.
5. Recover refrigerant from sealed refrigeration system.
6. Remove the pipe insulation to expose pipe work at the evaporator. Un-braze the pipework to the evaporator.
7. Remove the 4 screws retaining the evaporator to the chassis and lift evaporator clear.
8. Fit and secure the replacement evaporator and braze pipe work.
9. Replace the receiver/filter drier. (Refer to Procedure 20 – steps 4 to 7)
10.Pressurise system to 3000kPa and conduct a leak test. Refit and secure pipe work
insulation.
11.Evacuate system to 100 microbar (30”) for a period of at least 30 minutes.
12.Recharge system with the correct refrigerant. Refer to specifications table on page 3.
13.Refit the evaporator shroud and fan motor assembly and refrigeration section jacket.
14.Refit air inlet louver and jacket top.
15.Restore power. The refrigeration plant should commence operation.
TM025 Rheem Heat Pump Service Instructions REV: B
Date of Issue: 02/08/07
This document is stored and maintained electronically by
57
Service. All printed copies not bearing this statement in RED are deemed “uncontrolled”.
Receiver/Filter Drier (Procedure 20)
Wear Personal Protective Equipment when conducting step 2 of this
procedure to reduce the risk of electric shock. Refer to Rheem Safety
Procedure on electrical testing.
1. Isolate the power to the water heater.
2. Remove the access cover and confirm with a multi-meter between Active and
Neutral, then Active and Earth, then Neutral and Earth terminals of the terminal
block that voltage is not present.
3. Remove the air inlet louver (refer to Procedure 10).
4. Recover refrigerant from sealed refrigeration system.
5. Undo the compression nuts on the inlet and outlet of the receiver/filter drier.
6. Cut the cable tie and remove the receiver/filter drier.
7. Fit the replacement receiver/filter drier, secure using a cable tie and retighten the
compression fittings.
8. Pressurise system to 3000kPa and conduct a leak test.
9. Evacuate system to 100 microbar (30”) for a period of at least 30 minutes.
10.Recharge system with the correct refrigerant. Refer to “Specifications – Refrigeration
System” table on page 3.
11.Refit air inlet louver and jacket top.
12.Restore power. The refrigeration plant should commence operation after a 30 second
delay.
TM025 Rheem Heat Pump Service Instructions REV: B
Date of Issue: 02/08/07
This document is stored and maintained electronically by
58
Service. All printed copies not bearing this statement in RED are deemed “uncontrolled”.
Compressor and Accumulator (Procedure 21)
Wear Personal Protective Equipment when conducting step 2 of this
procedure to reduce the risk of electric shock. Refer to Rheem Safety
Procedure on electrical testing.
1. Isolate the power to the water heater.
2. Remove the access cover and confirm with a multi-meter between Active and
Neutral, then Active and Earth, then Neutral and Earth terminals of the terminal
block that voltage is not present.
3. Remove the refrigeration section jacket (refer to Procedure 11).
4. Remove the evaporator shroud and fan motor assembly (refer to Procedure 12 Steps 3
- 6).
5. Recover refrigerant from sealed refrigeration system.
6. Disconnect the wiring to the compressor and unclip and remove the compressor T
sensor from the compressor discharge pipe work.
7. Remove the pipe insulation to expose pipe work at the compressor and accumulator.
Un-braze the discharge pipe-work from the compressor and the suction line from the
accumulator.
8. Remove the 3 nuts retaining the compressor to the chassis and lift the compressor and
accumulator clear.
9. Fit and secure the replacement compressor and accumulator, braze pipe work,
reconnect wiring to the compressor and refit the discharge T sensor and retaining clip.
16.Replace the receiver/filter drier (Refer to Procedure 20 – steps 4 to 7).
10.Pressurise system to 3000kPa and conduct a leak test. Refit and secure pipe work
insulation.
11. Evacuate system to 100 microbar (30”) for a period of at least 30 minutes.
12.Recharge system with the correct refrigerant. Refer to “Specifications – Refrigeration
System” table on page 3.
13. Refit the evaporator shroud and fan motor assembly and refrigeration section jacket.
14.Refit air inlet louver and jacket top.
15. Restore power. The refrigeration plant should commence operation after a 30 second
delay.
TM025 Rheem Heat Pump Service Instructions REV: B
Date of Issue: 02/08/07
This document is stored and maintained electronically by
59
Service. All printed copies not bearing this statement in RED are deemed “uncontrolled”.
TX Valve Replacement (Procedure 22)
Wear Personal Protective Equipment when conducting step 2 of this
procedure to reduce the risk of electric shock. Refer to Rheem Safety
Procedure on electrical testing.
1. Isolate the power to the water heater.
2. Remove the access cover and confirm with a multi-meter between Active and
Neutral, then Active and Earth, then Neutral and Earth terminals of the terminal
block that voltage is not present.
3. Remove the refrigeration section jacket (refer to Procedure 11).
4. Recover refrigerant from sealed refrigeration system.
5. Remove the pipe insulation to expose pipe-work at the TX valve assembly and the TX
valve sensor.
6. Separate the TX valve sensor and capillary from the suction line.
7. Un-braze the pipe-work and remove the TX valve.
8. Braze the replacement TX valve into place and attach the sensor to the suction line.
Note: Ensure the sensor bulb is in good contact with the suction line.
9. Replace the receiver/filter drier (Refer to Procedure 20 – steps 4 to 7).
10. Pressurise system to 3000kPa and conduct a leak test. Refit and secure the pipe work
insulation.
11. Evacuate system to 100 microbar (30”) for a period of at least 30 minutes.
12. Recharge system with the correct refrigerant. Refer to “Specifications – Refrigeration
System” table on page 3.
13. Restore power. The refrigeration plant should commence operation after a 30 second
delay.
14. Refit air inlet louver and jacket top.
15. Adjust TX valve if required (Refer to Procedure 23).
TX Valve Adjustment (Procedure 23)
Components within the refrigeration plant section will be “live” during the
adjustment process. Wear Personal Protective Equipment to reduce the risk
of electric shock.
The TX valve is supplied preset and should be installed with the factory setting (6ºC)
unaltered. This setting is calibrated for the lowest superheating and optimum evaporator
utilization. However, should it be necessary to adjust the superheat, turn the adjusting
spindle as follows: Clockwise = Reduced refrigerant flow, increase of superheat.
Anticlockwise = Increased refrigerant flow, decrease in superheat.
1. Remove the air inlet louver (refer to Component
Replacement - Procedure 10).
2. Remove the TX valve sealing cap (see diagram
opposite).
3. Using a 4mm Allen key back the TX valve adjuster screw
anticlockwise all the way out. Note: The adjuster screw is
recessed approximately 8mm.
4. Screw the adjuster screw in three full turns to achieve the
required superheat setting of +6ºC. Note: 1 full 360º turn
of the adjuster screw = 2ºC.
5. Refit and tighten the TX valve cap to a torque of 4Nm.
TM025 Rheem Heat Pump Service Instructions REV: B
Date of Issue: 02/08/07
This document is stored and maintained electronically by
60
Service. All printed copies not bearing this statement in RED are deemed “uncontrolled”.
Heat Exchanger (Procedure 24)
Wear Personal Protective Equipment when conducting step 2 of this
procedure to reduce the risk of electric shock. Refer to Rheem Safety
Procedure on electrical testing.
A quantity of hot water may discharge from the flexible hose(s) during this
procedure. Wear Personal Protective Equipment to prevent scalds or burns
and ensure all escaping water is caught in a container to prevent the sensor
strip from becoming water damaged.
1. Isolate the power and water supplies to the water heater.
2. Remove the access cover and confirm with a multi-meter between Active and
Neutral, then Active and Earth, then Neutral and Earth terminals of the terminal
block that voltage is not present.
3. Relieve pressure from the water heater and drain approximately 10 litres of water
from the cylinder through the T & PR valve.
4. Remove the refrigeration section jacket (refer to Procedure 11).
5. Recover refrigerant from sealed refrigeration system.
6. Undo flexible hose unions at heat exchanger. Note: Ensure all escaping water is
caught in a container to prevent the sensor strip from becoming water damaged.
7. Remove insulation from refrigeration pipe work to and from the heat exchanger and
remove inlet and outlet water sensors.
8. Cut cable ties and remove heat exchanger styrene insulation.
9. Un-braze refrigeration pipe work from heat exchanger and remove heat exchanger.
10. Un-braze water system inlet and outlet pipe work from old heat exchanger and braze
these components on to the new heat exchanger.
11. Braze the replacement heat exchanger (refrigeration pipe work) into place.
12. Refit inlet and outlet water sensors and replace pipe work and heat exchanger
insulation.
13. Remake flexible hose connections to heat exchanger.
17.Replace the receiver/filter drier (Refer to Procedure 20 – steps 4 to 7).
14. Pressurise system to 3000kPa and conduct a leak test. Refit and secure the pipe work
insulation.
15. Evacuate system to 100 microbar (30”) for a period of at least 30 minutes.
16. Recharge system with the correct refrigerant. Refer to “Specifications – Refrigeration
System” table on page 3.
17. Restore water supply and bleed air from the heat exchanger water outlet union. Note:
Ensure all escaping water is caught in a container to prevent the sensor strip
from becoming water damaged.
18. Restore power. The refrigeration plant should commence operation after a 30 second
delay.
19. Adjust TX valve (Refer to Procedure 23).
20. Refit refrigeration jacket (reverse procedure 11).
21. Restore water and power supplies. The refrigeration plant should commence operation
after a 30 second delay.
TM025 Rheem Heat Pump Service Instructions REV: B
Date of Issue: 02/08/07
This document is stored and maintained electronically by
61
Service. All printed copies not bearing this statement in RED are deemed “uncontrolled”.
Exploded View - Refrigeration Plant
TM025 Rheem Heat Pump Service Instructions REV: A
Date of Issue: 02/08/07
62
This document is stored and maintained electronically by
Service. All printed copies not bearing this statement in RED are deemed “uncontrolled”.
Replacement Parts List – Refrigeration Plant
Item
1
2
3
4
5
6
7
8
9
10
11
12
13
14
15
16
17
18
19
20
21
22
23
24
25
26
27
28
29
30
31
32
33
NS
Description
Air Grille
Fan Motor Assy
Air Shield
Fan Shroud
Jacket Top
Evaporator Coil
Condenser
Hose – Braided
Circulator
Capacitor – Fan Motor
Relay
Controller Assy
Control Cover
Sensor Clip
Sensor
Capacitor - Compressor
Compressor
Chassis Assy
Receiver/Filter Drier
TX Valve
Drip Tray
Side Cover
Side Cover - Drip tray outlet
Label – Air Grille
Condenser Insulation
Condenser Insulation Cover
Pipe – Refrigerant, Low Pressure
Pipe – Refrigerant, High Pressure
Pipe – Refrigerant, Drier to Heat Exchanger
Pipe – Refrigerant, Drier to TX
Pipe – Refrigerant, TX to Evaporator
Pipe – Condenser, Upper Water with Thermistor Holder Fitting
Pipe – Condenser, Lower Water with Thermistor Holder Fitting
Heat Pump Module to Water Heater Mounting Screws (pkt of 3)
Part Number
104798
180027
108374
180026
100659
180025
180032
088086
051575
890374
052123
051577
051659
890263
056006
890373
180029
140114
180021
180024
104797
108372
108373
120513
090249
090250
181526
181527
181528
181529
181530
088096
088098
080156
NS = Not shown
TM025 Rheem Heat Pump Service Instructions REV: A
Date of Issue: 02/08/07
This document is stored and maintained electronically by
63
Service. All printed copies not bearing this statement in RED are deemed “uncontrolled”.
Exploded View - Water Heater
TM025 Rheem Heat Pump Service Instructions REV: B
Date of Issue: 02/08/07
This document is stored and maintained electronically by
64
Service. All printed copies not bearing this statement in RED are deemed “uncontrolled”.
Replacement Parts List – Water Heater
Item
1
2
3
4
5
6
7
8
9
10
11
12
13
14
15
16
17
18
19
20
21
22
23
24
25
26
27
Description
Jacket Bottom
Pipe Seal – Inlet/Outlet (¾” x 38)
Inlet Diffuser
Name Band
Dip Tube (Outlet)
Wiring loom assembly
Anode – Black
Anode – Blue
Anode – Green
Anode Cover
Dropper Tube Seal
Dropper Tube – Short
O-ring – Dropper Tubes
Fitting ¾” to ½” Brass
Pipe Seal – Dropper Tubes (30 x 16)
Dropper Tube – Long
Grommet - Sensor Strip
Foam Cover
Sensor Strip
Jacket Top
Pipe Seal – T & PR (½” x 38)
Element Gasket
Thermostat – EWT 1L2-561
Thermostat Clamp
Access Cover
Element Bolts
Element 2.4kW
Element 3.6kW
Terminal Block
T & PR Valve HTE523/507
TM025 Rheem Heat Pump Service Instructions REV: B
Date of Issue: 02/08/07
This document is stored and maintained electronically by
Part Number
100633
221418
220516
120512
225601
N/A
221904
221924
222024
221720-1
087027
220558
087023
088040
221233
220559
080149
221735
053053
108375
221420
050704
051571
102501
100703-1
051404
050324
050323
051521
220641
65
Service. All printed copies not bearing this statement in RED are deemed “uncontrolled”.
Rheem Electric Water Heater Warranty - (Australia Only)
WARRANTY CONDITIONS
1.
2.
3.
4.
This warranty is applicable only to water heaters
manufactured from 1st September 2006.
The water heater must be installed in accordance
with the Rheem water heater installation
instructions, supplied with the water heater, and in
accordance with all relevant statutory and local
requirements of the State in which the water
heater is installed.
Where a failed component or water heater is
replaced under warranty, the balance of the
original warranty period will remain effective. The
replaced part or water heater does not carry a new
warranty.
Where the water heater is installed outside the
boundaries of a metropolitan area as defined by
Rheem or further than 25 km from a regional
Rheem branch office, or an Accredited Service
Agent, the cost of transport, insurance and
travelling costs between the nearest Rheem
5.
6.
7.
Accredited Service Agent’s premises and the
installed site shall be the owner’s responsibility.
Where the water heater is installed in a position
that does not allow safe, ready access, the cost
of accessing the site safely, including the cost of
additional materials handling and / or safety
equipment, shall be the owner’s responsibility.
The warranty only applies to the water heater and
original or genuine (company) component
replacement parts and therefore does not cover
any plumbing or electrical parts supplied by the
installer and not an integral part of the water
heater, e.g. pressure limiting valve; isolation
valves; non-return valves; electrical switches;
pumps or fuse.
The water heater must be sized to supply the hot
water demand in accordance with the guidelines
in the Rheem water heater literature.
WARRANTY EXCLUSIONS
REPAIR AND REPLACEMENT WORK WILL BE CARRIED OUT AS SET OUT IN THE RHEEM WATER HEATER
WARRANTY ABOVE HOWEVER THE FOLLOWING EXCLUSIONS MAY CAUSE THE WATER HEATER WARRANTY
TO BECOME VOID AND MAY INCUR A SERVICE CHARGE AND / OR COST OF PARTS.
a)
b)
c)
Accidental damage to the water heater or any
component, including: Acts of God; failure due to
misuse; incorrect installation; attempts to repair the
water heater other than by a Rheem Accredited
Service Agent or the Rheem Service Department.
Where it is found there is nothing wrong with the
water heater; where the complaint is related to
excessive discharge from the temperature and / or
pressure relief valve due to high water pressure;
where there is no flow of hot water due to faulty
plumbing; where water leaks are related to
plumbing and not the water heater or water heater
components; where there is a failure of gas,
electricity or water supplies; where the supply of
gas, electricity or water does not comply with
relevant codes or acts.
Where the water heater or water heater
component has failed directly or indirectly as a
result of: excessive water pressure; excessive
temperature and / or thermal input; blocked
overflow / vent drain; corrosive
d)
e)
f)
from the water heater.
Where the water heater is located in a position
that does not comply with the Rheem water
heater installation instructions or relevant
statutory requirements, causing the need for
major dismantling or removal of cupboards, doors
or walls, or use of special equipment to bring the
water heater to floor or ground level or to a
serviceable position.
Repair and / or replacement of the water heater
due to scale formation in the waterways or the
effects of either corrosive water or water with a
high chloride or low pH level when the water
heater has been connected to a scaling or
corrosive water supply or a water supply with a
high chloride or low pH level as outlined in the
Owner’s Guide and Installation Instructions
booklet.
Breakage of collector glass for any reason
including hail damage. (We suggest that the
collector glass be covered by your home
insurance policy).
SUBJECT TO ANY STATUTORY PROVISIONS TO THE CONTRARY, THIS WARRANTY EXCLUDES ANY
AND ALL CLAIMS FOR DAMAGE TO FURNITURE, CARPETS, WALLS, FOUNDATIONS OR ANY OTHER
CONSEQUENTIAL LOSS EITHER DIRECTLY OR INDIRECTLY DUE TO LEAKAGE FROM THE WATER
HEATER, OR DUE TO LEAKAGE FROM FITTINGS AND / OR PIPE WORK OF METAL, PLASTIC OR
OTHER MATERIALS CAUSED BY WATER TEMPERATURE, WORKMANSHIP OR OTHER MODES OF
FAILURE.
Rheem Australia Pty Ltd
A.B.N 21 098 823 511
FOR SERVICE TELEPHONE
131 031 AUSTRALIA
or refer local Yellow Pages
NOTE: Every care has been taken to ensure accuracy in preparation of this publication. No liability can be accepted for any
consequences, which may arise as a result of its application.
TM025 Rheem Heat Pump Service Instructions REV: B
Date of Issue: 02/08/07
This document is stored and maintained electronically by
66
Service. All printed copies not bearing this statement in RED are deemed “uncontrolled”.
Document Revision History
Title
Service Instructions for Rheem Heat Pump
Revision
A
B
Document Number
TM025
Details of change
Service Instructions issued for 310 Series Heat Pump
Addition to flow diagram
TM025 Rheem Heat Pump Service Instructions REV: B
Date of Issue: 02/08/07
This document is stored and maintained electronically by
D.O.I.
03/07
08/07
67
Service. All printed copies not bearing this statement in RED are deemed “uncontrolled”.