1
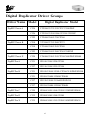
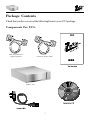
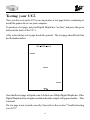
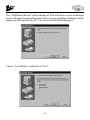
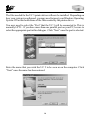
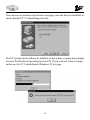
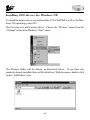
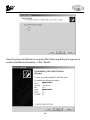
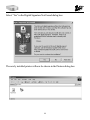
Operators Manual
UC5
ZipRip hardware and software is the property of SMA (Pty) Ltd Australia P.O. Box 774, Fyshwick 2609, ACT Australia
This documentation or any part of it may not be reproduced, stored
or transmitted in any form, including but not limited to electronic,
photocopying, mechanical copying, electrostatic copying, recording
or other means without express written permission of SMA (Pty) Ltd
Australia
Windows is a registered trademark of Microsoft Corporation.
Macintosh is a registered trademark of Apple Computers
Incorporated. Other brand or product names, throughout this
document, are trademarks or registered trademarks of their respective
holders.
Ricoh and PriPort are registered trademarks of Ricoh Japan.
Table of Contents
Introduction ............................................................................................... 4
Basic Specification .................................................................................... 5
Generic Digital duplicator Driver Groups ............................................ 6
Package Contents ..................................................................................... 7
External Features ..................................................................................... 8
Testing your UC 5 .................................................................................... 9
Activity Indicator ................................................................................... 10
GDI Printer Driver Installation ............................................................ 11
Win 3.11 ............................................................................................. 12
Win 95/98/ME .................................................................................... 15
Win NT .............................................................................................. 20
Win2000 ............................................................................................. 25
Basic Operation of the UC5 ................................................................. 32
Frequently Asked Questions ............................................................... 34
Troubleshooting UC5 ............................................................................ 39
3
Introduction
The UC 5 is a high speed interface for Digital Duplicators. With a UC 5 you can
print directly from your PC to your Digital Duplicator. This will significantly improve the quality of your printed material as well as speed up your printing jobs.
We are confident that you will find it a pleasure to use and an asset to your organisation.
4
Basic Specifications
Printer Language: ................................ Windows GDI.
Supported Resolutions: ....................... 300, 400 and 600 dpi.
Graphics Screening: ............................ Coarse, Fine, LineArt, Error Diffusion.
Density control supported.
Supported Drivers:.............................. Win 3.11, Win 95/98/ME., Win 2000,
Win NT
Ports:.................................................. ECP/EPP parallel port.
On Board Memory: ............................ 16 MB
Supported Digital Duplicator
Brands: ............................................... Ricoh, Gestetner, Rex Rotary, Nashuatec,
Savin and Standard. NB check that
your model has interface support.
Certification ........................................ CE, UL, FCC
5
Digital Duplicator Driver Groups
Driver Name Model
ZipRIP Classic A
Digital Duplicator Model
C224
VT2200/5327/1252/CP327/3200DNP
C226
VT2250/5329L/2546/CP329L/325DNP
C222
VT2400/5360/1270/CP360
C210
VT3500/5375/1280/CP375
C218
VT3600/5380/1285/CP380
C223
VT3800/5385/1290/CP385/330DNP
ZipRIP Classic X
C228
VT6000/5390/1295/CP390/3400DNP/SD600
ZipRIP Pro A
C231
JP1010/5306/1224/CP306
C237
JP1210/5308/1225/CP308
C231
JP1030/5306L/1224L/CP306/3150DNP/SD300
C231
JP1050/5306B/1224B/CP306B
C237
JP1230/5308L/3150eDNP/SD330
C237
JP1250/5308B/1225B/CP308B
ZipRIP Pro C
C229
JP5000/5450/1560/CP450/3350DNP/SD400
ZipRIP Pro D
C232
JP5800/5480/1580/CP480
ZipRIP Pro X
C235
JP8000/5490/1395/CP490/3450DNP/SD630
ZipRIP Classic B
ZipRIP Pro B
6
Package Contents
Check that you have received the following Items in your UC5 package.
Components For UC5.
Guide
Cable for connection to
Digital Duplicator
Centronics Parallel Cable
UC5
ZipRIP - UC5
7
External Features
All indicators and plugs referred to in this manual are described in the diagrams
below.
8
Testing your UC5
Once you have set up the UC5 you can produce a test page before continuing to
install the printer drivers on your computer.
To produce a test page, put your Digital Duplicator “on-line” and press the green
button at the back of the UC 5.
After a short delay a test page should be printed. The test page should look like
the illustration below.
Note that the test page will print as an A4 sheet on a 300dpi Digital Duplicator. If the
Digital Duplicator has a higher resolution then the output will appear smaller. - This
is normal.
If a test page is not created correctly, then refer to the section “Troubleshooting
your UC5”.
9
Activity Indicator
The red activity indicator shows the status of the UC 5. The table below explains
the different status indications.
Red Indicator
Display
Meaning
On just after the
UC5 is turned on.
UC5 initialising - the red light will
stay on for 6 seconds.
Flashing rapidly.
The UC5 is receiving a print job.
Continuously on.
The UC5 has received a print job and
is now waiting.
Continuously off.
The UC 5 is idle.
Flashing slowly
and evenly.
There is an error on the digital
duplicator, such as paper jam.
10
GDI Printer Driver Installation
NOTE:
Before beginning the driver installation ensure you are in
possession of your Windows Operating System CD.
Once the UC5 has been installed, you will need to install a GDI printer driver.
Please follow the instructions relating to the operating system installed on the PC
connected to the UC 5.
Note: To allow fastest printing to the UC 5, we recommend that the parallel port
is set to “ECP Mode”. On most new PC’s this is the default setting. However, on
older PC’s you may have to set this in the BIOS configuration utility. If you are
unsure of how to do this, please check with your PC supplier, or IT support staff.
As a guide, most PC’s enter the BIOS when either “delete” or “F1” keys are
pressed at boot up. Once the BIOS programme is running the “Parallel Port
Mode” setting can generally be found in the “Chipset Features” or “Integrated
Peripherals” section.
The following pages will give detailed and illustrated instructions on how to
install the GDI Printer driver for the following operating systems:Windows 3.11
Windows 95/98
Windows NT
Windows 2000
11
Installing GDI drivers for Windows 3.11
To install the printer driver you will need the UC5 CD ROM as well as the Windows 3.11 installation disks.
To set up the UC 5 driver open the Windows “Control Panel” located in the
“Main Program Group”.
Double-click on the “Printers” icon. This will show the printers setup dialogue box. All installed printers will be listed in this box.
Click on the “Add >>” button. Highlight the option “Install Unlisted or Updated Printer”. Click on the “Install” button.
12
You will need to specify the location of the setup files for the UC 5 printer. These
are located in the “win3.11” directory on the supplied UC 5 drivers CD ROM.
Insert the Drivers CD and enter the letter of YOUR CD ROM. For example
“X:\win311”, if “X” is your CD drive letter, as shown in the illustration below.
Click “OK” once you have entered the directory path.
The following dialogue with a list of driver names should be displayed. Select the
model which matches the Digital Duplicator the UC 5 is being installed on and
click “OK”. (Refer to the driver list on page 6)
13
The UC 5 drivers will now be installed. Some of the files used by the driver are
stored on the Windows 3.11 installation disks, as a result you may be prompted to
insert some of these disks during the installation process.
Once the driver has been installed the UC 5 will be listed in the Printers dialogue
box. By default Windows installs the driver on LPT1:. The port can be changed
by clicking on the “Connect” button and specifying an alternative.
Before continuing to use the UC 5 follow the final instructions on setting up the
default options for the UC 5 settings.
Click on “Setup” to set the default options for the UC 5 driver. (These settings can
be overridden by settings made in the “Print - Setup..” dialogue boxes within application programs.)
Choose settings which will be most commonly used with your Digital Duplicator.
Click the “OK” button when done.
14
Installing GDI drivers for Windows 95/98/ME
To install the driver you will need the UC5 CD ROM and your Windows operating
system CD.
The first step is to add a printer driver. Choose the “Printers” menu from the
“Setting” menu in the Windows “Start” menu.
The Printers folder will be shown, as illustrated below. If you have any
printer(s) already installed, these will be listed here. With the mouse, double-click on the “Add Printer” icon.
15
The “Add Printer Wizard” will be displayed. This will show a series of dialogue
boxes with questions about the printer driver you are installing. Dialogues which
require specific input for the UC 5 are covered in the following pages.
Choose “Local Printer” and click on “Next”.
16
You should now click on “Have Disk”. A dialogue box labelled “Install from Disk”
will appear. Enter the location of the directory containing the UC 5 printer driver.
This will be on the supplied UC5 GDI CD ROM in a directory called “win95”.
Select “Browse” and locate the drive that contains the UC 5 CD ROM. For
example, if the drive used for the supplied CD ROM is “X” then enter “X:\win95”.
The following dialogue box will appear. Select the driver name that matches the
Digital Duplicator you are installing the UC 5 on and click “Next”. (Refer to the
driver list on page 6).
17
The files needed for the UC 5 printer driver will now be installed. Depending on
how your system is configured, you may need to insert your Windows Operating
System CD as this holds some of the files needed by the printer driver.
You now need to select the “Port” that the UC 5 will be connected to. This is
normally LPT1:. If you have more than one parallel port on your PC, be sure to
select the appropriate port in this dialogue. Click “Next” once the port is selected.
Enter the name that you wish the UC 5 to be seen as on the computer. Click
“Next” once the name has been entered.
18
You can now set windows to print out a test page, once the driver is installed, to
ensure that the UC 5 is functioning correctly.
The UC 5 printer driver will now be installed. As this is done, you may be prompted
to insert the Windows Operating System CD. If you selected “print test page”
earlier on, the UC 5 should print a Windows 95 test page.
19
Installing GDI drivers for Windows NT.
To install the printer driver you will need the UC5 CD ROM as well as the Windows NT operating system CD.
The first step is to add a printer driver. Choose the “Printers” menu from the
“Settings” menu in the Windows “Start” menu.
The Printers folder will be shown, as illustrated below. If you have any
printer(s) already installed, these will be listed here. With the mouse, double-click
on the “Add Printer” icon.
20
The “Add Printer Wizard” will be displayed. This will show a series of dialogue
boxes with questions about the printer driver you are installing. Dialogues which
require specific input for the UC 5 are covered in the following pages.
If you are installing the printer driver on the computer connected directly to the UC
5, then choose “My Computer” and click “Next”. Alternatively, if you are installing the driver onto a machine that will be connected to the UC5 attached to another computer over a network, then choose “Network printer server”.
If “My computer” was selected then a list of available ports will be displayed.
Select the port you have connected the UC 5 to and click “Next”. LPT1: is the
most likely port to be used.
If “Network print server” was selected then a dialogue box will appear asking for you to specify the network path of the shared printer. Enter the network path and continue the installation.
21
After defining the port to be used Windows NT displays a dialogue box listing
standard drivers supplied on the Windows NT operating system CD. The UC5
drivers must be installed from the supplied UC5 CD ROM. Click “have disk” at
this dialogue box.
In the dialogue box shown enter YOUR computers CD drive letter. For example,
if your computer CD ROM is drive letter X then enter “X:\winnt4” and click “OK”.
22
A dialogue will be displayed with a list of Driver Names. Select the driver that
matches the Digital Duplicator you are installing the UC 5 on and click “Next”.
(Refer to page 6 for the driver list).
The files needed for the UC 5 printer driver will now be installed. Depending on
how Windows NT was configured, you may need to insert the Windows NT
operating system CD as this holds some files needed by the printer driver.
In the following dialogue box enter the name that you wish the UC 5 to be seen as.
You can also choose to make the UC 5 the default system printer.
23
You can now choose to share the UC 5 over your local area network. To do this
select “Shared” and specify a suitable name for the printer to be identified as across
the network. It is also possible to share the printer at a later stage if required.
Select “Next” when done.
In the final dialogue box you can specify that Windows NT prints a test page
to the UC 5 once the drivers are installed. Click “Next” to continue. The drivers
will now be installed, depending on your NT installation you may be prompted for
the Windows NT installation CD. The driver should now be correctly installed.
24
Installing GDI drivers for Windows 2000
To install the printer driver you will need the UC5 CD ROM as well as the Windows 2000 operating system CD.
The first step is to add a printer driver. Choose the “Printers” menu from the
“Settings” menu in the Windows “Start” menu.
The Printers folder will be shown, as illustrated below. If you have any printer(s)
already installed, these will be listed here. With the mouse, double-click on the
“Add Printer” icon.
25
The “Add Printer Wizard” will be displayed. This will show a series of dialogue
boxes with questions about the printer driver you are installing. Dialogues which
require specific input for the UC 5 are covered in the following pages.
If you are installing the printer driver on the computer connected directly to the UC
5, then choose “Local Printer” and click “Next”. Alternatively, if you are installing
the driver onto a machine that will be connected to the UC 5 attached to another
computer over a network, then choose “Network printer”.
26
If “Local printer” was selected then a list of available ports will be displayed as
illustrated below. Select the port you have connected the UC 5 to and click “Next”.
LPT1: is the most likely port to be used.
If “Network printer” was selected then a dialogue box will appear asking for you
to specify the network path of the shared printer. Enter the network path and
continue the installation.
After defining the port to be used Windows 2000 displays a dialogue box listing
standard drivers supplied on the Windows 2000 operating system CD. The UC 5
drivers must be installed from the supplied UC 5 CD ROM. Click “have disk” at
this dialogue box.
27
In the dialogue box shown enter your CD ROM Drive Letter eg “D:\” and click
“OK”.
A dialogue will be displayed with a list of Driver Names (Refer to the driver list on
page 6 for the model of machine you are installing onto). Select the driver that
matches the Digital Duplicator you are installing the UC 5 on and click “Next”.
The files needed for the UC 5 printer driver will now be installed. Depending on
how Windows 2000 was configured, you may need to insert the Windows 2000
operating system CD as this holds some files needed by the printer driver.
28
In the following dialogue box enter the name that you wish the UC 5 to be seen as.
You can also choose to make the UC 5 the default system printer.
ZipRip Classic A
You can now choose to share the UC 5 over your local area network. To do this
select “share as” and specify a suitable name for the printer to be identified as
across the network. It is also possible to share the printer at a later stage if
required. Select “Next” when done.
In the next dialogue box you can specify that Windows 2000 prints a test page to
the UC 5 once the drivers are installed. Click “Next” to continue. The drivers will
now be installed, depending on your system specifications you may be required to
type a path to the UC5 drivers, or to your Win 2000 installation CD. The driver
should now be correctly installed.
29
Once the printer installation is completed the following dialog box appears to
confirm installation information. Click “Finish”.
ZipRip Classic A
ZipRip Classic A
30
Select “Yes” in the Digital Signature Not Found dialog box.
The newly installed printer will now be shown in the Printers dialog box.
31
Basic Operation Instruction of the UC5.
After you have completed all the installation procedures and loading of the relevent
driver for the Digital Duplicator you are printing to, the UC5 is ready for use.
Powering the UC5 on.
The power button is located on the back panel of the UC5. Insert the power cord
and switch the mains on. Switch the UC5 on at the back panel of the unit. The
green light on the front will indicate that the unit has power. This light remains on
until such a time as the switch is turned off at the back panel. On power up the red
light will flash once very quickly and then flash on and off depending on the version
of firmaware installed. For example: 4 flashes for version 4 and 3 flashes for
version3. The red light will then stay on for 6 seconds and then switch off. The
UC5 is now ready to receive a print job.
Powering the UC5 off.
To turn the UC5 off, switch off the power button located on the back panel and
disconnect the power cord from the mains.
Printing to the UC5.
To print to the UC5, select the print option from the file menu of your application.
In the print dialogue window select the ZipRip driver you have installed (NB if you
are unsure as to which machine model you have refer to the Generic Driver List on
page 6 of this manual)and the quantity you wish to print. In the properties section
in the print dialogue box you can choose what size paper you are printing on and
select a paper tray if your machine support this feature. Once you have made your
selections press “Print” or “OK” depending on your application. The file is processed by your computer and transfered to the UC5. The red light on the UC5 will
begin to flash rapidly indicating it is receiving and processing your file. Once the
file is transfered your Digital Duplicator will cut a master and print the quantity you
have specified.
32
Reset Button.
This button is located on the back panel of the UC5. It is the red button. If you
wish to reset the UC5 without powering it off then press this button.
Test Button.
This button is located on the back panel of the UC5. It is the green button. If you
wish to check that the UC5 is operating correctly press the button and the Digital
Duplicator will cut a master and print test pages. Please refer to page 9 of this
manual for the full test page description.
33
Frequently Asked Questions
Q:
A:
How far can I have the UC5 from the computer?
The official specification for parallel cable recommends a length not
greater than 3 feet (1 metre).
Q:
A:
How far can I have the UC5 from the Digital Duplicator?
The official specification allows for 6 feet (appro.. 2 metres) cable. This
cable is supplied with the UC5. The potential for line communication
problems are greater the farther the UC5 is away from the computer.
Q:
A:
How many computers can you run from the UC5?
One IBM or compatible connected to the parallel port.
Q:
A:
Will the UC5 work with a laptop or notebook computer?
Yes, all computers connect to the UC5 as if it were a standard compu
ter printer. The GDI driver will need to be installed in each computer.
Q:
A:
Is any special wiring required for the UC5?
No, it will work on 110 or 220 volt systems by using the appropriate
power cord.
Q:
A:
How much RAM memory does the UC5 have?
It comes standard with a maximum 16 megabytes RAM.
Q:
What if my file size is over 1 megabyte? Will the UC5 be able to
print the file?
Yes, the UC5 is not limited by your file size. If your PC can process the
file, the UC5 can print it to the Digital Duplicator.
A:
Q:
A:
Can you add additional memory?
No, the UC5 comes with maximum memory installed as standard.
Q:
A:
Must you configure all software when you install the UC5?
No. Once the driver is installed in any operating system on the computer, all software application programs can use it.
34
Q:
A:
Will the UC5 work with Windows 3.11 Windows 95? Windows 98?
Windows ME? Windows NT? Windows 2000?
Yes. Printer drivers must be installed for each operating system.
Q:
A:
Will the UC5 work with all application software programs?
The customised printer drivers provided allow all Windows 3.11, Windows 95, Windows 98, Windows ME, Windows NT, and Windows
2000 programs to send documents to the UC5
Q:
A:
Will the UC5 work on a Network?
Yes, the GDI driver has to be installed onto each client computer or
there is a optional network upgrade available.
Q:
A:
What fonts are built into the UC5?
None. All operating systems use True Type fonts.
Q:
Will the UC5 allow the Digital Duplicator to create an A3 / 11” x 17”
image?
Yes, as long as the Digital Duplicator model has the image output capability.
A:
Q:
A:
Can you combine two A4 / US Letter pages side by side into a single
A3 / 11” x 17” image?
No. The laying out of two pages A4 / US Letter has to be done in the
software where you are sending the image from.
Q:
A:
Can you reverse scan with the UC5 and the Digital Duplicator?
No.
Q:
A:
Can you set the number of copies to print from the computer?
Yes, all the newer Digital Duplicator models allow you to set the copy
count from your computer.
Q:
A:
What does the green button do?
The Green test button on the back panel of the UC5 is pushed in, the
Digital Duplicator will output a page which confirms the hardware and
35
communication between the UC5 and the Digital Duplicator is correct.
Q:
A:
What does the red button do?
When the Red button is pushed in the UC5 resets.
Q:
A:
If I have a software or hardware question, who do I call?
Your local sales/service organisation should be contacted first or connect to the web site www.ziprip.com.
Q:
I download a file to the UC5 and the master is not cutting on my
JP5800 / JP5000?
If your JP5800 / JP5000 has the “Power Saving” function enabled
then you could find that when the JP5800 / JP5000 is in powered down
state, sending a file via the UC5 will not wake it up. You should either
wake the machine up through the keyboard before sending an image or
disable the “energy saving” feature as follows:
A:
Q:
A:
Go to USER TOOL settings
Choose “System Settings”
Scroll to “Power Saving”
Set to “off”
Exit User Codes
When I download a file to the UC5 connected to my JP8000 the UC5
freezes?
If your JP8000 has the “Power Saving” function enabled then you
could find that when the JP8000 is in powered down state, sending a
file via the UC5 will wake it up but the UC5 will freeze with the RED
light showing. Switch the UC5 off and on again to clear the error. You
should either wake the machine up through the keyboard before sending an image or disable the “energy saving” feature as follows:
36
Q:
A:
Q:
A:
Q:
A:
Go to USER TOOL settings
Choose “System Settings”
Scroll to “Power Saving”
Set to “off”
Exit User Codes
I have entered a custom page size but the print job comes out too
small?
It is possible that you have input the page size incorrectly. The Unit of
measurement used for page size is 0.01 inches or 0.1 mm. This means
that you need to multiply by a factor of 100 to get the correct size in
inches or a factor of 10 to get the correct size in mm.
The image I am getting is larger than it should be and has fine horizontal lines running through it?
It is possible that you have entered a page size greater than the maximum image area of the Digital Duplicator connected to the UC5. Check
the maximum page size of your Digital Duplicator and the page size
entered in the UC5. Also check that you have used the correct multiplication factor for your page measurements. (see FAQ above).
When I define a custom page size the image I get is printed transverse (across) the drum.
The “width” value in the page setup refers to the size of the leading
edge of the page. The leading edge is the edge that feeds into the
Digital Duplicator. The “length” value refers to the size of the side of
the page. By entering a “width” value greater than the “length” value
the image will be positioned transverse on the drum. This means that
the operator will need to use the longest edge of the sheet as the leading edge.
37
Q:
A:
Missing Tabs in the Printer Properties dialogue box.
There are two possible causes for this problem:1. corrupt UC5 driver installation
2. corrupt Windows Operating System file(s)
First try resolving the problem by reinstalling the UC5 drivers. If this
does not solve the problem then you will need to reinstall the Windows
Operating System.
A:
WHY?
Certain printer installations can overwrite or modify some of the Windows Operating System files used by the UC5 drivers. As a result some
of the dialogue boxes go missing. By restoring the Operating System
files back to the original version the Dialogue Boxes reappear and work
as normal.
Q.:
A:
The image is in the wrong position on your JP5800.
The UC5 is currently set to offset an A4 image to the centre of an A3
page. This works for the JP5000 but on the JP5800 the UC5 shifts the
image and so does the Digital duplicator resulting in the image being
put right off the A4 page. To solve this problem when cutting an A4
master insert an A3 sheet of paper into the paper feed tray and the
image will be placed in the middle of the A3 which is the correct position when you insert the A4 paper.
Q:
A:
I keep getting a time out error printing from Windows 95.
Increase the time out settings within the printer driver. These are found
under the details tabs in the properties window. Set “not selected” to
300 seconds. Set “transmission retry” to 9999 seconds.
38
Troubleshooting UC5
Normally, your UC5 will function correctly with no user intervention. If
there is a problem use this section as a guide to solve it.
Problem:
The following message is printed when I try to print a document: There was an error writing to LPT1: for the printer...
The printer is not ready. Make sure it is turned on and
on-line.
Try the following:
a) Check all physical cable connection and power.
b) Reset the UC5.
c) Check you are not trying to print to the UC5 across a
network. If this is the case see your windows documentation on network printing.
d) Check the parallel port is set to “ECP” mode.
Problem:
Print jobs download to the UC5, but the Digital Duplicator
does not create a master.
Try the following
a) Press the Digital Duplicator “on-line” key. Some Duplicators do not support Auto on-line functions. Check that
your Duplicators Auto on-line function has been enabled.
Check also that the last print run on the Digital Duplicator
has been completed.
b) Turn the Digital Duplicator off then on.
Problem:
Activity light on the UC5 is permanently on, but no master is
created.
Try the following:
Press the reset button on the UC5.
39
Problem:
UC 5 connected via optional network interface does not
respond.
Try the following:
a) Reset the network interface.
b) Check connections to the network interface.
c) Make sure that the configuration for the network interface port is referencing the correct network interface.
If none of the above resolves your problem you can send a description
of the error to the ZipRip web site. Please include all details such as
PC specification, Operating System, Application and version being
used as well as a detailed account of the error and any preceding events
that might have led to it. www.ziprip.com
40
Contact Local Dealer:
Web contact:-
For further FAQ’s and downloads visit
www.ziprip.com
41
42