1
-1.
:,;
Yame -
J
Owner's
Owner’s manual
manual
d’emploi
Mode d'emploi
Manual
Manual de ;nstrucc;ones
instrucciones
DB625MP
DB62SMP
AM/FMCDIMP3
CDIMP3PLAYER
PLAYER
AMlFM
•
COMBINERADIO
RADIO AM/FM
CDiiP3
COMBINE
AM/FM CD/MP3
•
SINTONIZADORDE
DE AM/FM
Y iEPROD”CTOR DE
DE
SINTONIZADOR
AM/FM YREPRODUCTOR
DISCOSCOMPACTOS/MP3
COMPACTOS/MPB
DISCOS
lli]DO~@
DIGITAL AUDIO
~
This equipment
equipment has
has been
been tested
tested and
and found
found to
This
comply with
with the
the limits
limits for
for a Class
Class B digital
digital dedecomply
vice, pursuant
pursuant to Part
Part 15 of the
the FCC
FCC Rules.
Rules.
vice,
These limits
limits are
are designed
designed to provide
provide reasonable
reasonable
These
protection against
against harmful
harmful interference
interference in a resiresiprotection
dential installation.
installation.
dential
This equipment
equipment generates,
generates, uses,
uses, and
and can
can radiradiThis
radio frequency
frequency energy
energy and,
and, if not
not installed
installed
ate radio
used in accordance
accordance with
with the
the instructions,
instructions, may
may
and used
cause harmful
harmful interference
interference to radio
radio communicacommunicacause
tions. However,
However, there
there is no guarantee
guarantee that
that interintertions.
ference will not
not occur
occur in a particular
particular installation.
installation.
ference
this equipment
equipment does
does cause
cause harmful
harmful interference
interference
If this
to radio
radio or
or television
television reception,
reception, which
which can
can be
be
to
determined by turning
turning the
the equipment
equipment off
off and
and on,
determined
the user
user is
is encouraged
encouraged to
to consult
consult the
the dealer
dealer or
or
the
an experienced
experienced radio/TV
radio/TV technician
technician for
for help.
help.
an
MODEL
L
. """.~.·.~
clarion
12V 8 GROUND
AM 530·1700kHzlFM 87.9-107.9MHz
THIS DEVICE COMPLIES WITH PART 15 OF THE FCC RULES
OPERATION 1$ SUBJECT TO THE FOLLOWING TWO CONDITIONS
(1) THIS DEVICE MAY NOT CAUSE HARMFUL INTERFERENCE, AND
(2) THIS DEVICE MUST ACCEPT ANY INTERFERENCE RECEIVED,
INCLUDING INTERFERENCE TAHT MAY CAUSE UNDESIRED
OPERAnON
THIS PRODUCTION COMPLIES WITH DHHS RULES 21 CFR
SUBCHAPTER
J APPLICABLE AT DATE OF MANUFACTURE
CLARION CO.,lTO.
50 KAMITODA,TODA·SHI,SAITAMA-KEN,JAPAN
MANUFACTURED
SEA1AlNo
PE·c::::J
22
DE625MP
DB625MP
b
USE OF CONTROLS. , ADJUSTMENTS. , OR
PERFORMANCE OF
OF-iROCEDURES
OyH&
PERFORMANCE
PROCEDURES OTHER
THAN THOSE
THOSE SPECIFIED
SPECIFIED HEREIN,
HEREIN, MAY
MAY RERETHAN
SULT IN HAZARDOUS
HAZARDOUS
RADIATION EXPOEXPORADIATION
SULT
SURE.
SURE.
THE COMPACT
COMPACT DISC
DISC PLAYER
PLAYER and
and MINI
MINI DISC
DISC
THE
PLAYER SHOULD
SHOULD NOT
NOT BE
BE ADJUSTED
ADJUSTED OR
PLAYER
REPAIRED BY
BY ANYONE
ANYONE EXCEPT
EXCEPT PROPERLY
PROPERLY
REPAIRED
QUALIFIED SERVICE
SERVICE PERSONNEL.
PERSONNEL.
QUALIFIED
CHANGES OR
OR MODIFICATIONS
MODIFICATIONS
NOT EXEXCHANGES
NOT
PRESSLY APPROVED
APPROVED BY
BY THE
THE MANUFACMANUFACPRESSLY
TURER FOR
FOR COMPLIANCE
COMPLIANCE COULD
COULD VOID
VOID THE
THE
TURER
USER’S AUTHORITY
AUTHORITY
TO OPERATE
OPERATE THE
THE
USER'S
TO
EQUIPMENT.
EQUIPMENT.
INFORMATION FOR USERS;
CHANGES
OR MODIFICATIONS
MODIFICATIONS
TO THIS
THIS
CHANGES
OR
TO
PRODUCT NOT
NOT APPROVED
APPROVED BY
BY THE
THE MANUMANUPRODUCT
FACTURER WILL
WILLVOIDTHE
WARRANTY AND
AND
FACTURER
VOID THE WARRANTY
WILL VIOLATE
VIOLATE FCC
FCC APPROVAL.
APPROVAL.
WILL
Thank you for
for purchasing
purchasing this
this Clarion
Clarion product.
product.
Thank
Please
read
this
owner’s
manual
in
its
entirety before
before operating
operating this
this equipment.
equipment.
* Please read this owner's manual
entirety
After reading
reading this
this manual,
manual, be sure
sure to keep
keep it in a handy
handy place
place (e.g.,
(e.g., glove
glove compartment).
compartment).
* After
l
l
Check the contents
contents of the enclosed
enclosed warranty
warranty card
card and
and keep
keep it carefully
carefully with
with this
this manual.
manual.
** Check
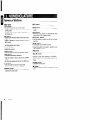
Contents
Contents
1.
FEATURES .....................................................................................................................................
FEATURES
List of
of Accessories
Accessories ..........................................................................................................................
List
CONTROLS ....................................................................................................................................
CONTROLS
4
4
4
2.
NOMENCLATURE ..........................................................................................................................
3. NOMENCLATURE
5
6
Names of Buttons
Buttons.. ..........................................................................................................................
Names
Display Items
Items ...................................................................................................................................
Display
6
7
7
8
PRECAUTIONS ..............................................................................................................................
4. PRECAUTIONS
CONFIRM BEFORE
BEFORE OPERATION
OPERATION ...............................................................................................
5. CONFIRM
.......................................................................................................................
Notes
on
Play
MP3
Notes
Play MP3
About CDs
CDs .....................................................................................................................................
About
OPERATIONS ...............................................................................................................................
6. OPERATIONS
Basic Operations
Operations ...........................................................................................................................
Basic
Radio
Operations ..........................................................................................................................
Radio Operations
CD/MPS
Operations ......................................................................................................................
CD/MP3 Operations
Adjustment Menu
Menu ..........................................................................................................................
Adjustment
WIRING TECHNIQUES
TECHNIQUES ................................................................................................................
7. WIRING
7.
Connecting Wires
Wires to
to Terminals
Terminals .....................................................................................................
Connecting
INSTALLATIONS ..........................................................................................................................
8. INSTALLATIONS
8.
Installation .....................................................................................................................................
Installation
Installation Procedure
Procedure ...................................................................................................................
Installation
IN CASE
CASE OF
OF DIFFICULTY
DIFFICULTY.. .........................................................................................................
9. IN
9.
10. ERROR
ERROR DISPLAY
DISPLAY .........................................................................................................................
10.
11. SPECIFICATIONS
SPECIFICATIONS ........................................................................................................................
11.
DB625MP
DB625MP
10
10
10
12
12
13
13
13
13
16
16
17
17
19
19
21
21
21
21
22
22
22
22
24
24
.25
25
28
28
29
29
33
1. FEATURES
n•
n•
n•
,!
,
IIIAG~TUNE
mRlil:rUNE FM
FM Reception
Reception System
System
8-Times
-Bit D/A
8-Times Oversampling
Oversampling Digital
Digital Filter
Filter and
and 11-Bit
D/A Converters
Converters
4-Channel
4-Channel RCA
RCA Line
Line Level
Level Output
Output with
with Fader
Fader Control
Control
List of
of Accessories
Accessories
List
@
G) Wiring
Wiring harness
harness ..........................................
@
® Removal
Removal tool
tool .............................................
@
@ Counter
Counter sunk
sunk self-tapping
self-tapping screw
screw .............
@I
@ Round
Round head
head self-tapping
self-tapping screw
screw ...............
@
® Taptite
Taptite screw
screw .............................................
1
22
.4
.4
.44
2
The
The use
use of
of any
any accessories
accessories except
except for
for those
those proprovided
vided might
might result
result in
in damage
damage to
to the
the unit.
unit. Make
Make
sure only
only to use
use the
accessories shipped
shipped with
the accessories
with
sure
the
unit, as shown
shown above.
above.
the unit,
®
Be sure
sure to
to unfold
unfold and
and read
read the
the next
next page.
page. // Veuillez
Veuillez deplier
d@p/ieret
et vaLis
vows referer
&f&rer a
2 /a
la page
page suivante.
suivante.
Be
Cercidrese de
de desplegar
desplegar yy de
de leer
leer la
/a pagina
pa’gina siguiente.
siguiente.
Cerci6rese
DB625MP
DB625MP
44
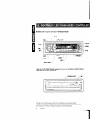
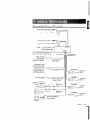
I
I.
al / Unidad
Unidad princIpal
principal
w MaIn
Main un/ll
unit / Appa",iI pdndpall
~~~fiiiiiiiiiiiiiijiii~-~,dl-l.-[OPENI
~
II I
I
Q
[DISP]
.~I
II ............ [T-Ml
/
[AM]-
[SCNl--j
ii
[MUTE] ..-.eI
/
/
i
[PRESET]
[RDMI-~
[RPTIJ
[BEQ LIGHT] --
With the
the FLIP
FLIP DOWN
DOWN PANEL
PANEL opened
opened/ / Ouvrez Ie PANNEAU RABATTABLE /
With
Apertura
del PANEL
PANEL ABATIBLE
Apertura del
ABATIBLE
,-
CD/MPB SLOT1
IA1
rL[C~P3SL:Tl L~·l
l~
100
I
u
~ ~-0J
-J;;
0
~rg}
I
Note: Be sure to unfold this page and refer to the front diagrams as you read each chapter.
Note:
Be sure to unfold this page and refer to the front diagrams as you read each chapter.
Remarque
Veuilkv depltei cette
page et vows r&f&ei am schenm
quand vous liser chaque chapltre
Remarque: Veuillez depfieJ cette page et vous rMerer aux scllemas quand vous Iisez chaque chapitre.
Nota: Cuando lea /OS capitulos, despliegue
esta ptigina y consulte /OS diagramas.
Nota: Cuando lea los capftulos, despliegue esta pagina y consulte los diagramas.
55
DB625MP
DB625MP
-
Names
Names of
of Buttons
Buttons
Main
Main Unit
Unit
[FNC]
[FNC] button
button
• Press
Press the
the button
button to
to turn
turn on
on the
the power.
power.
Press
Press the
the button
button for
for at
at least
least 11 second
second to
to turn
turn
off
off the
the power.
power.
l• Switches
Switches the
the operation
operation mode
mode among
among the
the radio
dio mode,
mode, etc.
etc.
l
[FM]
[FM] button
button
• Switches
Switches the
the FM
FM band
band while
while in the
the radio
radio mode.
mode.
l
[WI]
[~II] button
button
• Plays
Plays or
or pauses
pauses aa CD/MP3
CO/MP3 while
while in the
the CD/
COl
MP3
MP3 mode.
mode.
l• Press
Press the
the button
button for
for at
at least
least 1 second
second to
to enter
enter
the
the adjustment
adjustment menu
menu mode.
mode.
l
[Al,
[A], WI
[V] button
button
• Adjust
Adjust the
the volume.
volume.
l
[OPEN] button
button
[OPEN]
Use the
button to open
Flip down
panel.
•l Use
the button
open the
the Flip
down panel.
[DISP] button
button
[DISP]
Switches the
indication.
•l Switches
the display
display indication.
Use the
button to input
input a title
CD/MPS
title in the
the CO/MP3
•l Use
the button
mode.
mode.
Scrolling the
the displayed
displayed CD text
text and
and MP3
MP3 text.
text.
•l Scrolling
button
[T-M] button
Use the
the button
button to set
set the
the tuning
tuning mode.
mode.
•l Use
Use the
the button
button to
to set
set the
the Auto
Auto Store.
Store.
•l Use
[PRESET] button
button
[PRESET]
Stores a station
station into memory
memory or recall
recall it directly
directly
•l Stores
while in the
the radio
radio mode.
mode.
while
66
DE625MP
DB625MP
[RPT]
[RPT] button
button
l• Plays
Plays repeatedly
repeatedly while
while in the
the CD/MP3
CO/MP3 mode.
mode.
[RDM]
[ROM] button
button
• Performs
Performs random
random play
play while
while in the
the CD/MPB
CO/MP3
mode.
mode.
l
[SCN]
[SCN] button
button
• Performs
Performs scan
scan play
play for
for 10 seconds
seconds for
for each
each
track
track while
while in the
the CD/MP3
CO/MP3 mode.
mode.
l
[BEQ
[SEQ LIGHT]
LIGHT] button
button
• Use
Use the
the button
button to
to select
select one
one of
of the
the six
six types
types
of
of sound
sound characteristics
characteristics already
already stored
stored in
memory.
memory.
[MUTE]
[MUTE] button
button
l• Turning
Turning the
the volume
volume down
down quickly.
quickly.
l• Press
to turn
turn
Press the
the button
button for
for at
at least
least 11 second
second to
the
the loudness
loudness on
on or
or off.
[AM]
button
[AM] button
Switches the
band while
in the
radio mode.
mode.
•l Switches
the AM
AM band
while in
the radio
l
[41, WI
button
[<<Ill],
[~>] button
Selects aa station
in the
radio mode.
mode.
•l Selects
station while
while in
the radio
l• Selects
Selects aa track
when
listening
to
a
CD/MP3.
track when listening to a CO/MP3.
buttons are
used to
make various
•l These
These buttons
are used
to make
various setsettings
tings.
[CD/MPS SLOT]
SLOT]
[CD/MP3
CD/MPB insertion
insertion slot.
slot.
•l CO/MP3
[A]
button
[~] button
Ejects a
a CO/MP3
CD/MPS when
when itit is
is loaded
loaded into
into the
the
•l Ejects
unit.
unit.
Qispla y Items
Items
Qisplay
Operation status
status indication
indication
Operation
Titles, PS names,
names, etc.
etc. are
are
Titles,
displays.
displays.
i/l
r-:
I
Stereo indication
indication
: Stereo
Mute indication
indication
([m)
MUTE] : Mute
Preset channel
channel indication
indication (1
(1 to 6)
Preset
Clock (Clock
(Clock indication)
indication) etc.
etc.
Clock
SPY : Speaker
Speaker Setting
Setting indication
indication
sp.
@ :: 5
5&
&4
4 in.
in. (127
(127 mm
mm &
& 102
102 mm)
mm) Speaker
Speaker indication
indication
fV
0
6&
&6
6 xx 9
9 in.
in. (152
(152 mm
mm &
& 152
152 mm
mm xx 229
229 mm)
mm) Speaker
Speaker indication
indication
~
:: 6
&
~
OEM Speaker
Speaker indication
indication
: OEM
:
A&3
: SEQ
BEQ LIGHT
LIGHT indication
indication (SEQ
(BEQ L1GHT:Seat
LIGHT:Beat EQ
EQ Light)
Light)
~!£;:£
gm
Rock indication
indication
:: Rock
m
Pops indication
indication
f:ill
:: Pops
n
Easy indication
indication
!!JI
:: Easy
g
Top 40
40 indication
indication
:: Top
Jazz indication
indication
~ :: Jazz
_
Flat indication
indication
m!I
:: Flat
DB625MP
DB625MP
77
1. When
When the
the inside
inside of
of the
the car
car isis very
very cold
cold and
and
1.
on the
the
the player
player isis used
used soon
soon after
after switching
switching on
the
on the
the disc
disc or
or the
the
heater moisture
moisture may
may form
form on
heater
optical parts
parts of
of the
the player
player and
and proper
proper playback
playback
optical
may not
not be
be possible.
possible. IfIf moisture
moisture forms
forms on
on the
the
may
moisture
disc, wipe
wipe itit off
off with
with aa soft
soft cloth.
cloth. IfIf moisture
disc,
forms
forms on
on the
the optical
optical parts
parts of
of the
the player,
player, do
do not
not
use
use the
the player
player for
for about
about one
one hour.
hour. The
The concondensation
densation will
will disappear
disappear naturally
naturally allowing
allowing
normal
normal operation.
operation.
2.
2. Driving
Driving on
on extremely
extremely bumpy
bumpy roads
roads which
which
cause
cause severe
severe vibration
vibration may
may cause
cause the
the sound
sound
to
to skip.
skip.
3. When
When the
the auto
auto antenna
antenna cord
cord is
is connected
connected to
to
the
is
the car
car auto
auto antenna
antenna cord,
cord, when
when the
the unit
unit is
switched
switched to
to the
the radio
radio mode
mode (or
(or the
the TV
TV mode),
mode),
the
extended automatically.
automatically. If the
the
the antenna
antenna is extended
car
narrow space,
space, the
the antenna
antenna may
may
car is in aa narrow
strike
strike something,
something, so
so be
be careful.
careful.
4. This
This unit
unit uses
uses aa precision
precision mechanism.
mechanism. Even
Even
in the
the event
event that
that trouble
trouble arises,
arises, never
never open
open
the
the case,
case, disassemble
disassemble the
the unit,
unit, or
or lubricate
lubricate
the
the rotating
rotating parts.
parts.
Insert the
unit all the
until it is fully
locked
fully locked
•l Insert
the unit
the way
way in until
place. Otherwise
Otherwise it may
may fall
out of place
place when
in place.
fall out
when
jolted.
jolted.
When extending
extending the
the ignition,
ignition, battery,
battery, or ground
ground
•l When
wires, make
make sure
sure to use
use automotive-grade
automotive-grade wires
wires
wires,
other wires
wires with
with a O.75mm
0.75mm22 (AWG
(AWG18)
more
or other
18) or more
to prevent
prevent wire
wire deterioration
deterioration and damage
damage to the
wire coating.
coating.
wire
prevent a short
short circuit,
circuit, never
never put or leave
leave
•l To prevent
any metallic
metallic objects
objects (such
(such as
as coins
coins or
or metal
metal
any
tools) inside
inside the unit.
unit.
tools)
the unit
unit starts
starts to
to emit
emit smoke
smoke or
or strange
strange smells,
smells,
•l IfIf the
turn off the power
power immediately
immediately and consult
consult your
your
turn
dealer.
dealer.
Make sure
sure not
not to
to get
get your
your fingers
fingers caught
caught bebe•l Make
tween the
the faceplate
faceplate and
and the
the unit.
unit.
tween
Be careful
careful not
not to
to drop
drop the
the unit
unit or
or subject
subject itit to
to
•l Be
strong shock.
shock.
strong
The unit
unit may
may break
break or
or crack
crack because
because itit conconThe
tains glass
glass parts.
parts.
tains
88
DB625MP
DB625MP
• Do
Do not
not touch
touch the
the liquid
liquid crystal
crystal fluid
fluid ifif the
the LCD
LCD
isis damaged
damaged or
or broken
broken due
due to
to shock.
shock. The
The liquid
liquid
crystal
crystal fluid
fluid may
may be
be dangerous
dangerous to
to your
your health
health
or
or even
even fatal.
fatal.
IfIf the
the liquid
liquid crystal
crystal fluid
fluid from
from the
the LCD
LCD contacts
contacts
your
your body
body or
or clothing,
clothing, wash
wash itit off
off with
with soap
soap imimmediately.
mediately.
l• Make
to ground
ground the
the unit
unit to
to aa negative
negative 12V
12V
Make sure
sure to
DC
DC power
power supply.
supply.
l• Do
Do not
not open
open the
the top
top or
or bottom
bottom covers
covers of
of the
the
unit.
unit.
l• Do
Do not
not install
install the
the unit
unit in
in aa spot
spot exposed
exposed to
to didirect
rect sunlight
sunlight or
or excessive
excessive heat
heat or
or humidity.
humidity. Also
Also
avoid
avoid places
places with
with too
too much
much dust
dust or
or the
the possipossibility
bility of
of water
water splashing.
splashing.
l Do not subject the faceplate to excessive shock,
• Do not subject the faceplate to excessive shock,
as
is aa piece
piece of
of precision
precision equipment.
equipment.
as itit is
l When replacing a fuse, only use a new one with
• When replacing a fuse, only use a new one with
the
the prescribed
prescribed rating.
rating. Using
Using aa fuse
fuse with
with the
the wrong
wrong
rating
rating may
may cause
cause your
your unit
unit to
to malfunction.
malfunction.
l To prevent short circuits when replacing a fuse,
• To prevent short circuits when replacing a fuse,
first
first disconnect
disconnect the
the wiring
wiring harness.
harness.
l Do not place any object between the faceplate
• Do not place any object between the faceplate
and the
unit.
and
the unit.
Do not
not use
use your
own screws.
screws. Use
Use only
only the
the
your own
•l Do
screws provided.
provided. IfIf you
use the
the wrong
screws,
screws
you use
wrong screws,
you
could damage
damage the
unit.
you could
the unit.
l Do not apply excessive
force to
to the
the open
open faceface• Do not apply excessive force
plate or
or place
place objects
objects on
on it.
it. Doing
Doing so
so will
will cause
cause
plate
damage or
or breakdown.
breakdown.
damage
l
Cleaning
Cleaning the
the Unit
Unit
• IfIf you
you experience
experience problems
problems during
during installation,
installation,
consult your
your dealer.
dealer.
consult
l
l
the unit
unit fails
fails to
to operate
operate properly,
properly, press
press the
the ReRe• IfIf the
set button.
button. The
The unit
unit returns
returns to
to factory
factory settings
settings
set
when
when the
the Reset
Reset button
button isis pressed.
pressed. After
After you
you press
press
the
the unit
unit still
still fails
fails to
to operate
operate
the Reset
Reset button,
button. IfIf the
properly
properly after
after the
the Reset
Reset button
button has
has been
been pressed,
pressed,
contact
contact your
your local
local dealer
dealer for
for assistance.
assistance.
IfIf the
the faceplate
faceplate of
of this
this unit
unit isis stained,
stained, wipe
wipe itit with
with
aa dry
dry soft
soft cloth
cloth such
such as
as aa silicon
silicon cloth.
cloth.
IfIf the
the faceplate
faceplate isis stained
stained badly,
badly, wipe
wipe the
the stain
stain
off
off with
with aa cloth
cloth moistened
moistened with
with neutral
neutral cleaner,
cleaner,
then
then wipe
wipe neutral
neutral detergent
detergent off.
off.
-
Applying
Applying spray
spray cleaner
cleaner directly
directly to
to the
the unit
unit may
may
affect
affect its
its mechanical
mechanical parts.
parts. Wiping
Wiping the
the faceplate
faceplate
with
with aa hard
hard cloth
cloth or
or using
using aa volatile
volatile liquid
liquid such
such
as
as thinner
thinner or
or alcohol
alcohol may
may scratch
scratch the
the surface
surface or
or
erases
erases characters.
characters.
Cleaning
Cleaning the
the CD
CD Slot
Slot
I
1
Reset
Reset button
button
As
As dust
dust can
can accumulate
accumulate in
in the
the CD
CD slot,
slot, clean
clean itit
occasionally.
occasionally. Your
Your CDs
CDs can
can get
get scratched
scratched ifif you
you
put
in aa dusty
dusty CD
CD slot.
slot.
put them
them in
the LCD
LCD may
may become
become difficult
difficult to
to
• Characters
Characters in the
read
temperatures below
below 41 ‘F
'F (5 “C).
·C).
read in temperatures
l• The
The illustrations
illustrations of
of the
the display
display and
and the
the panel
panel
appearing
appearing in this
this manual
manual are
are examples
examples used
used
to
to explain
explain more
more clearly
clearly how
how the
the controls
controls are
are
used.
the display
display
used. Therefore,
Therefore, what
what appears
appears on the
in the
the illustrations
illustrations may
may differ
differ from
from what
what appears
appears
on the
the display
display on the
the actual
actual equipment,
equipment, and
and
some
the display
display may
may repsome of the
the illustrations
illustrations on the
resent something
something impossible
impossible in actual
actual operaoperaresent
tion.
tion.
l
Lens Fogging
Fogging
Lens
Right after
after you turn
turn on the car heater
heater in cold
cold
Right
weather, dew
dew or condensation
condensation may form
form on the
weather,
lens in
in the
the CD
CD player
player of
of the
the unit.
unit. Called
Called lens
lens fogfoglens
ging, CDs
CDs may be impossible
impossible to play. In such
such a
ging,
situation, remove
remove the
the disc
disc and
and wait
wait for
for the
the conconsituation,
densation to evaporate.
evaporate. If the unit still does
does not
densation
operate normally
normally after
after aa while,
while, consult
consult your
your
operate
dealer.
dealer.
Cleaning the
the Faceplate
Faceplate Terminals
Terminals
Cleaning
the terminals
terminals on
on the
the unit
unit or
or faceplate
faceplate get
get dirty,
dirty,
IfIf the
wipe them
them with
with aa dry,
dry, soft
soft cloth.
cloth.
wipe
D6625MP
DB625MP
99
Notes
Notes on
on Playing
Playing MP3
MP3
This unit
unit can
can play
play MP3
MP3 (MPEGl
(MPEG1,,2,2.5
2, 2.5 Audio
Audio Layer
Layer
This
3). Note,
Note, however,
however, that
that the
the MP3
MP3 recording
recording media
media
3).
and
and formats
formats acceptable
acceptable are
are limited.
limited. When
When writing
writing
MP3,
MP3, pay
pay attention
attention to
to the
the following
following restrictions.
restrictions.
Settings
Settings for
for your
your MP3
MP3 encoder
encoder and
and
CD
CD writer
writer
Acceptable
Acceptable media
media
When
When you
you use
use your
your CD
CD writer
writer to
to record
record MP3
MP3 up
up
to
to the
the maximum
maximum disc
disc capacity,
capacity, disable
disable additional
additional
writing.
on an
an empty
empty disc
disc up
up to
to the
the
writing. For
For recording
recording on
maximum
maximum capacity
capacity at
at once,
once, check
check Disc
Disc at
at Once.
Once.
The
The MP3
MP3 recording
recording media
media acceptable
acceptable to
to this
this unit
unit
are
are CD-ROM,
CD-ROM, CD-R,
CD-R, and
and CD-RW.
CD-RW.
When
When using
using CD-RW,
CD-RW, do
do full
full format
format not
not quick
quick forformat
mat to
to prevent
prevent malfunction.
malfunction.
The
.x.
The Displayable
Displayable ID3
103 tag
tag is
is ID3
103 version
version 11.x.
For
the
character
code,
refer
to
the
List
of
Codes.
For the character code, refer to the List of Codes.
Acceptable
Acceptable medium
medium formats
formats
The
The following
following formats
formats are
are available
available for
for the
the memedia
this unit.
unit. The
The maximum
maximum number
number of
of
dia used
used in this
characters
characters used
used for
for file
file name
name including
including the
the dedelimiter
limiter (“.‘I)
(".") and
and three-character
three-character extension
extension are
are inindicated
parentheses.
dicated in parentheses.
l• ISO
IS0 9660
Level 1 (12 characters)
9660 Level
characters)
l• ISO
IS0 9660
Level 2 (31 characters)
9660 Level
characters)
l• Joliet
Joliet (64
(64 characters)
characters)
l• Romeo
Romeo (128
(128 characters)
characters)
Up to 200
200 characters
characters can be displayed
displayed in the
the long
long
file name
name format.
format. For a list
list of available
available characcharacfile
ters, see
see the
the instruction
instruction manual
manual of the
the writing
writing
ters,
software and
and the
the section
section Entering
Entering file and
and folder
folder
software
names below.
below.
names
The media
media reproducible
reproducible on this
this unit
unit has the folThe
lowing limitations:
limitations:
lowing
Maximum number
number of
of directory
directory levels:
levels: 88
•l Maximum
Maximum number
number of files
files per folder:
folder: 255
•l Maximum
Maximum number
number of
of characters
characters for
for folder
folder
•l Maximum
name: 64
64
name:
Maximum number
number of
of folders:
folders: 50
50
•l Maximum
MP3
written
in
the
formats
other
than
the above
above
MP3 written in the formats other than the
may not
not be
be successfully
successfully played
played and
and their
their file
file
may
names or
or folder
folder names
names are
are not
not properly
properly disdisnames
played.
played.
10
10
DB625MP
DB625MP
Entering
Entering ID3
ID3 tag
tag
N&es on
on Playing
Playing MP3
MP3
Notes
Entering
Entering file
file and
and folder
folder names
names
The
The code
code list
list characters
characters are
are the
the only
only file names
names
and folder
folder names
names that
that can
can be entered
entered and
and disdisand
played.
played.
If you
you use any
any other
other character
character for entry,
entry, the
the file
and folder
folder names
names are
are not
not displayed
displayed correctly.
correctly.
and
They may
may neither
neither be displayed
displayed correctly
correctly dependdependThey
the CD writer
writer used.
used.
ing on the
The unit
unit recognizes
recognizes and
and plays
plays only
only those
those MP3
MP3
The
which have
have the
the MP3
MP3 extension
extension (MP3).
(MP3).
which
Example
of
folder/file
hierarchy
Example
of a medium's
medium’s
folderlflle
hierarchy
([}])
2
,M::
J;®
4
.h@
.h 8c)
.I>@
J'l@
Note:
Note:
A file
file with
with a name
name entered
entered with
with characters
characters not
not on
on
•A
the code
code list
list may
may not
not play
play correctly.
correct/y.
the
l
.1>'2'
Writing files
files into
into a medium
medium
Writing
When a medium
medium containing
containing MP3
MP3 data
data is loaded,
loaded,
When
the unit
unit checks
checks all the
the data
data on the
the medium.
medium. If the
the
the
medium contains
contains a lot of folders
folders or non-MP3
non-MP3 files,
files,
medium
therefore, it takes
takes a long
long time
time until
until the
the unit
unit starts
starts
therefore,
playing MP3.
MP3.
playing
addition, it may
may take
take time
time for the
the unit
unit to move
move
In addition,
next MP3
MP3 file
file or a Track
Track Search
Search or Folder
Folder
to the next
Search may
may not
not be performed
performed smoothly.
smoothly.
Search
Level 1
Level
.I>@,
.I>@'
f--J
D
pj)
File
File
.I>@
G
Root
Root
Folder
Folder
0
Level 3
Level
Level
Level 4
Level 2
Level
When a Track
Track Search
Search is
is executed
executed with
with file
file J>
b
When
@ being
being played
played ...
. ..
@
Loading such
such a medium
medium may
may produce
produce loud
loud noise
noise
Loading
damage the speakers.
speakers.
to damage
attempt to playa
play a medium
medium containing
containing a
• Do no attempt
non-MP3 file with
with the
the MP3
MP3 extension.
extension.
non-MP3
The unit
unit mistakes
mistakes non-MP3
non-MP3 files
files for
for MP3
MP3 data
data
The
as long
long as
as they
they have
have the
the MP3
MP3 extension.
extension.
as
not attempt
attempt to playa
play a medium
medium containing
containing
• Do not
non MP3.
MP3.
non
l
l
MP3 playing
playing order
order
MP3
When selected
selected for
for play,
play, Folder
Folder Search,
Search, Track
Track
When
Search, or
or for
for Folder
Folder Select,
Select, files
files and
and folders
folders are
are
Search,
accessed in
in the
the order
order in
in which
which they
they were
were written
written
accessed
by the
the CD
CD writer.
writer.
by
Because
of
this, the
the order
order in
in which
which they
they are
are exexBecause of this,
pected to
to be
be played
played may
may not
not match
match the
the order
order in
in
pected
which they
they are
are actually
actually played.
played. You
You may
may be
be able
able
which
to set
set the
the order
order in
in which
which MP3
MP3 are
are to
to be
be played
played
to
by writing
writing them
them onto
onto a
a medium
medium such
such as
as a
a CD-R
CD-R
by
with their
their file
file names
names beginning
beginning with
with play
play sesewith
quence numbers
numbers such
such as
as "01"
“01” to
to "99",
“99”, dependdependquence
ing on
on your
your CD
CD writer.
writer.
ing
For example,
example, a
a medium
medium with
with the
the following
following folder/
folder/
For
file hierarchy
hierarchy is
is subject
subject to
to Folder
Folder Search,
Search, Track
Track
file
Search, or
or Folder
Folder Select
Select as
as shown
shown below.
below.
Search,
Current
file number
J>G)
Operation of the button
r<.. J Button
I
[~IButton
Beginning of file
,/)0. ,/)@
I
J>@ • J>@
When an
an Folder
Folder Search
Search is
is executed
executed with
with file
file
When
bJ> @
@ being
being played
played ...
. ..
Current
folder
number
W
Operation of the button
[AMI Button
I
[FMJ Button
OJ·OJ.Q].I1J..· 111J.11J.Q]·I1J.Q]·..
When Folder
Folder Select
Select is
is selected
selected with
with file
file J>
& @
@
When
being played
played to
to move
move from
from folder
folder to
to folder
folder ...
. ..
being
Current
Current
folder
folder
number
number
m
Q]
Operation
of the
the button
button
Operation
of
[<dl J Button
Button I[~>
[,>I I Button
Button hAMI
[AMI Button
Button I[FMI
[FM1 Button
Button
[<..
m
OJ
I
0
I1J
I
ca
OJ
I
DB625MP
DB625MP
m
GJ
11
AboutCDs
About
CDs
Handling CDs
CDs
Handling
• Don’t
Don't touch
touch the
the recording
recording surface
surface of
of the
the CD.
CD.
CDs
CDs that
that can’t
can't be
be used
used
• CDs
CDs that
that aren’t
aren't round
round can’t
can't be
be used.
used.
l
l
• CD-R
CD-R and
and CD-RW
CD-RW are
are easier
easier to
to damage
damage than
than
a normal
normal music
music CD. Use
Use a CD-R
CD-R or
or a CD-RW
CD-RW
after
after reading
reading the
the caution
caution items
items on the
the packpackage
age etc.
etc.
l• Don’t
Don't stick
stick tape
tape etc.
etc. on the
the CD.
CD.
Also,
Also, don’t
don't use
use a CD
CD with
with tape
tape stuck
stuck on it.
l
l
• CDs
CDs with
with coloring
coloring on the
the recording
recording surface
surface or
or
that
used.
that are
are dirty
dirty can’t
can't be used.
l• Don’t
mark.
Don't use
use CDs
CDs without
without disc
disc mark
[Q]D~@
DIGITAL AUDIO
•A
A CD-R
CD-R or
or CD-RW
CD-RW that
that hasn’t
hasn't been
been finalized
finalized
can’t
played. (For
(For the
the finalization
finalization process
process
can't be played.
refer
your CD-R/CD-RW
CD-R/CD-RW writing
writing software,
software,
refer to your
and
and your
your CD-R/CD-RW
CD-R/CD-RW recorder
recorder instruction
instruction
manual.)
manual.)
l
When using
When
using a new
new CD
CD
If the
the CD
CD center
center hole
hole or
or outside
outside rim has
has burrs,
burrs
use
use it after
after removing
removing them
them with
with a ball
ball pen
pen etc.
etc. '
CD storage
CD
storage
Don’t place
place them
direct sunlight
sunlight (On the
•l Don't
them in direct
the
seat
or dashboard
dashboard etc.)
etc.) and
and where
seat or
where the
the temtemperature is high.
high.
perature
Store CDs
CDs in
in their
cases.
•l Store
their cases.
CD accessories
accessories
CD
Don’t use
use disc
disc type
type accessories.
accessories.
Don't
cleaning
CD cleaning
Clean from
from the
the center
center of the
the disc
disc and
and move
move outoutClean
ward.
ward.
E+3
Removing CDs
CDs
Removing
When removing
removing CDs
CDs from
from this
this unit
unit pUll
pull them
them out
out
When
horizontally.
horizontally.
12
12
DB625MP
DB625MP
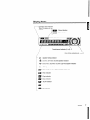
Basic Operations
Operations
Basic
Note: Be
Be sure
sure to
fo read
read this
fhis chapter
chapter referring
referring to
to the
the front
front diagrams
diagrams of
of
Note:
chapter "2.
“2. CONTROLS"
CONTROLS” on page
page 5 (unfold).
chapter
Power
Power
Each time
time the
the button
button is pressed
pressed the sound
sound set·
setEach
ting switches.
switches.
ting
Turning ON
ON the
the Power
Power
•0 Turning
Press the
the [FNC]
[FNC] button.
button.
Press
Sound setting
setting
Sound
Display
Display
“User”
"User"
“Rock”
"Rock"
“PODS”
"Pops"
“Easy”
"Easy"
“Too40”
"Top40"
“Jazz”
"Jazz"
“Flat”
"Flat"
User memory
memory
User
Rock
Rock
Turning OFF
OFF the
the Power
Power
•0 Turning
Press the
the [FNC]
[FNC] button
button for
for at
at least
least 11 second.
second.
Press
Pops
Pops
Easy
Easy
Selecting the
the Source
Source
Selecting
Too 40
40
Top
Press the
the [FNC]
[FNC] button.
button.
Press
Source required
required
Source
Display
Display
Tuner
Tuner
“TUNER”
"TUNER"
CD
CD
“CD”
"CD"
Standby
Standby
(Illumination only
onlv mode)
mode)
(Illumination
“ALL OFF"
OFF”
"ALL
Jazz
Jazz
Flat
Flat
Volume
Volume
Notes:
Notes:
User memory:
memory: The
The values
values set
set on
on the
the <Audio
<Audio
• User
Mode>.
Mode>.
Each setting
setting value
value is
is changed
changed with
with the
the <Speaker
<Speaker
• Each
Setting>. First,
First, select
select the
the speaker
speaker type
type with
with the
the
Setting>.
Speaker setting.
setting.
Speaker
Increasing Volume
Volume
•0 Increasing
Audio
Mode
Audio Mode
l
l
Press the
the [A]
[A] button.
button
Press
Decreasing Volume
Volume
•0 Decreasing
Press the
the [V]
[v]
button.
Press
button.
1. Select
Select the
the source
source for
for adjustment
adjustment
1.
Press the
the [FNC]
[FNC] button.
button.
Press
2. Enter
Enter Audio
Audio mode
mode
2.
Press the
the [BEQ
[BEQ LIGHT]
LIGHT] button
button for
for at
at least
least 11
Press
second.
second.
Mute
Mute
Turning the
the volume
volume down
down quickly.
quickly.
Turning
3. Select
Select the
the Audio
Audio item
item for
for adjustment
adjustment
3.
Press the
the [MUTE]
[MUTE] button.
button.
Press
Press the
the [FM]
[FM] or
or [AM]
[AM] button.
button.
Press
Each time
time the
the button
button is
is pressed
pressed the
the items
items that
that
Each
can be
be adjusted
adjusted switch
switch as
as shown
shown below.
below.
can
Each time
time the
the button
button is
is pressed
pressed the
the Mute
Mute turns
turns
Each
ON or
or OFF.
OFF.
ON
When it's
it’s ON,
ON, the
the "MUTE"
“MUTE” indicator
indicator blinks.
blinks.
When
4. Adjust
Adjust the
the Audio
Audio item
item
4.
Press the
the [<<ill]
[a]
Press
Adjustment
Adjustment
Item
Item
Bass level
level
Bass
Middle level
level
Middle
Treble level
level
Treble
Balance
Balance
Fader
Fader
Volume
offset
Volume offset
Loudness
Loudness
Compensating for
for low
low and
and high
high tones
tones during
during low
low
Compensating
volume.
volume.
Press the
the [MUTE]
[MUTE] button
button for
for at
at least
least 11 sec·
secPress
ond.
ond.
Each time
time the
the button
button is
is pressed
pressed for
for at
at least
least 11
Each
second the
the Loudness
Loudness turns
turns ON
ON or
or OFF.
OFF.
second
When it's
it’s ON,
ON, "LOUD
“LOUD ON"
ON” is
is displayed.
displayed.
When
Beat EQ
EQ Light
Light
Beat
You can
can recall
recall the
the best
best sound
sound setting
setting preset
preset for
for
You
different types
types of
of the
the music.
music.
different
1. Select
Select the
the source
source to
to set
set
1.
Press the
the [FNC]
[FNC] button.
button.
Press
2. Select
Select the
the Sound
Sound type
type
2.
or [~>]
[)>I button.
button.
or
Display
Display
“Bas”
"Bas"
“Mid”
"Mid"
“Tre”
"Tre"
“Bal”
"Bal"
“Fad”
"Fad"
“V-OFF”
"V·OFF"
Range
Range
-8 -- +8
+8
-8
-8 -- +8
+8
-8
-8 -- +8
+8
-8
Left 15
15 -- Right
Riaht 15
15
Left
Rear
15
Front
15
Rear 15 - Front 15
-8
+O
-8 - ±O
Note:
Note:
Volume offset:
offset Each
Each source's
source’s volume
volume can
can be
be set
set
• Volume
as aa difference
difference from
from the
the basic
basic volume.
volume.
as
l
5. Exit
Exit Audio
Audio mode
mode
5.
Press the
the [BEQ
[BEQ LIGHT]
LIGHT] button.
button.
Press
Press the
the [BEQ
[BEQ LIGHT]
LIGHT] button.
button.
Press
DE625MP
DB625MP
13
I
Basic Operations
ODerations
Basic
In MP3
MP3 source
source
•0 In
Speaker Setting
Setting
Speaker
Fine-tuning so that
that the
the BEQ
BEQ LIGHT
LIGHT value
value is optioptiFine-tuning
mal when
when setting
setting the
the speaker
speaker type.
type.
mal
Enter Standby
Standby
1. Enter
Information
Information
Track number
number
Track
Disc name
name
Disc
Press the
the [FNC]
[FNC] button.
button.
Press
Select the
the "ALL
“ALL OFF"
OFF” display.
display.
Select
Enter Speaker
Speaker Setting
Setting mode
mode
2. Enter
Press the
the [SEQ
[BEQ LIGHT]
LIGHT] button.
button.
Press
Folder name
name
Folder
name
File name
Select the
the Speaker
Speaker type
type
3. Select
Press the
the [<<Ill]
[a] or [~>]
[,>I button.
button.
Press
Each time
time the button
button is pressed
pressed the
the setting
setting
Each
switches as shown
shown below.
below.
switches
Display
Speaker type
type
Display
Speaker
“SP OFF"
OFF”
OFF
"SP
OFF
“SP 5/4"
514”
For 5 &
& 4 in.
in. speaker
speaker
"SP
For
“sp 6*9/6"
@g/6”
For 6
6&
& 6x9
6x9 in.
in. speaker
speaker
For
"SP
“SP
OEM”
For the
the OEM
OEM speaker
speaker
"SP OEM"
4. Exit
Exit Speaker
Speaker Setting
Setting mode
mode
Press
the
[BEQ
LIGHT]
button.
Press the [SEQ LIGHT] button.
Switching Display
Display
Switching
Switching the
the information
information displayed.
displayed.
Switching
Press
the
[DISP]
button.
Press the [DISP] button.
Each time
time the
the button
button is
is pressed
pressed the
the display
display
Each
switches as
as shown
shown below.
below.
switches
In Tuner
Tuner source
source
•l In
Display
Display
“DNPS”
"DNPS"
“FOL NAME"
NAME”
"FOL
“FIL NAME"
NAME”
"FIL
“TITLE”
Song title
title &
& Artist
Artist name
name
"TITLE"
Song
Album name
name &
& Artist
Artist name
name "ALBUM"
“ALBUM”
Album
Track number
number &
& Track Time
Time
Track
Clock
Clock
Station/Disc Naming
Naming (SNPS/DNPSj
(SNPWDNPS)
Station/Disc
Attaching a
a title
title to
to a
a Station
Station or
or CD.
CD.
Attaching
Receive/play the
the station/disc
station/disc you
you want
want to at1. Receive/play
tach a
a title
title to
to
tach
2. Enter
Enter name
name set
set mode
mode
2.
Press the
the [DISP]
[DISP] button
button for
for at
at least
least 2
2 seconds.
seconds.
Press
“NAME SET"
SET” is
is displayed.
displayed.
"NAME
3. Move
Move the
the cursor
cursor to
to the
the enter
enter character
character posiposi3.
tion
tion
Press the
the [<<Ill]
[d] or
or [~>]
[,>I button.
button.
Press
4. Select
Select the
the character
character type
type
4.
Press the
the [~II]
[WI] button.
button.
Press
Each time
time the
the button
button is
is pressed
pressed the
the character
character
Each
type switches
switches as
as shown
shown below.
below.
type
Character type
type
Character
Information
Information
Frequency
Frequency
Display
Display
Alphabet
Alphabet
Alphabet
Alphabet
Station name
name
Station
Clock
Clock
“SN PS”
"SNPS"
Numbers and
and symbols
symbols
Numbers
Special
characters
(Accent characters)
characters)
Special characters (Accent
In CD
CD source
source
•0 In
Information
Information
Track
number
Track number
Disc
name
Disc name
Disc title
title
Disc
Track
title
Track title
Track
number
& Track
Track Time
Time
Track number &
Clock
Clock
14
14
DB625MP
DB625MP
Display
Display
“DN PS”
"DNPS"
“D-TITLE”
"D-TITLE"
“T-TITLE”
"T-TITLE"
upper case
case
upper
lower
case
lower case
5. Select
Select the
the characters
characters
5.
Press the
the [FM]
[FM] or
or [AM]
[AM] button.
button
Press
6. Repeat
Repeat steps
steps 3
3 through
through 5
5 and
and enter
enter the
the name.
name.
6.
7. Exit
Exit name
name set
set mode
mode
7.
Press the
the [DISP]
[DISP] button.
button.
Press
Notes:
Notes:
When operation
operation stops
stops for
for 10
IO seconds
seconds the
the name
name at
at
•l When
that time
time is
is registered,
registered, and
and Name
Name Set
Set mode
mode closes.
closes.
that
Memory numbers
numbers
•l Memory
-- FM:
FM: 32
32 stations
stations
16stations
stations
-- AM:
AM: 16
internal CO
CD player:
player; 30
30 discs
discs
-- Internal
The title
title of
of station/CO
station/CD can
can be
be changed
changed by
by the
the same
same
•l The
operation used
used to
to name
name it.
it.
operation
Disc Naming
Naming can't
can’t be
be done
done during
during CO
CD text
text or
or clock
clock
•l Disc
display.
display.
Basic Operations
Operations
Basic
Theft Deterrent
Deterrent Faceplate
Faceplate
Theft
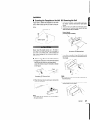
0• Reattaching
Reattaching the
the Faceplate
Faceplate
The'"faceplate of
of the
the unit
unit can
can be detached
detached and
and
The*faceplate
taken with
with you,
you, helping
helping to deter
deter theft.
theft.
taken
1. Align
Align the
the shaft
shaft on the
the unit
unit with
with the
the depression
depression
on the
the faceplate.
faceplate.
on
0• Removing
Removing the
the Faceplate
Faceplate
Press the
the [OPEN]
[OPEN] button.
button.
11. Press
Drop open
open the
the faceplate.
faceplate.
Drop
Drawing the
the faceplate
faceplate to left
left side
side pull
pull it to
to the
the
22. Drawing
front and
and remove
remove it.
front
the faceplate
faceplate in until
clicks.
2. Push
Push the
until it clicks.
The faceplate
faceplate is locked
allowing you
you
The
locked in place,
place, allowing
the unit.
to use
use the
unit.
Notes:
Notes:
equipment
• The faceplate
faceplate is a precision
precision piece
piece of equipment
and
damaged by shocks
that
and can be damaged
shocks or jolts.
jolts. For
For that
reason, keep the faceplate
faceplate in its special
special storage
storage
case while detached.
defached.
case
expose the faceplate
faceplate or its storage
storage case to
• Do not expose
direct sunlight
sunlight or excessive
excessive heat
heat or humidity. Also
Also
direct
avoid places
p/aces with too much
much dust
dust or the possibility
possibility
avoid
of water
water splashing.
splashing.
l
l
DB625MP
OB625MP
15
15
I
Radio
Radio Operations
Operations
II
Tuning
Tuning Mode
Mode
Auto
Auto Store
Store Entry
Entry
Choose
Choose the
the tuning
tuning mode.
mode.
Press
Press the
the [T-M]
[T-M] button.
button.
Each
Each time
time the
the button
button is
is pressed
pressed the
the Tuning
Tuning
mode
mode switches
switches as
as shown
shown below.
below.
Tuning
Tuning mode
mode Display
Display Operation
Operation
“Auto
Auto
Auto seek
seek
"Auto 1”
1" Automatic
Automatic search
search
for
for aa station.
station.
“Auto
Preset
Preset scan
scan
"Auto 2”
2" Search
Search in order
order of
of
the
seek
the
seek
the stations
stations in the
Preset
Preset memory.
memory.
“Manual”
Manual
Manual
"Manual" Normal
Normal manual
manual
tuning
tuning control.
control.
Putting
Putting aa station
station with
with good
good reception
reception in the
the
memory
memory automatically.
automatically.
1. Select
Select the
the band
band for
for Auto
Auto Store
Store Entry
Entry
Press
Press the
the [FM]
[FM] or
or [AM]
[AM] button.
button.
2. Open
Open Auto
Auto Store
Store Entry
Entry
Press
Press the
the [T-M]
[T-M] button
button for
for at
at least
least 22 seconds.
seconds.
When
stations that
that can
can be
be received
received are
are put
put
When 6 stations
in the
the memory
memory Auto
Auto Store
Store Entry
Entry closes.
closes.
Tuning
Tuning
2.
2. Call
Call up
up the
the station
station
Press
Press the
the [PRESET]
[PRESET] button.
button.
Selecting
Selecting the
the station.
station.
1. Select
Select tuner
tuner source
source
Press
Press the
the [FNC]
[FNC] button.
button.
Select
Select the
the “TUNER”
"TUNER" display.
display.
2. Select
Select the
band
the band
Press the
[FM] or
or [AM]
[AM] button.
button.
Press
the [FM]
Each time
[FM] button
button is
is pressed
pressed itit
time the
the [FM]
Each
switches
between the
FMl, FM2,
FM2, and
and FM3
FM3
switches between
the FM1,
bands.
bands.
3. Tune
up or
or down
down band
band
3.
Tune up
Press the
[a]....] or
or [B&l
button.
Press
the [<
[~>] button.
Note:
Note:
During reception
reception of
of stereo
stereo stations
stations the
the "Sf"
“SY indiindi• During
cator is ON.
ON.
catoris
l
Station Preset
Preset Memory
Memory
Station
Putting the
the station
station in
in the
the memory.
memory.
Putting
1. Select
Select the
the band
band
1.
Press the
the [FM]
[FM] or
or [AM]
[AM] button.
button.
Press
2. Select
Select the
the frequency
frequency to
to put
put in
in the
the memory
memory
2.
Press the
the [<
[a]....] or
or [~>]
[,)I button.
button.
Press
3. Put
Put the
the frequency
frequency in
in the
the memory
memory
3.
Press
the
[PRESET]
button
for at
at least
least 2
2 secsecPress the [PRESET] button for
onds.
onds.
The preset
preset number
number display
display blinks
blinks 11 time.
time.
The
On each
each band,
band, 11 station
station can
can be
be put
put in
in the
the
On
memory on
on each
each [PRESET]
[PRESET] button.
button.
memory
16
16
DB625MP
DB625MP
Preset
Tuning
Preset Tuning
Calling
Calling up the
the stations
stations in the
the memory.
memory.
1. Select
Select the
the band
band
Press
Press the
the [FM]
[FM] or
or [AM]
[AM] button.
button.
Changing
Changing the
the reception
reception area
area
This
This unit
unit is
is initially
initially set
set to
to USA
USA frequency
frequency intervals
intervals
of 10kHz
1OkHz for
and 200kHz
200kHz for
FM. When
using
of
for AM
AM and
for FM.
When using
outside the
USA, the
reception range
range
itit outside
the USA,
the frequency
frequency reception
can be
be switched
intervals below.
below.
can
switched to
to the
the intervals
Setting the
the reception
reception area
area
•0 Setting
1, If
If the
Reset button
button is
is pressed
pressed while
pressing
1.
the Reset
while pressing
[PRESET 1]
I] and
and [PRESET
[PRESET 5],
51, reception
reception area
area
[PRESET
will
inside the
USA to
outside
will switches
switches from
from inside
the USA
to outside
the
USA or
USA to
inside the
the USA
or from
from outside
outside the
the USA
to inside
the
USA.
USA.
station preset
preset memories
memories are
are lost
lost when
'":::Any
Any station
when
the
reception area
area is
is changed.
changed.
the reception
CRSC (Clean
(Clean Reception
Reception System
System
CRSC
Circuit) <In
<In FM
FM reception>
reception>
Circuit)
Temporarily have
have reception
reception switched
switched from
from stereo
stereo
Temporarily
to mono
mono to
to reduce
reduce multi-path
multi-path noise
noise when
when listening
listening
to
to the
the FM
FM station.
station.
to
Setting
Display
Display
Setting
“CRSC ON"
ON”
"CRSC
“CRSC OFF"
OFF”
"CRSC
Note:
Note:
The CRSC
CRSC is
is ON.
ON.
The
The CRSC
CRSC is
is OFF.
OFF.
The
Strong electrical
electrical fields
fields (such
(such as
as from
from power
power lines)
lines)
• Strong
may cause
cause unstable
unstable sound
sound quality
quality when
when CRSC
CRSC is
is
may
turned ON.
ON. In
In such
such aa situation,
situation, turn
turn itit OFF
OFF:
turned
l
CDIMP3 Onerations
Operations
CDAWP3
Playing CD
CD &
& MP3
MP3
Playing
0• When
When there
there is
is no
no disc
disc inserted
inserted
Drop open
open the
the faceplate
faceplate
1. Drop
Press
Press the
the [OPEN]
[OPEN] button.
button.
2. Insert
Insert aa disc.
disc.
3. Press
Press the
the faceplate
faceplate on
on the
the right
right side,
side, and
and rereturn
turn itit to
to its
its former
former position.
position.
.• When
When the
the faceplate
faceplate has
has been
been dropped
dropped open,
open,
it might
might interfere
interfere with
with the
the shift
shift lever
lever or
or somesomething
this happens,
happens, pay
pay attention
attention to
to
thing else.
else. If this
safety
an apapsafety and
and move
move the
the shift
shift lever
lever or
or take
take an
propriate
propriate action,
action, then
then operate
operate the
the unit.
unit.
.• Do not
not use
use the
the unit
unit with
with the
the faceplate
faceplate in the
the
open
it's used
used in the
the open
open posiposiopen condition.
condition. If it’s
tion
tion dust
dust can
can enter
enter the
the inside
inside part
part and
and cause
cause
damage.
damage.
When aa disc
0• When
disc is
is inserted
inserted
-I
33 in.
in. (8cm)
(8cm) disc
disc can’t
can't be
be played.
played. Using
Using an
an adapter
adapter
and
and inserting
inserting them
them into
into this
this unit
unit can
can cause
cause damdamage.
age.
Note:
Note:
l
• The MP3
MP3 media
media that
that this
this unit
unit can
can play
play are
are CDCOROM, CD-R,
CO-R, and
and CD-RW.
CO-RW
The medium
medium formats
formats must
must be
be /.Sb
ISO 9660
9660 Level
Level 1,
1,
Level
Level 2, Jo/jet,
Joliet, or
or Romeo.
Romeo. The methods
methods and
and preprecaufions
cautions to be
be followed
followed for
for writing
writing MP3
MP3 data
data are
are
covered
covered in <Notes
<Notes on playing
playing MP3x
MP3>.
Check
Check that
that section
section before
before creating
creating your
your MP3
MP3 memedia.
Fast
Fast Forwarding
Forwarding and
and Reversing
Reversing
0• Fast
Fast Forwarding
Forwarding
Hold
Hold down
down on
on the
the [,)I
[~>] button.
button.
Release
Release your
your finger
finger to
to play
play the
the disc
disc at
at that
that
point.
point.
0• Reversing
Reversing
Press the
[FNC] button.
button.
Press
the [FNC]
Select
the
“CD”
display.
Select the "CD" display.
Hold down
down on
Hold
Release
Release your
your
point.
point.
Pause and
and play
•0 Pause
play
the
[a]....] button.
button.
the [<
finger
to
play the
disc at
at that
finger to play
the disc
that
Press the
button.
Press
the [FII]
[~II] button.
Each time
button is pressed
pressed it pauses
pauses and
and
Each
time the
the button
plays.
plays.
Eject the
the disc
disc
•0 Eject
Track Search
Search
Track
Drop open
open the
the faceplate
faceplate
1. Drop
Press the
the [OPEN]
[OPEN] button.
button.
Press
Eject the
the disc
disc
2. Eject
Press the [~]
[A] button.
button.
Press
Selecting the
the song
song you
you want
want to
to hear.
hear.
Selecting
Searching for
for a
a song
song on
on the
the disc
disc or
or in
in the
the MP3
MP3
Searching
folder.
folder.
Press the
the [<
[44]
or [~>]
[,)I button.
button.
Press
....] or
Folder Search
Search
Folder
on
Selecting the
the folder
folder recorded
recorded on
on the
the MP3
MP3 media.
media.
Selecting
Press
the
[FM]
or
[AM]
button.
Press the [FM] or [AM] button.
3. Press
Press the
the faceplate
faceplate on
on the
the right
right side,
side, and
and rere3.
turn itit to
to its
its former
former position.
position.
turn
OB625MP
DB625MP
17
17
CD/MP3
CDIMP3 Operations
Operations
TracMFolder Repeat
Track/Folder
Repeat
Ill
Replaying
Replaying the
the song,
song, disc
disc or
or MP3
MP3 folder
folder you’re
you're
listening
listening to.
to.
Press
Press the
the [RPT]
[RPT] button.
button.
Each
pressed the
the Repeat
Repeat
Each time
time the
the button
button is pressed
Play
Play switches
switches as
as shown
shown below.
below.
Display
Repeat
Display
Repeat play
play
“REP
Track
Repeat
(In
CD)
Track Repeat
CD)
"REP ON”
ON"
(in MP3)
MP3)
“REP
(In
"REP ON”
ON"
Folder Repeat
Repeat
Folder
MP3 media)
media)
(In MP3
OFF
OFF
“F
REP ON”
"F REP
ON"
“REP
"REP OFF”
OFF"
Track Scan
Scan
Track
Playing the
part of each
Playing
the first
first part
each song
song on the
the disc
disc or
or
MP3 folder
listening to and
and searching
searching for
for
MP3
folder you
you are
are listening
the
listen to.
the song
song you
you want
want to listen
1. Start
Track
Scan
Start Track Scan
Press the
[SCN] button.
button.
Press
the [SCN]
“Scan
ON” is displayed.
displayed.
"Scan ON"
2. Release
Release itit when
when the
the song
song you
you want
want to
to listen
listen to
to
2.
is played
played
is
Press the
the [SCN]
[SCN] button.
button.
Press
Random Play
RandomPlay
Play all
all the
the songs
songs on
on the
the disc
disc or
or MP3
MP3 folder
folder in
in
Play
random order.
order.
random
Press the
the [ROM]
[RDM] button.
button.
Press
Each time
time the
the button
button is
is pressed
pressed Random
Random Play
Play
Each
turns ON
ON or
or OFF.
OFF.
turns
When it's
it’s ON,
ON, "ROM
“RDM ON"
ON” is
is displayed.
displayed.
When
Note:
Note:
When the
the [~>
[,)I 1 button
button is
is pressed,
pressed, the
the next
next song
song
•l When
select starts.
starts.
select
Folder Select
Select (Function
(Function of
of MP3)
MP3)
Folder
Quickly selecting
selecting the
the folder
folder you
you want
want to
to listen
listen to.
to.
Quickly
1,
Enter
Folder
Select
mode
1. Enter Folder Select mode
Press the
the [PRESET5]
[PRESET51 button.
button.
Press
During
Select
mode
the
folder information
information is
is
During Select mode the folder
displayed as
as shown
shown below.
below.
displayed
L. <Folder
<Folder name
name display>
display>
Displays the
the current
current folder
folder name.
name
Displays
18
18
DB625MP
D8625MP
2. Select
Select the
the folder
folder level
level
Press
Press the
the [FM]
[FM] or
or [AM]
[AM] button.
button.
With
With the
the [FM]
[FM] button
button you
you move
move 1 level
level down
down
and
and with
with the
the [AM]
[AM] button
button 1 level
level up.
Selecting
Selecting a folder
folder in
in the
the same
same level
level
Press
[< ] or
or [)>I
[~>] button.
button.
Press the
the [<4]
With
[< ] button
button you
you move
move to the
the previpreviWith the
the [X4]
ous
[~>] button
button to
to the
the next
next
ous folder,
folder, and
and with
with the
the [))I
folder.
folder.
Returning to
level
Returning
to the
the top
top level
Press the
[PRESET31 button.
button.
Press
the [PRESET3]
3. Decide
Decide the
play
the folder
folder to play
Press the
button.
[~II] button.
Press
the [HI]
The
Folder
Select
mode releases,
releases, and
The Folder Select mode
and the
the
MP3 in
in the
being displayed
is played.
played.
MP3
the folder
folder being
displayed is
Note:
Note:
The methods
to other
the
• The
methods for
for moving
moving to
other folders
folders in
in the
Folder
different from
those in
the
Folder select
select mode
mode are
are different
from those
in the
Folder
Folder search
search mode.
mode.
See <Notes
<Notes on
details.
See
on playing
playing MP3>
MP3> for
for details.
l
Canceling the
the Folder
Folder Select
Select mode
mode
•0 Canceling
Press the
the [PRESET5]
[PRESET51 button.
button.
Press
Text/Title Scroll
Scroll
TextITitie
Scrolling the
the displayed
displayed CD
CD text,
text, MP3
MP3 text.
text.
Scrolling
Press
the
[DISP]
button
for
at
least
1 second.
second.
Press the [DISP] button for at least 1
Adjustment Menu
Menu
Adjustment
Adjustment Menu
Menu
Adjustment
Manual
Manual Clock
Clock Adjustment
Adjustment
Setting
Setting during
during operation
operation beep
beep sound
sound etc.
etc. funcfunctions.
tionS'.
The
The Adjustment
Adjustment menu
menu basic
basic operation
operation method
method is
is
explained
explained here.The
here. The reference
reference for
for the
the Adjustment
Adjustment
menu
menu items
items and
and their
their setting
setting content
content is
is after
after this
this
operation
operation explanation.
explanation.
1. Enter
Enter Adjustment
Adjustment menu
menu mode
mode
Press
[~II] button
button for
for at
at least
least 11 second.
second.
Press the
the [HI]
“MENU”
"MENU" is
is displayed.
displayed.
2. Select
Select the
the Adjustment
Adjustment menu
menu item
item
Press
[FM] or
or [AM]
[AM] button.
button.
Press the
the [FM]
Example:
Example: When
When you
you want
want to
to set
set the
the beep
beep
sound
"Beep" display.
display.
sound select
select the
the “Beep”
3. Set
Set the
the Adjustment
Adjustment menu
menu item
item
1. Select
Select Clock
Clock Adjustment
Adjustment mode
mode
Press
the
[FM]
or [AM]
[AM] button.
button.
Press the [FM] or
Select
"elK ADJ”
ADJ" display.
display.
Select the
the “CLK
2. Enter
Enter Clock
Clock Adjust
Adjust mode
mode
Press
[<<OIl] or
or [,)I
[~>] button
button for
for at
at least
least 11
Press the
the [a]
second.
second.
The
The clock
clock display
display blinks.
blinks.
Adjust
the
3. Adjust the hours
hours
Press
[FM] or
or [AM]
[AM] button.
button.
Press the
the [FM]
Adjust
the
minutes
Adjust the minutes
Press
Press the
the [a]
[<<OIl] or
or [,)I
[~>] button.
button.
4. Exit
Exit Clock
Clock adjustment
adjustment mode
mode
Press
[<<OIl] or
or [)>I
[~>] button.
button.
Press the
the [a]
Example:
Example: When
When “Beep”
"Beep" is selected,
selected, each
each time
time
the
the button
button is
is pressed
pressed it switches
switches
“Beep
"Beep ON”
ON" or
or “Beep
"Beep OFF”.
OFF". Select
Select 1
of them
them as the
the setting.
setting.
You can
can continue
continue by returning
returning to step
step 2 and
and
setting
setting other
other items.
items.
4. Exit
Exit Adjustment
Adjustment menu
menu mode
mode
Press
the
[
)I
I]
button.
Press the [~II] button.
Note:
Note:
When other
other items
items that
that are
are applicable
applicable to
to the
the basic
basic
• When
operation method
method above
above are
are displayed
displayed afterwards
afterwards
operation
their setting
setting content
content chart
chart is
is entered.
entered. (Normally
(Normally the
the
their
uppermost setting
setting in
in the
the chart
chart is
is the
the original
original setsetuppermost
ting.)
ting.)
Also, the
fhe explanation
explanation for
for items
items that
that aren't
aren’t appliappliAlso,
cab/e «Manual
(<Manual Clock
Clock Adjustment>etc.)
Adjustment>etc.) are
are enencable
tered step
step by
by step.
step.
tered
l
Touch Sensor
Sensor Tone
Tone
Touch
Setting the
the operation
operation check
check sound
sound (beep
(beep sound)
sound)
Setting
ON/OFF.
ON/OFF.
Setting
Display
Setting
Display
Beep is
is heard.
heard.
“Beep ON"
ON”
"Beep
Beep
Beep canceled.
canceled.
“Beep OFF"
OFF”
"Beep
Beep
Press
,I I] button.
button.
Press the
the [[~II]
Note:
Note:
• At
At the
the time
time of
of clock
clock adjustment,
adjustment, when
when only
only aa
change
change of
of the
the hour
hour is
is made,
made, itit is
is not
not adjusted
adjusted to
to
00
00 seconds.
seconds. On/y
Only when
when the
the minute
minute is
is changed,
changed, itit
is
to 00
00 seconds.
seconds.
is adjusted
adjusted to
l
DSI
(Disabled System
DSI (Disabled
System Indicator)
Indicator)
A
A red
red indicator
indicator will
will blink
blink on
on the
the unit
unit after
after the
the facefaceplate
is removed,
removed, warning
warning potential
potential thieves.
thieves.
plate is
Setting
Display
Display
Setting
LED
“DSI
"OS I ON”
ON"
lED flashes.
flashes.
LED OFF.
OFF.
“DSII OFF"
OFF”
"OS
lED
Selectable Illumination
lllumina tion
Selectable
Selecting the
the button
button illumination
illumination color
color as
as green
green
Selecting
or red.
red.
or
Setting
Display
Display
Setting
The illumination
illumination color
color is
is green.
green.
“KEY GRN"
GRN”
"KEY
The
The illumination
illumination color
color is
is red.
red.
“KEY RED"
RED”
"KEY
The
Switching Display
Display Type
Type
Switching
Setting the
the Display
Display type.
type.
Setting
Display
Setting
Display
Setting
Demonstration.
“DisplayD”
"DisplayD"
Demonstration.
Circle Display
Display is
is play
play time.
time.
“DisplayA”
"DisplayA"
Circle
Circle
Display
is
clock.
“DisplayB”
"DisplayB"
Circle Display is clock.
“DisplayC”
"DisplayC"
Silent display
display type.
type.
Silent
DB625MP
DB625MP
19
Adjustment Menu
Adjustment
Menu
Contrast
Adjustment
Contrast Adjustment
Adjusting
Adjusting the
the display
display contrast.
contrast.
Display
Display and
and Setting
Setting
"CaNTO"
"CaNT
“CONT 5"
5” (Original
(Original setting)
setting)
"CaNT
“CONT 10"
10”
Dimmer
Dimmer
Dimming
Dimming this
this unit's
unit’s display
display automatically
automatically when
when
the vehicle
vehicle light
light switch
switch is turned
turned ON.
Setting
Display
Setting
Display
"DIM
The
The display
display dims.
dims.
“DIM ON"
ON”
The display
disPlav doesn't
doesn’t dim.
dim.
"DIM
The
“DIM OFF"
OFF”
Text
Text Scroll
Scroll
Setting the
the displayed
displayed text
text scroll.
scroll.
Setting
Setting
Display
Setting
Display
“SCL AUTO"
AUTO”
Repeats scroll.
scroll.
"SCL
Repeats
Scrolls when
when the display
display
“SCL MANU"
MANU” Scrolls
"SCL
chanaes.
changes.
Notes:
Notes:
fext scrolled
scrolled is shown
shown below.
The text
•l CD
text
CD
text
Folder name/
name/ File name/
name/ Song title/
tit/e/ Artist
name/
•l Folder
Artist name/
Album
name
Album name
20
DB625MP
DB625MP
Connecting Wires
Wires to Terminals
Terminals
Connecting
Rear
Rear right
right output
output (Red)
(Red) ~~IJB!B=~-l==========;\'\
Rear
Rear left
left output
output (White)
(White) D==tn-o=ll
Front
Front right
right output
output (Red)
(Red) ~:;tIn-~rll========;\\
-n
"Z
Front
Front left
left output
output (White)
(White) D==tIIJ:lR!B=dl o
-1
=..... C:=]):J:==~-----rrl
::
m
FM/AM
FM/AM antenna
antenna input
input
If no connections
connections are
are made,
made, do
do not
not
let
let the
the wire
wire come
come out
out from
from the
the tab.
tab.
When using
using the
optional power
power
optional
amplifier, connect
connect to its
amplifier,
power control
control terminal.
terminal.
power
Depending on what
Depending
what
antenna you are using,
antenna
connect either
either to the
connect
control terminal
control
terminal of the
motor antenna,
antenna, or to
motor
the power
power terminal
terminal for
the booster
booster amplifier
amplifier of
the film-type
antenna.
film-type antenna.
Fuse
Fuse (10A)
(10A)
:
r
] Wiring
Wiring harness
harness
(Accessory
CD)
(Accessory 0)
n
:I_,
“ONT Power
Power control
control wire
wire
(Blue/White)
(Blue/White)
ANT
1 ‘ONT1 Motor
Motor antenna
antenna control
control
wire
(Blue)
wire (Blue)
J
White/Black
White/Black
e
®
To front left
speaker
White
White
To car
car light
light control
control ;....
. . ---c---,...-------To
IMUM,
switch
ILLUMI
switch
Dimmer control
control wire
wire
Dimmer
(Orange //White)
(Orange
White)
Ignition key
key (Q?
m
@
Ignition
@
switch I
switch
I
ACC
ACC
c
/"h....l....-_ . . . .
I
To front right
speaker
Ignition wire
wire
Ignition
Green/Black
Green/Black
(Red)
....:.(R_e_d.:...)--~IIII''''---1"--~
e
v---t-?
....
Car fuse
fuse box
box
Car
To rear left
speaker
.111
Battery wire
wire
Battery
(Yellow)
(Yellow)
Purple/Black
1"-_.------,--1
Ground wire (Black) 0
(To car chassis)
e
-
®
To rear right
speaker
Purple
Purple
Battery
Battery
DB625MP
DB625MP
21
21
Installation
Ins talla tion
Installation
•1 Installation
Firewall or
or metal
metal support
suooort
Firewall
Screw (M4X8)
(commercially available)
/
d the
the mounting
mounting
Bend
the tabs
tabs of the
sleeve with
screwdriver or
sleeve
with a screwdriver
similar utensil
utensil and
and attach
attach it in
similar
place.
place.
\
Self-tapping screw
screw
Self-tapping
(commercially available)
available)
(commercially
Metal mounting
mounting strap
strap
Metal
(commercially available)
available)
(commercially
Note:
Note:
sure that
that the unit
unit is installed
installed securely
securely in place.
If the unit
unit is unstable,
unstable, it may
may malfunction
malfunction (eg, the
• Make sure
place. If
sound may
may skip).
sound
l
Installing in
in Japanese-Made
Japanese-Made Cars
Cars
•H Installing
1.
2.
Refer to the
section "Removing
“Removing the
hard rubber
rubber frame”
and then
then remove
remove the
the hard
hard rubber
rubber frame.
Refer
the section
the hard
frame" and
frame.
Align
the
holes
in
the
unit
(two
locations
on
each
side)
with
the
vehicle
mounting
bracket
and secure
secure
Align the holes the unit (two locations
each side) with the vehicle mounting bracket and
the
unit with
accessory screws.
screws.
the unit
with the
the accessory
T
I
• 8mm
8mm
, MAX.
, MAX.
~
T:
cars
T: Toyota
Toyota cars
N: Nissan
Nissan cars
cars
N:
L
Accessory
Accessory
Accessory
Accessory
_.@
05mm
@...for
Nissan car
car
@
for Nissan
@...for
Toyota car
car
@
for Toyota
Notes:
Notes:
During installation,
installation, do
do not
not use
use any
any screws
screws except
except for
for those
those provided.
The use
use of
of different
djfferent screws
screws might
might
• During
provided. The
result in
in damage
damage to
to the
the main
main unit.
unit.
result
Damage may
may occur
occur if
if a
a screwdriver
screwdriver or
or similar
similar tool
too/ is
is used
used with
with excessive
excessive force
force during
during the
the installationl>.
insta//ationg.
• Damage
l
l
22
22
DB625MP
D8625MP
Ins
talla tion
Installation
H
Removing the
the Unit
Unit
• Screwing
Screwing the
the Faceplate
Faceplate on
on the
the Unii
Unit n• Removing
If ypu
you want
want to
to fasten
fasten the
the faceplate
faceplate to
to the
the main
main
unit
unit so
so that
that it does
does not
not fall
fall off,
off, screw
screw in the
the proprovided
the holes
holes shown
shown
vided screws
screws (04
(04 X
X 16
16 mm)
mm) in the
below.
below.
Accessory
®
Accessory @
1,
1. Refer
Refer to
to the
the section
section “Removing
"Removing the
the hard
hard rubrubber
ber frame”
frame" and
and then
then remove
remove the
the hard
hard rubber
rubber
frame.
frame.
2. Remove
Remove the
the screw
screw (M4x8)
(M4x8) on
on the
the back
back panel.
panel.
3. Insert
the
two
removal
tools
deeply
Insert the two removal tools deeply into
into the
the
slots
slots on
on each
each side,
side, as
as shown.
shown.
Screw
Screw (M4x8)
(M4x8)
(commercially
(commercially available)
available)
~
Never
Never insert
insert the
the taptite
taptite screw
screw (04
(04 x 16 mm)
mm) in
any
any other
other screw
screw hole
hole than
than the
the one
one specified.
specified. If
you
screw it in another
another hole,
hole, it will
contact and
and
will contact
you screw
may cause
cause damage
damage to the
mechanical parts
parts inmay
the mechanical
side the
unit.
side
the unit.
Removing the
the hard
hard rubber
rubber frame
frame
•W Removing
Accessory
Accessory @
® Removal
Removal tool
tool
4.
Lower the
removal tool
bottom, and
and
4. Lower
the removal
tool toward
toward the
the bottom,
pull out
out the
unit halfway
halfway while
pressing towards
pull
the unit
while pressing
towards
the
inside.
the inside.
1. Engage
Engage the
catch pins
pins on
on the
removal tool
and
1.
the catch
the removal
tool and
remove the
locks on
on the
lower level.
level.
the lower
remove
the two
two locks
Lower the
and pull
pull itit forward
as shown
shown
Lower
the frame
frame and
forward as
in the
in
the figure.
figure.
~J(,~t1
:> ®
Catch
Lock
.~
------.
~
Accessory @ Removal
Removal tool
tool
Accessory
Note:
Note:
Be careful
careful to
to avoid
avoid injury
injury from
from the
the catch
catch pins
pins on
on
• Be
the removal
removal tool.
tool.
the
l
2. When
When the
the lower
lower level
level is
is removed,
removed, remove
remove the
the
2.
upper two
two locations.
locations.
upper
~!
5. Pull
Pull the
the unit
unit all
all the
the way
way out
out with
with your
your hands,
hands,
5.
being careful
careful not
not to
to drop
drop it.
it.
being
~
Note:
Note:
The frame
frame can
can be
be removed
removed from
from the
the top
top side
side in
in
• The
the same
same manner.
manner.
the
l
DB625MP
DB625MP
23
23
Installation Procedure
Procedure
Installation
prevent short
short circuits,
circuits, remove
remove the
the key
key from
from
1. To prevent
the ignition
ignition and
and disconnect
disconnect the
the 0 terminal
terminal of
the
the battery.
battery.
the
e
Make the
the proper
proper input
input and
and output
output wire
wire concon2. Make
nections for
for each
each unit.
unit.
nections
Connect the
the speaker
speaker wires
wires of the
the wiring
wiring harhar3. Connect
ness
ness.
4. Connect
Connect the
the wiring
wiring harness
harness wires
wires in the
the folfollowing order:
order: ground,
ground, battery,
battery, ignition.
ignition.
lowing
Connect the
the wiring
wiring harness
harness connector
connector to the
the
5. Connect
unit.
unit.
Install the
the unit
unit in your
your car.
6. Install
Reconnect the
the 0 terminal
terminal of the
the battery.
battery
7. Reconnect
Press the
the reset
reset button.
button.
8. Press
e
~,:~$&$*., .‘ cGyr.i
/ 1: ~~$$k&d
If you
you connect
connect tthee Ignition
ignition wire
wire (red)
(red) and
and the
the batbattery wire
wire (yellow)
(yellow) to
to the
the car
car chassis
chassis (ground),
(ground), you
you
tery
may cause
cause a short
short circuit,
circuit, that
that in turn
turn may
may start
start a
may
fire. Always
Always connect
connect those
those wires
wires to
to the
the power
power
fire.
source running
running through
through the
the fuse
fuse box.
box.
source
If your
your car's
car’s ignition
ignition doesn()t
does not have
have an
an ACe
ACC popo•l If
sition, connect
connect the
the ignition
ignition wires
wires to
to a
a power
power
sition,
source that
that can
can be
be turned
turned on
on and
and off
off with
with the
the
source
ignition key.
key. If
If you
you connect
connect the
the ignition
ignition wire
wire to
to
ignition
a power
power source
source with
with a
a constant
constant voltage
voltage supply,
supply,
a
as with
with battery
battery wires,
wires, the
the battery
battery may
may die.
die.
as
l If the console has a lid, make sure to install the
• If the console has a lid, make sure to install the
unit so
so that
that the
the faceplate
faceplate will
will not
not hit
hit the
the lid
lid when
when
unit
closing and
and opening.
opening.
closing
If the
the fuse
fuse blows,
blows, first
first make
make sure
sure the
the wires
wires aren't
aren’t
•l If
touching to
to cause
cause a
a short
short circuit,
circuit, then
then replace
replace
touching
the old
old fuse
fuse with
with one
one with
with the
the same
same rating.
rating.
the
l Insulate
unconnected
wires
with
vinyl
tape or
or
• Insulate unconnected wires with vinyl tape
other similar
similar material.
material. To
To prevent
prevent a
a short
short circirother
cuit, do
do not
not remove
remove the
the caps
caps on
on the
the ends
ends of
of the
the
cuit,
unconnected wires
wires or
or the
the terminals.
terminals.
unconnected
Connect the
the speaker
speaker wires
wires correctly
correctly to
to the
the terter•l Connect
minals to
to which
which they
they correspond.
correspond. The
The unit
unit may
may
minals
be damaged
damaged or
or fail
fail to
to work
work ifif you
you share
share the
the @
be
wires or
or ground
ground them
them to
to any
any metal
metal part
part in
in the
the
wires
car.
car.
e
24
24
D6625MP
DB625MP
When only
only two
two speakers
speakers are
are being
being connected
connected
•l When
the system,
system, connect
connect the
the connectors
connectors either
either to
to the
both the
the front
front output
output terminals
terminals or to both
both the
the
both
rear output
output terminals
terminals (do not mix
mix front
front and
and rear).
rear
For example,
example, if you
you connect
connect the
the EB
@ connector
connector
For
the left
left speaker
speaker to a front
front output
output terminal,
terminal, do
of the
not connect
connect the
the 0 connector
connector to a rear
rear output
output
not
terminal
terminal
e
After the
the unit
unit is installed,
installed, check
check whether
whether the
the
•l After
brake lamps,
lamps, blinkers,
blinkers, wipers,
wipers, etc.
etc. on the
the car
car
brake
are working
working properly.
properly.
are
Mount the
the unit
unit so that
that the mounting
mounting angle
angle is
•l Mount
30” or less.
less.
30°
What might seem to be a malfunction in your unit may just be the result of slight misoperation
miswiring. Before calling service, first check the following table for possible problems.
or
The fuse has blown.
After
After checking
checking for
for short
short circuits
circuits in the
the
wires,
wires, replace
replace the
the fuse
fuse with
with one
one with
with the
the
same
same rating.
rating.
No
No ACC
ACC position
position on
on vehicle
vehicle
ignition.
ignition.
Connect
Connect the
the same
same wire
wire to
to the
the ignition
ignition as
as
the
the battery
battery wire.
wire.
Nothing happens when
the buttons are pressed.
The
the
The computer
computer chip
chip in the
unit
not functioning
functioning
unit is not
normally.
normally.
Press
the unit.
Press the
the reset
reset button
button on the
There’s a source you
There’s
There's no CD
CD inserted.
inserted.
Set
Set the
the media
media you
you want
want to
to listen
listen to.
to. IfIf
there’s
there's no
no media
media in
in this
this unit,
unit, you
you can’t
can't
switch
switch to
to each
each source.
source.
The memory
memory is erased
erased
when
when the ignition
ignition is
The battery
battery wire
wire has not
been
been connected
connected to the
the
proper
proper terminal.
terminal.
Connect
Connect the
the wire
wire correctly,
correctly, referring
referring to
to the
the
section
section on
on <Connecting
<Connecting Wires
Wires to
to TermiTerminals>.
nals>.
The
The ignition
ignition and
and battery
battery
wire
wire are
are incorrectly
incorrectly
connected.
connected.
Connect
Connect the
the wire
wire correctly,
correctly, referring
referring to
to the
the
section
section on
on <Connecting
<Connecting Wires
Wires to
to TermiTermi-
You’re
You're using Non-fading
Non-fading
preout.
preout.
Loudness
Loudness has
has no
no effect
effect in
in Non-fading
Non-fading
The power does not turn
turned OFF.
There's no loudness
effect.
nals>.
preout.
Even if Loudness is turned Tuner
Tuner source
source is
is selected.
selected.
ON, high-pitched tone isn't
compensated for.
High-pitched
High-pitched tone
tone isn’t
isn't compensated
compensated for
for
when
when in
in Tuner
Tuner source.
source.
No sound
sound can
can be
be heard,
heard,
No
or the
the volume
volume is
is low.
low.
or
The fader
fader or
or balance
balance
The
settings are
are set
set all
all the
the way
way
settings
to one
one side.
side.
to
Center the
the fader
fader and
and balance
balance settings.
settings.
Center
The input/output
input/output wires
wires or
or
The
wiring harness
harness are
are
wiring
connected incorrectly.
incorrectly.
connected
Reconnect the
the input/output
input/output wires
wires or
or the
the
Reconnect
wiring harness
harness correctly.
correctly. See
See the
the section
section
wiring
on <Connecting
<Connecting Wires
Wires to
to Terminals>.
Terminals>.
on
The values
values of
of Volume
Volume offset
offset
The
are low.
low.
are
Increase the
the values
values of
of Volume
Volume offset.
offset.
Increase
The sound
sound quality
quality is
is poor
poor
The
or distorted.
1
Check the
the speaker
speaker wiring.
wiring.
One of
of the
the speaker
speaker wires
wires is
is Check
One
being pinched
pinched by
by aa screw
screw in
in
being
the car.
car.
the
The speakers
speakers are
are not
not wired
wired
The
correctly.
correctly.
Reconnect the
the speaker
speaker wires
wires so
so that
that each
each
Reconnect
output terminal
terminal is
is connected
connected to
to aa different
different
output
speaker.
speaker.
The Touch Sensor Tone
doesn't sound.
The preout
preout jack
jack is
is being
being
The
used.
used.
The Touch
Touch Sensor
Sensor Tone
Tone can't
can’t be
be output
output
The
from the
the preout
preout jack.
jack.
from
The Dimmer function
doesn’t work.
work.
doesn't
The Dimmer
Dimmer wire
wire isn't
isn’t
The
connected correctly.
correctly.
connected
Check the
the Dimmer
Dimmer wire
wire connection.
connection.
Check
I
I
DB625MP
DB625MP
25
25
The desired frequency
can't be entered with the
Direct Access
Direct
Access Tuning.
The specified
specified disc
disc does
not play,
play, but
but another
another one
not
The antenna
antenna control
control wire is
not connected.
connected.
Connect the wire correctly,
referring to the
Connect
correctly, referring
section
<Connecting Wires
Wires to Termisection on <Connecting
nals.
nals>.
A station
can’t be
station that
that can't
received is being
being entered.
entered.
received
Enter a station
received.
Enter
station that can be received.
You’re
enter a
You're trying
trying to enter
frequency
0.01 MHz
MHz
frequency with a 0.01
unit.
unit.
What
What can be designated
designated in the FM band is
too.1
to 0.1 MHz.
The specified
specified CD is quite
quite
dirty.
Clean the CD.
The CD is upside-down.
Load the CD with the labeled side up.
The disc is severely
scratched.
Try another disc instead.
Random play has been
selected.
Turn off random
random play.
play.
The setting is not canceled.
The
remain on
The settings
settings for
for these
these functions
functions remain
on
until the setting
or the disc
disc ejected,
ejected,
until
setting to off or
even ifif the
power is
is turned
or the
the power
turned off
off or
the
even
source
changed.
source changed.
Finalization processing
processing is
is
Finalization
not being
being conducted
conducted for
not
for
CD-R/CD-RW.
CD-R/CD-RW.
Conduct finalization
processing with
CD
Conduct
finalization processing
with CD
recorder.
recorder.
plays instead.
random olav, start bv
themselves.
.
Cannot play CD-R or CD.
Load the
CD with
labeled side
up.
CD is
is upside-down.
upside-down
A
CD ejects
with the
the labeled
side up.
Load
the CD
A CD
ejects as
as soon
soon as
as itit The
The CD
loaded.
is loaded.
1-------------+-------------------1
The
CD is
is quite
Clean the
CD, referring
referring to
Clean
the CD,
to the
the section
section on
on
The CD
quite dirty.
dirty.
<CD cleaning>.
cleaning>.
<CD
Can’t remove disc
The
cause is
is that
more than
The cause
that more
than
10 minutes
minutes has
has elapsed
elapsed
10
since
since the
the vehicle
vehicle ACC
ACC
switch was
OFF.
switch
was turned
turned OFF.
The
disc can
can only
be removed
removed within
10
The disc
only be
within 10
minutes of
being turned
minutes
of the
the ACC
ACC switch
switch being
turned
OFF. IfIf more
more than
10 minutes
minutes has
has elapsed,
OFF.
than 10
elapsed,
turn
ON again
again and
and press
press
turn the
the ACC
ACC switch
switch ON
the
Eject button.
button.
the Eject
The disc won’t insert.
There’s
another
There's already
already another
disc
inserted.
disc inserted.
Press the
button and
and remove
remove the
disc.
[~l button
the disc.
Press
the [A]
For the
albums first
last
For
the albums
first or
or last
song.
song.
For each
each album,
album, Track
Search can't
can’t be
be
For
Track Search
done in
in the
backward direction
direction for
done
the backward
for the
the first
first
song or
or in
in the
direction for
last
song
the forward
forward direction
for the
the last
song.
song.
Track Search can’t be
done.
26
26
DBWSMP
DB625MP
I
conforming to ISO
IS0 9660 Use a medium
medium conforming
conforming to ISO
IS0 9660
Not conforming
i/2, Joliet,
Joliet, and Romeo.
l/2, Joliet,
Joliet, and
Level 1/2,
Level 1/2,
Romeo.
invalid
The MP3 has no or invalid
track name extension.
extension.
track
“.MPY extension
extension to the MP3 track
track
Add the ".MP3"
name.
media is scratched
scratched or
The media
dirty.
referring to the section
section
Clean the media, referring
cleaning>.
on <CD cleaning>.
Noise or no sound
generated when an MP3
generated
is played.
track has the MP3
The track
track name extension
extension while
while
track
it is not an MP3.
“.MP3” extension
extension in nonDo not use the ".MP3"
MP3.
Takes time
time before
before the
the
Takes
unit starts
starts playing
playing MP3.
MP3.
unit
medium contains
contains many
many
The medium
folders, tracks,
tracks, and
folders,
hierarchical levels.
levels.
hierarchical
checks all tracks
tracks on the loaded
loaded
The unit checks
medium first. If the medium
medium has many
many
medium
tracks recorded,
recorded, it may take
take a long time
time for
fat
tracks
before it starts
starts playing
playing MP3.
the unit before
Fails to
to play
play MP3
MP3 in
in the
the
Fails
intended order.
order.
intended
The MP3
MP3 tracks
tracks were
were not
not
The
written by
by the
the CD
CD writer
writer in
in
written
the order
order in
in which
which you
you
the
wanted them to be played.
played.
wanted
Depending on the CD writer, you may be
Depending
able to
to set
set the
the order
order in
in which
which MP3
MP3 tracks
tracks
able
played by writing
writing them onto a
are to be played
medium with
with their
their track
track names
names beginning
beginning
medium
play sequence
sequence numbers
numbers such as "01"
“01”
with play
to "99".
“99”.
to
The sound
sound skips
skips when
when an
an The
The media
media is
is scratched
scratched or
or
The
MP3 is
is being
being played.
played.
dirty.
dirty.
MP3
Clean the
the media,
media, referring
referring to
to the
the section
section
Clean
on <CD
<CD cleaning>.
cleaning>.
on
The recording
recording condition
condition is
is
The
bad.
bad.
Record the
the media
media again
again or
or use
use another
another
Record
media.
media.
Can't display the 103 tag
information correctly.
Record is
is not
not made
made in
in
Record
conformity with
with the
the 10
ID 3
3 tag
tag
conformity
version1 .x.
version1.x.
Record in
in conformity
conformity with
with the
the 10
ID 3
3 tag
tag
Record
version1 .x.
version1.x.
Can't enter Folder Select
mode.
There’s no
no folder
folder recorded
recorded
There's
in the
the MP3
MP3 media.
media.
in
Use a
a media
media with
with levels.
levels.
Use
The songs
songs in
in the
the
The
selected folder
folder aren't
aren’t
selected
played in
in Folder
Folder Select
Select
played
mode.
mode.
There are
are no
no MP3
MP3 in
in the
the
There
selected folder.
folder.
selected
Make sure
sure there's
there’s recorded
recorded content
content in
in the
the
Make
MP3 media.
media.
MP3
Many tracks
tracks are
are recorded
recorded
Many
on the
the media.
media.
on
When the
the media
media directory
directory is
is complex,
complex, the
the
When
Track/Folder search
search can
can take
take time.
time.
Track/Folder
The MP3
MP3 related
related text
text isn't
isn’t A
A character
character is
is entered
entered that
that
The
this unit
unit can't
can’t display.
display.
displayed correctly.
this
For the
the characters
characters that
that can
can be
be used
used for
for
For
MP3 text
text entry,
entry, refer
refer to
to <Notes
<Notes on
on playing
playing
MP3
MP3>.
MP3>.
The MP3
MP3 track
track time
time isn't
isn’t
The
displayed correctly.
correctly.
displayed
There are
are times
times when
when itit isn't
isn’t displayed
displayed
There
correctly according
according to
to the
the MP3
MP3 recording
recording
correctly
conditions.
conditions.
DB625MP
DB625MP
27
27
3
The messages
messages shown
shown below
below display
display your
your systems
systems condition
condition.
The
MECHAER
I
Something is wrong with the disc. Orthe
I
unit
unit is maifunctioning
malfunctioning for
for some
some reason
reason.
Check
And then
then press
press the
the reset
reset
Check the
the drsc.
disc. And
button
button on
on the
the unit.
unit. IfIf the
the “MECHA
"MECHA ER”
ER" code
code
does
does not
not disappear,
disappear, consult
consult your
your nearest
nearest
service
service center.
center.
Toe ER
ER
TOC
The
upsideThe CD
CD is quite
quite dirty.
dirty. The
The CD
CD is upsidedown.
down. The
The CD
CD is scratched
scratched a lot.
Clean
correctly.
Clean the
the CD
CD and
and load
load it correctly.
E-05
E-05
The
The CD is upside-down.
upside-down.
Load
Load the
the CD
CD correctly
correctly.
I
E-l
5
E·15
Media
Media was
was played
played that
that doesn’t
doesn't have
have data
data Use media
media that
that has
has data
data recorded
recorded that
that the
the unl
unit
can
recorded
recorded that
that the
the unit
unit can
can play.
can play.
E-77
The unit is malfunctioning
malfunctioning for
for some
some
reason.
Press
Press the
the reset
reset button
button on
on the
the unit.
unit. IfIf the
the “E"E77”
77" code
code does
does not
not disappear,
disappear, consult
consult your
your
nearest
nearest service
service center.
center.
Notes:
Notes:
• NO NAME
NAME:: Attempted
Attempted to display
display DNPS
DNPS during
during the CD play
play having
having no disc
disc names
names preset.
preset.
l• NO TEXT:
TEXT: - Attempted
Attempted to display
display the disc text
text or
or track
track text while the CD having
having no CD text is being
being
played.
played.
- Attempted
103 tag while the MP3
ID3 tag is being
display the 103
MP3 having
having no 103
being played.
played.
Attempted to display
l
28
28
OB625MP
OB625MP
FM tuner
tuner section
section
FM
Frequency
Frequency range
range (200
(200 kHz
kHz space):
space):
87.9
87.9 MHz
MHz -- 107.9
107.9 MHz
MHz
Usable
Usable sensitivity
sensitivity (SIN
(SIN == 30dB):
30dB):
9.3
n)
9.3 dBf
dBf (0.8
(0.8 pV/75
iJV/75 (2)
Quieting
QUieting Sensitivity
Sensitivity (S/N
(SIN == 50dB):
50dB):
15.2
15.2 dBf
dBf (1.6
(1.6 uV175
iJV/75 n)
Q)
Frequency
Frequency response
response (+3
(±3 dB):
dB):
30Hz-15kHz
30 Hz - 15 kHz
Signal
Signal to
to Noise
Noise ratio
ratio (MONO):
(MONO):
70
70 dB
dB
Selectivity
Selectivity (k400
(±400 kHz):
kHz):
t~ 80
80 dB
dB
Stereo
kHz):
Stereo separation
separation (1 kHz):
40
40 dB
dB
Signal
Signal to
to Noise
Noise ratio
ratio (1
(1 kHz):
kHz):
105
dB
105 dB
Dynamic
Dynamic range:
range:
93
93 dB
dB
Channel
Channel separation:
separation:
I
85
85 dB
dB
MP3
MP3 Decode:
Decode:
Compliant
Compliant with
with MPEG-1.0/2.0/2.5
MPEG-1.0/2.0/2.5
Audio
Audio Layer-3
Layer-3
Audio
Audio section
section
Maximum
Maximum output
output power:
power:
5owx4
50 W x4
Full
Full Bandwidth
Bandwidth Power
Power (at
(at less
less than
than 11 %
% THD):
THD):
22Wx4
22Wx4
section
CD player
player section
Tone
Tone action
action
Bass:
Bass: 100
100 Hz
Hz +lO
±1 0 dB
dB
Middle:
1
kHz
Middle: 1 kHz +lO
±10 dB
dB
Treble:
Treble: 10
10 kHz
kHz +lO
±10 dB
dB
Preout
Preout level
level /I Load
Load (during
(during disc
disc play):
play):
1800
kn
1800 mV/lO
mV/10 kR
Preout impedance:
impedance:
Preout
5 600 n
R
$600
Laser diode:
diode:
Laser
GaAlAs (A=780
(h=780 nm)
nm)
GaAIAs
Digital filter
filter (D/A):
(D/A):
Digital
8 Times
Times Over
Over Sampling
Sampling
8
Operating voltage
voltage (11
(11 -- 16V
16V allowable):
allowable):
Operating
14.4 V
v
14.4
AM
AM tuner
tuner section
section
Frequency
kHz space):
Frequency range
range (10
(10kHz
space):
530
530 kHz
kHz - 1700
1700 kHz
kHz
Usable
Usable sensitivity
sensitivity (S/N
(SIN = 20dB):
20dB):
28
dBiJ (25
(25 uV)
iJV)
28 dBu
D/A Converter:
Converter:
D/A
Bit
11 Bit
Spindle speed:
speed:
Spindle
1000
400 rpm
rpm (CLV
(CLV 2times)
2times)
1000 -- 400
Wow
&
Flutter:
Wow & Flutter:
Below Measurable
Measurable Limit
Limit
Below
Frequency response
response (±1
(+l dB):
dB):
Frequency
10
Hz-20
kHz
10 Hz - 20 kHz
Total harmonic
harmonic distortion
distortion (1
(1 kHz):
kHz):
Total
0.01 %
%
0.01
General
General
Current consumption:
consumption:
Current
10A
10A
Dimensions:
Dimensions:
7” (Width)
(width) xx 2"
2” (Heigth)
(Heigth) xx 6-1/8"
6-l/8” (Depth)
(Depth)
7"
[178
(W)
x
50
(H)
x
155
(D)
mm]
[178 (W) x 50 (H) x 155 (D) mmj
Weight:
Weight:
2.76 Ibs
Ibs (1.25
(1.25 kg)
kg)
2.76
Note:
Note:
Specifications and
and design
design are
are subject
subject to
to change
change
• Specifications
without notice
notice for
for further
further improvement.
improvement.
without
l
DB625MP
DB625MP
29
29
Clarion
Clarion Co..
Co., Ltd.
Ltd.
2002/3
2002/3 (A.K)
(A-K)
All Rights Reserved. Copyright 0 2002: Clarion Co., Ltd.
All Rights Reserved. Copyright © 2002: Clarion Co., Ltd.
Printed in Malaysia / lmp!im& a Matisse / lmpreso en Malasla
Printed in Malaysia Ilmprime a Maiaisie Ilmpreso en Maiasia
PE-2549B
PE-2549B
280-7815-00
280-7815-00
clariOri
clarion”
CAR AUBIO
AUlD 0«} BEYOND
BEYOND
CAB
Produut Registration
Registration
Product
for USA
USA and
and Canada
Canada only
only
IMPORTANT:
IMPORTANT:
1. Detach
Detachthis
this section
sectionof
of the
the card
cardand
andkeep
keepit with
with your
yourrecords.
records.
1.
2. Retain
Retainyour
yoursales
salesreceipt
receiptto
to validate
validatewarranty
warrantyservice.
service.
2.
3. IfIf you
youpurchased
purchaseda Clarion
ClarionADX
ADXSeries,
Series,Pro
ProVideo
Videoor
or Pro
ProAudio
Audio
3.
product,
be
sure
to
complete
the
box
on
the
last
page
of
this form.
form.
product, be sure to complete the box on the last page of this
Informationon
on Clarion
Clarionauthorized
authorizedWarranty
WarrantyCenters
Centers
Information
maybe
beobtained
obtainedby
bywriting
writingClarion
ClarionCorporation
Corporation
at the
the address
addressbelow
below
may
at
or
by
calling
or by calling
l-800-GO-CLARION.
1-800-GO-CLARION.
InlISA:
In
USA:
ClarionSales
SalesCorporation
Corporation
Clarion
Warranty
Service
Center
Warranty Service Center
661West
WestRedondo
Redondo
BeachBlvd.
Blvd.
661
Beach
Gardena,
CA90247
90247
Gardena,
CA
(310)327-9100
327-9100
(310)
In Canada
Canada
In
ClarionCanada,
Canada,
Inc.
Clarion
Inc.
WarrantyService
ServiceCenter
Center
Warranty
2239Winston
WinstonPark
ParkDrive
Drive
2239
Oakville,Ontario
OntarioL6H
L6H5R1
5Rl
Oakville,
(905) 829-4600
829-4600
(905)
www.clarionmultimedia.com
www.clarionmultimedia.com
clarion
WAR RAN T YIN FOR MAT ION
THIS PAGE OFF AND KEEP IT WITH
RECEIPT!
TEAR THIS
WITH YOUR
YOUR RECEIPT!
Thankyoufor selectinga high-qualityproductfrom Cla
with yourpurchase.We’dlike to helpserveyoubettert
choosingClarion.Pleasetakea few momentsto fill out
answera few questionsaboutyourselfandyourproduc
daysof purchase.Youranswerswill be keptstrictlycon
In Canada,placethe card in an e
ClarionCanada,Inc.,WarrantyServiceCenter,2239Win
q
This product
productis
is warranted
againstall
all defects
defectsin
in material
materialworkmanship
periodof
This
warranted against
workmanship for a period
one year
date of original
originalpurchase.
purchase.The
The conditions
conditionsof this
and the
one
year from
from the
the date
this warranty
warranty and
the
extentof the
the responsibility
responsibilityof Clarion
ClarionCorporation
Corporationunder
underthis
this warranty
are as
as follows:
extent
warranty are
follows:
PROOFOF
OF DATE
DATEOF
OF PURCHASE
PURCHASEWILL BE
BE REQUIRED
REQUIREDFOR
FORWARRANTY
SERVICEOF
OF THIS
1. PROOF
WARRANTY SERVICE
THIS
-.
0 Mr. 0 Ms. 0 Mrs. 0 Miss
n-T-l-r-
_.
,.
PRODUCT.INFORMATION
INFORMATIONABOUT
CLARIONAUTHORIZED
SERVICECENTERS
CENTERSMAY
MAY
PRODUCT.
ABOUT CLARION
AUTHORIZED WARRANTY
WARRANTY SERVICE
ALSO
BE OBTAINED
OBTAINEDBY
BY CONTACTING
CONTACTINGOR
OR WRITING
CLARIONCORPORATION
CORPORATION
AT
ALSO BE
WRITING CLARION
AT THE
THE ADDRESS
ADDRESS
,.
LISTEDON
ON THE
FRONTOF
OF THIS
THIS CARD.
CARD.
LISTED
THE FRONT
2. This
Thiswarranty
becomevoid
serviceperformed
performedby
by anyone
anyoneother
otherthan
an approved
approvedClarion
Clarion
2.
warranty will
will become
void ifif service
than an
co
Warranty
ServiceCenter
Centerresults
resultsin
in damage
damageto
product.
Warranty Service
to product.
co
3. This
Thiswarranty
doesnot
not apply
applyto
anyproduct
productwhich
hasbeen
beensubject
subjectto
misuse,neglect
neglector
or
3.
warranty does
to any
which has
to misuse,
:::r
accident,or
or which
hashad
hadthe
serialnumber
numberaltered,
altered,defaced
defacedor
or removed,
removed,or
or which
hasbeen
been
accident,
which has
the serial
which has
connected,installed,
installed,adjusted
adjustedor
or repaired,
repaired,other
otherthan
in accordance
accordance
with
instructions
connected,
than in
with the
the instructions
furnished
by Clarion
ClarionCorporation.
Corporation.
furnished by
4.
This
warranty
does
not
covercar
car static
staticor
or other
otherelectrical
electricalinterferences,
interferences,
tape
headcleaning
cleaningor
or
4. This warranty does not cover
tape head
co
adjustments,
or labor
laborcosts
costsfor
removalor
or reinstallation
reinstallation
of the
unitfor
repair.
adjustments,
or
for the
the removal
of
the unit
for repair.
5. The
Thesole
soleresponsibility
responsibility
of Clarion
ClarionCorporation
Corporation
under
shallbe
be limited
limitedto
repairor
or
5.
of
~nder this
this Warranty
Warranty shall
to the
the repair
:::r
replacement
thereof,
at the
solediscretion
discretionof
of Clarion
ClarionCorporation.
Corporation.
replacement
thereof, at
the sole
'<
6. IfIf itit becomes
becomesnecessary
necessaryto
sendthe
productor
or any
anydefective
defectivepart
partto
ClarionCorporation
Corporation
or an
an
6.
to send
the product
to Clarion
or
C>
C
authorizedwarranty
servicestation,
station,the
productmust
mustbe
beshipped
shippedin
in its
its original
originalcarton
cartonor
or
authorized
warranty service
the product
equivalent
carton,
fully
insured,
with
shipping
charges
prepaid.
Clarion
Corporation
will
not
equivalent carton, fully insured, with shipping charges prepaid. Clarion Corporation will not
assumeany
anyresponsibility
responsibility
for
anyloss
lossor
or damage
damageincurred
incurredin
in shipping.
shipping.
assume
for any
7. ALL
IMPLIED
WARRANTIES
EXCEPT
TO
EXTENT
PROHIBITED
BYAPPLICABLE
LAWSHALL
SHALL
7.
ALL IMPLIED
WARRANTIES EXCEPT
TO THE
THE EXTENT
PROHIBITED
BY
APPLICABLE LAW
HAVENO
NOGREATER
GREATER
DURATION
THANTHE
PERIOD
SETFORTH
FORTH
ABOVE.
UNDER
NO
HAVE
DURATION
THAN
THE WARRANTY
WARRANTY PERIOD
SET
ABOVE. UNDER
NO
CIRCUMSTANCES
SHALL
CLARION
CORPORATION
BE
LIABLE
FOR
ANY
LOSS
OR
DAMAGE,
DIRECT
CIRCUMSTANCES SHALL CLARION CORPORATION BE LIABLE FOR ANY LOSS OR DAMAGE, DIRECT
ORCONSEQUENTIAL,
CONSEQUENTIAL,
ARISING
OUTOF
OFTHE
USEOR
ORINABILITY
INABILINTO
USETHE
PRODUCT.
BECAUSE
OR
ARISING OUT
THE USE
TO USE
THE PRODUCT.
BECAUSE
SOMESTATES
STATES
DONOT
NOTALLOW
LIMITATIONS
ONHOW
HOWLONG
LONGAN
IMPLIED
WARRANN
LASTSOR
OR
SOME
DO
ALLOW LIMITATIONS
ON
AN IMPLIED
WARRANTY LASTS
EXCLUSIONS
OR
LIMITATIONS
OF
INCIDENTAL
OR
CONSEQUENTIAL
DAMAGES,
THE
ABOVE
EXCLUSIONS OR LIMITATIONS OF INCIDENTAL OR CONSEQUENTIAL DAMAGES, THE ABOVE
LIMITATIONS
OREXCLUSIONS
EXCLUSIONS
MAYNOT
NOTAPPLY
LIMITATIONS
OR
MAY
APPLY TO
TO YOU.
YOU.
8.
THIS
WARRANTY
GIVES
YOU
SPECIFIC
LEGAL
RIGHTS,
MAYALSO
HAVEOTHER
OTHER
RIGHTS
8. THIS WARRANTY GIVES YOU SPECIFIC LEGAL RIGHTS, AND
AND YOU
YOU MAY
ALSO HAVE
RIGHTS
WHICH
FROMSTATE
STATE
TO
STATE.
WHICH VARY
VARY FROM
TO STATE.
9. Should
Shouldyou
haveany
anydifficulties
difficultieswith
performance
of this
productduring
duringwarranty,
or with
any
9.
you have
with the
the performance
of
this product
warranty, or
with any
Clarionauthorized
authorizedservice
servicecenters,
centers,you
maycontact
contactthe
ClarionNational
NationalService
ServiceManagers
Managersat
at the
Clarion
you may
the Clarion
the
addresslisted
listedon
on the
of this
cardor
or call
call 1-800-GO-CLARION
l -800-GO-CLARION
for
a listing
listingof
of Authorized
address
the front
front of
this card
for a
Authorized
Warranty
ServiceCenters
Centersin
in your
area.
Warranty Service
your area.
C>
.
...
...
...
-
rTTl-Il-Tl-rT-T-Tl
What Clarionproduct did you purchase?
...
.....
Car A
-
...
-
281-0607-00
281-0607-00
I
I 0 Color LCD Display/Control Unit
SUA
z 0 Color LCD Display
snA
3 0 Cellular Telephone
1oOP
4 0 Voice-Activated Navigation System
11UC
s 0 Video Cassette Player
120E
a 0 TV Tuner
130A
7 0 Rear Vision Camera
140s
r-rT-r-
El What is the nameof the store where you purchased
PRODUCT
mmDPROOUCT
REGISTRATION
REGISTRATION
CARD
CAROl
Thank
selectinga high-quality
high-qualityproduct
productfrom
Clarion.We
hopeyou
are completely
completelysatisfied
Thank you
you for
for selecting
from Clarion.
We hope
you are
satisfied
with
purchase.
We’d
like to
helpserve
serveyou
betterby
by finding
out more
moreabout
aboutyour
reasonsfor
with your
your purchase.
We'd like
to help
you better
finding out
your reasons
for
choosingClarion.
Clarion.Please
Pleasetake
momentsto
outthe
registrationinformation
informationon
cardand
and
choosing
take a few
few moments
to fill
fill out
the registration
on this
this card
answera few
questionsabout
aboutyourself
andyour
product.Then,
returnthe
cardto Clarion
Clarionwithin
10
answer
few questions
yourself and
your product.
Then, return
the card
within 10
daysof
of purchase.
purchase.
Your
answerswill
be kept
keptstrictly
strictlyconfidential.
confidential.
We
appreciateyour
response!
days
Your answers
will be
We appreciate
your response!
Are there any children in your household? I 0 Yes
.
Canada,place
placethe
card in
in an
mail to:
In Canada,
the card
an envelope
envelope and
and mail
to:
Clarioncanada.
Canada,Inc.,
Inc.,Warranty
ServiceCenter,
Center,2239
ParkDrive,
Drive,Oakville,
Oakville,Ontario
OntarioL6H
L6H5Rl.
5Al.
Clarion
Warranty Service
2239 Winston
Winston Park
0
Mr. 0 Ms. 0 Mrs. 0 Miss
. . 0 Mr.
I
I
I
I
I
I
I
I
I
I
I
I
l-l
I
I
I
I
I
I
I
I
I
301 -12
If yes,pleasespecifyagerange:
III
40
13 -16
What is the highest level of educationyou have comple
I 17 SomeHighSchool
4
0 CompletedColk
20 HighSchoolGraduate
5
q
6
13 CompletedGrac
q
3
SomeCollege
SomeGraduate
What best describesyour primary occupation?
1
I q Professional/Technical
50 ClericallServic
20 UpperManagement/Executive
6 q Tradesman/M
3u MiddleManagement
7q Self-Employe
4
mmm
rl-rlIrllll,lrrrrl
I.',
•
Clarionproduct
product did
did you
purchase?
II What
What Clarion
you purchase?
Car Audio
Car
Audio
0
1I D
80
[7 AM/FM
Cassette
6
AM/FM Cassette
s9 0
0 AM/FM
CDPlayer
Player
AM/FM CD
ColorLCD
LCDDisplay/Control
Display/Control
Unit
Color
Unit
z2 0
0 Color
ColorLCD
LCDDisplay
Display
3 0 Cellular
CellularTelephone
3D
Telephone
44 0
0 Voice-Activated
NavigationSystem
System
Voice-Activated Navigation
0 Video
CassettePlayer
Player
55 0
Video Cassette
q
IOD
10
II
11
4
20 $10,000- $19,999
50 $40,000- $49,999
61
0 $50,000- $59,999
91
AM/FM
Cassette/CD
Player
AM/FM Cassette/CD
Player
Equalizer/DSP
ProcessorModule
Module
Equalizer/DSP
Processor
6 0 TVTuner
6DTVTuner
13 13 Amplifier
130
Amplifier
7 0 Rear
RearVision
Camera
70
Vision camera
14 0
14
0
0 $20,000 $29,999
6
0 $30,000- $39,999
7[
GroupA (Pleasecheck two)
0 CD
CDChanger
Changer
0
120
0
12
s 0 FoodService
10 Under$10,000
3
Multimedia
Multimedia
0 Sales/Marketing
Speakers
Speakers
I 0 Newspaper
Advertisement
70 Recomi
20 TVCommercial
80 On-line
Clarion
3
0 RadioCommercial
4
0 MagazineAdvertisement
IO0 Store0
5
0 Recommended
by Friend/Family
I I 17 Special
90
120 Other
60 ClarionName/Reputation
GroupB (Pleasecheck two)
q
•
What
is the
name of
of the
store where
purchasedthis
product?
What is
the name
the store
where you
you purchased
this product?
r’
. ’ 8
13
q
i4
0 Price
Warranty
150 Quality/Reliability
16
q
Features
17
16
I 0 Rock
4
0 Pop
71
2 0 Jazz
5
0 Country
6
3 0 Blues
6
0 Classical
9
REGISTRATION
CARD1
ct from Clarion.Wehopeyouarecompletelysatisfied
youbetterby findingout moreaboutyourreasonsfor
ts to fill outthe registrationinformationon this cardand
yourproduct.Then,returnthe cardto Clarionwithin 10
strictlyconfidential.
Weappreciateyourresponse!
thecardin anenvelope
andmailto:
:enter,2239WinstonParkDrive,Oakville,
OntarioL6H5Rl.
1
Marital Status? (Optional) 2 0 Married
What is
is your
your age?
age? (Optional)
(Optional)1I rnl._....;M.;.;.a;;;n,;,;·ta;;;I..;S.;.;.ta;;;t;;;;us;.;?..:(~OP:;,;t.;.;.io.;.;.na..:I)_..;2.:.0;;;:,.;.;.M,;;,ar
3 q Single
g
.ri.e;.;d__3;.;0;;.;,S;;;in
;;.;.;.le
i .1. What
IJ Yes
Yes
Are there
there any
any children
children in your
your household?
household? 1I 0
. . Are
yes,please
pleasespecify
specifyage
agerange:
range:
If yes,
301 1 --12
30
12
20No
4013-16
40
13 -16
5017&L!p
5017&up
O What is the highest
highest level
level of education
educationyou
you have
havecompleted?
completed?
"What
I 0 Some
SomeHigh
HighSchool
School
10
4 0 Completed
CompletedCollege
College
40
z 0 High
HighSchool
SchoolGraduate
Graduate
20
5 0 Some
SomeGraduate
GraduateSchool
School
50
3 q Some
SomeCollege
College
30
CompletedGraduate
GraduateSchool
School
6q Completed
60
7 0 VocationfTechnical
VocationlTechnical
School
70
School
What best
best describes
describesyour
your primary
primary occupation?
occupation?
. . What
mm
s q Homemaker
Homemaker
90
I 0 ProfessionalfTechnical
ProfessionalfTechnicai
10
5 0 Clerical/Service
Clerical/Service
Worker
50
Worker
z 0 Upper
UpperManagement/Executive
Management/Executive
20
6 0 Tradesman/Machine
Tradesman/Machine
Operator/Laborer
60
Operator/Laborer
IO0 Student
Student
100
30
30
7 0 Self-Employed/Business
Self-Employed/Business
Owner
70
Owner
II 0 Retired
Retired
,,0
8 0 Food
FoodService
Service
80
12 0 Other
Other
120
MiddleManagement
Management
Middle
4 q Sales/Marketing
Sales/Marketing
40
II What is your annual household income? (Optional)
n
I
I
I
r-r-l
r-l-l
4 0 $30,000
$30,000-- $39,999
$39,999
40
7 0 $60,000
$60,000-- $69,999
$69,999
70
100 $90,000
$90,000-- $99,999
$99,999
100
20 $10,000
$10,000-- $19,999
$19,999
20
50
50
$40,000-- $49,999
$49,999
$40,000
80 $70,000
$70,000-- $79,999
$79,999
80
II 0 $100,000
$100,000and
andover
over
110
3 0 $20,000
$20,000-- $29,999
$29,999
3D
60 $50,000
$50,000-- $59,999
$59,999
60
90 $80,000
$80,000-- $89,999
$89,999
90
II Which factors influenced you the MOST in choosing this Clarion Product?
CarAudio
s 0 AM/FMCassette
s 0 AM/FMCDPlayer
GroupA(Please
A (Pleasecheck
check two)
two)
Group
IO17 AM/FMCassette/CD
Player
II 0 CDChanger
12 0
Equalizer/DSP
ProcessorModule
130 Amplifier
140 Speakers
--rrT-m
I 0 Under
Under$10,000
$10,000
10
I$/ I I I I I I
0
1I 0
Newspaper
Advertisement
Newspaper
Advertisement
80 On-line
On-lineInformation
Information
80
20 TV
TVCommercial
Commercial
20
q
3
30
7 0 Recommended
Recommended
by Store
StoreSalesperson
Salesperson
70
by
RadioCommercial
Commercial
Radio
s 0 Clarion
ClarionWeb
WebSite
Site
90
4 fl Magazine
MagazineAdvertisement
Advertisement
40
IO00
10
StoreDisplay
Display
Store
5 c] Recommended
Recommended
by Friend/Family
Friend/Family
50
by
ii 00 Special
SpecialPromotion
Promotion
11
60 Clarion
ClarionName/Reputation
Name/Reputation
60
120 Other
Other
120
GroupB(Please
B (Pleasecheck
check two)
two)
Group
u purchasedthis product?
13q Warranty
Warranty
130
15q Quality/Reliability
Quality/Reliability
150
1700 Appearancel.Design
Appearance/Design
17
i40
Price
140
Price
160 Features
Features
180
1800 Ease
Easeof
of Operation
Operation
18
190 Other
Other
190
IIi1 What type of music do you listen to most often? (Please check one)
I q Rock
Rock
1
4 q Pop
Pop
40
ToRap
70Rap
tonNewAge
100
New Age
2 0 Jazz
Jazz
20
50
0 Country
Country
5
0
8e 0
I I 00 Easy
EasyListening
Listening
11
0
3s 0
66
o
Blues
Blues
0 Classical
Classical
0
Rhythm&
& Blues
Blues
Rhythm
9 00 Reggae
Reggae
9
1200 Alternative
Alternative
12
Which of the following
following products/services
products/servicesdo
do you
you own or intend
intend to buy
buy within the next
next 18 months?
months?
III Which
OW” Intend
l”tslld
tobUy
buy
to
owl Intend
l”twJtobuy
to buy
Own
Own
100
100
Satellite
SatelliteSystem/Service
System/Service
Cellular
CellularTelephone
Telephone
180
180
250
250
30
30
1’ 0
110
Pager
Pager
190
190
260
260
Home
HomeDesktop
DesktopPC
PC
Laptop
LaptopComputer
Computer
10
10
90
90
20
20
Color
ColorMonitor
Monitor
240
24 El
170
170
CD-ROM
CD-ROM
40
40
120
120
Call
CallWaiting
Waiting
200
200
270
270
Computer
ComputerSpeakers
Speakers
50
50
130
130
Karaoke
Karaoke
210
2’0
280
280
Color
ColorPrinter
Printer
60
60
140
140
Vehicle
VehicleNavigation
NavigationSystem
System
220
220
*go
290
Modem
Modem
LargeScreen
ScreenTV
TV(35"
(35” or
or larger)
larger)
Large
70
70
150
150
Vehicle
VehicleSecurity
SecuritySystem
System
230
=3Cl
300
300
80
80
160
this your
first Clarion
Clarionpurchase?
purchase?
your first
illSIs this
- lEI What
Whattype
type of
of computer
computerdo
do you
you own?
own?
:
I 0 1st purchase
purchase
10
2 0 2nd
2nd purchase
purchase
20
3rd or more
more
30 3rd
‘II
D
(D
(D
:
(D
1? 0
IBMPC
PCor
or Clone
Clone
IBM
3q Do
DoNot
NotOwn
Own
3D
2 0 Macintosh
Macintoshor
or Clone
Clone
20
III Which on-line service/network do you subscribe to?
I 0 America
AmericaOnline
Online
10
40MSN
40MSN
7 0 Other
Other
70
2
0 CompuServe
CompuServe
20
5 q Internet
Internet
50
0 Do
Donot
not have
haveservice/access
service/access
8a 0
3 0 GEnie
GEnie
3D
6 0 Prodigy
Prodigy
60
ADX SERIES, PRO VIDEO & PRO AUDIO WARRANTY INFORMATION
Clarion offers
offers two-year
two-year warranty
warranty coverage
coverage on
on ADX
ADX Series,
Series, Pro
Pro Video,
Video,and
and Pro
Pro Audio
Audio products
products (excluding
(excluding
Clarion
speakers) ONLY
ONLYifif the
the product
product is
is installed
installed at
at the
the same
same location
location w~ere
where purchased.
purchased. IfIf not
not installed
installed by
bv the
the
speakers)
dealer,one-year
one-vearwarranty
warrantvcoverage
coveraaeisis provided.
Drovided.
authorized dealer,
authorized
I
Toobtain
obtain two-year
two-year warranty
warranty coverage
coverageon
on your
your Clarion
ClarionADX
ADXSeries,
Series,Pro
Pro Video,
Video,or
or Pro
Pro Audio
Audio product,
product,
To
excluding
speakers,
complete
this
section
in
full
and
return
it
along
with
a
copy
of
your
receipt
and
excluding speakers, complete this section in full and return it along with a copy of your receipt and
the attached
attached product
product registration
registration information
information in
in an
an envelope
envelopeaddressed
addressedto:
to:
the
ClarionSales
SalesCorporation
Corporation
Clarion
PO.Box
Box863
863
P.O.
Brea,CA
CA92822-0863
92822-0863
Brea,
I
I
I
I
I
I
I
I
I
I
I
I
I
I
I
I
I
I
I
I
I
I
I
Ii
Clarion
Clarion”
11111
CAl
CANAUDIO
AUNIU«)
0 IEYOND
BEYlNO
PLEASE PLACE
FIRST-CLASS STAMP
HERE
(Post OHice will not deliver
withOut proper postage.)
CLARION
CLARION SALES CORPORATION
CORPORATION
PO BOX
BOX 863
863
BREA
BREA CA
CA 92822-0863
92822-0863
11.1•••• 1.11••1•••1.1•• 1.111•••1••1••11••••11•• 11••••11••••111