1
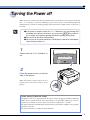
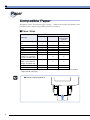
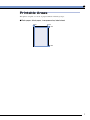
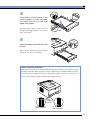
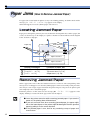
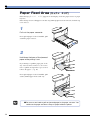
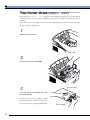
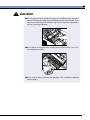
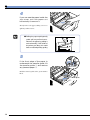
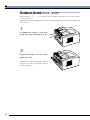
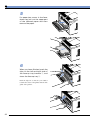
Table of Contents
Turning the Power on ................................................................ 2
Turning the Power off ................................................................ 3
Paper ............................................................................................... 4
Compatible Paper ................................................................................................ 4
Printable Areas .................................................................................................... 7
Incompatible Paper ............................................................................................. 8
Loading Paper .............................................................................. 9
Paper Jams (How to Remove Jammed Paper) .................... 12
Locating Jammed Paper ............................................................................... 12
Removing Jammed Paper ............................................................................. 12
Paper Feed Area [キュウシ エリア] ....................................................................... 14
Top Cover Area [ウエカバー エリア] ...................................................................... 16
Output Area [ハイシ エリア] ..................................................................................... 20
Canceling Printing (Job Cancel) ............................................... 23
Checking Operation ................................................................. 25
1
Turning the Power on
When you turn the power on, the status of the printer and optional device(s) is checked before
printing is enabled.
1
Press in the power button on the
left side of the printer.
When the printer is on, the top of the power
button is level with the surface of the printer.
When the printer is turned on, the operation
panel indicators and the display comes on
and the status of the printer and optional
device(s) is self-diagnosed.
If the results of the self-diagnosis are normal,
printing is enabled. The オンライン
indicator, the 印刷可 indicator and the
selected paper feed indicator come on and
the message [00 インサツ カノウ]
appears on the display.
00 インサツ カノウ
印刷可
メッセージ
A4
ジョブ
動作モード
ジョブキャンセル
ユーティリティ
セットアップ
給紙選択
リセット/実行
オンライン
排出
The following information appears on the display.
Printing enabled, no
printing data being
processed
2
00 インサツ カノウ
A4
Currently selected
paper feed size
Turning the Power off
When the power is turned off, all of the printing data in the memory is lost. Always check that
the ジョブ indicator is off before turning the power off in order to avoid deleting important
printing data by accident or deleting printing data from another computer when connected to a
network.
● If the power is turned off when the ジョブ indicator is on, any printing data
remaining in the printer’s memory is lost. Press the 排出 key while offline to output any important printing data before turning off the power.
● Do not turn off the power while printing.
● Do not turn off the power during the self-diagnosis carried out immediately
after turning the power on.
1
Check that the ジョブ indicator is
off.
00 インサツ カノウ
印刷可
メッセージ
A4
ジョブ
Off
2
Press the power button on the left
side of the printer.
When the printer is turned off, the power
button pops out from the surface of the
printer.
Power saving (Panel off mode)
The printer can be set to panel off mode in order to reduce the power consumed. When the
printer is set to panel off mode, all of the indicators except 印刷可 indicator go off if no
operations are carried out and no data is sent from the computer for a set time.
The panel off mode is automatically canceled if data is sent from the computer or an operation
panel key is pressed.
The panel off mode is set using the menu function.
3
Paper
Compatible Paper
This printer can use the following types of paper. ○ indicates that single-side printing can be
performed, and × indicates that printing cannot be performed.
■ Paper Sizes
Paper type
Plain paper (64-105 g/m2)
A5
B5
A4
Letter
Executive
Legal
User paper*1
width: 76.2-215.9 mm
length: 127-355.6 mm
Thick paper (106-163 g/m2)
width: 76.2-215.9 mm
length: 127-355.6 mm
Transparencies A4
Label sheet A4
Paper tray
Paper Source
Paper cassette
○
○
○
○
○
○
○
○
○
○
○
○
○
○
○
○
○
○
○
×
×
○
×
×
○
○
×
×
×
×
250-sheet
paper feeder
(option)
*1 When you are using plain paper of less than 100 g/m2 weight, you can only print on paper
larger than A5-size paper.
● Load the paper lengthwise.
4
■ No. of Sheets Stored in Paper Sources
Paper type
Plain paper (64 g/m2)
Thick paper (128 g/m2)
Transparencies
Label sheet
Paper tray
Paper Source
Paper cassette
approx. 100
approx. 50
approx. 50
approx. 40
approx. 250
×
×
×
250-sheet
paper feeder
(option)
approx. 250
×
×
×
■ No. of Sheets Output
Paper type
Plain paper (64 g/m2)
Thick paper (128 g/m2)
Transparencies
Label sheet
Output*2
Face-down tray Face-up tray
approx. 150
approx. 50
approx. 40*3
approx. 30
approx. 10*3
1
approx. 60*3
approx. 40
*2 The actual number of output sheets varies according to the established environment.
*3 The face-down tray can be set as the standard output destination but because this could
cause the paper to curl or crease, we recommend the face-up tray.
● Thick paper
Paper which is 106-163 g/m2 can be used with this printer. Always load paper of this thickness
into the paper tray.
● When you want to print on thick paper, always select [給紙方法] from the [給
紙] sheet of the printer driver and then select [手差し (トレイ) ].
● Transparencies
It can be difficult to separate transparencies from each other. Pick them up one at a time and by
all four sides, and then load them into the paper tray.
● When printing face up on transparencies, remove the transparencies one at
a time as they come out.
● When you want to print on transparencies, always select [給紙方法] from
the [給紙] sheet of the printer driver and then select [手差し (トレイ) ].
5
● Label sheet
Check that the label sheet is face up when you load it into the paper tray.
● Do not use the following types of label sheet. There is a risk of severe jamming
and damage to the inside of the printer.
・ Label sheet with some adhesive surfaces exposed
・ Label sheet with some parts of the lower surface exposed on the upper
surface
・ Label sheet with labels that peel off easily
● When feeding label sheet sideways, remove each sheet by hand one at a
time. The first sheets printed out might curl.
● When you want to print on label sheet, always select [給紙方法] from the [給
紙] sheet of the printer driver and then select [手差し (トレイ) ].
6
Printable Areas
This printer can print over areas of paper within the following ranges.
● Plain paper, thick paper, transparencies, label sheet
5 mm
5 mm
5 mm
5 mm
7
Incompatible Paper
In order to avoid paper jams and damaging the printer, do not use the following kinds of paper.
● Paper that jams easily
・Paper that is too thick or too thin
・Non-standard size paper
・Wet or damp paper
・Torn paper
・Coarse or extremely smooth paper
・Paper with binder holes, serrated paper
・Curled paper, creased paper
・Specially coated paper
・Label sheet with labels that peel off easily
・Paper which has already been used for photocopying or laser printing (reverse side also
incompatible)
・Paper which has raised surfaces
・Wrinkled paper
・Folded paper
● Heat-sensitive paper
・Paper with ink that melts, burns or gives off toxic vapours in the heat of the fixing assembly
。
(apporox. 150 C)
・Thermal paper
・Color paper with a processed surface
・Specially coated paper
・Paper with adhesive on it
● Paper that can cause printer malfunction or damage
・Carbon paper
・Paper with staples, clips, ribbons or tape attached
・Paper which has already been used for photocopying or laser printing (reverse side also
incompatible)
● Paper on which toner cannot fix easily
・Coarse paper such as pulp paper and Japanese writing paper
・Paper with rough fibers
・Specially coated paper
8
Loading Paper
You can load up to 250 sheets (64 g/m2) of plain A5-, B5-(B5-JIS), A4-, Executive-, Letter- and
Legal-size paper into the printer’s paper cassette. Load all paper lengthwise.
Follow the precautions below in order to avoid paper jamming.
● Do not remove the paper cassette during printing. Doing so can lead to
paper jamming or damage.
● Do not load paper which has raised parts, creases or curled edges.
● Do not load paper beyond the paper limit mark. The number of plain (64 g/m2)
sheets that can be loaded are approximately 250.
● See “Paper” (→ p. 4) for details on the kinds of paper that can be used.
Follow the instructions below when loading paper into the paper cassette. You can also follow
these instructions when loading paper into the paper cassette of the 250-sheet paper feeder.
1
1
Press down the lock button on the
rear of the paper size guide q, and
move the paper size guide to the
mark indicating the size of the
paper you want to load w.
2
Position the paper size guide so that the
triangular mark points to the size indicator
of the paper that you want to load.
● If you want to use B5-size paper (182 × 257 mm) move the guide to the
position shown in the diagram below (side of B5-JIS). The guide cannot be
used at the B5-ISO position.
B5-JIS position
B5-ISO
position
9
2
Slide the side paper size guide to
the mark indicating the size of the
paper that you want to load.
The side paper guides operate together.
3
Fan the paper, then straighten the
edges.
4
Line up the end of the stack of
paper with the paper size guide and
load the paper.
Paper limit mark
● Make sure that the stack is not higher than the paper limit mark on the paper
size guide.
10
5
Press down on both sides of the
stack of paper so that the paper
fits under the clips on the side
paper size guides.
Clip
Check that there is plenty of space between
the clips and the paper. If there is not, remove
some of the paper.
Clip
6
Insert the paper cassette into the
printer.
Insert it slowly until its front surface is flush
with the front surface of the printer.
Paper remaining indicator
In the paper cassette, there is a paper remaining indicator that indicates the amount of paper
that has been loaded. When the paper cassette is full, the paper remaining indicator rises to
the top. The paper remaining descends as the amount of paper decreases, so this gives you
an idea of the amount of paper remaining in the paper cassette.
Paper
remaining
indicator Large amount of
paper remaining
Small amount of
paper remaining
11
Paper Jams (How to Remove Jammed Paper)
If a paper jam occurs inside the printer for any reason during printing, an alarm sounds and the
message [13 ヨウシガ ツマリマシタ] appears on the display.
When this happens, locate the jammed paper and remove it.
Locating Jammed Paper
Paper passes through the printer by the route indicated in the diagram below. When a paper jam
occurs, use the message on the display as a guide to check the locations indicated in the diagram
below and remove all paper.
1
Paper tray
2
3
Face-down tray
Face-up tray
Paper cassette 1
Paper cassette 2
1
2
3
Display messages
Location of paper jam
[キュウシ エリア]
[ウエカバー エリア]
[ハイシ エリア]
Paper feed area (→ p. 14)
Top cover area (→ p. 16)
Output area (→ p. 20)
Removing Jammed Paper
When a paper jam occurs, follow the instructions below to remove it and restart printing. If the
message does not disappear even when the jammed paper is removed according to this procedure,
there may be some scraps of paper left inside the printer. Inspect each part of the printer again
and completely remove all jammed paper.
Return the printer to on-line status once the message [00 インサツ カノウ] appears on the
display. Printing is restarted from the page which was interrupted.
● Leave the printer turned on while removing jammed paper. If you turn the
power off, the printing data will be deleted.
● If you use too much force when removing jammed paper, the paper might
tear or the internal parts of the printer might be damaged. Remove jammed
paper by pulling it in the correct direction.
● If the jammed paper is torn, look for any remaining scraps of paper and
remove them.
12
1
Appears when paper jams.
Locate the jammed paper by
referring to the message on the
display.
13 ヨウシガ ツマリマシタ
ウエカバー エリア
The location of the paper jam is
displayed.
If there is more than one paper
jam, they are all displayed in
sequence.
2
Remove the jammed paper.
Remove any jammed paper from each of the
various possible paper jam locations
according to the instructions on the following
pages.
3
When all the jammed paper has
been removed, close all the covers
and check the display message.
If there is no longer any jammed paper, the
メッセージ indicator goes off and the
display reads [00 インサツ カノウ]. If
there is still an error message, carry out an
inspection again.
00 インサツ カノウ
印刷可
メッセージ
A4
ジョブ
Off
● The error message might not disappear if paper is removed without opening
a cover, for example from the paper tray area, face-down tray area or faceup tray area. If this happens, always open the top cover once and then
close it again.
4
オンライン
排出
Press the オンライン key to turn
on the オンライン indicator.
Printing is restarted from the page where it
was interrupted.
00 インサツ カノウ
A4
13
Paper Feed Area
[キュウシ エリア]
If the message [キュウシ エリア] appears on the display, check the paper cassette or paper
tray area.
If the message does not disappear even after any jammed paper has been removed, check the top
cover area too.
1
Pull out the paper cassette.
If an optional paper feeder is installed, pull
out all the paper cassettes.
2
Hold down the base of the jammed
paper while pulling it out.
If you manage to pull the paper part of the
way out but cannot remove it, do not use
force to pull it out. Open the top cover and
remove the paper. (→ p. 16)
If an optional paper feeder is installed, pull
out the jammed paper in the same way.
● Do not use one hand to pull out jammed paper in the paper cassette. You
could tear the paper and leave scraps of paper inside the printer.
14
3
If the paper jam is in the paper tray,
just pull out the jammed paper.
If you manage to pull the paper part of the
way out but cannot remove it, do not use
force to pull it out. Open the top cover and
remove the paper. (→ p. 16)
4
Load the paper and paper
cassette.
If the error message does not disappear, open
the top cover once and close it again.
15
Top Cover Area [ウエカバー エリア]
If the message [ウエカバー エリア] appears on the display, check the top cover area. When
removing the top cover, use a toner cartridge protective bag or a thick cloth to protect the toner
cartridge.
If the message does not disappear even after any jammed paper has been removed, check the
feed area and the output area too.
1
Open the top cover.
2
Pull out the toner cartridge.
3
Protective bag
Put the toner cartridge into the
protective bag.
Do not expose the toner cartridge to bright
light such as direct sunlight. If you do not
have a protective bag, wrap it in a thick cloth.
16
Toner cartridge
Caution
● Do not put your hands inside the top cover immediately after using the
printer. The fixing assembly and surrounding area are extremely hot. Take
care not to touch any parts inside the top cover except those specified. If
you do, you may get burned.
● Never touch the high pressure contact points inside the top cover. This
may damage the printer.
High pressure
contact points
● Never touch or wipe the transfer charging roller. This could lead to reduced
printing quality.
17
4
If you can see the paper inside the
top cover, pull the paper out
horizontally to remove it.
Slowly remove the paper, taking care not to
spill any unfixed toner.
● Pulling the paper up diagonally
could spill any unfixed toner.
Remove the paper by pulling it
out horizontally. If the inside of
the printer gets dirty, this could
lead to reduced printing quality
5
If the front edge of the paper is
underneath the transfer guide, lift
the transfer guide q, and remove
any jammed paper w.
Green mark
Hold the transfer guide at the green mark to
lift it.
Transfer guide
18
6
If you cannot see the paper, lift the
transfer guide q, pull out the edge
of the jammed paper and then
remove the paper w.
Green mark
Hold the transfer guide at the green mark to
lift it.
Slowly pull out the paper with both hands.
Transfer guide
Caution
● If your hands or clothes get dirty from touching the toner, wash them
immediately in cold water. Do not use hot water. If you do, the toner may
stain permanently.
● If the edge of the jammed paper has been fed as far as the output area,
remove the paper from the face-up tray side. If you remove it from the top
cover, the inside of the printer could get dirty and reduce printing quality.
7
Return the transfer guide to its
original position.
Transfer guide
Caution
● Replacing the toner cartridge without returning the transfer guide to its
original position could damage the printer and the toner cartridge.
8
Insert the toner cartridge and close
the top cover.
19
Output Area
[ハイシ エリア]
If the message [ハイシ エリア] appears on the display, check the rear cover area and the
face-down tray area.
If the message does not disappear even after any jammed paper has been removed, check the top
cover area too.
1
If a paper jam occurs in the facedown tray, open the face-up tray.
2
Remove the paper from the facedown tray side.
When you have removed the paper, open the
top cover once and close it again to cancel
the error message.
20
3
If a paper jam occurs in the faceup tray, hold the face-up tray with
both hands and open it out
horizontally.
The clips on the lower side of the face-down
tray come off and the it can be opened out
horizontally.
Caution
● Do not touch the fixing assembly
or surrounding area because they
are extremely hot immediately
after printing. If you do, you may
get burned.
● Take care not to open the face-down tray with too much force. This could
damage the printer.
4
Remove the jammed paper.
When you have removed the paper, open the
top cover once and close it again to cancel
the error message.
1
21
5
If a paper jam occurs in the facedown tray, pull out the upper part
of the jammed paper and then
remove the paper.
1
6
When you have finished, push the
clips on the left and right side of
the face-up tray inwards q, and
close the face-up tray w.
Push the clips in so that they are further
towards the center of the printer than the side
guide of the printer.
22
Canceling Printing (Job Cancel)
To cancel printing currently being performed, carry out job cancel. Job cancel lets you cancel a
job while data is being received or processed. It does not affect the printing data for the next job
or any other interface jobs for which data processing has not begun.
● Carry out job cancel off-line when data is being processed (when theジョブ
indicator is on or flashing). If you press the ユーティリティ/ジョブキャンセル key when
the ジョブ indicator is off, it functions as the ユーティリティ key.
● Data that has already been processed and is currently being printed (when
paper feeding has begun) cannot be canceled. In this case, be careful
because carrying out job cancel might cancel the next printing data.
● If printing data is sent from a printer driver other than your printer driver and
mixed with your data, multiple printing jobs might be canceled.
Follow the instructions below to carry out job cancel. Only carry out job cancel when the ジョ
ブ indicator is on or flashing (when the data of the job you want to cancel is being received or
processed).
1
オンライン
排出
Press the オンライン key to turn
off the オンライン indicator.
00 LIPS
A4
23
2
動作モード
ジョブキャンセル
ユーティリティ
セットアップ
Press the ジョブキャンセル key.
リセット/実行
The message [03 ジョブ キャンセル]
appears on the display, and the data being
processed is canceled.
When processing takes time, such as when
receiving data, the message on the display
changes to [00 ジョブ スキップ].
When the message [00 インサツ カノ
ウ] appears on the display, job cancel is
complete.
03 ジョブ キャンセル
00 ジョブ スキップ
セントロニクス
00 インサツ カノウ
A4
● When the message [00 ジョブ スキップ] appears on the display, you
can press the リセット key to carry out a soft reset or hard reset. If you
do so, any printing data being received or other interface printing data is
lost, so carry out printing again.
● When the message [03 ジョブ キャンセル] appears on the display, you
cannot carry out a soft reset or hard reset. Wait until job cancel is complete
or the message [00 ジョブ スキップ] appears on the display.
24
Checking Operation
This printer has a test print function for checking the printer’s status or printing quality. Perform
test printing to check that the printer is working correctly after installation or whenever you
want to check its operating condition.
● The test print is programmed to print on A4 size paper.
● If the paper is smaller than A4, the image may be cut to size and then printed.
● If the paper is larger than A4, the printout will have large white margins on
the right or bottom of the paper.
1
When the printer is off, press in the
power button on the left side of the
printer.
The message [00 インサツ カノウ]
soon appears on the display, indicating that
printing can be carried out.
2
オンライン
排出
Press the オンライン key to turn
off the オンライン indicator.
00 インサツ カノウ
A4
25
3
動作モード
ジョブキャンセル
ユーティリティ
Press the ユーティリティ/ジョブキャンセル key.
セットアップ
リセット/実行
The message [ステータス プリント]
appears on the display.
ユーティリティ
ステータス プリント
4
Press the < and > keys
to select [テスト プリント], then
press the V key.
[テスト プリント] appears on the display
and the test print is printed.
動作モード
ジョブキャンセル
ユーティリティ
セットアップ
リセット/実行
ユーティリティ
テスト プリント
01 テスト プリント
5
If you are not going to use the
printer immediately, press the
power button to turn the printer off.
26
→
→
■ Test Print Contents
If the printer is working correctly, the following page will be printed.
27