1
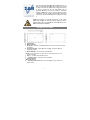
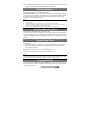
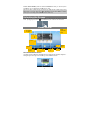
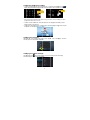
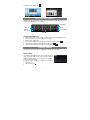
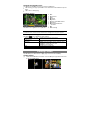
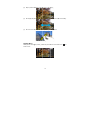
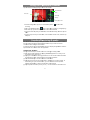
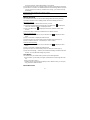
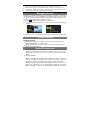
Инструкция для
Alcatel OT-T10
Перейти в карточку товара
8 800 775 98 98
л чит т нич
ю н льт цию.
гл т чн . Б з вы дны
www.sotmarket.ru
д бн я инф м ция
тзывы, бз ы и
т в
ы
,
Table of Content
Buttons & Ports ........................................................................................................... 2 Charging Battery ......................................................................................................... 3 Installing Memory Card ............................................................................................... 3 Transferring Files ........................................................................................................ 3 Turning On/Off ............................................................................................................ 3 Unlocking the Screen .................................................................................................. 4 Home Screen .............................................................................................................. 4 Accessing Internet ...................................................................................................... 6 Using the Virtual Keyboard ......................................................................................... 7 Playing Music.............................................................................................................. 7 Playing Video .............................................................................................................. 8 Viewing Photos ........................................................................................................... 9 Using the Camcorder/Camera .................................................................................. 11 Sending/Receiving E-mails ....................................................................................... 11 Other Applications ..................................................................................................... 13 Managing Apps ......................................................................................................... 13 Managing Tasks ........................................................................................................ 14 Troubleshooting ........................................................................................................ 14 Safety Precautions ................................................................................................. 14 1
This device meets applicab
ble national SAR
R limits of 2.0
W/kg. The specific
s
maximu
um SAR values can be found
on page 18 of this user guid
de. When carryying the device
or using it while worn on
n your body, e
either use an
approved accessory
a
such as a holster or otherwise
ody to ensure
maintain a distance
d
of 0.5 cm from the bo
compliance with RF expos
sure requiremen
nts. Note that
the product may be transmitting even if you
u are not using
it.
Pro
olonged exposure to music at
a full volume on the music
pla
ayer may dama
age the listener's hearing. Se
et your device
vollume safely. Usse only headph
hones recomme
ended by TCT
Mo
obile Limited and its affiliates.
Buttons & Porrts
a. Touch Screen
b. Built-in Webca
am
c. DC-IN port – cconnects to any standard
s
electric source through tthe provided
AC adaptor.
d. Charging indic
cator– Lights red
d during charging
g, and lights orannge as
charging comp
pletes
e.. Micro USB Po
ort – Connects to
o PC via USB cable.
f. Power –Press a
and hold to turn on
o or off the unit; briefly press to l ock or
unlock the scre
een.
ease/ decrease th
he volume.
g.. VOL+/- – Incre
h..
Earphone so
ocket – connects to
t stereo earphon
nes.
i. Built-in Speak
kers
j. Micro SD card Slot
g; reset your devicce if the
Microphone /Reset pin hole – Sound recording
k.
device freezes.
2
Note: Pressing the Reset button will only turn off the device. To turn on the
device , user needs to press and hold the Power button.
Charging Battery
The device has a built-in rechargeable battery. No extra battery installation is required.
Just charge the device when it indicates low battery.
To charge the battery, connect the device to any standard wall outlet via the DC-IN
port using the power adaptor. It takes about 5 hours to fully charge the battery. When
the battery is fully charged, the charge indicator should light up in orange. During
charging, the indicator lights up in red.
Note:
a. You are strongly recommended to charge the battery immediately when the device indicates the battery
is lower than 15%!
b. For extended battery life, it is suggested NOT to use the device when it is charging.
c. For maximum performance, lithium-ion batteries need to be used often. If you don’t use the device
often, be sure to recharge the battery at least once per month.
d. Be sure to use only the dedicated power adaptor provided with the unit for charging.
Installing Memory Card
This device can read files directly from memory card.
To use a memory card, find the card slot on the device and then insert the memory
card into the slot in the correct orientation. To access the files stored in the memory
card, enter the Explorer mode by tapping the Explorer icon and select the “SD Card”
directory.
Transferring Files
Before reading or playing files, you may need to transfer media files from a computer
to the device.
(1) Connect the device to a computer with the supplied USB cable. Two removable
disks will be added to the computer, respectively referring to the internal flash
memory and the SD card.
(2) Once the connection is done, turn on the USB storage.
(3) Open a removable disk, then copy files from the PC to it.
Note:
Since pre-installed applications and Android OS occupies a considerable part of capacity – about 2.0GB, it
is normal that you see huge difference between available memory space and total capacity.
Turning On/Off
To turn on the device, press and hold the Power button on the unit until you see the
boot-up screen then release. It may take a few minutes to start up the system, please
wait before you proceed.
3
To turn off the devic
ce, press and hold the Power button
b
until you see the option
“Powe
er Off”, tap on “P
Power Off” and th
hen tap on “OK”.
Tip: For
F the sake of po
ower saving, this device may slee
ep with the screenn display locked
when there is no toucch action for a while
w
(depending on the actual seetting of Screen
Timeo
out). You can brieffly press the Powe
er button to wake it up.
Unlocking tthe Scre
een
The sc
creen will be locke
ed after the device is idle for a few seconds. You neeed to unlock the
righ
screen
n by dragging the lock icon
htwards before you continue to use the device.
Hom
me Screen
n
Go to
application
page
Go to
t Google
Searrch page
World City
Weathe
er
forecasst
Default
Shortcut to
application
n
Wi-Fii
Return
Go to Home
screen
Screen
mode
e
Recently ussed
applications
Battery
level
Time
The extended Ho
ome Screen
The Home
H
Screen conssists five separate
e screens for positioning the shortcuuts, widgets etc..
Slide your
y
finger left or right on the scree
en to go to the exte
ended screens.
4
Custtomizing Hom
me Screen Ite
ems
„ To add
a a Home Scree
en item (shortcut, widget
w
etc.), you can
c tap the applicaation icon
to
display all applicationss and widgets, the
en hold your tap on
o an item to placee it on the home
page
e.
Hold down
Hold down
Note
e: If current page off Home Screen hass no enough room fo
or a shortcut or widdget, you will be
prom
mpted that there is n
no more room.
„ To move
m
a Home Scre
een item, hold you
ur finger onto it to highlight it, then ddrag it to the
desired location, and release it.
emove a Home Sccreen item, hold your
y
finger onto it to
t highlight it, dragg it to the recycle
„ To re
bin symbol
s
“X” and the
en release your finger.
Chan
nging the wallpaper
Hold your
y
tap on the Home screen unttil a menu appea
ar. Tap on “Wallppaper” and then
choos
se a picture as the
e desktop wallpape
er.
Chan
nging the Sys
stem Settings
s
Tap th
he Setting icon
on the Home Sccreen to open the settings menu andd change
releva
ant settings for you
ur device if necesssary.
5
Disp
play all Applic
cations and widgets
w
The device
d
has many useful applicatio
ons and widgets pre-installed. Yoou can tap the
Applic
cation Tab
tto display them.
ger on an item ca
an add it to the desktop
d
as a shorrtcut.
Tip Holding your fing
Access
sing Interrnet
This device
d
features cconnection of Wi-Fi networks tha
at provides you eeasy access to
the Internet.
For Wi-Fi
W
application, you need to configure a Wi-Fi ne
etwork first, and yyou will have to
stay in
n a Wi-Fi service
e zone. Wheneve
er it is within the coverage
c
of a WiiFi network you
have configured, the d
device will attemp
pt to make a con
nnection.
Make
e WI-FI Connection
Before
e launching an IInternet applicatiion such as the web browser, yoou first need to
activa
ate the Wi-Fi and
d configure a Wi-F
Fi network.
(1) Ta
ap the Setting icon
n
on the Hom
me Screen to open
n the
se
ettings menu.
(2) Se
elect “Wi-Fi” and slide the toggle switch to “ON” to turn
on
n Wi-Fi.
(3) Th
he device will sca
an automatically for
f available Wi-Fi networks and display them in
the
e right panel. Th
he list of available networks show
ws all the wireleess networks in
range of your devicce.
(4) Ch
hoose a networkk from the list and
d then tap “Conn
nect” to connect. Some network
ma
ay be secured w
with password, enter the passw
word before connnecting. If the
co
onnection is succcessful, the messsage Connected
d to…(WiFi Netw
work Name) will
ap
ppear under the W
WIFI Setting.
Note:
1. The available network lisst is constantly refresshed automatically.
2. Whe
en the Wi-Fi is enable
ed, the device will connect automatically to
t your configured neetworks when they
are in range.
r
Laun
nching the W
Web browser
To lau
unch the Web bro
owser, you tap th
he Browser icon
6
in the Hom
me screen.
To dis
splay context me
enus, tap
.
Using the Virtual
V
Keyb
board
Tappin
ng on any text input field can open the
t virtual board. With
W the virtual keeyboard, you can
enter a website addresss or any text requiired.
Backspace
Enter
Cap
ps Lock
Number/
er switch
Lette
input method
Space
Usin
ng the Web Brrowser
„
„
„
Yo
ou can scroll the sscreen up and do
own by tapping on the page and ddragging it up or
do
own (be careful n
not to tap a link until you are ready!).
To
o open a link, sim
mply tap it.
To
o go back to the p
previous page th
hat you browsed, tap the Back icoon
.
„
„
To
o display the available menu item
ms, tap the Menu icon
.
To
o go back directlyy to the Home sccreen, tap the Ho
ome icon
.
Playiing Music
Tap th
he Music icon in the Home or app
ps page to launch the music playyer.
Music Library
You should
s
enter the m
music library once you start the music
player. The Music Librrary shows your music files sorted by
categories (Artist, Albu
um, etc.) if your music
m
files conta
ain
these song information tags.
„ Yo
ou can drag yourr finger up and do
own on the file lis
st to
sc
croll through it.
„ Ta
ap a song to playy.
7
Artist
List music files by artist.
a
Album
List music files by album.
a
Songs
List all music files.
Playlists
List your favorite so
ongs.
Now Playing
Go
o to the Now Play
ying screen.
Play
yback Screen
d
a b c
e
g f
h i
k
j
a.
b.
c.
d.
e.
f.
g.
h.
i.
j.
k.
Now Playing List
Shuffle songs
s
/Not shufflee
Repeat /Not
/
repeat
Display lyric
Artist Na
ame
Album Name
Title
Previous
s song/Rewind
Play/Pau
use
Next son
ng/Fast Forward
Progress
s bar
Play
yback menu
During
g playback of a m
music file, tap on
n the MENU icon
menu:
to bring upp a context
Library– return to music library menu.
Party Shuffle – select Party Shhuffle mode.
Add to playlistt – add a song to
o the playlist.
Delete – delete
e a song.
Sound Effects – Set the soundd effects for
the music playb
back.
Play
ylist
The playlist
p
is a list of songs that you have
h
added manually.
To ad
dd the current track to a playlist, ta
ap
during playback,
p
selelect
ct “Add to
playlis
st” and then choo
ose a playlist or tap
t “new” to crea
ate a new playlistt.
To pla
ay a playlist,
(1) In the Music menu
u, tap the Playlist icon
tha
at you have adde
ed are listed.
(2) Ta
ap a song to startt playing.
to disp
play all the playliist. All songs
Playiing Video
o
Tap th
he Video icon in the Home or app
ps page to launch the video playeer.
8
Navigate through
h Video Files
You should
s
see the vid
deo list when you enter the video
o player.
„ Yo
ou can drag your finger up and do
own on the video list to scroll the vvideo list up and
do
own.
„ Ta
ap a video to starrt playing.
Play
yback Screen
a
d
c
b
e
f
g
h
i
j
k
a.
b.
c.
d.
e.
f.
g.
h.
i.
j.
k.
VOLV
Progress
P
bar
VOL+
V
Bookmark
B
Brightness
B
Previous
P
Video/Faast Rewind
Play/Pause
P
Next
N
video/Fast fo
orward
View
V
Mode
Exit
E
Video
V
settings
Note: Some
S
video files mayy not be played corre
ectly with the device. Refer to the Techniccal Specifications at
the end
d of the manual, and make sure the video
o resolution, encoding
g format or file type iis supported.
Vide
eo Playback S
Settings
Tap on
o the
icon to display the video settings.
Delete Bookmark and Play
from
m beginning
Delete Bookmark
Pla
ay Mode
Help
Retturn
Delete
e bookmark and play from beginning.
Delete
e the video bookmark.
Single
e – Plays current vid
deo and then stopss after playing.
Repea
at One – Repeat the
e current video.
Repea
at All – Repeat all videos.
v
Get insstructions on playin
ng video.
Exit fro
om the menu.
Viewing Photo
os
Tap th
he Gallery icon in
n the Home or ap
pps page to launch the Photo Gaallery.
View
wing Photos
(1)
Photos should be
e listed in thumbnail. You can slid
de your finger onn the screen left
e photos.
or right to browse
9
(2)
Tap
T a photo thum
mbnail to view th
he photo in full sc
creen.
(3)
To
T display the prrevious/next pictu
ure, slide your fin
nger on the screeen horizontally.
(4)
To
T zoom in or ou
ut the picture, pin
nch your finger on the picture.
Disp
play Menu
When
n you are viewing
g the picture, you
u can tap on the screen
s
or the Me nu icon
show a menu.
10
to
Usin
ng the Ca
amcorder/Camera
a
Tap th
he Camera in the
e apps page to la
aunch the Camerra.
Preview w
window
Zoom
Viewfinder
Start/Stopp
Settings
VCR modde
Photograpphy mode
To
o start making vid
deo clips, tap on the Start/Stop button
recording.
to staart video
Ta
ap on the Start/Stop button
again to stop vid
deo recording or photographing.
Th
he video clip / photo can be previe
ewed in the Prev
view Window.
To
o play the video cclip that you have
e made, enter the
e Video Player, aand then tap the
vid
deo.
To
o view the photo that you have takken, enter the Ph
hoto Viewer mod e, and then tap
the
e photo.
Sen
nding/Re
eceiving E-mails
This device
d
has an E-mail application pre-installed. Yo
ou can send or reeceive e-mails
from the
t Internet at an
ny time with this device.
d
Make sure you have an I nternet
conne
ection before usin
ng the email servvice.
In the
e Home Screen, ttap the Applicatio
ons shortcut to display all applicaations and then
tap the Email icon to la
aunch the e-mail application.
Setu
up Email Acco
ount
First you
y need to setup an E-mail acco
ount for receiving
g or sending emaails.
(1) Start up the email application by ta
apping the Email application icon and you are
prompted to setup an account.
(2) Inp
put your email ad
ddress and login password. You can set the accoount as default
by
y selecting the op
ption “Send emaiil from this accou
unt by default”.
(3) Ta
ap “Manual Setup
p” to set the ema
ail server informa
ation.
(4) Ch
hoose the serverr type from POP3
3, IMAP or Excha
ange for incomin g emails. To
kn
now what type of your email serve
er is, you can con
nsult the service provider,
ne
etwork administra
ator or search forr information in th
he Internet.
(5) Inp
put required information (server, port etc.). You can obtain the infoormation from
11
the service provider, network administrator or the Internet.
(6) Choose the server type for outgoing emails, and input required server information.
(7) Click “Next” to continue. Your tablet will check the server settings. When it prompts
you that “Your account is set up, and email is on its way”, your account is set up
successfully.
(8) Input your name and then tap on “Done” to finish.
Note: If you have more than one account, every time when you start up the email application, you enter the
default email account.
Manage Accounts
You can setup more than one account and manage these accounts by checking
information about the account, adding another account or deleting an account.
Add another Account
Following these steps to add another account if you want.
(1) Launch the email application and then tap on the Menu icon
menu item. Choose “Accounts” to display accounts.
to display the
(2) Tap on the Menu icon
to display the menu item, and then choose “Add
account”.
(3) Follow the steps of setting up a Email Account to add an account.
Delete an Email Account
(1) When you are in the email box, tap on the Menu icon
to display the menu
items.
(2) Tap on “Accounts” to display all email accounts.
(3) Hold your tap on the account that you want to delete until a menu pop up.
(4) Tap on “Remove Account” and then tap on “OK” to confirm.
Check the Account Setting
(1) When you are in the email box, tap on the Menu icon
to display the menu
items.
(2) Tap on “Accounts” to display all email accounts.
(3) Hold your tap on the account that you want to check until a menu pop up.
(4) Tap “Account settings” and then you should see all setting information about the
account. You can edit these settings as you want.
View Emails
You should enter your mailbox when you start up the email application.
„ In the mailbox, you can slide your finger up and down to scroll through the email
list.
„ Tap on an email to open it.
„ Holding your tap on the email can display a menu. With the menu, you can open,
reply, forward or delete the email.
Email Menu Items
12
In the email list, tap on the Menu icon
Refresh
Compose
Folders
Accounts
Account Settings
to display the menu.
Refresh the emails.
Compose a new email.
Go back to email box.
View all email accounts.
Check your account settings.
Other Applications
Some useful small apps have been preinstalled in this device, such as Calculator,
Calendar, Sound Recorder, Office Suite etc.. They are easy to use, thus no detailed
instructions are necessary for these apps. Please always follow the actual operation
of your device.
Managing Apps
You can manage your applications of the device easily.
There are number of useful apps pre-installed in the device as it is produced at the
factory, and you can copy some from other resources, download or purchase them
over the internet.
Download or Purchase Applications
With your device, you can visit an apps store or E-market website (e.g.Google Play)
that provides you plenty of free apps to download. For those apps that are not free,
you will have to pay for them if you want to have them.
Install Applications
You can install applications following these steps:
(1) Open the Explorer application, then find the app you want to install.
(2) Tap the app you want to install to start installation. However, for the sake of
security, the device may prompt you that there is possibility of attack risk if you install
and run some apps whose sources are not guaranteed. In this case, you shall turn to
the Settings menu and select Security to check the “Unknown sources” before you go
on with the installation.
(3) Once the installation is completed, you can find the icon of the app in the apps
screen. It is ready for running.
Uninstall Applications
(1) Tap the Settings shortcut in the Home Screen to display setting menus.
(2) Select “Apps”.
(3) Tab on the application that you want to uninstall.
(4) Tab on “Uninstall” to uninstall the application.
(5) You can simply tap and hold on an app icon to jump to the Home Screen, then
drag it to the dustbin icon to uninstall it.
13
Note:
„ Yo
ou cannot uninstall the pre-installed appliccations, but you can deactivate
d
or stop theem.
„ Ma
ake sure all apps yo
ou have copied or downloaded
d
to yourr device are in the ..apk format.
„
So
ome applications de
eveloped for Androiid mobile might not run properly in thee device. Please
consult the respective
e software develope
er for further inform
mation.
Manag
ging Tasks
Your device
d
can hand
dle multiple tasks at the same time. For example, you can view
photo
os while listening to music. Multita
asking is helpful but
b inefficient if tooo many tasks
are ru
unning. In order tto save system memory
m
and enha
ance system perf
rformance, you
can end some tasks th
hat you don’t use
e at the moment.
(1) Tap
T
to disp
play applicationss that you used re
ecently.
(2) Hold your tap on
n the application that you want to stop, and then sselect “Remove
from
f
list”.
(3)
n open the Settin
ngs menu and se
elect Apps to mannage the tasks.
Besides, you can
Troubleshooting
Rese
et this device
e
„ In the event that th
he device freezess, you can force the device to shuut down by
ho
olding the Powerr button for a few
w seconds.
„ If the
t Power button
n does not reset your device, use
e the “pinhole resset” button,
loc
cated on the bacck the device.
Safety Precauti
P
ons
We
W recommend that you read th
his chapter carefully before usinng your device.
The
T
manufacture
er disclaims anyy liability for damage, which m ay result as a
consequence
c
off improper use or use contrary to the instructiions contained
herein.
h
TRAFFIC
T
SAFET
TY:
Given
G
that studie
es show that usin
ng a device while
e driving a vehiclle constitutes a
real
r
risk, even w
when the hands-ffree kit is used (car
(
kit, headsett...), drivers are
requested
r
to refrrain from using th
heir device when the vehicle is noot parked.
When
W
driving, do
o not use your de
evice and headph
hone to listen to music or to the
radio.
r
Using a h
headphone can be dangerous and
a
forbidden inn some areas.
When
W
switched o
on, your device emits electromag
gnetic waves thaat can interfere
14
with the vehicle s electronic systems such as ABS anti-lock brakes or airbags. To
ensure that there is no problem:
- do not place your device on top of the dashboard or within an airbag
deployment area,
- check with your car dealer or the car manufacturer to make sure that the
dashboard is adequately shielded from device RF energy.
CONDITIONS OF USE:
You are advised to switch off the device from time to time to optimize its
performance.
Switch the device off before boarding an aircraft.
Switch the device off when you are in healthcare facilities, except in designated
areas. As with many other types of equipment now in regular use, these devices
can interfere with other electrical or electronic devices, or equipment using radio
frequencies.
Switch the device off when you are near gas or flammable liquids. Strictly obey
all signs and instructions posted in a fuel depot, petrol station, or chemical plant,
or in any potentially explosive atmosphere.
When the device is switched on, it should be kept at least 15 cm from any
medical device such as a pacemaker, a hearing aid or insulin pump, etc. In
particular when using the device, you should hold it against the ear on the
opposite side to the device, if any.
To avoid hearing impairment, move the handset away from your ear while using
the hands-free mode because the amplified volume might cause hearing
damage.
Do not let children use the device and/or play with the device and accessories
without supervision.
When replacing the cover please note that your device may contain substances
that could create an allergic reaction.
Always handle your device with care and keep it in a clean and dust-free place.
Do not allow your device to be exposed to adverse weather or environmental
conditions (moisture, humidity, rain, infiltration of liquids, dust, sea air, etc). The
manufacturer s recommended operating temperature range is 0 C to +45 C.
At over 45 C the legibility of the device s display may be impaired, though this is
temporary and not serious.
Do not open, dismantle or attempt to repair your device yourself.
Do not drop, throw or bend your device.
Do not use the device if the glass made screen, is damaged, cracked or broken
to avoid any injury.
Do not paint it.
Use only battery chargers and accessories which are recommended by TCT
15
Mobile
M
Limited and its affiliates and are compatible with your deviice model. TCT
Mobile
M
Limited
L
and its a
affiliates disclaim
m any liability for damage causedd by the use of
other
o
chargers or accessories.
Remember
R
to m
make back-up co
opies or keep a written record oof all important
information store
ed in your device.
Some
S
people m
may suffer epileptic seizures orr blackouts wheen exposed to
flashing
f
lights, or when playing video
v
games. Th
hese seizures or blackouts may
occur
o
even If a person never ha
ad a previous se
eizure or blacko ut. If you have
experienced
e
seizzures or blacko
outs, or if you have
h
a family hhistory of such
occurrences,
o
ple
ease consult you
ur doctor before playing video ggames on your
device
d
or enablin
ng a flashing-ligh
hts feature on you
ur device.
Parents
P
should m
monitor their child
dren s use of vide
eo games or otheer features that
incorporate flashing lights on the device. All perso
ons should discoontinue use and
consult
c
a doctorr if any of the following
f
sympto
oms occur: convvulsion, eye or
muscle
m
twitching
g, loss of awaren
ness, involuntary
y movements, orr disorientation.
To
T limit the like
elihood of such symptoms, please take the foollowing safety
precautions:
p
- Do not play or u
use a flashing-lig
ghts feature if you
u are tired or neeed sleep.
- Take a minimum
m of a 15-minute
e break hourly.
- Play in a room in which all lightss are on.
- Play at the farth
hest distance posssible from the sc
creen.
- If your hands, w
wrists, or arms be
ecome tired or so
ore while playingg, stop and rest
for
f several hourss before playing again.
a
- If you continue to have sore han
nds, wrists, or arrms during or afteer playing, stop
the
t game and se
ee a doctor.
When
W
you playy games on yo
our device, you
u may experiennce occasional
discomfort
d
in your hands, arms, shoulders, neck, or other partss of your body.
Follow
F
the instrructions to avoid
d problems suc
ch as tendinitis, carpal tunnel
syndrome,
s
or oth
her musculoskele
etal disorders.
Prolonged expossure to music at full volume on thhe music player
may damage headphones recommended byy TCT Mobile
Limited and its affiliates.
a
PRIVACY:
Please
P
note that you must resp
pect the laws an
nd regulations inn force in your
jurisdiction or o
other jurisdiction
n(s) where you will use your device phone
regarding
r
taking photographs an
nd recording sounds with your deevice. Pursuant
to
t such laws and
d regulations, it may be strictly forbidden to takke photographs
and/or
a
to record the voices of other people or any
a of their persoonal attributes,
and
a duplicate or distribute them, as this may be considered
c
to bee an invasion of
16
privacy.
p
It is the user's sole resp
ponsibility to ens
sure that prior a uthorization be
obtained,
o
if nece
essary, in order to
o record private or
o confidential coonversations or
take
t
a photograp
ph of another pe
erson; the manuffacturer, the selleer or vendor of
your
y
device (including the operattor) disclaim any
y liability which m
may result from
the
t improper use
e of the device.
BATTERY:
Observe
O
the follo
owing precautions for battery use:
- Do not attempt to open the batte
ery (due to the risk of toxic fumess and burns).
- Do not puncture
e, disassemble or
o cause a short-c
circuit in a batterry,
- Do not burn orr dispose of a used battery in household rubbissh or store it at
temperatures
t
abo
ove 55 C.
Batteries
B
must be disposed of in accorda
ance with locaally applicable
environmental
e
re
egulations.
Thiis symbol on your device, the bbattery and the
acccessories means
s that these pro
oducts must be
takken to collection points
p
at the end of their life:
-Mu
unicipal waste disposal
d
centerss with specific
bins for these items
s of equipment
- Collection bins at points of sale.
The
ey will then be re
ecycled, preventiing substances
being disposed of in
n the environme nt, so that their
com
mponents can be
e reused.
In European
E
Union countries:
The
ese collection points
p
are acceessible free of
cha
arge. All products
s with this sign m
must be brought
to these
t
collection points.
p
In non-European
n
Un
nion jurisdictions :
Item
ms of equipment with this symbool are not to be
thro
own into ordinary
y bins if your jurissdiction or your
region has suitab
ble recycling aand collection
facilities; instead the
ey are to be takeen to collection
poin
nts for them to be
e recycled.
CH
HARGERS:
Mains
s powered charge
ers will operate within
w
the temperrature range of: 0 C to 40 C.
The chargers design
ned for your de
evice meet with
h the standard for safety of
inform
mation technologyy equipment and
d office equipmen
nt use. They are also compliant
to the
e eco design d
directive 2009/125/EC. Due to different appliccable electrical
speciffications, a charg
ger you purchassed in one jurisdiction may not w
work in another
jurisdiction. They shou
uld be used for th
his purpose only.
17
RA
ADIO WAVES:
THIS DEVICE MEETS
S INTERNATION
NAL GUIDELINES
S FOR EXPOSU
URE TO RADIO
ES
WAVE
Your device
d
is a radio
o transmitter and receiver. It is de
esigned not to exxceed the limits
for ex
xposure to radio waves (radio fre
equency electrom
magnetic fields) recommended
by international guid
delines. The guidelines were developed
d
by ann independent
scienttific organization (ICNIRP) and in
nclude a substan
ntial safety marggin designed to
assurre the safety of all persons, regardless of age
e and health. Thhe radio wave
expos
sure guidelines u
use a unit of me
easurement kno
own as the Speccific Absorption
Rate, or SAR. The SA
AR limit for mobile
e devices is 2 W/kg.
Tests for SAR are co
onducted using standard opera
ating positions w
with the device
mitting at its hig
ghest certified po
ower level in alll tested frequen cy bands. The
transm
highest SAR values under the ICNIRP
P guidelines for th
his device model are:
Maximum SA
AR for this mode
el and conditions under which it w
was recorded:
Body-worn SAR
Wi-Fi
0.068 W/kg.
g use, the actua
al SAR values fo
or this device are
e usually well beelow the values
During
stated
d above. This iss because, for purposes
p
of system efficiency annd to minimize
interfe
erence on the n
network, the ope
erating power of
o your device iss automatically
decre
eased when full p
power is not needed. The lower the
t power outputt of the device,
the lower its SAR valu
ue.
ng has been carried out at a sepa
aration distance oof
Body--worn SAR testin
1.5 cm. To meet RF exposure guide
elines during body-worn operati on, the device
should
d be positioned a
at least this dista
ance away from the body.
If you are not using a
an approved acce
essory ensure th
hat whatever prooduct is used is
free of
o any metal and that it positions the
t device the indicated distancee away from the
body.
nizations such a
as the World He
ealth Organization and the US F
Food and Drug
Organ
Admin
nistration have suggested that if people are conc
cerned and want to reduce their
expos
sure they could use a hands-free accessory to keep
k
the wirelesss device away
from the
t head or bodyy during use, or reduce
r
the amount of time spent oon the device.
LIC
CENCES:
Th
he Wi-Fi Logo is a certification maark of the Wi-Fi
Allliance.
Yo
our device uses non-harmonized frequency and
is intended for use
e in all Europeann countries.
Th
he WLAN can be
b operated in tthe EU without
re
estriction indoorrs, but cannot be operated
18
outdo
oors in France.
Gene
eral information
Inte
ernet address: ww
ww.alcatelonetou
uch.com
Hott Line Number: see “TCT Mobile Services” leaflet or go to our webbsite.
You have
h
purchased a product which uses the open source
s
(http://opeensource.org/ )
progra
ams mtd, msdossfs, netfilter/iptab
bles and initrd in object code aand other open
source programs lice
ensed under the
e GNU General Public Licensee and Apache
Licens
se.
We will
w provide you w
with a complete copy of the corrresponding sourcce codes upon
reque
est within a period
d of three years from
f
the distributtion of the produ ct by TCT.
You may
m download the
e source codes from
f
http://source
eforge.net/projeccts/alcatel/files/.
The provision
p
of the so
ource code is fre
ee of charge from
m internet.
On ou
ur website, you w
will find our FAQ (Frequently Aske
ed Questions) seection. You can
also contact
c
us by e-m
mail to ask any qu
uestions you may have.
An ele
ectronic version of this user guid
de is available in
n English and otther languages
accorrding to availabilitty on our server: www.alcatelone
etouch.com
Your device
d
is a transcceiver that opera
ates on Wi-Fi.
e
is in compliance with the essential re
equirements andd other relevant
This equipment
provis
sions of Directive
e 1999/5/EC. The
e entire copy of the Declaration oof Conformity
for yo
our telephone can
n be obtained thrrough our website: www.alcatelonnetouch.com.
Disc
claimer
There
e may be certaiin differences between the use
er manual descrription and the
device
e’s operation, depending on the
e software relea
ase of your devvice or specific
opera
ator services.
TCT Mobile
M
shall not be held legally responsible for such
s
differences , if any, nor for
their potential conseq
quences, which responsibility sh
hall be borne bby the operator
exclus
sively.
This handset
h
may con
ntain materials, in
ncluding applicatiions and software
re in executable
or sou
urce code form, which is submittted by third parties for inclusion in this handset
(“Third
d Party Materialss”).
All thiird party materia
als in this handse
et are provided “as
“ is”, without w
warranty of any
19
kind, whether express or implied, including the implied warranties of merchantability,
fitness for a particular purpose or use/third party application, interoperability with other
materials or applications of the purchaser and non-infringement of copyright. The
purchaser undertakes that TCT Mobile has complied with all quality obligations
incumbent upon it as a manufacturer of mobile devices and handsets in complying
with Intellectual Property rights. TCT Mobile will at no stage be responsible for the
inability or failure of the Third Party Materials to operate on this handset or in
interaction with any other devices of the purchaser. To the maximum extent permitted
by law, TCT Mobile disclaims all liability for any claims, demands, suits or actions, and
more specifically – but not limited to – tort law actions, under any theory of liability,
arising out of the use, by whatever means, or attempts to use, such Third Party
Materials. Moreover, the present Third Party Materials, which are provided free of
charge by TCT Mobile, may be subject to paid updates and upgrades in the future;
TCT Mobile waives any responsibility regarding such additional costs, which shall be
borne exclusively by the purchaser. The availability of the applications may vary
depending on the countries and the operators where the handset is used; in no event
shall the list of possible applications and software provided with the handsets be
considered as an undertaking from TCT Mobile; it shall remain merely as information
for the purchaser. Therefore, TCT Mobile shall not be held responsible for the lack of
availability of one or more applications wished for by the purchaser, as its availability
depends on the country and the operator of the purchaser. TCT mobile reserves the
right at any time to add or remove Third Party Materials from its handsets without prior
notice; in no event shall TCT Mobile be held responsible by the purchaser for any
consequences that such removal may have on the purchaser regarding the use or
attempt to use such applications and Third Party Materials.
20
Alcatel OT-T10
Описание
ф мл ни
дит
нл н з 2 мин ты
Характеристики
Д т в
в
м
з
нии
з в
ии
Д т в
и
Аксессуары
гл
л жб
т чн я
дд ж и
л т
вин и
л т з з любым
д бным
б м
тзывы
ции и
ид и