1
25-key USB Mobile MIDI Controller
User’s Guide
ESI - Copyright © 2008
Revision 1, August 2008
www.esi-audio.com
KeyControl 25 XL
ESI
INDEX
1. Introduction.................................................................................................................................. 4
2. Description of KeyControl 25 XL............................................................................................... 5
2.1 Front Panel........................................................................................................................................................... 5
2.2 Rear Panel ............................................................................................................................................................ 6
3. Installation .................................................................................................................................... 6
3.1 Hardware Installation........................................................................................................................................... 6
3.2 Software Installation ............................................................................................................................................ 7
4. Controls & Functions................................................................................................................... 7
4.1 Assigning of Parameter Presets............................................................................................................................ 7
4.2 Program Change................................................................................................................................................... 7
4.3 MIDI Channel ...................................................................................................................................................... 7
4.4 Bank Select MSB/LSB......................................................................................................................................... 8
4.5 Transpose ............................................................................................................................................................. 8
4.6 Octave .................................................................................................................................................................. 8
4.7 Dual...................................................................................................................................................................... 8
4.8 MTC..................................................................................................................................................................... 8
4.9 Mute ..................................................................................................................................................................... 8
4.10 Snapshot............................................................................................................................................................. 8
4.11 Upload & Download .......................................................................................................................................... 8
4.12 All Notes Off...................................................................................................................................................... 9
4.13 Controller Reset ................................................................................................................................................. 9
4.14 GM/GS/XG ON ................................................................................................................................................. 9
5. Controller Assignments & Presets.............................................................................................. 9
5.1 Preset Table.......................................................................................................................................................... 9
5.2 LED Display Status............................................................................................................................................ 12
6. General Information .................................................................................................................. 13
3
KeyControl 25 XL
ESI
1. Introduction
Thank you for purchasing KeyControl 25 XL.
KeyControl 25 XL is a compact 25-key keyboard, perfect for live usage on stage and in studios.
The new versatile MIDI controller can be used immediately after it has been connected to a sound
device or to a computer. You can connect KeyControl 25 XL to your Macintosh or PC via a simple
USB connection. No additional power supply is required, no drivers have to be installed.
KeyControl 25 XL offers numerous controllers: it has a pitch bend and modulation wheel, 4 knobs,
a fader and various buttons. The 4 knobs can even be assigned twice, just switch between the two
banks by pushing a button. Of course all controllers work in real time. If you are looking for a small
and affordable controller keyboard and you don't need more than 25 keys, KeyControl 25 XL is the
solution for you.
Please note that this document covers the basics of the KeyControl 25 XL installation as well as the
usage of the various built-in functions. However, this manual is not intended to explain the basics
about MIDI, MIDI controller messages, MIDI programs, MIDI channels or anything about typical
audio-/MIDI sequencing software. If you need to get more information about MIDI (i.e. you don’t
know what a MIDI controller actually is for example), a good start is usually the manual of your
notation or sequencing software (i.e. the included Cubase LE 4.0). In addition there are a lot of
details about MIDI on the Internet. A good technical resource and great starting point is
www.midi.org, some details are typically also provided in various forums about audio / MIDI and
home recording.
Note: the manual from time to time refers to preset numbers (always in Courier font). Chapter 5
contains a reference table in section 5.1 with various MIDI controllers and other parameters that
can be assigned to controller knobs, the slider, modulation wheel and data buttons. Every time you
see a number or reference in Courier, it refers to that table.
4
KeyControl 25 XL
ESI
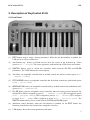
2. Description of KeyControl 25 XL
2.1 Front Panel
(1)
EDIT button, used to assign / change parameters. When the edit functionality is enabled, the
LED next to it will be switched on.
(2)
data buttons (up / down), by default used to move the octave of the keyboard up / down
(preset #154 - Octave). The octave position is indicated by the LEDs next to the buttons.
(3)
SWITCH button, used to switch the controller knobs between R1~R4 and R5~R8
parameters. The LEDS indicate the selected group.
(4)
data slider, an assignable controller that by default controls the master volume (preset #147
– master volume).
(5)
PITCH BEND wheel, an assignable controller that by default controls the pitch bend (preset
#146 – pitch bend).
(6)
MODULATION wheel, an assignable controller that by default controls the modulation value
(preset #148 – modulation).
(7)
R1~R8 knobs, each are assignable rotary controllers that can control various functions. By
default, R1 to R4 are assigned to preset #7 – channel volume, R5 is assigned to preset
#152 – program change, R6 is assigned to preset #153 – channel, R7 is assigned
to preset #156 – tempo, R8 is assigned to preset #157 – velocity curve. The
SWITCH button allows you to switch between R1~R4 and R5~R8 groups.
(8)
additional control functions, when the edit function is enabled via the EDIT button, the
functions printed above the keyboard are assigned to each key.
(9)
LED display, shows the current parameters and status.
5
KeyControl 25 XL
ESI
2.2 Rear Panel
(1)
MIDI OUT, connector for the MIDI out signals.
(2)
PEDAL connector, an input for a switching or continuous pedal controller that by default
controls sustain (preset #64 – sustain).
(3)
USB connector, connects to your PC or Mac.
(4)
DC 9V connector, connects to an optional power supply (not included) with 9V and DC
current.
(5)
OFF/ON switch, turns KeyControl 25 XL on or off.
3. Installation
3.1 Hardware Installation
Before driver installation, please locate your original Windows CD (if you are using Windows), as
you may need it during installation. Please also make sure to install the chipset drivers for your
motherboard if you have not done so already.
Find the USB port on your computer. A sample USB port is pictured below. It is typically located
next to the PS/2 or serial ports on the back of your computer.
Plug the KeyControl 25 XL USB cable (Series A plug type) into the USB port of your computer.
The other end of the cable will be connected with KeyControl 25 XL.
KeyControl 25 XL gets the power from the computer via USB cable by default when connected to a
computer and after you have switched it on. The LEDs of KeyControl 25 XL will be turned on once
the unit is powered and connected to your PC.
6
KeyControl 25 XL
ESI
MIDI connection
If you are not using the USB connection to your computer, you can also use the MIDI out port with
a standard MIDI cable. This will be connected to the MIDI input of your MIDI interface or
soundcard for example.
3.2 Software Installation
After KeyControl 25 XL has been connected to your computer, you can immediately start using it.
Under Windows, a new MIDI input device called USB Audio Device will be available in all your
MIDI compatible applications. Under Mac OS X, a new device called KeyControl 25 XL will be
available.
This device can be selected as MIDI input source in all MIDI compatible applications. How this is
done, varies from application to application, so please consult the manual for your audio/MIDI or
notation software for more details.
4. Controls & Functions
4.1 Assigning of Parameter Presets
To assign parameter presets (check the table in section 5.1 for reference) to any wheel, knob or
slider, you need to press the EDIT button to enter the edit mode which will be indicated by the LED
next to it. Then press the ASSIGN key to enter the preset assignment mode. The LED display will
show CHO. Now move the controller that you want to assign a preset to (for example, if you want
to assign something to R1, move the R1 knob). The LED will show the number of the currently
assigned preset. Enter the desired number with the numeric keys on the keyboard (for example, if
you want assign preset #147 – master volume, you would enter 147) and once finished,
press ENTER to confirm.
4.2 Program Change
By default, R5 is assigned to preset #152 – program change. However, as explained in
section 4.1, any other controller can be used as well if previously assigned to the preset.
The program can also be changed by pressing the EDIT button to enter the edit mode, which will be
indicated by the LED next to it and then pressing the PROGRAM key. After that, input the
program number with the numeric keys and press ENTER to confirm.
4.3 MIDI Channel
By default, R6 is assigned to preset #153 – channel. However, as explained in section 4.1,
any other controller can be used as well if previously assigned to the preset.
The MIDI channel can also be changed by pressing the EDIT button to enter the edit mode, which
will be indicated by the LED next to it and then pressing the CHANNEL key. After that, input the
channel number with the numeric keys and press ENTER to confirm.
7
KeyControl 25 XL
ESI
4.4 Bank Select MSB/LSB
The LSB/MSB bank value can be changed by pressing the EDIT button to enter the edit mode,
which will be indicated by the LED next to it and then pressing the BANK MSB or BANK LSB
key. After that, input the bank number with the numeric keys and press ENTER to confirm.
4.5 Transpose
Hold EDIT and use the data up and down buttons to adjust transpose. Adjustment range is +/- 12
semitones. Hold EDIT and both data up and down at the same time to set transpose to initial 0.
4.6 Octave
By default, the data up and down buttons are assigned to preset #154 – octave. Press both data
up and down at the same time to set octave to initial 0.
4.7 Dual
Press EDIT button to enter the edit mode, which will be indicated by the LED next to it, and then
press the DUAL key to enable / disable the dual function in which two notes can be sent out
simultaneously.
4.8 MTC
Press EDIT button to enter the edit mode, which will be indicated by the LED next to it, and then
press the MTC key to enable / disable the sending of MTC messages.
4.9 Mute
Press EDIT button to enter the edit mode, which will be indicated by the LED next to it, and then
press the MUTE key to enable / disable the mute function. If enabled, no messages will be
transmitted.
4.10 Snapshot
Press EDIT button to enter the edit mode, which will be indicated by the LED next to it, and then
press the SNAPSHOT key to transmit the values of all controls (R1~R8, sliders, wheels, …) at
one time.
4.11 Upload & Download
KeyControl 25 XL can send and receive all configuration data in form of SysEx strings. To make
use of that, a SysEx-compatible sequencing software like Cubase. Make sure in MIDI filter settings
in your software that SysEx data is not filtered out.
To transfer the data from the keyboard to your computer, start recording in your software. Then
press the EDIT button to enter the edit mode, which will be indicated by the LED next to it, and
after that press UPLOAD to transmit the data at one time.
To transfer the data back from the computer to KeyControl 25 XL, make sure that the data is ready
for transfer in your software. Press the EDIT button to enter the edit mode, which will be indicated
8
KeyControl 25 XL
ESI
by the LED next to it, and after that press DOWNLOAD to start receiving of the data. Now start the
transfer / playback of the data from your software.
4.12 All Notes Off
Press EDIT button to enter the edit mode, which will be indicated by the LED next to it, and then
press the ALL NOTE OFF key to send note off messages on all notes at one time.
4.13 Controller Reset
Press EDIT button to enter the edit mode, which will be indicated by the LED next to it, and then
press the CTRL RESET key to transmit the reset all controller message.
4.14 GM/GS/XG On
Press EDIT button to enter the edit mode, which will be indicated by the LED next to it, and then
press GM/GS/XG ON to transmit GM initialization message ("F0 7E 7F 09 01 F7"), GS initialization
message ("F0 41 10 42 12 40 00 7F 00 41 F7"), and XG initialization message ("F0 43 10 4C 00 00 7E 00 F7")
simultaneously.
5. Controller Assignments & Presets
The controller knobs, the slider, the modulation wheel, the data buttons, the pitch bend wheel and
the parameter for the pedal connector can each be assigned to a certain controller preset. The
following section lists them. To find the required preset value, browse through the PARAMETER
column and then select the PRESET NO.; the previous chapter of the manual explains how to assign
the presets.
5.1 Preset Table
PRESET NO.
PARAMETER
INITIAL VALUE
VALUE RANGE
0
Bank Select MSB
0
0-127
1
Modulation MSB
0
0-127
2
Breath MSB
127
0-127
3
Controller
0
0-127
4
Foot Controller MSB
127
0-127
5
Portamento Time MSB
0
0-127
6
Data Entry MSB
2
0-127
7
Channel Volume MSB
100
0-127
8
Balance MSB
64
0-127
9
Controller
0
0-127
10
Panpot MSB
64
0-127
11
Expression MSB
127
0-127
9
KeyControl 25 XL
ESI
12
Effect Control 1 MSB
0
0-127
13
Effect Control 2 MSB
0
0-127
14-31
Controller
0
0-127
32
Bank Select LSB
0
0-127
33
Modulation LSB
0
0-127
34
Breath LSB
127
0-127
35
Controller
0
0-127
36
Foot Controller LSB
127
0-127
37
Portamento Time LSB
0
0-127
38
Data Entry LSB
0
0-127
39
Channel Volume LSB
127
0-127
40
Balance LSB
64
0-127
41
Controller
0
0-127
42
Panpot LSB
64
0-127
43
Expression LSB
127
0-127
44-63
Controller
0
0-127
64
Sustain
0
0-127
65
Portamento
0
0-127
66
Sostenuto
0
0-127
67
Soft Pedal
0
0-127
68
Legato FootSwitch
0
0-127
69
Hold 2
0
0-127
70
Sound Controller
64
0-127
71
Resonance
64
0-127
72
Release Time
64
0-127
73
Attack Time
64
0-127
74
Cutoff
64
0-127
75
Decay Time
0
0-127
76
Vibrato Depth
64
0-127
77
Vibrato Depth
64
0-127
78
Vibrato Depth
64
0-127
79
Sound Controller
64
0-127
80-83
Controller
0
0-127
10
KeyControl 25 XL
ESI
84
Portamento Control
0
0-127
85-90
Controller
0
0-127
91
Reverb
40
0-127
92
Effects
0
0-127
93
Chorus
0
0-127
94
Effects
0
0-127
95
Effects
0
0-127
96
RPN Increment
0
0-127
97
RPN Decrement
0
0-127
98
NRPN LSB
0
0-127
99
NRPN MSB
0
0-127
100
RPN LSB
0
0-127
101
RPN MSB
0
0-127
102-119
Controller
0
0-127
120
All Sound Off
0
0-127
121
Reset All Controllers
0
0-127
122
Local Control
0
0-127
123
All Notes Off
0
0-127
124
OMNI Off
0
0-127
125
OMNI On
0
0-127
126
Mono
0
0-127
127
Poly
0
0-127
128
Pitch Bend Sensitivity(RPN)
2
0-127
129
Channel Fine Tuning(RPN)
64
0-127
130
Channel Coarse Tuning(RPN)
64
0-127
131
Modulation Depth Range(RPN)
64
0-127
132
Vibrato Rate(NRPN)
64
0-127
133
Vibrato Depth(NRPN)
64
0-127
134
Vibrato Delay(NRPN)
64
0-127
135
Filter Cutoff Frequency(NRPN)
64
0-127
136
Filter Resonance(NRPN)
64
0-127
137
EQ Low Gain(NRPN)
64
0-127
11
KeyControl 25 XL
ESI
138
EQ High Gain(NRPN)
64
0-127
139
EQ Low Frequency(NRPN)
64
0-127
140
EQ High Frequency(NRPN)
64
0-127
141
EG Attack Time(NRPN)
64
0-127
142
EG Decay Time(NRPN)
64
0-127
143
EG Release Time(NRPN)
64
0-127
144
Polyphonic Key Pressure
100
0-127
145
Aftertouch
100
0-127
146
Pitch Bend
64
0-127
147
Master Volume
100
0-127
148
Start(MTC)
-
-
149
Continue(MTC)
-
-
150
Stop(MTC)
-
-
151
Reset(MTC)
-
-
152
Program
0
0-127
153
Global Channel
0
0-15
154
Octave
0
-3~3
155
Transpose
0
-12~12
156
Tempo
100
20-250
157
Keyboard Curve
0
0-4
158
Pedal Curve
64
1-127
The default preset assignments of each function are described in Chapter 2.
5.2 LED Display Status
This section contains an overview of the various display possibilities of the 3-digit LED display.
NO.
STATUS
DEFINITION
1
xxx
3 Digit Display
2
xx
Upper Transpose Value
3
-xx
Lower Transpose Value
4
x
Upper Octave Value
5
-x
Lower Octave Value
6
CHO
Indicates the preset to be assigned in preset assignment mode.
12
KeyControl 25 XL
ESI
7
ON / OFF
Certain function On/Off, or pedal polarity positive/negative.
8
don
A certain function has been done.
9
Err
Operation Error.
10
SEu
Parameters have been uploaded.
11
SEd
Parameters have been downloaded.
6. General Information
Trademarks
ESI, KeyControl and KeyControl 25 XL are trademarks of EGOSYS, Inc. and ESI Audiotechnik
GmbH. Windows is a trademark of Microsoft Corporation. Other product and brand names are
trademarks or registered trademarks of their respective companies.
The FCC Regulation Warning
This device complies with Part 15 of the FCC Rules. Operation is subject to the following two
conditions: (1) this device may not cause harmful interference, and (2) this device must accept any
interference received, including interference that may cause undesired operation. Caution : Any
changes or modifications in construction of this device with are not expressly approved by the party
responsible for compliance, could void the user's authority to operate equipment.
Note: This equipment has been tested and found to comply with the limits for a Class A digital
device, pursuant to Part 15 of the FCC Rules. These limits are designed to provide reasonable
protection against harmful interference when the equipment is operated in a commercial
environment. This equipment generates, uses, and can radiate radio frequency energy and, if not
installed and used in accordance with the instruction manual, may cause harmful interference to
radio communications. Operation of this equipment in a residential area is likely to cause harmful
interference in which case the user will be required to correct the interference at his own expense. If
necessary, consult an experienced radio/television technician for additional suggestions.
Correspondence
For technical support inquiries, contact ESI support online at www.esi-audio.com.
Disclaimer
All features and specifications subject to change without notice.
Parts of this manual are continually being updated. Please check our web site www.esi-audio.com
occasionally for the most recent update information.
Declaration of Conformity (for the European Union)
The product described in this manual is manufactured in China by ESI Audiotechnik GmbH,
Brennerstraße 48, D-71229 Leonberg, Germany. The product is labelled with the CE mark and
conform to the protection requirements of the European Electromagnetic Compatibility Standards
13
KeyControl 25 XL
ESI
and Directives. The product is designed and constructed such that electromagnetic disturbances
generated do not exceed levels allowing radio and telecommunications equipment and other
equipment to operate as intended, and, the product has an adequate level of intrinsic immunity to
electromagnetic disturbance to enable operation as specified and intended.
The product is marketed as ESI KeyControl 25 XL controller keyboard.
With reference to regulations in the directives 73/23/EEC, 89/336/EEC, the equipment listed above
is covered by this certificate and labelled with the CE mark conforms to the following standards:
EN55103-1 & EN55103-2
Product family standard for audio, video, audio-visual and
entertainment lighting control apparatus for professional use.
This declaration is made by Claus Riethmüller (Managing Director).
Leonberg, Germany
_____________________
City
14
21.08.2008
______________
Date
___________________________
Signature