1
DENON
DVD VIDEO AUTO CHANGER
DVM-1845
OPERATING INSTRUCTIONS
MODE D'EMPLOI
INSTRUCCIONES DE FUNCIONAMIENTO
WARNING: TO
REDUCE THE RISK OF FIRE OR ELECTRIC SHOCK, DO NOT EXPOSE THIS
APPLIANCE TO RAIN OR MOISTURE.
The lightning flash with arrowhead symbol. within an
equilateral triangle. is intended to alert the user to the
presence of uninsulated "dangerous voltage" within the
product's enclosure that may be of sufficient magnitude
to constitute a risk of electric shock to persons.
CAUTION:
The exclamation point within an equilateral triangle is
intended to alert the user to the presence of important
operating and maintenance (servicing) instructions in
the literature accompanying the appliance.
TO REDUCE THE RISK OF ELECTRIC SHOCK, DO NOT REMOVE
COVER (OR BACK). NO USER SERVICEABLE PARTS INSIDE.
REFER SERVICING TO QUALIFIED SERVICE PERSONNEL.
The caution marking is located on the rear of the cabinet.
IMPORTANT SAFEGUARDS
1) Read Instructions - All the safety and operating instructions should be read before the product is operated.
2) Retain Instructions - The safety and operating instructions should be retained for future reference.
3) Heed Warnings - All warnings on the product and in
the operating instructions should be adhered to.
4) Follow Instructions - All operating and use instructions should be followed.
5) Cleaning - Unplug this product from the wall outlet
before cleaning. Do not use liquid cleaners or aerosol
cleaners. Use a damp cloth for cleaning.
6) Attachments - Do not use attachments not recommended by the product manufacturer as they may
cause hazards.
7) Water and Moisture - Do not use this product near
water - for example, near a bath tub, wash bowl,
kitchen sink, or laundry tub; in a wet basement; or
near a swimming pool; and the like.
8) Accessories - Do not place this
PORTABLE CART WARNING
product on an unstable cart,
(Symbol provided by RETAC)
stand, tripod, bracket, or table.
The product may fall, causing
serious injury to a child or adult,
and serious damage to the product. Use only with a cart, stand,
tripod, bracket, or table recommended by the manufacturer, or
sold with the product. Any
S3125A
mounting of the product should follow the manufacturer's instructions, and should use a mounting accessory recommended by the manufacturer.
9) A product and cart combination should be moved with
care. Quick stops, excessive force, and uneven surfaces
may cause the product and cart combination to overturn.
10) Ventilation - Slots and openings in the cabinet are
provided for ventilation and to ensure reliable operation of the product and to protect it from overheating,
and these openings must not be blocked or covered.
The openings should never be blocked by placing the
product on a bed, sofa, rug, or other similar surface.
This product should not be placed in a built-in installation such as a bookcase or rack unless proper ventilation is provided or the manufacturer's instructions
have been adhered to.
11) Power Sources - This product should be operated
only from the type of power source indicated on the
marking label. If you are not sure of the type of power
supply to your home, consult your product dealer or
local power company. For products intended to operate from battery power, or other sources, refer to the
operating instructions.
12) Grounding or Polarization - This product may be
equipped with a polarized alternating-current line plug
(a plug having one blade wider than the other). This
plug will fit into the power outlet only one way. This is
a safety feature. If you are unable to insert the plug
fully into the outlet, try reversing the plug. If the plug
should still fail to fit, contact your electrician to
replace your obsolete outlet. Do not defeat the safety
purpose of the polarized plug.
13) Power-Cord Protection - Power-supply cords should be
routed so that they are not likely to be walked on or
pinched by items placed upon or against them, paying
particular attention to cords at plugs, convenience receptacles, and the point where they exit from the product.
14) Lightning - For added protection for this product during a lightning storm, or when it is left unattended and
unused for long periods of time, unplug it from the
wall outlet. This will prevent damage to the product
due to lightning and power-line surges.
15) Power lines - An outside antenna system should not
be located in the vicinity of overhead power lines or
other electric light or power circuits, or where it can
fall into such power lines or circuits. When installing
an outside antenna system, extreme care should be
taken to keep from touching such power lines or circuits as contact with them might be fatal.
16) Overloading - Do not overload wall outlets, extension
cords, or integral convenience receptacles as this can
result in a risk of fire or electric shock.
17) Object and Liquid Entry - Never push objects of any
kind into this product through openings as they may
touch dangerous voltage points or short-out parts that
could result in a fire or electric shock. Never spill liquid of any kind on the product.
18) Servicing - Do not attempt to service this product
yourself as opening or removing covers may expose
you to dangerous voltage or other hazards. Refer all
servicing to qualified service personnel.
19) Damage Requiring Service - Unplug this product from
the wall outlet and refer servicing to qualified service
personnel under the following conditions:
a) When the power-supply cord or plug is damaged.
b) If liquid has been spilled, or objects have fallen into
the product.
c) If the product has been exposed to rain or water.
d) If the product does not operate normally by following the operating instructions. Adjust only those
controls that are covered by the operating instructions as an improper adjustment of other controls
may result in damage and will often require extensive work by a qualified technician to restore the
product to its normal operation.
e) If the product has been dropped or damaged in
any way.
f) When the product exhibits a distinct change in performance - this indicates a need for service.
20) Replacement Parts - When replacement parts are
required, be sure the service technician has used
replacement parts specified by the manufacturer or
have the same characteristics as the original part.
Unauthorized substitutions may result in fire, electric
shock, or other hazards.
21) Safety Check - Upon completion of any service or
repairs to this product, ask the service technician to
perform safety checks to determine that the product
is in proper operating condition.
22) Heat - The product should be situated away from heat
sources such as radiators, heat registers, stoves, or
other products (including amplifiers) that produce heat.
-2-
EN
-<
»
Laser Safety
This unit employs a laser. Only a qualified service person should remove the cover or attempt to service this device, due to
possible eye injury.
CAUTION:
CAUTION:
LOCATION:
USE OF CONTROLS OR ADJUSTMENTS OR PERFORMANCE OF PROCEDURES OTHER THAN THOSE SPECIFIED HEREIN MAY RESULT IN HAZARDOUS RADIATION EXPOSURE.
VISIBLE AND INVISIBLE LASER RADIATION WHEN OPEN AND INTERLOCK DEFEATED. DO NOT STARE INTO
BEAM.
INSIDE, NEAR THE DECK MECHANISM.
FCC WARNING- This equipment may generate or use radio frequency energy. Changes or modifications to
this equipment may cause harmful interference unless the modifications are expressly approved in the manual. The user could lose the authority to operate this equipment if an unauthorized change or modification
is made.
RADIO-TV INTERFERENCE
This equipment has been tested and found to comply with the limits for a Class B digital device, pursuant to Part
15 of the FCC Rules. These limits are designed to provide reasonable protection against harmful interference in
a residential installation. This equipment generates, uses, and can radiate radio frequency energy and, if not
installed and used in accordance with the instructions, may cause harmful interference to radio communications.
However, there is no guarantee that interference will not occur in a particular installation. If this equipment does
cause harmful interference to radio or television reception, which can be determined by turning the equipment off
and on, the user is encouraged to try to correct the interference by one or more of the following measures:
1) Reorient or relocate the receiving antenna.
2) Increase the separation between the equipment and receiver.
3) Connect the equipment into an outlet on a circuit different from that to which the receiver is connected.
4) Consult the dealer or an experienced radiofTV technician for help.
This Class B digital apparatus complies with Canadian ICES-003.
I
CAUTION: TO PREVENT ELECTRIC SHOCK, MATCH WIDE BLADE OF PLUG TO WIDE SLOT, FULLY INSE'RT.
I
Non-use periods - Turn off the unit when it is not in use. Unplug the unit from the household AC outlet if it is
not to be used for a long time. Unplug the unit during lightning storms.
Please read this operating instructions carefully before using your DVD player, and keep it for future reference.
-<
Important
Use only discs marked with logos listed on page 6.
-<
Power Supply
» -<
»
The main power supply is engaged when the main plug is
plugged in a 120V, 60Hz AC outlet. To operate the unit, press
the ON/STANDBY button to turn on the unit.
-<
Warning
»
To avoid fire or electric shock, do not expose this unit to rain
or moisture.
WARNING:
LIVE PARTS INSIDE.
DO NOT REMOVE ANY SCREWS.
-< Installation Location
Cautions on Installation
»
Noise or disturbance of the picture may be generated if this
unit or any other electronic equipment using microprocessors
is used near a tuner or TV.
If this happens, take the following steps:
• Install this unit as far as possible from the tuner or TV.
• Set the antenna wires from the tuner or TV away from this
unit's power cord and inpuVoutput connection cords.
• Noise or disturbance tends to occur particularly when using
indoor antennas or 300Q/ohms feeder wires. We recommend
using outdoor antennas and 75Q/ohms coaxial cables.
NOTE:
• For heat dispersal, do not install this equipment in a confined space such as a book case or similar unit.
»
For safety and optimum performance of this unit:
• Do not stand the unit up vertically. Install the unit in a horizontal and stable position. Do not place anything directly on
top of the unit. Do not place the unit directly on top of the TV.
• Shield it from direct sunlight and keep it away from sources of
intense heat. Avoid dusty or humid places. Avoid places with
insufficient ventilation for proper heat dissipation. Do not
block the ventilation holes on the sides of the unit. Avoid locations subject to strong vibration or strong magnetic fields.
• Be sure to remove a disc and unplug the AC power cord
from the outlet before carrying the unit.
-3-
EN
~ Dew Warning
Moisture condensation may occur inside the unit when it is moved
from a cold place to a warm place, or after heating a cold room or
under conditions of high humidity. Do not use the DVD Player at
least for 2 hours until its inside is dry.
~ Avoid the Hazards of Electrical Shock and Fire
>-
• Do not handle the power cord with wet hands.
• Do not pull on the power cord when disconnecting it from AC
wall outlet. Grasp it by the plug.
• If, by accident, water is spilled on this unit, unplug the power
cord immediately and take the unit to our Authorized Service
Center for servicing.
~ Caution
1) Do not attempt to open the cabinet. There are no parts you can
service inside. Refer all servicing to qualified service personnel.
2) Slot and openings in the cabinet and at the side or bottom are
provided for ventilation. To ensure reliable operation and to
protect the unit from overheating these opening must not be
blocked or covered. Avoid enclosed spaces such as book
cases unless proper ventilation is provided.
3) Keep the unit away from the radiator heat sources.
4) Avoid using near strong magnetic fields.
• IMPORTANT SAFEGUARDS
2
• PRECAUTIONS
3
Laser Safety
3
Important
3
Power Supply
3
Warning. . .
.
3
Installation Location
3
Cautions on Installation
3
Dew Warning
4
Avoid the Hazards of Electrical Shock and Fire
4
Caution
4
• INTRODUCTION
5
About Copyright.
5
Notice for the Progressive Scan Outputs
5
Supplied Accessories
5
5
Symbols Used in this Manual
• ABOUT THE DISCS
6
Playable Discs
6
• FEATURES
7
• FUNCTIONAL OVERVIEW
8
FRONT PANEL
8
8
REMOTE CONTROL
Tour of the Remote Control
9
11
Front Panel Display
Displays During Operation
11
Loading the Batteries
12
Using a Remote Control.
12
• CONNECTIONS
13
Description - Rear Panel
13
Connection to an Audio System
14
Connection to a TV (for video)
15
16
Connection to a TV with an HDMI Compatible Port
• DISC PLAyBACK
17
Basic Playback
17
17
CANCELING AND CALLING BACK PBC FUNCTION
HDMI Setup
17
General Features
17
Disc Menus
17
Title Menu
18
CALLING UP A MENU SCREEN DURING PLAYBACK. . 18
Still/Pause
18
Resume
18
Fast Forward / Reverse Search
18
Slow Forward / Slow Reverse
18
Step by Step Playback
18
Zoom
19
5) Do not push objects of any kind into this through the
cabinet slot as they could touch current carrying parts or
short circuit parts resulting in a fire or electric shock.
6) Never spill liquid of any kind on this unit.
If liquid is spilled into the unit, consult qualified service engineer.
7) Use this unit in a horizontal (flat) position only.
8) This equipment is in Stand-by mode when it turns off whilst
the power cord is connected.
9) Keep the set free from moisture,water and dust.
10) Sufficiently ventilate the place of installation. If the unit is left
in a room full of the smoke from cigarettes, etc., for long periods of time, the surface of the optical pickup could get dirty, in
which case it will not be able to read the signals properly.
11) Store the operating instructions in a safe place. After reading
the operating instructions, store them in a safe place as they
could come in handy in the future.
12) Handle the power cord carefully. Hold the plug when unplugging the code.
13) All the safety cautions and operating instructions should be
read before the DVD player is operated.
14) Use caution not to pinch your finger in the disc slot.
15) Do not put heavy objects on the AC power cord.
16) Keep the AC power cord away from heat appliances.
17) Be sure to remove a disc and unplug the AC power cord from
the outlet before carrying the DVD player.
18) Do not put any pressure to the DVD player when carrying.
19) Do not use the DVD player outdoors.
•
•
•
•
-4-
Title / Chapter Search
19
19
By using the SEARCH MODE button
19
By using the SKIP buttons ~ ~
Track Search
19
19
By using the SEARCH MODE button
19
By using the SKIP buttons ~ ~
Time Search
19
20
Marker Setup Screen
Repeat
20
20
REPEAT TITLE / CHAPTER
REPEAT TRACK / GROUP / DISC
20
20
A-B REPEAT
Program Playback
21
Random Playback
22
MP3 / JPEG / WMA Playback
22
DivX® Playback
24
DivX® Subtitle
24
Changing the On-Screen Display
25
Slide Show Mode
26
Dialog Speed
26
Audio Language
26
27
Subtitle Language
Camera Angle
27
Picture Control.
27
Stereo Sound Mode
28
Virtual Surround
28
Black Level Setting
28
DVD SETUP
29
Language Setting
29
Display Setting
29
Audio Setting
30
Ratings Control
30
30
RATING LEVEL
IF YOU FORGET THE PASSWORD
30
CONTROL LEVELS
30
Others Setting
31
Reset to the Default Settings (except for Ratings Control) .. 31
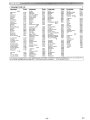
Language Code List
32
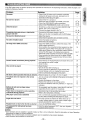
TROUBLESHOOTING GUIDE
33
34
SPECIFICATIONS
MAINTENANCE
34
EN
The serial number of this product may be found on the back of the DVD player. No others have the same serial
number as yours. You should record the number and other vital information here and retain this book as a permanent record of your purchase to aid identification in case of theft. Serial numbers are not kept on file.
Date of Purchase
Dealer Purchase from
Dealer Address
Dealer Phone No.
Model No.
Serial No.
-«
>-
About Copyright
Unauthorized copying, broadcasting, public performance and lending of discs are prohibited.
This product incorporates copyright protection technology that is protected by U.S. patents and other intellectual property rights. Use of this copyright protection technology must be authorized by Macrovision, and is
intended for home and other limited viewing uses only unless otherwise authorized by Macrovision. Reverse
engineering or disassembly is prohibited.
U. S. Patent Nos, 4,631,603,4,819,098, 4,907,093, 5,315,448 and 6,516,132.
-<
~
Notice for the Progressive Scan Outputs
Consumers should note that not all high definition television sets are fully compatible with this product and may
cause artifacts to be displayed in the picture. In case of picture problems with 525 progressive scan output, it is
recommended that the user switch the connection to the 'standard definition' output. If there are questions
regarding your TV set compatibility with this 525p DVD player, please contact our customer service center.
-<
~
Supplied Accessories
Please check to make sure the following items are included with the main unit in the carton.
Remote
control·····1
"AA" (R6P)
Audio
Video
Operating
Service Station Warranty
batteries ••• 2 cable······ 1 cable······ 1 Instructions" 1 List········ 1 Card······· 1
nn
-<
~
Symbols Used in this Manual
The following symbols appear below in some headings and notes in this manual, with the following
meanings.
!DVD-vl:
VCD
I:
CD
I:
MP3
I:
Description refers to playback of DVDVideo discs. (including DVD-R/RW discs)
IJPEGI:
Description refers to viewing of JPEG
discs.
Description refers to playback of Video
CDs.
IWMAI:
Description refers to playback of discs formatted with WMA.
Description refers to playback of Audio
CDs.
I DivX®I:
Description refers to playback of discs formatted with DivX®.
Description refers to playback of discs formatted with MP3.
A NOTE ABOUT RECYCLING
This product's packaging materials are recyclable and can be reused. Please dispose of any materials in accordance with your
local recycling regulations.
Batteries should never be thrown away or incinerated but disposed of in accordance with your local regulations concerning
chemical wastes.
(Ji::t,
n-n
·
'CJ<.;7 •
Make your contribution to the environment!!!
Used up batteries do not belong in the dust bin.
You can dispose of them at a collection point for used up batteries or special waste. Contact your council for details.
-5-
EN
Playable Discs
Playable
discs
2\2
DVD-Video
• 1,2,3,5
-" ..
_-~_
.. _--
Region code
Mark (logo)
VI DEO
2\2 OYO
DVD oyo
Disc types
Example
..:~
~or(j)
R
• 1,3,4,5,
6,7,8
Disc size
~
~ ~ ~ ---~-----~~~---~~-~-
DVD-R
DVD-RW
Recorded
signals
Digital video
(MPEG2)
DivX®
12 em
or
8cm
?hapter
.
DivX®
Example
~
I(C~
.-.......-
Title 1
I
Group 1
I
Track 1 I Track 2 I Track 3 1 Track 4
[QJD§PA~
• 1,3,5,9
[DIGITAL \IIOEol
~---~-~-~- -
~
VIDEO CD
----------
[Q]O~~
Audio CD
• 3, 5
f--
Digital video
with
audio
-
- ~ - ~ - ~ - - - - - - - --
Digital audio
---
[Q]Oo§~
[Q]o~~
hm;r;ttHtt;jffl
DIGITAL AUDIO
li$tmHtii1tt1
[Q]o~~
• 3, 4, 5, 7,
8, 10
COMPACT
~
Video CD,
Audio CD
----~-- ~ - - ~ - -
DIGITAL AUDIO
CD-R
CD-RW
-'"-----~--~
-
a
Digital audio
MP3
WMA*10
Digital picture
(JPEG)
DivX®
[~ak
ctureCD
• 3, 4, 5,
7,8
]
12 em
or
8cm
Windows
- . " , Media'"
I ~;-':~
~
) Example
(J;~'U'~
Grou
JD
JPEG
~I
1
~'Z',~ . -Tcack
1 ITrack 2 I Track 3
- - . . ..
II ..
~
-
I
Track 1 I Track 2 I Track 3 I Track 4
Track 5
I
Track 6
MP3,
JPEG,
WMA,
I Track 4 :
I
Grou
UP
2
Track 5 ,I Track 6
----.
12cm
COMPATIBLE
~ is a trademark of DVD Format/Logo Licensing Corporation.
_ . Plays
Example
~
l-----~---~--
Picture CD
[
Track 6
e---
Video CD
- - - - - - - - - - -------
GrouD 2
~ ITrack 5 _I
(DVD-R/RW only)
RW
--~----
Title 2
~11 ~haPler 21 Chapler 31 Chapter ~I Chapler _11 Cha~
1
I
Windows Media and the Windows logo are trademarks
or registered trademarks of Microsoft Corporation in
the United States and/or other countries.
is trademark of Eastman Kodak Company.
DivX, DivX Certified, and associated logos are trademarks of
DivX, Inc. and are used under
license.
If you cannot play back a disc which bears one of the marks above, check the following notes.
*1: This unit conforms to the NTSC color system. Discs recorded in other color systems such as PAL cannot be played back.
*2: Certain DVD discs do not operate as described in this manual due to the intentions of the disc's producers.
*3: Scratched or stained discs may not be played back.
*4: Some discs cannot be played back because of incompatible recording conditions, characteristics of the recorder or special properties of discs.
*5: You can play back discs which bear the marks above. If you use nonstandardized discs, this unit may not play them
back. Even if they are played back, the sound or video quality will be compromised.
*6: Only the discs recorded in the video format and finalized can be played back.
Unfinalized discs cannot be played back. Depending on the recording status of a disc, the disc may not be played back
at all or normally (the picture or sound may be distorted, etc.).
*7: If there is too much recordable space left on a disc (the used portion is less than 2 3/16 inches (55mm) across), it may not be played
back properly.
*8: Do not glue paper or put stickers on to the disc. These may damage the disc, and the unit may not read it correctly.
*9: This unit conforms to ver.1.1 and ver.2.0 of Video CD standard, with PBC function.
Ver.1.1 (without PBC function): You can enjoy playback picture as well as music CD.
Ver.2.0 (with PBC function): While using a Video CD with PBC function, "Pbc" appears on the screen and the display.
NOTE: When playing back Video CDs with PBC function, some operations (e.g., track search and repeat tracks) cannot be
performed. Cancel PBC function temporarily to perform those operations (refer to page 17).
*10: This player cannot play back the disc contents protected by Windows Media Digital Rights Management (DRM).
What is PBC? "PBC" stands for Playback Control.
You can play back interactive software using menu screens. Refer to instructions in the Video CD.
• NEVER play back the following discs. Otherwise, malfunction may result!
DVD-RAM / CD-i / Photo CD / DVD with region codes other than 1 or ALL / DVD-ROM for personal computers / CD-ROM
for personal computers
• Any other discs without compatibility indications
• On the following disc, the sound MAY NOT be heard.
DVD-Audio / Super Audio CD
CAUTION:
NOTES:
• Use caution not to pinch your finger in the disc slot.
• Only the sound recorded on the normal CD layer can
• Be sure to remove a disc and unplug the AC power
be delivered. (Super Audio CD)
cord from the outlet before carrying the DVD player.
• The sound recorded on the high density Super Audio
CD layer cannot be delivered. (Super Audio CD)
• Disc with the Video zone can be played. (DVD-Audio)
• Disc only of the Audio zone cannot be played. (DVD~d~
-6EN
Information about the current operation can be displayed
on a TV screen, allowing you to confirm the currently
active functions (such as program playback) using the
remote control.
• Progressive Scan system
Unlike conventional interlace scanning, the progressive scan
system provides less flickering and images in higher resolution than that of traditional (525i/480i) television signals.
• Dimmer
• Dolby Digital Sound
The brightness of the front panel display can be adjusted.
By connecting this player to a Multi-Channel Dolby Digital
decoder, you can enjoy high-quality Multi-Channel Dolby
Digital surround sound as heard in the movie theaters.
• Screen Saver
The screen saver program starts if there is no activity at
the player or its remote for more than 5 minutes. The
brightness of the display is darken by 75%. The program is
deactivated when there is any activity.
• DTS (Digital Theater System)
When this player is connected to the DTS decoder, you
can enjoy Multi-Channel surround system which
reproduces the original sound as truthfully as possible.
Multi-Channel surround system is developed by DTS, Inc.
• Picture Control
Picture Control adjusts Brightness, Contrast, Color, Gamma
Correction and Sharpness of the specific display.
• HDMI (High Definition Multimedia Interface)
You can enjoy clearer video output when connecting this
player to a display equipment with an HDMI-compatible port.
• Search
Chapter search:
Title search:
Track search:
Time search:
• Dialog Speed
Playback in slightly faster or slower speed while keeping
the sound quality as in the normal playback.
Dialog speed is available only on discs recorded in the
Dolby Digital format.
Chapter:
Title:
Track:
Disc:
Various playback modes are available including still pictures, fast forward/reverse, slow motion and step frames.
• Still Mode
The resolution of pictures while in the still (pause) mode
can be adjusted.
5 Disc:
A-B:
• Random Playback for Audio CD, MP3, JPEG and
WMA
Group:
This player can shuffle the playback order of tracks in random order.
• Program Playback for Audio CD, MP3, JPEG and
WMA
Electric reference points designated by user can be called
back.
• Resume Playback
• Auto Power Off
User can resume playback from the point at which the
playback has been stopped even if the power is turned off.
The power turns off automatically if there is no activity at the
player or its remote for more than 30 minutes (refer to page 31).
• Component Video Out Jacks
Jacks located on the back of the DVD Player which are
used to send high-quality video to a TV via Component
Video In Jacks.
You can select a desired language for subtitles if that language is available on the DVD and DivX®.
• Bit rate indication
• ORC (Dynamic Range Control)
You can control the range of sound volume.
• Choices for audio language and sound mode
• Displaying a JPEG picture
Kodak Picture CDs can be played back. Still images stored
in JPEG format on CD-R/RW can also be played back.
• Ratings Control (Parental lock)
You can set the control level to limit playback of discs
which may not be suitable for children.
• Automatic detection of discs
Repeated playback of a chapter of the disc.
Repeated playback of a title of the disc.
Repeated playback of a track of the disc.
Repeated playback of the entire disc.
(exclude DVD-Video)
Repeated playback of Audio CD/
MP3/JPEG/ WMA discs is possible.
Repeated playback of a part between two
points. (exclude MP3/JPEG/ WMA discs)
Repeated playback of a folder of MP3/
JPEGIWMNDivX® disc being played is
possible.
2-time or 4-time magnified image can be displayed.
You can display DVD menus in a desired language, if
available on a DVD.
You can select a desired audio language and sound mode if
different languages and modes are available on a disc.
chapter.
title.
track.
time point or a title
• Marker
• DVD menus in a desired language
You can select a desired camera angle if a disc contains
sequences recorded from different angles.
desired
desired
desired
desired
• Zoom
You can program the playback order of tracks in a desired order.
• Selecting a camera angle
a
a
a
a
• Repeat
• Still/FastlSlow/Step playback
• Subtitles in a desired language
Search for
Search for
Search for
Search for
or a track.
• Reproducing WMA data
You can enjoy WMA files which are recorded on CD-R/RW
• Reproducing DivX® data
You can enjoy DivX'" files which are recorded on DVDR/RW or CD-R/RW
• Official DivX" Certified product
• Plays all versions of DivX" video (including DivX® 6)
with standard playback of DivX" media files.
This player automatically detects if a loaded disc is DVDVideo, Video CD, Audio CD, MP3, JPEG, WMA or DivX®.
• Playing back an MP3 disc
You can enjoy MP3 files which are recorded on CD-R/RW
• Direct Search
"WMA" (Windows Media Audio) is an audio
codec developed by Microsoft4D in the United
States of America.
You can search the desired title, chapter, and track with
numeric button during playback or in stop mode.
• On-screen display
-7-
EN
FRONT PANEL
1
I
12
2,
,
---+-
--~e;I;;;:;~;:;;;;;;::;-__;: :~;:; ; ; ; ; :; :;:; ; ; :; ; ; ; ; ;p:; ;:~i~; ~.!~ :; .; .-; ;=; : : : ; ;: ; ;: : ;:; ; ; :; ; ; :; ; ; :; ; ;~
__
....
~""JHomI ~
11
.. ~
10
~
34
I REMOTE CONTROL I
1.
2.
3.
4.
5.
6.
7.
8.
1-
9.
10.
11.
12.
13.
14.
15.
16.
17.
18.
19.
20.
21.
22.
23.
24.
@35
25.
.
@~
26.
27.
28.
29.
30.
31.
32.
33.
6
5
24
34.
DENON
35.
RC-1040
ON/STANDBY (POWER ON/OFF) Buttons [page 17]
Disc loading tray
OPEN/CLOSE Button [page 17]
PLAY Button [page 17]
STOP Button [page 17]
f-olII.... (SKIP DOWN) Button [page 19]
~~(SKIP UP) Button [page 19]
Disc Indicator
Green LED indicator lights up when playing discs, Red
LED indicator lights up not playing discs.
Lights off when discs not into the unit.
STILUPAUSE Button [page 18]
Display, Remote Sensor Window
HDMI Button [page 17]
Press to set the HOMI connector's video signal output
mode.
HDMI indicator [page 17]
Lights up when there is video signal output from the
HOMI OUT jack.
A-B REPEAT Button [page 20]
REPEAT Button [page 20]
RANDOM Button [page 22]
ZOOM Button [page 19]
CLEAR Button [page 19]
ANGLE Button [page 23]
MENU Button [page 17]
ENTER Button [page 17]
Cursor Buttons [page 17]
RETURN Button [page 18]
SEARCH MODE Button [page 19]
~~(Fast Reverse SEARCH) Button [page 18]
Press more than 2 seconds when you use the front
panel button for this function.
~~(Fast Forward SEARCH) Button [page 18]
Press more than 2 seconds when you use the front
panel button for this function.
SETUP Button [page 29]
SUBTITLE Button [page 27]
TOP MENU Button [page 18]
DISPLAY Button [page 25]
AUDIO Button [page 26]
Numeric Buttons [page 17]
MODE Button [page 21]
DISC EXCHANGE Button [page 17]
Press to change discs during playback.
DISC SKIP Button [page 17]
Press to select a desired disc or disc tray.
DISC NUMBER Buttons [page 17]
Press to select a desired disc or disc tray directly.
The buttons with circled numbers can only be operated with
the remote control.
-8-
EN
-<
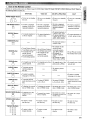
Tour of the Remote Control
DVD-Video
Video CD
CD, MP3, JPEG, WMA
DivX®
• To turn on or standby
the unit.
• To turn on or standby
the unit.
• To turn on or standby
the unit.
• To turn on or standby
the unit.
• To mark a segment
between A and B for
repeated playback.
• To mark a segment
between A and B for
repeated playback.
• To mark a segment
between A and B for
repeated playback.
(CD)
• To mark a segment
between A and B for
repeated playback.
• To repeat playback of
a track or disc.
• To repeat playback of
a track or disc. (CD)
• To repeat playback of
• To repeat playback of
a track, group or disc.
a track, group, or disc.
(MP3, JPEG, WMA)
POWER ON/OFF Buttons
POWER
ON
8
OFF
0
A-B REPEAT Button
A-B
REPEAT
0
REPEAT Button
REPEAT
0
RANDOM Button
RANDOM
0
MODE Button
MODE
0
ZOOM Button
ZOOM
0
ANGLE Button
ANGLE
0
SUBTITLE Button
SUBTITLE
0
AUDIO Button
AUDIO
0
DISPLAY Button
DISPLAY
0
• To repeat playback of
a title or chapter.
-
-
• To set Picture Control.
• To set Black level on/off.
• To magnify part of the • To magnify part of the • To magnify part of the • To magnify part of the
picture (x2/x4).
picture (x2).
picture (x2). (JPEG)
picture (x2).
• To access various
camera angles on
the disc.
-
• To rotate a picture.
(JPEG)
• To select a subtitle
language on the disc.
-
-
• To select a subtitle
language on the disc.
• To access various
• To select STEREO,
audio functions on the
L-ch or R-ch.
disc.
• To select STEREO,
L-ch or R-ch. (CD)
• To access various
audio functions on the
disc.
• To display the current
disc or HOMI mode.
• To display the current
disc or HOMI mode.
• To display the current
disc or HOMI mode.
• To display the current
disc or HOMI mode.
• To search for a track,
time or marker.
• To search for a track. • To search for a track
• To search for time or a or time.
marker. (CD)
• To open or close
the disc tray.
• To open or close
the disc tray.
• To open or close
the disc tray.
• To open or close
the disc tray.
• To select a title or
chapter directly.
• To select a track
directly.
• To select a track
directly.
• To select a track
directly.
0
0
• To play back tracks in
random order.
• To activate the 3D
sound (Virtual
• To set Picture Control.
• To set Picture Control.
surround system).
• To set Black level on/off.
• To set Black level on/off.
(CD, MP3, WMA)
• To activate the 3D
• To activate the 3D
• To program a
sound (Virtual
sound (Virtual
specific playback
surround system).
surround system).
order.
• To set Dialog Speed.
• To activate the Slide
Show mode. (JPEG)
SEARCH MODE Button • To search for a title,
SEARCH
chapter, time or
MODE
marker.
OPEN/CLOSE Button
gr6~'
-
-
Numeric Buttons
000
000
000
CD@
-9-
EN
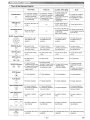
--< Tour of the Remote Control
CLEAR Button
CLEAR
0
MENU Button
MENU
0
TOP MENU Button
TOP MENU
0
DVD-Video
Video CD
CD, MP3, JPEG, WMA
• To clear the markers.
• To clear the numbers
entered incorrectly.
• To cancel the A point
for A-B Repeat.
• To clear the markers.
• To clear the numbers
entered incorrectly.
• To cancel the A point
for A-B Repeat.
• To clear the markers. (CD)
• To clear the numbers
entered incorrectly.
• To cancel the Apoint for A-B
Repeat. (CD)
• To remove status number in
program input.
• To clear the numbers
entered incorrectly.
• To cancel the A point
for A-B Repeat.
--
• To call up the file list.
(MP3, JPEG, WMA)
• To call up the file list.
--
• To return to the first item
• To return to the top file
in the highest hierarchy
in the highest hierarchy
of the file list.
of the file list.
(MP3, JPEG, WMA)
• To call up the menu on
a disc.
• To call up the top
menu on a disc.
DivX~
ENTER, Cursor Buttons
6!0
RETURN Button
RETURN
0
SETUP Button
SETUP
0
• To move the cursor
and determine its
position.
• To move the cursor
and determine its
position.
• To move the cursor
and determine its
position.
• To move the cursor
and determine its
position.
• To return to the
previous operation in
the setup menu.
• To return to the
previous operation in
the setup menu.
• To return to the
previous operation in
the setup menu.
• To return to the
previous operation in
the setup menu.
• To call up the setup
menu.
• To call up the setup
menu.
• To call up the setup
menu.
• To call up the setup
menu.
• To skip titles or
chapters.
• To skip tracks.
• To skip tracks.
• To skip tracks.
SKIP Buttons
, - SKIP ---,
EJ 8
SEARCH Buttons
8 8
• To search forward/
• To search forward/
backward through a disc. backward through a disc. • To begin fast forward/
reverse search.
• To begin slow forward/ • To begin slow forward
in
the
pause
mode.
(CD, MP3, WMA)
slow reverse in the
pause mode.
• To search forward/
backward through a
disc.
• To begin slow forward
in the pause mode.
• To stop playback.
• To stop playback.
• To stop playback.
• To stop playback.
• To begin playback.
• To begin playback.
• To begin playback.
• To begin playback.
• To pause playback.
• To advance playback
frame by frame.
• To pause playback.
• To pause playback.
• To advance playback
frame by frame.
• To select a desired
disc.
• To select a desired
disc.
• To select a desired
disc.
• To select a desired
disc.
• To select a desired
disc directly.
• To select a desired
disc directly.
• To select a desired
disc directly.
• To select a desired
disc directly.
STOP Button
STOP
0
PLAY Button
PLAY
8
STILUPAUSE Button • To pause playback.
STIll/PAUSE
• To advance playback
frame by frame.
(0
DISC SKIP Button
DISC SKIP
CJ
DISC NUMBER Buttons
DISC 1
DISC 2
c:=J c:=J
DISC 3
DISC 4
DISC 5
c:=J c:=J c:=J
DISC EXCHANGE Button
DISC
EXCHANGE
0
• To change discs during • To change discs during
playback.
playback.
-10 -
• To change discs during • To change discs during
playback.
playback.
EN
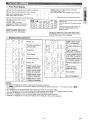
FUNCTIONAL OVERVIEW'" , ,,',
,.
",
'-___Jr
J'L-. Front Panel Display
--=--~
Ir-:=
I·.
Displays a type of the disc which is on the tray.
DVD: DVD-Video, DivX"
CD: Audio CD, MP3, JPEG, WMA, Video CD, DivX~
Lights up when the progressive scan system is activated. ........
Lights up when the disc playback comes to a pause. u , .'.
Lights up when playing back in slow mode,
"1
(DVD-Video, Video CD, DivX®)
Lights up when the inserted disc is being play back.
The present display state is shown..• TL./GR.: Title
• TR./CP.: Track or Chapter
To change to the display of a title, press the
DISPLAY button in the state of Resume.
Displays the chapter (title) or track " - - '
number. In case the chapter (title) or
!,rac~ number is over 100, displays
-<
"1
I,'
l'
i I
,--'-_.- Lights up when the repeat function is on.
....-r;i---+,-,-+1-l-+--~--A-L""'L
I I Lights up when the Disc or 5Disc repeat
~ II P.S~AN
: iii
:....: :....:
: : 5 !
A-B
...
:
:
..
:. :
:
!:
function IS on.
Lights up when the A-S repeat function
is on.
....
Lights up when you have selected the
audio file (CD/MP3/WMA) on the
program screen.
-t'_========:;========:=:I::T',
Li~;="'='::;:::::,~="j-'
=:r
:
DVD
!
L
Displays the elapsed time of the chapter (title) or track.
(The display of 10 hours or more cannot be performed,)
Selected HDMI output mode is displayed.
»
Displays During Operation
~
I
..- i ....
! ;
,
....!
....
....
I
.... .... ....
~ e_. ! ....
_..
!_.! !
....
....
,
f
.... !.... ....
....,
.... I....I ....
....
......-5
; ;
,....!
!
.... ,....,,
I....I 5....I
I ;....I I....,
.... ...., ....
l
.... l e
!.... I....e
...., j....
j
....i
I.... j....!
._. ....
f ! ....
i....! ,....;
I
I
I
I
I
I
I
I
I
I
.... ....
.... ....
.... ....
....
....
.- ....
.... ....
I ,
,,........I
....
I....;
I
I
I
I
I
...• ....
!....I 5 ;
,....!
.... ....
....!
Tray open
;
....,
I
,....I
.... ....
....
....,
I
HOMI output mode
(OFF) is selected
I
No disc inserted or
cannot read
....
~
.... ....
Power on
.... .... ....
;
.... ._.
!....J
.... ,....
! ,E , ,
,...., ~....,
....
, ....,
... ....
.... ....
....
....
!....
Tray closed
....
I
.... , ,
....
....! ! i
....
I.... ....
....I
I....
Power off
HOMI output mode
(48Dp) is selected
HOMI output mode
(72Dp) is selected
HOMI output mode
(1 D8Di) is selected
;
;. I
I
I
,....,
Loading the Disc
....
!
!....
I....
I.... I....
,....
,,....
.... ....
,
....
.... j
,
;....
....I I ,
;
I
I 1....I
......
....
!....I .... ;....I
!....!
....
I
I
Program playback is
set
Program playback
setting disc is selected
Program playback setting
group (folder) is selected
;
I
I
I
~
I
,,j
I
I
I
Program playback setting
....; ....
I
ALL CLEAR is selected
; I
....
!.... !....
.... ....
i.... ....
Random playback is
set
I....
....,
....
~
5 Disc random
I
I
I
....
....
I
,....,
....
playback is set
I
Tray rotation
AC cord plugged in
HOMI output mode
(1 D8Dp) is selected
NOTES:
• The front panel display has blinked while setting the program playback.
• "P**-• • •" is displayed on the front panel display while setting the program playback. ("**" is program number, "• • •" is
track number.)
• "A" is displayed on front panel display while selecting the audio file (CD, MP3, WMA).
• "F-***" is displayed on the front panel display while selecting the group (folder). ("***" is group (folder) number.)
• "A-CLEAr" is displayed on the front panel display while selecting ALL CLEAR.
• "SHUFFLE" is displayed on the front panel display while setting the random playback.
• "5-SHUFF" is displayed on the front panel display while setting the 5 Disc random playback.
- 11 -
EN
-<
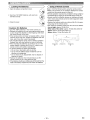
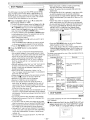
..( Using a Remote Control
Loading the Batteries
1. Open the battery compartment cover.
2. Insert two "AA" (R6P) batteries, with each one
oriented correctly.
3. Close the cover.
Cautions On Batteries
• Use "AA" (R6P) batteries in this remote control unit.
• Replace the batteries with new ones apprQ}:imately once
a year, though this depends on the frequency with which
the remote control unit is used.
• If the remote control unit does not operate within a close
proximity of the main unit, replace the batteries with new
ones, even if less than a year has passed.
• The included batteries serve only for verifying operation.
Replace them with new batteries as soon as possible.
• When inserting the batteries, be careful to do so in the
marks in the
proper direction, following the EB and
remote control unit's battery compartment.
• To prevent damage or battery fluid leakage:
• Do not mix a new battery with an old one.
• Do not mix two different types of batteries such as
alkaline and manganese.
• Do not short-circuit, disassemble, heat or dispose of
batteries in flames.
• Remove the batteries when not planning to use the
remote control unit for a long period of time.
• If the batteries should leak, carefully wipe off the fluid from the
inside of the battery compartment, then insert new batteries.
j
Keep in mind the following when using the remote control:
• Make sure that there are no obstacles between the remote
control and the remote sensor on the unit.
• Remote operation may become unreliable if strong sunlight or
fluorescent light is shining on the remote sensor of the unit.
• Remote control for different devices can interfere with each
other. Avoid using remote control for other equipment located close to the unit.
• Replace the batteries when you notice a fall off in the operating range of the remote control.
• The maximum operable ranges from the unit are as follows.
- Line of sight: approx. 23 feet (7m)
- Either side of the center: approx. 16 feet (5m) within 30°
- Above: approx. 16 feet (5m) within 15°
- Below: approx. 10 feet (3m) within 30°
e
-12 -
16 feet (5m)
3D'
23 feet (7m)
16 feet (5m)
3D'
EN
-<
Description - Rear Panel
"
o~
j~
~
~
AUDIO
OUT
~o
DIGITAL OUT
IPttNlIlTSTREAMj
l
G ~.
::~
@9
~
~
i
1
~
COMPONENT
VIOEOOUT
Y
COAXIAL
HOM IOUT
~
OPTICAL
~~
S·VloEo
OVT
REMOTE
CONTROL
~
liN
PRICR
G~
~H:
G ~[Q] GG 0
VIOEO
OUT
R
I
I
2
3
PRIC.
II
4
5
I
6
o
o~
OUT
IlOOMTO 1l000A
~
i
I
7
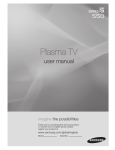
1. HDMI OUT Jack
Use an HDMI connection cable (commercially available) to connect to a display with an HDMI compatible port.
2. AUDIO OUT Jacks
Connect to the Audio input jacks of AN-compatible TV or wide screen TV, Stereo system.
3. DIGITAL OUT Jacks
Use either an optical or coaxial digital cable (commercially available) to connect to an AV amplifier with a built-in
decoder (AV control center).
4. VIDEO OUT Jack
Use a video cable to connect one of the jacks to Video input on your AN-compatible TV or wide screen TV.
5. COMPONENT VIDEO OUT Jacks
Use a Component Video cable (commercially available) to connect these jacks if you have a TV with Component Video
in jacks. These jacks provide CO/PB. CR/PR and Y video. Along with S-Video, Component Video provides the best quality
picture.
6. S-VIDEO OUT Jack
Use the S-Video cable (commercially available) to connect this jack to the S-Video jack on your AN-compatible TV or
wide screen TV for a higher quality picture.
7. REMOTE CONTROL IN/OUT Jacks
Connecting the DENON Satellite Remote Control to these jacks enables you to operate more than one DENON components with one remote control.
When using the DENON Satellite Remote Control,
1. Connect the DENON Satellite Remote Control to the REMOTE CONTROL IN jack of this player. This allows you to operate this player with the Satellite Remote Control.
2. Connect another DENON component to the REMOTE CONTROL OUT jack of this player. This allows you to operate this
player and the connected component with the same Satellite Remote Control.
NOTE:
• When there is video output from the HDMI OUT jack, no signal is output from the COMPONENT VIDEO OUT jacks.
Selecting Progressive Scan (525p/480p or Interlaced 525i/480i) Playback
e If your TV is compatible with progressive scanning (525p/480p), connect the TV to the COMPONENT VIDEO OUT jacks of
the DVD player and set PROGRESSIVE to ON in the DISPLAY setting. Next, set your TV to the progressive scan mode.
Refer to page 29 for instructions on changing the display setting. P.SCAN will appear on the display of the unit.
elf yourTV is not compatible with progressive scanning, set PROGRESSIVE to OFF (refer to page 29). Make sure that P.SCAN
on the display of the unit lights off.
e Use a commercially available adaptor if the video input jacks of your TV or monitor is the BNC type.
What is Progressive Scanning?
• Unlike conventional interlace scanning, the progressive scan system provides less flickering and images in higher resolution
than that of traditional (525i/480i) television signals.
Manufactured under license from Dolby Laboratories. "Dolby" and the double-D symbol are trademarks
of Dolby Laboratories.
"DTS" and "DTS Digital Out" are registered trademarks of DTS, Inc.
-13 -
EN
The following shelwS examples of connections commonly used to connect the DVD player to TV and other
components.
If using this DVD player to play back a DVD in a Dolby Digital Multi channel surround or DTS surround format, the DVD
player outputs a Dolby Digital or DTS data stream from its OPTICAL or COAXIAL DIGITAL OUT jacks.
By hooking up the player to a Dolby Digital or DTS decoder, you can enjoy more convincing, realistic ambience with
powerful and high-quality surrounding sound of a professional standard which can be heard in movie theaters.
Use a commercially available audio optical or coaxial digital cable for the audio connections.
NOTES:
• Be sure to turn off the power of all components in the system before connecting another component.
• Refer to the Instruction Manuals for your TV, stereo system and any other components to be connected to the
DVD player.
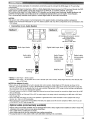
~ Connection to an Audio System
I Method 1 I
j
@
@
@o
0
I I
I Method 21
o@
I \"",, °1
1
DO
0
'
c:::::::J
AV amplifier with a built in decoder
(AV control center),
Dolby Digital decoder,
DTS decoder,
MD deck or OAT deck
Stereo system
r--'=:-l
I!!Im
Audio Input Jacks
00
.........
I 00 (g I
~Ol
Digital Audio Input Jacks
I
i
loAtl
Audio Coaxial
Digital cable
(commercially
available)
Audio cable
(supplied)
Optical cable
(commercially
available)
AUDIO
OUT
AUDIO OUT
(analog)
L
DIGITAL OUT
0>
<0
IPCM/BITSTREAMj
DIGITAL OUT
R
COAXIAL
OPTICAL
d~
• Method 1 DVD Player + Stereo system
• Method 2 DVD Player + AV amplifier with a built in decoder (AV control center), Dolby Digital decoder, DTS decoder, MD
deck or OAT deck
NOTES (for Method 2 only):
• When using an AV amplifier with a built in decoder (AV control center), Dolby Digital or DTS decoder as shown in the
Method 2, set DOLBY DIGITAL or DTS to BITSTREAM accordingly for audio output in the setup mode (refer to page 30).
Set it to PCM or OFF for the decoder that is not used currently. Playing back a DVD using incorrect settings may generate
noise distortion, and may also damage the speakers.
• The audio source on a disc in a Dolby Digital Multi channel surround format cannot be recorded as digital sound by an MD
deck or OAT deck.
• Set DOLBY DIGITAL to PCM and DTS to OFF for audio output in the setup mode for connecting to an MD deck or OAT deck
(refer to page 30).
• Harsh noise that could harm your ears or the speakers is generated when a DVD recorded in DTS is played while using a
decoder, etc., that is not DTS-compatible.
• When playing back a copyright-protected 96kHz PCM DVD, the digital sound will be down sampled at 48kHz, even if you set
LPCM SELECT to OFF (refer to page 30).
Optical cable (commercially available)
• Optical cable (commercially available) may be damaged when bent at sharp angles. Ensure cables are coiled in loops with
a diameter of 6 inches (15 cm) or more when storing them.
• Use a cable which is 9.8 feet (3m) or shorter.
• Insert cable plugs firmly into the connectors when making connections.
• If a plug has dust or is dirty, clean it with a soft cloth before inserting it into a connector.
-14 -
EN
CONNECTIONS
-<
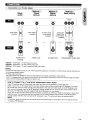
Connection to a TV (for video)
I Method 3 I
Best picture
Method 2
Better
picture
Method 1
Good
picture
Basic
audio
..
-.--~'~-'-----_._-----.--.-.~--.'--R
o
00
Video Cable
(supplied)
Audio Cable
(supplied)
AUDIO
OUT
S-Video Cable
(commercially
available)
Component
Video Cable
(commercially
available)
S-VIOEO
OUT
o
o
L
or
COMPONENT
VIDEO OUT
Y
PRiCR
00
o
R
AUDIO OUT
(analog)
:l
000 I
"
or
and
COMPONENT
VIDEO IN
S-VIDEO IN
VIDEO IN
PB/CB
S-VIDEO OUT
VIDEO OUT
COMPONENT VIDEO OUT
• Method 1 DVD Player + TV with Video Input Jack
• Method 2 DVD Player + TV with S-Video Input Jack
• Method 3 DVD Player + TV with Component Video Input Jacks
NOTES:
• Connect the DVD player directly to a TV. If the AudioNideo cables are connected to a VCR, pictures may be distorted due
to the copy protection system.
• S-Video output connector
The video signals are divided into color (C) and brightness (Y) signals, achieving a clearer picture.
If the TV is equipped with a S-Video input connector, we recommend connecting it to this unit's S-Video output connector
using a commercially available S-Video connection cord.
HOW TO CONNECT TO A TV WITHOUT AUDIONIDEO INPUT JACKS
If your TV does not have RCA type audio and video input jacks it is still possible to connect this DVD
player to your TV's 75-ohm coaxial antenna terminal using an optional Stereo AudioNideo RF Modulator, not included. Connect the audio and video outputs of the DVD player to the audio and video inputs on the RF Modulator, and
then connect the coaxial output of the RF Modulator (usually marked 'TO TV") to the 75 ohm coaxial antenna terminal on your TV. Follow the instruction supplied with the RF Modulator for more details.
If your TV's 75 ohm coaxial antenna terminal is already occupied by an antenna or cable box connection, remove that
cable from your TV's antenna terminal and reconnect it to the coaxial antenna input terminal of the RF Modulator
(usually marked "ANT IN"), then connect the RF modulator to your TV's antenna terminal as described above.
NOTE:
• The picture quality from DVD discs will not be as good if the DVD player is connected to the TV's antenna terminal
through an RF Modulator.
-15 -
EN
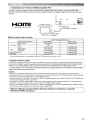
Connection to a TV with an HOMI Compatible Port
A simple 1-cable connection (using a commercially available cable) with a device having an HDMI (HighDefinition Multimedia Interface) connector allows digital transfer of the digital images of DVD-Video and other
sources.
AUDIO
,
OUI
@f)
Hi:lmI™
HIGH DEFINITION MULTIMEDIA INTERFACE
A display equipment
with an HDMI compatible port
fHlMIOUT
~
~
U
D u---r
-
OIGITALOUT
{PCM.'8ITS'IIEAM!
~
HDMI cable
(commercially available)
To HDMI Input
Connector
• Actual output modes by media
Audio Recording Format
Dolby Digital
DVD-Video DTS
LPCM
Dolby Digital
DivX®
MP3/MP2
Audio CDNideo CD
MP3IWMA
'1
DOLBY DIGITAUDTS Seltina
BITSTREAM '1
PCM or OFF
Dolby Digital
2 channel PCM
DTS
2 channel PCM
2 channel PCM
Dolby Digital
2 channel PCM
2 channel PCM
2 channel PCM
2 channel PCM
2 channel PCM
2 channel PCM
2 channel PCM
If the connected equipment is not compatible with HDMI BITSTREAM, signals are output on peM.
Copyright protection system
To play back the digital video images of a DVD via an HDMI connection, it is necessary that both the player and the display equipment (or an AV amplifier) support a copyright protection system called HDCP (High-bandwidth Digital Content Protection System).
HDCP is copy protection technology that comprises data encryption and authentication of the connected AV equipment.
This player supports HDCP Please read the operating instructions of your display equipment (or AV amplifier) for more information.
*HDMI: High-Definition Multimedia Interface
NOTES:
• When using an HDMI-incompatible or HDCP-incompatible display equipment, the image will not be viewed properly.
• Among the devices that support HDMI, some devices can control other devices via the HDMI connector; however, this player cannot be controlled by another device via the HDMI connector.
• The audio signals from the HDMI connector (including the sampling frequency, the number of channels and bit length) may
be limited by the equipment that is connected.
• Among the monitors that support HDMI, some do not support audio output (for example, projectors). In connections with
equipment such as this, audio signals are not output from the HDMI output connector.
• When the set's HDMI connector is connected to a DVI-D compatible monitor (HDCP compatible) with an HDMI-DVI converter cable (commercially available), the signals are output in digital RGB.
"HDMI, the HDMI logo and High-Definition Multimedia Interface are trademarks or registered
trademarks of HDMI Licensing LLC."
-16 -
EN
DISC PLAYBACK
'
.
.
» o-<
--< Basic Playback
IDVD-vi I VCD II
CD
II MP3 IIJPEGI
IWMA II Divx®1
Getting started
•
•
o
Press the HDMI button on the front panel to select
the HDMI output mode.
The output mode changes as follows every time
the HDMI button is pressed.
• The HOMI indicator on the front panel lights up when
HOMI output mode is on.
Turn on the power of the TV, amplifier and any other components which are connected to the OVO player.
Make sure the TV and audio receiver (commercially available) are set to the correct channel.
480P
I'.) Press the OPEN/CLOSE button to open disc load-
720P
~
1080
~
1080P
~
OFF
I
480P (Default): Video output from the HOMI OUT jack at 480p.
720P: Video output from the HOM I OUT jack at 720p.
1080: Video output from the HOMI OUT jack at 1080i.
1080P: Video output from the HOMI OUT jack at 1080p.
OFF: No video output from the HOMI OUT connector.
ing tray.
m Press the DISC SKIP button repeatedly or press
the DISC NUMBER button.
• The desired disc tray moves to the front position.
Place the disc in the tray,
with the label facing UQ:..
• Repeat steps m and U to
NOTES:
• Video and audio signals may distorted temporarily
when switching to/from the HOMI output mode.
• Use a display equipment with an HOM I-compatible port.
• The HOMI indicator on the front panel flashes when you
select the HOMI output mode but there is no HOMI cable.
• You can check the HOMI connection status by pressing
the DISPLAY button during playback with the HOMI
output mode (refer to page 26).
• If the TV is not compatible with newly selected HOMI
output mode, the actual output mode will be kept the
one before changing the selection. When this occurs,
the neWly selected mode will appear on the front panel
display (see page 11) while the actual output resolution
will be indicated by performing the on-screen display as
described on page 26.
load more discs.
Left side tray
111 Press the PLAY button.
• The tray will close automatically, and playback will start
from the first chapter or track of the disc. If the playback
does not start automatically, press the PLAY button.
• If the disc has not been set on the left side tray, the
OVO player will play the disc which is set on the right
side tray.
• When you want to select the other disc, press the DISC
SKIP button repeatedly or the DISC NUMBER button
for your desired disc.
• When you playback the OVO with a title menu, it may
appear on the screen. In this case, refer to "Title
Menu".
m Press the STOP button to stop playback.
NOTES:
~
t
Press the POWER ON button.
• "P-ON" will appear briefly on the display panel.
o
I-
HDMI Setup
-<
I-
General Features
IDVD-vi
DVD may contain menus to navigate the disc and access special features. Press the appropriate Numeric buttons or use the
Cursor buttons (A / T / .... / ~) to highlight your selection in the
DVD main menu and press the ENTER button to confirm.
~
• A "prohibited icon" may appear at the
~
top-right on the TV screen during oper~
ation, warning that a prohibited operation has been encountered by the OVO player or the
disc.
• With OVOs that use some titles for playback program
signals, playback may start from the second title, or it
may skip these titles.
• During the playback of two layered disc, pictures may
stop for a moment. This happens when the 1st layer
switches to the 2nd layer. This is not a malfunction.
• During the playback of a OVO-RW which has been
recorded in the VR mode, the sound or picture may
freeze momentarily depended on disc content.
• You can open the tray and change 2 discs during playback by pressing the DISC EXCHANGE button.
• Disc position will be displayed on the TV screen when
you press DISC NUMBER or DISC SKIP button.
NOTE:
• Unless otherwise stated, all operations described in this
manual are based on remote control use. Some operations
can be carried out using the menu bar on the TV screen.
-<
o
I-
Disc Menus
IDVD-vi
Press the MENU button.
• The OVO main menu will appear.
I'.) If the feature is not available,
<S>
symbol may
appear on the TV screen.
m If disc menu is available on the disc, audio language, subtitle options, chapters for the title and
other options will appear for selection.
Press the Cursor buttons (A / T/ .... /~) to select an
item, and the ENTER button to confirm the selection.
I o
CANCELING AND CALLING BACK PBC FUNCTION
I VCD I
o Insert a Video CD.
I'.) Press the STOP button.
m Press the Numeric buttons to enter the desired
Track number.
o
• PSC function is now canceled and the playback of the
Video CD will start.
To call back PSC function, press the STOP button
twice, and then press the PLAY button.
• The title menu will appear on the TV screen.
-17 -
EN
-<
-<
Title Menu
j
Fast Forward I Reverse Search
lovo-vll vco II
lovo-vi
II
CD
MP3
II WMA I
D Press the TOP MENU button.
• The title menu will appear.
f) If the feature is not available,
IOivX®1
0
symbol may
appear on the TV screen.
D Press the Cursor buttons (.... / ... / .... / .) to select an
item, and the ENTER button to confirm the selection.
• Playback will begin at the selected title.
I VCO I
D When playing back a Video CD with PSC function,
the title menu will appear automatically.
f) Press the Numeric buttons to select the desired title.
D During playback, press the .... or ~ button
repeatedly to select a desired forward or reverse
speed.
• .... Button
r
• Playback will begin at the selected title.
ICALLING UP A MENU SCREEN DURING PLAYBACK I
lovo-vi
• Contents of menus and corresponding menu operations may vary among discs. Refer to the manual
accompanying the disc for details.
!ovo-vll vco II co II
MP3
I WMA
II JPEG I
II oivx®1
D During playback, press the
STILUPAUSE button.
• Playback will pause and sound
will be muted.
-<
STOP button.
• Resume message will appear
on the TV screen.
f) Press the PLAY button, play-
back will resume from the
point at which playback was
stopped.
.
.
--_.-
o
j
I
I ...... dITSl
1------1
~
j
lovo-vll vco II OivX® I
Step by Step Playback
STILUPAUSE button.
• Playback will pause and sound
will be muted.
<Example: DVD>
GE:Dl
• On DVDs, set STILL MODE to FIELD on the display menu if
pictures in the slow playback mode are blurred (refer to page 29).
• Only Slow Forward is available when playing back Video CD
and discs with DivX® files.
D During playback, press the
firsl and ltlCfl "PlAy'
......
• Slow forward or reverse speed is different depending on the disc. Approximate
speed is 1 (1/16),2 (1/8), and 3 (1/2). ~.
I
Pless 'PLAY" to play lrom tlEno.
To play the beglnnmg.
po'es5 'STOP
-~~511
---
Slow Forward I Slow Reverse
To return to normal playback, press
the PLAY button.
NOTES:
II MP3 II JPEG I
IWMA II oivx®1 -<
Resume ON
1-' _.-.
- ........
f) Press the .... or ~ button.
• Slow motion playback will begin and
r ~Bu"~1
sound will be muted.
..
D Press the ~~ or ~~ button repeat- ~
Resume
D During playback, press the
~~h I-"-.i"~h
-
edly to select a desired speed.
• On DVDs set STILL MODE to FIELD on the display
menu if pictures in the pause mode are blurred (refer to
page 29).
CD
.. -_
D During playback, press the STILUPAUSE button.
NOTE:
!ovo-vll vco II
-
-. .
lovo-vil vco II OivX® I
f) To continue playback, press the PLAY button.
-<
1 ---~ ~~I.~r
• For some DivX® files, Fast Forward/Reverse Search
may not function.
j
Still I Pause
-
f) To return to normal playback, press the PLAY button.
NOTE:
NOTE:
-<
·~~.~~Dl~
.~l~r_·~-
• For DVDs, fast forward or reverse search speed is different depending on the disc. The approximate speed is
1 (x2), 2(x8), 3 (x20), 4 (xSO), and S (x100).
• For Video CDs, Audio CDs, MP3, WMA and DivX®, the
approximate speed is 1 (x2), 2 (x8), and 3 (x16).
• For Video CDs, Audio CDs, MP3, WMA and DivX®
sound will be output at any speed of fast forward and
reverse search .
D Press the RETURN button to go back to the title menu.
• Press the MENU button to call up the DVD main menu.
• Press the TOP MENU button to call up the title menu.
. __'~~l~ [=--~~]
1 .-'- '~~1. j~1
~~Button
L311
f) The disc advances frame by frame each time the
• To cancel resume, press the STOP button twice.
STILUPAUSE button is pressed.
NOTES:
• Some Video CDs with PSC function resume playback
from the beginning of the track.
• The resume information will be saved even when the
power is turned off.
• For MP3, JPEG or WMA, playback will resume from the
beginning of the current track.
D To exit step by step playback, press the PLAY button.
NOTE:
-18 -
• On DVDs, set STILL MODE to FIELD on the display menu
if pictures in the pause mode are blurred (refer to page 29).
EN
DISC PLAYBACK
.
>~
~ ~om
IDVD-vi I VCD
CD
II
MP3 II JPEG II WMA
I
I DivX® I
PBGOFF
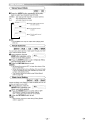
There are two ways to begin playback a disc at a specific track.
D Press the ZOOM button during playback.
By using the SEARCH MODE button
o Playback will continue.
f) Press the ZOOM button repeatedly to select a
D Press the SEARCH MODE but-
desired zoom factor: x2, x4 or off.
o
I VCD II
II JPEG II DivX® I
This function allows you to enlarge the video image and to
pan through the zoomed image.
>
Track Search
Only x2 zoom is available on Video CDs, JPEG and DivX®.
~ / .... / ~) to move the
zoomed picture across the screen.
I8J Use the Cursor buttons (JJ./
(jWj15JI
J---------l--
ton.
o The track search display
appears.
f) Within 30 seconds, select a desired track number using
the Numeric buttons.
o For the disc with less than 10 tracks, press the track
number directly.
o For discs with 10 or more but less than 100 tracks, to
play back a single-digit track, press 0 first, then the
track number (e.g. for track 3, press 0, 3). To play back
a double-digit track, press the track number.
o For discs with 100 or more tracks, to play back a single- or
a double-digit track, press 0 first, then the track number
(e.g. for track 3, press 0, 0, 3, and for track 26, press 0, 2,
6). To play back a triple-digit track, press the track number.
o Press the CLEAR button to erase the incorrect input.
NOTE:
o
The +10 button can also bring up the track search display
except for the disc with less than 10 tracks. For such a disc,
track search can be done by just pressing the track number.
By using the SKIP buttons
D To exit zoom mode, press the ZOOM button.
NOTES:
o
o
o
o
Zoom function does not work while disc menu is shown.
x4 zoom is not available on some discs.
Navigation screen is not available on JPEG.
You cannot pan through the zoomed picture on some
JPEG files.
NOTE:
o
> --<
--< Title I Chapter Search
The SKIP I+C and ~ buttons are not available when
playback is stopped.
I
D Press the SEARCH MODE button 1m _129
repeatedly until the chapter
=-=-=-'-----------'
search or the title search display
appears during playback.
f) Enter the desired chapter/title
number with the Numeric buttons. " - - - - - - - - - '
IDVD-vil VCD II CD
PSG OFF
By using the SKIP buttons
II Divx®1
D Press the SEARCH MODE
button until the time search
~
screen appears on the TV
~
screen.
f) Within 30 seconds, enter a desired disc time point on
the disc with the Numeric buttons.
o
o
~ ~
During playback, press the SKIP ~ button to move to the next
chapter. Press it repeatedly to skip to subsequent chapters.
Press the SKIP ~ button to go back to the beginning of the current chapter. Press it repeatedly to go to the previous chapters.
o Chapter number will appear briefly on the front display panel.
o If the SKIP ~ or ~ button is pressed while the playback
is paused, the playback after skipping to the next chapter
will be also paused.
>
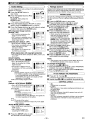
Time Search
IDVD-vi
By using the SEARCH MODE button
~ ~
During playback, press the SKIP ~ button to move to the
next track. Press it repeatedly to skip to subsequent tracks.
Press the SKIP ~ button to go back to the beginning of the
current track. Press it repeatedly to go to the previous tracks.
o Track number will appear briefly on the front panel display.
o If the SKIP ~ or ~ button is pressed while the playback
is paused, the playback will be paused again after skipping
to the next track.
Playback will start at the specified time.
For Time Search, "0" appears automatically when there
is no need to enter a number. For example,
"0:0_:__" appears in the time search screen if the total
time of the disc is less than 10 minutes.
I8J Press the CLEAR button to erase an incorrect input.
NOTE:
o
For some DivX® files, Time Search may not function.
NOTES:
o
o
o
Depending on the disc being played, the Numeric
buttons can be used to search for a desired chapter by
entering the chapter number directly. Refer to the manual accompanying the disc.
The SKIP ~ and ~ buttons are not available when
playback is stopped.
A disc that does not contain chapters within titles, the
SKIP ~ and ~ buttons change the titles.
-19 -
EN
Marker Setup Screen
REPEAT TRACK' GROUP' DISC
lovo.vll vco II co I
I VCO IIc--c-=--0--...J
PBG OFF
PBG OFF
You can use markers to memorize your
favorite places on a disc.
To activate Repeat function, press the REPEAT button during
playback.
o
•
Press the SEARCH MODE button repeatedly until the display screen and Markers
appear during playback.
f) Press the Cursor buttons (.... or~) to select 1,2,3,
4,5,6,7,8,9, or 10 and ensure that "__ : __ : __"
appears in the display.
D When the disc reaches the point you want to
The repeat mode changes as described below every time
you press the button.
I£] OFF--....~ I£] TRACK - -....~ I£] DISC
(repeat off)
(current track repeat)
(entire disc repeat)
t
I
NOTES:
remember, press the ENTER button.
• In the track repeat, the repeat setting will be cleared
when moving to other track.
• Repeat playback does not function during A-B repeat
playback.
• You cannot set up to the 5 Disc Repeat in Video CD.
• The title or track and elapsed playback time will appear
in the TV screen.
D To return to the Marker later, press the SEARCH
MODE button repeatedly during playback and the
Cursor buttons (.... or ~) to choose a desired
marker, then press the ENTER button.
~ Press the SEARCH MODE or RETURN button to exit.
NOTES:
• Opening the disc tray, turning off the power or selecting
AC at step f) and pressing the ENTER button will
erase all Markers.
• To clear a marker, using the Cursor buttons (..... or ~),
position the cursor on to the marker number to be
cleared and press the CLEAR button.
• You can mark up to 10 points.
~ Repeat
I£] 5 Disc Repeat
I MP3 IIJPEGII WMA II oivx®1
I£] OFF ,..1£] TRACK. . . I£] GROUP .... 1£] DISC
(repeat off) (current track
(current folder
(entire disc
repeat)
repeat)
repeat)
t
I
NOTES:
• In the track or group repeat, the repeat setting will be
cleared when moving to other track or group.
• You cannot set up to the 5 Disc Repeat in DivX®.
>-
• The REPEAT button is available only during playback.
I£] 5 Disc Repeat
I
I
A-B REPEAT
---;:=====::;1 ------;:1=OV=O=.=;V1:-;: 1=v=c=o~I-;=1 =c=o=::::;-ll;::=o=iv=x=::;®I
!ovo.vl o pre.ss the A-B REPEAT button ~
I
RE_P_E_AT_T_IT_LE_'_C_H_A_PT_E_R
To activate Repeat function, press the REPEAT button during
playback.
at your chosen starting point.
•
• I£] A- appears briefly on the
TV screen.
The repeat mode changes as described below every time
you press the button.
f) Press the A·B REPEAT button ~
a@ir1 at your chosen end point.
OFF ---I.~ EJ CHAPTER - . . . EJ TITLE
(repeat off)
(current chapter repeat) (current title repeat)
8
t
I
~
• I£] A-B appears briefly on the
TV screen, and the repeat
sequence begins.
D To exit the sequence, press
NOTES:
the A-B REPEAT button.
• The Repeat Title/Chapter setting will be cleared when
moving to other title or chapter.
• Repeat playback does not function during A-B repeat
playback.
• Repeat Title/Chapter is not available with some scenes.
NOTES:
-20-
• The A-B Repeat section can only be set within the current title (for DVD-Video), or current track (for Audio CD,
Video CD and with DivX® files).
• A-B Repeat is not available with some scenes on DVD.
• To cancel the A point which was set, press the CLEAR
button.
• A-B Repeat playback does not function during title,
chapter, track, group, disc or 5 disc repeat playback.
• For some DivX® files, A-B Repeat playback may not
function.
EN
DISC PLAYBACK
I MP3 II JPEG II WMA I
~
--< Program Playback
D
This function allows you to program a playback order of
Audio CD, MP3, JPEG, or WMA in a desired sequence.
""OGA....
CD
You may determine the order in which
tracks will play.
D In stop mode press the MODE
button.
• The PROGRAM screen will
appear.
fJ
"LlClEAR
I
PAO'''''.
O~
~r
AlLClE.o.fI
l
m
I·-·CM""
Press the Cursor buttons ( . or 'Y) to select a
disc, then press the ENTER button.
• Press the CLEAR button to erase the most recently
entered program.
PLAY
~I
DOEF
~,
button to start programmed play-
NOTE:
PFlQGAAM
IOOEF
( . or 'Y) to select a track, then
press the ENTER button.
• Press the CLEAR button to erase
the most recently entered program.
Press the
back.
I+
I+
I,::-,0,
~l
o~,
fJ
m Press the Cursor buttons
D
In stop mode, press the MODE ~-----~
button.
• The PROGRAM screen will
DOEF
appear.
Press the Cursor buttons (A or
'"
'"
loMlC
I
T) to select a group, then press '----'
the ENTER button.
• A track selection screen appears. ~--~-----Press the Cursor buttons (A or
O"'C
T) to select a track, then press
~
the ENTER button to save it in
~~EAR
'" I
a program.
'"
• Press the CLEAR button to erase '-J
the most recently entered track.
• The programmed track is
displayed in the right-hand
PROGAAM
IO.o.oc
I
screen.
6.
~
• If the entire program cannot be
G"'
§...,
displayed on the screen, "T"
appears.
• Pressing the Cursor button (~)
will show a list of folders that
'------------'
belong to the hierarchy which is one-level higher than
the currently selected folder.
Press the PLAY button to start programmed playback.
• Press the RETURN button, and the stop screen will
show up with the program contents in memory.
D
NOTES:
• DVD-Video, MP3, JPEG and WMA discs will display in
gray when "PROGRAM [5DISC]" screen appears.
• Press the STOP button once and then the PLAY button
again, playback will restart from the point where the STOP
button was pressed. (Program continued.)
• Press the STOP button twice and then the PLAY button
again, playback will restart from the first track in the usual
way. Your program is still stored until either the disc tray is
open or power is turned off.
• Up to 99 tracks can be entered.
• To erase tracks in the program all together, select ALL
CLEAR at the bottom of the list at step fJ. And, "A-CLEAr"
is displayed on the front panel display at that time.
• To repeat the current track in the program, press the
REPEAT button repeatedly until 1m] TRACK appears during
playback. To repeat the entire program press the REPEAT
button repeatedly until ~ DISC or IlW 5DISC appears
during playback.
• If eight or more tracks were set in a program, use the
SKIP ~ or ~ button to see all the tracks.
• When selecting the folder:
-Press the Cursor button (~) when you want to go to
the next hierarchy.
-Press the Cursor button (....) when you want to go back
to the previous hierarchy (except for the top hierarchy).
• Even if an inserted disc contains mixed MP3, JPEG
and WMA files, Program function allows 99 tracks in
combination of MP3, JPEG and WMA files.
• The front panel display has blinked while setting the
program playback.
• "F-'" " is displayed on the front panel display while
selecting the group (folder). ( ••• is group (folder) number.)
• MP3, JPEG and WMA discs will display in gray and you
cannot select them when "CD" screen appears.
- 21 -
EN
-<
>- -<
Random Playback
MP3 I JPEG I WMA Playback
This function shuffles the playback order of tracks instead of
playback in the original sequence.
I
CD
II
MP3
II JPEG II WMA I
When playing back tracks in a single disc randomly.
D In stop mode, press the
RANDOM button once or press
the MODE button twice.
• The RANDOM screen is displayed.
f) Press the PLAY button to start
random playback.
I
I
""DOM
I MP3 I IJPEGI I WMA I
When a CD-R or CD-RW disc with MP3, JPEG or WMA files
is inserted in the DVD player, the file list will appear
automatically on the TV screen. The number of tracks is also
displayed on the front panel.
D
!.... co.o.o..
~_w
"",,.,._.
<Example: CD>
When playing back tracks in more than one discs randomIy.(only CD-DA)
D In stop mode, press the
RANDOM button twice or press
the MODE button three times.
RANDOMI5D"C]
• The RANDOM [5DISC] screen is
displayed.
f) Press the PLAY button to start
random playback.
NOTES:
• MP3, JPEG and WMA discs will display in gray when
"RANDOM [5DISC]" screen appears.
Unknown disc will displays as "- - - - -", or blank if there
is no disc in the tray.
• If you wish to repeat the current track in the random
selection, press the REPEAT button repeatedly until
B TRACK appears during playback. If you wish to
repeat the entire random selection, IJress the REPEAT
button repeatedly until IE] DISC or lEJ 5DISC
appears during playback.
• You cannot go back to the previous track during random playback.
• "SHUFFLE" or "5-SHUFF" is displayed on the front
panel display at Step D.
>-
6
Press the Cursor buttons (. or T) to select the desired
group (folder) or track.
• To return to the previous screen, press the Cursor button C...).
• If a group (folder) is selected, press the Cursor button
(~) or ENTER button to go on to the track selection
screen. Press the Cursor buttons (. or T) to choose a
track, then press the PLAY or ENTER button.
• If a track is selected, press the PLAY or ENTER button
to start playing back tracks. The selected track and the
subsequent tracks will be played back.
• When selecting the folders
-Press the Cursor button (~) when you want to go to
the next hierarchy.
-Press the Cursor button (.....) when you want to go
back to the previous hierarchy (except for the top hierarchy).
• Press the TOP MENU button to return to the first item.
Press the STOP button to stop playback.
NOTES:
-22-
• Folders are known as Groups; files are known as Tracks.
• A symbol of iI is shown on the top of the group name.
• A symbol of ~ is shown on the top of MP3 files.
• A symbol of Ii:l is shown on the top of JPEG files.
• A symbol of Ii is shown on the top of WMA files.
• Maximum of 255 folders can be recognized.
• Maximum of 999 files can be recognized.
• Up to 8 hierarchies can be recognized.
• If the track extends beyond the scope of screen, a
down arrow "T" appears, indicating that the user can
view another part on the previous page. The current
page number and the number of total pages are shown
on the left of the down arrow "T".
• If no MP3, JPEG or WMA files are found in the group,
the group is not displayed.
• The DVD player can reproduce data recorded as per
ISO 9660 Level 1, Level 2 or Joliet on the disc.
• It can also run a disc on which data is recorded in a
multi-session.
• For more details of recording systems, refer to the
instruction manual for the CD-R/RW drive or the writing
software.
• For MP3 and WMA files recorded in Variable Bit Rate
(VBR), the unit may not display the actual elapsed time.
• In stop mode, press the MENU button. File list appears.
EN
01
PLAYBACK
.
This player recommends the use of files recorded at the following specifications:
Applicable MP3 file
Sampling
frequency
44.1kHz
48kHz
Type
MPEG1
audio layer 3
Remarks
• It is prohibited to record
MP3 sound on a digital
device when the connection
is made digitally.
• MP3 files recorded at fixed
bit rate of 32 kbps or higher
are recommended.
Kodak Picture CO
The DVD player can also run JPEG files stored on Kodak
Picture CDs. You can enjoy picture images on the television
set by playing back the Picture CDs.
This unit confirm to ver.7.0 of Kodak Picture CD.
For details of Kodak Picture CD, contact a shop that proVide
developing service of Kodak Inc.
o
I l
Remarks
• A JPEG image that extends
6300x5100 dots
beyond the screen is
Size of image Lower limit:
reduced so that it will be
32x32 dots
displayed within the screen.
I
Applicable WMA file
44.1kHz
Sampling
frequency
48kHz
Bit rate
Type
•
•
•
•
•
•
•
•
•
Information on MP3, JPEG and WMA discs
This DVD player can play back images and sounds from data
recorded in MP3 and JPEG formats on CD-R/RW discs.
A file with an extension of ".mp3 (MP3)" is called an MP3 file.
A file with an extension of ".jpg (JPG)" or ".jpeg (JPEG)" is
called a JPEG file.
The DVD player can run an image file conforming to the
Exif specification. Exif is a file format, Exchangeable
Image File format established by Japanese Electronic
Industry Development Association (JEIDA).
A file with an extension of ".wma (WMA)" is called a WMA file.
Files whose extension is other than ".mp3 (MP3)", ".jpg
(JPG)" and ".jpeg (JPEG)" or ".wma (WMA)" will not be
listed on the MP3, JPEG or WMA menu.
If the file is not recorded in MP3, JPEG or WMA format,
noise may be produced even if the file extension is either
".mp3 (MP3)", ".jpg (JPG)", ".jpeg (JPEG)" or ".wma (WMA)".
The name of group and track can be displayed up to 25 characters. Unrecognizable characters will be replaced with asterisks. The ninth and deeper hierarchies cannot be displayed.
Unplayable groups or tracks may be displayed depending
on the recording conditions.
If the TOP MENU button is pressed when a file list is displayed, the first item will be highlighted.
.;~
• If all menu items cannot be
c=l c=l
displayed on the screen scope, Picture1 ~. ~
'~" appears at the right bot.
tom of the screen, indicating
that the user can view remainpictur..
PictureS
Pictures'
ing items on the next page.
',...." appears, it indicates that ~
1/32 .
... .
the user can view other items '--------1,1-------'
on the previous page. The
Currenttracknumbarl
Applicable JPEG file
Upper limit:
Remarks
• Those frequencies are
applicable to WMA version 9.
• Ensure that the copyright
48-192kbps
function is set to off when
preparing a WMA disc.
o A prohibition "disable" symbol will appear if the user
attempts to run a non-reproWMA version 9 ducible file such as copyright-protected.
• Recorded in 5.1 channel format cannot be played back.
When Kodak Picture CD is inserted in the DVD
player, Kodak Picture CD menu appear automatically on the TV screen.
track number of the currently
!
B B
the numberoflotal tracks
highlighted item and the total tracks are shown at the center bottom of the screen.
fJ
• If '~" is shown at the right bottom, use the SKIP ~ button to view the next page. If ',...." is shown at the left bottom, use the SKIP ~ button to view the previous page.
• It may take some time until all menu items are displayed on the menu screen.
Press the Cursor buttons (. / T / ~ / ~), select a
desired track to be played back, then press the
PLAY or ENTER button.
• If a Kodak Picture CD file is selected, an image will be
played back from the selected track and go to the next
one in turn.
~
Press the STOP button, to stop playback.
NOTES on JPEG and Kodak Picture CD:
• A track is displayed for 5 or 10 seconds and then the
next track is displayed.
• Every press on the ANGLE button will turn the image
clockwise by 90 degrees when an image is displayed.
• To change the size of the playback image, press the
MODE button twice. The size change mode appears on
top of the TV screen during playback. Then press the
Cursor buttons (~ or~) or ENTER button to switch
between NORMAL (100%) and SMALL (95%).
• Progressive JPEGs (JPEG files saved in the progressive format) will not be played back on this DVD player.
• High resolution JPEG files take longer to be displayed.
• The size change mode may have no effect on some
files (e.g. files with a small picture size).
• In stop mode, press the MENU button. Kodak Picture
CD menu appears.
NOTES on WMA:
• The DVD player can reproduce data recorded as ISO
9660 level 2 with 31 characters file name included
punctuation marks. The name of file can be displayed
up to 25 characters.
• Maximum of 8 subfolders can be recognized.
• It can also be displayed tag information of WMA at
least 64 characters.
• A file with an extension of Joliet as Unicode format in
up to 64 characters can be recognized.
• This unit cannot play back copyright protected WMA files.
-23 -
EN
~ DivX® Playback
-
~
• When using tools or utilities to make up DivX" files,
read their instruction manual beforehand.
• A DivX® file whose file size exceeds 2GB cannot be
played back.
• If a large-sized DivX® file is selected, it may take a while
to start the playback (over 20 seconds sometimes).
• Constant"bitrate of image between 500 kbps and 4,000
kbps is recommended if you make DivX® files on a CDR/RW.
• If DivX" files written on CD discs cannot be played
back, rewrite them on a DVD disc and try to play back.
• For more information for DivX®, please visit: http://www.divx.com
• If you insert a CD-R/RW with DivX"" files that are mixed
with MP3, JPEG, or WMA files, the Playback Media
Selection screen will be displayed. Please select Video
and proceed to Step D.
IOivX®1
This DVD player can play back DVD-R/RW and CD-R/RW
discs recorded in DivX" format. When a DVD-R/RW or CDR/RW with DivX® files is inserted in the DVD player, the file
list will appear automatically on the TV screen. The number
of tracks will be also displayed on the front panel.
o
Press the Cursor buttons (. or T) to select the
desired group (folder) or track.
• To return to the previous screen, press the Cursor button (~).
• If a group (folder) is selected, press the Cursor button
(~) or ENTER button to go on to the track selection
screen. Press the Cursor buttons (. or T) to choose a
track, then press the PLAY or ENTER button.
• If a track is selected, press the PLAY or ENTER button
to start playing back tracks. The selected track and the
subsequent tracks will be played back.
• When selecting the folders:
-Press the Cursor button (~) when you want to go to
the next hierarchy.
-Press the Cursor button (~) when you want to go back
to the previous hierarchy (except for the top hierarchy).
• Press the TOP MENU button to return to the first item.
f) Press the STOP button to stop playback.
NOTES:
• DivX'" is a codec (compression/decompression) that
can compress images to a very small amount of data.
The software can compress video data from almost any
sources to the size that can be sent on the Internet
without compromising visual quality of the images.
• A file with an extension of ".avi" or ".divx" is called an
DivX'" file. All files with the ".avi" extension are recognized as MPEG 4.
• Files with extension other than ".avi" and ".divx" will not
be listed on the DivX'<' menu. However, unplayable
groups or tracks may be displayed, depending on the
recording conditions.
• Even if the file has an extension of either ".avi" or
".divx", this player cannot play it back if it is recorded in
the format other than DivX"'.
• Folders are known as Groups; files are known as tracks.
• A symbol of • is shown on the top of DivX" file.
• Maximum of 255 folders can be recognized.
• Maximum of 999 files can be recognized.
• If the track extends beyond the scope of screen, a
down arrow "T" appears, indicating that the user can
view another part on the previous page. The current
page number and the number of total pages are shown
on the left of the down arrow "T".
• The name of group and track can be displayed up to 25
characters. Unrecognizable characters will be replaced
with asterisks. The ninth and deeper hierarchies cannot
be displayed.
• You can play back the disc recorded in multi-session.
• Playback will be paused if the file list is displayed during the playback.
• It may take a while for audio and images to be output
after you inserted a disc and pressed the PLAY button.
• When playing back the files recorded in high bit rates,
the images can be interrupted on some occasions.
• Although DivX" logo has been obtained for this player,
it may not be able to play back some data, depending
on the disc characteristics, bit rates, or audio format
settings, etc.
• Use the software recognized by DivX®, Inc. when you
make DivX·) files.
""'=~'~".,,,,,<"'o,,,,,,,,,,,
I
1=~I'O::""'"
I
I
• Press the TOP MENU button to call up the Playback
Media Selection screen in stop mode.
• If you select Audio & Pictures, instead of Video on the
Playback Media Selection screen, the DVD player can
play back MP3/JPEGIWMA files. Refer to page 22 for
details.
This player recommends the use of files recorded at the following specifications:
Applicable DivX" file
Plays all
versions of
DivX" video
Playable
(including
Codec of AVI DivX"" 6) with
files
standard
playback of
DivX® media
files.
720 x 480
Maximum size @3Ofps
of image
720 x 576
@25fps
Remarks
• They are recognized as
MPEG 4.
• It is prohibited to record
MP3 sound on a digital
device when the connection
is made digitally.
Sampling
frequency of
audio
8kHz - 48kHz
Audio type
MPEG1 audio
layer 3 (MP3) • MP3 files recorded at fixed
MPEG1 audio
bit rate of 32kbps or higher
are recommended.
layer 2
Dolby Digital
~ DivX® Subtitle
The subtitle created by the user can be displayed during
DivX" playback.
o
-24-
After select the DivX® file, the SUBTITLE LIST will
appear except when the "DivX SUBTITLE" setting
is "OFF". Refer to "Language Setting" on page 29.
!
SUOnTlE LIST
rl!f
~
ISlAl]
[Sllli
['>1'111
EN
I VCD II
Cursor buttons (... or T) to select the
desired extension you want to display, then press
the ENTER button. DivX® with the subtitle starts
playback. The subtitle cannot be displayed when
the setting is "OFF".
f) Press the
• Current track number/total tracks, elapsed time and
remaining time of the current track, and current playback status will be displayed.
• Current repeat setting appears on the right side of the
display bar only when the Repeat setting is active.
( c;- T: Track repeat! c;- D: 1 Disc repeat! c;- 5: 5 Disc
repeat!A c;- B: A-B repeat)
• If there is more than one extension, the extension
selection appears in the SUBTITLE LIST.
NOTES:
• DivX<'ll subtitle can only be displayed according to the
same name with an extension of the DivX<'ll file name.
• Files whose extension is other than ".SMI", ".smi",
".SRT', ".srt", ".SUB" and ".sub" will not be listed in the
SUBTITLE LIST.
• This unit cannot be recognized if the DivX® file and its
subtitle file are not in the one folder.
• The subtitle may not be displayed if the file size is too
large.
• To change the subtitle, refer to "Subtitle Language" on
page 27 if multiple subtitles are available.
• The subtitle cannot display if the on-screen information
is displayed.
• If "DivX SUBTITLE" is set to "OFF" in LANGUAGE
menu, the SUBTITLE LIST will not be displayed even if
you select a DivX@ file with created subtitle.
• Unrecognizable characters will be replaced with asterisks.
--< Changing the On-Screen Display
>-
ID Press the DISPLAY button again.
• Current track number/total tracks, elapsed time and
remaining time of the entire disc, and current playback
status will be displayed.
• Current repeat setting appears on the right side of the
display bar only when the Repeat setting is active.
• On Audio CDs, when you are playing back a disc in
program or random mode, [IITj PROGRAM (or RANDOM)
will be displayed.
B
Press the DISPLAY button again.
• During program or random playback, each playback
status will be displayed when you press the DISPLAY
button. Then press the DISPLAY button again.
• Current HDMI status will be displayed during the HDMI
output mode.
~
Press the DISPLAY button again to exit.
You can check information about the current disc by pressing
the DISPLAY button on the remote control.
!DVD-vi
~
once during playback to show I[Ill>JOf]
current disc number.
f) Press the DISPLAY button
during playback.
~
D Press the DISPLAY button
1
r
• Current chapter number/total
~
chapters, elapsed time and
remaining time of the current chapter, and current playback status will be displayed.
I MP3 II JPEG II DivX® I
D Press the DISPLAY button once during playback to
show current disc number.
r
1
f) Press the DISPLAY button
I ~ TRACK 0'
~I
during playback.
• Current file name will be displayed.
ID Press the DISPLAY button
again.
B
~
~
Press the DISPLAY button again.
• The bit rate (the amount of video data currently being
read) and current playback status will be displayed.
• Current repeat setting appears on the right side of the
display bar only when the repeat setting is active.
(c;- C: Chapter repeat!c;- T: Title repeat!A c;- B: A-B
repeat)
• If you are playing back a two-layered disc, the layer
number will also be displayed.
(LO: Layer 0 is being played back. L1: Layer 1 is being
played back.)
~
<Example: MP3>
I!ill 1/36
om:15
c. T ~
I
B Press the DISPLAY button again.
• During program or random playback, each playback
status will be displayed when you press the DISPLAY
button. Then press the DISPLAY button again.
• Current HDMI status will be displayed during the HDMI
output mode.
Press the DISPLAY button again.
• Current HDMI status will be displayed during the HDMI
output mode.
l;) Press the DISPLAY button again to exit.
~
• For MP3, current track num~
ber/total tracks, elapsed time of
the current track, and current playback status will be
displayed.
• For JPEG, current track number/total track will be displayed.
• For discs with DivX® files, current track number/total
tracks, elapsed time and remaining time of the current
track, and current playback status will be displayed.
• Current repeat setting appears only when the Repeat
setting is active.
(c;-T: Track repeat! c;-G: Group (Folder) repeat!
c;-D: 1 Disc repeat!C;-5: 5 Disc repeat (except for DivX®)
/Ac;-B: A-B repeat (DivX® only)) J'i.
• When you are playing back a disc with MP3 or JPEG
files in program or random mode, [IITj PROGRAM (or
RANDOM) will be displayed.
ID Press the DISPLAY button again.
• Current title number/total titles,
elapsed time and remaining
time of the current title, and
current playback status will be
displayed.
I
CD
D Press the DISPLAY button once during playback to
show current disc number.
f) Press the DISPLAY button during playback.
~ Press the DISPLAY button again to exit.
-25-
EN
D
!WMA!
I
I]
Press the DISPLAY button
r 'i TRACK 01
~
once during playback to show
~
current disc number.
f) Press the DISPLAY button
during playback.
r I mTITLE NAME
~ 11
• Current file name will be displayed.
I!it ARTIST NAME
again.
• Title name based on tag information of currently played-back
file will be displayed.
IDVD-vi
Available only on discs recorded in the Dolby Digital format,
Dialog Speed plays back in slightly faster or slower speed
while keeping the sound quality as in the normal playback.
D During playback, press the
again.
I
• OFF appears on the TV screen.
f) Press the ENTER button or the Cursor buttons (.... or
~I
~
D Press the DISPLAY button
r
MODE button repeatedly until the
IWDOFFI
Dialog Speed setting appears.
~
~
D Press the DISPLAY button
~
--< Dialog Speed
~)
to switch among )0)0 (x1.3), )0 (xO.8) and OFF.
Plays back approximately at 0.8 times of normal playback.
)t)t: Plays back approximately at 1.3 times of normal playback.
D To return to normal playback, press the PLAY button.
NOTES:
)0:
IIilll 1/36
00115
C. T
~
I
• Artist name based on tag infor- ~
mation of currently played-back
file will be displayed.
~ Press the DISPLAY button again.
• Current track number/total tracks and elapsed time will
be displayed.
• Current repeat setting appears only when the Repeat
setting is active.
( 4 T: Track repeat! 4 D: 1 Disc repeat! 45: 5 Disc
repeat! 4 G: Group (folder) repeat).
• When you are playing back a disc in program or random
mode, ~ PROGRAM (or RANDOM) will be displayed.
~ Press the DISPLAY button again.
• During program or random playback, each playback
status will be displayed when you press the DISPLAY
button. Then press the DISPLAY button again.
• Current HDMI status will be displayed during the HDMI
output mode.
D Press the DISPLAY button again to exit.
• Every time you press the STOP button, the setting will
be turned OFF.
• Subtitle can be viewed during this function.
• Picture Control, Black Level and Audio Language setting cannot be changed while using this mode.
• Virtual Surround does not function while using this mode.
• This feature may not work at some point on a disc.
• When using digital audio connection (COAXIAL, OPTICAL or HDMI), the LPCM sound will be output.
• When using the Dialog Speed function with
Multi-channel digital outputting, the analog output
sound will be fixed at 2 channel.
• When using digital audio connection, only the Dolby
Digital sound will be available.
-<
7
Audio Language
IDVD-vil DivX® I
The DVD player allows you to select a language (if multiple
languages are available) during DVD disc playback.
NOTE:
• If the file does not contain tag information, NOT AVAILABLE will be displayed.
D
Press the AUDIO button during playback.
f) Press the AUDIO button repeatedly to select your
desired language.
NOTE FOR HDMI DISPLAY:
• The displayed HDMI status are
as follows:
1. Information for image out~
put!Resolution of image
2. Sound output format
3. Maximum number of audio channels that can be
accepted by the connected equipment
~ Slide Show Mode
IJPEGI
lSI 1.ENG Dolby 0 3121ch 48k/3 I
I~ 2.FAE Dolby 0 3f2.1ch 4Skl3
I
~
••
•
~
1l:JJ 3.JPN Dolby 0 312.1ch 48k/3 I
You can switch to the slide show mode during playback.
D Press the MODE button during playback.
• The slide show mode screen will appear.
• You cannot change to the slide show mode in stop
mode or from the file list screen or the Picture CD
menu screen.
f) Press the ENTER button.
• The slide show mode will change.
CUT IN/OUT: The entire image appears in one time.
FADE IN/OUT: The image appears and disappears
gradually.
D Press the MODE button to exit.
-26-
EN
DISC PLAYBACK
NOTES:
• The sound mode cannot be changed during playback
of discs not recorded in double sound.
• Some discs allow to change audio language setting on
the disc menu. (Operation varies between discs. Refer
to the manual accompanying the disc.)
• For discs with DivXI!> files, the screen only displays
MP3, MP2 or Dolby Digital audio. Other audio sound is
not supported.
• Pressing the AUDIO button may not work on some
DVDs with multiple audio languages (e.g. DVDs which
allow to change audio language setting on the disc
menu).
• If you choose a language that has a three-letter language code, the code will be displayed every time you
change the Audio Language setting. If you choose any
other Languages, '---' will be displayed instead (refer to
page 32).
• Audio Language selection cannot be made during
Dialog Speed.
• If the disc has no audio language, NOT AVAILABLE will
be displayed.
-<
The DVD player allows you to select a subtitle language (if
multiple languages are available) during DVD playback.
Press the SUBTITLE button during playback.
If) Press the SUBTITLE button repeatedly to select
your desired subtitle language.
subtitles during playback.
• The selected angle will be displayed on the display bar
at the top of the screen.
If) Press the ANGLE button repeatedly to select your
desired angle.
1m
1
".
11
~
~
[IJ:j;I2'.
I)
~Angle1
~ Angle 2
~
•••
~
[[tiJI.,.
11
~Angle8
~
-<
Picture Control
>lovo-vil vco II OivX® I
o
During playback, press the
MODE button.
1_ BAIGHTNESS* ....
If) Press the Cursor buttons (&
or T) to switch among items.
~ Press the ENTER button or the Cursor buttons (..... or
~) to adjust the selected item to a desired level.
~ Subtitle 2
~
••
•
[I_OFF
Press the ANGLE button during playback.
Picture Control adjusts Brightness, Contrast, Color, Gamma
Correction and Sharpness of the specific display.
~~Subtitle1
~
o
• If the ANGLE ICON setting is OFF in the OTHERS
menu, the ( 0 ) will not appear.
• The selected language will be displayed on the display
bar at the top of the screen.
• Press the Cursor buttons (..... or ~) to turn on or off
I)
0 )
NOTE:
o
r1- 2.FAE/.
>[QYlfY]
Camera Angle
Some DVD discs contain scenes which have been shot
simultaneously from various angles. You can change the
mark appears on the screen.
camera angle when the (
>/ovo-vil OivX® I
Subtitle Language
~
-<
• -6, -5, -4, -3, -2, -1, 0, +1, +2, +3, +4, +5, +6 can be selected.
D To return to normal playback, press the RETURN
'I
button.
NOTES:
~OFF
• The default settings for all items in Picture Control are "0".
• The setting display will disappear in 10 seconds of no use.
• This function cannot be used during Dialog Speed
(refer to page 26).
• If you return all items to the default settings, select
"INITIALIZE" at step 6.
~
~ To turn off subtitles, press the SUBTITLE button
repeatedly until OFF appears.
NOTES:
• Some discs allow subtitle language setting on the disc
menu. (Operation varies between discs. Refer to the
manual accompanying the disc.)
• Pressing the SUBTITLE button may not work on some
DVDs with multiple subtitle languages (e.g. DVDs which
allow subtitle language ~etting on the disc menu).
• If your desired language is not shown after pressing the
SUBTITLE button several times, the disc does not have
subtitles in that language.
• If you choose a language that has a three-letter language code, the code will be displayed every time you
change the Subtitle Language setting. If you choose
any other Languages, '---' will be displayed instead
(refer to page 32).
• If the disc has no subtitle language, NOT AVAILABLE
will be displayed.
• For discs with DivX'" files, the screen only displays the
number of subtitle languages.
-27-
EN
~ Stereo Sound Mode
~
I VCD II CD
D Press the AUDIO button repeatedly during play-
I
back to select your desired sound mode.
STEREO - both right and left channels are active (stereo)
L-ch
- only left channel is active
R-ch
- only right channel is active
~ Both right and left channels
11
[I\!U STEREO
~
are active (stereo).
.........
rl:ili L·oh
~ Only the left channel
11
~
rL@Roh
-------,
IS
active.
~ Only the right channel
1
...c--~.-'-'
IS
active.
NOTE:
• The STEREO can only be output when playing back
DTS CD.
~ Virtual Surround
IDVD-vil
~
VCD II CD II MP3 II WMA
I
You can enjoy stereo phonic virtual space through your existing 2 channel stereo system.
D During playback, press the
r~ I
MODE button repeatedly until the ~
Virtual Surround setting appears.
f) Press the ENTER button to set it 1(Natural effect),
2(Emphasized effect) or OFF.
D Press the RETURN button to exit.
NOTES:
• Set Virtual Surround to OFF or lower the volume if the
sound is distorted.
• Virtual Surround will not be effective if the sound mode
is set to something other than STEREO (for Audio CD
or Video CD playback only).
• This function cannot be used during Dialog Speed
(refer to page 26).
»
~ Black Level Setting
IDVD-vll
VCD
II DivX®]
Adjust the Black Level Setting to make the black parts of the
picture as bright as you prefer.
o
rliONiI
During playback, press the
MODE button repeatedly until ~
Black Level setting appears.
f) Press the ENTER button to switch ON or OFF.
ON (Default) : Makes the dark parts brighter.
OFF: Shows the original picture as recorded.
D Press the RETURN button to exit.
NOTE:
• This function cannot be used during Dialog Speed
(refer to page 26).
- 28-
EN
In Setup menu, QUICK mode, CUSTOM mode and INITIALIZE mode are available (refer to pages 29-31).
QUICK mode consists of the setting menus frequently used, and they are accompanied with QUICK mark.
You can make all settings in CUSTOM mode.
-<
>-
Language Setting
STILL MODE (Default: AUTO)
o
Press the SETUP button in stop mode.
fJ Press the Cursor buttons (..... or ~) to select
.
CUSTOM, then press the ENTER button.
• The custom mode will appear.
ID Press the Cursor buttons (..... or ~)
to select LANGUAGE, then press
the ENTER button to confirm.
II Press the Cursor buttons (.... or
T) to select an item, then press
the ENTER button.
DIALOG (Default: ORIGINAL)
I
'~~J"=
1~;~lE I~G'NAI
DISC MENU
ENGLISH
OSO
ENGLISH
l»F
~}(
SUBTITLE
• Sets the audio language.
SUBTITLE (Default: OFF)
• Sets the subtitle language.
DISC MENU (Default: ENGLISH)
• Sets the language for DVD Menu.
OSD (Default: ENGLISH) QUICK
PROGRESSIVE
(Default: OFF) QUICK
• Sets the language for the On-Screen display.
DivX SUBTITLE (Default: OFF)
Press the Cursor buttons (.... or T) to select a setting, then press the ENTER button.
• If OTHER is selected in the DIALOG, SUBTITLE or DISC
MENU, press four-digit number to enter the code for the desired
language (refer to the "Language Code Lisf' on page 32).
• Only the languages supported by the disc can be selected.
[;J Press the SETUP button to exit and activate the
>-
You can change certain aspects of the DVD display screens,
still mode setting, Progressive and HDMI settings.
o
Press the SETUP button in stop mode.
fJ Press the Cursor buttons (..... or ~) to select
CUSTOM, then press the
ENTER button.
• The custom mode will appear.
I
_~~'fl:l
DO
,
ID Press the Cursor buttons (..... or
~) to select DISPLAY, then press
the ENTER button to confirm.
II Press the Cursor buttons (.... or ' - - - - - - - - - - /
T) to select an item, then press the ENTER button.
,
CfVASPi:CT------,~Jt£IIfFleI)X
::inn MODE
PAQGI,I()()E
AUIO
OH
AUIOI
HOMI SELECT
vebC,
HDUI PICTURF
"~MAi.
PROGRESSIVE
~Jti ~fa
~---TV AsPtCT
STU MOOE
AUTO
PAQG MODE
i"<OMISELECT
11DMIPlCIURE
MH01
YC\>C,
NOflM"L
• Press the Cursor buttons (. or
T) to select a setting (AUTO1,
AUT02 or VIDEO), then press
the ENTER button.
• For HDMI or Component Video
connecter, this function allows
you to select the image output,
depending on the base material (video or film) of the
recorded DVD images, when PROGRESSIVE is ON.
• AUT01 : Automatically selects the best image output
(AUT02 or VIDEO) based on the information of
data stream.
• AUT02: A combination of the top and bottom fields is
output as one-frame image.
• VIDEO: Either of top or bottom field is output for oneframe image.
• Language Setting for DIALOG and SUBTITLE may not
be available with some discs. Then use the AUDIO and
SUBTITLE buttons. Details are on pages 26-27.
Display Setting
'
PROG.MODE (Default: AUT01)
new settings.
NOTE:
-<
I
FRAME
• Press the ENTER button repeatIPROGAESSlvD Of'F
edly to turn ON or OFF.
• The setting will be effective
when you exit the setup screen
by pressing SETUP.
• When PROGRESSIVE is ON, PSCAN appears on the
DVD player's display after you exit the setup screen.
• Refer to page 13 for more details.
• Sets the DivX® subtitle language.
~
I:,· ~~:~~
• Press the Cursor buttons (. or
T) for an item selection (AUTO,
FIELD, or FRAME), then press
the ENTER button.
• This function allows you to
adjust picture resolution and
quality in still mode.
• An individual picture on TV screen is called as "frame",
which consists of two separate images called as "field".
Some pictures may be blurred at the AUTO setting in
still mode due to their data characteristics.
• AUTO: Automatically selects the best resolution setting
(FRAME or FIELD) based on the data characteristics of
the pictures.
• FIELD: Select FIELD when the pictures are still unstable even if AUTO is selected. FIELD stabilizes the pictures, although the picture quality may become coarse
due to the limited amount of data.
• FRAME: Select FRAME to display relatively motionless
pictures in higher resolution. FRAME improves the picture quality, although it may unstabilize the pictures due
to simultaneous output of two field data.
Language options are not available with some DVD or DivX®.
HDMI SELECT (Default: YCbCr)
• Select an HDMI output mode
between YCbCr and RGB.
• When the connected equipment
is not compatible with YCbCr,
HDMI signal is output as RGB
regardless of the setting.
TV ASPECT (Default: 4:3 LETTER BOX) QUICK
• Press the Cursor buttons(. or
T) for an item selection, then
press the ENTER button.
• Select 4:3 LETTER BOX for a
black bars appears on top and bottom of the screen.
• Select 4:3 PAN & SCAN for a full
height picture with both sides trimmed.
• Select 16:9 WI DE if a wide-screen TV is connected to the
DVD player.
• Select 4:3 SQUEEZE when the TV screen is too large horizontallyat 16:9 WI DE setting and when it is impossible to
adjust the screen size using the TV's controls.
I
=~iiid'a
~JLnTrRf\Ol
STILLMOOE
PFlQGnt:S5IVE
Pf«X;.MOOE
flU TO
OF!"
AU 101
ITi~1 "~lCCr_-:.J YCbC'
ItOMI PIC lURE
NORMAL
HDMI PICTURE (Default: NORMAL)
• Select a HDMI picture mode between NORMAL and
ENHANCED.
• Select ENHANCED if the blackwhite contrast is not clear.
• This setting is effective only for
HDMI RGB output.
~ Press the SETUP button to exit
-29-
and activate the new settings.
EN
DVD SETUP
-<
.
.
,'.
-<
Audio Setting
You can change some Audio settings. It only affects during the
playback of DVD discs.
D Press the SETUP button in
stop mode.
If) Press the Cursor buttons (..... or
~)
to select
CUSTOM, then press the
ENTER button,
I
Ratings Control allows you to set a limit, which prevents your
children from viewing inappropriate materials on DVDs. A fourdigit password that you establish will give you the control.
=l.!.I~YJ".
OAC
lPCMSElECT
ON
OFF
DOlBYOlGlTAI.
!I1TsrflEAM
BJT$TFlEAM
DTS
AlIDlOlolOOE
RATING LEVEL
You can set a viewing limit through Rating Level. Playback of
the discs will stop if the disc's general rating exceeds the limit
you set
HOM)
D Press the SETUP button in stop mode.
• The custom mode will appear.
~
Press the Cursor buttons (..... or ~) to select
AUDIO, then the ENTER button to confirm,
D Press the Cursor buttons (A or T) button to select
an item, then press the ENTER button.
DRC (Dynamic Range Control)
(Default: ON)
If) Press the Cursor buttons (..... or ~) to select
• When doing this for the first time,
enter any four-digit number by
pressing the Numeric buttons
(except for 4737), then press the
ENTER button. That number will
be used as the password from the
second time onward. Record your
password in case you forget it
LPCM SELECT (Default: OFF)
I
a~~'i(.
""" SELECT
lPCI.l
~
ON
OFF
DOlBY DlGITA!.
8l1STREAM
DIS
81TSTA£_
AUDIOMOOE
HOUI
When playing disc with copyright protection
• The sound will be down sampled at 48kHz, even if you
set to OFF.
DOLBY DIGITAL
(Default: BITSTREAM) lQlJtC~
Press the Cursor buttons (A or '-T) to select RATING LEVEL,
then press the ENTER button.
m Press the Cursor buttons (A or
T) to select a desired level, then
press the ENTER button.
D Press the SETUP button to exit
and activate the new settings.
~
l~l
I
7 [NC·l7J
~IRI
• [PG I3J
3[PGI
NOTE:
• Set to BITSTREAM when the
player is connected to a Dolby
~a
Digital decoder.
• This function is effective only for
~:~~~~
the COAXIAL, OPTICAL and HDMI
connections.
BITSTREAM:
DOLBY DIGITAL signals are output as Bitstream.
• For HDMI connection, if the connected equipment
is not compatible with the Dolby Digital
BITSTREAM, the signals are output as PCM
regardless of the setting.
PCM: Convert Dolby Digital to PCM.
I
DTS
(Default: BITSTREAM)
I0
CUSTOM, then press the ENTER button.
Press the Cursor buttons (..... or ~----~.....
~) to select RATINGS, then
al.!lra:ir.'
press the ENTER button.
D Press the Numeric buttons to
,..~
~,enter your four-digit password.
~
• DRC function compresses the
range of sound volume.
• DRC function is available only on
the discs that are recorded in the
Dolby Digital format
• Set to ON when outputting in 48kHz.
• This function is available only on
digital outputting of a disc
recorded in 96kHz.
• This function is not effective for
the HDMI sound output
>-
Ratings Control
=l!.I .'
ORe
LPCM SELECT
ON
OFF
AUOIO MOOE
HOMI
QUJCK·
• This function may not work on some DVDs. Be sure if
the RATINGS operates in the way you have set
To Change the Password:
1) Follow the steps D to D above,
2) Press the Cursor buttons (. or T) to select PASSWORD
CHANGE, then press the ENTER button.
3) Enter a new four-digit password, then press the ENTER button.
4) Press the SETUP button to exit
I
• Password will be cleared and rating level will be set to ALL
If) Repeat steps D to D to re-establish the parental lock.
I
• Set to BITSTREAM when the unit
is connected to a DTS decoder.
OAC
ON
BITSTREAM:
lPCM SelECT
OFf
DTS signals are output as
AUDIO MOOE
HDNI
Bitstream.
• For HDMI connection, if the
connected equipment is not
compatible with the DTS Bitstream, the signals are
not output regardless of the setting,
OFF:
No DTS sound will be output
• DTS sound is bitstream output only, from digital
audio outputs.
OOlBY DIGITAl.
Drs
IFYOU FORGET THE PASSWORD
D Press 4,7,3,7 at step D.
81TSTREAM
8lTSTFU;:Al.l
I
CONTROL LEVELS
• ALL
Parental lock is canceled.
• LevelS
DVO software of any grade (adult/general/children) can
be played back.
• Levels 7 to 2
Only DVD software intended for general use and children can be played back.
• Level 1
Only DVD software intended for children can be played
back, with those intended for adult and general use
prohibited.
AUDIO MODE (Default: HDMI)
• Set to HDMI when outputting the
HDMI sound .
• Set to ANALOG when not
outputting the HOMI sound.
~
Press the SETUP button to exit
and activate the new settings. ' - - - - - - - - - '
-30-
EN
-<
>-
Others Setting
This function allows you to adjust Angle Icon availability, Auto
Power off, brightness of the Player's display panel, slide show
mode and to obtain DivX~ registration code.
D Press the SETUP button in stop mode.
f.I Press the Cursor buttons (~or~) to select CUSTOM,
then press ENTER.
------------,~
~)
to select Other, then press the
ENTER button to confirm.
D Press the Cursor buttons (. or
T) to select an item, then press
ENTER.
ANGLE ICON (Default: ON)
• Press the ENTER button repeatedly to turn ON or OFF.
This allows you to return all selections of SETUP (except for
RATINGS) to their default settings.
D Press the SETUP button in stop mode.
f.I Press the Cursor buttons (~ or~) to select
INITIALIZE, then press the ENTER button.
• The custom mode will appear.
R Press the Cursor buttons (~or
Reset to the Default Settings
(except for Ratings Control)
R Press the Cursor buttons (. or T) to select YES,
then press the ENTER button.
D Press the SETUP button to exit.
NOTE:
• If you do not wish to initialize, select NO at step
I
=~~E';.
I
I
I
=~~d;=
R.
ANGLE ON
ON
AUTO POWER OFF ON
BRIGHT
PANElOl~V
St.lDESHOW
~
o...XIRlVOO
AUTO POWER OFF (Default: ON)
• Press the ENTER button repeatedly to turn ON or OFF.
• It will turn off the DVD player
automatically after 30 minutes of no
use.
PANEL DISPLAY
(Default: BRIGHT)
• Press the Cursor buttons (. or
T) to select a setting (BRIGHT,
DIMMER and AUTO), then press
the ENTER button.
• When AUTO is selected, the display dims only during playback.
SLIDE SHOW (Default: 5sec)
• This adjusts the playback speed of
the JPEG SLIDE SHOW.
• Press the Cursor buttons (. or
T) to select between 5 sec and
10 sec, then press the ENTER
button.
DivX(R)VOD
OTtlERS
MN LOlSPlAV
L!®9::tiC=-:J
OIMMER
,",0
=~~~U=
OTHERS
~----
s-
,"'"'
• This player allows you to use the
=~ ,"d"llI
DivX" Video-On-Demand (VOD)
Orixnvoo
services. You can play back the
Your'
l'lluon COde ".
~
~
loleammore",Sll
files purchased or rental from the
VOD services. You need to have
a registration code to purchase
or rental VOD files. Please visit www.divx.com/vod for
more details.
www.~com'Vod
I;J Press the SETUP button to exit.
NOTES:
• You cannot play back the DivX" VOD files obtained with
different registration codes on this player.
• You cannot play back the DivX" VOD files, of which rental
period has been expired. In such case, press the MENU
button and select other files that can be played back.
• Some DivX'" VOD files are restricted with the limited
playable times (you cannot play them back beyond the
limit). If your DivX'" VOD file has such limit, the playback
confirmation screen will appear. Use the Cursor buttons
(..... or ~) to select YES if you want to play back the file,
or to select NO if you do not wish to play it back. Then,
press the ENTER button to confirm the selection.
• Please send your inquiries regarding the VOD files to
DivX"', Inc.
- 31 -
EN
»
-< Language Code List
Language
A-B
Abkhazian
Afar
Afrikaans
Albanian
Amharic
Arabic
Armenian
Assamese
Aymara
Azerbaijani
Bashkir
Basque
Bengali;Bangla
Bhutani
Bihari
Bislama
Breton
Bulgarian
Burmese
Byelorussian
C-E
Cambodian
Catalan
Chinese [CHI]
Corsican
Croatian
Czech [CZE]
Danish [DAN]
Dutch [OUT]
English [ENG]
Esperanto
Estonian
F-H
Faroese
Fiji
Finnish [FIN]
French [FRE]
Code
4748
4747
4752
6563
4759
4764
5471
4765
4771
4772
4847
5167
4860
5072
4854
4855
4864
4853
5971
4851
5759
4947
7254
4961
5464
4965
5047
6058
5160
5161
5166
5261
5256
5255
5264
Language
Code
Language
Code
Language
Code
Frisian
Galician
Georgian
German [GER]
Greek [GRE]
Greenlandic
Guarani
Gujarali
Hausa
Hebrew
Hindi
Hungarian [HUN]
I-K
Icelandic [ICE]
Indonesian
Interlingua
Interlingue
Inupiak
Irish [IRI]
Italian [ITA]
Japanese [JPN]
Javanese
Kannada
Kashmiri
Kazakh
Kinyarwanda
Kirghiz
Kirundi
Korean [KOR]
Kurdish
L-N
Laothian
Latin
Latvian;Lettish
Lingala
Lithuanian
Macedonian
Malagasy
5271
5358
5747
5051
5158
5758
5360
5367
5447
5569
5455
5467
Malay
Malayalam
Maltese
Maori
Marathi
Moldavian
Mongolian
Nauru
Nepali
Norwegian [NOR]
O-R
Occitan
Oriya
Oromo(Afan)
Panjabi
Pashto;Pushto
Persian
Polish [POL]
Portuguese [POR]
Quechua
Rhaeto-Romance
Romanian [RUM]
Russian [RUS]
5965
5958
5966
5955
5964
5961
5960
6047
6051
6061
Somali
Spanish [SPA]
Sundanese
Swahili
Swedish [SWE]
6561
5165
6567
6569
6568
5565
5560
5547
5551
5557
5347
5566
5647
5669
5760
5765
5757
6469
5771
6460
5761
5767
5861
5847
5868
5860
5866
5957
5953
6149
6164
6159
6247
6265
5247
6258
6266
6367
6459
6461
6467
S
Samoan
Sangho
Sanskrit
Scots Gaelic
Serbian
Serbo-Croatian
Sesotho
Setswana
Shona
Sindhi
Singhalese
Siswat
Slovak
Siovenian
6559
6553
6547
5350
6564
6554
6566
6660
6560
6550
6555
6565
6557
6558
T
Tagalog
Tajik
Tamil
Tatar
Telugu
Thai
Tibetan
Tigrinya
Tonga
Tsonga
Turkish [TUR]
Turkmen
Twi
U-Z
Ukrainian
Urdu
Uzbek
Vietnamese
Volapuk
Welsh
Wolof
Xhosa
Yiddish
Yoruba
Zulu
6658
6653
6647
6666
6651
6654
4861
6655
6661
6665
6664
6657
6669
6757
6764
6772
6855
6861
4971
6961
7054
5655
7161
7267
If you choose a language that has a three-leiter language code (written in bracket), the code will be displayed every time you change the Au·
dio or Subtitle Language setting on pages 26-27. If you choose any other languages, '...' will be displayed instead.
-32 -
EN
If the DVD player does not perform properly when operated as instructed in this Operating Instruction, check the player, consulting the following checklist.
Problem
Solution
No power
- Check if the AC power cord is properly connected.
- Unplug the AC power cord once, and wait for 5-10
seconds and then plug it in again.
No sound or picture
- Check
-Check
-Check
-Check
if the TV is turned on.
the video connection and HDMI connection.
the VIDEO/AUDIO cable connections.
if the PROGRESSIVE mode is set correctly.
Page
-
15,16
14-16
13,29
-
Distorted picture
- Sometimes a small amount of picture distortion may
appear. This is not a malfunction.
- Connect the player directly to the TV.
15,16
Completely distorted picture or black/white
picture with DVD
- Connect the DVD player directly to the TV.
- Make sure the disc is compatible with the DVD player.
15,16
6
No sound or distorted sound
-Adjust the volume.
- Check that the speakers are connected correctly.
-
14
No audio at digital output
- Check the digital connections.
-Check the audio settings.
14,16
30
No image from HDMI connection
-Check the HDMI connection. (Check the status of the
HOM I related indications.)
- Check whether the connected monitor equipment or other
equipment supports HDCP (This player will not output a
video signal unless the other equipment supports HDCP)
- Connect the OVO player to the display device using the
AudioNideo cables (supplied) and check the setting of HOMI.
-Check whether the output format of this player (HDMI
FORMAT) matches the supported input format of other
connected equipment.
16, 17
Picture freezes momentarily during playback
-Check the disc for fingerprints/dust and clean with a soft
cloth wiping from center to edge.
-Clean the disc.
34
Disc cannot be played
- Clean the disc.
- Ensure the disc label is facing up.
- Check if the disc is defective by trying another disc.
-Cancel Ratings control or change the control level.
-Insert a correct disc that plays on this player.
34
17
30
6
16
16-17
16
34
No return to start-up screen when disc is removed - Reset the player by turning it off, then on again.
-
The player does not respond to the remote
control
12
- Aim the remote control directly at the sensor on the front
of the player.
- Reduce the distance to the player.
- Replace the batteries in the remote control.
- Re-insert the batteries with their polarities (+/- signs) as
indicated.
12
12
-
Buttons do not work or player stops
responding
- To completely reset the player, unplug the AC cord from
responding the AC outlet for 5-10 seconds.
Player does not respond to some operating
commands during playback
-Operations may not be permitted by the disc.
Refer to the instructions of the disc.
6
DVD player cannot read CDs/DVDs
- Use a commercially available CD/DVD cleaner to clean
the lens before sending the DVD player for repair.
34
Angle does not switch
-The angle cannot be switched for DVDs which do not
contain multiple angles. In some cases multiple angles
are only recorded for specific scenes.
27
Playback does not start when the title is selected -Check the RATINGS setting.
30
The password for rating level has been
forgotten
30
-Enter the default password "4737", then your forgotten
password will be cleared.
NOTES:
• Some functions are not available in specific modes, but this is not a malfunction. Read the description in these Operating
Instructions for details on correct operations.
• Playback from a desired track and random playback are not available during program playback.
• Some functions are prohibited on some discs.
- 33-
EN
SPECIFICATIONS
SIGNAL SYSTEM
NTSC color
APPLICABLE DISCS
(1) DVD-Video Discs
1-layer 12cm single-sided discs, 2-layer 12cm single-sided
discs, 2-layer 12cm double-sided discs (1 layer per side)
1-layer 8cm single-sided discs, 2-layer 8cm single-sided
discs, 2-layer 8cm double-sided discs (1 layer per side)
(2) DVD-R/DVD-RW
(3) Compact discs (Audio CD, Video CD)
12cm discs, 8cm discs
(4) CD-R/CD-RW
AUDIO OUTPUT PROPERTIES
(1) Frequency response
1 DVDs (linear PCM) : 4Hz to 22kHz (48kHz sampling)
: 4Hz to 44kHz (96kHz sampling)
2 CDs
: 4Hz to 20kHz
(2) SIN ratio
: 115dB
(3) Total harmonic distortion: 1kHz CD: 0.003%
(4) Dynamic range
: DVD: 100dB
CD: 98dB
DIGITAL AUDIO OUTPUT
Optical digital output: Optical connector, 1 set
Coaxial digital output: Pin jack, 1 set
POWER SUPPLY
AC 120V, 60Hz
S-VIDEO OUTPUT
Y output level: 1Vp-p (75Q/ohms)
C output level: 0.286Vp-p
Output connectors: S connectors, 1 set
POWER CONSUMPTION
10W (Standby: 0.8W)
VIDEO OUTPUT
Output level: 1Vp-p (75Q/ohms)
Output connector: Pin jacks, 1 set
MAXIMUM EXTERNAL DIMENSIONS
W: 17-3/32" (435mm)
H: 4-3/32" (104mm)
D: 14-9/16" (370mm)
(including protruding parts)
COMPONENT OUTPUT
Y output level: 1Vp-p (75Q/ohms)
PB/CB output level: 0.648Vp-p (75Q/ohms)
PRiCR output level: 0.648Vp-p (75Q/ohms)
Output connector: Pin jacks, 1 set
MASS
9.92 Ibs (4.5 kg)
HDMIOUTPUT
HDMI jack, 1 set
REMOTE CONTROL UNIT
RC-1040
Infrared pulse type
Supply: DC 3V, 2 R6P/AA batteries
AUDIO OUTPUT
Output level: 2Vrms
2 channel (L, R) output connector: Pin jack, 1 set
MAINTENANCE
Cleaning the Cabinet
• Use a soft cloth slightly moistened with a mild detergent solution. Do not use a solution containing alcohol, spirits,
ammonia or abrasives.
Cleaning Discs
• When a disc becomes dirty, clean it with a cleaning cloth. Wipe the disc from the center out. Do not wipe in a circular
motion.
• Do not use solvents such as benzine, thinner, commercially available cleaners, detergent, abrasive cleaning agents or
antistatic spray intended for analog records.
Cleaning the disc lens
• If the player still does not perform properly when it is operated while referring to the relevant sections and to "TROUBLESHOOTING GUIDE" in this Operating Instruction, the laser optical pickup unit may be dirty. Consult your dealer or
an Authorized Service Center for inspection and cleaning of the laser optical pickup unit.
Disc Handling
•
•
•
•
Use discs which have the following logos on them.
Handle the discs so that fingerprints and dust do not adhere to the surfaces of the discs.
Always store the disc in its protective case when it is not used.
Note that discs with special shapes (heart-shaped discs, octagonal discs, etc.) cannot be
played on the this product. Do not attempt to play such discs, as they may damage the player.
~
~ DVD
v
Iillrrm t£
MP3
~~CD
IDE 0
R
RW
_ . Plays
_.
TM
-WI"'-nd-ow-s--l
Medla lM
IDIGITAl V1OEOI
mJo§1
IReWritablel
VIDEO CD
IillD§~ llil~i
DIGITAL AUDIO
DIGITAL AUDIO
IReWritablel
COMPATIBLE
-34-
EN
MEMO
-35 -
EN
DENON
TOKYO, JAPAN
www.denon.com
Printed in China
000 511 4593 000
Denon Brand Company, D&M Holdings Inc.
1VMN23562
E8701 UD *****
DENON SERVICE NETWORK I §IU~U'U!
•
•
•
•
•
•
•
•
Please consult the outlet where the equipment was purchased.
Bitte wenden Sie sich an den Handler, bei dem Sie das Produkt gekaufthaben.
SVP veuillez consulter votre revendeur.
Neemt u alstublieft contact op met het verkooppuntwaar u de apparatuur heeft gekocht.
Por favor consulte en el establecimiento donde compr6 el equipo.
Vanligen ta kontakt med butiken dar du kopt utrustningen.
Rivolgetevi al rivenditore che vi ha venduto I'apparecchio.
Contacte a loja onde comprou 0 equipamento.
• 1l1tiJf1Jt.A**egili~jnlPJ 0
• .icJf1JtJiJfJij~*maqjllj~T~liJ 0
Australia
Audio Products Group Pty Ltd. 67 O'Riordan Street Alexandria NSW 2015, PO Box 150, Mascot NSW 1460 Australia
Tel: 1300 134400 Fax: +61 295780159
Austria
Digital-Professional-Audio Vertriebsges.m.b.H., Seeb6ckgasse 59, A-1160 Wien Tel: 01-480-1006 Fax: 01-485-7679
Transtel-Sabima PVBA Duboisstraat 48, B-2060 Antwerpen, Belgium Tel: 03-237-3607
Belgium
Canada
D&M CANADA INC. 5-505 Apple Creek Blvd., Markham, Ontario, L3R 5B1 Tel: 905-475-4085 Fax: 905-475-4159
~if~li!3ffU[ii]J¥1~(J:im )fijlllHHiJ J:imrlJitEimq:.!m887-&7j(;m:*1I6010:i:
China
~i3:(021 )64372299 ~¥U021 )64339973 illBi'.Iiii: 200020 7<::;t~Fn&%1M3e: 021-62949285
EUROSTAR OSTRAVA s.r.o. areal Vodni stavby Praha, budova A2 Dobronicka 635,148 00 Praha 4 Czech Rep.
Czech republic
Tel: 261-112-901 Fax: 261-112-904
Denmark
Hifi Klubben NS Dali Aile 1, 9610 Noerager, Denmark Tel: 45-96 72 1000 Fax: 45-96 72 10 14
Finland
Soundata Oy Hameentie 157 5th floor 00560 Helsinki Finland Tel: +358-(0)9-47693300 Fax: +358-(0)9-47693310
DENON FRANCE A division of D&M France SAS Tour Ventose, 2 rue des Bourets, 92156 Suresnes Cedex, France
France
Tel:+33(0)1-41-383230 Fax: +33(0)1-41-380110
DENON DEUTSCHLAND A division of D&M Germany GmbH An der Landwehr 19, D-41334 Nettetal, Germany
Germany
Tel: +49(0)2157-1208-0 Fax: +49(0)2157-1208-10
KINOTECHNIKI LTD. 14, PYRGOU STR. 16675, GLYFADA ATHENS Tel: +302109601071 Fax: +302109601072
Greece
D&M Sales and Marketing (H.K.) Ltd. Unit 501, Ocean Centre, Harbour City, 5 Canton Road, Tsimshatsui, Kowloon, Hong Kong
Hong Kong
Tel: 852-2516-5864 Fax: 852-2516-5940
'l!i'~h~~¥j>Ull.I1UUH5~lJjji'l!lJ]£lJjjWq:.'[,'5m501:i: 11~i5: 852-2516-5864 ffJll: 852-2516-5940
A.I.D.A. Audio Kft. 1112 Budapest Olt u. 37. Hungary Tel: 01-248-2030 Fax: 01-248-2039
Hungary
Einar Farestveit & co hf., Borgartun 28, PBox 5440, 125 Reykjavik. Tel: +354 5207900 Fax: +3545207910
Iceland
Pro FX Dynamic House. 64, Church Street, Bangalore-560 001, India Tel: +91-80-5768-6722 Fax: +91-80-2559-4298
India
PT AutoaccindoJaya. Cideng Barat No.7 Jakarta, Indonesia Tel: +62-21-633-2730 Fax: +62-21-632-2886
Indonesia
Newpan Ltd. 14 Rosansky st. Rishon Lezion 75706, Israel. Tel: +972-3-953-5900 Fax: +972-3-961-6193
Israel
Audiodelta S.r.l.19 Via Pietro Calvi 20129 Milano Italy Tel: 39-02-5411-6008/39-02-5412-8253 Fax: 39-02-5412-0258
Italy
D&M Sales and Marketing Korea Ltd. Chung Jin B/D., 10F, 53-5, Wonhyoro 3 Ga, Yongsan-Gu, Seoul, 140-719, Korea
Korea
Tel: 02-715-9041 Fax: 02-715-9040
Wo Kee Hong Trading Sdn Bhd. 2nd Floor, (Left Wing), Bangunan Infinite Centre, Lot 1, Jalan 13/6, 46200 Petaling Jaya,
Malaysia
Selangor Darul Ehsan, Malaysia Tel: 03-7954-8088 Fax: 03-7954-7088
Labrador, SA de CV Callejon del Naranjo 35, Naucalpan, 53560, Edo. Mex., Mexico Tel: 52-5359-5161 Fax: 52-5357-1775
Mexico
Penhold BV Poppenbouwing 58, NL-4191 NZ Geldermalsen, Netherland Tel: 31-345-588080 Fax: 31-345-588085
Netherlands
Avalon Pacific Marketing Limited. 15c Vestey Drive, Mt Wellington, Auckland, New Zealand.
New Zealand
PO Box 11 631 Ellerslie, Auckland, New Zealand Tel: +64-9-573-5933 Fax: +64-9-573-3720
Hi-Fi Klubben Marcus Thranes gate 4-6,0473 Oslo, Norway Tel: +47228063 10 Fax: +47 22 806329
Norway
Lotteworld Audio Video Systems Incorporated CET Building Mezzannine Floor NO.4 Mindanao Avenue, Barangay
Philippines
Bahay Toro, Project 8, Ouezon City, Philippines. Tel: +632-929-5334 Fax: +632-929-1343
HORN DISTRIBUTION SA Ulica Kurantow 34,02-873 Warszawa Poland Tel: +4822331 5533 Fax: +4822331 5500
Poland
Videoacustica Ota. Do Paizinho-Armazem 5-Estrada De Circunvala~ao-Apart. 3127 1303 Lisboa Codex
Portugal
Tel: +351214241770 Fax: +351214188093
ALL (E&E) Service Center Pte Ltd. Machtech Industrial Building, #06-04, No.2, Kallang Pudding Road, Singapore 349307
Singapore
Tel: 6747-8274 Fax: 6748-9007
BIS AUDIO s.r.o. Dobronivska cesta 1642/696001 Zvolen Tel:045-5400 703 Fax:045-5400 704
Slovakia
Mandarin Distributors SA 10 Thora Crescent, Wynberg Ext.3 Sandton, PO. Box 5137, Johannesburg Republic of South
South Africa
Africa Tel: 27-11-444-8445 Fax: 27-11-444-8363
Gaplasa SAAV lng. Conde de Torroja, 25, 28022 Madrid Tel: 91-746-00-45 Fax: 91-329-44-57
Spain
Hi-Fi Klubben G6teborg Skanegatan 25, 41252 G6teborg Tel:031 3351010 Fax:031 3351019
Sweden
KOENIG APPARATE AG, Abteilung Elektronik. EggbOhlstrasse 28, CH-8052 ZOrich, Switzerland
Switzerland
Tel: 01-306-1626 Fax: 01-306-1690
Taiwan R.O.C.
KOLIN-DENON Entertainment INC. 5F-3, No. 14, Shiwei Street, Sanchung City, Taipei Hsien, 241 Taiwan, R.O.C.
JV:;.ft~~ff~jJ~l¥ii:fBfij~IH~"iJ tJ;jt~=mrlJ¥j;~m14~5FZ3 m~i5: (02)8287-2618 1lJll: (02)8287-1384
Realise Tech-Service Co., Ltd. 2F, No. 14, Shiwei Street. Sanchung City, Taipei Hsien, 241 Taiwan, R.O.C.
Jffi!;.ftf-ftH~~l¥ii:fBfijlllH}"iJ tJ;jt~=mm¥j;~m14~2F .~( ft~~}D: (02)8287-6668 1lJll: (02)8287-6272
Mahajak Development Co., Ltd. 46 Mahajak Building, Sukhumvit Soi 3 (Nana-Nua) Klongtoey, Wattana, Bangkok
Thailand
Thailand. 10110 Tel: 66-2-256-0020 Fax: 66-2-253-1696
Ertekin electronik tic. ve san. a.s. Galipdede Caddesi No.: 113 Kuledibi-Karak6y / Istanbul, Turkey
Turkey
Tel: +90(212)293-9515 Fax: +90(212)249-3512
VV & SONS L.L.C. Street No-11/B, Road NO-128, Shed No-39 AI Khabisi, Deira, Dubai, U.A.E
U.A.E.
Tel: +971-4-266-2435, 268-4575 Fax: +971-4-266-2052
Ukraine
Mirs Ltd. Osipova str. 37/0ffice 1,65012 Odessa, Ukraine
Tel: +380 (482) 305530 Fax: +380 (482) 305555
United
DENON UK A division of D&M Audiovisual Ltd. Moorbridge House, Padbury Oaks, 579 Bath Road,
Longford, Middlesex, UB7 OEH, United Kingdom Tel: +44(0)1753-680568 Fax: +44(0)1753-689697
Kingdom & Eire
DENON ELECTRONICS (USA), LLC (a D&M Holdings Company)
U.S.A.
100 Corporate Drive, Mahwah, NJ 07430-2041 Tel: 800-497-8921 Fax: 888-544-8434
Anh Duy Manufacturing - Trading Co., Ltd. 170 Ung Van Kheim St., Ward 25, Blinh Thanh Dist., HCMC, Vietnam
Vietnam
Tel: +848 898 3424 Fax: +848 898 3425
•
•
•
•
•
•
•
•
If there is no service center in your local area, please contact one of our overseas service centers, listed above, for follow-up service consultation.
1st kein Service-Center in Ihrer Nahe, setzen Sie sich bitte miteinem der hier aufgelisteten Adressen in Verbindung.
Si il n'y a pas destation technique proche de chez vous, veuillez contacter nos I' un de noscentres techniques, lisles ci dessous, pour toutes demandes techniques.
Ais er geen servicecenter bij uin de buurt is, neem dan contact op een een van onze bovengenoemdeservicecenters voor ondersteuning.
Si no hay un servicio tecnico en su zona, por favor contacte con uno de los servicios tecnicos centrales. indicados abajo, para realizar un seguimiento de su consult.
Om det inte finns nagon auktoriserad Oenon-verkstad dar du bor, kontakta en av vara internationella servicecentra (se ovan).
5e non ci sono dei centri assistenza autorizzati nella vostra zona, potete fare riferimento agli altri centri assistenza autorizzati, vedi elenco sopra, per qualsiasi
consultazione tecnica.
Caso nao exista um centro de assistencia tecnica na sua area, con suite um dos centros acima apresentados
•
•
~D;fi'j"!'l!!MiI!\\n1U~ep'L" m!JJl:~pJi9li*:L}i5JI/ij~H~f:l5ep,L,'i!t~-mf&g~f)HJl1L
;fi~Ji!!xg~~tj:J,L'. i.Jl**l:i£PliJli'ft1ni¥Jl/ij51-g~~tj:J{". ):..J.j;!mWf,g~~~iilJ
0
0
DENON
www.denon.com
Oenon Brand Company, O&M Holdings Inc.
Printed in China 000 515 0921801 &1 611
DENON®
LIMITED WARRANTY
(USA / CANADA)
USA (ENGLISH)
CANADA (ENGLISH)
CANADA (FRENCH)
PAGE
2
3
4
USA
DENON ELECTRONICS (USA), LLC
(a D&M Holdings Company)
100 Corporate Drive
Mahwah, NJ 07430-2041
(800) 497-8921
(888) 544-8434 Fax
DENON REGIONAL SUPER SERVICE CENTERS (Repair only-No parts orders please)
PYRAMID AUDIO
UNITED RADIO SERVICE
AUDIO SERVICES
305 E. Braker Lane
Austin, TX 78753-2746
(512) 458-8292
(512) 453-4542 Fax
5717 Enterprise Parkway
E. Syracuse, NY 13057-2905
(800) 634-8606
(315) 446-8505 Fax
544 Central Dr., Suite 101
Virginia Beach, VA 23454-5245
(757) 498-8277
(757) 498-9554 Fax
--------------------------------------------------------------------------------------------------
INNER SOUND
NORMAN'S ELECTRONICS
GOLD CROWN ELECTRONICS
1416 S.E. Morrison Street
Portland, OR 97214-2646
(503) 238-1955
(503) 238-1787 Fax
3653 Clairmont Road
Atlanta, GA 30341-4907
(770) 451-5057
(770) 455-8337 Fax
Victoria Business Park
129 E. Savarona Way
Carson, CA 90746-1406
(310) 538-8282
(310) 538-8281 Fax
------------~-------------------------------------------------------------------------------------
SERVICE WIDE TECHNOLOGIES
ELECTRONICE EXPRESS
2239 Curtiss Street
Downers Grove, IL 60515-4010
(630) 969-7333
(630) 969-7330 Fax
1809 E. Fabyan Parkway
West Chicago, IL 60185
(630) 208-4600
(630) 208-4601 Fax
CANADA
D&M CANADA INC.
5-505 Apple Creek Boulevard
Markham Ontario, L3R 5Bl
(905) 475-4085
(905) 475-4159 Fax
WARRANTY (HOME)
ODD 515 0944 600
1
I
~"'lll"~"'III"""""II"'''''''''II'~'''''''III''''''''''lll'
111
,'l~"
,III,
-'llll,
Th,,"",","y .,11 '" ho"ored wly m ,h, U.S.A
t
t
t.
t
t
-,'III
DEN 0 N
-.,III
,1111
,11'
,11'
"11
111
'.,1
"111
,"1'··
·,,11"·
·'.,1.'·
·."11··
·,.,1"·
·.,'.1
·,.11.'·
·,.,1'··
·"111··
·"111··
·'1111'·
·."11
®
•
LIMITED WARRANTY
,
Length of Non-Transferable Warranty
0
.
This warranty on your DENON product which is distribuled and warranted by DE
N ELECTRONICS (USA), LLC remains in effect for the following periods from
the date of the original consumer purchase from an AUTHORIZED DEN ON ELECTRONICS (USA). LLC DEALER.
4
~
t
t
t
,,
I
t
t
t
,
,
,
~
i.
,
•
.~-.'....
,
~~
t
t
;
!.•
·.,Ill.
,Pod'$ a trademark 01 Apple Computer. Inc, registered
II)
the U.S and other countries
,t
t
t
What is Covered
Except as specified below. this Warranty covers all defects in material and workmanship in this product occurring during the above warranty periods. The following are
not covered by the Warranty: (I) Any product which is not distributed in the U.S.A. by DENON ELECTRONICS (USA). LLC. (2) Any produci which is nol purchased in
the U.S.A. from an authorized DENON dealer. unless the product is purchased through Ihe U.S.A. Mililary Exchange Service where the Warranty will be One (I) year for
all products lisled above except in the case of Cartridges. Accessories. Remole Controller and Headphone which will remain al 90 days. (Note: AUTHORIZED DE 0
DEALERS can be identified by DENON AUTHORIZED DEALER Slicker displayed in the stores. If you are uncertain as 10 whelher a dealer is a DENON
AUTHORIZED DEALER. please contact DE ON as lisled below). (3) Any product on which the serial number has been defaced, modified or removed. (4) Damaged
delerioration or malfunction resulting from: a) Accident, acl of nalure. abuse. misuse, negieci. unauthorized produci repair. opening of or modificalion or failure to follow
instructions supplied with the product. h) Repair or allempted repair by anyone nol aUlhorized by DENON. c) Any shipme11l of the produci (claim must be presenled to
carrdier). (5) .'dtemls sUubjsecAt to(wS)eaDr from ndormal usage (tape hCeDad/sD·'Vc'Dlrtrdidges. (s9ty)luUS' battery. etC)·1 (6) Periodiclchecdk/-uPS Wfhich dOl nol dl.isclose an (y,dOe)fAect. (7) ISI·e of the
pro uct OUtSl e t le . . .
amage magnettc lape or
ISCS.
se III md ustna. commercia. an or pro eSSlona app Icattons.
ny mSia allon or
removal charges resulting from product failure.
•
What We Will Pay For
~ rep~:~:~:~7i:~eo;~~:~~~~~~a:ea:~t~,t;,~~~i~~e~r~~ne~~~v~~~~t~~,~~~t~:lc~od:'I'~~:~::~;~~~~~
~~t~,~~:~~~ej~~~~,~:si~rf~aU::rIObe defective by DENON. DEN ON will
tt
t
i
How to Obtain Warranty Performance
If your unit ever needs service. it may be taken or shipped to any aUlhorized DENON service station or DENON ELECTRONICS (if you are uncertain as to
whether a service station is DENON authorized. please contact DENON as listed below.) In all olher cases, the following procedures apply whenever your unil must
be lrallSported for warranty service;
,
;:•.0.'• .,
,
,
~
~
~
~
•
~
•
~
~,
,
~
a.
b.
•
~
•
~
~Oo:._
c.
d.
You are responsible for transporting your unit or arranging for its transportation.
If shipment of your unil is required:
You must pay the initial shipping charges. but we will pay Ihe relurn shipping charges if the repairs are covered by the Warranty.
WHEN RETURNING YOUR UNIT FOR WARRANTY SERVICE. A COPY OF THE ORIGINAL SALES SLIP MUST BE ATTACHED.
You should include the following: your name. address. daytime telephone number, model and serial number of the product and a description of Ihe
problem. In the case of a CD or DVD Player. please enclose ONE (I) disc Ihal the unit has failed with for test reasons. " will be returned with the unit.
THIS WARRANTY IS VALID IN THE U.S.A. 0 LY.
If your produci does not require service, but you have questions regarding its operation, please conlact our Technical Services Department as listed below.
,
'._.~.'
,
4
f
t.~_·.
,
..~.
~.:
~.~.'
t
~ =.~'
.•
THIS WARRA TY IS EXPRESSLY MADE IN LIEU OF ALL OTHER WARRANTIES. EXPRESSED OR IMPLIED. INCLUDING WITHOUT LIMITATION,
WARRA TIES OF MERCHANTABILITY AND FITNESS FOR A PARTICULAR PURPOSE.
t
OUR LIABILITY IS LIMITED TO THE REPAIR OR REPLACEMENT. AT OUR OPTION. OF ANY DEFECTIVE PRODUCT AND SHALL IN NO EVENT
INCLUDE INCIDENTAL OR CONSEQUE TlAL COMMERCIAL OR PROPERTY DAMAGES OF ANY KIND. WE ARE 01' RESPONSIBLE FOR
PRODUCTS LOST. STOLE AND/OR DAMAGED DURING SHIPPING.
,
..:
~
SOME STATES DO NOT ALLOW LIMITATIONS ON HOW LONG AN IMPLIED WARRA TY LASTS AND/OR DO 01' ALLOW THE EXCLUSION OF
INCIDENTAL OR CONSEQUENTIAL DAMAGES, SO THE ABOVE LIMITATIONS AND EXCLUSIONS MAY NOT APPLY TO YOU.
,
,
This warranty gives you specific legal righls. but you may also have other rights which vary from state to state. This Warranty may not be altered other Ihan in a
•
~
t
t
•
!.,;,;", ;,"'"
,.'.
t
I
by '" offim of "'"0" Eltt'ro"i•.,
USA;~:ON ELECTRONICS (USA), LLC
t.~·.
I
'
(a D&M Holdings Company)
100 Corporate Drive
Mahwah, NJ 07430·2041
;
,
•
~~~:~~~~~~~m
t
.,11111.....:.1111.......11111'........11"......'1111'.......11111........111,.......1111,......<11111......11111,.......111".....,11111.......1111........1111.......11111,.....,11111......1111.......1111......'111".....'11111......'1111,......1111......·,11II'·....·.11I1'·. . .·'11I1··. . .·'11II··....·.11I1o·....·.11I1'·. . .·'11I1......·,1111··....·'1111··. . .·'111'··. . .
2
~"IUI~'~-'llIt""-'IIl"''''''I'I''~'''-''III''''''-''lll'''''-'111' ....... II~"....... "III.......IIII'......-"lIr.......IIl'......'IIII...... ,11~··. . .·"lI.'·. . .·"III'. . .·.lill'·. . .·,"II!·....·"II'··. . .·"III......·.,Il"·....·.IUI··....·.II'I··. . .·.rlll··.... ·.II~··. . .·.IIII··....·.11lt.......1111.......111"
•
11m warranly will be honored only
¥
DENON
t
t
t
t
t
......11110.....,'111....... 1111.
Canada.
In
~
®
t
t
LIMITED WARRANTY
,
,_- ~_.
Length of Non-Transferable Warrant)'
::;~~,:~~~~~:~,~~:;~,~~~~~(~:;,~~~;~:~~I~:~t~~u~~~,d :~:al~~. 6E~~~CANADA
,
INC. remains in effect for lhe following periods from the date of the
~~
'0_'='
•
,f~
t
tt
•
t
t
,t
f
t
t
tt
t
f
~
,
~
t
t,
~
What is Covered
Except as spc<.:ified below. this Warranty covers all defet:ts in malerial and workmanship in this produci occurring during the above warranly periods. The following are
not covered by the Warranty: (I) Any prOdUCI which is not dislrihuted in Canada hy D&M CANADA INC. (2) Any product which is nol purchased in Canada from an
authorized DEN ON dealer. (Nole: AUTHORIZED DENON DEALERS can he identified by DENON AUTHORIZED DEALER sticker displayed in the slores. If you are
uncenain as to whether a dealer is a DE ON AUTHORIZED DEALER. please conlacl D&M CANADA INC. as listed below). (3) Any product on which the serial
•
number has been defaced. modified or removed.
•
~
,
1
,
~
.,
t
tt.
t
•
What We Will Pay For
repl,:,~j~:~I;i:~:~~~::~::~~a;;I:~'lt~t~,::~i~~~r~~':~~~v~:~~tO~,~~ll:,:llc~O~:sl~~:~::I~;~~~~~ ~~~,~~:~~~ f.~~(~~I~:si~rf~~;odr.to
be dcleclive by DENO . DE ON will
How to Obtain Warranty Performance
If your unit ever needs service. ilmay be laken or shipped 10 any authorized DENON service station or D&M CANADA INC. (if you arc uncenain as to whether a
service stalion is DENON authorized. please contact D&M CANADA I C. as listed below.) In all other cases. the following procedures apply whenever your unit
must be transported for warranty service:
a.
b.
You are responsible for transporting your unit or arranging for its transportation.
If shipmenl of your unit is required;
You must pay the initial shipping charge:-;. but we will pay the return :-;hipping charges if the repairs arc cuvered by the Warranty.
WHEN RETURNING YOUR UNIT FOR WARRANTY SERVICE, A COpy OF THE ORIGINAL SALES SLIP MUST BE ATTACHED.
You should include the following: your name. address. daytime telephone number. model and serial number of the producl and a description of the
problem. In the case of a CD or DVD Player. please enclose ONE (I) disc that the unil has failed with for test reasons. 11 will be relUrned with the unit.
c.
~
a) Accident. act of nature. abuse. misuse. neglect.
unauthorized product repair. opening of or modification or failure 10 follow instructions supplied with the product. h) Repair or allempted repair by anyone not aUlhorized
by DENON. c) Any shipmenl of the producl (claim must he presenled to carrier). (5) hems subject to wear from normal usage (tape heads. cartridges, stylus. hallery,
elc.). (6) Periodic check·ups which do not disclose any defect. (7) Use of the product outside Canada. (X) Damaged magnetic tape or CD/DVD discs. (9) Use in
industrial. commercial. and/or professional applications. (10) Any installation or removal charges resulting from product failure.
'_._'.
,
(4) Damaged deterioration or malfunction resultinf! from:
d.
;
:
,_-_~
~_~_.
~_..'
~_'
~
i
~
6~-~'.
,
•
,
,
,
t
t
THIS WARRANTY IS VALID IN CA ADA ONLY
t
THIS WARRANTY IS EXPRESSLY MADE IN LIEU OF ALL OTHER WARRANTIES. EXPRESSED OR IMPLIED. INCLUDING WITHOUT LIMITATION.
WARRANTIES OF MERCHANTABILITY AND FITNESS FOR A PARTICULAR PURPOSE.
,
,
OUR LIABILITY IS LIMITED TO THE REPAIR OR REPLACEMENT. AT OUR OPTION. OF ANY DEFECTIVE PRODUCT AND SHALL IN NO EVENT
I CLUDE INCIDENTAL OR CONSEQUENTIAL COMMERCIAL OR PROPERTY DAMAGES OF ANY KIND. WE ARE OT RESPO SIBLE FOR
PROD CTS LOST. STOLE AND/OR DAMAGED DURING SHIPPI G.
f'~._:
,
t
,
~
t
t
t
t
If your product does not require service. hut you have questions regarding its operalion. please
'~:'
our Technical Services Department as listed below.
SO 1E PROVINCES DO NOT ALLOW LIMITATIONS ON HOW LONG A IMPLIED WARRA TY LASTS A D/OR DO NOT ALLOW THE EXCLUSIO
INCIDENTAL OR CONSEQUENTIAL DAMAGES. SO THE ABOVE LIMITATIONS AND EXCLUSIONS MAY NOT APPLY TO YOU.
OF
,
This warranty gives you specific legal rights. but you may also have other rights which vary fr0111 province to province. This Warranty may not be altered other
than in a writing signed by an officer of D&M Canada Inc.
5-505 Apple Creek Boulevard
Markham, Ontario
L3R 5B 1
(905) 475-4085
www.denon.ca
t
t
,
111'
11"
11'10
111.'
1111
111'
1111
1111
1111
111
1111
'1111
"111
1111'
,1111'
1111
'111"
'1111'
111"
1
,
,
,
t
D&M CANADA INC.
t
.,1111
COl1laCI
~
i
'f
¥
'1111
1111'
'1111
'.111
1111'
111'
,.111
'1111
1111'
111"
'111··
·,1111 . .
3
~"llll""""IIII"~"IIII"~'''III •." ,.• ''I'''''''''IIII''~''111"'~"'III"""'III'~""II""""III"""IIII''''''''III'
•
Celte garantle ne sera honoree qu au Canada,
~
I
It
t
t
t
t
t
t
t
t
t
t
t
t
GARANTIE L1MITEE
~
•
~
•
~
•
~
t
•
~
t.'
t.'
t
•
~
~
!.-:',
,
~
,
I
~
!
~
•
t
,
•
t
t
•
•
t
•
Apple et ,Pod sont des ma,ques comme,clOles d Apple Compute" Inc. deposees au' Etats·Unos eJ dans d auUes pays
Couverture
Celte garantie COllvre tOllS les defauts de materiel au de fabrication dll produi!. " I'exception de ceux indiques ci-apres qui conforrment scion les lermes dllrant la periode
de la garantie. Ne sont pas cOllverts par la garanlie: (1) Toul produit qui n'est pas distribue au Canada par D&M CANADA INC. (2) Tout produit qui n'a pas ete achete au
Canada aupres d'un revcndeur officicl DENON (Note: On peut idenlifier les revendeurs offieiels DENON par leur allto·eollant "REVENDEUR OFFICIEL DENON" alliche
dans leur magasin. Si vous doulez qu'un revendellr soit olliciellement reconnu. contactez D&M CANADA INC. it I'adresse ci-dessolls.) (3) Tout produil dont Ie numero de
serie a ete efface, modifie au enleve. (4) Dommages dus it la deterioration au 11 un fonctionnement defectueux la suile de: a) accident. aCle de la nature, abus, utilisation
impropre, negligence. reparation au moyen d'un produit non autorise. debale, modification. emploi contraire aux instructions fournies avec Ie produit, b) reparation au
tentative de reparation par quelqu'unnon reconnu par DENON. c) lOut envoi du produit (la reclamation doit etre presentee au transporteur), (5) Articles sujels 11 delerioralion
par l'usage (teles de magnelophone. cellules phono, pointes de lecture phono. piles, elc.). (6) Verificalion periodique qui ne revele aueun defau!. (7) Utilisation du produit
hors du Canada. (8) Bandes magnetiques. disques CD au DVD endommages. (9) Utilisation commerciale. industrielle au professionnelle. (10) Toutes charges d'installation
au de deplacement resultant d'un defaut du produi!.
'I
Notre paiement
Si vOlre produit DENON eSI reconnu defectueux par DEN ON durant la periode d'application de la garantie apres la date d'achat du consommateur. DENON
reparem au. iI son choix. remplaeem avec un modele neuf. usage au equivalent ce produit defectueux sans frais de pieces ni de main d'ceuvre.
Execution de 13 garantie
Si votre produit necessite service. il peut clre envoye 11 tout atelier de service officiel DENON au chez D&M CANADA INC. (Si vous doutez que I'atelier de
service soit otriciellement reconnu. contactez D&M CANADA INC. " l'adresse ci-dessous). Dans taus les autres cas, les procedures suivantes s'appliquent si votre
article doil eire transporte pour un service SOllS garantie.
H.
b.
c.
•
•
~
I,
t
t
Categorie de prodllit
t.,.
•
DENON®
Duree du garantie non-transferable
La garantie de votre produil DENON, distribue el garanti par D&M CANADA INC. prend effel 11 partir de la dale d'achat dll consommateur original allpres d'un
rcvcndellr official D&M CANADA INC. pendant les periodes suivantes.
•
•
.....,'111' ......1111'.......1111'. ....,1111' .......'111......,[111' ..... ·.lllt'·. . .·.IIII'·. . .·.'IIIo·....·,'III·..... ·,'II..·. . .·.'III......,'11'··. . .·.'111'·. . .·.'11"·......·.1111··.... ·0\111'·. . .·.1111··. . .·,111
d.
VallS etes responsable du transport de VOlfe article ou vallS devez vallS arranger VQllS-meme pour son transport.
Si volfe article do it etre envoyc, vallS dcvez payer les frais d'envoi initiaux, mais nous payerons les frais de retour si la garanlie couvre les reparations.
LORSQUE VOUS RENVOYEZ VOTRE ARTICLE POUR UN SERVICE SOUS GARANTIE, VOUS DEVEZ JOIN ORE UNE COPIE DE LA
FACTURE D'ACHAT D'ORIGINE.
Vous devez inclllre egalement vas nom, adresse, numere de telephone de jour, nllmeros de modele el de serie du produil el une descriplion du probleme.
Dans Ie cas d'un lecleur CD ou DVD. joindre un disque que I'appareil n'a pu lire pour test. II vous sera relourne avec l'article.
CESTTE GARodA , TIE EST VALABLESEULMENT AU CAdNADA. .
.
t'
.
d'
h'
d
I' d
fi
.d
I volre pI' ulI ne reqUicrt aucun service mals que vallS avez es questions quant "son onctlonnement, contactez notre epartement lee mquc ont a resse Igure CI- essous.
t
•
._....'
~...'
~...'.'
•
t
t
.0'.'
t_:.·,
~
".:.',
,
,
~o:
.
~_~.'
"0:."
,
CETTE GARANTIE EST EXPR,?SSEMENT FAITE EN LIEU ET PLACE DE TO UTES LE;S AUTRES GARANTIES EXPRIMEES 0 SOUS-E TE DUES' Y
COMPRIS. SANS SE LIMITER A CELLES-Cl, LES GARA TIES MARCHANDES ET SPECIFIQUES POUR U USAGE PARTICULIER.
.•_:.',
NOTRE RESPONSABILITE SE LIMITE A LA REPARATION OU AU REMPLACEMENT, A NOTRE CHOIX, DE TOUT PRODUIT DEFECTUEUX ET
N'INCLUT EN AUCUN CAS DES DOMMAGES FORTUITS, COMMERCIAUX INDIRECTS NI MATERIELS D'AUCUNE SORTE. NOUS NOUS SOMMES
PAS RESPONSABLES POUR LA PERTE DE LES PRODUITS ET/OU LES MARCHANDISES ENDOMMAGEES PENDANT LE TRNASPORT DES BIENS.
t.·
•
CERTAINES PROVINCES NE PERMETTENT PAS DE L1MITES QUANT A LA DUREE D'UNE GARANTIE SOUS·ENTENDUE ET/OU NE PERMETTENT
PAS L'EXCLUSION DE DOMMAGES FORTUITS. LES LIMITATIONS ET EXCLUSIONS MENTIONNEES PLUS HAUT PEUVENT NE PAS S'APPLIQUER
A VOTRE CAS.
•
•
etr;~~~dr;,~:n~~ee~~~su~o;;eu~~:n~~~:~el~~~UuxnS~s~\~~~~~;e~~~~:ils~ed~o~;~ ~~~:;:1S "yel d'autres droits qui varient d'une province i11'autre. La gamnlie ne pellt
t
D&M CANADA INC.
t•
%
t
~
t
t
tt
t
i
•
t
•
5-505M~k~~~~e~~t~~~evard
!
www.denon,ca
t
t
(9oi(:7~~~085
.,111'.......1111......'1111......'1111'......1111......'11110.....,1111··.....·'IIII'· . . .·.tlll'·. . .·.IIII··....·.'III··. . .·.IIII......,11.'.......1111.......111'......'1111'......'1111'......'11".......'111'......'1111.......'1111.......'1111.......'1111........1111.......,1111'.......'111'.......1111.......,1111'.......1111....... '1111.......,1111.......,111" .....
4