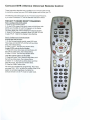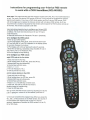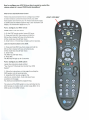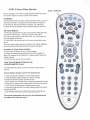
1
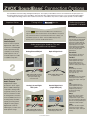
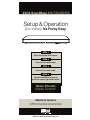
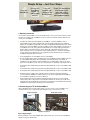
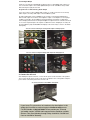
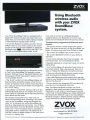
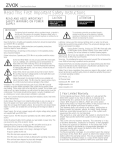
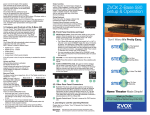
® ® ZVOX SoundBase 870/770/670/570 Quick Setup 1 2 3 Position the SoundBase. Connect the power cord. Connect to Optical Audio Output of TV. 1 OFF 4 Connect to Optical Audio Input of SoundBase. Back of SoundBase “TV base” position 2 Back of TV Back of SoundBase AC Power Receptacle Shelf position Place the SoundBase on stable, flat surface. Ensure all components are stable and secure. Connect the AC power cord to the back of the SoundBase. Leave the Power Switch in “Off”. Then insert the AC plug into an AC power receptacle. Optical Audio Output Connect one end of an optical digital cable to the TV’s Audio Out optical jack. SoundBase’s Optical Audio Input #1 Connect the other end of the optical cable to the SoundBase’s optical input jack #1. 6 Confirm you hear TV sound through the SoundBase. With an optical digital audio connection, you should hear the TV sound through the SoundBase with the SoundBase volume set to 12-15. If you don’t hear sound or if you did not use an optical connection, press the INPUT button on the SoundBase remote control to select the correct input. Select the TV input using the remote control ,1387 ,138 ',$/2* (03+$6,6 32:(5 6855281' or the front panel. Other Possible TV Audio Outputs a b RCA Jack Analog Audio Out A red/white pair of RCA jacks on the back of the TV labeled OUTPUT. Do not connect to RCA jacks labeled INPUT. Input 1 Back of TV “Minijack” Analog Audio Out Some TVs use a minijack output or headphone jack. Do not use a minijack labeled INPUT. Back of SoundBase Input 1 5 Flip on the Power. ON Back of TV Input 1—digital (optical jack) Input 2—digital (optical jack) Input 3—digital (coaxial jack) Input 4—analog (RCA jacks) Back of SoundBase Input 5—analog (RCA jacks) c Coaxial Digital Audio Output (Single RCA jack, may be orange) Any cable with an RCA plug at each end can be used. Input 6—analog (front minijack) Back of TV Back of SoundBase A=6?(\KPV33* Bluetooth device ® ® ZVOX SoundBase Connection Options Your SoundBase has both analog and digital audio inputs. The majority of SoundBase owners connect between the optical jack on a TV and the optical input jack on the SoundBase. This page describes audio output types found on a TV or Set Top Box (optical digital, coaxial digital and analog) and the cable needed to connect to a SoundBase. Any of these audio outputs provides excellent fidelity. Important Notes 1 Where Is The Audio Output? Most TVs have an optical digital audio output, while a few have a coaxial digital audio output instead. You could also use an analog audio output on a TV, or an audio output on a cable or satellite set top box. Pairing with a Audio signal outputs for popular TV brands: device <RXVHH DSSHDURQWKH6RXQG%DVHZKHQWKH%OXHWRRWK LQSXWLVVHOHFWHG7KH´E/8(µÁDVKHVLIWKH6RXQG%DVHLVQRWSDLUHG ZLWKD%OXHWRRWKGHYLFH,I\RXU%OXHWRRWKGHYLFHKDVDGLVSOD\WKH 6RXQG%DVHDSSHDUVDV´=92;µ7KH6RXQG%DVHGLVSOD\VWRSV ÁDVKLQJZKHQLWSDLUVZLWKWKH%OXHWRRWKGHYLFH Audio output jacks found on TVs and cable/satellite set top boxes: Analog Stereo Minijack Optical Digital Jack A digital audio output provides the “best” signal but the audible advantage compared to analog audio is typically small. If you find it more convenient to make an analog audio connection to the SoundBase, then use it. Dialog clarity should be equally good using either a digital or analog signal. Digital audio can be an advantage if you want more audio dynamic range. 4VZ[YLJLU[3,+3*+:HTZ\UN ;=ZOH]LIV[OHUVW[PJHSKPNP[HS V\[W\[HUKHZ[LYLVTPUPQHJR H\KPVV\[W\[6SKLY3,+3*+ :HTZ\UNTVKLSZOH]LSLM[HUK YPNO[9*(QHJRZHZHUH\KPV V\[W\[PUZ[LHKVM[OLTPUPQHJR V\[W\[4VZ[:HTZ\UNWSHZTH ;=ZOH]LHZPUNSLVW[PJHS H\KPVV\[W\[ Panasonic: 4VZ[7HUHZVUPJ;=ZOH]LHU VW[PJHSKPNP[HSH\KPVV\[W\[ Toshiba: 9LJLU[;VZOPIH;=ZOH]LHU VW[PJHSKPNP[HSH\KPVV\[W\[ :VTLTVKLSZHSZVOH]LH OLHKWOVULQHJR[OH[JHUIL \ZLKHZHUHUHSVNH\KPVV\[W\[ 2 Analog Versus Digital Audio Outputs Samsung: Sharp: 9LJLU[:OHYW;=ZOH]LH KPNP[HSH\KPVV\[W\[HUKHU HUHSVNZ[LYLVH\KPVV\[W\[ 1HJRZ[`SL^PSS]HY` Audio signal cable needed: (Z[LYLVTPUPWS\NH[VULLUK HUKHWHPYVM9*(WS\NZ H[[OLV[OLYLUK Audio signal cable needed: (UVW[PJHSJHISL Insignia: 4VZ[0UZPNUPH;=ZOH]LHKPNP[HS H\KPVV\[W\[HUKHUHUHSVN Z[LYLVH\KPVV\[W\[1HJRZ[`SL ^PSS]HY` LG: Analog Left and Right RCA jacks Coaxial Digital Jack (single RCA jack) 3.;=Z[`WPJHSS`OH]LHU VW[PJHSKPNP[HSH\KPVV\[W\[ :VTLTVKLSZHSZVOH]LH OLHKWOVULQHJR[OH[JHU IL\ZLKHZHUHUHSVN H\KPVV\[W\[ Sony: 9LJLU[:VU`;=ZHUVW[PJHS KPNP[HSV\[W\[HUKHZ[LYLV TPUPQHJRH\KPVV\[W\[:VTL :VU`;=Z\ZLSLM[HUKYPNO[9*( QHJRZMVYHUHUHSVNH\KPVV\[W\[ PUZ[LHKVMHZ[LYLVTPUPQHJR Vizio: Audio signal cable needed: (WHPYVM9*(WS\NZH[LHJOLUK Audio signal cable needed: (U9*(WS\NH[LHJOLUK A=6?(\KPV33* 4VZ[=PaPV;=ZOH]LHKPNP[HS H\KPVV\[W\[HUKHUHUHSVN Z[LYLVH\KPVV\[W\[1HJRZ[`SL ^PSS]HY` ZVOX SoundBase 870/770/670/570 ® Setup & Operation Don’t Worry It’s Pretty Easy. STEP 1 Place the system on furniture. STEP 2 Connect one signal cable. STEP 3 Connect the power cable. STEP 4 Use the SoundBase remote to select the correct input and volume. Home Theater Made Simple! What’s in the box SoundBase system • Remote control • Instruction sheets AC power cord • Optical digital and Analog signal cables ® (866) 367-9869 | [email protected] READ THIS FIRST WARNING Important Safety Instructions For ZVOX System TO PREVENT FIRE OR SHOCK HAZARD, DO NOT EXPOSE THIS APPLIANCE TO RAIN OR MOISTURE. THIS APPLIANCE SHALL NOT BE EXPOSED TO DRIPPING OR SPLASHING WATER AND NO OBJECT FILLED WITH LIQUIDS SUCH AS VASES SHALL BE PLACED ON APPARATUS. CAUTION RISK OF ELECTRICAL SHOCK, DO NOT OPEN Warning: To reduce the risk of electrical shock, do not remove cover (or back) – no serviceable parts inside. Refer servicing to qualified service personnel. The exclamation point within an equilateral triangle is intended to alert the user to the presence of important operating and maintenance (servicing) instructions in the literature accompanying the appliance. This lightning flash with arrowhead symbol, within an equilateral triangle, is intended to alert the user to the presence of uninsulated “dangerous voltage” within the product’s enclosure that may be of sufficient magnitude to constitute a risk of electrical shock to persons. Important Safety Instructions 1. Read these instructions. 2. Keep these instructions. 3. Heed all warnings. 4. Follow all instructions. 5. Do not use this apparatus near water. 6. Clean only with dry cloth. 7. Do not block any ventilation openings. Install in accordance with the manufacturer’s instructions. 8. Do not install near any heat sources such as radiators, heat registers, stoves, or other apparatus (including amplifiers) that produce heat. 9. Do not defeat the safety purpose of the polarized or grounding-type plug. A polarized plug has two blades with one wider than the other. A grounding type plug has two blades and a third grounding prong. The wide blade or the third prong are provided for your safety. If the provided plug does not fit into your outlet, consult an electrician for replacement of the obsolete outlet. 10. Protect the power cord from being walked on or pinched particularly at plugs, convenience receptacles, and the point where they exit from the apparatus. 11. Only use attachments/accessories specified by the manufacturer. 12. Use only with the cart, stand, tripod, bracket, or table specified by the manufacturer, or sold with the apparatus. When a cart is used, use caution when moving the cart/apparatus combination to avoid injury from tip-over. 13. Unplug this apparatus during lightning storms or when unused for long periods of time. 14. Refer all servicing to qualified service personnel. Servicing is required when the apparatus has been damaged in any way, such as power-supply cord or plug is damaged, liquid has been spilled or objects have fallen into the apparatus, the apparatus has been exposed to rain or moisture, does not operate normally, or has been dropped. 15. Grounding or Polarization–This product may be equipped with a polarized alternating-current line plug (a plug having one blade wider than the other). This plug will fit into the power outlet only one way. This is a safety feature. If you are unable to insert the plug fully into the outlet, try reversing the plug. If the plug should still fail to fit, contact your electrician to replace your obsolete outlet. Do not defeat the safety purpose of the polarized plug. Alternate Warnings–This product is equipped with a three-wire grounding-type plug, a plug having a third (grounding) pin. This plug will only fit into a grounding-type power outlet. This is a safety feature. If you are unable to insert the plug into the outlet, contact your electrician to replace your obsolete outlet. Do not defeat the safety purpose of the grounding-type plug. 16. Ventilation–Slots and openings in the cabinet are provided for ventilation and to ensure reliable operation of the product and to protect it from overheating, and these openings must not be blocked or covered. The openings should never be blocked by placing the product on a bed, sofa, rug, or other similar surface. This product should not be placed in a built-in installation such as a bookcase or rack unless proper ventilation is provided or the manufacturer’s instructions have been adhered to. 17. The MAINS plug or an appliance coupler is used as the disconnect device, the disconnect device shall remain readily operable. 18. CLASS II apparatus with double insulation, and no protective earth provided. 19. CAUTION: Danger of explosion if the remote control battery is incorrectly replaced. Replace only with the same or equivalent type. 20. WARNING: The remote control battery (battery or batteries or battery pack) shall not be exposed to excessive heat such as sunshine, fire or the like. 21. No naked flame sources, such as lighted candles, should be placed on the apparatus. Special Safety Warnings Regarding Placement of ZVOX System and Other Equipment Stable Placement. Do not place the ZVOX system on an unstable cart, stand, bracket or table. The ZVOX system may fall, causing serious injury to a child or adult and serious damage to the product. Do not use the ZVOX system on any unstable surface. Placement of a TV on the ZVOX system. A television that weighs less than the cited limits and that has a base that is smaller than both dimension limits (shown below) can be placed on top of a ZVOX system—BUT ONLY WHEN THE FOLLOWING SAFETY PRECAUTIONS ARE STRICTLY OBSERVED. PLACING A TV ON TOP OF A ZVOX SYSTEM WITHOUT FOLLOWING ALL THE PRECAUTIONS IS DANGEROUS AND SHOULD NOT BE DONE. • The TV must be anchored to the rear wall using anchor bolts and supporting cables according to the recommended guidelines provided by the TV manufacturer. Household accidents and other unforeseen disturbances are likely to occur. ZVOX Audio provides no guarantee that any object placed on top of a ZVOX Audio product is safe and stable. It is the sole responsibility of the ZVOX owner to check that any object placed on the ZVOX system is stable at the time of installation and at frequent intervals afterward. • SoundBase 870 and 770: The TV must weigh 140 pounds (64 kg) or less. The base of the TV must measure less than: Width Depth 41.5 in (1106 mm) 17 in (440 mm) • SoundBase 670: The TV must weigh 120 pounds (55 kg) or less. The base of the TV must measure less than: Width Depth 35.5 in (903 mm) 15.75 in (403 mm) • SoundBase 570: The TV must weigh 110 pounds (50 kg) or less. The base of the TV must measure less than: Width Depth 31.5 in (800 mm) 14 in (357 mm) • Install the ZVOX system on a solid and flat surface. Be sure to prevent the ZVOX system from changing position after installation. Simple Setup – Just Four Steps 12 3 4 Place the SoundBase. Connect the SoundBase to your TV and/or audio devices. Learn the features and controls of the ZVOX system. “Teach” the SoundBase to respond to your preferred remote controls commands (Volume/Mute/Power). 1. Speaker placement You can place the SoundBase on any flat, stable surface near your TV. If the TV base is small enough, you can place the SoundBase system on a piece of furniture and then place the TV on top of the SoundBase. • Consider the surface that will support the SoundBase. It is the SoundBase owner’s responsibility to insure that a furniture finish is unaffected by supporting the combined weight of a SoundBase and possibly a TV. Place an appropriate barrier between the surface and the feet of the SoundBase if you are in doubt. The four support pads on the bottom of a SoundBase are a soft, inert synthetic material that does not react with typical furniture finishes. But some furniture finishes can be deformed or altered by having any heavy object resting on them for a long period of time. ZVOX Audio, Inc. cannot be responsible for any change in the appearance of any supporting surface finish that may occur after a SoundBase is placed upon the surface. • A safe installation is the SoundBase owner’s responsibility. • Use an unswitched AC outlet to provide power to a SoundBase. If Auto Standby is turned on, a SoundBase will always enter its Standby state after 30 minutes of inactivity. A SoundBase uses less than 0.5 watt in Standby. Use of a switched AC outlet to cut off AC power to a SoundBase system may erase user preferences and delays subsequent turn-on. • A TV heavier than 140 lbs (64 kg) should not be placed directly on top of a SoundBase 870 and 770. • A TV heavier than 120 lbs (55 kg) should not be placed directly on top of a SoundBase 670. • A TV heavier than 110 lbs (50 kg) should not be placed directly on top of a SoundBase 570. • A flat panel TV has a high center of gravity. Please confirm the furnishing supporting your TV and the SoundBase is stable and secure. The surface supporting the SoundBase/ TV combination should not move in any direction. • All TV manufacturers recommend that a flat panel TV be anchored to a secure vertical surface with a tether. This prevents a household accident from causing a TV to fall off its supporting surface. ZVOX Audio recommends you heed this recommendation and all other installation recommendations made by the TV manufacturer. 2. Connecting your TV to the SoundBase Almost all HDTVs have an audio output, which you can connect to your SoundBase. You should not disconnect or change any video program source connected to your TV. TV Optical Output ZVOX Optical Input Optical Cable Optical Digital Output Almost all HDTVs use an optical digital audio output, which you connect to the Soundbase’s optical #1 using an optical cable. Coaxial Digital Output A few TVs, set top boxes and DVD/Blu-ray players have a coaxial digital audio output. You can connect this output to the coaxial digital audio input on the SoundBase using a cable with an RCA phono plug at each end. Program Sources with an Analog Audio Output If your TV set does not have a digital audio output, you could connect the TV set’s analog audio output to an analog audio input on the SoundBase system. An analog audio input on the SoundBase is also useful for connecting portable devices with an audio output. For instance, the headphone output of a smartphone or music player could be connected to the SoundBase front panel minijack. This requires a cable with a stereo miniplug at both ends. The minijack headphone output from a TV could be connected to one of the rear panel inputs. This requires a cable with a stereo miniplug at one end (to fit the TV headphone jack) and Red/White RCA plugs at the other end (to connect to the ZVOX back panel). You can connect an RCA jack analog audio output to Analog Input 4. OR You can connect a minijack analog audio output to Analog Input 4. 3. Connect the AC cord After making the signal connection, connect the AC power cord to the back of the speaker. Then connect the AC power cord to an AC power receptacle. Turn on the speaker using the power switch on the back panel next to the AC cord. AC cord connection to SoundBase back panel. If your home TV system does not conform to the descriptions in this guide, don’t hesitate to send an inquiry to [email protected] or call ZVOX Audio at (866) 367-9869. Please provide your TV brand and model number. A ZVOX Audio representative should be available (Eastern Time Zone) Monday through Friday 9:30 AM to 7:30 PM and noon to 4:00 PM on Saturday. 4a. Infrared Remote Control Features of the SoundBase Learning: You can “teach” the SoundBase to respond to your current TV remote control for the following functions: Volume, Mute (on/off) and Power (on/off). See the separate sheet for instructions. After this “learning” process, you will not need the SoundBase remote control for adjusting Volume, Mute and Power. Teaching the SoundBase to respond to your preferred remote does not affect the included SoundBase remote. The SoundBase remote will still provide its full range of adjustments. Input Selection: Pressing the INPUT button allows you to select a different input. Inputs are selected in the following order: Input 1—digital (optical jack) Input 5—analog (RCA jacks) Input 2—digital (optical jack) Input 6—analog (front minijack) Input 3—digital (coaxial jack) Bluetooth device Input 4—analog (RCA jacks) Remote Control Capabilities Mute Volume The VOLUME buttons on the SoundBase remote control operate in the normal manner. Power (STANDBY) MUTE VOLUME INPUT Bass set at -2 MUTE VOLUME INPUT Treble set at 1 The Power button on the SoundBase remote control toggles the SoundBase between STANDBY and On. Note: A SoundBase will automatically enter STANDBY if the selected input is silent for longer than approximately 30 minutes. A SoundBase in STANDBY will automatically turn back on if it senses a volume adjustment or power command from the “learned” remote control or the SoundBase remote control. Mute The MUTE button on the SoundBase remote control operates in the normal manner. When MUTE is active, the display will show a blinking -00- for 20 seconds. MUTE VOLUME INPUT Bass and Treble The Bass control has a range of -4 to 4. The Treble control has a range of -4 to 4. Note: The bass output of a SoundBase system is affected by its position within a room. You may find it sounds best with slightly more or less bass than the neutral setting. MUTE VOLUME INPUT MUTE VOLUME INPUT MUTE VOLUME INPUT Surround Settings There are three SURROUND levels: • Surround One (“Sd 1”) has low virtual surround effect and strong vocals. Use this setting if vocal clarity is important to you. • Surround Two (“Sd 2”) has moderate virtual surround effect and moderate vocals. Most people prefer this setting for most program material. • Surround Three (“Sd 3”) has strong virtual surround effect and moderate vocals. Many people prefer this setting when watching movies. Output Leveling MUTE VOLUME INPUT Press this button to prevent large changes in volume. When engaged, it boosts quiet dialog and lowers the output of loud commercial breaks. It also reduces volume swings between cable or satellite channels. This feature can be used along with any of the three Surround settings. Accuvoice Press this button to increase the clarity of most voices. Pressing Accuvoice overrides the current Surround setting. A second press returns the SoundBase to the last-used Surround setting. MUTE VOLUME INPUT 4b. SoundBase Front Panel and Rear Panel 1 2 3 SoundBase Front Panel Controls and Input 4 5 SoundBase Back Panel Inputs and Outputs 1 MUTE/Power button. If the system is on, a press of this button toggles MUTE on and off. Also while the system is on, if you press and hold the MUTE button for longer than four seconds, the system will enter STANDBY. 2 VOLUME -/+. The volume range indication is 01 to 30. 3 INPUT. Selects between the seven input choices on a SoundBase. See 4a Input in first column. 4 AUDIO CONNECTING JACK. Connect a smartphone or other audio device to this jack using a cable with a stereo miniplug at each end. Select Input 6 on the SoundBase (In6A appears on the display). 5 SUB OUTPUT AND STEREO SIGNAL OUTPUT. If your powered subwoofer has both Left and Right inputs, the SUB OUTPUT of the SoundBase should be connected to both inputs via a “Y” adapter. The STEREO SIGNAL OUTPUT supplies an audio signal for use with another another audio system or wireless headphones. The signal level from both outputs varies along with the volume setting on the SoundBase. 5. Digital Audio Troubleshooting TV sets with no audio output: You should check the program sources connected to the TV for an audio output (cable box, disc player, game box). Many cable boxes and DVD/Blu-ray players have both analog and digital audio outputs. If you connect directly to a set top box and a DVD/Bluray player, you need to switch inputs on the TV and the SoundBase. Bluray disc audio: If you don’t get sound from a Bluray disc, the digital audio on that disc may be encoded using a proprietary format. In this case, use the Bluray disc menu or the Bluray player menu to select Dolby Digital or PCM digital output. Internet streaming HD video audio: If your TV features a internet connection and displays HD streaming content, it may be necessary to select Dolby Digital or PCM digital audio in the TV or from the streaming provider’s sound options. STILL NEED ASSISTANCE? If your home TV system does not conform to the descriptions in this guide, don’t hesitate to send an inquiry to [email protected] or call ZVOX Audio at (866) 367-9869. Please provide your TV brand and model number. A ZVOX Audio representative should be available (Eastern Time Zone) Monday through Friday 9:30 AM to 7:30 PM and noon to 4:00 PM on Saturday. A=6?(\KPV33* A=6?HUK:V\UK)HZLHYLYLNPZ[LYLK[YHKLTHYRZHUK(JJ\=VPJLPZH[YHKLTHYRVMA=6?(\KPV33* )S\L[VV[OPZHYLNPZ[LYLK[YHKLTHYRV^ULKI`)S\L[VV[O:0.0UJ\ZLK\UKLYSPJLUZLI`A=6?(\KPV33* This guide applies to the SoundBase models 350, 450, 570, 670, 770 and 870. It does not apply to the SoundBase 220, 320, 420, 555 and 580 and earlier ZVOX Audio products. The PS Menu Adjusting the PS Menu The SoundBase has a variety of function and sound adjustments that could prove useful depending on the SoundBase owner's installation and usage preference. The list of adjustments is called the PS Menu. To make a selection from the PS menu listing, press and hold down both the MUTE and VOLUME UP front panel buttons for about 3 seconds. If this is the first time you have used the PS menu, you will see the characters "PS-0" start flashing. Immediately release the two buttons when you see the PS number flashing. Then quickly press and release the Volume Up button while "PS" is still flashing. This will increase PS number setting. Pressing Volume Down will decrease the PS number setting, down to "PS-0". Each time you press the Volume Up or Volume Down button, you have an additional six seconds to make an adjustment. If your 1V set does not have a "internal speakers off'' feature or if your 1V displays a distracting "TV speakers off'' message, the PS menu albws you to adjust the SoundBase and your preferred remote control so that the volume buttons on your preferred remote control adjust the sound just from the ScundBase and not the TV These adjustments are made using the four front panel buttons on a SoundBase while watching the LED display. The SoundBase remote control cannot make adjustments to the PS Menu. Once you arrive at your intended PS number, just wait for the display to stop flashing the PS number. When the flashing stops, the adjustment is made. Press both buttons for three or more seconds to trigger the PS number adjustment mode. While flashing, the Volume Up or Down buttons set the PS number. After adjustment, the setting is stored when the display turns off. (866) 367-9869 I [email protected] PS Emulation Modes The first six options in the PS menu are emulation modes. See "Using the SoundBase remote control emulation modes" for instructions. -- No brand Sony emulation LG Samsung Vizio Panasonic Marantz There are no PS number choices between PS 6 and PS1 0. Additional PS Settings Additional SoundBase adjustments affect how you turn the SoundBase on and off and how it responds to remotes "AS" Auto Standby: When PS10 is selected, the SoundBase will automatically enter a low-power draw Standby mode after 20-30 minutes of very low to no audio signal. In most uses, this means the SoundBase will turn tts self off after you turn off the lV. - "noAS" no Auto Standby: When PS1 i is selected, the SoundBase will only enter Standby in response to a press of the POWER button on the SoundBase remote or from a "learned" remote control. The SoundBase will not enter Standby automatically. .. "AO" Auto On: The SoundBase turns on in response to the Power, Volume and Mute commands from the SoundBase remote and from the "learned" remote. "noAO" no Auto On: The SoundBase turns on in response to a SoundBase remote command, but not a "learned" remote command. Once on, the SoundBase will respond to a "learned" remote. .. "OnEr'' One Remote: The SoundBase responds to just the SoundBase remote control. Any "learned" remote response is disabled. Choosing PSi 2 or PS13 restores a "learned" remote's ability to control the SoundBase. Using the SoundBase remote control emulation modes PS 1 through PS 6: Most SoundBase users teach the SoundBase to respond to their preferred remote control using the SounBase built-in "learning" function. Should this approach not work with your preferred remote control, there is an alternate method that can allow your preferred remote to control the sound level heard from the SoundBase. To use this method, your preferred remote control needs an Aux or Audio device button in addition to device buttons for the TV and set top box. This method cannot be used if your preferred remote control controls only two devices (Set Top Box and TV). You will also need the User Manual for your specific Cable or Satellite remote control, along with the "device brand and code" list for your remote control. This list may be a separate document from the remote control User Manual. Using the PS numbers 1 through 6, you set the SoundBase to respond to the volume/ mute/power infrared commands of a specific TV or audio system manufacturer. In most cases, you need to choose a different brand than your TV Choosing a brand that is different from your TV eliminates the chance that the TV's internal speakers will start playing along with the SoundBase. Sony is a good choice from the PS menu for any brand of TV that is not Sony. Most cable or satellite remote controls can be adjusted to control a SoundBase set to "Sony" in the PS menu. If you have a Sony TV that will not allow you to turn off the internal speakers, you will have to choose a different brand from the PS menu numbers 1 through 6. Once you have chosen a brand from the SoundBase PS menu, you need to adjust the setting on your cable or satellite remote so its Volume buttons adjust that same brand of Aux or Audio device. There are two adjustments you may need to make on the cable or satellite remote. Cable/Sat remote adjustment 1: The volume buttons on a cable or satellite remote are typically locked adjust on the TV's internal speakers. Even if you press the "Cable" button on your remote, the volume buttons will still send out volume commands for your T\1, not the cable box. You need to unlock the Cable/Sat remote volume buttons according to the cable or satellite remote control's instructions. Once unlocked, pressing Aux on the Cable/Sat remote will then cause the volume buttons on the Cable/Sat remote to control whatever brand of device is set on the Aux button. Cable/Sat remote adjustment 2: The cable/ satellite remote instructions will also tell you how to set the "AUX" or "AUDIO" button to the brand you chose on the SoundBase PS menu. The instructions should list a few numbers that let you control a device that responds to Sony codes, for instance. Try the different "number code" options listed until you find one that controls the SoundBase. If you cannot find a code that controls the SoundBase, you can set the SoundBase to one of the other four brands available and search for a compatible code for that brand. Once you find a code number that controls the SoundBase, you can then "lock" the cable or satellite remote volume buttons to adjust only the Aux or Audio device and not the TV Once locked, the volume buttons will always control the SoundBase, even if a TV/Cable/ Satellite/DVD button on the Cable/Satellite remote control is pressed. Master Reset A master reset restores a SoundBase to the factory default behavior. It erases any "learned" remote control response. It sets the SURROUND mode to Surround "2" sets OUTPUT LEVEUNG and DIALOG , EMPHASIS to OFF and sets BASS and TREBLE to no boost or cut in bass or treble output. It sets the INPUT to Optical Input 1. To perform the Master Reset, first put the SoundBase in Standby mode by pressing the POWER button on the SoundBase remote control. When you see "OFF" on the SoundBase display, the unit is in Standby. You can also put a SoundBase in Standby by pressing down on the front panel MUTE button for about 5-7 seconds. Once the Sound Base is in Standby, locate the INPUT button on the face of the SoundBase. (You cannot use the INPUT button on the remote to perform a Master Reset.) Press and hold down the front panel INPUT button for about 15 to 20 seconds. When you see the three letters " r S t " appear on the display (see figure below), release the INPUT button. The SoundBase will then show the four-digit firmware code number and turn "ON". The RESET is complete. RESET Indication. (866) 367-98691 [email protected] C 2014 Z:VOX Audio LLC. Using Bluetooth wireless audio with your ZVOX Sound Base system. Your ZVOX Sound Base®system is equipped with a Bluetooth® receiver that allows it to play music wirelessly from your smart phone, tablet, laptop computer or other Bluetooth equipped audio devices. • To start the Bluetooth connection process, use the INPUT button on your remote control (or the control module on the front of the Sound Base) to select the Bluetooth input (rllll). Keep pushing the INPUT button until the SoundBase display reads "bLUE." • Now follow the directions for your Bluetooth device to "pair" to the SoundBase. This typically involves going to "Settings" then the "Biuetooth Settings" and choosing the "ZVOX" listing when it appears on the list of available devices. ·The "bLUE" symbol on the Sound Base display wi ll flash during the connection process. Once the connection is made the "bLUE" symbol should stop flashing - and your device should indicate "Connected" by the "ZVOX" listing. A Sound Base can remember "pairing" with up to five different Bluetooth devices. The system will connect more quickly to a Bluetooth device that has previously been paired with the system. We strongly recommend that you have only one Bluetooth-transmitting device operating in the same room as the SoundBase. Having two Bluetooth devices "on" in the same room as the SoundBase can lead to an interrupted signal connection . Turn off Bluetooth transmission from other Bluetooth devices in the same room . If your Sound Base drops a connection to a Bluetooth device, check to see if an add itional device like a phone or tablet is present in the same room (or even in a nearby room ). If you wish to connect to a different Bluetoothequipped device, turn Bluetooth on from the new device and turn Bluetooth off on the previous device . Troubleshooting suggestions if Bluetooth won't connect. • Be sure the device is within range of the SoundBase. The closer the device is to the Sound Base, the better. The device may need to be 20 feet or closer. • Be sure the SoundBase input is set to "bLUE." • Be sure the Bluetooth function on your device is activated. • If your device indicates that it has connected - but then disconnects, try re-connecting the device. If repeated attempts to connect don't work, try the following steps: - Turn the Sound Base off using the Power button on the remote control. Wait a few seconds, then turn it back on. Repeat the Bluetooth connection process. - If there are other Bluetooth devices nearby, temporarily de-activate their Bluetooth function . - Clear other Bluetooth sound systems from the pairing list on your Bluetooth device (implement the option "Ignore This Device"). - On your device, turn Bluetooth OFF, wait about 30 seconds, then turn Bluetooth back ON. Note: Consistent Bluetooth reception can be degraded by other nearby sources of radio frequency interference. A wifi router or radio-frequency remote control near to the Sound Base can create interference that reduces the effective range of the Sound Base's Bluetooth reception . Infrared remote controls will NOT cause interference with the Bluetooth reception . zvox® Great Sound Made Simple www.zvoxaudio.com 866-367-9869 [email protected] © 2014 R2 ZVOX Audio LLC. ZVOX and SoundBase are registered trademarks of ZVOX Audio LLC. Bluetooth is a registered trademark of Bluetooth SIG. Your Current TV Remote Can Control Your SoundBase® System. After following the steps outlined in this guide, your cable remote will adjust the volume output from your SoundBase system. Please Note: If you have a DirecTV remote control, use the DirecTV remote guide included along with this instruction sheet. remote control. To insure accuracy, the learning routine records each button’s commands twice, then confirms a successful recording. ZVOX® Audio has specific instruction sets available for a variety of popular remote controls. These instructions provide an alternate method for configuring your SoundBase to respond to your preferred remote control. If you can not easily teach the SoundBase to respond to your preferred remote control, please contact ZVOX Audio about additional instructions for your preferred remote control. The steps involve pressing the Volume, Mute, and Power buttons of your preferred remote control with it positioned close to the numeric display of the SoundBase. Once complete, the SoundBase will respond to these buttons from your preferred remote, in addition to the SoundBase PREPARE 1 2 Sit within easy reach of the SoundBase system’s front control panel. Locate the following buttons on your remote control: @V\^PSSULLK[VWYLZZ[^VI\[[VUZVU [OLSoundBaseZ`Z[LTMYVU[WHULS[V Z[HY[[OLSLHYUPUNWYVJLZZ[OLUWYLZZMV\Y YLTV[LJVU[YVSI\[[VUZ 1 =63<4,<7 2 =63<4,+6>5 3 4<;, 4 76>,9 3 4 Press both SoundBase system VOLUME buttons until “Lrn” appears (about 4 seconds). Then release both VOLUME buttons. 3 1 2 .L[YLHK`[VWYLZZVOLUME UPVU[OL 9LTV[L*VU[YVS ;OLSLHYUPUNWYVJLZZ PU]VS]LZWYLZZPUN[OLZL MV\YI\[[VUZPUZLX\LUJL This remote is only an example. Your remote is probably different. Please locate these buttons on your remote. 0M`V\ZLL[OL¸UVJOHUNL¹TLZZHNL(nocH)K\YPUN[OLSLHYUPUNYV\[PUL[OL SoundBaseZ`Z[LTZ`Z[LTKPKUV[HJJLW[[OLPUMYHYLKJVKL;OLJ\YYLU[Z[LW PU[OLSLHYUPUNYV\[PUL^PSSYLWLH[ Error Message of the SoundBase Learning Routine LEARN BUTTONS volume up volume down mute 1 2 3 >OLU HWWLHYZWYLZZ =63<4,<7MVYZLJVUK @V\ZOV\SKZLL HWWLHYZWYLZZ >OLU =63<4,<7MVYZLJVUKHNHPU @V\ZOV\SKZLL MVSSV^LKI` . power 4 HWWLHYZWYLZZ >OLU =63<4,+6>5MVYZLJVUK HWWLHYZWYLZZ >OLU 4<;,MVYZLJVUK HWWLHYZWYLZZ >OLU 76>,9MVYZLJVUK @V\ZOV\SKZLL @V\ZOV\SKZLL @V\ZOV\SKZLL >OLU HWWLHYZWYLZZ =63<4,+6>5MVYZLJVUKHNHPU >OLU HWWLHYZWYLZZ 4<;,MVYZLJVUKHNHPU HWWLHYZWYLZZ >OLU 76>,9MVYZLJVUKHNHPU @V\ZOV\SKZLL MVSSV^LKI` @V\ZOV\SKZLL MVSSV^LKI` @V\ZOV\SKZLL MVSSV^LKI` . YOU ARE DONE! . . For USA SoundBase® Owners: Alternative Adjustment Guide For So me Remote Controls Issued by USA Cable and Satellite TV Providers. This guide applies to specific remote controls from DirecTV, Dish, Verizon FIOS, Comcast and AT&T that have an AUX or AUDIO button. If you have a remote control with just two device buttons (TV and Set Top Box), you should "teach" your Sound Base to respond to you r remote control as described in the instruction sheet titled Your Current TV Remote Can Control Your SoundBase System. Please confirm that your remote has the same device keys as shown in the image on the relevant page of these instructions. These instructions address the following situtations: 1) Your remote control does not adjust the SoundBase volume after following th.e instructions in the guide titled Your Current TV Remote Can Control Your SoundBase System. 2) Your TV has no "internal speakers off' feature and the poor sound from your TV interferes with the Sound Base audio. 3) Your TV displays an intrusive 'TV Speakers Off' message after teaching the SoundBase to respond to your preferred remote control and turning off the internal TV speakers. Two Device Remote control Remote control with AUX Button There are TV and STB buttons, but no AUDIO or AUX button. Besides the TV and STB buttons, this remote has an AUX button. © 2014 ZVOX Audio LLC. (866) 367-98691 [email protected] The SoundBase "learn your remote" feature does not work with many DirecTV remotes. The following instructions should be used to adjust a DirecTV remote to control a 'NO X Audio Sound Base. DirecTV remote RC65, RC66 and similar DirecTV remotes: Configure the ZVOX Audio speaker: On the front panel of the ZVOX Audio speaker: a) Press and hold down both the Mute/Power button and the Volume Up button until you see "PS" on the display. b) Release the buttons. c) Press and release the Volume Up button until you see "PS-5" ("PS-3" for Panasonic TV) d) Wait until the "PS-5" or "PS-3" display disappears. IUS'( ILJ &.lV lVINPUT FORMAT POWER ~ ( ) Then, configure the DirecTV remote: a) Move the slider button at the top of the DirecTV remote over to the AV1 position . b) Press and hold the MUTE and SELECT buttons until the light above AV1 blinks twice. c) Enter 11480 (10812 for Panasonic TV). The AV1 light will blink twice . d) Press and hold the MUTE and SELECT buttons until the light above AV1 blinks twice. e) Enter 993 and then press SELECT. f) Move the slider button to the left, back to the DirecTV icon. The DirecTV remote now powers your TV on/off, while the volume control will control your ZVOX. DirecTV remotes RC23, RC32: Configure the ZVOX Audio speaker: On the front panel of the ZVOX Audio speaker: a) Press and hold down both the Mute/Power button and the Volume Up button until you see "PS" on the display. b) Release the buttons . c) Press and release the Volume Up button until you see "PS-5" ("PS-3" for Panasonic TV) d) Wait until the "PS-5" or "PS-3" display disappears. Then, configure the DirecTV remote: a) Move the slider button at the top of the DirecTV remote over to the AV1 position. b) Press and hold the MUTE and SELECT buttons until the light above AV1 blinks twice. c) Enter 10250 (10812 for Panasonic TV). The AV1 light will blink twice . d) Press and hold the MUTE and SELECT buttons until the light above AV1 blinks twice. e) Enter 993 and then press SELECT. f) Move the slider button to the left, back to the DirecTV icon. The DirecTV remote now powers your TV on/off, while the volume control will control your ZVOX. ... - Dish Network Remote 20.1 IR or 21 .0 IR: These instructions describe how to configure your Dish Network remote to control the volume from your ZVOX Audio system and not from your TV. The following instructions apply to any TV brand except Panasonic. If you have a Panasonic TV, use the alternate instructions below. For any TV brand except Panasonic: Part 1: Configure the ZVOX system 1. Power on your ZVOX system . 2. On the ZVOX system front panel, press and hold down both MUTE and VOLUME UP until PS-0 appears on the display (about 5-6 seconds). Release the buttons. The PS-0 display will continue flashing for about 5 seconds. 3. While PS-0 is flashing, repeatedly press VOLUME UP until it reads "PS-5". Wait for the display to stop flashing. Part 2: Configure your Dish Network remote Program code to the AUX button 1. On the Dish Network remote control, press and hold the AUX button until all the other mode buttons light up, and then release the AUX button. The AUX button flashes. 2. Enter 0-5-1-2 then press the pound key(#). The AUX key will blink three times. Lock the volume buttons to the ZVOX 1. Press and hold the AUX mode button until all mode buttons light up, then release it. The AUX mode button will blink. 2 Press the POUND(#) button, press the plus(+) side Of the VOLUME button, press the 0 number button, press the POUND (#) button. The AUX mode button flashes three times. 3. Press the SAT mode button then Press the plus(+) and minus(-) sides of the VOLUME button down simultaneously and release them. You have just completed the programming. When you press VOLUME+, VOLUME-, or MUTE, the volume of the Sound Base will respond regardless of which device button on the Dish Network remote was last pressed. 20. 1 IR above, 21.0 TR below diSl? •I . _ . .. Dish Network Remote 20.1 IR or 21.0 IR: FOR PANASONIC TVs: Part 1: Configure the Sound Base system 1. Power on your ZVOX system. 2. On the ZVOX system front panel, press and hold down both MUTE and VOLUME UP until PS-0 appears on the display (about 5-6 seconds). Release the buttons. The PS-0 display continues flashing for about 5 seconds. 3. While PS-0 is flashing, repeatedly press VOLUME UP until it reads "PS-3". Wait for the display to stop flashing. Part 2: Configure your Dish Network remote Program code to the AUX button 1. On the Dish Network remote control, press and hold the AUX button until all the other mode buttons light up, and then release the AUX button. The AUX button flashes. 2. Enter 0-8-5-8 then press the pound key (#). The AUX key will blink three times. Lock the volume buttons to the ZVOX 1. Press and hold the AUX mode button until all mode buttons are lit, then release it. The AUX mode button will blink. 2. Press the POUND(#) button, press the plus (+) side of the VOLUME button, press the 0 number button, press the POUND (#) button. The AUX mode button flashes three times. 3. Press the SAT mode button, then press down the plus(+) and minus(-) sides of the VOLUME burton simultaneously and release them. You have just completed the programming . When you press VOLUME+, VOLUME-, or MUTE, the volume of the SoundBase will respond regardless of which device button on the Dish Network remote was last pressed. 20. I IR above, 2 1.0 IR below Comcast Custom DVR 3-Device Universal Remote Control These instructions describe how to configure your Comcast cable remote to control the volume from your ZVOX Audio system and not from your TV. The following instructions apply to any TV brand except Panasonic. If you have a Panasonic TV, use the alternate instructions below. FOR ANY TV BRAND EXCEPT PANASONIC: Part 1: Configure the ZVOX system 1. Power on your ZVOX system. 2. On the ZVOX system front panel, press and hold down both MUTE and VOLUME UP until PS-0 appears on the display (about 5-6 seconds). Release the buttons. The PS-0 display will continue flashing for about 5 seconds. 3. While PS-0 is flashing, repeatedly press VOLUME UP until it reads "PS-5". Wait for the display to stop flashing. Part 2: Configure your Comcast remote Activate the AUX function 1. On the Comcast remote control, press AUX once. Then press and hold SETUP until the AUX key blinks twice, then release Setup. 2. Enter 1-0-0-4-7. The AUX key will blink twice. Assign ZVOX code to the Aux button 1. Press AUX once, then press and hold Setup until the AUX key blinks twice, then release Setup. 2. Enter 1-0-2-5-0. The AUX key will blink twice. Lock the volume buttons to the ZVOX 1. Press AUX once. Then, press and hold Setup until the AUX key blinks twice, then release Setup. 2. Enter 9- 9- 3 (the AUX key blinks twice) and then press AUX once. The AUX key will blink twice. 3. Press the CABLE button once. You have just completed the programming. Now, when you press VOL+, VOL-, or Mute, the volume of the ZVOX system is controlled regardless of whether the Comcast remote is in the TV mode or Cable mode. Comcast DVR 3-Device Universal Remote Control These instructions describe how to configure your Comcast cable remote to control the volume from your ZVOX Audio system and not from your TV. The following instructions apply to any TV brand except Panasonic. If you have a Panasonic TV, use the alternate instructions below. FOR ANY TV BRAND EXCEPT PANASONIC: Part 1: Configure the ZVOX system 1. Power on your ZVOX system. 2. On the ZVOX system front panel, press and hold down both MUTE and VOLUME UP until PS-0 appears on the display (about 5-6 seconds}. Release the buttons. The PS-0 display will continue flashing for about 5 seconds. 3. While PS-0 is flashing, repeatedly press VOLUME UP until it reads "PS-5". Wait for the display to stop flashing. Part 2: Configure your Comcast remote Activate the AUX function 1. On the Comcast remote control, press AUX once. Then press and hold SETUP until the AUX key blinks twice, then release Setup. 2. Enter 1-0-0-4-7. The AUX key will blink twice. Assign ZVOX code to the A ux button 1. Press AUX once, then press and hold Setup until the AUX key blinks twice, then release Setup. 2. Enter 1-0-2-5-0. The AUX key will blink twice. Lock the volume buttons to the ZVOX 1. Press AUX once. Then, press and hold Setup until the AUX key blinks twice, then release Setup. 2. Enter 9- 9- 3 (the AUX key blinks twice} and then press AUX once. The AUX key will blink twice. 3. Press the CABLE button once. You have just completed the programming. Now, when you press VOL+, VOL-, or Mute, the volume of the ZVOX system is controlled regardless of whether the Comcast remote is in the TV mode or Cable mode. Instructions for programming your 4-device FIOS remote to work with a ZVOX SoundBase (RC1445302) Please note: This page describes the FIOS 4-device remote (with DVD, AUX, TV and STB buttons at the top). The newer, two-device FIOS remote (STB and TV only) cannot be configured to control a separate audio system. If you have a ZVOX Audio system and the 2-device FIOS remote, ZVOX Audio encourages you to replace the 2-device remote with a 4-device FIOS remote. As of July 2013, there are a number of sources for this remote control (search for F/OS 4-device remote on the internet). This remote is typically under $20 These instructions describe how to configure your Verizon FIOS four-device remote to control the volume from your ZVOX Audio Sound Base. The main text instructions are for any TV brand, except Panasonic. The alternate instructions for Panasonic TVs are in [brackets]. Part 1: Configure the ZVOX system 1. Power on your ZVOX system. 2. On the ZVOX system front panel, press and hold down both MUTE and VOLUME UP until PS-0 appears on the display (about 5-6 seconds). Release the buttons. The PS-0 display will continue flashing for about 5 seconds. 3. While PS-0 is flashing, repeatedly press VOLUME UP until it reads "PS-5" [ "PS-1" for Panasonic TVs]. Wait for the display to stop flashing. Part 2: Configure your FIOS remote Assign ZVOX code to the Aux button 1. Press and hold the AUX key. 2. While holding down the AUX key, press the OK key. 3. Release both keys simultaneously. The Device Keys will blink twice. 5. Enter 3 - 7 - 3 - 6 [ 1-7-8 -5 for Panasonic TVs ]. The AUX key will blink 3 times. Lock the volume buttons to the ZVOX 1. Press and hold t he STB key. 2. While holding down the STB key, press OK. 3. Release both keys simultaneously. The Device Keys will blink twice. 4. Press 9 - 5 - 5. The STB key will blink twice. 5. Press AUX. The AUX key will blink 3 times to indicate success in programming. 6. Press the STB key once. Note: To return the FIOS remote control to adjusting the volume of the TV s peakers, instead of the Sound Base, press the TV button in step 5. You have just completed the programming. When you press the VOL+, VOL-, or Mute buttons on the FIOS remote, the volume of the ZVOX system will respond (and not the TV's internal speakers), regardless of whether the FIOS remote is in the TV, DVD or STB mode. How to configure your AT&T U-Verse black remote to control the volume output of a recent ZVOX Audio SoundBase• AT&T U-verse 510-52 Remote Control These instructions describe how to configure your AT&T U-verse remote to control the volume from your ZVOX Audio system and not from your TV. These instructions apply to ZVOX Audio 5oundBase systems with a four character LED display. The instructions apply to any TV. Part 1: Configure your AT&T remote Assign code to the AUX button 1. On the AT &T remote control, press AUX once. 2. Press and hold AUX, then press and hold the OK key then release both keys simultaneously. All the mode keys should flash twice. 3. Enter 6-0-1-0. -The AUX key will light up for 2 seconds. Lock the volume buttons to the ZVOX 1. Press and hold AT&T key, then press and hold the OK key then release both keys simultaneously. All the mode keys should flash twice. 2. Enter 9-5-5. The AT&T key will flash twice. 3. Press AUX. The AUX key will light up for 2 seconds. Part 2: Configure your ZVOX system Locate the instruction sheet entitled "Your Current TV Remote Can Control Your ZVOX System" 1. Follow the instructions on that page for putting the ZVOX system into its learning mode. 2. Using the AT&T remote, program the volume up, volume down, mute and power keys as shown on the page. You have just completed the programming. The volume of the ZVOX system is now controlled by the AT&T remote no matter which control mode (AT&T, TV or DVD) is set on the AT&T remote. AT&T I STB KEY AT&T U-Verse Silver Remote AT&T I STB KEY How to configure your AT&T U-Verse SILVER remote to control the volume output of a recent ZVOX Audio system. OVERVIEW: You set the AUX device of the U-Verse remote control to a brand the ZVOX can learn. You teach the ZVOX system to respond to the Volume, Mute (and Power, if desired). You adjust the U-Verse remote so that the volume buttons always control the ZVOX, no matter what device is selected on the U-Verse remote. ON YOUR REMOTE: 1) Press and hold the AUX button of the remote. While still holding down the AUX button, press and hold the OK button. 2) Let go of both buttons at the same time. You should see the four top buttons blink twice. 3) Type "6002" into the key pad. AUX button should blink three times. You have now programmed your remote's AUX device setting to send out infrared commands the ZVOX system can learn. IN FRONT OF YOUR ZVOX SYSTEM: 1) Press the AUX button on the U-Verse remote. 2) Follow the instructions provided with the ZVOX system to teach it to respond to the Volume Up, Volume Down, Mute and Power buttons. 3) Verify that the remote volume buttons. LOCK THE VOLUME BUTTONS OF THE U-VERSE REMOTE TO AUX: The following instructions are from the AT&T remote control manual: Volume Buttons Always Control The Same Device 1. Press and hold the STB key on the remote control 2. While holding the STB mode key, press the OK key 3. Release both the STB key and the OK key - All the mode keys will flash twice indicating programming mode 4. Enter 955 by pressing the number keys on the remote control - The STB key will flash twice indicating correct entry 5. Press the mode key that you want to always send the volume commands (AUX) - The selected mode key will flash three times indicating successful assignment and return to normal operations. The volume commands will now go to the selected device no matter what mode you are in. <D CD <D ASC 0£.f <D (!) (!) <D ® (!) 0 E> GMt Jill MHO PORS rw WltYl DElETE SPAC( ASPECT G 1-Year Limited Warranty, ZVOX Audio SoundBase Systems To the original purchaser of a ZVOX Audio system in the United States of America, ZVOX Audio warrants the ZVOX Audio system to be free of defects in material and workmanship for a period of one ( 1) year from date of purchase. To obtain a warranty repair of a ZVOX Audio system, a Return Authorization must be obtained from ZVOX Audio. With respect to defects, ZVOX will, at its option, repair any defect in the product or replace the product at no charge to the original purchaser for parts or labor. If ZVOX Audio elects to replace a system, the replacement system will be equivalent to the condition of the ZVOX Audio system as received by ZVOX Audio for service. The repair of a ZVOX Audio system by an independent service agency is not supported. This ZVOX Audio warranty applies to the original purchaser of the ZVOX Audio system purchased in the USA from an authorized ZVOX Audio retailer and used in the United States of America. ZVOX Audio cannot provide service to an owner of a ZVOX Audio system outside the United States of America. This warranty does not extend to any malfunction, physical damage or failure caused by misuse, abuse, accident, faulty hookup, improper electrical source, defective associated equipment or use of the system with equipment for which it is not intended. The only acceptable method of establishing warranty status is a copy of the original proof of purchase from an authorized ZVOX Audio retailer, indicating the customer's name and purchase date. The warranty period starts from the date on the proof of purchase of the ZVOX Audio product. Obtaining service on a ZVOX Audio product: The owner of the ZVOX Audio product should first contact the ZVOX Audio retailer that sold the ZVOX Audio system to inquire about warranty service. If the dealer does not provide service for ZVOX products, please contact ZVOX Audio directly at [email protected] or (866) 367-9869 to obtain a Repair Authorization. A Repair Authorization from ZVOX Audio does not include the cost of shipping the ZVOX Audio system to ZVOX Audio. Do not send a ZVOX Audio system to ZVOX Audio for repair prior to obtaining a Repair Authorization. ZVOX Audio reserves the right to refuse or return any products delivered to ZVOX Audio without prior written authorization. The Repair Authorization number should be included inside the carton. The Repair Authorization number should be marked on the return shipping label on the outside of the carton. Shipping carton and cushions: This 1-year limited warranty does not cover the cost of a replacement shipping carton and set of cushions. A replacement shipping carton and cushion set can be purchased from ZVOX Audio if you elect to discard the original carton and cushions. The genuine ZVOX Audio carton and cushions for your specific ZVOX Audio model must be used to ship your unit to ZVOX Audio. ZVOX Audio urges you to keep your system's shipping carton and all the comer and side cushions. Shipment to ZVOX Audio: The ZVOX Audio system owner is responsible for shipping charges to ZVOX Audio using the shipping method of their choice. The ZVOX Audio system should be shipped to the ZVOX Audio address provided in the Return Authorization. ZVOX Audio is not responsible for physical damage sustained by a product in shipment back to ZVOX Audio, regardless of the nature of the Return Authorization. ZVOX Audio suggests using a shipper that provides you a tracking number. Once the repair has been performed, ZVOX Audio will then ship the unit back to the customer with no charge for shipping. ZVOX Audio can only ship to locations in the United States of America. For a ZVOX Audio system owner outside the United States of America: A ZVOX Audio system owner outside the United States of America should contact the ZVOX retailer in the country where they purchased the ZVOX system to inquire about warranty service. You may then be referred to the authorized ZVOX Audio distributor in that country. This is the sole and express warranty. This warranty is in lieu of all other warranties, expressed or implied, of merchantability, fitness for purpose or otherwise. In no event shall ZVOX Audio LLC be liable for incidental or consequential damages or have any liability with respect to defects other than the obligations set forth as stated. Except as provided herein, ZVOX Audio LLC shall have no liability or responsibility to the purchaser or any other person or entity with respect to any liability, loss or damage caused directly or indirectly by use of the product, including, but not limited to, any incidental or consequential damages. © 2014 June 30, ZVOX Audio LLC.