1
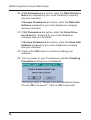
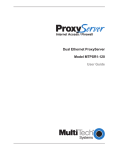
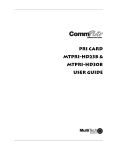
ISDN ProxyServer
Model MTPSR1-202ST
Quick Start Guide
The CE mark is affixed to the enclosed MultiTech product to
confirm compliance with the following European Community
Directives:
Council Directive 89/336/EEC of 3 May 1989 on the approximation
of the laws of Member States relating to electromagnetic compatibility;
and
Council Directive 73/23/EEC of 19 February 1973 on the harmonization of the laws of Member States relating to electrical equipment designed for use within certain voltage limits;
both amended by
Council Directive 93/68/EEC of 22 July 1993 on the harmonization
of CE marking requirements.
Quick Start Guide
82076801 Revision B
ISDN ProxyServer (Model No MTPSR1-202ST)
This publication may not be reproduced, in whole or in part, without
prior expressed written permission from Multi-Tech Systems, Inc. All
rights reserved.
Copyright © 1998, by Multi-Tech Systems, Inc.
Multi-Tech Systems, Inc. makes no representations or warranties
with respect to the contents hereof and specifically disclaims any
implied warranties of merchantability or fitness for any particular
purpose. Furthermore, Multi-Tech Systems, Inc. reserves the right
to revise this publication and to make changes from time to time in
the content hereof without obligation of Multi-Tech Systems, Inc. to
notify any person or organization of such revisions or changes.
Record of Revisions
Revision
Description
A
Manual released. All pages at revision A.
(1/12/98)
B
(7/7/98)
Manual revised to include version 2.01 software.
Patents
This Product is covered by one or more of the following U.S.
Patent Numbers: 5.301.274; 5.309.562; 5.355.365; 5.355.653;
5.452.289; 5.453.986. Other Patents Pending.
TRADEMARK
Trademark of Multi-Tech Systems, Inc. are the Multi-Tech logo.
Windows is a registered trademark of Microsoft.
Multi-Tech Systems, Inc.
2205 Woodale Drive
Mounds View, Minnesota 55112
(612) 785-3500 or (800) 328-9717
Fax 612-785-9874
Tech Support (800) 972-2439
Internet Address: http://www.multitech.com
Fax-Back (612) 717-5888
iv
Contents
Introduction ........................................................................... 7
Related Documentation .........................................................8
Safety Warnings .................................................................... 9
Unpacking your ProxyServer ................................................9
Cabling your ProxyServer ................................................... 10
Before You Start Loading your Software .............................12
Network Configuration ................................................... 12
Call Control Parameters ................................................13
Data Control .................................................................. 14
Loading your Software .......................................................16
IP Port Configuration .....................................................19
Limited Warranty .................................................................24
Service ..........................................................................24
v
ISDN ProxyServer Quick Start Guide
vi
Introduction
Introduction
Welcome to Multi-Tech's new ISDN ProxyServer model number
MTPSR1-202ST, a single, secure gateway that provides multiple
LAN users with high performance Internet access. The ISDN
ProxyServer functions as a TCP/IP proxyserver that resides on the
outer edge of your firewall and provides Basic Rate ISDN Service
using its internal 2B+D terminal adapter. The ISDN ProxyServer
features a 10BaseT port for local LAN connection, Command Port
for configuration, and an internal 2B+D ISDN terminal adapter for
64K bps per channel or 128K bps effective bandwidth when
software BONDing (Bandwidth ON Demand) is employed. System
management is provided through the command port using bundled
Windows® software which provides easy-to-use configuration
menus.
Figure 1. ISDN ProxyServer
1
ISDN ProxyServer Quick Start Guide
Related Documentation
The ISDN ProxyServer Quick Start Guide is intended to be used
by qualified systems administrators and network managers. This
quick start guide provides the necessary information for a qualified
person to unpack, cable, load software, and configure the unit for
proper operation.
A detailed User Guide is also provided with your ISDN ProxyServer. This user guide provides in-depth information on the features
and functionality of Multi-Tech’s Proxy Server. The User Guide is
provided in diskette form and is also available from our Web site.
A ProxyServer Client Setup User Guide is provided to enable LAN
users to configure their Windows 95 PCs to access the Internet
through a ProxyServer. This User Guide is also provided on the
Manuals diskette and at Multi-Tech’s Web site.
The diskette media is produced using Adobe Acrobat for viewing
and printing the user guide. To view or print your copy of a user
guide, load Adobe Acrobat Reader on your system. Adobe Acrobat
Reader can be downloaded from Adobe’s Web site at:
http://www.adobe.com/prodindex/acrobat/roadstep.html
Launch the Reader and select the .pdf file from the diskette.
Viewing and printing a user guide from The Web also requires that
you have the Adobe Acrobat Reader loaded on your system. The
ISDN ProxyServer User Guide is also available on Multi-Tech’s
Web site at:
http://www.multitech.com
From the MTS home page, click Support | Manuals | ProxyServer and choose the User Guide for your Model MTPSR1-202ST
which will download the .pdf file.
2
Safety
Safety Warnings
1. Never install telephone wiring during a lightning storm.
2. Never install telephone jacks in wet locations unless
the jack is specifically designed for wet locations.
3. Never touch uninsulated telephone wires or terminals
unless the telephone line has been disconnected at the
network interface.
4. Use caution when installing or modifying telephone
lines.
5. Avoid using a telephone (other than a cordless type)
during an electrical storm. There may be a remote risk
of electrical shock from lightning.
6. Do not use the telephone to report a gas leak in the
vicinity of the leak.
Unpacking your ProxyServer
Remove all items from the box.
Quick Start Guide
MultiExpress
Figure 2. Unpacking
3
ISDN ProxyServer Quick Start Guide
Cabling your ProxyServer
Cabling your ProxyServer involves making the proper Power,
Command Port, Ethernet, and WAN connections. Figure 3 shows
the back panel connectors and the associated cable connections.
Table 1 details the procedures for connecting the cables to your
ProxyServer.
ISDN
PHONE
10BASE T
COMMAND PORT
ON
POWER OFF
Power
Connection
Telco
Connection
PC
Connection
Ethernet
Connection
Figure 3. Cable Connections
4
Cabling
Table 1. Cabling Procedure
Step
Procedure
1
Connect one end of the power supply to a live AC outlet
and connect the other end to the ProxyServer as shown in
Figure 3. The power connector is a 6-pin circular DIN
connector.
2
Connect the ProxyServer to a PC by using the short
RJ45 to DB25 (female) cable provided with your unit. Plug
the RJ45 end of the cable into the Command Port of the
ProxyServer and the other end into the RS232 cable from
the PC serial port. See Figure 3.
3
To make the network connection, connect one end of an
RJ45 (UTP) cable to the 10 BASE-T connector on the back
of the ProxyServer as shown in Figure 3. Connect the other
end of the cable to your LAN.
4
Connect one end of an RJ45 cable to the ISDN
connector on the back of the unit and connect the other
end to the ISDN Telephone Network (Telco wall jack) as
shown in Figure 3.
5
Turn on power to the ProxyServer by placing the ON/OFF
switch on the back panel to the ON position.
Wait for the Fail LED on the ProxyServer to go OFF
before proceeding. This may take a couple minutes to
go off.
At this time your ProxyServer is completely cabled. Proceed
to the next section to load your ProxyServer software.
5
ISDN ProxyServer Quick Start Guide
Before You Start Loading your Software
Consider the following choices before you configure your ProxyServer and record your selections on the following pages; then
refer to them while loading your software.
Network Configuration
ü Network Switch Type_______________________________
Select the network switch type your ISDN service provider uses
at its local central office. You can set the ProxyServer to NET3
(DSS1), 1TR6, VN4, INS64, NI-1, AT&T 5ESS, or DMS-100. If
you do not know the switch type, you can get the information
from your ISDN service provider.
ü Data TEI__________________________________________
The Data TEI is the TEI that is assigned to the data channel.
You can select “Auto TEI,” a fixed TEI (from 0 to 63), or “Disabled.” A TEI (terminal endpoint identifier) is a number used by
the central office switch to uniquely identify each device that is
connected to the network. When it uses dynamic TEI assignments (Auto TEI), the central office switch assigns a TEI each time
the ProxyServer connects to the network. However, the ISDN
service provider may assign a fixed TEI at subscription time, in
which case you must configure the ProxyServer with the fixed TEI
number. You can also disable the channel, which may be useful
when multiple ProxyServers are attached to a network terminator bus.
ü Voice TEI_________________________________________
The Voice TEI is the TEI assigned to the voice channel. You
have the same choices as for the Voice TEI: “Auto TEI,” a fixed
TEI number (from 0 to 63), or “Disabled.”
ü Data SPID________________________________________
The ProxyServer must be configured with the Service Profile
Identifier (SPID). The data SPID is assigned by the local phone
company and is for the specific BRI line to which the ProxyServer will be attached. The data SPID string can have up to 20
characters. The data SPID is not used if the switch type is set
to NET3.
6
Software
Note: For DMS-100 switches, any ASCII character except the
underline (_) character is valid. For NI-1 and AT&T switches,
only the digits 0-9 are valid.
ü Voice SPID________________________________________
The voice SPID is assigned by the local phone company and is
for the specific BRI line to which the ProxyServer will be attached. The voice SPID string can have up to 20 characters.
The data SPID is not used if the switch type is set to NET3.
Note: For DMS-100 switches, any ASCII character except the
underline (_) character is valid. For NI-1 and AT&T switches,
only the digits 0-9 are valid.
ü Data Directory Number______________________________
The data Directory Number (DN) is a telephone number that is
assigned to the ProxyServer at subscription time by the ISDN
service provider. The DN is a string of up to 24 characters;
valid characters are 0-9, the * character, and the # character.
ü Voice Directory Number______________________________
The voice Directory Number (DN) is a telephone number that is
assigned to the ProxyServer at subscription time by the ISDN
service provider. The DN is a string of up to 24 characters;
valid characters are 0-9, the * character, and the # character.
Call Control Parameters
ü Persistent DTR Dialing______________________________
A high DTR (Data Terminal Ready) signal on the Command port
indicates that your computer or terminal is ready to communicate with your ProxyServer. DTR normally goes high when a
communication program starts or is ready to dial. Persistent
DTR dialing enables the ProxyServer to automatically redial the
number stored in memory location 0 whenever DTR is high and
the serial port does not have an active call. You may enable or
disable this feature.
ü Calling Line Identification___________________________
Identifies whether the two endpoints of a connection are enabled or disabled. Since RING messages only appear for
ISDN data calls, the CLI feature does not define a means of
7
ISDN ProxyServer Quick Start Guide
conveying Calling Party information to the terminal for ISDN
voice calls. The CLI information is only included with the first
RING message for a given incoming call, and appears as follows:
RING
FM: 5552000 TO: 5551000
If the Calling Party Number information is not included in the
incoming SETUP message, the RING message appears as
follows:
RING
TO: 5551000
If the Called Party Number information is not included in the
incoming SETUP message, the RING message will appear as
follows:
RING
FM: 5552000
If neither the Called Party Number, nor the Calling Party Number is included in the incoming SETUP message, the RING
message will contain no additional information.
ü Auto Protocol Detection - Always Unchecked (Disabled)
Identifies that automatic protocol detection is enabled or disabled for an ISDN data call. The default setting is 0, which disables the Auto-Protocol Detection function.
ü Auto Answer Data Calls _________ Rings to Answer____
Select Auto Answer if you want your ProxyServer to automatically answer all incoming data calls (this option does not affect
the analog port). The Rings to Answer number, in the range of
1 to 255, selects the number of rings the ProxyServer waits
before answering an incoming call. The default is one ring.
Data Control
ü Data Protocol_____________________________________
The data protocol, also known as the B-channel protocol and
the rate adaption protocol, is the “language” that is spoken over
each 64K bps channel between two ISDN devices. The devices
on both ends of the ISDN link must use identical data protocols.
8
Software
MLPPP Protocol
The MLPPP (Multi-Link PPP) protocol provides rates up to 64K
bps per channel. This protocol uses both B channels at once,
providing an aggregate data transmission speed of 128K bps.
ü Dialing Method _____________________________________
Select either the “Enbloc” or the “Overlap” dialing method for
use when establishing a data call. Your ISDN service provider
determines the dialing method. The en bloc method is used for
most ISDN dialing; however, you can select the overlap method
if you are working with a private network.
9
ISDN ProxyServer Quick Start Guide
Loading your Software
The following loading procedure does not provide every screen or
option used in the process of installing the ProxyServer software.
The assumption is that a technical person with a thorough knowledge of Windows and the software loading process is doing the
installation. Additional information on the ProxyServer software is
provided in the User Guide.
1. Run Windows on the PC that is connected to the
Command Port.
2. Insert ProxyServer Version 2.01 Disk 1 into the disk
drive on the PC that is connected to the ProxyServer.
3. Win3.1 users - access Run by clicking on the File
menu in the Program Manager and then clicking on
Run. In the Run dialog box, type a:\setup or b:\setup
(depending on the drive letter of your floppy disk drive)
in the Command Line field and then click on OK.
Win95 users - click on the Start box and then click on
Run. In the Run dialog box, click on the down arrow
and choose a:\setup or b:\setup (depending on the
drive letter of your floppy disk drive) in the Command
Line field and then click on OK.
10
Software
4. Follow the on-screen instructions to install the ProxyServer software.
5. The following dialog box selects the COM port of your PC
that is connected to the Command Port of the
ProxyServer. From the Select Port list box, click on the
down arrow and choose the COM port of your PC.
6. Click on OK to continue.
11
ISDN ProxyServer Quick Start Guide
7. Click on the Finish button to continue.
8. The “Do you want to download default setup?” dialog
box is displayed.
9. Click on Yes to download the default setup. Clicking on the
No button prevents the defaults from being downloaded to
the ProxyServer.
12
Software
IP Port Configuration
This dialog allows for the configuration of IP parameters that are
generally applicable to IP Proxying on all ports.
10. The default LAN IP address has to be changed to
your unique LAN address. Change the default IP
address, 192.168.0.1, to your unique LAN IP address.
11. If your ISP dynamically assigns the WAN port IP
address, do nothing and proceed to the next step.
If a static WAN IP address needs to be assigned,
highlight WAN in Port Selection, then click on the ISP
assigns Dynamic Address check box to disable the
feature, and click on the IP Address field and enter
your IP WAN address. Also, ensure that the Net Mask
for your WAN is correct.
12. Click on the OK button.
13
ISDN ProxyServer Quick Start Guide
13. Click on the Default Configuration supplied by your
local ISDN service provider. Refer to your entry in
Network Switch Type in Before You Start Loading Your
Software in this chapter.
14. Click on the ISDN Dial Number field and enter the
telephone number supplied by your ISDN service
provider. The telephone number can be a standard
local number or it can include a long distance prefix.
Note: Some ISDN service providers require only that
you enter the phone number you call for ISDN service.
15. If the phone number is all your ISDN service provider
requires, click on the OK button then go to step 25 to
continue loading your software. However, if your ISDN
service providers requires that you enter additional
parameters, continue to step 16.
16. Click on the Data TEI field in Network Parameters.
Refer to your Data TEI entry in the Network
Configuration section in Before You Start Loading Your
Software. If the Data TEI is different, click on the dropdown list arrow and click on the selection that
corresponds to the Data TEI supplied by ISDN service
(i.e., Disabled, Auto TEI, or zero to 63).
14
Software
17. Click on the Voice TEI field in Network Parameters.
Refer to your Voice TEI entry in the Network
Configuration section in Before You Start Loading Your
Software. If the Voice TEI is different, click on the
drop-down list arrow, then click on the selection that
matches the Voice TEI supplied by your ISDN service
(i.e., Disabled, Auto TEI, or zero to 63).
18. If your ISP or Remote Access Server (RAS) uses
Point-to-Point Protocol (ppp), click on the User Name
field in the Authentication group and enter your user
name. If SLIP protocol is used by your ISP or RAS,
authentication is provided in script form.
19. If your ISP or RAS uses Point-to-Point Protocol (ppp),
click on the Password field in the Authentication
group and enter your password. If SLIP protocol is
used by your ISP or RAS, authentication is provided in
script form.
20. Depending on your default configuration, the US
Parameters group or the Europe Parameters group
will be active.
If the US Parameters are active, enter the Data SPID
supplied by your local phone company and you recorded in Before You Start Loading Your Software.
If the Europe Parameters are active, enter the Data
ISDN number supplied by your local telephone company and you recorded in Before You Start Loading
Your Software.
21. If US Parameters are active, enter the Voice SPID.
If Europe Parameters are active, enter the Voice
ISDN.
15
ISDN ProxyServer Quick Start Guide
22. If US Parameters are active, enter the Data Directory
Num(ber) supplied by your local telephone company
and you recorded.
If Europe Parameters are active, enter the Data Sub
Address supplied by your local telephone company
and you recorded.
23. If US Parameters are active, enter the Voice Directory Num(ber) supplied by your local telephone
company and you recorded.
If Europe Parameters are active, enter the Voice Sub
Address supplied by your local telephone company
and you recorded.
24. Click on the OK button to continue loading your
software.
25. Turn on power to your ProxyServer and the Checking
ProxyServer dialog box is displayed.
The Setup utility is "Ready to Download default Setup
Choose OK to proceed." Click on OK to proceed.
16
Software
26. The Writing Setup dialog box is displayed as the
setup configuration is written to the ProxyServer.
27. Check to ensure that the Fail LED on the ProxyServer
is Off after the download is complete and the ProxyServer is rebooted.
28. Win3.1 users - you are returned to your Program
Manager where the Proxy Server Program Group and
Program Item (Windows icons) have been created.
Win95 users - you are returned to your ProxyServer
folder which will be visible on your desktop.
17
ISDN ProxyServer Quick Start Guide
Limited Warranty
Multi-Tech Systems, Inc. (“MTS”) warrants that its products will be
free from defects in material or workmanship for a period of two
years from the date of purchase, or if proof of purchase is not
provided, two years from date of shipment. MTS MAKES NO
OTHER WARRANTY, EXPRESSED OR IMPLIED, AND ALL
IMPLIED WARRANTIES OF MERCHANTABILITY AND FITNESS
FOR A PARTICULAR PURPOSE ARE HEREBY DISCLAIMED.
This warranty does not apply to any products which have been
damaged by lightning storms, water, or power surges or which
have been neglected, altered, abused, used for a purpose other
than the one for which they were manufactured, repaired by the
customer or any party without MTS’s written authorization, or used
in any manner inconsistent with MTS’s instructions.
MTS’s entire obligation under this warranty shall be limited (at
MTS’s option) to repair or replacement of any products which
prove to be defective within the warranty period, or, at MTS’s
option, issuance of a refund of the purchase price. Defective
products must be returned by Customer to MTS’s factory transportation prepaid.
MTS WILL NOT BE LIABLE FOR CONSEQUENTIAL DAMAGES
AND UNDER NO CIRCUMSTANCES WILL ITS LIABILITY EXCEED THE PURCHASE PRICE FOR DEFECTIVE PRODUCTS.
Service
Multi-Tech has an excellent staff of technical support personnel
available to help you get the most out of your Multi-Tech product.
Refer to your ISDN ProxyServer User Guide for Warranty and
Service information.
18
82076801