1
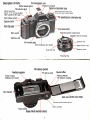
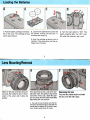
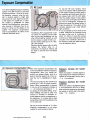
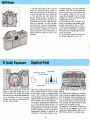
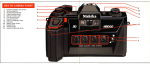
POSTED6-27-' 04
This manual is for referenceand historical purposes,all rights reserved.
This page is copyright O by M,__B__ul_ku_s_,__NJ_.
This pagemay not be sold or distributedwithout the expressedpermissionof the producer
I have no,connection with any camera company
On-linecamerarnanuallibrary
This is the full text and imagesfrom the manual. This may take 3 full minutesfor
this PDF documentto download.
The main pageis locatedat www.butkus.org/chinon
If you find this manual usefirlohow about a donation of $3 to: M. Butkus,29 Lake
Ave., High Bridge, NJ 08829-L701andsendyour e-mail addressso I can thank you.
Most other placeswould chargeyou $7.50for a electroniccopy or $18.00for a hard
to read Xerox copy.
This will allow me to continue to buy new manualsand pay their shipping costs.
It'll make you feel better, won't it?
If you usePay Pal or wish to useyour credit card,usethe Pay Pal Link on my page.
If you found this page from any other location (other then a link)
pleasenotify me at [email protected]
www.orphancameras.com
Description of Parts
Hot-shoe/eyepiececover
Hot-shoe(X-contact)
Shutterreleasebutton.
Exposurecompensationscale
Film advancelever
Film rewindknob with crank
(Pullup to open cameraback)
Shuttersoeeddial
(Set at "A" for normaloperation.
"AEL"
standsfor AE Lock.)
Film speecVexposure
compensationdial
Cable releasesocket
Exposurecounter
Neck strap eyelet
Lens releasebutton
Automaticaperturecouplinglever
Main switch
Alignmentindexfor mounting
Self-timerLED
Aperturering
Lens mountingindex
Minor (Delicate,don't touch!)
Depth-of-field
scale
Distancescale
Auto lock pin
Focusingring
Film advancesprocket
Viewfindereyepiece
Film take-up spool
Rewind bufton
MamiyaWinder
film advancecoupling
Shuttercurtains
(Delicate,don't touch!)
Filmchamber
Back cover with film memo holder
Tripod socket
MamiyaWinder electricalcontacts
l.
Insertthe batteries.
Take out the batterycaftridgeand inserttwo batteries
into the cartridge.Replacethe caftridge.
the main
2.Turn
switchto "ON".
$. loaO the film.
{. s"t the fitm speed.
(1) Open the back cover by pullingup the rewind (3) Advancethe film until the film pedorationsare
knob.Loada film car.tridge
intothe filmchamber.
engagedwith the sprocketteeth.
(2) Inseftthe end of the film intothe slot of the take- (4) Close the back cover tightlyand make two blank
up spool.
exposuresuntil the exposurecounter stops at
"1".
Lift up the film speed dial
and rotateit untilthe number
in the window matchesthe
film speed of the film being
used.
Do not alignthe auto lock
pin on lhe aperture ring
with the central index
mark of the lens.
/l';:.ia:'.'X
\ltili;-/
$. Set the camera in AE mode.
(1) Set the shutterspeeddial to "A".
(2) Set the exposurecompensationdial to the "0".
(3) Set the aperturein accordancewiththe lightconditions.
4r
aDertures
Recommended
(withASA/ISO
100film)
h
lfr
f/16-11
f l 1 1- 8
1'15.6-4
(4) Whenthe shutterreleasebuttonis lightlypressed,an LED
lightsinsidethe viewfinderto indicatethe correctshL:rer
speedautomaticallyselectedby the camerain accordance
with the aperturesetting.
ff an LED flashesor buzzersounds,see page 10.
for specialefYou can selectthe shutterspeed'manually
fects.For detailsof the manualmode,see page 11.
www.orphancameras.com
Compose and focus on the subiect.
Then pressthe shutterreleasebuttongently.
Wind the film advanceleverfor the next shot.
/,
wn"n the lastexposurehasbeenmade...
Press in the rewind button. Fold the crank out and rotate the
rewindknob in the directionof the arrow.See page 13.
Neveropen the back coveruntilthe film is rewoundback into
the cartridge.
Loadingthe Batteries
1. Pushthe batterycartridgein the direction of the arrow The cartridgewill pop
up for easy removal.
2. Loadthe two batteriesthat come with
the camera,makingsure that plus (+)
terminalsare lacingup
4. Turn lhe main switchto "ON". This
switchshouldbe left in the "OFF" position when the camerais not in use.
3. Insertthe cartridgeas shownin the illustrationThenpressdownuntilthe cartridgelocksinto place.
Lens Mounting/Removal
Matchthe red dots on the lensand camera body, then rotatethe lens in the direction of the arrow until it clicks into
position.
lf the auto lock pin (A) is set at the central index mark,the aperturering cannot
be turned. In this case, rotatethe aperture ring awaylrom the indexmarkwhile
depressingthe auto lock pin.
. Theautolockoinshouldbe setto thecenona
tralindexmarkwhenthelensis mounted
cameralikethe MamiyaZE-Xwhichis capableol shutterspeedpriorityAE mode.
Removing the lens
Pressthe lensreleasebuttonandrotate
the lensto the leftuntilit stops.
Loadingthe Film
2. Insertthe end of the film intothe slot
of the film take-upspool.
1. Openthe backcoverof the cameraby
pullingup on the rewindknob (Avoiddirect sunlightwhen loadingor unloading
film. Stand in the shade or cast a
shadowwith your own body.)
Load a film cartridge into the film
chamberof the cameraand returnthe
rewind knob to its originalpositionto
hold the film in place.
the
3. Firstadvancethefilmby operating
film advancelever;then rotatethe rewind knobin the directionof the arrowto
take the slackout of the film.lt is importantto makesurethatthe boththe upper
and lowerteeth of the sprockelare engagedin the perforations
of the film.
Settingthe Film SPeed
4. Closethe back cover of the camera
and advance the film by alternately
reoperatingthe film advanceleverand"1"
leasingthe shutteruntilthe numeral
appearsin the exposurecounter While
performingthis operation,make sure
that the film is advancingproperlyby
checking if the rewind knob rotates
whenthe filmadvanceleveris operated
www.orphancameras.com
Set the film speedof the film beingused
by lifting up the outer rim of the film
speeddialand rotatingit untilthe conect
ASA/ISOvalue appearsin the window.
(The film speed is jndicatedon the film
cadridoeor box.)
. lt,whensettingthefilmspeedtheexposure
shiftsfrom
scaleaccidentally
compensation
to the
it shouldbe returned
the "0" position,
"0" oosition
It is convenientto removethe end of the
film box and insertit intothe memoholder on the back of the camera
film speedscan be set as
lntermediate
followswhen necessary.
AE (AutomaticExposure)Photography
. Do not alignthe auto lock pin on the
aperture ring with the central index
mark:otheruise,correctexposurecannot be obtained
1. Set the shutterspeeddial to "A" for
AE (automaticexposure)operation.
2. Set the exposurecompensation
dial
to the "0" mark (How to use exposure
compensation
is explainedlater.)
3. Set the apertureafterselectingin accordancewith the light conditionsas
shownin the illustration
Recommendedapertures
(withASA/ISO100 film)
fl16-11
fl11-I
4. When the shutter !.eleasebutton is
lightlypressed,an LED lightsinsidethe
vieMinderto indicatethe correctshufier
speed automaticallyselected by the
camerain accordancewiththe aperture
setting.
. The "OVER" LED flashes and the
buzzersoundsat the rateof 8 timesper
secondto indicateoverexposure.
To obtain the correctexposure,turn the aperture ring untilthe LED stopsflashing
o The "LT" LEDflashesandthe buzzer
soundsat the rateof 8 timesoer second
to indicateunderexposure.
Again, turn
the aperturering until the LED stops
flashing
. A lit "LT" LED also indicatesthat the
shutterspeed is set betweenmore than
1 secondand 4 seconds.The use of a
flashunit is recommended
in conditions
so dark that the "LT" LED remainslit or
flashes.
o lf any of the shutterspeedLEDsflash
slowly(2 timesper second)andthe buzzer sounds,this is an indication
thatthe
batteriesare low and should be reolaceo.
apenure (giving you a faster shutter
speed),or to mount the camera on a
sturdy tripod to avoid the possibilityof
blurredoictures
The safe slowest shutter speed for
hand-heldshootingvarieswith the focal
lengthof the lensin use.The slow shutter speed warningsystem automatically
adjust for this variation when you
changelenses
It is also possible to take
photographswith presetshutter
speeds
o Keepingthe shutter releasebutton
pressed after the exposure has been
completedcauses the LED displayto
continue indicatingthe same shutter
speeds to permit easy checking of
whetheror not the exoosurewas correct.
o Slow Shutter Speed Warning
When the shutterspeed automatically
"A" (Auto)
selectedby the camerain the
and "AEL" (AE Lock)modesis too slow
for hand-heldshooting,a buzzer will
sound at the rate of 1 time per second
warningyou to set the lens to a wider
10
1. Set the shuttersoeeddial to the desiredsoeed.
2. Lightpressureon the shutterrelease
buttonwill causean LED to lightand indicate lhe shuttersoeed selected lf the
lens apertureis not appropriatefor the
a secondLED will
degreeof brightness,
flash (4 times per second)to indicate
anothersoeed3. The correctexposurecan be obtained
by turning the apenure ring until the
ManualExposure
flashingLED and the steadyLED coincide
o Whenthe shutterspeedsettingis appropriatefor lhe apedure,a singleLED
will light(but not flash)
o With manualshutterspeed settings,
the LED remainslit for 10 secondsafter
the shutter release button is oushed
lightlyand then released 11the shutter
releasebuttonis releasedafterthe exposureis completed,
the LED willgo out
even beforeten secondshaveelaosed
11light pressureis maintainedon the
shutterreleasebuttonfor morethanten
seconds,the LEDwilldisappearas soon
as the buttonis released
Focusing
Manualshuttersoeedsfor lhe ZM work
independently
of the meteringsystem,
allowingfor maximumcreativityin exposure control.Duringmanualoperation,
set the shutterspeedand lensaperture
to accordwithyourspecificexposurereouirements
Light pressureon the shutter release
buttonwill causean LED to llash at the
rateof 4 timespersecondto indicatethe
appropriateshutterspeedfor the aperturesetting.The exposureshouldbe adiustedon this basis.
Holdingthe Gamera
the subject
Beforetakinga photograph,
must be brought into sharp focus by
rotatingthe focusingring.Correctlocus
can be checkedby any of the following
conditions:
(1) When linesin the centralsplit-image
rangefinder
appearsstraight.
(2) When the pan of the image in the
microprismringappearssharplydefined
(3) When the part of the image in the
mattefield is clearand sharp
www.orphancameras.com
Pressthe elbowfirmlyagainstthe side
of yourbodyfor a steadierhold,whether
or vediusing the camera horrzontally
cally. lt is also recommendedthat you
pressthe cameraagarnstyourforehead
for extrasteadiness
Most bluned photographsare due to
camerashakecausedby notholdingthe
camerasteady.lmprovethe sharpness
oi your picturesby holdingyour camera
steady Depress the release button
gentlywith a squeezingmotion,withoul
jerking.
Hewindingthe'Fi|m
Whenthe lastexposurehas beenmade,
the Jilmmust be rewoundback into the
cartridge before removing it from the
camera.Never ooen the cameraback
untilthis has beendone.
2. Fold the crank out from the rewind
knob and rotatein the directionof the
arrow.
3. When the rewindknob stans to turn
lightly,pull up on the rewind knob to
ooen the cameraback and removethe
lilm.
. Whenthe filmhas beenlullyadvanced,
the
film advance lever may stop halfway Press
the rewindbuttonand rewindthe film Turn the
film advanceleverfully afterthe completionof
rewindingand it will returnto its normalposition
1. Pressin the rewindbutton
13
ExposureCompensation
(1) AE Lock
exposuremetering
The center-weighted
systemo{ the ZM will give you the best
oossibleexoosuresin mostof all shooting situationsHowever,when the subject is situated against a bright light
sourcesuchas snow,againsta window,
in the shade of a backlittree, or when
the subject is spotlightedon stage
someexpoagainsta dark background,
sure increaseor decreasemay be required to bring out the details of the
subject The exposure compensation
by eitherof two
may be accomplished
methodsdescribedbelow
The MamiyaZM is equippedwith a special device for obtainingcorrectexpobut any
sure not only with backlighting,
other difficultlightingsituationas well.
And this deviceis calledthe AE Lock
"AEL"
Set the shutterspeeddial to the
(AE Lock)position
Whenthe shutterreleasebuttonis lightly
pressed the camera locks in, or
memorizes,the exposurereadinguntil
the finger is removedfrom the release
button
To use the AE Lock function,move
closeto the subjectuntilthe desiredpart
of the subjectcoversthe centerarea of
lhe viewfinderand lightlypressthe shutter releasebutton untilthe LED lights.
Hold the shutterreleasein this position
and movebackto the placefromwhere
you want to photograph,composethe
pictureand pressthe releasebuttonto
make the exposure.The subjectwill be
correctlyexposed even under difficult
lightconditions
lf it is not oossibleto move closeto the
subject,determinethe exposureusing
the oalm of the hand at a distanceof
about 12" (30cm),or pointthe camera
so that sky or otherbrightareasare not
includedin the viewfinder;then lock in
the exposurevalueand makethe exposure as describedabove
15
dial
Use of the exposurecompensation
is the mosteffectivemethodoJexposure
compensationwhen you cannot approachyour subjectclosely,such as a
person slandingagainstthe snow across the river or spollightedon stage,
erc.
The dial surroundsthe film rewindknob
permitsup to +2EV (2 flstops)compenis required
sation.When compensation
it may be set for exposureincreaseat
+1 +2 or exposuredecreaseat -1 -2
by rotatingto the desiredsetting In-between settingsmay also be used.The
amount of increase or decrease requireddependsmainlyon experience;
in
the beginning,it's a good idea to take
samephotoat two or threesettingsto be
on the safe side
"0" when
Be sureto set the dial backto
exposurecompensalionis not longer
neededto avoidexposurefailures
www.orphancameras.com
to
Exposure increase(for backlit
subject):
When the subjectis situatedagainsta
exposuremustbe inbrightbackground,
creasedto compensateSet the dial to
+1 ot +2 as required.
Exposure decrease (for frontlit
subjects):
against
Whenyoursubjectis spotlighted
a dark backgroundsuch as on stage,
best resultsare obtainedby decreasing
the exposure.Set the dial to the appropriate-l or -2 setting.
Self-timer
1. Set the mainswitchto "S-T" The film
should be advancedeither belore or
afterthis adjustmentThe self-timerwill
not functionunlessthe film is advanced.
2. The self-timertlvillstart when the
shutter releasebutton is pressed,releasingthe shutteraftera periodof approximately
ten secondsWhilethe selftimer is in operation,an LED will flash
and the buzzerwill soundinlermittently.
The LED flashestwrcea secondfor the
first 8 seconds,changingto 4 times a
secondduringthe last 2 secondsas a
warningthat the shutteris about to be
released
B (bulb) Exposure
. Beforeshooting,coverthe vieMinder
eyepiece with the hofshoe/eyepiece
cover to preventlightfrom enteringvia
the eyepiece Failure to do so may
cause the photographto be incorrectly
exposedas a resullof extraneouslight
enteringfrom the back.
o The self-timercan be halted even
after the countdownhas started by sef
ting the main switchto "On" or "OFF".
. lf the shutterreleasebuttonis pushed
again while the self-timeris operating,
the shutterwillbe releasedafleran interval of 10 seconds
o The self-timercannotbe used when
the shuttersoeeddial is set to "B''
Depth-of-Field
Stopped-downaperture
Deolh'ot-lield
Focuseddistance
"8"
Set the shuttersoeed dial at the
(bulb)for exposureslongerthan 2 sec
At this positionthe shutterwill remain
open as longas the shutterreleasebut
ton is held down The use of a cable
releaseand triood is recommendedto
oreventcamerashake
When the camerais focusedon a subject,a cenaindistancein frontand back
of the subjectis also in relativelysharp
focus This is called the depth-of-field
and increasesas the lens aoertureis
stoppeddown whileit decreasesas the
lens is openedup to largerapertures
To rendera backgroundin sharpfocus,
or to allow snap-shootingwithoutthe
botherof pinpointfocusing,the lenscan
be stoppeddown to increasethe depthof-focus.Openingup the lens aperture
appropriatelyenables a subjectto be
renderedin sharp detailagainsta pur-
posely blurred background or foreground
The depth-of-field
range can be determined using the depth-ofifield
scale of
the cameralens.Oncethe desiredaoerture is selected,the corresponding
figures on both sides of the centerindex
mark indicatethe depth-of-field
for that
apertureon the distancescale.
For example.if the camerais focusedat
15ft (5m) at an apertureof f/11, the
range from approximately10ft (3m) to
30ft (10m)will also be in sharpfocus.
FlashPhotogiaphy
1. Clip-ontypeflashunits(theMamiyalite ZE or MZ 18R)are mounteddirectly
on the hot shoe For griptype units(the
MamiyaliteMZ 36R), a sensor base
mustbe attachedto the hotshoe A sync
cord is not required.
2. Set the shuttersoeeddial to the "A''
or "AEL" position.
3. The Mamiyalite
wiltbe fullychargeda
few secondsafter lhe switch is turned
on. lf you maintainlightpressureon the
shutter releasebutton while the flash
unit is being charged,the LED display
will shift from the shutter speed for
naturallight conditionsto 1/60 sec. as
soon as the flashis fullycharged
Whenthe shutterspeeddialis at a man.1/1000
ual soeed between
sec and 1/
125 sec, the camera automatically
synchronizesfor flash at 1/60 sec. on
charging When the dial is set between
1/60sec and 2 sec, the shutterwill be
18
InfraredPhotography
The reddot (or redline)to the rightof the
centerindex mark oJthe lens is the infraredmark.This mark is providedbecause focusingwhen using black and
white infraredfilm differsthan with ordinary films. Compensationmust be
appliedas explainedbelow.
1 First focus the camera as for normal
photography;
then readthe distanceindicatedby the center index mark and
move this value to the infraredmark
oosition.
2. Ared filtershouldalso be usedwith
infraredfilm so referto the film instructionsconcerningexposure.
o Thereis no needfor focuscompensation when using color infraredfilms
in the film
Use the filtersrecommended
instructions.
www.orphancameras.com
released at the selected speed Light
oressureon the shutterreleasebutton
will causean LED to appearat the shuf
ter speedsetting Whenthe flashis fully
charged,an LED willstartto flashat the
"60" setting (Whenthe speedis set to
1/60 sec., the LED will lightup without
flashing.)
4. Set the lensto the apedureindicated
by the flash unit and starttakingphotographs as explainedin detail in the
The Mamiyalite
Mamiyaliteinstructions.
is a seriescontroltype automaticelectronicflash,so energyis savedat close
distances.The remaining energy is
storedin a capacitoruntilthe flashis recharged,shorteningrecycletimes and
extendingbatterylife
. Thelvlamiyalite
lVlZ18Ror MZ36Rwillnot
flashif the switchon theflashunitis setto
"MZ-AUTO"Use eitherthe "AUTO"or
"MANUAL"
setting.
Macro
50mmf/3.5
135mmf/2.8
135mmfl3.5
200mm f/4
Auto macro
spacer ZE
,300mm f/4
Zoom 80 - 200mm fl3.8
24
E/EFLenses
Mamiya-Sekor
Lens
Construction
Groups E l e m e n t s
6
6
'*' '""r""f iit",
d stl:e
t,."
L e n sh o o d
Weight
1 Sft orO4m
49mm
Somm f/.14
6
7
to
1 5ft or 0 45m
49mm
Screw-in
somml/17
5
6
to
1 5tt or 0 45m
71az Qng)
53oz (1509)
1 09 o z ( 3 1 0 9 )
1 f to r 0 3 m
49mm
Screw-in
lft or03m
49mm
Screw-in
5 8oz (1659)
4 9oz (1409)
1 SftorO4m
49mm
Screw-in
1 5ft or045m
4gmm
screw-,a
5 . 1 o 2(.1 4 5 9 )
Z ro.,ZOOS'
35mmf/2 8
U
Minl
aperture
+ 5 . 1 o 2(.1 4 5 9 ) l
Screw-in
35mmf/2 8
c)
Angle
ol vrew
OJ
5
10'
22
I
22
2 8 m m f/ 2 8
7
8
2 8 m m f/ 3 5
5
5
35mmf/2 I
6
6
SOmml/14
6
7
22
22
63"
22
4 : . ' 1 6
5omm f/1 7 S
5
6
47'
74
to
1 Sftor045m
52mm
Screw-in
5 3oz (150g)
5omm f/2 S
6
to
1s f t o r 0 4 5 m 52mm
Screw-in
Macro 5omm f/3 5
5
22
22
22
32
32
22
5 1oz (1459)
7 1az (2@g)
1 3 5 m mf / 2 8
A
5
18"
1 3 5 m mf / 3 5
/
A
18'
2c0mmf/4
5
5
12'
5
8"
3mmm f/4
Z o o m 2 8 - 5 0 m m f/ 3 5 - 4 5
8
I
74"-47'
Zoom 35-70mm t/35-45
6
7
Z o o m 3 5 - 1 0 5 m mt l 3 5 - 4 3
I J
t5
63'-34
63'-23
Z o o m 7 G . l S o m mf / 3 8
I
12
34'-17"
Zoom 8G20Ommf/3 8
10
14
30'-12'
22
32
32
25
www.orphancameras.com
O 7 S f to r O 2 2 m
49mm
Screw-in
s f t o r 1 5 m 52mm
s f t o r 1 5 m 49mm
Built-in
109oz,lt6g
Built-in
101oz (2859)
143oz (405q)
257a2 (7309)
7ft or 2m
'18ft
or 5m
52mm
Built-in
77mm
Builfin
2 f to r 0 6 m
1 7 5 f to r 0 5 m
55mm
Screw-in
55mm
Screw-in
52mm
Builtin
159oz {4509)
175oz (495q)
58mm
Screw-rn
26 5oz (7509)
6m (27cmin macro) 5 5 m m
3Sftorlm
4fi or 1 3m
102oz l2X)g)
138oz (39Oq)
Screw-rn
Accessories
27
Mamiyalite MZ 36R
This is a grip type seriescontrolautomalic elecironicflashunit lts systemof
flash intensity adjustmentpermits a
choiceof 3 differentllash aoertureset
tings In the manualmode,the flashintensitycan be adjustedin fivestepsfrom
1/16 to fullintensity.
The flashcan be set
to the desired angle for bounce and
close-upphotography
Guidenumber:36 (ASA/ISO100.m)
Angleof coverage:Vertical- 45', horizontal- 60"
(Attachingthe wide-anglediffuser
providescoveragefor a 28mmwideanglelens.)
The flash can be rotated 90" upwards, 180" to the left and 150' to
the right.
Batteries:8 AA-size alkalineor Ni-Cd
batteries
Mamiyalite MZ 18R
The MZ 18R is a clip-ontype electronic
flashunit lf you set the lensaperturefor
flashaccordinglo the speedof the filmin
use, it is not necessaryto adjust the
aperturefor eachchangein distanceso
long as the subjectremainswithinthe
unit's effectiveflash range. Naturally,
manualflashphotography
is alsopossible
Guidenumber:18 (ASA/ISO100.m)
Angleof coverage:Vertical- 45', horizontal- 60'
(Attachingthe wide-anglediffuser
providescoveragefor a 28mmwideanglelens.)
Batteries:4 M-size alkalineor Ni-Cd
batteries
28
Mamiyalite ZE
This is a clip-on type lightweightand
comDactelectronicflash unit lt has 2
flashaperturesettingsand manualflash
photography
is also possible.
Guidenumber:17 (ASA/ISO100.m)
Angle of coverage:Vertical- 45",horizontal - 60"
(Attachingthe wide-angledrffuser
providescoveragefor a 28mmwideanglelens)
Batteries:4 M-size alkalineor Ni-Cd
batteries
Accessories
Mamiya Winder ZE
Mountingthe MamiyaWinderZE on the
cameraeliminatesthe needto advance
film manuallyPhotographic
opportunities
can be capturedmore easily because
there is no need to take the eye away
fromthe viewfinder
for film advance
Single frame photographyis easy by
simply removingthe finger from the
shutterreleaseafter each shot.
Continuoussequence photographyis
possible at the rate of approximately
2 framesper secondby merelyholding
downthe shutterreleasebutton.
Power source: Four AA-sizealkalineor
rechargeable
Ni-Cadbatteries
Filters
Mamiya filters are made of high-quality
optical glass to maintainthe high performance of the camera lens They are
availablein the followingfive types:SY48
(Y2), 5056 (02), SL3s (UV), YG, and
SL-1B(skylisht)
DiopterCorrectionLensesZE
Lene Hoods ZE
Mamiyalens hoodsare an importantaccessoryfor gettingthe best possibleperformancefromthe cameralensbecause
they minimizethe entry of stray light
which can cause internalreflectionand
leadto flareor ghostimages.
Alwaysuse the lens hood designedfor
the specitic focal length of the lens
beingused
Far- and near-sightedpeoplesometimes
find it difficultto focus a camera due to
the optical characteristicsot the viewfinder system This situation, however,
can easily be remedied by using a
dioptercorrectionlens and adapter
Thesedioptercorrectionlensesare available in six differentstrengths:+3, +2,
+1, -1, -2 and -3.
Beforepurchasinga dioptercorrection
lens at your Mamiyadealer,be sure to
actually try various strength diopter
lenses and select the one that suits
your eyesight.
29
ORubberEye-cupZE with Adapter
Thisadapteris requiredfor attachingthe
dioptercorrectionlensesto the camera
The rubber eye-cup helps to prevent
stray light enteringlhe vienrfinder
while
takingphotographs
To attachthe dioptercorrectionlens,firsi
removethe mountingring locatedinside
the eye-cupby turningit counter-clockvr'ise;then put the lens in place and
replacethe ring.
O AngleFinderZE
The anglefinderis usefulwhenshooting
at low anglesand for copy work Click
stops are providedevery 9O",but full
360' rotationis possiblefor viewingeven
from the side or from below The angle
finderalsofeaturesbuilt-indiopteradjust
ment from -4 to +4
@Close-upLens ZE
The close-uplensesZE are convenient
attachmentlenseswhich screw directly
to the filterthreadsof the mastercamera
lens enablingswiftand easy conversion
to close-upphotography.
Two modelsare available:
Close-uplens
No t having+2 diopters,and Close-up
lensNo 2 having+4 diopters.
Diameter
ofthreads:
49mm
OAuto ExtensionRingsZE
OMagnifierZE
The magnifieris a usefulaid for critical
focusing as required in 6opy work,
close-up photography,and similar applications The size of the image is
doubled and only the center part is
visiblefor moreaccuratework.The magnifier also featuresdiopter adjustment
from -5 to +5
o
w
www.orphancameras.com
@
w
A set of three extensionrings are intended for close-up photographyand
mount betweenthe camera body and
lens, directly coupling with the ZM
camera meteringsystem and the lens
automatic diaphragm Three ditferent
lengthsof the rings can be used individually
or in combination
o
G@
o
Accessories
a
@AutoBellowsZE
This is an easy to operate,precision
bellowstype close-upattachmentAutomatic aperture stop-downcoupling is
possibleusing a doublecable release
And the front standardcan be swiveled
360', permittingsimplereversingof the
lens for large magnificationratios with
imagesthat are sharpto the veryedges
@BellowsStandZE
Usedwith the Auto Bellows,the Bellows
Standis used for copyingsmall objects
suchas stamps,coins,insects,etc Clips
are providedfor holdingsub.iects
on the
platform And the platform rotates for
precisepositioningThe platformis also
finishedto provide18%reflectance,
convenientfor measuringexposuresA clear
glassplatformis also includedfor backlightingof subjects
Shiftcontrolalso enablescontrolof perspective And the cameracan also be
rotated at the back for a choice of
verticalor horizontalformat with easy
operationThe focusingrail allows the
entire bellowsunit to be shifted back
and forthfor sensitiveadjustment
of distanceand focusing
€) Microscope Adapter ZE
The microscope
adapterZE is designed
to permit photomicrographyusing
Mamiya'sZE Seriescameras.lt serves
to connectthe camerabody to the microscope,allowingthe magnifiedimage
to be observedthroughthe viewfinder
of
the camera. Photomicrographybecomeseasy,with no problemsof parallax or exposurecompensation.
o
':ri:l&
$
JZ
OSlideCopierZE
This device is mountedon the front of
the Auto Bellowsfor making copies of
slides.Convenient
filmtraysare provided
lor copyingfilm strips The slide stage
also movesverticallyand horizontally
for
easiercroppingof 35mmslides
@ 645AdapterzE
The 645 Adapter ZE is an adapter designed to allow the 645 lens to be
mountedonto the ZE seriescamera.lt
combinesthe high-pedormance
lens of
mediumjormatcameraswith the raoidshootingcapabilities
of the 35 mm camera to enableAE photography
basedon
stopped-downapedure metering.
1l;)
J
I
Precautionson Batteries
HandlingCautions
The Mamiya ZM has a built-in circuit that automatically gives a
warning when battery power is running low. In this case, the
LED corresponding to the correct shutter speed flashes and a
warning buzzer sounds at the rate of 2 times per second when
the shutter release button is lightly pressed.
The batteries should be replaced as quickly as possible,
although several exposures can still be made. When the batteries go completely dead, the LEDs won'l light at all.
. Batteriesshould always be removedwhen the camera is not to be
used for an extendedtime Keep them in a cool,dry place.Leavingbatteries in the camerafor long periodsmay resultin leakagewhich could
damagethe internalmechanisms
. When replacing batteries, use 1 5V alkaline-manganesebatteries
LR44 (A-76),or silveroxide batte.iesSRzt4(G-13).Although1 3V mercury batteriesare the same shape and size, they will not operatethe
camera normally
. Be sureto replacebothtwo batteriesat the sametime Do not mrxnew
and old batteriesor batteriesof differenttypes or brands
. When loadingbatteriesinto the batterycartridge,be surethe plus and
minus terminalsare locatedproperly.Before loadingthe batteries,oe
sure to wipe the terminalsof the batteriesand the cartridgewith a dry
cloth to removeany soilingor finger marks, etc
. Never take apart batteries,short them, or throw them into fire.
When the camera is not in use, the main switch should be left in the
"OFF" position lf the
camera'smain switch is left in the "ON" position,
the LEDswill lightup wheneverthe shutterbuttonis depressed,causing
prematurebatteryexhaustion
The depth ot the tripod socketis 7/32 in (5.5mm) lf a tripod is used
with a mount screw longer than this, the internalmechanismsof the
camera may be damaged Do not use excessivelorce when mounting
the cameraon a tripod
Avoid strongvibrationand shocksincethis may causeadverseinfluence
on the delicatelyadjustedpartsof the camera.Be carefulnol to drop the
cameraor allow it to strike againstobjects.
Do not keep the camera for extended periods where temperatureis
above 100'F (40"C)or below 5'F ( 15"C),or where there is excessive
humidityor salt in the air The camera mechanismor film can also be
damaged if the camera is left for a long time in a.place where there is
naphthaleneor formalin gas. Always store color film at the designated
temoerature.
Never touch the surfaceof the miorroror lens with the hands Any dust
should be blownoff with a bloweror wiped off by lightlyapplyinga soft
cloth Be especiallysure to never rub the surfaceof the mirror
Always clean the cameracarefullyafter photographingat the beach or
other placewherethere is salt in the air. Cleanthe many plasticpartsby
gently wiping with a soft, dry cloth. Never use solventswhen cleaning.
Inspectthe cameraperiodicallywhen it is not beingused. Be sure to inspect movingparts beforetryingto take importantphotographsThis includes the film advance and shutter operation,electronicflash synchronization,etc. Test shots shouldalso be takenif possibleto discover
any irregularities
that may exist.(lncidenlaldamagewhich resultsin this
camera malfunctioningwill not be compensated)
Do not try to repair or lubricatethe camera iJ some irregularityis discovered Leavethis to Vour Mamivadealer.
Specifications
Type of camera: 35mm single-lensreflex (SLR), aperture
priorityautomaticexposurecamerawith manualoverride.
Picture format: 24mm x 36mm
E seriesand EF serieslenses
Usable lenses: Mamiya-Sekor
controlledmetal focal plane Speed
Shutter: Electronically
range from 4 sec. to 1/1000sec. at AUTO positionand
2 sec.to 1/1000sec. at MANUALand B (bulb).
when
Camerashake warning: A buzzersoundsinlermittently
the shutterspeed dropsbelowthe slowestsafe speedfor
hand-heldshootingaccordingto the lensusedon the camera in the Auto/AELmode.
Self-timer:Approx 10-seconddelay;timeroperationsignalled
by buzzerand flashingLED.
Sync contact: X-syncon a hot-shoe
meteropen-apedure
Meteringsystem: TTL center-weighted,
ing usingSPD (siliconphotodiode)
Meteringrange: EV0.5- EV18 (ASA/ISO100, fil .7 lens)
EV1- EV18 (ASA/ISO100,f/2 lens)
Exposurecompensation: +2 f-stops
Film speed range:ASA/ISO12-32OO
Viewfinder information display: LED dot displaysindicate
shutterspeedsof 1 - 1/1000sec.,plus B and LT. Flashing
buzzerwarnof over-and underLEDSand an intermittent
exposureand batteryexhaustion
In manualmode; An LED dot lightsat the speed set for
www.orphancameras.com
34
manualshutterspeed.lf the speedsettingis differentfrom
the exposure automaticallycalculatedby the camera,
anotherLED flashesat the laterspeed.
Viewfindermagnificationratio: 0.85Xwith 93% coverageof
fieldof view (with50mm lens at infinity).
typewith mattefield.
Focusing screen: FixedspliVmicroprism
Film advance: Using film advancelever with 130" winding
angleand 30'stand-offangle
"S" mark
Exposure counter: Additivetype Automaticresetto
when cameraback is oPened
Film rewind: Manualrewindwith rewindlever.
LR44 ( -76)
Power source: Two 1 5V alkaline-manganese
batteriesor two 1.5V silveroxide SR44 (5-76,G-13,etc)
batteries.
Power switch: Main switchand shutterreleasebutton.
Flash synchronization: When usinga Mamiyalitewith the
cameraon Auto or Manualand adiustedto 11125- 1/1000
set to 1/60 sec.
sec, the shutterspeed is automatically
when the flash is fullycharged
Winder coupling: Electricalcontactand couplerbuilt in for
operationwith the MamiyaWinderZE
Dimensions: 140mm(W) x 88mm (H) x 52mm (D)
Weight:480g
"
and designare subjectto changewithoutnotice
Specifications