1
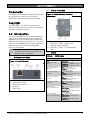
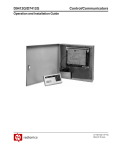
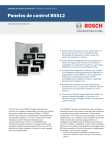
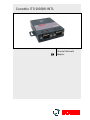
Conettix ITS-D6686-INTL
Installation Guide
EN
Ethernet Network
Adapter
Conettix ITS-D6686-INTL | Installation Guide | Contents
Contents
1.0
1.1
1.2
1.3
2.0
2.1
2.2
3.0
3.1
3.2
3.3
3.4
3.5
4.0
2
Introduction ...................................................... 3
Network Interface................................................. 3
Serial Interface..................................................... 3
LEDs .................................................................... 3
Installation ........................................................ 4
Mounting the D6686 ............................................ 4
Connecting the D6686 ......................................... 4
Configuring and Programming the D6686 5
Factory Default IP Address.................................. 5
Identifying the MAC Hardware Address .............. 5
Obtaining an IP Address ...................................... 5
Using the D6200 to configure the D6686 ............ 5
Programming Overview for the D6600 ................ 8
Specifications ................................................... 9
Bosch Security Systems, Inc. | 11/12 | F01U274797-02
Conettix ITS-D6686-INTL | Installation Guide | 1.0 Introduction
.
Trademarks
All hardware and software product names used in
this document are likely to be registered
trademarks and must be treated accordingly.
1.2
Serial Interface
Figure 2: D6686 Network Interface
Copyright
This document is the intellectual property of
Bosch Security Systems, Inc. and is protected by
copyright. All rights reserved.
1.0 Introduction
The Conettix D6686 Ethernet Network Adapter is
a two-channel network adapter that supports IP
Addresses for both IPv4 and IPv6 environments.
Networked installations can have one if it is only
used with one D6600 receiver or two configured
channels when used with a backup D6600
receiver configuration.
Follow these instructions to avoid the
possibility of harm to the operator, or
damage to the equipment.
1.1
Network Interface
Figure 1: Power/Ethernet
1- Power/Diagnostic LEDs
2- Serial Port 2 (DTE) – optional (use
supplied cable if required)
3- Serial Port 1 (DTE) – use supplied null
cable
1.3
LEDs
Table 1:
D6686 LEDs
LED
Power/Diagnostic
(Blue)
RX Serial 1 Activity
(Green)
TX Serial 1 Activity
(Yellow)
RX Serial 2 Activity
(Green)
12345-
Ethernet Link LED
RJ45 Ethernet Jack
Ethernet Activity LED
Reset Pin
Power Plug
TX Serial 2 Activity
(Yellow)
Ethernet Link
(Bi-color LED on left)
Ethernet Activity
(Bi-color LED on right)
Bosch Security Systems, Inc. | 11/12 | F01U274797-02
Description
Steady On: Power OK
Blinking 2x: No DHCP response
Blinking 2x: Setup Menu active
Off: No data activity
Blinking: Data received by
D6686 on Channel 1
Off: No data activity
Blinking: Data transmitted from
D6686 on Channel 1
Off: No data activity
Blinking: Data received by
D6686 on Channel 2
Off: No data activity
Blinking: Data transmitted from
D6686 on Channel 2
Off: No Ethernet link established
Solid Yellow: 10 Mbps Ethernet
link established
Solid Green: 100 Mbps Ethernet
link established
Off: No data activity
Solid Yellow: Half Duplex data
activity
Solid Green: Full Duplex data
activity
3
Conettix ITS-D6686-INTL | Installation Guide | 2.0 Installation
2.0 Installation
2.1
Figure 3: D6686 Connections
Mounting the D6686
Mount the D6686 on a rail or other user-supplied
spot behind the D6600 that it will be connected
to. Refer to Figure 3.
2.2
Connecting the D6686
Connect the D6686 as follows:
• Power cable to an available electrical outlet
• Ethernet cable to network switch
• RS-232 serial cable to Serial 1 port
Refer to the D6600/D6100IPv6 Installation and
Operation Guide – Network Communication
section, (P/N: 4998122704) for applications
using both serial ports.
Refer to Figure 3.
1– Power cable
2– Ethernet cable
3– RS-232 serial cable (Serial 1 port)
4– Serial 2 port (empty)
5 – Standard 19-in. mounting rack
4
Bosch Security Systems, Inc. | 11/12 | F01U274797-02
Conettix ITS-D6686-INTL | Installation Guide | 3.0 Configuring and Programming the D6686
.
3.0 Configuring and
Programming the D6686
3.1
Factory Default IP Address
By default, the D6686 uses DHCP to obtain an IP
Address. The unit requires a static IP Address.
Refer to Sections 3.2, 3.3, and 3.4 for more
information.
3.2
Identifying the MAC Hardware
Address
1. Verify that the D6686 is properly installed,
connected, and powered.
Refer to Section 2.0 Installation on page 4.
2. Locate the D6686’s media access control
(MAC), or hardware, address.
The MAC address is hard-coded into the
D6686 during manufacturing, and it cannot
be changed. This address is 6 bytes (12
digits) in length and is located on a label on
the D6686 in the format of “xx-xx-xx-xx-xx-xx”.
For example, 190.200.128.111 could be an IPv4
address and
2001:0db8:85a3:0042:0000:8a2e:0370:7334
could be an IPv6 address. Within an isolated
network, you can assign IP addresses at random
if each one is unique. However, connecting a
private network to the Internet requires using
registered IP addresses (called Internet
addresses) to avoid duplicates. IPv6 addresses
are typically set using DHCP on the network. The
D6686 supports IPv4 and/or IPv6 addressing
schemes or both at the same time.
3.4
Bosch Security Systems, Inc. recommends that
you read this entire section before proceeding.
In order to access the configuration
program, ensure that the D6686
and the PC used to configure it are
directly connected using an
Ethernet cable.
Figure 4: MAC Address Location
Be sure that the PC being used to
configure the device is configured
to use DHCP to obtain an IP
Address. When it is connected
directly to the D6686 it will obtain
an Auto-IP address.
1
1- MAC address location on D6686 label
3. Record the MAC address and keep it for
reference.
3.3
Obtaining an IP Address
Provide the D6686’s MAC address to the site’s
network administrator, who will assign an IP
address for the D6686.
An IP Address is an identifier for a computer or
device on a transmission control
protocol/internet protocol (TCP/IP) network.
Networks use the TCP/IP protocol route
messages based on the IP address of the
destination. The format of an IP address using
IPv4 is a 32-bit numeric address written as four
numbers or fields separated by periods. Each
number can be 0 to 255. The format of an IP
address using IPv6 is a 128-bit numeric address
written as eight groups of four hexadecimal digits
separated by colons.
Using the D6200 to configure the
D6686
The D6200 Software is the recommended way to
program the network devices. Review Section 3.5
Programming Overview for the D6600 on page 8
and the Network Utilities section in the D6200
Programming Software Operation and Installation
Guide (P/N: 4998154991).
1. When you have the IP address and the
network administrator confirms that it is
ready, connect the Ethernet port of the
D6686 directly to the PC Ethernet port
using an Ethernet cable.
2. With the PC already booted and running,
apply power to the D6686 and wait
approximately 1 minute for the PC and
D6686 to acquire an Auto-IP Address
(169.254.xxx.xxx).
Bosch Security Systems, Inc. | 11/12 | F01U274797-02
5
Conettix ITS-D6686-INTL | Installation Guide | 3.0 Configuring and Programming the D6686
3. Open the D6200 software and select
Network – Network Utilities - Network
Device Setup as shown below
7. Click the Open XML button, select
D6686.xml, and click Open.
4. Select List All Conettix IP Devices tab
and click the Start button. The program
will scan the network for the device.
5. The D6686 will be shown in the list with
the IP address. Record the IP address
that is listed is shown.
6. Select XML Configuration tab and click
the Setting button. Enter in the Setting
dialog:
• D6686/D6100IPv6 IP: The IP address
recorded in the previous step
• FTP User Name: admin
• FTP Password: PASS
• Click OK
6
8. Make changes to the parameters that are
required for your particular installation
scenario by selecting the specific item,
enter the required changes, and click
Change. The values that are changed will
be displayed in red as shown below. All of
the programmable configuration
parameters are listed on the next page
with the valid values.
Bosch Security Systems, Inc. | 11/12 | F01U274797-02
Conettix ITS-D6686-INTL | Installation Guide | 3.0 Configuring and Programming the D6686
.
Bosch Security Systems, Inc. | 11/12 | F01U274797-02
7
Conettix ITS-D6686-INTL | Installation Guide | 3.0 Configuring and Programming the D6686
9. Click on the Save XML As button to save
the changes made and enter a name for
these configuration settings.
10. Click on the Send XML button to send
these changes to the D6686. The device
will save the changes and reboot with the
new configuration.
11. Disconnect the Ethernet cable connecting
the PC and the D66868 and connect the
D6686 to the network switch or router as
required.
•
•
The number and type of receiving lines in use
Sending the files back to the D6600
(CPU/Host/Network, Account Database, or
Line Card)
• Upgrading the Software installed in the
D6600 (CPU, System, or PSTN line cards)
Refer to the D6200 Software Operation and
Installation Guide (P/N: 4998154991) for
information and procedures on how to
accomplish these tasks.
The D6686 is a Lantronix EDS-2100
with custom firmware installed and
UL Listed for use on the D6600. If
standard Lantronix firmware is
installed on a D6686, the device will
no longer function on a D6600.
If encryption is enabled on the
D6686, you must enable it on all
field devices (B420, DX4020-G,
B5512, etc) with the same key.
Encryption must also be enabled in
the D6600 Receiver. Refer to the
D6600 Program Entry Guide (P/N:
4998122702).
The network interface module
(DX4020, C900V2, C900TTL-E, or
D9133TTL-E) must have the proper
software version to support
encryption. For more details, refer
to the Device Installer Operation and
Installation Guide (P/N:
4998138688).
3.5
Programming Overview for the
D6600
The D6600 Receiver is shipped with factory
default program parameters and features already
installed. Descriptions of the program items are
found in the D6600 Program Entry Guide (P/N:
4998122702). Many of the operational features of
the D6600 can be altered through programming
options. The programming options you choose
depend on:
• The type(s) of peripheral reporting device(s)
used in your central station (for example
external printer or automation computer)
• The supervision characteristics for these
devices
• The type of communicators reporting to the
receiver
8
Bosch Security Systems, Inc. | 11/12 | F01U274797-02
Conettix ITS-D6686-INTL | Installation Guide | 4.0 Specifications
.
4.0 Specifications
Table 2: Specifications
Supported
Protocols
Connectors
ARP, UDP/IP, TCP/IP, Telnet, ICMP, SNMP, DHCP, BOOTP, TFTP, and FTP
Serial:
2 - DB9M DTE serial ports
Network:
1 - RJ45 10Base-T/100Base-TX Ethernet port
Cables
Ethernet:
Data Rates
Serial Line Formats
CAT5 or better unshielded twisted pair
Max Length: 6 m (20 ft) and installed in same enclosure/rack as
D6600.
RS-232:
Max Length: 6 m (20 ft) and installed in same enclosure/rack as
D6600.
Serial speed ranging from 300 bps to 115.2 kbps (D6600 supports 38400 bps)
Characters
7 or 8 data bits
Stop bits:
1 or 2
Parity:
Odd, even, none
Modem Controls
DTR, DSR
Flow Control
Software: XON/XOFF
Hardware: CTS/RTS
FTP
SNMP (read only)
Serial login
Telnet login
Flash ROM standard: downloadable from a TCP/IP host (TFTP), FTP, or over serial port
Management
System Software
Diagnostic LEDs
Compatibility
AC Current
Required
Power Input
Environmental
Power
10/100 Mb Link on RJ45, 10/100 Activity on RJ45
RX Serial 1 Activity, TX Serial 1 Activity, RX Serial 2 Activity, TX Serial 2 Activity
Ethernet: v2.0/IEEE 802.3
D6600
UPS Standby Current: 0.4 A
AC nominal operating range: 100 to 240 VAC, 50/60 Hz, 0.4A max
Operating Temperature:
0° to 50° C (32° to 122° F)
Storage Temperature:
-40° to 85° C (-40° to 185° F)
Dimensions (H x W x D):
Unit:
Weight
3.75 in. x 2.9 in. x .9 in. (9.5 cm x 7.3 cm x 2.3 mm)
0.6 lbs. (0.26 kg)
Bosch Security Systems, Inc. | 11/12 | F01U274797-02
9
Bosch Security Systems, Inc.
130 Perinton Parkway
Fairport, NY 14450-9199
(800) 289-0096
© 2012 Bosch Security Systems, Inc.
F01U274797-02