1
Installation Guide
Trend Micro Incorporated reserves the right to make changes to this
document and to the products described herein without notice.
Before installing and using the software, please review the readme
files, release notes, and the latest version of the applicable user
documentation, which are available from the Trend Micro Web site at:
http://www.trendmicro.com/download
Trend Micro, the Trend Micro t-ball logo, OfficeScan, Intrusion Defense Firewall,
Control Server Plug-in, Damage Cleanup Services, eServer Plug-in, InterScan,
Network VirusWall, ScanMail, ServerProtect, and TrendLabs are trademarks
or registered trademarks of Trend Micro, Incorporated. All other
product or company names may be trademarks or registered
trademarks of their owners.
Copyright © 2011 Trend Micro Incorporated. All rights reserved.
Document version: 1.2
Document number: APEM74782/110113
Release date: February 2011
Table of Contents
Chapter 1: Introduction ................................................................................................................. 3
Chapter 2: Quick Start Guide to Agentless Anti-Malware ................................................................ 8
Chapter 3: Quick Start Guide to Firewall and DPI Protection with Agents .................................... 10
Chapter 4: Installing Deep Security Manager ............................................................................... 12
Chapter 5: Installing the Deep Security Virtual Appliance ............................................................ 16
Chapter 6: Installing the Deep Security Agents ............................................................................ 18
Chapter 7: Basic Configuration ..................................................................................................... 28
Appendix A: The Virtual Appliance and the Coordinated Approach using Deep Security Agents ... 30
Appendix B: Deep Security Manager Memory Usage ..................................................................... 31
Appendix C: Deep Security Virtual Appliance Memory Usage ....................................................... 32
Appendix D: High Availability Environments ................................................................................ 33
Appendix E: Performance Recommendations ............................................................................... 34
Appendix F: Creating your own SSL Authentication Certificate..................................................... 36
Appendix G: Interoperability with Agent Releases ....................................................................... 38
Appendix H: Troubleshooting ....................................................................................................... 39
Appendix I: FAQs ......................................................................................................................... 46
Appendix J: Known Incompatibilities ........................................................................................... 48
Appendix K: Upgrading from Deep Security 7.0 ............................................................................ 49
Appendix L: Upgrading from Deep Security 7.5 to 7.5 SP1 ........................................................... 50
Appendix M: Uninstalling ............................................................................................................. 51
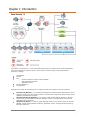
Chapter 1: Introduction
Trend Micro™ Deep Security™ 7.5 provides advanced protection for systems in the dynamic datacenter—
from virtual desktops to physical, virtual or cloud servers. Deep Security provides comprehensive
protection, including:
Anti-Malware
Firewall
DPI
o
Intrusion Detection and Prevention (IDS/IPS)
o
Web Application Protection
o
Application Control
Integrity Monitoring
Log Inspection
Deep Security consists of the following set of components that work together to provide protection:
Deep Security Manager™, the centralized management component which administrators use to
configure security policy and deploy protection to enforcement components: Deep Security Virtual
Appliance and Deep Security Agent.
Deep Security Virtual Appliance™ is a security virtual machine built for VMware™ vSphere™
environments, that provides Anti-Malware, IDS/IPS, Firewall , Web Application Protection and
Application Control protection.
Deep Security Agent™ is a security agent deployed directly on a computer, which can provide
IDS/IPS, Firewall, Web Application Protection, Application Control, Integrity Monitoring and Log
Inspection protection.
3
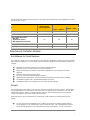
The following table identifies which protection is provided by the Deep Security Virtual Appliance, the Deep
Security Agent, or both:
Deep Security
Virtual Appliance
Deep Security Agent
Windows™,
Linux™, Solaris™
HP-UX™, AIX™
Anti-Malware
Yes
No
No
Firewall
Yes
Yes
No
Deep Packet Inspection:
IDS/IPS
Application Control
Web Application Protection
Yes
Yes
No
Integrity Monitoring
No
Yes
Yes
Log Inspection
No
Yes
Yes
Deep Security Protection Modules
Anti-Malware for Virtual Machines
The Trend Micro Deep Security Virtual Appliance now supports Anti-Malware protection for virtual machines
within VMware's vSphere™ 4.1 environment. The Deep Security Manager's new Anti-Malware module now
supports:
Agentless anti-malware protection using VMware vShield Endpoint
Protection of active virtual machines running on vSphere 4.1
Highly customizable Anti-Malware configurations applicable to security profiles and virtual
machines
Real-time, manual and scheduled scans
Use of the Trend Micro Smart Protection Network™
Quarantined file management, including download and delete from Deep Security Manager
Anti-Malware support built in to Dashboard widgets and reports
Anti-Malware Web service integration from the Deep Security Manager
Firewall
The Firewall defines what traffic, to and from, the protected computer is allowed or denied. Firewall Rules
can be applied based on a combination of protocol, port use, traffic direction, interfaces in use, and host
identification triggers. Since it is a stateful firewall, rules can also be implemented to protect against
various reconnaissance scans and denial of service attacks.
Firewall protection can be implemented on physical and virtual machines by installing Deep Security
Agents.
You can also protect Virtual Machines in a VMware environment by installing a Deep Security
Virtual Appliance on the VWware ESX™ Server hosting the VMs. The Virtual Appliance lets you
provide firewall protection to the VMs without having to install Agents. You can increase the
4
protection by also installing an Agent on the VM (the ―Coordinated Approach‖). The Agent will
provide the primary protection with the Virtual Appliance acting as a backup.
Deep Packet Inspection (DPI)
Deep Packet Inspection analyses the actual content of the network traffic moving in and out of your
computers. DPI Rules are designed to find attacks masquerading as legitimate traffic. They can stop traffic
containing content designed to exploit specific application and OS vulnerabilities on a computer.
DPI Rules deliver Intrusion Detection and Prevention (IDS/IPS) protection by protecting vulnerabilities from
known and unknown attacks. DPI rules also protect vulnerabilities such as Cross-Site Scripting (XSS) and
SQL injection in web applications through a set of Web Application Protection rules. DPI rules are also used
to provide Application Control to computers, by detecting known application traffic that may need to be
restricted in corporate environments.
Ongoing Deep Security Rule updates automatically provide the most current, comprehensive protection
against known and unknown attacks.
DPI protection can be implemented on both physical and virtual machines by installing Agents on the
computers.
DPI can protect virtual machines using only the Virtual Appliance, or you can use the Coordinated Approach
and use both the Virtual Appliance and an Agent to protect the computer.
Integrity Monitoring
The Integrity Monitoring module is used to monitor a system for changes to specified areas (certain files,
registry values, etc.). This can alert you to the installation of unauthorized software or to unexpected
changes to already installed software.
The Integrity Monitoring module requires the installation of an Agent on the computer, physical or virtual.
It is not supported by the Deep Security Virtual Appliance at this time.
Log Inspection
The Log Inspection module is used to monitor system logs and alert when specific types of events occur.
For example, there is a Log Inspection Rule which alerts when a certain number of failed authentication
events occur within a certain timeframe.
Like the Integrity Monitoring module, the Log Inspection module requires the installation of an Agent on the
computer, physical or virtual. It is not supported by the Deep Security Virtual Appliance at this time.
5
Integration with VMware vShield Endpoint
VMware
Operating System: VMware vCenter 4.1 and ESX 4.1
Software: VMware vShield Manager, and VMware vShield Endpoint 1.0 (including VMware
Endpoint Thin Agents for each virtual machine.)
The VMware vCenter manages the ESX servers which host the guest VMs that are to be protected. The
VMware vShield Manager manages VMware vShield Endpoint which in turn communicates with the VMware
Thin Agents. The last two components provide the API which Deep Security uses to provide Anti-Malware
protection.
Deep Security
Software: Deep Security Manager 7.5, Deep Security Virtual Appliance 7.5, and Deep Security
Filter Driver 7.5.
The Deep Security Manager coordinates the Anti-Malware protection being provided to each guest virtual
machine. This is done through the Deep Security Virtual Appliance which uses the VMware Endpoint API to
apply the protection to the virtual machines. The Deep Security Filter Driver controls network traffic in and
out of the guest virtual machines.
What’s New in Deep Security 7.5 SP1
Performance and Scalability (DS 7.5 SP1)
Deep Security 7.5 SP1 brings increased overall performance and scalability by significantly improving the
speed and efficiency of security update deployments, heartbeats, recommendation scans, memory usage,
and the Deep Security Manager user interface.
6
Automatic Activation and/or Protection of Newly Added Computers (DS 7.5
SP1)
Alongside Scheduled Tasks, Event-based Tasks now let you automatically and conditionally activate and/or
assign Security Profiles to computers that are:
vMotioned onto a managed ESX host
Created on a managed ESX host
Added via Agent-initiated activation
Added when an Active Directory is imported or synchronized
7
Chapter 2: Quick Start Guide to Agentless Anti-Malware
1. Prepare your VMware Environment
Install VMware vShield Manager and VMware vShield Endpoint
The VMware vShield Manager and VMware VShield Endpoint drivers are required if you want to implement
Anti-Malware protection of your virtual machines. Please consult your VMware vShield documentation for
the following procedures:
1.
2.
3.
Deploy the VMware vShield Manager. The vShield Manager is used to deploy and license vShield
Endpoint Protection.
Prepare the ESX Server for vShield Endpoint by installing the vShield Endpoint Host Driver.
Install vShield Endpoint Thin Agents on the virtual machines.
When you create a new virtual machine, the default configuration does not include a SCSI
controller. You must specifically add a SCSI controller to the virtual machine. For a list of supported LSI
SCSI drivers and installation instructions, please consult your VMware Endpoint documentation.
In a High Availability environment, Trend Micro strongly recommends that you implement Agentless Anti-Malware protection on all the ESX servers in a cluster.
2. Prepare the Deep Security Environment
Install the Deep Security Manager and the Deep Security Virtual Appliance
The Deep Security Manager is the central management console for the Deep Security system and the Deep
Security Virtual Appliance provides the Anti-Malware protection on the ESX server.
Important: Only install Deep Security Manager on the same ESX server as one that is hosting the VMs
you want to protect if that ESX server is part of an ESX cluster. This is because the Deep Security Manager
will force the ESX server to go into maintenance mode. If the ESX server is part of a cluster, the VMs,
including the Deep Security Manager, will be vMotioned to another ESX server during this process.
The install packages are available from the Trend Micro Download Center,
http://downloadcenter.trendmicro.com.
To confirm that you possess a legitimate version of each install package, use a hash calculator to
calculate the hash value of the downloaded software and compare it to the value published on the Trend
Micro Download Center Web site.
1.
2.
3.
Place the install packages for the Deep Security Manager, the Deep Security Virtual Appliance, and
the Deep Security Filter Driver in the same folder. (This way the Deep Security Manager will
automatically import the Virtual Appliance and the Filter Driver when it is installed.)
Install the Deep Security Manager. (See Chapter Four: Installing the Deep Security Manager.)
Install and activate the Deep Security Virtual Appliance. (See Chapter Five: Installing the Deep
Security Virtual Appliance.)
8
3. Enable Anti-Malware protection on virtual machines
Use the Deep Security Manager to activate the virtual machines to be
protected.
1.
2.
Right-click on a virtual machine in the Computers list and select Actions > Activate. The status
column for the virtual machine will change to "Managed (Online)".
Right-click on a virtual machine in the Computers list and assign the default Windows AntiMalware Security Profile.
Remember that newly added virtual machines must have a VShield Endpoint Thin Agent installed
before they can be provided with Anti-Malware protection.
Note that the Anti-Malware feature is not available for Deep Security Agents in this release.
If you plan to use manual or scheduled scans be sure to turn off sleep and standby mode on the
guest virtual machines. If a guest virtual machine goes into sleep or standby mode during a scan you
will see an error indicating that the Anti-Malware Scan Terminated Abnormally. Virtual Machines must
be in the running state for scans to complete successfully.
9
Chapter 3: Quick Start Guide to Firewall and DPI
Protection with Agents
This chapter describes how to get started with Firewall and DPI protection with Agents installed on physical
or virtual machines.
Firewall and DPI can protect virtual machines using only the Virtual Appliance, or you can use the
Coordinated Approach and use both the Virtual Appliance and an Agent to protect the computer. To use the
Virtual Appliance in the Coordinated Approach, prepare your VMware Environment as described in Chapter
2: Quick Start Guide to Agentless Anti-Malware, and then prepare the Deep Security Environment by
installing the Deep Security Manager and Deep Security Virtual Appliance as described in that chapter.
1. Prepare the Deep Security Environment
Install the Deep Security Manager and the Deep Security Agent
The Deep Security Manager is the central management console for the Deep Security system and the Deep
Security Agent provides the Firewall and DPI protection for the computer on which it is installed.
The install packages are available from the Trend Micro Download Center,
http://downloadcenter.trendmicro.com.
To confirm that you possess a legitimate version of each install package, use a hash calculator to
calculate the hash value of the downloaded software and compare it to the value published on the Trend
Micro Download Center Web site.
1.
2.
3.
There are Deep Security Agent packages available for several types of operating systems.
Download a Deep Security Agent install package for each type of computer that you need to
protect.
If you have not already done so, install the Deep Security Manager. (See Chapter Three:
Installing the Deep Security Manager.)
Install and activate the Deep Security Agent(s). (See Chapter Six: Installing the Deep Security
Agents.)
10
2. Add Computers to the Deep Security Manager
Add computers that have Deep Security Agents to Deep Security Manager’s
Computers list.
There are four ways of adding computers to the Deep Security Manager Computers screen:
1.
2.
3.
4.
Adding computers individually by specifying their IP addresses or hostnames
Discovering computers by scanning the network
Connecting to a Microsoft Active Directory and importing a list of computers
Connecting to a VMware vCenter and importing a list of computers.
This Quick Start Guide describes how to add an individual computer by specifying its IP address or
hostname. To use one of the other methods, consult the on-line help or User’s Guide.
Go to the Computers screen by clicking Computers in the navigation pane and click New in the toolbar.
Type the hostname or IP address of the new computer in the Hostname textbox. The New Computer
wizard also lets you specify a Security Profile which it will apply to the new computer if it finds the
computer and determines that an unactivated Agent is present. Choose the default Security Profile that
matches your computer’s type and functionality. When you click Next, the wizard will find the computer
and activate the Agent. When Agent activation has completed, the wizard will give you the option of
opening the computer’s Details screen which lets you configure many of the Agent’s settings. Skip the
Details screen for now.
3. Enable Firewall and DPI protection on computers
Activate the Deep Security Agents
Agents need to be activated by the Manager before rules can be assigned to them. The activation process
includes the exchange of unique fingerprints between the Agent and the Manager. This ensures that only
this Deep Security Manager (or one of its nodes) can send instructions to the Agent.
Computers added individually to the Computers list have their Agents activated automatically. The
Agent status will read ―Managed (Online)‖ once the Agent has been activated.
To manually activate an Agent on a computer:
1.
Right-click on a computer in the Computers list and select Actions > Activate. The status
column for the computer will change to "Managed (Online)".
Assign a Security Profile to the Computer
To assign a Security Profile to the computer:
1.
2.
Right-click on the computer to be protected in the Computers list and select Actions > Assign
Security Profile.... Assign the default Security Profile that matches your computer’s type and
functionality. The default Security Profiles are configured with rules for Anti-Malware, Firewall, DPI,
Integrity Monitoring and Log inspection protection.
After clicking OK, the Manager will send the Security Profile to the Agent. The Computer Status
column and the Manager's status bar will display messages that the Agent is being updated. Once
the Agent on the computer has been updated, the status column will read "Managed (Online)".
11
Chapter 4: Installing Deep Security Manager
What you will need
System Requirements
Memory: 4GB
Disk Space: 1.5GB (5GB recommended)
Operating System: Microsoft Windows Server 2008 (32-bit and 64-bit), Windows Server 2008 R2
(64-bit), Windows 2003 Server SP2 (32-bit and 64-bit)
Database (Recommended but Optional): Oracle 11g, Oracle 10g, Microsoft SQL Server 2008
SP1, Microsoft SQL Server 2005 SP2
Web Browser: Mozilla Firefox 3+ (cookies enabled), Internet Explorer 7+ (cookies enabled)
For more information on system requirements and performance, see Appendix E: Performance
Recommendations.
License (Activation Code)
A license (Activation Code) is required for each Deep Security protection module that you want to use.
Administrator/Root Privileges
You need to have Administrator privileges to install Deep Security Manager.
URL/IP and Free Ports on the Deep Security Manager Host Machine
The installer places a shortcut to Deep Security Manager in the Windows start menu. You need to note this
URL if you want to access the Manager remotely.
You must make sure the following ports (on the machine hosting Deep Security Manager) are open and not
reserved for other purposes:
Port 4119: Used by your browser to connect to Deep Security Manager. (Configurable in Step 7 in
this section.)
Port 4120: The ―heartbeat‖ port, used by Deep Security Agents and Appliances to communicate
with Deep Security Manager. (Configurable in Step 7 in this section.)
Port 1433 and 1434: bi-directional Microsoft SQL Server ports.
Port 1521: bi-directional Oracle Database server port.
Port 514 (optional): bi-directional communication with Syslog server.
For a complete list of ports used by Deep Security, see ―Ports Used by Deep Security‖ in the
Reference section of the online help or the User’s Guide.
Network Communication
Communication between Deep Security Manager and Deep Security Agents/Appliances and ESX servers
uses DNS hostnames.
In order for Deep Security Agent/Appliance deployments to be successful, you must ensure that each
computer can resolve the hostname of the Deep Security Manager. This requires that the Deep Security
Manager computer have a DNS entry or an entry in the Agent/Appliance computer’s hosts file.
Note you will specify this hostname as part of the Deep Security Manager Installation (see Step 7 in
the Installing Deep Security Manager procedure.)
12
If you do not have DNS, you will have to specify an IP address in Step 7.
A Database
Deep Security Manager comes with an embedded database (Apache Derby), which is only suitable for
evaluation purposes. For enterprise deployments, Deep Security requires Microsoft SQL Server 2008 or
2005, or Oracle Database 11g or 10g.
During the installation of Deep Security Manager, the installer asks whether you are using the embedded
database engine, or one of the two supported enterprise database engines. If you choose the latter, the
installer will prompt you for configuration information.
Note that if you intend to use Microsoft SQL Server or Oracle Database, you must install it and
create a database before you install Deep Security Manager.
1. Start the Installer
You must log in as a Windows Administrator to install Deep Security Manager.
Copy the appropriate 32-bit or 64-bit Deep Security Manager installation file (Manager-Windows7.5.xxx.i386.exe or Manager-Windows-7.5.xxx.x64.exe) to the target machine and run it. When the
Installation Wizard appears, click Next to continue.
2. License Agreement
After reading and accepting the license agreement, select ―I accept the agreement‖ and click Next.
3. Upgrading vs. Overwriting an Existing Installation
If a previous version of Deep Security Manager is installed on your system, you are given the option to
―upgrade the existing installation‖, or to ―overwrite the existing installation‖. Upgrading the
installation will upgrade the Deep Security Manager to the latest version but will not overwrite your
Security Profiles, DPI Rules, Firewall Rules, Application Types, etc. or change any of the security settings
being applied to the computers on your network. Overwriting the existing installation will erase all data
associated with the previous installation and then install the latest filters, rules, profiles, etc.
Note that even if you create a new installation, existing security elements currently being applied on
your computers by Deep Security Agents will not be affected until you use Deep Security Manager to
update them. To update Agents from a new installation of the Manager will require deactivation and
reactivation of the Agents.
4. Installation Location
Specify a location to install Deep security manager and click Next.
When selecting a directory the installer may append the suggested directory name on the end of
the directory path you have selected. Review the directory entry before proceeding if you have used the
'browse' button.
13
5. Database Options
Select whether you wish to use Deep Security Manager’s embedded database engine (Apache Derby), or an
existing SQL Server or Oracle 10 database.
If you are using an Oracle or SQL Server database, it must be created before Deep Security Manager is
installed.
When using named pipes to connect to a SQL Server, a properly authenticated Microsoft Windows
communication channel must be available between Deep Security Manager’s host and the SQL Server host.
This may already exist if:
the SQL Server is on the same host as Deep Security Manager,
both hosts are members of the same domain, or
a trust relationship exists between the two hosts.
If no such communication channel is available, Deep Security Manager will not be able to communicate to
the SQL Server over named pipes.
6. License
If you are creating a new installation, you will be asked to enter your Activation Code(s). Enter the code
for All Protection Modules or the codes for the individual modules for which you have purchased a license.
You can proceed without entering any codes, but none of the Protection Modules will be available for use.
(You can enter your first or additional codes after installation of the Deep Security Manager by going to
System > Licenses.)
7. Hostname, URL, or IP address, and Communication Ports
If you are creating a new installation, enter the hostname, URL, or IP address of this computer. This
address will be used to access the web interface of Deep Security Manager. It will also be used by Deep
Security Agents/Appliances to communicate with the Manager. It is therefore important to select a
hostname that will be resolvable by the Agents/Appliances.
You can optionally change the default communication ports. The ―Manager Port‖ is the port on which the
Manager’s browser-based UI is accessible through HTTPS. The ―Heartbeat Port‖ is the port on which the
Manager listens for communication from the Agents/Appliances.
When you are satisfied with the settings, click Next.
The Manager Address must be either a resolvable hostname, a fully qualified domain name, or an
IP address. If DNS is not available in your environment, or if some computers are unable to use DNS, a
fixed IP address should be used instead of a hostname.
8. Credentials
Enter a username and password for the Master Administrator account. This account will have full
administrative privileges in Deep Security Manager, including the ability to create other administrator
accounts with full or limited privileges.
Selecting the Enforce strong passwords checkbox to require this and future administrator passwords to
include upper and lower-case letters, non-alphanumeric characters, and numbers, and to require a
minimum number of characters is recommended. (This can be changed later in System Settings.)
14
9. Security Update
Select whether you want Deep Security Manager to automatically retrieve the latest Components (virus
patterns, engines, etc.) or Software (Deep Security Agents, Appliances, etc.) Although recommended, this
is not required; you can retrieve or configure them later using the Deep Security Manager.
Updates to security Components, Deep Security Agents, and Deep Security Virtual Appliances can
all be deployed using the Deep Security Manager. (See the ―Updates‖ section of the online help or the
User’s Guide for details.) New versions of the Deep Security Manager, however, must be installed
independently of your current Deep Security Manager. That is, you must download the new version
from the Trend Micro Download Center, run the installer, and follow the instructions to perform a
software upgrade.
9. Confirm Settings
This page displays a summary of the installation options. Verify the information you entered and click
Finish to continue.
10. Setup Complete
Setup is now complete. Click Finish to close the Setup wizard. The Deep Security Manager service starts
when setup is complete. To start the Deep Security Manager Web-based management console, select the
Run Trend Micro Deep Security Manager option before clicking Finish.
Running Deep Security Manager
The Deep Security Manager service starts automatically at boot up. The service can be started, restarted
and stopped from the Microsoft Services Management Console. The service name is ―Trend Micro Deep
Security Manager‖.
To run the Web-based management console, go to the Trend Micro program group in the Start menu and
click Deep Security Manager.
To run the Web-based management console from a remote computer you will have to make note of the
URL:
https://[hostname]:[port]/
where [hostname] is the hostname of the server on which you have installed Deep Security Manager and
[port] is the ―Manager Port‖ you specified in step 7 of the installation (4119 by default).
Users accessing the Web-based management console will be required to sign in with their User Account
credentials.
15
Chapter 5: Installing the Deep Security Virtual Appliance
ESX 4.1 Requirements for the Deep Security Virtual Appliance
In addition to the ESX 4.1 standard system requirements, the following specifications must be met:
CPU: 64-bit, Intel-VT present and enabled in BIOS
Supported vSwitch: standard vSwitch or 3rd party vSwitch – Cisco Nexus 1000v
A virtualized ESX environment (ESX running as a VM) is not supported.
Deep Security Virtual Appliance System Requirements
Memory: 1GB (Memory requirements can vary depending on the number of VMs being protected.
See Appendix C for details.)
Disk Space: 20GB
Operating System: VMware vCenter 4.1.0 and ESX/ESXi 4.1.0
o
Additional VMware Utilities: VMware Tools, VMware vShield Manager, VMware vShield
Endpoint Security 1.0
o
VMware Endpoint Protection supported guest platforms: Windows Vista (32-bit),
Windows 7 (32-bit), Windows XP (32-bit), Windows 2003 (32-bit, 64-bit), Windows 2008
(32-bit, 64-bit). (For the latest list of supported guest platforms, see your VMware
documentation.)
Add a vCenter to the list of managed computers
1.
2.
3.
4.
5.
6.
7.
8.
Right-click on Computers in the navigation pane and select Add VMware vCenter... to start the
Add VMware vCenter Wizard.
Provide the server address (IP or hostname) and port, a name and description, and the username
and password for the vCenter. Click Next.
If you have installed vShield Manager for anti-malware protection, enter the address and
credentials for it here. (You can enter this information afterwards by using the Deep Security
Manager to edit the vCenter’s Properties.) Click Next.
Leave the global network configuration for future Deep Security Virtual Appliances at their
default settings. Click Next.
Accept the vShield Manager’s SSL certificate.
Accept the vCenter’s host’s certificate.
The Add VMware vCenter Wizard will display the details of the vCenter being added. Click
Finish.
On the confirmation screen, click Close.
The VMware vCenter is now displayed among your other Computers in the Computers list.
Prepare the ESX Server for the Virtual Appliance deployment
1.
2.
3.
4.
If you haven’t already imported the Deep Security Virtual Appliance and Deep Security Filter
Driver install packages into the Deep Security manager, do so now. In the Deep Security
Manager, go to System > Updates > Software Packages and click on Open Download
Center…. You will be taken to the Trend Micro Download Center where you can find the Filter
Driver and Virtual Appliance software. Once you have downloaded them both to your computer,
click Import Software… to import them into the Deep Security Manager.
Under Computers in the Deep Security Manager navigation pane of the Deep Security Manager,
click on the newly added vCenter to display the various vCenter components on the Computer
screen.
Find the ESX Server in the Computers list (its "status" column should read "Unprepared"), rightclick on it, and select Actions > Prepare ESX to display the Prepare ESX Server Wizard. Click
Next.
The ESX Server must be put into maintenance mode before the Virtual Appliance’s Filter Driver
component can be installed.
16
Important: All virtual machines running on this ESX Server must be stopped/paused or
vMotioned off the ESX server. This is required for the installation for the Deep Security Filter
Driver.
Select Yes to allow the Deep Security Manager to manage this process automatically. Click Finish.
5.
6.
The ESX Server will be placed in maintenance mode, the Deep Security Filter Driver will be
installed, and the ESX server will be restarted.
Once the Filter Driver has been installed, you are given the option to continue with the next step,
deploying the Deep Security Virtual Appliance. Click Next to continue.
You can monitor the preparation process in the VMware vSphere Client management console.
Deploy the Virtual Appliance to the ESX Server
1.
2.
3.
4.
5.
Right-click on the ESX Server in the Computers list (the "status" column should now read
"Prepared"), and select Actions > Deploy Appliance to display the Deep Security Virtual
Appliance Wizard. Click Next.
Give the Virtual Appliance a name, a datastore, and a folder. (The Virtual Appliance should be
installed on local storage to ensure continued protection should the storage area network (SAN)
become unavailable.) Click Next.
You are given the option to choose between Thin Provisioned Format which uses the least
amount of disk space and Thick Provisioned Format which uses all the allocated disk space
(recommended). Select an option and click Finish.
The Virtual Appliance will now be deployed on the ESX Server. (Once again, this procedure can be
monitored in the VMware vSphere Client management console.)
When the Virtual Appliance deployment is complete, you will be prompted to proceed with the next
step, Activating the Deep Security Virtual Appliance. Click Next to continue.
The Virtual Appliance is now displayed along with the other Computers in the vCenter Group in the
Computers list.
To manually assign an IP address to the Virtual Appliance (only required if the Virtual Appliance
doesn’t have access to a DHCP server):
1.
2.
3.
4.
5.
6.
7.
8.
Log in to the vSphere client
Select the Virtual Appliance
View the console
Press F2
Log in using username/password: dsva/dsva
Select Configure Management Network
Specify a hostname, subnet mask, default gateway, and DNS
Press Enter to save changes
Activate the Virtual Appliance on the ESX Server
1.
2.
3.
Right-click on the Virtual Appliance in the Computers list and select Actions > Activate
Appliance to display the Activate Deep Security Appliance Wizard. Click Next.
Select the Deep Security Virtual Appliance Security Profile
Select which Virtual Machines on the ESX Server you want to protect and click Finish.
The status of the Virtual Appliance will now display "Managed (Online)".
17
Chapter 6: Installing the Deep Security Agents
Deep Security Agent System Requirements
Memory: 128MB
Disk Space: 100MB (200MB recommended, primarily for logging)
Windows: Windows 7 (32-bit and 64-bit), Windows 2008 (32-bit and 64-bit), Windows 2008 R2
(64-bit), Windows Vista (32-bit and 64-bit), Windows 2003 SP2 (32-bit and 64-bit), Windows XP
(32-bit and 64-bit)
Solaris: Solaris 8, 9 and 10, (64-bit Sparc), Solaris 10 (64-bit x86)
Linux: Red Hat 4 (32-bit and 64-bit), Red Hat 5 (32-bit and 64-bit), Red Hat 6 (32-bit and 64bit), SuSE 10 (32-bit and 64-bit), SuSE 11 (32-bit and 64-bit), SuSE 11 SP1 (32-bit and 64-bit)
AIX: AIX 5.3, 6.1 (The AIX Agents only support Integrity Monitoring and Log Inspection.)
HP-UX: HP-UX 11i v2 (11.23), 11i v3 (11.31) (The HP-UX Agents only support Integrity
Monitoring and Log Inspection.)
The clock on a Deep Security Agent (DSA) machine must be synchronized with Deep Security
Manager (DSM) to within a period of 24 hours. If the DSA clock is behind the DSM clock then an "Agent
Activate" operation will fail because the certificate generated for the DSA by Deep Security Manager
will not yet be valid. If this condition is encountered an "Agent Activate Failed" event will be recorded in
the System Events: "A client error occurred in the Deep Security Manager to Deep Security Agent
protocol: HTTP client error received: certificate is not yet valid".
Installing the Windows Agent
1. Begin the Installation
Copy the installation file to the target machine and double-click it to run the installer package.
Click Next to begin the installation.
Remember that you must have administrator privileges to install and run the Agent on Windows
machines. With the exception of Windows Vista and Windows 7, this means logging in as an
administrator. For Windows Vista and Windows 7, you must be running at the elevated administrator
privilege level. To install the Agent on Vista, log in as an administrator, right-click on cmd.exe and
select ―Run as Admin‖.
2. License Agreement
Read the license agreement and click Next to continue.
3. Select a Destination Folder
Specify a destination folder and click Next to continue.
(If you are upgrading, you will not be able to change the installation directory. To install to a different
directory, you will have to first uninstall the previous version.)
4. Confirm Installation
The installer package now has all the information needed to install the Deep Security Agent. Click Next to
proceed with the installation.
18
5. Installation Complete
Click Close to complete the installation.
The Deep Security Agent is now installed and running on this computer, and will start every time the
machine boots.
During an install, network interfaces will be suspended for a few seconds before being restored. If
you are using DHCP, a new request will be generated, potentially resulting in a new IP address for the
restored connection.
Installing the Deep Security Agent over Windows Remote Desktop is NOT recommended because of
the temporary loss of connectivity during the install process. However, using the following command
line switch when starting Remote Desktop will allow the install program to continue on the server after
the connection is lost: On Windows Server 2008 or Windows Vista SP1 and later or Windows XP SP3
and later, use:
mstsc.exe /admin
On earlier versions of Windows, use:
mstsc.exe /console
19
Installing the Linux Agent
Requirements:
The Redhat agent requires these versions (or later) of the following packages:
atk-1.2.4-3.0.i386.rpm
gtk2-2.2.4-15.i386.rpm
libstdc++-ssa-3.5ssa-0.20030801.48.i386.rpm
pango-1.2.5-5.i386.rpm
These can be installed using yum or up2date.
To install the Deep Security Agent on a Linux machine, you need to log on as "root". Alternatively, you can
use the "sudo" utility to install the Agent.
$ su
Password:
To install the Deep Security Agent for Linux:
Use "rpm -i" to install the ds_agent package. Use ―rpm -U‖ to upgrade from a previous install. This
approach will preserve your profile settings:
# rpm -i Agent-RedHat_2.6.18_8.EL5_i686-7.5.0-xxxx.i386.rpm
Preparing...
########################################## [100%]
1:ds_agent
########################################## [100%]
Loading ds_filter_im module version 2.4.21-20.EL-i686 [ OK ]
Starting ds_agent: [ OK ]
The Deep Security Agent will be started automatically upon installation.
To start, stop and reset the Linux Agent:
Command-line options:
/etc/init.d/ds_agent
/etc/init.d/ds_agent
/etc/init.d/ds_agent
/etc/init.d/ds_agent
/etc/init.d/ds_agent
start - starts the agent
status – displays the status of the agent
stop - stops the agent
reset - resets the agent
restart - restarts the agent
20
Installing the Solaris Agent
Requirements:
For Solaris Sparc/8 and Sparc/9:
libgcc 3.4.6 or better (www.sunfreeware.com)
libiconv 1.11 or better (www.sunfreeware.com)
pfil_Solaris_x.pkg
Agent-Solaris_5.x_sparc-7.x.x-yyy.sparc.pkg.gz
Note:‖x‖ will be 8 or 9 depending on the version of the Solaris operating system you are installing on.
For Solaris Sparc/10 :
SUNWgccruntime, GCC Runtime libraries
pfil_Solaris_10sparc.pkg (see note below)
Agent-Solaris_5.10_sparc-7.x.x-yyy.sparc.pkg.gz
For Solaris X86/10:
SUNWgccruntime, GCC Runtime libraries
pfil_Solaris_10x86.pkg (see note below)
Agent-Solaris_5.10_i386-7.x.x-xxx.x86_64.pkg.gz
All Solaris versions up to and including Solaris 10 Update 3 require pfil to be installed.
21
To install the Solaris 10 Agent:
For Solaris 10 Update 4 and above, you only need to perform steps 5 and 6.
1) Acquire all of the required packages (see above)
2) Prepare to remove the Sun version of ipfilter and pfil
a. Note the version numbers and other information
modinfo
modinfo
pkginfo
pkginfo
| grep pfil
| grep ipf
-l SUNWipfr
-l SUNWipfu
b. To check the status
svcs -x ipfilter
svcs -x pfil
c. If either of these commands gives errors, then the problem should be corrected before
proceeding further. Also check that Sun's version of pfil loads correctly.
ifconfig ce0 modlist
(use your network interface)
and see if pfil is in the list between "ip" and your network interface. If it isn't, then check that your
interface type is uncommented in /etc/ipf/pfil.ap, reboot and try again. Don't proceed further until
you are convinced that Sun's version of ipfilter/pfil is working correctly.
d. Export current ipfilter and pfil service configurations
svccfg export network/pfil > /var/tmp/pfil.svc
svccfg export network/ipfilter > /var/tmp/ipfilter.svc
e. Disable the two services
svcadm -v disable pfil
svcadm -v disable ipfilter
f. Reboot the system
3) Remove the Sun version of ipfilter and pfil
a. Check that the kernel modules are not loaded after reboot
modinfo | grep ipf
modinfo | grep pfil
b. Save copies of some of the Sun pfil files before removing the Sun packages,
Removing the Sun packages will remove these files and you will need them
to launch the public domain version of pfil.
cp /lib/svc/method/pfil
/lib/svc/method/pfil.dist
cp /usr/sbin/pfild
/usr/sbin/pfild.dist
cp /etc/ipf/pfil.ap
/etc/ipf/pfil.ap.dist
c. Remove the Sun IPFilter packages
pkgrm SUNWipfu
pkgrm SUNWipfr
d. Reboot the system
22
4) Install pfil
a. Restore the pfil service configuration file
cp /lib/svc/method/pfil.dist
/lib/svc/method/pfil
b. Install pfil
pkgadd -d pfil_Solaris_10xxxx.pkg all
c. After installation, remove the Solaris 9 statup scripts as they are
not needed, pfil will be using "svcadm"
rm /etc/rc2.d/S10pfil
rm /etc/rcS.d/S10pfil
rm /etc/init.d/pfil
d. Restore the pfil configuration file, NOTE, the config files for the
public domain pfil are in /etc/opt/ipf, while Sun's config files are
in /etc/ipf, because the service config files saved in step 4.d still
refer to Sun's config file path, you should use /etc/ipf for consistency
with Solaris 10.
cp /etc/ipf/pfil.ap.dist
/etc/ipf/pfil.ap
e. Configure pfil network device
vi /etc/ipf/pfil.ap ( uncomment appropriate device(s) )
f. Enable the pfil service
svcadm -v enable pfil
if you receive an error on this command, then the service configuration
file for pfil was removed and needs to be revived from the exported copy
in step 4.d
svccfg -v import /var/tmp/pfil.svc
svcadm -v enable pfil
g. Reboot the system
h. Verify the pfil service started
modinfo | grep pfil
This should show the public domain version of pfil
(pfil Stream module 2.1.11)
(pfil Streams driver 2.1.11)
Also check that pfil is loaded into the tcp/ip stack correctly
ifconfig ce0 modlist
(use your network interface)
If it isn't, then check that your interface type is uncommented in the pfil
configuration file /etc/ipf/pfil.ap, reboot and try again
5) Make sure SUNWgccruntime is installed. If it isn’t, locate the package and install it:
pkgadd –d . SUNWgccruntime
6) Install the Agent:
gunzip Agent-Solaris_5.x_sparc-7.x.x-xxxx.sparc.pkg.gz
pkgadd -d Agent-Solaris_5.x_sparc-7.x.x-xxxx.sparc.pkg all
23
To install the Solaris Sparc 8 and Sparc 9 Agents:
For Solaris 8, SUN patch 113685 is required by the pfil driver. If you do not have SUN patch 113685
installed then you can obtain an alternate version of the pfil package by contacting Trend Micro.
For Solaris 8, SUN patch 112438 (/dev/random) is required by the Deep Security Agent.
1) Acquire all of the required packages (see above)
2) Install libiconv-1.8-solx-sparc.gz:
gunzip libiconv-1.8-solx-sparc.gz
pkgadd -d libiconv-1.8-solx-sparc all
3) Install libgcc-3.4.6-solx-sparc.gz:
gunzip libgcc-3.4.6-solx-sparc.gz
pkgadd -d libgcc-3.4.6-solx-sparc all
4) Install pfil:
pkgadd -d pfil_Solaris_x.pkg all
5) Push the pfil stream module into the network interface:
ifconfig <interface> modinsert pfil@2
Note that pfil should go right after ip in the network interface stream. To determine where ip is,
perform:
ifconfig <interface> modlist
and ensure that the number used on the modinsert is one higher than the number of ip in the modlist.
Also note that pfil must be added to the network stack for each of the interfaces the agent will be
protecting
touch /etc/ipf.conf
/etc/init.d/pfil start
(For more information, see " Notes on Installing PFIL on a Solaris (8 and 9 Sparc) Host ", below.)
6) Install the Agent:
gunzip Agent-Solaris_5.x_sparc-5.x.x-xxxx.sparc.pkg.gz
pkgadd -d Agent-Solaris_5.x_sparc-5.x.x-xxxx.sparc.pkg all
Solaris 10 Agent Command-line Options
1)
2)
3)
4)
5)
svcadm enable ds_agent - starts the agent
svcadm disable ds_agent - stops the agent
/opt/ds_agent/dsa_control -r - resets the agent
svcadm restart ds_agent - restarts the agent
svcs –a | grep ds – displays agent status
24
Solaris 8 and 9 Agent Command-line Options:
1)
2)
3)
4)
5)
/etc/init.d/ds_agent start - starts the agent
/etc/init.d/ds_agent stop - stops the agent
/etc/init.d/ds_agent reset - resets the agent
/etc/init.d/ds_agent restart - restarts the agent
Note that the filtering activity log files are in
/var/log/ds_agent
To Upgrade the Solaris Agent (all versions)
pkgadd –v -a /opt/ds_agent/ds_agent.admin -d Agent-Solaris_5.9_sparc5.x.x-xxxx.sparc.pkg
Notes on Installing PFIL on a Solaris (8 and 9 Sparc) Host
The Solaris agent uses the PFIL IP filter component developed by Darren Reed. We currently support
version 2.1.11. We have built this source code and provided a package on our website at:
http://labs.thirdbrigade.com
Further information can be found at: http://coombs.anu.edu.au/~avalon. (For a copy of the PFIL source
code, contact your support provider.)
Notes on pfil
(The following assumes your interface is hme)
If you do "ifconfig modlist", you will see a list of STREAMS modules pushed
onto the interface like this (for hme0):
0 arp
1 ip
2 hme
You need to insert pfil between ip and hme:
ifconfig hme0 modinsert pfil@2
Checking the list, you should see:
0
1
2
3
arp
ip
pfil
hme
To configure the pfil Streams module to be automatically pushed when the
device is opened:
autopush -f /etc/opt/pfil/iu.ap
At this point,
25
strconf < /dev/hme
should return
pfil
hme
Also, modinfo should show
# modinfo | grep pfil
110 102d392c
6383 24
110 102d392c
6383 216
1
1
pfil (pfil Streams module 2.1.11)
pfil (pfil Streams driver 2.1.11)
Installing the AIX Agent
To install the Deep Security Agent for AIX:
1.
2.
3.
Log in as Root
Copy the package to a temporary folder (―/tmp‖)
Unzip the package using gunzip:
/tmp> gunzip Agent-AIX_5.3-7.x.x-x.powerpc.bff.gz
4.
Install the Agent:
/tmp> installp –a –d /tmp ds_agent
To start and stop the AIX Agent:
Enter either one of the following:
/etc/rc.d/init.d/ds_agent start
/etc/rc.d/init.d/ds_agent stop
26
Installing the HP-UX Agent
To install the Deep Security Agent for HP-UX:
1.
2.
3.
Log in as Root
Copy the package to a temporary folder (―/tmp‖)
Unzip the package using gunzip:
/tmp> gunzip Agent-HPUX_11.23_ia64-7.x.x-x.ia64.depot.gz
4.
Install the Agent: (Note that the package is referenced using the full path. Relative paths will not
be accepted.)
/tmp> swinstall –s /tmp/Agent-HPUX_11.23_ia64-7.x.x-x.ia64.depot
ds_agent
To start and stop the HP-UX Agent:
Enter one of the following:
/sbin/init.d/ds_agent start
/sbin/init.d/ds_agent stop
27
Chapter 7: Basic Configuration
Ensure Time Stamps are Reliable
All computers on which Deep Security Software is running should be synchronized with a reliable time
source. For example, regularly communicating with Network Time Protocol (NTP) server.
Configure Email Notifications
Various warning and error conditions will raise Alerts in Deep Security Manager.
You should provide the Deep Security Manager to send email notifications via an existing SMTP server when
Alerts are raised.
To setup email notifications:
1. In the Deep Security Manager, go to System > System Settings > System.
2. In the SMTP area, enter the address, credentials, and other details of your SMTP server.
3. Click the Test SMTP Settings button to test your SMTP configuration. If the configuration is
successful, a success notification will be displayed. If it is not successful, a warning notification
will be displayed. (If you receive the warning, make sure the SMTP server is running, accessible,
and that the required ports are open as indicated in chapter 4: Installing Deep Security manager.)
When you are done click Save.
4. Now go to System > System Settings > Notifications.
5. In the Alert area, enter the email address to which you want the notifications to be sent. Click
Save.
Note that this email address is not associated with any individual User’s Deep Security account.
The accounts of individual Users can be configured to receive email notifications as. To enable email
notifications for a User, edit the User’s Properties on the System > Users screen.
By default, the Manager will send a notification for every Alert. You can refine the conditions under which
notifications are sent by going to System > System Settings > System and clicking on View Alert
Configuration… in the Alert Configuration area. The notification conditions can be configured for each
Alert on the Alert’s Properties screen.
For more information on Alerts and Notifications, see the corresponding sections in the online help or the
User’s Guide.
Create Roles and User Accounts
Deep Security uses role-based access control to restrict Users’ access to various parts of the Deep Security
system. Once you have installed the Deep Security Manager you should create individual accounts for each
User and assign each User a Role which will restrict their activities to all but those necessary for the
completion of their duties.
Deep Security comes pre-configured with two Roles:
Full Access: The Full Access Role grants the User all possible privileges in terms of managing the Deep
Security system including creating, editing, and deleting computers, computer groups, Security Profiles,
Rules, Anti-Malware configurations, components, and others.
Auditor: The Auditor Role gives the User the ability to view all the information in the Deep Security system
but without the ability to make any modifications except to their own personal settings, such as password,
contact information, dashboard layout preferences, and others.
You can create new Roles which can restrict Users from editing or even seeing elements of the Deep
Security system such as specific computers, the properties of security Rules, or the System Settings.
Before creating User accounts, identify the Roles that your Users will take and itemize what elements of the
Deep Security system those Roles will require access to and what the nature of that access will be (viewing,
28
editing, creating, etc.). Once you have created your Roles, you can then begin creating User accounts and
assigning them specific Roles.
For details on how to create Roles and User accounts, see the corresponding sections of the online help or
the User’s Guide.
Basic Firewall Configuration
Many Firewall Rules and other elements of Deep Security make use of reusable components such as IP
Lists, Mac Lists, and Schedules. If you are enabling Firewall protection and if the computers you are
protecting are operating in a Windows Domain environment, modify the IP List named Domain Controller(s)
to enable communication from the Domain Controller to the domain clients:
1.
2.
3.
In the Deep Security Manager, go to Components > IP Lists and double-click on the Domain
Controller(s) IP List to display its Properties window.
Edit the IP(s) text area replacing the IP 127.0.0.1 with the list of IPs that represent the Domain
Controller(s) with which your protected computers may communicate.
Click OK to save your changes.
Then make sure the following two Firewall Rules are in effect:
TCP from Domain Controller
UDP from Domain Controller
When using Ethernet, ARP forms the basis of the TCP/IP stack. ARP facilities provide translation from IP
addresses to Ethernet addresses, which are essential for sending packets to other systems on the local LAN
segment. Without this conversion, there can be no other form of peer-to-peer IP communication.
It is thus very important that Deep Security Manager does not configure a Deep Security Agent to drop ARP
packets, unless that is actually desired (configuration uses static ARP tables). If your network relies on
dynamic ARP, make sure the following Firewall Rule is in effect:
ARP
Java Security
The Deep Security Manager runs within a Java Virtual Machine (JVM), and the JVM places certain controls
on network behaviour. Java uses a cache to store both successful and unsuccessful DNS lookups. By
default, successful lookups are cached forever as a guard against DNS spoofing attacks. However, this
caching may prevent the Deep Security Manager from communicating with computers that use DHCP or
whose IP address has changed. Deep Security Manager uses a value of 60 seconds for this setting.
Alternatively, in environments where DNS spoofing is a risk, the DNS cache can be configured to an
unlimited lifetime. To configure the lifetime of the DNS cache for Deep Security Manager you need to do the
following:
1. open the java.security file located in [Manager install directory]\jre\lib\security
2. find the line for the networkaddress.cache.ttl and set the value to -1:
networkaddress.cache.ttl=-1
3. save the file and restart the Deep Security Manager service
For more information on the Java network cache settings see:
http://java.sun.com/javase/6/docs/technotes/guides/net/properties.html
29
Appendix A: The Virtual Appliance and the Coordinated
Approach using Deep Security Agents
The Virtual Appliance
The Deep Security Virtual Appliance provides Anti-Malware, Firewall, Intrusion Detection/Prevention,
Application Control, and Web Application protection services to Virtual Machines without requiring the
presence of an in-guest Agent. The Virtual Appliance uses VMware's VMsafe-NET API to intercept network
traffic at the hypervisor. It is supported on VMware vSphere 4 (Requires vCenter 4.1 and ESX 4.1).
Security policies are applied per virtual machine.
The Virtual Appliance provides some distinct security advantages over scenarios with an in-guest Agent:
The Appliance is isolated from the guest. The guest can operate with only the minimum required
software being installed.
Short-lived and reverted machines for which administrator time may not have been allocated for
installing security software can easily and quickly be protected.
Virtual machines and other Appliances whose operating systems are not directly accessible can be
protected, even those machines being managed by other administrators.
The Deep Security Virtual Appliance simplifies deployment. There is no need to remotely install Agent
software on the virtual machine. Connectivity to the virtual machine from Deep Security is not required.
The Coordinated Approach
Using the Virtual Appliance to protect virtual machines doesn't preclude the use of Deep Security Agents for
virtual machines on the same host. This coordinated approach provides the following benefits:
Allows you to implement the additional Integrity Monitoring and Log Inspection modules on the
virtual machine.
Recommendation Scans can be run on the virtual machines.
Provides mobility to the virtual machines. They can be moved between data centers or cloud
providers and the protection moves with them.
Performance improvement. While the Deep Security Agent is active on the virtual machine, the
Virtual Appliance automatically passes traffic through to the Agent.
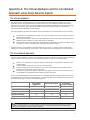
For the Coordinated Approach to be implemented for a particular protection module, both the Agent and
the Appliance have to implement that protection. The following table shows the Deep Security protection
modules that can make use of the Coordinated Approach:
Supported by
Appliance
Supported by Agent
Coordinated
Approach Available
Anti-Malware
Yes
No
No
Firewall
Yes
Yes
Yes
Deep Packet Inspection
Yes
Yes
Yes
Integrity Monitoring
No
Yes
No
Log Inspection
No
Yes
No
If you install an Agent on a virtual machine that was previously being protected only by a Deep
Security Virtual Appliance, the virtual machine will have to be activated again from the Manager to
register the presence of the Agent on the computer.
30
Appendix B: Deep Security Manager Memory Usage
Configuring the Installer’s Maximum Memory Usage
The installer is configured to use 1GB of contiguous memory by default. If the installer fails to run you can
try configuring the installer to use less memory.
To configure the amount of RAM available to the installer:
1.
2.
3.
4.
Go to the directory where the installer is located.
Create a new text file called ―Manager-Windows-7.5.xxxx.xxx.vmoptions‖ (where ―xxxx.xxx‖ is the
build number of the installer and platform).
Edit the file by adding the line: ―-Xmx800m‖ (in this example, 800MB of memory will be made
available to the installer.)
Save the file and launch the installer.
Configuring the Deep Security Manager’s Maximum Memory Usage
The Deep Security Manager default setting for maximum memory usage is 4GB. It is possible to change
this setting.
To configure the amount of RAM available to the Deep Security Manager:
1.
2.
3.
4.
5.
Go to the Deep Security Manager directory (the same directory as Deep Security Manager.exe),
e.g. C:\Program Files\Trend Micro\Deep Security Manager.
Create a new file called ―Deep Security Manager.vmoptions‖.
Edit the file by adding the line: ― -Xmx3g‖ (in this example, ―3g‖ will make 3 GB memory available
to the DSM.)
Save the file and restart DSM.
You can verify the new setting by going to System > System Information and in the System
Details area, expand Manager Node > Memory. The Maximum Memory value should now
indicate the new configuration setting.
31
Appendix C: Deep Security Virtual Appliance Memory
Usage
The following table lists minimum recommended Deep Security Virtual Appliance memory allocation based
on the number of VMs being protected:
Number of virtual machines being
protected by the Deep Security
Virtual Appliance
Recommended memory
allocation (Anti-Malware
only)
Recommended memory
allocation (Anti-Malware and
DPI)
0 – 10 VMs
512MB
1GB
10 – 32 VMs
1GB
1GB
33 - 64 VMs
2GB
2GB
Configuring the Deep Security Virtual Appliance’s Memory Allocation
Changing the Deep Security Virtual Appliance’s memory allocation settings requires powering off the
DSVA virtual machine. Virtual machines being protected by the Virtual Appliance will be unprotected
until it is powered back on.
To configure the Deep Security Virtual Appliance’s memory allocation:
1.
2.
3.
4.
5.
In your VMware vSphere Client, right-click on the DSVA and select Power > Shut Down Guest
Right-click on the DSVA again and select Edit Settings… The Virtual Machine Properties
screen displays.
On the Hardware tab, select Memory and change the memory allocation to the desired value.
Click OK.
Right-click the DSVA again and select Power > Power On.
32
Appendix D: High Availability Environments
If you intend to take advantage of VMware High Availability (HA) capabilities, make sure that the HA
environment is established before you begin installing Deep Security. All ESX servers used for recovery
operations must be imported into the Deep Security Manager with their vCenter, they must be ―prepared‖,
and a Deep Security Virtual Appliance must be installed on each one. This will ensure that Deep Security
protection will remain in effect after a HA recovery operation.
33
Appendix E: Performance Recommendations
The following guidelines provide a general idea of the infrastructure requirements for Deep Security
deployments of different scales.
Manager and Database Hardware
Many of Deep Security Manager operations require high CPU and Memory resources (such as Updates and
Recommendation Scans). Trend Micro recommends that each manager node have 4 cores and sufficient
RAM in high scale environments. Where possible the 64-bit version of the Manager should be used as it
can address 4GB of RAM (compared to the 1GB the 32-bit version uses).
The Database should be installed on hardware that is equal to or better than the specifications of the best
Manager node. For the best performance the database should have 8-16GB of RAM and fast access to the
local or network attached storage. Whenever possible a database administrator should be consulted on the
best configuration of the database server and a maintenance plans should be put in effect.
For more information on running multiple Manager nodes, see Multi-Node Manager in the Reference
section of the online help or the User’s Guide.
Database Disk Space
Database disk space should be pre-allocated. When logging is left at default levels, an average computer
will require approximately 50 MB of database disk space for data and an additional 5MB of space for
transaction logs. So one thousand computers will require 50 GB for data and 5 GB for transaction logs, two
thousand computers will require 100 GB for data and 10 GB for transaction logs, etc.
The amount of space required per computer is a function of the number of logs (events) recorded and how
long they are retained. The Firewall and DPI tab of the System > System Settings screen allows you to
control settings such as the maximum size of the event log files, the number of these log files to retain at
any given time ("pruning controls"). Similarly, the TCP, UDP, and ICMP tabs on a Stateful Configuration's
Properties window lets you configure how Stateful Configuration Event logging is performed. Similar
settings are available for other Deep Security modules in the System > System Settings screens. (For
more information on logging, see Advanced Logging Policy Modes in the and Configure Logging in the
Reference and the How To… sections of the online help or the User’s Guide.)
These Event collection settings can be fine-tuned at the Global, Security Profile, and individual computer
level. (See Inheritance and Overrides in the Reference section of the online help or the User’s Guide.)
At their default settings, the following three modules generally consume the most disk space, in
descending order: Firewall, Integrity Monitoring, Log Inspection.
Dedicated Servers
The Deep Security Manager and the database can be installed on the same computer if your final
deployment is not expected to exceed 1000 computers (real or virtual). If you think you may exceed 1000
computers, the Deep Security Manager and the database should be installed on dedicated servers. It is also
important that the database and the Deep Security Manager be co-located on the same network with a 1GB
LAN connection to ensure unhindered communication between the two. The same applies to additional
Deep Security Manager Nodes: dedicated, co-located servers. A 2ms latency or better is recommended
between the Manager and the Database.
Note that it is a good idea to run multiple Manager Nodes for redundancy reasons, whether you
have 1000 managed computers or not.
34
Performance Profiles
As of Deep Security Manager 7.5 SP1, a new system for optimizing the performance of manager-initiated
and agent/appliance-initiated operations is available. Previously the Manager processed all operations in a
fixed amount of concurrent jobs using a first-in first-out system. This has been replaced with an optimized
concurrent scheduler that considers the impacts of each job on CPU, Database and Agent/Appliances. By
default, new installations use the "Aggressive" performance profile which is optimized for a dedicated
Manager. If the DSM is installed on a system with other resource-intensive software it may be preferable to
use the "Standard" performance profile. The performance profile can be changed by navigating to System
> System Information and clicking the Managers... button in the toolbar. From this screen select the
desired Manager node and open the Properties window. From here the Performance Profile can be
changed via the drop-down menu.
The Performance Profile also controls the amount of Agent/Appliance-initiated connections that the Manager
will accept. The default of each of the performance profiles effectively balances the amount of accepted,
delayed and rejected heartbeats.
Low Disk Space Alerts
Low Disk Space on the Database Host
If the Deep Security Manager receives a ―disk full‖ error message from the database, it will start to write
events to its own hard drive and will send an email message to all Users informing them of the situation.
This behavior is not configurable.
If you are running multiple Manager nodes, the Events will be written to whichever node is handling the
Event. (For more information on running multiple nodes, see Multi-Node Manager in the Reference
section of the online help or the User’s Guide.)
Once the disk space issue on the database has been resolved, the Manager will write the locally stored data
to the database.
Low Disk Space on the Manager Host
If the available disk space on the Manager falls below 10%, the Manager generates a Low Disk Space
Alert. This Alert is part of the normal Alert system and is configurable like any other. (For more
information on Alerts, see Alert Configuration in the How To… section of the online help or the User’s
Guide.)
If you are running multiple Manager nodes, the node will be identified in the Alert.
When the Manager’s available disk space falls below 5MB, the Manager will send an email message to all
Users and the Manager will shut down. The Manager will not restart until the available disk space is greater
than 5MB.
You must restart the Manager manually.
If you are running multiple nodes, only the node that has run out of disk space will shut down. The other
Manager nodes will continue operating.
35
Appendix F: Creating your own SSL Authentication
Certificate
The Deep Security Manager creates a 10-year self-signed certificate for the Web browser-to-Manager
connections. If required, this certificate can be replaced with a real certificate. (The certificate is maintained
on Deep Security Manager upgrades.)
More information on generating the certificate can be found at Thawte Tomcat Support.
Once generated, the certificate should be imported into the .keystore in the root of the Deep Security
manager installation directory and have an alias of ―tomcat‖. The Manager will then use that certificate.
To create your SSL authentication certificate:
1.
2.
3.
4.
5.
Go To the Deep Security Manager installation directory (C:\Program Files\Trend Micro\Deep
Security Manager ) and make a new folder called ―Backupkeystore‖
Copy .keystore and configuration.properties to the newly created folder Backupkeystore
Open command prompt and go to the following location:
C:\Program Files\ Trend Micro \Deep Security Manager\jre\bin
Run the following command which will create a self signed certificate
C:\Program Files\ Trend Micro \Deep Security Manager\jre\bin>keytool -genkey -alias tomcat keyalg RSA -dname cn=dsmserver
Choose password: changeit
NOTE: -dname is the common name of the certificate your CA will sign. Some CA require a particular cn
to sign the Certificate signing request (CSR) . Please consult your CA Admin to see if you have that
particular requirement.
6.
7.
8.
9.
10.
11.
12.
13.
14.
15.
There is a new keystore file created under the user home directory. If you are logged in as
―Administrator‖, You will see the .keystore file under C:\Documents and Settings\Administrator
View the newly generated certificate using the following command
C:\Program Files\ Trend Micro \Deep Security Manager\jre\bin>keytool -list –v
Run the following command to create a CSR for your CA to sign:
C:\Program Files\ Trend Micro \Deep Security Manager\jre\bin>keytool -certreq -keyalg RSA -alias
tomcat -file certrequest.csr
Send the certrequest.csr to your CA to sign. In return you will get two files. One is a certificate
response and the second is the CA certificate itself.
Run the following command to import the CA cert in JAVA trusted keystore:
C:\Program Files\Trend Micro\Deep Security Manager\jre\bin>keytool -import -alias root trustcacerts -file cacert.crt -keystore "C:/Program Files/ Trend Micro /Deep Security
Manager/jre/lib/security/cacerts"
Run the following command to import the CA cert in your keystore:
C:\Program Files\ Trend Micro \Deep Security Manager\jre\bin>keytool -import -alias root trustcacerts -file cacert.crt
(say yes to warning message)
Run the following command to import the certificate response to your keystore:
C:\Program Files\ Trend Micro \Deep Security Manager\jre\bin>keytool -import -alias tomcat -file
certresponse.txt
Run the following command to view the certificate chain in you keystore:
C:\Program Files\Trend Micro\Deep Security Manager\jre\bin>keytool -list –v
Copy the .keystore file from your user home directory C:\Documents and Settings\Administrator
to C:\Program Files\ Trend Micro \Deep Security Manager\
Open the configuration.properties file in folder C:\Program Files\ Trend Micro \Deep Security
Manager. It will look something like:
keystoreFile=C\:\\\\Program Files\\\\Trend Micro\\\\Deep Security Manager\\\\.keystore
port=4119
keystorePass=$1$85ef650a5c40bb0f914993ac1ad855f48216fd0664ed2544bbec6de80160b2fe980
36
16.
17.
18.
19.
0f79f913f28e80381c8e71f2fed96a2aa522ada039a7abfa01542d42dbe36 installed=true
serviceName= Trend Micro Deep Security Manager
Replace the password in the following string:
keystorePass=xxxx
where ―xxxx‖ is the password you supplied in step five
Save and close the file
Restart the Deep Security Manager service
Connect to the Deep Security Manager with your browser and you will notice that the new SSL
certificate is signed by your CA.
37
Appendix G: Interoperability with Agent Releases
The following table summarizes the interoperability of currently supported versions of Deep Security
software components. Keep in mind that an older version of a Deep Security Agent may not provide the
functionality introduced in a newer version of the Deep Security Manager.
DSM 7.5 DSM 7.0 DSM 6.1
DSA 7.5
DSA 7.0
DSA 6.1
DSM: Deep Security Manager
DSA: Deep Security Agent
: Interoperable
: Not Interoperable
38
Appendix H: Troubleshooting
Please consult the Deep Security Manager, Deep Security Agent and Deep Security Virtual Appliance
―readme‖ files for any issues not addressed in the Troubleshooting or FAQs sections.
Deep Security Manager
Installation
Problem
Experiencing problems installing two Deep Security Managers on the same machine.
Solution
Only one instance of the Deep Security Manager can be installed on any given machine.
Problem
Unable to install or upgrade the Deep Security Manager.
Solution
During installation or upgrade of the Deep Security Manager the service may fail to install properly if the
Services screen is open on some platforms. Close the services screen prior to installation or upgrade of
Deep Security Manager.
If the problem persists, reboot the computer.
Communications
Problem
The Agent protecting the Deep Security Manager is generating ―Renewal‖ errors, and/or you cannot
connect remotely to the Deep Security Manager.
Solution
After applying the "Deep Security Manager" Security Profile, you may notice that the Deep Security Agent
will return numerous "Renewal Error" DPI Events. This is because the Agent cannot inspect the SSL Traffic
that existed before the "Deep Security Manager" Security Profile and its SSL Host Configuration was
applied. It is recommended that all browser sessions to the Deep Security Manager be restarted after
applying the ―Deep Security Manager‖ Security Profile.
39
Problem
"Communications Problem Detected" Alert on a computer managed by the Deep Security Manager.
or
Offline Bundle.zip error when preparing the ESX.
or
Offline Bundle.zip error when deploying the Deep Security Virtual Appliance.
or
Protocol Error when activating the Deep Security Appliance.
Solution
If you encounter any of the above situations it may be that a computer being managed by the Deep
Security Manager is unable to resolve the hostname of the computer hosting the Deep Security Manager.
To ensure the Deep Security Manager is able to resolve the hostname of the computer hosting
the Deep Security Manager:
1.
2.
3.
4.
5.
Log in to the Deep Security Manager that is managing the Agent
Go to System >System Information and in the System Details, view the Manager Node entry
and note the hostname
Log in to the computer that is having communication problems
Perform an nslookup using the name from step 2
If the nslookup fails you must modify the hosts file on the computer to use the DSM hostname
with the correct IP address or update the DNS entry for the Deep Security Manager machine on
the specified DNS server
To change the hosts file on the Virtual Appliance you must log in via vCenter. Once in the console press
ALT+F2 to get to the console login screen. Then type: sudo vi /etc/hosts
Configuration
Problem
Traffic Analysis is not working.
Solution
Stateful Configuration must be on, with TCP and UDP logging enabled.
Problem
Many DPI rules are being triggered on the Agent protecting the database used by Deep Security Manager.
Solution
When using Deep Security Manager with a database on a remote computer that is running a Deep Security
Agent (DSA) there is a possibility of DPI false positives. The false positives are caused by the contents of
the DPI Rules (when saving to the database) triggering the DPI Rules running on the DSA. The workaround
is to either create a bypass Firewall Rule to apply to the database server with the source IP being the static
IP of Deep Security Manager or to enable encryption on the database channel. SQL Server can be
encrypted by adding:
database.SqlServer.ssl=require
to \webclient\webapps\ROOT\WEB-INF\dsm.properties and restart the Deep Security Manager service.
40
Problem
Port scans show ports 25 and 110 are open regardless of which Firewall Rules I implement to close them.
Solution
The presence of Norton Antivirus may interfere with scan results. Norton AV filters ports 25 and 110 to
check incoming and outgoing email for viruses. This can cause erroneous scan results if the Manager is
installed on a machine with email scanning enabled since ports 25 and 110 will always appear to be open
regardless of any filters placed on the host.
Problem
Port scans show ports 21, 389, 1002, and 1720 are open regardless of which Firewall Rules I implement to
close them.
Solution
If Windows Firewall is enabled on the Deep Security Manager it may interfere with port scans causing false
port scan results. Windows Firewall may proxy ports 21, 389, 1002, and 1720 resulting in these ports
always appearing open regardless of any filters placed on the host.
Deep Security Virtual Appliance
Deployment
Problem
Timeout when preparing the ESX server.
Solution
In order for the Filter Driver to be successfully installed, the ESX server it is being deployed to must be
rebooted. The Deep Security Manager offers the option to automatically reboot the server. If this selection
is chosen all virtual machines on the ESX server must be paused/stopped or vMotioned off of the box. If
this is not done the ESX server cannot be put in to maintenance mode and cannot be rebooted. The Deep
Security Manager will report a timeout issue if the ESX server cannot be put in to maintenance mode.
Problem
Cannot contact the Deep Security Virtual Appliance.
Solution
By default the Deep Security Virtual Appliance uses DHCP to acquire an IP address when it is deployed. If
you are deploying in an environment that does not have a DHCP server then you must assign a static IP
address to the Appliance.
To assign a static IP address to the Virtual Appliance:
1.
2.
3.
4.
Log in
Select
Log in
Select
to the Virtual Center hosting the Deep Security Virtual Appliance using vSphere Client
the Appliance and click the console tab
to the Appliance by pressing F2 and using the default username and password (dsva:dsva)
Configure Management Network from the menu and press Enter
41
5.
6.
7.
Change the Hostname, IP Address, Netmask, Gateway and DNS entries to match that of your
network
Press Enter to save the changes
Reboot the Appliance by selecting Reboot System from the main menu
Configuration
Problem
Anti-Malware scan terminated abnormally.
Solution
Virtual machines must be in the running state for scans to complete successfully. This termination may be
due to the Virtual Machine being shutdown or suspended during the scan. Check on the status of the
Virtual Machine, and try again.‖
This happens when the guest VM was rebooted, or enters into a sleep or standby mode.
Deep Security Agent
Installation
Problem
The following error is seen during a Solaris Agent installation:
## Executing postinstall script.
devfsadm: driver failed to attach: dsa_filter
Warning: Driver (dsa_filter) successfully added to system but failed to attach
Starting Trend Micro Deep Security Drivers
can't load module: Invalid argument
Solution
Some Solaris patches change the version of netinfo running on a system. It is the version of netinfo that
determines which Agent install package is required for a particular system.
To identify the netinfo version on a system, run the following command:
modinfo | grep neti
The filesize determines which install package to use:
Filesize
74c
1abs
ec8
2600
Install Package
u5sparc
u7sparc
u5x86
u7x86
For more detail you can view /var/adm/messages.
The following entries indicate that you are attempting to install an
U7 Agent on a machine that requires the U5 Agent:
Feb 19 11:14:58 Sparc-v210-2 unix: [ID 819705 kern.notice] /usr/kernel/drv/sparcv9/dsa_filter:
undefined symbol
Feb 19 11:14:58 Sparc-v210-2 unix: [ID 826211 kern.notice] 'net_protocol_release'
42
Feb 19 11:14:58
undefined symbol
Feb 19 11:14:58
Feb 19 11:14:58
undefined symbol
Feb 19 11:14:58
Feb 19 11:14:58
undefined symbol
Feb 19 11:14:58
Feb 19 11:14:58
undefined symbol
Feb 19 11:14:58
Feb 19 11:14:58
undefined symbol
Feb 19 11:14:58
Feb 19 11:14:58
'dsa_filter'
Sparc-v210-2 unix: [ID 819705 kern.notice] /usr/kernel/drv/sparcv9/dsa_filter:
Sparc-v210-2 unix: [ID 826211 kern.notice] 'hook_alloc'
Sparc-v210-2 unix: [ID 819705 kern.notice] /usr/kernel/drv/sparcv9/dsa_filter:
Sparc-v210-2 unix: [ID 826211 kern.notice] 'net_hook_register'
Sparc-v210-2 unix: [ID 819705 kern.notice] /usr/kernel/drv/sparcv9/dsa_filter:
Sparc-v210-2 unix: [ID 826211 kern.notice] 'hook_free'
Sparc-v210-2 unix: [ID 819705 kern.notice] /usr/kernel/drv/sparcv9/dsa_filter:
Sparc-v210-2 unix: [ID 826211 kern.notice] 'net_protocol_lookup'
Sparc-v210-2 unix: [ID 819705 kern.notice] /usr/kernel/drv/sparcv9/dsa_filter:
Sparc-v210-2 unix: [ID 826211 kern.notice] 'net_hook_unregister'
Sparc-v210-2 unix: [ID 472681 kern.notice] WARNING: mod_load: cannot load module
The following entries indicate that you are attempting to install an
U5 Agent on a machine that requires the U7 Agent:
Feb 19 11:19:36
undefined symbol
Feb 19 11:19:36
Feb 19 11:19:36
undefined symbol
Feb 19 11:19:36
Feb 19 11:19:36
undefined symbol
Feb 19 11:19:36
Feb 19 11:19:36
undefined symbol
Feb 19 11:19:36
Feb 19 11:19:36
'dsa_filter'
Sparc-v210-1 unix: [ID 819705 kern.notice] /usr/kernel/drv/sparcv9/dsa_filter:
Sparc-v210-1 unix: [ID 826211 kern.notice] 'net_unregister_hook'
Sparc-v210-1 unix: [ID 819705 kern.notice] /usr/kernel/drv/sparcv9/dsa_filter:
Sparc-v210-1 unix: [ID 826211 kern.notice] 'net_register_hook'
Sparc-v210-1 unix: [ID 819705 kern.notice] /usr/kernel/drv/sparcv9/dsa_filter:
Sparc-v210-1 unix: [ID 826211 kern.notice] 'net_lookup'
Sparc-v210-1 unix: [ID 819705 kern.notice] /usr/kernel/drv/sparcv9/dsa_filter:
Sparc-v210-1 unix: [ID 826211 kern.notice] 'net_release'
Sparc-v210-1 unix: [ID 472681 kern.notice] WARNING: mod_load: cannot load module
Activation
Problem
Deep Security Agent is installed, but the Agent UI displays blank fields.
Solution
If the ―Manager URL‖, ―Manager certificate name‖, and ―Manager certificate fingerprint‖ fields are blank, the
Agent has not been activated. These fields are blank until the Agent has been activated by Deep Security
Manager. Find the Computer in the DSM’s Computers list, right-click on it and select Actions >
Activate/Reactivate.
Problem
Getting the following error message in an ―Agent Activate Failed‖ system event: "A client error occurred in
the DSM to DSA protocol: HTTP client error received: certificate is not yet valid".
Solution
The clock on a Deep Security Agent machine must be synchronized with the Deep Security Manager to
within 24 hours. If the DSA clock is behind the DSM clock then an Agent Activate operation will fail because
the certificate generated for the Agent by the Deep Security Manager will not yet be valid.
43
Configuration
Problem
You see a DSA_IOCTL_SET_FILTER_CONFIG error on a computer with the description:
Engine command code DSA_IOCTL_SET_FILTER_CONFIG failed with error: 0x0005aa
(insufficient system resources exist to complete the requested service.).
Solution
This may be caused by one of two reasons:
1. The system is running with the /3GB boot option.
The /3GB flag reduces the amount of memory available to the kernel, which in turn reduces the amount of
non-pageable memory in the kernel. The exact amount can be influenced by many factors such as TCP
chimney offloading, use of large amounts memory over the 4GB addressing space, external device drivers
such as audio, video, etc.
2. Too many rules are applied on the computer for the amount of kernel memory available to the driver.
In these situations it will be necessary to reduce the number of Firewall and DPI rules applied to your
Computer in order to reduce the memory footprint, as well as improve performance. The Recommendation
Scan feature of Deep Security can help with this. By Scanning your computers for Recommendations you
can use the "Show Recommended for Unassignment" view of the "DPI Rules" page for computer and
unassign DPI Rules that do not need to be applied to maintain appropriate security. If you manager your
computers via Security Profiles you can use the same "Show Recommended for Unassignment" DPI Rules
view but note that it will only show DPI Rules that are not recommended on any of the Computers to which
the Security Profile is assigned, and may still leave you with a set of DPI Rules that has a footprint that is
too large for some Computers. If the Security Profile itself still has too many DPI Rules assigned it may be
necessary to make additional Security Profiles and divide the Computers amongst them such that the
Security Profiles are better representations of what DPI Rules are actually recommended to be applied to
the various Computers. This should allow you to reduce the number of DPI Rules assigned to all your
Computers.
44
Diagnostics Collection
Problem
Your support provider has asked for a diagnostics package.
Solution
In Deep Security Manager, go to System > System Information and click Create Diagnostics Package…
in the toolbar. This displays the Diagnostic Package Wizard which will create a zip file containing
Install/Uninstall and Debug Logs, System Information, Database Contents (last hour only for time-sensitive
items), and a File Listing. This information can be given to your support provider to help troubleshoot any
problems.
Problem
Your support provider has asked you to increase the size of the diagnostics package.
Solution
The default maximum size of a diagnostic package is approximately 200MB. A command line instruction is
available to increase the size of the diagnostic package:
dsm_c -action changesetting -name configuration.diagnosticMaximumFileSize -value ####
The following example increases the size of the package to 1GB (1000MB):
dsm_c -action changesetting -name configuration.diagnosticMaximumFileSize -value 1000
Do not change the size of the diagnostic package unless instructed to do so by your support provider.
Problem
Cannot create a diagnostics package with Internet Explorer 7.
Solution
When exporting files (CVS, XML, software, or updates) or creating a diagnostic package, Internet Explorer’s
―Information Bar‖ may inform you that file downloads are being blocked and Deep Security Manager will
instruct you to ―check the server0.log‖. To permit file downloads, click on ―More information‖ in the
Information Bar and follow the instructions to allow file and software downloads.
45
Appendix I: FAQs
Please consult the Deep Security Manager and Deep Security Agent release notes for any issues not
addressed in the Troubleshooting or FAQs sections.
Where can I download the installer package for Deep Security 7.5?
The Trend Micro Download Center - http://downloadcenter.trendmicro.com
Where can I download the technical documents for Deep Security 7.5?
The Trend Micro Download Center - http:// downloadcenter.trendmicro.com
What is the default username and password to log into the Deep Security Manager console?
You are prompted for a username and password during installation. The default username to log in to the
Manager Console is "MasterAdmin" (no quotes). There is no default password. Both this and the password
are set during the installation. The username IS NOT case-sensitive. However, the password IS casesensitive.
Can I reset the Manager console login password?
Yes. You can reset or change the Manager console login password. Go to System > Users, right-click on
the User select Set Password….
How can I unlock a locked out User?
In the Manager, go to System > Users, right-click on the User and select Unlock User(s).
To unlock a User from the Manager host command line, enter the following from the Deep Security
Manager’s install directory:
dsm_c -action unlockout -username USERNAME [-newpassword
NEWPASSWORD]
where USERNAME is the User’s username. Optionally, use ―-newpassword‖ to set a new password for the
User.
Can I use my domain account credentials when logging on to the Manager console?
Yes. Go to System > Users and select Synchronize with Directory.
How can I mass-deploy the Agents to the computers being protected?
Organizations typically use existing enterprise software distribution systems such as Microsoft System
Center™ or Novell™ ZENworks™ to install Agents.
Can I still use my existing license or activation code when upgrading to version 7.5?
Your existing protection modules will be supported but you will need contact a sales representative for a
new Activation Code to enter during the upgrade process.
Can I uninstall the DS Agents from the Manager console?
No. You can de-activate an Agent/Appliance from the DSM, but you must uninstall locally.
What is the end of life or support policy for Deep Security?
• Product support is provided 2 years after a release, or
• Product support is provided for 18 months after a subsequent release, whichever time period is longer
How do I deactivate the DS Agent from the command line?
See the User’s Guide section ―Manually Deactivate/Stop/Start the Agent/Appliance‖. It is platform
dependent.
46
How can I manually update the DS Agent that has no connection with the DS Manager?
Updating the Agent is not possible without connection to the Manager, since the Manager must send the
security configuration details to the Agent.
47
Appendix J: Known Incompatibilities
Please consult the Deep Security Manager, Deep Security Virtual Appliance, or Deep Security Agent
readme files for the most recent list of known incompatibilities.
48
Appendix K: Upgrading from Deep Security 7.0
You will be licensed for the same modules in Deep Security 7.5 for which you were licensed in Deep
Security 7.0, but you will need to enter a new Activation Code provided by your sales representative
during the upgrade process.
In Deep Security 7.5, there are changes to the system requirements for a deploying the Deep Security
Virtual Appliance in a vSphere environment. These changes are necessary to support the new Anti-Malware
protection for virtual machines provided by the 7.5 DSVA.
The following example describes the upgrade steps necessary to upgrade an existing Deep Security 7.0
system installation to Deep Security 7.5.
Example existing Deep Security 7.0 Environment:
ESX4.0 prepared by Deep Security Filter Driver (7.0.0.894)
vCenter 4.0
Deep Security Manager 7.0 SP1 (7.0.1630)
Deep Security Virtual Appliance 7.0.SP1 (7.0.0.916)
Guest VM protected by Deep Security Virtual Appliance
Upgrade Steps
1.
2.
3.
4.
5.
6.
7.
Upgrade the existing Deep Security Manager to 7.5.xxxx (See ―Upgrading vs. Overwriting an
Existing Installation‖ in Chapter 3: Installing the Deep Security Manager.)
Upgrade your VMware environment to the specifications listed in Chapter 4: Installing the Deep
Security Virtual Appliance.
Power on the Deep Security Virtual Appliance and guest VM
Upgrade to Deep Security Virtual Appliance 7.5.0.xxxx: In the Deep Security Manager, navigate
to the Deep Security Virtual Appliance, right-click and select Actions > Upgrade.
Add a certificate for vShield Manager: in the Deep Security Manager, right-click Computers >
vCenter, and on the vShield Manager tab, click Add/Update Certificate…
Install VMware VShield Endpoint Thin Agent on the guest VM
Re-activate the Deep Security Virtual Appliance and assign the "Windows Anti-Malware Protection"
Security Profile to the guest VM
49
Appendix L: Upgrading from Deep Security 7.5 to 7.5
SP1
Download the latest versions of the Deep Security Manager software packages from the Trend Micro
Download Center at http://downloadcenter.trendmicro.com.
The Filter Driver and the Virtual Appliance must both be upgraded to version 7.5 SP1. Upgrading
one without the other will leave both in a non-functioning state.
Upgrade Steps
1.
2.
3.
4.
Upgrade the existing Deep Security Manager (and any Manager nodes) to 7.5.5xxx (See
―Upgrading vs. Overwriting an Existing Installation‖ in Chapter 3: Installing the Deep Security
Manager.)
In the newly upgraded Deep Security Manager, got to System > Updates > Software Packages
and import the new Agent, Filter Driver, and Virtual Appliance installation packages.
To upgrade Deep Security Agents, go to the Computers screen, select the Agent(s) you want to
upgrade, right-click on them and select Actions > Upgrade Agent Software.
To upgrade the Filter Driver on your ESX server, go to the Computers screen, select the ESX
server you want to upgrade, right-click on it, and select Actions > Upgrade Filter Driver.
The ESX server will be put in maintenance mode and then rebooted during the upgrade process.
Because of this the virtual machines on the ESX server must be paused or shutdown. The upgrade
wizard will prompt you to allow the Deep Security Manager to carry out these operations for you.
5.
To upgrade the Virtual Appliance, go to the Computers screen, select the Virtual Appliance you
want to upgrade, right-click on it, and select Actions > Upgrade Virtual Appliance.
50
Appendix M: Uninstalling
To remove the Virtual Appliance
To remove the Virtual Appliance:
1.
2.
3.
4.
Use the Deep Security Manager to ―deactivate‖ the Virtual Appliance.
Log in to vCenter.
Stop the Appliance.
Delete from disk.
To remove the Filter Driver from a prepared ESX Server
To restore the ESX Server to its “un-prepared” state:
1.
2.
3.
From the Deep Security Manager Computers list, select the Virtual Center. Choose the Prepared
Computer for un-deployment, right-click the Computer and select Restore ESX.
Follow the wizard steps, accepting the defaults.
Choose "Yes" to have the DSM handle the ESX Server driver un-installation automatically.
The Deep Security Manager will attempt to bring the ESX server into and out of maintenance
mode automatically. Any running virtual machines will need to be manually shutdown. At the end of
the uninstallation process, the ESX Server will be automatically rebooted and brought out of
maintenance mode.
Or
4.
Choose "No" to manually put the ESX server into /out of maintenance mode.
The Deep Security Manager wizard will start the uninstallation of the Filter Driver automatically
once the ESX Server has been put into maintenance mode. At the end of the uninstallation process,
the ESX Server will be automatically re-booted but remain in maintenance mode.
To uninstall the Deep Security Manager
From the Windows Start Menu, select Trend Micro > Trend Micro Deep Security Manager Uninstaller,
and follow the wizard steps to complete the uninstallation.
To uninstall from the command line:
Uninstall.exe
(For a silent uninstall, add ―-q‖)
To uninstall the Deep Security Agent
From the Windows Control Panel, select Add/Remove Programs. Double-click Trend Micro Deep Security
Agent from the list, and click Change/Remove.
To uninstall from the command line:
msiexec /x <package name including extension>
(For a silent uninstall, add ―/quiet‖)
51
To uninstall the Linux Agent:
To completely remove the agent and any configuration files it created, use "rpm -e":
# rpm -ev ds_agent
Stopping ds_agent: [ OK ]
Unloading dsa_filter module [ OK ]
If iptables was enabled prior to the installation of the Deep Security Agent, it will be re-enabled when the
agent is uninstalled.
To uninstall the Solaris Agent:
Enter the following:
pkgrm ds-agent
(Note that uninstall may require a reboot.)
To uninstall the AIX Agent:
Enter the following:
installp -u ds_agent
To uninstall the HP-UX Agent:
Enter the following:
/tmp> swremove ds_agent
52