1
AT&T
999-507-148
~!!!lm!!KFS
Release 2
System Manual
Contents
Contents
Important Safety Instructions
ii
Overview
1
An Example System Setup
2
Required Parts
4
Installation Guidelines
Telephones and Devices
a Combination Extensions
Using A Direct Connection
Using a Bridging Adapter
n
Installation Procedures
Installing the Control Unit and Modules
m Connecting Lines and Extensions
n Connecting Caller ID Display Units
n Assembling System Phones
Desk Mounting
Wall Mounting
n Connecting and Testing Telephones
n Connecting Paging, Music-On-Hold,
and Call Reporting (SMDR) Devices ,
Paging System
Music-on-Hold Audio Source
Call Reporting (SMDR) Printer
n
Connecting Intercom Autodialers
n
Equipment Upgrades
Adding New Modules
H Replacing System Modules
n
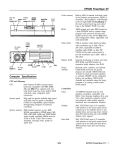
Specifications
a
a
10
12
13
13
14
15
16
16
16
16
17
ia
ia
19
21
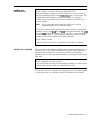
Important Safety Instructions
The following list provides basic safety precautions that should always be
followed when using your telephone equipment:
A
1.
Read and understand all instructions.
2.
Follow all warnings and instructions marked on the product.
3.
Unplug all telephone connections before cleaning. DO NOT use liquid
cleaners or aerosol cleaners. Use a damp cloth for cleaning.
4.
This product should be serviced by (or taken to) a qualified repair center
when service or repair work is required.
5.
DO NOT use this product near water, for example, in a wet basement location
6.
DO NOT place this product on an unstable cart, stand, or table.
7.
Never push objects of any kind into slots or openings as they may touch
dangerous voltage points or short out parts that could result in a risk of fire
or electric shock. Never spill liquid of any kind on the product.
8.
Avoid using this telephone during an electrical storm. There may be a remote
risk of electric shock from lightning.
9.
DO NOT use the telephone to report a gas leak in the vicinity of the leak.
10. The product is provided with a three-wire grounding type plug. This is a
safety feature. DO NOT defeat the safety purpose of the grounding type
plug. DO NOT staple or otherwise attach the AC power supply cord to
building surfaces.
CAUTION:
DO NOT block or cover the ventilation slots and openings. They prevent the
product from overheating. DO NOTplace the product in a separate enclosure
unless proper ventilation is provided.
Additional Safety Instructions for
Installation Personnel
A
1.
DO NOT install telephone wiring during a lightning storm.
2.
DO NOT install telephone jacks in a wet location unless the jack is specifically
designed for wet locations.
3.
Never touch uninsulated telephone wires or terminals, unless the telephone
line has been disconnected at the network interface.
4.
Use caution when installing or modifying telephone lines.
5.
The control unit must be securely wall mounted.
CAUTION:
If any wiring from the extension jacks leaves the building premises, you must
install AT&T IROB protectors (see “Requirements for Out-of-Building
Extensions” on page 22).
A CAUTION:
Use only AT& T-manufactured PARTNER modules in the PARTNER Plus
A
Communications System.
CAUTION:
Environmental and electrical conditions must meet the specifications as listed
on pages 21 and 22.
SAVE THESE INSTRUCTIONS
::
Contents
Section 1: Introduction
Quick Start Procedure
What’s in This Manual
How to Use This Manual
The MERLIN Plus Communications System
l-1
1-2
1-4
l-5
Section 2: Planning the System
Introduction
System Configuration Form
Call Restrictions Forms
System Speed Dial Forms
System Configuration Form
Line Assignments Form
Call Restrictions Form
System Speed Dial Form
2-l
2-2
2-17
2-22
2-25
2-27
2-29
2-33
Section 3: Administering the System
Introduction
Administration Preview
Basic Administration
Line Assignments for Voice Terminals
Systemwide Options
3-l
3-2
3-10
3-23
3-31
Section 4: Using The Attendant Console
Overview
Handling Calls
4-l
4-4
.
Section 5: Reference
Overview
MERLIN Plus System Features
Accessory Equipment
5-l
5-2
5-12;
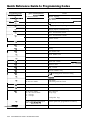
Section 6: Quick Reference Guides.
Quick Reference Guide to System Administration
Quick Reference Guide to Voice Terminal Features
Quick Reference Guide to Programming Codes
Quick Reference Guide to ASA Features
6-1
6-16
6-20
6-21
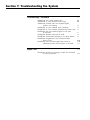
Section 7: Troubleshooting the System
Troubleshooting Procedures
System Test
7-l
7-13
Section 8: Installation
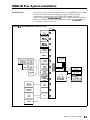
MERLIN Plus System Installation
8-l
Section 1: introduction
Quick Start Procedure
If You’re in a Hurry
What’s in This Manual
Section 1. Introduction
Section 2. Planning the System
Section 3. Administering the System
Section 4. Using the Attendant Console
Section 5. Reference
Section 6. Quick Reference Guides
Section 7. Troubleshooting the System
Section 8. Installation
User’s Guide
CFlRLA Card
Document List
How to Use This Manual
Administering a New System?
Need to Use the Phone Before the System is Running?
Making Changes to a Running System?
Managing Incoming Call Traffic as System Attendant?
Using a Voice Terminal for the First Time?
Having Trouble with the System?
The MERLIN Plus Communications System
The Control Unit
The Voice Terminals
l-l
l-l
1-2
1-2
l-2
l-2
I-2
1-2
1-2
l-2
l-2
1-3
l-3
l-3
1 - 4
1-4
l-4
1-4
1-4
l-4
1-4
l-5
l-5
l-5
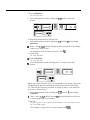
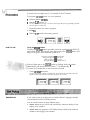
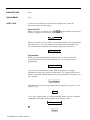
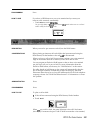
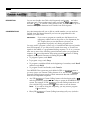
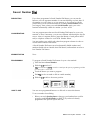
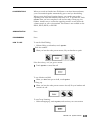
Quick Start Procedure
IF YOU’RE IN A HURRY
If you need to make and receive calls the moment your MERLIN@ Plus
system is installed, and before you’ve had time to learn how to implement
the entire system, this “Quick Start” information is for you. Follow this short
procedure and in a few minutes you’ll hear the familiar sound of a dial tone,
enabling you to make and receive calls, so that your business can continue
uninterrupted while the rest of the system is being planned.
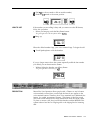
1
Connect the system to a grounded ac power outlet.
2
Connect the system to the Central Office line in jack A.
3
Plug a voice terminal into Intercom # 10.
4
Turn on the system power switch.
You now can make unrestricted calls on Touch-Tone lines only from the voice
terminal.
r\..:-1.
c-r-2
n----A..--
a
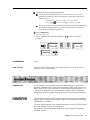
What’s in This Manual
You’ll find the information in this MERLIN Plus Communications System
manual conveniently divided into eight sections, as described below. You’ll
also find ten copies of the MERLIN Plus System User‘s Guide enclosed.
SECTION 1.
INTRODUCTION
This section tells you what’s in this manual and how to use it. It also offers a
brief introduction to the system’s control unit and the voice terminals
(telephones).
SECTION 2.
PLANNING THE SYSTEM
Use the information in this section to make some key decisions about how
you want the system to operate. This section includes planning forms to
record your decisions. If someone else will be system administrator, have
that person fill out the planning forms.
SECTION 3.
ADMINISTERING THE
SYSTEM
This section tells you how to use the information on the planning forms to
customize the system to meet your business needs. If someone else will be
system administrator, have that person administer the system following the
steps in this section.
SECTION 4.
USING THE ATTENDANT
CONSOLE
If your system will have an attendant manage incoming call traffic, that
person can find helpful information in this section on using the
administrator/attendant telephone.
SECTION 5.
REFERENCE
This section contains a detailed discussion of every component, option, and
feature in the MERLIN Plus system. The entries are organized alphabetically
to help you find the information you need quickly. As you become familiar
with the system, you’ll probably go to this section first when you want to
change a system setting or a voice terminal feature, or when you simply want
to find out more about some aspect of the system.
SECTION 6.
QUICK REFERENCE
GUIDES
The guides in this section offer quick access to administration and
programming procedures. Use them when you want to find a particular
procedure fast.
SECTION 7.
TROUBLESHOOTING THE
SYSTEM
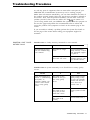
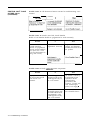
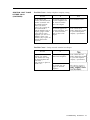
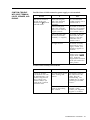
The tables in this section can help you isolate and solve any of the technical
problems that may cause your system to malfunction.
SECTION 6.
INSTALLATION
This is a technical reference section. It should answer any questions an
installer or technician may have about MERLIN Plus system wiring and
installation requirements.
USER’S GUIDE
This guide is a handy reference for anyone who uses a MERLIN Plus system
voice terminal on the job. Give one to everyone in your business who uses i
voice terminal.
CFIRLA CARD
This card should be given to anyone in your company who works at home o
travels frequently but still needs to make or receive business calls. It contains
instructions for using Call Forwarding and Remote Line Access, convenient
features for people who spend a lot of time out of the office. (Refer to
Section 5, “Reference, ’ for more details about these two features.)
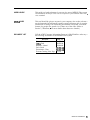
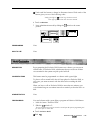
DOCUMENT LIST
Call the AT&T Customer Information Center at l-800-432-6600 to order any o
the following documents for the MERLIN Plus system:
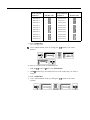
Document
Order No.
System Manual
CFlRLA Card
Installation Manual
User’s Guide
Customization Chart
Customer Training Video Tape
999-507-148
999-502-148
518-600-008
999-500-148
999-503-148
775-358
What’s in This Manual
1.
How to Use This Manual
How you should use this manual at any particular time depends on what you
want to do, as the following information suggests.
ADMINISTERING A NEW
SYSTEM?
Use the information in Section 2, “Planning the System, ’ to decide which
options and features you want for your system, then follow the instructions
in Section 3, “Administering the System,’ and in Section 5, “Reference,’ to
set up the system with the options and features you’ve selected.
NEED TO USE THE PHONE
BEFORE THE SYSTEM IS
RUNNING?
Refer to the “Quick Start Procedure” at the beginning of this section.
MAKING CHANGES TO A
RUNNING SYSTEM?
Change the planning forms to reflect the changes you want to make, then see
the relevant entries in Section 5, “Reference, ” and Section 6, “Quick Reference
Guides,’ to make the changes.
MANAGING INCOMING
CALL TRAFFIC AS
SYSTEM ATTENDANT?
See Section 4, “Using the Attendant Console, ’ for information on how to use
the attendant’s telephone to handle incoming calls.
USING A VOICE TERMINAL
FOR THE FIRST TIME?
See the relevant entries in Section 5, “Reference,’ and the Quick Reference
Guide to Voice Terminal Features in Section 6-and keep the MERLIN Plus
System User’s Guide handy.
HAVING TROUBLE WITH
THE SYSTEM?
Find the symptom in Section 7, “Troubleshooting, ’ then follow the
suggestions for solving the problem.
-.
.
.
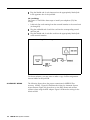
The MERLIN Plus Communications System
The basic MERLIN Plus system provides connections to up to four outside
telephone lines and ten voice terminals. We use,the term “voice terminal”
instead of “telephone” because a basic telephone only lets you make and
receive calls, while a voice terminal can be programmed to do a whole lot
more, which you will soon discover as you read this manual.
To accommodate your growing communications needs, the system expands
easily and economically to support up to eight outside lines and 20 voice
terminals. If your business eventually outgrows even the fully expanded
MERLIN Plus system, you can protect your investment in voice terminals,
accessory equipment, and training time with the purchase of a larger MERLIN
system.
The paragraphs that follow offer a brief introduction to the system’s control
unit and voice terminals. The optional equipment J.OU can add to your
system is described under the heading “Accessory Equipment” in Section 5,
“Reference. ’
THE CONTROL UNIT
The control unit is the system’s brain. It manages all incoming, outgoing,
and intercom call traffic. It makes all of the system’s decisions and controls
all of the system’s responses. For an illustration of the control unit with its
major components labeled, see “Administration Preview” in Section 3,
“Administering the System. ’
THE VOICE TERMINALS
A voice terminal is a MERLIN system telephone that provides basic telephone
functions and allows you to take advantage of the special MERLIN system
features. All voice terminals have buttons for fixed features such as
Conference, Drop, Transfer, and Hold. They differ from one another in the
number of buttons above and to the right of the dial pad that can be used for
outside lines and programmable features. The lo-button voice terminal with
the “HFAI” designation has the hands-free intercom feature. Voice terminals
with “SP” or “BIS” designations also have the hands-free answer on intercom
feature and a built-in speakerphone. For more information on using basic
telephones with the MERLIN Plus system, see “Basic Telephones” in Section
5, ‘Reference. It Your MERLIN Plus system works best with the following
voice terminals:
l
BIS-10 Voice Terminal
l
BIS-22 Voice Terminal
l
BIS-22D Voice Terminal with Display
l
BIS-34 Voice Terminal
l
BIS-34D Voice Terminal with Display
l
5-Button Voice Terminal
l
lo-Button Voice Terminal
l
lo-Button Hands-Free Answer on Intercom (HFAI-10) Voice Terminal
l
3CButton Voice Terminal
l
34-Button (SP-34) Voice Terminal with Speakerphone
l
34-Button (SP34D) Voice Terminal with Speakerphone and Display
l
3CButton Deluxe Voice Terminal
The MERLIN Plus Communications System
l-5
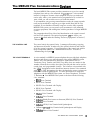
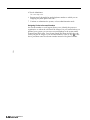
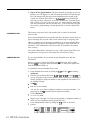
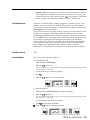
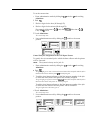
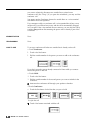
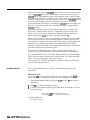
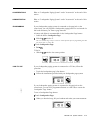
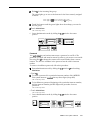
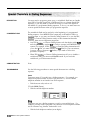
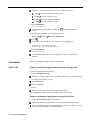
BIS-10, 818-22, BIS-34, and BIS-34D Voice Terminals
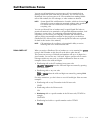
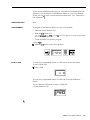
The BE-10 Voice Tem?inal allows you to make and receive outside and
intercom calls without lifting the handset. There are two columns of five
buttons above the dial pad for incoming lines, auto intercom, and
programmable features. The dual lights next to each button indicate the
current status of selected features and lines.
3
1
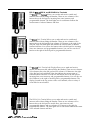
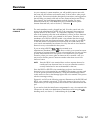
The BE-22 Voice Terminal allows you to make and receive outside and
intercom calls without lifting the handset. There are two columns of five
buttons above the dial pad and one column of 12 buttons to the right of the
dial pad, each with dual lights that indicate the current status of selected
features and lines. You can use the buttons above the dial pad for incoming
lines, auto intercom, and programmable features. You can also use the 12
buttons to the right of the dial pad for programmable features.
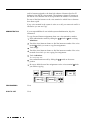
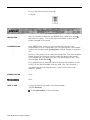
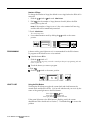
The BE-22D Voice Terminal with Display allows you to make and receive
outside and intercom calls without lifting the handset. There are two columns
of five buttons above the dial pad and one column of 12 buttons to the right
of the dial pad, each with dual lights that indicate the current status of
selected features and lines. You can use the buttons above the dial pad for
incoming lines, auto intercom, and programmable features. You can also use
the 12 buttons to the right of the dial pad for programmable features. The
display, located in the top portion of the voice terminal, offers a variety of
visual aids for most features.
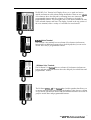
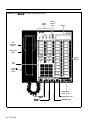
The BIS-34 Voice Terminal allows you to make and receive outside and
intercom calls without lifting the handset. There are two columns of five
buttons above the dial pad for outside lines, auto intercom, and
programmable features and two columns of 12 buttons to the right for
programmable features. The dual lights next to each button indicate the status
of the selected features and lines.
a
a
TL-
..rCI, 1.1
ma..- h---..^:^^r:-^^ 0. .^&^-
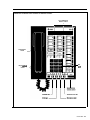
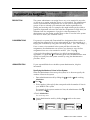
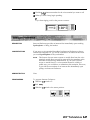
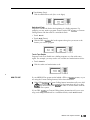
The BIS-34D Voice Terminal with Display allows you to make and receive
outside and intercom calls without lifting the handset. There are two columr
of five buttons above the dial pad for incoming lines, auto intercom, and
programmable features and two columns of 12 buttons to the right for
programmable features. The dual lights next to each button indicate the statr
of the selected features and lines. The display, located in the top portion of
the voice terminal, offers a variety of visual aids for most features.
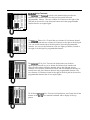
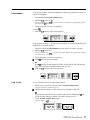
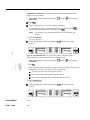
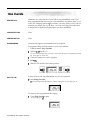
5-Button Voice Terminal
The 5-button voice terminal has one column of five buttons (an Intercom
button and four additional buttons above the dial pad) that you can use for
outside lines and/or programmable features.
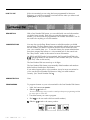
1 O-Button Voice Terminals
The IO-Button Voice Teminal has two columns of five buttons (an Intercom
button and nine additional buttons above the dial pad) for outside lines and
programmable features.
The IO-Button (HFAZ-IO) Voice 7’errninal has a built-in speaker that allows you
to answer intercom calls without lifting the handset. It also has two column:
of five buttons (an Intercom button and nine additional buttons above the di
pad) for outside lines and programmable features.
The MFRI IN Pl~rs Cnmmtlnicntinns Svstnm
1
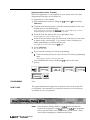
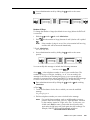
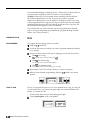
34-Button Voice Terminals
The 34-Button Voice Temzinal is a basic voice terminal that provides two
columns of five buttons above the dial pad for outside lines and
programmable features. The two columns of 12 buttons to the right of the
dial pad can be used for Auto Intercom buttons and other programmable
features that do not require lights.
:r r4- i i
The 34-Button Deluxe Voice Terminal has two columns of five buttons located
above the dial pad and two columns of 12 buttons to the right of the dial pad.
You can use the buttons above the dial pad for lines and programmable
features. You can use the 24 buttons, with two lights per button, located to
the right of the dial pad for programmable features.
The 3CBufton (SP-34) Voice Terminal with Speakerphone has a built-in
speakerphone that allows you to initiate and answer both outside and
intercom calls without using the handset. Above the dial pad are two
columns of five buttons (an Intercom button and nine additional buttons) for
outside lines and Auto Intercom buttons and programmable features. The
two columns of 12 buttons located to the right of the dial pad can be used for
programmable features that do not require lights.
The 34-Button (SP-34D) Voice Terminal with Speakerphone and Display has all the
features of the W-34 voice terminal combined with a display in the top
portion.
Summary
Voice terminal models BIS-34 and BIS-34D are ideal for the system
administrator/attendant console because their features allow you to easily use
all the system’s features. You can also use the BIS-22 and the 3CButton
Deluxe models as the console. However, the SP-34, SP-34D, BE-10, HFAI-10,
lo-Button, and 5-Button voice terminals are not recommended for use as an
administer/attendant console because the administrator would be unable to
see which buttons were being assigned special features during system
administration. In addition, lo- and 22-button voice terminals cannot be used
to program certain system features.
Section 2: Plannina the System
introduction
2-l
System Configuration Form
2-2
Dial Signals
Long Distance Dialing
Transfer Return Interval
Call Report
Music-on-Hold
Background Music
Outside Telephone Lines
Hold Disconnect Interval
Voice Terminals
Program Mode Lock
Line Assignments Form
Name and Intercom Number
Line Assignments for Voice Terminals
Ringing Options
Button-Free Line Operation
Automatic Line Selection Sequence
Line Assignments for ASA Features
Call Restrictions Forms
Disallowed List
Unrestricted
Toll Restricted
Outward Restricted
Allowed Lists
System Speed Dial Forms
Private
Number and Identification
Restriction Override
System Configuration Form
2-2
2-2
2-3
2-3
2-3
2-4
2-4
2-4
2-5
2-8
2-9
2-9
2-9
2-1:
2-1:
2-l.
2-l.
2-l
2-l
2-1,
2-l
2-1
2-1
2-2
2-2
2-2.
2-2,
2-2
Line Assignments Form
2-27
Call Restrictions Form
2-29
System Speed Dial Form
2-33
Introduction
You can begin making and receiving calls as soon as your MERLIN@ Plus
Communications System is installed. But to take full advantage of the
system’s power, you should customize it to fit your business needs.
Customizing the system is called administering the system throughout this
manual.
Administering the system involves entering information into the system’s
memory about how you want the system to operate. You enter this
information by touching buttons and dialing numbers on the telephone
referred to in this manual as the administrutorlattendant console.
This section of the manual helps you decide what information you want to
enter into the system’s memory and shows you how to record that
information on forms. A checklist of the forms appears below. You can fin
copies at the end of this section. Remove them now, make a photocopy of
each, and put the originals back in this binder. Keep the copies on hand so
you can fill them out as you plan your system.
El System Configuration Form
0 Line Assignments Form
0 Call Restrictions Forms
q
NOTE:
System Speed Dial Forms
In this section of the manual, the information that appears before tl
boxes helps you make important decisions about your system. The
the instructions in the boxes tell you where to enter these decisions
on the forms.
Introduction :
System Configuration Form
Use the System Configuration Form to record information about the
following:
l
Dial Signals
l
Long Distance Dialing
l
Transfer Return Interval
l
Call Report
l
Music-on-Hold
l
Background Music
l
Outside Telephone Lines
l
Voice Terminals
The following information should help you make the appropriate entries for
your system on the System Configuration Form.
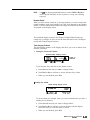
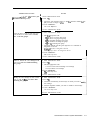
DIAL SIGNALS
The MERLIN Plus system comes set to generate Touch-Tones when you dial
an outside call. This means that if one or more of your outside telephone
lines transmits rotary (pulse) signals, you have to administer the-system for
rotary dialing. Otherwise you won’t be able to dial out over the rotary lines.
NOTE:
If some of your outside lines are Touch-Tone and some rotary, you
may want to ask your local telephone company to replace the rotary
lines with Touch-Tone lines.
Under “Dial Signals’ on the form . . .
Check the box next to “Touch-Tone” if all the outside telephone lines
connected to your system are Touch-Tone lines.
Check the box next to “Rotary (Pulse)” if one or more of the outside lines
connected to your system are rotary lines.
LONG DISTANCE DIALING
Under “Long Distance Dialing” . . .
Check the box next to “Toll-Prefix” if you have to dial a toll prefix (1 or 0)
before the area code when you dial the telephone number for a long
distance call.
Check the box next to “Area Code Only” if you do not have to dial a toll
prefix (1 or 0) before the area code when you dial the telephone number
for a long distance call.
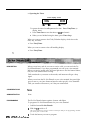
TRANSFER RETURN
INTERVAL
Initially, when someone in the MERLIN Plus system transfers a call and it is
not answered in four rings, the call returns to the sender. You can change
that setting so that calls don’t return, or return after up to nine rings.
Under “Transfer Return Interval” . . .
Check “No Return” if you don’t want transferred calls to return to the
originator, if the call is unanswered.
Check ’ Rings” then fill in a number between 1 and 9, depending
on the number of times you want a transferred call to ring before it’s
returned to the originator.
The following three features, Call Report, Music-on-Hold, and Background
Music require optional equipment. If your business is not using these feature
skip these discussions and continue with “Outside Telephone Lines. If
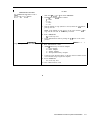
CALL REPORT
Call Report, also called Station Message Detail Recording (SMDR), enables
businesses to keep records of incoming and outgoing calls. This optional
feature requires a MERLIN PLUS system data collector and an AT&T 4751476
or 572/573 printer or its equivalent.
The Call Report feature gives you information in a report that is printed
automatically as calls occur. The report includes the date and time of each
call, its duration, the number dialed (if the call is outgoing), and the line and
voice terminal on which the call is made. An account code is printed if’the
user enters one when the call is made. (See “Account Code Entry” in Sectior
5, “Reference. “)
During system administration you can set the system to generate call records
for outgoing calls only or for both incoming and outgoing calls. The minimul
call duration, when calls begin to be recorded, can be set as short as 10
seconds or as long as nine ‘minutes. The default setting is 0 which represents
ten seconds- the time it takes to connect a call and to avoid recording busy
or unanswered calls. The other durations that can be selected are given in
minutes (1 to 9).
Under ‘Call Report”. . .
Check “Outgoing Calls Only” if you want only outgoing calls reported.
Check “Incoming and Outgoing Calls” if you want both incoming and
outgoing calls reported.
Write in the time you’ve selected as the minimum length for a call to be
reported (O-9).
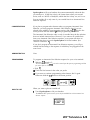
MUSIC-ON-HOLD
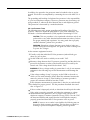
If you have an optional audio system, you can connect it with an RCA-type
phonograph jack to the Music-on-Hold jack provided at the top of the Contrc
Unit. Then when callers are placed on hold, they hear background music
while they’re waiting.
You can control the music volume or turn off the music from the
administrator/attendant console.
System Configuration Form 2
I
Under “Music-on-Hold” . . .
If you have the optional audio equipment connected to the Music-on-Hold
jack, check that volume selection you desire.
If you have an optional audio source connected to the Music-on-Hold jack
and an optional loudspeaker paging system connected to the Paging jack or a
CO line jack, you can provide background music throughout your building.
BACKGROUND MUSIC
You can control the background music volume either at the audio source or at
the administrator/attendant console.
Under “Background Music” . . .
If you want to adjust the volume of the background music at the
administrator/attendant console check that volume selection you desire.
Your local telephone company gives you the telephone numbers for your
outside lines. The control unit jacks where the outside lines connect to the
system are labeled alphabetically: A through D for a system with four or
fewer outside lines, and A through H for a system with five to eight outside
lines.
OUTSIDE TELEPHONE
LINES
To simplify system administration, plan to assign your outside lines to an
unbroken sequence of jacks beginning with jack A. Begin with the lines for
your local published telephone numbers. Group special line types such as
WATS lines together in the sequence, and place any personal lines at the end
of the sequence.
Under “Outside Telephone Lines” . . .
Write in the telephone number and the line type for each of your outside
lines next to the appropriate letter.
If you have an optional loudspeaker paging system that you are planning
to connect to a CO line instead of the Paging jack on the Control Unit,
write “CO Paging” under line type for the CO line you plan to use for
paging-
The MERLIN Plus system comes set for a long (450 milliseconds) hold
disconnect interval because most telephone company switching systems use
the long interval. If your telephone company uses a short (50 millisecond)
interval, you’ll need to reset your system to prevent calls from remaining on
hold after callers have hung up. Refer to “Hold Disconnect Interval” in
Section 5, “Reference,’ for more information on how to detect the hold
disconnect interval.
HOLD DISCONNECT
INTERVAL
-
_.
-
I
Under “Hold Disconnect Interval” on the “Outside Telephone Lines”
form. . .
Check the column under “Long” if you want the 450 millisecond Hold
Disconnect Interval.
Check the column under “Short” if you want the 50 millisecond Hold
Disconnect Interval.
VOICE TERMINALS
Each MERLIN Plus system voice terminal (telephone) in your system will
have a 2-d@ intercom number corresponding to the number of the voice
terminal jack on the control unit where the voice terminal connects to the
system. The valid intercom numbers for a control unit with 10 voice termin
jacks are 10 through 19. For a control unit with 20 voice terminal jacks, the
valid intercom numbers are 10 through 29. The jack locations are illustrated
on a label to the left of the modules in the control unit.
Intercom Number 10
By design, the intercom 10 position is the primary call-handling position in
the system, and it is also the system administration point. If your system w
have an attendant, you should assign intercom number 10 to the voice
terminal at the system attendant’s location. For complete system
administration, the voice terminal assigned intercom 10 should be either a
BIS-22 or a BIS-34 model. If you have 10 or fewer voice terminals, you may
prefer to use a BIS-22 voice terminal.
Under “Voice Terminals” . . .
Write in the name of the system attendant/administrator and that person’s
location on the line next to number 10.
Intercom Number 18
Notice on the form that “ASA” appears in the “Name” column next to
intercom number 18. ASA stands for Automatic System Access, a group of
features that includes Call Forwarding, Direct Extension Dialing, System
Answer, and Remote Line Access. These features allow you to take
advantage of the economy and efficiency of your MERLIN Plus system and
long-distance service lines when you’re away from the office on business, OI
even when you’re at home.
System Configuration Form :
Activation of the ASA features requires a dedicated voice terminal jack on the
control unit. At startup, the system automatically reserves jack (intercom
number) 18 for the ASA features. But you can choose another voice terminal
jack for ASA during system administration, or you may decide not to use any
of the ASA features and assign intercom number 18 to a voice terminal. (To
find out more about the Automatic System Access features- Call Forwarding,
Direct Extension Dialing, System Answer, and Remote Line Access-see the
entries for them in Section 5, “Reference.“)
Under “Voice Terminals” . . .
Do not write in a name next to intercom number 18 if you plan to use any
of the Automatic System Access features (unless you plan to assign an
intercom number other than 18 to ASA during system administration).
Cross out ’ (ASA)’ next to intercom number 18 if you do not plan to use
any of the ASA features or you are assigning the ASA features to a
different intercom number. You can then treat intercom number 18 just
like any other intercom number as you assign them. If you are assigning
the ASA features to a different intercom number, write “ASA” next to the
intercom number you plan to use instead of intercom number 18.
Intercom Number 19
Notice on the form that “BB” and “Reports” appear in parentheses in the
“Name” column next to intercom number 19. The Busy Buster feature
automatically redials the last number you dialed up to 10 times and signals
you if and when the line begins to ring.
Operation of the BB feature requires a dedicated voice terminal jack on the
control unit. At startup, the system automatically reserves jack (intercom
number) 19 for Busy Buster. You can choose another voice terminal jack for
Busy Buster during system administration, or you may choose not to use the
BB feature and assign intercom number 19 to a voice terminal. (For more
information on Busy Buster, see the entry for “Busy Buster” in Section 5,
“Reference. “)
Under “Voice Terminals” . . .
Do not write in a name next to intercom number 19 if you plan to use the
Busy Buster feature.
Cross out “BB” next to intercom number 19 if you plan to deactivate Busy
Buster during system administration or if you plan to assign it to a
different intercom number. (Intercom number 19 will still be reserved for
the data collector and printer which are used to print reports.) You can
then treat intercom number 19 just like any other intercom number when
you assign intercom numbers to voice terminals at the appropriate point in
this planning sequence. If you are assigning BB to a different intercom
number, write BB next to the intercom number you plan to use instead of
intercom number 19.
Notice that “Reports” also appears in parentheses in the “Name” column nez
to intercom 19 on the form. If your system has the Call Report option,
intercom 19 is automatically reserved for the data collector and printer
required to print this report. If your system also has BB, both features can
share the same port with the use of the adapter supplied with the data
collector. You can designate an intercom number other than 19 for the Call
Report or System Feature Report equipment when you administer the system
but you cannot assign both the Call Report and System Feature Report
equipment and a voice terminal to the same intercom number. If you change
the voice terminal jack assignment for the data collector and printer, you
should administer the new jack assignment for both report features. (For
more information on the Call Report and System Feature Report options and
equipment, see the appropriate entries in Section 5, “Reference. “)
Under “Voice Terminals It . .
Do not write in a name next to intercom number 19 if your system has the
Call Report and/or System Feature Report option (unless you plan to
assign an intercom number other than 19 to the Call Report or System
Feature Report equipment when you administer the system).
Cross out “(Reports)” next to intercom 19 if your system does not have the
Call Report or the System Feature Report option or if you want to assign
them to a different intercom number. Then you can treat intercom 19 just
~like any other intercom number as you assign intercom numbers below. If
you are assigning Reports to a different intercom number, write Reports
next to the intercom number you plan to use instead of intercom number
19.
Intercom Numbers 11 through 29
To simplify system administration, you should assign consecutive intercom
numbers, beginning with 11, to the remaining voice terminals in your system
(As explained earlier, intercom number 10 goes to the administratorjattendan
voice terminal, and intercom numbers 18 and 19 are reserved for system
features unless reassigned.)
If you are using the ASA feature, Direct Extension Dialing, you can assign ar
alternate attendant to handle returning DXD calls that are busy, misdialed, o:
unanswered. All other calls are directed to the main attendant. For more
information, see “Alternate Attendant It in Section 5, “Reference. ’
Under “Voice Terminals’ . . .
Next to intercom numbers that are as yet unassigned, write in the names
and work locations of the people tc be assigned voice terminals.
If assigning an alternate attendant to handle returning Direct Extension
Dialing calls, write “Alt. Attendant” and the name of the person next to
the appropriate intercom number.
Paging Groups
The MERLIN Plus system lets you page the people in your business through
the speakers on their voice terminals. You don’t need an external paging
system for this feature.
The system automatically assigns all voice terminals to a single paging group
Svdnm Confinllmtion F o r m
2.
called the Page-All Group. You can’t change the makeup of the Page-All
Group. (See the “Group Page” entry in Section 5, “Reference,” for more
information on the Page-All feature.) The system also assigns intercoms 10
through 19 to Paging Group 1 and intercoms 20 through 29 to Paging Group
2. You can keep these groups as they are, or you can change the makeup of
Paging Groups 1 and 2 during system administration to fit the needs of your
business.
You can assign as few or as many voice terminals as you want to Groups 1
and 2. You can also assign the same voice terminal to both groups.
Under “Paging Groups” . . .
Check the appropriate column(s) next to the intercom number, name, and
location of each person to indicate the Paging Group(s) you plan to assign
the person to.
Templates
There are four voice terminal templates designed to make administration of
voice terminal features easier. The four templates are the Clear Template,
Dialer Template, Feature Template, and the Receptionist/Secretary Template.
The Clear Template is used to erase previous voice terminal features so that
new features can be assigned. The Dialer Template is for personnel who do
not require special phone features and aren’t likely to need to make toll calls.
The Feature Template is for managers and owners who need unrestricted
phone use along with special additional features. The Receptionist/Secretary
Template is for receptionists, secretaries, and backup call handlers who
process several calls. See “Voice Terminal Templates” in Section 5,
“Reference” for more details.
Under “Template” on the “Voice Terminal” form . . .
Write a “1” if you want to assign the Clear Template to a voice terminal
and erase any features currently assigned to that voice terminal.
Write a “2” if you want to assign the Dialer Template to a voice terminal.
Write a “3! if you want to assign the Feature Template to a voice terminal.
Write a “4” if you want to assign the Secretary/Receptionist Template to a
voice terminal.
PROGRAM MODE LOCK
The Program Mode Lock feature allows you to lock specified voice terminals
so that individuals cannot change the features assigned to their voice
terminals.
Under ‘Lock” on the “Voice Terminals” form . . .
Put a check mark next to each voice terminal you want to assign Program
Mode Lock.
You should now have -a completed System Configuration Form.
Line Assignments Form
NAME AND INTERCOM
NUMBER
You can use the information already entered on your System Configuration
Form to complete this part of the Line Assignments Form.
In the “Name” column on the form . . .
Write the names of the people in your business next to their intercom
numbers.
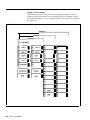
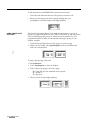
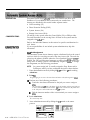
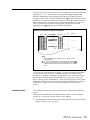
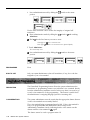
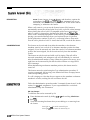
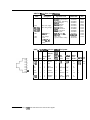
LINE ASSIGNMENTS FOR
VOICE TERMINALS
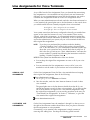
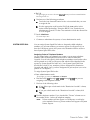
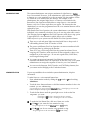
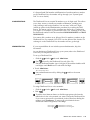
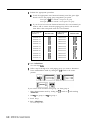
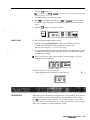
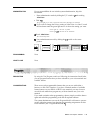
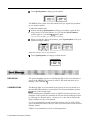
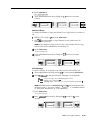
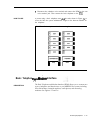
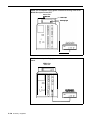
When your system is first installed all your outside telephone lines appear or
the same buttons on every voice terminal in the system. These are the voice
terminals’ original line assignments. Figure 2-1 shows the original line
assignments for 5-, 10-, 22-, and 34-button voice terminals. A voice terminal
retains its original line assignments until someone administers it differently.
FIGURE 2-1 Original Line Assignments.
34-Bu1tont
22-But’QnI
10-Buttonl
1
I
Line H
I
Line G
IE
I
I
Line F
I
F--ii
E--ii
E--ii
E--ii
F-ii
Ir-ii
E---ii
ri
lai
E--ii
IF--I IT-ii
E--I r-ill
Line Assignments Form
2.
MERLIN Plus system line administration offers you these options:
l
Customize the line assignments on some or all of your voice terminals.
l
Keep the original line assignments on some or all of your voice terminals.
The following paragraphs offer guidelines for choosing a line assignment
option for each voice terminal and recording your choices on the form.
Guidelines for Choosing Line Assignment Options
As you decide whether to keep the original line assignments or customize the
line assignments on one or more voice terminal, review your business calling
patterns and each person’s telephoning responsibilities. You may find that by
customizing line assignments, you can help control costs and increase the
efficiency of your communications system.
Let’s say, for example, that you are the MERLIN Plus system administrator
for a branch office of a large company. Your system has six outside telephone
lines:
l
l
l
l
Lines A, B, and C are local, general purpose lines with your office’s
published telephone numbers. They’re listed first, second, and third
respectively in directories and advertisements.
Line D is a WATS line to the distant area where most of your company’s
suppliers are located.
Line E is a foreign exchange (FX) line to the distant city where the
company’s headquarters are located.
Line F is a general purpose line with an unpublished telephone number
that the branch manager wants as a personal line.
Figure 2-1 shows how these lines appear on all voice terminals before you
customize line assignments.
Now let’s consider the following facts about the calling requirements of three
people in the office: the buyer, the branch manager, and the clerk.
l
l
l
m
41
I
!--
A--!-----.-
I----
Most of the buyer’s outgoing calls are to suppliers in the area served by
the WATS line and to the purchasing and accounting departments at
company headquarters. The buyer receives relatively few incoming calls,
but they are usually important.
The branch manager calls company headquarters often and wants a
personal line for other calls.
The clerk handles most of the incoming calls from customers and
prospective customers, and has no need to call suppliers or the
headquarters offices.
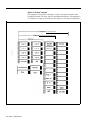
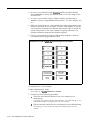
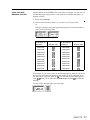
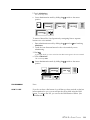
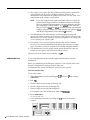
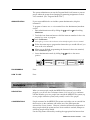
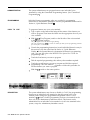
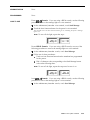
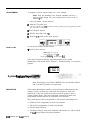
Figure 2-2 shows how you might customize the line assignments on the
buyer’s, the manager’s, and the clerk’s voice terminals to best meet their
individual needs and responsibilities.
FIGURE 2-2 Customized Line Assignments.
CLERK
Line A = Primary listed telephone number
Line B = Second listed telephone number
Line C = Third listed telephone number
Line D = WATS line
Line E = FX line
Line F = Manager’s personal line
I ine Anninnmnntn Fnrm
2-l’
Original Line Assignments
You can keep the original line assignments on the voice terminals of those
people who need access to every outside line in the system.
In the “Line” columns to the right of each appropriate intercom
number . . .
On the top row work 1 under Line A, 2 under Line B, and so on for as
many lines as you have in your system.
Customized Line Assignments
After you’ve reviewed the responsibilities of the people in your business, you
can determine who needs customized line assignments.
In the “Line” columns to the right of each appropriate intercom
number. . .
On the top row write a “1” for the line you want to appear on the first
button, a “2” for the line to appear on the second button, and so on up to
eight.
RINGING OPTIONS
For each line that is assigned to a voice terminal, you can select one of three
ringing options:
Immediate Ring
People who have primary responsibility for answering calls or handling a
particular line should have that line administered for immediate ring.
Delayed Ring
People who are providing secondary coverage for a line should have that line
assigned for delayed ring so that the line rings only after ringing first at the
person’s voice terminal who has primary responsibility for that line.
No Ring
In places like office lobbies, conference rooms, and public places, the no ring
option may be appropriate.
In the “Line” columns to the right of each appropriate intercom
number. . .
In the bottom row for every line that is being assigned to a voice terminal,
write an “I” if the line should ring immediately, a “D” if it should ring
only after ringing at another voice terminal first, or an*“N” if the line
should not ring at this voice terminal.
A 1ti
I :__ A-^:-^- --.- c-.,-
BUTTON-FREE LINE
OPERATION
You can use this option to assign outside lines to a voice terminal without
assigning them to specific line buttons. This feature is useful for S-Button ant
IO-Button voice terminals so that buttons are available for programmable
features. You can also select either the immediate ring or no ring option with
Button-Free Line Operation.
Immediate Ring
Those people with primary responsibility for answering calls coming in on a
shared line should have that line administered for immediate ring.
No Ring
For voice terminals located in public places, such as lobbies and conference
rooms, so they do not ring for outside calls.
In the bottom row for ringing options of each appropriate intercom
number. . .
Circle the “I” or “N” if the line will be Button-Free, assigned to the voice
terminal but not to a specific line button.
AUTOMATIC LINE
SELECTION SEQUENCE
When you touch Speakerphone or lift the voice terminal handset to make an
outside call, the system automatically scans the outside telephone lines in the
order in which they appear on your voice terminal’s line buttons until it finds
a free line for your call. For example, if your voice terminal has the original
line assignments, the system gives you Line A, if it’s free, when you touch
Speakerphone or lift the handset. If Line A is busy, the system tries Line B,
and so on in alphabetical order until it finds a free line for your call.
Likewise, if your voice terminal has customized line assignments, the system
will search for a free line following the customized sequence.
In most cases, you probably.want a voice terminal’s automatic line selection
sequence to be the same as the sequence in which the lines appear on the
voice terminal’s line buttons. If, however, you want a special automatic line
selection sequence for a voice terminal, you can program that sequence when
you administer the system’s outside lines.
NOTE:
LINE ASSIGNMENTS FOR
ASAFEATURES
A special automatic line selection sequence for a voice terminal can
contain any or all of the lines that appear on the voice terminal’s line
buttons.
Four ASA features require the assignment of at least one incoming line on
which you want to use the feature. These features are: Call Forwarding (CF),
Direct Extension Dialing (DXD), Remote Line Access (RLA), and System
Answer (SA). Call Forwarding also requires the assignment of at least one
outgoing line.
Call Forwarding (CF)
This ASA feature connects incoming calls on assigned lines to the Voice
Synthesis Processor (VSP) so that callers hear a prerecorded message before
calls are forwarded to the designated number. The CF feature requires the
assignment of at least one incoming line and one outgoing line. They cunnot
be the same line.
Line Assinnments Fnrm 2-11
In the “CF” row under the “Line Assignments for ASA Features” . . .
Write an “I” in the column of the line(s) where incoming calls are being
forwarded.
Write an “0” in the column of the line where you want to send the
outgoing forwarded calls.
The system is factory set to answer CF calls after two rings. You can change
the number of rings from 0 to 9. If the number of rings is set to 0, the voice
terminal will not ring, and calls will be forwarded immediately.
Under ‘Ring Interval” in the ’ CF” row’ . . .
Write the number of rings (O-9) before incoming calls will be answered by
the VSP and forwarded.
When in CF mode, callers hear the message:
“Your call is being fonuarded. Please hold.”
You can modify this message to include the incoming phone number:
“You have reached [number]. Your call is being fonuarded.
Please hold. ’
You can modify the message for all incoming CF lines or just for some of the
incoming CF lines. You can also turn off the message so that calls are
forwarded immediately without notifying the caller.
Under “Modify Message” in the row for “CF” . . .
Write the incoming phone number if you want it added to the VSP
message, or write a “0” if you want to turn off the VSP message.
Direct Extension Dialing (DXD)
This ASA feature allows incoming callers using Touch-Tone phones to direct
their calls to specific extensions. Direct Extension Dialing can be assigned to
one or more lines so that incoming calls are answered by the Voice Synthesis
Processor (VSP) which prompts callers to dial the desired extension number.
In the “DXD” row under “Line Assignments for ASA Features” . . .
Write an “I” in the column of the line(s) where incoming calls are being
directed to specific extensions.
The system is factory set to answer DXD calls after two rings. You can
change the number of rings from 0 to 9. If the number of rings is set to 0, the
voice terminal will not ring, and calls are answered immediately by the VSP.
Under “Ring Interval” in the ” DXD” row . . .
Write the number of rings (O-9) before DXD calls are answered.
Callers on DXD incoming lines are prompted with the following message:
“Please dial desired extension number. ’
Once the caller dials the two-digit extension number (which is the two-digit
intercom number), the call is transferred to the extension and the caller hears
the following message:
Please hold. ”
You can also modify the voice message so that callers first hear the number
they’ve reached, followed by the request for the extension number:
“You have reached [numberl. Please dial desired extension
number. ”
Under “Modify Message” in the “DXD” row . . .
Write in the incoming phone number if you want it added to the VSP
message.
Remote Line Access (RLA)
This ASA feature allows you to call in from outside and use a password to
gain access to one of the system’s outside lines. Remote Line Access can alsc
be used from a remote location to change the call forwarding number. This
feature requires the assignment of at least one incoming line.
In the “RLA” row under “Line Assignments for ASA Features” . . .
Write an “I” in the column of the line(s) where incoming lines can be used
for RLA.
The system is factory set to answer RLA calls after two rings. You can
change the number of rings from 0 to 9. If the number of rings is set to 0, the
voice terminal will not ring, and calls are answered immediately by the VSP.
Under ‘Ring Interval” in the “RLA” row . . .
W.rite the number of rings (O-9) before RLA calls are answered.
System Answer (SA)
System Answer can be used as an automated attendant to answer a call and
provide a brief message before placing the caller on hold until someone is
available to take the call. System Answer can have up to eight incoming lines
assigned to it.
In the “SA” row under “Line Assignments for ASA Features” . . .
Write an “I” in the column of the line(s) where incoming calls are being
answered and placed on hold by System Answer.
The system is factory set to answer SA calls after two rings. You can change
the number of rings from 0 to 9. If the number of rings is set to 0, the voice
terminal will not ring, and calls will be forwarded immediately.
Line Assignments Form
2-1
Under “King Interval” in the ” SA” row on the “Line Assignments for ASA
Features” form . . .
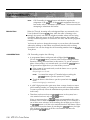
Write the number of rings (O-9) before CF calls are answered.
You can select one of four ways to have incoming SA calls answered. You can
choose the default voice message, a shortened version of it, or a longer
version of it. The default message says:
“Please hold. Your call will be handled momentarily. ”
The shorter message says:
” Please hold. ”
The longer message says:
“You have reached [number]. Please hold. Your call will be handled momentarily. ”
You can also elect to have no voice message so that incoming SA calls are
immediately placed on hold.
Under “Modify Message” in the ‘SA” row . . .
Write a “0” if you do not want the voice message.
Write a “1” if you want the message just to say, ‘Please hold. ’
Write a “2” if you want the message to say, “Please hold. Your call will be
handled momentarily. ”
Write the incoming phone number if you want the longer message
preceded with the phrase, “You have reached [number]. ’
You should now have a completed Line Assignments Form. Keep it in a
place where you can find it when you want to administer the system or
program individual voice terminals.
-.-
_.
-
Call Restrictions Forms
You can use call restrictions to prevent some or all voice terminals from
making outside calls (both local and long distance). You can also use the
Disallowed List to prevent some or all voice terminals from making billable
calls to 900 numbers, the 976 exchange, or other numbers as desired.
NOTE:
System Speed Dial with Restriction Override, which can be used as 2
password to access an otherwise restricted number, takes precedence
over Disallowed List. Disallowed List takes precedence over
everything else.
You can use Allowed Lists of numbers and/or special Speed Dial codes to
permit call restricted voice terminals to call specified telephone numbers, local
exchanges, or area codes. By combining call restrictions with selected
exceptions, you can control your outgoing call traffic and associated costs
without placing unreasonable constraints on the people in your business.
(Disallowed List, Allowed Lists, and System Speed Dial codes are explained
in detail in this section of the manual.)
NOTE:
DISALLOWED LIST
Call restrictions do not affect a voice terminal’s ability to receive
incoming calls nor to make intercom calls.
When you assign a Disallowed List of numbers to a voice terminal, the persox
trying to dial a number on this list will not be able to place the call.
The system can store up to 20 disallowed numbers with up to 16 digits for a
given number. You can also use “wild card” digits to prevent calls to certain
exchanges within any area code, or similar combinations. Here are some
examples of how to use wild card digits:
l
Disallowing calls to the 976 exchange in any area code:
lHold976 or OHold where the wild card digits are entered by pressing
Hold three times.
l
Disallowing calls to any area code:
1Hold or OHold where the wild card digits are entered by pressing Hold
three times.
For many restrictions, you don’t have to use wild card digits. Here are some
examples:
l
Disallowing calls to any 976 number in the 201 area code:
1201976
l
Disallowing calls to the 201 area code:
1201
l
Disallowing calls to a specific number in the 201 area code; 555-9876 for
example:
12015559876.
l
Disallowing local calls to a specific number such as 5555432:
555-5432
Creating the Disallowed List
Once you’ve decided how many billable numbers you want to disallow, you
write each entry next to a separate item (labeled 01 through 20) on the
Disallowed List Entry Form located at the beginning of the Call Restrictions
Form.
On the “Disallowed List Entry Form- List 09” . . .
Write billable numbers, area codes, etc., in the “Number” column to create
your Disallowed List.
Assigning the Disallowed List
Now that you have created your Disallowed List, you should decide to which
voice terminals it is to be assigned when you administer the system. Enter
this information on the of the Call Restrictions Assignment Form.
In the “Disallowed Lists” column of the Call Restrictions Assignment
Form . . .
Put a check mark next to the intercom number of each voice terminal to
which the list is to be assigned when you administer the system.
UNRESTRICTED
When your system is first installed, all voice terminals are unrestricted, that
is, there are no limitations on outgoing call traffic including long distance and
local toll calls.
In the “Unrestricted” column on the Call Restrictions Assignment
Form . . .
Put a check mark for each voice terminal that will not have either outward
or toll restrictions.
TOLL RESTRICTED
Some people in your business may need to be able to call any local telephone
number but have little need to make long distance calls. You can place a toll
call restriction on their voice terminals. The system will allow local calls from
those voice terminals but will ignore attempts to dial long distance numbers.
Then, if there are certain areas of the country these people have to call on
business, you can set up an Allowed List of those long distance area codes
and assign the list to the toll restricted voice terminals when you administer
the system. You can also mark selected long distance telephone numbers for
Restriction Override and store them under Speed Dial codes in the system’s
memory. Then anyone in your system, including those with toll restricted
voice terminals, can use the Speed Dial codes to dial those long distance
numbers.
Under “Toll Restricted” on the Call Restrictions Assignment Form . . .
Put a check mark next to the intercom number of each voice terminal that
will be restricted from making long distance calls.
OUTWARD RESTRICTED
Some people in your business may have little need to make any outside ca
either local or long distance. During system administration you can place
outward cull restriction on their voice terminals, and the system will ignore
attempts to dial outside telephone numbers from those voice terminals. Tl
if you want these people to be able to make local calls in business or perso
emergencies, you can assign them an Allowed List of local exchanges and,
perhaps, emergency numbers such as 911 when you assign the call
restrictions.
You can also use System Speed Dial codes (called passwords in some
telephone systems) with Restriction Override to allow restricted voice
terminals to call selected local or long distance telephone numbers. You
simply mark the numbers for Restriction Override and store them in the
system’s memory under Speed Dial codes when you administer the systen
Then anyone in your system, including those with restricted voice termina
can use the Speed Dial codes to call the stored numbers.
On the Call Restrictions Assignment Form . . .
Put a check mark in the “Outward Restricted” column next to the interco
numbers for the voice terminals you want to place outward restrictions 0’
when you administer the system.
ALLOWED LISTS
When you assign an Allowed List of numbers to a voice terminal, the pers
using the voice terminal can call the numbers on the list regardless of any
restriction placed on the voice terminal.
The system can store up to eight Allowed Lists of numbers with up to 10
entries in each list. Each entry can have up to eight digits. You might,
therefore, want to create one or more Allowed Lists with entries such as tk
following:
l
Local exchange codes
A local exchange code is the first three digits in a 7-digit telephone
number.
l
Long distance area codes
l
Area codes plus local exchange codes
l
Emergency numbers with eight or fewer digits
For example, 911 is a multipurpose emergency number in many areas.
Call Restrictions Forms :
Naming Allowed Lists
Once you’ve decided how many Allowed Lists you want and what numbers
should be included in each, you may want to identify each list by name (for
example, “New England Customers” or ‘Local Emergency Numbers”) in
addition to the numbers that already appear on the form (List 01, List 02,
etc.).
On the “Allowed Lists Entry Form” . . .
Write the name, if any, that you want to use to identify each list on the
/line next to the list’s code number (List 01, List 02, List 03, etc.)
Creating Allowed Lists
Under “Number” on the appropriate “Allowed Lists Entry Form” . . .
Write area codes, local exchange codes, emergency or other telephone
numbers, on the lines next to the “Item” numbers.
Assigning Allowed Lists
Now that you’ve created some Allowed Lists, you should decide how you
want to assign them to restricted voice terminals when you administer the
system. You’ll need to refer to the “Call Restrictions Assignment Form”.
Under “Allowed Lists Assigned” on the Call Restrictions Assignment
Form . . .
Put a check mark in the appropriate box representing the allowed lists that
you want to assign to each voice terminal when you administer the
system.
Keep your completed Call Restrictions Forms in a place where you can find it
easily for system administration.
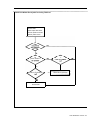
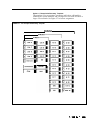
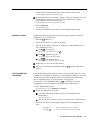
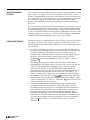
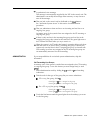
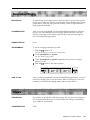
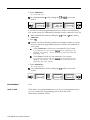
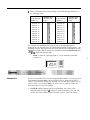
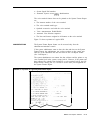
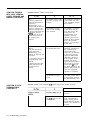
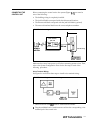
Call Restrictions Flow Chart
The following flowchart shows how the MERLIN Plus system processes
outgoing calls. For example, if a call is dialed manually or with Personal
Speed Dial, the system first checks to see if the voice terminal is toll or
outward call restricted. If the voice terminal is unrestricted, the number dialed
is checked against the Disallowed List. If the number is not on the
Disallowed List, the call goes through.
FIGURE 2-3 MERLIN Plus System Processing Flowchart.
Number dialed:
System Speed Dial number
Personal Speed Dial number
Manually dialed number
number outward or
number on an Allowed
number on the Disallowed
Number will not go through
Number dialed
Call Restrictions Forms 2-2’
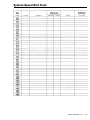
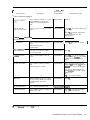
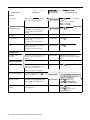
System Speed Dial Forms
You can assign System Speed Dial codes to frequently called telephone
numbers. Then, people in your business can call any of these telephone
numbers by dialing its 3- or 4-character System Speed Dial code. You can
also assign these codes to account numbers that you want printed on Call
Reports if your system has the Call Report (also referred to as the Station
Message Detail Recording [SMDR]) feature. People can then dial an account’s
code during a call to add the account number to the information on the Call
Report.
You can store up to 130 telephone and/or account numbers under System
Speed Dial codes. The available codes are # 60 through # 89 and # 900
through #999. Each stored number can have up to 16 characters, including
any of the following special characters:
0 P for pause
l
R for a switchhook flash (Recall)
0 S for stop
l
T for Touch-Tone enable
See the “Special Characters in Dialing Sequences” entry in Section 5,
.
“Reference,’ to find out how to use these special characters.
PRIVATE
You can identify private numbers that you do not want to appear on displays
or print on Call Reports by entering a * before the number on the System
Speed Dial Form. Then, voice terminal displays and Call Report printouts will
show the System Speed Dial code instead of the number.
In the “Private” column on the System Speed Dial form . .
Put a star (*) in front of those numbers you want to mark for privacy
when you administer the system. When you enter a star (*), before the
telephone number, the number will nbt appear on displays or print on Call
Reports. See “System Speed Dial” in Section 5 “Reference” for more
information on Call Reports.
r)-r)r)
c.m+am c-d nine cnrmc
NUMBER AND
IDENTIFICATION
In the “Number” column on the System Speed Dial form . . .
Write the telephone numbers or account numbers you want to encode on
the line containing the dial codes ( #60, #61, #62, etc.) of your choice. Put
a check mark in the telephone column if the number is a telephone
number or put a check mark in the account column if the number is an
account number.
NOTE:
Do not assign the same System Speed Dial code to both a
telephone number and an account number.
To prevent confusion when entering both account numbers and telephone
numbers, reserve codes #60 through #89 for telephone numbers and #900
through #949 for account numbers or vice versa. Also, it may be helpful to
use the last four digits of a firm’s telephone number to create an account
number, so the account number can be easily identified.
In the “Name’ column . . .
Write the name of the person or organization to identify each number.
RESTRICTION OVERRIDE
When you encode the telephone numbers during system administration, you
can mark some or all of them for Restriction Override. Then people with
restricted voice terminals or voice terminals that have been assigned a
Disallowed List can call these marked numbers by dialing the System Speed
Dial codes.
In the “Restriction Override” column . . .
Put a check mark on the line for each telephone number you want to mark
for Restriction Override when you administer the system.
You should now have a complete set of planning forms. Keep them together
in a safe place until you are ready to install and administer your system.
System Speed Dial Forms
2-2
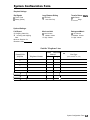
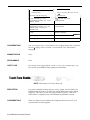
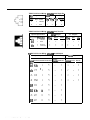
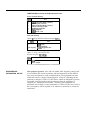
System Confiauration Form
Required Settings:
Dial Signals
Long Distance Dialing
Transfer Return. lntervz
0 Touch-Tone
Cl Rotary (Pulse)
0 Toll Prefix
q Area Code Only
0 No Return
o- Rings
Call Report
Music-on-Hold
Background Music
Cl Outgoing Calls Only
q Incoming and Outgoing
Calls
Minimum Duration for
Recorded Calls
Cl Low Volume
q Medium Volume
Cl High Volume
Cl Low Volume
Cl Medium Volume
Cl High Volume
Optional Settings:
Outside Telephone Lines
Control Unit
Jack/Line
Telephone Number
Hold
Disconnect
Interval
Short
Long
~
Line Type
(Local, WATS, FX, etc.)
A
B
C
System Configuration Form 2-21
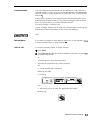
System Configuration Form (continued)
Voice Terminals
2-26 System Configuration Form (continued)
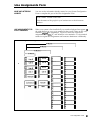
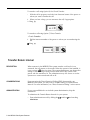
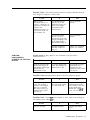
Line Assignments Form
Line Assignments for Voice Terminals
Name
29
-
I = Immediate Ring; D = Delayed Ring; N = No Ring; Circled = Button-Free
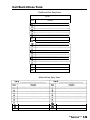
Line Assignments Form
2-27
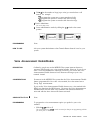
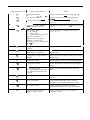
Line Assignments for ASA Features
ASA
Feature
Line
A
Line
B
Line
C
Line
D
Line
E
Line
F
Line
G
Line
H
Ring
Interval
Modify
Message
-
CF
DXD
RLA
SA
CF = Call Forwarding; DXD = Direct Extension Dialing; RLA = Remote Line Access; SA = System Answer
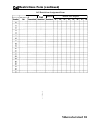
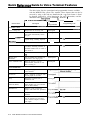
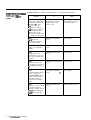
Call Restrictions Form
Disallowed List Entry Form
List 09
Item
Number
07
cl8
1091
18
19
20
Allowed Lists Entry Form
08
08
09
09
10
10
Call Rrxtrictinna Fnrm
2-29
.;,
,,: , ,:.
1 .,.,
‘,-
Call Restrictions Form (continued)
I
List 05
List 06
I
08
08
09
09
10
10
List 07
I
-
Number
Item
Number
01
(
1
01
(
02
I
I
02
I
03
I
03
04
I
I
04
05
05
06
06
07
07
08
08
09
09
--
-
-
I
List 08
Item
I
1
List 04
List 03
.
.
-
I
.
.I
Call Restrictions Form (continued)
Call Restrictions Assignment Form
Al
Outward
Allowed Lists Assigned
Call Rractrirtinnc Fnrm lrnntim cd\
331
System Speed Dial Form
System Speed Dial Form
2-33
System Speed Dial Form (continued)
2-34
System Speed Dial Form (continued)
System Speed Dial Form (continued)
System Speed Dial Form (continued)
Number
2-M
Svst:tnm Sneer-i l3nl Form fcnntinuedl
-1 N a m e
Restriction
Override
Section 3: Administerins the System
3-l
Introduction
Initial Administration
Ongoing Administration
Administration Preview
3-l
3-1
3-2
3-2
Planning Forms
3-2
Key System Components
The BIS-34, BIS-34D, or 34-Button deluxe
Voice Terminal Used as an Administrator Console 3-6
The BBS-22 or BIS-22D Voice Terminal Used as
an Administrator Console
3-6
The BIS-10 Voice Terminal Used as an
Administrator Console
3-7
Administration Mode
3-7
Confirmation and Error Signals
3-9
Basic Administration
Outside Telephone Lines
Ghost Lines
Dial Signals
Long Distance Dialing
Transfer Return Interval
Call Report
Music-on-Hold
Background Music
Hold Disconnect Interval
Voice Terminal Jack Assignments
Paging Groups
Voice Terminal Templates
Program Mode Lock
Line Assignments for Voice Terminals
Original Line Assignments
Customized Line Assignments
Ringing Options
Button-Free Line Operation
Line Assignments for ASA Features
3-10
3-10
3-10
3-10
3-10
3-11
3-11
3-12
3-13
3-13
3-13
3-16
3-16
3-22
3-23
3-23
3-23
3-25
3-25
3-26
Systemwide Options
Call Restrictions to Voice Terminals
Disallowed List
Allowed Lists
Call Restrictions Assignment Forms
System Speed Dial
3-31
3-31
3-31
3-31
3-31
3-33
You can begin using your MERLIN@ Plus Communications System right
now. Just make sure the system is set to generate the right dial signals for
your outside telephone lines and to recognize the long distance dialing
procedure for your area. To make these simple checks, see “Dial Signals”
and “Long Distance Dialing” under “Basic Administration” later in this
section.
To take full advantage of your system’s advanced features you should plan to
customize it to fit the needs of your business. However, you do not need to
customize it all at once. Look through this section for options and features
that best suit the way your business operates, and make the most important
settings first. You can always change these or add others later.
Before you begin to customize your system, you should understand the
meaning of the terms “administer” and “program” as they are used in this
manual:
l
l
INITIAL ADMINISTRATION
Program means to assign features to an individual voice terminal. Most
people will probably program their own voice terminals. But you may
want to program certain features that can affect the calling patterns of
your business.
Although an AT&T technician may perform the initial administration of your
system, you can assist with the setup by familiarizing yourself with the timesaving instructions located under the following headings:
l
ONGOING
ADMINISTRATION
Administer means to establish options and features that have systemwide
impact, such as assigning the outside lines that each voice terminal can
access or defining System Speed Dial codes for everyone to use.
Administration Preview
l
Basic Administration
l
Customized Line Assignments
l
Systemwide Options
Use the “Quick Reference Guide to System Administration” in Section 6 to
make changes to the system once it has been set up and administered. If you
need more information on an administration procedure than the Quick
Reference Guide provides, look it up in Section 5, “Reference. ’
lntrntil w+inn
?,I
Administration Preview
The information about your system recorded on the planning forms listed
below is important to both initial and ongoing system administration.
PLANNING FORMS
l
System Configuration Form
l
Line Assignments Form
l
Call Restrictions Forms
l
System Speed Dial Form
If you haven’t filled out any planning forms yet, you should do so now. It
won’t take long, and it will save you time later. Section 2, “Planning the
System,’ contains copies of the forms and instructions for completing them.
When you’ve completed the forms, go on to “Key System Components.”
Read the following to get acquainted with the system’s control unit and the
administrator/attendant console.
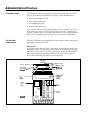
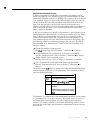
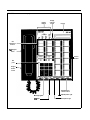
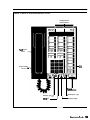
KEY SYSTEM
COMPONENTS
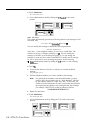
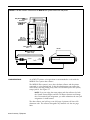
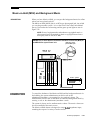
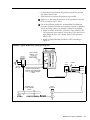
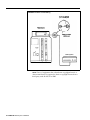
Control Unit
The control unit is the vital core of the system. It provides the power and
intelligence for all voice terminals, and it directs all incoming and outgoing
call traffic. All the system’s memory, including systemwide administration
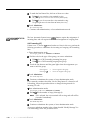
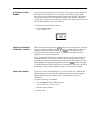
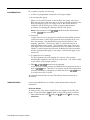
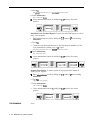
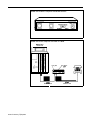
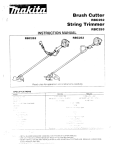
and voice terminal programming, resides in the control unit. Figure 3-1
shows the control unit with the front cover removed.
FIGURE 3-1 MERLIN Plus system Control Unit.
Top cover
removed
Power light
Busy Buster jack-o_
--E3
Automatic
Svstem 6
Access jack
//\\ - P
Control
unit
label
Warning light
..A.. 1--L
a
~
g
i
n
8
cl
R
-
g
j
.
a
c
Line
module
-Station
module
On/Off
switch
k
...
Administrator/Attendant Console
A BIS-34 voice terminal or a BIS-34D voice terminal with display, both of
which have lights for every outside line and voice terminal button, are ideal
administrator/attendant consoles for MERLIN Plus systems with more than 10
voice terminals. Figure 3-2 shows a BIS-34D with display used as a console.
The line buttons above the dial pad and the Auto Intercom buttons to the
right of the dial pad give you one-touch access to each line and voice
terminal. The lights allow you to keep track of administration procedures as
well as changes in the status of the voice terminals and the outside lines
during normal call handling.
A BIS-22 voice terminal or a BIS-22D voice terminal is a good selection for an
administrator/attendant console if you have 10 voice terminals or less. When
using a BIS-22 voice terminal with more than 10 voice terminals on the
system, some features require that you enter the intercom numbers of the
voice terminals that do not have Auto Intercom buttons at the console. Also
the following features are administered using a dial code (see “The BIS-22
Voice Terminal as an Administrator Console” in this section) instead of an
intercom number:
Change the makeup of paging groups
(See ,the ‘Group Page” entry in Section 5, “Reference, ’ for details.)
Assign Disallowed List systemwide or to selected voice terminals
(See the “Disallowed Lists” entry in Section 5, “Reference, ’ for details.)
Assign Allowed Lists to restricted phones
(See the “Allowed Lists” entry in Section 5, “Reference,” for details.)
Lock voice terminals so that individuals cannot reprogram them.
(See the “Program Mode Lock” entry in Section 5, “Reference, ” for
details.)
The position of the TIP switch on the left side of the administrator/attendant
console depends on the task you are performing. There are three positions
and four functions as follows:
I
Position
Function
T (up.,
Tests lights and ringing
Center
Normal call-handling.mode
P (down)
Programming mode for the voice
terminal
Administration mode for the system
after touching Administer or dialing
#49
The functions of some buttons on the administrator/attendant console change
as you switch from one mode to the other. The double entries on some of
the button labels shown in Figures 3-2 and 3-3 indicate these changes in
function. The button’s function in the normal call-handling mode is shown
above the line on the label, and its function in administration mode is shown
below the line.
FIGURE 3-2 BIS-34D with Display as Administrator/Attendant Console.
Display
buttons
Display
contrast
control
Display
Call
appearance
buttons
Test/ Program
switch
Feature
- buttons
Dial
pad
-
Ringer volume
control
Speakerphone
volume control
Message light
HFAI light
- Speakerphone light
L
Microphone light
FIGURE 3-3 BIS-22 as Administrator/Attendant Console.
Call Appearance/
Feature buttons
Test/Program
switch
- Dial
pad
Ringer Volume
control -
-r
iii
Speak
volume control
Message light
HFAI light
Speakerphone light
-Microphone light
A A-:-:^*-^&:^^
n-a. .: ^...
II &!
THE 818-34, BIS-34D, OR
34-BUTTON DELUXE
VOICE TERMINAL USED
AS AN ADMINISTRATOR
CONSOLE
If you are using a BIS-34, BIS-34D, or 34-Button deluxe voice terminal as the
administrator/attendant console, you have the ideal arrangement for your
MERLIN Plus system. You can administer all the features, including
Disallowed and Allowed Lists, Busy Buster, and Group Page, for all the voice
terminals on your system by using the Auto Intercom buttons (intercom
numbers 10 through 29.) The lights next to each button indicate the status of
the voice terminal as you administer each feature. The administrator console
is automatically assigned the following features when you initially set up your
MERLIN Plus system:
l
l
l
l
THE BIS-22 OR BIS-22D
VOICE TERMINAL USED
AS AN ADMINISTRATOR
CONSOLE
Lines are assigned to 4 of the 10 buttons above the dial pad if the control
unit has one line module.
Lines are assigned to 8 of the 10 buttons above the dial pad if the control
unit has two line modules.
Auto Intercom buttons for intercom numbers 10 through 19 are assigned
to the top 10 buttons in the first column of buttons to the right of the dial
pad.
Auto Intercom buttons for intercom numbers 20 through 29 are assigned
to the top 10 buttons in the second column of buttons to the right of the
dial pad.
If you are using a BIS-22 or BIS22D voice terminal as the
administrator/attendant console, the voice terminal is automatically assigned
the following features when you initially set up the MERLIN Plus system:
l
l
l
l
Lines are assigned to 4 of the 10 buttons above the dial pad if the control
unit has one line module.
Lines are assigned to 8 of the 10 buttons above the dial pad if the control
unit has two line modules.
Auto Intercom buttons for intercom numbers 10 through 19 are assigned
to the top 10 buttons in the column of buttons to the right of the dial pad.
If your system has more than 10 voice terminals (intercom numbers 20
through 29), you will not have buttons at the console for these voice
terminals. Therefore, when you administer Group Page, Program Mode
Lock, or program the Allowed and Disallowed Lists, you need to dial a
code from the Dial Code Chart that corresponds with the voice terminal.
When using the dial codes, you do not touch an Auto Intercom button.
Dial codes are not the same as intercom numbers.
Dial Code Chart
If the intercom
number is:
n --..: ^...
Dial this
code:
Intercom 25
#Of3
Intercom 21
#04
Intercom 26
#09
Intercom 22
#05
Intercom 27
#lO
Intercom 23
#06
Intercom 28
#ll
Intercom 24
#07
Intercom 29
#12
I----AA-:-:-*..-*:--
If the intercom
number is:
#03
Intercom 20
m .3
Dial this
code:
For example, if you want to assign voice terminal 21 to a Group Page group
or add the voice terminal to an Allowed List, use the dial code, #04, that
corresponds with intercom number 21.
NOTE:
THE BIS-10 VOICE
TERMINAL USED AS AN
ADMINISTRATOR
CONSOLE
It is important that you record your decisions about Allowed and
Disallowed Lists on the Call Restrictions Assignment Form; record
decisions about your Call Report and/or System Feature Report jack
assignment and Group Page on the System Configuration Form.
Keep these forms handy in case you decide to make changes.
The BIS-10 voice terminal is not recommended to be used as the
administrator/attendant console because the administrator cannot see the
buttons being administered. Furthermore, some features cannot be
programmed from this voice terminal. However, if you are using a BIS-10
voice terminal as an administrator/attendant console to perform the
administration procedures for many of the special features, follow the
instructions provided for the BIS-22 voice terminal, which generally require
that you enter the dial codes (see chart below) directly without touching an
Auto Intercom button.
intercom
number is:
If the
Intercom 10
Intercom 11
Intercom 12
Intercom 13
Intercom 14
Intercom 15
Intercom 16
Intercom 17
Intercom 18
Intercom 19
ADMINISTRATION MODE
Dial this code:
#22
#21
#20
#19
#18
#17
#16
#15
#14
#13
If the intercom
number is:
Intercom 20
Intercom 21
Intercom 22
Intercom 23
Intercom 24
Intercom 25
Intercom 26
Intercom 27
Intercom 28
Intercom 29
Dial this code:
#03
#04
#OS
#06
#07
#08
#09
#lO
#ll
#12
The information under the next three headings tells you how to do the
following:
l
Make button label sheets for the administrator/attendant console
l
Enter administration mode
l
Leave administration mode
Labeling Buttons
The button label sheets on your administrator/attendant console have to show
how the functions of certain buttons change when you shift from the normal
call-handling mode to the administration mode. Figure 3-2 shows you what
the button labels should look like for a BIS-34D voice terminal with Display.
Figure 3-3 shows the button labels for a BIS-22 voice terminal.
Administration Preview 3-i
To make button labels for the voice terminal you plan to use as your
administrator/attendant console, do the following:
1
Remove the blank button labels from the voice terminal according to the
instructions that came with the voice terminal.
2
Fill in the button labels with pencil or ballpoint pen since either can be
erased if you make changes later.
)
For any BIS-34 and 34-button voice terminals, follow the button
labeling shown in Figure 3-2.
)
For any BIS-22 voice terminal, follow the button labeling shown in
Figure 3-3.
NOTE:
3
On the button labels divided by a horizontal line, the term above
the line identifies the button’s function when the console is in the
normal call-handling mode. The term below the line identifies the
button’s function in administration mode.
Reinsert the labels following the instructions that came with the voice
terminal.
Entering Administration Mode
You have to enter administration mode to set up the system initially and
anytime you use the attendant console to administer the system. Follow the
boxed instructions below whenever you have to enter administration mode.
Entering Administration Mode
To enter administration mode:
1
Slide the TIP switch on the left side of the console to P (down).
2
Touch Administer, or dial #49.
The green lights next to the line buttons begin flashing.
The console rings every 5 seconds to remind you that it’s in programming mode.
The green lights go ofi
The red lights go on next to Administer and Restrict.
Leaving Administration Mode
Follow the boxed instructions below when you’ve finished an administration
session.
Leaving Administration Mode
To leave administration mode:
1
Slide the TIP switch on the left side of the console to the center
position.
The red light goes ofi next to Administer and Restrict.
The red light goes on next to a line button.
CONFIRMATION AND
ERROR SIGNALS
Many of the administration and programming procedures described in this
manual require you to enter a star code (that is, dial * plus one or more
digits). Many procedures also require you to enter intercom numbers or other
sequences of digits.
Confirmation Signal
If you enter a star code that the system recognizes, the console beeps twice
when you touch Administer to conclude the procedure. The two beeps
confirm allowable input.
Error Signal
You will hear only one beep from the attendant console if you make one of
the following errors:
l
You enter an unrecognized star code.
0 You enter a nonexistent intercom number.
l
l
l
You enter one or more digits that are inconsistent with the administration
procedure.
You attempt to administer a voice terminal that is active on a call or in
program mode.
You attempt to assign an alternate attendant position with the System
Answer feature on.
To recover from the error, touch Administer and begin the procedure again.
Administration Preview 3-9
Basic Administration
Basic administration should take no more than a few minutes. All the
information you need should be on the System Configuration Form.
OUTSIDE TELEPHONE
LINES
This simple procedure tells the control unit how many outside telephone lines
your system has. But it works only if your outside lines are plugged into an
unbroken sequence of line jacks on the control unit beginning with line jack
A. The System Configuration Form shows the number of lines you have and
the control unit line jack for each line under the heading “Outside Telephone
Lines. ”
To set the systemwide line assignments, do the following:
1
Enter administration mode.
The red lights go on next to Administer and Restrict.
2
3
Dial *4 plus the number of outside lines in the system.
(For example, dial *43 for a system with three lines.)
Touch Administer.
The console beeps twice.
4
Continue to administer the system, or leave administration mode.
GHOST LINES
When you first turn on the system, the control unit thinks there are the same
number of outside lines in the system as there are line jacks on the control
unit. This causes the control unit to create “ghost’ lines in a system that has
fewer lines than line jacks. Since ghost lines can interfere with some system
features, you should eliminate them using the procedure described above for
designating the number of lines in the system.
DIAL SIGNALS
Locate the column headed “Dial Signals”on the System Configuration Form.
Is the box next to “Touch-Tone” checked? If so, yclou don’t have to do anything
here. Your system is factory set to generate Touch-Tones when you dial an
outside call on any of your outside telephone lines.
But if the box next to “Rotary (Pulse)” is checked, you have to set the system
to generate rotary (pulse) signals when you dial outside calls. Set the system
for pulse dialing as follows:
1
Enter administration mode.
The red rights go on next to Administer and Restrict.
2
Dial *39.
NOTE:
3
If you ever have to reset the system for Touch-Tone dialing, dial
*38 instead of *39 in step 2.
Touch Administer.
The console beeps twice.
4
LONG DISTANCE DIALING
3-10 Basic Administration
Continue with administration, or leave administration mode.
Locate the column headed “Long Distance Dialing” on the System
Configuration Form. Is the box next to “Toll Prefix” checked? If so, yolou don’t
have to do anything here. Your system is factory set for this type of longdistance dialing: toll prefix (1 or 0) + area code + telephone number.
But if the box next to “Area Code Only” has a check, you have to set the
system for this type of long-distance dialing (area code + telephone number)
as follows:
1
Enter administration mode.
The red lights go on next to Administer and Restrict.
2
Dial *37.
3
Touch Administer.
The console beeps twice.
4
Continue to administer the system, or leave administration mode.
Reversing the Procedure
If you ever have to reset your system to toll-prefix dialing, follow the above
procedure but dial *36 instead of *37 in step 2.
TRANSFER RETURN
INTERVAL
Locate the column headed “Transfer Return Interval” on the System
Configuration Form. If the box next to ’ Rings” is checked and the
number 4 is filled in, the system is factory set to return unanswered
transferred calls after four rings. You don’t have to do anythirzg.
But if the “No Rings” box is checked, or the “- Rings” box is filled in
with a number other than 4, then you have to change the system as follows:
1
2
Enter administration mode.
Dial *2 plus the number of rings (0 through 9) you want before a call
returns.
NOTE:
3
If 0 is selected, calls will not be transferred back to the originator.
Touch Administer.
The console beeps twice.
4
CALL REPORT
Continue to administer the system or leave administration mode.
If you have the optional data collector and printer necessary to generate Call
Reports, you can keep records of incoming and outgoing calls. You will first
need to set the date using the following procedure:
1
Enter administration mode.
The red lights go MZ next to Administer and Restrict.
2
Dial *80.
3
Dial two digits for the month (01 through 12).
4
Dial two digits for the day (01 through 31).
5
Dial two digits for the year (00 through 99).
6
7
Touch Administer.
The console beeps twice.
Continue to administer the system, or leave administration mode.
Now set the time:
1
Enter administration mode.
The red lights go on next to Administer and Restrict.
2 Dial *81.
3
Dial two digits for the hour (00 through 23) using 24-hour time.
4
Dial two digits for the minute (00 through 59).
5 Touch Administer.
The console beeps twice.
6
Continue to administer the system, or leave administration mode.
Since the system is factory set to have no calls reported, you must now select
the type of calls you want reported. Locate the column headed “Call Report”
on the System Configuration Form and follow the procedures below:
1 Enter administration mode.
The red lights go on next to Administer and Restrict.
2
3
4
Dial *84.
Dial a number code 0 through 2 to specify the kind of calls to be reported:
w
If you do not want any calls reported, dial 0.
D
If you only want outgoing calls reported, dial 1.
b
If you want outgoing and incoming calls reported, dial 2.
Touch Administer.
The console beeps twice.
6
Continue to administer the system, or leave administration mode.
Once you’ve selected the type of report, you need to specify the duration of
the calls reported. If you filled in “1” next to “Minimum Duration of Recorded
Calls, ’ you don’t have to do anything here since the system is set for one
minute. If you specified another duration (0, or 2 through 9) follow this
procedure:
1
Enter administration mode.
The red lights go on next to Administer and Restrict.
2 Dial “83.
3
Dial one digit from 0 to 9 for the num.ber of minutes.
4 Touch Administer.
The console beeps twice.
6
MUSIC-ON-HOLD
Continue to administer the system, or leave administration mode.
If you have an optional audio source and want to control the volume through
system administration, locate the column headed “Music-on-Hold” on the
System Configuration Form, then dial the appropriate code given in the
procedure below:
1 Enter administration mode.
The red lights go on next to Administer and Restrict.
2
Dial one of the following codes to set the volume you prefer:
)
Dial *12 to turn off Music-on-Hold.
B
Dial *13 to set the volume to low.
)
Dial *14 to set the volume to medium.
b
Dial *15 to set the volume to high.
3 Touch Administer.
The console beeps twice.
4
BACKGROUND MUSIC
Continue to administer the system, or leave administration mode.
If you have an optional audio source connected to the Music-on-Hold jack
and an optional loudspeaker paging system, you can regulate the volume of
background music with a dial code in system administration. Locate the
column headed “Background Music” on the System Configuration Form, then
dial the appropriate code given in the procedure below:
1
Enter administration mode.
The red lights go on next to Administer and Restrict.
3
3
Dial one of the following codes to set the volume you prefer:
)
Dial *16 to turn off the background music.
b
Dial *17 to set the volume to low.
b
Dial *18 to set the volume to medium.
b
Dial *19 to set the volume to high.
Touch Administer.
The console beeps twice.
4
HOLD DISCONNECT
INTERVAL
Continue to administer the system, or leave administration mode.
If you placed a check mark in the column marked “Short” under “Hold
Disconnect Interval” on the System Configuration Form, then your local
telephone company uses the 50 millisecond disconnect interval instead of the
450 millisecond interval. If your local telephone company uses a short
interval, you must administer this setting for each incoming line in the
system.
Follow the procedure below to administer a short hold disconnect interval:
1
Enter administration mode.
The red lights go on next to Administer and Restrict.
2
3
Dial *69.
Touch each incoming line button to change the disconnect interval.
Green light on = line assigned the long disconnect interval
Green light off = line assigned the short disconnect internal
4 Touch Administer.
The console beeps twice.
5
VOICE TERMINAL JACK
ASSIGNMENTS
Continue to administer the system, or leave administration mode.
Your MERLIN Plus system has twenty jacks for voice terminals and special
features. If you are using the ASA features (CF, DXD, RLA, or SA), Busy
Buster (BB), Call Report, or System Feature Report (Reports), you need to
assign a jack for them. The “Voice Terminal” form indicates the default jack
assignments for these features and the main attendants, if you have changed
these assignments on your form, use the appropriate procedure below to
Basic Administration
3-13
change the jack assignments accordingly:
NOTE:
You cannot reassign any of the following features to jack 10 since it is
reserved for the main attendant.
Changing the Automatic System Access (ASA) jack assignment:
1
Enter administration mode.
The red lights go on next to Administer and Restrict.
2 Dial *59.
The green light goes on next to the Auto Intercom button of the jack assigned to ASA.
2
Perform one of the following procedures:
)
Touch the Auto Intercom button of the jack you want to assign to
ASA.
The green light goes off next to the old Auto Intercom button, and the green light goes
on next to the nezuly assigned Auto Intercom button.
D
Dial the intercom number of jack you’re assigning to ASA.
NOTE:
If you hear a denial tone, the feature is on or the VSP port is
active. You can either wait or turn off the feature.
4 Touch Administer.
The console beeps twice.
5
Continue to administer the system, or leave administration mode.
Changing the Busy Buster (BB) jack assignment:
NOTE:
1
If you are going to use the Call Report or System Feature Report
option, you can assign BB to the same jack as ASA by using the
adapter provided with the optional data collector or memory module.
Enter administration mode.
The red lights go on next to Administer and Restrict.
2 Dial *35.
The green light goes on next to the Auto intercom button of the jack assigned to BB.
2
Perform one of the following procedures:
)
Touch the Auto Intercom button of the jack you want to assign to BB.
b
Dial the intercom number of jack you’re assigning to BB.
The green light goes ofi next to the old Auto Intercom button, and the green light goes
on next to the newly assigned Auto Intercom button.
4 Touch Administer.
The console beeps twice.
s
Continue to administer the system, or leave administration mode.
Changing the Reports jack assignment for Call Report:
NOTE:
-__
-
_....
.
.
If you are using the same printer and data collector for producing
Call Reports and System Feature Reports, you must administer the
new jack assignment for both features.
1
Enter administration mode.
The red lights go on next to Administer and Restrict.
2
Dial *82.
The green light goes on next to the Auto Intercom button of the jack assigned to Cull
Report.
3
Perform one of the following procedures:
)
Touch the Auto Intercom button of the jack you want to assign to Call
Report.
The green light goes off next to the old Auto Intercom button, und the green light goes
on next to the newly assigned Auto Intercom button.
b
4
Dial the intercom number of jack you’re assigning to Call Report.
Touch Administer.
The console beeps twice.
5
Continue to administer the system, or leave administration mode.
Changing the Reports jack assignment for System Feature Report:
NOTE:
If you are using the same printer and data collector for producing
Call Reports and System Feature Reports, you must administer the
new jack assignment for both features.
Enter administration mode.
The red lights go on next to Administer and Restrict.
Dial *85.
The green light goes on next to the Auto Intercom button of the jack assigned to System
Feature Report.
Perform one of the following procedures:
)
Touch the Auto Intercom button of the jack you want to assign to
System Feature Report.
The green light goes off next to the old Auto intercom button, and the green light goes
on next to the newly assigned Auto Intercom button.
w
Dial the intercom number of jack you’re assigning to System Feature
Report.
Touch Administer.
The console beeps twice.
Continue to administer the system, or leave administration mode.
Assigning an Alternate Attendant position:
1
Enter administration mode.
The red lights go on next to Administer and Restrict.
2 Dial *79.
3
Perform one of the following procedures:
)
Touch the Auto Intercom button of the voice terminal you want to
assign as the Alternate Attendant position.
B
Dial the intercom number of voice terminal you’re assigning for the
Alternate Attendant.
Racir? Adminidrntinn
8-15
4
6
Touch Administer.
The console beeps twice.
Continue to administer the system, or leave administration mode.
When you filled in the “Paging Groups” columns on the System
Configuration Form, you learned the following about paging groups:
PAGING GROUPS
l
l
l
l
All voice terminals are automatically assigned to a single paging group,
the Page-All Group, which you cannot change.
Intercoms 10 through 19 are automatically assigned to Page Group 1;
intercoms 20 through 29 are automatically assigned to Page Group 2.
You can assign the same voice terminal to both paging groups.
If you are using a BIS-10 or a BIS-22 voice terminal, you must administer
the Group Page feature in a slightly different way.
Look at the “Paging Groups” columns on the System Configuration Form. If
you plan to keep intercoms 10 through 19 in Page Group 1 and the remaining
intercoms in Page Group 2, yolou don’t have to do anything here. If you plan to
change the makeup of the paging groups, follow the procedure below:
1
Enter administration mode.
The red lights go on next to Administer and Restrict.
2
Dial *71 for Page Group 1 or *72 for Page Group 2.
3
Perform one of the following procedures:
4
If
you have the corresponding Auto Intercom buttons, a green light goes on next to each
one that already is assigned to that paging group.
D
Touch the appropriate Auto Intercom button(s).
ti
Dial a code from the Dial Code chart (located earlier in this section
under “Using the BIS-22 Voice Terminal as an Administrator Console”)
that corresponds with the voice terminal.
The green light goes on.
Touch Administer.
The console beeps twice.
VOICE TERMINAL
TEMPLATES
.
5
Follow steps 2 through 4 for each paging group you want to administer.
6
Continue to administer the system, or leave administration mode.
If you have entered a number 1 through 4 under the “Template” column of
your “Voice Terminal” form, use the following procedure to assign the
template to the voice terminal:
1
Enter administration mode.
The red lights go on next to Administer and Restrict.
2
Dial *lO followed by the option number of the template:
1
2
3
4
3-16 Basic Administration
= Clear Template
= Dialer Template
= Feature Template
= ReceptionistlSecreta y Template
3
Touch the Auto Intercom button or dial the intercom number of the source
voice terminal(s).
The console beeps twice after each voice terminal is administered a template.
4 Touch Administer.
The console beeps twice.
6
Label the target voice terminal buttons with the corresponding features as
shown in Figures 3-4, 3-5, 3-6, and 3-7.
NOTE:
6
Features previously administered on a voice terminal that do not
appear on the template still apply, such as Voice Announcement
Enable/Disable and Personalized Ring.
Continue to administer the system, or leave administration mode.
Basic Administration
3-17
Option 1: Clear Template
This template is used to erase previously programmed features on a voice
terminal so that new features can be assigned. The Clear Template removes
any features assigned to a voice terminal, but does not erase line assignments.
See Figure 3-4.
FIGURE 3-4 The Clear Template.
34-0u1ton’
22-BUttanI
‘O-Outtonl
Liz
r- 1
IF-ii
la1
E-II B--ii
ET---ii IT-ii
Ix1 E--71
B-71 F-ii
ET--ii E--ii
r-ii Is1
FF-ii Ii--II
loo1 r-ii
Option 2: Dialer Template
This template is for personnel who do not require special features, and who
are likely to have no need to make toll calls. This template can be assigned to
even the smallest voice terminals, including the 5-button voice terminals. See
Figure 3-5 for button assignments.
FIGURE 3-5 The Dialer Template.
(SB
F-ii
I::i
r-ii
F-II
E----II
B--ii
lF-3
lR---ii
Isi
Basic Administration
3-19
Option 3: Feature Template
This template is designed for managers, owners, and personnel who need
unrestricted phone use along with several additional features. This template is
for 22-button or larger voice terminals. See Figure 3-6 for button assignments.
FIGURE 3-6 The Feature Template.
I
Conference
pii-1
3-20 Basic Administration
pqi
E--ii
Isi
E--ii
ISI
ISI
E-ii
E--ii
E--ii
E-3
pq,,,,
piiq
Option 4: Receptionist/Secretary Template
This template is for receptionists, secretaries, and backup call handlers,
including the system attendant, and is designed for use with 22-button or
larger voice terminals. See Figure 3-7 for button assignments.
FIGURE 3-7 The Receptionist/Secretary Template.
I
I
22-Buttonl
‘0-B”ttonl
Conference
pi--:
m-~.
.
I
.
.
.
-
--
PROGRAM MODE LOCK
If you placed a check mark in the “Lock” column of the “Voice Terminal”
form you want to prevent the voice terminal from reprogramming any of the
features assigned to it. Use the procedure below to prevent the user of a voice
terminal from reprogramming any of the features assigned to it:
1
Enter administration mode.
The red lights go on next to Administer and Restrict.
2 Dial *89.
2
Perform one of the following procedures:
P
Touch the Auto Intercom button of the voice terminal you are
administering.
w
Dial the intercom number of the voice terminal you are administering.
4 Touch Administer.
The console beeps twice.
5
Continue to administer the system, or leave administration mode.
This concludes basic administration. You can use your system now, just as it
is, and leave further administration until later, or you can go on and
customize the outside telephone line assignments to individual voice
terminals.
1-33
Rscir Arlminictratinn
Line Assignments for Voice Terminals
As you filled out the Line Assignments Form, you learned that customizing
line assignments to voice terminals can help control costs and increase the
efficiency of your communications system. All the information you need to
customize line assignments should be on the Line Assignments Form.
When you enter administration mode and touch the Auto Intercom button for
a voice terminal, the green lights next to the line buttons on the console show
you which outside lines are currently assigned to that voice terminal.
Green light on = line is assigned to the voice terminal
Green light off = line is not assigned to the voice terminal
Your system comes from the factory configured so that all your outside lines
appear on the same line buttons on every voice terminal. These are the
system’s original line assignments. A voice terminal retains its original line
assignments until someone administers it differently. If this is the first time
anyone has administered your system, all your voice terminals should have
their original line assignments.
NOTE:
If you have not performed the procedure under the heading
“Outside Telephone Lines” earlier in this section, the green lights
next to the line buttons on your administrator/attendant console may
show that your system has more outside lines than it really has. If
this is the case, go back now to “Basic Administration” and enter the
correct number of outside lines following the instructions under the
heading, “Outside Telephone Lines. ’
MERLIN Plus system line administration offers two choices:
l
l
ORIGINAL LINE
ASSIGNMENTS
You can keep the original line assignments on some or all of your voice
terminals.
You can customize the line assignments to some or all of your voice
terminals to suit the needs of your business and voice terminal users.
On the Line Assignments Form, find the voice terminals that are keeping
their original line assignments, then do the following:
1 Enter administration mode.
The red lights go on next to Administer and Restrict.
2
One after another, touch the Auto Intercom buttons for each of these
voice terminals.
The green lights next to the line buttons should show that all of your
outside lines appear on each of these voice terminals. If you discover that
one or more lines do not appear on a voice terminal designated to keep
the original line assignments, you can use the procedure in the entry for
“Customized Line Assignments” in Section 5, “Reference,’ to give that
voice terminal the original line assignments.
3 Leave administration mode.
CUSTOMIZED LINE
ASSIGNMENTS
On the Line Assignments form, the numbers 1 through 8 on the top row to
the right of the intercom numbers should show how you plan to customize
the line assignments to voice terminals.
Customizing a voice terminal’s line assignments is simply a matter of
removing and adding lines. But keep the following points in mind:
Line Assignments for Voice Terminals
3-23
On every voice terminal (except a 5-button model), the button directly
above Conference is always the Intercom button. You can’t assign a line
or feature to it.
l
On every voice terminal (except a 5-button model), the button above
Transfer is always a programmable feature button. You can’t assign a line
to it.
l
When you assign lines to a voice terminal, the system assigns them to line
buttons in the order shown in Figure 3-8 below. This sequence is also the
voice terminal’s automatic line selection sequence-the order in which the
system selects lines for the voice terminal’s outgoing calls-unless you
program a different automatic line selection sequence.
l
l
On any voice terminal, line buttons without lines assigned to them can
have feature buttons programmed on them.
FIGURE 3-8 The order in which,the system assigns lines to buttons.
To assign lines to a voice terminal:
1 Enter administration mode.
The red lights go on next to Administer and Restrict.
2
Perform one of the following procedures:
b
Touch the Auto Intercom button for the voice terminal you’re
administering.
A green light goes on next to the Auto Intercom button. Green lights also go on next
to the buttons of any lines already assigned to the voice terminal.
D
3-24
Line Assignments for Voice Terminals
Dial the intercom number for the voice terminal you are administering.
Green lights go on next to the buttons of any lines already assigned to the voice
terminal.
3
Touch all the line buttons that have a green light on next to them.
4
In the order that you want lines to appear on the voice terminal, touch all
the line buttons again. If you want to reserve a button(s) for feature
programming, touch that button(s) last.
The green light next to each line button goes off.
The green light goes on next to the button you touch.
5 Touch Administer.
The console beeps twice.
6
RINGING OPTIONS
BUTTON-FREE LINE
OPERATION
Continue to administer the system, or leave administration mode.
Perform the following procedure to select the ringing option for each line
assigned to your voice terminals:
1
Slide the TIP switch to P.
2
Touch the line button you want to program.
3
Dial one of the codes for the type of ringing you have indicated on the
Line Assignments Form:
b
Dial *35 for no ring (N).
)
Dial *36 for delayed ring (D).
)
Dial *37 for immediate ring (I).
The red light next to the button goes off.
The red light next to the button flashes.
The red light next to the button goes on steady.
4
Repeat steps 2 and 3 for each line button.
5
When you’ve finished programming, slide the TIP switch to the center
position.
If you selected Button-Free Line Operation, so that incoming lines on a voice
terminal are not assigned to buttons, you can administer whether or not calls
should ring at the voice terminal. If the voice terminal is in a public place,
such as‘a building lobby, you can select the no ring option.
If you circled “I” for Immediate Ring or “N” for No Ring on the Line
Assignments for Voice Terminals form, follow the procedure below:
1
Enter administration mode.
The red lights go on next to Administer and Restrict.
2
Follow the appropriate procedure:
b
Touch the Auto Intercom button for the voice terminal you’re
administering.
The green light goes on.
b
3
Dial the intercom number for the voice terminal you’re administering.
Touch the line button until the green light shows the assignment you
want:
Green light on
Green light off
=
=
the line is assigned to the voice terminal
the line is not assigned to the voice terminal
Line Assianments for Voice Terminals
3-25
4
To make the line Button Free, dial one of these two codes:
D
Dial *31 if you want the voice terminal to ring.
D
Dial *32 if you do not want the voice terminal to ring.
The green light next to the Auto Intercom button flashes slowly.
The green light next to the Auto Intercom button flashes rapidly.
5 Touch Administer.
The console beeps twice.
6
LINE ASSIGNMENTS FOR
ASA FEATURES
Continue with administration, or leave administration mode.
The four Automatic System Access (ASA) features require the assignment of
incoming lines and one requires the additional assignment of outgoing lines.
Call Forwarding (CF)
If there is an “I” and an “0” entered under two lines in this row, perform the
following procedure to administer the incoming and outgoing call forwarding
lines:
1
Enter administration mode.
The red lights go on next to Administer and Restrict.
2
3
Dial the code for the type of line group you want to administer:
w
Dial *51 for a Call Forwarding incoming line group.
w
Dial *52 for a Call Forwarding outgoing line group.
Touch the line buttons until the green lights show the assignments you
want to each line group.
Green light on
Green light off
=
=
line is assigned to the group
line is not assigned to the group
4 Touch Administer.
The console beeps twice.
5
Continue to administer the system, or leave administration mode.
If you entered a number other than 2 in the “Ring Interval” column for call
forwarding, follow the procedure below to change the ring interval for
incoming CF calls:
1 Enter administration mode.
The red lights go on next to Administer and Restrict.
2
Dial *762 plus the number of rings (0 through 9).
NOTE:
If 0 is selected, the voice terminal will not ring, and calls will be
forwarded immediately.
3 Touch Administer.
The console beeps twice.
4
Continue to administer the system, or leave administration mode.
If you put a telephone number in the column headed “Modify Message” for
Call Forwarding, follow the procedure below:
1
Enter administration mode.
The red lights go on next to Administer and Restrict.
2 Dial *50.
3
Touch the line button for the line on which you want to hear the modified
message.
The green light goes on.
4
Dial the telephone number you want to include in the message.
NOTE:
5
For special phone numbers, such as 800 numbers, you may prefer
to have the recorded voice pronounce the number as “Eight
hundred” followed by the number, instead of “Eight, zero, zero.”
To do this, touch Hold to enter a pause after the toll prefix and
again after the 800 area code and then again after the exchange.
For example, l-800-555-1212 would be entered as:
1 Hold 800 Hold 555 Hold 1212
Repeat the procedure for each line you are administering.
6 Touch Administer.
7
Continue to administer the system, or leave administration mode.
If you put a “0” in the column headed “Modify Message” for CF, follow this
procedure to turn off the voice message:
1
Enter administration mode.
The red lights go on next to Administer and Restrict.
2 Dial *30.
3
Dial 0 to turn off the message.
NOTE:
To turn on the message, dial 1 instead of 0 in step 3.
4 Touch Administer.
The console beeps twice.
6
Continue to administer the system, or leave administration mode.
To enter or change the call forwarding destination number from the
administrator console, use the following procedure:
1 Enter administration mode.
The red lights go on next to Administer and Restrict.
2 Dial *53.
3
Dial the destination number.
4 Touch Administer.
The console beeps twice.
6
Continue to administer the system, or leave administration mode.
Direct Extension Dialing (DXD)
If there is an “I” entered in this row, perform the following procedure to
administer the incoming Direct Extension Dialing line(s):
1
Enter administration mode.
The red lights go on next to Administer and Restrict.
2
Dial *58 for the Direct Extension Dialing incoming line group.
Line Assignments for Voice Terminals
3-27
3
Touch the line buttons until the green lights show the assignments you
want.
Green light on
Green light ofi
4
=
=
line is assigned to DXD
line is not assigned to DXD
Touch Administer.
The console beeps twice.
5
Continue to administer the system, or leave administration mode.
If you entered a number other than 2 in the “Ring Interval” column for Direct
Extension Dialing, follow the procedure below to change the ring interval for
incoming DXD calls:
1
Enter administration mode.
The red lights go on next to Administer and Restrict.
2
Dial *761 plus the number of rings (0 through 9).
NOTE:
If 0 is selected, the voice terminal will not ring, and calls will be
answered immediately.
3 Touch Administer.
The console beeps twice.
4
Continue to administer the system, or leave administration mode.
If you put a telephone number in the column headed “Modify Message” for
DXD, follow the procedure below:
1
Enter administration mode.
The red lights go on next to Administer and Restrict.
2
3
Dial *50.
Touch the line button for the line on which you want to hear the modified
message.
The green light goes on.
4
Dial the telephone number you want to include in the message.
NOTE:
3
6
7
For special phone numbers, such as 800 numbers, you may prefer
to have the recorded voice pronounce the number as “Eight
hundred” followed by the number, instead of “Eight, zero, zero.”
To do this, touch Hold to enter a pause after the toll prefix and
again after the 800 area code and then again after the exchange.
For example, l-800-555-1212 would be entered as:
1 Hold 800 Hold 555 Hold 1212.
Repeat the procedure for each line you are administering.
Touch Administer.
Continue to administer the system, or leave administration mode.
Remote Line Access (RLA)
If there is an “I” entered in this row, perform the following procedure to
administer the incoming Remote Line Access line group:
1
2
3-28
Enter administration mode.
The red lights go on next to Administer and Restrict.
Dial *54 for the Remote Line Access incoming line group.
Line Assionments for Voice Terminals
3
Touch the line buttons until the green lights show the assignments you
want.
Green right on
Green light off
=
=
line is assigned to RLA
line is not assigned to RLA
4 Touch Administer.
The console beeps twice.
5
Continue to administer the system, or leave administration mode.
If you entered a number other than 2 in the “Ring Interval” column for RLA,
follow the procedure below to change the ring interval for incoming RLA
calls:
1 Enter administration mode.
The red lights go on next to Administer and Restrict.
2
Dial “763 plus the number of rings (0 through 9).
NOTE:
If 0 is selected, the voice terminal will not ring, and calls will be
answered immediately.
3 Touch Administer.
The console beeps twice.
4
Continue to administer the system, or leave administration mode.
To use RLA, you must assign a 5-digit password (the first two digits are the
caller’s intercom number) to gain access to the system from a remote location.
You also need this password when changing the call forwarding destination
number when off-site.
To assign the password, follow this procedure:
1 Enter administration mode.
The red lights go on next to Administer and Restrict.
2
To create a password for a particular intercom number, dial the intercom
number plus any three digits except 000.
3 Touch Administer.
The console beeps twice.
4
Continue to administer the system, or leave administration mode.
System Answer (SA)
If there is an “I” entered in this row, perform the following procedure to
administer the incoming System Answer line(s):
1 Enter administration mode.
The red lights go on next to Administer and Restrict.
2
Dial *75 for the System Answer incoming line group.
3
Touch the line buttons until the green lights show the assignments you
want.
Green light on
Green light of/
=
=
line is assigned to SA
line is not assigned to SA
4 Touch Administer.
The console beeps twice.
I it-m Acsinnmcmts fnr \/nirn Tcwminalc
RSQ
5
Continue to administer the system, or leave administration mode.
If you entered a number other than 2 in the “Ring Interval” column for SA,
follow the procedure below to change the ring interval for incoming SA calls:
1 Enter administration mode.
The red lights go on next to Administer and Restrict.
2
Dial *764 plus the number of rings (0 through 9).
NOTE:
If 0 is selected, the voice terminal will not ring, and calls will be
answered immediately.
3 Touch Administer.
The console beeps twice.
4
Continue to administer the system, or leave administration mode.
If you put an entry in the column headed “Modify Message” for SA, follow
the procedure below:
1
Enter administration mode.
The red lights go on next to Administer and Restrict.
2
Dial *77 and the message number desired:
0
I
2
=
=
=
No voice message; call is placed on hold immediately
Message says, n Please hold”
Message says, “Please hold. Your call
will be handled momentarily. ”
3 Touch Administer.
4
Continue to administer the system, or leave administration mode.
This concludes outside line administration. You can go on now to
’ Systemwide Options, ’ or you can leave further administration for another
time.
3-30
Line Assignments for Voice Terminals
Systemwide OPtions
Now that your MERLIN Plus system is up and running, you can continue
with system administration at a pace that best suits your work schedule.
Under this heading you’ll find a menu of options and features from which to
choose.
CALL RESTRICTIONS TO
VOICE TERMINALS
When your system is first installed, all voice terminals are unrestricted. The
Call Restrictions Assignment Form should show whether you plan to restrict
any of your voice terminals or assign Disallowed or Allowed Lists.
DISALLOWED LIST
If you plan to prevent all or some voice terminals from making billable calls,
you should have filled in one or more entries on the Disallowed List Entry
Form and put a check next to each voice terminal being assigned the
Disallowed List on the Call Restrictions Assignment Form.
Use the following procedure to set up a Disallowed List:
1
Enter administration mode.
The red lights go on next to Administer and Restrict.
Dial *09 followed by the Disallowed List code (01 through 20).
2
3
Dial the disallowed number (up to 16 digits). If the number includes wild
card digits, touch Hold once for each one.
Touch Administer.
The console beeps twice.
4
ALLOWED LISTS
Continue to administer the system, or leave administration mode.
If you plan to create lists of numbers that restricted voice terminals are
allowed to call, you should have filled in one or more of the lists on the
Allowed List Entry Form. As the directory shows, you can have up to eight
Allowed Lists with up to 10 entries on each list.
To set up an Allowed List:
1
Enter administration mode.
The red lights go on next to Administer and Restrict.
Dial a * and a 2-digit code (01 through 08) that corresponds to the number
of the list.
2
Dial the 2-digit number of the item in the Allowed List (between 01 and
10).
3
Dial the allowed number, toll-prefix, and area code, if necessary, or
exchange to be added to the list (maximum eight digits).
4 Touch Administer.
The console beeps tzoice.
5
CALL RESTRICTIONS
ASSIGNMENT FORMS
Continue to administer the system, or leave administration mode.
For those voice terminals with a check mark in the “Disallowed List’ column
on the form, follow the procedure below:
1
Enter administration mode.
The red lights go on next to Administer and Restrict.
2 Dial *0900.
3
Follow the appropriate procedure below:
NOTE:
To assign the Disallowed List to all voice terminals, touch
Conference.
w
Touch the Auto Intercom button for the voice terminal you want to
assign the Disallowed List.
The green light goes on next to the Auto Intercom button.
b
Dial the appropriate code from the Dial Code chart located earlier in
this section under the heading “The BIS-22 Voice Terminal Used as an
Administrator Console” for the voice terminal to which the Disallowed
List is to be assigned.
4 Touch Administer.
The console beeps twice.
5
Continue to administer the system, or leave administration mode.
For those voice terminals with a check mark in the “Unrestricted” column on
the form, you don’t have to do anything here because when your system is first
installed, all voice terminals are unrestricted.
Check marks in the “Toll Restricted” and “Outward Restricted” columns show
the type of restriction you want to place on the voice terminal.
To assign either outward call restrictions or toll call restrictions to voice
terminals, follow the procedure below:
1
Enter administration mode.
The red lights go on next to Administer and Restrict.
2
3
Follow the appropriate procedure:
w
Touch the Auto Intercom button of the voice terminal you want to
restrict.
D
Dial the intercom number of the voice terminal you want to restrict.
Touch Restrict until the green light next to it shows the kind of call
restriction you want the voice terminal to.have:
Steady green light on
Flashing green light
Green light ofi
=
=
=
Unrestricted (all calls permitted)
Toll restricted (local and intercom calls only)
Outward restricted (intercom calls only)
4 Touch Administer.
The console beeps twice.
5
Continue to administer the system, or leave administration mode.
For restricted voice terminals, if there is a check mark in one or more of the
“Allowed List Assigned” columns, do the following:
1
Enter administration mode.
The red lights go on next to Administer and Restrict.
2
-
Dial a * and a two-digit code (01 through 08) that corresponds to the list
you checked off to assign to the voice terminal.
3 Dial 00.
The green light goes on next to the Auto intercom button for each voice terminal that has
been assigned this list.
4
Perform one of the following procedures:
)
Touch the Auto Intercom button for the voice terminal that you want
to assign the list.
b
Use the appropriate code from the Dial Code chart earlier in this
section under the heading “Using the BIS-22 Voice Terminal as an
Administrator Console” for the voice terminal to which the allowed list
is to be assigned.
5 Touch Administer.
The console beeps twice.
6
SYSTEM SPEED DIAL
Continue to administer the system, or leave administration mode.
You can assign System Speed Dial codes to frequently called telephone
numbers or to account numbers you want to appear on call reports (if you
have the Call Report option). All system voice terminals will have access to
these System Speed Dial codes.
Assigning Codes to Telephone Numbers
As you learned when you planned your system, you can store telephone
numbers under System Speed Dial codes with or without Restriction
Override. You can also specify which telephone numbers stored under codes
will be printed out in full on call reports and which will be identified in the
reports by System Speed Dial code only. Your System Speed Dial Form
should show which, if any, numbers you have designated for Restriction
Override and which, if any, you have designated as private (that is, not to be
printed on Call Reports).
To assign System Speed Dial codes:
1
Enter administration mode.
The red lights go on next to Administer and Restrict.
2
Dial the code ( #60 through #89 or #900 through #999) that you are
assigning to the telephone number.
3
Dial one of the following codes:
w
If you did not put a check mark in the “Restriction Override” column,
dial *90.
w
If you put a check mark in the “Restriction Override” column, dial
*92.
4
Dial the telephone number. If you checked the “Private” column next to
the number, dial a * before the telephone number.
NOTE:
Private numbers will not appear on Call Reports or on display
voice terminals. However, private numbers will appear on System
Feature Reports.
6 Touch Administer.
The console beeps twice.
6
Repeat steps 2 through 4 for each telephone number to which you are
assigning a System Speed Dial code.
7
Continue to administer the system, or leave administration mode.
Assigning Codes to Account Numbers
An account number on a call report allows you to identify the person or
organization to whom the call should be charged. As you learned when you
planned your system, you can store account numbers in the system under
System Speed Dial codes. Your System Speed Dial Form should show the
codes you plan to assign to your account numbers. Then, in step #3 of the
above procedure enter the account number instead of the phone number.
394 Svstemwide Ootions
Section 4: Usina The Attendant Console
4-1
Overview
The Attendant Console
Handling Calls
Transferring Calls
Using Auto Intercom Buttons
Using Group Page Features
Using the Send Message Feature
Selecting Ringing Options
Using Night Service
Activating System Answer
Using an Alternate Attendant Console
Using the Headset
Speakerphone Performance Tips
4-l
4-4
4-4
4-5
4-6
4-7
4-8
4-8
4-9
4-9
4-9
4-10
Overview
As your company’s system attendant, you will probably answer most calls
that come into the business and transfer many of those calls to other people
in the office. This section includes descriptions, instructions, and suggestions
that will help you transfer calls and use Auto Intercom buttons and Group
Page features, the Send Message feature, and the headset. For more
information about any of the MERLIN@ Plus Communications System
features discussed here, refer to Section 5, “Reference. It
THE ATTENDANT
CONSOLE
The main attendant console, plugged into jack 10 on the control unit, also
serves as the administration console. All of the company’s lines appear on
separate buttons on this console. It is important, especially if you answer
most of the incoming calls, that as the attendant, you have an Auto Intercom
button with lights for each voice terminal in the system. Therefore, most
attendants use a BIS-34 or BIS-34D model voice terminal that has enough
buttons for lines and Auto Intercom buttons. When you plug in your BIS-34
or BIS-34D model voice terminal into intercom jack 10 on the control unit,
your console automatically has a button for every line and an Auto Intercom
button for every voice terminal in the system.
If you are using a BIS-22 or BISZD voice terminal as an
administrator/attendant console, all the lines to which your system has access
will appear on separate buttons on your voice terminal, but you may not have
an Auto Intercom button for each person’s voice terminal in your system.
Therefore, when you want to place an intercom call or transfer a call, you
may need to dial the person’s intercom number rather than use an Auto
Intercom button.
NOTE:
Since the BIS-10 voice terminal does not have separate buttons for
outside and Auto Intercom lines, its use as an attendant console is
severely limited and so not recommended for that use.
Since the BIS-22 or BIS-22D voice terminal may not have Auto Intercom
buttons for every voice terminal in your MERLIN Plus system, you may need
to use the special procedure described in “Using the Send Message Feature”
in this section to turn on the Message light at the voice terminal of the person
who has a message waiting.
Figures 4-1 and 4-2 on the following pages are illustrations of the BIS-34D and
BIS-22 voice terminals respectively. Look at the picture of the type of voice
terminal that you are using and check the location of the buttons and the dial
pad.
If you need to check the initial button assignments for any voice terminal with
34 buttons to be used as an administrator/attendant console in regular callhandling mode, see Section 3, “Administering the System. ”
F‘IGURE 4-1 The BIS-34D with display as attendant console.
Display
contrast
control
Display
buttons
Display
Call
appearance
buttons
Test/Program
switch
Feature
buttons
Dial
pad
-
Ringer volume
control
--I
Speakerphone
volume control
- Speakerphone light
Message light
HFAI light
J
Microphone light
FIGURE 4-2 The BIS-22 voice terminal as attendant console.
Call Appearance/
Feature buttons
I
I
I
Test/Program
switch
Ringer volumbe
control
-
I
- Dial
pad
Overview 4-3
Handling Calls
As the system attendant, you will be answering most of the incoming calls.
To handle the calls efficiently, you will find it helpful to know about the
following features and procedures:
l
Transferring calls
l
Using the Auto Intercom buttons for people in your system
l
Paging through the voice terminal speakers
l
Using the Send Message feature
l
l
l
TRANSFERRING CALLS
Changing the ringing options of the outside lines on your console or
helping others to change the ringing options for the lines on their voice
terminals
Using Night Service when you are off duty
Activating System Answer when you are away from the console for a
short period of time or busy on other calls
l
Using an alternate attendant position to handle returning ASA calls
l
Using the headset
Since an important part of your job may be to screen calls and then transfer
them to the appropriate people, you should be familiar with the following
ways to transfer calls.
l
Transferring Calls by Dialing the Intercom Number
To transfer a call to someone by dialing his or her intercom number:
1
2
3
l
Touch Transfer.
Dial the person’s intercom number.
Hang up.
Transferring Calls with One-Touch Transfer
To transfer a call to someone using One-Touch Transfer:
1
With the call in progress, touch the Auto Intercom button of the
person to whom you want to transfer the call.
2
When you hear a beep, announce the call.
3
Hang up.
If the person has activated the Voice Announcement Disable feature or if
the person is using the intercom line at his or her voice terminal, you
cannot announce the call because it will ring automatically.
4-4 Handling Calls
0 Screening Calls
When you screen a call, you first discuss the call with the person to whom
it is to be transferred. There are many reasons for consulting about the
call. For example, a person may want to obtain a file before taking the
call, may be busy and not want to.answer the call at the moment, or may
want the attendant to answer the call and take a message.
To screen a call:
1 Touch Hold.
2
Touch Intercom and dial the intercom number of the person to whom
the call may be transferred.
or
Touch the person’s Auto Intercom button.
3
Announce the call and ask if it will be accepted.
NOTE:
If the person has activated the Voice Announcement Disable
feature or if the person is using the intercom line at his or her
voice terminal, you cannot announce the call because it will
ring automatically.
If the person chooses not to accept the call:
a
Touch the held call’s line button.
b Advise the caller.
c Hang up.
If the person chooses to accept the call:
a
Advise the person to touch the appropriate line button.
b Hang up.
USING AUTO INTERCOM
BUTTONS
Auto Intercom buttons on your attendant console allow you to handle calls
efficiently in several ways:
l
l
l
Auto Intercom buttons allow you to quickly and easily transfer calls.
The lights next to Auto Intercom buttons indicate when others in your
office are using their voice terminals. If the green light is on next to an
Auto Intercom button, it means the person at that intercom number is
using the voice terminal or has activated the Do Not Disturb feature.
If the green light next to the person’s Auto Intercom button is flashing, it
means that the person is calling you.
Be sure to type or write the names of the people in your office on the
appropriate Auto Intercom buttons.
To call someone in your MERLIN Plus system with one touch:
1
Touch the Auto Intercom button for the person you want to call.
2
When you hear the person answer, begin speaking into your
speakerphone or lift the handset and begin speaking.
clEl q
II
Susan 15
USING GROUP PAGE
FEATURES
The Group Page feature allows you to make announcements to groups of
people or to page individuals for calls. When a call comes in, you can put the
call on hold and page the person for whom the call is intended. To use a
programmed button to make an announcement through a group of voice
terminal speakers:
1
Touch the Group Page button for the group you want to page.
2
When you hear a beep, touch Speakerphone or lift your handset and
make the announcement.
To page a group using a dial code:
1 Touch Intercom.
2
Touch Speakerphone or lift your handset.
3
Dial a code for the group you want to page.
70 = Page-All (all voice terminals in the system)
71 = group 1
72 = group 2
4
A - 6 Handinn C a l l s
When you hear a beep, begin speaking.
USING THE SEND
MESSAGE FEATURE
When someone in the MERLIN Plus system has a message, you can turn on
the Message light at the person’s voice terminal to indicate that there is a
message waiting.
1
Touch Send Message.
2 Touch an Auto Intercom button, if you have one for the person.
-
or
Dial the 3-character dial code opposite the person’s intercom number as
found on the following table.
mpi
If the intercom
number is:
Dial this code:
If the intercom
number is:
Dial this code:
Intercom 10
#22
Intercom 20
#03
Intercom 11
#21
Intercom 21
#04
Intercom 12
#20
Intercom 22
#05
Intercom 13
#19
Intercom 23
#06
Intercom 14
#18
Intercom 24
#07
Intercom 15
#17
Intercom 25
#Of3
Intercom 16
#16
Intercom 26
#09
Intercom 17
#15
Intercom 27
Intercom 18
#14
Intercom 28
#lO
#ll
Intercom 19
#13
Intercom 29
#12
For example, if you want to turn on the Message light at Intercom 24, but do
not have an Auto Intercom button for that person, look for Intercom 24 on
the table above. Opposite Intercom .24 you will find the Send Message dial
code, #07. Then you would touch Send Message and dial #07 to send the
message.
To turn off the message light, repeat the steps.
SELECTING RINGING
OPTIONS
You can program any outside line at your console to ring immediately, to ring
after a delay, or not ring at all. You will probably want most lines at your
console to ring immediately (the factory-set condition), but if you answer calls
on a certain line only when someone else doesn’t answer them, program that
line for delayed ringing. You may want to program the lines at other
people’s voice terminals for no ring so that they are not interrupted while
they work.
If you want someone in the office to answer calls when you are busy or not at
your desk, program the lines at that person’s voice terminal for delayed ring.
The backup person may also want to program a Ring Override button for his
or her voice terminal. When the backup person must answer calls that would
ordinarily ring at your console, he or she can touch the Ring Override button
and have all calls ring immediately at his or her voice terminal.
USING NIGHT SERVICE
During the night or on weekends when you are off duty, you can still make it
convenient for someone else, such as a guard, to answer calls. You do so
with the Night Service feature. There are three ways to provide Night Service
for your office:
l
l
l
A42 Hnnrilinn Calls
You can provide the person with a voice terminal that has all the lines, or
the person can monitor the attendant console and answer calls there. Be
sure that all lines on which calls can come in after hours are set for
immediate ring. If the lines are not normally set for this ringing option,
the person can activate a Ring Override button that he or she has
programmed for the voice terminal. (See “Ring Override” in Section 5,
“Reference. “)
The backup person can also answer calls that come in after hours by
programming a Call Pickup button so that he or she can pick up calls that
come in at the administrator/attendant console. Since the attendant
console has all the lines of your MERLIN Plus system, the person
answering calls after hours can pick up calls by touching the Call Pickup
button whenever the attendant console rings. (See “Call Pickup” in
Section 5, “Reference”) If the person is in another part of the building,
the attendant can connect his or her cons.ole and an extra alert device to a
Supplementary Alert Adapter (see ‘Supplementary Alert Adapter” under
“Accessory Equipment” in Section 5, “Reference. “) so that each time a call
comes in, an extra alert device goes on.
Your system administrator can also administer and activate the Call
Forwarding feature for after-hours use. When the system is in Call
Forwarding mode, incoming calls on designated lines are connected to a
Voice Synthesis Processor (VSP) in the control unit for a message that
informs the caller that the call will be forwarded. While the caller is
listening to the message, the control unit calls the telephone number to
which calls are being forwarded and uses the system’s Conference feature
to connect the incoming call to the outgoing call. For more information
about this feature, refer to “Automatic System Access” in Section 5,
‘Reference. ’
ACTIVATING SYSTEM
ANSWER
You can activate the System Answer feature with a System Answer button so
that when selected calls come in, the system automatically answers them,
then plays a pre-recorded message before placing them on hold. This feature
can only be activated from the attendant console or the alternate attendant
console. If your system has an alternate attendant, the System Answer feature
must be administered to that voice terminal.
To activate the System Answer feature:
1
Touch System Answer.
The green light goes on.
USING AN ALTERNATE
ATTENDANT CONSOLE
When Automatic System Answer (ASA) calls are not answered, they normally
return to the main attendant console. However, you may prefer to assign an
alternate attendant position to handle just ASA calls; all other calls are
directed to the main attendant console. The alternate attendant position is
assigned by the system administrator.
If you are assigned the alternate attendant console, you can do anything the
main attendant can do, except you cannot turn on message lights at voice
terminals nor perform administration procedures from that console. The only
calls handled by the alternate attendant are returned ASA calls. For example,
if a Direct Extension Dialing (DXD) call is unanswered or busy, the call will be
transferred to the alternate attendant console, if one has been assigned.
USING THE HEADSET
If you have a heavy call-handling load, you may want to use a headset and
headset adapter. (For more information about the headset and the headset
adapter that connects the headset to the voice terminal, see Section 5,
“Reference.“)
To place a call using your headset:
1
Touch On/Quiet on the headset adapter.
The green light next to the button goes on.
2
Dial the outside number.
To answer a call:
SPEAKERPHONE
PERFORMANCE TIPS
For optimal use of the speakerphone on the BIS, HFAI, or SP voice terminals,
follow these guidelines:
Place the voice terminal in an area with low background noise.
Room acoustics and background noise may affect the proper operation of
your voice terminal’s speakerphone. High background noise is caused by
loud voices and loud electronic devices (radios, typewriters, office
equipment, etc.).
Keep the area under and next to the microphone free of books and
papers.
Let one person talk at a time. When both parties speak at the same time,
transmission can be broken.
Always face your terminal when talking.
Place your voice terminal at least six inches away from the edge of the
desk or table upon which it rests.
Section 5: Reference
Overview
5-l
MERLIN Plus System Features
5-2
Abbreviated Ringing
5-3
Account Number Entry
5-3
Allowed Lists
5-6
Alternate Attendant
5-9
Auto Answer-All
5-11
Auto Answer-Intercom
5-12
Auto Intercom
5-13
Automatic Line Selection
5-14
Automatic System Access (ASA)
5-16
Auxiliary Lines
5-17
Bridging
5-18
Busy Buster (BB)
5-19
Button-Free Line Operation
5-21
Call Forwarding (CF)
5-24
Call Pickup
5-30
Call Report
5-32
Call Restriction
5-37
Centralized Programming
5-38
Conference
5-39
COPY
5-41
Customized Line Assignment
5-43
Direct Extension Dialing (DXD)
5-44
Disallowed List
5-48
Display Unit
5-51
Do Not Disturb (DND)
5-54
Drop
5-55
Group Listening
5-56
Group Page
5-57
Hands-Free Answer on Intercom (HFAI)
5-60
Hold
5-61
Hold Disconnect Interval
5-62
,
Hold-Exclusive
5-63
Hold Retrieve
5-64
Intercom
5-66
Intercom Preference
5-67
Last Number Dial
5-68
Lights
5-69
Line Request
5-71
Line Select
5-72
Loudspeaker Paging
5-72
Manual Signaling
5-74
Message
5-75
Monitor-on-Hold
5-76
Night Service
5-77
One-Touch Dialing
5-78
On-Hook Dialing
5-79
Outside Auto Dial
5-80
Personal Lines
5-81
Personal Speed Dial
5-82
Personalized Ringing
5-85
Privacy
5-85
Privacy (on Lines A and E)
5-86
Program
5-87
Program Mode Lock
5-88
Recall
5-91
Remote Line Access
5-91
Ring Override
5-96
Ringing Line Preference
5-97
Ringing Options
5-97
Saved Number Dial
5-99
Send Message
5-100
Speaker
5-102
Special Characters in Dialing Sequences
5-104
System Answer (SA)
5-106
System Feature Report (SFR)
5-108
System Reset
5-113
System Speed Dial
5-114
Test
5-117
Toll Prefix Setting
5-118
Tones
5-119
Touch-Tone Enable
5-121
Touch-Tone or Rotary Setting
5-122
Transfer
5-123
Transfer Return Interval
5-124
Voice Announcement Enable/Disable
5-125
Voice Terminal Templates
5-126
Accessory Equipment
5-128
Basic Telephones
5-128
Basic Telephone and Modem Interface
5-131
Data Collector and Printer
5-133
General Purpose Adapter (GPA)
5-135
Headset and Headset Adapter
5-136
Loudspeaker Paging System
5-137
Music-on-Hold (MOH) and Background Music
5-141
Supplemental Alert Adapter (SAA)
5-143
Overview
This section of the MERLIN@ PZus System Manual provides the information
you need to program, administer, and use the many MERLIN Plus system
features. It also tells you how to use the accessory equipment that you can
add to your system.
There are two main groups of information in this section:
l
l
MERLIN Plus System Features include those that come with the MERLIN
Plus system voice terminal and that individual users can program onto the
voice terminal, those features that the attendant uses, and those that the
system administrator assigns to the system.
Accessory Equipment includes the additional hardware that can be used
with the MERLIN Plus system.
For your convenience, the individual features and the accessories are listed
alphabetically in two separate sections. Therefore, you can quickly refer to
the entry for each feature or accessory when you need to use it.
Overview Cl
MERLIN Plus System Features
Your MERLIN Plus system offers features that provide effective telephone
service both on a business-wide and personal basis. In order to meet company
priorities and needs, the system administrator can assign lines and add
features that will benefit the whole system. The voice terminals (telephones)
in the MERLIN Plus system come ready to use with many preassigned
features, such as Transfer and Hold. However, people in your system can
also add features to their individual voice terminals, such as Privacy or Saved
Number Dial, that will help them handle calls easily and efficiently.
The information included in each feature description in “MERLIN Plus
System Features” is divided into five headings:
Description
The description of the feature tells what it does and its advantages for
those people using it.
Considerations
Special considerations include any qualifications the person using the
feature should know about. It also includes ways in which the feature can
or cannot be used, or other features it can be or cannot be used with.
Administration
Administration procedures tell the system administrator how to administer
the features using the administrator/attendant console. For complete
information on system administration, refer to Section 3, “Administering
the System. ’
Programming
The term “Programming” refers to customizing a voice terminal to suit the
needs of the person who will be using it. Brief programming instructions
and programming codes are included for each programmable feature.
Directions for programming features onto available programmable buttons
on a voice terminal also appear in the MERLZN Plus System User’s Guide.
How to Use
Procedures for using each feature are divided into specific steps so that a
person can easily and efficiently use his or her voice terminal.
5-2 MERLIN Plus System Features
DESCRIPTION
When another line rings while you are busy on a call, your voice terminal
rings only once. In this way you are aware that you have another call, but it
does not interrupt the call in progress.
After the ringing cycle stops, the green light continues to flash to remind you
of the other call.
CONSIDERATIONS
None
ADMINISTRATION
None
PROGRAMMING
None
HOW TO USE
If you want to pick up the new call, you can place the call in progress on hold
or Exclusive Hold and touch the line button of the new call. You don’t need
to hang up first.
DESCRIPTION
You can use account numbers to identify the department, project, or client to
whom the call should be charged. If your system uses the Call Report feature
(often referred to as Station Message Detail Recording [SMDR]), you can
include these account numbers in the Call Reports. (See “Call Report.“)
There are two methods you can use to enter account numbers on a printed
Call Report: a quick method and a general method. Most businesses will be
satisfied with the quick method of entering account numbers on a Call
Report. The general method is recommended for businesses that have many
accounts, or in which there is no central accounting organization and users
must invent their own codes.
l
Option A-The General Method: The general method of entering an
account number on a Call Report is to use a programmed Account
Number Entry button. While you have a call in progress, you simply
touch the Account Number Entry button (a light goes on beside the button
so that you know the account number will be entered) and dial all the
digits of the account number. You can also program buttons or speed dial
codes for frequently used account numbers. If necessary, you can dial
extra numbers for subaccounts.
MERLIN Plus System Features
5-3
l
CONSIDERATIONS
Option B-The Quick Method: The quick method of entering an account
number on a Call Report is to dial a System Speed Dial code (60 through
89 or 900 through 999) that the system administrator has stored in the
system (see “System Speed Dial”) or a 3tharacter Personal Speed Dial
code that you have assigned to an account number (see “Personal Speed
Dial”). While you have a call in progress, you simply dial the speed dial
code that corresponds with the account code. You can dial the code with
one touch by programming a System Speed Dial or Personal Speed Dial
button.
This feature can be used only with outside calls; it cannot be used with
intercom calls.
If the system administrator has specified that the Call Report feature does not
report incoming calls, account codes can be entered only for outgoing calls.
There is a maximum of 16 characters available for an Account Number Entry.
The system beeps twice if the administrator attempts to enter more than 16
characters. If the administrator dials fewer than 16 characters, the system
does not beep.
The system administrator should give a copy of the System Speed Dial code
assignments to each person in the system who will use those codes.
ADMINISTRATION
If your responsibilities do not include system administration, skip this
information.
Before you assign a System Speed Dial code ( # 60 through # 89 or # 900
through #999) to a specific account number, refer to the System Speed Dial
Form that you have filled out.
To administer Account Number Entry codes:
Enter administration mode by sliding the TIP switch to P and touching
Administer.
Dial the System Speed Dial code ( #60 to #89 or #900 through #999) that
you are assigning to the account number. Make certain that you have not
already assigned a telephone number to that speed dial code, unless you
are making a change.
Dial *88.
Dial the account number.
You can also use a client’s telephone number as an account number. For
that purpose dial *88 and then dial the telephone number.
Touch Administer.
The console beeps twice.
Repeat steps 2 through 5 for each account number or telephone number to
which you are assigning a System Speed Dial code.
Leave administration mode by sliding the TIP switch to the center
position.
PROGRAMMING
To program a general Account Number Entry button (program this feature on
a button with lights):
1
Label the button Account Number Entry.
2
Slide the TIP switch to P.
The voice terminal rings every 5 seconds to remind you that you are programming and that
you cannot place OY receive calls.
3
4
5
Touch the button you want to program.
Dial *82.
Slide the TIP switch to the center position.
Bmp-pJ
To program a button for a specific account number or System Speed Dial code
assigned to an account number:
1
Label the button Account Number plus the name of a client or project.
2
Slide the TIP switch to P.
The voice terminal rings every 5 seconds to remind you that you are programming and that
you cannot place or receive calls.
3
4
Touch the button you want to program.
Dial *88 plus the account number.
Or
Dial *95 plus the System Speed Dial code (60 through 89 and 900 through
999) from a list that your administrator can give you.
5
HOW TO USE
Slide the TIP switch to the center position.
To use a general Account Number Entry button:
1
While you have a call in progress, touch Account Number Entry.
The green light next to the button goes on.
2
Dial the account number of the account to be charged for the call.
OY
Dial a System Speed Dial code ( # 60 through # 89 or # 900 through # 999)
for the account number to which you want to charge the call.
3
Touch Account Number Entry again.
The green light goes of.
If you enter the account code incorrectly, keep the call in progress and follow
this procedure:
1
2
Touch Account Number Entry twice.
The green light goes off and back on again.
Dial *
3
Dial the account number correctly.
4
Touch Account Number Entry again.
The green light goes off.
I
0
r~
Account
No. Entry Ia
To use a button for a specific account number:
1
While you have a call in progress, touch the programmed Account
Number button for the particular account number to be recorded.
DESCRIPTION
When the system is installed, people can use their voice terminals to place
intercom, local, and toll calls. However, the system administrator can restrict
any voice terminal to intercom or local calls. (See “Call Restriction.“) If
restricted voice terminals require additional calling access, the administrator
can designate a list of numbers (an Allowed List) that people may call despite
the established restrictions.
CONSIDERATIONS
Allowed Lists help you control the cost of your monthly phone bill, but still
allow you to place all the business calls you need from any voice terminal in
your system.
The administrator may decide to store one or more System Speed Dial codes
with Restriction Override. All voice terminals in the system can use those
codes as a type of password that allows the person to dial certain outside
numbers. Those numbers may be called regardless of toll or outward call
restrictions previously placed on a voice terminal. (See “System Speed Dial. “)
The system administrator can establish eight Allowed Lists for the system.
They are numbered 01 through 08 and each can have a maximum of 10
entries, numbered 01 through 10. Each entry may consist of a toll prefix, if
necessary (1 or 0), an area code (for example, 201), and/or an exchange code
(for example, KM), and/or emergency numbers (for example, 911).
5-6
MFRI IN Plus Svstem Features
When the administrator has dialed the maximum eight digits for an Allowed
List entry, the system beeps twice to remind the administrator that he or she
cannot dial any more digits. If the administrator dials fewer than eight digits,
the system does not beep.
ADMINISTRATION
If your responsibilities do not include system administration, skip this
information.
Before you administer Allowed Lists for your system, refer to the Allowed
List Form that you have filled out.
To set up an Allowed List:
Enter administration mode by sliding the TIP switch to P and touching
Administer.
Dial a * and a 2-digit code (01 through 08) that corresponds to the number
of the list.
For example, to add an entry to List 5, dial *05.
Dial the 2-digit number of the item in the Allowed List (between 01 and
10).
For example, to add an entry to List 3 as the first item on the list, dial *03
01.
Dial the number, toll-prefix and area code if necessary, or exchange to be
added to the list (maximum eight digits).
For example, to add the 201 area code with the toll-prefix, and 834
exchange to List 2 as the seventh item on the list, dial *02 07 1 201 834.
Touch Administer.
The console beeps twice.
Leave administration mode by sliding the TIP switch to the center
position.
To delete an entry from an Allowed List:
1
Enter administration mode by sliding the TIP switch to P and touching
Administer.
2
Dial a * and a 2-digit code (01 through 08) that corresponds to the number
of the list.
3
Dial the Zdigit item number (01 through 10) of the entry you want to
delete.
For example, to delete the eighth entry of List 1, dial *Ol 08.
4
Touch Drop.
5 Touch Administer.
The console beeps twice.
6
Leave administration mode by sliding the TIP switch to the center
position.
To clear all the entries from an Allowed List:
1
Enter administration mode by sliding the TIP switch to P and touching
Administer.
2
Dial a * and a 2-digit code (01 through 08) that corresponds to the number
of the list you want to clear.
For example, to clear all entries from List 6, dial *06.
3 Touch Drop.
The console beeps twice.
4 Touch Administer.
The console beeps twice.
5
Leave administration mode by sliding the T/l’ switch to the center
position.
Before you assign Allowed Lists to voice terminals in your system, refer to the
Call Restrictions, Allowed and Disallowed Lists Forms that you have filled
out. Then use the following procedures to assign or remove voice terminals
for access to Allowed Lists:
1
Enter administration mode by sliding the TIP switch to P and touching
Administer.
3
Dial a * and a 2-digit code (01 through 08) that corresponds to the list you
want to assign to the voice terminal.
3 Dial 00.
The green light goes on next to the Auto Intercom button for each voice terminal to which
this list is already assigned.
For example, to assign List 2 to a voice terminal, dial *0200.
4
Perform one of the following procedures:
B
Touch the Auto Intercom button, if you have one, for the voice
terminal for which you are giving access or removing access to the
Allowed List.
Green light on = the list is assigned to the voice terminal
Green light ofi = the list is not assigned to the voice terminal
b
If you do not have an Auto Intercom button for the voice terminal that
you want to assign the list to or remove the list from, use the code
from the dial code chart in Section 3.
5 Touch Administer.
The console beeps twice.
6
Leave administration mode by sliding the TIP switch to the center
position.
PROGRAMMING
None
HOW TO USE
Ask your system administrator what call restrictions, if any, he or she has
assigned to your voice terminal.
DESCRIPTION
You can assign a voice terminal, other than intercom 10, to be used as an
Alternate Attendant. When Direct Extension Dialing (DXD) calls. are busy or
do not answer, they can be directed to the Alternate Attendant position. All
other calls are directed to the main attendant position. When an Alternate
Attendant position is assigned, System Answer must be activated from there.
The alternate attendant console position can do anything the main attendant
position can do, except turn on message lights at voice terminals and perform
administration procedures.
The only calls transferred to the alternate attendant console are DXD calls that
are busy, dialed incorrectly, or unanswered.
The System Answer (SA) feature must be off when assigning the alternate
attendant position.
MERLIN Plus System Features
5-9
ADMINISTRATION
If your responsibilities do not include system administration, skip this section.
To assign an alternate attendant position:
1
Enter administration mode by sliding the TIP switch to P and touching
Administer.
2 Dial *79.
3
Touch the Auto Intercom button or dial the intercom number of the voice
terminal you want to assign as the alternate attendant console.
4 Touch Administer.
The console beeps twice.
5
PROGRAMMING
Leave administration mode by sliding the TIP to the center position.
If you will be using the System Answer feature, see “System Answer” later in
this section, you must program the SA button. Only the attendant or the
alternate attendant can have the SA button.
1
Label the button “System Answer. ’
2
Slide the TIP switch to P
3
The voice terminal rings every 5 seconds to remind you that you are programming and that
you cannot place or receive calls.
Touch the button you want to program.
4 Dial *58.
5
HOW TO USE
Slide the TIP switch to the center position1.
To activate System Answer from the Alternate Attendant position:
1
Touch System Answer.
Green light on = SA on
Green light off = SA off
Green light flashing = Problem with SA
If the green light next to the System Answer button is flashing, notify the
system administrator who should refer to Section 7, “Troubleshooting, ’ to
correct the problem.
NOTE:
This feature requires a General Purpose Adapter and can be used
with a modem, an answering machine, a facsimile machine, or a
cordless telephone.
DESCRIPTION
If you want an optional piece of equipment, such as a modem, an answering
machine, or a facsimile machine, connected to your voice terminal, to turn on
automatically when you receive ringing calls, you need to program an Auto
Answer-All button.
CONSIDERATIONS
You cannot have both the Auto Answer-All and Auto Answer-Intercom
features activated at the same time. If you have a Hands-Free Unit (HFU) and
Auto Answer-All is activated, all incoming calls will be answered at once.
This feature only answers ringing incoming calls. It will not answer voice
announced calls. You should program Voice Announcement Disable on your
voice terminal if you want all your incoming calls to ring. (See “Voice
Announcement Enable/Disable” later in this section for more information.)
ADMINISTRATION
None
P R O G R A M M I N G
Program the Auto Answer-All feature on a button with lights.
To program an Auto Answer-All button for your voice terminal:
Label the button Auto Answer-All.
Slide the T/P switch to P.
The voice terminal rings evey 5 seconds to remind you that you are programming and that
you cannot place or receive calls.
Touch the button you want to program.
Dial *75.
Slide the TIP switch to the center position.
HOW TO USE
To have a modem, answering machine, or facsimile machine answer calls
automatically:
1
Touch Auto Answer-All.
The green light next to the button goes on.
. .--. . -.
-
-
- __
This feature remains active until you:
1
Touch Auto Answer-All again.
The green light next to the button goes off.
NOTE:
This feature is used with a Hands-Free Unit.
DESCRIPTION
If your voice terminal has the Hands-Free-Answer-on-Intercom (HFAI) feature
or is connected to a Hands-Free Unit (HFU), you can have your speakerphone
go on automatically whenever you receive an intercom call. To do this with
an HFU, you must program an Auto Answer-Intercom button.
CONSIDERATIONS
You can have both Auto Answer-Intercom and Auto Answer-All programmed
for your voice terminal, but both features cannot be activated at the same time.
ADMINISTRATION
Nohe
PROGRAMMING
Program the Auto Answer-Intercom feature on a button with lights.
To program an Auto Answer-Intercom button for your voice terminal:
1
Label the button Auto Answer-Intercom.
2
Slide the TIP switch to P.
The voice terminal rings every 5 seconds to remind you that you are programming and that
you cannot place or receive calls.
3
4
5
Touch the button you want to program.
Dial *70.
Slide the TIP switch to the center position.
qH
n n n
n n n
q mm
mum
l
70
TOP
HOW TO USE
To have your hands-free unit turn on automatically when you receive
intercom calls with voice announcement:
1
Touch HFAI or Auto Answer-Intercom.
The green light next to the button goes on.
To return to answering calls yourself:
1
Touch HFAI or Auto Answer-Intercom again.
The green light next to the button goes ofi
DESCRIPTION
You can use an Auto Intercom button for one-touch dialing of intercom
numbers. Program any 2-d@ intercom number onto an Auto Intercom
button and use the button whenever you want to call the intercom number.
CONSIDERATIONS
In the MERLIN Plus system, you place an intercom call with a voice
announcement. Your co-worker hears your voice through the voice terminal
speaker and can respond to you without lifting the handset. If the co-worker
does not have a BIS model voice terminal or HFAI enabled, he or she cannot
respond to you without lifting the handset.
However, if the person you are calling has activated the Voice Announcement
Disable feature, your intercom call rings rather than beeps at the person’s
voice terminal.
You cannot announce an intercom call to a person active on the voice
terminal’s speaker.
You cannot have both an Auto Intercom button and a Manual Signaling button
for the same person. If you try to program both, you deactivate the one that
you programmed earlier. You can use either feature to place an intercom call.
(See “Manual Signaling. “)
If you program this feature onto a button with lights, the green light next to
the button goes on when the person at that intercom number uses the voice
terminal or uses the Do Not Disturb feature. When the person calls you, the
green light next to the person’s Auto Intercom button flashes.
None
MFRI IN PIIIS Svstem Features
5-l 3
PROGRAMMING
A button with lights is recommended but not required for the Auto Intercom
feature.
To program an Auto Intercom button for your voice terminal:
Label the button with a name and intercom number.
Slide the TIP switch to P.
The voice terminal rings every 5 seconds to remind you that you are programming and that
you cannot place OY receive calls.
Touch the button you want to program.
Dial *91 plus an intercom number.
Slide the TIP switch to the center position.
HOW TO USE
To place an intercom call with one touch:
1
Touch the Auto Intercom button for the intercom number you want to
dial.
2
If you hear a short beep, begin speaking or lift your handset. If you hear
a long beep, wait for someone to answer on the other end.
If the line is busy or if no one answers:
1
Touch Speakerphone to cancel the call.
Automatic Line Selection
DESCRIPTION
You can program the order in which your system selects outside lines when
you touch Speakerphone or lift your handset to place a call. For example,
you can program the line you use most often to be the first line in the
Automatic Line Selection sequence. A line you use less often can be
programmed to be the next line the system selects. Then, when you touch
Speakerphone or lift your handset, the system automatically selects the line
you usually use. If that line is busy, the system then selects your second
choice, such as a WATS or Readyline, unless that line is busy too, and ‘so on.
You can include all or only some of your outside lines in an Automatic Line
Selection sequence.
CONSIDERATIONS
If you plan to program other features when you program Automatic Line
Selection, you must program Automatic Line Selection first. If you are
already in the middle of a programming session, slide the TIP switch to the
center position and then back to P before programming this feature.
The Automatic Line Selection order is only for outside lines; the line selection
does not include intercom lines. However, if you remove all outside lines
from your Automatic Line Selection sequence, your system will select an
intercom line when you touch Speakerphone or lift the handset. (See
‘Intercom Preference. “)
If you don’t program an Automatic Line Selection sequence, you will get
outside lines according to the sequence in which they are plugged into the
control unit.
ADMINISTRATION
None
PROGRAMMING
To program an Automatic Line Selection sequence for your voice terminal:
1
Slide the TIP switch to P.
The voice terminal rings every 5 seconds to remind you that you are programming and that
you cannot place or receive calls.
2 Dial **.
3
Touch the line buttons in the order you prefer.
4
If you want to continue programming other features, dial ** again.
Otherwise slide the TIP switch to the center position.
I T
HOW TO USE
.
P
When you want to place an outside call:
1
Touch Speakerphone or lift your handset.
The MERLIN Plus system connects you to the first available line in the Automatic Line
Selection sequence.
MFRI IN Plrrs Sv.ct:tF?m Featlwnsa
S-15
DESCRIPTION
CONSIDERATIONS
Automatic System Access (ASA) includes four features that allow more
flexible use of your MERLIN Plus system and your outside lines. The
features are described in this section under separate entries:
l
Call Forwarding (CF)
l
Direct Extension Dialing (DXD)
l
System Answer (SA)
l
Remote Line Access (RLA)
CF and RLA only operate when the Central Office (CO) or PBX provides
Forward Disconnect on the serving lines. All lines in the system must be
assigned to the ASA port.
Refer to the individual features in this section for specific considerations for
each feature.
If your responsibilities do not include system administration, skip this
information.
ASA Jack Assignment
The Automatic System Access features require a dedicated jack on the control
unit into which you can plug one end of the Auto Access cord. The cord also
plugs into the memory module where the Voice Synthesis Processor (VW) is
located. The VSP provides taped messages to callers when ASA features are
being used. At startup, jack 18 is automatically assigned to ASA. To change
the assignment, use the following procedures:
NOTE:
1
You cannot assign jack 19, usually assigned to Busy Buster and/or
Call Report, unless you have reassigned the jack for these features.
Enter administration mode by sliding the TIP switch to P and touching
Administer.
2 Dial *59.
The green light goes on next to the Auto Intercom button of the jack assigned to ASA.
3
Perform one of the following procedures:
)
Touch the Auto Intercom button for the jack you want to assign to
ASA.
The green light goes ofi next to the button for the old number, and the green light goes
on next to the button for the new number. lf you hear a denial tone, the feature is on
or the VSP port is active. Either wait or turn ofj the feature.
)
Dial the intercom number of the voice terminal you want to assign to
ASA.
4 Touch Administer.
The console beeps twice.
5
Leave administration mode by sliding the TIP switch to the center
position.
PROGRAMMING
Refer to the individual features in this section.
HOW TO USE
Refer to the individual features in this section.
DESCRIPTION
The MERLIN Plus system provides an auxiliary jack, labeled “AUX, It at the
top of each Line Module. This auxiliary line is bridged directly to outside
Line A or Line E, and does not go through the MERLIN Plus system control
unit. You can connect accessory devices to the system, and use these devices
independently of the system. These devices include:
l
l
l
l
l
CONSIDERATIONS
Basic Telephones-During an electrical power outage, your MERLIN Plus
system will not function. However, you can plug a basic telephone (not a
MERLIN Plus system voice terminal) into the AUX jack, and use it to
place and receive calls on Line A or Line E.
Facsimile Machines-You can also plug a facsimile machine into the AUX
jack. When calls come in on Line A or Line E, the FAX machine will
respond to them as it would if plugged into any other outside telephone
line.
Modems and Computers-You can plug a modem into the AUX line and
use it for transmitting and receiving data on Line A or Line E. The
modem will function on this line as it would on any other outside
telephone line. When using a modem, it is important that you prevent
other employees from using voice terminals connected to Line A or Line E
since this could interfere with data transmissions. You can program Line
A or Line E for privacy (see “Privacy on Lines A and E”), thus preventing
others from bridging onto calls on Line A or Line E. To have the modem
answer incoming calls automatically, simply set it up for auto-answer as
you would on any telephone line. You can place outside calls with the
modem either by connecting a basic telephone and dialing manually, or by
using the modem’s autodial capabilities.
Telecommunication Devices for the Deaf and Dictation Machines-You
can plug these devices into the AUX jack and transmit or receive data on
Line A or Line E. The machines will respond as if they were plugged into
any other outside telephone line.
Answering Machines-You can plug an answering machine into the AUX
jack so that when calls come in on line A or Line E, the answering
machine will record messages as it would if plugged into any other
outside telephone line.
When a call comes in on Line A or Line E, it will ring both on the voice
terminal that is assigned to Line A or Line E and on any device connected to
the auxiliary jack bridged to Line A or Line E. If you are using the auxiliary
line for a device such as a FAX or modem, you may want to use the No Ring
option (see “Ringing Options”) to prevent calls from ringing on a voice
terminal connected to Line A or Line E. This will prevent employees from
answering calls that should be going to the accessory device connected to the
auxiliary line.
If you do not want the accessory device to ring on incoming calls, you can
simply turn it off or set it not to ring, and program Line A or Line E for
normal ringing.
You cannot use a MERLIN Plus system voice terminal on the auxiliary jack.
You cannot connect a loudspeaker paging system into the auxiliary jack.
The system administrator can administer the Privacy feature for Line A and/or
Line E so that no one else in the system can bridge onto or monitor these
lines while a call is active on them. For more information, see “Privacy (on
Lines A and E). ”
ADMINISTRATION
If you want calls that come in on the line connected to an auxiliary jack to
ring at that device but not at any other voice terminal that has the same line
assigned to it, program the other voice terminals to not ring on that line.
(See “Ringing Options. “)
If you don’t want calls that come in on the line connected to an auxiliary jack
to ring at that device, you will have to see if the device has a switch to turn
off the ring and set it accordingly.
PROGRAMMING
None
HOW TO USE
Use the basic telephone, facsimile machine, or modem and computer
connected to the auxiliary jack as you normally would.
Plug in the auxiliary telephone whenever you want to bridge or monitor Line
A or Line E.
DESCRIPTION
If you share a line with another person, you can join (or “bridge” onto) a call
in progress on that line. In this way you can easily join a conference call by
just touching a line button and Speakerphone or lifting your handset. (See
” Conference. ” )
CONSIDERATIONS
Up to three people connected to the MERLIN Plus system, including the
originator of the call, can bridge onto a call at one time. When a person
bridges onto a call in progress, the red and green lights next to the line
button on your voice terminal flash alternately so that you know that
someone else has joined the call.
You cannot use the Bridging feature on a voice terminal with Button-Free Line
Operation.
5-18 MERLIN Plus System Features
If a person has activated the Privacy feature on his or her voice terminal, you
cannot bridge onto a call in progress at that voice terminal. (See “Privacy.“)
ADMINISTRATION
None
PROGRAMMING
None
HOW TO l&E
To bridge onto a call in progress:
1
Touch the line button associated with the call.
2
Touch Speakerphone or lift your handset.
DESCRIPTION
The Busy Buster feature automatically redials at least ten times the most
recent number you dialed. If the called telephone begins to ring within this
time, your voice terminal alerts you. To use this feature, the system
administrator must have assigned the feature to a voice terminal jack on the
control unit, a connection must have been made from that voice terminal jack
to the BB jack on the memory module, and a button must be programmed at
each applicable voice terminal.
CONSIDERATIONS
The Busy Buster feature is shared by everyone in the MERLIN Plus system.
When you and other people in your’ system use this feature at the same time,
the system places the telephone number each person has dialed in a queue.
The system then dials each number in the queue.
The system redials the call on the same line on which the call was placed. If
you use a stop character in the dialing sequence of a System Speed Dial
number, you cannot use Busy Buster to retry the number for you.
Each person in the system can have only one Busy Buster number active at a
time.
If you or someone else places or accepts another call on a voice terminal that
has activated Busy Buster, the system will continue to try to complete the call,
even though your voice terminal is in use. When the BB call goes through,
the voice terminal will alert you with an abbreviated ring even if you’re on
another call.
If you are using an SP-34 or an SP-34D voice terminal, Busy Buster can only
be programmed onto one of the two rows of buttons above the dial pad.
Occasionally when Busy Buster is, activated the voice terminal rings even
when the call was not connected. This is due to noisy Central Office lines
that can provide false indications to the MERLIN Plus system.
MFRI IN Plus Svstem Features
5-19
When a Busy Buster call is answered, your voice terminal is alerted. If there
is a significant delay between the time that the called party answers and the
time you pick up your alerting voice terminal, the party you called may
become confused by the silence and hang up. Therefore, if you are expecting
a Busy Buster call, you may want to activate the Do Not Disturb feature so
that only transfer return calls, which include Busy Buster calls, will ring at
your voice terminal.
If you activate Busy Buster for a number that is in the same local exchange as
the number you’re calling from, there is a chance that when successful, the
call will be answered so quickly that the exchange network cannot provide the
information to alert your voice terminal. The party you called could become
confused and hang up.
ADMINISTRATION
If your responsibilities do not include system administration, skip this
information.
The system is factory-set to have the Busy Buster feature assigned to voice
terminal jack 19 on the control unit. However, you can use the following
procedure to assign the feature to any other voice terminal jack in the system,
except jack 10.
1
Enter administration mode by sliding the TIP switch to P and touching
Administer.
2 Dial *35.
3
Touch the Auto Intercom button or dial the intercom number of the jack
to which the Busy Buster feature will be assigned.
The green light goes on next to the Auto Intercom button to which the feature will be
assigned.
4 Touch Administer.
The console beeps twice.
PROGRAMMING
6
Leave administration mode by sliding the TIP switch to the center
position.
6
Make sure the BB jack is moved to the corresponding voice terminal jack
you’ve just assigned.
This feature requires a button with lights.
To program a button on your voice terminal for the Busy Buster feature:
1
Label the button Busy Buster.
2
Slide the TIP switch to P.
3
5-20 MERLIN Plus Svstem Features
The voice terminal rings every 5 seconds to remind you that you are programming and that
you cannot place or receive calls.
Touch the button you want to program.
4
5
HOW TO USE
Dial *31 (you do not need to dial an outside number).
Slide the TIP switch to the center position.
If the number you are calling is busy and you want to use the BB feature,
follow this procedure:
1 Before you hang up, touch the Busy Buster button.
The green light next to the Busy Buster button flashes.
2 Hang up.
When the dialed number rings, your voice terminal rings. To begin the call:
1
Touch Speakerphone or lift the handset.
If you no longer want to have the system repeatedly redial the last number
you dialed, you can deactivate the feature.
1
Without lifting the handset, touch Busy Buster.
The green light next to the button goes off.
El
q
Busy
Buster
ml
El
DESCRIPTION
Button-Free Line Operation allows people with a 5-button or any lo-button
voice terminal to access lines, even though the lines do not appear on the
voice terminal buttons. Therefore, those voice terminals have additional free
buttons for needed programmed features. This feature is ideal for people
who need several lines, but who rarely handle more than one call at a time.
To place or answer a call, they just lift their handset, and the MERLIN Plus
system selects a free line for outgoing calls or the ringing line for incoming
calls.
MERLIN Plus Svstem Features
5-21
CONSIDERATIONS
The system administrator can assign a maximum of eight lines to a buttonfree voice terminal. However, if the administrator again wants lines assigned
to buttons on a voice terminal, he or she can assign only the number of lines
for which the voice terminal has line buttons. For example, if the
administrator has assigned eight lines to a 5-button voice terminal with
Button-Free Line Operation and decides to assign lines to voice terminal
buttons, only four of those eight lines can appear. The features that the
administrator or user has programmed onto the voice terminal buttons will be
replaced by lines.
With Button-Free Line Operation, the system administrator can administer the
individual voice terminals so that they ring or do not ring when calls come in.
(See “Ringing Options. “) Button-Free Line Operation with the no ring option
is appropriate for voice terminals in public places, such as lobbies.
When anyone in your system uses the Button-Free Line Operation feature:
There are no red and green lights associated with lines to keep track of
call-handling features, such as Transfer or Hold.
The person with Button-Free Line Operation can answer transferred calls
and ringing lines by picking up the handset.
There is no way of knowing which line the system has selected for an
outgoing call. Therefore, make sure that all lines assigned to these voice
terminals are of the same type. Do not mix regular lines, WATS lines,
and Foreign Exchange lines.
You cannot program an Automatic Line Selection sequence on voice
terminals with Button-Free Line Operation. In this case, only your system
administrator can assign the sequence of lines for your voice terminal.
You can use the Intercom, Hold, Transfer, and Call Pickup features, but
you cannot use the Bridging or the Conference feature.
ADMINISTRATION
If your responsibilities do not include system administration, skip this
information.
To make lines on a voice terminal button-free:
1
Enter administration mode by sliding the T/P switch to P and touching
Administer.
2
Touch the Auto Intercom button or dial the intercom number for the voice
terminal you are administering.
A green light goes on next to the Auto intercom button. Green lights go on next to the
buttons of any lines already assigned to the voice terminal.
3
Touch the line button until the green light next to it shows the line
assignment you want:
Green light on = the line is assigned to the voice terminal
Green light off = the line is not assigned to the voice terminal
4
To make the line Button-Free, dial one of these two codes:
b
Dial *31 if you want the voice terminal to ring.
D
Dial *32 if you do not want the voice terminal to ring.
The green light next to the Auto intercom button flnshes rapidly.
The green light next to the Auto Intercom .button flashes slowly.
.
5 Touch Administer.
The console beeps twice.
6
Leave administration mode by sliding the TIP switch to the center
position.
q
T
l
P
To remove Button-Free Line Operation by reassigning lines to separate
buttons on a voice terminal:
1
Enter administration mode by sliding the TIP switch to P and touching
Administer.
2
Touch the Auto Intercom button for the voice terminal you are
administering.
3 Dial *34.
A green light should go on next to the lines that have been assigned to the voice terminal.
4
Touch Administer.
The console beeps twice.
5
Leave administration mode by sliding the TIP switch to the center
position.
PROGRAMMING
None
HOW TO USE
If you do not have a line button for a call that you have received or that has
been transferred to you, you can still put the call on hold using the Hold
button. To retrieve the call, you can use the Hold Retrieve feature. (See
” Hold Retrieve. ” )
NOTE:
DESCRIPTION
Call Forwarding is an ASA feature and therefore requires the
assignment of the ASA jack. If the ASA jack assignment has not yet
been made, refer to “Automatic System Access” in this section before
attempting to administer this feature.
When in CF mode, incoming calls on designated lines are connected to the
Voice Synthesis Processor (VSP), then while the caller is listening to the
’ message, the control unit dials the telephone number where calls are being
forwarded. When the person at the CF number answers, the system then
uses the conferencing feature to connect the two calls, and the call progresses
normally.
You have the option to change the message or you can have calls forwarded
without the message so that callers are unaware that their calls are being
forwarded. You can also change the call forwarding number from any TouchTone phone.
CONSIDERATIONS
Call Forwarding requires the following:
l
A programmed button with green and red lights labeled CFIDXD.
You use the CFlDXD button to activate either Call Forwarding or Direct
Extension Dialing (discussed later in this section). To put the system in
either of these modes, or in normal mode, you touch the CFlDXD button.
The green and red lights show you what mode you are in.
b
If the system is in normal mode, touch the button twice to put the
system in CF mode
Only red light on = CF mode
NOTE:
b
You must first assign a CF number before touching the
CFlDXD button to put the system in CF mode.
Touch the button a third time to put the system back into norma
mode.
Green and red light off = normal mode
l
A valid 5-digit password to gain access from a remote location to enter a
call forwarding number or to change the current call forwarding number.
To enter a password, follow the administration procedure discussed’later
in this entry.
l
That there can be more than one CFlDXD button in the system, but a
voice terminal can have only one CFlDXD button:
If two or more users have a CFlDXD button programmed on their voice
terminals, each of them can turn the features on and off. For example, if
one of these users activates Call Forwarding, the red light goes on next to
the CFlDXD button on all the voice terminals that have that button. When
a person deactivates the feature by touching the CFlDXD button, the light
goes off next to the button on all the voice terminals that have the
programmed CFlDXD button.
A synthesized voice message:
This message is automatically supplied by the VSP in the control unit. The
administrator can modify the message when necessary or may choose to
turn off the message.
That one jack on the control unit be dedicated to the ASA features.
See “Automatic System Access” in this section for administration
procedures.
That you administer at least one line to an incoming and one line to an
outgoing line group:
At startup, none of the system’s lines are assigned to the CF incoming or
outgoing line group.
If there is only one line in the incoming line group and one line in the
outgoing line group, they cannot be the same line. The green light next to
the CF button will flash when you try to turn it on.
When the system is in CF mode, the feature’s operation affects only those
calls that come in on lines in the CF incoming line group. Likewise, the
system only uses the lines in the CF outgoing line group to forward calls.
Calls coming in on lines not assigned to the CF incoming line group are
not automatically answered for call forwarding.
ADMINISTRATION
If your responsibilities do not include system administration, skip this
information.
Call Forwarding Line Groups
At startup, none of the system’s outside lines are assigned to the CF incoming
or outgoing line group. To use this feature you must assign line(s) to each
group*
1 Enter administration mode by sliding the TIP switch to P and touching
Administer.
2
Dial the code for the type of line group list you want to administer:
b
CF incoming line group, dial *51
Green light on = line is assigned to the group
Green light off = line is not assigned to the group
t
For a CF outgoing line group, dial *52
Green light on = line is assigned to the group
Green light of = line is not assigned to the group
3
Touch the line buttons until the green lights show the makeup you want
for the line group.
MERLIN Plus System Features
5-25
4
Touch Administer.
The console beeps twice.
5
Leave administration mode by sliding the TIP tswitch to the center
position.
Voice Messages
The system automatically provides the following default voice message for call
forwarded calls:
“Your call is being fonuarded. Please hold. ”
You can modify this message to include the following statement:
“You have reached nnn...”
where nnn.. , is the telephone number of one of your outside lines. The
number can be up to 16 digits, including * or # . You can modify the
message for all lines in an incoming line group, or you can modify the
message for some and leave others unmodified. To modify the CF message
for one or more lines in your incoming line groups, do the following:
1
2
3
E.nter administration mode by sliding the TIP switch to P and touching
Administer.
Dial *50.
Touch the line button for the line on which you want the modified
message.
The green light goes on.
4
Dial the telephone number you want to include in the message.
NOTE:
5
6
For special phone numbers, such as an 800 number, you may
prefer to have the recorded voice say “Eight hundred” followed
by the number, instead of “Eight, zero, zero.” In this case, you
would touch the Hold button to enter a pause after the toll prefix,
then again after the 800 area code, and again after the exchange.
For example, l-800-555-1212 would be entered as follows:
1 Hold 800 Hold 555 Hold 1212
Repeat for other lines,
Touch Administer.
The console beeps twice.
7
Leave administration mode by sliding the T/P switch to the center
position.
To return to the message provided with the system:
c
1
Enter administration mode by sliding the TIP switch to P and touching
Administer.
2 Dial *50.
3
Touch the line button.
The green light goes of.
4 Touch Administer.
The console beeps twice.
5
Leave administration mode by sliding the TIP switch to the center
position.
You may also choose to forward your calls without a message:
1
Enter administration mode by sliding the TIP switch to P and touching
Administer.
2 Dial *30.
3
Dial 0 to turn off the message.
NOTE:
To turn on the message, dial 1 instead of 0 in step 3.
4 Touch Administer.
The console beeps twice.
5
Leave administration mode by sliding the TIP switch to the center
position.
T
l
P
f-
Numbers of Rings
To change the number of rings (the default is two rings) before the CF call is
answered:
1
Slide the TIP switch to P and touch Administer.
2
Dial *762 plus the number of rings (between 0 and 9) before CF picks up
the call.
NOTE:
If the number of rings is set to 0, the voice terminal will not ring,
and the calls will be forwarded immediately.
3 Touch Administer.
The console beeps twice.
MERLIN Plus Svstem Features
5-27
4
Leave administration mode by sliding the TIP switch to the center
position.
I
I
Passwords
You and others in your business need at least one valid 5-digit password in
order to change a call forwarding number from a remote location. The first
two numbers in the password are the caller’s intercom number.
To create or invalidate a password, follow this procedure:
1
2
3
Enter administration mode by sliding the TIP switch to P and touching
Administer.
Dial *56
Perform the appropriate step below:
B
To create a password for a particular intercom number, dial a MERLIN
Plus system intercom number plus any three digits except 000.
The console beeps twice.
b
To invalidate any password beginning with a particular intercom
number, dial the intercom number plus 000. Repeat the procedure for
more passwords.
The console beeps twice.
4
Touch Administer.
The console beeps twice.
5
Leave administration mode by sliding the TIP switch to the center
position.
I
I
M
T
.P
Ipq
kil
1
l
P
Call Forward Destination Number
You can enter or change the telephone number where you want calls
forwarded (the CF destination number) in either of two ways:
l
l
Follow the first procedure below to enter or change the CF destination
telephone number from the administratorlattendant console with the system in
administration mode.
Follow the second procedure below to enter or change the CF destination
telephone number from II phone outside the system with the system in CF
mode.
From the Administrator/Attendant Console To enter, change, or delete the
CF destination telephone number from the administrator/attendant console,
follow this procedure.
1
Press CFlDXD to go into normal mode.
Green and red lights go off.
2
Enter administration mode by sliding the TIP switch to P and touching
Administer.
3 Dial *53.
4
Perform the appropriate step below:
w
To enter or change a CF destination telephone number, dial the new
number.
b
To remove the current CF destination number without replacing it
with another number, touch Administer.
5 Touch Administer.
The console beeps twice.
6
Leave administration mode by sliding the TIP switch to the center
position.
From Outside the System To enter or change the CF destination number
from outside the system while the system is in CF, DXD, or RLA mode,
follow this procedure.
NOTE:
This procedure is available on the MERLIN Plus CFlRLA card, so
that ;ou can refer to it when you’re changing the CF destination
while off-site.
Dial the telephone number for one of the lines in the CF incoming line
group.
When the call is answered, you hear the CF voice message.
During the voice message, dial * # *.
The system goes into RLA mode, and the VSP asks you to enter your password.
NOTE:
If a voice prompt is not administered, the CF destination number
cannot be changed from outside the system.
At the voice prompt, enter your password.
The VSP asks you to enter a line number.
At the voice prompt, dial 00.
The VSP asks you to enter the new call fonoard number followed by a pound (#).
Dial the new CF telephone number plus a pound ( #).
The VSP repeats the new number and asks you to either confirm it by dialing a * or deny it
by dialing 00.
Dial * to confirm, or dial 00 to return to step 5, above, and try again.
After receiving the confirmation signal, the VSP repeats the new number once more and
identifies it as the new call forward number.
Hang up.
A button with a red light next to it is required for the CF feature.
To program a CFlDXD button on a voice terminal:
1
Label the button CFIDXD.
2
Slide the TIP switch to P.
3
4
5
HOW TO USE
The voice terminal rings every 5 seconds to remind you that you’re programming and that
you can‘t place or receive calls.
Touch the button you want to program.
Dial *83.
Slide the TIP switch to the center position.
Using the CF/DXD Button
Touching the CFlDXD button repeatedly cycles the system through DXD, CF,
and normal modes. The red and green lights next to the CFlDXD button will
help you recognize which mode the system is in.
Green and red
Only green
Only red
Red light
light off =
light on =
light on =
flashing =
Normal mode
DXD mode
CF mode
Problem with CF
If the red light next to the CFlDXD button is flashing, notify the system
administrator who should refer to Section 7, “Troubleshooting. ’
To return to CF mode after an error has been corrected:
1
Touch CFlDXD three times.
The first time puts the system in normal mode; the second touch of the button puts the
system in DXD mode; the third touch puts the system in CF mode.
DESCRIPTION
If you want to pick up an intercom or outside call that is ringing at another
voice terminal, use the Call Pickup feature.
You can use this feature in three different ways:
l
l
Option A-You can use a dial code and dial the intercom number of the
ringing voice terminal.
Option B-You can program a Call Pickup button and dial the intercom
number of the ringing voice terminal.
l
CONSIDERATIONS
Option C-You can program a One-Touch Call Pickup button for a specific
voice terminal in your business so that when the person is away, you can
answer that person’s calls with one touch. You, can program a Call Pickup
button for each voice terminal for which you need to answer calls.
If the line on which the call is coming in appears on a button on your voice
terminal, you do not need to use the Call Pickup feature to answer the call.
You can just touch the line button on which the call is ringing and then touch
Speakerphone or lift your handset.
If you want someone in the office, such as a guard, to answer calls that come
in after hours, program a Call Pickup button for calls that come in at the
administrator/attendant console. Since the attendant console has all the lines
of your MERLIN Plus system, the person answering calls after hours can pick
up all calls by touching the Call Pickup button whenever the attendant
console rings. If the person is in another part of the building, the attendant
can connect his or her console and an extra alert device to a Supplemental
Alert Adapter (see ‘Supplemental Alert Adapter’ under ‘Accessory
Equipment”), so that each time a call comes in, an extra alert device goes on.
ADMINISTRATION
None
PROGRAMMING
You do not need to program Option A.
To program Option B:
1
Label the button Call Pickup.
2
Slide the TIP switch to P.
The voice terminal rings every 5 seconds to remind you that you are programming and that
you cannot place or receive calls.
3
Touch the button you want to program.
4
Dial *85.
5
Slide the TIP switch to the center position.
mmpgg
To program Option C:
1
Label the button Call Pickup plus an intercom number.
2
Slide the TIP switch to P.
The voice terminal rings evey 5 seconds to remind you that you are programming and that
you cannot place or receive calls.
3
Touch the button you want to program.
4
Dial *85 plus an intercom number.
5
Slide the TIP switch to the center position.
HOW TO USE
You can use a programmed button or a dial code to pick up an intercom or
outside call at any other voice terminal in the system.
To pick up a call ringing at any other voice terminal using Option A:
1
Touch Speakerphone or lift your handset.
2 Dial #3.
3
Dial the intercom number of the voice terminal where the call is ringing.
To pick up a call ringing at any other voice terminal using Option B:
1
Touch Speakerphone or lift your handset.
2
Touch the Call Pickup button you programmed above.
3
Touch the Auto Intercom button or dial the intercom number of the voice
terminal at which the call is ringing.
To pick up ringing calls at a specific voice terminal using Option C:
1
Touch Speakerphone or lift your handset.
2
Touch the One-Touch Call Pickup button you have programmed for the
voice terminal.
NOTE:
DESCRIPTION
This feature is used with a MERLIN Plus system data collector and
an AT&T 475/476 or 572/573 printer or its equivalent.
The Call Report feature, often called Station Message Detail Recording
(SMDR), enables a business to keep records of incoming and outgoing calls.
The information in a printed call report gives details about outgoing and
incoming calls: the date and time of each call, its duration, the line and voice
terminal on which the call was made or received, and the dialed numbers of
the outgoing call. Call reports are printed automatically as calls go out or
come in. This information helps a business build records of its telephone
traffic patterns and identify abuses in voice terminal privileges.
If an account code is entered when the call is made, the call report prints that
information for you. Account codes are helpful in billing customers and
different departments of the company for telephone calls that should be
charged to them. (See “Account Number Entry. “) The data collector and the
printer can also print a System Feature Report, a list of the features that have
been administered to the system (see “System Feature Report”). Figure 5-1
shows a printout that contains several typical Call Reports. Each line
beginning with “C” represents an individual Call Report.
FIGURE 5-l A Printout of Typical Call Reports.
DATE
C
C
C
C
c
c
C
C
C
08121186
08/21/86
08/21/W
08/21/86
08/22/86
08/22/86
08/22/M
08/22/M
08/23186
TIME
CALLED NUMBER
DURATION
11:Ol
11:05
13:15
14:05
09:43
10:12
11:15
14:25
11:15
9090334
7879096565
110869685679714?
4697896
IN
8889914321
IN
110869685679714?
4697896
00:01:13
CO:O6:24
00:13:06
00:09:00
00:02:16
00:12:18
00:17:09
C!O:O8:15
00:19:11
LN
STN
ACCOUNT
8
6
4
3
4
7
3
4
3
11
15
11
12
11
14
12
11
12
32145677
63354324
63354324
C 08/24/U 08:lO
Notes:
1
Column headings (DATE, TIME, etc.) do not appear on Call
Report printouts.
2 An IN in the Called Number column indicates an incoming Call.
3 A ? at the end of a number in the Called Number column
indicates that the number called had more than the 15 reported
digits.
As you can see from the reports in Figure 5-1, the system prints the number
of each outgoing call. If there’s a telephone number you’d like to keep
private-say, a number containing a long distance access code-you can give
that number a System Speed Dial code and mark it for privacy when you
enter it during system administration. Then the system will print the System
Speed Dial code instead of the telephone number on Call Reports, as the last
Call Report in Figure 5-l shows. See “System Speed Dial” later in this
section.
CONSIDERATIONS
The Call Report feature can only be invoked at the administrator/attendant
console.
When the system administrator administers the system for the Call Report
feature, he or she can set certain options for the feature.
l
The administrator should set the initial time and date, so that these details
appear correctly on the call report.
l
The system is set to have the data collector and the printer connected to
voice terminal jack 19 for the Call Report feature. However, the
administrator can administer the printer and connect it to any other voice
terminal jack in the system, except jack 10.
NOTE:
l
l
l
If you are using the same printer and data collector for both the
System Feature Report and the Call Report features and change
the voice terminal jack assignment, you must administer the new
jack assignment for both features. You cannot use the same jack
that you used for ASA but ASA can share the same jack assigned
to BB by using the adapter provided with the data collector. ASA
and BB jack assignments can be changed if necessary.
The administrator can select the type of calls that appear on the call
report. The system is factory-set to have no calls reported. However, the
administrator can set the system for reporting outgoing and incoming calls,
or for reporting only outgoing calls.
The system is set to record outgoing calls that last at least 1 minute.
However, the system administrator can change that setting for a longer
(up to 9 minutes) or shorter (as little as 10 seconds) minimum duration.
The administrator can also specify which System Speed Dial codes are
printed on call reports, and which ones will be private.
The entries on a call report are preceded by a ‘C. It
ADMINISTRATION
If your responsibilities do not include system administration, skip this
information.
Before you administer the Call Reports options for your system, refer to the
System Configuration Form that you have filled out.
To administer the various Call Reports options for your system:
The Date and the Time.
To set today’s date:
1
Enter administration mode by sliding the TIP switch to P and touching
Administer.
2 Dial *80.
3
Dial two digits for the month (01 through 12).
4
Dial two digits for the day (01 through 31).
5
Dial two digits for the year (00 through 99).
For example, if the date is March 24, 1988, dial *80032488.
6 Touch Administer.
The console beeps twice.
7
_ 5-34 MERLIN Plus System Features
Leave administration mode by sliding the TIP switch to the center
position.
To set the current time:
1
Enter administration mode by sliding the TIP switch to P and touching
Administer.
2 Dial *81.
3
Dial two digits for the hour (00 through 23).
4
Dial two digits for the minute (00 through 59).
For example, if the time is 2:16 A.M., dial *810216; if the time is 2:16
P.M., dial *81 14 16.
5 Touch Administer.
The console beeps twice.
6
Leave administration mode by sliding the TIP switch to the center
position.
mpJ
Control Unit Jack Assignment for the Call Report Feature.
To specify the voice terminal jack to which the data collector and the printer
will be connected:
NOTE:
1
2
The system is factory-set for jack 19.
Enter administration mode by sliding the TIP switch to P and touching
Administer.
Dial *82.
The green light goes on next to the Auto Intercom button that corresponds with the jack to
which the data collector and the printer ar-e currently assigned.
3
Touch the Auto Intercom button or dial the intercom number of the jack
to which the data collector and printer are currently assigned.
The green light goes off next to the Auto intercom button that corresponds with the jack to
which the data collector and printer are currently assigned.
Touch the Auto Intercom button or dial the intercom number of the jack
to which the data collector and the printer will be connected.
The green light next to the button goes on.
4 Touch Administer.
The console beeps twice.
5
Leave administration mode by sliding the TIP switch to the center
position.
Minimum Call Duration. To specify a minimum call duration other than 1
minute for call reporting:
1
Enter administration mode by sliding the TIP switch to P and touching
Administer.
2 Dial *83.
3
Dial one digit from 0 to 9 for the number of minutes.
For example, to specify a minimum duration of 10 seconds, dial *830. To
specify a minimum duration of 9 minutes, dial *839.
NOTE:
Ten seconds is the shortest duration you can set under one
minute.
4 Touch Administer.
The console beeps twice.
5
Leave administration mode by sliding the TIP switch to the center
position.
Type of Documented Calls. To specify the type of calls that will be
documented (the system is set to have no calls reported):
1
Enter administration mode by sliding the TIP switch to P and touching
Administer.
2 Dial *84.
3
Dial a number code 0 through 2 to specify the kind of calls to be reported
(the system is factory-set so that no calls are reported):
)
If you do not want any calls reported, dial 0.
b
If you want only outgoing calls reported, dial 1.
)
If you want outgoing and incoming calls reported, dial 2.
4 Touch Administer.
The console beeps twice.
5
Leave administration mode by sliding the TIP switch to the center
position.
PROGRAMMING
None
HOW TO USE
None
DESCRIPTION
When the system is first installed, people can use their voice terminals to
place intercom, local, and toll calls. However, the system administrator can
assign either of two types of call restrictions for selected voice terminals:
l
l
CONSIDERATIONS
Outward Call Restriction restricts voice terminals so that only intercom
calls can be placed.
Toll Call Restriction restricts voice terminals so that only intercom and
local calls can be placed.
Even if a voice terminal has Outward Call Restriction, the person can bridge
onto calls in progress, answer incoming calls, and place and receive intercom
calls.
If the outward call restrictions are too limiting, the administrator can
designate a list of numbers that individuals may call beyond the established
restrictions. (See “Allowed Lists. “)
If the administrator decides to store a System Speed Dial code with
Restriction Override, all voice terminals in the system can use the code as a
type of password that allows the person to access the outside number,
regardless of toll or outward call restrictions previously placed on the voice
terminal. (See “System Speed Dial. “)
If there are two or more voice terminals in the system that will have the same
restrictions, the administrator can use the Copy feature to copy these
restrictions from one voice terminal to another. (See “Copy. “)
When administering call restrictions, the system administrator can use
restriction reset to ensure the integrity of the assigned restrictions.
ADMINISTRATION
If your responsibilities do not include system administration, skip this
information.
To administer call restrictions to a voice terminal:
1
Enter administration mode by sliding the TIP switch to P and touching
Administer.
2
Touch the Auto Intercom button or dial the intercom number of the voice
terminal you want to restrict.
3
Touch Restrict until the green light beside it shows the kind of call
restriction you want the voice terminal to have.
Steady green light on = Unrestricted (all calls permitted)
Flashing green light = Toll restricted (local and intercom calls only)
Green light of = Outward restricted (intercom calls only)
4
Touch Administer.
The console beeps twice.
5
Repeat steps 2 through 4 for each voice terminal you want to restrict.
MERLIN Plus &stem Features
5-37
6
Leave administration mode by sliding the TIP switch to the center
position.
Use the reset restriction code to ensure the integrity of assigned call
restrictions:
1
Enter administration mode by sliding the TIP switch to P and touching
Administer.
2
Dial *11 plus the line button you want to reset.
Green light on = line is restriction reset.
Green light ofi = line is not restriction reset. (System default.)
3 Touch Administer.
The console beeps twice.
4
Leave administration mode by sliding the TIP switch to the center
position.
PROGRAMMING
None
HOW TO USE
Ask your system administrator what call restrictions, if any, he or she has
assigned to your voice terminal.
DESCRIPTION
The Centralized Programming feature allows the system administrator the
convenience of programming features onto individual voice terminals directly
from the administrator/attendant console. In this way there is no need to go
to each voice terminal to do the programming. This feature is useful when
the administrator is assigning Ringing Options for incoming calls.
CONSIDERATIONS
The system administrator must be certain that the appropriate feature buttons
on the voice terminals are accurately labeled.
The voice terminal being programmed must be idle. If the voice terminal is
busy or in program mode, the administrator hears a beep at the
administrator/attendant console, indicating that he or she cannot use this
feature until the voice terminal is idle again.
This feature cannot be used to program station 10.
5-36
MERLIN Plus System Features
The system administrator can use the Program Mode Lock feature to prevent
people within the system from changing programming assignments on their
voice terminals. (See “Program Mode Lock.“)
ADMINISTRATION
If your responsibilities do not include system administration, skip this
information.
To program a feature onto a voice terminal from the administrator/attendant
console:
1
Enter administration mode by sliding. the TIP switch to P and touching
Administer.
2
Touch the Auto Intercom button or dial the intercom number for the voice
terminal you want to program.
2 Touch Conference.
Green lights go on next to the line buttons of lines already assigned to the voice terminal.
4
Follow the same steps to program the feature that you would follow if you
were at the voice terminal.
6
When you are finished programming the features for that voice terminal,
touch Conference again.
6
Leave administration mode by sliding the TIP switch to the center
position.
I
1
M
1
.P
4
T
.P
PROGRAMMING
None
HOW TO USE
None
DESCRIPTION
When you want people outside the MERLIN Plus system to join a call in
progress, you can use the Conference feature. You can set up a conference
call that includes up to two people from outside the MERLIN Plus system, up
to two people within the system, and yourself, a total of five people.
CONSIDERATIONS
People connected to the MERLIN Plus system can bridge onto an outside line
that is active on the conference call unless one of the participants has
activated the Privacy feature. However, when the maximum configuration of
three people within the system and two from outside is reached, attempts to
add more people will be denied.
Use the Drop button followed by touching the appropriate line button when
MERLIN Plus Svstem Features
5-39
you want to selectively disconnect one outside line at a time from a
conference call. (See “Drop.“) If you press the switchhook, you may end the
conference call.
You cannot use the Conference feature for outside lines on a voice terminal
with Button-Free Line Operation.
If you attempt to add to a conference call a voice terminal that is busy on an
another call, you will hear busy tones, and the call is automatically dropped
in 15 seconds. If the voice terminal does not answer, you can drop the call by
touching Drop without disconnecting the person who is already a part of the
conference.
ADMINISTRATION
None
PROGRAMMING
None
HOW TO USE
To set up a conference call when one outside line is already on the call:
1
Touch Conference.
2
Touch a free line button.
3
Dial the outside number of the person you want to add to the conference
call.
If you don’t want the person already connected to listen while you connect
the second person to the call:
1
Touch Hold.
2
Touch a free line button.
3
Dial the outside number of the second person you want to include in the
conference.
4
Announce the conference call through your speaker or handset.
5 Touch Conference.
6
Touch the line button for the line that you put on hold.
To rejoin the call
1
5-40
MERLIN Plus Svstem Features
Touch a line button associated with the call.
To disconnect one participant from the call:
1 Touch Drop.
2
Touch the button of the line you want to disconnect.
To add someone inside the system to the conference call:
1
Dial the person’s intercom number to request that he or she pick up the
line that the conference call is on. (See “Intercom. “)
DESCRIPTION
If there are two or more voice terminals that require identical feature
assignments, the system administrator can use the Copy feature to copy the
line and programmable feature assignments from one voice terminal onto
another.
CONSIDERATIONS
When the administrator uses the Copy feature, the MERLIN Plus system
copies the line assignments from one voice terminal to the other. Feature
assignments are always overwritten by lines.
Several other features are also copied during the Copy process: Ringing
Options, Voice Announcement Enable/Disable, Automatic Line Selection,
Personalized Ringing, Button-Free feature, and Call Restrictions except for
Allowed Lists.
The “System Answer” button programmed for the System Answer feature
cunnof be copied. If attempted, the corresponding button on the voice terminal
you are copying to will be blank.
If you have a 5-button voice terminal, you cannot copy any lines or features
onto a larger voice terminal, or vice versa.
Except for the 5-button voice terminal, the administrator can copy the lines
and features from any small voice terminal onto a larger voice terminal. If
you are the system administrator, you might want to copy the button
assignments from a BIS-10 onto a BIS-22 voice terminal for example. You can
also copy from a large voice terminal to a smaller voice terminal. However, if
you copy lines or features from a large voice terminal onto a smaller voice
terminal, such as from a BIS-34 to a BIS-22, the system copies only those lines
and/or features for which there are corresponding buttons on the smaller
voice terminal. For example, in copying the lines and features from a BIS-34
voice terminal onto a BIS-22 voice ‘terminal, the system copies only those lines
MERLIN Plus Svstem Features
5-41
and/or features assigned to the three left columns of buttons (the first 22
buttons) of the BIS-34 voice terminal. The rightmost column of buttons on
the BIS-34 voice terminal will not be copied onto the smaller voice terminal.
Be sure to label the buttons on the voice terminal to which lines or features
have been copied.
If any voice terminal in the system is active on a call, you must wait until it is
idle before you can use Copy.
If your responsibilities do not include system administration, skip this
information.
ADMINISTRATION
To copy line and feature assignments from one voice terminal to another:
Enter administration mode by sliding the TIP switch to P and touching
Administer.
Touch the Auto Intercom button or dial the intercom number of the voice
terminal to which you want to copy line assignments.
Touch Copy.
Touch the Auto Intercom button or dial the intercom number of the voice
terminal from which you are copying line assignments.
Touch Administer.
The console beeps twice.
Leave administration mode by sliding the TIP switch to the center
position.
Be sure to label the new line assignments on the voice terminal to which
you did the copying.
PROGRAMMING
None
HOW TO USE
None
--
.
.--.
.
-.
^
-
DESCRIPTION
The system administrator can assign lines to any voice terminal in any order,
or choose not to assign particular lines to a voice terminal. The administrator
can use Customized Line Assignment if he or she wants to assign lines or
groups of lines to selected voice terminals with similar requirements for
placing and receiving calls. For example, this might include people within a
particular department who need the same line assignments as each other, but
different from line assignments of people in other departments. The
administrator can also assign personal lines so that no one else in the system
has access to them. (See “Personal Lines.“)
CONSIDERATIONS
If a person in a system with Customized Line Assignments does not have a
particular line assigned to his or her voice terminal, he or she can pick up a
ringing call on that line by using the Call Pickup feature. (See “Call Pickup.“)
If two or more voice terminals in the system will have the same line
assignments, the administrator can use the Copy feature to copy the line
assignments from one voice terminal to another. (See “Copy. “)
A line jack with nothing plugged into it is called a nonequipped line
appearance, or ‘ghost line. ’ To eliminate ghost lines, the administrator must
specify how many lines the system contains by using the administration
procedure below.
ADMINISTRATION
If your responsibilities do not include system administration, skip this
information.
Specifying the Number of Lines in Your System
When the administrator first sets up the system, he or she must specify the
number of lines in the system.
1
Enter administration mode by sliding the TIP switch to P and touching
Administer.
2 Dial *4.
3
Dial a number (1 through 8) that corresponds with the number of lines in
your MERLIN Plus system.
For example, if the system contains six lines, the administrator dials *4
and then 6 or *46.
4 Touch Administer.
The console beeps twice.
5
Leave administration mode by sliding the TIP switch to the center
position.
MERLIN Plus Svstem Features
s-43
Assigning Lines to Voice Terminals
Before you assign lines to voice terminals in your system, refer to the Line
Assignments Form that you have filled out.
To assign lines to a voice terminal:
Enter administration mode by sliding the TIP switch to P and touching
Administer.
Touch the Auto Intercom button or dial the intercom number for the voice
terminal that you are administering.
A green light goes on next to the Auto intercom button. Green lights also go on next to
the buttons of any lines already assigned to the voice terminal.
Touch all of the line buttons that have a light next to them.
The green light next to each line button goes off.
Touch all the line buttons again, this time in the order that you want them
to appear on the voice terminal. If you want to reserve a button(s) for
feature programming, touch that button(s) last.
Green lights go on next to the line buttons you touch.
Touch Administer.
The console beeps twice.
If you reserved a button(s) for feature programming:
b
Touch the button(s) that you want to be used for feature programming
again.
Green light goes off next to the button you touch.
Leave administration mode by sliding the TIP switch to the center
position.
PROGRAMMING
None
HOW TO USE
The system administrator assigns lines to buttons for the whole system and
for individual voice terminals. Be sure that the lines that you have access to
are labeled on your voice terminal.
NOTE:
G-AA
MFRI IN PIIIS Svstem Features
Direct Extension Dialing (DXD) is an ASA feature and therefore,
requires the assignment of the ASA jack. If the ASA jack assignment
has not yet been made, refer to “Automatic System Access” in this
section before attempting to administer this feature.
DESCRIPTION
When you put the system in DXD mode, the control unit acts like an
automated attendant. Incoming calls on designated lines are connected to the
Voice Synthesis Processor (VSP) for the following message prompt:
“Please dial desired extension number. ”
When the caller dials the extension number (the 2-digit intercom number), the
control unit transfers the call to that extension and the caller hears the
following message:
” Please hold. ”
You can also modify the voice message, so that callers first hear the number
they’ve reached, followed by the request for the extension number:
“You have reached [number]. Please dial desired extension number.”
CONSIDERATIONS
Direct Extension Dialing requires the following:
l
A programmed button (with green and red lights) labeled CFlDXD
You use the CFlDXD button to activate either Call Forwarding or Direct
Extension Dialing. To put the system in either of these modes, or in
normal mode, you touch the CFlDXD button. The green and red lights
show you what mode you’re in.
b
If the system is in normal mode touch the button once to put the
system in DXD mode.
Green and red lights off = Normal mode
Only green light on = DXD mode
Green light flashing = Problem with DXD;
call your system administrator
Only red light on = CF mode
b
l
Touch the button three times to put the system back into normal mode
(both the green and red lights are off).
A synthesized voice message
This message is automatically supplied by the VSP in the control unit.
The administrator can modify the message to add the telephone number
that the callers have contacted.
l
That one jack on the control unit be dedicated to the ASA features
At startup, jack number 18 is automatically designated as the ASA jack.
An Auto Access cord that you plug into this jack is connected to the
memory module which houses the VSP. If you want to change this jack
assignment, follow the simple administration procedure discussed under
“Automatic System Access” earlier in this section.
0 Its own incoming line group.
The feature’s operation includes only calls coming in on lines assigned to
the DXD incoming line group. Calls coming in on lines not in the DXD
incoming line group are not answered by the DXD feature. At startup, no
lines are assigned to the DXD incoming line group. There’s a simple
procedure (discussed under “Administration”) for changing the makeup of
the DXD incoming line group.
CF and DXD are mutually exclusive modes: the system cannot be in both
modes at the same time.
There can be more than one CFlDXD button in the system, but there can be
only one CFlDXD button on a voice terminal. If two or more users have a
CFlDXD button programmed on their voice terminals, each of them can turn
the features on and off. For example, if one of these users activates the Direct
Extension Dialing feature, the green light goes on next to the CFlDXD buttons
on all the voice terminals that have a button for the feature. When the
person deactivates the feature by touching the CFlDXD button, the light goes
off next to the button at all the voice terminals that have programmed the
CFlDXD features.
You should consider having a Transfer Return Interval if you plan to use
DXD. (See “Transfer Return Interval.“) Depending on the incoming call
traffic, you may also want to designate an alternate attendant position to
handle all returning ASA calls. (See “Alternate Attendant. “)
When a caller responds to the voice prompt by entering an intercom number,
the control unit uses the system’s transfer feature to transfer the call to the
voice terminal with that intercom number. If the call goes unanswered at the
destination voice terminal and there is an administered Transfer Return
Interval, the call is transferred to the administrator/attendant or the alternate
attendant console when the interval expires.
If the system is administered for no return of transferred calls, the call
continues to ring at the destination voice terminal until the caller hangs up.
If a compatible audio-source is available, Music-On-Hold is recommended for
DXD, so that the caller can hear music while waiting. See “Music-On-Hold”
under “Accessory Equipment” later in this section.
If the system is in both DXD and Remote Line Access modes and the lines
overlap, DXD takes precedence.
ADMINISTRATION
If your responsibilities do not include system administration, skip this
information.
DXD Line Groups
At startup, rzone of the system’s outside lines are assigned to each ASA line
group. You need to assign which lines you want to designate for DXD.
1
Enter administration mode by sliding the TIP switch to P and touching
Administer.
2
Dial *58 for a DXD incoming line group.
3
Touch the line buttons until the green lights show the makeup you want
for the line group.
Green light on = line is assigned to the group
Green light ofi = line is not assigned to the group
4
Touch Administer.
The console beeps twice.
KAC;
MFRI IN Ph IR Svstem Fent~lrnn
3
Leave administration mode by sliding the TIP switch to the center
position.
Number of Rings
To change the number of rings (the default is two rings) before the DXD call
is answered:
1
Slide the TIP switch to P and touch Administer.
2
Dial *761 plus the number of rings (between 0 and 9) before call is picked
UP*
NOTE: If the number of rings is set to 0, the voice terminal will not ring,
and the calls will be answered immediately.
3 Touch Administer.
The console beeps twice.
4
Leave administration mode by sliding the T/P switch to the center
position.
You can modify this message to include the following statement:
“You have reached mm.. ’
where nnn.. . is the telephone number of one of your outside lines. The
number can be up to 16 digits, including * or # . You can modify the
message for all lines in an incoming line group, or you can modify the
message for some and leave others unmodified. To modify the DXD message
for one or more lines in your incoming line groups, do the following:
1
2
3
Enter administration mode by sliding the TIP switch to P and touching
Administer.
Dial *50.
Touch the line button for the line on which you want the modified
message.
The green light goes on.
4
Dial the telephone number you want to include in the message.
NOTE:
For special phone numbers, such as an 800 number, you may
prefer to have the recorded voice say “Eight hundred” followed
by the number, instead of “Eight, zero, zero.” In this case, you
would touch Hold to enter a pause after the toll prefix, then
again after the 800 area code, and again after the exchange. For
example, l-800-555-1212 would be entered as follows:
1 Hold 800 Hold 555 Hold 1212
MERLIN Plus System Features
5-47
5
6
Repeat for other lines.
Touch Administer.
The console beeps twice.
7
PROGRAMMING
Leave administration mode by sliding the TIP switch to the center
position.
A button with a red and green light next to it is required for the DXD
features.
To program a CFlDXD button on a voice terminal:
1
Label the button CFIDXD.
2
Slide the TIP switch to P.
3
The voice terminal rings every 5 seconds to remind you that you’re programming and that
you can’t place OY receive calls.
Touch the button you want to program.
4 Dial *83.
5
HOW TO USE
Slide the T/P switch to the center position.
Using the CF/DXD Button
Touching the CFlDXD button repeatedly cycles the system through DXD, CF,
and normal modes. The red and green lights next to the CFlDXD button will
help you recognize which mode the system is in.
Green and red light off = Normal mode
Only green light on = DXD mode
Only red light on = CF mode
DESCRIPTION
Most businesses find it inappropriate for their employees to make billable calls
to numbers such as those beginning with the “976” exchange or the ’ 900”
area code, for services such as, comedy, weather, sports, lottery, and
chatlines. The Disallowed List feature enables you to deny access to up to 20
area codes, exchanges, and entire numbers, even on unrestricted lines.
If a voice terminal has been assigned a disallowed number, any attempt to
dial that number will not go through. As soon as the dialed digits match any
complete disallowed number, dialing is blocked. The only exception to this is
e .m LICC), Ihl lm**- C. ,,.+rrm Cnn,, ,..A_
if a System Speed Dial number with Restriction Override matches a number
on the Disallowed List, the number will go through. (see “System Speed
Dial” for more details.)
CONSIDERATIONS
The Disallowed List can contain 20 numbers up to 16 digits each. This allows
you to deny access to virtually any number combination, including area
code/exchange, and foreign numbers. You can enter “wild card” digits
(which are pauses in the administration procedure) by touching the Hold
button. The pauses can be used to represent any area code or combination
you require. For example, to prevent calls to the “976” exchange in any state,
the disallowed number would be entered as 1 Hold Hold Hold 976 or 0 Hold
Hold Hold 976.
You cannot dial a number on an Allowed List if it matches a number on the
Disallowed List. For example, if 976-3535 is on the Allowed List, but the 976
exchange is on the Disallowed List, the number will not go through.
ADMINISTRATION
If your responsibilities do not include system administration, skip this
information.
As you administer a Disallowed List to your system, refer to the Disallowed
List Form you completed in Section 2.
To set up a Disallowed List:
1
Slide the TIP switch to P and touch Administer.
2
Dial *09 followed by the Disallowed List code (01 to 20).
3
Dial the disallowed number (up to 16 digits). If the number includes wild
card digits, touch Hold once for each wild card digit.
4 Touch Administer.
The console beeps twice.
5
Leave administration mode by sliding the TIP switch to the center
position.
To assign Disallowed List to voice terminals:
1
2
3
Slide the TIP switch to P and touch Administer.
Dial *0900.
Touch the Auto Intercom button or dial the appropriate code from the
table below for the voice terminal you want to assign the Disallowed List.
If you want to prevent all voice terminals in the system from dialing the
number, touch Conference. To remove all voice terminals from a
disallowed number assignment, touch Drop.
Green light on = Disallowed List assigned.
Green light of = Disallowed List not assigned.
MERLIN Plus Svstem Features
5-49
If the intercom
number is:
Dial this code:
If the intercom
number is:
Dial this code:
Intercom 10
#22
Intercom 20
#03
Intercom 11
#21
#20
#19
#18
#17
#16
#15
#14
#13
Intercom 21
Intercom 26
#04
#05
#06
#07
#08
#09
Intercom 27
#lO
Intercom 28
#11
Intercom 29
#12
Intercom 12
Intercom 13
Intercom 14
Intercom 15
Intercom 16
Intercom 17
Intercom 18
Intercom 19
Intercom 22
Intercom 23
Intercom 24
Intercom 25
4 Touch Administer.
The console beeps twice.
5
Leave administration mode by sliding the TIP switch to the center
position.
To remove a number from a Disallowed List:
1
Slide the TIP switch to P and touch Administer.
2
Dial *09 followed by the Disallowed List code (01-20) that you want to
remove.
3 Touch Administer.
4
Leave administration mode by sliding the TIP switch to the center
position.
DESCRIPTION
Some 34-Button speakerphone voice terminals, namely, the BIS-34D and the
34-Button (SP-34D) voice terminal with display, are equipped with a display
unit. You can also purchase one separately and add it later to a 34-Button
(SP-34) voice terminal. To order the Display Unit, call the AT&T National
Sales Parts Center’s tollfree number, l-800-222~PART, and ask for order
number 105400030 (for black BE-34 voice terminals).
The display provides information that helps you handle calls and program
your voice terminal more easily. For example, when you dial a number or
touch an Auto Intercom button, or when you receive an intercom call or a
returned transfer call, the number associated with the call appears on the
display screen. When you are programming a button, the display unit can
help you check if the button has a feature already programmed onto it. If you
have not yet programmed a feature on the button, the word “blank” appears
on the display screen.
FIGURE 5-2 Operating Display Unit Timekeeping Features.
CONSIDERATIONS
You can also use the display unit for providing an alarm, timing calls that you
place or receive, and displaying the time, day, and the date. See Figure 5-2.
To adjust the clarity of the display screen characters, turn the contrast
thumbwheel until the numbers and letters are clear.
Only the numbers for incoming intercom calls are displayed on the screen;
the display unit does not show the identification of incoming calls from
outside the system.
When the display is idle, the screen shows the time, day, and date.
The information appears on the screen for a maximum of 10 seconds. If you
disconnect a call or touch another display option button, such as the
Time/Timer button, before the 10 seconds are over, the display is replaced
with the time/date display.
Dial the numbers and characters of your calls slowly so that the display unit
can place them correctly on the screen.
MERLIN Plus Svstem Features
5-51
ADMINISTRATION
None
PROGRAMMING
None
HOW TO USE
To use the four features associated with the display unit, follow the
instructions on the next few pages.
Received Call ID
When you receive an intercom call, the 2digit intercom number of the person
calling you appears on the screen, as shown below.
23--On Intercom
When you transfer a call to another voice terminal and the call is unanswered,
the call returns to your voice terminal. The 2-digit intercom number of the
voice terminal from which the call is returning appears on the screen.
Trans Return--l8
Program Mode
When you begin programming, the display tells you that you are in the
program mode and the intercom number of your voice terminal you are
programming.
Program Mode 16
If you touch a button that has already been programmed, the display
identifies the name of the feature on that button. The example below shows
that the Last Number Redial feature has been programmed on the button you
have touched.
If the button has not been programmed, the message below appears on your
display screen.
1 Blank 1
If you touch a preassigned, or nonprogrammable button, such as Conference
or Hold, the following message appears on the display screen:
1 Not Programmable (
01
5-52 MERLIN Pius Svstem Features
NOTE:
You can use nonprogrammable buttons, such as Hold or Recall to
enter a special character, such as a pause or a stop, into a dialing
sequence.
Number Dialed
When you dial outside, intercom, or account numbers, or touch a button that
contain numbers, such as an Outside Auto Dial, Auto Intercom, Last Number
Redial, or Saved Number Redial button, the digits associated with that button
are printed on the display screen.
1 5551234 )
The combined display screens in the Display Number Dialed feature can
contain up to 16 digits. (It does not set the time and date for the Call Report
and System Feature Report features.)
Time-Keeping Features
The time-keeping features of the display unit allow you to set an alarm, clock,
calendar, and timer.
l
Setting the Clock and Calendar
Clock/calendar display screen
12:Oia
Su
l-01 *
Alarm on
Indicator
4 Clock + + Calendar +
To set the time, day, and date on the display screen:
a
Press Set until the item you want to change flashes.
b
Press Fwd or Rev to advance or reverse the time, day or date.
c
When you are finished, press Exit.
0 Setting the Alarm
Alarm setting display screen
ALARM: Off
12:oo p
+ Alarm +
status
Alarm set for
12:00 p.m.
To set the alarm (for example, when you want a reminder that you have a
meeting in five minutes):
a
Press Set until the item you want to change flashes.
b
Press Fwd or Rev to advance or reverse the time until the display
shows the time you want the alarm to sound.
c
When you are finished, press Exit.
MERLIN Plus Svsttem Features
5-53
l
Operating the Timer
Timer display screen
12:03a
0o:oo
+ Clock &
+ Timer)
To operate the timer for calls you need to time: Press Time/Timer (to
display timer).
a
Press Timer Start to turn the timer to 0O:OO and start it.
b
When you are finished using the timer, press Timer Stop.
When you want to return to the Clock/Calendar display, which shows the
time, day, and date:
l
Press Time/Timer.
When you want to return to the call handling display:
l
DESCRIPTION
Press Time/Timer.
When you are busy and do not want to receive calls, you can touch the Do
Not Disturb button, if you have programmed one onto your voice terminal.
When you receive outside calls, the green light next to the line button flashes,
but your voice terminal does not ring.
Calls transferred to you return to the sender, and intercom calls get a busy
signal.
When you activate the Do Not Disturb at your voice terminal, the green light
goes on next to your Auto Intercom button at other people’s voice terminals.
Calls you transfer will return to you if they are unanswered.
CONSIDERATIONS
ADMINISTRATION
None
PROGRAMMING
The Do Not Disturb feature requires a button with lights.
To program a Do Not Disturb button for your voice terminal:
1
Label the button Do Not Disturb.
2
Slide the TIP switch to P.
The voice terminal rings every 5 seconds to remind you that you are programming and that
you cannot place or receive calls.
,. CI
3
.,F”, ,111 l-v..- CT..-I^-- I-^^* .._^^
Touch the button you want to program.
4 Dial *71.
5
HOW TO USE
Slide the TIP switch to the center position.
To prevent calls from ringing at your voice terminal:
1
Touch Do Not Disturb.
The green light next to the button goes on.
This feature remains active until you:
1
Touch Do Not Disturb again.
The green light next to the button goes ofi
DESCRIPTION
If you get a busy signal or no answer as you set up a conference call, or if
you want to disconnect one outside line at a time from a conference call, use
the Drop feature. For more information about using this feature,
see ‘Conference. ”
CONSIDERATIONS
If you press the switchhook, you may disconnect everyone on the conference
call.
In order for a person within the MERLIN Plus system to be disconnected
from the conference, he or she must hang up.
ADMINISTRATION
None
PROGRAMMING
None
MERLIN Plus System Features
5-55
To disconnect one outside line at a time from a conference call:
HOW TO USE
1 Touch Drop.
2
Touch the button of the line you want to disconnect.
DESCRIPTION
If you want other people in your office to hear a call, you can turn on your
voice terminal speaker. Everyone can then hear the voice of the other person
on the call without that person being aware that the call is on a speaker.
CbNSlDERATlONS
This feature is not available on the BIS model voice terminals.
Your speaker may make a squealing noise when the handset comes close to
it. To prevent this noise, touch Speaker when you have completed a call and
are ready to hang up your handset. Another way to reduce the squealing
sound is to turn down the volume control on your voice terminal.
ADMINISTRATION
None
PROGRAMMING
None
HOW TO USE
To allow others to hear a call:
1
--
.--.
.
-.
-
-
Without hanging up, touch Speaker and continue your conversation.
DESCRIPTION
The system administrator can set up Group Page groups so anyone in the
system can use the Group Page feature to page up to 20 people at a time
directly through the voice terminal speakers.
You can have up to three paging groups. The Page-All group consists of all
voice terminals in the system; groups 1 and 2 can have up to 20 voice
terminals in each group.
CONSIDERATIONS
If necessary, one voice terminal can be assigned to more than one paging
group*
You can program buttons for the groups you want to page. Or, you can save
available feature buttons for other uses and use a dial code for this feature.
If someone in the Group Page group picks up the handset during a Group
Page announcement, he or she is connected to the person making the
announcement, and the page announcement is terminated.
When someone in the MERLIN Plus system has activated the Voice
Announcement Disable feature for his or her voice terminal, he or she cannot
hear a Group Page announcement.
ADMINISTRATION
If your responsibilities do not include system administration, skip this
information.
When the system is first set up, the system has the following Group Page
groups:
Group 1 = voice terminals 10 through 19
Group 2 = voice terminals 20 through 29
Page-All = voice terminals 10 through 29
If these group assignments are not satisfactory for the system, the
administrator can add or delete voice terminals from the individual groups.
The Page-All group, the paging group containing all the voice terminals in the
system, cannot be administered.
Before you begin to administer Group Page groups, refer to “Paging Groups”
on your “System Configuration Form. ’ Then use one of the following
procedures to add or remove a voice terminal from a paging group:
To administer the Group Page feature, follow this procedure:
1
2
Enter administration mode by sliding the TIP switch to P and touching
Administer.
Dial *71 for group 1 or *72 for group 2.
A green light goes on next to the Auto Intercom button, if you have one, of any voice
terminal already assigned to that paging group.
..--.
._.
-.
^
-
- --
3
Perform the appropriate procedure:
b
Touch the appropriate Auto Intercom button(s) until the green light
beside it shows the paging group assignment you prefer.
Green light on = voice terminal is assigned to the group
Green light off = voice terminal is not assigned to the group
w
If you do not have an Auto Intercom button for the voice terminal you
want to add or remove from the paging group, dial a code from the
chart below that corresponds with the voice terminal.
If the intercom
number is:
Dial this code:
If the intercom
number is:
Dial this code:
Intercom 10
#22
Intercom 20
#03
Intercom 11
#21
Intercom 21
#04
Intercom 12
#20
Intercom 22
#05
Intercom 13
#19
Intercom 23
#06
Intercom 14
#18
Intercom 24
#07
Intercom 15
#17
Intercom 25
#08
Intercom 16
#16
Intercom 26
#09
Intercom 17
Intercom 27
#lO
Intercom 18
#15
#14
Intercom 28
#ll
Intercom 19
#13
Intercom 29
#12
4 Touch Administer.
The console beeps tzoice.
5
Follow steps 2 through 4 for each paging group you want to administer.
6
Leave administration mode by sliding the TIP switch to the center
position.
If you want to clear all entries from group 1 or from group 2:
1
Enter administration mode by sliding the TIP switch to P and touching
2
Dial *71 for group 1 or *72 for group 2.
Administer.
3 Touch Drop.
4 Touch Administer.
The console beeps twice.
5
Leave administration mode by sliding the TIP switch to the center
position.
To program a Group Page button for your voice terminal:
1
Label the button Group Page plus a group number.
2
Slide the TIP switch to P.
;
The voice terminal rings every 5 seconds to remind you that you are programming and that
you cannot place or receive calls.
3
Touch the button you want to program.
4
Dial *91 plus a Group Page code:
70 = Page-All (all voice terminals in the system)
71 = group 1
72 = group 2
5
Slide the TIP switch to the center position.
q
1
HOW TO USE
l
54
1
P
.P
You can use a programmed button or a dial code to access this feature.
To use a Group Page button to make an announcement through a group of
voice terminal speakers:
1
Touch the Group Page button for the group you want to page.
2
When you hear a beep, lift your handset and make the announcement.
NOTE:
If you don’t lift your handset to make the announcement and
another BIS terminal is nearby, you may hear a loud squeal from
your voice terminal.
To page a group using a dial code:
1 Touch Intercom.
2
Touch Speakerphone or lift your handset.
..rn,
1k1 n,..- m..-r--
r--l...--
c c1
3
Dial the code for the group you want to page:
70 = Page-All (all voice terminals in the system)
71 = group 1
72 = group 2
4
When you hear a beep, begin speaking.
DESCRIPTION
If you are using a voice terminal that has a Hands-Free Answer on Intercom
(HFAI) button on it, without lifting your handset, you can touch the HFAI or
HFAIlMic button when you want to answer intercom calls hands free. You
will hear the other person’s voice through your voice terminal speaker.
CONSIDERATIONS
The HFAI feature can only be used for intercom calls, not outside calls. It is
not for use with group paging calls. When you turn on the HFAI feature, the
green light next to the button goes on. For optimal use of the HFAI feature
and speakerphone voice terminals, follow these guidelines:
l
Place the voice terminal in an area with low background noise.
Room acoustics and background noise may affect the proper operation of
your voice terminal’s speakerphone. High background noise is caused by
loud voices and loud electronic devices (radios, typewriters, etc.).
l
Keep the area near the microphone free of books and papers.
0 Let one person talk at a time. When both parties speak at the same time,
transmission can be broken.
l
l
Always face your terminal when talking.
Place your voice terminal at least six inches away from the edge of the
desk or table upon which it rests.
NOTE:
l
If you are having difficulty hearing the other person, increase the
speaker’s volume level. (Refer to CIB 3078, “Adjusting the
Volume Control Switch on Your Voice Terminal” for further
information.)
Certain conditions may cause difficulty with the speakerphone to persist.
If raising the volume level on the speaker does not help, (see NOTE
above), lift the handset to continue the conversation.
If you use the Voice Announcement Disable feature on a voice terminal with
HFAI, you deactivate the HFAI feature.
ADMINISTRATION
None
PROGRAMMING
None
HOW TO USE
If you have a HFAI button on your voice terminal and you want your
intercom calls answered automatically:
1
Touch HFAI or touch HFAIIMic.
The green light flashes on BIS-IO and IO-Button HFAl models when active on a call and
remains steady on all other BIS models.
DESCRIPTION
When you need to put someone on hold, use the Hold feature.
CONSIDERATIONS
Before placing an intercom call on hold that has been answered using the
HFAI feature, lift the handset or the call wiIl be disconnected.
When you leave a call on hold for more than a minute, your voice terminal
rings at one minute intervals to remind you the call is still on hold.
You can program an Exclusive Hold button so that no other voice terminal
can pick up a call you’ve put on hold. For more information about the
Exclusive Hold feature, see the entry for “Hold-Exclusive” in this section.
If a caller placed on hold hangs up, the system will automatically drop the
line. If the light continues to flash after a caller has hung up, the Hold
Disconnect Interval may be too long (450 milliseconds) for the local telephone
company to detect. See “Hold Disconnect Interval” for information to correct
this problem.
ADMINISTRATION
None
PROGRAMMING
None
HOW TO USE
To place a call on hold:
1
2
If the call was answered using the HFAI feature, lift the handset.
Touch Hold.
When yoou put a call on hold, the green light next to the call’s line button
flashes rapidly. If someone else puts a call on hold from another voice terminal,
the green light flashes slowly next to the call’s line button on your voice
terminal.
To take a call off hold:
1
Touch the call’s line button.
The green light becomes steady.
DESCRIPTION
Telephone company central offices use either a “short” (50 millisecond) or a
“long” (450 millisecond) disconnect interval. Because most switching systems
use a long interval, your MERLIN Plus system is factory-set for a long
interval. If your telephone company uses a short interval, or if your MERLIN
Plus system has been reprogrammed, the disconnect interval for your system
‘may cause problems with held calls.
CONSIDERATIONS
If your system has either of the following problems, the system administrator
must change the Hold Disconnect Interval:
l
l
If a caller waiting on hold is disconnected, the disconnect interval setting
of your MERLIN Plus system is shorter than the setting at your local
telephone company’s central office.
If a caller waiting on hold hangs up, but the light next to that line
continues to flash as if the call was still on hold, the disconnect interval
setting of your MERLIN Plus system is longer than the setting at your
local telephone company’s central office.
You can perform a quick test to see if you need to change the interval from
450 milliseconds to 50 milliseconds. Make an outside call to someone who
would be willing to help you for a few minutes. Ask them to hang up the
phone ten seconds after you put them on hold. When they’re ready, put the
call on hold. If the call is not dropped within a few minutes, the Hold
Disconnect Interval needs to be administered to 50 milliseconds.
ADMINISTRATION
If your responsibilities do not include system administration, skip this
information.
To change the disconnect interval of your MERLIN Plus system to match the
central office disconnect interval:
1
Enter administration mode by sliding the TIP switch to P and touching
Administer.
2
Dial the 3-character code *69.
5-62 MERLIN Plus Svstem Features
3
Touch each line button to change its disconnect interval. Each touch of the
button gives you one of the following codes:
Steady green light on = line has long disconnect interval
Green light off = line has short disconnect interval
4 Touch Administer.
5
Leave administration mode by sliding the TIP switch to the center
position.
cl
I cl
555-1234
q
PROGRAMMING
None
HOW TO USE
None
DESCRIPTION
By programming the Exclusive Hold feature onto a button, you can put an
outside caller on Exclusive Hold, which means that no one else at another
voice terminal in the system can pick up the held call.
CONSIDERATIONS
This feature must be programmed on a button with a green light.
To place a call on normal hold, after it’s been placed on Exclusive Hold, or
vice versa, you must reconnect with the caller before touching the hold
button.
When you leave a call on Exclusive Hold for more than one minute, your
voice terminal rings at one minute intervals to remind you that the call is on
hold.
ADMINISTRATION
None
PROGRAMMING
You need a button with a green light to program an Exclusive Hold button:
1
Label the button “Exclusive Hold.”
2
Slide the TIP switch to P.
3
The voice terminal rings every five seconds to remind you that you are programming and
you cannot place or receive calls.
Touch Exclusive Hold.
4 Dial *77.
MERLIN Plus Svstem Features
5-63
5
HOW TO USE
Slide the TIP switch to the center position.
To put an outside call on hold so no one else in the system can pick up the
call:
1
Touch Exclusive Hold.
The green light next to the line button of the held call flashes rapidly to remind you that
the call is on hold.
2
If a call has been on Exclusive Hold for more than a minute, your voice
terminal will ring once every minute to remind you that the call is waiting.
To pick up the call that you have put on Exclusive Hold.
1
Touch the line button of the held call.
To place a call on normal hold after it’s been placed on Exclusive Hold:
1
Touch the line button of the held call.
2 Touch Hold.
DESCRIPTION
If you do not have a line button for a call that you have received or that has
been transferred to you, you can still put it on hold using the Hold button.
However, to retrieve the call, you must use a dial code or program a Retrieve
Call button.
CONSIDERATIONS
To use this feature, you can either program a button or use a dial code.
This feature is especially useful for 5-Button voice terminals that may not have
line buttons for every incoming or transferred call.
S-64
MFRI IN PIIIS Svstem Features
If your system administrator has set your voice terminal for Button-Free Line
Operation, you should have a Hold Retrieve button on your voice terminal,
so that you can put calls on hold and retrieve them later. (See “Button-Free
Line Operation. “)
ADMINISTRATION
None
PROGRAMMING
To program a Hold Retrieve button for your voice terminal:
1
Label the button Retrieve Call.
2
Slide the TIP switch to P.
3
The voice ferminal rings every 5 seconds to remind you fhaf you are programming and fhaf
you cannot place or receive calls.
Touch the button you want to program.
4 Dial *95*.
5
HOW TO USE
Slide the TIP switch to the center position.
You can use a programmed button or a dial code to access this feature.
To put a call on hold:
1 Touch Hold.
You can use a programmed button or a dial code for the Hold Retrieve
feature.
To use a Retrieve Call button to retrieve a held call:
1 Touch Retrieve Call.
III
cl
Retrieve
El
Call
/[
MERLIN Plus System Features
5-65
To use a dial code to retrieve a held call:
1
Dial #*.
DESCRIPTION
Each voice terminal connected to the MERLIN Plus system has a unique 2digit intercom number. You can dial intercom numbers to place calls to
people connected to the system.
CONSIDERATIONS
In the MERLIN Plus system, you place an intercom call with a voice
announcement. Your co-worker hears your voice through the voice terminal
speaker, and can either touch Speakerphone or lift the handset to respond to
you.
I
However, if the person you are calling has activated the Voice Announcement
Disable feature, your intercom call rings rather than beeps at the person’s
voice terminal and you cannot give your voice announcement. (See “Voice
Announcement Enable/Disable. “)
If you program an Auto Intercom button for the intercom number you want
to call, you can dial the number with one touch. (See “Auto Intercom.“)
You cannot announce an intercom call to a person active on the voice
terminal’s speaker.
ADMINISTRATION
None
PRO.GRAMMlNG
None
HOW TO USE
To place an intercom call with a voice announcement:
1
2
5-66 MERLIN Plus System Features
Touch Intercom.
Touch Speakerphone or lift your handset.
3
Dial the 2-digit intercom number for the voice terminal you want to call.
4
When you hear a beep, begin speaking.
01
If you hear ringing, wait for the person to answer.
DESCRIPTION
Intercom Preference provides an intercom line immediately upon touching
Speakerphone or lifting the handset.
CONSIDERATIONS
If you are at a voice terminal that either has Intercom Preference or has no
outside lines assigned to it, you will be connected to an intercom line when
you touch Speakerphone or lift your handset.
NOTE:
This feature does not remove access to outside lines from the voice
terminal; outside lines can only be removed by the attendant at the
attendant console during administration. If you want to restrict
access to outside lines for a voice terminal located in a lobby or
public area, you would have to administer this restriction. However,
to provide the convenience of an intercom line immediately upon
pickup, use Intercom Preference.
ADMINISTRATION
None
PROGRAMMING
To program Intercom Preference:
1
Slide the TIP switch to P.
2 Dial ****.
3
Slide the TIP switch to the center position.
MFRI IN Phln Svstem Fnntlwen
S-67
HOW TO USE
If the voice terminal you are using has been programmed for Intercom
Preference, you will be connected to an intercom line when you either touch
Speakerphone or lift your handset.
DESCRIPTION
With a Last Number Dial button, you can redial with one touch the number
you dialed most recently. Each time you want this feature to redial a
number, you must touch the programmed Last Number Dial button. You do
not need to do anything to save this number.
CONSIDERATIONS
You may also use the Busy Buster feature to redial the number you dialed
most recently. The Busy Buster feature automatically redials at least ten times
the last number you dialed. If someone answers the call within this time,
your voice terminal alerts you. To use this feature, the system administrator
must have assigned the feature to a voice terminal jack on the control unit.
See “Busy Buster” earlier in this section for more information.
On BIS-10 and BIS-22 model voice terminals, the Personal Speed Dial code
#24 is pre-programmed as the default for Last Number Dial. (See “Personal
Speed Dial,” later in this section.)
The Last Number Dial can contain up to 16 digits.
The Last Number Dial feature saves manually dialed numbers and numbers
dialed with an Outside Auto Dial button.
If you make frequent calls to a few numbers, it may be more convenient for
you to use the Saved Number Dial feature to help you redial numbers
correctly. (See “Saved Number Dial. “)
ADMINISTRATION
None
PROGRAMMING
To program a button on your voice terminal for the Last Number Dial feature:
1
Label the button Last Number.
2
Slide the TIP switch to P.
The voice terminal rings every 5 seconds to remind you that you are programming and that
you cannot place or receive calls.
3
Touch the button you want to program.
4
Dial *73 (you do not need to dial an outside number).
5
Slide the TIP switch to the center position.
HOW TO USE
You can use a programmed button or a dial code to access this feature.
If you are using the Last Number Dial feature, you can follow this procedure
to have the system redial the last number you dialed:
1
Without touching Speakerphone or lifting your handset,
touch Last Number,
or dial #24 if you haven’t reprogrammed this as a personal speed dial
code.
Your voice terminal speaker goes on, and you hear dialing.
2
When you hear the other person answer, begin talking or lift your handset
and begin talking.
If the line is busy, or if no one answers:
1
Touch Speakerphone or hang up the handset to cancel the call.
If later you want the system to redial the number, touch Last Number, or dial
#24 again.
DESCRIPTION
The lights next to the line buttons on your MERLIN Plus system voice
terminal give you immediate status of any of your lines. There is also a light
next to the Message button, and, on most voice terminals, there is a light next
to the Speakerphone button.
The lights next to the feature buttons on your voice terminal indicate the
on/off status of the feature programmed on that button.
Lights
-
--
.
.--.
._.
-.
^
-
Line Status
Red light steady
This is either the line you are now
using or the line you will get when
you touch Speakerphone or lift your
handset.
Green light steady
This line is busy or the feature is
activated.
Green light flashing
This is the line on which a call is
coming in.
Green light flashing rapidly
This is the line of a call you have put
on hold.
Green light flashing slowly
This is the line of a call someone else has
put on hold from another voice
terminal.
Alternating flashing red and green
lights on a line you are using
Someone in the system has bridged
onto your call.
Green light on next to the Message
button
This means that the attendant has a
message waiting for you.
Green light on next to the
Speakerphone button
This means that the voice terminal
speaker is on. Without lifting the
handset, you can begin dialing, or you
can hear a conversation through the
speaker.
Green light on next to the HFAIlMic
button on a BIS-10 or lo-Button HFAI
voice terminal or next to the HFAI
button on any other BIS or HFAI voice
terminal
You can answer and speak to others
on intercom calls without lifting your
handset.
Green light on next to the
Speakerphone and Microphone buttons
on any BIS voice terminal
You can answer and speak to others
on all calls without lifting your
handset.
Green light on next to the Call
Forwarding/Direct Extension Dialing
(CFIDXD) button
The system is in DXD mode.
Red light on next to the CFlDXD button
The system is in CF mode
Green light on next to the Remote Line
Access (RLA) button
The system is in RLA mode
Green light on next to the System
Answer (SA) button.
The system is in SA mode.
CONSIDERATIONS
None
ADMINISTRATION
None
PROGRAMMING
None
HOW TO USE
None
DESCRIPTION
If any or all the lines that appear on your voice terminal are busy, you can
still request the use of one of these intercom or outside lines. When the line
becomes available, the system alerts you.
CONSIDERATIONS
If two or more people request the same line, the system places them in a
queue according to the sequence in which the people requested the line.
When the line is free, the system checks the queue, and the first person who
requested the line is alerted.
If the line is not used within 10 seconds after the voice terminal has received
the alert, the next voice terminal in the queue is alerted. This process is
repeated until the queue is empty.
If the voice terminal is idle, the red light goes on next to the line that was
requested. If the voice terminal is busy, the red light does not go on next to
that line.
The Line Request feature does not reserve a line. Anyone in the MERLIN
Plus system who has the line appearance can use the line when it is free.
ADMINISTRATION
None
PROGRAMMING
None
HOW TO USE
To request an intercom or outside line that is presently busy:
1
Touch the intercom or outside line button of the line you want to use.
The red light goes on next to the line button you requested.
2
The MERLIN Plus system signals you with a beep when the line becomes
free.
MFRI IN Ph,n SvdtPm Featlwes
G-71
DESCRIPTION
You may need to make an outside call at a time when you also need to leave
your primary line open for incoming calls. If your voice terminal has more
than one outside line, you can select a line other than your primary line for
an outside call.
CONSIDERATIONS
None
ADMINISTRATION
None
PROGRAMMING
None
HOW TO USE
To select a specific outside line:
1
Touch the button for the specific outside line you want to use.
2
Touch Speakerphone or lift your handset and dial.
The red light goes on beside the line you select.
cl
q
NOTE:
DESCRIPTION
555~1234pJ
This feature is used with an optional loudspeaker paging system and
is compatible with paging systems with talkback. Refer to
“Loudspeaker Paging System” under “Accessories” at the end of this
section for more information.
If you have a Loudspeaker Paging System connected to the MERLIN Plus
system, you can page people, make announcements, and provide background
music (if available) throughout the building.
You have two options:
1
You can connect the loudspeaker paging system to the Page Jack on the
front of the control unit.
2
You can connect the loudspeaker paging system to a CO (outside) line
jack on a line module and administer that jack as a paging port.
CONSIDERATIONS
Refer to “Loudspeaker Paging System” under “Accessories” at the end of this
section.
ADMINISTRATION
Refer to “Loudspeaker Paging System” under “Accessories” at the end of this
section.
PROGRAMMING
If your loudspeaker paging system is connected to the page jack on the
control unit, you can program a loudspeaker paging button to use instead of a
dial code whenever you want to page someone.
A button with lights is recommended for the Loudspeaker Page feature:
1
Label the button Loudspeaker Page.
2
Slide the TIP switch to P.
The voice terminal rings every 5 seconds to remind you that you are programming and that
you cannot place or receive calls.
3 Touch Loudspeaker Page.
4
Dial *91.
5 Dial 6.
6
HOW TO USE
Slide the TIP switch to the center position.
If your loudspeaker paging system is connected to a CO line, follow this
procedure:
1
Touch the loudspeaker page’s line button.
2
Follow the instructions provided with your loudspeaker page system.
If your loudspeaker paging system is connected to the page jack on the
control unit, you can use a programmed button or a dial code to access the
Loudspeaker Page feature.
To use a Loudspeaker Page button:
I Touch Loudspeaker Page.
2
When you hear the beep, lift your handset and make your announcement.
MERLIN Plus System Features
5-73
To use this feature by dialing a code:
1
Touch Intercom.
2 Lift your handset.
3 Dial 6.
4
When you hear a beep, make your announcement.
When you hang up, the loudspeaker turns off automatically.
DESCRIPJION
You can use a Manual Signaling button to generate a beep at a co-worker’s
voice terminal. Most often, this feature is used by a boss who wants to buzz
his or her secretary. Assign a Manual Signaling button to each person you
want to signal.
CONSIDERATIONS
You can signal someone with a Manual Signaling button while you have an
outside call in progress.
The beep sounds at your co-worker’s voice terminal even if it is busy.
If you program this feature on a button with lights, the green light next to the
button goes on when your co-worker uses his or her voice terminal or uses
the Do Not Disturb feature.
You cannot have both a Manual Signaling button and an Auto Intercom button
for the same person. If you try to program both, you deactivate the feature
that you programmed earlier. You can use either feature to place an intercom
call. (See “Auto Intercom. “)
ADMINISTRATION
None
PROGRAMMING
To program a Manual Signaling button for your voice terminal:
1
Label the button Signal plus a name.
2
Slide the TIP switch to P.
The voice terminal rings eve y 5 seconds to remind you that you are programming and that
you cannot place or receive calls.
3
- -_
..--.
._.
-.
^
-
Touch the button you want to program.
4
Dial *6 plus an intercom number.
5
Slide the TIP switch to the center position.
El
T
HOW TO USE
.P
T
.P
To signal a co-worker:
1
Without lifting your handset, touch a Manual Signaling button.
The signal is heard as long as you continue to touch the button.
To place an intercom call using a Manual Signaling button:
1
Touch Intercom.
2 Touch Speakerphone.
DESCRIPTION
h
CONSIDERAiiONS
3
Touch the Manual Signaling button for the person you want to call.
4
If you hear a beep, start talking (or lift your handset to speak). If you hear
ringing, the voice signaling path is busy and the voice terminal is being
alerted with the intercom ring.
When the light next to the Message button is on, your MERLIN Plus system
attendant has a message for you.
Your Message light can only be turned on from the administrator/attendant
console.
If the attendant is using a BIS-22 and the system has more than 10 voice
terminals, refer to “Send Message” for directions on sending a message to
voice terminals in the system.
5-button voice terminals do not have a Message button.
ADMINISTRATION
None
PROGRAMMING
None
HOW TO USE
The system attendant can touch Message to turn on the light next to the
Message button at a person’s voice terminal.
1
At the administrator/attendant console, touch Send Message.
2
Touch the Auto Intercom button for the person’s voice terminal.
The red light next to the Auto intercom button goes on, indicating the person’s light is lit.
A person can turn off the Message light on his or her voice terminal. The
system attendant can also turn off the light at a voice terminal by repeating
the two steps above.
DESCRIPTION
This feature is only for use with voice terminals that have a speaker button
but not a speakerphone button. When someone puts your call on hold, you
can turn on your voice terminal’s built-in speaker, hang up, and continue
working while you wait for the person to return to the call.
CONSIDERATIONS
None
ADMINISTRATION
None
PROGRAMMING
None
HOW TO USE
To turn on your speaker until you are taken off hold:
1
When you have been put on hold, touch Speaker.
2 Hang up.
3
When you hear the person return to the call, lift your handset and
continue the call.
The speaker automatically turns ofi
5-76 MERLIN Plus Svstem Features
DESCRIPTION
1.
When the person who usually answers calls leaves for the day, you can make
answering calls after hours easy for night shift personnel and security guards
by providing Night Service for your office. You can implement Night Service
one of three ways:
l
l
l
Provide the person with a voice terminal that has all the lines, or have the
person monitor the attendant console and answer calls there. Be sure that
all lines on which calls come in after hours are set for immediate ring. If
the lines are not normally set for this ringing option, the person can
activate the Ring Override feature that he or she has programmed for the
voice terminal. (See “Ring Override. “)
The backup person can also answer calls that come in after hours by
programming a Call Pickup button so that he or she can pick up calls
ringing at the administrator/attendant console. Since the attendant
console has all the lines of your MERLIN Plus system, the person
answering calls after hours can pick up calls at his or her voice terminal by
touching the Call Pickup button when the attendant console rings. (See
“Call Pickup. “) If the person is in another part of the building, the
attendant can connect his or her console and an extra alert device to a
Supplemental Alert Adapter (see ’ Supplemental Alert Adapter’ under
“Accessory Equipment”), so that each time a call comes in, an extra alert
device sounds.
You can also choose to administer and activate the Call Forwarding feature
for after-hours use (see “Call Forwarding” in this section). When the
system is in Call Forwarding mode, you can administer incoming calls on
designated lines so that they are connected to a Voice Synthesis Processor
(VSP) in the control unit. The VSP message informs the caller that the call
will be forwarded. While the caller is listening to the message, the control
unit calls the telephone number to which calls are being forwarded and
uses the system’s Conference feature to connect the incoming call to the
outgoing call.
CONSIDERATIONS
None
ADMINISTRATION
The system administrator must decide who will answer calls that come in
after hours and how those calls will be answered.
PROGRAMMING
For programming procedures for Call Pickup, Ring Override, and Call
Forwarding features, see the individual entries for these features in this
section.
HOW TO USE
For further information on the attendant console, see Section 4, “Using the
Attendant Console. ” If you need help in using the Call Pickup, the Ring
Override, or the Call Forwarding features, see the entries ‘Call Pickup, ’
‘Ring Override, If or “Call Forwarding” in this section.
DESCRIPTION
In the MERLIN Plus system, there are six features that allow you to dial or
redial a telephone number with the touch of a button.
Outside Auto Dial-Dial an outside number by touching a button. An
Outside Auto Dial button can hold a maximum of 16 digits.
Auto Intercom-Dial an intercom number with one touch whenever you
want to call someone connected to your MERLIN Plus system.
System Speed Dial-If your system administrator has assigned a System
Speed Dial code ( #60 through #89 or #900 through #999) to a frequently
dialed telephone number or account number, you can program the speed
dial code onto an available voice terminal button. Then when you want to
dial the telephone number or enter the account number on a call report,
just touch the System Speed Dial button for that number.
Last Number Dial-If you have programmed a Last Number button for
your voice terminal, you can redial with one-touch the most recent
number that you dialed. Each time you want this feature to redial a
number, you must touch the programmed Last Number Dial button. You
do not need to do anything to save this number.
Busy Buster- This feature automatically redials at least ten times the most
recent number you dialed. If someone answers the call within this time,
your voice terminal alerts you. To use this feature, the system
administrator must have assigned the feature to a voice terminal jack.
Saved Number Dial-If you have Saved Number buttons on your voice
terminal, you can save numbers for later redialing. When you are ready
to redial each of the telephone numbers, merely touch the Saved Number
button on which you have saved that number.
CONSIDERATIONS
In order to use any one of these six One-Touch Dialing features, you must
program it onto an available button on your voice terminal.
The system administrator can use the Program Mode Lock feature to prevent
programming from individual voice terminals. If this feature is enabled for
your voice terminal, you will not be able to program these buttons.
ADMINISTRATION
None
PROGRAMMING
If you want to use any of the six One-Touch Dialing features, you must
program them onto your voice terminal. For programming procedures for
each of the features, see their separate entries in this section.
HOW TO USE
When you want to use one of the six One-Touch Dialing features, merely
touch the appropriate button.
DESCRIPTION
Instead of using your handset to listen while you place a call, you may want
to use your voice terminal’s built-in speaker.
CONSIDERATIONS
When instructions in this guide tell you to lift your handset before dialing,
you may choose to leave your handset on-hook and use the speaker instead.
If you have a Speakerphone button, you can use it when you dial a call, so
you can speak with people hands-free. See the “Hands-Free Answer on
Intercom” feature in this section for more information on speakerphone
guidelines.
ADMINISTRATION
None
PROGRAMMING
None
HOW TO USE
To use the speaker while you place a call:
1
Without lifting your handset, touch Speakerphone or Speaker.
2 Dial the number.
3
When you hear the other person answer, begin your conversation.
If the line is busy, or if you get no answer:
1
Touch Speakerphone or Speaker to cancel the call.
MERLIN Plus System Features
5-79
DESCRIPTION
You can use Outside Auto Dial to dial frequently used numbp
and codes
with one touch. These numbers and codes can include teleph. ne numbers,
and PBX, Centrex, or Custom Calling feature codes. You can include up to 16
numbers and special characters in an Outside Auto Dial sequence.
CONSIDERATIONS
Any time instructions tell you to dial an outside number, you can touch an
Outside Auto Dial button instead if you have one programmed for the
number you want to dial.
IMPORTANT:
If you want to program an outside auto dial button for an
emergency number such as the police or fire department, the
FCC requires that you test the button to be sure you
programmed it properly only during off-peak hours.
You may need to program a pause, stop, or switchhook flash into an Outside
Auto Dial sequence, or you may need to switch from rotary to Touch-Tone
signals in the middle of a programmed dialing sequence. To do so, you must
enter one or more of the following special characters when you program the
sequence. (For more information about using special characters in a dialing
sequence, see ” Special Characters in Dialing Sequences. ” )
l
To program a pause, touch Hold.
l
To program a stop, touch Drop.
l
l
To program a switchhook flash at the beginning of a number, touch Recall
and then touch Hold.
To program Touch-Tone Enable, touch Transfer.
Your MERLIN Plus system may work behind a PBX or a Centrex system or
you may want to use Custom Calling features. If so, use the PBX, Centrex, or
Customer Calling features exactly as their instructions describe. However,
there are two important exceptions:
l
Any PBX, Centrex, or Custom Calling feature code that begins with a ’ # ”
must be preceded by another ’ # ’ in order to operate in the MERLIN Plus
system. For example, if PBX, Centrex, or Custom Calling instructions tell
you to dial # 1234, you must dial # # 1234 in order to use the feature.
NOTE:
l
If you will be doing this frequently, you may want to program
# # on a button.
When PBX, Centrex, or Custom Calling instructions tell you to include a
switchhook flash, you must touch
instead, If you touch the
2
Slide the TIP switch to P.
7’he voice terminal rings every 5 seccnds to remind you that you are programming and that
you cannot place or receive calls.
.
3
Touch the button you want to program.
4
Dial *SO plus a telephone number or a PBX or Centrex code (if you need
to include a special character in the dialing sequence, use the directions
above).
5
Slide the TIP switch to the center position.
q
1
HOW TO USE
&I
T
.P
.P
To dial an outside number with one touch:
1
Without touching Speakerphone or lifting your handset, touch the
Outside Auto Dial button for the number you want to dial.
Your voice terminal speaker goes on, and you hear dialing.
2
If you programmed the special character STOP in a dialing sequence, after
you hear the second dial tone, touch the Outside Auto Dial button again
to continue the dialing.
3
When you hear the other person answer, start speaking or lift your
handset then start speaking.
cl
Homo pJ
Offi
Cl
II
-I
If the line is busy or if no one answers:
1
DESCRIPTION
Touch Speakerphone or hang up to cancel the call.
i
When the system administrator assigns lines to voice terminals, he or she can
select lines that will serve as personal lines for individuals in the business,
such .as the president of the company. No one else has these lines on his or
her voice terminal. Calls that come in on these personal lines will not ring at
other voice terminals or at the attendant’s console.
MERLIN Plus Svstern Features
5-81
CONSIDERATIONS
A secretary can cover calls that come in on his or her boss’ personal line by
having the line assigned to his or her own voice terminal and programming
the line for immediate ring. A secretary can screen calls that come in on the
personal line by programming the line on the . )ss’ voice terminal to delayed
ring or no ring and programming the line at 1. or her own voice terminal for
immediate ring. (See “Ringing Options.“)
ADMINISTRATION
If your responsibilities do not include system administration, skip this
information.
To assign a personal line to a voice terminal:
1
Enter administration mode by sliding the TIP switc.. to P and touching
Administer.
2
Touch the Auto Intercom button or dial the intercom number for the voice
terminal to which you want to assign a personal line.
A green light goes on next to the Auto Intercom button. Green lights also go on next to
the buttons of any lines already assigned to the voice terminal.
3
To add the personal line, touch the line button associated with that line
until the green light next to it goes on.
NOTE:
If another voice terminal in your system has that line, you must
remove it from that voice terminal by dialing the intercom
number for that voice terminal and touching the line button that
corresponds with that line so that green light next to it goes off.
4 Touch Administer.
The console beeps twice.
5
Leave administration mode by sliding the TIP switch to the center
position.
p+g
.
PROGRAMMING
None
HOW TO USE
You can begin speaking when a call comes in on your personal line. If you
want your personal line to be the first line in your Automatic Line Selection
sequence, tell your system administrator when he or she administers that
feature for your voice terminal. (See “Automatic Line Selection.“)
If you don’t have many available buttons on which to program Outside Auto
Dial, you can use the programming instryctions below to assign a 3-character
Personal Speed Dial code (from # 01 through # 24 for BIS-10 models and from
#Ol through #l2 for BBS-22 models) to telephone numbers, PBX, Centrex, or
’ DESCRIPTION
-
--
.
.-s.
._.
-.
^
c
.
Custom Calling feature codes you frequently dial.
You can assign a Personal Speed Dial code to a sequence containing up to 16
numbers and special characters.
CONSIDERATIONS
Personal Speed Dial uses a dialing code. You do not place these codes on a
voice terminal button.
ADMINISTRATION
None
PROGRAMMING
This feature is not associated with a voice terminal button.
Programming a Pause, Stop, or Switchhook F/ash You may need to
program a pause, stop, or switchhook flash into a Personal Speed Dial
sequence, or you may need to switch from rotary to Touch-Tone signals in
the middle of a programmed dialing sequence. To do so, you must enter one
or more of the following special characters when you program the sequence.
(For more information about using special characters in a dialing sequence,
see “Special Characters in Dialing Sequences. “)
l
To program a pause, touch Hold.
l
To program a stop, touch Drop.
l
l
To program a switchhook flash at the beginning of a number, touch Recall
and then touch Hold.
To program Touch-Tone Enable into a dialing sequence, touch Transfer.
From a MS-70 Voice Terminal If you are using a BIS-10 voice terminal, use
the following procedure to program a Personal Speed Dial sequence:
1
Slide the TIP switch to P.
The voice terminal rings every 5 seconds to remind you that you are programming and that
you cannot place or receive calls.
2
Dial a Personal Speed Dial code ( # 01 through # 24).
NOTE:
Personal Speed Dial code #23 is preprogrammed for Saved
Number Dial and #24 is preprogrammed for Last Number Dial.
You can assign these Custom Calling features to different
Personal Speed Dial codes, using a slightly modified procedure.
Here’s how to program Last Number Dial or Saved Number Dial
onto Personal Speed Dial code #Ol:
a
Slide the TIP switch to P.
4
Slide the TIP switch to the center position.
From a 61922 Voice Terminal If you are using a BE-22 voice terminal, use
the following procedure to program a Personal Speed Dial sequence:
1
HOW TO USE
Slide the TIP switch to P.
The voice terminal rings every 5 seconds to remind you that you are progrumrtzing and that
you cannot place or receive culls.
2
Dial a Personal Speed Dial code ( #f 01 through # 12).
3
Dial *90 plus a telephone number or a PBX, Centrex, or Custom Calling
feature code. Follow the instructions above if you need to include a special
character in the dialing sequence.
4
Slide the TIP switch to the center position.
from a MS-70 Voice Terminal
code:
To place a call using a Personal Speed Dial
1
Touch Speakerphone or lift the handset.
2
Dial a Personal Speed Dial code (#Ol through #24).
3
If you programmed the special character STOP in a personal speed dial
sequence, after you hear the second dial tone, dial the Personal Speed
Dial code again to continue the dialing.
4
If the line is busy, touch Speakerphone or hang up to cancel the call.
From a MS-22 Voice Terminal
code:
To place a call using a Personal Speed Dial
1
Touch Speakerphone or lift the handset.
3
Dial a Personal Speed Dial code ( # 01 through # 12).
3
If you programmed the special character STOP in a personal speed dial
sequence, after you hear the second dial tone dial the Personal Speed Dial
code again to continue the dialing.
4
If the line is busy, touch Speakerphone or hang up to cancel the call.
5-84 MERLIN Plus System Features
DESCRIPTION
To make it easy for the right person to pick up calls in a group office, people
in this type of office may want to program their voice terminals with a ringing
pattern that is easier for each person to identify. There are eight different
ringing patterns available.
CONSIDERATIONS
Once you have programmed your Personalized Ringing selection, calls that
ring at your voice terminal have this ringing pattern. However, note that
only the second part of the transfer ring (one short and one long ring) has
your Personalized Ringing pattern.
ADMINISTRATION
None
PROGRAMMING
To choose a ringing pattern that you like:
1
Slide the TIP switch to P.
You hear the ringing sound your voice terminal makes.
2
Touch Speakerphone or Speaker.
3
Touch Speakerphone or Speaker repeatedly until you hear a ringing
pattern you like.
4
Slide the TIP switch to the center position.
You hear another ringing pattern.
HOW TO USE
After you have programmed your Personalized Ringing preference, you don’t
need to do anything else to use the feature. When a call rings at your voice
terminal, you will hear the ringing pattern that you have chosen.
DESCRIPTION
If you share an outside line with other people, you may choose to program a
Privacy button that allows you to control others from joining or monitoring
your telephone conversations.
CONSIDERATIONS
None
MERLIN Plus System Features
5-85
ADMINISTRATION
None
PROGRAMMING
The Privacy feature requires a button with lights.
To program a Privacy button for your voice terminal:
1
2
Label the button Privacy.
Slide the TIP switch to P.
The voice terminal rings every 5 seconds to remind you that you are programming and that
you cannot place or receive calls.
3
Touch the button you want to program.
4 Dial *72.
5
Slide the TIP switch to the center position.
To suspend the Privacy feature:
HOW TO USE
1 Touch Privacy.
The green light next to the button goes ofi
To activate the Privacy feature:
1
If the green light next to Privacy is off, touch the button.
The green light next to the button goes on.
DESCRIPTION
The system administrator can administer the Privacy feature for Line A and/or
Line E so that no one in the system can bridge onto or monitor these lines
while a device plugged into the Aux jack is off-hook on Line A or Line E.
(See “Auxiliary Lines. “)
CONSIDERATIONS
This feature is used for a modem, facsimile machine, or other equipment
connected to the line through an auxiliary (AUX) jack on the control unit.
This Privacy must be administered and therefore is a different feature than
the Privacy feature that people can program for their voice terminals.
-
ADMINISTRATION
If your responsibilities do not include system administration, skip this
information.
1
2
Enter administration mode by sliding the T/I’ switch to P and touching
Administer.
Dial *57.
The green light goes on next to those lines that cannot be bridged or monitored.
3
If you want to change the Privacy setting of either Line A or Line E, touch
the line button until the green light next to it shows the setting you want:
Green light on = the line is private
Green light ofj = the line can be monitored
4 Touch Administer.
The console beeps twice.
5
Leave administration mode by sliding the TIP switch to the center
position.
Ii
si
i,
I[
n n n
. . .
n mm
n n n
*57
T
.P
PROGRAMMING
None
HOW TO USE
None
DESCRIPTION
By using the Test/Program switch and following the instructions listed below,
you can program features that you have selected for your voice terminal onto
available buttons.
CONSIDERATIONS
There are several programmable features that you can use with either a
button or a dial code. Therefore, if you have a limited number of available
feature buttons on your BIS-10 or BIS-22 voice terminal, you may choose to
use a dial code rather than program any of those features onto your voice
terminal.
If you make a mistake when programming a button, simply touch the button
again and redial the programming code and all required numbers.
The system administrator can use the Program Mode Lock feature to prevent
people within the system from changing programming assignments on their
voice terminals. (See “Program Mode Lock. “)
MERLIN Plus System Features
5-87
ADMINISTRATION
The system administrator can program features onto individual voice
terminals by using the Centralized Programming feature. (See “Centralized
Programming. “)
PROGRAMMING
Individual feature programming codes are provided in programming
instructions in the reference description for each programmable feature and in
Section 6, “Quick Reference Guides. ’
HOW TO USE
To program a feature onto your voice terminal:
Type or print on the button label strips all the names of the features you
want to program. Then insert the labels into the appropriate slots on your
voice terminal.
Slide the TIP (Test/Program) switch on the left side of the voice terminal
to the P (Program) position.
The green lights next to the buttons begin flashing.
The voice terminal rings every 5 seconds to remind you that you are programming and that
you cannot place or receive calls.
Consult the programming instructions in each individual feature’s entry in
this section or use the codes listed in Section 6, “Quick Reference
Guides, ’ of the System Manual, to determine the feature’s programming
code. (You can also refer to the MERLIN Plus System User’s Guide for
programming codes. )
Touch the first button you want to program.
Dial the required programming code and any other numbers required.
Touch the second button you want to program and dial the required
programming code and numbers. Continue to follow this procedure for
all other buttons you want to program.
Slide the TIP switch to the center position.
DESCRIPTION
The system administrator may choose to disable (or “lock”) the programming
function at an individual voice terminal so that the person at the voice
terminal cannot change the programmed assignments. When a voice
terminal’s TIP switch is locked, programming for that voice terminal can be
done only at the administrator/attendant console. This feature can be
administered for an individual voice terminal or for all voice terminals in the
system, except the administrator/attendant console.
5-66 MERLIN Plus System Features
CONSIDERATIONS
To program features onto a voice terminal, the administrator can use the
Centralized Programming or the Copy feature.
The TIP switch allows a person to test the voice terminal lights and ringing of
the voice terminal and program features on the voice terminal. When the
system administrator has locked the programming function at a particular
voice terminal, the person at the voice terminal can still slide the TIP switch
to both the Test and the Program positions and can use the Test option only.
However, the person cannot change any programmed features at the voice
terminal.
When your MERLIN Plus system comes from the factory, programming can
be done by the user at his or her own voice terminal (each voice terminal’s
T/P switch is unlocked).
The administrator/attendant console connected to jack 10 cannot be locked out
of program mode.
ADMINISTRATION
If your responsibilities do not include system administration, skip this
information.
To lock or unlock the programming function on an individual voice terminal:
1
Enter administration mode by sliding the TIP switch to P and touching
Administer.
2 Dial *89.
3 Perform one of the following procedures:
)
Touch the Auto Intercom button of the voice terminal that you are
administering.
Green light on = the voice terminal is locked.
Green light off = programming can be done from the voice terminal.
b
If you don’t have an Auto Intercom button for the voice terminal, then
. use the corresponding dial code from the chart below:
If the intercom
number is:
Intercom
Intercom
Intercom
Intercom
Intercom
Intercom
Intercom
Intercom
Intercom
Intercom
10
11
12
13
14
15
16
17
18
19
Dial this code:
#22
#21
#20
#19
#18
#17
#16
#15
#14
#13
If the intercom
number is:
Intercom 20
Intercom 21
Intercom 22
Intercom 23
Intercom 24
Intercom 25
Intercom 26
Intercom 27
Intercom 28
Intercom 29
Dial this code:
#03
#04
#05
#06
#07
#OS
#09
#lO
#ll
#12
MERLIN Plus System Features
5-89
4 Touch Administer.
The console beeps twice.
5 Leave administration rnode by sliding the T/P s Gtch to the center
position.
1
If you want to lock the programming function on all the voice terminals in
‘your system (except the administrator/attendant console connected to jack 10):
1
2
3
Enter administration mode by sliding the TIP switch to P and touching
Administer.
Dial *89.
Perform one of the following procedures according to whether you want
to lock or unlock the programming function at all the voice terminals in
your system:
D
b
4
Touch Conference to lock every voice terminal in your system.
A green light goes on next to the Auto intercom button corresponding to the
appropriate voice terminals. The voice terminals are locked; they cannot enter
programming mode.
Touch Drop to unlock all voice terminals in your system.
A green light goes off next to the Auto intercom button corresponding to the
appropriate voice terminals. The voice terminals are unlocked; they can enter
programming mode when necessary.
Touch Administer.
The console beeps twice.
5
Leave administration mode by sliding the TIP switch to the center
position.
PROGRAMMING
None
HOW TO USE
Check with your system administrator to see if you can program features at
your voice terminal or if programming can be done only at the
administrator/attendant console.
5-90 MERLIN Plus Svstem Features
Recall
DESCRIPTION
If you are on a PBX or Centrex system, you can use the Recall feature when
directions tell you to include a switchhook flash.
CONSIDERATIONS
By touching the Recall button, you will get one of the following:
l
A new dial tone.
l
Access to Custom-calling services.
If you have PBX, Centrex, or Custom Calling features, you must touch Recall
time instructions call for a switchhook flash. By touching the Recall
button, you automatically place a specially timed pause onto the line. If you
press the switchhook instead, you disconnect your call.
any
ADMINISTRATION
None
PROGRAMMING -
None
HOW TO USE
To use Recall as a switchhook flash:
1
Touch Recall.
NOTE: Remote Line Access (RLA) is an ASA feature and therefore,
requires the assignment of the ASA jack. If the ASA jack assignment
has not yet been made, refer to “Automatic System Access” in this
section before attempting to administer this feature.
DESCRIPTION
When the system is in RLA mode, you can call in from outside (for example,
from your home phone) and use a password to gain access to one of the
system’s outside lines. You can also use RLA to change the telephone
number to which calls are being forwarded during CF operation. (For more
information, see “Call Forwarding” earlier in this section.) In RLA mode, the
Voice Synthesis Processor (VSP) prompts callers through the procedures for
entering a password and gaining access to an outside line.
MERLIN Plus System Features
5-91
CONSIDERATIONS
RLA operation requires the following:
l
l
At least one programmed button with red and green lights
An incoming line group
When you use an RLA button to activate RLA, the system will treat as
RLA calls only those calls that come in on lines specifically assigned to the
RLA incoming line group. At startup, none of the outside lines are
included in the RLA line group. There are simple administration
procedures for changing the makeup of the RLA line group.
NOTE: If the system is in both CFlDXD and RLA modes and the lines
overlap, CFlDXD takes precedence.
l
Passwords
To gain access to one of the system’s outside lines during RLA operation,
a caller must enter a valid 5-digit password when prompted to do so by
the voice message. The administration procedure that follows is for
assigning passwords. The first two digits of a password must be an
intercom number in the system. The remaining three digits can be any
three digits. Once the caller has gained access to the system, the caller’s
identity is verified against the password, including the intercom number,
and any restrictions that apply to the caller’s voice terminal apply to the
current call.
l
A synthesized voice message
For RLA operation, the voice message is a series of voice prompts
automatically supplied by the VSP in the control unit. You cannot modify
or turn off the voice prompts for RLA.
l
Either RLA or CFlDXD buttons must be activated
To call in from a remote location, the MERLIN Plus system must be set to
RLA or CFlDXD mode. Therefore, if you plan to use RLA during business
off hours (weekends, evenings) be sure either the RLA or CFlDXD button
is on before the office is closed.
An outward restricted user can only dial numbers that are present in an
allowed list.
ADMINISTRATION
If your responsibilities do not include system administration, skip this
information.
RLA Line Groups
At startup, none of the system’s outside lines are assigned to the RLA line
group. To use this feature, you will need to assign line group(s) as follows:
1
5-92 MERLIN Plus System Features
Enter administration mode by sliding the TIP switch to P and touching
Administer.
2
Dial *54 for the incoming line group.
The green lights go on next to the buttons for the lines currently assigned
to the list.
Green light on = line is assigned to the group
Green light off = line is not assigned to the group
3
Touch line buttons until the green lights show the makeup you want for
the line group.
4 Touch Administer.
The console beeps twice.
6
Leave administration mode by sliding the TIP switch to the center
position.
888
0
n n n
n n n
mmm
354
Passwords
You andothers in your business must enter a password to use RLA. The
password is 5-digits and must be entered in order to gain access to an outside
line using RLA OY to change the current call forward number from a remote
location. The first two numbers in the password are the caller’s intercom
number.
To create or invalidate a password, follow this procedure:
1
2
3
Enter administration mode by sliding the TIP switch to P and touching
Administer.
Dial *56.
To create a password for a particular intercom number, dial a MERLIN
Plus system intercom nutiber plus any three digits (except 000).
The console beeps twice.
4
To invalidate any password beginning with a particular intercom number,
dial the intercom number plus 000. Repeat the procedure for more
passwords.
The console beeps twice.
5
Touch Administer.
The console beeps twice.
6
Leave administration mode by sliding the TIP switch to the center
position.
q
T
l
P
888
I
8mm
n n n
el
1
l
MERLIN Plus System Features
P
5-93
Number of Rings
To change the number of rings (the default is two rings) before the RLA call is
answered:
1
Slide the TIP switch to P and touch Administer.
2
Dial *763 plus the number of rings (between 0 and 9) before the RLA
feature picks up the call.
NOTE: If the number of rings is set to 0, the voice terminal will not ring,
and the calls will be immediately answered.
3 Touch Administer.
The console beeps twice.
4
PROGRAMMING
Leave administration mode by sliding the TIP switch to the center
position.
A button with a green light next to it is recommended for the RLA feature.
To program an RLA button on a voice terminal:
1
Label the button RLA.
2
Slide the TIP switch to P.
3
Touch the button you want to program.
The voice terminal rings every 5 seconds to remind you that you‘re programming and can’t
receive or place calls.
4 Dial *84.
5
Slide the TIP switch to the center position.
I[id
T
HOW TO USE
9P
Using the RLA Button
Touching the RLA button toggles the system back and forth between the
normal mode and the RLA mode. You can tell which mode you are in by the
status of the green light next to the RLA button.
Green light on = RLA mode
Green light off = Normal mode
Green light flashing = Problem with RLA
If the green light next to the RLA button is flashing, notify the system
administrator who should refer to Section 7, “Troubleshooting, ’ to correct the
problem.
5-94 MERLIN Plus System Features
Gaining Access to a Line using RLA
If the system is in RLA mode, you can gain access to a line in the RLA
outgoing line group from a remote location by following this procedure:
NOTE: If you will be using this feature, ask your system administrator
for the handy MERLIN Plus CFlRLA Card that provides instructions
for RLA.
1
Dial the telephone number of a line in the RLA incoming line group.
2
When the call is answered, the VSP begins prompting you through the
procedure in which the following information is called for:
The system verifies each response, such as the correct password or
unrestricted lines or telephone numbers. If the response is incorrect or
not allowed, the system requests the caller to respond again.
NOTE:
l
l
Enter the 5-digit password (the first two digits are a valid intercom
number).
Enter the telephone number you want to reach plus a # .
3
When you have finished responding to the voice prompts, you will hear
normal call-progress tones (ringing, busy signal, fast busy signal, etc.).
4
Complete your call as usual.
pgEJ-q
If the system is in either CF or DXD mode, you can gain access to a line in
the RLA outgoing line group from a remote location by following this
procedure.
1
Depending on the mode the system is in, dial the telephone number for a
line in either the CF or the DXD incoming line group.
When the call is answered, the VSP gives the appropriate message.
2
As soon as the message ends, dial * # *.
The VSP begins prompting you through the RLA procedure.
3
Respond appropriately to the voice prompts until you hear normal callprogress tones (ringing, busy signal, fast busy signal, etc.).
4
Complete your call as usual.
gii.li.I/
MERLIN Plus System Features
5-95
DESCRIPTION
Sometimes you may want all of your calls to ring immediately, even if you
have programmed the lines on your voice terminal to ring after a delay or not
at all. (See “Ringing Options. “) For instance, you may need to cover calls for
someone who shares one of your lines. You can use a Ring Override button
to temporarily override the ringing option you have established.
CONSIDERATIONS
None
ADMINISTRATION
None
PROGRAMMING
A button with lights is recommended but not required.
To program a Ring Override button for your voice terminal:
1
Label the button Ring Override.
2
Slide the TIP switch to P.
The voice terminal rings every 5 seconds to remind you that you are programming and that
you cannot place or receive calls.
3
Touch the button you want to program.
4 Dial *78.
5
HOW TO USE
Slide the TIP switch to the center position.
To have all your calls ring immediately at your voice terminal:
I Touch Ring Override.
lf
you have programmed this feature on a button with lights, the green light goes on.
1
To return to your programmed line ringing:
I
5-96 MERLIN Plus System Features
Touch Ring Override again.
The green light goes ofi
DESCRIPTION
When you receive an outside call, the MERLIN Plus system automatically
connects you to the ringing line.
CONSIDERATIONS
If you want to place an outside call while one of the lines on your voice
terminal is ringing or in use, touch the line button of the line you want to
use. When you touch Speakerphone or lift the handset, the MERLIN Plus
system connects you to the line you have selected.
ADMINISTRATION
None
PROGRAMMING
None
HOW TO USE
When you receive an outside call:
1
Touch Speakerphone or lift your handset.
The MERLlN Plus system connects you to the ringing line.
DESCRIPTION
You can designate incoming calls to ring immediately at your voice terminal,
ring at a second voice terminal if they are not answered at the first one after
two rings (delayed ring), or not ring at all. When your system is installed,
the lines at each voice terminal ring immediately when a call comes in on
them. However, you can change this so that people in your office can answer
calls at their desk for someone who is away or you can program phones in
public places not to ring.
CONSIDERATIONS
The following tips are useful for deciding how and when voice terminals in
your MERLIN Plus system should ring.
Immediate Ring: People responsible for answering incoming calls, such as the
system attendant, should have the lines on their voice terminals programmed
for immediate ring. You can also use this option for private lines that don’t
need to be screened or for people who answer their own calls.
Delayed Ring: You can provide backup coverage on a shared line by having
that line ring at a second voice terminal only after it has rung a few times
somewhere else. Then, when calls come in for a person who is away from
his or her desk, that person’s calls will ring at a second voice terminal, the
MERLIN Plus System Features
5-97
voice terminal belonging to a backup person. Delayed ring is often useful for
a secretary who can pick up calls for someone on a personal line.
No Ring: People who do not normally answer incoming calls should have
their lines programmed for no ring. You may also prefer to program
telephones in public places, such as lobbies or conference rooms, not to ring.
A line programmed for no ring does not ring on outside calls, but does ring for
transferred and intercom calls. Even though the phones don’t ring, they still
can pickup lines that appear on the voice terminal.
If you decide that you want a line that you have programmed for delayed
ring or no ring to temporarily ring immediately, program the Ring Override
feature. (See “Ring Override.“)
ADMINISTRATION
INone
PROGRAMMING
To program the line ringing option you prefer:
1
Slide the TIP switch to P.
2
Touch the line button for which you want to program immediate, delayed,
or no ringing.
3
Dial one of these codes for the type of ringing you want the line to have:
b
Dial *35 for no ring.
7’he red light next to the line button goes ofi
ti
Dial *36 for delayed ring.
L
Dial *37 for immediate ring.
The red light next to the line button flashes.
The red light next to the line button goes on steady.
4
Repeat steps 2 and 3 for each line button you want to program.
5
When you are finished programming, slide the TIP switch to the center
position.
BppJ
HOW TO USE
El
1
l
P
Even if you program the lines on your voice terminal not to ring, you can tell
if a call comes in for you because the green light next to the line button still
flashes. To answer the call:
1
Touch the line button next to the flashing green light.
i
Touch Speakerphone or lift your handset.
5-98 MERLIN Plus System Features
,
Saved Number haI
.
DESCRIPTION
If you have programmed a Saved Number Dial button, you can use the
button to save an important number for one-touch dialing at a later time. If
the number you call is busy or no one answers, or if you need to call the
person back, you can save that number by touching Saved Number before
you hang up. Later, when you touch Saved Number again, your voice
terminal automatically redials the number you have saved.
CONSIDERATIONS
You can program more than one Saved Number Dial button for your voice
terminal, so that, if necessary, you can save different calls during the day. Be
sure to write on a separate sheet of paper the identity of each person called
and/or telephone number for each Saved Number button.
You may prefer to use a dial code rather than program a button in order to
use the Saved Number Dial feature.
A Saved Number Dial button saves both manually dialed numbers and
numbers dialed with an Outside Auto Dial button, and numbers saved on a
Last Number Dial button.
ADMINISTRATION
None
PROGRAMMING
To program a Saved Number Dial button for your voice terminal:
Label the button Saved Number.
Slide the TIP switch to P.
The voice terminal rings every 5 seconds to remind you that you are programming and that
you cannot place or receive calls.
Touch the button you want to program.
Dial *74 (you do not need to dial an outside number).
Slide the TIP switch to the center position.
HOW TO USE
You can use a programmed button or a dial code to access this feature.
To save a number for redialing:
1
Before you touch Speakerphone or hang up your handset from a call in
progress, touch Saved Number or dial # 23, if you haven’t already
programmed this personal speed dial code.
MERLIN Plus System Features
5-99
2
Touch Speakerphone or hang up your handset.
The MERLIN Plus system saves this number until you repeat this procedure
to save another number.
To redial this number later:
J
Without touching Speakerphone or lifting your handset, repeat the first
step you used to save the number. So if you touched Saved Number,
touch it again or if you dialed #23, dial it again.
Your voice terminal speaker goes on, and you hear dialing.
2
When you hear the other person answer, touch Speakerphone or lift your
handset and begin talking.
If the line is busy, or if no one answers:
1
Touch Speakerphone, or hang up to cancel the call.
DESCRIPTION
The system attendant can turn on the Message light at the voice terminals of
people in the MERLIN Plus system in order to alert them that they have a
message. (See “Message. “)
CONSIDERATIONS
The Message light at voice terminals in the system can only be turned on at
the attendant/administrator voice terminal. The alternate attendant position
cannot turn on the message light.
If your administrator/attendant console is a BIS-22 with more than ten voice
terminals on the system, the attendant can still use the Send Message feature
by following the directions below. However, he or she will not know if the
light is already on at the voice terminal.
If you’ve programmed Personal Speed Dial numbers, such as LND or SND,
onto Auto Intercom buttons, then you cannot use those buttons with the Send
Message feature.
5-Button voice terminals do not have a Message button.
5-100 MERLIN Plus System Features
ADMINISTRATION
None
PROGRAMMING
None
HOW TO USE
From a BE-34 Console If you are using a BIS-34 console, use the following
procedure to turn on the message light at a voice terminal:
1
At the administrator/attendant voice terminal, touch Send Message.
2
Touch the Auto Intercom button for the person’s voice terminal.
The red light next to the Auto Intercom button goes on, indicating the person’s Message
light is on.
NOTE:
To turn off the light, repeat the steps.
From a B/S-22 Console If you are using a BIS-22 console, use one of the
following procedures to turn on the message light at a voice terminal:
1
At the administrator/attendant console, touch Send Message.
2
Follow one of these procedures:
b
Touch an Auto Intercom button that the attendant has programmed
for the person.
b
Dial a 3-character code corresponding to the Send Message button
code on the following chart.
NOTE:
To turn off the light, repeat the steps used to turn it on.
from B BE-70 Console If you are using a BIS-10 console, use the following
procedure to turn on the message light at a voice terminal:
1
At the administrator/attendant console, touch Send Message.
MERLIN Plus System Features
5-101
2
Dial a 3-character code corresponding to the Send Message dial code on
the following chart.
If the intercom
number is:
Intercom 10
Intercom 11
Intercom 12
Intercom 13
Intercom 14
Intercom 15
Intercom 16
Intercom 17
Intercom 18
Intercom 19
Dial this Send
Message dial
code:
#22
#21
#20
#19
#18
#17
#16
#15
#14
#13
If the intercom
number is:
-
Intercom 20
Intercom 21
Intercom 22
Intercom 23
Intercom 24
Intercom 25
Intercom 26
Intercom 27
Intercom 28
Intercom 29
Dial this Send
Message dial
code:
#03
#04
#05
#06
#07
#08
#09
#lO
#11
#12
For example, the attendant may want to turn on the Message light at
Intercom 21, but does not have an Auto Intercom button for that person. The
attendant refers to the chart above and finds that the Send Message dial code
is #04. Then from a BIS-22 console the attendant touches Send Message and
dials #04 to light the message light.
To turn off a message light at a voice terminal, repeat the
steps above.
NOTE:
DESCRIPTION
If your voice terminal does not have a speakerphone button, you can use your
voice terminal speaker when you have dialed a call or been put on hold to
monitor a line without lifting your handset. You can also allow others in your
office to hear a conversation while you have a call in progress. There are
three main ways to use your speaker:
l
On-Hook Dialing-Without lifting your handset, turn on the voice
terminal speaker and dial an outside or intercom number. (You can also
use the one-touch dialing features for this purpose. See “One-Touch
CONSIDERATIONS
When you touch an Outside Auto Dial button or an Auto Intercom button,
your voice terminal speaker automatically goes on and you hear dialing.
When you use the Group Listening feature, your speaker may make a
squealing noise when the handset comes close to it. To prevent this, touch
Speaker when you have completed a call and are ready to hang up your
handset. Another way to reduce the squealing sound is to turn down the
volume control on your voice terminal. This feature is not available on the
BIS-10, BIS-22, BIS-34, or BIS-34D
ADMINISTRATION
None
PROGRAMMING
None
HOW TO USE
To use On-Hook Dialing:
1
Without lifting your handset, touch Speaker.
2 Dial the number.
3
When you hear the other person answer, lift your handset to speak.
If the line is busy, or if you get no answer:
1
Touch Speaker to cancel the call.
.
To use Monitor-on-Hold:
1
When you have been put on hold, touch Speaker.
2 Hang up.
3
When you hear the other person return to the call, lift your handset and
continue the call.
To use Group Listening:
1
Without hanging up, touch Speaker, and continue your conversation.
II
Speaker
MERLIN Pius System Features
5-103
DESCRIPTION
You may need to program a pause, stop, or switchhook flash into an Outside
Auto Dial, a Personal Speed Dial, a Disallowed List, or a System Speed Dial
sequence, or you may need to switch from rotary to Touch-Tone signals in
the middle of a programmed dialing sequence. To do so, you must enter one
or more special characters when you program the sequence.
CONSIDERATIONS
The switchhook flash can be used only at the beginning of a programmed
dialing sequence. Your MERLIN Plus system may work behind a PBX or a
Centrex system, or you may use Custom Calling features. If so, use the PBX,
Centrex, or Custom Calling features exactly as their instructions describe.
However, there are two important exceptions:
l
l
Any PBX, Centrex, or Custom Calling feature code that begins with a It # ”
must be preceded by another ” # It in order to operate in the MERLIN Plus
system. For example, if PBX, Centrex, or Custom Calling instructions tell
you to dial # 1234, you must actually dial #f # 1234. For your convenience,
you may want to program a # # button, if you need to follow this
procedure frequently.
When PBX, Centrex, or Custom Calling instructions tell you to include a
switchhook flash, you must touch Recall instead. If you touch the
switchhook, you’ll disconnect the call.
ADMINISTRATION
None
PROGRAMMING
Use the following procedures to enter special characters into a dialing
sequence.
Pause
Program a pause (1.5 seconds) into a dialing sequence. For example, you
may need a pause between an access code, such as a 9, and an outside
telephone number in an Outside Auto Dial sequence.
1
Dial the access code, such as a 9.
2 Touch Hold (Pause).
3
Dial the outside telephone number.
stop
Program a stop into a dialing sequence to wait for a second dial tone. For
example, you may need to program a stop between a local telephone number
and an alternate long distance authorization code.
1
5-104 MERLIN Plus System Features
Dial the local telephone number (seven digits).
2 Touch Drop (Stop).
3
Dial the authorization code (five or six digits),
Switchhook Flash
Program a switchhook flash at the beginning of a dialing sequence. For
example, you may need to program a button with a PBX, Centrex, or Custom
Calling feature code that calls for a switchhook flash.
1
Touch Recall.
2
Touch Hold (Pause).
3
Dial the PBX or Centrex dial code sequence that gives you access to the
feature you want to program.
Touch-Tone Enable
Program Touch-Tone Enable into a dialing sequence on a line with rotary
signal. For example, you may need to use a credit card authorization service.
1
2
HOW TO USE
Touch Transfer.
Dial the credit card authorization code.
If your MERLIN Plus system works behind a PBX or a Centrex system, or you
are using the Custom Calling features, follow these directions:
1
When PBX, Centrex, or Custom Calling feature instructions tell you to dial
a ’ # , ’ dial a second ’ # . ’ For example, if the instructions tell you to dial
#4567, you must actually dial # #4567 in order to use the feature with the
MERLIN Plus system.
If your PBX, Centrex, or Custom Calling feature instructions tell you to use a
stop, touch Drop instead and for a switchhook flash, touch Recall instead.
MERLIN Plus System Features
5-105
System Answer is an ASA feature and therefore, requires the
assignment of the ASA jack. If the ASA jack assignment has not yet
been made, refer to “Automatic System Access” in this section before
attempting to administer this feature.
NOTE:
DESCRIPTION
When a call comes in, you can set the System Answer (SA) feature to
automatically answer the call and place it on hold, or provide a brief message
before placing the call on hold. If a compatible audio-source (tape player,
radio, or stereo) is plugged into the Music-On-Hold jack (see “Music-OnHold” under “Accessory Equipment” in this section), you have the option of
playing a pre-recorded message about your business (hours of operation,
special promotions, numbers to call, etc.), or allowing callers to hear music
once the call is placed on hold. To answer the held call, touch the line button.
CONSIDERATIONS
This feature can be activated from either the attendant or the alternate
attendant console, but not both. If an alternate attendant position has been
assigned, SA can be activated only from that console. If no alternate attendant
position has been assigned, SA can be activated only from the attendant
console.
This feature can also be activated while a call is ringing. That call will be
answered immediately and subsequent calls will automatically be answered
after the administered number of rings. When the system is first set up, up to
eight lines can be answered by SA and the caller will hear two rings before
the SA message.
When administering an alternate attendant position, this feature must be
turned off.
This feature cannot be copied using the Copy administration procedure. If
copying is attempted, the receiving voice terminal will have an empty button
in the corresponding position.
If a call is ringing on a line that does not appear on the attendant or alternate
attendant’s console, touching SA will not answer the call.
Follow the administration procedure under “Automatic System Access” in this
section, for ASA jack assignments. If your responsibilities do not include
administration, skip this information.
SA Line Groups
To add lines that can be answered by SA:
1
Enter administration mode by sliding TIP to P and touching Administer.
2 Dial *75.
3
Touch the incoming line button that you are adding to or removing from
the feature.
Green light on = line can be answered by SA
Green light of = line cannot be answered by SA
5-106 MERLIN Plus System Features
4
5
Touch Administer.
Leave administration mode by sliding the T/P switch to the center
position.
Number of Rings
To change the number of rings (the default is two rings) before SA answers a
call:
1
Slide the T/P switch to P and touch Administer.
2
Dial *764 plus the number of rings (between 0 and 9) before the SA
feature picks up the call.
NOTE: If the number of rings is set to 0, the voice terminal will not ring,
and the calls will be immediately answered by SA.
3 Touch Administer.
The console beeps twice.
4
Leave administration mode by sliding the TIP switch to the center
position.
BWp-y
Voice Message
To select a message to be played to the caller for lines answered by SA:
1
Enter administration mode by sliding TIP to P and touching Administer.
2
Dial *77-followed by the option desired. (Message 2 is the default):
0
=
=
=
1
2
No voice message; call is immediately placed on hold
Message says, “Please hold. ”
Message says, “Please hold, your call will be handled momentarily. ”
If a line number is administered using *50, this message precedes
message 1 and 2: “You have reached . , .’ where . . . is a number entered
by the system administrator in “Call Forwarding.”
NOTE:
3 Touch Administer.
The console beeps twice.
4 Leave adminisbration mode by sliding the TIP switch to tlhle center
position.
M
T
l
P
MERLIN Plus System Features
5-l 07
PROGRAMMING
To program a System Answer button on a voice terminal:
Only the attendant or the alternate attendant can have a
System Answer button. The voice terminal does not have to be at
Intercom # 10.
NOTE:
1
Label the button “System Answer.”
2
Slide the T/P switch to P.
The voice terminal rings every 5 seconds to remind you that you are programming and that
you cannot place or receive calls.
3 Touch System Answer.
HOW TO USE
4
Dial the three-digit code *58.
s
Slide the TIP switch to the center position.
To activate the System Answer feature:
1 Touch System Answer.
Green light on = SA on
Green light off = SA of
Green light flashing = Problem with SA.
If the green SA light is flashing, report the problem to the system
administrator who should refer to Section 7, “Troubleshooting,” to correct the
problem.
System Featwe
This feature is used with a MERLIN Plus system data collector
and an AT&T 475 printer or its equivalent.
NOTE:
DESCRIPTION
If the system administrator needs to verify the features administered to the
system or needs a written copy of the lines and features on each voice
terminal, he or she can use the data collector and the printer to print a
, System Feature Report. This report lists both systemwide features and
programmed features and lines on individual voice terminals.
The system features that can be printed on the System Feature Report are:
l
Disallowed List assignments for each voice terminal.
l
Allowed List assignments for each voice terminal
l
Transfer Return Interval
l
5-108 MERLIN Plus Svstem Features
Call Report settings, such as the minimum call duration of a call for which
the CalI Report feature will print information
l
System Speed Dial numbers
l
Automatic System Access (ASA) administration
The voice terminal features that can be printed on the System Feature Report
are:
l
The intercom number of the voice terminal
l
The voice terminal model type
l
Optional accessories used with the voice terminal
l
Voice Announcement Enable/Disable
l
Automatic Line Selection sequences
l
The lines and features assigned to all buttons on the voice terminal
Figure 5-3 shows a printout of a typical SFR.
CONSIDERATIONS
The System Feature Report feature can be accessed only from the
administrator/attendant console.
If the system administrator wants to have the date and time on the System
Feature Report, the administrator can set these options on the control unit
when he or she administers the date and time for the Call Report feature.
(See “Call Report.“)
The system administrator can connect the data collector and the printer to any
voice terminal jack in the system, except jack 10. However, if the printer and
data collector have already been assigned to a voice terminal jack for the Call
Report feature, usually jack 19, it is best to use the same jack assignment for
the System Feature Report.
FIGURE 5-3 A printout of a typical System Feature Report.
MERLIN Plus System Features
5-l 09
If you are using the same printer and data collector for both
features and change the voice terminal jack assignment, you must
administer the new jack assignment for both features.
NOTE:
You cannot use the same jack that you used for ASA but you can use
the same jack that you used for BB, by using the 450F adapter and
cord supplied with the data collector. If necessary, you can change the
jack assignments for BB and ASA.
The report for each voice terminal shows all voice terminals as having 34buttons. This allows flexibility for upgrading and changing voice terminals.
ADMINISTRATION
If your responsibilities do not include system’administration, skip this
information.
To set the date and the time, to assign a voice terminal jack for the System
Feature Report, and to print or to cancel a report, use the following
procedures.
The Date and the Time. (If you have already set the date and time for the
Call Report feature, you don’t have to do it again.)
To set today’s date:
1
Enter administration mode by sliding the T/P switch to P and touching
Administer.
2 Dial *80.
3
Dial two digits for the month (01 through 12).
4
Dial two digits for the day (01 through 31).
5
Dial two digits for the year (00 through 99).
For example, if the date is May 16,1986, dial *80 05 16 86.
6 Touch Administer.
The console beeps twice.
7
Leave administration mode by sliding the TIP switch to the center
position.
5 Touch Administer.
The console beeps twice.
6
Leave administration mode by sliding the TIP switch to the center
position.
Control Unit Jack Assignment for the System Feature Report. To assign a
voice terminal jack on the control unit for the System Feature Report:
NOTE: The system is factory-set to have the data collector and printer
connected to voice terminal jack 19 for the System Feature Report
feature.
1
Enter administration mode by sliding the TIP switch to P and touching
Administer.
2 D i a l *85.
3
Touch the Auto Intercom button or dial the intercom number of the jack
to which the data collector and the printer will be connected for the Call
Report feature.
The green light next to the current jack assignment goes off; the green light next to the
Auto intercom button for the jack to which the data collector and the printer zvill be
connected goes on. .
4 Touch Administer.
The console beeps twice.
5
Leave administration mode by sliding the TIP switch to the center
position.
Complete Sfstem Report. To print out a system administration report and a
report for every voice terminal in your system:
1
2
Enter administration mode by sliding the TIP switch to P and touching
Administer.
Dial *60.
The printer prints the reports as it receives the data from the system.
3 Touch Administer.
The console beeps twice.
4
Leave administration mode by sliding the TIP switch to the center
position.
System Administration Report. To print out a system administration report
only:
1
Enter administration mode by sliding the TIP switch to P and touching
Administer.
..--. ._. -. ^ - ._.
2 Dial *61.
The yrintec prints the report us it receizvs data from the system.
3 Touch Administer.
The console beeps tmice.
4
Leave administration mode by sliding the TIP switch to the center
position.
Individual Voice Terminal Reports. To print out individual reports on one or
more voice terminals:
1
2
3
Enter administration mode by sliding the TIP switch to P and touching
Administer.
Dial *62.
Touch the Auto Intercom button(s) or dial the intercom number(s) of the
voice terminal(s) for which you want a report.
The printer prints the report as it receizjes data from the system.
4 Touch Administer.
The console beeps twice.
5
Leave administration mode by sliding the TIP switch to the center
position.
Printout Cancellation. To cancel a printout in progress and to delete all
waiting report requests:
1
2
Enter admini&ation mode by sliding the TIP switch to P and touching
Administer.
Dial ‘63.
The printer stops printing.
3 Touch Administer.
The console beeps twice.
4
PROGRAMMING
Leave administration mode bv sliding the TIP switch to the center
position.
None
5-112 MERLIN Pius System Features
HOW TO USE
None
System Reset
WARNING:
This feature is intended for service personnel only.
DESCRIPTION
When the service prson or the administrator uses System Reset, the entire
MERLIN Plus system is set to the initial feature assignments, and
consequently erases any system administration, such as System Speed Dial
numbers or call restrictions. It is useful when making radical changes to the
system or starting administration over again.
CONSIDERATIONS
When the the service person on the administrator resets the system, all
programming done for any voice terminal in the MERLIN Plus system is
erased. If the administrator has administered customized line assignments for
any voice terminal, these are erased also, and the line configuration is
returned to square operation. All administered features are erased.
ADMINISTRATION
System Reset requires readministering your system and reprogramming all
voice terminals.
To reset your system to the initial feature assignments:
Enter administrativn mode by sliding the TIP switch to P and touching
Administer.
Dial *99198.
The console
s beeps twice.
If the console beeps only once or not at all, the reset didn’t work,
probably because som&one was using the system when you dialed the
System Reset code. Wait until no one is using the system, and try the
reset again.
NOTE:
Go to the control unit and turn off the power for ten seconds, then turn it
back on.
The red lights go on, and the green lights flash.
The console rings every 5 seconds.
Touch Administer.
The console beeps twice.
Leave administration mode by sliding the TIP switch to the center
position.
MERLIN Plus System Features
5-113
PROGRAMMING
None
HOW TO USE
This feature is recommended for service personnel only.
System Speed Dial
The administrator can store System Speed Dial codes for telephone numbers,
such as a warehouse number or a branch office number, and account
numbers that people in the office frequently use. People can then dial the
number simply by dialing the proper Speed Dial code. Your MERLIN Plus
system can store up to 130 System Speed Dial numbers. System Speed Dial
is particularly useful when the administrator wants to give users access to a .
specific number, for instance, an authorization code for an alternate longdistance service, but does not want to divulge the number.
DESCRIPTION
.
CONSlDERATlONb
For more information about assigning a System Speed Dial code to account
numbers that the administrator wants to appear on call reports, see “Account
Number Entry. ’
You can program a System Speed Dial code for an area code and an
exchange. Then when you want to dial a telephone number that begins with
this area code and exchange, you can dial the Speed Dial code or touch the
button programmed for the Speed Dial code, and then dial the remainder of
the telephone number or use another Speed Dial code. The MERLIN Plus
system can hold a maximum of 130 System Speed Dial codes of up to 16
digits each.
The system administrator can assign System Speed Dial codes to telephone
numbers with or without Restriction Override.
l
l
If the administrator decides to store a System Speed Dial code with
Restriction Override, all voice terminals in the system can use the code as
a type of password that allows the person to access the outside number,
regardless of Disallowed List, toll or outward call restrictions previously
placed on the voice terminal.
The administrator may decide to store a System Speed Dial code without
Restriction Override so that the Disallowed List, and all toll or outward
restrictions placed on voice terminals continue to apply.
For System Speed Dial codes assigned to telephone numbers, the
administrator can specify which Speed Dial codes will be printed on call
reports (see “Call Report”), which codes will be displayed on display sets,
and which ones will be private.
It is sometimes necessary to include a pause, stop, or switchhook flash, or to
switch from rotary to Touch-Tone signals within a dialing sequence. To do
so, the administrator must enter one or more of the following special
characters into the dialing sequence. However, if you do use the‘special
characters in the dialing sequence, you cannot use Recall to retry the number
for you.
5-114 MERLIN Plus System Features
l
To program a pause, touch Hold.
l
To program a stop, touch Drop.
l
To program Touch-Tone Enable, touch Transfer.
l
To program a switchhook flash at the beginning of a dialing sequence,
touch Recall and then touch Hold.
NOTE: If the first digit of a System Speed Dial number is the special
character Recall, follow it by a pause (also a special character) when
programming the dial sequence. If you need to use Recall in other than
the first digit of the dialing sequence of a System Speed Dial number, you
cannot use the Speed Dial feature.
(For more information about using special characters in a dialing sequence,
including PBX, Centrex, and Custom Calling features, see “Special
Characters. “)
If a number to which the administrator assigns a System Speed Dial code
contains a ” # ” character, the character must be entered twice (For example,
9 # # 123). A single ” # ” character ends administration of the current Speed
Dial code.
When the administrator has dialed the maximum 16 characters for a System
Speed Dial code, the system beeps twice to confirm the entry and to remind
the administrator that he or she cannot dial any more characters. If the
administrator dials less than 16 characters, the system does not beep.
The administrator should give a copy of the System Speed Dial code
assignments to each person who will be using these codes.
People can dial the codes or program a button for specific Speed Dial codes.
ADMINISTRATION
If your responsibilities do not include system administration, skip this
information.
Before you administer the System Speed Dial feature, refer to the System
Speed DialForm that you have filled out.
To assign System Speed Dial codes to frequently dialed telephone numbers:
1
Enter administration mode by sliding the TIP switch to P and touching
Administer.
2
Dial the code ( # 60 through # 89 or # 900 through #999) that you are
assigning to the telephone number.
3
Dial one of the following codes:
b
Dial *90 to assign the Speed Dial code (without Restriction Override).
For example, if you want the Speed Dial number to have the same
restrictions as the actual telephone number, that is, call or toll
restrictions still apply with this number, dial the System Speed Dial
code (such as # 67 or # 936), *90, and then the telephone number.
b
Dial *92 to assign the Speed Dial code with Restriction Override.
For example, if you want to assign a System Speed Dial code to a
telephone number that anyone in the system can dial, regardless of any
previously placed restrictions, dial the System Speed Dial code (such
as # 67 or # 936), *92, and then the telephone number.
MERLIN Plus System Features
5-l 15
4
Dial the telephone number. (If you want the number to be private so that
only the dial code appears on Call Reports and on display voice terminals,
insert a * before the telephone number. However, private numbers do
appear on System Feature Reports.)
For example, for a private number with Restriction Override, dial a
System Speed Dial code (such as #67 or #936), *92, and a telephone
number with a * before it, such as *l-617-555-1234.
5 Touch Administer.
The console beeps twice.
PROGRAMMING
6
Repeat the last four steps for each telephone number to which you are
assigning a System Speed Dial code.
7
Leave administration mode by sliding the TIP switch to the center position.
To program a button for a System Speed Dial code assigned to a telephone
number:
1
Label the button with a name and/or a number.
2
Slide the TIP switch to P.
The voice terminal rings every 5 seconds to remind you that you are programming and that
you cannot place or receive calls.
HOW TO USE
3
Touch the button you want to program.
4
Dial *95 plus a System Speed Dial code number from 60 through 89 and
900 through 999 that your administrator can give you.
5
Slide the TIP switch to the center position.
In order to use the System Speed Dial feature, you can use a Speed Dial code
or touch a programmed button.
To place a calI by dialing a System Speed Dial code:
1
Touch Speakerphone or lift your handset.
2
Dial a System Speed Dial code ( # 60 through # 89 or # 900 through # 999).
To place a caII using a button programmed for a specific System Speed Dial
code:
1
5-116 MERLIN Plus System Features
Touch Speakerphone or lift your handset.
2
Touch the System Speed Dial button for the particular code.
3
If the special character STOP is included in a system speed dial number,
after you hear the second dial tone, dial the System Speed Dial code again
to continue the dialing.
Test
DESCRIPTION
When you need to test the lights and the ringing on your voice terminal, or if
you need to verify that your voice terminal has been installed correctly, you
can use the Test/Program (TIP) switch on the left side of your voice terminal.
CONSIDERATIONS
If your system administrator has administered the Program Mode Lock
feature for your voice terminal, you cannot use the T/P switch for changing
programmed features at the voice terminal. However, you can still use the
TIP switch for testing voice terminal lights and ringing.
ADMINISTRATION
None
PROGRAMMING
None
HOW TO USE
To test the lights and ringing on your voice terminal:
1
Slide the TIP switch to T. On some voice terminal models you must hold
the switch in that position until you are finished testing’ your voice
terminal.
The red and green lights next to your voice terminal buttons flash alternately, and your
voice terminal rings.
2
Slide the TIP switch to the center position.
If your voice terminal does not respond when you slide the Test/Program
switch to T, check Section 7, “Troubleshooting the System,” for possible
causes and recommended action.
MERLIN Plus System Features
5-117
Toll Prefix Setting
DESCRIPTION
In most telephone systems people must dial a toll prefix (a 1 or a 0) before
they dial an area code and telephone number. When the MERLIN Plus
system is installed, it is set for dialing a toll prefix. If people in your system
don’t need to dial a toll prefix, the system administrator must set the system
for dialing the area code only.
CONSIDERATIONS
None
ADMINISTRATION
If your responsibilities do not include system administration, skip this
information. To administer the system so people can dial an area code and
telephone number without a toll prefix:
1
Enter administration mode by sliding the T/l? switch to P and touching
Administer.
2 Dial *37.
3 Touch Administer.
The console beeps twice.
4
Leave administration mode by sliding the TIP switch to the center
position.
To change the syste,m setting so that people must dial a tolI prefix before an
area code and a telephone number:
f
Enter administration mode by sliding the TIP switch to P and touching
Administer. m
2 Dial *36.
3 Touch Administer.
The console beeps twice.
4
Leave adkinistration mode by sliding the TIP switch to the center
position.
5l
1
PROGRAMMING
5-l 18
None
MERLIN Plus System Features
.P
id
1
l
P
HOW TO USE
Ask your administrator whether you need to dial a tolI prefix ( a 1 or a 0)
before you dial an area code and a telephone number.
Tones
DESCRIPTION
Your MERLIN Plus system and your voice terminal provide the following
tones to inform you of the progress of a call you are placing or are about to
place. There are also tones that let you know you are in administration or
programming mode and a tone to tell you that your voice terminal is working
satisfactorily.
Feedback
Meaning of the Feedback
Sound
Dial tone
Steady tone
You can begin dialing tyhen
you are ready.
Busy tone
A slow pulsed tone
The line is busy.
Voice signal
tone
A beep
You can announce the call
through the other person’s
voice terminal speaker.
Dialing
feedback
For Touch-Tone lines a series
of tones
You have dialed another digit
of the telephone number.
For.rotary lines a series of
rotary pulses
Ringing tone
A ringing sound
The call is ringing at the other
person’s phone.
Testing
feedback
A steady ringing sound
Your MERLIN Plus system ha
been-installed correctly.
Programming
reminder
Your voice terminal rings
every 5 seconds to remind you
that you can’t place or receive
calls.
One beep
You are in programming mod{
and cannot place or receive
calls.
Error/Deny
tone
Confirmation
tone
Hold
Reminder
-.
Tbvo l~eps
One beep every minute
You have made an error in
administration and should try
the step again.
The administration feature ha!
been entered into the system.
You have a call on hold.
-
The MERLIN Plus system also provides you with the following ringing
sounds or voice announcements so that you know immediately what kind of
call you are receiving.
MERLIN Plus System Features
5-119
If you hear this type of ring or
announcement
‘---
One short and one long ring
yr: You_ are receiving this kind of call
Transferred Call
A beep followed by a voice
Intercom Call with Voice
- -----+----announcement through your- voice
Announcement
terminal speaker
A beep followed by a voice
announcement through your voice
terminal before you receive a
transferred call
Transferred Call with Voice
Announcement
A beep
Manual Signaling
One long beep
Ringing Intercom Call
One long ring
Outside Call
CONSIDERATIONS
You can program your voice terminal with a ringing pattern that is different
from the ringing sound of nearby voice terminals. See “Personalized
Ringing. ’
ADMINISTRATION
None
PROGRAMMING
None
HOW TO USE
By listening to the tones that the system or your voice terminal gives you,
you can use your MERLIN Plus system more efficiently.
NOTE: This feature is for rotary lines only.
DESCRIPTION
If you have telephone lines that carry rotary signals, use the Touch-Tone
Enable feature to switch to Touch-Tone signals midway through a dialing
sequence. This lets you take advantage of bank-by-phone, credit card
authorization, computer access, and alternate long distance services.
CONSIDERATIONS
When you hang up your handset after using this feature on a call, your
system returns to rotary signals.
5-120 MERLIN Plus System Features
None
To program a Touch-Tone Enable button for your voice terminal:
1
Label the button Touch-Tone Enable.
2
Slide the TIP switch to P.
The voice terminal rings every 5 seconds to remind you that you are programming and that
you cannot place or receive calls.
3
Touch the button you want to program.
4 D i a l *76.
s
HOW TO USE
Slide the T/P switch to the center position.
To switch from rotary pulse to Touch-Tone signals as you dial a number:
Touch Speakerphone or lift your handset.
Dial the first part of the number.
Touch Touch-Tone Enable.
Dial the remaining numbers.
Touch-Tone or RcHaq Setting
When the MERLIN Plus system is installed, it is set to generate Touch-Tone
signals. If any of the system’s lines are rotary, the administrator must reset
the system to rotary dialing by entering a code at the administrator/attendant
console.
CONSIDERATIONS
If your system has any rotary lines, you should select the rotary setting for
the system then program a Touch-Tone Enable button which can be activated
when you are using your Touch-Tone lines. (See “Touch-Tone Enable” .)
ADMINISTRATION
If your responsibilities do not include system administration, skip this
information.
To set your system for rotary dialing:
1
Enter administration mode by sliding the TIP switch to P and touching
Administer.
MERLIN Plus System Features
s-121
2 Dial *39.
3
Touch Administer.
The console beeps twice.
4
Leave administration mode by sliding the TIP switch to the center
position.
If you need to reset the system for Touch-Tone dialing:
1
Enter administration mode by sliding the TIP switch to P and touching
Administer.
2 Dial *38.
3 Touch Administer.
The console beeps twice.
4 Leave adminiis1 :ration mode by sliding thLe T/P switch to tl le center
position.
1
1
l
P
H
PROGRAMMING
None
HOW TO USE
If you have telephone lines that carry rotary signals, you can switch to
Touch-Tone signals midway through a dialing sequence by using the TouchTone Enable feature. (See “Touch-Tone Enable. “)
DESCRIPTION
You can use your voice terminal Transfer button to transfer outside calls to
someone else in your MERLIN Plus system.
There are three ways to transfer calls:
l
l
l
Cl22 MERLIN Plus System Features
Option A-Simple Transfer You can ask the person to whom you are
transferring the call if he or she wants to accept the caII.
Option B-One-Touch Transfer If you have an Auto Intercom button for
the person to whom you want to transfer a call, you can transfer a call
with one touch.
Option C-Direct Transfer You can transfer a call directly by dialing the
intercom number.
CONSIDERATIONS
If no one answers the transferred call, the call returns to the sender after a
specified number of rings set by the system administrator. The administrato
may also choose to set the system not to return calls. (See “Transfer Return
Interval. “)
If the person to whom you are transferring the call has activated the Voice
Announcement Disable feature or if the person is using the intercom line at
his or her voice terminal, you cannot announce the call.
You cannot transfer a conference call.
Option A, Simple Transfer, can be used only when the person receiving the
transferred call has the line button on his or her voice terminal.
ADMNISTRATION
None
PROGRAMMING
If you want to program an Auto Intercom button for a voice terminal to whit
you often transfer calls, see “Auto Intercom. ’
HOW TO USE
To screen a call using Option A, Simple Transfer:
1 Touch Hold.
3
Touch Intercom and dial the intercom number of the person to whom yo‘
are transferring the call.
or
Touch the person’s Auto Intercom button.
3
Announce the call and ask if it will be accepted.
No?
a
Touch the held call’s line button.
b Advise the caller.
c Hangup.
cl
I I
Cl
Surrn 15 El
q III
Cl
q
555-1234
q
Yes?
a
Advise the person to touch the appropriate line button.
b Hang up.
MERLIN Plus System Features
5-12
To transfer a call using Option B, One-Touch Transfer:
1
With the call in progress, touch the Auto Intercom button of the person to
whom you want to transfer the call.
2
When you hear a beep, you can announce the call, if appropriate.
3 Hang up.
To transfer a call using Option C, Direct Transfer:
1 Touch Transfer.
2
Dial the intercom number of the person to whom you are transferring the
call.
3 Hang up.
Transfer Return Interval
DESCRIPTION
When someone in the MERLIN Plus system transfers a call and it is not
answered, the call returns to the sender. When the system is first installed, it
is set to return calls after four rings. The system administrator can change that
setting so that calls ring as many as nine times before they return to the
person who has transferred it. The administrator may also choose to set the
system not to return transferred calls at all.
CONSIDERATIONS
If you are using the Direct Extension Dialing (DXD) feature with your
MERLIN Plus system, you may want to consider setting a Transfer Return
Interval. For more information, see “Direct Extension Dialing” in this section.
ADMINISTRATION
If your responsibilities do not include system administration, skip this
information.
To administer the Transfer Return Interval for your system:
1
5-124 MERLIN Plus System Features
Enter administration mode by sliding the TIP switch to P and touching
Administer.
2
Dial *2 plus the number of rings (up to nine) you want before a call
returns. For example:
*20 programs the system not to return transferred calls
*21 programs the system to transfer calls after one ring.
*29 programs the system to transfer calls after nine rings.
3 Touch Administer.
The console beeps twice.
4
Leave administration mode by sliding the TIP switch to the center
position.
PROGRAMMING
None
HOW TO USE
Ask your system administrator what Transfer Return Interval is set for your
system.
Voice Announcement Enable/Disable
DESCRIPTION
Ordinarily, people can use the MERLIN Plus system intercom feature to
announce calls through your voice terminal speaker. However, if you do not
want a voice announcement to interrupt your work, you can use the Voice
Announcement Disable feature to have intercom calls ring at your voice
terminal instead.
CONSIDERATIONS
If someone in the MERLIN Plus system has the Voice Announcement Disable
feature programmed for his or her voice terminal, he or she cannot hear a
Group Page announcement.
If you use the Voice Announcement Disable feature on a voice terminal with
HFAI, you deactivate the HFAI feature. However, the Voice Announcement
Disable feature does not affect voice terminals with connected hands-free
units and with the Auto Answer-All feature activated.
ADMINISTRATION ’
None
PROGRAMMING
To program the voice announcement option you prefer for your voice
terminal:
1
Slide the TIP switch to P.
The voice terminal rings every 5 seconds to remind you that you are programming and that
you cannot place or receive calls.
MERLIN Plus Svstem Features
5-125
Touch Intercom.
Dial one of the following codes to indicate that you want voice
announcements allowed or prevented at your voice terminal:
b
If you want voice announcements allowed, dial *38.
The green light next to the Intercom button goes on.
b
If you want voice announcements prevented, dial *39.
The green light next to the Intercom button goes off.
4
HOW TO USE
Slide the TIP switch to the center position.
None
Voice Terminal Templates
DESCRIPTION
During administration, it may be useful to use the four voice terminal
templates already designed for typical business uses, rather than program
each voice terminal individually. The four templates are:
l
l
l
l
CONSIDERATIONS
The Clear Template: This template is used for erasing previous voice
terminal features so that new features can be assigned. This template does
not remove line assignmerits.
The Dialer Template: This template is for personnel who do not require
special features, and who aren’t likely to make toll calls.
The Feature Tenfplate: This template is designed for personnel, such as
managers and owners, who need unrestricted phone use along with
several additional features offered by the MERLIN Plus system.
The Receptionist/Secretary Template: This template is intended for
receptionists, secretaries, and backup call handlers, including the system
attendant.
Both the Receptionist/Secretary template and the Features template require a
22-button or larger voice terminal.
Features, such as Voice Announcement Enable/Disable and Personalized Ring,
previously administered to a voice terminal still apply even though they do
not appear on the templates.
Unless Program Mode Lock is on, an individual can choose to reprogram
different features over the features provided on the template.
5-126 MERLIN Plus System Features
ADMINISTRATION
To administer one of the four templates onto a voice terminal:
I
Enter administration mode by sliding the TIP switch to P and touching
Administer.
2
Dial *lO followed by the option number of the template:
1 = Clear template
2 = Dialer template
3 = Feature template
4 = ReceptionistlSecretn y template
3
Touch the Auto Intercom button or dial the intercom number of the target
voice terminal.
The console beeps twice after each voice terminal is administered a template.
NOTE: Label the target voice terminal with the lines and features provided
by the assigned template.
4
Touch Administer.
The console beeps tzoice.
5
Continue to administer the templates to voice terminals, or leave
administration mode.
PROGRAMMING
None
HOW TO USE
Refer to Section 3 “Administration” under “Voice Terminal Templates” for
further information.
MERLIN Flus System Features
5-127
Accessory Equipment
Once you have set up your MERLIN Plus system, you may decide to
purchase additional hardware such as a headset that the system attendant can
use for easier call-handling or a basic telephone that is connected to the
MERLIN Plus system but which you can use off-premises. The information
included in “Accessory Equipment” will help you decide what optional
equipment you want to add to your system and how to use these accessories.
The information in the entry for each accessory is divided into five parts:
Description
The description of the accessory tells what it does and its advantages for
the user.
Drawings and Diagrams
Drawings of the accessory and its parts are included for each piece of
equipment, along with, if applicable, diagrams showing how the
equipment is connected to other MERLIN Plus system accessories.
Considerations
Special considerations include any qualifications the user should know
about the hardware, ways in which the equipment can or cannot be used,
or other hardware or features it can or cannot be used with.
Administration
If applicable, administration procedures are given for setting options at the
administrator/attendant console so that people in the MERLIN Plus system
can use the accessory equipment.
How to Use
If applicable, procedures describe how to use the equipment or voice
terminal.
Basic Telephmea
*’
”
DESCRIPTION
5-128 Accessory Equipment
Basic Touch-Tone telephones can provide regular phone service and can use
many of the features of your communication system using dial codes and
switchhook flashes. The table below shows the telephones that are compatible
with the MERLIN Plus system and the possible connections:
Compatible Telephones
_ _ _ __.. ._--. --. -~
.--
.-~
.-._
Industry standard rotary
_ ._ -__.. ---.-Industry standard Touch-Tone
Touch-Tone with MClRCL (317%SYS)
Speakerphone 420 (3102-420)
Connect To
AUX port
BTMI
AUX port
BTMI
GPA
~ --..-AUX port
BTMI
GPA
--__
AUX port
BTMI
CPA
NOTE: Touch-Tone with MClRCL (3178-SYS) models do not have a
message waiting indicator.
CONSIDERATIONS
You can also use accessories with your MERLIN Plus system that work
similarly to basic telephones. These accessories include auto-dial modems,
facsimile machines, credit phones, answering telephones, manual dial
modems, auto dialers, and answering machines. The following devices
support these accessories.
l
l
l
Basic Telephone and Modem Interface (BTMI)-The BTMI is intended for
on-premises telephones and accessories. You can connect to your
MERLIN Plus system such accessories as auto-dial modems, facsimile
machines, credit phones, and answering telephones. You do not need to
use a MERLIN Plus system voice terminal with these accessories.
General Purpose Adapter (GPA)- The GPA is intended for accessory
equipment that you can connect to your MERLIN Plus system voice
terminal such as manual dial modems, auto dialers, answering machines,
and cordless telephones.
Auxiliary Jack (AUX jack)- The AUX jack on the MERLIN Plus system
control unit is primarily intended to let you share Line A and/or E with
the MERLIN Plus system. You can connect such devices as data devices,
a facsimile machine, or an answering machine to the AUX jack.
Once you have assigned lines to a basic telephone, be sure to provide the
person using the telephone with a list of the codes for the lines he or she has
access to.
Basic telephones are able to receive ringing intercom calls, but not intercom
calls with voice announcement. Therefore, you must program the Voice
Announcement Disable feature for the telephone.
In order to program Voice Announcement Disable, Ringing Options, or an
Automatic Line Selection sequence for the basic telephone, the system
administrator can use the Centralized Programming feature on the
administrator/attendant console.
Accessory Equipment
5-l 29
ADMINISTRATION
If your responsibilities do not include system administration, skip this
information.
1
Assign lines to the basic telephone:
a
Enter administration mode by sliding the TIP switch to P and touching
Administer.
b
Dial the intercom number or touch the Auto Intercom button for the
basic telephone that you are administering.
A green light comes on next to the Auto Intercom button. Green lights also come on
next to the buttons of any lines already assigned to the telephone.
.
c
Touch each line button so that the green light next to it shows the line
assignment you prefer.
Green light on = the line is assigned to the telephone
Green light ojfj = the line is not assigned to the telephone
2
To restrict the type of calls that the basic telephone can place:
a
Touch Restrict until the green light next to it shows the code for the _
call restrictions you want the telephone to have:
Steady green light = Unrestricted (all calls permitted)
Flashing green light = Toll restricted (local and intercom calls)
Green light off = Outward restricted (intercom calls)
b
When you are finished administering the basic telephone, touch
Administer.
The console beeps twice.
c
Leave adrninistr#ion’ mode by sliding the TIP switch to the center
position.
3
Then connect a MERLIN Plus system voice terminal directly to the control
unit voice terminal jack to which you plan to connect the BTMI. (You can
also program the basic telephone by using the Centralized Programming
feature on the administration/attendant console. For more information on
this feature, see ‘Centralized Programming. “)
4
Program this substitute telephone for Voice Announcement Disable:
5
6
a
Slide the TIP switch to P.
b
Touch the Intercom button until the green light next to it goes off.
If you want to change the order in which the system selects available lines
for this telephone, assign an Automatic Line Selection sequence.
a
While in programming mode, dial **.
b
Touch the line buttons in the order you want them to be selected.
c
When you are finished programming the basic telephone, slide the TIP
switch to the center position.
If you want the basic telephone not to ring on specified lines, use the
Ringing Options feature. While in programming mode, touch the line for
which you want to program a ringing option:
a
If you don’t want the phone to ring, dial *35.
b
If you want the phone to ring immediately when a call comes in, dial
*37.
5-130 Accessory Equipment
7
HOW TO USE
Disconnect the substitute voice terminal and connect the BTMI to the sam
voice terminal jack. Then connect the basic telephone to the BTSlI.
person using a basic telephone must .dial the codes shown in Figure 5-4 to
access the lines the system administrator assigns to the intercom number for
the telephone.
A
FIGURE 5-4 Basic telephone codes for accessing lines.
I
Drop
II
Hold
Basic Telephon : .^and
., iiibdem Interface
DESCRIPTION
The Basic Telephone and Modem Interface (BTMI) allows you to connect mos
types of telephone and data devices to your MERLIN Plus system, including
auto-dial modems, facsimile machines, credit phones, and answering
machines. See Figures 5-5 and 5-6.
Accessory Equipment
s-13
FIGURE 5-5 The Basic Telephone and Modem Interface.
TEL. DEVICE
FIGURE 5-6 A basic telephone connected to a BTMI.
MERLIN Plus
control unit
Line jack
Tel. device
TT
4-Pair
modular cord
5-132 Accessory Equipment
2-Pair
modular cord
CONSIDERATIONS
The BTMI works with Touch-Tone and rotary telephones
ADMINISTRATION
None
PROGRAMMING
If you do not want the basic telephone to ring on every line, you can specify
which lines ring when a call comes in using Ringing Options and
programming the lines for immediate or no ring. See “Ringing Options” in
this section.
You can also specify the order of lines for the phone by programming an
Automatic Line Selection sequence. Be sure to program Automatic Line
Selection only for those lines to be used by the basic telephone. See
“Automatic Line Selection” in this section.
Basic telephones are able to receive ringing intercom calls, but not intercom
calls with voice announcement. Therefore, y6u must program the Voice
Announcement Disable feature for the telephone. See “Voice Announcement
Disable” in this section.
In order to program Voice Announcement Disable, Ringing Options, or an
Automatic Line Selection sequence for the basic telephone, you can use either
the Centralized Programming feature on the administrator/attendant console
or program a substitute MERLIN Plus system voice terminal plugged into the
voice terminal jack designated for the BTMI. See “Centralized Programming”
in this section.
For more information on assigning lines and features for a basic telephone,
see “Basic Telephones. ”
HOW TO USE
See the “User’s Guide for Off-Premises and Basic Telephones, ’ included with
the BTMI, for instructions on how to operate a telephone connected to a
BTMI.
A person using a basic telephone must dial 3-character codes to access the
lines the system administrator assigns to the intercom number for the
telephone. For a list of these codes, see “Basic Telephones.”
DESCRIPTION
The MERLIN Plus system Data Collector uses information from the Call
Report and System Feature Report features and transmits the material from
the MERLIN Plus system to a printer or to a PC with a standard RS232-C,
1200 baud, serial interface. You can connect the data collector to an available
voice terminal jack on the control unit.
Accessorv Eauimnent
5-l 33
FIGURE 5-7 A data collector connected to the MERLIN Plus system control unit and printer.
Busy Buster (BB)
Automatic
System Access
(ASA) jack
Jack 19
(System default for the
Data Collector)
Wire manager
slots
Adapter
1
Printer
’ Data Collector
(Back view)
L+g b
CU. PRINTER
\
CONSIDERATIONS
0 READY
•
l
POWER
DATA
COLLECTOR
/
An AT&T 475 printer or its equivalent is recommended to work with the
MERLIN Plus system data collector.
The MERLIN Plus system is set to have the data collector and the printer
connected to voice terminal jack 19, but the administrator can connect the
data collector and the printer to any other voice terminal jack in the system,
except jack 10. See Figure 5-7.
NOTE: If you are using the same printer and data collector for both
the System Feature Report and the Call Report features and change
the voice terminal jack assignment, you must administer the new jack
assignment for both features.
The data collector can hold up to one full page of printout, 60 lines of 80
characters each. The collector disregards any material over the one page
limit.
5-134 Accessory Equipment
For proper operation of the printer with the MERLIN Plus system data
collector, the printer options must be set correctly. The options and the
method of selecting them varies with different printers. Consult the Customer
Information Bulletin (CIB) that is provided with the data collector for the
correct option settings for your AT&T 475 printer.
ADMINISTRATION
Refer to the CIB and System Feature Report for Administration procedures.
HOW TO’USE
None
General Purpose Adapter (GPA)
DESCRIPTION
With the General Purpose Adapter (GPA) you can connect to your voice
terminal’s Touch-Tone (not rotary) equipment such as manual dial modems,
auto dialers, answering machines, and telephone extensions (including
cordless telephones). See Figure 5-8.
FIGURE S-8 A modem, PC and a voice terminal connected to a GPA (back
view).
BASIC
TEL.@P.
@
Jo’N w AUTo
GENERAL PURWSE
ADAPTER
I
Modular cord
I
I
/I
I
I
Data device
Modem
Basic telephone or other Touch-Tone device
Voiceterminal
CONSIDERATIONS
If you set the GPA to the Auto (automatic setting), you must program an
Auto Answer-All button for your voice terminal. (See “Auto Answer-All. “)
Accessorv EauiDment 5-135
ADMINISTRATION
None
HOW TO USE
You can select the switch position, labeled Join, Basic, or Auto on the
adapter, required for operating the telephone or data equipment. When you
have made the appropriate selection for your needs, slide the three-position
option switch to the selected mode of operation. For the Joined Call
Operation option, see the information that comes with the GPA.
Originating a Call
l Use the Basic Operation switch position if you only originate calls with
your telephone or data device. You may also answer incoming calls using
your telephone or data device. However, incoming calls ring only at your
voice terminal, not at the telephone or data device.
Using an Automatic Answering Device
l Use the Automatic Operation switch position for using automatic
answering devices. Before operating these devices, program an Auto
Answer-All feature button so you can set the devices to go on
automatically when you receive ringing calls.
Headset and Headset Adapter
DESCRIPTION
A Headset connected to your voice terminal by way of the Headset Adapter
allows you to handle calls more easily. See Figure 5-9.
.
FIGURE 5-9 A
Line
headset connected to the headset adapter.
CONSIDERATIONS
A headset cannot be used with a j-button or a lo-button HFAI voice terminal.
The cord on the headset is plugged into the headset adapter, and the voice
terminal and the adapter are connected by way of a modular cord tvhich
comes with the adapter. The headset adapter plugs into the jack labeled
“Other. ”
ADMINISTRATION
None
HOW TO USE
To place a call using your headset:
1
Touch On/Quiet on the headset adapter.
The green light next to the button goes on.
2
Dial the outside number.
To answer a call:
1
Touch On/Quiet on the headset adapter.
To mute the microphone:
1
Hold down On/Quiet on the headset adapter.
To hang up:
1
Touch Off on the headset adapter.
The green light next to On/Quiet goes off.
Loudspeaker
DESCRIPTION
If you have a compatible loudspeaker paging system, you can connect it to
the MERLIN Plus system either through the page jack on the control unit or
through a CO (outside) line jack on a line module as shown in Figures 5-10
and 5-11. You can then page people, make announcements, and provide
background music (if available) throughout the building.
Accessory Equipment
S-137
FIGURE 5-10 Loudspeaker Paging System connected to the Page Jack on the
MERLIN Plus system control unit.
Plus
Cl . . . .
MERLIN
FIGURE 5-11 Loudspeaker Paging System connected to a CO Line on a Line
Module.
MERLIN Plus
control unit
Loudweaker
S-138 Accessory Equipment
CONSIDERATIONS
Considerations for the Page Jack connection:
The loudness of the loudspeaker paging system is controlled by the
loudspeaker paging system only.
To control the loudness of the background music throughout the building, or
to turn off the background music, the system administrator can dial a code at
the administrator/attendant console for the preferred volume. Background
music volume can also be controlled at the music source. The following are
the jack pin-out specifications for the loudspeaker paging system. Pin
numbers from left to right (1 through 8) are:
0 4,5
for voice
l
3,6 for contact closure
l
1,2,7,8 are unused
Considerations for CO line connection:
If the paging unit is connected to a CO port but is administered as a paging
port, it is treated differently than a CO line, and has the following
restrictions:
l
l
An auxiliary jack cannot be used as a paging port.
Conferencing to this paging port or adding this port to a conference call is
prohibited.
l
Transferring of the paging port is prohibited.
l
Bridging onto the paging port is prohibited.
l
No Call Reports can be generated for this line.
l
l
l
No Call Restrictions apply, therefore, even outward restricted voice
terminals could use this line for toll calls.
The volume is controlled by the loudspeaker paging system only.
Unlike the page jack connection, the CO connection provides no signal to
alert you when the loudspeaker paging system has been activated.
If you want to save available feature buttons for other features, use the dial
code instead of programming a Loudspeaker Page button.
ADMINISTRATION
If your responsibilities do not include system administration, skip this
information.
Administration for the Page Jack connection:
To set the volume of background music, or to turn the music off, dial one of
the following codes:
1
Enter administration mode by sliding the TIP switch to P and touching
Administer.
Accessory Equipment
5-139
2
Dial one of the following codes to set the volume you prefer:
B
Dial *16 to turn off the background music.
b
Dial *17 to set the volume to low.
b
Dial *X3 to set the volume to medium.
w
Dial *19 to set the volume to high.
3 Touch Administer.
The console beeps twice.
4 Leave administration mode by sliding the TIP switch to the center
’ position.
Administration procedures for CO line connection:
1
Slide the TIP switch to P and touch Administer.
2 Dial *91
3
Touch the button for the line you want to be the paging port.
Green light on = line added to paging port
Green light off = line removed from paging port
4 Touch Administer.
The console beeps twice.
5
Leave administration mode by sliding the TIP switch to the center
position.
PROGRAMMING
Refer to “Loudspeaker Page” earlier in this section.
HOW TO USE
Using the Loudspeaker Paging System connected to the Page Jack:
To use the Loudspeaker Page button:
1
2
Touch Loudspeaker Page.
When you hear the beep, lift your handset and make your announcement.
To use this feature dialing a code:
1 Touch Intercom.
2 Lift your handset.
3 Dial 6.
4
When you hear the beep, make your announcement.
The loudspeaker will turn off automatically when you hang up.
Using the Loudspeaker Paging System connected to a CO line:
5140 Accessory Equipment
1
Touch the loudspeaker page’s line button.
2
Follow the instructions provided with your loudspeaker page system.
3
If your loudspeaker page system provides a warning tone (beep), wait for
the tone before making your announcement.
Music-on-Hold (MOH) and Background Music
DESCRIPTION
When you have Music-on-Hold, you can provide background music for callers
whom you have placed on hold.
The Music-on-Hold (MOH) Jack is an RCA-type phonograph jack, into which
you can plug an audio system. It is on the front of the control unit behind
the top cover under the red warning and the green power lights as seen in
Figure 5-12.
NOTE: Users of equipment that rebroadcasts copyrighted music or
other material may be required to obtain a copyright license from a
third party such as ASCAP or BMI.
FIGURE 5-12 An Audio System connected to the Music-on-Hold Jack (MOH) on
the MERLIN Plus system control unit.
RCA-type phone
jack to MOH jack
MERLIN Plus
control unit
(MOH) jack
Audio system
0
\
00
0
To control the loudness of the Music-on-Hold and the background music for
the building, the system administrator can dial a code at the
administrator/attendant voice terminal for the preferred volume. The
administrator can also turn off the Music-on-Hold and background music by
entering a code at the administrator/attendant console.
The system is factory-set for medium music volume. The music volume can
also be controlled at the music source.
The Music-on-Hold feature is designed to accept &ohm impedance input,
matching the output of a variety of audio sources.
Accessory Equipment
5-141
You should use the Music-on-Hold feature with DXD so that callers can hear
music when they are placed on hold. See “Direct Extension Dialing” in this
section.
You can also use the Music-on-Hold feature with System Answer, so that
callers hear a special prerecorded message or music while they are waiting.
ADMINISTRATION
If your responsibilities do not include system administration, skip this
information.
From the administrator/attendant console, you can set the volume for Musicon-Hold or turn it off by dialing one of the four settings listed below:
1
Enter administration mode by sliding the TIP switch to P and touching
Administer.
2
Dial one of the following codes to set the volume you prefer.
)
Dial *12 to turn off Music-on-Hold.
D
Dial *13 to set the volume to low.
w
Dial *14 to set the volume to medium.
b
Dial *15 to set the volume to high.
3 Touch Administer.
The console beeps twice.
4
Leave administration mode by sliding the TIP switch to the center
position.
If you want to set the volume on the background music for the building or
turn the music off, dial one of the following codes:
1
Enter administration mode by sliding the TIP switch to P and touching
Administer.
2
Dial one of the following codes to set the volume you prefer:
w
Dial *16 to turn
off the background music.
s
Dial *17 to set the volume to low.
D
Dial *18 to set the volume to medium.
b
Dial *19 to set the volume to high.
b
3 Touch Administer.
The console beeps twice.
4
PROGRAMMING
5-l 42 Accessory Equipment
Leave administration mode by sliding the TIP switch to the center
position.
None
Operate your audio system according to the directions that came lvith the
equipment.
HOW TO USE
Supplemental Alert Adapter (SAA)
You can connect Extra Alert Devices, such as a bell, horn, strobe, or chime, to
your system so that people working in noisy or remote areas of a building can
be alerted when a call rings. See Figure 5-13. When you activate the
Supplemental Alert Adapter (SAA) and a voice terminal rings, the adapter
automatically activates the connected extra alert device, which gives a visual
or audible signal that a call has come in.
DESCRIPTION
FIGURE 5-13 An extra alert bell and a voice terminal connected to the SAA (back view).
I
SAA
Modular voice
terminal cord
7-Foot
modular cord
_ Extra_ alert _
modul :ord
Extra alert
switch
.
b
Modular +
wall jack
Extra alert
strobe
Voice terminal
25-l&ot modular cords
Accessorv Eaubment 5 - 1 4 3
CONSIDERATIONS
An Extra Alert Switch allows you to turn an extra alert device on and off and
alternately select between two different connected alerting devices, such as a
strobe during business hours and a bell off-hours. You may also alternate
between two extra alert devices installed in different locations.
In addition, an extra alert switch allows you to use two extra alert devices
simultaneously. However, you may need a voice terminal power supply
when you have more than one extra alert device connect to the SAA. The
extra alert switch is compatible with MERLIN Plus extra alert devices (-48V).
If you want the SAA to automatically turn on the extra alert devices
connected to
the extra alert switch, plug the extra alert switch into the Alerter jack of the SAA.
If you want to use extra-alerting devices simultaneously, you need to plug the
modular cord for each device into a Line Bridging Adapter which you can
connect to either position (1) or position (2) on the bottom of the extra alert
switch.
For more information, contact your equipment dealer.
ADMINISTRATION
None
PROGRAMMING
None
HOW TO USE
To set up your SAA:
1
Unplug the appropriate voice terminal from its modular wall jack, and
plug it into the jack labeled V.T. on your SAA.
2
Plug one end of the modular cord into the jack labeled C.U. on the SAA
and the other end into the voice terminal’s modular wall jack.
3
Plug the modular cord from the extra alert device into the jack labeled
Alerter on the SAA.
To have the extra Bert device turn on when a call rings at the appropriate
voice terminal, turn the SAA to the On position.
If you want to use more than one extra alert device alternately:
1
Turn the extra alert switch’s knob to the appropriate On position labeled
(1) or (2). For example, if you connect a bell to position (1) and a strobe to
position (2), turn the control switch to position (1) to operate the bell and
to position (2) to operate the strobe.
If you want to use more than one extra alert device simultaneously:
1
5-144 Accessory Equipment
Turn the extra alert switch knob to the appropriate On position labeled (1)
or (2). For example, if you connect a bell and a strobe to a line bridging
adapter and the adapter to position (1) on the SAA, turn the control
switch to this position.
Section 6: Quick Reference Guides
Quick Reference Guide to System Administration
Quick Reference Guide to Administration Codes
6-1
6-12
Quick Reference Guide to Voice Terminal Features
6-16
Quick Reference Guide to Programming Codes
6-20
Quick Reference Guide to ASA Features
6-21
Quick Reference to Administration Procedures for ASA
6-22
Quick Reference Guide to ASA Voice Terminal Features
6-24
Quick Reference Guide to Using the ASA Features
6-25
Quick Reference Guide to System Administration
The following table is a quick guide to administration procedures for the
MERLIN” Plus Communications System. If you need more information on a
procedure than the table gives you, look up the procedure in Section 5,
“Reference.”
Before you perform the steps given for any procedure, you first have to enter
administration mode as follows:
1
Slide the TIP switch on the left side of the console to P.
The red lights next to the line buttons go on steady.
The green lights next to the line buttons begin /lashing.
The console rings every 5 seconds to remind you that it’s in programming mode.
2 Touch Administer.
The red lights go on steady next to Administer and Restrict.
All other lights go off, and the ringing stops.
If you are performing several of these procedures in one
administration session, you don’t have to leave administration mode
after each one. Simply dial the appropriate code or touch the
appropriate button to begin the next procedure.
NOTE:
When you finish administering the system, leave administration mode as
follows:
1
Slide the T/P switch to the center position.
2
Change any voice terminal (telephone) button labels and any entries on
forms or directories to reflect the administration or programming changes
you’ve made.
Do This
Administration Procedure
.-
Specify toll-prefix or area-code-only
dialing.
Enter administration mode.
Dial the appropriate code:
*36 for toll-prefix dialing
*37 for area-code-only dialing.
3 Touch Administer.
1
2
The console beeps twice.
4 Leave administration mode.
Specify Touch-Tone or rotary (pulse)
dialing.
Enter administration mode.
2 Dial the appropriate code:
1
*38 for Touch-Tone dialing
l 39 for rotary (pulse) dialing.
3 Touch Administer.
The console beeps twice.
4 Leave administration mode.
Quick Reference Guide to System Administration
6-l
r
Administration Procedure
-.
II ,LIake Line A and.or Line i? Private.
--r
-1..
Do This
1 Enter administration mode.
2
Dial * 57. The green lights next to the buttons for Line A and Line
E indicate their status:
Green light on = privacy actizye
Green light off = privacy inactiz~e
3
Touch the line button until the green light indicates the privacy
status you want.
4 Touch Administer.
The console beeps twice.
5 Leave administration mode.
--...
Customize line assignments b a
telephone.
1 Enter administration mode.
2
Touch the Auto Intercom button or dial the intercom number for the
phone.
3
Touch the line buttons to add or remove lines. Add the lines in the
order that they should appear.
Green light on = line is assigned
Green light off = line is not assigned
4 Leave administration mode.
Specify number of lines in the system
1 Enter administration mode.
2 Dial ‘4.
3
Dial the number of lines in the system (l-8).
Q Touch Administer.
The console beeps twice.
5 Leave administration mode.
Assign Button-Free Line Operation to a
telephone.
1 Enter administration mode.
2
Touch the Auto Intercom button or dial the intercom number for the
phone.
3
Tou?h the line button until the green light next to it shows the line
assignment you want:
Green light on = the line is assigned to the voice terminal
Green light off = the line is not assigned to the voice terminal
Q
Dial either *31 if you want the phone to ring on incoming calls or
‘32 if you don’t want it to ring.
5 Touch Administer.
The console beeps twice.
6 Leave administration mode.
NOTE: To make all outside lines reappear on the voice terminal, enter
administration mode, touch the Auto Intercom button or dial the
intercom number of the phone, dial ‘34, touch Administer, and leave
administration mode.
6-2
Quick Reference Guide to System Administration
Do This
Administration Procedure
issign Call Restrictions to a telephone.
1 Enter administration mode.
2 Touch the Auto Intercom button or dial the intercom number Eor the
phone.
3
Touch Restrict repeatedly until the green light indicates the desired
restriction.
Green light on steady = Unrestricted fall calls permitted)
Green light flashing = Toll restricted (no long distance ,verrnitted)
Green light off = Outward restricted (no outside calls)
4 Touch Administer.
The console beeps tzuice.
5 Leave administration mode.
idd an entry to an Allowed List.
1 Enter administration mode.
Dial the code for the right list; for lists 1 through 8 dial l Ol through /
*08.
2
3
Dial the item number (01 through 10).
4
Dial the entry (up to eight digits).
The console beeps twice on the eighth digit.
5 Touch Administer.
The console beeps twice.
6 Leave administration mode.
temove an entry from an Allowed List.
1
Enter .administration mode.
2
Dial the code for the right list; for lists 1 through 8 dial *Ol through
*08.
3
Dial the item number (01 through 10).
4 Touch Drop.
5 Touch Administer.
The console beeps twice.
6 Leave administration mode.
4ssign an Allowed List to a voice terminal.
1 Enter administration mode.
2
Dial the code for the right list; for lists 1 through 8 dial *Ol through
*08.
3 Dial 00
4
Touch the Auto Intercom button or dial the appropriate intercom
code number for the telephone.
Greetr lrqlrt on = list is assigned to the telephone
Green Ircht off = list is not assigned to the telephone
5 Touch Administer.
The LIW~~ beeps twice.
6 Leave administration mode.
Quick Reference Guide to System Administration
6-3
Administration Procedure
Add an ent? to the Disallowed List.
Do This
i
1
Enter administration mode.
2
Dial *09 followed by the Disallowed List code (01 to 20).
3
Dial the disallowed number (up to 16 digits).
4 Touch Administer.
The console beeps tzoice.
5 Leave administration mode.
Remove an entry frbm the Disalloved
List.
1
Enter administration mode.
2
Dial *09 and the Disallowed List code (01-20).
-
3 Touch Administer.
The console beeps tzuice.
4 Leave administration mode.
Assign a Disallowed List to a voice
terminal. -
1
Enter administration mode.
2
Dial *09 then 00.
3
Touch the Auto Intercom or dial the appropriate intercom code
number of the voice terminal you want to assign the list to.
Green light on = list is assigned
Green light of = list is not assigned
4 Touch Administer.
The console beep twice.
5 Leave adniinistration mode.
Copy line assignments, call restrictions,
and programmed features from one
telephone (the source) to another (the
target).
1
Enter administration mode.
2
Touch the Auto Intercom button or dial the intercom number for tk
target voice terminal.
3 Touch Copy.
4
Touch the Auto Intercom button or dial the intercom number for tk
souke voice terminal.
5 Touch Administer.
The console beeps twice.
6 Leave administration mode.
Change the Hold Disconnect Interval.
64
1 Enter administration mode.
2
Dial l 69.
3
Touch the line button of the incoming line that you want to change
the hold disconnect interval.
Green fight on = the long (450 millisecond) interval is selected.
Green light off = the short (50 millisecond) interval is selected.
Quick Reference Guide to System Administration
Do This
Administration Procedure
Assign System Speed Dial codes to
telephone numbers dnd account numbers.
Enter administration mode.
Dial the code ( I#60 through # 89 or # 900 through # 999) you are
assigning to the number.
Dial either:
*90 to assign the code without Restriction Override
*92 to assign the code with Restriction Override
*88 to assign the code to an account number.
Dial the telephone number or account number.
NOTE: To designate a telephone number as private (not printed on
call reports), dial * before the number in step 4.
lf
the telephone number or account number has the maximum allozred 16
digits, the console beeps fzoice zohen you enter the sixteenth digit.
Touch Administer.
The console beeps fzuice.
Leave administration mode.
Enter administration mode.
Assigning or removing a voice terminal
from a paging group.
Dial the code for the paging group (*71 or *72).
Touch the Auto Intercom button or dial the appropriate code from
the dial code chart for the phone you want to add or remove.
Green light on = telephone is assigned
Green light off = telephone is removed
NOTE: Touch DROP to remove all voice terminals from a paging
group.
Touch Administer.
The console beeps twice.
Leave administration mode.
Set the Transfer Return Interval.
1 Enter administration mode.
2
Dial the code for the transfer return interval you want (up to nine
* rings):
*2 plus the number of rings wanted (*25 = five rings).
*20 for transferred calls to not be returned.
3 Touch Administer.
The console beeps twice.
4 Leave administration mode.
Quick Reference Guide to System Administration
6-5
Administration Procedure
Set the Music-on-Hold volume.
l-
Do This
1
Enter administration mode.
2
Dial the code for the volume you want:
*I2 to turn off Music-on-Hold.
*13 to set the volume to low.
*14 to set the volume to medium.
*15 to set the volume to high.
Or use the music source volume control instead.
3 Touch Administer.
The console beeps twice.
4 Leave administration mode.
Set the background music volume.
1 Enter administration mode.
2
Dial the code for the volume you want:
*16 to turn off the background music.
*17 to set the volume to low.
*18 to set the volume to medi;?.
*19 to set the volume to high.
Or use the music source volume control instead.
3 Touch Administer.
The console beeps twice.
4 Leave administration mode.
Set the date for Call Reports and System
Feature Reports.
1 Enter administration mode.
2
Dial l 80.
3
Dial two digits for the month (01 through 12), two for the day (01
through 31), and two for the year (00 through 99).
4 Touch Administer.
The console beeps twice.
5 Leave administration mode.
Set the time for Call Reports and System
Feature Reports.
1 Enter administration mode.
2 Dial *81.
3
Dial two digits for the hour (00 through 23) and two for the minut
(00 through 59).
4 Touch Administer.
The console beeps t;twe.
5 Leave aciministratlon mode.
6-6
Quick Reference Guide to System Administration
Administration Procedure
Designate a telephone lack on the control
unit for Call Reports.
Do This
1 Enter administration mode.
2 Dial *82.
Tke green light goes on next to the Auto [ntercom button for the jack to
zokick the data collector and printer are currently assigned.
3
Touch the Auto Intercom button for the new telephone jack to
which you are assigning the data collector and printer.
The green light goes off next to the Auto Zntercom button for the old jack,
and the green light next to the Auto intercom button for the nezu jack
goes
On.
4 Touch Administer.
The console beeps twice.
5 Leave administration mode.
Set the minimum call duration for Call
Report records.
1
Enter administration mode.
2 Dial *83.
3 Dial one digit (0 through 9) for the minimum number of minutes.
NOTE: The system adds 10 seconds to the number of minutes you
select.
4 Touch Administer.
The console beeps twice.
5 Leave administration mode.
Set the calls reported option for Call
Reports.
1
Enter administration mode.
2 Dial *84.
3
Dial the code for the calls reported option you want:
0 = no calls reported
1 = outgoing calls only
2 = outgoing and incoming calls
4 Touch Administer.
The console beeps twice.
5 Leave administration mode.
Print a System Feature Report.
1
Enter administration mode.
2
Dial the code for the report or set of reports you want:
*60 for one system administration report and individual phone
reports.
*61 for a system administration report.
*62 plus touch one or more Auto Intercom buttons or dial one or
more intercom numbers for individual phone reports.
*63 to abort a printout and cancel all other report requests.
3 Touch Administer.
The console beeps twice.
4 Leave administrdtion mode.
Quick Reference Guide to System Administration
6-7
Do This
Administration Procedure
Designate a voice terminal jack on the
control unit for System Feature Reports.
1 Enter administration mode.
2 Dial *85.
If previously administered, the green right goes on next to the Auto
Intercom button for the jack to zuhich the data collector and printer are
currently assigned.
3
Touch the Auto Intercom button of the jack to which the data
collector and printer are connected.
The green fight goes ofi next to the Auto Intercom button for the old jack,
rnd the green light next to the Auto Intercom button for the new jack goes
on.
4 Touch Administer.
The console beeps twice.
5 Leave administration mode.
Program a telephone using Centralized
Programming.
1 Enter administration mode.
2
Touch the Auto Intercom button or dial the intercom number for the
phone you want to program.
3 Touch Conference.
4 Program the telephone.
5 Touch Conference.
6 Leave administration mode.
Lock the programming function at a voice
terminal
1 Enter administration mode.
2 Dial *89.
3
Touch the Auto Intercom button or dial the dial code of the voice
terminal you are administering.
Green light on = the voice terminal is locked
Green light off = the voice terminal is unlocked and can be programmed
NOTE: Touch CONFERENCE to enable program mode lock
systemwide.
Touch DROP to disable program mode lock systemwide.
4 Totich Administer.
The console beeps twice.
5 Leave administration mode.
Designate a voice terminal jack on the
control unit for Busy Buster.
1 Enter administration mode.
2
Dial*35.
3
Touch the Auto Intercom button or dial the intercom number for the
voice terminal jack to which you want the BB jack connected.
4 Touch Administer.
The console beeps twice.
5 Leave administration mode.
6-6
Quick Reference Guide to System Administration
Do This
Administration Procedure
/
I Desigmte J jail\ fur the ASA features (jack
I 18 is the initial assignment).
I
I
!
1 Enter administration mode.
2 Dial *59.
3 Touch the Auto Intercom button or dial the intercom number ior the
jack you want to assign to ASA.
4 Touch Administer.
The console beeps twice.
5 Leave administration mode.
Select the lines, except tie lines, that you
want to add to or remove from CFIDXD,
RLA, or SA line groups.
1
2
3
Enter administration mode.
Dial the appropriate code:
*51 for the CF incoming line group
*52 for the CF outgoing line group
*58 for the DXD incoming line group
*54 for the RLA incoming line group
*75 for SA incoming line group
Touch line buttons until the green light next to it indicates its
assignment to the list.
Greet1 l@zt on = line is assigned to the list
Green light off = line is not assigned to the list
4 Touch Administer.
The console beeps twice.
5 Leave administration mode.
Enable or disable the voice message for all
lines in your CF and/or DXD incoming
line groups.
1
Enter administration mode.
2 Dial *30.
3
Dial the appropriate code:
1 to turn on the Call Forwarding voice message
0 to turn off the voice message
4 Touch Administer.
The console beeps twice.
5 Leave administration mode.
Modify the voice message for one or more
lines in your CF, RLA, SA and/or DXD
incoming line groups.
1
Enter administration mode.
2 Dial *50.
3
Touch the line button(s) for the line(s) on which you want to mc
the message.
4
Dial the telephone number you want to include in the message.
5 Touch Administer.
The console beeps twice.
6 Leave administration mode.
Quick Reference Guide to System Administration
6-9
_.
.-.
Administration Procedure
Change the password for the CF or RLA
feature.
.~~
Do This
1 Enter administration mode.
2 Dial *56.
3
Dial an intercom number plus three digits.
NOTE: To invalidate any passwrod, dial the intercom number and
000.
4 Touch Administer.
The console beeps twice.
5 Leave administration mode.
Enter or change the telephone number to
which you want calls forwarded.
1 Enter administration mode.
2 Dial *53.
3
Dial the new CF destination telephone number.
NOTE: To remove a CF destination number without replacing it,
touch Administer.
4 Touch Administer.
The console beeps tzuice.
5 Leave administration mode.
Reset the system.
WARNING: This procedure erases all system administration and
telephone programming, returns the system to its factory settings, and
restores initial feature assignments to the phones. Use this feature only
when you want to change the system radically,
1
Enter administration mode.
2 Dial *99198.
The console beeps twice.
3
Turn the power off, wait 10 seconds, and then turn it on again.
4 Leave administration mode.
Select a message to be played with System
Answer.
1 Enter administration mode.
2
Did*77 followed by the desired option:
0 = no voice message
= “Please hold”
: = “Please hold, your call will be handled momentarily”
NOTE: If a line number is administered using *50, the following
message is appended to the end of message 1 and 2: “You have
reached . . .’ where . . . is a number entered by the system
administrator for Call Forwarding.
3 Touch Administer.
The console beeps twice.
4 Leave administration mode.
6-10
Quick Reference Guide to System Administration
-.
I
Do This
Administration Procedure
Select number of rings
before a call is
pished up bV an .A5.-2 feature.
1
Slide the T P sLvitch to P and touch Administer.
2
Dial *76 plus the ASA feature number:
1 = DXD
2 = CF
3 = RLA
4 = SA
3
Dial the number of rings (between 0 and 9) before the ASA feature
picks up the call.
NOTE: If the number of rings is set to 0, the voice terminal rvill not
ring, and the calls will be immediately answered.
4 Touch Administer.
l’he console beeps twice.
5
Leave administration mode by sliding the TIP switch to the center
position.
L
Assign a template to a voice terminal.
1 Enter administraiion mode.
2
Dial *lO followed by the desired template:
1 = Clear template
2 = Dialer template
3 = Feature template
4 = Receptionist/Secretary template
3
Touch the Auto Intercom button or dial the intercom number for the
voice terminal being assigned the template.
4 Touch Administer.
The console beeps twice.
5 Leave administration mode.
Quick Reference Guide to System Administration
I
6-11
Quick Reference Guide to Administration Codes
Administration Code
T/
Other Numbers/Buttons
j f\dd telephone numbers to an
) Allowed List (1 through 8)
00
*09
01 through 10 plus up to 20
telephone number digits
*2
Set the Transfer Return Interval for 0 through 9
rings.
B through 8 (lines)
Assign the number of lines in the system
plus template option:
1 = Clear
2 = Dialer
3 = Feature
4 = Receptionist/Secretary
and intercom number
Assign a template to a voice terminal
l 12
*13
Reinstate restriction
Turn off Music-on-Hold
Set Music-on-Hold to low volume
-
l 14
Set Music-on-Hold to medium volume (the default
setting)
*15
Set Music-on-Hold to high volume
l 16
Turn off background music
*17
.
Set background music to low volume
*18
Set background music to medium volume (the
default setting)
*19
Set background music to high volume
*30
1 = to turn on the Call
Forwarding voice message
0 = to turn off the Call
Forwarding voice message
Enable or disable the voice message on one or more
lines in your CF and/or DXD incoming line groups
l 31
Set a line for immediate ring on a voice terminal
with Button-Free Line Operation
*32
Set a line for no ring on a voice terminal with
Button-Free Line Operation
*34
Reassign lines to a voice terminal that has ButtonFree Line Operation
l 35
6-12
Add (or remove) a Disallowed List to a voice
terminal
Add telephone numbers to a Disallowed List
0 through 9 (rings)
the line button(s) for the line(s) on
which you want to reinstate
restriction
*11
--
Add (or remove) an Allowed List (1 through 8) to a
voice terminal
*Ol through *08
01 through 10 plus 11 ipto
eight telephone nun iber
digits
.-
_ -__-- --.. -Feature
jack number assigned to BB
Quick Reference Guide to System Administration
Set the control unit jack for the Busy Buster feature
/
Administration Code
I
O t h e r
Numbers;Buttons i
1
Feature
‘37
Set the system for area code onI>
*.x
Set the system for Touch-Tone dialing
*39
Set the system for rotary dialing
*50
the line button(s) for the line(s) on
which you want the modified
message
the telephone number you want to
include in the message
the line buttons of the lines you
want to add to or remove from the
group
_---__-
Modify the Call Forwarding, Direct Extension
Dialing, Remote Line Access, or System Answer
voice messages for one or more lines in your CF.
DXD, RLA, or SA incoming line groups
Select lines that will be included in the Call
Forwarding incoming: line group
*52
the line buttons of the lines you
want to add to or remove from the
group
outgoing line group
*53
the new Call Forwarding
destination telephone number
Enter or change the telephone number to Mhich
you want calls forwarded
*54
the line buttons of the lines you
want to add to or remove from the
group
-
Select lines that will be included in the Remote Line
Access incoming line group
*56
the ASA password (a MERLIN
Plus system intercom number plus
any three digits)
Choose at least one valid 5-digit password so that
you can gain access to an outside line using Remote
Line Access or change the current call forward
number from a remote location
*57
line A or E only
Assign Privacy to Line A or E
*58
the line buttons of the lines you
want to add to or remove from the
group
-
Select lines that will compose the Direct Extension
Dialing incoming line group
the intercom number for the lxk
you want to assign to ASA
Change the jack assignment of the ASA features
from jack 18, the initial assignment
l 59
Choose lines that will compose the Call Fori\.arding I
-
*60
Print a System Feature Report for the system and
for every voice terminal in the system
l 61
Print a System Feature Report for the whole system
an intercom number of the \ 0lt.t
terminal
Print a System Feature Report for art individual
voice terminal
Cancel a System Feature Report in progress and all
report requests
*63
‘69
-
the outside line buttons
Set Hold Disconnect Interval
Quick Reference Guide to System Administration
6-13
Administration Code /
*71
*71
*75
_
*76
*77
Other Numbers/Buttons
t!~ Intercom numbers
_~ _. -- .~_.
the intercom numbers
-1
the outside line buttons
ASA feature number (14) and
number of rings (O-9)
_-plus. message option
0 = no message
1 = “Please hold”
2 = “Please hold your call will be
answered momentarily”
T-
Feature
I Assign voice terminals to Group Page group 1
Assign voice terminals to Group Page group 2
-__ - .___
Assign lines that can be answered by System
Answer
Set number of rings before an ASA feature picks up
a call
Choose a message to be played with System
A n s w e r .
You can also append
message 1 or 2 to the call
forwarding message modified with
the *50 code.
NOTE:
*79
an intercom number of the voice
terminal
Assign an alternate attendant position
*80
a 2-digit month, a 2-digit day of
the month, and a 2-digit year
Set the date for the Call Report and System Feature
Report feature
*87
a 2-digit hour, a 2-digit minute of
the hour
Set the time for the Call Report and System Feature
Report feature
l 82
an intercom number
Set the control unit jack for the Call Report feature
*83
0 through 9 (minutes)
Set the minimum call duration for the Call Report
feature
*84
- 0 = no calls reported
1 = only outgoing calls reported
2 = outgoing and incoming calls
reported
Set the type of calls that are printed on the call
report
*85
an intercom number
Set the control unit jack for the System Feature
Report
*88
an account number
Assign System Speed Dial codes to account
numbers for the Account Number Entry feature
*89
the intercom number
Enable or disable a person from changing
programmed features at his or her voice terminal
l 90
system speed dial code and
telephone number digits
Assign System Speed Dial codes to outside
telephone numbers
1
I-
1 Administration Code /
*Q’
~.
*99198
Feature
j system speed dial code and
/ telephone number digits
Assign System Speed Dial codes: Lx,ith Restriction
Override to outside telephone numbers
/ a * plus the telephone number
i digits
Assign System Speed Dial codes with Restriction
Override to outside telephone numbers that are
private (only the dial code is printed on the call
report)
I
/
c-
i-.
Other Numbers/Buttons
-.---L
---___-___-.- ..~-
Reset the system (for service personnel only)
Quick Reference Guide to System Administration
6-15
Quick Reference Guide to Voice Terminal Features
Feature Name
I
-
The table below lists the preassigned and programmable features available
with the MERLIN Plus system voice terminal. Those features that can also be
accessed by using a dial code are identified with a “t.” Each feature is listed
by function, followed by a brief description. For more information, read the
individual feature descrrptions in Section 5, “Reference. ”
_. ..--._-- ..,. --__- .---..-.- .- - r-.--r------ ---1
Description
--__-
Preassigned
or
Programmable
Programming Code
--__
PLACING CALLS
Line Request
Request the use of a busy line
Preassigned
Line Select
Select a line other than the line
the system automatically selects
for you
Preassigned
Change from rotary to Touch-Tone
signals during a dialing sequence
Programmable
Auto Answer-All
Have optional equipment such as
a modem, answering machine, or
facsimile machine turn on when a
call comes in
Programmable
Recall
Disconnect a call without hanging
UP
Preassigned
Ringing Line
Preference
Lift the handset and instantly be
connected to the ringing line
Preassigned
Voice Terminal Tones
Know by the ring, or by an
announcement, the’kind of call
that is coming in
Preassigned
.-- ___Touch-Tone Enable
_~~l_~ _~~~
Dial *76
- - -
ANSWERING CALLS
Dial *75
I
CALL HANDLING
Call Pickup
Pick up a ringing call at another
voice terminal
Conference
Have a telephone conference with
several people at one time
Drop
Disconnect a person from a
conference call
Hands-Free Answer on
Intercom (HFAI)
Answer intercom calls without
Hold Retrieve
Return to a call on hold (for
people with button-free operation)
Transfer
Transfer a call to another voice
terminal
Exclusive Hold
Place a call on hold so that it can
only be picked up by the same
voice terminal. Requires a button
with lights.
6-16
Preassigned
lifting handset (on voice terminal
with an HFAI button)
Quick Reference Guide to Voice Terminal Features
Dial *77
i
I
Description
Feature Name
_.--..
Preassigned or
Programmable
Programming Code
!-
CALL-HANDLING REPORTS
Enter an account number on a Call
Programmable
Dial l 82
Programmable
Dial *88 + an account number (up
to 16 digits)
Report (SMDR) by dialing the
number or a System Speed Dial
code
Account Number
Entry with one touch
Enter an account number on a Call
Report
or
Dial *95 + a System Speed Dial
code (60 through 89 or 900
through 999)
__--. -- __-_QUICK DIALING
T
Dial an intercom number with one
touch
A button with lights is
recommended
Programmable
Dial with one touch the number
that you last dialed
Programmablet
Dial *73
3utside Auto Dial’
Dial an outside number with one
touch
Programmable
Dial *90 + an outside telephone
number, PBX, Centrex, or Custom
Calling feature code (up to 16
digits)
Personal Speed Dial
Dial a number quickly by dialing a
code
(Does not require a button)
Programmable
Dial a Personal Speed Dial code
(BIS-10: #Ol through #24, BIS-22:
# Ol- # 12) + one of the following
codes:
l 90 + an outside number, or a
PBX, Centrex, or Custom Calling
feature code,
Auto Intercom
_---__-__
Last Number Dial
Dial *91 + an intercom number
or
*88 + an account number
Busy Buster
Redial automatically up to 15 times
the most recent number you dialed
at approximately 30 second
intervals.
Programmable
Dial *31
Saved Number Dial
Save a number and dial it later
Programmablet
Dial *74
System Speed Dial
Dial a number quickly by dialing an
administered code
Programmable
Dial *95 + a System Speed Dial
code (60-89 and 900-999)
t You can also.access this feature by using a dial code.
Quick Reference Guide to Voice Terminal Features
6-17
/
~
Description
Feature Name
-- - - .-.-- -~.-~ ._._ ---... -..-.
Preassigned or
Programmable
Programming Code
PAGING
Group Page
_-~ .__-Loudspeaker Page
Page a group of people through
their voice terminal speakers
Programmablet
Page someone through a
loudspeaker system connected to
the page jack on the Memory
Module
Programmablet
Dial *91 + one of the following
codes:
70 for all voice terminals
71 for Group 1
72 for Group 2
--___
Dial *91 + 6
Prevent calls from ringing while
you are busy
Programmable
Dial *71
Programmable
Dial *72
Programmable
Dial **, then touch the line
buttons in the preferred ringing
order
Programmable
Dial *78
PRIVACY
Do Not Disturb
Requires a button with lights
Privacy
Prevent others from accidentally
joining your calls
Requires a button with lights
LINE OPTIONS
Automatic Line
Selection
Choose the order of the lines you
will get when you pick up the
handset
RINGING OPTIONS
Ring Override
Have a line ring immediately even
though
it is programmed to ring
t
after a delay or not at all
Requires a button with lights
Personalized Ringing
Choose a ringing sound you like for
your voice terminal
e
Ringing Options
Have lines ring immediately, ring
after a delay, or not ring at all
Programmable
Dial *35 for no ring
Dial *36 for delayed ring
Dial l 37 for immediate ring
Voice Announcement
Disable
Have intercom calls ring at your
voice terminal
Programmable
Dial *38 to enable voice
announcements
Dial *39 to disable voice
announcements
8-18
Quick Reference Guide to Voice Terminal Features
Feature Name
INTEROFFICE COMMUNICATION
Manual Signaling
_---__ _~ -.-_
Message
-~Send Message
Signal someone within your
MERLIN Plus system
Programmable
Dial *6 + an intercom number
Know when the attendant has
taken a message for you
Preassigned
The attendant touches Send
Message + an intercom number
Turn on the message light at
someone else’s voice terminal
(attendant console only)
Preassigned
Touch Send Message + an
intercom number
AUTOMATIC SYSTEM ACCESS
Call Forwarding/Direct
Extension Dialing
Have your calls forwarded when
you are at a different location
Programmed
Dial *83
Remote Line Access
Gain access to a company line even
though you are at another location
Programmed
Dial *84
System Answer
Have your calls answered
automatically and placed on hold
Programmed
Dial *58
Quick Reference Guide to Voice Terminal Features
6-19
Quick Reference Guide to Programming Codes
Programming Codes
--_--_ _-.- --.-..
.
Feature
Other Numbers/Buttons
- - _ _--I_
an intercom number
__.~~
Manual Signaling
-._-__
Busy Buster
----_
-___
Ringing Options, no ring
Ringing Options, delayed ring
Ringing Options, immediate ring
_
-
Voice Announcement Enable
-
Voice Announcement Disable
System Answer
I
I
I
I
*70
Auto Answer Intercom
*71
Do Not Disturb
*72
Privacy
*73
Last Number Dial
Saved Number Dial
/-----+
Auto Answer-All
I
I
*76
Touch-Tone Enable
*77
Exclusive Hold
*78
Ring Override
*82
Account Number Entry
*83
CalI Forwarding/Direct Extension Dialing
I
I
I
f--z--l
I
Remote Line Access
an intercom number
Call Pickup
Call Pickup with One Touch
*88
an account number
Account Number Entry with One Touch
*90
a telephone number
Outside Auto Dial
*91
an
70
71
72
Auto Intercom
Group Page
intercom number
= All voice terminals
= Group 1
= Group 2
6
Loudspeaker Page
a 2 or 3-character System Speed
Dial code (60-89, 900-999)
System Speed Dial (programmed on a button)
Hold Retrieve
6-20
..-.-__
Quick Reference Guide to Proarammina Codes
Quick Reference Guide to ASA Features
The Automatic System Access features allow you more flexible use of your
MERLIN Plus system and your outside lines. The ASA features include:
l
Call Forwarding (CF)
When the system is in CF mode, incoming calls on designated lines are
connected to a Voice Synthesis Processor (VSP) in the control unit for a
message. Meanwhile, the control unit calls the telephone number to
which calls are being forwarded and uses the system’s Conference feature
to connect the incoming call to the outgoing call.
l
Direct Extension Dialing (DXD)
When you put the system in DXD mode, the control unit connects
incoming calls on designated lines to the VSP for a message. Meanwhile,
the caller dials the extension number (a 2-digit intercom number), and the
control unit transfers the call to that extension.
l
l
Remote Line Access (RLA)
When the system is in RLA mode, you can call in from outside and use a
password to gain access to one of the system’s outside lines. You can alsc
use the RLA feature to change the telephone number to which calls are
being forwarded during CF operation. The VSP prompts you through the
necessary procedures.
System Answer (SA)
When the attendant or the alternate attendant activates the System
Answer button, selected incoming calls are answered automatically and
placed on hold. The system administrator can choose to have the caller
hear a special message before being placed on hold or, if connected to a
compatible audio-source, a pre-recorded message or music can be played
instead.
This quick reference helps you administer, program, and use these features
more quickly. For more information about the ASA features, refer to Section
5, “Reference. ’
Quick Reference Guide to ASA Features
6-21
Quick Reference to Administration Procedures for ASA
Do This
Administration Procedure
--
designate a jack for the ASA features (jack
18 is the initial assignment).
1 Enter administration mode.
2 Dial *59.
3 Touch the Auto Intercom button or dial the intercom number for the
jack you want to assign to ASA.
4 Touch Administer.
The console beeps twice.
5 Leave administration mode.
4ssign an alternate attendant to handle
4SA calls.
1 Enter administration mode.
2 Dial *79.
3 Touch the Auto Intercom button or dial the intercom number of the
voice terminal you want to assign as the alternate attendant console.
4 Touch Administer.
The console beeps twice.
5 Leave administration mode.
Select the lines, except tie lines, that you
rrrrant to add to or remove from CFIDXD,
RLA, or SA line groups.
1 Enter administration mode.
2
Dial the appropriate code:
*51 for the CF incoming line group
*52 for the CF outgoing line group
*58 for the DXD incoming line group
*54 for the RLA incoming line group
*75 for SA incoming line group
3
Touch line buttons until the green light next to it indicates its
assignment to the list.
Green light on = line is assigned to the list
Green light off = line is not assigned to the list
4 Touch Administer.
The console beeps twice.
5 Leave administration mode.
Enable or disable the voice message for all
lines in your CF and/or DXD incoming
line groups.
1 Enter administration mode.
2 Dial *30.
3 Dial the appropriate code:
1 to turn on the Call Forwarding voice message
0 to turn off the voice message
4 Touch Administer.
The console beeps twice.
5 Leave administration mode.
6-22
Quick Reference Guide to ASA Features
Administration Procedure
Modify the voice message for one or more
lines in your CF, RLA, SA andlor DXD
incoming line groups.
.__-.-
Do This
1 Enter administration mode.
2 D i a l *50.
3
Touch the line button(s) for the line(s) on which you want to modify
the message.
4
Dial the telephone number you want to include in the message.
5 Touch Administer.
The console beeps twice.
6 Leave administration mode.
Change the password for the CF or RLA
feature.
1 Enter administration mode.
2 D i a l *56.
3
Dial an intercom number plus three digits.
NOTE: To invalidate any password, dial the intercom number and
000.
4 Touch Administer.
The console beeps twice.
5 Leave administration mode.
Designate the number of rings before a call
will be answered by ASA features.
1 Enter administration mode.
2 D i a l *76.
3
Dial the number that corresponds to the ASA feature you‘ve
selected:
1 = DXD
2 = CF
3 = RLA
4 = SA
4
Dial O-9 (for the number of rings).
5 Touch Administer.
The console beeps twice.
6 Leave administration mode.
Modify the voice message for one or more
lines in your CF, RLA, SA or DXD
incoming line groups
1 Enter administration mode.
2 Dial *SO.
3
Touch the line button(s) for the line(s) on which you want to modif)
the message.
4
Dial the telephone number you want to include in the message.
5 Touch Administer.
The con~k keps twice.
6 Leave administration mode.
Enter or change the telephone number to
which you want calls forwarded
1 Enter administration mode.
2 D i a l *53.
3
Dial the new CF destination telephone number.
4 Touch Administer.
The console beeps twice,
5 Leave administration mode.
Quick Reference Guide to ASA Features
6-23
Quick Reference Guide to ASA Voice Terminal Features
Preassigned
Or
Feature Name
I.
._--
Description
Programmable
Programming Code
_ _----.- _---
Call Forwarding/Direct
Extension Dialing
Have your calls forwarded when
yau are at a different location/allow
caller to dial an extension directly
when in DXD mode
Programmed
Dial *83
Remote Line Access
Gain access to a company line even
though you are at another location
Programmed
Dial *&I
System Answer
Have your calls automatically
answered and placed on hold.
Programmed
Dial *58
6-24
Quick Reference Guide to ASA Features
Quick Reference Guide to Using the ASA Features
.-~
Do This
Procedure
Using the CFiDXD Button
1
Repeatedly touch the CFlDXD button until the red and
green light next to the button show the ASA mode you
want the system to be in.
Red and green light ojfj = the system is in the normal mode (calls
coming into the system are handled normally)
Green light on = the system is in DXD mode
Red light on = the system is in CF mode
Using ,the RLA button
1
Touch the RLA button until the lights show the ASA mode
you want the system to be in.
Green light on = the system is in the RLA mode
Green light ofi = the system is in normal mode
Saining access to a line in the RLA outgoing
.ine group from a remote location (with the
system in the RLA mode)
1
With the system in RLA mode (the green light next to the
RLA button is on), dial the telephone number of a line in
the RLA incoming line group.
When the call is answered, the Voice Synthesis Processor (VSP)
begins prompting you through the procedure.
2
Respond appropriately to the VSP prompts until you hear
normal call-progress tones, such as ringing or the busy
signal.
3 Complete your call.
Saining access to an RLA line group from a
remote location (with the system in the CF
ar DXD mode)
Depending on whether the system is in the CF or DXD
mode, dial the telephone number of a line in either the CF
or DXD incoming line group.
When the call is answered, the VSP gives the appropriate
message.
As soon as the message ends, immediately dial the 3character code, * # *.
The VSP begins prompting you through the RLA procedure.
Respond appropriately to the VSP prompts until you hear
normal call-progress, such as ringing or a busy signal.
Complete your call.
Using the SA button
1
Touch the SA button on either the attendant console or the
alternate attendant console.
Green light on = SA is on
Green light of = SA is off
Section 7: Troubleshooting the System
Troubleshooting Procedures
SYMPTOM: Can’t place outside calls.
SYMPTOM: A voice terminal doesn’t ring.
SYMPTOM: Trouble with voice terminal lights,
speaker, and ringing.
SYMPTOM: A voice terminal rings constantly.
SYMPTOM: A voice terminal spontaneously places calls.
SYMPTOM: All voice terminal lights are out with
no dial tone.
SYMPTOM: Problem with calls on hold.
SYMPTOM: Unsuccessful attempts to use Busy Buster.
SYMPTOM: Programmed voice terminal feature
doesn’t work.
SYMPTOM: Voice terminal lights flash when an
Automatic System Access feature is activated.
System Test
7-1
7-I
7-4
7-5
7-6
7-7
7-7
7-8
7-9
7-10
7-11
7-13
SYMPTOM: System not working; trouble not described
in above procedures.
7-13
Troubleshooting Procedures
As with any piece of equipment, there are times when some parts of your
MERLIN@ Plus Communication System may not be working properly.
Rather than call someone immediately, you can often determine the cause of
the problem yourself. Simply follow the step-by-step procedures outlined in
this section. Then, with the problem identified, you can either correct the
problem yourself or know from the tables who can heip you correct it. If
you’re having trouble with your MERLIN Plus system, locate the symptom on
the next few pages and perform the recommended action to isolate and
correct the problem. The symptoms are listed on the contents page of this
section.
If you are unable to identify a problem, perform the System Test found on
the last page of this section before calling your equipment supplier for
assistance.
SYMPTOM: CANT PLACE
OUTSIDE CALLS.
Possible Cause 1: Faulty accessory connected to voice terminal.
Do This
Disconnect the accessory
from the malfunctioning
voice terminal.
If
Then
-1
The trouble no longer
occurs
Do not reconnect the
faulty accessory. Contact
your equipment supplier
to replace it.
The trouble still occurs
Reconnect accessory and
go to Possible Cause 2.
Possible Cause 2: System incorrectly set to Touch-Tone or rotary (pulse)
service.
Do This
Check the instructions in
Section 3, “Administering
the System,” to
determine whether your
system is set for TouchTone or rotary (pulse)
service.
If
Then
The system is set to
Touch-Tone and you
have rotary (pulse)
service
Set the system to rotary
(pulse). Doing so may
not solve this particular
problem, but will allow
you to move on to
Possible Cause 3.
The system is set to
rotary and you have
Touch-Tone service
Set the system to TouchTone.
The system is set
correctly
Go to Possible Cause 3.
Troubleshooting Procedures 7-1
SYMPTOM: CAN’T PLACE
OUTSIDE CALLS
(CONTINUED).
Possible Cause 3: Call Restriction feature activated on malfunctioning voice
terminal.
r
--I----.-
Possible Cause 4: Outside Auto Dial, Saved Number
Redial or Last Number Redial are programmed or used incorrectly.
Do This
If
Then
See Section 5 “Reference”
to make sure these
features are programmed
correctly and the MERLIN
Plus System User’s Guide
to be sure the features are
being used correctly.
Any of these features are
programmed incorrectly
Program each feature
correctly and determine
whether this action solves
the problem.
Possible Cause 5: Faulty MeRLIN system components.
Do This
Try to place an outside
call and an intercom call
from several voice
terminals.
7-2 Troubleshooting Procedures
If
Then
The trouble appears only
on intercom calls or the
trouble appears only on
one voice terminal
The trouble is caused by
a component in your
system. Go to the
troubleshooting
procedure for the
symptom, “Trouble with
voice terminal lights,
speaker, and ringing. ’
The trouble appears only
on outside calls from all
voice terminals, or the
trouble appears on only
some voice terminals
Go to Possible Cause 6.
SYMPTOM: CANT PLACE
OUTSIDE CALLS
(CONTINUED).
Possible Cause 6: Faulty telephone company wiring.
Do This
At the control unit
location, find the network
interface associated with
the outside line from
which you cannot
make a call. Unplug the
line cord from the
network interface and, in
its place, plug in a basic
Touch-Tone or rotary
telephone. (Do not use a
MERLIN system voice
terminal.) Try to place an
outside call from the
telephone.
Then
If
The trouble appears on
the basic telephone and
the network interface
uses a line adapter
Go to Possible Cause 7.
The trouble appears on
the basic telephone, and
the network interface
does not have a line
adapter
Your outside line is
faulty. Report the trouble
to your local telephone
company representative.
Possible Cause 7: Faulty network interface line adapter.
Do This
Replace the network
interface line adapter
with another one. Plug
the basic telephone into
each of the
jacks, and try to place an
outside call.
If
The trouble still appears
on the basic telephone
Your outside lines are
faulty. Report the trouble
to your local telephone
company representative.
The trouble does not
appear on the basic
telephone
Troubleshooting Procedures 7-3
SYMPTOM: A VOICE
TERMINAL DOESN’T RING.
Possible Cause 1: Volume control is set too low.
Do This
Slide the volume control
to a high setting.
Then
If
The voice terminal still
doesn’t ring
Go to Possible Cause 2.
Possible Cause 2: Voice terminal is administered not to ring.
Do This
Refer to Section 3,
“Administering the
System,” to learn how to
administer ringing
options.
Then
If
The voice terminal is
administered not to ring
Change the ringing
option by following the
instructions in Section 3,
“Administering the
System. ”
The voice terminal is
programmed to ring
Go to Possible Cause 3.
Possible Cause 3: Do Not Disturb feature is activated.
Do This
Refer to Section 5,
“Reference,” to see if the
Do Not Disturb feature is
activated.
If
Then
The feature is activated
Deactivate the feature
following the instructions
in Section 5, “Reference, ”
or see the “Do Not
Disturb” entry in the
MERLIN Plus System
User’s Guide.
The feature is not
activated
Refer to the
troubleshooting
procedure for the
symptom, “Trouble with
voice terminal lights,
speakers, and ringing. ’
SYMPTOM: TROUBLE
WITH VOICE TERMINAL
LIGHTS, SPEAKER, AND
RINGING.
Possible Cause 1: Cable connection, power supply, or voice terminal.
Do This
Slide the TIP switch on
the side of the voice
terminal to the T position
and hold it there.
Then
If
All the red and green
lights flash alternately
and a tone sounds
continually
The voice terminal is
working properly. Go to
Possible Cause 3.
Some red and green
lights flash continually
and/or a tone sounds at
irregular intervals
The trouble is caused by
either the voice terminal
or the cable connection.
Go to Possible Cause 2.
None of the lights turn
on and a tone sounds
continually or irregularly
The trouble is either the
control unit, the voice
terminal, or the cable
connection. Go to
Possible Cause 2.
The lights are dim
The trouble is a faulty
control unit or power
supply. Contact your
equipment supplier for
assistance.
The speaker is locked on
The voice terminal T/P
switch is set to P tiith
Program Mode Lock
active. Deactivate
Program Mode Lock then
set the T/P switch to the
center position.
Possible Cause 2: Faulty voice terminal.
Do This
Unplug the modular
voice terminal cord from
the malfunctioning voice
terminal. Plug the cord
into a working voice
terminal. Slide its T/P
switch to the T position
and hold it there.
If
Then
The same trouble appears
on the working voice
terminal
The trouble is either in
the control unit or the
cables. Plug the
malfunctioning voice
terminal into its original
jack and go to Possible
Cause 3.
The trouble does not
appear on the working
voice terminal
The malfunctioning voice
terminal is faulty.
Contact your equipment
supplier for assistance.
Troubleshootina Procedures 7-5
SYMPTOM: TROUBLE
WITH VOICE TERMINAL
LIGHTS, SPEAKER, AND
RINGING (CONTINUED).
Possible Cause 3: Cable connections.
Do This
If
Step 1.
Go to the control unit
and locate the intercom
jack for the
malfunctioning voice
terminal and an intercom
jack for a working voice
terminal. Unplug both
from the control unit and
replug each into the
other’s jack. See if the
trouble now occurs on
the working voice
terminal.
The trouble occurs on the
previously working voice
terminal
The problem is caused by
your control unit. Call
your equipment supplier
for assistance.
The trouble no longer
occurs on the working
voice terminal
The trouble is caused by
a cable (there may be
more than one) in the
wiring run to the
malfunctioning voice
terminal. However,
check the previous two
causes for this symptom
first. If the problem
persists, go on to Step 2
of this cause.
Step 2.
Test each cable in the
wiring run to the
malfunctioning voice
terminal by following this
procedure:
The trouble still occurs
Check the connection; if
the connections are
correct and secure,
remove the second cable
in the wiring run and
replace it with another
cable that is known to
work properly. If the
problem still occurs,
replace the third cable in
the run and so on until
all the cable in the run
has been replaced. If the
problem still persists, call
your local equipment
supplier for assistance.
The trouble no longer
occurs
The cable was the source
of the problem; discard
the malfunctioning cable.
a. Connect the wiring run
to a functioning voice
terminal.
b. Replace the first cable
in the wiring run with
one known to be
working.
SYMPTOM: A VOICE
TERMINAL RINGS
CONSTANTLY.
T h e n
Possible Cause: Voice terminal TIP switch isn’t in the center position.
Then
Slide it to the center
position
The TIP switch is in the
center position
7-6 Troubleshooting Procedures
Your voice terminal is
faulty. Unplug it from
the modular jack and try
another voice terminal in
its place.
SYMPTOM: A VOICE
TERMINAL
SPONTANEOUSLY
PLACES CALLS.
Possible Cause: Voice terminal is connected to the port that is administered
for Busy Buster (BB).
Do This
I
Check the control unit to
see if the voice terminal is
plugged into jack 18 (BB
default) or the
administered BB port.
SYMPTOM: ALL VOICE
TERMINAL LIGHTS ARE
OUT WITH NO DIAL TONE.
Then
If
Move the voice terminal
to another port
The voice terminal should
no longer spontaneously
place calls.
You need that jack for the
voice terminal
Administer BB to a
different jack.
Possible Cause 1: Control unit is not receiving power.
r
Do This
Set the control unit
power switch to Off and
Ihen back to On. Doing
$0 resets the control unit.
T
Then
If
The green power light on
the control unit is on and
the trouble remains
Call your equipment
supplier for assistance.
The green power light is
on and the trouble is
gone
The problem was
corrected when you reset
the control unit.
The green power light is
off
Go to Possible Cause 2.
The red warning light on
the control unit is on
Go to Possible Cause 4.
Possible Cause 2: Switch-controlled power outlet.
Do This
Make sure the control
unit is not plugged into
an outlet controlled by a
wall switch.
If
Go to Possible Cause 3.
The control unit is not
plugged into a switchcontrolled outlet
If the control unit is
plugged into a switchcontrolled outlet, turn on
the switch
Troubleshooting Procedures 7-7
SYMPTOM: ALL VOICE
T E R M I N A L LIGHTS ABE
OUT WITH NO DIAL TONE
(CONTINUED).
Possible Cause 3: Faulty power outlet.
Do This
Test the outlet by
plugging
in an appliance such as a
lamp or a radio.
If
Then
The appliance doesn’t
work
The outlet is faulty.
The appliance works
Go to Possible Cause 4.
Possible Cause 4: A module is loose.
Do This
Set the control unit
power switch to Ofi.
NOTE:
You will damage the
modules if you don’t turn
the power off.
If
All modules are secure
and the red warning light
goes off
You’ve solved the
problem.
All modules are secure
and the red warning light
remains on
Contact your equipment
supplier. When calling
your supplier, identify
your system as the
MERLIN Plus R2 system.
Remove the top cover
and then remove and
replace each module,
making sure each is
securely seated in its slot.
Replace the top cover and
fasten its screw. Set the
power switch back to On.
SYMPTOM: PROBLEM
WITH CALLS ON HOLD.
Then
Possible Cause 1: Call was inadvertently placed on exclusive hold.
Do This
At the voice terminal that
put the call on hold,
touch the button of the
held call.
If
Then
The trouble no longer
appears.
The call was placed on
Exclusive Hold.
The trouble still appears.
Have another system
voice terminal pick up the
held call.
Your voice terminal is
faulty, contact your
equipment supplier.
Possible Cause 2: The Hold Disconnect Interval setting is different than the
local telephone company’s central office.
Do This
Refer to “Hold
Disconnect Interval” in
Section 5, “Reference” for
instructions to change the
setting to 450
milliseconds (long) or 50
milliseconds (short) for
each incoming line.
SYMPTOM:
UNSUCCESSFUL
ATTEMPTS TO USE BUSY
BUSTER.
If
Then
The Hold Disconnect
Interval is set to 450
milliseconds (long) and
callers are no longer
disconnected when
placed on hold
You’ve solved the
problem.
The Hold Disconnect
Interval is set to 50
milliseconds (short) and
the light indicating a held
call no longer flashes
after the caller hangs up
You’ve solved the
problem.
The light continues to
flash after a caller has
hung up
Contact your equipment
supplier for assistance.
Possible Cause 1: Busy Buster is not connected to the port that is
administered for it.
Do This
Check the location of the
BB cord and compare its
jack number with the jack
number that was
administered for BB.
If
Then
The cord is plugged into
a jack other than the one
administered for BB
Move the BB cord to the
administered jack or
administer the jack
assignment to the current
cord location.
Possible Cause 2: Returning Busy Buster call is not picked up quickly.
Do This
Answer returning Busy
Buster calls promptly
when the voice terminal
alerts you, so that the
other party doesn‘t get
confused by the silence
and hang up
If
Then
You are interrupted by
other calls while waiting
for a Busy Buster call
Activate the Do Not
Disturb feature so that
only transfer return calls,
which include Busy
Buster calls, will ring at
your voice terminal.
Possible Cause 3: The Bus Buster number is in the same local exchange as
the number you’re calling xom.
Do This
Place the call again.
If
The number is busy.
Then
Activate Busy Buster
again.
Troubleshooting Procedures 7-9
SYMPTOM. DROGRAMMED
VOICE TE ” ?NAL
F E A T U R E JESN’T
WORK.
7-10 Troubleshootino
Possible Cause 1: Feature is programmed or is being used incorrectly.
Do This
Procedures
If
Then
Step 1.
Review the programming
instructions in Section 5,
“Reference, ” to make
sure the feature is
programmed correctly,
and the user instructions
For the feature in the
MERLIN Plus System
User’s Guide to make sure
it is being used correctly.
The feature is
programmed correctly
and the feature still
doesn’t work
Try the feature again. If
the problem persists, go
to Possible Cause 2.
Step 2.
rum on the Call
Forwarding or Remote
Line Access feature
The feature still doesn’t
work
Go to Step 3.
Step 3.
Assign a CF destination
number
The feature still doesn’t
work
Go to Step 4.
Step 4.
Assign lines to the
incoming line group list
and/or the outgoing line
group list
The feature still doesn’t
work
Go to Step 5.
Step 5.
Remove the extra lines
from either the incoming
3r outgoing line group
list
The feature still doesn’t
work
Go to Step 6.
Step 6.
Use the procedure, listed
under “Custom Line
Assignments ” to remove
“ghost lines” created by
lines that do not have
equipment connected to
them
The feature still doesn’t
work
1
Go to Step 7.
Step 7.
Unplug the voice terminal
from the designated
Automatic System Access
(ASA) jack and plug the
ASA cord into the jack
instead
The feature still doesn’t
work
Go to Possible Cause 2.
SYMPTOM: PROGRAMMED
VOICE TERMINAL
FEATURE DOESNT WORK
(CONTINUED).
Possible Cause 2: Control unit or voice terminal may be defective.
Do This
Step 1.
Program the feature on a
second voice terminal and
try to use the feature.
Step 2.
Replace the first voice
terminal with a voice
terminal known to be
working correctly.
SYMPTOM: VOICE
TERMINAL LIGHTS FLASH
WHEN AN AUTOMATIC
SYSTEM ACCESS
FEATURE IS ACTIVATED.
Then
If
The feature works
correctly
The trouble is either the
voice terminal on which
the feature did not work
or the control unit. To
determine which, go to
Step 2.
The feature still doesn’t
work
The problem is in the
control unit. Contact
your equipment supplier
for assistance.
The trouble remains
The problem is in the
control unit. Contact
your equipment supplier
for assistance.
The trouble no longer
occurs
The first voice terminal is
defective. Replace it.
Possible Cause 1: No lines are assigned to the ASA incoming or outgoing
line group.
If
Do This
Refer to Section 5,
“Reference” for
instructions for
administering incoming
or outgoing lines for the
ASA feature you want.
Then
The feature works
Press the feature button
twice to stop the flashing
light.
The feature still doesn’t
work
Go to Possible Cause 2.
Possible Cause 2: Only one line is assigned to the incoming and outgoing
group and it’s the same line for both.
If
Do This
Incoming and outgoing
lines cannot be the same
line. See Section 5
“Reference’ for
instructions for
administering two
separate lines.
The feature works
Then
Press the feature button
work
Troubleshooting Procedures
7-11
SYMPTOM: VOICE
TERMINAL LIGHTS FLASH
WHEN AN AUTOMATIC
SYSTEM ACCESS
FEATURE IS ACTIVATED
(CONTINUED).
Possible Cause 3: A voice terminal is plugged into the ASA jack.
c
Do This
Move the voice terminal
or administer a new jack
assignment for the ASA
features.
The feature still doesn’t
work.
1 Go to Possible Cause 4.
Possible Cause 4: The ASA jack isn’t administered.
Do This
Refer to Section 5,
“Reference” for
instructions for
administering the ASA
jack.
If
Then
The feature works
Press the feature button
twice to stop the flashing
light.
The feature still doesn’t
work
Contact your equipment
supplier.
System Test
If you are experiencing a problem other than those described in the previous
tests, try the following procedure before calling your equipment supplier.
SYMPTOM: SYSTEM NOT
WORKING; TROUBLE NOT
DESCRIBED IN ABOVE
PROCEDURES.
Possible Cause 1: The control unit may need to be reset.
Set the control unit
power switch to Off and
then back to On.
Then
If
Do This
The trouble remains
Go to Possible Cause 2.
Possible Cause 2: A module may be loose.
Do This
Set the control unit
power switch to Ofl.
NOTE:
The modules can be
damaged if you don‘t
turn off the power.
Remove the top cover,
pull out each module and
reinsert it so that it is
securely seated in its slot.
Replace the cover and
fasten its screw. Set the
power switch to On.
Then
If
The trouble remains
Contact your equipment
supplier for assistance.
When calling your
supplier, identify your
system as MERLIN Plus
R2 system.
In the Event of a Power Failure
l
The system administrator does not need to readminister the system after
each power failure.
l
The memory module has a four-day battery backup.
l
The batteries are five-year life batteries and are not customer replaceable.
Contact your equipment supplier when the system requires a replacement
battery.
In the Event of a Liquid Spill or Leak onto the Control Unit
1
Turn off and unplug the control unit.
2
Contact an AT&T service technician immediately.
Section 8: Installation
MERLIN Plus System Installation
Introduction
Installation Requirements
Connecting the Control Unit
Accessory Wiring
Typical MERLIN Plus System Wiring
Interference Information Notice
FCC Registration and Repair Information
8-l
8-l
8-2
8-7
8-8
8-13
8-14
8-14
MERLIN Plus System Installation
INTRODUCTION
This section contains technical reference material for a MERLIN@ Plus system
installer. For more detailed information on wiring, installing, adding
accessories to, and upgrading your MERLIN Plus system, order the
MERLIN Plus System Znsfullation Manual from the AT&T Customer Information
Center at l-800-432-6600 and request document number 518-600-008. Figure
8-1 illustrates system connectivity.
FIGURE 8-l Typical MERLIN Plus system (overview).
Building wring
Il--illI
l-l
1
I
u
BE-22
voice terminal
0
l-l
-a
MS-34
voice termmal
u
r
HFAI
voice terminal
-
u
l
u
U
U
voice terminal
with Speakerphone
U
MERLIN Plus
control unit
1
I
DSW cords
q lJoocloml
CO line wring
or
Telephone company
Network interface
RJllIRJI4/RJZl
Loudspeaker
paging system
Auxiliary line services
Fax machine
Power failure telephone
Answering machine
U
U
U
MERLIN Plus System Installation
8-l
INSTALLATION
REQUIREMENTS
Before you install the control unit, make sure that the installation area meets
the following requirements.
Environment
The environment for the control unit should be as follows:
a Temperature: 40 to 104 OF (4 to 40 “C).
l
l
l
Humidity: not to exceed 80 percent.
Airborne Contamination: no exposure to corrosive gases, dust, chemicals, or
similar substances.
VentiZation: l-inch space above and to the sides.
Wiring
A branch circuit is part of your building wiring and it includes all the wires,
receptacles, and switches controlled by one circuit breaker. For best results,
your MERLIN Plus system control unit should be plugged into a dedicated ac
branch circuit, that is, one that is not used by other appliances. The MERLIN
Plus control unit must never share a branch circuit with appliances such as
heaters, refrigerators, coffee makers, or microwave ovens that can generate a
large transient voltage when they are switched on and off.
The control unit should be located within:
l
A single cord length of the network interface, allowing for slack. You can
use up to 400 feet of DIW cable.
l
6 inches of the jack field that is centered beneath it.
l
5 feet of a grounded ac power source (not switch-controlled).
Also, a wiring run from the control unit to a voice terminal location cannot
exceed 1000 feet.
Caution: Since lightning can induce high voltage on parallel runs of
wire that are close together, do not route wiring from the control unit
to voice terminals along side CO line or ac building wires. If voice
terminal wiring must cross CO or ac wiring, cross them as near to 90
degrees as possible.
AC Outlet Check
Check, or have checked by a qualified electrician, the outlet into which your
MERLIN Plus system control unit will be plugged. Check that the hot,
neutral, and ground wires are properly connected to the outlet by using a
circuit tester.
The outlet can also be tested using a voltmeter by taking the measurements
shown in Figure 8-2.
FIGURE 8-2 Proper ac outlet measurements.
120 Volts
Less than
1 volt
NOTE: If you discover that there is no current to the outlet or that the
voltages are not correct, have the problem corrected by a qualified
electrician.
The orange light on the power switch is an outlet test. The light will only
come on when the switch is in the on position and indicates:
l
The outlet is powered.
l
Line and neutral are properly wired.
l
An outlet ground is present.
If the orange light does not come on when the power switch is on, the outlet:
l
May not be functioning
l
May be miswired
l
May be improperly grounded
Telephone Line Protection
Your local telephone company is required to provide lightning protectors
where telephone lines enter your building. To protect your MERLIN Plus
system, those protectors must be grounded to an approved ground. The
following approved grounds are listed in order of preference:
l
l
A building ground electrode system if one is available.
.
Connect together as many of the following items as possible, using AWG
No. 6 wire:
)
Metal underground water pipe
b Metal building frame
) Concrete encased electrode
b Ground ring
b Ground rod
MFRI IN Phrs Svst:tF?m lnntnllntinn
8-3
In addition, the ground to the protectors must be bonded to the ac service
ground. This bond is accomplished by connecting the two with AWG No. 6
wire.
The grounding and bonding of telephone line protectors is the responsibility
of your local telephone company. However, protectors may be missing, not
well grounded, or without the bond between the ac and telephone ground.
This protection is best tested by a trained technician.
CO Line Protector Tests
The following tests verify proper grounding and bonding of the CO line
protector. These tests should be performed on every new installation. You
will need a volt-ohm-milliammeter (VOM) capable of measuring 115 VAC.
CAUTION: This test procedure is for experienced technicians only-do not
perform this or any other electrical measurement test unless you have
the proper training and experience. You may prefer that a properly
certified electrician perform this procedure.
WARNING: Hazardous voltages that may cause death or injury are
present during the following tests. Use great care when working with
ac power line voltages.
At the common equipment location:
Visually verify that individual CO line protectors (carbon blocks, gas
tubes, etc.) are in place.
Set the VOM to the scale on which you can read 1 VAC.
Measure voltage between the CO protector ground lug and the third wire
ground of the nearest ac outlet on the branch circuit to be used by the
control unit. This voltage should be less than 1 VAC.
WARNING: If the ac voltage reading is greater than 1 volt, do not measure
resistance in the following step as this measurement could damage the
VOM.
If the voltage reading of step 3 is proper, set the VOM to the scale on
which you can read resistance (ohms). Read the resistance between the
same two points as in step 3. If the bonding of protector grounds is
proper, the resistance should be less than 1 ohm.
If the resistance measurement is greater than 1 ohm, the ac outlet should
be checked for proper ground. Use the procedure described above and
refer to Figure 8-2.
If the ac outlet is improperly wired, an electrician should repair the outlet.
If the outlet is properly grounded, and either the resistance or voltage
measurements of the protector is not of proper value, call the local
telephone company Customer Operations Group (COG). Give the COG
the name and address and request that the local telephone company
properly ground and bond the CO line protector to the ac power.
NOTE: If access to an ac outlet is not feasible, the following test can
be used to check protector grounding. This test does not check for
bonding of power and telephone company protector grounds.
6-4 MERLIN Plus System Installation
1
Connect the test set between the protector ground lug and the
ring side of the CO line.
2
If the dial tone is present, the protector is grounded.
3
If there is no dial tone, the protector is not grounded; notify the
COG as stated in step 7, above.
4
One of the following methods is recommended for additional
protection for those sites that are frequently exposed to lightning
activity and have a history of damage to electronic equipment:
l
l
Install an AT&T model 147A (ac and CO line) protector. The
147A protector has a capacity of four lines. If you have five to
eight telephone lines, use a model 146A CO line protector
add-on unit.
Install a Coupled Bonding Conductor (CBC) according to
Figure 8-3.
FIGURE 8-3 Typical MERLIN Plus system grounding plan.
Attach bonding
conductor to the
control unit
To
co (
R
T
Ground
wire bond
AC
Outlet
Q
0
Closely coupled bonding
conductor. Use cable shield
or No. 10 AWG tie-wrapped
to cable.
Conduit
,,’
(\
B
w
Power
1 1 GND kveen) Service
Power
ground rod
-
Cold water pipe
or other approved
ground
Bond wire
MERLIN Plus System Installation
8-5
Mounting the Control Unit
The control unit is designed to be wall mounted 6 inches above the
jack field that is centered beneath it in two columns. The slots at the
bottom of the control unit provide for simple, neat cord management
as shown in Figure 84.
FIGURE 8-4 Mounting the control unit on the wall.
ction
Access door
- with label
8-6
MERLIN Plus System Installation
CONNECTING THE
CONTROL UNIT
Before connecting the control unit to the system (Figure 8-5), you must be
sure of the following:
l
The building wiring is completely installed.
l
The jack field labels correspond with their distant end locations.
l
The distant end labels correspond with the jack field labels (optional).
l
The network interface labels have the correct telephone numbers.
FIGURE 8-5 Connecting the control unit.
I
Control unit
I
Voice terminal
jack field
CO line wiring
D2R kord
Network interface
Make sure the control unit power is off before connecting system. wires. Then,
refer to the System Configuration Form for the first step in each of the
following procedures.
Voice Terminal Wiring
See Figure 8-6 and follow these steps to install voice terminal wiring:
FIGURE 8-8 Installing voice terminal wiring.
yn...,Tq
Modular voice
terminal cord
1
Label one end of each D8W cord for each intercom number.
2
Plug the unlabeled end of each intercom cord into the corresponding voice
terminal jack of the control unit.
MFRI IN Phrn Svstem Insttnllntinn
8-7
3
Plug the labeled end of each intercom into the appropriately labeled jack
in the apparatus box of the jack field.
CO Line Wiring
See Figure 8-7 and follow these steps to install your telephone (CO) line
wiring:
1
Label each line cord running from the network interface to the control unit
(A through H).
2
Plug the unlabeled end of each line cord into the corresponding control
unit line jack.
3
Plug the labeled end of each line cord into the appropriately labeled jack
at the network interface.
FIGURE 8-7 installing CO line wiring.
Modular cord
to co
For future reference, you may want to make a copy of all the assignments
that are labeled at the jack field.
ACCESSORY WIRING
8-8
The following figures show the proper connections for MERLIN Plus
accessory features. Figure 8-8 illustrates the wiring for Automatic System
Access features. Figure 8-9 shows how to wire Busy Buster and the data
collector when using the 450F adapter. Figure 8-10 shows the wiring for the
Music-on-Hold.
MERLIN Plus System Installation
FIGURE 8-8 Automatic System Access Wiring
Automatic System
Access (ASA) jack
Station Jack 18
(System default
for ASA features)
FIGURE 8-9 Busy Buster and Data Collector Wiring using a 450F Adapter
4BU cord
Station Jack 19
(System default
for the Data
Collector)
D8W modular
voice terminal cord
w
Printer
MERLIN Plus System installation
8-9
FIGURE 8-10 Music-on-Hold Wiring
RCA-type phove
jack to MOH jack
\
MERLIN Plus
control unit
Audio system
Users of equipment that rebroadcasts copyrighted music or
other material may be required to obtain a copyright license from a
third party such as ASCAP or BMI.
NOTE:
8-10 MERLIN Plus System Installation
‘ABLE 8-1 ’ iring Parts Cross
PPEC
Description
61400
2750-D14
2750-DO8
2750-DO7
Net Intf Adptr
Net Brdg Adptr
61407
NIlCU Mod
Cord
CU Jumper
Cord
Cbl Strp Tool
1000 fi 4Pr
Cable
61208
32910
4
*
1
2
3
4
5
6
7
6
Eference
Apparatus Code
COMCODE
SKU
Z122C Apparatus Box
2A Adapter Mounting
Z601A Adapter
Z610A Adapter
267C Adapter
267A2 Adapter
103A Conn Block
102A Conn Block
65B Faceplate
D2R-29 Cord 7 ft
DSW-87 Cord 2.5 ft
953A Tool
(Spooled DIW Cable)
103980843
103970562
103946653
103950556
103715652
103715082
103104220
103083200
103658498
103732541
104%0148
103951588
403101140
58080
58078
58082
58085
53300
51970
56390
56120
51930
53800
57368
51990
‘ABLE
- 2 4-Pair Wil ng for the! IlERLll
LO2A
Modular LO3A
1Z601A
Cord
r
Modjk Wire
rerm.
,Stmp
Signal Pair Pins
Colors
DIW
Cable
Colors
25-Pair
Cable
Colors
VlT
VlR
1
5
4
GREEN
RED
2
1
W-B1
BLUE
W-B1
BI-W
26
CT
CR
2
1
2
BLUE
ORANGE
3
4
w-o
w-o
ORANGE O-W
2
27
-48V
GND
3
3
6
BLACK
YELLOW
5
6
W-G
W-G
GREEN G-W
3
28
V2T
V2R
4
7
8
BROWN
SLATE
7
8
W-BR
W-BR
BROWN BR-W
4
29
Note that the cord (e.g., D2R) used with AUX Service reverses these signals.
Plus System
25-Pair
Conn.
?agiq AUX
Pin No. ‘ack
lack
1
VlT
VlR
1
2
VIR*
VIT*
TABLE 8-3 CO Line Wiring, 8-Position Jack, Single-Pa r
RJll NI Specification
CU Line Jack
D2R Cord
plug
plug
Pin
Signal
T
4
GREEN
4
3
3
T
R
3
RED
3
4
4
R
Signal
-Pin Color-
TABLE 8-4 CO Line Wiring, 8-Position Jack, Two-Pair
RJ14 NI Specification
S i g n a l Pin C*
267A2 Adapter
267C Adapter
plue
Jack 1
Jack 2
plug
Jack
-
Pin
-
Tl
Rl
4
3
GREEN
RED
4
3
4
3
4
3
4
3
1
4
3
T2
R2
2
5
BLACK
YELLOW
2
5
2
5
2
5
2
5
2
4
3
BLE 8-5 CO Line Wiring, 6-Posit1
RJ21 NI Specification
I Jack, Multipair
CO Line Wiring
25-Pair
.gnal Color Terminal Conn Pin hmber Jack No.
Tl
Rl
Bl-W
W-B1
T2
R2
O-W
w-o
T3
R3
Z610A Adapter
rerminal Jack Pin No.
1
2
26
1
1
4
3
1
2
1
4
3
3
4
27
2
2
4
3
3
4
2
4
3
G-W
W-G
5
6
28
3
3
4
3
5
6
3
4
3
T4
R4
BR-W
W-BR
7
8
29
4
4
4
3
7
8
4
4
3
T5
R5
S-W
W-S
9
10
30
5
5
4
3
T6
R6
Bl-R
R-B1
11
12
31
6
6
4
3
T7
R7
O-R
R-O
13
14
32
7
7
4
3
T8
R8
G-R
R-G
15
16
33
8
8
4
3
’
TYPICAL MERLIN PLUS
SYSTEM WIRING
Figure S-11, below, shows a typical wiring installation for a MERLIN Plus
System. Local telephone lines connect with system wiring at a network
interface. Voice terminal wiring connects to the control unit through building
wiring and a jack field. Table 8-6 lists the material needed for the sample
configuration shown in Figure 8-11.
FIGURE 8-11 Typical MERLIN Pius system wiring installation.
Control
unit
Illlli i
D6W
i
cords
I I I
D2R cords
I
I
102A Connecting
block with
65B faceplate I
adapter
-line)
I I I I I I I I I
Z601A adapters
I I
I
DIW cable
Concealed wires
I
--___.
Surface
wiring
(5)
Alternate NI arrangement
267C Adapter
TABLE 8-8 Material List for 8 Telephones and 3 Lines
Voice Terminal Wiring
Qty
3
3
5
1
2
8
8
Item
102A Connecting Block (1 shown)
65B Faceplate (1 shown)
103A Connecting Block (1 shown)
1000 ft Cable Spool, DIW
Z122C Apparatus Box
Z6OlA Adapters
DSW Cords, 2.5 ft
Line Side Wiring
Option 1: Using Multiline Network Interface (RJ21):
Qty
3
1
span capacity
Item
D2R Cords
Z610A Adapter
Z122C Apparatus Box
Option 2: Using One-Pair/Two-Pair
Network Interfaces (RJllIRJlU:
Qty
3
1
INTERFERENCE
INFORMATION NOTICE
Item
D2R Cords
267C Adapter
This equipment generates, uses, and can radiate radio frequency energy and,
if not installed and used in accordance with the instructions in this manual,
may cause interference to radio communications. The equipment has been
tested and found to comply with the limits for a Class A computing device
pursuant to Subpart J of Part 15 of FCC Rules, which are designed to provide
reasonable protection against such interference when the equipment is
operated in a commercial environment. Operating this equipment in a
residential area is likely to cause interference, in which case the user, at his or
her own expense, will be required to do whatever is necessary to correct the
interference.
Nofificution of the Local Telephone Company: Before connecting this
equipment, you or your equipment supplier must notify your local
telephone company’s business office of the following:
w
The telephone numbers you will be using with this equipment.
b
The registration number for the MERLIN Plus system:
AS593M-13529-KF-E
)
The ringer equivalence number (REN) for the MERLIN Plus system:
Q.8A
You must notify your local telephone company if and when this
equipment is permanently disconnected from the line(s).
Installation and Operational Procedures: The System Manual and the
MERLIN Plus Installation Guide contain information about installation and
operational procedures.
Repair Instructions: If you experience trouble because your equipment is
malfunctioning, the FCC requires that the equipment not be used and that
it be disconnected from the network until the problem has been corrected.
Repairs to this equipment can only be made by the manufacturers, their
authorized agents, or by others who may be authorized by the FCC.
Rights of the Local Telephone Cornpuny: If this equipment causes harm to the
telephone network, the local telephone company may discontinue your
service temporarily. If possible, they will notify you in advance. But if
advance notice is not practical, you will be notified as soon as possible.
You will also be informed of your right to file a complaint with the FCC.
Your local telephone company may make changes in its facilities,
equipment, operations, or procedures that affect the, proper functioning of
this equipment. If they do, you will be notified in advance to give you an
opportunity to maintain uninterrupted telephone service.
Hearing Aid Compatibility: The custom telephone sets for this system are
compatible with inductively coupled hearing aids as prescribed by the
FCC.
MERLIN Plus System Installation
6-15
Index
A
Abbreviated Ringing, 5-3
Accessory Equipment, 5-128, 5-144
Accessory, faulty, 7-l
Account number, assigned to System Speed Dial
Code, 2-22, 6-5
Account Number Entry, 5-3, 5-6, 6-17, 6-20
maximum number of characters available, 5-4
with Call Report, 5-32
with One Touch, 6-20
with System Speed Dial, 5-114, 6-14
Account Number Entry button, description of, 5-3
Adapter, See General Purpose Adapter.
Administering the system
description of, 2-l
with Customized Line Assignments, 5-43
Administration, 3-2, 3-9
definition of, 3-1
initial, 3-1
ongoing, 3-1
Administration mode, 3-8 - 3-9
procedure to enter, 6-l
procedure to leave, 3-9
Administrator/attendant console, 2-1, 3-2
with Centralized Programming, 5-38
with System Feature Report, S-109
Alerter jack, 5-144
Allowed List Form, 5-7
Allowed Lists, 2-17-2-20, 5-6, 5-9
add an entry, 6-12
add to a voice terminal, 6-12
administering, 3-31
assigning, 2-20
assigning to voice terminals, 5-8, 5-9
capacity, 3-31
clearing all entries, 5-8
creating, 2-20
Entry Form, 2-29
kinds of entries on, 5-6
maximum number of entries on, 5-6
naming, 2-20
number of, 3-31, 5-6
remove from a voice terminal, 6-12
removing an entry, 5-7, 5-8
setting up, 5-7
using with dial codes, 3-6
Alternate Attendant, 5-9 -5-10
Answering machine, 5-11 See also Auto Answer-All.
with Auto Answer-All, 5-11
using with auxiliary lines, 5-17
with General Purpose Adapter, 5-135
Area Code Only
administration of, 3-11
System Configuration Form, 2-2
setting the system for, 6-13
dialing, 6-1
ASA features, administering jack assignment, 3-13
ASA jack with Direct Extension Dialing, 5-45
Assign codes to account numbers, 3-34
Assign codes to telephone numbers, 3-33
Assign Privacy to Line A or E, 6-13
Assigning lines, 6-12
to buttons, order of, 3-24
to the system, 3-23
to voice terminals, 5-44
Attendant, assign an alternate to handle ASA calls, 6-22
Attendant Console
alternate, using, 4-9
BIS-22 voice terminal used for, 4-1
BIS-34 voice terminal used for, 4-1
description of, 41- 4-3
using Auto Intercom Buttons, 4-5 - 4-6
using, 4-l
using Group Page, 4-6
using Send Message, 4-7
Auto Access cord, 5-16
with Direct Extension Dialing, 5-45
Auto Answer Intercom, 6-20
Auto Answer-All, 5-11-S-12, 6-16, 6-20
turns on answering machine, 6-16
turns on facsimile machine, 6-16
turns on modem, 6-16
with General Purpose Adapter, 5-135, 5-136
Auto Answer-Intercom, 5-12 - 5-13
Auto Intercom, 5-13-5-14, 5-74, 5-78, 6-17, 6-20
using, 4-6
with Speaker, S-103
Auto Intercom button, and Manual Signaling
button, 5-13, 5-74
with transfer, 5-123
Automatic Line Selection, 5-14 - 5-15, 5-67, 6-18
Automatic Line Selection sequence, 2-13, 3-24
with Basic Telephone, S-130
with Button-Free Line Operation, 5-22
with copy, 5-41
Automatic System Access, 5-16 - 5-17, S-109
Call Forwarding, S-70, 5-77
Direct Extension Dialing, S-70
Remote Line Access, S-70
System Answer, S-70
using with dial codes, 3-6
Auxiliary jack, 5-17, 5-129
Auxiliary lines, 5-17 - 5-18
using basic telephones, 5-17
using facsimile machines, 5-17
using modems, 5-17
with Privacy (on Lines A and E), 5-86
B
Background Music, 3-13, 5-141-5-143, 5-72, S-140
setting volume, 3-13, 5-142, 6-6, 6-12
turn off, 6-12
Basic Administration, 3-10 - 3-22
Basic Telephone and Modem Interface, 5-129, S-131- 5-133
Basic Telephones, 5-128 - 5-131, 5-133
with auxiliary lines, 5-17
BIS voice terminal, 5-13
with display, l-6
BIS-10 Voice Terminal, l-5
description of, 1-6
limited use as attendant console, 3-7, 41
BIS-22 and 22-button voice terminals
as Administrator/Attendant Console, 3-5
as attendant console, 41
administration restrictions, 3-3
administration with, 3-3
as attendant console, 43
description of, 1-5, 1-6
labels for, 3-8
using with Send Message, S-100
with Message, 5-75
Index I-1
BIS-34 and 34-button voice terminals, 1-5, 3-3
as attendant console, 4-2
description of, l-6
labels for, 3-8
with display, l-5, l-7
with Night Service, 5-77
with display, 3-3
with display as Administrator/Attendant Console, 3-4
with display, description of, 1-7
with display unit, 5-51
Bridging, 5-18, 5-19
Busy Buster, 5-19 - 5-21, 5-68, 5-78, 6-17, 6-20
administering jack ,assignment, 3-14
designating a voice terminal jack for, 6-8
jack, 5-19
set control unit jack for, 6-12
unable to use, 7-9
voice terminal jack 19 reserved for, 2-6
Busy tone, 5-119
Button functions change for administration, 3-3
Button label sheets for the administrator/attendant
console, 3-7
Button-Free feature, with copy, 5-41
Button-Free Line Operation, 5-21-5-23
cannot be bridged, 5-18
cannot use Bridging with, 5-22
cannot use Conference with, 5-22
reassigning lines, 6-12
setting immediate ring on a line, 6-12
setting no ring on a line, 6-12
with Conference, 5-40
with Hold Retrieve, 5-65
C
Call Forwarding, 5-24 - 5-30, 6-21
Call Forwarding. See also CFIDXD.
Call Pickup, 5-30-5-32, 5-77, 6-16, 6-20
button, 5-77
using a Call Pickup button, 5-30
using a dial code for, 5-30
using a One-Touch Call Pickup button, 5-31
with Customized Line Assignments, 5-43
with One Touch, 6-20
Call Report, 2-22 -2-25, 3-11, 5-32-5-36, 5-133, 6-17
Account Number Entry, 5-32
administering jack assignment, 3-14
control unit jack assignment, 5-35
designating jack, 6-7
general method of entering an account number, 5-3
maximum number of characters available for Account
Number Entry, 5-4
minimum call duration, 5-36
Minimum Duration of Recorded Calls, 3-12
not printing a number, 6-5
setting time, 5-35, 6-6, 6-14
settings on System Feature Report, 5-109
type of calls documented, 5-36
with Account Number Entry, 5-3, 5-6
with System Speed Dial, 5-34, 5-116
Call Restriction, 5-6, 5-37 - 5-38, 7-2
Allowed Lists Forms, 5-8
assigning to voice terminals, 3-31
Assignment Form, 2-31
Form, 2-1, 2-17 - 2-21, 2-29 - 2-31
Outward Call Restriction, 5-37
reset, 5-37, 5-38
Toll Call Restriction, 5-37
use of, 2-17
with copy, 5-41
Calls, handling at attendant console, 4-4
Calls on hold, problem with, 7-8
Cancel the call, with Speaker, 5-103
Centralized programming, 5-38 - 5-39, 5-88, 5-129, 6-8
for Program Mode Lock, 5-89
using administrator/attendant console, 5-38
Centrex, 5-104
with Recall, 5-91
CFlDXD
add lines to line groups for, 6-22
button, using, 6-25
remove lines from line groups, 6-22
Clear Template, 5-126
description of, 3-18
example, 3-18
CO line wiring, 8-8
6-position jack, multipair, 8-12
6-position jack, single-pair, 8-12
6-position jack, two-pair, 8-12
Conference, 5-39 - 5-41, 6-16
Confirmation tone, 3-9, 5-120
Control unit, 3-2
connecting, 8-7
function of, 1-5
Jack Assignment for the System Feature Report, 5-111
Mounting, 8-6
copy, 5-41, 5-42
from large to small voice terminal, 5-41
Program Mode Lock, 5-89
with Customized Line Assignments, 5-43
with 5-button voice terminal, 5-41
Cordless Telephone, 5-11
with General Purpose Adapter, 5-135
Coupled Bonding Conductor, 8-5
Custom CalIing features, 5-104
Custom-Calling services, 5-91
Customized Line Assignment, 3-23 - 3-30, 5-43, 5-44
D
Dialer Template, 5-126
description of, 3-19
example, 3-19
Dialing feedback
rotary lines, 5-119
Touch-Tone lines, 5-119
Dictation machines, with auxiliary lines, 5-17
Direct Extension Dialing, 5-44 - 5-48, 6-21
Disallowed List, 2-17, 5-48 -550,
assign to voice terminals, 3-31
Entry Form, 2-29
using with dial codes, 3-6
Disconnect a line from a conference call. See Drop.
Display Unit, 561, 5-54
Do Not Disturb, 4-5, 5-13, 5-54-5-55, 5-74, 6-18, 6-20, 7-4
Drop, 5-55-5-56, 5-105, 6-16
in Personal Speed Dial, 5-83
with Conference, 5-39 - 5-40
with Outside Auto Dial, 5-80
with System Speed Dial, 5-115
E
Emergency numbers, 2-19
Environment for the control unit, 8-2
Error signal, 3-9
Error/Deny tone, 5-120
Exclusive Hold, 6-20, 7-8. See Hold-Exclusive.
Extra Alert devices, 5-143, 5-144
Extra Alert Switch, 5-144
F
Facsimile machine, 5-11, 5-86, 5-129, 5-131. See also Auto
Answer-All.
with Auto Answer-All, 5-11
with auxiliary lines, 5-17
Feature Template, 5-126
description of, 3-20
example, 3-20
5-Button Voice Terminal, l-5
description of, l-7
with Button-Free Line Operation, 5-22
with copy, 541
with headset, 5-137
with Send Message, 5-100
Forms
Allowed Lists Entry, 2-29
Call Restrictions Assignment, 2-31
Disallowed List Entry, 2-29
Line Assignments, 2-1, 2-13, 2-27
System Configuration, 2-1, 2-2, 2-25
System Speed Dial, 2-33
Forms
Call Restrictions, 2-1, 2-17, 2-21
System Speed Dial, 2-1, 2-22, 2-25
4-Pair wiring, 8-11
G
General Purpose Adapter, 5-11, 5-129, 5-135 - 5-136
Ghost lines, 3-10, 5-43
Grounding
CO line protector tests, 8-4, 8-5
Grounding requirements, 8-2
Group Listening, 5-56, 5-102
with Speaker, 5-102, 5-103
Group Page, 2-8, 5-57-5-60, 6-18, 6-20
assign voice terminals to, 6-14
using, 46
using with dial codes, 3-6
H
Hands-Free Answer on Intercom (HFAI), 5-60 -5-61, 6-16
HFAI button light, 5-70
using, 5-13
voice terminal, 5-13
Hands-Free Unit with Auto Answer-Intercom, 5-12
Headset, 5-128, 5-136 - 5-137
Headset Adapter, 5-136 - 5-137
HFAIlMic button light, 5-70
Hold, 5-61, 5-62, 5-104
in Personal Speed Dial, 5-83
with Outside Auto Dial, 5-80
with System Speed Dial, 5-115
Hold Disconnect Interval, 5-62 -5-63
administering, 3-13
Hold-Exclusive, 5-63 - 5-64. See also Exclusive Hold.
Hold Retrieve, 5-64, 5-66, 6-16, 6-20
I
Immediate ring, 5-77, 5-82. See also Ringing Options.
Individual Voice Terminal Reports, printout, 5-112
Installation, 8-l - 8-12
requirements, 8-2
Intercom 10, 2-5
attendant’s location, 2-5
system administration point, 2-5
Intercom, 5-66, 5-67
button, location of, 3-24
Intercom Calls with Voice Announcement, 5-66
Intercom numbers, 2-5
Intercom numbers 11 through 29, 2-7
Ringing Intercom Calls, 5-66
Intercom Call with Voice Announcement, 5-120
Intercom Preference, 5-67, 5-68
J
Jack
designate for ASA features, 6-22
designating for Call Report, 6-7
Jack lB, reserved for attendant console, 4-l
Jack 19, 5-16
L
Last Number Dial, 5-68-5-69, 5-78, 6-17, 6-20, 7-2
with Saved Number Dial, 5-99
Lights, 5-69 - 5-71
Line A, make private, 6-2
Line Assignments, 3-23 - 3-30
for ASA Features, 2-13
Form, 2-1, 2-27
Line Bridging Adapter, 5-144
Line buttons, with Customized Line Assignments, 3-23
Line E, make private, 6-2
Line Request, 5-71, 6-16
Line Ringing Options
Immediate Ring, 2-13
No Ring, 2-13
Line Select, 5-72, 6-16
Index l-3
Lines A and E, assigning privacy to, 6-13
Lines A or E, auxiliary jack bridged to, 5-17
Local exchange codes, 2-19
Local telephone company, source of outside lines, 2-4
Long distance area codes, 2-19
Long Distance Dialing, 3-10
on System Configuration Form, 2-2
Loudspeaker Page, 5-72, 5-74, 5-140, 6-18
System, 5-137
M
Manual Signaling, 5-13, 5-74 - 5-75, 5-120, 6-19, 6-20
button, with Auto Intercom, 5-13
Message, 5-75, 5-76, 6-19
button light, 5-70
Message light, 41, 4-7, 5-75
used with Send Message, 5-100, 6-19
Microphone button light, 5-70
Minimum call duration, setting, 6-7
Modem, 5-11, 5-86, 5-129, 5-131. See also Auto Answer-All.
with auxiliary lines, 5-17
with General Purpose Adapter, 5-135
Monitor-on-Hold, 5-76, 5-102
with Speaker, 5-102, 5-103
Music-on-Hold, 3-12, 5-141- 5-143
jack, 5-141
setting volume, 3-12, 5-141, 6-6, 6-12
turn off, 6-12
N
+
Network interface, 7-3
Night Service, 5-77 -5-78
No ring, 5-82. See also Ringing Options.
0
One-Touch Call Pickup. See Call Pickup.
One-Touch Dialing, 5-78 - 5-79
Auto Intercom, 5-78
Busy Buster, 5-78
Last Number Dial, 5-78
Outside Auto Dial, 5-78
Saved Number Dial, 5-78
System Speed Dial, 5-78
On-Hook Dialing, 5-79, 5-102, 5-103
with Speaker, 5-102
Original line assignments, 3-23
keeping, 3-23
Outgoing calls, controlling, 2-17
Outside Auto Dial, 5-78, 5-80 - 5-81, 6-17, 6-20, 7-2
button, 5-80
maximum number of characters, 5-80
with Saved Number Dial, 5-99
with Speaker, 5-103
with special characters, 5-104
Outside Call, 5-120
can’t place, 7-l - 7-3
Line Request, 5-71
Line Select, 5-72
Outside line jacks, description of, 2-4
Outside Telephone Lines, 2-4
number of administered, 3-10
Outward Call Restriction, 5-6, 537
assigning, 3-32
l-4 Index
P
Page jack, 5-72
pin-out specifications, 5-139
Page-All Group, 2-8, 3-16
Paging group, 2-8
administration of, 3-16
assigning, 6-5
Page Group 1, 2-8, 3-16
Page Group 2, 2-8, 3-16
removing, 6-5
Password
change for CF feature, 6-23
change for RLA feature, 6-23
creation of, 5-93
procedure to invalidate, 6-23
System Speed Dial Codes, 2-19, 5-6
using with RLA mode, 5-91
Pause, 5-104
in Personal Speed Dial, 5-83
with Outside Auto Dial, 5-80
with System Speed Dial, 2-22, 5-115
PBX, 5-104
with Recall, 5-91
Personal Lines, 5-81-5-82, 5-43
Personal Speed Dial, 5-82 -5-84, 6-17
code, 5-4
description of, 5-4
maximum number of characters, 5-83
with special characters, 5-104
Personalized Ringing, 5-85, 5-120, 6-$8 ,
’
with copy, 5-41
Planning forms, need for, 3-2
Planning the system, 2-l- 2-25
Printer, 5-35, 5-108, 5-133 -5-135
jack assigned to, 6-7
needed for reports, 2-7
with Call Report, 5-32
Printout Cancellation for System Feature Report, 5-113
Privacy, 5-85 - 5-86, 6-18, 6-20
(on Lines A and E), 5-86-5-87, 6-2
Program, definition of, 3-1
Program Mode Lock, 3-22, 5-88-5-90, 5-117
Programmable feature button above transfer button, 3-24
Programming
erased. See System Reset.
voice terminals, 5-87 -5-88
Protector, 147A, 8-5
Q
Quick Reference Guide
to Administration Codes, 6-12-6-15
to ASA Features, 6-21-6-25
to Programming Codes, 6-20
to System Administration, 3-1, 6-1, 6-11
to Voice Terminal Features, 6-16 - 6-19
R
Recall, 5-91, 5-105, 6-16
in Personal Speed Dial, 5-83
with Outside Auto Dial, 5-80
with System Speed Dial, 2-22, 5-115
Receptionist/Secretary Template, 5-126
description of, 3-21
example, 3-21
Remote Line Access, 5-91-5-95, 6-21. See also RLA.
Reset the system, 6-10, 6-15
for Touch-Tone dialing, 5-122
Restriction Override, 2-18, 3-33, 5-6, 5-115, 6-15
assigning System Speed Dial Code with, 6-5
marking on System Speed Dial Forms, 2-23
Retrieve, see Hold Retrieve, 5-65
Ring Override, 5-77, 5-96, 6-18, 6-20
button, 5-%
Ringing Intercom Call, 5-120
Ringing Line Preference, 5-97
Ringing Options, 5-82, 5-97-5-98, 5-129, 6-18, 6-20
Delayed Ring, 5-97
Immediate Ring, 5-97
No Ring, 5-98
with auxiliary lines, 5-18
with Basic Telephone, 5-130
with copy, 5-41
Ringing tone, 5-119
Rings, designate the number of for ASA features, 6-23
RLA
add lines to line groups for, 6-22
button, using, 625
remove lines from line groups, 6-22
Rotary dialing, 6-l
setting the system for, 6-13
Rotary service, system incorrectly set to, 7-l
Rotary signals, 5-104
administration of, 3-10
need to administrator, 2-2
with Personal speed Dial, 5-83
with Touch-Tone Enable, 5-121
Rotary telephones with BTMI, 5-133
Speed dial. See System Speed Dial.
Station Message Detail Recording. See Call Report.
stop, 5-104
character, with Busy Buster, 5-19
in Personal Speed Dial, 5-83
with Outside Auto Dial, 5-80
with System Speed Dial, 2-22, 5-115
Supplemental Alert Adapter, 5-77, 5-143 -5-144
Switchhook flash, 5-104, 5-129
in Personal Speed Dial, 5-83
with Outside Auto Dial, 5-80
with Recall, 5-91
with System Speed Dial, 2-22, 5-115
Switchhook
using with Conference, 5-40
with conference calls, 5-55
System Administration Report, printout, 5-112
System administrator, l-2
System Answer, 5-106 -5-108, 6-21
add lines to line groups for, 6-22
button, using, 6-25
remove lines from line groups, 6-22
with copy, 5-41
System components, description of, 3-2
System Configuration Form, 2-1, 2-25, 2-26
description of, 2-2
use for basic administration, 3-10
System connectivity, 8-l
System Feature Report, 5-133
abort and cancel, 6-7
administering jack assignment, 3-15
administrator/attendant console with, 5-109
Call Report settings on, 5-109
cancel a report in progress, 6-13
cancel all report requests, 6-13
S
control unit jack assignment for, 5-111
Saved Number Dial, 5-68,~7B,5-99-5-100,6-17,6-u)
individual phone reports, 6-7
button, 5-99
printing individual voice terminal reports, 6-13
Saved Number Redial, 7-2
printing system and individual voice terminal
screening calls, 45,582
reports, 6-13
Send Message, 5-75,5-lOO-5-102,6-19
printing
whole system reports, 6-13
dial code chart, 5-102
printout, 6-7
USin& 47
printout camxllation, 5-113
Serial interface for data collector, 5-133
set control unit jack, 6-14
Setting date. See Call Report.
setting date, 5-110
Setting time. See m Report.
setting time, 5-110
Setting volume for background music, 5-142
system administration report, 6-7
SMDR. See Call Report.
System Speed Dial numbers on, 5-109
speaker, 5-56, S-102-5-103
Transfer
Return Interval on, 5-109
with Monitor-on-Hold, 5-76
using with dial codes, 36
with On-Hook Dialing, 5-79
voice terminal Allowed tit assignments on, 5-109
Speakerphone button light, 5-70
System, planning, 2-l - 2-25
Speakers on voice term&la, 2-7
Special chamcbs in dialing sequences, 5-80,5-83,5-104-5-105 System Processing flowchart, 2-21
System Reset, 5-113 - 5-114
Drop, 5-105
System
Hold, 5-lB4
setting for area code only, 6-13
Pause, 5-104
setting for rotary dial+ 6-13
Recall, 5-105
setting for toll prefix, 613
stop, 5-104
setting for Touch-Tone dialing, 6-13
Switchhook flash, 5-105
Touch-Tone Enable, 5-105
Transfer, 5-105
with System Speed Dii, 5-115
Index l-5
System Speed Dial, 2-22 - 2-25, 5-78, 5-114 - 5-117,
6-17, 6-20
Account Number Entry, 5-114
assigning, 2-22, 6-5
assigning to account numbers for Account Number
Entry, 5-5, 6-14
assigning to telephone numbers, 3-33, 6-14
assigning to private outside telephone numbers, 6-14
assigning with Restriction Override to outside telephone
numbers, 6-15
assigning with Restriction Override to private outside
telephone numbers, 6-15
description of, 5-4
Form, 2-1, 2-33, 3-33, 5-4
maximum number of digits, 5-114
on System Feature Report, 5-109
option, administering, 3-33
printed on Call Report, 5-34
with Account Number Entry, 5-4 - 5-6
with Call Report, 5-33
with Restriction Override, 2-19, 5-6,5-115, 5-116
with special characters, S-104
System Test, 7-l
troubleshooting procedure, 7-13
System wiring installation, typical, 8-12
Systemwide Options, 3-31
T
Telecommunication Devices for the Deaf, with auxiliary
lines, 5-17
Telephone number
assigning System Speed Dial codes to, 2-22
change, 6-23
enter, 6-23
privacy with CaB Report, 5-33
Telephones. See Voice tenninak.
NJ-Button Hands-Free Answer on Intercom (HFAI-10)
Voice Terminal, l-5
description of, l-7
with headset, 5-137
using, S-60
IO-Button Voice Terminal, 13
description of, l-7
34-Button Deluxe Voice Terminal, l-5
description of, l-8
M-Button Voice Terminal, l-5
description of, l-8
34-Button (SP-34) Voice Terminal with Speakerphone, l-5
description of, l-8
34-Button (SP-34D) Voice Terminal with Speakerphone
and Display, 1-5
description of, l-8
Testing the Voice Terminal, 5-117-5-118
Test/Program switch, 5-87,5-117
explanation of, 3-3
locked, 5-88
Tie, setting for System Feature Report, 5-110
Toil CalI Restriction, 5-6, 5-37
assigning, 3-32
l-6 Index
Toll prefix
dialing, 6-1
on System Configuration Form, 2-2
setting, 5-118 - 5-119, 6-13
system factory set for, 3-10
Tones, 5-119 - 5-120
Touch-Tone dialing, 6-1
resetting the system for, 5-122
setting the system for, 6-13
Touch-Tone Enable, 5-121, 6-16, 6-20
in Personal Speed Dial, 5-83
with Outside Auto Dial, 5-W
with System Speed Dial, 2-22, 5-11
Touch-Tone equipment with General Purpose Adapter, 5-135
Touch-Tone lines, l-l
Touch-Tone or Rotary Setting, 5-122
Touch-Tone service, system incorrectly set to, 7-l
Touch-Tone signals, 5-104
system set for, 2-2
with Personal Speed Dial, 5-83
Touch-Tone telephones with BTMI, 5-133
Touch-Tones, system factory set for, 3-10
TIP switch, 7-5, 7-6
to enter administration mode, 3-8
Transfer, 5-105, 5-123 -5-124, 6-16
button, S-123
in Personal Speed Dial, 5-83
with Outside Auto Dial, 5-80
with System Speed Dial, 5-115
Transfer Return Interval, 3-11, 5-123, 5-124 - 5-125
administration of, 3-11
on System Configuration Form, 23
on System Feature Report, S-109
setting 6-5
with Direct Extension Dialing, 5-46
Transferred call, 5-120
with Voice Announcement, S-120
Troubleshooting procedures, 7-l - 7-12
V
Voice announcement, 5-13
Voice Announcement Disable, 45, 5-13, S-123, 5-129,
6-18, 6-20
on HFAI voice terminaI, 5-125
with Basic Telephone, S-130
with Group Page, 557
with hands-free units, 5-125
Voice Announcement Enable/Disable, S-66, 5-125 -5-126
with copy, 5-41
Voice message
disable for lines in CF incoming line groups, 6-22.
disable for lines in DXD incoming line groups, 6-22
enable for lines in CF incoming line groups, 6-22
enable for lines in DXD incoming line groups, 6-22
modify for lines in CF incoming line groups, 6-23
modify for lines in DXD incoming line groups, 6-23
modify for lines in RLS incoming line groups, 6-23
modify for lines in SA incoming line groups, 6-23
Voice signal tone, 5-119
Voice Synthesis Processor, 5-16, 5-77
with Direct Extension Dialing, 5-45
Voice terminal
Allowed List assignments on System Feature Report, 5-109
assigning lines to, 544
definition of, 2-5
description of, l-5 - 1-9, 5-2
doesn’t ring, 7-4
jack, 2-5, 3-13
jack 19 for Busy Buster, 2-6
lights are out with no dial tone, 7-8
lights flash when an ASA feature is activated, 7-11
lights, trouble with, 7-5-7-6
programmed feature doesn’t work, 7-10
ringing, trouble with, 7-5 - 7-6
speaker, trouble with, 7-5 - 7-6
spontaneously places calls, 7-7
with Group Listening, 5-56
Voice Terminal Templates, 3-16 -3-21, 5-126, 5-127
Voice Terminal Tones, 6-16
Voice terminal wiring, 8-7
outward call restricted, 2-19
restricted, 2-17
toll restricted, 2-18
unrestricted, 2-18
Volt-ohm-miRiammeter, use of, 8-4
Volume setting for Music-on-Hold, 5-141
W
Wig installation requirements, 8-2
Wig parts cross reference, 8-11
Index l-7