1
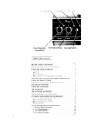
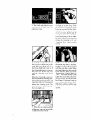
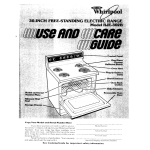
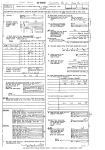
30.INCHFREE-STANDING
ELECTRICRANGE
Model RJE-385P
namel
Reflector
Chrome Trim
Manual Oven
Model and Serial
Number Plate
Bake Element
Automatic
Air-Flow
Oven
Fiberglass
Removable
Storage Drawer
Copy
!:ilw
Your
Model
iL?lk'.!
CO!,
!!>I>
and
riec,'i
ir:!olIT4t!(~"
1 Complete
Mndii
't'r'
Serial
.i‘i'.
Numbers
(\I
ca!l
~\i'itll
Here
!dodt'l
a qllt'~tlc~l~
Nc;:nt?i~r
I<'dCil,
;i:~cy 5erlal
Numbers
[from
tile
ScrlLll N~lln!‘,T
platt’ iwst behl:ld tile top ot VIV over) door 1
2
Purchase date from sales slop (or date Irlstalled)
Copv this Irlformatlon
111these spaces Keep this
book. your warranty
and sales slop together in a handy
place
See
Cooking
Guide
for
important
hrt!ilsc~.d ~Ilstd~htlon
rh
Srri\cv
safety
Companp and Phone Number
information.
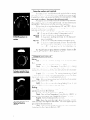
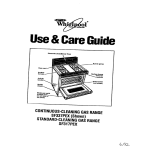
Owen
Oven Signal Light
Lock Light
Oven Selector
Oven Tempera&e
Control Knob
Knob
Clean Light
Oven Light Switch
Table of Contents
BEFORE USING YOUR RANGE
USING
THE
SURFACE
UNIT
CONTROLS
USING
THE OVEN CONTROLS
. Rakll~<~
l l3rolllng
l Var 1,1!‘1(~Hrl)lI I t’i!lurk~
l KtJ\+,t!lncj
ttltl ( )L~‘II Tt~rn~x~r~~turt.~ Control
SETTING
THE
CLOCK
USING THE MINUTE
USING
THE
TO THE
CORRECT
Knob
TIME OF DAY
TIMER
AUTOMATIC
MEALTIMER.
CLOCK
OVEN RACK POSITIONS
USING
THE
OVEN
LIGHT
THE OVEN VENT
THE OPTIONAL ROTISSERIE
USING THE SELF-CLEANING
OVEN
CLEANING AND CARING FOR YOUR RANGE
Rt~rn, IVII-~~ dnd RtJplaclny
Control
Clt~a~~~r~y llndu
tile Cooktop
9 Rrmov~r~y
the Stcjraye Drtlwer
l Cl~nr-iiny
Chart
l
Knobs
l
IF YOU NEED SERVICE OR ASSISTANCE
1
2.
3
4.
Before Calling for Assistance
If You Need Assistance
If You Need Service
If You Have a Problem.
:
::
Minute
Surface Unit Signal Light
Surface Unit Control
Stop Time Knob
Timer
Digital
Knobs
Before
using
Clock
Start Time Knob
your range
IMPORTANlWe build appliances
to last. but we can’t control
how they are used
Before using It, you are personally
responsible
for making sure that it
l IS properly
Installed
and leveled
on a floor that will hold the weight, and
in a well-vrntllated
room
l IS connected
only t(i the right kind of outlet. with the rtght electric supply
and grounding
l IS used only
for loba expected
of home ranges
l IS out of the weather
l IS properly
rnalntalned
l 1s not used by children
or others who may not understand
how It should
be used
To bake, turn the Oven
Selector Knob to BAKE
To broil, turn the Oven
Selector Knob to
BROIL.
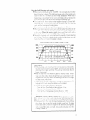
The following
sitions
for different
to BROIL.
chart
suggests
broiling
times and oven-rack
kinds of meats when the Oven Selector
Knob
Inches
top
(cm)
from
Approximate
of food
Minutes
to Broil
Food
Description
Element
pois set
1st
side
2nd
side
ALWAYS broil with the
door open about 4
inches (10 cm).
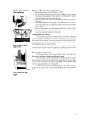
/
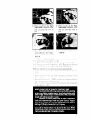
Loosen the locking
I
screw; NOTICE position
of notches.
Lower: move black part
toward “LO.”
One notch equals about
10°F (5°C).
Higher:
move black
part toward “HI.”
One notch equals about
10°F (5°C).
Variable
Resetting
Broil
Feature:
the Oven
Temperature
Control:
Does your new oven seem hotter or colder tharl your old oven’?
The temperatures
in older ovens often shift very gradually.
getting hotter
or colder without
the user really noticing
the change.
Your new oven is
properly
adlusted
to provide
accurate
temperatures,
but when compared
to your old range. the new design may give you different
baking results. If
you think that the temperature
setting on your range needs to be hotter or
colder, you can adjust the Oven Temperature
Control
Knob by yourself.
To adjust the setting. first pull the Oven Temperature
Control
Knob
straight off. On the back, Just across from the locking screw. are a row of
notches on the black part of the knob and one tooth on the chrome
part.
To set your ovc’n about lO’F(5’C)
cooler,
loosen the lockingscrew
about two full turl-1s and move the row of notches
one notch
closer to
“LO.”
To set your oven about
lO’F(5-C)
warmer.
move
the row of
notches one notch closer to -‘HI.” Each notch equals about lO’F(5”C).
Tighten
the locking
screw
and put the knob
back
on the
control
panel
5
Setting
1
2
the clock
to the correct
time
of day
Timer Knob and turn it clockwrse
until the digits
Push in the Minute
show the correct !imr of day
The Minute Timer dial will turn as you set the clock. When clock is set.
let the knob pop out Then, while it is out, turn the Minute Timer hand
counter-clockwise
to “OFF.”
If you push
in on the knob
when
setting
the Minute
Timer,
you will change
the setting
of the clock.
Using
the Minute
Timer
Without
pushing
it in, turn the knob until the minutes
you want
to time show in the window.
When the time you set is up, a buzzer till
sound
Turn the dial to “OFF‘
to stop the buzzer,
The Mirlute
Timer doczs not start or stop cooking.
It only buzzes
when the time you set IS up It can be used to time almost any cooking
operation
It can PLAIT r-erninri
you of other
things
(like when to add
softener
to the washer!
For the most accurate!
timing,
turn the knob past the time you
want Then turn it back to the setting.
Do not push in on the knob while
setting the Minute
Timer
Pushing
in the knob while turning
will change
the setting on the clock
Using
the automatic
MEALTIMER
clock
With thi, AutonlCltlc
MI-iAL-TIMER’
Clock. 1t.5 easy Just before you
leave’ loI vc jur C~pp~)ilitr ::t’llT put the roast In the oven. set the start time tor
2 00 and the, \t\)p rlmt to1 f- 00 (four hours’)
Set the Oven Selector
to
‘TIMED
<\nd xjl tile ( )vt~n TtJrnperature
Control
Knob for the temperature you \cdnt Thtprl le,~w Ti :c’ oven LVIII start at 2 00. bake for four hours
cat the it~lt~crecl li~mp’r,!turc~
anti shut off at (3 00
.l-:nk
To start and stop your OWH automatically:
1. Be sure the clock is set to the
right
time of day. (The start
and stop time hands will also
show the correct
time.)
2.
Place
the food
in the oven.
3. Push in and turn the Start
Time Knob clot-kwise
to the
time
start.
5
you
want
the
oven
4.
in
and
turn
Time Knob clockwise
time
stop.
to
Turn the Oven
Temperature
Conrrol
Knot) ICI tht) temper
aturc’ you want TO II\C’ tcl cook
the tood
Push
6.
you
Set the
“TIMED.“
want
O~ren
the
the
Stop
to the
oven
to
Selector
to
Oven rack positions
Place
Rack:
( 11) thp 5i~cijnd or thrrti
‘IO lo(d IS 117rhe center
rack yulde tram
of the cxwn
tlic’ top
50 food IS about the drstance from the brorl
c~lt~rnc~nt suggested
rn the brollrny
trrnctablt~
under “Using the Own
Corltrols
”
To remove rack. pull
forward until rack
stops, lift front and pull.
OrI the bottom
51 !ood
rack yurdc>s
15 ill the centt’r
of tht’oLtJ[~
When baking,
alulays
leave at least 1’2 to 2 inches
(4-5 cm) of
air space between
the sides of a pan and other pans and the oven wall
for air circulation.
Using
the oven light
The own I~yhr ~111 come ori iL hen rht> owr~ door ~boprne!
c)n the lryht icrthout
c;pen~ny the door. pu5,h the oven lryht swtch
aydrrl tc, tIlrr\ ttic Iryh! off
To replace
the oven light bulb:
Iiw I)~~e~\ iqhr bulb has a giass cover h)hIch IS held
h, >lder This cover must be in place ichen the oven IS berny
To turn
Push It
011 by a wart’
usrti
To replace
the oven
light, remove
glass
cover.
9
Oven vents through
right rear surface unit.
.
The oven vent
r-1
, ,lt.‘ri’
* /Ii’
z\.
> \ k I:’
L: ;,ie’
:l:i’
no:,!
:t’Ll,
7:;ttdCY
PIiJIl!t‘l”
‘,‘\“lkz!l
L’cl:t 1s !I.~ edt’:i tt ,: air
clri uldrl, 11’ ,:I rl I<’ ‘)\I’
~i1.111IS b<>k,riy L’0r.i <‘jr: c f x\‘ti on thus surf,lct’
unrt
u,hile trrc SIL~>:. l> i ~ii :’I ~.~~rnl pan ot rood LCIII stav \<drrTr on thr, .Inrt uh~le
owii
is ~111 It nid~ tw L~‘~?II~:enough
to melt butter. too
Do not try to save heat or energy
by blocking
the vent. Poor
baking
can result.
Plastic
utensils
may melt if they are over the vent
while the oven is on
tht
oi’t’:’
,z c ‘#
the
‘!\‘r1l*.’
~11: ii .il
t’SCc?\lt’
thtt>LigiT
it
.A
The optional
Stlttiny
rotisserie
the ( oiitrol*,
1. Set the
tr, “CLEPIN.”
Oven
I0 Ihe Self-c
Selector
Knob
leaning
cycle:
2. Set
Control
the Oven
Temperature
Knob to “CLEAN.”
3. The clock
and dials for start
and stop time should
all ha\,e the
right time of day
4. Push
in on the Stop
Time
Knob and set it ahead
as many
hours as you want for the cleaning cycle.
For a lightly
soiled
oven, two hours
ahead
may be
enough.
For heavay soil,
three
hours ahead
nray be about right.
If some soil does not get removed
during
the cleaning
cycle.
see
‘Special
Tips”
later
in this
svc-tion
5. Lock the oven door by moving
the Lock Lever all the way to the
right.
When it is all the way ov’er.
the Clean
Light will come on. If
the Clean Light doesn’t
come on,
the lever
isn’t all the way over
and the cleaning
cycle
won’t
start.
When the clean Itght comes
on.
the oven starts the cleaning
cycle.
About
20 minutes
later, the Lock
Light will come on. It will stay on
during
the cleaning
cycle.
The
door cannot
be unlocked
while
the Lock Light is on
7. When the oven has cooled ojj
all the way, wipe out any residue
or ashes from the bottom.
6. The oven will shut off when
the preset
stop time is reached,
but the oven door will stay locked
until the oven has cooled.
When
the Lock Light turns off, turn the
Oven
Selector
Knob
and Oven
Temperature
Control
Knob
to
“OFF.”
This turns off the Clean
Light. Now, move the Lock Lever
back to the left. Do notforce
the
Lock Lever.
If it doesn’t
want to
move
easily.
wait until
it does.
With the Lock Lever all the way
to the left, the oven door can be
opened.
How
l
l
l
l
l
the Self-Cleaning
cycle works:
When oven controls
are set to “CLEAN,.‘
the oven gets much hotter
than it does for cooklng
This high heat causes soil on the Inside oven
wall5 to burn of! or break U~I and mostly
disappear
While this is
happemng.
a sp,Jclal part 111the oven vent helps remove
smoke
Do
not c o~‘c’t the nyllt-rear
surface> unit during the cleaning
cycle
Then chart btzlo\k shoiis
about LLhat happens
during
a 2-hour
SelfCleaning
qcl~
Any time less than that shortens
only the cleaning
cyclv not the lwanng
and cooling
times
it will be her
Doll’t :oucll the’ ~angt’ dunng the cleaning
cycle
When the clt’<~n~~lg cyzle IS ovt’r. you ~‘111 find some fine ashes in the
upon the amount
of so11 there was
o~‘erl The, arnoullt of ash depends
II) tljt’ wt’r
When the oven is cool, clean up all that is left with a
darn11 cloth cleall>er.
or a soapfilled
steel-wool
pad
Dlrr;rlg ttlcl c Iear~~rly c~,clt’. YOU may hear the sounds of metal heating
and c-ool~ny Th~be art’ tlormal
sounds.
and a lot llke those you can
l~t’~~t ~.4irt~nttlcz or(‘n !ltIats for regular cooking
SELF-CLEAN
OVEN-LIGHT
SOIL
CYCLE
1000
lOO@
800
800
600
600,
400
400
200
200
1 hr
‘+7 hr.
1% hr.
2 hr.
24,
hr.
Special
tips:
l If ttlc clean~ny
( ~cltl doesn’t yet the oL’en as clean as It should be.
the time set for cleaning
was probably
not long enough
Set the
cleanlny
tlmr longer next time You can set It for more than 3
hours. tf you ivant
l Plan to clear]
the o~‘en before it gets too heavily
solled
Otherwise. you may riotIce more smoke than you would expect comIng from the ol’tmn Lgent And, the cleaning
cycle has to be longer
to clean a very solled oven
l There
~111 by nc~rmal “1 leat odors”
during the clearilng
cycle To
Ir~lp qet r:d of t.ltlm
keep the kitchen dell Lentllated
l
‘T;I sror)
‘5rn
Tut n
‘>irr;
‘ll’,(
.+’
NOTE:
Do not
force
l
I)<
liht
lr or’iir
!lOt
d7.t
r!Itj
I ht’
tilt>
tht’
r,
ll~t’
clea,r:;ny cvcle after it has starred
5107~ Time Knob to the rtyht tlrnt
:f Jas
(IL.< II Selector
Knc)b to “OFF ”
Ovc,r: Imperature
Contrc )I Krnoh to ‘OFF
:rls! ,‘)k”[I !‘I,( I rVt’,l [door when the Li)c;\ L~g!hr turns
iOIl
i(JIllI1
zt’rCldj
the Lock
cwen
O’Jen
Lever. Walt luntll It movt~‘s t~as~lb
in your Self-Cleaning
Oven
;inerS
l
ri;
l
rdck5 art’ Ieit i:’ thts oien dunng a cleaning
cycle. they will lose
tilt-,! shllltl. ~IXI llor and be harder to slide in and out To make
thc:n SII& C’~SIV~ polish the edges of the racks and rack guides
with a 5oapfilleL:
steel vm3I pad. rinse well, and wipe on a thin
coating of salad oil
CkaWrS
111 yOUr
Self-Ckanlng
&en
It
11
Cleaning
and caring
for your
range
Ynur ranyr 15 dt5qned
to be easy to clean You ii’111 usually :~pe off
splls and spattet<
ichtan thw
happen.
but you ~111 sometImes
want to
clean under and lwhllltl
the control
knob5 and surface units The sectIon
~111 tell vou hoi{ to rc’rnow
those. and u hat to ~1st' ~4 hen cleanlny
Pull knob and trim ring
straight out. Remember
how the spring goes.
Removing
and replacing
surface
unit control
knobs:
1 Be SUTC the ~~~nt~.ol knobs art’ st’t t(~) OFF’
2 Pull stralyi:t
out on the 5lac.k knobs
13 If thv i-c~rltr~)I ha-. a ihrome
tnrn nny pull it stralyht out
4 LZ’ayh ttlk) kni lb. and trlrn rinys) In warm
sudsy water
3 Rtaplacv th<J tr~rl rings first If the control
spring was removed,
it back exactlv
as shown on the left., .small
end first.
put
Removing
and replacing
oven control
knobs:
1 Be sure the knobs are wt t(~) “OFF
2 Pull t’a~ in k:ll )b itralght
(of!
~3 lYash tht> ~IIO~Y 11‘1‘~4~arrn \LIC~S> i4c:ter
4 Th,J knot>\ are I ,ot Interchangcablt
Make sure you put the’ adjustable Oven Temperature
Control
Knob on the right place and thti
nonadjustable
0~1~ Slector
Knob (III the other
Removing
surface
units
and reflector
bowls:
To remove surface
unit, lift and pull
straight out.
(re;t’ptdc
:t’
wash surface
I’ ,il the unit Strdlght aiiay
from
units: they will burn themselves
the plug-11~ Do not
clean during
nor-
Hold surface unit level
when replacing.
Replacins
5.
Cleaning
Prop up the top with
support rod.
reflector
bowls and surface
units:
Be sire the surface unit controls
are on “OFF.”
Put the reflector
bowls back into their places. Make sure you can see
the plug-ins
(receptacles)
for the surface
units through
the square
hole in the side of each bowl and trim ring.
Hold the surface
unit ievel with the prongs (terminals)
pointing
at
the plug-in.
With the prongs started in the plug-in, start pushing in on the surface
unit At the same time, lift a little on the side of the surface unit that’s
by the plug-in.
Make sure the surface-unit
prongs are pushed into the plug-in as far
as they will go. The surface unit will fit into the reflector
bowl and be
level when everything
has been done right.
under the cooktop:
To clean the area under the cooktop.
lift the front of the cooktop
at
the center. Rarse the swing-up
rod to hold it (Be sure the tip of the rod is
in the notch in the cooktop.)
Use warm soapy water and a sponge or cloth.
Scouring
powders
or any other abrasive
cleaner
may harm porcelarn
enamel finishes and can scratch chrome.
Be careful
not to raise the cooktop
so high that it touches
the
control console.
And don‘t drop it. Dropping
the cooktop
can chip or crack
a hard porcelain
finish. or damage side panels and surface units.
Removing
The
Never
the storage
drawer
keep anything
drawer:
below
your
oven
is meant
to store
pots
and
pans.
in there that will burn or melt.
You may want to remove
the drawer
for cleaning
under the range.
Pull It strarght out until it stops. Lift the front and pull some more to get it
over the stop. Now slide it out until it stops again. Lift the drawer
away
from the range until it slips out of the guides.
To put it back. fit the side rarls at the back of the drawer
into both
guides on the range. Push it closed while lifting the front to get past the
stops.
Pull to stop. Lift; pull
again.
13
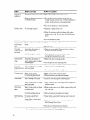
PART
WHAT TO USE
HOW TO CLEAN
Outside of
appliance
Soft cloth, warm soapy water
l
Wipe off regularly
Nylon or plastic scouring’pad
for stubborn spots
l
Do not allow food containing acids (such as
vinegar. tomato. lemon juice or milk) to remain on
surface. Acids will remove the glossy finish.
l
Do not use abrasive
l
Spatters
l
Wipe off excessive spills with damp cloth when
surface unit is cold. Do not place in Self-Cleaning
Oven.
l
Do not immerse
l
Wash. rinse and dry well.
l
Do not soak.
or
l
Wipe out excess spills. Wash with other cooking
utensils for routine cleaning.
Oven cycle
l
Place upside down on oven racks in oven
during Self-Cleaning
Oven cycle.
Automatic dishwasher or
warm. soapy water or plastic
scrubbing pad
l
Wash with other cooking
l
Do not place in Self-Cleaning
Porcelain
broiler pan and
grid
Warm. soapy water or soapy
steel wool pads
l
Wash with other cooking
l
Do not place in Self-Cleaning
Control
Warm, soapy water
Commercial glass cleaner
l
l
Wash, rinse and dy with soft cloth.
Follow directions provided with cleaner.
Self-Cleaning
l
Leave in oven during Self-Cleaning
Warm. soapy water or soapy
steel wool pads
l
Wash. rinse and dry. Use soapy steel wool pads for
stubborn areas
Warm. soapy water or plastic
scrubbing pad
l
Make certain oven is cool. Wash. rinse and dry well
with soft cloth
Commercial
l
Follow directions
Surface units
No cleaning
required
Control knobs
and chrome
rims
Warm, sudsy water and bristle
brush
Porcelain
enamel reflector bowls
Automatic dishwasher
warm. soapy water
Self-Cleaning
Chrome
rings
trim
panel
Oven racks
Oven door
glass
Self-Cleaning
Oven
Oven cycle
glass cleaner
For areas outside SelfCleaning area use warm.
soapy water or soapy steel
wool pads
or harsh cleansers.
or spills will burn off.
in water.
utensils.
Oven.
utensils.
provided
Oven
cycle.
with cleaner
@ Clean before using Self-Cleaning
burn-on of soil.
cycle to prevent
l
Follow directions given on page 9
Self-Cleaning
Oven Cycle.”
l
Do not use commercial
Do not use foil to line the bottom
14
when range is cool.
of your Self-Cleaning
oven cleaners
Oven.
“Using the
If you need service or assistance,
we suggest you follow these
four steps:
. Before calling
for assistance..
Performance
problems
fix yourself
without
tools
often result
of any kind.
from
.
lirtle
things
you can find
If nothing
operates:
l Is the rilrlye
~~luyy~~: .ntcr <III [lperiltlny
outlet or wired into a IIW circuit
iuth the proper voIt~3ye Ii 1See Installation
Instructions.)
l Havtj
v;~u checkcjci tilt> ma111 fuse or clrcult-breaker
box”
If the oven will not operate:
l Is the Oven
St’lecto!
Knob
not TIMED)
i
l 15 the
Ovt~n T~~rnp~‘t-nturt’
wtt1ny~
turned
to a settlny
(‘ontl-c!l
Knob
(BAKE
turned
If surface
units will not operate:
. Have t’i iu ci~i~cki~ci t!rt’ r‘i~iin fuse or clrcult-breaker
l Are suric\cc
unit\ pluggiG
1~1dll the, Lc’ay”
l II0 tht’ iontrc)l
k110b turn’
or BROIL.
but
to a temperature
box”
If surface-unit
Control
Knob or Knobs will not turn:
l Ii tilt> il)rlnc_l l)ul 1’1 I o~rc’ctl~
as 5hoLc.n on pagtx 12 in the “Cleaning
,!!lii
l
(‘cltlriq
I)td VC)~I pui!i
!( ‘I vi
21
tL3rx+
III tkltc ~rtl ttt’llly
st’ctll
III’
to turll’
If the Self-Cleaning
Cycle will not operate:
l Are
the’ ()~jcl~~ Sttlec tar Knob and the
KllOb St’i to (‘I.I:Ah
i”
Oven
Temperature
Control
1, the, i.l lck L,,\e’r illi *iIt> S~C’~Lto tht, right’ iThe Clean Light will come
(‘II
If cooking
results
aren’t what you expect:
. Is the ~drlyt’ Ii’vc~l’
l Arc LY!~I u>~ng I>~IIY I~’ orllrnt’nded
III the Cooking
Guide?
l Jr t,zlklr,y
haitc you ,:iloutYi
1’
tc~ 2 Inches (4-Z cm) on all sides of
lilt,
pan5
101 di: 1‘1i--u1~3tio1!j
l Dot’s
the OVCJII ternpk,rature
seem too low or too high’? See page 5.
‘RtJ5ettlny
>‘our 0~11 Temperature
Control
Knob ”
l 1 Icjve LOU preheated
t:le oven as the recipe calls for”
l Are rht) pans the SIN ( alled for 111the recipe’
l Arc you !ollo\clny
a tt,ited recipe from a reliable source’)
l Do the (I)c,kiny
utt!nslls h<lve smooth
flat bottoms”
l Do the cooklny
utcnslls fit the surface unit being used?
SW the Cooking
Guide
for mc)re information
on cooking
problt~ms and hi )Lk to solve t htjm
l
15
2.
If you need assistance
number.
Call the Whirlpool
Dial free from:
Continental
U.S.
Michigan
Alaska
& Hawaii
‘:. . .
COOL-LINE
.
- service
.
assistance
..
...
..
.
(800)
(800)
(800)
telephone
253-1301
632-2243
253-1121
and talk with one of o,!r trarllcd
YOU
ill
servtce
at-ea
3.
j
FRANCHISED
SERVICE
j
Ilr)u.
to
Obtdi!:
is necessary.
Corrsultarnts The Consultant can instruct
sattsiactory operation from your appliance or. if
recommend
a qualified service company in your
If you need service+. . .
Whirlpool has a nattonwide netuiork of franchised TECH-CARE”
service companies
TECH-CARE
service technicians are trained to fulfill
the product warranty and provide after-warranty
service. anywhere in the
United States. To locate TECH-CARE
service in your area, call our
COOL-LINE
service assistance telephone number (see Step 2) or look in
your telephone directory Yellow Pages under:
APPLIANCES-HOUSEHOLDMAJOR-SERVICE
8 REPAIR
k"vHlRLPOOLAPFtlAN;t'
FHANCh~SFDTELY
4.
ELECTRICAL
APPLIANCESMAJOR-REPAIRING
8 PARTS
OR
,Atit
':R;l'
Sr,- R.POOLA~'PLlANCtS
~:'ANCHISEL'
:F;H
If you have a problem:‘:.
WASHING MACHINES.
8 IRONERS-SERVICING
DRYERS
OR NHIRLPOOLAP~LIANCES
'"AYE
>ER'JL
i
FRPNCHISEDTFCH
CARESERVICE
..
Call our COOLLINE
service asststance telephone number (see
Step 2) and talk with one of our Consultants. or if you prefer, write to:
Mr Guy Turner. Vice Prestdent
Whirlpool Corporation
Administrative
Center
2000 US-33 North
Renton Harbor. MI 39022
If you must call or wrote. p!ease provide
model number, serial number,
date of purchase. and a complete description of the problem. This informatton is needed 111order to better respond to your request for assistance.
Benlon Harbor, Michigan. Aulomalic Washers, Clolhes Dryers.
Freezers, Aefrlgeralor-Freezers,
Ice Makers. Dishwashers.
Buill-In Ovens and Surlace Unils. Ranges, Microwave Ovens,
Compaclors. Room Air Conditioners, Dehumidiliers,
Central
Healing and Air Condilionlng Systems.
Part No 310609 Rev A
Pnntrti !n ti 5 A