1
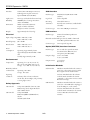
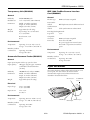
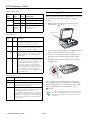
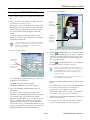
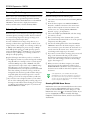
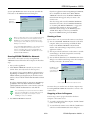
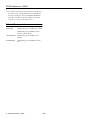
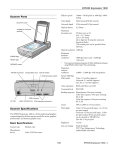
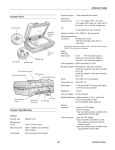
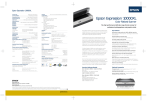
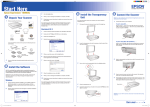
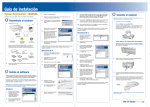
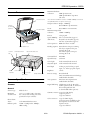
EPSON Expression 1640XL
Maximum hardware
resolution*
1600 dpi (main scan)
3200 dpi with Micro Step Drive
(sub scan)
Scanner Parts
document cover
*The maximum hardware resolution of 1600 × 3200 dpi is achieved
using EPSON’s Micro Step Drive technology
Output resolution 50 dpi - 12800 dpi
50 to 6400 in 1 dpi increments
carriage
(at home
position)
document table
Zoom
50 to 200% in 1% increments
Maximum interpolated
resolution
12800 × 12800 dpi
control
panel
] Start button
terminator switch
1 bit per pixel
Speed (1600 dpi,
draft mode)
Color: 13.2 msec/line (approx.)
Grayscale: 4.5 msec/line (approx.)
Line Art: 4.5 msec/line (approx.)
Color separation
RGB color filters on CCD
Reading sequence Monochrome: One-pass scanning
Color byte sequence: One-pass
scanning (R, G, B)
Color line sequence: One-pass
scanning (R, G, B)
transportation lock
SCSI ID
dial
Line art
optional interface slot
Command level
ESC/I-B8
Optical density
3.6 Dmax
Color depth
42-bit internal/42-bit external
Grayscale depth
14-bit internal/14-bit external
Pixel depth
14 bits per pixel (14 bits per pixel
input, 1 to 14 bits per pixel output)
Brightness
7 levels
Line art settings
Fixed threshold
TET (Text Enhancement Technology,
enable/disable selectable)
Scanner Specifications
Area separation
AAS (Auto Area Segmentation,
enable/disable selectable)
Scanner
Digital halftoning 3 halftoning modes (A, B, and C)
4 dither patterns (A, B, C, and D) for
bi-level and quad-level data
(2 downloadable dither patterns)
USB
SCSI interfaces
AC inlet
interface
option connector
transportation lock
(ADF/TPU)
General
Scanner type
Flatbed, color
Maximum
document size
12.2 × 17.2 inches (310 × 437 mm)
A3 or Letter (The reading area can be
specified from your software)
Photoelectric
device
Effective pixels
Gamma correction 2 types for CRT display
3 types for printer
1 type user-defined
Color correction
Color MatrixCCD line sensor
19520 × 27520 pixels at 1600 dpi,
100% scaling
8/00
1 type for CRT display
3 types for printer (available in color
byte sequence mode and color line
sequence mode)
1 type user-defined
EPSON Expression 1640XL - 1
EPSON Expression 1640XL
Interfaces
Light source
Xenon gas cold cathode fluorescent lamp
Reliability
100,000 cycles of carriage movement
(main unit MCBF)
Dimensions
Width: 25.8 inches (656 mm)
Depth: 18 inches (458 mm)
Height: 6.9 inches (176 mm)
Weight
SCSI Interface
SCSI-2 (micro DB 50-pin connectors)
USB (Type B receptacle connector)
Optional IEEE 1394 (FireWire)
Approximately 46.2 lb (21 kg)
Rated frequency
50 to 60 Hz
Rated current
100 to 120 VAC: 1.2 A
220 to 240 VAC: 0.7 A
Selectable from 0 to 7
Terminator
Internal active terminator (enable/disable
selectable)
Connector type
Two micro DB 50-pin connectors
Operating: Approximately 45 W
Approximately 55 W with TPU or ADF
unit
Standby: Approximately 12 W
Operating: 41 to 95 °F (5 to 35 °C)
50 to 89 °F using ADF (10 to 32 °C)
Storage: −13 to 140 °F (−25 to 60 °C)
One receptacle (Type B)
Interface type
For use with the optional automatic
document feeder (B813212) and
transparency unit (B813202)
Output voltage
21.6 to 26.4 VDC
4.75 to 5.25 VDC
Output current
1.3 A (24 V)
0.3 A (5 V)
Initialization Methods
SCSI interface
Hardware: Initialized when the scanner is
turned on or the scanner receives a SCSI
Reset signal from the SCSI interface
Software: Initialized when the software
sends the Esc @ (initialize the scanner
command), or the scanner receives a SCSI
Bus Device message
Ordinary office or home conditions.
Avoid dust, direct sunlight, and proximity
to strong light sources.
USB interface
Safety: UL 1950 CSA C22.2 No. 950
EMC: FCC part 15 subpart B class B
CSA C108.8 class B
Hardware: Initialized when the scanner is
turned on or the USB cable is unplugged
from the USB port on the scanner
Software: Initialized when the software
sends the Esc @ command or the scanner
receives a Bus Reset from the USB
interface
Safety: EN 60950
EMC: EN 550022 (CISPR Pub 22)
class B
AS/NZS 3548 class B
2 - EPSON Expression 1640XL
Universal Serial Bus Specification
Revision 1.0
Option (ADF/TPU) Interface Connector
Safety Approvals
230 V model
ID setting
Connector type
Humidity (without
condensation)
Operating: 10 to 80%
Storage: 10 to 85%
120 V model
TTL-compatible
Electrical standard Full speed mode (12Mb) of Universal
Serial Bus Specification Revision 1.0
Environmental
Operating
conditions
Logic level
Interface type
Input voltage range 100 to 120 VAC, ± 10%
220 to 240 VAC, ± 10%
Temperature
ANSI X3T9.2/375R Revision 10L
(SCSI-2)
USB Interface
Electrical
Power
consumption
Interface type
8/00
EPSON Expression 1640XL
Transparency Unit (B813202)
IEEE 1394 FireWire Scanner Interface
Card (B808342)
General
General
Reliability
MCBF 100,000 cycles
Readable area
11.4 × 16.5 inches (290 × 420 mm)
Interface type
IEEE 1394-1995 compatible
Dimensions
Width: 12.8 inches (324 mm)
Depth: 21.3 inches (540 mm)
Height: 3.6 inches (92 mm)
Data transfer
method
Half-duplex Data/Strobe differential serial
Synchronization
method
Clock synchronization with DS-Link
Weight
Approximately 11 lb (6 kg)
Electrical
Input voltage: 21.6 to 26.4 VDC
4.7 to 5.25 VDC
Encoding/decodingDS-Link
Rated current: 1.3A
0.3 A
3.3 V
Compatible
connectors
IEEE 1394-1995 compatible
Power class
Environmental
Temperature
Logic level
Operating: 41 to 95 °F (5 to 35 °C)
Storage: −14 to 140 °F (−20 to 60 °C)
Humidity (without
condensation)
Operating: 10 to 80%
Storage: 10 to 85%
Power class code 100
No power supply from external sources
Fitted with a repeat function with bus
power
Environmental
Temperature
Automatic Document Feeder (B813212)
Operating: 41 to 95 °F (5 to 35 °C)
Storage: −13 to 140 °F (−25 to 60 °C)
Humidity (without
condensation)
Operating: 10 to 80%
Storage: 10 to 85%
General
Paper input/output Load face-up; eject face-down
Paper quantity
100 pages (55 g/m2 paper, maximum
total thickness under 0.48 inches
[12 mm])
Reliability
100,000 sheets (load/eject MCBF)
Dimensions
Width: 23.8 inches (606 mm)
Depth: 19.2 inches (488 mm)
Height: 5.3 inches (134 mm)
Weight
Approximately 28.7 lb (13kg)
Lights and Buttons
The scanner has three indicator lights and two buttons on its
control panel. A ] Start button is located beside the
document table. Light status and button functions are
described in the tables that follow.
RESET button
P OPERATE
button
Electrical
Input voltage
22.8 to 25.2 VDC
4.75 to 5.25 VDC
Input current
24 V: 1.3 A
5 V: 0.3 A
Environmental
Temperature
Operating: 50 to 89 °F (10 to 32 °C)
Storage: −4 to 140 °F (−20 to 60 °C)
ERROR light
OPERATE light
READY light
Humidity (without
condensation)
Operating: 20 to 80%
Storage: 95% or less
8/00
EPSON Expression 1640XL - 3
EPSON Expression 1640XL
Scanner indicator lights
Transporting the Scanner
Light
Light
status
Color
Scanner status
OPERATE
N
Green
Scanner is on
READY
N
Green
Ready to scan images
F (flashing)
Green
Scanning is in progress
N
F (rapidly
flashing)
O
Red
An error occurred; see the
following table for more
information
ERROR
When you transport the scanner a long distance or store it for
an extended time, follow the steps below to secure the
carriage.
1. Make sure the transportation lock on the back of the
scanner is in the
position.
N = on, O = off, F = flashing
home position
Error conditions
ERROR
light
READY
light
N
N
Command error: The scanner has received
incorrect commands from your scanning
software. Try rescanning the document.
F
O
Interface error: Check that your scanner is
securely connected to your computer, and then
turn the scanner off and back on again.
F
F
Fatal error: Check that the transportation lock is
released, and then turn the scanner off and on
again. If this doesn’t solve the problem, call your
EPSON dealer.
O
O
Error type
2. If you’re using a transparency unit or automatic document
feeder, remove it and replace the scanner cover.
3. Turn on the scanner and wait until the carriage moves to
the home position as shown. Then turn off the scanner.
Option error: There’s a problem with an installed
option. Check to make sure the transparency unit
or automatic document feeder is flat against the
document table. Check that your option is
securely connected to the option (ADF/TPU)
connector at the back of the scanner. Finally,
check that the automatic document feeder isn’t
out of paper and doesn’t have a paper jam. If
these suggestions don’t solve the problem, call
your EPSON dealer.
4. Slide the transportation lock at the back of the scanner to
the
position.
N = on, O = off, F = flashing
Scanner buttons
Button
P Operate
Turns the scanner on and off.
Reset
Resets the scanner to its default settings after an error.
Pressing this button while scanning a document stops
the scanner and may cause an error.
]
Automatically launches a ] Start button-compatible
application. You must set up your scanner software and
a compatible application to use this button.
If you installed Presto! PageManager, it’s automatically
assigned to the ] Start button. You can set up Presto!
PageManager to scan your image automatically and send
it directly to another application or a peripheral device,
such as a printer.
Start
locked position
Function
4 - EPSON Expression 1640XL
If the carriage does not automatically return to the home
position, slowly raise the front of the scanner and hold it up
until the carriage comes to rest in the home position. Then
turn the transportation lock counterclockwise to the
position.
If you are using a transparency unit and it is switched on,
the scanner carriage will not move to the home position.
Remove the transparency unit first, then perform the
steps above.
8/00
EPSON Expression 1640XL
5. Click the Preview button.
Scanning with EPSON TWAIN Pro
1. Start your host application (for example, Adobe Photoshop
LE).
2. Select your scanner driver. (Unless you change your source,
you only need to do this step once.)
Click to
define the
scan area
automatically
For example, if you’re running Windows and using Adobe
Photoshop LE as your host application, click File, Import,
Select TWAIN_32 Source. In the Select Source dialog
box, select EPSON TWAIN Pro(32-bit). Then click
Select.
If you have a Macintosh, click File, Import, Twain
Select. In the Select a source dialog box, choose EPSON
TWAIN Pro and click OK.
A dotted
marquee
frames the
area to be
scanned
The command you choose from the File menu differs
from one host application to another. With other host
applications, you might choose Acquire or Select
Source instead of Import.
You see a preview of your scan in the window that opens.
3. Open the scanner software.
6. Click the
Auto Locate button to automatically define
the scan area around the edges of your image. Or adjust the
scan area by positioning the mouse pointer over any of the
eight boxes around the marquee’s edge and dragging the
box to resize the marquee.
Click to start
scanning
Click the
Auto Exposure button to automatically set
the highlight, midtones, and shadow exposure.
Click to display
a preview of
the image
Generally it’s a good idea to use the Auto Exposure
button to obtain the best settings for your scan. If you’re
not satisfied with the results, see your electronic
EPSON TWAIN User’s Guide for information about
adjusting settings.
If you need to remove color cast from your image, use
the Gray Balance Intensity feature.
For example, choose Import from Photoshop’s File menu.
In Windows, select TWAIN_32.
7. When you’ve finished making adjustments, click the Scan
button.
On a Macintosh, select TWAIN_Acquire.
The READY light on the front of the scanner flashes while
it’s scanning. In a few moments, a scanned image is
imported into your host application’s window.
The EPSON TWAIN Pro main window appears.
4. Choose the Document Source, Image Type, and
Destination.
(If the READY light continues to blink, it may indicate an
error condition. See page 3 for more information.)
For example, if you’re scanning a photograph, select
Flatbed as your Document Source, 24-bit Color (Std)
as your Image Type, and EPSON Stylus Printer
(Photo) as the Destination, if you’re sending the scanned
image to an EPSON inkjet printer. If you’re using the
optional transparency unit, select TPU for Neg. Film or
TPU for Pos. Film as your Document Source. If you’re
using the optional automatic document feeder, select Auto
Document Feeder as your Document Source.
8. Click Close to close the EPSON TWAIN Pro window and
return to your application.
9. If you want, save your image using the Save or Save As
options from the File menu of your host application.
8/00
EPSON Expression 1640XL - 5
EPSON Expression 1640XL
Scanning Color Images
Using a Network Scanner
If the colors in your scanned image don’t match those in your
original document, try experimenting with the Unsharp
Mask setting. Click the Destination button in the EPSON
TWAIN Pro main window to display the Destination
window, and then select or deselect Unsharp Mask.
Network scanning involves the following steps:
❏ The scanner server must be turned on and running EPSON
Scan Server.
❏ From the client computer, start EPSON TWAIN Pro
Network to establish a connection to the scanner server.
Only one client computer at a time can connect to the
scanner server. (See “Starting EPSON TWAIN Pro
Network” on page 7 for instructions.)
Selecting Resolution
❏ Choose the Image Type, Resolution, and other settings
you want for your scan.
Resolution refers to how many dots per inch (dpi) or dots per
centimeter (dpcm) your image contains. The best resolution
for a scanned image depends on the type of image you’re
scanning and your final output device.
❏ Place your first image on the document table (or in the
optional automatic document feeder or one of the optional
transparency unit’s film guides).
As a rule of thumb for most images except line art, use a
scanning resolution that is approximately one third of your
output resolution. For example, use a scanning resolution up
to 100 dpi with a 300 dpi laser printer, and up to 200 dpi
with a 600 dpi laser printer. For 1440 dpi ink jet printers,
such as the EPSON Stylus® COLOR series, use a scanning
resolution of up to 300 dpi. Try a scanning resolution of
240 dpi for 720 dpi printing.
❏ Start the scan. Although this can be done from EPSON
TWAIN Pro Network on the client computer, it may be
more convenient to press the scanner’s ] Start button or to
start the scan from the scanner server. Then you can scan
several images with a single trip to the scanner.
❏ If you want to scan more than one image, place your second
image on the document table and press the scanner’s
] Start button again. Repeat this step for every image you
want to scan. (The settings you chose for the first image
apply to these images too.)
Keep the following in mind when you choose a resolution:
❏ The higher the resolution you select, the larger the resulting
image file will be. For example, an 8.5 × 11-inch original
scanned at 300 dpi can produce a 24MB file. The same
original scanned at 72 dpi creates only a 1.3MB file. Large
files take longer to process and print, so consider the
practical limitations of your computer system and hard disk
drive when selecting a resolution. To keep your file size
manageable, select the lowest possible resolution that gives
acceptable quality. (If your final output is for on-screen
viewing, you can scan at 72 dpi and reduce your file size.)
❏ When you return to the client computer, your scanned
images appear in the host application’s window. Close
EPSON TWAIN Pro Network to end your connection to
the scanner server and allow other client computers to use
the scanner.
Some applications, such as Adobe Photoshop LE,
automatically close the client computer’s connection to
the scanner server when you press the ] Start button.
You can’t use the ] Start button to scan multiple images
if you’re using these applications.
❏ If you need to scan at a higher resolution, you can reduce
the size of the resulting image file by scanning only part of
the image. For information about selecting part of an image,
see “Making and modifying marquees” in your electronic
EPSON TWAIN User’s Guide.
6 - EPSON Expression 1640XL
Starting EPSON Scan Server
EPSON Scan Server starts automatically whenever the scanner
server is turned on. When EPSON Scan Server is running,
you’ll see either the EPSON Scan Server dialog box, or the
EPSON Scan Server icon
on the Windows taskbar. If you
need to start EPSON Scan Server manually, click Start,
Programs, EPSON Scan Server, and then select EPSON
Scan Server.
8/00
EPSON Expression 1640XL
If your host application is Presto! PageManager for EPSON,
choose Acquire from the File menu. When EPSON
TWAIN Pro Network starts, the EPSON TWAIN Pro
Network main menu appears and you connect to the
scanner server.
You can quit EPSON Scan Server at any time. Just click the
Exit button on the EPSON Scan Server dialog box.
Wait for this
message
before you exit.
Since the settings and controls for EPSON TWAIN Pro
Network are the same as those for EPSON TWAIN Pro,
see “Scanning with EPSON TWAIN Pro” on page 5 for
general scanning instructions. For more detailed
information about settings, see the EPSON Expression
1640XL Online Reference Guide on your EPSON
Expression 1640XL Scanning Tools CD-ROM.
Click to exit
Starting a Scan
Before you quit, make sure no client computers are trying
to use the scanner. Don’t exit if the status area of the
EPSON Scan Server dialog box indicates that you are
connecting to a client. Wait until you see the message
Waiting for connection.
You can start a scan on your network scanner in several ways:
❏ You can start EPSON TWAIN Pro Network on the client
computer, make your scan settings, and click the Scan
button on the EPSON TWAIN Pro Network main
window. The scanned image is imported into your host
application’s window.
If you installed EPSON TWAIN Pro on the scanner server
so that you could make a direct connection to the
scanner, remember that you must exit EPSON Scan
Server to use EPSON TWAIN Pro. EPSON Scan Server
disables EPSON TWAIN Pro.
❏ You can press the ] Start button on the scanner to send the
scanned image to the client computer that is currently
connected to the scanner server.
Starting EPSON TWAIN Pro Network
❏ You can click the Start button on the EPSON Scan Server
dialog box to send the scanned image to the client computer
currently connected to the scanner server.
You connect to the scanner server by starting EPSON
TWAIN Pro Network from the client computer. Follow these
steps:
1. Start your host application.
IP address of the
client computer
connected to the
scanner server
2. Select EPSON TWAIN Pro Network as your source, or
scanner driver. (You only need to do this step once.)
For example, if you’re running Windows and using Presto!
PageManager for EPSON as your host application, choose
Select Source from the File menu. In the Select Source
window, choose EPSON TWAIN Pro Network and click
Select.
If you have a Macintosh and are using Presto! PageManager
for EPSON, click File, Select Source, then Select
TWAIN Source. In the Select a source window, select the
EPSON TWAIN Pro Network icon and click OK.
Click to start a scan from the scanner server
No matter how you start the scan, the client computer must
be running EPSON TWAIN Pro Network to connect to the
scanner server.
The command you choose from the File menu differs
from one host application to another. With other host
applications, you might choose Import or Select
TWAIN_32 Source, for example.
Stopping a Scan in Progress
You can stop a scan in progress from either the client
computer or the scanner server.
3. Start EPSON TWAIN Pro Network.
❏ To cancel a scan from the client computer, click the Cancel
button on the Progress bar.
❏ To cancel from the scanner server, click the Cancel button
at the bottom of the EPSON Scan Server dialog box.
8/00
EPSON Expression 1640XL - 7
EPSON Expression 1640XL
❏ To break the connection between the client computer and
the scanner server, click the Stop button on the EPSON
Scan Server dialog box. This closes EPSON TWAIN Pro
Network on the client computer and allows other client
computers to connect to the scanner server.
Related Documentation
CPD-10855
EPSON Expression 1640XL User’s Guide
EPSON Expression 1640XL Software
Reference Guide (html)
TM-EXPR1640
EPSON Expression 1640XL Service
Manual
PL-EXPR1640
EPSON Expression 1640XL Parts Price
List
8 - EPSON Expression 1640XL
8/00