1
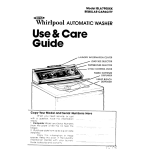
‘whiti
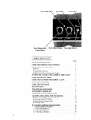
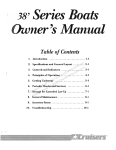
01 SO-INCH FREE-STANDING
ELECTRIC RANGE
Model RJE-385P
-3
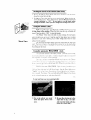
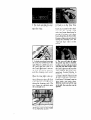
Surface Units
Bowls with
---Chrome Trim
Model and !3erial
Number Plate
Bake Element
Automatic Oven
Light Swrtch
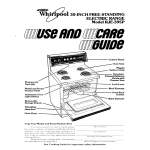
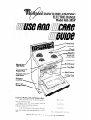
Copy Your
Model
Air-Flow
and
Serial
Numbers
Mere
When you need service.
or call with a question.
have this mformatlon
ready
1 Complete
Model
and Serial
Numbers
(from
the
plate just behmd
the top of the oven door)
2 Purchase
date from sales slip
Copy this InformatIon
In these spaces
Keep this
book. your warranty
and sales slip together
in a handy
place
See Cooking
Guide
Oven
for important
SendI I\;llrnht’r
~._
f’urchasi~
Seri~e
safety
Company
_
I)nrL,
dnd F’hi~nc hLurnhc,r
information.
~-
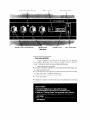
Oven Signal Light
Lock Light
Clean Light
Oven Temperature
Control Knob
Table of Contents
YOUR RESPONSIBILITIES
USING THE SURFACE UNIT CONTROLS
USING THE OVEN CONTROLS
Baking
Broiling
Variable
Broil Feature
Resetting
the Oven Temperature
l
l
l
l
Control
SETTING THE CLOCK TO THE CORRECT TIME OF DAY
USING THE MINUTE TIMER
USING THE AUTOMATIC MEALTIMER-’ CLOCK
OVEN RACK POSlTIO%
USING THE OVEN LIGHT
THE OVEN VENT
THE OPTIONAL ROTISSERIE
ACCESSORY CANNING KIT
USING THE SELF-CLEANING
OVEN
CLEANING AND CARING FOR YOUR RANGE
l
l
l
l
Removing
Cleaning
Removing
Cleaning
and Replacing
Control
Under the Cooktop
the Storage Drawer
Chart
Knobs
IF YOU NEED SERVICE OR ASSISTANCE
1.
2.
3.
4.
Before Calling for Assistance
If You Need Assistance
If You Need Service
If You Have a Problem
Page
3
4
3
4
4
5
5
b
(1
6
8
8
8
8
9
9
12
12
13
Surface Unit Signal Light
Surface Unit Control
Knobs
Minute
Surface Unit
Indicators
Stop Time Knob
Timer
Digital
‘Clock
Start Time Knob
Your responsibilities
Proper
installation
and safe use of the range are
responsibilities.
Read this “Use and Care Guide”
and
Guide”
carefully
for important
use and safety information.
You must be sure your range..
l is properly
installed
and leveled on a floor that will hold
iir a well-ventilated
room.
l is connected
only to the right kind of outlet, with the right
and grounding
(see “Installation
Instructions”).
l is used only for jobs expected
of home ranges.
l is out of the weather.
l is properly
maintained.
l is not used by children
or others who may not understand
be used.
your personal
the ‘Cooking
the weight.
electric
how
and
supply
it should
Using
the surface
unit
controls
Surface
Unit Control
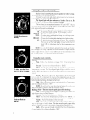
Knobs must be pushed
in before turning.
Iill-rr rather way to the settlrq
you want
A design by each knob tells which unit is turned on by that knob.
(For example.
[ .I shows the right front unit )
The Signal
Light will glow whenever
a Surface
Unit is on. Be
sure this light is off when you have finished
cooking.
The knob may be set anywhere
between
“HI” and “OFF.”
As you
use your surface units. you will get used to the settings that match your
pots. pans and favorite
foods the best.
As a guide. the setting should cook at about the following
heats.
HI - To start most foods cooking.
To bring water to a boil.
MED-HI
-To
hold a rapid boil: to fry pancakes
or chlcken.
MED -To
make gravy, puddings
and icings. to cook large quantitles of vegetables
MED-LO
--To
keep food cooking
after starting it at a higher setting
LO -To
keep food warm until ready to serve. You will notlce
that you can set the heat higher or lower wlthin the LO
hand 1 G I to help keep food at the temperature
you
want
NOTE:
U\t’ c)nl~ fl,~t~bottorned
utensils for beit result\ and to preVPIII tlarnagiz ti) the r<llnye Sprclalt);
Items wtth rounded
or ntiged bottoms
(woks. ntiyeJ
bottom
C~~~II~JI~ or tea kettles) are not recommended
See
the “Cooking
C;u~ti~~~ for Important
utensil lnforrnatton
Using
the oven controls
Baking:
Racks
First..
Follow<
the
dlrectlons
on
page
X for
Positlonlrlg
O\,cr~
To bake, turn the Oven
Selector Knob to BAKE.
To broil, turn the Oven
Selector Knob to
BROIL.
Fourth-Place
food In the oven. During baking. the elements
will
turrl 011 and off IO help keep the oven at the temperature
you set. The
Oven Signal Light will turn on and off with the elements.
The top element
helps heat during baking, but does not turn red.
\
Fifth--LZ;:hc,n
the baklny IS done. turn both the OL.~JII Temperature
and Oven Selector
Knobs tcj “OFF ”
NOTE:
Du riot lock the oven door durlny
baklny
Ii LOU do VOLI
may not be able to unlock It until the oven has cooled
Broiling:
(Note-The
door must be partly
open while broiling.)
First-Follow
the directlons
on page 5 for placing the meat at the
right distance
from the Broil Element
Second-Turn
the Oven Selector
to “BROIL
Third--Turn
the Oven Temperature
Control
Knob to ‘BROIL”
or
turn It to a lower temperature
(see “Variable
Broil Featurtl.”
on paytj 5 1
Fourth-Put
the broiler pan on the oven rack
Fifth-Opel)
the oven door about four inches (10 cm). There is a
stop III the hirlges tr~z hold it there. The door must be part/y open hi/e
broiilng.
The Oven SIgnal Light will glow while the broil element
is on
Sixth-When you are through.
turn both the Oven Temperature
Control
and the O~rcn Selector
Knobs to “OFF”
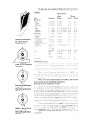
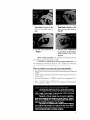
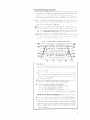
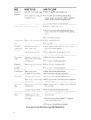
The following
sitions for different
to BROIL
chart
suggests
broiling
times and oven-rack
kinds of meats when the Oven Selector
Knob
Food
ALWAYS broil with the
door open about 4
inches (10 cm).
Beef Steaks
Rare
Medium
Well done
Beef Steaks
Rare
Medium
Well done
Hamburgers
Lamb Chops
Medium
Ham slice. precooked
or tendered
Canadian Bacon
Pork Rib or Loon Chop
Well done
Chlcken
Fish
l.lver
Frankfurters
/
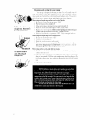
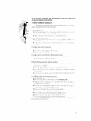
Loosen the locking
I
screw; NOTICE position
of notches.
Lower: move black part
toward “LO.”
One notch equals about
10 F (5 C).
Higher:
move black
part toward “HI.”
One notch equals about
lo’-F (5-C).
Variable
Broil
Feature:
Description
Inches (cm)
top of food
to Broil
Element
1” (2 5 cm)
1” (2 5 cm)
l”(25cm)
3” (Hcml
3” (8 cm)
3” (8 cm)
1’~” I4 cm)
1’2” i4cm)
1’2” l4cm)
‘2” t 1 cm)
4”-5”
4”-5”
4”-5”
3” (8
1 (25cmi
‘2 ~1
(1-L 5 cm)
‘2 ilcmi
‘4’Yl’
(2-2 5 cm)
2-3 lb
(l-1 5 kg)
cut In half
whole
illlets
’ 2” ‘a’
Il-2cm)
3”
po-
is set
from
Approximate
Minutes
2nd side
1st side
i-9
%ll
11-13
/ 10- 13 cm) 13. 15
j 10~13 cm) 17-19
(10-l? cm1 1’1-21
cmi
6-X
(8 cmi
~3”(8 cm)
?” (X cm)
3-s
4-i
57
6-X
x-10
14-16
4-5
b s
4-5
6X
b
4-5
4
4&S’ j 10-13 cm1 1,s
10
7”-9” 118-2’3
~ cm) 25 :%I
13”(H cm)
11 16
7-x
Ii” (8 cm)
10-12
‘2-14
5-7
3” (8 cml
4”-5” t lo- 13 cm)
.i
h-7
3
4-‘,
Settins
the
clock
to the
correct
turn
it clockwise
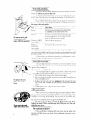
Push
show
2
The Minute Timer dial till turn as you set the clock. When clock is set,
let the knob pop out. Then, while It is out. turn the Minute Timer hand
counter-clockwise
to “OFF”
If you push in on the knob
when
setting
the Minute
Timer, you will change
the setting
of the clock.
the
Minute
and
of dav
1
Using
in the Minute
Timer Knob
the correct trme of day.
time
until
the digits
Timer
Without
pushing
it in, turn the knob until the minutes
you want
to time show in the window.
When the time you set is up, a buzzer till
sound
Turn the dial to “OFF”
to stop the buzzer.
The Minute
Timer does not start or stop cooking
It only buzzes
when the time you set is up It can be used to time almost any cooking
operatron
It can even remind
you of other things
(like when to add
softener
to the washer)
For the most accurate
timtng.
turn the knob past the time you
want. Then turn it back to the settrng. Do not push in on the knob while
settrng the Minute
Timer
Pushing
in the knob while turning
will change
the settrng on the clock
Using
the
automatic
MEALTIMER
clock
Wrth thr Autcjmatrc- MEALTIMER’
Clock. it’s easy <Just before c’ou
:~~~I~xJ1~11~out~appo~l~tm~~nt.
put the roast 111the oven. set the start trrne for
L’ 00 and tht> stop tlmtl for 6 00 (four hours]
Set the Oven Selector
to
TIMtl)
and set the O~VI~ Temperature
Control
Knob for the tempera
!urtl vou want Then ItlaL,tJ The oven ~‘111start at 2 00. bake for four hours
<It th<, selected temperature
and shut off at 6 00
I ,711,
To start and stop your oven automatically:
1. Put racks
them
and
oven.
where
place
you want
food in the
2. Be sure the clock
is set to the
right time of day. (The start
and stop time hands will also
show the correct
time.)
3.
5.
turn the Start
clockwise
to the
want
the oven to
4.
Oven
6.
Push
in and
Time
Knob
time
start.
you
Set the
“TIMED.”
Selector
to
Push
in
Time
Knob
time
shut
you
off.
turn the Stop
clockwise
to the
want
the oven to
and
Turn the Oven
Temperature
Control
Knob to the temperature you want to use to cook
the food.
When cooking
is finished,
turn both the Oven Selector
and the
Temperature
Control
Knobs to “OFF ”
If you want to stop the pven before it stops automatically,
turn
the Temperature
and Selector
Knobs to “OFF“
Remove
food from the
oven You don’t have to do anything
with the Stop Time Knob
Oven
When you want the oven to start now, but stop automatically:
1. Put racks where you want them and place the food in the oven.
2. Be sure the clock and the start and stop time hands show the right time
of day.
3 Push In and turn the Stop Time Knob to the time you want the oven to
stop cooking.
4 Turn the Oven Selector. to “TIMED”
and the Oven Temperature
Control to the temperature
setting you want
5. When cooking
IS fimshed.
turn the Oven Selector
and Temperature
Control
Knobs to “OFF”
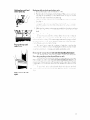
Oven
rack
positions
Your oven has two racks. Always
put the racks where you want
to be before you turn on the oven.
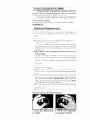
To remove
a rack. take hold of it on the front edge and pull it out
until it stops Then lift up the front edge and pull again It will slide past the
stops. out of the guides and out oi the oven
To put it back. fit the back corners
into the guides at each side of
the oven and slide it in. keeping
the front tilted up until the rack passes
the stops in the rack guides.
them
To remove rack, pull
forward until rack
stops, lift front and pull.
For:
Place
Rack:
Baking
On the second rack guide
or so food is in the center
Broiling
So food is about the distance
from the broil
1r1 the
broiling
trmetable
element
suggested
under “Using the Oven Controls
”
Roasting
LARGE
cuts of meat
On the bottom
Roasting
SMALLER
cuts of meat
So food
from the bottom
of the oven.
rack guides
IS in the centt’r
of the oven
When baking,
always
leave at least 1’2 to 2 inches
(4-5 cm) of
air space between
the sides of a pan and other pans and the oven wall
for air circulation.
For best results. yet additional
information
on placing pans. cookie
sheets and other utensils from the “Cooking
Guide ”
Using
@$@j$\
To replace
the oven
light, remove
glass
cover.
light
To turn
Push it
To replace
the oven light bulb:
The oven light bulb has a glass cover which IS held on by a wire
holder
This cover must be in place when the oven is being used
1 Turn off the electric power at the main power supply
2 Pull out on the wire holder and move it to one side This WIII let you
remove
the glass cover
3 Replace the bulb with a 40-watt
appliance
bulb (designed
to stand
up to oven heat) available
at most grocery.
variety
and hardware
stores
4 Replace glass cover
Snap the wire holder in place
oven
vent
There is an oven vent under the right rear surface element
When
the oven is on. heated air will escape through
it. A vent is needed
for air
circulation
in the oven during baking.
You can cook on this surface unit
while the oven is on. A warm pan of food WIII stay warm on this unit while
the oven is on. It may be warm enough to melt butter, too.
Do not try to save heat or energy
by blocking
the vent. Poor
baking
can result.
Plastic
utensils
may melt if they are over the vent
while the oven is on.
The
x
oven
The oven light will come on urhen the oven door IS opened
on the light without
opening
the door. push the oven light switch
again to turn the light off
The
Oven vents through
right rear surface unit.
the
optional
rotisserie
If you would like a rotisserie
with your oven,
(Part No 261881)
from your dealer. Easy installation
with the kit.
you can order a kit
instructions
come
Accessory
canning
kit
(Part
No. 242905)
The large diameter
of most water-bath
or pressure
canners
combined with high heat settings for long periods
of time can shorten
the life
of regular surface units and cause damage to the cooktop.
If you plan to use the cooktop
for canning.
we recommend
the
installation
of a Canning
Kit. Order the kit from your Whirlpool
Dealer or
Tech-Care
Service
Company.
SEE THE “COOKING
INFORMATION.
Using
the
GUIDE”
Self-Cleaning
FOR
oven
IMPORTANT
CANNING
cycle
The Self-Cleaning
Oven uses high heat that actually
burns away
oven soil For best results and safety. read this sectlon carefully
Make sure
vou understand
how evrrythlng
-works
before
you set your oven to
“CLEAN
”
Things
to do before you start:
l Some
areas may not be cleaned ciurlng the Self-Cleaning
cycle
-~The frame around
the oven opening.
-The
door. especially
the part around
the outside of the oven seal
SolI on these areas will be more difficult
to remove
after the SelfCleaning
cycle Use hot water and detergent
or a soapy steel-wool
pad Rinse uselI
l Do not move
or bend the fiberglass
oven door seal. Do not try to
clean it by hand.
l The
high heat during the cleaning
cycle WIII discolor
the racks and
take the shine off them if they are left In the oven during the SelfCleaning
cycle If you want your oven racks to stay shiny and bright.
take them out before starting
the cleaning
cycle
If you do clean the
racks during the cleaning
cvcle. read the “Special
Tips” at the end of
this sectlon
l
l
Don’t leave any pots
be able to stand the
Wipe up spillovrrs.
bottom of the oven
or pans In the oven during cleaning
They u’on‘t
high heat
bollovers
and grease that hasn‘t baked onto the
This ~111 help reduce smoking during the cleaning
CYCk
l
l
l
The porcelain
reflector
bowls may be cleaned
in the oven
Put the
oven racks on the second
and top lack guides
Wipe the reflector
bowls and put tulo reflector
bowls upside down on each rack For best
results. they should not touch each other or the oven walls Chrome
trim rings must not be cleaned
in the oven.
Turn on the vent hood fan or other kitchen vents during the cleaning
cycle
This will help remove
smoke.
odor and heat that are normal
during the cycle
If you have a rotissene.
be sure the motor socket cover is closed
Setting
the controls
1. Set the
to “CLEAN.”
Oven
to the Self-Cleaning
Selector
Knob
cycle:
2. Set
Control
the Oven
Temperature
Knob to “CLEAN.”
0
3. The clock
and dials for start
and stop time should
all have the
right time of day.
5. Lock the oven door by moving
the Lock Lever all the way to the
right. When it is all the way over.
the Clean Light
will come on. If
the Clean Light doesn’t
come on,
the lever
isn’t all the way over
and the cleaning
cycle
won’t
start.
When the clean light comes
on.
the oven starts the cleaning
cycle.
About 20 minutes
later, ihe Lock
Light will come on. It will stay on
during
the cleaning
cycle.
The
door cannot
be unlocked
while
the Lock Light is on.
7.
When
oven has cooled off
wipe out any residue
from the bottom.
the
all the way,
or ashes
10
4. Push
in on the Stop
Time
Knob and set it ahead
as many
hours as you want for the cleaning cycle.
For a lightly
soiled
oven, two hours
ahead
may be
enough.
For heavy
soil,
three
hours ahead may be about right.
If some soil does not get removed
during
the cleaning
cycle,
see
“Special
Tips”
later
in this
section.
6. The oven will shut off when
the preset
stop time is reached,
but the oven door will stay locked
until the oven has cooled.
When
the Lock Light turns off, turn the
Oven
Selector
and Owen Temperature
Control
Knobs
to
“OFF.”
Now moue the Lock Lever back to the left. This turns off
the
the Clean Light. Do notjorce
Lock Leoet-. If it doesn’t
want to
moue easily, wait until it does.
With the Lock Lever all the way
to the left, the oven door can be
opened.
11
Cleaning
and
caring
for your
range
‘r’our range 1s desqned
to be easy to clean \r’ou ~~11 usually wipe off
‘spills and spatters
when they happen,
but you UIII sometimes
want to
clean under and behrnd the control
knobs and surface units This sectton
iv111tell you hoi< to remote
those. and U. hat to use i;c hen cleaning
Pull knob and trim ring
straight out. Remember
how the spring goes.
Removing
and replacing
surface
unit control
knobs:
1 Be sure the control
knobs are set to “OFF“
2 Pull the black knobs straight off
13 If the control
has a chrome trim ring. pull it straight off.
1 Was/r the krnobs land tnm rings) 111ivarm. sudsy water
? Replace t tit> tnm rings first If the control
spring was removed.
it back exactlv
as shown on the left..
small end first.
17 Hold the black knob so it points to “OFF“
Push It straght
back
put
on
Hemoving
and replacing
oven control
knobs:
i Be sure the knobs are set to “OFF ”
L Pull cacti kriob straight off
i 1L’ash the knobs rn warm. sudsy ilater
1 The knobs art’ not rnterchangeable
Make sure vou 11ur ttltz adjustable Oven Temperature
Control
Knob on the right place’. and the
nonadjustable
Oven Selector
Knob on the other
Removing
surface
units and reflector
bowls:
1 Ftrst. be sure the Surface
Unit Controls
are all Oi-f-.
and
rhat
t/l*
surface unrts are cool
2. Lift each surface unit about an inch (2.5 cm) at the edge away from the
plug-irr
(receptacle).
Pull the unit straight
away from the plug-tn.
Do
not wash surjace units;
they will burn themselves
clean during normal
To remove surface
unit, lift and pull
straight out.
/I
/,
LI se
j
12
L.Ift
rout
tht,
:i~fle3Zcx
bo~4li
they will go
level
Prop up the top with
support rod.
Pull to stop. Lift: pull
again.
The surface
u;,lt sh&ld
fit into
the reflect&
bowl
and be
PART
WHAT
Outside of
appliance
Soft cloth.
HOW
TO USE
warm
soapy
water
l
Wipe
pad
l
Do not allow food containing
acids (such as
Lslnegar. tomato,
lemon Juice or milk) to remain
surface
Acids will remove
the glossy finish
Nylon or plastic >ccIunny
fcr stubbc lrli spots
Surface
un1t.i
Control
knobs
and chrome
rlms
Chrome
nnys
tnm
Warm,
trust1
TO CLEAN
sr~tisv \cate>r and br!stleJ
Automat!,ils~liC.d~tht~r 0:
warm. so,lpy iiatczt i)r plastic
scrubbing
pc1c!
off regularly
when
range
or harsh
is cool
l
Do not use abrasive
l
Spatters
l
Lt’~pt~ off excessive
>llrface unit IS cold
( h’ll
spills with damp cloth when
Do not place tn Self-Cleaning
l
110 1101 Immerse
water
l
l&h.
l
I)( I riot soak
l
WI~V out excess spills Wash with
utenlls
for routine
cleaning
other
l
Place
dunliy
tn oven
l
Waste [LIth other
l
111J II< it place
l
Wa,t:
l
11~I II{
or spills will burn
rlnsti
in
cleansers
off
and dry well
down
Self-Cleaning
on oven racks
Oven cycle
topside
with
cooking
in Self-Cleaning
othedr cooklng
Oven.
utensils
Warn-i. ~~‘,IIx. :~<\t(ll or soapy
stet’l LL’O(J1[J,Kl~
Control
Warm, soapy water
Commerc,lal
glass cleaner
l
l
Wash.
Follow
rinse and dry with soft cloth.
directions
provided
with cleaner
Si~lf~cl~ar~lny
l
I_~‘nvt’
111
Warm. s0-lj-r~ LLllttJr or soap4
steel wooi pad5
l
Wash rinse and dry
stubborn
areas
Warm. soapy LL(3trr or pldst~c
scrubblny
pad
l
Make certain oven
with ioft cloth
l
Follow
panel
Ovt~n racks
Oven
glass
door
Commerc
Self-Cleanrng
Oven
t )iX'!'
~zll y&s
cyck
I leaner
For areas outside SelfCleaning
area LISA u’arm.
soapy water or soapy steel
wool pads
-
.-~___--~-
.~
111Self-Cleaning
oven
during
dIrectIons
* Clean before using
burn-on
of soil
Oven
Self-Cleaning
Use soapy
is cool
provided
Wash.
with
steel wool
l
Do not use commercial
Self-Cleaning
oven
cleaner
9
cleaners.
Oven.
pads for
rinse and dry well
cycle
Follou dlrectlons
given on page
Self-Cleaning
Oven Cycle ”
of your
cycle
Self-Cleaning
l
Do not use foil to line the bottom
14
place
cooklng
utensils
Aluminum
broiler pan
and grid
)I
on
to prevent
“Using
the
IF YOU NEED SERVICE OR ASSISTANCE,
FOLLOW THESE FOUR STEPS:
WE SUGGEST
YOU
2. If you need assistance*.
Call the Whirlpool
number.
Dial
free
COOL-LINE”
service
Continenta:
U.S.
Michigan
Alaska & Hawaii
...
..
.
.. .
.
.
alid talk with one of o11r tralned Consultants
yc>u In how to obtain
satisfactory
operation
st’rvlce
IS necessary.
recommend
a qualified
ilrt’a
3.
assistance
telephone
from:
(800)
(800)
(800)
253-1301
632-2243
253-1121
The Consultant
can Instruct
from your appliance
or. if
service
company
in your
If you need service*.
WhIrlpool
has a natIonwIde
network
of franchised
TECH-CARE
”
IC;IVIC~ companlus
TECH-CARE
service technicians
are trained
to fulfill
the product
warranty
and provide
after-warranty
service, anywhere
in the
linited
States
Tc, locate
TECH-CARE
service
In your area, call our
COOL-LI%E
stlrvlce ahslstance
telephone
number
(see Step 2) or look In
Lour telephone
dirrctorv
\r’ellow Pages under
APPLIANCES-HOIJSEHOLD~
MAJOR-SERVICE
B REPAIR
ELECTRlCALAPPLlANCESMAJOR-REPAIRING
8 PARTS
WASHING
MACHINES
8 IRONERS-SERVICING
DRYERS
4. If you have a problem*.
Call (our COOL -LlNt
service
assistance
telephone
number
(see
Stt,p 2) arid talh 1c1t11~:IIQ of our Consultants.
OI if you prefer. write to
It LJOLI muit call ot write. please provide
model number,
serial number,
date of purchase
and a complete
description
of the problem.
This Information IS needed III order to better respond
to your request for assistance