1
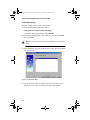
ATA RAID 1200A IUG.book Page i Wednesday, November 13, 2002 2:22 PM
Adaptec ATA RAID 1200A
Installation and User’s Guide
R
ATA RAID 1200A IUG.book Page ii Wednesday, November 13, 2002 2:22 PM
Copyright
© 2001-2002 Adaptec, Inc. All rights reserved. No part of this publication may be
reproduced, stored in a retrieval system, or transmitted in any form or by any
means, electronic, mechanical, photocopying, recording or otherwise, without the
prior written consent of Adaptec, Inc., 691 South Milpitas Blvd., Milpitas, CA 95035.
Trademarks
Adaptec, the Adaptec logo, and Adaptec ATA RAID Management Software are
trademarks of Adaptec, Inc., which may be registered in some jurisdictions.
Windows 95, Windows 98, Windows NT, Windows 2000, Windows Me, and
Windows XP are trademarks of Microsoft Corporation in the US and other
countries, used under license.
All other trademarks are the property of their respective owners.
Changes
The material in this document is for information only and is subject to change
without notice. While reasonable efforts have been made in the preparation of this
document to assure its accuracy, Adaptec, Inc. assumes no liability resulting from
errors or omissions in this document, or from the use of the information contained
herein.
Adaptec reserves the right to make changes in the product design without
reservation and without notification to its users.
Disclaimer
IF THIS PRODUCT DIRECTS YOU TO COPY MATERIALS, YOU MUST HAVE
PERMISSION FROM THE COPYRIGHT OWNER OF THE MATERIALS TO
AVOID VIOLATING THE LAW WHICH COULD RESULT IN DAMAGES OR
OTHER REMEDIES.
ii
ATA RAID 1200A IUG.book Page iii Wednesday, November 13, 2002 2:22 PM
Regulatory Compliance Statements
Federal Communications Commission Radio Frequency Interference Statement
WARNING: Changes or modifications to this unit not expressly approved by the party
responsible for compliance could void the user’s authority to operate the equipment.
This equipment has been tested and found to comply with the limits for a Class B digital device,
pursuant to Part 15 of the FCC rules. These limits are designed to provide reasonable protection
against harmful interference in a residential installation. This equipment generates, uses, and
can radiate radio frequency energy, and if not installed and used in accordance with the
instruction manual, may cause harmful interference to radio communications. However, there is
no guarantee that interference will not occur in a particular installation. However, if this
equipment does cause interference to radio or television equipment reception, which can be
determined by turning the equipment off and on, the user is encouraged to try to correct the
interference by one or more of the following measures:
■
Reorient or relocate the receiving antenna.
■
Increase the separation between equipment and receiver.
■
Connect the equipment to an outlet on a circuit different from that to which the receiver is
connected.
■
Consult the dealer or an experienced radio/television technician for help.
■
Use a shielded and properly grounded I/O cable and power cable to ensure compliance of
this unit to the specified limits of the rules.
This device complies with part 15 of the FCC rules. Operation is subject to the following two
conditions: (1) this device may not cause harmful interference and (2) this device must accept
any interference received, including interference that may cause undesired operation.
Adaptec, Inc.
ATA RAID 1200A
Tested to Comply
With FCC Standards
FOR HOME OR OFFICE USE
European Union Compliance Statement
This Information Technology Equipment has been tested and found to comply with
EMC Directive 89/336/EEC, as amended by 92/31/EEC and 93/68/EEC, in
accordance with:
■ EN55022 (1998) Emissions
■ EN55024 (1998) Immunity:
–
–
–
–
–
–
EN61000-4-2 (1998) Electrostatic discharge: ±4 kV contact, ±8 kV air
EN61000-4-3 (1998) Radiated immunity
EN61000-4-4 (1995) Electrical fast transients/burst: ±1 kV AC, ±0.5 kV I/O
EN61000-4-5 (1995) Surges ±1 kV differential mode, ±2 kV common mode
EN61000-4-6 (1996) Conducted immunity: 3 V
EN61000-4-11 (1994) Supply dips and variation: 30% and 100%
In addition, all equipment requiring U.L. listing has been found to comply with EMC
Directive 73/23/EEC as amended by 93/68/EEC in accordance with EN60950 with
amendments A1, A2, A3, A4, A11.
iii
ATA RAID 1200A IUG.book Page iv Wednesday, November 13, 2002 2:22 PM
Australian/New Zealand Compliance Statement
This device has been tested and found to comply with the limits for a Class B digital
device, pursuant to the Australian/New Zealand standard AS/NZS 3548 set out by
the Spectrum Management Agency.
Canadian Compliance Statement
This Class B digital apparatus meets all requirements of the Canadian InterferenceCausing Equipment Regulations.
Cet appareil numérique de la classe B respecte toutes les exigences du Règlement sur
le matériel brouilleur du Canada.
Japanese Compliance (Voluntary Control Council Initiative)
This equipment complies to class B Information Technology equipment based on
VCCI (Voluntary Control Council for Interface). This equipment is designed for home
use but it may causes radio frequency interference problem if used too near to a
television or radio. Please handle it correctly per this documentation.
iv
ATA RAID 1200A IUG.book Page v Wednesday, November 13, 2002 2:22 PM
Adaptec Customer Support
If you have questions about installing or using your Adaptec product, check this
document first—you will find answers to most of your questions here. If you need
further assistance, use the support options listed below.
Technical Support Identification (TSID) Number
■
Before contacting Technical Support, you need your unique 12-digit TSID
number. The TSID number identifies your product and support status.
■
The TSID number is included on two white, bar-coded labels, like the example
below.
■
If you register by mail, affix one copy of the TSID label to the registration card,
which may be contained on the CD. Also affix a copy of the TSID label to the CD
jacket so that you don’t lose it.
Support Options
■
Search the Adaptec Support Knowledgebase (ASK) at ask.adaptec.com for
articles, troubleshooting tips, and frequently asked questions for your product.
■
For support via Email, submit your question to Adaptec’s Technical Support
Specialists at ask.adaptec.com.
North America
■
Visit our Web site at www.adaptec.com.
■
For information about Adaptec’s support options, call +1 408-957-2550, 24 hours
per day, 7 days per week. To speak with a Technical Support Specialist,
■
For Hardware products call +1 408-934-7274,
Monday to Friday, 3:00 A.M. to 5:00 P.M., Pacific Time.
■
For RAID and Fibre Channel products call +1 321-207-2000
Monday to Friday, 3:00 A.M. to 5:00 P.M., Pacific Time.
To expedite your service, have your computer in front of you.
■
To order Adaptec products, including accessories and cables, call +1 408-957-7274.
Or, you can order cables online at www.adaptec.com/buy-cables.
v
ATA RAID 1200A IUG.book Page vi Wednesday, November 13, 2002 2:22 PM
Europe
■
Visit our Web site at www.adaptec-europe.com.
■
German: To speak with a Technical Support Specialist, call
+49 89 43 66 55 22, Monday to Friday, 9:00 to 17:00, CET. For support via e-mail,
submit your question to Adaptec’s Technical Support Specialists at
ask-de.adaptec.com.
■
French: To speak with a Technical Support Specialist, call
+49 89 43 66 55 33, Monday to Friday, 9:00 to 17:00, CET. For support via e-mail,
submit your question to Adaptec’s Technical Support Specialists at
ask-fr.adaptec.com.
■
English: To speak with a Technical Support Specialist, call
+49 89 43 66 55 44, Monday to Friday, 9:00 to 17:00, GMT. For support via
e-mail, submit your question to Adaptec’s Technical Support Specialists at
ask.adaptec.com.
■
You can order Adaptec cables online at www.adaptec.com/buy-cables.
Australia and New Zealand
■
Visit our Web site at www.adaptec.com.au.
■
To speak with a Technical Support Specialist, call +612 9416 0698,
Monday to Friday, 10:00 A.M. to 4:30 P.M., Eastern Australian Time. To expedite
your service, have your computer in front of you.
Hong Kong and China
■
Visit our Web site at www.adaptec.com.
■
To speak with a Technical Support Specialist, call +852 2869 7200,
Monday to Friday, 10:00 A.M. to 5:00 P.M. To expedite your service, have your
computer in front of you.
■
Fax Technical Support at +852 2869 7100.
Singapore
■
Visit our Web site at www.adaptec.com.
■
To speak with a Technical Support Specialist, call +65 245 7470,
Monday to Friday, 10:00 A.M. to 5:00 P.M. To expedite your service, have your
computer in front of you.
Japan
■
Visit our Web site at www.adaptec.co.jp.
■
To speak with a Technical Support Specialist, call +81 3 5308 6120
Monday–Friday, 9:00 A.M. to 12:00 P.M and 1:00 P.M. to 6:00 P.M.
vi
ATA RAID 1200A IUG.book Page vii Wednesday, November 13, 2002 2:22 PM
Adaptec Software License Agreement
PLEASE READ CAREFULLY: THE USE OF THIS SOFTWARE IS SUBJECT TO THE SOFTWARE
LICENSE TERMS OF ADAPTEC, INC. AND OTHER LICENSORS WHOSE SOFTWARE MAY
BE BUNDLED WITH THIS PRODUCT.
BY YOUR USE OF THE SOFTWARE INCLUDED WITH THIS PRODUCT YOU AGREE TO THE
LICENSE TERMS REQUIRED BY THE LICENSOR OF THAT SOFTWARE, AS SET FORTH
DURING THE INSTALLATION PROCESS. IF YOU DO NOT AGREE TO THE LICENSE
TERMS APPLICABLE TO THE SOFTWARE, YOU MAY RETURN THE ENTIRE UNUSED
PRODUCT FOR A FULL REFUND.
In return for acquiring a license to use the Adaptec software (“Software”) and the related
documentation, you agree to the following terms and conditions:
1.
License. This Agreement grants you, the Licensee, a license to:
a. Use the Software on a single computer system or on multiple workstations, systems and
servers which incorporate an Adaptec RAID controller and may be accessed by multiple
users from multiple locations. You may make as many installations of the Software as
needed, but must restrict such installation only to systems, workstations or servers
using an Adaptec RAID controller.
b. Make one copy of the Software in machine readable form solely for back-up purposes
provided you reproduce Adaptec’s copyright notice and any proprietary legends.
2.
Restrictions. You may not distribute copies of the Software to others. You may not post or
otherwise make available the Software, or any portion thereof, in any form, on the Internet.
You may not use the Software in a computer service business, including in time sharing
applications. The Software contains trade secrets and, in order to protect them, you may not
decompile, reverse engineer, disassemble, or otherwise reduce the Software to a humanperceivable form. YOU MAY NOT MODIFY, ADAPT, TRANSLATE, RENT, LEASE, LOAN,
RESELL FOR PROFIT, DISTRIBUTE, NETWORK OR CREATE DERIVATIVE WORKS
BASED UPON THE SOFTWARE OR ANY PART THEREOF.
3.
Ownership of Software. As Licensee, you own the media upon which the software is
recorded or fixed, but Adaptec and its licensors retain title and ownership of the Software
recorded on the original media and all subsequent copies of the Software, regardless of the
form or media in which or on which the original and other copies may exist. This license is
not a sale of the Software or any copy.
4.
Confidentiality. You agree to maintain the Software in confidence and that you will not
disclose the Software to any third party without the express written consent of Adaptec. You
further agree to take all reasonable precautions to preclude access of unauthorized persons
to the Software.
5.
Term. This license is effective until January 1, 2045, unless terminated earlier. You may
terminate the license at any time by destroying the Software (including the related
documentation) together with all copies or modifications in any form. Adaptec will have the
right to terminate our license immediately if you fail to comply with any term or condition
of this Agreement. Upon any termination, including termination by you, you must destroy
the Software (including the related documentation), together with all copies or
modifications in any form.
6.
Special Terms Applicable to Databases. Where a database is included with the Software, you
acknowledge that it is licensed only in connection with the use of the Software to perform
disc creation, and that the database and all data derived therefrom must be maintained in
confidence in accordance with the provisions of Section 4. This license does not grant you
any rights to distribute or disclose such database or data.
7.
Limited Warranty. Adaptec and its Licensor warrant only that the media upon which the
Software is furnished will be free from defects in material or workmanship under normal
use and service for a period of thirty (30) days from the date of delivery to you. ADAPTEC
AND ITS LICENSORS DO NOT AND CANNOT WARRANT THE PERFORMANCE OR
RESULTS YOU MAY OBTAIN BY USING THE SOFTWARE OR DOCUMENTATION. THE
FOREGOING STATES THE SOLE AND EXCLUSIVE REMEDIES ADAPTEC AND ITS
LICENSORS WILL PROVIDE FOR BREACH OF WARRANTY. EXCEPT FOR THE
FOREGOING LIMITED WARRANTY, ADAPTEC AND ITS LICENSORS MAKE NO
WARRANTIES, EXPRESSED OR IMPLIED, INCLUDING, BUT NOT LIMITED, AS TO
vii
ATA RAID 1200A IUG.book Page viii Wednesday, November 13, 2002 2:22 PM
NON-INFRINGEMENT OF THIRD PARTY RIGHTS, MERCHANTABILITY OR FITNESS
FOR A PARTICULAR PURPOSE. Some states do not allow the exclusion of implied
warranties or limitations on how long an implied warranty may last, so the above
limitations may not apply to you. This warranty gives you specific legal rights and you may
also have other rights which vary from state to state.
8. The entire liability of Adaptec and its licensors, and your exclusive remedy for a breach of
this warranty, shall be:
a. The replacement of any media not meeting the above limited warranty which is
returned to Adaptec; or:
b. If Adaptec or its distributor is unable to deliver replacement media which is free from
defects in materials or workmanship, you may terminate this Agreement by returning
the Software and your money will be refunded.
9. Limitation of Liability. IN NO EVENT WILL ADAPTEC OR ITS LICENSORS BE LIABLE TO
YOU FOR ANY INCIDENTAL, CONSEQUENTIAL OR INDIRECT DAMAGES,
INCLUDING ANY LOST PROFITS, LOST SAVINGS, OR LOSS OF DATA, EVEN IF
ADAPTEC OR A LICENSOR HAS BEEN ADVISED OF THE POSSIBILITY OF SUCH
DAMAGES, OR FOR ANY CLAIM BY ANY OTHER PARTY. Some states do not allow the
exclusion or limitation of special, incidental, or consequential damages, so the above
limitation or exclusion may not apply to you.
10. Export. You acknowledge that the laws and regulations of the United States and other
countries may restrict the export and re-export of the Software. You agree that you will not
export or re-export the Software or documentation in any form in violation of applicable
United States and foreign law.
11. Government Restricted Rights. The Software is subject to restricted rights as follows. If the
Software is acquired under the terms of a GSA contract: use, reproduction or disclosure is
subject to the restrictions set forth in the applicable ADP Schedule contract. If the Software is
acquired under the terms of a DoD or civilian agency contract, use, duplication or disclosure
by the Government is subject to the restrictions of this Agreement in accordance with 48
C.F.R. 12.212 of the Federal Acquisition Regulations and its successors and
49 C.F.R. 227.7202-1 of the DoD FAR Supplement and its successors.
12. General. You acknowledge that you have read this Agreement, understand it, and that by
using the Software you agree to be bound by its terms and conditions. You further agree that
it is the complete and exclusive statement of the agreement between Adaptec and you, and
supersedes any proposal or prior agreement, oral or written, and any other communication
between Adaptec and you relating to the subject matter of this Agreement. No additional or
any different terms will be enforceable against Adaptec unless Adaptec gives its express
consent, including an express waiver of the terms of this Agreement, in writing signed by an
officer of Adaptec. You assume full responsibility for the use of the Software and agree to
use the Software legally and responsibly. This Agreement shall be governed by California
law, except as to copyright matters, which are covered by Federal law. This Agreement is
deemed entered into at Milpitas, California by both parties. Should any provision of this
Agreement be declared unenforceable in any jurisdiction, then such provision shall be
deemed severable from this Agreement and shall not affect the remainder hereof. All rights
in the Software not specifically granted in this Agreement are reserved by Adaptec.
Should you have any questions concerning this Agreement, you may contact Adaptec by
writing to:
Adaptec, Inc.
Legal Department
691 South Milpitas Boulevard
Milpitas, California 95035.
viii
ATA RAID 1200A IUG.book Page ix Wednesday, November 13, 2002 2:22 PM
Contents
1
Introduction
Overview 1-1
Features 1-1
Contents of Kit 1-2
System Requirements 1-3
Operating Systems 1-3
ATA/100 Compatibility Requirements
Bootable Controller 1-4
Installation Overview 1-5
Defining RAID 1-5
Supported RAID Levels 1-5
RAID Performance Hints 1-6
2
1-4
Installing the Hardware
Adaptec ATA RAID 1200A Card Layout 2-2
Installing the Adaptec ATA RAID 1200A Card 2-2
Connecting the LED Activity Indicator (Optional) 2-4
Setting up ATA Hard Disk Drives 2-5
Setting Jumpers on ATA Disk Drives 2-5
Mounting ATA Drives and Connecting Power Cables 2-6
Connecting Your Hard Disk Drives 2-6
Connecting ATA Disk Drives to the Adaptec ATA RAID
1200A Card 2-7
Set Mainboard CMOS Setup 2-10
ix
ATA RAID 1200A IUG.book Page x Wednesday, November 13, 2002 2:22 PM
Adaptec ATA RAID 1200A Installation and User’s Guide
3
Using the BIOS Array Configuration Utility
Introduction 3-1
Create Array 3-2
Array Mode 3-3
Array Name 3-4
Select Disk Drives 3-4
Block Size 3-4
Start Creation Process 3-5
Start Creation With RAID 1
Create only 3-5
Create and duplicate 3-6
Delete Array 3-6
Create/Delete Spare 3-6
Select Boot Disk 3-7
4
3-5
Installing the Device Driver
Installing the Device Driver for Windows 98 4-2
Installing the Driver When Installing Windows 98 4-2
Installing the Driver When Windows 98 is Already
Installed 4-3
Installing the Device Driver for Windows Me 4-4
Installing the Driver When Installing Windows Me 4-4
Installing the Driver When Windows Me is Already
Installed 4-5
Installing the Device Driver for Windows 2000 4-5
Installing the Driver When Installing Windows 2000 4-5
Installing the Driver When Windows 2000 is Already
Installed 4-6
Installing the Device Driver for Windows NT 4.0 4-7
Installing the Driver When Installing Windows NT
4.0 4-7
Installing the Driver When Windows NT 4.0 is Already
Installed 4-8
Installing the Device Driver for Windows XP 4-9
Installing the Driver When Installing Windows XP 4-9
Installing the Driver When Windows XP is Already
Installed 4-10
x
ATA RAID 1200A IUG.book Page xi Wednesday, November 13, 2002 2:22 PM
Contents
5
Using the Adaptec ATA RAID Management
Software
Installing the Adaptec ATA RAID Management
Software 5-2
Using the Adaptec ATA RAID Management Software 5-3
Viewing the Array 5-4
Viewing the Controller 5-6
Viewing the Channel 5-6
Create Arrays 5-7
Create RAID 0 (Striping) 5-8
Create RAID 1 (Mirroring) 5-9
Create RAID 0/1 (Mirrored Striping) 5-11
Create JBOD (Volume) Array 5-12
View the Event Log 5-12
Delete Arrays 5-13
Rename Arrays 5-14
Monitoring Arrays 5-14
Rescan 5-14
Duplicate 5-15
Add Disk to Array 5-15
A
Troubleshooting
General Troubleshooting Procedures
Frequently Asked Questions A-2
A-1
Index
xi
ATA RAID 1200A IUG.book Page 1 Wednesday, November 13, 2002 2:22 PM
1
Introduction
In this Chapter
Overview
1-1
Contents of Kit
1-2
System Requirements
1-3
ATA/100 Compatibility Requirements
1-4
Installation Overview
1-5
Defining RAID
1-5
Overview
The Adaptec ATA RAID 1200A card provides data protection and
increased performance with enhanced ATA technology. The
Adaptec ATA RAID 1200A supports ATA/100 hard drives with
data transfer rates up to 100 MB/sec providing maximum disk
performance in systems that have a PCI (Peripheral Component
Interconnect) bus.
Features
The Adaptec ATA RAID 1200A is a low profile small form factor
card that provides two channels with 256 bytes of FIFO per
channel. Each channel uses an internal ATA connector that
supports two ATA hard drives in a master/slave configuration.
The controller supports up to four ATA hard drives in RAID 0,
RAID 1, and RAID 0/1, and JBOD modes.
1-1
ATA RAID 1200A IUG.book Page 2 Wednesday, November 13, 2002 2:22 PM
Adaptec ATA RAID 1200A Installation and User’s Guide
The Adaptec ATA RAID 1200A utilizes Plug-and-Play technology
and installs into a standard PCI slot and supports a 32-bit and 33
MHz PCI bus.
Note: The Adaptec ATA RAID 1200A supports ATA hard
disk drives only and is backward compatible with all
ATA/66 systems. ATA/33 hard disk drives are not
supported. Throughout the industry these devices are also
referred to as ATA, EIDE, IDE, or UltraDMA.
This Installation and User’s Guide explains how to install the
Adaptec ATA RAID 1200A card, connect ATA hard disk drives to
it, run the BIOS Array Configuration Utility to create the first array
for bootable array configuration, and then install the software
device drivers for your operating system.
Use the Adaptec ATA RAID Management Software™, which is
included with the Adaptec ATA RAID 1200A, to create and
manage arrays, and provide proper levels of fault tolerance and
event notification. See Chapter 5 for information on installing and
using the software.
Contents of Kit
■
Adaptec ATA RAID 1200A card
■
Two 40-pin, 80-wire ATA/100 cables
■
CD containing Adaptec ATA RAID 1200A device drivers,
Adaptec ATA RAID Management Software, online copy of the
Adaptec ATA RAID 1200A Installation and User’s Guide, and
Readme file
■
Floppy disk containing Windows software device drivers
■
Printed copy of the Adaptec ATA RAID 1200A Installation and
User’s Guide
1-2
ATA RAID 1200A IUG.book Page 3 Wednesday, November 13, 2002 2:22 PM
Introduction
System Requirements
The minimum system requirements for the Adaptec ATA RAID
1200A are:
■
A Pentium II, 266 MHz Processor or higher system that is
PCI 2.2 or previous version compliant
■
An available, unobstructed 5V PCI slot that supports Bus
Mastering
■
A minimum of one ATA drive
■
CD-ROM or DVD-ROM drive
■
Floppy disk drive
■
64 MB or more of system memory
■
5 MB of free hard disk space for the Adaptec ATA RAID
Management Software
Operating Systems
The Adaptec ATA RAID 1200A supports these operating systems:
■
Microsoft Windows® 98 (and Windows 98 Second Edition)
■
Microsoft Windows® Millenium Edition (Me)
■
Microsoft Windows® 2000 Professional and Server
■
Microsoft Windows NT® 4.0
■
Microsoft Windows XP®
1-3
ATA RAID 1200A IUG.book Page 4 Wednesday, November 13, 2002 2:22 PM
Adaptec ATA RAID 1200A Installation and User’s Guide
ATA/100 Compatibility Requirements
The ATA/100 standard is backwards compatible with all ATA/66
systems. When used with ATA/66 systems, the Adaptec ATA
RAID 1200A card is limited to the transfer speeds of the ATA/66
system.
Warning: Do not install more than one Adaptec ATA RAID
1200A card in your system.
Note: The Adaptec ATA RAID 1200A supports only hard
disk drives. Do not connect any ATAPI devices (CD-ROM,
LS-120, MO, or removable media drives) to the Adaptec
ATA RAID 1200A controller.
To achieve the ATA/100 transfer speeds, you must ensure that:
■
The drives are ATA/100 hard drives.
■
The cable must be 80-conductor, ATA/100 cables and the
length should not exceed 18 inches (45 cm). ATA/100 cables are
supplied with the Adaptec ATA RAID 1200A controller kit.
■
The operating system is one of the following and supports
Direct Memory Access (DMA): Windows 98, Windows Me,
Microsoft Windows 2000, Windows NT, and Windows XP.
Bootable Controller
If you are using the Adaptec ATA RAID 1200A card with a SCSI
card in the system and want to make the Adaptec ATA RAID
1200A card bootable, confirm in the system CMOS that this option
is available. Refer to your system’s documentation for more
information.
1-4
ATA RAID 1200A IUG.book Page 5 Wednesday, November 13, 2002 2:22 PM
Introduction
Installation Overview
To Install the Adaptec ATA RAID 1200A hardware and software,
follow these steps:
1 Install the Adaptec ATA RAID 1200A card in your system (see
Chapter 2).
2 Connect ATA drives to the Adaptec ATA RAID 1200A card (see
Chapter 2).
3 Create the first bootable array using the BIOS Array
Configuration Utility (see Chapter 3).
4 Install the appropriate software driver for your operating
system (see Chapter 4).
5 Install the Adaptec ATA RAID Management Software on your
system (see Chapter 5).
Defining RAID
RAID (Redundant Array of Independent Disks) offers outstanding
data availability, excellent performance, and high capacity. A
RAID is defined as:
■
Unified array—Two or more hard drives are grouped to appear
as one single device to the host system while operating
independently of one another.
■
Fault-tolerant redundancy—If one drive fails no data is lost.
(RAID 0 is an exception to this definition because RAID 0 is not
fault tolerant. See Supported RAID Levels.)
Supported RAID Levels
The Adaptec ATA RAID 1200A card includes a BIOS Array
Configuration Utility for boosting disk performance and data
protection. The BIOS Array Configuration Utility supports the
following RAID levels:
■
RAID 0, Striping—Two or more drives that can read and write
data in parallel. Offers higher performance than a single drive,
but no fault tolerance. RAID 0 arrays do not store redundant
data; if any disk in the array fails, all data is lost.
1-5
ATA RAID 1200A IUG.book Page 6 Wednesday, November 13, 2002 2:22 PM
Adaptec ATA RAID 1200A Installation and User’s Guide
■
RAID 1, Mirroring—Data is mirrored on one pair of disks
providing 100 percent redundancy. Offers complete fault
tolerance. If one disk fails, data is still available. Increases read
performance through striping, but write performance is
unaffected. Adaptec recommends using the same size disks, but
if you use a disk with less disk space, the actual data capacity of
the array equals the smaller capacity disk.
■
RAID 0/1, Mirrored Striping—Increases both read and write
performance. Data is striped and mirrored on two or more pairs
of disks. Offers complete fault tolerance. If one disk in a pair
fails, data is still available. The actual data capacity of the array
equals the available disk space of the smaller RAID 0 array.
■
JBOD, Volume—Subsystem of disk drives. Allows you to
combine disk drives into larger logical volumes. Two or more
hard disk drives of unequal size can be grouped to appear as
one single device to the host system. Doesn’t provide fault
tolerance. Adaptec recommends using the same size disks, but
if you use a disk with less disk space, you can combine the disks
into a single unit without loss of any capacity.
RAID Performance Hints
The following suggestions provide the best performance and
reliability:
■
Use ATA 66/100 hard disks.
■
Use the same model hard disk drive throughout the system.
Different models exhibit different timing characteristics, which
might decrease overall RAID performance.
■
If you have only two hard disk drives, connect each on a
different channel as a master drive.
■
If you are using mirrored pairs, group each pair on a separate
connector.
■
Always use 80-conductor cables.
1-6
ATA RAID 1200A IUG.book Page 1 Wednesday, November 13, 2002 2:22 PM
2
Installing the Hardware
In this Chapter
Adaptec ATA RAID 1200A Card Layout
2-2
Installing the Adaptec ATA RAID 1200A Card
2-2
Connecting the LED Activity Indicator (Optional)
2-4
Setting up ATA Hard Disk Drives
2-5
Mounting ATA Drives and Connecting Power Cables 2-6
Connecting Your Hard Disk Drives
2-6
Set Mainboard CMOS Setup
2-10
This chapter explains how to install the Adaptec ATA RAID 1200A
card and connect ATA hard drives to it.
Warning: Before handling the Adaptec ATA RAID 1200A card
and any other electronic component, ground yourself by
touching an unpainted metal surface on your computer
chassis.
2-1
ATA RAID 1200A IUG.book Page 2 Wednesday, November 13, 2002 2:22 PM
Adaptec ATA RAID 1200A Installation and User’s Guide
Adaptec ATA RAID 1200A Card Layout
Figure 2-1 identifies the major components on the Adaptec ATA
RAID 1200A card. You might find it helpful to refer to this figure
while installing the Adaptec ATA RAID 1200A and attaching ATA
disk drives to it.
IDE2 Controller
IDE1 Controller
LED
Connector
PCI Bus Contacts
Figure 2-1 Adaptec ATA RAID 1200A Card
Installing the Adaptec ATA RAID 1200A Card
To install your Adaptec ATA RAID 1200A card, follow these steps:
Note: If you are installing the Adaptec ATA RAID 1200A
card into an existing system, back up all data before
continuing this installation.
1 Turn OFF power to the computer and disconnect the power
cord.
2 Remove the cover from the computer case.
3 Locate an unused, unobstructed, PCI expansion slot and
remove the expansion slot cover. (The expansion slot must be
5V, PCI 2.2 or previous version compliant, and must support
PCI Bus Mastering.) Save the slot cover screw for use in Step 4.
2-2
ATA RAID 1200A IUG.book Page 3 Wednesday, November 13, 2002 2:22 PM
Installing the Hardware
4 Insert the Adaptec ATA RAID 1200A card in the PCI expansion
slot; press down firmly until it clicks into place, then replace the
slot cover screw as shown in Figure 2-2.
Note: f you are using this Adaptec ATA RAID 1200A card
with a SCSI controller in the same system and you want to
make the ATA card bootable, install it at the lowest BIOS
address. Check your system documentation to determine
which slot is at the lowest address. (Usually it is PCI slot 1 at
the top for motherboards without AGP slot, and PCI slot 2,
second next to the AGP slot, for motherboards with AGP
slot.
Figure 2-2 Installing the Adaptec ATA RAID 1200A in a PCI Expansion
Slot
2-3
ATA RAID 1200A IUG.book Page 4 Wednesday, November 13, 2002 2:22 PM
Adaptec ATA RAID 1200A Installation and User’s Guide
Connecting the LED Activity Indicator
(Optional)
An LED on the front panel of most computers lights to indicate
activity on your hard disks. If you want the LED to light whenever
there is activity on hard disks connected to the Adaptec ATA RAID
1200A card, you must disconnect the LED cable from the
motherboard and connect it to the LED connector on the Adaptec
ATA RAID 1200A as shown in Figure 2-3.
Note: If you connect the LED cable to the Adaptec ATA RAID
1200A card,the LED lights whenever there is activity on
hard disks connected to the Adaptec ATA RAID 1200A card
only. The LED will no longer light whenever there is activity
on hard disks not connected to the Adaptec ATA RAID
1200A card.
Note: When connecting the LED cable to the Adaptec ATA
RAID 1200A card, make sure you connect the red (or
colored) part of the cable to the top portion of the LED
connection (plus), and the black part of the cable to the
bottom portion (minus).
Figure 2-3 Connecting the LED Activity Indicator
2-4
ATA RAID 1200A IUG.book Page 5 Wednesday, November 13, 2002 2:22 PM
Installing the Hardware
Setting up ATA Hard Disk Drives
Setting up ATA drives before connecting them to the Adaptec ATA
RAID 1200A card typically involves setting jumpers, mounting
ATA drives inside your computer, and connecting power cables to
each device.
Since setup can vary from device to device or computer to
computer, always refer to the ATA drive’s or computer’s
documentation for specific instructions. Following are some
guidelines for setting up ATA drives. Additional installation hints
for ATA drives are also provided.
Note: If you refer to the ATA drive’s documentation for
installation instructions, be sure to return to this document
to continue with installation of the software included in your
kit.
Setting Jumpers on ATA Disk Drives
If you are installing two hard disk drives, set up each drive as a
master. This is typically done by changing jumper settings on the
drive. The master setting is the factory default setting on most ATA
drives. Refer to your hard disk drive documentation to determine
the correct jumper setting for master operation.
If you are installing four hard disk drives, set up two drives as
master and the other two as slave. Mark the master and slave drives
so you remember which are which when you are connecting the
cables.
2-5
ATA RAID 1200A IUG.book Page 6 Wednesday, November 13, 2002 2:22 PM
Adaptec ATA RAID 1200A Installation and User’s Guide
Mounting ATA Drives and Connecting Power
Cables
Each ATA drive must be mounted in an available drive bay inside
your computer (as shown in Figure 2-4) and connected to a power
cable from your computer’s power supply. Refer to your computer
and device documentation for instructions on installing devices
inside your computer.
Figure 2-4 ATA Drive Mounted in Drive Bay
Connecting Your Hard Disk Drives
The Adaptec ATA RAID 1200A supports up to four ATA drives in
a master/slave configuration. Before connecting drives to the
Adaptec ATA RAID 1200A, be sure to also review Setting up ATA
Hard Disk Drives on page 2-5.
2-6
ATA RAID 1200A IUG.book Page 7 Wednesday, November 13, 2002 2:22 PM
Installing the Hardware
Connecting ATA Disk Drives to the Adaptec ATA RAID 1200A
Card
Connect all hard disk drives to the Adaptec ATA RAID 1200A card
using the 40-pin ATA/100 cables included in your kit. The
ATA/100 cables have the following color-coded connectors:
■
Blue—Connects to the controller
■
Black—Connects to the master or single drive
■
Gray—Connects to the slave or second drive.
Note: Although the master/slave configuration is
determined by the jumper settings on your hard disk drives,
Adaptec recommends you use this color-coded
configuration for the cable. See Setting Jumpers on ATA Disk
Drives on page 2-5 for more information.
Blue Connector
Gray Connector
Black Connector
Figure 2-5 40-pin ATA/100 Cable
2-7
ATA RAID 1200A IUG.book Page 8 Wednesday, November 13, 2002 2:22 PM
Adaptec ATA RAID 1200A Installation and User’s Guide
To connect ATA drives to the Adaptec ATA RAID 1200A card,
follow these steps:
1 Connect the blue connector of an ATA/100 cable to the channel
1 connector on the controller card as shown in Figure 2-6, being
careful to match pin 1 of the cable to pin 1 of the connector. The
cables and connectors are keyed. If the cable does not slide
easily into the connector, do not force it. Instead, reverse the
cable.
Note: The stripe along the edge of the cable indicates Pin #1.
If the cable does not slide easily into the connector, reverse
the cable.
Figure 2-6 Connecting the Cable to the Channel Connector
2-8
ATA RAID 1200A IUG.book Page 9 Wednesday, November 13, 2002 2:22 PM
Installing the Hardware
2 Connect the black connector of the ATA/100 cable to a master
drive. If you have not already set up your drives, refer to Setting
up ATA Hard Disk Drives on page 2-5 before continuing.
Figure 2-7 Connecting an ATA Drive
3 If you are connecting only two hard disk drives, connect the
blue connector of the second ATA/100 cable to the channel 2
connector on the controller card, just as you did in Step 1. Now
that you have finished connecting both drives, your hardware
installation is complete; do not continue to the next step.
Figure 2-8 Connecting Two ATA Drives
2-9
ATA RAID 1200A IUG.book Page 10 Wednesday, November 13, 2002 2:22 PM
Adaptec ATA RAID 1200A Installation and User’s Guide
4 If you are connecting four hard disk drives, connect the gray
connector of the ATA/100 cable to the slave drive and go to
Step 5.
5 Connect the blue connector of the second ATA/100 cable to the
channel 2 connector on the controller card, just as you did in
Step 1.
6 Connect the black connector of the ATA/100 cable to the
remaining master drive.
7 Connect the gray connector of the ATA/100 cable to the
remaining slave drive.
Note: Use the ATA/100 cables supplied with your Adaptec
ATA RAID 1200A controller kit for optimum performance.
Figure 2-9 Connecting Four ATA Drives
Set Mainboard CMOS Setup
The Adaptec ATA RAID 1200A card is a PCI Plug and Play device.
Therefore, you should not have to make any changes to the system
CMOS. The system should automatically assign the Interrupt and
Port address. To set the Adaptec ATA RAID 1200A card to be the
bootable controller, confirm in the system CMOS that the drive
types for on-board IDE controller drives are set to Not Installed or
None. Alternatively, you can use the Boot to SCSI option if this
setting is available.
2-10
ATA RAID 1200A IUG.book Page 1 Wednesday, November 13, 2002 2:22 PM
3
Using the BIOS Array
Configuration Utility
In this Chapter
Introduction
3-1
Create Array
3-2
Delete Array
3-6
Create/Delete Spare
3-6
Select Boot Disk
3-7
Introduction
The Adaptec ATA RAID 1200A card has an on-board BIOS Array
Configuration Utility which allows you to create a bootable array
on your hard disk drives.
Before you can use your BIOS Array Configuration Utility, make
sure you have done the following:
1 Installed the Adaptec ATA RAID 1200A card into a valid PCI
slot.
2 Attached the hard disk drives.
3 Reinstalled the computer cover and connected all power cables.
4 Powered-on your system.
3-1
ATA RAID 1200A IUG.book Page 2 Wednesday, November 13, 2002 2:22 PM
Adaptec ATA RAID 1200A Installation and User’s Guide
To start the BIOS Array Configuration Utility, press Ctrl+H while
starting up the system to enter the BIOS Configuration Main menu.
The Main menu of the BIOS Array Configuration Utility appears as
shown in Figure 3-1.
Figure 3-1 BIOS Array Configuration Utility Main Menu
To use the menu
■
Press F1 to view array status.
■
Press the arrow keys to navigate between options.
■
Press Enter to confirm any selection.
■
Press Esc to return to the Main menu.
Create Array
This option allows you to create RAID arrays with the hard disk
drives attached to your Adaptec ATA RAID 1200A card.
3-2
ATA RAID 1200A IUG.book Page 3 Wednesday, November 13, 2002 2:22 PM
Using the BIOS Array Configuration Utility
After you have selected the Create Array option in the Main menu,
press Enter to display the Create RAID menu as shown in
Figure 3-2.
Figure 3-2 Create RAID Menu
!
Caution: If you proceed to create RAID, all the data stored in
the hard disks will be lost. The exception is RAID 1
Duplication where data is copied from the Source disk to the
Target disk.
Array Mode
This option allows you to select the appropriate RAID mode for the
desired array. There are four modes to choose from (see
Figure 3-3):
■
RAID 0 (Striping) —This option is recommended for high
performance usage. Requires at least two disks.
■
RAID 1 (Mirroring)—This option is recommended for data
security usage. Requires two disks.
■
RAID 0/1 (Mirrored Striping)—This option is recommended
for data security and high performance usage. Allows
Mirroring with two Striping Arrays. Requires four disks.
3-3
ATA RAID 1200A IUG.book Page 4 Wednesday, November 13, 2002 2:22 PM
Adaptec ATA RAID 1200A Installation and User’s Guide
■
JBOD (Volume)—This option is recommended for high
capacity without redundancy or added performance features.
Requires at least two drives.
For more information about RAID levels, see Supported RAID Levels
on page 1-5.
Figure 3-3 RAID Array Modes
Array Name
This option allows you to specify an array name of eight characters
or less. If you don’t want to specify an array name, press Enter and
one will be automatically created.
Select Disk Drives
This option allows you to select the disk drives to be used with the
RAID array.
Block Size
This option allows you to select the block size of the RAID array.
There are three options: 16K, 32K, and 64K. The default block size
for RAID 0 is 64K. This option is available for selection for RAID 0
and RAID 0/1 only.
3-4
ATA RAID 1200A IUG.book Page 5 Wednesday, November 13, 2002 2:22 PM
Using the BIOS Array Configuration Utility
Start Creation Process
After you have made your selections, select this option and press
Enter to start the creation process.
Note: If you skip the Select Disk Drive option before selecting
the Start Creation process, you will get an error message at
the end of the creation process.
Start Creation With RAID 1
When you select the Start Creation option under RAID 1, you will
get a Process option sub-menu displaying the following options
(see Figure 3-4):
■
Create only
■
Create and duplicate
Figure 3-4 RAID 1 Options
Create only
This option allows you to create the array. When you select this
option, you will get a warning that all the data on the selected disks
will be deleted. Press Y to continue.
3-5
ATA RAID 1200A IUG.book Page 6 Wednesday, November 13, 2002 2:22 PM
Adaptec ATA RAID 1200A Installation and User’s Guide
Create and duplicate
This option allows you to duplicate all the data on the Source disk
drive (disk #1) to the Target disk drive (disk #2).
Note: The size of the Source disk drive must be less than or
equal to the size of the Target disk drive.
Depending on the size of your disk drive, the BIOS setting can take
several hours to run the duplication. Wait, or press Esc to cancel.
Delete Array
This option allows you to remove a RAID array on your Adaptec
ATA RAID 1200A card.
Note: After you have made and confirmed this selection, all
the data stored in the hard disk drive will be lost. (The entire
partition configuration will be deleted also.)
Create/Delete Spare
This hot spare function allows you to select the disk to be used as a
spare for a Mirror Disk array or to delete a spare disk from a Mirror
Disk array. If one of your disks in an array fails, you have the
option to quickly rebuild the array using the spare disk.
Note: You must create a RAID 1 array before you can create a
spare disk.
Note: The size of the spare disk drive must be equal to or
larger than the size of the Source disk drive.
3-6
ATA RAID 1200A IUG.book Page 7 Wednesday, November 13, 2002 2:22 PM
Using the BIOS Array Configuration Utility
Select Boot Disk
This option allows you to select the boot disk from among the hard
disk devices attached to the Adaptec ATA RAID 1200A card.
Warning: If you create an array with your boot disk, you must
remove the boot mark before you can delete the RAID array.
Using the arrow keys, from the Main menu select Select Boot Disk
and press Enter. In Channel Status, select the drive you would like
to set as the bootable disk and press Enter. There will be an asterisk
in parentheses indicating that the disk drive selection has been
made. Reselection will erase the boot mark.
Note: Your PC or server must be configured properly to use
the Adaptec ATA RAID 1200A card as the bootable
controller. The system will then use the bootable array as the
(fixed) boot C drive.
3-7
ATA RAID 1200A IUG.book Page 1 Wednesday, November 13, 2002 2:22 PM
4
Installing the Device Driver
In this Chapter
Installing the Device Driver for Windows 98
4-2
Installing the Device Driver for Windows Me
4-4
Installing the Device Driver for Windows 2000
4-5
Installing the Device Driver for Windows NT 4.0
4-7
Installing the Device Driver for Windows XP
4-9
This chapter explains how to install the device driver for the
following Windows operating systems:
■
Windows 98 (and Windows 98 Second Edition)
■
Windows Me
■
Windows 2000
■
Windows NT 4.0
■
Windows XP
4-1
ATA RAID 1200A IUG.book Page 2 Wednesday, November 13, 2002 2:22 PM
Adaptec ATA RAID 1200A Installation and User’s Guide
Installing the Device Driver for Windows 98
Installing the Driver When Installing Windows 98
Before you begin to install Windows 98, you will need the driver
floppy disk supplied with your Adaptec ATA RAID 1200A
controller kit.
When installing Windows 98 on a hard disk drive or an array
attached to the Adaptec ATA RAID 1200A, connect only the hard
disk drive or array that you intend to use as the Windows 98 boot
drive.
To install the driver when installing Windows 98, follow these
steps:
1 Install Windows 98 completely on drives or arrays attached to
the Adaptec ATA RAID 1200A before installing the driver.
2 Select Start from the task bar, then select Settings and Control
Panel.
3 Double-click the System icon, then select the Device Manager
tab.
4 Select Other devices, then PCI Mass Storage Controller.
5 Select Properties, then select the General tab.
6 Select Reinstall Driver and follow the Update Device Driver
Wizard.
7 On the Wizard searches for update drivers for PCI Mass
Storage Controller window, click Next.
8 Select Search for a better driver than the one your device is
using now and click Next.
9 On the Windows will now search for new drivers screen, make
sure a checkmark only appears next to specify location. Insert
the Adaptec ATA RAID 1200A floppy disk into the floppy disk
drive and type the following path as the location, then click
Next.
a:\win98_me
4-2
ATA RAID 1200A IUG.book Page 3 Wednesday, November 13, 2002 2:22 PM
Installing the Device Driver
10 You will get this message:
Windows is now ready to install the best driver for this device...
Click Next.
11 After completing the installation, select Finish.
12 You will be prompted to restart the computer. Select Yes.
Installing the Driver When Windows 98 is Already Installed
To install the Adaptec ATA RAID 1200A driver if Windows 98 is
already installed, follow these steps:
1 Start Windows 98.
Windows 98 will automatically discover the new hardware and
start the Found New Hardware Wizard to guide you through
the device driver installation.
2 On the Add New Hardware Wizard window, select Next.
3 Select Search for the best driver for your device and click Next.
4 On the Windows will now search for new drivers screen, make
sure only a checkmark appears next to Specify Location. Insert
the Adaptec ATA RAID 1200A floppy disk into the floppy disk
drive. Type the following path as the location, then click Next:
a:\win98_me
5 The following message appears:
Windows is now ready to install the best driver for this device...
Click Next.
6 After completing the installation, select Finish.
7 The Adaptec RCM device is detected and the driver is
automatically loaded. Installation is now complete.
4-3
ATA RAID 1200A IUG.book Page 4 Wednesday, November 13, 2002 2:22 PM
Adaptec ATA RAID 1200A Installation and User’s Guide
Installing the Device Driver for Windows Me
Installing the Driver When Installing Windows Me
Before you begin to install Windows Me, you will need the driver
floppy disk supplied with your Adaptec ATA RAID 1200A
controller kit.
When installing Windows Me on a hard disk drive or an array
attached to the Adaptec ATA RAID 1200A, connect only the hard
disk drive or array that you intend to use as the Windows Me boot
drive.
To install the driver when installing Windows Me, follow these
steps:
1 Install Windows Me completely on drives or arrays attached to
the Adaptec ATA RAID 1200A before installing the driver.
2 Select Start from the task bar, then select Settings and Control
Panel.
3 Double-click the System icon, then select the Device Manager
tab. If the System icon is not present, click the link on the left
side of the window that says View all Control Panel options.
4 Select Other devices, then PCI Mass Storage Controller.
5 Select Properties, then select the General tab.
6 Select Reinstall Driver and follow the Update Device Driver
Wizard.
7 On the Wizard searches for update drivers window, select
Automatic search for a better driver. Insert the Adaptec ATA
RAID 1200A floppy disk into the floppy disk drive and click
Next.
8 The following message appears:
Windows has finished installing an updated driver for your
hardware device.
Click Finish.
9 You will be prompted to restart the computer. Select Yes.
4-4
ATA RAID 1200A IUG.book Page 5 Wednesday, November 13, 2002 2:22 PM
Installing the Device Driver
Installing the Driver When Windows Me is Already Installed
To install the Adaptec ATA RAID 1200A driver if Windows Me is
already installed, follow these steps:
1 Start Windows Me.
Windows Me will automatically discover the new hardware
and start the Found New Hardware Wizard to guide you
through the device driver installation.
2 On the Add a New Hardware Wizard window, insert the
Adaptec ATA RAID 1200A floppy disk into the floppy disk
drive. Select Automatic search for a better driver and click
Next.
3 The following message appears:
Windows has finished installing the new hardware device.
Click Finish.
4 The Adaptec RCM device is detected and the driver is
automatically loaded. Installation is now complete.
Installing the Device Driver for Windows 2000
Installing the Driver When Installing Windows 2000
To install the driver when installing Windows 2000, follow these
steps:
1 Insert the Windows 2000 setup media (floppy disk or CD) and
restart your system to begin the Windows 2000 installation. You
might see the following message:
Press any key to boot from CD.
You will have five seconds to press a key to boot from the CD.
2 When the following message is displayed, press F6 :
Press F6 if you need to install a third party SCSI or RAID
driver...
3 A message will appear after a short time, prompting you to
install your driver. Press S to specify a driver.
4-5
ATA RAID 1200A IUG.book Page 6 Wednesday, November 13, 2002 2:22 PM
Adaptec ATA RAID 1200A Installation and User’s Guide
4 Insert the Adaptec ATA RAID 1200A driver floppy disk into the
floppy disk drive and press Enter.
5 You will be presented with a selection of driver options. Using
the arrow keys, select the following driver and press Enter:
Adaptec ATA RAID 1200A Controller for Win2000
If you have no other controllers to add, press Enter to continue
with the Windows 2000 installation.
Installing the Driver When Windows 2000 is Already Installed
To install the Adaptec ATA RAID 1200A driver if Windows 2000 is
already installed, follow these steps:
1 Start Windows 2000.
Windows 2000 will automatically discover the new hardware
and start the Found New Hardware Wizard to guide you
through the device driver installation.
2 At the Welcome to the Found New Hardware Wizard window,
select Next.
3 On the Install Hardware Device Drivers screen, select search for
a suitable driver for my device and click Next.
4 On the Locate File screen, select Floppy Disk Drives and insert
the Adaptec ATA RAID 1200A floppy disk into the floppy disk
drive. Click Next.
5 On the the wizard found a driver screen, click Next.
6 At the Completing the Found New Hardware Wizard window,
select Finish.
7 The Adaptec RCM device is detected and the driver is
automatically loaded. Installation is now complete.
4-6
ATA RAID 1200A IUG.book Page 7 Wednesday, November 13, 2002 2:22 PM
Installing the Device Driver
Installing the Device Driver for Windows NT 4.0
Installing the Driver When Installing Windows NT 4.0
Before you begin to install Windows NT 4.0, you will need the
driver floppy disk supplied with your Adaptec ATA RAID 1200A
controller kit.
To install the driver when installing Windows NT 4.0, follow these
steps:
1 Start your system with the Windows NT 4.0 Boot disk in the
floppy disk drive or the Windows NT 4.0 Boot CD in the
CD-ROM drive.
2 Press the F6 key when the message Setup is inspecting your
computer’s hardware configuration is displayed.
3 Follow the on-screen prompts. After a few moments, you will
see a blue screen message, To set up Windows now, press Enter.
Press Enter to begin the installation.
4 Press S to specify an additional device.
5 Press Enter to select Other and insert the floppy disk into your
floppy disk drive and press Enter again.
6 Using the arrow keys, select the following driver and press
Enter:
Adaptec ATA RAID 1200A Controller for Win NT 4.0
7 To add the driver for other devices in your system, press S for
each additional device and insert the appropriate driver disk.
Your system manufacturer and respective device vendor should
provide these device drivers.
8 Press Enter to continue with the Windows NT operating system
setup. Follow the instructions on-screen and in the
Windows NT documentation to complete the installation.
4-7
ATA RAID 1200A IUG.book Page 8 Wednesday, November 13, 2002 2:22 PM
Adaptec ATA RAID 1200A Installation and User’s Guide
Installing the Driver When Windows NT 4.0 is Already Installed
To update or install the Adaptec ATA RAID 1200A driver if
Windows NT is already installed, follow these steps:
1 Start Windows NT.
2 Click the Start button on the Windows NT task bar, then select
Settings.
3 From the Settings menu, select Control Panel.
4 From the Control Panel, select the SCSI Adapters icon.
5 From the SCSI Adapters window, select the Drivers tab.
6 From the Drivers window, select Add.
7 Select Have Disk.
8 Insert the Adaptec ATA RAID 1200A driver disk into your
floppy disk drive and press Enter. Enter the following path to
the installation files, then click OK.
a:\win_nt
9 In the Install Driver window, click OK.
10 On the SCSI Adapters window, click OK. The driver is now
installed and started.
4-8
ATA RAID 1200A IUG.book Page 9 Wednesday, November 13, 2002 2:22 PM
Installing the Device Driver
Installing the Device Driver for Windows XP
Note: For the most up-to-date Windows XP drivers and
installation instructions, see the Readme file or go to the
Adaptec Web at www.adaptec.com.
Warning: When installing the device driver for Windows XP,
install only the Adaptec device driver. Other manufacturer’s
device drivers are not compatible with the Adaptec ATA
RAID 1200A card.
Installing the Driver When Installing Windows XP
To install the driver when installing Windows XP, follow these
steps:
1 Insert the Windows XP setup media (floppy disk or
CD) and restart your system to begin the Windows XP
installation. You might see the following message:
Press any key to boot from CD.
You will have five seconds to press a key to boot from the CD.
2 When the following message appears, press F6:
Press F6 if you need to install a third party SCSI or RAID
driver...
3 A message will appear after a short time, prompting you to
install your driver. Press S to specify a driver.
4 Insert the Adaptec ATA RAID 1200A driver floppy disk into the
floppy disk drive and press Enter.
5 You will be presented with a selection of driver options. Using
the arrow keys, select the following driver and press S:
Adaptec ATA RAID 1200A Controller for Windows XP
If you have no other controllers to add, press Enter to continue
with the Windows XP installation.
4-9
ATA RAID 1200A IUG.book Page 10 Wednesday, November 13, 2002 2:22 PM
Adaptec ATA RAID 1200A Installation and User’s Guide
Installing the Driver When Windows XP is Already Installed
To install the Adaptec ATA RAID 1200A driver if Windows XP is
already installed, follow these steps:
1 Start Windows XP.
Windows XP will automatically discover the new hardware and
start the Found New Hardware Wizard to guide you through
the device driver installation.
2 Select the option, Install from a list or specific location
(Advanced), then select Next.
3 Select the option, Don’t search, I will choose the driver to
install, then click Next.
4 Click Have Disk button.
5 Insert the Adaptec ATA RAID 1200A floppy disk into the
floppy disk drive. Type the following path as the location, click
OK, then Next:
A:\win_xp
6 Follow the on-screen prompts to complete the installation.
7 After completing the installation, select Finish.
8 You will be prompted to restart the computer. Select Yes.
9 The new hardware Adaptec RCM device is also detected. The
drivers are automatically loaded for that device and when it
completes, the installation of the driver is complete.
4-10
ATA RAID 1200A IUG.book Page 1 Wednesday, November 13, 2002 2:22 PM
5
Using the Adaptec ATA
RAID Management
Software
In this Chapter
Installing the Adaptec ATA RAID Management
Software
5-2
Using the Adaptec ATA RAID Management Software 5-3
With Adaptec ATA RAID Management Software, you can add,
delete, or reconfigure RAID arrays on your system. You can use the
easy to use on-screen features to manage your RAID
configurations and monitor device information and event
notifications.
5-1
ATA RAID 1200A IUG.book Page 2 Wednesday, November 13, 2002 2:22 PM
Adaptec ATA RAID 1200A Installation and User’s Guide
This chapter explains how to use Adaptec ATA RAID Management
Software to perform the following operations:
■
Install the Adaptec ATA RAID Management Software
■
View arrays, ATA devices, and controllers
■
Create, delete, rename, and monitor arrays
■
Add a spare disk
■
View events
Installing the Adaptec ATA RAID Management
Software
To install Adaptec ATA RAID Management Software on your
Windows Server or Workstation, follow these steps:
1 Start Windows.
2 Insert the Adaptec ATA RAID Management Software CD in
your CD-ROM drive.
3 Follow the instructions on-screen to complete the installation
(see Figure 5-1).
Figure 5-1 Adaptec ATA RAID Management Software Setup Menu
5-2
ATA RAID 1200A IUG.book Page 3 Wednesday, November 13, 2002 2:22 PM
Using the Adaptec ATA RAID Management Software
Using the Adaptec ATA RAID Management
Software
After you have installed the Adaptec ATA RAID Management
Software, click the Start button on the Windows task bar and select
the Adaptec ATA RAID Management Software program (see
Figure 5-2).
Figure 5-2 Launch Menu
The Adaptec ATA RAID Management Software Main menu
appears (see Figure 5-3).
Figure 5-3 Main Menu
5-3
ATA RAID 1200A IUG.book Page 4 Wednesday, November 13, 2002 2:22 PM
Adaptec ATA RAID 1200A Installation and User’s Guide
Viewing the Array
From the Main menu, select the Array tab. The left pane displays
the arrays and the hard disk drives. The right pane displays
detailed information for the arrays and hard disk drives you have
selected.
From the Main menu, you can also select the array and right-click
the mouse to open a drop-down menu of options (see Figure 5-4):
■
■
For RAID 0 and JBOD the options are:
■
Delete
■
Rename
For RAID 1 the options are:
■
Add/Remove Spare
■
Delete
■
Duplicate
■
Rename
Figure 5-4 RAID 1 Drop-down Menu
5-4
ATA RAID 1200A IUG.book Page 5 Wednesday, November 13, 2002 2:22 PM
Using the Adaptec ATA RAID Management Software
■
For RAID 0/1 the options are (see Figure 5-5):
■
Delete
■
Build
This option allows you to verify data integrity and fix
miscompares.
■
Rename
Figure 5-5 RAID 0/1 Drop-down Menu
See the different RAID level sections in this chapter for more
information on how to use these options.
5-5
ATA RAID 1200A IUG.book Page 6 Wednesday, November 13, 2002 2:22 PM
Adaptec ATA RAID 1200A Installation and User’s Guide
Viewing the Controller
From the Main menu, select the Controller tab, the left pane
displays the host bus adapter (HBA). The right pane displays
detailed information for the HBA you have selected
(see Figure 5-6).
Figure 5-6 Controller Information
Viewing the Channel
From the Controller tab, select your Channel. The right pane
displays the Channel Information you have selected (Figure 5-7).
Figure 5-7 Channel Information
5-6
ATA RAID 1200A IUG.book Page 7 Wednesday, November 13, 2002 2:22 PM
Using the Adaptec ATA RAID Management Software
Viewing Hard Disk Drives
From the Controller tab, select a Channel, then select a hard disk
drive. The right pane displays the Device Information you have
selected (see Figure 5-8).
Figure 5-8 Device Information
Create Arrays
To create a RAID array, go to the Main menu and from the toolbar,
select a RAID array.
The Adaptec ATA RAID Management Software supports the
following RAID levels:
■
RAID 0—Striping mode for boosting performance.
■
RAID 1—Mirroring mode for data security.
■
RAID 0/1—Mirrored Striping.
■
JBOD—High capacity without redundancy or highperformance features.
For more information on supported RAID levels, see Defining
RAID on page 1-5.
5-7
ATA RAID 1200A IUG.book Page 8 Wednesday, November 13, 2002 2:22 PM
Adaptec ATA RAID 1200A Installation and User’s Guide
Create RAID 0 (Striping)
To create a RAID 0 array, follow these steps:
1 From the Main menu Menu bar, select
Configuration>Create>RAID 0 (Striping)
or, from the Main menu toolbar, select RAID 0.
2 From the Available Disks screen, select the disk and click Add,
then click Next.
Note: You must have at least two hard disk drives to create an
array.
3 Select the Block size from the Block Size screen, then click Next
(see Figure 5-9).
Figure 5-9 Block Size Menu
4 Specify an array name of eight characters or less. If you don’t
specify an array name, one will be automatically created.
5-8
ATA RAID 1200A IUG.book Page 9 Wednesday, November 13, 2002 2:22 PM
Using the Adaptec ATA RAID Management Software
5 Click Create. The following message appears:
All data on the selected disks will be deleted! Are you sure you
want to continue?
Click Yes to continue.
6 You will get a confirmation message notifying you that the
RAID you specified has been created successfully. You will be
prompted to restart your system. Click Yes to restart. After you
have restarted your system, your Main menu will display your
built arrays.
Warning: If you have created an array and tried to use it
without first restarting, you can get possible data corruption.
Create RAID 1 (Mirroring)
To create a RAID 1 array, follow these steps:
1 From the Main menu Menu bar, select
Configuration>Create>RAID 1 (Mirroring)
or, from the Main menu toolbar, select RAID 1.
5-9
ATA RAID 1200A IUG.book Page 10 Wednesday, November 13, 2002 2:22 PM
Adaptec ATA RAID 1200A Installation and User’s Guide
2 From the Available Disks screen, select the disk and click Add
for Source Disk. Select another disk and click Add for Target
Disk (see Figure 5-10).
Note: You must have two hard disk drives to create a RAID 1
array.
Figure 5-10 Create RAID 1 Menu
3 To add a spare disk, click the Add a spare disk option. Select a
spare disk from the Available Disks screen and click Add.
4 Specify an array name of eight characters or less. If you don’t
specify an array name, one will be automatically created.
5 Select one of the following options:
■
Create only (default)—creates RAID 1 relationship between
two disks.
■
Create and duplicate—allows you to duplicate all the data
on the Source disk to the Target disk.
5-10
ATA RAID 1200A IUG.book Page 11 Wednesday, November 13, 2002 2:22 PM
Using the Adaptec ATA RAID Management Software
6 Click OK. A message will be displayed for whichever
initialization option you choose:
■
Create only
All data on the selected disks will be deleted! Are you sure
you want to continue?
■
Create and duplicate
All data on the Source disk will be duplicated to the Target
disk. Are you sure you want to continue?
Click Yes to continue.
7 You will get a confirmation message notifying you that the
RAID you specified has been created successfully. You will be
prompted to restart your system. Click Yes to restart. After you
have restarted your system, the Main menu will display your
built arrays.
Create RAID 0/1 (Mirrored Striping)
To create a RAID 0/1 array, follow these steps:
1 From the Main menu Menu bar, select
Configuration>Create>RAID 0/1 (Mirrored Striping)
or, from the Main menu toolbar, select RAID 0/1.
2 Select the Block size from the Block Size screen. Specify an array
name of 8 characters or less. If you don’t specify an array name,
one will be automatically created. Click OK.
3 The following message appears:
All data on the selected disks of the array will be deleted! Are
you sure you want to continue?
Click Yes to create your array.
Note: You must have four hard disk drives to create a
RAID 0/1 array.
4 You will be prompted to restart your system. Click Yes to
restart. After you have restarted your system, the Main menu
will display your built array.
5-11
ATA RAID 1200A IUG.book Page 12 Wednesday, November 13, 2002 2:22 PM
Adaptec ATA RAID 1200A Installation and User’s Guide
Create JBOD (Volume) Array
To create a JBOD array, follow these steps:
1 From the Main menu Menu bar, select
Configuration>Create>JBOD (Volume)
or, from the Main menu toolbar, select JBOD.
2 From the Available Disks screen, select the disk, then click Add.
Note: You must have at least two hard disk drives to create a
JBOD array.
3 Specify an array name of eight characters or less. If you don’t
specify an array name, one will be automatically created. Click
Next. A list of disks will be displayed.
4 Click Create. The following message appears:
All data on the selected disks will be deleted! Are you sure you
want to continue?
Click Yes to continue.
5 You will get a confirmation message notifying you that the
RAID you specified has been created successfully. You will be
prompted to restart your system. Click Yes to restart. After you
have restarted your system, the Main menu will display your
built arrays.
View the Event Log
The Event Log is a file used to maintain information about prior
controller activities or errors. To view the Event Log, follow these
steps:
1 On the Main menu, select View log from the toolbar.
You will get a display of the type of event, the time it occurred,
and a description of the event.
5-12
ATA RAID 1200A IUG.book Page 13 Wednesday, November 13, 2002 2:22 PM
Using the Adaptec ATA RAID Management Software
2 From the toolbar, click Event Log. You will get a drop-down
menu of options. Select Sort to organize your search by type,
time, or description (see Figure 5-11).
Figure 5-11 Event Log
3 From the toolbar or drop-down menu, click Exit to return to
Main menu.
Delete Arrays
To delete an array, follow these steps:
1 From the Main menu, select the array and right- click your
mouse. A drop-down menu will be displayed. Click Delete.
2 The following message appears:
All data on the array will deleted! Are you sure you want to
continue?
Click Yes to continue.
5-13
ATA RAID 1200A IUG.book Page 14 Wednesday, November 13, 2002 2:22 PM
Adaptec ATA RAID 1200A Installation and User’s Guide
3 You will get a confirmation message notifying you that the
array you specified has been deleted. You will be prompted to
restart your system. Click Yes to restart.
Warning: To delete a bootable RAID array when an aoperating
system is already installed, you must do so in the BIOS. See
Select Boot Disk on page 3-7.
Rename Arrays
To rename an array, follow these steps:
1 From the Main menu, select an array and right-click your
mouse. A drop-down menu will be displayed. Click Rename.
2 Type a new name for your array. Specify an array name of eight
characters or less. Click OK. Your new array name will appear
on your Main menu screen.
Monitoring Arrays
Rescan
From the Main menu Menu bar (see Figure 5-12), select Adaptec
ATA RAID Management Software
Configuration>Monitor>Rescan
5-14
ATA RAID 1200A IUG.book Page 15 Wednesday, November 13, 2002 2:22 PM
Using the Adaptec ATA RAID Management Software
With the Rescan option, you can view the change status of each
device and array.
Figure 5-12 Rescan Menu
Duplicate
From the Main menu Menu bar, select
Configuration>Monitor>Duplicate
The Duplicate option verifies data integrity and fixes any
miscompares.
Add Disk to Array
From the Main menu Menu bar, select
Configuration>Monitor>Add disk to array
This option is available only when a critical RAID 1 or RAID 0/1
array is deleted. It allows you to add a new disk to a critical RAID 1
or RAID 0/1 array.
5-15
ATA RAID 1200A IUG.book Page 1 Wednesday, November 13, 2002 2:22 PM
A
Troubleshooting
In this Appendix
General Troubleshooting Procedures
A-1
Frequently Asked Questions
A-2
General Troubleshooting Procedures
The following tips are general troubleshooting procedures:
■
Check that the Adaptec ATA RAID 1200A card is seated evenly
all the way into the PCI slot.
■
Check that the PCI expansion slot is 5V and compliant with PCI
2.2 or previous version, and supports Bus Mastering.
■
Check that the Adaptec ATA RAID 1200A card is detected
during boot. If it is not detected, try to move it to another free
PCI slot.
■
Check that all ATA cables and power cables are connected.
A-1
ATA RAID 1200A IUG.book Page 2 Wednesday, November 13, 2002 2:22 PM
Adaptec ATA RAID 1200A Installation and User’s Guide
Frequently Asked Questions
Q: Can I use hard disk drives with different capacity or transfer modes?
A: In order to get optimized performance, Adaptec suggests using
hard disk drives with the same model.
Q: Can I use multiple Adaptec ATA RAID 1200A controllers in my system?
A: No, only one Adaptec ATA RAID 1200A controller is supported
in each system.
Q: How do I assign a booting device?
A: Press Ctrl+H to assign a booting device in the Adaptec RAID
Array Configuration BIOS Utility.
Q: Why can’t I see correct capacity in FDISK utility?
A: It's a well-known issue of Windows 98's FDISK utility. If an IBM
75 GB hard disk DTLA 307075 only gets 7768 MB in Windows 98’s
FDISK utility, please contact Microsoft for the latest version of
FDISK utility or download IBM's Disk Manager DiskGo! 2.5 to fix
it. For Windows 2000, there is no 64 GB issue.
Q: How do I rebuild a mirror array when one of the drives corrupts? (How do I rebuild
a RAID 1 array when one of the drives fails?)
A: Restart the system and use the Broken RAID 1 BIOS Menu (BIOS
RAID 1 Rebuild Menu) to rebuild the drive by following these
steps:
1 Restart the system.
2 The BIOS will detect the change in drive configuration and will
bring up the Broken RAID 1 BIOS Menu (BIOS RAID 1 Rebuild
Menu) with the following options:
1. Power OFF and replace the failed drive.
2. Destroy the mirror 1 relationship. (Eliminate the RAID 1
relationship.)
3. Select replacement drive and rebuild. (Select a replacement
drive and rebuild the array.)
4. Continue to boot.
A-2
ATA RAID 1200A IUG.book Page 3 Wednesday, November 13, 2002 2:22 PM
Troubleshooting
3 If you have another drive available for use in rebuilding the
RAID 1 array, skip this step and proceed to step 4. If you have
no other drive available for rebuild, select option 1 to power OFF
the system and replace the problem drive with a functional
unit. Power ON your system when you are done.
4 Select option 3 to select the drive you wish to use for the rebuild
and proceed to rebuild the RAID 1 array.
Q: Why do I see “NO ROM BASIC SYSTEM HALTED” when booting?
A: There isn’t any activated primary partition in you system. Please
use FDISK or any other utilities to create/set one.
A-3
ATA RAID 1200A IUG.book Page 1 Wednesday, November 13, 2002 2:22 PM
Index
A
C
Adaptec ATA RAID Management
Software
creating arrays 5-7
deleting arrays 5-13
duplicate 5-15
installing 5-2
renaming arrays 5-14
rescan 5-14
using 5-3
viewing arrays 5-4
viewing controller 5-6
viewing Event Log 5-12
viewing hard disk drives 5-7
viewing the channel 5-6
ATA hard drives
connecting to card 2-7
mounting 2-6
setting jumpers 2-5
setting up 2-5
ATA/100 compatibility
requirements 1-4
CMOS setup 2-10
connecting LED activity indicator
2-4
contents of kit 1-2
controller layout 2-2
B
BIOS Array Configuration Utility
array mode 3-3
creating arrays 3-2
creating/deleting spares 3-6
defining 3-1
deleting arrays 3-6
selecting boot disk 3-7
start creation 3-5
bootable controller 1-4
D
defining RAID 1-5
F
fault-tolerant redundancy 1-5
features 1-1
frequently asked questions A-2
I
installation overview 1-5
installing card 2-2
installing device driver for
Windows 2000 4-5
installing device driver for
Windows 98 4-2
installing device driver for
Windows NT 4.0 4-7
installing device driver for
Windows XP 4-9
installing device drivers for
Windows Me 4-4
J
JBOD 1-6
L
LED activity indicator, connecting
2-4
Index-1
ATA RAID 1200A IUG.book Page 2 Wednesday, November 13, 2002 2:22 PM
Adaptec ATA RAID 1200A Installation and User’s Guide
O
system requirements 1-3
operating systems supported 1-3
overview 1-1
T
troubleshooting A-1
R
RAID
defining 1-5
JBOD support 1-6
performance hints 1-6
RAID 0 support 1-5
RAID 0/1 support 1-6
RAID 1 support 1-6
supported levels 1-5
RAID 0 1-5
RAID 0/1 1-6
RAID 1 1-6
S
setting up ATA hard drives 2-5
supported RAID levels 1-5
Index-2
U
unified array 1-5
W
Windows 2000
installing device driver
Windows 98
installing device driver
Windows Me
installing device driver
Windows NT 4.0
installing device driver
Windows XP
installing device driver
4-5
4-2
4-4
4-7
4-9
ATA RAID 1200A IUG.book Page 1 Wednesday, November 13, 2002 2:22 PM
R
Adaptec, Inc.
691 South Milpitas Boulevard
Milpitas, CA 95035
© 2001-2002 Adaptec, Inc.
All rights reserved. Adaptec, and the Adaptec logo
are trademarks of Adaptec, Inc. which may be
registered in some jurisdictions.
PART NUMBER: 512790-06, Ver. AC JG 11/02