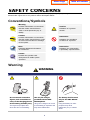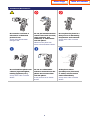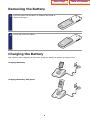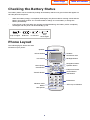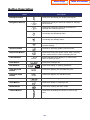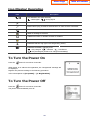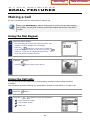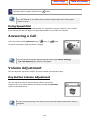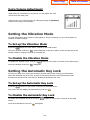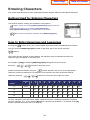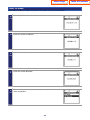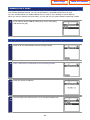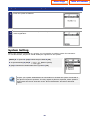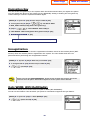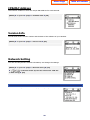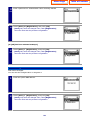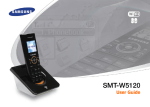
1
SMT_W5100E_Cover.qxp
10/5/2006
11:14 AM
Page 1
Home Page
SMT-W5100E
Handset User Guide
SMT-W5100E-UG 01 10/2006
w w w. s a m s u n g . c o m / b c s
Table of Contents
Home Page
Table of Contents
Publication Information
SAMSUNG TELECOMMUNICATIONS AMERICA reserves the right without prior
notice to revise information in this publication for any reason.
SAMSUNG TELECOMMUNICATIONS AMERICA also reserves the right without prior
notice to make changes in design or components of equipment as engineering
and manufacturing may warrant.
Copyright 2006-2008
Samsung Telecommunications America
All rights reserved. No part of this manual may be reproduced in any form or by
any means—graphic, electronic or mechanical, including recording, taping,
photocopying or information retrieval systems—without express written
permission of the publisher of this material.
Every effort has been made to eliminate errors and ambiguities in the information
contained in this booklet. Any questions concerning information presented here
should be directed to SAMSUNG TELECOMMUNICATIONS AMERICA. SAMSUNG
TELECOMMUNICATIONS AMERICA disclaims all liabilities for damages arising from
erroneous interpretation or use of information presented in this manual.
0
Home Page
Table of Contents
SAFETY CONCERNS
This document provides the information to prevent bodily injury and property damage.
Please make a good use of our product with its description below.
Conventions/Symbols
Warning
Caution
Provides information or instructions
that the reader should follow in
order to avoid personal injury or
fatality.
Indication of a general
caution.
Caution
Provides information or instructions
that the reader should follow in order
to avoid a service failure or damage
to the system.
Restriction
Note
Instruction
Indicates additional information
as a reference.
Indication for commanding
a specifically required action
Indication for prohibiting
an action for a product
Checks
Provides the operator with
checkpoints for stable system
operation.
Warning
WARNING
Power
Do not connect conductive
objects, such as necklace or
coins, to the charging phones
of the battery (metallic part).
The object may explode and
cause fire due to overheating.
Use only the charger
provided with the SMTW5100 phone.
The battery shall be used
only for the SMT-W5100
phone.
Using other chargers can result
in overheating or explosion and
may cause malfunction.
Using the battery for other
purposes may cause
malfunction, fire, or electric
shock.
1
Home Page
Table of Contents
Installation/Maintenance
Do not make a call near a
microwave or Bluetooth
product in use.
It may cause disconnection
during the call.
Do not put instruments that
contain water such as vases,
cups, cosmetics, and
medicines, or small metals
near the phone.
Do not place the phone in a
dusty area or in fluctuating
temperature environments.
It may cause a fire or electric
shocks.
Moisture in the phone can
cause a fire and electric shocks.
Do not install the phone near
a heater (cigarette lighter,
heating apparatus, etc.).
It may cause a fire or electric
shocks.
Do not use inflammable
solvent or material near the
phone. Do not store them
near the phone.
If the phone makes
(horrible) noise, bad smell,
or smoke, call the Service
Center immediately.
It may cause a fire or electric
shocks.
It may cause a fire or electric
shocks.
2
Home Page
Table of Contents
Caution
CAUTION
Installation/Maintenance
Before executing the
[MENU] Æ
[8. System] Æ
[4. Unregistration],
double check
whether this
function should be
executed since all
phone information
registered to the
system will be
deleted.
Do not install the
phone on an
unstable surface or
near the direct rays
of sunlight.
Use a soft dry cloth
to clean the phone.
Do not use any
chemical solvents
like wax, benzene,
alcohol, thinner,
mosquito spray,
aerosol, lubricant, or
detergent.
It may cause severe
damage to the parts
of the phone, and
your phone may not
work properly.
The use of chemicals
on the phone may
cause fading/
discoloring or damage
to the parts.
3
Do not separate,
repair or remodel the
phone arbitrarily.
If a repair is needed,
please contact where
the phone was
purchased or call the
Service Center.
Home Page
Table of Contents
TABLE OF CONTENTS
SAFETY CONCERNS
1
Conventions/Symbols................................................................................... 1
Warning ...................................................................................................... 1
Caution ....................................................................................................... 3
TABLE OF CONTENTS
4
PREPARATION
7
Overview of SMT-W5100 .............................................................................. 7
Unpacking................................................................................................... 7
Installing the Battery ................................................................................... 7
Removing the Battery .................................................................................. 8
Charging the Battery.................................................................................... 8
Checking the Battery Status ......................................................................... 9
Phone Layout .............................................................................................. 9
Button Description.................................................................................10
Icon (Display) Description......................................................................11
To Turn the Power On ................................................................................ 11
To Turn the Power Off................................................................................ 11
BASIC FEATURES
12
Making a Call ............................................................................................ 12
Using the Dial Keypad ...........................................................................12
Using the Call Lists ................................................................................12
Using Speed Dial...................................................................................13
Answering a Call........................................................................................ 13
Volume Adjustment ................................................................................... 13
Key Button Volume Adjustment .............................................................13
Voice Volume Adjustment......................................................................14
Setting the Vibration Mode ......................................................................... 14
To Set up the Vibration Mode.................................................................14
To Disable the Vibration Mode ...............................................................14
Setting the Automatic Key Lock .................................................................. 14
To Set up the Automatic Key Lock..........................................................14
To Disable the Automatic Key Lock ........................................................14
Entering Characters ................................................................................... 15
Buttons Used for Entering Characters.....................................................15
How to Enter Uppercase and Lowercase ................................................15
How to Enter Special Characters............................................................16
How to Enter Numbers..........................................................................16
4
Home Page
CONVENIENT FEATURES
Table of Contents
17
Features Used During a Call ....................................................................... 17
Mute on a Call.......................................................................................17
Conference Call while on the Phone.......................................................17
Call Transfer..........................................................................................18
Holding a Call........................................................................................18
Right Navigation Button.........................................................................18
Features on a Calling Failure ...................................................................... 19
Call Back...............................................................................................19
Station Message....................................................................................19
Camp On ..............................................................................................20
MENUS
21
Menu Structure ......................................................................................... 21
Phonebook................................................................................................ 22
Find Number.........................................................................................22
Outgoing Calls.......................................................................................24
Incoming Calls ......................................................................................24
Missed Calls ..........................................................................................24
New Entry.............................................................................................25
Delete List.............................................................................................25
Utilities ..................................................................................................... 26
Alarm....................................................................................................26
Schedule...............................................................................................26
Calculator .............................................................................................27
World Time ...........................................................................................27
Conversion............................................................................................28
Timer....................................................................................................28
Message ................................................................................................... 29
Station Message....................................................................................29
SMS (Short Message Service) ................................................................29
VMS (Voice Mail System) .......................................................................31
Volume/Ring ............................................................................................. 32
Incoming Calls Tone ..............................................................................32
Connection Tone ...................................................................................33
Key Tone...............................................................................................33
Warning Tone .......................................................................................33
Soft Menu ................................................................................................. 34
Station Message....................................................................................34
Direct Pickup.........................................................................................34
Do Not Disturb......................................................................................34
Page.....................................................................................................35
Conference ...........................................................................................35
Call Forward.............................................................................................. 37
Phone Settings .......................................................................................... 38
5
Home Page
Table of Contents
Phone Name.........................................................................................38
Background ..........................................................................................38
Password ..............................................................................................38
Language..............................................................................................39
Back Light.............................................................................................39
LCD Contrast.........................................................................................40
Cradle Hook ..........................................................................................40
Reset....................................................................................................40
Program Msg (Programmed Message) ...................................................41
Phone Lock ...........................................................................................41
Intern. Lock (Internal Lock)...................................................................41
Call Answer...........................................................................................42
System ..................................................................................................... 43
Registration...........................................................................................43
System Setting......................................................................................48
Encryption Key......................................................................................49
Unregistration .......................................................................................49
QoS (WMM: WiFi MultiMedia) ................................................................49
IP&MAC Address ...................................................................................50
Version Info ..........................................................................................50
Network Setting ....................................................................................50
SSID Setting .........................................................................................55
Help .....................................................................................................56
Function Description..............................................................................56
Troubleshooting ....................................................................................56
TROUBLESHOOTING
57
ANNEX
58
Product Specifications................................................................................ 58
6
Home Page
Table of Contents
PREPARATION
Overview of SMT-W5100
This user guide provides instructions for the use of Samsung’s SMT-W5100 mobile phone.
The SMT-W5100 (Wireless IP-Phone Mobile type) is the wireless mobile phone that allows a voice
communication through IEEE 802.11 b/g wireless LAN.
SMT-W5100 supports voice communication using IEEE802.11 b/g WLAN. Based on IEEE802.11 b/g
standard, VoIP voice signals received are compressed to a voice codec and transferred as data
packets.
Unpacking
After purchasing the SMT-W5100 phone, you have to check that the following items have been
packed in the box.
Battery
(standard
type)
SMT-W5100
Charger
Quick & Installation
Reference Guide
Adapter
User Guide/Quick
& Installation
Reference Guide
Installing the Battery
Put the lower part of your battery, and then install the battery by
pressing the upper part.
7
Earphone
Leather case
for phone
Home Page
Table of Contents
Removing the Battery
1
Press the button and the battery is separated and raised as
shown in the figure.
2
Lift up and remove the battery.
Charging the Battery
After checking each component of the phone, charge the battery as shown in the figure below.
Charging the battery
Charging the battery with phone
8
Home Page
Table of Contents
Checking the Battery Status
The battery status can be checked by looking at the battery status icons given below that appear on
the LCD panel of the phone.
-
When the battery energy is completely discharged, the phone makes a warning sound and the
battery icon starts to blink. It is recommended to change to a new battery or charge the
battery immediately.
-
If the phone is still used after the warning sound and blinking, the battery will be completely
discharged and the power will automatically go off.
X
X
Fully charged
Sufficient
X
Insufficient
Fully
discharged
Phone Layout
The following figure shows the main
elements of your phone.
Speaker
Volume Button
Headset
Connection Hole
LCD Screen
Backlight Button
Menu Button
Send Button
Transfer Button
Navigation Button
Speaker Button
End/Power Button
Cancel Button
Hold Button
Dial Buttons
Vibration mode
Button
Microphone
9
Auto Key Lock Button
Home Page
Table of Contents
Button Description
Name
Description
Backlight Button
Used when illuminating the display and keypad.
Navigation Buttons
Used when moving the menu bar upward or entering
the soft menu.
Used when moving the menu bar downward or
entering the volume/ring menu.
Used when moving the menu bar to the right direction
or entering the phonebook menu.
Used when moving the menu bar to the left direction
or entering the message menu.
Used when selecting or saving the selected item for
function settings.
Speaker Button
Used When selecting speaker phone function.
End/Power Button
Used when turning the power on/off, when returning
to the initial screen or when terminating the call.
Cancel Button
Delete characters from display or in menu mode
return to previous menu.
Hold Button
Used when holding a call.
Dial Buttons
~
Used when dialing or entering characters.
Auto Key Lock
Button
Used when applying the automatic key lock.
Vibration mode
Button
Used when applying the vibration mode.
Transfer Button
Used when transferring a call.
Send Button
Used when calling or receiving a call.
Menu Button
Used when entering the menu mode.
Volume Button
Used when controlling the volume of voice or key
tone.
10
Home Page
Table of Contents
Icon (Display) Description
Icon
Description
This indicates the signal intensity.
: weak signal
: strong signal
This turns on when the service is not available.
Blinks when trying to make a call and turns on when a call is connected.
The status that indicates an alarm is set.
When a message is received.
Vibration function or vibration function is enabled.
Indicates that the automatic key lock is enabled.
Indicates that the ring type is set as light only (silent).
Indicates the battery charging level.
: fully charged
: sufficient
: insufficient
: fully discharged (needs to be charged immediately)
To Turn the Power On
Press the
button for more than 2 seconds.
When power is on without the registration, the ‘Unregistered’ message will
be displayed.
Register the phone according to the following procedure:
refer to descriptions in [8. System] X [1. Registration].
To Turn the Power Off
Press the
button for more than 2 seconds.
The phone will automatically turn off.
11
Home Page
Table of Contents
BASIC FEATURES
Making a Call
For your convenience there are several ways to make a call.
Refer to [1. Phonebook] in ‘Menus’ of this guide for how to use the latest outgoing
call numbers, incoming call numbers, missed call numbers and save the new phone
number.
Using the Dial Keypad
1
Press the phone number.
- Use the dialing pad to enter the required number. The
telephone number will appear on the display.
- Press the
button for a short time to modify an
incorrectly entered number, one by one. Press the
button for a long time to completely delete all the
incorrectly entered numbers at once.
2
Press the
- Press the
button.
button to hang up the phone.
Using the Call Lists
You can view not only the latest calls or received phone numbers but also absent subscriber
messages.
This is achieved by simply selecting the desired phone number for information or to make a call.
1
Press the
2
Using the
button.
buttons to view the call history.
-
: Latest received number
-
: Latest called number
-
: Failed call
12
Home Page
3
Select the phone number and press the
Table of Contents
button.
The outging calls, incoming calls or missed calls lists store up to 99 entries each. If
they are all filled up, the oldest phone number will be erased when a new phone
number is saved.
Using Speed Dial
You can make a call using a speed dial number you assigned to a phone number in your contacts.
Press and hold the last two digits of a speed dial number for more than two seconds.
Answering a Call
Press any button except [Volume] button,
button, or
button
to start a conversation while the phone is ringing.
You can set how to answer the incoming call. Refer to [7. Phone Settings]
Æ [#. Call Answer] from ‘Menus’ in this guide.
Volume Adjustment
You can adjust the key button volume, and voice volume from the other party.
Key Button Volume Adjustment
You can adjust the volume with key button while on the phone.
Select the one of 5 volume levels you want by pressing the [Volume]
button in the initial screen.
If a key is pressed during a call, the key tone will not be played unless when using an
earphone.
13
Home Page
Table of Contents
Voice Volume Adjustment
While having a conversation on the phone, you can adjust the voice
volume from the other party.
Select the one of 14 volume levels you want by pressing the [Volume]
button while having a conversation.
Setting the Vibration Mode
To avoid interrupting other people in public places or during a meeting, you can set the phone to
vibration instead of ringing.
To Set up the Vibration Mode
Press the
button for more than 2 seconds on the initial screen.
Then the vibration mode icon
will be displayed on the top of phone screen and the phone will
vibrate instead of ringing if there is an incoming call.
To Disable the Vibration Mode
To disable the vibration mode, press the
Then the vibration mode icon
button for more than 2 seconds on the initial screen.
disappears.
Setting the Automatic Key Lock
In order to protect your privacy, this function prevents others from viewing your information.
When the automatic key lock is set, no keys of the phone will work, and functions other than
answering a call cannot be used until you disable the Automatic Key Lock.
To Set up the Automatic Key Lock
Press the
button for more than 2 seconds on the initial screen.
The screen will then display the automatic key lock icon
.
To Disable the Automatic Key Lock
To disable the automatic key lock, press the
button for more than 2 seconds on the initial
screen.
Then the automatic key lock icon
disappears.
14
Table of Contents
Home Page
Entering Characters
This section describes how to enter uppercase/lowercase English characters and special characters.
Buttons Used for Entering Characters
The buttons used for entering the characters are as follows.
-
button: Screen for entering [ENG (uppercase)] appears first and
a menu bar prompting you to select [eng (lowercase)/
Sym (Special character)] on the lower part of the screen.
-
button: Enter the desired characters from [ENG/eng/Sym].
How to Enter Uppercase and Lowercase
Pressing the
button allows you to enter English uppercase letters automatically and to select
one type from the [ENG/eng/Sym] located on the lower part of the screen using the
buttons.
The screen will then provide an input field for the character type you selected the other two
character types will appear on the menu bar.
For example, if [eng] is selected, [ENG/eng/Sym] will appear on the menu bar.
Press the
buttons to move the cursor.
button and place the cursor on the appropriate
Modify the desired characters using the
location to insert the characters. If a character to be entered is the same as the last entered
buttons to move the cursor right one space.
character, press the
Dial Button
Count
1
0
1
2
‘space’
.
3
4
5
6
7
8
9
A
D
G
J
M
P
T
W
2
B
E
H
K
N
Q
U
X
3
C
F
I
L
O
R
V
Y
4
S
*
/
#
@
Z
To enter characters, press the button where a desired character is displayed repetitively to display
the next character. (e.g., If the number [5] button is pressed, the character ‘J’ is entered. If the [5]
button is pressed once more, the ‘K’ is entered.)
15
Home Page
Table of Contents
How to Enter Special Characters
Press the
button and select [Sym] from the menu bar on the lower part of the screen.
Then the special characters are displayed in the same order.
Select desired special characters using the
buttons and press the
button to enter the
character on the screen.
How to Enter Numbers
Press the dial button for more than 2 seconds so that numbers are entered irrespective of
which character has been selected from out of the English Uppercase/English Lowercase/Special
Characters has been entered.
16
Home Page
Table of Contents
CONVENIENT FEATURES
Features Used During a Call
These convenient functions may be used during a call.
Mute on a Call
This is used to block your voice from your phone during a call. But you can still hear the other party.
1
Press the
2
Move to [1. Mute(On)] using
button during a phone conversation.
and then press the
button,
button.
- If you want to resume talking to the phone, press the
button again and select [1. Mute(Off)].
Conference Call while on the Phone
This is the setting function for conference call while on the phone.
1
Press the
2
Select the [2. Conference] using
and then
button while on the phone with other party.
button,
button.
3
Enter the 3rd party phone numbers who wants to participate
in a conference.
4
When the call is connected with the 3rd party, press the
button.
Select the [1. Conference] and then press
button.
- Up to 5 people can participate in a conference call.
17
Home Page
Table of Contents
Call Transfer
This function allows to transfer a call to the other party during a call conversation.
1
Press the
2
Press the call number to be transferred.
3
Press the
button during the conversation.
button to hang up. Then the call will be transferred to the third party on hold.
- Press the
button again in transfer mode to resume the call with the previous caller
again.
Holding a Call
This is used to hold a call for a while during a phone conversation.
1
Press the
2
Re-press the
button during the conversation.
button in standby status to resume the hold call.
Right Navigation Button
If you press the
button during a call, a menu will appear allowing you
to save telephone numbers.
- You can save the telephone number of the present caller
- You can dial a number using the Phonebook.
- You can dial a number using the Call list.
18
Home Page
Table of Contents
Features on a Calling Failure
This section describes functions that can be used for internal calls when the other party is busy or
when a call cannot be connected due to features such as ‘Do Not Disturb’, set by the other party.
Call Back
If an internal call cannot be connected, you can reserve the call.
1
If the other party does not answer your call or if he or she
is in
button.
‘Busy’ or in ‘Do Not Disturb’ status, press
2
Move to [1. Call Back] using the
then
button and
button.
press the
- Your phone will ring when the other party either finishes
the call or clears the DND function. Once you pick up your
phone, the phone of the other party starts to ring.
Station Message
If an internal call cannot be connected, you can send a message.
1
If other party is not answering, ‘busy’ or ‘rejecting call’ is
set,
then press the
2
button.
Move to [2. Message] using the
then
press the
- The
button and
button.
icon appears on the other party’s phone.
19
Home Page
Table of Contents
Camp On
If an internal call cannot be connected, you can make the other party’s phone to play an urgent
sound
and wait for the other party to answer your call.
1
If the other party does not answer your call or if he or she
is in
button.
‘Busy’ or in ‘Do Not Disturb’ status, press
2
Move to [3. Camp On] using the
then
press the
button and
button.
- The urgent sound cannot be heard while the other party is
busy.
The bell of the other party starts to ring when the other
party hangs up the call.
20
Home Page
Table of Contents
MENUS
Menu Structure
Press the [Menu] button in idle mode. The menu will appear on the screen.
The Menu screen displays the functions-Phonebook, Utilities, Message, Soft Menu, Volume/Ring,
Phone Settings, System and Help as icons.
1. Find Number
Phonebook
2. Schedule
3. Incoming Calls
3. Calculator
4. Missed Calls
4. World Time
5. New Entry
5. Conversion
6. Delete List
6. Timer
2. Connection Tone
Message
1. Station Msg
1. Incoming calls Tone
Volume
/Ring
1. Station Msg
1. Alarm
2. Outgoing Calls Utilities
Soft Menu
2. Direct Pickup
3. Key Tone
3. DoNotDisturb
4. Warning Tone
4. Page
5. Conference
1. Disable
Call Forward
2. All Calls
3. Busy Calls
Phone
Settings
4. No Answer
5. Busy/No Answer
6. DoNotDisturb
1. Registration
System
2. System Setting
1. Phone Name
2. Background
3. Password
4. Language
5. Back Light
6. LCD Contrast
7. Cradle Hook
8. Reset
9. Program Msg
0. Phone Lock
*. Intern. Lock
#. Call Answer
1. Function Desc
Help
3. Encryption Key
4. Unregistration
5. QoS (WMM)
6. IP&MAC Addr.
7. Version Info
8. Network Setting
9. SSID Setting
21
2. Troubleshooting
2. SMS
3. VMS
Home Page
Table of Contents
Phonebook
Press the [Menu] button in idle mode, and then select the [1. Phone book] icon to find out
various methods to make a call and view the call lists.
Find Number
This function allows you to search a phone number by name,
number and location.
Search by Name
You can search and make a call the desired phone number using a name.
[MENU] X 1. Phone book X [OK] X 1. Find Number X 1. By Name
X Enter a name X [OK]
- If you press the [OK] button without entering a name, all the numbers in
the list saved will be displayed.
- Use the
buttons to move between phone number,
and press [Send] button to make the call.
- Use the
buttons to move between phone number,
and press [OK] button to detail information.
Search by Number
You can search and make a call the desired phone number using a phone number.
[MENU] X 1. Phone book X [OK] X 1. Find Number X 2. By Number
X Enter a phone number X [OK]
- If you press the [OK] button without entering a number, all the numbers
in the list saved will be displayed.
- Use the
buttons to move between phone number,
and press [Send] button to make the call.
- Use the
buttons to move between phone number,
and press [OK] button to detail information.
22
Home Page
Search by Speed Dial Number
You can search and make a call the desired phone number using a speed dial number.
[MENU] X 1. Phone book X [OK] X 1. Find Number X 3. By Location
X Enter a speed dial number X [OK]
- If you press the [OK] button without entering a speed dial number,
all the numbers in the list saved will be displayed.
Modifying/Deleting Phone Number
This is the method to modify or delete the saved phone number.
[MENU] X 1. Phone book X [OK] X 1. Find Number X 1/2/3
X Enter Name/Phone number/Speed dial number X [OK]
X
X [MENU] X 1. Edit X Modify phone number
X [OK]
- To modify the phone number, select [1. Edit]
- To delete the phone number, select [2. Delete].
- Using the [Cancel] and [Dial] buttons, modify the phone number and
press the [OK] button to save it.
23
Table of Contents
Home Page
Table of Contents
Outgoing Calls
After view only the latest dialed phone number, select the desired phone number and make a call.
[MENU] X 1. Phone book X [OK] X 2. Outgoing Calls X [OK]
- The maximum of 99 phone numbers can be saved in the outgoing calls list.
If they are all filled up, the oldest phone number is erased when a new
dialed phone number is saved.
- Use the
buttons to move between phone number,
and press [Send] button to make the call.
- To see the date and time information of an outgoing call, use the
buttons to move the number and press [OK] button.
Incoming Calls
After view only the latest received phone number, select the desired phone number and make a call.
[MENU] X 1. Phone book X [OK] X 3. Incoming Calls X [OK]
- The maximum of 99 phone numbers can be saved in the incoming calls
list. If they are all filled up, the oldest phone number is erased when a
new received phone number is saved.
- Use the
buttons to move between phone number,
and press [Send] button to make the call.
- To see the date and time information of an incoming call, use the
buttons to move the number and press [OK] button.
Missed Calls
After view only the latest missed phone number, select the desired phone number and make a call.
[MENU] X 1. Phone book X [OK] X 4. Missed Calls X [OK]
- The maximum of 99 phone numbers can be saved in the missed calls list.
If they are all filled up, the oldest phone number is erased when a new
missed phone number is saved.
- Use the
buttons to move between phone number,
and press [Send] button to make the call.
- To see the date and time information of a missed call, use the
buttons to move the number and press [OK] button.
24
Home Page
Table of Contents
Saving/Modifying/Deleting Phone Number
This is the method to modify or delete the saved phone number.
[MENU] X 1. Phone book X [OK] X 2/3/4 X [OK]
X
(Move to a phone number) X [MENU] X 1. Save
X Enter name, phone number, speed dial number X [OK]
- To save the phone number, select [1. Save]
- To modify the phone number, select [2. Edit]
- To delete the phone number, select [3.
Delete].
- Using the [Cancel] and [Dial] buttons, modify the phone number and
press the [OK] button to save it.
New Entry
This function allows you to save the new phone number by using the menu function.
[MENU] X 1. Phone book X [OK] X 5. New Entry X Enter name,
phone number (home, station, mobile), speed dial number X [OK]
- You can directly enter the phone number on the idle mode,
and save that number using the
button.
Delete List
This function enables you to delete phone numbers registered in the phonebook or calling numbers
and called numbers.
[MENU] X 1. Phone book X [OK] X 6. Delete List X [OK]
X 1. Del Phonebook X Enter a Password X
(Yes/No)
X [OK]
- To delete all phone number saved in the phonebook, select [1. Del Phonebook].
- To delete the list of outgoing call numbers, select [2. Del Outgoing].
- To delete the list of incoming call numbers, select [3. Del Incoming].
- To delete the list of missed call numbers, select [4. Del Missed].
- To delete all phone number saved in the phonebook and the list of outgoing/incoming/missed calls
numbers, select [5. Del All].
25
Home Page
Table of Contents
Utilities
Press the [Menu] button in idle mode, and then select the [2. Utilities] icon.
Alarm
This function enables you to delete phone numbers registered in the phonebook or calling numbers
and called numbers.
[MENU] X 2. Utilities X [OK] X 1. Alarm X [OK] X 1. Set Alarm
X [OK] X Enter time X
X
(Move to the alarm interval field)
(Select alarm interval) X [OK]
- To set the alarm, select [1. Set Alarm]
- To disable the alarm, select [2. Reset Alarm].
- To change the alarm melody, select [3. Alarm
Melody].
You can choose one among 5 melodies.
- When the alarm is set, the alarm icon
will appear on the screen.
Schedule
This function allows you to enter important tasks or appointments and then set the phone alarms on
those dates. So, you can easily use this function to manage a personal schedule.
If the alarm is set up as mute, you can directly check what the schedule is on the screen.
[MENU] X 2. Utilities X [OK] X 2. Schedule X [OK] X Select dates
X [OK] X Enter time X
XEnter contents X
X
(Move to the content field)
(Move to the melody field)
(Select Melody) X [OK]
26
Home Page
Table of Contents
Modifying/Deleting Schedule
This function allows you to modify or delete the registered schedule.
[MENU] X 2. Utilities X [OK] X 2. Schedule X [OK] X Select dates
X [OK] X
(Select schedule list) X [MENU] X 1. Modify
X Modify Time/contents/melody X [OK]
- To modify a schedule, select [1. Modify]
- To delete a schedule, select [2. Delete].
- To add a schedule, select [3. Add].
- To delete all schedules, select [4. Delete All ].
Calculator
This function allows you to do four arithmetical operations (addition, subtraction, multiplication and
division) in a simple way.
[MENU] X 2. Utilities X [OK] X 3. Calculator X [OK] X Enter numbers
X
(Select arithmetical operation symbol)
X Enter numbers X [OK]
- When entering negative numbers, press [Auto Key Lock] button, and
When incorrect numbers are entered, press the [Cancel] button.
- Press the
buttons to reuse the result.
- Press the [Cancel] button to reset or the [End/Power] button to
terminate.
World Time
This function allows you to check current date and time in each region of the world.
[MENU] X 2. Utilities X [OK] X 4. World Time X [OK]
X
(Move the meridian line)
- The corresponding time of each capital name will be shown.
27
Home Page
Table of Contents
Conversion
This function allows you to convert a variety of units (length/weight/volume/area/temperature).
After entering a value, you may select a unit and convert the value into another unit.
[MENU] X 2. Utilities X [OK] X 5. Conversion X [OK]
X 1. Length/2. Weight/3. Volume/4. Area/5. Temperature
X [OK] X Enter values X
X
(Select a unit to convert)
(Move to the target conversion unit field)
X
(Select a desired conversion unit) X [OK]
Timer
This function raises an alarm after a preset time is elapsed when you set the time.
[MENU] X 2. Utilities X [OK] X 6. Timer X [OK]
- Press the [Speaker] button to select [Set]
- Press the [Menu] button to select [Start].
- If you want to pause the timer for a while, press the [Menu] button to
select [Stop].
- When the time is up, the bell stars to ring.
28
Home Page
Table of Contents
Message
Press the [Menu] button in idle mode, and then select the [3. Message] icon.
The [Message] menu consists of 3 sub menus: Station Msg, SMS and VMS.
Station Message
You can send a reply by checking messages received from an extension on the busy state.
[MENU] X 3. Message X [OK] X 1. Station Msg X [OK]
X
(Select a station number) X [OK] X 1. Reply
X [OK]
- To connect call, select [1. Reply].
- To delete the message, select [2.
Delete].
SMS (Short Message Service)
This function allows you to send or receive messages to/from other station.
Inbox
This function allows you to check an incoming message. Up to 20 incoming messages can be saved.
[MENU] X 3. Message X [OK] X 2. SMS X [OK] X1. Inbox
X [OK] X
(Select the message) X [OK]
- Press the [Menu] button to delete selected message or to delete all
messages.
- After the message is selected, Press the [Menu] button to reply or to
resend or to delete selected message.
- Press the [Send] button to make a call to the person who left the
selected message. However, if the message does not include the phone
number of the person, a call cannot be made.
- If there are unchecked messages,
checked messages,
is displayed, if there are
is displayed.
29
Home Page
Table of Contents
Outbox
Write
This function allows you to write and send the new message.
[MENU] X 3. Message X [OK] X 2. SMS X [OK] X 2. Outbox X [OK]
X 1. Write X [OK] X 1. New Text X [OK] X Enter the new message
X [OK] X enter the destination number X [OK]
- To write new text, select [1. New Text]
- To select the message stored in the Templates, select [2.
Template].
- After editing the selected message in the Templates, you can send the
message.
- Up to 80 characters/numbers including the blank can be written.
Sent
This function allows you to check a sent message saved in the message box and the message that
fails to be sent, to re-send the message, to delete a message or all messages.
[MENU] X 3. Message X [OK] X2. SMS X [OK] X 2. Outbox
X [OK] X 2. Sent X
(Select the sent message) X [OK]
- Select the message and press the [OK] button to check the sent
message.
- After the message is selected, press the [Menu] button to resend or
delete the selected message.
- Up to 10 outgoing messages can be saved.
- If the message is sent,
is displayed, if the message fails to be sent,
is displayed.
Templates
New
This function allows you to register a new message to the Templates.
[MENU] X 3. Message X [OK] X 2. SMS X [OK] X 3. Templates
X [OK] X 1. New X [OK] X Enter the character X [OK]
- Up to 10 messages can be saved in the message box.
30
Home Page
Table of Contents
Search
This function allows you to check the messages saved in the Templates.
[MENU] X 3. Message X [OK] X 2. SMS X [OK] X 3. Templates
X [OK] X 2. Search X [OK] X
(Select the message
X [OK]
- Press the [Menu] button to delete selected message or to delete all
messages.
- After the message is selected, press the [Menu] button to send, edit,
delete the selected message.
SMS Settings
Alert Time
This function allows you to set alert time that notifies to the user when a message arrives.
[MENU] X 3. Message X [OK] X 2. SMS X [OK] X 4. SMS Settings
X [OK] X 1. Alert Time X [OK] X
(Select the alert time)
X [OK]
VMS (Voice Mail System)
Message
This function allows you to check the number of the new VMS messages and hear new message
contents. This function is available after installing VMS and setting a VMS group.
[MENU] X 3. Message X [OK] X 3. VMS X [OK] X 1. Message X [OK]
- After accessing the VMS, You can use the soft menu by pressing the
[Menu] button.
31
Home Page
Table of Contents
Volume/Ring
Press the [Menu] button in idle mode, and then select the [4. Volume/Ring] icon.
You can press the
in idle mode to perform the same function.
Incoming Calls Tone
Ring Type
You can select the modes of call sound such as the ring, vibration, ring after vibration and Light only.
[MENU] X 4. Volume/Ring X [OK] X 1. Incoming calls tone X [OK]
X 1. Ring Type X [OK] X
(Select ring type) X [OK]
For information about how to set the vibration mode, refer to the description of
‘Setting the Vibration Mode’ section in ‘Basic Features’ of this guide.
Ring Tone
This function enables you to select one ring melody out of a selection of 18 melodies.
[MENU] X 4. Volume/Ring X [OK] X 1. Incoming calls tone X [OK]
X 2. Ring Tone X [OK] X
(Select melody) X [OK]
Ring Volume
This function enables you to adjust the ring volume.
[MENU] X 4. Volume/Ring X [OK] X 1. Incoming calls tone X [OK]
X 3. Ring Volume X [OK] X
(Select ring volume) X [OK]
You can adjust the volume of the bell by using the [Volume] button.
32
Home Page
Table of Contents
Connection Tone
This function enables to set an alarm in call connection.
[MENU] X4. Volume/Ring X [OK] X 2. Connection Tone X [OK]
X
(Select On/Off) X [OK]
Key Tone
This function enables you to set the type of key tone.
[MENU] X 4. Volume/Ring X [OK] X 3. Key Tone X [OK]
X
(Select key tone) X [OK]
Warning Tone
This function enables you to hear a warning tone when you move to a shadow zone during a call.
[MENU] X 4. Volume/Ring X [OK] X 4. Warning Tone X [OK]
X
(Select On/Off) X [OK]
33
Home Page
Table of Contents
Soft Menu
Press the [Menu] button in idle mode, and then select the [5. Soft Menu] icon.
Station Message
You can send a reply by checking messages received from an extension on the busy state.
[MENU] X 5. Soft Menu X [OK] X 1. Station Msg X [OK]
X
(Select a station number) X [OK] X 1. Reply
X Call is connected.
- To connect call, select [1. Reply].
- To delete the message, select [2.
Delete].
Direct Pickup
You can hear one of the other handsets ringing, but you know there is nobody in the vicinity of the
device.
You can take over this call.
[MENU] X 5. Soft Menu X [OK] X 2. Direct Pickup X [OK]
X Dial the ringing extension number X [OK]
Do Not Disturb
You can deny all of call requests anytime you want to.
[MENU] X 5. Soft Menu X [OK] X 3. DoNotDisturb X [OK]
X
(Select On/Off) X [OK]
- When DND (Do Not Disturb) mode is set up, the ‘DND’ message and the
icon will appear on the initial screen.
34
Home Page
Table of Contents
Page
This function allows you to page through your phone at the specific area in the system.
[MENU] X 5. Soft Menu X [OK] X 4. Page X [OK]
X
(Select page zone) X [OK]
X My voice is announced through the phone.
Conference
You can call multiple parties to have a conversation in one channel. Up to five persons, including the
person holding the conference, can participate in a conference call.
Group Conf.
Load
You can load a conference group from the system and have a conference with the group.
[MENU] X 5. Soft Menu X [OK] X 5. Conference X [OK]
X 1. Group Conf. X [OK] X 1. Load X [OK] X Group list is displayed
X
(Select a group) X [OK]
X Group members are connected
- To modify or delete the group, press the [Menu] button in the group list
and then select [1. Edit], or [2. Delete].
Save
Members that are frequently called upon for a meeting can be saved to the system as a group.
A group saved to the system can be conveniently used later by selecting ‘Group Conference’.
[MENU] X 5. Soft Menu X [OK] X 5. Conference X [OK]
X 1. Group Conf. X [OK] X 2. Save X [OK] X Entering group name
X [OK] X Enter phone number of member
X
(Move to next field)
X Enter phone number of next member X [OK]
35
Home Page
Each Conf.
You can have a conference by entering directly phone number of each member.
[MENU] X 5. Soft Menu X [OK] X 5. Conference X [OK]
X 2. Each Conf. X [OK] X Enter phone number of member X [OK]
X
(Move to next field) X Enter phone number of next member
X [OK]
- The
mark means that you have completed entering the phone
number.
- The
mark means that you have failed the call connection.
- The
mark means that you have connected with the member.
- You can retrieve a conference group or a phone number saved in the
phone by pressing [Menu] button at the phone number entry screen.
36
Table of Contents
Home Page
Table of Contents
Call Forward
Press the [Menu] button in idle mode, and then select the [6. Call Forward] icon.
This feature enables you to forward your incoming calls to a specific extension, group of extensions
or external number when you are unable to receive an incoming call.
[MENU] X 6. Call Forward X [OK] X
(Select forward type) X [OK] X Enter a forwarded number X [OK]
< Forward type >
- To disable the forward mode, select [1. Disable].
- To forward all incoming calls, select [2. All Calls].
- To forward incoming calls when you are using the phone, select [3. Busy Calls].
- To forward incoming calls when you cannot answer within the specified time,
select [4. No Answer].
- To forward incoming calls when you are busy or cannot answer within the
specified time, select [5. Busy/No Answer].
- To forward incoming calls when DND mode is set up, select
[6. DoNotDisturb].
- When the forward mode is set up, the ‘FWD’ message will appear on the
initial screen.
- To use the [5. Busy/No Answer] function, the [3. Busy Calls] and
[4. No Answer] functions must be set.
37
Home Page
Table of Contents
Phone Settings
Press the [Menu] button in idle mode, and then select the [7. Phone Settings] icon.
The submenus are not displayed until a password is entered.
Phone Name
This function enables you to enter random characters on the screen displayed on the initial screen.
[MENU] X 7. Phone Settings X [OK] X Enter a Password
X 1. Phone Name X [OK] X Enter your name X [OK]
If you save your name in your phone, your name will be displayed on the other party’s
phone when you are connected to another party (intercom user). (This applies only
when your phone number is not saved in the phonebook of the intercom user.)
Background
This function enables you to select the background of the initial screen that appears when power on.
[MENU] X 7. Phone Settings X [OK] X Enter a Password
X 2. Background X [OK] X
(Select a screen) X [OK]
Password
This function enables you to prevent others from using your phone by changing the initial factory set
password of the phone. The initial password is set to 0000.
[MENU] X 7. Phone Settings X [OK] X Enter a Password
X 3. Password X [OK] X Enter new password X [OK]
X Enter new password again X [OK]
38
Home Page
Table of Contents
Language
This feature enables you to set the language displayed on the screen of the phone.
[MENU] X 7. Phone Settings X [OK] X Enter a Password
X 4. Language X [OK] X
(Select language) X [OK]
Back Light
This function enables you to set the intensity of the lighting on the phone screen.
Light Time
This function enables you to set the time for background lighting, which lights automatically when
the keys are pressed or a messages appears.
[MENU] X 7. Phone Settings X [OK] X Enter a Password
X 5. Back Light X [OK] X 1. Light Time X [OK]
X
(Select light time) X [OK]
- The lighting of the LCD screen turns off automatically unless a button is
pressed within 8 seconds. You can also set the lighting duration to
20 seconds or turn off the lighting altogether.
- Select ‘Always Off’ to disable the light at all times.
Power Save
You can set the mode of the energy-saving lighting.
[MENU] X 7. Phone Settings X [OK] X Enter a Password
X 5. Back Light X [OK] X 2. Light on/off X [OK]
X
(Select On/Off) X [OK]
39
Home Page
Table of Contents
LCD Contrast
This feature supports to set the LCD contrast if you want to change it.
[MENU] X 7. Phone Settings X [OK] X Enter a password
X 6. LCD Contrast X [OK] X
(Select contrast) X [OK]
Cradle Hook
This function enables to select call off/on when you charge your phone battery with a charger.
[MENU] X 7. Phone Settings X [OK] X Enter a password
X 7. Cradle Hook X [OK] X
(Select cradle hook option)
X [OK]
Reset
This function enables you to initialize all the functions and status of a phone.
[MENU] X 7. Phone Settings X [OK] X Enter a password X 8. Reset
X [OK] X
X Enter a password X
(Select reset option) X [OK]
(Yes/No) X [OK]
- To reset the status of a phone, select [1. Reset All]. All the saved records as
well as the phone options are deleted.
- To reset the options for the phone functions, select [2. Reset Func.].
40
Home Page
Table of Contents
Program Msg (Programmed Message)
This function enables to advise your absence by sending a programmed message to the caller,
when you are in absence.
[MENU] X 7. Phone Settings X [OK] X Enter a password
X 9. Program Msg X [OK] X 1. On X
(Select a message)
X [OK]
- To set the programmed message, select [1. On]
- To cancel the programmed message setting, select [2. OFF].
- Up to 20 programmed messages can be selected.
- In the programmed message setting, the programmed message is
displayed on the caller’s phone screen, when the called attempt to call
you.
Phone Lock
When the Phone lock is set, no keys of the phone will work, and functions other than answering a
call cannot be used until you enter the password.
[MENU] X 7. Phone Settings X [OK] X Enter a password
X 0. Phone Lock X [OK]
Intern. Lock (Internal Lock)
This function enables to lock incoming/outgoing calls to prevent others from using your phone
without permission.
[MENU] X 7. Phone Settings X [OK] X Enter a password
X *. Intern. Lock X [OK] X
(Select lock option)
X [OK]
- To disable the lock function, select [1. Unlock].
- To lock an outgoing trunk call, select [2. Lock Outgoing]. At this time,
outgoing (incoming) calls are allowed.
- To lock all outgoing/incoming trunk/station calls, select [3. Lock All
Calls].
- If the lock mode is set up, ‘LCK’ is displayed on the phone screen.
41
Home Page
Table of Contents
Call Answer
This function enables you to select the Call Answer Mode for how to answer the incomming call.
[MENU] X 7. Phone Settings X [OK] X #. Call Answer
X
(Select the mode) X [OK]
- You can answer a call by pressing the any button or [Send] button
according to the selecting mode.
42
Home Page
System
Press the [Menu] button in idle mode, and then select the [8. System] icon.
Registration
This function enables to register a phone to the wireless LAN system (main system).
The phone is available only after registered to the system.
[MENU] X 8. System X [OK] X 1. Registration X
(Select the system) X [OK]
To set the phone’s operation mode, select from SIP mode and
Non SIP mode.
Contact the system administrator to check which mode the system
supports, and then select either SIP mode or Non SIP mode.
If you want to access FON AP, select Non SIP Mode.
(Non SIP mode should be selected for system operation mode.)
System DHCP Mode
This function enables to register a phone to the system using a dynamic IP address.
- User ID: Enter a user ID for a phone registered in the system.
- Password: Enter a user password for a phone registered in the system.
1
Select SSID input mode, and press the [OK] button.
- Auto: An automatic search finds available SSIDs, and the user
can select an SSID from the results.
- Manual: enter an SSID manually.
2
If you select [Auto] at Step 1, SSIDs are automatically searched.
Select an SSID from the list of searched SSIDs.
- Ask the system administrator which SSID should be selected.
43
Table of Contents
Home Page
3
If you have chosen [Manual] at Step 1, directly enter an SSID,
and then press [OK].
- SSID: Enter the ESSID set in the WLAN connection device.
Consult the system administrator to verify the ESSID.
4
Enter the user ID.
5
Enter Password set in the system.
6
Set the feature On/Off of WMM (WiFi MultiMedia).
- Refer to your system administrator to set On/Off.
44
Table of Contents
Home Page
7
Select the Encryption Key mode.
- If you have selected SSID Auto input at Step 1, you can register
the handset without entering the encryption key depending on
the encryption key setting on the AP(Access Point).
If an encryption key has not been enabled on the AP, Step 7 and
8 will be skipped and the user will be directed to the registration
screen automatically.
If an encryption key has been enabled on the AP, an automatic
search will run to detect encryption mode, and will switch to an
input screen of the relevant mode.
- If the encryption mode is WEP: ASCII mode or HEX mode screen
will be displayed.
- If encryption mode is WPA_PSK or WPA2_PSK: TKIP/AES mode
is automatically recognized and an encryption input screen is
displayed.
- If Manual has been selected at Step 1, a screen is displayed as
shown to the right.
- As for its availability, refer to your system administrator.
- In case a WEP key has been enabled, select ASCII Mode or
HEX Mode to enter the WEP Key.
- In case a WPA_PSK or WPA2_PSK key has been enabled, select
AES Mode or TKIP Mode to enter the Encryption Key.
8
Enter the Encryption key and press the [OK] button.
- Encryption key: Enter the Encryption key into the WLAN
connection device. Refer to your system administrator to verify
the Encryption key.
- If no Encryption key is present, leave it blank and press [OK].
9
When the phone is successfully registered, the display will
appear as on the right.
45
Table of Contents
Home Page
Static IP Mode
This function enables to register a phone to the system using a fixed IP address.
1
Enter a phone IP address.
2
Enter the System IP address.
3
Enter the System Gateway.
4
Enter the System Netmask.
5
The next steps are the same as Step 1 to 9 of System DHCP
mode registration.
46
Table of Contents
Home Page
Table of Contents
Standard DHCP Mode
This option registers a phone to the system using a dynamic IP address assigned by a server that
uses a DHCP standard protocol. You can use this feature if a separate DHCP server is used.
You can use this feature if a separate DHCP server is used or if you attempt to access FON AP.
When you move to another site (area shift), you can still use your phone without registering it again.
1
If you want to access FON AP, select [On]; if not, select [Off],
and then press [OK].
If [On] has been selected at Step 1 (FON AP access)
1
Enter an ID for authentication when accessing FON AP.
2
Enter a password for authentication when accessing FON AP.
3
Enter the System IP address.
4
The next step is the same as step 1 to 9 of System DHCP mode.
47
Home Page
Table of Contents
If [Off] has been selected at Step 1 (normal AP access)
1
Enter the System IP address.
2
The next steps are the same as Step 1 to 9 of System DHCP
mode registration.
System Setting
While using a phone registered to a system, you can transfer to another system for connection.
To use this function, the phone should already be registered to the system.
[MENU] X 8. System X [OK] X Enter the password X [OK]
X 2. System Setting X [OK] X
(Select system)
X [OK] X Confirm the information of the system X [OK]
Inquire your system administrator for information on whether the system connected to
the phone is Sytem1~System4. To newly register a phone to System2, select System2
and register the phone according to the ‘Phone Registration’ procedure described
earlier.
48
Home Page
Table of Contents
Encryption Key
You can set the encryption key in the system which should be entered when you register the phone.
You can register the phone to the system only by additionally setting or clearing the encryption key
without having to enter the system information again.
[MENU] X 8. System X [OK] X Enter the password X [OK]
X 3. Encryption Key X [OK] X
[1. Disable/2. WEP/
3. WPA_PSK/4. WPA2_PSK] (Select Encryption key)
X [OK] X
[1. ASCII Mode/2. HEX mode] or
[1. AES Mode/2. TKIP mode] (Select Encryption mode) X [OK]
X Enter encryption key X [OK]
Consult the system administrator and enter the value set on the system.
Unregistration
This function enables a user to clear the registration information stored in the wireless phone (SMTW5100) when the wireless phone is registered in the system. The user should check the user
password before performing the unregistration function.
[MENU] X 8. System X [OK] X Enter the password X [OK]
X 4. Unregistration X [OK] X Enter the password X [OK]
X
(Yes/No) X [OK]
Before execute the [Unregistration], double check whether this function should be
executed since all phone information registered to the system will be deleted.
QoS (WMM: WiFi MultiMedia)
This function allows you to set the feature On/Off of WMM (WiFi MultiMedia).
You can use this feature if the AP which your phone is connected to supports the QoS feature.
[MENU] X 8. System X [OK] X 5. QoS (WMM) X [OK]
X
(Select On/Off) X [OK]
49
Home Page
IP&MAC Address
This function enables to show the unique MAC address for each terminal.
[MENU] X 8. System X [OK] X 6. IP&MAC Addr. X [OK]
Version Info
You can find out the version number and the date of the software of your handset.
[MENU] X 8. System X [OK] X 7. Version Info X [OK]
Network Setting
You can view the phone’s network information, and change the settings.
[MENU] X 8. System X [OK] X 8. Network Setting X [OK]
X
(1.Network info/2. System IP/3. Phone IP/4 .FON AP/
5. DNS setting) X [OK]
Network Info
You can view the phone’s network info, system IP, and phone IP.
50
Table of Contents
Home Page
System IP
You can change the phone’s system IP, user ID, and password.
The changed value can be changed or reregistered.
1
Enter a system IP address.
2
Enter a user ID.
3
Enter a password.
4
Select [Save] or [Registration], and press [OK].
- [Save] only saves the changed value, while [Registration]
saves the value and also performs reregistration.
51
Table of Contents
Home Page
Table of Contents
Phone IP
The phone’s IP can be changed between the system DHCP, static IP mode, and the standard DHCP.
1
[MENU] X 8. System X [OK] X 8. Network Setting
X [OK] X 3. Phone IP X
Select [1.System DHCP /2.Static IP mode /3.Standard
DHCP]
[If 1. System DHCP or 3. Standard IP mode has been selected at Step 1]
2
Select [Save] or [Registration], and press [OK].
- [Save] only saves the changed value, while [Registration]
saves the value and also performs reregistration.
[If 2. Static IP mode has been selected at Step 1]
In Static IP mode, you can change the phone’s IP address, gateway, and netmask.
3
Enter the phone’s IP address.
4
Enter the phone’s gateway address.
52
Home Page
5
Enter the phone’s netmask address.
6
Select [Save] or [Registration], and press [OK].
Table of Contents
- [Save] only saves the changed value, while [Registration]
saves the value and also performs reregistration.
FON AP
You can select/cancel FON AP registration mode and change the FON ID and FON password.
The changed value can be changed or reregistered.
1
If you want to access FON AP, select [On]; if not, select [Off],
and then press [OK].
[If [On] has been selected at Step 1]
2
Enter an ID for authentication when accessing FON AP.
53
Home Page
3
Enter a password for authentication when accessing FON AP.
4
Select [Save] or [Registration], and press [OK].
- [Save] only saves the changed value, while [Registration]
saves the value and also performs reregistration.
[If [Off] has been selected at Step 1]
2
Select [Save] or [Registration], and press [OK].
- [Save] only saves the changed value, while [Registration]
saves the value and also performs reregistration.
DNS Setting
DNS can be changed.
You can save the changed value or reregister it.
1
Enter the system DNS address.
2
Select [Save] or [Registration], and press [OK].
- [Save] only saves the changed value, while [Registration]
saves the value and also performs reregistration.
54
Table of Contents
Home Page
SSID Setting
1
2
[MENU] X 8. System Setting X [OK] X 9. SSID Setting
X
(Select Auto/Manual) X [OK]
If you select Auto at Step 1, SSIDs are automatically searched.
Select an SSID from the list of searched SSIDs.
- Ask the system administrator which SSID should be selected.
3
Select the Encryption Key mode.
- If you have selected SSID Auto input at Step 1, you can register
the handset without entering the encryption key depending on
the encryption key setting on the AP(Access Point).
If an encryption key has not been enabled on the AP, Step 7 and
8 will be skipped and the user will be directed to the registration
screen automatically. If an encryption key has been enabled on
the AP, an automatic search will run to detect encryption mode,
and will switch to an input screen of the relevant mode.
- If the encryption mode is WEP: ASCII mode or HEX mode screen
will be displayed.
- If encryption mode is WPA_PSK or WPA2_PSK: TKIP/AES mode
is automatically recognized and an encryption input screen is
displayed.
- If Manual has been selected at Step 1, a screen is displayed as
shown to the right.
- As for its availability, refer to your system administrator.
- In case a WEP key has been enabled, select ASCII Mode or HEX
Mode to enter the WEP Key.
- In case a WPA_PSK or WPA2_PSK key has been enabled, select
AES Mode or TKIP Mode to enter the Encryption Key.
55
Table of Contents
Home Page
4
Table of Contents
Select [Save] or [Registration], and press [OK].
- [Save] only saves the changed value, while [Registration]
saves the value and also performs reregistration
Help
Press the [Menu] button in idle mode, and then select the [9. Help] icon.
Function Description
For the convenience of users, Function Descriptions provides some helps on using functions.
[MENU] X 9. Help X [OK] X [1. Function Desc]
X
(Select the function description) X [OK]
- Soft Menu: Briefly describes Soft Menu including Station Msg,
DoNotDisturb, Page and Conference.
- Phone Settings: Briefly describes Call Forward, Program Msg, and
Intern. Lock.
- Busy Call Function: Briefly describes the functions to be used during a
call, such as Call back, Station Msg, Camp On, Transfer, Hold, and Mute.
Troubleshooting
When any problem occurs in your station, you can fix the problem with this menu.
[MENU] X 9. Help X [OK] X [2. Troubleshooting]
X
(Select the Troubleshooting description) X [OK]
- This menu describes how to troubleshoot some issues, such as No ring
tone, Howling, Can’t Make a Call, Unregisterable, Call Disconnect and No
Operation.
56
Home Page
Table of Contents
TROUBLESHOOTING
Possible problems and troubleshooting steps for your phone are described below.
Check the troubleshooting steps before contacting your Authorized Samsung Reseller.
General
Trouble
Solution
The bell does not ring or the ring
sound is too small.
- Check if the phone is set to vibration mode.
The battery is not empty but the
phone does not turn on.
- Take the battery out and put it in again, and turn the
phone on.
- Adjust the volume at [MENU] Æ [4. Volume/Ring]
Æ [1. Incoming calls] Æ [3. Ring Volume].
- Take the battery out, clean the charging phones of the
battery. Then put the battery back in, and turn the
phone on.
Voices echo during a call.
- Press the [Volume] button and adjust the volume
- Move to another area.
Calls are disconnected frequently.
Move to another area since the frequency is unstable.
The phone operates abnormally or
does not operate at all.
Take the battery out and insert it again, and turn the
phone on again.
Power/Installation
Trouble
The lamp on the charger flashes yellow.
Solution
- Take the battery out from the charger and put the
battery in again.
- If the yellow light continues to flash, clean the
charging phones of the charger.
Phone registration failure.
- Check if the power of the system or AP is on and
reregister the phone.
- Move to a serviceable area of the system or AP and
reregister the phone.
Screen
Trouble
Solution
The LCD does not light up.
Battery is discharged. Recharge the battery and turn
the phone on again.
The
- Your phone may not be registered on the system.
Use the phone after registration.
indicator appears on screen
and calls cannot be made.
- Move to an area where service can be provided.
- Check if the power of the system or AP is on.
57
Home Page
ANNEX
Product Specifications
The specifications of the SMT-W5100 are as follows.
Item
Specification
Model Name
SMT-W5100
Frequency
2400~2483.5 MHz
Size (mm)
46 (width) × 138.4 (length) × 18 (height)
Weight
106.5 g
Battery Charge Time
3.5 Hour (Li-Ion)
Battery Duration
Call duration: 4 Hours
Standby duration: 40 Hours
58
Table of Contents
SMT_W5100E_Cover.qxp
10/5/2006
11:14 AM
Page 1
Home Page
Table of Contents
Home Page
SMT-W5100E
Handset User Guide
SMT-W5100E-UG 02 07/2008
w w w. s a m s u n g . c o m / b c s
Table of Contents