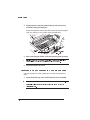
1
QMS 1725 SLS Print System User's Guide ® 1800332-001B Trademarks The following are trademarks or registered trademarks of their respective owners. Other product names mentioned in this manual may also be trademarks or registered trademarks of their respective owners. Registered trademarks are registered in the United States Patent and Trademark Office; some trademarks may also be registered in other countries. QMS and the QMS logo are registered trademarks of QMS, Inc., and Crown, the Crown seal, CrownNet, ImageServer, PS Executive Series, and QUIC are trademarks of QMS, Inc. PostScript is a trademark of Adobe Systems Incorporated for a page description language and may be registered in certain jurisdictions. Throughout this manual, “PostScript Level 2” is used to refer to a set of capabilities defined by Adobe Systems for its PostScript Level 2 page description language. These capabilities, among others, are implemented in this product through a QMS-developed emulation that is compatible with Adobe's PostScript Level 2 language. Adobe/Adobe Systems Incorporated. AppleTalk, EtherTalk, LaserWriter, LocalTalk, Macintosh, TrueType/Apple Computer, Inc. CompuServe/H & R Block. DEC, DECnet, LN03, VMS/ Digital Equipment Corporation. Hewlett-Packard, HP, PCL, HP-GL, LaserJet/HewlettPackard Co. IBM PC, Token-Ring/International Business Machines Corporation. Centronics/Centronics Data Computer Corporation. Microsoft, MS-Windows/Microsoft Corporation. Novell and NetWare/Novell, Inc. UNIX/UNIX Systems Laboratories. Ethernet/Xerox Corporation. Proprietary Statement The digitally encoded software included with your QMS 1725 SLS Print System is Copyrighted © 1995 by QMS, Inc. All Rights Reserved. This software may not be reproduced, modified, displayed, transferred, or copied in any form or in any manner or on any media, in whole or in part, without the express written permission of QMS, Inc. Copyright Notice This manual is Copyrighted © 1995 by QMS, Inc., One Magnum Pass, Mobile, AL 36618. All Rights Reserved. This manual may not be copied in whole or in part, nor transferred to any other media or language, without the express written permission of QMS, Inc. Dear Customer, Although your new QMS printer is the result of the latest and most advanced engineering techniques in the electronic industry, it isn’t necessary for you, the user, to understand every detail of the printer’s design in order to make it do what you bought it for. But there are some things you’ll need to know about your printer, and we’ve included guidebooks to help you get started. We’ve designed your user’s guide to help you find the information you need as quickly and easily as possible: n n n n n Table of Contents—Use this section as a road map to discover what’s in the Getting Started guide. About the Documentation—This section functions as a Welcome Center. It gives you an idea about what’s in your Setup and User’s Guide as well as in the other documentation that has accompanied your printer. About This Manual—This section describes the same information as in the table of contents, but in a descriptive format. Headers, Footers, and Tab Dividers—Use these as markers to help you locate the section of the manual you want quickly. Index—The blue pages at the end of this guide will help you find the specific information you need. We hope you enjoy your new QMS printer and find our guides helpful and informative. Your QMS Technical Writer Contents 1 Introduction About the Printer .......................................................................... 1-2 About the Documentation ........................................................... 1-2 Standard Product Documentation 1-3 Related Documentation 1-5 About This Manual ....................................................................... 1-5 Typographic Conventions 1-5 Printer Features ............................................................................ 1-6 Media Flexibility 1-6 Multiple Resolutions 1-6 Five Resident Emulations 1-7 Sessions Support 1-8 Resident Fonts and Symbol Sets 1-8 QMS Crown Technology 1-8 Software Loadable System (SLS) 1-10 Printer Options ...........................................................................1-11 Using the Control Panel ............................................................ 1-13 Control Panel Indicators 1-14 Message Window 1-15 Control Panel Keys 1-16 2 Printer Configuration Introduction .................................................................................. 2-2 Methods of Configuration ........................................................... 2-2 Using an Application 2-2 Using PS Executive Series Utilities 2-3 Using Printer Commands 2-3 Using the Control Panel 2-3 Configuration Menu ..................................................................... 2-4 How to Move Around the Configuration Menu 2-5 Accessing the Configuration Menu 2-5 Selecting Configuration Menu Options 2-6 Changing Character Information 2-8 Saving Configuration Changes 2-10 Canceling Configuration Changes 2-11 Setting the Message Window Language 2-11 Restoring the Factory Default Configuration 2-12 Operator Control Menu ............................................................. 2-12 Copies 2-12 Collation 2-13 Orientation 2-13 Inputbin 2-13 Outputbin 2-14 Chain Inputbins 2-14 Manual Feed Size 2-14 Def. Duplex 2-15 Tumble Duplex 2-15 Administration Menu ................................................................. 2-15 Communications ....................................................................... 2-16 Setting Timeouts 2-16 Setting Serial Interface Parameters 2-17 Setting Parallel Interface Parameters 2-23 Emulation 2-24 ii QMS 1725 SLS Print System User's Guide Setting AppleTalk Interface Parameters 2-26 Emulations ..................................................................................2-29 Setting an ESP Default Emulation 2-29 Setting PostScript Parameters 2-29 Setting HP PCL5 Parameters 2-30 Setting HP-GL Parameters 2-36 Setting Lineprinter Parameters 2-39 Special Pages .............................................................................2-42 Working with Status Pages 2-42 Working with Trailer Pages 2-44 Enabling/Disabling Trailer Pages 2-44 Printer Start-Up Options ............................................................2-45 Enabling/Disabling the Start-Up Page 2-45 Enabling/Disabling the SYS\START File 2-46 Loading the PostScript Error Handler 2-46 Memory .......................................................................................2-46 QMS Memory Management 2-47 Memory Terms 2-48 Evaluation of Your Printing Environment 2-50 Duplexing and Memory Requirements 2-51 Memory Clients 2-52 Quick Config 2-52 Configuring Spooling 2-52 PostScript Heap 2-53 PostScript Fonts 2-54 Emulation 2-54 Emulation (Temporary) 2-55 Display List 2-55 Disk Cache 2-56 Frame Buffer 2-57 Printer Memory 2-58 Printer Engine Features .............................................................2-58 Adjusting the Image Alignment 2-58 Setting Default Paper 2-59 Setting Inputbin x Name 2-59 Setting Outputbin x Name 2-60 Setting Default Resolution 2-60 Setting Gamma Correction 2-60 Specifying Page Recovery Action 2-60 Setting Toner Out Action 2-61 Contents iii Setting Manual Feed Timeout 2-61 Setting the Letterhead Option 2-61 Reading the Page Counters 2-62 Miscellaneous ............................................................................ 2-62 Restoring the Factory Default Configuration 2-62 Setting the Message Window Language 2-63 Hard Disks .................................................................................. 2-63 Identifying Hard Disks 2-64 The Disk Operations Menu 2-64 Formatting a Hard Disk 2-65 Collation 2-66 Spool Overflow 2-66 Installation .................................................................................. 2-67 Operator Password 2-67 Use Operator Password 2-67 Admin Password 2-67 Use Admin Password 2-68 Using Passwords 2-68 Configuring Optional Features ................................................. 2-68 3 Daily Operations Introduction .................................................................................. 3-2 Preventing Media Jams ............................................................... 3-2 About Paper ................................................................................. 3-3 Paper Sizes 3-3 Paper Storage 3-4 Paper Feeding .............................................................................. 3-5 Cassette Feed 3-5 Manual Feed 3-6 Face-up Output Bin ..................................................................... 3-8 Printing Transparencies ............................................................. 3-8 Printing Labels ............................................................................. 3-9 Printing Envelopes .................................................................... 3-10 Formatting Data for Envelopes 3-10 iv QMS 1725 SLS Print System User's Guide Printing a Single Envelope 3-10 The Optional Envelope Feeder 3-11 Tray Chaining .............................................................................3-11 Collating Output .........................................................................3-12 End Job Mode .............................................................................3-14 Common Reasons to Use End Job Mode 3-15 Using the EOD Commands 3-15 Setting the End Job Mode for the Serial and Parallel Protocols 3-16 Setting the End Job Mode via the Control Panel 3-17 Adding an EOD Command to Your File 3-18 Creating a Network Job Separator 3-20 Working with Status Pages .......................................................3-20 Identifying a Status Page Type 3-20 Printing a Status Page 3-21 Cancelling/Ending Print Jobs ...................................................3-21 Cancelling a Print Job 3-22 Ending a Print Job 3-23 4 Print Quality Introduction .................................................................................. 4-2 Changing Print Resolution .......................................................... 4-2 Setting Default Resolution 4-2 Setting Print Density .................................................................... 4-2 Using Gamma Correction ............................................................ 4-3 Terms 4-4 Gamma Correction Concept 4-6 Using the Image Calibration Page .............................................. 4-7 5 Printer Care Introduction .................................................................................. 5-2 When to Replace the Toner Cartridge ........................................ 5-2 Handling the Toner Cartridge 5-3 Contents v Installing the Toner Cartridge .................................................... 5-3 Handling the Printer .................................................................... 5-5 Keeping the Printer Clean ........................................................... 5-6 Cleaning the Anti-Static Teeth 5-6 Cleaning the Transfer-Guide Lock-Tray and Strip 5-8 Cleaning the Media-Feed-Guide Area 5-9 6 Troubleshooting Printer Problems Introduction .................................................................................. 6-2 Status Messages ......................................................................... 6-2 Service Messages 6-4 HP-GL Error Codes and PCL Error Codes 6-5 PostScript Errors ......................................................................... 6-5 Testing PC Communication ........................................................ 6-6 Creating the Test File 6-6 Sending the Test File 6-7 Verifying the Serial Port Setting Changes 6-11 Testing Macintosh Communication ......................................... 6-12 Printer Problem Checklist ......................................................... 6-12 Media Jams ................................................................................ 6-14 Locations 6-14 Clearing an Input Bin Media Jam 6-15 Clearing an Image-Transfer Area Media Jam 6-17 Clearing a Fuser Assembly Area Media Jam 6-18 Clearing an Output Bin Media Jam 6-20 Clearing a Duplexer Media Jam 6-21 Problem Descriptions ............................................................... 6-22 Paper Jam Message Stays On 6-22 Data Indicator Stays Lit 6-22 No Advanced Status Page 6-23 No Start-up Page 6-23 Printer Resets 6-23 Blank Pages 6-24 vi QMS 1725 SLS Print System User's Guide Not All Pages Print 6-24 Printer Will Not Duplex 6-25 Print Quality Problems ..............................................................6-25 Printer Will Not Print 600 dpi 6-26 Image Defects .............................................................................6-26 White or Light Lines 6-26 Light Image (Entire Page) 6-26 Dark Image (Entire Page) 6-27 Stain Along the Edge of the Page 6-27 Stains on the Back of the Page 6-27 Image Easily Smears when Rubbed 6-27 Placing a Service Call ................................................................6-28 7 Professional Printing Introduction .................................................................................. 7-2 About Typefaces and Fonts ........................................................ 7-2 Typeface Classification ............................................................... 7-3 Typography Terms ....................................................................... 7-4 Resident Fonts ............................................................................. 7-7 Resident PostScript Fonts 7-7 Resident HP PCL Fonts 7-9 Resident HP-GL Symbol Sets 7-10 8 Printer Options Introduction .................................................................................. 8-2 Additional Paper Cassettes ......................................................... 8-3 The Envelope Feeder ................................................................... 8-3 Selecting Envelopes 8-3 Installing the Envelope Feeder 8-3 Duplexer Assembly ...................................................................... 8-7 Installing the Duplexer Assembly 8-7 Contents vii Font and Emulation Cards ........................................................ 8-11 Installing an Optional Font 8-13 Removing an Optional Font 8-14 Installing Optional Emulation Cards 8-15 Removing a Printer Emulation 8-15 Downloading an Emulation From Disk .................................... 8-17 Security Card ............................................................................. 8-18 Removing and Re-installing the Tray Assembly .................... 8-20 Removing the Tray Assembly 8-20 Re-installing the Tray Assembly 8-24 Memory Modules (SIMMs) ........................................................ 8-26 Installing a SIMM 8-26 Removing a SIMM 8-29 Installing Optional Interfaces ................................................... 8-30 Installing an Optional Interface Card and Daughterboard 8-30 Centronics to Dataproducts Conversion ................................ 8-36 Hard Disks .................................................................................. 8-38 Internal 8-38 External 8-42 Identifying 8-42 Updating System Software ....................................................... 8-43 Procedure 8-43 A QMS Customer Support Sources of Support .....................................................................A-2 B Technical Specifications Print Engine Specifications ........................................................B-2 Controller Specifications ............................................................B-3 Electrical Requirements ..............................................................B-4 Environmental Requirements .....................................................B-4 viii QMS 1725 SLS Print System User's Guide Physical Characteristics ............................................................. B-4 Print Media ................................................................................... B-5 Print Media Sizes B-5 Envelopes B-6 Optional Hardware ...................................................................... B-6 Paper Handling B-6 Hard Disks B-7 Consumable Supplies ................................................................. B-7 Cable Pinouts .............................................................................. B-8 Centronics Parallel B-8 Serial B-9 IBM PC/XT, PC/AT, and Compatible Computers B-10 LocalTalk (Optional Interface) B-11 Macintosh to Serial B-11 Warranty Considerations ......................................................... B-12 Consumables and Your Warranty B-12 Electrostatic Discharge and Your Warranty B-12 C Document Option Commands Introduction ................................................................................. C-2 Supported DOCs ......................................................................... C-2 Header/Trailer Page Commands C-2 HP-GL Emulation Commands C-2 HP PCL 5 Emulation Commands C-3 Lineprinter Emulation Commands C-3 PostScript Emulation Commands C-4 Printer Commands C-4 Updated DOCs ............................................................................. C-4 PCL 5 Emulation Terminology C-4 Updated PCL 5 DOCs C-7 CCITT Commands ..................................................................... C-18 Accessing CCITT Emulation C-18 Command Syntax C-18 Contents ix ImageSize C-19 ImagePosition C-19 Rotation C-20 LineEnd C-20 BlockEnd C-20 EBAMode C-21 BitReverse C-21 InvertImage C-21 Compression C-22 DPI C-22 ImageData C-22 PageEnd C-23 JobEnd C-23 D Sessions Sessions .......................................................................................D-2 What is a Session? D-2 How is a Session Used? D-3 Session Command D-4 Examples D-7 Sessions Document Finishing Terminology D-9 Document Finishing DOC D-10 E Notices Manual Notice .............................................................................. E-2 Laser Safety ................................................................................. E-2 FCC Compliance .......................................................................... E-2 International Notices ................................................................... E-4 Canadian Users E-4 Vfg 1046/1984 Conformity Statement E-4 Bescheinigung des Herstellers/Importeurs E-4 Declaration of Manufacturer/Importer E-4 Electronics Emissions E-5 Colophon ...................................................................................... E-5 x QMS 1725 SLS Print System User's Guide F Configuration Menu Menu Diagrams ............................................................................F-2 Glossary Index v Contents xi 1 Introduction In This Chapter... n n n n n n n About the printer About the documentation About this manual Printer features and user benefits Printer options Using the printer’s control panel Printer-host communication About the Printer About the Printer The QMS 1725 SLS Print System offers the unique QMS Crown multitasking operating system, superior performance, extensive connectivity, upgrade options including duplex printing, and flexible emulation support. In addition, it prints 17 pages per minute (letter/A4 paper size) and is a high-quality 300x300 and 600x600 dpi multiple-resolution desktop printer. About the Documentation The documentation provides a window into the many capabilities of your printer. The more familiar you are with the documentation, the easier it’ll be for you to get the results you want from your printer. 1-2 QMS 1725 SLS Print System User's Guide About the Documentation Several pieces of documentation accompany your printer. If you’ve ordered printer options, you’ll have even more manuals. But don’t worry—you don’t have to read them all before you’re able to use your printer. In fact, some of them you may never have to refer to at all, depending on the type of documents you print and the environment in which you print them. This section will give you an idea of how we’ve organized information and which documents you’ll probably refer to the most. Standard Product Documentation The following documentation is shipped with your printer: n QMS 1725 SLS Print System Setup Guide Refer to this guide as you unpack and set up the printer. It contains detailed, illustrated instructions to guide you as you unpack and set up your printer and connect it to a host computer. It also covers installing a toner cartridge and filling the paper trays. Each person who plans on using this printer should review this document. n QMS 1725 SLS Print System User’s Guide You're looking at this manual right now. This manual guides you through the day-to-day operation of your printer. It includes information on using the printer’s control panel, making configuration changes, replacing print media, using advanced printing features, handling and cleaning your printer, improving print quality, and troubleshooting printer problems. The “About This Manual” section later in this chapter provides more contents of this manual. Introduction 1-3 About the Documentation n PS Executive Series Utilities On-line documentation explains how to install and use the PS Executive Series Utilities that accompanies your printer. Once you install this software on your host, use its menus to access the printer’s features, such as printer naming, font and emulation downloading, and sample files that illustrate some of your printer’s capabilities. A Windows driver is also included with this software. (Before installing the utilities, be sure to check for a README.TXT file in case of last-minute updates.) n QMS Crown Document Option Commands Document Option Commands (DOCs) are software codes you insert in documents to enable printer features that cannot be accessed by your application or page description language. This manual lists and explains all of the DOCs. Using QMS DOC, you can develop one driver to support all languages and emulations for your printer. Also, you can use host network management software to create customized network printer queues for all users connected to the printer. In most cases, only advanced users and system administrators need this information. n QMS Crown Network Notes Refer to this manual for tips on using your QMS 1725 SLS Print System if you’re connecting to a network. It discusses 3Com 3+Open, Banyan VINES, LAN Manager-based LANs, Novell NetWare, TCP/IP, UNIX, and VMS/DECnet. In most cases, only advanced network users and system administrators need this information. This manual is provided on disk in encapsulated PostScript (EPS) form. Refer to the README file on the disk for information on printing a hard copy of the manual. 1-4 QMS 1725 SLS Print System User's Guide About This Manual Related Documentation Don’t forget that your application, host operating system, and network documentation all contain useful printing information. n Printer Option Documentation If you purchased a printer option (for example, a CrownNet interface card for a Ethernet network), you probably received separate documentation for it. See chapter 8, “Printer Options,” for additional information. n Further information on QMS printers is available through your modem or fax machine. See appendix A, “QMS Customer Support,” for details. About This Manual This manual is a complete guide to the features, operation, and maintenance of your QMS 1725 SLS printer. Each chapter begins with highlights of its contents. An extensive index at the end of the manual further helps to locate specific topics and a glossary defines relevant terms. The appendixes contain supplementary information such as cable pinouts, technical specifications, and other printer-related material. Typographic Conventions The following typographic conventions are used in this manual: Mixed-Case Courier Text you type, and messages and information displayed on the screen Mixed-Case Italic Courier Variable text you type; replace the italicized word(s) with information specific to your printer or computer UPPERCASE COURIER Information displayed in the printer message window lowercase bold PostScript operators and DOS commands Introduction 1-5 Printer Features » lowercase italic Variable information in text UPPERCASE File and utility names ↵ Press the Enter key (PC) or Return key (Macintosh) ^ Press and hold down the Ctrl key (PC) Note: Notes contain tips, extra information, or important information that deserves emphasis or reiteration. O Caution: Cautions present information that you need to know to avoid equipment damage, process failure, or extreme annoyance. M WA RNING! Warnings indicate the possibility of personal injury if a specific procedure is not performed exactly as described in the manual. A CHTUNG! Bitte halten Sie sich exakt an die im Handbuch beschriebene Vorgehensweise, da sonst Verletzungsgefahr bestehen könnte. Printer Features This brief overview will acquaint you with your printer’s major features and how they can benefit you. Consult the index or the table of contents to locate this information. Media Flexibility Your printer supports print media of different sizes— A4, executive, legal, letter—in portrait and landscape orientations. User Benefit—You can print on commonly used media sizes. Multiple Resolutions The printer supports two print resolutions: 300x300 and 600x600 dpi (dots per inch). 1-6 QMS 1725 SLS Print System User's Guide Printer Features User Benefit—Two resolutions allow you to customize the quality of your output according to its use: 300x300 dpi for most hardcopy needs, 600x600 dpi for high-resolution output. Five Resident Emulations Your printer supports printing in HP PCL5, HP-GL, Lineprinter, CCITT, and PostScript emulations. User Benefit—Most applications can print directly to the printer. HP PCL 5 Emulation The printer emulates the Hewlett-Packard LaserJet IIISi at both 300x300 dpi (bitmap and scalable fonts) and 600x600 dpi (scalable fonts only). The available resolution for HP-GL/2 is 300x300 dpi. HP-GL Emulation The printer provides HP-GL plotter emulation (7470A, 7475A, 7550A, and ColorPro) at 300x300 dpi and 600x600 dpi. Lineprinter Emulation The Lineprinter emulation prints simple, unformatted text files at 300x300 and 600x600 dpi. Each text line ends with a carriage return. CCITT This emulation supports CCITT Group 3 1-D, Group 3 2-D, and Group 4. Key features specific to this emulation include a stream-oriented data flow system, concise data attribute set, and enhanced performance. PostScript Level 2 Emulation and Level 1 Compatibility The QMS 1725 SLS Print System’s Level 2 emulation allows you to take full advantage of your printer's high print resolution (up to 600x600 dpi). The Level 2 emulation is compatible with Adobe’s PostScript Level 2 language while providing additional capabilities. QMS Level 2 emulation supports extensive graphics capabilities to control Introduction 1-7 Printer Features the appearance of text, geometric shapes and images, and improves memory and resource management. Full support for PostScript Level 1 files is also included. Sessions Support Since your printer supports sessions, it’s possible for you to combine multiple documents into a single print job with global features that override the individual document’s page description—even when the individual documents are composed from different applications using different printer description languages. Sessions allow you to print multiple chapters as a book, a series of reports as a batch process, or “wild card” file selections on UNIX or VMS computer systems. More information about sessions and session commands are in appendix D, “Sessions.” Resident Fonts and Symbol Sets Your printer comes with 12 PostScript typeface families containing 39 licensed fonts, and it provides TrueType font support (in PostScript emulation only). All resident PostScript typeface families have multilingual character sets. The printer also has 7 resident bitmap HP PCL fonts in 25 symbol sets each, 12 resident scalable HP PCL fonts in 35 symbol sets each, 1 resident scalable HP PCL font in 5 symbol sets, and 40 resident HP-GL symbol sets. User Benefit—With so many resident fonts and symbol sets, there is less need for time-consuming downloading. QMS Crown Technology The QMS Crown multitasking operating system provides fast processing speeds, networking capability, and higher printer performance while maintaining outstanding print quality. Compile-Ahead Technology and True Multitasking Compile-ahead technology keeps all of your printer’s resources busy to improve throughput. While the engine is printing a page, compile-ahead technology uses available printer memory to prepare 1-8 QMS 1725 SLS Print System User's Guide Printer Features the subsequent pages of the document (or the next job). With pages ready in memory, the engine continues printing as it deposits printed pages in the output tray. (In other words, compiling, rasterizing, and printing all work independently but simultaneously.) User Benefit—Because print job processing time is significantly reduced, you spend less time waiting for your documents to print. Simultaneous Interface Operation (SIO) Other printers may have multiple interface ports, but your QMS 1725 SLS Print System is unique because SIO allows all of its interface ports—AppleTalk, parallel, serial, and an optional interface—to be active at the same time. The multiple interfaces let you connect to any AppleTalk network or directly to an IBM or compatible PC. The printer also works in many minicomputer and mainframe computer environments. User Benefit—You can have more than one computer printing to the printer. Each interface has an input buffer (which may be expanded with additional memory) that receives data while another interface is being used to print. Emulation Sensing Processor (ESP) Technology Most printers can recognize only their native command language. However, using a form of artificial intelligence, ESP technology analyzes incoming file data from any of the printer’s interfaces, selects the appropriate emulation from those installed on the printer, and processes the print job. User Benefit—When your printer is in ESP mode, you can easily print PostScript, HP PCL 5, HP-GL, CCITT, and Lineprinter documents without changing printer switch settings or sending software commands to accommodate different printer languages. Introduction 1-9 Printer Features Context Switching After its initial use, the state of an emulation and downloaded data (such as fonts, macros, and overlays) is preserved for as long as the printer power is on. User Benefit—Repetitive downloading of emulations, fonts, macros, and overlays is unnecessary, saving you time. Compressed Data Formats Crown printers convert data received from the input buffers into intermediate, compressed blocks until the data is needed for printing. These compressed blocks of data are designed to be processed rapidly by the printer, and many more can be stored in memory at one time than can traditional bitmapped images. User Benefit—This increases the speed of printer features such as collation and automatic jam recovery. Automatic Jam Recovery With most printers, if a media jam occurs, you must remove the jammed media and then reprint the job. On a QMS Crown printer, if the Page Recovery menu option is set to ON and a media jam occurs, once you remove the jammed media, the printer reprints the jammed page and then continues with the print job. This is possible because compressed data formats allow more pages to be stored in memory. The printer remembers the last page printed, pulls the necessary information from memory, and automatically reprints any lost pages. User Benefit—You save time and print media because it’s unnecessary to resend a print job after clearing a media jam. Software Loadable System (SLS) Your printer has a software loadable system, which allows you to replace or upgrade its system software from a host computer. User Benefit—Future enhancements to the system software can be easily installed as they become available from QMS. 1-10 QMS 1725 SLS Print System User's Guide Printer Options Printer Options The following options are available for your QMS 1725 SLS Print System. Contact your QMS vendor for purchase information. Media Handling Accessories The optional media handling accessories include legal- and A4-size media cassettes, a large-capacity sheet feeder (1500 sheets), and a duplexing unit. You can also print directly on business or personalsized envelopes with an optional envelope feeder or by using the manual feed. User Benefit—Your printer handles a variety of sizes and types of common print media. Upgradable RAM (Random Access Memory) The QMS 1725 SLS Print System comes with 13 MB of RAM. However, you can upgrade this RAM to 32 MB through the installation of SIMMs (single in-line memory modules). Additional RAM allows you to print at higher resolutions on certain media sizes, download and cache fonts, and send large data-intensive files to the printer without tying up the host for long periods. User Benefit—Your printer’s memory can be upgraded as your needs grow. Fonts Contact your QMS vendor for a complete list of available fonts. User Benefit—Optional fonts increase the printer’s functionality and allow you to create more distinctive documents. Emulations Your printer provides support for optional emulations, such as LN03 and QUIC II. User Benefit—Extra emulations allow you to print documents created in printer languages other than those resident on the printer. Introduction 1-11 Printer Options ImageServer The optional ImageServer kit acts as an interface between document imaging applications and the printer. To purchase the ImageServer kit, contact your QMS vendor. User Benefit—With this option installed, you can load TIFF, CALS and CCITT emulations. ImageServer enables your printer to print at or near the rated engine speed when working with complex, rasterized images. Network Interfaces The QMS 1725 SLS Print System can use optional interfaces such as IBM 3270, IBM 5250A, or one of the CrownNet NICs (network interface cards) running multiple protocols. Contact your QMS vendor for a list of available protocols. User Benefit—Optional interfaces provide flexibility and fast data transfer in complex network environments. Hard Disk Expandability The QMS 1725 SLS Print System provides support for a larger internal hard disk and optional external SCSI hard disks. User Benefit—Hard disks provide true virtual memory as well as storage for character bitmaps, downloaded outline fonts, and other files. 1-12 QMS 1725 SLS Print System User's Guide Using the Control Panel Using the Control Panel The control panel, located on the front of the printer, allows you to direct the printer’s operation. In addition, it displays the current status of the printer, including any condition that needs your attention. The control panel consists of the following parts: n n n Sixteen indicators provide printer status information and identify the current media source. A message window displays status and configuration information. Nine keys allow you to control the printer. Message Window Introduction 1-13 Using the Control Panel Control Panel Indicators Indicators on the control panel display printer status information, current media source, and paper jam locations. Flashes when the printer is warming up. It remains on when the printer is ready to receive a print job and while it is processing or printing a job (unless an error is encountered). Lights when the printer requires operator intervention. This indicator is usually accompanied by a status message in the message window. Lights when the printer is receiving data from one or more of the simultaneous interfaces. Lights when the printer’s hard disk is being accessed. Lights when the printer is on line and ready to accept and process new print jobs. Press it once to take the printer off line (the indicator is not lighted) and make the printer ready for configuration. Lights when the print resolution is set to 600 dots per inch. Lights when the duplex option is installed and duplex printing is chosen. Lights when manual feed is chosen as the inputbin. 1-14 QMS 1725 SLS Print System User's Guide Using the Control Panel This light will flash to indicate the printer is terminating the current print job. Envelope feeder (optional) select indicator Jam indicators (4). Light in area of Upper paper cassette select suspected jam indicator location. Lower paper cassette select indicator Message Window The control panel message window provides status and configuration information. Status messages are listed in chapter 6, “Troubleshooting Printer Problems.” Setting the Message Window Language Status messages and configuration menus can be displayed in the message window in English, French, German, or Spanish. If you need to change the message window language, use the Keypad Language option in the Administration/Miscellaneous menu. If you’re not familiar with using the configuration menu, refer to chapter 2, “Printer Configuration,” for complete information. Menu Administration/Miscellaneous/Keypad Language Choices English, French, German, Spanish Default English Notes The printer must be restarted for changes to the Keypad Language menu to take effect. You can either let the printer restart automatically after you save the change and exit from the configuration menu, or you can wait for the change to take effect the next time you manually turn on the printer. Introduction 1-15 Using the Control Panel Control Panel Keys Press the Online/Offline key once to take the printer off line (the indicator goes out). You must take the printer off line before using all other keys except the Cancel key. When the printer goes off line, the communication ports are closed, so no new data is accepted. The printer continues printing until it has finished all jobs in process. Although jobs continue to compile and print using the data already received, a job may be interrupted, causing it to wait for more incoming data before printing resumes. When the printer is off line, press the Online/Offline key once to place it back on line and ready to accept new print jobs (the indicator goes back on). If a remote console has the printer off line, pressing the Online/Offline key will not take effect until the console puts the printer back on line. Press the Cancel key to cancel all print jobs currently printing, interpreting, or spooling; or to send an end-of-job indicator to print jobs waiting for incoming data. The printer then resumes printing other print jobs in the queue. If you press the Cancel key by mistake, or if you decide not to cancel a print job after pressing this key, press the Menu key to “cancel” the Cancel key’s function. Press the 600 DPI key to choose between printing at 300 dots per inch or 600 dots per inch. The indicator is on when the resolution is set to 600 dots per inch. Press the Duplex key to choose duplex printing. The indicator is on when the printer is set for duplex printing. 1-16 QMS 1725 SLS Print System User's Guide Using the Control Panel Press the Tray Select key to choose the cassette (input bin) from which the printer should draw media. Press the Next key to advance through the list of selections or options for the current menu. When changing character information, use this key to advance to the next choice for the current input character. Press the Previous key to return to the previous selection or option for the current menu. When changing character information, use this key to return to the previous choice for the current input character. Press the Menu key to access the configuration menu after the printer goes off line. When you’re changing printer configuration, press this key to cancel a change (before pressing the Select key), to return to a previous menu, or to return to a previous character when entering character information. Press the Select key to access a menu or to choose a displayed menu option. v Introduction 1-17 2 Printer Configuration In This Chapter . . . n n n n n Methods of configuration Configuration menu Operator control menu Administration menu Installation menu Introduction Introduction This chapter begins by listing and describing the different ways you can configure your printer to meet your special printing needs. The next section describes how to use the printer control panel to access the configuration menu and how to make configuration changes. The rest of the chapter provides basic printer configuration information about some of the configuration menu options. Menu features are grouped according to task. Each feature is introduced, then a table describes the feature’s location in the configuration menu, the available choices for that feature, and the factory default (the value set at the factory). Methods of Configuration You have different methods of configuring your printer to meet your printing needs: n n n n Through an application Through PS Executive Series Utilities Through printer commands Through the printer control panel Using an Application Using your application is the best way to control your printer since most printing is done on a per-job basis. This helps prevent confusion in network environments and saves you from making changes at the printer control panel. Your application documentation explains how to control your printer settings: probably by choosing options from a printing menu. 2-2 QMS 1725 SLS Print System User's Guide Methods of Configuration Applications use printer drivers to send appropriate commands to the printer for requested tasks. If your application doesn’t have a QMS 1725 Print System driver, you can select a comparable PostScript driver, such as another QMS driver or a LaserWriter driver. However, comparable drivers may not allow you to access all of your printer's features, such as 600x600 dpi printing, duplexing, or collating. Using PS Executive Series Utilities You can also use the PS Executive Series Utilities (shipped with your printer) to control the printer from your host. See the README file on the utilities disk for information on installing the utilities, and see the utilities on-line help for details on using the software. Using Printer Commands Printer commands (such as PostScript operators, QMS Document Option Commands [DOCs], and HP PCL and HP-GL commands) can enable job-specific features your application or page description language can’t access. See the QMS Crown Document Option Commands manual, for information on these commands. See appendix C, “Document Option Commands,” of this manual for a list of DOCs this printer supports. Using the Control Panel Your printer is configured at the factory for most typical printing environments, so most users don’t have to use the control panel often. However, if you do need to change a printer setting for all print jobs (not just on a per-job basis), you can do so through the control panel. If you’re working in a shared printing environment, your system administrator should be the only person to make changes through the printer’s control panel. Printer Configuration 2-3 Configuration Menu Configuration Menu The printer’s configuration menu allows you change the default printer configuration settings. Any changes made to the configuration will reside as new default settings and affect all subsequent print jobs. The options in the configuration menu are organized under three main menus: n Operator Control Menu Use this menu to select document processing options such as copy count, choosing input and output paper bins, chaining input bins, and duplexing (if a duplexing unit is installed). Document processing selections are usually specified within individual jobs since each job has its own requirements. However, if there’s no way of specifying these selections within an application, use the control panel to change selections, send the job, and then change the defaults back. » Note: Defining document processing selections for a particular job through the control panel is not recommended in a shared environment. When many systems are using the same printer, theres no way of making sure that no other jobs are sent to the printer while the defaults are changed. n Administration Menu Use this menu to maintain printer-host communication information, and for selecting and configuring printer emulations, configuring special pages, printing engine calibration, and configuring hard disks. » Note: For information on printer-host communication using an optional interface, refer to the QMS CrownNet Interface System Adm inistrators Guide (available through QMS). n Installation Menu Use this menu to establish passwords for the Operator Control and Administration menus. This menu displays only when an optional security card is installed. See chapter 8, “Printer Options,” for details on using a security card. 2-4 QMS 1725 SLS Print System User's Guide Configuration Menu How to Move Around the Configuration Menu Use the control panel keys to move around the printer menu. The top line of the message window always displays the name of the current menu, and the bottom line displays the name of an option within that menu. The control panel keys are as follows: Press the Online/Offline key once to take the printer off line (the indicator goes out). You must take the printer off line before using all other keys except the Cancel key. Press the Online/Offline key once to exit the configuration menu and put the printer back on line, ready to accept new print jobs (the indicator goes back on). Press the Menu key to access the configuration menu after the printer goes off line. When you’re changing printer configuration, press this key to cancel a change (before pressing the Select key), to return to a previous menu, or to return to a previous character when entering character information. Press the Next key to advance through the list of selections or options for the current menu. When changing character information, use this key to advance to the next choice for the current input character. Press the Previous key to return to the previous selection or option for the current menu. When changing character information, use this key to return to the previous choice for the current input character. Press the Select key to access a menu or to choose a displayed menu option. Accessing the Configuration Menu To access the configuration menu, make sure the printer is idle (IDLE displays in the message window), then press the Online/Offline key to Printer Configuration 2-5 Configuration Menu take the printer off line (the Online/Offline indicator is not lighted), and finally press the Menu key. Example The following table shows how to use control panel keys to access the printer configuration menu. Press the control panel keys in the order shown. The printer responds by displaying a status message or configuration menu in the message window. » Note: You may need to press the Next key more than one time to advance through the list of options. Press this to... key The message window reads... Online/ Offline Turn off the Online/Offline indicator and ready the printer for configuration. IDLE Menu Access the configuration menu. CONFIGURATION OPERATOR CONTROL The printer must be off line and idle before you can access the configuration menu. Selecting Configuration Menu Options Once you access the configuration menu, you use the control panel keys to move through the menu. Use the following keys: Press this key to... Next Advance to the next option or submenu within a menu. Previous Return to the previous option or submenu within a menu. Select Select an option or enter a submenu. Example To change the default printer emulation from ESP to PostScript, press the control panel keys in the order shown in the following table. 2-6 QMS 1725 SLS Print System User's Guide Configuration Menu » Note: You may need to press the Next key more than once to advance through the list of selections or options. Press this to... key The message window reads... Online/ Offline Turn off the Online/Offline indicator and ready the printer for configuration. IDLE Menu Access the configuration menu. CONFIGURATION OPERATOR CONTROL Next Advance to the Operator Control/ Administration menu. CONFIGURATION ADMINISTRATION Select Access the Administration menu ADMINISTRATION COMMUNICATIONS Select Access the Communications menu. COMMUNICATIONS TIMEOUTS Next Advance to the Communications/Parallel menu. COMMUNICATIONS PARALLEL Select Access the Parallel menu. PARALLEL MODE Next Advance to the Parallel/Emulation menu. PARALLEL EMULATION Select Access the Emulation menu. EMULATION ESP Previous Advance to the Emulation/PostScript menu. EMULATION POSTSCRIPT Select Select PostScript as the default emulation. POSTSCRIPT IS SELECTED After 3 seconds you are returned to the Parallel/Emulation menu. PARALLEL EMULATION Online/ Exit from the menu (Online/Offline) or Offline or return to the previous menu (Menu). You Menu are prompted to save your change(s). SAVE CHANGES? NO Next Advance to the Save Changes?/Yes option. SAVE CHANGES? YES Select Select Yes. The printer finishes printing any print jobs in process, saves your change, and returns to idle. IDLE Printer Configuration 2-7 Configuration Menu Changing Character Information Sometimes, rather than selecting an option, you need to enter character information. A character is any letter, digit, or symbol. A field is a group of characters that have meaning. Use the printer control panel to enter character information in the message window during printer configuration. The maximum length of the message window is 16 characters. Entering character information through the control panel is similar to setting the time and date on a digital watch. You enter one character at a time. The current input character flashes. Use the following keys to change the current input character: Press this key to... Next Advance to the next choice for the current input character. Previous Return to the previous choice for the current input character. Once you have changed the current input character, use the following keys to move the cursor to another input character: Press this key to... Select Advance the cursor to the next character. Menu Return the cursor to the previous character. To exit from the character selection process, move the cursor to the last character of the input field (the character farthest to the right) and press the Select key, or move to the first character of the input field (the character farthest to the left) and press the Menu key. When you exit, the printer verifies character information and confirms it in the message window. If character information is valid, you’re returned to the previous menu; if it’s invalid, you’re returned to the input field. Press the Menu key to cancel any changes to the character information. If the current character information is longer than the value that you need to enter, replace each extra character with a space. The printer interprets a space at the end of character information as a blank. 2-8 QMS 1725 SLS Print System User's Guide Configuration Menu Example To change the HP-GL emulation scaling percent, press the control panel keys in the order shown in the following table. The printer responds by displaying a status message or configuration menu in the message window. An underline indicates the current input character in the message window. » Note: You may need to press the Next key more than one time to advance through the list of selections or options. Press this to... key The message window reads... Online/ Offline Turn off the Online/Offline indicator and readies the printer for configuration. IDLE Menu Access the configuration menu. CONFIGURATION OPERATOR CONTROL Next Advance to the Administration menu. CONFIGURATION ADMINISTRATION Select Access the Administration menu ADMINISTRATION COMMUNICATIONS Next Advance to the Communications/ Emulation menu. COMMUNICATIONS EMULATIONS Select Access the Emulations menu. EMULATIONS ESP DEFAULT EMUL Next Advance to the Emulations/HP-GL menu. EMULATIONS HP-GL Select Access the HP-GL menu. HP-GL PLOTTER Next Advance to the HP-GL/Scaling Percent menu. HP-GL SCALING PERCENT Select Access the Scaling Percent menu. SCALING PERCENT 100 Previous Lower the current character to 0. SCALING PERCENT 000 Select Select 0 and move the current character to the next 0. SCALING PERCENT 000 Next (5 times) Advance the current character to 5. SCALING PERCENT 050 Printer Configuration 2-9 Configuration Menu Select Select 5 and move the current character to the last 0. SCALING PERCENT 050 Select Select 50 as the default scaling percent. 50 IS SELECTED After 3 seconds you are returned to the HP-GL/Scaling Percent menu. HP-GL SCALING PERCENT Online/ Exit from the menu (Online/Offline) or Offline or return to the previous menu (Menu). You Menu are prompted to save your change(s). SAVE CHANGES? NO Next Advance to the Save Changes?/Yes option. SAVE CHANGES? YES Select Select Yes. The printer finishes printing any print jobs in process, saves your change, and returns to idle. IDLE Saving Configuration Changes Before the printer can accept print jobs with configuration changes, the changes must be saved. Example To save your configuration changes, press the control panel keys in the order shown in the following table. The printer responds by displaying a status message in the message window. 2-10 Press this key to... The message window reads... Online/ Offline or Menu Exit from the menu (Online/Offline) or SAVE CHANGES? return to the previous menu (Menu). You NO are prompted to save your change(s). Next Advance to the Save Changes?/Yes option. SAVE CHANGES? YES Select Select Yes. The printer finishes printing any print jobs in process, saves your change, and returns to idle. IDLE Online/ Offline Turn on the Online/Offline indicator and IDLE ready the printer to accept and print jobs. QMS 1725 SLS Print System User's Guide Configuration Menu » Note: The printer may need to be restarted before certain changes to the Administration menu take effect. Some changes restart the printer auto- REBOOT NOW? in the control YES to restart the printer and have the change(s) take effect immediately, or select NO to wait matically while others display the message panel message window. If this message appears, select until you manually restart the printer for changes to take effect. Canceling Configuration Changes If you change a configuration option and then decide to cancel that change, you can do so when exiting the configuration menu. Example To cancel your configuration changes, press the control panel keys in the order shown in the following table. The printer responds by displaying a status message in the message window. Press this to... key The message window reads... Online/ Exit from the menu (Online/Offline) or SAVE CHANGES? Offline or return to the previous menu (Menu) and be NO Menu prompted to save your change. Select Select No. The printer finishes printing any IDLE print jobs in process, does not save your changes, and returns to idle. Online/ Offline Turn on the Online/Offline indicator and ready the printer to accept print jobs. IDLE Setting the Message Window Language Status messages and configuration menus can be displayed in the message window in English, French, German, or Spanish. If you need to change the message window language, use the Keypad Language option in the Administration/Miscellaneous menu. Menu Administration/Miscellaneous/Keypad Language Choices English, French, German, Spanish Default English Printer Configuration 2-11 Operator Control Menu Notes The printer must be restarted for changes to the Keypad Language menu to take effect. You can either let the printer restart automatically after you save the change and exit from the Configuration menu, or you can wait for the change to take effect the next time you manually turn on the printer. Restoring the Factory Default Configuration If you need to cancel all of the configuration changes you have made, you can reset all of the configuration settings to their factory defaults. Menu Administration/Miscellaneous/Restore Defaults Choices Yes, No Default No Notes This process takes several minutes to complete. Operator Control Menu The Operator Control menu consists of the following submenus: Copies Collation Orientation Inputbin Outputbin Chain Inputbins Manual Feed Size Def. Duplex Tumble Duplex Copies While it is usually preferable to select in your application the number of copies you want to print, you can change the default number of copies for all print jobs through the printer control panel. 2-12 Menu Operator Control/Copies Choices 001-999 Default 001 Notes Sets the default number of copies for all subsequent print jobs. QMS 1725 SLS Print System User's Guide Operator Control Menu Collation Use this option to arrange multiple copies of a document in sequential order. Menu Operator Control/Collation Choices On, Off Default On Notes For additional information on collation, refer to Collating Output in chapter 3, “Daily Operations.” Orientation Specifies whether text and graphics are placed on the page in a portrait or landscape orientation. Menu Operator Control/Orientation Choices Landscape, Portrait Default Portrait Inputbin Allows you to select the default cassette (input bin) from which media is drawn into the printer. Menu Operator Control/Inputbin Choices Upper, Lower Default Upper Notes The current default input bin is indicated by the appropriate LED on the print control panel. Printer Configuration 2-13 Operator Control Menu Outputbin Use this option to indicate the default output bin (tray). You can choose to have paper exit the printer at either the upper bin or the face-up bin. Menu Operator Control/Outputbin Choices Upper, face-up Default Upper Chain Inputbins Allows you to “chain” input bins (cassettes) so that when the first input bin empties, the printer will automatically draw media from the second input bin with the same size and type of media. Menu Operator Control/Chain Inputbins Choices On—Switch to the next input bin with the same size and type of media when the default input bin is empty. Off—Don’t switch input bins; use only the default input bin. Default On Notes Use the Operator Control/Inputbin menu to set the default input bin. Make sure the two bins use the same size media. Manual Feed Size Use this option to select the size of the print medium to be fed manually. 2-14 Menu Operator Control/Manual Feed Size Choices Letter, Legal, A4, Executive, Com9, Com10, DL, Monarch, and Envelope (see notes) Default Letter Notes The Envelope setting should be used if your envelope size doesn’t match any of the other listed envelopes sizes. QMS 1725 SLS Print System User's Guide Administration Menu Def. Duplex The Def[ault] Duplex option allows you to print on the front and back of each page. Menu Operator Control/Def. Duplex Choices On, Off Default Off Notes This is an optional feature and supported only if the duplexing unit and enough memory are installed. See “Quick Config” in the Memory submenu later in this chapter. Tumble Duplex Prints jobs so they can be bound at the top edge (flip-chart style). Menu Operator Control/Tumble Duplex Choices On, Off Default Off Notes The Operator Control/Def. Duplex option must also be turned on. This is an optional feature and supported only if the duplexing unit is installed. Administration Menu The Administration menu consists of the following submenus: Communications Emulations Special Pages Startup Options Memory Engine Miscellaneous Disk Operations Printer Configuration (Optional) 2-15 Communications Communications This menu contains several options that allow you to configure the printer's communication parameters to match the host and application parameters. » Note: This section contains information on Timeouts, Serial, Parallel and Emulation menus. For information on printer-host communication using the Ethernet interface or any options located under the Network 1 submenu (the Network 1 menu appears only when an optional interface has been installed), refer to chapter 2, Printer Configuration, of the QMS CrownNet Interface System Adm inistrators Guide. Setting Timeouts The Timeouts options limit the amount of time the printer waits on transmission from the host for various types of data. Setting a PostScript Emulation Timeout The PostScript emulation timeout is the maximum number of seconds the PostScript emulation waits for incoming data. Menu Administration/Communications/Timeouts/PS Wait Timeout Choices 00000-99999 Default 00030 (30 sec.) Notes A value of 000 is the same as infinity (no timeout). The job is closed and the next job in the queue begins if all of the following occur: n n No additional data is received during the specified period of time. The interface didn’t time out. An EOD (end-of-document commands) was not seen. When a print job is sent from a Macintosh, the PS Wait timeout is automatically changed to 00300 (5 min.). Large print jobs, such as those generated by graphics or computer-aided design applications, require timeouts of 00300 (5 min.). 2-16 QMS 1725 SLS Print System User's Guide Communications Setting an Emulation Timeout The emulation timeout is the maximum number of seconds emulations other than PostScript (such as HP-GL, HP PCL5, and Lineprinter) wait for incoming data. Menu Administration/Communications/Timeouts/Emul Timeout Choices 00000-99999 Default 00005 (5 sec.) Notes A value of 000 is the same as infinity (no timeout). Setting a Print Job Timeout The print job timeout is the maximum number of seconds the printer processes a print job before it ends the job. Menu Administration/Communications/Timeouts/Job Timeout Choices 00000-99999 Default 00000 (infinity, no timeout) Notes A value of 000 is the same as infinity (no timeout). Setting an ESP Timeout The ESP timeout is the maximum number of seconds the printer waits to match an emulation before printing the job in the default emulation. Menu Administration/Communications/Timeouts/ESP Timeout Choices 00000-99999 Default 00003 (3 sec.) Notes A value of 000 is the same as infinity (no timeout). Setting Serial Interface Parameters Use the Administration/Communications/Serial menu to set the serial interface communication values used for printer-host communication. Printer Configuration 2-17 Communications Mode Enables or disables the serial port. Menu Administration/Communications/Serial/Mode Choices Interactive—Establish two-way communication between the host and the printer. Noninteractive—Establish one-way communication from the host to the printer. Disabled—Turn off serial communication with the host. The printer stops accepting print jobs over the serial interface. Default Interactive Notes The printer must be restarted for changes to the Mode menu to take effect. You can either let the printer restart automatically after you save the change and exit the Configuration menu, or you can wait for the change to take effect the next time you manually turn on the printer. Emulation Sets the serial interface emulation. Menu Administration/Communications/Serial/Emulation Choices ESP, Hexdump, PostScript, PCL5, HPGL, CCITT, Lineprinter Other optional emulations also appear, if installed. Default ESP Minimum Number of Kilobytes for Spooling Sets the minimum number of kilobytes of system memory allocated to the serial interface. 2-18 Menu Administration/Communications/Serial/Min K Spool Choices 00000-99999 Default 00015 QMS 1725 SLS Print System User's Guide Communications Notes This value must be less than K Mem For Spool. A 00000 value does not turn off the spooling buffer for the serial interface. If the value is set to 00000, the printer calculates the Min K Spool automatically at initialization. The printer must be restarted for changes to the Min K Spool menu to take effect. You can either let the printer restart automatically after you save the change and exit the Configuration menu, or you can wait for the change to take effect the next time you manually turn on the printer. Spooling Timeout Sets the number of seconds the interface waits for data from the host before terminating a spooled print job. Menu Administration/Communications/Serial/Spool Timeout Choices 00000-99999 Default 00030 End Job Mode Enables (and identifies an end-of-job sequence) or disables data stream sensing for the end-of-document (EOD) command. Menu Administration/Communications/Serial/End Job Mode Choices None—The printer recognizes only the PostScript ^D command. QMS EOD—The printer recognizes only the QMS %%EndOfDocument command. HP EOD—The printer recognizes only the HP <ESC>%12345X command. Default None Notes See chapter 5, “Additional Technical Information,” for details on how to implement this feature on your QMS 1725 SLS Print System. Printer Configuration 2-19 Communications Default Job Priority Allows you to specify which jobs are printed first, according to the interface through which they are received, when jobs are received simultaneously. For example, you can give jobs received via the serial interface priority over jobs received via the parallel and AppleTalk interfaces. Menu Administration/Communications/Serial/Def Job Prio Choices 001-100 (highest-lowest priority) Default 001 (highest priority) Baud Rate Sets the rate data is transmitted (bits per second) over the serial interface. Menu Administration/Communications/Serial/Baud Rate Choices 300, 600, 1200, 2400, 4800, 9600, 19200, 38400 Default 9600 Notes Baud rates of 19200 and 38400 require hardware flow control (Administration/Communications/Serial/Hdwe Flow Ctl menu). Parity Sets the check bit used to identify data transmission errors. Menu Administration/Communications/Serial/Parity Choices None, Odd, Even Default None Notes The printer’s parity setting must match that of the host or application. Use the Administration/Communications/Serial/Ignore Parity menu to specify how the printer handles parity errors. Ignore Parity Specifies how the printer should handle parity errors. Menu 2-20 Administration/Communications/Serial/Ignore Parity QMS 1725 SLS Print System User's Guide Communications Choices Off—Ignore parity errors. The printer prints its best interpretation of the character(s) affected by the error. On—Don’t ignore parity errors. The printer replaces the character(s) affected by the error with a question mark. Default Off Receive Software Flow Control Sets the software communication protocol used by the printer to control communication from the host computer. Menu Administration/Communications/Serial/Rcv Sw Flow Ctl Choices ETX/ACK, Robust XON/XOFF, None, XON/XOFF Default None Transmit Software Flow Control Sets the software communication protocol used by the host computer to control communication with the printer. Menu Administration/Communications/Serial/Xmit Sw Flow Ctl Choices ETX/ACK, None, XON/XOFF Default None Data Bits Sets the number of data bits transmitted per character. Menu Administration/Communications/Serial/Data Bits Choices 7 Bits, 8 Bits Default 8 Bits Stop Bits Sets the number of stop bits transmitted per character. Menu Administration/Communications/Serial/Stop Bits Choices 1 Bit, 2 Bits Default 1 Bit Printer Configuration 2-21 Communications Hardware Flow Control Controls the flow of data between the printer and the host. Menu Administration/Communications/Serial/Hdwe Flow Ctl Choices DSR POL DSR DTR POL DTR RTS CTS Normal, reverse Off, on Normal, reverse Off, on Off, on Off, on Defaults DSR POL DSR DTR POL DTR RTS CTS Normal Off Normal On Off Off Notes If the host uses hardware flow control, set this option to match the type used by the host. However, to download printer system software to flash ROM via the serial port, RTS and CTS must be set to On, and the cable pinouts must be connected as shown in appendix B, “Technical Specifications.” PS Protocol Sets the binary communications protocol (BCP) for communicating over a serial interface to a PostScript printer. Menu 2-22 Administration/Communications/Serial/PS Protocol QMS 1725 SLS Print System User's Guide Communications Choices Normal—Enable standard, ASCII hex protocol. Data is sent and received in ASCII format. This mode is recommended if you do not print binary data. It was designed for data in the printable ASCII range. Print jobs can alter the PS protocol value through PostScript operators. Normal Fixed—Enable standard, ASCII hex protocol. Print jobs cannot alter this value through PostScript operators. Binary—Enable Quoted binary communications protocol. Print jobs can alter this value through PostScript operators. Data in the printable ASCII range also prints. Binary Fixed—Enable Quoted binary communications protocol. Print jobs cannot alter this value through PostScript operators. Data in the printable ASCII range also prints. Default Normal Notes See chapter 5, “Additional Technical Information,” for a full discussion of PS Protocol. Setting Parallel Interface Parameters Use the Administration/Communications/Parallel menu to set the parallel interface values used for printer-host communications. Mode The parallel interface supports Centronics parallel communication as well as IEEE 1284 bidirectional parallel communication. Menu Administration/Communications/Parallel/Mode Choices Enabled—Establish one-way communication from the host to the printer. Disabled—Turn off parallel communication with the host. The printer stops accepting print jobs over the parallel interface. Default Enabled Printer Configuration 2-23 Communications Notes The printer must be restarted for changes to the menu to take effect. You can either let the printer restart automatically after you save the change and exit from the Configuration menu, or you can wait for the change to take effect the next time you manually turn on the printer. Emulation Sets the parallel interface emulation. Menu Administration/Communications/Parallel/Emulation Choices ESP, Hexdump, PostScript, PCL5, HPGL,CCITT, Lineprinter Other optional emulations also appear, if installed. Default ESP Minimum Number of Kilobytes for Spooling Sets the minimum number of kilobytes of system memory allocated to the parallel interface. Menu Administration/Communications/Parallel/Min K Spool Choices 00000-99999 Default 00015 Notes This value must be less than K Mem For Spool. A 00000 value does not turn off the spooling buffer for the parallel interface. If the value is set to 00000, the printer calculates the Min K Spool automatically at initialization. The printer must be restarted for changes to the Min K Spool menu to take effect. You can either let the printer restart automatically after you save the change and exit the configuration menu, or you can wait for the change to take effect the next time you manually turn on the printer. 2-24 QMS 1725 SLS Print System User's Guide Communications Spooling Timeout Sets the number of seconds the interface waits for data from the host before terminating a spooled print job. Menu Administration/Communications/Parallel/Spool Timeout Choices 00000-99999 Default 00030 Data Bits Sets the number of data bits transmitted per character. Menu Administration/Communications/Parallel/Data Bits Choices 7 Bits, 8 Bits Default 8 Bits End Job Mode Enables (and identifies an end-of-job sequence) or disables data stream sensing for the end-of-document (EOD) command. Menu Administration/Communications/Parallel/End Job Mode Choices None—The printer recognizes only the PostScript ^D command. QMS EOD—The printer recognizes only the QMS %%EndOfDocument command. HP EOD—The printer recognizes only the HP <ESC>%12345X command. Default None Notes See chapter 5, “Additional Technical Information,” for details on how to implement this feature on your QMS 1725 SLS Print System. Printer Configuration 2-25 Communications Default Job Priority Allows you to specify which jobs are printed first, according to the interface through which they are received, when jobs are received simultaneously. Menu Administration/Communications/Parallel/Def Job Prio Choices 001-100 (highest-lowest priority) Default 001 (highest priority) Notes For example, you can give jobs received via the parallel interface priority over jobs received via the serial and AppleTalk interfaces. PS Protocol Sets the binary communications protocol (BCP) for communicating over a parallel interface to a PostScript printer. Menu Administration/Communications/Parallel/PS Protocol Choices Normal—Enable standard, ASCII hex protocol. Data is sent and received in ASCII format. This mode is recommended if you do not print binary data. It was designed for data in the printable ASCII range. Print jobs can alter the PS protocol value through PostScript operators. Normal Fixed—Enable standard, ASCII hex protocol. Print jobs cannot alter this value through PostScript operators. Binary—Enable Quoted binary communications protocol. Print jobs can alter this value through PostScript operators. Data in the printable ASCII range also prints. Binary Fixed—Enable Quoted binary communications protocol. Print jobs can not alter this value through PostScript operators. Data in the printable ASCII range also prints. Default Normal Setting AppleTalk Interface Parameters Use the A dmi nistration/Communications/A ppleTalk menu to set the A ppleTalk interface v alues used for printer-host communication. 2-26 QMS 1725 SLS Print System User's Guide Communications Mode E nables or disables the communication interface. Menu Administration/Communications/AppleTalk/Mode Choices Enabled—Establish one-way LocalTalk communication (from the host to the printer). Disabled—Turn off the LocalTalk interface (the printer stops accepting LocalTalk interface print jobs). Default Enabled Notes The printer must be restarted for changes to the Mode menu to take effect. You can either let the printer restart automatically after you save the change and exit the Configuration menu, or you can wait for the change to take effect the next time you manually turn on the printer. Connection Allows you to enable or disable print spooling. Menu Administration/Communications/AppleTalk/Connection Choices Conventional—Allow one LocalTalk connection and accept only one print job at a time. If two users send print jobs to the printer, the workstation belonging to the first user is unavailable until the first job has been printed, and the workstation belonging to the second user is unavailable until both jobs have been printed. Spool—Allow multiple LocalTalk connections and accept (spools) more than one print job at a time. Workstations are available while jobs are printing. Default Conventional Notes The printer must be restarted for changes to the Connection menu to take effect. You can either let the printer restart automatically after you save the change and exit the Configuration menu, or you can wait for the change to take effect the next time you manually turn on the printer. Printer Configuration 2-27 Communications Minimum Number of Kilobytes for Spooling S ets the mi nimum number of kiloby tes of sy stem memory allocated to the LocalTalk i nterface. Menu Choices Default Notes Administration/Communications/AppleTalk/Min K Spool 00000-99999 00015 This v alue must be less than the K Mem for Spool value. A 00000 value does not turn off the spooling buffer for the parallel interface. If the value is set to 00000, the printer calculates the Min K Spool automatically at initialization. The printer must be restarted for changes to the Min K Spool menu to take effect. You can either let the printer restart automatically after you save the change and exit from the Configuration menu, or you can wait for the change to take effect the nex t time y ou manually turn on the printer. 2-28 QMS 1725 SLS Print System User's Guide Emulations Emulations Use the Administration/Emulations menu to set the parameters for the available printer emulations. Optional printing emulations appear only if installed. » Note: To choose an emulation or ESP for a particular interface, use the appropriate interface menu in the Administration/Communications menu. Setting an ESP Default Emulation The emulation sensing processor (ESP) feature of the QMS 1725 SLS Print System analyzes incoming print jobs and identifies which emulation the printer will use. The ESP Default Emul sets the ESP default emulation used when ESP is unable to identify the language of a print job. This allows the system administrator to select alternate default emulations. Menu Administration/Emulations/ESP Default Emul Choices HPGL, Lineprinter, PostScript, PCL5, CCITT Default PCL5 Notes You must turn the printer off and back on again for the change to take effect. For more information on ESP, see chapter 5, “Additional Technical Information.” Setting PostScript Parameters This menu allows you to select a PostScript emulation level. This is useful if you have files prepared in an application which is not fully compatible with Adobe’s PostScript Level 2 page description language. Menu Administration/Emulations/PostScript/Emulation Level Printer Configuration 2-29 Emulations Choices Level 2—For PostScript Level 2 files and most Level 1 files. Level 1 B/W—For files that contain only black-and-white PostScript Level 1 operators. This mode does not support the PostScript color operators; the use of color operators could cause the print job to fail. Level 1 Color—For files that contain color PostScript Level 1 operators. This mode accepts color PostScript Level 1 operators and translates these commands to the appropriate grayscale. This is the recommended setting for Level 1 compatibility since it contains all of the commands in Level 1 B/ W and the color commands. Default Level 2 Setting HP PCL 5 Parameters For details on the HP PCL 5 language, refer to the HP PCL 5 Printer Language Technical Reference Manual ( available from HewlettPackard Co.; order part number 5961-0509) HP PCL5C Technical Support Notes, available free through the QMS Bulletin Board, QFAX, and CompuServe, also has information on HP PCL5C. (See appendix A, “QMS Customer Support,” to find out how to access the bulletin board, Q-FAX, and CompuServe.) In addition, appendix C of this guide has information on the PCL 5 Document Option Commands. Default Font Sets the default font for this emulation. Menu Administration/Emulations/PCL 5/Default Font Choices Courier12, Courier12Bold, Courier12Italic, Courier10, Courier10Bold, Courier10Italic, Lineprinter, Times*, Times*Italic, Times*Bold, Times*BldItalic, Univ*, Univ*Italic, Univ*Bold, Univ*BldItalic, UnivCond*, UnivCond*Italic, UnivCond*Bold, UnivCond*BldItlc, Select by Index Default 2-30 Courier12 QMS 1725 SLS Print System User's Guide Emulations Notes * represents a scalable font (default point size [12 points] is used to scale the font and produce the characters in the selected size). If you use Select by Index to select a font by its font index, the printer uses the Administration/Emulations/PCL5/Default Font Idx value to choose the default font. Symbol Set Sets the character set used by the HP PCL5 emulation. Menu Administration/Emulations/PCL 5/Symbol Set Choices Roman-8, PC-850, PC8-US, PC8-DN, ECMA-94, Legal, HPGerman, HPSpanish, ISO-2, ISO-4, ISO-6, ISO-10, ISO11, ISO-14, ISO-15, ISO-16, ISO-17, ISO-21, ISO-25, ISO-57, ISO-60, ISO-61, ISO-69, ISO-84, ISO-85, Desktop, PS Math, Math 8, Microsoft-Pub, Pi-Font, PS-Text, Ventura-Intl, Ventura-Math, Ventura-US, Windows, PS-Zapf-Dingbats, Ventura-Dingbats, Zapf-Dingbats100, Zapf-Dingbats200, Zapf-Dingbats300 Default Roman-8 Notes Not all symbol sets are available with certain resident fonts. The Desktop, PS Math, Math 8, Microsoft-Pub, Pi-Font, PSText, Ventura-Intl, Ventura-Math, Ventura-US, and Windows symbol sets cannot be used with the resident bitmap fonts Courier 10, Courier 10 Italic, Courier 10 Bold, Courier 12, Courier 12 Italic, Courier 12 Bold, and LinePrinter. The five dingbat symbol sets (PS-ZapfDingbats, VenturaDingbats, Zapf-Dingbats100, Zapf-Dingbats200, and ZapfDingbats300) can be used with all fonts. If a mismatch between a symbol set and font occurs, the standard PCL font selection mechanism is used to locate a font that matches the selected symbol set. With the standard set of fonts distributed for your printer, this matches the Times* font, but other user-installed fonts could change this result. See Hewlett-Packard’s PCL 5 Printer Language Technical Reference Manual (HP part number 5961-0509) for more information on selecting PCL 5 fonts. Printer Configuration 2-31 Emulations Lines/Inch Sets the number of lines printed per inch. Menu Administration/Emulations/PCL 5/Lines Per Inch Choices 1-48 Default 6 Line Termination Adds an indicator which controls the way the printer interprets CR (carriage return) and LF (line feed) characters. Menu Administration/Emulations/PCL 5/Line Termination Choices CR=CR, LF=LF CR=CR+LF, LF=LF CR=CR, LF=CR+LF CR or LF=CR+LF Default CR=CR, LF=LF Point Size x100 Identifies the point size for scalable fonts in 0.25 point increments. Menu Administration/Emulations/PCL 5/Point Size x100 Choices 00025-99975 (0.25-999.75 points) Default 01200 (12 points) Notes If the font is not scalable or if a bitmap font is specified, this setting is ignored. Retain Temporary Fonts and Macros Allows you to choose whether to retain temporary HP PCL5 fonts and macros at the end of each print job. Menu 2-32 Administration/Emulations/HP PCL 5/Retain Temporary QMS 1725 SLS Print System User's Guide Emulations Choices Off—Reset PCL to its default state at the end of each PCL print job, execute an implicit <ESC>E at the start and end of the job, and delete any temporary fonts, macros, and patterns. On—Reset PCL to its default state at the end of each PCL print job. Temporary fonts, macros, and patterns from previous PCL print jobs are retained in memory after the print job has completed. You can recall these downloaded fonts, macros, and patterns from within your PCL file without having to download them again. On Compatibility—Retain the entire state of PCL as well as the temporary macros, fonts, and patterns from previous PCL jobs unless you do one of the following: n n n n Default Change any PCL front panel option Send any PCL-specific DOC—except the emulation DOC Send any other DOC, such as number of copies, duplex, orientation, or inputbin Send a PCL job from a different communications port—for example, if the PCL print environment is set for PCL jobs to print from the parallel port, and a PCL job is sent from the serial port. If any one of these occurs, the PCL state is reset to the new default, and the previous state is lost. Off Scalable Fonts Specifies whether to enable or disable the printing of HP PCL5 scalable fonts by an application. Menu Administration/Emulations/HP PCL 5/Scalable Fonts Choices Enable—Allow selection of scalable fonts. When you print PCL4 documents, PCL5 may substitute scalable fonts that could cause your PCL 4 documents to print incorrectly. Disable—Print using bitmap fonts only. Printer Configuration 2-33 Emulations Default Enable Notes This feature may be useful when printing PCL4 documents which may inadvertently select unwanted scalable fonts. Default Font Index Sets the default font index when Select by Index is chosen in the Administration/Emulations/PCL 5/Default Font menu. If a font by the same index number exists, it is selected as the default font. This font must be a cartridge or downloaded soft font. Menu Administration/Emulations/PCL 5/Default Font Idx Choices 00000-32767 Default Depends on cartridge or downloaded font(s) Monochrome HP-GL/2 Allows your printer to emulate a monochrome or color plotter. Menu Choices Default 2-34 Administration/Emulations/PCL 5/Monochrome GL/2 Off—Emulate a color plotter (8 pens). Since a monochrome print system has only 2 pen colors (black and white), grayscale patterns are substituted for other colors. On—Emulate a monochrome plotter (2 pens). On QMS 1725 SLS Print System User's Guide Emulations Notes When set to off, this option maps pen colors as follows: Pen 0=White, Pen 1=Black, Pen 2=Red, Pen 3=Green, Pen 4=Yellow, Pen 5=Blue, Pen 6=Magenta, Pen 7=Cyan. When set to on, this option tells the printer to map each pen to its assigned color, then convert the color to a grayscale using the National Television System Committee (NTSC) color standard for luminosity coefficients (Additive System): Y = 0.30R + 0.59G + 0.11B Example of how to use the color standard formula: White Y = [1*0.30) + (1*0.59) + (1*0.11)]—100% gray Black Y = [0*0.30) + (0*0.59) + (0*0.11)]—0% gray Red Y = [1*0.30) + (0*0.59) + (0*0.11)]—30% gray Green Y = [0*0.30) + (1*0.59) + (0*0.11)]—59% gray Yellow Y = [1*0.30) + (1*0.59) + (0*0.11)]—89% gray Blue Y = [0*0.30) + (0*0.59) + (1*0.11)]—11% gray Magenta Y = [1*0.30) + (0*0.59) + (1*0.11)]—41% gray Cyan Y = [0*0.30) + (1*0.59) + (1*0.11)]—70% gray Download Location Controls the default storage location of PCL objects (fonts, macros, and patterns) when it is not otherwise specified through Document Option Commands. Menu Choices Administration/Emulations/PCL 5/Downld Location Disk—All downloaded PCL objects are stored in the default disk resource, if present. Memory—All downloaded PCL objects are stored in temporary storage in RAM. Default Disk Notes Document Option Commands specifying resources override this option on a per-job basis. If this option is set to Disk and no hard disk is installed, memory is used as the default storage location. If the printer has both a hard disk and a large amount of memory, setting this option to Memory enhances printer performance. Printer Configuration 2-35 Emulations Setting HP-GL Parameters Fifteen configuration choices are available. Plotter Identifies the HP-GL plotter type. Menu Administration/Emulations/HPGL/Plotter Choices 7550A, 7475A, 7470A, Colorpro Default 7550A Scaling Percent Identifies the percentage to reduce or enlarge an image. Menu Administration/Emulations/HPGL/Scaling Percent Choices 001-150 (1-150%) Default 100 (100%) Notes To scale plots, select the paper size originally used for the plot in the Paper Type menu, and then enter the reduction or enlargement needed to fit the plot on the new page in the Scaling Percent menu. If necessary, enter new x,y coordinates in the Origin menu to reposition the plot on the page. Origin Sets the image offset from the plotter’s origin in 0.01" increments. 2-36 Menu Administration/Emulations/HPGL/Origin/X Direction Choices 00000-08500 (0"-8.5") Default 00000 Menu Administration/Emulations/HPGL/Origin/Y Direction Choices 00000-11000 (0"-11.0") Default 00000 QMS 1725 SLS Print System User's Guide Emulations Reverse Image Determines whether an image is printed in reverse. Menu Administration/Emulations/HPGL/Reverse Image Choices On—Print a white image on a black background. Off—Print a black image on a white background. Default Off Enhanced Mode Increases the resolution of a downloaded character. Menu Choices Administration/Emulations/HPGL/Enhanced Mode On—Uses an increased resolution for the grid Off—Uses standard resolution for the grid Default Off Notes The HP-GL user-defined character (UC) command downloads and draws characters with an encoding scheme that uses pen control movements and coordinate sequences. The characters are drawn on a grid that is superimposed on the character plot cell. Expand Mode Defines a larger imageable area for the selected media type. This increased imageable area affects the default placement of the scaling points P1 and P2. Menu Administration/Emulations/HPGL/Expand Mode Choices On—Expands the imageable area. Off—Doesn’t expand the imageable area. Default Off Printer Configuration 2-37 Emulations Notes Setting this option to On partially determines the range of plotter units for a selected media type. When the plotter senses the media type, it automatically sets the hard clip limits to 0.591"/15 mm on three sides and to 1.537"/39 mm on the fourth side. However, if Expand Mode is set to On, then the limits are set to 0.197"/5 mm on three sides and 1.143"/29 mm on the fourth side. The HP-GL emulation senses the media size when the Paper Type is set to Scale to Paper or when it is set to a particular media size through the control panel or through a QMS Document Option Command. Paper Type Identifies the original image’s paper size. Menu Administration/Emulations/HPGL/Paper Type Choices Scale to Paper, A (letter/8.5"x11.0"), A4 (210x297 mm), B (11.0"x17.0"), A3 (297x420 mm) Default A Pen 1 - Pen 8 Sets the width and color for the eight plotter pens. A width and a color option are available for each pen. 2-38 Menu Administration/Emulations/HPGL/Pen x/Width Choices 00-60 (0.1-6.0 mm) Default Pen 1—7 (0.7 mm) Pen 2—3 (0.3 mm) Pen 3—3 (0.3 mm) Pen 4—3 (0.3 mm) Pen 5—3 (0.3 mm) Pen 6—3 (0.3 mm) Pen 7—3 (0.3 mm) Pen 8—3 (0.3 mm) Notes A pen width of 00 defaults the to the pixel setting of 0.1 mm. Menu Administration/Emulations/HPGL/Pen x/Color QMS 1725 SLS Print System User's Guide Emulations Choices Black, Violet, Brown, Gray - 25%, Gray - 50%, Gray - 75%, Red, Orange, Yellow, Green, Blue, Cyan, Magenta Default Pen 1—Black (100% black) Pen 2—Black (100% black) Pen 3—Red (70% black) Pen 4—Green (41% black) Pen 5—Blue (89% black) Pen 6—Violet (59% black) Pen 7—Orange (25.8% black) Pen 8—Brown (50% black) Notes Cyan=30% black, magenta=59% black, and yellow=11% black. Setting Lineprinter Parameters Twelve configuration options are available. Font Sets the printer fonts for the current print job. Menu Administration/Emulations/Lineprinter/Font Choices All printer-resident PostScript fonts. Default Courier Notes Any PostScript fonts available on the printer can be used. To see a list of available PostScript fonts, print an advanced status page through the printer configuration menu (Administration/Special Pages/Status Page Type) or through the PS Executive Series Utilities. Point Sz 100ths Sets point size (in .01 point increments) of the font for the current print job. Menu Administration/Emulations/Lineprinter/Point Sz 100ths Choices 00400-25600 (4-256 points) Default 00880 (8.8 points) Printer Configuration 2-39 Emulations Character Map Specifies the type of character map to be used. Menu Administration/Emulations/Lineprinter/Character Map Choices ASCII, EBCDIC Default ASCII Line Numbering Specifies if a five-digit number is to be prefixed to the beginning of each line. Menu Administration/Emulations/Lineprinter/Line Numbering Choices On—Number all lines. Off—Don’t number lines. Default Off Tab Stops Specifies the number of spaces between tab stops. Menu Administration/Emulations/Lineprinter/Tab Stops Choices 0-256 Default 8 Line Feed is Carriage Return-Line Feed Specifies whether each line feed (LF) in the print job is translated to a carriage return/line feed (CRLF) combination. 2-40 Menu Administration/Emulations/Lineprinter/LF is CRLF Choices On—Translate all line feeds to carriage return/line feed combinations. Off—Use lines feeds only as line feeds. Default On QMS 1725 SLS Print System User's Guide Emulations Carriage Return is Carriage Return-Line Feed Specifies whether each carriage return (CR) in the print job is translated to a carriage return/line feed (CRLF) combination. Menu Administration/Emulations/Lineprinter/CR is CRLF Choices On—Translate all carriage returns to line feeds. Off—Use carriage returns only as carriage returns. Default Off Form Feed is Carriage Return-Form Feed Specifies whether each form feed (FF) in the print job is translated to a carriage return/form feed (CRFF) combination. Menu Administration/Emulations/Lineprinter/FF is CRFF Choices On—Translate all form feeds to carriage return/form feed combinations. Off—Use form feeds only as form feeds. Default On Orientation Specifies whether text and graphics are placed on the page in a portrait or landscape orientation. Menu Administration/Emulations/Lineprinter/Orientation Choices Landscape, Portrait Default Portrait Autowrap Specifies whether long lines are to be wrapped to the next line instead of being truncated. Menu Administration/Emulations/Lineprinter/CRISCRLF Choices On—Wrap long lines. Off—Truncate long lines. Default Off Printer Configuration 2-41 Special Pages Lines Per Page Specifies the number of lines printed on a page before an automatic page eject. Menu Administration/Emulations/Lineprinter/Lines per Page Choices 001-128 Default 066 Notes Interline spacing is set to the selected point size. Logical pages consisting of more lines than specified are split into multiple pages. Margins Defines the left, right, top, and bottom margins in 1/100" increments. Menu Administration/Emulations/Lineprinter/Margins Choices Bottom0-1700 (0"-17.00") Left0-1700 (0"-17.00") Right0-1700 (0"-17.00") Top0-1700 (0"-17.00") Default Bottom 0 Left 0 Right 0 Top 0 Special Pages Use the Administration/Special Pages menu to print special pages, such as status pages, header pages, and trailer pages. See the QMS Crown Document Option Commands manual for detailed information on the contents of these special pages. Working with Status Pages Printing a status page is a two-step procedure: Identify the type of status page you want to print, and then print it. 2-42 QMS 1725 SLS Print System User's Guide Special Pages Identifying a Status Page Type Two types of status pages are available. Menu Administration/Special Pages/Status Page Type Choices Standard—Lists printer identification information, current memory configuration, timeouts, communication settings, input buffer sizes, and available fonts. Advanced—Contains the same information as the standard status page as well as configuration menu settings, fonts, and downloaded emulations. Default Standard Printing a Status Page Prints a status page. Menu Administration/Special Pages/Print Status Choices Yes, No Default No Notes The type of status page printed is determined by the selection made in the Status Page Type menu. Calibration Page Prints a calibration page. Menu Administration/Special Pages/Calibration Page Choices Yes—Prints calibration page. No—Calibration page will not be printed. Default No Notes See the Administration/Engine/Image Alignment menu for calibration instructions. Working with Header Pages A header page is a separator page that prints before a print job to help users sort their jobs. The information on the header page can be customized. See the QMS Crown Document Option Commands manual for more information. Printer Configuration 2-43 Special Pages Enabling/Disabling Header Pages Menu Administration/Special Pages/Header Page Choices On—Print a header page before each job. Off—Don’t print a header page before each job. Default Off Identifying a Header Page Input Source You can select the input bin (tray or cassette) from which the printer pulls media when printing the header page. Menu Administration/Special Pages/Header Inputbin Choices Upper—Pull header page media from the upper input bin. Lower—Pull header page media from the lower input bin. Default Upper Notes If you used the Administration/Engine/Inputbin x Name options to change the names of the input bins, these names replace Upper and Lower in the message window. Working with Trailer Pages A trailer page is a separator page that prints after a print job to help users sort out their jobs and, if requested, identify print job errors. Enabling/Disabling Trailer Pages 2-44 Menu Administration/Special Pages/Trailer Page Choices Off—Don’t print a trailer/error page for each print job. On—Print a trailer/error page for each print job. On Error—If any print job errors exist, print a trailer page that lists the errors as well as other trailer page information. Errors Only—If any print job errors exist, print a trailer page that lists the errors but omits other trailer page information. Default Off Notes See the QMS Crown Document Option Commands manual for more information. QMS 1725 SLS Print System User's Guide Printer Start-Up Options Identifying a Trailer Page Input Source You can select the input bin (tray or cassette) from which the printer pulls media when printing the trailer page. Menu Administration/Special Pages/Trailer Inputbin Choices Upper—Pull trailer page media from the upper input bin. Lower—Pull trailer page media from the lower input bin. Default Upper Notes If you used the Administration/Engine/Inputbin x Name options to change the names of the inputbins, these names replace Upper and Lower in the message window. Printer Start-Up Options The Administration/Startup Options menu allows you to configure your printer to run certain options automatically when you turn it on. Enabling/Disabling the Start-Up Page By default, the printer prints a start-up page when you turn it on. The start-up page lists basic information about the printer, such as its name, the PostScript emulation level and version, and various printer settings. However, you can turn the start-up page off to conserve paper and toner. Menu Administration/Startup Options/Do Start Page Choices Yes—Print a start-up page each time the printer is turned on. No—Don’t print a start-up page each time the printer is turned on. Default Yes Printer Configuration 2-45 Memory Enabling/Disabling the SYS\START File If you have a hard disk and Do Sys Start is enabled, when the printer is turned on, the controller checks the hard disk for a PostScript file named SYS\START and executes this file. Menu Administration/Startup Options/Do Sys Start Choices Yes—Check the hard disk for and execute the SYS\START file when the printer is turned on. No—Don’t check the hard disk for a SYS\START file. Default No Notes This file does not print. Information on creating a SYS\START file is available via Q-FAX (see appendix A, “QMS Customer Support,” for information on using Q-FAX). Loading the PostScript Error Handler Error Handler is a diagnostic tool that identifies PostScript errors encountered during a print job. Menu Administration/Startup Options/Do Error Handler Choices Yes—Load the Error Handler. No—Don’t load the Error Handler. Default No Notes Refer to the PostScript Language Reference Manual (Adobe Systems Incorporated, Reading, PA: Addison-Wesley, 1990, ISBN 0-201-18127-4) for more information on PostScript errors. Memory Memory allows your printer to store and retrieve information that’s required to perform many of its tasks. The memory requirements of each printer are dictated by the applications to be run. Each printer comes standard with a certain amount of memory, but you may add more memory as necessary. 2-46 QMS 1725 SLS Print System User's Guide Memory The memory is divided among users (or “clients”), each of which allocated a specific amount (or “block”) of memory. Each memory client is dedicated to a specific printing and application purpose. Your QMS 1725 SLS Print System allows you to distribute its memory among the various memory clients where it can best serve your specific printing needs. The following sections provide information on memory management so you can get the most from your printer. Generally, there are two main reasons for wanting to reconfigure your printer’s memory: n n To achieve maximum performance To enable additional features The ability to configure your printer’s memory doesn’t necessarily mean that you must change your current configuration. If you’re presently using all the features you need and the printer is performing efficiently, you shouldn’t feel compelled to reconfigure your printer's memory. Just remember that if your printing needs change, not only do you have the ability to increase the amount of printer memory, but you also can redistribute it where you feel it would best meet your printing requirements. QMS Memory Management Managing the memory on your printer is much the same as managing your personal income. In money management, you have a certain amount of income and many ways of spending that income. You decide where that money goes according to what’s important to you. There’s no single correct way to manage money, but there is one best way for you according to your financial obligations. The same is true for managing the memory on your printer. There’s no single correct way for everyone to allocate available printer memory. There may be, however, a best way to configure your printer's memory for maximum efficiency in your specific printing environment. For example, if you use a large number of PostScript fonts of various point sizes, you may want to increase the amount of memory allocated to the area specified for PostScript fonts. Or you may want to Printer Configuration 2-47 Memory increase memory to the area that minimizes slowdowns when collating large print jobs. Memory configuration affects these things as well as the number of jobs that can be accepted by the printer, the number of options available simultaneously, the number of downloadable fonts and emulations that can be stored, and overall printer performance. Memory Terms Before you can configure your printer's memory efficiently, you must first understand the different types of memory and how they work together. Your QMS 1725 SLS Print System documentation uses the following memory terms: Hard Disk The QMS 1725 SLS Print System comes standard with an internal hard disk and has the option of upgrading to a larger internal hard disk (up to 512 MB) and adding up to six external drives. See also SCSI. Memory Memory allows your printer to store and retrieve information. It’s the space within your printer where information is stored while being actively worked on. Memory Client A memory client is a function that has a dedicated block of memory. Each memory client controls certain features. When insufficient memory is allocated to a specific client, the features it controls may not be accessible. Excess Memory Client The memory remaining after providing all the other memory clients with their specified amounts of memory is automatically added to the excess memory client. The frame buffer is the excess memory client for the QMS 1725 SLS Print System. 2-48 QMS 1725 SLS Print System User's Guide Memory Storage Storage is a device which information can be kept. There are three main types of storage—ROM, RAM, and hard disks. ROM (Read Only Memory) ROM contains data and/or machine-executable instructions that can be read but not modified. On your QMS 1725 SLS Print System, the operating system code, resident fonts, and resident emulations are stored in ROM. This information is not lost when the printer’s power is turned off. RAM (Random Access Memory) RAM is the memory your printer uses to perform each task. It can be written to and read from. Once a task is complete, the memory is free again to be used for another file. This memory is volatile, so if your printer loses power while a file is being sent, the file must be resent. The number and type of features you can run on your printer simultaneously depend on the amount of RAM you have and how that RAM is distributed. Your printer comes with 13MB of RAM, but it is upgradable to 32 MB by adding Single In-line Memory Modules (SIMMs). RAM Disk Also called a virtual disk, the RAM disk is an area of RAM that is used to simulate an additional hard disk. Data can be written and read more quickly than on a hard disk, but a RAM disk loses any information stored on it when the printer’s power is turned off. The spooling buffer is a RAM disk client. SCSI (Small Computer System Interface) The printer’s SCSI port (located on the interface panel on the back of the printer) allows you to connect optional SCSI hard disks that provide storage for fonts, emulations, and other files. Hard disks are also used to increase collation capacity and provide a secondary storage area for spooled data, while providing virtual memory capabilities. Printer Configuration 2-49 Memory Physical Memory Physical memory refers to the amount of RAM installed in the printer. Spool Spooling is temporary storage to hold print jobs until the printer is available to process them. Evaluation of Your Printing Environment The first step in allocating your printer’s memory is to define your printing needs. Each of your printer’s features requires a minimum amount of memory. If you use a feature, you must allocate enough memory to the client that controls it. On the other hand, if there are features you don’t use, you can take the memory in the clients that control the unused features and assign it to other clients that need additional memory. Evaluation Questions To get a better idea of what your printing requirements and your printer’s capabilities are, answer the following questions: 2-50 1 How much RAM does your printer have (standard and additional memory)? 2 Do you have the option of installing additional memory if it’s needed? 3 Does your printer have any external hard disks connected? If so, how many and what size? 4 Which resident emulations will you be running? 5 Will you be loading any non-resident emulations? If so, how many and which ones? 6 How many printer ports will be connected? 7 Do you have an optional interface connected? 8 How many people will be using this printer simultaneously? QMS 1725 SLS Print System User's Guide Memory 9 How many downloadable fonts will you be using? What sizes? From which emulation? 10 Will you use many different sizes of fonts/typefaces? 11 How large are the files you typically print? How large is the largest file you’ll be printing? 12 Are most of your files text, or are any graphics intensive? 13 Will you want to download fonts, forms, or operators to memory? 14 Will you be collating documents? If so, how large and complex will these documents be? 15 What media sizes will you be using? 16 Will you be printing at 300x300 dpi or 600x600 dpi? After you have answered all of these questions, read the following sections to find out which memory clients control features you plan to use and which memory clients control features you don’t need. Duplexing and Memory Requirements Additional memory is required for duplexing at 600 dpi resolution on legal-size media. The following chart represents the minimum amount of memory needed to print various paper sizes at 300 or 600 dpi resolution. In most cases, the minimum amount of memory does not allow the printer to run at rated speed. The amounts shown assume the Page Recovery function (Administration/Engine/Page Recovery) is turned on. 300 dpi 600 dpi Paper Size Simplex Duplex Simplex Duplex Letter 8MB 8MB 8MB 12MB Legal 8MB 8MB 12MB 16MB A4 8MB 8MB 8MB 12MB Executive 8MB 8MB 8MB 12MB Printer Configuration 2-51 Memory Memory Clients This submenu allows you to allocate the printer’s memory (RAM) among the various memory clients. The flexibility of defining memory available to clients allows experienced users to optimize the printer's performance according to a given set of conditions. O Caution: Misallocated memory may hinder the performance level of the printer. Quick Config In addition to the ability to set each client’s memory allocation through the Memory submenu, your QMS 1725 SLS Print System also has a Quick Config option to aid you in setting your printer for your specific environment. The Quick Config option is intended to allow you to specify the following items: n n n Resolution (300 or 600 dpi) Printing mode (simplex or duplex) Page size (letter/executive, A4, or legal) The Quick Config menu uses these items to allocate the printer’s memory. The printer does not allow items to be selected that do not work with the amount of RAM currently installed in the printer. If you are uncertain about how to configure your printer’s memory, use only the Quick Config option in this submenu. Configuring Spooling The K Mem for Spool, listed on the status page as Host Input, is the total number of kilobytes of RAM allocated to all spooling buffers. This memory client stores incoming data from the various interfaces until it is processed and printed. Menu Administration/Memory/K Mem for Spool Status Page Host Input Alias 2-52 QMS 1725 SLS Print System User's Guide Memory Choices 00112-99999 Default Variable Notes This value must be greater than the sum of the Min K Spool for all installed and enabled interfaces. If you change the K Mem for Spool value, the printer automatically restarts after you save your changes and exit from the configuration menu. When the sum of the Min K Spool for all interfaces is less than K Mem for Spool, memory is allocated as follows: 1 Interfaces with Min K Spool (in the Administration/Communications menu) value greater than zero to receive their specified allocation. 2 Half of the remaining memory is equally distributed among any interfaces with a Min K Spool value of zero. 3 The other half of the remaining memory is called float memory. This memory is divided among all ports with a Min K Spool value of zero. If only one port has a Min K Spool value of zero, that port receives all float memory. PostScript Heap The K Mem for PSHeap, listed on the status page as Heap, is the number of kilobytes of RAM dedicated to the PostScript emulation interpreter. This memory client holds downloaded PostScript emulation fonts, operators, and forms. Menu Administration/Memory/K Mem for PSHeap Status Page Heap Alias Choices 01024-99999 Default Variable Notes If you change the K Mem for PSHeap value, the printer automatically restarts after you save your changes and exit from the configuration menu. Printer Configuration 2-53 Memory PostScript Fonts The K Mem for PS Fonts, listed on the status page as Font Cache, is the number of kilobytes of RAM dedicated to caching previously scaled bitmap representations of fonts for the PostScript emulation interpreter. Menu Administration/Memory/K Mem for PS Fonts Status Page Font Cache Alias Choices 00088-99999 Default Variable Notes This memory setting can reduce the number of times a PostScript font must be converted from outline form to bitmap form, thus reducing processing time. If you change the K Mem for PS Fonts value, the printer automatically restarts after you save your changes and exit from the Configuration menu. Emulation The K Mem Emulation is the number of kilobytes of RAM to be used by non-PostScript emulations for temporary storage and for loading optional emulations. 2-54 Menu Administration/Memory/K Mem Emulation Choices 00768-99999 Default Variable Notes If you receive an emulation error, you may need to increase the amount of memory for this client. If you change the K Mem Emulation value, the printer automatically restarts after you save your changes and exit from the configuration menu. QMS 1725 SLS Print System User's Guide Memory Emulation (Temporary) The K Mem Emul Tmp is the number of kilobytes of RAM to be used by non-PostScript emulations for storing downloaded (soft) fonts, forms, or macros. Menu Administration/Memory/K Mem Emul Tmp Choices 00256-99999 Default Variable Notes This value must be greater than the sum of the Min K Spool for all installed and enabled interfaces.Data in this client disappears when the printer is turned off. This client is listed as Temporary on the status page. Increasing this client’s size increases the number of PCL downloaded fonts which can be accepted. If you change the K Mem Emul Tmp value, the printer automatically restarts after you save your changes and exit from the Configuration menu. Display List The K Mem Display is the number of kilobytes of RAM dedicated to the display lists. The display list holds the intermediate representation of pages to be printed. Increasing the size of the Display List increases the number of pages that can be collated. The maximum number of pages that can be collated is 100 pages. Menu Administration/Memory/K Mem Display Choices 00128-99999 Default Variable Notes If you change the K Mem Display value, the printer automatically restarts after you save your changes and exit from the configuration menu. Printer Configuration 2-55 Memory Disk Cache The K Mem Disk Cache is the number of kilobytes of RAM dedicated to the disk cache. This memory client speeds file system throughput on any installed hard disks by storing frequently used data in system memory instead of continually storing it to and retrieving it from a hard disk. Menu Administration/Memory/K Mem Disk Cache Choices 00032-99999 Default Variable Notes If no hard disk is used, the disk cache should be set to the minimum. The printer then reallocates the released memory to other clients that need additional memory. If one or more hard disks are used, they remain unavailable until sufficient memory is available to the disk cache. If you change the K Mem Disk Cache value, the printer automatically restarts after you save your changes and exit from the configuration menu. The amount of memory needed for this memory client depends on the size and number of hard disks, the number of subdirectories on each disk, and the amount of memory dedicated to caching. » Note: If sufficient memory is available to the disk cache, all disks are accessible. If insufficient memory is available to the disk cache, some disks may be accessible while others may not be. The recommended amount of memory for the disk cache client is n n 120 KB minimum 0.5 KB per MB of disk storage total for all disks For example, the recommended amount of memory for the disk cache for a single 120 MB hard disk is 180 KB, and for two 120 MB hard disks it is 240 KB. These are recommended values. The printer will still operate with a smaller cache, but decreased performance may result. 2-56 QMS 1725 SLS Print System User's Guide Memory Frame Buffer The Frame Buffer memory client holds rasterized or bitmapped images of page faces which are ready to be sent to the print engine. A frame holds the contents of each single page image. Claculating the Frame Buffer Size The following formulas should help you determine the minimum number of kilobytes required in the frame buffer for any printing situation. Your printer may require additional memory in the frame buffer to print at a rated speed. paper feed width (inches) x horizon. resolution (dpi) ÷ 8 = scanline width (bytes) paper feed length (inches) x vert. resolution(dpi) = number of scanlines scanline width (bytes) x number of scanlines = total frame buffer memory (bytes) bytes ÷ 1024 = KB For example, if you are printing a duplex, 8.5 x 11.0'' page at 600 dpi, with the short edge of the page fed into the printer first, your equation would look like this: (8.5 x 600) / 8 = 638 bytes (scanline width) 11 x 600 = 6,600 (number of scanlines) 638 x 6,600 = 4,210,800 bytes or 4,210,800 ÷ 1024 = 4,113 kilobytes Now, since in this example you are duplexing, you must double the frame buffer memory to 8,421,600 bytes or 8,225 KB. If you are uncertain about how to configure your printer’s memory, use only the Quick Config menu. Memory is then automatically allocated to the memory clients that require it. Any excess memory is allocated to the Frame Buffer client. Printer Configuration 2-57 Printer Engine Features Printer Memory MB Printer Mem, listed as System Use on the status page, is the number of megabytes of RAM available to be split among the various memory clients. The size of this client's memory limits the number of jobs that may be queued simultaneously. When this client's memory is exhausted, the printer slows down, and the hosts are forced to wait. Menu Administration/Memory/MB Printer Mem Status Page System Use Alias Choices None--For information only. Default Depends on the amount of memory installed. Notes This memory client is not user-configurable. Printer Engine Features Through the Administration/Engine menu you can set print enginerelated parameters. Adjusting the Image Alignment This option allows you to adjust the horizontal and vertical placement of printed images. To check image alignment, print a standard status page (Administration/Special Pages/Print Status). When the printer is placing images properly, the alignment angle bar in the lower-left corner of the status page is 0.5"/12.7 mm from the left and bottom edges of the page. If the angle bar is off, use the Administration/Engine/Image Alignment option to align the image horizontally and vertically in pixel increments (1/300" or 0.08 mm). There are separate adjustments for the front and back of a sheet for duplex alignment. » Note: Engine constraints may limit the accuracy of pixel alignment. 2-58 QMS 1725 SLS Print System User's Guide Printer Engine Features Horizontal Offset Menu Administration/Engine/Image Alignment/Horiz Offset Choices 00000-00300 (0.00"/0 mm-1.00"/25.4 mm) Default 00100 (0.33"/.84 mm) Notes Values above 100 move the image to the right. Values below 100 move the image to the left. Vertical Offset Menu Administration/Engine/Image Alignment/Vertical Offset Choices 00000-00300 (0.00"-1.00") Default 00100 (0.33"/.84 mm) Notes Values above 100 move the image down. Values below 100 move the image up. Vertical Duplex Offset default = 00150 Setting Default Paper Default Paper is used when the default media is requested but the default input bin is missing from the engine so there’s no way to sense the media size automatically. Menu Administration/Engine/Default Paper Choices Letter, A4 Default Letter Setting Inputbin x Name These options are used to name input bins 1 and 2. Menu Administration/Engine/Inputbin x Name Choices Up to 16 alphanumeric characters Default Inputbin 1 “upper” / Inputbin 2 “lower” Printer Configuration 2-59 Printer Engine Features Setting Outputbin x Name These options are used to name output bins 1 and 2. Menu Administration/Engine/Outputbin x Name Choices Up to 16 alphanumeric characters Default Outputbin 1 “upper”/ Outputbin 2 “face up” Setting Default Resolution This option sets the print engine’s default resolution. Menu Administration/Engine/Def Resolution Choices 300 dpi—300x300 dpi resolution. 600 dpi—600x600 dpi resolution. Default 600 dpi Setting Gamma Correction This option sets the print engine’s gamma correction. Menu Administration/Engine/Gamma Correction Choices 0,1,2,3 Default 0 Notes Gamma correction produces optimum print quality for halftones. For information on gamma correction, see chapter 4, “Print Quality,” in this guide. Specifying Page Recovery Action When a media jam or other similar error occurs, the printer can reprint the job starting from the page on which the jam occurred. 2-60 Menu Administration/Engine/Page Recovery Choices On—Reprints from the page on which the jam or error occurred. Off—Doesn’t reprint a print job when a jam or error occurs. Default On QMS 1725 SLS Print System User's Guide Printer Engine Features Setting Toner Out Action You can configure the printer to stop or to continue printing when a TONER OUT error message is displayed in the message window. Menu Administration/Engine/Toner Out Act. Choices Continue—Printing when a TONER OUT message displays. Stop— No printing when a TONER OUT message displays. Default Continue Setting Manual Feed Timeout This option allows you to set the amount of time the printer waits for paper to be inserted into the manual feed slot before it cancels the job. Menu Administration/Engine/Man. Feed Timeout Choices 00000 - 00300 seconds Default 00060 seconds Notes A value of 00000 sets the timeout to infinity Setting the Letterhead Option This option only appears if the duplexing unit is installed on the printer. The letterhead option allows you to print both simplex and duplex jobs on letterhead paper from the same input bin (cassette) without having to sort the pages manually. Menu Administration/Engine/Letterhead Choices On, off Default Off Notes Letterhead paper must be loaded face down in the input bin with the bottom edge inserted first into the printer. You may notice a decrease in the printing speed depending on the mix of simplex and duplex pages. Printer Configuration 2-61 Miscellaneous Reading the Page Counters The page count of the pages printed can be read from the message window or through a remote console without the need for a status page to be printed. Menu Administration/Engine/Page Counters/Sheets Printed Choices Ten-digits, non-configurable. (For information only.) Default Current page count Notes The sheets printed number represents the number of media pages that have been fed through the printer. A duplexed page increments this counter by only one. Menu Administration/Engine/Page Counters/Faces Printed Choices Ten-digits, non-configurable. (For information only.) Default Current faces printed count Notes The faces printed number represents the number of page faces that have been printed. A duplexed page would increment this counter by two. Miscellaneous The Miscellaneous submenu allows you to change printer configurations, such as defaults and message window language. Restoring the Factory Default Configuration If you need to cancel all of the configuration changes you have made, you can reset all of the configuration settings to their factory defaults. 2-62 Menu Administration/Miscellaneous/Restore Defaults Choices Yes, No Default No Notes This process takes several minutes to complete. QMS 1725 SLS Print System User's Guide Hard Disks Setting the Message Window Language Status messages and configuration menus can be displayed in the message window in English, French, German, or Spanish. Menu Administration/Miscellaneous/Keypad Language Choices English, French, German, Spanish Default English Notes The printer must be restarted for changes to the Keypad Language menu to take effect. You can either let the printer restart automatically after you save the change and exit from the Configuration menu, or you can wait for the change to take effect the next time you manually turn on the printer. Hard Disks Use the Administration/Disk Operations menu to perform disk operation processes that appear only when optional hard disks are installed. O Caution : If you connect to this printer an external hard disk you previously used with an earlier QMS Crown printer, this QMS 1725 SLS Print System software release will automatically reorganize the files on the hard disk when the printer is turned back on again. (The printer release number is listed on both the start-up and the status page.) Once this reorganization is done, the files on the hard disk can no longer be accessed if the hard disk is reattached to an earlier QMS Crown printer. This reorganization process takes time. If, when you first turn the printer on after attaching a previously used hard disk, it does not come on line immediately, be patient. Interrupting the reorganization process could cause all files on the hard disk to be lost. Printer Configuration 2-63 Hard Disks Identifying Hard Disks The documentation that comes with your external SCSI (Small Computer System Interface) hard disk should contain all of the necessary information for connecting and configuring the disk. Device Numbers Hard disks are identified by device numbers which you assign. Valid choices for external SCSI hard disks range from DSK0 to DSK5. However, you cannot repeat numbers; each device number must be unique. The recommended device number for the internal SCSI hard disk, if present, is DSK6. Optional Disks (DSK0 - DSK5) Internal Disk DSK6 » Note: For the printer to recognize any attached hard disk(s), each hard disk must be turned on before you turn on the printer. DISK ONLINE appears on the start-up page if the printer recognizes the disk(s). The Disk Operations Menu The Administration/Disk Operations menu contains all of the options you need to format a hard disk, as well as to install optional fonts on and remove them from a hard disk. » Note: The install, remove, and format disk operations do not include support for a Font Folio disk. You must download the fonts to your hard disk from host applications. 2-64 QMS 1725 SLS Print System User's Guide Hard Disks Error Messages The following three messages may appear while you are using the Disk Operations menu. Message Meaning Action FORMAT FAILED The hard disk cannot be used. Press the Menu key to remove the message, and contact your QMS vendor. WRITE ERROR The hard disk encountered a write error, or there is no room for the data on the hard disk or in RAM. Press the Menu key to remove the message, and restart the operation from the beginning. Formatting a Hard Disk O Caution: If you format the internal hard disk, the printers system code will be lost. You would then have to reload the system software. Refer to Installing Print System Software Upgrades, in chapter 8 for instructions on loading system software. You have two ways of formatting a hard disk: n n PS Executive Series Utilities Printer configuration menu Using PS Executive Series Utilities The PS Executive Series Utilities offer formatting options for both Macintosh and PC setups. See the on-line documentation for details on formatting disks. Using the Printer Configuration Menu After you have accessed the Administration/Disk Operations menu, press the control panel keys in the order shown in the following table. The printer responds by displaying a status message in the message window. Always turn on any external hard disks prior to turning on the printer. Printer Configuration 2-65 Hard Disks » Note: You may need to press the Next key one or more times to advance through the list of selections or options. Use this to... key Select Access the Administration/Disk Operations/Format Disk menu. DISK OPERATIONS FORMAT DISK Select Access the Format Disk/Dsk#: menu. FORMAT DISK DSK#: x Next Scroll through the list of attached disks. FORMAT DISK DSK: x Select Select the disk and display a format confirmation message. Select Begin the formatting process. The hard FORMAT DISK disk is formatted while the system FORMATTING... reboots. You are informed when the formatting process is complete. The printer then reboots, and a start-up page prints (if enabled). » The message window reads... FORMAT DISK ARE YOU SURE? FORMAT DISK FORMAT COMPLETE Note: After an unformatted disk is formatted and the FORMAT COMPLETE message displays, you must turn the printer off and back on again before the printer can recognize the disk. Collation This option is used to specify which disk and how much of that disk should be used to store collated print jobs when the jobs cannot be accommodated by RAM space. The printer scrolls through all the installed hard disk addresses. Refer to “Collating Output,” in chapter 3, “Daily Operations,” for more information. Spool Overflow This option is used to specify which disk and how much of that disk should be used to store print jobs when the jobs can not be accommodated by RAM. The maximum setting varies according to the disk size installed in the printer. 2-66 QMS 1725 SLS Print System User's Guide Installation Installation The Installation menu appears only if a security card is installed. The system administrator uses the Installation menu to set passwords for the Operator Control and Administration menus. Operator Password Allows you to enter a password used to enter the Operator menu when enabled. Menu Installation/Operator Passwrd Choices Up to 16 alphanumeric characters Default Blank (no password) Notes Enable the password in the Installation/Use Operator Pwd menu. Use Operator Password Determines if a password is required to enter the Operator menu. Menu Installation/Use Operator Pwd Choices On—Require a password to enter the Operator Control menu. Off—Don’t require a password to enter the Operator Control menu. Default Off Notes Enter the password in the Installation/Operator Passwrd menu. Admin Password This represents the password used to enter the Administration menu when enabled. Menu Installation/Admin Password Choices Up to 16 alphanumeric characters Default Blank (no password) Notes Enable the password in the Installation/Use Admin Pwd menu. Printer Configuration 2-67 Configuring Optional Features Use Admin Password Determines if a password is required to enter the Administration menu. Menu Installation/Use Admin Pwd Choices On—Require a password to enter the Administration menu. Off—Don’t require a password to enter the Administration menu. Default Off Notes Enter the password in the Installation/Admin Password menu. Using Passwords When a password is required to enter the Operator Control or Administration menu, the message window will display ENTER PASSWORD if you press the Select key to enter the menu. Enter the password or press the Menu key to return to the menu. If you specify the correct password, access to the selected menu is granted. However, if you enter an invalid password, the message window flashes INVALID PASSWORD for three seconds and then returns you to the Configuration menu. Configuring Optional Features Several of the optional features available affect printer configuration and the Configuration menu. When an optional feature is installed, its configuration information merges into the Configuration menu. New menu entries appear, and the range of choices for existing configuration values is extended. v 2-68 QMS 1725 SLS Print System User's Guide 3 Daily Operations In This Chapter . . . n n n Printing modes Using different print media Paper feeding Introduction Introduction This chapter covers basic printer operation with various kinds of print media, loading paper and envelopes, and the paper delivery system of the printer. Manual feed is included as is tray chaining (switching). This chapter also explains what a status page is and how to cancel print jobs at the operator control panel. Preventing Media Jams There are several things you can do to reduce the occurrence of media jams. n n n n n 3-2 Your paper, labels, and overhead transparencies must meet the guidelines set for the printer. See appendix B, “Technical Specifications.” If you have problems with double feeding, remove the media from the cassette or input bin and fan the edges. The sheets may be sticking together. However, do not fan transparencies since this causes static electricity. Print media must be stored away from moisture and humidity. Many manufacturers place an arrow on the end of the wrapper that indicates which side of the media should be used for printing. If you have problems and cannot determine which side of the paper should be printed, remove the paper from the cassette, rotate the stack a half-turn, turn the stack over, and then place it back in the cassette. If none of the above relieves media jamming, notify your vendor. QMS 1725 SLS Print System User's Guide About Paper About Paper Your print quality depends in large part on the quality of the paper. You can get sharper contrast on printed pages by using special laser printer paper, which is available from a variety of paper manufacturers. This paper is thicker, smoother, and whiter than copier paper and gives your page a more professional appearance. The printer accommodates paper from 16 to 24 pounds (60 to 90 g/m2) with cassette feed and 16 to 36 pounds (60 to 135 g/m2) with manual feed. Conventional copier paper is adequate for most applications. Copier paper has a smooth, clean surface, controlled electrical properties, and heat stability. This assures good image transfer without excessive curling of the paper. You can use special paper, such as bond paper, often used for stationery, for special applications. However, textured paper may result in uneven toner placement and print quality may vary. You may want to do a test run before printing a large quantity. Colored paper may also be used, but not paper with a colored coating applied. Appendix B, “Technical Specifications,” contains additional paper specifications. Paper Sizes Your printer supports four different paper sizes. It automatically detects which size paper cassette is installed and judges the paper size accordingly; letter-size paper in a legal-size cassette does not work. Be sure to match the paper size to the appropriate paper cassette. You may purchase additional paper cassettes from your QMS vendor. Daily Operations 3-3 About Paper The table that follows gives exact paper sizes your printer supports as well as the imageable area. This imageable area is smaller than the size of the paper. » Note: Imageable areas are not centered on their respective pages and may vary plus or minus 1/16" (1.6 mm). This can be adjusted from the control panel in the Administration/Engine/Image Alignment menu. Type Size Imageable Area Letter 8.50" x 11.00" (215.90 x 279.40mm) 8.20" x 10.66" (208.28 x 270.76mm) Legal 8.50" x 14.00" (215.90 x 355.60mm) 8.20" x 13.66" (208.28 x 346.96mm) Executive 7.25" x 10.50" (184.15 x 266.70mm) 6.95" x 10.16" (176.53 x 258.06mm) A4 8.27" x 11.69" (210.00 x 297.00mm) 7.97" x 11.36" (202.50 x 288.50mm) Paper Storage How you store paper can make a big difference in print quality and printer operation. Improperly stored paper increases the chance of paper jams during printing and can drastically affect the appearance of your printed pages. Keep paper in good condition by storing it n n n n In its wrapper On a flat surface In a closed cabinet In a cool, dry area Do not leave paper unwrapped or in a place where heat and humidity can damage it. 3-4 QMS 1725 SLS Print System User's Guide Paper Feeding Paper Feeding There are two ways of feeding paper through your printer: n n Cassette feed (automatically) Manual feed (by hand) Cassette Feed Cassette feed automatically pulls paper from one of the cassettes at the front of the printer. The cassettes handle paper as light as 16 pounds (60 g/m2) or as heavy as 24 pounds (90 g/m 2), and the maximum loading depth is 1.97'' inches (50 mm). Use the following instructions to install a cassette: 1 Fill the cassettes with paper. If you’re using n n n Letterhead and printing simplex (single sided), be sure to place the paper face up, top edge inserted first. Letterhead and printing duplex (double sided), place the paper face down, bottom edge inserted first. Letterhead and printing combination simplex and duplex jobs, refer to the Letterhead option in the Engine submenu covered in chapter 2, “Printer Configuration.” Label » Note: The cassette label indicates which size paper to use. When inserted in Daily Operations 3-5 Paper Feeding the printer, each cassette sets off a series of internal switches which the printer reads to determine page size. Use only the size paper marked on the cassette's label for cassette feed. 2 Place the covers on the cassettes. 3 Slide the filled cassettes into the openings in the front of the printer. Manual Feed Manual feed is the method of feeding media by hand. You can use the manual feed slot with the adjustable feed guide on top of the paper cassettes for a single manual-feed job. Single-sheet manual feed makes it possible to feed individual sheets of paper or other material (such as envelopes, label stock, and transparencies) into your printer. Paper weight can range from 16 to 36 pounds (60 to 135 g/m2). Envelopes can be fed from the manual feed slot of the upper cassette or with the optional envelope feeder (see chapter 8, “Printer Options,” for more information). Cut sheets, labels, and transparencies can be fed from the manual feed slot of either cassette. » Note: Use the face-up output bin (described in the previous section) when printing heavy-weight stock and envelopes. Using this bin bypasses some internal printer rollers and results in less curl. It is used often with manual feed. Specify the size of the media to be manually fed in the Operator Control/Manual Feed Size menu option. The printer remains in manual 3-6 QMS 1725 SLS Print System User's Guide Paper Feeding feed mode after pulling a sheet from the manual feed slot. Manual feed is very useful for n n n Odd-sized paper (cut sheets) Transparencies Heavy-weight labels and envelopes Use the following instructions to feed media by hand. 1 Press the Online/Offline key to take the printer offline. 2 Press the Tray Select key until the Manual Feed indicator is lit. 3 Select the manual feed size in the Operator Control menu. 4 Adjust the manual feed guides on the upper or lower paper cassette to match the width of media you are using. Manual feed guide (left) Manual feed guide (right) 5 Insert the media between the guides as far as it goes. The media is automatically fed into the printer, and the printed media is forwarded to the selected output bin. Daily Operations 3-7 Face-up Output Bin Face-up Output Bin After being printed, paper normally stacks face down in the recessed area on the top of the printer. The face-down output bin holds up to 500 sheets of paper. For face-up output, you must attach the face-up output bin to the rear of the printer and configure the printer to access this bin. This output bin holds up to 50 sheets of paper. Use the following instructions to attach the face-up output bin: 1 Insert the two end tabs of the face-up output bin into the slot on the back of the printer. 2 Allow the extended part of the bin to lean back into its normal position. 1 2 Printing Transparencies You can also print transparencies for overhead projectors. Use only transparencies recommended for laser printers, such as Canon brand type D and 3M type PP2500. Always use manual feed from either the upper or lower cassette, and the face-up output bin at the back of the printer. Remove each transparency from the face-up bin after printing 3-8 QMS 1725 SLS Print System User's Guide Printing Labels to avoid jams. Transparencies must withstand temperatures up to 356° F (180° C). Other specifications on overhead transparencies are n n n Thickness: 0.111 to 0.113 mm (4.37 to 4.45 mils) Cutting Dimension Tolerance: +/-0.7 mm (0.031") Cutting Angle: 90° (+/- 0.2°) Transparencies are especially sensitive to a dirty paper path. If there are shadows either on the top or the bottom of the sheets, see chapter 5, “Printer Care,” of this manual for instructions on how to clean the media path. Printing Labels Adhesive label stock has pressure-sensitive (peel and stick) adhesive backing. The procedure for feeding labels is almost the same as for regular paper; however, you must use the face-up output bin. Recommended labels have the following specifications: n n » Type: Use only labels recommended for laser printers, such as Avery 5260. Adhesive label stock should have pressuresensitive (peel-and-stick) adhesive backing. Weight: The printer supports 17-34 lb (64-128 g/m2) labels when using manual feed. Note: Label data should be formatted within your application. Try printing your data on a plain sheet of paper first to check placement. This reduces the number of label sheets you use. Daily Operations 3-9 Printing Envelopes Printing Envelopes Envelopes may be printed in two ways: n n From the manual feed slot on the upper cassette (single envelopes) From the optional envelope feeder (up to 100 envelopes) Non-standard-size envelopes are acceptable using manual feed as long as they fall into the following size ranges: n n Minimum size: 3.5" x 7" (86 mm x 178 mm) Maximum size: 7.4" x 10.5" (188 mm x 267 mm) Formatting Data for Envelopes Your printer receives the necessary instructions to print on envelopes from your software. Read the printing section of your application manual to find out how your software supports envelope printing. The page orientation should be in landscape mode for most applications. Usually, this is accomplished through the application. When formatting data for envelopes, leave a 0.6" (15 mm) margin from the edges of the envelope. Print on only one side. Remember, some parts of an envelope consist of three layers of paper the front, back, and flap. Print in these layered regions may be faded. Printing a Single Envelope Adjust the manual feed guides on top of the cassette to the correct size of the envelope. Insert a single envelope into the manual feed 3-10 QMS 1725 SLS Print System User's Guide Tray Chaining slot as shown in the following illustration, with the face up and the flap side toward the left manual feed guide. Manual feed guides Because envelopes pass through heated rollers, the gummed area on the flap may seal. Open the flap immediately after it passes through the printer, before the seal cools. You may then reseal in the normal manner. The use of envelopes with emulsion-based glue avoids this problem. » Note: Before printing envelopes, disable the duplexer if it is installed and check the manual feed guides to make sure theyre not too tight and buckling the envelopes. Also, make sure envelopes meet specifications listed in appendix B, Technical Specifications. If envelopes curl excessively, use the face-up output bin at the rear of the printer. The Optional Envelope Feeder To load up to 100 envelopes at a time, use the optional envelope feeder. Instructions for installation and use are in chapter 8, “Printer Options.” See your QMS vendor for more information on the optional envelope cassette. Tray Chaining This printer has two cassettes (also known as trays or input bins) for a total media capacity of approximately 1000 sheets before a reload is Daily Operations 3-11 Collating Output necessary. You may choose to have the printer automatically draw from the alternate cassette when the current cassette empties. There are three ways to do this: n n n Your application may include a specific procedure for using a dual-cassette printer. Check your documentation. PS Executive offers a menu-driven program for paper tray selection in the paper source section. If you have this program installed, you can use it to help you configure the printer's paper source. The most convenient way to configure the printer is through its control panel. Use the following table to help you configure cassette chaining through the control panel. » Note: Make sure that the two cassettes installed in your printer use the same size paper. Menu Operator Control/Chain Inputbins Choices On—turns on tray chaining. Off—turns off tray chaining. Default On Notes Use the Operator Control/Inputbin menu to set the default input bin. Collating Output With sufficient memory or a hard disk installed, the QMS 1725 SLS Print System can deliver multiple copies of your files in collated order to the face-down output bin without having to send the file repeatedly. This feature dramatically reduces your data transmission and 3-12 QMS 1725 SLS Print System User's Guide Collating Output improves performance. The illustration below shows collated and uncollated stacking for two copies of a three-page file. 2 1 3 1 2 3 1 Collated 1 2 2 3 3 Uncollated The face-down output bin has an offset stacking feature that when enabled, offsets the multiple copies of a print job. With a hard disk installed, collation performance is greatly improved because the file is stored in QMS-compressed format for repeated printing. When disk space is consumed during a print job, the printer begins chunk collating. Chunk collation breaks a job into sections and performs collation on each of those sections. The next diagram shows the printing order of three copies of a large document when chunk collation is used. Several factors control the point when chunk collation occurs. Copy Copy Copy 1 2 3 Pages 101-200 Pages 101-200 Pages 101-200 Copy Copy Copy 1 2 3 Pages 1-100 Pages 1-100 Pages 1-100 The maximum collation sequence is 100 sheets. Disk space of 10 MB is probably sufficient for most printing applications. The maximum Daily Operations 3-13 End Job Mode amount that may be dedicated to collation is 50 MB. See the “Collation” section in chapter 2, “Printer Configuration” for more information on setting the printer’s collation values. End Job Mode When sending print jobs through the serial and parallel protocols, some applications and their printer drivers append an end-of-document command (EOD) to each print job to ensure that each file prints correctly. The reason for this is that some protocols and print queuing systems send print jobs to the printer as one continuous data stream (one print job immediately following another). However, some applications are limited in printer language and are unable to produce an EOD command. The lack of an EOD command can cause some print jobs to be “run” together. The ESP technology (capable of receiving print jobs from all supported emulations simultaneously) incorporated in your QMS 1725 SLS Print System examines the first part of each print job to determine its emulation. Once the emulation is identified, the print job processes without checking for any changes in emulation until an EOD is received. This minimizes any slowdown during the sensing process. To help ESP technology determine the proper emulation of successive print jobs, the printer must be able to identify the end of job for each job. Therefore, unless a wait timeout (the amount of time the printer is waiting on data from the host) occurs and ends each print job, or unless you add an EOD command between each file being printed through these protocols, some print jobs may be interpreted by the printer as one job with the same emulation. See chapter 2, ”Printer Configuration,” for more information on emulation timeout. When printing multiple jobs with little or no time delay and with no EOD command between each job, the serial and parallel protocols may be unable to detect an end of job automatically. So the End Job Mode feature on QMS Crown printers was designed to allow you to set the end of document for print jobs being sent through these protocols. 3-14 QMS 1725 SLS Print System User's Guide End Job Mode Common Reasons to Use End Job Mode If you are printing via the serial and parallel protocols, and one of the following conditions exists, you may need to set the end job mode: n n n n n Multiple print jobs with little or no time delay and with no EOD commands have been sent to the printer and the message window displays only one active job. Multiple print jobs of the same printer language have been sent to the printer and they print on the same page. (For example, you send the AUTOEXEC.BAT file with no EOD command followed with little or no time delay by the CONFIG.SYS file, and they both print on the same page.) Multiple print jobs of different printer languages “run” together as if they are a single print job. (For example, you send a PCL print job followed by a PostScript print job, and the PCL job prints and is followed by what appears to be program code instead of your PostScript print job.) You want to print multiple jobs with header pages. You want to print multiple jobs where job separation is important. When your printer is in ESP mode, printing multiple jobs through the serial and parallel protocols and end job mode is not set, ESP technology interprets the emulation for only the first job. The print jobs that follow are interpreted as being the same emulation as the first job. For example, if there are two print jobs, the first a PCL file with no EOD command, and the second a PostScript file with a Ctrl-D (a PostScript end-of-file character)—ESP technology interprets the emulation of the first job correctly. But since the first print job has no EOD command, it “runs” into the second job, and even though the second job is PostScript, it prints in PCL. Using the EOD Commands Since the serial and parallel protocols may not be able to detect an EOD automatically, due to a lack of an EOD command in some printer languages, you can insert an EOD command at the end of your file to Daily Operations 3-15 End Job Mode tell the printer where your print job ends. QMS Crown printers recognize two end-of-document commands: QMS EOD and HP EOD. These commands are functionally the same. They enable data stream sensing for the EOD command, allowing your host computer to control print job separation. The QMS EOD and the HP EOD commands perform an end of document for all of the printer emulations supported on your printer (PostScript, HP-GL, HP PCL, and Lineprinter). See your system administrator or applications development department to have them identify the standard EOD command for your organization, or to have them select a standard EOD command. Setting the End Job Mode for the Serial and Parallel Protocols Your printer can be connected through the serial or parallel interface to a stand-alone PC, to a PC print server, or to some other type of print queuing system. This section provides a quick guide to the steps needed to set the end job mode for each environment. The following sections provide more detailed information for each step. Stand-Alone PC 1 Set the end job mode from the printer's control panel. 2 Add the EOD command to your file. » Note: If using steps 1 and 2 is not feasible in your stand-alone PC environment, you can alternatively use a program that either causes an emulation timeout or that inserts an EOD command between each print job. See your QMS vendor for more information on this type of program. PC Print Server 3-16 1 Set the end job mode from the printer’s control panel. 2 Create a job separator to append an EOD command and send it between each print job. QMS 1725 SLS Print System User's Guide End Job Mode Other Print Queuing Systems If you use a print queuing system other than a PC print server and you experience what appears to be an EOD command problem, you may need to use another procedure, such as a print utility, an initialization sequence, or a header page to add an EOD command. See your print queuing system documentation, your network administrator, or your QMS vendor for more information. Setting the End Job Mode via the Control Panel Use the following procedure to set the end job mode from the printer’s control panel for printers connected via the serial or parallel interface to a stand-alone PC, a PC print server, or some other type of print queuing system: » Note: If you print both serial and parallel protocol jobs, then you must set the end job mode for each protocol. Wait for the printer to go idle, and then press the control panel keys in the order shown in the following instructions to access the End Job Mode option. The printer responds by displaying a status message in the message window. » Note: You may need to press the Next key one or more times to advance through the list of selections or options. Key Purpose Message Window Online/Offl Turns off the Online/Offline indicator and IDLE ine readies the printer for configuration. Menu Accesses the configuration menu. CONFIGURATION OPERATOR CONTROL Next Advances to the Operator Control/Administration menu. CONFIGURATION ADMINISTRATION Select Accesses the Administration menu ADMINISTRATION COMMUNICATIONS Next Advances to the Communications/Parallel COMMUNICATIONS (or Serial) menu. PARALLEL (or SERIAL) Daily Operations 3-17 End Job Mode Select Accesses the Parallel (or Serial) menu. PARALLEL/SERIAL MODE Next Advances to the Parallel (or Serial)/End Job Mode menu. PARALLEL/SERIAL END JOB MODE Select Accesses the End Job Mode menu. END JOB MODE OPTION Next Advances to the appropriate option (QMS END JOB MODE EOD, HP EOD, or None). OPTION Select Selects the option. OPTION IS SELECTED Returns to the Parallel (or Serial)/End Job PARALLEL/SERIAL Mode menu. END JOB MODE Online/Offl Asks you if you want to save your ine change. SAVE CHANGES? NO Next Advances to the Yes option. SAVE CHANGES? YES Select Saves your change and idles the printer. IDLE Online/Offl Puts the printer back on line. ine IDLE Adding an EOD Command to Your File When adding an EOD command to your file, use the syntax for the selected EOD command exactly as written (the command's syntax is case sensitive). Daily Operations 3-18 End Job Mode » Note: <ESC> represents the escape character. (The decimal value for the escape character is 027, and the hexadecimal value is 1B.) How you enter the escape character depends on your application. Some applications allow you to press and hold the ALT key and then type 027 to enter the escape character, while others allow you to type certain character sequences to represent the escape character. See your computer or application documentation to find out how to enter the escape character on your system. » For this EOD command... Use this syntax... QMS EOD %%EndOfDocument <CR><LF> HP EOD <ESC>%-12345X Note: The <CR><LF> sequence following the %%EndOfDocument line for the QMS EOD is necessary to avoid an INPUT IDLE message remaining in the printer message window after the document finishes printing. When the QMS EOD or the HP EOD is set, the printer does not recognize the Ctrl-D EOD command. Add your organization's standard EOD command to the end of your print file, or add it to a separate file. Adding an EOD Command to the End of Your File Create an output file (for example, print an ASCII, PCL, or PostScript file to disk) and add your organization's standard EOD command (QMS EOD or HP EOD) to the end of that file. Sample output file: Text Text Text Text %%EndOfDocument Adding an EOD Command to a Separate File Create an ASCII text file that contains only the EOD command. For example, create a DOS batch file listing each print filename followed Daily Operations 3-19 Working with Status Pages by the EOD command filename for each file being printed. Then “run” the batch file to print your list of files. Sample DOS batch file: Command Explanation Print Print Print Print Job filename EOD command filename Job filename EOD command filename mktg.doc end.txt acct.doc end.txt Creating a Network Job Separator If your printer is connected to a network through a PC and the PC is acting as a print server managing the printing of shared network files, then your system administrator must create a job separator and associate it with a print job queue. Different network environments have different procedures for creating the job separator, such as initialization sequences, custom banner pages, print job headers, or print job trailers. The print server does not necessarily send multiple print jobs to the printer in the order that you queued them to the printer. The network job separator is accessed with each print job, so this ensures that network job separation is enforced. See QMS Crown Network Notes for more information on how to create a network job separator for several commonly used networks. Working with Status Pages Printing a status page is a two-step procedure: Identify the type of status page you want to print, and then print it. Identifying a Status Page Type Two types of status pages are available: n 3-20 Standard—This one-page document provides printer identification information (printer type and name, firmware version and QMS 1725 SLS Print System User's Guide Cancelling/Endi ng Print Jobs release, and number of sheets printed), printer settings (PostScript level, start-up options, paper handling information, resolution, and gamma correction setting), current memory configuration, time-outs, communication settings and input buffer sizes for all standard and optional interfaces, and hard disk status (address, size, and free space). In addition, an angle bar prints in the lower-left corner for image alignment. n Advanced—This document, which can be five or more pages long, contains the same information as the standard status page as well as configuration menu settings and a full list of fonts and downloaded emulations. Menu Administration/Special Pages/Status Page Type Choices Standard, Advanced Default Standard Printing a Status Page After you have identified the type of status page to print, send it to the printer in one of the following ways: n » Use the PS Executive Series Utilities (see the PS Executive online help for instructions). Note: Only standard status pages can be printed from PS Executive. Advanced status pages are not available. n Use the control panel keys to select “Yes” in the Print Status menu option. Menu Administration/Special Pages/Print Status Choices Yes, No Default Yes Cancelling/Ending Print Jobs The Cancel key has two functions: Daily Operations 3-21 Cancelling/Ending Print Jobs n n It cancels all print jobs that are currently printing, interpreting, or spooling. It allows you to send an end-of-job indicator to a currently compiling print job that is waiting for incoming data. Once the print jobs are canceled or ended, the printer resumes printing other jobs in the queue. You don’t have to press the Online/Offline key to take the printer off line before using the Cancel key. There are no equivalent functions in the configuration menu. » Note: If you need to cancel the cancel job or end job procedure, press the Menu key. Cancelling a Print Job Press the control panel keys in the order shown in the following instructions to cancel a print job. Press this key Cancel to... The message window reads... Access the Cancelling Job menu. You are prompted for confirmation that you want to cancel the print job. CANCELLING JOB? YES Cancel Select Yes. or Select Cancel all print jobs in the queue that are currently printing, interpreting, or terminating. The CANCELLING JOB message displays until the print job is completely removed from the printer. 3-22 YES IS SELECTED CANCELLING JOB QMS 1725 SLS Print System User's Guide Cancelling/Endi ng Print Jobs Ending a Print Job If the first print job in the queue is waiting for, but not receiving the data it needs to finish printing, the message window displays WAITING FOR INPUT END JOB? Use the following procedure to end all print jobs in the queue that are waiting for incoming data. » Note: This procedure does not end a print job that is still receiving data. Its only purpose is to provide an end-of-job indicator for a print job that does not have one. You can identify an end-of-job indicator in the Administration/Communications/Parallel and Administration/Communications/Serial menu. (See chapter 2, Printer Configuration, for more information). Press this to... key The message window reads... Cancel Access the Cancelling Job menu. CANCELLING JOB? YES Next Advance to the End Job option. CANCELLING JOB? END JOB Cancel Select End Job. or Select END JOB IS SELECTED The message window momentarily displays RATE IS SELECTED (where RATE is the baud rate you selected) and then SERIAL BAUD RATE 3 If you want to change other settings, use the Next key to scroll to the setting you want to change, then repeat the procedure described in steps 6 through 8. Otherwise press the Online/Offline key. The message window displays Daily Operations 3-23 Cancelling/Ending Print Jobs SAVE CHANGES? NO 4 To save your change, press the Next key so that the message window displays SAVE CHANGES? YES 5 Press the Select key to save the change. The Online/Offline indicator lights, and the message window displays IDLE v 3-24 QMS 1725 SLS Print System User's Guide 4 Print Quality In This Chapter . . . n n n n S etting print density Using gamma correcti on Using the cali brati on page Changi ng printer resolution Introduction Introduction The Q M S 1725 SLS P rint Sy stem i ncludes M ulti-Res technology in i ts design. In addi tion to resolution selecti on, this technology giv es y ou more control ov er the factors that affect y our print quality. Some of these factors include pri nt density, image calibration, gamma correcti ons, screen frequency, and screen angles. Thi s chapter ex plains how to use these factors to improv e y our ov erall print quality. Changing Print Resolution A nother way to sharpen the i mages printed on y our pages i s through setting the pri nt resoluti on. Your printer is capable of printing at 300 or 600 dpi . For pages requiring the best quality y our printer can prov ide, set the pri nter resolution to 600 dpi. Setting Default Resolution Thi s option sets the pri nt engi nes default resoluti on. Menu Choices Default Notes Administration/Engine/Def Resolution 300 dpi300x 300 dpi resolution. 600 dpi600x 600 dpi resolution. 600 dpi Printing duplex using 600x600 resolution with legal size media requires 16 MB of printer memory. Setting Print Density P ri nt density i s the amount of toner placed on each dot, making the print appear lighter or darker. The hi gher the densi ty, the darker the print looks and the higher the contrast is on the page. To adjust the print density 4-2 QMS 1725 SLS Print System User's Guide Using Gamma Correction 1 Open the printer top cover. 2 Locate the density adjustment dial that is inside the printer on the left side. The scale on the densi ty adjustment dial show s the density setti ng; the dark marking identifies increased density, and the light marki ng i dentifies reduced density. 3 Adjust the dial to the desired setting. To i ncrease density (darken print on the page), slide the dial tow ard the rear of the printer. To decrease density (lighten print on the page), slide the dial toward the front of the pri nter. The dial clicks at the center setti ng. » Note: You may want to increase density as the toner cartridge depletes. Using Gamma Correction Gamma correction is an adjustment of the ranges of shading in a printed image to prov ide the best copy of scanned images. Through manipulati on of shading lev els, y our pri nter can be set to improv e the print quality of a scanned i mage automatically. The main benefit of gamma correcti on is that i t improv es the print quali ty of a scanned image by improv ing contrasts at a giv en resolu- Print Quality 4-3 Using Gamma Correction ti on. To get the best gray -scale PostS cript image at any resolution, gamma correcti on should be turned on. Terms S everal terms related to gamma correction are ex plai ned in thi s secti on to help y ou better understand the gamma correction concept. Gray Levels Gray lev els are a progressiv e series of gray tones betw een black and w hite. Gray lev els are obtained by vary ing the rati o of black to w hite dots. The number of gray lev els depends on printer resoluti on and screen frequency. Halftone A halftone is a printed copy of a scanned image as a set of tiny, ev enly spaced spots of v ariable di ameter that, w hen printed, v isually blur together to appear as shades of gray. Your QM S 1725 SLS Pri nt S ystem creates halftone cells by mapping each gray level onto a collection of dots. Factors that influence the quality of a halftone are n n n n Dev ice resolution of the pri nter S creen frequency of the halftone Quality of the scan Diameter of the laser beam Changi ng print resolution from 300x 300 dpi to 600x 600 dpi smooths the resulting spots. In additi on, because each spot i s represented by a w ider range of dots, a greater number of gray levels i s possible. The laser beam i s part of the print engine, so i ts not a factor y ou can adjust. Screen Frequency S creen frequency is the number of lines of dots that compose each inch of a halftone screen. The screen frequency of a halftone deter- 4-4 QMS 1725 SLS Print System User's Guide Using Gamma Correction mi nes the number of spots used to represent gray levels i n a giv en area. A 71 lines per i nch (lpi) screen frequency has 71 lines of dots for each inch of the halftone screen. The follow ing illustration shows the relationshi p between screen frequency , gray lev els, and pri nt resolution. As the screen frequency increases, the number of gray levels decreases. 300x300 dpi Gray Levels 600x600 dpi 250 201 200 150 129 100 73 51 50 33 33 19 9 0 42 53 71 106 Screen Frequency (lpi) The number of gray lev els that y our pri nter can produce depends on the screen frequency and the print resoluti on. The default v alue for screen frequency using 600 dpi is 71 lpi. This ty pically allows 73 different lev els of gray. The default v alue for screen frequency usi ng 300 dpi is 53 lpi. This ty pically allows 33 di fferent lev els of gray. You can change screen frequency through y our applicati on or by using the PostScript setscreen operator. The ex tra gray lev els av ailable through higher resolution prov ide a smoother shift from the darkest black to v ery light gray s w hile higher resolution prov ides sharper image outlines. Print Quality 4-5 Using Gamma Correction Gamma Correction Concept Often in scanned images, gray scaling may be too light or dark to show details clearly. Using gamma correction on a gray -scale image is similar to usi ng a graphic equalizer on a home stereo; the range of gray lev els i s adjusted for the best possible image. Thi s sharpens ov erall midrange contrast w hile blacks (shadows) and w hites (highlights) keep their original values. Gamma correction sets gray scale v alues specifi ed through the P ostScript setgray operator to y our printers gray -scale v alues. Gamma correction is linked to print resolution. The main benefit of gamma correcti on is that it improv es the print quality of a scanned image by i mprov ing halftones at a giv en resolution. To get the best gray -scale PostScript image at any resolution, gamma correction should be turned on. You can set gamma correction through P S Ex ec or through the A dmi nistration/Engine/Gamma Correction menu. Menu Choices Default Notes Administration/Engine/Gamma Correction 0, 1, 2, 3 0 0 the gamma correction is turned off. 1gamma correction provides a low contrast. 2gamma correction provides medium contrast 3gamma correction provides a high contrast Gamma correction applies only to PostScript images. If turning on gamma correction doesnt yield a suitable grayscale image for your needs, set a specific gamma correction value through your drawing application or through the PostScript settransfer operator. (See your drawing application PostScript Language Reference Manual for more information.) documentation and the 4-6 QMS 1725 SLS Print System User's Guide Using the Image Calibration Page Using the Image Calibration Page The Calibration Page opti oin, av ai lable through the Speci al Pages submenu in the A dministrati on menu, allow s y ou to print an image calibration page to use for evaluating print job quality. The main benefi t of the calibration page is its usefulness in isolating problems that affect pri nt quality. To ev aluate pri nt quality, pri nt a calibration page from y our printer by using the Special Pages submenu. See the Special Pages S ubmenu section of chapter 2, Printer Confi guration. Then revi ew the calibrati on page using the follow ing description: Diagonal Line The di agonal line across the top of the calibration page show s the quali ty of the di agonal line. At 600 dpi the li ne is less jagged than at 300 dpi . Halftone Bar (Black to White) The v erti cal bar on the left side of the calibration page shows the appearance of the current gamma correction v alue halftones. The halftone bar illustrates the gray lev els from black to w hite. Halftone Bar (White to Black) The v erti cal bar on the right side of the calibration page show s the appearance of the current gamma correcti on v alue halftones. The halftone bar illustrates the gray lev els from w hite to black. Printer Resolution Thi s parameter i dentifi es the printer resoluti on i n dots per i nch. The more dots per inch, the finer the resolution and the more perfect the elements look to the ey e. Screen Frequency Thi s parameter i dentifi es the number of screen lines. Print Quality 4-7 Using the Image Calibration Page Screen Angle Thi s parameter i dentifi es the screen angle. Dot Percent Thi s parameter i dentifi es how the different halftone settings and densities look at v arious gray lev els. Font Samples The different font samples show how sharp, smooth and clean the tex t is at 600 dpi. Vertical Resolution The rectangle on the bottom left-hand si de of the calibration page shows the increase in v ertical resolution at 600 dpi. Each bar segment shifts down by 1/600''. Dot Gain Area The circle on the bottom-center part of the calibration page shows the decrease in dot gain (dark area in the center of the ci rcle) at 600 dpi. The arc rotation is by 2 degrees. The near v ertical and near horizontal lines are less jagged. Horizontal Resolution The rectangle on the bottom right-hand side of the calibration page shows the i ncrease in horizontal resolution at 600 dpi. E ach bar segment shifts ri ght by 1/600''. For quick calibration, use the following procedure: 4-8 1 Set the density or contrast using the density control lever located inside the printer on the left side of the fuser assembly (see About Print Density, earlier in this chapter). The standard setting is centered in the middle of the scale. A setting toward the thicker end of the scale darkens print, and a setting toward the thinner end of the scale lightens it. 2 Through the control panel, selct a gamma correction settig from the Administration/Engine submenu. QMS 1725 SLS Print System User's Guide Using the Image Calibration Page » Note: You may want to use the PostScript settransfer operator for different gamma corrections not predefined in the printer. 3 Check your grayscale quality by printing a calibration page. Use the Calibration Page option in the Administration/Special Pages submenu to print a status page. 4 Repeat steps 1 through 3 until you see the steps in the grayscale bar chart on the calibration page. » Note: You may need to recalibrate each time you change the toner cartridge. v Print Quality 4-9 5 Printer Care In This Chapter . . . n n n Toner cartridge installation Printer handling practices Printer cleaning procedures Introduction Introduction Quality printing requires uniform toner application and a clean paper path. This chapter explains basic maintenance to keep your printer running smoothly. It includes installing a toner cartridge, cleaning printer parts, and general printer care. When to Replace the Toner Cartridge The toner cartridge lasts for approximately 8,000 prints at 5% coverage. (For example, a one-page letter with no graphics.) When the cartridge toner supply runs low, the printer message TONER OUT displays. Usually, parts of the page print lighter. It is your option whether or not to continue printing when the engine senses it is out of toner. When toner is low, it is sometimes helpful to take the cartridge out of the printer and redistribute the toner. This is done by gently rocking the cartridge side to side. Then reinstall the cartridge. If the TONER OUT message remains in the display panel after redistributing toner, the cartridge must be replaced. 5-2 QMS 1725 SLS Print System User's Guide Installing the Toner Cartridge Handling the Toner Cartridge The cartridge contains the toner and laser-sensitive drum needed to operate the laser printer. The cartridge n n n n Is sensitive to light; do not expose it to direct sunlight after opening Should be installed immediately after opening Should be kept level for storage; do not stand or store the cartridge on its end Contains a magnet; keep the cartridge away from CRTs, disk drives, and floppy disks since damage may occur to stored data Additional toner cartridges may be purchased from your QMS vendor. Toner specifications are in appendix B, “Technical Specifications.” Installing the Toner Cartridge The toner cartridge contains the toner and laser-sensitive drum needed to operate the laser printer. O CA UTION : The toner cartridge is sensitive to direct sunlight. Do not remove the cartridge from its protective bag until you are ready for installation. 1 Open the printer top cover. 2 Hold the new cartridge with both hands and gently rock it from side to side. This distributes toner inside the cartridge and helps assure quality printing. Printer Care 5-3 Installing the Toner Cartridge 3 Gently push the cartridge into the printer until it fits firmly. 4 Grasp the tab protruding from the left side of the cartridge and flex it to break it loose. 5 Pull the tab straight out. Pull the attached 22 inches (55 cm) of tape completely out of the cartridge. Discard the tab and tape. 6 Close the printer top cover. The toner cartridge is now ready for use. 5-4 QMS 1725 SLS Print System User's Guide Handling the Printer Handling the Printer Handle the printer with care to preserve its life. Abuse may cause damage. n n n n n n Do not place anything on the top of the printer. Two or more people are required to move the printer. Never carry or move the printer by lifting from the paper cassette slot. Lift the printer from the bottom only. Keep the output bin at minimum level. If paper stacks too high, you may experience paper jams and excessive paper curl. Do not leave the printer open for any length of time, especially in well-lit places. Light may damage the toner cartridge. Remove the toner cartridge before moving the printer. Never ship printer with a toner cartridge installed. If you are not going to use the printer for an extended length of time n n Unplug the power cord from the power source outlet Leave the cartridge inside the printer Printer Care 5-5 Keeping the Printer Clean Keeping the Printer Clean To maintain sharp print quality, clean the inside of the printer at the following times: n n n Every time the toner cartridge is changed After printing 8,000 single-sided pages Whenever print quality becomes unsatisfactory The inside of the printer must be wiped clean of any toner residue and paper dust. The areas requiring regular cleaning are n n n n M The anti-static teeth The transfer-guide lock-tray (green with handle) The transfer-guide strip (silver metal) The media-feed-guide area (black steel) WARNING! Unplug the printers power cord before cleaning the printer. A CHTUNG! Ziehen Sie den Netzstecker aus der Steckdose bevor Sie den Drucker reinigen. Cleaning the Anti-Static Teeth The anti-static teeth decrease the static charge placed on each sheet of media as it passes through the printer. This allows the media to pull toner from the toner cartridge drum. If the anti-static teeth are dirty, too much of the static charge remains on the media and can cause light or missing print on pages (especially in duplex operation). 5-6 QMS 1725 SLS Print System User's Guide Keeping the Printer Clean To clean the anti-static teeth 1 Open the printer top cover to the upright position and remove the cleaning brush from its position guides located directly behind the control panel on the inside of the printer. 2 Use the cleaning brush to wipe clean the anti-static teeth. Anti-static teeth Transfer charging roller O Caution: Be careful not to touch the transfer charging roller when cleaning the anti-static teeth. Finger oil, scratches, or other contaminants on the roller may reduce print quality . Printer Care 5-7 Keeping the Printer Clean Cleaning the Transfer-Guide Lock-Tray and Strip The transfer-guide area controls the path of the media as it passes through the printer. Dust can accumulate over time on these guides and affect the appearance of your print. To clean the transfer-guide area 1 Make sure the printer’s power cord is unplugged and open the printer top section. 2 With a water-dampened, soft cloth, gently wipe off any dust that may have accumulated on the transfer-guide lock-tray and the transfer-guide strip. Transfer- Transfer guide lock- tray charging roller O Caution: Be careful not to touch the transfer charging roller with the water- moistened cloth. Finger oil, scratches, and other contaminants may reduce the print quality. 3 5-8 Using a dry, soft cloth, wipe the cleaned area to remove moisture. QMS 1725 SLS Print System User's Guide Keeping the Printer Clean Cleaning the Media-Feed-Guide Area The media feed guide area provides the media path between the transfer guide area and the fuser assembly. M WARNING : Be careful; the area around the fuser assembly is hot. A CHTUNG! Verletzungsgefahr! Bei Betrieb wird die Umgebung der Fixiereinheit heib. 1 Make sure the printer’s power cord is unplugged and open the printer top section. 2 With a water-dampened, soft cloth, wipe off any accumulated dust from the media feed guide area. Fuser assembly Media feed guide 3 Using a dry, soft cloth, wipe the cleaned area to remove moisture. v Printer Care 5-9 6 Troubleshooting Printer Problems In This Chapter . . . n n n n n n n Status messages Printer problem checklist Media jams Problem descriptions Print quality problems Image defects Placing a service call Introduction Introduction This chapter provides information to aid you in resolving printer problems you may encounter, or at least guide you to the proper sources of help. You’ll find in this chapter tables of common status messages, a problem checklist, and actions you should take when a specific problem occurs. There are step-by-step instruction for removing media jams from the key locations along the media path, as well as descriptions of common print quality problems with corresponding solutions. You’ll also find what information you’ll need to have before placing a service call if one becomes necessary. Status Messages Printer control panel messages help you locate many problems. When the printer needs operator assistance, the message window displays one of the following messages: Status message Explanation x ACTIVE JOBS The printer is on line. x identifies the number of jobs in process. ADJUST INPUTBIN The specified input bin (cassette) isn’t BIN inserted correctly, or the cover is open. INPUTBIN BIN JAM Media has jammed while being pulled from the specified input bin. CANCELLING JOB The Cancel key has been pressed, and the oldest job in the print queue is being cancelled. CLOSE ENGINE DOOR(S) One or more of the front or side covers is open and must be closed. DUPLEXER ABSENT The optional duplexer unit is not installed. DUPLEXER JAM 6-2 Media has jammed while passing through the duplexer. QMS 1725 SLS Print System User's Guide Status Messages IDLE The printer is on line, but no jobs are in process. ILLEGAL DUPLEX PRINTING The optional envelope feeder was selected as the input bin and the duplexer as the output bin. The printer does not support duplexing envelopes. ILLEGAL MANUAL FEED PRINTING Media has been inserted in the manual feed slot before the paper tray lifting mechanism is in the ready position. INITIALIZING The printer is getting ready to go on line. INPUT IDLE PRINTING The printer is on line and printing jobs already in the queue. No new jobs are arriving at the communication interfaces. OUTPUTBIN OUTPUTBIN FULL The specified output bin is full. OUTPUTBIN OUTPUTBIN JAM Media has jammed between the printer engine and the specified output bin (tray). PRINTING STATUS A status page is printing PUT SIZE PAPER The selected input bin (cassette) needs IN INPUTBIN BIN paper of the specified size. TEST PRINT A test print page is printing. TONER ABSENT The toner cartridge is not installed. TONER OUT The engine’s toner cartridge is empty. TRANSPORT JAM Media has jammed while passing through the engine. WAITING FOR IDLE A job is in process. Access to the menu is not allowed until the job is finished. Troubleshooting Printer Problems 6-3 Status Messages WAITING ON INPUT END JOB? The compiler is waiting on incoming data for the first job in the queue. The job may not have an end-of-job indicator and therefore cannot end. The message clears if more input arrives from the port or if you press the Cancel key. No other jobs can be printed until this job has ended. WARMING UP The printer is warming up. Service Messages When the printer requires service, operation stops and the message window displays CALL FOR SERVICE followed by the location of the problem and error number. Have this information available when you call for service. » Note: A service message sometimes occurs as a result of an unusual combination of events, not because of an actual problem. When the printer stops and a service message displays in the message window, turn the printer off and back on. This often clears the service message indicator and printer operation resumes. Always try this before making a service call. Service calls should be placed to the vendor from whom you purchased the printer. If you cannot get service from your vendor, see appendix A, “QMS Customer Support.” 6-4 QMS 1725 SLS Print System User's Guide PostScript Errors HP-GL Error Codes and PCL Error Codes The following tables list error codes that could appear on the printer message window when running HPGL or PCL emulations. HPGL Error Code Explanation PCL Error Codes Explanation 0 Not enough memory for job. 0 Not enough memory for job. 1 Too many transformations. 1 State lost. 2 Math error. 2 Math error. 3 Job aborted. 3 Job aborted. 4 Instruction not recognized. 4 Out of memory for macros. 5 Wrong number of parameters. 5 Disk full. Cannot store fonts. 6 Out of range parameter, or illegal character. 7 Not used. 8 Unknown character set. 9 Position overflow. 10 Buffer overflow. 6 - 13 Internal error 1 - 8. PostScript Errors If your printer is having trouble printing when using PostScript emulation, you should turn on the Error Handler in the control panel menu. Error Handler is a diagnostic tool that identifies PostScript errors encountered during a print job. Troubleshooting Printer Problems 6-5 Testing PC Communication Menu Administration/Startup Options/Do Error Handler Choices Yes—Load the Error Handler. No—Don’t load the Error Handler. Default No Notes Refer to the PostScript Language Reference Manual (Adobe Systems Incorporated, Reading, PA: Addison-Wesley, 1990, ISBN 0-201-18127-4) for information on PostScript errors. Testing PC Communication To test communication between your printer and your PC, first create a short file that ejects a page from the printer. Then send the file to the printer. Creating the Test File To create the test file, type the following commands at the DOS prompt: copy con printest.ps↵ showpage↵ ^D^Z↵ You can use either uppercase or lowercase letters; however, you must type the PostScript showpage operator in lowercase letters. The ↵ symbol means to press the Enter key. To produce the ^D and ^Z, press and hold down the Ctrl key while you type the appropriate letters (d and z). These characters signify the end of the file and must always be included. 6-6 QMS 1725 SLS Print System User's Guide Testing PC Communication Sending the Test File Parallel Communication 1 To send the PRINTEST.PS file you just created to the printer, type print printest.ps↵ 2 If you’re prompted for the name of the list device, type lpt1↵ or type the name of the PC’s parallel port to which the printer is connected (for example, lpt2 or lpt3). » Note: If the computer has more than one parallel port, they're probably labeled. If not, check the computer documentation for the parallel port names. 3 If the printer and PC are communicating, a blank page ejects from the printer. Skip ahead to “PC Printing Software” to finish connecting the printer. If a blank page doesn’t eject and you typed the file correctly, you may want to check your AUTOEXEC.BAT file to see if LPT1 (the parallel port) is being directed to COM1 (the serial port): a If the AUTOEXEC.BAT file contains the line mode lpt1:=com1: delete it. b Then type mode lpt1:,,p↵ The P tells the PC to continue sending print jobs until the printer accepts them. c Reboot the PC and try the communication test again. See chapter 6, “Troubleshooting Printer Problems,” and refer to your DOS documentation for more information. Troubleshooting Printer Problems 6-7 Testing PC Communication Serial Communication 1 To send the PRINTEST.PS file you just created to the printer, type print printest.ps↵ 2 If you’re prompted for the name of the list device, type com1↵ or type the name of the PC’s serial port to which the printer is connected (for example, com2 or com3). » Note: If the computer has more than one serial port, they're probably labeled. If not, check the computer documentation for the COM port names. 3 If the printer and PC are communicating, a blank page ejects from the printer. Skip ahead to “PC Printing Software” to finish connecting the printer. If a blank page doesn’t eject and you typed the file correctly, you may want to check your AUTOEXEC.BAT file in DOS to make sure that the printer’s serial port settings match those of the PC. a Look for a command line like this in your AUTOEXEC.BAT file: mode com1: 9600,n,8,1,p In this example, the serial port settings are 9600 for baud rate, N (no) parity, 8 data bits, and 1 stop bit. The P stands for infinite retry. » Note: If the mode statement isnt present in your AUTOEXEC.BAT file, you may temporarily set the m o de parameters at the DOS prompt to continue this test by typing the command line as shown above. To make this setting permanent you will need to add the m ode statement in your AUTOEXEC.BAT file and reboot the PC. 6-8 b Check the start-up page, which prints when you turn on the printer (unless you disabled it). This tells you the current serial port settings for the printer. c If the serial settings (baud rate, parity, data bits, and stop bits) QMS 1725 SLS Print System User's Guide Testing PC Communication shown on the start-up page match those in your AUTOEXEC.BAT file, you need make no further changes. Go to the section “Special PC Concerns,” later in this chapter. If the printer’s serial port settings are different from your PC’s settings, use the printer control panel, as described in the following section, “Changing Serial Port Settings,” to make them match. Changing Serial Port Settings Since your printer is configured at the factory for the most typical printing environments, the serial settings in your AUTOEXEC.BAT file and on the start-up page may be the same. However, if they differ, you must configure the printer to use the serial settings specified in the AUTOEXEC.BAT file. The following instructions explains how to use the printer control panel to configure the printer’s serial settings: 1 Press the printer control panel Online/Offline key. The indicator goes out and the message window displays IDLE 2 Press the Menu key to enter the top-level menu. 3 Press the Next key one or more times until the message window displays OPERATOR CONTROL ADMINISTRATION 4 Press the Select key to enter the Administration menu. 5 Press the Next key one or more times until the message window displays ADMINISTRATION COMMUNICATIONS 6 Press the Select key to enter the Communications menu. Troubleshooting Printer Problems 6-9 Testing PC Communication 7 Press the Next key one or more times until the message window displays COMMUNICATIONS SERIAL 8 Press the Select key to enter the Serial menu. 9 Press the Next key one or more times until the message window displays SERIAL BAUD RATE 10 Press the Select key to enter the Baud Rate menu. The message window displays the currently selected baud rate: *9600 BAUD » Note: The asterisk * denotes the selection in the menu that is currently active. 11 Press the Next key to cycle through the list of baud rates: 300 BAUD 600 BAUD 1200 BAUD 2400 BAUD » 4800 BAUD 9600 BAUD 19200 BAUD 38400 BAUD Note: RS232 baud rates 19200 and 38400 require RTS/CTS protocol. XON/XOFF protocol is not supported at baud rates of 19200 and 38400. 12 When the baud rate you want is displayed, press the Select key. The message window momentarily displays RATE IS SELECTED (where RATE is the baud rate you selected) and then SERIAL BAUD RATE 6-10 QMS 1725 SLS Print System User's Guide Testing PC Communication 13 If you want to change other settings, use the Next key to scroll to the setting you want to change, then repeat the procedure described in steps 6 through 8. Otherwise press the Online/Offline key. The message window displays SAVE CHANGES? NO 14 To save your change, press the Next key so that the message window displays SAVE CHANGES? YES 15 Press the Select key to save the change. The Online/Offline indicator lights, and the message window displays IDLE Verifying the Serial Port Setting Changes 1 Reboot the printer. 2 Compare the serial port settings listed on the start-up page to those in your AUTOEXEC.BAT file. 3 Try the communication test again. If a blank page ejects from the printer, the printer and the computer are communicating. Continue with “PC Printing Software,” to finish connecting the printer. If a blank page does not eject and you typed the file correctly, go to the “Printer Problem Checklist” section later in this chapter and refer to your DOS documentation for more information. Troubleshooting Printer Problems 6-11 Testing Macintosh Communication Testing Macintosh Communication You can check communi cation between the printer selected in the Chooser and the M acintosh by sendi ng a file to the printer from an appli cation (see y our application documentation for more information) or by printing a directory, as described here: 1 Display a disk or folder window. 2 Set up page information. Choose P age Setup from the File menu. Select paper size, printing orientation, and any other necessary opti ons. Then select OK. 3 Print a directory or a window. a Choose P rint Di rectory or P rint Window from the Fi le menu. A dialog box appears. b Select the printing options you want; then click OK. For information on print media types and sizes, see chapter 3, “Daily Operations.” Printer Problem Checklist This section contains a list of possible printer problems and solutions. If you have just installed your printer, be sure you have followed the steps in the QMS 1725 SLS Print System Setup Guide. If there is no display message, use the following steps to identify the source of your problem and to learn of possible solutions: 1 Does the printer power light come on? YES - Go to number 2. NO - Check the following: 6-12 QMS 1725 SLS Print System User's Guide Printer Problem Checklist n n n n 2 Is the power cord plugged into both the power outlet and the printer? Are both printer power switches in the On position (|)? Is the power outlet working? Does the line voltage from the power outlet match the printer's power requirements? See appendix B, “Technical Specifications,” in your Reference guide. Can you print a status page? YES - Go to question 3. NO - Check the following: n n n n n 3 Is the printer off line before you try to enter the Administration/Special Pages/Print Status menu? It should be. Does the cassette have paper? If it is out of paper, the PAPER OUT message displays and the Error indicator lights. Is the method of tray delivery configured correctly? See chapter 2, “Printer Configuration.” Are all the printer covers closed securely? Is there a media jam? If a paper jam message displays and the Error indicator lights, go to one of the following sections in this chapter on clearing a media jam. Is the printer receiving data from the computer? If the Data indicator blinks after a file is sent, the printer is receiving the data. If not, check the following: n n n Is the printer on line? The online/offline indicator should be on and the message window should display IDLE. Has the emulation been changed from ESP to an emulation that doesn’t match the file you are sending. See chapter 2, “Printer Configuration.” Print a status page from the control panel. If you are using the serial interface, is the baud rate (speed of data Troubleshooting Printer Problems 6-13 Media Jams transmission) of the printer, the computer, and your software application the same? See chapter 2, “Printer Configuration.” n 4 Is the printer printing codes or not printing at all when in ESP mode? n n n 5 If you still cannot identify the problem, contact your QMS vendor. Reconfigure the port to the specific printer emulation of the file you are trying to print. See chapter 2, “Printer Configuration” for instructions, or use the PS Executive Series Utilities to change modes. If a PostScript file prints PostScript emulation statements while in ESP mode, increase the ESP timeout. See chapter 2, “Printer Configuration” to change it from the control panel, or use the PS Executive Series Utilities. If you continue to have problems with the ESP mode selecting the appropriate printer emulation, contact your QMS vendor. If nothing prints at all, do an engine test print. On the front of the printer below the control panel and above the power switch is a line indentation with an opening. Insert a pen or end of a paper clip into the opening until you hear a slight click. This should produce a page with vertical lines from one end to the other. If the test print shows any pattern other than this, contact your QMS vendor. Media Jams Locations When a media jam occurs, the media path graphic on the printer's control panel lights in the area closest to the location of the jam and a 6-14 QMS 1725 SLS Print System User's Guide Media Jams paper jam message displays in the message window. Frequent jams in any area indicate that area should be checked, repaired, or cleaned. Repeated jams may also happen if you are using the wrong weight paper. Jams can occur in the following areas: n n n n n n Upper input bin Lower input bin Image transfer area Fuser assembly area Output area Duplexing unit After checking for and removing media from the areas indicated, open and close the printer cover to clear the jam signal. If all the jammed media has been removed, printing automatically restarts when the cover is closed. If printing does not restart or if the printer jams again, make sure that no pieces of media remain in the printer. Clearing an Input Bin Media Jam Follow these instructions to clear a media jam from the upper or lower input bin: 1 M Open the printer top cover and locate the transfer-guide lock-tray. WARNING : Be careful; the area around the transfer-guide and roller is hot. A CHTUNG! Verletzungsgefahr! Bei Betrieb wird die Umbegung der Papierführung heiß. Troubleshooting Printer Problems 6-15 Media Jams 2 Gently open the transfer-guide lock-tray and remove any media. If necessary, remove the cassettes from the printer first. Transfer -guide lock-tray 3 If you experience difficulty in removing the media, or if media isn’t visible under the transfer-guide lock-tray, lift the green lever on the inner metal plate to check for jammed media under the metal plate. Remove the media. Transferguide lock-tray Green lever 6-16 QMS 1725 SLS Print System User's Guide Media Jams 4 Restore the inner metal plate to its original position and close the transfer-guide lock-tray. Both must be properly in place before closing the printer or the printer may be damaged. 5 Close the printer’s top cover. Clearing an Image-Transfer Area Media Jam To clear a media jam from the image-transfer area, follow these steps: 1 M Open the printer top cover and locate the transfer-guide lock-tray. WARNING : Be careful; the area around the transfer-guide and roller is hot. A CHTUNG! Verletzungsgefahr! Bei Betrieb wird die Umbegung der Papierführung heiß . Troubleshooting Printer Problems 6-17 Media Jams 2 Gently open the transfer-guide lock-tray and remove any media by rolling it toward you. Avoid touching the transfer roller. Be careful not to get the paper near any clothing. It may contain some unfused toner. Transfer roller Transfer-guide lock-tray 3 O After removing the media, close the transfer-guide lock-tray. Caution: Make sure the transfer-guide lock-tray is properly in place before closing the printer or the printer may be damaged. 4 Close the printer top cover. Clearing a Fuser Assembly Area Media Jam Use this procedure to clear a paper jam from the fuser assembly area: 1 M Open the printer top cover and locate the fuser assembly. WARNING : Be careful; the area around the fuser assembly is hot. A CHTUNG! Verletzungsgefahr! Bei Betrieb wird die Umgebung der Fixiereinheit heiß. 6-18 QMS 1725 SLS Print System User's Guide Media Jams 2 If the jam is at the front of the fuser assembly, remove the media by using the green plastic knob at the left of the fuser and rolling it away from you. Be careful not to get the media near any clothing. It may contain some unfused toner. Green knob Fuser assembly 3 If the media is stuck in the rear of the fuser assembly, open the green fuser assembly rear door. Remove the media by turning the green plastic knob at the left of the fuser to feed the media through the fuser assembly. M WARNING : Be careful; the area around the fuser assembly is hot. A CHTUNG! Verletzungsgefahr! Bei Betrieb wird die Umgebung der Fixiereinheit heiß. Fuser assembly rear door Troubleshooting Printer Problems 6-19 Media Jams 4 After removing the media, close the fuser assembly rear door and make sure it is properly in place before closing the printer or the printer may be damaged. 5 Close the printer top cover. Clearing an Output Bin Media Jam Follow these steps to clear a jam from the output area: 1 M Open the printer top cover and locate the fuser assembly. WARNING : Be careful; the area around the fuser assembly is hot. A CHTUNG! Verletzungsgefahr! Bei Betrieb wird die Umgebung der Fixiereinheit heiß. 6-20 2 If the media is jammed inside the fuser assembly, grasp the edge of the media and remove it. 3 If the jammed media has passed completely through the fuser assembly and is partially visible in the upper output QMS 1725 SLS Print System User's Guide Media Jams bin, close the printer top cover, and then lift the media guide arm and pull out the media slowly. After removing the media, lower the media guide arm. Media guide arm Clearing a Duplexer Media Jam To clear a jam from the duplexing unit, follow these instructions: 1 Press lightly on the upper edge of the duplex access door on the lower-left side of the printer. 2 The door clicks and springs open. 1 2 Troubleshooting Printer Problems 6-21 Problem Descriptions 3 Carefully remove any jammed media. Then close the duplex access door. Problem Descriptions Paper Jam Message Stays On If a PAPER JAM message stays on, open the printer and clear the jam. If the message is still there, try opening and closing the top of the printer again. See the preceding section on clearing media jams for more information. Data Indicator Stays Lit If the printer has warmed up and the Data indicator stays on, two problems may exist. If you are downloading additional typefaces, too many can overload the printer’s memory, causing the printer to reset and lose information previously downloaded to RAM. Make sure you have enough printer memory. On an LocalTalk network, Macintosh computers sometimes interfere with each other. If this happens often, reinstall the LaserWriter and Laser Prep files, which reset the printer. If neither of these is the problem, place a service call to your QMS vendor. 6-22 QMS 1725 SLS Print System User's Guide Problem Descriptions No Advanced Status Page If your printer prints a standard status page even though you’ve configured the printer in the Administration/Special Pages/Status Page Type menu to print an advanced status page, your printer probably doesn’t have enough free memory available. To print an advanced status page you may need to reduce the amount of memory assigned to one or more of the memory clients or add more memory (see the “Memory” section in chapter 2,”Printer Configuration,” for information about memory clients). No Start-up Page If the Ready indicator is on, but no start-up page prints, check the following: 1 Has the start-up page been disabled? Use the PS Executive Series Utilities or the control panel to make sure the start-up page is on. 2 Turn the printer off. From a cold start, the printer takes approximately 1 to 2 minutes to warm up. Be sure you wait long enough for a start-up page before suspecting a problem. 3 Check to be sure the paper cassettes are loaded with paper, in place and secure. 4 Open the top cover of the printer and check for a media jam. 5 Make sure a toner cartridge is installed. If you still have not solved the problem, you need to call your QMS vendor for help. Go to the last section of this chapter, “Placing a Service Call.” Printer Resets Occasionally, Macintosh applications interfere with each other. Applications send a printer prep file to the printer at the beginning of each document. Other prep files cannot be sent without resetting the Troubleshooting Printer Problems 6-23 Problem Descriptions printer. Monitor your activities to see if there is a correlation between your use of a certain application and the printer resetting. If so, contact the application developer. Downloading too many typefaces can overload the printer memory and cause the printer to reset to default. Additional memory (RAM), which can be used for font storage, is available and easily installed. Contact your QMS vendor for information on RAM upgrades. See chapter 8, “Printer Options. If the printer resets in other circumstances, you should call your QMS vendor for service. Blank Pages If a blank start-up page ejects or blank pages come out during a printing job, try the following: 1 Check the toner cartridge. The image does not print if the cartridge is empty. 2 Be sure you have broken the tab on the side of the toner cartridge and removed the sealing tape. 3 If the toner cartridge is not empty, the sealing tape has been removed, and blank pages are ejecting, take the cartridge out, roll it from side to side, and reinstall the cartridge in the printer. 4 If these solutions do not work, contact your QMS vendor to purchase another toner cartridge. Not All Pages Print If the printer stops printing in the middle of your file, try the following: 1 Check your cable. You could have the wrong kind of cable, or your printer may not be configured for the correct cable and port. 2 6-24 Make sure no one pressed the Cancel key while your job was printing. QMS 1725 SLS Print System User's Guide Print Quality Problems 3 Check the message window to see if the cassette you are using needs more media. Printer Will Not Duplex If the error message DUPLEXER ABSENT appears in the message window, make sure you have the optional duplexing assembly correctly installed by referring to chapter 8, “Printer Options.” If you have correctly installed the duplexing unit and configured the printer from the front panel to duplex (Operator Control/Def.Duplex), but the printer continues printing simplex, you may need additional memory allocated to the frame buffer. See chapter 2, “Printer Configuration,” in this guide for additional information on memory required for duplexing. Print Quality Problems Print quality problems are those related to the appearance of the pages you print. Print quality problems include white lines on the page, uneven blacks, and other print distortions. First, refer to the appendix B, “Technical Specifications,” for recommended media types. If you are using recommended media and continue to have problems with the quality of your printed pages, try this quick-check procedure: 1 Check the print density control lever on the inside of the printer. Change the setting and try printing another page. See chapter 4, “Print Quality,” for information on setting the print density. 2 If the TONER OUT message is on, remove the toner cartridge and gently rock it from side to side. The toner can settle, and this procedure redistributes the toner. Reinsert the cartridge and try printing again. 3 If the message remains on, replace the toner cartridge. Troubleshooting Printer Problems 6-25 Image Defects 4 Place a service call to your QMS vendor. Printer Will Not Print 600 dpi If you have configured the printer from the front panel to print at 600 dpi resolution but the printer continues printing 300 dpi, you may need additional memory allocated to the frame buffer. See the “Memory” section in chapter 2, “Printer Configuration,” for additional information on memory configuration. Image Defects The following list includes several image defects with possible solutions. Try the solutions in the sequence given. If the solutions listed don’t solve the problem, place a service call to your QMS vendor. See the next section in this chapter, “Placing a Service Call.” White or Light Lines 1 Remove the toner cartridge and gently rock it from side to side as you would before installing a new cartridge. This redistributes toner inside the cartridge. Reinstall the cartridge. 2 If step 1 does not solve the problem, install a new toner cartridge. Light Image (Entire Page) 6-26 1 Make sure you pulled the tab from the toner cartridge. 2 Increase the print density by adjusting the print density control lever inside the printer to the thick end of the wedgeshaped scale. QMS 1725 SLS Print System User's Guide Image Defects 3 Remove the toner cartridge and gently rock it from side to side as you would when installing a new cartridge. This redistributes toner inside the cartridge. Then, reinstall the cartridge. 4 If steps 1, 2, and 3 do not solve the problem, install a new cartridge. Dark Image (Entire Page) 1 Decrease print density by adjusting the print density control lever inside the printer to the thin end of the wedge-shaped scale. 2 Remove the toner cartridge and gently rock it from side to side as you would when installing a new cartridge. This redistributes toner inside the cartridge. Then, reinstall the cartridge. 3 If steps 1 and 2 do not solve the problem, install a new toner cartridge. Stain Along the Edge of the Page Install a new toner cartridge. Stains on the Back of the Page The media path may be dirty. Clean the media path area. See chapter 5 “Printer Care,” for more information. Image Easily Smears when Rubbed Place a service call. Troubleshooting Printer Problems 6-27 Placing a Service Call Placing a Service Call If you have a problem you cannot resolve, contact your QMS vendor. Your QMS vendor is best equipped to immediately handle any problem you may encounter. If you have technical questions your vendor is unable to answer, you can call or fax questions to QMS Customer Technical Assurance (See Appendix A, “QMS Customer Support” for information on contacting QMS Customer Technical Assurance). If you’ve determined your printer needs to be examined by a QMS service technician, contact QMS National Service for work inside the US, or one of the QMS international offices for work outside of the US. (National and international contacts are listed in appendix A, “QMS Customer Support.”) Before calling, be sure you have the answers to these questions handy to help our technicians serve you more quickly: 1 What is your printer model and serial number? 2 What kind of host computer do you have? 3 What operating system do you have and what version? 4 What interface are you using? If serial, what protocol? 5 What application are you using? 6 What is the emulation of the file you're trying to print? In what emulation mode is the port? 7 What is the firmware revision number for your printer? (It is listed on both the status and start-up pages.) 8 If you can print, have a status page available. Your service representative needs to know these things prior to helping you. v 6-28 QMS 1725 SLS Print System User's Guide 7 Professional Printing In This Chapter . . . n n n n n About typefaces and fonts Typography terms Typeface classification Resident fonts Postscript typeface sampler Introduction Introduction This chapter defines common terms used in the description of fonts and typefaces, and displays the printer’s resident typefaces. About Typefaces and Fonts Many of the terms and phrases used in desktop publishing are derived from the language of professional printers and typesetters. This section explains common words and phrases used when discussing typefaces. Typeface A named design of a set of printed characters, such as Times, that has a specified obliqueness (degree of slant) and stroke weight (thickness of stroke). It does not define a particular size. Font A set of characters of the same typeface (such as Times), style (such as italic), stroke weight (such as bold), and point size (such as 10). Although you hear the term “font” used more generally, as if referring to a typeface, it’s really a subset of a typeface. 7-2 Typeface Family A group of similar typefaces. For example, the Times typeface family consists of four typefaces: Times Roman, Times Bold, Times Italic, and Times Bold Italic. Character Set A collection of symbols designed for various printing applications. Many character sets are composed of the letters (uppercase and lowercase A-Z), digits (0-9), and any symbol (such as blank space, dollar sign, and ampersand). Other character sets are composed entirely of symbols. QMS 1725 SLS Print System User's Guide Typeface Classification Typeface Classification One way of classifying the different typefaces is to group them into the following categories: Serif A serif is a decorative line or tail on the ends of the strokes of a letter. Serifs, usually on the lower half of a letter, have also been referred to as feet or curlicues. Courier, ITC Bookman, New Century Schoolbook, Palatino, and Times are serif typefaces. In the example shown, all the letters except “e” and “o” have serifs. Times Roman Sans Serif Sans serif (“sans” is French for “without”) indicates a typeface without any of these small tails. A sans serif typeface is decorative by the shape and styling of its letters but has less detail than a serif typeface. Helvetica, Helvetica Condensed, Helvetica Narrow, and ITC Avant Garde Gothic are all sans serif typefaces. In the example shown above, the slight curving at the bottom of the letters “t” and “a” is not a serif. It is part of the line forming the letter rather than a decorative line added on. Helvetica Script Script typefaces simulate handwriting or brush lettering. Each letter is connected visually, if not physically. ITC Zapf Chancery is a script typeface. Zapf Chancery Professional Printing 7-3 Typography Terms Pi or Symbol Pi or symbol typefaces are collections of assorted specialpurpose characters (for example, decorative, graphic, math, or monetary characters). They are especially useful for highlighting items in lists, providing graphics, and displaying symbols that might otherwise have to be drawn in by hand. Many typefaces today include a complement of the more commonly used pi characters. Symbol and ITC Zapf Dingbats are pi typefaces. Σψµβολ Typography Terms Monospacing The terms “monospaced” and “fixed-pitch” refer to a typeface whose characters all have uniform and equal spacing. These typefaces are useful for spreadsheets and other documents with columnar data. Monospacing is the opposite of proportional spacing. Proportional Spacing The term “proportionally spaced” refers to a typeface in which the width of each character varies. For example, the letter “i” is thinner than the letter “m” and therefore takes up less space. Proportional spacing saves page space and is easier on the eye. This manual’s text uses the Helvetica font, a proportionally spaced typeface. alphabet alphabet Because proportionally spaced typefaces place each character according to its individual size, they increase legibility and readability.This example shows the difference between a monospaced typeface (Courier) and a typeface (Times). 7-4 QMS 1725 SLS Print System User's Guide Typography Terms Bitmapped Font A bitmapped font is a one in which each character is represented by a set of dot patterns. Each font size requires a different set of dot patterns. Scalable Font A scalable font is one in which each character’s dot pattern (bitmap) is generated from a mathematical representation (or outline) of the character. Scalable fonts eliminate the need to store many different font sizes. Point Size Point size refers to the height of a proportionally spaced typeface. A point is a unit of measure equal to 1/72". Therefore, the larger the point size, the larger the letter. The following example shows a character in 8, 10, 12, 24, and 36 point sizes: AB C DE Pitch Pitch refers to the number of characters per horizontal inch (cpi) in a monospaced typeface.Therefore, the larger the pitch, the smaller the letter. For example, a ten-pitch typeface mathematic prints ten characters per inch (or 10 cpi) while a twelve-pitch typeface prints 0 1 twelve characters per inch (or 12 cpi). mathematical The example shows ten-pitch and twelve0 1 pitch Courier. Professional Printing 7-5 Typography Terms Stroke Weight Pa lat ino Pa lat in o Stoke weight (light/medium/bold) is the width (thickness), of the lines (strokes) that make up a character. The example at left shows the medium and bold weights of Palatino. Italic and Oblique Forms Italic was originally developed in the early sixteenth century as a typeface based on cursive handwriting. Today’s italics are still individually crafted typefaces designed to blend with a specific roman (upright) typeface. Times Roman Times Italic ITC Avant Garde Roman ITC Avant Garde Oblique Oblique (or slanted) type forms, however, are not designed and crafted individually but are mechanically slanted versions of the roman form from which they derive. Orientation Orientation is the direction of the print or image on a page. Portrait orientation reads from left to right, across the narrower dimension of the page. Landscape orientation also reads from left to right but places the print across the wider dimension of the page. Spreadsheet and table applications commonly use landscape printing. Both terms 7-6 QMS 1725 SLS Print System User's Guide Resident Fonts derive from painting; a portrait is usually a vertical view while a landscape is usually a horizontal view. Portrait AbcdefghijklmnopqrstuvwxyzAbcdefghijklmnop qrstuvwxyzAbcdefghijklmnopqrstuvwxyzAbcde fghijklmnopqrstuvwxyzAbcdefghijklmnopqrst uvwxyzAbcdefghijklmnopqrstuvwxyzAbcdefg hijklmnopqrstuvwxyzAbcdefghijklmnopqrstuv wxyzAbcdefghijklmnopqrstuvwxyz AbcdefghijklmnopqrstuvwxyzAbcdefghijklmnop qrstuvwxyzAbcdefghijklmnopqrstuvwxyzAbcde fghijklmnopqrstuvwxyzAbcdefghijklmnopqrst uvwxyzAbcdefghijklmnopqrstuvwxyzAbcdefg hijklmnopqrstuvwxyzAbcdefghijklmnopqrstuv wxyzAbcdefghijklmnopqrstuvwxyz AbcdefghijklmnopqrstuvwxyzAbcdefghijklmnop qrstuvwxyzAbcdefghijklmnopqrstuvwxyzAbcde fghijklmnopqrstuvwxyzAbcdefghijklmnopqrst uvwxyzAbcdefghijklmnopqrstuvwxyzAbcdefg hijklmnopqrstuvwxyzAbcdefghijklmnopqrstuv wxyzAbcdefghijklmnopqrstuvwxyz AbcdefghijklmnopqrstuvwxyzAbcdefghijklmnop qrstuvwxyzAbcdefghijklmnopqrstuvwxyzAbcde fghijklmnopqrstuvwxyzAbcdefghijklmnopqrst Landscape AbcdefghijklmnopqrstuvwxyzAbcdefghijklmnopqrstuvwxyzAbc defghijklmnopqrstuvwxyzAbcdefghijklmnopqrstuvwxyzAbcdefg hijklmnopqrstuvwxyzAbcdefghijklmnopqrstuvwxyzAbcdefghijkl mnopqrstuvwxyzAbcdefghijklmnopqrstuvwxyzAbcdefghijklmno pqrstuvwxyzAbcdefghijklmnopqrstuvwxyzAbcdefghijklmnopqrs tuvwxyzAbcdefghijklmnopqrstuvwxyzAbcdefghijklmnopqrstuvw wxyzAbcdefghijklmnopqrstuvwxyzAbcdefghijklmnopqrstuvwxyz AbcdefghijklmnopqrstuvwxyzAbcdefghijklmnopqrstuvwxyzAbc defghijklmnopqrstuvwxyzAbcdefghijklmnopqrstuvwxyzAbcdefg hijklmnopqrstuvwxyzAbcdefghijklmnopqrstuvwxyzAbcdefghijkl mnopqrstuvwxyzAbcdefghijklmnopqrstuvwxyzAbcdefghijklmno pqrstuvwxyzAbcdefghijklmnopqrstuvwxyzAbcdefghijklmnopqrs tuvwxyzAbcdefghijklmnopqrstuvwxyzAbcdefghijklmnopqrstuvw Resident Fonts Resident PostScript Fonts The following 39 PostScript fonts are resident in your printer. See your QMS vendor if you are interested in expanding your printer's typeface families. All of these typeface families are authentic: they are licensed, they carry the true name, and they have multilingual character sets. Serif Fonts ITC Bookman Light ITC Bookman Light Italic ITC Bookman Demibold ITC Bookman Demibold Italic Professional Printing Palatino Roman Palatino Italic Palatino Bold Palatino Bold Italic 7-7 Resident Fonts New Century Schoolbook Roman New Century Schoolbook Italic New Century Schoolbook Bold New Century Schoolbook Bold Italic Times Roman Times Italic Times Bold Times Bold Italic Courier Courier Oblique Courier Bold Courier Bold Oblique Sans Serif Fonts ITC Avant Garde Gothic Book ITC Avant Garde Gothic Book Oblique ITC Avant Garde Gothic Demibold ITC Avant Garde Gothic Demibold Oblique Helvetica Condensed Helvetica Condensed Oblique Helvetica Condensed Bold Helvetica Condensed Bold Oblique Helvetica Helvetica Oblique Helvetica Bold Helvetica Bold Oblique Helvetica Narrow Helvetica Narrow Oblique Helvetica Narrow Bold Helvetica Narrow Bold Oblique Script Font ITC Zapf Chancery Medium Italic Pi or Symbol Fonts Σψµβολ (Symbol) Dingbats (ITC Zapf Dingbats) 7-8 QMS 1725 SLS Print System User's Guide Resident Fonts Resident HP PCL Fonts Your printer has the following resident HP PCL fonts. All fonts can be automatically rotated to landscape orientation. Some are fixed in pitch and point size while others are scalable. Unless otherwise noted, samples are show in 10 point size. Serif Fonts Courier 12 pitch 10 point Courier 12 pitch 10 point Italic Courier 12 pitch 10 point Bold Courier 10 pitch 12 point Courier 10 pitch 12 point Italic Courier 10 pitch 12 point Bold Times (scalable) Times Italic (scalable) Times Bold (scalable) Times Italic Bold (scalable) Sans Serif Fonts Univers (scalable) Univers Italic (scalable) Univers Bold (scalable) Univers Italic Bold (scalable) Univers Condensed (scalable) Univers Condensed Italic (scalable) Univers Condensed Bold (scalable) Univers Condensed Italic Bold (scalable) Pi or Symbol Font Dingbats (ITC Zapf Dingbats) Professional Printing 7-9 Resident Fonts Resident HP-GL Symbol Sets Your printer has the following resident HP-GL symbol sets. All come in both fixed- and variable-spaced versions, and all are scalable. 9825 Character Set ANSI ASCII French/German ISO French ISO German ISO IRV (International Reference Version) ISO Italian ISO Norway, Version 1 ISO Norway, Version 2 ISO Portuguese ISO Spanish ISO Swedish ISO Swedish For Names ISO United Kingdom JIS ASCII Katakana Roman Extensions Scandinavian Spanish/Latin American Special Symbols v 7-10 QMS 1725 SLS Print System User's Guide 8 Printer Options In This Chapter . . . n n n n n n n Envelope feeder Duplexer assembly Font and security cards Downloadable emulations and print system software Single in-line memory (SIMMs) Installing optional interfaces Internal and external hard disks Introduction Introduction The QMS 1725 SLS Print System has many options which expand its capabilities. The following are available for purchase from your QMS vendor: n n n n n n n n n n n Paper cassettes in A4, letter, legal, and executive size High capacity feeder(1500-sheet capacity) Automatic envelope feeder (100-sheet capacity) Duplexer assembly Font and emulation cards Security card Memory upgrades (RAM expansions) Optional network interfaces Internal hard disk drives External hard disk drives Dataproducts parallel conversion If your vendor cannot offer optional accessories for your printer, please see appendix A, “QMS Customer Support.” 8-2 QMS 1725 SLS Print System User's Guide Additional Paper Cassettes Additional Paper Cassettes Additional paper cassettes let you switch paper size, color, and type without having to unload and load paper into the cassette. Keep replacement cassettes close by, and you can easily change paper by slipping one cassette out and another in. Each cassette has a capacity of 500 sheets. The Envelope Feeder With the optional envelope feeder, you can print up to 100 business or personal-size envelopes at a time. This tray lets you print mailing addresses on envelopes pre-printed with logos or addresses. It even allows you to print your own logo and return address, along with the mailing addresses. Selecting Envelopes Envelopes must meet the specifications listed in appendix B, “Technical Specifications.” They should be the top-flap type with pre-folded sealing flaps. The leading edge (the edge that feeds into the printer) must be thin and well creased. End-flap envelopes, envelopes with transparent windows, and envelopes with three or more layers on the left and right edges are not recommended. Installing the Envelope Feeder Envelopes must be properly loaded for the envelope feeder to function correctly. Printer Options 8-3 The Envelope Feeder 8-4 1 Turn the printer power switches off and remove the upper paper cassette. 2 Remove the envelope feeder slot-cover located above the upper paper cassette slot by pushing it in and then down. 3 Replace the cover of the upper cassette with the special paper cassette cover. QMS 1725 SLS Print System User's Guide The Envelope Feeder 4 Reinstall the upper paper cassette in the printer. 5 Take the envelope feeder in both hands, line up the positioning arms with the openings in the printer and insert the envelope feeder as far as it goes. Positioning Arms Printer Options 8-5 The Envelope Feeder 6 Open the envelope feeder cover and the envelope extension tray as shown. 7 Lift the paper weight up and insert the envelopes in the feeder as far as they will go before meeting resistance. Paper Weight 8 » Adjust the envelope feed guides located on both sides of the envelopes to match the size of the envelopes. Note: Arrange the envelopes so that they press lightly against the envelope feed guides. Do not adjust the guides too tightly; otherwise, a jam may occur. 9 Close the envelope feeder cover. 10 Turn the printer power switches back on. 8-6 QMS 1725 SLS Print System User's Guide Duplexer Assembly 11 Configure your printer for envelope printing through the control panel. a Use the M anual Feed Size option (Operator Control/M anual Feed Size) to select the env elope size. b S elect the output bin (Operator Control/Outputbin). S ee chapter 2, Printer Configurati on, in this guide for control panel instructi ons. Youre now ready to print env elopes. Duplexer Assembly The optional duplexing unit allows you to print on both sides of a sheet of paper using either manual feed or automatic feed from a paper cassette. Additional memory is required for duplexing at 600 dpi resolution on legal-size media. The following chart represents the minimum amount of memory needed to print various paper sizes at 300 or 600 dpi resolution. In most cases, the minimum amount of memory does not allow the printer to run at rated speed. The amounts shown assume the Page Recovery function (Administration/ Engine/Page Recovery) is turned on. 300 dpi 600 dpi Paper Size Simplex Duplex Simplex Duplex Letter 8MB 8MB 8MB 12MB Legal 8MB 8MB 12MB 16MB A4 8MB 8MB 8MB 12MB Executive 8MB 8MB 8MB 12MB Installing the Duplexer Assembly A Phillips screwdriver is needed for this procedure. To install the duplexer assembly Printer Options 8-7 Duplexer Assembly 1 Turn both power switches off and unplug the power cord. 2 Remove the upper and lower paper cassettes from the printer. 3 Loosen the screw on the metal plate in the lower paper cassette slot with a Phillips screwdriver. B e careful not to drop the screw i nsi de the printer. 4 8-8 Insert a finger or a screwdriver in the hole and slide the catch to the left as far as it goes while lifting the plate upward. QMS 1725 SLS Print System User's Guide Duplexer Assembly 5 Pull the plate to the right and toward you to remove it from the slot. S tore the plate in a safe place i n case y ou remov e the duplex er from the printer. I f y ou do remov e the duplex er, thi s plate should be reinstalled to ensure that the printer operates properly. 6 Remove the two screws on the duplexing unit slot-cover. 7 Push in a little on the right edge of the duplexing unit slotcover to unlock it. Then, slide the cover off to the right. Printer Options 8-9 Duplexer Assembly 8 Remove the four screws holding the inner cabinet in place, and pull out the inner cabinet. S tore the i nner cabinet i n a safe place i n case y ou ev er remov e the duplex ing unit from the printer. If y ou do remov e the duplex i ng unit from the printer, you must reinstall the inner cabinet. 9 Insert the duplexing unit into the printer as shown. 10 Replace the four screws that were removed in step 8. 8-10 QMS 1725 SLS Print System User's Guide Font and Emulation Cards 11 Replace the duplexing slot-cover, and reinstall the two screws that were holding it in place. 12 Replace the paper cassettes. » Note: Do not attempt to use the duplexer for envelopes, labels, or transparencies. 13 Plug in the power cord, turn both power switches on, and check the control panel to make sure the printer is ready to print. The message w indow should read IDLE . Font and Emulation Cards The two slots on the front, right side of the printer, below the bottom paper tray, may be used to expand the font and/or emulation capabilities of your printer. Both slots accept optional font, emulation, and security cards. Optional emulations may require additional RAM to operate properly. Contact your QMS vendor for font and emulation availability for your printer. The printer supports up to two cards at once. Follow these steps to install a card: 1 If you are using an HP ProCollection font card, turn off the printer. Printer Options 8-11 Font and Emulation Cards Otherwise, press the O nli ne/Offli ne key to take the printer off li ne. The indicator li ght should be off. O Caution : The printer must be off line (the Online/Offline indicator should be off) before you insert or remove cards. Press the Online/Offline key to turn the indicator off. If you forget to take the printer off line before inserting or removing a card, turn the printer power off and back on to regain access to the printer's resident fonts and data stored in the printer's memory. 2 To insert a font or emulation card, slide it into either slot with the label side facing up. 3 Put the printer back on line. To remove a card 1 If you are using an HP ProCollection font card, turn off the printer. Otherwise, press the O nli ne/Offli ne key to take the printer off li ne. The indicator li ght should be off. » 2 Pull the card out gently. 3 Put the printer back on line. Note: If you are using an application, make sure the printer driver installed supports the fonts in the card. If not, contact your application manufacturer for support. To download an emulation to a hard disk, refer to “Installing an Optional Emulation” later in this chapter. To download HP PCL fonts 8-12 QMS 1725 SLS Print System User's Guide Font and Emulation Cards to the hard disk, refer to the QMS Crown Document Option Commands manual. Installing an Optional Font After you have accessed the Administration/Disk Operations menu, press the control panel keys in the order shown in the following table. The printer responds by displaying a status message in the message window (DSK refers to the hard disk number, and CAR0 and CAR1 refer to the font card slot number). » Note: You may need to press the Next key one or more times to advance through the list of selections or options. Key Purpose Message Select Accesses the Administration/Disk Operations/Install Option menu. Select Accesses the Format Disk/Dsk#: menu. INSTALL OPTION DSK#: x Next Scrolls through the list of attached disks. Select Selects the disk and accesses the card INSTALL SOURCE address from which the optional font is CAR#: x being installed. Select Prompts you to insert the font card in INSTALL OPTION one of the card slots below the printer’s INSERT MEDIA media cassette. Menu DISK OPERATIONS INSTALL OPTION FORMAT DISK DSK: x Begins reading data from the card and installing the appropriate files on the hard disk This usually takes several minutes. INSTALL OPTION READING DATA... Acknowledges completion of the installation process. INSTALL OPTION INSTALL COMPLETE Exits from the Install Option menu and returns to the Disk Operations menu. DISK OPERATIONS INSTALL OPTION After the option is installed, remove the card from the slot and place the printer back on line. Printer Options 8-13 Font and Emulation Cards Removing an Optional Font Use the Administration/Disk Operations/Remove Option to remove optional fonts from your hard disk. You need the original font card containing the files. The Remove Option compares the contents of the card against the contents of the hard disk and then deletes the matching files from the hard disk. After you have accessed the Administration/Disk Operations menu, press the control panel keys in the order shown in the following table. The printer responds by displaying a status message in the message window (DSK refers to the hard disk number, and CAR0 and CAR1 refer to the font or card number). » Note: You may need to press the Next key one or more times to advance through the list of selections or options. Key Purpose Message Select Accesses the Administration/Disk Operations/Remove Option menu. DISK OPERATIONS REMOVE OPTION Select Accesses the Remove Option/Dsk#: menu. REMOVE OPTION DSK#: x Next Scrolls through the list of attached disks. REMOVE OPTION DSK: x Select Selects the disk and accesses the card REMOVE SOURCE address from which removal information CAR#: x is being read. Select Prompts you to insert the font card in REMOVE OPTION one of the card slots below the printer’s INSERT MEDIA media cassette. Begins reading data from the card and REMOVE OPTION removing the appropriate fonts from the READING DATA... hard disk. This usually takes several minutes. Menu 8-14 Acknowledges completion of the installation process. REMOVE OPTION REMOVE COMPLETE Exits the Install Option menu and returns to the Disk Operations menu. DISK OPERATIONS REMOVE OPTION QMS 1725 SLS Print System User's Guide Font and Emulation Cards After the option is removed, remove the card from the slot and place the printer back on line. Installing Optional Emulation Cards Use the Install Option selection from the Disk Operations menu. Refer to the instructions earlier in this for help using the printer control panel. To install an optional emulation, use this procedure: 1 Make sure the printer is on and idle. From the Administration menu, select the Disk Operations submenu. 2 Press the Next key until INSTALL OPTION displays. 3 Press the Select key. Then press the Nex t key until the destination of the optional emulation displays in the message w indow. 4 Press the Select key. Then press the Nex t key unti l the source of the optional emulati on displays in the message w indow. 5 Press the Select key. You are prompted to insert the emulation card into the card slot. 6 The hard disk then copies the contents of the card. When all of the contents are copied, press the Menu key to exit the menu. Press the Online/Offline key to allow the printer to receive data from the host. Removing a Printer Emulation Use the Remove Option menu selection if you need to remove an installed option from the hard drive. To remove an emulation, you need the original emulation card containing the emulation files. The Remove Option selection in the Disk Operations submenu compares the contents of the emulation card with the contents of the hard drive. The matching files are then deleted from the hard drive. To remove a printer emulation, follow this procedure: Printer Options 8-15 Font and Emulation Cards 1 Make sure the printer is on and idle. From the Administration menu, select the Disk Operations submenu. 2 Press the Next key until REMOVE OPTION displays. 3 Press the Select key. Then press the Nex t key until the address of the hard disk contai ning the opti onal emulation display s in the message w indow. 4 Press the Select key. Then press the Nex t key until the address of the card containi ng the emulation di splay s i n the message wi ndow. 5 Press the Select key. You are prompted to insert the emulation card into the card slot. 6 8-16 The hard disk then reads the contents of the card and the matching files are deleted from the hard disk. When all the matching files are deleted, press the Menu key to exit the menu. Press the Online/Offline key to allow the printer to receive data from the host. QMS 1725 SLS Print System User's Guide Downloading an Emulation From Disk Downloading an Emulation From Disk Optional emulations, such as LN03 and QUIC II, are available as PostScript files on floppy disks. This section describes how to download an optional emulation from the floppy disk to the printer’s hard disk. » Note: At least one hard disk (internal or external) must be installed on the printer before you can download an emulation. If more than one hard disk is available, the emulation automatically installs itself on the disk with the most free storage space. Once an emulation is downloaded, the only way to remove it is to reformat the hard disk (using the Administration/Disk Operations/Format Disk menu or PS Executive Series Utilities). Procedure 1 If necessary connect the PC to the printers parallel or serial port. 2 Turn on the printer, and wait for IDLE to appear in the message window. 3 Insert the emulation disk in your PCs 3.5" disk drive, and change to that drive (for example, if youre using the A drive, type a:↵). 4 Send the emulation to the printers hard disk. n If your P C and printer are connected through the parallel port, ty pe copy /b *.ps lpt#↵ w here n # i s 1 to 3. (/b refers to binary fi les.) If y our P C and printer are connected through the serial port, ty pe copy /b *.ps com# Printer Options 8-17 Security Card w here 5 # i s 1 to 4. (/b refers to binary fi les.) When the downloading is complete, reboot the printer. The emulation is ready to be used. Security Card A security card is available to set passwords for the Operator Control and the Administration menus. When a security card is installed, the Installation menu appears in the printer's menu structure. O Caution : The printer must be off line (the Online/Offline indicator should be off) before you insert or remove cards. Press the Online/Offline key to turn the indicator off. If you forget to take the printer off line before inserting or removing a card, turn the printer power off and back on to regain access to the data stored in the printers configuration menu. The security card uses the same card slots as the font and emulation cards. The card slots are located on the front, right side of the printer, below the bottom paper tray. To install a security card, use the following procedure: 1 Make sure the printer is off line. The Online/Offline indicator li ght should be off. 2 To insert a security card, slide it into either slot with the label side facing up. 3 Press the Menu key. 4 Press the Next key until the message window displays CONFIGURATION INSTALLATION 5 8-18 Press the Select key. QMS 1725 SLS Print System User's Guide Security Card 6 Press the Next key to view the following options: Operator Passwrd, Use Operator Pwd, Admin Password, and Use Admin Pwd. 7 To protect the Operation menu, use the Operator Passwrd option to select the password and then Use Operator Pwd to turn on this option. 8 To protect the Administration menu, use the Admin Password option to select the password and then Use Admin Pwd to turn on this option. 9 Once passwords are activated, press the Menu key to exit the menu. The following message is displayed SAVE CHANGES? *NO 10 Press the Next key until YES is displayed on the bottom line of the display window. Then press Select. Remove the security card from the card slot and put the printer back on line. Once a menu is password protected, you cannot enter the menus or make changes in it until you enter a valid password. You’ll know whether or not the menu is password protected when you press the Select key when trying to enter the menu structure. If the menu is password protected, ENTER PASSWORD appears on the message window. Passwords are entered as alphanumeric values. If you enter an invalid password, the message window flashes INVALID PASSWORD for three seconds, and then returns to the parent menu. If you forget the password, the System Administrator can easily recover it by following the installation procedure again. When the correct password is entered, the submenu displays. The password for these two menus may be the same or different. See “Installation Menu” in chapter 2, “Printer Configuration,” for more information. » Note: Password protection does not prevent software commands from changing functions. Printer Options 8-19 Removing and Re-installing the Tray Assembly Removing and Re-installing the Tray Assembly When you are installing the next four printer options (memory, optional interface, Centronics to Dataproducts conversion, and internal hard disk drive), the internal tray assembly must be accessed first. Use the following instructions to remove the tray assembly from the printer and to reinstall the tray assembly once the printer option has been installed. A small-point Phillips screwdriver is needed for this procedure. O Caution : It's very important to protect the printer tray assembly from electrostatic damage while performing this task. If an anti-static wrist strap is provided in your printer option kit, attach one end of it to your wrist and the other end to any convenient electrical ground (for example, the bare metal chassis of equipment, as on the back of a computer, that is plugged in but turned off). Never attach the wrist strap to any piece of equipment with an electrical current present. Turn off all power switches first. Plastic, rubber, wood, painted metal surfaces, and telephones are not acceptable grounding points. The printer isn't an acceptable grounding point either because it must be unplugged before you perform this task. If you don't have an anti-static wrist strap, discharge your body's static electric charge by touching a grounded surface before you handle any printer boards or components and before removing the tray assembly cover. Redischarge your body each time after walking around and before touching the printer tray assembly again. Handle the tray carefully, and try to handle it by the edges only. Removing the Tray Assembly » Note: The following procedure is written for the system administrator. Do not attempt this procedure if you have no experience working with circuit boards. 8-20 QMS 1725 SLS Print System User's Guide Removing and Re-installing the Tray Assembly 1 Turn off both power switches and remove the power cord. Disconnect all interface cables (parallel, serial, LocalTalk, SCSI and optional network interface cables) from the printer. 2 Position the printer so that the right side of the printer (to the right of the control panel) is facing you. 3 Remove the two screws on each end of the side panel by turning the screws counterclockwise to remove the side panel. 4 Remove the five screws on the metal tray assembly cover. 5 Remove the metal cover revealing the tray assembly. Printer Options 8-21 Removing and Re-installing the Tray Assembly 6 Unplug the two connectors on the tray assembly. The connector on the left is released by opening the ejector sw itches on each side of the connector and then pulli ng out the connector. The connector on the ri ght is released by pressi ng in the tab on each side with one hand and pulli ng the connector out w ith the other hand. Connectors 7 8-22 Remove the tray assembly screw located to the right of the fan to release the tray assembly. QMS 1725 SLS Print System User's Guide Removing and Re-installing the Tray Assembly 8 From the front of the printer, pull the tray assembly straight out until it reaches the safety catches. 9 Momentarily lift the tray to gently pull it over the safety catches. O Caution: Do Not continue lifting the tray assembly as you slide it out of the printer. After the tray assembly has been lifted over the safety catches, allow the tray to return to a level, horizontal position. Then pull the tray assembly straight out. Take the tray assembly completely out of the printer. You are now ready to install an optional feature in the printer. Follow the instructions for the feature you are installing, then return to the next section, “Re-installing the Tray Assembly” to complete the procedure. Printer Options 8-23 Removing and Re-installing the Tray Assembly Re-installing the Tray Assembly After installing a memory upgrade, an optional interface, or an internal hard disk drive, use the following instructions to re-install the tray assembly. O CAUTION : It's very important to protect the printer tray assembly from electrostatic damage while performing this task. If an anti-static wrist strap is provided in your printer option kit, attach one end of it to your wrist and the other end to any convenient electrical ground (for example, the bare metal chassis of equipment, as on the back of a computer, that is plugged in but turned off). Never attach the wrist strap to any piece of equipment with an electrical current present. Turn off all power switches first. Plastic, rubber, wood, painted metal surfaces, and telephones are not acceptable grounding points. The printer isn't an acceptable grounding point either because it must be unplugged before you perform this task. If you don't have an anti-static wrist strap, discharge your body's static electric charge by touching a grounded surface before you handle any printer boards or components and before removing the tray assembly cover. Redischarge your body each time after walking around and before touching the printer tray assembly again. Handle the tray carefully, and try to handle it by the edges only. » Note: The following procedure is written for the system administrator. Do not attempt this procedure if you have no experience working with circuit boards. 8-24 QMS 1725 SLS Print System User's Guide Removing and Re-installing the Tray Assembly 1 Using both hands, carefully re-insert the tray assembly in the slot on the front of the printer. 2 Replace the tray assembly screw in the hole located to the right of the fan. Tighten the screw by turning it clockwise. 3 Reconnect the two connectors on the tray assembly. You should hear them snap into place. 4 Replace the metal tray assembly cover using five screws to secure. The top of the cov er must be inserted in a slot abov e the openi ng and the cov er must be pushed in from the bottom to ali gn the holes. 5 Replace the side panel and secure it using two screws. 6 Reconnect all interface cables and the power cord and turn both printer power switches on. Printer Options 8-25 Memory Modules (SIMMs) Memory Modules (SIMMs) Additional printer memory on small boards called single in-line memory modules, or SIMMs, allows you to download more fonts, increase the printer's buffers (where it stores data sent from the computer), and duplex print at a higher resolution. Your printer comes standard with 13 MB RAM and can be upgraded through the installation of additional SIMMs to a maximum of 32 MB. » Note: When installing a memory upgrade, make sure the memory added is distributed among memory clients. See the Memory submenu section in chapter 2, Printer Configuration, for more information on memory distribution. Installing a SIMM If you are replacing a 4 MB SIMM with an 8 or 16 MB SIMM, you should first read the “Removing a SIMM” section of this chapter. » Note: The following instructions are written for the system administrator. Do not attempt this procedure if you have no experience working with circuit boards. 8-26 QMS 1725 SLS Print System User's Guide Memory Modules (SIMMs) O Caution : It's very important to protect the printer tray assembly from electrostatic damage while performing this task. If an anti-static wrist strap is provided in your printer option kit, attach one end of it to your wrist and the other end to any convenient electrical ground (for example, the bare metal chassis of equipment, as on the back of a computer, that is plugged in but turned off). Never attach the wrist strap to any piece of equipment with an electrical current present. Turn off all power switches first. Plastic, rubber, wood, painted metal surfaces, and telephones are not acceptable grounding points. The printer isn't an acceptable grounding point either because it must be unplugged before you perform this task. If you don't have an anti-static wrist strap, discharge your body's static electric charge by touching a grounded surface before you handle any printer boards or components and before removing the tray assembly cover. Redischarge your body each time after walking around and before touching the printer tray assembly again. Handle the tray assembly carefully, and try to handle it by the edges only. To install a SIMM, follow these steps: 1 Access the tray assembly by following the instructions in Removing the Tray Assembly, earlier in this chapter. 2 Remove the new SIMM from the anti-static bag. Printer Options 8-27 Memory Modules (SIMMs) 3 Hold the new SIMM at a 45° angle with the notch on the lefthand side. Slide the new SIMM into the open SIMM connector closest to the previously installed boards. Notch 45 4 Tilt the SIMM up to a 90° angle until you feel it snap into place. 90 8-28 ° ° QMS 1725 SLS Print System User's Guide Memory Modules (SIMMs) 5 Repeat steps 2 through 4 for each additional SIMM you are installing. 6 Return the tray assembly to the printer by following the instructions in Re-installing the Tray Assembly, earlier in this chapter. Removing a SIMM If you want to replace a 4 MB SIMM with an 8 MB SIMM, use the following procedure to remove a SIMM. Then refer to the previous section, “Installing a SIMM,” for installation instructions. » Note: SIMM connector 0 (DRAM 0) must always have an 8 MB SIMM installed and the printer must have at least 13 MB of RAM installed. 1 If you have not already done so, access the tray assembly by following the instructions in Removing the Tray Assembly, earlier in this chapter. 2 Using the release latch located on each side of the SIMM connector, release the SIMM. 3 Gently tilt the SIMM forward to a 45° angle. Then slide the SIMM up and out of the SIMM connector. 45 Notch 4 And then... go to ther previous section, Installing a SIMM. Printer Options 8-29 Installing Optional Interfaces Installing Optional Interfaces In addition to the three standard interfaces ( serial, parallel, and AppleTalk) your printer supports optional interfaces such as Ethernet, and IBM 3270/5250A. Additional interface options allow greater flexibility when working in a complex network environment. Depending on which optional kit you purchased for your printer, your option assembly kit may include some if not all of the following: n n n n n An interface board with metal plate attached A daughterboard Two plastic feet A plastic ribbon cable Two mini support posts A Phillips screwdriver is needed for this procedure. Installing an Optional Interface Card and Daughterboard » Note: The following instructions are written for the system administrator. Do not attempt this procedure if you have no experience working with circuit boards. 8-30 QMS 1725 SLS Print System User's Guide Installing Optional Interfaces O CAUTION : It's very important to protect the printer tray assembly from electrostatic damage while performing this task. If an anti-static wrist strap is provided in your printer option kit, attach one end of it to your wrist and the other end to any convenient electrical ground (for example, the bare metal chassis of equipment, as on the back of a computer, that is plugged in but turned off). Never attach the wrist strap to any piece of equipment with an electrical current present. Turn off all power switches first. Plastic, rubber, wood, painted metal surfaces, and telephones are not acceptable grounding points. The printer isn't an acceptable grounding point either because it must be unplugged before you perform this task. If you don't have an anti-static wrist strap, discharge your body's static electric charge by touching a grounded surface before you handle any printer boards or components and before removing the tray assembly cover. Redischarge your body each time after walking around and before touching the printer tray assembly again. Handle the tray assembly carefully, and try to handle it by the edges only. Use the following procedure to install an optional network interface: 1 Access the tray assembly by following the Removing the Tray Assembly procedure found earlier in this chapter. 2 Remove the optional I/O metal plate located to the right of the standard interface ports by removing the screw on each end of the plate. Printer Options 8-31 Installing Optional Interfaces 3 » Snap the two plastic feet to the bottom side of the interface board on the opposite end from the interface connection Note: Your optional interface card may look different than the ones shown in the illustration. 4 Peel the tape from the bottom of the plastic feet 5 With the plastic feet facing down, insert the interface card through the connector opening in the metal plate from the outside of the tray assembly. » Note: Your optional interface card may look different than the one shown in the illustration. Interface card Connector opening 6 8-32 Using the two screws from the I/O plate you removed in step 2, mount the metal plate on the interface card to the connector opening. QMS 1725 SLS Print System User's Guide Installing Optional Interfaces 7 » Once the metal plate is secure, press the interface board down to adhere the two plastic feet to the tray assembly. Note: Your optional interface card may look different than the one shown in the illustration. 8 » Open the two ejector latches on the interface board and the two on the controller board. Note: Your optional interface card may look different than the one shown in the illustration. Ejector latches Printer Options 8-33 Installing Optional Interfaces 9 » Take the plastic ribbon cable and fold it over so that the notches (keys) face upward on both connectors. Slide the ribbon cable connectors onto the interface card connector and the controller board connector. Note: Your optional interface card may look different than the one shown in the illustration. 8-34 QMS 1725 SLS Print System User's Guide Installing Optional Interfaces 10 Install the two mini support posts in the two holes on the controller board. 11 Snap the daughterboard on the two mini support posts and the two 48-pin connectors. The daughterboard fits only one way. » Note: Your daughterboard may look different than the one shown in the illustration. Printer Options 8-35 Centronics to Dataproducts Conversion 12 Return the tray assembly to the printer by following the instructions in Re-installing the Tray Assembly, earlier in this chapter. Centronics to Dataproducts Conversion Your printer is shipped with a Centronics parallel port, but a kit for converting it to a Dataproducts interface is available from your QMS vendor. Make sure you have all the parts necessary for the conversion. The Dataproducts conversion kit includes n n n n n 8-36 A n anti-stati c w ristband Tw o 2-pin shunts (small plastic pi eces li ned w ith metal) Tw o DIP resistor packs (a 200 ohm adn a 330 ohm) Tw o SI P resistor packs (not necessary for thi s procedure) A 50-pi n to 36-pin cable 1 Follow the instructions in Removing the Tray Assembly (earlier in this chapter), being careful to follow directions for eliminating static before you begin. 2 Place the two shunts on the two jumpers (JP3 and JP4) nearest the parallel port. QMS 1725 SLS Print System User's Guide Centronics to Dataproducts Conversion Orientation of the shunts is not important. Shunts 3 Use a flat-tipped screwdriver to remove the existing 1 K-ohm DIP resistor pack from the RP1 socket, located behind the parallel port. Gently slide the screwdriv er under the DI P resistor pack and lift the resistor pack up and off the controller board. DIP resistor pack RP1 Printer Options 8-37 Hard Disks 4 With the notched end of the new 220-ohm DIP resistor pack away from you (see the following illustration for orientation), carefully insert the resistor packs pins in the RP1 socket where you just removed the 1 K-ohm resistor pack; then install the new 330-ohm DIP resistor pack in the RP2 socket, located next to the RP1 socket. 330-ohm 220-ohm RP1 RP2 5 Follow the instructions in Re-installing the Tray Assembly (earlier in this chapter), being careful to follow the directions for eliminating static electricity. 6 Use the 50-pin to 36-pin cable included in your kit to connect the Dataproducts cable to the parallel port. Hard Disks Internal Your printer comes standard with an internal hard disk but can be upgraded to a larger disk if your printing environment requires more hard disk storage space.The internal hard disk drive provides space to store downloaded fonts and optional emulations and increases the font cache of the printer. The latest information on hard disks avail- 8-38 QMS 1725 SLS Print System User's Guide Hard Disks able for your printer can be found through Q-FAX (see appendix A, “QMS Customer Support,” for Q-FAX instructions). O Caution : If you connect to this printer an external hard disk you previously used with an earlier QMS Crown printer, this QMS 1725 SLS Print System software release will automatically reorganize the files on the hard disk when the printer is turned back on again. (The printer release number is listed on both the start-up and the status page.) Once this reorganization is done, the files on the hard disk can no longer be accessed if the hard disk is reattached to an earlier QMS Crown printer. The following is included in your hard disk drive assembly kit: n n n n n An anti-static wristband The hard disk drive with mounting brackets Phillips screws A power cable A plastic ribbon cable A Phillips screwdriver and needle-nose pliers are needed for this procedure. Upgrading the Internal Hard Disk The following procedure is written for the system administrator. Do not attempt this procedure if you have no experience working with circuit boards. O Caution : It's very important to protect the printer tray assembly from electrostatic damage while performing this task. If an anti-static wrist strap is provided in your printer option kit, attach one end of it to your wrist and the other end to any convenient electrical ground (for example, the bare metal chassis of equipment, as on the back of a computer, that is plugged in but turned off). Never attach the wrist strap to any piece of equipment with an electrical current present. Turn off all power switches first. Plastic, rubber, wood, painted metal surfaces, and telephones are not acceptable grounding points. The printer isn't an Printer Options 8-39 Hard Disks acceptable grounding point either because it must be unplugged before you perform this task. If you don't have an anti-static wrist strap, discharge your body's static electric charge by touching a grounded surface before you handle any printer boards or components and before removing the tray assembly cover. Redischarge your body each time after walking around and before touching the printer tray assembly again. Handle the tray assembly and disk drive carefully, and try to handle it by the edges only. Use the following instructions to install a new hard disk drive: 8-40 1 Access the tray assembly by following the instructions in Removing the Tray Assembly, earlier in this chapter. 2 Remove the existing hard disk by removing the four Phillips screws as shown in the following illustration. 3 Disconnect the ribbon cable and power cable from the connectors on the controller board. QMS 1725 SLS Print System User's Guide Hard Disks 4 » Connect the power cable and ribbon cable from the assembly kit to the new hard disk connectors. Note: The extra connector on the power cable is for future use and does not connect to anything at this time. 5 With the controller board ribbon cable and the power cable fitting under the brackets on the hard disk, attach the other end of ribbon cable to the controller board connector and the power cable to the 4-pin controller board connector. The power cable is key ed so it fits only one way. 6 Line up the holes on the tray assembly with the holes on the hard disk bracket flanges. 7 Insert the four Phillips screws you removed in step 2 into the holes and tighten with a screwdriver. Printer Options 8-41 Hard Disks 8 » Return the tray assembly to the printer by following the instructions in Re-installing the Tray Assembly, earlier in this chapter. Note: We recommend that when an internal hard drive is installed in the printer, it be given an address of DSK6. Refer to the Identifying Hard Disks section of this chapter for more information. External In addition to an internal hard disk drive, the QMS 1725 SLS printer supports up to three optional external SCSI hard disks (four if no internal hard drive is installed). The external hard disks connect to the SCSI port on the rear panel of the printer. These disks provide space for optional emulations and permanent downloading of fonts. This section explains the Disk Operations menu, which is accessed through the printer control panel, and must be used when installing or removing a printer option (such as an optional emulation). O Caution : If you connect to this printer an external hard disk you previously used with an earlier QMS Crown printer, this QMS 1725 SLS Print System software release will automatically reorganize the files on the hard disk when the printer is turned back on again. (The printer release number is listed on both the start-up and the status page.) Once this reorganization is done, the files on the hard disk can no longer be accessed if the hard disk is reattached to an earlier QMS Crown printer. Identifying The documentation that comes with your external SCSI (Small Computer System Interface) hard disk should contain all of the necessary information for connecting and configuring the disk. Device Numbers Hard disks are identified by device numbers which you assign. Valid choices for external SCSI hard disks range from DSK0 to DSK5. However, you cannot repeat numbers; each device number must be 8-42 QMS 1725 SLS Print System User's Guide Updating System Software unique. The recommended device number for the internal SCSI hard disk, if present, is DSK6. Optional Disks (DSK0 - DSK5) Internal Disk DSK6 » Note: For the printer to recognize any attached hard disk(s), each hard disk must be turned on before you turn on the printer. DISK ONLINE appears on the start-up page if the printer recognizes the disk(s). Updating System Software The system software in your QMS 1725 SLS Print System is stored on flash ROM, read-only memory that can be erased and rewritten to “in a flash.” This allows you to update the system software without opening up the printer and installing new PROMs. Updated system software allows you to take advantage of future enhancements to the printer. » Note: The software loadable system mentioned in this section does not modify the code used by QMS Viking Interface cards. Procedure Use the following procedure to update the system software in flash memory when downloading through the parallel port. Decompressing the System Software Before the printer system software can be downloaded, it must be decompressed on your PC’s hard disk. 1 Create a new directory on your PC. Printer Options 8-43 Updating System Software 2 Change to this directory. 3 Insert the printer system software disk in your PCs 3.5" disk drive. 4 Type x:pkunzip x:system↵ where x is the name of the disk drive in which you inserted the system software disk. 5 Follow the prompts. They instruct y ou to insert the sy stem softw are disks in the follow ing order: 6 a Last disk (sy stem software disk 2) b Disk 1 (sy stem softw are di sk 1) c Disk 2 (sy stem softw are di sk 2) Turn on the printer, wait for IDLE to appear in the message window, and then print an advanced status page. The adv anced status page prov ides a record of all current configurati on settings, so y ou can veri fy that they are the same after the system software has been updated. Downloading the System Software 1 Turn off the printer and then on again. The following message displays in the message window (the x.x represents the boot PROM revision number): QMS SOFTLOAD X.X INITIALIZING and then QMS SOFTLOAD X.X READY TO BOOT 8-44 QMS 1725 SLS Print System User's Guide Updating System Software 2 Once this message appears, you have 10 seconds to press the Select key. When you press the Select key, the following message appears in the message window: QMS SOFTLOAD X.X BOOT SYSTEM » Note: If 10 seconds pass before you press the Select key, the INITIALIZING message appears. You must return to step 1. 3 Press the Next key until Install to Disk appears on the second line of the message window: QMS SOFTLOAD X.X INSTALL TO DISK 4 Press the Select key to enter the Install to Disk submenu. 5 Press the Next key until the following message appears in the message window: INSTALL TO DISK PARALLEL 6 Press the Select key to load the software from the system disks. The following message appears in the message window: INSTALL TO DISK TARGET DISK 6 7 Disk 6 is the printers internal hard disk. Press the Select key. The following message displays: INSTALL TO DISK CONNECTING..... 8 Go to your host system and make sure the parallel cable is connected from the PC to the printers parallel port. Then send the SYSTEM.DL file to the printer. To do this, from the directory that the SYSTEM.DL file was installed, type: copy /b system.dl lpt1: Printer Options 8-45 Updating System Software The /b must be used to si gnify bi nary data. The copy command takes approx imately 5 minutes to transfer the file. When the transfer i s complete, the PC prompt returns. » Note: The INSTALL TO DISK CONNECTING..... message remains in the message window until the transfer is completed. 9 The software is installed when the following messages appear: INSTALL TO DISK DSK6: and then INSTALL TO DISK COMPLETED 10 Once you have completed installing the system software you are ready to boot the system. Return to your printer and press the Menu key. The message window displays the following message: QMS SOFTLOAD X.X INSTALL TO DISK 11 Press the Next key until the message window displays the following message: QMS SOFTLOAD X.X BOOT SYSTEM 12 Press the Select key to enter the Boot System submenu. The following message appears in the message window: BOOT SYSTEM HARD DISK 13 Press the Select key and the following message appears in the message window: BOOT SYSTEM HARD DISK 6 14 Hard disk 6 is the internal hard disk. If you have any external hard disk connected you can cycle through them by press8-46 QMS 1725 SLS Print System User's Guide Updating System Software ing the Next key. For this example we are using the internal hard disk. Press the Select key. The system begins loading, and the following message displays (the y.y represents the system revision number): BOOT SYSTEM LOADING Y.Y 15 At this point, DO NOT TOUCH ANY KEYS until the system has completed loading. The system may go through many cycles of rebooting, which can take several minutes. When the system rebooting is complete, the following message appears: IDLE 16 If you do touch some keys during this step, you must go back to step 10 and start from there again. 17 Verify your printers configuration by printing out another advanced status page and comparing it to the page printed before loading the new system. v Printer Options 8-47 A QMS Customer Support In This Chapter . . . n n Sources of customer support QMS world-wide offices Sources of Support Sources of Support Your QMS Vendor Your Application Vendor Your local vendor (the one from whom you bought the printer) may be best equipped to help you. Your vendor has specially trained service technicians available to answer questions, and the equipment to analyze your printer problems. Often, “printing” problems have more to do with the application being used than with the printer. In this case, the application manufacturer is the best source of help. The QMS Bulletin Board Q-FAX Q-FAX, a QMS information retrieval service, provides application notes, technical support notes on common printing problems, and information about printer specifications, options, accessories, consumables, and prices. The QMS Corporate Bulletin Board System (BBS) contains technical support notes, application notes, drivers, patches and utilities. Technical questions not requiring an immediate response can be left on electronic mail for the Sysop (System Operator). In the United States and Canada, call (800) 633-7213 to reach Q-FAX. In all other countries, call (334) 633-3850. Have your fax number handy when you call (or place the call from your fax machine's handset). The bulletin board [(334) 633-3632] operates at 1200, 2400, 9600, and 14400 baud, 8 data bits, no parity, 1 stop bit, with XMODEM, YMODEM, and ZMODEM capabilities. Contact QMS Customer Technical Assurance for more information about the bulletin board. You can choose to have either a directory (a list of currently available documents on a particular topic) or a specific document sent to you. The first time you call, request the directory (press 2 on your phone or fax keypad when prompted). Then call back to request specific documents. You can order up to three documents per call. A-2 QMS 1725 SLS Print System User's Guide Sources of Support CompuServe Internet Through CompuServe, you can ask general (non-technical) questions, share information with other users, and access printing information and programs. When you use CompuServe, type the following command: n go qmsprint ↵ takes you to the forum where QMS is located. The QMS library section contains application notes, printer drivers, utilities, technical information, and announcement files. QMS Customer Technical Assurance (CTA) The QMS server provides access to technical reports, new product announcements, a trade show schedule, and other general information about QMS. You can access the QMS server via any one of the many web viewers available to Internet users. If you don’t have access to a web viewer, we recommend the NCSA Mosaic web viewer (Mosaic is at ftp.ncsa.uiuc.edu). The QMS home page is at http://www.qms.com/. The QMS ftp resource is ftp.qms.com. QMS National Service QMS Customer Technical Assurance is The following numbers are valid in the US. To available M-F, 7:00 am-6:00 pm, Central contact QMS in other countries, see the list of Standard Time, at (334) 633-4500 (US). You world-wide offices in the following section. can also fax questions to CTA at (334) 6333716 (US). Please indicate whether you would (800) 762-8894 Call for service information like a fax or a phone call. and maintenance pricing If you call for assistance, have the following information ready so our technicians can help you more quickly: n n n n n n n n n Your phone number, fax number, and shipping address for repair of all QMS printers and printers of various other manufacturers. (800) 858-1597 On-Site Service and Depot Repair Information 7:00 am-7:00 pm, Central Standard Time The type of host computer you are using (334) 633-4300 Spare Parts Ordering and Information 8:00 am-5:00 pm Central Standard Time A description of the problem The printer model and serial number The type and version of operating system you are using The interface you are using, and if serial, the protocol The application and version you are using The emulation you are using Your printer firmware version (listed on the status and start-up pages) QMS Customer Support A-3 Sources of Support QMS World-wide Offices United States/Latin America QMS, Inc. One Magnum Pass Mobile, AL 36618 (334) 633-4300 QMS Asia-Pacific Melbourne 61 (3) 899 5777 Sydney 61 (2) 901 3235 Tokyo (81) (3) 3437 4030 Product Information: (800) 523-2696 OEM Information: (800) 631-2692 Consumables: (800) 777-7782 Fax: (334) 633-4866 E-mail: [email protected] Latin America Fax: (334) 639-3347 Canada Europe, Middle East, Africa QMS Canada, Inc. 9630 Rte. Trans-Canadienne Saint-Laurent, Québec H4S 1V9 Telephones: (514) 333-5940, (800) 361-3392 Fax: (514) 333-5949 National Service: (800) 268-4969 National Service Fax: (905) 673-7676 Düsseldorf (49) 211/596 1333 London (44) 1784 442255 Maarssen (31) 3465 51 333 Paris (33) (1) 4107 9393 Stockholm (46) (8) 725 5680 Offices in Ottawa, Québec City, Toronto, and Vancouver A-4 QMS 1725 SLS Print System User's Guide B Technical Specifications In This Chapter . . . n n n n n n n n Print engine specifications Controller characteristics Electrical and environmental requirements Physical characteristics Print media specifications Optional hardware Printer options and consumables Warranty considerations Print Engine Specifications Print Engine Specifications Engine Canon P170 Duty Cycle (maximum) 75,000 pages per month Print Method Laser beam scanning and dry electrophotographic printing; fixing by heated rollers Print Speed Up to 17 pages per minute using letter or A4 paper Up to 7.5 double-sided pages per minute using letter paper size » B-2 Note: Actual print speed depends on the host application Resolution 300x300 dpi 600x600 dpi Toner Microfine toner designed especially for high-resolution printers (EP-N cartridge); dry, single component in userreplaceable cartridge Toner Cartridge Life 8,000 pages at normal (5%) page coverage, letter or A4 paper Warm-Up Time Less than 5 minutes from cold start QMS 1725 SLS Print System User's Guide Controller Specifications Controller Specifications Emulations PostScript—Level 1 compatibility mode and Level 2 HP PCL 5 HP-GL 7475A/7550A Lineprinter CCITT Support for downloadable optional emulations Fonts 39 resident PostScript fonts that can be scaled from 4 points upward and rotated to any angle in 1° increments; all typefaces have multilingual character sets 7 resident bitmap HP PCL fonts in 25 symbol sets, 12 resident scalable HP PCL fonts in 35 symbol sets, and 1 resident scalable HP PCL font in 5 symbol sets, all of which can automatically be rotated to landscape orientation 40 resident HP-GL symbol sets Support for Type 1 and Type 3 host-resident downloadable and printer-card-resident PostScript fonts Support for Type 42 (PostScript format) host-resident downloadable TrueType fonts Interfaces Centronics Parallel, RS-232 (serial), and AppleTalk interfaces Internal SCSI hard disk Support for optional interfaces Support for optional SCSI hard disks ( 3 external SCSI hard disks) Memory 13 MB RAM standard, upgradable to 32 MB Type 80960 RISC microprocessor operating at 25 MHz Technical Specifications B-3 Electrical Requirements Electrical Requirements Frequency 50/60 Hz (± 2 Hz) Power Requirements 100/110/120v 50/60 Hz (about 90-130 VAC) or 220/240v 50 Hz (about 200-260 VAC) Environmental Requirements Noise Level Idle; less than 50 dB (A) Printing; less than 60 dB (A) Ozone Density The printer emits less than 0.1 ppm maximum with a 100% duty cycle under 8 hours of continuous operation Relative Humidity Printing: 20-80% RH (non-condensing) Storage: 35-85% RH (non-condensing) Temperature Range Printing: 50-90° F (10-32.5° C) Storage: 32-95° F (0-35° C) Atmospheric Pressure 570-760 mm Hg Physical Characteristics B-4 Dimensions WxDxH 17.8" x 22.4" x 19.0" 454 mm x 570 mm x 483 mm Weight Approximately 97 lbs (44 kg) without cassettes and 106 lbs (48 kg) with cassettes installed QMS 1725 SLS Print System User's Guide Print Media Print Media Delivery Face down; about 500 sheets of 20 lb (75 g/m2) paper Face up; about 100 sheets of 20 lb (75 g/m2) paper Feed Paper cassettes (2) About 500 sheets of 20 lb (75 g/m2) paper per cassette. Optional High-Capacity Feeder (1500-sheets) is also supported. Loading Cut-sheet paper from cassette or manual feed, envelopes from upper cassette manual feed slot or power feeder, labels and transparencies from upper or lower manual feed slots, Sizes (See “Print Media Sizes,” below) Types Cut-sheet paper, transparencies, labels and envelopes We do not recommend printing on perforated paper (including 3-hole-punched paper) Weight Paper (cassette): 17-24 lb (64-90 g/m2) Transparencies (manual feed): 17-34 lb (64-128 g/m2) Labels (manual feed): 17-34 lb (64-128 g/m2) Envelopes: 24 lb (90g/m 2) Print Media Sizes Media Media Size Inches A4 Millimeters 8.27x11.69 210.06x296.93 Imageable Area Inches 7.92x11.38 Millimeters 201.38x289.22 Executive 7.25x10.50 184.15x266.70 6.94x10.16 176.44x258.06 Legal Letter 8.50x14.00 8.50x11.00 215.90x355.60 215.90x279.40 8.18x13.66 8.16x10.69 207.94x346.96 207.26x271.61 Technical Specifications B-5 Optional Hardware Envelopes Minimum Size Maximum Size Manual feed 3 3/8” x 7” (86 mm x 178 mm) 7 2/5 x 10 1/2 (188 mm x 267 mm) Power feed (Requires optional envelope feeder) 3 7/8 x 7 1/2 (98.4 mm x 4 1/3 x 9 1/2 (110 mm x 190.5 mm) 241.3 mm) Optional Hardware Paper Handling Duplexer assembly Optional kit that allows printing on both sides of paper Envelope feeder Optional bin for power envelope feeding Media cassettes Optional cassettes: 500-sheet and 1500-sheet high capacity feeder B-6 QMS 1725 SLS Print System User's Guide Consumable Supplies Hard Disks Internal SCSI Hard Disk External SCSI Hard Disks Mounting space and connectors for one internal SCSI hard disk are present. Q-FAX, the QMS retrieval service, provides current information on hard disks available for this printer. Specifications are included in Q--FAX document 6502, “QMS-tested SIMMs and Hard Disks.” See appendix A, “QMS Customer Support” for information on using this service. There are subtle differences in the command sets of SCSI hard disks from different vendors; therefore, not all SCSI hard disks are compatible with this printer. With an internal SCSI hard disk installed, up to 3 external hard disks may be added. Without an internal SCSI hard disk installed, up to 4 external SCSI hard disks may be added. Q-FAX, the QMS retrieval service, provides current information on hard disks available for this printer. Specifications are included in Q--FAX document 6502, “QMS-tested SIMMs and Hard Disks.” See appendix A, “QMS Customer Support” for information on using this service. Consumable Supplies Cassettes Size Media—Sizes Media— Recommended Brands A4 500 sheets Legal 500 sheets Letter 500 sheets Letter 1500 sheets See “Print Media Sizes,” earlier in this chapter Paper Plain—Xerox 4024 Laser—Hammermill Laser Print Labels Avery 5260 Transparencies Canon brand type D 3-M type PP2500 Envelopes Com#10, Monarch EP-N toner cartridge Toner Technical Specifications Capacity B-7 Cable Pinouts Cable Pinouts Centronics Parallel This table gives the correct pinouts for the printer end of the Centronics/IEEE 1284 parallel cable used to connect your printer to a computer. B-8 Signal Pin No. Signal Description Direction 1 Strobe- In 2 Data 1 InOut 3 Data 2 InOut 4 Data 3 InOut 5 Data 4 InOut 6 Data 5 InOut 7 Data 6 InOut 8 Data 7 InOut 9 Data 8 InOut 10 Acnlg- Out 11 Busy+ Out 12 Pe+ Out 13 Select Out 16 Ground - 17 - - 18 Vcc Test - 19-30 Ground - 31 Iprime In 32 Fault- Out 33 Reserved - 34 Reserved - 35 Reserved - 36 Select In QMS 1725 SLS Print System User's Guide Cable Pinouts Notes to the Table Direction refers to the direction of signal flow as viewed from the printer. Return denotes “twisted-pair return” and is to be connected at signal-ground level. When wiring the interface, be sure to use a twisted-pair cable for each signal and never fail to complete connection on the return side. To prevent noise effectively, these cables should be shielded and connected to the chassis of the system unit and printer, respectively. All interface conditions are based on Transistor-Transistor Logic (TTL) level. Both the rise and fall times of each signal must be less than 0.2 microseconds. Data transfer must be carried out by recognizing the ACKNLG or BUSY signal. The cable must have an overall braided shield, Belden 8345 or equivalent. » Note: Connectors must have shielded housings. The overall shield must be bonded to the shielded housings at both ends of the cable. Serial This table gives the pinouts for the printer end of the 25-pin RS-232 cable. Pin Name 1 Not Used 2 Transmit Data (TXD) 3 Receive Data (RXD) 4 Request to Send 5 Clear to Send(GND) 6 Data Set Ready (DSR) 7 Signal Ground 20 Data Terminal Ready Technical Specifications B-9 Cable Pinouts IBM PC/XT, PC/AT, and Compatible Computers This diagram gives the suggested cable pinouts for IBM PC/XT, PC/ AT, and compatible computers » Note: Not all serial cables are configured as shown and may require an additional null-modem adapter. Check with your cable vendor for compatibility. B-10 CPU AT end of cable 9-Pin F Printer end of cable 25-Pin F Printer end of cable 25-Pin M CPU XT end of cable 25-Pin F Gnd 1 1 Gnd RXD 2 2 RXD RXD 2 2 RXD TXD 3 3 TXD TXD 3 3 TXD DTR 4 4 DTR DSR 6 4 DTR DSR 5 5 DSR CTS 5 5 GND GND 6 6 GND GND 7 7 RTS RTS 8 8 RTS DTR 20 6 DSR CTS 20 20 CTS RTS 4 8 CTS SG 7 7 SG Not Used Not Used QMS 1725 SLS Print System User's Guide 1 9 Cable Pinouts LocalTalk (Optional Interface) These are the pinouts for the optional 8-pin LocalTalk cable: Pin Name (Pinout view from front of connector) 1,2,7 Reserved 3 Transmit Data - (TXD) 4 Signal Ground (GND) 5 Receive Data - (RXD) 6 Transmit Data + (TXD) 8 Receive Data + (RXD) Macintosh to Serial These are the pinouts for a cable connecting the Macintosh printer or modem port to the printer’s serial port: » Note: To download printer system software from a Macintosh, you must have this type cable. To Macintosh DB-9 Female To Printer DIN-8 Male HandshakeOut 1 7 RTS HandshakeIn 2 8 CTS TXD- 3 3 TXD RXD- 5 2 RXD GND,RXD+ 4,8* 5 GND 6,7 Not Used * Pins 4 and 8 must be connected together on the DIN-8. Technical Specifications B-11 Warranty Considerations Warranty Considerations Various factors can affect a printer’s warranty. Two important ones are consumables and electrostatic discharge. Read your printer warranty carefully, and then store it in a safe place. Consumables and Your Warranty The use of non-QMS consumables and/or accessories alone does not affect either your warranty or any maintenance contract you may have purchased. However, if QMS printer failure or damage is found to be directly attributable to the use of non-QMS consumables and/or accessories, QMS will not repair the printer free of charge. In this case, standard time and material charges will be applied to service your printer for that particular failure or damage. QMS recommends that you use only QMS consumables and accessories to support your printer. To order QMS consumables and accessories in the US, call (800) 777-7782. In all other countries, check appendix A, “QMS Customer Support,” for the QMS office closest to you. Electrostatic Discharge and Your Warranty Electrostatic discharge can destroy circuit boards, such as a SIMM or your printer’s controller board. To prevent this, use an anti-static wristband. To use an anti-static wristband, attach one end of it to your wrist and the other end to any convenient electrical ground (for example, the bare metal chassis of equipment, as on the back of a computer, that is plugged in but turned off). Never attach the wrist strap to any piece of equipment with an electrical current present. Turn off all power switches first. Plastic, rubber, wood, painted metal surfaces, and telephones are not acceptable grounding points. The printer isn't an acceptable grounding point either because it must be unplugged before you remove you can access the printer’s controller board. If you don't have an anti-static wrist strap, discharge your body's static electric charge by touching a grounded surface before you handle any printer boards or components and before removing the con- B-12 QMS 1725 SLS Print System User's Guide Warranty Considerations troller board cover. Redischarge your body each time after walking around and before touching the printer controller board again. Handle the tray carefully, and try to handle it by the edges only. Incidental and consequential damages caused by not discharging electrostatic buildup can affect your printer warranty. v Technical Specifications B-13 C Document Option Commands In This Chapter . . . n n n Supported Document Option Commands (DOCs) Updated PLC 5 DOCs CCITT commands Introduction Introduction This appendix lists the supported Document Option Commands (DOCs) for your QMS 1725 SLS Print System. The commands are grouped by feature type. Each command is preceded by either a DOC statement (%%) or an IncludeFeature statement (%%IncludeFeature). See the QMS Crown Document Option Commands manual for information on how to use each command. This appendix also provides updated information on HP PCL 4 and PCL 5 DOCs, as well as a listing of CCITT commands. Supported DOCs Header/Trailer Page Commands Print document creator Print creation date and time Print copyright statement Print current date Print header page Print document host Print document owner Print document title Print trailer page Print routing information Print version and revision %%Creator: %%CreationDate: %%CopyRight: %%Date: %%IncludeFeature:header %%Host: %%For: %%Title: %%IncludeFeature:trailer %%Routing: %%Version: HP-GL Emulation Commands Expand plot Scale the image Select enhanced resolution Select original paper size C-2 %%IncludeFeature:expand %%IncludeFeature:scaling %%IncludeFeature:enhanced %%IncludeFeature:size QMS 1725 SLS Print System User's Guide Supported DOCs Select pen width and color Select plotter Shift the origin Reverse image %%IncludeFeature:pen %%IncludeFeature:plotter %%IncludeFeature:origin %%IncludeFeature:reverse HP PCL 5 Emulation Commands Enable scalable fonts %%IncludeFeature:scalablefonts* Establish the current resource %%IncludeFeature:install*and default object ID value Remove an external object %%IncludeFeature:remove* %%IncludeFeature:removeresource* Reset to PCL defaults %%IncludeFeature:reset Retain temporary macros/fonts %%IncludeFeature:retaintemporary Select default font %%IncludeFeature:font* Select default font ID %%IncludeFeature:fontid* Select monochrome %%IncludeFeature:monochromegl Select symbol set %%IncludeFeature:symbolset* Set carriage return to CR+LF %%IncludeFeature:criscrlf* Set linefeed to CR+LF %%IncludeFeature:lfiscrlf* Set number of lines per inch %%IncludeFeature:linesperinch* Set number of lines per page %%IncludeFeature:linesperpage* Set point size %%IncludeFeature:pointsize* Store fonts to disk %%IncludeFeature:resource* * Indicates a DOC about which updated information is provided in the following section, “Updated DOCs.” Lineprinter Emulation Commands Number lines %%IncludeFeature:number Retain temporary macros/fonts %%IncludeFeature:retaintemporary Select font for current job %%IncludeFeature:font Set carriage return to CR+LF %%IncludeFeature:criscrlf Set formfeed to CR+LF %%IncludeFeature:ffiscrlf Set point size for current job %%IncludeFeature:pointsize Set linefeed to CR+LF %%IncludeFeature:lfiscrlf Set margins %%IncludeFeature:lpmargins Set number of lines per page %%IncludeFeature:linesperpage Document Option Commands C-3 Updated DOCs Set orientation Set tabs Specify character map type Wrap lines %%IncludeFeature:lporientation %%IncludeFeature:tabs %%IncludeFeature:map %%IncludeFeature:autowrap PostScript Emulation Commands Select PostScript level %%IncludeFeature:languagelevel Printer Commands Collate print jobs Select emulation Select paper Select number of copies Select orientation Select output bins Set printer resolution %%IncludeFeature:collate %%IncludeFeature:emulation %%IncludeFeature:input %%IncludeFeature:numcopies %%IncludeFeature:orientation %%IncludeFeature:output %%IncludeFeature:resolution Updated DOCs This section provides updated information on HP PCL 4 and PCL 5 DOCs. This information will be merged into the appropriate manuals as they are revised. But until then, it supersedes the following: n QMS Crown Document Option Commands manual (part number 1800216-001E) PCL 5 Emulation Terminology Font A font is a unique set of objects that has an ID and attributes (symbol set, spacing, pitch, height, style, weight, and typeface number). A font is accessed by specifying a desired set of attributes. The system C-4 QMS 1725 SLS Print System User's Guide Updated DOCs selects the font that most closely matches these attributes from the available set of fonts. There are two types of fonts—bound and unbound. A bound font supports a single symbol set. An unbound font supports multiple, but not all, symbol sets. With unbound fonts, the symbol sets are organized into two groups—normal and Dingbats. All downloaded fonts are bound, and all resident fonts (except Zapf-Dingbats which supports the Dingbats symbol set) support the group of normal symbol sets. In the QMS PCL 5 emulation, only fonts located in the current resource may be accessed by a PCL font ID using the normal <ESC>(#X sequence. All other fonts (resident, cartridge, or other), including those stored on the additional resources, can be accessed only by attributes. Also, only objects stored in the current resource may be deleted directly by the PCL language. Therefore, unless they are explicitly removed, external fonts are always available to all PCL jobs. Font Index Number In addition to its ID, a downloaded font also has an unique index number that is automatically assigned by the printer when the font is downloaded. This index number may change if new resources are added, but in practice it usually remains fixed. All currently available PCL fonts (resident, cartridge, temporary, permanent, and external) are listed with their font index numbers on the Advanced Status Page. » Note: The font index number defines the default PCL font to be used if selectbyid is specified as the default PCL font. Do not confuse the font index with the PCL font ID, a mechanism used to identify downloaded fonts in the PCL language using the <ESC>(#X sequence. There is no way to specify fonts by their font index numbers from within the PCL language. Only the default PCL font is affected. Object There are three types of PCL downloaded objects: n Temporary Document Option Commands C-5 Updated DOCs Temporary objects reside on the current resource and they are deleted either at the beginning and end of a job (unless Retain Temporary is set to On or On Compatibility) or when the system is reset (<ESC>E or receipt of Printer Job Language). n Permanent Permanent objects reside on the current resource and are retained when the system is reset (<ESC>E or receipt of Printer Job Language). n External External objects reside on the additional resources. All objects are temporary when first created. They can be made permanent objects through PCL commands. Both temporary or permanent objects can become external objects when the current resource is changed (for temporary objects Retain Temporary must be set to On, True, or On Compatibility). External objects become permanent when the resource in which they reside becomes the current resource. User-downloaded PCL objects (with the exception of palettes) are identified by an ID when they are downloaded. The ID is usually set by the file performing the download. If not, the system will provide a default value (normally 0, but this can be set using the %%IncludeFeature:install DOC). If two objects of the same type are provided with the same ID, the last one received replaces the former. From that point on, downloaded objects are accessible by their IDs. Resource A resource is a location where downloaded objects such as fonts, macros, and patterns are stored. The printer has one default resource and one additional resource for each attached hard disk. All downloaded objects are stored in file systems which reside on these resources. The RAM1: resource may be used as the default, but systems with at least one hard disk use the system disk instead. So, for any hard disk-equipped printer, all downloaded objects (except palettes, which require special handling) are stored on disk. The default resource and one of the additional resources can reside on the same C-6 QMS 1725 SLS Print System User's Guide Updated DOCs hard disk, but they will be located in different directories of that resource’s file system. Updated PCL 5 DOCs Disable Scalable Fonts Command Syntax %%IncludeFeature:scalablefonts(value) Purpose Enables/disables PCL 5 scalable fonts. Variable Notes value Purpose Specifies whether to disable scalable fonts. Range 0—Enables scalable fonts 1—Disables scalable fonts Default 0 Disable scalable fonts to n Print PCL 4 documents which have selected PCL 5 scalable fonts. n More closely emulate the PCL 4 font environment. Install Object Command Syntax %%IncludeFeature:install(resource id object id) Purpose Establishes the current resource and the default object ID value for the current job to which it is attached. If it is attached to a job that downloads a font without setting the current object ID using the PCL escape sequence <ESC>(#X, it has the appearance of “storing” the font on disk. Variables resource id Purpose Identifies one of the possible locations for downloaded objects. Range 0 to 6 Default Internal system disk Format Integer Document Option Commands C-7 Updated DOCs Notes If no %%IncludeFeature:install DOC command is sent, the internal default location is used; otherwise, this parameter, which must be provided, specifies one of the alternate locations. For most QMS printers, resource 6 is the internal system disk. object id Notes C-8 Purpose Assigns an ID to an object, such as a font, macro, or pattern. Range 0-32767 Default 0 Format Integer Notes The object ID can be used instead of the usual PCL command to assign an ID. This ID is overwritten by any ID assigned from the PCL print job, if present. If neither a DOC command nor the PCL print job specify an ID, the default ID of 0 is used. Identifiers must be unique. If the ID matches an ID for an existing object, that object is deleted and replaced by the new object. If a %%IncludeFeature:remove command precedes a %%IncludeFeature:install command, the install command is ignored (these two commands are mutually exclusive). All downloaded objects are by default temporary and will be deleted at the end of a job unless Retain Temporary is set to On or On Compatibility. If the file the %%IncludeFeature:install command is attached to does not make its downloaded fonts permanent or Retain Temporary is not set, then those objects are removed from the disk when the job completes. A downloaded font can be accessed only by its ID if the font is stored in the current resource. Regardless of its resource, a font can be selected by its attributes. Example A shows a pair of jobs that will not produce the desired results (subjob 2 has only the appearance of storing the font on disk). By contrast, examples B and C show a pair of jobs that will produce the desired results. QMS 1725 SLS Print System User's Guide Updated DOCs Examples Example %! A—Job 1 %%IncludeFeature:emulation(pcl5) install(6 20) %%EndComments <ESC>)s#W<<download font header>><ESC>*c33E <ESC>(s#W<<char 33 data>><ESC>*c34E <ESC>(s#W<<char 34 data>>... <ESC>*c5F Example <ESC>(20Xthis text is NOT in the downloaded font... A—Job 2 Example %! B—Job 1 %%IncludeFeature:emulation(pcl5) install(6 20) %%EndComments <ESC>)s#W<<download font header>><ESC>*c33E <ESC>(s#W<<char 33 data>><ESC>*c34E <ESC>(s#W<<char 34 data>>. <ESC>*c5F Example <ESC>(8U<ESC>(s1p12v0s0b4153This text will be B—Job 2 in the downloaded font, if it supports the ROMAN-8 symbol set, is proportionally spaced, 12 points in height (or scalable), upright, medium weight, and has type # 4153. Example %! C—Job 1 %%IncludeFeature:emulation(pcl5) install(6 20 ) %%EndComments <ESC>)s#W<<download font header>><ESC>*c33E <ESC>(s#W<<char 33 data>><ESC>*c34E <ESC>(s#W<<char 34 data>>... <ESC>*c5F Example %! C—Job 2 %%IncludeFeature:emulation(pcl5) install(6) %%EndComments <ESC>(20Xthis text is also in the downloaded font...) Remove Object Command Syntax %%IncludeFeature:remove(resource id object id object type) Purpose Removes an external object from the printer system. Variables object type Purpose Specifies the kind of objects that are to be deleted from the specified printer system. Document Option Commands C-9 Updated DOCs Range *, font, macro, pattern, or other object type Default N/A Format Character Notes If object type is * or is not specified, then all objects on the specified resource with the specified object id are removed. object id Notes: Purpose Specifies the ID of the object that is to be removed from the printer system. Range *, -1 to 32767 Default -1 (wildcard) Format Integer Notes If the object id is not specified, or if it is specified as * or -1, all objects on the specified resource are removed. Unlike the %%IncludeFeature:install command, the %%IncludeFeature:remove command does not set any defaults, and it is not directly related to the job to which it is attached. This command allows you to remove external objects from the system without having to generate a job containing both the DOC command to set the appropriate current resource and the PCL code to delete the desired object. If this command is specified more than once, the last command received is the one that will be executed. In the following example, the remove(6 5 font) command is executed, and the remove(6 1 macro) command is ignored: %%IncludeFeature:remove(6 1 macro) remove(6 5 font) C-10 QMS 1725 SLS Print System User's Guide Updated DOCs Remove Resource Command Syntax %%IncludeFeature:removeresource(resource id object id) Purpose Identifies an external object that is to be removed from the printer system. Notes This is an obsolete DOC command that is identical to the remove command, except that it does not allow specification of an object type. The DOC string “removeresource(aaa bbb)” is equivalent to “remove(aaa bbb *)”. Variables resource id Purpose Indicates the resource from which the object is to be removed. Range 0-6 Default N/A Format Integer Notes This ID must be specified. It indicates the resource from which the desired object is to be removed. There is no way to specify “all resources.” If a %%IncludeFeature:install command precedes the %%IncludeFeature:remove command, the remove command is ignored (these commands are mutually exclusive). If the disk does not exist, PCL issues the NO SPACE FOR FONT, MACRO, OR PATTERN error message. object id Purpose Specifies the ID of the object that is to be removed from the printer system. Range *, -1 to 32767 Default -1 (wildcard) Format Integer Notes If the object id is not specified, or it is specified as * or -1, all objects on the specified resource with the specified object type are removed. Document Option Commands C-11 Updated DOCs Resource Command Syntax %%IncludeFeature:resource(resource id object code) Purpose Establishes the current resource and the default object code value for the current job to which it is attached. Notes This command is identical to the %%IncludeFeature:install DOC. It is included for backward compatibility. All downloaded objects are by default temporary, and will be deleted at the end of a job unless Retain Temporary is set to on, true, or on compatibility. If the file that the %%IncludeFeature: resource command is attached to does not make the downloaded font permanent and Retain Temporary is not set, then those objects are removed from the disk when the job completes. A downloaded font can only be accessed by its ID if the font is stored in the current resource. Regardless of its resource, a font can be selected by its attributes. Variables resource id Purpose Identifies one of the possible locations for downloaded objects. Range 0-6 Default Internal system disk (usually DSK6:/BIN/EMULATE/PCL/FONTS) Format Integer Notes If no resource item is provided, the internal default location is used; otherwise, this parameter, which must be provided, specifies one of the alternate locations. For most QMS printers, resource 6 is the internal system disk. object code C-12 Purpose Assigns a code to an object such as a font, macro, or pattern. Range 0-32767 Range 0 Format Integer QMS 1725 SLS Print System User's Guide Updated DOCs Select Font Command Syntax %%IncludeFeature:font ( font name) Purpose Specifies the default font to use. Notes Fonts are identified by the names shown above. Only the resident fonts may be selected (the available set varies from printer to printer). An asterisk * in the name indicates that a font is scalable, and that a point size is to be applied. The value selectbyid indicates that the default font ID or unique font index will be used for default font selection. Selecting a bound, bitmap font overrides the default settings for symbol set and point size. An unbound font uses the specified default symbol set if possible, while a scalable font uses the default font size. Variable font name Purpose Specifies the default font name. Range courier12 courier12bold courier12italic courier10 courier10bold courier10italic lineprinter times* times*italic times*bold Default Depends on printer configuration Format Character times*blditalic univ* univ*italic univ*bold univ*blditalic univcond* univcond*italic univcond*bold univcond*blditlc selectbyindex Select Font Index Command Syntax %%IncludeFeature:fontid (index #) Purpose Specifies the default font index number. Document Option Commands C-13 Updated DOCs Notes This index is used when the Default Font selected is selectbyid. This allows for selection of fonts only on the current resource. Selection of default font by index overrides the symbol set value. The symbol set is overridden if a bound font is selected as the default or if an unbound font is selected that does not support the default symbol set. If a font with the specified index exists, it is selected as the Default Font. If the specified value does not exist, courier 12 point is substituted. Variable index # Purpose Specifies the index number of the default font. Range 0 to 32767 Default Selectbyid-dependent Format Integer Select Symbol Set Command Syntax %%IncludeFeature:symbolset (name) Purpose Specifies the default symbol set for the emulation. Notes This command specifies the default symbol set. Not all symbol sets are available with certain resident fonts. In particular, the Desktop, PS Math, Math 8, Microsoft Pub, Pi Font, PS Text, Ventura Intl, Ventura Math, Ventura US, and Windows symbol sets cannot be used with the resident bitmap fonts: courier10, courier10bold, courier10italic, courier12, courier12bold, courier12italic, and lineprinter. The five dingbat symbol sets (PS-Zapf-Dingbats, Ventura-Dingbats, Zapf-Dingbats100, Zapf-Dingbats200, and Zapf-Dingbats300) can be used with all fonts. If a mismatch between symbol set and font occurs, the standard PCL font selection mechanism is used to locate a font that matches the selected symbol set. With the standard set of fonts distributed by QMS, this matches the Times* font, but other user installed fonts could change this result. Variable name Purpose C-14 Specifies the symbol set name. QMS 1725 SLS Print System User's Guide Updated DOCs Range roman-8 pc-850 pc8-us pc8-dn ecma-94 legal hpgerman hpspanish iso-2 iso-4 iso-6 iso-10 iso-11 iso-14 iso-15 iso-16 iso-17 iso-21 iso-25 iso-57 Default N/A Format Character iso-60 iso-61 iso-69 iso-84 iso-85 desktop ps-math math8 microsoft-pub pi-font ps-text ventura-intl ventura-math ventura-us windows ps-zapf-dingbats ventura-dingbats zapf-dingbats100 zapf-dingbats200 zapf-dingbats300 Set Carriage Return (Line Termination) Syntax Purpose Variable %%IncludeFeature:criscrlf (value) Controls the default line termination mode (the <ESC>&k#G command). Specifies the line termination treatment of a carriage return. value Purpose Specifies whether a carriage return is treated simply as a carriage return, or as a carriage return-line feed combination. Range Off/false—Treat line feed as a line feed. On/true—Treat line feed as a carriage return-line feed combination. Default Printer configuration dependent Format Boolean Document Option Commands C-15 Updated DOCs Notes The result of various settings for these parameters is shown in table below, in terms of the equivalent code passed to the PCL line termination command (<ESC>&k#G). The second setting (lfiscrlf on, criscrlf off) is correct for most ASCII listings printed from UNIX machines. PC listings should usually be done with both items set to off, and Macintosh listings usually require the third setting (lfiscrlf off, criscrlf on). The following table shows the criscrlf/lfiscrlf commands and the corresponding PCL Line Termination command parameters. LFISCRLF CRISCRLF PCL Code Off On Off On Off Off On On 0 2 1 3 Comments CR→CR,LF→LF,FF→FF CR→CR,LF→CR-LF,FF→CR-FF CR→CR-LF,LF→LF,FF→FF CR→CR-LF,LF→CR-LF,FF→CR-FF Set Linefeed (Line Termination) C-16 Syntax %%IncludeFeature:lfiscrlf (value) Purpose Controls the default line termination mode (the <ESC>&k#G command); specifies the line termination treatment of a linefeed. Variable value Purpose Specifies whether a linefeed is treated simply as a linefeed or as a carriage return-linefeed combination. Range Off/false—Treats linefeed as a linefeed. On/true—Treats linefeed as carriage return-linefeed combination. Default Printer configuration dependent QMS 1725 SLS Print System User's Guide Updated DOCs Format Boolean Notes The result of various settings for these parameters is shown in the table included in the Set Carriage Return (Line Termination) discussion, in terms of the equivalent code passed to the PCL line termination command. The second setting (lfiscrlf on, criscrlf off) is correct for most ASCII listings printed from UNIX machines. PC listings should usually be done with both items set to Off, and Macintosh listings usually require the third setting (lfiscrlf Off, criscrlf On). Note that the FF becomes a CR-FF when the LF is a CRLF. Set Lines Per Inch Command Syntax %%IncludeFeature:linesperinch (# x 100) Purpose Sets the default PCL line spacing. Notes The %%IncludeFeature:linesperinch DOC affects PCL’s default VMI (vertical motion index). Variable # Purpose Specifies the default number of lines per inch. Range 100-4800 (1-48 lines per inch x 100) Default 600 (6 lines per inch x 100) Format Integer Set Point Size Command Syntax %%IncludeFeature:pointsize(default font size) Purpose Specifies the point size for scalable default font. Notes If the selected font is not scalable or if a bitmap font size is specified, this setting is ignored. Variable default font size Document Option Commands C-17 CCITT Commands Purpose Specifies the floating point number for point size. Range 0.25 to 999.75 in 0.25 increments Default Printer configuration dependent Format Floating point number CCITT Commands The CCITT command language consists of ASCII text strings that set options for the CCITT emulation. The options must be set on a per-image basis because they are returned to their default values after each image is decompressed. If the correct options are not set for decompression before the decompression begins, the emulation absorbs the data until it finds a valid end-of-job marker. The remainder of this chapter provides the function, syntax, and default settings of all available CCITT commands. Accessing CCITT Emulation To access CCITT emulation, include the following QMS Document Option Commands (DOC) to the beginning of each data stream: %%IncludeFeature:emulation(ccitt) Command Syntax The following conventions are used in the discussion of all CCITT commands that follow. C-18 mixed-case bold CCITT command mixed-case italic Command variable; replace thes variable with information specific to your document %% Introduce the command; you must type these characters ( ) Enclose command variables; you must type the parentheses QMS 1725 SLS Print System User's Guide CCITT Commands ImageSize Function Sets the image size to be used for decompression of the image data that follows the %%ImageData command. Syntax %%ImageSize (width height) width The width of the image in pixels. height The height of the image in pixels. Default None. Notes This command must be used in order to decompress an image. This command must be sent before the %%ImageData command. If it is not, the image is ignored. ImagePosition Function Sets the image position (in 0.001" increments) from the upper-left corner of the page. Syntax Default %%ImagePosition (x y) x The horizontal location of the image's upper-left corner. y The vertical location of the image's upper-left corner. 0 0—Places the image in the upper-left corner of the page. Document Option Commands C-19 CCITT Commands Rotation Function Sets the rotation to be used when the image is decompressed. Syntax %%Rotation (degree) degree 00° rotation 9090° rotation 180180° rotation 270270° rotation Default 0–The image is not rotated Notes Rotation occurs about the current image position origin set by the %%ImagePosition command. If no %%ImagePosition command has been used, rotation occurs about the origin (0,0). Any rotation (except 0) about the default image position (0,0) causes the image to be rotated off the page. Therefore, any rotation other than 0° must coincide with a %%ImagePosition command. LineEnd Function Sets line-end flags, which indicate whether CCITT end-of-lines are included in the image data. Syntax Default %%LineEnd (true/false) true Indicates that end-of-lines are required in the image data. Otherwise, an error results. false Indicates that end-of-lines are not required in the image data but, if present, are accepted with no error. false BlockEnd Function Indicates whether a CCITT End of Block is included in the image data. C-20 QMS 1725 SLS Print System User's Guide CCITT Commands Syntax Default %%BlockEnd (true/false) true Indicates that a BlockEnd is required in the image data. Otherwise, an error results false Indicates that a BlockEnd is not required in the image data but, if present, it is accepted with no error. false EBAMode Function Sets the Encoded Byte Align flag, which indicates that the image data is broken into individual lines that are each aligned on a byte boundary. Syntax Default %%EBAMode (true/false) true Indicates that the data is encoded byte aligned. false Indicates that the data is not encoded byte aligned. false BitReverse Function Causes the CCITT emulation to reverse the bits within each byte of the image data automatically. Syntax Default %%BitReverse (true/false) true Indicates that the bits are to be reversed. false Indicates that the bits are not to be reversed. false InvertImage Function Indicates whether the data in the image is inverted. Syntax %%InvertImage (true/false) true Indicates that the data in the image is inverted. false Indicates yhat the date in the image is not inverted. Document Option Commands C-21 CCITT Commands Default false Compression Function Sets the data compression type of the data following the %%ImageData command. Syntax %%Compression (type) type Default 0Group 4 1Group 3, 1-dimensional 2Group 3, 2-dimensional 0 (Group 4) DPI Function Sets the print resolution to match the scanned resolution of the original image. This command can also be used to scale the image. DPI resolutions above the original scanned resolution will reduce the image while DPI resolutions below the original scanned resolution will enlarge the image. Syntax %%DPI (horizontal vertical) horizontal vertical Default Currently selected engine resolution. ImageData Function Instructs the emulation to begin decompression of the image data using the currently set image options. This command begins reading the image data after the end of the current line. After the image, the input stream is flushed until the next set of %% characters is encountered. C-22 Syntax %%ImageData Default None—no options. Notes You must specify %%ImageSize before %%ImageData. If you do not, the data following %%ImageData is absorbed with no effect on the file. QMS 1725 SLS Print System User's Guide CCITT Commands PageEnd Function Instructs the emulation to eject the current page (whether or not any data has been printed to it) and clear the page memory. If an image has not been decompressed since the beginning of the job or since the last %%PageEnd, a blank page is ejected. You must include this command for a page to be printed. Syntax %%PageEnd Default None—no options. Notes You must include this command for a page to be printed. Image data must be included after this command. JobEnd Function Signals the end of a CCITT print job and resets the printer to the default mode. Ends the job and returns the printer to ESP mode. Syntax %%JobEnd Default None—no options. Notes If this command is omitted, the printer remains in CCITT emulation mode until the emulation wait timeout expires (Administration/x/Emul Timeout menu). v Document Option Commands C-23 D Sessions In This Chapter . . . n Sessions commands Sessions Sessions What is a Session? A session is a means of grouping multiple documents, including documents created in different emulations, to form one larger document which can be treated as a single entity by QMS Crown printers. To avoid confusion over terminology, we’ll use these definitions when discussing Sessions: n n n Subjob — what we would normally call a document; that is, a single print job in any supported page description language. Document — a group of smaller jobs, combined through QMS sessions Document Option Commands, to apply global printing attributes. Session — the QMS DOC mechanism for applying global printing attributes to multiple documents. Despite their different printer description languages, subjobs can be combined in a single session that maintains global features, such as duplex mode, copy count, document layout, and collation. A session also gives you the flexibility to override the major document’s global printing attributes for one or more subjobs. Some printer description languages support language-specific markers which work well when the complete document is composed of a single printer description language generated by a single application. However, language-specific markers do not work very well when you need to create a document from files using multiple printer description languages. In such cases, high-level document manipulation applications find it difficult to deal with markers without taking into account the language and semantics of the language-specific delimiters. Sessions solve that difficulty by offering a language-independent means of combining multiple subjobs. D-2 QMS 1725 SLS Print System User's Guide Sessions Here are some examples of applications for which you might want to use sessions: n n n To print “wild card” file selections on UNIX or VMS computer systems. To print the chapters of a technical manual, such as this one, as a single document. To print a series of different monthly, weekly, or yearly reports as a batch process. How is a Session Used? A session is invoked by the DOC %%Session command. Language-independent delimiters included in the command allow any data acceptable to an emulation, including 8-bit data, to be transferred to the printer without terminating documents or subjobs early and out of context. » Note: The session mechanism is supported only for optional network interfaces on QMS Crown printers at this time. It is not supported for jobs submitted through any other interface LocalTalk, parallel, or serial. Use of the %%Session command in print jobs submitted over non-network communication channels may lead to incorrect or erroneous output. Session Command Location The session command must n n Be placed at the beginning of the data stream of a document to delimit the session boundaries. Precede all of the data that belongs to an individual subjob. This will ensure that the command is not saved in the actual data stream that is passed to a language or emulation. Some host applications add DOCs at the beginning of a document’s data stream before transmitting a job to the QMS Crown printer. If you do not ensure that such features are completely disabled, the processing of the %%Session command will be terminated, and unexpected results may be printed. Sessions D-3 Sessions Alternatively, if FTP is used to transmit a document to a QMS Crown printer supporting the %%Session command, the following ftp command must be entered prior to sending a file to the printer: cd no_doc_cmds The default mode of the FTP protocol for the QMS Crown printer adds network addressing information, in the form of DOCs, to the start of a job and this data would also terminate the session. Session Command Since each subjob may use a different end-of-subjob argument, the %%Session: ... command sequence must be inserted at the beginning of each subjob to specify the end-of-subjob argument for that particular subjob. D-4 Function: Signal the start of a subjob within a session. Syntax: %%Session: mode argument terminator Notes: The %%Session command provides two methods to signal the end of a subjob, end by count and end by delimiter string. Both methods may be used within one document, but each subjob may only use one method. Parameter: mode argument Purpose: Specify the argument of the %%Session command. Default: none (job does not consist of subjobs) QMS 1725 SLS Print System User's Guide Sessions Range: n 0 length Specifies the byte count for the end of subjob. The maximum possible value is 2147483647. A length of 0 means ignore the byte count terminator. The length excludes the %%Session command n 2 delimiter string Specifies the host-supplied delimiter string for the subjob boundary. n 4 delimiter string Specifies the host-supplied delimiter string for the subjob boundary. After detection of the string, all characters up to the next occurrence of a terminator, or up to 256 characters for the line, are absorbed. » Note: The delimiter string must consist of printable ASCII characters. It may not contain ASCII spaces, carriage return, or line feed. A delimiter of null means ignore the delimiter string terminator. The maximum value of the delimiter string is 32 bytes or characters. Notes: Sessions End by Count You can specify how many bytes are contained in the current subjob. After the printer reads the required number of bytes within the current document, the printer knows that it has reached the end of the subjob. Any data which comes after this point, within the same connection, is treated as the beginning of the next subjob. End by Delimiter String You can specify a delimiter string to detect the end of a subjob. Make sure that the specified delimiter string does not exist in the actual content of the subjob, however, because it will end the subjob and treat all remaining data as a new subjob. D-5 Sessions Parameter: terminator Default: none Range: <CR> carriage return <LF> line feed <CR><LF> carriage return plus line feed Notes: One or more ASCII space characters must be used to separate each item. Any extra characters between the argument and the terminator are discarded. Session Command Detection and Arguments At the start of a document data stream, the printer examines the initial bytes of data to see if it can match the %%Session: ... string. If the string is found, the mode and argument parameters are extracted to determine what kind of session matching is desired. If the initial bytes for the document do not match %%Session: ... or if there are errors in the mode and argument parameters to the command, the printer will act as if the command is not present in the job and default to the use of language-specific terminators to end subjobs for the remainder of the document. If a valid %%Session command is encountered, the printer processes all of the data up to the end of that subjob. Once the subjob terminates and more data arrives from the host computer, the printer checks again to see if the subsequent data consists of a new %%Session command to start the next subjob. Again, if the text at the start of the subsequent subjob does not match %% Session: ... or if there are errors in the mode and argument parameters to the command, the printer will act as if the command is not present in the job and default to the use of language-specific terminators to end the subjobs for the remainder of the document. D-6 QMS 1725 SLS Print System User's Guide Sessions Examples End by Count Example For the end-by-count method of signaling the end of a subjob using a length, the byte count begins after the terminator following the %%Session: ... sequence. For example, counting starts with %! as the first 2 bytes in the following example: %%Session: 0 65535 %! %%IncludeFeature: emulation(postscript) ... ... » Note: When using this method, include all white space and forms control characters inserted by the host system in the byte count. End by Delimiter String Example To group the three subjobs in the following example into a document using the end-by-delimiter string method, the new combined data stream may look like this: » Note: Text in the Tekton typeface is comment, not part of the data stream. Open connection: data comes into the printer %%Session: 5 null %! %%IncludeFeature: emulation (postscript) %%EndComments ... PostScript data %%EndSubJob %%Session: 4%%End2ndSubJob %! %%IncludeFeature: emulation (pcl5) %%EndComments ... PCL 5 data ... Sessions D-7 Sessions %%End2ndSubJob %%Session: 4%%End3rdSubJob %! %%IncludeFeature: emulation (impress) %%EndComments ... imPRESS data ... Close connection Subjob Terminator Example To further clarify subjob terminators, let’s look at the following example. If you want to group the three subjobs into a document using the %%session command with subjob terminators, the new combined data stream may look like the following example. » Note: An empty subjob terminator (such as %%Session: 0 0 or %%Session: 2 null) will be discarded as shown in the following example. This is what ignore means in the definition of length described earlier in this appendix. Also, in the following example at define 2nd subjob boundary, the %%Session command being executed. The Session commands (%%Session: 2 null and %%Session: 4) %%Session: 0 7213 is the real other %% included in the text are part of the job. Also note that the Tekton typeface (used in this note) is used to signify comments that are not part of the job. Open connection: data comes into the printer %%Session: 0 0 Ignore line %%Session: 1 null Ignore line %%Session: 4 %%EndSubJob Define 1st subjob boundary %! %%IncludeFeature: emulation (postscript) %%EndComments ... PostScript data ... %%EndSubJob %%Session: 0 7213 Define 2nd subjob boundary %%Session: 2 null Include in 2nd subjob D-8 QMS 1725 SLS Print System User's Guide Sessions %%Session: 4 %%End2ndSubJob Include in 2nd subjob %! %%IncludeFeature: emulation (pcl5) EndComments ... PCL 5 data ... %%End2ndSubJob %%Session: 0 0 Ignore line %%Session: 2%%End3rdSubJob Define 3rd subjob boundary %! %%IncludeFeature: emulation (impress) %%EndComments ... imPRESS data ... Close connection Sessions Document Finishing Terminology Newlayout The %%newlayout command is the mechanism that allows groups of subjobs to use the same layout features. A layout may be specified once for an entire document or altered for individual subjobs using the newlayout command. Collation Range Collation range is a group of consecutively delivered pages to which the same settings of collation and offset parameters apply. When collation is On, the set of pages can match the collation range. But when collation is Off, collation range and set are not the same. Set If collation is on, the set is one copy of all pages in the document. If collate is off, the set consists of all the copies of a single page in a document. Sessions D-9 Sessions Document Finishing DOC Function: Used when a document has more than one subjob and you want to control whether different subjobs have the same format. The %%IncludeFeature: newlayout command is used at the beginning of subjobs to do one or both of the following: n n Indicate to the printer that new document formatting options, such as grids, booklets, borders, margins, pages sizes, page offsets, and orientation, should apply from this point on. Indicate that a new collation range is to take effect from this point on. This command is intended for use when multiple small documents are combined into a single print job in order to control which QMS formatting or finishing command settings may be changed and when they take effect. Syntax: %%IncludeFeature: newlayout(value) Parameter: value Default: n/a Range: off, on, collate, on collate off Ignores any changes to layout or collation properties specified at this subjob boundary via DOC. The layout and collation properties in effect with the previous subjob remain in effect. This command is equivalent to the absence of the %%IncludeFeature: newlayout command altogether. D-10 QMS 1725 SLS Print System User's Guide Sessions on Any QMS DOC settings for standard commands (such as layout, document finishing, or document formatting) which are specified in the current subjob will replace the previous values of these settings inherited from the previous subjobs. All other settings inherited from the previous subjobs in the document remain unchanged. This subjob will be considered part of the collation range established by the previous subjob. See the “Collation Range” definition earlier in this section. collate Create a new collation range, but retain the same layout and document formatting options that were in effect with the prior subjob, as in the following two subjob sessions: Subjob A %! %%IncludeFeature: numcopies(10) ... PCL 5 Data ... Subjob B %! %%IncludeFeature:newlayout(collate) %%IncludeFeature: numcopies(25) ... PostScript Data In this example, all of subjob A prints with its attributes (numcopies and other layout, document format, and document finishing commands). When that job is completed, subjob B prints 25 copies with all other attributes unchanged). Sessions D-11 Sessions on collate Allows a change in both the layout properties and in the collation properties at this subjob boundary. Any QMS DOC settings for standard commands (such as layout, document finishing, or document formatting) which are specified in the current subjob will replace the previous values of these settings inherited from the previous subjobs. All other settings inherited from the previous subjobs in the document remain unchanged. This setting is a combination of the on and collate parameter values. Notes: %%IncludeFeature: newlayout (on collate) is always issued at the beginning of the document for the first subjob regardless of the actual command specified by the user. %%IncludeFeature: newlayout (off) is assumed for subsequent subjobs when the command is not present. v D-12 QMS 1725 SLS Print System User's Guide E Notices In This Chapter . . . n n n n n Manual notices Laser safety FCC compliance International notices Colophon Manual Notice Manual Notice QMS, Inc. reserves the right to make changes to this manual and to the equipment described herein without notice. Considerable effort has been made to ensure that this manual is free of inaccuracies and omissions. However, QMS, Inc. makes no warranty of any kind including, but not limited to, any implied warranties of merchantability and fitness for a particular purpose with regard to this manual. QMS, Inc. assumes no responsibility for, or liability for, errors contained in this manual or for incidental, special, or consequential damages arising out of the furnishing of this manual, or the use of this manual in operating the equipment, or in connection with the performance of the equipment when so operated. Laser Safety This printer is certified as a Class 1 laser product under the U.S. Department of Health and Human Services (DHHS) Radiation Performance Standard according to the Radiation Control for Health and Safety Act of 1968. This means that the printer does not produce hazardous laser radiation. Since radiation emitted inside the printer is completely confined within protective housings and external covers, the laser beam cannot escape from the machine during any phase of user operation. FCC Compliance This equipment has been tested and found to comply with the limits for a Class B digital device, pursuant to Part 15 of the FCC Rules. These limits are designed to provide reasonable protection against harmful interference in a residential installation. This equipment generates, uses, and can radiate radio frequency energy, and if not installed and used in accordance with the user documentation, may E-2 QMS 1725 SLS Print System User's Guide FCC Compliance cause harmful interference to radio communications. However, there is no guarantee that interference will not occur in a particular installation. If this equipment does cause harmful interference to radio or television reception, which can be determined by turning the equipment off and on, the user is encouraged to try to correct the interference by one or more of the following measures: » 1 Reorient or relocate the receiving antenna. 2 Increase the separation between the equipment and the receiver. 3 Connect the equipment to an outlet on a circuit different from that to which the receiver is connected. 4 Consult the dealer or an experienced radio/TV technician for help. Note: A shielded cable is required to comply with the limits for a Class B digital device, pursuant to Part 15 of the FCC rules. O Caution: Any modifications or changes to this product not expressly approved in writing by the manufacturer responsible for compliance to Federal Regulations could void the user's authority to operate this product within the Laws and Regulations of the Federal Communications Commission. M WARNING! To prevent electrical shock, do not remove any covers from your printer unless you are experienced in working with circuit boards and are following instructions for procedures described in QMS documentation. A CHTUNG! Um elektrische Kurtzschlüsse zu vermeiden, entfernen Sie keine Gehaüseteile von Ihrem Drucker, wenn Sie keine Erfahrungen im Umgang mit elektrischen Bauteilen haben. Befolgen Sie die in der QMS Dokumentation beschriebenen Hinweise. Notices E-3 International Notices International Notices Canadian Users This digital apparatus does not exceed the Class B limits for radio noise emissions from digital apparatus set out in the Radio Interference Regulations of the Canadian Department of Communications. Le présent appareil numérique n'émet pas de bruits radioélectriques dépassant les limites applicables aux appareils numériques (de la classe B) prescrites dans le Règlement sur le brouillage radioélectrique édicté par le ministère des Communications du Canada. Vfg 1046/1984 Conformity Statement Hierdurch bescheinigen wir, daß dieses Produkt in Übereinstimmung mit Postordnung 1046/1984 ist und RFI unterdrückt ist. Die Geschäftslage und der Verkauf diese Geräte auszuprobieren, mit der Übereinstimmung und der Regierung zu bestätigen, wurde der Deutschen Bundespost gegeben. Bescheinigung des Herstellers/Importeurs Hiermit wird bescheinigt, daß QMS 1725 SLS Print System in Übereinstimmung mit den Bestimmungen der Vfg 1046/1984 funkentstört ist. Der Deutschen Bundespost wurde das Inverkehrbri ngen dieses Gerätes angezeigt und die Berechtigung zur Überprüfung der Serie auf Einhaltung der Bestimmungen eingeräumt. QMS Inc., Mobile, AL, USA Declaration of Manufacturer/Importer We hereby certify that the QMS 1725 SLS Print System is in compliance with Vfg 1046/1984 and is RFI suppressed. The marketing and sale of this equipment was reported to the German Postal Service. E-4 QMS 1725 SLS Print System User's Guide Colophon The right to retest this equipment to verify compliance with the regulation was given to the German Postal Service. QMS Inc., Mobile, AL, USA Electronics Emissions Your printer complies with the Electronics Emissions Requirements of the German Federal Minister for Postal and Telecommunication Technology regulation: Vfg 1046/1984 Your printer complies with the Electronics Emissions Requirements of the European Economic Council directive: 82/499/EEC Colophon v This manual was written and formatted in FrameMaker. Some illustrations were created in Adobe Illustrator and translated to WMF format in Transverter Pro; other illustrations were created directly in FrameMaker. Typefaces chosen are Benguiat, Courier, Helvetica, MarkerFelt, and Tekton. The manual was printed in camera-ready form on a QMS printer. Notices E-5 F Configuration Menu In This Chapter . . . n Menu Diagrams Menu Diagrams Menu Diagrams Take printer offline by pressing , then press Operator Control Administration Disk Operations Copies Collation Orientation Inputbin Outputbin Chain Inputs Manual Feed Size Def. Duplex Tumble Duplex Take printer offline by pressing , then press Operator Control Disk Operations Administration Install Option Remove Option Format Disk Collation Spool Overflow F-2 QMS 1725 SLS Print System User's Guide Menu Diagrams Take printer offline by pressing , then press Operator Control Disk Operations Administration Communications Emulations Timeouts PS Wait Timeout Emul Timeout Job Timeout ESP Timeout Serial Mode ESP Default Postscript Emulation Level Level 2 Level 1 B/W Level 1 Color PCL5 Emulation Default Font Min K Spool Spool Timeout End Job Mode Baud Rate Symbol Set Lines Per Inch Parity Ignore Parity Rcv SW Flow Xmit SW Flow CTL Data Bits Stop Bits Line Termination Point Size x100 Retain Temporary Special Pages Startup Options Memory Print Status Do Start Page Quick Config. Calibration Page Do Sys Start K Mem For Spool Header Page Do Error Handler K Mem For PSHeap Header Inputbin K Mem PSFonts Trailer Page K Mem Emulation Trailer Inputbin K Mem Emul. Temp Status Page Type K Mem Display K Mem Disk Cache K Mem Frame Buff MB Printer Mem. Enable Disk Swap Scalable Fonts Default Font IDX Monochrome GL/2 Downld Location HP-GL HDWE Flow CTL Plotter Scaling Percent DSR DTR RTS CTS PS Protocol Def Job Prio Parallel Mode Emulation Origin Reverse Image Enhanced Mode Duplex V. Offset Default Paper Inputbin 1 Name Inputbin 2 Name Outputbin 1 Name Outputbin 2 Name Def. Resolution Gamma Correction Enable Buzzer Page Recovery Toner Out Act. Letterhead Man Feed Timeout Page Counters Sheets Printed Faces Printed Pen 1 - 8 Pen Color End Job Mode PS Protocol Def Job Prio Point Sz 100ths Character Map Line Numbering Min K Spool Vertical Offset Duplex H. Offset Pen Width LinePrinter Mode Connection Miscellaneous Image Alignment Restore Defaults Keypad Language Horiz. Offset Expand Mode Paper Type Min K Spool Spool Timeout Data Bits AppleTalk Engine Font Tab Stops LF is CRLF CR is CRLF FF is CRLF Orientation Autowrap Lines Per Page Margins Left Right Top Bottom Configuration Menu F-3 Menu Diagrams v F-4 QMS 1725 SLS Print System User's Guide Glossary AppleTalk A local area network communication protocol developed by Apple Computer. AppleTalk operates on LocalTalk, Ethernet, or Token-Ring cabling and can be used by Macintosh systems, PCs, and printers. See also LocalTalk. Application Any computer program designed to help people perform a certain type of work (for example, word processing, page layout, programming, graphics, and spreadsheets). Adobe Illustrator, Excel, and Word are applications. ASCII An acronym for American Standard Code for Information Interchange. This coding scheme, developed by the American National Standards Institute (ANSI), specifies a digital code for each of the 96 displayable characters on a standard computer keyboard as well as for control characters. The full ASCII character set is 250+. Baud Rate or Baud Baud Rate or Baud The data transfer rate between two devices, such as your computer and your printer. Both devices must be configured for the same baud rate. Your printer’s baud rate ranges from 300 to 38,400 bits per second. Bit An acronym for binary digit. The bit is the most fundamental unit of information that a computer can accept. It has two states called 1 (one) and 0 (zero), or on and off, and can be used to represent a yes/no statement. Groups of bits are used to represent more complex statements, such as characters. The most common grouping of bits is called a byte, which consists of 8 bits. See also ASCII, byte. Bitmap A grid composed of small dots used to define an image, line drawing, or character. See also raster graphics. Bitmapped Font A bitmapped font is a one in which each character is represented by a set of dot patterns. Each font size requires a different set of dot patterns. Buffer Storage space used to compensate for a difference in rate or sequence of data flow when transmitting data from one device to another. Byte A unit of information consisting of 8 bits, the equivalent of one character. See also bit. Cancel Key The control panel key that cancels a print job or sends an end-of-job indicator to a print job waiting for incoming data. It is not necessary to take the printer off line before using the Cancel key. Card See font card, and security card. G-2 QMS 1725 SLS Print System User's Guide Download Connector A coupler used to join a cable to a device or to another cable. Connectors are identified as male or female. A male connector has one or more exposed pins or prongs. A female connector has one or more receptacles designed to accept the pins on the male connector. Connector Box A piece of equipment consisting of a small box with a built-in cable that links the printer to the LocalTalk cable system. Consumables Supplies, such as paper, transparencies, and toner. Control Panel The area on the front of the printer consisting of eight keys that allow you to configure the printer and perform frequently used operations, four LEDs (light-emitting diodes) that identify various printer status information, and an LCD (liquid crystal display) message window that provides status information ad configuration menus. Controller The software that controls the engine of a printer. The controller is the intelligence of the printer. Crown A multitasking operating system architecture developed by QMS and used in the QMS 1725 SLS Print System. Default A printer control panel setting used in the absence of a application selection. See also factory default. Download Transfer information from one device to another. Downloaded fonts and emulations are not built into the printer. They are transferred from the computer and temporarily stored in the printer's memory (until the printer is turned off) or on a hard disk. Glossary G-3 dpi dpi An acronym for dots per inch, a measurement unit used to indicate printer resolution. Your QMS 1725 SLS Print System has 300x300 and 600x600 dpi resolution. Driver See printer driver. DTR/DSR An acronym for Data Terminal Ready and Data Signal Received, a hardware-controlled protocol. It controls the flow of data via signals on the DTR/ DSR line, as opposed to XON/XOFF protocol, which is software controlled. Electrophotographic Drum A drum in the toner cartridge that is sensitive to both light and electricity. It is used in the creation and transfer of images to the printed page. See also toner, toner cartridge. Emulation Software that allows the printer to respond to commands intended for a different type of printer. For example, when the printer is set for HP PCL emulation, it responds to the same commands (HP PCL) that a HewlettPackard LaserJet printer does. Emulation Card See font card, and security card. Emulation Sensing Processor (ESP) Technology Emulation Sensing Processor technology. Using a form of artificial intelligence, ESP technology analyzes incoming file data from any of your printer's interfaces, selects the appropriate printer language from those installed on the printer, and processes the print job. ESP technology works with most popular commercially available applications. Ethernet Network Developed by Xerox, Ethernet is a local area network that uses coaxial cable (thick or thin), or twisted pair wire to connect nodes transmitting variable-length frames of data at 10 Mbps (10-million bits per second). G-4 QMS 1725 SLS Print System User's Guide Fuser Assembly EtherTalk Refers to the communication protocol used by Macintosh computers when transmitting and receiving data through an Ethernet interface. Excess Memory Client The memory remaining after providing all the other memory clients with their specified amounts of memory is automatically added to the excess memory client. All excess memory in your QMS 1725 SLS Print System goes into a pool shared by the frame buffer and the display list clients. Expansion, RAM See memory upgrade. Factory Default The printer settings that are programmed into the printer at the factory. These settings are used unless they are changed at the printer control panel or overridden by settings in an application. See also default. Flash ROM Quick loading, reprogrammable memory that holds information (such as system code and downloadable emulations) even when the printer is turned off. The chief advantage of flash ROM is that system upgrades can be loaded from a floppy disk without the necessity of swapping out expensive EPROMS or having to place a service call. Font A complete character set in one typeface or style. Two types of fonts are available for your printer—downloaded and resident. See also download, resident fonts, typeface, and typeface family. Font Card A module the size of a credit card that contains fonts that can supplement the printer's internal, resident fonts to increase the variety of available typefaces. Fuser Assembly An assembly that contains two heated rollers between which the paper passes after toner has been applied; the heated rollers bond the toner to the paper. Glossary G-5 Gamma Correction Gamma Correction Gamma corrections allow you to sharpen the midrange contrast when scanning black and white images. Gray Scale Progressive shades from black to white which provide detail and contrast to printed images. Handshake, Handshaking A procedure, usually part of a communications protocol, to establish a data communications path. Devices must be able to communicate with each other. Your printer uses either XON/XOFF or DTR/DSR protocol to communicate with a computer. Hard Disk A secondary storage place for such items as downloaded fonts and emulations and for spooled data, thus providing virtual memory capabilities. You can add an internal hard disk and up to three external hard disks to your QMS 1725 SLS Print System. Header Page A separator page, printed before a print job, that identifies the print job and helps users sort out the print jobs in the printer's output tray. See the QMS Crown Document Option Commands manual information on customizing the header page information. Heap A portion of memory reserved for a program to use for temporary storage. Host The computer or network to which a printer is connected. HP PCL An acronym for Hewlett-Packard Printer Control Language, the printer control language native to the HP Laser Jet Series II and III printers. Your QMS 1725 SLS Print System has a resident HP PCL 5 emulation. G-6 QMS 1725 SLS Print System User's Guide Landscape Orientation HP-GL An acronym for Hewlett-Packard Graphics Language, the programming language on which HP plotters are based. Your QMS 1725 SLS Print System has a resident HP-GL emulation. IDE An acronym for Integrated Drive Electronics. “Integrated” refers to the fact that all of the controller electronics are on the drive itself, so no separate adapter card or expansion slot is required. See also SCSI. Imageable Area The maximum area of a sheet of media capable of being printed on. It is subject to both hardware limits (the physical page size and the margins required by the print engine) and software constraints (the amount of memory available for the full-page frame buffer). Interface The place where two devices are physically connected, allowing them to communicate. Interface Cable A special cable used to connect the printer to the computer so they can communicate. Interface Port Your printer comes with three standard interface ports—serial, parallel, and AppleTalk—located on the back panel. An optional interface port is available through the installation of an optional network interface card. See also network interface card. Jam Recovery The printer’s ability to reprint the jammed page and then continue with the print job once you remove the jammed media. With most printers, if a jam occurs, you must reprint the job after removing the jammed media. Landscape Orientation See orientation. Glossary G-7 LCD LCD An acronym for Liquid Crystal Display. The printer’s LCD message window on the control panel provides status information and configuration menus. LED An acronym for Light-Emitting Diode. Four LEDs on the printer’s control panel indicate printer status. LocalTalk One type of cable system used to link computers and peripheral devices in an AppleTalk network. See also AppleTalk. Manual Feed The process by which media is fed into the printer by hand (as opposed to letter the printer automatically pull media from a cassette or tray). Media Any material (such as paper, labels, and transparencies) used in the printer for printed output. Memory The space within your printer where information is stored while being actively worked on. The term applies to internal storage space as opposed to external storage, such as disks or tapes. See also RAM and ROM. Memory Client A user of a block of memory. Each memory client controls certain features. When insufficient memory is allocated to a specific client, the features it controls may not be accessible. Memory Upgrade An available option that is easily attached to the printer's controller board to expand its standard 13 MB of RAM to a maximum of 32 MB. See also SIMM (Single In-Line Memory Module ). Menu Key The control panel key that accesses the printer configuration menu when the printer is off line. Use this key to advance through the menus or to return to a previous position in the menu. When changing printer setup, press this G-8 QMS 1725 SLS Print System User's Guide Online/Offline Key key to cancel a change (before pressing the Select key) or to return to previous menus one level at a time. Motherboard The main circuit board containing the primary components of a computer system. Network Interface Card (NIC) A printed circuit board, in the shape of a card, used to connect a printer physically to a network cable. See your QMS vendor for a complete list of available network interface cards. Next Key The control panel key that advances through a list of selections or options for a menu. When changing character information, use this key to advance to the next choice for the current input (underlined) character. Non-volatile Memory This type of memory is not lost when the printer loses power. Null Modem A cable configuration used for serial communication. This cable arranges the communication between two devices. NV RAM This protected form of RAM is used to store information such as your printer’s configuration menu. Configuration options you have chosen, such as emulations, memory settings, and input bins, are saved to this nonvolatile RAM. This information is not lost when you turn off your printer. Off Line Not accepting data from the computer. The printer is taken off line by pressing the Online/Offline key. When the Online indicator is off, the printer is off line. The printer must be off line to enter the Configuration menu. On Line Accepting data from the computer. The printer is on line when the Online/ Offline key is pressed and the Online indicator is on. Online/Offline Key The control panel key used to take the printer off line and put it back on line. Glossary G-9 Orientation Orientation The direction of print on the page. Printing across the narrow width of a page is called portrait orientation printing. The word “portrait” comes from portraits of people, which are usually vertical in format. Printing across the length of a page is called landscape orientation printing. The term “landscape” is derived from pictures of the landscape, which are usually horizontal in format. Page Description Language (PDL) A programming language, such as PostScript, that is used to describe output to a printer or a computer monitor. Page Memory A special buffer large enough to hold an entire page of data. Paper Path The path the paper follows in its journey through the printer; it begins at the paper cassette or tray pickup point and ends at the output tray. Parallel Interface A data transmission technique that sends each bit simultaneously over separate lines. (For this reason it is generally faster than a serial interface.) It is normally used to send 1 byte (8 bits) at a time between computers and printers. You printer has a Centronics parallel interface port. See also serial interface. Parity, Parity Check The addition of overhead bits to ensure that the total number of 1s in a grouping of bits is either always even (for even parity) or always odd (for odd parity). This permits detection of single errors. It may be applied to characters, transmission blocks, or any convenient bit grouping. PCL See HP PCL. Peripheral Device A hardware device connected to a computer (such as a printer) or to a printer (such as an external hard disk). G-10 QMS 1725 SLS Print System User's Guide Print Engine Permanent Soft Fonts Permanent soft fonts are soft fonts downloaded into the printer's memory that remain resident there, even if the printer is reset, until the printer is turned off or the fonts are deleted by an application. See also download . Physical Memory The amount of RAM installed in the printer. Point Size The height of a character or symbol in a font. There are 72 points per inch. This text is printed using a 10 point font. Portrait Orientation See orientation. PostScript A page description language trademarked by Adobe Systems Incorporated. PostScript Level 2 capabilities, among others, are implemented in your printer through a QMS-developed PostScript emulation. PostScript Level 2 emulation is the native language of your printer’s controller. It describes text, graphics, and page images to the printer. Previous Key The control panel key that returns through the list of previous selections or options for the current menu. When changing the character information, use this key to return to the previous choice for the current input (underlined) character. Print Density Print density refers to the relative darkness of print on the page. Very dense print appears totally black. Less dense print looks lighter, with solid-filled areas not totally covered. Print density can be adjusted by a lever inside the printer. Print Engine The non-intelligent portion of the printer, including the laser, print drum, and paper-feeding mechanism. Glossary G-11 Print Quality Print Quality A general measure of the appearance and readability of a printed page. Criteria of print quality include the darkness, clarity, and sharpness of the printed page. Printed Circuit Board A flat board made of plastic, fiberglass, or another nonconducting material on which chips and other electronic components are mounted. Printer Driver A printer driver is a program that translates the file you are printing into a language that the printer understands. Usually, the printer driver is installed within an application. Protocol A set of rules or standards designed to enable computers and other devices to connect to one another and to exchange information. Queue A list of documents waiting to be printed. RAM An acronym for Random Access Memory, the memory your printer uses to perform tasks. It can be written to and read from. Once a task is complete, the memory is free again to be used for another file. This memory is volatile, so if your printer loses power while a file is being sent, you must resend the file. The number and type of features you can run simultaneously on your printer depend on the amount of RAM available and how that RAM is distributed. RAM can be increased by adding SIMMs. See also SIMM. RAM Disk Also called a virtual disk. The RAM disk is an area of RAM that is used to simulate an additional hard disk. Data can be written to and read from a RAM disk more quickly than a hard disk, but a RAM disk loses any information stored on it when the printer’s power is turned off. The frame buffer and spooling buffer are RAM disk clients. See also RAM. Raster Graphics The system of forming graphics using a bitmap, or grid of small dots, is called raster graphics. The term “raster” denotes the Cartesian grid system G-12 QMS 1725 SLS Print System User's Guide RTS in which the dots are arranged. Bitmaps can define images, shapes, or characters created with a specific number of dots per inch. See also bitmap. Rasterization The conversion of vector graphics (images described mathematically as points connected by straight lines) to equivalent images composed of pixel patterns that can be stored and manipulated as sets of bits. Remote Console A feature in QMS Crown printers allowing users to configure the printer and monitor printer conditions over network interfaces. Resident Permanently stored in the printer’s memory. Resident Fonts Fonts permanently stored in the printer's memory; also called internal fonts. Resolution A measurement of the dots per inch (dpi) in output material, either printed or visual, as in a high-resolution monitor. Your printer features a 300x300 and 600x600 dpi resolution. RISC An acronym for Reduced Instruction Set Computing, a microprocessor design that focuses on rapid and efficient processing of a relatively small set of instructions. ROM An acronym for Read Only Memory. This type of memory contains data and/or printer-executable instructions that can be read but not modified. On QMS Crown printers, the operating system code, resident fonts, and resident emulations are all stored in ROM. This information is not lost when the printer’s power is turned off. RTS An acronym for Request To Send. RTS is a signal sent from the host to the printer indicating it is ready to send data. Glossary G-13 Scalable Font Scalable Font A scalable font is one in which each character’s dot pattern (bitmap) is generated from a mathematical representation (or outline) of the character. Scalable fonts eliminate the need to store many different font sizes. Screen The pattern in which dots or lines are placed on a page to create colors or levels of gray. See also screen angle. Screen Angle The angle at which a screen is printed. See also screen. Screen Font A font designed for display on a computer monitor. Screen fonts usually have corresponding printer fonts. SCSI An acronym for Small Computer System Interface, which allows up to three external hard disks to be connected to your printer. See also IDE. Security Card A module the size of a credit card that allows you to set passwords for the Operator Control and Administration menus. When a security card is inserted into the printer card slot, the Installation menu appears in the configuration menu. Select Key The control panel key used to access a menu or to choose a displayed selection or option. Serial Interface A data transmission technique that sends each bit sequentially over a single line. It is normally used to send one bit at a time for data communications. See also parallel interface. SIMM (Single In-line Memory Module) A small circuit board designed to accommodate surface-mount memory chips. SIMMs use less board space and are more compact than more conventional memory-mounting hardware. See also memory upgrade. G-14 QMS 1725 SLS Print System User's Guide Toner SIO (Simultaneous Interface Operation) The capability of printing to all three of the printer's concurrently active ports rather than being restricted to one. Soft Fonts Fonts created or stored on disks. They can be transferred to the printer’s memory and remain available to be used until the printer is turned off. See also download. Spool An acronym for simultaneous print operations on line. Spooling is temporary storage to hold print jobs until the printer is available to process them. Start-up Page A page generated when you turn on the printer (unless you have disabled it). It gives limited information on the printer, including name, pages printed, current interface settings, and amount of RAM available. Storage A device in or on which information can be kept. There are three main types of storage, ROM, RAM, and hard disks. ROM stores read-only data, RAM represents temporary storage, and hard disks hold information on a more permanent basis. See also hard disk, RAM, ROM, spool. System Administrator The person in charge of managing a network; also called a network administrator. Timeout The expiration of a predefined interval, that triggers some action such as a disconnection that occurs following 30 seconds without any data activity (in a 30-second, no-activity timeout). Timeout also refers to the length or existence of such an interval. Toner A dry, powdered substance capable of being attracted to electrically charged areas on a photosensitive revolving drum. The printer's EP (electrophotographic) toner cartridge holds the toner. The toner is first attracted to this charged area, then attracted to the negatively charged paper. The toner is melted (or fused) in place by the fuser assembly. Glossary G-15 Toner Cartridge Toner Cartridge A disposable cartridge containing dry toner and a print drum. The QMS 1725 SLS Print System uses an EP-BII toner cartridge. Trailer Page A separator page, printed after a print job, that identifies the print job and helps users sort out the print jobs in the printer's output tray. See the QMS Crown Document Option Commands manual information on customizing the trailer page. Transformer Box Also known as a connector box. This piece of equipment consists of a small box with a built-in cable that links the printer to a LocalTalk cable. Transparency A type of media, also known as OHP (overhead projection) film, commonly used for presentations. Typeface The basic printed design of characters in a font. For instance, Courier, and Times typefaces each print characters of different designs. Typeface Family A group of related typefaces. For example, the Times typeface family consists of four typefaces: Times Roman, Times Bold, Times Italic, and Times Bold Italic. See also font and typeface. Utility A program that performs a specific function of computer system management, such as maintaining disks and files or controlling a peripheral device. Virtual Memory An extension to the effective size of the printer’s memory by using a disk file or swap file to simulate additional memory space. It enables the hard disk to accept data swapped from RAM to free temporarily the RAM for other tasks. Volatile Memory Memory that is cleared when the printer is turned off. Most RAM is volatile. G-16 QMS 1725 SLS Print System User's Guide XON/XOFF XON/XOFF Control characters used for flow control in data transmission. v Glossary G-17 Index %%EndOfDocument 2-19 <ESC>%12345X 2-19 600 DPI key 1-16 A Accessories See Optional Accessories Administration menu 2-4, 2-15 Special Pages menu 2-42 Startup Options menu 2-45 Administration password 2-67 Advanced status page 2-42 Alignment See Image Alignment ANSI ASCII symbol set (HP-GL) 7-10 Anti-static teeth 5-6 AppleTalk G-1 See LocalTalk Application G-1 Configuration, printer 2-2 ASCII G-1 Automatic Jam Recovery 1-10 Autowrap menu (Lineprinter) 2-41 Avant Garde Gothic ITC Avant Garde Gothic 7-3 B Baud G-2 Baud Rate menu (Serial) 2-20 Bins Output 2-14 See also Cassette, Trays Selection 2-13 Bit G-2 Bitmap G-2 Bitmapped font 7-5, G-2 Blank pages 6-24 Bookman ITC Bookman 7-3 Buffer G-2 Sizes 3-21 Frame, Memory allocating 2-57 Bulletin board, QMS A-2 Byte G-2 C Cable Macintosh B-11 Cable pinouts See Pinouts Canadian users Statement E-4 Cancel Cancelling a print job 3-21 Key 1-16, 3-21, G-2 Status message 6-2 Card Emulations 8-11 Font 8-12 Installing 8-11, 8-18 Security 8-18 Cassette 8-3 Chaining 2-14, 3-11 See also Trays CCITT 1-7 Accessing C-18 Commands C-19 Character Map menu (Lineprinter) 2-40 Character set 7-2 Chunk collation 3-13 Cleaning Anti-static teeth 5-6 Paper feed guide 5-9 Transfer guide lock tray 5-8 Transfer guide strip 5-8 Cleaning printer 5-6 Client, memory 2-48 Collating Chunk 3-13 Output 3-12 Collation 2-13 Colophon E-5 I-2 Communication Serial port 6-8 Settings 3-21 Testing, Macintosh 6-12 Testing, parallel port 6-6 Communications submenu 2-16 Compile-Ahead Technology 1-8 Compressed Data Formats 1-10 CompuServe A-3 Configuration Application, via 2-2 Changes, canceling 2-11 Changes, saving 2-10 Character information, changing 2-8 Commands, via 2-3 Control panel, via 2-3 Defaults, restoring 2-12, 2-62 Menu options, selecting 2-6 Methods 2-2 PostScript operators, via 2-3 PS Executive Series Utilities, via 2-3 Configuration menu 2-4 Accessing 2-5 Administration menu 2-4 Changes, canceling 2-11 Changes, saving 2-10 Character information, changing 2-8 Installation menu 2-4 Operator Control menu 2-4 Options, selecting 2-6 Connection menu (LocalTalk) 2-27 Connector G-3 Connector box G-3 Consumable supplies B-7 Consumables G-3 Warranty B-12 Context Switching 1-10 Control panel G-3 Configuration, printer 2-3 Indicators 1-14 Language, message window 2-11, 2-63 LEDs 1-14 QMS 1725 SLS Print System User's Guide Message window 1-15 Message window language 2-11, 2-63 Control panel messages 6-2 Controller G-3 Specifications B-3 Copies 2-12 Correction, gamma 2-60 Courier 7-8 cpi Pitch 7-5 CR is CRLF menu (Lineprinter) 2-41 Creating a network job separator 3-20 Crown G-3 Customer support, QMS See Support D Dark image 6-27 Data Bits menu (parallel) 2-25 Data Bits menu (Serial) 2-21 Data indicator Stays lit 6-22 Won’t light 6-13 Def Resolution menu 2-60, 4-2 Default G-3 Default Font Index menu (PCL5) 2-34 Default Font menu (PCL5) 2-30 Defaults, configuration Restoring 2-12, 2-62 Device numbers, hard disks 2-64, 8-42 Dingbats ITC Zapf Dingbats 7-3 Disk cache 2-56 Disk Operations menu 2-64 Display 2-55 Do Error Handler menu 2-46 Do Start Page menu 2-45 Do Sys Start menu 2-46 DOC C-4 Document Finishing DOC D-10 Header page commands C-2 HP PCL 5 emulation commands C-3 HP-GL emulation commands C-2 Index Lineprinter emulation commands C-3 PCL 4 emulation commands C-4 PCL 5 C-7 PCL 5 emulation commands C-3, C-4 PostScript emulation commands C-4 Printer commands C-4 Sessions D-2 Trailer page commands C-2 Updated commands C-4 Document Option Commands See DOC Documentation 1-2, 1-3 DOS commands mode 6-8 Dots per inch See dpi Downld Location menu (PCL5) 2-35 Download G-3 Downloading optional emulation 8-17 dpi G-4 Duplex key 1-16 Duplexer assembly 8-7 Installing 8-7 Duplexing 2-15 Memory requirements 2-51 Problems 6-25 Tumbling 2-15 E Electronics emissions E-5 Emul Timeout menu 2-17 Emulation 2-16 Card 8-12 Downloading optional 8-17 HP-GL parameters, setting 2-36 Installing 8-11 Lineprinter parameters, setting 2-39 Memory, allocating 2-54 Emulation menu Parallel 2-24 Serial 2-18 Optional, downloading 8-17 I-3 PCL5 parameters, setting 2-30 PostScript parameters, setting 2-29 Temporary, allocating memory 2-55 Timeout 2-17 Emulation Level menu (PostScript) 2-29 Emulation Sensing Processor (ESP) Technology 1-9 See also ESP Emulations 1-11 Menu 2-29 Setting parameters 2-29 End Job Mode 3-14 %%EndOfDocument 2-19 <ESC>%12345X 2-19 Menu Parallel 2-25 Serial 2-19 QMS EOD 2-19 See EOD command Setting 3-16, 3-17 Ending a print job 3-22 End-of-document command 3-14 Engine Default Paper 2-59 Features, configuring 2-58 Inputbin Name 2-59 Letterhead 2-61 Manual Feed Timeout 2-61 Outputbin Name 2-60 Engine menu Gamma Correction 2-60 Image Alignment menu 2-58 Page Recovery menu 2-60 Resolution menu 2-60, 4-2 Toner Out Act. menu 2-61 Vertical Offset menu 2-59 Enhanced Mode menu (HP-GL) 2-37 Envelope Formatting data 3-10 Printing 3-10 Selection 8-3 I-4 Single print 3-10 Specifications 3-10, B-5, B-6 Envelope feeder 8-3 Installing 8-3 Environmental requirements B-4 EOD command 3-15 Add EOD command, to your file 3-18 Network job separator 3-20 Other print queuing systems 3-17 PC print server 3-16 See End Job Mode Stand-alone PC 3-16 Error Waiting for idle 6-3 Waiting on input end job 6-4 Error Handler, PostScript 2-46 Error messages ESP 1-9 Timeout 2-17 Won’t work 6-14 Expand Mode menu (HP-GL) 2-37 External hard disk See Hard disk F Face-up output 3-8 Factory defaults, restoring 2-12, 2-62 FCC compliance E-2 Feeding paper Cassette 3-5 Manual feed 3-6 FF is CRFF menu (Lineprinter) 2-41 Flash ROM System software, updating 8-43 Flow control Hardware 2-22 Software, receive 2-21 Software, transmit 2-21 Font card 8-12 Installing 8-11 Font index number C-5 Font menu (Lineprinter) 2-39 QMS 1725 SLS Print System User's Guide Fonts Bitmapped 7-5, G-2 Defined 7-2 Installing optional 8-13 PCL 5 C-4 PCL5, scalable 2-33 PCL5, temporary, retaining 2-32 PostScript, allocating memory 2-54 PostScript emulation B-3 Removing optional 8-14 Scalable 7-5, G-14 See font name Subset 7-2 Formatting Hard disk 2-65 Frame Buffer Memory, allocating 2-57 French/German symbol set (HP-GL) 7-10 G Gamma correction 2-60, 4-3, 4-6 Gray levels 4-4 Halftone 4-4 Screen frequency 4-4 Gray levels 4-4, 4-5 Gray-scale 4-6 H Halftone quality Device resolution 4-4 Laser beam 4-4 Scan quality 4-4 Screen frequency 4-4 Halftones Cells 4-4 Gamma correction 4-4 Hard disk 2-63, B-7 Device numbers 2-64, 8-42 Disk Operations menu 2-64 Error messages 2-65 Expandability 1-12 Index External B-7 Formatting 2-65 IDE board B-7 Identifying 2-64, 8-42 Internal 8-38, B-7 SCSI B-7 Hardware flow control 2-22 Hdwe Flow Ctl menu (serial) 2-22 Header Inputbin menu 2-44 Header pages 2-43 DOC C-2 Header Page menu 2-44 Inputbin 2-44 Heap See Postscript Helvetica 7-8 Horiz. offset menu 2-58 Host Input 2-52 HP EOD 2-19, 3-16 HP PCL 5 Emulation See PCL HP-GL DOC C-2 Emulation 1-7 Enhanced Mode 2-37 Expand Mode menu 2-37 Origin menu 2-36 Paper Type menu 2-36, 2-38 Pen 1 - Pen 8 2-38 Plotter menu 2-36 Reverse Image menu 2-37 Scaling Percent menu 2-36 Setting parameters 2-36 Symbol sets 7-10 9825 Character Set symbol set (HP-GL) 7-10 ANSI ASCII 7-10 French/German 7-10 ISO French 7-10 ISO German 7-10 ISO IRV (International Reference I-5 Version) 7-10 ISO Italian 7-10 ISO Norway, Version 1 7-10 ISO Norway, Version 2 7-10 ISO Spanish 7-10 ISO Swedish 7-10 ISO Swedish For Names 7-10 ISO United Kingdom 7-10 JIS ASCII 7-10 Katakana 7-10 Roman Extensions 7-10 Scandinavian 7-10 Spanish/Latin 7-10 Special Symbols 7-10 HP-GL/2 See PCL5<$npage> 2-34 I IBM PC AT cable pinouts B-10 XT cable pinouts B-10 Idle Status message 6-3 Idle input printing Status message 6-3 Ignore Par. Err. menu (serial) 2-20 Image alignment 2-58, 3-21 Imageable Area 3-4 Indicators, control panel 1-14, 6-22 Initializing Status message 6-3 Input bin name 2-59 Input bins Chaining 2-14, 3-11 Header pages 2-44 Selection 2-13 Trailer pages 2-45 Installation menu 2-4, 2-67 Installing 8-13 Cards 8-18 Duplexer assembly 8-7 Emulation cards 8-11 I-6 Envelope feeder 8-3 Font cards 8-11 Internal hard disk 8-39 Network interface 8-30 Options 8-14 RAM expansion 8-26 SIMMs 8-26 Toner cartridge 5-3 Interface AppleTalk parameters, setting 2-26 Parallel parameters, setting 2-23 Serial parameters, setting 2-17 Internal hard disk See Hard disks International Reference Version See ISO IRV Internet A-3 Invalid password 2-68 ISO French symbol set (HP-GL) 7-10 ISO German symbol set (HP-GL) 7-10 ISO IRV (International Reference Version) symbol set (HP-GL) 7-10 ISO Italian symbol set (HP-GL) 7-10 ISO Norway, Version 1 symbol set (HP-GL) 7-10 ISO Norway, Version 2 symbol set (HP-GL) 7-10 ISO Spanish symbol set (HP-GL) 7-10 ISO Swedish For Names symbol set (HP-GL) 7-10 ISO Swedish symbol set (HP-GL) 7-10 ISO United Kingdom symbol set (HP-GL) 7-10 Italic 7-6 ITC Bookman 7-7 ITC Zapf Chancery 7-8 ITC Zapf Dingbats 7-8 J Jams Clearing 6-15, 6-17, 6-18, 6-20, 6-21 Locations 6-14 QMS 1725 SLS Print System User's Guide Preventing 3-2 Recovery 2-60 See also Printer errors JIS ASCII symbol set (HP-GL) 7-10 Job Timeout menu 2-17 K K Mem Disk Cache menu 2-56 Display menu 2-55 Emul Tmp menu 2-55 Emulation menu 2-54 For PS Fonts menu 2-54 For PS Heap menu 2-53 For Spool menu 2-52 Katakana symbol set (HP-GL) 7-10 Keypad language menu 2-11, 2-63 L Labels Printing 3-9 Specifications B-7 Stock 3-9 Vendor B-7 Landscape orientation 7-6 Language Message window 2-11, 2-63 Laser safety E-2 LEDs 1-14 Letterhead 2-61 Level 1 PostScript 2-29 Level 2 PostScript 2-29 LF is CRLF menu (Lineprinter) 2-40 Light image 6-26 Line Numbering (Lineprinter) 2-40 Line Termination menu (PCL5) 2-32 Lineprinter 1-7 Autowrap menu 2-41 Character Map menu 2-40 CR is CRLF menu 2-41 DOC C-3 FF is CRFF menu 2-41 Index Font menu 2-39 LF is CRLF menu 2-40 Line Numbering menu 2-40 Lines per Page menu 2-42 Margins menu 2-42 Orientation menu 2-13, 2-41 Parameters, setting 2-39 Point Sz 100ths menu 2-39 Tab Stops menu 2-40 Lines per inch 4-5 Lines Per Page menu (Lineprinter) 2-42 LocalTalk Connection menu 2-27 Menu 2-26 Min K Spool menu 2-28 Mode menu 2-27 Parameters, setting 2-26 Pinouts, cable B-11 M Macintosh Macintosh-to-serial cable pinouts B-11 System software, updating 8-43 Testing communication 6-12 Macros PCL5, temporary, retaining 2-32 Manual feed Guides 3-7 Size 2-14 Manual Feed Timeout 2-61 Manual notice E-2 Margins menu (Lineprinter) 2-42 MB Printer Mem menu 2-58 Memory 2-48 Buffer, frame 2-57 Client G-8 Clients 2-47, 2-48 Configuration 3-21 Definitions 2-48 Disk cache 2-56 Display 2-55 I-7 Duplexing requirements 2-51 Emulation 2-54 Emulation, temporary, allocating memory 2-55 Fonts, PostScript 2-54 Frame Buffer 2-57 Heap, PostScript 2-53 Host Input 2-52 K Mem Disk Cache menu 2-56 K Mem Display menu 2-55 K Mem Emul Tmp menu 2-55 K Mem Emulation 2-54 K Mem for PS Fonts menu 2-54 K Mem for PS Head menu 2-53 K Mem for Spool menu 2-52 Management 2-47 MB Printer Mem menu 2-58 Physical 2-50 PostScript fonts 2-54 Printer 2-58 PS Heap 2-53 RAM 2-49 RAM disk 2-49 ROM 2-49 SCSI 2-49 Spooling 2-52, 3-21 Storage 2-49 System Use 2-58 Submenu 2-46 Upgrade 8-26 Menu Administration 2-15 Installation 2-67 Operator Control 2-12 See menu name Menu key 1-17, 2-5 Message window 1-15 Language, changing 2-11, 2-63 Messages 6-2 Service 6-2 Min K Spool menu LocalTalk 2-28 Parallel 2-24 I-8 Serial 2-18 mode command (DOS) 6-8 Mode menu LocalTalk 1-31, 2-27 Parallel Serial 2-18 Monochrome HP-GL/2 menu (PCL5) 2-34 Monospacing 7-4 Moving printer 5-5 N Network interface 1-12 Installing 8-30 New Flash Image menu 8-43 Next key 1-17, 2-5 NV RAM G-9 O Object C-5 Oblique 7-6 Offset, image, configuring 2-58 Online/Offline key 1-16, 2-5 Operator Control menu 2-4, 2-12 Optional accessories Cards 8-11, 8-18 Dataproducts conversion 8-36 Duplexer assembly 8-7 Emulation cards 8-11 Envelope feeder 8-3 External hard disk 8-42 Font cards 8-11 Hard disk, external B-7 Hard disk, internal B-7 Network interface 8-30 Paper cassettes 8-3 Security card 8-18 Optional features 2-68 Orientation Landscape 7-6 Menu (Lineprinter) 2-13, 2-41 Portrait 7-6 QMS 1725 SLS Print System User's Guide Origin menu (HP-GL) 2-36 Output Face-up tray 3-8 Output bins 2-14 Output bin name 2-60 See also Cassette Ozone density B-4 P Page Recovery menu 2-60 Paper Cassette selection 3-12 Cassettes 8-3 Feeding 3-5 Jams 6-15, 6-17, 6-18, 6-20, 6-21 Jam, Message stays on 6-22 Kinds of 3-3 Label 3-9 Paper Type menu (HP-GL) 2-36, 2-38 Recommended 3-3 Sizes 3-3, 3-4 Stacking, Face-up 3-8 Storage 3-4 Vendor B-7 Weight 3-3 Parallel Cable pinouts B-8 Data Bits menu 2-25 Dataproducts conversion 8-36 Emulation menu 2-24 End Job Mode menu 2-25 Menu 2-23 Min K Spool menu 2-24 Parameters, setting 2-23 Protocol 3-15 PS Protocol menu 2-26 Spool Timeout menu 2-25 Testing communication 6-6 Parity Errors, ignore 2-20 Menu 2-20 Serial 2-20 Index Password Administration 2-67 Invalid 2-68 Using 2-68 PC System software, updating 8-43 Testing parallel port 6-6 Updating print system software 8-44 PC/AT See IBM PC PC/XT See IBM PC PCL 4 DOC C-4 PCL 5 Default Font Index menu 2-34 Default Font menu 2-30 DOC C-3, C-4, C-7 Downld Location menu 2-35 Font C-4 Font index number C-5 Fonts, scalable 2-33 Fonts, temporary, retaining 2-32 Line Termination menu 2-32 Macros, temporary, retaining 2-32 Monochrome HP-GL/2 menu 2-34 Object C-5 Point Size x 100 menu 2-32 Resource C-6 Retain Temporary menu 2-32 Scalable Fonts menu 2-33 Symbol Set menu 2-31 Terminology C-4 Pen 1 - Pen 8 menu (HP-GL) 2-38 Physical characteristics Dimensions B-4 Pinouts, cable Centronics B-8 IBM PC/AT B-10 IBM PC/XT B-10 LocalTalk B-11 Macintosh-to-serial B-11 Serial B-9 I-9 Pitch 7-5 Plotter menu (HP-GL) 2-36 Point size 7-5 Point Size x 100 menu (PCL5) 2-32 Point Sz 100ths menu (Lineprinter) 2-39 Portrait orientation 7-6 PostScript DOC C-4 Emulation Level menu 2-29 Error Handler 2-46 Fonts, allocating memory 2-54 Heap 2-53 Level 1 2-29 Level 2 2-29 Parameters, setting 2-29 Timeout 2-16 PostScript Level 2 Emulation and Level 1 1-7 PostScript operators setgray 4-6 showpage 6-6 Power light Won’t light 6-12 Preventing media jams 3-2 Previous key 1-17, 2-5 Print density 4-2 Print job Cancelling 3-21, 3-22, 3-23 Print media Page sizes B-5 See Envelopes, Labels, Paper, and Transparencies Print quality Density adjustment 4-2 Gamma correction 4-3 Halftones 4-4 Print quality problems See Printer errors Print resolution 4-5 Gray levels 4-5 Printable area Table of 3-4 I-10 Printer All pages don’t print 6-24 Blank pages 6-24 Care 5-5 Cleaning 5-6 Electrical requirements B-4 Memory 2-58 Moving 5-5 Physical characteristics B-4 Problem checklist 6-12 Resets 6-23 Start-up options 2-45 Won’t print 6-14 Printer commands C-4 Printer emulation Removing 8-15 Printer errors All pages don’t print 6-24 Application Vendor A-2 Dark image 6-27 Data indicator Stays lit 6-22 Won’t light 6-13 ESP won’t work 6-14 Hard disk errors 2-65 Image quality problems 6-25 Light image 6-26 No print 6-14 Power light won’t light 6-12 Print quality 6-25 See also Jams Smears 6-27 Startup page won’t print 6-23 Status page won’t print 6-13 White lines 6-26 Printer Features 1-6 Printer Options See Optional Accessories Printing Envelopes 3-10 Labels 3-9 Transparencies 3-8 Printing environments 2-50 QMS 1725 SLS Print System User's Guide Printing status Status message 6-3 Problem checklist 6-12, 6-28 Proportional spacing 7-4 PS Executive Series Utilities Configuration, printer 2-3 PS Protocol 2-22 Parallel 2-26 Serial 2-22 PS Wait Timeout menu 2-16 Q Q-FAX A-2 QMS Crown Technology 1-8 QMS EOD 2-19, 3-16 QMS National Service A-3 See also Support R Radiation E-2 RAM 2-49 Installing expansion 8-26 NV RAM G-9 Removing a SIMM 8-29 RAM disk 2-49 Random Access Memory See RAM Rcv Sw Flow Ctl menu (serial) 2-21 Read-Only Memory 2-49 Reboot Now? message 2-11 Removing Font, optional 8-14 SIMMs 8-29 Resets Printer 6-23 Resident fonts HP PCL fonts 7-9, 7-10 Resident Fonts and Symbol Sets 1-8 Resolution Problems 6-26 Setting 2-60, 4-2 Resource C-6 Retain Temporary menu (PCL5) 2-32 Index Reverse Image menu (HP-GL) 2-37 ROM 2-49 Roman Extensions symbol set (HP-GL) 7-10 S Sans serif typefaces 7-3 Scalable font 7-5, G-14 Scalable Fonts menu (PCL5) 2-33 Scaling Percent menu (HP-GL) 2-36 Scandinavian symbol set (HP-GL) 7-10 Schoolbook New Century Schoolbook 7-3 Screen frequency 4-4, 4-5 Script typefaces 7-3 SCSI 2-49, 2-64, 8-42 SCSI disks B-7 Security card 8-18 Select key 1-17, 2-5 Serial Baud Rate menu 2-20 Cable pinouts B-9 Data Bits menu 2-21 Emulation menu 2-18 End Job Mode menu HP EOD 2-19 Hardware control 2-22 Hdwe Flow Ctl menu 2-22 Ignore Par. Err. menu 2-20 Menu 2-17 Min K Spool menu 2-18 Mode menu 2-18 Parameters, setting 2-17 Parity menu 2-20 Port 6-8 Parameters, changing 6-9 Testing communication 6-8 Protocol 3-15 PS Protocol menu 2-22 Rcv sw flow Ctl menu 2-21 Software control, receive 2-21 Spool Timeout menu 2-19 I-11 Stop Bits menu 2-21 Xmit software flow control menu 2-21 Serif typefaces 7-3 Service See Support Service call Placing 6-28 Service message 6-2 Sessions Collation range D-9 Command D-3 Document Option Commands D-2 Newlayout D-9 Set D-9 setgray 4-6 showpage operator (PostScript) 6-6 SIMMs 2-49 Simultaneous Interface Operation (SIO) 1-9 Small Computer System Interface See SCSI Smears 6-27 Software flow control 2-21 Receive 2-21 Software Loadable System (SLS) 1-10 Spanish/Latin symbol set (HP-GL) 7-10 Special Pages Calibration 2-43 Header pages 2-43 Menu 2-42 Status Page Type menu 2-42 Trailer pages 2-44 Menu Header Inputbin menu 2-44 Header Page menu 2-44 Trailer Inputbin menu 2-45 Trailer Pages menu 2-44 Special Symbols symbol set (HP-GL) 7-10 Specifications Controller B-3 Duty cycle B-2 Emulations B-3 I-12 Memory B-3 Ozone density B-4 Print engine B-2 Print Media B-5 Print method B-2 Print speed B-2 Resolution B-2 Toner cartridge B-2 Warm-up time B-2 Spooling 2-50 Memory 2-18 Memory, allocating 2-52 Menu (parallel) 2-25 Menu (serial) 2-19 Min K Spool menu 2-24, 2-28 Timeout 2-19 Stain 6-27 Standard status page 2-42 Start-up options 2-45 Startup Options menu Do Error Handler menu 2-46 Do Start Page menu 2-45 Do Sys Start menu 2-46 Start-up Page Menu 2-45 Won’t print 6-23 Status message Cancelling job 6-2 Idle 6-3 Idle input printing 6-3 Initializing 6-3 Printing status 6-3 Reboot Now? 2-11 Test print 6-3 Waiting for idle 6-3 Waiting on input end job 6-4 Warming up 6-4 Status Page Advanced 2-42 Printing 2-43, 3-20 Standard 2-42 Type 2-42 Won’t print 6-13 QMS 1725 SLS Print System User's Guide Stop Bits menu (serial) 2-21 Storage Memory 2-49 SCSI 2-49 Stroke weight 7-6 Subjob, sessions D-2 Support CompuServe A-3 Customer A-2 Internet A-3 QMS bulletin board A-2 QMS, World-wide A-4 Technical A-3 United States A-3 Symbol 7-8 Symbol sets HP-GL 7-10 Menu (PCL5) 2-31 See HP-GL symbol sets SYSSTART file 2-46 System software Updating 8-43, 8-44 System Use 2-58 T Tab Stops menu (Lineprinter) 2-40 Temperature requirements B-4 Test file, creating 6-6 Test print Status message 6-3 Testing communication 6-8 Timeouts 2-16 Emul Timeout 2-17 ESP 2-17 Job Timeout menu 2-17 PostScript 2-16 Settings 3-21 Spooling 2-19 Index Toner Cartridge Care 5-3 Installation 5-3 Model EP-B B-2 Replacing 5-2 Toner out action 2-61 Toner Out Act. menu 2-61 Trailer Inputbin menu 2-45 Trailer pages 2-44 DOC C-2 Menu 2-44 Source, specifying 2-45 Transparencies Printing 3-8 Specifications 3-9 Vendor B-7 Tray assembly 8-20 Installing 8-24 Removing 8-20 Tray chaining 3-11 Tray Select key 1-17 Trays 8-3 See also Cassettes Tumble Duplex 2-15 Typeface 7-2 Card 8-12 Courier 7-8, 7-9 Defined 7-2 Family 7-2 Helvetica 7-8 Italic 7-6 ITC Bookman 7-7 ITC Zapf Chancery 7-8 ITC Zapf Dingbats 7-8 LinePrinter 7-9 Monospacing 7-4 Oblique 7-6 Pitch 7-5 Point size 7-5 Proportional spacing 7-4 Sans serif 7-3 Script 7-3 Serif 7-3 I-13 Stroke weight 7-6 Symbol 7-8 Times 7-9 Univers Condensed 7-9 Zapf Dingbats 7-9 Typographic Conventions 1-5 v U Updating system software 8-43 Upgradable RAM (Random Access Memory) 1-11 Using the EOD commands 3-15 V Vendor Labels B-7 Paper B-7 Transparencies B-7 Vertical Offset menu 2-59 Virtual disk 2-49 W Waiting for idle Status message 6-3 Waiting on input end job Status message 6-4 Warming up Status message 6-4 Warranty B-12 White lines 6-26 X Xmit Sw Flow Ctl menu (serial) 2-21 Z Zapf Chancery ITC Zapf Chancery 7-3 Zapf Dingbats ITC Zapf Dingbats 7-3 I-14 QMS 1725 SLS Print System User's Guide