1
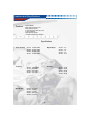
QUALITY, RLIABILITY, & PURE BLISS
AS SERIES DUAL CONE
FULL-RANGE SPEAKERS
AS13N / AS14N / AS24N / AS15N / AS16N
OPERATING INTSTRUCTIONS
PLEASE RETAIN MANUAL FOR FUTRE USE AND REFERENCE
Table of Contents
Getting Started----------------------------------------------------- 2
Introduction---------------------------------------------------------- 3
Features and Specifications------------------------------------- 4
Wiring----------------------------------------------------------------- 5
Choosing a Location----------------------------------------------- 6
Installation------------------------------------------------------------ 7
Wiring------------------------------------------------------------------ 8
9
Securing the Speaker---------------------------------------------Troubleshooting------------------------------------------------------10
Warning and Disclaimer------------------------------------------- 11
Warranty--------------------------------------------------------------- 12-13
Getting Started
Welcome to Audiobahn Inc.. This manual has been designed to provide information for
the owner, salesperson, and installer. For those of you who want quick information on
how to install this product, please turn to the installation section of this manual. Other
information can be located by using the table of contents. We at Audiobahn Inc. have
worked very hard to make sure that all of the information in this manual is current, but,
as we are constantly finding new ways to improve our product, this information is subject
to change without notice. All updated information can be found on our web page in the
technical support section.
2
Features and Specifications
Features
Chrome Basket
Black Carbon Injection Cone
Butyl Rubber Surround
2 Layer High-Temp ASV Voice Coil
4 Ohm Impedance
Mylar Whizzer Tweeter
Complete with Mounting Hardware
Specifications
Power Handling
AS13N:
AS14N:
AS24N:
AS15N:
AS16N:
40 Watts RMS
60 Watts RMS
60 Watts RMS
60 Watts RMS
60 Watts RMS
Magnet Weight
AS13N:
AS14N:
AS24N:
AS15N:
AS16N:
3 oz.
4 oz.
4 oz.
4 oz.
10 oz.
Frequency
AS13N:
AS14N:
AS24N:
AS15N:
AS16N:
150Hz-20kHz
90Hz-20kHz
60Hz-20kHz
60Hz-20kHz
50Hz-20kHz
Sensitivity
AS13N:
AS14N:
AS24N:
AS15N:
AS16N:
88 dB
89 dB
90 dB
91 dB
92 dB
Speaker Size
AS13N:
AS14N:
AS15N:
AS24N:
AS16N:
3.5” 2-Way
4" 2-Way
5" 2-Way
4x6" 2-Way
6.5" 2-Way
Wiring
The picture below is a representation of the connection terminals on all the AS Series
Dual Cone Speakers. The picture is shown as if you are looking at the speaker with
the cone facing up towards the sky. You will notice a large terminal on the left and a
smaller terminal on the right. The large terminal is the positive (+) connection and the
smaller terminal is the negative (-) connection. Provided with the speakers are two
sets of speaker wire used to connect the source unit or amplifier to the speakers. You
will notice on the provided speaker wire there are 2 terminals at one end. The large
terminal is positive (+) and will connect to the positive (+) terminal on the speaker. The
small terminal is negative (-) and will connect to the negative (-) terminal on the
speaker. The wires are also color coded. The solid blue wire is positive (+) and the
small terminal is negative (-).
+
-
Choosing A Location
It is always best to plan the complete installation prior to attempting to install any product. The routing
of wires, power connections and mounting locations should be planned first. As with any car stereo installation,
and all work performed should be checked thoroughly and carefully prior to the operation of the system.
The placement of your Audiobahn speakers within your vehicle will greatly affect the overall
performance of your audio system. Every vehicle is different, so installation into particular locations of the
vehicle may not be possible without modifications. Factory provided locations are generally preferable due to
ease of installation. In all cases speakers should be placed in a location free of obstruction by body panels,
window cranks, storage compartments or anything that may hinder the speakers performance. Avoid areas that
do not provide a flat, sturdy mounting surface.
Audiobahn AS Series Dual Cone Speakerss are designed to fit into almost any factory location.
Again, if at all possible it is recommended that you use a factory location. This applies mostly to later model
vehicles. For those earlier models that do not have factory locations or are limited to front locations, it is
recommended that you choose an are with sufficient airspace.
If you allow an insufficient amount of airspace, the speaker may not reproduce low frequencies very
well. It is recommended to mount the speakers in door panels, kick panels, rear decks, etc. Ideally the speaker
should be mounted where it will be in an enclosed airspace allowing for extended bass response.
Installation
Installation
Note: Audiobahn strongly recommends that you operate your system at low volumes prior to the completed
installation of your Audiobahn speakers. This will allow a test of the speaker before securing it to its permanent
location.
Caution: Make sure that all speaker wiring is fully protected from cuts, tears and possible wear. All short circuits
developing as a result could severely damage the source unit or possibly the amplifier as well as the speakers
themselves. Makes sure all speaker wires are placed easily within reach of the speaker terminal with no stress
on the wire or connectors.
Mounting
1) Confirm the mounting location and depth requirements by inspecting the area where the speaker will be
mounted. Most speakers will fit into stock locations on the vehicle. In this case only depth consideration is
important.
2) If the location you have picked does require cutting, you may use the supplied template to help you locate
and mark the mounting location and cuts to be made. Be careful when cutting out the template. If you cut the
template properly, the speaker will be a perfect fit.
3) If there is a cosmetic panel where the speaker will be mounted, we recommend using a utility knife to
carefully cut a hole in it. Confirm the cut by placing the speaker in the hole. You may need to modify the hole cut
as necessary.
4) If it is necessary to cut steel, reinstall the cosmetic panel in place and use the hole you have previously cut
as a template. This will help to insure proper cutting and a good fit. Mark the locations for the speaker mounting
screws. Then remove the panel and drill the screw holes. When finished you can replace the panel.
5) After cutting and drilling all holes, inspect the mounting areas for any metal burrs or rough edges. File any
area that may interfere with the mounting of the speaker.
6) Clean any metal shavings from the mounting area and check for areas in which water may enter the speaker
cavity. Treat the area for water protection when necessary.
Make sure your source unit (Cassette, CD, DAT, DVD etc.) is turned off while connecting the speaker terminals.
Turn on the various components and slowly advance the volume. Remember to check and recheck all
connections to insure you have a secure fitting.
7
Wiring
Wiring
Audiobahn recommends using at least 18-gauge wire with your new speaker system. Thinner gauge wire may
easily be severed and can cause damage to your system should any bare wires come in contact with the
vehicles chassis.
Makes sure that your audio system is off while installing and connecting your new Audiobahn speakers.
Failure to do so could result in damaging the speaker beyond repair. This is not something that would be
covered under the manufacturer warranty.
Be sure to route the wires to the speakers with the insulated terminal ending at the speaker. This will insure a
good contact with the speaker. If you need to shorten the speaker lead, do so on the opposite end of the
insulated terminals or the bare end.
Be sure the polarity is correct at all times. The speaker leads are color coded for negative and positive. Make
sure that the leads connected to the positive terminal of your amplifier or source unit is correctly connected to
the positive terminal of the speaker.
To ensure long-term reliability all bare wires and wire-to-wire connections should be soldered and insulated
with heat shrink or electricians tape. Under no circumstances should you leave any bare wires uncovered, as
this can and will lead to the failure of your speakers and possibly other components.
When mounting in a door it is imperative to have the right amount of slack in the connecting wire as to not get
crimped or torn when the door is opened or closed. Avoid areas of the door jam that pinch. This will cause
damage to the speaker and other components over long-term use.
Once the speaker wiring is complete, you can connect the opposite end to the amplifier or source unit. Again,
be sure to observe correct polarity. Solder and wrap all stripped connections.
Securing the Speaker
Securing the Speaker
Once you have tested your system and confirmed that it is operating properly, turn off your system and
prepare for the final mounting of the speakers.
1) Position the speaker into the mounting hole and confirm the correct mounting location and hole
placement. Screw clips are provided to insure a snug fit. Place crew clips over the metal surface
and line up the hole with the hole you have previously drilled. Place the speaker into the hole. Align
the mounting holes and proceed to insert the screws. Be sure to tighten the screws evenly as
not to warp the speaker frame.
2) Turn your system back on to confirm the speakers proper operation. First test at low volume and
then you may steadily increase the volume as desired
9
10
11
12
13